

Page 1

III
CNC46208
CNC46208Lathe Control System
Programming Manual
SALECNC.com
http://www.salecnc.com
Email: sales@salecnc.com
Page 2

III
Daily checking
Daily
Confirm environment temperature, humidity and
dust
Whether there is abnormal vibration or sound
Whether the vent hole is blocked by yarn
Periodic checking
1 year
Whether the fixed parts are loose
Whether the terminal block is damaged
※Transportation and storage
The packaging boxes shouldn’t be stacked more than six layers
Do not climb onto, stand on or put heavy objects on the packaging box
Do not drag or convey the product with a cable connected to the product
Do not impact or scratch the panel and display
Keep the packaging box away from moisture, insulation and rain
Precautions
※Unpacking and checking
Unpack and check whether the product is the one you ordered
Check whether the product is damaged during transporting
Check whether the parts are complete and intact according to the packing list
If the model doesn’t match, any accessories are missing or damaged, please contact us immediately
※Wire connection
The personnel for wire connection and checking should be qualified
The product must be grounded reliably (resistance < 4Ω) and do not use neutral wire to replace the earth wire
The wires must be connected properly and firmly to avoid failures and accidents
The surge absorption diode must be connected to the product properly, or else it will damage the product
Please cut off the power supply before inserting/removing the plug or opening the enclosure
※Checking and repairing
Please cut off the power supply before repairing or replacing the components
Check the failure if short circuit or overload occurs, and restart after eliminating all failures
Do not connect/cut off the power supply frequently; wait for at least one minute before restarting
※Others
Do not open the enclosure without permission
Please cut off the power supply if it won’t be used for a long time
Prevent dust and iron powder from entering the controller
If non-solid state relay is used for output, please connect freewheeling diode to relay coil in parallel. Check
whether the connected power supply is qualified to avoid burning out the controller
The lifetime of the controller depends on the environment te mperature. If the temperature of processing field is
too high, please install cooling fan. The allowable temperature range of the controller is 0℃-60℃
Avoid using in the environment with high temperature, moisture, dust or corrosive gas
Install rubber cushion if the vibration is severe
※Maintenance
Under normal condition (environment: daily average 30℃, load rate 80%, running rate 12 hours every day),
please perform daily and periodic checking according to the items below.
Page 3

Contents
1. PROGRAMMING BASICS .................................................................................................... - 1 -
1.1. INTRODUCTION OF CNC MACHINE
1.2. DEFINITION OF
COORDINATE
1.3. MACHINE TOOL COORDINATE SYSTEM AND MECHANICAL HOME .........................................- 2 -
1.4. WORKPIECE COORDINATE SYSTEM AND PROGRAM
1.5. ABSOLUTE/RELATIVE COORDINATE PROGRAMMING ............................................................- 4 -
1.6. CONVERSION BETWEEN
IMPERIAL
1.7. PROGRAM CONSTITUTION ...................................................................................................- 5 -
1.8. GENERAL STRUCTURE OF
1.9. MAIN
PROGRAM
AND SUBROUTINE......................................................................................- 8 -
PROGRAM
2. M S F T INSTRUCTION......................................................................................................... - 9 -
2.1. AUXILIARY FUNCTION (M CODE) ........................................................................................- 9 -
2.1.1. Subroutine call M98 ..................................................................................................- 10 -
2.1.2. Return from subroutine and return to main program M99 ........................................- 10 -
2.1.3. Principal axis control M03, M04, M05 .....................................................................- 12 -
2.1.4. Coolant control M08, M09 ........................................................................................- 12 -
2.1.5. Tailstock control M10, M11 ......................................................................................- 13 -
2.1.6. Chuck control M12, M13 ..........................................................................................- 13 -
2.1.7. Lubricant control M32, M33 .....................................................................................- 13 -
2.1.8. Program pause M00...................................................................................................- 14 -
2.1.9. Program running ends and return to program beginning M30 ..................................- 14 -
2.2. PROGRAMMABLE I/O
INSTRUCTIONS
2.2.1. Programmable input instruction M88........................................................................- 14 -
2.2.2. Programmable output instruction M89......................................................................- 14 -
2.3.
P
RINCIPAL
AXIS FUNCTION (S
2.3.1. Principal axis rotation switching control ...................................................................- 15 -
2.3.2. Principal axis rotation analog voltage control ...........................................................- 15 -
2.3.3. Principal axis rate ......................................................................................................- 15 -
2.3.4. Constant line speed control G96, constantrotation speed control G97* ...................- 16 -
2.3.5. Principal axis maximum rotation limit* ....................................................................- 16 -
2.4. FAST MOVING AND FEEDING FUNCTION (G98/G99, F
2.4.1. Fast moving ...............................................................................................................- 16 -
2.4.2. Cutting feeding instruction F .....................................................................................- 17 -
2.4.3. G98, G99 ...................................................................................................................- 18 -
2.4.4. Manual feeding ..........................................................................................................- 19 -
2.5. TOOL COMPENSATION FUNCTION (T
3. G INSTRUCTION ................................................................................................................. - 21 -
3.1. INTRODUCTION .................................................................................................................- 21 -
3.1.1. Modal, non-modal and initial state ............................................................................- 21 -
3.1.2. Relative definition .....................................................................................................- 21 -
TOOL
.............................................................................- 1 -
AXIS .......................................................................................- 2 -
HOME
....................................................- 3 -
AND METRIC SYSTEM*....................................................- 5 -
....................................................................................- 6 -
.................................................................................-
INSTRUCTION
INSTRUCTION
) .....................................................................- 14 -
INSTRUCTION
) .................................- 16 -
) ...........................................................- 19 -
14 -
- 1 -
Page 4

CNC4620 Progra mming Manual
3.2. INTERPOLATION
3.2.1. Fast moving G00 .......................................................................................................- 22 -
3.2.2. Linear interpolation G01 ...........................................................................................- 23 -
3.2.3. Arc interpolation G03, G02 .......................................................................................- 24 -
3.2.4. Pause instruction G04 ................................................................................................- 26 -
3.2.5. Return to mechanical home G28 ...............................................................................- 26 -
3.3. THREAD CUTTING..............................................................................................................- 27 -
3.3.1. Thread cutting instruction G32..................................................................................- 27 -
3.3.2. Z axis taping cycle G33 .............................................................................................- 30 -
3.4. WORKPIECE COORDINATE SYSTEM SETTING G50 ..............................................................- 30 -
3.5. FIXED CYCLE.....................................................................................................................- 31 -
3.5.1. Axial cutting cycle G90 .............................................................................................- 32 -
3.5.2. Thread cutting cycle G92 ..........................................................................................- 34 -
3.5.3. Radial cutting cycle G94 ...........................................................................................- 37 -
3.5.4. Notice for fixed cycle instructions ............................................................................- 38 -
3.6. MULTI-CYCLE
3.6.1. Axial roughing cycle G71 .........................................................................................- 40 -
3.6.2. Radial roughing cycle G72 ........................................................................................- 43 -
3.6.3. Closed cutting cycle G73...........................................................................................- 47 -
3.6.4. Finishing cycle G70...................................................................................................- 52 -
3.6.5. Axial grooving multi-cycle G74................................................................................- 52 -
3.6.6. Radial grooving multi-cycle G75 ..............................................................................- 55 -
4. CNC PROCESS KNOWLEDGE .......................................................................................... - 57 -
FUNCTION
INSTRUCTIONS
................................................................................................- 22 -
............................................................................................- 39 -
- 2 -
Page 5

SALECNC.com
1. Programming Basics
1.1. Introduction of CNC machine tool
CNC (Computer Numerical Controler) machine tool consists of CNC system, servo motor (or step
motor) drive, machine tool (including headstock, feed drive mechanism, worktable, tool holder,
electric control cabinet), etc. After CNC processing, the part program edited by the user will send
motion instructions and control instructions, while motion instructions drive the feeding of machine
tool through motor drive, and control instructions include principal axis start/stop, tool selection,
cooling, lubrication, etc. It achieves parts cutting through relative motion of tool and workpiece.
CNC programming is to write part processing program according to the dedicated programming
instructions of CNC system with the information such as part size, processing process, process
parameters, tool parameters, etc. CNC processing is that the CNC system controls the machine tool
to finish part processing according to the requirement of part processing program. The working
principle of CNC machine tool and the flow of CNC processing are shown in the figure below.
Analyze part drawing and confirm process
Write part program and enter CNC system
Check and run the program for testing
Set tool offset and coordinates
Run the processing program and process the part
Check the workpiece size, modify program or tool conpensation
Processing is finished and part is formed
Fig. 1-1 CNC Processing Flow Chart
- 1 -
Page 6

SALECNC.com
1.2. Definition of coordinate axis
CNC machine tool is shown in Fig. 1-2-1
Tailstock seat Principal axis seat Tool Too holder
Fig. 1-2-1
The system uses the right angle coordinate system constituted with X axis and Z axis. X axis is
vertical to the principal axis, and Z axis is parallel to the principal axis. The direction to the
workpiece is negative, and the direction from the workpiece is positive.
According to the relative position of the tool holder and principal axis of the machine tool, CNC
lathe has front tool holder and rear tool holder. Same programming instruction has different motion
tracks in front tool holder and rear tool holder. This system can be used in the front tool holder and
rear tool holder of the CNC lathe. Seen from the figures below, the X directions of front and rear
tool holder coordinate systems are different, while the Z direction is same. The figures and
examples in this manual use front tool holder coordinate system to describe the application of
programming.
Fig. 1-2-2 Front tool holder coordinate system Fig. 1-2-3 Rear tool holder coordinate system
1.3. Machine tool coordinate system and mechanical home
Machine tool coordinate system is the reference of CNC for coordinate calculation, and is the
intrinsic coordinate system of the machine tool. The origin of the machine tool coordinate system is
mechanical reference or mechanical home.
Mechanical home is determined by the zero switch or home switch on the machine tool, which are
usually installed at the maximum travel in positive direction of X axis and Z axis. For mechanical
home operation, the system will set current machine tool coordinates to 0 after returned to
- 2 -
Page 7

SALECNC.com
mechanical home, and create a machine tool coordinate system with current position as the
coordinate origin.
Note: If the zero switch isn’t installed on the lathe, it isn’t possible to perform home operation.
1.4. Workpiece coordinate system and program home
Work piece coordinate system is the right angle coordinate system set on the part drawing for
programming, which is also called floating coordinate system. When the part is installed on the
machine tool, set the absolue coordinates of the current position of the tool with G50 instruction
according to the relative position of tool and workpiece, and thus create workpiece coordinate
system in the system. The current position of the tool is the program home. Generally, Z axis and
principal axis of the workpiece coordinate system coincide, and X axis is in the head or end of the
part. The workpiece coordinate is always valid once created until replaced by new workpiece
coordinate system.
Part Bar stock
Fig. 1-4
In the figure above, XOZ is machine tool coordinate system, X1O1Z1 is the workpiece coordinate
system of X axis in the head of the workpiece, X2O2Z2 is the workpiece coordinate system of X
axis in the end of the workpiece, O is the mechanical home, A is tool tip, and the coordinates of A
in above three coordinate systems are as follows:
The coordinates of point A in machine tool coordinate system (X, Z);
The coordinates of point A in X1O1Z1 coordinate system (X1, Z1);
The coordinates of point A in X2O2Z2 coordinate system (X2, Z2);
Interpolation function
Interpolation is to control two or several axes to move simultaneously. The motion track complies
with fixed mathematical relationship, constitutes two-dimensional (plane) or three-dimensional
(space) profile, and interpolation is also called profile control. During interpolating, the motion axis
is called joint axis, the movement amount, direction and speed of which are controlled
simultaneously in the entire motion process, to form desired synthetic motion track.
Only control the motion end of one axis or multi-axis, do not control the track in the motion process,
- 3 -
Page 8

SALECNC.com
and the motion control mode is called point-position control.
The X axis and Z axis of this system are linked, which is two axes linked CNC system. This system
has linear, arc and thread interpolation function.
Linear interpolation: the synthetic motion track of X axis and Z axis is the straight line from the
start point to the end point.
Arc interpolation: the synthetic motion track of X axis and Z axis is arc from the start point to the
end point, the radius is specified by R, or the circle center is specified by I, K.
Thread interpolation: X axis, Z axis or two axes motion and principal axis rotation interpolation; F
specifies the pitch of threads, which is the movement (unsigned) of the axis (X or Z) that moves
longer when the principal axis rotates for a circle in the process of thread cutting. This system can
process metric straight thread, taper thread and end thread, and the machine tool must be installed
with principal axis encoder to process threads. If the encoder isn’t installed and it is threading, the
system can’t receive signals from the encoder and can’t perform other operations. (1000 wires
encoder or above is recommended for this system)
1.5. Absolute/relative coordinate programming
Two methods are available for specify the end position of the track during programming:
1: The end position of the track is expressed in absolute coordinates and it is called absolute
coordinate programming (instruction address uses X, Z).
2: The end position of the track is expressed with the coordinate difference of end point relative to
start point and it is called relative coordinate programming (instruction address uses U, W). The
negative value of relative coordinates represents running in negative direction of the axis, while the
positive value of relative coordinates represents running in positive direction of the axis.
This system allows expressing one axis of the end position with absolute coordinates and expressing
the other axis with relative coordinates in the same block. This method is called mixed
programming.
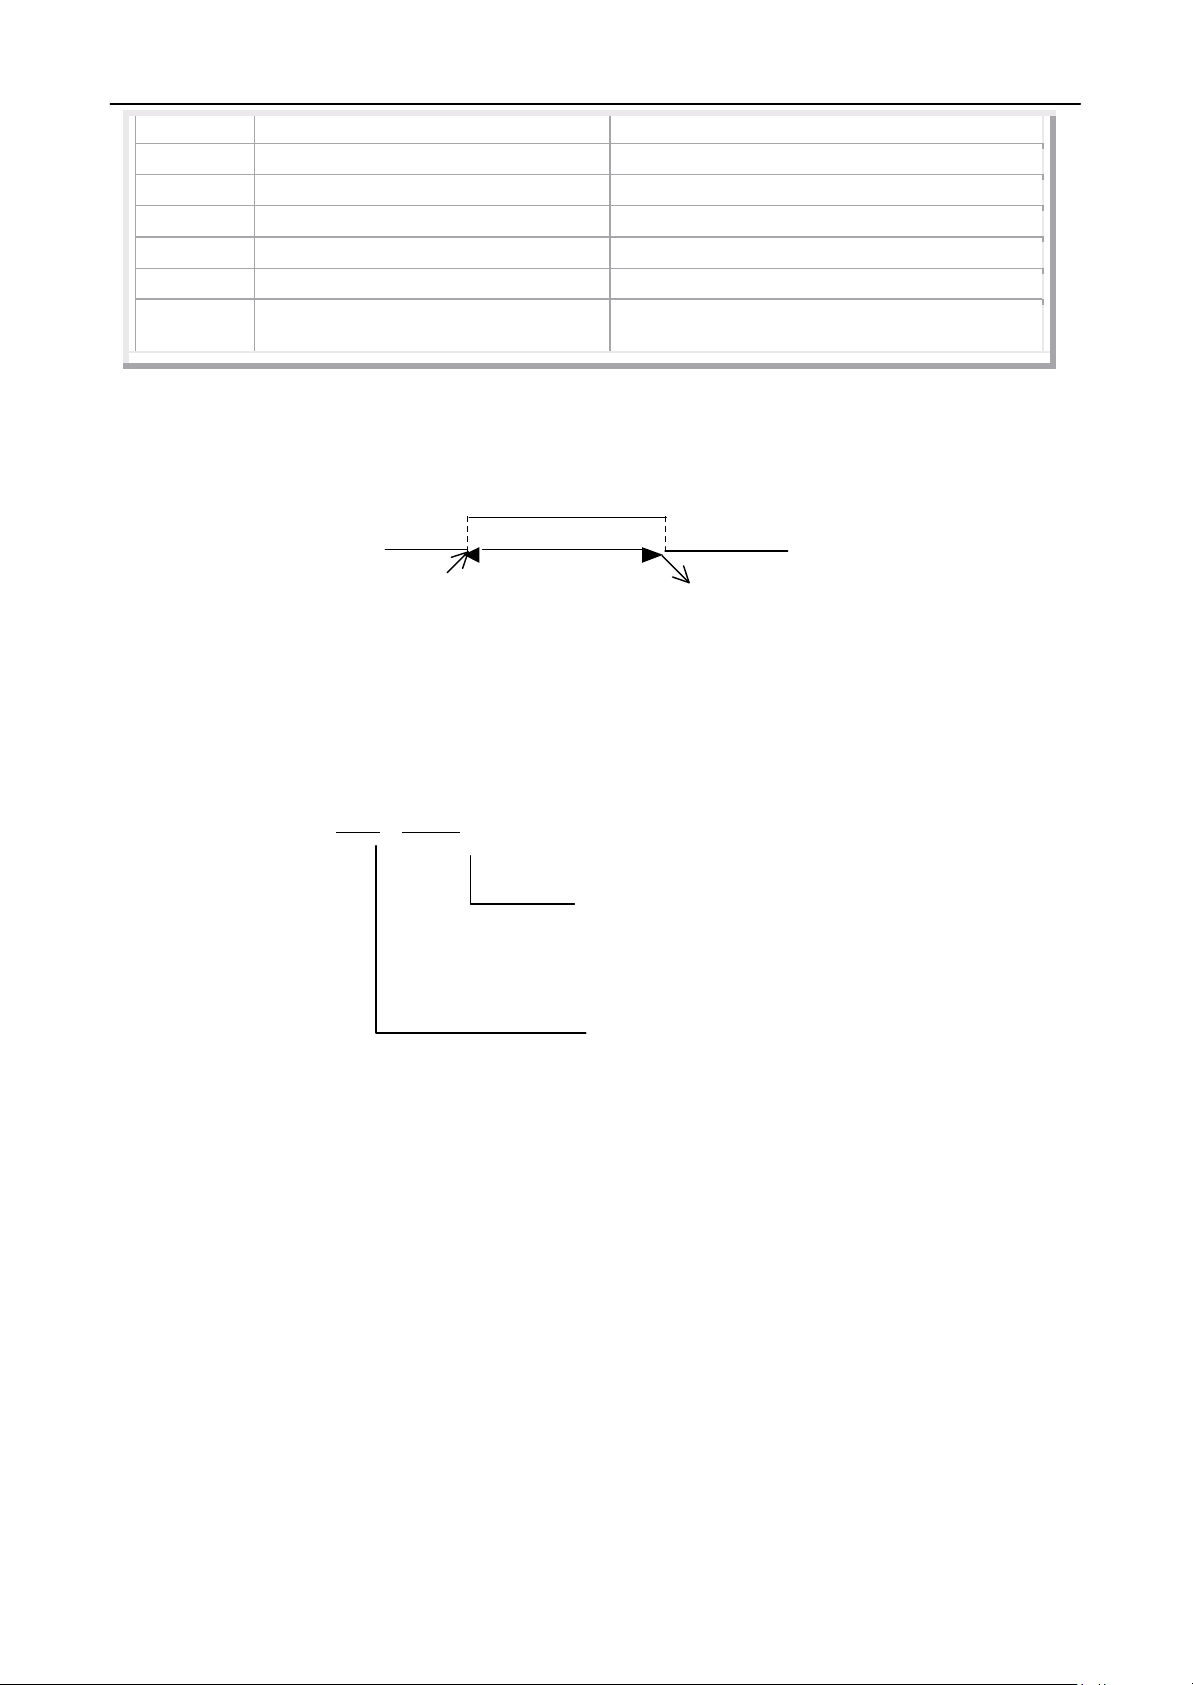
For example: A→B linear interpolation (as in Fig. 1-5)
Fig. 1-2-5
Absolute coordinates programming: G01 X200 Z50;
Relative coordinates programming: G01 U100 W-50;
Mixed coordinates programming: G01 X200 W-50; or G01 U100 Z50;
- 4 -
Page 9

SALECNC.com
System
G code
Minimum unit
Imperial
G20
0.0001 inch
Metric
G21
0.0001mm
1.6. Conversion between imperial and metric system*
Set the unit to imperial or metric with G code (G20, G21).
The G code for imperial and metric switch should be placed in front of the program. Use
separate block instruction before setting the coordinate system. The unit system of the
following values changes according to the G code for imperial and metric switch.
(1) Feeding speed instruction value expressed with F.
(2) Instruction value related to position
(3) Compensation
(4) The value of one scale of the Handwheel pulse generator
(5) Movement of single step
Note:
(6) Part value of the parameter
1. When the system is electrified, the G code for imperial and metric switch is same as
before the power supply is cut off
2. In the program, do not change G20, G21
3. If the mechanical unit system is different from the input unit system, the maximum
error would be 0.5 of minimum movement unit, and the error won’t be accumulated.
4. When imperial input (G20) and metric input (21) are switched, the offset should
comply with the new setting of the input unit.
1.7. Program constitution
To complete automatic processing of the part, you need to write the part program (the program)
according to the instruction format of the CNC system, which will execute the program and
complete the controls such as machine tool feeding, principal axis start/stop, tool selection, cooling
and lubrication, and thus finish the part processing.
For example:
Fig. 1-7
- 5 -
Page 10

SALECNC.com
O0001; (program name)
G0 X100 Z50; (quickly locate point A)
M12; (clamp the workpiece)
T0101; (replace tool #1 and execute tool #1 offset)
M3 S600; (start the principal axis, and set the principal axis rotation to 600rpm)
M8 (coolant on)
G1 X50 Z0 F600; (approach point B at the speed of 600mm/min)
W-30 F200; (cut from point B to point C)
X80 W-20 F150; (cut from point C to point D)
G0 X100 Z50; (quickly back to point A)
T0100; (cancel tool offset)
M5 S0; (stop principal axis)
M9; (coolant off)
M13; (release workpiece)
M30; (program ends, principal axis/coolant off)
%
After above program, the tool will have a track of A→B→C→D→A.
1.8. General structure of program
The program consists of several block started with “OXXXX” (program name) and ended with “%”,
while block consists of several instruction words started with block number (can be omitted),
changed line with “CR” and ended with “LF”. The general structure of a program is shown in Fig.
1-3-2 below:
Instruction word Program name
Block end Block switch symbol
Block No. Block
Program end symbol
1) Program name
To identify the programs, every program has a name consists of instruction address O and
four digits later in the start of the program. This system can save up to 9999 programs,
and the program names can’t repeat.
- 6 -
Fig. 1-8 General Program Structure
○ □□□□
Page 11

SALECNC.com
2) Instruction word
Instruction word is the basic instruction unit for CNC system to complete the control
function. Instruction word consists of one English letter (instruction address) and later
digits (instruction value, signed or unsigned). Instruction address regulates the meaning of
following instruction value. In different combinations of instruction word, same
instruction address may have different meanings.
Instruction address Instruction value Instruction address Instruction value
X 1000 X -1000
omitted)
Instruction word Instruction word
Program No. (0000~9999, leading zero can’t be
Instruction address O
3) Block switch symbol, block No. and block
A program consists of several blocks and is executed in blocks. Generally, a block is
executed only the previous block has been executed. Blocks are separated with “;” or “*”,
and “;” is used in this manual. A block consists of several instruction words, and is started
with block No. and ended with “;” or “*”.
For example: block may have “/” symbol in the front, which is called block switch symbol
4) When the program is run automatically, if the switch function is enabled, the program will
execute next block automatically when running to this block. If the switch function isn’t
enabled, this block will be executed. The option of switch function is in the auxiliary interface
of main menu. This function won’t be saved after power off, and it is disabled by default after
initialization.
/ N0100 G0 X200 Z300 ;
Block end symbol
Block No.
Block switch symbol
5) Block No.
N0000~N9999; the leading zero can be omitted. Block No. can be omitted, but the target
block for program call and switch must exist. The sequence of block No. may be random,
and the block No. in latter part doesn’t need to be larger than previous number. For the
convenience of reference, the line No. is usually arranged according to certain increment.
During manual editing, it is possible to determine whether insert line No. increment
automatically through No. 47 comprehensive parameter. The initialized value is 0, i.e. do
not insert line No. automatically.
6) Program end symbol
The program is started from program name and ended with “%”, which is the end symbol
of the program file. During communicating, “%” is the end symbol and start symbol.
- 7 -
Page 12

SALECNC.com
1.9. Main program and subroutine
To simplify the programming, if same or similar processing track and control process need to be
used for several times, the program instructions of this part can be edited to independent program
for calling. The program that calls other programs is called as main program, and the program being
called (ended with M99) is called as subroutine. Both subroutine and main program occupy system
capacity and storage space. Subroutine also must have independent program name, and can be
called by any other main proram or run independently. When subroutine ends, it returns to the main
program and continues the execution. The system supports nine layers nesting, i.e. a subroutine can
call other subroutines, as shown in Fig. 1-9 below.
Call Return
Main program Subroutine
Fig. 1-9
- 8 -
Page 13

SALECNC.com
Instruction
Function
Remark
M00
Program pauses
State isn’t retained
M30
Program ends
M98
Subroutine calling
M99
Return from subroutine
M03
Principal axis forward rotation
Functions are interlocked, and state is
maintained
M04
Principal axis reverse rotation
*M05
Principal axis stop
M08
Coolant on
Functions are interlocked, and state is
maintained
*M09
Coolant off
M10
Tailstock forward
Functions are interlocked, and state is
maintained
M11
Tailstock backward
M12
Chuck clamped
Functions are interlocked, and state is
maintained
M13
Chuck released
M32
Lubricant on
Functions are interlocked, and state is
maintained
*M33
Lubricant off
2. M S F T Instruction
2.1. Auxiliary function (M code)
M instruction consists of instruction address M and later 1~2 digits, and is used to control the flow
of executing program or output signals to machine tool.
Instruction value (00~99, leading value can be omitted)
Instruction address
One block only contains one valid M instruction. If a block has two or more M instructions, the
last M instruction is valid.
If M instruction and the instruction word that executes moving function are in the same block, the
sequence follows:
① If M instruction is M00, M30, M98 and M99, execute M instruction after moving;
② When M instruction outputs signal to the machine tool, execute M instruction while moving.
M Instructions List
- 9 -
Page 14
M40
Gear position speed setting output off
M41
First gear speed output
M42
Second gear speed output
M43
Third gear speed output
M44
Fourth gear speed output
M88
Check the signa of specified input pin
Allow specifying effective input voltage level
M89
Control the switch of specified output
pin
Allow specifying output voltage level
Note: the instructions marked with “*” are valid after electrified.
After the system executed the M instruction that output signal to machine tool, delay for a period
and then execute following instruction word or block. The delay time is set by the system
parameter M code waiting time.
M code starts executing
Delay time
Start executing following instruction word or block
2.1.1. Subroutine call M98
Instruction format:
M98 P○○○ □□□□
Subroutine No. (0000~9999) being called. If
the calling time isn’t entered, the leading 0
of the subroutine No. can’t be omitted; if the
calling time is entered, the subroutine No.
must contain four digits.
If the calling time (1-999) is 1, it isn’t required to
enter
Instruction function: after other iinstructions of current block are executed, the system
won’t execute next block, but to execute the subroutine specified by P. The
subroutine can be executed for 999 times at most. In MDI mode, the
subroutine can’t be called.
2.1.2. Return from subroutine and return to main program M99
Instruction format: M99 P○○○ (return from subroutine)
Instruction function: when the called subroutine is finished, return to the block specified
- 10 -
by P in the main program and continue to execution; if P isn’t entered,
return to the next block of M98 instruction that calls current subroutine
in the main program. If M99 is used in the end of the main program (i.e.
current program isn’t called and executed by other programs), current
program will execute repeatedly. M99 iinstruction is invalid in MDI
Page 15

SALECNC.com
mode.
Call Return
Main program Subroutine
Call Return
Main program Subroutine
Fig. 2-1-1 Returning from Subroutine
Fig. 2-1-2 Returning to Main Program
- 11 -
Page 16

The system can call nine layers subroutine, i.e. a subroutine can call other subroutines (as
shown in the figure below)
Fig. 2-1-3 Program Nesting Calling
2.1.3. Principal axis control M03, M04, M05
Instruction function: M03 or M3: Principal axis forward rotation;
M04 or M4: Principal axis reverse rotation;
M05 orM5: Principal axis stop
M05 output is valid when the system is electrified, and executes M03 or M04 at this
moment. M03 or M04 output is valid and maintains, and cancels M05 output at the same
time (output is invalid); when M03 or M04 output is valid, execute M05, cancel M03 or
M04 output, M05 output is valid and maintains. The interlocking of principal axis and
chuck can be selected through #022 management parameter. The default setting is
MFUNC(L)1, i.e. not interlocked. MFUNC(L)2 is interlocked, User-Def is user-defined
M code. The parameter setting requires restarting the system.
Note: when the system is stopped in emergency, cancel M03 and M04 output, and M05
output is valid.
2.1.4. Coolant control M08, M09
Instruction function: M08 or M8: cooling pump open;
M09 or M9: cooling pump closed
After the system is electrified, M09 is valid, i.e. M08 output is invalid. Execute M08,
and M08 output is valid, cooling pump opens; execute M09, and cancel M08 output,
- 12 -
Page 17

cooling pump closes. Coolant control port is determined by #075 port parameter, and
the initialized value is OUT4.
Note1: when the system is stopped in emergency, cancel M08 output.
Note 2: M09 doesn’t have corresponding output signal, and M08 output is canceled when
M09 is executed.
2.1.5. Tailstock control M10, M11
Instruction function: M10: tailstock forward.
M11: tailstock backward
After the system is electrified, both M11 and M10 do not have output; execute M10,
M10 output is valid, cancel M11 output, and tailstock forwards; execute M11, M11
output is valid, cancel M10 output and tailstock retreats.
M10 and M11 can’t be valid at the same time.
Note1: when the system is reset or stopped in emergency, the output states of M10
and M11 won’t change.
2.1.6. Chuck control M12, M13
Instruction function: M12: chuck clamped;
M13: chuck released.
After the system is electrified, both M12 and M13 have no output; execute M12, M12
output is valid, and cancel M13 output; execute M13, M13 output is valid, and cancel
M12 output. M12 and M13 can’t be valid simultaneously. Chuck locking port is
OUT8 by default, and chuck release is OUT9. When chuck is locked, OUT8 output is
valid; when chuck is released, OUT9 output is valid. External input control port is
IN12. The interlocking of chuck and principal axis is selected through #022
management parameter. MFUN(L)1 is not interlocked, and MFUNC(L)2 is
interlocked. M12 and M13 are released through macro program. The user can
customize. After parameter #022 is changed to User-Def, it is realized by writing the
macro program of M code.
Note 1: When the system is reset or stopped in emergency, the output states of M12
and M13 won’t change.
Note 2: chuck can be controlled with external input signal.
2.1.7. Lubricant control M32, M33
Instruction function: M32: lubricant pump open;
M33: lubricant pump closed
After the system is electrified, M33 is valid, i.e. M32 output is invalid. Ex ecute M32,
M32 output is valid, and lubricant pump opens; execute M33, cancel M32 output, and
lubricant pump clodes; lubricant output port is specified by #075 port parameter; the
default option is OUT5.
Note 1: when the system is stopped in emergency, M32 output is invalid;
Note 2: M33 doesn’t have corresponding output signal; cancel M32 output when M33
is executed;
- 13 -
Page 18

SALECNC.com
2.1.8. Program pause M00
Instruction format: M00 or M0
Instruction function: after other instructions of current block are executed, the program
pauses. Press the cycle start key to run next block.
2.1.9. Program running ends and return to program beginning M30
Instruction format: M30
Instruction function: after other instructions of current block are executed, the program
stops automatically, executes M05, M09, and the processing pieces increase by 1.
The cursor returns to the beginning of the program.
2.2. Programmable I/O instructions
2.2.1. Programmable input instruction M88
Instruction function: the user defines the function of standby input point.
Instruction format:M88 Pxx Lx Qxxxx
P is used to specify the value range of output port number 0-23.
L is used to specify the valid input level, “1” is high voltage level and “0” is low voltage level.
Q is used to specify the testing time in the unit of ms.
Note 1: if specified voltage level isn’t detected in the time specified by Q instruction, the alarm
prompts “abnormal program termination error”.
Note 2: if Q instruction isn’t specified, the system will always wait for input signal by default,
and won’t execute next instruction until the signal is valid.
Note 3: if the specified port isn’t in the range 0-23, the alarm prompts “specified port number
error”.
Note 4: if P instruction isn’t written, the alarm prompts “specified port number error”.
2.2.2. Programmable output instruction M89
Instruction function: the user defines the function of standby output point.
Instruction format: M89 Pxx Lx
P is used to specify the value range of output port number 0-23.
L is used to specify the valid output level, “1” is high voltage level and “0” is low voltage level.
Note 1: if the specified port isn’t in the range 0-23, the alarm prompts “specified port number
error”.
Note 2: if P instruction isn’t written, the alarm prompts “specified port number error”.
2.3. Principal axis function (S instruction)
S instruction consists of instruction address S and later digits, and is used to control the
rotation of principal axis.
- 14 -
Page 19

SALECNC.com
Gear position control: S _1~16 principal axis rotation is controlled by switching 16-gear BCD
code. In gear position control mode, #061 comprehensive parameter must be 1, and port
parameters #070~073 specify the output port of gear position.
Analog control: S _0~maximum rotation; in analog control mode, #061 comprehensive
parameter must be 0, and it is required to set the maximum principal axis rotation of parameter #20.
The controller will output 0~10V analog voltage on principal axis port XS8 according to this
parameter. If S instruction and the instruction word that executes moving function are in the same
block, motion instruction and S instruction are executed at the same time.
2.3.1. Principal axis rotation switching control
Instruction format: S_1~16.
Instruction function: 16 gear BCD coding position control.
2.3.2. Principal axis rotation analog voltage control
Instruction format: M03 (M04) S
Instruction function: set principal axis rotation, the system outputs 0~10V analog voltage to
control principal axis servo or inverter, achieve stepless speed change, and the
value of S instruction is saved after power off.
For example:
Program:
O0001; (program name)
M3 S300; (principal axis forward rotation)
G0 X100 Z50; (quickly move to point A)
G0 X50 Z0; (quickly move to point B)
G1 W-30 F200; (cut from point B to point C)
X80 W-20 F150; (cut from point C to point D)
G0 X100 Z50; (quickly back to point A)
M30; (program ends, principal axis/coolant off)
%
2.3.3. Principal axis rate
If principal axis rotation analog voltage control mode is valid, the actual rotation of the principal axis
can be adjusted in 10%~150% instruction rotation range by 15 levels (change 10% every level) with
- 15 -
Page 20

the principal axis ratio adjustment key. In the main menu of the controller, you can press the left/right
key to modify the ratio, or use the principal axis ratio knob on the additional panel to modify
principal axis ration; to modify with the left/right key, the principal axis should be started first.
The actual rotation after the principal axis ratio is adjusted is limited by the maximum rotation of
the current gear position of the principal axis. The principal axis ratio isn’t saved after power off,
and the initial ratio after electrified is 100%.
2.3.4. Constant line speed control G96, constantrotation speed control
G97*
Instruction format: G96 S ; (S0000-S9999, leading 0 can’t be omitted).
Instruction function: constant line speed control is valid, specify cutting line speed (m/min),
and cancel constant rotation control. G96 is mode G instruction. If current mode is
G96, it is not necessary to enter G96.
Instruction format: G97 S ; (S0000-S9999, leading 0 can’t be omitted).
Instruction function: cancel constant line speed control and constant rotation control is valid,
specify principal axis rotation (r/m); G97 is mode G instruction. If current mode is
G97, it is not necessary to enter G97.
When the lathe is shaping workpiece, the workpiece usually rotates around the principal axis.
The cutting point of the tool may be considered as circle motion around the principal axis,
and the instant speed in circumferential tangent direction is called as cutting line speed (line
speed for short).
Constant line speed control function is valid only when principal axis rotation analog voltage
control function is valid. In constant line speed control, the principal axis rotation reduces
along with the change of X axis absolute coordinates of the programming track (neglecting
tool length compensation) and increase of X axis absolute coordinates, and the principal axis
rotation increases along with the decrease of X axis absolute coordinates, making cutting line
speed maintain at S instruction value.
Line speed = principal axis rotation *|X|*л/1000 (m/min)
In constant line speed control, Z coordinate axis of the workpiece coordinate system must
coincide with the principal axis, or else the actual line speed isn’t consistent with the specified
line speed.
2.3.5. Principal axis maximum rotation limit*
Use the value following G50S to specify the maximum principal axis rotation (r/m) of constant
line speed control
G50 S ;
In constant line speed control, the principal axis rotation is limited to the maximum if it is higher
than the value specified in above program.
2.4. Fast moving and feeding function (G98/G99, F instruction)
This system has three axis control modes, i.e. fast moving, cut feeding and manual feeding.
2.4.1. Fast moving
Fast moving: for lathe, X axis direction and Z axis direction move at independent speed, set
through #105 and #107 parameters, and the motion of the two directions doesn’t constitute
- 16 -
Page 21

fixed linear or arc track. This system allows G instruction and manual fast moving; X axis
direction and Z axis direction can’t move simultaneously in manual fast moving.
The fast moving speeds of X axis and Z axis are set by X axis fast moving speed and Z axis
fast moving speed respectively. You can adjust the actual fast moving speed with the ratio
adjustment key, and the actual fast moving speed is 25%, 50% or 100% of the set fast moving
speed.
The ratio isn’t saved after power off, and the initial value is 100 after electrified.
2.4.2. Cutting feeding instruction F
Cutting feeding: the system controls the motion of X axis and Z axis simultaneously, making
the motion track of the tool consistent with the track (linear, arc) defined by the instruction,
and the instantaneous speed of the motion track in tangential direction is consistent with F
instruction value, and the process of this motion control is called cutting feeding or
interpolation. The speed of cutting feeding is specified by F instruction word. When the
system is executing interpolation instruction (cutting feeding), it desomposes the cutting
feeding speed specified by F instruction to X axis and Z axis according to the programming
track, the system controls the instantaneous speed of X axis and Z axis simultaneously,
making the vector synthesis speed of the two direction equal to F instruction value.
Remark: use the feeding ratio key on the panel of the machine tool or external ratio switch
to adjust the cutting feeding speed in real time, and the actual cutting feeding speed can be
adjusted in the range of 0~150% of the instruction speed by 16 levels (10% every level). The
adjustment of feeding ratio is invalid for thread cutting.
F is the vector synthesis speed of the instantaneous speed of X axis and Z axis;
dx is the instantaneous (dt period) increment of X axis, and fx is the instantaneous speed of
X axis;
dz is the instantaneous (dt period) increment of Z axis, and fz is the instantaneous speed of Z
axis;
For example: as in Fig. 2-4-1, the values in the brackets are coordinates of the points
(diameter value in X direction).
- 17 -
Page 22

The program follows:
2.4.3. G98, G99
O0010;
Fig. 2-4-1
G00 X160 Z80; (move the machine tool to safe position first)
G98;
G0 X50 Z0; (move to point B quickly from point A through point M)
G1 W-30 F250; (B→C)
X100 W-20; (C→D)
X140; (D→E)
G2 W-40 R20; (EFG arc interpolation)
W-10; (G→H)
M30;
%
Instruction format: G98 Fxxxx; (F0001~F8000, the leadin 0 can be omitted, specify the feeding
speed every minute, mm/min)
Instruction function: specify the cutting feeding speed in the unit mm/min, G98 is mode G
instruction. If current mode is G98, it isn’t required to enter G98.
Instruction format: G99 Fxxxx; (F0.0001~F500, the leadin 0 can be omitted)
Instruction function: specify the cutting feeding speed in the unit mm/r, G99 is mode G instruction.
If current mode is G99, it isn’t required to enter G99. When the system executes G99 Fxxxx, the
product of of F instruction value (mm/r) and current principal axis rotation (r/m) is used as the
instruction feeding speed to control the actual cutting feeding speed. When the principal axis
rotation is changed, the actual cutting feeding speed also changes. Use G99 Fxxxx to specify the
cutting feeding every rotation of the principal axis, and form even cutting grain on the surface of the
workpiece. In G99 mode, the machine tool must be installed with principal axis encoder, and set
principal axis encoder wires.
G98 and G99 are in the same group of mode G instruction, and only one is valid at the same time.
G98 is initial G instruction, and G98 is valid by default when the system is electrified.
- 18 -
Page 23

2.4.4. Manual feeding
Manual feeding: this system allows X axis or Z axis positive/negative motion at current manual
feeding speed in the manual mode, X axis and Z axis can’t move simultaneously. The actual manual
speeds in X axis direction and Z axis direction are adjusted with the manual ratio adjustment key in
the range 10%~150%. The manual speed of each level is the product of the fixed value set by the
system parameter and manual ratio, and the manual speed of every axis is set by the parameter
independently. When manual fast moving key is valid, manual speed uses the fast moving speed of
every axis, and manual ratio is invalid.
Manual feeding ratio isn’t saved after power off, and the initial ratio is 100% after electrified.
2.5. Tool compensation function (T instruction)
The system allows automatic tool change, and can control the automatic tool holder of position 4~8 to
change tools during the processing, achieving the part processing of multi-process and multi-tool.
The system also allows tool length compensation, which doesn’t need to consider the actual position
of the tool while programming, and only needs to get the position offset data of every tool (tool offset)
through tool setting operation before processing. Before processing with tool, execute tool length
compensation first, i.e. offset the system coordinates according to tool offset to make the motion track
of the tool tip consistent with the programming track. After tool is changed, the user only needs to
reset the tool and modify tool offset, and doesn’t need to modify processing program. If the
processing size has error due to tool abrasion, modify tool offset according to tool offset directly to
eliminate processing size error.
Fig. 2-5-1
Instruction format:
T ○○ ○○
Tool offset No. (00-16, leading 0 can’t be omitted)
Target tool No. (00-08, leading 0 can’t be omitted)
Instruction function: automatic tool holder changes tool to target tool No., and executes tool
length compensation according to the tool offset corresponding to the tool offset
No. of the instruction. Tool offset No. may be same to or different from tool No.,
- 19 -
Page 24

i.e. one tool can correspond to several offset No. The tool offset corresponding to
tool offset No. 00 is X=0, Z=0, and the system doesn’t have tool compensation
state, i.e. coordinate offset of the system is 0 (without coordinate offset). After
tool length compensation, execute T□□00, the system will offset the system
coordinates reversely according to current tool offset, the state is changed from
tool length compensated to not compensated, the displayed tool offset No. is 00,
and this process is to cancel tool length compensation.
For example: T0101 is to select #1 tool and execute #1 tool offset;
T0102 is to select #1 tool and execute #2 tool offset;
T0301 is to select #3 tool and execute #1 tool offset
After electrified, the tool No. and offset No. displayed by T instruction are the state before
power off.
Only one T instruction is valid in one block; if two or more T instructions are in the block, the
last the valid.
If T instruction and the instruction executing moving function are in the same block, the tool
change instruction is executed before the moving instruction.
This system is suitable for automatic tool holder with 4—8 tool positions; by modifying the
parameter s of #2 tool magazine and modifying parameters #17, #18, #19 and #20, tool
position signals (independent) input directly, tool holder forward to change the tool, and
reverse to lock after in position. The control of tool holder is realized through embedded T
code macro program; #023 management parameter is TFUNC(L) by default, and you can
customize T code if this parameter is changed to User-Def.
In manual mode, press the tool change key on the panel of the machine tool to change the
tool manually.
- 20 -
In coordinate menu of the system, tool setting includes setting and compensation. For tool
setting, it is necessary to cut current workpiece for test first, enter actually measured X axis
diameter and Z axis length, and the system will calculate the offset automatically and save in
the parameter. For example, if cut with #1 tool, press the record mode in tool setting interface,
enter X cutting diameter and Z cutting length to #1 parameter and call T0101. Compensation
is to offset current compensation No.
Page 25

Instruction word
Group
Function
Remakr
G00
01
Fast moving
Initial G instruction
G01
Linear interpolation
Modal G instruction
G02
Arc interpolation (CW)
3. G Instruction
3.1. Introduction
G instruction consists of instruction address G and later 1~2 instruction values. It is used to regulate
the interpolation mode, pause function and coordinate setting of the tool relative to the workpiece.
G □□
Instruction value (00~99, first 0 can be omitted)
Instruction address G
G instruction word is divided into group 00, 01, 02, 03, and 04. In the same block, you can enter G
instruction words of different groups. If two or more G instruction words of same group are entered
in the same block, only the last G instruction word is valid. The G instruction words of different
groups without common parameter (instruction word) may be in the same block, and the functions
are valid simultaneously and are unrelated with the sequence. The system doesn’t support the G
instruction words not in this table, and will alarm if there is.
3.1.1. Modal, non-modal and initial state
The modal function is that a code is always valid once it is specified in current block, until
another code of the same group appears in the block, and it isn’t required to specify if this
instruction is used in next block.
The non-modal function is that a code is only valid in its block, and it should be specified
again if it is used in next block.
After the system is electrified, the mode G instruction word that is valid before the
function or state is executed is called initial G instruction word. If the initial G instruction
word is executed after electrified, it isn’t required to enter this G instruction word. The
initialized instruction word of the system is G01.
3.1.2. Relative definition
This manual has the following description:
Start point: the position when current block is running;
End point: the position after current block ends;
X: absolute coordinates of the end point in X direction;
U: difference between start point and end point in X absolute coordinates;
Z: absolute coordinates of the end point in Z direction;
W: difference between start point and end point in Z absolute coordinates;
F: cutting feeding speed
G instruction word list
- 21 -
Page 26

G03
Arc interpolation (CCW)
G32
Thread cutting
G90
Axial cutting cycle
G33
Z axis taping cycle
G92
Thread cutting cycle
G94
Radial cutting cycle
G04
00
Pause, quasi stop
Non-modal G
instruction
G31
Jump instruction
G27
Reference point returns
checking instruction
G28
Return to mechanical home
G29
Return instruction from the
reference point
G30
Return to second reference
point instruction
G50
Coordimate system setting
G70
Finishing cycle
G71
Axis roughing cycle
G72
Radial roughing cycle
G73
Closed cutting cycle
G74
Axial grooving multi-cycle
G75
Radial grooving multi-cycle
G96
02
Constant line speed on
Modal G instruction
G97
Constant line speed off
Initial G instruction
G98
03
Feeding every minute
Initial G instruction
G99
Feeding every revolution
Modal G instruction
3.2. Interpolation function
3.2.1. Fast moving G00
Instruction format: G00 X(U)Z(W);
Instruction function: X axis and Z axis move to the end point simultaneously from the
start point at the fast moving speed respectively. G00 is initial G instruction.
of X axis and Z axis through comprehensive parameter 009 and 011. The synthetic
track isn’t straight line necessarily, and it should be noted that the two axes may not
- 22 -
The two axes move at independent speed respectively. Set the fast moving speed
Page 27

reach the end point at the same time.
Either or both instruction addresses X(U) and Z(W) can be omitted. If one is
omitted, the coordinates of the start point and end point of the axis are consistent; if
both are omitted, the start point and end point are in the same position.
The fast moving speed of X axis and Z axis are set by X axis fast moving speed
and Z axis fast moving speed respectively, and the actual moving speed can be adjusted
with the fast ratio key on the panel of the machine tool.
The maximum speed that the machine tool actually can reach depends on the actual
condition of the machine tool and the motor. For detailed parameters, please refer to
the manual of the machine tool.
G00 is modal instruction, and can be omitted if next block is same.
G00 can be abbreviated to G0, which is equivalent to G00.
If X axis and Z axis are moved at the same time, note whether the tool is in safe
area to avoid bump.
For example: the tool moves from point A to point B quickly.
Z axis X axis
G0 X20 Z25; (A coordinates)
G0 U-8 W-14; (A→B)
3.2.2. Linear interpolation G01
Instruction format: G01 X(U)_ Z(W)_F_;
X(U)/Z(W): absolute or relative coordinates of the end point.
F : cutting feeding speed
Instruction function: G01 instruction makes the tool arrive at the position of specified point
along the connection line from current point to the point specified by X(U), Z(W) at
specified speed. The motion track is a straight line from the start point to the end point. F
instruction value is the vector synthetic speed of instantaneous speed of X axis and Z axis,
and the actual cutting feeding speed is the product of feeding ratio and F instruction value.
Once executed, F instruction value is maintained until new F instruction value is executed.
For example:
G01 X60.0 Z-25 F200; (absolute value programming)
G01 U20.0 W-25.0; (relative value programming)
- 23 -
Page 28

Z axis
Z axis
End point
Start point
Start point
End point
X axis
end point
G03 track
G02 track
End point Start point
3.2.3. Arc interpolation G03, G02
Instruction format: G03/ G02 X(U)_ Z(W)_ R_ (I_ K_) F_;
Instruction function: the motion track is the CW arc/CCW arc from the start point to the end
point, and the track is shown in the figure below.
R: arc radius (0~9999.999mm);
I: the difference between X coordinates of the circle center and arc start
(-9999.999~9999.999mm);
K: the difference between Z coordinates of the circle center and arc start
(-9999.999~9999.999mm);
For example: as shown in Fig. 3-2-3-2 below
- 24 -
Fig. 3-2-3-1
Page 29

Start point End point Circle center
Fig. 3-2-3-2
Program:
G02 X63.06 Z-20.0 R19.26 F300;
Or G02 U17.81 W-20.0 R19.26 F300;
Or G02 X63.06 Z-20.0 I35.36 K-6.37 F300;
Or G02 U17.81 W-20.0 I35.36 K-6.37 F300;
Notice:
z
In G02/G03 block, it is required to enter at least one of the instruction addresses of I, K
and R, or else the system will alarm; if I, K and R are entered at the same time, R is
valid, while I and K are invalid; if R isn’t entered or R equals to 0, the system alarms;
z
If X(U) and Z(W) aren’t entered, and R is used to specify the radius, X axis and Z axis
won’t move when G02/G03 instruction is executed; if R isn’t entered and use I, K
instruction word, the track of executing G02/G03 instruction is a full circle (360°);
z
When R instruction is used, it is two arcs larger and smaller than 180° in theory. In this
system, the arc smaller than 180° is valid (as in Fig. 3-4-3 below). If the end point ins’t on
the arc defined with R, the system will alarm;
End point Start point
z
In G02/G03 block, if I and K instruction words are used to define the circle center, the
Fig. 3-4-3
system won’t alarm even if the end point isn’t on the arc. The track of the instruction is:
- 25 -
Page 30

Instruction
Function
G28 X(U)_
X axis returns to mechanical home, Z axis
stays at the original position
G28 Z(W)_
Z axis returns to mechanical home, X axis
stays at the original position
G28
Two axes stay at original position, and
continue to execute next block
G28 X(U) Z(W)
X and Z axis return to mechanical home
in the circle center and arc direction defined by the instruction, X axis and Z axis move
along the arc from the start point at the same time; if the coordinates of X axis or Z axis
are same to the end point, X axis or Z axis stops motion, and the axis (Z axis or X axis)
continues to move to the end point, as shown in Fig. 3-4-4 below
End point Start point
Fig. 3-4-4
3.2.4. Pause instruction G04
Instruction format: G04 P ;
Or G04 X ;
Instruction function: every axis stops motion, do not change current G instruction mode
and maintained data and state, delay for specified time, and then execute next
block. The delay time is specified with instruction word P (unit: ms), X (unit:
sec). G04 is non-modal G instruction.
G04 P1000 delay 1000ms = 1sec
G04 X1 delay 1sec
3.2.5. Return to mechanical home G28
Instruction format: G28 X(U)_ Z(W)_;
Instruction function: from the start point, arrive at the center point specified by X(U), Z(W)
at the fast moving speed and then return to the mechanical home at the same time.
G28 is non-modal G instruction.
One or both instruction addresses X(U) and Z(W) can be omitted; see the table below for
details
- 26 -
Page 31

X: absolute coordinates of center point in X direction; U: the difference of the absolute
coordinates of the center point and start point in X direction;
Z: absolute coordinates of center point in Z direction; W: the difference of the absolute
coordinates of the center point and start point in Z direction.
Process of instruction action (see the figure below):
(1) Move to center point from the start point simultaneously at independent fast
moving speed (point A → point B).
(2) When the two axes reach the center point, move to the mechanical home from the
center point simultaneously at independent fast moving speed (point B →point
R).
(3) If U and W are 0, return to the machine tool home directly, e.g. G28 U0 W0, the
system returns to the reference point directly, and doesn’t pass through the
center point (point A → point R).
simultaneously
Start point Center point Mechanical home
3.3. Thread cutting
3.3.1. Thread cutting instruction G32
Instruction format: G32 X(U) Z(W) F P D V ;
X(U): thread X axis end point coordinates or increment value
Z(W): thread Z axis end point coordinates or increment value
F: metric thread pitch (0.001~500 mm), it is the movement of the long axis when
the principal axis rotates a circle, maintain valid after F instruction value is
executed, until the F instruction word of specified thread pitch is executed again.
P: thread cutting acceleration pitch, the unit is mm, unsigned, the acceleration
length of the long axis during thread cutting; if the program doesn’t specify the P
value, the system calls parameter #109 automatically for calculation; if X is long
axis, P is the radius.
D: thread cutting deceleration pitch, the unit is mm, unsigned, the deceleration
length of the long axis during thread cutting; if the program doesn’t specify the D
value, the system calls parameter #110 automatically for calculation; if X is long
axis, D is the radius.
V: pitch cutting back amount, the unit is mm, signed; the sign relates to the back
direction; it is the back length of the short axis during thread cutting; if the
program doesn’t specify the V value, the system calls parameter #111
- 27 -
Page 32

automatically for calculation; if X is short axis, V is the radius.
Instruction function: the motion track of the tool is a straight line from the start point to the end point;
the coordinate axis with larger displacement from the start point to the end point (X
axis depends on the radius value) is the long axis, and the other is the short axis.
During motion, the long axis moves a pitch when the long axis rotates a circle, short
axis and long axis make linear interpolation; when the tool cuts the workpiece, a
spiral grooving with equal pitch is formed on the surface of the workpiece, achieving
thread processing of equal pitch. F instruction word can be used to specify the pitch
of metric thread, and execute G32 instruction to process straight thread, taper thread
and end thread of metric equal pitch:
If the X coordinates of start point and end point are same (do not enter X or U), it is straight
thread cutting;
If the Z coordinates of start point and end point are same (do not enter Z or W), it is end
thread cutting;
If the X coordinates and Z coordinates of start point and end point are different, it is taper
The thread pitch is the displacement of the long axis when the principal axis rotates one circle
(X axis displacement depends on the radius); see Fig. 3-7-2 below for the method to
distinguish the long axis and short axis:
thread cutting, as in Fig. 3-7-1 below
Fig. 3-7-1
Start point
End point
Start point
If Lz ≥ Lx (α≤45°), Z is the long axis; If
Lx ≥ Lz (α>45°), X is the long axis.
Taper thread End point
Thread cutting notice:
z
The machine tool must be installed with principal axis encoder for thread cutting; the
Fig. 3-7-2
transmission ration of principal axis encoder and the principal axis is 1:1, modify
#013 principal axis encoder wires, and the system is initialized to 0. When the system
- 28 -
Page 33

receives the signals from principal axis encoder Z (origin), it moves X axis or Z axis
and starts thread processing, therefore, the processing of same thread can be finished
through roughing and finishing as long as the principal axis rotation isn’t changed.
z
Since X axis and Z axis have acceleration and deceleration process in the beginning
and at the end of thread cutting, the pitch error is large at this moment, and therefore
acceleration pitch P must exist before the long axis start point and deceleration pitch
D (usually called as retreating groove) must exist after the end point of the long axis
during actual thread cutting, i.e. programmed thread length is longer than actual
thread length. Thread cutting length includes P, D; similarly, the end position of the
short axis must have back amount V, i.e. at the end position of thread cutting, the
short axis exits thread cutting in V back amount, as shown in the figure below.
For example:
Thread pitch: 4mm. P = 3.5mm, D = 3.5mm, V=1, total cutting depth 1mm (single side),
cut in two times
G00 X28 Z3; (cut 0.5mm in the first time)
G32 X51 W-77 F4.0 P3.5 D3.5 V1; (taper thread first cutting)
G00 X55; (tool exits)
W77; (Z returns to the start point)
X27; (cut another 0.5mm in the second time)
G32 X50 W-77 F4.0; (taper thread second cutting)
G00 X55; (tool exits)
W77; (Z returns to the start point)
As in Fig. 3-7-3:
Start point End point
z
Under the condition that the start point, end point and thread pitch of G32 are fixed, the
Fig. 3-7-3
moving speed of X axis and Z axis during thread cutting depends on the principal axis
rotation, and doesn’t relate to cutting feeding ration. During thread cutting, principal
axis ratio control is valid; when principal axis rotation is changed, the pitch error
increases due to acceleration/deceleration of X axis and Z axis, therefore, do not adjust
the principal axis rotation during thread cutting or stop the principal axis (or else the
tool and workpiece will be damaged).
z
During thread cutting, the long axis increment should be larger than the value of (P+D),
and the actual thread length of the long axis should be larger than pitch F.
z
When the system is reset, stopped in emergency or alarms, thread cutting stops
- 29 -
Page 34

immediately.
3.3.2. Z axis taping cycle G33
Instruction format: G33 Z(W) F ;
Instruction function: the motion track of the tool is from the start point to the end point, and
then returns to the start point. During the motion, Z axis moves a pitch when
principal axis rotates one circle, always keeps consistent with the pitch of the thread,
forms a spiral grooving in the internal hole of the workpiece, and completes the
thread processing of the internal hole after once cutting.
Instruction description: G33 is modal G instruction;
Z(W): do not enter Z or W, the Z coordinates of the start point and end point are
same, and do not execute thread cutting;
F: metric thread pitch, range: 0.001~500 mm;
Cycle process:
① Z axis feeding and taping (principal axis must be specified to ON before G33
instruction);
② M05 signal outputs after reaching the Z axis coordinate end specified by the program;
③ Principal axis stops completely;
④ Principal axis reverse signal output (opposite to original rotation of the principal
axis);
⑤ Z axis back to the start point;
⑥ Principal axis resumes the turning before G33.
Program:
O0011;
G00 Z90 X0Z0 M03; start the principal axis
G33 -Z50 F1.5; taping cycle
G00 X60 Z10; continue processing
M30
Note 1: before taping, determine the principal axis according to the rotation of the thread, and the
principal axis will resume original rotation after taping.
Note 2: this instruction is rigid taping; when principal axis stop signal is valid, the principal axis
stops rotation after a period of deceleration, and Z axis will feed following the rotation of the
principal axis at this moment, until the principal stops completely, and therefore, the bottom
hole position of the thread is deeper than actual required position during actual processing;
the specific exceeded length depends on the principal axis rotation and principal axis brake
device during taping.
Note 3: during taping cutting, the moving speed of Z axis depends on the principal axis rotation and
pitch, and isn’t related to cutting feeding speed ratio.
Note 4: during single block running or feeding maintenance operation, the system displays “Pause”,
taping cycle doesn’t stop, until taping completes and returns to the start point.
Note 5: when the system is reset, stopped in emergency or alarms, taping cutting decelerates to stop.
3.4. Workpiece coordinate system setting G50
Instruction format: G50 X _ Z _ ;
- 30 -
Page 35

Current tool
compensation state
Coordinates after G50 X20 Z20 is
executed
#01 tool
compensation
T0100
X:20 Z:20
X:12
T0101
X:32 Z:43
Z:23
X: new X axis absolute coordinates of current position;
Z: new Z axis absolute coordinates of current position;
Instruction function: set the absolute coordinates of current position, and thus create
workpiece coordinate system (also floating coordinate system). After executing this
instruction, the system sets current position as the program home. When workpiece
coordinate system is created, absolute coordinate programming enters the coordinates
according to this coordinate system, until G50 is executed again to create new workpiece
coordinate system. G50 is non-modal G instruction.
X or Z isn’t entered in G50 instruction, the coordinate axis isn’t entered sets the coordinates
according to current absolute coordinates; if both X and Z aren’t entered, current
coordinates won’t be changed. Aslong as G50 is executed, current position will be set as the
program home.
Program home
Before settin g coordinate system with G50
After setting coordinate system with G50
As shown in the figure above, after instruction “G50 X100 Z150” is executed, the
workpiece coordinate system as shown in the figure is created, and point (X100, Z150) is
set to program home.
Note: If G50 is executed to set coordinate system in tool length compensation state, the
absolute coordinates displayed by the system are the coordinate value after current
tool offset is modified; program home is the position defined by G50 coordinate value
in workpiece coordinate system. Return to program home in tool length compensation
state, the position of home end is the program home position after tool length
compensation is canceled.
For example:
3.5. Fixed cycle
To simplfy the programming, the system provides a G instruction of single processing cycle
that only uses one block to complete fast moving positioning, linear/thread cutting, and finally
returns to start point:
G90: axial cutting cycle
G94: radial cutting cycle
G92: thread cutting cycle
- 31 -
Page 36

3.5.1. Axial cutting cycle G90
Format: G90 X/U Z/W R_ F_ ;
X/U: cutting end X axis coordinates;
Z/W: cutting end Z axis coordinates;
F: cutting speed
R: cone slope; radial coordinate difference (radius) between cutting start and cutting
end; if R and U do not have same sign, |R| ≤ |U/2| (diameter programming) or |R| ≤
|U/2|(radius programming) is required. If R isn’t specified, the cylinder processing
is shown in the figure below:
Cutting Fast feeding
Z axis X axis Start point
Execution process:
1) X axis locates (G0) to cutting start quickly from cycle start;
2) Interpolate (G1) to cutting end from cutting start in linear;
3) X axis radially back to radial coordinate position of cycle start in line interpolation
(G1) mode;
4) Z axis quickly locates (G0) and returns to the start point, and cycle ends.
Note:
1) G90 is modal instruction.
2) In single block operation, the system stops at the end position of every block, and pause
and resetting operation are valid in the motion process.
- 32 -
Page 37

3) U, W and R reflect the relative position of cutting end and start. G90 has four track
combinations depending on the sign.
During diameter programming, if R and U do not have same sign and |R| > |U/2|, 0792-G90,
G92, G94 program error alarms, and the value of R exceeds allowed range
4) During first tool cutting, if U is 0, current value is the end coordinates by default; W can’t
be 0, or else the system alarms
5) Before executing G90, specify the position of start point, or else the system takes current
point as the start
6) G90 is valid in MDI mode, and modal function is also available.
As in Fig. 3-5-1:
Fig. 3-5-1
- 33 -
Page 38

O9001
M03 S500T0101
G00 X70 Z2
G90X56Z-60F500
X52
X48
X44
X40
X36
X32
X30
M30
3.5.2. Thread cutting cycle G92
Instruction format: G92 X/U Z/W R_ F_ P D V ;
X/U: thread end X axis coordinates;
Z/W: thread end Z axis coordinates;
F: thread pitch
R: thread slope; radial coordinate difference (radius) between cutting start and cutting
end; if R and U do not have same sign, |R| ≤ |U/2| (diameter programming) or |R| ≤
|U|(radius programming) is required. If R isn’t specified, it is straight thread
P, D, V: same to G32 instruction function, but the value of V in G92 is unsigned; the
system retreats the tool according to the direction of the start point automatically,
and G32 needs to check the retreating direction of the specified V sign
%
Thread cutting
Quick feeding
Z axis
X axis
- 34 -
Page 39

Thread cutting Quick feeding Z axis X axis
Execution process:
1) X axis locates (G0) to cutting start quickly from cycle start;
2) Interpolate to thread end from cutting start;
3) X axis radially back to radial coordinate position of cycle start in quick positioning (G0)
mode;
4) Z axis quickly locates (G0) and returns to the start point, and cycle ends.
Function description:
1) G92 instruction function is similar to G32 function, and only cycle cutting function is
increased.
2) U, W, and R reflect the relative position of cutting end and start. G92 has four track
combinations depending on the sign.
3) During first tool cutting, if U is 0, current value is the end coordinates by default; W can’t
be 0, or else the system alarms
4) Principal axis ratio control is invalid during thread cutting
5) If the converted feeding speed every minute exceeds the maximum feeding speed, the
system alarms
6) G92 instruction can process one thread in several times of feeding, but the processing of
two continuous threads can’t be realized, nor process endd thread. G92 instruction thread
pitch has the same definition as G32, and the pitch is the displacement of the long axis that
the principal axis rotates one circle (X axis displacement depends on the radius).
- 35 -
Page 40

G92 thread cutting notice:
z
The machine tool must be installed with principal axis encoder for thread cutting; the
transmission ration of principal axis encoder and the principal axis is 1:1; the principal
axis encoder outputs A/B differential signal and Z signal (conversion signal) with 90°
phase difference. When cutting thread, the system starts thread processing after
receiving principal axis encoder Z signal. Therefore, the processing of same thread can
be finished through roughing and finishing of several connected G92 blocks as long as
the principal axis rotation isn’t changed.
z
Since X axis and Z axis have acceleration and deceleration process in the beginning
and at the end of thread cutting, the pitch error is large at this moment. The thread
back function of G92 function can be used to process the thread without retreating
groove.
z
Under the condition that the start point, end point and thread pitch of G92 are fixed,
the moving speed of X axis and Z axis during thread cutting depends on the principal
axis rotation, and doesn’t relate to cutting feeding ration. During thread cutting,
principal axis ratio control is valid; when principal axis rotation is changed, the pitch
error increases due to acceleration/deceleration of X axis and Z axis, therefore, do not
adjust the principal axis rotation during thread cutting or stop the principal axis (or
else the tool and workpiece will be damaged).
z
During thread cutting, and after feeding maintenance operation is executed, thread
cutting doesn’t stop.
z
Thread cutting is invalid when single block is running, and the running pauses after the
first non-thread cutting in the thread cutting cycle is executed. When the system is reset,
stopped in emergency or alarms, thread cutting stops immediately.
As in Fig. 3-10-7:
Linear thread
Fig. 3-10-7
Program: O3201
M03S500
G00X9.72Z2;
G32W-20 F1.75
G00X20
Z20
M30
- 36 -
Page 41

3.5.3. Radial cutting cycle G94
Instruction format: G94 X/U Z/W R_ F_ ;
X/U: cutting end X axis coordinates;
Z/W: cutting end Z axis coordinates;
F: cutting speed
R: cone slope; axial coordinate difference between cutting start and cutting end; if R
and W do not have same sign, |R| ≤ |W| is required. If R isn’t specified, it is straight
end processing
Cutting feeding Quick positioning
Z axis Start point X axis
Execution process:
1) X axis locates (G0) to cutting start quickly from cycle start;
2) Interpolate (G1) to cutting end from cutting start in linear;
3) Z axis axially back to axial coordinate position of cycle start in linear interpolation (G1)
mode;
4) Z axis quickly locates (G0) and returns to the start point, and cycle ends.
Instruction description:
1) G94 is modal instruction.
2) In single block operation, the system stops at the end position of every block, and pause and
resetting operation are valid in the motion process.
3) U, W and R reflect the relative position of cutting end and start. G94 has four track combinations
depending on the sign.
- 37 -
Page 42

If R and W do not have same sign and |R| > |W|, 0792-G90, G92, G94 program error alarms,
and the value of R exceeds allowed range
4) During first tool cutting, if W is 0, current value is the end coordinates by default; U can’t be 0, or
else the system alarms
5) Before executing G94, specify the position of start point, or else the system takes current point as
the start
6) G94 is valid in MDI mode, and modal function is also available.
3.5.4. Notice for fixed cycle instructions
1) In the fixed cycle instruction, once X(U), Z(W) and R are executed, the instruction values
of X(U), Z(W) and R are always valid before new fixed cycle instruction to re-specify
X(U), Z(W) and R. If G00, G01, G02, G03 and G32 are executed, the values of X(U), Z(W)
and R will be cleared;
2) If the next block of G90, G92 or G94 is instruction word without motion, the action of
G90, G92 or G94 block will be executed again when the block without motion is
executed. To avoid this instance, it is required to cancel the cycle action with other G
instructions after the fixed cycle instruction;
(For example)
M3; (turn on the principal axis)
…
G90 X200.0 Z10.0 F2000;
X205.0 (repeat G90 once)
- 38 -
Page 43

G code
Function
Format
G70
Finishing cycle G70
G70 P(ns) Q(nf);
G71
Axial roughing cycle
G71
G71 U(Δd) R(e) F S T ;
G71 P(ns) Q(nf) U(Δu) W(Δw);
G72
Radial roughing cycle
G72
G72 W(Δd) R(e) F_ S T ;
G72 P(ns) Q(nf) U(Δu) W(Δw);
G73
Closed cutting cycle
G73
G73 U(Δi) W (Δk) R (d) F_ S_ T_ ;G73 P(ns)
Q(nf) U(Δu) W(Δw) ;
G74
Axial grooving
multi-cycle G74
G74 R(e ) ;
G74 X(U)_ Z(W)_ P(Δi)Q(Δk)
R (Δd) F_ ;
G75
Radial grooving
multi-cycle G75
G75 R(e ) ;
G75 X(U)_ Z(W)_ P(Δi) Q(Δk)
R(Δd) F_ ;
G76
Multi-thread cutting
cycle G76
G76 P(m)(r)(a) Q(△dmin) R(d);
G76 X(U)_ Z(W)_ R(i) P(k) Q(△d)
F(I) ;
X206.0 Z20.0 (repeat G90 once)
…
3) If the fixed cycle instruction is in the same block as M, S and T instructions, the cycle
instruction can be executed at the same time with M, S and T instructions. However, if
the fixed cycle is canceled (due to instruction G00, G01) after instruction M, S, T as in
the example below, the fixed cycle instruction must be re-specified.
(For example)
N003 T0101;
…
N010 G90 X20.0 Z10.0 F2000;
N011 G00 T0202;
N012 G90 X20.5 Z10.0;
3.6. Multi-cycle instructions
- 39 -
Page 44

Finishing track---FT (finish turning) track
Fast moving
Cutting feeding
A: roughing reference point
A-B-C: program path
Roughing start (rough turning start)
Initial point
3.6.1. Axial roughing cycle G71
Standard instruction format:
Format: G71 U(△d) R(e) F_ S_ T_
G71 P(ns) Q(nf) U(△u) W(△w)
U(△d): the single tool feed (radius) of X axis during roughing, unsigned
R (e): the single tool retreat (radius) of X axis during roughing, unsigned
P (ns): start block line of finishing track
Q(nf): end block line of finishing track
U(△u): reserved finishing amount of X axis, unsigned
W(△w): reserved finishing amount of Z axis, unsigned
F: feeding speed during roughing
S: principal axis rotation during roughing
T: tool No., tool offset No.
Execution process:
① Initial point → A1: fast moving;
② First roughing cycle: A
A
→B
1
B
→C
1
③ Second roughing cycle: A
A
→B2, C
2
B
→C2
2
- 40 -
④ The n
th
→B1→C
1
, C
1
1→D1→A2: fast moving
1: linear interpolation
→B2→C
2
2→D2→A3: fast moving
: linear interpolation
roughing cycle: A
→Bn→C
n
1→D1→A2
2→D2→A3
n→Dn→A’
Page 45

Condition
Result
X axis of C (nf block) > X axis of B (ns block); Z axis of C > Z axis of B
①
X axis of C (nf block) > X axis of B (ns block); Z axis of C < Z axis of B
②
X axis of C (nf block) < X axis of B (ns block); Z axis of C > Z axis of B
③
X axis of C (nf block) < X axis of B (ns block); Z axis of C < Z axis of B
④
X axis of C (nf block) = X axis of B (ns block) or
Z axis of C (nf block) = Z axis of B (ns block)
Generate
error
alarm
0768
A
→B
n
n, Cn→Dn→A’: fast moving
B
→C
n
n: linear interpolation
⑤ The last roughing cycle: A
A
→B
: fast moving
’
’
B
→C
’
’: interpolation depends on the mode specified by
speed specifies F value or the F value in ns→nf block according to G71
block, and uses current default F value if not specified.
C
→ Initial point: fast moving. G71 roughing cycle ends.
’
Function description:
1) ns-nf block must follow G71 block. The system won’t execute the block written between G71
block and ns block
2) The F value in G71 block is valid when executing G71 roughing cycle; if the F value isn’t
specified in G71 block, execute in current default value.
3) Pause and reset are valid in the motion process.
4) If the combined cycle instruction should be used several times in the same program, ns~nf can’t
have same block No., or else the ns~nf profile may have error when the next combined cycle
instruction is executed.
5) If the last tool feed is smaller than U(△d), the system will execute the last roughing cycle directly
6) Tool retreating path: after last roughing, the tool retreats to the initial point from point nf.
7) Before executing G71, the tool must specify the position of the initial point first, which must be
out of the program path limit range, or else the system alarms (0769--G71, G72, G73 initial point
position error). If the position of the initial point isn’t specified, the current point is the initial
point.
8) The outside range of the program path is defined as below
This quadrant is the outside range of the program path
9) The offset direction of roughing depends on program path automatically (as in the figure below,
the processing path program is A→B→C)
→B’→C
’
→ initial point
’
ns→nf block. Interpolation
- 41 -
Page 46

SALECNC.com
B: block line ns C: block line nf
B’-C’: offset path
Related parameters and notice:
1) If ∆d is 0 or larger than total cutting amount, the system alarms. The tool retreating
angle is 45°, and do not retreat if R (e) is 0.
2) If △u is 0, X axis doesn’t reserve for finishing; if △u is larger than △d, the system
alarms because it can’t calculate the first roughing end.
3) If △w is 0, Z axis doesn’t reserve for finishing.
4) In ns-nf block, the size of X axis and Z axis must change one-way (constantly increase
or decrease), or else the system alarms.
5) ns-nf block only contains the following instructions: G00, G01, G02, G03, G04; can’t
include the following M functions: M30, M98, M99, or else the system alarms.
6) ns block only can be G00 or G01 instruction.
G71 program processing example:
图1-1
O7101
- 42 -
Fig. 1-1
Fig. 3-11-3
Page 47

SALECNC.com
M03 S500T0101
G00 X25Z10
M03S550F3000
G71U0.5R0.5
G71P10Q20U0.2W0.2
N10G0X0Z0F300
G2X5Z-2.5R2.5F200
G1W-1.25F300
G2X10W-2.5R2.5F200
G1W-2.5F300
N20X15W-2.5
G70P10Q20
G0X20
Z0
M30
%
3.6.2. Radial roughing cycle G72
Instruction format: G72 W(△d) R(e) F_ S_ T_
G72 P(ns) Q(nf) U(△u) W(△w)
W(△d): the single tool feed of Z axis during roughing (unsigned, unit: mm)
R(e): the single tool retreating of Z axis during roughing (unsigned, unit: mm)
P (ns): start block line of finishing track
Q(nf): end block line of finishing track
U(△u): reserved finishing amount of X axis, unsigned
W(△w): reserved finishing amount of Z axis, unsigned
F: cutting feeding speed during roughing
S: principal axis rotation
T: tool No., tool offset No.
- 43 -
Page 48

Finishing track Fast moving
Cutting feeding A: roughing reference point
A-B-C: program path Initial point
Execution process:
① Initial point → A1: fast moving;
② First roughing cycle: A
A
→B
, C
1
1→D1→A2: fast moving
→C
1: linear interpolation
B
1
1
③ Second roughing cycle: A
A
→B2, C
2
B
→C2
2
④ The n
A
→B
n
B
→C
n
2→D2→An: fast moving
: linear interpolation
th
roughing cycle: A
n, Cn→Dn→A’: fast moving
n: linear interpolation
→B1→C
1
2
n
⑤ The last roughing cycle: A
A
→B
: fast moving
’
’
B
→C
’
’: interpolation depends on the mode specified by
1→D1→A2
→B2→C
→Bn→C
→B’→C
’
2→D2→An
n→Dn→A’
→ initial point
’
ns→nf block. Interpolation
speed specifies F value or the F value in ns-nf block according to G72
block, and uses current default F value if not specified.
C’→ Initial point: fast moving. G72 roughing cycle ends.
Function description:
1) ns-nf block must follow G72 block. The system won’t execute the block written between
G72 block and ns block
2) The F value in G72 block is valid when executing G72 roughing cycle; if the F value isn’t
specified in G72 block, execute in current default value.
3) Pause and reset are valid in the motion process.
- 44 -
Page 49

Condition
Result
X axis of C (nf block) > X axis of B (ns block); Z axis of C > Z axis of B
④
X axis of C (nf block) > X axis of B (ns block); Z axis of C < Z axis of B
③
X axis of C (nf block) < X axis of B (ns block); Z axis of C > Z axis of B
②
X axis of C (nf block) < X axis of B (ns block); Z axis of C < Z axis of B
①
X axis of C (nf block) = X axis of B (ns block) or
Z axis of C (nf block) = Z axis of B (ns block)
Generate
error alarm
4) If the combined cycle instruction should be used several times in the same program, ns~nf
can’t have same block No., or else the ns~nf profile may have error when the next
combined cycle instruction is executed.
5) If the last tool feed is smaller than U(△d), the system will execute the last roughing cycle
directly
6) Tool retreating path: after last roughing, the tool directly retreats to the initial point from
point nf.
7) Before executing G72, the tool must specify the position of the initial point first, which
must be out of the program path limit range, or else the system alarms. If the position of the
initial point isn’t specified, the current point is the initial point.
8) The outside range of the program path is defined as below
This quadrant is the outside range of the program path
9) The offset direction of roughing depends on program path automatically (the processing
path program is A→B→C)
- 45 -
Page 50

B: block line ns C: block line nf
B’-C’: offset path
Related parameters and notice:
1) If ∆d is 0 or larger than total cutting amount, the system alarms.
2) The tool retreating angle is 45°, and do not retreat if R (e) is 0.
3) If △u is 0, X axis doesn’t reserve for finishing.
4) If △w is 0, Z axis doesn’t reserve for finishing; if △w is larger than △d, the system
alarms.
5) In ns-nf block, the size of X axis and Z axis must change one-way (constantly increase
or decrease), or else the system alarms.
6) ns-nf block only contains the following instructions: G00, G01, G02, G03, G04; can’t
include the following M functions: M30, M98, M99, or else the system alarms.
7) ns block only can be G00 or G01 instruction.
G72 processing example:
图1-1
Fig. 1-1
- 46 -
Fig. 3-11-6
Page 51

O7201
M03S500T0101
G00X20Z5
M03S500F3000
G72W0.5R-0.4
G72Q20U0.2W0.2
N10G1X17Z-11.25F300
X15
W5
G1X10W2.5F200
G1W2.5F300
G02X5W2.5R2.5F200
G1W1.25F300
N20G2X0W2.5R2.5F200
G70P10Q20
G0X20
Z5
M30
3.6.3. Closed cutting cycle G73
Instruction format:
G73 U(△i) W(△k)
%
R(d) F_ S_ T_
G73 P(ns) Q(nf) U(△u) W(△w)
U(△i): X axis roughing reserve. Unsigned, negative sign is invalid (radius)
W(△k): Z axis roughing reserve. Unsigned, negative sign is invalid
R(d): Roughing cutting times; Unsigned integer, decimal fraction is invalid (unit:
time)
P (ns): start block line of finishing track
Q(nf): end block line of finishing track
U(△u): reserved finishing amount of X axis. Unsigned, negative sign is invalid
(diameter)
W(△w): reserved finishing amount of Z axis. Unsigned, negative sign is invalid
F: cutting feeding speed during roughing
S: principal axis rotation during roughing
T: tool No., tool offset No. during roughing
- 47 -
Page 52

SALECNC.com
Finishing track(program path) Fast moving Cutting feeding A-B-C: program path
Execution process:
① A→A1: fast moving;
② First roughing cycle: A
A1→B1→C
1: interpolation depends on the mode specified by
1
→B
1
→C
1→A2:
ns→nf block. The
interpolation speed specifies F value according to G73 block, and uses
current default F value if not specified.
C1→A2: fast moving
③ Second roughing cycle: A
A2→B
→C2
2
: interpolation depends on the mode specified by
→B2→C
2
2→A3
ns→nf block. The
interpolation speed specifies F value according to G73 block, and uses
current default F value if not specified.
→Bn→C
n
n→A
ns→nf block. The
④ The n
An→Bn→C
C2→A3: fast moving
th
roughing cycle: A
n: interpolation depends on the mode specified by
interpolation speed specifies F value according to G73 block, and uses
current default F value if not specified.
Cn→A: fast moving. Roughing cycle ends.
Function description:
1) ns-nf block must follow G73 block. The system won’t execute the block written between
G73 block and ns block
2) The F value in G73 block is valid during G73 roughing cycle. If the F value isn’t specified
in G73 block, execute according to current default value. The F value in ns-nf block is
valid while executing G70.
3) The compensation function is valid when the G73 instruction is executed in tool tip radius
compensation, but the tool initial point in G73 cycle is the position where tool tip radius
compensation function is canceled temporarily.
4) In single block operation, the system stops at the end position of every block; the pause and
resetting operation are valid during the motion.
5) If the combined cycle instruction should be used several times in the same program, ns~nf
can’t have same block No., or else the ns~nf profile may have error when the next
- 48 -
combined cycle instruction is executed.
Page 53

SALECNC.com
Condition
Result
X axis of C (nf block) > X axis of B (ns block); Z axis of C > Z axis of B
①
X axis of C (nf block) > X axis of B (ns block); Z axis of C < Z axis of B
②
X axis of C (nf block) < X axis of B (ns block); Z axis of C > Z axis of B
③
X axis of C (nf block) < X axis of B (ns block); Z axis of C < Z axis of B
④
X axis of C (nf block) = X axis of B (ns block) or
Z axis of C (nf block) = Z axis of B (ns block)
Generate
error
alarm
6) Before executing G73, the tool must specify the position of the initial point first, which
must be out of the program path limit range, or else the system alarms. If the position of the
initial point isn’t specified, the current point is the initial point.
7) The outside range of the program path is defined as below
This quadrant is the outside range of the program path
8) The offset direction of roughing depends on ns~nf program path (the processing path
program is A→B→C)
- 49 -
Page 54

B: block line ns C: block line nf
B’-C’: offset path
Related parameters and notice:
1) △i can be set with parameter (116-G73 X axis margin), or modify parameter setting
with program instruction; if △i is smaller than △u, the system alarms.
2) △k can be set with parameter (117-G73 Z axis margin), or modify parameter setting
with program instruction; if △k is smaller than △w, the system alarms.
3) D can be set with parameter (120-G73 cycle times), or modify parameter setting with
program instruction; if d is non-integer larger than 1, the system only calculates the
integer, if d is smaller than 1, the system calculates as 1.
4) The system alarms if ns and nf aren’t specified.
5) △u can be set with parameter (118-G73 X axis finishing margin), or modify
parameter setting with program instruction; if
finishing.
6) △w can be set with parameter (119-G73 Z axis finishing margin), or modify
parameter setting with program instruction; if △w is 0, Z axis doesn’t reserve for
finishing.
7) In ns-nf block, the size of X axis and Z axis must change one-way (constantly increase
or decrease), or else the system alarms.
8) ns-nf block only contains the following instructions: G00, G01, G02, G03, G04; can’t
include the following M functions: M00, M30, M98, M99, or else the system alarms.
9) ns block only can be G00 or G01 instruction, or else the system alarms.
10) G73 instruction can’t be executed in MDI mode, or else the system alarms.
- 50 -
△u is 0, X axis doesn’t reserve for
Page 55

O7301
M03S500T0101
G00X25Z5
G73U5W5R5F500
G73P10Q20U0.2W0.2
N10G0X1Z-0.5R0.5F300
X5Z-5
X10
Z-10
G03X15W-2.5R2.5
G1Z-15
N20G2X20W-2.5R2.5F200
G70P10Q20
G0X20
Z5
M30
G73 processing example programming
%
Fig. 3-11-8
- 51 -
Page 56

3.6.4. Finishing cycle G70
Instruction format:G70 P(ns) Q(nf);
P(ns): the number of the first block of the finishing track;
Q(nf): the number of the last block of the finishing track;
Instruction function: the tool starts finishing from the start position along the workpiece
finishing track specified by ns~nf block. After G71, G72 or G73 roughing,
finish with G70 instruction, and complete the cutting of finishing margin in one
time. After G70 cycle, the tool returns to the start point and executes the next
block after G70.
G70 instruction track depends on the programming track of ns~nf block. The relationship of
ns and nf in G70~g73 block is as follow:
, , , , , , , ,
G71/G72/G73 ……;
N(ns) , , , , , ,
, , , , , , , ,
·
F_
·
S_
·
T_ Finishing path block
·
·
N(nf) … … …
G70 P(ns) Q(nf) ;
Note:
● F, S and T instructions in ns~nf block are valid when executing G70;
● While executing G70 instruction, it is possible to stop automatic running and move
manually; however, when G70 cycle is executed again, it is required to return to the
position before manual movement. If not, it will continue the execution and following
running track will be dislocated.
● ns~nf block can’t have the following instructions:
Other group oo G instructions except G04 (pause);
Other group 01 instruction except G00, G01, G02 and G03;
Subroutine calling instruction (e.g. M98/M99).
3.6.5. Axial grooving multi-cycle G74
Instruction format: G74 R (e);
G74 X/U _ Z/W_ P(Δi) Q(Δk) R(Δd) F_ ;
R(e ): axial (Z axis) tool retreating, unsigned
X/U: groove end coordinates (X is absolute coordinates, and U is the increment from
current coordinates to point coordinates)
Z/W: groove end coordinates (Z is absolute coordinates and W is the increment from
current coordinates to point coordinates)
- 52 -
Page 57

P(Δi): single radial (X axis) offset of the tool, radius, unsigned. Offset direction is
same to the radial direction of the end coordinates.
Q(Δk): single axial (Z axis) feeding of the tool, unsigned. Feeding direction is same to
the axial direction of the end coordinates.
R(Δd): radial (X axis) tool retreating after cutting to the groove bottom, unsigned. The
retreating direction is opposite to the radial offset direction.
F: axial grooving cycle feeding speed
A1 start point Bn end point
Execution process:
① First grooving cycle: A
A1→B1: axially feed to point B1 in pecking style; B1→C1→D1→A2: fast moving (the
cycle B1→C1 doesn’t have tool retreating action)
② Second grooving cycle: A
A2→B2: axially feed to point B2 in pecking style; B2→C2→D2→A3: fast moving.
③ The n
An→Bn: axially feed to point Bn in pecking style; Bn→Cn→Dn→A1: fast moving. G74 grooving
th
grooving cycle: A
cycle ends
Function description:
1) The position of thee cutting start (A1) should be specified before grooving cycle, or else the system
takes current point as the cutting start.
2) In the first grooving cycle, the tool isn’t retreated in radial direction when cut to the
groove bottom (B1)
3) If X/U isn’t specified or movement is 0, the system considers P(Δi) as 0 no matter
whether P(Δi) is specified. In this case, only Z axis acts and cuts to groove end, and the
tool isn’t retreated in radial direction.
4) Pecking style tool feeding cycle
1
→B1→C
→B2→C
2
→Bn→C
n
1→D1→A2
2→D2→A3
n→Dn→A1
- 53 -
Page 58

A1 start B1 end point
Related parameters and notice:
1) If e is 0, the system doesn’t have axial tool retreating action.
2) The system alarms if Z/W isn’t specified or the movement is 0.
3) The system alarms if X/U is specified but P(Δi) is larger than X axis movement (U/2). If
P(Δi) is specified to 0, it can be used for axial cycle drilling.
4) If Δk is 0 or larger than entire groove depth (W), the system reports error.
5) If Δd is 0, the tool isn’t retreated in radial direction; if Δd is larger than Δi, the system
reports error.
G74 processing example: Fig. 3-11-10
O7401
G00X100Z20
M03S800T0101
G01X60Z2
G74R3
G74X20Z-15P2Q5R1F500
G00X100Z20
M30
%
Fig. 3-11-10
- 54 -
Page 59

3.6.6. Radial grooving multi-cycle G75
Instruction format: G75 R(e ) ;
G75 X/U _ Z/W_ P(Δi) Q(Δk) R(Δd) F_ ;
R(e ): radial (X axis) tool retreating, radius, unsigned
X/U: groove end coordinates (X is absolute coordinates, and U is the increment from
current coordinates to point coordinates)
Z/W: groove end coordinates (Z is absolute coordinates and W is the increment from
current coordinates to point coordinates)
P(Δi): single radial tool feeding, unsigned, radius. Feeding direction is same to the
radial direction of the end coordinates.
Q(Δk): axial offset of the tool, unsigned. Offset direction is same to the axial direction
of the end coordinates.
R(Δd): axial (Z) tool retreating after cutting to the groove end, unsigned. The
retreating direction is opposite to the axial offset direction of the tool.
F: axial grooving cycle feeding speed
Start point
Execution process:
① First grooving cycle: A
A1→B1: radially feed to point B1 in pecking style; B1→C1→D1→A2: fast moving (the
cycle B1→C1 doesn’t have tool retreating action)
② Second grooving cycle: A
A2→B2: radially feed to point B2 in pecking style; B2→C2→D2→A3: fast moving.
③ The n
An→Bn: radially feed to point Bn in pecking style; Bn→Cn→Dn→A1: fast moving. G75 grooving
th
grooving cycle: A
cycle ends
→B1→C
1
→B2→C
2
→Bn→C
n
1→D1→A2
2→D2→A3
n→Dn→A1
- 55 -
Page 60

Function description:
1) The position of thee cutting start (A1) should be specified before grooving cycle, or else the system takes
current point as the cutting start.
2) In the first grooving cycle, the tool isn’t retreated in axial direction when cut to the groove
bottom (B1)
3) If Z/W isn’t specified or movement is 0, the system considers Q(Δk) as 0 no matter whether
Q(Δk) is specified. In this case, only X axis acts and cuts to groove end, and the tool isn’t
retreated in axial direction.
4) Pecking style tool feeding cycle
B1 end point A1 start point
Related parameters and notice:
1) If e is 0, the system doesn’t have radial tool retreating action.
2) The system reports error if X/U isn’t specified or the movement is 0.
3) If Δi is 0 or larger than entire groove depth (U/2), the system reports error.
4) The system reports error if Z/W is specified but Δk is larger than z axis movement
(W). If Δk is 0, it can be used for radial cycle drilling
5) If Δd is 0, the tool isn’t retreated in axial direction; if Δd is larger than Δk, the
system reports error.
G75 processing example: Fig. 3-11-12
O7501
Fig. 3-11-12 G75 Instruction Cutting Diagrma
G00X100Z0
M03S800T0101
G01X80Z-10
G75R3
G75X30Z-30P5Q2R1F500
G00X100Z20
M30
- 56 -
Page 61

SALECNC.com
4. CNC Process Knowledge
1. What is the content of CNC programming?
A: Analyze part drawing, determine process and path, calculate the coordinates of tool track, write
processing program, enter programs into CNC system, check the program, cut for testing, etc.
2. What is the objective of CNC processing analysis? And the content?
A: To process parts on the CNC machine tool, it is required to analyze and treat the process
according to part drawing, create CNC process, and then prepare processing program. The entire
process is automatic. The content includes machine tool cutting amount, work step arrangement,
feeding path, processing margin, tool size and model, etc.
3. What is tool setting point? What is the influence of tool setting point selection to programming?
A: Tool setting point is the start point of the tool relative to workpiece motion during CNC
processing. This start point is also the program start of programming. If the tool setting point is
selected properly, it is convenient for mathematic processing and programming; easy to align on the
machine tool; convenient for checking and reduce processing error during processing.
4. What are machine tool coordinate system and workpiece coordinate system? And their
differences?
A: Machine tool coordinate system is also called mechanical coordinate system, which is the
feeding coordinate system of the moving parts of the machine tool, and the coordinate axes and
direction are standard. The coordinate origin is set by the manufacturer, and is called machine tool
(or part) origin. Workpiece coordinate system is calso called as programming coordinate system,
which is used for programming.
5. Please simply describe the tool position, tool change point and workpiece coordinate origin.
A: Tool position point is the reference point to confirm the tool position. If the CNC machine tool
with multi-tool processing needs to change tool during processing, it is also required to set a tool
change point during programming. Tool change point is the reference point to change tool position.
The positions of tool change points shouldn’t interfere with each other. The origin of workpiece
coordinate system is also workpiece home or programming home; the position is set by the
programmer at the design and process reference position of the workpiece for size calculation.
6. What is the effect of tool compensation and what are compensation instructions?
A: Tool compensation usually includes length compensation and radius compensation. Tool length
compensation can be tool length compensation or position compensation. With tool radius
compensation: execute roughing and finishing with the tool of same program and same size;
program with part profile directly to avoid calculating tool center track; if the diameter is changed
due to tool abrasion or change, it doesn’t need to modify the program, and only needs to enter the
value of tool radius change in tool parameter setting state; with tool compensation function, use
same program to process the internal and external profiles of same nominal size.
7. What is separated roughing and finishing? And the advantages?
A: When determine the part processing flow, the roughing and finishing should be executed
separately, execute the finishing after the roughing of every surface, and do not execute both
roughing and finishing on the machine tool, which is called separated roughing and finishing. This
- 57 -
Page 62

SALECNC.com
processing allows using the machine tool reasonably, making the distortion and error produced in
roughing be modified in finishing, to improve processing precision; in addition, it also finding crack,
pore and other defects in advance and stop the processing in time.
8. What is the advantage of installing workpiece with clamps?
A: Since the positioning components of the clamp and the relative position of the tool and machine
tool motion can be adjusted in advance, using clamp when processing parts is fast and convenient,
and has high repeat precision, which can ensure the processing requirement of the workpiece.
9. What is the advantage of selecting refined reference according to the principle of unified
reference?
A: The refined reference selected in this principle can be used for the processing of multi-surface
and multi-process, reduce the error due to reference change and improve the processing precision.
In addition, it also can reduce the types of clamp and the workload in clamp design.
10. What is the principle to confirm the direction of clamping force?
A: (1) The direction of clamping force doesn’t destroy the accuracy of workpiece positioning.
(2) The direction of clamping force should minimize the force.
(3) The direction of clamping force should minimize the workpiece distortion.
11. What are the factors that cause principal axis rotation error?
A: Concentricity between over-bearing holes of the bearings, verticality between shell hole
positioning face and the axis, bearing clearance, roundness of the bearing raceway, size and shape
error of the roller, beating of locking nut end, etc.
12. What are the bad results if the beating of the principal axis shoulder bearing surface exceeds the
tolerance?
A: In this case, the holes bored through principal axis feeding and reference surface tilt. In addition,
if the cutter wears due to principal axis feeding is uneven and the wear of some blades speeds up,
tool use is not economical.
13. How the materials difficult process are measured?
A: The materials difficult to process are measured in quality of processed surfaces, chip formation
and difficulty of discharge. If one of above three aspects is poor obviously, the material is difficult
to process.
14. What are the cutting characteristics of materials difficult to process?
A: In the following five aspects:
1) Since the materials difficult to process have low thermal conductivity and high thermal
strength, the cutting temperature is high;
2) The chip distortion has large factor, and the hardening is serious;
3) The materials usually have high strength and thermal strength, and thus the cutting force
is large;
4) Cutter wear soon, and thus the durability is low;
5) Chip rolling, breaking and discharging are difficult.
15. What improvement measures should be taken to cut the materials difficult to process?
A: The following improvement measures should be taken:
- 58 -
Page 63

SALECNC.com
1) Select appropriate tool material with good cutting performance;
2) Select reasonable tool geometric parameters;
3) Use proper cutting liquid;
4) Select reasonable cutting amount.
5)
16. What are the advantages of using indexable carbide blade?
A: Have the following advantages:
1) Since the blade isn’t welded and doesn’t require grinding during usage, it will avoid
internal stress and crack due to welding and grinding and improve the tool durability.
2) The tool is used for long time, and it will avoid internal stress and crack due to welding
and grinding and improve the tool durability.
3) The tool can be used for long time, therefore it will not only reduce the tool material, but
also reduce the labor and equipment required to manufacture and grind the tool.
4) If the tool is blunt, you can just rotate the blade to continue using, and thus shorten the
time in tool change, tool setting, etc.
5) It is convenient to recycle when the blade is blunt, reduce tool material consumption and
reduce the cost.
17. What is size reference?
A: The start size is the size reference.
18. How to sselect reference while drawing?
A: The design reference, process reference and measurement reference should be unified, so as to
reduce error and convenient for measurement and checking.
19. What is metal cutting process?
A: While cutting, under the impact of cutting blade and tool face, the metal being cut slipd and
becomes chips.
20. What are the influences of cutting amount on cutting force?
A: (1) When cutting depth ap and feeding amount f increase, cutting force increases; it known from
the cutting force calculation formula FZ=150apf0.75 that if the cutting depth increases by one
time, main cutting force FZ increases by one time; if the feeding amount increases by one time,
the main cutting force FZ increases by 70% (chip thickness increases and chip distortion
decreases due to the increase of feeding amount, and therefore the cutting force must be
lower).
(2) When cut plastic metal, the cutting force usually decreases along with the increase of
cutting speed; when cut brittle metal, cutting speed doesn’t have much influence on cutting
force.
21. What are the materials of tool cutter?
A: At present, the tool materials include metal and non-metal materials: metal materials include
carbon tool steel, alloy tool steel and high-speed carbide. Non-metallic materials include synthetic
diamond and cubic boron nitride ceramics, in which the hard red performance of carbon tool steel
and alloy tool steel is low (about 200 to 400°C), and are rarely used to make tools.
- 59 -
Page 64

SALECNC.com
22. What are the influences of cutting amount on cutting temperature?
A: If cutting speed increases by one time, the cutting temperature increases about 30%-40%; if the
feeding amount increases by one time, the cutting temperature only increases 15%-20%; if the
cutting depth increases by one time, the cutting temperature only increases 5%-8%.
23. What is process dimension chain?
A: The connected dimensions are arranged into closed dimension drawing, which is the dimension
chain; the dimension chain applied in the processing is called process dimension chain.
24. What is positioning error?
A: The position error of the processing surface relative to process reference due to workpiece
positioning is called positioning error.
25. What are the errors may be generated in the processing?
A: The errors in the processing might be principle, clamp installation, machine tool, clamp
precision, process system distortion, worepiece residual stress, tool and measurement.
26. What is the objective of using clamp in machinery manufacture?
A: In machinery manufacturing, the objective of using clamp is to ensure product quality, improve
labor productivity, solve the special difficulty in lathe processing, expand the processing range of
the machine tool, and reduce the technical requirement on workers.
27. What spindles are used if the workpiece is positioned with internal hole?
A: Commonly used spindles include cylindrical, small taper, cone, thread, and splined spindles.
28. What are the effects of positioning device and clamping device?
A: The effect of the positioning device is to confirm the position of the workpiece in the clamp,
making the workpiece in the proper position relative to tool and cutting motion during processing.
The effect of the clamp device is to clamp the workpiece, ensuring that the given position of the
workpiece in the clamp won’t change during processing.
29. What is repeat positioning? What is partial positioning?
A: The positioning points are more than the degrees of freedom that should be limited, indicating
that certain positioning points limit same degree of freedom, which is called repeat positioning.
30. What are machine tool errors? What are their main influences on the quality of workpiece?
A: Machine tool errors include:
1) The error between machine tool principal axis and bearing due to manufacture and wear;
It has bad influences on roundness, flatness and surface roughness of the workpiece.
2) The error due to machine tool rail wear, which will causse error in the straightness of
cylinder.
3) Machine tool transmission error: it destroies proper motion relationship and cause pitch
error.
4) Machine tool installation position error, e.g. parallel error of guide rail and principal axis
installation, which will cause taper error in processed cylinder.
31. What are geometric accuracy and work precision of the lathe?
- 60 -
Page 65

SALECNC.com
A: Geometric accuracy of the machine tool refers to the geometric shape accuracy of the basic parts
of the machine tool, geometric accuracy of relative position, and geometric accuracy of the relative
motion. The work precision of the machine tool is the precision of the machine tool in motion
state and under the effect of the cutting force. The precision of the machine tool in work state is
reflected on the precision of the processed parts.
32. What are the conditions of ribbon cutting?
A: When process plastic metal materials, the cutting speed is high, cutting thickness is low, cutting
angle is large, the slide amount of the chips is low, haven’t destroyed the materials, and thus form
ribbon chips.
33. What is the important meaning of process analysis?
A: Appropriate process analysis has important meaning to ensure processing quality, improve
productivity, reduce production cost, reduce labor strength and make reasonable process
regulations.
34. What are design reference and process reference (including assembly reference, positioning
reference, measurement reference and procedure reference)?
A: (1) Design reference is the reference on the part drawing to determine the positions of other
points, lines and surfaces.
(2) Process reference is the reference of the parts used in processing and assembly. According
to the purpose, it is divided into assembly reference, measurement reference, positioning
reference and procedure reference.
1) Assembly reference is used to confirm the position of the part in component and product
during assembly.
2) The measurement reference is used to measure the size and position of processed surface.
3) The positioning reference is used to make the workpiece occupy the proper position in
machine tool or clamp during processing.
4) Procedure reference is used to confirm the size, shape and position precision of the
35. What is the reason of positioning error? How to calculate?
A: When a batch of workpieces are processed in clamp, the reasons for errors in processing size
might be:
The sum of above errors is positioning error, resulting in the formula ÑD=ÑY +ÑB. The
positioning reference displacement error and reference noncoincidence error that cause positioning
error also include many elements respectively in calculation. For example, in addition to the
clearance in NY, the geometric shape and position error of clamp positioning component
(verticality, coincidence degree) also have influence on reference displacement.
processed surface on the procedure drawing.
1) The maximum displacement of same batch of workpieces along the direction of processing
size caused by the size and geometric shape error of the positioning reference and the
clearance between the positioning reference and positioning components is called positioning
reference displacement error, which is expressed in NY.
2) The displacement of the size of same batch workpieces relative to procedure reference
caused by noncoincidence between procedure reference and positioning reference is called
reference noncoincidence error, which is expressed in ÑB.
- 61 -
 Loading...