

Page 1

Adobe® Photoshop® Lightroom® CC and
Lightroom® 6
Help
Page 2

Legal notices
Legal notices
For legal notices, see http://help.adobe.com/en_US/legalnotices/index.html.
Last updated 4/20/2015
Page 3

Contents
Chapter 1: What's new
New features summary . . . . . . . . . . . . . . . . . . . . . . . . . . . . . . . . . . . . . . . . . . . . . . . . . . . . . . . . . . . . . . . . . . . . . . . . . . . . . . . . . . . . . . . . . . . . . . . . .1
Chapter 2: Lightroom on mobile
Work with Lightroom on mobile . . . . . . . . . . . . . . . . . . . . . . . . . . . . . . . . . . . . . . . . . . . . . . . . . . . . . . . . . . . . . . . . . . . . . . . . . . . . . . . . . . . . . . . .7
Syncing Lightroom - Desktop and the Mobile app . . . . . . . . . . . . . . . . . . . . . . . . . . . . . . . . . . . . . . . . . . . . . . . . . . . . . . . . . . . . . . . . . . . . . 22
Chapter 3: Workflows
How to manage all your photos with Lightroom . . . . . . . . . . . . . . . . . . . . . . . . . . . . . . . . . . . . . . . . . . . . . . . . . . . . . . . . . . . . . . . . . . . . . . . 25
Import photos from a camera or card reader . . . . . . . . . . . . . . . . . . . . . . . . . . . . . . . . . . . . . . . . . . . . . . . . . . . . . . . . . . . . . . . . . . . . . . . . . . 25
Smart Previews . . . . . . . . . . . . . . . . . . . . . . . . . . . . . . . . . . . . . . . . . . . . . . . . . . . . . . . . . . . . . . . . . . . . . . . . . . . . . . . . . . . . . . . . . . . . . . . . . . . . . . . 28
Viewing and organizing photos in the Library module . . . . . . . . . . . . . . . . . . . . . . . . . . . . . . . . . . . . . . . . . . . . . . . . . . . . . . . . . . . . . . . . . 29
Editing photos in the Develop module . . . . . . . . . . . . . . . . . . . . . . . . . . . . . . . . . . . . . . . . . . . . . . . . . . . . . . . . . . . . . . . . . . . . . . . . . . . . . . . . 35
Export photos from Lightroom . . . . . . . . . . . . . . . . . . . . . . . . . . . . . . . . . . . . . . . . . . . . . . . . . . . . . . . . . . . . . . . . . . . . . . . . . . . . . . . . . . . . . . . . 38
Edit Lightroom photos in Photoshop or Photoshop Elements . . . . . . . . . . . . . . . . . . . . . . . . . . . . . . . . . . . . . . . . . . . . . . . . . . . . . . . . . . 40
Print photos from Lightroom . . . . . . . . . . . . . . . . . . . . . . . . . . . . . . . . . . . . . . . . . . . . . . . . . . . . . . . . . . . . . . . . . . . . . . . . . . . . . . . . . . . . . . . . . 42
Create web galleries in Lightroom . . . . . . . . . . . . . . . . . . . . . . . . . . . . . . . . . . . . . . . . . . . . . . . . . . . . . . . . . . . . . . . . . . . . . . . . . . . . . . . . . . . . . 45
Create slideshows in Lightroom . . . . . . . . . . . . . . . . . . . . . . . . . . . . . . . . . . . . . . . . . . . . . . . . . . . . . . . . . . . . . . . . . . . . . . . . . . . . . . . . . . . . . . . 49
iii
Chapter 4: Workspace
Workspace basics . . . . . . . . . . . . . . . . . . . . . . . . . . . . . . . . . . . . . . . . . . . . . . . . . . . . . . . . . . . . . . . . . . . . . . . . . . . . . . . . . . . . . . . . . . . . . . . . . . . . . 52
Setting preferences for working in Lightroom . . . . . . . . . . . . . . . . . . . . . . . . . . . . . . . . . . . . . . . . . . . . . . . . . . . . . . . . . . . . . . . . . . . . . . . . . 55
Displaying the Library on a second monitor . . . . . . . . . . . . . . . . . . . . . . . . . . . . . . . . . . . . . . . . . . . . . . . . . . . . . . . . . . . . . . . . . . . . . . . . . . . 56
Personalizing identity plates andmodule buttons . . . . . . . . . . . . . . . . . . . . . . . . . . . . . . . . . . . . . . . . . . . . . . . . . . . . . . . . . . . . . . . . . . . . . . 58
Using the Watermark Editor . . . . . . . . . . . . . . . . . . . . . . . . . . . . . . . . . . . . . . . . . . . . . . . . . . . . . . . . . . . . . . . . . . . . . . . . . . . . . . . . . . . . . . . . . . . 58
Color management . . . . . . . . . . . . . . . . . . . . . . . . . . . . . . . . . . . . . . . . . . . . . . . . . . . . . . . . . . . . . . . . . . . . . . . . . . . . . . . . . . . . . . . . . . . . . . . . . . . 59
Chapter 5: Importing photos
Import photos from a folder on a hard drive . . . . . . . . . . . . . . . . . . . . . . . . . . . . . . . . . . . . . . . . . . . . . . . . . . . . . . . . . . . . . . . . . . . . . . . . . . . 63
Import photos from a tethered camera . . . . . . . . . . . . . . . . . . . . . . . . . . . . . . . . . . . . . . . . . . . . . . . . . . . . . . . . . . . . . . . . . . . . . . . . . . . . . . . . 66
Import photos from iPhoto (Mac OS) . . . . . . . . . . . . . . . . . . . . . . . . . . . . . . . . . . . . . . . . . . . . . . . . . . . . . . . . . . . . . . . . . . . . . . . . . . . . . . . . . . 67
Import photos from other catalogs . . . . . . . . . . . . . . . . . . . . . . . . . . . . . . . . . . . . . . . . . . . . . . . . . . . . . . . . . . . . . . . . . . . . . . . . . . . . . . . . . . . . 67
Specify import options . . . . . . . . . . . . . . . . . . . . . . . . . . . . . . . . . . . . . . . . . . . . . . . . . . . . . . . . . . . . . . . . . . . . . . . . . . . . . . . . . . . . . . . . . . . . . . . 68
Set import preferences . . . . . . . . . . . . . . . . . . . . . . . . . . . . . . . . . . . . . . . . . . . . . . . . . . . . . . . . . . . . . . . . . . . . . . . . . . . . . . . . . . . . . . . . . . . . . . . 71
Supported file formats . . . . . . . . . . . . . . . . . . . . . . . . . . . . . . . . . . . . . . . . . . . . . . . . . . . . . . . . . . . . . . . . . . . . . . . . . . . . . . . . . . . . . . . . . . . . . . . . 72
Import photos automatically . . . . . . . . . . . . . . . . . . . . . . . . . . . . . . . . . . . . . . . . . . . . . . . . . . . . . . . . . . . . . . . . . . . . . . . . . . . . . . . . . . . . . . . . . . 73
The Filename Template Editor and Text Template Editor . . . . . . . . . . . . . . . . . . . . . . . . . . . . . . . . . . . . . . . . . . . . . . . . . . . . . . . . . . . . . . . 75
Chapter 6: Viewing photos
View photos . . . . . . . . . . . . . . . . . . . . . . . . . . . . . . . . . . . . . . . . . . . . . . . . . . . . . . . . . . . . . . . . . . . . . . . . . . . . . . . . . . . . . . . . . . . . . . . . . . . . . . . . . . 78
Browse and compare photos . . . . . . . . . . . . . . . . . . . . . . . . . . . . . . . . . . . . . . . . . . . . . . . . . . . . . . . . . . . . . . . . . . . . . . . . . . . . . . . . . . . . . . . . . . 82
Setting Library view options . . . . . . . . . . . . . . . . . . . . . . . . . . . . . . . . . . . . . . . . . . . . . . . . . . . . . . . . . . . . . . . . . . . . . . . . . . . . . . . . . . . . . . . . . . 86
Last updated 4/20/2015
Page 4

PHOTOSHOP LIGHTROOM
Content s
Chapter 7: Managing catalogs and files
How Lightroom catalogs work . . . . . . . . . . . . . . . . . . . . . . . . . . . . . . . . . . . . . . . . . . . . . . . . . . . . . . . . . . . . . . . . . . . . . . . . . . . . . . . . . . . . . . . . 89
Creating and using catalogs . . . . . . . . . . . . . . . . . . . . . . . . . . . . . . . . . . . . . . . . . . . . . . . . . . . . . . . . . . . . . . . . . . . . . . . . . . . . . . . . . . . . . . . . . . 90
Back up a catalog . . . . . . . . . . . . . . . . . . . . . . . . . . . . . . . . . . . . . . . . . . . . . . . . . . . . . . . . . . . . . . . . . . . . . . . . . . . . . . . . . . . . . . . . . . . . . . . . . . . . . 94
Locate missing photos . . . . . . . . . . . . . . . . . . . . . . . . . . . . . . . . . . . . . . . . . . . . . . . . . . . . . . . . . . . . . . . . . . . . . . . . . . . . . . . . . . . . . . . . . . . . . . . . 97
Create and manage folders . . . . . . . . . . . . . . . . . . . . . . . . . . . . . . . . . . . . . . . . . . . . . . . . . . . . . . . . . . . . . . . . . . . . . . . . . . . . . . . . . . . . . . . . . . . 98
Manage photos . . . . . . . . . . . . . . . . . . . . . . . . . . . . . . . . . . . . . . . . . . . . . . . . . . . . . . . . . . . . . . . . . . . . . . . . . . . . . . . . . . . . . . . . . . . . . . . . . . . . . 102
Keep folders in sync . . . . . . . . . . . . . . . . . . . . . . . . . . . . . . . . . . . . . . . . . . . . . . . . . . . . . . . . . . . . . . . . . . . . . . . . . . . . . . . . . . . . . . . . . . . . . . . . . 106
The Volume Browser . . . . . . . . . . . . . . . . . . . . . . . . . . . . . . . . . . . . . . . . . . . . . . . . . . . . . . . . . . . . . . . . . . . . . . . . . . . . . . . . . . . . . . . . . . . . . . . . . 106
Chapter 8: Maps
Work with the Map module . . . . . . . . . . . . . . . . . . . . . . . . . . . . . . . . . . . . . . . . . . . . . . . . . . . . . . . . . . . . . . . . . . . . . . . . . . . . . . . . . . . . . . . . . . 107
Chapter 9: Organizing photos
Face recognition . . . . . . . . . . . . . . . . . . . . . . . . . . . . . . . . . . . . . . . . . . . . . . . . . . . . . . . . . . . . . . . . . . . . . . . . . . . . . . . . . . . . . . . . . . . . . . . . . . . . 110
Photo collections . . . . . . . . . . . . . . . . . . . . . . . . . . . . . . . . . . . . . . . . . . . . . . . . . . . . . . . . . . . . . . . . . . . . . . . . . . . . . . . . . . . . . . . . . . . . . . . . . . . . 114
Grouping photos into stacks . . . . . . . . . . . . . . . . . . . . . . . . . . . . . . . . . . . . . . . . . . . . . . . . . . . . . . . . . . . . . . . . . . . . . . . . . . . . . . . . . . . . . . . . . 119
Flag, label, and rate photos . . . . . . . . . . . . . . . . . . . . . . . . . . . . . . . . . . . . . . . . . . . . . . . . . . . . . . . . . . . . . . . . . . . . . . . . . . . . . . . . . . . . . . . . . . 122
Keywords . . . . . . . . . . . . . . . . . . . . . . . . . . . . . . . . . . . . . . . . . . . . . . . . . . . . . . . . . . . . . . . . . . . . . . . . . . . . . . . . . . . . . . . . . . . . . . . . . . . . . . . . . . . 127
Metadata basics and actions . . . . . . . . . . . . . . . . . . . . . . . . . . . . . . . . . . . . . . . . . . . . . . . . . . . . . . . . . . . . . . . . . . . . . . . . . . . . . . . . . . . . . . . . . 134
Work with video in Lightroom . . . . . . . . . . . . . . . . . . . . . . . . . . . . . . . . . . . . . . . . . . . . . . . . . . . . . . . . . . . . . . . . . . . . . . . . . . . . . . . . . . . . . . . 137
Finding photos in the catalog . . . . . . . . . . . . . . . . . . . . . . . . . . . . . . . . . . . . . . . . . . . . . . . . . . . . . . . . . . . . . . . . . . . . . . . . . . . . . . . . . . . . . . . . 138
Advanced metadata actions . . . . . . . . . . . . . . . . . . . . . . . . . . . . . . . . . . . . . . . . . . . . . . . . . . . . . . . . . . . . . . . . . . . . . . . . . . . . . . . . . . . . . . . . . 142
Using the Quick Develop panel . . . . . . . . . . . . . . . . . . . . . . . . . . . . . . . . . . . . . . . . . . . . . . . . . . . . . . . . . . . . . . . . . . . . . . . . . . . . . . . . . . . . . . 145
iv
Chapter 10: Processing and developing photos
Develop module tools . . . . . . . . . . . . . . . . . . . . . . . . . . . . . . . . . . . . . . . . . . . . . . . . . . . . . . . . . . . . . . . . . . . . . . . . . . . . . . . . . . . . . . . . . . . . . . . 147
Cure red eye and pet eye effects . . . . . . . . . . . . . . . . . . . . . . . . . . . . . . . . . . . . . . . . . . . . . . . . . . . . . . . . . . . . . . . . . . . . . . . . . . . . . . . . . . . . . 152
Create panoramas . . . . . . . . . . . . . . . . . . . . . . . . . . . . . . . . . . . . . . . . . . . . . . . . . . . . . . . . . . . . . . . . . . . . . . . . . . . . . . . . . . . . . . . . . . . . . . . . . . . 154
HDR photo merge . . . . . . . . . . . . . . . . . . . . . . . . . . . . . . . . . . . . . . . . . . . . . . . . . . . . . . . . . . . . . . . . . . . . . . . . . . . . . . . . . . . . . . . . . . . . . . . . . . . 155
Working with image tone and color . . . . . . . . . . . . . . . . . . . . . . . . . . . . . . . . . . . . . . . . . . . . . . . . . . . . . . . . . . . . . . . . . . . . . . . . . . . . . . . . . . 157
Apply local adjustments . . . . . . . . . . . . . . . . . . . . . . . . . . . . . . . . . . . . . . . . . . . . . . . . . . . . . . . . . . . . . . . . . . . . . . . . . . . . . . . . . . . . . . . . . . . . . 165
Retouch photos . . . . . . . . . . . . . . . . . . . . . . . . . . . . . . . . . . . . . . . . . . . . . . . . . . . . . . . . . . . . . . . . . . . . . . . . . . . . . . . . . . . . . . . . . . . . . . . . . . . . . 168
Retouch with the Spot Removal brush . . . . . . . . . . . . . . . . . . . . . . . . . . . . . . . . . . . . . . . . . . . . . . . . . . . . . . . . . . . . . . . . . . . . . . . . . . . . . . . 175
Upright automatic perspective correction | Lightroom 5 . . . . . . . . . . . . . . . . . . . . . . . . . . . . . . . . . . . . . . . . . . . . . . . . . . . . . . . . . . . . . . 176
Enhanced Spot Removal tool | Lightroom 5 . . . . . . . . . . . . . . . . . . . . . . . . . . . . . . . . . . . . . . . . . . . . . . . . . . . . . . . . . . . . . . . . . . . . . . . . . . . 180
Radial Filter | Lightroom 5 . . . . . . . . . . . . . . . . . . . . . . . . . . . . . . . . . . . . . . . . . . . . . . . . . . . . . . . . . . . . . . . . . . . . . . . . . . . . . . . . . . . . . . . . . . . . 183
Develop module options . . . . . . . . . . . . . . . . . . . . . . . . . . . . . . . . . . . . . . . . . . . . . . . . . . . . . . . . . . . . . . . . . . . . . . . . . . . . . . . . . . . . . . . . . . . . 186
Chapter 11: Exporting photos
Export files to disk or CD . . . . . . . . . . . . . . . . . . . . . . . . . . . . . . . . . . . . . . . . . . . . . . . . . . . . . . . . . . . . . . . . . . . . . . . . . . . . . . . . . . . . . . . . . . . . . 191
Post photos online using publish services . . . . . . . . . . . . . . . . . . . . . . . . . . . . . . . . . . . . . . . . . . . . . . . . . . . . . . . . . . . . . . . . . . . . . . . . . . . . 194
Export to Hard Drive using Publish Services . . . . . . . . . . . . . . . . . . . . . . . . . . . . . . . . . . . . . . . . . . . . . . . . . . . . . . . . . . . . . . . . . . . . . . . . . . 200
Presets for export, and other settings . . . . . . . . . . . . . . . . . . . . . . . . . . . . . . . . . . . . . . . . . . . . . . . . . . . . . . . . . . . . . . . . . . . . . . . . . . . . . . . . 201
Chapter 12: External Editors
External editing preferences . . . . . . . . . . . . . . . . . . . . . . . . . . . . . . . . . . . . . . . . . . . . . . . . . . . . . . . . . . . . . . . . . . . . . . . . . . . . . . . . . . . . . . . . . 204
Open Lightroom photos in external applications . . . . . . . . . . . . . . . . . . . . . . . . . . . . . . . . . . . . . . . . . . . . . . . . . . . . . . . . . . . . . . . . . . . . . 205
Last updated 4/20/2015
Page 5

PHOTOSHOP LIGHTROOM
Content s
Chapter 13: Slideshows
Slideshow module panels and tools . . . . . . . . . . . . . . . . . . . . . . . . . . . . . . . . . . . . . . . . . . . . . . . . . . . . . . . . . . . . . . . . . . . . . . . . . . . . . . . . . . 209
Specifying the slide layout . . . . . . . . . . . . . . . . . . . . . . . . . . . . . . . . . . . . . . . . . . . . . . . . . . . . . . . . . . . . . . . . . . . . . . . . . . . . . . . . . . . . . . . . . . . 210
Adding overlays to slides . . . . . . . . . . . . . . . . . . . . . . . . . . . . . . . . . . . . . . . . . . . . . . . . . . . . . . . . . . . . . . . . . . . . . . . . . . . . . . . . . . . . . . . . . . . . 214
Play and export slideshows . . . . . . . . . . . . . . . . . . . . . . . . . . . . . . . . . . . . . . . . . . . . . . . . . . . . . . . . . . . . . . . . . . . . . . . . . . . . . . . . . . . . . . . . . . 218
Chapter 14: Printing photos
Print module basics . . . . . . . . . . . . . . . . . . . . . . . . . . . . . . . . . . . . . . . . . . . . . . . . . . . . . . . . . . . . . . . . . . . . . . . . . . . . . . . . . . . . . . . . . . . . . . . . . 223
Print module layouts and templates . . . . . . . . . . . . . . . . . . . . . . . . . . . . . . . . . . . . . . . . . . . . . . . . . . . . . . . . . . . . . . . . . . . . . . . . . . . . . . . . . . 225
Print job options and settings . . . . . . . . . . . . . . . . . . . . . . . . . . . . . . . . . . . . . . . . . . . . . . . . . . . . . . . . . . . . . . . . . . . . . . . . . . . . . . . . . . . . . . . . 231
Chapter 15: Photo books
Create photo books . . . . . . . . . . . . . . . . . . . . . . . . . . . . . . . . . . . . . . . . . . . . . . . . . . . . . . . . . . . . . . . . . . . . . . . . . . . . . . . . . . . . . . . . . . . . . . . . . 235
Chapter 16: Web galleries
Web module panels and tools . . . . . . . . . . . . . . . . . . . . . . . . . . . . . . . . . . . . . . . . . . . . . . . . . . . . . . . . . . . . . . . . . . . . . . . . . . . . . . . . . . . . . . . 239
Web gallery layouts . . . . . . . . . . . . . . . . . . . . . . . . . . . . . . . . . . . . . . . . . . . . . . . . . . . . . . . . . . . . . . . . . . . . . . . . . . . . . . . . . . . . . . . . . . . . . . . . . . 240
Web gallery templates and settings . . . . . . . . . . . . . . . . . . . . . . . . . . . . . . . . . . . . . . . . . . . . . . . . . . . . . . . . . . . . . . . . . . . . . . . . . . . . . . . . . . 243
Preview, export, and upload web photo galleries . . . . . . . . . . . . . . . . . . . . . . . . . . . . . . . . . . . . . . . . . . . . . . . . . . . . . . . . . . . . . . . . . . . . . 244
v
Chapter 17: Keyboard shortcuts
Keyboard shortcuts . . . . . . . . . . . . . . . . . . . . . . . . . . . . . . . . . . . . . . . . . . . . . . . . . . . . . . . . . . . . . . . . . . . . . . . . . . . . . . . . . . . . . . . . . . . . . . . . . . 247
Last updated 4/20/2015
Page 6
Chapter 1: What's new
New features summary
Adobe Photoshop Lightroom CC/Lightroom 6 rolls out several new features and enhancements that enrich your digital
imaging experience. Read on for a quick introduction and find links to resources that offer more information.
GPU-related enhancements
New in this release of Lightroom
Lightroom now provides a new preference that lets you use your computer's graphics processing unit (GPU). For
optimal performance, many Develop module operations can now make use of the GPU.
Select Preferences > Performance. Now, select Use Graphics Processor.
1
Note: Lightroom requires a GPU with OpenGL 3.3 or later. If you're running Lightroom on Mac OS X, you can use the
GPU on Mac OS X version 10.9 or later.
For more information, see the Lightroom GPU FAQ .
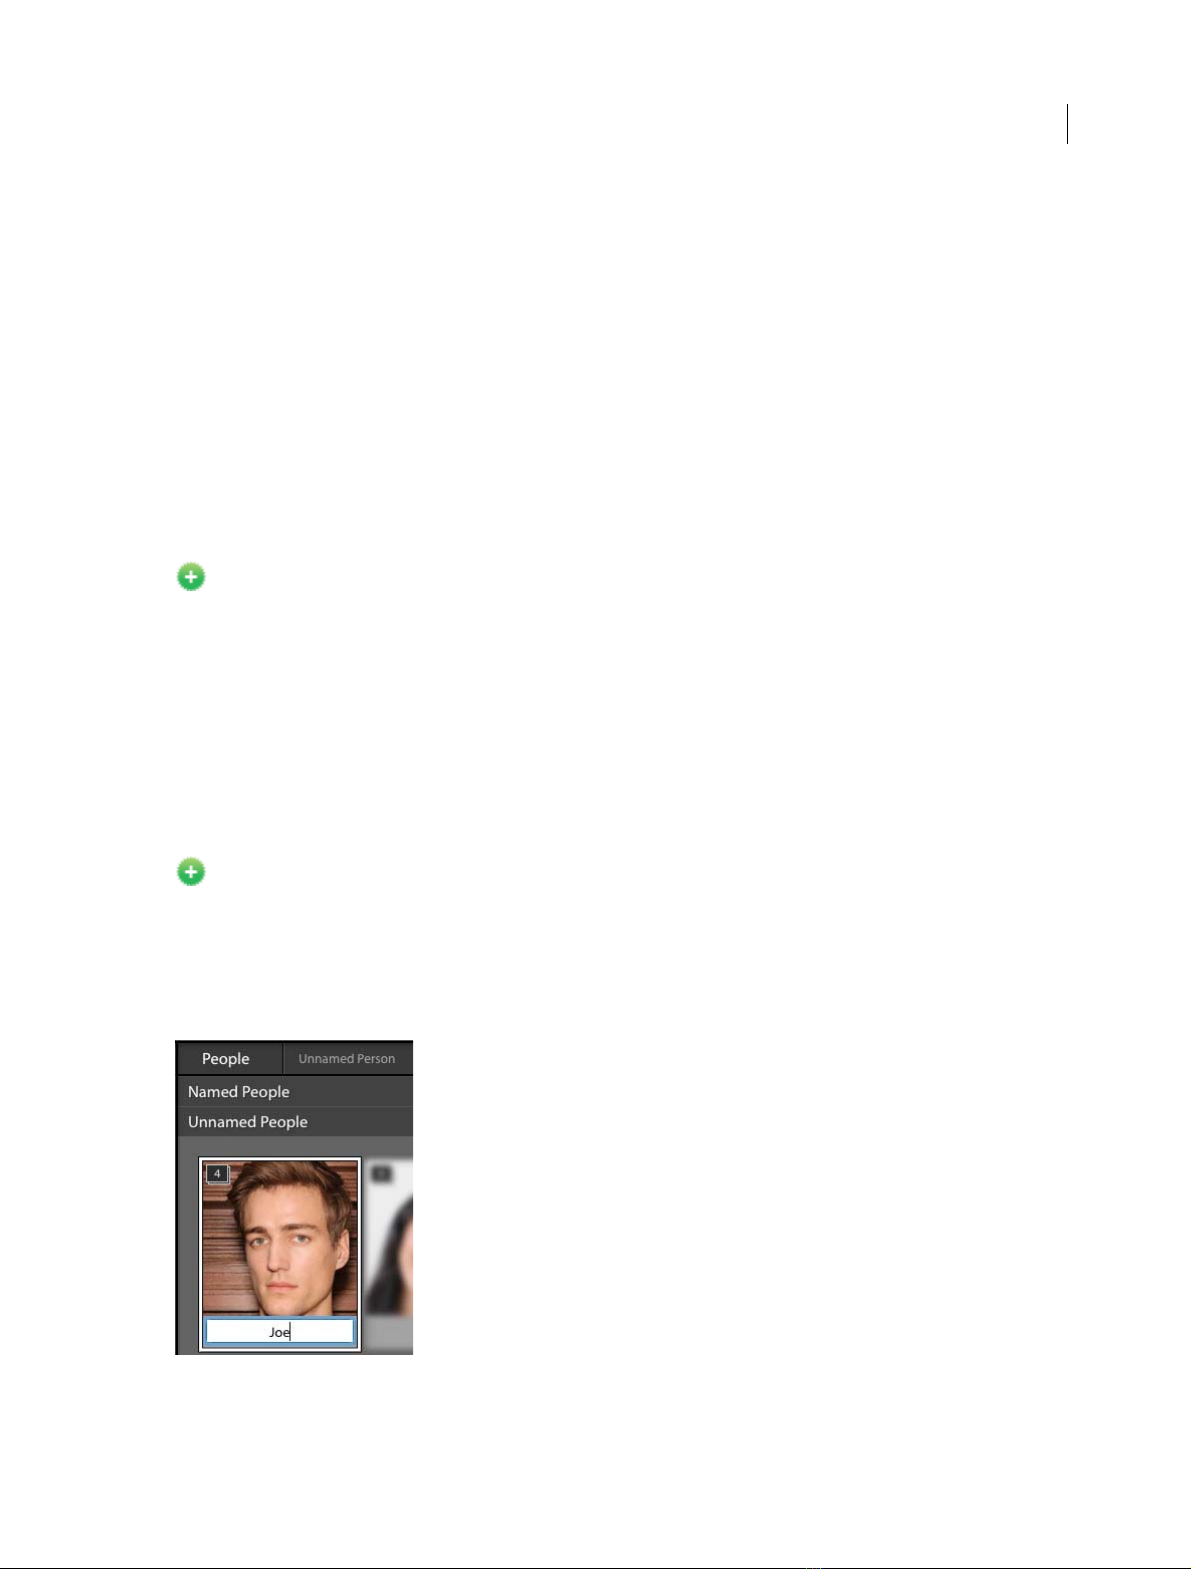
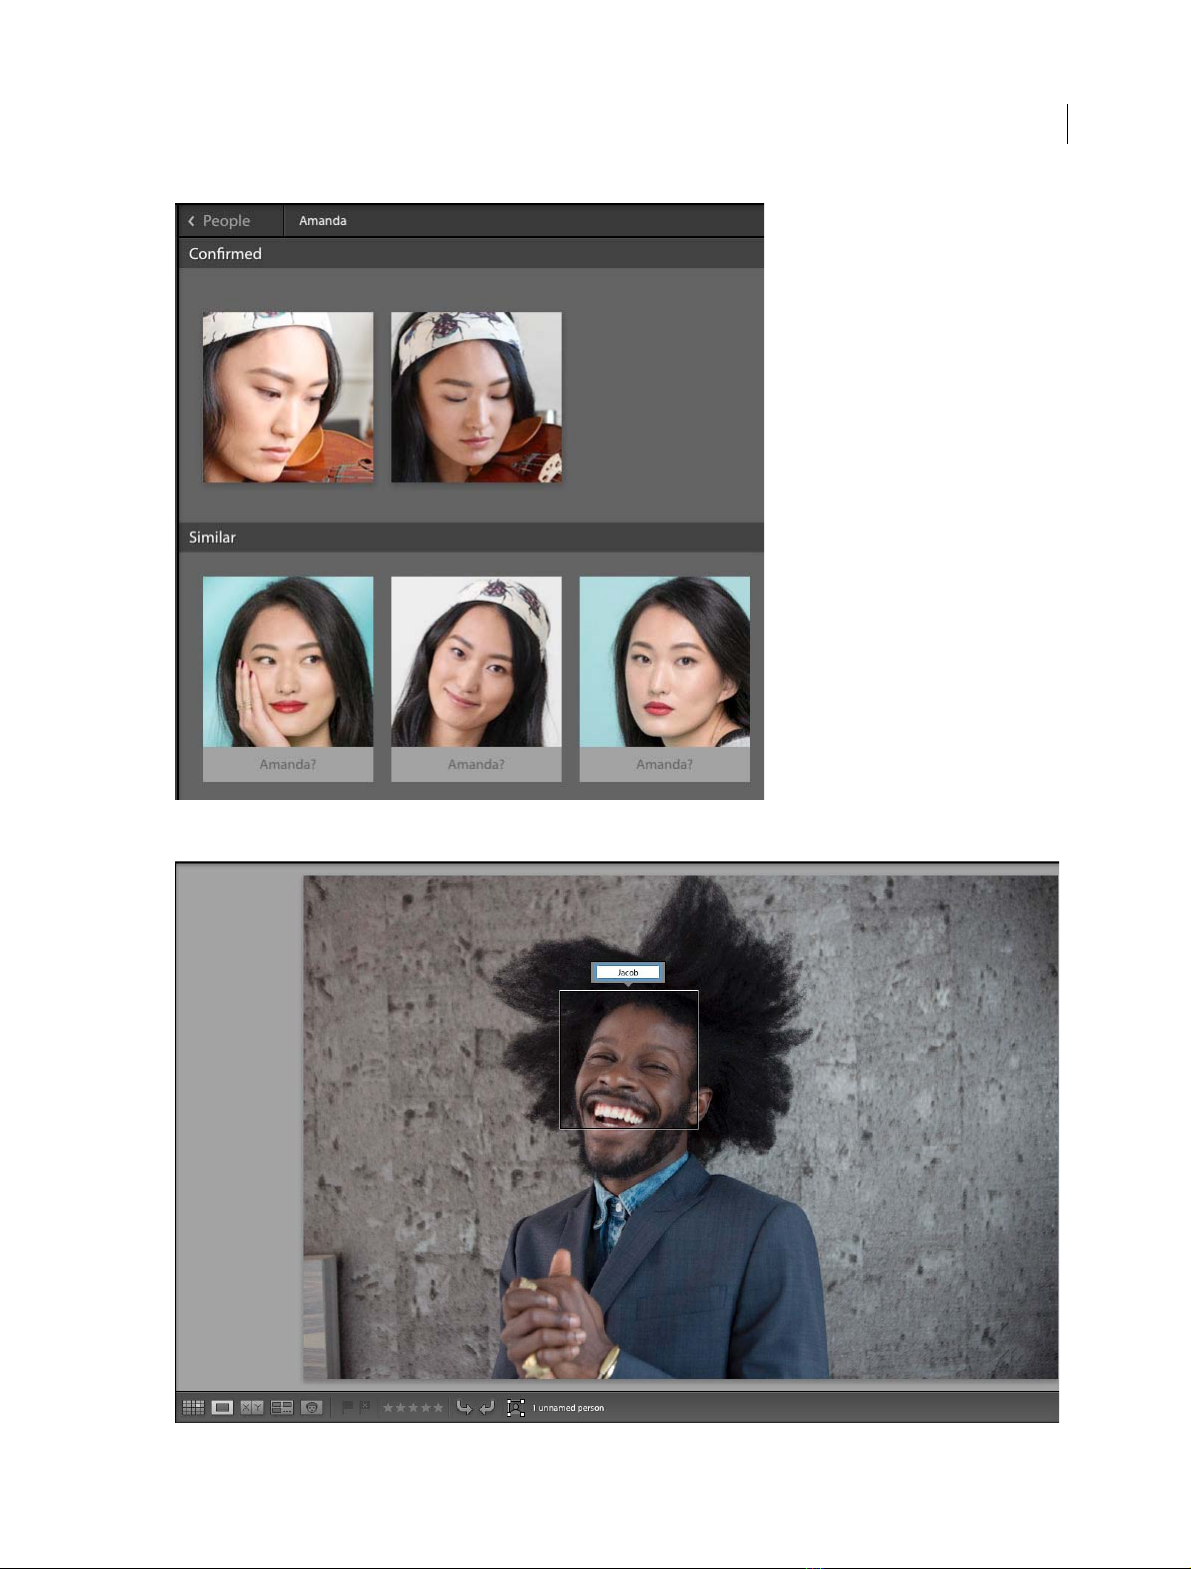
Face recognition
New in this release of Lightroom
Lightroom lets you quickly organize and find images using facial recognition technology. Lightroom scans your image
catalog to find potential faces for your review and confirmation.
In the Library module, switch to the People view. Now, choose to find faces in your catalog.
For more information, see Face recognition.
Last updated 4/20/2015
Page 7
What's new
2
Last updated 4/20/2015
Page 8
What's new
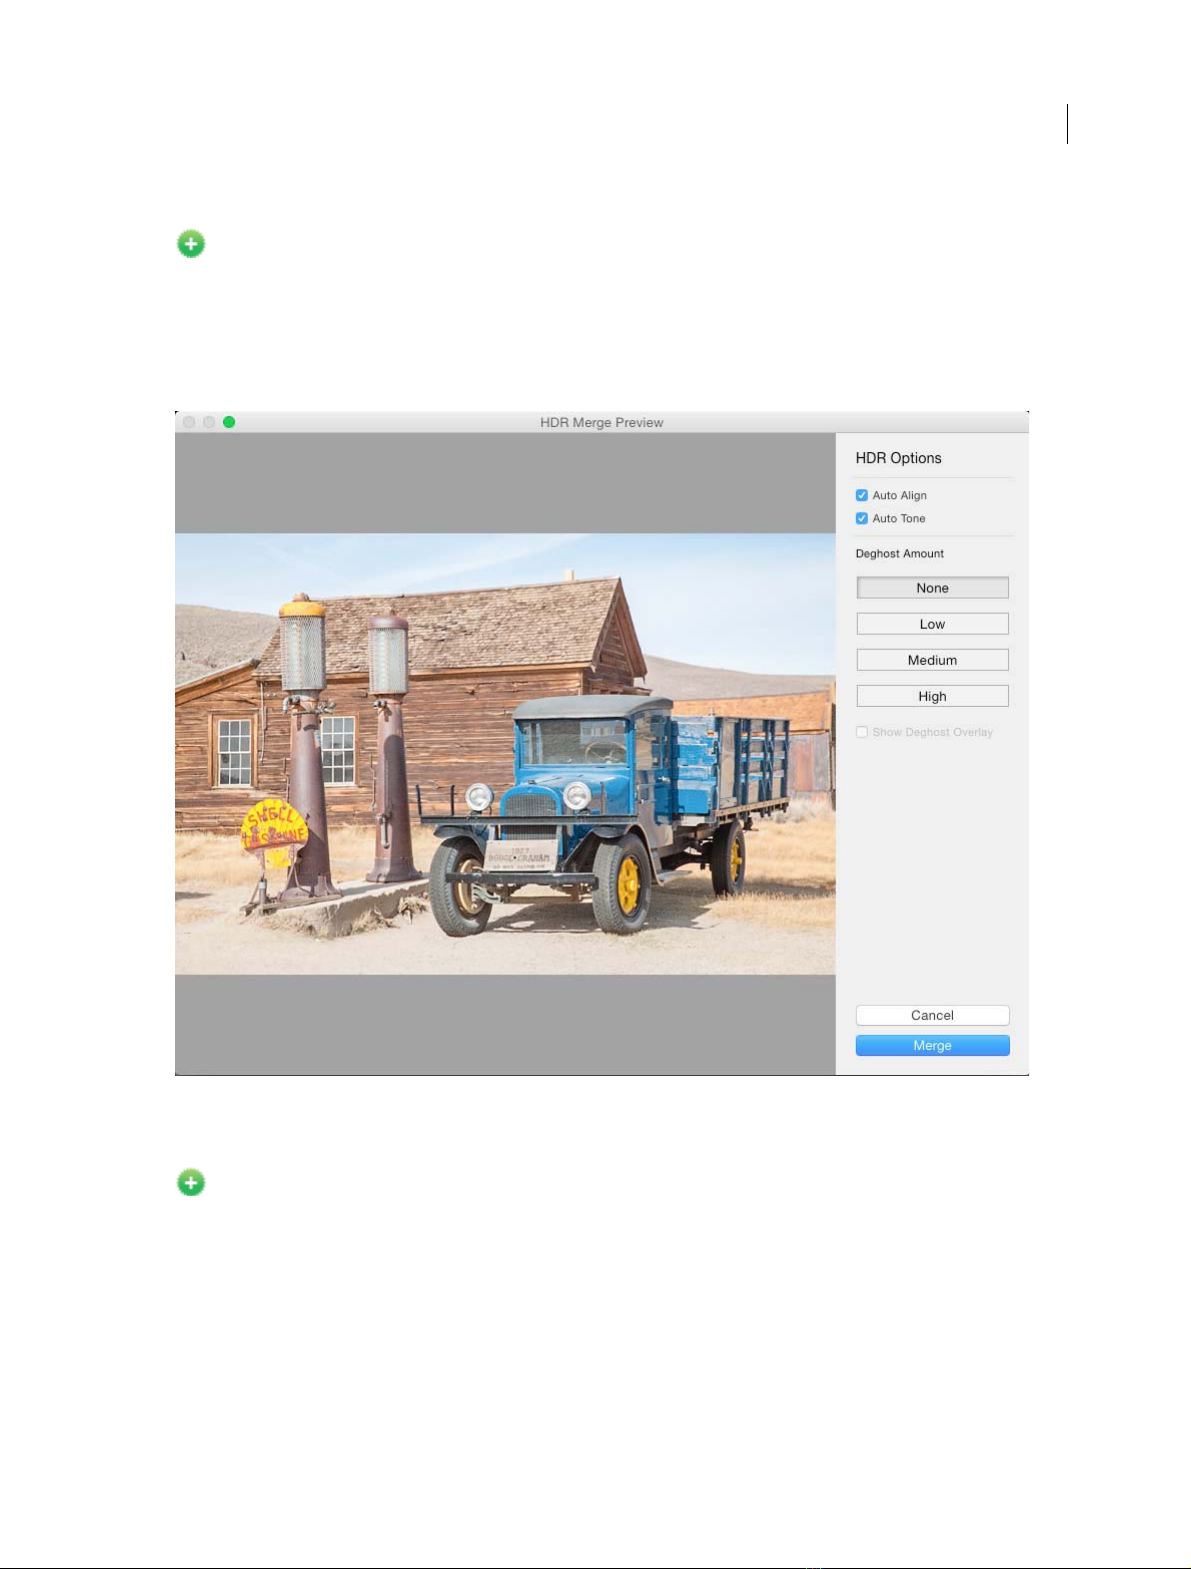
HDR photo merge
New in this release of Lightroom
You can merge multiple exposure-bracketed images into a single HDR image. Lightroom lets you preview the merged
file and adjust the amount of deghosting before adding it as a DNG file to your catalog.
In the Library or Develop modules, select the images and then choose Photo > Photo Merge > HDR.
For more information, see HDR photo merge.
3
Panorama merge
New in this release of Lightroom
Lightroom now lets you easily merge photos of a landscape into a breathtaking panorama. You can see a quick preview
of the panorama and make adjustments to it before the merged image is generated.
While previewing the panorama, you can choose to Auto Crop the merged image to remove undesired areas of
transparency. You can also specify a layout projection—Spherical, Perspective, or Cylindrical—or let Lightroom choose
the appropriate projection automatically.
In the Library or Develop modules, select the source images and then choose Photo > Photo Merge > Panorama.
For more information, see Create panoramas.
Last updated 4/20/2015
Page 9
What's new
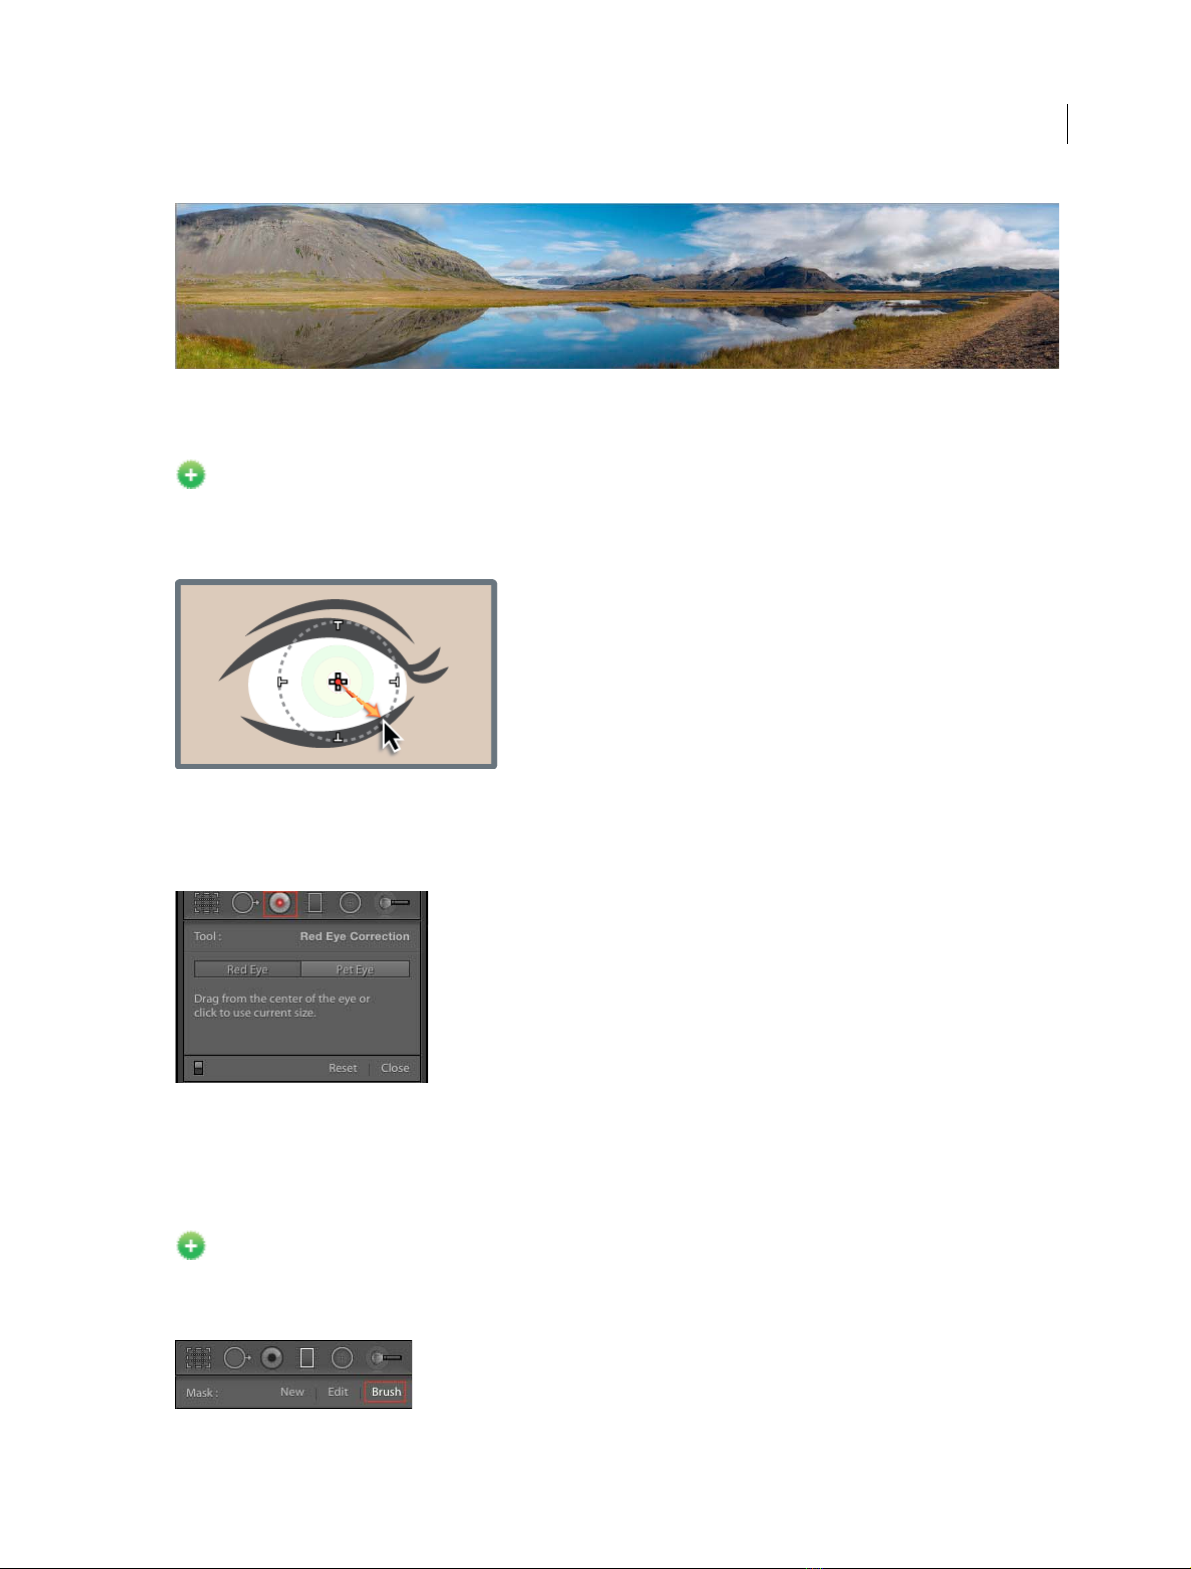
Cure pet eye effect
New in this release of Lightroom
Working in much the same way as red eye correction, pet eye correction in Lightroom helps you cure unnatural pet eye
colors captured in photos.
4
In the Develop module, click the Red Eye Correction tool icon. Now, click Pet Eye and drag from the center of the eye
to select the pupil. Adjust the settings as necessary.
For more information, see Cure red eye and pet eye effects.
Filter brushes
New in this release of Lightroom
You can modify Graduated Filter and Radial Filter masks using brush controls. Once you've added a mask, to access
brush controls, select the Brush option next to New/Edit.
Last updated 4/20/2015
Page 10
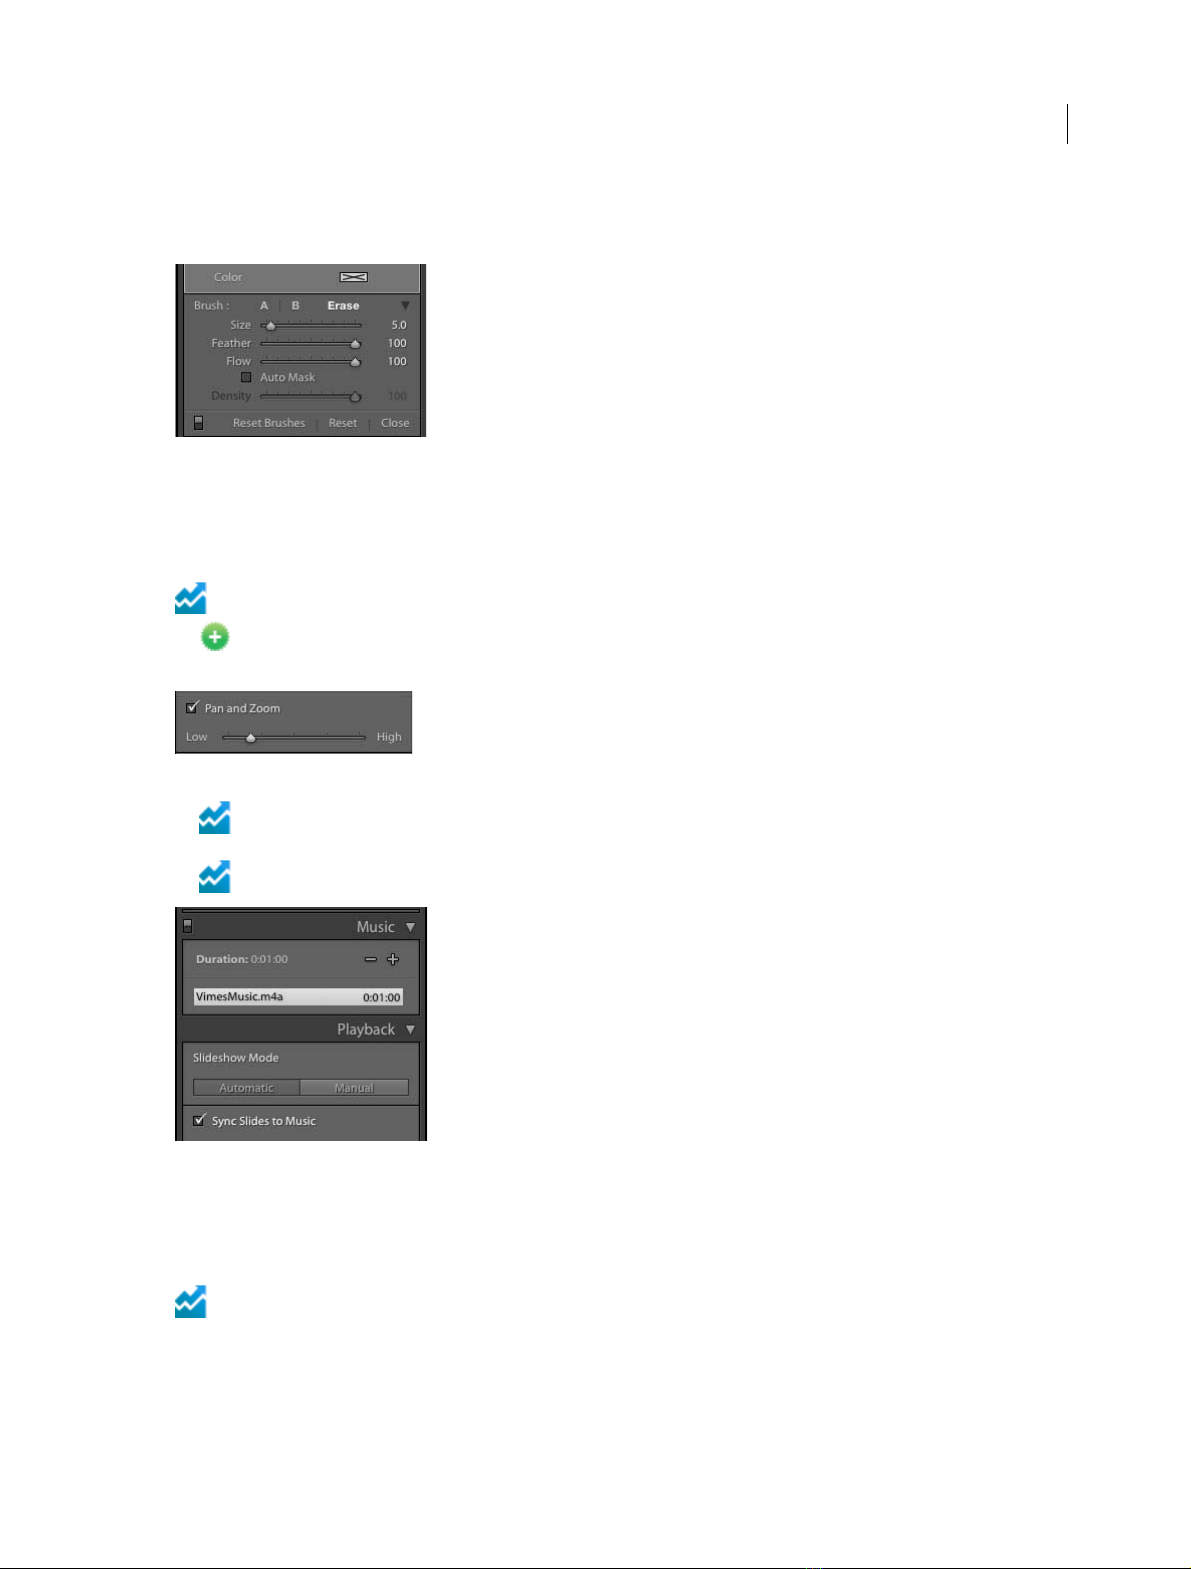
What's new
Lightroom lets you customize three different filter brushes: A (+), B (+), and Erase (-). You can customize several
settings for these brushes.
For more information, see Modify a Graduated Filter or Radial Filter using brush controls.
Slideshow-related improvements
Enhanced in this release of Lightroom
• You can now adjust the amount of panning and zooming using a convenient slider control. Setting the slider
to Low causes minimal panning and zooming.
5
• You can now add up to 10 music tracks to slideshows. The tracks play sequentially in the order that you choose.
You can add, reorder, or remove the tracks in the Music panel.
• Lightroom can now automatically synchronize slide transitions to music.
For more information, see Play and export slideshows.
Improvements to the Web module
Enhanced in this release of Lightroom
In addition to the classic HTML gallery, three new gallery styles are now available:
• Grid
• Square
Last updated 4/20/2015
Page 11

What's new
• Tr ac k
These galleries are designed to work with desktop- as well as mobile-web browsers.
Support for touch-enabled computers
New in this release of Lightroom
Lightroom now offers a touch workspace experience. You can switch to the touch workspace from anywhere in the app
by clicking the Touch icon available only on touch-enabled devices, such as the Microsoft Surface Pro 3.
Once you've switched to the touch workspace, you have access to the controls available in Lightroom for mobile and
more. Among other things, you can do the following in the touch workspace:
• Scroll through panels and filmstrips
• Add flags
• Zoom in/out in the Loupe and Grid views
• Access your user-created presets and local corrections
Other enhancements
Library module
6
• New 250% option in the Windows UI scaling preference
• The Collection list can now be filtered in much the same way as the Keyword list. Click + in the Collections
panel and then enable Show Collection Filter.
• A new preview size called Auto is now available. Auto automatically builds previews at your monitor's
resolution.
• Flag and Rating categories are now available as part of Metadata filters.
Book module
• Photo text-metadata settings are now saved with custom pages.
Slideshow module
• You can now preview slideshows at your screen aspect ratio or at your intended output aspect ratio (16x9 or
4x3).
Develop module
• New Auto option added to the Crop tool. You can use this option to apply an adjustment similar to the Level
Upright option in the Crop panel.
• You can now reposition Adjustment Brush strokes by selecting and dragging Edit pins.
• Mask overlays for the Gradient and Radial filters are now accessible using the same menu commands and
keyboard shortcuts that display the mask overlay for the local adjustment brush.
• New keyboard shortcut to cycle through Upright modes: Control/Ctrl+Tab. You can preserve your crop using
the keyboard combination Option+Control+Tab (Mac).
• CMYK support while soft-proofing
Last updated 4/20/2015
Page 12

Chapter 2: Lightroom on mobile
Work with Lightroom on mobile
This article describes the steps to set up and use Lightroom on mobile on your iPhone, iPad, or Android phone.
Sign-in
• Don't have Lightroom on mobile?
Visit the Lightroom on mobile Getting Started page to learn about getting started with Lightroom on mobile.
• I have Lightroom on mobile. How do I get started?
1 On your iPad, iPhone, or Android phone, tap the Lightroom app icon.
2 Sign in with your Adobe ID.
7
3 Review the next few screens, and get started with Lightroom on mobile. This document is divided up into a few
tabs:
App interface. Describes how the Lightroom on mobile app is laid out.
Organize. Describes the ways you can set up Collections and keep your photos in order.
Editphotos. Describes all the cool edits you apply to your photos.
SyncandShare. Describes the several options you have to share and show off your photos.
Last updated 4/20/2015
Page 13
Lightroom on mobile
App interface
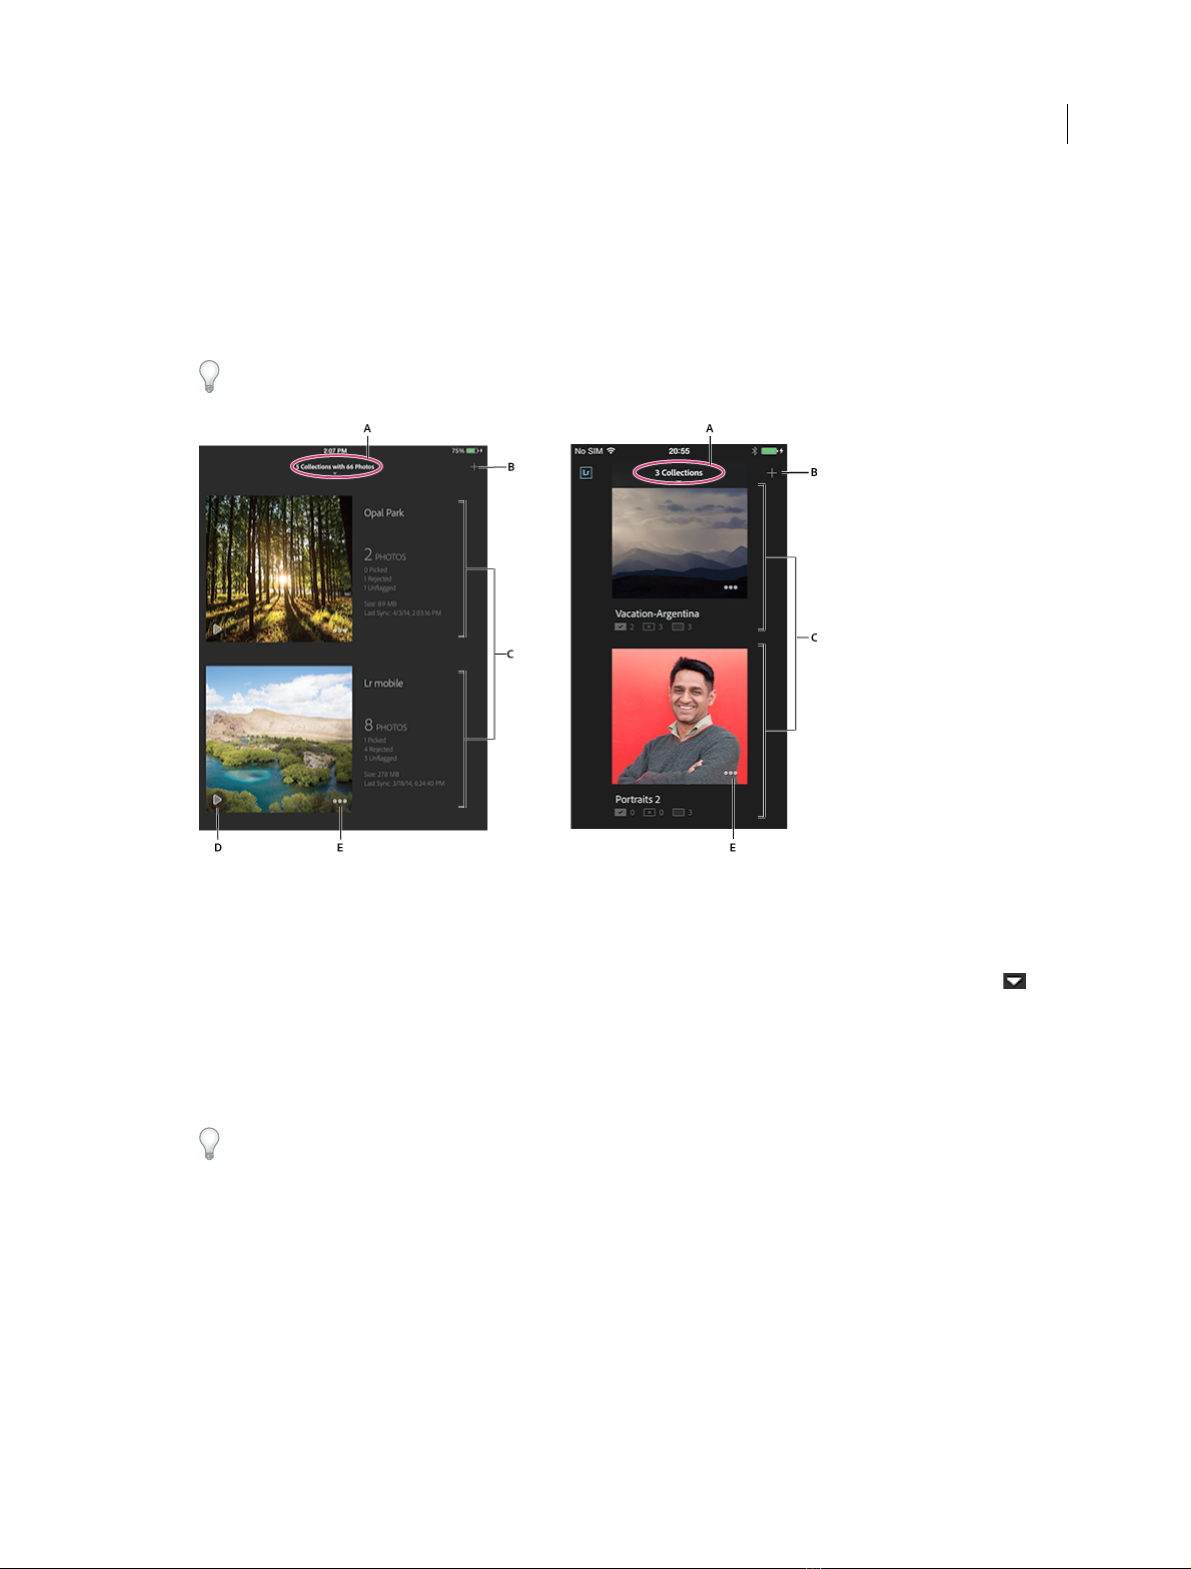
• Collections view
When you start Lightroom on mobile for the first time, the first window that opens is the Collections view. The
Collections view is a listing of all the Collections that you either created in Lightroom on mobile, or synced from
Lightroom desktop.
In the Collections view, tap with two fingers to cycle through various metadata and Collection-related information.
In the image (below), all available information is displayed.
8
A Collections view opti ons B New Collect ion icon C Available Collections, with related information displayed D Slideshow icon E Collection
options
Sorting order in the Collections view
You can specify the order of how the Collections appear in the Collections view. Tap the inverted triangle ( )
located in the top-middle of the Collections view. Choose one of the available sorting options.
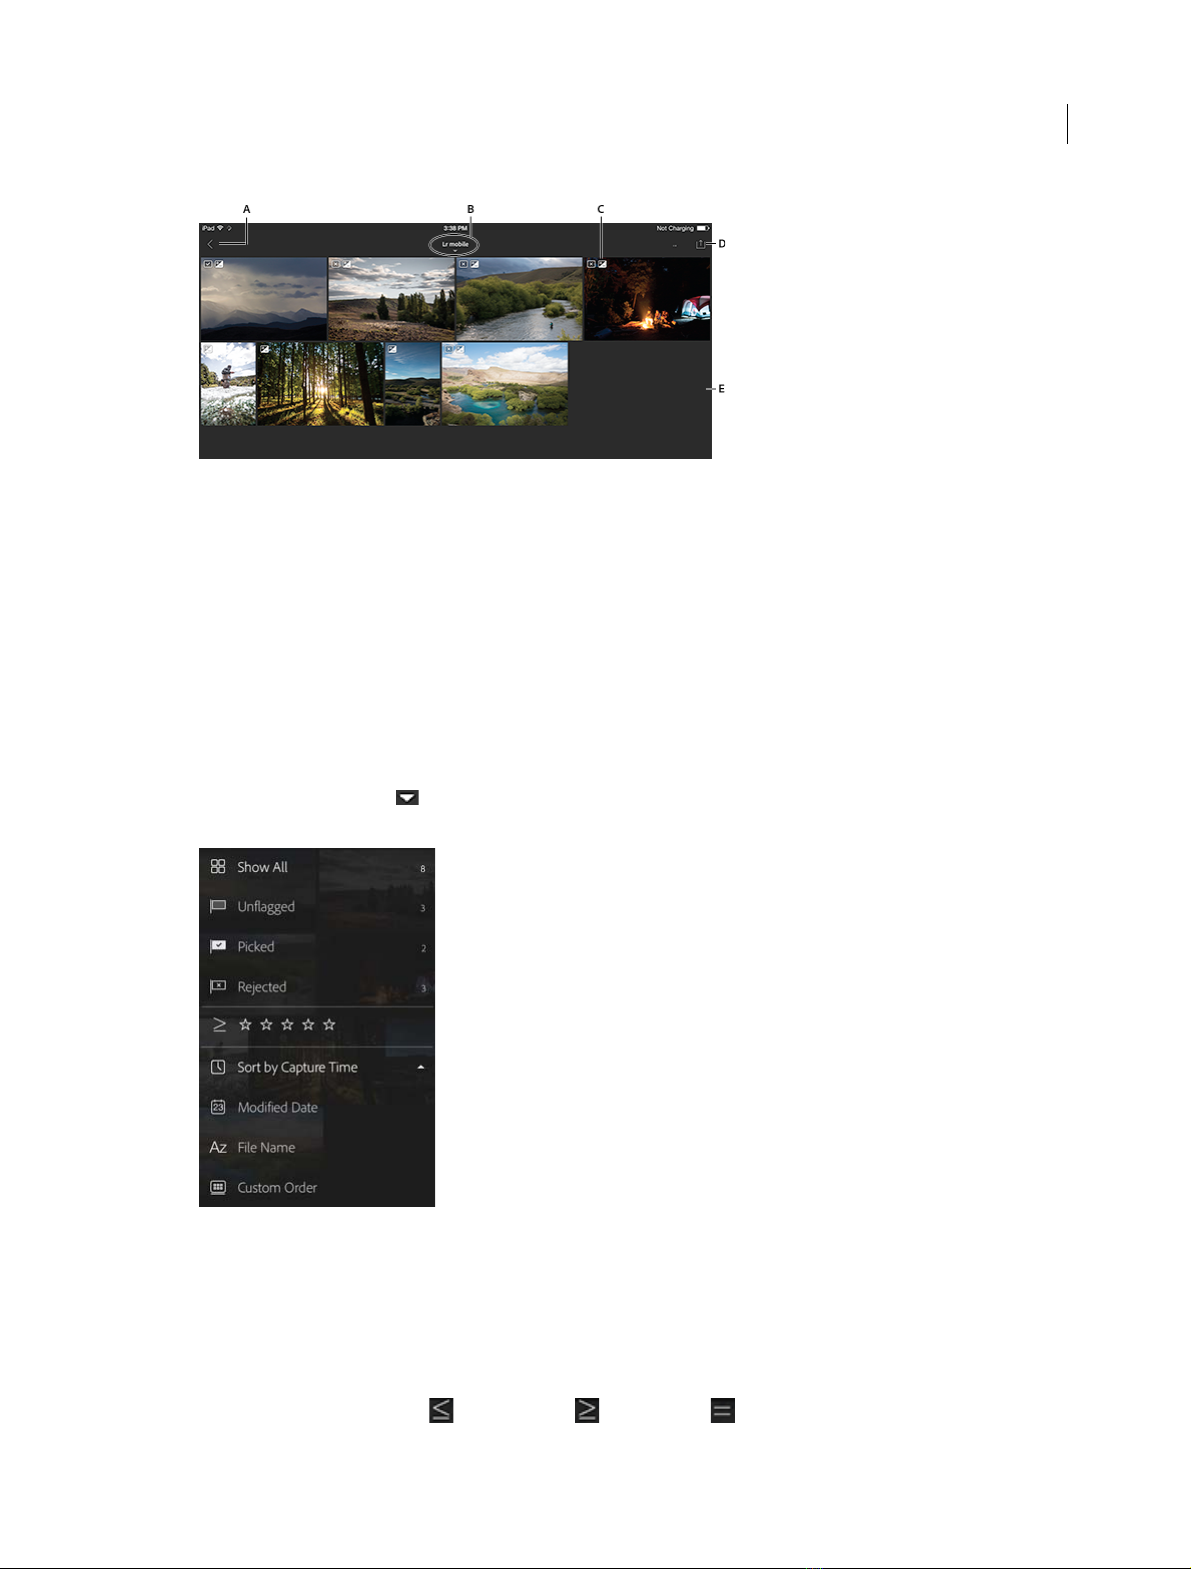
• Grid view (viewing photos in a Collection)
The Grid view is available when you are looking at the photos within a Collection. In the Collection view, tap a
Collection to open the Grid view.
In the Grid view, tap with two fingers to cycle through various photo-related metadata. This helps you view the data
for all the photos in the Collection.
Last updated 4/20/2015
Page 14
Lightroom on mobile
A Tap for Collections view B Grid view options C Photo metadata D Collection options E Grid view
Specify a cover photo for the Collection
By default, Lightroom picks one of the pictures to be the cover photo for the Collection. You can change this option
and specify a photo of your choice.
1 In the Grid view, tap and hold a photo.
2 In the context menu that appears, select Set as Cover.
9
Filtering and Sorting options
In the Grid view, you can set a filter to see only a specific type of photo, or will specify a sorting order for how the
photos will appear.
Tap the inverted triangle ( ) located at the top-middle of the Grid view. Choose one of the Filters and Sorting
orders.
Flag state
Choose to view pictures based on their flag status—Unflagged, Picked, or Rejected. Tap a flag state.
Star rating
Display only those photos that meet a certain star rating. Tap the symbol in front of the stars, and choose the
exclusion criteria: lesser than (
), greater than ( ), or equal to ( ). Then, tap a star to select the number of
stars that the filter should include, exclude, or be equal to.
Last updated 4/20/2015
Page 15
Lightroom on mobile
Sort by capture time | Modified date | File name
Select one of these sorting options to reorder the display of photos based on the selected criteria. Clicking the option
again toggles between ascending and descending orders.
Custom Order
Sort the photos based on a custom sort order specified in Lightroom desktop.
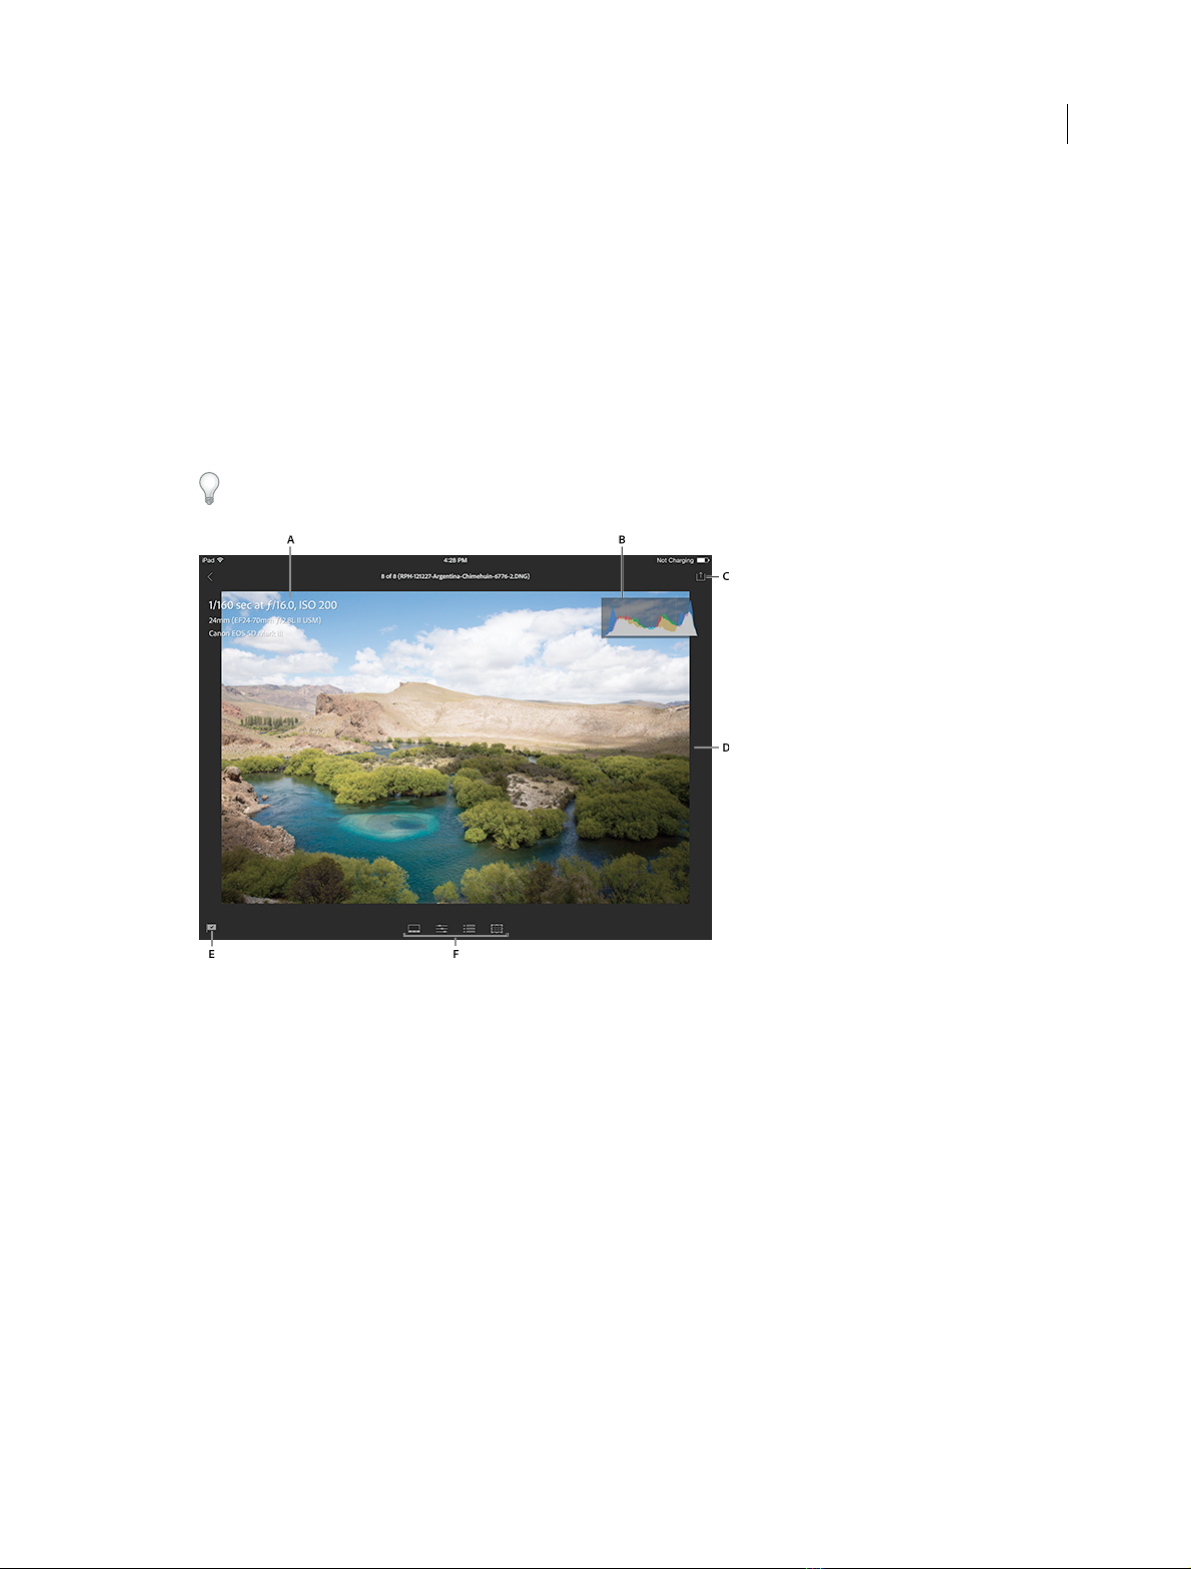
• Loupe View (preparing to edit a photo)
The Loupe view is available when you tap a photo in the Grid view. Only one photo is visible at a time. In the Loupe
view, you can apply Adjustments and Presets, and also use the Cropping Tool.
In Loupe view, tap with two fingers to cycle through metadata and photo-related information. In the image (below),
you can see available EXIF information and a histogram.
10
A EXIF information B Histogram C Share icon D Loupe view E Flag status icon F Actions (Adjustments, Presets, Cropping Tool)
The Loupe view is the window where you will perform most of your actions on a photo. In addition to modifying
the photo, you can share by mail or messages, copy, move, print, and more.
• Sidebar
The sidebar, when expanded, allows you to specify certain preferences and view your disk usage. You can also view
a list of shortcuts used in Lightroom on mobile.
• To expand the Sidebar, tap the Lightroom icon or your registration information available toward the upper-left
corner of the Lightroom on mobile window.
• To collapse the Sidebar, tap the Lightroom icon again.
Last updated 4/20/2015
Page 16

Lightroom on mobile
11
• Sync Only Over WiFi.Switch on, to disable syncing using bandwidth on your data plan.
• Presentation Mode. Fol low t he rel evant st eps f or yo ur m obi le op er ati ng s yste m to en able this m ode:( iOS) S wit ch
on to display a red dot where your finger/stylus touches the screen.(Android) Tap Device Settings > Developer
Options > Show Touc hes. If you notic e that De velop er Options i s not enabled on you r phone, tap Device Setti ngs
> About Phone > Build Number. Tap the build number repeatedly.
• Collect Usage Data. Switch on, to send non-personalized, anonymous usage data to Adobe
• About Lightroom on mobile. Tap to view the names of the awesome people who made Lightroom on mobile.
• Gesture Shortcuts. Tap, to view the gestures that you can use in Lightroom.
• Clear Cache. Tap, to clear previews and temporary f iles, from your mobile device. No photos or edits are deleted.
• Reset Help Overlays. Tap, to restore the gesture-tips displayed after you installed Lightroom on mobile
• Sign Out. Sign out of Adobe Lightroom on mobile.
• Disk Usage. Displays how much disk space you have used from your quota.
Note: When you tap Clear Cache, Lightroom on mobile has to resync some information. The first time you access your
Collections after you clear the cache, previews will take just a bit longer to appear.
Organize
Use the Share option to send photographs over email, print, or copy or move them around in Collections. You can share
a photo while in Loupe view, or share multiple photographs from the Grid view.
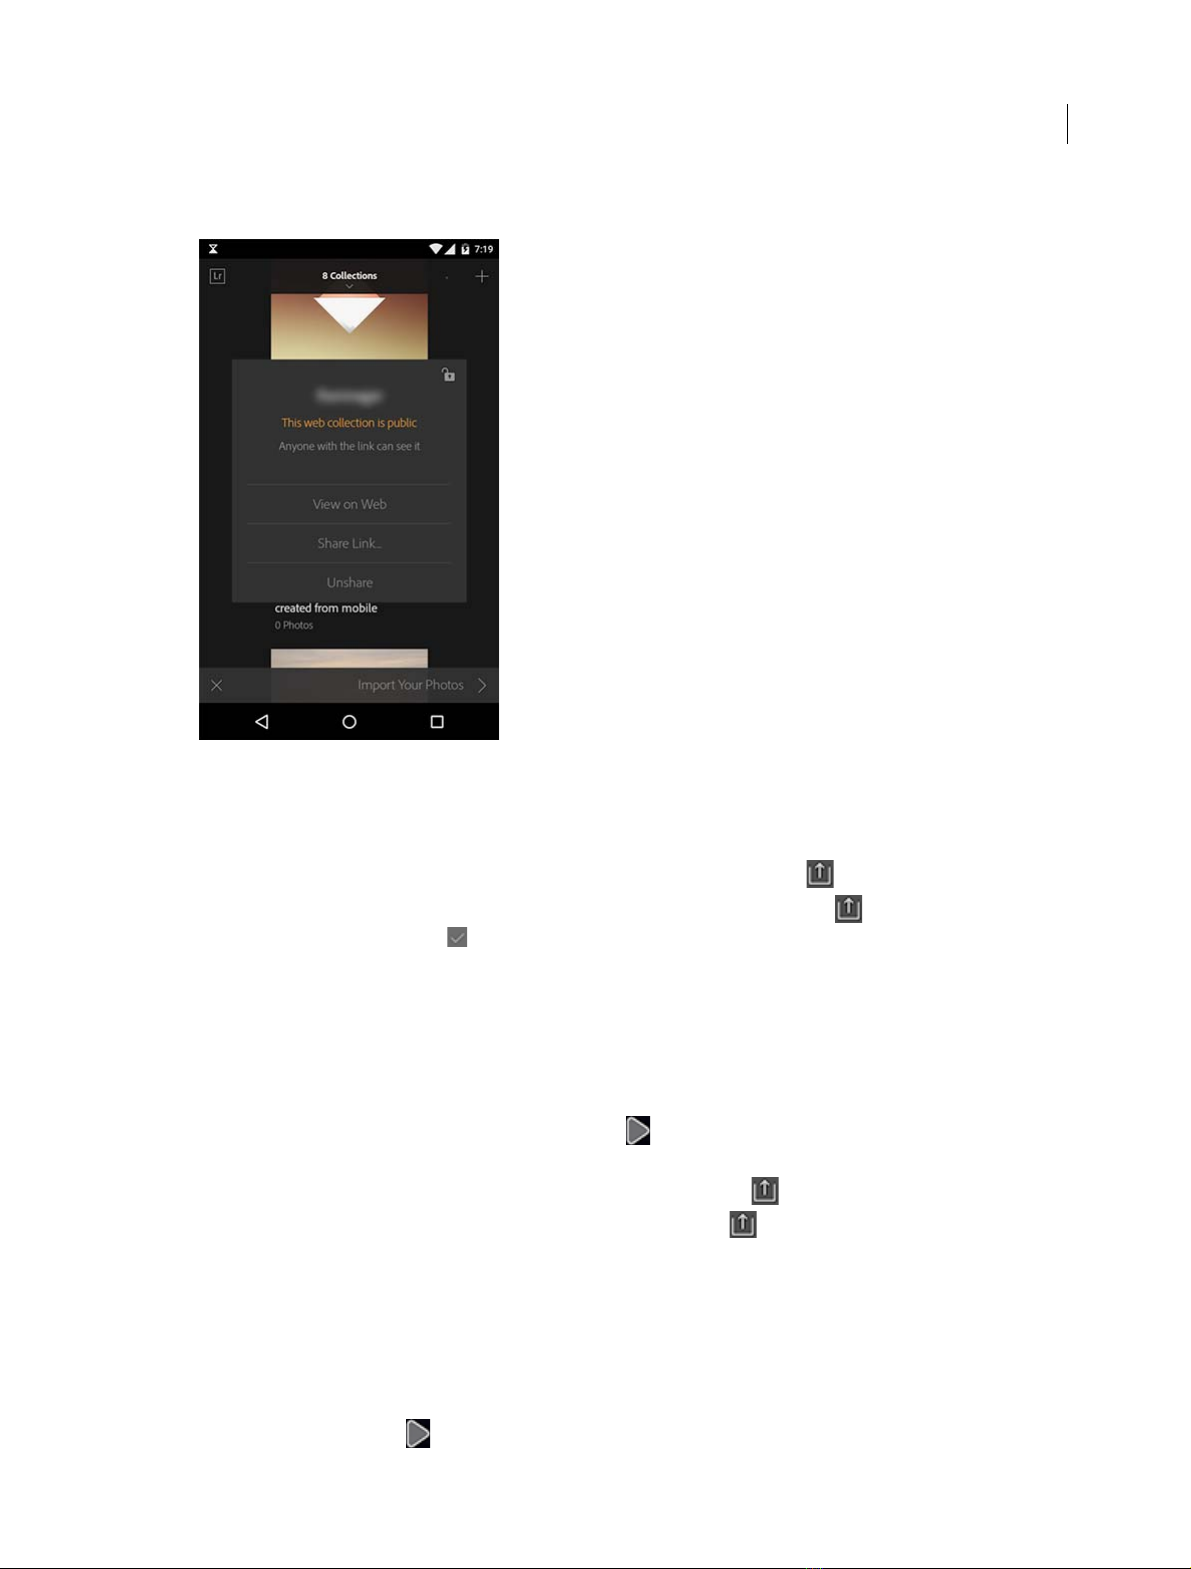
• Share web collections
You can share web-based collections of images using the Lightroom website. Do the following:
1 While in the Collections view, tap the Collection options icon (...) and then select Web Collection Sharing.
2 In the dialog box that appears, tap the appropriate options:Share: Share the collection on the Lightroom
website.View On Web: View the collection in a web browser window.Share Link: Share a link to the collection
using mail, messaging, and other apps on the device. Simply follow the onscreen instructions to do so.
Last updated 4/20/2015
Page 17
Lightroom on mobile
Note: Tap Unshare if you want to revoke the sharing of a web collection.
12
• Message or Mail photos
1 You must first select the photos you want to share by a mail or message. Do one of the following:
• If you're in Loupe view (viewing an individual photo), tap the Share icon ( ), and then tap Share.
• If you're in Grid view (viewing all photos in a Collection), tap the Share icon ( ), select multiple photos,
and then tap the confirm ( ) icon.
2 Tap the Message or Mail icon.
3 Follow the on-screen instructions and provide the necessary information to send a mail or message containing
the photos.
• View photos as a slideshow
You can view the photographs in your Collection as a slideshow. To start a slideshow, do one of the following:
• (iOS) In the Collections view, tap the Slideshow icon ( ) at the lower-left corner of a Collection tile.(Android)
Tap the Collection options icon (...) and select Play Slideshow.
• In the Grid view (viewing photos in a Collection), tap the Share icon ( ), and then tap Slideshow.
• In the Loupe view (viewing individual photos), tap the Share icon ( ), and then tap Play From Here.
Slideshow options
To specify the type of transition and the duration of each slide:
1 During a slideshow, tap a photo.
2 At the top-center of the screen, tap Slideshow Options.
3 Modify the settings you would like to change.
4 Tap the slideshow icon ( ) at the top-right corner of the window.
Last updated 4/20/2015
Page 18

Lightroom on mobile
• Copy or Move photos
You can copy or move photos between collections. Do one of the following, depending on which screen you are on:
Multiple photos
1 In the Grid view (viewing photos in a Collection), tap the Share icon ( ), and then tap Copy To or Move To.
2 In the next screen, tap to select the photos you want to copy or move.
3 In the upper-right corner, tap the Next icon ( ).
4 From the list of Collections displayed, tap the Collection you want to copy or move the photos to, and then tap
the Confirm icon (
) at the upper-right corner of the screen.
Single photo
1 In the Loupe view (viewing a single photo), tap the Share icon ( ), and then tap Copy To or Move To.
2 From the list of Collections displayed, tap the Collection you want to copy or move the photo to, and then tap
the Confirm icon (
) at the upper-right corner of the screen.
• Save photos after editing them
When you are done with your edits on a photo, you can save a copy of the modified photo (.JPG format), in your
Camera Roll. Do one of the following:
13
Multiple photos
iOS
1 In the Grid view (viewing photos in a Collection), tap the Share icon ( ), and then tap Share.
2 In the next screen, tap to select the photos you want to make a copy of.
3 In the upper-right corner, tap the Next icon ( ).
4 In the popup menu, tap Save Images. Copies of the images are created in the Cameral Roll on your mobile device.
Android
1 In the Grid view, tap the Share icon and then tap Save To Gallery.
2 On the next screen, tap to select the photos that you want to copy.
3 Tap the check mark icon in the upper-right corner of the screen.
Single photo
• In the Loupe view (viewing a single photo), tap the Share icon ( ), and then tap Save Image.
If Camera Roll photos are set for automatic import in a Collection, the saved images are automatically added to the
Collection and synced with Lightroom Desktop.
• Remove photos from Collections
You can remove photos from a Collection when they are no longer required. Note that any photo removed from a
Collection will continue to be available in the Lightroom catalog.
Multiple Photos
1 In the Grid view (viewing photographs in a Collection), tap the Share icon ( ), and then tap Remove.
2 Tap the photos you want to remove from the Collection.
3 Ta p the t r ash b i n icon ( ) at the upper-right corner of the screen.
Last updated 4/20/2015
Page 19
Lightroom on mobile
4 In the Remove From Collection dialog, tap Remove to remove the photograph, or tap Cancel to not remove the
photo.
Single Photo
1 In the Loupe view (viewing individual photographs), tap the Share icon ( ), and then tap Remove.
2 In the Remove From Collection dialog, tap Remove to remove the photograph, or tap Cancel to not remove the
photo.
Edit photos
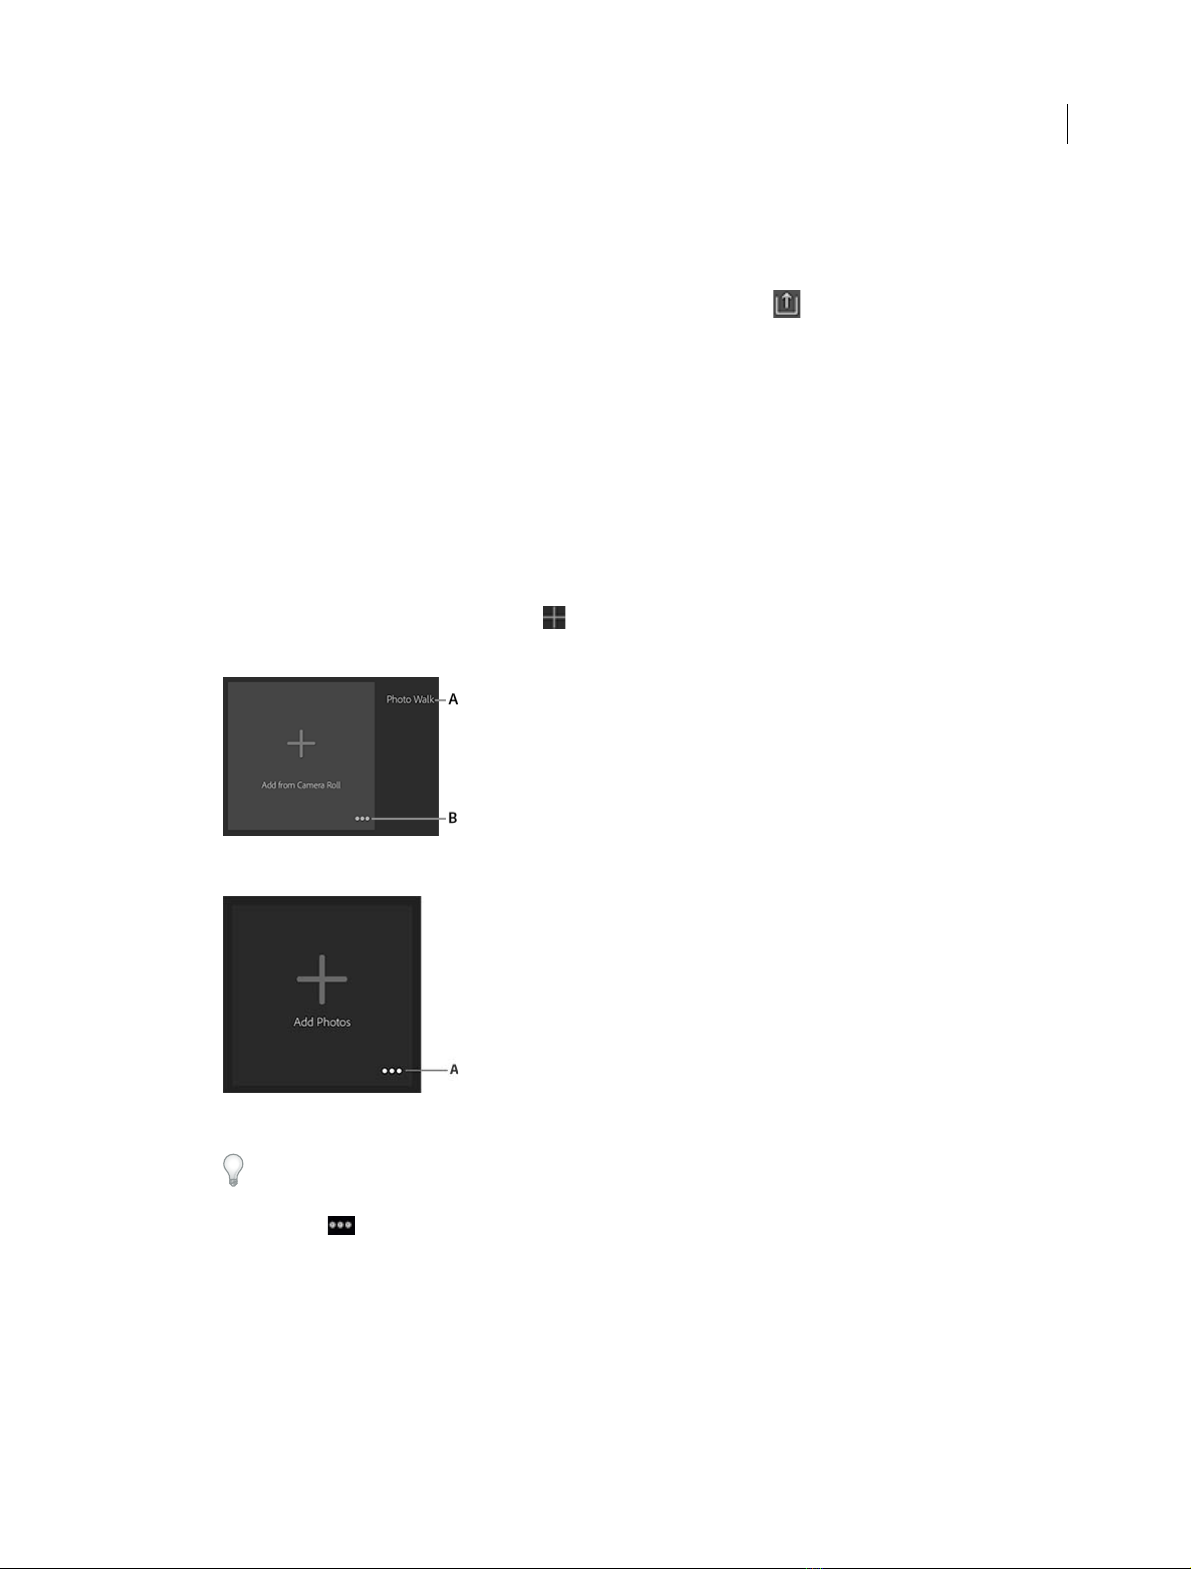
• Creating and setting up Collections
Collections help you organize photographs, grouping and sorting them according to your preferences and
requirements. In Lightroom on mobile, you can create Collections and import specific photos of your choice from
the Camera Roll or Gallery on your device.
1 In the Lightroom on mobile app, click the icon at the top-right corner of the screen.
2 In the New Collection dialog, type a name for the new Collection, and tap OK.
14
A Name of the Collection B Collection Options
A Collection options
Collections are sorted based on their names. Swipe vertically, upwards or downwards, to browse through the list
of Collections.
3 Ta p Opt i ons ( ), to set up your Collection.
4 You can now set up the Collection, and specify settings including what pictures must show up.
Last updated 4/20/2015
Page 20

Lightroom on mobile
15
• (iOS) Add from Camera Roll or (Android) Add Photos. Allows you to pick and choose pictures from your
Camera Roll or Gallery.
• Enable Auto Import. Sets up the collection to import any picture from the Camera Roll/Gallery
automatically.
• Enable Offline Editing. Provides you with the option to edit the photos in the Collection even when your
phone is not connected to the Internet. Edited photos are automatically synced over the cloud whenever
you're next connected to the Internet.
• Web S h ari n g . Share the Collection on the Lightroom website.
• Rename. Opens a dialog that lets you provide a new name for the Collection. The new name is synced with
Lightroom desktop automatically.
• Remove. Deletes the Collection. However, the photos that were available in the Collection are not deleted
from the device.
• Play Slideshow.Play the contents of the Collection as a slideshow.
5 Tap on a different part of the screen to close the Collections Options view.
Did you add photos to the Collection? Take it out for a spin! Tap the Collection to view all the photos in the
Collection. Tap one of the thumbnails to open and Work with Lightroom on mobile.
• Add or import photos (from Camera Roll or Gallery)
While in the Collections view
1 In the Collections view, tap Options ( ) on the Collection you want to add photos to.
2 Tap Add from Camera Roll (iOS) or Add Photos (Android).
Last updated 4/20/2015
Page 21
Lightroom on mobile
3 Do one of the following:
• Tap the photos you want to add to the Collection.
• Drag your finger across the photos you want to add to the Collection.
4 When you've selected all the pictures you want to add to the Collection, tap the check mark ( ) at the top right
of the window.
If you want to cancel this action and not add any photos to the Collection, tap the Cancel icon ( ) at the topleft corner of the window.
Note: Lightroom on mobile has been tested up to 250,000 photographs. When you attempt to sync more than 250,000
images, a warning message indicates that no more syncing is possible.
While in the Grid view (viewing photos in a Collection)
1 Tap the Share icon ( ), at the upper-right corner of the screen.
2 In the Add from Camera Roll/Add Photos dialog, tap or drag to select one or more photographs.
3 To add the selected photos to the current Collection, tap the Confirm icon ( ) at the top-right corner of the
screen.
To cancel the addition of photos to the Collection, tap the Cancel icon ( ) at the top-left corner of the screen
16
Note: Lightroom on mobile has been tested up to 250,000 photographs. When you attempt to sync more than 250,000
images, a warning message indicates that no more syncing is possible.
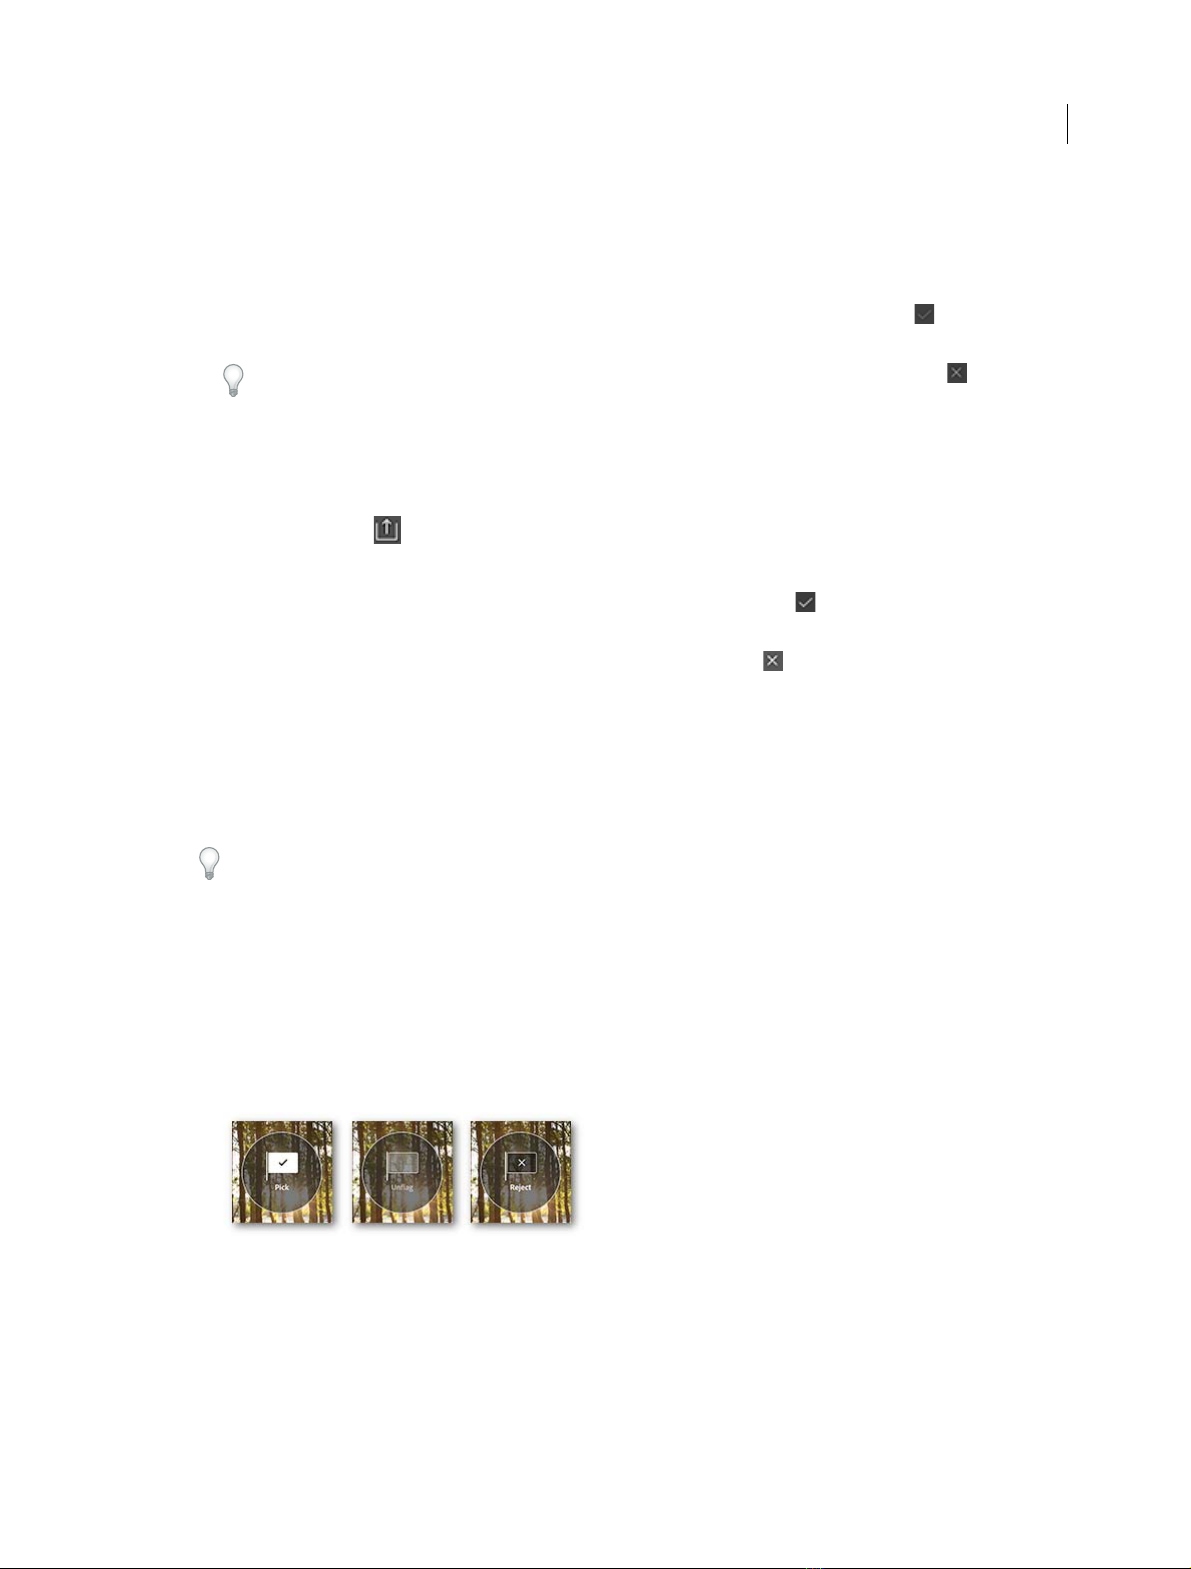
• Flag photos
Flagging photographs can be a quick and easy way to categorize or sort them. In Lightroom, you can flag
photographs, one at a time, as Pick, Reject, or Unflag.
You can see the status of picked, rejected, or unflagged items at various places in Lightroom on mobile.
•For individual photographs, the current state is visible at the left-bottom corner of the screen.
• For Collections, tap the screen with two fingers to cycle through the options until the information on picked,
rejected, and unflagged items is displayed.
1 Open a photograph in Loupe view.
2 To flag a photograph with an appropriate state, do one of the following, with the photograph open:
• Flick upwards or downwards to change the state of the flag.
• Tap the flag icon located at the lower-left corner of the screen. You can cycle through the three available states.
3 You can view the status of picked, rejected, or unflagged items in multiple places in Lightroom on mobile.
• For individual photographs, the current flagged state is visible at the left-bottom corner of the screen.
• Tap the screen with two fingers to cycle through displayed information until the the number of picked,
rejected, and unflagged photos is displayed. You can do this while viewing:
• All photos in a Collection.
Last updated 4/20/2015
Page 22

Lightroom on mobile
• All Collections in Lightroom on mobile.
Sync and Share
• Edit your photos
Lightroom on mobile makes it convenient to take your images and edit them anywhere. Edit any pictures—from
those on the Camera Roll on your mobile device, to DSLR-shot RAW images, using Smart Previews. You can
perform extensive edits, and see them all synced back to your connected devices.
A Filmstrip view B Adjustments C Presets D Cropping Options
Filmstrip view (iOS only) Lightroom on mobile displays the images in a Collection, while rendering thumbnails at
the bottom of the window to access picutres quickly.
Adjustments Manually edit the photograph with various controls such as White Balance, Temperature, Exposure,
Contrast, and more, at your fingertips.
Presets View thumbnails of your image with different preset effects applied, before applying the effect on the photo.
Select from a varied range of presets.
17
Cropping tool options Use th e cr opp ing tool to cr op, rot ate , ma nua lly a lter the cr opp ing rat io, or pi ck f rom a vai labl e
ratios to get the right fit for your photo.
Remember that you can always reset or restore your photos to a previous state. Check out the Undo or reset edits
section (below).
• Undo or reset edits
Before you start editing your photos, here's a step-by-step guide to resetting edits or undoing any actions on your
photos. You can undo, redo, or roll back edits to your photo at any point in time. Follow these instructions to see the
options you have.
While working with Adjustments, tapping the slider or the live Adjustment tile resets the adjustment performed.
1 Ta p the Adju s tment ( ) or Preset ( ) icon, and swipe to the right-most tile at the bottom of the window.
2 Ta p the R e set t ile .
A list of options is displayed. Depending on how far back you want to roll back your edits, tap a corresponding
option.
3 Depending on how far back you want to roll back your edits, tap an option.
Last updated 4/20/2015
Page 23

Lightroom on mobile
A Reset options B Reset tile C Redo D Undo
Basic Tones Basic tones.
18
All Resets all edits performed on the photo.
To Im po r t Resets all edits performed on the photo since being pulled into the Collection.
To Open Restores the photograph to the state it was in when you opened it.
Certain options (for example, To Import and To Open) may not be available if you have not edited the
photograph.
4 Tap the Redo and Undo icons to step back or forward in your actions, one step (edit) at a time.
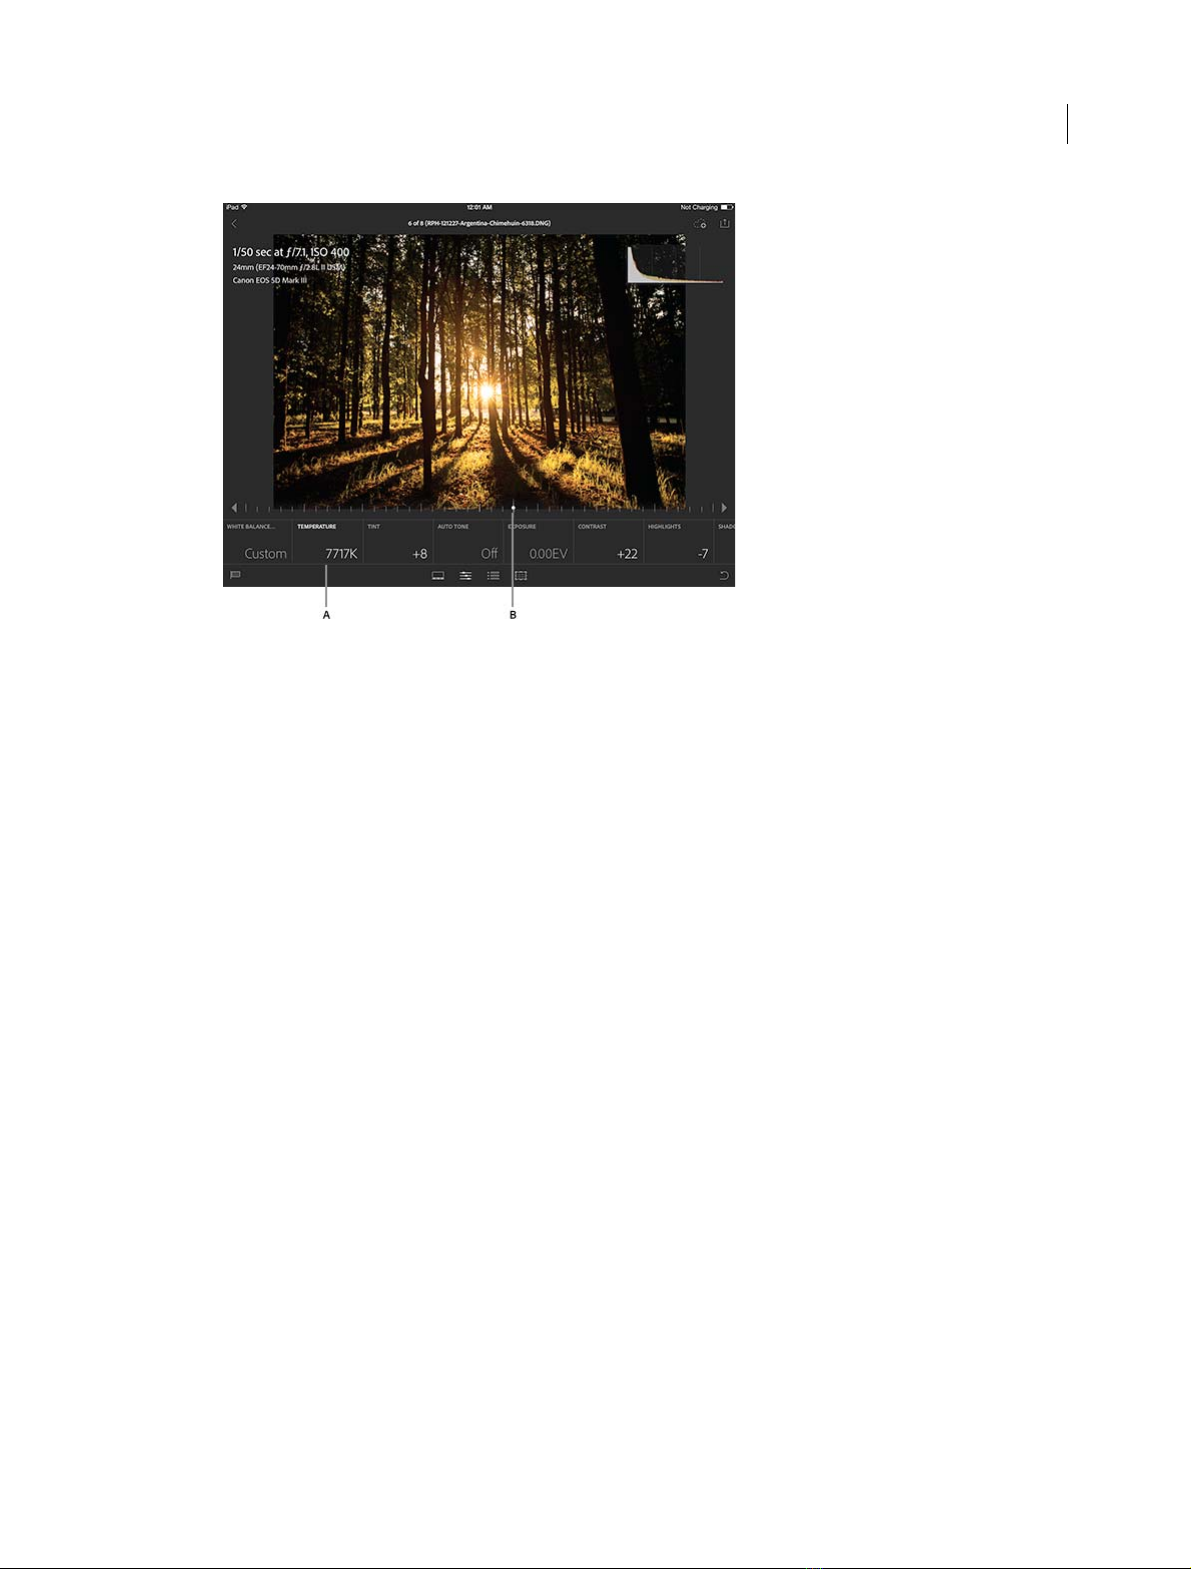
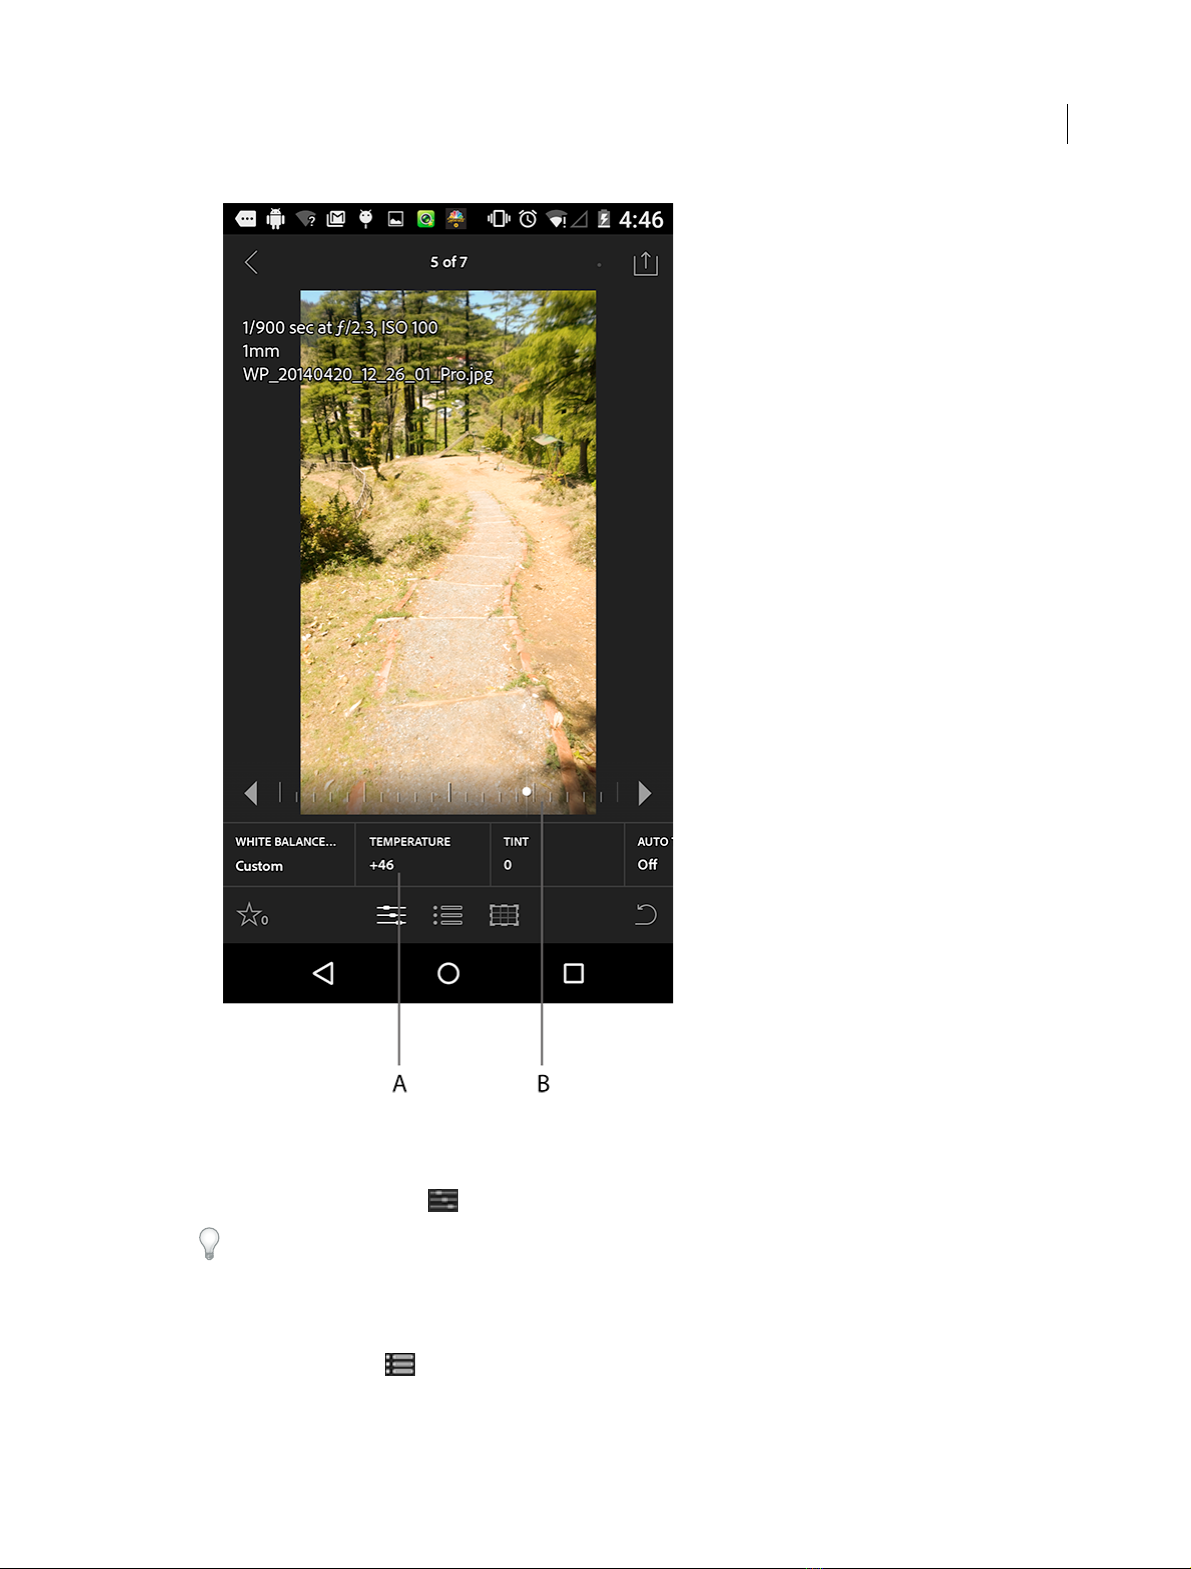
• Apply Adjustments
1 In the Collections view, tap a Collection, and then tap a photo to open it in Loupe view.
2 Ta p the Adju s tment s i con ( ).
3 The available adjustments are displayed as tiles, along the bottom of the window. Swipe to the left or right, to view
all the tiles. Tap a tile to activate the corresponding action. For example, to modify the warmth of the photo, tap
on the Temperature tile.
4 To modify the photo, do one of the following:
• Select from one of the preview thumbnails displayed.
• Drag the slider across the screen, to modify the value of the adjustment. In the image below, the Temperature
has been modified by drawing the adjustment slider to the right.
Last updated 4/20/2015
Page 24
Lightroom on mobile
A Selected adjustment tile (Temperature) B Slider, to change the value of the White Balance setting
19
Last updated 4/20/2015
Page 25
Lightroom on mobile
20
A Selected adjustment tile B Slider to change the value
5 Tap the image with three fingers to see a before/after preview.
6 Ta p the Adju s tment s i con ( ) to apply the Adjustment.
Tap the slider or the active Adjustment tile twice to undo an edit.
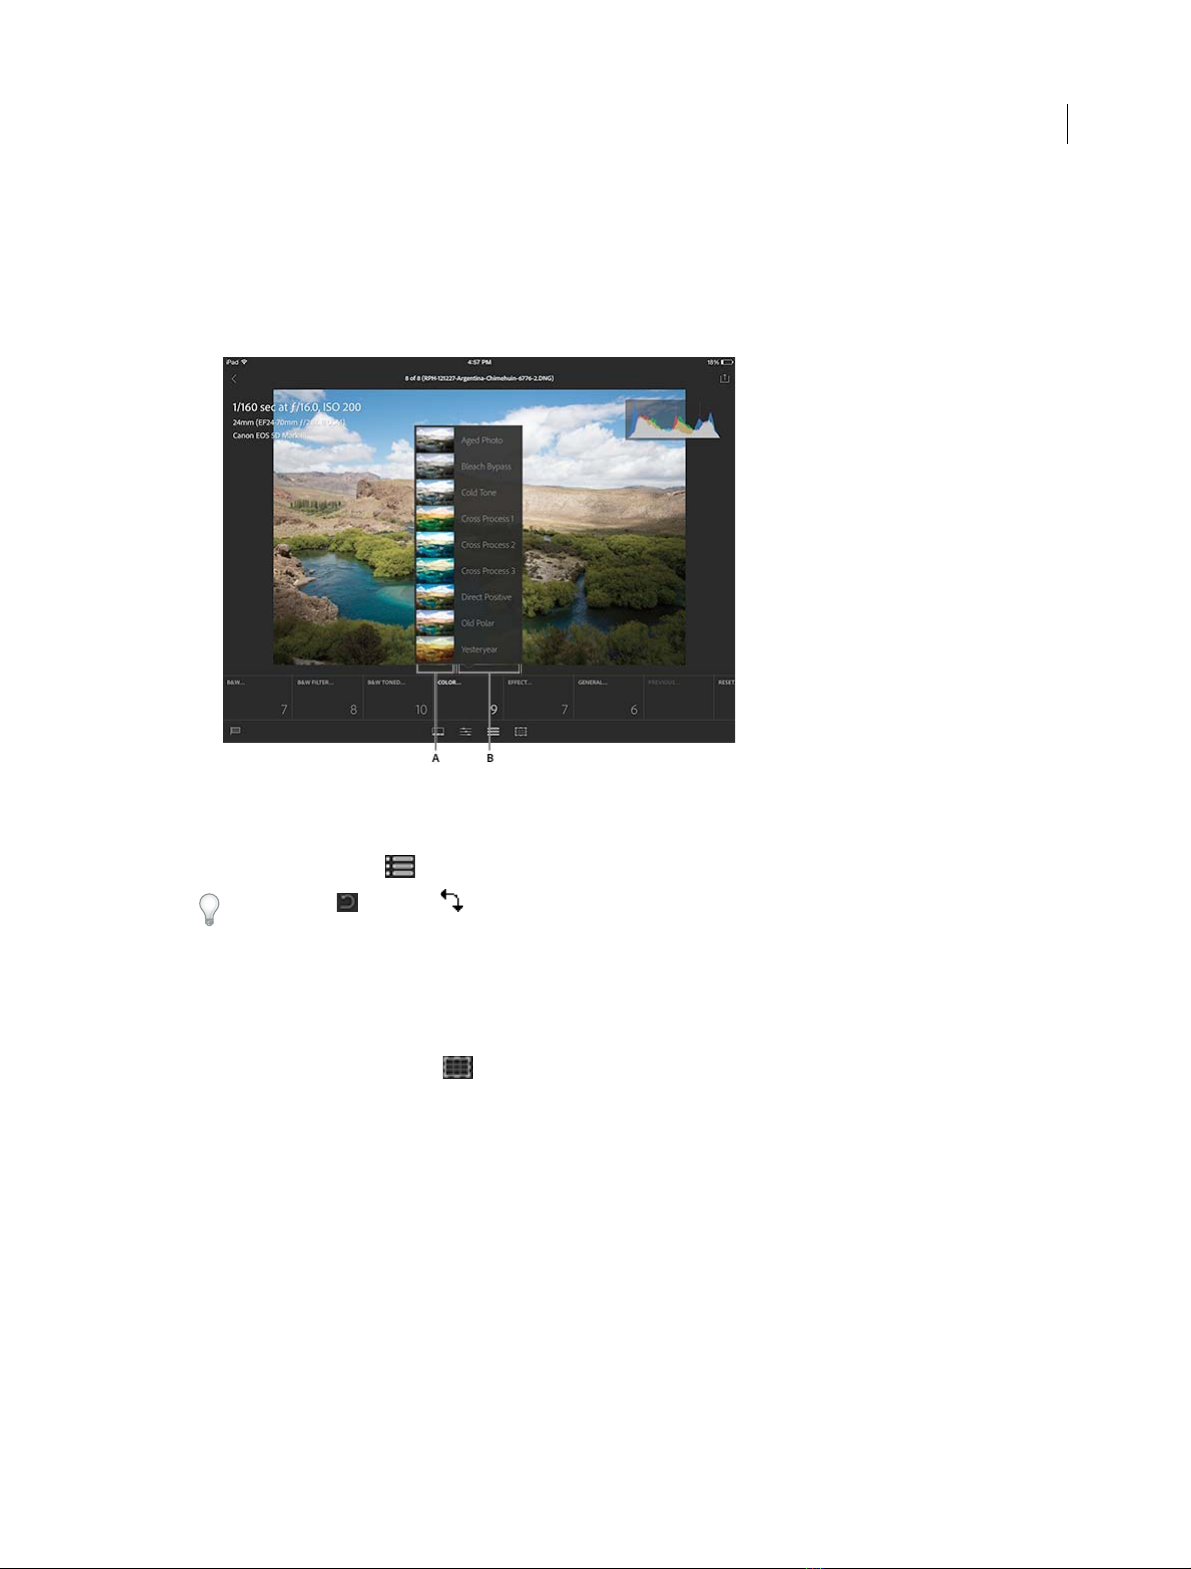
• Apply Presets
1 In the Collections view, tap a Collection, and then tap a photo to open it in Loupe view.
2 Tap the Presets icon ( ).
Last updated 4/20/2015
Page 26
Lightroom on mobile
3 The available Presets are displayed as tiles, along the bottom of the window. Swipe to the left or right, to view all
the tiles. Tap a tile to activate the corresponding action. For example, to view the various color-related presets,
tap the Color tile.
Note: It is not possible to transfer user-created Presets from Lightroom desktop to Lightroom on mobile.
4 View the various Color-related Presets. Tap a Preset to apply that effect to the photo.
21
A Thumbnail previews of various Presets B Preset names
5 Tap the image with three fingers to see a before/after preview.
6 Tap the Presets icon ( ), to apply the Preset.
Tap th e Un do ( ) or Redo ( ) icons to move back or forward in your edits, one step at a time.
• Crop photos
Note: The Cropping Tool has several inbuilt presets. It is not possible to add user-created cropping presets.
1 In the Collections view, tap a Collection, and then tap a photo to open it in Loupe view.
2 Tap the Cropping Tool icon ( ).
3 The available Cropping aspect ratios are displayed as tiles, along the bottom of the window. Swipe to the left or
right, to view all the tiles. Tap a tile to apply the corresponding cropping aspect ratio. For example, to view how
a square crop of your photo will look, tap the 1 x 1 tile.
Last updated 4/20/2015
Page 27
Lightroom on mobile
A Lock/unlock aspect ratios B Rotate photo C Cropping Tool guide
4 Do one of the following for addition options:
• Tap the aspect ratio tile to flip the orientation of the crop.
22
• Drag the edges and corners of the cropping guide, to change the shape and size of the crop.
• Tap within the cropping guide and drag it to reposition it.
• (iOS only) Tap the lock icon ( ), to crop without a preset aspect ratio.
• (iOS only) Tap the rotate icon ( ), to rotate the image.
Note: On Android, you can rotate the photo by making a vertical or horizontal swipe outside the cropping box.
5 Tap the image with three fingers to see a before/after preview.
More information:
• Get started with Lightroom on mobile
• Lightroom on mobile FAQ
• Setting up Lightroom Desktop to sync with Lightroom on mobile
Syncing Lightroom - Desktop and the Mobile app
This article describes the steps to set up and use Lightroom desktop to sync photos with your Lightroom mobile app
for the iPad, iPhone, and Android phones. If you're looking for information on how to use the Lightroom mobile app,
see Work with Lightroom mobile.
Last updated 4/20/2015
Page 28
Lightroom on mobile
Set up Lightroom for sync
Important: To update to the latest version of Lightroom, you must have a subscription to Creative Cloud or the
Photoshop Photography Program. You can also download Lightroom for a free 30-day trial.
1 Click Help > Check for Updates. Ensure that you are running the latest version of Lightroom 5.
To sync Lightroom desktop with Lightroom mobile, you must be running Lightroom 5.4 or higher.
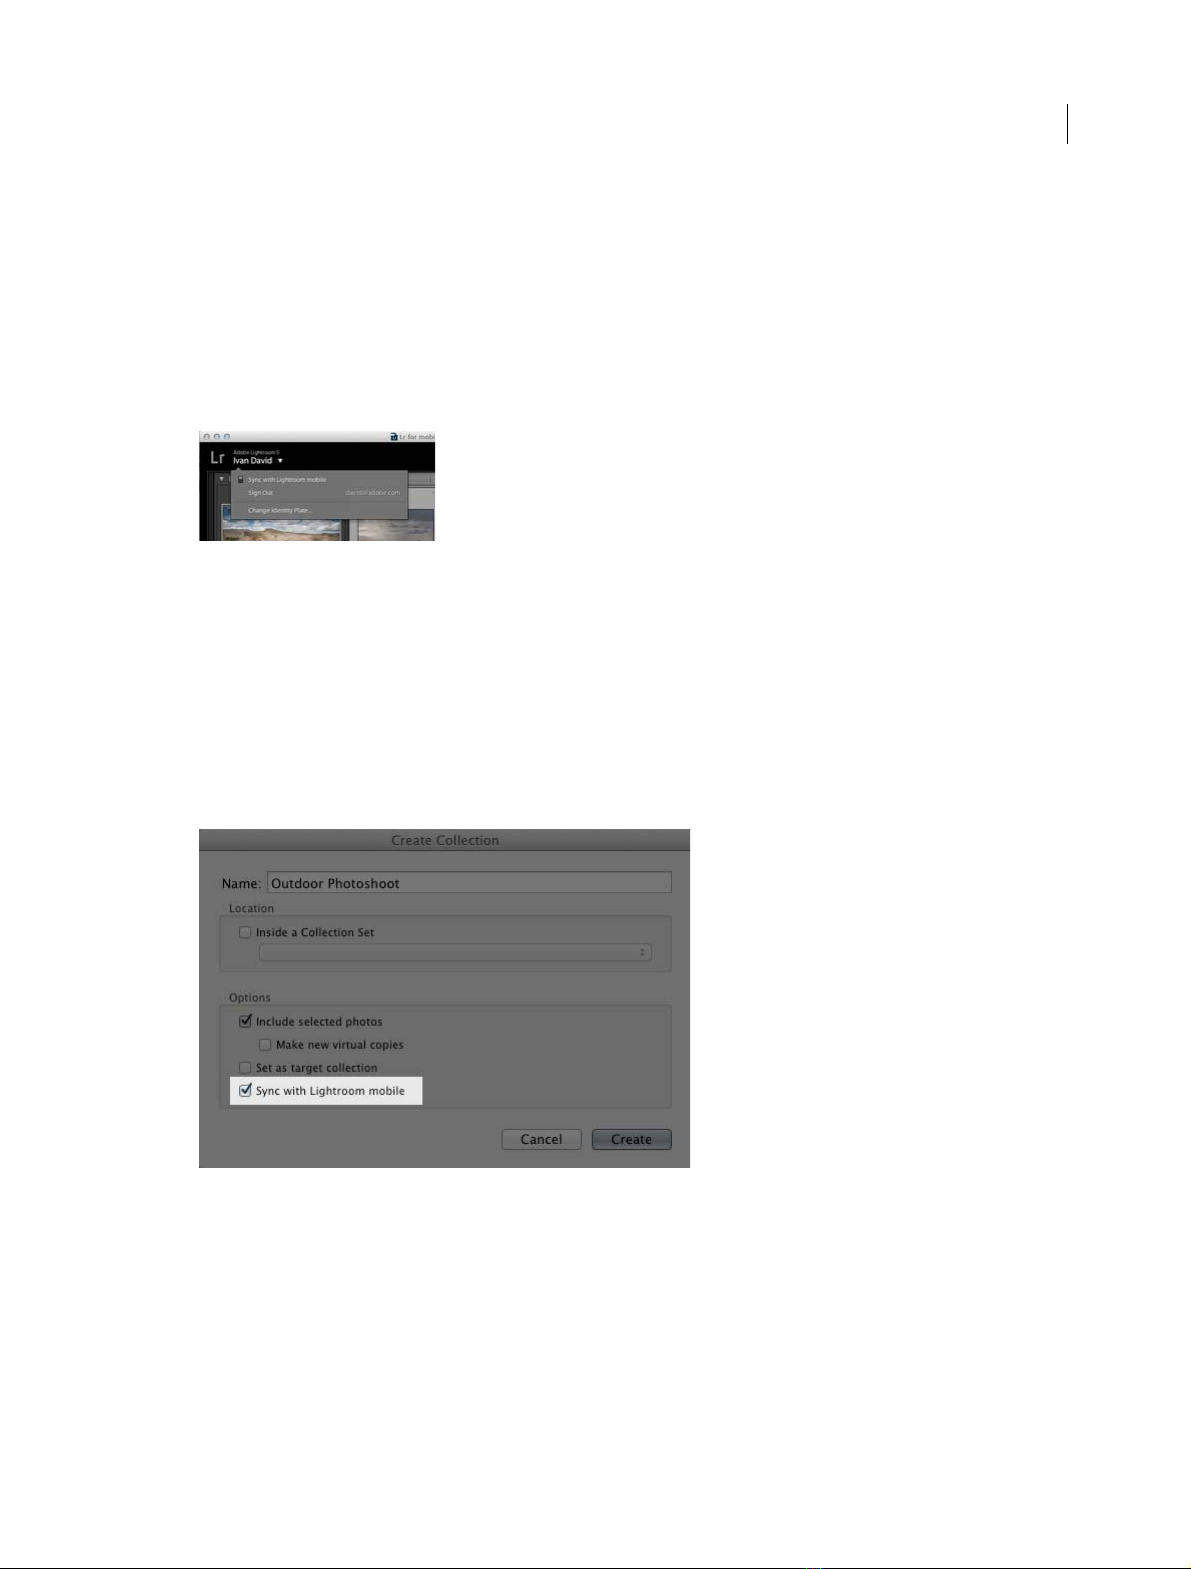
2 Click the Identity Plate at the upper-left corner of the screen. Sign in to Lightroom desktop (5.4) with your Adobe
ID.
3 On the Lightroom mobile Sign In page, enter your Adobe ID and password, and then click Sign In.
4 Click the Identity Plate and ensure that the Sync with Lightroom mobile option is turned on.
23
Setting up Collections
To sync with Lightroom mobile, photographs must be in Collections. Photos within a synced Collection are
automatically available on your device for editing and sharing.
1 While creating Collections, in the Create Collection dialog, select the Sync with Lightroom mobile checkbox.
2 If you have existing Collections, you can set them up to sync with Lightroom mobile, too.
Last updated 4/20/2015
Page 29
Lightroom on mobile
A Non-synced Collection B Synced Collection (bi-directional arrow icon)
24
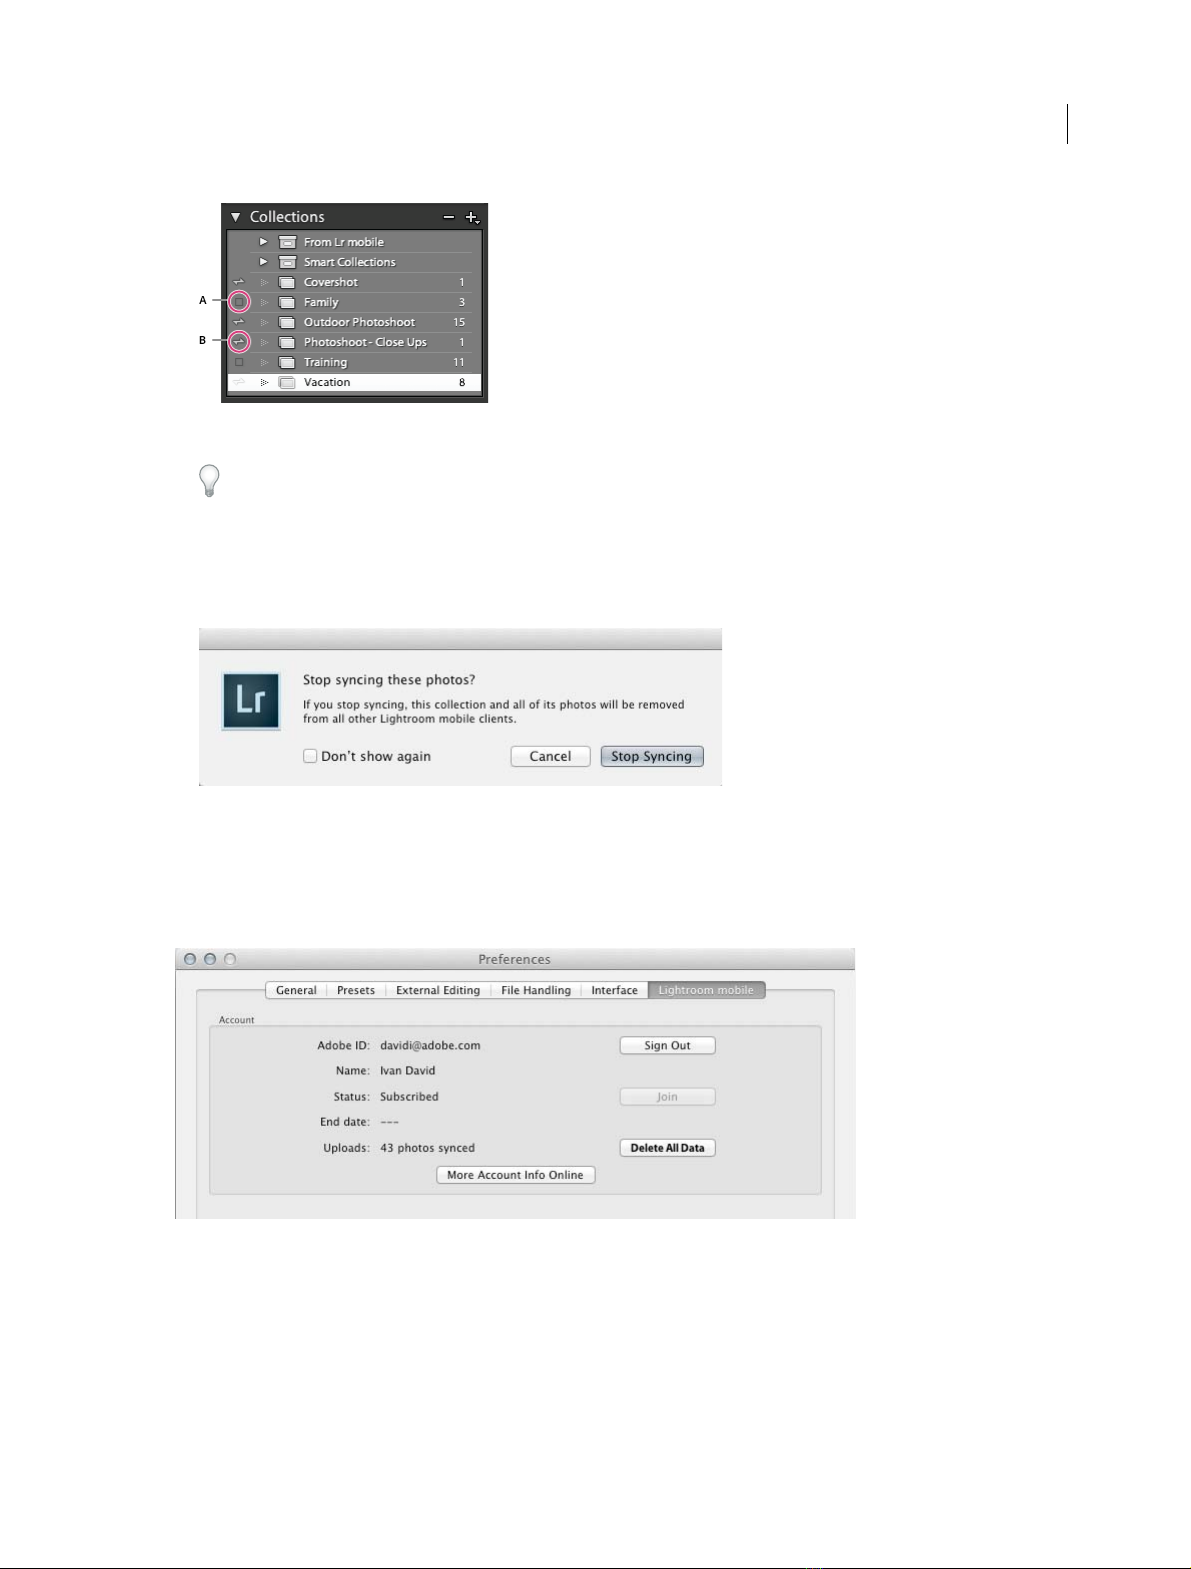
You can also right click and existing Collection, and click Sync with Lightroom mobile from the context menu.
3 To stop a Collection from syncing with your device, do one of the following in the Collections panel:
• Click the sync icon next to the name of the Collection.
• Right-click a Collection and click Sync with Lightroom Mobile from the context menu.
Lightroom mobile preferences
Setting for Lightroom mobile sync features are available in the Preferences folder. To access the Preferences dialog, click
Edit (Mac: Lightroom) > Preferences > Lightroom mobile.
In the Lightroom mobile preferences tab, you can sign in or out, view more information. You can also delete synced
information. Note that this does not delete photographs from Collections.
Last updated 4/20/2015
Page 30

Chapter 3: Workflows
How to manage all your photos with Lightroom
This tutorial is perfect for first time Lightroom users.
How to manage all your photos with Lightroom
Import photos from a camera or card reader
When you import photos into Lightroom, you create a link between the photo itself and the record of the photo in the
catalog. In the case of importing from a camera or card reader, Lightroom copies the photos to your hard drive and
adds the links to the photos in the catalog.
25
When importing, you work from left to right in the import window. First, on the left, identify what files you want to
import (the source files). Then, in the middle of the window, choose how you want to import them into the catalog
(when importing from a camera or card, you copy them). Finally, on the right, specify where you want to store the files
(the destination folder) and other options for the imported files.
Important: When importing for the first time, think through how you want to organize your photos and where you plan
to store them before you start to import. Planning ahead can help minimize the need to move photos later and possibly
lose track of them in your catalog.
1. Connect the camera or camera card reader to your computer.
If necessary, see your camera's documentation for instructions on how to connect the camera to the computer.
To have Lightroom st art automati cally when you plug in a came ra or card reader, cho ose Lightroom > P refe renc es (Mac
OS) or Edit > Preferences (Windows). In General, look under Import Options and select Show Import Dialog When A
Memory Card Is Detected.
2. Open Lightroom and the import window.
In Lightroom, click the Import button in the Library module or choose File > Import Photos And Video to open the
import window.
Last updated 4/20/2015
Page 31

Work flows
A Preview area B Source panel C Toggle Minimal import D Options and Destination panels
26
3. Point Lightroom to the camera or card reader.
On the left side of the import window, use the Source panel to navigate to the device or card that contains the photos
you want to import: Click From or Select A Source to find the device.
If you're importing from an attached camera card, select Eject After Import to automatically disconnect the card after
Lightroom finishes importing photos.
4. Preview and select photos.
In the center of the import window, click one of the following:
Copy Copies the photo files to the folder you choose, including any sidecar files.
Copy As DNG Copies photos to the folder you choose and converts any camera raw files to the Digital Negative (DNG)
format.
Note: The Add and Move import methods are not available when importing from a camera or camera card.
Then, select the photos that you want to import. Use the options above and below the preview area to help you select.
All Photos Displays all photos in the selected source location.
New Photos Displays photos in the selected source location that are new since you last imported from this location into
Lightroom and ignores suspected duplicates.
Suspected duplicates are dimmer than other photos in the Grid view and cannot be selected.
Grid view icon ( ) and Loupe view icon ( ) Toggle between Grid and Loupe view in the preview area.
Last updated 4/20/2015
Page 32

Work flows
Check All and Uncheck All Select and deselect, respectively, all photos in the preview area.
Sort Lets you sort the previews by capture time, selected state, filename, or type of media (photos and videos).
You can also use standard key commands to select multiple photos in the Grid view: Shift-click to select contiguous
photos or Ctrl-click (Windows) or Command-click (Mac OS) to select discrete photos. After photos are selected, as
indicated by the light gray border, click a check box in any selected photo border to check them all. Lightroom imports
photos that are checked.
Note: Lightroom supports photos up to 65,000 pixels long or wide, up to 512 megapixels. For a complete list of supported
file formats, see
Supported file formats .
5. Tell Lightroom where to put your photos.
On the right side of the import window, click To and specify where you want to save your copied photos. You can select
a location on your hard drive, on an attached external drive, or on a networked drive.
You can also open the Destination panel on the right side of the import window to create a subfolder in your chosen
location.
27
In Grid view, the Destination Folders option above the preview area shows the path to the folder or folders you've
selected to save the photos.
6. Specify file-handling and other import options.
Use the File Handling, File Renaming, and Apply During Import panels on the right side of the import window to
customize how your photos are imported. For explanations of all of the import options in these panels, see
Specify
import options.
7. Click Import.
Lightroom displays a progress bar in the upper-left corner of the window as it imports the photos. Then it shows you
the thumbnails in the Library module.
More Help topics
Import photos from a tethered camera
Import photos from a folder on a hard drive
Set import preferences
Last updated 4/20/2015
Page 33

Work flows
Smart Previews
About Smart Previews
Importing photographs into your catalog establishes a link between the catalog and the physical file. The photograph
can exist on an internal or external drive. In previous versions of L ightroom, you could edit images t hat were contained
on drives connected to Lightroom.
Smart Previews in Lightroom allow you to edit images that are not physically connected to your computer. Smart
Preview files are a lightweight, smaller, file format, based on the lossy DNG file format.
Advantages of Smart Previews
• Smart Previews are much smaller than the original photos. You can free up disk space on devices with smaller
storage capacities (for example, SSD drives) by choosing to keep original files on a high-capacity external device (for
example, NAS devices or external discs). For example, 500 raw images from a high-end DSLR camera may occupy
14 GB of disk space. The Smart Preview files for the same images amounted to 400 MB of disk space.
• Continue to work with your Smart Preview files even when the device containing your original photographs is
disconnected. You can perform all edits that you would perform on the original file.
28
• Automatically sync any edits made on Smart Preview files with your original files, as soon as the device is
reconnected to your computer.
• Once created, your Smart Preview files are always up-to-date. When your storage device is connected, any edits you
make to the original file are instantly applied to the smart previews as well.
Creating Smart Previews
There are several ways of generating Smart Preview files:
Import. When you import new images into your catalog, select Build Smart Previews (Import dialog > File Handling
section). Smart Previews are created for all the images imported into the catalog.
Export. When you export a set of photographs as a catalog, you can choose to build and include Smart Previews in the
exported catalog. Click File > Export as Catalog, and then select the Build / Include Smart Previews checkbox.
On-the-fly. You can create Smart Preview files on demand. Select the files for which you want Smart Previews, and then
click Library > Previews > Build Smart Previews.
Note: Smart Previews are stored in the [Catalog Name] Smart Previews.lrdata file, located in the same folder as the catalog.
Working with Smart Previews
You can identify the Smart Preview status of a photograph based on the information displayed below the Histogram:
Last updated 4/20/2015
Page 34

Work flows
29
Deleting Smart Previews
Do one of the following:
• In the Library or Develop module, for a photo that has a Smart Preview, click the status Original + Smart Preview
below the Histogram, and then click Discard Smart Preview.
• In Library or Develop module, click Library > Previews > Discard Smart Previews.
Viewing and organizing photos in the Library module
The Library module is where you view, sort, manage, organize, compare, and rate the photos in your catalog. It’s your
home base for working with photos after importing them into Lightroom.
Last updated 4/20/2015
Page 35

Work flows
30
A Library Filter Bar B Image display area C Identity plate D Panels for working with source photos E Filmstrip F Module Picker G Panels for
working with metadata, keywords, and adjusting images H
Toolbar
1. View photos.
The Library module offers several view modes that let you see your photos in different sizes and easily compare them.
Switch between views using the keyboard shortcuts indicated, and see
Survey viewsfor more detail.
Grid view (G) Grid view displays photos as thumbnails in cells, which can be viewed in compact and expanded sizes.
The Grid view gives you an overview of your entire catalog or specific groups of photos for rotating, sorting, organizing,
and managing.
Loupe view (E) Displays a single photo. Controls let you view the entire photo or zoom in to see part of it. Zoom levels
up to 11:1 are available. When you’re in the Grid or Survey view, double-clicking a photo displays the image in Loupe
view.
Zoom in to photos by clicking in the Navigator panel or by selecting a magnification level at the top of the Navigator
panel.
Compare view (C) Displays photos side by side so that you can evaluate them.
Survey view (N) Displays the active photo with selected photos so that you can evaluate them. The active photo has the
lightest colored cell. Change the active photo by clicking a different thumbnail, and deselect a photo in Survey view by
clicking the X
in the lower-right corner of the thumbnail. (See step 2, Select photos , for more about active and
selected photos.)
You can also display any of these views of the Library module in a second window, which you can view on a second
monitor, if you have one. See
Displaying the Library on a second monitor.
Switching between Grid, Loupe, Compare, and
Last updated 4/20/2015
Page 36

Work flows
31
2. Select photos.
The Folders and Collections panels on the left side of the Library module let you select specific folders or collections to
display. Use them to navigate and manage the folders that contain your photos and to view collections of photos.
Click any photo in the Filmstrip or in the preview area to select it. You can select one or more photos using common
selection commands: Shift-click to select photos in a sequence in Grid view, for example, and Ctrl-click (Windows) or
Command-click (Mac OS) to select nonsequential images.
When you select a photo, it becomes the active photo. You can select multiple photos, but only one photo at a time is
the active photo. Selected photos are indicated in the grid and the Filmstrip by a thin border around the thumbnail and
a lighter-gray cell than deselected photos. The lightest colored cell indicates the active photo. See
the Grid view and the Filmstrip.
Selecting photos in
Last updated 4/20/2015
Page 37

Work flows
32
Open and close panels on the left and right side of Lightroom modules by clicking the disclosure triangle next to the
panel name.
3. Find and filter photos.
When you have hundreds or thousands of photos, locating a specific image might not be as easy as simply selecting a
folder or a collection. Luckily, the Library Filter bar at the top of the Grid view can help. The Library Filter bar lets you
find photos by various types of metadata: you can find photos by keyword, rating, color label, and more.
1 Select one or more folders or collections to search. Or, select All Photographs in the Catalog panel.
2 Press \ to display the Library Filter bar if it's not visible.
3 In the Library Filter bar, select a criteria by which to filter. If you want to find all photos with a certain keyword, for
example, click Text.
4 Specify filter criteria. For example, choose Text > Keywords > Contains All and type rodeo in the search box. For a
text filter, press Enter (Windows) or (Return).
Photos that meet your criteria appear in the Grid view.
You can also filter photos by using the Filter menu in the upper-right corner of the Filmstrip.
See Find photos using the Library Filter barand Filter photos in the Filmstrip and Grid view.
Last updated 4/20/2015
Page 38

Work flows
4. Organize your photos.
Collections are one of the basic ways to organize photos in Lightroom. Collections group photos in one place for easy
viewing or for performing different tasks. For example, photos in a collection can be assembled into a slideshow or used
to create a photo book. Collections are listed in the Collections panel of every module, so they can be selected anytime
you need them. See
Another organizational tool in Lightroom is stacking. Stacking is a way to group a set of visually similar photos
together, making them easy to manage. Stacks are useful for keeping multiple photos of the same subject or a photo and
its virtual copies in one place. Stacks also reduce clutter in the Grid view and the Filmstrip. See
stacks.
Finally, you can apply ratings, flags, and color labels to photos. Star ratings are a universal way to rank the quality of a
photo — a 5-star photo is great, a 2-star photo is so-so. Flags are an extension of this idea: flag a photo as a Pick or a
Reject, indicating it's a keeper or that you're not going to process it. Color labels are more individual, and you can use
them in any way that's meaningful. Perhaps photos with a yellow label need a white-balance adjustment, or photos with
a red label need to be cropped. See
Photo collections.
Grouping photos into
Flag, label, and rate photos.
5. Add metadata and keywords to photos.
Applying keywords and metadata are additional tools for organizing and finding photos.
33
Keywords are text metadata that describe the important contents of a photo. You tag photos with keywords using the
Keywording and Keyword Lists panels. For example, select a photo in the Grid view, and in the text entry box in the
Keywording panel, enter words separated by commas. You can also apply keyword sets or apply keywords using the
Painter tool. See
Metadata is a set of standardized information about a photo, such as the photographer’s name; the image resolution and
color space; and copyright information. Most digital cameras attach some basic metadata — such as height, width, file
format, and the time the image was taken — to a photo, but you can edit that information and add more in the Library
module. See
Keywords.
Metadata basics and actions.
Last updated 4/20/2015
Page 39

Work flows
34
6. Make quick adjustments to photos.
The Quick Develop panel lets you quickly apply tone adjustments to photos. The tone adjustments in the Quick
Develop panel in the Library module are the same as their counterparts in the Develop module. However, the Develop
module has more precise controls for editing images. See
Using the Quick Develop panel.
Last updated 4/20/2015
Page 40

Work flows
Editing photos in the Develop module
The Develop module in Lightroom lets you adjust the color and tonal scale of your photos as well as crop photos,
remove red eye, and make other corrections. All the adjustments you make in Lightroom are nondestructive. With
nondestructive editing, your original file is not altered, whether it’s a camera raw file or a rendered file such as a JPEG
or TIFF. Your edits are stored in Lightroom as a set of instructions that are applied to your photo in memory.
Nondestructive editing means you can explore and create different versions of your photo without degrading your
original image data.
The panels along the left side of the Develop module let you select photos, select and preview them at various stages of
editing, and apply global presets. The center of the Develop module provides a viewing and working area. The tools
below the work area provide various functions, from toggling between before-and-after views to turning on soft
proofing. The panels along the right side offer tools and controls for adjusting your photos. See
Develop module tools.
35
A Presets, Snapshots, History, and Collections panels B Toolbar C Histogram D Photo Information E Smart Preview status F To ol str ip
G
Adjustment panels
Because edits are stored in Lightoom as instructions, you do not need to save them in the traditional sense. When you
print or export your photos, the adjustments are included. You only need to save your changes if you want them to be
available to Adobe Bridge or Camera Raw. See
You can edit camera raw, DNG, JPEG, TIFF, PSD, and PNG files in Lightroom. Applying adjustments to photos is a
subjective and individual process. Use the following steps as a guide for editing photos in the Develop module.
1. Select a photo to edit.
Select a photo in the Library module and press D to switch to the Develop module. To switch to a different photo in the
Develop module, choose it from the Collections panel or the Filmstrip.
2. Evaluate the photo.
Synchronize Lightroom metadata with Camera Raw and Adobe Bridge.
Last updated 4/20/2015
Page 41

Work flows
Use the zoom controls in the Navigator panel to inspect your photo and the Hand tool to reposition the photo in the
viewing area. When you move the pointer over the photo in the viewing area, notice that the RGB values appear under
the Histogram. Use the Histogram panel as a visual guide for measuring color tones, as well as to preview shadow and
highlight clipping. You can even drag in the histogram interface to make tonal adjustments to the photo. See
Adjust
images using the histogram.
3. Make global color adjustments.
The Develop module displays panels for making global adjustments to photos on the right side of the window. You can
make Develop module adjustments in any order, but a common approach to using these panels is to start at the top and
work down. Starting with the Basic panel, for example, you can adjust the white balance, tonal scale, and color
saturation of a photo, including Clarity and Vibrance. If desired, you can refine global color and tonal adjustments in
the Tone Curve and HSL/Color/B&W panels. You create special effects or colorize monochrome photos using the Split
Toni n g pa n el. S ee
Working with image tone and color.
36
4. Reduce noise and apply sharpening.
Use the Detail panel to reduce noise and adjust the sharpness in a photo. Use the Lens Corrections panel to correct
perspective distortions caused by the camera lens. See
Sharpening and noise reductionand Correct lens distortion and
adjust perspective.
Use the Before/After button in the toolbar to see the results of your edits, or simply press \ to cycle between before and
after views. Use the History panel to return to any previous edit. Click the plus sign (+) in the Snapshots panel to capture
any editing state that you can return to at a later time.
Last updated 4/20/2015
Page 42

Work flows
37
5. Retouch and correct flaws.
At any time, use the Crop Overlay, Red Eye Correction, and Spot Removal tools to crop and straighten your photo and
to remove red eye, dust, and spots. To apply a postcrop vignette or film grain effect, use the options in the Effects panel.
Adjust crop and rotation, Using the spot removal tool , and Vignette and grain effects.
See
6. Apply local adjustments.
Color correct specific areas of a photo by using the Adjustment Brush tool or the Graduated Filter tool. See Apply local
adjustments.
7. Apply adjustments to other photos.
You can apply edits from one photo to many others. For example, apply a set of edits to all of the photos from a specific
shoot that require the same global adjustments. You can copy and paste them, or synchronize them. When you copy or
synchronize corrections, Lightroom allows you to select the specific edits that you want to apply to the other photos.
You can also use the Painter tool in the Grid view of the Library to apply Develop settings from one photo to another.
Apply Develop adjustments to other photos.
See
8. Soft-proof images.
Last updated 4/20/2015
Page 43

Work flows
If your image will ultimately be printed, you may want to preview how the colors will look using the Soft Proofing panel.
When you're satisfied with your edits, select the Soft Proofing box in the toolbar to replace the Histogram panel with
the Soft Proofing panel. Use the gamut warning icons in the upper corners of the histogram to see which colors are out
of gamut for the monitor and which colors are out of gamut for the selected printing conditions.
Use the Profile and Intent menus to preview different color-managed print conditions. See Soft-proof images.
38
Export photos from Lightroom
In Lightroom, you do not save photos in the traditional sense. Instead, you export photos. You can export photos in
various file formats suitable for a wide range of uses. For example, you can export photos as JPEGs to share online or
as TIFFs for a print publication. You can export to a folder on a computer or to an attached or networked drive,
including Flash drives. If you want to share photos on a CD or DVD, you can burn the photos to a disc after you've
exported them.
When you export photos, you create new files that include Develop module adjustments and other changes you’ve
made to the photos’ XMP metadata. When exporting, you can choose a photo’s filename, color space, pixel dimensions,
and resolution. Export settings can be saved as presets for reuse.
In ad dition, the Pu blish Ser vic es pan el all ows y ou to expor t and upl oad JP EG photos di rectly from Light room to photo sharing websites. You can also upload layouts from the Book module to Blurb.com. See
publish servicesand Create photo books.
To export photos from Lightroom to a computer, hard drive, or Flash drive, follow these basic steps:
1. Select the photos to export.
Select photos from the Grid view or the Filmstrip. See Selecting photos in the Grid view and the Filmstrip.
Last updated 4/20/2015
Post photos online using
Page 44

Work flows
2. Open the Export dialog box.
Choose File > Export or click the Export button in the Library module. Then, choose Export To > Hard Drive in the
pop-up menu at the top of the Export dialog box.
39
To export to a Flash drive, choose Export To > Hard Drive, and in the Export Location panel, choose Export To >
Specific Folder. Then, click Choose and navigate to the Flash drive.
3. (Optional) Choose an export preset.
Lightroom has several presets to make it easier to export photos to disk in specific file formats. For example, the For
Email preset generates a 72-dpi JPEG image and automatically sends the email from Lightroom. If desired, select a
preset from the left side of the Export dialog box and skip to step 6. See
Export photos using presets .
4. Specify export options.
Specify a destination folder, naming conventions, and other options in the various Export dialog box panels.
For example, use the File Settings panel to choose a format for your exported photos — JPEG, PDF, TIFF, DNG, or the
original format — and choose a color space. See
File Settings.
In the Image Sizing panel, specify how to size the image — dimensions and resolution. See Image Sizing.
For information on settings in the other panels, see Export files to disk or CD.
Last updated 4/20/2015
Page 45

Work flows
5. (Optional) Save your export settings.
To save your export settings for reuse, click Add at the bottom of the Preset panel on the left side of the Export dialog
box. See
6. Click Export.
Save export settings as presets.
Edit Lightroom photos in Photoshop or Photoshop
40
Elements
Lightroom allows you to open and edit your photos in Adobe Photoshop, Adobe Photoshop Elements, or another
photo-editing application. Lightroom automatically uses Photoshop or Photoshop Elements as the external editor if
you have either application installed on your computer. You can also specify an external editor in Lightroom
preferences.
When you open a photo from Lightroom directly in Photoshop CS3 or later, you have several options. You can edit the
photo in its current format, or open it as a Smart Object. You can also merge a series of shots into a panorama, merge
to HDR, or open two or more photos as one layered image in Photoshop. When you save edits to a photo in Photoshop,
Lightroom automatically imports the new photo into the catalog.
To edit a photo using Photoshop or Photoshop Elements from within Lightroom, you must have one of those
applications installed on your computer. Then follow these steps:
1. Set or check your external editor.
1 In Lightroom, choose Edit > Preferences (Windows) or Lightroom > Preferences (Mac OS).
2 Click the External Editing tab. If Photoshop or Photoshop Elements is installed on your computer, it appears as the
designated external editor.
3 If desired, under Additional External Editor, click Choose and navigate to and select a program or application.
See External editing preferencesfor more on the options in this dialog box.
Last updated 4/20/2015
Page 46

Work flows
41
2. Select a photo to edit.
In the Lightroom Library or Develop module, select one or more photos and choose one of the following:
• Photo > Edit In > Edit In Adobe Photoshop [version number]
• Photo > Edit In > Edit In Adobe Photoshop Elements [version number]
See Open photos as Smart Objects in Photoshop, Merge photos as panoramas in Photoshop, Merge photos to HDR in
Photoshop, and Open photos as layers in Photoshopfor more on those commands.
If you’re opening a camera raw file in Photoshop CS3 or later, Photoshop opens the photo directly.
If you’re opening a TIFF, JPEG, or PSD file, choose to open a copy of the photo with Lightroom adjustments applied,
or open a copy of the original photo.
Last updated 4/20/2015
Page 47

Work flows
See Open photos in Photoshopor Open photos in Photoshop Elements.
3. Edit in Photoshop or Photoshop Elements.
Lightroom opens your photo in Photoshop or Photoshop Elements.
Perform your desired edits in that application, and when you’re ready, choose File > Save.
3. Return to Lightroom.
42
Switch back to Lightroom. In the Library Grid view, a new version of your photo appears next to the original. The new
photo contains the edits you made in Photoshop or Photoshop Elements. The original photo is untouched.
Note: When saving from Photoshop or Photoshop Elements, be sure to turn on the Maximize Compatibility option so that
Lightroom can read the images. Photoshop CS3 and later automatically save PSD files from Lightroom with maximum
compatibility.
Print photos from Lightroom
The Print module lets you specify the page layout and print options for printing photos and contact sheets on your
printer.
The left panels contain a list of templates and a preview of their page layouts. The area in the center of the Print module
displays the photos in the chosen template. The right panels contain controls for specifying how the photos appear in
the layout; modifying the template; adding text to the printed page; and selecting settings for print color management,
resolution, and sharpening. See
Print module panels and tools.
Last updated 4/20/2015
Page 48

Work flows
A Template Browser and Collections panels B Show Previous Page and Show Next Page buttons C Page number D Panels for specifying layout
and output options
43
To print photos from Lightroom, follow these basic steps:
1. Select the photos you want to print.
In the Library module, use the Grid view or the Filmstrip to select the photos you want to print. See Selecting photos
in the Grid view and the Filmstrip.
You can also select a folder or a collection of photos using the Folders or Collections panel.
2. Choose the page size.
Switch to the Print module and click the Page Setup button in the lower-left corner of the module. Choose a page size
by doing one of the following:
• (Windows) In the Paper area of the Printing Preferences or Print Setup dialog box, choose a page size from the Size
menu. Then, click OK.
• (Mac OS) In the Page Setup dialog box, cho ose a printer from the Format For menu and choose a page size from the
Paper Size menu. Then, click OK.
Important: Leave the Scale set to 100% and make size adjustments in Lightroom.
3. Choose a template.
A template provides a basic layout for your photo prints. Lightroom includes three types of print templates:
1 Single Image/Contact Sheet templates let you print one or more photos, all at the same size, on a page.
2 Picture Package templates let you print one photo in multiple sizes on a page.
3 Custom Package templates let you print multiple photos at various sizes on one or more pages.
Lightroom print templates scale the photos to accommodate the paper size you choose.
On the left side of the Print module, move the pointer over a name in the Template Browser; a preview of the template
appears in the Preview panel above the Template Browser. Click a template name to select it for the photo or photos you
want to print. See
About print templatesand Choose a print template.
Last updated 4/20/2015
Page 49

Work flows
After you select a template, look in the Layout Style panel, at the top of the right side of the module, to see whether it's
a Single Image/Contact Sheet, Picture Package, or Custom Package template.
4. Add or remove photos from the layout.
Depending on the type of template you choose, you may need to add, change, or remove photos from the layout.
• For Single Image/Contact Sheet templates and Picture Package templates, select one or more photos in the Filmstrip
to add them to image cells in the preview area. Deselect photos in the Filmstrip to remove them from the template.
• For Custom Package templates, drag a thumbnail from the Filmstrip to image cell in the preview area.
5. (Optional) Customize the template.
For Single Image/Contact Sheet layouts, modify the template using the controls in the Image Settings and Layout
panels. For example, zoom to fill the photos in the cell, add a stroke border, and adjust margins and cell size. You can
also drag the guides in the preview area to resize cells.
For Picture Package and Custom Package templates, you can drag cells freely in the preview area and specify options in
the Image Settings panel. Use the Rulers, Grid & Guides panel to adjust the display of the work area. Use the Cells panel
to add new cells or pages to the layout.
44
See Specify how photos fill an image cell, Specify rulers and guides, Modify page margins and cell size (Single
Image/Contact Sheet layouts), and Print borders and strokes in Picture Package and Custom Package layouts.
6. (Optional) Add text and other extras.
In the Page panel, specify whether to print a background color, your identity plate, and a copyright watermark. See
Printing overlay text and graphics.
7. Specify output settings.
In the Print Job panel, do any of the following:
• Specify a print resolution or leave the setting at its default (240 ppi). See Set print resolution.
Last updated 4/20/2015
Page 50

Work flows
• Specify how color management is handled for your photos. Choose from the Profile and Rendering Intent pop-up
menus. See
Set print color management.
• Select whether to use Draft Mode Printing. See Print in draft mode.
• Select 16 Bit Output to print to a 16-bit color printer on Mac OS 10.5 or higher.
• Select whether to sharpen the photos. If you select Print Sharpening, use the pop-up menus to choose how much
sharpening to apply and whether you want to sharpen for matte or glossy paper. See
Sharpen a photo for print.
• To achieve colors that more closely resemble the bright and saturated look of onscreen colors, select Print
Adjustment and drag the Brightness and Contrast sliders.
Note: Print adjustments do not preview onscreen. It may take some experimentation to determine what Brightness and
Contrast settings work best for your photos and your printer.
8. Check printer settings.
Click Printer (in the lower-right corner) and Print Settings (in the lower-left corner), in turn, to check that the options
for your device are configured as you desire. If you want Lightroom to manage color, turn off any color management
in the printer settings.
9. Click Print.
10. (Optional) Save the layout as a custom template or as a print collection.
45
If you plan to reuse your settings, including layout and overlay options, save the settings as a custom print template. Or
save the settings as a print collection to preserve a set of specific Print module options with a collection of photos. See
Work with custom print templatesand Save print settings as a print collection.
Create web galleries in Lightroom
The Web module lets you create web photo galleries, which are websites that feature your photography. In a web gallery,
thumbnail versions of images link to larger versions of the photos, on the same page or on another page.
The panels on the left side of the Web module in Lightroom contain a list of templates and previews of their page
layouts. The center pane is the image display area, which automatically updates as you make changes and lets you
navigate between the pages in your gallery. Panels on the right have controls for specifying how the photos appear in
the template layout, modifying the template, adding text to the web page, previewing the web gallery in a browser, and
specifying settings for uploading the gallery to a web server. See
Web m o dul e pa n els a n d to ols .
Last updated 4/20/2015
Page 51

Work flows
A Type of w eb g all er y B Te m p l ate B row s e r C Preview button D Navigation buttons E Panels for customizing layout and specifying output
options
46
Lightroom can create two types of web galleries:
HTML Gallery Produces a web page of thumbnail images that link to pages with larger versions of the photos. Airtight
galleries are HTML.
Flash Gallery Produces a website with different views: a row of thumbnail images that display a larger version of the
photos, and a navigable slideshow. View these galleries in a browser using Adobe Flash® Player.
To create a web gallery in Lightroom, follow these basic steps:
1. Select the photos you want to include in your gallery.
In the Library module, select images in the Grid view or Filmstrip. See Selecting photos in the Grid view and the
Filmstrip.
In the Library module, you can also use the Folders or Collections panel to select a folder or a collection of photos to
use in the web gallery.
2. Arrange the photo order.
Switch to the Web module. The photos you selected appear in both the Filmstrip and in the work area in the center of
the Web module.
If your source photos are in a collection or a folder that doesn't contain any subfolders, drag photos in the Filmstrip to
rearrange them in the order that you want them to appear in the gallery. See
Rearrange web gallery photo order.
You can filter the photos in the Filmstrip of the Web module by clicking the Use pop-up menu in the toolbar and
choosing All Photos, Selected Photos, or Flagged Photos.
3. Choose a template for the gallery.
On the left side of the Web module, move the pointer over a name in the Template Browser; a preview of the template
appears in the Preview panel above the Template Browser. Click a template name to select it for your galler y. See
Choose
a web gallery template.
Last updated 4/20/2015
Page 52

Work flows
4. Enter website information.
In the Site Info panel on the right side of the module, type a title for your website (Site Title), a title for your gallery
(Collection Title), and a description (Collection Description). You can also enter your e-mail address so that visitors to
your gallery can click your name to send you an email. See
Add titles, description, and contact information to web
photo galleries.
47
5. (Optional) Customize the gallery's look and layout.
In the Color Palette panel on the right side of the module, click the color box next to an element to choose a new color
for it. See
Choose colors for gallery elements.
In the Appearance panel, modify the gallery layout by setting the Grid Pages and Image Pages options (for HTML
galleries) or by choosing an option from the Layout menu and choosing a size for Large Images and Thumbnail Images
(for Flash galleries). See
Specify the appearance of Lightroom HTML galleriesand Specify the appearance of Lightroom
Flash galleries.
Last updated 4/20/2015
Page 53

Work flows
48
6. Add titles and captions to images.
In the Image Info panel, choose the metadata you want to display as the title and caption for each photo. Leave the Title
and Caption boxes deselected if you don’t want text to appear under the photos. See
Display photo titles and captions
in web photo galleries.
7. (Optional) Add a copyright watermark.
Display a copyright watermark on web gallery photos by selecting a watermark in the Output Settings panel. See
Display a copyright watermark in web photo galleries.
8. Specify output settings.
In the Output Settings panel, specify the quality of the enlarged view of your photos and whether to apply output
sharpening.
9. Preview your web gallery in a browser.
At the lower-left corner of the Web module, click Preview In Browser. Lightroom opens a preview of your web gallery
in your default browser. See
Preview a web photo gallery.
10. Export or upload your web photo gallery.
Last updated 4/20/2015
Page 54

Work flows
After you finish your gallery, you can either export the files to a specific location or upload the gallery to a web server.
In the Upload S ettings panel, choose Web Ser ver from the FTP Ser ver menu, or choose Edit Settings to specify settings
in the Configure FTP File Transfer dialog box. If necessary, consult your ISP for help with FTP settings. See
export, and upload web photo galleries .
11. (Optional) Save the layout as a custom template or as a web collection.
If you plan to reuse your web gallery settings, including layout and upload options, save the settings as a custom web
template. Or save the settings as a web collection to preserve a set of specific Web module options with a collection of
photos. See
Create custom web gallery templatesand Save web settings as a web collection.
Preview,
Create slideshows in Lightroom
Most of the work of creating sl idesh ows i s done in the Sl idesh ow mo dule, whe re you can s elect l ayout t empl ates , choo se
transitions, and set playback options.
In the Slideshow module, the left panels contain a list of templates and previews of their layouts. The Slide Editor view
in the center of the workspace displays the photos in the selected slide template. The toolbar below the Slide Editor
contains controls for playing a preview of the slideshow, refining the selection, and adding text to the slides. The right
panels contain controls for modifying the template, adding text to the slide layout, and selecting playback settings. See
Slideshow module panels and tools.
49
A Slide Editor view B Template prev i ew C Slideshow templates and Collections D Playback controls E Rotate and Add Text tools F Panels for
setting layout and playback options
You can also play an "impromptu" slideshow in any module by choosing Window > Impromptu Slideshow. An
impromptu slideshow uses the current template and settings in the Slideshow module. Playing an impromptu slideshow
in the Library module is a convenient way to quickly view images in a folder at full-screen size and rate, rotate, or delete
photos using keyboard shortcuts.
To create a slideshow in Lightroom, follow these basic steps:
Last updated 4/20/2015
Page 55

Work flows
1. Select the photos you want to include in your slideshow.
In the Library module, select photos in the Grid view or Filmstrip. Or use the Folders or Collections panel to select an
entire folder or a collection of photos to use for the slideshow. See
Selecting photos in the Grid view and the Filmstrip.
2. Arrange the slide order.
Switch to the Slideshow module. If your source photos are in a collection or in a folder that doesn't contain any
subfolders, drag the photos in the Filmstrip to arrange them in the desired order. See
Rearrange slide order.
Alternatively, let Lightroom choose the order in which the slides play: In the Playback panel on the right side of the
Slideshow module, select Random Order. See
Randomize the slide order.
3. Choose a template for the slideshow.
A template provides a basic layout for your slides.
On the left side of the Slideshow module, move the pointer over a name in the Template Browser; a preview of the
template appears in the Preview panel above the Template Browser. Click a template name to select it for your slideshow.
Choose a slideshow template.
See
4. (Optional) Customize the template.
Customize your slideshow by modifying the options in the Options, Layout, Overlays, Backdrop, and Titles panels. For
example, add a drop shadow; specify whether to show your identity plate or a caption; and specify a color or image for
the background. See
Adding overlays to slidesand Set the slide background.
50
5. Set playback options.
Using the options in the Music and Playback panels, set slide duration and transition options. You can also specify
introductory and ending slides, and select a music playlist to accompany the slideshow. See
Set slide and transition
durationand Play music with a slideshow.
Last updated 4/20/2015
Page 56

Work flows
51
6. Preview or play the slideshow.
Click the Preview button in the lower-right corner of the Slideshow module to see the slideshow play in the Slideshow
Editor view. Click the Play button to play the slideshow in full-screen mode. Use the buttons in the toolbar to pause,
stop, or advance slides. See
Preview a slide showand Play a slideshow.
7. (Optional) Export the slideshow.
To share your slideshow, save it as an MP4 video that can play with transitions and music. Or, save it as a static PDF
document that others can open. Click the Export Video or Export PDF button in the lower-left corner of the Slideshow
module. See
Export a slideshowfor information on the video and PDF options.
8. (Optional) Save the layout as a custom template or as a slideshow collection.
Save your slideshow layout as a custom template so you can reuse it easily. Or save the slideshow settings as a slideshow
collection. A slideshow collection lets you easily return to a specific set of slide show options for a collection of photos.
Create custom slideshow templatesand Save slideshow settings as a slideshow collection.
See
Last updated 4/20/2015
Page 57

Chapter 4: Workspace
Workspace basics
Lightroom application interface
Lightroom is a complete toolbox for professional photographers, organized into modules. Each module focuses on a
specific portion of the photographic workflow: the Library module is for importing, organizing, comparing, and
selecting photos; the Develop module is for adjusting color and tone, or creatively processing photos; and the Slideshow,
Print, and Web modules are for presenting your photos.
Each of the modules in the Lightroom workspace includes panels that contain options and controls for working on your
photos.
52
A Library Filter bar B Image display area C Identity plate D Panels for working with source photos E Filmstrip F Module Picker G Panels for
working with metadata, keywords, and adjusting images H
The Filmstrip, located at the bottom of the workspace in every module, displays thumbnails of the contents of the folder,
collection, keyword set, or metadata criteria that is currently selected in the Library module. Each module uses the
contents of the Filmstrip as the source for the tasks performed in it. To change the selection in the Filmstrip, go to the
Library module and select different photos. See
Toolbar
Filmstrip.
Last updated 4/20/2015
Page 58

Workspace
To work in Lightroom, first select the images you want to work with in the Library module. Then click a module name
in the Module Picker (upper-right in the Lightroom window) to begin editing, printing, or preparing your photos for
presentation in an on-screen slide show or web gallery.
53
Hold down Ctrl+Alt/Command+Option and press a number from 1 through 5 to switch to any of the five modules.
The activity monitor displays over the identity plate when Lightroom is busy with a task.
• To cancel a process, click the X beside the progress bar.
• To switch and view another process in progress, click the triangle beside the progress bar
Managing panels and the screen view
You can customize the Lightroom workspace by displaying only the panels you want or by hiding some or all of the
panels to maximize the display of your photos.
Open or close a panel
❖ Click the panel header. To open or close all panels in a group, Ctrl-click (Windows) or Command-click (Mac OS) a
panel name.
Open or close one panel at a time
❖ Right-click (Windows) or Control-click (Mac OS) on a panel header and choose Solo mode, or Alt-click (Windows)
or Option-click (Mac OS) on a panel header.
Solo mode applies independently to a set of panels. The triangle in the panel header is solid when not in Solo mode.
Scroll through a group of panels
❖ Drag the scroll bar or use the scroll wheel on your mouse.
Show or hide panel groups
• To show or hide a single panel group, click the Show/Hide Panel Group icon . A solid icon indicates the panel
group is showing.
• To show or hide both side panel groups, choose Window > Panels > Toggle Side Panels, or press the Tab key.
• To hide all panels, including side panels, the Filmstrip, and Module Picker, choose Window > Panels > Toggle All
Panels, or press Shift-Tab.
Set how panel groups show or hide automatically
❖ Right-click (Windows) or Control-click (Mac OS) the outside edge of the panel group (beyond the scroll bar) and
then choose an option:
Auto Hide & Show Displays the panel as you move the pointer to the outside edge of the application window. Hides
the panel as you move the pointer away from the panel.
Auto Hide Hides the panel as you move the pointer away from the panel. You must open the panel manually.
Manual Turns off automatic show/hide behavior.
Sync With Opposite Panel Applies the same hide/show panel behavior to the left and right panels or to the top and
bottom panels.
Last updated 4/20/2015
Page 59

Workspace
Resize the width of a panel group
❖ Move the pointer over the inside edge of a panel group, and when the pointer becomes a double-arrow, drag the
panel.
Remove or restore a panel from a group
If you don’t use a panel often, you can hide it from view.
❖ Right-click (Windows) or Control-click (Mac OS) on any panel header in the group, and then choose the panel
name.
Change the Lightroom screen mode
You can change the screen display to hide the title bar; the title bar and the menus; or the title bar, menus, and panels.
• Choose Window > Screen Mode, and then choose an option.
• When in Normal, Full Screen With Menubar, or Full Screen mode, press the F key to cycle through those three
modes.
• Press Ctr l+A lt+ F (Win dow s) or Co mma nd+Opt ion +F ( Mac OS ) to swi tch to Normal scr een mod e fr om Ful l Scr een
With Menubar or Full Screen mode.
• Press Shift+Ctrl+F (Windows) or Shift+Command+F (Mac OS) to enter Full Screen And Hide Panels mode, which
hides the title bar, menus, and panels.
54
• When in Full Screen And Hide Panels screen mode, press Shift-Tab and then the F key to display the panels and
menu bar.
Note: Full Screen mode and Full Screen And Hide Panels mode in Mac OS hide the Dock. If you start Lightroom and do
not see the Minimize, Maximize, or Close buttons for the application, press the F key once or twice until they appear.
Turn off all settings in a panel
You can temporarily turn off all the settings in a panel of the Develop module or the filtering in the Filmstrip.
❖ Click the Panel On/Off icon .
Dim or hide the Lightroom interface
Use Lights Out to dim or black out the Lightroom interface so that your photo stands out on screen.
❖ Choose Window > Lights Out and then choose an option. You can press the L key to cycle through the three options.
Customize Lights Out in the Interface Preferences by specifying the dim level and screen color.
The toolbar
You can hide the toolbar or customize it in the Library and Develop modules to include the items you need.
Show controls in the Library module toolbar
Depending on which view is active in the Library module, the toolbar contains controls for browsing photos, applying
metadata, starting an impromptu slide show, rotating photos, and applying ratings, flags, or labels. The toolbar Info box
displays the filename of the selected photo.
1 To show controls in the toolbar, choose any of the following from the toolbar pop-up menu:
View Modes Lets you select Grid View, Loupe View, Compare View, or Survey View.
Last updated 4/20/2015
Page 60

Workspace
Painter (Grid view only) Lets you apply keywords and other attributes quickly by dragging the Painter tool across
photos.
Sorting (not available in Compare view) Specifies the sort direction or sorting criteria for displaying the photo
thumbnails.
Flagging Assigns, removes, and displays a Pick or Rejected flag for selected photos.
Rating Assigns, removes, and displays rating stars for selected photos.
Color Label Assigns, removes, and displays color labels for selected photos.
Rotate Rotates selected photos clockwise or counterclockwise.
Navigate Selects the previous or next image.
Slideshow Plays an impromptu slide show of the photos.
Thumbnail Size (Grid view only) Sets the size of the photo thumbnails.
Zoom (Loupe view only) Zooms the view in or out.
Info Displays the filename of the selected photo.
Compare (Compare view only) Displays options for zooming, swapping, and selecting compared photos.
Label (Survey view only) Displays Survey view label.
55
2 (Optional) Choose a selected item in the toolbar pop-up menu to remove the control from the toolbar.
Show or hide the toolbar
❖ Choose View > Show/Hide Toolbar or press the T key to toggle the toolbar on or off.
Change toolbar icons
❖ On the right side of the toolbar, click the menu and select or deselect items to display in the toolbar.
Setting preferences for working in Lightroom
You can set preferences to change the Lightroom user interface.
IMPORTANT
If you reset your preferences without noting your current catalog name and location, it can appear that your catalog has
disappeared when you restart Lightroom.
Before you reset your preferences, refer to this technote, which contains steps to avoid this confusion.
Open the Preferences dialog box
• On Windows, choose Edit > Preferences.
• On Mac OS, choose Lightroom > Preferences.
Restore preferences to default settings
1 Navigate to the following location:
Mac OS /Users/[user name]/Library/Preferences/
Last updated 4/20/2015
Page 61

Workspace
Windows 7 and 8 Users\[user name]\AppData\Roaming\Adobe\Lightroom\Preferences\
2 Drag the following file to the Recycle Bin (Windows) or to the Trash (Mac OS):
Mac OS com.adobe.Lightroom5.plist or com.adobe.Lightroom6.plist
Windows Lightroom 5 Preferences.agprefs or Lightroom 6 Preferences.agprefs
Note: See Preference and other file locations in Lightroom 5 for more information on important Lightroom files.
Reset presets to their original settings
❖ In the Presets Preferences, click any of the Restore buttons in the Lightroom Defaults area.
Restore prompts you chose not to display
❖ In the General Preferences, click Reset All Warning Dialogs in the Prompts area.
Change the interface font size or the panel end marker
❖ In the Interface Preferences, choose options from the Panels menus.
56
Change the language setting
Lightroom can display menus, options, and tool tips in multiple languages.
1 Choose Edit > Preferences (Windows) or Lightroom > Preferences (Mac OS).
2 In the General tab, choose a language from the Language pop-up menu.
3 Close Preferences and restart Lightroom.
The new language takes effect the next time you start Lightroom.
More Help topics
Set import preferences
Customize catalog settings
Setting Library view options
Displaying the Library on a second monitor
You can open a window that displays a second view of the Library. This second window displays the photos that are
selected in the Library module, and uses the Library module view options that are specified in the primary Lightroom
window for Grid and Loupe view. The second window can stay open regardless of which module you’re working in, so
it’s easy to view and select different photos at any time. If you have a second monitor connected to the computer that
runs Lightroom, you can display the second window on that screen.
When working with multiple windows, Lightroom applies commands and edits to the photo or photos that are selected
in the main application window regardless of what is selected in the second window. To apply a command to one or
more selected photos in the second window, right-click (Windows) or Control-click (Mac OS) the selected photos in
Grid, Compare, or Survey view in the second window and choose a command.
1 Click the Second Window button in the Filmstrip to open the second window.
Last updated 4/20/2015
Page 62

Workspace
By default, the second window opens the selected photo in Loupe view. If you have a second monitor connected to
the computer, the second window automatically opens on that monitor in full-screen display. Otherwise, Lightroom
opens a floating Secondary Display window.
57
2 To change the view mode of the Lightroom Library second window, right-click the Second Window button and
choose an option from the menu. Or, click Grid, Loupe, Compare, or Survey in the second window. If you have a
second monitor, you can also select the Slideshow option.
3 Specify view options.
Grid Resize thumbnails by dragging the Thumbnails slider and filter photos using the Library Filter bar. See Find
photos using the Library Filter bar.
Loupe Choose Normal, Live, or Locked. Normal displays the most-selected photo from the primary window. Live
displays the photo that is under the pointer in the Filmstrip or Grid view in the primary window. Locked displays
the selected photo even if you choose a different photo in the primary window. In all Loupe modes in the second
window, you can adjust the zoom level.
You can lock any photo by right-clicking (Windows) or Control-clicking (Mac OS) it in the main window and
choosing Lock To Second Monitor. Or select the photo and press Ctrl+Shift+Enter (Windows) or
Command+Shift+Return (Mac OS). The photo that is currently locked to the second monitor displays a secondwindow badge
Compare Offers the same functionality as the Compare view in the primary window. See Comparing photos in the
in the Filmstrip and in the thumbnail in Grid view of the main window.
Library module.
Survey Offers the same functionality as the Survey view in the primary window. See Comparing photos in the
Library module.
Slideshow (Available with a second monitor) Allows you to play a full-screen slide show of the currently selected
folder or collection on a second monitor. Click Play to play the slide show; click the slide or press Esc to end it. To
override the current options in the Slideshow module for Intro Screen, Pause On Intro, Ending Screen, and Repeat,
select Override and then select the option.
4 (Available with a second monitor) Display the second window as a floating window by clicking the Second Monitor
button in the main window and deselecting Full Screen.
Last updated 4/20/2015
Page 63

Workspace
5 (Available in Full Screen mode on a second monitor) Click the Second Monitor button in the main window and
choose Show Second Monitor Preview to open a small floating window that lets you remotely control the second
monitor display. Use the Second Monitor preview window to toggle between Grid, Loupe, Compare, Survey, and
Slideshow views on the second monitor. You can also use the Second Monitor preview window to control playback
of the slide show. The Second Monitor preview window is meant to be used when your second monitor is not visible
from your location.
6 To close the second window, click the Second Window button, or click it and deselect Show.
Personalizing identity plates andmodule buttons
You can personalize the Lightroom interface, slide shows, and printed output using identity plates that include your
name and logo.
1 Do one of the following to open the Identity Plate Editor:
• Choose Edit > Identity Plate Setup (Windows) or Lightroom > Identity Plate Setup (Mac OS).
• In the Overlays panel of the Slideshow module or the Page panel of the Print module, click the Identity Plate
preview and choose Edit from the pop-up menu.
58
2 In the Identity Plate Editor, select one of the following:
Use A Styled Text Identity Plate Uses the text you enter in the box with the font characteristics that you specify in
the menus below the box.
Ti p: (Mac OS) To create a multiline text identity plate, press Option+Return in the text box. Lightroom displays just
the first line of an identity plate to the left of the Module Picker. However, all lines appear when the identity plate is
selected as an output overlay in the Slideshow, Print, or Web module.
Use A Graphical Identity Plate Uses a graphic that is no more than 57 pixels high (Mac OS) or 46 pixels high
(Windows) that you drag into the box. The graphic can be a BMP, JPG, GIF, PNG, or TIFF (Windows) or JPG, GIF,
PNG, TIFF, PDF, or PSD (Mac OS). The resolution of graphical identity plates may be too low for printed output.
3 Choose Save As from the Enable Identity Plate menu, and give your identity plate a name.
4 To display your identity plate on the left side of the Module Picker, select Enable Identity Plate and choose one of
your saved identity plates from the menu to the right.
5 In the pop-up menus in the right side of the dialog box, customize the font, size, and color of the Module Picker
buttons. The first color picker box sets the color of the current module, and the second box sets the color for
unselected modules.
Using the Watermark Editor
Create a copyright watermark
1 In any module, choose Edit > Edit Watermarks (Windows) or Lightroom > Edit Watermarks (Mac OS).
2 In the Watermark Editor dialog box, select a Watermark Style: Text or Graphic.
Last updated 4/20/2015
Page 64

Workspace
3 Do either of the following:
• (Text watermark) Type the text under the preview area and specify Text Options: font, style, alignment, color,
and drop shadow. OpenType fonts are not supported.
• (Gr aph ic wat erm ark) Click Choos e i n th e Ima ge O ption s pan e an d then nav igat e to a nd ch oose t he PNG or J PEG
that you want to use.
4 Specify Watermark Effects:
Opacity Adjust the level of transparency of the watermark.
Size Proportional scales the watermark larger or smaller. Fit sizes the watermark across the width of the photo. Fill
sizes the watermark to fill the height and width of the photo.
Inset Repositions the watermark horizontally or vertically in the photo.
Anchor Anchor the watermark to one of nine anchor points in the photo, and rotate the watermark left or right.
If you have trouble seeing the watermark on final images, experiment with a larger size or different position on the
photo.
Manage copyright watermarks
• In any module, choose Edit > Edit Watermarks (Windows) or Lightroom > Edit Watermarks (Mac OS).
• If you have multiple photos selected in the Filmstrip, click the Left and Right navigation arrow buttons to
preview the watermark on each photo.
59
• To save the current settings as a preset and exit the Watermark Editor, click Save. To save the watermark and
continue working in the Watermark Editor, click the preset menu (in the upper-left corner of the window) and
choose Save Current Settings As New Preset. Type a name in the New Preset dialog box and click Create.
• To select a watermark, choose it in the preset menu in the upper-left corner of the window.
• To edit a watermark, choose it in the preset menu and change the settings. Then, click the preset menu again and
choose Update Preset “[name].”
• To rename a copyright watermark, choose it in the preset menu, then click the menu again and choose Rename
Preset “[name].”
• To delete a copyright watermark, choose it in the preset menu, then click the menu again and choose Delete Preset
“[name].”
Apply a copyright watermark to images
For instructions on how to apply copyright watermarks to photos, see:
• Export files to disk or CD
• Display a copyright watermark in a slideshow
• Print photos with a copyright watermark
• Display a copyright watermark in web photo galleries
Color management
Last updated 4/20/2015
Page 65

Workspace
The color conundrum
No device in the digital photographic workflow can reproduce the full range of colors viewable to the human eye. Each
device operates within a specific color space, which simply describes a range, or gamut, of colors that the device can
record, store, edit, or output. Some color spaces are bigger than others. For example, the CIE Lab space is large; the
sRGB space, used by many web browsers, is relatively small.
In addition, each device describes color either additively, using the RGB color model, or subtractively, using the CMYK
color model. RGB is used by cameras and monitors; printers use CMYK.
60
A Lab color space B An image's color spaces C Device color spaces
Because of these varying color spaces, colors often look different depending on where you view them. Color
management systems use profiles to reconcile color differences among devices so that you can confidently predict the
color that you'll see when you share or print photos.
A Profiles describe the color spaces of the camera and the image. B Using the profiles, the color management system identifies the image's actual
colors. C
The monitor's profile tells the color management system how to translate the image's colors to the monitor's color space. D Using the
printer profile, the color management system translates the image's colors to the printer's color space, so the colors appear correctly in print.
Last updated 4/20/2015
Page 66

Workspace
Lightroom simplifies color management by displaying colors using device-independent color spaces. This means that
all you need to do before working in Lightroom is to
color settings or color profiles when you’re ready to output your photos.
Calibrate your monitor. Then, when you’re in Lightroom, choose
How Lightroom manages color
Lightroom primarily uses the Adobe RGB color space to display colors. The Adobe RGB gamut includes most of the
colors that digital cameras can capture as well as some printable colors (cyans and blues, in particular) that can’t be
defined using the smaller, web-friendly sRGB color space.
Lightroom uses Adobe RGB:
• for previews in the Library, Map, Book, Slideshow, Print, and Web modules
• when printing in Draft mode
• in exported PDF slideshows and uploaded web galleries
• when you send a book to Blurb.com (If you export books as PDF or JPEG from the Book module, however, you can
choose sRGB or a different color profile.)
• for photos uploaded to Facebook and other photo-sharing sites using the Publish Services panel
In the Develop module, by default Lightroom displays previews using the ProPhoto RGB color space. ProPhoto RGB
contains all of the colors that digital cameras can capture, making it an excellent choice for editing images. In the
Develop module, you can also use the Soft Proofing panel to preview how color looks under various color-managed
printing conditions.
61
A Image is edited in the Develop module. B Image's color values are translated to the color space of chosen print conditions C Lightroom displays
proof profile's interpretation of the image's color values.
When you export or print photos from Lightroom, you can choose a profile or a color space to determine how the
colors you see in Lightroom will appear on the device you’re sending the photo to. For example, you can export using
sRGB if you’re going to share photos online. If you’re printing (other than Draft mode), you can choose a custom color
profile for your device.
See File Settingsand Set print color management.
Calibrate your monitor
To help Lightroom display colors reliably and consistently, calibrate your monitor. When you calibrate your monitor,
you are adjusting it so that it conforms to a known specification. After your monitor is calibrated, you can optionally
save the settings as a color profile for your monitor.
1 If you are calibrating a CRT monitor, make sure it has been turned on for at least a half hour. This gives it sufficient
time to warm up and produce more consistent output.
2 Set the ambient lighting in your room to be consistent with the brightness and color of the lighting conditions that
you usually work under.
Last updated 4/20/2015
Page 67

Workspace
3 Make sure your monitor is displaying thousands of colors or more. Ideally, make sure it is displaying millions of
colors or 24-bit or higher.
4 Remove colorful background patterns on your monitor desktop, and set your desktop to display neutral grays. Busy
patterns or bright colors surrounding a document interfere with accurate color perception.
5 For best results, calibrate and profile your monitor using third-party software and measuring devices. In general,
using a measuring device such as a colorimeter along with software can create more accurate profiles because an
instrument can measure the colors displayed on a monitor far more accurately than the human eye.
Otherwise, use the monitor calibration tools that come with Windows or Mac OS. To calibrate your monitor using
the utility in your operating system see one of the following:
• OS X Mavericks: Calibrate your display (Apple Support)
• OS X Mountain Lion: Calibrate your display (Apple Support)
• Calibrate your display in Windows 7 (Microsoft Support)
• Get the best display on your monitor (Microsoft Support)
Note: Monitor performance changes and declines over time; recalibrate and profile your monitor every month or so. If
you find it difficult or impossible to calibrate your monitor to a standard, it may be too old and faded.
Most profiling software automatically assigns the new profile as the default monitor profile. For instructions on how to
manually assign the monitor profile, see your operating system’s Help.
62
Install a color profile
Color profiles are often installed when a device is added to your system. The accuracy of these profiles (often called
generic profiles or canned profiles) varies from manufacturer to manufacturer. You can also obtain profiles from a
custom profile service, download profiles from the web, or create custom profiles using professional profiling
equipment.
1. To install a color profile, copy it to one of the following locations:
• Win d ows 7 , 8 : \Windows\system32\spool\drivers\color
• Mac OS: /Library/ColorSync/Profiles or /Users/[user name]/Library/ColorSync/Profiles
Ti p: By default on Mac OS 10.7 (Lion), the user Library folder is hidden. If you don’t see it in the Finder, press Option
and click the Go menu. Then, choose Library. See
2. Restart Lightroom.
Access hidden user library files | Mac OS 10.7 Lion.
Last updated 4/20/2015
Page 68

Chapter 5: Importing photos
Import photos from a folder on a hard drive
When you import photos into Lightroom, you create a link between the photo itself and the record of the photo in the
catalog.
When importing, you work from left to right the import window. First, on the left, identify what files you want to
import (the source files). Then, in the middle of the window, choose how you want to import them into the catalog
(add, move, or copy them). Finally, on the right, specify where you want to store the files (the destination folder) and
other options for the imported files.
Important: When importing for the first time, think through how you want to organize your photos and where you plan
to store them before you start to import. Planning ahead can help minimize the need to move photos later and possibly
lose track of them in your catalog.
63
1 Do one of the following to open the import window:
• Click the Import button in the lower-left corner of the Library module.
• From the main menu, choose File > Import Photos And Video.
• Drag a folder or individual files from the Explorer (Windows) or Finder (Mac OS) into the Grid view, and then
skip Step 2.
A Preview area B Source panel C Toggle Minimal import D Options and Destination panels
2 In the upper-left corner of the import window, click Select A Source or From, or use the Source panel on the left side
of the import window to navigate to the files you want to import.
Last updated 4/20/2015
Page 69

Importing photos
Note: Connected networks appear in the Source panel. To add a network location, click From or Select A Source, choose
Other Source, and navigate to the networked folder. On Windows, click the Plus button to the right of the Source panel
name and choose Add Network Volume.
3 In the top center of the import window, specify how you want to add the photos to the catalog:
Copy As DNG Copies photos to the folder you choose and converts any camera raw files to the Digital Negative
(DNG) format.
Copy Copies the photo files to the folder you choose, including any sidecar files.
Move Moves the photo files to the folder you choose, including any sidecar files. Files are removed from their
current location.
Add Keeps the photo files in their current location.
4 Select the photos that you want to import from the preview area in the center of the import window. A check mark
in the upper-left corner of the thumbnail indicates that the photo is selected for import.
• To filter photos in the preview, select any of the following:
All Photos Removes all filters.
New Photos Excludes suspected duplicates and previously imported photos.
Destination Folders (Available only when copying or moving photos into a catalog) Groups photos by their
destination folder.
64
• Click the Loupe view button in the toolbar to zoom in to a single photo.
• Click Check All or Uncheck All in the toolbar to globally selecte or deselect all photos in the folder.
• Click the Sort pop-up menu in the toolbar to sort photos by capture time, checked state, filename, or media type
(image or video file).
• Drag the Thumbnails slider to adjust the size of the thumbnails in the grid.
Last updated 4/20/2015
Page 70

Importing photos
• Click the box in the upper-left corner of a preview to select or deselect specific photos. Or, Alt-click (Windows)
or Option-click (Mac OS) anywhere on the thumbnail to select and deselect photos.
5 If you're importing photos by moving or copying them, specify where to put them: In the upper-right corner of the
window, click To and choose a location for the photos. Or click a location in the Destination panel and specify other
options:
Into Subfolder Copies or moves the imported photos into a new folder. Type the name of the new folder in the text
field.
Organize Organize the photos in the new subfolder in one of three ways: preserve the original folder hierarchy of
the source folder; create subfolders by date; or put all photos into one folder.
Date Format Choose a format for the dates.
65
Folder names that are italicized in the Destination panel indicate new folders that will be created when you import.
Review the Destination panel carefully to help ensure that you are correctly importing the photos to your intended
location.
6 Specify other options for the imported files using the panels on the right side of the window. See Specify import
options.
7 Click Import.
More Help topics
Import photos from a camera or card reader
Supported file formats
Set import preferences
Last updated 4/20/2015
Page 71

Importing photos
Import photos from a tethered camera
When selected Canon, Nikon, or Leica digital cameras are connected to the computer, you can import photos directly
into a Lightroom catalog. You can bypass the camera's capture software and importing from a camera card.
1 Connect a supported camera to your computer and open Lightroom.
For a list of cameras that can be tethered to Lightroom, see Tethered camera support in Lightroom .
2 Choose File > Tethered Capture > Start Tethered Capture.
3 In the Tethered Capture Settings dialog box, specify how you want to import the photos:
Session The session is the name of the folder that stores the captured photos. Select Segment Photos By Shots to
create subfolders within the session. You can name the subfolders after clicking OK.
Naming Choose a filenaming convention for the photos. Session Name - Sequence uses the name entered in
Session. For any naming convention that uses a numerical sequence, specify the Start Number. See
optionsand The Filename Template Editor and Text Template Editor.
Destination Choose a location for the session folder.
Information Add metadata and keywords to the imported photos, if desired. See Apply metadata and keywords to
photos when importing.
Naming
66
4 Click OK to start the photo-capture session.
5 Use the floating tethered capture bar to import photos.
• View the shutter speed, aperture, ISO, and white balance of the tethered camera in the center of the floating bar.
• Click the shutter release button (the large round circle) to capture a photo. Or, press the camera’s shutter release
button.
• Optionally, choose a preset to apply on import from the Develop Settings pop-up menu. See Apply Develop
settings to photos when importing.
• Click the Settings button in the lower-right corner of the floating bar to edit capture settings.
• If you are segmenting photos by shots, press Ctrl+Shift+T (Windows) or Command+Shift+T (Mac OS) to create
a new shot.
• By default, Lightroom selects and displays the most recently captured photo in the preview area. Choose File >
Tethered Capture and deselect Auto Advance Selection if you do not want Lightroom to automatically select the
most recently captured photo.
• Close the floating tethered capture bar or choose File > Tethered Capture > Stop Tethered Capture to end the
session.
• Press Ctrl+T (Windows) or Command+T (Mac OS) to show/hide the floating tethered capture bar.
Note: If you're having problems with tethered shooting, see Troubleshoot tethered capture in Lightroom .
More Help topics
Import photos from a camera or card reader
Last updated 4/20/2015
Page 72

Importing photos
Import photos from iPhoto (Mac OS)
To import photos from iPhoto into Lightroom, first you have to help Lightroom find the original photos, which are
hidden in a package file. Then, you can copy or add the photos to a Lightroom catalog just like you would import any
other photos from a folder on your computer.
Note: These instructions are for iPhoto '11 version 9.2.
1 In the Finder, navigate to your iPhoto package file. By default, it's located in /Users/[user name]/Pictures, and it's
called iPhoto Library.
2 Control-click the iPhoto Library file and choose Show Package Contents.
A Finder window opens that shows the contents of the package file. The Masters folder contains all of the photos
that are in iPhoto. However, Lightroom cannot access this folder.
3 Control-click the folder named Masters and choose Duplicate.
4 Drag the folder named "Masters copy" from the iPhoto Library Finder window to your Desktop.
Lightroom can see this folder.
5 Open Lightroom and drag the Masters copy folder into the Grid view of the Library module.
The import window opens, with your iPhoto files selected in the preview area. By default, Lightroom wants to Add
these photos to your catalog. Select Copy or Move, if preferred, and specify the destination folder and other options
in the panels on the right side of the import window.
67
More Help topics
Import photos from a folder on a hard drive
Specify import options
Import photos from other catalogs
Import photos from a different Lightroom catalog
When you import photos from a different Lightroom catalog into the current catalog, you can specify options to handle
new photos and photos that already appear in the current catalog.
Note: Catalogs from earlier versions of Lightroom, including public beta releases, must be opened and updated before they
can be imported into another catalog. See
1 Choose File > Import From Another Catalog.
2 Navigate to the catalog you want to import and click Open (Windows) or Choose (Mac OS).
3 Specify the photos to import:
• Under Catalog Contents, make sure the folders containing the photos to import are selected.
• To select or deselect individual photos, click Show Preview, and click the box in the upper-left corner of any
preview image. You can also choose Check All or Uncheck All.
Upgrade a catalog from an earlier version of Lightroom.
Last updated 4/20/2015
Page 73

Importing photos
4 In the New Photos area, choose an option from the File Handling menu:
Add New Photos To Catalog Without Moving Imports photos at their current location.
Copy New Photos To A New Location And Import Imports photos to a new location. Click Choose and specify the
folder.
Don’t Import New Photos Only photos that exist in the current catalog are imported. Lightroom determines a photo
is a duplicate (already in the catalog) if it has the same, original filename; the same Exif capture date and time; and
the same file size.
5 In the Changed Existing Photos area, do any of the following:
• Replace metadata, Develop settings, and negative files to override all the settings in the current catalog. If you
choose this option, you can select the Preserve Old Settings As A Virtual Copy option to keep a backup. You can
also select the Replace Non-Raw Files Only option to avoid replacing raw negatives. If changes to raw negative
files affect only metadata, selecting this option helps save time.
• Replace metadata and Develop settings only to leave the negative files (the source photos) unchanged. If you
choose this option, you can select the Preserve Old Settings As A Virtual Copy option to keep a backup.
• Replace nothing to import only new photos.
• If photos in the current catalog are missing and can be found in the imported catalog, indicate whether you want
to update the metadata and Develop settings for these files. Select the Preserve Old Settings As A Virtual Copy
option to keep a backup. If the photos missing in the current catalog appear in the imported catalog, specify
whether the missing files are copied and where they copied to.
68
6 Click Import.
Import photos from Photoshop Elements
Lightroom detects if your computer has a Photoshop Elements catalog and can import photos and data from the PSE
catalog into a new Lightroom catalog. Lightroom imports photos and data from Photoshop Elements 6 through
Elements 13 on Windows and from Photoshop Elements 9 through 13 on Mac OS.
1 In the Library module, choose File > Upgrade Photoshop Elements Catalog.
The Upgrade Photoshop Elements Catalog dialog box displays the most recently opened Photoshop Elements
catalog.
2 To choose a different PSE catalog, click the Photoshop Elements drop-down menu.
3 To change the destination of the new Lightroom catalog, click Change and navigate to a different folder.
4 Click Upgrade to import the PSE catalog into a new Lightroom catalog.
More Help topics
Import photos from iPhoto
Specify import options
After you choose the photos you want to import (see Import photos from a folder on a hard driveor Import photos from
a camera or card reader), use the File Handling, File Renaming, and Apply During Import panels on the right side of
the import window to specify options for the photos you are bringing into your Lightroom catalog.
Last updated 4/20/2015
Page 74

Importing photos
Back up photos during import
❖ If you’re copying or moving photos into the catalog, you can create a one-time copy, or backup, of the original photo
files. In the File Handling panel on the right side of the import window, select Make A Second Copy To and specify
a location.
Note: You still need to regularly back up your photos and catalog. For more detailed information on backing up
Lightroom, see
Back up a catalog.
Ignore duplicates when importing
Lightroom determines a photo is a duplicate of another file in the catalog if it has the same, original filename; the same
Exif capture date and time; and the same file size. You can instruct Lightroom to disregard duplicate files when
importing.
❖ In the File Handling panel on the right side of the import window, select Don’t Import Suspected Duplicates.
Specify initial previews
As photos are imported, Lightroom can immediately display a photo’s embedded preview, or display higher-quality
previews as the program renders them. Embedded previews are created by cameras and are not color managed, so
embedded previews don’t match how Lightroom interprets the camera raw files. Previews rendered by Lightroom take
longer to generate but are color managed.
69
❖ In the File Handling panel on the right side of the import window, choose an option from the Build Previews menu:
Minimal Immediately display images using the smallest previews embedded in the photos. Lightroom renders
standard-size previews when needed.
Embedded & Sidecar Display the largest possible preview available from the camera. This option may take longer
than a Minimal preview but is still faster than rendering a standard-size preview.
Standard Display previews as Lightroom renders them. Standard-size previews use the Adobe RGB color space and
are what you see in the Fit zoom level of the Loupe view. Specify the Standard preview size in the Catalog Settings
dialog box. See
1:1 Display previews that are a 100% view of actual pixels.
❖ To create Smart Previews for your imported photos, select Build Smart Previews.
Smart Previews allow you to edit images that are not physically connected to your computer. Smart Preview files are
a lightweight, smaller, file format based on the lossy DNG file format. See
Export a catalog.
Smart Previewsfor more information.
Rename photos when importing
When copying or moving photos into the catalog during import, you can specify how the files are named.
1 In the File Renaming panel on the right side of the import window, select Rename Files.
2 Choose a naming option from the Template pop-up menu. For descriptions of the choices, see Naming options. If
you choose an option that uses a custom name, type the name in the Custom Text field.
3 (Optional) If you don’t want a custom numeric sequence to start with “1,” enter a value in the Start Number field.
Last updated 4/20/2015
Page 75

Importing photos
Apply Develop settings to photos when importing
Any Develop settings preset can be applied to photos as they are imported. This is especially useful for applying
Develop settings to photos from a camera for which you created a Develop preset.
❖ In the Apply During Import panel on the right side of the import window, choose a setting from the Develop
Settings menu.
Apply metadata and keywords to photos when importing
❖ In the Apply During Import panel on the right side of the import window, choose any of the following options from
the Metadata menu:
• To not apply metadata to photos during import, choose None.
• To apply a set of metadata that you saved as a template, choose a metadata preset from the menu.
• To apply a new set of metadata to photos while importing, choose New and enter the information in the New
Metadata Preset dialog box.
Note: When adding metadata to photos, Lightroom doesn’t apply the data to proprietary camera raw files but to their
sidecar XMP files.
❖ To add keywords to photos while importing, type them in the Keywords text box. Use commas to separate the
keywords.
70
Naming options
Lightroom uses the same naming options for importing, renaming, and exporting photos.
Custom Name (x of y) Names the photos using a custom name, followed by sequential numbers in relation to the total
number of photos being imported. For example, 1 of 10, 2 of 10, 3 of 10, and so on.
Custom Name - Original File Number Names the photos using a custom name, followed by the numeric portion of the
photos’ original filenames.
Custom Name - Sequence Names the photos using a custom name, followed by sequential numbers starting with the
number you specify.
Custom Name Names the photos using a name you specify.
Date - Filename Names the photos using the creation (capture) date, followed by the photos’ complete original
filenames.
Filename - Sequence Names the photos using the photos’ original filenames, followed by sequential numbers starting
with the number you specify.
Filename Names the photos using the photos’ original filenames.
Shoot Name - Original File Number (Import) Names the imported photos using the shoot name, followed by the
numeric portion of the photos’ original filenames.
Shoot Name - Sequence (Import) Names the imported photos using the shoot name, followed by sequential numbers
starting with the number you specify.
Session Name - Sequence (Tethered capture import) Names the photos using the session name, followed by sequential
numbers starting with the number you specify.
Edit Names the photos using the options you set in the Filename Template Editor. See The Filename Template Editor
and Text Template Editor.
Last updated 4/20/2015
Page 76

Importing photos
Import using presets
If you have certain configurations of import options that you reuse frequently, you can save them as presets to speed
the import process.
• To create an import preset, specify import options and then chose Import Preset > Save Current Settings As New
Preset at the bottom of the import window.
• To apply an import preset, select it from the Import Preset menu at the bottom of the import window, and click
Import.
• To delete, update, or rename an import preset, select it in the Import Preset menu and then choose the appropriate
command in the Import Preset menu.
Import photos using fewer options
You can import folders of photos using a simplified import window that offers quick access to key import options,
including presets. The minimal import window does not display thumbnail previews.
1 Click the Show Fewer Options button in the lower-left corner of the import window.
2 Click Select A Source on the left side of the window to choose the path for the photos you want to import.
3 In the middle of the import window, specify whether you want to Copy As DNG, Copy, Move, or Add the photos to
the catalog.
4 Click To on the right side of the window and specify a destination.
71
5 (Optional) Apply a metadata preset, add keywords, and destination subfolder options.
Set import preferences
You set import preferences in the General and File Handling panels of the Preferences dialog box. You can also change
some preferences in the Auto Import Settings dialog box (see
previews in the Catalog Settings dialog box (see Export a catalog).
1 From the Lightroom main menu, choose Edit > Preferences (Windows) or Lightroom > Preferences (Mac OS).
2 In the General preferences, specify the following import options:
Show Import Dialog When A Memory Card Is Detected Allows the import dialog box to open automatically after
connecting a camera or memory card reader to your computer.
Select the "Current/Previous Import" collection during import Opens the completed import in a collection when
the import process finishes.
Ignore Camera-Generated Folder Names When Naming Folders Tells Lightroom to not use the folder names that
your camera creates.
Treat JPEG Files Next To Raw Files As Separate Photos For photographers who capture raw + JPEG photos on their
cameras. Selecting this option imports the JPEG as a standalone photo. If selected, both the raw and the JPEG files
are visible and can be edited in Lightroom. If deselected, Lightroom treats the duplicate JPEG as a sidecar file, and
the raw file appears with the raw file extension and +jpg.
Specify Auto Import settings ). F ina lly, you sp ecif y im por t
Last updated 4/20/2015
Page 77

Importing photos
3 In File Handling panel, specify the following options:
Import DNG Creation Choose the type of file extension (upper-case or lower-case), Camera Raw version
compatibility, and JPEG preview size for imported DNG files. For more information on DNG files and DNG
creation options, see
Reading Metadata Select the options to recognize a period ( . ) or forward slash ( / ) between keywords as
designating keyword hierarchies.
File Name Generation Specify which characters and spaces in the filenames of imported photos are illegal, and
determine how they’re replaced.
Convert photos to DNG.
More Help topics
Supported file formats
Specify import options
Supported file formats
Lightroom can import the following types of files:
72
Camera raw formats
Camera raw file formats contain unprocessed data from a digital camera’s sensor. Most camera manufacturers save
image data in a proprietary camera format. Lightroom reads the data from most cameras and processes it into a fullcolor photo. You use the controls in the Develop module to process and interpret the raw image data for your photo.
For a list of supported cameras and camera raw formats, see www.adobe.com/go/learn_ps_cameraraw.
If you have trouble opening camera raw files in Lightroom, see Why doesn't my version of Photoshop or Lightroom
support my camera?
Digital Negative format (DNG)
The Digital Negative (DNG) is a publicly available archival format for raw files generated by digital cameras. DNG
addresses the lack of an open standard for the raw files created by individual camera models, helping ensure that
photographers will be able to access their files in the future. You can convert proprietary raw files to DNG from within
Lightroom. For more information about the Digital Negative (DNG) file format, visit
comprehensive information and a link to a user forum. Lightroom can import 32-bit DNG images.
www.adobe.com/dng. You’ll find
TIFF format
Tagged-Image File Format (TIFF, TIF) is used to exchange files between applications and computer platforms. TIFF is
a flexible bitmap image format supported by virtually all paint, image-editing, and page-layout applications. Also,
virtually all desktop scanners can produce TIFF images. Lightroom supports large documents saved in TIFF format (up
to 65,000 pixels per side). However, most other applications, including older versions of Photoshop (pre-Photoshop
CS), do not support documents with file sizes greater than 2 GB. Lightroom can import 8-bit, 16-bit, and 32-bit TIFF
images.
The TIFF format provides greater compression and industry compatibility than Photoshop format (PSD), and is the
recommended format for exchanging files between Lightroom and Photoshop. In Lightroom, you can export TIFF
image files with a bit depth of 8 bits or 16 bits per channel.
Last updated 4/20/2015
Page 78

Importing photos
JPEG format
Joint Photographic Experts Group (JPEG) format is commonly used to display photographs and other continuous-tone
images in web photo galleries, slide shows, presentations, and other online services. JPEG retains all color information
in an RGB image but compresses file size by selectively discarding data. A JPEG image is automatically decompressed
when opened. In most cases, the Best Quality setting produces a result indistinguishable from the original.
Photoshop format (PSD)
Photoshop format (PSD) is the standard Photoshop file format. To import and work with a multi-layered PSD file in
Lightroom, the file must be saved in Photoshop with the Maximize PSD and PSB File Compatibility preference turned
on. You’ll find the option in the Photoshop file handling preferences. Lightroom imports and saves PSD files with a bit
depth of 8 bits or 16 bits per channel. To work with 32-bit images in Lightroom, save your file as TIFF.
CMYK files
Lightroom imports CMYK files but adjustments and output are performed in the RGB color space.
PNG format
Developed as a patent-free alternative to GIF, Portable Network Graphics (PNG) format is used for lossless
compression and for display of images on the web. Unlike GIF, PNG supports 24-bit images and produces background
transparency without jagged edges; however, some web browsers do not support PNG images. PNG format supports
RGB, Indexed Color, Grayscale, and Bitmap mode images without alpha channels. PNG preserves transparency in
grayscale and RGB images.
73
Video files
Lightroom imports AVI, MOV, MP4, and other digital video files from digital still cameras. For more information, see
Work with video in Lightroom.
File format exceptions
Lightroom does not support the following types of files: Adobe Illustrator®; Nikon scanner NEF; files with dimensions
greater than 65,000 pixels per side or larger than 512 megapixels.
Note: To import photos from a scanner, use your scanner’s software to scan to TIFF or DNG format, and then import those
files into Lightroom.
Import photos automatically
The Auto Import feature automatically imports photos into a Lightroom catalog by monitoring a watched folder for
photos and then importing them into a catalog. After you specify auto-import settings, you can simply drag photos into
the watched folder, and Lightroom imports them automatically, allowing you to bypass the import window.
Auto Import is useful if Lightroom doesn’t support your camera for tethered import: You can use your camera's
software to download photos from your camera to a watched folder.
Note: If Lightroom starts automatically when you attach a camera or card reader to your computer and you want to turn
off this functionality, change your import preferences. See
Set import preferences.
Last updated 4/20/2015
Page 79

Importing photos
Enable automatically importing photos
• Choose File > Auto Import > Enable Auto Import.
Specify auto import settings
1 Choose File > Auto Import > Auto Import Settings.
2 In the Auto Import Settings dialog box, specify any of the following:
Watched Folder Chooses or creates the watched folder where Lightroom detects photos to auto import. The folder
you specify must be empty. Auto Import does not monitor subfolders in a watched folder.
Destination Chooses or creates a folder where the auto-imported photos are moved into.
File Naming Names the auto-imported photo. See Naming options.
Information Applies Develop settings, metadata, or keywords to auto-imported photos.
3 Select Standard from the Initial Previews menu to have Lightroom render previews of the imported photos rather
than only using the embedded previews in the photo files. See
Specify initial previews.
74
Set up watched folders
1 In the Auto Import Settings dialog box, click the Choose button next to Watched Folder.
2 Navigate to the location you want and do any of the following:
• To create a watched folder, click Make New Folder and then overwrite New Folder to give the folder a name
(Windows), or click New Folder (Mac OS), give the folder a name, and click Create.
• To select an existing watched folder, select the folder.
Note: You can't choose an existing folder that contains photos as a watched folder.
3 Click OK (Windows) or Choose (Mac OS).
Select a destination folder for auto-imported photos
When Lightroom detects photos added to a watched folder, the photos are moved into a destination folder and
automatically imported into the catalog.
1 In the Destination area of the Auto Import Settings dialog box, click the Choose button beside Move To.
2 In the Browse For Folders (Windows) or Open (Mac OS) dialog box, navigate to the location you want, and do any
of the following:
• To create a destination folder, click Make New Folder and then overwrite New Folder to give the folder a name
(Windows), or click New Folder, give the folder a name, and click Create (Mac OS).
• To select an existing destination folder, select the folder.
3 Click OK (Windows) or Choose (Mac OS).
4 (Optional) Type a name for the destination folder in the Subfolder Name text box.
Last updated 4/20/2015
Page 80

Importing photos
Apply Develop settings and metadata to auto-imported photos
• In the Information area of the Auto Import Settings dialog box, do any of the following:
• To apply Develop settings to auto-imported photos, choose a preset from the Develop Settings menu. See Create
and apply Develop presets
• To apply metadata to auto-imported photos, choose a preset from the Metadata menu. See Create a metadata
preset.
• To apply keywords to auto-imported photos, type in the Keywords text box. Use commas to separate the
keywords.
• To have Lightroom render previews of the imported photos rather than only using the embedded previews in the
photo files, choose Initial Previews > Standard.
More Help topics
Import photos from a tethered camera
The Filename Template Editor and Text Template Editor
75
The Filename Template Editor and the Text Template Editor let you specify text strings for different uses. Using the
Filename Template Editor, you can use the text strings to name files as they’re being imported or exported. Using the
Text Templa te E ditor, you can use tex t st rin gs t o ad d capt ions to photo s in a sli des how, a dd te xt ove rla ys to ph otos b eing
printed, and add titles and other text to web gallery pages.
A token is a text string that is replaced by the corresponding option you set. In the Filename Template Editor and the
Text Templ ate Edit or, t oke ns sp ec ify t he con tent da ta tha t re pla ces th e tex t stri ng. Token s sav e yo u the effo rt of man ually
typing content data and let you leverage the data already in the photo files.
The Filename Template Editor and the Text Template Editor include the following elements:
Preset Chooses, saves, deletes, or renames presets.
Image Name Specifies a text string option using the filename or folder name.
Numbering Specifies three types of numbering: Import, which is a sequential number for each import operation;
Image, which sequentially numbers each photo that has been imported into the catalog; and Sequence, which numbers
each photo in sequence, letting you choose a new Start Number each time you import. (This element is not available in
the Filename Template Editor when exporting photos.) Specify the starting Import and Image numbers in the File
Handling tab of the Catalog Settings dialog box. See
Additional Specifies a text string option using the creation (capture) date and time, or Exchangeable Image Format
(Exif) data. This element is only available in the Filename Template Editor when importing or auto-importing photos.
Sequence And Date Specifies a text string option using sequential numbers and creation (capture) date and time. This
element is only available in the Filename Template Editor when exporting photos.
Metadata Specifies a text string option using IPTC or Exif metadata. This element is only available in the Filename
Template Editor when exporting photos.
Export a catalog.
Exif Data Specifies a text string option using Exif data. This element is only available in the Text Template Editor when
creating slideshows, printing photos, or creating web photo galleries.
Last updated 4/20/2015
Page 81

Importing photos
IPTC Data Specifies a text string option using Exif data. This element is only available in the Text Template Editor when
creating slideshows, printing photos, or creating web galleries.
Custom Uses the options you specify for the text string.
Open the Filename Template Editor and choose presets
1 Do any of the following to open the Filename Template Editor:
• In the File Renaming panel on the right side of the import window, choose Edit from the Template menu when
importing photos by copying or moving files. See
• Cho ose File > Aut o Impo rt > Auto Impor t Set tin gs, an d the n choos e Edi t from the Fil e Nam ing menu in the Auto
Import Settings dialog box. See
Specify Auto Import settings .
• Choo se Fil e > Exp ort, a nd the n cho os e Edi t fro m the Temp lat e me nu i n t he F ile N ami ng ar ea of the E xp ort di alo g
box.
• Choose Library > Rename Photo, and then choose Edit from the Template menu in the File Naming area of the
Rename dialog box.
2 Choose a preset from the Preset menu.
Rename photos when importing.
76
Open the Text Template Editor and choose presets
1 Do any of the following to open the Text Template Editor:
• In the Slideshow module, add text to the slide layout. Make sure that the text is selected in the work area, and
then choose Edit from the Custom Text menu in the toolbar. See
Add text and metadata to slides.
• In the Page panel of the Print module, select Photo Info, then choose Edit from the Custom Settings pop-up
menu. See
Print filename, caption, and other information (Single Image/Contact Sheet layouts).
• In the Web module, select Title or Caption in the Image Info panel, then choose Edit from the Title or Caption
pop-up menu. See
2 Choose a preset from the Preset menu.
Add titles, description, and contact information to web photo galleries.
Create and save filename and text template presets
1 In the Filename Template Editor dialog box or the Text Template Editor dialog box, choose an option and then click
Insert for as many categories as you want. This action creates the text string.
For example, choose Filename from the Image Name menu and then click Insert. A token is added to the Example
window just below the Preset menu. Add one or as many tokens as you want.
2 To change a token, move your pointer over the token displayed in the Example window. Click the triangle to see
more options, and then choose an option from the pop-up menu.
3 To delete tokens, select one or more tokens in the window and then press the Delete key.
If you don’t want to save your token settings as a preset and want to use them immediately, skip the next step and
click Done.
4 (Optional) To save your settings for reuse, choose Save Current Settings As New Preset from the Preset menu. In the
New Preset dialog box, type a name in the Preset Name field and click Create.
Last updated 4/20/2015
Page 82

Importing photos
Rename filename and text template presets
1 In the Filename Template Editor or Text Template Editor, choose a preset from the Preset menu.
2 Choose Rename Preset from the Preset menu.
Delete filename and text template presets
1 In the Filename Template Editor or Text Template Editor, choose a preset from the Preset menu.
2 Choose Delete Preset from the Preset menu.
77
Last updated 4/20/2015
Page 83

Chapter 6: Viewing photos
View photos
Filmstrip
About the Filmstrip
The Filmstrip displays the photos you are working on as you move between modules. It contains photos from the
currently selected Library folder, collection, or keyword set. Move between photos in the Filmstrip using the Left and
Right Arrow keys or by choosing a different source from the Filmstrip Source Indicator pop-up menu to the right of
the navigation buttons.
78
A Show/Hide Second Window button B Go to G ri d vi ew C Go Back and Go Forward buttons (to navigate modules) D Filmstrip Source Indicator
and menu E
Source filter F Show/Hide Filmstrip control
Hide or show the Filmstrip
• Click the Show/Hide Filmstrip icon at the bottom of the Filmstrip.
• Choose Window > Panels > Show/Hide Filmstrip.
Change the photos displayed in the Filmstrip
• Choose an item in a panel on the left side of the Library module, or select criteria from the Library Filter bar,
Keyword List panel, or Metadata panel to choose photos.
• Click the Source Indicator in the Filmstrip, and choose a new source from the pop-up menu. You can choose All
Photographs, Quick Collection, Previous Import, or a previously viewed source. Previously viewed Filmstrip
sources are listed, unless you choose Clear Recent Sources.
After you choose a source or sources, the Grid view also displays the photos that are displayed in the Filmstrip. If you
select multiple folders or collections, Multiple Sources appears in the Source Indicator.
If the Grid view does not display all photos when multiple sources are selected, choose Filters Off from the Library Filter
bar.
Last updated 4/20/2015
Page 84

Viewing photos
Change the size of Filmstrip thumbnails
• Place the pointer over the top edge of the Filmstrip. When the pointer changes to a double arrow , drag the
Filmstrip edge up or down.
• Double-click the top edge of the Filmstrip to switch between the last two sizes of thumbnails.
Scroll through photos in the Filmstrip
• Drag the scroll bar at the bottom of the Filmstrip, click the arrows on the sides, or drag the top edge of a thumbnail
frame.
• Press the Left and Right Arrow keys to navigate through thumbnails in the Filmstrip.
Show ratings and picks in Filmstrip thumbnails
❖ Choose Edit > Preferences (Windows) or Lightroom > Preferences (Mac OS), and click the Interface tab. In the
Filmstrip area, select Show Ratings And Picks.
Rearrange thumbnails in the Filmstrip and Grid view
❖ Select a collection or a folder that does not contain any subfolders, and then drag a thumbnail to a new location.
79
Loupe view
Zoom an image
You can use the Navigator panel in the Library module or the Develop module to set the level of magnification for an
image in Loupe view. Lightroom saves the last level you used and lets you switch between that level and the current level
when you click the photo with the pointer. You can also toggle between four levels using the Zoom In and Zoom Out
commands.
The settings remain in effect until you select a different zoom level in the Navigator panel or choose a new command
from the View menu.
Note: When two images are in Compare view in the Library module, setting a zoom level in the Navigator panel or choosing
a zoom command automatically displays the selected image in Loupe view.
Set the zoom levels for the pointer
1 In the Navigator panel, select either Fit or Fill for the first zoom level.
2 For the second zoom level, select either 1:1 (a 100% view of actual pixels) or choose an option from the pop-up
menu.
Note: Zoom levels for the pointer are also available in the secondary window.
Switch between zoom levels
• To switch between the two zoom levels set in the Navigator panel, click the photo with the pointer or press the
spacebar. The pointer changes to the Zoom tool whenever it is possible to zoom in. You can also click the photo to
switch between zoom levels in the secondary window.
• To switch between four zoom levels, press Ctrl-+ or - (Windows) or Command-+ or - (Mac OS). If you choose a
Zoom command from the View menu, the level switches between the four settings in the Navigator panel (Fit, Fill,
1:1, and the option chosen from the menu).
Last updated 4/20/2015
Page 85

Viewing photos
80
To zoom the photo to the center of the screen, select Zoom Clicked Point To Center in the Interface Preferences.
Pan the image
When the photo is zoomed and parts are not visible, use the Hand tool on the photo or the pointer on the Navigator
panel to move hidden areas into view. The Navigator panel always displays the entire image with a frame overlay to
represent the edges of the main view.
Note: Panning is synchronized in the Before and After views in the Develop module.
• Drag the Hand tool in the Loupe view to move the image. You can also pan with the Hand tool in the Loupe view
in the secondary window.
• Drag the pointer in the Navigator panel to move the image in Loupe view.
• Click the pointer in the Navigator panel to move the image to that location in Loupe view.
Temporarily zoom in to pan the image
• Press and hold the space bar to temporarily zoom in.
• Press and hold the mouse button down to zoom in, and then drag in either the photo or the Navigator to pan the
photo.
Display the Info Overlay on a photo
You can display information about a photo in Loupe view in the Library; in Loupe view or Before and After views in
the Develop module; and in Loupe view in the secondary window. You can display two sets of metadata and customize
which information appears in each set.
❖ Choose View > Loupe Info > Show Info Overlay, or choose the specific info set to display. Or, press the I key to
display, hide, and cycle through the info sets.
Change the info displayed in the Info Overlay
1 In the Library or Develop module, choose View > View Options.
2 If working in the Library, make sure the Loupe View is selected.
3 In the Loupe Info fields, choose the options you want to display for each set from the menus.
Grid view
Show photos in the Grid view and the Filmstrip
Lightroom provides many ways to show specific photos in the Grid view and the Filmstrip. The method you use
depends on which photos you want to see. The Catalog panel lets you instantly display all photos in the catalog or the
Quick Collection, as well as the most recently imported photos.
Note: You can also show photos in the Grid view and the Filmstrip by selecting folders, collections, keywords, or by
searching for photos. You can refine a selection by using the options in the Library Filter bar.
❖ In the Catalog panel, select any of the following:
All Photographs Shows all the photos in the catalog.
Last updated 4/20/2015
Page 86

Viewing photos
Quick Collection Shows photos in the Quick Collection. To learn about grouping photos in the Quick Collection,
Work with the Quick Collection.
see
Previous Import Shows photos from the most recent import.
Other categories, such as Previous Export As Catalog, may also appear in the Catalog panel.
Navigate between photos
In the Library module, you navigate between images by selecting the previous or next photo.
❖ In any view of the Library module, do one of the following:
• To select the previous photo, press the Left Arrow key, click the Select Previous Photo icon in the toolbar, or
choose Library > Previous Selected Photo.
• To select the next photo, press the Right Arrow key, click the Select Next Photo icon in the toolbar, or choose
Library > Next Selected Photo.
note: Make sure Navigate is chosen from the toolbar menu for the Select Previous Image and Select Next Image icons
to appear.
Rearrange photos in the Grid view
❖ In the Grid view, do any of the following to rearrange photos in the grid:
• Click the Sort Direction icon in the toolbar.
81
• Choose a sort option from the Sort pop-up menu in the toolbar.
• If you have selected a regular collection or the lowest folder in a folder hierarchy, drag from the center of a
thumbnail to sort in any order.
Note: If you have selected a smart collection or a folder that contains other folders, User Order is not available in the
Sort pop-up menu, and you cannot drag to sort photos in any order.
View raw+JPEG photos
Some cameras capture raw and JPEG versions of photos. In order to view and work with the JPEG version of the photo,
you must instruct Lightroom to import and recognize the JPEG version as a standalone file. See
Set import preferences .
Change the thumbnail size in the Grid view
1 In the Grid view, choose Thumbnail Size from the toolbar menu.
The Thumbnails control is not available unless this option is selected.
2 Drag the Thumbnails slider.
Switching between Grid, Loupe, Compare, and Survey views
In the Library module, you can view thumbnails in the Grid view, a single photo in Loupe view, two photos in Compare
view, or two or more photos in Survey view.
❖ In the Library module, do any of the following:
• Click the Grid View , Loupe View , Compare View , or Survey View icon in the
toolbar.
• Choose View > Grid, Loupe, Compare, or Survey.
Last updated 4/20/2015
Page 87

Viewing photos
• Choose View and then choose either Toggle Loupe View or Toggle Zoom View to toggle between the chosen view
and the previous view.
• With one or more photos selected in the Grid view, choose Photo > Open In Loupe to switch to the Loupe view.
If more than one photo is selected, the active photo opens in the Loupe view. Use the Right and Left Arrow keys
to cycle between selected photos in the Loupe view.
For more information on comparing photos in Lightroom 3 and Lightroom 4, see Comparing similar photos, from
Adobe Digital Imaging How-Tos.
More Help topics
Setting preferences for working in Lightroom
Selecting photos in the Grid view and the Filmstrip
Filter photos in the Filmstrip and Grid view
Finding photos in the catalog
Set Library view options for Loupe view
Displaying the Library on a second monitor
Change the Loupe view info overlay
82
Photo collections
Finding photos in the catalog
View the contents of a folder
Flag, label, and rate photos
Browse and compare photos
Filter photos in the Filmstrip and Grid view
You can restrict, or filter, the photos displayed in the Filmstrip and the Grid view to photos with a specific flag status,
star rating, color label, or kind of file (master photo, vitual copy, video).
Apply filters
❖ To filter the photos displayed in the Filmstrip and Grid view, do one of the following:
• Choose File > Library Filters > Filter By [criteria].
• Press \ to open the Library Filter bar at the top of the Library module. Select Attribute and then select icons to
filter the display.
• In the Filmstrip, click Filter, and then select icons to filter the display.
Last updated 4/20/2015
Page 88

Viewing photos
A Displays photos flagged as Picks or Rejects, or unflagged B Displays photos with a specific star rating, or those higher or lower C Displays
photos with one or more color labels
Learn More. George Jardine discusses how to organize photos and find them fast using the Filter Bar.
Control filter behavior for a folder or collection
By default, filter behavior is not sticky. If you apply a filter to a folder or collection and then navigate away from that
folder or collection, the filter is cleared when you return to the original location.
• To control filters for a selected a folder or a collection, choose File > Library Filters and any of the following:
Enable Filters: Turns on the last-used filters that were applied to the folder or collection.
Lock Filters: Applies the current filters to subsequently selected folders or collections.
Remember Each Source’s Filters Separately: Available when filters are locked. Applies the last-used filters for the
selected folder or collection.
• To make filters “stick” so that they are active when you return to a previously filtered folder or collection, choose File
> Library Filters > Lock Filters and then File > Library Filters > Remember Filters.
83
Selecting photos in the Grid view and the Filmstrip
You select photos in the Grid view that you want to work with in the Library or other modules. The photos you select
are reflected in the Filmstrip. Likewise, the specific photos selected in the Filmstrip are displayed in the Grid view.
When you select a photo, it becomes the active photo. You can select multiple photos, but only one photo at a time is
the active photo. Selected photos are indicated in the grid and the Filmstrip by a thin white border and a cell color that
is lighter than unselected photos. The lightest colored cell indicates the active photo.
When you have several photos s elec ted, you can click any selected photo to make it act ive without deselec ting the other
photos. If you click a photo outside the selection, it becomes the active photo, and all other photos are deselected.
When you have more than one photo selected in the Grid view and you make changes such as applying ratings, labels,
or adding metadata, those changes are applied to all of the selected photos.
When you have more than one photo selected in the Filmstrip and you’re in Loupe, Compare, or Survey view, changes
such as applying ratings, labels, or adding metadata are applied only to the active photo.
Last updated 4/20/2015
Page 89

Viewing photos
84
Note: You can also select or deselect flagged photos in the Grid view and the Filmstrip. See Select flagged photos.
1 (Optional) In the Library module, select items in the Catalog, Folders, or Collections panel to display the photos you
want to use. If desired, specify criteria in the Library Filter bar to narrow the selection.
Note: You can also select photos using the Keyword List and Metadata panels. Click the arrow to the right keyword
count or metadata criteria. Photos that contain that tag or criteria display in the Grid view and the Filmstrip.
2 In the Grid view or the Filmstrip, do any of the following:
• To select a photo, click a photo thumbnail.
• To select non-contiguous photos in the Grid view or the Filmstrip, click the first photo and then Ctrl-click
(Windows) or Command-click (Mac OS) additional photos.
• To select a photo and all photos between it and the active photo, Shift-click a photo.
• To select all photos, choose Edit > Select All or press Ctrl+A (Windows) or Command+A (Mac OS).
• To deselect all photos, choose Edit > Select None or press Ctrl+D (Windows) or Command+D (Mac OS).
• To deselect all photos except the active one, choose Edit > Select Only Active Photo or press Shift+Ctrl+D
(Windows) or Shift+Command+D (Mac OS).
• To change the active photo in a group of selected photos, click a different photo thumbnail.
• To select a new active photo and deselect all other photos in a group of selected photos, click a photo’s grid cell
border.
• To deselect the active photo in a group of selected photos, choose Edit > Deselect Active Photo or press /. The
next photo in the multiple-photo selection becomes the active photo.
• To deselect selected photos and select all the photos that were unselected, choose Edit > Invert Selection.
When you select multiple photos, the first photo you select is the primary selection (active photo), indicated by the
brighter highlighted frame.
Last updated 4/20/2015
Page 90

Viewing photos
After selecting photos, add them to the Quick Collection to easily prepare them for printing, presenting in a slide
show, assembling into a web gallery, or exporting.
Comparing photos in the Library module
Lightroom lets you view large previews of one or more photos for tasks like picking out the best photo in a series. You
can view side-by-side previews of two photos in the Compare view, or view tiled previews of two or more photos in the
Survey view.
In the Compare view, one photo is the select (active) and the other is the candidate. Using controls in the toolbar, you
can swap the select and candidate photos, zoom in and out of one or both views simultaneously, and specif y when you’re
done comparing.
In the Survey view, the selected (active) photo has a white border. You can designate the active photo by clicking it in
the image display area. All photos have a Deselect Photo icon
from the Survey view. (On the Mac OS, move the pointer over the photo to see the icon.)
Both views provide access to rating stars, color labels, and Pick or Rejected flags for each photo. Both views also let you
deselect photos to narrow down the images under consideration. See
You can always switch between the Compare and Survey views while comparing photos. You can also display Compare
and Survey views in a second window on a second monitor. See
in the lower-right corner for removing the photos
Flag, label, and rate photos .
Displaying the Library on a second monitor .
85
Compare photos in the Compare view
1 In the Grid view or the Filmstrip, select two photos and then do one of the following:
• Click the Compare View icon in the toolbar.
• Choose View > Compare.
Note: If you only select one photo and then switch to Compare view, Lightroom uses the currently selected photo and
either the last previously selected photo or an adjacent photo in the Grid view or the Filmstrip.
2 Do any of the following to adjust the photo previews:
• To zoom in or out of both photos simultaneously, make sure the Link Focus icon is displayed in the toolbar
and then drag the Zoom slider.
• To zoom in or out of one photo, select the photo, make sure the Unlink Focus icon is displayed in the toolbar
and then drag the Zoom slider.
note: Clicking the toolbar icon toggles between Link Focus and Unlink Focus.
• To synchronize the scaling of the candidate and the select photos, click Sync in the toolbar.
3 Set the rating stars, color labels, or Pick or Rejected flags for the photos.
4 Do any of the following to specify different selected and candidate photos:
• Click Swap in the toolbar to reverse the selected and candidate photos.
• Click the Select Next Photo icon in the toolbar (or press the Right Arrow key) to compare subsequent photos
with the first selection. Select Previous Photo to compare previous photos with the first selection. Press the Up
arrow to replace the selected photo with the current selection and replace the candidate selection with the next
image.
• Click the Deselect Photo icon in the lower-right corner below the photo.
• Select the Candidate photo and then click Make Select in the toolbar.
5 Repeat steps 2 through 4 as needed.
Last updated 4/20/2015
Page 91

Viewing photos
6 Click a different view button to exit the Compare view.
Compare photos in the Survey view
1 In the Grid view or the Filmstrip, select two or more photos and then do one of the following:
• Click the Survey View icon in the toolbar.
• Choose View > Survey.
Note: You can always add more photos to your comparison at any time by selecting them in the Filmstrip. Keep in mind
that the previews in the Survey view are smaller when more photos are selected. See
and the Filmstrip.
2 In the Survey view, do any of the following:
• To specify the select photo, click a photo in the work area or in the Filmstrip, or click the Select Previous Photo
or Select Next Photo icon in the toolbar.
Note: Navigate must be chosen in the Survey view toolbar pop-up menu for the icons to appear.
• To delete photos, click the Deselect Photo icon in the lower-right corner of a photo.
• To rate, label, or flag photos, click the rating stars, color labels, and Pick or Rejected flags beneath the photos.
Selecting photos in the Grid view
86
More Help topics
Flag, label, and rate photos
Find photos using the Library Filter bar
View the contents of a folder
Finding photos in the catalog
Setting Library view options
Set Library view options for the Grid view
The Library View Options determine how photos look in the Grid view. You can specify different combinations of
elements, ranging from showing only thumbnails, to thumbnails accompanied with photo information, filters, and
Rotation buttons.
1 I n the L i b r ary m odule , c hoos e View > Vi ew Op t ions.
2 In the Grid View tab of the Library View Options dialog box, select Show Grid Extras to view information and icons
in the photo thumbnail cells. (Show Grid Extras is selected by default.)
Deselecting this option shows photo thumbnails with no additional information in the Grid view.
3 In the Options area of the dialog box, select any of the following items:
Show Clickable Items On Mouse Over Only Shows clickable items, such as Rotation buttons and flags, only when the
pointer moves over the cell. Deselecting this option means that clickable items are always displayed.
Tint Grid Cells With Color Labels Displays the label colors in the background of each cell.
Last updated 4/20/2015
Page 92

Viewing photos
Show Image Info Tooltips Displays a description of an item, such as a photo, badge, or pick flag, when you hold the
pointer over the item.
4 In the Cell Icons area of the dialog box, select any of the following items to appear in cells:
Flags Makes Pick or Rejected flags available in the upper-left corner of the thumbnail cell.
Quick Collection Markers Shows the Quick Collection marker in the upper-right corner of the photo thumbnail.
Thumbnail Badges Shows thumbnail badges indicating which photos have keywords, cropping applied, or image
adjustments.
Unsaved Metadata When you’ve added metadata or keywords to a photo in Lightroom without saving the metadata
to file, the Metadata File Needs To Be Updated icon
appears in the upper-right corner of the cell area. See Vi ew
unsaved metadata.
5 In the Compact Cell Extras area, select any of the following to appear in compact cells:
Index Number Shows the order number of the photo in the Grid view.
Rotation Makes Rotation buttons available.
Top Label Shows the top label you choose from the menu.
Bottom Label Shows the bottom label you choose from the menu.
87
6 In the Expanded Cell Extras area, select any of the following to appear in expanded cells:
Show Header With Labels Shows the header area of the thumbnail cell. The header area can display up to four labels
that you choose from the menus.
Show Rating Footer Shows the footer items you select.
Use Defaults Restores the Grid view options to their factory-set defaults.
7 From the Show Grid Extras menu, choose one of the following to set the size of the thumbnail cells in the Grid view:
Expanded Cells Displays the most photo information available in the Grid view, including a header with up to four
metadata labels.
Compact Cells Displays smaller cells with less photo information so that more thumbnails are visible in the Grid
view.
Change the Grid view options
You can quickly change the Grid view options by choosing from the Grid View Style menu. The views are based on the
default or custom view options set in the Library View Options.
❖ In the Grid view, choose View > Grid View Style and choose any of the following:
Show Extras Shows or hides cell extras set in the Library View Options.
Show Badges Shows or hides keyword tags, cropping, and image adjustment badges.
Compact Cells Shows compact cells in the Grid view.
Expanded Cells Shows expanded cells in the Grid view.
Cycle View Style Cycles through the different views available in the Grid View Style menu.
Last updated 4/20/2015
Page 93

Viewing photos
Set Library view options for Loupe view
The Library View Options determine what information displays with your photos in the Loupe view. You can specify
two different sets of information.
1 I n the L i b r ary m odule , c hoos e View > Vi ew Op t ions.
2 In t he Loupe View tab of the L ibrary View Options dialog box, select Show Info Overlay to display information wit h
your photos. (Show Info Overlay is selected by default.)
Deselecting this option displays photos with no information overlay in the Loupe view.
3 In the Loupe Info 1 and Loupe Info 2 areas of the dialog box, use the menus to choose what displays in the two Info
Overlays in the Loupe view. You can select up to three items in each overlay, including the filename, metadata, or
no data.
4 S elect Show Brief ly When P hoto Changes to br ief ly displ ay the Info Overl ays only when photos change in the Loup e
view.
5 Under General area of the dialog box, select Show Messages When Loading Or Rendering Photos to display overlays
in the Loupe view during a process.
6 From the Show Info Overlay menu, choos e Info 1 or Info 2 to select the currently active Info Overlays in Loupe v iew.
88
Change the Loupe view info overlay
❖ In the Library module, choose View > Loupe Info and then choose any of the following:
Show Info Overlay Displays the Info Overlay specified in the Library View Options.
Info 1 Displays the Info 1 Overlay.
Info 2 Displays the Info 2 Overlay.
Cycle Info Display Cycles through the two Info Overlay sets.
More Help topics
Display the Info Overlay on a photo
Last updated 4/20/2015
Page 94

Chapter 7: Managing catalogs and files
How Lightroom catalogs work
What's in a catalog?
A catalog is a database that stores a record for each of your photos. This record contains three key pieces of information
about each photo:
1 A reference to where the photo is on your system
2 Instructions for how you want to process the photo
3 Metadata, such as ratings and keywords that you apply to photos to help you find or organize them
When you import photos into Lightroom, you create a link between the photo itself and the record of the photo in the
catalog. Then, any work you perform on the photo — such as adding keywords or removing red eye — is stored in the
photo's record in the catalog as additional metadata. When you're ready to share the photo outside Lightroom —
upload it to Facebook, print it, or create a slideshow, for example — Lightroom applies your metadata changes, which
are like photo-developing instructions, to a copy of the photo so that everyone can see them. Lightroom never changes
the actual photos captured by your camera. In this way, editing in Lightroom is nondestructive. You can always return
to the original, unedited photo.
89
The Lightroom catalog versus a file browser
The way Lightroom works is different from a file browser such as Adobe Bridge. File browsers need direct, physical
access to the files they display. Files must actually be on your hard drive, or your computer must be connected to a
storage media that contains the files, for Adobe Bridge to show them. Because Lightroom uses a catalog to keep track
of the photos, you can preview photos in Lightroom whether they are physically on the same computer as the software.
The advantages of the catalog-based workflow
The Lightroom catalog workflow provides two distinct advantages for photographers:
1 Your photos can be stored anywhere
2 Your edits are nondestructive
Lightroom offers flexibility in managing, organizing, and editing photos because your photos can be anywhere — on
the same computer with the Lightroom application, on an external hard disk, or perhaps on a network drive. Because
the catalog stores a preview of each photo, you can work with your photos in Lightroom and see your editing changes
as you work. And all the while, Lightroom doesn't touch your original photo files.
Last updated 4/20/2015
Page 95

Managing catalogs and files
Best practices for working with Lightroom catalogs
It’s wise to approach your work in Lightroom with some forethought. You can move catalogs and photos, put photos in
multiple catalogs, and combine or merge catalogs, but doing so can be confusing. In addition, links between your
catalog and your photos may break. Follow these steps to plan your catalog setup and to minimize having to shuffle
catalogs and photos around between computers and drives.
1 Decide in advance where you want to store your Lightroom catalog. You can’t store it on a network. You’ll probably
store it on your computer’s hard drive or an external disk. After you decide where you’ll save the catalog, consider
the specific folder or path where you’ll put it.
2 Determine where you want to keep your photos. How much disk space is on your hard drive? Will it be enough? If
you’re working on multiple computers, consider keeping your catalog and photos on an external drive that you can
plug into either system. Copy or move your photos to that location before you import them into Lightroom.
3 Finally, start Lightroom and import photos into the catalog by adding them in place.
Two f i n a l recommendat i o ns:
• Although you can have multiple Lightroom catalogs, try to work with just one. There’s no upper limit to the number
of photos you can have in a catalog, and Lightroom offers myriad ways to sort, filter, and otherwise organize and
find photos within a catalog. For example, you can use folders, collections, keywords, labels, and ratings. With a little
thought and practice, you can probably find ways to organize and manage all of your photos successfully in one
catalog.
• After you start working in Lightroom, if you need to move or rename photos — say that your hard drive fills up and
you have to switch to an external drive — perform those tasks from within Lightroom. Do not use the Explorer
(Windows) or Finder (Mac OS) to move photos. If you do, you’ll likely encounter the dreaded “photos are missing”
error and you’ll have to relink everything.
90
More Help topics
Creating and using catalogs
Lightroom catalog FAQ
Manage photos
Creating and using catalogs
Create a catalog
When you create a catalog, you actually create a folder for it, too. The name of folder is the same as the name of the
catalog, without the catalog suffix. For example, if you name the folder “Wedding Photos,” then catalog file will be
“Wedding Photos.lrcat”. When you add photos to the catalog, Lightroom creates a preview cache file, such as “Wedding
Photos Previews.lrdata,” and puts it in the folder with the catalog.
1 Choose File > New Catalog.
2 Specify the name and location of the new catalog folder, and then click Save (Windows) or Create (Mac OS).
Lightroom resets and displays an empty Library module, ready for you to import photos.
Last updated 4/20/2015
Page 96

Managing catalogs and files
Open a catalog
When you open a different catalog, Lightroom closes the current catalog and relaunches.
1 Choose File > Open Catalog.
2 In the Open Catalog dialog box, specify the catalog file and then click Open.
You can also choose a catalog from the File > Open Recent menu.
3 If prompted, click Relaunch to close the current catalog and relaunch Lightroom.
You can also change General preferences to specify which catalog opens when Lightroom starts. See Change the default
catalog.
Upgrade a catalog from an earlier version of Lightroom
You can open, or import, a catalog from an earlier version of Lightroom, including a beta version, in a more recent
version Lightroom. When you do, Lightroom upgrades it. The new, updated catalog contains all of the metadata
associated the previous catalog and photos.
1 Do one of the following:
• Start Lightroom 5 for the first time.
91
• If you’ve opened Lightroom 5 previously, choose File > Open Catalog.
2 Navigate to the old catalog .lrcat file, and then click Open.
If you can't remember where the old catalog is located, search for “lrcat” in the Explorer (Windows) or Finder (Mac
OS).
3 If prompted, click Relaunch to close the current catalog and restart Lightroom.
4 (Optional) In the Lightroom Catalog Upgrade dialog box, change the destination for the upgraded catalog.
5 Click Upgrade.
Important: When you upgrade a catalog, Lightroom leaves the old catalog untouched, makes a copy the old catalog,
and renames its previews file. So, in addition to your new, upgraded catalog, you'll also have:
• old catalog.lrcat
Last updated 4/20/2015
Page 97

Managing catalogs and files
• old catalog-2.lrcat
• old catalog Previews 2.lrdata
You can keep or delete these files.
Copy or move a catalog
Note: Before copying or moving a catalog and preview files, back them up.
1 Locate the folder that contains the catalog and preview files. In Lightroom, choose Edit > Catalog Settings
(Windows) or Lightroom > Catalog Settings (Mac OS).
2 In the Information area of the General panel, click Show to go to the catalog in the Explorer (Windows) or Finder
(Mac OS).
3 Quit Lightroom.
4 In the Explorer (Windows) or Finder (Mac OS), copy or move the catalog.lrcat, Previews.lrdata, and (if present)
Smart Previews.lrdata files to the new location.
5 Double-click the .lrcat file in the new location to open it in Lightroom.
6 (Optional) If Lightroom can't find folders or photos in the copied or moved catalog, a Question Mark icon appears
by folder names in the Folders panel and an Exclamation Point icon appears in photo thumbnails in the Grid view.
To restore folder links, right-click (Windows) or Control-click (Mac OS) a folder with a Question Mark icon and
choose Find Missing Folder. To relink individual photos, see
Locate missing photos .
92
Export a catalog
You can create a catalog that contains a subset of a larger catalog by selecting the photos and exporting them as a new
catalog. This is useful when, for example, you import photos into a catalog on a laptop and then later add them to a
master catalog on a desktop computer.
1 Select the photos you want to add to the new catalog.
2 Choose File > Export As Catalog.
3 Specify the name and location of the catalog.
4 Indicate whether you want to export the negative files and previews, and then click Save (Windows) or Export
Catalog (Mac OS).
“Negative files” refers to the original files that were imported into Lightroom.
The new catalog contains links to the selected photos and their information. You must open the new catalog to view
it.
5 (Optional) To combine catalogs, import the new catalog into another. See Import photos from a different Lightroom
catalog.
To learn how to maintain a synchronized Lightroom catalog across multiple computers, watch the Synchroniz e Catalogs
tutorial (08:12) from the Learn by Video series. Although this video was produced for Lightroom 3, it is accurate for
newer versions of Lightroom.
Last updated 4/20/2015
Page 98

Managing catalogs and files
Delete a catalog
Deleting a catalog erases all the work you’ve done in Lightroom that isn’t saved in the photo files. While the previews
are deleted, the original photos being linked to are not deleted.
❖ Using the Explorer (Windows) or Finder (Mac OS), locate the folder that contains your catalog and drag it to the
Recycling Bin (Windows) or Trash (Mac OS).
Important:Make sure that the folder you delete contains only the catalog files you intend to erase, and not additional
files.
To enhance performance, Lightroom builds a Previews folder next to the .lrcat file in the Explorer (Windows) or
Finder (Mac OS). It is safe to delete this folder as long as its name matches the .lrcat file name. If you delete a
Previews folder that’s still needed by a catalog, Lightroom will re generate it when you work in that catal og, but it wi ll
run more slowly until the previews are rebuilt.
Change the default catalog
By default, Lightroom opens the most current catalog at startup. This behavior can be changed to opening a different
catalog or to always prompting you to choose a catalog.
1 Choose Edit > Preferences (Windows) or Lightroom > Preferences (Mac OS).
2 In the General tab, choose one of the following from the When Starting Up Use This Catalog menu:
Load Most Recent Catalog Opens the most recent catalog you've been working with.
93
Prompt Me When Starting Lightroom Opens the Select Catalog dialog box at startup so you can choose.
A catalog in the default location Lightroom lists all of the catalogs in \Pictures\Lightroom (Windows) or
/Pictures/Lightroom (Mac OS) for you to choose.
Other Allows you to navigate to a specific catalog file (.lrcat) and select it as the default catalog to open at startup.
Customize catalog settings
You can specify many preferred behaviors for Lightroom catalogs in the Catalog Settings dialog box.
1 Choose Edit > Catalog Settings (Windows) or Lightroom > Catalog Settings (Mac OS).
2 In the General tab, specify any of the following:
Information Provides information such as the location, filename, and creation date of the catalog. Click Show to
view the catalog file in Explorer (Windows) or Finder (Mac OS).
Backup Lets you specify the frequency with which the current catalog is backed up. See Back up a catalog.
3 In the File Handling tab, specify any of the following:
Preview Cache Determines how Lightroom renders three types of image previews. All previews are stored in the
preview cache file in the folder where your catalog is located.
Standard Preview Size Specifies the maximum length, in pixels, of the long side of full-size rendered previews.
Choose a size that is equal to or larger than your screen resolution. For example, if your screen resolution is 1920 x
1200 pixels, choose Standard Preview Size > 2048 Pixels. If your screen resolution exceeds 2048 pixels, Lightroom
generates a 1:1 preview instead.
Preview Quality Specifies the appearance of the thumbnail previews. Low, Medium, and High are similar to the
quality scale for JPEG images.
Last updated 4/20/2015
Page 99

Managing catalogs and files
Automatically Discard 1:1 Previews This setting specifies when 1:1 previews are discarded based on the most recent
access to the preview. 1:1 previews have the same pixel dimensions as the original photos, and show sharpening and
noise reduction. They are rendered as needed and can make the catalog preview file large, so it's good to discard
them periodically.
Smart Previews Indicates how much disk space is being used by Smart Previews. For information on using Smart
Previews, see
Import Sequence Numbers Specifies starting sequence numbers for photos as you import into the catalog. Import
Number is the first number in a series that identifies how many import operations are performed. Photos Imported
is the first number in a series that identifies how many photos have been imported into the catalog. See
Templ a te E d itor a nd Te x t Temp l ate E dit o r .
4 In the Metadata tab, select any of the following:
Offer Suggestions From Recently Entered Values When you start typing a metadata entry that resembles a previous
entry, one or more suggestions appear as you type. Deselect this option to turn it off. Click Clear All Suggestion Lists
to clear previous entries.
Include Develop Settings In Metadata Inside JPEG, TIFF, PNG, And PSD Files Deselect this option to prevent
Lightroom from including Develop module settings in the XMP metadata of JPEG, TIFF, PNG, and PSD files.
Automatically Write Changes Into XMP S el ect thi s o ptio n t o sav e m et adat a c han ge s dir ec tl y to t he XM P side ca r f il es,
making the changes visible in other applications. Deselect this option to save metadata settings only in the catalog.
For information on saving XMP changes manually, see
Smart Previews.
The Filename
About metadata and XMP.
94
Enable Reverse Geocoding of GPS Coordinates To Provide Address Suggestions Allows Lightroom to send your
photo's GPS coordinates, if available, to Google so that Lightroom can determine the city, state, and country of the
photo and add that information into the IPTC Location metadata.
Export Reverse Geocoding Suggestions Whenever Address Fields Are Empty If selected, Lightroom includes
Google-suggested IPTC Location metadata in photos when you export them.
Write Date Or Time Changes Into Proprietary Raw Files This option controls whether Lightroom writes a new date
and time to proprietary raw files when you use the Metadata > Edit Capture Time command to change a photo’s
capture time metadata. By default, this option is not selected.
Optimize the catalog
After you have imported, edited, and perhaps removed a number of files, you may have to wait a significant amount of
time while working in Lightroom. When that happens, optimize your catalog to improve performance.
❖ Choose File > Optimize Catalog.
Adobe also recommends
• Lightroom catalog FAQ
• How Lightroom catalogs work
Back up a catalog
Last updated 4/20/2015
Page 100

Managing catalogs and files
Plan your backup strategy
Lightroom allows you to schedule regular catalog backups when you exit the software. Backups executed from
Lightroom include only the catalog file. You must independently back up your edited photos and anything exported
from Lightroom.
Performing frequent, regular catalog backups is only part of what should be a comprehensive backup strategy. When
formulating a backup strategy:
• Remember that the more frequently you back up your catalog and photos, the less data you stand to lose when a
crash or corruption occurs.
• If possible, store the backup copies of your photos and catalog on a separate hard disk from your working files.
• Consider using dedicated backup software to automate the process and synchronize changes between your working
and backup files.
• If you’re worried that your backup files might be accidentally erased, create redundant backups on additional disks,
or on read-only media such as DVDs.
• For greater security, store your backup disk in a separate location from your working disk, preferably offsite or in a
fire-proof safe.
• Consider making copies of your photos when you import them. Remember that this gives you only a copy of your
original photos, not your edited photos. See
By default, Lightroom saves backed up catalogs to the following locations:
Back up photos during import.
95
• Wi n do w s : \Users\[user name]\Pictures\Lightroom\[catalog name]\Backups\
• Mac OS: /Users/[user name]/Pictures/Lightroom/[catalog name]/Backups\
Inside the Backups folder, Lightroom creates a folder with the date and time of the backup: YYYY-MM-DD HRMN.
(The time is represented by a 24-hour clock without a colon between hours and minutes.) The backed up catalog is
saved inside the date-stamped folder, with the same name as the working catalog. Lightroom writes a new catalog every
time it creates a backup. To save space on your hard disk, delete or compress old backup files. In addition, make sure
that you have write permissions for the location where you decide to save your backup.
Note: Running Mac OS X Time Machine™ backup or restore operations while Lightroom is in use is not recommended.
Schedule catalog backups
1 Choose Edit > Catalog Settings (Windows) or Lightroom > Catalog Settings (Mac OS).
2 In the Backup area of the General panel, choose an option from the Back Up Catalog pop-up menu:
When Lightroom Next Exits Backs up the catalog the next time you exit Lightroom, and then the Back Up Catalog
option switches to Never.
Every Time Lightroom Exits Backs up the catalog every time you exit Lightroom, so changes from every working
session are always backed up.
Once A Day, When Exiting Lightroom Backs up the catalog the first time you exit Lightroom each day. If you exit
Lightroom more than once a day, additional changes are not backed up until the next day.
Once A Week, When Exiting Lightroom Backs up the catalog once a week. If you exit Lightroom more frequently,
additional changes are not backed up until the next week.
Once A Month, When Exiting Lightroom Backs up the catalog once a month. If you exit Lightroom more frequently,
additional changes are not backed up until the next month.
Never No backups are performed by Lightroom. (Not recommended.)
Last updated 4/20/2015
 Loading...