

Page 1
VRO 300 ADDENDUM
ACU-RIT
E
REMOTE STORAGE INSTALLATION
When you create programs using the VRO 300, you can save them on the VRO
300’s internal storage space, or on the hard disk drive of a PC using the remote
storage feature.
The Remote storage feature enables you to free up the VRO 300’s internal storage
space. Your PC is the ideal place to backup important files and organize them in
one convenient location.
Equipment
To set up the remote storage program, you will need the following items:
• VRO 300
• IBM-compatible PC
• Serial cable
• Remote Storage installation disk
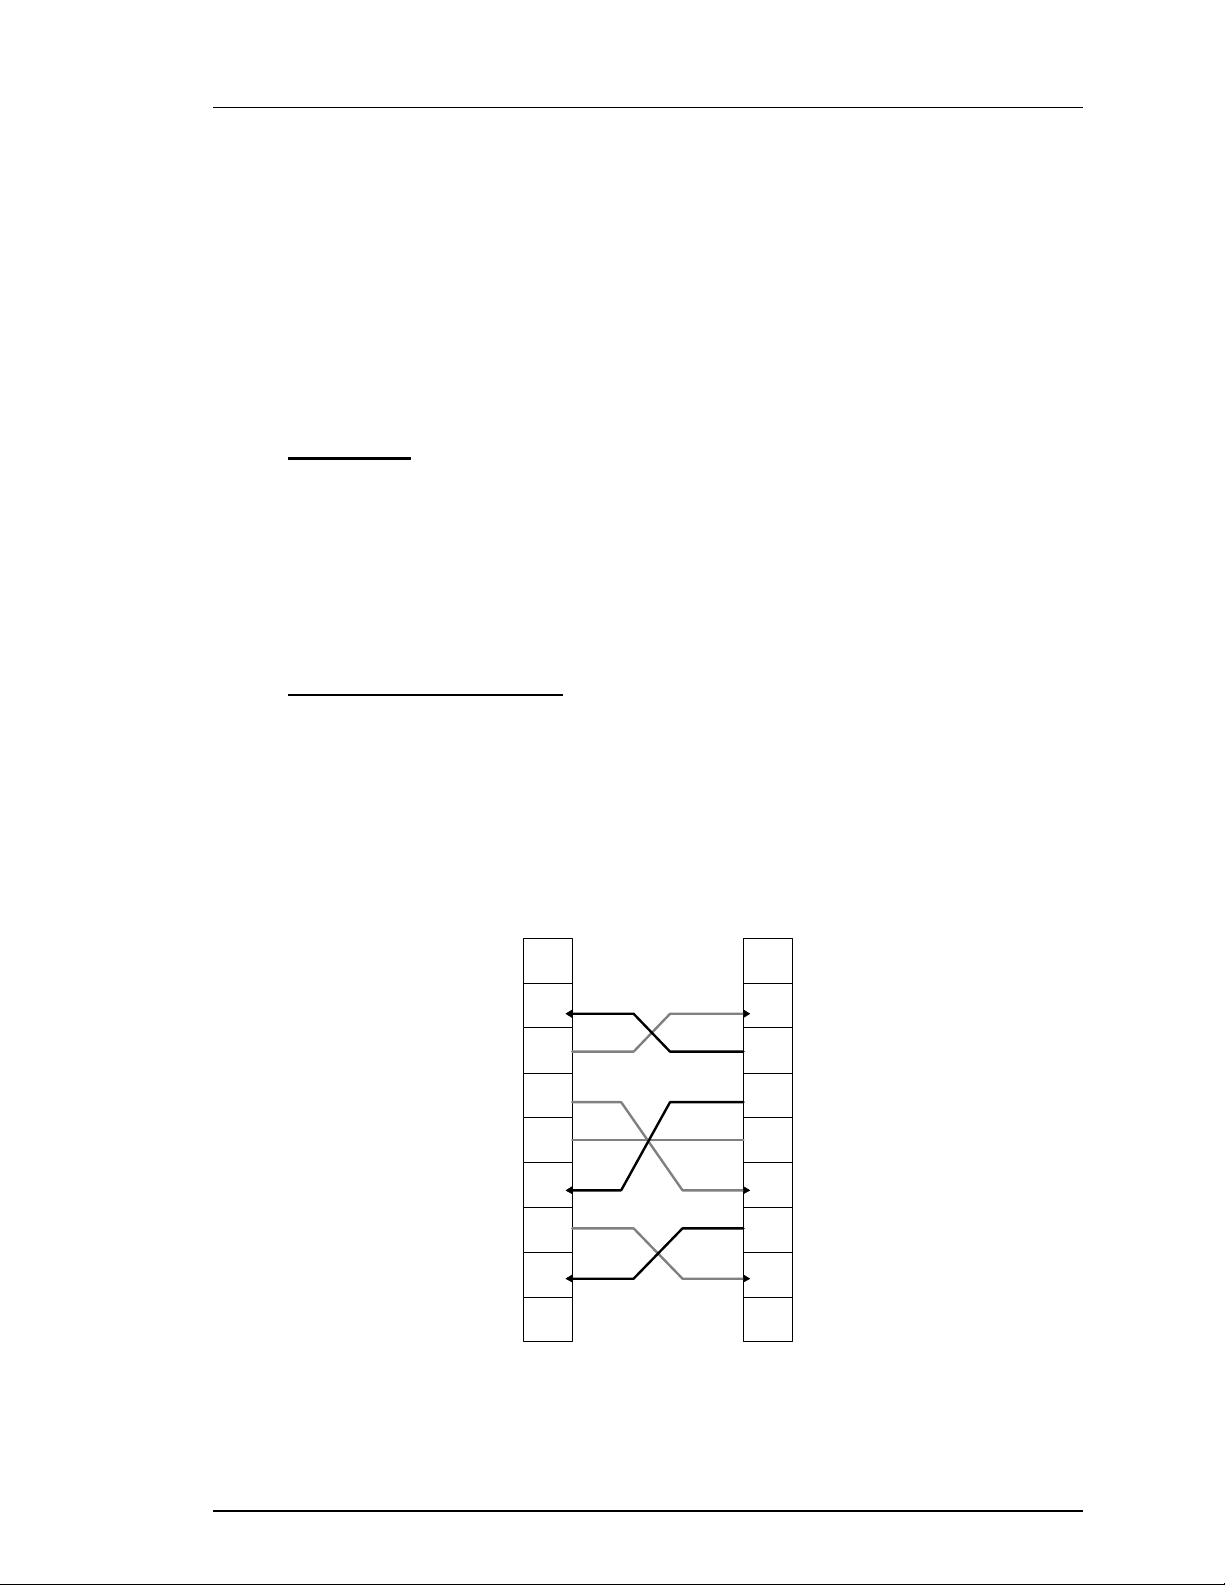
Choosing a Serial Cable
Before the VRO 300 and your PC can communicate with each other, they need to
be connected with a serial cable. The graphic below illustrates how the cable’s
wires must be attached to the end connectors for successful transmission. Check
that the cable you purchase matches this wiring diagram:
NC
RxD
TxD
DTR
GND
DSR
RTS
Connector 1
1
2
3
4
5
6
7
(Wires)
Connector 2
1
2
3
4
5
6
7
NC
RxD
TxD
DTR
GND
DSR
RTS
8
CTS
NC
9
2002-7001 Ed A Page 1 of 9
8
CTS
NC
9
Page 2
VRO 300 ADDENDUM
ACU-RIT
E
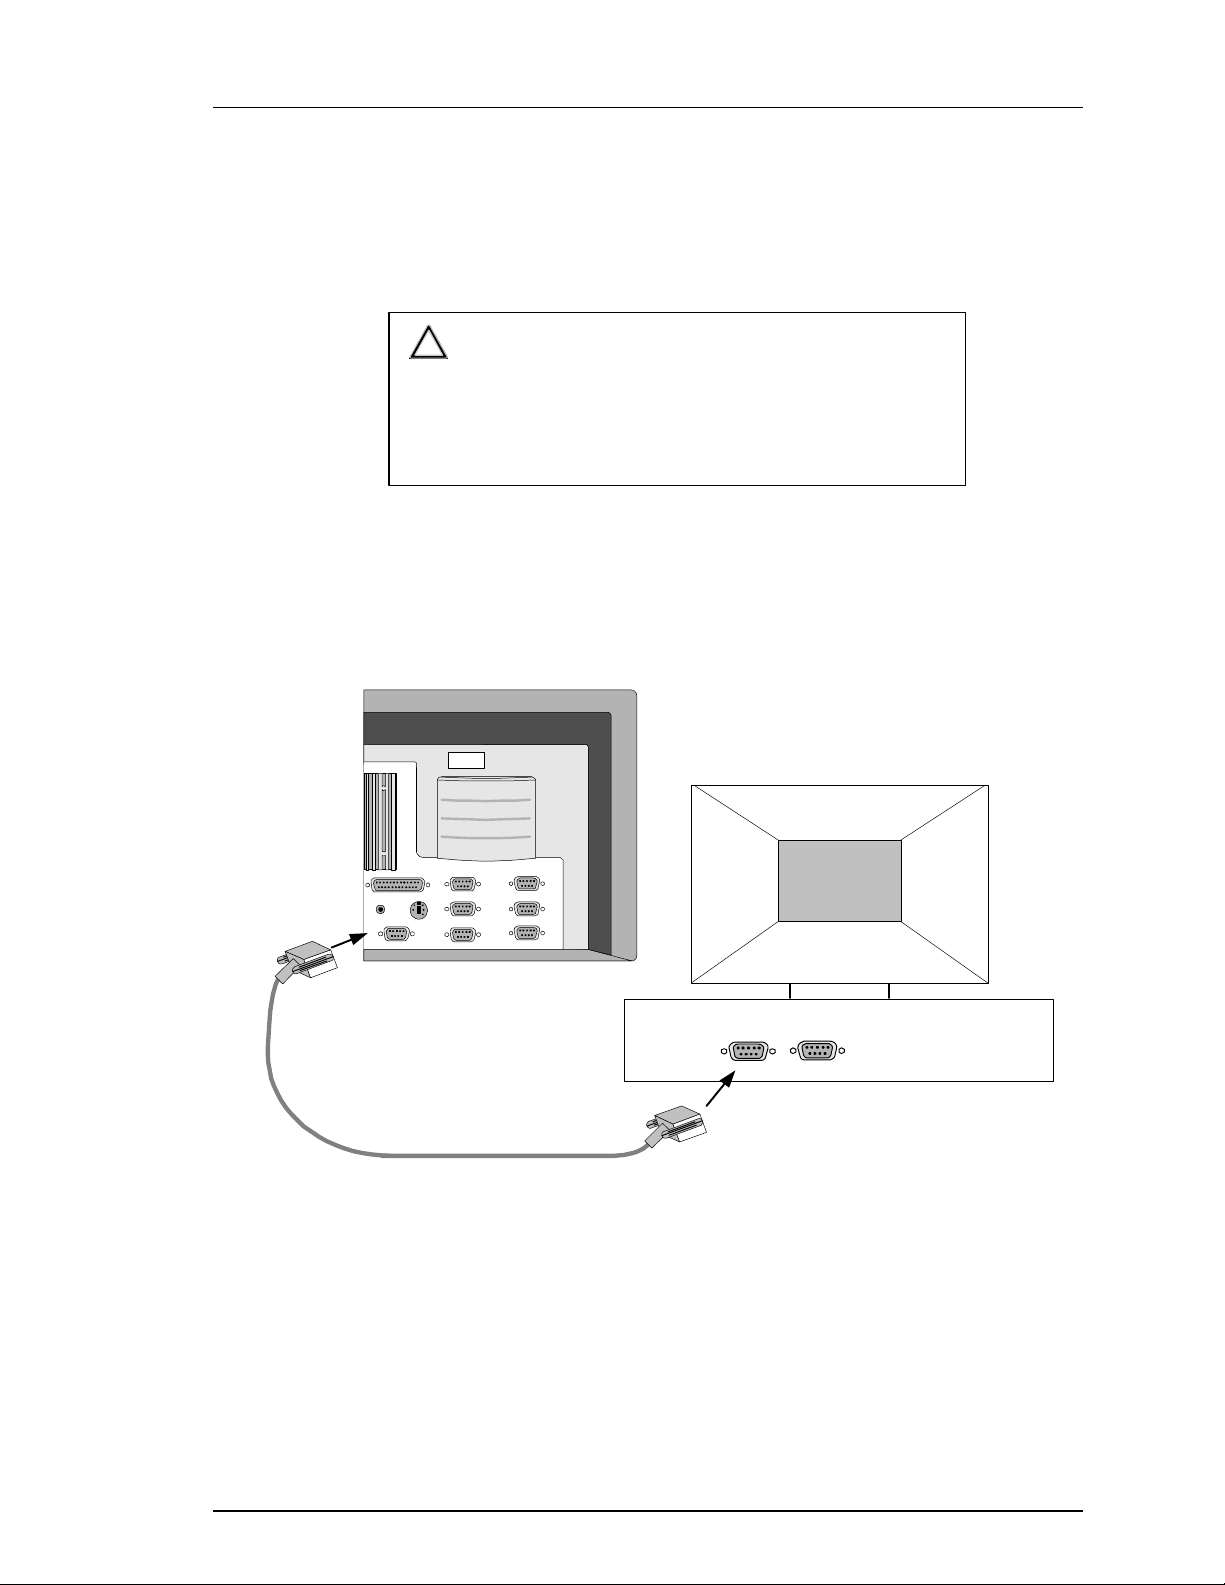
Connecting the VRO 300 to a PC
Before you can save programs remotely, you need to connect the VRO 300 to your
PC.
!
CAUTION
To avoid the possibility of electrical shock, power down both
the VRO 300 and the PC before connecting the serial cable.
• Connect one end of the cable into the serial port located on the rear of the VRO
300. Connect the opposite end of the cable into an available COM port on the
back of your PC.
PN 200x00x
SN 9766554
Connect
one end of
your cable
to the Serial
Port on the
VRO 300
CFI
EDGE FINDER
SERIAL PORT
TOUCH PROBE
INPUT 2
INPUT 6
INPUT 4
INPUT 5
INPUT 3
INPUT 1
• Note that the COM port must be available—that is, not already assigned a
piece of hardware by the PC. You cannot simply disconnect a piece of hardware and connect the cable. If there’s no COM port recognized as being available by the PC, then you will need to make one accessible (consult your PC
owner’s manual).
2002-7001 Ed A Page 2 of 9
COM 1 COM 2
Connect
the opposite
end of your
cable to an
available
COM Port
on the back
of your PC
Page 3

VRO 300 ADDENDUM
ACU-RIT
E
Installing the Remote Storage Program
You can install the Remote Storage program on your PC using either Microsoft
Windows® 95 or DOS® operating systems. Choose the system you will use, then
follow the applicable steps below.
For Windows 95:
1. Boot up the PC.
2. Insert the “Remote Storage” disk into the PC’s floppy disk drive.
3. Click on “Start”.
4. Click on “Run”, type a:install then click on “OK”. This copies all of the
files from the disk into a folder on the PC’s hard disk drive.
5. Instructions on how to use the Remote Storage will be displayed on the
screen.
6. Close the DOS Window. The Remote Storage icon should now appear on
your desktop. Double-click on the icon to run the Remote Storage program.
For DOS:
1. Boot up the PC.
2. Insert the “Remote Storage” installation disk into the PC’s floppy disk
drive.
3. At the C:\. prompt, type a: then press ENTER.
4. After the A:> prompt, type install, and press ENTER again. This com-
mand tells the PC to copy all of the files from the disk into a folder on the
PC’s hard disk drive.
5. At the next prompt, type c: to switch to the PC’s hard disk drive.
6. After C:\ appears, type cd remtstor and press ENTER.
7. C:\REMTSTOR\> will appear. Type remtstor and press ENTER.
®
The PC should now display the Remote Storage Utility screen.
2002-7001 Ed A Page 3 of 9
Page 4

VRO 300 ADDENDUM
ACU-RIT
E
Setting the PC’s COM Port and Baud Rates
After the Remote Storage software has been installed, the following screen will
appear on your PC:
Communications
Port Selected
Baud Rate
01-01-99 14:00:43
0 of 0
QUIT
(F5)
Keyboard
Command
Keys
READY COM: 1 BAUD: 9600
COMMAND TIME PROGRAM DIRECTORY
ACU-RITE Remote Storage Utility v1.0.0
COM PORT
(F1)
BAUD RATE
(F2)
Now you need to identify your COM port and set the baud rate.
• COM Port – COM (short for “communication”) port 1 is the program’s de-
fault setting. You can switch to COM port 2 by pressing the F1 key on your
PC’s keyboard. Remember that the COM port setting must be available, and it
must correspond with the PC port that you connected the serial cable to.
• Baud Rate – Set the baud rate by pressing the F2 key on the PC’s keyboard
and scrolling through the pre-set rates until the correct value appears. Use the
same rate you entered on the VRO 300 SERIAL PORT screen. (Refer to Re-
mote Storage Program Operation.)
After the COM port has been identified and the baud rate has been selected, you
can begin storing VRO 300 programs on your PC. (For more information about
creating, saving and deleting programs, refer to the Remote Storage Program
Operation section.)
2002-7001 Ed A Page 4 of 9
Page 5

VRO 300 ADDENDUM
ACU-RIT
E
®
Error Messages
If the communication lines between the VRO 300 and the PC are disrupted, an error
message will appear on the VRO 300 screen. Settings that do not match and a
faulty serial cable connection are the most common problems and are easiest to
correct.
Error Cause Solution
Baud rate error
Checksum error
No response
from PC
Timeout error
VRO 300 and PC baud
rate settings do not
match.
VRO 300 and PC baud
rate settings do not
match.
Baud rate is too slow. Increase the baud rates on both the
Serial cable connection
and COM port setting
do not match.
Incorrect serial cable Verify that you are using a serial
VRO 300 and PC baud
rate settings do not
match.
The selected COM
port is disabled.
Loose serial cable Check that each end of the serial
Change one of the settings so that
the VRO 300 and the PC baud rates
are the same.
Change one of the settings so that
the VRO 300 and the PC baud rates
are the same.
VRO 300 and the PC.
If the COM port setting (1 or 2) on
the PC screen does not correspond
with the port the serial cable is
connected into:
a) Change the setting; or
b) Disconnect the cable from the
COM port that it is connected
to and connect it to a different
COM port.
cable and that it is not a NULL
modem cable. Replace the cable, if
necessary.
Change one of the settings so that
the VRO 300 and the PC baud rates
are the same.
a) Change the PC’s COM port
setting and connect the serial
cable into the appropriate port
b) Exit the remote storage pro-
gram on the PC, then refer to
your Microsoft® Windows
and PC operator’s manuals for
instructions on how to enable a
COM port.
cable fits snugly into the VRO 300
serial port and the PC COM port
2002-7001 Ed A Page 5 of 9
Page 6

VRO 300 ADDENDUM
ACU-RIT
E
REMOTE PROGRAM STORAGE OPERATION
The remote storage feature is used to download and upload part programs using a
serial port. It works in conjunction with dedicated software running on a host
computer. The following information describes the new VRO 300 operations
needed to support remote storage.
Configuring the VRO 300 Serial Port
Serial port configuration is done from Installation Setup. The form below is used
to set up the function and protocol of the serial port.
INSTALLATION SETUP
DISPLAY CONFIGURATION
ENCODER SETUP
SERIAL PORT
SERIAL PORT
PARALLEL PORT
PROTECTION
GRAPH ORIENTATION
DIAGNOSTICS
3 OF 7
SERIAL PORT
PORT CONFIGURATION
OUTPUT TAIL
LF AFTER CR
PORT PROTOCOL
PARITY
DATA BITS
STOP BITS
REMOTEFUNCTION
1200BAUD
NONE
8
1
The serial port can be disabled or configured to operate as a printer port, a bidirectional link to a computer, or a remote storage port. As a REMOTE
STORAGE port, the VRO 300 will interact with the remote storage software
running the host computer to transfer part programs.
PRINTER COMPUTER
REMOTE
STORAGE
CANCEL DONE
Pressing the DONE softkey returns you to Installation Setup accepting all changes
to the serial port configuration. Pressing the CANCEL softkey returns you to Installation Setup without accepting any changes to the serial port configuration.
2002-7001 Ed A Page 6 of 9
Page 7

VRO 300 ADDENDUM
ACU-RIT
E
Loading a Program using Remote Storage
Begin by pressing the PROGRAM FUNCTIONS softkey, then press the LOAD
softkey. A list of programs stored in the VRO 300 will appear. This box is used
to select the program to be loaded and initially shows all of the programs in internal storage.
If the REMOTE STORAGE softkey is pressed, the list box shows the programs
which exist on the host computer. If the softkey is released, the list shows the
programs which exist in the VRO 300. If no programs exist at the source, the list
will be empty.
Note: The REMOTE STORAGE softkey is only available if the serial port is
configured for remote storage.
PICK A PROGRAM TO LOAD
REMOTE
STORAGE
ALPHABET CANCEL LOAD
LOAD PROGRAM
09-30-96
387900-1
PROTO -01
The arrow keys are used to cursor up or down.
1 OF 3
Pressing the LOAD softkey (or ENTER key)
loads the highlighted program into memory. If a program is currently in memory,
the operator is required to confirm this operation.
While the program is being downloaded from the host computer, the operator may
press the CANCEL softkey to stop the program from being downloaded.
LOADING PROGRAM. PLEASE WAIT OR PRESS CANCEL SOFT KEY.
CANCEL
If the download procedure is canceled, the system will return to the PGM view and
the message “LOAD PROGRAM CANCELED.” will be displayed on the prompt
bar.
If the download procedure fails, the system will return to the PGM view and a
message explaining the error will be displayed on the prompt bar. Program memory will be cleared.
If the download is successful, the system will return to the PGM view with the new
program in memory.
2002-7001 Ed A Page 7 of 9
Page 8

VRO 300 ADDENDUM
ACU-RIT
E
Saving a Program using Remote Storage
Begin by pressing the PROGRAM FUNCTIONS softkey, then press the SAVE
softkey to save programs using the Remote Storage feature. A form will appear
which will enable you to enter a name for the part program. The program will be
saved to the internal storage of the VRO 300.
If the REMOTE STORAGE softkey is pressed, the program will be uploaded to
the host computer. If the softkey is released, the program will be saved in the
VRO 300.
Note: The REMOTE STORAGE softkey is only available if the serial port is
configured for remote storage.
ENTER A NAME FOR THE PROGRAM.
REMOTE
STORAGE
ALPHABET CANCEL SAVE
SAVE PROGRAM
PROGRAM NAME
387920-2
The Program Name field defaults to the name shown in the program listing. A
program name is comprised of numbers or letters (press the alphabet softkey) and
is limited to 8 digits/characters.
Pressing the SAVE softkey (or ENTER key) saves the program on the host computer. If a program with that name already exists, the operator will be asked if it is
OK to overwrite what already exists.
While the program is being uploaded to the host computer, the operator may cancel the save procedure by pressing the CANCEL softkey.
SAVING PROGRAM. PLEASE WAIT OR PRESS CANCEL SOFT KEY.
CANCEL
If the upload is canceled, the system will return to the PGM view and the message
“SAVE PROGRAM CANCELED.” will be displayed on the prompt bar.
If the upload fails, the system will return to the PGM view and a message explaining the error will be displayed on the prompt bar.
If the upload is successful, the system will return to the PGM view.
2002-7001 Ed A Page 8 of 9
Page 9

VRO 300 ADDENDUM
ACU-RIT
E
Deleting a Program using Remote Storage
Begin by pressing the PROGRAM FUNCTIONS softkey, then press the
DELETE softkey. A list of programs stored in the VRO 300 will appear.
If the REMOTE STORAGE softkey is pressed, the list shows the programs
which exist on the host computer. If the softkey is released, the list shows the
programs which exist in the VRO 300’s internal storage. If no programs exist at
the source, the list will be empty.
Note: The REMOTE STORAGE softkey is only available if the serial port is
configured for remote storage.
PICK A PROGRAM TO DELETE.
REMOTE
STORAGE
ALPHABET CANCEL DELETE
DELETE PROGRAM
09-30-96
387900-1
PROTO -01
The arrow keys are used to cursor up or down.
1 OF 3
Pressing the DELETE softkey (or ENTER key)
deletes the highlighted program. You will be asked to confirm this operation.
If the operation fails, the system will return to the PGM view and a message explaining the error will be displayed on the prompt bar.
If the operation is successful, the system will return to the PGM view.
2002-7001 Ed A Page 9 of 9
 Loading...