

ABUS TVIP41560, TVIP61560 User manual [ml]
WLAN HD 720p Außen Kamera | Außen Dome Kamera: TVIP61560 | TVIP41560
Diese Kurzanleitung beschreibt die ersten Einrichtungsschritte für Ihre Netzwerkkamera.
Detaillierte Informationen erhalten Sie in der beiliegenden Bedienungsanleitung.


Deutsch
Sehr geehrte Kundin, sehr geehrter Kunde,
wir bedanken uns bei Ihnen für den Kauf eines unserer
Produkte. Dieses Produkt erfüllt die Anforderungen der
geltenden europäischen und nationalen Richtlinien.
Die Konformität wurde nachgewiesen, die entsprechenden Erklärungen und Unterlagen sind beim Hersteller
hinterlegt: ABUS Security-Center GmbH & Co. KG, Linker
Kreuthweg 5, 86444 Ang, GERMANY.
Um diesen Standard zu erhalten und einen gefahrlosen
Betrieb sicherzustellen, müssen Sie als Anwender diese
Bedienungsanleitung beachten! Lesen Sie vor Inbetriebnahme des Produkts die komplette Bedienungsanleitung, beachten Sie alle Bedienungs- und Sicherheitshinweise!
Alle enthaltenen Firmennamen und Produktbezeichnungen sind Warenzeichen der jeweiligen Inhaber. Alle
Rechte vorbehalten. Bei Fragen wenden Sie sich an Ihren Fachhandelspartner!
3

Deutsch
Lieferumfang ......................... 6
Warnhinweise ......................... 7
Übersicht ......................... 8
Netzwerkeinbindung ......................... 10
Hardwareinstallation ......................... 16
Nederlands
Leveringsomvang ......................... 48
Waarschuwingen ......................... 49
Overzicht ......................... 50
Netwerkverbinding ......................... 52
Hardware-installatie ......................... 58
English
Scope of delivery ......................... 20
Warnings ......................... 21
Overview ......................... 22
Network connection ......................... 24
Hardware installation ......................... 30
Français
Étendue de la livraison ......................... 34
Avertissements ......................... 35
Vue d‘ensemble ......................... 36
Intégration réseau ......................... 38
Installation matérielle ......................... 44
4
Dansk
Leveringsomfang ......................... 62
Advarselshenvisninger ......................... 63
Oversigt ......................... 64
Netværksintegration ......................... 66
Hardwareinstallation ......................... 72
Svensk
Leveransomfång ......................... 76
Varningar ......................... 77
Översikt ......................... 78
Nätverksanslutning ......................... 80
Installation av hårdvara ......................... 86
Deutsch

Polski
Zakres dostawy ......................... 90
Wskazówki ostrzegawcze ......................... 91
Przegląd ......................... 92
Integracja z siecią ......................... 94
Instalacja sprzętu ......................... 100
Italiano
Dotazione ......................... 104
Avvertenze ......................... 105
Panoramica ......................... 106
Collegamento in rete ......................... 108
Installazione dell’hardware ......................... 114
Español
Volumen de entrega ......................... 118
Advertencias ......................... 119
Vista general ......................... 120
Conexión de red ......................... 122
Instalación del hardware ......................... 128
Deutsch
5

Lieferumfang
WLAN HD 720p Außen Dome Kamera (TVIP41560)
WLAN HD 720p Außen Kamera (TVIP61560)
• Netzteil (inkl. EU, AU, UK)
• 1 m Netzwerkkabel
• Befestigungsmaterial
• Kurzanleitung
• CD
TVIP41560 TVIP61560
EU, AU, UK
Quick Guide
TVIP41560
Soware
6
Deutsch
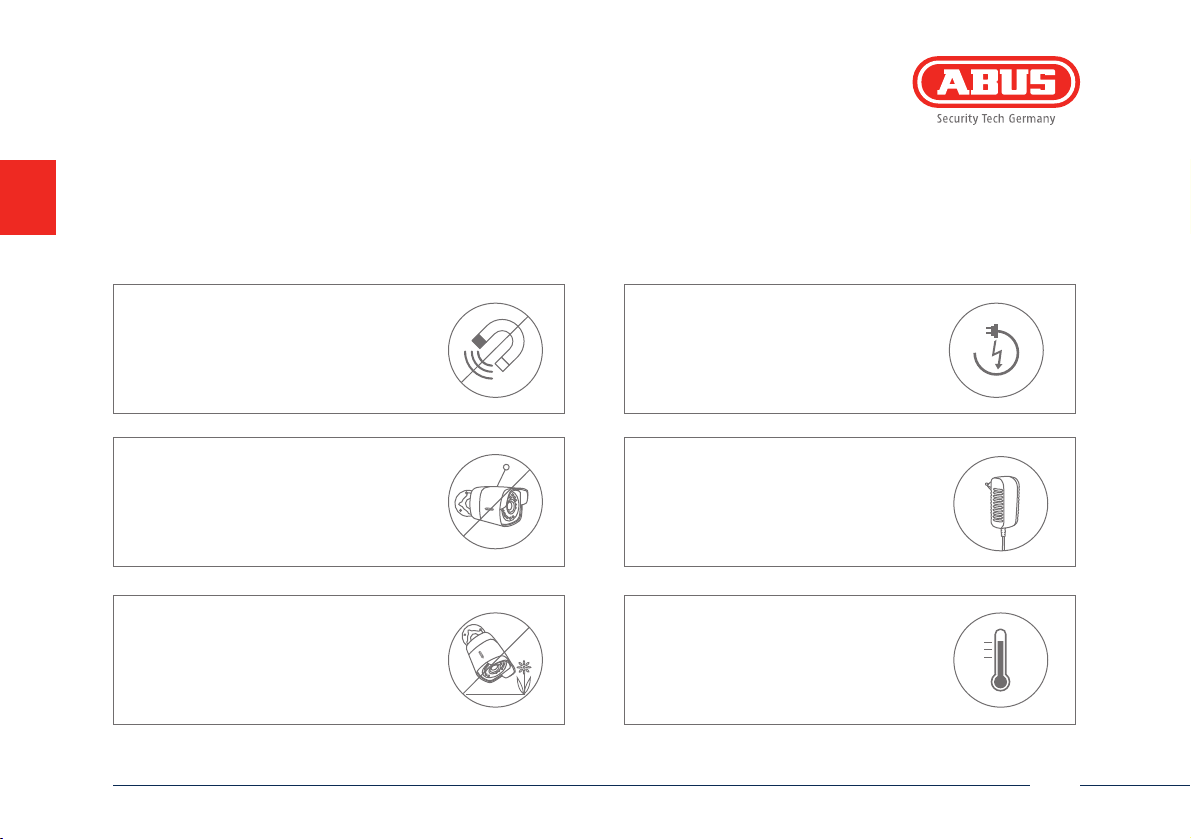
Warnhinweise
Halten Sie starke Magnetfelder
von der Netzwerkkamera fern.
Führen Sie keine Gegenstände in
die Kamera (z.B. Nadeln).
Achten Sie darauf, dass die Netzwerkkamera sicher montiert ist.
Deutsch
Achten Sie auf eine unterbrechungsfreie Stromversorgung bei Betrieb
mit permanenter Spannungsquelle.
Betreiben Sie die Netzwerkkamera
nur mit einer geeigneten
Spannungsquelle.
Betreiben Sie die Netzwerkkamera
nur unter den vom Hersteller empfohlenen Umgebungsbedingungen.
7

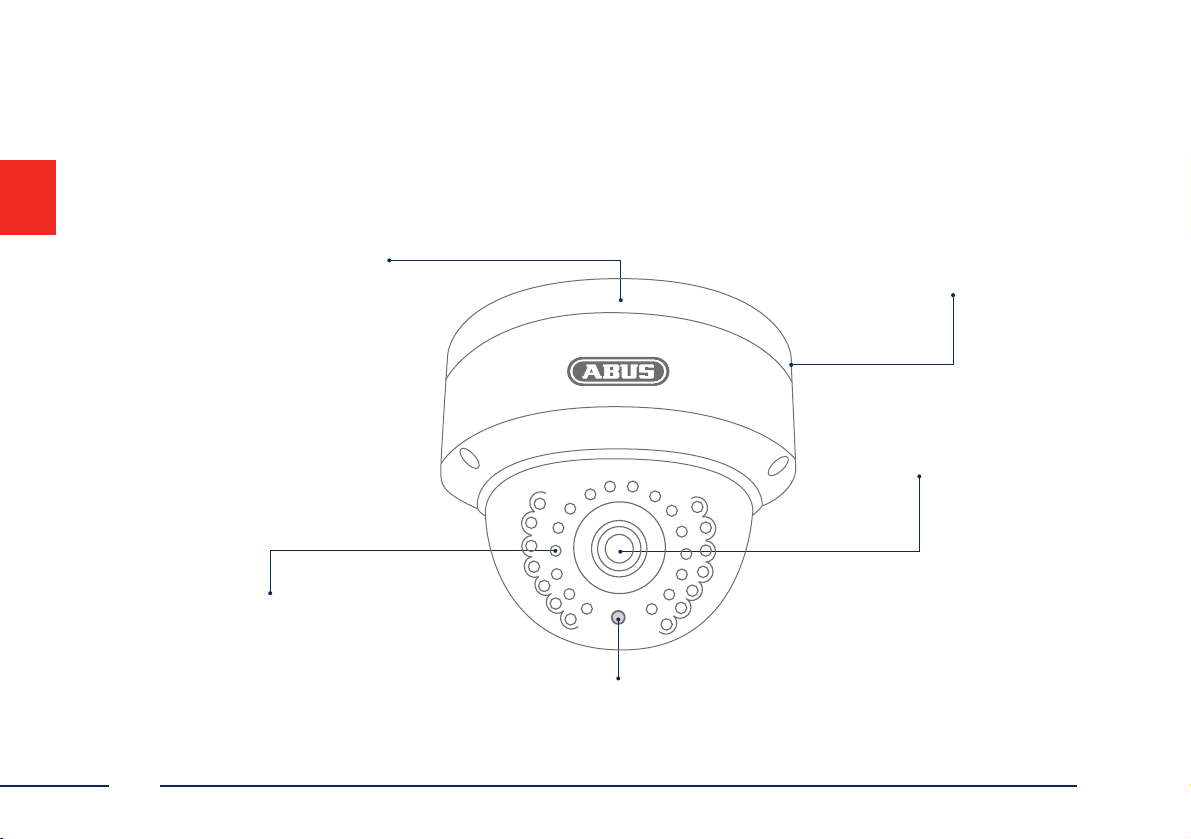
Übersicht
Bodenplatte
IR-LEDs
Lichtsensor für Tag/Nacht-Umschaltung
8
Innenliegender microSD Kartenslot & WPS-/Reset-Taste
(beim Kamera-Reset für ca. 30 Sekunden gedrückt halten)
Objektiv
Deutsch
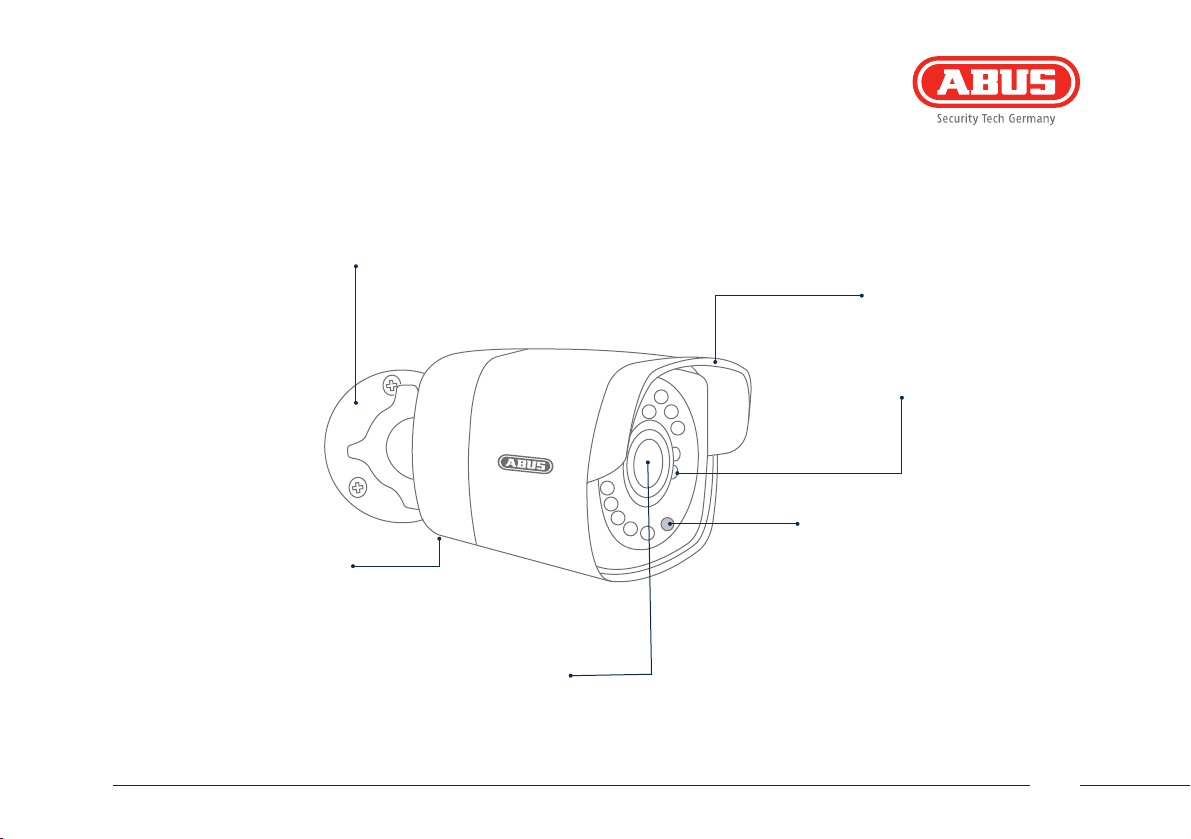
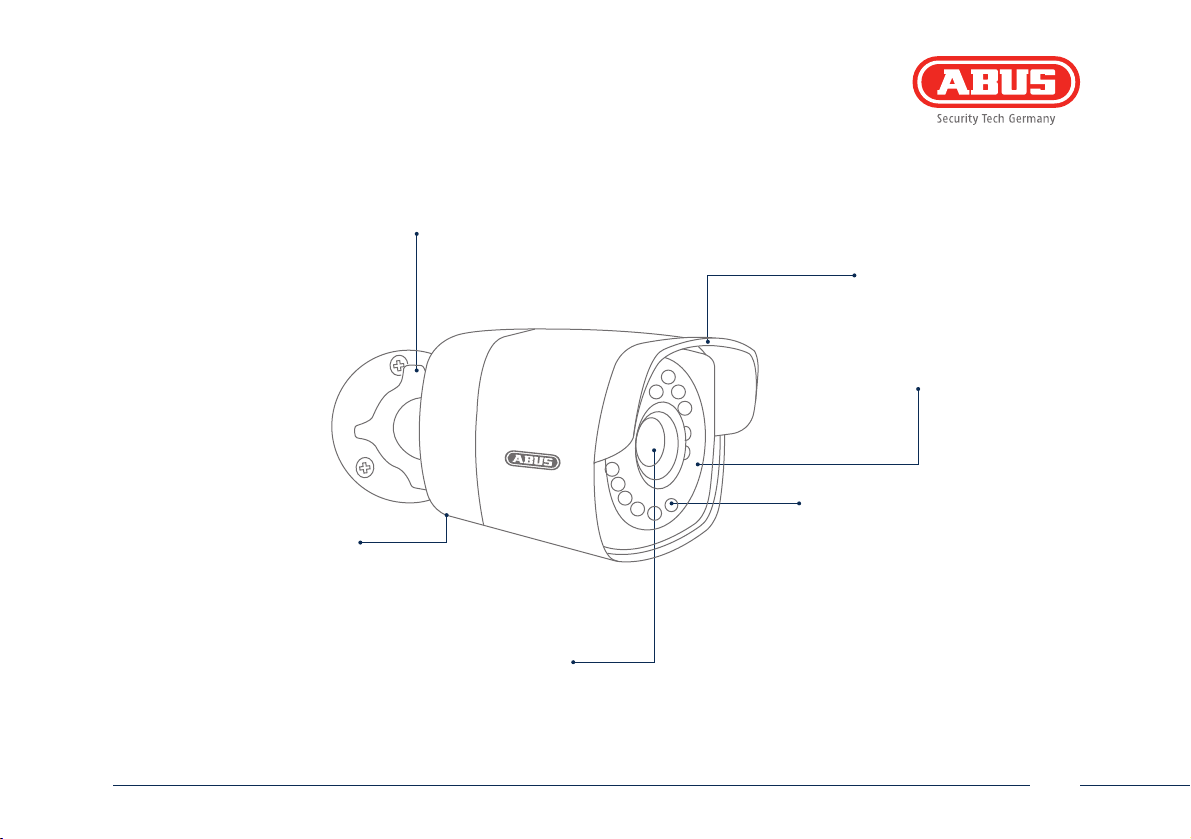
Kamerahalter
Sonnendach
IR-LEDs
Lichtsensor für Tag-/Nacht-Umschaltung
Abgedeckter microSD Kartenslot &
WPS-/Reset-Taste
(beim Kamera-Reset für
ca. 30 Sekunden gedrückt halten)
Deutsch
Objektiv
9

Netzwerkeinbindung
Es gibt 3 Möglichkeiten der Netzwerkeinrichtung:
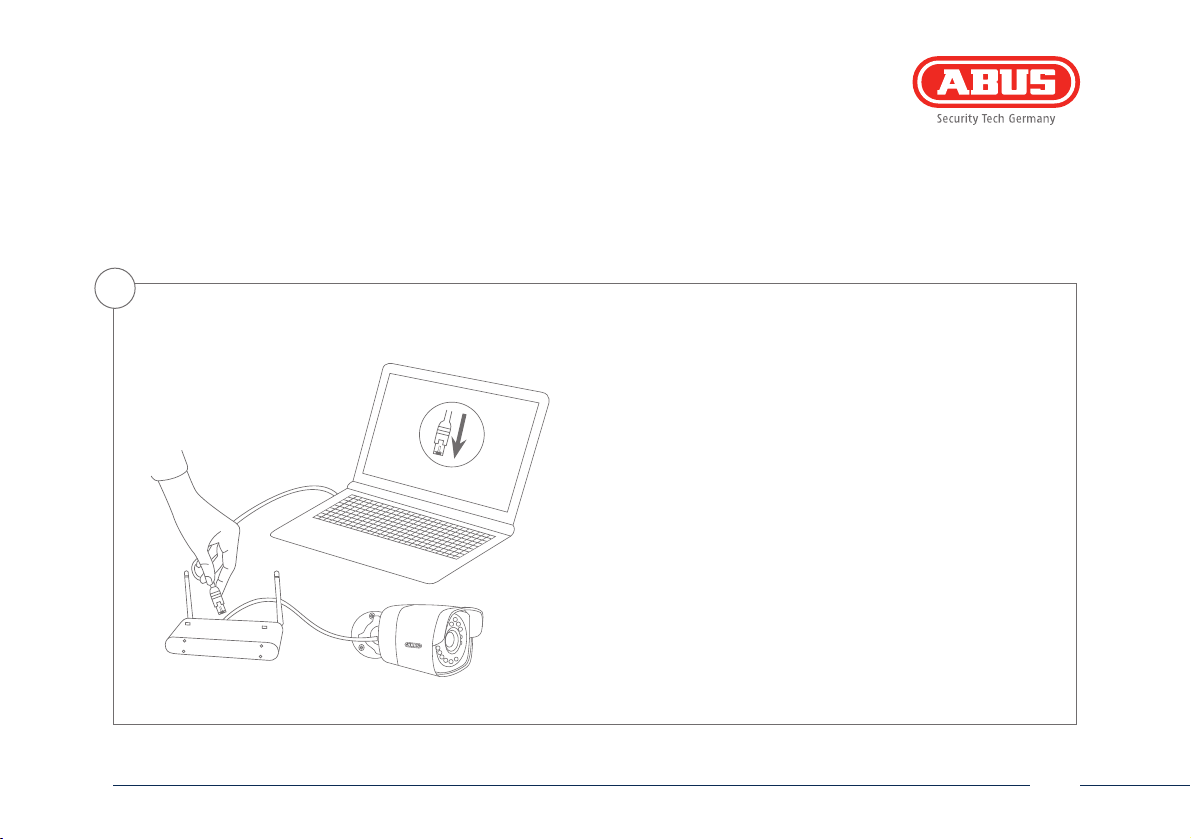
1
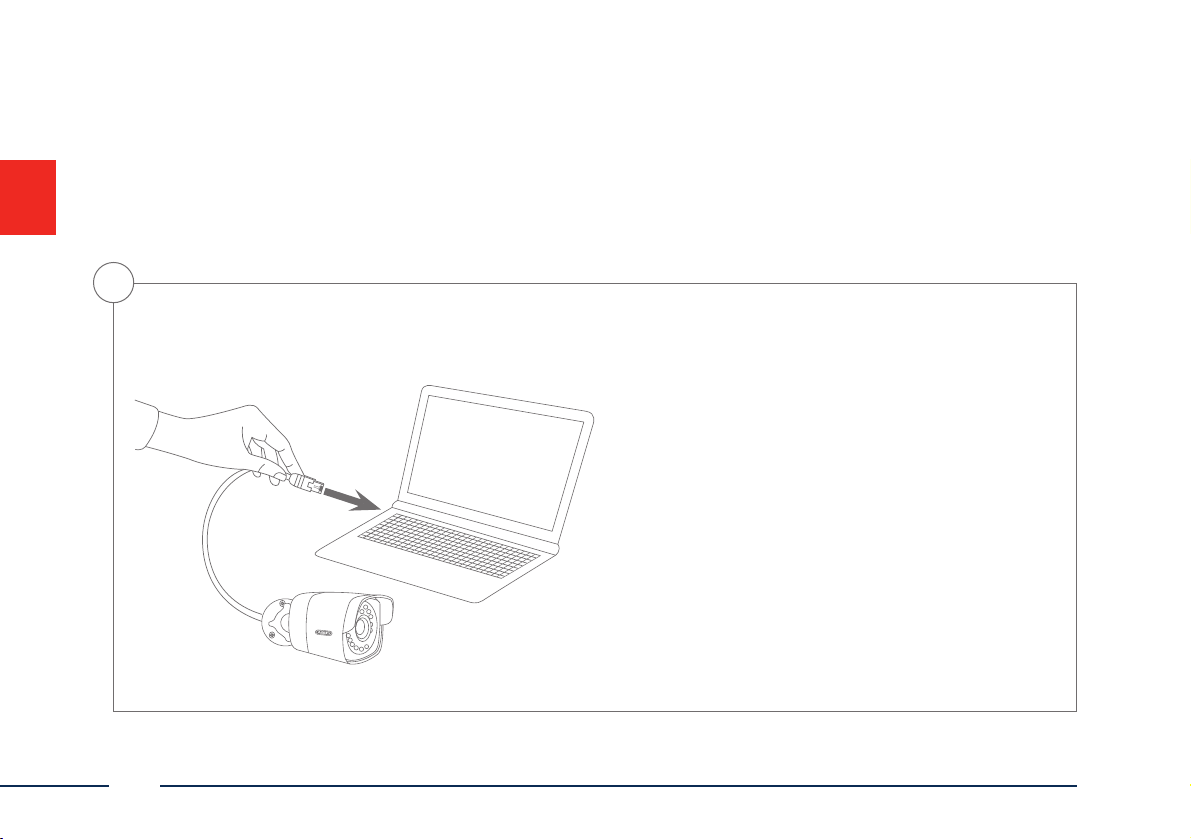
Variante 1:
Direkter Anschluss der Netzwerkkamera an einen
PC/Laptop
• Verwenden Sie das beiliegende Netzwerkkabel um
Kamera und PC/Laptop miteinander zu verbinden.
• Schließen Sie die Spannungsversorgung der
Netzwerkkamera an. Die Netzwerkkamera erkennt
automatisch, ob eine direkte Verbindung zwischen
PC und Kamera hergestellt werden soll.
• Kongurieren Sie die Netzwerkschnittelle Ihres PCs/
Laptop auf die IP Adresse 192.168.0.2, das Default
Gateway auf 192.168.0.1 und die Subnetzmaske auf
255.255.255.0.
•
Gehen Sie weiter zu Punkt 5, um die Ersteinrichtung
abzuschließen und die Verbindung zur
Netzwerkkamera aufzubauen.
10
Deutsch
2
Variante 2: Anschluss der Netzwerkkamera an einen Router/Switch
• Verbinden Sie Ihren PC/Laptop mit dem Router/Switch.
• Verbinden Sie die Netzwerkkamera mit dem Router/Switch.
• Schließen Sie die Spannungsversorgung der Netzwerkkamera an.
• Wenn in Ihrem Netzwerk ein DHCP-Server (Automatische
IP-Adressen Vergabe durch den Router) verfügbar ist, stellen
Sie die Netzwerkschnittstelle Ihres PCs/Laptop auf „IP-Adresse
automatisch beziehen“.
• Sollte kein DHCP-Server verfügbar sein, kongurieren Sie die
Netzwerkschnittstelle Ihres PCs/Laptop auf 192.168.0.2, das
Default Gateway auf 192.168.0.1 und die Subnetzmaske auf
255.255.255.0.
• Gehen Sie weiter zu Punkt 3, um die Ersteinrichtung
abzuschließen und die Verbindung zur Netzwerkkamera
aufzubauen.
Deutsch
11
3
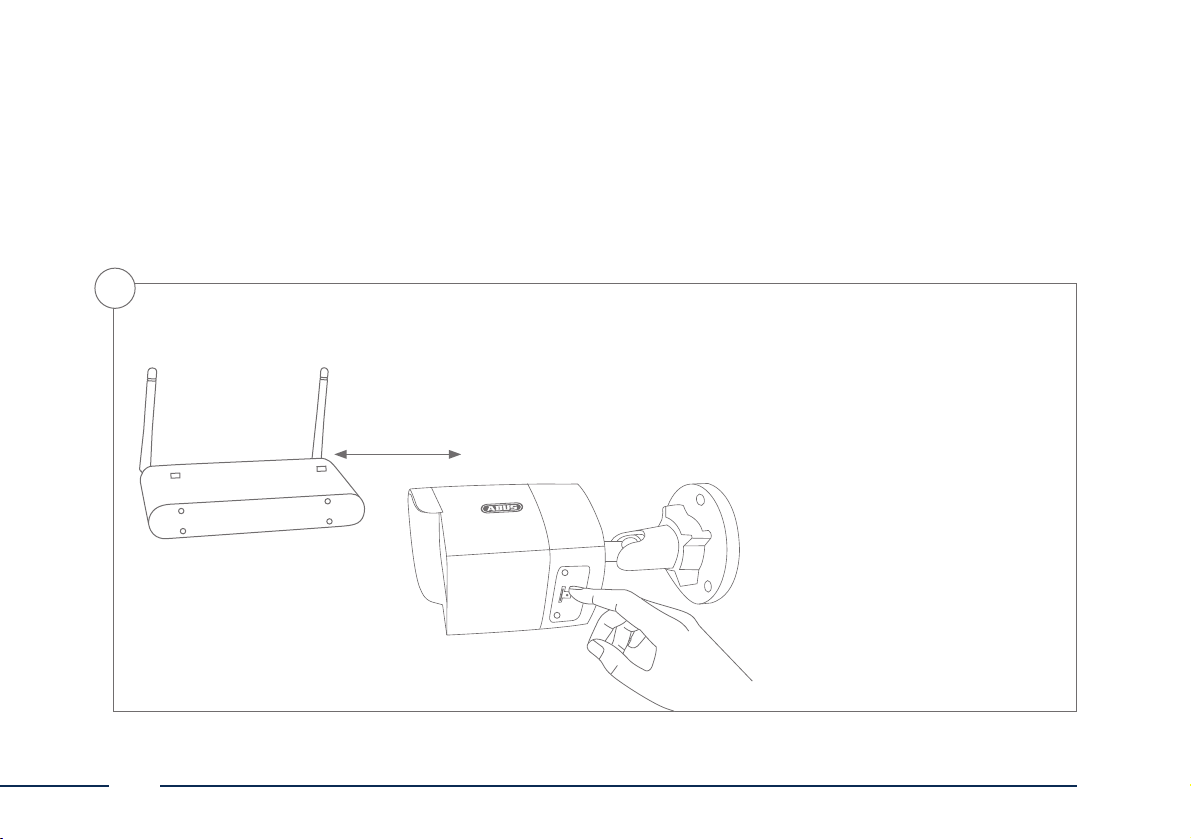
Variante 3:
12
WLAN Einrichtung per WPS
• Drücken Sie die WPS Taste an Ihrem
Router.
• Drücken Sie innerhalb von 2 Minuten
die WPS Taste für ca. 10 Sekunden an
der Netzwerkkamera.
• Die WLAN Verbindung zwischen Router
und Kamera ist nun aufgebaut.
• Starten Sie die Kamera neu, indem
Sie das Netzteil ein- und ausstecken.
Deutsch

4
Automatische Portfreigaben mit „UPnP“ aktivieren
Fritz!Box:
• Rufen Sie die Benutzeroberäche
der Fritz!Box auf.
• Klicken Sie auf „Einstellungen“.
• Klicken Sie auf „Erweiterte
Einstellungen“/„System“/
„Netzwerkeinstellungen“ oder
ggf. „Netzwerk“/„UPnP“.
• Aktivieren Sie die Option
„Statusinformationen über UPnP
übertragen“ und „Änderungen der
Sicherheitseinstellungen über UPnP
gestatten“.
• Speichern Sie die Einstellungen
mit „Übernehmen“.
Deutsch
D-Link:
• Klicken Sie im Hauptmenu des
Router-Menus auf den Punkt
„Erweitert“.
• Klicken Sie auf den Punkt
„Netzwerk erweitert“.
• Aktivieren Sie den Punkt UPnP.
Netgear:
• Klicken Sie im Hauptmenu der
Browseroberäche unter „Erweitert“
auf UPnP.
• Die automatische
Gerätekonguration per UPnP kann
aktiviert und deaktiviert werden.
13
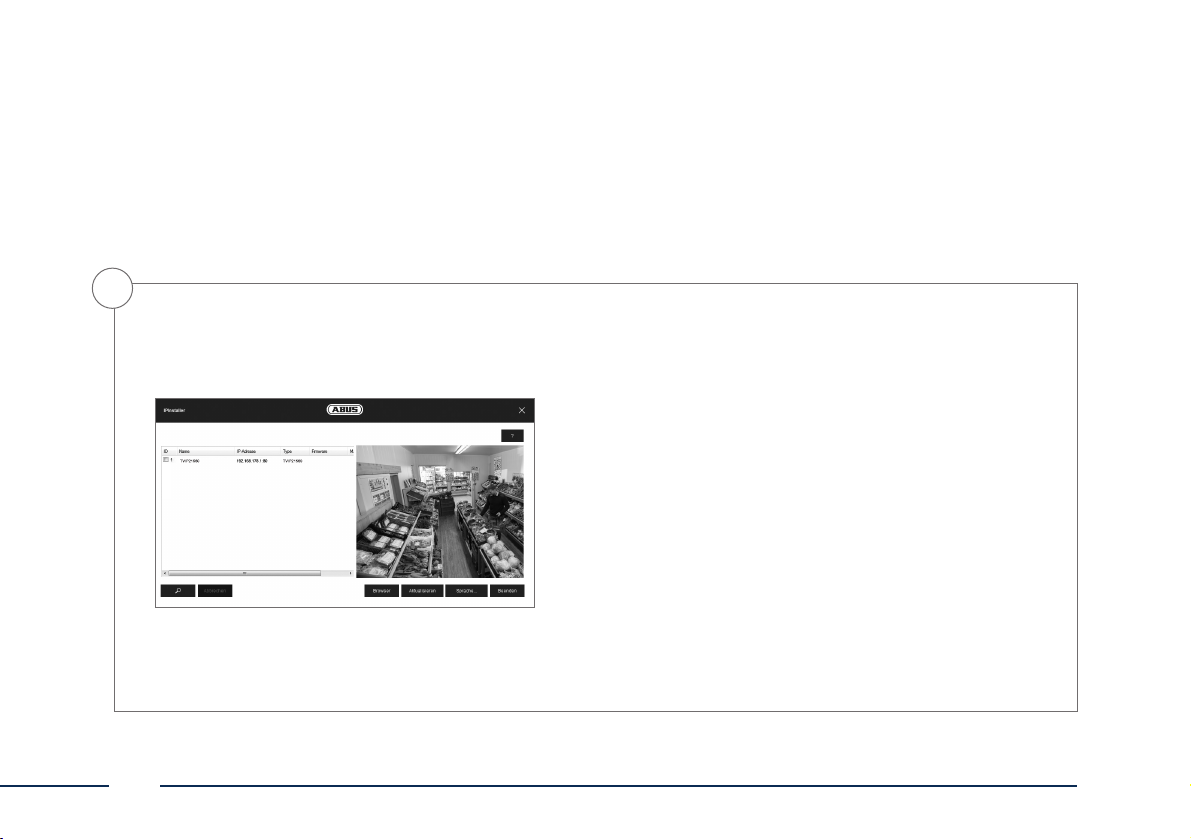
5
Erster Zugang zur Netzwerkkamera
• Der erste Zugang zur Netzwerkkamera erfolgt unter Verwendung
des ABUS IP Installers.
• Nach dem Start des Assistenten sucht dieser nach allen
angeschlossenen Netzwerkkameras und Videoservern in Ihrem
Netzwerk.
• Sie nden das Programm auf der beiliegenden CD-ROM. Installieren
Sie das Programm auf Ihr PC-System und führen Sie es aus.
• Falls ein DHCP-Server in Ihrem Netzwerk vorhanden ist, erfolgt die
Vergabe der IP-Adresse sowohl für Ihren PC/Laptop, als auch der
Netzwerkkamera automatisch.
• Ist kein DHCP-Server verfügbar, so stellt die Netzwerkkamera
automatisch folgende IP Adresse ein: 192.1 68.0.100 .
• Ihr PC-System muss sich im selben IP-Subnetz benden, um eine
Kommunikation zur Netzwerkkamera herstellen zu können.
14
Deutsch
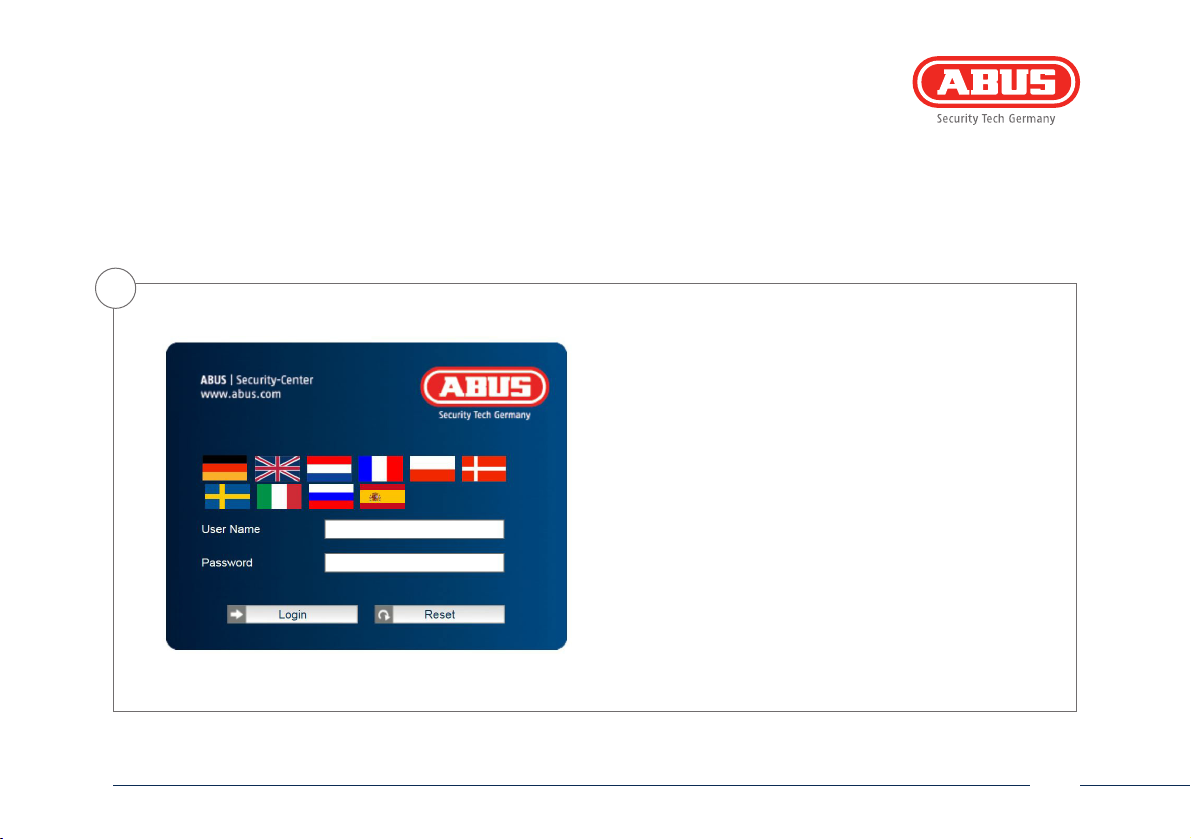
6
Passwortabfrage
• Ab Werk ist in der Netzwerkkamera ein Administratorkennwort
vergeben. Aus Sicherheitsgründen sollte jedoch umgehend ein
neues Passwort vergeben werden. Nach dem Speichern eines
solchen Administrator-Passworts fragt die Netzwerkkamera vor
jedem Zugang nach dem Benutzernamen und dem Passwort.
• Das Administratorkonto ist werksseitig wie folgt voreingestellt:
Benutzername „admin“ und Passwort „12345“.
Deutsch
admin
12345
• Für die Eingabe des Benutzernamens und Passwortes gehen Sie
bitte wie folgt vor: Önen Sie den Internet Explorer und geben
Sie die IP-Adresse der Kamera ein (z. B. „http://192.168.0.100“).
• Sie werden aufgefordert sich zu authentizieren: Sie sind nun
mit der Netzwerkkamera verbunden und sehen bereits einen
Videostream.
15

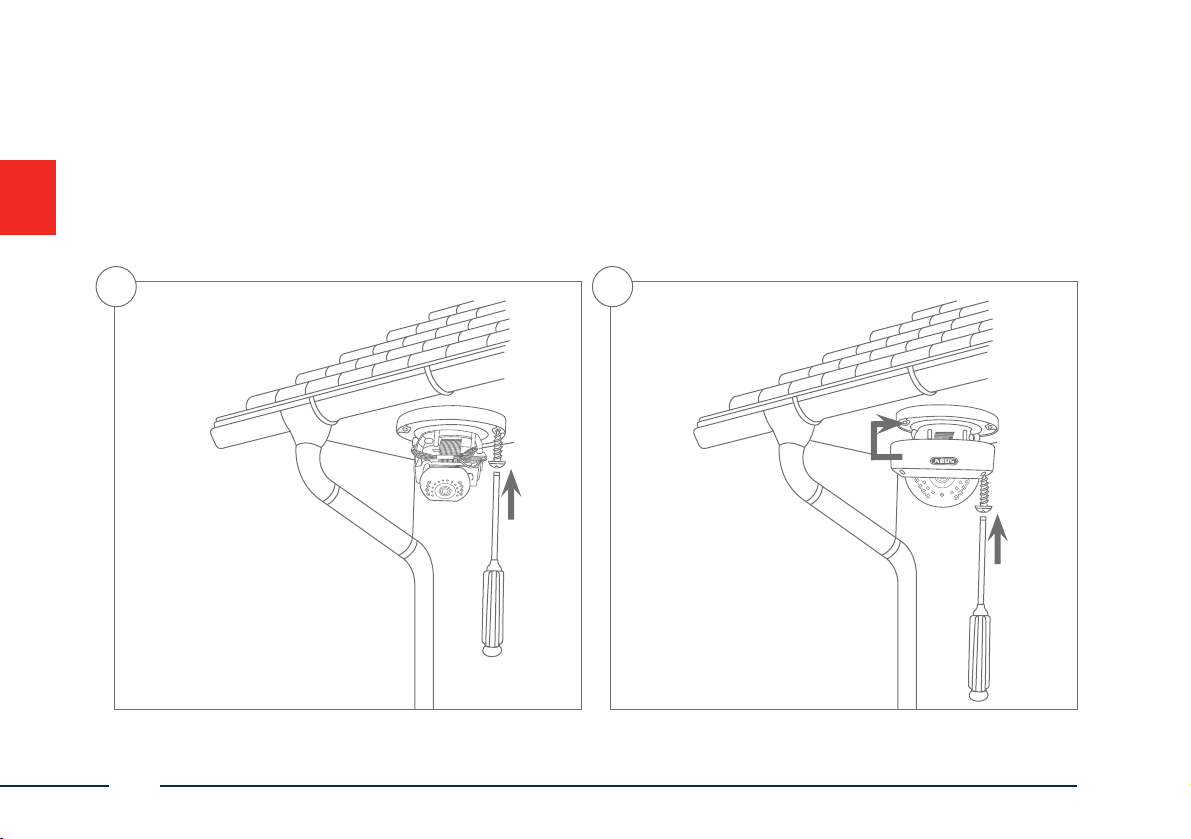
Hardwareinstallation
21
16
Deutsch
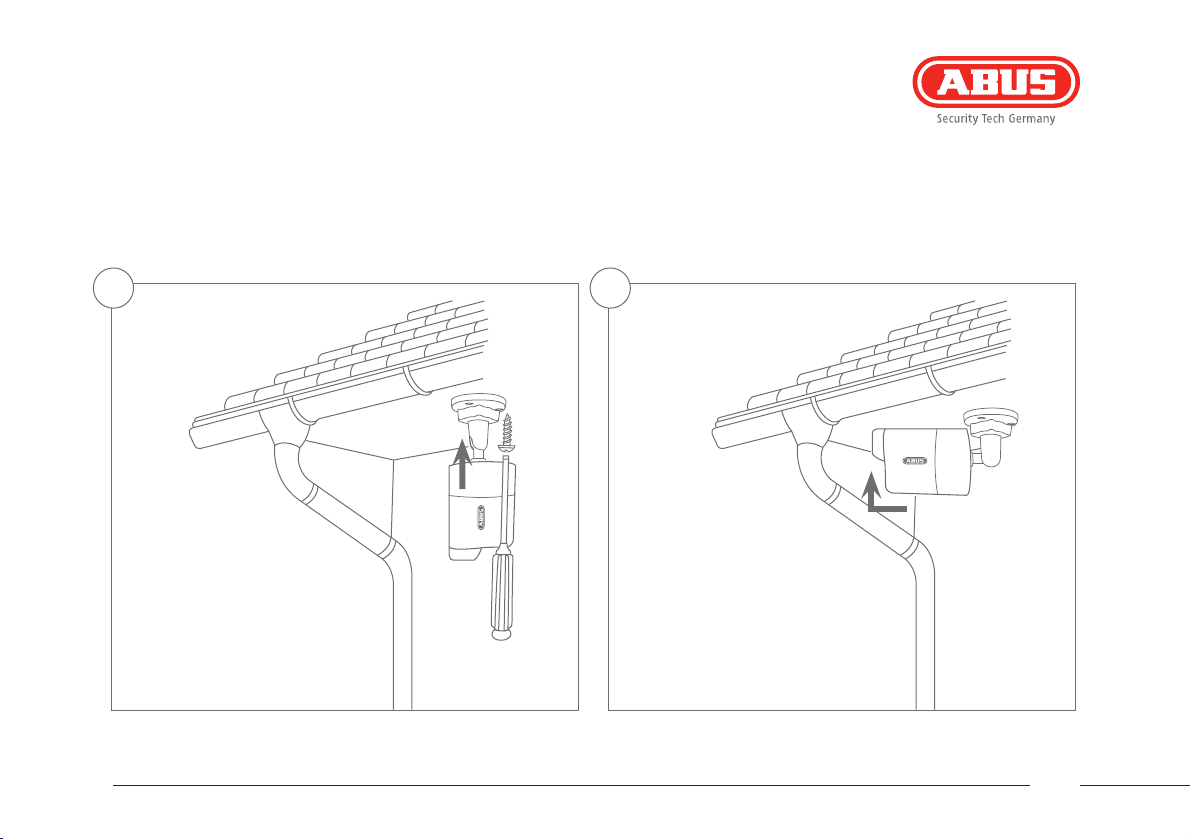
1 2
Deutsch
17

Dear customers,
Thank you for purchasing this product. This product complies with current domestic and European regulations.
Conformity has been proven, and all related certications
are available from the manufacturer on request (ABUS
Security-Center GmbH & Co. KG, Linker Kreuthweg 5, 86444
Ang).
To maintain this status and to guarantee safe operation, it
is your obligation to observe these operating instructions!
Read the entire operating manual carefully before putting
the product into operation. Pay attention to all operating
and safety information! All company names and product
descriptions are trademarks of the corresponding owner. All
rights reserved.
If you have any questions, please contact your specialist
dealer.
18
English

WLAN HD 720p Outdoor Camera / Outdoor Dome Camera: TVIP61560 | TVIP41560
This quick start guide describes the initial installation steps for your network camera.
More detailed information can be found in the accompanying user guide.

Scope of delivery
WLAN HD 720p Outdoor Dome Camera
WLAN HD 720p Outdoor Camera
• Power supply unit (incl. EU, AU, UK)
• 1 m network cable
• Installation material
• Quick start guide
• CD ROM
TVIP41560 TVIP61560
EU, AU, UK
20
TVIP41560
Soware
Quick Guide
English

Warnings
Keep strong magnetic elds
away from the network camera.
Do not insert any objects into
the camera (e.g. needles).
Make sure that the network
camera is mounted securely.
English
Ensure an uninterrupted power
supply when operating the monitor
on a permanent voltage source.
Only operate the network camera
with a suitable power source.
Only operate the network camera in
the ambient conditions recommended by the manufacturer.
21
Overview
Base plate
IR-LEDs
Photo sensor for day/night switching
22
Internal microSD card slot & WPS/reset button
(hold down for approx. 30seconds to reset the camera)
Lens
English
Camera holder
Covered microSD card slot & WPS/reset button
(hold down for approx. 30seconds to reset the camera)
English
Sun shield
IR-LEDs
Photo sensor for
day/night switching
Lens
23
Network connection
There are three ways to set up the network.
1
Option 1:
Connecting the network camera to a PC/laptop
directly
• Use the network cable supplied to connect the
camera and PC/laptop with one another.
• Connect the power supply to the network camera.
The network camera automatically detects whether
a direct connection between the PC and camera
should be made.
• Congure the network interface of your PC/laptop to
the IP address 192.168.0.2 , the default gateway to
192.168.0.1 and the subnet mask to 255.255.255.0.
• Go to point 3 to nish the initial set-up and
establish the connection to the network camera.
24
English

2
English
Option 2:
Connecting the network camera to a router/switch
• Connect the PC/laptop to the router/switch.
• Connect the network camera to the router/switch.
• Connect the power supply to the network camera.
• If a DHCP server is available in your network (IP address
is assigned automatically via the router), set the network
interface of your PC/laptop to “Obtain an IP address
automatically”.
• If no DHCP server is available, congure the network interface
of your PC/laptop to 192.168.0.2, the default gateway to
192.168.01 and the subnet mask to 255.255.255.0.
• Go to point 3 to nish the initial set-up and establish the
connection to the network camera.
25
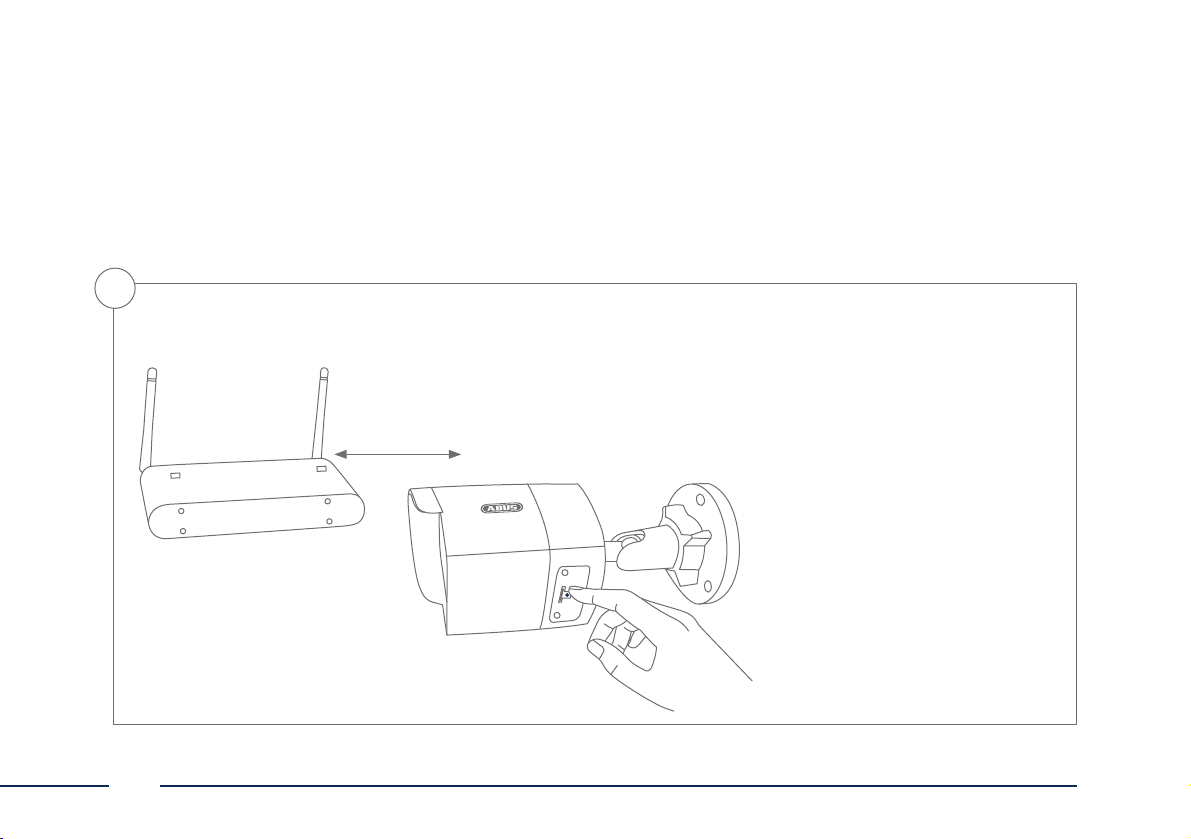
3
26
Option 3:
WLAN setup via WPS
• Press the WPS button on your router.
• Press the WPS button on the network
camera within 2 minutes for approx.
10 seconds.
• The WLAN connection between the
router and camera is now established.
• Restart the camera by unplugging the
power supply unit and plugging it
back in.
English

4
Activate “Automatic port releases with UPnP”
Fritz!Box:
• Open the user interface of the
Fritz!Box.
• Click on “Settings”.
• Click on “Advanced settings” /
“System” / “Network settings”
or “Network” / “UPnP”.
• Activate the option “Transmit status
information via UPnP” and “Permit
changes to the security settings via
UPnP”.
• Save the settings by pressing
“Apply”.
English
D-Link:
• n the main router menu, click on
the “Advanced” item.
• Click on the “Advanced network”
item.
• Activate the UPnP item.
Netgear:
• Click on UPnP in the main menu
of the browser interface under
“Advanced”.
• Automatic device conguration
via UPnP can be activated and
deactivated.
27
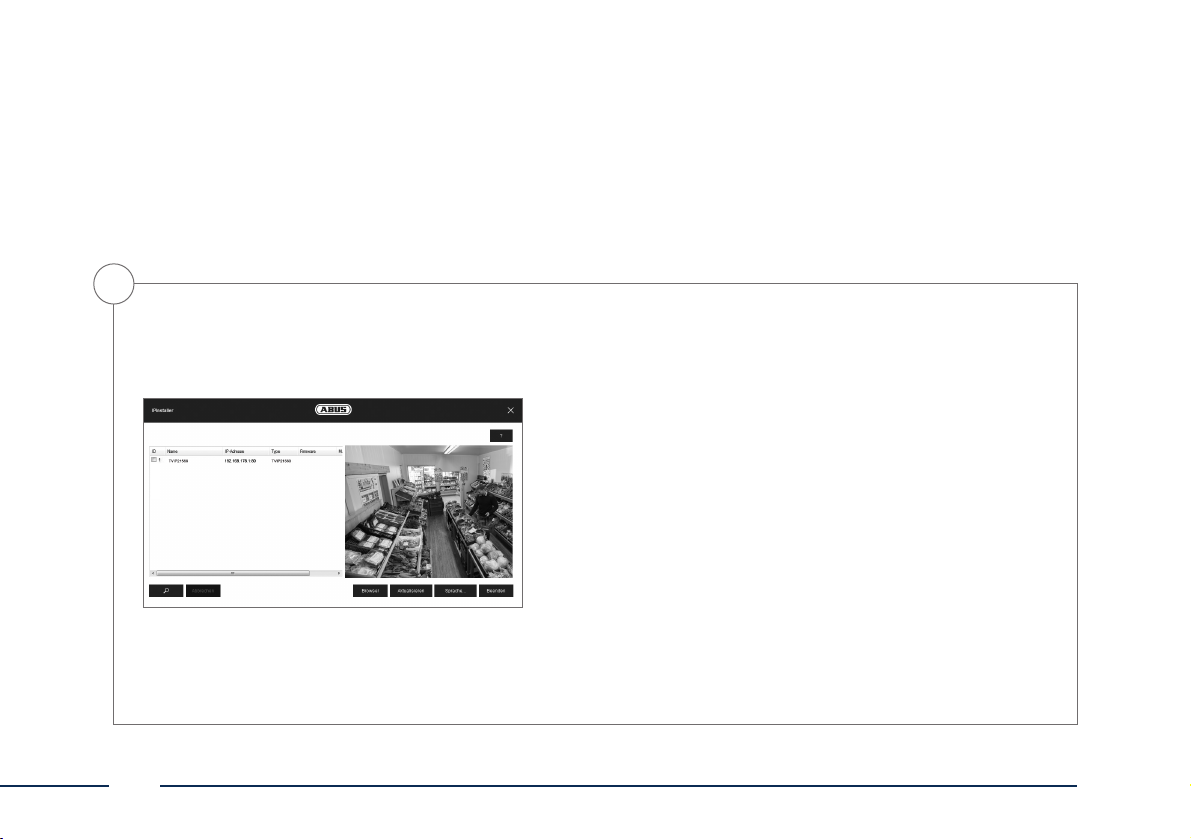
5
Accessing the network camera for the first time
• The network camera is accessed for the rst time using the ABUS IP
Installer.
• Aer the installation wizard is started, it searches for all the
network cameras and video servers connected in your network.
• You can nd the program on the CD-ROM included. Install the
program on your PC and then run it.
• If a DHCP server is available on your network, the IP address is
assigned automatically for both the PC/laptop and the network
camera.
• If no DHCP server is available, the network camera automatically
sets the following IP address: 192.16 8.0.1 00.
• Your PC system must be located in the same IP sub network to
establish communication with the network camera.
28
English
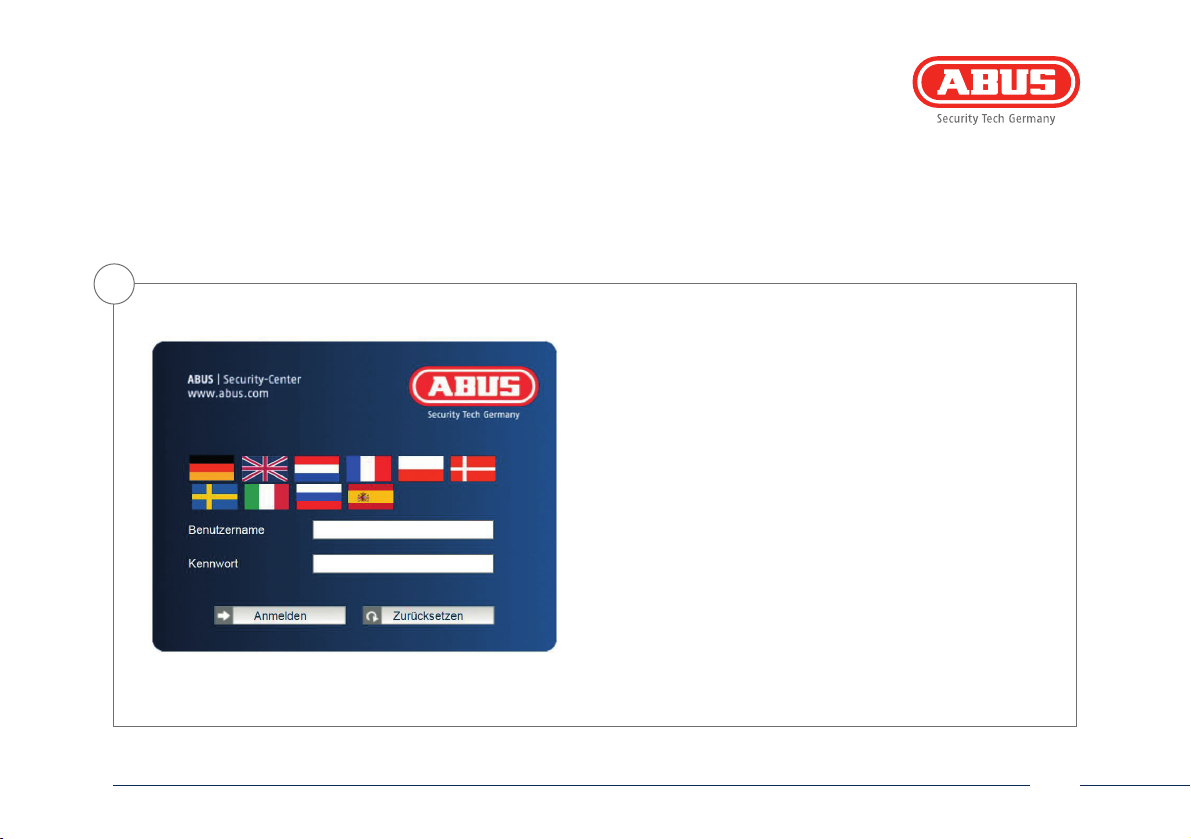
6
English
admin
12345
Password prompt
• When delivered, an administrator password is already dened
for the network camera. However, a new password will be
dened for reasons of security. Aer the new administrator
password is stored, the network camera asks for the user name
and password every time it is accessed.
• The administrator account is set up in the factory as follows:
user name “admin” and password “12345”.
• To enter a user name and password, proceed as follows: Open
Internet Explorer and enter the IP address of the camera (e.g.
“http://192.168.0.100”).
• You are prompted for authentication: You are now connected
with the network camera and can see a video stream.
29
Hardware installation
21
30
English
 Loading...