

Page 1
Dialog 4223 Professional/Dialog 4225 Vision
Note: This guide covers only the two newest
telephone models available at UCSC. Some
features available for these telephone models are
currently unavailable on the UCSC Telephone
Switch. In some cases, pages referring to these
features have been removed from this document. In
other cases, unavailable features are indicated with
a note like this one.
System Telephones for MX-ONE™ Telephony System and MD110
User Guide
Cover Page Graphic
Place the graphic directly on the page, do not care about
putting it in the text flow. Select Graphics > Properties
and make the following settings:
• Width: 15,4 cm (Important!)
• Height: 11,2 cm (May be smaller)
• Top: 5,3 cm (Important!)
• Left: -0,3 cm (Important!)
This text should then be hidden.
Page 2

EN/LZT 103 68 R6A
© Aastra Telecom Sweden AB 2008. All rights reserved.
Page 3

Table of Contents
Note: Some features available for these telephone models
are currently unavailable on the UCSC Telephone System. In
some cases, pages referring to these features have been
removed from this document. In other cases, unavailable
features are indicated with a note like this one.
Welcome ..........................................................4
Important User Information ...............................6
Description ....................................................... 7
Free Seating ................................................... 28
Incoming Calls ............................................... 29
Outgoing Calls ............................................... 35
During Calls ....................................................52
Call Metering ..................................................59
Call Forwarding .............................................. 62
Absence Information ...................................... 76
Messages ......................................................79
Group features ............................................... 85
Other Useful features ......................................89
Settings ..........................................................98
Accessories ................................................. 117
Installation ....................................................124
Troubleshooting ............................................ 132
Glossary ....................................................... 135
Index ............................................................ 136
Tab le of Co nt en ts
3Dialog 4223 Professional/Dialog 4225 Vision
Page 4

Welcome
Some features
unavailable at
UCSC have been
deleted from this
version of this
guide. The version
available at this
website will contain
some features that
you will be unable
to use.
Welcome
Welcome to the user guide for the Dialog 4223 Professional and
Dialog 4225 Vision. This guide describes the available features of
the telephones when they are connected to MX-ONE™
Te l e p h o n y S y st e m or MD110.
The functions and features available with these telephones are
designed for easy use in all different telephone handling situations.
Depending on the version and configuration of the exchange that
your telephone is connected to, some of the functions and features
that are described in this user guide may not be available. There
may also be some differences in the way your telephone is
programmed. Please consult your system administrator if you need
further information.
Some markets use differing codes for some features. In this guide
they are described using the most common code.
The latest version of the user guide can be downloaded from:
http://www.aastra.com
Dialog 4223 Professional/Dialog 4225 Vision4
Page 5

Welcome
Copyright
All rights reserved. No parts of this publication may be reproduced,
stored in retrieval systems, or transmitted in any form or by any
means, electronic, mechanical, photocopying, recording or
otherwise, without prior written permission of the publisher except
in accordance with the following terms.
When this publication is made available on Aastra media, Aastra
gives its consent to downloading and printing copies of the content
provided in this file only for private use and not for redistribution. No
parts of this publication may be subject to alteration, modification
or commercial use. Aastra will not be liable for any damages arising
from use of an illegal modified or altered publication.
Aastra is a registered trademark of Aastra Technologies Limited. All
other trademarks mentioned herein are the property of their
respective owners.
Warranty
AASTRA MAKES NO WARRANTY OF ANY KIND WITH REGARD
TO THIS MATERIAL, INCLUDING, BUT NOT LIMITED TO, THE
IMPLIED WARRANTIES OF MERCHANTABILITY AND FITNESS
FOR A PARTICULAR PURPOSE. Aastra shall not be liable for
errors contained herein nor for incidental or consequential
damages in connection with the furnishing, performance or use of
this material.
Declaration of conformity
Hereby, Aastra Telecom Sweden AB, SE-126 37 Hägersten,
declares that this telephone, is in conformity with the essential
requirements and other relevant provisions of the European
R&TTE directive 1999/5/EC.
Details to be found at: http://www.aastra.com/sdoc.
5Dialog 4223 Professional/Dialog 4225 Vision
Page 6

Important User Information
Important User Information
Safety instructions
Save these instructions.
Read these safety instructions before use!
Note: When using your telephone or connected
equipment, the following basic safety precautions should
always be followed to reduce risk of fire, electrical shock
and other personal injury.
• Follow instructions in the equipment's user guide or other
documentation.
• Always install equipment in a location and environment for which it is
designed.
• For mains powered telephones: Only operate with the mains power
voltage indicated. If you are uncertain of the type of power supplied to the
building, consult property management or your local power company.
• For mains powered telephones: Avoid placing the telephone's power
cable where it can be exposed to mechanical pressure as this may
damage the cable. If the power supply cord or plug is damaged,
disconnect the product and contact qualified service personnel.
• Headsets used with this equipment must comply with EN/IEC 60950-1
and for Australia AS/NZS 60950: 2000.
• Do not make any changes or modifications to equipment without seeking
approval from the party responsible for compliance. Unauthorized
changes or modifications could void the user's authority to operate the
equipment.
• Do not use the telephone to report a gas leak in the vicinity of the leak.
• Do not spill liquid of any kind on the product or use the equipment near
water, for example, near a bathtub, washbowl, and kitchen sink, in a wet
basement or near a swimming pool.
• Do not insert any object into equipment slots that is not part of the
product or auxiliary product.
• Do not disassemble the product. Contact a qualified service agency
when service or repair work is required.
• Do not use a telephone (other than cordless type) during an electrical
storm.
Disposal of the product
Your product should not be placed in municipal waste. Please check local
regulations for disposal of electronic products.
Dialog 4223 Professional/Dialog 4225 Vision6
Page 7
Description
1
2
8
5
b
5
7
13
14
6
10
11
9
12
15
16
16
3
4
17
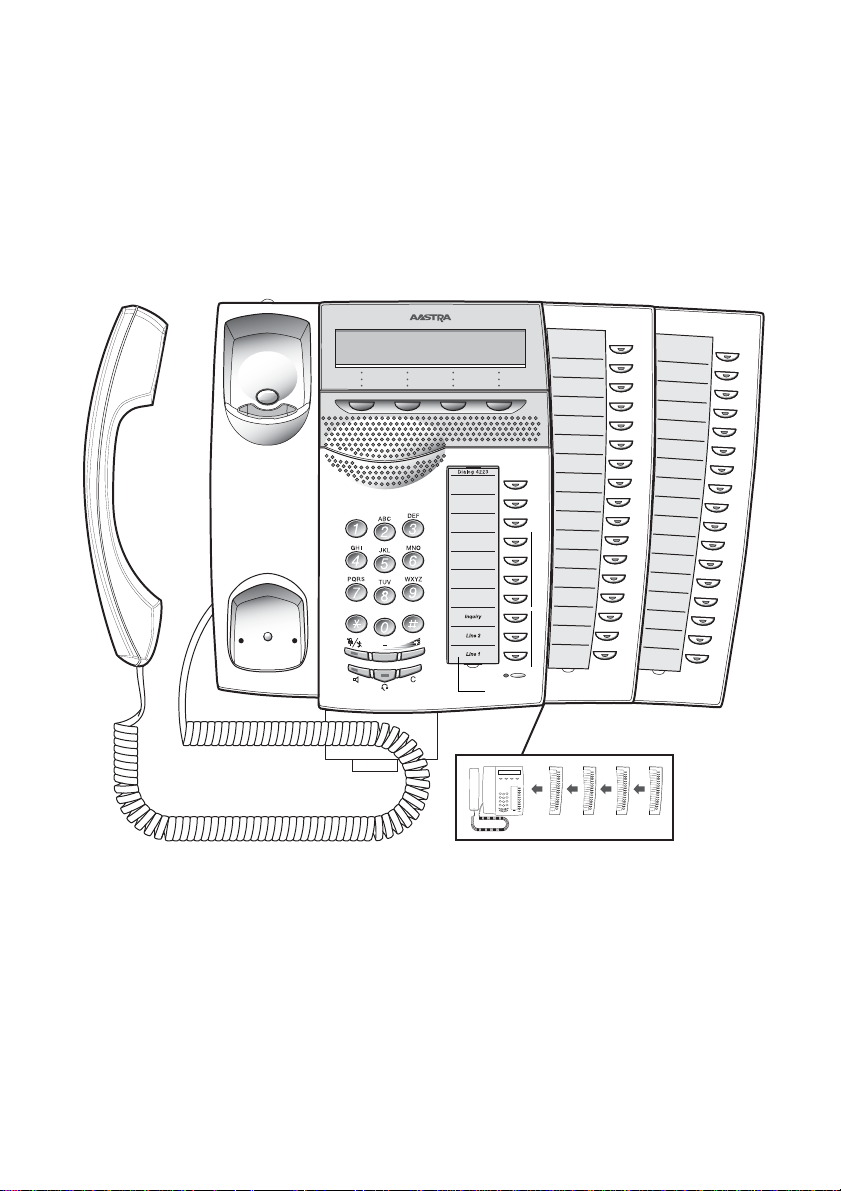
Dialog 4223 Professional
Description
1Display
See section “Display information” on page 16.
2 Display menu keys
The key functions depend on the traffic state. When you are
requested “(see display)”, press the required key to access the
feature.
3Callback
Indicating/activating Callback. See section “When you receive a
busy tone” on page 40. The feature can be removed or moved to
another programmable function key by your system administrator.
7Dialog 4223 Professional/Dialog 4225 Vision
Page 8

Description
4 Diversion (Follow-me)
Indicating/activating and deactivating Diversion (Follow-me). See
section “Call Forwarding” on page 62. The feature can be removed
or moved to another programmable function key by your system
administrator.
5 Programmable function keys
Program numbers or features. See section “Programming of
function keys” on page 98.
Note: The key marked with a “b” is also used to program a
melody, see section “Melody Ringing” on page 109.
6 Triple Access Line
Handle calls. Line 1 and 2 are available both for incoming and
outgoing calls. Inquiry can only be used for outgoing calls.
7 Microphone
Used for handsfree conversation.
8Clear
Disconnect calls or exit a feature. Can always be pressed instead of
replacing the handset.
9 Headset key
Handle headset calls and activate Headset Preset. See section
“Headset (optional)” on page 118.
10 Loudspeaker on/off
a. Activate handsfree conversation. See section “During Calls” on
page 52.
b. Activate Loudspeaker Preset. See section “Headset Preset” on
page 119.
11 Mute
a Switch the microphone on or off during a call. See section
“Mute” on page 53.
b Switch off the ring signal in idle mode or when ringing. See
section “Mute ring signal” on page 108 and “Silent Ringing” on
page 108.
12 Volume control
Adjust the volume. See section “Settings” on page 98.
13 Loudspeaker
Dialog 4223 Professional/Dialog 4225 Vision8
Page 9

14 Handset
Brown James 2222 11:06 28 Aug 2008
Absence Account Authority more...
Supplied with hearing aid feature as standard. An extra handset
can be connected, see section “Accessories” on page 117.
Please note: The handset can attract and trap small metal
objects in the earcap region.
15 Pull-out leaf for easy guide (optional)
See section “Pull-out leaf (optional)” on page 121.
16 Key panel
With 17 programmable keys. Up to four panels can be connected.
See section “Key panel” on page 117. Use the Designation Card
Manager to make and print your own key panel designation cards,
see below.
17 Designation card
Use the DCM (Designation Card Manager) to make and print your
own designation cards. DCM is included on the Enterprise
Telephone Toolbox CD or it can be downloaded from:
http://www.aastra.com
For more information, please contact your Aastra Certified Sales
Partner.
Description
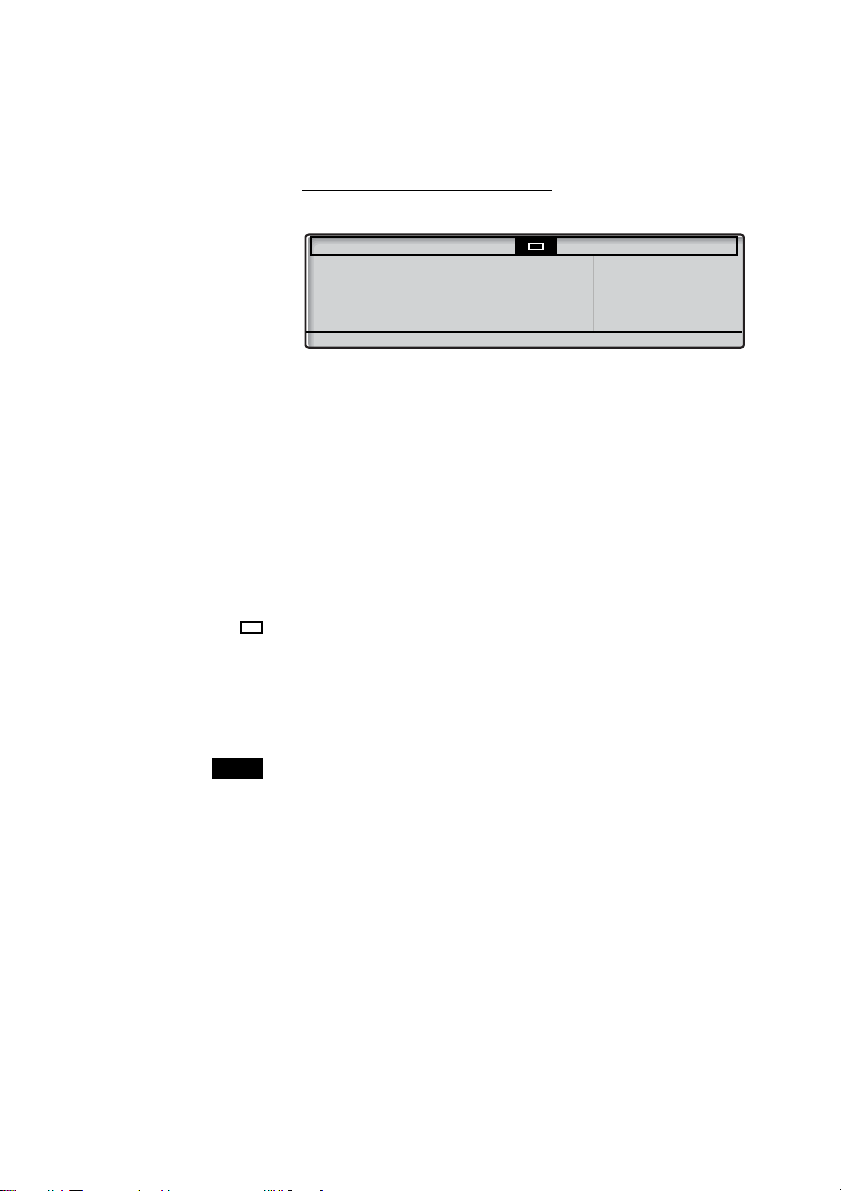
D4 mode information
The Dialog 4223 Professional phone can be connected to the
exchange in two different modes (user interfaces), either D3 mode,
or D4 mode. There is one user guide for each mode.
To find out the mode for your telephone, check the right hand side
of the second row of the display (see picture), when the telephone
is in idle mode:
• No extension number is shown (i.e. blank) - your telephone is
• Extension number is shown - your telephone is using D3 mode
using D4 mode = This is the correct guide.
= This is not the correct guide, download the user guide from:
http://www.aastra.com
Note: This user guide is not valid for the Dialog 4223
Professional in D3 mode.
9Dialog 4223 Professional/Dialog 4225 Vision
Page 10
Description
1
2
3
8
b
8
10
11
7
19
9
8
12
13
16
45
20
6
14
15
18
17
19
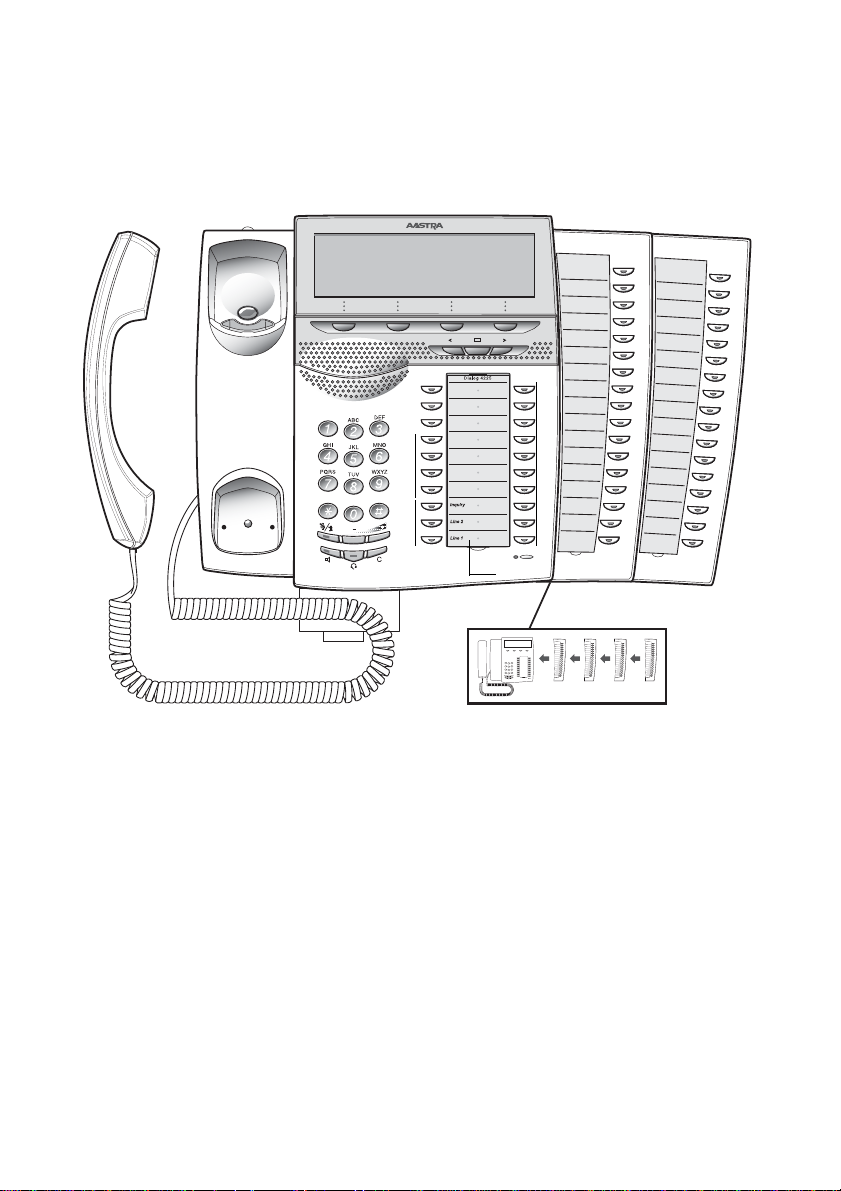
Dialog 4225 Vision
1Display
See section “Display information” on page 16.
2 Display menu keys
The key functions depend on the traffic state. When you are
requested “(see display)”, press the required key to access the
feature.
3 Navigation key left
4Home
Navigate one step to the left in the top menu. See section “Display
information” on page 16.
Return to home position (idle mode), when you are navigating the
top menu. See section “Display information” on page 16.
5 Navigation key right
Navigate one step to the right in the top menu. See section
“Display information” on page 16.
Dialog 4223 Professional/Dialog 4225 Vision10
Page 11

6Callback
Indicating/activating Callback. See section “When you receive a
busy tone” on page 40. The feature can be removed or moved to
another programmable function key by your system administrator.
7 Diversion (Follow-me)
Indicating/activating and deactivating Diversion (Follow-me). See
section “Call Forwarding” on page 62. The feature can be removed
or moved to another programmable function key by your system
administrator.
8 Programmable function keys
Program numbers or features. See section “Programming of
function keys” on page 98.
Note: The key marked with a “b” is also used to program a
melody, see section “Melody Ringing” on page 109.
9 Triple Access Line
Handle calls. Line 1 and 2 are available both for incoming and
outgoing calls. Inquiry can only be used for outgoing calls.
10 Microphone
Used for handsfree conversation.
11 Clear
Disconnect calls or exit a feature. Can always be pressed instead of
replacing the handset.
Description
12 Headset key
Handle headset calls and activate Headset Preset. See section
“Headset (optional)” on page 118.
13 Loudspeaker on/off
a. Activate handsfree conversation. See section “During Calls” on
page 52.
b. Activate Loudspeaker Preset. See section “Headset Preset” on
page 119.
14 Mute
a Switch the microphone on or off during a call. See section
“Mute” on page 53.
b Switch off the ring signal in idle mode or when ringing. See
section “Mute ring signal” on page 108 and “Silent Ringing” on
page 108.
15 Volume control
Adjust the volume. See section “Settings” on page 98.
16 Loudspeaker
11Dialog 4223 Professional/Dialog 4225 Vision
Page 12

Description
17 Handset
Supplied with hearing aid feature as standard. An extra handset
can be connected, see section “Accessories” on page 117.
Please note: The handset can attract and trap small metal
objects in the earcap region.
18 Pull-out leaf for easy guide (optional)
See section “Pull-out leaf (optional)” on page 121.
19 Key panel
With 17 programmable keys. Up to four panels can be connected.
See section “Key panel” on page 117. Use the Designation Card
Manager to make and print your own key panel designation cards,
see below.
20 Designation card
Use the DCM (Designation Card Manager) to make and print your
own designation cards. DCM is included on the Enterprise
Telephone Toolbox CD or it can be downloaded from: http://
www.aastra.com
For more information, please contact your Aastra Certified Sales
Partner.
Dialog 4223 Professional/Dialog 4225 Vision12
Page 13

Lamp indications
Description
Ô
ÕÔ
ÖÔ
ÖÔ
ÕÔ
Extinguished lamp The feature is not active.
Steady light
Slowly flashing lamp The line (or feature) is put on hold.
Rapidly flashing lamp An incoming call.
Light with short breaks Ongoing call.
The feature is active or the multiple
represented line is busy.
13Dialog 4223 Professional/Dialog 4225 Vision
Page 14

Description
Dial tone
Special dial tone
Ringing tone or queue tone
Busy tone
Congestion tone
Number unobtainable tone
Tones and signals
The following different tones and signals are sent from the
exchange to your phone.
Tone characteristics
The tones shown in this section are the most used tones
worldwide. Many markets use a differing tone for one or more
situations.
Call waiting tone
Intrusion tone
Conference tone every 15 seconds (to all parties)
Verification tone
Warning tone, expensive route
Dialog 4223 Professional/Dialog 4225 Vision14
Page 15

Internal ring signal
External ring signal
Recall signal
(Callback reminder)
Description
Ring signals
Three different ring signals inform you about the type of the
incoming call. The signals shown in this section are the most used
signals worldwide. Many markets use signals that are adapted for
the local standards. If you get a signal that is not described or you
cannot identify, ask your system administrator.
15Dialog 4223 Professional/Dialog 4225 Vision
Page 16

Description
Display information
The display gives you feedback information such as time and date,
traffic state and connected phone numbers. The following pages
show examples of information displays from different telephone
states.
Notes:
The order in which the date is stated is system dependent.
All names and numbers presented on the displays in this
user guide are examples.
Your phone has a graphical display. The number of rows and
characters per row depend on the character size and the font.
When the display shows a list, or when the phone is in a setting
mode, the middle field of the display is adapted to fit each situation.
Dialog 4223 Professional/Dialog 4225 Vision16
Page 17
Description
Program PhoneSet CallList PhoneBook Messages
Absence Account Authority more...
11:06 28 Aug 2008
Brown James
2222
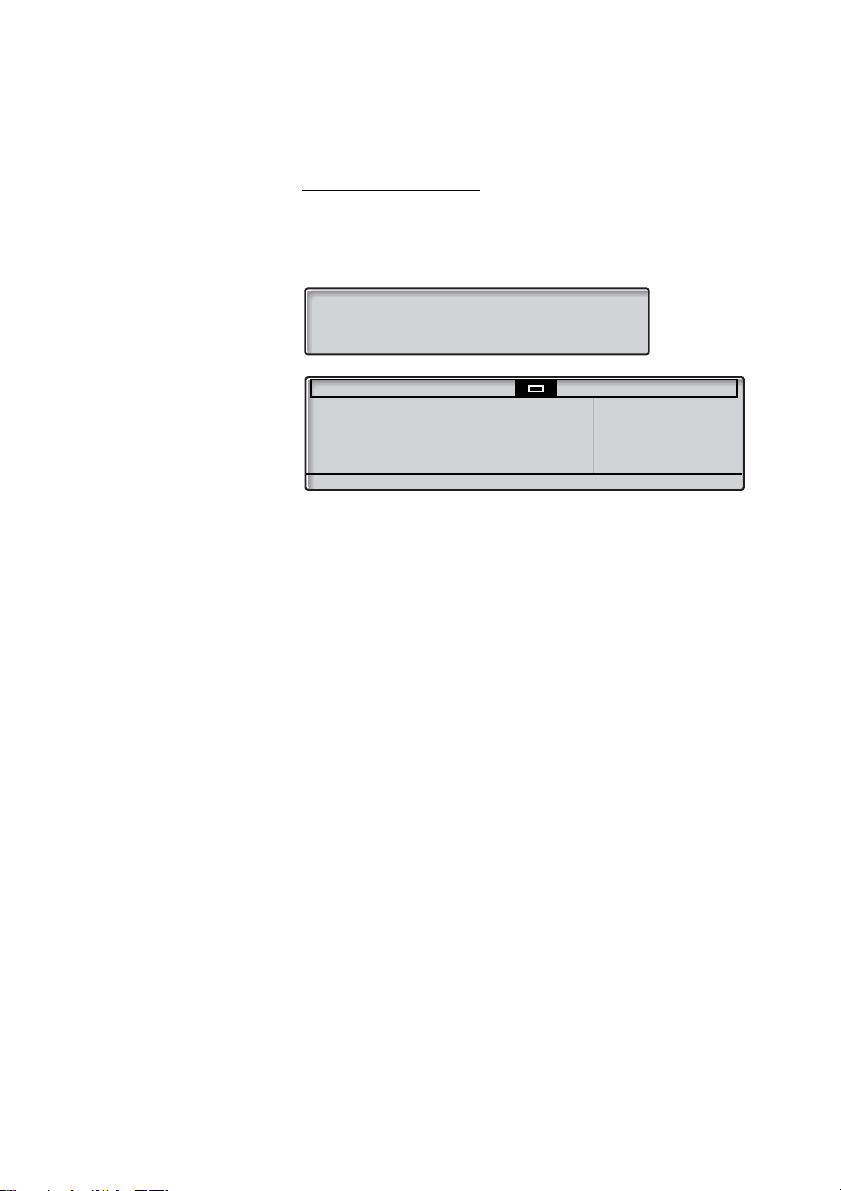
Top menu (Dialog 4225 Vision)
The top menu is in the black frame below.
The following main text and symbols can be shown in the display´s
top menu (see also section “Menu structure Dialog 4225 Vision” on
page 26.):
Program Access the Program menu.
See section “Settings” on page 98.
PhoneSet Access the PhoneSet menu.
See sections “Settings” on page 98, “Accessories” on page 117
and “Troubleshooting” on page 132.
CallList Access the CallList menu.
See section “Call list” on page 96.
Home position (idle mode).
PhoneBook Access the PhoneBook menu.
See section “Dial by Phonebook” on page 45.
Messages Access the Messages menu.
See section “Messages” on page 79.
Position indicator (selected top menu item).
17Dialog 4223 Professional/Dialog 4225 Vision
Page 18
Description
Brown James 2222 11:06 28 Aug 2008
FollowMeTo 3333
CallList PhoneBook No Diverison more...
11:06 28 Aug 2008
Brown James
2222
Program PhoneSet CallList PhoneBook Messages
Smith Bob >Direct
Nelson Lord 5555
CallBack CallPager Timer
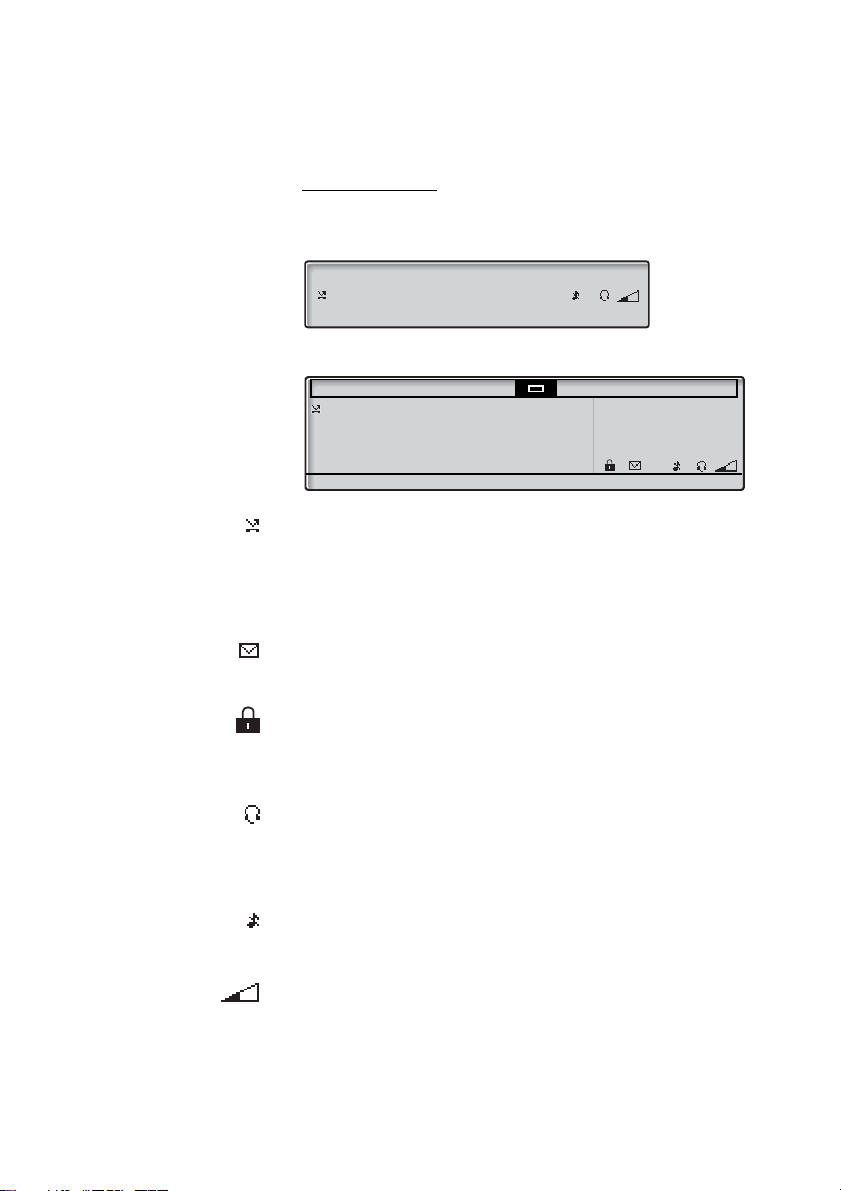
Display symbols
Traffic status is indicated by the following symbols on the display:
Dialog 4223 Professional:
Dialog 4225 Vision:
Forwarded call.
Indicates that the call is forwarded to another extension than the
one dialed. See section “Call Forwarding” on page 62.
> Prefix before type of forwarded call (Direct or Follow-me).
See section “Call Forwarding” on page 62.
Message.
Indicates that there is a message waiting. See section “Messages”
on page 79.
Phone lock.
Indicates that the phone is locked for unauthorized calls.
An authization code must be used to make calls. See section
“Authority” on page 49.
Headset Preset
Indicates that the phone is set for incoming and outgoing calls to
be connected to the headset when you answer or make calls
without lifting the handset. See section “Headset (optional)” on
page 118.
Ringer off.
Indicates that the ring signal is switched off. See section “Silent
Ringing” on page 108.
Volume level bar.
Indicates the ring signal volume in idle or ringing mode, or when in
speech mode the loudspeaker or earpiece volume. For the Dialog
4223 Professional, the symbol is shown for a few seconds when a
volume key has been pressed.
Dialog 4223 Professional/Dialog 4225 Vision18
Page 19

Description
Smith Bob 3333 12:24 23 Aug 2008
Nelson Lord 5555 11:33 23 Aug 2008
Call Up Down more...
Program PhoneSet CallList PhoneBook Messages
Smith Bob 3333 12:24 23 Aug 2008
Nelson Lord 5555 11:33 23 Aug 2008
0012115171 15:11 22 Aug 2008
Carter Jim 4444 14:06 21 Aug 2008
Call Up Down more...
Smith Bob
The following symbols can be shown in the top menus or other
display lists (example of the
CallList menu).
Dialog 4223 Professional:
Dialog 4225 Vision:
Missed call.
Indicates a missed but checked incoming call.
Incoming call.
Indicates an answered incoming call.
Outgoing call.
Indicates an outgoing call.
Bar indicator.
Indicates the shown part of the total list, and where it is positioned
in the total list.
Selection frame.
Indicates the subject to be called or selected in the list.
19Dialog 4223 Professional/Dialog 4225 Vision
Page 20
Description
Brown James 2222 11:06 28 Aug 2008
Absence Account Authority more...
Program PhoneSet CallList PhoneBook Messages
Absence Account Authority more...
11:06 28 Aug 2008
Brown James
2222
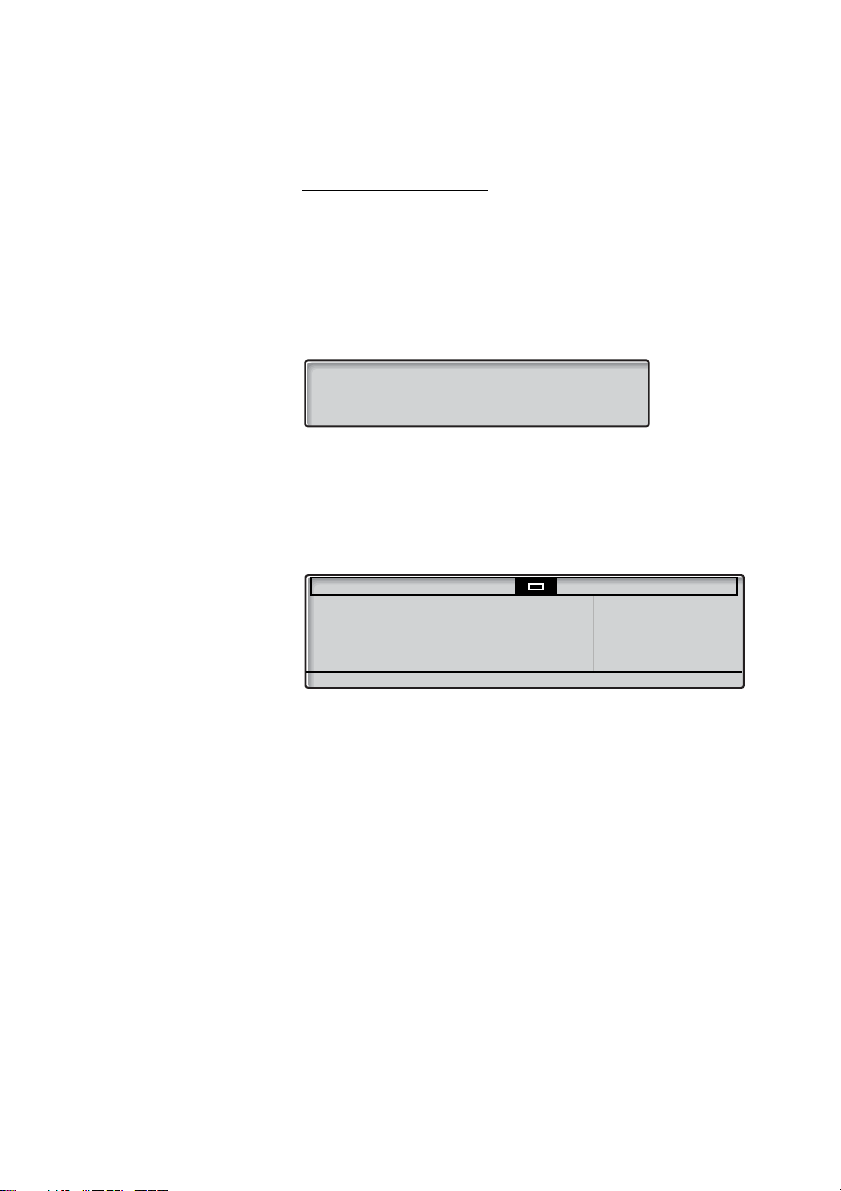
Idle phone (idle mode)
Dialog 4223 Professional:
When your phone is idle, the upper row shows general information
and your extension number. The lower row presents lead text for
the display menu keys. In the example below, the extension
number for James Brown is 2222.
Note: A long name overwrites the number.
Dialog 4225 Vision:
When your phone is idle, the display shows the top menu. Below
the top menu; time, date, name and your extension number are
shown to the right. Below the line, lead text for the display menu
keys are shown. In the example below, the extension number for
James Brown is 2222.
Dialog 4223 Professional/Dialog 4225 Vision20
Page 21
Description
Calling... 11:06 28 Aug 2008
Smith Bob 3333
Callback CallPager Timer
Smith Bob >Direct 11:06 28 Aug 2008
Nelson Lord 5555
Callback CallPager Timer
Program PhoneSet CallList PhoneBook Messages
Calling...
Smith Bob 3333
CallBack CallPager Timer
11:06 28 Aug 2008
Brown James
2222
Program PhoneSet CallList PhoneBook Messages
Smith Bob >Direct
Nelson Lord 5555
CallBack CallPager Timer
11:06 28 Aug 2008
Brown James
2222
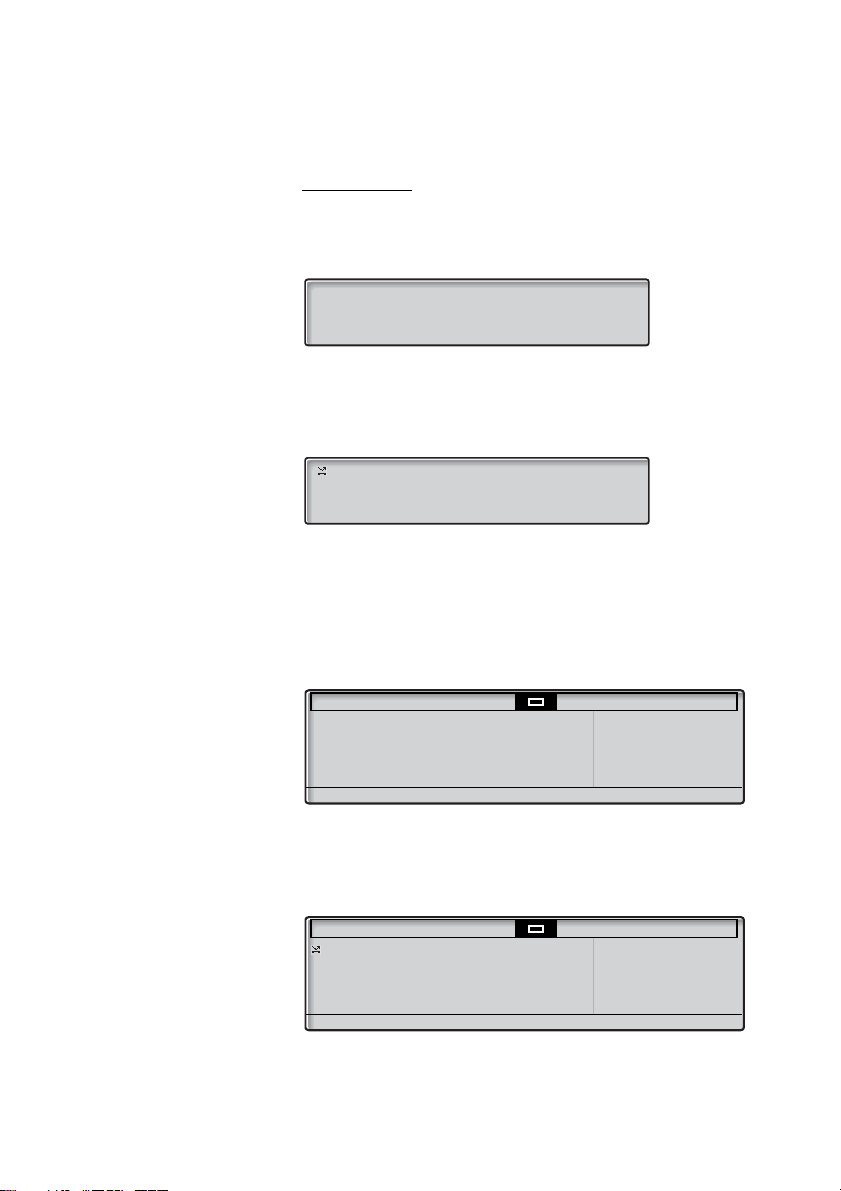
Outgoing call
Dialog 4223 Professional:
When you make an outgoing call on your phone, traffic information
and dialed name (if available) and number are shown.
If the called party’s phone is diverted, the forwarded call icon, the
answering extension name (number when name is not available)
and the type of diversion are shown.
The call to Smith is directly diverted to Nelson (5555).
Dialog 4225 Vision:
When you make an outgoing call on your phone, the idle
information is shown. Below the top menu; traffic information and
dialed name (if available) and number are shown.
If the called party’s phone is diverted, the forwarded call icon, the
answering extension name (number when name is not available)
and the type of diversion are shown below the top menu.
The call to Smith is directly diverted to Nelson (5555).
21Dialog 4223 Professional/Dialog 4225 Vision
Page 22
Description
11:06 28 Aug 2008
Smith Bob 3333
Absence Account Authority more...
Smith Bob >Direct 11:06 28 Aug 2008
Carter Jim 4444
Absence Account Authority more...
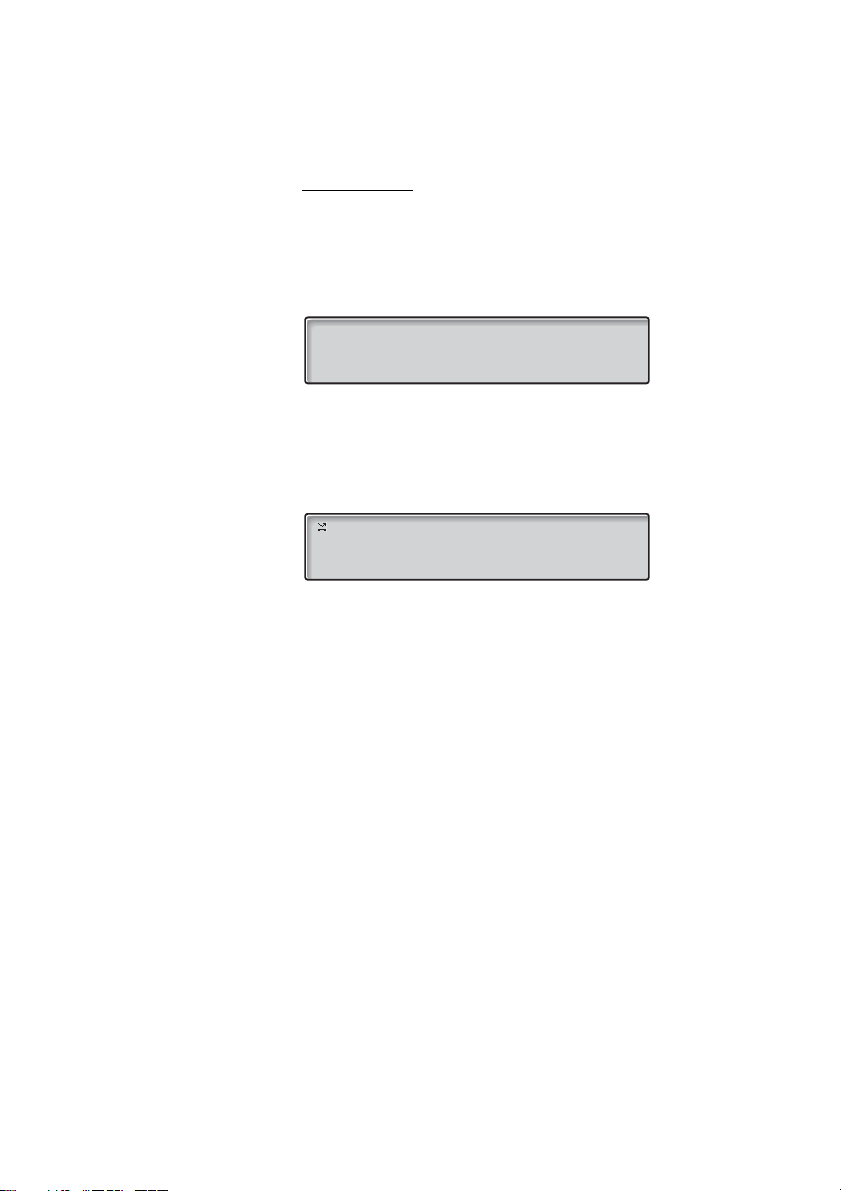
Incoming call
Dialog 4223 Professional:
When you receive an incoming call, the calling party’s extension
number flashes (if the name is available, this is also shown). If the
number for an external call is not available, the display shows
External instead of the number (flashing).
If a diverting extension is calling, the forwarded call icon, the called
person's name (number when there is no name available), type of
diversion, and the calling party’s name and number (flashing) are
shown.
Carter (4444) has called Smith and the call is directly diverted to
you.
Dialog 4223 Professional/Dialog 4225 Vision22
Page 23

Description
Program PhoneSet CallList PhoneBook Messages
Smith Bob 3333
Absence Account Authority more...
11:06 28 Aug 2008
Brown James
2222
Program PhoneSet CallList PhoneBook Messages
Smith Bob >Direct Jim Carter 4444
Absence Account Authority more...
Dialog 4225 Vision:
When you receive an incoming call, the idle information is shown.
Below the top menu, the calling party’s extension number flashes (if
the name is available, this is also shown). If the number for an
external call is not available, the display shows
External instead of
the number (flashing).
If a diverting extension is calling, the forwarded call icon, the called
person's name (number when there is no name available), type of
diversion, and the calling party’s name and number (flashing) are
shown below the top menu.
Carter (4444) has called Smith and the call is directly diverted to
you.
23Dialog 4223 Professional/Dialog 4225 Vision
Page 24

Description
Features crossed out
on this page are
currently unavailable
at UCSC
+/-
</>
Absence
Account
Activate
AddMember
Authority
Back
Back *
Call
CallBack
CallList
CallPickUp
CallWaiting
Cancel DND
Change *
Clear
Conf/Transf
Conference
CommonHold
Connect
CostInfo
Deactivate
Delete
Details
Down
Exit
Exit *
Enter
Find
GrpPickUp
Display menu keys
The following text can be displayed for the display menu keys:
Adjust display contrast
Move cursor when
programming melodies
Handle Absence/Diversion
Account Code
Activate
Add member to a conference
Authorization Code
Return to previous menu
Return to previous menu
Call the number displayed
Callback
Access Call list
(Dialog 4223 Professional)
Call pick-up
Call waiting
Cancel Do Not Disturb
Change a setting
Reset time measurement
To get a new line for conference
or transfer
Connect a conference member
Put the call on common hold
Connect
Display cost information
Deactivate
Delete an item
Show details for framed object
Scroll down
Exit the displayed menu
Exit the displayed menu
Enter values
Search
Group call pick-up
HideMenu
Intrusion
Lock
LogOn
LogOff
more...
n Missed
Next
NoDiversion
NotDisturb
Open
PhoneBook
Hide menu key designations
Intrusion
Lock the phone
Log on
Log off
More menu choices
No. of missed calls in call list
Show next logged number
Cancel Absence/Diversion
Do Not Disturb
Unlock the phone
Access Phonebook
(Dialog 4223 Professional)
Program
Program *
Redial
Return
Save *
Save&Exit *
Select
ShowDate
ShowMenu
ShowTimer
Space
Program
Enter Program melody mode
Last Number Redial
Return to previous menu keys
Save setting
Save setting and exit menu
Select item in a list
Show date
Show menu key designations
Show timer
Enter a space when writing
names
Start/Stop
Timer
Tones
Start/Stop time measurement
Display time measurement
Dialing during a connected call
(Push button tones, DTMF)
TraceMalC
Transfer
Up
*
Always displayed in English
Malicious Call Tracing
Execute a transfer
Scroll up
Dialog 4223 Professional/Dialog 4225 Vision24
Page 25
Description
n Missed* CallList PhoneBook more...
Call List
Unanswered calls
Outgoing calls
Incoming calls
Explanations
* Only shown when there are missed calls.
n = Number of missed calls.
** Current number is shown.
*** Text is not shown on the display.
Absence
Account
Authority
Lock/Open
LogOn/Off
Timer
Redial
Program
PhoneSet
Hide/ShowMenu
Program mode key:
RingChar:
Programming of
function keys***
Idle display menu keys
Select Profile
Direct Diversion to nnnn**
Follow Me
Absence reason
External Follow Me
Do not Disturb
Di v on no a nsw er t o nn nn* *
Div on busy to nnnn**
Display Contrast
Melody Programming
Firmware Indication
Headset Preset
Local Test Mode
Option Unit Settings
Set Hearing Level
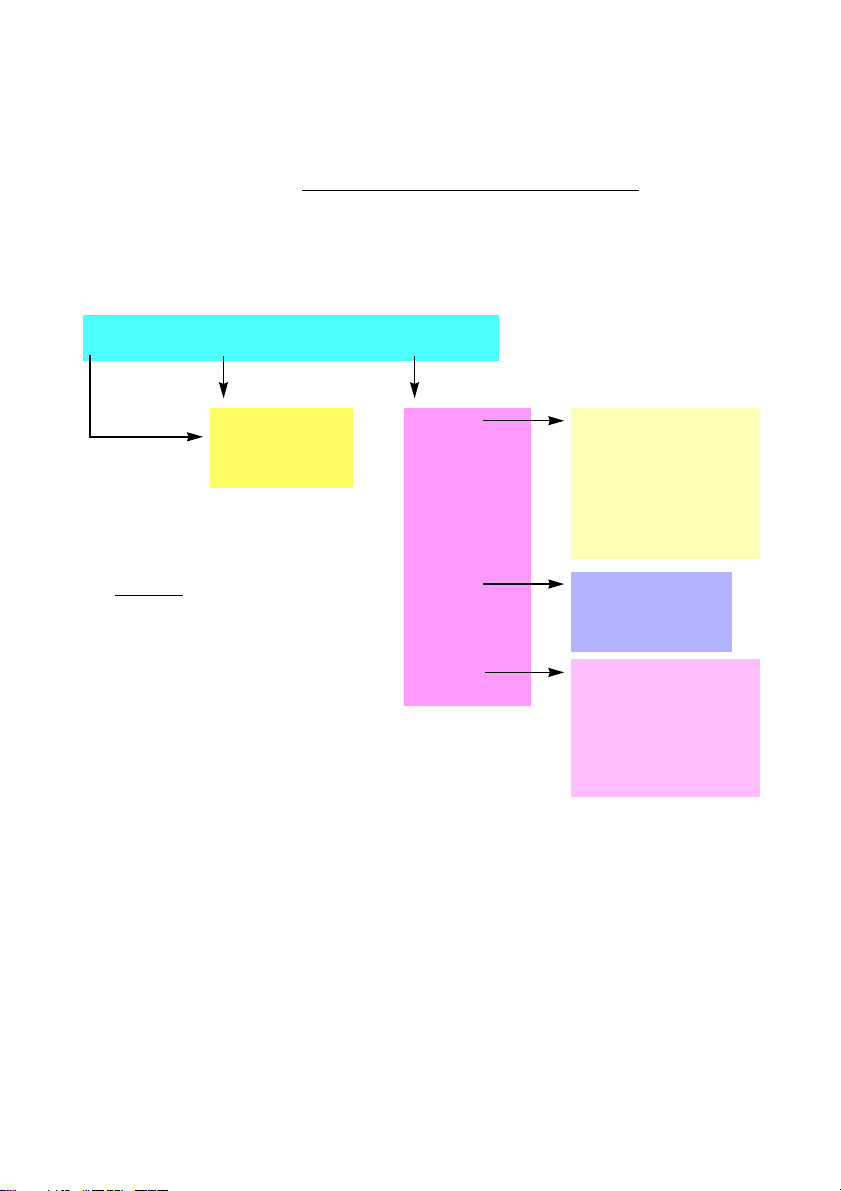
Menu structure Dialog 4223 Professional
Menu structure for each of the menus that can be selected from
the idle menu. When you are navigating the menus, a selected
menu is marked with a black frame.
25Dialog 4223 Professional/Dialog 4225 Vision
Page 26
Description
Program PhoneSet CallList PhoneBook Messages
Explanations
* Only shown when there are missed calls.
n = Number of missed calls.
** Current number is shown.
*** Text is not shown on the display.
Home. Return to home position, when
navigating the top menu.
n Missed* Absence Account more...
Central
Directory
Message Waiting
Top m e n u
Idle display menu keys
Programming of keys
Call List
Unanswered calls
Outgoing calls
Incoming calls
Authority
Lock/Open
LogOn/Off
Timer
Redial
Hide/ShowMenu
Select Profile
Direct Diversion to nnnn**
Follow Me
Absence reason
External Follow Me
Do not Disturb
Div on no answer to nnnn**
Div on busy to nnnn**
Display Contrast
Melody Programming
Firmware Indication
Headset Preset
Local Test Mode
Option Unit Settings
Set Hearing Level
Program mode key:
RingChar:
Programming of
function keys***
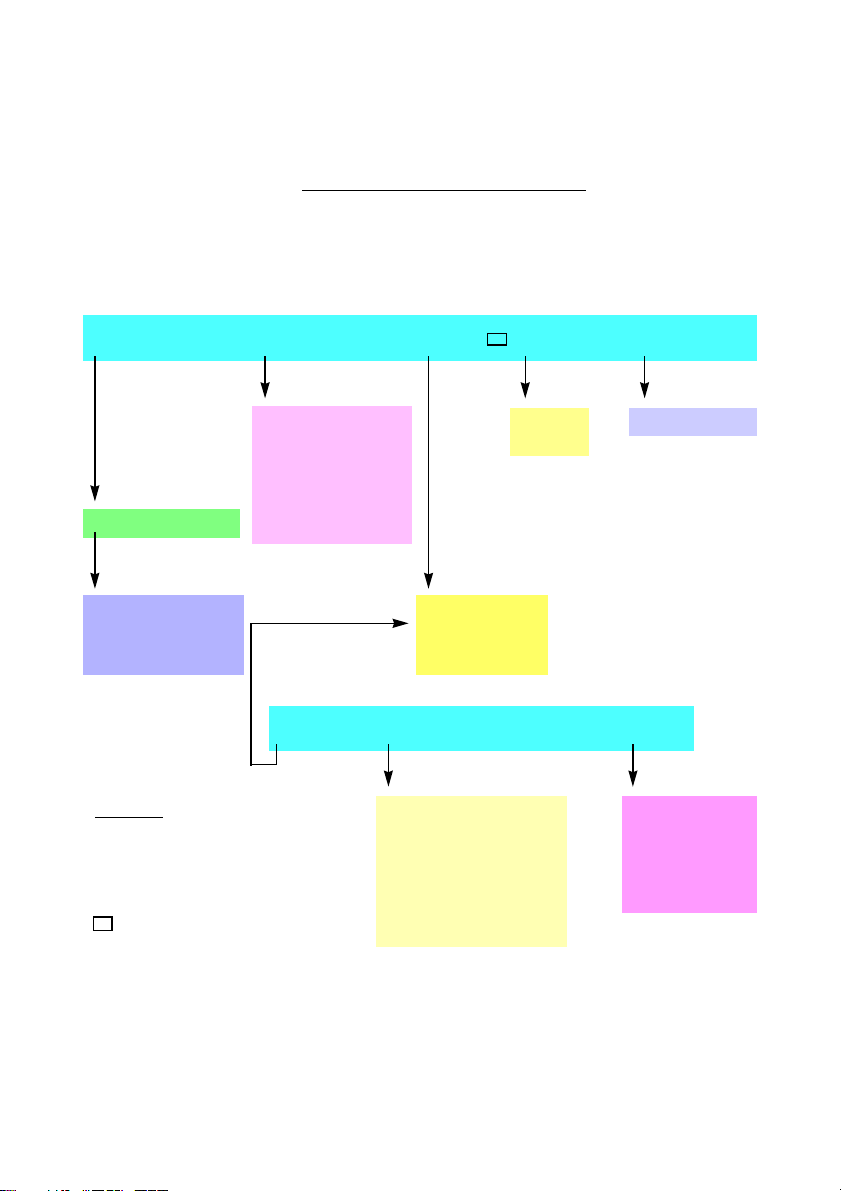
Menu structure Dialog 4225 Vision
Menu structure for each of the menus that can be selected from
the idle menu. When you are navigating the menus, a selected
menu is marked with a black frame.
Dialog 4223 Professional/Dialog 4225 Vision26
Page 27

Display language (optional)
One of the following languages can be selected to display
information on your phone.
Digit 0–9 = the language code:
0 English 1 French 2 German 3 Spanish 4 Italian
5__________6 _________ 7 _________ 8 _________ 9 _________
Note: By default 5-9 are programmed for English. These
can be changed locally to other languages.
To select a language:
*08* Dial.
( 0— 9) Enter the language code.
#í Press.
Description
27Dialog 4223 Professional/Dialog 4225 Vision
Page 28

Incoming Calls
This feature is
currently
unavailable at
UCSC
Answer calls
A ring signal and a flashing lamp indicate an incoming call.
Note: If the feature Parallel Ringing is activated, the call will
ring on more than one phone, see section “Parallel Ringing”
on page 33.
On Line 1
Normally you will receive calls on Line 1.
u Lift the handset.
Incoming Calls
On any other Line key
u Lift the handset.
ÖÔ Press the flashing Line key.
Line
Handsfree
Line ÖÔ Press the flashing Line key.
You are connected to the caller via the loudspeaker and the
microphone.
í Press to terminate a handsfree call.
29Dialog 4223 Professional/Dialog 4225 Vision
Page 29
Incoming Calls
Busy 11:06 28 Aug 2008
Smith Bob 3333
Callback CallPager CallPickUp more...
Program PhoneSet CallList PhoneBook Messages
Busy
Smith Bob 3333
CallBack CallPager CallPickUp more...
11:06 28 Aug 2008
Brown James
2222
On another extension
You can answer a call to another extension.
uz Call the ringing extension.
Busy tone.
Note: The display images might differ from the above.
CallPickUp Press to answer (see display).
If
CallPickUp
Notes:
You can also press
is programmed by you).
France, press
is not shown, press
8 or On hold/Pick-up (The function key
4; Sweden, press 6
more...
until it appears.
Dialog 4223 Professional/Dialog 4225 Vision30
Page 30

Incoming Calls
The "Free on 2nd"
key is called
"Accept 2nd Call"
at UCSC.
This feature is
currently
unavailable at
UCSC
Answer a second call during an ongoing
call
If your phone is preprogrammed with a Free on 2nd key, you can
receive another call, if this feature is activated.
Free on 2nd Ô Press to activate/deactivate.
Line 2
ÖÔ Press to answer.
Line 1
ÖÔ Press to switch back to the first call.
When Free on 2nd is active the lamp is on.
Note: The function key is preprogrammed by your system
administrator.
When you have an ongoing call on Line 1, and Line 2 flashes to
indicate a new incoming call:
The first call is put on hold.
The second call is put on hold. You are connected to the first caller.
í Press to terminate the connected call.
Call Waiting
If the calling party has activated Call Waiting, you can receive a
second call even if Free on 2nd is not activated.
To answer the waiting call:
í Press to terminate the connected call.
Your phone will ring to announce the waiting call.
Line
ÖÔ Press the flashing Line key to receive the new call.
31Dialog 4223 Professional/Dialog 4225 Vision
Page 31

Outgoing Calls
Outgoing Calls
Make calls
How to make internal and external calls:
u Lift the handset and proceed depending on call type:
Internal calls
z Dial the extension number.
External calls
0 Press the digit or digits to get an external line.
Dial tone.
Note: The particular digit or digits used in your office, e.g.
0 or 00.
z Dial the external number.
d or í Replace the handset or press to end the call.
Note: If you receive a queue tone when dialing the digit or
digits to get an external line (if feature Least Cost Routing is
used in the system), keep waiting. Once a line becomes free
you will receive a dial tone. If a warning tone is heard, the
selected line is marked “Expensive”.
35Dialog 4223 Professional/Dialog 4225 Vision
Page 32

Outgoing Calls
This feature is
currently
unavailable at
UCSC
Handsfree
With the handset on hook:
z Dial the number.
You are connected via the loudspeaker and microphone.
í Press to terminate a handsfree call.
Note: You can dial your calls more quickly by using
common Speed Dialing numbers and by using your own
programmed function keys. See section “Speed Dialing” on
page 44.
Number Presentation Restriction
If you do not want your name and number to be displayed to the
person you are calling, use the following procedure.
Note: The Number Presentation Restriction is only valid for
the ongoing call, i.e. the procedure has to be repeated the
next time you want to use it.
*42# Dial and wait for a new dial tone.
z Dial the number.
Instead of your name and number, the display on the called phone
shows
Anonymous.
Dialog 4223 Professional/Dialog 4225 Vision36
Page 33

Individual External Line
Smith Bob 3333 12:24 23 Aug 2008
Nelson Lord 5555 11:33 23 Aug 2008
Call Up Down more...
This feature is
currently
unavailable at
UCSC
To make a call on a specific external line:
*0* Dial.
z# Dial the Individual External Line number and press.
Outgoing Calls
z Dial the digit or digits to get an external line and the external
number.
Redial calls from the Call list
To use the Call list, see section “Call list” on page 96.
Dialog 4223 Professional
CallList Press (see display).
Down or Up Press to frame the requested list (see display).
Select Press (see display),
n Missed press (see display).
The picture below is an example of how the display looks when the
complete Call list has been selected.
or use the shortcut directly to the unanswered calls list,
n = Number of missed calls.
Down or Up Press to frame a phone number (see display).
Call Press to call the framed phone number (see display).
37Dialog 4223 Professional/Dialog 4225 Vision
Page 34

Outgoing Calls
Program PhoneSet CallList PhoneBook Messages
Smith Bob 3333 12:24 23 Aug 2008
Nelson Lord 5555 11:33 23 Aug 2008
0012115171 15:11 22 Aug 2008
Carter Jim 4444 14:06 21 Aug 2008
Call Up Down more...
Dialog 4225 Vision
Å Select CallList in the top menu (see display).
Down or Up Press to frame the requested list (see display).
Select Press (see display),
The picture below is an example of how the display looks when the
complete Call list has been selected.
or use the shortcut directly to the not answered calls list,
n Missed press (see display).
n = Number of missed calls.
Down or Up Press to frame a phone number (see display).
Call Press to call the framed phone number (see display).
Dialog 4223 Professional/Dialog 4225 Vision38
Page 35

Last External Number Redial
This feature is
currently
unavailable at
UCSC
When you initiate an external call the system automatically stores all
the dialed digits, irrespective of whether the call was successful or
not.
u Lift the handset.
Outgoing Calls
Redial Press to repeat the stored number (see display).
If
Redial
external number is automatically redialed.
is not shown, press
Notes:
You can also dial
function key is programmed by you).
Finland and Sweden, dial
more...
until it appears. The last
* * * or press Last Number Redial (The
* * 0
Save external number
When you make an external call, you can save the number in order
to redial the same number easily. Any number previously saved is
erased.
To save an external number:
Redial Ô Press before you finish the call.
Note: The function key is preprogrammed by your system
administrator.
Redial number
u Lift the handset.
Redial Ô Press to redial the number.
Note: The function key is preprogrammed by your system
administrator.
39Dialog 4223 Professional/Dialog 4225 Vision
Page 36

Outgoing Calls
NOTE: This feature
works only with
campus extensions
When you receive a busy tone
If you call an extension and receive a busy tone, or get no answer,
or all external lines are busy, you can use any of the following
methods:
Callback
If a called extension is busy or there is no answer:
CallBack Press (see display).
It can take several seconds before the procedure is executed.
If
CallBack
is not shown, press
Notes:
You can also press
programmed by you).
France, Finland and Sweden, press
more...
6 or Callback (The function key is
d Replace the handset to finish the procedure.
You are called back (recall ring signal) when the ongoing call is
finished or the next time a new call is finished. You have to answer
within eight seconds, otherwise the Callback service is cancelled.
While waiting for the Callback, you can make and receive calls as
usual.
u Lift the handset when you are called back.
The system calls the extension.
Note: Callbacks can be activated on several extensions at
the same time. Callbacks from additional lines will recall on
Line 1.
until it appears.
5
Dialog 4223 Professional/Dialog 4225 Vision40
Page 37

Outgoing Calls
This
information
does not apply
at UCSC
If all external lines are busy (after dialing the digit or digits to get a
line):
CallBack Press (see display).
If
CallBack
is not shown, press
Notes:
You can also press
programmed by you).
France, Finland and Sweden, press
more...
6 or Callback (The function key is
z# Dial the external number and press.
d Replace the handset to finish the procedure.
When an external line becomes free you will be called back (recall
ring signal). You have to answer within eight seconds, otherwise
the Callback service is cancelled. While waiting for the Callback,
you can make and receive calls as usual.
u Lift the handset when you are called back.
The system calls the external number.
Note: Only one Callback can be activated on a busy
external line. Callbacks from additional lines will recall on
Line 1.
Cancel any single Callback
#37*z Dial and enter the extension number.
Note: To cancel a single Callback on a specific external
line, dial the digit or digits to get a line instead of the
extension number.
until it appears.
5
#í Press.
Cancel all Callbacks
#37# Dial.
í Press.
41Dialog 4223 Professional/Dialog 4225 Vision
Page 38

Outgoing Calls
Speed Dialing
Common Speed Dialing numbers
By using common Speed Dialing numbers, you can make calls
simply by pressing a few keys. The common Speed Dialing
numbers consist of 1–5 digits and are stored in the exchange (by your
system administrator).
uz Lift the handset and dial the common Speed Dialing number.
Individual Speed Dialing numbers
You can program up to ten frequently used phone numbers on the
digit keys 0–9 and use them as individual Speed Dialing numbers (if
this feature is allowed).
Note: In Finland, up to nine numbers, keys 1–9.
To u s e :
**( 0— 9) Dial and press the relevant digit.
Note: Finland, dial
To program and alter individual Speed Dialing numbers:
* * ( 1 — 9 ); Sweden, dial ( 0 — 9 ) #.
*51*( 0— 9) Dial and press the selected digit.
Note: Finland, dial
* 5 1 * ( 1 — 9 ).
*z Press and dial the phone number.
#í Press.
Note: The programmed number may consist of a
maximum of 20 digits plus
dial tone from the public network.
Dialog 4223 Professional/Dialog 4225 Vision44
*, which indicates the second
Page 39

To erase one programmed number:
This feature is
currently
unavailable at
UCSC
#51*( 0— 9) Dial and press the selected digit.
Outgoing Calls
Note: Finland, dial
#í Press.
To erase all programmed numbers:
#51# Dial.
í Press.
Dial by a function key
Both features and phone numbers can be programmed on a
function key. To program a key, see section “Programming of
function keys” on page 98.
Head office Ô Press the function key.
This function key is programmed by you.
Dial by Phonebook
By use of the Integrated Telephone Directory you can search for a
name, group, operator, etc. via your display and then call the
desired person or group by use of a menu function key below the
display.
# 5 1 * ( 1 — 9 )
PhoneBook Press to enter the Phonebook (see display).
On the Dialog 4223 Professional:
Continue with any of the Phonebook options.
On the Dialog 4225 Vision:
Ç Select PhoneBook in the top menu (see display).
Select Press (see display).
Continue with any of the Phonebook options.
45Dialog 4223 Professional/Dialog 4225 Vision
Page 40

During Calls
During Calls
Group Listening (loudspeaking)
This feature lets other people in your room listen to your phone
conversation. You speak in the handset while the other party´s
voice is heard on the loudspeaker.
During an ongoing conversation:
 Press to switch between loudspeaker and handset.
When the key lamp is on, the other party´s voice can be heard on
the loudspeaker.
Note: You can adjust the volume, See section “Settings” on
page 98.
From loudspeaking to handsfree
d Replace the handset.
Handsfree conversation.
From handsfree to loudspeaking
u Lift the handset and press.
í Press to end the call.
Dialog 4223 Professional/Dialog 4225 Vision52
Page 41

Handsfree
During Calls
Âd Press and replace the handset.
Handsfree conversation.
í Press to end the call.
From handsfree to handset
u Lift the handset.
Conversation via the handset.
Mute
É Press to switch the microphone on or off.
When the lamp is on, the person on the line cannot hear what is
being said near to your phone.
Inquiry
You have a voice connection on Line 1 and want to make an
Inquiry to an internal or external party.
Inquiry
Ô Press.
The first party is put on hold (Line 1 flashes slowly).
Note: You can also press Line 2.
z Call the third party.
When the other party answers, you can switch between the calls
(Refer Back), Transfer the call, create a Conference or end one of
the calls.
í Press to end the Inquiry call.
The third party is disconnected.
Line 1
ÖÔ Press to return to the first call.
53Dialog 4223 Professional/Dialog 4225 Vision
Page 42

During Calls
Refer Back
The Line key lamp flashes for the call put on hold.
Line 1
ÖÔ Press to put third party on hold.
First call is connected.
Inquiry
ÖÔ Press to put the first call on hold.
Third party is connected.
Note: You can also press Line 2 if you have initiated the
Inquiry on Line 2.
í Press to terminate the connected call.
Transfer
You have an ongoing call and you want to transfer the call to
another extension.
Conf/Transf Press (see display).
Note: You can also press Inquiry or a free Line key.
z Call the third party.
Transfer Press before or after answer (see display).
The ongoing call is transferred.
Note: If you have put more than one call on hold, the last
call that was put on hold will be transferred. If the dialed
extension is busy or Transfer is not allowed, your phone will
ring again.
Dialog 4223 Professional/Dialog 4225 Vision54
Page 43

Conference
With this procedure you can include up to seven parties in a
conference. Only the conference leader (i.e. the person initiating the
conference) can admit participants. During the conference a tone
will be heard every 15 seconds.
Note: The conference tone might be disabled for your
system.
You have an ongoing conversation (Line 1) and want to establish a
phone conference. You will become the conference leader.
Conf/Transf Press (see display).
Note: You can also press Line 2 or Inquiry.
During Calls
z Call the third party.
Wait for answer.
Conference Press to establish a conference (see display).
Note: You can also press
key is programmed by you).
Repeat the procedure to add more conference members.
3 or Conference (The function
d Replace the handset to leave the conference.
Note: A tone is heard each time a participant enters or
leaves the conference. When the conference leader leaves
the conference, the conference will continue with the other
included parties. The conversation is changed back to a
normal two party connection when there are only two
parties left.
55Dialog 4223 Professional/Dialog 4225 Vision
Page 44

During Calls
Hold
You can temporarily put the ongoing call on hold. Calls put on hold
can be resumed on your own or on another phone.
Individual
Line ÕÔd Press the ongoing call Line key and replace the handset.
Line
ÖÔ Press the flashing Line key again to resume the call.
CommonHold Press (see display).
The key lamp flashes slowly.
Common
If
CommonHold
is not shown, press
Notes:
You can also press
programmed by you).
France, press
4; Sweden, press 6
more...
until it appears.
8 or Hold/Pick-up (The function key is
d Replace the handset.
The key lamp flashes slowly. If your number is multiple represented
on other phones, the key lamp that represents your number flashes
slowly on these phones.
To resume the call on your own extension:
Line
ÖÔ Press the flashing Line key.
Dialog 4223 Professional/Dialog 4225 Vision56
Page 45

To resume the call on another extension:
z Call the extension where the call was put on hold.
During Calls
CallPickUp Press (see display).
If
CallPickUp
is not shown, press
Notes:
You can also press
programmed by you).
If your number is multiple represented on the phone, you
can also press the key that represents your number.
France, press
4; Sweden, press 6
more...
8 or Hold/Pick-up (The function key is
Send Caller Identity Code at transfer
When transferring a call you can send the caller’s Identity Code or
number to the receiver’s display.
You have a voice connection with an external party on Line 1.
Conf/Transf Press to put the call on hold (see display).
Note: You can also press Line 2 or Inquiry.
*77* Dial.
z# Dial the caller’s Identity Code or number and press.
z Call the third party.
until it appears.
Transfer Press before or after answer (see display).
The ongoing call is transferred with the caller´s Identity Code or
number.
Note: You can only use this feature if the receiver’s phone
is programmed to handle Identity Codes.
57Dialog 4223 Professional/Dialog 4225 Vision
Page 46

During Calls
Dialing during a connected call
When calling interactive teleservices, e.g. telephone banks, you
need to use Dual Tone Multi Frequency (DTMF) signals. If your
exchange has not been programmed to automatically convert your
entered digits into DTMF signals, you need to activate the feature
during the call.
During an ongoing call:
Tones z Press (see display) and dial the requested digits.
Entered digits are transmitted as DTMF signals.
Notes:
You can also press
Finland, press
9 and dial the required digits.
1 and dial the required digits.
Dialog 4223 Professional/Dialog 4225 Vision58
Page 47

Call Metering
Cost in £ 3.25 11:06 28 Aug 2008
R. Towers 0012345678
Tones CostInfo Conf/Transf more...
Program PhoneSet CallList PhoneBook Messages
Cost in £ 3.25
R. Towers 0012345678
Tones CostInfo Conf/Transf more...
11:06 28 Aug 2008
Brown James
2222
This feature is
currently
unavailable at
UCSC
Call Metering
Cost information
Cost information for your call can be shown in the local currency in
the display.
CostInfo Press to display or hide the cost indication (see display).
If
CostInfo
Note: The cost indication is automatically displayed for all
charged calls, when the feature is activated.
is not shown, press
more...
until it appears.
59Dialog 4223 Professional/Dialog 4225 Vision
Page 48

Call Metering
11:06 00:00
R. Towers 0012345678
Start Clear ShowDate Exit
Program PhoneSet CallList PhoneBook Messages
R. Towers 0012345678
Start Clear ShowDate Exit
11:06 00:00
Brown James
2222
Call Duration (Timer)
The elapsed time of your call can be measured, either manually
(default) or automatically. To change to Automatic Timer, contact
your system administrator.
Manual Timer
The timer can be activated when your phone is ready for dialing
(internal dial tone is heard), during an outgoing call, or when you
have a voice connection.
Note: System dependent, it can also be possible to
activate Manual Timer when your phone is idle.
Timer Press to activate the Call Duration feature (see display).
If
Timer
is not shown, press
more...
until it appears.
The display shows:
Key functions that are available during call duration mode:
Start Press to start the timer (see display).
The elapsed time is shown.
Clear Press to clear the timer (see display).
ShowDate Press to show date (see display).
Exit Press to exit the Call Duration feature (see display).
Stop Press to stop the timer (see display).
ShowTimer Press to show the measured time (see display).
Dialog 4223 Professional/Dialog 4225 Vision60
Page 49

Call Metering
11:06 00:00
R. Towers 0012345678
ShowDate Exit
Program PhoneSet CallList PhoneBook Messages
R. Towers 0012345678
ShowDate Exit
11:06 00:00
Brown James
2222
Automatic Timer
The timer automatically starts when the called person answers, and
automatically stops when the call is finished. Both outgoing and
incoming calls are measured.
If you make inquiries, conferences, or put calls on hold, etc. during
the call, the timer is not stopped. I.e. the time measured is the total
time from when the first called person answers, until the call to the
last connected person is finished.
Note: The timer shows the elapsed time from the last call
until a new call has been answered. If you need to keep a
record of your calls, always write down the time at once
when a call has been finished.
Timer Press to show the Call Duration feature (see display).
If
Timer
is not shown, press
more...
until it appears.
The display shows:
Key functions that are available during call duration mode:
ShowDate Press to show date (see display).
Exit Press to exit the Call Duration feature (see display).
ShowTimer Press to show the measured time (see display).
61Dialog 4223 Professional/Dialog 4225 Vision
Page 50

Call Forwarding
This feature is
currently
unavailable at
UCSC
Call Forwarding
Diversion
If you do not want to be disturbed or will be out of the office, you
can have all calls to your extension diverted to a preprogrammed
answering position. During Diversion you will hear a special dial
tone and the Diversion lamp indicates that your Triple Access Line
is diverted. You can still make calls as usual.
Diversion can be made direct, on no answer, on busy or to another
information service facility.
Note: If your phone is programmed with “Multiple Directory
Diversion and Do Not Disturb” (ask your system
administrator), Diversion is ordered and cancelled
simultaneously on all lines.
Dialog 4223 Professional/Dialog 4225 Vision62
Page 51

Order Direct Diversion from your own extension
The call can be diverted to an individual position or up to three predetermined common answering positions (depending on the type
of the incoming call). Programmed by your system administrator.
Diversion Ô Press,
or
Call Forwarding
Note: Diversion can also be ordered and cancelled from
the answering position, use the same procedure as in
section “Internal Follow-me” on page 66.
Note: The function key is preprogrammed by your system
administrator. If you order Diversion with the handset off
hook or the loudspeaker on, press the Diversion key twice.
Absence press (see display).
If
Absence
is not shown, press
Down or Up Press to frame
(nnnn = number to the answering position, e.g. the operator).
Direct Diversion to nnnn
Activate Press (see display).
Exit Press (see display).
Note: You can also use the following procedure to activate:
dial
* 2 1 # (U.K. * 2 #) and press the Clear key.
Cancel Direct Diversion from your own extension
Diversion ÕÔ Press,
Note: The function key is preprogrammed by your system
administrator.
or
NoDiversion press (see display).
Note: You can also use the following procedure to cancel:
dial
# 2 1 # (U.K. # 2 #) and press the Clear key.
more...
until it appears.
(see display).
63Dialog 4223 Professional/Dialog 4225 Vision
Page 52

Call Forwarding
Diversion when there is no answer
Order:
Absence Press (see display).
If
Absence
is not shown, press
Down or Up Press to frame
(see display).
(nnnn = number to the answering position, e.g. the operator).
Div on no answer to nnnn: Not active
Activate Press (see display).
Exit Press (see display).
The incoming call is diverted after 3 signals.
Note: You can also use the following procedure to activate:
dial
* 2 1 1 # (Finland and Norway, * 6 1 #) and press
the Clear key.
Cancel:
Absence Press (see display).
If
Absence
is not shown, press
Down or Up Press to frame
(see display).
(nnnn = number to the answering position, e.g. the operator).
Div on no answer to nnnn: Active
Deactivate Press (see display).
Exit Press (see display).
Note: You can also use the following procedure to cancel:
dial
# 2 1 1 # (Finland and Norway, # 6 1 #) and press
the Clear key.
more...
more...
until it appears.
until it appears.
Dialog 4223 Professional/Dialog 4225 Vision64
Page 53

Diversion when caller receives a busy tone
Order:
Call Forwarding
Absence Press (see display).
If
Absence
is not shown, press
Down or Up Press to frame
(see display).
(nnnn = number to the answering position, e.g. the operator).
Div on busy to nnnn: Not active
Activate Press (see display).
Exit Press (see display).
Note: You can also use the following procedure to activate:
dial
* 2 1 2 # (Finland and Norway, * 6 7 #) and press
the Clear key.
Cancel:
Absence Press (see display).
If
Absence
is not shown, press
Down or Up Press to frame
(nnnn = number to the answering position, e.g. the operator).
Div on busy to nnnn: Active
Deactivate Press (see display).
Exit Press (see display).
Note: You can also use the following procedure to cancel:
dial
# 2 1 2 # (Finland and Norway, # 6 7 #) and press
the Clear key.
more...
more...
until it appears.
until it appears.
(see display).
65Dialog 4223 Professional/Dialog 4225 Vision
Page 54

Call Forwarding
This feature is
currently
unavailable at
UCSC
Internal Follow-me
All calls to your extension are diverted to another extension of your
choice (within the private network). The Follow-me lamp indicates
that you have activated Follow-me. During Follow-me, your phone
can still be used for outgoing calls and you will hear a special dial
tone when you lift the handset.
Note: If your phone is programmed with “Multiple Directory
Diversion and Do Not Disturb” (ask your system
administrator), Internal Follow-me is ordered and cancelled
simultaneously on all lines.
Order from your own extension
Absence Press (see display).
Down or Up Press to frame
Select Press (see display).
If
Absence
is not shown, press
z Dial the answering position number.
Enter Press (see display).
Note: You can also use the following procedures to activate:
dial
* 2 1 * (U.K. * 2 *), dial the answering position
number, press
or
lift the handset, press the Diversion key (The function key is
preprogrammed by your system administrator), dial the
answering position number, press the Diversion key again,
and replace the handset.
more...
Follow Me
(see display).
# and press the Clear key,
until it appears.
Dialog 4223 Professional/Dialog 4225 Vision66
Page 55

Cancel from your own extension
Diversion ÕÔ Press,
Note: The function key is preprogrammed by your system
administrator.
or
NoDiversion press (see display).
Note: You can also use the following procedure to cancel:
dial
# 2 1 # (U.K. # 2 #) and press the Clear key.
Redirect from answering position
If you move from one answering position to another answering
position, you can redirect Follow-me from that new position.
Note: Internal Follow-me must be ordered from your own
extension before you can redirect from answering position.
*21*z Dial and enter your own extension number.
Call Forwarding
Note: U.K., dial
* 2 * No.
*z Press and enter the Diversion number.
#í Press to redirect.
Calls are diverted to the answering position.
Cancel from answering position
#21*z Dial and enter your own extension number.
Note: U.K., dial
# 2 * No.
#í Press.
67Dialog 4223 Professional/Dialog 4225 Vision
Page 56

Call Forwarding
For security
reasons, this
feature is available
only by special
request at UCSC.
If available on your
telephone, this feature is
activated by pressing *23#
at UCSC.
If available on your
telephone, this feature is
canceled by pressing #23#
at UCSC.
External Follow-me
If external Follow-me is allowed you can have all calls to your
extension diverted to an external number of your choice. The
Follow-me lamp indicates that you have activated Follow-me.
During Follow-me, your phone can still be used for outgoing calls
and you will hear a special dial tone when you lift the handset.
Order
Absence Press (see display).
Down or Up Press to frame
Select Press (see display).
If
Absence
is not shown, press
External Follow Me
z Enter the digit or digits to get an external line and enter the
external number.
Enter Press (see display).
Note: You can also use the following procedure to activate:
dial
* 2 2 #, enter the digit or digits to get an external line,
enter the external number, press
Cancel
Diversion ÕÔ Press,
Note: The function key is preprogrammed by your system
administrator.
or
NoDiversion press (see display).
Note: You can also use the following procedure to cancel:
dial
# 2 2 # and press the Clear key.
more...
until it appears.
(see display).
# and press the Clear key.
Dialog 4223 Professional/Dialog 4225 Vision68
Page 57

Call Forwarding
This feature is referred to
as "Roving Number" at
UCSC and is available by
special request only.
Personal Number
With this feature you can be reached on your normal office phone
number even if you are out of the office, at home, etc.
Depending on the functionality of your office exchange, you can
have either one individual single search profile or you can choose
between five individual search profiles.
A search profile can be designed to fit the situation, i.e. in the office,
traveling, at home, etc. Both internal or external phone numbers
can be used in a profile.
Your search profile is programmed or modified by your system
administrator. See section “To design and order your search
profiles” on page 72.
When the feature is activated, incoming calls are transferred to your
selected phones or back-up services in the order that you choose.
If an answering position in the profile is busy, the call can be
transferred to another predefined position in the profile, i.e. Voice
Mail or a colleague.
You can handle the profiles from your own office phone. How to do
this is described in this section (an operator can also assist you).
You can also use any of the Personal Assistant applications, if
available. Contact your system administrator for more information.
When out of the office, the feature Direct Inward System Access
(DISA) can be used, if available in your system. How to use DISA is
described in this section.
69Dialog 4223 Professional/Dialog 4225 Vision
Page 58

Call Forwarding
To activate or change to another profile from your office
phone
Absence Press (see display).
If
Absence
is not shown, press
Down or Up Press to frame
Select Profile
more...
until it appears.
(see display).
Select Press (see display).
Down or Up Press to frame the required profile (see display).
Select Press (see display).
The display shows the selected profile.
Notes:
You can also use the following procedure to activate:
dial
* 1 0 *, enter the search profile digit (1-5), press # and
press the Clear key.
You can also activate/cancel and change to another profile
by programming one function key/search profile (the
function keys has to be pre-assigned by your system
administrator). When the search profile is active the key
lamp is on. See section “Settings” on page 98.
When another party is included in the activated profile, a
colleague or an operator, etc., always remember to inform
them about your absence. If Voice Mail is included in the
activated profile, always update your greeting with Absence
Information.
To cancel from your office phone
Absence Press (see display).
If
Absence
is not shown, press
Down or Up Press to frame
Select Press (see display).
Down or Up Press to frame
Select Press (see display).
Note: You can also use the following procedure to cancel:
dial
# 1 0 # and press the Clear key.
more...
Select Profile
No Profile
(see display).
Dialog 4223 Professional/Dialog 4225 Vision70
until it appears.
(see display).
Page 59

Call Forwarding
To activate or change to another profile from an external
phone
The external phone must be of push button type provided with
pound key (
tone pulses (DTMF).
#) and star key (*) or a mobile phone adapted for dial
z Call the DISA feature at your office.
Dial tone.
*75* Dial.
z* Enter the Authorization Code and press.
z# Dial your own extension number and press.
Dial tone.
*10* Dial.
z* Dial your own extension number and press.
( 1— 5) Press the search profile digit.
#d Press and replace the handset.
Note: When another party is included in the activated
profile, a colleague or an operator, etc., always remember
to inform about your absence. If Voice Mail is included in the
activated profile, always update your greeting with Absence
Information.
71Dialog 4223 Professional/Dialog 4225 Vision
Page 60

Call Forwarding
To cancel from an external phone
The external phone must be of push button type provided with
pound key (
tone pulses (DTMF).
#) and star key (*) or a mobile phone adapted for dial
z Call the DISA feature at your office.
Dial tone.
*75* Dial.
z* Dial the Authorization Code and press.
z# Dial your own extension number and press.
Dial tone.
#10* Dial.
z# Dial your own extension number and press.
d Replace the handset.
To design and order your search profiles
The search profiles are installed or changed by your system
administrator. In order to set up your profiles, copy the setting
form, fill in your new or changed profiles and give it to your system
administrator.
Note: If a profile handling application is connected to your
system, you can edit profiles via your Intranet. See separate
instructions for the application.
Dialog 4223 Professional/Dialog 4225 Vision72
Page 61

Call Forwarding
Important notes when designing your search profiles:
• Avoid ring times longer than 45 seconds for your profiles.
Usually the caller hangs up after 3-6 ring signals. If you need a
longer ring time, the maximum time is 60 sec.
• Consider the time you need to react and answer on each
answering position in your profile.
You might need up to 15 seconds to react and answer a call on
a desk or cordless phone and 20–25 seconds for a mobile
phone.
• There must be an answering position at the end of every profile
(Voice Mail or operator/secretary).
If not, calls might end up unanswered.
• Consider what should happen while you are busy on a phone.
The available options are:
– Activate Free on 2nd (if available)
– Diversion to Voice Mail
– Diversion to the operator
• If an answering machine, a fax or other answering device is
used as an early answering position, it might interrupt the
searching.
Disconnect the answering device, or design the ring times so
they do not affect the searching.
• If your system admits just one single personal profile, design the
profile only with your 2–3 most frequently used positions.
If you add more numbers, there is a risk that the caller hangs up
before a latter position is called.
• If your system admits 1–5 personal profiles, design the different
profiles to fit your most frequently used positions.
Make sure you use as few answering positions as possible for
each profile. Profile examples:
–In office
–At home
–Traveling
– Absent/not reachable
73Dialog 4223 Professional/Dialog 4225 Vision
Page 62

Call Forwarding
Example:
How to fill in your setting form for search profiles:
Profile 1 In office
Search
order
1Desk 1234 10
2Cordless 5234 15
3 Voice Mail
* Examples: Desk, Cordless, Mobile, External, Voice Mail, Operator, etc.
Profile 2 At home
Search
order
1External 222222 20
2 Mobile 0706666666 25
3 Voice Mail
Type of telephone or
Answering position* Telephone number
Type of telephone or
Answering position* Telephone number
Ring time
(seconds)
Ring time
(seconds)
Dialog 4223 Professional/Dialog 4225 Vision74
Page 63

Setting form for search profiles
Name:
Department:
Tel e p h o n e N o :
Account:
Call Forwarding
Profile 1 ..........................
Search
order
1
2
3
4
* Examples: Desk, Cordless, Mobile, External, Voice Mail, Operator, etc.
Type of telephone or
Answering position* Telephone number
Profile 2 ..........................
Search
order
1
2
3
4
Type of telephone or
Answering position* Telephone number
Profile 3 ..........................
Search
order
1
2
3
4
Type of telephone or
Answering position* Telephone number
Profile 4 ..........................
Search
order
1
2
3
4
Type of telephone or
Answering position* Telephone number
Ring time
(seconds)
Ring time
(seconds)
Ring time
(seconds)
Ring time
(seconds)
Profile 5 ..........................
Search
order
1
2
3
4
Type of telephone or
Answering position* Telephone number
Ring time
(seconds)
75Dialog 4223 Professional/Dialog 4225 Vision
Page 64

Absence Information
Absence Information
Absence Information is used to inform callers why you are absent
and when you will return. If you are authorized, you can also enter
Absence Information for another extension from your extension.
During Absence Information, your phone can still be used for
outgoing calls and you will hear a special dial tone when you lift the
handset.
Order
Absence Press (see display).
If
Absence
is not shown, press
Down or Up Press to frame
Absence reason
more...
until it appears.
(see display).
Select Press (see display).
Down or Up Press to frame the required reason (see display).
Select Press (see display).
When no return time or date is needed, the display shows the
selected reason, and diversion information.
Dialog 4223 Professional/Dialog 4225 Vision76
Page 65

When a return time or date is requested:
Absence Information
0915 Enter the date (MMDD) or time (HHMM) of your return.
(Example shows “Back on September 15”).
Note: The order in which the date is stated is system
dependent.
Enter Press (see display).
NoDiversion Press (see display).
The display shows the selected absence reason, the time or date
of return, and diversion information.
Note: You can also use the following procedure to order:
dial
* 2 3 *, enter the absence code (0-9), enter time or
date of return (if requested), press
key. The absence code is system dependent. Contact your
system administrator regarding the available absence
codes.
Cancel
Note: You can also use the following procedure to cancel:
dial
# 2 3 # and press the Clear key.
# and press the Clear
77Dialog 4223 Professional/Dialog 4225 Vision
Page 66

Messages
Please refer to your
campus directory or our
web page (http://
its.ucsc.edu/telephone/
voicemail/index.html) for
UCSC-specific
directions for accessing
your voicemail
messages, setting up
your voicemail box, etc.
Voice Mail (optional)
The Voice Mail application allows you to leave a voice message to
the caller when you are unable to answer calls, e.g. when out of
office, in a meeting, etc. The caller can then leave a message in
your mailbox. When back in your office you can enter your mailbox
and listen to the messages received.
You can choose to divert all incoming calls to your mailbox, or calls
when there is no answer, or calls when your phone is busy.
If you use the Personal Number feature, it is recommended to
program Voice Mail as the last answering position for all search
profiles.
When you enter your mailbox, you will hear recorded instructions
on how to handle listening, recording, storing and deleting
messages, and how to change your security code.
Note: How to handle your mailbox, depends on the type of
Voice Mail system. The following describes the, in MD110,
integrated type. For other types, please refer to separate
user instructions. Contact your system administrator if you
do not know which type of Voice Mail system you have.
To activate and deactivate your mailbox
For all incoming calls:
See “Diversion” on page 62 (procedure with code 21). Use the
number to the Voice Mail system as the “answering position
number”.
When incoming calls get no answer:
See “Diversion” on page 62 when there is no answer (procedure
with code 211).
When incoming calls get a busy tone:
See “Diversion” on page 62 when caller receives a busy tone
(procedure with code 212).
Dialog 4223 Professional/Dialog 4225 Vision82
Page 67

Group features
If available on your
telephone, this feature is
activated by pressing 77 at
UCSC.
Group features
Group Call-pick-up
People working in a team can have their phones programmed by
their system administrator to form Call Pick-up groups.
In a Call Pick-up group, any member can answer any individual call
to group members.
GrpPickUp Press to answer (see display).
GrpPickUp Press to answer (see display).
If
GrpPickUp
is not shown, press
Notes:
You can also press
One Call Pick-up group can serve as an alternative to
another group. Calls to the alternative group can only be
answered when there are no calls to your own group.
Finland and Sweden, press
8.
more...
0
until it appears.
Common Bell Group
Calls are signalled on a common bell.
If
GrpPickUp
is not shown, press
Notes:
You can also press
Finland and Sweden, press
more...
8.
until it appears.
0
85Dialog 4223 Professional/Dialog 4225 Vision
Page 68

Group features
Group Hunting
An internal Group Hunting number is a common directory number
for a group of extensions. Calls to the group will be indicated at a
free extension in the group.
When you leave the group temporarily, you make your phone
unavailable for incoming calls.
To leave the group temporarily
*21*z Dial and enter your own extension number.
#í Press.
To re-en t e r t h e g r oup
#21# Dial.
í Press.
Note: U.K., dial
Note: U.K., dial
* 2 * No.
# 2 #
Dialog 4223 Professional/Dialog 4225 Vision86
Page 69

If you are authorized you can divert all calls to your group, to
another extension or group:
*24* Dial.
z* Dial the number of the group to be diverted and press.
z Dial the extension number of the new anwering position.
Group features
#
í
Press.
To cancel the Diversion:
#24* Dial.
z Dial the number of the group that has been diverted.
#
í
Press.
87Dialog 4223 Professional/Dialog 4225 Vision
Page 70

Other Useful features
This feature is
currently unavailable
at UCSC.
Immediate Speech Connection
You automatically answer a call without lifting the handset or
pressing any keys. The feature can be permanently active or
activated by use of a function key (preprogrammed by your system
administrator).
Permanently active
Program the ringing option with “Immediate Speech Connection
with one ring signal”, option 6, on the Line key. See section
“Programming of ring signals” on page 102.
Activated on a function key
Automatic answer Ô Press to order or cancel.
Note: The function key is preprogrammed by your system
administrator.
The incoming call is signalled with one ring signal. When the key
lamp is on you can use this feature.
Dialog 4223 Professional/Dialog 4225 Vision90
Page 71

General Deactivation
These features are
currently unavailable
at UCSC.
This feature is
currently unavailable
at UCSC.
The following features can be simultaneously cancelled:
• Callback (all Callbacks are cancelled).
• Diversion/Internal and External Follow-me.
• Manual Message Waiting/Message Diversion.
• Do Not Disturb.
Order
#001# Dial.
í Press.
Night Service
When the exchange is in Night Service mode, all your incoming
calls to the operator are transferred to a selected extension or
group of extensions. The exchange has three different Night
Service modes:
Other Useful features
Common Night Service
All incoming calls to the operator are transferred to one specific
extension. Answer the call in the normal way.
Individual Night Service
Selected external calls to the operator are transferred to one
specific extension. Answer the call in the normal way.
Universal Night Service
All incoming calls to the operator are transferred to a universal
signalling device, e.g. the common bell. Answer the call as
descibed in section “Common Bell Group” on page 85.
91Dialog 4223 Professional/Dialog 4225 Vision
Page 72

Other Useful features
This feature is
currently unavailable
at UCSC.
Hot Line
This feature is programmed by your system administrator.
Delayed Hot Line
When the handset of the delayed Hot Line phone is lifted or when
the Line key is pressed, a timer is started. If no digit is pressed
before time out, a call is automatically generated to a specific
extension or external line. If a digit is pressed before time out the
phone works as an ordinary phone.
Direct Hot Line
The same feature as described above, but without a delay. Only
Hot Line calls can be placed from this line. To be used e.g. as
alarm phone, door phone etc.
Emergency mode
In the event of an emergency the operator can set the exchange
into Emergency mode, during which only preprogrammed
extensions are permitted to make calls. If your extension is not
assigned with this category and you try to make a call, you will not
receive a dial tone.
Dialog 4223 Professional/Dialog 4225 Vision92
Page 73

Additional Directory Number
You can be assigned (preprogrammed by your system
administrator) one or more Additional Directory Numbers (lines) on
free function keys.
To answer, make calls and use features on the additional directory
lines, use the same procedure as for the Triple Access Line, unless
you have other instructions. However, you have to press the
additional Line key after lifting the handset.
Example:
To make a call on an additional directory line:
u Lift the handset.
Additional line Ô Press.
z Dial the extension number.
Other Useful features
Note: The function key is preprogrammed by your system
administrator.
93Dialog 4223 Professional/Dialog 4225 Vision
Page 74

Other Useful features
This feature is
currently unavailable
at UCSC.
Multiple Represented Directory Number
Your extension number can be programmed on a dedicated key on
other system telephones, i.e. your number is “represented” on
these phones. Other extension numbers can of course also be
“represented” on your phone.
Note: This feature has to be programmed by your system
administrator.
Incoming calls
Incoming calls can be answered (indicated with a flashing key
lamp, calling party information and/or ring signal) on all phones
where the number is represented.
Outgoing calls
The dedicated key can be used to call the programmed extension.
How outgoing calls are handled depends on the programming of
the phone, please contact your system administrator regarding
this.
TraceMalC Press (see display).
Malicious Call Tracing
If you are disturbed by bothersome or malicious external incoming
calls, you can request number tracing from the network provider.
You can invoke tracing during or after an ongoing conversation.
The external line can be held for a limited period of time.
Order
During an ongoing conversation:
If
TraceMalC
The system acknowledges with different tones whether the tracing
request was accepted or rejected.
is not shown, press
Note: You can also press Mal. Call Tracing (The function
key is preprogrammed by your system administrator).
Dialog 4223 Professional/Dialog 4225 Vision94
more...
until it appears.
Page 75

Other Useful features
CallList Press (see display).
Down or Up Press to frame the requested list (see display).
Call list
With this feature, calls to and from your phone will be logged. By
use of the display menu keys below the display, you can browse
the Call list, make calls to numbers in the list and delete numbers
from the list.
You can choose to browse in the complete list of all calls, or in
specific lists of unanswered, outgoing and incoming calls. When
new unanswered calls have been stored in the list,
n Missed
Your phone must be idle and unlocked to be able to browse the
Call list.
To access the Call list
Dialog 4223 Professional:
is shown in the display (n = number of missed calls).
Select Press (see display),
The desired list is displayed, see section “Call list options” on
page 97.
or use the shortcut directly to the unanswered calls list,
n Missed press (see display).
n = Number of missed calls.
Dialog 4225 Vision:
Å Select CallList in the top menu (see display).
Down or Up Press to frame the requested list (see display).
Select Press (see display),
n Missed press (see display).
The desired list is displayed, see section “Call list options” on
page 97.
or use the shortcut directly to the unanswered calls list,
n = Number of missed calls.
Dialog 4223 Professional/Dialog 4225 Vision96
Page 76

Other Useful features
Smith Bob 3333 12:24 23 Aug 2008
Nelson Lord 5555 11:33 23 Aug 2008
Call Up Down more...
Program PhoneSet CallList PhoneBook Messages
Smith Bob 3333 12:24 23 Aug 2008
Nelson Lord 5555 11:33 23 Aug 2008
0012115171 15:11 22 Aug 2008
Carter Jim 4444 14:06 21 Aug 2008
Call Up Down more...
Call list options
Call Press to call the framed phone number (see display).
Down or Up Press to frame a phone number in the list (see display).
more... Press to show more options (see display).
Delete Press to delete the framed call (see display).
Return Press to return to the previous menu key options
(see display).
Example of the complete Call list:
The content of the Call list is (from left to right):
– Type of call symbol. See explanation below.
– Name of the calling/called person, e.g. “
– Phone number of the calling/called person, e.g. “
– Time of the call, e.g. “
10:48“.
– Date of the call.
– Bar indicator. Indicates the shown part of the total list, and
where that part is positioned in the total list.
With the following call symbols displayed:
J Gilmour“.
5467“.
Missed call.
Indicates a missed but checked incoming call.
Incoming call.
Indicates an answered incoming call.
Outgoing call.
Indicates an outgoing call.
97Dialog 4223 Professional/Dialog 4225 Vision
Page 77

Settings
Settings
Programming of function keys
Frequently used features and phone numbers can be programmed
on the function keys for easy access. When you want to use the
feature, just press the key. Certain features must be
preprogrammed by your system administrator. Both phone
numbers and feature codes can be programmed on a function key.
Enter programming mode
Dialog 4223 Professional:
Program Press (see display).
If
Program
is not shown, press
more...
Select Press (see display).
Continue with “Program or change a feature”.
Dialog 4225 Vision:
Å Select Program in the top menu (see display).
Select Press to select
Continue with “Program or change a feature”.
Programming of keys
Dialog 4223 Professional/Dialog 4225 Vision98
until it appears.
(see display).
Page 78

Program or change a feature
Ô Press the key to program or change.
Notes:
If the key is already programmed, the number or feature will
be displayed. If you do not want to change the programmed
feature, press
changes.
To erase a programmed feature, press the Clear key, and
press
Exit
Exit
to leave the menu.
to leave the menu without saving the
Settings
z Enter phone number or a feature code according to the list in
section “Features and required data”.
Notes:
If a wrong number is entered, press the Clear key to erase
it, and then enter the number again.
You can continue programming another function key
(repeat from “Press the key to program or change”).
ÕÔ Press the function key again.
Exit Press to finish programming (see display).
Remove the transparent cover and write the feature name or phone
number beside the key.
Note: Use the DCM (Designation Card Manager) to make
and print your own designation cards. DCM is included on
the Enterprise Telephone Toolbox CD or it can be
downloaded from:
http://www.aastra.com
For more information, please contact your Aastra Certified
Sales Partner.
99Dialog 4223 Professional/Dialog 4225 Vision
Page 79

Settings
These features are
currently unavailable
at UCSC.
Features and required data
Feature To be entered on the function key
Dial by a function key
Call pick up:
Group 8 4 6
Individual No. + 8 No. + 4 No. + 6
Call Waiting 5664
Conference 3
Intrusion on busy
extension
Last External Number
Redial
Hold, common 846
Personal Number
(list no.)
Extension number or procedure
Feature code
Most
common
Finland France Sweden
488
*** **0 **0
1—5)
(
Dialog 4223 Professional/Dialog 4225 Vision100
Page 80

Settings
These features are
currently unavailable
at UCSC.
Features that can only be programmed by your system
administrator:
• Additional lines • Callback*
• Dedicated intercom link • Diversion*
• Do Not Disturb* • External line
• Free on 2nd • Immediate Speech
• Individual External Line • Malicious Call Tracing
• Manual Message Waiting • Multiple representation
• Name and Number Log • Search profile lists and pre-
*The feature can also be programmed by you.
When the feature has been programmed by you, you will not get a
toggle function. Instead you will have one key for activation and
another key for deactivation. The key lamp will not indicate that the
feature is activated.
When the feature has been programmed by your system
administrator you will get a toggle function and the key lamp will
indicate that the feature is activated.
Connection*
assigning of function keys
for Personal Number
101Dialog 4223 Professional/Dialog 4225 Vision
Page 81

Settings
Programming of ring signals
You have 6 programmable ring signals on your phone. The different
signals can be programmed on lines, additional lines and multiple
represented lines.
Enter programming mode
Dialog 4223 Professional:
Program Press (see display).
If
Program
is not shown, press
more...
Select Press (see display).
Continue with “Program or change a ring signal”.
Dialog 4225 Vision:
Å Select Program in the top menu (see display).
Select Press to select
Continue with “Program or change a ring signal”.
Programming of keys
until it appears.
(see display).
Dialog 4223 Professional/Dialog 4225 Vision102
Page 82

Program or change a ring signal
Settings
Line 1 Ô Press the corresponding Line key.
A digit (0–6) is shown in the display.
Note: If you do not want to change the programmed ring
signal, press
changes.
Exit
to leave the menu without saving the
( 0— 6) Select the ring signal you want to use according to the list
below.
0 = Silent.
1 = Periodic ring signal.
2 = Delayed periodic ring signal.
3 = One muted ring signal.
4 = One muted delayed ring signal.
5 = Immediate Speech Connection with one ring signal
controlled by function key.
6 = Immediate Speech Connection with one ring signal.
Note: Options 5 and 6 are not available for multiple
represented lines.
Line 1
ÕÔ Press.
Exit Press to finish programming (see display).
103Dialog 4223 Professional/Dialog 4225 Vision
Page 83

Settings
Programming of ring signal tone character
There are 10 different programmable ring signal tone characters on
your phone, each corresponding to a digit between 0 and 9.
Note: If you use melodies to signal incoming calls, this will
replace the tone character. See section “Melody Ringing”
on page 109.
Dialog 4223 Professional:
Program Press (see display).
If
Program
is not shown, press
more...
Select Press (see display).
The current tone character is displayed.
( 0— 9) Press the corresponding digit.
The phone rings with the chosen tone character.
Exit Press to finish programming (see display).
Dialog 4225 Vision:
Å Select Program in the top menu (see display).
Select Press to select
The current tone character is displayed.
( 0— 9) Press the corresponding digit.
The phone rings with the chosen tone character.
Exit Press to finish programming (see display).
Programming of keys
until it appears.
(see display).
Dialog 4223 Professional/Dialog 4225 Vision104
Page 84

Settings
Handset and loudspeaker volume
Use the Volume keys to adjust the volume of the handset or
loudspeaker during a call. Adjust the handset listening volume
when the handset is off hook. Adjust the loudspeaker volume when
dial tone is heard via the loudspeaker, or during a handsfree call.
ì Press to change the volume.
The handset and loudspeaker volume level is stored.
To adjust the volume during Group Listening:
d
Replace the handset.
ì Press to change the volume.
The handset and loudspeaker volume level is stored.
u Lift the handset and press.
105Dialog 4223 Professional/Dialog 4225 Vision
Page 85

Settings
Extra amplification of the handset/headset hearing
volume level
For people with impaired hearing, the handset hearing volume level
can be extra amplified. To adjust the level:
Note: A level change also effects a headset connected to
the headset outlet.
Dialog 4223 Professional:
PhoneSet Press (see display).
If
PhoneSet
is not shown, press
more...
Select Press (see display).
Down or Up Press to frame
Set Hearing Level
(see display).
Select Press (see display).
A tone signal is heard, and the display shows the current setting.
The Line 1 key lamp also indicates the current setting;
key lamp off=standard level, key lamp on=increased level.
Change Press to adjust the volume level (see display).
The display shows the new setting. The Line 1 key lamp also
indicates the new setting as described above.
Exit Press to finish setting (see display).
When extra amplification has been selected, the Line 1 key lamp
turns off.
until it appears.
Dialog 4223 Professional/Dialog 4225 Vision106
Page 86

Dialog 4225 Vision:
Å Select PhoneSet in the top menu (see display).
Settings
Down or Up Press to frame
Set Hearing Level
(see display).
Select Press (see display).
A tone signal is heard, and the display shows the current setting.
The Line 1 key lamp also indicates the current setting;
key lamp off=standard level, key lamp on=increased level.
Change Press to change the volume level (see display).
The display shows the new setting. The Line 1 key lamp also
indicates the new setting as described above.
Exit Press to finish setting (see display).
When extra amplification has been selected, the Line 1 key lamp
turns off.
107Dialog 4223 Professional/Dialog 4225 Vision
Page 87

Settings
Ring signal volume
Use the Volume keys to adjust the ring signal volume when the
phone is in idle mode or ringing. Adjusted volume is stored.
ì Press to adjust the volume.
Mute ring signal
You can suppress the ring signal for an incoming call.
É Press to suppress the ring signal.
The ring signal is switched off for the current call, and your phone is
automatically set to Silent Ringing (see below).
Silent Ringing
If you do not want to be disturbed by the ring signal but still want to
answer an incoming call, you can switch off the ring signal.
Incoming calls are only indicated by a flashing line lamp and display
information.
When the phone is in idle mode, or when ringing:
É Press to switch off the ring signal.
The Mute key lamp and the Ringer off symbol are switched on to
indicate Silent Ringing. The ring signal will automatically be
switched on the next time you Lift the handset or press any key.
Dialog 4223 Professional/Dialog 4225 Vision108
Page 88

Settings
Melody Ringing
If you want to replace the ring signal with personal melodies when
your phone rings, you can program one melody to signal an internal
call, a second melody for an external call and a third melody to
signal a Callback call.
Dialog 4223 Professional:
PhoneSet Press (see display).
If
PhoneSet
is not shown, press
Select Press (see display).
Down or Up Press to frame
Melody Programming
Select Press (see display).
Continue with section Melody mode.
Dialog 4225 Vision:
Å Select PhoneSet in the top menu (see display).
Down or Up Press to frame
Select Press (see display).
Continue with section Melody mode.
Melody mode
The display shows
activated melody for internal calls (Line 1), external calls (Line 2) or
Callback calls (Inquiry), the corresponding key lamp is switched on.
In melody mode you can:
• Program new melodies
• Edit or delete stored melodies
• Activate or deactivate stored melodies
Melody Programming
Melody Mode
more...
until it appears.
(see display).
(see display).
and if there is a stored and
Exit Press if you want to exit melody mode (see display).
Note: If you do not press any key within 30 seconds,
melody mode is automatically cancelled.
109Dialog 4223 Professional/Dialog 4225 Vision
Page 89

Settings
Program a new melody, edit or delete a current melody
Program Press (see display).
Line 1
Ô Press for internal calls,
Line 2
Ô press for external calls,
Inquiry
Ô press for Callback calls.
< or > Press to move the cursor to the right of the position to be
The display shows
lamp (for Dialog 4225 the upper most key to the left) is also
switched on, indicating Program mode.
Press the key for the requested type of call:
If there is a current melody, the melody is played and the last 19
notes or signs are displayed.
or
or
To edit the current melody:
edited (see display).
Program Melody
. The upper most function key
í Press to erase the note to the left of the cursor.
Keep pressed to erase all the notes.
To enter a new melody or notes, see section “To e n te r n o t es ” on
page 113.
Dialog 4223 Professional/Dialog 4225 Vision110
Page 90

To store the current melody:
Line
ÖÔ Press the flashing Line key (Line 1 or Line 2 or Inquiry).
If you do not want to continue to program or delete a melody for
another line:
Back Press to return to the previous menu (see display).
Note:
The melody is not yet activated, see section “Activate or
deactivate a stored melody” on page 112.
If no key is pressed within 30 seconds, all entered notes or
changes will be automatically stored, and the phone returns
to idle mode.
To delete the current melody:
í Press and hold until no notes are displayed.
Settings
ÖÔ Press the flashing Line key (Line 1 or Line 2 or Inquiry).
Line
If you do not want to continue to program or delete a melody for
another line:
Back Press to return to the previous menu (see display).
Note: If no key is pressed within 30 seconds, the change
will be automatically stored, and the phone returns to idle
mode.
111Dialog 4223 Professional/Dialog 4225 Vision
Page 91

Settings
Activate or deactivate a stored melody
A stored melody has to be activated in melody mode to be heard
when you get an incoming call.
To activate (in melody mode):
Line
Ô Press the key for the requested type of call (Line 1 or Line 2
or Inquiry).
The corresponding key lamp is switched on:
Line 1 key = Internal calls
Line 2 key = External calls
Inquiry key = Callback calls
Note: If you want to return to an ordinary ring signal but
keep the melody stored, press again the key for the
requested type of call. When the key lamp is off, the stored
melody is deactivated.
Exit Press to exit melody mode (see display).
Dialog 4223 Professional/Dialog 4225 Vision112
Page 92

Settings
To ente r n o t e s
In melody mode, the key pad is used to enter notes, pauses, etc. A
maximum of 40 notes can be programmed for incoming calls, and
20 notes for recalls.
This is how the keys are used:
Press to insert notes (1—9).
Note: A short press gives a short note, a long press gives
a long tone (displayed by a capital letter), +c and +d means
the higher octave.
* Press to insert a short pause (p).
Hold to get a long pause (P). Repeat to get a longer pause (pp...p).
0 Press to get a higher octave for the inserted note.
A + is shown in front of the note to indicate the higher octave.
Example: 30 to get +e
# Press to increase or decrease the pitch for the inserted note.
Press once for sharp pitch, twice for flat pitch and three times to
get the normal pitch.
< or > Press to move the cursor to the left or to the right (see
display).
 Press to listen to the entered notes.
í Press to erase the note to the left of the cursor.
Keep pressed to erase all the notes.
Melody example:
James Bond theme programmed for internal calls:
C d d D D pp C C C C #d #d #D #D pp D D D ##A G pppp G F G
Enter the notes.
Grey digit = Long press.
Note: The
the note, but is displayed before the note.
# key (to get a sharp or flat tone) is pressed after
113Dialog 4223 Professional/Dialog 4225 Vision
Page 93

Settings
Program Intern
CddDDppCCCC#d#d#D#D<
< > Back
Program Intern
CddDDppCCCC#d#d#D#D<
<>Back
Program Intern
#D#DppDDDbAGppppGFG<
< > Back
Program Intern
#D#DppDDDbAGppppGFG<
<>Back
When the first 19 positions are entered, the display shows (only last
entered 19 positions can be shown):
When all the notes are entered, the display shows (only last entered
19 positions are shown):
Note: The flat A (
##A) is shown as bA, i.e. b is used to show
both the note b and the flat sign.
Dialog 4223 Professional/Dialog 4225 Vision114
Page 94

Display contrast
You can adjust the contrast for the display.
Dialog 4223 Professional:
Settings
PhoneSet Press (see display).
If
PhoneSet
is not shown, press
more...
until it appears.
Select Press (see display).
Down or Up Press to frame
Display Contrast
(see display).
Select Press (see display).
- or + Press repeatedly to adjust the contrast (see display).
Save&Exit Press to save the setting and exit the menu (see display).
Note: To exit the menu without saving the changes, press
Save&Exit
Dialog 4225 Vision:
before you press any of the adjustment keys.
Å Select PhoneSet in the top menu (see display).
Down or Up Press to frame
Select Press (see display).
- or + Press repeatedly to adjust the contrast (see display).
Save&Exit Press to save the setting and exit the menu (see display).
Display Contrast
Note: To exit the menu without saving the changes, press
Save&Exit
before you press any of the adjustment keys.
(see display).
115Dialog 4223 Professional/Dialog 4225 Vision
Page 95

Accessories
Accessories
Key panel
Your phone can be equipped with 1-4 additional key panels (type
DBY 419 01). Each key panel offers 17 additional keys for storing of
your most frequently used telephone numbers and features, and
for supervising extensions. To install the key panel, see section
“Installation” on page 124.
Use the DCM (Designation Card Manager) to make and print your
own key panel designation cards. DCM is included on the
Enterprise Telephone Toolbox CD or it can be downloaded from:
http://www.aastra.com
For more information, please contact your Aastra Certified Sales
Partner.
117Dialog 4223 Professional/Dialog 4225 Vision
Page 96

Accessories
Headset (optional)
To install the headset, see section “Installation” on page 124.
The following headset features are available.
Answer calls
Press to answer.
Í
The Headset key lamp is turned on.
Note: When the phone is set for Headset Preset, you can
also press the flashing Line key to answer the call. See
section “Headset Preset” on page 119.
í Press to terminate the headset call.
Make calls
z Press and dial the number.
Í
The Headset key lamp is turned on.
Note: When the phone is set for Headset Preset, you can
also dial the number directly without pressing the Headset
key, or you can press a Line key instead of the Headset key.
See section “Headset Preset” on page 119.
í Press to terminate the call.
From headset to handset
u Lift the handset.
From handset to headset
Press.
Í
d
The Headset key lamp is turned on.
Replace the handset.
Dialog 4223 Professional/Dialog 4225 Vision118
Page 97

Headset with Group Listening (loudspeaking)
Accessories
 Press to toggle between headset with or without Group
Listening.
When the Loudspeaker key lamp is on, the Group Listening is
active.
From headset to handsfree
 Press.
The Loudspeaker key lamp is turned on.
Press.
ÏÍ
From handsfree to headset
Press.
Í
The Headset key lamp is turned on.
Headset Preset
By default the phone is set to Loudspeaker Preset mode, so that
calls are connected to the loudspeaker when you answer or make
calls by pressing a Line key. Also when you dial the number without
lifting the handset, the call is automatically connected to the
loudspeaker.
When you use a headset for your telephone, you can change the
setting to Headset Preset mode to get calls connected to the
headset instead. In Headset Preset mode you can make headset
calls by pressing digits directly (direct dialing). You can also answer
headset calls by pressing a Line key.
Notes:
Independent the type of preset setting, when you lift the
handset the call is always connected to the handset.
Also handsfree and loudspeaking work as usual, i.e. when
the Loudspeaker key is pressed, the call is temporarily
connected to the loudspeaker.
Activation and deactivation of Headset Preset can only be
done when the telephone is in idle mode.
119Dialog 4223 Professional/Dialog 4225 Vision
Page 98

Accessories
Í
To activate Headset Preset:
Press and hold for at least 4 seconds.
A short acknowledgement tone signal is heard, and the Headset
Preset symbol is shown in the display.
Note: You can also activate Headset Preset, via the
PhoneSet
To cancel Headset Preset:
menu.
 Press and hold for at least 4 seconds.
A short acknowledgement tone signal is heard, and the Headset
Preset symbol is switched off in the display.
Note: You can also cancel Headset Preset, via the
PhoneSet
Headset volume
During a call, use the Volume keys to change the volume of the
headset.
menu.
ì Press to change the volume.
The set headset volume level is stored.
To adjust the volume for the loudspeaker of the phone during
Group Listening:
Press.
ÏÍ
ì Press to change the volume.
The Loudspeaker volume level is stored.
Í
Â
Press.
For those with impaired hearing, the headset hearing volume level
can be further amplified, use the same procedure as described in
section “Handset and loudspeaker volume” on page 105.
Dialog 4223 Professional/Dialog 4225 Vision120
Page 99

Accessories
Extra handset (optional)
The extra handset is used in parallel with the ordinary handset
allowing another person to listen to an ongoing call. The extra
handset is connected to the headset outlet under the phone, see
section “Installation” on page 124.
It is possible to switch between the speaking party and the listening
party.
Í
Press to switch between the speaking and listening party.
Note when speaking: For good speech quality, only one
person at the time should speak.
Pull-out leaf (optional)
The pull-out leaf is used for a personal telephone number list and is
installed under the phone. To install the pull-out leaf, see section
“Installation” on page 124.
Use the DCM (Designation Card Manager) to make and print your
own card for the pull-out leaf. DCM is included on the Enterprise
Telephone Toolbox CD or it can be downloaded from: http://
www.aastra.com
For more information, please contact your Aastra Certified Sales
Partner.
121Dialog 4223 Professional/Dialog 4225 Vision
Page 100

Installation
Handset cable to the left Handset cable to the right
Installation
Install cables
You can put the cable to the handset into the notch underneath the
telephone. The cable to the exchange has to be plugged into
“LINE” and the handset cable has to be plugged into “HANDSET”.
Change cables
To remove a cable, use a screwdriver to unlock the stop.
Dialog 4223 Professional/Dialog 4225 Vision124
 Loading...