


SPEED Game Mouse
User’s Manual
Model(s): X-710 X-718
www.a4tech.com
THIS DEVICE COMPLIES WITH PART 15 OF THE FCC RULES. OPERATION IS SUBJECT TOTHE FOLLOWING TWO CONDITIONS: (1) THIS DEVICE MAY NOT CAUSE HARMFUL INTERFERENCE AND (2) THIS DEVICE MUST ACCEPT ANY INTERFERENCE RECEIVED, INCLUDING INTERFERENCE THAT MAY CAUSE UNDESIRED OPERATION.
Federal Communications Commission Requirements
The equipment has been tested and found to comply with the limits for Class B Digital Device, pursuant to part 15 of the FCC Rules. These limits are designed to provide reasonable protection against harmful interference in a residential installation. This equipment generates, uses and can radiate radio frequency energy and, if not installed and used in accordance with the instruction, may cause harmful interference to radio communication. However, there is no guarantee that interference will not occur in a particular installation. If this equipment does cause harmful interference to radio or television reception, which can be determined by turning the equipment off and on, the user is encouraged to try to correct the interference by one or more of the following measures:
•Reorient of relocate the receiving antenna.
•Increase the separation between the equipment and receiver.
•Connect the equipment into an outlet on a circuit different from that to which the receiver is connected.
•Consult the dealer or an experienced radio/TV technician for help.
THE CHANGES OR MODIFICATIONS NOT EXPRESSLY APPROVED BY THE PARTY RESPONSIBLE FOR COMPLIANCE COULD VOID THE USER’S AUTHORITY TO OPERATE THE EQUIPMENT.
This device complies with Part 15 of the FCC Rules. Operation is subject to the following two conditions:
(1). this device may not cause harmful interference, and
(2). this device must accept any interference received, including interference that may cause undesired operation.

HOW TO CONNECT YOUR MOUSE
1.Locate an available USB mouse port on the back of your computer.
2.Insert the USB mouse connector into the USB port .
If you like to use the PS2 port (for the round PS/2 plug), you will need to plug the USB connector with a PS2 adapter.
HOW TO CHANGE THE DPI SETTING OF SPEED GAME MOUSE
Click the button shown on the right figure to quickly shift from 600-800-1200-1600-2000 DPI as the scroll wheel changes color between shifts. You don’t need any driver for this fabulous function!

MODEL: X-710
At Resolution: |
Scrolling Wheel |
Recommend for: |
Suitable for Resolution of display |
|
will change to: |
|
Recommend |
|
|
|
|
400DPI |
Non |
Slow-Speed and normal accuracy player |
640×480 |
|
|
|
|
600DPI |
Green |
Medium-Speed and required average accuracy player |
800×600 |
|
|
|
|
800DPI |
Yellow |
Fast Speed and required above average accuracy player |
1024×768 |
|
|
|
|
1000DPI |
Red |
High-Speed and required above average accuracy player |
1152×864 |
|
|
|
|
|
Click 6th key to quickly shift from 400, 600, 800 to 1000 DPI |
||
MODEL: X-718 |
|
|
|
At Resolution: |
Scrolling Wheel |
Recommend for: |
Suitable for Resolution of display |
|
will change to: |
|
Recommend |
|
|
|
|
600DPI |
Non |
Slow-Speed and normal accuracy player |
800×600 |
|
|
|
|
800DPI |
Green |
Medium-Speed and required average accuracy player |
1024×768 |
|
|
|
|
1200DPI |
Yellow |
Fast Speed and required above average accuracy player |
1152×864 |
|
|
|
|
1600DPI |
Red |
High-Speed and required pinpoint accuracy player |
1280×960 |
|
|
|
|
2000DPI |
Red & Yellow |
Extra High-Speed and required pinpoint accuracy player |
1280×1024 |
|
coruscating |
|
|
|
|
|
|
|
Click 6th key to quickly shift from 600, 800, 1200, 1600 to as high as 2000 DPI |
||
STEP ONE: HOW TO INSTALL SMART-X7 SOFTWARE
***** For Windows Me / 2000 / 2003 / XP
1.MUST: Please uninstall any previous mouse driver before installing the Smart-X7
2.MUST: Make sure you have completely finished setting up your
mouse pad and mouse
3.Insert the included Compact Disc (CD) into your CD-ROM
4.Click “Install Driver”. Select model: X-710/718 Optical Mouse
5.Click the button on the right to install driver
6.Follow the on screen instruction to complete your installation
7.Restart your computer after the driver has been installed
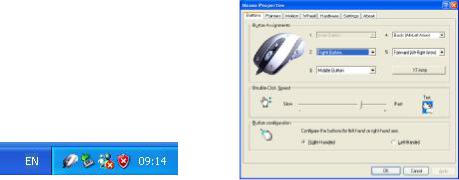
8.You will see a mouse icon “ ” appear on the bottom right
of your task bar (near the clock area)
9.Double click on the mouse icon “ ” will bring you the mouse property (Image - Top: Mouse Properties Window)
10.If the mouse image appears in the mouse properties menu looks exactly the same as the mouse on hand, then you have successfully installed the Smart-X7 driver
 Loading...