


3xLOGIC VIGIL Client User Manual

VIGIL Client Software
v7.00.0000
Users Guide
March 2012 Revision

Table of Contents
1 INTRODUCTION ..................................................................................................................................................................... 5
2 SYSTEM REQUIREMENTS .................................................................................................................................................... 6
3 FEATURES .............................................................................................................................................................................. 7
4 MAIN SCREEN ........................................................................................................................................................................ 8
4.1
I
CON TOOLBAR
4.2
I
NFORMATION BAR
4.3
C
AMERA SIDEBAR
5 SERVERS WINDOW ............................................................................................................................................................. 10
5.1
A
DD / EDIT A SERVER
5.2
DVR S
ETTINGS
DVR Recorder Tab ................................................................................................................................................................ 12
Picture Quality Tab ................................................................................................................................................................ 14
Simple Settings Tab ........................................................................................................................................................... 14
Advanced Settings Tab ...................................................................................................................................................... 14
Camera Names Tab .............................................................................................................................................................. 15
Camera Settings Tab ............................................................................................................................................................. 15
Camera Settings Sub-Tab .................................................................................................................................................. 15
Recording Mode Sub-Tab .................................................................................................................................................. 16
CODEC Settings Tab ......................................................................................................................................................... 18
Settings Tab ........................................................................................................................................................................... 20
Site Name ........................................................................................................................................................................... 20
Global Server Settings Tab ................................................................................................................................................ 20
Sequence Tab .................................................................................................................................................................... 21
Auto Logon ......................................................................................................................................................................... 21
Data Drive Settings ............................................................................................................................................................ 21
Users Tab .............................................................................................................................................................................. 22
Update Tab ............................................................................................................................................................................ 23
5.3
R
EMOTE REGISTER
.................................................................................................................................................................. 8
............................................................................................................................................................. 9
............................................................................................................................................................. 9
...................................................................................................................................................... 11
............................................................................................................................................................... 12
......................................................................................................................................................... 24
6 CAMERA SIDEBAR .............................................................................................................................................................. 25
6.1
S
ITES TAB
Cameras Treeview ................................................................................................................................................................. 25
Audio Treeview ...................................................................................................................................................................... 26
Relays Treeview .................................................................................................................................................................... 26
V-POS Treeview .................................................................................................................................................................... 26
Chat Treeview ........................................................................................................................................................................ 27
Server Alarms Treeview ........................................................................................................................................................ 27
POS/ATM Live Treeview ....................................................................................................................................................... 28
6.2
G
ROUPS TAB
7 LIVE VIEWER ........................................................................................................................................................................ 30
7.1
L
IVE VIEWER CONTROLS
7.2
L
IVE VIEWER WINDOW RIGHT CLICK MENU
7.3
F
ULL SCREEN MODE
7.4
ON S
7.5
PTZ C
7.6
R
ECORDING MODES
8 V-POS TREEVIEW CONFIGURATION ................................................................................................................................ 37
8.1
V-POS E
Add / Edit Exceptions ............................................................................................................................................................. 38
8.2
V-POS E
Exception Event Playback ..................................................................................................................................................... 42
....................................................................................................................................................................... 25
.................................................................................................................................................................. 29
.................................................................................................................................................. 30
....................................................................................................................... 31
....................................................................................................................................................... 32
CREEN DISPLAY
AMERA CONTROLS
XCEPTIONS
VENTS
(OSD) C
........................................................................................................................................................ 36
....................................................................................................................................................... 37
.............................................................................................................................................................. 40
ONFIGURATION
................................................................................................................................................ 33
3xLOGIC’s VIGIL Client - Users Guide Page 2
.................................................................................................................. 33
Doc# 12031914

8.3
V-POS S
General Tab ........................................................................................................................................................................... 43
Database Settings Tab .......................................................................................................................................................... 44
DVR Settings Tab .................................................................................................................................................................. 45
Email Settings Tab ................................................................................................................................................................. 45
Event Settings Tab ................................................................................................................................................................ 46
DVR Site Information Tab ...................................................................................................................................................... 46
8.4
V-POS R
Report Criteria........................................................................................................................................................................ 47
Manual Query ..................................................................................................................................................................... 47
Predefined Exception Query .............................................................................................................................................. 49
Search for Transaction by Receipt ..................................................................................................................................... 49
Report Results ....................................................................................................................................................................... 49
8.5
V-POS Q
ETTINGS
EPORTS
UICK SEARCH
........................................................................................................................................................... 43
............................................................................................................................................................ 47
................................................................................................................................................... 50
9 DIGITAL VIRTUAL SWITCH ................................................................................................................................................. 51
9.1
V
IRTUAL SWITCH KEYPAD
9.2
V
IRTUAL SWITCH SCREEN
10 SEARCHING ...................................................................................................................................................................... 54
10.1 S
Search Criteria ....................................................................................................................................................................... 55
Video Search Results ............................................................................................................................................................ 55
10.2 S
Search for Line Items ............................................................................................................................................................. 56
Search for Transaction .......................................................................................................................................................... 56
10.3 C
10.4 V
Playback Controls .................................................................................................................................................................. 60
Advanced Playback Controls ................................................................................................................................................. 61
Controlling Playback Video with Digital PTZ: ........................................................................................................................ 64
Playback Right-click Menu: .................................................................................................................................................... 65
11 EXPORTING ...................................................................................................................................................................... 66
EARCHING VIDEO
EARCHING
USTOM SEARCH
IDEO PLAYBACK
Smart Search Tab .............................................................................................................................................................. 61
Zoom Tab ........................................................................................................................................................................... 62
Adjust Image Tab ............................................................................................................................................................... 62
Markers Tab ....................................................................................................................................................................... 63
Buffering Tab ...................................................................................................................................................................... 63
Audio Tab ........................................................................................................................................................................... 64
Visual Search Tab .............................................................................................................................................................. 64
POS/ATM D
............................................................................................................................................................ 58
............................................................................................................................................................ 59
................................................................................................................................................ 51
................................................................................................................................................ 52
.......................................................................................................................................................... 55
ATA
........................................................................................................................................... 56
11.1 S
11.2 V
11.3 A
11.4 E
12 SITE MAP .......................................................................................................................................................................... 70
13 SERVER ALARMS ............................................................................................................................................................ 71
13.1 P
13.2 S
13.3 S
14 SETTINGS ......................................................................................................................................................................... 74
14.1 S
Managed by VCM .................................................................................................................................................................. 74
Enable Client Login ................................................................................................................................................................ 75
14.2 L
14.3 S
14.4 A
14.5 H
TILL IMAGE EXPORTING
IDEO EXPORTING
UDIO EXPORTING
XPORT FILE BROWSER
REVIEW ALARMS
UPPRESS ALARMS
EARCH ALARMS
TARTUP TAB
IVE TAB
EARCH TAB
LARMS TAB
ARDWARE TAB
......................................................................................................................................................................... 76
........................................................................................................................................................... 67
.......................................................................................................................................................... 68
........................................................................................................................................................... 72
......................................................................................................................................................... 72
............................................................................................................................................................. 73
................................................................................................................................................................. 74
................................................................................................................................................................... 77
................................................................................................................................................................... 78
.............................................................................................................................................................. 79
................................................................................................................................................. 66
.................................................................................................................................................. 68
3xLOGIC’s VIGIL Client - Users Guide Page 3
Doc# 12031914

14.6 D
14.7 A
14.8 C
14.9 S
14.10
14.11
Digital Virtual Switch .............................................................................................................................................................. 82
Analog Virtual Switch ............................................................................................................................................................. 83
Virtual Switch Input Mappings ............................................................................................................................................... 84
ESTINATIONS TAB
UDIO TAB
HAT TAB
ITEMAPS TAB
T
RANSCODER TAB
V
IRTUAL SWITCH TAB
.......................................................................................................................................................... 80
...................................................................................................................................................................... 80
....................................................................................................................................................................... 80
................................................................................................................................................................ 81
....................................................................................................................................................... 81
.................................................................................................................................................. 81
15 SITE MAP DESIGNER ...................................................................................................................................................... 85
15.1 S
15.2 S
16 DV PLAYER ....................................................................................................................................................................... 88
17 LANGUAGE SWITCHER .................................................................................................................................................. 90
18 CONTACT INFORMATION ............................................................................................................................................... 91
ITE MAP DESIGNER ICONS AND BUTTONS
ITE MAP / HOT SPOT PROPERTIES
................................................................................................................................. 87
....................................................................................................................... 86
3xLOGIC’s VIGIL Client - Users Guide Page 4
Doc# 12031914

1 Introduction
VIGIL Client gives you unrivalled access to live and recorded video from any of your networked DVR’s.
Advanced playback and intelligent SmartSearch functionality lets you identify and review events of interest
quickly and easily. The result is a more accurate and efficient investigation of incidents with easy export of
evidence material. Our mapping function provides unlimited map layers and camera links for unrivaled access
to your cameras.
A unique combination of control, efficiency, and adaptability offering investigators unparalleled accessibility
and manageability to their video network. The result is faster response times, reduced investigator times, and
increased access and effectiveness of your video surveillance investments.
VIGIL Client’s advanced SmartSearch functionality includes:
• Instant playback of 1, 5 or 10 minute video increments with the click of a mouse
• The ability to define advanced search parameters, incorporating video analytics and POS/ATM data
integration for unrivalled incident investigations
• Quickly and accurately navigate through large amounts of recorded high-definition video
• Advanced playback – review recorded video using an intuitive interface and buttons. Users can play
forward and reverse, at normal or variable speed (up to 50-times)
• Bookmark and export video clips or still images in industry-standard formats including AVI or
3xLOGIC’s Authenticated Video for forensic investigations. Files are exported with our exclusive DV
Player application ensuring that recipients can easily access and view surveillance video related to your
investigation.
Advanced Control Feature - Alarm monitoring
• Can be triggered by an internal system event, as well as external third-party access control and
building management system triggers.
• VIGIL Client's Virtual Switch Functionality enables additional PC VGA monitor outputs to be used as a
Virtual Switch. This allows the user constant live view of their sites on the virtual switch monitors while
maintaining the standard VIGIL Client monitor for regular usage, i.e. live, playback, export and alarm
window usage. The Virtual Switch can be controlled using on screen virtual keyboard or using a Pelco
KBD300a.
Advanced Control Feature - POS/ATM Integration
• Instantly link surveillance footage with related transactional data for complete access of your operation.
Increase compliance requirements while reducing shrinkage and theft. Coupled with advanced
exception-based reporting functionality enables operators to be notified in the event of POS/ATM
transactions fall outside the norm – so called POS/ATM exceptions.
3xLOGIC (www.3xlogic.com) is based in Victoria, British Columbia and is the manufacturer of the VIGIL line of
digital video products which have been available under a variety of OEM names and our own VIGIL name for
over 10 years.
3xLOGIC’s VIGIL Client - Users Guide Page 5
Doc# 12031914

2 System Requirements
Recommended
Operating System Microsoft Windows XP Professional SP3 or Windows 7 Professional or Ultimate (32 or 64 bit)
CPU Intel Core2 Duo, minimum 2.8 GHz
RAM Minimum 2 GB (4GB when running Virtual Switch)
Video Card PCI Express 1GB (2GB when running Virtual Switch)
Hard Drive SATA (Minimum 100MB required for install)
Note: VIGIL Client will only run on Windows platforms that support DirectX 7.01 or higher. Run
DxDiag.exe to view the version of DirectX that is currently installed.
3xLOGIC’s VIGIL Client - Users Guide Page 6
Doc# 12031914

3 Features
Details
Search Retrieve a list of stored footage for specified cameras from a start date/time to an end date/time.
Quick Search Retrieve a list of all footage for the past 1 – 8 hours.
Regular Playback Scan through recorded footage using play/pause buttons.
Scroll-bar Playback
Current Frame
Video Cueing Cue video to a specified date/time or frame number.
Save Footage Save the currently displayed video footage in AVI or Authentic Video (MJPG) format.
Save Picture Save the currently displayed frame in JPG or BMP format.
Full Screen View footage or pictures at their full resolution.
Live Viewer
Modular Live and
Playback
Use a scroll-bar to locate footage by dragging to a desired location, or skim ahead or back 1 or
10 frames per click.
See the frame number, frame count, frame size (in KB) and frame time/date for the currently
displayed frame.
View many video feeds at once; see the site name, camera name and local time/date for each
live video feed; with the client/server, view feeds for multiple sites at once.
View Live and Playback feeds at the same time.
3xLOGIC’s VIGIL Client - Users Guide Page 7
Doc# 12031914

3xLOGIC’s
4 Main Screen
is displayed
This table is a quick listing of the main toolbar buttons and their usage. Detail of each corresponding window is
program.
no longer display alarm events.
be loaded from a configured VCM Server or from Local settings.
Opens the Cameras list. You can also open this sidebar from the menu by going to
window.
can be opened
window. You can also open this window from the menu by going to
has finished loading.
window to exit
from which Site settings can
from which the
This is the Main Screen window that
when VIGIL Client
4.1 Icon Toolbar
outlined in later sections.
Exits the VIGIL Client
cause VIGIL Client to
Logs off the current user.
Opens the Servers window.
Opens the Search
Search window
Opens the Exports
Browser.
Click Yes in the Exit Confirmation
Clicking the button opens the context menu
Clicking the button opens the context menu
.
VIGIL Client. This will
View | Cameras.
Custom
View | Export File
VIGIL Client - Users Guide Page 8
Doc# 12031914

3xLOGIC’s
Opens the Site Map
window. You can also open this window from the menu by going to
window. You can also open this window from the menu by going to
Opens the Digital Virtual Switch window.
window. You can also open this window from the menu by going to
button opens the context menu
Inc. Client
The information bar found at the very bottom of the main Client window provides you with the
CPU usage, dat
usage is under 95 percent; red indicates that it is
information screen detailing information about the system, current streams and
The Sidebar will be discussed in section 6
Client settings can be imported or
window that displays the software version.
A green CPU bar indicates that the CPU
over 95 percent, clicking on the CPU Usage will bring up an
virtual switch.
View | Site Map.
Opens the Server Alarms
Server Alarms.
Opens the Settings
Clicking the
exported.
Opens the About 3xLOGIC
4.2 Information Bar
sent to the Virtual Switch,
from which the VIGIL
e, time, and chat status.
View |
View | Settings.
last command
4.3 Camera Sidebar
Camera Sidebar.
VIGIL Client - Users Guide Page 9
Doc# 12031914

3xLOGIC’s
5 Servers Window
erver in this context is a DVR PC running
servers more efficient than remembering IP addresses or DNS names. Server
information is stored by a description that is created by the user.
ngs, the Servers list will be populated by the VCM Server the Client connects to.
displays a list of saved servers. It also displays their current connection status and offers different buttons to
ngs and more.
e of setting up servers is to make
Managed by VCM
Connected to the server, but with non
Connects to all configured servers.
have a username and password stored in the settings, it
will prompt for the username and password.
Connects to the selected server only.
have a username and password stored in the settings, it
prompt for the username and password.
Connects to the selected server only.
automatically bypass the stored username and password
and will prompt one for this connection.
disconnect from the currently selected
window where you can add a server.
Opens a prompt confirming if you wish to remove the currently selected
window for the currently selected server allowing
window for the currently selected server. You must
be connected to the server with administrative privileges for this to be
window for the currently selected server.
A S
connecting to local and remote
Setti
VIGIL Server. The purpos
Note: If
is enabled in the
The Servers window
interact with the servers, change setti
Disconnect
Connect All
Connect
Connect
As…
Opens a prompt asking if you want to
server.
Disconnected from the server.
Connected to the server.
privileges.
will
-administrative
If a server does not
If the server does not
However, it will
Add
Remove
Edit
DVR Settings
Remote Register
Opens the Server Settings
server from the server list.
Opens the Server Settings
you to change the stored settings.
Opens the DVR Settings
available.
Opens the Registration
VIGIL Client - Users Guide Page 10
Doc# 12031914

5.1 Add / Edit a Server
.
Click the Add or Edit (with a Server Selected) buttons from the Servers window to open the Server Settings
window.
Description
IP/DNS
Name
User Name/
Password
Use Dialup
TCP/IP
Ports
A short description or name that will be used
to identify this server.
The IP address or DNS name of the server. To
use a dialup connection, leave this setting
blank and Enable Use Dialup, select the dialup
connection to use from the drop-down menu.
The user name and password that VIGIL Client
will use to log in to the server. If these are left
blank, a prompt will be opened during
connection for the user name and password to
be input manually. Note: The default
administrator login to VIGIL Server is:
username administrator and password 123
The default user login is: username user and
password 123.
Enable to use a dialup connection to connect to
a server. Note: At least one Windows dialup
connection must be set up for this feature to
become enabled.
Open a window to change the default TCP/IP
port settings if they have been altered on the
server.
For the Client software to connect properly to the Server, the TCP/IP Ports in the
Client software must match the TCP/IP Ports on the Server.
To change the TCP/IP Ports: select a preset number from the drop-down menu;
enter in the Data Port and then click the Get Settings button; or enter the ports
manually.
Retrieves the settings from the server. Enter
Get Settings
Reset to Defaults
Check Network Status Checks the status of your network every set amount of time.
Timeouts Before Failure
the Data Port and then click the Get Settings
button to retrieve the other ports from the
server.
Click to reset the ports to their default
values.
The number of times VIGIL Client will attempt to connect to a Server before
marking the Server as offline.
3xLOGIC’s VIGIL Client - Users Guide Page 11
Doc# 12031914
Live Overlay
Enables live overlay features from an installed capture card to be used. Select the input number
Use Live Overlay
From Card Capture
Card
Input Number Select the input number for the live overlay from the drop-down menu.
from the drop-down menu.
Note: For this feature to function properly Live Overlay must be enabled in the Settings |
Hardware section and the capture card drivers must be installed.
Poll Server Data
Poll Server Data
Enable Polling of Server Alarms and Live POS/ATM Data from the DVR Server. The frequency of
polling can also be configured.
5.2 DVR Settings
To access a remote server’s DVR settings, VIGIL Client must be connected to the server with administrative
privileges. Select a server from the list and click Connect. If the default user does not have administrative
privileges, use Connect As to login as an administrator.
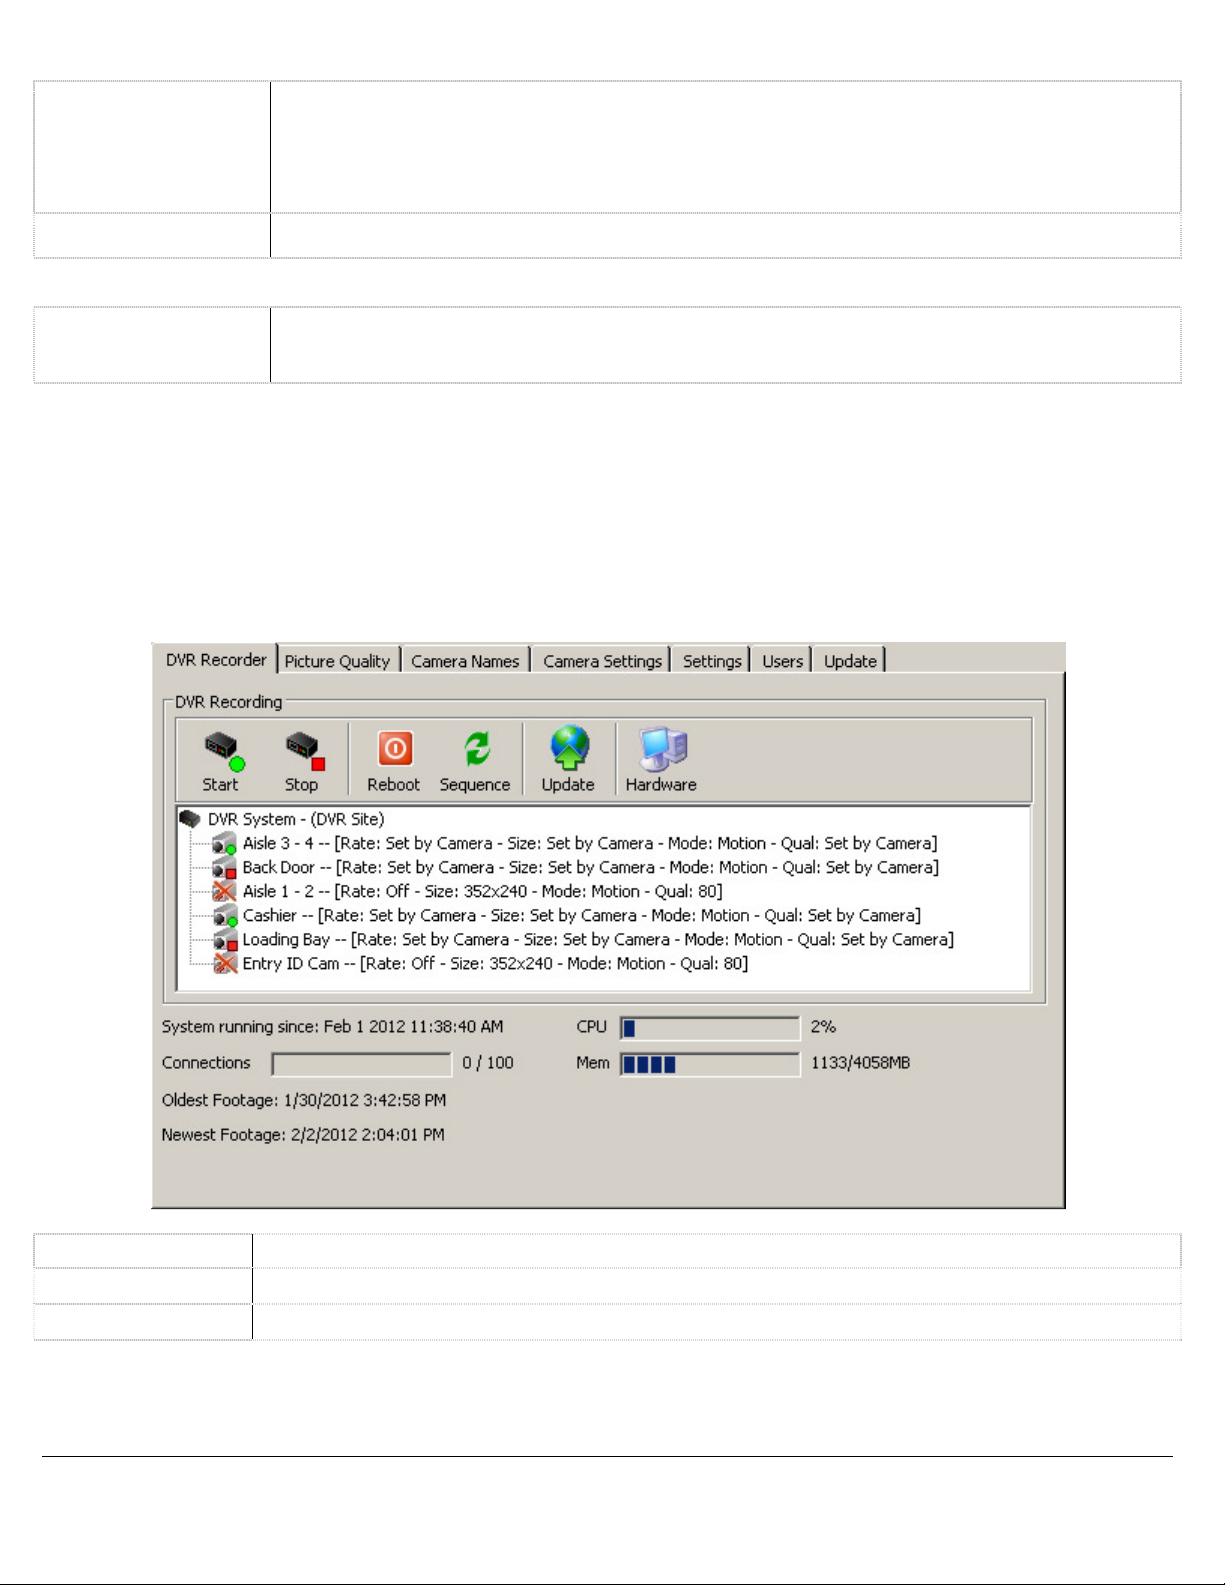
DVR Recorder Tab
From this window, cameras can be set to start or stop recording, the server can be rebooted or updated, and
basic information about the operating performance of the DVR is displayed.
Start Starts recording on the currently selected camera(s).
Stop Stops recording on the currently selected camera(s).
Reboot Restarts the server. Warning: This action will restart the server and take it temporarily offline.
3xLOGIC’s VIGIL Client - Users Guide Page 12
Doc# 12031914

3xLOGIC’s
Sequence
window which turns on/off the camera sequencing on
connected analog monitors.
Uploads and applies an update file on the server. Select the .VGL update file and the update
Warning
Opens the Hardware Information window which provides some basic information about the Capture
VIGIL
Camera information is displayed in the main portion of the
show the status of
Along with the status icons, camera settings are also
displayed. The camera recording frame rate, the recording
resolution, recording mode and compression quality are
At the bottom of the window, DVR information such as running time, number of Client Connections, current
Oldest / Newest Footage Dates are displayed.
Shows the time when the
Shows the CPU usage on the DVR.
Shows the amount of client connections to the DVR.
The total memory usage on the DVR.
Shows the date and time of the oldest/newest footage stored on the DVR.
The sequences must be configured on the
This action will restart the server and take it temporarily offline.
recording.
Camera is currently stopped and not recording.
Opens the Sequence
Note:
Server.
Update
Hardware
window. Three status icons are used to
each camera:
listed.
process will begin.
Card installed in the
CPU and Memory usage and
System running
since
:
Server.
Camera is currently
Camera is disabled.
VIGIL Server was last rebooted.
CPU
Connections
Mem
Oldest Footage/
Newest Footage
VIGIL Client - Users Guide Page 13
Doc# 12031914

Picture Quality Tab
The recording quality of each camera can be adjusted on this tab.
Simple Settings Tab
Adjust the camera recording quality to preset values: Low (20), Medium (40), High (60) and Super-High (80).
Advanced Settings Tab
Adjust the camera recording quality between 20 and 90. This is for fine-tuning the camera recording quality.
3xLOGIC’s VIGIL Client - Users Guide Page 14
Doc# 12031914

Camera Names Tab
Adjusts the U and V color difference signals used in YUV color format for the video footage.
The Camera Names tab allows the ability to change the name of each camera.
To change the name of a camera, type in the new name beside the camera number and click either Apply or
OK.
Camera Settings Tab
The Camera Settings tab provides advanced configuration of camera parameters, recording mode and rates,
and recording CODECs.
Camera Select a camera to configure.
Default Camera Settings Set the currently selected camera back to default settings.
Default All Cameras Set all cameras back to default settings.
Camera Settings Sub-Tab
Brightness Adjusts the brightness of the video footage.
Sharpness Adjusts the sharpness of the video footage
Contrast Adjusts the contrast of the video footage.
Hue Adjusts the hue of the video footage.
Saturation U/
Saturation V
Noise Reduction
Note that not all cameras use a YUV color format, in which case, adjusting the Saturation U
slider will adjust the color saturation while the Saturation V slider will have no effect.
Reduces video noise on grainy video images. Warning: If this value it is set too high it may
have detrimental effects.
3xLOGIC’s VIGIL Client - Users Guide Page 15
Doc# 12031914

Recording Mode Sub-Tab
The Recording Mode Sub Tab allows for the Recording Speed of the Camera and the Recording Mode to be
configured. There are four Recording Mode options encompassing a full range of recording possibilities. These
modes are accessible by selecting the appropriate option from the Recording Mode drop-down menu.
Opens the Recording Speed window. The recording speed can
be set individually for Constant, Motion and Alarm Recording
Mode. Use the drop-down menu to select the desired number
Set Speeds
of frames per second (fps). Note: Network cameras will often
record and play back at a slower rate than what was set in the
Recording Speed window, depending on the bandwidth and
camera.
Constant Always recording, 24 hours 7 days a week.
Motion
Records only when motion is detected. Full configuration over motion area, amount of motion, size of
motion and post motion recording time makes this a very versatile recording mode.
Post Motion Record
Trigger Blocks
Motion Sensitivity
Reset to Default Resets the motion settings back to their default values.
The length of time a camera continues to record before and after motion or
an alarm is detected.
The number of motion zones necessary to trigger the motion detector. The
recommended value is 1.
Controls the sensitivity of the motion detection. High sensitivity will detect
a large amount of motion; less sensitivity will detect a smaller amount of
motion.
Alarm Only
Records in alarm mode when any alarm is detected. The alarms can be of any type including Video
Analytics, Video Motion, Digital Input and POS/ATM alarms.
Schedule
Records based on a schedule. The easy to use graphical interface provides a full overview of a week’s
schedule in 15-minute intervals. This mode offers full control over recording times and any combination
of constant or motion controlled recording modes.
Mode drop-down menu, the Schedule window will appear. To edit an existing schedule click
the … button to open the Schedule window. To modify a schedule, click the appropriate
recording mode button (Const or Motion) and then click-and-drag across a time slot. Areas
that are blank (no color) have no recording modes defined for that time and will not record
any footage.
If Schedule is selected from the Recording
3xLOGIC’s VIGIL Client - Users Guide Page 16
Doc# 12031914

Note: The smallest time interval that can be used is a 15 minute period.
Const Sets or changes the section to Constant recording mode; these time periods are colored green.
Motion Sets or changes section to Motion recording mode; these time periods are colored blue.
HZoom+/-
VZoom+/- Expands and contracts the schedule vertically.
Move a time
period
Copy a time
period
Change record
mode
Change the
start/end time
Importing from
another camera
Viewing start and
end times of a
section
Deleting a time
period
Expands and contracts the schedule horizontally; this allows for better precision in setting time
periods.
Click and hold the Shift key, then click-and-drag the section.
Click and hold the Ctrl key, then click-and-drag the section.
Click a section of the schedule, and then click the appropriate button (Const or Motion) to change
the recording mode for that section.
Select the section by clicking on it and then click-and-drag the right or left edge of the section.
Select the camera from the Import From Camera drop-down menu, and then click Import. This will
overwrite the current schedule.
Select the section by clicking on it. The start and end times of the section are displayed near the
bottom left corner of the Schedule window. Hover the mouse over any part of the section to display
the time.
To select a section, click on it and then click Delete.
Deleting a
schedule
Apply Schedule To
All Cameras
Click the Clear All button to delete the entire schedule.
When marked, this checkbox will apply the created schedule to all cameras that have been set to
Schedule recording mode.
3xLOGIC’s VIGIL Client - Users Guide Page 17
Doc# 12031914

CODEC Settings Tab
The CODEC Settings tab allows advanced configuration of the recording CODEC used for storing video footage.
Normally, two video encoding CODECs are available for recording video footage: AZTECH and MPEG4, however some
models support Hardware CODECs, which have slightly different customization options.
AZTECH CODEC Settings
The AZTECH CODEC is the default CODEC for most systems. To switch the recording CODEC to AZTECH, select
the AZTECH option from the CODEC drop-down menu.
Space Saving
Mode (AZTECH)
Enabled
Sensitivity
Noise Adaptive
Detect Using
Grayscale/ Color
Use B Frame
Enables advanced compression technology to decrease the file size of recorded footage.
Note: This is a CPU intensive setting.
Adjusts the threshold used by the CODEC to identify areas of change between frames. The higher
the sensitivity, the smaller a change is encoded.
Adjusts the noise threshold used by the comparison algorithm when determining whether a block
contains a change. When this value is increased, more noise is allowed in the block without
triggering change for that block. This feature does not decrease noise in an image.
Determines whether grayscale or color will be used to detect changes. Note: Color detection is a
CPU intensive setting.
Uses bi-directional frames to decrease the file size of recorded footage. Note: This setting is
extremely CPU and Memory intensive.
MPEG4 CODEC Settings
To switch the recording CODEC to MPEG4, select the MPEG4 option from the CODEC drop-down menu.
Key-frame Rates
Motion Search
Scope
Quantization
Method
Sets the number of key-frames recorded per second. The higher the value, the greater the data
space needed for recording, but the higher the quality of the video.
Changes the size of the regions used to detect motion.
Selects the type of compression. H263 offers higher compression than MPEG4 but requires more
CPU usage.
3xLOGIC’s VIGIL Client - Users Guide Page 18
Doc# 12031914

ME Accuracy
ME Algorithm
Motion Estimation Accuracy includes two options: Full Pixel and Half Pixel. Full Pixel checks for
motion comparing differences of full pixels. Half Pixel will check for motion using an interpolation
method that detects finer movements. Note: Half Pixel is a CPU intensive setting.
The Motion Estimation Algorithm changes the shape of the area used for motion detection and
includes two options: Full Search and Fast Search. Fast Search will save CPU time but Full Search is
more accurate.
ME Vectors
Sets the number of vectors tested for motion from 1 to 4. The greater the number, the more CPU
processing is required.
Hardware CODEC Settings
Depending on the DVR model, it may use Hardware CODEC recording, which has slightly different
customization options. For some types of cards the CODEC used can be changed on the VIGIL Server Settings
| Hardware Tab via the Hardware CODEC Dropdown box.
Variable Bit Rate
Constant Bit Rate
Restrict Maximum
Bit Rate
The default setting of Variable Bit Rate allows the encoder to change its recording bit rate
automatically as required. This option offers the best combination of file size and visual quality.
Changes a variable bit rate into a constant bit rate. A setting of Constant Bit Rate with a very high
bit rate selected will provide the maximum video quality settings, although this is at the expense of
storage space.
Sets a hard limit on the maximum quality that can be recorded. Use the slide bar to select the
desired maximum bit rate.
Recording Rate / Resolution
In the Recording Rate / Resolution Section, the cameras are grouped into Bank tabs that represent the
physical camera banks in the DVR. This allows the user to maximize the capture resolution and recording
speeds for each camera bank. When the number of FPS is changed in the Recording Rate / Resolution window,
it is applied to all recording modes.
Note: The number of banks and the cameras in each bank is determined by the capture card
installed, which cannot be configured. There are many possible layouts of banks and channels per
bank. If no capture card is installed (NVR) only the Network Camera tab will be available.
Camera Select a camera number within the current bank tab to change its settings.
Capture
Resolution
Select the desired recording resolution from the drop-down menu.
3xLOGIC’s VIGIL Client - Users Guide Page 19
Doc# 12031914

Select the desired number of frames per second. Each bank has a set amount of FPS that can be set
Recording Speed
Network Camera
to its cameras. Values will change depending on the recording speeds for other cameras within the
same bank.
Network cameras are automatically detected and the analog feed is disabled for that camera
number. Network camera speeds are independent of other cameras and do not change the
maximum allowable FPS for cameras belonging to the same camera bank.
Settings Tab
The Settings tab provides control over some of the basic behaviour of the DVR server.
Site Name
The name of the Site where VIGIL Server is located. The site name is included when saving still images.
Global Server Settings Tab
When enabled, the DVR starts recording footage as soon as the VIGIL Server program is
Auto-Start Recorder
Network Logging Logs network activity that can be reviewed in the Network Log Analyzer.
Resolve Client Name
A/C Cameras
Watchdog
Limit Search to One
Day
Client Connections Enter the maximum number of simultaneous client connections allowed.
launched. When disabled, the user must manually start the recorder using the controls in the
Recorder Controls window.
When enabled, client IP addresses are translated into their computer names for easier
recognition.
Enable A/C Cameras to set VIGIL Server to record footage from A/C powered cameras. Disable it
to record footage from D/C powered cameras.
When enabled, the watchdog circuit on the video capture card is used to verify that VIGIL Server
is responsive. If the software becomes unresponsive, then the watchdog will reboot the DVR
When enabled, the Search window will be limited to performing searches for a single day only.
3xLOGIC’s VIGIL Client - Users Guide Page 20
Doc# 12031914

Sequence Tab
The Sequence tab configures the camera display sequences for the analog output monitors. Only analog video
feeds can be added to a sequence. This is due to hardware limitations on the capture cards.
Monitor Number Select the analog output monitor number for the sequence.
Auto Start
Sequence
Add Add a new camera to the sequence with a specified dwell time.
Edit Modify the dwell time of the selected camera.
Delete Remove the selected camera from the sequence.
Up / Down Moves the selected camera up/down in the sequence.
When enabled, the sequence for the selected analog output monitor is started automatically when
VIGIL Server starts.
Auto Logon
When this is checked, a message prompts for a username and password. The username and password entered
will be used to log into VIGIL Server automatically when the program is launched.
Data Drive Settings
The Data Drive Settings area displays the data drive information of the DVR.
available/total space of the drive are displayed.
The path of the drive and the
The status of the data drive is indicated by its icon:
Configured drive
Currently recording on this drive
Drive warning
Drive error, contact your system administrator.
3xLOGIC’s VIGIL Client - Users Guide Page 21
Doc# 12031914

Users Tab
The Users tab allows the configuration of users on the DVR with specific permissions. Each user belongs to a
group and each group has a set of permissions.
Users
Click the Users button to access the User configuration options.
Add a User
Edit a User
Changing a
Users Group
Click the Add button and enter a Username, Group and
Password in the Add New user window.
Select a User from the Drop-Down Menu and click the Edit
button. The user’s group or password can be changed, the
user’s name cannot.
Select a User from the Drop-Down Menu and check the box
beside the Group the User will be a member of.
Note: A User can only belong to one group.
Delete a User
Select a User from the Drop-Down Menu and click the delete
button.
Groups
Click the Groups button to access the Group configuration options.
Add a Group Click the Add button and enter a group name in the Add New Group window.
Select a group from the Drop-Down menu and enable the check box beside each permission that
Permissions
Select All / None Enable all permissions or disable all permissions.
Delete a Group Select a Group from the Drop-Down Menu and click the delete button.
the group will have. To disable permissions for the group, un-check the box beside the
permission.
3xLOGIC’s VIGIL Client - Users Guide Page 22
Doc# 12031914

Update Tab
The Update tab controls the VIGIL Update Service on the remote server. This tool can be used to provide
software updates to the server alone or host updates for interconnected VIGIL DVR Systems.
A Primary Server provides update files
to other systems, but does not receive
Primary
Server
Secondary
Server
Client
update files from other systems and
does not automatically apply updates
locally. Update files must be manually
added to the Updates tab.
A Secondary Server acts as both a
client and a server. As a client it
receives update files from other Update
Servers and applies them locally. As a
Server, it provides update files to other
systems, both files added manually as
well as files it receives from other
systems.
A Client receives and applies updates to
local software, but does not provide
update files to other systems.
Daily
Weekly
Automatically apply
updates
Local Products to
Update
Update
Server
Address /
Port
Backup
Server
Address /
The Update Service connects to the Update Server once per day during the hour specified In This
Hour.
The Update Service connects to the Update Server once per week on the day selected from the
drop-down menu during the hour specified In This Hour.
When a new version of software is available for one of the products listed in the Local Products to
Update section, it is automatically applied. Note: When this feature is enabled, the system will
restart itself, apply the update, and restart itself again.
The products listed here will be updated when a new update is available. If a product is installed,
but not listed, it will not be updated.
Port
The DNS name or IP Address and port
for the main server the update service
will check for update files.
The DNS name or IP Address and port
of the backup server to check for
update files. The backup server will be
checked if the connection to the main
update server fails.
3xLOGIC’s VIGIL Client - Users Guide Page 23
Doc# 12031914

5.3 Remote Register
Opens the Registration window, where you can register software components for the remote server.
To obtain registration information for VIGIL Server, record or export the Serial number listed in the
registration window. Send the following information to 3xLOGIC at support@3xlogic.com.
The serial number or serial number export file.
Your Name, Company Name and Contact Information.
Details of the modules you wish to purchase.
A representative will contact you to complete the transaction. If you receive a Registration file, use the import
feature to import the registration information. If you receive registration keys, Select the appropriate module
from the Unregistered Modules drop-down list, enter the registration key, and click Register.
3xLOGIC’s VIGIL Client - Users Guide Page 24
Doc# 12031914

3xLOGIC’s
6 Camera Sidebar
consists of three tabs: Sites,
The standard camera organization is by
Live Viewer
The Cameras Treeview shows all configured and currently enabled cameras on the connected Server.
Double Click
Data (Live). The default view is the
ite, click the
Server site status is indicated by one of these three icons:
Site connected with administrator privileges.
Site connected without administrator privileges.
Options:
Connect to the site with the configured username and
Enter a username and password to connect to the
Reload the Information from the Site.
Double Click Display All to open all Cameras on this site in Live View
View Window.
Right Click on a Camera and choose Replay Camera to playback the last
The Camera Sidebar
Sites tab.
6.1 Sites Tab
camera can be viewed in the
Groups and POS/ATM
server site. To view cameras listed by s
by double-clicking the camera’s name.
Sites tab. A
Cameras Treeview
Site not connected.
Right-Click on a Site Name for the following
Connect
Connect As…
Refresh
Disconnect Disconnect from the Site.
password.
site.
Display All
Right Click
Windows.
Double Click on a Camera to open it in a Live
two minutes of footage.
VIGIL Client - Users Guide Page 25
Doc# 12031914

Audio Treeview
The Audio Treeview shows all configured and currently enabled Audio channels on the connected Server.
Double Click
Current
Channel
Sensitivity
Stop Click to Stop playing the current Live Audio Channel.
Double Click on an Audio Channel to Play it Live.
Control Volume with the Windows Volume controls.
The currently selected Live Audio channel.
This slider adjusts the audio sensitivity without
affecting the sensitivity settings on the connected
server.
This level meter indicates the audio level for the
currently selected audio channel.
Relays Treeview
The Relays Treeview shows all configured Relays on the connected Server and allows for them to be quickly
toggled on or off.
The current status of the Relay is indicated by the following icons:
The Relay is Toggled On.
The Relay is Toggled Off.
Double Click the Refresh option to poll the current state of the
Refresh
Relays from the DVR Server. Client does not actively poll for
relay state as that would be prohibative on bandwidth.
V-POS Treeview
The V-POS Treeview will be available when V-POS is installed on the DVR Server. Details of each option will be
discussed in Section 8 - V-POS Treeview Configuration.
Opens the POS/ATM Exceptions window, where POS/ATM
Exceptions
Events
Settings
Reports
Exceptions can be created, edited, deleted, imported,
exported or manually run.
Opens the POS/ATM Exception Events window, where
users can view, acknowledge, or playback POS/ATM
exception alerts.
Opens the Settings window, where V-POS settings can be
configured.
Opens the Reports window, where manual or predefined
queries can be run.
Quick Search
Opens the Quick Search window, where transactions can
be searched for by receipt number, IDX line number or
Event ID number.
3xLOGIC’s VIGIL Client - Users Guide Page 26
Doc# 12031914

Chat Treeview
VIGIL Server and Client include a chat feature to speak or write back and forth between VIGIL Clients
connected to VIGIL Servers. The Chat session is initiated by the VIGIL Client only and can be used to
communicate via voice or text chat. Double click on Chat in the Treeview to initiate a chat session with the
selected Server.
Note: For voice chat to be available and function correctly, audio settings for Chat must be
configured correctly in the VIGIL Server Settings window (see the VIGIL Server Users Guide for
more information).
Check Hands Free for VIGIL Chat to automatically detect the volume level and only send voice when
Hands Free
Talk
Voice Detection
Graphs
Send Text Sends a typed message. Type text into the textbox and click Send Text.
Sensitivity
sound reaches a specific volume. Uncheck Hands Free to use the Talk button to manually start and
stop sending voice data.
When Hands Free is unchecked, click Talk to send voice data. Unclick Talk to stop sending voice
data.
The voice detection graphs provide a visualization of voice data detected in the chat session.
Use the slide bar to adjust the chat audio sensitivity. To the left is less sensitive, to the right is
more sensitive. Note: Use the down button to expand the Controls section.
Server Alarms Treeview
Double Click on the Server Alarms Treeview item to open the Alarms window for the selected server. Server
Alarm Polling must be enabled for this option to work.
3xLOGIC’s VIGIL Client - Users Guide Page 27
Doc# 12031914

POS/ATM Live Treeview
Double Click on the POS/ATM Live Treeview item to open the POS/ATM Data (Live) window for the selected
store.
Site
Name
Filter
The POS/ATM Data (Live) window presents Data in tabular form with these columns:
• Qty. – The quantity of the item purchased.
• Item – The item purchased.
• Amount – The price of the item purchased.
• Code – The transaction code identifies the type of transaction.
• Reg # – The cash register number.
• Cashier – The cashier currently logged into the data terminal.
• Receipt # – The receipt number of the current receipt.
• Timestamp – The time at which the Point of Sale event occurred.
• Idx – A unique identifier to quickly identify and find POS/ATM data line items.
The column headers are all able to be resized as well as moved around within the window. Simply drag and
move the column header to the desired location. The column locations can be reset by right-clicking in the
Live POS/ATM Data window and selecting Reset Column Order.
Note: Some types of data terminals do not support all of the columns that are available.
There are four options available when the POS/ATM Data (Live) window is right-clicked:
The Site Name is listed in the Title of the
window in [ ].
Enter a register number to filter from the
POS/ATM data, or leave the entry blank to
view data from all data terminals.
Copy Line Copies the selected data record to the Windows clipboard.
Opens the Select Destination window where an
export destination is selected. After making a
selection, the POS/ATM Export Settings window
Export All Records
Print All Records Prints the live POS/ATM Data to the default printer.
Reset Column Order Resets the order of the POS/ATM Data columns if they have been rearranged.
opens. Select the time periods to export or select
Export All to export all Data records. Once
complete, click OK to begin the export process.
Click Cancel to exit without exporting.
3xLOGIC’s VIGIL Client - Users Guide Page 28
Doc# 12031914
 Loading...