

Page 1

X-Series Installation and
Safety Guide
Version 2.5
Page 2

Part Number: TECHD-0000000122
Publication Control Number: 102506:0914
Digital Vaccine is a registered trademark and TippingPoint and the TippingPoint logo are trademarks
of 3Com Corporation or one of its subsidiaries.
This document contains confidential information or trade secrets or both, which are the property of
3Com Corporation. This document may not be copied, reproduced, or transmitted to others in any
manner, nor may any use of the information in this document be made, except for the specific
purposes for which it is transmitted to the recipient without the prior consent of 3Com Corporation.
Copyright © 2006 3Com Corporation. All rights reserved.
Page 3

Table of Contents
Table of Contents i
List of Figures v
List of Tables vii
Table of Contents
About This Guide ix
Overview ix
Target Audience ix
Organization x
Conventions xi
Headings xi
Typeface xi
Cross References xi
Messages xi
Related Documentation xiii
Customer Support xv
Contact Information xv
Chapter 1: Overview 1
Overview 1
TippingPoint X-Series Overview 1
Core Functionality 2
TippingPoint X-Series Environment 2
Optimized VPN Connectivity 3
Policy Enforcement 3
Security Zones and Network Interfaces 3
TippingPoint IPS 3
Threat Suppression Engine 4
Local Security Manager 4
Security Management System 5
Threat Management Center 5
X-Series Hardware Installation and Safety Guide V 2.5 i
Page 4

Table of Contents
Chapter 2: Prepare the Site 7
Overview 7
Safety Requirements 8
Class A Notices 8
General Guidelines 9
Rack and Clearance Requirements 12
Ventilation and Location 12
Environmental Requirements 12
Reliable Earthing 12
System Grounding Requirements 12
Unpack the TippingPoint System 13
Chapter 3: TippingPoint X505 Overview 15
Overview 15
Chassis Overview 16
Chassis Features 16
LEDs 17
Technical Specifications 18
Hardware Specifications 18
Technical Specifications 19
Software Specifications 19
Hardware Installation and Configuration 19
Install the TippingPoint Chassis 20
Connect the power 21
Complete Initial Setup Configuration 21
Connect the X505 to the Internet 22
Register the TippingPoint X505 22
Chapter 4: TippingPoint X506 Overview 23
Overview 23
Chassis Overview 24
Chassis Features 24
LEDs 24
Technical Specifications 25
Hardware Specifications 25
Technical Specifications 26
Software Specifications 27
Hardware Installation and Configuration 27
Install the TippingPoint Chassis 27
Connect the power 28
Complete Initial Setup Configuration 28
Connect the X506 to the Internet 29
Register the TippingPoint X506 30
ii X-Series Hardware Installation and Safety Guide V 2.5
Page 5

Table of Contents
Connector and Pinout Specifications 31
Port Connectors 31
Index 35
X-Series Hardware Installation and Safety Guide V 2.5 iii
Page 6

Table of Contents
iv X-Series Hardware Installation and Safety Guide V 2.5
Page 7

List of Figures
Figure 3 - 1: TippingPoint X505 - Front Panel 16
Figure 3 - 2: TippingPoint X505 - Back Panel 16
Figure 4 - 1: TippingPoint X506 - Front Panel 24
Figure A - 1: RJ-45 Connector 31
Figure A - 2: DB-9 Connector 32
List of Figures
X-Series Hardware Installation and Safety Guide V 2.5 v
Page 8

List of Figures
vi X-Series Hardware Installation and Safety Guide V 2.5
Page 9

List of Tables
Table About - 1: TippingPoint Documents xiii
Table About - 2: Customer Support Information xv
Table 1: X-Series System Performance 4
Table 2 - 1: Environmental Requirements for the TippingPoint X-Series 12
Table 3 - 3: LED Descriptions 17
Table 3 - 4: Management Port LED Descriptions 17
Table 3 - 5: TippingPoint X-Series X505 Specifications 18
Table 3 - 6: TippingPoint X505 Hardware Specifications 19
Table 3 - 7: Software Specifications for the TippingPoint X-Series IPS 19
Table 3 - 8: Rack Space Requirements 20
Table 4 - 2: LED Descriptions 24
Table 4 - 3: Segment Port LED Descriptions 25
Table 4 - 4: TippingPoint X-Series X506 Specifications 25
Table 4 - 5: TippingPoint X506 Hardware Specifications 26
Table 4 - 6: Software Specifications for the TippingPoint X-Series IPS 27
Table 4 - 7: Rack Space Requirements 27
Table A - 1: RJ-45 1000 Base-T Connector Pinouts 31
Table A - 2: RJ-45 10/100 Base-T Connector Pinouts 32
Table A - 3: DB-9 Connector Pinouts 32
X-Series Hardware Installation and Safety Guide V 2.5 vii
Page 10

List of Tables
viii X-Series Hardware Installation and Safety Guide V 2.5
Page 11

About This Guide
Explains who this book is intended for, how the information is organized, where information
updates can be found, and how to obtain customer support if you cannot resolve a problem.
Overview
Wel com e t o t he TippingPoint X-Series Hardware Installation and Safety Guide. The TippingPoint XSeries combines firewall and VPN functionality with the TippingPoint Intrusion Prevention System
(IPS) to provide a unified approach to network security. The Local Security Manager (LSM) and
Security Management System (SMS) provide management options for your X-Series devices and
network security.
This chapter includes the following sections:
• “
Target Audience” on page ix
• “Organization” on page x
• “Conventions” on page xi
• “Related Documentation” on page xiii
• “Customer Support” on page xv
Target Audience
This guide is intended for use by technicians and maintenance personnel responsible for installing,
configuring, and maintaining the TippingPoint X-Series. Users should be familiar with
telecommunications products and networking concepts.
TippingPoint X-Series Hardware Installation and Safety Guide V 2.5 ix
Page 12

About This Guide
Organization
The TippingPoint X-Series Hardware Installation and Safety Guide is organized as follows:
About the Guide
Explains who this book is intended for, how the information is organized, where information updates
can be found, and how to obtain customer support if you cannot resolve a problem.
TippingPoint Overview
Provides a description of the deployment environment of the TippingPoint X-Series, including layout
and illustrations of hardware components and features.
Prepare the Site
Provides general requirements for the installation site and guidelines for electrical and network
connections. For specific requirements, review the chapter according to device model.
TippingPoint X505 Overview
Provides a description of the deployment environment of the TippingPoint X-Series X505, including
layout and illustrations of hardware components and features.
TippingPoint X506 Overview
Provides a description of the deployment environment of the TippingPoint X-Series X506, including
layout and illustrations of hardware components and features.
Appendix A: Connector and Pinout Specifications
Provides connector and pinout information for the TippingPoint X-Series systems.
x X-Series Hardware Installation and Safety Guide V 2.5
Page 13

Conventions
This book, and the other books in this series, follow some conventions for structuring information.
Headings
Every chapter starts with a brief description of the information you can find in that chapter, which
correlates with the major headings in that chapter. Each major heading corresponds to a task or
concept that is important for you to understand. Headings are of a different size and type to make them
easy to skim, whether you are viewing an online or print copy of this document.
Typeface
This book uses the following typeface conventions:
Bold Used for the names of screen elements like buttons, drop-down lists, or fields. For
Code Used for text a user must type to use the product.
Italic Used for book titles, variables, and important term.
Hyp erlin k
Conventions
example, when you are done with a dialog, you would click the OK button.
Used for web site and cross reference links.
Cross References
When a topic is covered in depth elsewhere in this guide, or in another book in this series, a cross
reference to the other information will be provided. Cross references within this book will take the
form: “for more information about conventions, see page 6, Conventions.” Cross references to other
publications will take the form: “for more information about <topic>, see Publication Name.”
Messages
Messages are special text that are emphasized by font, format, and icons. There are four types of
messages in this book:
•Warning
•Caution
•Note
•Tip
A description of each message type with an example message follows.
Warning
Warnings tell you how to avoid physical injury to people or equipment. For people, injury includes
anything from temporary conditions, such as pain, to irreversible conditions such as death. For
equipment, injury means anything requiring repair. Warnings tell you what you should or should not
do, and the consequences of not heeding the warning.
X-Series Hardware Installation and Safety Guide V 2.5 xi
Page 14
About This Guide
Warnings have an icon to the left showing a white lightning bolt drawn inside of a red octagon.
Warnings also start with the word “WARNING”, and are presented in bold face type.
WARNING: Only trained and qualified personnel should install, replace, or
service this equipment. Disconnect the system before servicing.
Caution
Cautions tell you how to avoid a ser ious loss that stops short of physical damage such as the loss of data,
time, or security. Cautions tell you what you should or should not do to avoid such losses, and the
consequences of not heeding the caution.
Cautions have an icon to the left showing a black exclamation point drawn inside of a yellow triangle.
Cautions also start with the word “CAUTION”.
CAUTION: Do not type del *.* from the root (C:\) directory. Typing del *.* from the root
directory will destroy all the program and configuration data that your computer needs to
run, and will render your system inoperable.
Note
Notes tell you about information that might not be obvious, or that does not relate directly to the
current topic, but that may affect relevant behavior.
A note has an icon to the left showing a piece of note paper, and starts with the word “Note”.
Note: Most car rental companies no longer allow cash deposits in lieu of a credit
card when renting a car. Non-credit card deposits can only be arranged by a
lengthy application and approval process.
Tip
Tips are suggestions about how you can perform a task more easily or more efficiently.
A tip has an icon to the left showing a light bulb drawn inside and starts with the word “Tip”.
Tip: Setting the logging parameter to “off” or “minimal” will improve your
system’s processing performance, but it will make debugging very difficult in the
event of a system crash. During system integration, you can set logging to “full” to
ease debugging. After you have finished testing, set logging to “minimal” to
improve performance.
xii X-Series Hardware Installation and Safety Guide V 2.5
Page 15
Related Documentation
The TippingPoint X-Series systems have a full set of documentation. These publications are available in
electronic format on your installation CDs. For the most recent updates, check the Threat Management
Center (TMC) web site at https://tmc.tippingpoint.com
Table About - 1: TippingPoint Documents
Audience Publication Location
Related Documentation
.
Hardware
Te c h n i c i a n s
• Quick Start TippingPoint X-Series X5
• Quick Start TippingPoint X-Series X505
• Quick Start TippingPoint X-Series X506
• Quick Start TippingPoint X-Series X710
TippingPoint X-Series Hardware Installation and
Safety Guide
SMS Installation and Configuration Guide
printed version in the TippingPoint
X-Series box, TippingPoint X-Series
Documentation CD,
https://
tmc.tippingpoint.com
TippingPoint X-Series
Documentation CD,
https://
tmc.tippingpoint.com
printed version in the TippingPoint
X-Series box, TippingPoint X-Series
Documentation CD,
https://
tmc.tippingpoint.com, X-Series
server
X-Series Hardware Installation and Safety Guide V 2.5 xiii
Page 16

About This Guide
Table About - 1: TippingPoint Documents (Continued)
System
Administ rators
X-Series Command Line Interface Reference
TippingPoint X-Series
Documentation CD,
https://tmc.tippingpoint.com
X-Series Concepts Guide
TippingPoint X-Series
Documentation CD,
https://tmc.tippingpoint.com
X-Series Local Security Manager User’s Guide
TippingPoint X-Series
Documentation CD,
https://tmc.tippingpoint.com
Local Security Manager Online Help available in the LSM application
SMS Installation and Configuration Guide hard copy in the shipping materials,
TippingPoint X-Series
Documentation CD,
https://tmc.tippingpoint.com
Security Management System User’s Guide
TippingPoint X-Series
Documentation CD,
https://tmc.tippingpoint.com
and on the SMS server
Security Management System Online Help available in the SMS application
TippingPoint SMS External Interface Guide
Third Party Management for TippingPoint IPS
TippingPoint X-Series
Documentation CD,
https://tmc.tippingpoint.com
and on the SMS server
TippingPoint X-Series
Documentation CD,
https://tmc.tippingpoint.com
xiv X-Series Hardware Installation and Safety Guide V 2.5
Page 17
Customer Support
The TippingPoint customer support phone number is 1-866-681-8324.
TippingPoint is committed to providing quality customer support to all of its customers. Each
customer is provided with a customized support agreement that provides detailed customer and
support contact information. For the most efficient resolution of your problem, please take a moment
to gather some basic information from your records and from your system before contacting customer
support, including your customer number (on the Customer Support Agreement and shipping invoice
that came with your system).
Table About - 2: Customer Support Information
Information Location
Your customer number You can find this number on your Customer Support Agreement and on
Customer Support
the shipping invoice that came with your TippingPoint system.
Your X-Series serial number
Your X-Series software version
number
Your X-Series system boot time You can find this information in the LSM in the System Stats frame.
You can find this number on the shipping invoice that came with
your
TippingPoint X-Series system or on the X-Series device.
You can find this information in the LSM in the System Stats
frame, in the Update tab, or by using the CLI
command.
show version
Contact Information
Use the following information to contact TippingPoint Customer Support:
Telephone
North America: +1 866 681 8324
International: +1 512 681 8524
Australia: 800 783 933
New Zealand: 0800 852 300
E-mail
support@tippingpoint.com
X-Series Hardware Installation and Safety Guide V 2.5 xv
Page 18

About This Guide
xvi X-Series Hardware Installation and Safety Guide V 2.5
Page 19

1
Overview
This chapter introduces TippingPoint concepts and functionality. It provides an overview of the
TippingPoint X-Series. The TippingPoint X-Series includes the following models: X505 and X506.
Overview
In the highly technical era of data transfers and the Internet, the protection of data and networks
concern most businesses, corporations, and network administrators. TippingPoint has studied the
issue of data security and network protection from malicious activity and attacks. One of the solutions
is the TippingPoint X-Series device (X-Series). The X-Series provides constant vigilance for a network,
monitoring and managing packets while blocking malicious attacks.
This chapter includes the following topics:
• “
TippingPoint X-Series Overview” on page 1
• “TippingPoint X-Series Environment” on page 2
TippingPoint X-Series Overview
The TippingPoint X-Series device combines virtual private network (VPN) management, stateful
packet inspection firewall, bandwidth management, and web content filtering with the TippingPoint
Intrusion Prevention System (IPS).
The IPS provides total packet inspection and intrusion prevention. The IPS detects and blocks
inappropriate, incorrect, or anomalous activity on the network by comparing network traffic with
filters defined by the TippingPoint Threat Management Center (TMC). The X-Series uses filters to
scan traffic and recognize header or data content in the attack along with the protocol, service, and the
operating system or software the attack affects. The attack filter includes an action set, which defines
the reaction when the X-Series encounters packets that match attack filter parameters. In a broad
sense, the X-Series either drops matching packets or permits them.
X-Series Hardware Installation and Safety Guide V 2.5 1
Page 20

Chapter 1: Overview
The Stateful IP filtering provides service-level, stateful inspection of network traffic. It incorporates
filtering functionality to protect mission-critical applications. An administrator can use firewalls and
content filters that determines how the system handles traffic to and from a particular service. These
filters are specified by the source, destination, and service or protocol of the traffic.
The X-Series is responsible for the host and service database used by TippingPoint. The X-Series scans
your network and maintains an inventory of the active hosts and services on those hosts. System
administrators can use information collected by the X-Series to tune attack and IP filters.
Core Functionality
The X-Series provides the following core functionality:
• Optimized VPN connectivity — The TippingPoint X-Series allows inspection and control of traffic
• Enforcement of usage policies — The TippingPoint X-Series can be used to rate-limit applications,
• Multicast applications — The TippingPoint X-Series prioritizes real-time traffic and provides secure
• Detection and suppression — Unlike an intrusion detection system (IDS), the X-Series identifies and
• Filter customization — Through IP filters, exceptions, and attack filter creation, you can customize
• Real-time threat aggregation — The TMC collects threat information from throughout the world,
• Monitoring — Enterprise networks are in a constant state of change. Because enterprises regularly
The following sections describe each security application in more detail.
both inside and outside of VPN tunnels.
such as peer-to-peer file sharing applications, and includes an optimal Web Content Filter
subscription service.
connectivity for IP multicast traffic.
stops malicious traffic on the edge of the network.
TippingPoint to meet the specific needs of your enterprise.
converts it to attack filters, and distributes it to TippingPoint™ customers.
reconfigure and add new devices and services, TippingPoint monitors the network for these changes
using network discovery.
TippingPoint X-Series Environment
A single X-Series can be installed at the perimeter of your network, on your Intranet, or both.
All of the functionality of the X-Series runs directly on the device as the TippingPoint Operating
System (TOS). The Local Security Manager (LSM) is a web-browser client for managing your X-Series
that provides a graphical interface for on-the-box administration, configuration, and reporting. The
LSM accesses the functionality of the X-Series TOS.
You can also access the functionality of the X-Series using the Command Line Interface (CLI). The CLI
provides a command line interface for you to set values, run setup commands, and perform general
functions. However, the LSM provides most of the advanced functionality, such as reporting and filter
configuration.
The Security Management System (SMS) provides functionality beyond that provided by the LSM and
CLI. The SMS enables you to manage not one but multiple X-Series devices. The SMS coordinates all X-
2 X-Series Hardware Installation and Safety Guide V 2.5
Page 21

TippingPoint X-Series Environment
Series and IPS devices across your TippingPoint environment for administration, configuration, and
monitoring. Most importantly, the SMS includes enterprise-wide reporting and trend analysis.
From the SMS, you must set an overall profile of settings for each X-Series. The profile controls how the
device responds to traffic that matches filters. The X-Series is always in Active mode, and reacts to
traffic as specified by the appropriate filter.
The LSM and X-Series maintain a connection to the Threat Management Center (TMC) which is
located at TippingPoint headquarters. The TMC monitors 10,000 sensors around the world for the
latest attack information. As a result, your network can be continually inoculated.
Each component of the TippingPoint X-Series X-Series environment is discussed in more detail in the
following sections. Additional information about the TippingPoint X-Series is available in the
TippingPoint X-Series Concepts Guide.
Optimized VPN Connectivity
The X-Series VPN supports IPSec, L2TP, and PPTP tunneling protocols, as well as DES, 3DES, AES128/192/256, MD5, and SHA-1 encryption standards, and manual keyring, IKE with pre-shared keys,
and IKE with X.509 certificates. The device provides intrusion prevention inspection within VPN
tunnels, and can also prioritize traffic bi-directionally, both inside and outside of the VPN tunnels. The
VPN is hardware-accelerated, with an ASIC designed specifically for encrypting and decrypting
packets. To increase network security, you can configure VPN traffic to terminate in a security zone
that is separate from your internal LAN security zones. The X-Series also supports NAT deployment
within VPN tunnels.
Policy Enforcement
Policy enforcement includes the X-Series firewall, content filtering, and the TippingPoint IPS. The
TippingPoint X-Series has a stateful inspection firewall with a top-down rule evaluation engine. The
firewall can be used to rate-limit both security zones and applications, preventing excess bandwidth
consumption. TippingPoint offers a Content Filtering subscription service, which allows or denies web
sites by category. You can also manually allow or block URLs as exceptions to the defined rules. Content
Filtering is applied through firewall rules.
Security Zones and Network Interfaces
Security Zones enable you to define multiple Layer 2 VLANs. A security zone can be associated with a
single physical port, or can exist virtually by logical definition. Policy enforcement is applied to traffic
that moves between security zones. Network interfaces enable you to define Layer 3, and can represent
two or more security zones. Security zones can be defined through 802.1q VLAN tags.
TippingPoint IPS
TippingPoint X-Series devices use the TippingPoint IPS to protect your network by scanning,
detecting, and responding to network traffic according to the filters, action sets, and global settings
maintained on each device by a client. Each device provides intrusion prevention for your network
according to the amount of network connections and hardware capabilities.
X-Series Hardware Installation and Safety Guide V 2.5 3
Page 22

Chapter 1: Overview
The TippingPoint IPS is designed to handle the extremely high demands of carriers and high-density
data centers. Even while under attack, TippingPoint Intrusion Prevention Systems are extremely lowlatency network infrastructure ensuring switch-like network performance.
The TippingPoint IPS is an active network defense system that uses the Threat Suppression Engine
(TSE) to detect and respond to attacks. TippingPoint Intrusion Prevention Systems are optimized to
provide high resiliency, high availability security for remote branch offices, small-to-medium and large
enterprises and collocation facilities. Each TippingPoint can protect network segments from both
external and internal attacks. TippingPoint Intrusion Prevention Systems are extremely low-latency
network infrastructure ensuring switch-like network performance, even while under attack.
X-Series devices provide the following ethernet interfaces and traffic performance:
Table 1: X-Series System Performance
Model
X5, 25-user license 6 x 10/100 20,000 8 Mbps 50 Mbps 8 Mbps
X5, unlimited-user license 6 x 10/100 60,000 8Mbps 50 Mbps 8 Mbps
X505 4 x 10/100 130,000 50 Mbps 200 Mbps 50 Mbps
X506 6 x 10/100 130,000 50 Mbps 200 Mbps 50 Mbps
Ethernet
interfaces
Concurrent
sessions
IPS
Performance
Firewall
Performance
Tripl e D E S
Threat Suppression Engine
The Threat Suppression Engine (TSE) is a highly specialized, hardware-based intrusion prevention
platform consisting of state-of-the-art network processor technology and TippingPoint's own set of
custom ASICs. The TSE is a line-speed, hardware engine that contains all the functions needed for
Intrusion Prevention, including IP defragmentation, TCP flow reassembly, statistical analysis, traffic
shaping, flow blocking, flow state tracking and application-layer parsing of over 170 network protocols.
The TSE reconstructs and inspects flow payloads by parsing the traffic at the application layer. As each
new packet of the traffic flow arrives, the engine re-evaluates the traffic for malicious content. The
instant the engine detects malicious traffic, it blocks all current and all subsequent packets pertaining
to the traffic flow. The block of the traffic and packets ensures that the attack never reaches its
destination.
The combination of high-speed network processors and custom ASIC chips provide the basis for IPS
technology. These highly specialized traffic classification engines enable the IPS to filter with extreme
accuracy at gigabit speeds and microsecond latencies. Unlike software-based systems whose
performance is affected by the number of filters installed, the highly-scalable capacity of the hardware
engine enables thousands of filters to run simultaneously with no impact on performance or accuracy.
Local Security Manager
The Local Security Manager (LSM) is responsible for local administration, configuration, and
reporting for a single X-Series. Through the use of a graphical user interface (GUI), the LSM provides
the interfaces, tools, and processes that configure and monitor the X-Series. The LSM provides a subset
4 X-Series Hardware Installation and Safety Guide V 2.5
Page 23

TippingPoint X-Series Environment
of the management functionality offered through the Security Management System, which is designed
to manage several X-Series units from a central server.
You access the LSM through a web-browser (Internet Explorer V. 6+ and Firefox). The application
accesses the TippingPoint Operating System and settings stored on the device. Through the LSM, you
can manage settings directly to the device. You access each device to use the LSM. The LSM is not a
central application that accesses each device in turn, but resides as a graphical client for managing the
device.
For more detailed information, see the TippingPoint Local Security Manager User’s Guide.
Security Management System
The Security Management System (SMS) provides a global view and control for the TippingPoint XSeries environment. It is shipped as a management server and includes an enterprise desktop—the
workstation client—through which end users can perform secure, policy-based management tasks for
multiple X-Series devices. It provides facilities similar to the LSM, but supports a larger scope. Most
importantly, it provides enterprise-wide reporting.
Unlike the LSM, the SMS client provides a central application for managing multiple X-Series devices.
You can create multiple profiles of filters with settings to distribute to specific devices organized in
segment groups. You can also update the TOS software updates, Digital Vaccine packages, and
configuration settings for all devices through the SMS.
For more detailed information, see the TippingPoint Security Management System User’s Guide.
Threat Management Center
The Threat Management Center (TMC) is the central intelligence bureau for the TippingPoint X-Series
environment. The TMC performs comprehensive global reconnaissance for emerging threats. It rapidly
builds new filters and algorithms to suppress such threats.
The TMC offers the following end user service:
• Digital Vaccine — A subscription service that offers real-time continuous update capability. With
Digital Vaccine, the X-Series devices pull new threat filters from the TMC on a routine basis.
• Software Updates — Updated versions of the software you can use for your TippingPoint X-Series
system, including the Local Security Manager and Security Management System
• Documentation — Downloadable PDF files of software and hardware documentation, including
release notes
• Technical Support — Details information for contacting and receiving technical support for user
issues
X-Series Hardware Installation and Safety Guide V 2.5 5
Page 24

Chapter 1: Overview
6 X-Series Hardware Installation and Safety Guide V 2.5
MGM
Page 25

2
Prepare the Site
This chapter discusses the general requirements necessary to prepare your site for the installation of
the TippingPoint X-Series System.
Overview
Before installing the new TippingPoint X-Series, you need to gather materials and prepare the network
and hardware site. To carefully and correctly install the component(s) you must read through all
preparation instructions and requirements. This chapter includes general guideline information for all
TippingPoint devices.
The chapter consists of the following sections:
• “
• “Rack and Clearance Requirements” on page 12
• “Ven ti la ti on a nd Lo cat ion” on page 12
• “Environmental Requirements” on page 12
• “Reliable Earthing” on page 12
• “System Grounding Requirements” on page 12
• “Unpack the TippingPoint System” on page 13
Safety Requirements” on page 8
For specific information on the models, review the specific chapters per model:
• Chapter 3‚ “
• Chapter 4‚ “TippingPoint X506 Overview”
• Chapter 5‚ “TippingPoint X710 Overview”
TippingPoint X505 Overview”
X-Series Hardware Installation and Safety Guide V 2.5 7
Page 26

Chapter 2: Prepare the Site
Safety Requirements
If not properly installed and maintained, electrical circuitry equipment like the TippingPoint X-Series
can pose dangers to both personnel and equipment. To prevent accidents, adhere to the following
guidelines to ensure general safety:
• Remove any dust from the area and keep the area around the TippingPoint X-Series system clear
and dust-free during and after installation.
• Wear safety glasses if you are working under conditions that might be hazardous to your eyes.
• There are no serviceable parts inside.
Class A Notices
The following notices apply to the X505 and X506, which are Class A devices.
Note: This Class A digital apparatus meets all requirements of the Canadian
Interference-Causing Equipment Regulations.
Cet appareil numérique de la classe A respecte toutes les exigences du
Réglement sure le matériel brouilleur du Canada.
Note: This device complies with part 15 of the FCC Rules. Operation is subject to
the following two conditions:
• This device may not cause harmful interference.
• This device must accept any interference received, including interference that may cause
undesired operation.
Note: This is a Class A product based on the standard of the Voluntary Control
Council for Interference by Information Technology Equipment (VCCI). If this
equipment is used in a domestic environment, radio disturbance may arise. When
such trouble occurs, the user may be required to take corrective actions.
Statement 191
8 X-Series Hardware Installation and Safety Guide V 2.5
Page 27

General Guidelines
See the following list of cautions and warnings for further safety guidelines.
CAUTION: Before you start the installation procedures, read this entire chapter for
important information and safety warnings.
Use proper electromagnetic static discharge (ESD) protection whenever you handle
TippingPoint equipment.
Do not power up the equipment while you install and connect the system.
If you connect the power improperly and then apply power, the cards and chassis could be
damaged.
The equipment rack must be anchored to an unmovable support to prevent it from falling
over when one or more servers are extended in front of it on slide assemblies. The
equipment rack must be installed according to the manufacturer’s instructions. You must
also consider the weight of any other device installed in the rack.
Safety Requirements
You are responsible for installing an AC power disconnect for the entire rack unit. This main
disconnect must be readily accessible, and it must be labeled as controlling power to the
entire unit, not just to the server.
Make sure that the chassis cooling fans run continuously while the system is powered.
CAUTION: Make sure all cards are completely connected to the backplane. Improper
connections can disrupt system operation
Use of controls or adjustments or performance of procedures other than those specified
herein may result in hazardous radiation exposure.
X-Series Hardware Installation and Safety Guide V 2.5 9
Page 28

Chapter 2: Prepare the Site
WARNING: This warning symbol means danger. It tells you how to avoid physical
injury to people or equipment. For people, injury includes anything from temporary
conditions, such as pain, to irreversible conditions such as death. For equipment,
injury means anything requiring repair. Warnings tell you what you should or
should not do, and the consequences of not heeding the warning.
Only trained and qualified personnel should install, replace, or service this
equipment. Disconnect the system before servicing.
This product requires short-circuit (overcurrent) protection, to be provided as part
of the building installation. Install only in accordance with national and local
wiring regulations.
Do not operate the system unless all cards and top cover is in place.
To reduce the risk of fire, use only No. 26 AWG or larger telecommunication line
cord.
There is a risk of explosion if the battery is replaced by an incorrect type. Dispose
of used batteries according to the instructions.
This equipment is to be installed and maintained by service personnel only as
defined by AS/NZS 3260 Clause 1.2.14.3 Service Personnel.
This unit is intended for installation in restricted access areas only.
When connecting equipment to IT power distributions, Phase to phase voltage
must not exceed 240 V.
The ports on the front of the TippingPoint are Safety Extra-Low Voltage (SELV)
circuits. SELV circuits should only be connected to other SELV circuits.
Do not work on the system or connect or disconnect cables during periods of
lightning activity.
To prevent the unit from overheating, do not operate it in an area that exceeds the
maximum recommended ambient temperature of 104° F (40° C). To prevent airflow
restriction, allow at least 3 inches (7.6 cm) of clearance around the ventilation
openings.
10 X-Series Hardware Installation and Safety Guide V 2.5
Page 29

Safety Requirements
WARNING: Only trained and qualified personnel should install, replace, or
service this equipment. Disconnect the system before servicing.
Read all of the installation instructions before you connect the system to its power
source.
Never touch uninsulated telephone wires or terminals unless the telephone line
has been disconnected at the network interface.
The TippingPoint X506 uses double pole/neutral fusing. Use caution when
servicing this product.
For protection against fire on the TippingPoint X506, use replacement fuses with
the following type and rating only: 5x20 mm, 2a, 250 volts, fast acting.
Do not operate the system unless all faceplates and covers are in place.
Faceplates and cover panels serve three important functions: they prevent
exposure to hazardous voltages and currents inside the chassis; they contain
electromagnetic interference (EMI) that could disrupt other equipment; and they
direct the flow of cooling air through the chassis.
To prevent personal injury or damage to the chassis, lift the chassis from
underneath its lower edge.
Enclosed racks may have higher ambient temperatures than open racks. Ensure
enclosed racks ambient temperatures do not exceed maximum recommended
ambient temperature of 104
°F (40 °C).
X-Series Hardware Installation and Safety Guide V 2.5 11
Page 30

Chapter 2: Prepare the Site
Rack and Clearance Requirements
Tipping Point recommends that you mount the TippingPoint X-Series X505 and X506 models in a
standard 19-or 23-inch rack. The vertical hole spacing on the rack rails must meet standard EIA-310-C
requirements, which call for a one inch (2.54 cm) spacing.
Ventilation and Location
Ventilation and proper location are essential to the proper operation of the TippingPoint X-Series
system. Follow these guidelines to ensure that the TippingPoint X-Series receives adequate ventilation,
• When mounting this unit in a partially filled rack, load the rack from the bottom to the top, with the
heaviest component at the bottom of the rack.
• Ensure that the unit is positioned properly on the rack
• There should be a minimum clearance of three inches (7.62 cm) at the ventilation openings.
• When mounting this unit in an enclosed or multi-rack assembly, the operating ambient
temperature of the rack may be greater than that of the room. Ensure that the maximum ambient
temperature of 104° F (40 ° C) is not exceeded.
Environmental Requirements
In order for the TippingPoint X-Series to run properly, your environment must meet the proper
criteria.
The following table lists the recommendations for temperature, humidity, and altitude settings for the
Service Provider (SP) environment.
Table 2 - 1: Environmental Requirements for the TippingPoint X-Series
Environmental
Specifications
Temperature 0 to 40 ° C (32 to 104 ° F) — Operating
-20 to 80° C (-4 to 176 ° F) — Storage
Humidity 5 to 95% (non-condensing)
Altitude No degradation up to 13K feet above sea level
Reliable Earthing
Ensure the mounting rack is reliably connected to earth.
Description
System Grounding Requirements
Damage from Electromagnetic Static Discharge (ESD) can occur when electronic components are
improperly handled. This damage can result in complete or intermittent system failures. Proper ESD
12 X-Series Hardware Installation and Safety Guide V 2.5
Page 31

protection is required whenever you handle equipment. It is not necessary to open the TippingPoint
chassis to add or remove any components.
Unpack the TippingPoint System
Each system chassis is securely packaged in a shipping box.
CAUTION: ESD can damage the TippingPoint X-Series if you do not take necessary
precautions. Installation and maintenance personnel should be properly grounded using
ground straps to eliminate the risk of ESD damage to the equipment.
Use caution when opening the TippingPoint X-Series boxes.
To unpack the TippingPoint X-Series system
STEP 1 Inspect the packing container. If you see any damage or other signs of mishandling, inform
both the local freight provider and TippingPoint before unpacking. Your freight provider can
provide you with the procedures necessary to file a claim for damages.
Unpack the TippingPoint System
STEP 2 Carefully open the box.
STEP 3 Remove all packing material.
STEP 4 Verify the contents in the shipping package. Compare the packing list to your shipment and to
your order. If items are missing, contact your TippingPoint sales or field representative.
STEP 5 Remove the chassis from the box.
STEP 6 Open the accessory kit. It contains the cables, documentation, and management software.
STEP 7 Inspect all the equipment inside for damage. If you think any equipment might be damaged,
contact your freight provider for how to lodge a damage claim and contact your TippingPoint
sales or field representative for instructions.
Please Recycle: The shipping materials are recyclable. Please save for later use
or dispose of them appropriately.
X-Series Hardware Installation and Safety Guide V 2.5 13
Page 32

Chapter 2: Prepare the Site
14 X-Series Hardware Installation and Safety Guide V 2.5
Page 33

3
TippingPoint X505 Overview
This chapter provides an overview of the TippingPoint X505.
Overview
This chapter describes the components, chassis, requirements, and installation of the TippingPoint XSeries X505 device.
Prior to installation, you should also obtain the TippingPoint Command Line Interface Reference. After
installation of the components, you will need to run through the TippingPoint Setup Wizard as part of
the installation and configuration procedures.
This chapter includes the following topics:
• “
• “Technical Specifications” on page 18
• “Hardware Installation and Configuration” on page 19
Chassis Overview” on page 16
X-Series Hardware Installation and Safety Guide V 2.5 15
Page 34

Chapter 3: TippingPoint X505 Overview
Chassis Overview
The TippingPoint X505 system comprises a 1.15 rack unit chassis that uses a front-access architecture.
The X505 has four ports supporting connections to two to four network security zones. The X505 is
rack-mountable on a 19- or 23-inch rack.
The following images shows the front and back chassis panels for a TippingPoint X505.
Figure 3 - 1: TippingPoint X505 - Front Panel
Management Port
Console Port
Figure 3 - 2: TippingPoint X505 - Back Panel
USB
Port
LAN
Port
Power
WAN
Port
The following sections describe the TippingPoint X505 hardware components.
Chassis Features
The chassis offers features for viewing the status of the system and modifying settings. There is a pushbutton power switch with an LED on the front panel. This push-button turns the unit’s DC voltage
power on and off. There is also a power switch located at the back of the chassis, which controls the AC
power to the power supply.
16 X-Series Hardware Installation and Safety Guide V 2.5
Page 35

LEDs
The following table describes the LEDs.
Table 3 - 3: LED Descriptions
LED Color State Description
Chassis Overview
Act ivit y
LED
Link (left
side LED)
100 LED Green 100 Mbps Indicates the connection speed is 100 Mbps
No light No traffic Indicates that the port is not passing data.
Blinking
amber
No light No link Indicates that the port is not linked.
Green Active Indicates that the port is connected and ready for data.
No light 10 Mbps Indicates the connection speed is 10 Mbps
Data Traffic Indicates that port is passing data.
The management port has its own set of LEDs:
Table 3 - 4: Management Port LED Descriptions
LED Color State Description
Link No light No traffic Indicates that the port is not linked.
Green Link available Indicates that the port is linked.
Activity Blinking amber Data Traffic Indicates that the port is passing data.
X-Series Hardware Installation and Safety Guide V 2.5 17
Page 36

Chapter 3: TippingPoint X505 Overview
Technical Specifications
The following section describes the hardware, technical, and software specification for the
TippingPoint X505.
• “
Hardware Specifications” on page 18
• “Technical Specifications” on page 19
• “Software Specifications” on page 19
Hardware Specifications
The following table lists hardware specifications for the TippingPoint X-Series X505.
Table 3 - 5: TippingPoint X-Series X505 Specifications
Specification Description
Dimensions 17.25 in x 12.25 in x 2 in (43.8
cm x 31.1 cm x 4.4 cm)
Weight 9 lbs (2.2 kg)
Management Interface One 10/100 Ethernet interface.
Serial Interface RJ45 interface - COM1,
115200 baud, parity: none,
flow control: none
Network Interfaces Four 10/100 NIC copper
interfaces, supporting up to
50 Mbps of traffic.
Power Requirements 100 to 240 VAC, 1-2 amperes
@ 50-60 Hz
Maximum Power
Consumption: 64 Watts
Service Provider operating
requirements
Temperature 0 to 40 ° C (32 to104 ° F) —
Operating
-20 to 70° C (-4 to 158 ° F) —
Storage
Altitude No degradation up to 13K feet
Humidity 5% to 95% (non-condensing)
18 X-Series Hardware Installation and Safety Guide V 2.5
Page 37

Hardware Installation and Configuration
Technical Specifications
The following table lists technical specifications on the X505 hardware.
Table 3 - 6: TippingPoint X505 Hardware Specifications
Specification Detail Description
Internal hardware Processor Pentium 4
1 GB IDE Flash drive
1 GB 266 MHz DDR
Primary cache: 32 KB
Secondary cache: 1 MB
Power consumption Max 64W
External interfaces One 10/100 Ethernet, one USB
port, 4 copper ports
Software requirements and network management requirement TP Security Management
Software (SMS) Version 2.5
and above.
Maximum data rates (per port) 50 Mbps
Software Specifications
To run the Intrusion Prevention System (IPS), you need one of the following software applications/
devices.
Table 3 - 7: Software Specifications for the TippingPoint X-Series IPS
Specification Description
TippingPoint X-Series Security Management
System (SMS) Software, Version 2.5 and above.
(optional)
1 Windows-based PC running Windows 9x,
NT, 2000, XP, or ME
SMS can optionally be used to manage multiple
TippingPoint Intrusion Prevention Systems.
Must be attached to your network via serial
port.
Hardware Installation and Configuration
The TippingPoint X-Series X505 ships with the following pre-installed components:
• One custom processor card with four Ethernet ports
• A host processor to control, configure, monitor, and store network traffic
• A 1GB IDE Flash Drive
• A three-fan cooling unit.
X-Series Hardware Installation and Safety Guide V 2.5 19
Page 38

Chapter 3: TippingPoint X505 Overview
This chapter includes the following sections:
• “
Install the TippingPoint Chassis” on page 20
• “Connect the power” on page 21
• “Complete Initial Setup Configuration” on page 21
• “Connect the X505 to the Internet” on page 22
• “Register the TippingPoint X505” on page 22
Install the TippingPoint Chassis
To install the TippingPoint you must do the following:
• Determine Total Rack Space
• Bolt the Device to the Rack
Determine Total Rack Space
Before you install the chassis, you should determine the total rack space that is required to install your
system. The required rack space will increase if you plan to install multiple systems.
The X505 system fits in either a 19-inch or a 23-inch wide rack. See the following table for individual
rack space requirements.
Table 3 - 8: Rack Space Requirements
Requirement Configuration Type Min/Max Number of Chassis
Physical Size of Rack
(Total number of chassis must be
< or = 42 RUs). Each TippingPoint
X-Series
X505 requires 1RU.
Network Equipment Building
Systems (NEBS)
(Total number of chassis must
generate: < or = 1372 Watts)
Typical Maximum of 9 chassis on a 7-foot rack.
Typical 13 chassis generating < or = 105 Watts
Bolt the Device to the Rack
Use the following guidelines when bolting the TippingPoint X-Series to the rack:
WARNING: To prevent bodily injury when mounting or servicing this unit in a
rack, you must take special precautions to ensure that the system remains stable.
20 X-Series Hardware Installation and Safety Guide V 2.5
Page 39

Hardware Installation and Configuration
• If the rack comes with stabilizing devices, install the stabilizers before mounting or servicing the
unit in the rack.
• If the rack is partially filled, load the rack from the bottom to the top with the heaviest component at
the bottom of the rack.
• If you plan to expand your system to include additional TippingPoint X-Series systems in the future,
allow space in the rack for additions. During the initial installation, keep in mind the weight
distribution and stability of the rack.
Connect the power
STEP 1 Locate the male power inlet on the back of the chassis.
STEP 2 Plug one end of a standard female power plug into the power inlet
STEP 3 Plug the other end into an AC outlet or power strip and press the power switch to power on.
CAUTION: The X505 may take several minutes to boot up. When the Status LED is steady
green, the device is powered up and ready to use.
Complete Initial Setup Configuration
STEP 1 Configure your computer’s network connection to receive an IP address by DHCP.
STEP 2 Use an Ethernet cable to connect your computer to the X505 LAN port. Your computer will
receive an IP address from the X505 device.
STEP 3 With your computer’s internet browser, connect to the X505 default LAN address (https://
192.168.1.254).
STEP 4 The OBE wizard opens.
STEP A Accept the default security level of Level 2.
STEP B Specify the SuperUser account information at the prompt:
•User Name
•Password
• Confirm password
STEP C Accept the default settings in the rest of the Setup Wizard by clicking No when
prompted.
STEP D Depending on your internet connectivity, you may need to update your WAN set-
tings in the Virtual Interfaces setup screen.
• If you use DHCP to connect to your Internet provider, accept the default WAN
settings.
• If you use PPPoE, enter your ISP user name and password.
• If your ISP assigns a static IP address, select Static as the external interface type
and enter the IP address, subnet mask, and default gateway information.
X-Series Hardware Installation and Safety Guide V 2.5 21
Page 40

Chapter 3: TippingPoint X505 Overview
STEP E Define additional user accounts if desired.
At this point, your initial configuration of the X505 is complete. You can use the LSM to change
settings in the future.
Note: When you connect to the LAN address, your browser may display a
security certificate warning. Accept the certificate and continue with the
configuration procedure.
Connect the X505 to the Internet
STEP 1 Use an Ethernet cable to connect the X505 WAN port to your router. If the X505 is
configured to receive its WAN IP address by DHCP, PPPoE, PPTP, or L2TP, the device
connects to your service provider. This may take a minute or more.
STEP 2 Check the status of the external virtual interface with the LSM or the CLI. If active, the inter-
face will be in “Up” status, and will have an IP address.
STEP 3 Use your web browser to connect to an external URL, such as http://www.tippingpoint.com
If you can see the web site, your internet connection is active, and you can register your
device and configure other features of the X505.
Register the TippingPoint X505
To activate your license, you must register the TippingPoint X505 on the 3Com eSupport Web site
(http://esupport.3com.com). Have the following information available:
• Product code 3CRTPX505-73.
• Serial number. You can find the serial number:
— in the Local Security Manager (LSM), on the System Summary page.
— with the Command Line Interface (CLI) show version command.
— on the bottom of the X505 unit, on the bar code sticker.
• Product purchase information:
— Company Purchased From
—Purchase Location City
— Warranty Start Date in the format mm/dd/yyyy
22 X-Series Hardware Installation and Safety Guide V 2.5
Page 41

4
TippingPoint X506 Overview
This chapter provides an overview of the TippingPoint X506.
Overview
This chapter describes the components, chassis, requirements, and installation of the TippingPoint XSeries X506 device.
Prior to installation, you should also obtain the TippingPoint X-Series Command Line Interface
Reference. After installation of the components, you will need to run through the TippingPoint Setup
Wizard as part of the installation and configuration procedures.
This chapter includes the following topics:
• “
• “Technical Specifications” on page 25
• “Hardware Installation and Configuration” on page 27
Chassis Overview” on page 24
X-Series Hardware Installation and Safety Guide V 2.5 23
Page 42
Chapter 4: TippingPoint X506 Overview
COM
USB
Chassis Overview
The TippingPoint X506 system comprises a 1 rack unit chassis that uses a front-access architecture.
The X506 has six ports supporting up to six network segments and is rack-mountable on a 19- or 23inch rack.
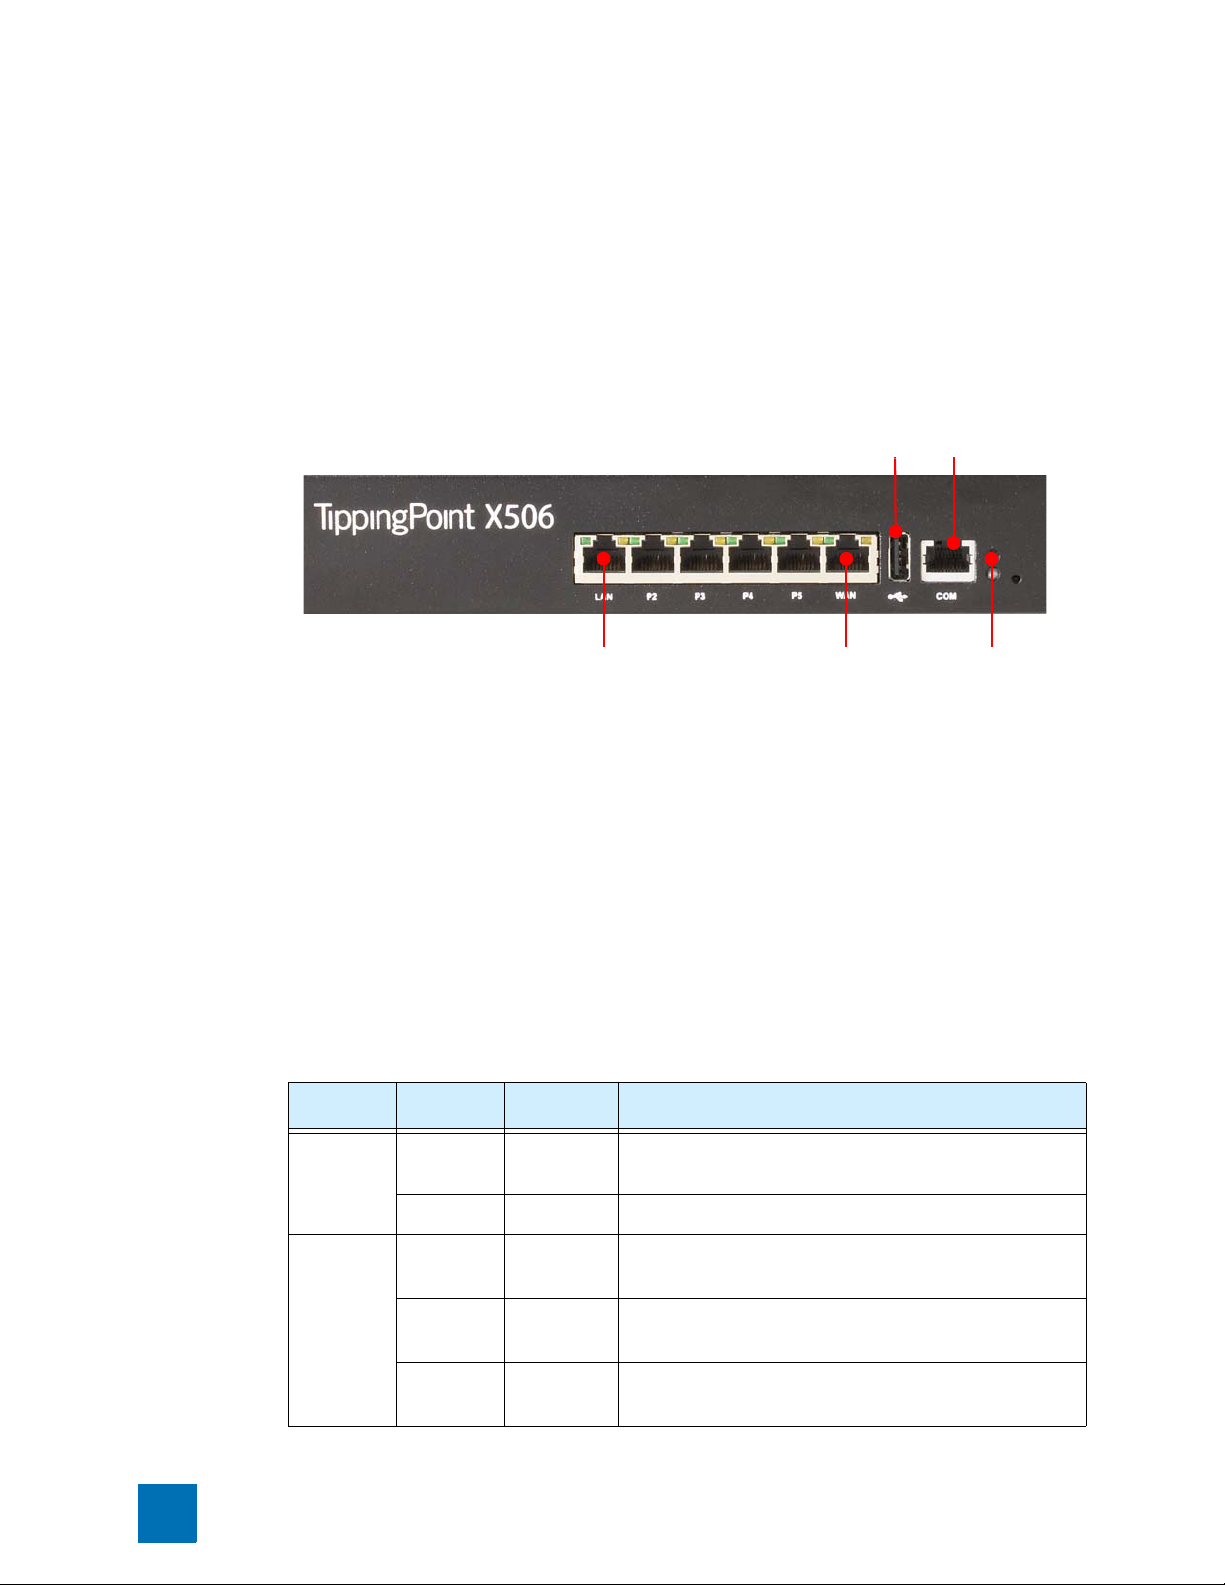
The following image shows the front chassis interface for a TippingPoint X506.
Figure 4 - 1: TippingPoint X506 - Front Panel
Port
Port
LAN Port WAN Port
The following sections describe the TippingPoint X506 hardware components.
Chassis Features
The chassis offers features for viewing the status of the system and modifying settings.
LEDs
There are two LEDs on the front panel, one for status and one for power.
Status
LEDs
The following table describes the LEDs.
Table 4 - 2: LED Descriptions
LED Color State Description
Top LE D F la shi ng
green
Solid green Operational Indicates that the system is powered and operating properly.
Bottom
LED
24 X-Series Hardware Installation and Safety Guide V 2.5
Flashing Establishing
Solid green Operational Indicates that all configured VPN connections are established
Solid green,
slow flash
Bootup Indicates that the system is booting up.
Indicates that the VPN connection is in the process of being
VPN
Established
with traffic
established.
successfully.
Indicates that the established VPN connections are passing
data traffic.
Page 43

Technical Specifications
The following table describes the Link and Activity LEDs that are at the upper left and right corners of
each segment connector.
Table 4 - 3: Segment Port LED Descriptions
LED Color State Description
Link (left side
LED)
Activity (right
side LED)
No light No link Indicates that the port is not linked.
Green Active‘ Indicates that the port is connected and ready
No light No traffic Indicates that the port is not passing data.
Blinking amber Data Traffic Indicates that port is passing data.
Technical Specifications
The following section lists the hardware, technical, and software specification for the TippingPoint
X506.
• “
Hardware Specifications” on page 25
• “Technical Specifications” on page 26
• “Software Specifications” on page 27
Hardware Specifications
for data.
The following table lists hardware specifications for the TippingPoint X-Series X506.
Table 4 - 4: TippingPoint X-Series X506 Specifications
Specification Description
Dimensions 17.25 in x 12.25 in x 1.75 in
(43.8 cm x 31.1 cm x 4.4 cm)
Weight 9 lbs (2.2 kg)
Management Interface One 10/100 Ethernet interface.
Serial Interface RJ45 interface - COM1,
115200 baud, parity: none,
flow control: none
Network Interfaces Six 10/100 Ethernet copper
interfaces, supporting up to
50 Mbps of traffic.
X-Series Hardware Installation and Safety Guide V 2.5 25
Page 44

Chapter 4: TippingPoint X506 Overview
Table 4 - 4: TippingPoint X-Series X506 Specifications
Power Requirements 100 to 240 VAC, 1-2 amperes
Specification Description
@ 50-60 Hz
Maximum Power
Consumption: 64 Watts
Service Provider operating
requirements
Temperature 0 to 40 ° C (32 to104 ° F) —
Operating
-20 to 70° C (-4 to 158 ° F) —
Storage
Altitude No degradation up to 13K feet
Humidity 5% to 95% (non-condensing)
Technical Specifications
The following table lists technical specifications for the X506 hardware.
Table 4 - 5: TippingPoint X506 Hardware Specifications
Specification Detail Description
Internal hardware Processor 1.5 Ghz Celeron M
512 MB Compact Flash drive
1 GB PC2100 DDR
Primary cache: 32 KB
Secondary cache: 1 MB
Power consumption Max 64W
External interfaces One 10/100 Ethernet, one USB
Software requirements and network management requirement TP Security Management
Maximum data rates (per port) 50 Mbps
WARNING: The X506 uses double pole/neutral fusing. To protect against risk of
fire, replace X506 fuses only with the same type of fuse (5x20mm, 2A, 250 volts,
fast-acting). Disconnect the power source before replacing the fuses.
26 X-Series Hardware Installation and Safety Guide V 2.5
port, 6 copper ports
Software (SMS) Version 2.5
and above.
Page 45

Hardware Installation and Configuration
Software Specifications
To run the TippingPoint X-SeriesIntrusion Prevention System (IPS), you need one of the following
software applications/devices.
Table 4 - 6: Software Specifications for the TippingPoint X-Series IPS
Specification Description
TippingPoint X-Series Security Management
System (SMS) Software, Version 2.5 and above.
(optional)
1 Windows-based PC running Windows 9x,
NT, 2000, XP, or ME
SMS can optionally be used to manage multiple
TippingPoint Intrusion Prevention Systems.
Must be attached to your network via serial
port.
Hardware Installation and Configuration
This chapter includes the following sections:
Install the TippingPoint Chassis” on page 27
• “
• “Connect the power” on page 28
• “Complete Initial Setup Configuration” on page 28
• “Connect the X506 to the Internet” on page 29
• “Register the TippingPoint X506” on page 30
Install the TippingPoint Chassis
To install the TippingPoint you must do the following:
• Determine Total Rack Space
• Bolt the Device to the Rack
Determine Total Rack Space
Before you install the chassis, you should determine the total rack space that is required to install your
system. The required rack space will increase if you plan to install multiple systems.
The TippingPoint X-Series system fits in either a 19-inch or a 23-inch wide rack. See the following table
for individual rack space requirements.
Table 4 - 7: Rack Space Requirements
Requirement Configuration Type Min/Max Number of Chassis
Physical Size of Rack
(Total number of chassis must be
< or = 42 RUs). Each TippingPoint
X-Series
X506 requires 1RU.
Typical Maximum of 9 chassis on a 7-foot rack.
X-Series Hardware Installation and Safety Guide V 2.5 27
Page 46
Chapter 4: TippingPoint X506 Overview
Table 4 - 7: Rack Space Requirements
Requirement Configuration Type Min/Max Number of Chassis
Network Equipment Building
Systems (NEBS)
(Total number of chassis must
generate: < or = 1372 Watts)
Typical 13 chassis generating < or = 105 Watts
Bolt the Device to the Rack
Use the following guidelines when bolting the TippingPoint X-Series to the rack:
WARNING: To prevent bodily injury when mounting or servicing this unit in a
rack, you must take special precautions to ensure that the system remains stable.
• If the rack comes with stabilizing devices, install the stabilizers before mounting or servicing the unit
in the rack.
• If the rack is partially filled, load the rack from the bottom to the top with the heaviest component at
the bottom of the rack.
• If you plan to expand your system to include additional TippingPoint X-Series systems in the future,
allow space in the rack for additions. During the initial installation, keep in mind the weight
distribution and stability of the rack.
Connect the power
STEP 1 Locate the male power inlet on the back of the chassis.
STEP 2 Plug one end of a standard female power plug into the power inlet
STEP 3 Plug the other end into an AC outlet or power strip and press the power switch to power on.
CAUTION: The X506 may take several minutes to boot up. When the Status LED is steady
green, the device is powered up and ready to use.
Complete Initial Setup Configuration
STEP 1 Configure your computer’s network connection to receive an IP address by DHCP.
STEP 2 Use an Ethernet cable to connect your computer to the X506 LAN port. Your computer will
receive an IP address from the X506 device.
STEP 3 With your computer’s internet browser, connect to the X506 default LAN address (https://
192.168.1.254).
STEP 4 The OBE wizard opens.
28 X-Series Hardware Installation and Safety Guide V 2.5
Page 47

Hardware Installation and Configuration
STEP A Accept the default security level of Level 2.
STEP B Specify the SuperUser account information at the prompt:
•User Name
•Password
• Confirm password
STEP C Accept the default settings in the rest of the Setup Wizard by clicking No when
prompted.
STEP D Depending on your internet connectivity, you may need to update your WAN set-
tings in the Virtual Interfaces setup screen.
• If you use DHCP to connect to your Internet provider, accept the default WAN
settings.
• If you use PPPoE, enter your ISP user name and password.
• If your ISP assigns a static IP address, select Static as the external interface type
and enter the IP address, subnet mask, and default gateway information.
STEP E Define additional user accounts if desired.
At this point, your initial configuration of the X506 is complete. You can use the LSM to change
settings in the future.
Note: When you connect to the LAN address, your browser may display a
security certificate warning. Accept the certificate and continue with the
configuration procedure.
Connect the X506 to the Internet
STEP 1 Use an Ethernet cable to connect the X506 WAN port to your router. If the X506 is
configured to receive its WAN IP address by DHCP, PPPoE, PPTP, or L2TP, the device
connects to your service provider. This may take a minute or more.
STEP 2 Check the status of the external virtual interface with the LSM or the CLI. If active, the inter-
face will be in “Up” status, and will have an IP address.
STEP 3 Use your web browser to connect to an external URL, such as http://www.tippingpoint.com
If you can see the web site, your internet connection is active, and you can register your
device and configure other features of the X506.
X-Series Hardware Installation and Safety Guide V 2.5 29
Page 48

Chapter 4: TippingPoint X506 Overview
Register the TippingPoint X506
To activate your license, you must register the TippingPoint X506 on the 3Com eSupport Web site
(http://esupport.3com.com). Have the following information available:
• Product code 3CRTPX506-96.
• Serial number. You can find the serial number:
— in the Local Security Manager (LSM), on the System Summary page.
— with the Command Line Interface (CLI) show version command.
• Product purchase information:
— Company Purchased From
—Purchase Location City
— Warranty Start Date in the format mm/dd/yyyy
30 X-Series Hardware Installation and Safety Guide V 2.5
Page 49

A
Connector and Pinout Specifications
This appendix provides connector and pinout information for the TippingPoint X-Series X-Series
systems.
Port Connectors
The TippingPoint X-Series supports the RJ-45 connectors, which have pinouts shown below.
The following figure displays an RJ-45 connector.
Figure A - 1: RJ-45 Connector
The following table describes the pinout information for a 1000 Base-T RJ-45 connector.
Table A - 1: RJ-45 1000 Base-T Connector Pinouts
Pin Number Signal Name
1 Twisted Pair 1 positive (TP1+)
2 Twisted Pair 1 negative (TP1-)
3 Twisted Pair 2 positive (TP2+)
4 Twisted Pair 3 positive (TP3+)
5 Twisted Pair 3 negative (TP3-)
X-Series Hardware Installation and Safety Guide V 2.5 31
Page 50

Appendix A: Connector and Pinout Specifications
Table A - 1: RJ-45 1000 Base-T Connector Pinouts
Pin Number Signal Name
6 Twisted Pair 2 negative (TP2-)
7 Twisted Pair 4 positive (TP4+)
8 Twisted Pair 4 negative (TP4-)
.The following table describes the pinout information for a 10/100 RJ-45 connector.
Table A - 2: RJ-45 10/100 Base-T Connector Pinouts
Pin Number Signal Name
1Transmit positive
2 Transmit negative
3 Receive positive
4Unused
5Unused
6 Receive negative
7Unused
8Unused
DB-9 Connector Pinout
The following figure displays a -DB-9 connector. This connector is used in the X505 only.
Figure A - 2: DB-9 Connector
The following table details the pinout information for the DB-9 connector.
Table A - 3: DB-9 Connector Pinouts
Pin Number Signal Name
1 Data Carrier Detect (DCD)
2 Receive Data (RxD)
3Transmit Data (TxD)
32 X-Series Hardware Installation and Safety Guide V 2.5
Page 51

Table A - 3: DB-9 Connector Pinouts
Pin Number Signal Name
4 Data Terminal Ready (DTR)
5Ground (GND)
6Data Set Ready (DSR)
7Request to Send (RTS)
8 Clear to Send (CTS)
9Ring Indicator (RI)
Port Connectors
X-Series Hardware Installation and Safety Guide V 2.5 33
Page 52

Appendix A: Connector and Pinout Specifications
34 X-Series Hardware Installation and Safety Guide V 2.5
Page 53

Index
A
action set 1
C
chassis
X505 20
X506 27
Class A digital apparatus 8
Command Line Interface (CLI) 2
configuration
OBE Setup Wizard 21, 28
connecting to Internet 22, 29
connector & pinout specifications 31
content filtering 3
core functionality 2
customer support xv
D
DB-9 (COM) 32
DB-9 pinout 32
Digital Vaccine 5
E
electromagnetic static discharge (ESD) 9,
12
encryption standards 3
environmental requirements 12
ethernet interfaces 4
F
FCC rules 8
firewall 3
G
guide
conventions xi
customer support xv
organization x
overview ix
related documentation xiii
target audience ix
H
hardware specifications
X505 18
X506 25
I
installation
environmental requirements 12
location 12
prepare the site 7
rack and clearance 12
reliable earthing 12
safety requirements 8
system grounding 12
unpacking 13
venti lation 12
installing chassis
bolting device to rack 20, 28
X505 20
X506 27
IPS core functionality 2
IPSec 3
L
L2TP 3
LEDs
X505 17
X506 24
Local Security Manager (LSM) 2, 4
location 12
M
management processor connectors
DB-9 (COM) 32
DB-9 pinout 32
port connectors 31
P
PPTP 3
prepare the site 7
environmental requirements 12
location 12
rack and clearance 12
reliable earthing 12
safety requirements 8
system grounding 12
unpacking 13
venti lation 12
R
rack and clearance requirements 12
rack space
X505 20
X506 27
registering
X505 22
X506 30
related documentation xiii
reliable earthing 12
requirements
environmental 12
rack and clearance 12
reliable earthing 12
system grounding 12
S
Safety Extra-Low Voltage (SELV) 10
safety requirements 8
ESD 9
Security Management System (SMS) 2, 5,
19, 27
Security Zones 3
software specifications
X505 19
X506 27
Stateful IP filtering 2
system grounding requirements 12
T
Threat Management Center (TMC) 5
Threat Suppression Engine (TSE) 4
traffic performance 4
U
unpacking 13
V
venti lation 12
VPN connectivity 3
X505 15
X506 23
X-Series core functionality 2
X-Series Hardware Installation and Safety Guide V 2.5 35
Page 54

Index
36 X-Series Hardware Installation and Safety Guide V 2.5
 Loading...