

Page 1
P H A S E R® 8 6 0
COLOR PRINTER
Advanced Features
and Troubleshooting Guide
Page 2

Page 3

Phaser® 860 Color Printer
Advanced Features and Troubleshooting Manual
June 2001
Page 4

Copyright © Xerox Corporation. Unpublished rights reserved under the copyright laws of the United States.
Contents of this publication may not be reproduced in any form without permission of Xerox Corporation.
®
, PhaserShare®, ColorStix
Phaser
Ethernet
®
, the stylized X, and XEROX® are registered trademarks of Xerox Corporation. PhaserLink™,
PhaserPort™, PhaserPrint™, PhaserSym™, PhaserTools™, infoSMART™, and the TekColor™ name are
trademarks of Xerox Corporation. TekColor Care
®
, Acrobat®, Acrobat® Reader, Illustrator®, PageMaker®, Photoshop®, and PostScript®, ATM®, Adobe
Adobe
Garamond
®
, Birch®, Carta®, Mythos®, Quake®, and Tekton® are registered trademarks and Adobe Jenson™,
Adobe Brilliant Screens™ technology, and IntelliSelect™ are trademarks of Adobe Systems Incorporated or its
subsidiaries which may be registered in certain jurisdictions.
®
, LaserWriter®, LocalTalk®, Macintosh®, Mac® OS, AppleTalk®, TrueType2®, Apple Chancery®,
Apple
®
Chicago
, Geneva®, Monaco®, and New York® are registered trademarks, and QuickDraw™ is a trademark of
Apple Computer Incorporated.
Marigold™ and Oxford™ are trademarks of AlphaOmega Typography.
Avery™ is a trademark of Avery Dennison Corporation.
®
Software is a registered trademark of FTP Software, Incorporated.
FTP
®
PCL
and HP-GL® are registered trademarks of Hewlett-Packard Corporation.
Hoefler Text was designed by the Hoefler Type Foundry.
ITC Avant Guard Gothic
Chancery
®
, and ITC Zapf Dingbats® are registered trademarks of International Typeface Corporation.
®
Bernhard Modern™, Clarendon™, Coronet™, Helvetica™, New Century Schoolbook™, Optima™, Palatino™,
Stempel Garamond™, Times™, and Univers™ are trademarks of Linotype-Hell AG and/or its subsidiaries.
®
MS-DOS
and Windows® are registered trademarks of Microsoft Corporation.
Wingdings™ in TrueType
Corporation and TrueType is a registered trademark of Apple Computer, Inc.
Albertus™, Arial™, Gill Sans™, Joanna™, and Times New Roman™ are trademarks of Monotype Corporation.
®
Antique Olive
is a registered trademark of M. Olive.
Eurostile™ is a trademark of Nebiolo.
®
and NetWare® are registered trademarks of Novell, Incorporated.
Novell
®
, Sun Microsystems®, and Sun Microsystems Computer Corporation® are registered trademarks of Sun
Sun
Microsystems, Incorporated.
®
SPARC
is a registered trademark of SPARC International, Incorporated. SPARCstation™ is a trademark of
SPARC International, Incorporated, licensed exclusively to Sun Microsystems, Incorporated.
®
is a registered trademark in the US and other countries, licensed exclusively through X/Open Company
UNIX
Limited.
Other marks are trademarks or registered trademarks of the companies with which they are associated.
®
PANTONE
Colors generated by the Phaser 860 Color Printer are four- and/or three-color process simulations
and may not match PANTONE-identified solid color standards. Use current PANTONE Color Reference Manuals
for accurate colors.
PANTONE Color simulations are only obtainable on this product when driven by qualified Pantone-licensed
software packages. Contact Pantone, Inc. for a current list of qualified licensees. All trademarks noted herein are
either the property of Xerox Corporation, Pantone, Inc., or their respective companies. © Pantone, Inc., 1988.
®II
, the TekColor® icon, Made For Each Other®, DocuPrint®, WorkSet®,
SM
and RealSUPPORTSM are service marks of Xerox Corporation.
, ITC Bookman®, ITC Lubalin Graph®, ITC Mona Lisa®, ITC Symbol®, ITC Zapf
®
format is a product of Microsoft Corporation. WingDings is a trademark of Microsoft
ii Phaser 860 Color Printer
Page 5

Contents
Advanced Features . . . . . . . . . . . . . . . . . . . . . . . . . . . . . . . . . . . . . . . . . . . . . . . . 1
Print quality modes . . . . . . . . . . . . . . . . . . . . . . . . . . . . . . . . . . . . . . . . . . . . . . . . . . . . . . . . . . 2
TekColor™ color corrections . . . . . . . . . . . . . . . . . . . . . . . . . . . . . . . . . . . . . . . . . . . . . . . . . . . . . 3
Secure prints, proof prints, and saved prints. . . . . . . . . . . . . . . . . . . . . . . . . . . . . . . . . . . . . . . . 4
Separation pages . . . . . . . . . . . . . . . . . . . . . . . . . . . . . . . . . . . . . . . . . . . . . . . . . . . . . . . . . . . . . . 6
Collating copies . . . . . . . . . . . . . . . . . . . . . . . . . . . . . . . . . . . . . . . . . . . . . . . . . . . . . . . . . . . . . . . 6
N-up. . . . . . . . . . . . . . . . . . . . . . . . . . . . . . . . . . . . . . . . . . . . . . . . . . . . . . . . . . . . . . . . . . . . . . . . . 7
Booklet printing . . . . . . . . . . . . . . . . . . . . . . . . . . . . . . . . . . . . . . . . . . . . . . . . . . . . . . . . . . . . . . . 8
Negative and mirror images . . . . . . . . . . . . . . . . . . . . . . . . . . . . . . . . . . . . . . . . . . . . . . . . . . . . . 9
Scaling . . . . . . . . . . . . . . . . . . . . . . . . . . . . . . . . . . . . . . . . . . . . . . . . . . . . . . . . . . . . . . . . . . . . . . . 9
Watermarks. . . . . . . . . . . . . . . . . . . . . . . . . . . . . . . . . . . . . . . . . . . . . . . . . . . . . . . . . . . . . . . . . . 10
Image smoothing . . . . . . . . . . . . . . . . . . . . . . . . . . . . . . . . . . . . . . . . . . . . . . . . . . . . . . . . . . . . . 10
Color and Color Sampler Charts . . . . . . . . . . . . . . . . . . . . . . . . . . . . . . . . . . . . 11
Color Sampler Charts. . . . . . . . . . . . . . . . . . . . . . . . . . . . . . . . . . . . . . . . . . . . . . . . . . . . . . . . . . 11
Printing a color sampler chart from the printer’s front panel . . . . . . . . . . . . . . . . . . . . . . 12
Printing the colors from an application. . . . . . . . . . . . . . . . . . . . . . . . . . . . . . . . . . . . . . . . 13
Printing the color sampler charts with CentreWare IS. . . . . . . . . . . . . . . . . . . . . . . . . . . . 13
Printing the color sampler charts with utility files . . . . . . . . . . . . . . . . . . . . . . . . . . . . . . . 14
PANTONE Colors . . . . . . . . . . . . . . . . . . . . . . . . . . . . . . . . . . . . . . . . . . . . . . . . . . . . . . . . . . . . . 15
Printing PANTONE Colors from the color selection book . . . . . . . . . . . . . . . . . . . . . . . . . 15
Printing printer-specific PANTONE Colors. . . . . . . . . . . . . . . . . . . . . . . . . . . . . . . . . . . . . . 15
Installing the PANTONE Color files . . . . . . . . . . . . . . . . . . . . . . . . . . . . . . . . . . . . . . . . . . . 16
Printing the PANTONE Color Chart from a Macintosh. . . . . . . . . . . . . . . . . . . . . . . . . . . . 16
Printing the PANTONE Color Chart from a PC . . . . . . . . . . . . . . . . . . . . . . . . . . . . . . . . . . 17
PhaserPrint Plug-in for Photoshop . . . . . . . . . . . . . . . . . . . . . . . . . . . . . . . . . . 18
Installing the plug-in . . . . . . . . . . . . . . . . . . . . . . . . . . . . . . . . . . . . . . . . . . . . . . . . . . . . . . . 18
Using the plug-in . . . . . . . . . . . . . . . . . . . . . . . . . . . . . . . . . . . . . . . . . . . . . . . . . . . . . . . . . 18
Fonts. . . . . . . . . . . . . . . . . . . . . . . . . . . . . . . . . . . . . . . . . . . . . . . . . . . . . . . . . . . 20
Resident typefaces (PostScript) . . . . . . . . . . . . . . . . . . . . . . . . . . . . . . . . . . . . . . . . . . . . . . . . . 20
Resident typefaces (PCL5C) . . . . . . . . . . . . . . . . . . . . . . . . . . . . . . . . . . . . . . . . . . . . . . . . . . . . 23
Downloading fonts . . . . . . . . . . . . . . . . . . . . . . . . . . . . . . . . . . . . . . . . . . . . . . . . . . . . . . . . . . 23
Printing a list of resident fonts . . . . . . . . . . . . . . . . . . . . . . . . . . . . . . . . . . . . . . . . . . . . . . . . . 25
Advanced Features and Troubleshooting Manual i
Page 6

Printer Management. . . . . . . . . . . . . . . . . . . . . . . . . . . . . . . . . . . . . . . . . . . . . . 27
CentreWare IS Printer Management software . . . . . . . . . . . . . . . . . . . . . . . . . . . . . . . . . . . . . . 27
Usage Profile . . . . . . . . . . . . . . . . . . . . . . . . . . . . . . . . . . . . . . . . . . . . . . . . . . . . . . . . . . . . . . . . . 28
Email notification . . . . . . . . . . . . . . . . . . . . . . . . . . . . . . . . . . . . . . . . . . . . . . . . . . . . . . . . . . . . . 28
Operational features . . . . . . . . . . . . . . . . . . . . . . . . . . . . . . . . . . . . . . . . . . . . . . . . . . . . . . . . . . . 30
The printer’s Startup Page . . . . . . . . . . . . . . . . . . . . . . . . . . . . . . . . . . . . . . . . . . . . . . . . . 30
Protected mode for the front panel menus . . . . . . . . . . . . . . . . . . . . . . . . . . . . . . . . . . 31
SysStart Job execution . . . . . . . . . . . . . . . . . . . . . . . . . . . . . . . . . . . . . . . . . . . . . . . . . . . . .32
Manual feed timeout . . . . . . . . . . . . . . . . . . . . . . . . . . . . . . . . . . . . . . . . . . . . . . . . . . . . . . .33
Front panel intensity . . . . . . . . . . . . . . . . . . . . . . . . . . . . . . . . . . . . . . . . . . . . . . . . . . . . . . . 33
Front panel contrast . . . . . . . . . . . . . . . . . . . . . . . . . . . . . . . . . . . . . . . . . . . . . . . . . . . . . . . . 34
Intelligent Ready mode . . . . . . . . . . . . . . . . . . . . . . . . . . . . . . . . . . . . . . . . . . . . . . . . . . . . . 34
Front panel language . . . . . . . . . . . . . . . . . . . . . . . . . . . . . . . . . . . . . . . . . . . . . . . . . . . . . . .35
Selecting the source for cleaning pages . . . . . . . . . . . . . . . . . . . . . . . . . . . . . . . . . . . . . . . 35
Automatic tray switching . . . . . . . . . . . . . . . . . . . . . . . . . . . . . . . . . . . . . . . . . . . . . . . . . . . . 35
Printer Utilities. . . . . . . . . . . . . . . . . . . . . . . . . . . . . . . . . . . . . . . . . . . . . . . . . . . 36
Utility files on the printer’s CD-ROM . . . . . . . . . . . . . . . . . . . . . . . . . . . . . . . . . . . . . . . . . . . . . .36
Utility files on the Xerox web site . . . . . . . . . . . . . . . . . . . . . . . . . . . . . . . . . . . . . . . . . . . . . . . 37
Downloading utility files from a Macintosh . . . . . . . . . . . . . . . . . . . . . . . . . . . . . . . . . . . . . . . 38
Using the Apple Printer Utility to perform other tasks . . . . . . . . . . . . . . . . . . . . . . . . . . . . 39
Downloading utility files from a PC . . . . . . . . . . . . . . . . . . . . . . . . . . . . . . . . . . . . . . . . . . . . . 40
Troubleshooting Phaser 860 Printers . . . . . . . . . . . . . . . . . . . . . . . . . . . . . . . . 43
Getting Help . . . . . . . . . . . . . . . . . . . . . . . . . . . . . . . . . . . . . . . . . . . . . . . . . . . . . . . . . . . . . . . . . 43
Indicator light problems . . . . . . . . . . . . . . . . . . . . . . . . . . . . . . . . . . . . . . . . . . . . . . . . . . . . . . . 46
Front panel error messages . . . . . . . . . . . . . . . . . . . . . . . . . . . . . . . . . . . . . . . . . . . . . . . . . . . . 47
Problems with automatic two-sided printing . . . . . . . . . . . . . . . . . . . . . . . . . . . . . . . . . . . . . 50
Problems printing on labels . . . . . . . . . . . . . . . . . . . . . . . . . . . . . . . . . . . . . . . . . . . . . . . . . . . . . 51
Print quality problems . . . . . . . . . . . . . . . . . . . . . . . . . . . . . . . . . . . . . . . . . . . . . . . . . . . . . . . . 52
Printing problems . . . . . . . . . . . . . . . . . . . . . . . . . . . . . . . . . . . . . . . . . . . . . . . . . . . . . . . . . . . . 54
Preventing media jams . . . . . . . . . . . . . . . . . . . . . . . . . . . . . . . . . . . . . . . . . . . . . . . . . . . . . . 55
Specifications for the Phaser 860 Color Printer . . . . . . . . . . . . . . . . . . . . . . . . 57
Regulatory Information for Phaser 860 Printers . . . . . . . . . . . . . . . . . . . . . . . 59
Canadian EMC (Electromagnetic Compatibility) regulatory standards . . . . . . . . . . . . . . . . . . 59
Declaration of conformity. . . . . . . . . . . . . . . . . . . . . . . . . . . . . . . . . . . . . . . . . . . . . . . . . . . . . . . 60
FCC Class B device . . . . . . . . . . . . . . . . . . . . . . . . . . . . . . . . . . . . . . . . . . . . . . . . . . . . . . . . . . . . 61
Index . . . . . . . . . . . . . . . . . . . . . . . . . . . . . . . . . . . . . . . . . . . . . . . . . . . . . . . . . . 63
ii Phaser 860 Color Printer
Page 7

Advanced Features
Advanced Features
Your Phaser 860 Color Printer comes with many useful features to help you create the best
possible printed documents. You can access the printer features in the printer driver,
which you use when you send a print job to the printer. To ensure that you have access to
all of the printer features, make sure you have installed the printer driver that comes on
your Phaser 860 Printer CD-ROM. Updated printer drivers are also available on the Xerox
web site:
www.xerox.com/officeprinting
Note
You can also set some of the features on the printer’s front panel. The settings in
the printer driver override the front panel settings.
The following features are described in this manual:
■
Print quality mode — see page 2
■
TekColor correction — see page 3
■
Secure prints, proof prints, and saved prints — see page 4
■
Separation pages — see page 6
■
Collating copies — see page 6
■
N-up (multiple pages on a single sheet of paper) — see page 7
■
Booklet printing — see page 8
■
Negative and mirror images — see page 9
■
Scaling — see page 9
■
Watermarks — see page 10
■
Image smoothing — see page 10
For additional information on these features, refer to the Windows printer driver’s online
help.
Refer to the Phaser 860 Color Printer User Guide for information about two-sided printing,
printing on legal paper, or printing on the following special media:
■
Phaser High-Resolution Photo Paper
■
Phaser Labels and Phaser Business Cards
■
Phaser 860 Transparencies
■
Envelopes
■
Letterhead paper
For information about fonts, refer to page 20.
For information about using color, refer to page 11.
Advanced Features and Troubleshooting Manual 1
Page 8

Advanced Features
Print quality modes
You can choose between different print quality modes to obtain the best combination of
speed and print quality for your job.
Print quality mode Maximum speed*
Fast Color
■ Fastest color print mode
■ Ink-saving mode since prints lighter than Standard mode
■ Useful for text and business graphics
■ Ideal for previewing work
■ Produces fast, high-quality transparencies
■ Can select Darken Text to have the printer add a small amount
of color ink to the black text to make it darker and sharper
Standard
■ General-purpose mode for color printing
■ Produces vibrant, saturated prints with smooth color
transitions
■ Suitable for most office uses and images
■ Best quality mode for printing transparencies
Enhanced
■ Balance of high quality and fast speed
■ Increases color saturation compared to Standard mode
■ Smoothest and brightest large-area fills
■ Useful for printing paper copies of overhead presentations
High Resolution/Photo
■ Highest-quality color prints
■ Richest color and near-photographic detail
■ Makes very fine lines, sharp edges, and small text sharper
■ 1200 x 600 dpi
■ Printer must have the DP Features Set
(or must be a DX model)
16 ppm Paper
7 ppm Transparency
10 ppm Paper
3.5 ppm Transparency
6 ppm Paper
3.5 ppm Paper
‡
‡
* Approximate number of pages per minute based on prints with margins of .5 in. or greater; does not include image processing
time.
‡
Transparencies are printed in Standard mode even if you select Enhanced or High Resolution/Photo mode.
You can specify the print quality in a supported driver:
Windows 95 / Windows 98 PostScript driver:
■
On the
Windows 2000 PostScript driver:
■
Setup
tab, select a print quality by clicking or dragging the scroll bar.
On the Paper/Quality tab, select a print quality by clicking or dragging the scroll bar.
Windows NT PostScript driver:
■
On the
LaserWriter 8.6
■
In the
Print Quality
Print
the desired mode for
tab, select a print quality by clicking or dragging the scroll bar.
8.7 driver:
or
dialog box, select the
Quality
Print Quality/Color
.
pull-down menu, then select
2 Phaser 860 Color Printer
Page 9

Advanced Features
TekColor™ color corrections
You can select a color correction to match particular press specifications or simulate your
computer screen’s colors. Otherwise, select Automatic to let the printer automatically pick
the best color correction for elements in your document.
Color correction Description
Automatic
sRGB Display
Vivid Color
None
SWOP Press
Euroscale Press
Commercial Press
SNAP Press
DIC
Toyo
FujiProof
Black and White
■ Automatically optimizes the color correction for each element (text,
graphics, and photographs) on the page
■ Closely approximates the colors on a standard display screen
■ Produces the brightest possible colors and makes blues appear less
purple
■ Doesn’t use a color correction so the colors you specified in the
application for your job are not altered
■ Use when you have specified colors from the PANTONE
■ Matches U.S. press standards using the Specification for Web Offset
®
Color Chart
Publications
■ Emulates the Euroscale 4-color process press mode
■ Emulates a 4-color process commercial press mode
■ Matches the standards for printing on uncoated and newsprint papers
using the Specifications for Non-Heat Advertising Printing
■ Matches Dai Nippon printing inks on coated paper
■ Matches commercial Toyo printing inks on coated paper
■ Matches the Fuji Color Art System for commercial North American
proofs
■ Produces a black-and-white version of a document
■ Colors converted to grayscale
■ Use to print page masters for photocopying in black-and-white
You can specify the color correction in a supported driver:
■
Windows 95 / Windows 98 PostScript driver:
On the TekColor tab, select the desired color correction. Some of the color corrections
are grouped under Office Color and Press Match Color.
■
Windows 2000 / Windows NT PostScript driver:
On the TekColor tab, select the desired color correction. Some of the color corrections
are grouped under Office Color and Press Match Color.
■
LaserWriter 8.6 or 8.7 driver:
In the Print dialog box, select the Print Quality/Color pull-down menu, then select
the desired correction for Color.
Advanced Features and Troubleshooting Manual 3
Page 10

Advanced Features
Secure prints, proof prints, and saved prints
You can choose one of the following special job types:
■
Secure Print: Print a confidential document; the password-protected job is stored on
the printer’s hard disk drive. The job prints only after you enter the password on the
printer's front panel.
■
Proof Print: Print only one copy of the job so you can proof the copy. If you want to
print the remaining copies, select the job name on the printer's front panel.
■
Saved Print: Store the job on the hard disk so you can print it on demand. The job
isn't deleted after printing.
Note
The printer must have a hard disk installed (and the DP Feature Set) to do secure
prints, proof prints, and saved prints. These jobs are stored on the hard drive and
remain in the printer even when it is powered off.
Printing secure print, proof print, and saved print jobs
You specify that the job is a secure print, proof print, or saved print job in a supported
driver:
■
Windows 95 / Windows 98 PostScript driver:
On the Setup tab, choose the job type. For a secure print, also enter a four-digit
password to assign to this job. For proof prints and saved prints, also enter the name
you want to give this job.
■
Windows 2000 / Windows NT driver:
On the Output Options tab, choose the job type. For a secure print, also enter a
four-digit password to assign to this job. For proof prints and saved prints, also enter
the name you want to give this job.
■
LaserWriter 8.6 or 8.7 driver:
In the Print dialog box, select the Job Type pull-down menu, then choose the job type.
For a secure print, also enter a four-digit password to assign to this job. For saved
prints, also enter the name you want to give this job.
To print a secure job, specify the password on the printer's front panel:
1. With Menus highlighted, press the Scroll Down key to scroll to Printable Pages.
2. Press the OK key.
3. If necessary, scroll to Secure Print Jobs.
4. Press the OK key.
5. Press the Scroll Down or Scroll Up key to scroll to the correct number for the first
digit of the password, then press the OK key to accept that digit.
6. Repeat step 5 for the second, third, and fourth digits.
7. If necessary, press the Scroll Down key to scroll to Print.
8. Press the OK key to print the job with that password.
4 Phaser 860 Color Printer
Page 11

Advanced Features
To print a saved print job or the remaining copies of a proof print job, select the job name
on the printer's front panel:
1. With Menus highlighted, press the Scroll Down key to scroll to Printable Pages.
2. Press the OK key.
3. If necessary, scroll to Proof Print Jobs or Saved Print Jobs.
4. Press the OK key.
5. Scroll until you find your job name.
6. Press the OK key.
7. If necessary, scroll to Print.
8. Press the OK key.
9. Scroll to the desired number of copies.
10. Press the OK key to print the job.
Deleting secure print, proof print, and saved print jobs
Secure print, proof print, and saved print jobs remain on the printer’s hard drive even
when you turn off the printer. After printing, secure print and proof print jobs are
automatically deleted. However, if you decide you don’t want to print the secure job or
don’t want to print the remaining copies of the proof job, delete the job using the printer’s
front panel. You can also delete saved print jobs.
Note
You will overwrite a proof print, saved print, or secure print job if you send a
second job of the same type with the same name or password.
To delete a secure job, specify the password of the job on the printer's front panel:
1. With Menus highlighted, press the OK key.
2. Press the Scroll Down key to scroll to the Printable Pages Menu.
3. Press the OK key.
4. If necessary, scroll to Secure Print Jobs.
5. Press the OK key.
6. Press the Scroll Down or Scroll Up key to scroll to the correct number for the first
digit of the password, then press the OK key to accept that digit.
7. Repeat step 6 for the second, third, and fourth digits.
8. Scroll to Delete.
9. Press the OK key to delete the job with that password.
Advanced Features and Troubleshooting Manual 5
Page 12

Advanced Features
To delete a saved print job or the remaining copies of a proof print job, select the job name
on the printer's front panel:
1. With Menus highlighted, press the OK key.
2. Press the Scroll Down key to scroll to the Printable Pages Menu.
3. Press the OK key.
4. If necessary, scroll to Proof Print Jobs or Saved Print Jobs.
5. Press the OK key.
6. Scroll until you find your job name.
7. Press the OK key.
8. Scroll to Delete.
9. Press the OK key to delete the job.
Separation pages
You can have the printer insert a separation page (a divider page) after a print job, between
copies of a print job, or between individual pages of a print job. You can also specify the
tray/source to use for the separation pages.
You can specify separation pages in a supported driver:
■
Windows 95 / Windows 98 PostScript driver:
On the Output Options tab, select the location of the separation pages and, if desired,
the source.
■
Windows 2000 / Windows NT driver:
On the Output Options tab, select the location of the separation pages and, if desired,
the source.
■
LaserWriter 8.6 or 8.7 driver:
In the Print dialog box, select the Advanced Media Handling pull-down menu, then
select the location of the separation pages and, if desired, the source.
Collating copies
When you print multiple copies of a print job, you can have it collated at the printer. Each
copy (pages 1, 2, and 3, etc.) is printed before the next copy. Otherwise, the printer prints
all copies of page 1, then all copies of page 2, etc.
Note
To use the Collate feature, the printer must have the optional hard drive and the
DP Feature Set.
6 Phaser 860 Color Printer
Page 13

Advanced Features
Note
Many applications have a collate option when you select Print in the
application. Collation done at the printer is faster than collation performed by an
application. For faster printing of a collated job, select collation in the printer
driver (as described below) and do not select collation in the application.
You can specify collation in a supported driver:
■
Windows 95 / Windows 98 PostScript driver:
On the Output Options tab, check the Collate checkbox.
■
Windows 2000 / Windows NT driver:
On the Output Options tab, check the Collate checkbox.
■
LaserWriter 8.6 or 8.7 driver:
In the Print dialog box, select the Advanced Media Handling pull-down menu, then
select whether to have Quick Collate on or off.
N-up
When printing a multiple-page document, you can choose to print more than one page on
a single sheet of paper. You can choose to print one, two, four, six, nine, or sixteen pages
per sheet. When you print more than one page on a sheet, you can also print a border
around each page.
You can select N-up in a supported driver:
■
Windows 95 / Windows 98 PostScript driver:
On the Setup tab, click the More Layout Options button, then choose the number of
pages per sheet in the More Layout Options dialog box.
■
Windows 2000 driver:
On the Layout tab, choose the number of pages per sheet from the drop-down list.
■
Windows NT driver:
On the Advanced tab under Document Options, select the desired Page Layout (N-up)
Option.
■
LaserWriter 8.6 or 8.7 driver:
In the Print dialog box, select the Layout pull-down menu, then select the number of
pages per sheet.
Advanced Features and Troubleshooting Manual 7
Page 14
Advanced Features
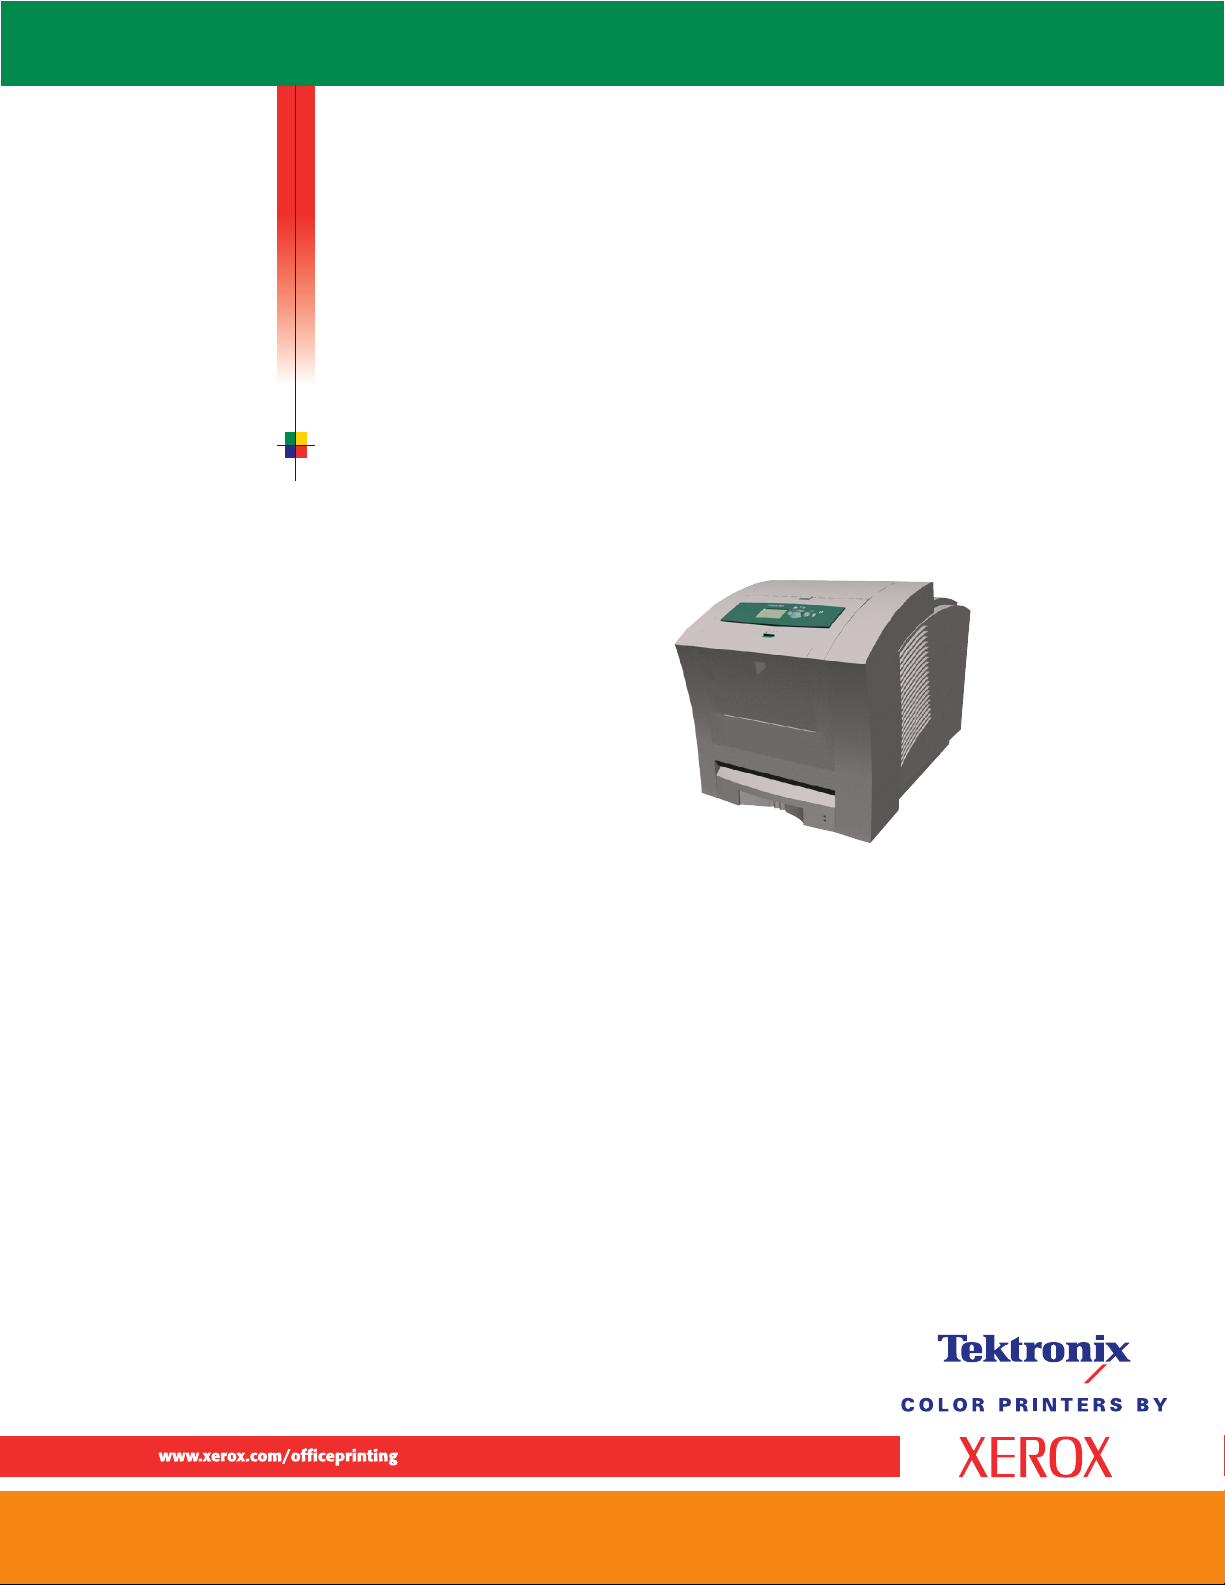
Booklet printing
You can print a document in the form of a small book. The printer automatically reduces
each page image by 50 percent and prints two pages per sheet of paper. The pages are
printed in the correct order so that you can fold and staple the pages to create a booklet.
0726-67
Note
To use this feature, the printer must have the DP Feature Set. You can create
booklets for any paper size that is supported for 2-sided (duplex) printing.
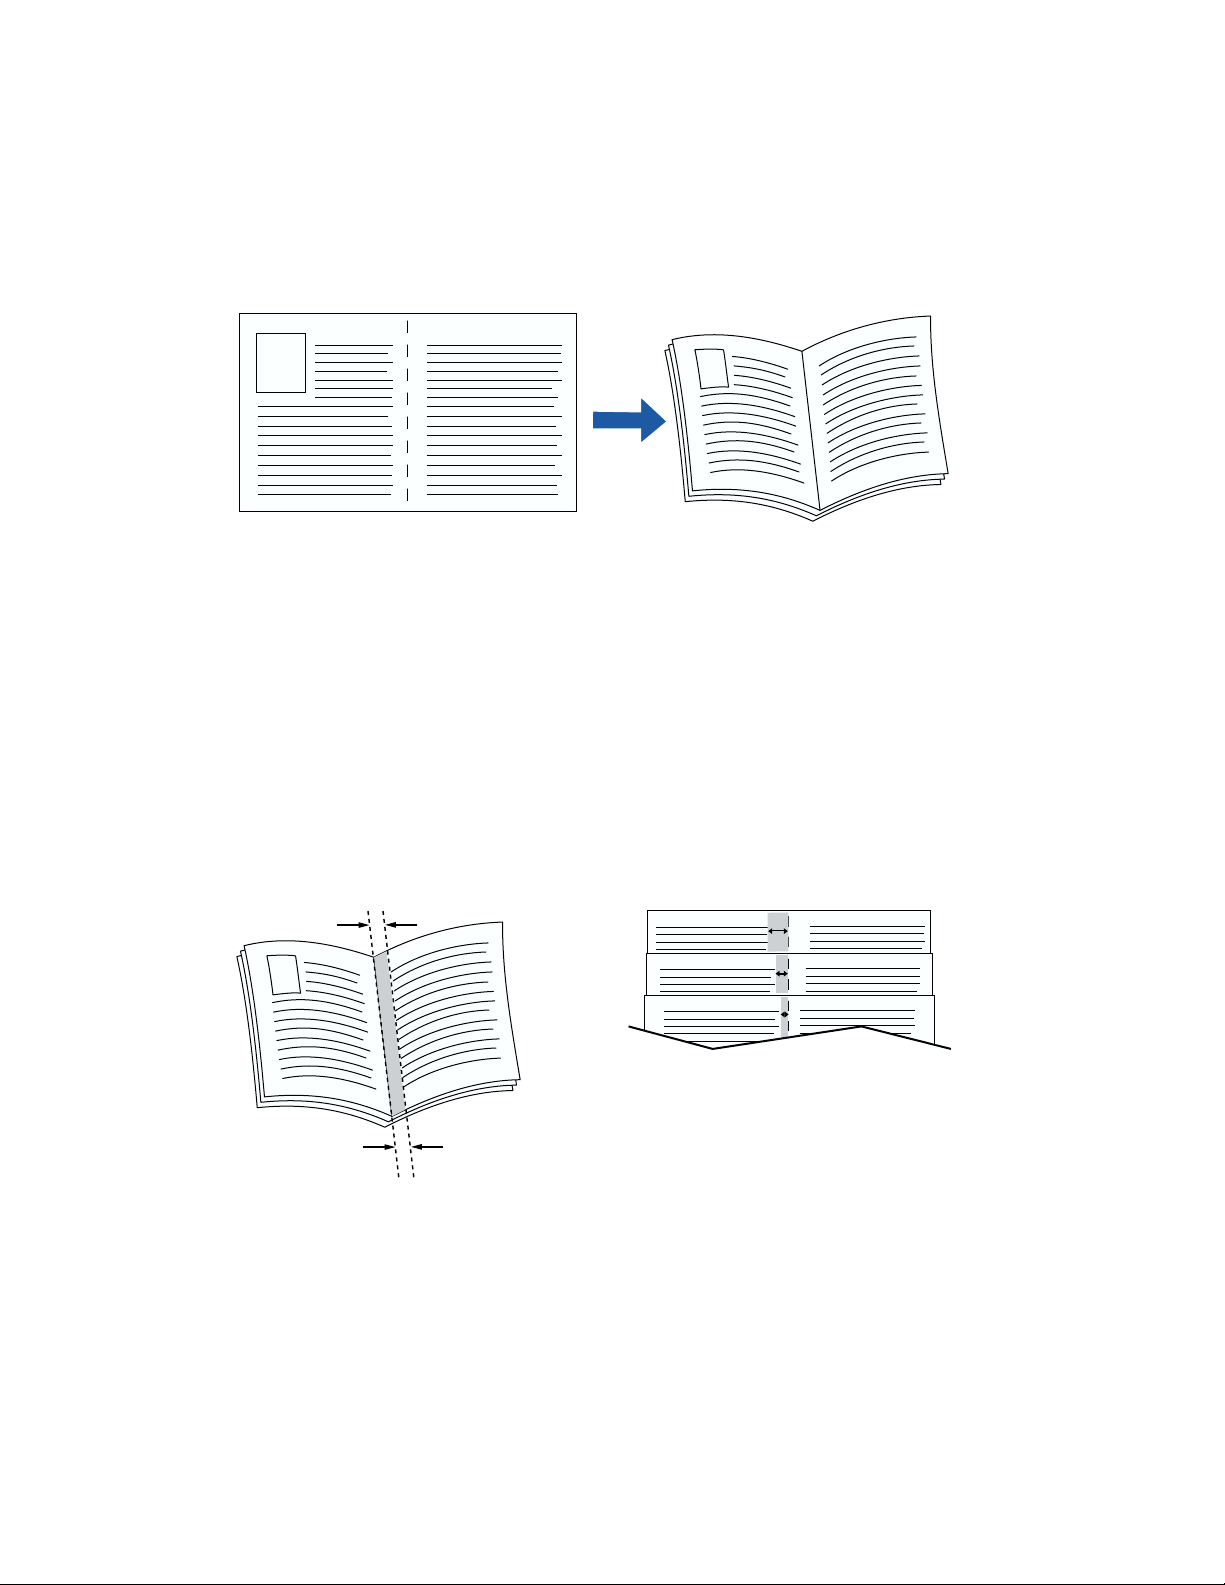
When you choose Print Booklet Style, you can also print a border around each page and
specify the creep and gutter. The gutter is the horizontal distance from the fold to the page
image (in points). The creep is the distance that page images are shifted inward (in 10ths of
a point); this compensates for the thickness of the folded paper, which otherwise would
cause the page images to shift slightly outward.
Gutter Creep
0726-76
0726-68
You can select booklet printing in a supported driver:
■
Windows 95 / Windows 98 PostScript driver:
On the Setup tab, click the More Layout Options button, then check the Print Booklet
Style checkbox in the More Layout Options dialog box.
■
Windows 2000 driver:
On the Layout tab, choose Booklet from the drop-down list.
8 Phaser 860 Color Printer
Page 15

Advanced Features
Negative and mirror images
You can print your pages as a negative image (reverses the light and dark areas in your
printed image) and/or mirror image (flips images horizontally on pages when printed).
You can select negative or mirror images in a supported driver:
■
Windows 95 / Windows 98 PostScript driver:
On the Setup tab, click the More Layout Options button, then click the Print as a
Negative Image and/or Print as a Mirror Image checkbox in the More Layout Options
dialog box.
■
Windows 2000 driver:
From the Layout tab or Paper/Quality tab, click the Advanced button. In the dialog
box under Document Options and PostScript Options, select either Yes or No for
Mirrored Output and Negative Output.
■
Windows NT driver:
On the Advanced tab under Document Options and PostScript Options, select either
Yes or No for Mirrored Output.
■
LaserWriter 8.6 or 8.7 driver:
From the File menu, select Page Setup, choose PostScript Options from the
pull-down menu, and then select Invert Image (to print a negative image) or Flip
Horizontal (to print a mirror image).
Scaling
You can reduce or enlarge your page images when they are printed. You select a scaling
value between 25 and 400 percent. The default is 100 percent.
You can scale the pages by using the supported driver:
■
Windows 95 / Windows 98 PostScript driver:
On the Setup tab, click the More Layout Options button, then specify the percentage
to scale in the More Layout Options dialog box.
■
Windows 2000 driver:
From the Layout tab or Paper/Quality tab, click the Advanced button. In the dialog
box under Graphic, select the desired percentage for Scaling.
■
Windows NT driver:
On the Advanced tab under Graphic, select the desired percentage for Scaling.
■
LaserWriter 8.6 or 8.7 driver:
From the File menu, select Page Setup and then specify the percentage in the box
after Scale.
Advanced Features and Troubleshooting Manual 9
Page 16

Advanced Features
Watermarks
A watermark is text (independent of that provided by the printing application) that is
printed on the first page or every page of the document. You can create a watermark or edit
an existing watermark’s text, color, location, and angle. You can also choose to print the
watermark only on the first page, print the watermark in the background, or print the text
of the watermark as an outline (instead of filled text).
Note
Not all applications support watermark printing.
You can select, create, and edit watermarks using a supported driver:
■
Windows 95 / Windows 98 PostScript driver:
On the Setup tab, click the More Layout Options button, and then click the
Watermark button to display the Watermarks dialog box.
■
Windows 2000 driver:
From the Layout tab or Paper/Quality tab, click the Advanced button. In the dialog
box, select the desired Watermark.
Image smoothing
Image Smoothing blends adjacent colors in low-resolution images for smoother color
transitions. For example, use Image Smoothing to improve the appearance of a 72-dpi
image downloaded from the World Wide Web. Image Smoothing is not recommended for
300-dpi or higher images.
You can turn Image Smoothing on in a supported driver:
■
Windows 95 / Windows 98 PostScript driver:
On the Setup tab, click the More Layout Options button, then click the Image
Smoothing checkbox in the More Layout Options dialog box.
■
Windows 2000 driver:
From the Layout tab or Paper/Quality tab, click the Advanced button. In the dialog
box under Printer Features, select either On or Off for Image Smoothing.
■
Windows NT driver:
On the Advanced tab under Printer Features, select either On or Off for Image
Smoothing.
■
LaserWriter 8.6 or 8.7 driver:
In the Print dialog box, select the Advanced Media Handling pull-down menu, then
select whether to have Image Smoothing on or off.
10 Phaser 860 Color Printer
Page 17
Color and Color Sampler Charts
Color and Color Sampler Charts
You can have the colors on your print match particular press specifications or match your
computer screen’s colors. To do this, pick a color correction in the printer driver; see
page 3 for more information.
You can use color sampler charts to help select the colors to use in your application. Refer
to the next section for more information.
For information on PANTONE Colors, refer to page 15.
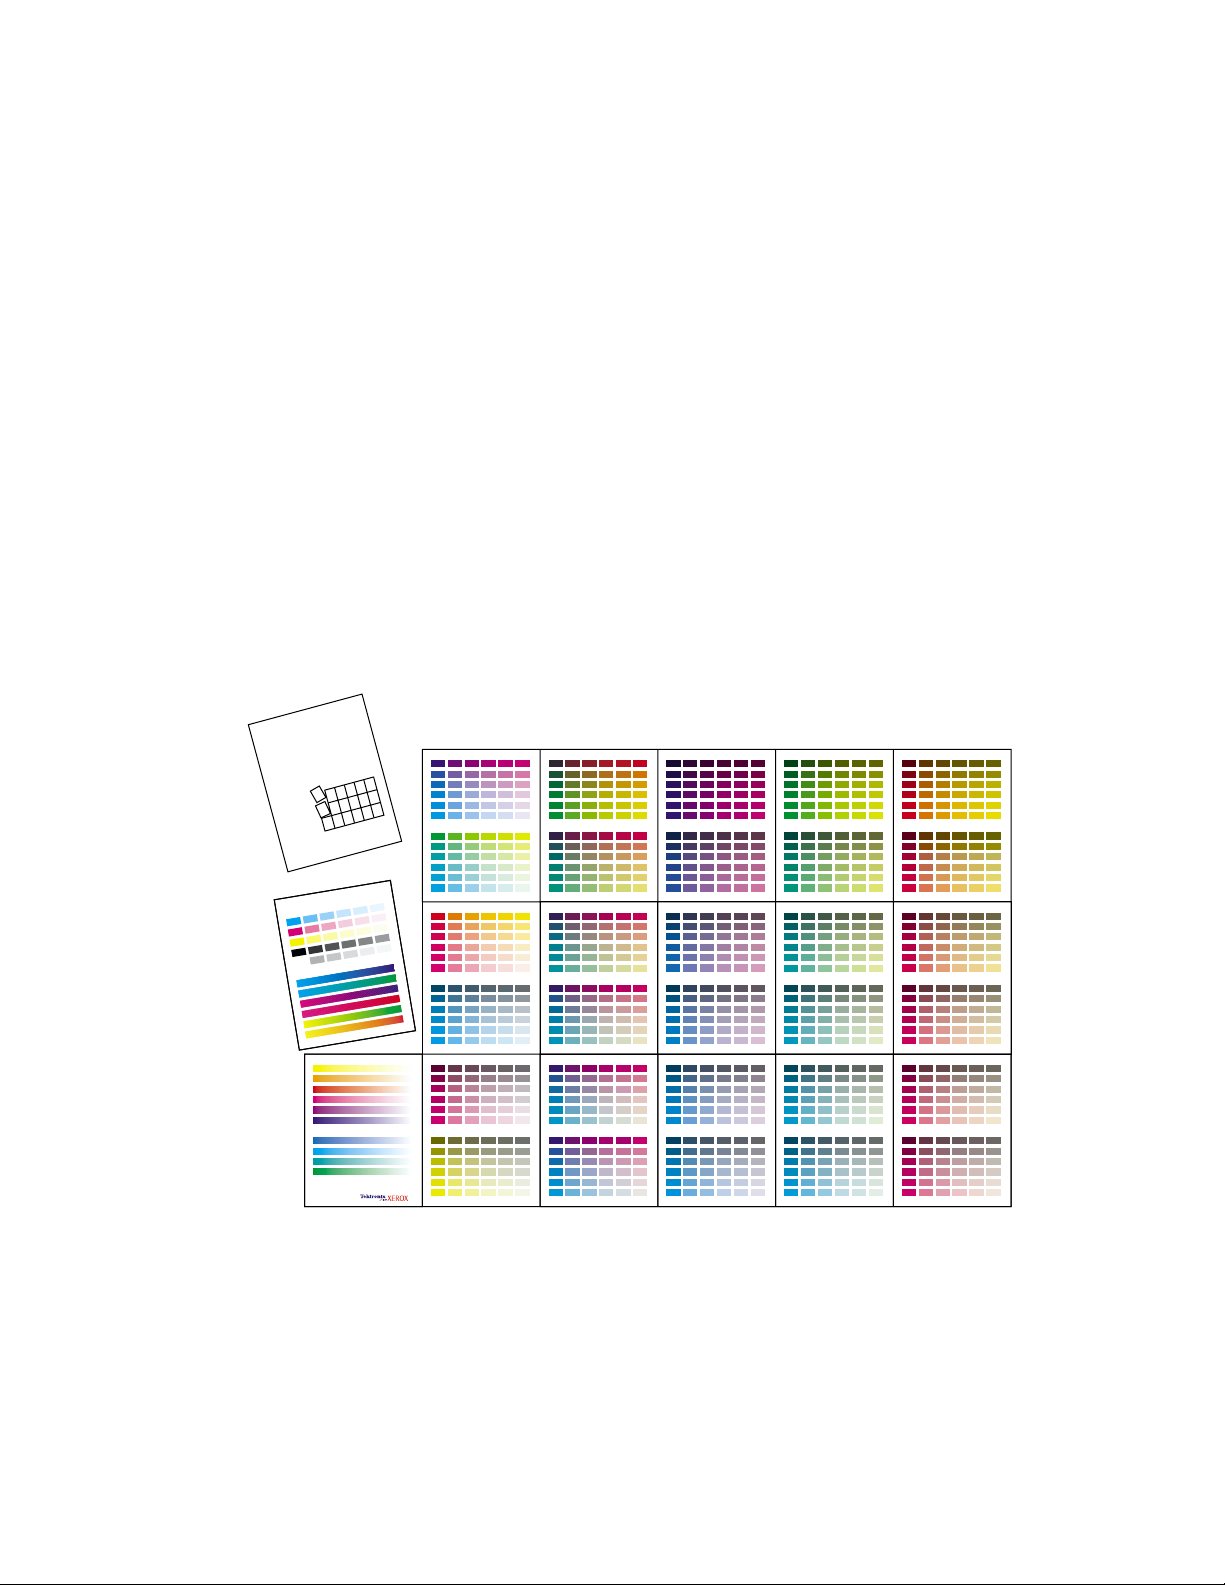
Color Sampler Charts
Color sampler charts are colored rectangles with each color’s component values; they help
you select colors in an application that can be reproduced on your printer.
Component values are percentages of each color — CMYK (Cyan, Magenta, Yellow, Black),
RGB (Red, Green, Blue), or HSB (Hue, Saturation, Brightness) — that combine to make a
particular color.
Xerox
Process Color
Sampler
This Graphic Arts guide is
designed to help you choose
colors on the Tektronix color
printers. These reference
pages can be combined into
a wall reference chart, or
held in a reference book.
To assemble the
chart combine the
pages in this order:
Copyright © Xerox Corporation
0726-89
Which color chart you print and use depends on how your application selects color. For
information on color selection, refer to the application’s documentation, then print one or
more of the color sampler charts.
Advanced Features and Troubleshooting Manual 11
Page 18

Color and Color Sampler Charts
Each color sampler chart is several pages long. Either:
■
Print them in panels and connect them to form a wall chart
■
Print them and place them in a binder for easy reference
Note
For information on printing the PANTONE Color sampler chart, refer to page 16.
Color sampler chart descriptions
Color sampler chart
CMYK Sampler
Chart
RGB Sampler
Chart
HSB Sampler
Chart
*This is the number of pages if you use one-sided printing; if you use two-sided printing, the
number of pages will be half of this value.
Cyan, magenta, yellow, and
black color model
Red, green, and blue color
model
Hue, saturation, and
brightness color model
Number
of pages*
18
12
12
Front panel
selection
CentreWare IS Utility
•••
•••
Depending on the type of color sampler chart, you can print the chart by using:
■
A selection on the printer’s front panel
■
CentreWare Internet Services
■
A utility file
Printing a color sampler chart from the printer’s front panel
Note
file
•
Use the same print quality mode and color correction to print the chart that you
plan to use when printing from your application; see page 3 for more
information. If you use any other print quality mode or color correction in the
printer driver when you print from an application, the colors may not match the
chart.
To specify the print quality mode and color correction to use for the color sampler chart,
on the printer's front panel:
1. With Menus highlighted, press the OK key.
2. Press the Scroll Down key to scroll to the Printer Setup Menu.
3. Press the OK key.
4. Scroll to Job Defaults Menu.
5. Press the OK key.
6. With Set Print Quality Mode highlighted, press the OK key.
7. Scroll to the print quality mode you want.
12 Phaser 860 Color Printer
Page 19

Color and Color Sampler Charts
8. Press the OK key to select that print quality mode.
9. Press the Back key to return to the Job Defaults Menu again.
10. Scroll to Set TekColor Correction.
11. Press the OK key.
12. Scroll to the color correction you want.
13. Press the OK key to select that color correction.
To print the color sampler chart, on the printer's front panel:
1. With Menus highlighted, press the OK key.
2. Press the Scroll Down key to scroll to the Printable Pages Menu.
3. Press the OK key.
4. Scroll to either Print CMYK Sampler Pages or Print RGB Sampler Pages.
5. Press the OK key.
Printing the colors from an application
1. Using the color sampler chart, select the desired colors in your application.
2. From your application, apply the desired colors in your document or graphic by
entering the specific CMYK or RGB values as indicated on the sampler chart.
3. When you print your document or graphic, select the same color correction and print
quality mode in the printer driver that you used to print the color sampler chart.
Printing the color sampler charts with CentreWare IS
1. Access your printer’s Internet Services home page; refer to page 27 for more
information.
2. Click the Print button to display the Print tab.
3. On the left side of the page, click Print Color Samplers.
4. On the Print Color Samplers page, select the color sampler (either RGB or CMYK) and
click the green button.
Advanced Features and Troubleshooting Manual 13
Page 20

Color and Color Sampler Charts
Printing the color sampler charts with utility files
From a Macintosh
1.
To print the color sampler charts with utility files, use the Apple Printer Utility. For
information about installing the Apple Printer Utility, refer to page 36.
2.
Download the desired color sampler utility file to the printer. Refer to page 38 for the
steps to download utility files using the Apple Printer Utility.
From a PC or workstation
1. Locate the utility files on the CD-ROM in the phsr860 folder inside the utility folder.
For more information, refer to page 36. You can use the files directly from the
CD-ROM or copy the files to your computer’s hard disk.
2. Download the desired color sampler utility file to the printer. Refer to page 40 for the
steps to download utility files; the procedure depends on the operating system your
PC uses.
14 Phaser 860 Color Printer
Page 21

Color and Color Sampler Charts
PANTONE Colors
PANTONE Color files for your printer include printer-specific color library files for some
specific applications and a file to print the PANTONE Color sampler chart.
For the latest information on color libraries, contact your local Xerox reseller or visit the
Xerox web site at:
www.xerox.com/officeprinting
Printing PANTONE Colors from the color selection book
In some applications, you can select colors from the PANTONE Process Imaging Guide.
These colors can be proofed on your Phaser printer before final output on a printing press.
For this method, the printer-specific PANTONE Color files are not required.
1. From the application, select and apply PANTONE Colors. Use the individual color
values from the PANTONE Process Imaging Guide.
2. Print your document, selecting Commercial Press or SWOP Press for the color
correction in the printer driver; see page 3 for more information.
3. When you are satisfied with the proof, the file can be separated for printing press
plates without adjustment to the file.
Printing printer-specific PANTONE Colors
Your printer can produce process color simulations of PANTONE Spot Colors.
1. Print a copy of the PANTONE Color chart; see page 16 for more information.
2. Within the application, define the desired color in your document by using the
individual CMYK values that appear on the sampler chart.
3. Print your document, selecting None for the color correction in the printer driver; (see
page 3 for more information). For best results, use the proper print quality setting and
the same type of paper that you used to print the PANTONE Color chart.
For final output on a color printing press (colors printed as a process color, not spot
colors):
1. Open the application.
2. Replace the printer’s PANTONE process Colors with standard PANTONE Colors.
3. Separate the file for printing press plates.
Advanced Features and Troubleshooting Manual 15
Page 22

Color and Color Sampler Charts
Installing the PANTONE Color files
To install the files from the web:
1.
Start your web browser (such as Netscape Navigator or Internet Explorer).
2.
Enter the following web address:
www.xerox.com/officeprinting/
3.
Choose the Phaser 860 printer from the drop-down list.
4.
From the pull-down lists, select your computer platform and PANTONE for type of
file.
5.
Click the Go button to search the web site and display the list of files to download.
6.
For each file that you want to download, click on the name of the file, select Save this
file to disk, click the OK button, select the location to save the file, and click the Save
button.
The requested file is downloaded to your computer.
7. Repeat step 5 for all files that you want to download.
8. Navigate to the location where you saved the file(s) and extract the file.
Printing the PANTONE Color Chart from a Macintosh
To print individual pages from the PANTONE Color chart, use Acrobat Reader:
1.
To install Acrobat Reader, insert the printer’s CD-ROM in your computer’s drive, go to
the Utilities folder, and follow the on-screen instructions to install Acrobat Reader
onto your computer’s hard disk.
2. Locate the Pantone files you downloaded from the web site and double-click the
desired PDF file.
3.
View and print pages from the PDF file. For best results, print on paper.
Note
Print only with the None color correction, since other settings cause PANTONE
Colors to print differently than expected. Refer to page 3 for more information.
For best results and truest color:
■
Print the chart on Phaser Premium Color Printing Paper.
■
Select one-sided printing when printing the color chart in order to reduce the
effects of color show-through.
16 Phaser 860 Color Printer
Page 23

Color and Color Sampler Charts
Printing the PANTONE Color Chart from a PC
To print individual pages from the PANTONE Color chart, use Acrobat Reader:
1.
To install Acrobat Reader, insert the printer’s CD-ROM in your computer’s drive, go to
the Utilities folder, and follow the on-screen instructions to install Acrobat Reader
onto your computer’s hard disk.
2.
Locate the Pantone files you downloaded from the web site and double-click the
desired PDF file.
3.
View and print pages from the PDF file. For best results, print on paper.
Note
Print only with the None color correction, since other settings cause PANTONE
Colors to print differently than expected. Refer to page 3 for more information.
For best results and truest color:
■
Print the chart on Phaser Premium Color Printing Paper.
■
Select one-sided printing when printing the color chart in order to reduce the
effects of color show-through.
Advanced Features and Troubleshooting Manual 17
Page 24

PhaserPrint Plug-in for Photoshop
PhaserPrint Plug-in for Photoshop
The PhaserPrint™ plug-in, included on the printer’s CD-ROM, operates within the
Photoshop application on Macintosh computers. With PhaserPrint, you can improve
image transfer time and gain easy access to Phaser printer features and other media
features.
Note
PhaserPrint software produces correct output only on supported Phaser printers.
If you use this plug-in with a printer not listed in the PhaserPrint dialog box, the
image may be placed incorrectly on the page, the colors may look incorrect, or
the file may not print.
Installing the plug-in
Compatibility requirements:
■
Photoshop 3.0 and higher
■
System 7.6.1 and higher
To install the plug-in on the Macintosh:
1. From the printer’s CD-ROM, run the Installer application.
2. Select either Easy Install or Custom Install.
3. When performing a custom install, select PhaserPrint plug-in for Photoshop.
4. Click the Install button. The file is then installed in the Photoshop application’s
folder on your computer’s hard disk.
Using the plug-in
1. Specify the default printer:
a. Open the Chooser.
b. Select a PostScript driver (such as the Apple LaserWriter 8).
c. Select your printer.
PhaserPrint software works like a printer driver, and prints to the printer you
selected in the Chooser.
2. Open Photoshop and open an image file.
18 Phaser 860 Color Printer
Page 25

PhaserPrint Plug-in for Photoshop
3. From Photoshop’s Mode menu, select one of the following image modes supported by
PhaserPrint:
■
Grayscale
■
Indexed Color
■
RGB Color
■
CMYK Color
■
Lab Color
4. From the File menu, select Export and then select PhaserPrint.
5. In the PhaserPrint dialog box, select your printer in the Printer Model field.
6. Make other selections in the PhaserPrint dialog box. For more information on the
selections in the dialog box or the plug-in’s features, refer to the online help.
7. Click the Print button in the PhaserPrint dialog box.
Advanced Features and Troubleshooting Manual 19
Page 26

Fonts
Fonts
Your Phaser 860 Color Printer uses the following types of fonts:
■
Resident fonts
■
Fonts downloaded onto the hard drive
■
Fonts downloaded into memory
■
Fonts downloaded with your print job from the application
ATM (Adobe Type Manager) software helps your computer display these fonts on screen
as they will appear in your prints. If you don’t already have ATM on your computer,
install it from the printer’s CD-ROM. Also install the printer’s screen fonts from the ATM
folder.
Resident typefaces (PostScript)
Printer-resident fonts are always available for printing. All printer configurations are
shipped with 136 resident fonts plus the Central and Eastern European encoding for many
of the fonts. To print a sample of the printer’s fonts, see page 25.
Resident Roman typefaces:
AdobeSansMM
AdobeSerifMM
AlbertusMT
AlbertusMT-Italic
AlbertusMT-Light
AntiqueOlive-Bold
AntiqueOlive-Compact
AntiqueOlive-Italic
AntiqueOlive-Roman
Apple-Chancery
Arial-BoldItalicMT
Arial-BoldMT
Arial-ItalicMT
ArialMT
AvantGarde-Book
AvantGarde-BookOblique
AvantGarde-Demi
AvantGarde-DemiOblique
Bodoni
Bodoni-Bold
Bodoni-BoldItalic
Bodoni-Italic
Bodoni-Poster
Bodoni-PosterCompressed
Bookman-Demi
Bookman-DemiItalic
Bookman-Light
Bookman-LightItalic
AntiqueOliveCE-Bold
AntiqueOliveCE-Compact
AntiqueOliveCE-Italic
AntiqueOliveCE-Roman
Apple-ChanceryCE
ArialCE
ArialCE-Bold
ArialCE-BoldItalic
ArialCE-Italic
AvantGardeCE-Book
AvantGardeCE-BookOblique
AvantGardeCE-Demi
AvantGardeCE-DemiOblique
BodoniCE
BodoniCE-Bold
BodoniCE-BoldItalic
BodoniCE-Italic
BodoniCE-Poster
BodoniCE-PosterCompressed
BookmanCE-Demi
BookmanCE-DemiItalic
BookmanCE-Light
BookmanCE-LightItalic
20 Phaser 860 Color Printer
Page 27

Carta
Chicago
Clarendon
Clarendon-Bold
Clarendon-Light
CooperBlack
CooperBlack-Italic
Copperplate-ThirtyThreeBC
Copperplate-ThirtyTwoBC
Coronet-Regular
Courier
Courier-Bold
Courier-BoldOblique
Courier-Oblique
Eurostile
Eurostile-Bold
Eurostile-BoldExtendedTwo
Eurostile-ExtendedTwo
Geneva
GillSans
GillSans-Bold
GillSans-BoldCondensed
GillSans-BoldItalic
GillSans-Condensed
GillSans-ExtraBold
GillSans-Italic
GillSans-Light
GillSans-LightItalic
Goudy
Goudy-Bold
Goudy-BoldItalic
Goudy-ExtraBold
Goudy-Italic
Helvetica
Helvetica-Bold
Helvetica-BoldOblique
Helvetica-Condensed
Helvetica-Condensed-Bold
Helvetica-Condensed-BoldObl
Helvetica-Condensed-Oblique
Helvetica-Narrow
Helvetica-Narrow-Bold
Helvetica-Narrow-BoldOblique
Helvetica-Narrow-Oblique
Helvetica-Oblique
HoeflerText-Black
HoeflerText-BlackItalic
HoeflerText-Italic
HoeflerText-Ornaments
HoeflerText-Regular
JoannaMT
JoannaMT-Bold
JoannaMT-BoldItalic
JoannaMT-Italic
LetterGothic
LetterGothic-Bold
LetterGothic-BoldSlanted
LetterGothic-Slanted
Fonts
ChicagoCE
ClarendonCE
ClarendonCE-Bold
ClarendonCE-Light
CoronetCE-Regular
CourierCE
CourierCE-Bold
CourierCE-BoldOblique
CourierCE-Oblique
EurostileCE
EurostileCE-Bold
EurostileCE-BoldExtendedTwo
EurostileCE-ExtendedTwo
GenevaCE
GillSansCE-Bold
GillSansCE-BoldCondensed
GillSansCE-BoldItalic
GillSansCE-Condensed
GillSansCE-ExtraBold
GillSansCE-Italic
GillSansCE-Light
GillSansCE-LightItalic
GillSansCE-Roman
HelveticaCE
HelveticaCE-Bold
HelveticaCE-BoldOblique
HelveticaCE-Cond
HelveticaCE-CondBold
HelveticaCE-CondBoldObl
HelveticaCE-CondObl
HelveticaCE-Narrow
HelveticaCE-NarrowBold
HelveticaCE-NarrowBoldOblique
HelveticaCE-NarrowOblique
HelveticaCE-Oblique
HoeflerTextCE-Black
HoeflerTextCE-BlackItalic
HoeflerTextCE-Italic
HoeflerTextCE-Regular
JoannaMTCE
JoannaMTCE-Bold
JoannaMTCE-BoldItalic
JoannaMTCE-Italic
LetterGothicCE
LetterGothicCE-Bold
LetterGothicCE-BoldSlanted
LetterGothicCE-Slanted
Advanced Features and Troubleshooting Manual 21
Page 28

Fonts
LubalinGraph-Book
LubalinGraph-BookOblique
LubalinGraph-Demi
LubalinGraph-DemiOblique
Marigold
MonaLisa-Recut
Monaco
NewCenturySchlbk-Bold
NewCenturySchlbk-BoldItalic
NewCenturySchlbk-Italic
NewCenturySchlbk-Roman
NewYork
NotDefFont
Optima
Optima-Bold
Optima-BoldItalic
Optima-Italic
Oxford
Palatino-Bold
Palatino-BoldItalic
Palatino-Italic
Palatino-Roman
StempelGaramond-Bold
StempelGaramond-BoldItalic
StempelGaramond-Italic
StempelGaramond-Roman
Symbol
Tekton
Times-Bold
Times-BoldItalic
Times-Italic
Times-Roman
TimesNewRomanPS-BoldItalicMT
TimesNewRomanPS-BoldMT
TimesNewRomanPS-ItalicMT
TimesNewRomanPSMT
Univers
Univers-Bold
Univers-BoldExt
Univers-BoldExtObl
Univers-BoldOblique
Univers-Condensed
Univers-CondensedBold
Univers-CondensedBoldOblique
Univers-CondensedOblique
Univers-Extended
Univers-ExtendedObl
Univers-Light
Univers-LightOblique
Univers-Oblique
Wingdings-Regular
ZapfChancery-MediumItalic
ZapfDingbats
LubalinGraphCE-Book
LubalinGraphCE-BookOblique
LubalinGraphCE-Demi
LubalinGraphCE-DemiOblique
MonacoCE
NewCenturySchlbkCE-Bold
NewCenturySchlbkCE-BoldItalic
NewCenturySchlbkCE-Italic
NewCenturySchlbkCE-Roman
NewYorkCE
OptimaCE-Bold
OptimaCE-BoldItalic
OptimaCE-Italic
OptimaCE-Roman
PalatinoCE-Bold
PalatinoCE-BoldItalic
PalatinoCE-Italic
PalatinoCE-Roman
StempelGaramondCE-Bold
StempelGaramondCE-BoldItalic
StempelGaramondCE-Italic
StempelGaramondCE-Roman
TimesCE-Bold
TimesCE-BoldItalic
TimesCE-Italic
TimesCE-Roman
TimesNewRomanCE
TimesNewRomanCE-Bold
TimesNewRomanCE-BoldItalic
TimesNewRomanCE-Italic
UniversCE-Bold
UniversCE-BoldExt
UniversCE-BoldExtObl
UniversCE-BoldOblique
UniversCE-Condensed
UniversCE-CondensedBold
UniversCE-CondensedBoldOblique
UniversCE-CondensedOblique
UniversCE-Extended
UniversCE-ExtendedObl
UniversCE-Light
UniversCE-LightOblique
UniversCE-Medium
UniversCE-Oblique
ZapfChanceryCE-MediumItalic
22 Phaser 860 Color Printer
Page 29

Fonts
Resident typefaces (PCL5C)
For PCL5C (Printer Command Language) printing, the printer supports Courier, Times,
and Universe typefaces in medium, bold, italic medium, and italic bold. In addition, there
are 46 PCL fonts. The printer port must be set to AutoSelect (which is the default) for the
printer to accept PCL data.
Resident PCL typefaces
AlbertusE-ExtraBold
AlbertusE-Medium
AntiqueOliveE-Bold
AntiqueOliveE-Italic
AntiqueOliveE-Regular
ArialE
ArialE-Bold
ArialE-BoldItalic
ArialE-Italic
ClarendonE-Condensed
CoronetE
CourierE-Bold
CourierE-BoldItalic
CourierE-Italic
CourierE-Regular
GaramondE-Antiqua
GaramondE-Halbfett
GaramondE-Kursiv
GaramondE-KursivHalbfett
LetterGothicE-Bold
LetterGothicE-Italic
LetterGothicE-Regular
MarigoldE
OptimaE-Bold
OptimaE-BoldItalic
OptimaE-Italic
OptimaE-Regular
SymbolE
TimesE-Bold
TimesE-BoldItalic
TimesE-Italic
TimesE-Roman
TimesNewRomanE
TimesNewRomanE-Bold
TimesNewRomanE-BoldItalic
TimesNewRomanE-Italic
UniversE-Bold
UniversE-BoldCondensed
UniversE-BoldCondensedItalic
UniversE-BoldItalic
UniversE-Condensed
UniversE-CondensedItalic
UniversE-Italic
UniversE-Medium
Downloading fonts
To supplement the resident fonts (which are always available for printing), downloadable
fonts can be sent from your computer and be stored in the printer’s memory or on a hard
drive. Adding more printer memory or a hard drive expands the number of fonts that can
be stored on your printer. Refer to the Phaser 860 Color Printer User Guide or the Xerox
web site for part numbers of the hard drive and memory.
By downloading fonts to a hard disk or memory, you save print time when you use a
Macintosh to print large documents or print several documents that use those fonts.
Because it has bi-directional communication with the printer, the Macintosh finds out
which fonts are already available in the printer memory and on the hard drive, and thus
doesn’t spend time downloading those same fonts from the application.
Note
Because PC drivers don’t have bi-directional font communication with the
printer, the PC only knows what fonts came with the printer. All other fonts are
downloaded from the application, even if they already were downloaded to the
hard disk or memory.
Advanced Features and Troubleshooting Manual 23
Page 30

Fonts
Before printing, make sure that the fonts specified in your document are installed in the
printer or are set up correctly. If you request a font in an application that is not resident in
the printer, is not correctly installed, or is not downloaded from the application in the
print job, the text is printed in Courier typeface.
The printer accepts these (and other) downloadable fonts:
■
Type 1
■
Type 3
■
Adobe
■
Agfa
■
Bitstream
■
Microsoft
■
Apple
■
TrueType (scalable to any point size; look the same on-screen and printed).
Downloading fonts from a Macintosh
Use the Apple Printer Utility to download fonts to the printer.
Note
In order to download the fonts to the printer with the Apple Printer Utility, the
SysStart Job must be disabled on the Phaser 860 front panel; refer to page 32 for
more information on SysStart Job.
1. If you don’t already have the Apple Printer Utility on your computer, install it from
the printer’s CD-ROM.
2. Start the Apple Printer Utility by double-clicking the icon (in the PhaserTools folder
on your computer’s hard disk).
3. In the Printer Selector dialog box:
a. Under AppleTalk Zones, select your printer’s zone.
b. Under Printers, select your Phaser 860 printer.
c. Click the Open Printer button.
4. In the printer’s dialog box, click the arrow next to Printer Preferences.
5. Click the arrow next to Fonts to display the list of installed fonts and their locations.
6. Click the Add button.
7. In the dialog box, select the folder containing the font you want to download, select
the font, and click the Add button. The font is listed as ready to download.
Note
To add all of the fonts in the folder to the list of fonts to download, click the
Add All button. To you decide not to download a font, highlight the font in the
list of fonts to download and click the Remove button.
24 Phaser 860 Color Printer
Page 31

Fonts
8. For Destination, select the download location: either the printer’s memory or the hard
disk.
9. To download the fonts in the list, click the Send button.
Note
To remove downloaded fonts from the printer, follow steps 2 through 5,
highlight the font in the list under Fonts (in the printer’s dialog box), and then
click the Remove button.
Downloading fonts from a PC
Use the Xerox CentreWare Font Download Utility to download fonts to the printer. For
detailed information, refer to the online help.
1. If you don’t already have the Xerox CentreWare Font Download Utility on your
computer, install it from the Advanced Network Management Tools CD-ROM.
2. Start the Xerox CentreWare Font Download Utility.
3. Select the printer from the List of Printers.
4. Click the Fonts/Forms Manager button.
5. In the Fonts / Forms Manager dialog box:
a. For Storage Device Type, select Printer Hard Disk.
b. For Resource Type, select PostScript Fonts.
c. Click the Browse button and select the fonts you want to download. They are
then displayed in the Selected Fonts list.
d. Click the Download button.
6. If you want to print a list of the fonts on the printer, refer to page 26.
7. When you have finished downloading fonts, click the Done button.
Printing a list of resident fonts
Listing the fonts from a Macintosh
Use the Apple Printer Utility to list the fonts available on the printer.
Note
In order to print the list of fonts to the printer with the Apple Printer Utility, the
SysStart Job must be disabled on the Phaser 860 front panel; refer to page 32 for
more information on SysStart Job.
1. If you don’t already have the Apple Printer Utility on your computer, install it from
the printer’s CD-ROM.
2. Start the Apple Printer Utility by double-clicking the icon (in the PhaserTools folder
on your computer’s hard disk).
Advanced Features and Troubleshooting Manual 25
Page 32

Fonts
3. In the Printer Selector dialog box:
a. Under AppleTalk Zones, select your printer’s zone.
b. Under Printers, select your Phaser 860 printer.
c. Click the Open Printer button.
4. From the File menu, select Print Font Samples.
Listing the fonts from a PC
Use the Xerox CentreWare Font Download Utility to list the fonts available on the printer.
For detailed information, refer to the online help.
1. If you don’t already have the Xerox CentreWare Font Download Utility on your
computer, install it from the Advanced Network Management Tools CD-ROM.
2. Start the Xerox CentreWare Font Download Utility.
3. Select the printer from the List of Printers.
4. Click the Fonts/Forms Manager button.
5. In the Fonts / Forms Manager dialog box:
a. For Font List Type, select PostScript Fonts/Forms.
b. Click the Print Font List button
6. Click the Done button to exit the Fonts / Forms Manager dialog box.
26 Phaser 860 Color Printer
Page 33

Printer Management
Printer Management
You can configure and manage your printer:
■
On the front panel
■
Using CentreWare IS Printer Management software
■
Through Usage Profile Reports, which can be emailed when the printer needs
attention (such as needing more paper)
This section covers the following features related to the operation of your printer:
■
The printer’s Startup Page — see page 30
■
Protected mode for the front panel menus — see page 31
■
Sys/Start Job execution — see page 32
■
Manual feed timeout — see page 33
■
Front panel intensity — see page 33
■
Front panel contrast — see page 34
■
Intelligent Ready mode — see page 34
■
Front panel language — see page 35
■
Automatic tray switching — see page 35
CentreWare IS Printer Management software
CentreWare Internet Services™ Printer Management software is a printer management tool
that uses a web browser to connect to the printer and gather printer information:
■
Job status
■
Job accounting
■
Printer usage
■
Routine troubleshooting
■
Configuration of printer settings
CentreWare IS requires a TCP/IP connection. To view information on your printer, enter
your printer’s IP address as the URL in a web browser. For example, if your printer’s IP
address is 113.25.72.34, the URL would be http://113.25.72.34. The CentreWare IS
interface appears on your computer’s screen.
For detailed information on CentreWare IS Printer Management software, refer to its
online help. You can access interactive troubleshooting assistance by
selecting Technical Support from the Support tab.
For general information, access the following web site:
www.xerox.com/officeprinting/products/860/sprt.html
then click the CentreWare link
Advanced Features and Troubleshooting Manual 27
Page 34

Printer Management
Usage Profile
A Usage Profile provides a proactive strategy for service, maintenance, and administration
of your printer. With a Usage Profile, you can keep track of most printer parameters in
detail. The Usage Profile helps you predict the ordering needs of customer- replaceable
consumables for remote locations.
The Usage Profile Report includes:
■
Consumables usage
■
Paper versus transparency usage
■
Number and location of media jams
■
Media tray usage
■
Total number of pages printed
To print the Usage Profile Report from the printer’s front panel:
1. With Menus highlighted, scroll to Printable Pages by pressing the Scroll Up or
Scroll Down key.
2. Press the OK key.
3. Scroll to Print Usage Profile.
4. Press the OK key.
Email notification
You can easily set up electronic mail notification of particular status conditions for three
people — your system administrator, key user, and service agent. With mail notification,
these people receive timely information on error conditions or supplies status. You enter
their email addresses and set up the types of error conditions to be reported to each
person, such as:
■
Supplies (customer-replaceable consumables) low or out
■
Empty media tray
■
Error conditions
To set up email notification in CentreWare IS:
1. From your printer’s Internet Services home page, click the Properties button.
2. Enter the email addresses for the system administrator, key user, and service agent:
a. On the left side of the Properties page in CentreWare IS, click Mail Alerts.
b. On the MaiLinX Alerts page for MaiLinX (and Usage Profile Properties),
select On.
c. Enter the appropriate email address for SysAdmin Email Address, Key User
Email Address, and Service Email Address.
d. Specify the type of message that each person receives.
e. Click the Save Changes button on the bottom of the page.
28 Phaser 860 Color Printer
Page 35

Printer Management
3. Specify the text and message text for the email:
a. On the MaiLinX Alerts page, click the MaiLinX Message Settings link.
b. For each recipient, specify the subject text and message text for the emails or
choose default to have the recipient receive the default text.
c. Click the Save Changes button on the bottom of the page.
4. Specify the conditions under which an email will be sent to each of the three
recipients:
a. On the MaiLinX Alerts page, click the Printer Unable to Print link.
b. Click to place a check in the box for each error condition that you want to
generate an email message to the recipient.
c. Click the Save Changes button on the bottom of the page.
d. Return to the MaiLinX Alerts page. (You can click the Back button in the
browser.)
e. On the MaiLinX Alerts page, click the Printer Warnings link.
f. Click to place a check in the box for each warning condition that you want to
generate an email message to the recipient.
g. Click the Save Changes button on the bottom of the page.
For detailed information, refer to the CentreWare IS online help.
Advanced Features and Troubleshooting Manual 29
Page 36

Printer Management
Operational features
The printer’s Startup Page
By default, the printer produces a Startup Page each time the printer is turned on or reset.
If desired, you can disable the Startup Page.
There are three methods for turning on/turning off the Startup Page:
■
From the printer’s front panel
■
Using CentreWare IS Printer Management software
■
Using utility files
To turn on/turn off the Startup Page from the printer’s front panel:
1. With Menus highlighted, press the OK key.
2. Scroll to Printer Setup Menu by pressing the Scroll Up or Scroll Down key.
3. Press the OK key.
4. Scroll to Startup Page. The end of the line also displays the setting (On or Off).
5. To change the setting, press the OK key.
To turn on/turn off the Startup Page using CentreWare IS Printer Management software:
1. From your printer’s Internet Services home page, click Properties.
2. On the left side of the Properties page in CentreWare IS, click Printer Defaults.
3. If desired, change the setting for Print Startup Page (under User Preferences on the
Printer Defaults page).
4. Click the Save Changes button on the bottom of the page.
To turn on/turn off the Startup Page using utility files:
■ Macintosh: Use the Apple Printer Utility (refer to page 39 for instructions).
■ PC: Download one of the following utility files, as described on page 40:
■
STARTPG.PS — turn on the Startup Page
■
NOSTRTPG.PS — turn off the Startup Page
30 Phaser 860 Color Printer
Page 37

Printer Management
Protected mode for the front panel menus
You can have the printer enter "protected mode" to prevent users from changing front
panel settings that may impact the prints of other users. Instead, users select printing
features, such as color corrections, through the printer drivers only. In protected mode,
users can access all menus except the Printer Setup Menu and the Network Setup
Menu.
Note
You can temporarily override protected mode. Enter the menu system
(by highlighting Menus and pressing the OK key), hold down either the Cancel
key or Scroll Up key, and press the Back key. You can then access the Printer
Setup Menu or the Network Setup Menu. These two menus are hidden again
as soon as you exit the menu.
There are two methods for entering/exiting protected mode:
■
Using CentreWare IS Printer Management software
■
Using utility files
To enter/exit protected mode using CentreWare IS Printer Management software:
1.
From your printer’s Internet Services home page, click Properties.
2. On the left side of the Properties page in CentreWare IS, click Printer Defaults.
3. If desired, change the setting for Front Panel Menus (under User Preferences on the
Printer Defaults page).
■
Select Off to have the front panel display all menus.
■
Select On to limit the menu items displayed on the front panel,
4. Click the Save Changes button on the bottom of the page.
To enter/exit protected mode using utility files:
To enter or exit protected mode, download one of the following utility files:
■ Macintosh:
■
Menu Short — limits menu access
■
Menu Long — expands menus
Refer to page 38 for downloading instructions.
PC:
■
■
MENUSHRT.PS — limits menu access
■
MENULONG.PS — expands menus
Refer to page 40 for downloading instructions.
Advanced Features and Troubleshooting Manual 31
Page 38

Printer Management
SysStart Job execution
You may load a startup file (SysStart) onto the printer’s internal hard disk, if installed. The
SysStart file is similar to an init file — when you turn on or reset the printer, the file
executes.
There are three methods for turning on/turning off SysStart:
■
From the printer’s front panel
■
Using CentreWare IS Printer Management software
■
Using utility files
Note
If the SysStart file contains an error, the printer ignores the remainder of the file
and may not start up as expected.
To turn on/turn off the execution of the SysStart job from the printer’s front panel:
1. With Menus highlighted, press the OK key.
2.
Scroll to Printer Setup Menu by pressing the Scroll Up or Scroll Down key.
3.
Press the OK key.
4. Scroll to Startup Mode. The end of the line also displays the setting (On or Off).
5. To change the setting, press the OK key.
6.
To make the change take affect, reset the printer.
To turn on/turn off the execution of the SysStart job using CentreWare IS Printer
Management software:
1.
From your printer’s Internet Services home page, click Properties.
2.
On the left side of the Properties page in CentreWare IS, click Printer Defaults.
3.
If desired, change the setting for System Start Job (under User Preferences on the
Printer Defaults page).
4.
Click the Save Changes button on the bottom of the page.
5.
To make the change take affect, reset the printer.
To turn on/turn off the execution of the SysStart job using utility files:
Macintosh:
■
■
Set SysStart Job — Turns on automatic execution of the SysStart job
■
No SysStart Job — Turns off automatic execution of the SysStart job
Refer to page 38 for downloading instructions.
To make the change take affect, reset the printer.
32 Phaser 860 Color Printer
Page 39

Printer Management
■
PC:
■
SYSTART.PS — Turns on automatic execution of the SysStart job
■
NOSYSTRT.PS — Turns off automatic execution of the SysStart job
Refer to page 40 for downloading instructions.
To make the change take affect, reset the printer.
Manual feed timeout
When you select Manual Feed-Paper or Manual Feed-Transparency in the printer driver,
the front panel prompts you to add the sheet of paper or transparency. If you don’t insert
anything in the manual-feed slot, the printer waits for a specified time before attempting to
pick paper from one of the paper trays.
To change the manual feed timeout from the printer’s front panel:
1. With Menus highlighted, press the OK key.
2. Scroll to Printer Setup Menu by pressing the Scroll Up or Scroll Down key.
3.
Press the OK key.
4.
Scroll to Set Manual Feed Timeout.
5. Press the OK key.
6. Scroll until the desired number of seconds (0 to 999) is displayed. (If you select a
value of 0, the printer does not time out while waiting for paper to be inserted.)
7.
Press the OK key.
To change the manual feed timeout using CentreWare IS Printer Management software:
1.
From your printer’s Internet Services home page, click Properties.
2.
On the left side of the Properties page in CentreWare IS, click Printer Defaults.
3.
If desired, change the setting for Manual Feed Timeout (under Timeout Settings on
the Printer Defaults page). (Select a number from 0 to 65535 seconds; if you select a
value of 0, the printer does not time out while waiting for paper to be inserted.)
4.
Click the Save Changes button on the bottom of the page.
Front panel intensity
To make the front panel text more readable, you can adjust the intensity of the front
panel’s back lighting:
1. On the front panel, with Menus highlighted, press the OK key.
2.
Scroll to Printer Setup Menu by pressing the Scroll Up or Scroll Down key.
3.
Press the OK key.
4. Scroll to Set Front Panel Intensity.
5. Press the OK key.
6. Scroll until the desired back light intensity is displayed. The intensity values range
from 0 (no back light) to 10 (brightest back light).
Advanced Features and Troubleshooting Manual 33
Page 40

Printer Management
7. Press the OK key.
Front panel contrast
To make the front panel text more readable, you can adjust the contrast between the text
and the background:
1. On the front panel, with Menus highlighted, press the OK key.
2. Scroll to Printer Setup Menu by pressing the Scroll Up or Scroll Down key.
3. Press the OK key.
4. Scroll to Set Front Panel Contrast.
5. Press the OK key.
6. Scroll the value until you achieve the desired contrast between the text and the
background. The values range from 1 to 10.
7. Press the OK key.
Intelligent Ready mode
Intelligent Ready mode is an automated system that monitors the printer’s usage and
warms up the printer when you are most likely to need it.
To turn Intelligent Ready mode on or off from the printer’s front panel:
1. With Menus highlighted, press the OK key.
2. Scroll to Printer Setup Menu by pressing the Scroll Up or Scroll Down key.
3. Press the OK key.
4. Scroll to Intelligent Ready. The end of the line also displays the setting (On or
Off).
5. To change the setting, press the OK key.
To select Intelligent Ready mode or schedule warmup/standby settings using
CentreWare IS Printer Management software:
1. From your printer’s Internet Services home page, click Properties.
2. On the left side of the Properties page in CentreWare IS, click Warmup.
3. For Warmup Mode, select either Intelligent Ready or Scheduled (if you want to
specify the warmup/standby settings for each day).
4. If you selected Scheduled in step 3, make selections for each day’s warmup setting
and standby setting.
5. Click the Save Changes button on the bottom of the page.
Note
Although the front panel selections only enable you to turn Intelligent Ready
mode on or off, CentreWare IS enables you to specify other settings, such as the
printer’s warm-up times.
34 Phaser 860 Color Printer
Page 41

Printer Management
Front panel language
To change the language used for the text on the front panel:
1.
On the front panel, with Menus highlighted, press the OK key.
2.
Scroll to Printer Setup Menu by pressing the Scroll Up or Scroll Down key.
3.
Press the OK key.
4.
Scroll to Set Front Panel Language.
5.
Press the OK key.
6.
Scroll the desired language.
7.
Press the OK key.
Selecting the source for cleaning pages
When one or two High-Capacity Paper Tray Assemblies are installed, the lower tray is the
default source for the cleaning pages that the printer uses in its cleaning procedures. You
can ensure that the printer always uses paper from the lower or middle paper tray in its
self-cleaning procedures by changing a setting in the printer’s front panel:
1. With Menus highlighted, press the OK key.
2. Press the Scroll Down key to scroll to the Printer Setup Menu.
3.
Press the OK key.
4.
Scroll to Set Cleaning Page Source.
5.
Press the OK key.
6. Scroll to the desired tray for the cleaning pages.
7. Press the OK key.
Automatic tray switching
When your printer has one or two high-capacity paper tray assemblies, you can easily run
large jobs without having to replace paper so often. The printer automatically takes paper
from the next tray when the first tray runs out.
■
For automatic tray switching to work properly, load the same type and size paper in
all of the printer’s paper trays.
■
In the printer driver, select Paper as the source, instead of a specific tray.
Advanced Features and Troubleshooting Manual 35
Page 42

Printer Utilities
Printer Utilities
In addition to using the printer’s front panel or the options in a supported driver, the
printer’s utility files offer another method for changing the way the printer operates.
Some utility files control print features, such as the default color correction. However,
printer features that are selected from a printer driver override utility file settings as well
as front panel settings.
Utility files are located on the:
■
Printer’s CD-ROM
■
Xerox web site
■
Phaser hard drive (if a hard disk is installed on your printer)
Utility files on the printer’s CD-ROM
Installing the utility files on a Macintosh
To install the Apple Printer Utility:
1. From the printer’s CD-ROM, run the Phaser Printer Installer application and select
Easy Install.
2. In the PhaserTools folder on your computer’s hard disk, locate the Apple Printer
Utility.
To install the printer’s utility files:
1. On the printer’s CD-ROM, open the English folder, open the Snippets folder, then
open the Printer Utilities folder.
2. Copy the Printer Utilities folder or individual files to your computer’s hard disk.
To download a utility file from your Macintosh to the printer, see page 38.
Installing the utility files on a PC
To locate the printer’s utility files:
1. Insert the printer’s CD-ROM into the CD-ROM drive.
■
If the Windows autorun feature is enabled, the CD-ROM launches automatically.
On the opening screen, click Exit.
2. In the Windows Explorer, select the drive letter of your computer’s CD-ROM drive.
3. Locate the utility files on the CD-ROM by opening the Utility folder, then opening the
Snippets folder, then opening the phsr860 folder.
Use the files on the CD-ROM or copy the files to your computer’s hard disk. To download
a utility file from your PC to the printer, see page 40.
36 Phaser 860 Color Printer
Page 43

Printer Utilities
Utility files on the Xerox web site
On the Xerox Color Printer web site, you can explore options such as customer support,
documents, and new product information. New and updated information is always being
added, so check the web site frequently.
Access the Xerox Color Printer web site by entering the following address in a web
browser:
www.xerox.com/officeprinting/
To locate the utility files:
1. Start your web browser (such as Netscape Navigator or Internet Explorer).
2. Enter the following web address:
www.xerox.com/officeprinting/860support
3. From the pull-down lists, select your printer, computer platform, and Printer Utilities
for the type of file.
4. Click the Go button to search the web site and display a list of files that you can
download.
5. For each file that you want to download, click on the name of the file, select Save this
file to disk, click the OK button, select the location to save the file, and click the Save
button.
The requested file is downloaded to your computer.
Advanced Features and Troubleshooting Manual 37
Page 44

Printer Utilities
Downloading utility files from a Macintosh
Use the Apple Printer Utility to download files from your Macintosh to the printer.
To download PostScript utility files to the printer:
1. From the PhaserTools folder on your computer’s hard disk, double-click the Apple
Printer Utility.
2. In the Printer Selector dialog box:
a. Under AppleTalk Zones, select your printer’s zone.
b. Under Printers, select your Phaser 860 printer.
c. Click the Open Printer button.
3. From the File menu, select Send PostScript File.
4. In the Select the PostScript files to download dialog box, select the folder location of
the PostScript file(s) that you want to download.
If you didn’t copy the files to your computer’s hard drive, use the CD-ROM; the utility
files are located in the Printer Utilities folder inside the Phaser Tools folder.
5. Select a utility file and click the Add to add the file to the list of files to download.
6. Repeat step 5 for all utility files that you want to download.
7. Click the Send button to download those files on the list.
8. In the lower portion of the dialog box for Save PostScript output as, either use the
default name or type a new name for the file to be used for saving printer output.
(Printer output includes status messages generated by the printer as it reports
conditions such as out of paper.)
9. Click the Save button.
10. If no output is returned by the printer but the Apple Printer Utility displays a dialog
box, click Continue. (If output is returned by the printer, you won't see this dialog
box; check your computer’s hard disk for the message file created by the utility.)
You can download utility files to print a color sampler chart; refer to page 24 for more
information about color sampler charts.
For information on downloading fonts from your Macintosh to the printer, refer to page 24;
to print a list of fonts on the printer, refer to page 25.
38 Phaser 860 Color Printer
Page 45

Printer Utilities
Using the Apple Printer Utility to perform other tasks
In addition to downloading PostScript files and fonts, you can use the Apple Printer Utility
to perform the following specialized tasks:
■
Turning on/off the Startup Page
■
Changing the printer’s AppleTalk name
Note
If your printer is connected through a print server, you can only use the Apple
Printer Utility to download PostScript utility files.
To turn on/off the Startup Page:
1. Double-click the Apple Printer Utility.
2. In the Printer Selector dialog box:
a. Under AppleTalk Zones, select your printer’s zone.
b. Under Printers, select your Phaser 860 printer.
c.
Click the Open Printer button.
3.
In the printer’s dialog box, click the arrow next to Printer Preferences to display a list
of options.
4. Click the arrow next to Startup Page.
5. Click to either place or remove the check mark from the box:
■
Check mark: Prints a Startup Page each time the printer is turned on or reset.
■
No check mark: Stops the Startup Page from automatically printing.
6.
Click the Send button to update this printer option.
To change the printer’s AppleTalk name:
1.
Double-click the Apple Printer Utility.
2.
In the Printer Selector dialog box:
a. Under AppleTalk Zones, select your printer’s zone.
b.
Under Printers, select your Phaser 860 printer.
c. Click the Open Printer button.
3. In the printer’s dialog box, click the arrow next to Printer Preferences to display a list
of options.
4. Click the arrow next to Name.
5. In the text box, type the new printer name.
6.
Click the Send button to update the printer name.
Advanced Features and Troubleshooting Manual 39
Page 46

Printer Utilities
Downloading utility files from a PC
Downloading files from Windows 95/Windows 98/Windows Me
1. Select the utility file you want to send to the printer, for example RESET.PS.
2. In the taskbar on your screen, click Start, then Programs, then MS-DOS Prompt.
3. Change the directory to the location of the utility files.
4. If your printer is connected to the parallel (LPT) port, type the following command
(where x is 1, 2, or 3):
COPY RESET.PS LPTx:
If your printer is connected to a network, refer to the"Downloading files if your printer
is connected to a Novell Netware network" section on this page.
Downloading files from Windows NT/Windows 2000
1. Select the utility file you want to send to the printer, for example RESET.PS.
2. In the taskbar on your screen, click Start, then Run, then type the following in the text
box to access the MS-DOS Prompt.
COMMAND
3. Change the directory to the location of the utility files.
4. If your printer is connected to the parallel (LPT) port, type the following command
(where x is 1, 2, or 3):
COPY RESET.PS LPTx:
If your printer is connected to a network, type the following command:
lpr -S <IP Address> -P PS RESET.PS
Downloading files if your printer is connected to a Novell Netware network
This procedure lets you redirect (capture) LPT ports in Novell NetWare. NetWare queues
can be captured from the DOS Prompt or captured directly from Windows. To find out if
an LPT port is already captured, type the following command from the DOS Prompt:
capture show
This will list the current capture data for each virtual port.
Note
If an ad command or file name error occurs, run the command from the file
servers Public directory.
40 Phaser 860 Color Printer
Page 47

Printer Utilities
■
For NetWare 3.xx and Netware 4.xx bindery queues:
capture q=[queue_name] l=[port] nb nff nt
where queue_name is the name of the queue to be captured, and port is the virtual
port to capture to, such as LPT3.
Also, nb is no banners, nff is no form feeds, and nt is no tabs.
For example: capture q=phaser_860 l=3 nb nff nt
Note
For NetWare 4.xx NDS queues, the queue name needs to start with a period.
For example:
capture q=.phaser_860_q.nds.printers.support l=2 nb nff nt
For Windows 95 / 98 environments:
1. From the Details tab of your printer’s driver, select the Capture Printer Port button.
2. In the Capture Printer Port dialog box:
■
For bindery queues, enter the path as \\server_name\queue_name
For example: \\nw_server\Phaser_860
■
For NDS queues, enter the path as \\Tree\queue_name.context
For example: \\Tek\.Phaser_860_Q.nds.printers
3. Click the OK button.
Note
If the appropriate file server is not listed, click the Attach button and select the
desired file server. Login and click the OK button. Within the Operation section,
check the box next to Permanent, then click Connect. The port should then be
captured.
Downloading files if your printer is connected to Windows NT
Use this procedure to redirect (capture) LPT Ports.
Under Windows NT print spooler, you create Ports based on their physical location:
■
Local ports = Lpt1 / Lpt2, etc.
■
IPX Port = \\NW_SERVER\Phaser
■
Appletalk Ports = WV Net 36:Phaser
■
TCP/IP Ports = 162.36.62.151:PS or [AUTO]
However, if you’re at a command prompt (DOS Prompt) and want to print, or copy, a
PostScript file to a port that is a network port, you can do the following:
■
TCP/IP Ports:
lpr -S [printers IP Address] -P [print queue] filename
For example: lpr -S 134.62.36.70 -P PS test.ps
Advanced Features and Troubleshooting Manual 41
Page 48

Printer Utilities
■
IPX and Appletalk ports require the redefinition of the LPTX port to the network path
through the use of the NET USE command.
NET USE LPT1 \\Server_Name\Queue_Name
For example: NET USE LPT1 \\NW_SERVER\Phaser
or: NET USE LPT2 \\NT_SERVER_NT\Phaser
After redirecting the port using the NET USE command you can use the COPY
command to print the postscript file.
For example: C:\> COPY TEST.PS LPT1:
When finished, end the redirect with the command:
NET USE LPT1 /delete
42 Phaser 860 Color Printer
Page 49

Troubleshooting Phaser 860 Printers
Troubleshooting Phaser 860 Printers
Getting Help
Refer to the following resources for information about your printer:
■
Printer CD-ROM
■
Advanced Network Management Tools CD-ROM
■
Printer’s front panel and internal pages
■
Windows driver and driver help system
■
Xerox web sites
■
CentreWare IS
■
Other online services
Printer CD-ROM
The printer’s auto-running CD-ROM guides you to the various resources available for
installing and learning more about your Phaser color printer.
■
Read Me release notes
■
Printer drivers
■
Driver installers (for Mac and Windows)
■
Phaser 860 Color Printer User Guide
■
Advanced Features and Troubleshooting Manual (this manual)
■
Setup Guide poster
■
How-to videos
■
Networking information
■
Cleaning instructions
■
Consumables instructions
■
Repacking instructions
■
Adobe Acrobat Reader (for reading the PDF files)
■
Adobe Type Manager (ATM)
Advanced Network Management Tools CD-ROM
This CD-ROM contains network management tools, including CentreWare DP, Unix tools,
and the Font Downloader application.
Advanced Features and Troubleshooting Manual 43
Page 50

Troubleshooting Phaser 860 Printers
Printer’s front panel and internal pages
You can press the Information key at any time to get additional information about the
message displayed on the front panel.
On the printer’s front panel, use the Printable Pages menu or the Support Menu to
print internal pages that give information about the printer configuration, supplies
information, paper tips, etc.
Windows driver and driver help system
If you are using Windows 95, Windows 98, Windows 2000, or Windows NT, install the
driver from the Printer CD-ROM and access the printer driver to:
■ Access interactive troubleshooting assistance from the
Technical Support link on the Troubleshooting tab.
■
Link to other relevant web sites from the Troubleshooting tab.
■
View information about the printer features on the driver tabs by clicking the
Help button on the tab.
■
View troubleshooting information by clicking a Help button, then selecting the
Troubleshooting Guide.
To access the Phaser 860 printer driver:
1. Click Start, select Settings, then click Printers.
2. In the Printers folder, right-click the icon for your Phaser 860 printer.
3. From the popup menu, select Properties.
Xerox web sites
www.xerox.com/officeprinting/
■
Product and supplies information
■
Downloading printer drivers
■
Finding your local reseller
■
Online documentation
www.xerox.com/officeprinting/infoSMART/
The infoSMART™ knowledge base is the same troubleshooting knowledge base used by
Xerox Customer Support staff to provide the latest technical information on:
■
Application issues
■
Networking issues
■
Printer errors
■
Print-quality issues
■
Troubleshooting
44 Phaser 860 Color Printer
Page 51

Troubleshooting Phaser 860 Printers
www.colorconnection.xerox.com/
This site helps you get the most from your color printer:
■
Interactive tutorials, color printing templates, and helpful tips for using your
printer and favorite software applications.
■
Easy access to online technical support.
■
Customized features to meet your individual needs.
CentreWare IS
For information on CentreWare IS, refer to page 27.
Other online services
Subscribe to email update notices: www.colorconnection.xerox.com/
Technical Support: www.xerox.com/officeprinting/support
To find a local reseller
See www.xerox.com/officeprinting/contacts for the most updated
information.
U. S.
1-800-835-6100
Canada
1-877-662-9338
Outside U.S. and
Canada
Contact your local
Xerox office for a list of
local resellers
Advanced Features and Troubleshooting Manual 45
Page 52

Troubleshooting Phaser 860 Printers
Indicator light problems
Status indicator light is off
The printer is turned off, is not ready, is disabled, or has detected an error.
■
Make sure that the printer is plugged in and turned on.
■
Do not plug the printer’s power cord into a power strip; use a wall outlet.
Status indicator light is blinking green
■
If the printer is receiving, processing, or printing a job, wait for the job to be
completed or cancel the job.
■
If you have entered the menu in the front panel, you can exit the menu.
■
If the warm-up sequence has not finished, wait until the printer displays Ready to
Print.
Status indicator light is blinking yellow
■
The printer is still printing but there is a warning condition that needs user attention
soon.
Status indicator light is blinking red
■
The printer has stopped because it detected an error or condition that required user
intervention, such as an open door or a paper jam. Correct the condition reported on
the front panel (such as by closing the door or clearing the paper jam).
■
Press the Information key to access more information on the error condition.
■
Refer to the following pages for information about particular error conditions. For
detailed information about jams, refer to the Phaser 860 Color Printer User Guide.
46 Phaser 860 Color Printer
Page 53

Troubleshooting Phaser 860 Printers
Front panel error messages
When in a menu, the front panel returns to Ready to Print
■
The front panel menu times out and returns to Ready to Print if no activity occurs
in the menu system in 2 minutes.
■
If you want to re-enter the menu system, highlight Menus and press the OK key.
Output tray full
■
Too much media is stacked in the output tray. Remove all printed pages from the
output tray.
Ink low - Add ink
■
One or more ink-loading bin is almost empty. Add more ink soon.
■
If needed, order additional Phaser 860 Xerox ColorStix® II ink sticks.
Out of ink
■
One or more ink-loading bin is empty. Add more ink sticks to the bin that is empty.
■
A label above each bin indicates the color and color number of that bin. Because
the magenta, cyan, and black ink sticks are all dark, refer to its color number to
determine which bin to load the ink stick. Don't worry if the yellow ink sticks
have darker areas.
■
Use only Phaser 860 Xerox ColorStix® II ink sticks; the use of other ink may
affect print quality and reliability. Xerox warranties and service contracts do not
cover damage, malfunction, or degradation of performance caused by the use of
non-Xerox supplies or consumables or the use of Xerox supplies not specified for
use with this printer.
■
Each ink stick is uniquely shaped to fit into the correct ink-loading bin. Insert the
ink stick's narrow end first.
Ink sticks jammed
■
One or more ink sticks are stuck in the ink-loading bin. Open and close the top cover.
■
If the problem persists, move the ink sticks until there are no spaces between sticks of
the same color.
■
To prevent problems:
■
Do not use broken ink sticks.
■
Always install the ink stick's narrow end first.
Maintenance drawer (A) locked
■
The maintenance drawer (labeled A) is locked because it contains hot ink that could
cause burns. You cannot remove the maintenance drawer until the ink has cooled.
■
Close the front cover and wait at least five minutes for the ink to cool before removing
the maintenance drawer from the printer.
■
Printing resumes when the maintenance drawer is unlocked and the cover is closed.
Advanced Features and Troubleshooting Manual 47
Page 54

Troubleshooting Phaser 860 Printers
Maintenance drawer (A) missing
■
■
the maintenance drawer is not installed, open the front cover and install the maintenance
If
drawer (labeled A).
If the maintenance drawer is already there, pull out the drawer, make sure that the
counter (orange piece labeled C2) is installed, and re-insert the maintenance drawer.
Maintenance kit low
■
The Maintenance Kit is almost empty.
■
Order a replacement Maintenance Kit since the Maintenance Kit will need replacing
soon.
Maintenance kit empty
■
The Maintenance Kit is depleted. Replace the Maintenance Kit to continue printing.
■
If the message remains after you installed a new kit, make sure that the new counter
(the orange piece labeled C2) was correctly installed.
Maintenance kit service life low
■
The 15-month service life will expire soon.
■
Order a replacement Maintenance Kit since the Maintenance Kit will need replacing
soon.
Maintenance kit service life expired
■
The 15-month service life has expired.
■
Replace the Maintenance Kit now to prevent print quality problems.
Printer error ##
■
An error occurred that may not be user-correctable.
■
Turn off the printer, wait at least 15 seconds, and then turn the printer back on.
■
If the error is not cleared, write down the error number.
■
If you have access to the internet, look up the error number on the infoSMART
web page (see page 44) for possible corrective action.
■
If the error persists, call Customer Support with the error number.
48 Phaser 860 Color Printer
Page 55

Troubleshooting Phaser 860 Printers
Paper jam message
■
Clear the jam. For detailed information about clearing jams, refer to the Phaser 860
Color Printer User Guide.
■
Make sure that paper or transparencies are installed correctly in the tray and that the
tray switch is set correctly.
■
If the jam occurred because too much media was loaded in the tray, reduce the
amount of media so it is below the fill line on the left side of the tray.
■
If the paper is wrinkled or curled, change the media; only use clean, undamaged
paper.
■
If the jam occurred because the paper is too thick or too thin, use the recommended
media instead; refer to the Phaser 860 Color Printer User Guide or print the Paper
Tips Page (from the Printable Pages menu).
Media jam - Retry manual feed
■
If an envelope has jammed because it was not loaded properly, pull out the jammed
envelope, verify that the manual-feed slot is fully extended (by gently pushing it
downward), and (when prompted by the front panel) insert an undamaged envelope
in the manual-feed slot:
■
Insert only one envelope.
■
Make sure the envelope is aligned against the left side of the manual-feed slot
with the flap side facing up. For more information about printing on envelopes,
refer to the Phaser 860 Color Printer User Guide.
■
Insert the envelope until it is pulled into the printer.
■
If a sheet of paper or a transparency has jammed because it was not loaded properly,
Pull out the paper or a transparency, verify that the manual-feed slot is fully extended
(by gently pushing it downward), and (when prompted by the front panel) insert an
undamaged sheet in the manual-feed slot:
■
Insert only one sheet of paper or one transparency.
■
Make sure the sheet is aligned against the left side of the manual-feed slot. For
more information about printing from the manual-feed slot, refer to the
Phaser 860 Color Printer User Guide.
■
Insert the sheet until it is pulled into the printer.
Advanced Features and Troubleshooting Manual 49
Page 56

Troubleshooting Phaser 860 Printers
Problems with automatic two-sided printing
Output is single-sided
■
Make sure that you have selected two-sided printing in the printer driver.
■
Use Letter-size, A4-size, or Legal-size paper only for two-sided printing.
■
If using the standard paper/transparency tray, make sure the tray switch is set to
Paper.
Frequent jams with two-sided printing
■
Paper must be between 60 - 120 g/m2 (16 - 32 lb. bond) in weight.
■
When using the manual-feed slot, make sure that the paper is loaded straight and
aligned along the left side of the manual-feed slot.
The second side of a two-sided print is upside-down
■
Select the correct method for binding preference in the printer driver.
■
Refer to the Phaser 860 Color Printer User Guide for more information on two-sided
printing and binding preference.
Letterhead paper prints on the wrong side or prints upside-down
■
From the manual-feed slot: For two-sided printing, load letterhead paper face up with
the letterhead entering the manual-feed slot last.
■
From a tray: For two-sided printing, load letterhead paper face down with the
letterhead towards the back of the tray.
50 Phaser 860 Color Printer
Page 57

Troubleshooting Phaser 860 Printers
Problems printing on labels
Labels are printed on the wrong side
■
Make sure the labels are loaded face up in a tray, or face down in the manual-feed
slot.
■
Make sure that two-sided printing is not selected in the printer driver; you cannot
print labels on two sides.
Printing labels from Microsoft Word
1. From the Tools menu, select Envelopes and Labels.
2. In the Envelopes and Labels dialog box, click the Labels tab.
3. In the dialog box, click on the label icon.
4. In the Label Options dialog box, select all of the following, depending on label size:
Letter-size:
a. Printer: Laser and Ink-jet
b. Label Products: Avery standard
c. Select the label size corresponding to the Xerox label media:
Avery
label sizes
5160 A/Letter (U. S.)
8.5 x 11 in.
5164 A/Letter (U. S.)
8.5 x 11 in.
Xerox label media
100 sheets / 30 labels per
sheet (each 1 x 2-5/8 in.)
100 sheets / 6 labels per
sheet (each 3-1/3 x 4 in.)
Metric-size:
a. Printer: Laser and Ink-jet
b. Label Products: Avery A4 and A5 sizes
c. Select the label size corresponding to Xerox label media:
Avery
label sizes
L7163 A4 (Metric Letter)
210 x 297 mm
L7165 A4 (Metric Letter)
210 x 297 mm
Xerox label media
100 sheets / 14 labels per
sheet (each 38.1 x 99.1 mm)
100 sheets / 8 labels per
sheet (each 67.1 x 99.1 mm)
5. Click the OK button to exit the Label Options dialog box.
6. Click the Print button.
Xerox part
number
016-1812-00
016-1813-00
Xerox part
number
016-1814-00
016-1815-00
Advanced Features and Troubleshooting Manual 51
Page 58

Troubleshooting Phaser 860 Printers
Print quality problems
Light-colored or missing stripes on prints
■
Run a test print by choosing Print Diagnostic Pages on the printer’s front panel
(by selecting the Support Menu, then selecting Improve Print Quality).
■
If a light stripe appears in one color, clean the printhead by choosing Eliminate
Light Stripes on the front panel (by selecting the Support Menu, then selecting
Improve Print Quality). Refer to the Phaser 860 Color Printer User Guide for
more information.
■
If a light stripe appears in all four colors, refer to the Phaser 860 Color Printer User
Guide for more information about how to:
■
Clean the Rapid Release Guide.
■
Clean the wiper blade on the maintenance drawer.
■
Inspect the printer's paper-exit area for debris and, if needed, clean this area.
■
Select Eliminate Light Stripes on the front panel to clean the print heads
and print a test page.
Ink streaks or oil on front, back, or edges of print
■
Choose Remove Print Smears on the front panel (by selecting the Support Menu,
then selecting Improve Print Quality). Refer to the Phaser 860 Color Printer User
Guide for more information. The cleaning process takes several minutes and uses
several blank sheets of paper.
■
Be sure to use paper supported by the printer. For a list of recommended media types,
refer to the Phaser 860 Color Printer User Guide or print the Paper Tips Page (from
the front panel).
■
If needed, clean the following parts of the printer, as described in the Phaser 860
Color Printer User Guide:
■
Clean the maintenance drawer wiper.
■
Clean the exit rollers if ink or debris is visible on those rollers.
■
Clean the paper-feed rollers if ink or debris is visible on those rollers.
Images are too light or too dark
■
Pull out the upper tray and check the position of the switch on the front-right side of
the tray. Push it forward for paper and backward for transparency. After setting the
switch correctly, push the tray back in.
■
Make sure that you have loaded the correct media (paper or transparencies). For a list
of recommended media types, refer to the Phaser 860 Color Printer User Guide or
print the Paper Tips Page (from the front panel).
■
Select another color correction in the printer driver, then print the job again. Refer to
page 3 for more information.
52 Phaser 860 Color Printer
Page 59

Troubleshooting Phaser 860 Printers
Prints have dull, faded colors
■
If you are using the standard paper/transparency tray or the high capacity
transparency/label tray, make sure that the tray switch is set for the appropriate
media.
■
When printing transparencies, only use Phaser 860 transparency film, which has been
specially formulated for use in this printer, and make sure that you have selected
Transparency (when feeding from a tray) or Manual Feed-Transparency (when using
the manual-feed slot) in the printer driver.
■
Increase the print quality or try a different color correction. Refer to page 2 and page 3
for more information.
Photographic images appear grainy
■
In the printer driver, select the highest print quality mode. Refer to page 2 for more
information.
■
Print images that are 150 dpi or higher.
Prints in black-and-white instead of color
■
In the printer driver, check if the TekColor Correction is set to Black and White; if it
is, choose a different color correction. Refer to page 3 for more information.
■
If using a Macintosh:
■
Make sure that you are using the correct PPD file with the latest Apple
LaserWriter printer driver, that supports color PostScript.
■
In the Print dialog box, make sure that Color/Grayscale is selected. Some
applications require special files to print in color. Make sure that these files are
properly installed. For information, refer to the topics on the printer’s CD-ROM
or the Xerox web site.
■
If using a PC:
■
Be sure to use the correct printer driver from the printer’s CD-ROM.
■
Make sure the application you are using is set up to print in color.
Blue colors look too purple
■
If printed blue colors look too purple, print your document with the Vivid Color color
correction. Refer to page 3 for more information.
Transparency print quality is poor.
■
Only use Phaser 860 transparency film, which has been specially formulated for use
in this printer.
■
Make sure that you have selected Standard as the print-quality mode. Refer to page 2
for more information.
■
Try setting Vivid Color as the color correction. Refer to page 3 for more information.
■
Make sure that the switch on the side of the standard paper/transparency tray or the
high-capacity transparency/label tray, is set to Transparency.
■
Make sure that you have selected Transparency (when feeding from a tray) or Manual
Feed-Transparency (when using the manual-feed slot) in the printer driver.
Advanced Features and Troubleshooting Manual 53
Page 60

Troubleshooting Phaser 860 Printers
Print is wrinkled or rippled
■
If your paper is smooth, glossy, or coated, try a different type of paper. Use only
supported paper types.
■
Use single-sided printing instead of double-sided printing.
Printing problems
The printer times out when connected to a parallel port
■
Windows users: To change the timeout for transmission retry, refer to the Microsoft
Online Help for instructions.
Part of the image is missing or the image is clipped
■
For more details on page sizes, print areas, and margins, refer to the Phaser 860 Color
Printer User Guide. To maximize the image area, you may have to adjust the margins
in your application software.
■
In your application, check the setting for Image Size.
■
Make sure you have selected the correct paper size in the printer driver.
■
Make sure you have selected Page Setup after changing printers.
Problems printing from a specific application
■
Get information and tips on printing from specific applications (such as QuarkXPress
and PageMaker) from the Xerox web site. Refer to page 44 for more information
Fonts print incorrectly in Windows
■
If you have downloaded fonts to your printer, or stored additional fonts on the
internal hard drive, you may need to reinstall the fonts.
■
If you are using PostScript fonts, make sure ATM (Adobe Type Manager) is installed
and configured properly. ATM software is shipped with your printer.
Text prints in Courier font
■
The font you have specified is not available so the printer substituted the Courier
font. The printer has 136 resident fonts. Other fonts must be set up from the printer
driver to print with each job.
54 Phaser 860 Color Printer
Page 61

Troubleshooting Phaser 860 Printers
Preventing media jams
Use the following guidelines to prevent media jams inside the printer.
■
Make sure the printer is on a flat, level surface.
■
Don't add media above the tray's fill line.
■
Media:
■
Use only the recommended media. Refer to the Phaser 860 Color Printer User
Guide or print the Paper Tips Page from the printer’s front panel.
■
For transparencies, only use Phaser 860 transparency film, which has been
specially formulated for use in this printer.
■
Use clean, undamaged paper. Keep paper and other supplies clean and free from
dust. Paper that has been sitting out of its sealed wrapper can become distorted,
causing paper jams. Keep paper sealed until you are ready to use it for printing.
■
Do not use paper that has been creased or wrinkled.
■
If paper is still jamming, flip the paper over in the paper tray
■
Do not print on sheets of labels that are missing labels.
■
Use only Phaser 860 printer Color Printing Labels or Xerox Phaser Premium
Business Cards.
■
Do not use perforated paper, or odd-sized paper.
■
For three-holed paper, make sure margins are adjusted to avoid printing over the
holes.
■
When using the manual-feed slot:
■
Always use two hands to load the media so that it enters evenly.
■
Wait until a front panel message prompts you before feeding the first sheet of
paper, first transparency, or first envelope. When printing multiple pages, wait
until the front panel message prompts you before adding the next sheet of media.
■
Clean the printer’s rollers if they are visibly dirty. Refer to the Phaser 860 Color
Printer User Guide for more information about cleaning the rollers.
■
In high-humidity conditions, or when using speciality papers that can be printed on
both sides: Remove the paper from the paper tray, turn over the stack of paper, and
reinsert the paper into the tray.
After you clear a media jam, the printer sometimes outputs a second, usually partial print
to remove any image that may remain on the print drum; then the printer prints your
original image.
If you have more than one tray, the lower tray is usually the tray that the printer uses in
self cleaning. You can change the default tray to use for self cleaning; refer to page 35 for
more information.
Advanced Features and Troubleshooting Manual 55
Page 62

Troubleshooting Phaser 860 Printers
56 Phaser 860 Color Printer
Page 63

Specifications for the Phaser 860 Color Printer
Specifications for the Phaser 860 Color
Printer
Temperature
Operating: 10 degrees C to 32 degrees C (50 degrees F to 90 degrees F)
Non-operating: -30
Humidity
Operating: 10% to 85% relative humidity, non-condensing
Non-operating: 10% to 95% relative humidity, non-condensing
Altitude
Operating: 0 to 2400 m (0 to 7,874 ft.) above sea level
Shipping: 0 to 15000 m (0 to 49200 ft.) above sea level
Primary voltage ranges
90 - 140 VAC, 110 VAC nominal
180 - 264 VAC, 220 VAC nominal
Frequency range
47 to 63 Hz
Primary fusing
125 VAC, 250 VAC, 10 Amps and 6 Amps (Not user-accessible)
degrees C to +60 degrees C (-22 degrees F to 140 degrees F)
Power Consumption
State Typical Power Maximum Allowable
Warming up 1000 watts 1100 watts
Continuous printing 220 watts 600 watts
Idle 180 watts 300 watts
Standby 130 watts not applicable
Energy Star (optional) not applicable 30 watts
Dimensions of the printer (without a High-Capacity Paper Tray Assembly)
Depth: 600 mm (23.5 in.)
Width: 432 mm (17 in.)
Height: 390 mm (15.3 in.)
Weight of the printer
36 kg (79 lb.)
Advanced Features and Troubleshooting Manual 57
Page 64

Specifications for the Phaser 860 Color Printer
Dimensions of one High-Capacity Paper Tray Assembly
Height: 127 mm (5 in.)
Depth: 530 mm (20.875 in.)
Width: 440 mm (17.375 in.)
Weight of one High-Capacity Paper Tray Assembly
9.1 kg (20 lb.)
Sound level
Sound Pressure (L
Printing: L
Idle: L
pA
L
wA
pA
L
wA
Printer tilt
Printer clearances
); Sound Power (L
A
p
< 60 dB (A)
< 7.2 Bels (A)
< 45 dB (A)
< 5.6 Bels (A)
)
A
w
2 cm/.75 in.
10 cm (4 in.)
0726-94
10 cm
(4 in.)
10 cm (4 in.)
0726-95
58 Phaser 860 Color Printer
Page 65

Regulatory Information for Phaser 860 Printers
Regulatory Information for
Phaser 860 Printers
Canadian EMC (Electromagnetic Compatibility)
regulatory standards
■
This digital apparatus does not exceed the Class B limits for radio noise emissions
from digital apparatus set out in the Radio Interference Regulations of the Canadian
Department of Communications.
■
Le présent appareil numérique n’émet pas de bruits radioélectriques dépassant les
limits applicables aux appareils numériques de la classe B prescrites dans le
Règlement sur le brouillage radioélectrique édicté par le ministere des
Communications du Canada.
Advanced Features and Troubleshooting Manual 59
Page 66

Regulatory Information for Phaser 860 Printers
Declaration of conformity
Xerox Corporation
Office Printing Business
P.O. Box 1000
Mail Stop 60-512
Wilsonville, Oregon 97070 U.S.A.
declares, under our sole responsibility, that the products
Phaser 860 printer (Z860)
to which this declaration relates, is in conformity with the following standard(s) or other
normative document(s):
For the
EC EN60950:1992
For the
EC EN55022:1992
For the
EC EN50082-1:1997
Radio-Frequency Electromagnetic Field immunity EN 61000-4-3: 1995-02
Electrostatic Discharge EN 61000-4-2: 1995-01
Fast Burst Transient EN 61000-4-4: 1995-01
Line Surge EN 61000-4-5: 1995-02
Radio-Frequency Conducted Immunity EN 61000-4-6: 1996-03
Voltage Dips and Interruptions EN 61000-4-11: 1994-06
Flicker EN 61000-3-3: 1994-12
Safety of Information Technology Equipment including
Electrical Business Equipment
Limits and methods of measurement of radio Interference
characteristics of Information Technology Equipment
The Generic Immunity Standard
Residential, Commercial, and Light Industry.
following the provision of the
Low Voltage Directive 73/23/EEC, the Electromagnetic Compatibility Directive
89/336/EEC, Machinery Directive 89/392/EEC.
60 Phaser 860 Color Printer
Page 67

Regulatory Information for Phaser 860 Printers
FCC Class B device
The equipment described in this manual generates and uses radio frequency energy. If it is
not installed and used properly in strict accordance with Xerox’s instructions, it may
cause interference with radio and television reception.
This equipment has been tested and verified to comply with the limits for a Class B digital
device, pursuant to Part 15 of the FCC Rules. These limits are designed to provide
reasonable protection against harmful interferences in a residential installation. This
equipment generates, uses and can radiate radio frequency energy and, if not installed and
used in accordance with the instructions, may cause harmful interference to radio
communications. However, there is no guarantee that interference will not occur in a
particular installation. If this equipment does cause harmful interference to radio or
television reception, which can be determined by turning the equipment off and on, the
user is encouraged to try to correct the interference by one of more of the following
measures:
■
Reorient or relocate the receiving antenna.
■
Increase the separation between the equipment and receiver.
■
Connect the equipment into an outlet on a circuit different from that to which the
receiver is connected.
■
Consult the dealer or an experienced radio/TV technician for help.
Warning
Changes or modifications not expressly approved by Xerox can affect emission
compliance and could void the user’s authority to operate this product. To
ensure emission compliance, use shielded interface cables.
Advanced Features and Troubleshooting Manual 61
Page 68

Regulatory Information for Phaser 860 Printers
62 Phaser 860 Color Printer
Page 69

Index
A
Adobe Photoshop plug-in 18
altitude, operating range 57
Automatic color correction 3
automatic tray switching 35
B
Black and White color correction 3
C
CD-ROM for printer 43
CentreWare IS 45
CentreWare IS Printer Management software 27
cleaning pages
changing the media tray source 35
CMYK Sampler
Macintosh utility file 14
PC utility file 14
color charts
CMYK 12
HSB 12
PANTONE Color 15
printing from a Macintosh 14
printing from a PC 14
printing from the front panel 12
RGB 12
color connection 45
color corrections 3
Commercial Press color correction 3
Index
D
declaration of conformity 60
DIC color correction 3
downloading files from servers
World Wide Web 37
downloading files to the printer
Macintosh 38
PC 40
Windows 95 40
downloading fonts 23
Macintosh 24
PC 25
drivers
location 43
uses 44
duplex
troubleshooting 50
Advanced Features and Troubleshooting Manual 63
Page 70

Index
E
enabling and disabling the Startup Page 30
energy saving mode 34
Enhanced print quality mode 2
Euroscale Press color correction 3
F
Fast Color print quality mode 2
features of the printer 1
Font Sampler, Macintosh utility file 14, 25
fonts
downloading 23
printing a list of resident fonts 25
sampler, printing 25
TrueType 23
FONTS.PS, PC utility file 14, 26
frequency range 57
front panel
information key 44
light intensity 33
menus 31
messages, troubleshooting 46, 47
FujiProof color correction 3
H
Help button in printer driver 44
High Resolution/Photo print quality mode 2
HSB Sampler
Macintosh utility file 14
PC utility file 14
I
information key 44
information pages 44
infoSMART 44
ink saving print quality mode 2
Intelligent Ready
short overview 34
L
labels
printing on wrong side 51
letterhead paper
printing on wrong side 50
64 Phaser 860 Color Printer
Page 71

M
Macintosh utility files 38
color samplers 14
Font Sampler 14, 25
Menu Long 31
Menu Short 31
manuals 43
media jams
output after clearing 55
preventing 55
Menu Long, Macintosh utility file 31
Menu Short, Macintosh utility file 31
MENULONG.PS, PC utility file 31
MENUSHRT.PS, PC utility file 31
modes
print quality 2
N
None color correction 3
Index
P
PANTONE Colors
installing printer files 16
printer-specific colors 15
printing the color chart from a Macintosh 16
printing the color chart from a PC 17
selection books 15
PC utility files
color samplers 14
FONTS.PS 14, 26
MENULONG.PS 31
MENUSHRT.PS 31
PhaserPrint plug-in
compatibility requirements 18
for Photoshop 18
installing for Macintosh 18
starting the plug-in 18
photographic print quality mode 2
Photoshop plug-in 18
Plug-in, Adobe Photoshop, using 18
power consumption specifications 57
primary fusing 57
primary voltage ranges 57
print features
automatic tray switching 35
controlling through CentreWare IS 27
print quality modes 2
print quality problems
troubleshooting 54
print speed 2
printed colors, problems with 52
Advanced Features and Troubleshooting Manual 65
Page 72

Index
printer
dimensions 57
front panel menus 31
print speed 2
quality modes 2
printer CD-ROM contents 43
printer drivers
location 43
uses 44
Q
quality modes 2
R
regulatory standards 59
resellers 45
RGB Sampler
Macintosh utility file 14
PC utility file 14
S
setting
front panel intensity 33
SNAP Press color correction 3
specifications 57
speed of printing 2
sRGB Display color correction 3
Standard print quality mode 2
standby mode 34
Startup Page
enable or disable 30
SWOP Press color correction 3
Sys/Start Job, enable or disable 32
T
TekColor color corrections 3
Toyo color correction 3
transparencies
print quality modes 2
tray switching 35
66 Phaser 860 Color Printer
Page 73

troubleshooting
black and white prints instead of color 53
duplex 50
front panel messages 46, 47
labels are printed on wrong side 50
labels printing on wrong side 51
letterhead paper printing on wrong side 50
paper jams, preventing 55
print quality problems 54
printed colors 52
two-sided printing 50
TrueType fonts 23
two-sided printing
troubleshooting 50
U
Usage Profile reports
brief overview 28
utility files
Macintosh, using 38
PC, using 40
Index
V
videos 43
Vivid Color color correction 3
voltage ranges 57
W
web sites 44
World Wide Web
downloading files from 37
X
Xerox web sites 44
Advanced Features and Troubleshooting Manual 67
Page 74

 Loading...