

Page 1

Upgrading Enterprise OS
®
Software
Software version 11.3
http://www.3com.com/
Part No. 09-1551-001
Published May 1999
Page 2

ii
©
3Com Corporation
5400 Bayfront Plaza
Santa Clara, California
95052-8145
3Com Corporation, 1999. All rights reserved. No part of this documentation may be reproduced in
any form or by any means or used to make any derivative work (such as translation, transformation, or
adaptation) without permission from 3Com Corporation.
3Com Corporation reserves the right to revise this documentation and to make changes in content from
time to time without obligation on the part of 3Com Corporation to provide notification of such revision
or change.
3Com Corporation provides this documentation without warranty of any kind, either implied or
expressed, including, but not limited to, the implied warranties of merchantability and fitness for a
particular purpose. 3Com may make improvements or changes in the product(s) and/or the program(s)
described in this documentation at any time.
UNITED STATES GOVERNMENT LEGENDS:
If you are a United States government agency, then this documentation and the software described
herein are provided to you subject to the following restricted rights:
For units of the Department of Defense:
Restricted Rights Legend: Use, duplication, or disclosure by the Government is subject to restrictions as
set forth in subparagraph (c) (1) (ii) for Restricted Rights in Technical Data and Computer Software Clause
at 48 C.F.R. 52.227-7013. 3Com Corporation, 5400 Bayfront Plaza, Santa Clara, California 95052-8145.
For civilian agencies:
Restricted Rights Legend: Use, reproduction, or disclosure is subject to restrictions set forth in
subparagraph (a) through (d) of the Commercial Computer Software - Restricted Rights Clause at 48
C.F.R. 52.227-19 and the limitations set forth in 3Com Corporation’s standard commercial agreement for
the software. Unpublished rights reserved under the copyright laws of the United States.
If there is any software on removable media described in this documentation, it is furnished under a
license agreement included with the product as a separate document, in the hard copy documentation,
or on the removable media in a directory file named LICENSE.TXT. If you are unable to locate a copy,
please contact 3Com and a copy will be provided to you.
Unless otherwise indicated, 3Com registered trademarks are registered in the United States and may or
may not be registered in other countries.
3Com, Boundary Routing, Net Age, NETBuilder, NETBuilder II, OfficeConnect, SuperStack, and Transcend
are registered trademarks of 3Com Corporation. 3TECH and PathBuilder are trademarks of 3Com
Corporation. 3ComFacts is a service mark of 3Com Corporation.
CompuServe is a registered trademark of CompuServe, Inc. Windows is a registered trademark of
Microsoft Corporation. Solaris is a registered trademark of Sun Microsystems, Inc. SunOS is a trademark
of Sun Microsystems, Inc. UNIX is a registered trademark of Xopen Company Limited. IBM, APPN, and
SNA are registered trademarks of International Business Machines Corporation. HP is a registered
trademark of Hewlett-Packard Company. Novell is a registered trademark of Novell, Inc. ProComm Plus
for Windows is a registered trademark of DataStorm Corporation. Crosstalk for Windows is a registered
trademark of Attachmate Corporation.
Other brand and product names may be registered trademarks or trademarks of their respective holders.
The software contained in this product may contain encrypted product which may not be
exported or transferred from the U.S. or Canada without an approved U.S. Department of
Commerce export license.
Printed on recycled paper.
Page 3

C
ONTENTS
BOUT
A
Conventions 7
Year 2000 Compliance 8
1
O
VERVIEW
Upgrade Tools and Process 9
How the Utilities Work 10
Rules and Support Limitations 11
Take Time to Plan 11
2
NSTALLING
I
Installing the Utilities on a Windows System 13
Installing the Utilities on a UNIX System 14
Preparing for the Installation 14
Procedure 14
Setting up for Auto Startup 16
3
P
LANNING
Setting up for TFTP File Transfers 17
Setting up for FTP File Transfers 17
Automatic Recovery 18
Manual Recovery 19
Checking DRAM 20
Checking Flash Memory 20
Checking the Software Version 21
Planning Tables 21
HIS
THE
AND
G
UIDE
P
TILITIES
U
REPARING
ON
THE
A
T
Primary, Secondary, and Test Boot Sources 10
Automatic or Manual Recovery 10
ETWORK
N
U
PGRADE
ANAGEMENT
M
TATION
S
U
4
PGRADING
Status and Settings Pages 27
Settings Page 28
Verifying for Upgrading 29
Installing Software on the NMS 29
Procedure 30
Upgrading Software 31
U
SING
THE
NETB
UILDER
U
PGRADE
L
INK
A
PPLICATION
Page 4

U
5
PGRADING
Preparing for the Upgrade 35
Setting up for TFTP File Transfers 36
Setting up for FTP File Transfers 36
Prediagnosing System Problems 37
Installing the Software on the NMS 37
Software Directories 38
Using the Bcmsysupgrade Utility to Upgrade 39
Filenames 40
NETBuilder II Bridge/Router 40
SuperStack II NETBuilder and OfficeConnect NETBuilder Bridge/Routers 41
PathBuilder S5xx Series Switch 41
Upgrading Software Only 41
Automatic Recovery 41
Manual Recovery 43
If the Bridge/Router or Switch Does Not Boot 44
Upgrading Hardware and Software 44
Automatic Recovery 44
Manual Recovery 47
If the Bridge/Router or Switch Does Not Boot 49
A
B
RIDGE
/R
OUTER
U
SING
THE
C
OMMAND
-L
INE
U
TILITIES
6
U
PGRADING
Preparing for the Upgrade 51
Setting up for TFTP File Transfers 52
Setting up for FTP File Transfers 52
Using Upgrade Link 53
Verifying the Bridge/Router for Upgrading 54
Upgrading the Image 54
Using the Command-Line Utilities 57
Installing the NETBuilder Software 57
Prediagnosing System Problems 57
Upgrading Using Automatic Recovery 57
Upgrading Using Manual Recovery 58
Using the Enterprise OS User Interface 59
B
ACKING
7
Setting Up for TFTP File Transfers 62
Setting Up for FTP File Transfers 62
Backing Up the Software 63
Using NETBuilder Upgrade Link 63
Using the Command Line Utilities 63
Verifying the Device for Backing Up 63
Backing Up the Software 64
Using the Command-Line 64
Prediagnosing System Problems 64
Backing Up the Software 65
U
P
THE
AND
S
OFTWARE
R
ESTORING
I
MAGE
S
OFTWARE
O
NLY
Page 5

Directory Paths 65
Restoring Software from a Backup 66
Configuring IP Routing 66
Configuring SNMP 66
Mapping Hostnames Using the etc/snmp.cfg File 67
Restoring the Software Using Upgrade Link 68
Verifying the Device for Restoring 68
Restoring the Software 68
Restoring the Software Using the Command-Line 69
Prediagnosing System Problems 69
Restoring the Software 69
R
8
EFERENCE
Accessing and Downloading the Utilities 71
Downloading the Utilities 71
Update Log File 72
Utility Descriptions and Syntax 72
Overview 72
bcmbackup 73
bcmconfig 74
bcmctrl 75
bcmdf 76
bcmdiagnose 77
bcminstall 78
bcmloadconfig 79
bcmnbrus 80
bcmrestore 80
bcmsetup 81
bcmsysupgrade 81
bcmuname 82
bcmupdate 83
UpgradeLink 84
THE
U
PGRADE
FOR
Downloading UNIX Files 71
Downloading Windows Files 71
Getting Help 73
M
ANAGEMENT
U
TILITIES
A
ROUBLESHOOTING
T
Getting Help 85
Man Pages 85
HTML Help 85
General Troubleshooting Error Messages 85
Return Codes from bcmdiagnose 86
Hardware-Related Messages 87
Installation Troubleshooting Messages 87
Installing the Enterprise OS Upgrade Management Utilities 87
Determining Connectivity 88
Validating the SNMP Service Configuration 88
Page 6

Testing the NMS/ TFTP Configuration 89
Creating an Upgrade File 89
Uploading an Upgrade File 90
Downloading an Upgrade File 91
C
B
C
D
HOOSING
NETBuilder II Upgrade Migration Path 93
SuperStack II NETBuilder Upgrade Migration Path 96
SuperStack II NETBuilder SI Upgrade Migration Path 98
OfficeConnect NETBuilder Upgrade Migration Path 99
PathBuilder Upgrade Migration Path 101
OUNTING
M
Mounting the CD-ROM on Solaris 2.5.x 103
Mounting a Local CD-ROM Drive 103
Mounting from a Remote CD-ROM Drive 103
Mounting the CD-ROM on HP-UX 10.x 105
Mounting from a Local CD-ROM Drive 105
Mounting from a Remote CD-ROM Drive 105
Mounting the CD-ROM on IBM AIX 4.1.x Through 4.2.x 106
Mounting from a Local CD-ROM Drive 106
Mounting from a Remote CD-ROM Drive 106
Unmounting the CD-ROM 107
T
ECHNICAL
Online Technical Services 109
World Wide Web Site 109
3Com Knowledgebase Web Services 109
3Com FTP Site 109
3Com Bulletin Board Service 110
3Com Facts Automated Fax Service 110
Support from Your Network Supplier 110
Support from 3Com 111
Returning Products for Repair 112
S
A
OFTWARE
THE
CD-ROM
S
UPPORT
Access by Analog Modem 110
Access by Digital Modem 110
P
ACKAGE
ON
A
UNIX P
LATFORM
LOSSARY
G
NDEX
I
OM
3C
ORPORATION
C
IMITED
L
ARRANTY
W
Page 7

A
BOUT THIS GUIDE
This guide describes how to upgrade your NETBuilder® bridge/router to
Enterprise OS software version 11.3. This guide also describes how to upgrade
your PathBuilder™ S5xx series switch to Enterprise OS software version 11.3.
You can also use this guide to upgrade your NETBuilder bridge/router to previous
software versions (8.0 through 11.2) by specifying the correct options.
You can upgrade your bridge/router from software version 8.0 through 11.2 to
any software version after 8.0 through 11.3 on the following platforms:
■ NETBuilder II
®
bridge/router with DPE
■ NETBuilder II bridge/router with CEC — The CEC module is not supported after
software version 10.1, but you can use the 11.2 utilities to upgrade a CEC
module to a DPE module, or to upgrade the CEC module to software version
10.1 or earlier.
■ SuperStack
■ SuperStack II NETBuilder Token Ring bridge/router
■ OfficeConnect
®
II NETBuilder SI bridge/router
®
NETBuilder bridge/router
You can upgrade your PathBuilder S5xx series switch to Enterprise OS software
version 11.3 from version 11.1.1 and version 11.2.
This guide also describes how to complete an image-only upgrade for patches,
new packages, or software recovery. It also describes how to backup and restore
software on a network management station.
See the Enterprise OS Software Version 11.3 Release Notes for any changes or
additions to the information in this guide.
Conventions Table 1 and Table 2 list conventions that are used throughout this guide.
Table 1 Notice Icons
Icon Notice Type Description
Information note Important features or instructions
Caution Information to alert you to potential damage to a
Warning Information to alert you to potential personal injury
program, system, or device
Page 8

8 ABOUT THIS GUIDE
Table 2 Text Conventions
Convention Description
Syntax The word “syntax” means you must evaluate the syntax provided and
supply the appropriate values. Placeholders for values you must supply
appear in angle brackets. Example:
Enable RIPIP using:
SETDefault !<port> -RIPIP CONTrol = Listen
In this example, you must supply a port number for <port>.
Commands The word “command” means you must enter the command exactly as
shown in text and press the Return or Enter key. Example:
To remove the IP address, enter:
SETDefault !0 -IP NETaddr = 0.0.0.0
This guide always gives the full form of a command in uppercase and
lowercase letters. However, you can abbreviate commands by entering
only the uppercase letters and the appropriate value. Commands are
not case-sensitive.
Screen displays This typeface represents information as it appears on the screen.
The words “enter”
and “type”
When you see the word “enter” in this guide, you must type
something, and then press the Return or Enter key. Do not press the
Return or Enter key when an instruction simply says “type.”
[Key] names Key names appear in text in one of two ways:
■ Referred to by their labels, such as “the Return key” or “the Escape
key”
■ Written with brackets, such as [Return] or [Esc].
If you must press two or more keys simultaneously, the key names are
linked with a plus sign (+). Example:
Press [Ctrl]+[Alt]+[Del].
Menu commands
and buttons
Words in italicized
type
Menu commands or button names appear in italics. Example:
From the Help menu, select Contents.
Italics emphasize a point or denote new terms at the place where they
are defined in the text.
Year 2000 Compliance For information on Year 2000 compliance and 3Com products, visit the
3Com Year 2000 Web page:
http://www.3com.com/products/yr2000.html
Page 9

1
OVERVIEW
This chapter provides an overview of the upgrade tools, process, and support
limitations.
Upgrade Tools and Process
Definition of network
management station
The upgrade procedures in this guide use the Enterprise OS Upgrade Management
Utilities on a UNIX or Windows network management station (NMS).
An NMS is a UNIX or Windows system that has a TFTP/FTP server running in
addition to software, such as the Enterprise OS Upgrade Management Utilities, to
manage your network. For Windows, the utilities include the 3Com
server.
If you are upgrading multiple bridge/routers, you can install and use the Network
Admin Tools utilities in the Transcend
Control Services, available separately. See the Transcend user guide for more
information.
You can use the NETBuilder Upgrade Link application that comes with the utilities
provides an easy to use graphical user interface (GUI) to upgrade one or more
bridge/routers. Or you can access the utilities directly using the command-line.
When upgrading multiple bridge/routers simultaneously using command line
utilities, the topology of the network should be considered and the bridge/routers
should be upgraded in a sequence that will not disrupt the network.
If you are performing an image-only upgrade, you can use the utilities or
applications, or you can copy the software manually using the Enterprise OS user
interface.
®
Enterprise Manager or Transcend Network
®
TFTP/FTP
The utilities are shipped with your software package on a CD-ROM and must be
installed on an NMS on the same network as the bridge/router. You can also
download the utilities from the 3Com web, FTP, or BBS sites.
The utilities run on the following operating systems:
■ Solaris 2.x
■ HP-UX 10.x
■ IBM AIX 4.x or later
■ Windows NT 4.x
■ Windows 95/98
Page 10
10 CHAPTER 1: OVERVIEW
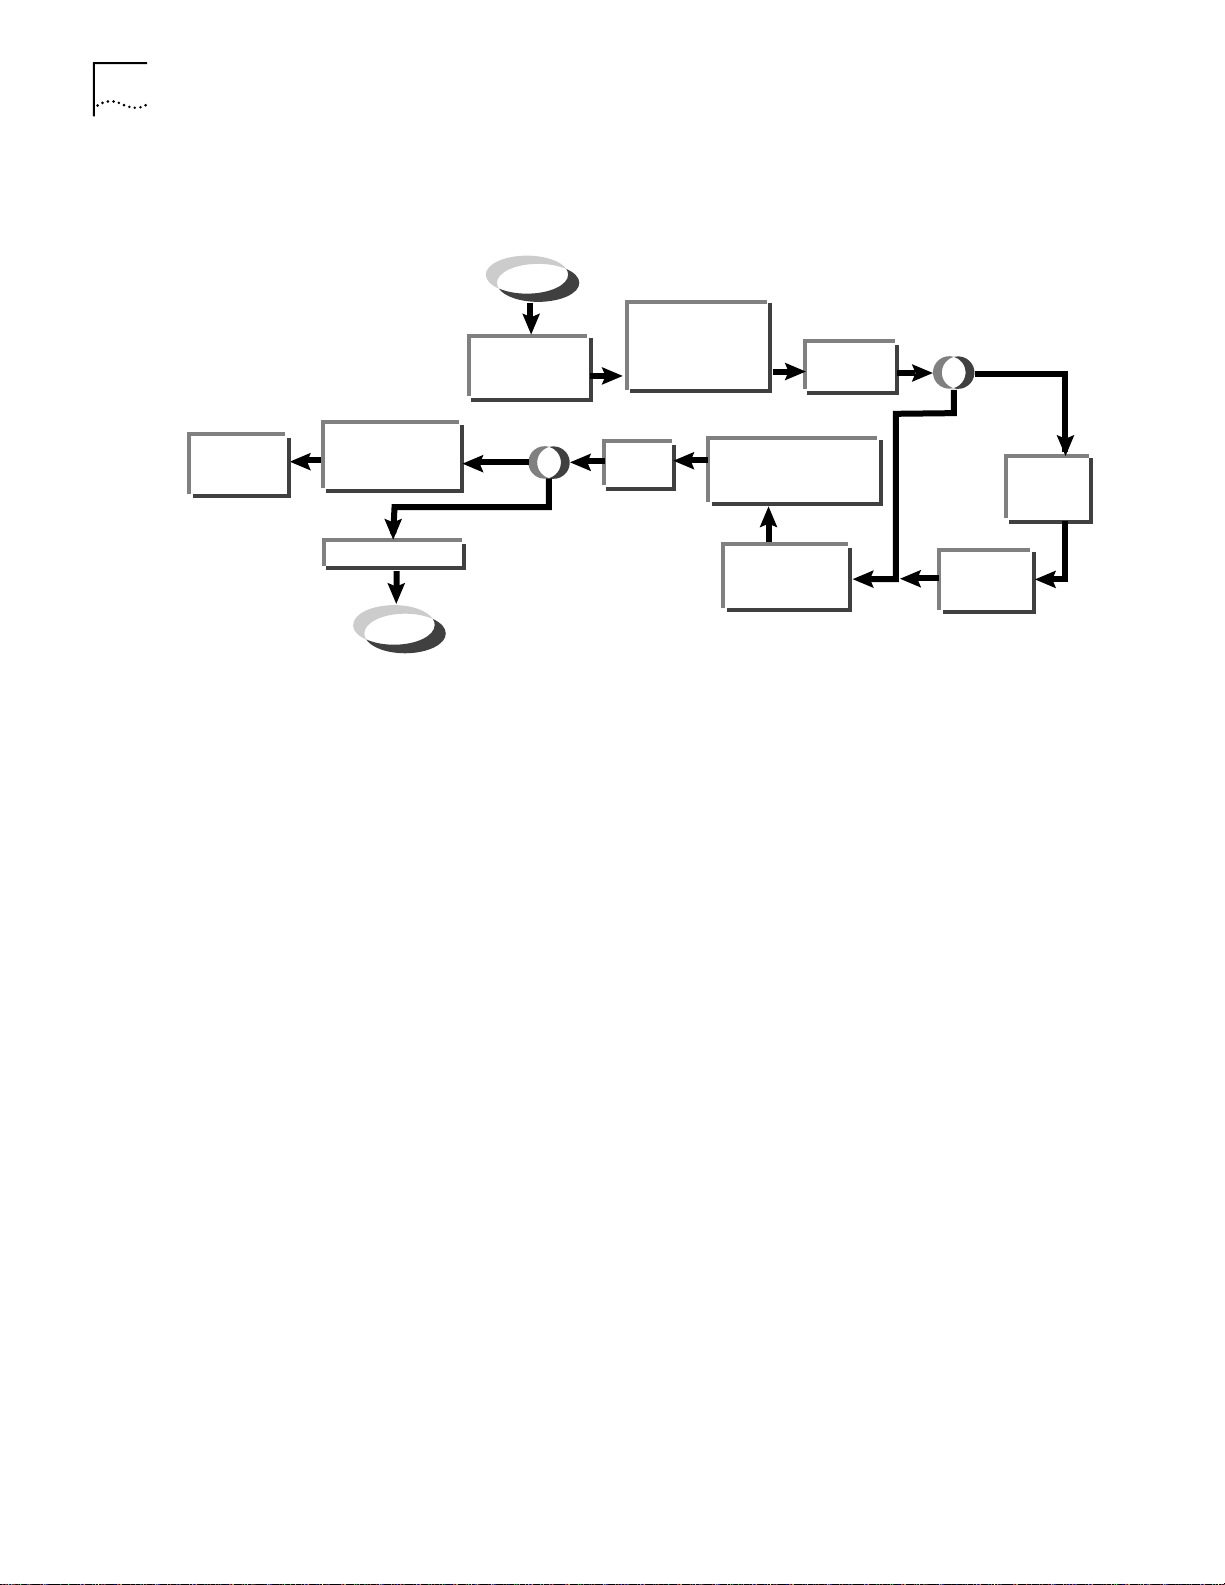
Figure 1 shows the typical upgrade process.
Figure 1 Upgrade Process
Restore old
software
version
If hardware
upgrade, reinstall
old hardware
Do final cleanup
Done!
Begin
Back up config
Install software
and utilities
on NMS*
Accept
upgrade?
No
Reject
?
Yes
*NMS = network management station
and boot files
from bridge/router
to NMS
Verify
upgrade
Reboot bridge/router,
test software images
Update
config files
and config files
Copy config
and boot files
to bridge/router
Is hardware
upgrade
required?
Yes
?
No
Perform
hardware
upgrade
Reset IP
config and
SNMP
How the Utilities Work The software on your bridge/router or switch consists of a bootable image file and
configuration files that store all your settings. The Enterprise OS Upgrade
Management Utilities update all your software files after copying them to a UNIX
or Windows NMS. Because the upgrade occurs on a copy of the files on the NMS,
the bridge/router remains operational during the upgrade. The utilities then copy
the new image and updated files back to the bridge/router.
Primary, Secondary, and Test Boot Sources
The NETBuilder bridge/router or PathBuilder switch boots from a default directory,
called the primary boot source, which can be set using the SysconF command in
the Enterprise OS user interface. If you have more than one set of boot images,
you can specify a backup directory, called the secondary boot source. There is also
a test boot source, which the utilities use to test a new upgrade before making it
the primary boot source. Because the boot sources are only pointers to particular
directories, the utilities can dynamically change the boot sources without having
to move any files.
Automatic or Manual Recovery
If your switch or bridge/router has enough flash memory, you can have both sets
of software: the old version and the new version. After a successful test boot with
the new software, the primary boot source is changed to the new version. If the
test boot is not successful, the system automatically reboots with the old version.
Dual-image support is described in the procedures for automatic recovery.
If you have only enough flash memory for the new version, you can still recover
the old version from the NMS using the utilities. Single-image support is described
in the procedures for manual recovery.
For memory requirements for automatic or manual recovery, see Chapter 3.
Page 11

Rules and Support Limitations 11
Rules and Support Limitations
Before planning your upgrade, refer to the following rules and support limitations:
■ The utilities do not support Remote Boot and Configuration Services (RBCS) or
network booting.
■ Upgrades from NETBuilder bridge/routers running version 7.x, or earlier, are not
supported.
■ You cannot upgrade to a different platform. For example, you can only
upgrade an OfficeConnect
You cannot upgrade a SuperStack
®
bridge/router to an OfficeConnect bridge/router.
®
II NETBuilder bridge/router to a
SuperStack II NETBuilder SI bridge/router. The only exception is an upgrade
from a NETBuilder II
®
CEC module to a DPE module.
Take Time to Plan Because networks today have become increasingly complex, upgrading your
network requires a systematic approach. 3Com recommends that you plan your
upgrade carefully before implementing it. See Chapter 3 to plan your upgrade.
Page 12

12 CHAPTER 1: OVERVIEW
Page 13

INSTALLING THE UTILITIES ON A
2
N
ETWORK MANAGEMENT STATION
Before you start the upgrade process, you must install the Enterprise OS Upgrade
Management Utilities on a network management station (NMS). If you are using
Transcend Enterprise Manager or Transcend Network Control Services, which has
the utilities bundled, you should install the latest utilities to take advantage of new
features and version support.
This chapter describes how to install the Enterprise OS Upgrade Management
Utilities on the following platforms:
■ Solaris 2.x
■ HP-UX 10.x
■ IBM AIX 4.x or later
■ Windows NT 4.x
■ Windows 95/98
Installing the Utilities on a Windows System
You can install the utilities from a CD-ROM or from utilities that you have
downloaded to your hard disk. To install the utilities on a Windows system, follow
these steps:
1 If you have installed utilities before or have Transcend, check the version by
entering:
bcmdiagnose
If the version is earlier than 11.3, continue to the next step. If you already have
11.3, you do not need to reinstall the utilities.
2 Change to the utilities directory.
■ If you are using the CD-ROM:
a Insert the CD-ROM into the CD-ROM drive.
b Open a command window.
c Change to the CD-ROM directory.
For example, if E is the drive letter for the CD-ROM, enter:
E:
3 If you download the utilities to your hard disk (see Chapter 8 for information
about downloading the utilities):
a Decompress the utilities.
b Open a command window.
c Change to the utilities directory using:
<drive>:\<path>\
Page 14

14 CHAPTER 2: INSTALLING THE UTILITIES ON A NETWORK MANAGEMENT STATION
4 Run the setup program for Windows:
■ To install all packages, including the utilities and package definitions for use
with Transcend if required, use:
bcmsetup <drive>: all
Where <drive> is the drive you want to install the utilities on.
The packages install in the default directory \usr\3Com\bcm\, and the following
paths are added to the autoexec.bat file:
<drive>:\usr\3com\bcm\bin\
<drive>:\usr\3com\common\bin\
5 Reboot your system to use the path, which is required for all utility commands. Or,
if you do not want to reboot, you can enter the path manually at the command
prompt:
<drive>:\usr\3com\common\data\profile
6 Use the bcmdiagnose utility to ensure that your installation is correct by entering:
bcmdiagnose
Installing the Utilities on a UNIX System
Preparing for the
Installation
Procedure To install the utilities on a UNIX system, follow these steps:
You can install the utilities from a CD-ROM or from utilities that you have
downloaded to your hard disk.
Before installing the utilities, verify the following items:
■ Your NMS is running one of the supported operating systems.
Check the operating system you are running by entering:
uname -a
The version message may refer to Solaris 2.5 as SunOS 5.5.
■ You need to upgrade utilities you have already installed. The utilities come
bundled with Transcend. To check the version, enter:
bcmdiagnose
■ Your root password on the NMS (UNIX only).
■ Your NMS is running a TFTP/FTP server.
1 Log on as root.
2 Change to the utilities directory.
■ If you are using the CD-ROM:
a Mount the CD-ROM.
For more information on mounting instructions for each supported UNIX
operating system, see Appendix C.
b Change to the appropriate directory on the CD-ROM for your operating system
using:
cd /<cd-rom path>/<os>
Where <os> is the directory for your operating system:
Page 15

Installing the Utilities on a UNIX System 15
Table 1 UNIX Directories
Operating System Directory Name
Solaris 2.5.x sunos5
HP-UX 10.x HP_UX
IBM AIX 4.1.x, 4.2x aix
■ If you download the utilities to your hard disk (see Chapter 8 for information
about downloading the utilities):
a Decompress the utilities.
b Change to the utilities directory on your hard disk using:
cd /<path>/
3 Run the setup program.
■ To install all packages from the CD-ROM, including the utilities and package
definitions for use with Transcend, enter:
./bcmsetup all
■ To install only the upgrade utilities, enter:
./bcmsetup bcm
The utilities are installed in the default directory /usr/3Com/bcm/.
If you are working in an HP-UX operating system, the bcmsetup command must
be uppercase, that is, BCMSETUP. The options that follow remain lowercase.
4 Complete the following step for your UNIX shell:
■ For a C-shell installation, add the contents of the following file to the .cshrc file
for each user you want to have access to the utilities, including root:
/usr/3Com/common/data/.login-bcm
Or you can enter the path after every logon:
source /usr/3Com/common/data/.login-bcm
■ For a Bourne shell installation, add the contents of the following file to the
.profile file for each user you want to have access to the utilities, including root:
/usr/3Com/common/data/.profile-bcm
Or you can enter the path after every logon:
. /usr/3Com/common/data/.profile-bcm
5 Return to normal privilege by entering:
exit
6 Use the bcmdiagnose utility to ensure that your installation is correct by entering:
bcmdiagnose
Page 16

16 CHAPTER 2: INSTALLING THE UTILITIES ON A NETWORK MANAGEMENT STATION
Setting up for Auto
Startup
On a UNIX NMS, after you have completed the previous setup procedures you
need to set up the BootP server.
To set up the BootP server, enter:
bcmsteup -bootp
This command does not need to be used when you are operating on a
Windows 95/98/NT-based NMS.
Page 17

PLANNING AND PREPARING THE
3
Setting Up a File
Transfer Method
U
PGRADE
This chapter describes setting up a file transfer method, choosing automatic or
manual recovery, checking the required memory for each package, including
instructions for checking the memory , and pr ovides planning tables to copy and fill
out for each bridge/router.
If you are upgrading multiple bridge/routers using Transcend Enterprise Manager
or Transcend Network Control Services, or are using the command-line utilities,
you should make sure each bridge/router has enough flash memory and DRAM for
the software package you have chosen. The Upgrade Link application
automatically checks the memory of the bridge/router.
For a list of all software packages and the recommended upgrade path for your
version, see Appendix B.
You can choose to transfer files using FTP or TFTP.
Setting up for TFTP File
Transfers
Setting up for FTP File
Transfers
To use TFTP, you need to set up your NMS in preparation for TFTP file transfers.
Make sure your TFTP server is running. On a Windows workstation, 3Com’s
3CServer is shipped along with the utilities. Upgrade Link launches 3CServer
during start up.
Specify the -tftp flag in all command line utilities which use file transfers
(bcmsysupgrade, bcmbackup, bcmrestore) if you want to use TFTP file transfer. For
example, to specify TFTP file transfer use:
bcmsysupgrade -s:from_nb -tftp <device>
If neither flag is used, TFTP is used by default for software release 11.0 and lower,
but FTP is used by default for software release 11.1 and higher. If the -ftp flag is
specified on a bridge/router running software version 11.0 or lower, the FTP
password is overwritten with the following text string:
****
To use FTP, you need to set up your NMS in preparation for FTP file transfers.
For Upgrade Link, the user name and password is specified in the Setting Page, as
shown on page 23.
Page 18

18 CHAPTER 3: PLANNING AND PREPARING THE UPGRADE
On a UNIX NMS, follow these steps:
1 Create a user on your system with /tftpboot as the home directory.
2 When using the upgrade utilities via the command line or the Transcend Upgrade
Manager, specify this user name and password in the BCMFTPUSER and
BCMFTPPASS environment variables.
Specify the -ftp flag in all command line utilities that use file transfers
(bcmsysupgrade, bcmbackup, bcmrestore) if you want to use FTP file transfer. For
example, to specify FTP file transfer use:
bcmsysupgrade -s:from_nb -ftp <device>
If no flag is used, TFTP is used by default for software release 11.0 and lower, but
FTP is used by default for software release 11.1 and higher. If the -ftp flag is
specified on a bridge/router running software version 11.0 or lower, the FTP
password is overwritten with the following text string:
****
On a Windows NMS, follow these steps:
1 Create a user in 3Com’s 3CServer FTP settings.
2 When using the upgrade utilities via command line or the Transcend Upgrade
Manager, specify the ftp user name and password in the BCMFTPUSER and
BCMFTPPASS environment variables.
You can specify the -ftp flag in the utilities (bcmsysupgrade, bcmbackup,
bcmrestore) if you want to use FTP file transfer.
If no flag is used, TFTP is used by default for software release 11.0 and lower, but
FTP is used by default for software release 11.1 and higher. If the -ftp flag is
specified on a bridge/router running software version 11.0 or lower, the FTP
password is overwritten with the following text string:
****
Choosing Automatic
Recovery or Manual
Recovery
If you have enough flash memory for dual-image support, complete your upgrade
using automatic recovery. If you have only enough memory for single-image
support, complete the upgrade using manual recovery. The following sections
describe the difference between automatic and manual recovery and the memory
requirements for each platform.
Automatic Recovery The default upgrade procedure uses automatic recovery. After backing up the
current software to the network management station (NMS), the new software is
copied into a test directory while the current software remains in the primary
directory. If you accept the upgrade after booting from the test directory, the new
software becomes the primary boot source, and the old software becomes the
secondary boot source.
If you are upgrading your hardware as well as the software, the procedure for
automatic recovery saves the software package that was originally on the new
hardware as the secondary boot source.
Page 19

19
Manual Recovery An upgrade with manual recovery (using the -m option with the bcmsysupgrade
utility) formats the flash memory after backing up the current software, then
copies the upgraded files to the bridge/router. If the upgrade is not successful, you
must restore the software from the NMS.
If you are upgrading your hardware as well as the softwar e, you can easily r ecover
your old hardware if the upgrade is not successful. However, because you erased
the flash memory on the new hardware, you will need to restore the original
software from the NMS if you want to return the new hardware to its original
state.
Table 2 lists the memory requirements for each software package on the platform
you are upgrading to. If you are upgrading to an earlier version of software, see
the guides that came with that version for the memory requirements.
Table 2 Version 11.2 Software Packages
Flash Memory Required for:
Software Package Model DRAM Required Automatic Recovery Manual Recovery
NETBuilder II with DPE: (The standard flash memory card from 3Com
(AC) - APPN/Connection Services DPE All DPE modules
(DW) - Multiprotocol Router DPE 40 MB 20 MB
(DE) - Multiprotocol Router with
56-bit Encryption
(DS) - Multiprotocol Router with
128-bit Encryption
SuperStack II NETBuilder Token Ring:
(TE) - Multiprotocol Router with
Encryption
SuperStack II NETBuilder SI:
(NW) - IP/IPX/AT Router 432, 442, 452, 462
(BF) - Boundary Router 433, 443, 453, 463
(CF) - Multiprotocol Router 437, 447, 457, 467
(AX) - APPN/Connection Services 438, 448, 458, 468
(NE) - IP/IPX/AT Router with 56-bit
Encryption
(NS) - IP/IPX/AT Router with 128-bit
Encryption
(CE) - Multiprotocol Router with
56-bit Encryption
(CS) Multiprotocol Router with
128-bit Encryption
DPE All DPE modules
DPE 40 MB 20 MB
327, 527 12 MB 8 MB 4 MB
532, 542, 552, 562
533, 543, 553, 563
537, 547, 557, 567
538, 548, 558, 568
432, 442, 452, 462
532, 542, 552, 562
432, 442, 452, 462
532, 542, 552, 562
437, 447, 457, 467
537, 547, 557, 567
437, 447, 457, 467
537, 547, 557, 567
ship with enough
DRAM for all
software packages.
ship with enough
DRAM.
All SuperStack II NETBuilder SI bridge/routers ship with enough
DRAM (16 MB) and flash memory (8 MB) for automatic recovery.
is 20 MB)
40 MB 20 MB
40 MB 20 MB
Page 20

20 CHAPTER 3: PLANNING AND PREPARING THE UPGRADE
Table 2 Version 11.2 Software Packages (continued)
Flash Memory Required for:
Software Package Model DRAM Required Automatic Recovery Manual Recovery
OfficeConnect NETBuilder:
(FD) - FRAD 120 8 MB 4 MB 4 MB
(NW) - IP/IPX/AT Router 112, 122, 132, 142 8 MB 4 MB 4 MB for 132
2 MB for all others
(BF) - Boundary Router 113, 123, 143 8 MB 8 MB 4 MB
(OF) - Multiprotocol Router 117, 127, 137, 147 12 MB 8 MB 4 MB
(AF) - APPN 116, 126, 146 12 MB 8 MB 4 MB
(NE) - IP/IPX/AT Router with 56-bit
Encryption
(NS) - IP/IPX/AT Router with 128-bit
Encryption
(VE) - VPN IP/IPX/AT Router with
Quick Step VPN and 56-bit
Encryption
(OE) - Multiprotocol Router with
56-bit Encryption
(OS) - Multiprotocol Router with
128-bit Encryption
(VW)- Multiprotocol Rou;r 147 12 MB 8 MB 4MB
PathBuilder S5xx Switch
(PW) - Multiprotocol Router S500, S580, S593,
(PE) - Multiprotocol Router with
56-bit Encryption
(PS) - Multiprotocol Router with
128-bit Encryption
112, 122, 132, 142 8 MB 4 MB 4 MB for 132
2 MB for all others
112, 122, 132, 142 8 MB 4 MB 4 MB for 132
2 MB for all others
115, 125, 135, 145 8 MB 8 MB 4 MB
117, 127, 137, 147 12 MB 8 MB 4 MB
117, 127, 137, 147 12 MB 8 MB 4 MB
S594
S500, S580, S593,
S594
S500, S580, S593,
S594
160 MB 16 MB 4 MB
160 MB 16 MB 4 MB
160 MB 16 MB 4 MB
Checking DRAM To check how much DRAM you have installed on the switch or bridge/router, on
the NMS use:
bcmuname -M <device>
Where <device> is the IP address or hostname of the switch or bridge/router.
Checking Flash Memory To check how much flash memory you have installed on the switch or
bridge/router, on the NMS use:
bcmdf <device>[:<drive:>]
Where <device> is the hostname or the IP address of the switch or bridge/router.
Specify drive A for NETBuilder II bridge/routers or PathBuilder switches.
Do not specify a drive for SuperStack II or OfficeConnect bridge/routers.
Page 21

Checking the Software Version 21
Checking the Software Version
To display the current software version and package you are running, use the
bcmuname utility on the NMS:
bcmuname -R <device>
Where <device> is the IP address or hostname of the bridge/router.
To display the current software version and package using the Enterprise OS user
interface, enter:
SHow -SYS VERSion
Planning Tables Photocopy the following planning tables, and fill out background information
about your bridge/routers before starting the upgrade process. The NETBuilder II
table is on page 22. The SuperStack II NETBuilder, SuperStack II NETBuilder SI,
OfficeConnect NETBuilder, and PathBuilder switch table is on page 23.
If you are upgrading both software and hardwar e, write down the information for
the new hardware. For example, if you are r eplacing a CEC 20 with a DPE module,
write down the information for the DPE module.
Page 22

MB
IP Address or Name
10.1.3.24 20
Flash
Memory
NETBuilder II Planning Table
❑ -m ❑ -new_hw
❑ -m ❑ -new_hw
❑ -m ❑ -new_hw
❑ -m ❑ -new_hw
❑ -m ❑ -new_hw
❑ -m ❑ -new_hw
❑ -m ❑ -new_hw
❑ -m ❑ -new_hw
❑ -m ❑ -new_hw
X X n/a 11.0 CF 11.1 CF
❑ -m ❑ -new_hw
Automatic Recovery?
Enough Flash Memory for
Manual Recovery?
Manual Recovery?
Enough Flash Memory for
(pre-10.3 upgrade only)
CEC Only: Firmware Version
and Two-Letter Code
Current Software Version
and Two-Letter Code
New Software Version
Check each appropriate option to use with the command-line utilities:
Hardware Upgrade?
❑
are upgrading to>
❑
are upgrading to>
❑
-V:<version you
are upgrading to>
-V:<version you
❑
-k:<package you
are upgrading to>
-k:<package you
❑
-V:<version you
are upgrading to>
❑
-k:<package you
are upgrading to>
❑
are upgrading to>
❑
are upgrading to>
❑
are upgrading to>
-V:<version you
❑
are upgrading to>
-k:<package you
❑
-V:<version you
are upgrading to>
-V:<version you
❑
-k:<package you
are upgrading to>
-k:<package you
❑
are upgrading to>
❑
are upgrading to>
❑
are upgrading to>
-V:<version you
❑
are upgrading to>
-k:<package you
❑
-V:<version you
are upgrading to>
-V:<version you
❑
-k:<package you
are upgrading to>
-k:<package you
Upgrading to a Software
Version Other than 11.0?
❑
-V:<version you
are upgrading to>
Upgrading Unlike
Packages?
❑
-k:<package you
are upgrading to>
Planning Tables 22
Page 23

IP Address or Name
10.1.3.24 8 MB X X 8
Flash
Memory
SuperStack II NETBuilder, SuperStack II NETBuilder SI, and OfficeConnect NETBuilder Planning Table
Automatic Recovery?
Enough Flash Memory for
❑ -m ❑ -new_hw
❑ -m ❑ -new_hw
❑ -m ❑ -new_hw
❑ -m ❑ -new_hw
❑ -m ❑ -new_hw
❑ -m ❑ -new_hw
❑ -m ❑ -new_hw
❑ -m ❑ -new_hw
MB
❑ -m ❑ -new_hw
9.3 BF 11.0 BF
❑ -m ❑ -new_hw
DRAM
Manual Recovery?
Manual Recovery?
Enough Flash Memory for
and Two-Letter Code
Current Software Version
and Two-Letter Code
New Software Version
Check each appropriate option to use with the command-line utilities:
Hardware Upgrade?
❑
-V:<version you
are upgrading to>
❑
-k:<package you
are upgrading to>
❑
are upgrading to>
❑
are upgrading to>
❑
-V:<version you
are upgrading to>
-V:<version you
❑
-k:<package you
are upgrading to>
-k:<package you
❑
are upgrading to>
❑
are upgrading to>
❑
are upgrading to>
-V:<version you
❑
are upgrading to>
-k:<package you
❑
-V:<version you
are upgrading to>
-V:<version you
❑
-k:<package you
are upgrading to>
-k:<package you
❑
are upgrading to>
❑
are upgrading to>
❑
are upgrading to>
-V:<version you
❑
are upgrading to>
-k:<package you
❑
-V:<version you
are upgrading to>
-V:<version you
❑
-k:<package you
are upgrading to>
-k:<package you
Upgrading to a Software
Version Other than 11.0?
❑
-V:<version you
are upgrading to>
Upgrading Unlike
Packages?
❑
-k:<package you
are upgrading to>
Planning Tables 23
Page 24

24 CHAPTER 3: PLANNING AND PREPARING THE UPGRADE
Page 25

UPGRADING USING THE NETBUILDER
4
Preparing for the
Upgrade
U
PGRADE LINK APPLICATION
This chapter describes how to upgrade the software on a NETBuilder bridge/router
or a PathBuilder switch using the Upgrade Link application. Upgrade Link is an
easy to use GUI for the upgrade utilities that runs in a web server. Access to the
server is available via a web browser. If you are upgrading multiple bridge/routers,
you should use Transcend Enterprise Manager or Transcend Network Control
Services instead. Contact your network supplier for more information about
Transcend. Or if you want to write scripts, you can use the command-line utilities
as described in Chapter 5. Use the command-line utilities if you do not have a web
browser on your network management station (NMS).
An NMS is a UNIX or Windows system that has a FTP/TFTP server running in
addition to software, such as the Upgrade Management Utilities, to manage your
network. For Windows, the utilities include the 3Com FTP/TFTP server called
3CServer.
Before upgrading your system, confirm the following items:
■ You have installed the utilities according to Chapter 2.
■ You have set the path for the utilities (UNIX only). If you have not set the path,
complete the following step for your UNIX shell:
■ For a C-shell installation, add the contents of the following file to the .cshr c
file for each user you want to have access to the utilities, including root:
/usr/3Com/common/data/.login-bcm
Or you can enter the path after every logon:
source /usr/3Com/common/data/.login-bcm
■ For a Bourne shell installation, add the contents of the following file to the
.profile file for each user you want to have access to the utilities, including
root:
/usr/3Com/common/data/.profile-bcm
Or you can enter the path after every logon:
. /usr/3Com/common/data/.profile-bcm
■ All configuration files are in the same directory as the boot image.
■ You have booted your bridge/router from the primary boot source.
■ You have a web browser installed with Java support, such as Netscape
Navigator 4.5 or Internet Explorer 4.x, and you have it in your path (UNIX).
CAUTION: Only one client at a time should access the Upgrade Link Server.
■ There is sufficient disk space on the NMS for the amount of software you are
installing.
Page 26

26 CHAPTER 4: UPGRADING USING THE NETBUILDER UPGRADE LINK APPLICATION
Minimal disk storage requirements depend on the number of different
software versions that are stored on the disk drive. Calculate:
■ 6 MB for each version of the NETBuilder II bridge/router or PathBuilder
switch image
■ 4 MB for each version of the SuperStack II, SuperStack II SI, or
OfficeConnect NETBuilder bridge/router image
While you must purchase one copy of software for each device, you only need
to install one copy of a version of software on the NMS.
Running Upgrade Link
Locally
Upgrade Link contains its own web server. Client access to the web server is
available locally or remotely via a web browser. Running the Upgrade Link
application locally means that the web browser and the web server are running on
the same NMS.
To run Upgrade Link locally on a UNIX NMS, use:
UpgradeLink [-NoAuthentication] [-NoSecurity]
This command starts the NETBuilder Upgrade Server and the default browser. Two
command options are available.
■ When NoAuthentication is specified, Upgrade Link will allow a remote client to
access the server without user authentication, see “Settings Page” for a
description of the available settings.
■ When you specify NoSecurity, Upgrade Link starts and will accept connections
from all IP addresses. Otherwise, only those client IP addresses listed in the
/usr/3Com/common/data/allow file will be accepted by Upgrade Link.
For security, an administrator can enter the IP addresses of only those clients who
will be allowed to upgrade devices. An allow file is an ASCII text file containing the
IP addresses of clients to upgrade devices. The allow file looks like the following:
129.213.100.151
129.213.100.152
139.87.172.100
Running Upgrade Link
Remotely
To run Upgrade Link locally on a Windows NMS, click the Start menu, then choose
Programs
⇒
Remote Upgrade Utilities⇒Upgrade Link.
Your default browser is launched. On Windows, the 3Com FTP/TFTP server is also
launched.
When you exit Upgrade Link, you will also exit the browser and, for Windows, the
FTP/TFTP server.
You can access the NETBuilder Upgrade Server remotely using a browser.
■ Start the NETBuilder Upgrade Server on the NMS using:
bcmnbrus <port> [-NoSecurity | -NoAuthentication]
Page 27
Status and Settings Pages 27
where port is the TCP socket on which the client can communicate with the
server. On UNIX systems, you can add this command to cron. On Windows
95/98/NT systems, this command can be run as a console application.
When NoSecurity is specified, the bcmnbrus command allows connections from all
IP addresses. Otherwise, only those client IP addresses listed in
the/usr/3Com/common/data/allow file will be accepted by Upgrade Link.
For security, an administrator can enter the IP addresses of only those clients who
will be allowed to upgrade devices. An allow file is an ASCII text file containing the
IP addresses of clients to upgrade devices. The allowed file looks like the following:
129.213.100.151
129.213.100.152
139.87.172.100
When NoAuthentication is specified, the bcmnbrus command allows the remote
client to access the server without user authentication, see “Settings Page” on
page 28 for a description of the available settings.
■ Then, to access Upgrade Link from a web browser, enter the following URL:
Status and Settings Pages
http://<server_nam>:<port>/
Do not resize the browser window while the Upgrade Link application is running.
CAUTION: Only one client at a time should access the Upgrade Link Server.
After each procedure described in this section, the Status or Settings page
appears. Table 3 describes the buttons on the bottom of the Status page.
Table 3 Status page Buttons
Button Description
History Shows the last 20 successful operations performed on the
Home Returns to the Console page.
bridge/router or switch.
Page 28

28 CHAPTER 4: UPGRADING USING THE NETBUILDER UPGRADE LINK APPLICATION
Table 3 Status page Buttons (continued)
Button Description
Abort Exits Upgrade Link and aborts the process. Some processes may need
to be completed even after clicking Abort. Upgrade Link displays a
message about any ongoing processes.
View Logs Opens a page listing the logs available for viewing.
Settings Page The Setting Page lets you establish basic settings.
■ You can choose the method of file transfers. TFTP is used by default for
NETBuilder bridge/router software release 11.0 and lower while FTP is used by
default for NETBuilder bridge/router software release 11.1 and higher and
Enterprise OS version 11.3.
■ Enter an SNMP read/write string and the NETBuilder bridge/router or
PathBuilder switch user name and password.
■ If -noAuthentication was not specified in Upgrade Link or on the bcmnbrus
command line, authentication will be used and you must enter the NETBuilder
or PathBuilder username and password.
■ If -noAuthentication was specified in Upgrade Link or on the bcmnbrus
command line, no authentication is required and any user name and password
entries are ignored.
■ If using FTP, enter the FTP client user name and password.
Page 29
Verifying for Upgrading 29
Verifying for Upgrading
Before upgrading, run the diagnostic utility in Upgrade Link to verify connectivity
to the switch or bridge/router by following these steps:
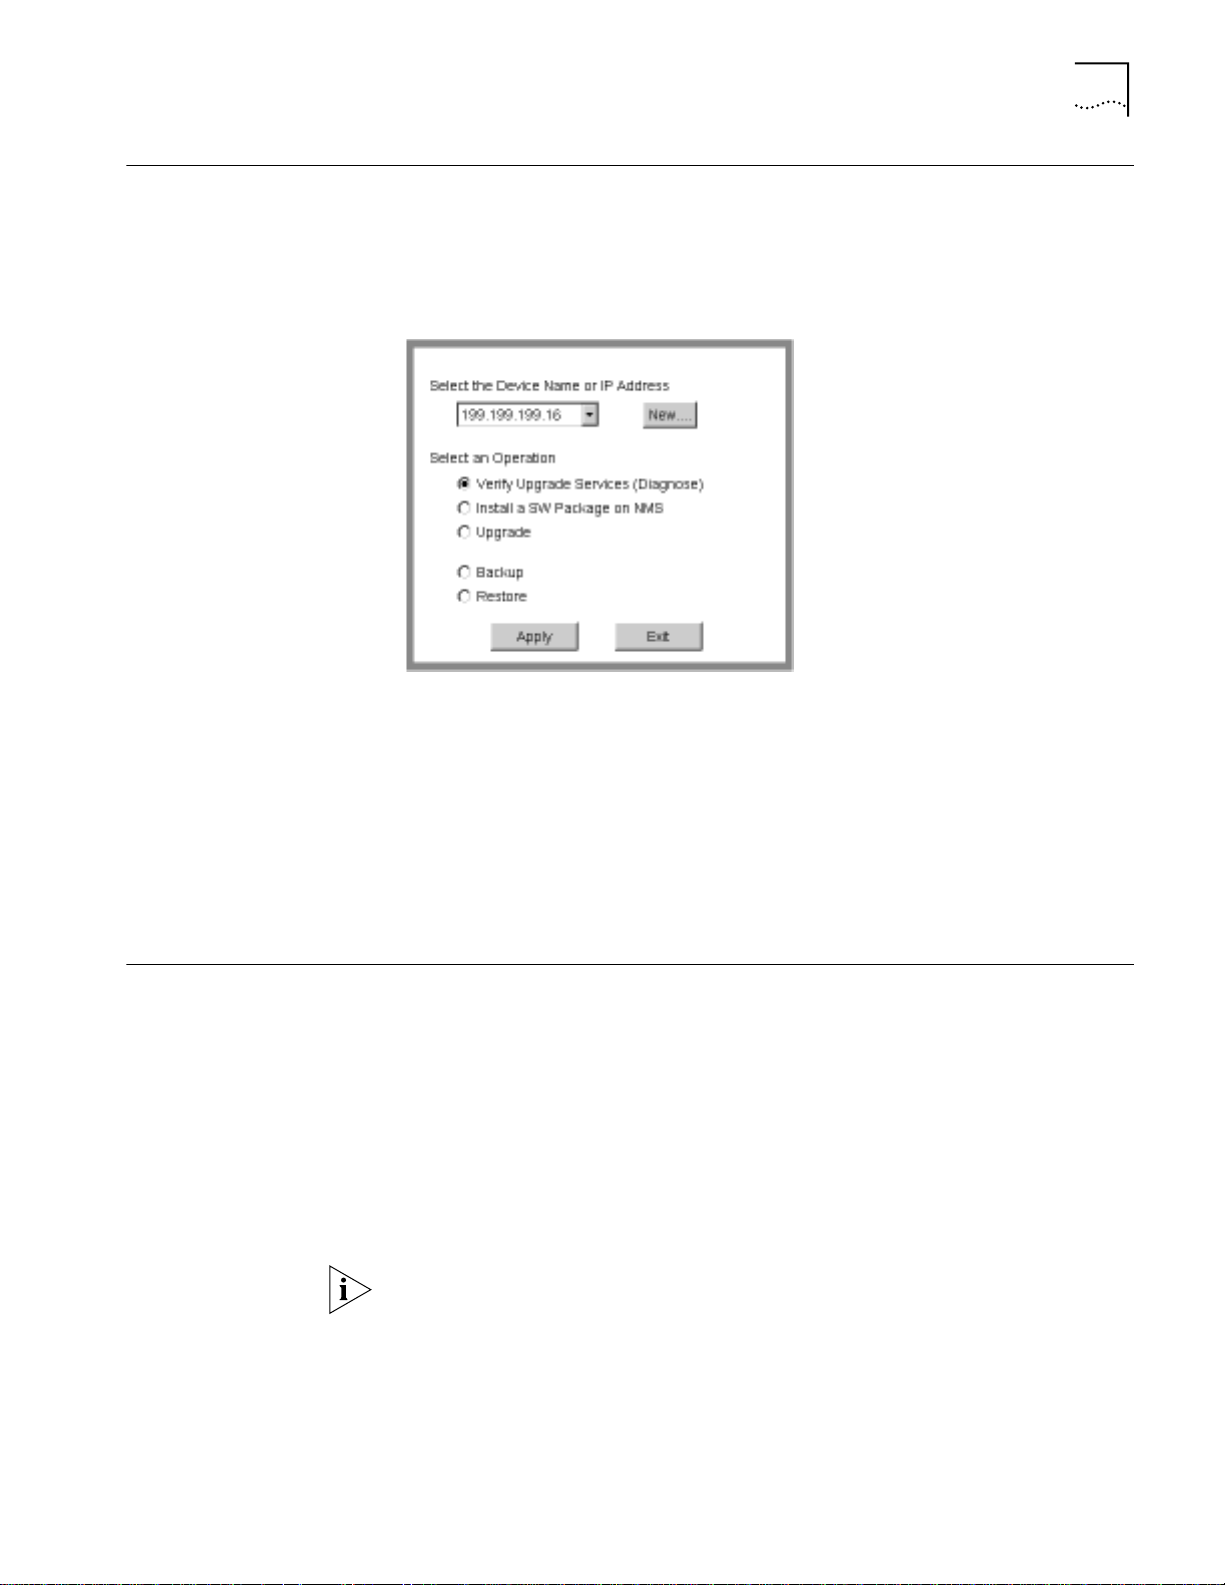
1 Choose a switch or bridge/router from the pop-up list in the Console page, or click
New to enter the IP address or hostname. The pop-up list contains devices that
you have upgraded or backed-up before.
2 Select Verify Upgrade Services (Diagnose) and click Apply.
The Settings Page appears. Select the appropriate settings as described in on
“Settings Page” on page 28 and click OK to close that window.
Installing Software on the NMS
The Status page appears showing the results of the diagnostic tests.
3 If the Status page shows a failure, check the SNMP read/write community string
and FTP/TFTP server settings.
If the Status page shows a success, click Home to continue with the upgrade and
return to the Console page.
Upgrade Link installs the software on the NMS in the following directory:
Windows:
\%tftpboot%\image\<platform>\SW|FW\<version>\<pkg>
UNIX:
/tftpboot/image/<platform>/SW|FW/<version>/<pkg>
For UNIX, if there is not enough space on the disk, you can link /tftpboot to
another disk. For example, to link /tftpboot to the usr directory, enter:
ln -s /usr/tftpboot /tftpboot/
The utilities work only with the default directory names and structures.
Page 30

30 CHAPTER 4: UPGRADING USING THE NETBUILDER UPGRADE LINK APPLICATION
Values
tftpboot For UNIX: Directory specified in inetd or tftpd for tftpd files.
%tftpboot% For Windows (using the default 3Com TFTP server): Directory
specified in the 3Server configuration.
<platform> NETBuilder II with CEC Module: NBII
NETBuilder II with DPE Module: NBDPE
SuperStack II NETBuilder SI bridge/router: NBSI
SuperStack II NETBuilder Ethernet
NBRO
bridge/router:
SuperStack II NETBuilder Token Ring
NBR2T
bridge/router:
SuperStack II NETBuilder Ethernet/ISDN
NBRI
bridge/router:
SuperStack II NETBuilder Token Ring/ISDN
NBR2TI
bridge/router:
OfficeConnect NETBuilder bridge/router: NBOCF
PathBuilder S5xx switch: NBPB500
<package> Two letter designator shown on the CD-ROM label.
[SW | FW] The software or firmware directory.
<version> Software version 9.0 through 11.3.
Procedure To install the new software on the NMS, follow these steps:
You must be logged in as root for this procedure (UNIX).
1 You can install the software from a CD-ROM, a tar archive, or a boot image
(image-only upgrade). If you are installing from a CD-ROM, mount the CD-ROM
on the NMS.
See Appendix C for information on how to mount the CD-ROM on a UNIX system.
2 For UNIX, log in as root.
3 Run Upgrade Link if you have not already done so.
4 Select Install a SW Package on NMS from the Console page.
Page 31

Upgrading Software 31
5 Click Apply.
The Install page appears.
6 Enter the path for the software, or click Browse to use a file browse page.
■ For UNIX CD-ROM, use the following path:
cdrom/<mount path>/image/
■ For Windows CD-ROM, use the following path:
<CD-ROM drive>:\image\
■ For Archive, enter the entire path including the filename.
■ For an FTP site, enter the full URL
7 Click Apply to install the software.
The Status page appears while the software is installing.
8 Select a package from the list that you want to uninstall. Click Delete to begin
uninstalling the package. Confirm you selection when prompted.
9 When the installation is complete, click Home to continue with the upgrade.
Upgrading Software To upgrade the software, follow these steps:
1 Run Upgrade Link if you have not already done so.
2 Choose a bridge/router from the pop-up list in the Console page, or click New to
enter the IP address or hostname. The pop-up list contains bridge/routers and
switches that you have upgraded or backed-up previously.
3 Select Upgrade and click Apply.
The Settings Page appears. Select the appropriate settings as described in
“Settings Page” on page 28 and click OK to close the window.
The Upgrade page appears.
Page 32

32 CHAPTER 4: UPGRADING USING THE NETBUILDER UPGRADE LINK APPLICATION
4 Select a software package from the pop-up list. The list includes all packages you
have installed on the NMS for your platform. If your package is not listed, install
the software by clicking New and see “Installing Software on the NMS” on
page 29.
CAUTION: When upgrading to a package containing encryption, you will be
presented with an export restriction message. To upgrade to an encrypted
package, you must acknowledge this restriction notice, otherwise the upgrade will
not continue.
The Upgrade page shows information about your system, including the flash
memory requirements for a manual or automatic recovery upgrade.
5 Click Next.
6 The recommended upgrade method is selected based on the amount of memory
you have installed. If you do not wish to perform a customized upgrade, go to
step 12.
CAUTION: If you override the Upgrade Link selection, your upgrade may fail.
7 Click on the Advanced button if you want to customize the upgrade process, that
is, you do not want to perform all of the upgrade stages at this time.
The Advanced page appears.
Page 33

Upgrading Software 33
8 Click the check box for each of the stages you want to complete in the current
operation.
9 Click New Hardware if you are replacing your bridge/router with a new system.
For example, click New Hardware if you are replacing the CEC module with a DPE
module.
You cannot upgrade to a different platform. For example, you can only upgrade
an OfficeConnect bridge/router to an OfficeConnect bridge/router. You cannot
upgrade a SuperStack II NETBuilder bridge/router to a SuperStack II NETBuilder SI
bridge/router. The only exception is an upgrade from a NETBuilder II CEC module
to a DPE module.
10 If you want to alter the Reboot Timeout, enter a new number in the box. The
default setting is appropriate for most networks.
11 Click OK.
12 Click Apply to begin the upgrade.
The Status page appears.
13 If you are performing a hardware upgrade, replacing a CEC module with a DPE
module for example, a message to replace the hardware appears after the
software has been backed up to the NMS. Replace the hardware at this time.
14 When the upgrade is complete, the bridge/router reboots from the new softwar e.
If the boot is not successful:
■ For automatic recovery, the bridge/router reboots from the original software
after the reboot timeout (default = 10 minutes).
■ For manual recovery, you must configure the bridge/router at the local
console to reestablish IP connectivity. Once connectivity is established, you can
restore the software to return the bridge/router to a preupgrade state. See
Chapter 7 for the procedure to restore connectivity and the software.
15 Click Home then Exit on the Console page to exit Upgrade Link.
Page 34

34 CHAPTER 4: UPGRADING USING THE NETBUILDER UPGRADE LINK APPLICATION
Page 35

UPGRADING A BRIDGE/ROUTER USING
5
THE COMMAND-LINE UTILITIES
This chapter describes how to upgrade the software on a bridge/router or switch
using the command-line Upgrade Management Utilities. 3Com recommends
using the Upgrade Link application described in Chapter 4, but you can use the
command-line utilities instead if you want to write scripts or if you do not have a
web browser on your NMS. Use Transcend Enterprise Manager or Transcend
Network Control Services to upgrade multiple bridge/routers.
You can perform the following types of upgrades:
■ Upgrading Software Only
■ Automatic Recovery
■ Manual Recovery
■ Upgrading Hardware and Software
■ Automatic Recovery
■ Manual Recovery
Preparing for the Upgrade
Before upgrading your system, confirm the following items:
■ You have installed the utilities according to Chapter 2.
■ You have set the path for the utilities (UNIX only). If you have not set the path,
complete the following step for your UNIX shell:
■ For a C-shell installation, add the contents of the following file to the .cshr c
file for each user you want to have access to the utilities, including root:
/usr/3Com/common/data/.login-bcm
Or you can enter the path after every logon:
source /usr/3Com/common/data/.login-bcm
■ For a Bourne shell installation, add the contents of the following file to the
.profile file for each user you want to have access to the utilities, including
root:
/usr/3Com/common/data/.profile-bcm
Or you can enter the path after every logon:
. /usr/3Com/common/data/.profile-bcm
■ All configuration files are in the same directory as the boot image.
■ You have booted your bridge/router from the primary boot source.
■ There is sufficient disk space on the NMS for the amount of software you are
installing.
Page 36

36 CHAPTER 5: UPGRADING A BRIDGE/ROUTER USING THE COMMAND-LINE UTILITIES
Minimal disk storage requirements depend on the number of different
software versions that are stored on the disk drive. Calculate:
■ 6 MB for each version of the NETBuilder II bridge/router image
■ 6 MB for each version of the PathBuilder S5xx switch image
■ 4 MB for each version of the SuperStack II, SuperStack II SI, or
OfficeConnect bridge/router image
While you must purchase one copy of software for each bridge/router or
switch, you only need to install one copy of a version of software on the NMS.
Setting Up a File
Transfer Method
You can choose to transfer files using FTP or TFTP.
Setting up for TFTP File Transfers
To use TFTP, you need to set up your NMS in preparation for TFTP file transfers.
Make sure your TFTP server is running. On a Windows workstation 3Com’s
3CServer is shipped along with the utilities. Upgrade Link launches 3CServer
during start up.
Specify the -tftp flag in all command line utilities which use file transfers
(bcmsysupgrade, bcmbackup, bcmrestore) if you want to use TFTP file transfer. For
example, to specify TFTP file transfer use:
bcmsysupgrade -s:from_nb -tftp <device>
If neither flag is used, TFTP is used by default for software release 11.0 and lower,
but FTP is used by default for software release 11.1 and higher. If the -ftp flag is
specified on a NETBuilder bridge/router running software version 11.0 or lower,
the FTP password is overwritten with the following text string:
****
Setting up for FTP File Transfers
To use FTP, you need to set up your NMS in preparation for FTP file transfers.
For Upgrade Link, the user name and password is specified in the Setting Page, as
shown on page 23.
On a UNIX NMS, follow these steps:
1 Create a user on your system with /tftpboot as the home directory.
2 When using the upgrade utilities via the command line or the Transcend Upgrade
Manager, specify this user name and password in the BCMFTPUSER and
BCMFTPPASS environment variables.
Specify the -ftp flag in all command line utilities that use file transfers
(bcmsysupgrade, bcmbackup, bcmrestore) if you want to use FTP file transfer. For
example, to specify FTP file transfer use:
bcmsysupgrade -s:from_nb -ftp <device>
Page 37

Prediagnosing System Problems 37
If no flag is used, TFTP is used by default for software release 11.0 and lower, but
FTP is used by default for software release 11.1 and higher. If the -ftp flag is
specified on a bridge/router running software version 11.0 or lower, the FTP
password is overwritten with the following text string:
****
On a Windows NMS, follow these steps:
1 Create a user in 3Com’s 3CServer FTP settings.
2 When using the upgrade utilities via command line or the Transcend Upgrade
Manager, specify the ftp user name and password in the BCMFTPUSER and
BCMFTPPASS environment variables.
You can specify the -ftp flag in the utilities (bcmsysupgrade, bcmbackup,
bcmrestore) if you want to use FTP file transfer.
If no flag is used, TFTP is used by default for software release 11.0 and lower, but
FTP is used by default for software release 11.1 and higher. If the -ftp flag is
specified on a bridge/router running software version 11.0 or lower, the FTP
password is overwritten with the following text string:
****
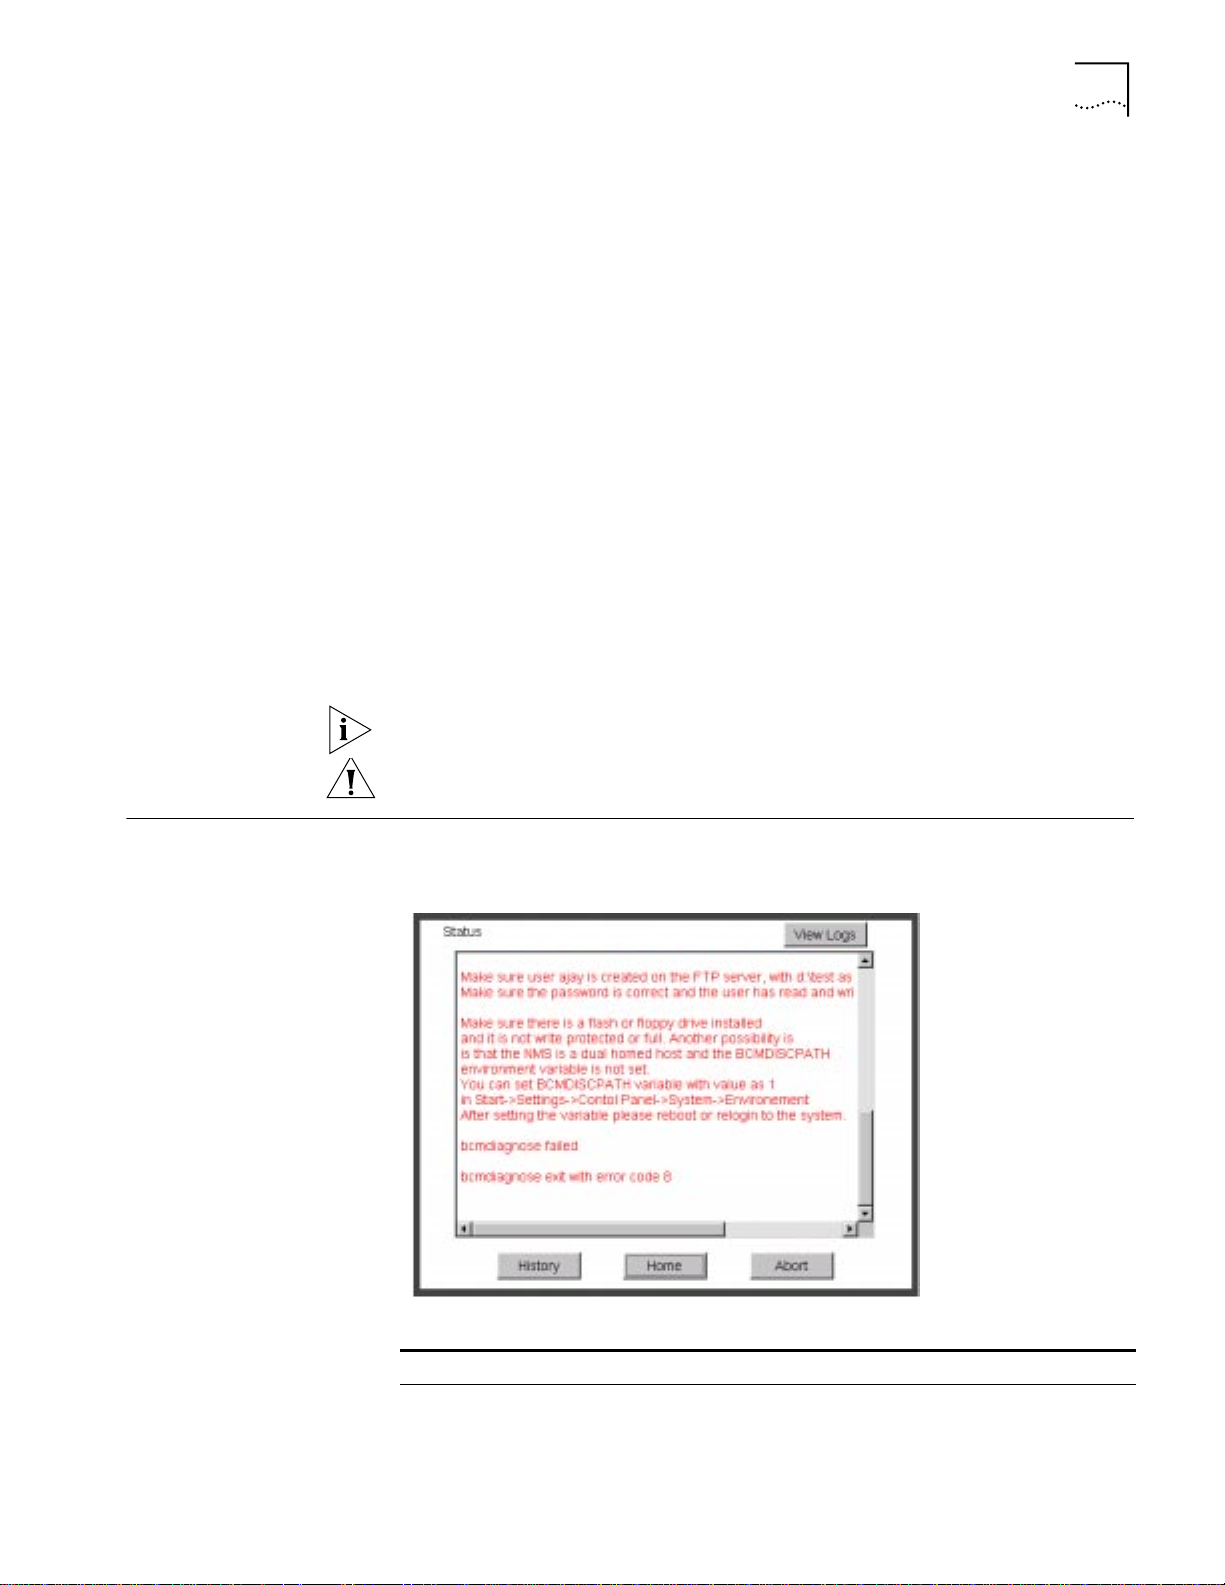
Prediagnosing System Problems
Installing the Software on the NMS
Before you begin your upgrade, 3Com recommends that you run the
bcmdiagnose utility specifying the file transfer utility, FTP, or TFTP and the IP
address or hostname of the bridge/router you are upgrading.
Before using the bcmdiagnose utility, you should set the BCMFTPUSER and
BCMFTPPASS environment variables. When using FTP, an error message is
generated and the file transfer is aborted if these variables are not set.
The bcmdiagnose utility helps detect any problems with SNMP, FTP or TFTP
connectivity.
To run the bcmdiagnose utility on your NMS, use:
bcmdiagnose [ -ftp | -tftp ] [<device> | -h]
Where <device> is the IP address or hostname of the bridge/router you are
upgrading. The -ftp and -tftp flags force the specified file transfer types. See
Appendix A for more information about any error messages that may appear.
To install the NETBuilder software, follow these steps:
1 For UNIX, login as root.
2 If you are using a CD-ROM, insert the CD-ROM into the CD-ROM drive on the
NMS.
a Mount the CD-ROM (UNIX only).
See Appendix C for information on how to mount the CD-ROM.
3 Make sure you are using version 11.3 of the Enterprise OS Upgrade Management
Utilities.
Page 38

38 CHAPTER 5: UPGRADING A BRIDGE/ROUTER USING THE COMMAND-LINE UTILITIES
To check which version you have installed, enter:
bcmdiagnose -h
The version of the installed utilities is displayed in the following message:
bcmdiagnose version 11.3. Copyright 3Com Corporation 1999
If the version of the utilities you have installed is not version 11.3, you must first
install the 11.3 utilities according to Chapter 2.
4 Install the software.
■ From a CD-ROM:
For UNIX, enter:
bcminstall
The path option may be used to install the utilities on an NMS that has two
or more CD-ROM drives or to install from a remote CD-ROM drive. You
must explicitly specify the second or remote CD-ROM drive using:
bcminstall -cdrom [<path>]
For example, to install software from a second CD-ROM drive on a Solaris
machine, enter:
bcminstall -cdrom /cdrom/cdrom1/image
After the installation is complete, the screen shows an inventory of all
bridge/router packages installed, including previous versions you have
installed.
For Windows, open a command window and use:
bcminstall -cdrom <CD-ROM drive>:\image
■ From a Tarred File, use:
bcminstall -tar <path>/<filename>
■ From an Image File, use:
bcminstall -image <path>/<filename>
The image file is the NETBuilder bridge/routers boot file, for example, boot.29K or
boot.68k.
Software Directories The bcminstall utility installs the software on the NMS in the following directory:
Windows:
\%tftpboot%\image\<platform>\SW|FW\<version>\<pkg>
UNIX:
/tftpboot/image/<platform>/SW|FW/<version>/<pkg>
For UNIX, if there is not enough space on the disk, you can link /tftpboot to
another disk. For example, to link /tftpboot to the usr directory enter:
ln -s /usr/tftpboot /tftpboot
The utilities work only with the default directory names and structures.
Page 39

Using the Bcmsysupgrade Utility to Upgrade 39
Values
tftpboot For UNIX: Directory specified in inetd or tftpd for tftpd files.
%tftpboot% For Windows (using the default 3Com TFTP server): Directory
specified in the Win.ini file in the “[3Com.nm] TFTPROOT=”
section. The Win.ini file is located in the default Windows
directory, for example C:\windows or C:\winnt4.
<platform> NETBuilder II with CEC Module: NBII
NETBuilder II with DPE Module: NBDPE
SuperStack II NETBuilder SI bridge/router: NBSI
SuperStack II NETBuilder Ethernet
NBRO
bridge/router:
SuperStack II NETBuilder Token Ring
NBR2T
bridge/router:
SuperStack II NETBuilder Ethernet/ISDN
NBRI
bridge/router:
SuperStack II NETBuilder Token Ring/ISDN
NBR2TI
bridge/router:
OfficeConnect NETBuilder bridge/router: NBOCF
PathBuilder S5xx Switch: NBPB500
<package> Two letter designator shown on the CD-ROM label.
[SW | FW] The software or firmware directory.
<version> Software version 9.0 through 11.3.
Using the Bcmsysupgrade Utility to Upgrade
Use the bcmuname utility to display your current platform, package, and version.
This section describes how to use the bcmsysupgrade utility for the most common
software upgrades.
The command syntax for the bcmsysupgrade utility is:
bcmsysupgrade [options] <stage> <device>
See “bcmsysupgrade” on page 81 for more information.
The procedures described in the following sections assume you are performing a
like-package upgrade to version 11.3 with automatic recovery (see “Choosing
Automatic Recovery or Manual Recovery” on page 18 for more information).
An example of a like-package upgrade is from the CF package to the CF package.
A like-package upgrade is an upgrade where the software package in the version
you are upgrading from and the version you are upgrading to have the same
two-letter designator.
If your upgrade is not a like-package upgrade with automatic recovery, or you are
upgrading to a version other than the default, you must use the bcmsysupgrade
utility with other options. Be sure to use the same options during each stage of
the upgrade process. See Table 4 for a description of the options.
Page 40

40 CHAPTER 5: UPGRADING A BRIDGE/ROUTER USING THE COMMAND-LINE UTILITIES
For UNIX, after you have upgraded, check the /tftpboot/CLIENTS/<IP address or
mac address>/tmp/stages.log file to ensure that the options were used
consistently throughout the upgrade process.
For Windows, after you have upgraded, check the \%tftpboot%\CLIENTS\<IP
address or mac address>\tmp\stages.log file to ensure that the options were used
consistently throughout the upgrade process.
Table 4 lists the most common bcmsysupgrade options.
Table 4 Common Options for Bcmsysupgrade
Task Option
Image-only upgrade
or
Upgrading to a software version other than 11.1
Upgrading unlike packages -k:<package you are upgrading to>
Upgrading with Manual Recovery -m
Specifying encryption license agreement. -EncryptionLicenseRead
Using TFTP file transfer. -tftp
Using FTP file transfer. -ftp
-V:<version you are upgrading to>
Whenever you specify an option with bcmsysupgrade, you must repeat that
option for all steps in the procedure.
Example To upgrade a bridge/router from the SW/NBII-WA,8.3 package to the SW/NBII-FF,
10.1005 package (unlike packages, manual recovery, and a different package
from 11.0), use:
bcmsysupgrade -s:from_nb -k:FF -V:101005 -m <device>
The same options must be used to upgrade configuration files:
bcmsysupgrade -s:update -k:FF -V:101005 -m <device>
See Chapter 8 for more information about how to use bcmsysupgrade for
specialized cases.
Filenames The following sections list the files that may be used when you upgrade a
NETBuilder system.
NETBuilder II Bridge/Router
■ boot.29k — image file that boots the main processor module.
■ mp6e.29k — image file that boots the MP 6-port Ethernet module.
■ mpatm.29k — image file that boots the MP ATMLink module.
■ mbri.68k — image file that boots the HSS 8-Port BRI module.
■ 4portwan.860 — image file that boots the HSS 4-Port WAN module.
■ iofw_upd.29k — file that updates the firmware for HSS 3-port, HSS 4-port,
HSS 8-port, and MP modules.
■ sys — file that is used during the upgrade process to determine the source OT
target software version.
Page 41

Upgrading Software Only 41
■ ccsmacro — file that contains predefined user macros.
■ fpupdate.29k (CEC Only) — file that updates the CEC module firmware.
You may also have several configuration files that will be upgraded by the utilities.
SuperStack II NETBuilder and OfficeConnect NETBuilder Bridge/Routers
■
boot.68k — image file that boots the system.
■ sys — file that may be used during the upgrade process to determine the
source or target software version.
You may also have several configuration files that will be upgraded by the utilities.
PathBuilder S5xx Series Switch
■
boot.ppc — image file that boots the system.
■ sys — file that may be used during the upgrade process to determine the
source or target software version.
Upgrading Software Only
This section describes how to upgrade the software on your existing hardware
using either automatic or manual recovery. If you are upgrading or replacing your
bridge/router, switch or main processor module (NETBuilder II), follow the
procedure in “Upgrading Hardware and Software” on page 44.
Automatic Recovery This section describes how to perform an upgrade of the Enterprise OS software
that does not include a hardware upgrade. See Chapter 3 for the memory
requirements for automatic recovery.
Whenever you specify an option with bcmsysupgrade, you must repeat that
option for all steps in the procedure. See Table 4 on page 40 or “bcmsysupgrade”
on page 81 for a list of the options available to use with the bcmsysupgrade utility .
To upgrade the bridge/router software to the default version, follow these steps:
1 Back up your current software to the NMS using:
bcmsysupgrade [options] -s:from_nb <device>
where [-options] lets you specify the -EncryptionLicenseRead flag that indicates
you have read and understand the encryption license agreement notice and
<device> is the IP address or hostname of the bridge/router you are upgrading.
CAUTION: When upgrading to a package containing encryption, you must specify
the -EncyrptionLicenseRead option flag. If you attempt to upgrade to an
encrypted package and you have not specified the -EncryptionLicenseRead option,
the upgrade will fail.
The bcmsysupgrade utility only backs up the files in the primary boot source. To
archive both the primary and secondary boot sources, use bcmbackup instead of
bcmsysupgrade. See “bcmbackup” on page 73 for more information.
2 NETBuilder II with CEC only — (The CEC module is not supported in software
version 11.3. However, you can use the utilities to upgrade your CEC module to
software version 10.1 or earlier.) If you are running CEC firmware versions 2.0 or
2.1, which are standard with NETBuilder II software versions 8.0, 8.1, and 8.2, you
must upgrade your CEC firmware before proceeding to the next step.
Page 42

42 CHAPTER 5: UPGRADING A BRIDGE/ROUTER USING THE COMMAND-LINE UTILITIES
CAUTION: If you are running any other firmware version besides 2.0 or 2.1, you
should upgrade the firmware after upgrading the software.
To upgrade the CEC firmware, follow these steps:
a Make sure there is a floppy diskette with write access in the floppy drive on the
bridge/router. The diskette is formatted during the upgrade, so make sure that
the contents of the diskette you intend to use can be overwritten. Perform a
manually recoverable firmware upgrade using the option -m if you do not want
the floppy diskette formatted.
b Upgrade your firmware to version 2.6 using:
bcmsysupgrade -s:upgrade_cec_fw -V:<version you are upgrading to>
<device>
After the firmware has been upgraded, the bridge/router reboots.
3 Update your configuration files using:
bcmsysupgrade -s:update <device>
4 Copy the upgraded software to the bridge/router using:
bcmsysupgrade -s:to_nb <device>
5 Test your new software using:
bcmsysupgrade -s:test_boot <device>
The bridge/router is rebooted, and the utilities confirm IP connectivity and that the
expected version of software is running.
6 Verify that your upgrade completed successfully.
To verify that the software is working properly, you can perform a set of
operational integrity checks on the newly upgraded device. These may include:
■ Some standard checks based on services active.
A basic service verification test can Ping to specific IP addresses.
■ Connectivity checks based on network topology.
Examples of a connectivity verification include:
■ Checking the connectivity between devices on different networks, through
designated bridge/routers.
■ Testing typical device connections on terminals, printers, or hosts.
■ Testing the connectivity with specific bridge/routers.
■ Custom checks based on applications and typical network use.
For instance, you can check normal operation over the network and perform
file transfers, as well as run traces on specific routes or check routing tables.
7 Accept or reject the upgrade.
■ If your upgrade completed successfully, accept your upgrade using:
bcmsysupgrade -s:accept <device>
■ If the upgrade process failed to meet your verification criteria, reject your
upgrade using:
bcmsysupgrade -s:reject <device>
The bridge/router is rebooted using the previous version of software.
Page 43

Upgrading Software Only 43
8 NETBuilder II with CEC only — (The CEC module is not supported in software
version 11.3. However, you can use the utilities to upgrade your CEC module to
software version 10.1 or earlier.) If the upgrade is successful, and if you have not
already done so in step 2, upgrade the CEC firmware by following these steps:
a Make sure there is a floppy diskette with write access in the floppy drive on the
bridge/router. Make sure that the contents of the diskette you intend to use
can be overwritten. Perform a manually recoverable firmware upgrade using
the option -m if you do not want the floppy diskette formatted.
b Upgrade your firmware to version 2.6 using:
bcmsysupgrade -s:upgrade_cec_fw -V:<version you are upgrading to>
<device>
After the firmware has been upgraded, the bridge/router reboots.
9 NETBuilder II only — If the upgrade is successful, and the NETBuilder II
bridge/router has a multiport HSS module or an MP module, upgrade the
firmware for all these modules using:
bcmsysupgrade -s:upgrade_io_fw -m <device>
The bridge/router reboots after the firmware is upgraded.
Manual Recovery This section describes how to perform a software upgrade with manual recovery
of a bridge/router that does not include a hardware upgrade. See Chapter 3 for
the memory requirements for manual recovery.
Whenever you specify an option with bcmsysupgrade (such as -m), you must
repeat that option for all steps in the procedure. See Table 4 on page 40 or
“bcmsysupgrade” on page 81 for a list of the options available to use with the
bcmsysupgrade utility.
To upgrade the bridge/router, follow these steps:
1 Back up your current software to the NMS using:
bcmsysupgrade [-options] -s:from_nb -m <device>
where [-options] lets you specify the -EncryptionLicenseRead flag that indicates
you have read and understand the encryption license agreement notice and
<device> is the IP address or hostname of the bridge/router you are upgrading.
CAUTION: When upgrading to a package containing encryption, you must specify
the -EncyrptionLicenseRead option flag. If you attempt to upgrade to an
encrypted package and you have not specified the -EncryptionLicenseRead option,
the upgrade will fail.
The bcmsysupgrade utility only backs up the files in the primary boot source. To
archive both the primary and secondary boot sources, use bcmbackup instead of
bcmsysupgrade. See “bcmbackup” on page 73 for more information.
2 Update your configuration files using:
bcmsysupgrade -s:update -m <device>
3 Copy the upgraded software to the bridge/router using:
bcmsysupgrade -s:to_nb -m <device>
4 Accept your upgrade using:
bcmsysupgrade -s:accept -m <device>
Page 44

44 CHAPTER 5: UPGRADING A BRIDGE/ROUTER USING THE COMMAND-LINE UTILITIES
The device reboots.
5 Verify that your upgrade completed successfully.
To verify that the software is working properly, you can perform a set of
operational integrity checks on the newly upgraded device. These may include:
■ Some standard checks based on services active.
A basic service verification test can Ping to specific IP addresses.
■ Connectivity checks based on network topology.
Examples of a connectivity verification include:
■ Checking the connectivity between devices on different networks, through
designated bridge/routers.
■ Testing typical device connections on terminals, printers, or hosts.
■ Testing the connectivity with specific NETBuilder bridge/router.
■ Custom checks based on applications and typical network use.
For instance, you can check normal operation over the network and perform
file transfers, as well as run traces on specific routes or check routing tables.
Upgrading Hardware and Software
6 If you determine that the new software does not meet your requirements, you can
reject the upgrade and revert to the software version you wer e running before the
upgrade by using the bcmrestore utility.
To reject your upgrade, use:
bcmrestore <device>
7 NETBuilder II only — If the upgrade is successful, and the NETBuilder II
bridge/router has a multiport HSS module or an MP module, upgrade the
firmware for all these modules using:
bcmsysupgrade -s:upgrade_io_fw -m <device>
The bridge/router reboots after the firmware is upgraded.
If the Bridge/Router or Switch Does Not Boot
If a failure causes the bridge/router or switch not to boot, or if the bridge/router or
switch is inaccessible using Telnet, you must configure the bridge/router at the
local console to reestablish IP connectivity. After connectivity is reestablished, you
can use the bcmrestore utility to return the bridge/router or switch to a
preupgrade state. See Chapter 7 for connectivity and recovery procedures.
This section describes how to upgrade the software on a bridge/router on which
you are upgrading or replacing your bridge/router or switch or main processor
module (NETBuilder II) using either automatic or manual recovery. If you are
upgrading only the software, follow the procedure in “Upgrading Softwar e Only”
on page 41.
Automatic Recovery This section describes how to perform a software and hardware upgrade with
automatic recovery. See Chapter 3 for the memory requirements for automatic
recovery.
Whenever you specify an option with bcmsysupgrade (such as -new_hw), you
must repeat that option for all steps in the procedure. See Table 4 on page 40 or
Page 45

Upgrading Hardware and Software 45
“bcmsysupgrade” on page 81 for a list of the options available to use with the
bcmsysupgrade utility.
To upgrade the bridge/router software and hardware, follow these steps:
1 Back up your current software to the NMS using:
bcmsysupgrade [options] -s:from_nb -new_hw <device>
where [-options] lets you specify the -EncryptionLicenseRead flag that indicates
you have read and understand the encryption license agreement notice and
<device> is the IP address or hostname of the bridge/router you are upgrading.
CAUTION: When upgrading to a package containing encryption, you must specify
the -EncyrptionLicenseRead option flag. If you attempt to upgrade to an
encrypted package and you have not specified the -EncryptionLicenseRead option,
the upgrade will fail.
The bcmsysupgrade utility only backs up the files in the primary boot source. To
archive both the primary and secondary boot sources, use bcmbackup instead of
bcmsysupgrade. See “bcmbackup” on page 73 for more information.
2 NETBuilder II with CEC only — (The CEC module is not supported in software
version 11.1. However, you can use the utilities to upgrade your CEC module to
software version 10.1 or earlier.) If you are running CEC firmware versions 2.0 or
2.1, which are standard with NETBuilder II software versions 8.0, 8.1, and 8.2, you
must upgrade your CEC firmware before proceeding to the next step.
CAUTION: If you are running any other firmware version besides 2.0 or 2.1, you
should upgrade the firmware after upgrading the software.
To upgrade the CEC firmware, follow these steps:
a Make sure there is a floppy diskette with write access in the floppy drive on the
bridge/router. Make sure that the contents of the diskette you intend to use
can be overwritten. Perform a manually recoverable firmware upgrade using
the option -m if you do not want the floppy diskette formatted.
b Upgrade your firmware to version 2.6 using:
bcmsysupgrade -s:upgrade_cec_fw -V:<version you are upgrading to>
<device>
After the firmware has been upgraded, the bridge/router reboots.
3 Update your configuration files using:
bcmsysupgrade -s:update -new_hw <device>
4 Swap your hardware.
5 Attach a console to the Console port on the bridge/router.
6 Set up IP routing by following these steps:
a Log on to the bridge/router as root and press the Return key.
The password prompt is displayed.
b At the password prompt, press the Return key.
The network manager prompt (Enterprise OS #) is displayed.
c Set up an IP address and subnet mask using:
SETDefault !<port> -IP NETaddr = <IP address> [<subnet mask>]
Page 46

46 CHAPTER 5: UPGRADING A BRIDGE/ROUTER USING THE COMMAND-LINE UTILITIES
Where <port> is the port through which the bridge/router can be accessed by
the NMS.
d Enable IP routing by entering:
SETDefault -IP CONTrol = ROute
e Enable a route discovery protocol. For example, enable OSPF by using:
SETDefault !<port> -OSPF CONTrol = Enable
f Check your configuration by pinging the bridge/router from the NMS:
ping <IP address>
Where <IP address> is the IP address of the bridge/router.
7 Set up SNMP.
This guide does not describe in detail how to set up the SNMP Service. See Using
Enterprise OS Software and Reference for Enterprise OS Software for more
information.
To enable SNMP read/write access, you need to modify two parameters in the
SNMP Service: COMmunity and MANager.
a The COMmunity parameter modifies the list of communities. For information
on how to use the COMmunity parameter, See Using Enterprise OS Software
and Reference for Enterprise OS Software.
By default all bridge/router configuration files are accessible to an SNMP-based
manager with read privileges. To change SNMP access to configuration files to
read/write for a network management station for a community named public,
enter:
ADD -SNMP COMmunity "public" RW
b With the MANager parameter , create a new manager with r ead/write access to
the bridge/router. For security reasons, limit the number of network
management stations by entering the IP address of the network management
station that will have access. For example, enter:
ADD -SNMP MANager “sysadm” 129.213.224.1
8 Copy the upgraded software to the bridge/router using:
bcmsysupgrade -s:to_nb -new_hw <device>
9 Test your new software using:
bcmsysupgrade -s:test_boot -new_hw <device>
The bridge/router is rebooted, and the utilities confirm IP connectivity and that the
expected version of software is running.
10 Verify that your upgrade completed successfully.
To verify that the software is working properly, you can perform a set of
operational integrity checks on the newly upgraded device. These may include:
■ Some standard checks based on services active.
A basic service verification test can Ping to specific IP addresses.
■ Connectivity checks based on network topology.
Examples of a connectivity verification include:
■ Checking the connectivity between devices on different networks, through
designated bridge/routers.
Page 47

Upgrading Hardware and Software 47
■ Testing typical device connections on terminals, printers, or hosts.
■ Testing the connectivity with specific bridge/routers.
■ Custom checks based on applications and typical network use.
For instance, you can check normal operation over the network and perform
file transfers, as well as run traces on specific routes or check routing tables.
11 Accept or reject the upgrade.
■ If your software upgrade completed successfully, accept your upgrade using:
bcmsysupgrade -s:accept -new_hw <device>
■ If the upgrade process failed to meet your verification criteria, reject your
upgrade using:
bcmsysupgrade -s:reject -new_hw <device>
The bridge/router is rebooted using the previous version of software.
12 NETBuilder II with CEC only — (The CEC module is not supported in software
version 11.1. However, you can use the utilities to upgrade your CEC module to
software version 10.1 or earlier.) If the upgrade is successful, and if you have not
already done so in step 2, upgrade the CEC firmware by following these steps:
a Make sure there is a floppy diskette with write access in the floppy drive on the
bridge/router. Make sure that the contents of the diskette you intend to use
can be overwritten. Perform a manually recoverable firmware upgrade using
the option -m if you do not want the floppy diskette formatted.
b Upgrade your firmware to version 2.6 using:
bcmsysupgrade -s:upgrade_cec_fw -V:<version you are upgrading to>
<device>
After the firmware has been upgraded, the bridge/router reboots.
13 NETBuilder II only — If the upgrade is successful, and the NETBuilder II
bridge/router has a multiport HSS module or an MP module, upgrade the
firmware for all these modules using:
bcmsysupgrade -s:upgrade_io_fw -m <device>
The bridge/router reboots after the firmware is upgraded.
Manual Recovery This section describes how to perform a software and hardware upgrade with
manual recovery. See Chapter 3 for the memory requirements for manual
recovery.
Whenever you specify an option with bcmsysupgrade (such as -m and -new_hw),
you must repeat that option for all steps in the procedure. See Table 4 on page 40
or “bcmsysupgrade” on page 81 for a list of the options available to use with the
bcmsysupgrade utility.
To upgrade the bridge/router, follow these steps:
1 Back up your current software to the NMS using:
bcmsysupgrade [options] -s:from_nb -m -new_hw <device>
where [-options] lets you specify -EncryptionLicenseRead that indicates you have
read and understand the encryption license agreement notice and <device> is the
IP address or hostname of the bridge/router you are upgrading.
Page 48

48 CHAPTER 5: UPGRADING A BRIDGE/ROUTER USING THE COMMAND-LINE UTILITIES
CAUTION: When upgrading to a package containing encryption, you must specify
the -EncyrptionLicenseRead option flag. If you attempt to upgrade to an
encrypted package and you have not specified the -EncryptionLicenseRead option,
the upgrade will fail.
The bcmsysupgrade utility only backs up the files in the primary boot source. To
archive both the primary and secondary boot sources, use bcmbackup instead of
bcmsysupgrade. See “bcmbackup” on page 73 for more information.
2 Update your configuration files using:
bcmsysupgrade -s:update -m -new_hw <device>
3 Upgrade your hardware.
4 Attach a console to the Console port on the bridge/router.
5 Set up IP routing by following these steps:
a Log on to the bridge/router as root and press the Return key.
The password prompt is displayed.
b At the password prompt, press the Return key.
The network manager prompt (Enterprise OS #) is displayed.
c Set up an IP address and subnet mask using:
SETDefault !<port> -IP NETaddr = <IP address> [<subnet mask>]
Where <port> is the port through which the bridge/router can be accessed by
the NMS.
d Enable IP routing by entering:
SETDefault -IP CONTrol = ROute
e Enable a routing protocol. For example, enable RIP by using:
SETDefault !<port> -RIPIP CONTrol = (TAlk, LIsten)
f Check your configuration by verifying that the bridge/router is accessible by
using the following at the network management station:
PING <IP address>
<IP address> is the IP address of the bridge/router.
6 Set up SNMP.
This guide does not describe in detail how to set up the SNMP Service. See Using
Enterprise OS Software and Reference for Enterprise OS Software for more
information.
To enable SNMP read/write access, you need to modify two parameters in the
SNMP Service: COMmunity and MANager.
a The COMmunity parameter modifies the list of communities. For information
on how to use the COMmunity parameter, see Using Enterprise OS Software
and Reference for Enterprise OS Software.
By default all configuration files are accessible to an SNMP-based manager
with read privileges. To change SNMP access to configuration files to read/write
for a network management station for a community named public, enter:
ADD -SNMP COMmunity "public" RW
b With the MANager parameter , create a new manager with r ead/write access to
the bridge/router. For security reasons, limit the number of network
Page 49

Upgrading Hardware and Software 49
management stations by entering the IP address of the network management
station that will have access.
For example, enter:
ADD -SNMP MANager “sysadm” 129.213.224.1
7 Copy the upgraded software to the bridge/router using:
bcmsysupgrade -s:to_nb -m -new_hw <device>
8 Accept your upgrade using:
bcmsysupgrade -s:accept -m -new_hw <device>
The bridge/router reboots.
9 Verify that your upgrade completed successfully.
To verify that the software is working properly, you can perform a set of
operational integrity checks on the newly upgraded bridge/router. These may
include:
■ Some standard checks based on services active.
A basic service verification test can Ping to specific IP addresses.
■ Connectivity checks based on network topology.
Examples of a connectivity verification include:
■ Checking the connectivity between devices on different networks, through
designated bridge/routers.
■ Testing typical device connections on terminals, printers, or hosts.
■ Testing the connectivity with specific NETBuilder bridge/routers.
■ Custom checks based on applications and typical network use.
For instance, you can check normal operation over the network and perform
file transfers, as well as run traces on specific routes or check routing tables.
10 If you determine that the new software does not meet your requirements, you can
reject the upgrade, and revert to the software version you were running before
the upgrade, by using the bcmrestore utility.
To reject your upgrade, use:
bcmrestore -new_hw <device>
11 NETBuilder II only — If the upgrade is successful, and the NETBuilder II
bridge/router has a multiport HSS module or an MP module, upgrade the
firmware for all these modules using:
bcmsysupgrade -s:upgrade_io_fw -m <device>
The bridge/router reboots after the firmware is upgraded.
If the Bridge/Router or Switch Does Not Boot
If a failure causes the bridge/router not to boot, or if the bridge/router or switch is
inaccessible using Telnet, you must configure the bridge/router or switch at the
local console to reestablish IP connectivity. After connectivity is reestablished, you
can use the bcmrestore utility to return the bridge/router or switch to a
preupgrade state. See Chapter 7 for connectivity and recovery procedures.
Page 50

50 CHAPTER 5: UPGRADING A BRIDGE/ROUTER USING THE COMMAND-LINE UTILITIES
Page 51

UPGRADING THE SOFTWARE IMAGE
6
O
NLY
An image-only upgrade is an upgrade that replaces the NETBuilder bridge/router
or PathBuilder S5xx series switch boot image file but does not upgrade any
configuration files. You can perform an image-only upgrade in the following
cases:
■ You are installing a patch release for your current version of software.
■ You are upgrading to a different package of the same version.
■ Your new version does not require updated configuration files (for example,
10.1 to 10.3).
■ You are upgrading a PathBuilder S5xx series switch.
You can upgrade:
■ Using Upgrade Link
■ Using the Command-Line Utilities
■ Using the Enterprise OS User Interface
Preparing for the Upgrade
You can also use Transcend Enterprise Manager or Transcend Network Control
Services to perform an image-only upgrade. See the guide that came with
Transcend for more information.
3Com recommends using the utilities instead of the Enterprise OS user interface.
The utilities automatically back up the software and perform all the necessary
copying and boot source settings automatically.
If you are using Upgrade Link or the command-line, confirm the following items:
■ You have installed the utilities according to Chapter 2.
■ You have set the path for the utilities (UNIX only). If you have not set the path,
complete the following step for your UNIX shell:
■ For a C-shell installation, add the contents of the following file to the .cshr c
file for each user you want to have access to the utilities, including root:
/usr/3Com/common/data/.login-bcm
Or you can enter the path after every logon:
source /usr/3Com/common/data/.login-bcm
■ For a Bourne shell installation, add the contents of the following file to the
.profile file for each user you want to have access to the utilities, including
root:
/usr/3Com/common/data/.profile-bcm
Or you can enter the path after every logon:
Page 52

52 CHAPTER 6: UPGRADING THE SOFTWARE IMAGE ONLY
. /usr/3Com/common/data/.profile-bcm
■ All configuration files are in the same directory as the boot image.
■ You have booted your bridge/router or switch from the primary boot source.
■ For Upgrade Link — You have a web browser installed with Java support, such
as Netscape Navigator 4.5 or Internet Explorer 4.x or later, and it is in your path
(UNIX).
■ There is sufficient disk space on the NMS for the amount of software you are
installing.
Minimal disk storage requirements depend on the number of different
software versions that are stored on the disk drive. Calculate:
■ 6 MB for each version of NETBuilder II bridge/router images
■ 6 MB for each version of PathBuilder S5xx series switch images.
■ 4 MB for each version of SuperStack II, SuperStack II SI, or OfficeConnect
bridge/router images
While you must purchase one copy of software for each bridge/router or
switch, you only need to install one copy of a version of software on the NMS.
Setting Up a File
Transfer Method
Setting up for TFTP File
Transfers
Setting up for FTP File
Transfers
You can choose to transfer files using FTP or TFTP.
To use TFTP, you need to set up your NMS in preparation for TFTP file transfers.
Make sure your TFTP server is running. On a Windows workstation, 3Com’s
3CServer is shipped along with the utilities. Upgrade Link launches 3CServer
during start up.
Specify the -tftp flag in all command line utilities which use file transfers
(bcmsysupgrade, bcmbackup, bcmrestore) if you want to use TFTP file transfer. For
example, to specify TFTP file transfer use:
bcmsysupgrade -s:from_nb -tftp <device>
If neither flag is used, TFTP is used by default for software release 11.0 and lower,
but FTP is used by default for software release 11.1 and higher. If the -ftp flag is
specified on a NETBuilder bridge/router running software version 11.0 or lower,
the FTP password is overwritten with the following text string:
****
To use FTP, you need to set up your NMS in preparation for FTP file transfers.
For Upgrade Link, the user name and password is specified in the Setting Page, as
shown on page 23.
Page 53

Using Upgrade Link 53
On a UNIX NMS, follow these steps:
1 Create a user on your system with /tftpboot as the home directory.
2 When using the upgrade utilities via the command line or the Transcend Upgrade
Manager, specify this user name and password in the BCMFTPUSER and
BCMFTPPASS environment variables.
Specify the -ftp flag in all command line utilities that use file transfers
(bcmsysupgrade, bcmbackup, bcmrestore) if you want to use FTP file transfer. For
example, to specify FTP file transfer use:
bcmsysupgrade -s:from_nb -ftp <device>
If no flag is used, TFTP is used by default for software release 11.0 and lower, but
FTP is used by default for software release 11.1 and higher. If the -ftp flag is
specified on a NETBuilder bridge/router running software version 11.0 or lower,
the FTP password is overwritten with the following text string:
****
On a Windows NMS, follow these steps:
1 Create a user in 3Com’s 3CServer FTP settings.
2 When using the upgrade utilities via command line or the Transcend Upgrade
Manager, specify the ftp user name and password in the BCMFTPUSER and
BCMFTPPASS environment variables.
You can specify the -ftp flag in the utilities (bcmsysupgrade, bcmbackup,
bcmrestore) if you want to use FTP file transfer.
If no flag is used, TFTP is used by default for software release 11.0 and lower, but
FTP is used by default for software release 11.1 and higher. If the -ftp flag is
specified on a NETBuilder bridge/router running software version 11.0 or lower,
the FTP password is overwritten with the following text string:
****
Using Upgrade Link Upgrade Link contains its own web server. Client access to the web server is
available locally or remotely via a web browser. Running the Upgrade Link
application locally means that the web browser and the web server are running on
the same NMS.
See Chapter 4 for information on starting and using the Upgrade Link application.
Page 54

54 CHAPTER 6: UPGRADING THE SOFTWARE IMAGE ONLY
Verifying the
Bridge/Router for
Upgrading
Before upgrading, run the diagnostic utility in Upgrade Link to verify connectivity
to the bridge/router by following these steps:
1 Choose a bridge/router or switch from the pop-up list in the Console page, or click
New to enter the IP address or hostname. The pop-up list contains bridge/routers
or switches that you have upgraded or backed-up before.
2 Select Verify Upgrade Services (Diagnose) and click Apply.
The Settings Page appears. Select the appropriate settings and click OK to close
the window.
The Status page appears showing the results of the diagnostic tests.
3 If the Status page shows a failure, check the SNMP read/write community string
and FTP/TFTP server settings.
If the Status page shows a success, click Home to continue with the upgrade and
return to the console page.
Upgrading the Image To upgrade the image, follow these steps:
1 Run Upgrade Link if you have not already done so.
2 Choose a bridge/router or switch from the pop-up list in the Console page, or click
New to enter the IP address or hostname. The pop-up list contains bridge/routers
or switches that you have upgraded or backed-up before.
Page 55

3 Select Upgrade and click Apply.
The Upgrade page appears.
Using Upgrade Link 55
4 Select a software package from the pop-up list. The list includes all packages you
have installed on the NMS for your platform. If your package is not listed, install
the software using the procedure in “Installing the Utilities on a Network
Management Station” on page 13.
CAUTION: If you select a NETBuilder bridge/router or PathBuilder switch software
package that includes encryption, a message regarding the license agreement
appears. To proceed with the installation you must accept this agreement.
The Upgrade window shows information about your system, including the flash
memory requirements for a manual or automatic recovery upgrade.
5 Click Next.
6 The recommended upgrade method is selected based on the amount of memory
you have installed. If you do not wish to perform a customized upgrade, go to
step 12.
CAUTION: If you override the Upgrade Link selection, your upgrade may fail.
Page 56

56 CHAPTER 6: UPGRADING THE SOFTWARE IMAGE ONLY
7 Click on the Advanced button if you want to customize the upgrade process, that
is you do not want to perform all of the upgrade at this time.
The Advanced Dialog box appears.
8 Click New Hardware if you are r eplacing your bridge/router with a new system. For
example, click New Hardware if you are replacing the CEC module with a DPE
module.
You cannot upgrade to a different platform. For example, you can only upgrade
an OfficeConnect bridge/router to an OfficeConnect bridge/router. You cannot
upgrade a SuperStack II NETBuilder bridge/router to a SuperStack II NETBuilder SI
bridge/router. The only exception is an upgrade from a NETBuilder II CEC module
to a DPE module.
9 If you want to alter the Reboot Timeout, enter a new number in the box. The
default setting is appropriate for most networks.
10 Click the check box for each of the stages you want to complete in the current
operation.
11 Click OK.
12 Click Apply to begin the upgrade.
The Status page appears.
13 If you are performing a hardware upgrade, replacing a CEC module with a DPE
module for example, a message to replace the hardware appears after the
software has been backed up to the NMS. Replace the hardware at this time.
14 When the upgrade is complete, the bridge/router reboots from the new softwar e.
If the boot is not successful:
■ For automatic recovery, the bridge/router reboots from the old software.
■ For manual recovery, you must configure the bridge/router at the local
console to reestablish IP connectivity. Once connectivity is established, you can
restore the software to return the bridge/router to a preupgrade state. See
Chapter 7 for the procedure to restore connectivity and the software.
15 Click Home then Exit to exit Upgrade Link.
Page 57

Using the Command-Line Utilities 57
Using the Command-Line Utilities
Installing the NETBuilder
Software
Prediagnosing System
Problems
Upgrading Using
Automatic Recovery
Use the command-line utilities within a script or execute the commands manually.
Otherwise, use Upgrade Link as described on page 53.
You can upgrade from a CD-ROM, a tar file, or an image you have downloaded
from 3Com. If you are installing the software from a CD-ROM, complete the
procedure in “Installing the Software on the NMS” on page 37.
You can choose to transfer files using FTP or TFTP. Complete the procedure in
“Setting Up a File Transfer Method” on page 17.
Detect any problems with SNMP or FTP/TFTP connectivity using:
bcmdiagnose <device>
Where <device> is the IP address or hostname of the bridge/router you are
diagnosing.
To perform an image-only upgrade using automatic recovery, follow these steps.
See Chapter 3 for the memory requirements for automatic recovery.
Whenever you specify an option with bcmsysupgrade, you must repeat that
option for all steps in the procedure.
1 Back up your current software to the NMS using:
bcmsysupgrade [-options] -s:from_nb -I -V:<software version> <device>
where [-options] lets you specify the EncryptionLicenseRead option that indicates
you have read and understand the encryption license agreement notice and
<device> is the IP address or hostname of the bridge/router or switch you are
upgrading.
CAUTION: When upgrading to a package containing encryption, you must specify
the -EncyrptionLicenseRead option flag. If you attempt to upgrade to an
encrypted package and you have not specified the -EncryptionLicenseRead option,
the upgrade will fail.
2 Copy the configuration files into the new software directory on the NMS using:
bcmsysupgrade -s:update -I -V:<software version> <device>
3 Copy the upgraded software to the bridge/router using:
bcmsysupgrade -s:to_nb -I -V:<software version> <device>
4 Test your new software using:
bcmsysupgrade -s:test_boot -I -V:<software version> <device>
The bridge/router is rebooted, and the utilities confirm IP connectivity and that the
expected version of software is running.
5 Verify that your upgrade completed successfully.
To verify that the software is working properly, you can perform a set of
operational integrity checks on the newly upgraded network. These may include:
■ Some standard checks based on services active.
A basic service verification test can Ping to specific IP addresses.
■ Connectivity checks based on network topology.
Page 58

58 CHAPTER 6: UPGRADING THE SOFTWARE IMAGE ONLY
Examples of a connectivity verification include:
■ Checking the connectivity between devices on different networks, through
designated bridge/routers.
■ Testing typical device connections on terminals, printers, or hosts.
■ Testing the connectivity with specific bridge/routers or switches.
■ Custom checks based on applications and typical network use.
For instance, you can check normal operation over the network and perform
file transfers, as well as run traces on specific routes or check routing tables.
6 Accept or reject the upgrade.
■ If your software upgrade completed successfully, accept your upgrade using:
bcmsysupgrade -s:accept -I -V:<software version> <device>
■ If the upgrade process failed to meet your verification criteria, reject your
upgrade using:
bcmsysupgrade -s:reject -I -V:<software version> <device>
The bridge/router or switch is rebooted using the previous version of software.
Upgrading Using
Manual Recovery
To perform an image-only upgrade using manual recovery, follow these steps. See
Chapter 3 for the memory requirements for manual recovery.
Whenever you specify an option with bcmsysupgrade, you must repeat that
option for all steps in the procedure.
1 Back up your current software to the NMS using:
bcmsysupgrade [-options] -s:from_nb -m -I -V:<software version> <device>
where [-options] lets you specify the EncryptionLicenseRead option that indicates
you have read and understand the encryption license agreement notice and
<device> is the IP address or hostname of the bridge/router you are upgrading.
CAUTION: When upgrading to a package containing encryption, you must specify
the -EncyrptionLicenseRead option flag. If you attempt to upgrade to an
encrypted package and you have not specified the -EncryptionLicenseRead option,
the upgrade will fail.
2 Copy the configuration files into the new software directory on the NMS using:
bcmsysupgrade -s:update -m -I -V:<software version> <device>
3 Copy the new software to the bridge/router using:
bcmsysupgrade -s:to_nb -m -I -V:<software version> <device>
4 Accept the upgrade using:
bcmsysupgrade -s:accept -I -m -V:<software version> <device>
The bridge/router reboots.
5 Verify that your upgrade completed successfully.
To verify that the software is working properly, you can perform a set of
operational integrity checks on the newly upgraded network. These may include:
■ Some standard checks based on services active.
A basic service verification test can Ping to specific IP addresses.
Page 59

Using the Enterprise OS User Interface 59
■ Connectivity checks based on network topology.
Examples of a connectivity verification include:
■ Checking the connectivity between devices on different networks, through
designated bridge/routers or switches.
■ Testing typical device connections on terminals, printers, or hosts.
■ Testing the connectivity with specific bridge/routers or switches.
■ Custom checks based on applications and typical network use.
For instance, you can check normal operation over the network and perform
file transfers, as well as run traces on specific routes or check routing tables.
6 If you determine that the new software does not meet your requirements, you can
reject the upgrade, and revert to the software version you were running before
the upgrade, by using the bcmrestore utility.
To reject your upgrade, use:
bcmrestore <device>
Using the
Enterprise OS User
Interface
If you have not installed the utilities, you can copy the boot image to the
bridge/router or switch using the Enterprise OS user interface. To copy the boot
image to the bridge/router or switch, follow these steps:
1 Install the software on a FTP/TFTP server on the LAN.
2 Attach a console or Telnet to the bridge/router or switch.
3 Log in with Network Manager privilege.
4 Change to the primary boot source directory using:
ChangeDir [<device>:]<path>
The default device is drive A.
5 Complete one of the following procedures:
■ If you have enough room on the bridge/router for both the current and new
image files, change the name of the current boot image using:
ReName <image name> <new name>
For example:
ReName boot.68k oldboot
■ If you do not have enough room on the bridge/router for both images, copy
the current image to the FTP/TFTP server for backup using:
COpy <image name> <IP address of server>:<path/>
Then delete the image on the bridge/router or switch using:
RemoveFile <image name>
6 Copy the new boot file from the FTP/TFTP server to the current (primary boot)
directory using:
COpy <IP address of server>:<path/><image name>
For example:
COpy 129.142.10.10:image/NBSI/SW/110/CF/boot.68k boot.68k
Page 60

60 CHAPTER 6: UPGRADING THE SOFTWARE IMAGE ONLY
7 Reboot the system by entering:
ReBoot
If the reboot is unsuccessful, the bridge/router or switch enters the monitor utility.
Boot from the old boot file using:
BT /<path>/<old name>
For example:
BT /primary/oldboot
Page 61

BACKING UP AND RESTORING
7
S
OFTWARE
You should always back up your software and configuration files to a network
management station (NMS) in case your hardware or software fails. This chapter
describes how to back up and restore the software using Upgrade Link or the
command-line utilities.
Prerequisites Confirm the following items:
■ You have installed the utilities according to Chapter 2.
■ You have set the path for the utilities (UNIX only). If you have not set the path,
complete the following step for your UNIX shell:
■ For a C-shell installation, add the contents of the following file to the .cshr c
file for each user you want to have access to the utilities, including root:
/usr/3Com/common/data/.login-bcm
Or you can enter the path after every logon:
source /usr/3Com/common/data/.login-bcm
■ For a Bourne shell installation, add the contents of the following file to the
.profile file for each user you want to have access to the utilities, including
root:
/usr/3Com/common/data/.profile-bcm
Or you can enter the path after every logon:
. /usr/3Com/common/data/.profile-bcm
■ For NETBuilder II with DPE — All boot sources (primary, secondary , and test) are
on drive A. The DPE module has flash memory drives A and B, but the
NETBuilder Upgrade Management Utilities only support drive A. Use the
bcmconfig utility or the SysconF command on the NETBuilder II user interface
to set up the boot sources if they are not on drive A.
■ All configuration files are in the same directory as the boot image.
■ You have booted your bridge/router from the primary boot source.
■ For Upgrade Link — You have a web browser installed with Java support, such
as Netscape Navigator 4.5 or Internet Explorer 4.x, and it is in your path (UNIX).
Page 62

62 CHAPTER 7: BACKING UP AND RESTORING SOFTWARE
Setting Up a File
Transfer Method
Setting Up for TFTP File
Transfers
Setting Up for FTP File
Transfers
You can choose to transfer files using FTP or TFTP.
To use TFTP, you need to set up your NMS in preparation for TFTP file transfers.
Make sure your TFTP server is running. On a Windows workstation, 3Com’s
3CServer is shipped along with the utilities. Upgrade Link launches 3CServer
during start up.
Specify the -tftp flag in all command line utilities which use file transfers
(bcmsysupgrade, bcmbackup, bcmrestore) if you want to use TFTP file transfer. For
example, to specify TFTP file transfer use:
bcmsysupgrade -s:from_nb -tftp <device>
If neither flag is used, TFTP is used by default for software release 11.0 and lower,
but FTP is used by default for software release 11.1 and higher. If the -ftp flag is
specified on a NETBuilder bridge/router running software version 11.0 or lower,
the FTP password is overwritten with the following text string:
****
To use FTP, you need to set up your NMS in preparation for FTP file transfers.
For Upgrade Link, the user name and password is specified in the Setting Page, as
shown on page 23.
On a UNIX NMS, follow these steps:
1 Create a user on your system with /tftpboot as the home directory.
2 When using the upgrade utilities via the command line or the Transcend Upgrade
Manager, specify this user name and password in the BCMFTPUSER and
BCMFTPPASS environment variables.
Specify the -ftp flag in all command line utilities that use file transfers
(bcmsysupgrade, bcmbackup, bcmrestore) if you want to use FTP file transfer. For
example, to specify FTP file transfer use:
bcmsysupgrade -s:from_nb -ftp <device>
If no flag is used, TFTP is used by default for software release 11.0 and lower, but
FTP is used by default for software release 11.1 and higher. If the -ftp flag is
specified on a NETBuilder bridge/router running software version 11.0 or lower,
the FTP password is overwritten with the following text string:
****
Page 63

Backing Up the Software 63
On a Windows NMS, follow these steps:
1 Create a user in 3Com’s 3CServer FTP settings.
2 When using the upgrade utilities via command line or the Transcend Upgrade
Manager, specify the ftp user name and password in the BCMFTPUSER and
BCMFTPPASS environment variables.
You can specify the -ftp flag in the utilities (bcmsysupgrade, bcmbackup,
bcmrestore) if you want to use FTP file transfer.
If no flag is used, TFTP is used by default for software release 11.0 and lower, but
FTP is used by default for software release 11.1 and higher. If the -ftp flag is
specified on a NETBuilder bridge/router running software version 11.0 or lower,
the FTP password is overwritten with the following text string:
****
Backing Up the Software
Using NETBuilder
Upgrade Link
Using the Command
Line Utilities
Verifying the Device for
Backing Up
Back up your software using Upgrade Link or the command-line utilities.
Upgrade Link is an easy to use GUI for the utilities that runs in a web browser. See
Chapter 4 for information on running Upgrade Link locally or remotely . Make sur e
you select and set up your file transfer method.
You can use the command-line utilities if you want to write scripts or if you do not
have a web browser on your NMS. See “Upgrading a Bridge/Router Using the
Command-Line Utilities”on page 63 for information on using the command-line
utilities. Make sure you select and set up your file transfer method.
Before backing up, run the diagnostic utility in Upgrade Link to verify connectivity
to the device by following these steps:
1 Choose a bridge/router from the pop-up list in the Console page, or click New to
enter the IP address or hostname. The pop-up list contains devices that you have
upgraded or backed-up before.
Page 64

64 CHAPTER 7: BACKING UP AND RESTORING SOFTWARE
2 Select Verify Upgrade Services (Diagnose).
A Status window appears showing the results of the diagnostic tests.
3 If the Status window shows a failure, check the SNMP read/write community
string for FTP/TFTP file transfer permissions.
If the Status window shows a success, click Home to continue with the backup.
Backing Up the Software
To back up the software, follow these steps:
1 Run Upgrade Link if you have not already done so.
2 Choose a bridge/router from the pop-up list in the Console page, or click New to
enter the IP address or hostname. The pop-up list contains bridge/routers that you
have upgraded or backed-up before.
3 Select Backup and click Apply.
The Settings page appears.
4 Select the appropriate settings and click OK.
The Backup page appears.
Using the
Command-Line
5 Select the boot source you want to back up.
The box on the right shows information about the previous backups.
Assign a name to the current backup by entering a name in the edit box. Names
can be only eight characters long and may only contain alphanumeric characters.
6 Click Apply to begin the backup.
The Status window shows when the backup is complete.
7 Click Home then Exit to exit Upgrade Link.
Use the command-line utilities if you have a script or if you do not have a web
browser. Otherwise, use Upgrade Link as described on page 63.
Prediagnosing System Problems
Detect any problems with SNMP or FTP/TFTP connectivity using:
bcmdiagnose [-ftp | -tftp] [<device> | -h]
Where <device> is the IP address or hostname of the bridge/router or switch you
are diagnosing.
Page 65

Backing Up the Software 65
If bcmdiagnose shows a failure, check the SNMP read/write community string for
FTP/TFTP file transfer permissions.
Backing Up the Software
To back up your software to an NMS, use:
bcmbackup [both | primary | secondary] [-name:<backname>]<device>]
Values
both Backs up both the primary and secondary boot source. This
value is the default.
primary Backs up the primary boot source.
secondary Backs up the secondary boot source.
<backname> Specifies the name of the backup for the boot blocks.
<device> The IP address or hostname of the bridge/router.
Directory Paths All backups and upgrades use the following directory paths.
For UNIX:
/tftpboot/CLIENTS/<mac_address>/bcm/<backname><directory name on
bridge/router>/
For example:
/tftpboot/CLIENTS/0800020A399E/bcm/name/primary/
For Windows:
\%tftpboot%\CLIENTS\<mac_address>\bcm\<backname>\<directory name on
bridge/router>\
For example:
\tftpboot\CLIENTS\0800020A399E\bcm\name\primary\
Values
tftpboot For UNIX: Directory specified in inetd or tftpd for tftpd files.
%tftpboot% For Windows (using the default 3Com TFTP server): Directory
specified in the Win.ini file in the “[3Com.nm] TFTPROOT=”
section. The Win.ini file is located in the default Windows
directory, for example C:\windows or C:\winnt4.
CLIENTS Name of the directory.
<mac_ address> The MAC address of the bridge/router or switch.
<directory name
on bridge/router>
The name of the boot directory on the bridge/router or
switch. If the primary boot source is set to “/,” the name of
the current version of software is used instead. If the
secondary boot source is set to “/,” then the directory is
called “secondar”.
Page 66

66 CHAPTER 7: BACKING UP AND RESTORING SOFTWARE
Restoring Software from a Backup
If your bridge/router fails, you can restore software from a backup on the NMS. If
your hardware fails or you lose IP and SNMP configuration, you must first
reconfigure IP and SNMP on the bridge/router. If you still have connectivity, go to
“Restoring the Software Using Upgrade Link” on page 68 or “Restoring the
Software Using the Command-Line” on page 69.
Configuring IP Routing If the bridge/router failure interrupted IP connectivity, you must set up IP routing
before restoring software.
To set up IP routing, follow these steps:
1 Attach a console to the Console port on the bridge/router.
2 Log on as root and press the Return key.
The password prompt is displayed.
3 At the password prompt, press the Return key.
The network manager prompt (Enterprise OS #) is displayed.
4 Set up an IP address and subnet mask using:
SETDefault !<port> -IP NETaddr = <IP address> [<subnet mask>]
For more information on IP configuration, see Using Enterprise OS Software.
5 Enable IP routing by entering:
SETDefault -IP CONTrol = ROute
6 Enable a routing protocol. For example, enable OSPF using:
SETDefault !<port> -OSPF CONTrol = Enable
7 Ensure your configuration by verifying that the bridge/router is accessible from the
NMS using:
PING <IP address>
Where <IP address> is the IP address of the bridge/router.
Configuring SNMP This chapter does not describe in detail how to set up the SNMP Service. See Using
Enterprise OS Software and Reference for Enterprise OS Software for more
information.
To enable SNMP read/write access, you need to modify two parameters in the
SNMP service: Community Manager and Manager.
1 The Community Manager parameter modifies the list of communities. For
information on how to use the COMmunity parameter, see Using Enterprise OS
Software and Reference for Enterprise OS Software.
By default all bridge/router configuration files are accessible to an SNMP-based
manager with read privileges. To change SNMP access to configuration files to
read/write for a network management station with a community named “public,”
enter:
ADD -SNMP COMmunity “public” RW
Page 67

Restoring Software from a Backup 67
2 With the Manager parameter , create a new manager with r ead/write access to the
bridge/router. For security reasons, limit the number of network management
stations by entering the IP address of the network management station that will
have access. For example, enter:
ADD -SNMP Manager “sysadm” 129.213.224.1
Mapping Hostnames Using the etc/snmp.cfg File
/etc/snmp.cfg is used to configure a mapping between hostnames and/or IP
addresses and SNMP community strings. If the NETBuilder bridge/routeris
configured to accept a community string other than "public", you need to update
this file with the new community string. Follow the examples in the file when
adding your own entries.
The following is an example file showing how community strings are mapped to a
device.
#
# This file indicates which community strings are to be used
# with a particular device. Follow the examples below
# Timeout values are given in seconds.
#
# Name read write Timeout [Platform]
# foo public private 10 netbuilder
#
# [platform] is optional, and must be one of:
# netbuilder
# netbuilder2
# netbuilderro
# netbuilder+
# lanplex5004
# lanplex5012
# lanplex6004
# lanplex6004R4
# lanplex6012
# lanplex6012R4
# lanplex2500
# lanplex2016
# fms
# fmsII
# fmsbridge
# fmstp8i
# linkswitch
# linkswitch1000
# linkswitch2200
# linkswitch3000
# msh
# msh4bridge
# mshfddi
# mshlinkswitch
# mshtrbridge
# linkconverter
#
# Example:
# 192.0.10.4 private private 10
Page 68

68 CHAPTER 7: BACKING UP AND RESTORING SOFTWARE
Restoring the Software
Using Upgrade Link
Upgrade Link is an easy to use GUI for the utilities that runs in a web browser.
Upgrade Link is an easy to use GUI for the utilities that runs in a web browser. See
Chapter 4 for information on running Upgrade Link locally or remotely . Make sur e
you select and set up your file transfer method.
Verifying the Device for Restoring
Before restoring, you should run the diagnostic utility in Upgrade Link to verify
connectivity to the bridge/router or switch by following these steps:
1 Choose a device from the pop-up list in the Console page, or click New to enter
the IP address or hostname. The pop-up list contains bridge/routers that you have
upgraded or backed-up before.
2 Select Verify Upgrade Services (Diagnose) then click Apply.
A Status window appears showing the results of the diagnostic tests.
3 If the Status window shows a failure, check the SNMP read/write community
string for TFTP file transfer permissions.
If the Status window shows a success, click Home to continue with the
restoration.
Restoring the Software
To restore the software, follow these steps:
1 Access Upgrade Link if you have not already done so.
2 Choose a bridge/router or switch from the pop-up list in the Console page, or click
New to enter the IP address or hostname. The pop-up list contains bridge/routers
and switches that you have upgraded or backed-up before.
Page 69

3 Select Restore and click Next.
The Setting page appears.
4 Select the appropriate settings and click OK.
The Restore page appears.
5 Select the boot source you want to restore.
Restoring Software from a Backup 69
Restoring the Software
Using the
Command-Line
The boxes on the right show information about the backups, including the names
directories and dates. You can select a backup by double-clicking it, or by entering
the name in the edit box.
6 Check the appropriate options:
■ Format the Flash — formats the flash memory before restoring the software. If
you uncheck this option, Upgrade Link will attempt to restore the software in
the available space. If there is not enough space for the image, the restoration
will fail.
■ Reboot — automatically reboots when the restoration is complete.
■ New Hardware — must be checked if you are replacing the hardware.
7 Click Apply to begin the restoration.
The Status window shows when the restoration is complete.
8 Click Home then Exit to exit Upgrade Link.
Use the command-line utilities if you have a script or if you do not have a web
browser. Otherwise, use Upgrade Link as described on page 68.
Prediagnosing System Problems
Detect any problems with SNMP or TFTP connectivity using:
bcmdiagnose [ -ftp | -tftp] [<device> | -h]
Where <device> is the IP address or hostname of the bridge/router you are
diagnosing.
If bcmdiagnose shows a failure, check the SNMP read/write community string for
FTP/TFTP file transfer permissions.
Restoring the Software
If you are replacing the hardware, restore the software using:
Page 70

70 CHAPTER 7: BACKING UP AND RESTORING SOFTWARE
bcmrestore -new_hw [ -<backname>] <device>
If you are not replacing the hardware, use:
bcmrestore [ -<backname>] <device>
Where <backname> is the name of the backup for the boot blocks.
Page 71

REFERENCE FOR THE
8
Accessing and Downloading the Utilities
Downloading the
Utilities
U
PGRADE MANAGEMENT UTILITIES
This chapter describes the syntax and options for each utility, as well as how to
download the utilities, and where they are installed on your system.
The Upgrade Management Utilities are provided on CD-ROM with every
Enterprise OS software package. See Chapter 2 to install the utilities from
CD-ROM.
The upgrade utilities are installed into the directory /usr/3Com/bcm/.
You can download the latest utilities from the following locations:
■ FTP — ftp.3Com.com
■ World Wide Web — http://www.infodeli.3Com.com/
■ 3Com Bulletin Board Service (3ComBBS) — See Appendix D for local BBS
numbers.
See the ruu112.txt file accompanying the utilities for instructions on
decompression and installation of the utilities.
Downloading UNIX Files
The UNIX files compressed with the UNIX compress utility. To use the downloaded
files, you must first expand the files using the UNIX decompress utility. For
instructions on how to download and decompress the utilities, see the
ruu111.txt file.
The following are the UNIX files:
ruusol113.Z Contains the utilities for Solaris 2.x.
ruuhp113.Z Contains the utilities for HP-UX 9.0.5, 10.10, and 10.20.
ruuaix113.Z Contains the utilities for IBM AIX 3.2.5, 4.1.4, and 4.2.
ruu112.txt Contains the instructions for downloading and decompressing
the utilities.
Downloading Windows Files
The Windows files are compressed with a compression utility. To use the
downloaded files, you must first expand them using the decompress utility
PKUNZip. PKUNZip can be downloaded from the following URLs:
■ http://www.pkware.com/
or
■ http://infodeli.3com.com/infodeli/swlib
Page 72

72 CHAPTER 8: REFERENCE FOR THE UPGRADE MANAGEMENT UTILITIES
For instructions on how to decompress and install the utilities, see the
ruu110.txt file.
The following are the Windows files:
ruu113.zip Contains the utilities for Windows95, Window98, and
Windows NT 4.0.
ruu113.txt Contains the instructions for downloading and decompressing
the utilities.
Update Log File The bcmsysupgrade utility creates log files in the
tftpboot/CLIENTS/<mac_address>/tmp directory. These log files include the
following:
■ bcmsysupgrade.log.<stage> — contains a detailed listing of transactions
executed for a stage.
■ stages.log — contains a history of bcmsysupgrade, bcmbackup, and
bcmrestore commands for all successfully completed stages and operations.
This file acts as an upgrade record of completed stages, and includes the date
and time of execution.
Utility Descriptions and Syntax
Overview Table 5 summarizes the functions of the upgrade utilities.
■ bcmupdate.log — contains a list of the configuration files converted during
the upgrade process. The file contains all stderr and stdout text, the log and
stage files. This file is appended to the bcmsysupgrade.log file when the
upgrade procedure is completed.
This section describes each of the Upgrade Management Utilities as well as the
syntax and options. The error codes for individual Enterprise OS Upgrade
Management Utilities are accessible in the man pages for the utilities. Utilities are
in alphabetical order.
Table 5 Network Management Utilities Functions
Utility Function
bcmbackup Backs up the current bridge/router operational state and files to the network
management station.
bcmconfig Manages the bridge/router boot source parameters.
bcmctrl Manipulates the bridge/router boot sources. Performs booting-related
functions. Queries or waits on file transfer states.
bcmdf Checks the media and displays the amount of used and free space.
bcmdiagnose Identifies the most common network management station installation and
bridge/router configuration problems.
bcmftp Sets the FTP username and password and initializes the FTP client on the
bridge/router.
bcminstall Installs bridge/router software and firmware on a network management
station.
bcmloadconfig Allows you to execute commands in a text file.
(continued)
Page 73

Utility Descriptions and Syntax 73
Table 5 Network Management Utilities Functions (continued)
Utility Function
bcmrestore Restores a bridge/router to a previous operational state by copying files from
bcmsetup Places the latest version of the Enterprise OS Upgrade Management Utilities
bcmsysupgrade Performs all upgrade functions on NETBuilder bridge/routers and PathBuilder
bcmuname Displays general information about the bridge/router.
bcmupdate Converts configuration files on the network management station for use with
UpgradeLink Launches Upgrade Link.
the network management station to the bridge/router and setting the boot
sources.
on the network management station. Integrates the Upgrade Management
Utilities with Transcend.
Switches.
a newer version of software.
Getting Help
Help is available in HTML or (UNIX) man pages.
Man Pages On a UNIX system, access the man pages by entering:
man bcm-intro
To access the man pages for a specific utility, use:
man <NMU_name>
where <NMU_name> is the name of the upgrade utility.
HTML Help To access the HTML help, enter the following URL in your browser:
/usr/3Com/bcm/gui/hlp/bcm-intro.html
Or to access help for a specific utility, use:
/usr/3Com/bcm/gui/hlp/<utility>.html
bcmbackup
Syntax bcmbackup [both | primary | secondary] <-ftp | -tftp> [-name: <backname>]
<device>
Description You can use this utility to prepare a network management station as a secondary
boot source, to archive the configuration as a backup copy, to obtain a baseline
configuration, or to perform an off-line configuration. The bcmbackup utility
copies the primary and secondary boot sources from a bridge/router or switch to a
network management station. The bcmbackup utility can be used instead of the
-s:from_nb stage of bcmsysupgrade, which captures only the primary boot source.
You can assign names to the backup directories, which allows you to maintain
multiple backups of the primary and secondary boot blocks. This symbolic name is
applicable to both the primary and secondary boot blocks. The default boot block
names are supported to maintain backward compatibility.
Page 74

74 CHAPTER 8: REFERENCE FOR THE UPGRADE MANAGEMENT UTILITIES
Values
both Default value, which backs up both the primary and
secondary boot sources.
primary Backs up the primary boot source.
secondary Backs up the secondary boot source.
<device> Indicates the IP address or hostname of the bridge/router.
<-ftp | -tftp> Specifies the file transfer protocol to be used in the backup
process.
<backname> Specifies the name to be given to the backup file of the
boot blocks.
Options No available options.
Example For example, to backup the primary boot block as MyBackup01 using FTP, enter:
bcmbackup primary -ftp -name:MyBackup01 199.199.199.2
bcmconfig
Syntax bcmconfig <device>[:<slot>] [<boot_source>] [options]
Description The bcmconfig utility performs EEPROM configuration of the device and retrieves
or sets the following parameters for each boot source:
■ Path and name for load image
■ Path and name for configuration files
The bcmconfig utility does not alter the running state of the bridge/router or
switch. It only determines what happens the next time the bridge/router or switch
is rebooted. The utility also detects the following error and warning conditions:
■ Files/paths not present locally to the box or locally to this server.
■ Inconsistency with other configurations in other blocks (such as subnet masks).
Values
<device> Indicates the name or IP address of the bridge/router.
<slot> Indicates the slot number of an I/O module. (Use options marked
with *.)
<boot_source> Designates type of boot source: master, primary, secondary, test,
dump, or all.
Options Where <boot source> is master, the [options] are:
-st[artup (once
forever
|
Attempts to boot once.
|
Attempts to boot forever.
local) Forces boot from local media.
Page 75

Utility Descriptions and Syntax 75
Where <boot source> is primary, secondary, test, or dump, the [options] are:
-configp[ath]:<file_path> Path to the configuration files.
-fi[le]:<file_name>* Name of boot file.
-bo[otdevice]: (network | Boots from network.
localA | Boots from local media A.
localB) Boots from local media B.
-configd[evice]: (bootdevice | Depends on -bootdevice.
local | Local media configuration.
network) Network configuration.
-fo[rmat]:(canonical | noncanonical) Address format.
-cl[ock]:(internal | external) Internal/external clocking.
-conn[ector]:(v35 | rs232) Connector type.
-ba[udrate]: <9.6KB | 19.2KB | 38.4KB | 56KB | 64KB |
128KB | 256KB | 448KB | 1536KB | 2048KB |
4MB | 16MB>
-sl[ot]:1..8 Boot slot.
-in[terface]:(a | b) Interface number.
-pa[ssword]:<wan_password> A character string from 0–5 characters.
-di[scovery]:(<localaddr> | <bootp>) Address discovery.
-ga[teway]:<IPADDRESS> Default gateway IP address.
-lo[calip]:<IPADDRESS> Bridge/router IP address.
-se[rver]:<IPADDRESS> TFTP boot server IP address.
-cf[gserver]:<IPADDRESS> Server where configuration files are stored.
-ma[sk]:<IPADDRESS> Bridge/router subnet mask.
-notraps Disables the sending of SNMP traps useful
during upgrading.
-re[tries]:0..255 Number of retries from 0–255.
-traps Enables the sending of SNMP traps; useful
after upgrade completes.
bcmctrl
Syntax bcmctrl <device>[:<slot>] [-<option>[:<value>]]
Description The bcmctrl utility does the following tasks:
■ Reboots a bridge/router. This follows a normal boot sequence, where the load
image and configuration files are found in the primary boot source.
■ Performs a test reboot.
■ Copies all the parameters in the test boot source to the primary boot source.
■ Reports reboot and file transfer states.
■ Reboots a specified multiprocessor module.
Page 76

76 CHAPTER 8: REFERENCE FOR THE UPGRADE MANAGEMENT UTILITIES
Values
Options
<device> Identifies the bridge/router that receives the changes specified by the
bcmctrl utility.
<slot> Specifies the slot where the I/O module is located that receives the
changes specified by the bcmctrl utility.
-u[pdate] Copies the complete set of boot parameters from the test boot
source to the primary boot source.This operation is typically
performed after a successful test reboot to ensure that the next
normal reboot uses the same parameters.
-s[wap] Swaps the parameters in the primary and secondary boot sources.
-c[ommit] Cancels the test reboot countdown timer. This stops the automatic
test reboot begun by the test reboot parameter.
-r[eboot]* Reboots the bridge/router or switch or the I/O module specified by
the <slot> parameter.
-t[estreboot]:
[<seconds>]*
Reboots the bridge/router or switch from the test boot source so
that if this command is not used again with the -c option, the
bridge/router automatically reboots with its primary configuration.
The optional seconds parameter indicates the length of time in
seconds the bridge/router should count down before automatically
rebooting. If you do not supply a value for <seconds>, the default
value of 120 seconds is used.
-q:r[eboot] Queries the reboot status of the bridge/router or switch or I/O
module specified by the <slot> parameter.
-q:t[ransfer] Queries the transfer status of the bridge/router or switch.
-w:r[eboot] Waits for the bridge/router or switch to reboot.
-w:t[ransfer] Waits for the last requested transfer to complete.
The options marked with an asterisk will reboot the bridge/router or individual
modules.
bcmdf
Syntax bcmdf <device>[:<drive:>]
Description The bcmdf utility displays the amount of total and available disk space.
Values
<device> The hostname or the IP address of the bridge/router or
switch.
<drive:> The device drive that holds the disk for which the amount of
total and available disk space will be counted and displayed.
Options No available options
Page 77

Utility Descriptions and Syntax 77
bcmdiagnose
Syntax bcmdiagnose [ -ftp | -tftp ] [<device>] [-h]
Description The bcmdiagnose utility identifies the most common installation and configuration
problems. 3Com recommends that this utility be run immediately following
bcmsetup and before running any other upgrade management utility. The
bcmdiagnose utility validates that the upgrade management installation process
went as expected, and tests that the bridge/router or switch and network
management station are configured correctly. The bcmdiagnose utility validates
that:
■ The upgrade utilities are installed correctly on the NMS.
■ The bridge/router or switch is reachable over IP.
■ The bridge/router SNMP Service is correctly configured.
■ The TFTP server and file permissions are correctly configured.
■ The boot images and the configuration files are in the same directory on
drive A.
■ The software is compatible with the firmware (NETBuilder II bridge/router with
CEC only).
Values
Options
■ When FTP is specified for file transfer, the FTP user name and password must
be correctly configured by setting the BCMFTPUSER and BCMFTPPASS
environment variables.
The bcmdiagnose utility displays troubleshooting messages and has two error
return codes:
■ 0 for success
■ 1 for failure
<device> Indicates the hostname or the IP address of the bridge/router or switch.
If bcmdiagnose is invoked without the bridge/router IP address or host
name, only the installation tests of the Enterprise OS Upgrade
Management Utilities is executed. If the device is specified, the
installation test is skipped, but the utility performs the IP, SNMP, and
TFTP server configuration tests.
-ftp Specifies FTP as the file transfer protocol to be used. FTP is the
default protocol for Enterprise OS software versions 11.1 and
higher.
-tftp Specifies TFTP as the file transfer protocol to be used. TFTP is the
default protocol for Enterprise OS software versions 11.0 and
lower.
[-h] Displays help message.
Page 78

78 CHAPTER 8: REFERENCE FOR THE UPGRADE MANAGEMENT UTILITIES
bcminstall
Syntax bcminstall [-h | -cdrom [<path>] | -tar <path> | -r | -diskette | -image
<path> | <device>]
Description The bcminstall utility installs bridge/router software and firmware onto a network
management station from either a CD-ROM, tar files, an image file, a
bridge/router, or a network management station floppy diskette. You must install
all applicable Enterprise OS software packages before beginning the upgrade
process. On a UNIX system, you must have superuser privileges to run the
bcminstall utility.
The default method of installing a Enterprise OS package is to install it from a
CD-ROM drive on the network management station. The bcminstall utility copies
the files on the CD-ROM into a directory under /%tftpboot%/image. Using the
path option allows installation from a network management station that has two
or more CD-ROM drives, or from a remote CD-ROM drive. On a UNIX system, you
must specify the path if you are installing from a CD-ROM that is not cdrom0. For
example, to install a Enterprise OS software package from a second CD-ROM on
Solaris, enter:
bcminstall -cdrom /cdrom/cdrom1/image
The following example shows how to install a boot image for an image-only
upgrade from the directory /tmp/:
bcminstall -image /tmp/boot.68k
Options
-h Displays a usage message. Installs using the first CD-ROM on
the network management station.
-cdrom [<path>] Installs using the CD-ROM from a directory path. Required for
Windows.
-tar <path> Installs a tarred package file.
-r Reports all installed bridge/router packages on the network
management station.
-diskette Installs from the network management station floppy drive
(version 9.1 and earlier).
-image <path> Installs an image file (for image-only upgrades only).
<device> The IP address of the bridge/router from which the
over-the-network installation occurs.
Default If no command line options are specified, the bcminstall utility uses the network
management station local CD-ROM drive.
Page 79

Utility Descriptions and Syntax 79
bcmloadconfig
Syntax bcmloadconfig [-s “<service1> [<service2>...]” | -l <line number>] [-i] -f
<config file path>/<filename> <device> [-b] [-t:<reboot timeout>]
Description You can execute multiple commands on the Enterprise OS user interface at once
by entering the commands in a text file, then loading the file. The bcmloadconfig
utility copies a specified configuration file to the bridge/router or switch and
executes the commands in the file.
The utility can execute only the SETDefault, SHow, SHowDefault, ADD, DELete,
and SAVEbgp commands. Blank lines and comment lines (lines beginning with the
# character) are allowed in the file. If the command requires more than one line,
the backslash (\) can be used to terminate the current line and to indicate that the
command continues on the next line. A line cannot contain more than one
command.
If you specify one or more services, only the commands belonging to those
services are executed. Up to 10 services can be specified. Instead of specifying a
service, you can specify a line number to indicate the starting line number within
the file to execute.
Values
By default, the bcmloadconfig utility terminates whenever it detects a bad
command, a command that is not supported by the bcmloadconfig utility, or a
command that fails to execute successfully on the bridge/router. If -i is specified,
the utility continues execution when an error is encountered.
All commands and comments and any generated messages are written to the
CONFIG.LOG file in the /tftpboot/CLIENTS/<MAC address>/cfg/ directory on the
NMS. Any passwords specified in the commands are replaced by a string of
asterisks. Skipped commands are not written to the CONFIG.LOG file.
-s “<service1> [<service2>...]” Only commands found for these services are
executed. Up to 10 services may be specified.
The default is to execute the configuration
commands for all services.
-l <line number> The Line in the configuration file to be
executed. Comments and blank lines are
considered lines in the file.
-s and -l are mutually exclusive.
-i Continue executing commands even when
errors are detected.
-f <config file path> The directory containing the command file that
is to be executed. The default path is the
current working directory.
<filename> The name of the command file that is to be
executed. There is no default filename. This
parameter is required.
<device> The IP address or hostname of the
bridge/router that will execute the commands.
Page 80

80 CHAPTER 8: REFERENCE FOR THE UPGRADE MANAGEMENT UTILITIES
-b Specifies that after the configuration file is
-t:<reboot timeout> Specifies a reboot time out period. If the device
bcmnbrus
Syntax bcmnbrus <port> [-NoSecurity] [-NoAuthentication]
Description The bcmnbrus utility launches the Upgrade Link application backend process.
copied to the bridge/router or switch a bcmctrl
-reboot is executed.
does not boot within the reboot timeout
period (default: 600 seconds ) bcmloadconfig
returns an error.
Values
<port> Specifies the TCP socket on which the client communicates with
the server. On UNIX systems you can add this command to cron
and on Windows 95/98/NT systems this command can be running
as a service.
Options
-NoSecurity Indicates that the bcmnbrus utility will allow connections from all
IP addresses.
-NoAuthentica
tion
Specifies that bcmnbrus will not prompt for a user name and
password.
bcmrestore
Syntax bcmrestore [both | primary | secondary] [options] <device>
Description The bcmrestore utility restores the Enterprise OS software from a backup on the
network management station to the bridge/router or switch. The software,
including the image and configuration files, is copied to the bridge/router, and the
primary boot source is set to the restored directory.
Values
both Restores both the primary and secondary boot sources. This value
is the default.
primary Restores the primary boot source.
secondary Restores the secondary boot source.
<device> Indicates the IP address or hostname of the bridge/router or
switch.
Options
-ftp | -tftp Specifies the file transfer protocol to be used in the restore
process.
-NoF[ormat] Does not format the drive before restore.
-NoR[eboot] Does not reboot when restoration is complete.
-U[naccept] Rejects a previously accepted automatically recoverable upgrade
by swapping the primary and test boot sources.
Page 81

Utility Descriptions and Syntax 81
-new_hw Used to restore software to a new bridge/router or switch. Use
this option when a failed bridge/router or switch is exchanged for
a new one. After IP and SNMP connectivity is established, use this
option to copy the original software to the new bridge/router or
switch.
bcmsetup
Syntax For UNIX:
bcmsetup <packages> [install_directory]
For Windows:
bcmsetup <drive:> [all | bcm | nat]
Description The bcmsetup utility places the latest version of the Enterprise OS Upgrade
Management Utilities on the network managment station. It also sets up the initial
package definitions for use by Transcend. You must be root to run the bcmsetup
utility.
Values
all Installs both the utilities and package definitions (bcm and
nat).
bcm Enterprise OS Upgrade Management Utilities.
nat Package definitions for use by Transcend.
Options
Default For UNIX, unless an alternate installation directory is specified, the utilities are
[Install_directory]
UNIX only
Defines the directory where the utilities and other files set up
with bcmsetup are to be located.
installed in the /usr/3Com/bcm directory.
For Windows, the utilities are always installed in \usr\3Com\bcm.
<drive:> Identifies the target drive where the utilities and other files set
up with bcmsetup are to be located.
bcmsysupgrade
Syntax bcmsysupgrade [options] <stage> <device>
Description The bcmsysupgrade utility is a master script that assists you in upgrading a
bridge/router to the latest version of software and/or firmware. The
bcmsysupgrade utility uses many of the other Enterprise OS Upgrade Utilities to
perform a complete upgrade of a bridge/router over the network.
Values
<stage>
-s:from_nb Downloads configuration files from the bridge/router.
-s:update Upgrades configuration files on the network
management station.
-s:to_nb Uploads configuration and image files to the
bridge/router.
-s:test_boot * Test boots the upgraded configuration.
Page 82

82 CHAPTER 8: REFERENCE FOR THE UPGRADE MANAGEMENT UTILITIES
-s:accept* Accepts the upgrade (cannot be used with -s:reject
stage).
-s:reject* Rejects the upgrade (cannot be used with -s:accept
stage).
-s:upgrade_cec_fw* Upgrades the NETBuilder II CEC firmware.
-s:upgrade_io_fw* Upgrades the I/O firmware.
<device> Specifies the IP address or hostname of the target
bridge/router.
Stages with an asterisk may reboot the bridge/router. The -s:accept stage only
reboots manual and patch upgrades.
Options
-EncryptionLicenseRead Specifies that the encryption license agreement has
been read and accepted. This flag must be used when
upgrading to any package with encryption.
-ftp | -tftp Specifies the file transfer protocol to be used in the
backup process. The default is FTP for bridge/routers
running Enterprise OS software version 11.1 or above.
The default is TFTP for bridge/routers running
Enterprise OS software version 11.0 or lower.
-d Runs bcmdiagnose utlility first.
-f Forces action, and ignores warnings. Use with extreme
caution!
-I Upgrades boot image only. The default is images and
configurations.
-k:<package> Package type to upgrade to. For <package>, use the
two-letter designator printed on the CD-ROM. The
default is to use the package being upgraded from.
-m Specifies a manually recoverable upgrade. The default
is automatic recovery.
-t Timeout value in seconds (defaults to 600, the range is
480 to 720 seconds).
-new_hw Indicates the replacement with like hardware.
(Examples, CEC with DPE, OCNB with OCNB)
-V:<version upgrading
to>
When upgrading to a software version other than the
default, you must enter the software version you are
upgrading to. The default version is the same as the
version of the upgrade software. Run “bcmdiagnose”
to determine the version.
bcmuname
Syntax bcmuname [options] <device>[:<slot> | <drive>]
Page 83

Utility Descriptions and Syntax 83
Description The bcmuname utility displays system information about the specified
bridge/router or switch or Intelligent I/O module (IIO). If no options are specified,
all the device-level options are printed.
Values
Options
<device> Specifies either the hostname or the IP address of the
bridge/router.
<slot> Specifies slot of an I/O module within the bridge/router. This
parameter is optional and is used only with the options
marked with (IIO).
<drive> Specifies the storage device (usually a flash drive) attached to
a bridge/router. This parameter is optional. When you specify
letters A: or B: they are assumed to be drive letters, any
numeric character is assumed to be a slot designator.
-2 Prints the @m mac address (used in bcmcp) (IIO).
-@ Prints the @M mac address (used in bcmcp) (IIO).
-a Prints all the above information (IIO).
-c Prints the contact information.
-d Prints the tftp directory that will be used by bcmcp.
-f:<sys_filename> Displays system information based on the contents of the
specified <path>/sys file.
-l Prints the machine location.
-M Prints the memory type.
-m Prints the machine platform name (IIO).
-n Prints the node name.
-r Prints the software release (IIO).
-R Prints the major software release.
-s Prints the software system name.
-t Prints the software or firmware type.
-w Prints the firmware release.
If an option is required, it must be specified in very stage of the upgrade process.
bcmupdate
Syntax bcmupdate -f:<from_path> -t:<to_path> [options]
Description The bcmupdate utility converts the bridge/router or switch configuration files that
work with an older version of software to files that work with the newer version of
software. 3Com recommends that this utility only be invoked with the
bcmsysupgrade utility script.
Values
-f:<path> Path to upgrade from.
-t:<path> Path to upgrade to.
Options
-v:<version> Version to upgrade from.
Page 84

84 CHAPTER 8: REFERENCE FOR THE UPGRADE MANAGEMENT UTILITIES
-V:<version> Version to upgrade to.
-p:<platform> Bridge/router platform type.
-m Saves user macros.
-n Prints trace messages.
When using the bcmupdate option on a Windows95, Windows98, or
Windows NT version 4.0 system, the following files are copied but not converted
or changed:
bgp bgpnet bgpol smt
bgpas dir bgppeer
ds egp dua
iineighb ipns area
iistuff systemna iicurcui
user name NatMap
The filenames are numbers in the es directory, and the text files are located in the
filter directory.
UpgradeLink
Syntax UpgradeLink [-NoSecurity | -NoAuthentication]
Description The Upgrade Link utility runs the Upgrade Link application and launches your
default web browser. On Windows, it launches the 3Com TFTP server that is
installed with the utilities.
Upgrade Link is an easy to use GUI for upgrading, backing up, or restoring
software on a single bridge/router.
Options
-NoSecurity Indicates that the bcmnbrus utility will allow connections
from all IP addresses.
-NoAuthentication Specifies that bcmnbrus will not prompt for a user name
and password.
Page 85

TROUBLESHOOTING
A
This appendix describes error codes and messages that may be displayed during
the upgrade process as a result of running the bcmdiagnose utility or when
network dependencies have not been met.
Getting Help For UNIX, to obtain help information about a utility, use:
<utility> -h
Help is available in HTML or (UNIX) man pages.
Man Pages On a UNIX system, access the man pages by entering:
man bcm-intro
To access the man pages for a specific utility, use:
man <NMU_name>
HTML Help To access the HTML help, enter the following URL in your browser:
General Troubleshooting Error Messages
where <NMU_name> is the name of the upgrade utility.
/usr/3Com/bcm/gui/hlp/bcm-intro.html
Or to access help for a specific utility, use:
/usr/3Com/bcm/gui/hlp/<NMU_name>.html
For more information about using the Enterprise OS Upgrade Management
Utilities, see Chapter 8.
The master boot block startup value is set to monitor. This is not a
supported value.
Meaning: The master boot block startup value is set to monitor.
Action: Make sure that your bcmconfig <ipaddr> master -startup value is set
to try boot once or try forever.
The primary boot block must access the boot file locally. That is, all files
must physically reside on the NETBuilder.
Meaning: The primary boot source is set to boot from the network.
Action: Set the primary boot source to local. Make sure the bcmconfig
<ipaddr> primary -bootdevice value is set to either localA or localB.
Page 86

86 APPENDIX A: TROUBLESHOOTING
The required file(s) <ipaddress>:<drive>:/<config file path> could not be
located.
Meaning: The bcmtest utility was unable to verify the presence of a file or
Action: Make sure that the required files and directories are available to the
directory.
bcmtest utility.
Return Codes from bcmdiagnose
The bcmdiagnose utility can display the following exit return codes:
Table 6 bcmdiagnose Return Codes
Code Meaning
0 The operation was successful.
1 A command line parsing error occurred.
2 A command line argument is invalid.
3 A installation error occurred.
4 A Enterprise OS Upgrade Management utility failed.
5 The device is not responding.
6 Internal parsing error.
7 A UNIX command failed.
8 The device configuration is incompatible with the operation.
9 The attempted operation is unsafe.
10 No arguments in a function call.
11 No sys file was found.
12 The boot image was not found.
13 The boot image is bad.
14 The module upgrade failed.
15 The module failed to reboot.
16 The boot image is not set.
17 Missing device address (DNS name or IP address).
18 The Enterprise OS software is not installed.
19 Error installing a Enterprise OS SW or FW package.
20 An error occurred during a UNIX file copy.
21 Enterprise OS software installation not performed.
22 Failed to perform a software upgrade.
22 Failed to perform firmware upgrade.
23 Test-Boot and/or reboot timed-out.
24 The Upgrade of the device and image is not supported.
25 A critical file was missing or corrupted in a file transfer.
Page 87

Hardware-Related Messages 87
Hardware-Related Messages
The XX package must have 20 MB of memory installed on the CEC or DPE
module. There is only 12 MB available.
Meaning: The bcmsysupgrade utility cannot continue because it does not detect
a CEC 20 or DPE in the system. The software package requires a
CEC 20 or DPE module.
Action: If you have a CEC 20 module, run the Memory Expansion Board utility
supplied with the memory upgrade by putting the diskette in the
floppy drive and entering bt memupgrd.29k. The program updates
the EPROM.
The hardware configuration of this NETBuilder could not be confirmed.
Meaning: Your hardware may not support the software package you are
upgrading to. The bcmsysupgrade script allows the upgrade to
proceed even if the hardware configuration is not recommended.
Action: Ensure that the bridge/router meets the hardware requirements for
the package you are upgrading to, and that it is on the recommended
upgrade migration path.
The NETBuilder hardware will not safely support the upgrade.
Meaning: The hardware is not sufficient to safely support the software upgrade,
and the bridge/router configuration is not on the upgrade migration
path.
Action: Contact your 3Com supplier for information about a hardware
upgrade.
Installation Troubleshooting Messages
Installing the
Enterprise OS Upgrade
Management Utilities
The troubleshooting messages in this section are displayed during installation.
Testing the Enterprise OS Upgrade Utilities installation.
Meaning: This is an introductory message displayed when the bcmdiagnose
utility is initiated.
Action: None.
There is a problem with the installation of the Enterprise OS Upgrade
Utilities. The path /usr/3Com/bcm/bin and usr/3Com/common/bin should
be in the PATH environment variable.
Meaning: The installation process has searched for certain utilities in
/usr/3Com/bcm/bin and /usr/3Com/common/bin directories but
cannot find them unless the path /usr/3Com/bcm/bin is first.
Action: Check that /usr/3Com/bcm/bin and /usr/3Com/common/bin have
been added in the path environment variable.
There is a problem with the installation of the Enterprise OS Upgrade
Utilities. The path /usr/3Com/bcm/bin should be first in the PATH
environment variable.
Meaning: The installation process cannot find the necessary directories unless
the path /usr/3Com/bcm/bin is first.
Action: Check that /usr/3Com/bcm/bin is first in the path environment
variable.
Page 88

88 APPENDIX A: TROUBLESHOOTING
There is a problem with the installation of the Enterprise OS Upgrade
Utilities. The location of the Enterprise OS Upgrade Utilities was not added
to the path environment variable or the directory does not contain all the
required programs.
Meaning: The installation process cannot find the utilities because it does not
Action: Check that a location for the utilities was specified in the path
There is a problem with the installation of the Enterprise OS Upgrade
Utilities. The version numbers of the Enterprise OS Upgrade Utilities are
not consistent.
Meaning: The bcmdiagnose utility has assumed that the version of the
Action: Check that you have specified version number for the utilities you are
know where to look for them.
environment variable.
Enterprise OS Upgrade Management Utilities in bcmcommon.sh is
correct and has checked that each executable utility has the same
version number. At least one utility is different.
installing correctly.
Determining Connectivity
Validating the SNMP
Service Configuration
Pinging <IP address>
Meaning: This is an introductory message that appears when the utilities are
attempting to reach a bridge/router with an IP address specified on
the command line.
Action: None.
The NETBuilder did not respond to a ping. Make sure the IP address or host
name is correct and that the NETBuilder is reachable via IP.
Meaning: The device that the utilities were trying to reach did not respond.
Action: Ensure the device can be reached using IP.
The NETBuilder responded to ping.
Meaning: The device which was specified in the IP address is reachable.
Action: None.
Testing SNMP read access
Meaning: This is an introductory message. Check to see if the SNMP Service is
active on the bridge/router.
Action: None.
The NETBuilder is not responding to SNMP get requests. Ensure that the
SNMP Service is configured on the NETBuilder and that you have read and
write access via SNMP. Also check the values of the community strings in
the /etc/snmp.cfg file. They should match the NETBuilder’s SNMP
community strings.
Meaning: The bcmdiagnose utility has attempted to verify whether the
bridge/router specified by the <IP address> value has been configured.
Action: Configure the SNMP server on your bridge/router to allow r ead access
to your network management station. See the Network Management
chapter in Using NETBuilder Family Software.
Page 89

Installation Troubleshooting Messages 89
The bridge/router is not responding to SNMP set requests. Ensur e that the
SNMP service is configured on the bridge/router and that you have read
and write access via SNMP. Also check the values of the community strings
in the /etc/snmp.cfg file. They should match the bridge/router’s SNMP
community strings.
Meaning: The bcmdiagnose utility has attempted to verify whether the
bridge/router specified by the <IP address> value has been configured.
Action: Configure the SNMP server on your bridge/router to allow write
access to your network management station. See the Network
Management chapter in Using NETBuilder Family Software.
SNMP read access OK
Meaning: There is no problem with SNMP configuration on the bridge/router.
Action: None.
Testing SNMP write access
Meaning: This is an introductory message. Check to see if SNMP Service is active
on the bridge router.
Action: None.
Testing the NMS/ TFTP
Configuration
SNMP write access OK
Meaning: There is no problem with SNMP configuration on the bridge/router.
Action: None.
Creating an Upgrade File
Testing file transfers using TFTP
Meaning: This is an introductory message displayed as the bcmdiagnose utility
begins its test.
Action: None.
The TFTP safe directory is <tftpboot_dir>. Make sure that the TFTP safe dir
exists.
Meaning: The TFTP safe directory is the root directory under which the utilities
will store your bridge/router files.
Action: Check that your TFTP safe directory exists.
The directory <tftpboot_dir> does not exist. Create <tftpboot_dir> with
full read/write/create file permissions. Make sure that this directory has
the proper file access permissions and is being used by the TFTP server.
Meaning: The bcmdiagnose utility has attempted to create a test file using the
TFTP safe directory and has failed.
Action: Assign full read/write/create file access permissions to the TFTP
directory.
Creating "test3.com"
Meaning: This information message is displayed while the UNIX copy command
tries to create the test file.
Action: None.
Could not remove "test3.com". Check that <tftpboot_dir> and
subdirectories have full read/write/create file permissions
Meaning: The UNIX remove command could not delete the test file.
Action: Assign full read/write/create file access permissions to the directories.
Page 90

90 APPENDIX A: TROUBLESHOOTING
Could not create "test3.com". Check that <tftpboot_dir> and
subdirectories have full read/write/create file permissions.
Meaning: The UNIX copy command could not create the test file.
Action: Assign full read/write/create file access permissions to the directories.
The file "test3.com" was not created with read access. Make sure
<tftpboot_dir> has full read/write/create file permissions.
Meaning: When the UNIX copy command created the file, read access was
Action: Assign full read/write/create file access permissions to the directories.
The file "test3.com" was not created with write access. Make sure
<tftpboot_dir> has full read/write/create file permissions.
Meaning: When the UNIX copy command created the file, write access was
Action: Assign full read/write/create file access permissions to the directories.
Uploading an Upgrade File
Could not remove "<ipaddress> | DNSname>:a:/test3.com". Check that the
NETBuilder media is not write protected and that "<ipaddress> |
DNSname>:a:/test3.com" is not the name of a directory on the NETBuilder.
Meaning: The bcmrm utility could not delete the file on the bridge/router.
Action: Make sure that your floppy disk write protect tab allows writing to
not assigned.
not assigned.
the diskette.
Copying TestFile from the NMS to "<ipaddress> | DNSname>:a:/test3.com".
Meaning: This is a status message.
Action: None.
The bcmcp command could not write the file "testfile" on NBAddress or
DNS name. Make sure there is a flash or floppy drive installed and that it is
not write protected.
Meaning: The bcmcp utility has been denied write access to the bridge/router.
Action: Make sure there is a flash or floppy diskette installed and that it is not
write-protected.
The file "<ipaddress> | DNSname>:a:/test3.com" is not present on the
brouter even though bcmcp did not report an error.
Meaning: The bcmtest utility could not locate the file on the bridge/router.
Action: Check with your systems administrator.
The checksums of "test3.com" and "<ipaddress> | DNSname>:a:/test3.com"
are different even though bcmcp did not report an error.
Meaning: The bcmsum utility reported differing checksums on the local and
remote test files.
Action: Check your network connection for possible corruption on the line.
The bcmcp command could not reliably copy the "test3.com" file to the
bridge/router.
Meaning: This is an information message.
Action: None.
Page 91

Installation Troubleshooting Messages 91
Downloading an Upgrade File
$local TestFile could not be removed. Make sure <tftpboot_dir> and
"test3.com" have full read/write/create file permissions.
Meaning: The UNIX remove command could not delete the test file.
Action: Assign full read/write/create file access permissions to the directories.
The bcmcp command could not write the file "testfile" on the NMS. Check
that the file access permissions are read/write/create in the TFTP server
safe directory. Make sure there is enough space available.
Meaning: The bcmcopy utility could not write the test file.
Action: Assign full read/write/create file access permissions to the
directories.The file “test3Com” is not present on the NMS even
though bcmcp did not report an error.
The file “test3Com” is not present on the NMS even though bcmcp did not
report an error.
Meaning: The UNIX test command could not validate that the test file exists on
the TFTP safe directory.
Action: Check with your systems administrator.
The checksums of "test3.com" and "<ipaddress> | DNSname>:a:/test3.com"
are different even though bcmcp did not report an error.
Meaning: The bcmsum utility reported differing checksums on the local and
remote test files.
Action: Check with your systems administrator.
The bcmcp command could not reliably copy the file "testfile" to the NMS.
Meaning: This is an information message.
Action: None.
Could not remove file "<ipaddress> | DNSname>:a:/test3.com". Check that
the NETBuilder media is not write protected and that "<ipaddress> |
DNSname>:a:/test3.com" is not the name of a directory on the NETBuilder.
Meaning: The bcmrm utility could not delete the test file.
Action: Check with your systems administrator.
"test3.com" could not be removed. Make sure <tftpboot_dir> and
"test3.com" have full read/write/create permissions.
Meaning: The UNIX remove command could not delete the test file.
Action: Assign full read/write/create file access permissions to the directories.
File transfers using TFTP are OK.
Meaning: No problem was found with TFTP file transfers between the network
management station and bridge/router.
Action: None.
Page 92

92 APPENDIX A: TROUBLESHOOTING
Page 93

B
CHOOSING A SOFTWARE PACKAGE
This chapter lists software packages from 8.0 through 11.2 and provides
recommended equivalent packages in 11.3.
NETBuilder II Upgrade Migration Path
Table 7 NETBuilder II Software Package Migration to 11.3
Recommended Upgrade Notes
From Version 8.0 To Version 11.3
LM DW (DPE), DE (DPE) or DS (DPE) The DE package has all the features of DW plus 56-bit
LT DW (DPE), DE (DPE) or DS (DPE) The DE package has all the features of DW plus 56-bit
CP DW (DPE), DE (DPE) or DS (DPE) The DE package has all the features of DW plus 56-bit
WM DW (DPE), DE (DPE) or DS (DPE) The DE package has all the features of DW plus 56-bit
WT DW (DPE), DE (DPE) or DS (DPE) The DE package has all the features of DW plus 56-bit
(continued)
Table 7 outlines the recommended migration path from previous software
packages to the latest packages supported in version 11.3. Use this table to
identify the new software package that is most similar to the package you are
currently using. Packages are identified by the two-letter designator of the version
string, which is found on your product CD-ROM disk label.
You can also identify the software package using:
bcmuname -R <device>
Where <device> is the IP address or hostname of the system you are planning to
upgrade. Or enter the Enterprise OS user interface command:
SHow -SYS VERsion
encryption. The DS package has all the features of
DW plus 128-bit encryption. A hardware upgrade to a
DPE module is required.
encryption. The DS package has all the features of
DW plus 128-bit encryption. A hardware upgrade to a
DPE module is required.
encryption. The DS package has all the features of
DW plus 128-bit encryption. A hardware upgrade to a
DPE module is required.
encryption. The DS package has all the features of
DW plus 128-bit encryption. A hardware upgrade to a
DPE module is required.
encryption. The DS package has all the features of
DW plus 128-bit encryption. A hardware upgrade to a
DPE module is required.
Page 94

94 APPENDIX B: CHOOSING A SOFTWARE PACKAGE
Table 7 NETBuilder II Software Package Migration to 11.3
Recommended Upgrade Notes
FF DW (DPE), DE (DPE) or DS (DPE) The DE package has all the features of DW plus 56-bit
encryption. The DS package has all the features of
DW plus 128-bit encryption. A hardware upgrade to a
DPE module is required.
CX AC (DPE) A hardware upgrade to a DPE module is required.
AP AC (DPE) A hardware upgrade to a DPE module is required.
From Version 8.1 To Version 11.3
LM DW (DPE), DE (DPE) or DS (DPE) The DE package has all the features of DW plus 56-bit
encryption. The DS package has all the features of
DW plus 128-bit encryption. A hardware upgrade to a
DPE module is required.
LT DW (DPE), DE (DPE) or DS (DPE) The DE package has all the features of DW plus 56-bit
encryption. The DS package has all the features of
DW plus 128-bit encryption. A hardware upgrade to a
DPE module is required.
CP DW (DPE), DE (DPE) or DS (DPE) The DE package has all the features of DW plus 56-bit
encryption. The DS package has all the features of
DW plus 128-bit encryption. A hardware upgrade to a
DPE module is required.
WM DW (DPE), DE (DPE) or DS (DPE) The DE package has all the features of DW plus 56-bit
encryption. The DS package has all the features of
DW plus 128-bit encryption. A hardware upgrade to a
DPE module is required.
WT DW (DPE), DE (DPE) or DS (DPE) The DE package has all the features of DW plus 56-bit
encryption. The DS package has all the features of
DW plus 128-bit encryption. A hardware upgrade to a
DPE module is required.
FF DW (DPE), DE (DPE) or DS (DPE) The DE package has all the features of DW plus 56-bit
encryption. The DS package has all the features of
DW plus 128-bit encryption. A hardware upgrade to a
DPE module is required.
CX AC (DPE) A hardware upgrade to a DPE module is required.
AP AC (DPE) A hardware upgrade to a DPE module is required.
From Version 8.2/8.3 To Version 11.3
CP DW (DPE), DE (DPE) or DS (DPE) The DE package has all the features of DW plus 56-bit
encryption. The DS package has all the features of
DW plus 128-bit encryption. A hardware upgrade to a
DPE module is required.
FF DW (DPE), DE (DPE) or DS (DPE) The DE package has all the features of DW plus 56-bit
encryption. The DS package has all the features of
DW plus 128-bit encryption. A hardware upgrade to a
DPE module is required.
CX AC (DPE) A hardware upgrade to a DPE module is required.
AP AC (DPE) A hardware upgrade to a DPE module is required.
WA DW (DPE), DE (DPE) or DS (DPE) The DE package has all the features of DW plus 56-bit
encryption. The DS package has all the features of
DW plus 128-bit encryption. A hardware upgrade to a
DPE module is required.
(continued)
Page 95

NETBuilder II Upgrade Migration Path 95
Table 7 NETBuilder II Software Package Migration to 11.3
Recommended Upgrade Notes
From Version 9.0/9.1 To Version 11.3
CP DW (DPE), DE (DPE) or DS (DPE) The DE package has all the features of DW plus 56-bit
encryption. The DS package has all the features of
DW plus 128-bit encryption. A hardware upgrade to a
DPE module is required.
FF DW (DPE), DE (DPE) or DS (DPE) The DE package has all the features of DW plus 56-bit
encryption. The DS package has all the features of
DW plus 128-bit encryption. A hardware upgrade to a
DPE module is required.
CX AC (DPE) A hardware upgrade to a DPE module is required.
AP AC (DPE) A hardware upgrade to a DPE module is required.
From Version 9.3/9.3.1 To Version 11.3
DW (DPE) DW (DPE), DE (DPE) or DS (DPE) The DE package has all the features of DW plus 56-bit
encryption. The DS package has all the features of
DW plus 128-bit encryption. A hardware upgrade to a
DPE module is required.
CP (CEC) DW (DPE), DE (DPE) or DS (DPE) The DE package has all the features of DW plus 56-bit
encryption. The DS package has all the features of
DW plus 128-bit encryption. A hardware upgrade to a
DPE module is required.
FF (CEC) DW (DPE), DE (DPE) or DS (DPE) The DE package has all the features of DW plus 56-bit
encryption. The DS package has all the features of
DW plus 128-bit encryption. A hardware upgrade to a
DPE module is required.
CX (DPE) AC (DPE)
AP (DPE) AC (DPE)
From Version 10.1 To Version 11.3
DW (DPE) DW (DPE), DE (DPE) or DS (DPE) The DE package has all the features of DW plus 56-bit
encryption. The DS package has all the features of
DW plus 128-bit encryption.
CP (CEC) DW (DPE), DE (DPE) or DS (DPE) The DE package has all the features of DW plus 56-bit
encryption. The DS package has all the features of
DW plus 128-bit encryption. A hardware upgrade to a
DPE module is required.
FP (CEC) DW (DPE), DE (DPE) or DS (DPE) The DE package has all the features of DW plus 56-bit
encryption. The DS package has all the features of
DW plus 128-bit encryption. A hardware upgrade to a
DPE module is required.
CX (DPE) AC (DPE)
IA (CEC) AC (DPE) A hardware upgrade to a DPE module is required.
AP (DPE) AC (DPE)
From Version 10.3 To Version 11.3
DW (DPE) DW (DPE), DE (DPE) or DS (DPE) The DE package has all the features of DW plus 56-bit
encryption. The DS package has all the features of
DW plus 128-bit encryption.
(continued)
Page 96

96 APPENDIX B: CHOOSING A SOFTWARE PACKAGE
Table 7 NETBuilder II Software Package Migration to 11.3
Recommended Upgrade Notes
From Version 11.0 To Version 11.3
AC (DPE) AC (DPE)
DW (DPE) DW (DPE)
DE (DPE) DE (DPE) or DS (DPE) The DE package has all the features of DW plus 56-bit
From Version 11.1 To Version 11.3
AC (DPE) AC (DPE)
DW (DPE) DW (DPE)
DE (DPE) DE (DPE) or DS (DPE) The DE package has all the features of DW plus 56-bit
From Version 11.2 To Version 11.3
AC (DPE) AC (DPE)
DW (DPE) DW (DPE)
DE (DPE) DE (DPE) or DS (DPE) The DE package has all the features of DW plus 56-bit
encryption. The DS package has all the features of
DW plus 128-bit encryption.
encryption. The DS package has all the features of
DW plus 128-bit encryption.
encryption. The DS package has all the features of
DW plus 128-bit encryption.
SuperStack II NETBuilder Upgrade Migration Path
Table 8 outlines the recommended migration path from prior version
software packages to the latest packages supported in version 11.3. Use this table
to identify the new software package that is most similar to the package you are
currently using.
Packages are identified by the two-letter designator of the version string, which is
found on your product diskette label.
You can also identify the package using:
bcmuname -R <device>
Where <device> is the IP address or hostname of the system you are planning to
upgrade. Or enter the Enterprise OS user interface command:
SHow -SYS VERsion
Page 97

SuperStack II NETBuilder Upgrade Migration Path 97
Table 8 SuperStack II NETBuilder Bridge/Router Software Package Migration to 11.3
Model Recommended Upgrade Notes
22x Series From Version 8.0 To Version 11.3
BA, RB, BX, AR, CF or CX n/a There is no equivalent package in version 11.3.
From Version 8.1 To Version 11.3
BX, BF, AR, CF or CX n/a There is no equivalent package in version 11.3.
From Version 8.2/8.3 To Version 11.3
BX, BF, AA, AB, CF, CX n/a There is no equivalent package in version 11.3.
From Version 9.0/9.1/9.3/10.1 To Version 11.3
BX, BF, AA, AB, CF, CX n/a There is no equivalent package in version 11.3.
32x Series From Version 8.3/9.0/9.1/9.3 To Version 11.3
FD, BF n/a There is no equivalent package in version 11.3.
CF TE
From Version 10.1 To Version 11.3
AF, BF n/a There is no equivalent package in version 11.3.
CF TE
From Version 11.0 To Version 11.3
TE TE
42x Series From Version 8.0/8.1 To Version 11.3
BX, AR, CF n/a There is no equivalent package in version 11.3.
From Version 8.2/8.3 To Version 11.3
BX, BF, AB, or CF n/a There is no equivalent package in version 11.3.
From Version 9.0/9.1/9.3 To Version 11.3
BX, BF, AB, or CF, EE n/a There is no equivalent package in version 11.3.
From Version 10.1 To Version 11.3
BX, BF, AB, AA, CF n/a There is no equivalent package in version 11.3.
From Version 11.0 To Version 11.3 .
EE n/a There is no equivalent package in version 11.3.
52x Series From Version 8.3/9.0/9.1/9.3 To Version 11.3
BF, CF n/a There is no equivalent package in version 11.3.
From Version 10.1 To Version 11.3
AF, CF n/a There is no equivalent package in version 11.3.
From Version 11.0 To Version 11.3
TE n/a There is no equivalent package in version 11.3.
Page 98

98 APPENDIX B: CHOOSING A SOFTWARE PACKAGE
SuperStack II NETBuilder SI Upgrade Migration Path
Table 9 outlines the recommended migration path from prior version
software packages to the latest packages supported in version 11.3. Use this table
to identify the new software package that is most similar to the package you are
currently using.
Packages are identified by the two-letter designator of the version string, which is
found on your product diskette label.
You can also identify the package using:
bcmuname -R <device>
Where <device> is the IP address or hostname of the system you are planning to
upgrade. Or enter the Enterprise OS user interface command:
SHow -SYS VERsion
Table 9 SuperStack II NETBuilder SI Bridge/Router Software Package Migration to 11.3
Recommended Upgrade Notes
From Version 10.0 To Version 11.3
BX BF
BF BF
AB NW or NE The NE package has all the features of NW plus encryption.
AF AX
CF CF or CE The CE package has all the features of CF plus encryption.
CX AX
From Version 11.0 To Version 11.3
BF BF
NW NW, NE or NS The NE package has all the features of NW plus 56-bit encryption. The NS
NE NE or NS The NS package has all the features of NE plus 128-bit encryption.
CF CF, CE or CS The CE package has all the features of the CF package plush 56-bit
CE CE or CS The CS package has all the features of the CE package plus 128-bit
AX AX
From Version 11.1 To Version 11.3
BF BF
NW NW, NE or NS The NE package has all the features of NW plus 56-bit encryption. The NS
NE NE or NS The NS package has all the features of NE plus 128-bit encryption.
CF CF, CE or CS The CE package has all the features of the CF package plush 56-bit
CE CE or CS The CS package has all the features of the CE package plus 128-bit
AX AX
package has all the features of NW plus 128-bit encryption.
encryption. The CS package has all the features of the CF package plus
128-bit encryption.
encryption.
package has all the features of NW plus 128-bit encryption.
encryption. The CS package has all the features of the CF package plus
128-bit encryption.
encryption.
Page 99

OfficeConnect NETBuilder Upgrade Migration Path 99
Table 9 SuperStack II NETBuilder SI Bridge/Router Software Package Migration to 11.3 (continued)
Recommended Upgrade Notes
From Version 11.2 To Version 11.3
BF BF
NW NW, NE or NS The NE package has all the features of NW plus 56-bit encryption. The NS
NE NE or NS The NS package has all the features of NE plus 128-bit encryption.
CF CF, CE or CS The CE package has all the features of the CF package plush 56-bit
CE CE or CS The CS package has all the features of the CE package plus 128-bit
AX AX
package has all the features of NW plus 128-bit encryption.
encryption. The CS package has all the features of the CF package plus
128-bit encryption.
encryption.
OfficeConnect
NETBuilder Upgrade
Migration Path
Table 10 outlines the recommended migration path from previous software
package versions to the latest packages supported in version 11.3. Use this table
to identify the new software package that is most similar to the package you are
currently using.
Packages are identified by the two-letter designator of the version string, which is
found on your product diskette label.
You can also identify the package using:
bcmuname -R <device>
Where <device> is the IP address or hostname of the system you are planning to
upgrade. Or enter the Enterprise OS user interface command:
SHow -SYS VERsion
Table 10 OfficeConnect Software Package Migration to 11.3
Recommended Upgrade Notes
From Version 9.2 To Version 11.3
BX BF
BF BF
AB NW, NE, or NS The NE package has all the features of NW plus 56-bit encryption. The NS
OF OF, OE, or OS The OE package has all the features of OF plus 56-bit encryption. The OS
n/a VE The VE package has 56-bit encryption.
From Version 9.3 To Version 11.3
BX BF
BF BF
AB NW, NE, or NS The NE package has all the features of NW plus 56-bit encryption. The NS
OF OF, OE, or OS The OE package has all the features of OF plus 56-bit encryption. the OS
AF AF
package has all the features of NW plus 128-bit encryption.
package has all the features of the OF package plus 128-bit encryption.
package has all the features of NW plus 128-bit encryption.
package has all the features of OF plus 128-bit encryption.
Page 100

100 APPENDIX B: CHOOSING A SOFTWARE PACKAGE
Table 10 OfficeConnect Software Package Migration to 11.3
Recommended Upgrade Notes
FD FD
n/a VE VE has 56-bit encryption.
From Version 10.1 To Version 11.3
BX BF
BF BF
AB NW, NE or NS The NE package has all the features of NW plus 56-bit encryption. the NS
OF OF, OE or OS The OE package has all the features of OF plus 56-bit encryption. The OS
AF AF
FD FD
n/a VE The VE package has 56-bit encryption.
From Version 10.2 (model
13x only)
BX BF
AB NW, NE, or NS The NE package has all the features of NW plus 56-bit encryption. The NS
OF OF, OE, or OS The OE package has all the features of OF plus 56-bit encryption. the OS
n/a VE The VE package has 56-bit encryption.
From Version 11.0 To Version 11.3
BF BF
NW or NE NW, NE, or NS The NE package has all the features of NW plus 56-bit encryption. The NS
OF or OE OF, OE, or OS The OE package has all the features of OF plus 56-bit encryption. the OS
VE VE The VE package has 56-bit encryption.
From Version 11.1 To Version 11.3
BF BF
NW or NE NW, NE, or NS The NE package has all the features of NW plus 56-bit encryption. The NS
OF or OE OF, OE, or OS The OE package has all the features of OF plus 56-bit encryption. the OS
VE VE The VE package has 56-bit encryption.
From Version 11.2 To Version 11.3
BF BF
NW or NE NW, NE, or NS The NE package has all the features of NW plus 56-bit encryption. The NS
OF or OE OF, OE, or OS The OE package has all the features of OF plus 56-bit encryption. the OS
VE VE The VE package has 56-bit encryption.
To Version 11.3
package has all the features of NW plus 128-bit encryption.
package has all the features of OF plus 128-bit encryption.
package has all the features of NW plus 128-bit encryption.
package has all the features of OF plus 128-bit encryption.
package has all the features of NW plus 128-bit encryption.
package has all the features of OF plus 128-bit encryption.
package has all the features of NW plus 128-bit encryption.
package has all the features of OF plus 128-bit encryption.
package has all the features of NW plus 128-bit encryption.
package has all the features of OF plus 128-bit encryption.
 Loading...