

Page 1
IP Messaging Module
User Guide - 3Com Native
Interface
3Com® Convergence Applications Suite
IP Messaging Module Release 7.1
VCX System Release 7.1
NBX System Release 6.0
Part Number 900-0374-01 Rev. AB
Published December 2006
http://www.3com.com/
Page 2

3Com Corporation
350 Campus Drive
Marlborough, MA
01752-3064
Copyright © 2001–2006, 3Com Corporation. All Rights Reserved.
No part of this documentation may be reproduced in any form or by any means or used to make any
derivative work (such as translation, transformation, or adaptation) without written permission from
3Com Corporation.
3Com Corporation reserves the right to revise this documentation and to make changes in content from
time to time without obligation on the part of 3Com Corporation to provide notification of such revision
or change.
3Com Corporation provides this documentation without warranty, term, or condition of any kind, either
implied or expressed, including, but not limited to, the implied warranties, terms, or conditions of
merchantability, satisfactory quality, and fitness for a particular purpose. 3Com may make improvements
or changes in the product(s) and/or the program(s) described in this documentation at any time.
If there is any software on removable media described in this documentation, it is furnished under a
license agreement included with the product as a separate document, in the hardcopy documentation, or
on the removable media in a directory file named LICENSE.TXT or !LICENSE.TXT. If you are unable to
locate a copy, please contact 3Com and a copy will be provided to you.
UNITED STATES GOVERNMENT LEGENDS:
If you are a United States government agency, then this documentation and the software described herein
are provided to you subject to the following:
United States Government Legend: All technical data and computer software is commercial in nature
and developed solely at private expense. Software is delivered as Commercial Computer Software as
defined in DFARS 252.227-7014 (June 1995) or as a commercial item as defined in FAR
such is provided with only such rights as are provided in 3Com’s standard commercial license for the
Software. Technical data is provided with limited rights only as provided in DFAR 252.227-7015 (Nov
1995) or FAR
portion of any legend provided on any licensed program or documentation contained in, or delivered to
you in conjunction with guide.
Unless otherwise indicated, 3Com registered trademarks are registered in the United States and may or
may not be registered in other countries.
3Com, the 3Com logo, and NBX are registered trademarks of 3Com Corporation. VCX and NBX NetSet
are trademarks of 3Com
Other brand and product names may be registered trademarks or trademarks of their respective holders.
52.227-14 (June 1987), whichever is applicable. You agree not to remove or deface any
Corporation.
2.101(a) and as
Page 3

CONTENTS
ABOUT THIS GUIDE
Conventions 8
Notices 8
Text 8
Figures 8
Related Documentation 9
Comments 10
1 GETTING STARTED
IP Messaging Overview 11
Accessing the Telephone User Interface 12
Initializing Your Mailbox 12
Entering the System 13
Standard Key Functions 13
Accessing Your Mailbox 13
Accessing the Web Provisioning Interface 15
Replacing a Forgotten Password 16
2 SETTING UP MESSAGING FEATURES
Using the TUI Setup Options Menu 19
Mailbox Setup and Greetings 20
Changing Your Password 20
Setting up Greetings 20
Scheduled Personal Greetings 20
Name Announcement 20
Page 4

Change Review Options 21
Print Options 21
Notification 21
Personal Address Book 22
Adding New Entries 22
Reviewing, Modifying, and Deleting Entries 22
Incoming Call Options 23
Distribution List 23
Creating a List 23
Modifying a List 24
Deleting a List 24
Reviewing a List 24
Message On Demand 24
Creating a New Message on Demand 25
Modifying a Message on Demand 25
Deleting a Message on Demand 25
Auto-attendant 25
Voice Form Mailbox 26
Delivery Reports 27
Multiuser Mailbox 27
Mailbox Number Prompt 28
Using the Web Provisioning Interface 28
Main Menu 29
Mailbox Preferences 30
Scheduled Greetings 32
Notification 33
Notification Filters 34
Notification Procedures 35
Notification Schedule 39
Personal Address Book 41
Distribution Lists 43
External E-mail 45
E-mail Fields Requiring Administrative Configuration 47
Family Mailboxes 48
Delivery Options 50
Logout 52
Page 5

3 USING MESSAGING FEATURES
Overview 53
Listening to Messages 54
Replying to and Forwarding Messages 54
Sending Messages 56
Using Delivery Reports 56
Using the E-mail Menu 57
Placing a Call 57
Using Call Monitor 58
How it Works 58
Using an E-Mail Application to Review Messages 58
POP3 E-Mail Applications 59
Sending Messages using SMTP 59
Retrieving Messages 60
Replying to Messages 60
Forwarding Messages 61
Deleting Messages 61
Moving Messages to Another Folder Using POP3 61
IMAP E-Mail Applications 61
Sending Messages using SMTP 61
Retrieving Messages 62
Replying to Messages 63
Forwarding Messages 64
Deleting Messages Using IMAP 64
Moving Messages to Another Folder Using IMAP 64
Create Custom Folders Using IMAP 64
Message Settings 65
Searching Messages Using IMAP 65
Page 6

Using Find Me Follow Me 66
Find Me Follow Me Overview 66
FMFM from the TUI 66
Modifying FMFM Settings 67
FMFM from the Web Provisioning Interface 67
Allowing Callers to Find You 68
Preventing Callers from Finding You 69
Entering Destination Phone Numbers 70
Logout 72
INDEX
Page 7

ABOUT THIS GUIDE
This guide describes how to use the messaging features of the IP
Messaging Module of the 3Com
This guide is intended for subscribers who want to set up and use IP
Messaging features on supported 3Com telephones. No special
knowledge is required or assumed.
This guide describes the voice prompt menu system provided by the
3Com Native Telephone User Interface (TUI). If your administrator has
enabled the traditional TUI (based on the Octel voice prompt menu
system), refer to the IP Messaging Module User Guide - Traditional
Interface.
®
Convergence Applications Suite.
This guide also describes how to set up messaging features in the IP
Messaging Web Provisioning interface.
Features that are supported on VCX systems only are noted throughout
this User Guide.
Release Notes are issued with some products. If the information in the
release notes differs from the information in this guide, follow the
instructions in the release notes.
Page 8
8 ABOUT THIS GUIDE
Conventions This section describes notice, text, and figure conventions.
Notices Tab le 1 describes notice icons.
Ta bl e 1 Notice Icon Descriptions
Icon Notice Type Description
Information note Information that describes important features
Caution Information that alerts you to potential loss of
Warning
Te xt Ta bl e 2 describes text conventions.
Ta bl e 2 Text Convention Descriptions
Convention Description
Screen displays This typeface represents information as it appears on
Keyboard key names If you must press two or more keys simultaneously, the
Words in italics Italics are used to:
the screen.
key names are linked with a plus sign (+). Example:
■ Emphasize a point.
■ Denote a new term at the place where it is defined
■ Identify menu names, menu commands, and
or instructions.
data or potential damage to an application,
system, or device.
Information that alerts you to potential
personal injury
Press Ctrl+Alt+Del
in the text.
software button names. Examples:
From the Help menu, select Contents.
Click OK.
Figures This guide provides figures and screen captures that contain sample data.
This data may vary from the data on an installed system.
Page 9

Related Documentation 9
Related Documentation
These 3Com documents contain additional information about the
products in this release that are a part of or support the 3Com
Convergence Applications Suite.
The following documents are a part of the IP Messaging Module:
■ IP Messaging Module Quick Reference Guide - 3Com Native Interface
■ IP Messaging Module User Guide - 3Com Native Interface
■ IP Messaging Module Quick Reference Guide - Traditional Interface
■ IP Messaging Module User Guide - Traditional Interface
■ IP Messaging Module Operations and System Administration Guide
■ IP Messaging Module Installation Guide for NBX
■ E-Mail Reader Application Quick Start Guide
The following documents are a part of the IP Conferencing Module:
■ IP Conferencing Module Installation Guide
■ IP Conferencing Module User Guide
■ IP Conferencing Module Administration Guide
■ Convergence Center Client User and Administration Guide
The following documents provide information on products that support
this release:
Enterprise Management Suite
■ Enterprise Management Suite Getting Started Guide, Version 2.3
■ Enterprise Management Suite User Guide, Version 2.3
■ Enterprise Management Suite 2.3 for VCX 7.1 User Guide
Digital Gateways
■ V7122 and V6100 Digital User Guide, Version 4.8
■ V6100 Digital Fast Track Installation Guide, Version 4.8
■ V7122 Digital Fast Track Installation Guide, Version 4.8
Page 10
10 ABOUT THIS GUIDE
Analog Gateways
■ V7111 Analog Fast Track Installation Guide, Version 4.8
■ V7111 Analog User Guide, Version 4.8
■ V6000 Analog Fast Track Installation Guide, Version 4.8
■ V6000 Analog User Guide, Version 4.8
Comments Send e-mail comments about this guide or about any Voice product
documentation to:
Voice_Techcomm_comments@3com.com
Include the following information with your comments:
■ Document title
■ Document part number (found on the front page)
■ Page number
■ Your name and organization (optional)
Example:
IP Messaging Module User Guide - 3Com Native Interface
System Release 7.1
Part Number 900-0374-01 Rev. AB
Page 25
Please address all questions regarding the 3Com software to your
authorized 3Com representative.
Page 11
1
GETTING STARTED
This chapter covers these topics:
■ IP Messaging Overview
■ Accessing the Telephone User Interface
■ Accessing the Web Provisioning Interface
Features that are supported only on VCX systems are noted throughout
this User Guide.
IP Messaging Overview
The IP Messaging (IPM) Module is part of the 3Com® Convergence
Applications Suite. IP Messaging centralizes and integrates voice mail,
e-mail, and fax mail so users can combine communications modes and
take advantage of powerful message handling and distribution features.
The IP Messaging Module provides services that enable users to contact
each other and access information in a customized way. This product is
used primarily for:
■ Voice mail
■ Unified messaging (the integration of voice, facsimile, and e-mail into
a single inbox for message retrieval and management).
Facsimile is supported only on the VCX system.
IP Messaging enables users to see their voice and fax mail as e-mail and
hear e-mail messages over the phone. They can control call paths with
Find Me Follow Me capabilities. This sends all calls or special calls to their
choice of phones and determines response times and messaging media
that meet changing needs. Users can also schedule message delivery and
send voice mails to an individual or group of fellow users, which is aided
by extensive, easily maintained distribution list capabilities.
Page 12
12 CHAPTER 1: GETTING STARTED
IP Messaging uses the Session Initiation Protocol (SIP) standard for
signaling. The IP Messaging architecture enables service providers to
deploy applications in basic, small-scale systems or in complex, fully
redundant, large-scale distributed or centralized systems. IP Messaging
communicates with external IP network resources by using a SIP gateway
or directly connected SIP endpoints.
Accessing the Telephone User Interface
Initializing Your
Mailbox
This section describes how to initialize and access your IPM mailbox
through your phone’s Telephone User Interface (TUI).
This guide describes the TUI (voice prompt menu system) provided by the
3Com native interface. Your administrator specifies the TUI available on
your telephone during IP Messaging configuration. If your administrator
has enabled the traditional TUI (based on the Octel voice prompt menu
system), see the IP Messaging Module User Guide - Traditional Interface.
The System Administrator provides the telephone number or internal
extension number for first-time users. To initialize your mailbox:
1 Dial the IP Messaging access number or press MSG.
2 At the password prompt, enter the default password. You can set your
own password by following the voice instructions.
The default password is the last 4 digits of the mailbox number. If the
mailbox number is only 3 digits, then the password is the mailbox
number.
The voice prompt describes the initialization process and introduces the
Setup Assistant function.
3 Follow the voice prompts:
a To enter a password (from 4 to 15 digits)
b To record a name announcement
c To record a personal greeting
Next, the voice prompt system presents the Main menu. For a
description of Main menu options, see
Next, the voice prompt system presents the Main menu. For a
description of Main menu options, see
you have recorded your name announcement and personal greeting,
the 3Com IP Messaging mailbox is ready to use. To customize your
mailbox settings, see
Chapter 2.
“Accessing Your Mailbox”.
“Entering the System”. After
Page 13

Accessing the Telephone User Interface 13
Entering the System To enter the system, dial the IP Messaging access number or press MSG.
The Auto-Attendant greets you and prompts you to select from the
available options.
Ta bl e 3 lists the standard keys used on the TUI.
Standard Key Functions
Ta bl e 3 lists the standard key functions. These keys always have the same
function and are accessible from any menu.
Ta bl e 3 Standard Keys
Key Function Description
[0] HELP Provides information about the options in the current
menu.
[*] CANCEL Cancels the current function and returns to the
previous menu.
[#]
ACCEPT/SKIP Accepts the current operation or skips to the next
step.
Accessing Your
Mailbox
You can access your mailbox from your own phone or from any other
phone that can access the IP Messaging system (for example, from a
phone in another office).
To access your mailbox:
1 Press the Voicemail (MSG) button or dial the 3Com IP Messaging access
(pilot) number.
The Voicemail button is a purple button on some phones. Other phones
such as the 3103 have a software tab (Messages) on the phone’s display.
Pressing the black button below this tab is equivalent to pressing the
Purple button.
2 You hear the prompt, “Please enter your password,” and have the
following options:
■ Enter your password to access your mailbox and listen to message
options, or,
■ Press * to access a different mailbox. The system then asks you to
enter the mailbox number and press #. At that point, you are
prompted to enter the password for the other mailbox and then listen
to message options.
3 The system prompts you to select options from the Main menu. Tab le 4
lists the Main menu options. Tab le 5 lists the shortcut key combinations.
Page 14

14 CHAPTER 1: GETTING STARTED
Ta bl e 4 Main Menu
Key Function Description
[1] Review Listen to messages in your mailbox.
[2] Send Send messages to other mailboxes.
[3] Find Me Follow Me Control which callers can access you and where
[4] Delivery Reports Confirm the message delivery with the time and
[6] Place a Call Place calls to another user.
[7 0] Shortcut Keys Access help on using shortcut keys. See Ta bl e 5
[9] Personal Options Access options for personal greetings,
[*] Exit Exit from your mailbox.
0 Help Access the help system on the telephone user
[0 0] Auto Attendant Dials the auto-attendant; only accessible from
you can be reached; only appears if an adminis
trator has enabled this feature.
the date; only appears after a message has been
sent and a report has been requested.
for a listing of system shortcuts. The voice
prompt system does not announce this option
but it is available.
notification, and administrative functions.
interface.
the Main Menu.
-
Ta bl e 5 Shortcut Key Combinations
Key Description
[7 1] Record a personal greeting
[7 2] Override a personal greeting
[7 3] Auto-play new messages
[7 4] Change the default fax number (supported on VCX only)
[7 5] Print new faxes (supported on VCX only)
[7 9] Define a macro
[7 #] Run the macro
[7 0] Access HELP for the shortcut keys
Page 15
Accessing the Web Provisioning Interface 15
Accessing the Web Provisioning Interface
Use the IP Messaging Web Provisioning interface to access mailbox
options through a web browser.
Your browser must have cookies and Java script support enabled to start
a provisioning session.
To access the IP Messaging web interface:
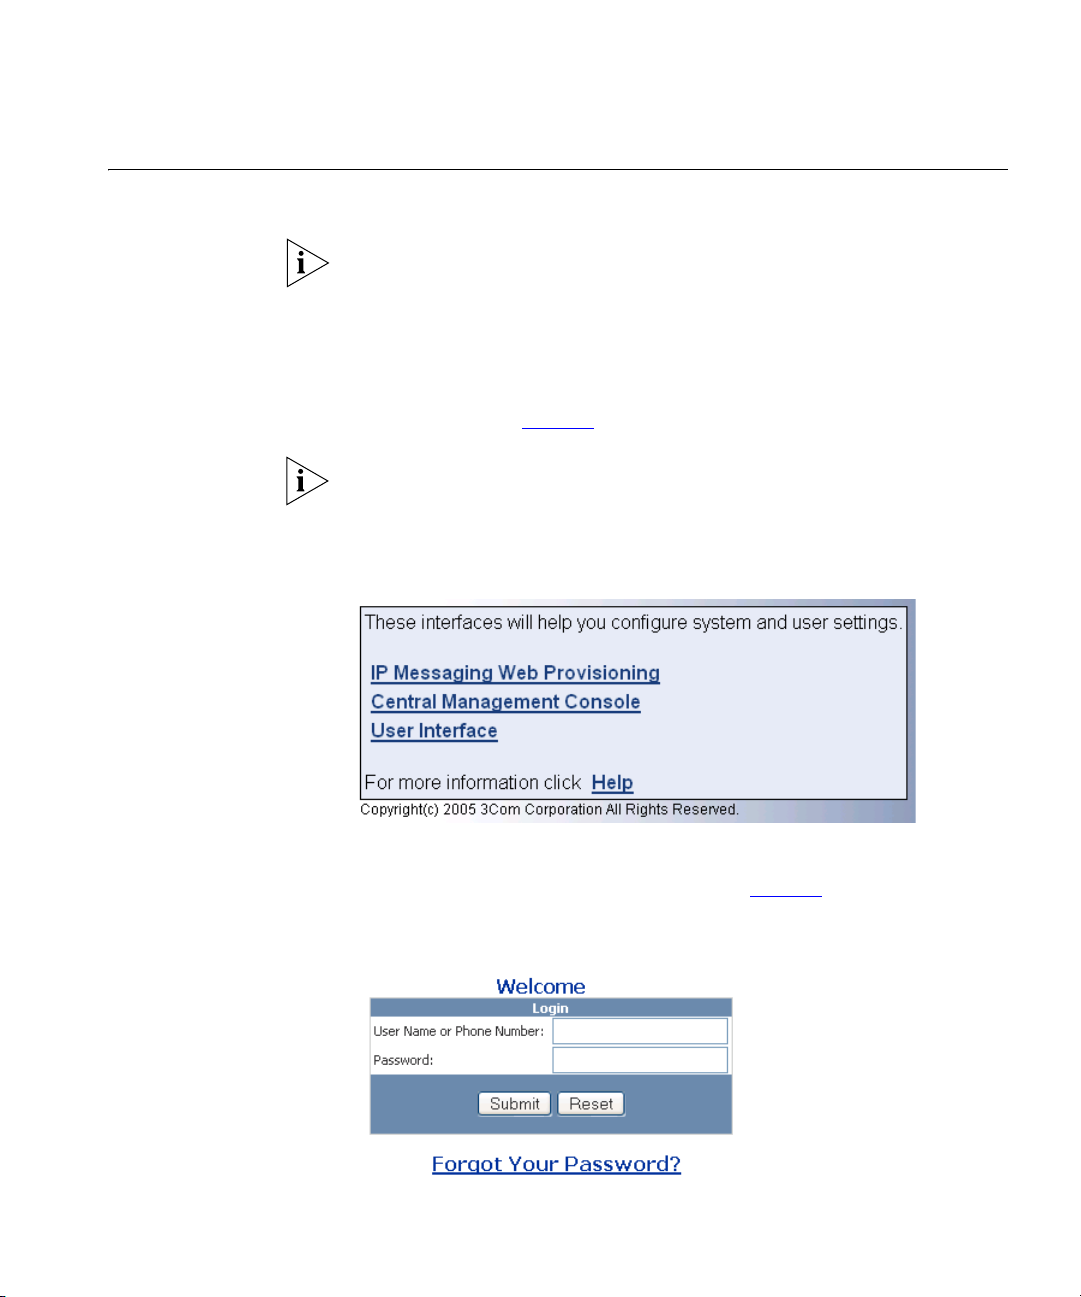
1 In your web browser’s Address text box, enter the URL address provided
by your administrator. The system displays the IP Messaging Web
Provisioning page (
Figure 1).
Depending on how IPM and telephony services have been installed, you
may also see an option for the User Interface or Central Management
Console.
Figure 1 IP Messaging Web Provisioning Welcome Page
2 Click IP Messaging Web Provisioning.
The IP Messaging Login dialog box appears (Figure 2).
Figure 2 Login Screen
3 Enter your user name (or telephone extension) and password.
Page 16

16 CHAPTER 1: GETTING STARTED
The password is either the default password (your telephone extension)
or the password that you set up from the TUI.
If you make a mistake when you enter your user name or password, the
next screen prompts you to enter them again. If you have forgotten your
password, see
4 Click Submit.
The default page for the IP Messaging Web Provisioning interface appears
(see
You can now:
■ set up messaging (see Chapter 2),
■ view message information (see Chapter 3)
■ set up Find Me Follow Me (see Chapter 4)
The interface has an inactivity timer. If the IP Messaging Web Provisioning
interface detects no activity for 15 minutes (900 seconds), the interface
automatically logs you out. You must log in again and start a new
session.
“Replacing a Forgotten Password”.
Figure 5.
Replacing a Forgotten
Password
If you forget your IP Messaging login password, IP Messaging can e-mail
you a temporary password. This feature must be configured by your
administrator. If you enter the required information and the system
responds with
No Email for User, your administrator has not
configured the password replacement feature.
To retrieve a temporary IP Messaging password:
1 Access the IP Messaging web interface as described in “Accessing the
Web Provisioning Interface”.
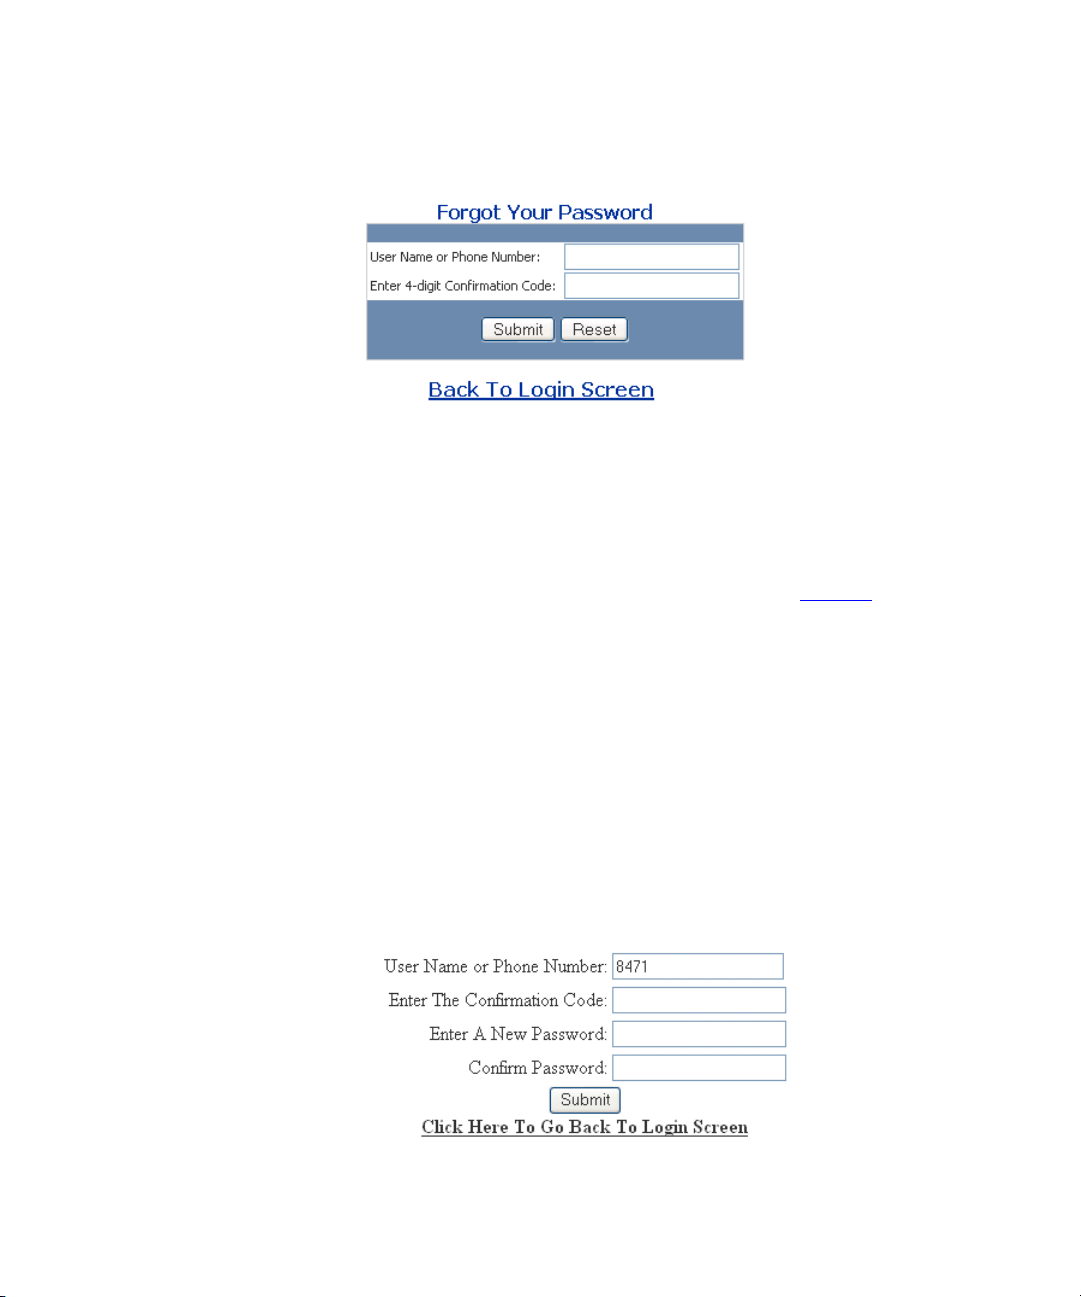
2 When the IP Messaging Login dialog box appears (Figure 2), click the
Forgot Your Password? link.
The IP Messaging Forgot Your Password dialog box appears.
Page 17
Accessing the Web Provisioning Interface 17
Figure 3 IP Messaging Forgot Your Password Dialog Box
3 Enter your mailbox number (or username) in the User Name or Phone
Number field.
4 Enter any 4-digit number in the Enter 4-digit Confirmation Code field.
Remember this number as you will be required to reenter it later.
5 Click Submit.
IP Messaging displays the Login dialog box again (Figure 2).
IP Messaging generates a temporary password and e-mails it to you at
the e-mail address configured by your administrator. The Subject: line of
the e-mail message is
Forgot Password.
6 Enter your mailbox number (or username) in the User Name or Phone
Number field.
7 Enter the temporary password in the Password field.
8 Click Submit. IP Messaging displays a screen that prompts you to change
your temporary password. Your mailbox number (or username) is already
entered.
Figure 4 IP Messaging Change Password Screen
Page 18

18 CHAPTER 1: GETTING STARTED
9 Enter the 4-digit number specified in step 4 in the Enter The Confirmation
Code text box.
10 Enter and confirm a new password.
11 Click Submit. IP Messaging changes your password and logs you into the
IP Messaging Web Provisioning interface.
The password used to access the IP Messaging Web Provisioning interface
is also the password you use to access your mailbox through your
telephone. If you use the password replacement feature described above,
you must enter the new password in response to the telephone voice
prompt to access messages.
Page 19

2
SETTING UP MESSAGING FEATURES
This chapter covers these topics:
■ Using the TUI Setup Options Menu
■ Using the Web Provisioning Interface
Features that are supported only on VCX systems are noted throughout
this User Guide.
Using the TUI Setup Options Menu
Use the Setup Options menu to set up IP Messaging (IPM) features such
as personal greetings, distribution list options, delivery report
configuration, and MWI notification. To access the Setup Options menu,
log onto the Telephone User Interface (TUI) (see
Telephone User Interface” ).
The following setup options are available through the TUI:
■ Mailbox Setup and Greetings
■ Notification
■ Personal Address Book
■ Incoming Call Options
■ Distribution List
■ Message On Demand
■ Delivery Reports
■ Multiuser Mailbox
■ Mailbox Number Prompt
Some features must be enabled by your administrator. If disabled, you
will not hear a voice prompt for that feature.
“Accessing the
Page 20

20 CHAPTER 2: SETTING UP MESSAGING FEATURES
Mailbox Setup and
Greetings
This section describes the Mailbox Setup and Greeting options when [9]
is selected from the Setup Options menu.
Changing Your Password
To change your password:
1 From the Main menu, press [9].
2 From the Setup Options menu, press [1].
3 From the Mailbox Setup and Greetings menu, press [1].
4 Enter a new password and then press [#].
5 Enter your new password again and then press [#]. The voice prompt
confirms that your password has been changed.
Setting up Greetings
To set up Greetings:
1 From the Main menu, press [9].
2 From the Setup Options menu, press [1].
3 From the Mailbox Setup and Greetings menu, press [2].
4 Follow the voice prompts to record, review, rerecord, or delete a normal,
busy, or extended absence greeting.
Scheduled Personal Greetings
To access the Scheduled Personal Greetings menu:
1 From the Main menu, press [9].
2 From the Setup Options menu, press [1].
3 From the Mailbox Setup and Greetings menu, press [3].
4 Follow the prompts to record, review, re-record, delete, and override
greetings and to review and modify greeting schedules.
Name Announcement
To access the Name Announcement menu:
1 From the Main menu, press [9].
2 From the Setup Options menu, press [1].
3 From the Mailbox Setup and Greetings menu, press [4].
Page 21

Using the TUI Setup Options Menu 21
The system prompts you to record your name.
4 Follow the prompts to record and review your name announcement and
then to accept, replay, rerecord, or cancel the recording.
Change Review Options
To set up what you hear as you review messages:
1 From the Main menu, press [9].
2 From the Setup Options menu, press [1].
3 From the Mailbox Setup and Greetings menu, press [6].
4 Follow the prompts to enable or disable:
■ Hearing the date and time of a message
■ Hearing sender information
■ Attaching the original message when you reply to a message
Print Options
To set printing options:
1 From the Main menu, press [9].
2 From the Setup Options menu, press [1].
3 From the Mailbox Setup and Greetings menu, press [9].
4 Follow the prompts to:
Facsimile is supported only on the VCX system.
■ Change your primary fax number.
■ Turn cover sheets ON or OFF.
■ Change your primary voice number.
■ Configure voice, fax, e-mail auto-delivery.
Notification Use this option to toggle notification on or off. This applies when new
messages arrive in your mailbox.
1 From the Main menu, press [9].
2 From the Setup Options menu, press [2].
3 To turn notification OFF if it is ON or to turn it ON if it is OFF, press [2].
Leave Notification turned ON if you are an NBX subscriber.
Page 22
22 CHAPTER 2: SETTING UP MESSAGING FEATURES
Personal Address
Book
To access the Personal Address Book (PAB) menu:
1 From the Main menu, press [9].
2 From the Setup Options menu, press [3].
3 To hear a summary of this feature, press [0].
This feature only shows up on the TUI if the administrator has enabled it.
Adding New Entries
To add new entries:
1 From the Main menu, press [9].
2 From the Setup Options menu, press [3].
3 From the Address Book menu, press [2].
4 Follow the prompts to:
■ Record, accept, replay, or rerecord a name tag for the address
book.
■ Enter a numeric key to use to access the address book.
Facsimile is supported only on the VCX system.
■ Enter a voice mail number, home phone number, work phone
number, personal mobile number, work mobile number, personal
fax number, work fax number, pager number, and work pager
number.
Reviewing, Modifying, and Deleting Entries
To review, modify, or delete address book entries:
1 From the Main menu, press [9].
2 From the Setup Options menu, press [3].
3 From the Address Book menu, press [1].
4 Follow the prompts to review, modify, or delete an entry.
Page 23

Using the TUI Setup Options Menu 23
Incoming Call Options Use the this option to toggle the Call-back Number feature on or off.
When this feature is turned on, the system prompts callers who leave a
message to leave a call-back number.
1 From the Main menu, press [9].
2 From the Setup Options menu, press [4].
3 To turn the Call-back feature OFF if it is ON or to turn it ON if it is OFF,
press [4].
Distribution List To access the Distribution List Options menu:
1 From the Main menu, press [9].
2 From the Setup Options menu, press [5].
3 To hear a summary of this feature, press [0].
Creating a List
To create a list:
1 From the Distribution List menu, press [1].
2 Follow the voice prompts to:
■ Name the list
■ Record and accept a voice tag
■ Add a destination number
The system prompts you to enter a destination number or allows
you to search the subscriber directory.
Destinations can include mailbox numbers, telephone numbers,
and VPIM destination addresses.
The Voice Profile for Internet Mail (VPIM) is a protocol that allows
subscribers to exchange messages between different voice mail
systems. By entering VPIM destinations in a distribution list,
subscribers in different locations can be members of a group
distribution list that spans multiple sites.
The VPIM option appears only if configured by your administrator.
For VPIM addresses, use the format <prefix><mailbox_number>.
For example, if the VPIM destination prefix is 888 and mailbox
number is 1234, you would enter 8881234.
Page 24

24 CHAPTER 2: SETTING UP MESSAGING FEATURES
Modifying a List
To modify a list:
1 From the Distribution List menu, press [2].
2 Follow the voice prompts to:
■ Select the list
■ Make changes to the list
■ Review and accept the changes
■ Enter a destination number
Deleting a List
To delete a list:
1 From the Distribution List menu, press [3].
2 Follow the voice prompts to select and delete the list.
Reviewing a List
To review a list:
1 From the Distribution List menu, press [4].
2 Follow the voice prompts to select and review the list.
Message On Demand Use the TUI to access and use the Message on Demand feature to create
a menu of options for callers to use to hear prerecorded messages.
Only one of the following features can be mapped to key [6]: Message
on Demand, Auto-attendant, or Voice Form Mailbox. Before you can use
the Message on Demand feature, it must be enabled and associated with
key [6] on the Setup Options menu by your administrator.
To access the Message on Demand menu:
1 From the Main menu, press [9].
2 From the Setup Options menu, press [6].
3 To hear a summary of this feature, press [0].
Page 25

Using the TUI Setup Options Menu 25
Creating a New Message on Demand
To create a new Message on Demand:
1 From the Message on Demand menu, press [1].
2 Follow the prompts to record a new menu, replay it, rerecord it, accept it,
and assign it a numeric key.
Modifying a Message on Demand
To modify an existing Message on Demand:
1 From the Message on Demand menu, press [2].
2 Follow the prompts to modify a menu tree, rerecord a menu prompt,
assign a key function, or delete a menu tree.
Deleting a Message on Demand
To delete a Message on Demand:
1 From the Message on Demand menu, press [3].
2 Follow the prompts to delete a Message on Demand.
Auto-attendant
Use the Auto-attendant feature to add sub-nodes, record prompts and
messages, select messages from the mailbox, and record a voice tag for
fax messages.
Only one of the following features can be mapped to key [6]: Message
on Demand, Auto-attendant, or Voice Form Mailbox. Before you use the
Auto-attendant feature, it must be enabled and associated with key [6]
on the Setup Options menu by your administrator.
Modifying Menus To modify an existing menu in the Auto-attendant
setup:
1 From the Main menu, press [9].
2 From the Setup Options menu, press [6].
3 Follow the prompts to record, replay, rerecord and accept prompts, and
to assign specific keys to a menu or message.
Page 26

26 CHAPTER 2: SETTING UP MESSAGING FEATURES
Voice Form Mailbox
Use the Voice Form Mailbox feature to use two special classes of
mailboxes to handle interactive voice forms: Form Mailbox and
Transcription Mailbox. A mailbox can be a Form Mailbox or a
Transcription Mailbox, but not both.
Only one of the following features can be mapped to key [6]: Message
on Demand, Auto-attendant, or Voice Form Mailbox. Before you can use
the Voice Form Mailbox feature, it must be enabled and associated with
key [6] on the Setup Options menu by your administrator.
Form Mailbox The Form Mailbox is a special mailbox that contains a
custom message for a caller. Use it to create and modify forms and to
collect data from users.
Access the Form Mailbox through the Personal Greeting menu which
allows the caller to select a form to fill out. The Form Mailbox has a
special administration function for creating, reviewing, and modifying
forms, similar to the Message On Demand function.
Transcription Mailbox The Transcription Mailbox is a special mailbox
that contains the caller response to the message received by the caller
from the Form Mailbox. Use it to retrieve messages from a Forms mailbox
to be transcribed to text.
The Transcription Mailbox has a review messages function that prompts
you to enter a Form Mailbox from which to retrieve messages. Then, you
can move back and forth through a Form message one response at a
time.
Specifications The specifications for the Forms Mailbox are:
■ The maximum number of questions for each form is 50.
■ The total recording time is 10 minutes for all answers on a form.
■ When you retrieve a Form message, the system copies it into the
Transcription Mailbox and puts it in the deleted queue in the Forms
Mailbox.
■ IP Messaging accepts numerical data through DTMF.
■ You can enter a form only through its root mode.
■ The system automatically saves a message even if it is not finished.
Page 27

Using the TUI Setup Options Menu 27
Managing Forms To use the Voice Form Mailbox feature:
1 From the Main menu, press [9].
2 From the Setup Options menu, press [6].
3 Follow the prompts to:
■ Record and accept a Form greeting or title
■ Replay or rerecord a greeting
■ Create, modify, or delete a Form
Delivery Reports This section describes how to configure the Delivery Reports option. This
option provides:
■ Voice message, fax, and e-mail delivery reports
■ Confirmation that a message is accepted or received by the system
■ When a message is sent to a recipient
■ When a message is delivered
■ Whether delivery is successful or in-progress
To configure delivery reports:
1 From the Main menu, press [9].
2 From the Setup Options menu, press [7].
3 To review your current delivery report configuration, press [1].
The voice prompt lists your current personal default and system default
settings for the Delivery Reports.
4 To customize your delivery report configuration, press [2] and follow the
prompts.
Multiuser Mailbox This feature enables you to access a main mailbox and up to
sub-mailboxes by using the same number. The features of the
999
Multiuser Mailbox are:
■ Send messages to other mailboxes in the same mailbox by entering
the sub-mailbox number as the send destination
■ Include sub-mailboxes as destinations in the distribution lists
■ Forward messages automatically from the main mailbox to each active
sub-mailbox with the Auto-forward function
Page 28

28 CHAPTER 2: SETTING UP MESSAGING FEATURES
To set up a Multiuser Mailbox:
1 From the Main menu, press [9].
2 From the Setup options menu, press [8].
3 Follow the prompts to:
■ Create sub-mailboxes
■ Disable active sub-mailboxes
■ Toggle a new message announcement on or off
Mailbox Number
Prompt
Using the Web Provisioning Interface
Use this feature to toggle the mailbox number prompt on or off.
1 From the Main menu, press [9].
2 From the Setup options menu, press [9].
3 To turn the Mailbox prompt OFF if it is ON or to turn it ON if it is OFF,
press [9].
You can use the IP Messaging Web Provisioning interface to manage
messaging options through a web browser.
The following setup options are available through the web provisioning
interface:
■ Main Menu
■ Mailbox Preferences
■ Scheduled Greetings
■ Notification Filters
■ Notification Procedures
■ Notification Schedule
■ Personal Address Book
■ Distribution Lists
■ External E-mail
■ Family Mailboxes
■ Delivery Options
■ Logout
Page 29

Using the Web Provisioning Interface 29
Main Menu Log into IP Web provisioning (see “Accessing the Web Provisioning
Interface”).
The Message Information screen (Figure 5
) appears with the Main Menu
on the left-hand side of the screen. The Main menu is available from all
screens and shows all possible menu options.
Some menu options such as Find Me Follow Me appear only if your
administrator has enabled that feature.
Figure 5 Main Menu on the Web Interface
Page 30

30 CHAPTER 2: SETTING UP MESSAGING FEATURES
Mailbox Preferences To edit mailbox settings, use the Mailbox Preferences option.
1 Select Mailbox Preferences from the Main menu. The Mailbox
Preferences screen appears (
Figure 6 Mailbox Preferences Screen
Figure 6).
2 To change your password:
a Type a new password in the Change Password field.
b Type the new password in the Confirm Password field.
c Click Save.
3 If required, enter an operator extension number to be associated with
your mailbox.
4 Set your mailbox Auto Login feature to ON (so that you do not have to
enter your password) or to OFF (so that you must enter your password).
5 Set the Prompt for your Mailbox Number to ON or OFF.
6 The Virtual Calling Card is a service that allows you to make outgoing
calls from your mailbox. The Time Left field display the remaining virtual
calling card minutes (enabled Maximum Time minus used minutes).This
feature is configured by your administrator.
Page 31

Using the Web Provisioning Interface 31
7 Enter or change your E-mail address in the Email Address field. This field
is optional.
By default, IP Messaging constructs an e-mail address using a subscriber’s
mailbox number as the username. For example, for mailbox number
1000, the e-mail address would be
1000@<IPM_hostname>.<DNS_domain> (or 1000@<IPM_IPaddress>).
The Email Address field allows you to assign a more meaningful
username. This is useful because IP Messaging uses the value configured
in the Email Address field when constructing the From: field for e-mail
retrieved by an e-mail client.
An e-mail address entered in the Email Address field to identify a
mailbox must be unique on that IP Messaging server. Two mailboxes on
the same IP Messaging server cannot share an e-mail address.
8 From the drop-down list, select the order in which New, Saved, and
E-mail messages are stored in your mailbox. The options are First In First
Out (FIFO) or Last In First Out (LIFO).
9 From the Message Send Order drop-down list (Figure 7), select the
order in which TUI commands send a message from your mailbox
Figure 7 Message Send Order
10 Set the FMFM (Find Me Follow Me) Call Intercept option to ON or OFF.
When you enable FMFM Call Intercept, IP Messaging requests
identification information from the calling party. When the calling party
provides the information, IP Messaging uses your configured FMFM
settings and tries to reach you. If contact is made, IP Messaging presents
the calling party information and prompts you to accept or reject the call.
If you cannot be reached, IP Messaging routes the call to your call
coverage point (by default, your voice mailbox).
The call screening option functions as part of the FMFM feature. If your
administrator has not enabled FMFM, the FMFM Call Intercept option
setting has no effect.
11 Click Save to save your settings.
Page 32

32 CHAPTER 2: SETTING UP MESSAGING FEATURES
Scheduled Greetings To set the time or day for your greetings:
1 From the Main menu, click Scheduled Greetings. The Schedule
Greetings screen appears (
■ If there is no recorded greeting, this message appears in the Greeting
Figure 8).
Number text box: “No Greetings Recorded”. Record greetings through
the TUI.
■ You cannot schedule the default greeting because it is the first
greeting recorded for the mailbox and must act as a default setting.
■ You must set up additional greetings through the TUI before
scheduling them through Web provisioning.
Figure 8 Scheduled Greetings Screen
2 To set up a new daily greeting schedule:
a Select the start and end time or select YES from the All Day
drop-down list.
b Select the day of the week or Everyday from the Day Of Week
drop-down list.
c Select the Greeting from the Greeting Number drop-down list.
The default greeting does not appear on the drop-down list.
d Click Add New.
Page 33

Using the Web Provisioning Interface 33
3 To schedule a greeting by date:
a Select the start and end time or select YES from the All Day
drop-down list.
b Select the Greeting from the Greeting Number drop-down list.
The default greeting does not appear on the drop-down list.
c Select the month, day, and year for the greeting to begin from the
Month, Day, and Year drop-down lists.
d You can set the Start Time and End Time for any day of the year
starting from today’s date through the next 4
years.
e Click Add New.
Notification The Notification option enables you to set the medium that the system
will use to notify users when messages are deposited into or retrieved
from their mailboxes. IP Messaging supports many notification methods,
including NBX MWI (Message Waiting Indication) Voice, E-mail, Socket
Connection (SIP Notify), Auto-Forward, and Pager notification methods.
You must perform three general steps to set up a notification method:
1 Create a notification filter.
2 Create a notification procedure by assigning a filter to a notification
method.
3 Enable a notification schedule for a filter, which automatically assigns the
schedule to any method that uses the filter.
These tasks are described in the next three sections.
The three Notification options appear on the Mailbox Options menu only
if your administrator has enabled notification for your mailbox.
Page 34

34 CHAPTER 2: SETTING UP MESSAGING FEATURES
Notification Filters
To create a Notification Filter:
1 From the Main menu, click Notification Filters. The Notification Filter
screen appears (
Figure 9 Notification Filter Screen
In Figure 9, no filters have been created. Your administrator may have
preconfigured notification filters, in which case they will be listed on this
screen.
2 Click Add New to create a Notification Filter. The Add Filters screen
appears (
Figure 10).
Figure 9).
Figure 10 Add Notification Filter Screen
3 Enter a string in the Name field to identify the filter.
4 Click the Status drop-down list to enable (Active) or disable (Inactive) the
filter. By default, a filter is created in the Active state, but you can disable
a filter at any time.
Page 35

Using the Web Provisioning Interface 35
5 Click the Message Type drop-down list and select whether this filter will
apply to all messages (the default), to messages marked normal, or to
messages marked urgent.
6 Enter values in the Sender, Recipient, Media, and Subject fields as
required. The entered values are applied according to the selected
Operator to restrict message notification according to the specified
values. The Operator options function as follows:
■ Field is empty (null value) and corresponding Operator is ALL — No
filtration. For example, if the Sender field is empty and Sender
Operator is ALL, messages from any sender result in user notification.
■ Field has a value and corresponding Operator is == — Messages
must include the specified field value for user notification to occur. For
example, if the Subject field value is “Status report” and the Subject
Operator is ==, only messages that include the string “Status report”
in the subject line result in user notification.
■ Field has a value and corresponding Operator is <> — Messages with
the specified field value are ignored. For example, if the Media field
value is Fax and the Media Operator is <>, all message types except
faxes result in user notification.
7 Click Save.
Notification Procedures
To create a Notification procedure:
1 From the Main menu, click Notification Procedures. The Notification
Procedure screen appears (
Figure 11 Notification Procedures Screen
Figure 11).
2 Click Add New.
Click Edit to edit an existing procedure or click Delete to delete an
existing procedure. The Add Notification Procedure screen appears
Figure 12).
(
Page 36

36 CHAPTER 2: SETTING UP MESSAGING FEATURES
Figure 12 Add Notification Procedures Screen
3 Enter a name for the procedure in the Procedure Name field.
4 Select Enabled from the Status drop-down list.
5 Select the Notification Filter to use from the Filter drop-down list.
6 Enter the number of times IP Messaging will attempt to send the message
notification in the Tri es text box.
7 Enter the time in seconds that IP Messaging will wait between
notification attempts in the Interval text box.
8 Enable (On) or disable (Off) in the Queue selection box.
■ If enabled and the system receives a notification outside its configured
schedule, the notification is queued until the schedule becomes active
again.
■ If disabled and the system receives a notification outside its configured
schedule, the notification is not queued and is not delivered
9 The Chain selection box allows you to select and link another notification
procedure to the one you are configuring. The linked procedure is
executed if the current procedure fails. If you do not want to link
procedures, accept the defalut value of None.
10 Select the notification method in the Typ e field. The method you select
determines the remaining fields on the screen. The following examples
describe the fields you see in you select Voice (the default), E-mail,
Page 37

Using the Web Provisioning Interface 37
Auto-Forward, Pager, Inband MWI, Blind Notify, and NBX MWI from
the drop-down list.
■ If you select Voice:
a Enter a phone number in the Phone Number field.
b Click Save.
■ If you select Email:
a Enter an e-mail address in the Email Address field.
The Template File field allows you to specify a file that contains e-mail
customization information for items such as the e-mail headers. This
feature is not supported in this release.
b Click Save.
■ If you select Auto-Forward:
a Enter an e-mail address in the Email Address field.
b Click Save.
■ If you select Pager:
a Enter a pager number in the Pager Number field.
b Enter a pager template file name in the Pager Template field.
c Enter a pager PIN number in the Pager PIN field.
d Click Save.
Page 38

38 CHAPTER 2: SETTING UP MESSAGING FEATURES
■ If you select Inband MWI:
a Enter a phone number in the Phone Number field.
b Enter an On code in the On Code field.
c Enter an Off code in the Off Code field.
d Enter a prefix in the Prefix field.
e Click Save.
■ If you select Blind Notify:
a Enter a PID Name in the PID Name field.
b Enter a PID User ID in the PID User ID field.
c Click Save.
■ If you select NBX MWI:
a Enter a phone number in the NBX Extension field.
b Select a server from the NBX Server drop-down list.
c Enter a password in the Password field.
d Click Save.
Page 39
Using the Web Provisioning Interface 39
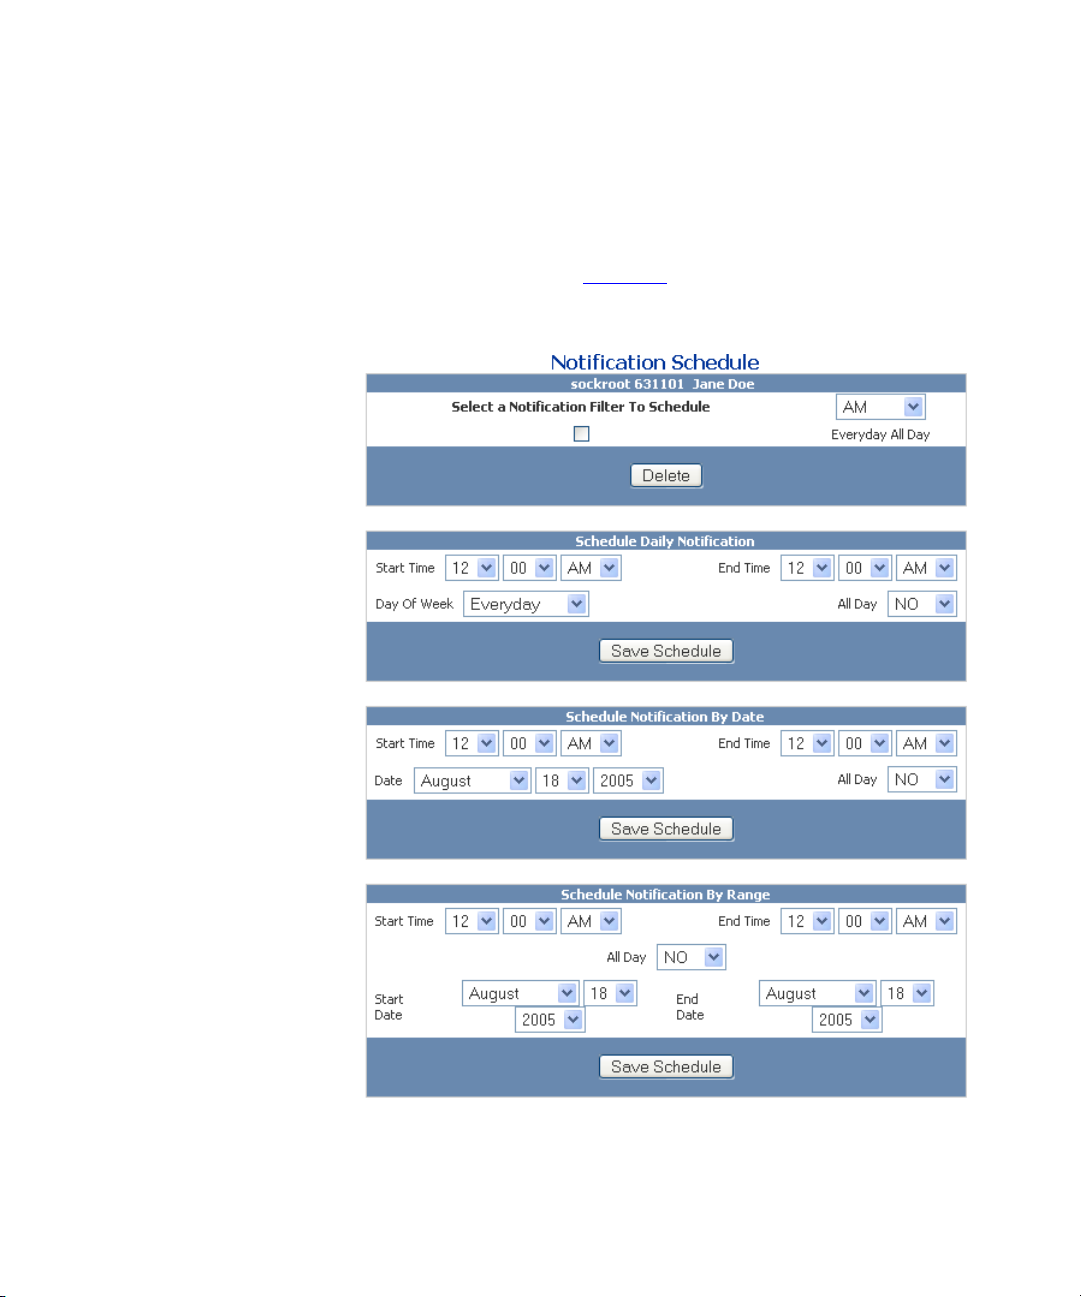
Notification Schedule
To create a Notification schedule:
1 From the Main menu, click Notification Schedule. The Notification
Schedule screen appears (
Figure 13 Notification Schedule Screen
Figure 13).
2 Select a Notification Filter from the drop-down list.
3 The Notification Schedule screen allows you to create one or more
schedules for a filter and then enable one of them.
Page 40

40 CHAPTER 2: SETTING UP MESSAGING FEATURES
You have three scheduling options:
Schedule Daily Notification — This section allows you to schedule filter
operation (message notification) for a time range and either one
particular day or every day of the week regardless of the date.
4 To schedule a notification for a particular day of the week:
a Select a start and end time, or select YES from the All Day
drop-down list.
b Select the day of the week the notification will be sent from the Day
Of Week drop-down lists, or select Everyday.
c Click Save Schedule.
Schedule Notification By Date — This section allows you to schedule
filter operation (message notification) for a particular date.
5 To schedule a notification by date:
a Select a start and end time, or select YES from the All Day
drop-down list.
b Select the month, day, and year the notification will be sent from the
Month, Day, and Year drop-down lists.
c Click Save Schedule.
Schedule Notification By Range — This section allows you to schedule
filter operation (message notification) between a range of dates.
6 To schedule a notification by date range:
a Select a start and end time, or select YES from the All Day
drop-down list.
b Select the month, day, and year the filter will become operational
from the Start Date drop-down lists. Select the month, day, and year
the filter will cease to be operational from the End Date drop-down
lists.
c Click Save Schedule.
You can create schedules for any existing notification filter by repeating
steps 2 through 6. Each saved schedule is listed in the top section (titled
Select a Notification Filter to Schedule). To enable a notification schedule,
click the check box next to the schedule description. By default, schedules
are created in a disabled state.
Page 41

Using the Web Provisioning Interface 41
Personal Address
Book
To access your personal address book and to add, edit, and delete entries:
1 From the Main menu, select Personal Address Book. The Personal
Address Book screen appears (
Figure 14 Personal Address Book
Figure 14).
2 To add a new entry to your personal address book, click Add New. The
Personal Address Book entry screen appears (
Figure 15).
Page 42

42 CHAPTER 2: SETTING UP MESSAGING FEATURES
Figure 15 Fields on the Personal Address Book Screen
3 Enter data in the Required Fields section.
4 Enter data in the General Information and Work Information
sections.
5 Click Save. The Personal Address Book Edit screen appears (Figure 16).
Page 43

Using the Web Provisioning Interface 43
Figure 16 Personal Address Book Edit Screen
6 To delete an entry, select it from the drop-down list and then click
Delete.
7 To display address book entries, click View.
8 To add more entries, click Add New.
Distribution Lists Use the Distribution Lists option to create distribution lists:
1 From the Main menu, click Distribution Lists. The Distribution Lists
Screen appears (
Figure 17 Distribution List Screen
s
Figure 17).
2 To create a new distribution list:
a Type the name of the list (a number between 1 and 9999) in the New
List text box and then click Create New List. The Create New Entry
screen appears (
Figure 18 Distribution List Entry Screen
Figure 18).
Page 44

44 CHAPTER 2: SETTING UP MESSAGING FEATURES
b Type an entry into the New Entry text box.
c Select the type of entry from the drop-down list:
■ List — Another distribution list number
■ Mailbox Entry —The mailbox number of a subscriber
■ Phone Number —The phone number of a subscriber
■ E-mail —The e-mail address of a subscriber
■ VPIM — Indicates the entry is the Voice Profile for Internet Mail
(VPIM) destination address of a subscriber. Use the format
<prefix><mailbox_number>. For example, if the VPIM destination
prefix is 888 and mailbox number is 1234, you would enter
8881234 in the New Entry text box.
VPIM is a protocol that allows subscribers to exchange messages
between different voice mail systems. By entering VPIM
destinations in a distribution list, subscribers in different locations
can be members of a group distribution list that spans multiple
sites.
The VPIM option appears only if configured by your administrator.
d Click Create New Entry. The system confirms the new entry
Figure 19)
(
Figure 19 New Entry Confirmation Screen
e Repeat steps b, c, and d to add more new entries.
f Click View All Lists. The Distribution List Edit screen appears
Figure 20).
(
Page 45

Using the Web Provisioning Interface 45
Figure 20 Distribution List Edit Screen
3 To display and edit a distribution list, select it from the drop-down list and
then click View/Edit.
4 To delete a distribution list, select it and then click Delete List. The
system confirms the deletion.
External E-mail Use the External E-mail feature to add external e-mail servers to your IP
Messaging system.
The External Email option appears on the Main menu only if your
administrator has enabled this feature.
1 Click External E-mail on the Mailbox Options menu. The External E-mail
screen appears (
Figure 21 External E-mail Setup
Figure 21).
2 Click Add New to add external e-mail servers to a mailbox. The Add New
External E-mail screen appears (
Figure 22).
Page 46

46 CHAPTER 2: SETTING UP MESSAGING FEATURES
Figure 22 Add New External E-mail
3 Enter a name to identify this external e-mail session in the Account
Name field. For example, you could enter POP3-Home.
4 Enter the external e-mail address that you want to link to in the Email
Address field.
5 Enter the name of the server if the system has a Domain Name Server
(DNS) in the Server field. If DNS is not available, enter the IP address of
the mail server.
6 Enter the user name of the e-mail account on the server in the
Username field.
7 Enter your password in the Password field. Re-enter your password in
the Confirm Password field.
If you change your password in the external e-mail account after setting
the password here, then the two passwords will not match. If this
situation occurs, the IP Messaging server will send a message to your
external e-mail account about the incorrect password, reminding you to
change your password here so it matches the external account.
Page 47

Using the Web Provisioning Interface 47
8 Enter a time interval in minutes in the Poll Interval field. This is the
amount of time that IP Messaging waits before retrieving e-mail
messages from (or updating messages to) this remote e-mail server.
9 Select POP3 or IMAP from the Protocol drop-down list.
10 Check Delete From Server to delete the e-mail message from the
remote e-mail server when messages are deleted in your IP Messaging
mailbox.
Delete From Server can’t be enabled if Synchronize is ON.
11 Click Save.
E-mail Fields Requiring Administrative Configuration
The remaining fields must be configured by an IP Messaging system
administrator or are for information only:
■ Poll at Login — This enabled feature retrieves e-mail messages from
this remote e-mail server every time you log in through the IP
Messaging Graphic User Interface (GUI) or the TUI.
■ Synchronize — This enabled feature synchronizes your external
e-mail with your IP message store.
Synchronization ensures that voice, e-mail, and fax messages are
synchronized between the IP Messaging mailbox and your external
e-mail account. If a second external account is enabled, the IP
Messaging mailbox can send messages to the second account, but the
second account cannot send messages back to the IP Messaging
mailbox. In other words, if the first external account has Synchronize
turned ON, then it cannot be enabled for the second external
account.
When synchronization is first enabled for an external e-mail account,
messages that already exist in the external e-mail account are not
synchronized with the IP Messaging store. New messages that arrive
after synchronization is enabled will be synchronized.
■ Account Validated — This field displays NO before External E-mail
has been configured. Once the IP Messaging system has successfully
connected to your external e-mail account, Account Validated
changes to YES.
■ Vmail Only — This enabled feature turns ON partial (one-way)
synchronization with an external e-mail account.
Page 48

48 CHAPTER 2: SETTING UP MESSAGING FEATURES
Voicemail messages on the IP Messaging server are synchronized with
your external email account. For example, if messages are saved on
the IP Messaging server, they are also marked as saved on your
external email account.
Conversely, external e-mail account messages are NOT synchronized
with the IP Messaging server. If new messages are received by your
external email account, they are ignored by the IP Messaging server
and cannot be reviewed through the TUI.
Family Mailboxes Use the Family (or Multiuser) Mailboxes option to create sub-mailboxes
under a main mailbox that can be used by a group. For example,
members of a family can populate sub-mailboxes as branches off the
main mailbox.
The administrator must enable multi-user mailboxes in Appmon before
Family Mailboxes will appear as a menu option.
1 From the Main menu, select Family Mailboxes. The Family Mailboxes
Main screen appears (
Figure 23).
Figure 23 Family Mailboxes
2 Enter a number in the field or leave it blank. If you leave it blank, IP
Messaging assigns the next available family mailbox number.
3 Click Add Mailbox.
Figure 24 shows the new family mailbox 631101_1 under
mailbox 631101.
Page 49

Using the Web Provisioning Interface 49
Figure 24 Add Family Mailbox
4 To add another family mailbox, click Add Mailbox again.
5 To reset all passwords for all mailboxes, click Reset All Passwords.
6 To reset a password for one specific mailbox, click Reset Password.
7 On the next screen, select a family mailbox and type the new password.
8 Type the new password again to confirm.
9 Click Save.
Page 50

50 CHAPTER 2: SETTING UP MESSAGING FEATURES
Delivery Options Use the Delivery Options feature to set up how you want your messages
delivered to you.
1 From the Main menu, click Delivery Options. The Auto Delivery screen
appears (
Figure 25 Auto-delivery Screen
Figure 25).
Facsimile and External Email are supported only on the VCX system.
Page 51

Using the Web Provisioning Interface 51
2 Type information in the text fields or select from the drop-down lists.
Maximum Retries — Specifies the maximum number of times IP
Messaging attempts to deliver a voice or fax message before declaring
the delivery unsuccessful.
Retry Interval (Seconds) — Specifies the time in seconds between
delivery attempts.
Voice Auto Delivery — Specifies that voice messages are automatically
delivered to the voice mailbox number entered in the Voice Number
field. Voice messages will also be sent to your mailbox.
Fax AutoDelivery — Specifies that fax messages are automatically
delivered to the fax number entered in the Fax Number field. Fax
messages will also be sent to your mailbox.
Email Auto Delivery — Specifies that e-mail messages are automatically
delivered to the e-mail address entered in the Email Address field. E-mail
messages will also be sent to your mailbox.
CNG Tone — Enabling this option turns on the automatic detection of a
fax send tone (Comfort Noise Generator), therefore allowing receipt of
the fax.
Line Turnaround — Enabling this option turns on detection of a fax
receive tone, enabling sending of faxes that have not already been sent to
be printed.
After Delivery — Specifies the action taken on auto-delivered messages.
The options are:
Leave New — A voice message will be delivered to the voice number
listed on the Delivery Options screen and placed in the new messages
folder.
Save — A voice message will be delivered to the voice number listed
on the Delivery Options screen and placed in the saved message
folder.
Delete — A voice message will be delivered to the voice number
listed on the Delivery Options screen and placed in the deleted
messages folder.
Digits Allowed — Specifies the maximum number of digits allowed for
either the voice or fax Auto Delivery number for any outbound dial.
Voice Number — Specifies the number to which voice messages are
sent.
Fax Number — Specifies the number to which fax messages are sent.
Page 52

52 CHAPTER 2: SETTING UP MESSAGING FEATURES
Email Address — Specifies the e-mail address to which e-mail messages
are sent.
Line Group — Designates a specific line or lines to which messages are
sent.
Urgent Voice Msg Only — Enables the auto delivery feature only for
the messages marked urgent.
3 Enter text in the Cover Sheet field, if required.
4 Enter text in the Forward Insertion Text field, if required.
5 Click Save.
Logout To log out of the system, from the Main menu, click Logout. The web
interface Main menu appears with this message:
You Have Been Logged Out.
Page 53

3
USING MESSAGING FEATURES
This chapter covers the following topics:
■ Overview
■ Listening to Messages
■ Replying to and Forwarding Messages
■ Sending Messages
■ Placing a Call
■ Using Call Monitor
■ Using an E-Mail Application to Review Messages
■ Using Find Me Follow Me
Some features must be enabled by your administrator. If disabled, you
will not hear a voice prompt for that feature.
Features that are supported only on VCX systems are noted throughout
this User Guide.
Overview This chapter describes how to use IP Messaging features. These features
allow you to listen to and send messages and place outside calls (if
enabled by your administrator).
There are three ways to access IP Messaging messages and information
about those messages:
Facsimile and External Email are supported only on VCX systems.
■ You can use the Telephone User Interface (TUI) on your telephone to
listen to new or saved messages in your mailbox. These messages
include voice, e-mail, and fax notification. You can also make calls to
external numbers if this feature has been enabled by your
administrator. These topics are discussed in this chapter.
Page 54

54 CHAPTER 3: USING MESSAGING FEATURES
■ You can use the IP Messaging Web Provisioning interface to view
information about messages in your mailbox. You can view the
number of new and saved messages of each message type as well as
the number of unreviewed and urgent messages. See
■ You can use a third-party application such as Microsoft Outlook to
access messages in your mailbox. See
Review Messages”. You can also synchronize a third-party e-mail
application so it mirrors the messages in your voice mailbox.
“Main Menu”.
“Using an E-Mail Application to
Listening to Messages
Replying to and Forwarding Messages
To listen to messages:
1 From the Main menu, press [1].
2 To hear a summary of this menu, press [0].
3 Follow the prompts to listen to new, saved, or deleted messages.
4 Follow the prompts to review, save, delete, reply to, forward (with and
without a recorded comment), replay, pause, fast forward, or skip the
message.
External Email is supported only on the VCX system.
If the message you are reviewing is an e-mail message, you listen to the
text component of the message (if Text-To-Speech is enabled on your
system) or print the message as a fax.
5 To hear message options, press [5].
6 Follow the prompts to return to the previous message or to get message
information
If a caller leaves a voice message, you can reply to that caller by either
sending a voice message or returning the call.
■ To reply by sending a voice message to the caller’s mailbox, the caller
must be an internal caller on the same site or, in a multi-site
environment, an internal caller at another company site.
■ To reply by placing a return call, the caller can be at the same site, at a
different site within the company, or an external caller.
IP Messaging stores the calling party's number when a message is left
in a subscriber mailbox, and uses this number to return a call. Note
Page 55

Replying to and Forwarding Messages 55
that your calling system may be configured to prevent calls to external
parties. Ask your administrator for the calling rules at your site.
To reply to a voice message by sending a voice message to the caller’s
mailbox:
1 After listening to the message, press [4] to select the Reply To option.
2 Press [1] to select the Send Message option.
3 Follow the prompts to record and send your reply message.
To reply to a voice message by placing a return call:
1 After listening to the message, press [4] to select the Reply To option.
2 Press [2] to select the Place a Call option.
3 Follow the prompts to place the call.
If a caller leaves a voice message, you can forward that message to one or
more mailboxes. The destination mailbox (or mailboxes) can be at your
site or, in a multi-site environment, mailboxes at another location in your
company.
To forward a voice message to another user’s mailbox:
1 After listening to the message, press [6] to select the Forward Message
option.
2 Enter the destination number followed by [#].
You can also locate a user through a directory search by pressing [0] [#]
and following the prompts. In a multi-site environment, your
administrator must configure each site to recognize the directories on
other sites. If this has not been done, a directory search will list local users
only. In this case, you must enter the destination number to forward a
message to a user at another site.
3 Repeat step 2 to enter more destinations. When you are finished, press
[#].
4 To send the message immediately, press [#]. To send the message with an
attached comment, wait for the prompt.
Page 56

56 CHAPTER 3: USING MESSAGING FEATURES
Sending Messages To send messages:
1 From the Main menu, press [2].
2 Follow the prompts to specify a destination. You can:
■ Enter a destination number.
■ Enter the first few letters of a subscriber’s last name to locate the
subscriber in the mailbox directory or you Personal Address Book.
■ Enter a distribution list identifier.
3 Follow the prompts to record the message.
4 After recording the message follow the prompts to:
a Review the message
b Erase and rerecord the message
c Append to the message
d Replay the last 10 seconds of the message
e Pause the message during playback
Using Delivery
Reports
f Fast forward 10 seconds of the message
5 Follow the prompts to send the message:
a Mark the message as urgent
b Mark the message as private
Marking a message as urgent moves it to the first position in the message
queue; marking it as private prevents the recipient from forwarding it.
c Send the message at a later time (future delivery)
d Generate a delivery report (see “Using Delivery Reports”).
e Disable notification
6 To hear a summary of the sending messages feature, press [0].
The Delivery Reports feature confirms that a message has been accepted
or received by the system, when it is sent to a recipient, when it is
delivered, whether delivery failed or is still in-progress. This feature
confirms the message delivery with the time and the date.
You can also use this feature from the Main menu (by pressing [4]) but
only when you have sent a message with a Delivery Report Option.
Page 57

Placing a Call 57
Using the E-mail
Use the E-mail menu to manage e-mail messages:
Menu
1 From the Main menu, press [5].
External Email is supported only on the VCX system.
2 Follow the prompts to:
■ Listen to the text of an e-mail message
■ Print an e-mail message to a fax printer
■ Save an e-mail message as voice mail
■ Delete the message
■ Hear header information such as the name, title, or company of the
sender
■ Fast forward a few seconds of the message
■ Rewind a few seconds of the message
■ Pause the message playback
■ Skip forward in the message
Placing a Call You can place a call from the voice mail menu.
The administrator can configure calling restrictions for some, one, or all
the phones at a site. These restrictions may limit the outbound calls a
phone can make and apply to calls made within the IP Messaging voice
mail menu. Ask your administrator if any calling restrictions have been
implemented on your phone system.
1 Press MSG on your phone and then enter your mailbox number and
password.
2 From the Main menu, press [6].
3 Follow the prompts to enter a phone number and make the call.
4 To cancel the call before it is connected and return to the Main menu,
press [99] or to end the call when you are finished your conversation and
return to the Main menu, press [99].
Page 58

58 CHAPTER 3: USING MESSAGING FEATURES
Using Call Monitor The Call Monitor feature allows you to listen to incoming voicemail
messages as they are recorded (a one-way bridge), interrupt the voicemail
message and speak directly to the caller (a two-way bridge), or return to
your voicemail session. You must be logged into your mailbox through
the TUI.
Call Monitor must be enabled by the IP Messaging System Administrator.
How it Works Call Monitor events are initiated by the conditions listed above. When an
event is generated, you will hear the following sequence:
“Beep, beep, beep. Someone is leaving you a message. To listen, press
9,1. To connect, press 9,2. To continue in your mailbox, press 9,9.”
■ Press [9,1] to initiate a one-way bridge that allows you to listen to the
caller leaving a message. [9,2] and [9,9] are also available in this state.
■ Press [9,2] to connect to the caller with a two-way bridge and
interrupt the message in progress. If the interrupted message is long
enough, it will be delivered to your mailbox. The caller will hear a
single beep when the connection is made to let them know that the
message has been interrupted.
Using an E-Mail Application to Review Messages
■ Press [9,9] at any point in the Call Monitor flow to end the Call
Monitor session and return you to the point at which your voicemail
session was interrupted.
You can use a third-party application (Microsoft Outlook Express,
Microsoft Outlook or IBM Lotus Notes) to access messages in your
mailbox.
External Email is supported only on the VCX system.
■ A voice message appears as a .wav file attachment in an e-mail
message. You can listen to the .wav file on any media player.
■ A fax message appears as a .tif file attachment in an e-mail message.
You can open the .tif file in a graphics application and send it to a
printer.
Page 59

Using an E-Mail Application to Review Messages 59
When you or your administrator create an account in the third-party
e-mail application, you or the administrator must:
■ Specify the protocol used by the e-mail application to access the IP
Messaging system:
■ POP3 — The Post Office Protocol, version 3, retrieves e-mail
messages from a mail server.
■ IMAP — The Internet Message Access Protocol is also used to
retrieve e-mail messages from a mail server but includes some
features not supported by POP3.
■ Associate a mailbox with the e-mail account.
■ Identify a third party server as your outgoing SMTP (Simple Mail
Transfer Protocol) e-mail server.
The remaining sections in this chapter provide general information on
configuring an e-mail account and how to work with e-mail messages
forwarded from an IP Messaging mailbox to an associated e-mail
account.
POP3 E-Mail
Applications
Follow these general steps to create an e-mail account in an application
that uses POP3. Ask your administrator for the specific information
required in your IP Messaging environment.
■ Create an account in your e-mail application (POP3) that points to an
IP Messaging mailbox.
■ Set the incoming mail server to be the IP Messaging DNS domain
name.
■ Configure IP Messaging as your outgoing server (SMTP), or configure
a third party server.
Once a message is downloaded to the e-mail account, it is marked
reviewed in the IP Messaging mailbox. If you do not configure the e-mail
account with a leave-message-on-server option (in Outlook Express, this
is the Leave copy of message on server option), the message is also
marked deleted and removed from the IP Messaging mailbox after the
configured retention time.
Sending Messages using SMTP
Your IP Messaging administrator must identify a third-party SMTP server
to send, forward, or reply to e-mail messages. You can then configure this
server in your e-mail application as the SMTP server.
Page 60

60 CHAPTER 3: USING MESSAGING FEATURES
When SMTP is used to send a message, the sent message in stored in
your e-mail client’s SENT folder. This SENT folder is not synchronized with
your IP Messaging mailbox.
Optionally, your administrator can identify IP Messaging as the SMTP
server. However, this configuration limits the exchange of e-mail
messages to IP Messaging subscribers. You cannot send or forward
messages to external addresses or reply to e-mail messages from external
addresses.
Retrieving Messages
When your e-mail account receives a message from your IP Messaging
mailbox that contains a fax or voicemail attachment, the message uses
the following format:
■ Subject: — The subject field specifies the type of message, either
“Voice Message”, “Fax Message”, or “Voice and Fax Message”.
■ From: — The From: field contains sender@IPM_domain/IPM_IP. Use
your e-mail application’s menu options to view additional information
such as caller-id or the sender’s mailbox number.
■ To: — The To: field contains Your_Mailbox@IPM_domain/IPM_IP.
■ Reply-To: The Reply-To field contains either the “E-Mail Return
Address” or the “From” field and only shows up if the “Reply-To”
field is not empty.
Replying to Messages
If you reply to an e-mail message in your inbox that was downloaded
from your IP Messaging mailbox, a copy of your reply is stored in your
local “Sent Items” folder. However, your local “Sent Items” folder is not
synchronized with your IP Messaging mailbox.
You can reply to the following message types:
■ Any e-mail message that has valid From: and/or “Reply-To” e-mail
address.
■ Any voice or fax message sent from other IP Messaging mailboxes or
from e-mail accounts within the IP Messaging system.
■ Any voice or fax message from a caller outside the IP Messaging
system whose e-mail address is in your Personal Address Book (PAB).
Page 61

IMAP E-Mail Applications 61
Replying to a message sent from an external phone number or
mailbox is possible if you have the sender's information (including
e-mail address) in your PAB. Otherwise, you cannot reply to the
message and the system generates the error message
unable to save/forward message
.
451 ERROR,
Forwarding Messages
You can forward any message regardless of its source. A copy of the
forwarded message is stored in the “Sent Items” folder in your e-mail
application. The “Sent Items” folder is not synchronized with your IP
Messaging mailbox.
Deleting Messages
If you delete a message from your inbox, the message is moved to the
DELETED folder in your e-mail application. The DELETED folder is not
synchronized with your IP Messaging mailbox.
Moving Messages to Another Folder Using POP3
IMAP E-Mail Applications
If you move a message from one folder to another, the folders are not
synchronized with your IP Messaging mailbox.
Follow these general steps to create an e-mail account in an application
that uses IMAP. Ask your administrator for the specific information
required in your IP Messaging environment.
■ Create an account in your e-mail application that points to an IP
Messaging mailbox and select IMAP as your mail protocol.
■ Set the incoming mail server (IMAP) to be the IP Messaging DNS
domain name. Your administrator should enable all the required IMAP
folders during IP Messaging mailbox configuration. All messages in
the New, Saved, and Deleted folders are synchronized.
■ Identify a third party server as your outgoing SMTP (Simple Mail
Transfer Protocol) e-mail server.
Sending Messages using SMTP
Your IP Messaging administrator must identify a third-party SMTP server
to send, forward, or reply to e-mail messages. You can then configure this
server in your e-mail application as the SMTP server.
Page 62

62 CHAPTER 3: USING MESSAGING FEATURES
When SMTP is used to send a message, the sent message in stored in
your e-mail client’s SENT folder. This SENT folder is not synchronized with
your IP Messaging mailbox.
Optionally, your administrator can identify IP Messaging as the SMTP
server. However, this configuration limits the exchange of e-mail
messages to IP Messaging subscribers. You cannot send or forward
messages to external addresses or reply to e-mail messages from external
addresses.
Retrieving Messages
When your e-mail account receives a message from your IP Messaging
mailbox that contains a fax or voicemail attachment, the message uses
the following format:
■ Subject: — The subject field specifies the type of message, either
“Voice Message”, “Fax Message”, or “Voice and Fax Message”.
■ From: — The From: field contains sender@IPM_domain/IPM_IP. Use
your e-mail application’s menu options to view additional information
such as caller-id or the mailbox number of sender.
■ To: — The To: field contains Your_Mailbox@IPM_domain/IPM_IP.
■ Reply-To: The Reply-To field contains either the “E-Mail Return
Address” or the “From” field and only shows up if the “Reply-To”
field is not empty.
Sending a Message in Outlook
When you use IP Messaging as an SMTP server to send a new message,
the sent message is saved in different places and depends on how you
configure your Outlook e-mail account.
If your default e-mail account in Outlook is with the IP Messaging server,
the sent message is saved in the“Sent Items” folder on your Outlook
“Personal Folders”, and not the IP Messaging “Sent Items” folder. Sent
messages are not synchronized with the IP Messaging server.
You can manually move the sent message from the “Sent Items” folder
of your Outlook “Personal Folders’ to the “Sent Items” folder of the IP
Messaging server if required. Any message in the IP Messaging “Sent
Items” folder is synchronized with the IP Messaging server.
Page 63

IMAP E-Mail Applications 63
Sending a Message in Outlook Express
When you use IP Messaging as an SMTP server to send a new message,
the sent message is saved in the “Sent Items” folder of IP Messaging and
always synchronized with the IP Messaging server.
Sending a Message in Lotus Notes
When you use IP Messaging as an SMTP server to send a new message,
the sent message is saved in different places depending on how you
configure your Notes e-mail accounts.
If your default e-mail account on Notes is with the IP Messaging server,
the sent message is saved in the “Sent” folder of your Notes local
database. The “Sent” folder is synchronized with the IP Messaging server.
Replying to Messages
You can reply to the following message types:
■ Any e-mail message that has a valid From: e-mail address
■ Any voice or fax message sent from other IP Messaging mailboxes or
from e-mail accounts within the IP Messaging system
■ Any voice or fax message from a caller outside the IP Messaging
system whose e-mail address is in your Personal Address Book (PAB).
Replying to a message sent from an external phone number or
mailbox is possible if you have the sender's information (including
e-mail address) in your PAB. Otherwise, you cannot reply to the
message and the system generates the error message
unable to save/forward message
.
451 ERROR,
Replying to a Message Using Outlook
If you reply to a message in your inbox that was downloaded from your IP
Messaging mailbox, a copy of your reply is stored in your “Sent” folder.
The “Inbox” folder is synchronized with your IP Messaging mailbox.
Replying to a Message Using Outlook Express
If you reply to a message in your inbox that was downloaded from your IP
Messaging mailbox, a copy of your reply is stored in your “Sent” folder.
The “Sent” folder is synchronized with your IP Messaging mailbox.
Page 64

64 CHAPTER 3: USING MESSAGING FEATURES
Replying to a Message Using Lotus Notes
If you reply to a message in your inbox that was downloaded from your IP
Messaging mailbox, a copy of your reply is stored in your “Sent” folder.
The “Sent” folder is synchronized with your IP Messaging mailbox.
Forwarding Messages
You can forward any message regardless of its source (voice, fax, or
e-mail).
■ In Outlook Express and Lotus Notes, a copy of the forwarded message
is stored in the “Sent” folder in your e-mail application. The “Sent”
folder is synchronized with your IP Messaging mailbox.
■ In Outlook, a copy of the forwarded message is stored in the “Inbox”
folder. The “Inbox” folder is synchronized with your IP Messaging
mailbox.
Deleting Messages Using IMAP
If you delete a message from a message list, the message is marked as
deleted. You can restore a message that is marked for deletion on an
IMAP server by using “Undelete”. You can permanently remove a
message by using “Purge Deleted Messages”. Once you purge a
message, it cannot be recovered. The “Deleted” folder is synchronized
with your IP Messaging mailbox.
Moving Messages to Another Folder Using IMAP
If you move a message from one folder to another, folder synchronization
with your IP Messaging mailbox depends on the e-mail application.
■ In Outlook and Outlook Express, if you move a message from one
folder to another folder, the message in the original folder is marked
as deleted.
■ In Lotus Notes, if you move a message from one folder to another
folder, the message is deleted from the original folder.
Create Custom Folders Using IMAP
Custom folders created in Outlook, Outlook Express, or Lotus Notes are
synchronized with your IP Messaging mailbox. However, you cannot
Page 65

IMAP E-Mail Applications 65
access custom folders through the Telephone User Interface (TUI). These
folders can only be accessed through an e-mail account using IMAP.
Message Settings
IP Messaging allows the following message settings:
■ Importance
■ normal
■ high
■ low
■ Sensitivity
■ normal
■ personal
■ private
■ confidential
Searching Messages Using IMAP
The IMAP search function allows you to search messages based on the
following criteria:
■ Keywords
■ Sender
■ Subject
■ Body content
■ Time (Received, Sent, Due, Expires, Created, Modified)
■ Sent-To
■ Items that are Read or Unread
■ Items with or without attachments
■ Message importance tagged as Normal, High, or Low
■ Message size
Page 66

66 CHAPTER 3: USING MESSAGING FEATURES
Using Find Me Follow Me
Find Me Follow Me
Overview
This section describes how to set up and use the Find Me Follow Me
(FMFM) feature from the telephone user interface (TUI) and from the web
interface.
FMFM features are enabled by your administrator and are configured
through the TUI or the web provisioning interface.
The following topics are covered:
■ Find Me Follow Me Overview
■ FMFM from the TUI
■ FMFM from the Web Provisioning Interface
Find Me Follow Me enables you to control which callers can access you
and where you can be reached. You can:
■ Allow all incoming numbers to contact you
■ Allow some incoming number to contact you
■ Prevent some incoming numbers from contacting you
■ Set up destination telephone numbers where you can be reached
■ Record a greeting for callers while the system tries to find you (TUI
only)
FMFM from the TUI To access FMFM from the TUI and set up FMFM for the first time:
1 Log in to the system by dialing the IP Messaging telephone number or
press the MSG button on the phone.
2 Enter your mailbox number and password as required.
3 From the TUI Main menu, press [3].
The system prompts you to specify who is allowed to find you, where
they can find you, a FMFM greeting, and a no answer timeout value. The
no answer timeout value determines how long the system tries to find
you at one number before trying the next number.
Page 67

Using Find Me Follow Me 67
Modifying FMFM Settings
Once you have configured FMFM, you can change your current settings.
For example, you can change the phone number where you can be
reached.
To modify current FMFM option values.
1 Log in to the system by dialing the IP Messaging telephone number or
press the MSG button on the phone.
2 Enter your mailbox number and password as required.
3 From the TUI Main menu, press [3].
4 The system prompts with the following options:
■ To enable or disable FMFM, press [1].
■ To change the phone number where you can be reached, press [3].
■ To listen to a summary of current settings, press [#]. After listening to
the summary you can change any of the following currently
configured settings:
FMFM from the Web
Provisioning Interface
■ To specify which callers can reach you, press [2]. You can:
Allow callers from any phone number to find you.
Allow callers from certain phone numbers to find you.
Prevent callers from certain phone numbers from finding you.
■ To change the phone number where you can be reached, press [3].
■ To re-record a greeting for callers while the system tries to find you,
press [4].
■ To disable the current FMFM setting, press [5].
■ To modify the No Answer Timeout value, press [6].
■ To return to the previous menu, press [*].
This section describes how to configure FMFM settings through the IP
Messaging Web Provisioning interface.
1 Access the 3Com® IP Messaging Web Provisioning interface. See “Main
Menu”.
2 In the Login dialog box, enter your username (or phone number) and
your telephone password.
3 Click Login.
Page 68

68 CHAPTER 3: USING MESSAGING FEATURES
4 From the Main menu, select Find Me Follow Me. The FMFM Menu
appears (
Figure 26 FMFM (Basic) Menu
Figure 26).
From this screen, you can set up the following FMFM functions:
■ Allow some or all callers to find you (see “Allowing Callers to Find
You”).
Allowing Callers to
Find You
■ Prevent callers from finding you (see “Preventing Callers from Finding
You”).
Once you specify the callers that can or cannot locate you, enter the
phone numbers IP Messaging will use to locate you. See “Entering
Destination Phone Numbers”.
This section describes how to allow all or some callers to find you.
To allow all callers to find you:
1 Access the Find Me Follow Me screen. See “FMFM from the Web
Provisioning Interface”.
To allow all callers to find you:
a Select “Allow all calls to contact me”.
b Click Continue. The Destination screen appears.
c Go to “Entering Destination Phone Numbers”.
To allow some callers to contact you:
a Select “Allow some calls to contact me”.
Page 69

Using Find Me Follow Me 69
b Click Continue. The Find Me Follow Me Allowed Numbers screen
appears (
Figure 27 FMFM Allowed Numbers Screen
Figure 27).
2 Enter the allowed number, then click Submit.
The screen refreshes and now contains the number you added.
Preventing Callers
from Finding You
To delete an allowed phone number, click the checkbox next to the
number, then click Delete.
3 Enter all the allowed phone numbers and click Submit after each entry.
4 When you finish entering allowed numbers, click Continue. The
Destination screen appears.
5 Go to “Entering Destination Phone Numbers”.
This section describes how to prevent callers from finding a user.
To prevent callers from finding a user:
1 Access the Find Me Follow Me screen. See “FMFM from the Web
Provisioning Interface”.
2 Select “Exclude some calls from contacting me”.
3 Click Continue. The Find Me Follow Me Exclude Numbers screen appears
Figure 28).
(
Page 70

70 CHAPTER 3: USING MESSAGING FEATURES
Figure 28 FMFM Exclude Numbers Screen
4 Enter a phone number that you want to exclude.
5 Click Submit. The screen refreshes and now contains the number you
added.
To delete an excluded phone number, click the checkbox next to the
number, then click Delete.
Entering Destination
Phone Numbers
6 Enter all the phone numbers you want to exclude and click Submit after
each entry.
7 When you finish entering excluded numbers, click Continue. The
Destination screen appears.
8 Go to “Entering Destination Phone Numbers”.
After you have specified the callers who are allowed or prevented from
reaching you, specify the phone numbers where you can be reached
(destination phone numbers). When forwarding a call, IP Messaging uses
the numbers in the order in which you enter them. You can use any
number that can be dialed by the IP Messaging system. For example, you
can enter an extension at another site or an external number such as a
cell phone number. Ask your administrator if your system has been
configured with any dialing restrictions or required prefixes to reach other
sites in your company.
Page 71

Using Find Me Follow Me 71
On the Find Me Follow Me Destination screen:
1 Enter the first number you want IP Messaging to try when attempting to
find you.
2 Click Submit. The screen refreshes and now contains the number you
added.
Figure 29 FMFM Destination Screen
To delete a destination phone number, click the checkbox next to the
number, then click Delete.
3 Enter all the phone numbers that you want IP Messaging to try when
attempting to find you, and click Submit after each entry.
4 Enter a value, in seconds, in the No Answer Timeout field. This value
determines how long the system tries a number before trying the next
number in the list. This value applies to all entered numbers. In other
words, you cannot specify 30 seconds for one number and 45 seconds
for another number.
Note that the No Answer Timeout value should be less than the no
answer timeout value configured on the phone (through the VCX V7000
User Interface). The no answer timeout value determines how long a
telephone rings before the system forwards unanswered calls (for
example, to a voice mailbox). If the No Answer Timeout value is more
than the no answer timeout value configured on the phone, FMFM will
access the phone’s voice mailbox and not try the next number is the
FMFM sequence.
5 When you finish entering destination numbers, click Finish.
Page 72

72 CHAPTER 3: USING MESSAGING FEATURES
The main FMFM screen appears. The screen indicates that FMFM is
enabled and displays the current configuration.
example of a FMFM configuration.
Figure 30 FMFM Final Screen
Figure 30 show an
Logout To log out of the system, from the Main menu, click Logout.
Page 73

INDEX
A
accessing
a mailbox 13
IP Messaging web interface 15
TUI 12
accessing a mailbox 13
accessing the IP Messaging web provisioning
interface 28
auto-attendant
modifying menus 25
options 25
C
call back option
enabling 23
call monitor
description 58
how it functions 58
calls
placing from voice mail 57
D
delivery options 50
delivery reports
setting up (TUI) 27
using (TUI) 56
distribution list
managing (IP Messaging) 43
managing (TUI) 23
external e-mail
adding servers 45
configuring 45
partial synchronization 47
synchronizing 47
F
family mailboxes
creating 48
family mailboxes (web interface) 48
FMFM
basic features 66
overview 66
G
greetings
scheduling (TUI) 20
setting up (IP Messaging) 32
setting up (TUI) 20
I
initializing a mailbox 12
IP Messaging
accessing the web provisioning interface 28
IP Messaging web interface
accessing 15
logging out 52
mailbox preferences 30
E
e-mail
accessing 58
managing 57
L
logging out 52
Page 74

74 INDEX
M
mailbox
accessing 13
initializing 12
number prompt 28
mailbox preferences
viewing (IP Messaging) 30
Message On Demand
options 24
message review options 21
messages
accessing through e-mail 58
changing review options 21
e-mail 57
forwarding 54
listening to 54
receipt notification 21
replying to 54
sending 56
multiuser mailboxes
setting up (IP Messaging) 48
setting up (TUI) 27
multiuser mailboxes (web interface) 48
N
name announcement
recording and reviewing 20
notification
creating a filter (IP Messaging) 34
creating a procedure (IP Messaging) 35
creating a schedule (IP Messaging) 39
enabling and disabling (TUI) 21
setting up (IP Messaging) 33
P
password
changing (TUI) 20
replacing a forgotten password 16
Personal Address Book (PAB)
accessing (IP Messaging) 41
accessing (TUI) 22
adding entries (TUI) 22
editing entries (TUI) 22
print options
setting up 21
S
setup options
TUI 19
shortcut key combinations 14
sub-mailboxes 48
synchronization
external e-mail 47
T
telephone keys, standard functions 13
Telephone User Interface
see TUI
TUI
accessing 12
call monitor 58
setup menu 19
V
Vmail only field 47
Voice Form Mailbox
managing 27
options 26
specifications 26
Transcription Mailbox 26
W
web provisioning interface
accessing 28
 Loading...