

Page 1
3Com®IP C
ONTACTCENTERDESKTOP
QUICK REFERENCE
3Com IPCC Desktop Manager Components
1
2
3Com IPCC
1
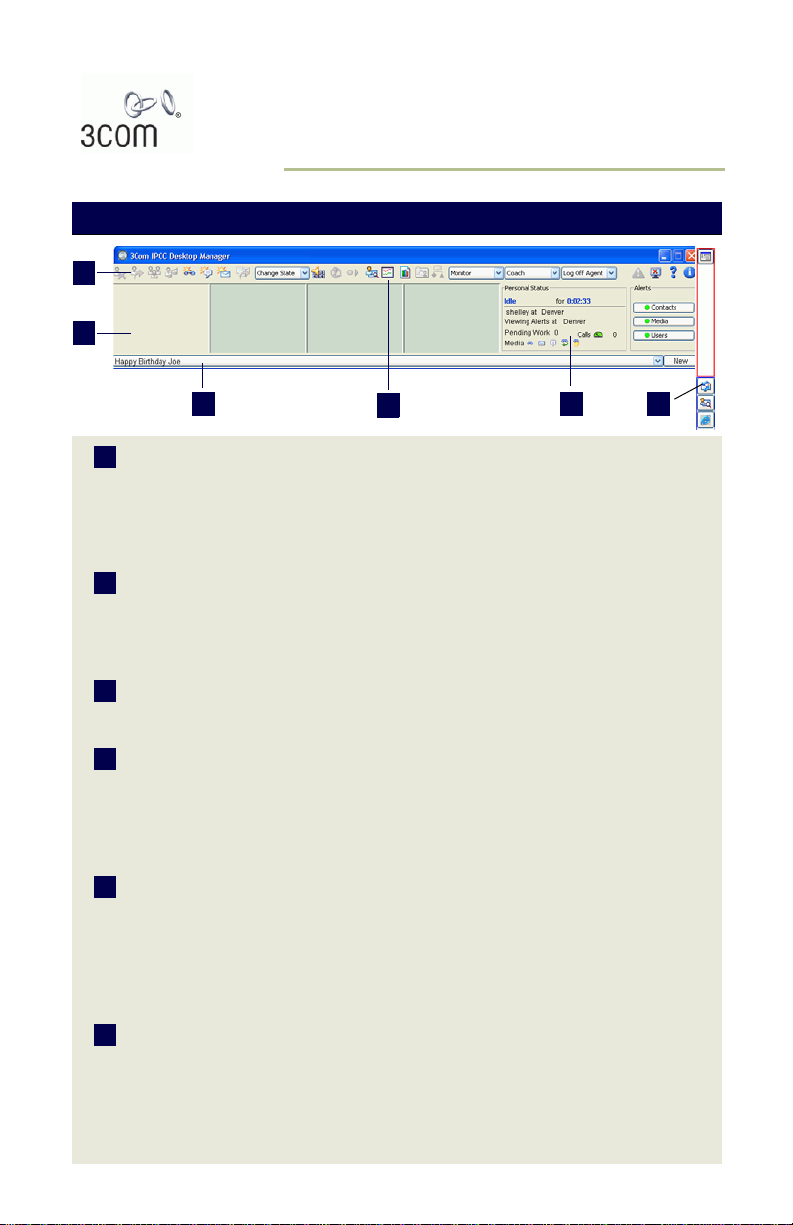
Desktop toolbar
3 5 6
Provides buttons and menus that enable you to handle
contacts, change your user state, generate touch tones,
4
adjust the volume, access online Help, open applications, and
log off the 3Com IPCC Desktop. The buttons that are
available on the toolbar are determined by your user role and
the task you are currently performing.
Contact panel Provides access to four lines that enable you to accept
2
immediate-assistance voice, e-mail, Web, voice message,
and callback contacts; answer inbound and internal voice
calls and Web collaboration sessions; and make outbound
phone calls.
Bulletin bar Displays bulletins issued by supervisors and administrators
3
and, for authorized users, displays system messages, alarms,
and emergency notifications.
4
Real-Time
Status Viewer
Enables you to view your personal user state and contacthandling statistics on the My Statistics tab in 3Com IPCC
Real-Time Status Viewer. Access to the My Statistics tab is
available to users with the “Enable agent personal statistics”
class of service setting enabled in their Contact Handling
feature set.
Personal Status
5
panel
Displays your current user state, the node to which you are
currently connected, the number of e-mail, voice message, or
callback contacts in your 3Com Pending folder, the level and
number of voice contacts waiting in the queue, the media
types you are set up to handle, and whether or not the
applications that provide the functionality for the media
components are available.
Shutter bar Enables you to open and close applications managed by the
6
3Com IPCC Desktop. The upper section (Quick Launch)
enables you to open external applications managed by the
3Com IPCC Desktop. The lower section (Open Applications)
enables you to minimize open application windows to the
shutter bar and restore application windows to their previous
state in the 3Com IPCC workspace.
Page 2

3Com IPCC DESKTOP
LOG ON
1 Double-click the 3Com IPCC icon on
your Windows desktop.
2 Enter your logon name and password.
3 Select the name of the node you want to
log on to.
4 Click the Log On button.
C
HANGE YOUR PASSWORD
1 If you are logged on, log off the 3Com
IPCC Desktop.
2 Double-click the 3Com icon on your
Windows desktop.
3 Click the Change Password link.
4 Type your logon name.
5 Type your current password.
6 Type and verify your new password.
7 Click Change Password.
8 Click Logon Window to return to the
logon window.
S
TART APPLICATIONS
` To start an 3Com IPCC application, click
the application icon on the 3Com IPCC
Desktop toolbar.
` To start an external application
managed by the 3Com IPCC Desktop,
click the application icon in the Quick
Launch section of the shutter bar.
` To maximize an open application
window in the 3Com IPCC workspace,
minimize all other windows.
` To close an application, click the
button in the title bar of the application
window.
Note: You may not be able to exit
certain applications if the application is
required for a task.
V
IEW PERSONAL STATUS
` View the Personal Status panel in the
3Com IPCC Desktop Manager to see
the following:
■ Your current user state and the
amount of time you have spent in the
user state.
■ The number of items in your 3Com
Pending folder in Outlook Express.
■ The level of voice contacts waiting in
queue. The number to the right of the
icon indicates the total number of
voice contacts in your worst
performing classification. (For
information, see “Monitor the level of
calls waiting” on page 4.)
■ Your assigned media types and
whether or not the application that
provides the functionality for the
media component is available. (For
information, see “Detect when a
media component is not available” on
page 11.)
V
IEW MY STATISTICS
W
ORK WITH WINDOWS
` To open an application that is already
running, click the application icon in the
Open Applications section of the shutter
bar.
` To minimize an application window to
the shutter bar, click the button on
the title bar of the application window.
` To switch between two open application
windows, click the title bar of the
application window.
2•3Com IP Contact Center Desktop Quick Reference
` In the Real-Time Status Viewer, click the
My Statistics tab to view the following
personal statistics for the logged-on
user:
■ User-state statistics.
■ Immediate- and deferred-assistance
contact-handling statistics.
■ Classification statistics from across all
nodes.
Page 3

V
IEW BULLETINS
The most recently issued bulletin is
displayed on the bulletin bar. To view
previously issued bulletins:
` Click the down arrow on the bulletin
bar.
P
LACE YOURSELF IN THE
AVAILABLE STATE
` On the Change State menu, select
Available.
A
CCEPT A CONTACT
` Click anywhere in the panel that
represents the contact (except for the
button).
Note: If you are set up for auto-answer,
you do not need to do anything to
accept an immediate-assistance
contact—you are connected as soon as
the contact is presented to you.
I
SSUE AN IDLE REQUEST
` From the Change State→Idle menu,
select a reason. If your request is
granted, you are immediately placed in
the Idle state.
To ensure that your status is reported
accurately, select another option when
the reason you are in the Idle state
changes.
C
HANGE AN IDLE REASON
` While in the Idle state, select a reason
from the Change State
Personal Status panel displays the new
reason.
→Idle menu. The
BE
COACHED BY A
SUPERVISOR
Voice . You can hear both the supervisor
and the caller. The caller can hear you but
not the supervisor.
Web. You can see both the supervisor’s
and the caller’s text messages. The caller
can see your text messages, but cannot
see the supervisor’s text messages. If the
caller entered a valid e-mail address when
initiating the contact, the entire transcript
will be sent to the caller after the Web
collaboration session is disconnected.
W
HEN THE SUPERVI SOR
BARGES IN
When a supervisor barges in on a voice or
Web contact, the contact becomes a voice
or Web conference until one or more
parties disconnect.
E
NTER WRAP-UP DATA
` When prompted after you disconnect an
immediate-assistance contact, select a
code from the Wrap Up menu, and then
click Done.
` While connected with a contact, select a
code from the Wrap Up menu. After you
disconnect the contact, you are
immediately placed in the Available
state or the Idle state, depending on
how you are set up.
Note: If you anticipate additional
wrap-up tasks after you disconnect the
contact, do not select a wrap-up code
while you are connected with the
contact.
R
EPORT AN EMERGENCY
BE
MONITORED BY A
SUPERVISOR
Voice . If monitoring tones are enabled,
both you and the caller can hear a tone
during the monitoring session.
Web. Neither you nor the caller have any
indication that the Web collaboration
session is being monitored.
3Com IP Contact Center Desktop Quick Reference •3
` Click the button on the 3Com IPCC
Desktop toolbar.
Note: Check with your supervisor for
specific tasks you should perform in any
emergency.
GET
HELP
` To get Help for the 3Com IPCC Desktop,
click the button on the 3Com IPCC
Desktop toolbar.
Page 4
` To view information about a particular
window or dialog box, click the Help
button in the window or dialog box.
LOG
OFF
` Click the button on the 3Com IPCC
Desktop toolbar.
VOICE FUNCTIONS
M
ONITOR THE LEVEL OF
CALLS WAITI NG
` Watch the calls waiting indicator (the
number to the right of this icon indicates
the number of contacts in queue) in the
Personal Status panel.
As the level of calls waiting increases,
the color of the indicator icon changes
from green to yellow, and then from
yellow to red. It is important to monitor
the calls waiting indicator, ensure that
you handle calls efficiently, and make
yourself available for the calls waiting to
be answered.
U
SING A PHONE OTHER THAN
THE
3Com IPCC
PHONE
SOFT
If you use a phone other than the 3Com
IPCC Soft Phone (also called an alternative
phone device or 3Com IPCC Phone Set),
see the 3Com IP Contact Center Desktop
User’s Guide for specific instructions.
A
NSWER A CALL
` Click anywhere in the contact panel that
represents the call (except for the
button).
Note: If you are set up for auto-answer
and the call is an immediate-assistance
voice contact, you do not need to do
anything to answer the call—you are
connected as soon as the call is
presented to you.
PUT A
CALL ON HOLD
` Click the button on the 3Com IPCC
Desktop toolbar.
To take the call off hold, click the button
again, or click the contact panel.
M
UTE A CALL
` Click the button on the 3Com IPCC
Desktop toolbar. The other party can no
longer hear you.
To take the call off Mute, click the button
again.
R
ECORD A CALL
` Click the Record button on the
3Com IPCC Desktop toolbar.
The recording button changes from red
to green.
` To stop recording, either click the Stop
Recording button or disconnect the
call.
The recording button changes from
green to red.
T
RANSFER A CALL
TO ANOTHER USER
1 While connected, click the button to
put the call on hold.
2 Make a call to the party to whom you
want to transfer the call.
3 Announce the transfer.
4 Click the button on the 3Com IPCC
Desktop toolbar.
5 Click the contact panel that represents
the call you are transferring. The
borders of the contact panel are
highlighted.
6 When prompted, select a wrap-up code
and click Done.
T
RANSFER A CALL
TO A CLASSIFICATION
1 While connected, click the button to
put the call on hold.
2 Click the button on the 3Com IPCC
Desktop toolbar.
3 Select a classification and click the
Transfer button.
4 When prompted, select a wrap-up code
and click Done.
4•3Com IP Contact Center Desktop Quick Reference
Page 5

E
STABLISH A CONFERENCE
1 While connected, click the button to
put the call on hold.
2 Make a call to the party you want to
conference in on the call.
3 Click the button on the 3Com IPCC
Desktop toolbar.
4 Click the contact panel that represents
the first call. The contact panel is
highlighted.
A
DJUST THE VOLUM E ON
YOUR HEADSET OR
MICROPHONE
1 Click the button on the 3Com IPCC
Desktop toolbar.
2 Do one of the following:
■ To adjust the volume on your speaker:
In the Speaker Volume field, drag the
slider to the left to lower the volume
and to the right to raise the volume.
■ To adjust the volume of your
microphone: In the Microphone
Volume field, drag the slider to the left
to lower the volume and to the right to
raise the volume.
M
AKE AN INTERNAL CALL
1 Place yourself in the Idle state.
2 Click the button on the 3Com IPCC
Desktop toolbar.
3 Click the Internal tab.
4 Do one of the following:
■ To redial the last user you called,
verify that the logon name is in the
User Name to Dial field.
■ To redial one of the last 10 users you
called, select a logon name from the
Recent Calls list.
■ To call another user, select a user
name from the Select from List list or
type the user name in the User Name
to Dial field.
5 Click the Call button.
M
AKE AN EXTE RN AL CALL
1 Place yourself in the Idle state.
2 Click the button on the 3Com IPCC
Desktop toolbar.
3 Do one of the following:
■ To redial the last external number you
■ To redial one of the last 10 external
■ To call another external party, select
4 In the Outbound Access field, select a
trunk group.
5 Click the Call button.
M
AKE A CALL IN RESPONSE
TO A CALLBACK
1 In Outlook Express, navigate to a
message with a link to a callback
request and open the message.
2 Click the callback link.
3 Modify the number in the Phone
Number to Dial field, if necessary.
4 In the Outbound Access field, select a
trunk group.
5 Click the Call button.
6 When finished with the contact, click the
the message window.
G
ENERATE TOUCH TONES
1 Click the button on the 3Com IPCC
Desktop toolbar.
2 Click the keypad buttons to generate
touch tones. Each touch tone is
generated immediately and the
corresponding character is displayed in
the text field. To clear the characters
from the field, click the Clear button.
called, verify that number is displayed
in the Phone Number to Dial field.
numbers you called, select a number
from the Recent Calls list.
an entry from the Select from List list
or type a number in the Phone
Number to Dial field.
button in the contact panel and the
button in the upper-right corner of
3Com IP Contact Center Desktop Quick Reference •5
Page 6

A
CCESS VOIC E MESSAGES
1 In Outlook Express, navigate to a
message with a link to a voice message
and open the message.
2 Click the voice message link. The 3Com
IPCC Center system places an internal
call to the voice server and plays the
voice message. When playback is
finished, the system automatically
removes the contact from the panel bar.
To stop playback, click the button in
the contact panel. To replay the voice
message, click the voice message link
again.
3 When finished, click the button in
the upper-right corner of the message
window.
A
CCESS VOICE MESSAGES
F
ROM A REMOTE LOCATION
` You can listen to voice messages in your
3Com inbox folder from a remote
location if your contact center is
configured to allow remote voice
message access, using any touchtone
phone. Ask your 3Com IPCC Center
system administrator for the remote
access code and the DID number.
Listen to your voice messages as follows:
1 Call the remote access number.
2 When prompted to do so, enter your DID
number and password.
3 Follow the prompts to listen to your
voice messages.
D
ISCONNECT A CALL
` Click the button in the contact panel
or click the button on the 3Com
IPCC Desktop toolbar.
E-MAIL FUNCTIONS
LOG ON TO
E
XPRESS ACCOUNT
1 In the Outlook Express window, do one
of the following:
■ Click your logon name in the Folders
list, and then click the IMAP Folders
button.
THE OUTLOOK
■ Click Yes or OK in the information
message window that appears after
the Outlook Express window is
displayed.
2 In the Logon dialog box, verify that the
User Name field contains your 3Com
IPCC Desktop logon name, type your
3Com IPCC Desktop password, and
then click the OK button.
3 In the Show/Hide IMAP folders dialog
box, click the OK button.
B
ROWSE CLASSIFICATION
FOLDER S
The Classifications folder contains
subfolders for each classification for which
you handle e-mail, voice message, or
callback contacts. You can only view and
claim messages to which you are
authorized.
1 In the Folders section of the Outlook
Express window, click to expand the
Shared folder and the Classifications
folder.
Classification
folders
2 Click a folder to display messages for
the classification.
C
LAIM A MESSAGE
1 Browse the classification folders to
locate a message to claim.
2 Select one or more messages in the
Message list.
3 Drag the messages to your 3Com inbox
folder or Pending folder.
■ Inbox Folder. If you move the
message to your inbox folder, a
timestamp appears in the subject line
indicating the amount of time you
have to respond to the message
before it is escalated.
■ Pending Folder. If you move the
message to your Pending folder, the
Pending Work field in the Personal
Status panel increments by one (1)
6•3Com IP Contact Center Desktop Quick Reference
Page 7

or—if the message is part of a
thread—the total number of
messages in the thread.
After responding, you must delete the
message to remove it from the
Pending folder. For information about
deleting a message, see “Delete a
message” on the next page.
O
PEN A MESSAGE
` Double-click the message in the
message list to open the message in its
own window.
` Click the message to open it in the
preview pane.
R
ESPOND TO A MESSAGE
1 Claim a message to your 3Com inbox or
Pending folder.
2 Open the message and do one of the
following:
■ If the message is an e-mail contact,
click the button at the top of the
message window, enter your
response, and then click the
button in the message window.
■ If the message is a voice message or
a callback contact, access the voice
message or make the call as
described on page 6.
3 Delete the message from the folder, if
necessary.
F
ORWARD A MESSAGE
1 Claim a message to your 3Com inbox
folder.
2 Open the message.
3 Click the button at the top of the
message window.
4 Enter the recipient’s e-mail address in
the Address field.
5 Click the button at the top of the
message window.
D
ELETE A MESSAGE
1 Select the message in the Outlook
Express message list.
2 Click the button on the Outlook
Express toolbar.
S
END AN E-MAIL MESSAGE
TO ANOTHER USER
1 Click the button on the 3Com IPCC
Desktop toolbar.
2 Do one of the following:
■ To send a message to the last user to
whom you sent a message, verify the
logon name in the User Name to Email field.
■ To send a message to one of the last
10 users to whom you sent a
message, select a logon name from
the Recent Calls list.
■ To send a message to another user,
select the user name or type the logon
name of the user in the User Name to
E-mail field.
3 Click the E-mail button.
4 Enter a subject in the Subject field and a
message in the message window.
5 Click the button at the top of the
message window.
S
END AN E-MAIL MESSAGE
TO AN EXTERNAL ADDRESS
1 Click the Create Mail button in the
Outlook Express window.
2 Type the recipient’s e-mail address in
the To field.
3 Enter a subject in the Subject field and a
message in the message window.
4 Click the button at the top of the
message window.
A
CCEPT AN ESCALATED
E-MAIL, VOICE MESSAGE, OR
CALLBACK CONTACT
` Click anywhere in the panel that
represents the e-mail, voice message,
or callback contact (except the
button).
Note: If you do not respond immediately
after you accept the contact, click the
button in the contact panel to save
the message to your Pending folder.
3Com IP Contact Center Desktop Quick Reference •7
Page 8

T
RANSFER AN ESCALATED
CONTACT TO A USER
To transfer an escalated e-mail, voice
message, or callback contact to a user:
1 While connected with a contact, click the
button on the 3Com IPCC Desktop
toolbar.
2 Select the user name or type the logon
name of the user in the User Name to
E-mail field.
3 Click the E-mail button.
4 Close the message window.
T
RANSFER AN ESCALATED
CONTACT TO A
CLASSIFICATION
To transfer an escalated e-mail, voice
message, or callback contact to a
classification:
1 While connected with a contact, click the
button on the 3Com IPCC Desktop
toolbar.
2 Select a classification.
3 Click the E-mail button.
4 Close the message window.
GET
HELP FOR OUTLOOK
` In the Outlook Express window, select
Help
→Contents, and then click Index.
WEB COLLABOR ATION FUNCTIONS
A
CCEPT A WEB CONTACT
` Click anywhere in the contact panel that
represents the Web contact (except for
the button).
The 3Com IPCC Web Collaboration
window opens, if necessary, and
displays caller information and the Web
page sent with the caller information.
V
IEW CALLER INFORMATION
` Look at the caller information panel in
the 3Com IPCC Web Collaboration
window.
The panel displays the name, phone
number, and e-mail address submitted
by the caller (immediate- assistance
Web contacts only), the caller’s Web
browser information sent by the 3Com
IPCC Center system, and the current
connection status.
Caller: Michael
Phone: (408) 555-5446
E-mail: michaelt@email.com
Browser: IE 6.0 on Windows
Your call has been connected.
S
END TEXT MESSAGES
1 After a Web collaboration session is
established, type text in the text
message panel of your 3Com IPCC
Web Collaboration window.
2 Click the Send button or press the Enter
key.
Message entries appear in the chat
transcript panel, preceded by a unique
ID; for example, <caller> or <logon
name>.
S
HARE WEB PAGES
1 Send a text message to inform the other
participants that you are about to display
a Web page.
2 Enter the URL in the Address field of the
Web browser (either type the address,
click a link on a Web page, or select a
saved page from your Favorites folder).
3 Press the Enter key. The Web page is
displayed immediately in the page
sharing frame of the 3Com IPCC Web
Collaboration window.
H
ELP A CALLER WITH A WEB
FORM
1 While connected with a Web contact,
navigate to the form that you want to
help the caller complete.
2 Enter text or make changes on the Web
form. Any changes are immediately
reflected on the Web form and can be
viewed by you and the caller
simultaneously.
8•3Com IP Contact Center Desktop Quick Reference
Page 9

C
ALL A CUSTOMER DURING A
WEB
SESSION
1 Click the caller’s phone number in the
caller information panel.
2 In the New Voice Call dialog box, make
any necessary changes to the phone
number and outbound access
information.
3 Click the Call button. The 3Com IPCC
system places an outbound call to the
customer.
4 To disconnect from the call and the Web
collaboration session, click the
button in both contact panels.
H
IGHLIGHT TEXT
1 Select the text that you want to highlight
in the page sharing frame of the Web
Collaboration window.
2 Click the Highlight button. After text on a
Web page is highlighted, you cannot
remove the highlight.
H
ANDLE A
MEET-ME SESSION
Before you begin, be sure that you have
your logon name, your meet-me ID, and the
meet-me session URL.
Note: Click the button on the 3Com
IPCC Desktop toolbar to locate your
current meet-me ID.
1 While connected with a voice contact,
tell the caller to go to the appropriate
URL.
2 Instruct the caller to enter your logon
name and meet-me ID and then click
the Submit button.
Note: You can also send the information
in an e-mail message.
3 Accept the inbound Web contact.
4 Conduct a Web collaboration session
with the caller.
5 To disconnect from the call and the Web
collaboration session, click the
button in both contact panels.
I
NITIATE A WEB SESSION
1 Click the button on the 3Com IPCC
Desktop toolbar.
2 Do one of the following:
■ To connect to the last user with whom
you initiated a session, verify the
logon name in the User Name to
Connect field.
■ To connect to one of the last 10 users
with whom you initiated a session,
select a logon name from the Recent
Calls list.
■ To connect to another user, select the
user name or type the logon name of
the user in the User Name to Connect
field.
3 Click the Connect button. The 3Com
IPCC system initiates a session with the
user.
4 Conduct a Web collaboration session
with the caller.
5 When complete, disconnect the Web
contact.
T
RANSFER A WEB CONTACT
TO USER
1 While connected with a Web contact,
initiate a Web session with another
3Com IPCC Desktop user.
2 When the second participant is
connected, announce the transfer.
3 Click the button on the 3Com IPCC
Desktop toolbar and click the contact
panel that represents the original
session.
4 When prompted, select a wrap-up code
and click Done.
T
RANSFER A WEB CONTACT
TO A CLASSIFICATION
1 While connected with a Web contact,
click the button on the 3Com IPCC
Desktop toolbar.
2 Select a classification and click the
Transfer button.
3 When prompted, select a wrap-up code
and click Done.
3Com IP Contact Center Desktop Quick Reference •9
Page 10

E
STABLISH A WEB
CONFERENCE
1 While connected with a Web contact,
initiate a Web session with another user.
2 When the second participant is
connected, click the button on the
3Com IPCC Desktop toolbar.
3 Click the contact panel that represents
the first participant.
D
ISCONNECT A WEB
CONTACT
` Click the button in the contact panel.
■ The contact panel is removed from
the panel bar.
■ The chat transcript panel indicates
that the session is disconnected and
the Web collaboration window is
minimized to the shutter bar.
■ A transcript of the session, including
comments from monitoring and
coaching, is stored and is sent to the
caller, if the caller entered a valid
e-mail address.
3Com IPCC C
H
ISTOR Y VIEWER
S
TART CONTACT HISTORY
V
IEWER
ONTACT
` Click the button on the 3Com IPCC
Desktop toolbar.
Note: If the 3Com IPCC Contact History
Viewer icon appears dimmed, you do not
have access to the application.
S
EARCH PRIOR CONTACTS
1 Enter your criteria in the Search Criteria
section of the 3Com IPCC Contact
History Viewer window.
2 Click the Search button.
S
TOP A SEARCH
` While a search is in progress, click the
Stop button in the Search Criteria
section.
C
LEAR SEARCH CRITERIA
` After a search is complete, click the
Reset button in the Search Criteria
section.
` If you want to clear only the date
selection and retain the remainder of the
search settings, click the Clear Date
Selection button.
R
EVIEW SEARCH RESULTS
Search results appear in the Results
section of the 3Com IPCC Contact History
Viewer.
■ Click a button next to the name of a
classification to display the contacts.
■ Click a button next to a contact to
display a list of contact segments and
the contact summary.
■ Click a button next to a contact
segment to display details of that
segment.
R
EVIEW MEDIA COMPONENTS
You must have the appropriate access
privileges to view a handled e-mail
message or Web collaboration transcript,
or to play a voice message or recording.
1 In the Search Criteria section, search for
the appropriate contact type. For
example, if you are searching for voice
contacts that include recorded
components, click the “Only show items
with recorded content” checkbox.
2 In the Results section, click the
button next to a segment to display the
details of the segment. If you are
authorized to review the media
component and it is included in the
contact segment, the Voice Message or
the View Messages field is enabled.
3 In the Details section, click the button in
the Voice Message or View Messages
field. For example, if you are reviewing a
Web collaboration transcript, click the
Read Web Collaboration Transcript
button in the View Messages field.
The appropriate application or 3Com
IPCC Desktop component opens:
10 • 3Com IP Contact Center Desktop Quick Reference
Page 11

■ Web collaboration transcripts, e-mail
messages, voice messages, and
callback requests are displayed in a
browser window.
■ Voice recordings are played
immediately by way of an internal call
to the 3Com IPCC Voice Manager.
4 When finished, close the application
window or disconnect the contact in the
contact panel.
GET H
C
OMMON ISSUES
C
ALL A SUPERVI SOR
ELP FOR
1 Click the button on the 3Com IPCC
Desktop toolbar.
2 Select a name from the Supervisors list.
3 Click the Call button. If you are
connected on another call, that call is
immediately put on hold.
I
NITIATE A WEB CHAT WITH
A SUPERVISOR
1 Click the button on the 3Com IPCC
Desktop toolbar.
2 Select a name from the Supervisors list.
3 Click the Connect button. The 3Com
IPCC system initiates a session with the
supervisor.
4 Exchange text messages in the chat
transcript panel of the 3Com IPCC Web
Collaboration window.
S
END AN E-MAIL MESSAGE
TO A SUPERVISOR
1 Click the button on the 3Com IPCC
Desktop toolbar.
2 Select a name from the Supervisors list.
3 Click the E-mail button.
4 Enter a subject and message in the
e-mail message window.
5 Click the button at the top of the
e-mail message window. The message
is delivered to the supervisor’s 3Com
inbox folder.
GET
OUT OF THE
NOT R
ESPONDING STATE
` On the Change State menu, select
Resume.
D
ETECT WHEN A MEDIA
COMPONENT IS NOT
AVAILA BLE
The following icons may be displayed in
your Personal Status panel when either of
the following situations occur: (1) the
application required to run a media type to
which you are assigned is not running on
your computer, or (2) the corresponding
application server is unavailable.
Application Server
Soft Phone Vo ic e
While access to an application or the
server is interrupted, you cannot receive
immediate-assistance contacts and cannot
claim deferred-assistance contacts of that
media type.
For information about what to do when a
media type to which you are assigned is
unavailable, refer to the 3Com IPCC
Desktop online Help.
Internet
Explorer
Outlook
Express or
MUAA
Soft Phone,
Outlook
Express, or
MUAA
Soft Phone,
Outlook
Express, or
MUAA
Web
collaboration
E-mail or
Voi ce
E-mail or
Voi ce
E-mail or
Voi ce
3Com IP Contact Center Desktop Quick Reference •11
Page 12

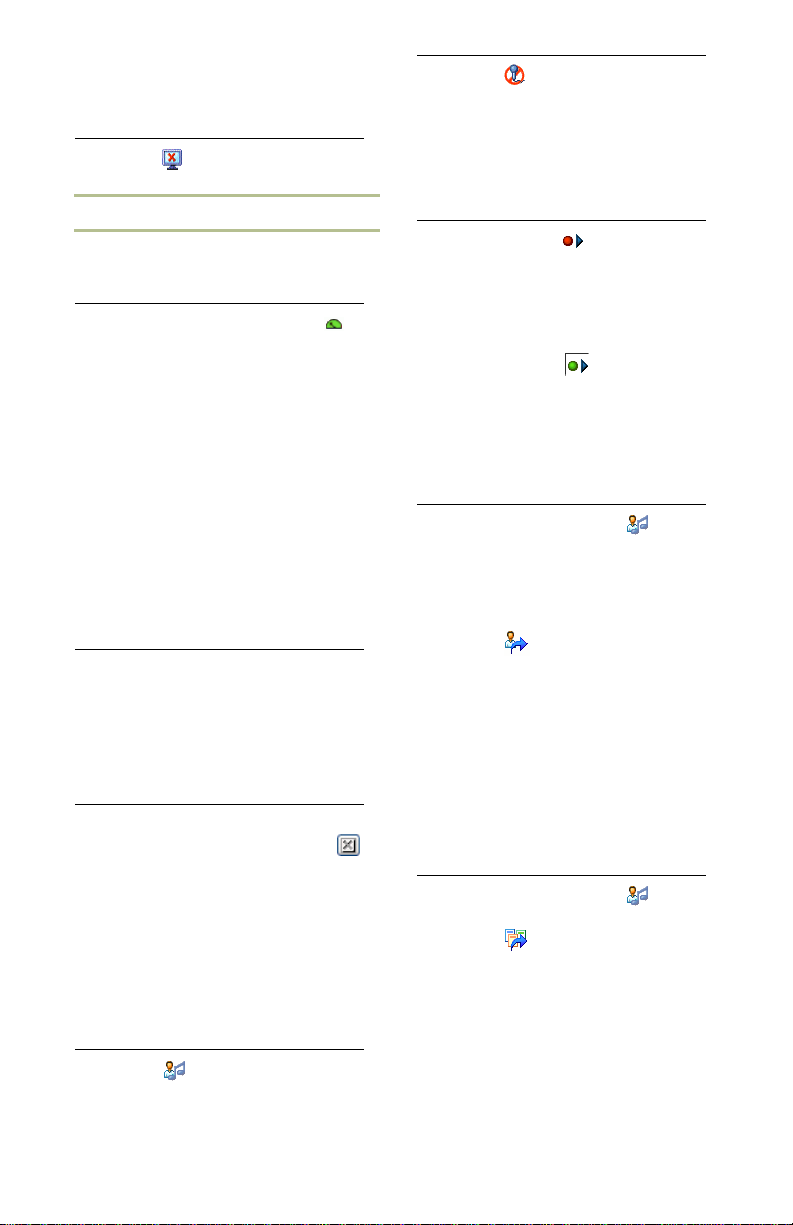
3Com IPCC Desktop Toolbar Buttons
Disconnect a contact.
Transfer a contact to another 3Com IPCC Desktop user.
Establish a voice or Web collaboration conference.
Put a voice contact on hold.
Open the New Voice Call address book to initiate a voice contact.
Open the New Web Session address book to initiate a Web
collaboration session.
Open the New E-mail Message address book to create an e-mail
message.
Transfer an immediate-assistance contact to another classification.
Change your user state or log off the 3Com IPCC Desktop.
Open the Phone Controls dialog box to generate touch tones during
a voice contact, adjust the volume on your headset or microphone,
or specify that the incoming call ring is generated on an alternate
speaker.
Open 3Com IPCC Contact History Viewer.
Open Real-Time Status Viewer and click on the My Statistics tab to
view personal statistics.
Prevent the other parties in a voice contact from hearing you.
Record a voice contact.
Notify all logged-on supervisors of an emergency during a contact.
Log off the 3Com IPCC Desktop and all applications managed by
the 3Com IPCC Desktop.
Display the 3Com IPCC Desktop Help system.
Open the About box to verify the software version of the 3Com IPCC
Desktop or get your meet-me ID.
Copyright © 2006, 3Com Corporation
All rights reserved.
3Com Corporation is headquartered in Marlborough, MA.
3Com and the 3Com logo are registered trademarks of 3Com Corporation. Shutters® is a registered
trademark of Nuasis Corporation. Other product and company names herein may be the trademarks of
their respective owners.
Product Version 7
Part Number 900-0360-01, Rev. AA
Published May 2006
 Loading...