

Page 1

Applications Handbook for the Palm III™ Organizer
Page 2

Copyright
Copyright © 1998 3Com Corporation or its subsidiaries. All rights reserved.
3Com, the 3Com logo, Palm Computing, Graffiti and HotSync are registered
trademarks, and PalmPilot, Palm III, Palm OS, Palm, the Palm Computing
platform logo, the PalmPilot logo and the Palm III logo are trademarks of
Palm Computing Inc., 3Com Corporation or its subsidiaries. Other product
and brand names may be tra demarks or regis tered trad emarks of their respective owners. This product is not manufactured by Pilot Corporation or Pilot
Corporation of America, manufacturers and distributors of writing instruments.
Disclaimer and Limitation of Liability
3Com Corporation and its subsidiaries assume no responsibility for any damage or loss resulting from the use of this handbook.
3Com Corporation and its subsidiaries assume no responsibility for any loss
or claims by third parties which may arise through the use of this software.
3Com Corporation and its subsidiaries assume no responsibility for any damage or loss caused by deletion of data as a result of malfunction, dead battery
or repairs. Be sure to ma ke backu p copies o f all import ant da ta on o ther media
to protect against data loss.
Important: Please read the “3Com End User Software License Agreement”
contained in the Basic Handbook for the Palm III Organizer before using the ac-
companying software program(s). Using any part of the software indicates
that you accept the terms of the 3Com End User Software License Agreement.
3.5" Software Diskettes Available
Palm Desktop software is supplied on a CD-ROM disc. If you do not have access to a CD-ROM drive for your co mputer, you may obtain 3.5" disk ettes. S ee
“Technical Support, Service and Repair" in the Basic H and boo k for th e Palm III
Organizer for the phone number to obtain these diskettes, or complete and
mail (or fax) th e diskette offer card supplied in the Palm III organizer product
package.
P/N: 405-0293
A/N: 423-0208
Page ii Applications Handbook for the Palm III Organizer
Page 3

Contents
Chapter 1: Address Book
Getting Started With Address Book Entries .....................................2
Working With Address Book Entries ................................................5
Address Book Menu Commands .....................................................10
Chapter 2: Calculator
Using the Calculator Screen ..............................................................13
Calculator Menu Commands ...........................................................15
Chapter 3: Date Book
Scheduling an Event ..........................................................................18
Rescheduling an Event ......................................................................22
Setting an Alarm for an Event ..........................................................22
Scheduling Repeating Events .............. .......... .. .......... .......................23
Marking a Private Event ....................................................................25
Deleting an Event ...............................................................................25
Changing the Date Book View .........................................................26
Date Book Menu Commands ............................................................29
Chap te r 4: Exp en s e
Creating an Expense Item .................................................................33
Entering Receipt Details ....................................................................35
Show Options ......................................................................................38
Transferring Your Data to Microsoft Excel .....................................39
Expense Menu Commands ...............................................................44
Chap ter 5: Ho tSync
The HotSync Process and the HotSync Manager ..........................47
Performing a HotSync Operation for the First Time .....................48
Conducting a Local HotSync Operation .........................................50
Selecting HotSync Setup Options ....................................................50
Customizing HotSync Application Settings ...................................54
Conducting a HotSync Operation via Modem ..............................55
Conducting HotSync Operation via a Network ............................59
Creating a User Profile ......................................................................59
Using File Link ....................................................................................61
®
Chap te r 6: Mail
Setting Up Mail on the Desktop .......................................................63
Synchronizing Mail with your E-Mail Application .......................66
Opening Mail on your Palm III organizer ......................................66
Viewing Messages ..............................................................................66
Creating Messages ..............................................................................68
Contents Page iii
Page 4

Looking Up an Address ....................................................................70
Addi ng M essage De ta il s ............... .......... .......... .. .......... .......... .. ........ 72
Send in g M e s s age s ......... ... .. .......... ......... ... .......... ......... .......... ... ......... . 75
Editing an Unsent Message .............................................................. 76
Draft Messages ................................................................................... 77
Filing a Message .................................................................................78
Deleting Messages .............................................................................78
Message List Options ........................................................................ 80
HotSy nc Optio n s . ... .. .......... .......... .. .......... .......... .. .......... .......... ......... . 82
Creating Special Filters .....................................................................84
Defi ni ng F ilter Stri ng s ................. .. .......... .......... ......... ... .......... ......... . 86
High-Priority Messages ....................................................................88
Trun ca t in g Me s sa g es ......... .. .......... .......... .. .......... .......... .......... .. ........ 88
Mail Menu Commands .....................................................................89
Chapter 7: Memo Pad
Working With Memos .......................................................................94
Arra n gi ng Me mos .. .......... ......... ... ......... .......... ... ......... .......... ... ......... . 95
Marking a Private Memo .................................................................. 96
Deleting a Memo ................................................................................ 97
Mem o Pa d M e nu Co mmands ...... ... .. .......... .......... ......... ... ......... ......98
Chapter 8 : Preferences
Buttons Preferences ......................................................................... 102
Digitizer Preferences ....................................................................... 105
Formats Preferences ........................................................................ 105
General Preferences ......................................................................... 106
Modem Preferences ......................................................................... 109
Network Preferences and Palm TCP/IP Software ......................110
Owner Preferences ...........................................................................124
Shor tCuts Pre fe re nces ..... ......... .......... .. .......... .......... .......... .. .......... . 125
Chapter 9: Security
Assig ning a Pass word ......... .......... .......... .. .......... .......... .......... .. ......128
Hidi ng P rivate Entri e s ......... ... .......... ......... .......... ... ......... .......... .. ....129
Showing Private Entries .................................................................. 130
Locking Your Palm III Organizer ..................................................130
Changing or Deleting a Password .................................................131
Recovering from a Forgotten Password ....................................... 132
Page iv Applications Handbook for the Palm III Organ izer
Page 5

Chapter 10: To Do List
Opening the To Do List ...................................................................133
Working With To Do Items .............................................................134
To Do Item Details ...........................................................................136
Deleting a To Do Item ......................................................................137
To Do Show Options ........................................................................138
To Do List Menu Commands .........................................................139
Appendix A: Expense Templates
Expense Templates ...........................................................................143
Appendix B: Creating a Custom Expense Report
About Mapping Tables ....................................................................147
Customizing Existing Sample Templates .....................................148
Determining the Layout of the Expense Report ..........................149
Analyzing Your Custom Expense Report .....................................150
Programming the Mapping Table .................................................151
Using Applications Other Than Microsoft Excel .........................156
Expense File Details .........................................................................156
Appendix C: Non-ASCII Characters for Login Scripts
Use of ^ char .......... ......... .......... ... ......... .......... .......... .. .......... .......... .. .157
Carriage Return and Line Feed ......................................................157
Literal Characters .............................................................................158
Index
Index....................................................................................................159
Contents Page v
Page 6

Page vi Applications Handbook for the Palm III Organizer
Page 7

Chapter 1
Address Book
The Address Book enables you to keep names, addresses,
phone numbers and other i nformation ab out your personal or
business co ntacts.
With the Address Bo ok, you can :
■ Quickly look up or ente r names, addresses, phone numbers and
other information.
■ Enter up to five phone numbers (home, work, fax, car, etc.) or
e-mail addresses for each name.
■ Define which phone numbers appear in the Address List screen
for each Address Book entry.
■ Attach a note to each Address Book entry where you can enter
additional information about the entry.
■ Assign categories to your Address Book entries, so you can
quickly sort and view your entries in logical groups.
To open the Address Book:
■ Press the Ad dress Book b u tton on the front panel of the Palm III
connected organizer to disp lay the Address Book on the scre e n.
A
P
S
P
N
L
O
I
I
T
C
A
a
b
c
M
U
N
E
Addres s button
Chapter 1 Page 1
C
A
R
L
O
C
T
A
U
L
3
2
F
I
D
N
1
™
Page 8

Getting Started With Address Book Entries
An Address Book entry is where you store name and address
information about people or businesses. Your Palm III organizer
makes it easy to c reate, edit and delete Address Book entries.
Creating an Address Book Entry
You can create Address Book entries on your Palm III organizer, or
you can use the Palm
entries on your computer and download the entries to your Palm III
organizer with the next H otSync
chapter for details.
Note: The Palm Desktop software also has data Import capabilities
that enable you to load database files into the Address Book
on your Palm III orga ni zer. R ef er to t he on line doc umen tat ion
supplied with the Palm Desktop software for details.
To create a new Address Book entry:
1. Press the button on the front of your Palm III organizer to
display the Address List screen.
2. Tap the New button to display the Address Edit screen.
™
Desktop sof tware to create Address Book
®
operation. See the “HotSync”
Cursor
at Last
name
Tap New
3. Enter the last name of the person you want to add to your
Address Book.
Page 2 Appl icat ions H andbo ok for the Palm III Organizer
Page 9

Note: Your Palm III organizer automatically capitalizes the first
letter of each field (except numeric and e-mail fields). You
®
do not have to use the Graf fiti
capital strok e t o capi tali ze
the first letter of th e name.
4. Use the Next Field Graffiti stroke to move to the First Name field.
Next Field
Note: You can also move to any field by tapping it directly.
5. Enter the person's first name in the First Name field.
6. Repeat steps 4 and 5 to enter the other information that you want
to include in this Address Book en try.
7. Tap the arrows to move to th e next page of information.
8. After you finish entering information, tap the Done button to
return to th e Address Li st screen.
Tap Done
Tip: You can create an Address Book entry that always appears at
the top of the l ist by beginnin g the Last name (or Company
name) field with a blank s pace. For example, you might cr eate
an " If Found Call" entry that contains your name and phone
number in case you lose your Palm III organizer.
Chapter 1 Page 3
Page 10

Editing an Address Book Entry
After you cr e a te an Address Book e ntry, you can update it or enter
additional inf ormation any time.
To edit an Address Book entry:
1. Tap the Address Book entry that you want to change to display
the Address View screen for that entry.
2. Tap the Edit bu tton (or anywhere on the screen) to display the
Address Edit screen.
3. Tap any field (Address, City, etc. ) an d enter or change the
information.
4. After you finish, tap the Done button t o re turn to the Address
List screen.
Deleting an Address Book Entry
There are two ways to delete an entry: use the Menu Commands
(descri b e d i n the “Record Menu” se ction of this chapter) or use the
Address Entry Details dialog.
To delete an entry with the Address Entry Details dialog:
1. Tap the Add ress Book e ntry that y ou want to delete to display the
Address View screen for that entry.
2. Tap the Edit bu tton to display th e Ad dress Edit screen.
3. Tap the Details b u tton to open the Event De tails dialog.
4. Tap the Delet e button to open the Dele te Address alert.
5. Tap the OK but ton to confirm you want to delete the entry.
Page 4 Appl icat ions H andbo ok for the Palm III Organizer
Page 11
Working With Address Book Entries
Your Palm III organizer enables you to quickly find your Address
Book entries , group them by category, and display the e ntries by name
or company name . You can also ch oose the type of information you
want your entries to include and exchange Address Book information
with other 3Com
Looking Up Address Book Entries
When working with the Address Book, the scroll button on the fr ont
panel of the Palm III organizer makes it easy to navigate among your
address e ntr ies. I n the Ad dress L ist s cre en, th e scrol l bu tton mo ves up
or down an entire screen of address entries. If you hold down the
scroll butt on, you ac celerate the scrolling so that it displ ays every th ird
screen. In the Address View screen, the scroll button moves to th e
previous or next address entry.
You can also use the A ddr ess Li st Look Up fe atur e to quickl y sc roll t o
any of your Address Book entries.
To Look Up an Address Book entry:
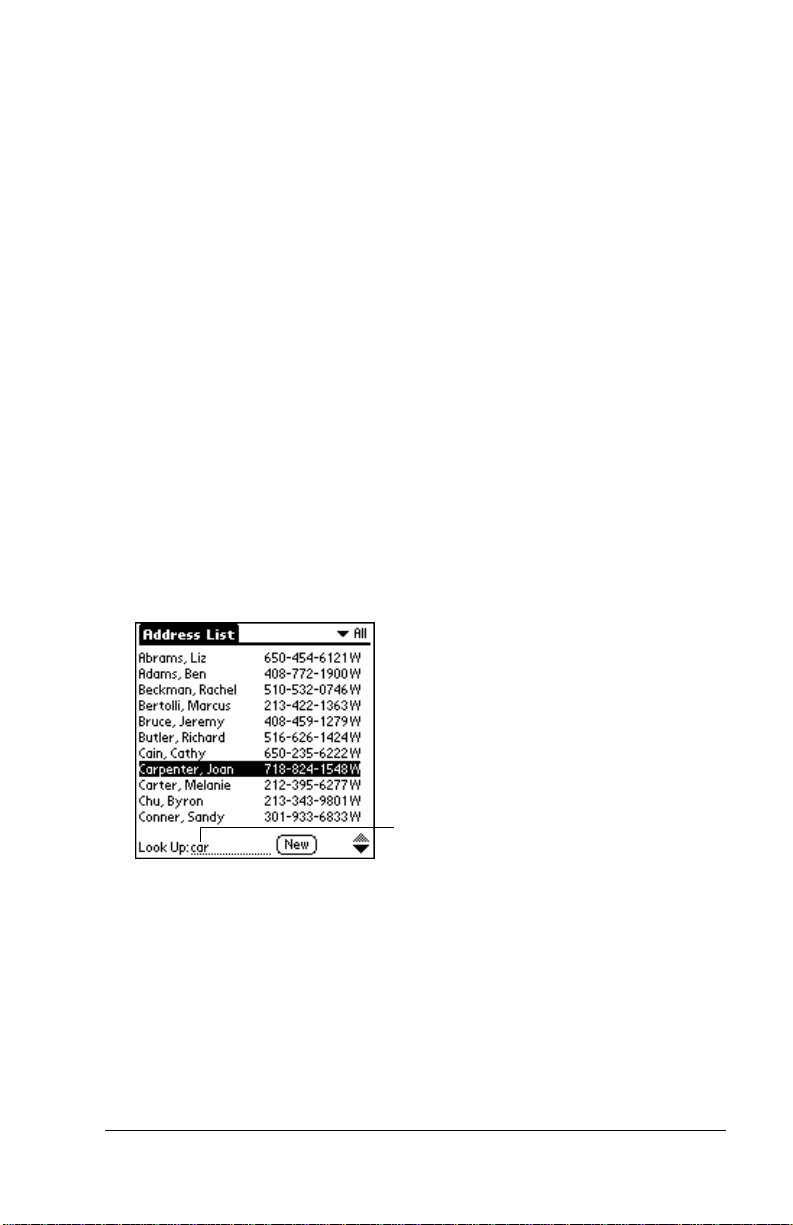
1. Display the Address List screen.
2. Enter th e first letter of th e name you want to fin d.
®
connected organizer users.
Look Up line
Note: The letter appears on the Look Up line and the list scrolls
to the first entry that begins with that letter. If you write
another let te r, the list scrolls to th e f irst entry that starts
with those two lett ers. For example, writing an “s” might
scroll to “Sands, ” and writing “sm” might scrol l further to
“Smith.” If you sort the list by company name, the Look
Up fea tu r e scrolls to th e f irs t l e tt e r o f the compa n y na me .
3. Tap any en try to vie w its c ontents , or use th e carr iage retur n strok e
to view th e sel e c ted entry.
Chapter 1 Page 5
Page 12
Choosing Types of Phone Numbers
Your Palm III organizer enables you to choose the types of phone
numbers or e-mai l address es that you associa te with an Address Book
entry. Any changes you make will apply only to the current Address
Book entry.
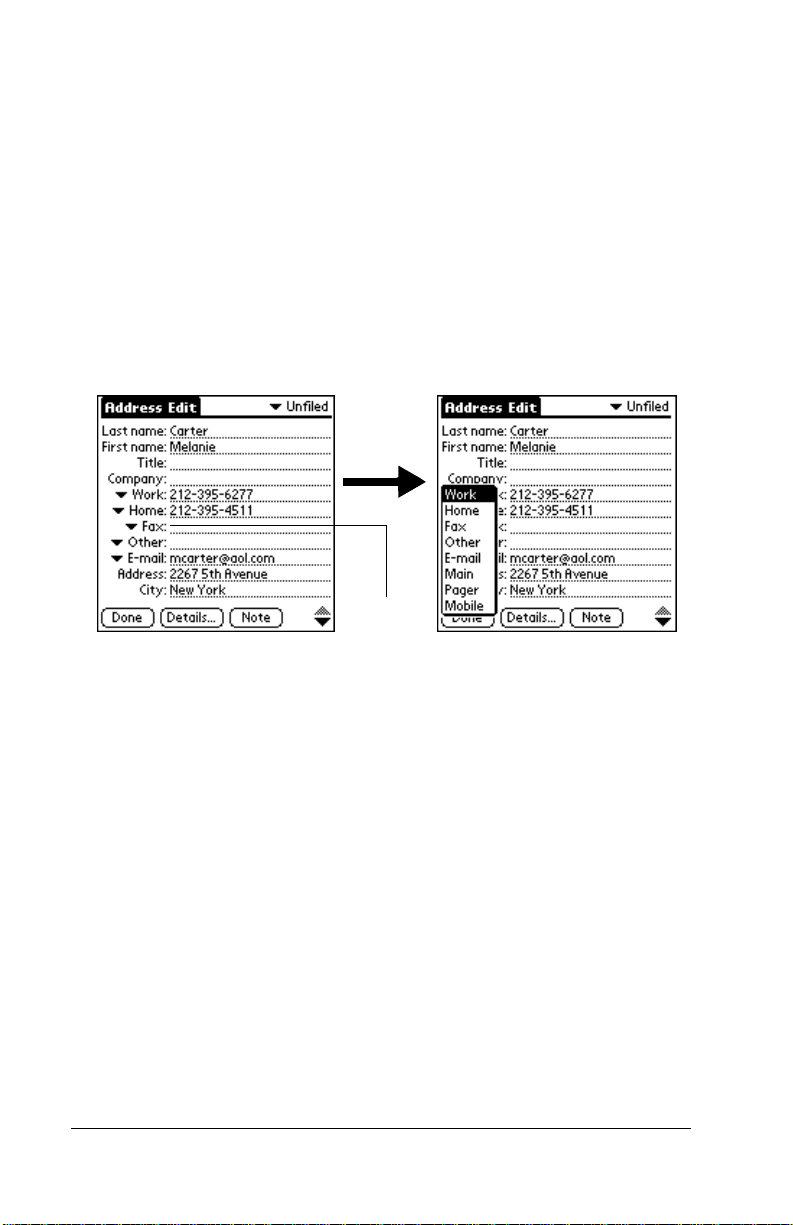
To choose other types of phone numbers in an Ad dress Book entry:
1. Tap the Address Book entry that you want to change to display
the Address View screen for that entry.
2. Tap the Edit bu tton to display th e Ad dress Edit screen for
that entry.
3. Tap the pick list next to the label you want to change.
Tap
triangle
4. Tap the new label you want to use.
Assigning Address Categories
Categories can help you file indiv idual Address Book entries into
groups for easy review. You can assign and edit categories in the
Address Book or by using the Categories pick list in the Details dialog
(see “Using Categories” in the Basic Handbook for the Palm III Organizer
for a complete description of categories).
To assign a category to an Address Book entry:
1. Tap the Address Book entry you wan t to assign to a category.
2. Tap the Edit button in the Address View screen to display the
Address Edit screen.
3. Tap the pick list in the upper-right corner an d tap the category that
you want to assign to the Address Book entry.
Page 6 Appl icat ions H andbo ok for the Palm III Organizer
Page 13

Sorting by Name or Company
You can sort the entries in the Ad dress List scre e n by Company and
Last Name, rather than by Last Name and First Name. Thes e se ttings
do not change your Address Book data in an y way; they merely
change the view.
To sort the entries in the Address List screen:
1. Display the Address List screen.
2. Tap the icon to open the Address Book menus.
3. Tap Pref e rences fr om the Op tion s me nu to ope n t he Addres s Boo k
Preferences dialog.
4. Tap the setting that you want for the A dd ress List screen.
5. Tap the OK but ton to display the Address List screen with your
new setti ng.
Note: Entries with no company name sort by last name.
Changing Address Entry Details
The Address Entry Details di alog provides a var iety of optio ns that
you can associate with an Address entry.
To open the Address Entry Details dialog:
1. Tap an Address Book entry to disp lay the Address View screen
for that entry.
2. Tap the Edit button to display the Address Edit screen.
3. Tap the Details button to ope n the Address Entr y Details dialog .
Chapter 1 Page 7
Page 14

4. Select any of the following settings:
Show in List
Choose which type of phone or other information
appears on the Address List screen for the current
entry. Your options are: Work, Home, Fax, Other
and E-mail.
Category
Assign the entry to a particular categor y. You r
options are: Business, Personal, QuickList,
Unfiled and Ed it Ca te go rie s.
Private
Hide this entry when the security features are
turned on.
Beaming Address Entries to Other 3Com Connected Organizers
The IR port on your Palm III organizer enables you to beam Address
Book entries to other 3Com connected organizers. You can beam any
of the foll o wing:
■ Busine s s ca rd. A specially designated entry containing
informa tion you wan t to exchan ge with bus iness cont acts. You can
send your busi n e ss ca rd quickly with one - to u c h bea ming.
■ Current address entry. The entr y currently selected on your Palm
III organizer. For example, you may want to beam the name of a
business contact to a coworker who also uses a Palm III organizer.
■ Category of address entries. All of the entries that you have
assigned to the selected category. For example, you might want to
share your list of restaur a nts with a friend.
Note: For more on the IR port, see “Beaming Information to Other
3Com Connected Organizers” in the Basic Handbook for the
Palm III Organizer.
To select a business card:
1. Create an Address Book entry containing the information you
want on your business card.
2. Tap your business card entry to display the Address View screen
for that entry.
3. Tap the icon to open the Address Book menus.
4. Tap Select Business Card from the Record menu, and tap Yes to
accept this entry as your business card.
Page 8 Appl icat ions H andbo ok for the Palm III Organizer
Page 15

To beam a business card:
1. Tap your business card entry to display the Address View screen
for that entry.
2. Tap the icon to open the Address Book menus.
3. Tap Beam Bu siness C ard from th e Record menu to beam y our card
to another 3Com connected organi zer.
Tip: You can press th e button for about two secon ds to beam
your card.
To beam the current entry:
1. Tap an Address Book entry that you wan t to beam to display the
Address View screen for that entry.
2. Tap the icon to open the Address Book menus.
3. Tap Beam Address from the Re cord menu to beam the current
entry to ano ther 3Com connected organ izer throug h the IR port.
Tip: You can set the ful l-screen pen stroke to beam the current
entry. See “Pen Preferences” for details.
To beam the current category:
1. Display the Address List screen.
2. Tap the pick list in the upper-right corner and tap the category you
want to beam to disp lay the entries in that category.
3. Tap the icon to open the Address Book menus.
4. Tap Beam Cat e gory from the Re cord menu to beam th e e ntries
in the curren t category to another 3Com c onnected organizer
through the IR port.
Chapter 1 Page 9
Page 16
Address Book Menu Commands
The Address Book includes menu commands to make it fast and easy
to perform common file and editing tasks. This sectio n explains the
menu commands that are specific to the Address Book.
Refer to “ Usin g Me nus” in the Basi c Handbook f or the Pal m III Organizer
for informati on about menu comma nds that are common to al l of your
Palm III organizer applications.
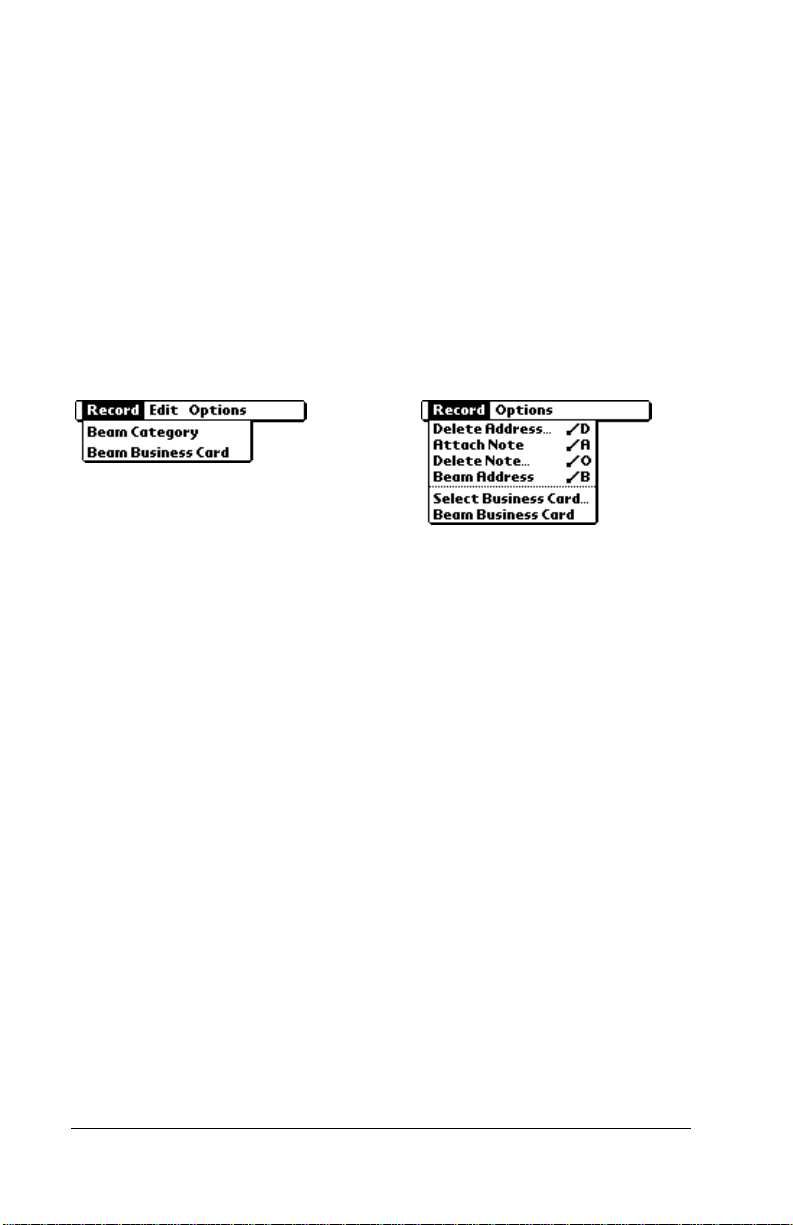
Record Menu
When you select the Record menu, its commands appear on the
screen. The menu commands are slightly different depending on the
current sc reen.
Address List
Address View
Delete Address
Attach Note
Page 10 Applications Handbook for the Palm III Organizer
Opens an alert dialog prompting you to confirm
dele tio n of the current entry . Ta p th e OK butto n
to delete the entry from your Palm III organizer,
or tap the Cancel button to close the alert dialog
and keep the entry.
Note: By default, your Palm III organizer
removes th e entry from the Address
Book, but retains a copy of the entry and
transfers it to an archive fil e on your
computer the next time you perform a
HotSync operation. To remove the entry
completely, clear the Save archive copy
on PC check box.
Opens the Address Book Note dialog where you
can create a Note for the current entry.
Page 17
Delete Note
Opens an alert dialog prompting you to confirm
deletion of the Note at tached t o the entr y. Tap th e
OK button to delete the Note , or tap the Cancel
button to close the alert dialog and keep the note.
Beam Address
Beams the cur rent Addre ss Book entry to an other
3Com connec te d organizer th rough the IR p ort.
Beam Category
Beams all Address Book entries in the current
category to another 3Com connected organizer
through the IR port.
Sel e ct Business
Card
Enables you to select the current Address Book
entry as your business card. To beam your
business card to other 3Com connected
organizers, use the Beam Business Card
command.
Beam Business
Card
Sends the current business card to another 3Com
connected organizer through the IR port. You can
also initiate this command by holding do wn the
Address Book button for at least two seconds.
This is a convenient way to exchange business
cards with other 3Com connected organizer
users.
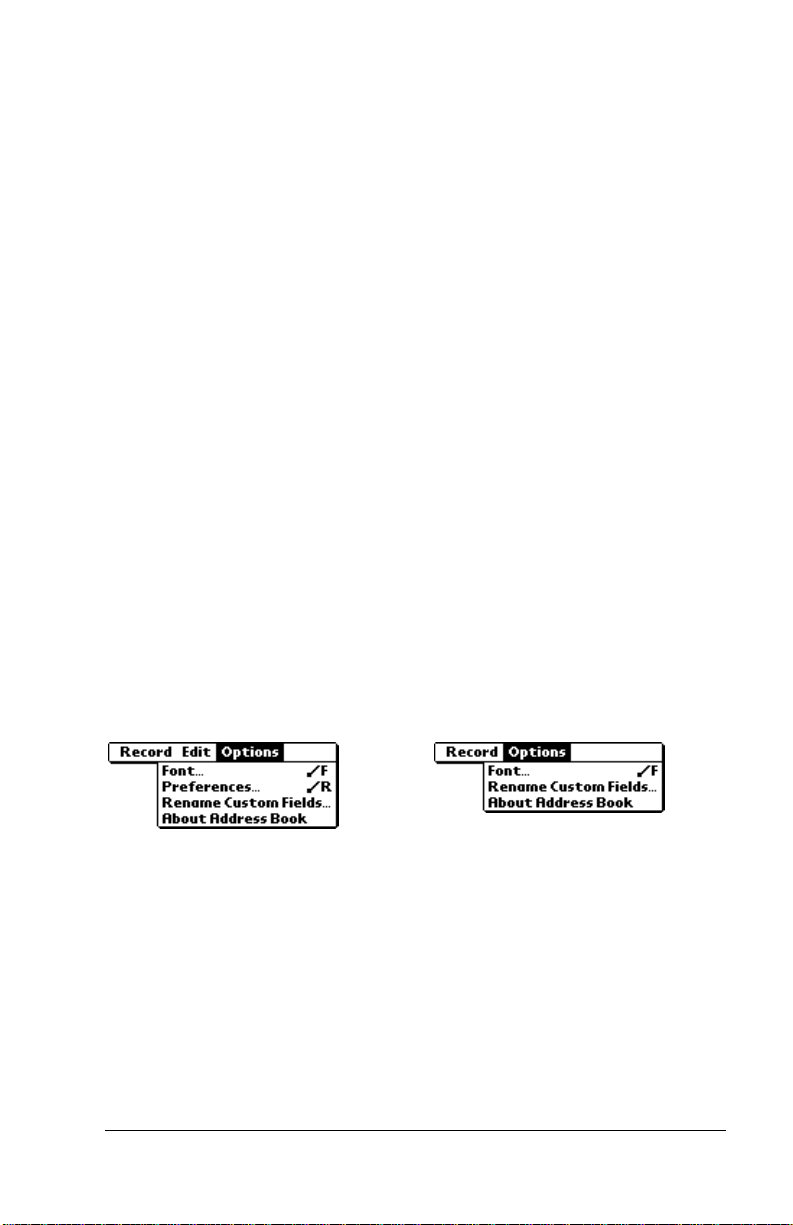
Options Menu
When you select the Options menu, its commands appear on screen.
Address View
Font
Address List
Opens the Select Font dialog where you can
choose a different font (text) style for your
Address Book entries. See “Choosing F onts” in
the Basic Handbook for the Palm III Organizer for
details.
Chapter 1 Page 11
Page 18
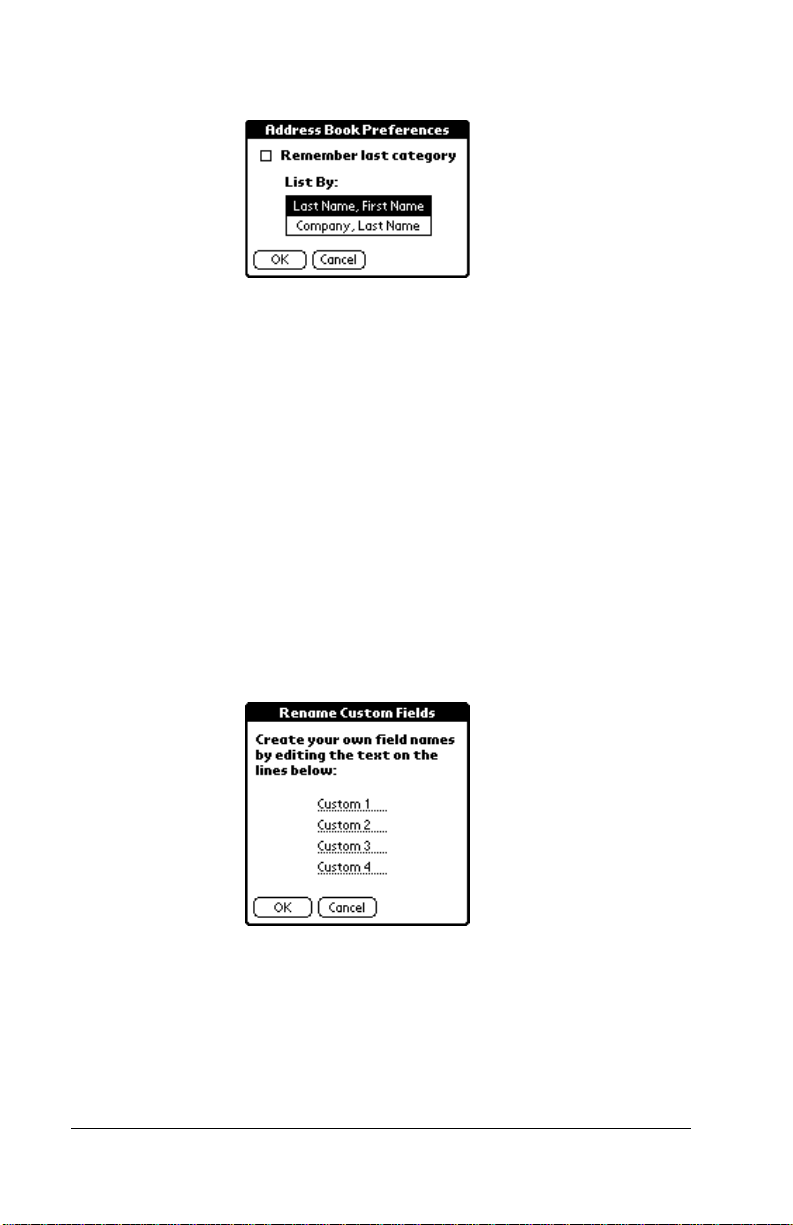
Preference s
Opens the Address Book Preferences dialog.
■ Remember last category. Determines how
the Address Book appears when you return
from another Palm application (Memo Pad,
To Do Li st , e tc .) . I f you se l ect this che c k bo x ,
the Address Book sh ows th e last c ategory you
selected. When you clear it, the Address Book
shows the add ress entries for all categories.
■ List By . Deter min es whether address entries
sort by last name, f irst name or b y company
name, las t name in the Addr ess List screen.
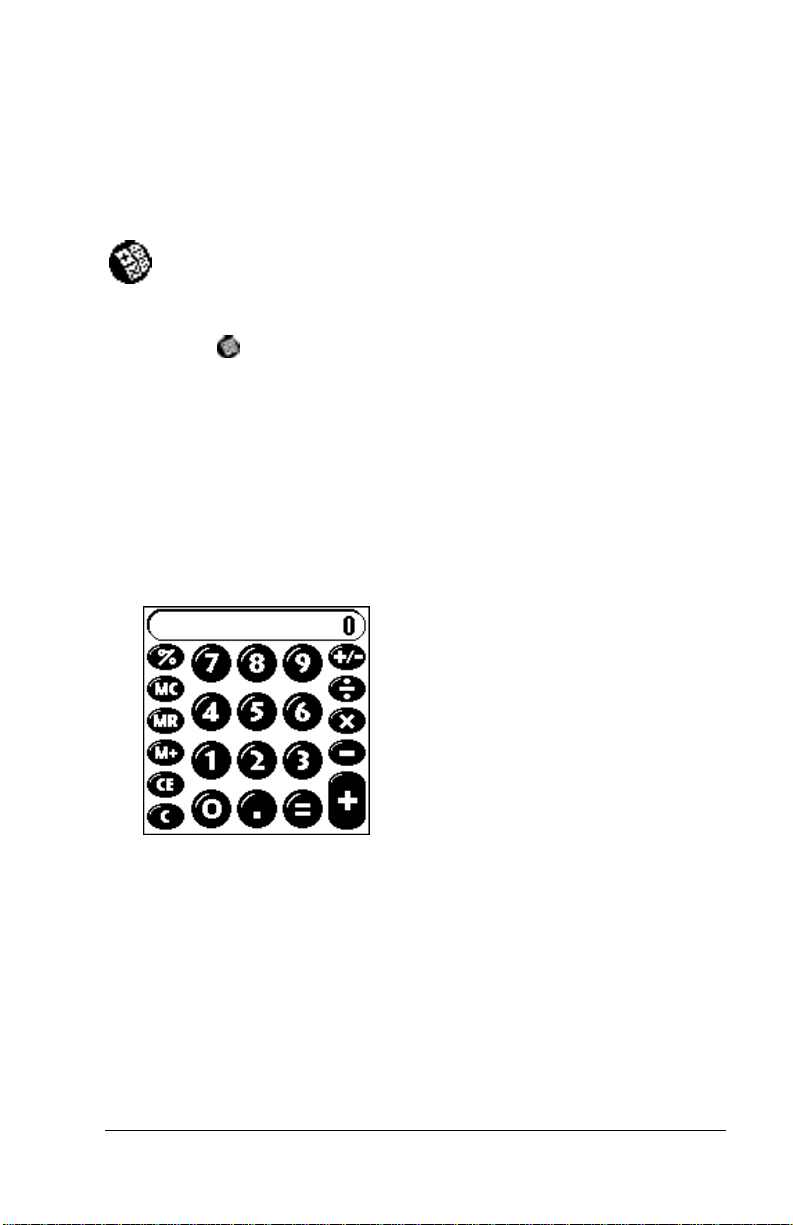
Rename Custom
Fields
Enables you to define custom field names. Each
Address Book entry contains four “custom fields”
that you can rename. Any changes you make to
the names of the custom fields appear in all of
your Address Book entries.
About Address
Book
Page 12 Applications Handbook for the Palm III Organizer
Shows version (revision) information for the
Address Book application.
Page 19
Chapter 2
Calculator
The Calculator enables you to perform basic calculations. You
can also store and retrie ve values in th e Calculator’s memory.
To openin g the Calcul ator:
■ Tap the icon next to the Graffiti
screen.
®
area to open the Calculator
Using the Calculator Screen
The Calcul ator is design e d to perform addition, subt raction,
multiplicatio n and div ision o pera tions .
To use the Calculator screen:
■ Use your fingers or the stylus to tap the Calculator buttons that
appear on the screen.
Chapter 2 Page 13
Page 20
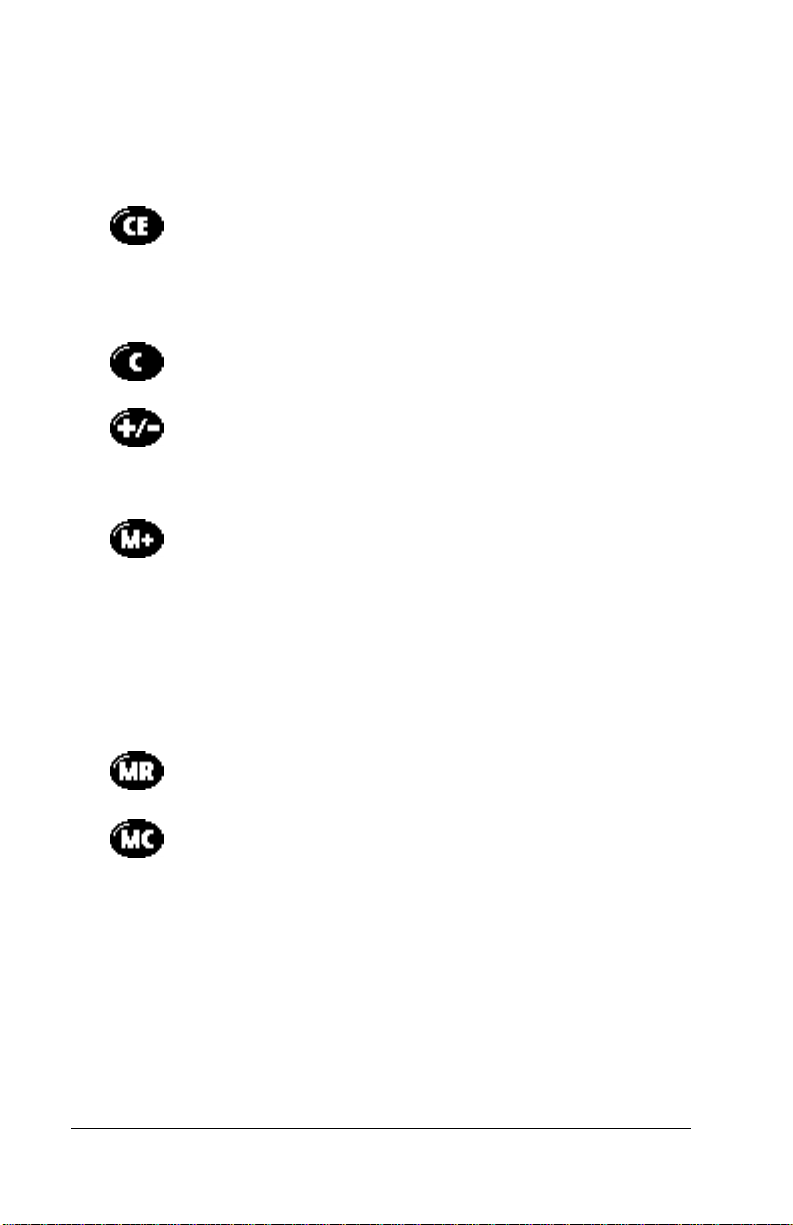
Special Calculator Buttons
The Calculator include s several buttons to help you p e rf orm
calculations.
Clears the last number you entered. Use this
button if you make a mistake while entering a
number in the middle of a calculation. This button
enables you to re -enter the number without
starting the calculation over.
Clears the entire calculation and enables you to
begin a fresh calculation.
Togg l e s the curr e nt n u m b e r b e tw e e n a n e ga tive
and posit i ve va lue . I f yo u want to e nte r a ne gati v e
number, enter the number first and then press th e
+/- button.
Place s th e cu rre n t n umber int o Me m o ry . Eac h
new number you enter with the M+ button is
added to the total already stored in memory. Th e
number that you add can be either a calculated
value, or any number you enter by pressing the
number buttons. Pressing this button has no
effect on th e cu r re nt calcu lat i o n (o r se rie s of
calculations); it merely places the value into
memory until it is recalled.
Recalls the stored value from memory and inserts
it in the current calculation.
Removes any v alu e that i s s tored in t he Cal culat or
memory.
Page 14 Applications Handbook for the Palm III Organizer
Page 21
Calculator Menu Commands
The Calculator supports the Copy and Paste commands. You can use
these command s to cop y a value from the Calc ulato r and past e it in to
another application on your Palm III organizer. Similarly, you can
copy values from other applications on your Palm III organizer, such
as Expense, and paste the values into the Calcu lator. For additional
information on the Copy and Paste commands, see “Using Menus” in
the Basic Handbook for the Palm III Organizer.
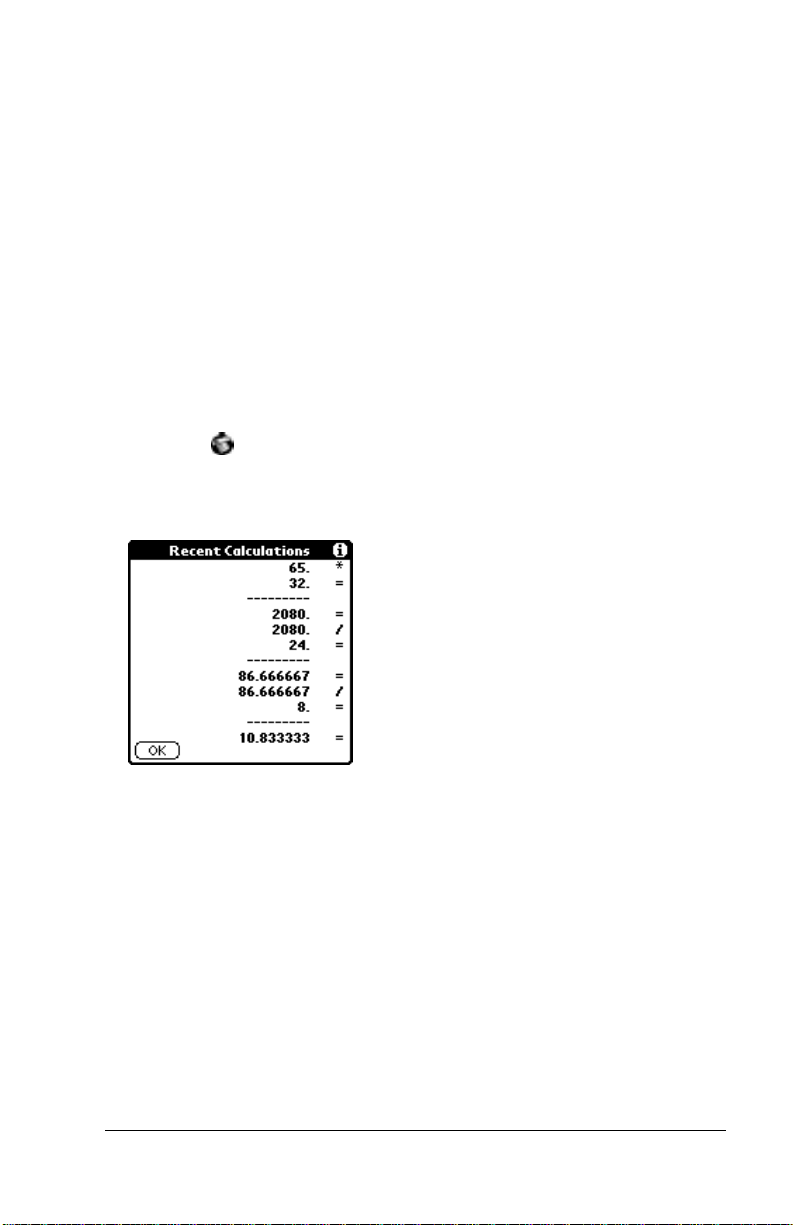
Recent Calculations
The Recent Calculations command enables you to review the last
series of calculations, and is particularly useful for confirming a series
of “chain” calculations .
To display the Recent Calculations:
1. Tap the icon to open the Calcu lator menus.
2. Tap Recent Cal culations f rom the Options menu to displa y the
Recent Calcula tions screen.
3. After you finish reviewing the dialog, tap th e OK button to close
the Recent Calculation s di alog and return to the Calculator.
Chapter 2 Page 15
Page 22

Page 16 Applications Handbook for the Palm III Organizer
Page 23

Chapter 3
Date Book
The Date Book enables you to quickly and eas ily schedule
appointments or any kind of activity associated with a time
and date.
With the Date Book, you can:
■ Enter a descri pt io n of y our appoi ntmen t a nd ass ign i t to a sp ecifi c
time and dat e.
■ Display a chart of your appointments for an entire week. The
Week View featur e make s it eas y to spo t any potent ia l sched ulin g
overlaps or conflicts .
■ Display a monthly calendar to quickly spot days where you have
mornin g, lunch or afternoon appointments.
■ Set an alarm to soun d pri or to the scheduled activity.
■ Create reminders for events that are based on a particular date,
rather than time of day. Bir thdays and anniv e rsaries are e asy to
track with your Palm III
■ Attach notes to individual events for a description or clarification
of the entry in your Date Book.
™
connected organizer.
To open the Date Book:
Press the Date Book button on the front panel of the Palm III organizer
to display the Date Book screen.
A
P
S
P
N
L
O
I
I
T
C
A
a
b
c
M
U
N
E
Date Bo ok button
Chapter 3 Page 17
C
A
R
L
O
C
T
A
U
L
3
2
F
I
D
N
1
Page 24
Scheduling an Event
An event can be any kind of activity that you associate with a day.
When the Date Book screen first appears, it shows the current date
and a list of times for a normal business day. You can enter a new
event on any of the available time lines.
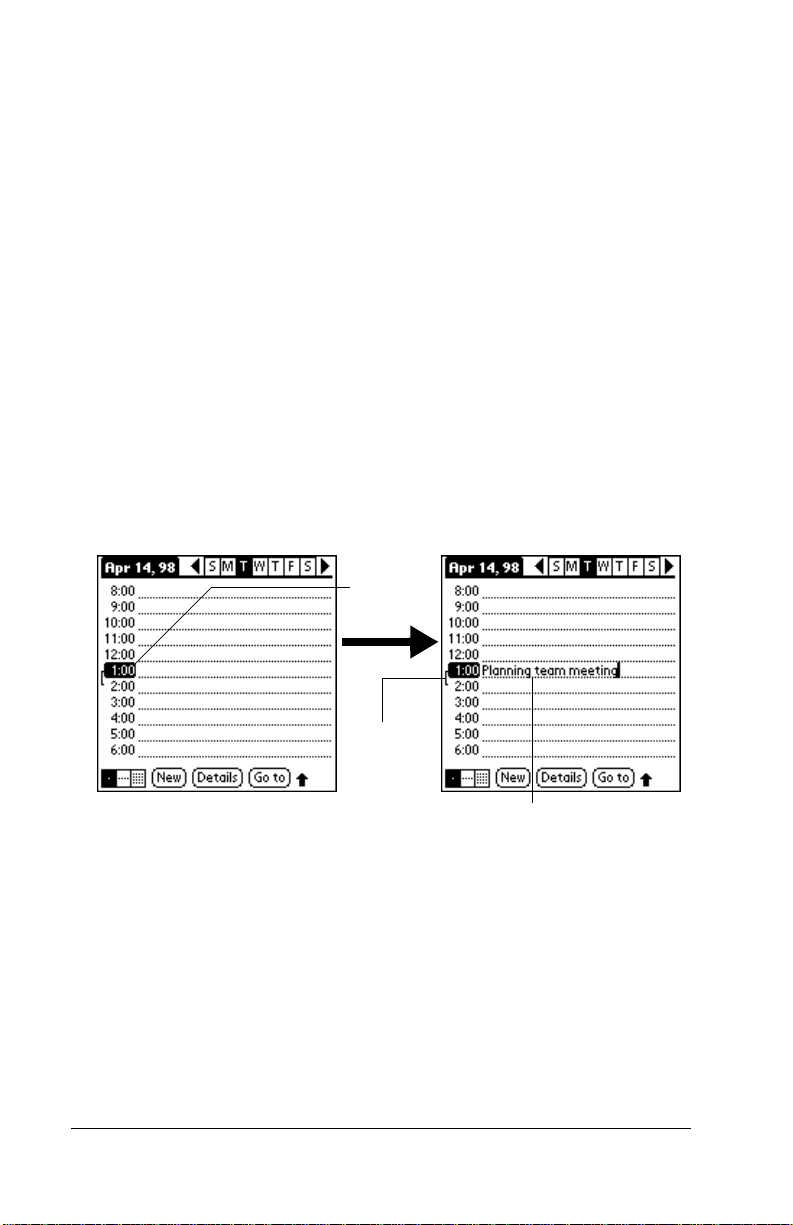
When you create an event, its description appears on the time line, and
its dura tion is a utomati cally s et to one hour . You c an easil y change the
start time and duration for any event.
You can also incl u de e vents in your Date Book that occur on a
particul ar date but have n o sp e cific star t or end times, such as
birthdays, holidays and anniversaries. Thes e are refer red to as
untimed events. Untimed events appear at the top of the Date Book
screen with a diamond in th e time list. You can have se veral untimed
events on a particular date.
To schedule an event for the current day:
1. Tap the time line that corresponds to your event in the Date Book
screen.
Tap a
time line
Time bar
shows
duration
Enter event
®
2. Use the stylus to w rite Graffiti
characte r stro ke s (or th e on -sc reen
keyboard) to describe your event. You can enter up to 255
characters.
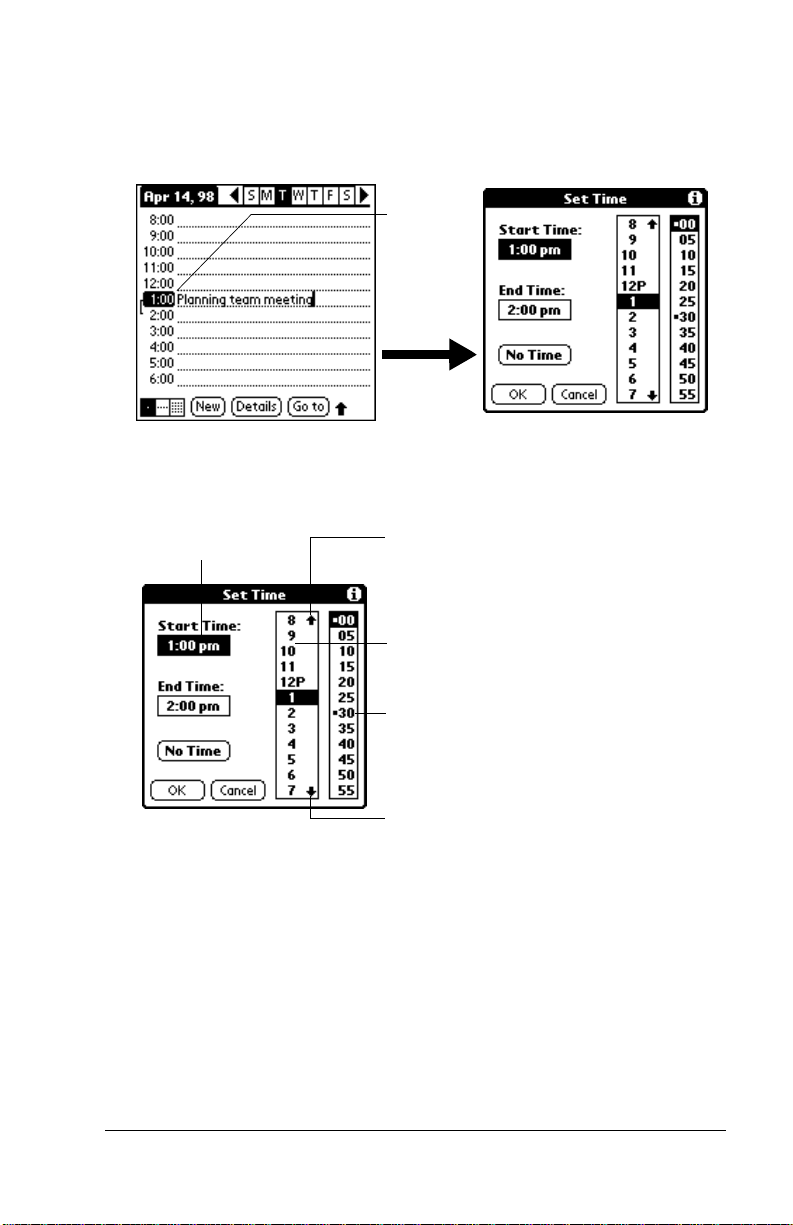
3. If your ap pointmen t is lon ger or shor ter th an an hour, tap the tim e
of the event to open the Set Time dialog. If your appointment is one
hour long, skip to step 7.
Page 18 Applications Handbook for the Palm III Organizer
Page 25
Note: You can also open the Set Time dialog (to sele ct a start
time) by maki ng sure no event is selected, and then
writing a number on the number side of the Graffiti
writing area.
Tap the
time of an
event
4. Tap the time col umns on the rig ht side of the Set Time dialog to set
the Start Time.
Start Time
highlighted
Tap to scroll to
earlier hours
Tap to change
hours
Tap to change
minutes
Tap to scroll to
later hours
5. Tap the End Time box, and then tap the time columns to set the
End Time.
6. Tap the OK button to confir m your selecti on and cl ose the Se t Time
dialo g.
7. Tap a blank area of the scree n to de-selec t the event. A vertical li ne
appears next to the time, indicating the duration of the event.
Chapter 3 Page 19
Page 26
To schedule an event for another day:
1. Sel e c t th e da te you wa n t fo r the even t b y d oing one of th e
following:
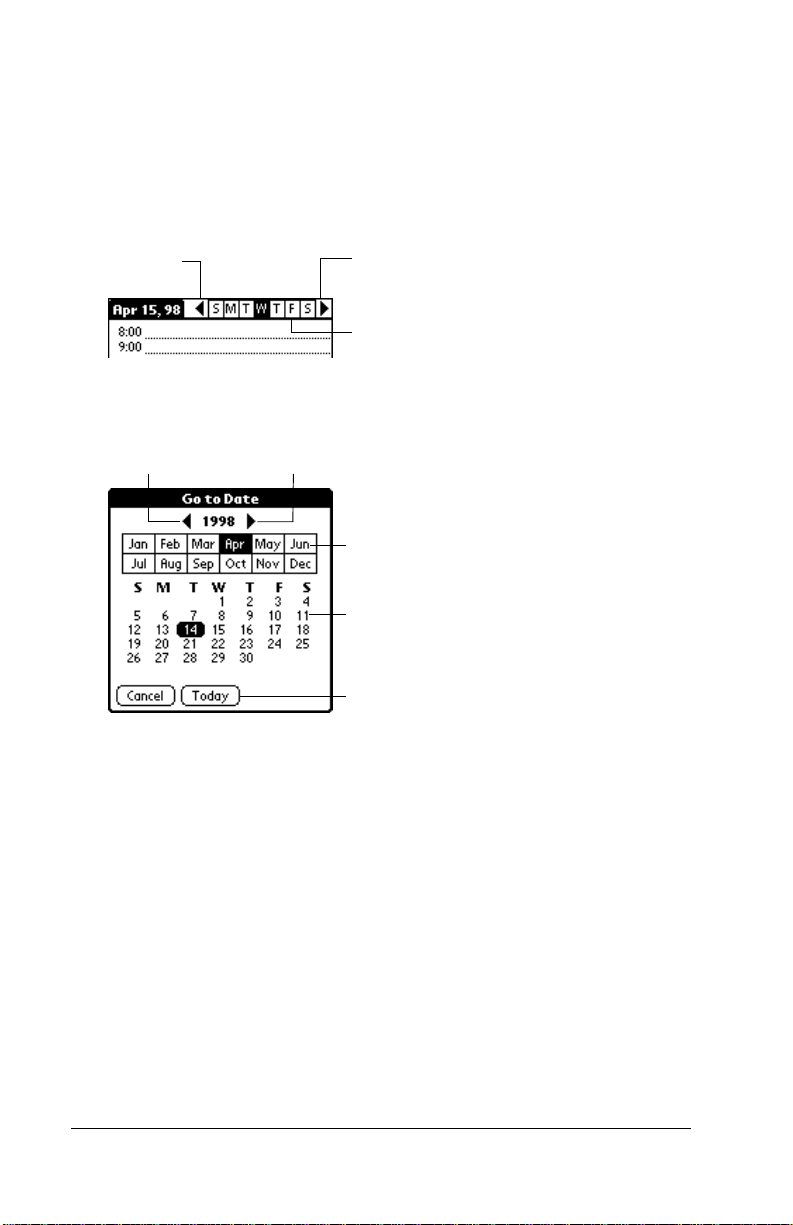
■ Tap the day of the week that you want in the Date Ba r at the top of
the Date Book screen. If necessary, tap the Previous week or Next
week scroll bars to move to another week.
Previous
week
■ Tap the Go To button to open the Go to D ate dialog. Sele ct a date
Next
week
Tap to select the day
of the current week
by tapping a year, month and day in the calendar.
Previous year Next year
Tap to scroll to
earlier hours
Tap to scroll to
earlier hours
Tap to select
current date
■ Press the scroll button on the front panel of the Palm III organizer
to scroll to another day. Press the upper half o f the butt on to move
to the previous day or the lower half to move to the nex t day.
2. After you locate the date, follow the steps described in the previous
section, “To schedule an event for the curre nt day.”
Page 20 Applications Handbook for the Palm III Organizer
Page 27
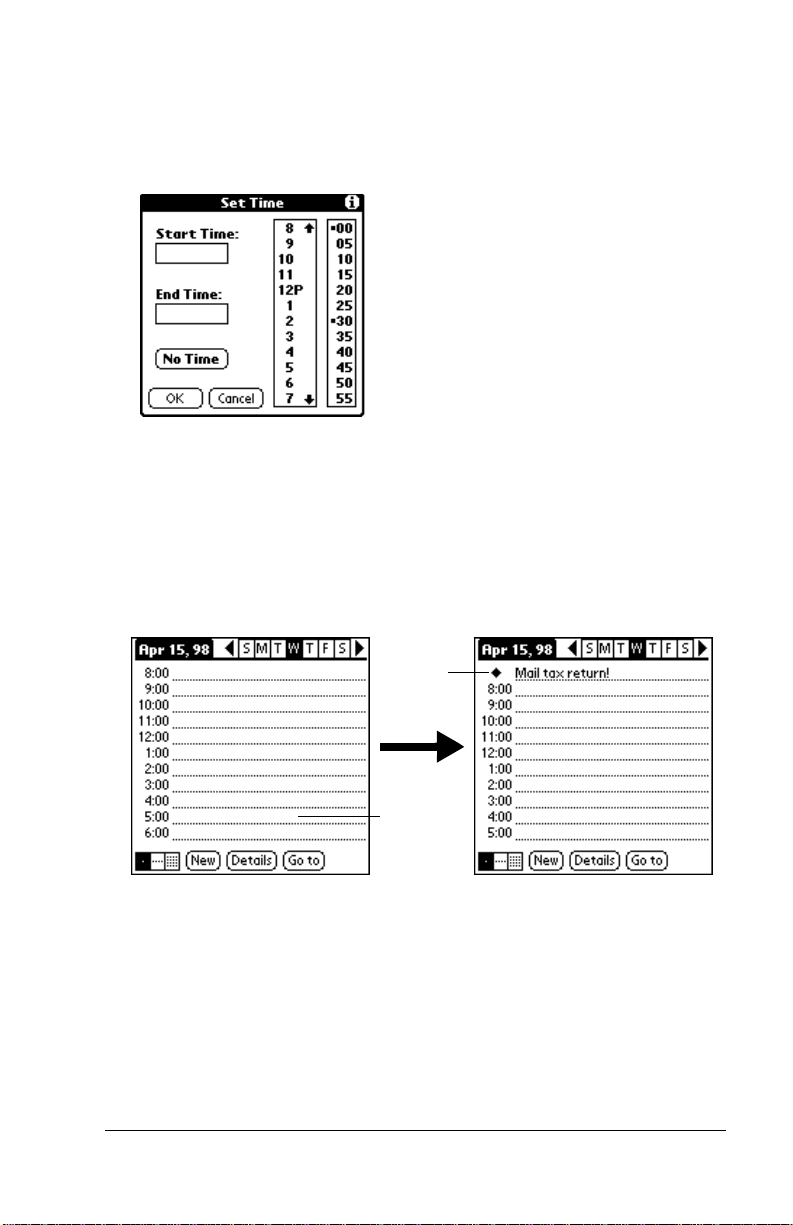
To schedule an untimed event:
1. Select the date that you want for the event as described in the
previous section, “To schedule an event for another day.”
2. Tap New to op e n the Set Tim e d ia l o g .
3. Tap OK, so that no sta rt or end tim es a re def ine d fo r t he new e ve nt.
Note: You can also create a ne w untimed event by making s u re
no event is selected, and then writing letters in the Graffiti
writing area.
4. Enter a description for the event (which appears at the top of the
Date Book scr e e n).
New
untimed
event
No time
selected
5. Tap a blank area on the screen to de-select the untimed event.
Note: I f you create an event and decide later that there is no
particular start or end time, you can easily change it to an
untimed eve nt. Tap the time of the event in the D a te Bo ok
screen, tap th e No Time button , an d th en tap th e OK b utt on to
confir m your selection and close t he Set Time dialog.
Chapter 3 Page 21
Page 28

Rescheduling an Event
You can easily make changes to your schedule with your Palm III
organizer.
To reschedule an event:
1. Tap the event you want to reschedule.
2. Tap the Details b u tton to open the Event De tails dialog for that
event.
3. To change the time, tap the Time box and selec t the new time as
described earlier in this chapter.
4. To change the date, tap the Da te b o x and select t he n e w date as
described earlier in this chapter.
5. Tap the OK but ton to close the Event Details dialog and return to
the Date Book screen.
Setting an Alarm for an Event
The Alarm setting enables you to set an audible alarm for events in
your Date Bo ok. You c an set an alarm to sound mi nutes, ho urs or days
before an event. The default Alarm setting is 5 minutes before the time
of the event, but you can change this to any number of minutes, hours
or days.
When you set an alarm, an icon appears to the far right of the event
with the alarm. When the alarm tone sounds, a reminder message al so
appears on the Palm III organizer screen.
To set an alarm for an event:
1. Tap the event to which you want to assign an alarm.
2. Tap the Details b u tton to open the Event De tails dialog for that
event.
3. Select the Alarm check box in the Event Details dialog to activate
the alarm.
4. Tap the Alarm units pick lis t to se lect Minutes, Hours or Days.
5. Select the “5” and enter any number from 0 to 99 (inclusive) as th e
numeric alarm se tt i ng.
Page 22 Applications Handbook for the Palm III Organizer
Page 29
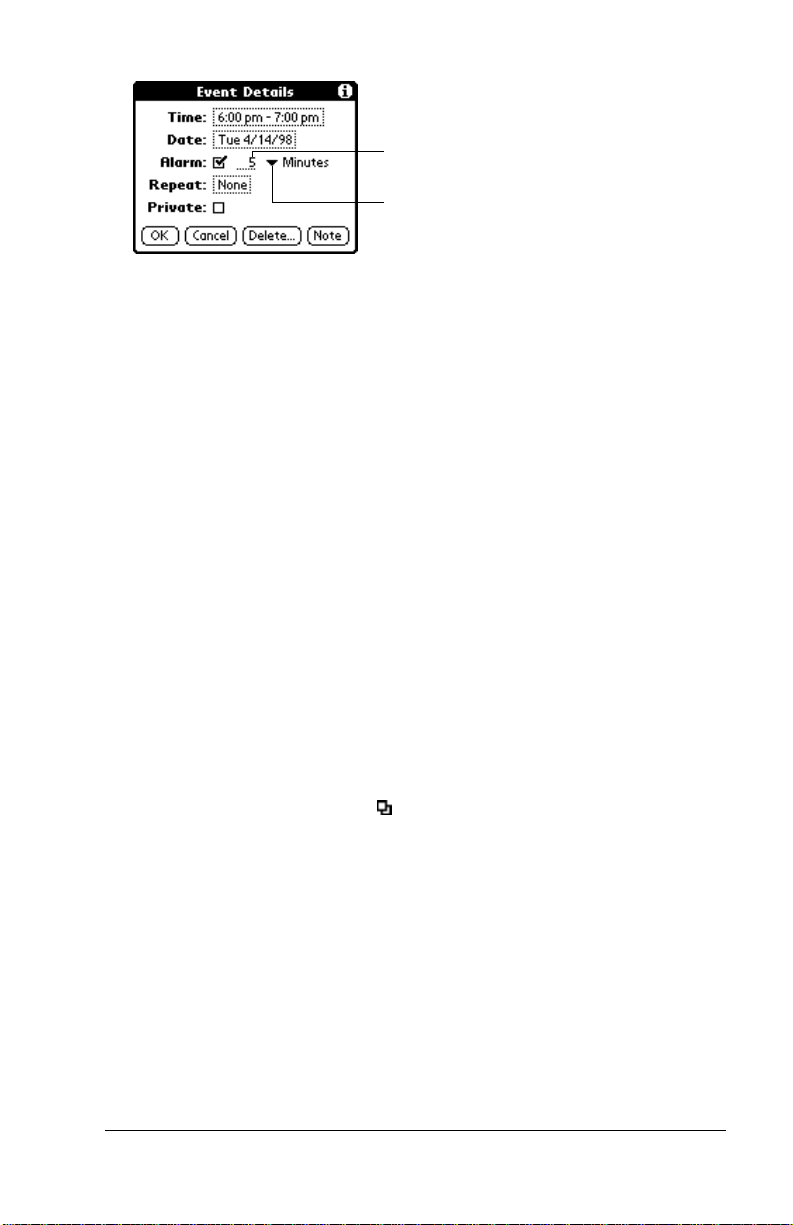
Enter nume ric
setting here
Tap here to
select alarm unit
6. Tap the OK button to close the Eve nt Details dialog and return to
the Date Book screen.
Note: You can set a silent alarm for an untimed event. In this case,
the alarm triggers at the spe cified period of min u tes, hours or
days before midnight (beginning) of the day of the untimed
event. No audible alarm sounds for an untimed event; instead,
the reminder message appears on the screen of the Palm III
organizer.
For example, you could create a reminder for an untimed
event that occurs on February 4th. If the alarm reminder is set
for 5 minutes, the alarm reminder appears at 11:5 5 PM on the
night of Feb ru a ry 3rd. The re minder r e mains on the screen
until you turn on your Palm III organizer and tap the OK
button to dismiss it.
Scheduling Repeating Events
The Repeat function enables you to schedule events that recur at
regular intervals. A birthday is a good example of an event that
repeats annually. Another example would be a weekly guitar lesson
that fall s on the same day of t he wee k and the same time of d ay. A fter
you enter a repeating event, a icon appears to the far right of the
event.
Chapter 3 Page 23
Page 30
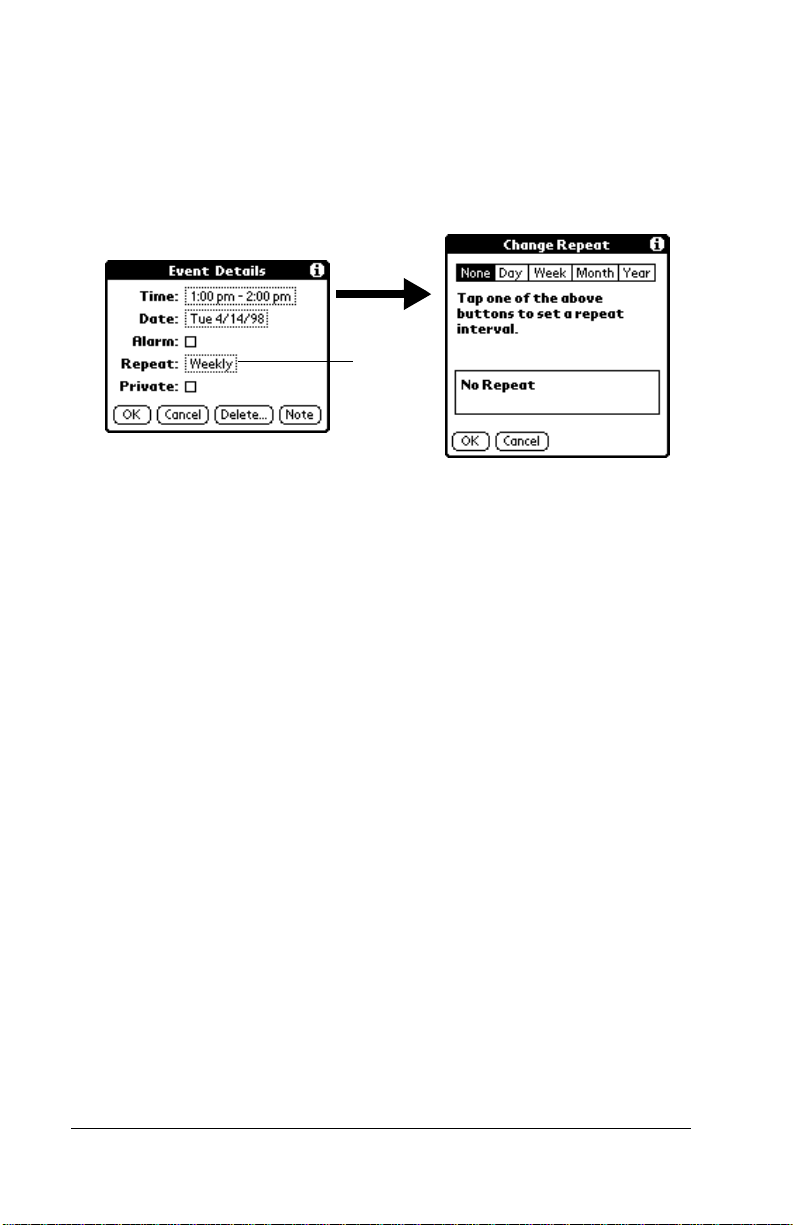
To schedule a repeating event:
1. Tap anywhere on the text of an event in the Date Book screen.
2. Tap the Details b u tton to open the Event De tails dialog.
3. Tap the Repeat box in the Event Details dialog to open the Change
Repeat dialog.
Tap the
Repeat
box
4. Tap Day, Week, Month or Year in the Change Repeat dialog.
5. Enter a number that corresponds to how often you want the event
to repeat in the “Every” area. For example, if you select Month and
enter the number “2,” the event repeats every other month.
6. If you want to specify an ending date for the repeating event, tap
the End on pick list and tap Choose Date. Use the Date Picker to
select an end date.
7. Tap the OK button to cl ose the Change Repeat dialog a nd activate
your settings.
Considerations for the R epeat F unction
■ If you change the start date of a repeating event, your Palm III
organizer calculates the number of days you have moved the
event. Your Palm III organizer then automatically changes the end
date to maintain the duration of the repeating event.
■ If you change the repeat type (e.g., daily to weekly) of a repeating
event, past occurrences (prior to the day on which you change the
setting) are left alone and your Palm III organizer creates a new
repeating event.
■ If you change the date of an occurrence of a repeating event (e.g.,
from January 14th to January 15th ) and appl y the chan g e to al l
occurrences, the new date becomes the start date of the repeating
event. Your Palm III organizer adjusts the end date to maintain the
duration of the e vent.
Page 24 Applications Handbook for the Palm III Organizer
Page 31

■ If you change other repeat settings (e.g., time, al arm, private) of a
repeating event and apply the change to all occurrences, your
Palm III organizer creates a new event. The start date of this new
event is the day on which the se tting is changed. Past occurrences
(prio r to the day of the chan g e ) are l e ft alone and n o t change d .
■ If you make a change to one occurrence of a repeating event (e.g.,
time), that occurrence no longer shows the Repeat icon.
Marking a Private Event
You can desi gnate a spe cific e vent as “pr ivate.” W hen you activ ate th e
Security features, your Palm III organizer hides all private entries and
you must enter a password to display them on the screen.
To mark an event as private:
1. Tap the event you want to mark as private.
2. Tap the Details button to ope n the Event Detail s dialog for that
event.
3. Select the Private check box.
4. Tap the OK button to close the Eve nt Details dialog and return to
the Date Book screen.
Deleting an Event
There are three ways to delete an event from the Date Book
application: simply delete the text of the event, use the Menu
Commands (described i n the “Re cord Menu” section later in this
chapter), or use the Eve nt Details dialog.
Note: I f you delete the text of a repeating event, you delete all
instance s of that event. If you use the Menu Command or the
Event Detail s di alog, you can del e te one occurrenc e of the
event (as an exception) or all occurrences.
To delete an event with the Event Details dialog:
1. Tap anywhere in the text area of the event to delete.
2. Tap the Details button to ope n the Event Detail s dialog.
3. Tap the Dele te b u tton to open the Delete Event alert.
4. Tap the OK but ton to confirm y ou want to delete the event.
Chapter 3 Page 25
Page 32

Changing the Date Book View
In addition to displaying the calendar for a specific day, you can also
display your Date Book by the week or month, and you can disp lay
the current time.
To toggle through the differe nt views:
■ Press the Date Book button repeatedly to display the next view.
To display the current time:
■ Tap the date in the Date Book title bar to display the current time.
Tap the date Current time displ ays
Note: After a few seconds, the title bar reverts to show the date.
Working in Week View
The Week View shows a char t of your events for an enti re week. Thi s
view lets you quickly review your appointments and available time
slots.
In addition, the gr aphical display helps you spot ove rl ap s and
conflicts in your schedule .
To display the Week View:
1. Tap the Week View button in the Date Bo ok screen to displ ay the
Week View.
Week view
2. Tap the navigation controls to move forward or backward a week
at a time, or to disp lay details of an even t.
Note: The Week View also shows untimed events and events
that are before and after the range of times shown.
Page 26 Applications Handbook for the Palm III Organizer
Page 33

Previous
week
Next
week
Tap for that day
Bar indicates e vent above display
Dot indicates untimed event
Bar indicates event be low displ a y
3. Tap any of your events to show a description of the event.
Event det a ils
Tap to s how Event details
If you want to r e sc h e dule an e v e nt, tap an d dr a g the event to a
different time or day.
You can tap a blan k ti me on any d ay to mov e to th at day and ha ve
the time sele cted for a new event. Or you can ta p a ny of the days
and dates that appear at the top of the Week View to move directly
to that day without selecting an event.
The Week View shows the time span defined by the Start Time
and End Time in the Date Book Preferences settings. If you have
an event before or after this time span, a bar appears at the top
or bottom of that day's colu mn, and these on-screen scroll
arrows appear if your scheduled events go beyond the displayed
time range.
Chapter 3 Page 27
Page 34

Spotting Event Conflicts in Week View
With the ability to define specific start and end times for any event, it’s
possible to sch e dule events th at overlap (an event that starts before a
previous event finishes).
In this case, any event conflict (time overlap) appears in the Week
View as overlapping bars. The Day View displays bracketed bars to
the left of th e conflicting times.
Event
conflicts
Working in Month View
The Month View screen shows which days have events scheduled.
Dots and lines in the Month View indicate events, repeating events
and untimed events.
Previous/nex t mont h
Dashed line indi cates da ily repea ting
Dots on right side indicate events
Dot below date indicates untimed events
Month view button
Tap any day that appears in the Month View screen to move directly
to that day with the Day View screen. Tap the arrows at the top to
move forwa rd or backwa rd a month. Tap the Go to bu tton to ope n the
Date Picker and choose a different month.
Page 28 Applications Handbook for the Palm III Organizer
Page 35

When the Month View is on the screen, you can use the scroll button
on the front panel of the Palm III organizer to move between months.
Press the upper half of the button to display the previous month, or
press the lower half to display the next month.
Note: You can control the dots and lines that appear in the Month
View. See “Options Menu” later in this chapter.
Date Book Menu Commands
The Date Book includes menu commands to perform common file and
editing tasks. This section explains the menu commands that are
specifi c to the Date Book.
See “Using Menus” in the Basic Handbook f or the P alm III Or ganizer for
information about menu commands common to all of your Palm III
organizer applications.
Record Menu
When you selec t the Record me nu, its commands appear on scre e n.
New Event
Delete Event
Chapter 3 Page 29
Creates an event and opens the Set Time
dialog where you can choose start and en d
times for th e new event. If you do not enter
start and end time s, i t crea te s a blan k un timed
event.
Opens an alert dialog, prompting you to
confirm that you want to delete the current
event. You must tap an event before you use
the Delete E vent co mmand. Tap the OK button
to delete the event from your Palm III
organizer, or tap t he Cancel b utton to close the
alert dialog and keep the event.
Page 36

Note: By default your Palm III organizer
removes the event from the Date Book,
but re ta i ns a copy of the even t and
transfers it to an archive fil e on your
computer the next time you perform a
®
HotSyn c
operation. To remove the
event completely, clear the Save
archive copy on PC check box.
Attach Note
Delete Note
Purge
Opens the Note dialog, where you can create a
Note for the current event.
Opens an alert dialog, prompting you to
confirm th at you really wan t to delete the Note
attached to the event. Tap the OK button to
delete th e Note from the me mory of your P alm
III organizer, or tap the Cancel button to close
the alert dialog and return to the Date Book.
Opens an alert dialog, prompting you to
confirm that you want to purge events older
than a certain time period — based on the
curr e nt d a te on the inter n a l cl o ck on the P alm
III organizer. You can use the Purge command
to conserve memory on your Palm III
organizer. The default setting for the Purge
alert is to “Save archive copy on PC.” This
setting removes events fr om the Date Book,
but retains copies and transfers them to an
archive file on your computer during the next
HotSync operation.
Note: The Purg e co m mand al so de le te s
repeating events if they end before
the date that you activate the Pu rg e
command.
Beam Even t
Beams the current event to another 3Com
®
connected organizer through the IR port.
See “Beaming Information to Other 3Co m
Connected Organizers” in the Basic Handbook
for the Palm III Organizer for more information.
Page 30 Applications Handbook for the Palm III Organizer
Page 37

Options Menu
When you select the Options menu, its commands appear on screen.
Font
Preferences
Opens the Select Font dialog where you can
choose a different font (text) style for your Date
Book entries. See “Choosing Fonts” in the Basic
Handbook for the Palm III Organizer for details.
Enables you to set the range o f times that appear
in the Date Book, and to automatically activate
alarms for each event.
■ Start/End Time. Enables you to define the
start and end times for the D ate Book sc reens.
If the time slots you sel ect do not fit on one
screen, you can tap the arrows to scroll up
and down.
■ Alarm Preset. Aut o matically sets an alar m
for each new event. The alarm for untimed
events is def ined by minutes, days or hours
before midnight of the date associated wi th
the event.
■ Alarm sound. Control s the type of tone th e
alarm generate s when it sounds.
Chapter 3 Page 31
Page 38

■ Remind me. Defines how many times the
alarm s ounds. The ch oice s are: Once , Twic e, 3
times, 5 times an d 10 times.
■ Play every. Defines how often the alarm
sounds. The choices are every: Minute,
5 minutes, 10 minutes an d 30 min ut es.
Display Opt ions
Allows you to change the Date Book’s
appearance and which events display.
■ Show Tim e Bar s. Ac tivates the ti me bars t hat
appear in the Day View. The time bars show
the duration of an event and illustrate event
conflicts.
■ Compress Day View. Controls how times
appear in the Day View. When Compress
Day View is off, all time slots display. When
it is on, start and end times displ a y for each
event, but blank t ime slot s towar d the bo ttom
of the screen disappear to minimize scrolling.
■ Month View settings. These check boxes
apply to the Month View of the Date Book.
You can activate any or all of these settings to
show that you have Time d, Untim ed or Daily
Repeating events in the Month View only.
Phone Lookup
Activates the Phone Lookup feature. See “Using
Phone Lookup” in the Basic Handbook for the Palm
III Organizer.
About Date
Book
Page 32 Applications Handbook for the Palm III Organizer
Shows version (revision) information for the Date
Book applicatio n.
Page 39

Chapter 4
Expense
The Expense application enables you to keep track of your
expenses and then transfer the information to a spreadsheet on
your computer.
With the Expense application you can:
■ Record dates, type of expenses, amount spent, payment method
and other details associated with any money that you spend.
■ Create categories for your expenses, such as business and personal
expenses associated with a range of dates.
■ Keep track of vendors (companies) and people i nvolved with each
particular expense.
■ Log miles traveled for a particular date or expense category.
■ Sort your expenses by date or expense type.
®
■ Transfer your expense information to a Microsoft
spreadshee t ( version 5.0 or later) on your compu ter. (Microsoft
™
Excel is not included with the Palm III
connected organize r
package.)
Excel
To open Expense:
1. Tap the icon to open the Applications Launcher.
2. Tap the icon to display the Expense List screen.
Creating an Expense Item
Expense enables you to record the date, expense type an d the amount
that you spent. You can sort your expe nse items into categories or
add other information that you want to associate with the item.
Chapter 4 Page 33
Page 40

To create an expense item:
1. Tap the New button in the Expense List to create a new item.
Cursor
of new
item
Tap New
Note: You can also create a new expense item by writing on the
®
number side of the Graffiti
pad while in the Expense List
screen. The first number you write begins your new
expense item.
2. Enter the amou nt of the expense.
3. Tap the Expense Type pick list and select a type from the list.
Tap here
Note: As soon as you select an expense type, your Palm III organizer
saves your entry. If you do not select an expense type, it does
not save the entry.
Tip: A quick way to create a new expense item is to make sure that
no expense item is selected in the Expense List, write the first
letter(s) of the expense type, and then write the numerical
amount of the expense item. This technique takes advanta ge of
the automatic fill feature. See “Opt ion s Menu” later in this
chapter for details.
Page 34 Applications Handbook for the Palm III Organizer
Page 41

Changing the Expense Item Date
Initially, expense items appear with the date you enter them on your
Palm III organizer. You can use the Expense application to change the
date associated with any expense item.
To change the date of an expense item:
1. Tap the expense item you want to change to highlight the date.
2. Tap the date of the selected item to open the Date dialog.
Tap date
3. Tap the date you want for the expense item.
For more information about the Date dialog, see “Scheduli ng an
Event.”
Entering Receipt Details
The Expense application provides a variety of options that you can
associate with an item. These options appear in the Receipt Details
dialog.
To open the Receipt Details dialog:
1. Tap the expense item you want to assign details.
2. Tap the Details b u tton to open the Receipt Details dialog.
Chapter 4 Page 35
Page 42

3. Select any of the following options:
Category
Type
Payment
Defines the category for the Expense item. The
default Category is Unfiled when All is
selected. Otherwise, the default is the
currently selected Category. An expense item
remains in the default catego ry until you
change it.
Your Palm III organizer provides two sample
categories, New York and Paris, to show how
you might sort your expenses according to
different business trips.
Choose Edi t Categories from the pick li st to
change existing or to create new expense
categories. For example, you might create a
category for a ra nge of dates, su ch as a week or
month, or you might delete or rename the
New York and Paris categories.
Opens a pick li st of the ex pense type opt ions so
that you can change the expense type for any
of your expense items.
Enables you to c ho ose the payment method
used to pay the expense item. If the item is
prepaid (such as airline tickets supplied by
your company), you ca n choose Pr e paid to
place your expense in the appropriate
company-paid cell of your printed expense
report spreadsheet. See “Transferring Your
Data to Microsoft Excel” later in this chapter
for more information.
Currency
Enables you to choose the type o f cu rrency
used to pay the expense item. The default
currency unit is defined in the Preferences
dialog (see “Preferences Menu” later in this
chapter). You can also d isplay up to four other
common types of currency. See “Customizing
the Curr ency Pi ck Li st” later in th is ch apter f or
details.
Page 36 Applications Handbook for the Palm III Organizer
Page 43

Vendor and City
Enable you to record the na me of the vendor
(usu a ll y a co m p any) asso ciated w i th the
expense and the city where the expense took
place. For example, a business lunch might be
at Rosie's Cafe (Vendor) in San Franci sco
(City).
Attendees
Displays the Attendees scr e e n which
resemble s a me mo in the Memo Pad . You can
use this screen to list the people who attended
the activity associated with the expense or to
make notes, su ch as the purpo se of the
expense.
Tap here
Note: You can tap the Look up button to displ ay the name s (and
the corresponding companies) of the people in your
Address B ook. Th e Look up b ut ton’ s f unc tion is s imi lar to
the Phone Lookup feature described in “Using Phone
Lookup” in the Basic Handbook for the Palm III Organizer.
4. Tap the OK b u tton to close the Receipt D e tails dialog and activate
your selections.
Chapter 4 Page 37
Page 44

Customizing the Currency Pick List
You can select the currencies and symbols that appear in the Curre ncy
pick list.
To customize the Currency pick list:
1. Tap the Curren cy p ick list in the Re ceipt Detai ls dialog, and then
tap the Edit Currencies selection to open the Select Currencies
dialog.
Tap Ed it
currencies
2. Tap each Currency pic k list to choose the country whose currency
you want to display on that line.
3. Tap the OK button to close the Select Currenc ies dialog and
activ ate you r se le ctions .
Note: If the cu r re ncy you w a nt to use is no t i n th e l is t of
countrie s, you can create your own cu stom count ry
and currency symbol. See “Expense Menu Commands”
later in this chapter for details.
Show Options
The Show Options de f ine the sort order and other settings that
relate to your expense items.
To open the Show Options dialog:
1. Tap the Show button in the Expense Li st to open the Show
Options dialo g.
Page 38 Applications Handbook for the Palm III Organizer
Page 45

Tap Show
2. Select any of the followin g options:
Sort By
Enables you to sort the Expense entries by date
or expense type.
Distance
Enables you to display Mileage entries in miles
or kilometers.
Show Currency
Shows or hides the currency symbol in th e
expense list.
3. Tap the OK button to close the Show Options dialog and activate
your selections.
Transferring Your Data to Microsoft Excel
After you enter your expenses i nto the Expense ap p lication on you r
Palm III org anizer, the Pal m
and print the data with your computer.
Note: You need Microsoft Excel version 5.0 (or later) to view and
print your Expense data using one of the provided templates.
Microsoft Exce l is not included with the Palm III organizer
package. The procedures in thi s se ction also assume that you
have installed the Palm Deskt op soft war e. See “Installing
Palm Desktop Software” in the Basic Handbook for the Palm III
Organizer for more information.
™
Desktop software enables you to view
Chapter 4 Page 39
Page 46

Printing an Expense Rep ort
Palm Desktop makes it quick and easy to print your Expense data.
To print your expense report:
1. Perform a HotS ync® operation to tran sf er your lates t E xpense d ata
to your computer and make it availabl e to P a lm Desktop. See the
“HotSync” chapter for det ai ls .
2. Click th e Exp ense b utt on in Pal m Deskt op to ope n Mic rosoft E xcel
and the Expense Report configuration dialog.
Note: If you launch Expense from t he Start menu (instead of
Palm Desktop), you must first choose your Palm III
organizer us er name.
3. Click the expense category that you want to print.
Click to select
Categories
Tip: You can press Shift+click to select multiple categories. To
print the expen se s associated with all of your Expense
categories, click the All button in the Categories area.
4. If you want to define an end date for the expense report, enter the
date in t he End Da t e area .
Note: If you do not specify an end date, all expense entries for
the selected categories will appear — up to the date of the
last HotSync operation with your Palm III organizer.
5. Click the Print button to display the expense report in the Print
Preview window.
Page 40 Applications Handbook for the Palm III Organizer
Page 47

6. Click the Print button in the Microsoft Excel window to print your
expense report.
To view your Expense data in a Microsoft Excel spreadsheet:
1. Perform a Hot S ync operation to transfer yo ur latest Expense data
to your computer and make it avai lable to Pal m D e sktop.
2. Click th e E xpense b ut ton in Pal m Deskt op to ope n Mi crosof t E xce l
and the Expense Report configuration dialog.
Note: If you start Expense from the Start menu (instead of Palm
Desktop), you must first choose your Palm III organizer
user name.
Chapter 4 Page 41
Page 48

Click to select
Categories
3. Click the expense category that you want to use.
Tip: You can press Shift+click to select multiple categories. If
you want to view the expenses ass ociated with all of your
Expense categori e s , click the All button in the Categ o ries
area.
4. If you want to define an end date for the expense report, enter the
date in t he End Da t e area .
Note: If you do not specify an end date, all expense entries for
the selected categories will appear — up to the date of the
last HotSync operation.
5. Click the Cr e ate b utton to displa y a Microsoft Exc e l spreadsheet
containing your Expense data.
Page 42 Applications Handbook for the Palm III Organizer
Page 49

At this point, your Expense data appears in Microsoft Excel
spreadsheet form. You can enter information, make formatting
changes and sa ve and print the file in the normal mann e r.
Using Expense Report Templates
Palm Desktop s oftw are c omes wi th seve ral expen se repor t tem pla tes.
When you use one of these templates, you can edit your Expense data
in Microsoft Excel. If you want to streamline or customi z e your
expense reports, you can change these templates. For example, you
can add your company name to a template. See “Appendix A:
Expense Templates” for sample templat es and “Appendix B: Creating
a Custom Expense Re p ort” for details on changing templates.
To view your Expense data using a Microsoft Excel template:
1. Display your Expense data in a Microsoft E xcel spreadsheet as
described in the previous procedure.
2. Click the Op tions button to open the Expe nse Report Options
dialog.
Enter name and
other in format ion
Choose e xpense
template
3. Enter name, department and ot her information as necess ary for
your expense report.
4. Click the Templates menu, then click an e xpe nse template. See
“Appendix A: Expense Templates” for samples.
Note: If you want to create your own custom expense template
and have it appear in the Templates menu, refer to
“Appendix B: Creating a Custom Expense Report.”
5. Click the OK button to retu rn to the Expense Report Opt ions
dialog.
Chapter 4 Page 43
Page 50

Expense Menu Commands
The Expense application includes menu commands to perform
common file and edit ing task s. This section e xplains the men u
commands that are specific to the Expense application.
See “Using Menus” i n the Basic Handbook for the Palm III Organizer for
informa tion about men u commands that are common to a ll of your
Palm III organizer applications.
Record Menu
When you select the Record menu, its commands appear on screen.
Delet e Item
Purge
Opens an alert dialog, prompting you to
confirm th at you want to del e te the current
expense item. You must tap an item before you
can use the Delete Item command. Tap the OK
button to delete the item from your Palm III
organizer, or tap th e Cancel button to close t he
alert dialog and keep the item.
Note: By default your Palm III organizer
removes the item from the Expense
application, but retains a copy of the
item and transfer s it to an archive file
on your computer the next time you
perform a HotSync operation. To
remove the item completely, clear the
Save archive copy on PC check box.
Conserves memory on your Palm III organizer
by deleting expense categories that you no
longer use.
The Purge command prompts you to confirm
that you wan t to p urge all the re cords from the
select e d ca t e gor y .
Page 44 Applications Handbook for the Palm III Organizer
Page 51

Options Menu
When you select the Options menu, its commands appear on screen.
Preferences
Custom
Currencies
Activates the Preferences dialog, which i s used to
activate the automat ic fill feature an d to set the
default currency symbol.
■ Use automatic fill. Enables you to select an
expense type by writing the first letter of an
expense type in the Graffiti writing area. For
example, if you write the letter “T,” it enters
the “Taxi” expense type. Writing “T” and
then “E” enters “Telephone” which is the fir st
expense type beginning with the l etters “TE.”
■ Default currency. Sets the default currency
symbol for the Expense application.
Enables yo u to def ine a ddi tio na l cu r renc y
symbols for the Expense ap p lication.
Note: You need to use thi s command only i f the
currency symbol you need is not
available in the Currency pick list of the
Receipt Details dialog (See “Entering
Receipt Details” earlier in this chapter).
About Expense
Shows version (rev ision) inf orm a tion for the
Expense application.
Chapter 4 Page 45
Page 52

To define a custom currency symbol:
1. Choose Custom Currencie s from the Opt ions menu to open the
Custom Curren cies dialog.
Tap a Cou ntry
button
2. Tap one of the four Country boxes to open the Currency Properties
dialog .
3. Enter the name of the country and th e symbol that you want to
appear in the Expense application, and then tap the OK button to
define your setting.
4. Tap the OK but ton to close the Custom Currencies dial og.
Note: If you wan t to use your c ustom c urrency symbol a s the de fault
for all Expense entries, choose the symbol in the Preferences
dialog. If you want to use your cu stom currency symbol only
for particular expense items, choose the symbol in the Receipt
Details dialog associated with those items.
Page 46 Applications Handbook for the Palm III Organizer
Page 53

Chapter 5
HotSync
®
HotSync® technology enab les you to sy nchro nize da ta bet ween
®
one or more 3Com
connected organizers and the Palm™
Desktop sof twar e. To sync hron iz e dat a, y ou must c onn ect your
™
Palm III
connected organizer and Palm Desktop either directly
with a cable or indirectly with a modem or network.
With HotSync technology you can:
■ Synchronize th e Dat e B ook, Add res s Book, T o Do L ist , Memo Pad
and Expense entries on your Palm III organizer with the entries on
your computer, and vice versa.
■ Manage individual or multiple 3Com connected organizers with a
centralized computer.
■ Keep your data safe by automatically cr eating back up copies each
time your synchronize.
The HotSync Process and the HotSync Manager
The HotSync process automatically synchronizes data between your
Palm III organizer and Palm Desk top . Changes you make on your
Palm III organizer or Palm Desktop appear in both places after a
HotSync operation. HotSync technology synchronizes only the
needed portions of files, thus reducing synchronization time. You can
synchronize your data by connecting your Palm III organizer directly
to your computer with the cradle or indire ctly with a modem or
network.
The HotSync M anager overse es the synchro nization process. It r uns in
the background and monitors a communications port on your
computer f or a Hot S ync comm an d fro m a 3C om co nnec te d o rg ani zer .
When it “he a rs” a HotSync command, HotSy nc Manager
synchron izes d ata in t he Date B ook, Add res s Book , To Do Li st, Memo
Pad, Mail and Expense applications. It can synchronize the data even
when Palm Desktop is not running!
Once you complete a few simple se tup steps, p e rforming a HotSync
operation is as simple as pressing a button. Follow the steps in the next
section to complete the setup.
Chapter 5 Page 47
Page 54

Performing a HotSync Operation for the First Time
The first time you synchronize your data, you need to enter user
information on both the Palm III organizer and the Palm Desktop.
Once you enter this information and synchronize, the HotSync
Manager recognizes your Palm III organizer and doesn’t ask for this
information again. If you are a System Administr ator preparing
several 3 Com connec ted org anizers for a group of users, see “Cre ating
a User Profile” later in this chapter before performing the following
steps.
Important: You mu s t p e rf o rm y our first H o tS ync oper a ti o n wi th a
local, direct connection, rather than using a modem.
To perform a HotSync operation for the first time:
1. Double- click the Palm Desktop icon on the Windows desktop (or
select Palm Desktop from the Start menu) to start the Palm
Desktop software.
2. Click the icon in the Windows Sy ste m Tray to open the
HotSync Manager menu.
Tip: The Windows System Tray is usually in the lower-right
corner on yo u r compute r display. The location may vary
depending on the location of the taskbar and the version
of Windows you are using.
3. Click Local from the HotSync Manager menu to indicate that you
are using the cradle to synchronize.
4. Turn on the Palm III organizer and slide it into the cradle.
Page 48 Applications Handbook for the Palm III Organizer
Page 55

Tip:
The curved edge on the bottom of the Palm III or ganizer
should align smoothly with the cradle when it is inserted
properly.
5. Press the button on the front of the Palm III organizer cradle to
open the New User dialog.
HotSync
button
6. Enter a user name for your Palm III organizer and click the OK
button to open the HotSync Progress dialog an d start the
synchronization process.
Important:
Every 3Com connected organizer should have a unique
name. Never try to synchronize more than one 3Com
conn e ct e d or g a n iz e r to th e sa me user n a m e .
Chapter 5 Page 49
Page 56

7. Wait for Palm Desktop to display a message indicating that the
process is complete.
Conducting a Local HotSync Operation
After you comp lete the first HotSync operation, the HotSync process
is even faster and easier!
To conduct a local HotSync operation:
1. Insert the Palm III organizer in the cradle.
2. If the HotSync Manager i s not running, start it.
3. Press t he button on the fr ont of t h e Pal m III or ganizer cradle to
start the HotSync process.
4. Wait for Palm Desktop to display a message indicating that the
process is complete.
Selecting HotSync Setup Options
You can choose when you want HotSync Manager to run, and you can
adjust the local and modem HotSy nc settings.
To set the HotSync Options:
1. Click the icon in the Windows Sy ste m Tray to open the
HotSync Manager menu.
2. Click Setup on the HotSync Manage r me nu to open the Setup
dialog.
Page 50 Applications Handbook for the Palm III Organizer
Page 57

3. Click the General tab and select one of the following options:
Always available
Adds HotSync Ma nager to the Startu p f older
and constantly monitors the communication
port for 3Com connected organizer
synchroni zation requests. With this opti on,
the HotSync Manager conducts
synchroni zations even when Palm Desktop is
not running.
Available only
when Palm
Desktop is
Starts HotSy nc Manager and monitors
requests automatically when you open the
Palm Desktop software.
running
Manual
Starts the HotSync Manager a nd monitors
requests only when you select HotSync
Manager from the Start men u .
Tip: If you’re not sure which option to use, keep the Always
available default setting.
4. Click the Lo cal tab to displa y the settings for the connection
between your computer and the Palm III organizer cradle, and
adjust the following options as needed.
Chapter 5 Page 51
Page 58

Serial Port
Identifies the port Palm Desktop will use to
communica te with th e cradle. This selectio n
should match the port number where you
connected the cradle.
Note: Your Palm III organizer cannot share
this port with an internal modem or
other device. If you have trouble
determining the correct serial port , see
“Troubleshooting” in the Basic
Handbook for the Palm III Organizer.
Speed
Determines the speed at which data is
transfer re d between your Palm III org a nizer
and Palm Desktop. We sugg est you tr y the As
Fast As Possibl e rate firs t, and adjust
downward if you experience problems. This
setting allows the Palm Desktop and Palm III
organizer to f ind and use the fastest speed.
5. Click th e Mod em t ab t o displ ay the M ode m se tti ngs an d ad just the
following options as nee ded.
Page 52 Applications Handbook for the Palm III Organizer
Page 59

Serial Port
Identifies the port where the modem is
located . If you are unsure of the port
assignment , look at the Modem Pr op e rties in
the Windows Control Pan el.
Speed
Determines the speed at which data is
transferr ed. We sugg est you try the As Fast A s
Possible rate first, an d adjust downward if you
experience problem s . This set tin g allow s the
Palm Desktop and Palm III organizer to find
and use the fastest speed.
Modem
Identifies the modem type or manufacturer.
Refer to your modem manual or face plate for
its type or se ttings. If you’re not sure of your
modem type or your modem doesn’t match
any that appear in the list, choose Hayes Basic.
Setup String
Identifies the setup string for your particular
modem. Not all modems require a setup
string. Refer to your mo dem manu al and e nter
the setup string if recommended by the
manufacturer.
6. Click OK to close the Setup di alog.
Chapter 5 Page 53
Page 60

Custom izing HotSync A p plication Se ttings
For each application you can define a set of options that determines
how records are handled during synchronization. These options are
called a “condui t.” By defaul t, Palm Desktop synchronizes all files
between the Palm III organizer and the Palm Desktop. In general, you
should leave the sett ings to synchr onize all file s. The on ly reas on you
might want to change these settings is to overwrit e data on either your
Palm III organizer or Palm Desktop, or to avoid synchronizing a
particular type of file because you don’t use it.
In addition to the Date Book, Address Book, To Do List, Memo Pad
and Expense application conduits, Palm Desktop includes System and
Install c onduit s. The Syste m co ndui t backs up the s yste m i nfor matio n
stored in your Palm III organizer, including Graffiti
ShortCuts. The Install conduit is used to install Palm-compatible
applications.
To customize HotSync application settings:
1. Click the icon in the Windows Sy ste m Tray to open the
HotSync Manager menu.
Tip: You can also cli ck the HotSy nc command on th e Palm
Desktop menu bar to open the HotSync Manager menu.
2. Click Custom from the HotSync menu to open the Custom dialog.
®
software
3. Select the appropriate u se r name from the list at the top of the
dialog.
4. Click an appli cation in the Co nduit list to cho ose the conduit yo u
want to cha nge.
5. Click the Chan ge button to open the Change HotSync Action
dialog.
Page 54 Applications Handbook for the Palm III Organizer
Page 61

6. Click the direction in which you wa nt to write data, or click Do
Nothing to skip data transfer for an applic ation.
Note: Changing the Hot S y nc setting from the default affects
only the next HotSync operation. Th ereafter, t he HotSync
Actions revert to their default settings. To use a new
setting on an ongoing basis, select the Set As Default box.
Thereafter, you can just click the Default button in the
Custom dialog to revert to the default settings.
7. Repeat steps 2 through 5 to change conduit settings for other
applications or for a different user name.
8. Click the OK button to close the Change HotSync A ction dialog
and activate your setting s.
Conducting a HotSync Operation via Modem
You can use a modem to synchronize your Palm III organizer when
you are away from your computer.
Note: You must conduct an initial local HotSync operation using the
Palm III organizer cradle before you perform a modem
HotSync operation.
To perform a HotSync operation via modem you need:
■ A modem conne cted to y our compute r
■ A modem connected to your P a lm III organ izer with a special
modem ca ble. (The cradle is not used for a modem HotSy nc
operation.) See “Technical Support, Service and Repair” in the
Basic Handbook for the Palm III Organizer for details on ordering this
special cable.
■ The Palm Desktop software configured for use with a modem as
described earlier in this chap te r in “Selecting HotSync Op tions.”
Chapter 5 Page 55
Page 62

Preparing Your Computer for a Modem HotSync Operation
There are a few steps you must perform t o prepare your computer f or
a modem HotSync operation. Be sure to perform these steps before
you leave your office so that your computer is ready to receive a call
from your Palm III organizer. See “Selecting HotSync Setup Options”
earlier in this chapter.
To prepare your computer for a modem HotSync operation:
1. Confirm that the computer modem is connected and tu rned on,
and that no c ommunicat ions appl ication s, suc h as fax or telephon y
software, are running on a COM port.
Note: Make sure the computer is disconnected from all
®
online services, su ch as Ame rica Online
®
CompuServe
. This helps to avoid conflicts with the
(AOL) and
COM port.
2. Start HotSync Manager if it is not already run ning, and click
Modem from the HotSync Manager menu.
Preparing Your Palm III Organizer for a Modem HotSync Operation
There are a few steps you must perform to prepare your Palm III
organize r for a mode m HotSync.
To prepare your Palm III organizer for a modem HotSync operation:
1. Turn on your Palm III organizer and tap the icon to open the
Applications Launcher.
2. Tap the icon to open the HotSync screen.
3. Tap the Enter Phone # box under the Modem Sync icon to open the
Phone Setup dialog.
Page 56 Applications Handbook for the Palm III Organizer
Page 63

Note: If you have Network HotSync software installed on your
Palm III organizer, the Re mote Setup dialog ap pears
instead. See “Network Preferences” for more
information.
4. Enter the telephone number to access the modem connected to
your computer.
5. If needed, enter a dial prefix (s uch as “9”) to access an outs ide li ne,
and then tap the Dial Prefix check box.
Tip: You can enter a comma in the field to i ntroduce a “pause”
in the dialing sequence.
6. If the phone line you’re using for the Palm III organizer has “Call
Waiting,” select the Disable call waiting check box to avoid an
interruption during the modem HotSy nc operation .
7. If you want to use a calling card to place the call, select the check
box and enter the calling card number.
8. Tap OK to retu rn to the HotSync dialog.
9. Tap the icon to open the HotSync menus.
10.Tap Modem Setup from the Options menu to display the Modem
Preferences screen.
11.Enter the Modem Preference settings as described in “Modem
Preferences.”
Selec ting the Conduits for a Modem HotSync Operatio n
The Conduit Setup dialog on your Palm III organizer enables you to
define which files and/or applications synchronize during a modem
HotSync operation. You can use these settings to minimize the time
required to synchronize data with a modem.
To change the Conduit Setup for a modem HotSync operation:
1. Tap the icon in the Graffiti area to display the Applications
Launcher.
2. Tap the icon to di sp lay the HotSync screen.
3. Tap the icon to open the HotSync menus.
4. Tap Conduit Setup from the Options menu to open th e Con duit
Setup dialog.
Chapter 5 Page 57
Page 64

5. Tap the check boxes to de-sel e ct the file s and/or applic ations that
you do not want to synchronize during a modem HotSync
operation. The default setting is to synchronize all files.
Note: Applicati ons t hat do no t have a d ata base (s uch as g ames )
do not synchronize — even if you select the item in the
Condu it Setup dialog.
6. Tap the OK button to close the Conduit Setup dialog and activate
your setti ngs for the n e xt modem HotSyn c op eratio n.
Perform ing a HotSync Op era t ion v ia a M od em :
After you prepare your computer and your Palm III organizer, and
select your Condui t Setup o ptions, you are ready to per form a Mod em
HotSync operation.
To perform a Modem HotSync oper ation:
1. Turn on your Palm III organizer.
Note: If you are not using a PalmPilot modem, you need a
specia l modem cable and an external modem. Connect
one end of the special modem cable to the serial connector
on the Palm III organ izer an d the ot her end to the ex terna l
modem. Do not att empt to use othe r kinds of ca bles, even
if they appear to be similar.
2. Tap the icon to open the Applications Launcher.
3. Tap the icon to open the HotSync application.
4. Tap the icon to dial th e Palm Deskto p modem and synchr onize
the applications selected under Conduit Setup.
5. Wa it f o r the Ho t Sync oper a tion to comp lete. If yo u h a ve an y
problems conducting a successful HotSync opera tion, see
“Troubleshooting” in the Basic Handbook for the Palm III Organizer.
Page 58 Applications Handbook for the Palm III Organizer
Page 65

Conducting HotSync Operation via a Network
When you use the Network HotSync software, you can take
advantage of the LAN and WAN connectivity available in many office
environ ments. The Netw ork HotSync software enable s you to
perform a HotSync operation using a cradle that is connected to any
PC on your LAN or WAN (pr ovided that the PC connected to the
cradle also has the Network HotSync so ftware ins talled and your PC
is on and the HotSync Manager is running).
The Network HotSy nc software is an optional compone nt that you can
download from the Palm webs it e (http://w w w.p alm. com ). The files
that you download also include a se tup program and documentation
for this feature.
Creating a User Profile
If you need to confi gure a numbe r of 3Com connec ted orga nizers wi th
specific information (such as a company phone list) before
distribut ing them to thei r actual us ers, you can cre ate a User Profil e to
load the data into a 3Com connected organizer wi thout associ ating
that data with a user name. The User Profile f e ature is designed only
for the first-time HotSy nc operation, before yo u as sign a User ID to a
particular 3Com conn ected or ganiz er. See “Using File Link” later in
this chapter for information about loading data after you assign a
User ID.
To create a User Profile:
1. Open the Palm Desktop software.
2. Click Users from the Tools menu to open the Users dialog.
3. Click the Profiles but ton to open the Profi les dialog .
4. Click the New button to open th e New Prof ile dialog.
Chapter 5 Page 59
Page 66

5. Enter a name for the Profile and click the OK button to return to the
Profiles dialog.
6. Repeat steps 3 and 4 for each Profile that you want to create, then
click th e OK b utton to cl ose the Profiles dialo g and return to Palm
Desktop.
7. Select the Profile from the User list and create the data for the
Profile (e.g., company phone list, etc.).
To use a Profile for the first-time HotSync operation:
1. Place the new 3Com connected organizer in the cradle, and press
the button on the cradle to open the Users dialog.
2. Click the Prof iles button to open the Profi les dialog.
3. Choose the Pr of ile that you wan t to load on the 3Com conne cted
organizer, and click the OK button to open the following alert
dialog:
4. Click the Yes b u tton to transfe r al l the Profile data to the 3Com
connected organize r.
The next time you perform a HotSync operation, Palm Desktop will
prompt you to assign a User name to the 3Com connected organizer.
Page 60 Applications Handbook for the Palm III Organizer
Page 67

Using File Lin k
The File Link fe atu re enables you to synchroniz e the Address Book
and Memo Pad information on your Palm III organizer with a separate
external file such as a company phone list. HotSync Manager stores
the data in a separate category on yo ur Palm Deskt op and your Palm
III organizer. You can configure the File Link feature to check for
changes to the external file when you perform a HotSync operation.
With File Li nk you can synchronize with data stored in an y of the
following formats:
■ Comma-separated (*.csv)
■ Memo Pad archive (*.mpa)
■ Address Bo ok arch iv e (*. aba)
■ Text (*.txt)
For information on how to set up a File Li nk, see the Pal m Desktop
Software online Help.
Chapter 5 Page 61
Page 68

Page 62 Applications Handbook for the Palm III Organizer
Page 69

Chapter 6
The Mail application enables you to manage your e-mail while
away from your desk . The key to Mail is th at it truly
synchronizes the mail in your desktop e-mail application with
the mail on your Palm III
For example, if you delete messages from your Palm
®
HotSync
operation also deletes the messages from your desktop email application — so you never have to delete messa ges twic e.
Similarly, if you read a message on your Palm III organizer and leave
it in your inbox, your next HotSync operation marks it as read on your
desktop e-mail.
With Mail, you can:
■ Use your Palm III organizer to send and/or retrieve e-mail
messages fr om your desktop e-mail application.
■ View, delete, file and/or reply to incoming mail.
■ Create outgoing messages as well as drafts of messages that you
can complete later.
■ Create simple or complex filters, which allow you to decide the
type of e-mail that your Palm III organizer retrieves from your
desktop e-mail application.
™
connected organizer.
™
Mail, your next
Setting Up Mail on the Desktop
Before you use Mail for the firs t time, your desktop e- mail appl icatio n
should be up and running. You must also set up the Palm
software for use with your desktop e-mail application.
Note: The follow ing instru ctions assume that you have alrea dy
installed Palm Desktop software on your computer and that
you did not set up Mail dur ing the in stalla tion. If y ou have no t
yet installed the Palm Desktop software, the installation
procedure will prompt you to set up Mail as part of the Palm
Desktop sof tware installation.
Chapter 6 Page 63
™
Desktop
Page 70

To set up Mail:
1. Click Start on the Windows des ktop to open the Start menu.
2. Point to Prog rams, poi nt to Palm Desktop, and then click Palm
Mail Setup to star t th e se tu p p rocedure.
3. Follow the instructions on the screen to set up your Palm III
organizer f or use with your desktop e-ma il ap p lication.
To select HotSync options:
1. Click the icon in the Windows System Tray to open th e
HotSync menu.
2. Click Custom from the HotSync menu to open the Custom dialog.
Tip: You can also click Custom from the HotSync menu in
Palm Desktop.
3. Click Mail in the Custo m list box .
4. Click the Chan ge button to open the Change HotSync Action
dialog.
Page 64 Applications Handbook for the Palm III Organizer
Page 71

5. Click one of the followi ng settings:
Synchronize
the files
Desktop
overwrites
handheld
Synchronizes the mail on your Palm III
organizer and your desktop e-mail application.
Replaces the mail on your Palm III organizer
with the mail in your desktop e-mail
application. You should use this option only if,
for some reas on, the two inbox es get out of sync.
This setting applies for only one HotSync
operation and then reverts back to the default
setting.
Do Nothing
Turns off communication between your Palm III
organizer and desktop e-mail application. This
setting appli e s f or only one HotSync op e ration
and then reverts back to the default setting.
Set As
Default
Changes the de fault settin g on an ongoi ng basis.
(When you first se t up Mail, Synchr onize the
files is the default setting.)
Tip: To turn off mail, se lect Do Nothing and then sele ct the Set as
Default check box.
To change you r Mail setu p options:
1. Click the icon in the Windows System Tray to open the
HotSync menu.
2. Click Custom from the HotSyn c me nu to open the Custom dialog.
Tip: You can also click Custom from the HotSync menu in
Palm Desktop.
3. Click the Mail in the Cond uit list to indicat e tha t you want to
change these settings.
4. Click the Chang e b ut ton to open the Change HotSync Action
dialog for the Mail conduit.
5. Modify your settings as needed.
6. Click the O K button to c onfirm you r change s and close th e Change
HotSync Action dialog.
Chapter 6 Page 65
Page 72

Synchronizing Mail with y o u r E-Mail Application
After you have enabled and configured Mail, you need to perform a
HotSync operation to synchronize Mail with your desktop e-mail
application. For a complete explanation of how to use the HotSync
feature, see the “HotSync” chapter.
Opening Mail on your Palm III organizer
1. Tap the icon to open the Applications Launcher.
2. Tap the icon to display the Message List screen.
Viewing Messages
The Message List lists your incoming messages, who sent them and
the date they were received. Messages you’ve read appear with a
check next them and high-priority messages appear in bold.
Previously read
To op en a mes sage:
■ Tap a message in the list to open it.
Recipient
Subject
Page 66 Applications Handbook for the Palm III Organizer
Header mode icons
Sender
Time and date sent
Message body
Page 73

Messages appear by default in the abbreviated mode. To switch from
the abbreviated mode to the full header mode, see “Displaying Full
Header Information” later in this chapter.
To close a message:
■ Tap the Done button to close the message and return to the
Message List.
Message Fonts
You can modify the way messages appear by changing the font (text)
style. See “Choosing Fonts” in the Basic Handbook for the Palm III
Organizer for details.
Displaying Full He ade r Informa tio n
By default, Mail displays abbreviated header information. The
abbreviated header displays only the From and Subject fields. The full
header provides complete informatio n about the sender, recei ver and
CC recipient s, in addi ti o n to the subj e ct and da te th e m e ssage wa s
created. Mail uses the header type you select for all your messages.
To display full header information:
1. Open a message.
2. Tap the Compl e te Header icon to display the full h e ader.
Complete Header icon
Abbreviated Header icon
Note: To redisplay the abbreviated header, tap the Abbreviated
Header icon.
Chapter 6 Page 67
Page 74

Creating Messages
You create messages with your Palm III organizer the same way you
create messages with your desktop e-mail application: you identify
the recip ien t(s) of th e m essage , de fi ne a subje ct an d cr eate t he body of
the message.
You create original messages and replies in the New Message screen.
All messages must, at the very leas t, cont ain information in the To and
Subject fields.
To create a message:
1. Tap the New bu tton in the M essa ge List sc reen t o dis play the New
Message screen.
Tap New
Note: You can also display the New Message screen by tapping
New from the Message menu.
®
2. Use the stylus to w rite Graffiti
characte r stro ke s (or th e on -sc reen
keyboard) to enter the e-mail address of the recipient. The cursor
indicates where new text will appear.
Page 68 Applications Handbook for the Palm III Organizer
Page 75

Note: Enter the add ress as if you are entering it fr om your
desktop e-mail application. For example, network users
sending a message to a user on the same network do not
need to add Internet information, such as @3com.com.
3. To send a car bon copy o f th is mes sage to add iti onal r eci pie nts , t ap
in the CC field, then enter the e-mail addresses of the additional
recipients, separating the addresses with a comma followed by a
space.
4. Tap in the Subj field, then enter a subject for your message.
5. Tap in the Body field, then enter the body text.
Note: If the address, CC, subject or body of t he message exceeds
the capaci ty of the screen display, tap the name of the
field (for example, “To”) to expand that field. Tap the
Done button to re turn to the New Message scr e e n.
Tap the name of the field to open
Tap to return to New Message screen
To reply to a message:
1. Tap a message in the Message List to display it on the screen.
2. Tap the Reply button to open the Re p ly Options dialog.
Chapter 6 Page 69
Page 76

3. Select who you want to receive the reply: only the Send er, All
recipients and the sender or do you want to Forward the message
to someone else.
4. Select whether you want to Include original text and Comment
original text.
5. Tap OK to clos e the Reply Options dialog and di sp lay the New
Message screen.
6. Enter your rep ly text.
Note: You have several message op tions inclu di ng setting the
priority. See “Adding Message Details” for details.
7. Tap Send to place your reply in the Outbox.
Looking Up an Address
To identify the rec ipient of a message, you need to enter that person’s
e-mail address in the appropriate field of the Message screen. You can
do this either by entering the dat a directly in to the field or by usin g the
Look Up command to access the inform ation in you r Addres s Boo k.
To look up an address:
1. Tap either the To or CC field name to expand one of these fields.
2. Enter a few letters of the address you want to find.
3. Tap the Looku p button.
4. If the letters you enter identify a unique listing from your Address
Book, your Palm III organizer completes the address for you. If not,
the Lookup dialog appears.
Note: You can also open the Look Up dialog in the New
Message scree n by tapping Lookup from the Op tions
menu or by using the Command stroke /L.
Page 70 Applications Handbook for the Palm III Organizer
Page 77

Tap here
5. Enter the first let t e r of the entry you want to find to scroll to the
first entry that begins with that letter. If you write an additional
letter, the list scrolls to the first entry that starts with those two
letters. Fo r ex ampl e, writing an “s” might scrol l to “Sander s,” and
writing “sm” might scroll farther to “Smith.”
6. Tap an address to sel e ct it.
7. Tap the Add button to enter the address in the To or CC field.
Tap to select
Tap here to enter address in field
Chapter 6 Page 71
Page 78

Adding Message Details
Before you send your message, you can attach additional at trib utes
(called me ssage det ai ls) t o you r messa ge, su ch as a sign atur e bl ock, or
flagging the message as high-priority. These features are dependent
on the desktop e-mail applic atio n you use. If your e-mail app lication
does not support the message detail you select, your Palm III
organizer cannot attach that attribute to your message.
The following message details are available:
Priority
BCC
Signature
Confirm
Read
Confirm
Delivery
Note: The Priority and BCC settings are valid only for the current
message and must b e s e t with each subse quent mess age you
create.
Flags a message as high, nor mal or low priority.
Creates a blind carbon copy field in the New
Message screen.
Attaches previously defined text as a signature
block. See “Adding a Signature to Your Message”
later in this chapter for details.
Requests a confirmation telling you when the
message was read.
Requests a confirmation telling you when the
message was delivered.
Setting a Priority
To set a priority for your message:
1. Tap the Details button in the New Message screen to open the
Message Details dialog.
Tap here
Page 72 Applications Handbook for the Palm III Organizer
Page 79

2. Tap the Priority pick list and select the priority you want.
Tap here
Tap to select priority
3. Tap the OK button to c onfirm your sel ectio n and retu rn to the New
Message screen.
Note: Your Palm III organizer can flag messages with a specific
priority only if your desktop e-mail application supports this
feature.
Sending a Blind Carbon Copy
To add a BCC field to your message:
1. Select the BC C check box in the M e ssage Details di alog to add the
BCC field to the New Message screen.
2. Tap the OK button to c onfirm your sel ectio n and retu rn to the New
Message screen.
BCC fiel d
3. Tap the BCC field and enter the address.
Chapter 6 Page 73
Page 80

Adding a Signature to Your Mes s age
Adding a signature to your message is a two-part process: first, you
must create y our sig natur e, the n you must sele ct th e sig natur e opti on
from th e Me ssage D e ta i l dialog .
To create a signature:
1. Tap the icon to open the Mail menus.
2. Tap Preferences from the Options menu to open the Preferences
dialog.
Add signature
text here
3. Ta p in the Sign a t u re T e x t f i e ld and ente r up to si x lines of te x t.
4. Tap the OK but ton to confirm your selection and return to the
previous screen.
To add a signature to your message:
1. Tap the Details button in the New Message screen to open the
Message Details dialog.
2. Select th e Signatu re check b ox to add a signatur e to the end of your
message.
3. Tap the OK button to co nfirm you r selec tion a nd retu rn to t he New
Message screen.
Note: The signature block does not display in your message; only
your recipient sees the signature block.
Page 74 Applications Handbook for the Palm III Organizer
Page 81

Requesting Confirmations
To receive a confirmation when your message is read:
1. Tap the Details button in th e New Message screen to op e n the
Message Details dialog.
2. Select the Confirm Read check box to request a confirmatio n when
the recipient reads your message.
3. Tap the OK button to c onfirm your sel ectio n and retu rn to the New
Message screen.
To receive a confirmation when your message is delivered:
1. Tap the Details button in th e New Message screen to op e n the
Message Details dialog.
2. Select the Confirm Delivery check box to request a confirmation
that the recipient received your message.
3. Tap the OK button to c onfirm your sel ectio n and retu rn to the New
Message screen.
Sending Messages
When you send messages from your Palm III organizer, it stores them
in the Outbox folder until the next time you synchronize your Palm III
organizer with your computer. During synchronization, all messages
stored in the Outbox folder are transferred to the Outb ox folder in
your desktop e-mail application. Messages created on your Palm III
organize r are transmitted the next time you send mail from your
desktop e-mail application.
To send a message:
■ Afte r you create a messa ge , ta p the Send bu tton in th e Ne w
Message screen.
Chapter 6 Page 75
Page 82

Editing an Unsent Message
You can edit or make ch ange s to a mes sage that ha s not ye t been sent,
as long as you have not yet performed a HotSync operation. When you
edit a mess age, your Palm III o rganize r remo ves the message f rom the
Outbox folder and ta k es you back to the New Message screen, wher e
you can edit the message and resend it, save it as a draft or can cel it.
To retrieve a message:
1. In the Message List screen, tap Outbox from the pick list in the
upper-right corner to display the messages contained in the
Outbox.
Tap to di s play folder list
2. Tap the message you want to retrieve to display the message.
Tap here
to select
message
Tap to
modify
message
3. Tap the Edit bu tton to remov e the messa ge from the Outbox folder
and place it back in the New Message screen.
Page 76 Applications Handbook for the Palm III Organizer
Page 83

Draft Messages
There are times when you may not want to immediately send a
message you compose — for example, you may want to add
additional information before sending it. Your Palm III organizer
stores su ch messages in the Draft folder until you are re ady to edit
them. When you edit a draft, it becomes a new message again.
Note: When you’re creating or edi tin g a message, you can also save
a message as a draft by canceling it. When you cancel a
message, Palm III organizer opens a dialog asking if you want
to save the message. If you tap the Yes button, your Palm III
organizer sav e s a draft of your message.
To save a messag e as a draft:
1. Create a message in the New Message screen.
2. Tap the icon to open the Mail menus.
3. Tap Save Draft fr om the Me ssage me nu to move the mes sage t o the
Draft folder.
To edit a message saved as a draft:
1. In the Message List screen, tap Draft from the pick list in the upperright corner to display a list of the messages in the Draft folder.
2. Tap the dra f t y o u w a nt to disp la y .
Tap here
to select
message
Tap to edit
draft in New
Message
screen
3. Tap the Edit bu tton to move you r draft to the New Message scre en.
4. Enter your changes, then either save it again as a draft or tap the
Send button to move the message to y o u r Ou tbox folde r.
Chapter 6 Page 77
Page 84

Filing a Message
Your Palm II I organizer can stor e any messag e you re ceive or c reate i n
the Filed folder. The contents of th is folder do not automatically
synchronize w ith your deskt op e-mail a pplicat io n durin g a HotSync
operation. However, your Palm III organizer does store a back-up
copy of the Filed folder on your computer hard drive.
To file a message:
1. Open a message.
2. Tap the icon to open the Mail menus.
3. Tap File from the Message menu to display the Message File
Options dialog.
4. Tap No to save the message and move it to the Filed folder or tap
Yes to file the message and keep a copy in the Inbox.
To remove a message you created from the Filed folder:
1. In the Message List sc reen, tap Filed fr om the pick list in t he upperright corner to display the contents of the Filed folder.
2. Tap the message you want to restore.
3. Tap the Edit bu tton to display and modify the messag e .
Note: After you display and modify the message, you can send it,
save it as a draft, or return it to the Filed folder.
Deleting Messages
Your Palm III organizer stores deleted message in the Deleted folder
until you perform the next HotSync operation. If you delete a message
from Palm III organizer, it will be deleted on your desktop e-mail
application after you perform a HotSync operation.
To delete a message:
1. Open the message you want to delete.
2. Tap the Delete button.
3. If you sel e cted the Preference op tion to confirm messag e deletion,
tap the Yes button to confirm that you want to delete the current
message.
Page 78 Applications Handbook for the Palm III Organizer
Page 85

Removing a Message From the Deleted Folder
You can reverse the deleti on of a message (by re moving it fr om the
Deleted fold er) as long as you have nei ther performed a HotSync
operation nor purged the contents of the Deleted folder.
To remove a message you received from the Deleted folder:
1. In the Message List screen, tap Deleted from the pick list in the
upper-right corner to display the contents of the Deleted folder.
2. Tap the message you want to restore.
3. Tap the Un delete b utton to m ove th e select ed messa ge to t he Inbox
and mark it as read.
To remove a message you created from the Deleted folder:
1. In the Message List screen, tap Deleted from the pick list in the
upper-right corner to display the contents of the Deleted folder.
2. Tap the message you want to restore.
3. Tap the Edi t bu t to n to d i s p lay and modify the mess a g e .
Note: After you display and modify the message, you can send it or
save it as a draft.
Purging Deleted Messages
Because your Palm III organizer stores deleted messages in the
Deleted folder until you perform a HotSy nc opera tion, de leted
messages ca n monop olize storage space. To avoid or correct this
problem, you can purge the contents of your Deleted folder. Messages
that you purge will still delete from your desktop e-mail application
during the n e xt HotSync oper ation.
To purge the contents of the Deleted folder:
1. Tap the icon to open the Mail menus.
2. Tap Purge D e leted from the Message menu.
3. When your Palm III organizer displays the Purge Deleted
Messages alert, tap the Yes button to confirm that you want to
purge the contents of the Deleted folder.
Note: You cannot restore messages after you purge them.
Chapter 6 Page 79
Page 86

Message List Options
Message List Opti ons enab le y ou t o man age the w ay th e Mess age Li st
displays informa tion.
Folders
Your Palm III organizer provides five different folders, each
pertaining to a particular mail category. The Message List displays the
messages in the folder you select. Folders provide an efficient way to
manage the mail you send and receive.
To select a folder:
1. Tap the pick list in the upper-right corner to open the followi ng list
of folders:
Inbox
Outbox
Delet e d
Filed
Draft
2. Tap to select the folder you want to display in the Message List
screen.
Contains the mail from your desktop e-mail
application Inbox, minus any that y ou have excluded
using filtering options. See “Creating Special Filters”
later in this chapter for details.
Contains the mail you created and sent on the Palm III
organ iz e r since th e l a st HotSyn c op e r ation.
Contains the me ssages you deleted since the last
HotSync operation.
Contains the me ssages you want to store on the Palm
III organizer.
Contains the messages you created using the Palm III
organ iz e r b u t are n o t y e t re a dy to se n d.
Date Column
The Date Column is optional in the Message List. By default, the Date
Column is hidden to increase the available scree n space.
To show the Date Column:
1. Tap the Sh ow butto n in th e Message List t o open t he Show O ptions
dialog .
Page 80 Applications Handbook for the Palm III Organizer
Page 87

Tap
Show
2. Sel e ct th e S how Date ch e c k bo x to show the D a te Co l u m n .
3. Tap OK to clo se the Show Options dialog and return to the
Message List.
Sorting the Message List
You can sort t he Mess ag e List by th e dat e it wa s sen t, b y the send er or
by the subject.
Note: High -priority messages always appear first, no matter how
you sort your message list.
To sort the Message List:
1. Tap the Sh ow butt on in th e Messag e List t o open th e Show Op tions
dialo g.
2. Tap the Sort by pick list and sel e ct one of the foll owing options:
Date
Sorts me ssage s b y da te and disp l a y s the most
recent message at the top of the screen.
Sender
Sorts messages by the sender’s user name and
displays them in ascending alphabetical order —
based on th e fi rs t word of the sende r field.
Subject
Sorts messages by the subject and displays them in
ascending alphabetical or der — based on the first
word of the subject field.
3. Tap OK to clo se the Show Options dialog and return to the
Message List.
Chapter 6 Page 81
Page 88

HotSync Options
HotSync Options enable you manage your e-mail more effectively by
selecting which messages download whe n you synchron ize your
computer and your Palm III organizer. You can define different
settings for local and remote syn chro niz ation. For example , you may
want to download all of your messages during local synchronization
and only urgent message s during rem ote syn chro niza tion. Once
defined, your Palm III organizer determines if synchronization is
occurring locally or remotely an d uses the appropriate HotSync
Options settings.
To activate the HotSync Options dialog:
1. Tap the icon to open the Mail menus.
2. Tap HotSync Op tion s from the Op tions me nu to open the HotSy nc
Options dialog.
3. Tap the Settings for pi ck list and sele ct Local Hot S y nc or Remote
HotSync.
Tap here
to dis play
HotSync
option s
Note: For more information ab out Local and Remote HotSync
operations, see the “HotSync” chapter.
4. Tap the filtering option you want to apply. The following filtering
options are available:
Page 82 Applications Handbook for the Palm III Organizer
Page 89

All
During sy nchroniza tion, all of th e me ssages in
your desktop e-mail Inbox synchronize with your
Palm III organizer and all messages in your Palm
III organizer Outbox are sent to your desktop email application.
Send Only
During synchronizatio n, only the mess ages in
your Palm III organizer Outbox are sent to your
desktop e-mail application where they are sent to
their final destination.
Filter
During synchronization, all messages in your
Palm III organizer Outbox are sent to your
desktop e-mail application, and messages in your
desktop e-mail Inbox that meet specific criteria
download to your Palm III organizer. When you
selec t the Filte r se t t i n g, the Hot S y n c Op tions
dialog opens and displays additional filter
settings. See “Creating Special Filters” for details.
Unread
During synchronization, only unread message s
download to your Palm III organizer from your
desktop e-m a il Inbox, and all me ssages in your
Palm Outbox are sent to your desktop e-mail
application.
Note: The All setting does not mean that all information
included in each message downloads to your Palm III
organizer. Truncation settings (explained in a following
section) for long messages still apply. Also, Mail never
downloads any attachments to your Palm III organizer.
The message and any text information appear, but the
attachment is left in your desktop e-ma il applic ati on.
5. If you selected All, Send Only or Unread, tap the OK button to
confirm yo u r se lection and close the HotSy nc Options di alog. If
you selected Filter, continue to the next section.
Chapter 6 Page 83
Page 90

Creating Special Filters
You can create special filters to control the type of messages that
download to your Palm III organizer during synchronization. Special
filters work on the premise of ignorin g or retrieving messag e s that
contain specific information in their header fields.
To create a special filter, you must decide whether you want to ign ore
or retrie ve ce rtain messages. Then, based on that decision, yo u must
tell your Palm III organizer what it needs to look for in the To, From,
and Subject hea der fields to sin g le out those mes sages.
To access the special filter settings:
■ Tap the Filter box in the HotSync Options dialog to display the
filter settings.
Tap here
to displ ay
Filter
options
Ignoring or Receiving Messages
The first step in establishing a special filter is to determine whether
you want to ignore or retri eve messages that match the inf ormation
you specify.
To define whether to ignore or receive messages:
■ Tap the pick list in the center of th e HotSync Options di alog and
select one of the f ollowin g settin gs:
Page 84 Applications Handbook for the Palm III Organizer
Page 91

Tap here
Select Filter option
Ignore
Messages
Containing
Retrieve
Only
Messages
Containing
Tells your Palm III organizer to exclude the
messages that meet the defined criter ia and
download all other messages during
synchronization. In general, this filter
downloads more mail during
synchronization because it blocks only one
defined subset of mail.
Tells your Palm III organizer to include only
the messa ges that meet the defined criter ia
and to igno re all other messages during
synchronization. This filter has the
potential to block more mail during
synchronization because it downloads only
one subset of mail.
Chapter 6 Page 85
Page 92

Defining Filter Strings
Messages are filtered based on the information contained in their To,
From and Subject header fields. The information th at defines what
your Palm III organizer is looking for is called a filter string. You create
a filter string by listing the words you want your Palm III organizer to
find and separating them with either a comma or a space. Each word
in the filter string is joined by an implicit OR; because of this, you
should not ente r connect ing words such a s AN D or OR.
To create a more complex filter, you can define filter strings f or the To,
From and Subject fields simultaneously. Your Palm III organizer joins
the filter strings for these fields using an implicit AND. Once again,
you should not add connecting words. Your Palm III organizer will do
that for you.
For example, suppose you want to receive only messages from John
Smith (jsmith@aol.com) or Jack Jones (jjones@aol.com) concerning the
Apollo Proje ct. You would create the following filter strings:
To field filter string: jsmith@ aol.com, jjones@aol.com
Subject field filter string: Apollo Project
Your Palm III organizer interprets this as, “Accept messages about the
Apollo Projec t fr om J ohn Smi th or Jack J o nes. Do n ot acc ep t messag es
from other people. Do not accept messages from John or Jack about
any other subject.”
When you define a string, note that your Palm III organizer searches
for any instance of that collection of characters. For example, if you
create a filt er that retrieve s only messages cont aining the stri ng “info,”
your Palm III organizer considers “info,” “rainforest” and “kinfolk”
appropriate matches.
To define filter strings:
1. Tap a header field in the HotSync Options dialog.
Page 86 Applications Handbook for the Palm III Organizer
Page 93

Tap here
to insert
cursor
2. Enter your filter string for the select ed header fi eld using co mmas
or spac e s to se p a ra t e th e wo rds. Do no t add conne c ti ng word s,
such as AND or OR, between words in a string.
3. If your string exceeds the length of the field, tap the name of the
field to display the Notes screen for that header field. For more
information about header field Notes scree ns, see “Creating
Messages.”
Enter
filter data
Tap here
Tap Do ne
to return
to HotSync
Options
4. Tap the Done button to retu rn to the HotSync Options di alog.
5. Tap the OK but ton to confirm y our filte r strings and cl ose the
HotSync Options dialog.
Chapter 6 Page 87
Page 94

High-Priority Messages
The Retrieve All High Priority setting lets you retrieve messages
marked high-priority, even if those messages would have been
blocked by a defined filter.
To retrieve high-priority messages:
1. Tap the Filt e r b ox in the HotSync Opt ions dialog to display
additional fi lter options.
2. Select the Retrie ve All Hig h Prio rity chec k box to retriev e all
messages ma rked high-priori ty.
Tap
check
box
3. Tap OK to confirm your selection and close the HotSync Op tions
dialog.
Note: This setting is applicable only if your e-mail application has
the capacity to flag high-priority messages.
Truncating Messages
The Truncate feature lets you set a point at which l ong messages
truncate when downlo ading to your Palm III organizer . By default,
this Truncate value is 4000 characters. By truncating long messages,
you re d u ce th e time it take s to synchroniz e y ou r de sktop e- m a i l an d
Palm Mail as well as the amount of storage space e-mail uses on your
Palm III organizer.
Note: Truncation is separate and independent from filtering.
To truncate messages:
1. Tap the Tr uncate but ton in th e HotSync Op tions d ialog to o pen th e
Truncate Options dialog.
Page 88 Applications Handbook for the Palm III Organizer
Page 95

Tap to
select
maximum
length
Tap
Truncate
2. Tap to selec t the truncation se t t i n g y ou w ant. The va l u e s ra ng e
from 250 characters to 8000 char acters.
Tip: If you select a low truncation value, you will have more
room on your Palm III organizer to store messages.
3. Tap OK to confirm your sel ection and return to th e HotSync
Opti ons dial o g .
Mail Menu Commands
The Mail application includes menu commands to make it fast and
easy to perform common file and editing tasks. This section explains
the menu commands that are specific to the Mail application.
See “Using Menus” in the Basic Handbook f or the P alm III Or ganizer for
information about menu commands that are common to all of your
Palm III organizer applications.
Message Menu
The Message menu varies based on whether you are viewing a
message, creating a message or viewing the Message List.
Message List
New Message
View Message
Chapter 6 Page 89
Page 96

New
Displays the Create Message screen, where you can
create a new e-mail message.
Save Draft
File
Send
Delete
Purge
Delet ed
Saves the curr e nt message as a dra f t and moves it to
the Draft fol der. Your Palm I II organizer stores Draft
messages until you send or delete them.
Moves the current message to the Filed folder. Your
Palm III organizer stores Filed messages until you
delete them.
Moves the c urrent mess age to the Outbox fol der. Your
Palm III organizer stores all sent messages in the
Outbox folder until you perform a HotSync
operation.
Move s the curren t me s s age to the De le t e d fo lder.
Your Palm III organizer stores deleted messages in
the Deleted folder until you perform a HotSync
operation, at which time it permanently removes
dele te d m e ss ages.
Enables you to empty (purge) the contents of the
Deleted folder. Your Palm III organizer stores deleted
messages in the Deleted folde r until you perform a
HotSync operation. By purging deleted messages,
you free up storage space on your Palm III organizer
before your next HotSync operation.
Note: The Purge Deleted command displays an
alert, prompting you to confirm that you want
to purge all messages from the Deleted fo lder.
If you tap Yes, all deleted messages are
purged from the memory of your Palm III
organizer.
Important: Messages that you purge are deleted
from your desktop e-mail application
during the next HotSync operation.
Page 90 Applications Handbook for the Palm III Organizer
Page 97

Options Menu
When you selec t the Options menu, its menu c ommands vary
depending on whether you are creating or editing a message.
Message List
Font
Preferences
HotSync
Options
Look Up
New Message
Enables you to adjust the size of the tex t on the
screen. This can make it e a sier to read the text or
to fit more tex t in the display ar e a .
Enables you to define a s p e ci f ic strin g of text as a
signature and to select whether or not your Palm
III organizer displays an alert when you delete a
message.
Opens a dialog, where you can select different
ways to filter messages sy nc hronized b e twe e n
your desktop e-mail application and your Palm
III orga ni z er. You can cre a t e simple or com p le x
filters to control the type of messages
downloaded to your Palm III organizer. In
addition, you can define separate settin gs for
local and remote synchronizations.
Opens a dialog, whi ch contains th e Ad dress List
from your Address Book. By tapping a selection,
you enter that address into the To field of any
message you are creating.
Note: The Look Up co mma nd is available only
when you are creating a message.
About Mail
Shows version (revision) information for the Mail
appl ic at ion.
Chapter 6 Page 91
Page 98

Page 92 Applications Handbook for the Palm III Organizer
Page 99

Chapter 7
Memo Pad
The Memo Pad provides a place to take notes that are not
associa te d with Date Book, Address Book o r To Do items.
With the Memo Pad, you can:
■ Take notes or write any kind of message on your Palm III
connected organizer.
■ Drag and drop memos into popular computer applications like
Microsoft Word, whe n you synchroni z e using Palm
®
software and HotS ync
technology.
■ Assign categories for memos. This enables you to quickly view
just your busi ness-related memos, per sonal memos or any other
catego ry tha t yo u de f in e.
■ Quickly jot down phone numbers and other types of information.
Later, you can copy and paste this information to other
applications.
To open the Memo Pad:
Press the Memo Pad button on the front panel of the Palm III organizer
to display the Memo List screen.
™
™
Desktop
A
P
S
P
N
L
O
I
I
T
C
A
a
b
c
M
U
N
E
C
A
R
L
O
C
T
A
U
L
3
2
F
I
D
N
1
Memo P a d button
Chapter 7 Page 93
Page 100

Working Wi th Me mos
A memo is where you enter, review and modify t he individual Memo
Pad entries. A memo can contain up to 4 ,000 charact ers; the numb er of
memos you can store is dependent only on the memory available on
your Palm III organizer.
To create a new memo:
1. Open the Memo Pad application.
2. Tap the New button to create a new memo.
Tap New
Note: In the Memo List screen, you can also begin writing in
®
the Graffiti
writing area t o create a new memo. The first
letter is automatically capitalized and begins your new
memo.
3. Enter the text you want to appear in the memo. Use the carriage
return stroke to move down to new lines in the memo.
4. After you finish, tap the Done button t o re turn to the Memo List
screen.
Reviewing Memos
Each time you create a memo, the first line of the memo appears in
the Memo List scre en. This make s it easy to loc a te and review your
memos.
Page 94 Applications Handbook for the Palm III Organizer
 Loading...