

Page 1

3Com® eXchange Call Center Administration Guide
Version 4.33
http://www.3com.com
Part Number 900-0146-01 Rev AA
Published May 2004
Page 2

3Com Corporation, 350 Campus Drive, Marlborough, MA 01752-3064
Copyright © 2004, 3Com Corporation. All rights reserved. No part of this documentation may be reproduced in any form or by any means or
used to make any derivative work (such as translation, transformation, or adaptation) without written permission from 3Com Corporation.
3Com Corporation reserves the right to revise this documentation and to make changes in content from time to time without obligation on
the part of 3Com Corporation to provide notification of such revision or change.
3Com Corporation provides this documentation without warranty, term, or condition of any kind, either implied or expressed, including, but
not limited to, the implied warranties, terms, or conditions of merchantability, satisfactory quality, and fitness for a particular purpose. 3Com
may make improvements or changes in the product(s) and/or the program(s) described in this documentation at any time.
If there is any software on removable media described in this documentation, it is furnished under a license agreement included with the
product as a separate document, in the hardcopy documentation, or on the removable media in a directory file named LICENSE.TXT or
!LICENSE.TXT. If you are unable to locate a copy, please contact 3Com and a copy will be provided to you.
UNITED STATES GOVERNMENT LEGEND
If you are a United States government agency, then this documentation and the software described herein are provided to you subject to
the following:
All technical data and computer software are commercial in nature and developed solely at private expense. Software is delivered as
“Commercial Computer Software” as defined in DFARS 252.227-7014 (June 1995) or as a “commercial item” as defined in FAR 2.101(a)
and as such is provided with only such rights as are provided in 3Com’s standard commercial license for the Software. Technical data is
provided with limited rights only as provided in DFAR 252.227-7015 (Nov 1995) or FAR 52.227-14 (June 1987), whichever is applicable.
You agree not to remove or deface any portion of any legend provided on any licensed program or documentation contained in, or
delivered to you in conjunction with, this guide.
Unless otherwise indicated, 3Com registered trademarks are registered in the United States and may or may not be registered in other
countries.
3Com, the 3Com logo, NBX, and SuperStack are registered trademarks of 3Com Corporation. NBX NetSet and pcXset are trademarks of
3Com Corporation.
Adobe is a trademark and Adobe Acrobat is a registered trademark of Adobe Systems Incorporated. Microsoft, Windows, Windows 2000,
and Windows NT are registered trademarks of Microsoft Corporation.
All other company and product names may be trademarks of the respective companies with which they are associated.
2 3Com
®
eXchange Call Center Administration Guide
Page 3

CONTENTS
ABOUT THIS GUIDE 5
Conventions 5
Related Documentation 5
Documentation Comments 6
Registration, Warranty, and Support Information 6
Disclaimer 6
CHAPTER 1: OVERVIEW OF THE 3COM EXCHANGE CALL CENTER 7
Engine Module 7
Admin Module 7
Visor Module 7
Agent Module 7
CHAPTER 2: EXCHANGE CALL CENTER ADMINISTRATION OVERVIEW 9
Starting 3Com eXchange Administration 10
The Administration Application Main Window 11
Menus on the Administration Application Menu Bar 11
CHAPTER 3: CONFIGURING THE ENTITIES 15
Defining a New Agent 15
Configuring Agents Details 16
Configuring Agents Groups 17
Configuring the Agents COS 19
Configuring Groups 25
Configuring Groups Details 26
Configuring the Groups Agents 27
Configuring Group's Thresholds 29
Configuring Trunks 32
Configuring Trunks Details 35
Configuring Trunk Groups Trunks 36
Entering a New Trunk Group 38
Configuring Super Groups 39
Configuring Super Groups Details 41
Configuring Super Groups 41
3Com® eXchange Call Center Administration Guide 3
Page 4

Configuring Supervisors 43
Configuring Supervisors Details 45
Configuring Services 46
Defining a New Service 47
Configuring Services Announcers 49
Configuring Services Destination 51
Configuring Services Overflow 52
Configuring Services Interflow 54
Configuring Services No Agents 55
Configuring the IRN 57
Configuring IRN Details 59
Configuring the IRN Destination 59
Configuring the DNIS 61
Configuring the System 63
Configuring System Working Times 64
Configuring the MIS Parameters 66
Configuring System Miscellaneous Parameters 68
Configuring System IVR Ports 69
Configuring System Incomplete Destinations 71
Configuring System Wrap-Ups 73
Configuring System Management Parameters 74
The Call Control Scripts Administration 76
The CCS Administration Dialog Box 77
The CCS Administration Menu Bar 79
The CCS Admin Options 79
Viewing and Modifying Scripts 80
Configuring Script Actions 82
Configuring the Announce Place in Queue Action 83
Configuring the Hang-Up Action 83
Configuring the Menu Action 83
Configuring the Play File Action 85
Configuring the Transfer Action 85
APPENDIX A: GLOSSARY 87
4 3Com
®
eXchange Call Center Administration Guide
Page 5
ABOUT THIS GUIDE
This book describes how to use the 3Com eXchange Center Administration Application and
the 3Com eXchange Engine Call Control Scripts (CCS). It describes how to configure system
entities and how to define the various methods of call routing. It is intended for the Call
Center administrators and programmers.
For information on the eXchange Call Center Administration applications, see the
Help topics. For a description of many of the eXchange Center concepts and terms
used in this document, see Appendix A: Glossary.
Conventions
Table 1 lists conventions that are used throughout this guide.
Table 1 Notice Icons
Icon Notice Type Description
Information note
Caution
Warning
Information that describes important features or
instructions
Information that alerts you to potential loss of
data or potential damage to an application,
device, system, or network
Information that alerts you to potential personal
injury or death
Related Documentation
The following documents are available for the 3Com eXchange Call Center system:
3Com eXchange Call Center Release Notes
3Com eXchange Call Center Hardware and Software Guidelines
3Com eXchange Call Center Setup Worksheets Guide
3Com eXchange Call Center Quick Installation Guide
3Com eXchange Call Center Installation and Getting Started Guide
3Com eXchange Call Center Administration Guide (this guide)
3Com eXchange Call Center Visor User Guide
3Com eXchange Call Center Agent User Guide
3Com® eXchange Call Center Administration Guide 5
Page 6

Documentation Comments
Your suggestions are important to us because we want to make our documentation more
useful to you.
Please send e-mail comments about this guide or any of the eXchange Call Center
documentation and Help systems to:
VOICE_TECHCOMM_COMMENTS@3com.com
Please include the following information with your comments:
Document title
Document part number (usually found on the front page)
Page number
Your name and organization (optional)
Example:
3Com eXchange Call Center Administration Guide
Part Number 900-0146-01 Rev AA
Page 25
Registration, Warranty, and Support Information
For details on how to register your product and get support from 3Com, see the Appendix
“Obtaining Support for Your 3Com Products” in the 3Com eXchange Call Center Installation
Guide.
Disclaimer
The illustrations and other views, telephone displays, and screen captures appearing in this
manual are examples used to explain how the application’s features and controls are used.
What appears in the illustrations may differ from what appears on your actual equipment and
may not represent something that is possible in actual operation. The functions that you can
use and the information that you can display may differ depending on the telephony state
and external equipment connected in your network and eXchange system. Therefore, use
the illustrations only as guidelines.
The names of companies, products, people, characters, and data mentioned in the examples
herein are fictitious and are in no way intended to represent any real individual, company,
product, or event, unless otherwise noted.
6 3Com
®
eXchange Call Center Administration Guide
Page 7
CHAPTER 1: OVERVIEW OF THE 3COM EXCHANGE CALL CENTER
3Com eXchange Call Center is a comprehensive routing and management system designed
to control and monitor the activities of the Call Center. The Call Center operates by means of
several modules: Engine, Admin, Visor, and Agent. They enable Call Center managers to
design a routing plan, accurately assess Call Center activity trends, and provide the most
efficient personnel allocation plan to meet the Call Center's requirements.
This chapter gives an overview of the product and these modules.
The figures in this guide may not represent exactly what you see on your screen in
all details. Use them only as guidelines. See the Help topics for details.
Engine Module
The Engine module, together with the Interactive Voice Response package (IVR), provides
the Call Center administrator with a number of sophisticated mechanisms for routing
incoming calls to agents according to the service required by the DNIS (number dialed).
Admin Module
The Administration module, also called the Admin module, is described more fully in the rest
of this guide. It enables authorized supervisors to define the parameters of different system
entities (for example, Agents, Agent Groups, and Trunk Groups) and to modify their profiles.
The Admin module has several administration levels with different access rights.
Visor Module
The Visor module is a Management Information System that monitors Call Center activities,
provides real-time information, generate reports that summarize the system's performance
over a given time period, and provides statistical analysis of the Call Center system behavior
within a specified period. See the 3Com eXchange Call Center Visor User Guide for details.
Agent Module
The Agent module provides the agent with all the necessary information regarding any
incoming call type and the caller, before a call is even answered. This Windows-based
application provides agents with an extensive toolbar so that they can perform all telephony
functions from their desktops. The toolbar is so compact that most of the agent's screenspace can be used to run other applications. See the 3Com eXchange Call Center Agent
User Guide for details.
3Com® eXchange Call Center Administration Guide 7
Page 8

8 3Com
®
eXchange Call Center Administration Guide
Page 9
CHAPTER 2: EXCHANGE CALL CENTER ADMINISTRATION OVERVIEW
The figures in this guide may not represent exactly what you see on your monitor
in all details. Use them only as guidelines. See the Help topics for feature details.
The 3Com eXchange Admin module enables authorized supervisors to define the
parameters of different system entities (for example, Agents, Agent Groups, and Trunk
Groups) and easily modify their profiles and behavior in the system. Several administration
levels have different access rights.
The following parameters reflect the structure of the Call Center that is handled by the
Administration:
Hardware (for example, the type of PBX installed, Number and types of trunks, and
number and types of IVR channels)
Personnel (for example, the list of Agents and the list of Supervisors and their
authorizations)
Functional (for example, the Services offered by the Call Center and its various Groups
and Super Groups)
Operational (for example, working days, holidays, and calls behavior).
The various types of parameters that are called ENTITIES are handled in the following
groups, which are discussed in this guide:
Agents
Groups
Trunks
Super Groups
Supervisors
Services
IRN (Intelligent Routing Numbers)
DNIS
System
3Com® eXchange Call Center Administration Guide 9
Page 10
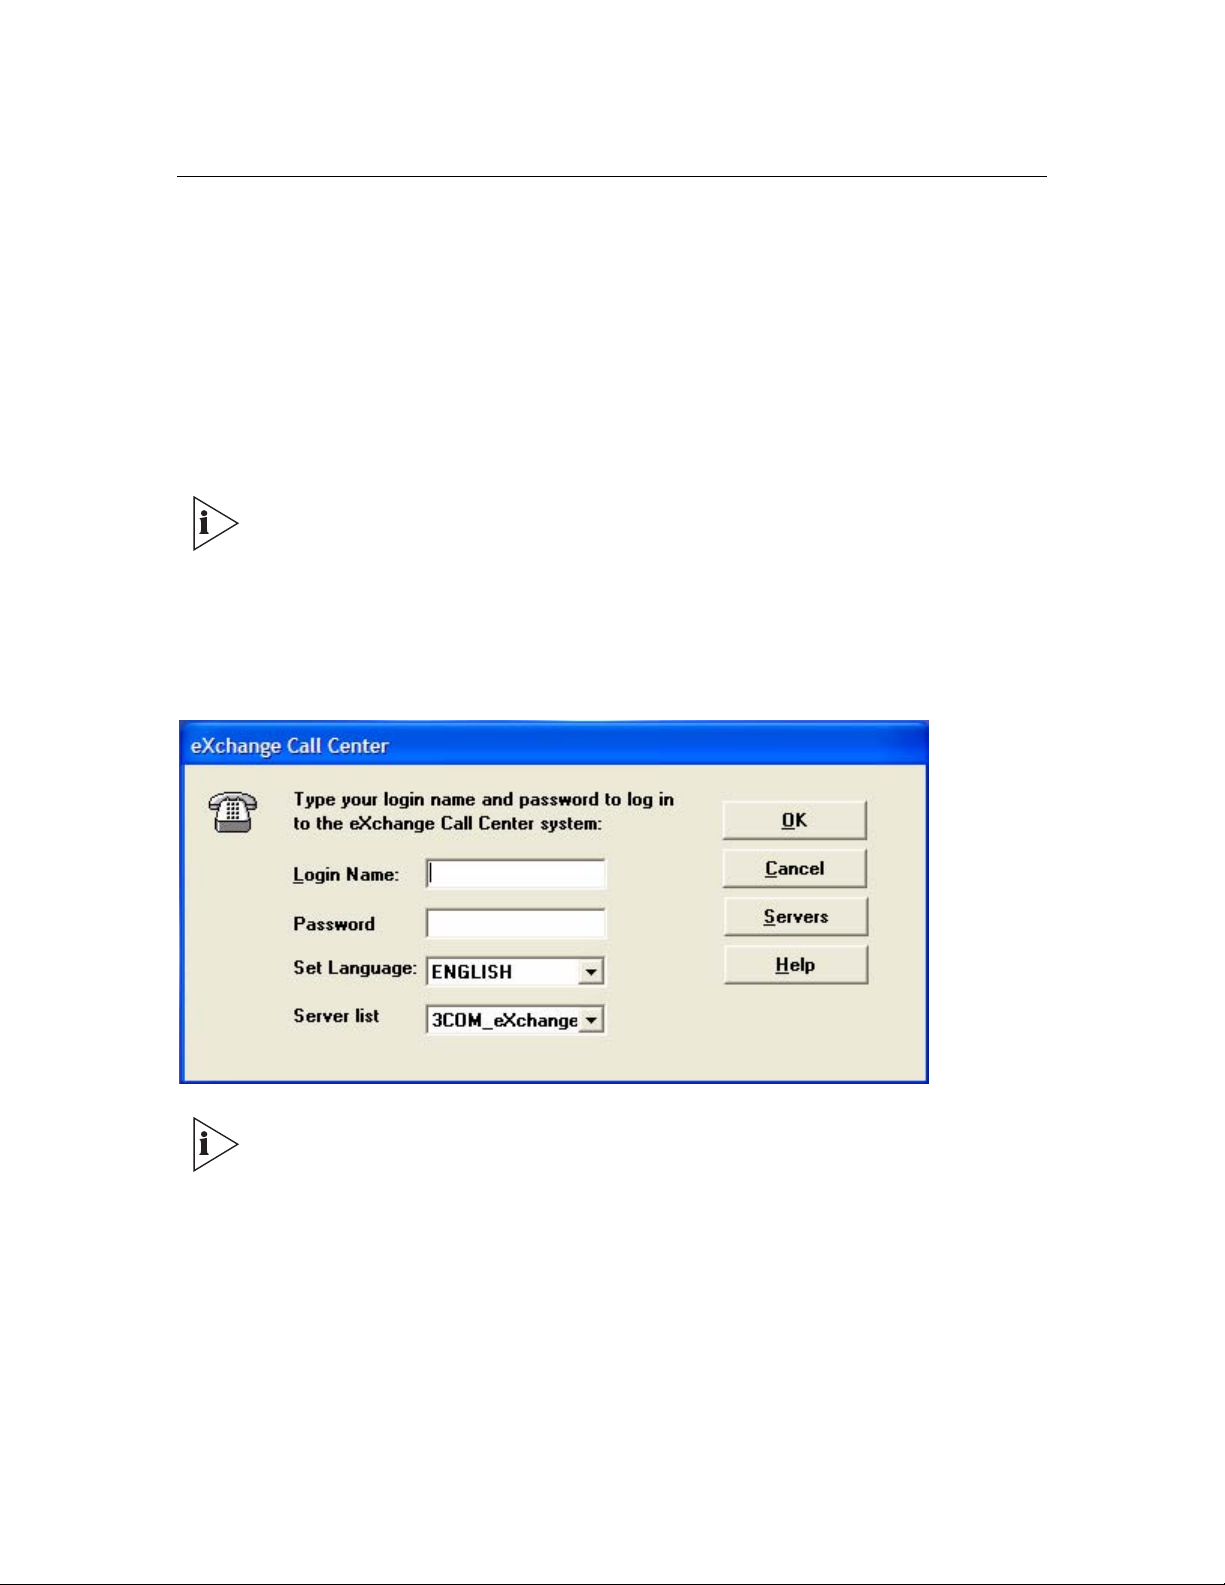
Starting 3Com eXchange Administration
To start the 3Com eXchange Administration application, choose one of these ways:
On your desktop, double-click 3Com eXchange Center folder > Administration
OR
Click Start > Programs > 3Com eXchange Center > Administration
If the computer is not already logged on to another 3Com eXchange application, and the
user is authorized, the system displays the Login dialog box.
• Every system must have at least one Supervisor with Administrator
authorization defined.
• New installations have a single supervisor defined by default. The default
login name is "EA". The default password is "E1996". Use this login name
and password when you log in for the first time.
Enter the Login Name, Password; choose the language and Server in the appropriate
fields:
Using the Set Language option, allows the user to operate in either, English or
Spanish. To revert back to the previous language (English or Spanish) the user
must log off and then log back on using the preferred language
10 3Com
®
eXchange Call Center Administration Guide
Page 11
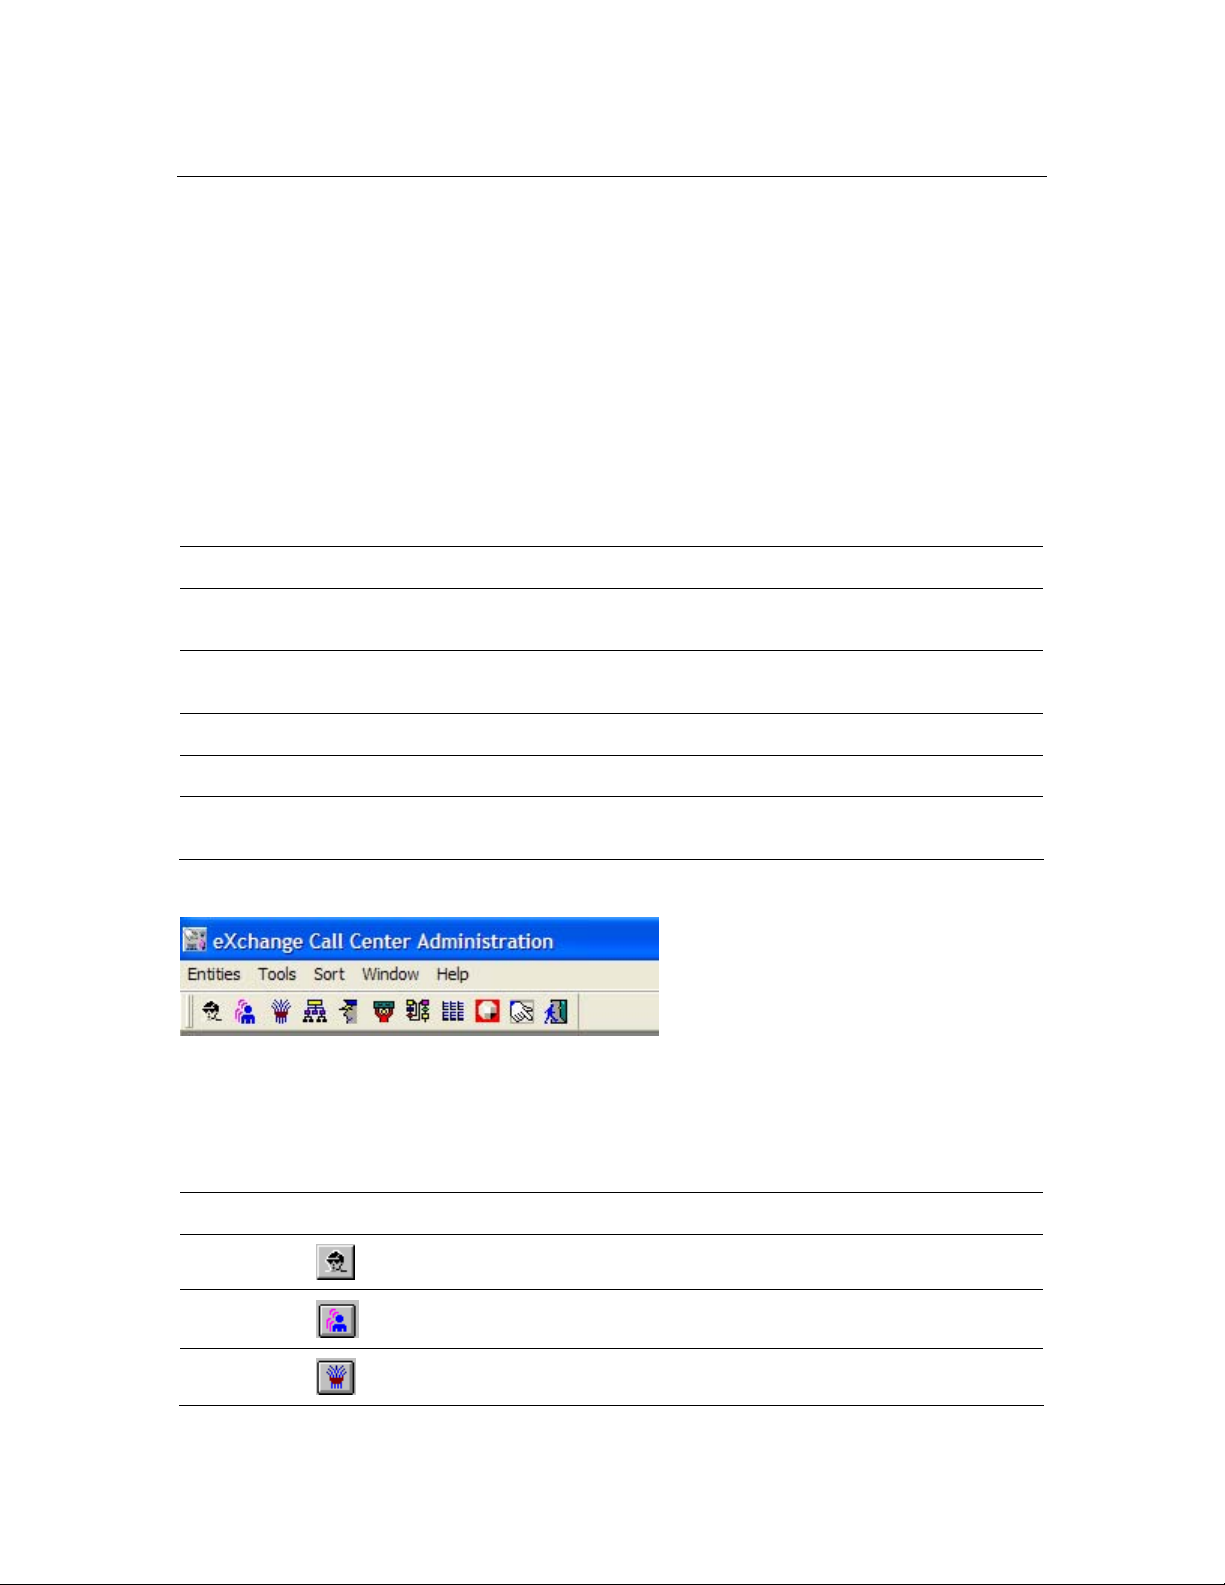
The Administration Application Main Window
After you successfully log in, the system displays the Administration Main Window.
The Administration window contains a menu bar, options, and toolbar that display icons that
you click to open configuration windows. The toolbar icons mirror the options within the
Entities menu. The remainder of the window contains a work area in which you configure and
display the Entities’ windows.
Menus on the Administration Application Menu Bar
Table 2 lists the menus on the Administration menu bar.
Table 2 Administration Application Menu Bar
Menu Name Operations
Entities
Tools
Sort Options for sorting.
Window Arranges the Administration windows and allows you to switch between open windows.
Help
Figure 1 The 3Com eXchange Call Center Administration Application Toolbar
Options to define or modify the attributes of specific 3Com eXchange Call Center
entities.
Options for terminating all the 3Com eXchange Visor open applications, and to activate
the scripting administration application.
Opens context-sensitive Help topics on 3Com eXchange Call Center windows and
operations.
The Entities Menu
Table 3 describes the Entities menu and its icons.
Table 3 Entities Menu
Entity Icon Description
Agents
Groups
Trunks
Opens a Configuration window for configuring agents.
Opens a Configuration window for configuring groups.
Opens a Configuration window for configuring trunk groups and trunks.
3Com® eXchange Call Center Administration Guide 11
Page 12
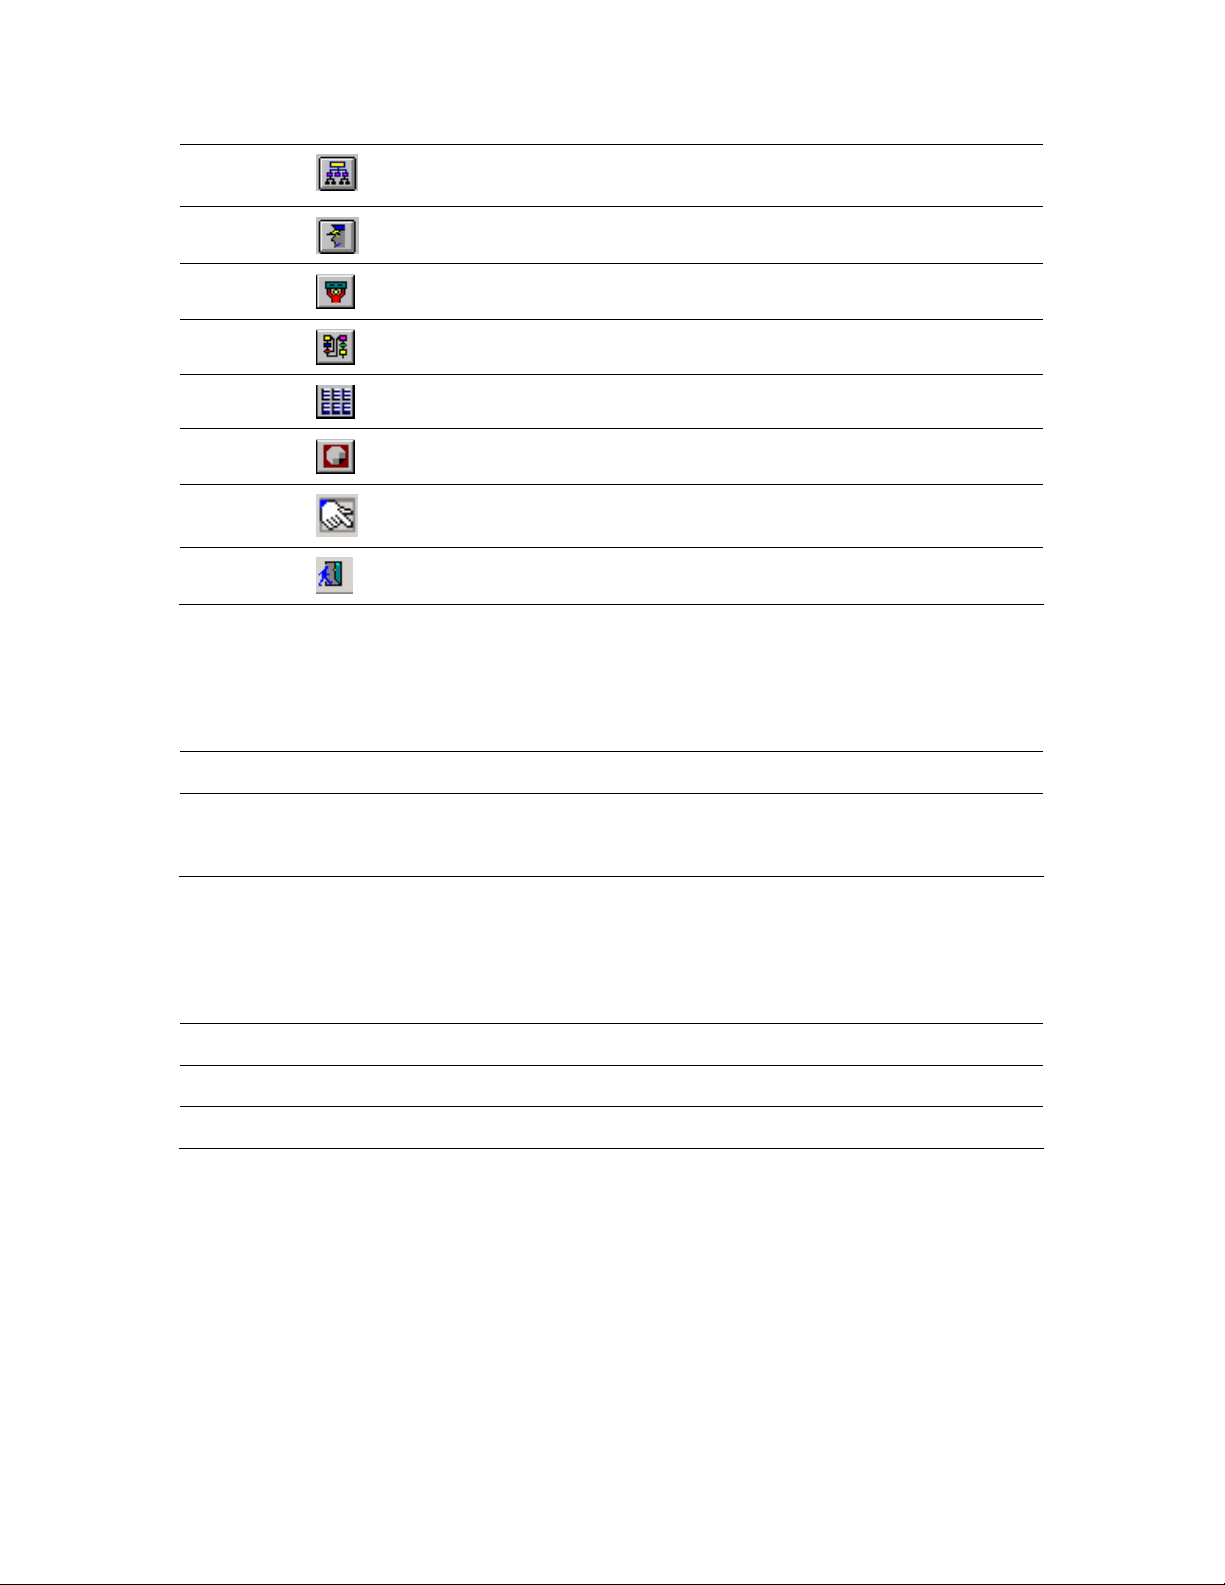
Super
Groups
Opens a Configuration window for configuring super groups.
Supervisors
Services
IRN
DNIS
System
CCS Admin
Exit
Opens a Configuration window for configuring supervisors.
Opens a Configuration window for configuring services.
Opens a Configuration window for configuring the IRN.
Opens an Entity Configuration Window for configuring the DNIS.
Opens a Configuration window for configuring the system parameters.
Opens the Call Control Scripts Administration application.
Closes the Administration application.
The Tools Menu
Table 4 describes the Tools menu.
Table 4 Tools Menu
Option Description
CCS Admin
Opens the CCS Administration application. Call Control Scripts can define the
requirements of incoming calls by extracting information. They also provide voice
messages to callers waiting in queue.
The Sort Menu
Table 5 describes the Sort menu:
Table 5 Sort Menu
Option Description
By Name Sorts the currently selected list by name.
By Number Sorts the currently selected list by number.
12 3Com
®
eXchange Call Center Administration Guide
Page 13

The Window Menu
The Window menu provides options that enable the open windows on the window to be
arranged in an orderly way. It also lists all the currently open windows. To switch from one
window to another, click the one that you want.
Table 6 Window Menu
Option Description
Tile The windows are displayed in a vertical tile format, one next to the other.
Cascade The windows are cascaded one on top of the other.
The Active window has a checkmark next to it in the list at the bottom of the menu.
The Help Menu
The Help menu provides Help topics as well as information about the 3Com eXchange Call
Center Administration system.
Table 7 Help Menu
Option Description
Index
Contents Opens the Table of Contents for Help for only the current application.
About
Opens the Index of the Help topics for all of the 3Com eXchange Call Center
applications. Enter a key word to search for a topic.
Displays information about the 3Com eXchange Call Center Administration system,
including the current software version number.
3Com® eXchange Call Center Administration Guide 13
Page 14
The Quick Search Option
The Quick Search option is not a menu option. Rather, it is located under any list of entities.
You can use it to locate specific entries in the list according to name or number: The Quick
Search is helpful when you need to locate specific entries in long lists. See Figure 2.
Click the Quick Search button at the bottom of the list and select the field in which you want
to search. Enter the information; the cursor moves to the first entry in the list that fits the
prefix entered. Characters that do not fit any of the entries are not echoed to the window.
Figure 2 Quick Search Dialog Box.
14 3Com
®
eXchange Call Center Administration Guide
Page 15
CHAPTER 3: CONFIGURING THE ENTITIES
This chapter covers how to configure the eXchange Call Center Administration entities.
The figures in this guide may not represent exactly what you see on your monitor
in all details. Use them only as guidelines. See the Help topics for feature details.
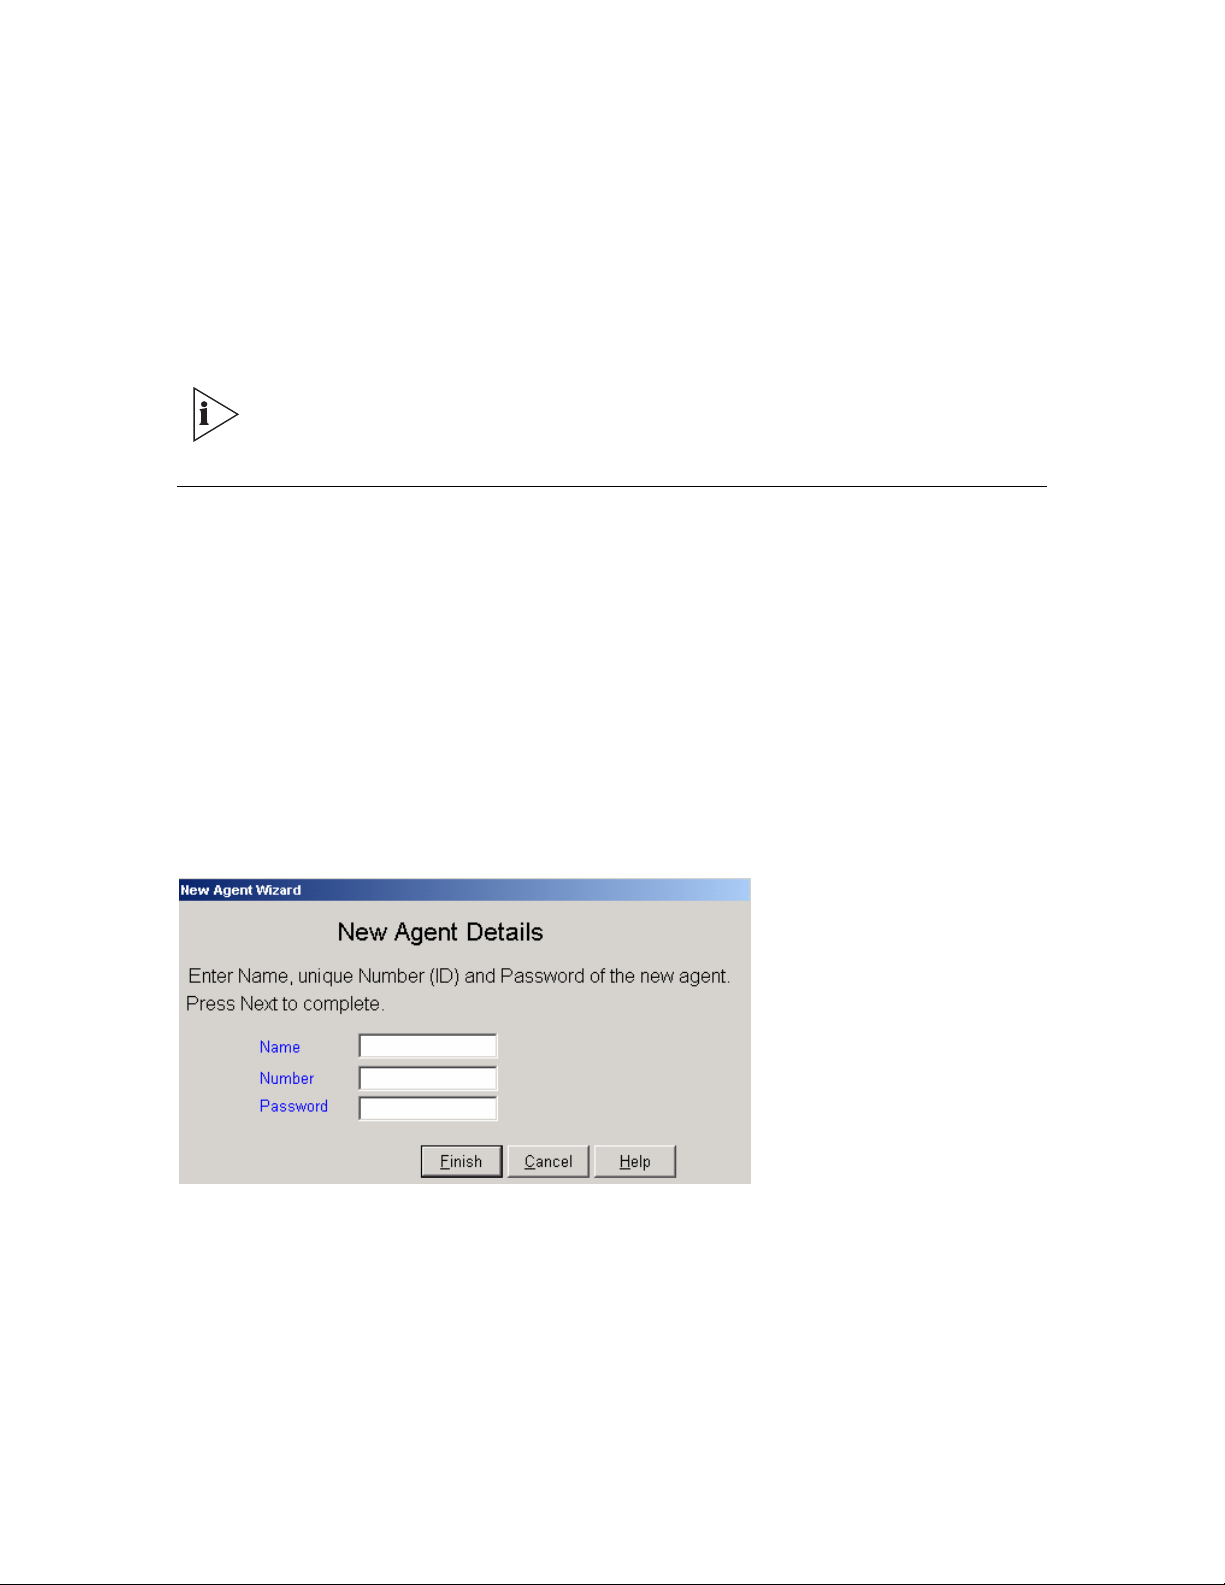
Defining a New Agent
This section describes how to define new agents that you want to add to the list of agents in
the Agents Groups administration window.
To Add a New Agent to the Agents List:
1 In the Administration application window, click the Agents tab below the list at the left of
the window.
-OrClick Entities > Agents.
2 In the Agents Configuration window, click the New button. The New Agent dialog box
appears.
3 Enter Name, Number, and Password in the appropriate fields, and then click Finish.
3Com® eXchange Call Center Administration Guide 15
Page 16

Configuring Agents Details
Use the Details page of the Agents Configuration window to configure the details of agents in
the system.
To Open the Details Page:
1 Click the Agents tab below the list.
-OrSelect the Agents option from the Entities menu.
2 Click the Details tab at the top of the Agents Configuration window.
The Details page of the Agents Configuration window displays the details for the
currently selected agent in the Agents list.
Table 8 describes the fields and buttons.
Table 8 Details Page of the Agents Configuration Window
Field, Button, or Area Description
Name The name of the selected agent.
Number The identification number of the selected agent.
Password
Class Of Service (CoS)
Call Answer Strategy
Group select
The 3Com eXchange Agent uses this password together with the
agent number to log on to the 3Com eXchange system.
The Class of Service to which the agent belongs. CoS determines the
permissible operations for this agent. For example, the CoS may
prevent the agent from being able to pick up calls from the queue.
Use this area to define the method by which an incoming call is
routed to the agent when the agent becomes available.
The strategy has two stages: 1) Determine the set of calls to be
considered for routing and then 2) Select, from the set, a single call to
route to the agent.
Click the appropriate radio button in this area to
define the criteria for selecting the set of calls:
By scanning groups in the order in which they
appear in the agent's group list.
By all groups without any priority
By TSF, that is, by how well the group is
providing the level of service defined for it,
judged by the Target ASA (Average Speed of
Answer).
16 3Com
®
eXchange Call Center Administration Guide
Page 17

Call select
Click the appropriate radio button in this area to
define the criteria for selecting a single call to route
to the agent:
Answer the call that has been waiting the
longest time
Answer the call that has the highest priority
Answer the call whose requirements are best
suited to the agent (that is, the best skill fit)
To save the Changes That You Made to the Configuration:
Click Save below the Details page.
To undo the Previous Change That You Made to the Configuration:
Click Undo.
To open the Help Topic for the Agents Configuration Dialog Box:
Click Help.
Configuring Agents Groups
Use the Groups page of the Agents Configuration dialog box to edit the Primary Groups
assignment for agents in the system.
To Open the Groups Page:
1 Click the Agents tab below the Agents list.
2 Click the Groups tab at the top of the Agents Configuration window.
The Agent Groups dialog box appears.
3Com® eXchange Call Center Administration Guide 17
Page 18
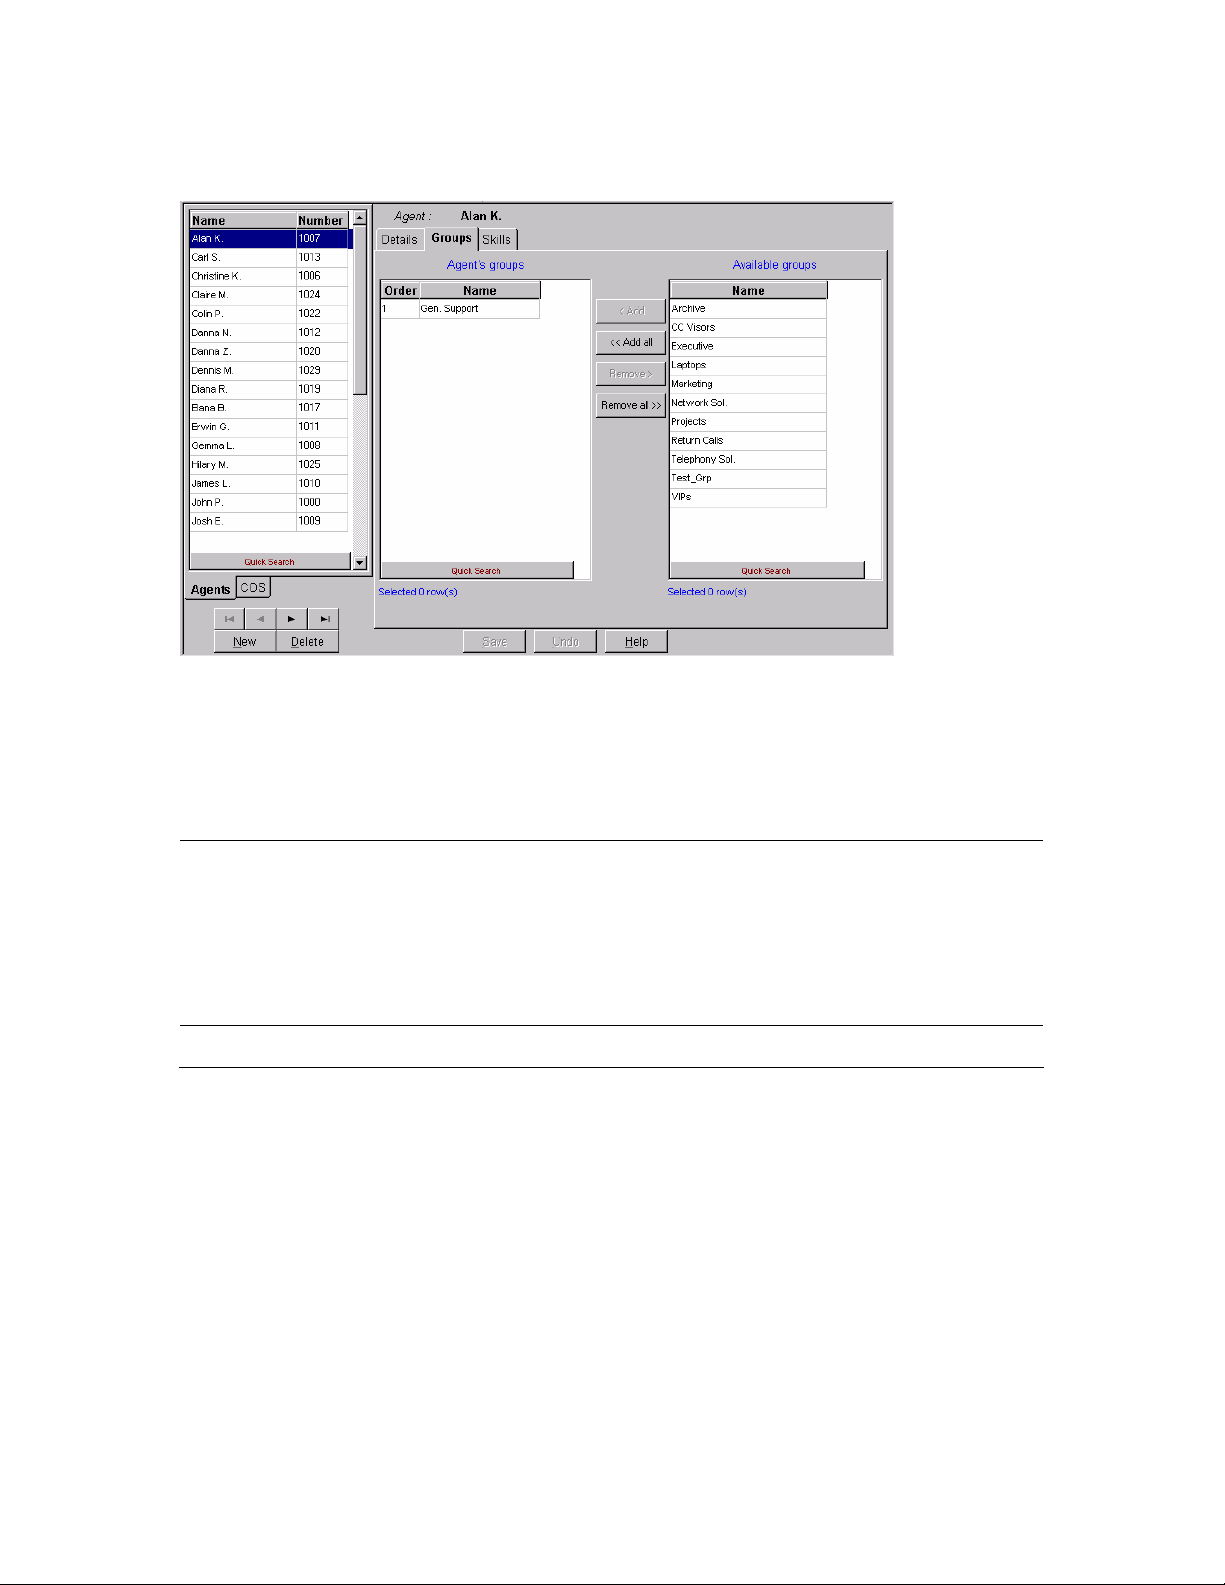
Figure 3 Agent Groups Window Dialog Box
The Groups tab of the Agents Configuration window displays the current groups configured
for the selected agent in the Agents list. The Agents Groups list contains the primary groups
to which the selected agent belongs. The selected agent becomes member of these groups
after performing Primary login. Table 9 describes the areas.
Table 9 Agents Group List
Agent's Groups
Available Groups This area displays the Name of all the available (unassigned) groups in the system.
This area displays the Order and Name of all the currently assigned groups for the
agent. The assignment configuration can be edited as required.
For agents who are assigned a Call Answer Strategy of "by group list order," the list
order defines from which group the agent will pick the next call. The first group has
priority over the second group when routing agent calls. For this reason, the
Sort/Order option cannot be used for this list. (For a full description, see “Call Answer
Strategy” in “Configuring Agents Details.”)
To Assign a Group to the Selected Agent:
1 Select the required group in the Available Groups list.
2 Drag and drop it into the Agent's Groups list, or click Add.
To Assign More Than One Group to the Selected Agent:
1 Use Ctrl+Click to select the required groups from the Available Groups list.
2 Drag and drop it into the Agent's Groups list, or click Add. To assign all groups to the
selected agent, click Add all.
18 3Com
®
eXchange Call Center Administration Guide
Page 19
To Un-assign a Group from the Selected Agent:
1 Click the group that you want to remove from the Agent's Groups list.
2 Drag and drop it into the Available Groups list, or click Remove.
To un-assign more than one group from the selected agent:
1 Click the groups to be removed from the Agent's Groups list using the <Ctrl>+<Left
mouse button click>.
2 Drag and drop it into the Available Groups list, or click the Remove button. To remove all
groups, click Remove all.
To Change the Order of the Groups:
Click the group to be moved and drag and drop it into the required position in the list.
To save the changes made to the configuration:
Click Save below the Groups page.
To undo the previous change that you made to the configuration:
Click Undo.
To open the help topic for the agent's configuration:
Click Help.
Configuring the Agents COS
The figures in this guide may not represent exactly what you see on your monitor
in all details. Use them only as guidelines. See the Help topics for feature details.
Agent Class of Service (CoS) enables the system administrators to control the set of
capabilities that are available to the agents. For example, one of the features available to
agents is the means to change their toolbar. If, in some environments, there is a reason not
to enable the agents to change the toolbar, the administrator can create an Agent COS that
disables this feature and then assign the relevant agents to this COS.
Changes to the agent COS take effect after the agents log on the next time.
3Com® eXchange Call Center Administration Guide 19
Page 20
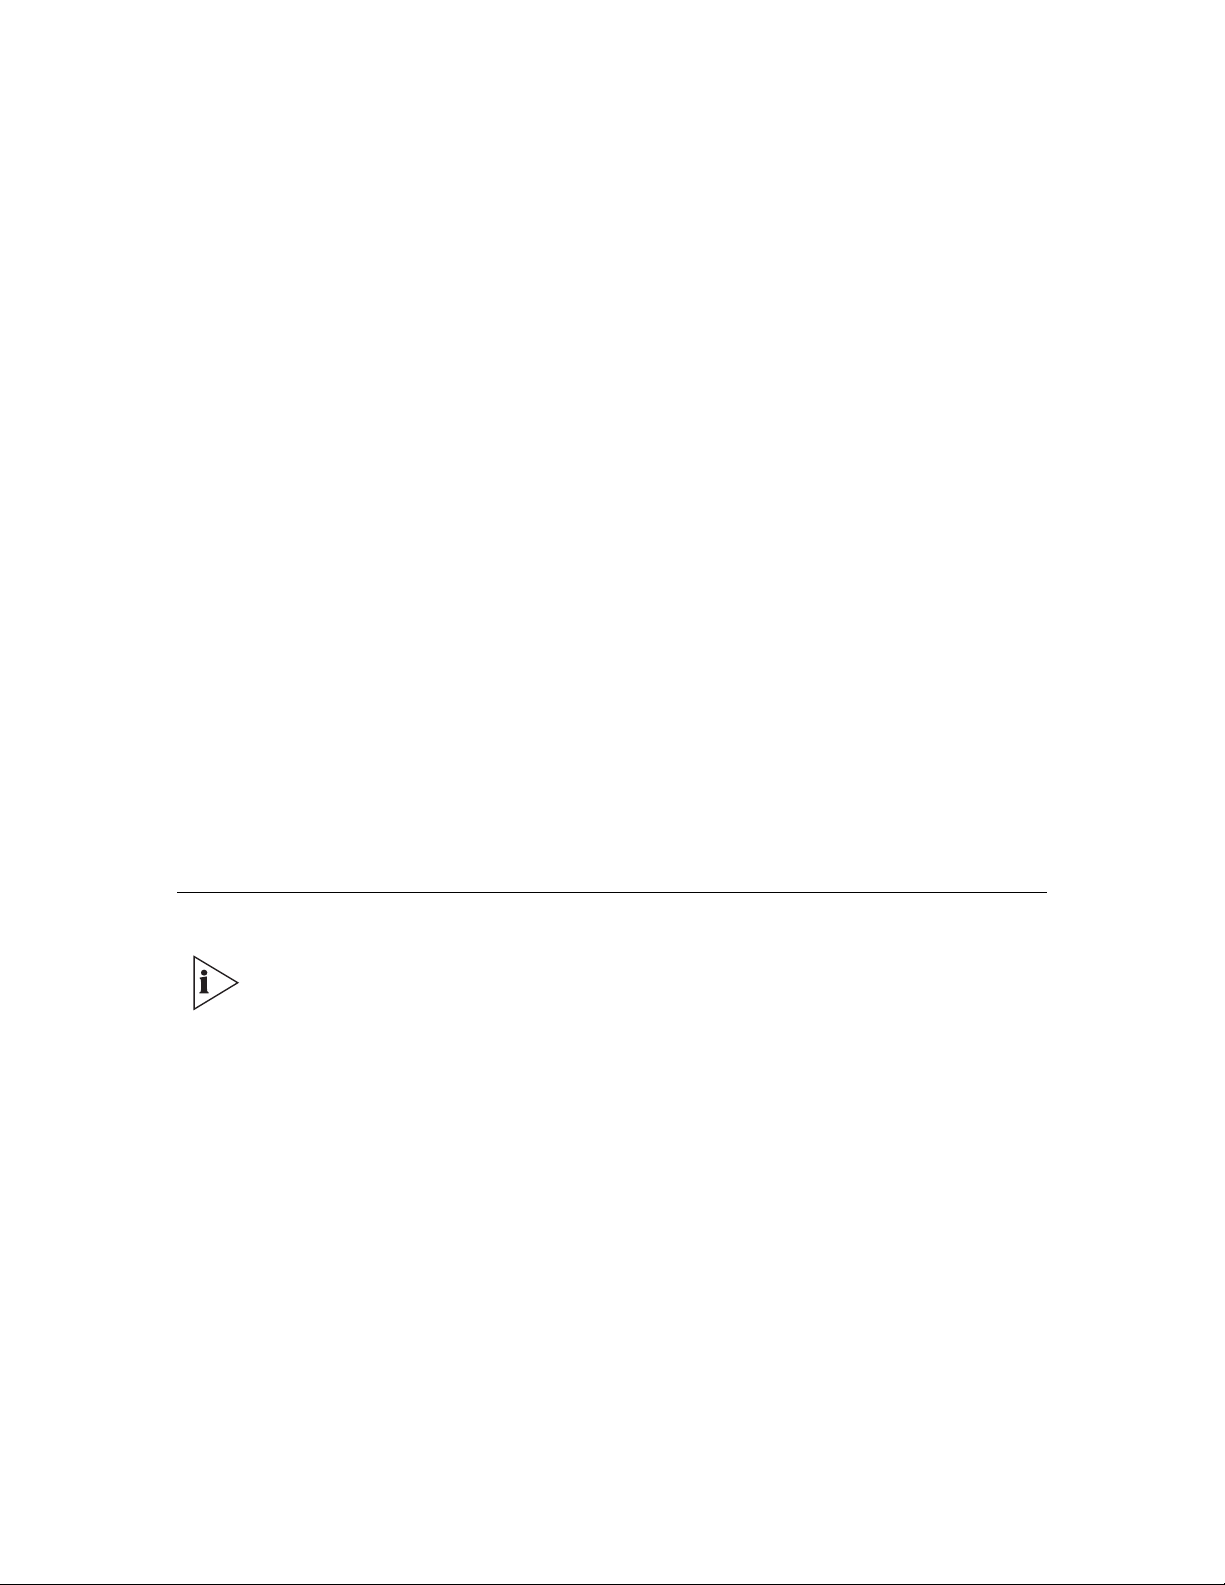
To Add a New Agent COS to the Agents COS List:
1 In the Agents Configuration window, click the COS tab located below the list.
2 Click New. The New COS Details dialog box appears.
Figure 4 New COS Details Dialog Box
3 Enter a Name for the new COS.
4 Select the relevant radio buttons to define the new agents COS.
5 Click Finish.
The newly defined agents COS now appears in the Agents COS list.
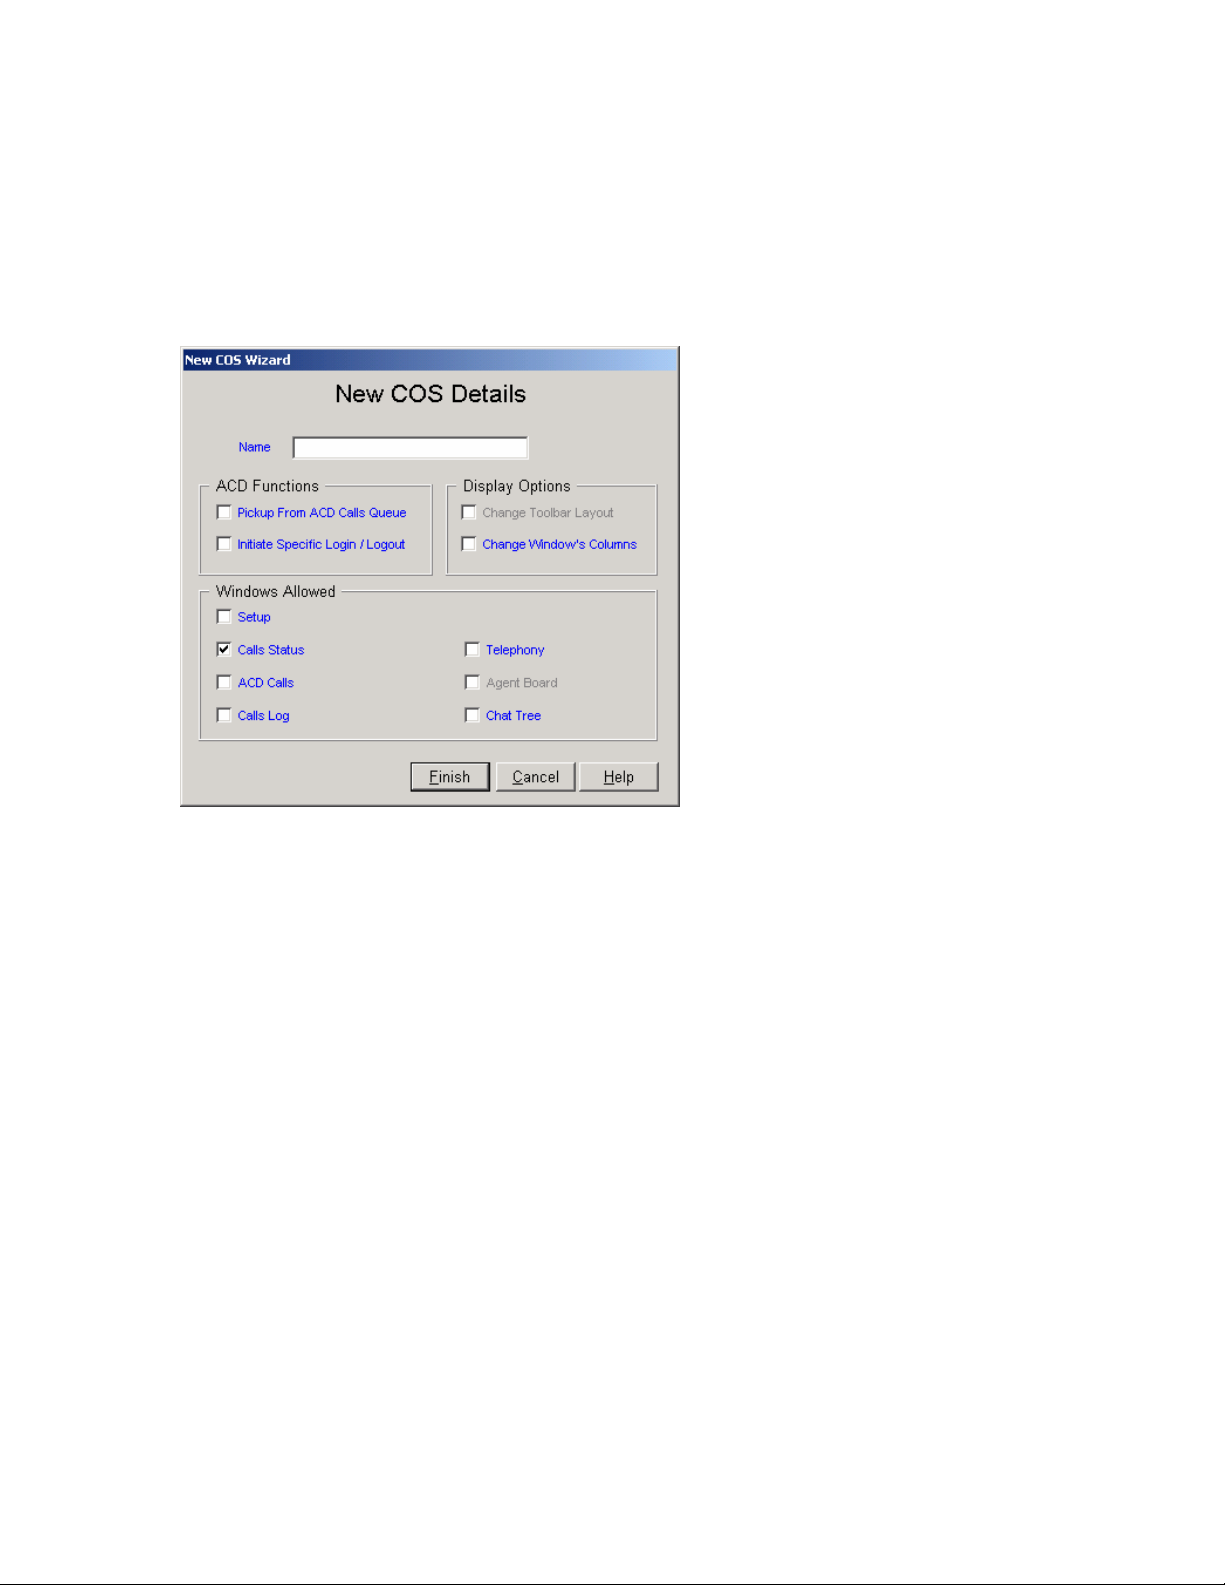
To Configure the Agents COS Details
Use the Details page of the Agent COS Configuration dialog box to set or reset the available
features to the selected COS.
To open the page:
1 Click the COS tab below the list.
2 Click the Details tab at the top of the Agents COS Configuration dialog box.
20 3Com
®
eXchange Call Center Administration Guide
Page 21
The Agents COS Details dialog box appears.
Figure 5 The Agent COS Details Dialog Box
Table 10 describes the Details page of the Agents COS configuration dialog box.
Table 10 Details of Agents COS
Name The Name of the Selected Agents Class of Service
ACD Functions The set of ACD functions that may be enabled or disabled by the COS.
Initiate Specific Login/Logout
Display Options
Change Toolbar Layout
Change Window's columns
This set of options gives or denies the agent the ability to design the agent
workspace (toolbar, windows, and so on)
This checkbox, if checked, enables the agents who
belong to the selected COS to use the specific login
and logout buttons to log into or out of a single group.
The specific group may or may not be part of the
agent's primary groups list. This checkbox, if
checked, also enables the agent to use the Login
Manager.
This checkbox, if checked, enables the agent to add
or remove buttons to or from the agent toolbar
This checkbox, if checked, enables the agent to add
or remove columns from the agent’s windows (for
example, the ACD calls window).
3Com® eXchange Call Center Administration Guide 21
Page 22

Windows
Allowed
This set of options gives or denies the agent the permission to use each of the
windows the agent may work with
Setup
Call Status
Calls Log
Telephony
Agent Board If checked, enables the agent to use the agent board.
If checked, enables the agent to use the setup
window
If checked, enables the agent to use the call status
window. This window displays each active call at the
agent extension. (Active means a call on hold, a
ringing call, a call the agent is talking on, a call that
the agent is initiating, and so on.)
If checked, enables the agent to use the calls log
window. This window displays all calls that were
handled by the agent during this shift (since last
primary login), and the agent may add log information
on each call.
If checked, enables the agent to use the telephony
option.
To Configure the Agents COS Agents
Use the Agents page of the Agents COS Configuration dialog box to assign or un-assign
agents to or from the selected COS.
To open this page:
1 Click the COS tab below the list.
2 Click the Agents tab at the top of the Agents COS Configuration dialog box.
22 3Com
®
eXchange Call Center Administration Guide
Page 23
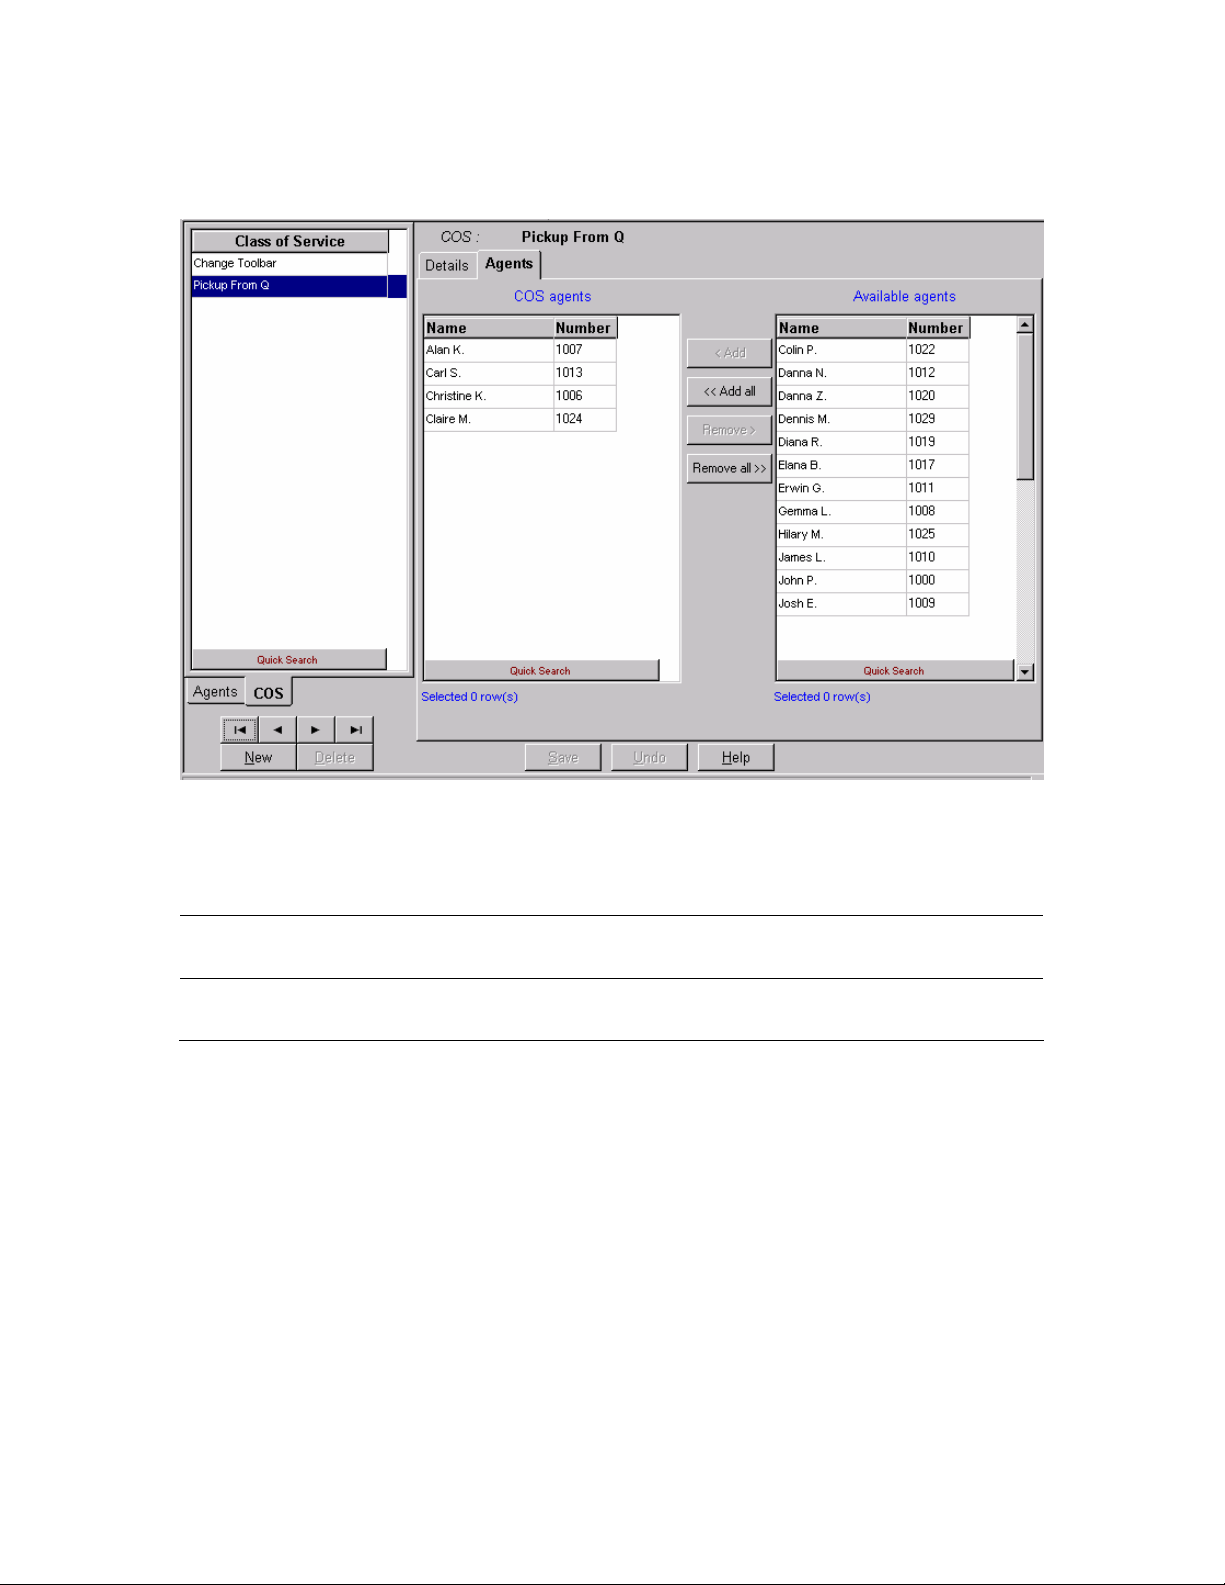
Figure 6 The Agents COS Agents Dialog Box
The Agents page of the Agents COS Configuration dialog box displays the agents currently
assigned to the selected Agent COS in the COS list. It contains the following areas.
Table 11 COS Agents
COS Agents
Available Agents
This area displays the Name and Number of all agents currently assigned to the
Agents COS.
This area displays the Name and Number of all agents that are not assigned to
any COS.
To Assign an Agent to the Selected Agents COS:
1 Click the required agent from the Available Agents list.
2 Drag and drop it into the COS Agents list, or click Add.
To Assign More Than One Agent to the Selected Agents COS:
1 Select the required agents from the Available Agents list (using the <Ctrl><Left mouse
button click>).
2 Drag and drop it into the COS Agents list, or click Add.
3Com® eXchange Call Center Administration Guide 23
Page 24

To Assign All Available Agents to the Selected Agents COS:
Click the Add all button.
To Un-assign an Agent from the Selected Agents COS:
1 Click the agent to be removed from the COS Agents list
2 Drag and drop it into the Available Agents list, or click Remove.
To Un-assign More Than One Agent from the Selected Agents COS:
1 Click the agents to be removed from the COS Agents list (using the <Ctrl>+<Left mouse
button click>).
2 Drag and drop it into the Available Agents list, or click Remove.
To Un-assign All Agents from the Selected Agents COS:
Click Remove all.
To Change the Order of the Groups:
Click the group to be moved and drag and drop it into the required position in the list.
To save the changes that you made to the configuration:
Click Save below the Groups page.
To undo the previous change that you made to the configuration:
Click Undo.
To open the help topic for the agent's configuration:
Click Help.
24 3Com
®
eXchange Call Center Administration Guide
Page 25
Configuring Groups
The figures in this guide may not represent exactly what you see on your monitor
in all details. Use them only as guidelines. See the Help topics for feature details.
The
icon in the Help topic text denotes that this particular function is NOT
available in the eXchange Call Center.
Use the Groups Configuration dialog box to view and edit the information for each group in
the system. In addition, new groups may be added and existing groups deleted from the
system.
To Open the Groups Configuration Dialog Box:
Click the Groups button in the Toolbar of the main application window.
OR
Select the Groups option from the Entities menu.
Figure 7 Group Details Configuration Dialog Box
3Com® eXchange Call Center Administration Guide 25
Page 26

Table 12 describes the Groups Configuration dialog box.
Table 12 Groups Configuration
Name Description
Groups List
New
Delete
Tabs Area
Save
This scrollable list displays the Name and Number of all the groups in the system. Use
the four navigational buttons below the list to move up and down the list, and jump to the
beginning or end of the list.
Click on any group in the list to see the list of options for sorting the list by Name or
Number.
Click this button to activate a wizard that enables you to add a new group to the list. To
add a new group to the Groups list:
1 Click the New button below the groups list. The New Group Wizard appears.
2 Enter Name and Number for the new group, and click the Finish button.
The newly defined group then appears in the Groups list.
Note: The Group Number is a virtual DN used by the 3Com eXchange system to identify
the group. This DN must be unique throughout the PBX numbering plan.
Click this button to delete a group from the group list. To delete a group from the groups
list, select the group to be removed from the list and click Delete.
Note: Deleting a group also deletes all of its statistics.
This area, at the right of the groups list, contains tabs that enable the configuration of the
selected group's Details, Agents and Thresholds
Click Save to save any changes that you made to the selected group's configuration.
Undo
Help
Click Undo to undo the previous change that you made to the selected group's
configuration.
Click Help to open the context-sensitive Help topic for the selected group's configuration.
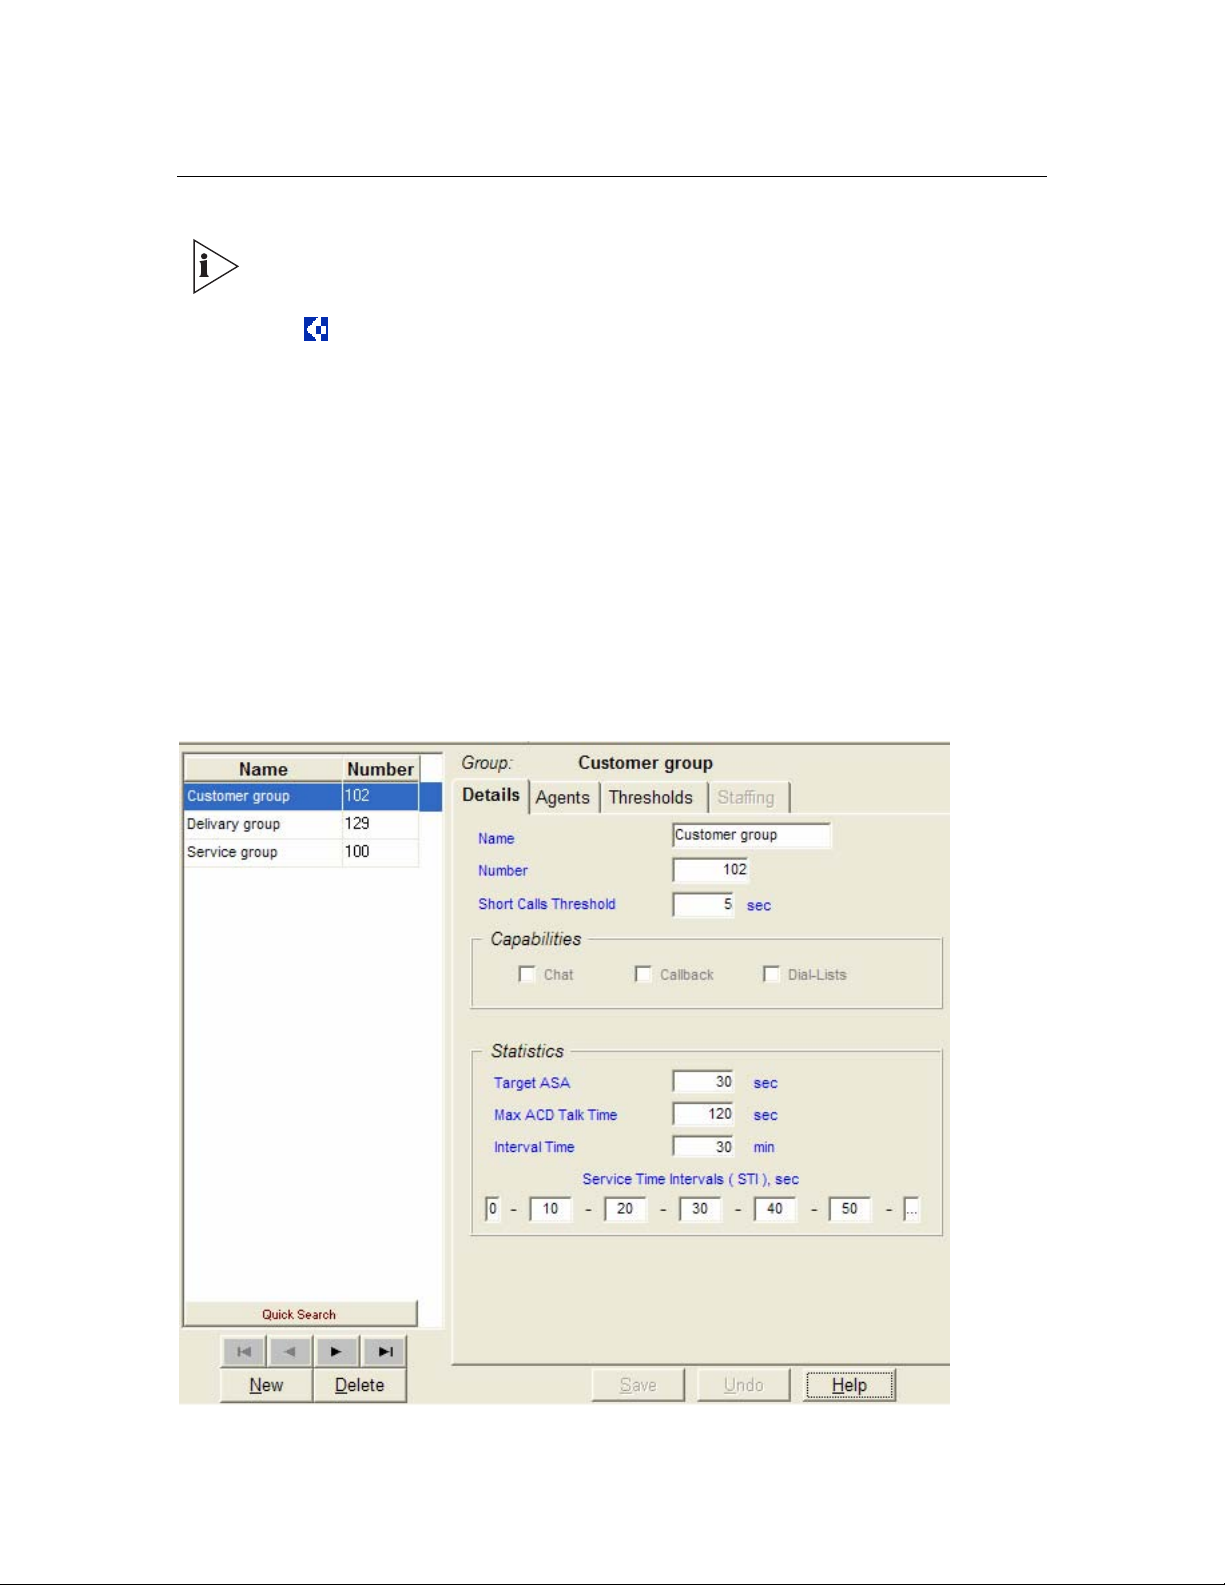
Configuring Groups Details
Use the Details page of the Groups Configuration window to configure the details of groups
in the system.
To open the Details page, click the Details tab at the top of the Groups Configuration dialog
box. Table 13 describes the elements of this tab.
Table 13 Group Details
Name A unique name for the group
Number
Short Calls
Threshold
A unique number for the group. Note: The Group Number is a virtual DN used by
the 3Com eXchange system to identify the group. This DN must be unique
throughout the PBX numbering plan.
A number representing the number of seconds in which a call must end in order to
be counted as a short call in the Historical Reports
26 3Com
®
eXchange Call Center Administration Guide
Page 27
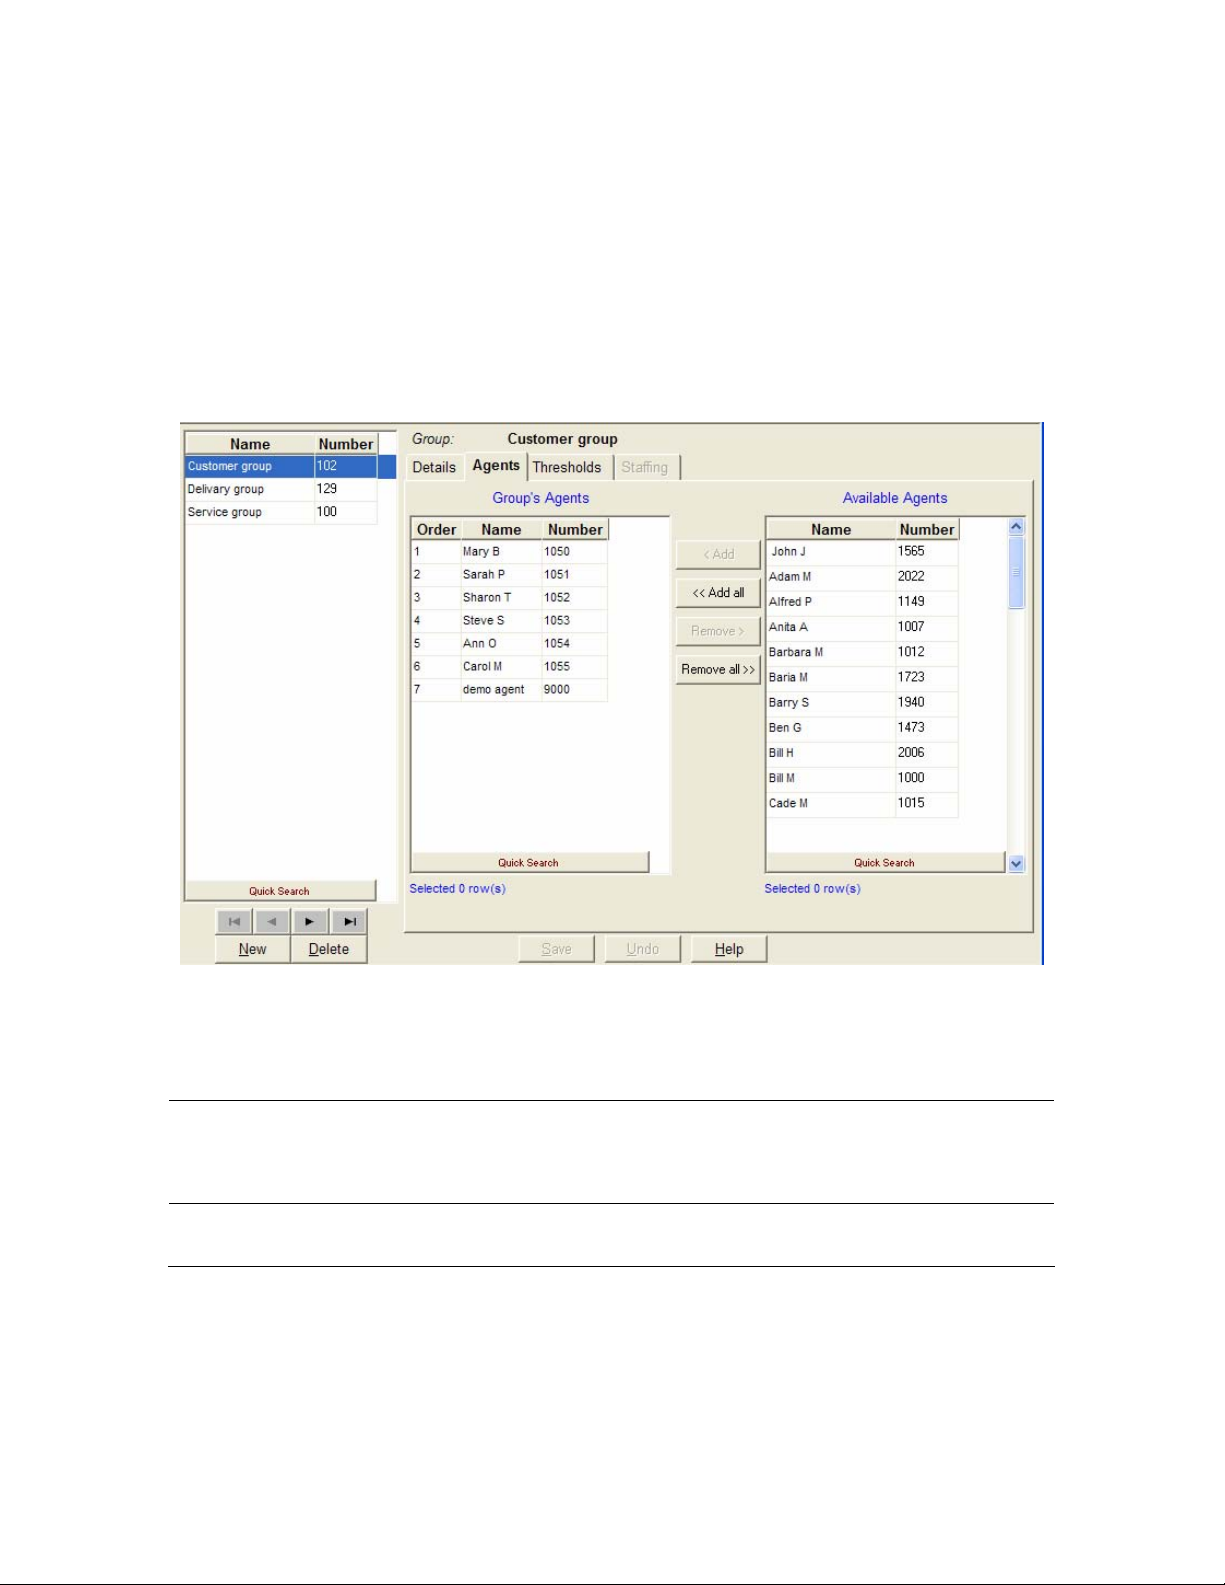
Configuring the Groups Agents
Use the Agents page of the Groups Configuration window to edit the Agents configuration for
groups in the system
To open the Agents Page:
Click the Agents tab at the top of the Groups Configuration window.
Figure 8 The Group Agents Configuration Dialog Box
The Agents page of the Groups Configuration window displays the current agents
configuration for the selected group in the Groups list. Table 15 describes the two lists.
Table 14 Group List
Group's Agents A scrollable list of agents that belong to the group.
Because the order in the list may affect the calls routing (see Agent Search Criteria in
Configuring Services Details, be careful how you order the list.
Available Agents
A scrollable list displaying all of the agents in the systems that are not assigned to this
group.
To Assign an Agent to the Selected Group:
1 Click the required group from the Available Agents list.
2 Drag and drop it into the Group's Agents list, or click the Add button.
3Com® eXchange Call Center Administration Guide 27
Page 28

To Assign More Than One Agent to the Selected Group:
1 Click to select the required agents from the Available Agents list.
2 Drag and drop it into the Group's Agents list, or click Add.
To Assign All Agents to the Selected Group:
Click Add all.
To Un-assign an Agent from the Selected Group:
1 Click the agent that you want to remove from the Group's Agents list.
2 Drag and drop it into the Available Agents list, or click Remove.
To Un-assign More Than One Agent from the Selected Group:
1 Click to select the agents that you want to remove from the Group's Agents list.
2 Drag and drop it into the Available Agents list, or click Remove.
To Un-assign All Agents from the Selected Group:
Click Remove all.
To Change the Order of the Agents in the Group's Agents List:
Click the agent that you want to move, and drag and drop it into the required position in the
list.
To Sort the Available Groups Lists:
Right-click the list area and select the required sort (by name or number) from the pop-up
menu
OR
Select the required sort option from the Sort menu in the menu bar.
To save the changes that you made to the configuration:
Click Save below the Agents page.
To undo the previous change that you made to the configuration:
Click Undo.
To open the help topic for the Agent's configuration:
Click Help.
28 3Com
®
eXchange Call Center Administration Guide
Page 29

Configuring Group's Thresholds
You assign threshold values to fields that are shown in the Real Time reports. Each of the
fields that has a threshold value attached to it may appear in those reports in one of three
background colors, depending on the field's current numerical value and its thresholds:
Normal color — The default background color is White. It indicates that the value shown
is in the normal zone, that is, no alarm range.
Yellow color — The default background color is Yellow. It indicates that the value is in a
warning level zone, that is, slightly too high or too low.
Red value color — The default background color is Red. It indicates that the value is
unacceptably high or low.
To Open the Threshold Page:
Click the Threshold tab at the top of the Group Configuration window.
Figure 9 The Group Thresholds Configuration Dialog Box
3Com® eXchange Call Center Administration Guide 29
Page 30

The Threshold page of the Groups Configuration dialog box displays the fields described in
Table 16. They can be edited, as required.
Table 15 Threshold
Name The name of the event for which the threshold is specified.
Yellow Indicates that the threshold has been exceeded.
Red Indicates that the threshold has been exceeded to an unacceptable level.
UP
When the "UP" box is unmarked, this is "the higher the better" situation - the "normal range
starts with infinity and "yellow "> "red" - See example 1 later in this chapter. When the "UP"
box is marked, this is "the lower the better" situation - the "normal" range starts with 0 and
"yellow" < "red." See example 2.
The Table 17 lists the fields that may have threshold values assigned to them.
Table 16 Threshold Values
Number Of Waiting
Calls
Number Calls Above
Target ASA
Avg. Call Wait Time
(sec.)
Number Of Logged
In Agents
Number Of Release
Agents
Number Of Idle
Agents
Number of calls currently in the queue.
Number of calls currently in the queue waiting above T.ASA seconds.
Average wait time in queue of currently queued calls, in seconds
Number of agents currently logged in to the group.
Number of agents currently logged in to the group and in Release state.
Number of agents currently logged in to the group and in Idle state.
Num. Of Agents On
Non-ACD Call
The TSF For TimeInterval (%)
Number Of
Abandoned Calls
Avg. Wait Time Of
Abnd. Calls
Num. Of Calls Ovfl.
From Group
Avg. Wait Time Of
Ovfl. Calls
RPH Of Group
Number of agents currently logged in to the group and busy with Non-ACD calls.
The Target Service Factor, for the specified time interval.
The number of abandoned calls, that is, calls during which the caller hangs up
before being served.
The average time that an abandoned call waited in the queue.
The number of overflowed calls in the group.
The average time an overflowed call waited in the queue.
The Rate Per Hour, that is, the average number of calls answered per hour, for
the group.
30 3Com
®
eXchange Call Center Administration Guide
Page 31

Avg. Wait Time In
Queue (sec.)
The average time that a delayed call waited in the queue.
Avg. ACD Talk Time
(sec)
Avg. Answer Time
(sec.)
Idle State (sec) The time that the agent is in the Idle state.
ACD Ring State
(sec)
ACD Talk State
(sec)
Wrap Up State (sec) The time that the agent is in the Wrap Up state.
NACD Inc State
(sec)
NACD Out State
(sec)
Release State (sec) The time that the agent is in the Release state.
NACD Out + Rls
State (sec)
NACD Inc + Rls
State (sec)
The average time that an agent talks on an ACD call.
The average time that an agent is in Busy Out State (that is, the agent did not
answer a routed call within a prescribed time).
The time that an ACD call is ringing at an agent's extension.
The time during which no calls are being handled and the agent is free to receive
calls.
The time that the agent is busy with an incoming non-ACD call.
The time that the agent is busy with an outgoing non-ACD call.
The time that the agent is busy with an outgoing non-ACD call while the station is
in Release state.
The time that the agent is busy with an incoming non-ACD call while the st ation is
in Release state.
Busy + Release
State (sec)
Busy State (sec)
Busy ACD Other
Grp State (sec)
O-ACD Rsrvd State
(sec)
O-ACD Talk State
(sec)
The time that an incoming call is ringing on the agent's telephone.
The time that the agent is in the Busy state. ACD calls are not routed to an agent
in this state.
The time that the agent is busy with an ACD call from another group.
The time that the agent is reserved during preparations for an Outbound ACD call.
The time that the agent is busy talking on an Outbound ACD call.
To save the changes that you made to the configuration:
Click Save below the Threshold page.
To undo the previous change that you made to the configuration:
Click Undo.
To open the help topic for the Group's Configuration:
Click Help.
3Com® eXchange Call Center Administration Guide 31
Page 32

Table 17 Examples of the Group's Threshold Setting
Example 1:
Number of logged in agents
Example 2:
Average wait time in queue
Management requires that a minimum of 5 agents will be logged into a
group at all times, for best service level. When this numbers falls, the
supervisor should be warned, and then alerted when there are no agents
logged in.
The field "Number of Logged In Agents" should be set to 5 as the Yellow
value and 0 as the Red value.
Management decides to provide that a level of service in which no call will
wait longer than 15 seconds in the group's queue. When the average wait
time exceeds this level, the supervisor should be warned, and then
alerted when the value exceeds 30 seconds.
The field "Avg. Call Wait Time (sec.)” should be set to 15 as the "Yellow"
value and 30 as the "Red" value.
Configuring Trunks
The figures in this guide may not represent exactly what you see on your monitor
in all details. Use them only as guidelines. See the Help topics for feature details.
Use the Trunks Configuration dialog box to configure the trunk groups and trunks parameters
in the system, as well as adding and deleting trunks and trunk groups to and from the
system.
To Open the Trunks Configuration Dialog Box:
Click the Trunks button in the Toolbar of the main application dialog box
OR
Select the Trunks option from the Entities menu.
32 3Com
®
eXchange Call Center Administration Guide
Page 33

Figure 10 The Trunk Groups Details Configuration Dialog Box
The Trunks Configuration dialog box contains these features:
Trunk Groups/ Trunks tab — To switch between lists, click the Trunk Groups or
Trunks tab below the Trunks list.
Trunk Groups Trunks list — When you select the Trunk Groups tab, this scrollable list
displays the Name and identification Number of the trunk groups in the system. When
you select the Trunks tab, the list displays the Name, identification Number, and Trunk
Group of all the trunks in the system.
Below the list, use the four navigational buttons to move up and down the list and to jump
to the beginning or end of the list.
Right-click on any trunk or trunk group in the list to access options for sorting the
list by Name or Number.
New — Click the New button to activate a wizard that helps you add a new trunk or trunk
group to the Trunks/Trunk Groups list.
To Add a New Trunk Group to the List:
1 Click the Trunks Group tab below the list.
3Com® eXchange Call Center Administration Guide 33
Page 34

2 Click the New button below the list. The New Trunk Group Wizard opens.
3 Enter a Name, Number, Activity Threshold, and ACD Threshold for the new trunk group.
4 Click Finish. The newly defined trunk group appears in the Trunk Groups list.
To Add a New Trunks to the List:
1 Click the Trunks tab and then click the New button below the list. The New Trunks
Wizard opens.
Figure 11 New Trunk Wizard
2 Click the Single Trunk or Range of Trunks radio button; depending on how many
trunks you want to add.
3 Enter the Trunk Number or Trunk Range as appropriate.
4 Optionally, enter the prefix to be added in order to create the trunk name.
5 If required, select a trunk group from the Trunk Group list. The new trunks are
automatically assigned to this group.
6 Click the Finish button. The newly defined trunk appears in the Trunks list.
To Update an Existing Trunk or Trunk Group:
1 Select the item that you want to change in the list. You may choose it by using the Quick
Search.
2 In the Details tab, change the relevant fields.
To Delete a Trunk group from the Trunk Groups List:
1 Click the Trunk Groups tab below the list.
2 Select the trunk group that you want to remove from the list and click Delete.
34 3Com
®
eXchange Call Center Administration Guide
Page 35

When you delete a trunk group, the system deletes all of that group’s statistics.
To Delete One or More Trunks from the Trunks List:
1 Click the Trunks tab below the list and then click Delete. The Delete Trunk(s) Wizard
opens.
Figure 12 Delete Trunk(s) Wizard
2 Select the trunk, range of trunks, or all trunks that you want to remove and click Delete.
Table 18 Trunk Group(s) Definitions
Tabs Area
Save
Undo
Help
If a trunk group is currently selected, this area, at the right of the trunk groups' list, contains
two tabs that enable the configuration of the Details and Trunks for the selected trunk
group.
Click Save to saves any changes that you made to the selected trunk or trunk group's
configuration.
Click Undo to undo the previous change that you made to the selected trunk or trunk
group's configuration.
Click Help to open the context-sensitive Help topic for the selected trunk or trunk group's
configuration screen
Configuring Trunks Details
Use the Details page of the Trunks Configuration dialog box to configure the Details of trunks
or Trunk groups in the system.
To Configure a Trunk's Details:
1 Verify that the Trunks list is clicked on.
2 Select the trunk that you want to configure from the list.
3Com® eXchange Call Center Administration Guide 35
Page 36

3 Click the Details tab at the top of the Trunks Configuration dialog box. The Details page
opens, displaying the Name, Number, and Trunk Group of the selected trunk.
4 Edit the Name and Number, as required.
5 To change the Trunk Group, use the Trunk Group Trunks configuration dialog box to
re-assign the trunk.
Assigning a trunk group to a trunk is done from the Trunk Groups dialog box.
6 To save the configuration changes, click Save below the Details page.
To Configure a Trunk Group's Details:
1 Click the Trunk Groups tab below the Trunks list.
2 Select the trunk group that you want to configure from the list.
3 Click the Details tab at the top of the Trunks Configuration dialog box.
The Details page opens, displaying the information in the table. Edit any of these details.
Name
Number
Activity
threshold
ACD threshold If a trunk's ACD activity falls below this predefined thresh old, compared to the
The name of the selected trunk group.
The identification number of the selected trunk group.
The percentage of time that you want a trunk in the trunk group to be active. If a
trunk's activity falls below this predefined threshold, compared to the Avg. activity
per trunk in the trunk group, the system adds a record to the Trunk Exception Log
report.
Average ACD activity per trunk in the trunk group, the system adds a record to the
Trunk Exception Log report.
To save the Configuration Changes:
Click Save below the Details page.
To undo the Previous Change That You Made to the Trunk's Configuration:
Click Undo.
To open the Help topic for the Trunk's Configuration:
Click Help.
Configuring Trunk Groups Trunks
Use the Trunks page of the Trunks Configuration dialog box to configure the assignment
of trunks to trunk groups in the system.
36 3Com
®
eXchange Call Center Administration Guide
Page 37

To Open the Trunks Page:
1 Click the Trunk Groups tab below the Trunks list.
2 Click the Trunks tab at the top of the Trunks Configuration dialog box.
Figure 13 The Trunk Group's Trunks Configuration Dialog Box
The Trunks page displays the current configuration for the selected trunk group. It contains
the following lists:
Trunk Group's
Trunks
Available Trunks This scrollable list displays the Name and Number of all the available trunks in
This area displays the Name and Number of all the currently assigned trunks
for the selected trunk group. The assignment configuration can be edited, if
required.
the system.
You can assign trunks to the selected trunk group in a number of ways:
Choose from the Available Trunks list the required trunk or trunks using the Shift or the
Ctrl button on your keyboard. Drag and drop your selection into the Trunk Group's
Trunks list.
OR
Choose from the Available Trunks list the required trunk or trunks using the Shift or the
Ctrl button on your keyboard. Then:
Click the Add button in the application to add your selection to the Trunk Groups
Trunks list.
3Com® eXchange Call Center Administration Guide 37
Page 38

OR
Click the Add all button to move all of the trunks listed in the Available Trunks list to
the Trunk Groups Trunks list.
To Un-assign (Remove) a Trunk from the Selected Trunk Group:
Select the required trunk or trunks using the Shift or the Ctrl button on your keyboard,
and then, from the Trunk Group's Trunks list, drag and drop your selection into the
Available Trunks list.
OR
Select the required trunk or trunks using either the Shift or the Ctrl button on your
keyboard, and then, from the Trunk Group's Trunks list, click Remove in the application.
OR
Click the Remove all button to remove all of the trunks listed in the Trunk Group's
Trunks list.
To Sort the Trunk Group's Trunks or Available Trunks Lists:
Right-click the list area and select the required sort (by name or number) from the pop-up
menu
OR
Select the required sort option from the Sort menu in the menu bar.
To save the Changes That You Made to the Configuration:
Click Save below the Trunks page.
To undo the Previous Change That You Made to the Configuration:
Click Undo.
To open the Help topic for the Trunk's Configuration:
Click Help.
Entering a New Trunk Group
Use the Trunk Groups tab of the Trunks Configuration dialog box to configure the trunk
groups in the system, as well as adding or deleting trunk groups' to and from the system.
To Open the Trunk Groups Configuration Dialog Box:
1 Click the Trunks button in the Toolbar of the main application dialog box.
OR
38 3Com
®
eXchange Call Center Administration Guide
Page 39

Select the Trunks option from the Entities menu.
2 Click the Trunk Groups tab under the list on the left side
3 Click New. The New Trunk Group Wizard opens
Figure 14 New Trunk Group Details Dialog Box
4 Enter Name, Number, Activity Threshold, and ACD Threshold as required.
5 Click Finish.
Configuring Super Groups
The figures in this guide may not represent exactly what you see on your monitor
in all details. Use them only as guidelines. See the Help topics for feature details.
A Super Group is a statistical entity that gives the supervisor the ability to view a number of
ACD groups as a single statistical entity. It provides a way to split the organization into
departments and to analyze the performance of each department.
Use the Super Groups Configuration dialog box to configure the details and groups for each
super group. You can also use this box to add new super groups and delete existing super
groups from the system.
3Com recommend that you do not delete any existing super groups that are
already active, that is, super groups that have accumulated statistical information.
Such data will remain in the Data Base with no standard way for you to retrieve it.
To Open the Super Groups Configuration Dialog Box:
Click the Super Groups button in the Toolbar of the main application dialog box.
OR
3Com® eXchange Call Center Administration Guide 39
Page 40

Select the Super Groups option from the Entities menu.
Figure 15 The Super Groups Details Configuration Dialog Box
The Super Groups Configuration dialog box contains these items:
Super Groups
list
New
This scrollable list displays the Name of all existing super groups in the system. Below
the list, use the four navigational buttons to move up and down the list and to jump to
the beginning or end of the list.
To add a new Super Group to the list, click New. The New Super Group Wizard
opens.
Enter a unique name for the new super group and click Finish.
The newly defined super group appears in the Super Groups list.
40 3Com
®
eXchange Call Center Administration Guide
Page 41

Delete To delete a super group from the Super Groups list:
1 Select the super group that you want to remove from the list.
2 Click Delete.
Tabs Area
Save
Undo
Help
This area at the right of the groups list contains two tabs that enable the configuration
of the Details and Groups for the currently selected super group.
Click Save to save any changes that you have made to the selected super group's
configuration.
Click Undo to undo the previous change that you made to the selected super group's
configuration.
Click Help to open the context-sensitive Help topic for the selected super group's
configuration.
Configuring Super Groups Details
Use the Details page of the Super Groups Configuration dialog box to configure the names
of the super groups in the system.
To Open the Details Page:
1 Click the Details tab at the top of the Super Groups Configuration dialog box.
2 The Details page of the Super Groups Configuration dialog box displays the name of the
currently selected super group in the Super Groups list, which you can edit if required.
To save Any Changes That You Made to the Configuration:
Click Save below the Details page.
To undo the Previous Unsaved Change That You Made to the Configuration:
Click Undo.
To open the Help Topic for the Super Group's Configuration:
Click Help.
Configuring Super Groups
Use the Groups page of the Super Groups Configuration dialog box to edit the Groups
configuration for super groups in the system.
To Open the Groups Page:
Click the Groups tab at the top of the Super Groups Configuration dialog box.
3Com® eXchange Call Center Administration Guide 41
Page 42

Figure 16 The Super Group Groups Configuration Dialog Box
The Groups page of the Super Groups Configuration dialog box displays the current groups
assignment for the selected super group in the Super Groups list. It contains the following
two lists:
Super Group's
Groups
Available Groups
This area displays the Name and identification Number of all the groups currently
assigned to the selected super group. The assignment configuration can be
edited, if required.
A scrollable list displaying the Name and Number of all the groups available for
assignment in the system.
There are several ways to assign a group to the selected super group:
Select the required group, using the Shift or the Ctrl button on your keyboard, from the
Available Groups list and drag and drop your selection into the Super Group's Groups
list.
OR
Select the required group, using the Shift or the Ctrl button on your keyboard, from the
Available Groups list and click the Add button in the application to add your selection to
the Super Group's Groups list.
OR
Click the Add all button to move all the groups listed in the Available Groups list to the
Super Group's Groups list.
42 3Com
®
eXchange Call Center Administration Guide
Page 43

To Un-assign a Group from the Selected Super Group:
Select the required group, using the Shift or the Ctrl button, from the Super Group's
Groups list and drag and drop your selection into the Available Groups list.
OR
Select the required group, using the Shift or the Ctrl button, from the Super Group's
Groups list and click the Remove button in the application.
OR
Click the Remove all button to remove all the groups listed in the Super Group's Groups
list.
To Sort the Super Group's Groups or Available Groups Lists:
Right-click the list area and select the required sort (by name or number) from the pop-up
menu
OR
Select the required sort option from the Sort menu in the menu bar.
Use Quick Search to locate specific entries in the list without resorting it.
To save the Changes That You Made to the Configuration:
Click Save below the Groups page.
To undo the Previous Change That You Made to the Configuration:
Click Undo.
To open the Help Topic for the Super Group's Configuration:
Click Help.
Configuring Supervisors
The figures in this guide may not represent exactly what you see on your monitor
in all details. Use them only as guidelines. See the Help topics for feature details.
A Supervisor in the Call Center is responsible for the management of one or more agent
groups. One agent group can also be managed by several Supervisors. Use the Supervisors
Configuration dialog box to configure the settings and privileges, groups, and super groups
for a supervisor in the system, as well as to add new supervisors and delete existing
supervisors from the system.
3Com® eXchange Call Center Administration Guide 43
Page 44

To Open the Supervisors Configuration Dialog Box:
Click the Supervisors button in the Toolbar of the main application dialog box.
OR
Select the Supervisors option from the Entities menu.
Figure 17 The Supervisors Super Group Configuration Dialog Box
The Supervisors Configuration dialog box contains these items:
Supervisors
list
New To add a new supervisor to the Supervisor's list:
Delete
Tabs Area This area, at the right of the groups list, contains three tabs that enable you to configure
Save
Undo
Help
This scrollable list displays the Name of all the supervisors in the system. Below the list,
use the four navigational buttons to move up and down the list and to jump to the
beginning or end of the list.
1 Click the New button below the Supervisors list. The New Supervisor Wizard opens.
See the field descriptions in Configuring Supervisors Details.
2 Enter a Name, Extension number, and assign privileges for the new supervisor and
click Finish. The newly defined supervisor appears in the Supervisors list.
To delete a supervisor from the Supervisors list, select the supervisor that you want to
remove from the list and click Delete.
the Details and Groups for the currently selected supervisor.
Click Save to save changes that you made to the selected supervisor's configuration.
Click Undo to undo the previous change to the selected supervisor's configuration.
Click Help to open the context-sensitive Help topic for the selected supervisor's
configuration.
44 3Com
®
eXchange Call Center Administration Guide
Page 45

Configuring Supervisors Details
The Details page of the Supervisors Configuration dialog box enables you to configure the
Details of the supervisors in the system.
To Open the Details Page:
Click the Details tab at the top of the Supervisors Configuration dialog box.
The Details page of the Supervisors Configuration dialog box displays the current details of
the selected supervisor in the Supervisors List, which you can edit as required.
The following fields are displayed on the dialog box and in the New Supervisor Wizard:
Name The name of the selected supervisor.
Password The password that the supervisor must type when logging in to the system.
Agent ID
Supervisor
Permissions
Click one of the following radio buttons to assign a supervisor's access level:
Supervisor Administrator
Entity Administrator
Entity Monitoring
The agent ID for the supervisor. This Agent ID is used when the supervisor
activates the 3Com eXchange Agent application, thus bypassing the 3Com
eXchange Agent log-on procedure.
This area displays a list of privileges that may be assigned or un-assigned to a
supervisor.
This supervisor may access and modify all the
system entities.
This supervisor may access and modify all the
system entities except for supervisor's details.
The supervisor has limited access to real time
report and historical reports for assigned groups.
Selecting Entity Monitoring options enables the tabs for Groups, Super Groups. When the
Tabs are enabled, you must drag and drop the available group over to Supervised group.
When the group is dragged to the list box, a dialog box opens with options for access to
reports or real time monitoring.
To save the Changes That You Made to the Configuration:
Click Save below the Details page.
To undo the Previous Unsaved Change That You Made to the Configuration:
Click Undo.
To open the Help Topic for the Supervisor's Configuration:
Click Help.
3Com® eXchange Call Center Administration Guide 45
Page 46

Configuring Services
The figures in this guide may not represent exactly what you see on your monitor
in all details. Use them only as guidelines. See the Help topics for feature details.
Every incoming call is assigned to a specific service, such as sales of specific products,
specific banking services, specific travel agency services, and so on. The service defines
how the call will be processed.
Use the Services Configuration dialog box to configure the services to which calls can be
assigned. In addition, use this box to add and delete new services from the system.
To Open the Services Configuration Dialog Box:
Click the Services button in the Toolbar of the main application window.
OR
Select the Services option from the Entities menu.
Figure 18 Services Configuration Dialog Box
The Services Configuration dialog box contains these items:
Services List
46 3Com
A scrollable list displaying the Name of all the current services in the system. Below the
list use the four navigational buttons to move up and down the list, and jump to the
beginning or end of the list.
®
eXchange Call Center Administration Guide
Page 47

New
Delete Clicking this button enables a service to be deleted from the list.
Clicking the New button activates a wizard that enables a new service to be added add a
new service to the list.
To delete a service from the Services list:
Select the service to be removed from the list and click the Delete button.
Tabs Area
Save
Undo
Help
This area, at the right of the Services list, contains a number of tabs that enable the
configuration of the following parameters for the currently selected service:
Details
Announcers
Destination
Overflow
Interflow
No. Agents
Click Save to save any changes made to the selected service's configuration.
Click Undo to undo the previous change made to the selected service's configuration.
Click Help to open the context-sensitive Help topic for the selected service's
configuration.
Defining a New Service
Use the Services Configuration dialog box to define new services to be added to the list.
To add a new service to the Services list:
Figure 19 New Service Wizard
3Com® eXchange Call Center Administration Guide 47
Page 48

1 In the Services Configuration dialog box, click New below the Services list. The New
Service Wizard is displayed.
2 Enter a Name, Agent Search Criteria, Music Source and Destination Group for the new
service, as requested by the wizard. For further explanation of Agent Search Criteria and
Music Source, see Configuring Services Details, next.
3 Click Finish. The newly defined service appears in the Services list.
To save the changes that you made to the configuration:
Click Save at the bottom of the dialog box.
Configuring Services Details
Use the Details page of the Services Configuration dialog box to configure the Details of the
services in the system.
To open the Details page:
Click the Details tab at the top of the Services Configuration dialog box.
The Details page of the Services Configuration dialog box displays the current details of the
selected service in the Services list, which can be edited, as required.
The following fields, areas, and radio buttons are displayed:
Name The name of the selected service.
Agent Search
Criteria
Longest Idle Agent
Terminal
Circular
Music Source
If only one agent is available at that time, he or she gets the call.
The call will be assigned to the agent who is idle
the longest.
The call will be assigned to the first available agent
in the list of agents for the group - i.e. an agent that
appears higher in the list is preferable to agents
lower in the list. Thus agents can be listed
according to the order of their ability. The order is
defined in Configuring Groups Agents.
The system searches the group's agent list,
starting from the last agent to receive a call, for the
next available agent. This method attempts to
distribute calls equally between agents in the
group.
The system connects a call waiting in queue to a music source. Select the port at
which music is provided for calls from the drop-down list. The options are Device or
CCS. If no music is specified, then the system default will be used.
To save the changes made to the configuration:
Click Save below the Details page.
48 3Com
®
eXchange Call Center Administration Guide
Page 49

To undo the previous change made to the configuration:
Click Undo.
To open the Help topic for the service's configuration:
Click Help.
Configuring Services Announcers
Use the Announcers page of the Services Configuration dialog box to configure parameters
for announcers that are used for the service. Announcers are voice messages or recordings
that are played to the caller at certain times.
To open the Announcers page:
Click the Announcers tab at the top of the Services Configuration dialog box.
Figure 20 The Service Announcers Configuration
The Announcers page of the Services Configuration dialog box displays the current
announcers configuration for the selected service in the Services list, which can be edited as
required. The following areas, fields, and buttons are displayed:
3Com® eXchange Call Center Administration Guide 49
Page 50

Mandatory
Click this check box and all callers entering the service will hear a mandatory
announcement, regardless of the availability of agents.
The announcer must be defined before clicking on the check box.
An announcer is defined by two fields:
A destination Call Control (CC) Script for the mandatory announcement
The length of time (in seconds) that the caller will hear music before the next
announcer.
First
Secondary
Cycle
Cycle All
Cycle Last To play the last secondar y announcement over and over.
No Cycle To play the secondary announcements only once.
Secondary
Announcers
No. The sequenti al number of the announcement.
Click this check box and an announcement will be heard once, when a caller first
enters the wait queue for the service.
The announcer must be defined before clicking on the check box.
An announcer is defined by two fields:
A destination Call Control (CC) Script for the mandatory announcement
The length of time (in seconds) that the caller will hear music before the next
announcer.
Once you have defined the secondary announcers, click one of the following radio
buttons:
To play all secondary announcements in the order they appear over
and over.
Use this area to define the following details, for up to twenty secondary
announcements, that are played according to "Secondary Cycle" settings, while the
caller is waiting in the queue:
The announcer must be defined before you click on the check box.
Unchecked announcements are not played.
Source The CC used for the ann ouncement (CC script).
Time
Add
Insert
Delete
Click this button to add a row at the end of the Secondary Announcers list, in which
you can add the details of an additional Secondary Announcement.
Click this button to insert a new row in the Secondary Announcers list, according to the
position of the hand pointer in the list. In this row, enter the details of an additional
Secondary Announcement.
Click this button to delete the last (or a selected) announcement from the Secondary
Announcers list.
The length of time (in seconds) that the caller will hear music before
the next Secondary announcer.
To save the changes made to the configuration:
Click Save below the Announcers page.
50 3Com
®
eXchange Call Center Administration Guide
Page 51

To undo the previous unsaved change made to the configuration:
Click Undo.
To open the Help topic for the service's configuration:
Click Help.
Configuring Services Destination
Use the Destination page of the Services Configuration dialog box to configure the services
routing destinations in the system. Multiple destinations can be defined for different times of
the day (shifts).
To open the Destination page:
Click the Destination tab at the top of the Services Configuration dialog box.
Figure 21 Services Destination
The Destination page of the Services Configuration dialog box displays the current
destination configuration of the selected service in the Services list, which can be edited, as
required. The following fields are displayed:
Name The name of the selected service.
Service
Routing
Destinations
3Com® eXchange Call Center Administration Guide 51
This area contains the following radio button:
Page 52

Show default
destination
Click this button to display the default destination for the
selected service. The default destination is used if no
destination is valid for the current day and time.
In Default Destination mode (for example: if show default
destination is clicked on), the Available Groups list appears,
displaying a list of available groups that may serve as a
service destination
To assign another group to the default destination Groups:
Drag the required group from the Available Groups list and
drop it into the Groups list.
To save the changes made to the Services Destination configuration:
Click Save below the Destination page.
To undo the previous unsaved change made to the configuration:
Click Undo.
To open the Help topic for the service's configuration:
Click Help.
Configuring Services Overflow
Use the Overflow page of the Services Configuration dialog box to configure the overflow
parameters for the service. Calls that overflow after a certain amount of time will actually
expand the number of groups for which they are waiting. Groups are the only additional
destinations to which a call can overflow. (Multiple destinations can be defined for different
times during the day, that is, shifts.) An option allows multiple overflow intervals for the same
shift. Example: The default overflow may have two intervals, the first is of 10 seconds and
the second is of 30 seconds. For each interval, a different set of groups serves as overflow
interval.
To open the Overflow page:
Click the Overflow tab at the top of the Services Configuration dialog box.
52 3Com
®
eXchange Call Center Administration Guide
Page 53

Figure 22 Services Overflow Dialog Box
The Overflow page of the Services Configuration dialog box displays the following areas,
fields and buttons, which can be edited, as required.
Name The name of the selected service.
Service
Overflow
Destinations
Show Default Destination
Overflow
This area contains the following radio button:
Click the Show Default Destination button to display the
default overflow destination for the service. The default
overflow destination is used if no overflow destination
per shift is valid for the current day and time.
In Default Destination mode (e.g.: if Show default
destination is clicked on), the Available Groups list
appears, displaying a list of available overflow groups that
may serve as a service overflow destination, and the
currently assigned overflow Groups for the service.
Use this area to define the interval – for example: the amount of time (in seconds)
after which a call will overflow (be put in the queue for other groups).
To assign another group to the overflow interval of the service's default destination:
1 In the Overflow Timeout area, choose the overflow interval.
2 Drag the required group from the Available Groups list and drop it into the Groups list.
3Com® eXchange Call Center Administration Guide 53
Page 54

To un-assign a group from the overflow interval of the service's default destination:
1 In the Overflow Timeout area, choose the overflow interval.
2 Drag the required group from the Groups list and drop it into the Available Groups list.
To save the changes made to the Services overflow configuration:
Click Save below the Overflow page.
To undo the previous unsaved change made to the configuration:
Click Undo.
To open the Help topic for the service's configuration:
Click Help.
Configuring Services Interflow
Interflow calls are those calls that are waiting for a service and are not handled within a
specified amount of time. Interflow calls are no longer part of the ACD domain. If the interflow
destination is an IRN or service, the call enters the interflow IRN/service as a new ACD call.
To open the Interflow page:
Click the Interflow tab at the top of the Services Configuration dialog box.
Figure 23 Service Interflow Configuration Dialog Box
54 3Com
®
eXchange Call Center Administration Guide
Page 55

The Interflow page of the Services Configuration dialog box displays the following areas,
fields and buttons, which can be edited, as required.
Name The name of the selected service.
Default destination
Interflow Timeout
From this drop-down list, you can select the default
interflow destination (Device, CC Script, IRN or
Service). This destination is used as interflow
destination when there is no "shift destination" for
the current day and time.
For IRN, Service or CC Script, a drop down list
alongside is opened, from which you can select the
IRN, Service or CF script for the default
destination. For Device, an edit box alongside is
opened, in which you set the devices DN.
Use this area to define the interflow timeout – that
is: how long (in seconds) a call will wait for a
service, after which a call will interflow (be directed
to another destination).
To save the changes made to the configuration:
Click Save below the Interflow page.
To undo the previous unsaved change made to the configuration:
Click Undo.
To open the Help topic for the service's configuration:
Click Help.
Configuring Services No Agents
“No agents” is the situation in which no agents are logged in to the “active” destination group
of the service. (“active” means the default or current shift.)
Use the No Agents page of the Services Configuration dialog box to configure the default
destinations as well as the destination per shift when no agents are logged in.
To open the No Agents page:
Click the No Agents tab at the top of the Services Configuration dialog box.
3Com® eXchange Call Center Administration Guide 55
Page 56

Figure 24 Services - No Agents Dialog Box
The No Agents page of the Services Configuration dialog box displays the following areas,
fields and buttons, which can be edited, as required.
Name The name of the selected service.
Use overflow
Default destination
Checking this box will assign the same destination defined as Overflow
Destination to serve as the No Agents destination.
From this drop-down list, you can select the required default destination (Device,
CC Script, IRN or Service) when no agent is logged in.
For IRN, Service or CC Script, a drop-down list alongside is opened, from which
you can select the IRN, Service or CC script for the default destination. For
device, an edit box alongside is opened, in which you set the device's DN
To save the changes made to the configuration:
Click Save below the No Agents page.
To undo the previous unsaved change made to the configuration:
Click Undo.
To open the Help topic for the service's configuration:
Click Help.
56 3Com
®
eXchange Call Center Administration Guide
Page 57

Configuring the IRN
The figures in this guide may not represent exactly what you see on your monitor
in all details. Use them only as guidelines. See the Help topics for feature details.
Intelligent Routing Numbers are used as entry points to the routing system. Each IRN can be
used to define rules for routing the incoming call to various destinations, including services.
These rules can also update the call profile, such as the call's priority.
The call profile consists of dynamic information attached to each call in the system. This
information is used to route the call and provide the history of the call. Information is updated
as the call moves through the system. For example: ANI (caller ID) information is recorded
when the call enters from the PSTN; any additional information can be input by the caller, via
IVR menus. (The caller can add any additional information via IVR menus). Each field in the
call profile is either mandatory, for example: predefined by the 3Com eXchange, or optional
(also known as a user field), for example: defined by the system administrator during the
3Com eXchange setup. The latter are different on each installation.
Use the IRN Configuration dialog box to configure the Details, and Destination of IRNs in the
system. It is also possible to add new IRNs and delete existing IRNs from the system.
To open the IRN Configuration Dialog Box:
Click the IRN button in the Toolbar of the main application window.
OR
Select the IRN option from the Entities menu.
Figure 25 IRN Details Configuration
3Com® eXchange Call Center Administration Guide 57
Page 58

The IRN Configuration dialog box contains these items:
IRN List This scrollable list displays, for each IRN currently configured in the system:
A dial number, that defines the entry to the IRN used to route the incoming call.
The destination type of the incoming call.
The destination (for example: Service, CC script or device) that will handle the incoming
call.
Below the list, use the four navigational buttons to move up and down the list, and jump to the
beginning or end of the list.
New
Delete
Click New to open the New IRN Wizard. Enter the required information according to the IRN
Details list.
Clicking the Delete button deletes the last (or a selected) IRN from the list. (Select an item in
the list using the hand pointer.)
Tabs
Area
Save
Undo
Help
This area, at the right of the IRN list, contains a number of tabs that enable the configuration
of the following parameters for the currently selected IRN:
Details
Destination
Click Save to save any changes made to the IRNs' configuration.
Click Undo to undo the previous change made to the IRNs' configuration.
Click Help to open the context-sensitive Help topic for this dialog box.
58 3Com
®
eXchange Call Center Administration Guide
Page 59

Configuring IRN Details
The Details page of the IRN Configuration dialog box shows the Details of the IRNs in the
system.
To open the Details page:
Click the Details tab at the top of the IRN Configuration dialog box.
The Details page of the IRN Configuration dialog box displays the current details of the
selected IRN in the list. These fields cannot be edited in this version of eXchange Call
Center.
The following fields are displayed:
IRN The dial number of the selected IRN.
Route directly to IRN
Destination
Route the call to the IRN destination
Route by Domain
(ANI Prefix)
Domain Routing
preferred over
customer routing
Route the call by the Domain derived from its ANI
prefix
Domain routing is preferred over customer routing
To save the changes made to the configuration:
Click Save below the Details page.
To undo the previous unsaved change made to the configuration:
Click Undo.
To open the Help topic for the IRN's configuration:
Click Help.
Configuring the IRN Destination
Use the Destination page of the IRN Configuration dialog box to configure the default
destinations for the IRNs in the system.
To open the Destination page:
Click the Destination tab at the top of the IRN Configuration dialog box.
The Destination page of the IRN Configuration dialog box displays the current destination
configuration of the selected IRN in the list, which can be edited, as required.
3Com® eXchange Call Center Administration Guide 59
Page 60

Figure 26 IRN - Destination Configuration
The box has the following fields:
IRN The dial number of the selected IRN.
Default destination
From this drop-down list, you can select the required default destination (Device
CC Script or Service).
From the drop-down list alongside, you can select the device number, the
service or CC script for the default destination.
To save the changes made to the configuration:
Click Save below the Destination page.
To undo the previous unsaved change made to the configuration:
Click Undo.
To open the Help topic for the IRN's configuration:
Click Help.
60 3Com
®
eXchange Call Center Administration Guide
Page 61

Configuring the DNIS
Use the DNIS Configuration dialog box to configure the Details of the DNIS call numbers. A
DNIS service is a series of digits that identifies to the Call Center the number that the caller
dialed.
To open the DNIS Configuration dialog box:
Click the DNIS button in the Toolbar of the main application dialog box.
OR
Select the DNIS option from the Entities menu.
Figure 27 The DNIS Details Configuration Dialog Box
The DNIS number is the same as the IRN DN. In the case where statistics should
be gathered on the IRN, the IRN should also be defined as a DNIS.
The DNIS Configuration dialog box contains these items:
DNIS List
3Com® eXchange Call Center Administration Guide 61
A scrollable list displaying the Name and Number of every DNIS in the system. Below the
list, use the four navigational buttons to move up and down the list, and jump to the
beginning or end of the list.
Page 62

New To add a new DNIS to the list, click the New button below the DNIS list.
The New DNIS Wizard opens.
Enter the Name and Number of the new DNIS, as requested by the wizard and click the
Insert button.
The newly defined DNIS appears in the DNIS list.
Delete
Tabs Area
Name The name of the DNIS.
Number The number of the DNIS.
Target ASA
Min talk time
Max talk time
Interval time
Clicking the Delete button enables a DNIS to be deleted from the list.
To delete a DNIS from the DNIS list select the DNIS to be removed from the list and click
the Delete button.
This area, at the right of the groups list, contains the Details tab to configure the following
information, for the currently selected DNIS in the list:
Target Average Speed of Answer. The amount of time (in seconds) that
the call should be answered, from the time it is received.
The minimum length of time (in seconds) defined for a call. Any call less
than this time period is counted as a short call.
The maximum length of time (in seconds) defined for a call. Any call that
exceeds this time period is counted as a long call.
The time period that will be monitored in the real-time reports for the
DNIS. Setting this field to 10 min. e.g., will cause the real-time report for
that DNIS to show statistical information relevant for the last 10 minutes.
DNIS time
intervals
This parameter determines the time intervals in which calls are
monitored. The calls can be viewed in STI histogram reports that show
the amount of calls answered, abandoned and waiting in each given
interval.
Save Clicking this button saves any changes made to the selected DNIS's configuration.
Undo
Help
62 3Com
Clicking this button will undo the previous change made to the selected DNIS's
configuration.
Click Help to open the context-sensitive Help for the selected DNIS's configuration.
®
eXchange Call Center Administration Guide
Page 63

Configuring the System
The figures in this guide may not represent exactly what you see on your
monitor in all details. Use them only as guidelines. See the Help topics for
feature details.
The System Configuration dialog box enables the Administrator to configure various
definitions and parameters that affect the behavior of the entire system.
To open the System Configuration Dialog Box:
Click the System button in the Toolbar of the main application dialog box.
OR
Select the System option from the Entities menu.
Figure 28 System - Working Times Configuration Dialog Box
The System Configuration dialog box contains these items:
Tabs
Area
Working Times Define the working hours of the Call Center.
MIS General MIS information.
3Com® eXchange Call Center Administration Guide 63
The tabs at the top of the dialog box that enable the configuration of these features:
Page 64

Misc. Miscellaneous parameters for handling calls.
IVR Ports The assignment of each Dial Number to a card and channel port.
Incomplete Define incomplete routing destinations.
Wrap-ups The wrap-up codes.
Management Define the system management alarms severity levels.
Configuring System Working Times
The Working Times page of the System Configuration dialog box enables you to configure
the day types, shifts, working/non working days for the Call Center.
The day types and shifts are used by the 3Com eXchange Engine to route calls to different
destinations according to the day and the time. The working/non working days information is
used by the MIS for calculating the daily average for Historical reports by intervals that span
more than one day. In this case, the average is calculated by dividing the total sum by the
number of working days in the report period.
Configuring system-working times involves defining different day types (e.g. Bank Holidays,
Christmas eve), which will be configured as working or non-working days. Each day type can
be assigned a color, so it can be easily viewed in the calendar. Up to 40 shifts can be
defined for each type of day. A shift is defined by a name and its start time.
To open the Working Times page:
Click the Working Times tab at the top of the System Configuration dialog box.
Figure 29 System - Working Times - A Typical Configuration
64 3Com
®
eXchange Call Center Administration Guide
Page 65

The Working Times page of the System Configuration dialog box contains these main areas:
Calendar
This area displays the calendar for the current working month. Days are colored
according to their type.
To scroll backward/forward to the previous/next month:
Click once on the arrow at the top/bottom of the scroll bar.
To jump to the previous/next year:
Click once on the scroll bar above/below the scroll box.
To mark a specific day of the week as a day type, for a certain period of time:
Click the day's name at the top of the calendar (example: Tue).
A dialog box opens for that day.
From the Set As list, select the type of day you want to assign to the
selected day of the week.
Click the appropriate radio button in the For Which Period area, to set the
day for the current month, current year or the entire calendar.
Click OK to accept the changes and overwrite any previous settings.
To mark a specific day of the month (example: date) as a day type, for a certain
period of time:
Click the particular date in the calendar (example: 4th).
A dialog box opens for that date.
From the Set As list, select the type of day you want to assign to the
selected day of the month.
Click the appropriate radio button in the For Which Period area, to set the
day for the current month, current year or the entire calendar.
Click OK to accept the changes and overwrite any previous settings.
To save the changes that you made to the Working Times configuration:
Click Save.
To undo the previous unsaved change that you made to the configuration:
Click Undo.
To open the Help topic for the system's configuration:
Click Help.
3Com® eXchange Call Center Administration Guide 65
Page 66

Configuring the MIS Parameters
Use the MIS page of the System Configuration dialog box to define general information that
is used by the MIS applications to calculate and display information, such as the historical
reports interval, company name and how to calculate the TSF (Target Service Factor). The
TSF indicates how well the group is providing the level of service defined for it, via the Target
ASA (Average Speed of Answer).
In this page, it is also possible to specify the colors that will be used to display different agent
states in the Real-Time Monitoring application for example: Agent Release State Color.
To open the MIS page:
Click the MIS tab at the top of the System Configuration dialog box.
Figure 30 System - Configuring the MIS Parameters
The MIS page of the System Configuration dialog box contains the following areas, fields,
and buttons:
Historical reports basic
interval
66 3Com
The interval that will present data in the Historical Reports application.
The options are: 15 min., 30 min. or 1 hour.
The basic interval determines the resolution of the historical reports. A
smaller interval gives historical reports a higher resolution. The interval also
determines the amount of disk space needed for the user's database.
Smaller intervals require more disk space to store the information, for larger
intervals less disk space is needed.
®
eXchange Call Center Administration Guide
Page 67

Company name The name of the company to appear at the bottom of the historical reports.
TSF Formula Click the appropriate ra dio button to define how the TSF is calculated:
Answered
Abnd after TASA
Accepted
Maximum Number of
DNIS Numbers
Abandoned calls storing
period (days)
Text Display Colors
The system allocates memory to gather statistics on DNIS numbers
according to this parameter, so that it should reflect the actual number of
DNIS numbers that the system is going to use.
This report gives a list of any abandoned calls provided that the call was
accompanied with ANI. It is used by the Call Center to give a call back to
these callers. These parameters define how long a record in this report is
saved.
A color-coded list displaying the different agent states in the Real-Time
Monitoring application.
To change the color for a particular agent state:
Scroll through the list.
The percentage of calls answered within the Target
ASA, out of calls routed and answered by the group.
The percentage of calls answered within the Target
ASA, out of calls routed and answered by the group,
and calls routed to the group and abandoned after the
Target ASA.
The percentage of calls answered within the Target
ASA, out of all the calls that are routed to the group.
Abandoned and overflowed calls are considered to be
answered after the Target ASA.
Double-click the required state.
In the Colors dialog box that opens, select the required color for the state,
click Apply and OK.
To save the changes made to the General configuration:
Click Save below the MIS page.
To undo the previous change made to the configuration:
Click Undo.
To open the Help topic for the system's configuration:
Click Help.
3Com® eXchange Call Center Administration Guide 67
Page 68

Configuring System Miscellaneous Parameters
Use the Misc. page of the System Configuration dialog box to define various parameters for
handling incoming calls, such as, setting call priorities and defining destinations for calls on
hold, and so on.
To open the Misc. page:
Click the Misc. tab at the top of the System Configuration dialog box.
Figure 31 System - the Misc. Parameters Dialog Box
The Misc page of the System Configuration dialog box contains the following areas, fields,
and buttons:
Forced released
timeout
Music source
String Lengths This area contains two drop-down lists in order to define:
In this field, define how long (in seconds) an agent station can ring before forcing
release.
Define, from this drop-down list, where to connect a caller while waiting in queue
between announcers.
The maximum agent ID length (default is 4 characters).
The wrap codes length (default is 2 digits).
To save any changes made to the parameters:
Click Save below the Misc page.
68 3Com
®
eXchange Call Center Administration Guide
Page 69

To undo the previous unsaved change made to the configuration:
Click Undo.
To open the Help topic for the system's configuration:
Click Help.
Configuring System IVR Ports
Use the IVR Ports page of the System Configuration dialog box to configure the IVR
parameters.
To open the IVR Ports page:
Click the IVR Ports tab at the top of the System Configuration dialog box.
Figure 32 System - IVR Ports Configuration Dialog Box
The 3Com eXchange Call Center supports one type of IVR port:
CTI Port
These are logical ports on the IVR computer (server or client). This type of port is
relevant to the 3Com NBX environment.
The 3Com eXchange Call Center supports two IVR modes:
IVR on Server The IVR services are provided by the 3Com eXchange Call Center server.
3Com® eXchange Call Center Administration Guide 69
Page 70

Client IVR
The IVR services are provided by the 3Com Call Center but not from the main
3Com eXchange Call Center server. This configuration supports one or more
IVR servers, which are different computers. Each is installed with a set of IVR
ports.
You can select the type of setup by clicking on the appropriate option within the IVR Mode
section of this page. When you select a mode, the options below change to reflect the
parameters required for that option.
To configure the system for IVR running on a server:
Click the IVR on Server option within the IVR Mode section of this page.
In the clients list, the IVR Server automatically appears. There is no way to change it since
this entry represents the fact the IVR services are given from the main Call Center server.
To configure the system for Client IVR:
1 Click the Client IVR option within the IVR Mode section of this page. The options
relevant for this configuration are enabled below.
2 Click New under the Client area to enter a computer name for each IVR computer. If
your network is not a DHCP network, edit the Windows(tm) host file to add this name
with the correct IP address of the IVR computers.
To add an IVR card to the system
In case of CTI ports IVR, the term card is virtual. One just may define a single
card and add to him all the IVR ports.
1 Edit the Connection Type to enter the card description (number and type). For each card,
click New to add an entry for it. Use the Type drop down list to select the appropriate IVR
port type (CTI or LS).
2 In the Numbering List, click New to define the ports dial numbers.
a) If the port's type is LS, select each card in the Connection type section and define a
new port for each card. For each new port, enter the port's dial number in the NBX and
the ports channel number in the card.
b) If the connection type is CTI, the channel is irrelevant. In this case, enter the channel
numbers as a sequential series.
To delete an entry from a List:
1 Select the row of the entry from the list.
2 Click the corresponding Delete button below. The entry is removed from the list.
To save any changes made to the parameters:
Click Save at the bottom of the page.
70 3Com
®
eXchange Call Center Administration Guide
Page 71

To undo the previous change made to the configuration:
Click Undo.
To open the Help topic for the system's configuration:
Click Help.
Configuring System Incomplete Destinations
The 3Com eXchange Engine routes calls to the incomplete call destination in the case where
there is no valid routing destination for that call. For example, a call enters an IRN with a CC
script as a destination, but the CC script is not set to the 'service required' mandatory CP
field, leaving the IRN without a destination. In this case, you will use the Incomplete
Destination for that call. If the call has already entered a service, it will look for the
Incomplete Call Destination of the service that the call belongs to. If it is not set, the 3Com
eXchange Engine will use the system's incomplete call destinations. If the call has not yet
entered the service, it will first look for the incomplete call destination of the IRN that the call
entered through. If it is not set, the 3Com eXchange Engine will use the system's incomplete
call destinations.
To open the Incomplete page:
Click the Incomplete tab at the top of the System Configuration dialog box.
Figure 33 System - Incomplete Destination Configuration Dialog Box
3Com® eXchange Call Center Administration Guide 71
Page 72

The Incomplete page of the System Configuration dialog box displays the following fields and
buttons, which can be edited as required:
Default Incomplete
Destination
Select, from this drop-down list, the required default incomplete destination
(Device, CCS, IRN or Service), to be used when shift destinations are not
defined.
Select, from the drop-down list alongside, the device number or CC script for
the default destination.
To save the changes that you made to the Incomplete destinations configuration:
Click Save below the Incomplete page.
To undo the previous change made to the configuration:
Click Undo.
To open the Help topic for the system's configuration:
Click Help.
72 3Com
®
eXchange Call Center Administration Guide
Page 73

Configuring System Wrap-Ups
Wrap-up codes are internal codes that are used to label a call. They can indicate the service
received by the call and/or identify the customer who received the service. Wrap-up codes
are used primarily for statistical reporting. Agents enter the wrap-up code when they have
finished handling a call, using the 3Com eXchange Agent's button specified to this purpose.
Use the Wrap-Ups page of the System Configuration dialog box to configure the wrap-up
codes for the system.
To open the Wrap-Ups page:
Click the Wrap-Ups tab at the top of the System Configuration dialog box.
Figure 34 System - Wrap-ups Configuration Dialog Box
The Wrap-Ups page of the System Configuration dialog box displays the following fields and
buttons, which can be edited as required:
Wrap-Up codes list
New
Delete
A list displaying the Name of the wrap-up code (usually, the subject of the call) and
the Number to be entered by the agent at the end of the call.
Click New to add a new row to the list in which to enter the Name and Number for
a new wrap-up code.
Click Delete to delete the last (or a selected) row from the Wrap-Up codes list.
3Com® eXchange Call Center Administration Guide 73
Page 74

To sort the Wrap-Up codes list:
Right-click the list area and select the required sort (by name or number) from the pop-up
menu.
OR
Select the required sort option from the Sort menu in the menu bar.
To save the changes made to the configuration:
Click Save below the Wrap-Ups page.
To undo the previous unsaved change made to the configuration:
Click Undo.
To open the Help topic for the system's configuration:
Click Help.
Configuring System Management Parameters
Use the Management tab of the System Configuration dialog box to define the severity of
various alarm messages in the system, view the licensing parameters coded in the Lock
Device and define the database backup policies.
To open the Management page:
Click the Management tab at the top of the System Configuration dialog box.
Figure 35 System - Management - Licensing Configuration Dialog Box
74 3Com
®
eXchange Call Center Administration Guide
Page 75

The Management page of the System Configuration dialog box contains two tabs,
Licensing, and DB Backup, located on the bottom of the dialog box.
The DB Backup tab displays the following information and fields:
Use the Backup page of the System Configuration window to define various parameters for
backing up the system files. There are three methods of backup; daily, weekly and monthly
which can be combined for best results. For each method you may specify the number of
generations to be stored e.g. if you choose '3' the system will store backup files from today,
yesterday and the day before. All backup file generations before that point will be erased.
3Com recommends that you set the backup start time at a quieter point of the
working day. Avoid setting the backup time for midnight because many system
background procedures are automatically carried out then.
To open the Backup page:
Click the Backup tab at the top of the System Configuration dialog box.
Figure 36 System - Management - DB Backup Dialog Box
The Backup page of the System Configuration dialog box contains the following fields:
Backup
Schedule
Destination Path
The location in the network where the backup files are to be
stored
Please use a complete pathname. Be aware that this path is
relative to the server, thus avoid using mapped drives, but use a
URL like addressing (e.g., \\batman\backup)
3Com® eXchange Call Center Administration Guide 75
Page 76

Start Time
Daily Check this box to set the backup on a daily basis
Keep: Set the number of daily backup generations that should be kept
Weekly Check this box to set the backup on a weekly basis
Keep: Set the number of weekly backup generations that should be kept
Day of the Week: Set which day of the week to start the backup
Monthly Check this box to set the backup on a monthly basis
From the drop-down list, select what time the backup process
should begin
Keep:
Day of the Month: Set which day of the month to start the backup
Backup now... Pressing this button will start the system backup procedure immediately
Because backup can cause a heavy load on the system, a warning is issued and a
confirmation is requested.
Save Config.
Data
Backup Log Historical log of all the backup files that are kept in the system
Pressing this button will start a process that will generate a copy of the configuration
data in the system's database. No statistical information will be included in this database.
Set the number of monthly backup generations that should be
kept
To save any changes made to the parameters:
Click Save below the Backup page.
To undo the previous change made to the configuration:
Click Undo.
To open the Help topic for the system's configuration:
Click Help.
The Call Control Scripts Administration
The figures in this guide may not represent exactly what you see on your monitor
in all details. Use them only as guidelines. See the Help topics for feature details.
The CCS Administration is the administrative tool that defines and maintains Call Control
Scripts.
See the Help topics for descriptions of the features available in the eXchange Call Center.
76 3Com
®
eXchange Call Center Administration Guide
Page 77

A script contains a set of actions that are performed on a call. Specific scripts can be created
containing a variety of actions, selected from the set of actions available in 3Com eXchange
Call Center. Scripts can be linked together to build flexible applications.
Scripts are activated in various stages of the contact processing, such as:
Incoming call entry point - IRN
An IRN defines the rules by which each incoming contact should be routed. The script
can supply the caller option like menu that routes the call depending on the caller's
selection. The script can supply routing according to customer. The script can affect
routing and change parameters (to be used later in handling the call) of an incoming in a
flexible way using requirements collected from the caller and other call parameters.
Activation of one script / different scripts on a Queued call
While the call is queued scripts can be combined. Scripts can offer different options like
announcements to the caller, enable the caller to receive information, offer a call back
initiated by the system at a later time and more.
On Interflow
When there are no agents logged in to the system.
When the customer answers an outbound calls
On Incomplete Call scenario - the call has reached a situation where there it has no valid
destination.
The actions of a Call Control Script can change the Call Profile of the processed call , by
changing fields of the call profile. These fields can be used to affect the routing of the call, for
example, by changing or setting the service or priority required by the call, adding
information about the caller in user-defined fields etc. The caller can change the call profile
when the script defines actions that require caller input, such as a menu. In this way, the
caller can contribute to the routing process.
All Call Profile information is accessible and visible for script actions, for 3Com
eXchange Agent windows display and for CRM application via DDE/ActiveX.
The Call Control Scripts are executed by the Engine, which can dynamically allocate IVR
ports when a script requires IVR input or output.
To invoke the CCS Administration:
From the Administration application dialog box, click the CCS Administration icon.
The CCS Administration Dialog Box
The CCS Administration dialog box is displayed after clicking the CCS Administration Icon in
the Administration application dialog box.
3Com® eXchange Call Center Administration Guide 77
Page 78

Figure 37 The CCS Administration Dialog Box
The CCS Administration dialog box contains the following areas:
Menu Bar
Scripts
Description
Action
Call Profile
Modifier
Call Profile Field
Value Editor
The menu bar at the top of the dialog box provides options for adding scripts, saving
changes and setting options.
This area at the top left of the dialog box, lists all the currently defined scripts in the
application. From this area, scripts and their actions can be viewed and modified.
This area at the bottom left of the dialog box provides a description of the purpose
or the text of an announcement for a selected script or action. The description can
be edited if required and can contain a maximum of 2,048 characters.
This area can be used to configure the parameters for the currently selected script
action.
The Call Profile Modifier is active whenever an action allows changes to the Call
Profile. (Not all the actions allow the Call Profile to be changed).
This area is activated in order to define a value for a specific field in the Call Profile.
The CCS Administration dialog box can be resized, to display the relevant amount of
information, by dragging its borders widthwise and/or lengthwise. Any changes to the window
size configuration will be automatically saved and displayed when the window is next
opened.
78 3Com
®
eXchange Call Center Administration Guide
Page 79

The Scripts, Comment and Action areas can be reduced and enlarged by dragging the lines
that separate them up or down and left or right. The line between the Call Profile fields
cannot be moved.
The CCS Administration Menu Bar
The CCS Administration menu bar contains three items:
File This menu provides the following sub menus:
New Script Adds a new script to the Scripts list.
Save Saves any changes made in the application.
Exit
Tools This menu provides the Options sub menu.
Help
This menu enables access to the context sensitive Help topic and provides information about
the current version of the application.
Closes the application. If changes are not saved before you try to exit the
application, a warning message pops up.
The CCS Admin Options
The CCS Admin Options dialog box enables you to define the following:
The type of voice files that are used by the IVR is displayed and an application to play
voice prompts can be defined. In any action, whenever a voice prompt is required, the
CCS Admin displays two icons. The first activates the application to play voice prompts
define here. The other is used to browse for the voice prompts files.
The timeout period for which an edit field is active on the window can be defined The
CCS Admin activates input fields when the mouse is pass over them and deactivates
them after this timeout.
The predefined chat responses list can be changed.
To open the CCS Admin Options dialog box:
Select Options from the Tools menu in the CCS Administration dialog box.
To define the timeout period for which an edit field is active on the window:
1 Click the General tab in the dialog box.
2 Enter the length of time that a field in the application will remain active for editing.
3Com® eXchange Call Center Administration Guide 79
Page 80

Viewing and Modifying Scripts
The figures in this guide may not represent exactly what you see on your monitor
in all details. Use them only as guidelines. See the Help topics for feature details.
The CCS Administration dialog box displays a list of the existing scripts. It is possible to
modify the script by adding and/or deleting scripts. Expanding a script displays the list of
actions that are currently defined for it. Actions are executed sequentially according to their
order in the script.
A maximum number of 500 scripts are allowed in this application. Up to 100 actions can be
defined for each script.
The system “protected scripts” that are supplied with the system and cannot be edited or
deleted.
A script is a list of actions that are executed sequentially until the list is exhausted or an
action causes a branch to another script. The actions that are defined for a script control the
flow of a call (that is, its routed destination). They can also update the call profile fields
that control the call handling as well as the agent's display.
The parameters of an action, for a script, can be defined by selecting the action in the Scripts
area. The action will be displayed and can be edited in the Action area.
Changes are made in the CCS Administration dialog box by right clicking in the
area of interest. A pop-up menu will open with the options relevant for that area.
From the CCS Administration dialog box, the following procedures may be executed on a
script or action:
To add a new script to the list:
Right-click the script list area and select New Script.
OR
Select the New Script option from the File menu.
A new script item will be added at the end of the list.
To move (change the order of) scripts in the list:
Select the script to be moved, and drag and drop it to the required position in the list. In the
popup menu that opens select the move option.
To copy scripts in the list:
Select the script to copy, and drag and drop it to the end of the list. In the popup menu that
opens select the copy option.
80 3Com
®
eXchange Call Center Administration Guide
Page 81

To delete a script from the list:
Right-click the script to be deleted and select Delete Script from the pop-up menu.
A script that is referenced somewhere else in this application, or in any of the
other 3Com eXchange Call Center applications, cannot be deleted. An error
message will appear to inform the user of other areas in which the script is
used. The script must be deleted from all areas, before it can be deleted from
this list.
To rename a script:
Click the right mouse button on the script to be renamed, select Rename from the pop-up
menu and type the required name.
A script name may contain up to 31 characters.
To open a script's pop-up menu:
Click the right mouse button on the script.
To see the actions currently defined for a script:
Double-click the script or click once on the plus (+) sign to the left of the script name. The list
of actions defined for the script will be displayed.
To collapse a script menu (hide the actions defined for a script):
Click the minus (-) sign alongside the script.
To add an action to be the first action in a script:
Right-click the required script and select the Insert Action from the pop-up menu.
The Actions menu pops up, enabling the required action to be selected for the script. The
action will be inserted directly beneath the script name as the first action.
To insert an action at a specific position in the list of actions:
Right-click the action after which you want to insert a new action and select Insert Action
from the pop-up menu.
The Actions menu pops up, enabling the required action to be selected for the script. The
action will be inserted after the selected action.
To change the order of actions in the list:
Select the action to be moved, and drag and drop it to the required position in the list. In the
popup menu that opens select the move option.
3Com® eXchange Call Center Administration Guide 81
Page 82

To move an action to another script:
Select the action to be moved, and drag and drop it into the required place in the required
script. In the popup menu that opens select the move option.
To copy an action to:
Select the action to be copied, and drag and drop it into the required place in the required
script. In the popup menu that opens select the copy option.
To view/edit the definition of an action:
Select the required action.
To delete an action from a script:
Click the action to be removed with the right mouse button and select the Delete Action
option from the pop-up menu.
The Delete Action option is active only after you select an action.
While you are performing any procedure on a script or action, an arrow ? appears
alongside the selected script or action. In addition, any changes to a script or
action are indicated by a red dot alongside it. When you save the changes, the
dot disappears.
The following actions are available:
Announce Place in
Queue
Hang-Up Disconnects the call.
Menu
Play File Enables a recorded voice file to be played to the caller.
Transfer Transfers a call to a destination in the PBX.
Announces the callers' position in the queue.
Provides a menu to the caller. The caller receives a voice prompt and can
choose an option by dialing a digit.
Configuring Script Actions
You have several choices of script actions.
If you set a transfer destination (usually in a script) to an invalid destination, the
caller customer hears ringing until he or she hangs up.
82 3Com
®
eXchange Call Center Administration Guide
Page 83

Configuring the Announce Place in Queue Action
The figures in this guide may not represent exactly what you see on your monitor
in all details. Use them only as guidelines. See the Help topics for feature details.
The Announce Place in Queue action announces the caller's position in the queue (Example:
"You are the 5th caller in queue”).
To add an Announce Place in Queue Action to a script:
Click the right mouse button on the required script, position the cursor on the Insert Action>
Option and select Announce Place in Queue from the Actions menu.
The Action area displays the following fields for configuring the Announce Place in Queue
script action (use the cursor to activate each field):
Announce language Select the language in which to play the announcement.
File to play [start]: Select the recording that precedes the place in queue announcement.
File to play [end]: Select the recording that follows the place in queue announcement.
Place in queue offset:
Highest place in queue
announced
Enter a number to be added to the true queue position in order to offset
the caller's position. This allows a high priority call to go before someone
in line without the person in line querying the wait time.
This area states the highest number announced. Anything above this
number will be announced digit by digit.
Configuring the Hang-Up Action
This action causes the call to be disconnected.
This is a terminating action for a call as well as a script; any actions following it will
therefore not be performed.
Configuring the Menu Action
This action provides a menu to the caller. The caller receives a voice prompt and can choose
an option by dialing a digit. Configuring the Menu action involves defining the menus for
these voice messages.
To add a Menu action to a script:
Click the required script with the right mouse button, position the cursor on the Insert Action
> Option and select Menu from the Actions menu.
The Action area contains two tabs, Digit Menu for configuring the Menu script action and
Parameters for configuring the voice prompt file parameters.
3Com® eXchange Call Center Administration Guide 83
Page 84

To open the Digit Menu page:
Click the Digit Menu tab in Menu Action area.
The following fields and check boxes are displayed in the Digit Menu page.
Digit
For each digit you can modify the following:
Call P
Branch Enables the call to branch to another script in order to continue processing.
A list of digits (including the * and # symbols) that the caller may press in response to a
voice prompt.
To define a menu action that is activated by pressing a specific digit:
Click the required digit.
The digit button appears indented. It is only possible to select one digit at a time.
An Error branch appears at the end of the digits list. This option can be used to define
processing, if the caller enters a digit that is not activated in the menu or does not enter a
digit at all.
Clicking on this check box activates the digit alongside it. It also activates the Call Profile
Modifier area of the CCS window, enabling the Call Profile to be updated when the caller
presses the activated digit.
Clicking on this check box activates a field in which another Call Control script can be
defined as a branch destination. (Use the cursor to activate the field). The field provides a
drop-down list from which the required script can be selected.
Processing of the call will continue on the new script if the caller presses an activated digit.
The call does not return to the original script. Be careful not to create infinite loops in which
the script never finishes processing (e.g. scripts that branch to each other or a script that
branches to itself).
To open the Parameters page:
Click the Parameters tab in Menu Action area.
The following fields and check boxes are displayed in the Parameters page. Use the cursor
to activate a field.
Prompt:
Invalid prompt:
Clear DTMF on entry
84 3Com
The path of the file that contains the voice prompt heard by the caller, when a
digit from the menu should be pressed. For example, "For technical support
please presses 1, for product information please press 2'".
The administrator can edit the voice file path and/or play, record or edit the voice
file itself.
The path of the prompt file that will be played if the caller presses a meaningless
digit (one that has not been activated in the previous step) and there was no
specific behavior defined for "Error".
When checked, this check box clears any previously received digits that were
defined for this action.
When unchecked, this check box enables any previously receive d digits to be
used in all actions.
®
eXchange Call Center Administration Guide
Page 85

Stop prompt on
DTMF
When this box is checked, any digit pressed by the caller will terminate the
currently played voice message, without waiting to the end of the message.
Retry:
Timeout (sec): Define the length of time (in seconds) to wait for a digit to be pressed.
Define the number of times the prompt will be repeated if the caller doesn't
respond or enters an invalid choice. The prompt file is played on each retry.
Configuring the Play File Action
The Play File action plays a pre-recorded voice file to the caller.
To add a Play File action to a script:
Click the required script with the right mouse button, position the cursor on the Insert
Action> Option and select Play File from the Actions menu.
The Action area displays the following fields and check boxes for configuring the Play File
script action:
Table 19 Agents Group List
File to play:
Timeout
The path of the voice file that contains the digitized voice (or music) that you want to
play. The administrator can edit the voice file path and/or play, record or edit the voice
file itself.
After the pre-defined timeout, the call will be transferred to the Incomplete Call
Destination.
Play
continuously in
loop
Clear DTMF on
start
Stop play on
caller DTMF
When this box is checked, the file should be played repeatedly. After a pre-defined
timeout, the call will be transferred to Incomplete Call Destination. If not checked, the
voice file will be played only once.
When checked, any previously received digits that were received before the action
started are cleared. When unchecked, previously received digits may be used in this
action.
When checked, any digit entered terminates the currently played message.
Configuring the Transfer Action
The Transfer parameters define the destination in the PBX to which a call will be transferred.
To add a Transfer action to a script:
Click the right mouse button on the required script, position the cursor on the Insert Action >
Option and select Transfer from the Actions menu.
The Action area displays the following fields for configuring the Transfer script action (use
the cursor to activate each field):
3Com® eXchange Call Center Administration Guide 85
Page 86

Table 20 Agents Group List
Transfer call to:
Busy alternate
destination:
No answer
destination:
No answer
timeout (sec.):
In this field, enter the destination to which the call should be transferred. This must
be a valid dial number in the PBX (may be an external dial number to the PBX).
This field can be used to define an alternate destination to which the call should be
transferred if the original destination is busy.
This field can be used to define a destination to which a call should be transferred if
there is no answer from the original destination.
This field can be used to define how long (in seconds) a call will wait for an answer
before entering a state of timeout when it will be transferred to the "No Answer"
destination.
(Enter the number of seconds directly in to the field or click the spin buttons.)
86 3Com
®
eXchange Call Center Administration Guide
Page 87

APPENDIX A: GLOSSARY
This section provides a description of some of the more important 3Com eXchange Call
Center concepts and terms.
ACD ACD (Automatic Call Distribution) is the method used by the PBXs to distribute
calls in the Call Center. ACD activity and performance within the 3Com eXchange
Call Center is statistically evaluated, recorded and reported.
Agents/Agent
Groups
Super-Groups A Super-Group is a collection of agent groups gathered together for reporting
Trunks/Trunk
Groups
Supervisors Each Supervisor is responsible for specific groups of agents. Using the 3Com
The function of an agent is to handle contacts routed by the 3Com eXchange Call
Center system. Each agent is equipped with a telephone set, and begins work by
logging on to the system. To log on, each agent enters a unique agent identification
number, and then the dial number of the group to which they are logging onto.
Agent Groups are used to form specialized units that are meant to receive calls
relating only to the special function of those units. When all the agent stations in a
group are busy or unavailable, incoming calls will be placed in a queue designated
for that group.
purposes. Super-Groups may contain several agent groups and are used mainly to
represent the hierarchy of "company-division-department".
A Trunk is a channel of conversation between the Public Service Telephone
Network (PSTN) and the Private Branch Exchange (PBX). These lines carry all the
ACD calls, as well as external non-ACD calls, to and from the system. A Trunk
Group is a collection of trunk lines grouped together to act as a single line unit, with
its own specific name and dial number. A Trunk Group is usually routed to a
specific agent group.
eXchange Call Center, Supervisors monitor agent performance and the Call Center
activities. Each Supervisor is assigned authorization attributes that enable or
disable access to different system operations. Authorized Supervisors can
determine the information that will be included in reports (such as groups, agents,
etc.) In addition, supervisors can change the information displayed on the Wall
Boards under their control. Supervisors can also be assigned privileges for
administering groups, e.g. adding and removing agents for specific groups.
Reports In order to obtain information that provides an accurate picture of how the Call
Center is operating and performing, supervisors and managers use reports. The
information displayed can be either Real-Time or Historical. Real-T ime Reports
display the actual present status of ACD activity along with statistical performance
evaluations whereas Historical Reports summarize past ACD activity as recorded
in the database. 3Com eXchange Call Center can generate and display man y
different kinds of Real-Time and Historical Report formats to enable an accurate
picture of ACD activity to be assessed and analyzed.
Report Templates The 3Com eXchange Call Center is supplied with a set of predefined report
templates (default reports). This covers the full range of information available from
the 3Com eXchange Call Center. In addition, for Historical Reports, user-defined
templates can also be designed. The purpose of templates is to provide the
supervisor with a virtually unlimited reservoir of report formats, which can be filled
out and generated, in a simple and straightforward manner.
3Com® eXchange Call Center Administration Guide 87
Page 88

Templates can be modified to meet specific supervisor requirements. In selected
templates, some default fields can be altered or removed, while others cannot.
Templates can be saved with unique names for future use.
Real-Time Interval The Real-Time Reports reflect the actions and activities performed by monitored
ACD entities on the Call Center along with various performance information based
on statistic calculations. The 3Com eXchange Call Center uses a sliding windo w
time period and reports statistical performance information over this amount of
time.
The sliding window time period is refereed by the Real-Time Interval and may be
differently defined for each group varying from 3 to 60 minutes. The Real-Time
Interval "moves" in increments of 1/60 of the defined period. (For example, if set to
15 minutes, the increment will be 15 seconds.)
Historical Reports
Interval
Dial Numbers Dial Numbers are used within the PBX environment to identify entities, which can
ASA Average Speed of Answer - the average time it takes a call to be answered by the
TSF / LOS Target Service Factor/ Level Of Service - the percentage of ACD calls answered
A system wide amount of time defining the increments by which all collected data
and statistical information is stored in the database to enable later interrogation and
reporting.
be a source or destination for a call. For instance, a dial number specific to the
group identifies an agent group. When this number is dialed, the caller will enter
the group as an ACD call.
group, from the time it enters the system.
within the Target Average Speed of Answer (Target ASA) defined for a group (out
of all the calls accepted by the group). This factor indicates how well the group is
providing the level of service defined for it via the Target ASA.
The TSF/LOS equation can be set by the administrator to one of three levels:
Answered
The percentage of calls answered within the Target ASA, out of calls routed
and answered by the group.
Abandoned After Target AS A
The percentage of calls answered within the Target ASA, out of the total of
(calls routed and answered by the group, and calls routed to the group and
abandoned after the Target ASA).
Accepted
The percentage of calls answered within the Target ASA, out of all the calls
that have been routed to the group. The latter total includes: Regular
answered calls, Abandoned calls, and the calls that were Interflowed out and
have been Answered by Another Group
Service Time
Interval (STI)
MDI 3Com eXchange Call Center windows are based on the Multiple Document
88 3Com
Definable amounts of time that simplify the evaluation of calls waiting in queues.
Different STIs may be defined for each group in the system in the Administration
application.
Interface (MDI) display method. Using this method, all the 3Com eXchange Call
Center work windows are contained within the work area of the main MDI window.
The work area is the region inside the main window where all the work takes place,
and the 3Com eXchange Call Center output is displayed. The supervisor uses work
windows to define 3Com eXchange Call Center entities, and view, generate, and
®
eXchange Call Center Administration Guide
Page 89

modify 3Com eXchange Call Center reports. There may be several active work
windows open at any given time for each 3Com eXchange Call Center application
(including minimized windows). In addition, MDI lets you tile or cascade multiple
windows in the main window.
Agent State Graphical representation of agent's status indicates the activity and the state of an
agent at any given time, as follows:
Wrap-Up Time
An amount of time at the end of an ACD call in which an agent performs additional
operations related to the call. This amount of time is set on the PBX and reported
by the 3Com eXchange Call Center for each individual agent and also as part of
the Treatment Time (the time that it took to treat the call from the time it entered the
PBX).
Wrap-Up Codes
A code entered by the agent during the Wrap-Up time in order to allow additional
information for evaluating the actions of the Call Center. In most cases Wrap-Up
codes are used for later reporting purposes, giving a different point of view for
evaluating the calls such as: type of call (request, complaint), level of required
action (urgent, regular, low), status of the deal (closed, needs recall), etc.
3Com® eXchange Call Center Administration Guide 89
Page 90

90 3Com
®
eXchange Call Center Administration Guide
 Loading...