

Page 1
3B SCIENTIFIC® PHYSICS
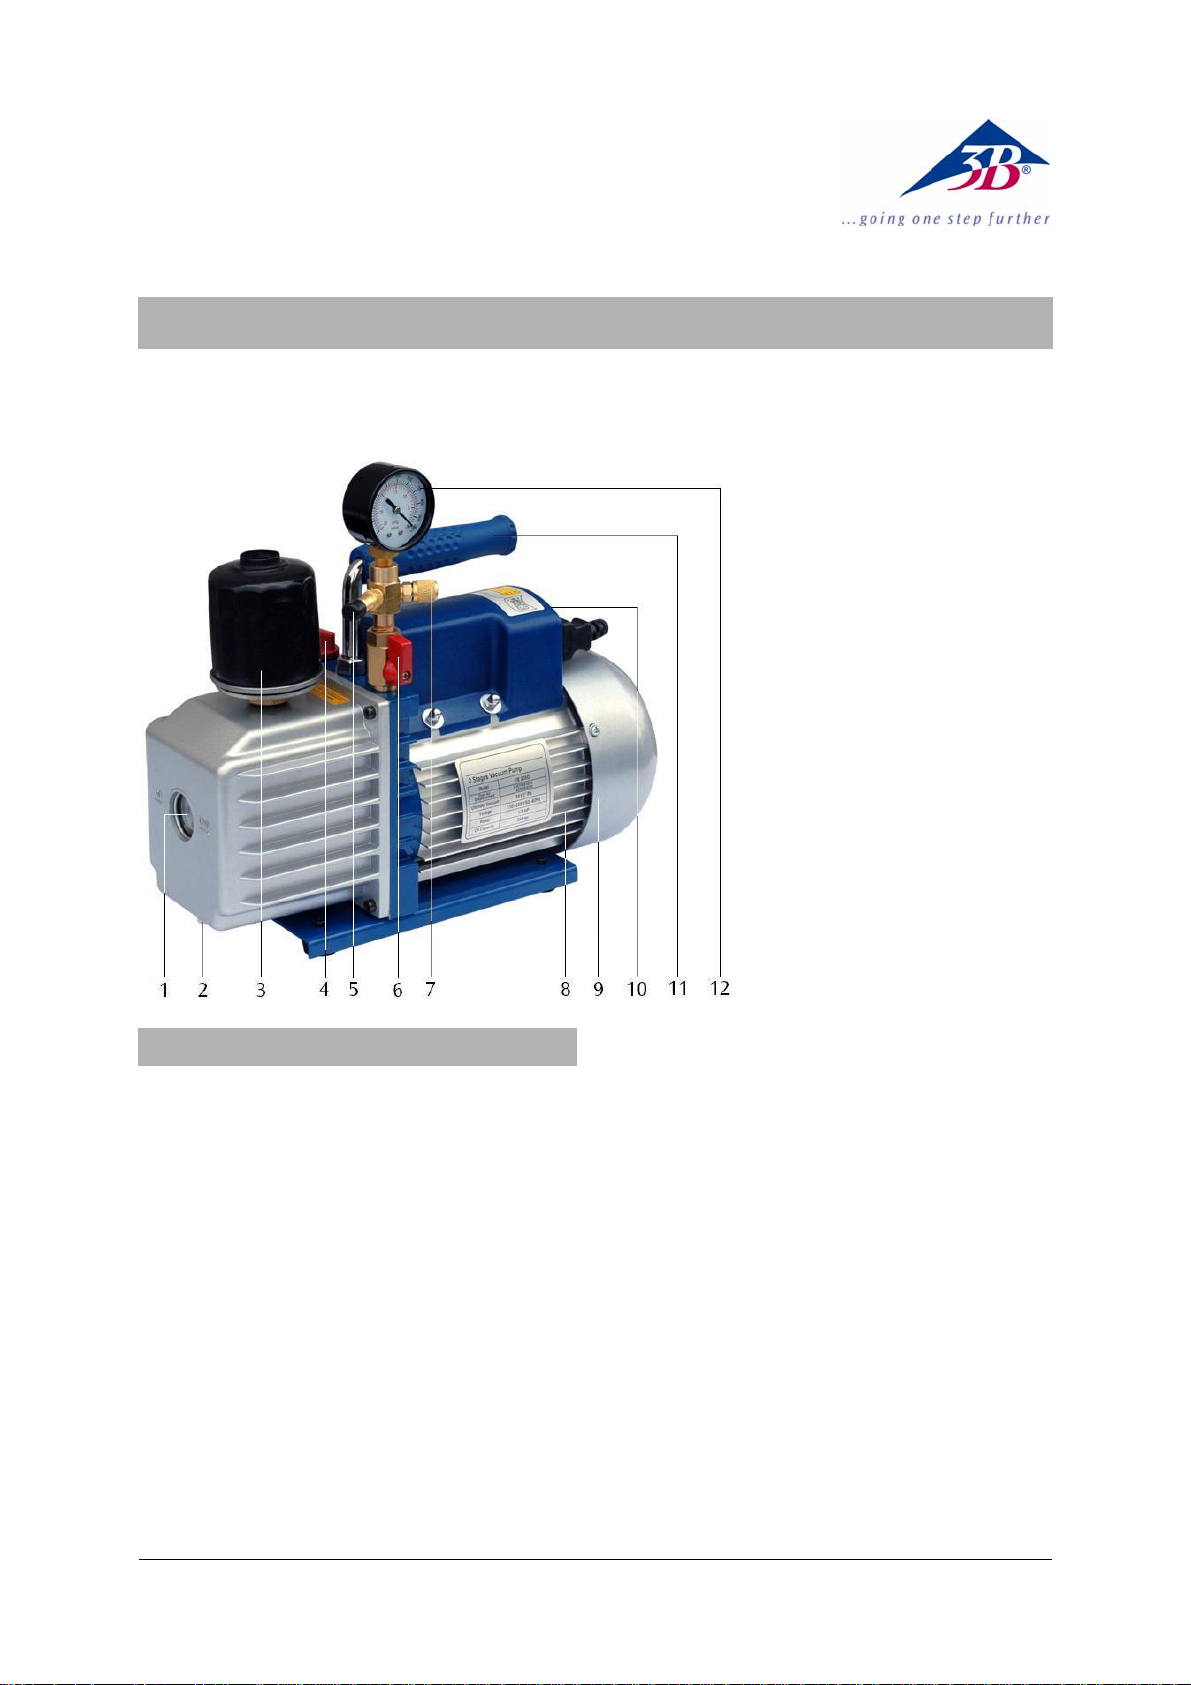
Rotary-Vane Vacuum Pump, Two-Stage 1003317
Instruction sheet
11/12 ALF
1 Oil sight glass
2 Oil drain cap
3 Exhaust filter
4 Oil fill cap
5 Hose nipple
6 Stopcock
7 Ventilation valve
8 Motor
9 Fan cover
10 Power switch and voltage
selector switch
11 Carrying handle
12 Manometer
1. Safety instructions
The rotary-vane pump 1003317 is in accordance
with the following applicable European directives
and standards:
89/336/EEC Electromagnetic Compatibility
73/23/EEC Low Voltage Directive
EMC: EN55014-1 (2000) + A2 (2002),
EN55014-2 (1997) + A1 (2001)
LVD: EN60034-1 (1998) + A11 (2002)
Safe operation of the pump is guaranteed, provided it is used correctly. However, there is no
guarantee of safety if the equipment is used in
an improper or careless manner.
The pump may only be used for its intended
use. Any other use is to be considered improper.
The manufacturer cannot be held responsible for
damages caused by improper use of the pump.
Under no circumstance must the pump be altered or tampered with.
In case of tempering the manufacturer declines
any responsibility for the functioning and safety
of the pump.
If it may be assumed for any reason that nonhazardous operation will not be possible (e.g. visible
damage), the pump should be switched off immediately and secured against any unintended use.
In schools and other educational institutions, the
operation of the pump must be supervised by
qualified personnel.
• Before setting up and using the pump for the
first time, read the manual carefully.
• Confirm that the voltage selector switch is
set to the local mains voltage.
• The pump may only be connected to the mains
via a socket that has an earth connection.
• The pump may only be opened/repaired by
qualified and trained personnel. Always disconnect the pump by pulling the mains plug before
proceeding to any of the mentioned operations.
1
Page 2

• In case of power failure during operation,
turn the pump off for safety reasons.
2. Description
The rotary-vane pump 1003317 must only be
used in vacuum experiments to depressurize
vacuum containers. It is not designed for commercial use.
The pump is a high performance, compact, twostage, oil-sealed rotary vane pump. It is protected against thermal overload and equipped
with an exhaust filter to reduce oil mist, a manometer and a
ventilation valve.
For reasons of transport the pump is delivered
with no oil in the reservoir. In the package you
should find a bottle of oil, sufficient for the first
filling.
The pump is equipped with a voltage selector
switch (refer to fig. 1), so that it can be operated
with mains voltages of 110 V or 230 V plus or
minus 10 %.
3. Technical data
Power supply: 110 – 120 V, 60 Hz
220 – 240 V, 50/60 Hz
Suction capacity: 100 l/min
Final pressure: 0.003 hPa
Motor power: 245 W
Oil capacity: 350 ml
Manometer: 0 – 1000 mbar
Hose nipple: 10 mm dia.
Di mensions: approx. 335x138x250 mm
3
Weight: approx. 11 kg
Ambient temperature: 5° – 40° C approx.
4. Operation
4.1 General information
• After unpacking, please place all parts of the
package (bags, boxes, polystyrene sides)
away from the reach of children.
• Check the presence of the data label on the
hosing. If the label is not present, do not use
the pump and inform the supplier.
• In case you need to send back the pump to
the distributer (e.g. repair) drain the oil.
• For the disposal of the oil adhere to the local
regulations.
4.2 Before operating the pump
• Place the pump horizontally on a stable
support.
• Do not connect the pump yet to the mains
voltage.
• Check that the voltage selector switch is set
to the local mains voltage and ensure that
the power switch is in the OFF position before connecting the pump to a power source.
• Remove the oil fill cap and add oil until it
shows at the bottom of the sight glass. Refer
to the technical data for the correct oil capacity of the pump.
• Screw back the oil fill cap, remove the cap
from the hose nipple and open the stopcock.
• Turn the motor switch to ON position.
• When the pump runs smoothly put the cap
back onto the hose nipple and close the
stopcock. This may take 2 to 30 seconds
depending on the ambient temperature.
• After the pump operates for approximately
one minute, check the sight glass for proper
oil level, which should be aligned with the
sight glass oil level line. Refill oil if necessary.
Note: Insufficient oil filling will result in poor vacuum performance. Excessive oil can result in
overflowing of oil from the exhaust fitting.
Fig. 1 A voltage selector switch, B power switch, C
socket
4.3 To shut off the pump after use
To prolong life span of the pump and a smooth
start-up, these procedures to shut off the pump
should be followed.
• Close the stopcock.
• Remove the hose from the hose nipple.
• Switch off the pump and open the stopcock for
a few seconds to relieve any vacuum inside
the pump.
• Place the cap on the hose nipple to prevent
any contamination or foreign particles from entering it.
2
Page 3

4.4 Maintenance
4.4.1 Vacuum pump oil
The condition and the type of oil used in any
high performance vacuum pump are extremely
important in determining the ultimate attainable
vacuum. It is recommended to use the high performance vacuum pump oil, which is specifically
blended to maintain maximum viscosity at normal running temperatures and to improve cold
weather start up.
4.4.2 Oil change
• Ensure that the pump is warmed up.
• Pull the mains plug.
• Remove the oil drain cap and drain the con-
taminated oil into a container. Take care not
lose the oil drain gasket.
• Dispose of the oil adhering to the local regu-
lations.
Oil can also be removed from the pump by
opening the stopcock and partially blocking the
exhaust with a cloth while the pump is running.
Do not operate the pump for more than 20 seconds using this method.
• When the drainage of oil completed, tilt the
pump forward to remove the residual oil.
• Screw in the oil drain cap.
• Remove the oil fill cap and fill the oil reser-
voir with new vacuum pump oil until oil is
seen at the bottom of the sight glass.
• Ensure that the stopcock is closed before
turning on the pump.
• Allow it to run for one minute before check-
ing the oil level.
• If the oil level is below the sight glass oil
level line, fill oil slowly (with the pump running) until the oil reaches the oil level line.
• Place back the oil fill cap, ensure the stopcock
is closed and the oil drain cap is closed tightly.
If the oil is badly contaminated with sludge that
forms during operation, you may use the following method to remove the oil from the pump
reservoir.
• Leave the pump running until it is warmed
up.
• While the pump is still running, remove the
oil drain cap. Take care not lose the oil drain
gasket.
• Restrict the exhaust slightly.
This will back-pressure the oil reservoir and
force out the sludge.
• Turn off the pump when the oil stops flowing.
• Repeat this procedure as required until the
contaminants are removed.
• Screw in the oil drain cap and refill the oil res-
ervoir to the proper oil level with clean vacuum
pump oil.
5. Troubleshooting guide
5.1 Failure to start
• Check if the voltage selector switch is in the
right position.
5.2 Oil leakage
• Ensure that that the oil is not a residual ac-
cumulation of spillage etc.
If leakage exists, the housing gasket or the shaft
seal may need to be replaced.
• Contact the distributor.
If leakage exists in the area of the oil drain plug,
• reseal the plug using a commercial pipe
thread sealer.
5.3 Failure to attain a good vacuum
• Ensure the vacuum gauge and all connec-
tions are in good condition and leak free.
• Confirm leakage by monitoring the vacuum
with the manometer while applying vacuum
pump oil at connections or suspected leak
points. The vacuum will improve briefly while
the oil is sealing the leak.
• Ensure the pump oil is clean.
A badly contaminated pump may require several
oil flushes.
• Ensure the oil is at the proper level.
For optimum pump operation, the oil must be
even with the oil level line on the sight glass
when the pump is running.
• Do not overfill as operating temperatures will
cause the oil to expand, which will appear at
a higher level than when the pump is not
running.
• To check the oil level, start the pump with
the stopcock closed.
• Check the oil level in the sight glass. Add oil
if necessary.
5.4 Automatic shut down
The pump is equipped with a thermal protection
function. If the ambient temperature is too hot,
the product may stop functioning.
• Do not to switch off the power supply imme-
diately.
If the pump does not re-start automatically after
3 minutes,
• cool the pump by lowering the ambient tempera-
ture to prolong the lifespan of the vacuum pump.
3
Page 4

6. Disposal
• The packaging should be disposed of at
local recycling points.
• Should you need to dispose of the equip-
ment itself, never throw it away in normal
domestic waste. Local regulations for the
disposal of electrical equipment will apply.
3B Scientific GmbH ▪ Rudorffweg 8 ▪ 21031 Hamburg ▪ Germany ▪ www.3bscientific.com
Subject to technical amendments
© Copyright 2012 3B Scientific GmbH
 Loading...