


COLOUR TELEVISIONS
IDTV 28C723IDW
Operating Instructions

CONTENTS |
|
|
General information.................................................................................................... |
2 |
|
Special features of your integrated digital television......................................................................... |
2 |
|
Receiving digital stations.............................................................................................................. |
2 |
|
Safety Instructions............................................................................................................ |
3 |
|
Special features............................................................................................................ |
4 |
|
Electrical connections............................................................................................................ |
5 |
|
Connection/Preparation.............................................................................................. |
6 |
|
Connecting the aerial and the mains cable.................................................................................. |
6 |
|
Inserting batteries into the remote control.......................................................................................... |
6 |
|
Control unit |
7 |
|
|
||
Front panel/External connections....................................................................................................... |
7 |
1 |
External connections table............................................................................................................. |
8 |
|
Remote control............................................................................................................................... |
8 |
|
Television operation....................................................................................................... |
9 |
|
Basic functions............................................................................................................... |
9 |
|
Settings.......................................................................................................................... |
10 |
|
Searching for television stations.................................................................................................... |
10 |
|
Tuning digital television stations..................................................................................... |
10 |
|
Automatic search........................................................................................................ |
10 |
|
Manual search.................................................................................................................................. |
11 |
|
Resetting the receiver............... ................................................................................................. |
11 |
|
Installation............................................................................................................................... |
12 |
|
Access control........................................................................................................ |
13 |
|
Special features for digital stations........................................................................ |
14 |
|
TV guide.................................................................................................................... |
16 |
|
Tuning analogue television stations............................................................................................... |
16 |
|
Autoprogramming.......................................................................................................... |
16 |
|
Tuning channels using the search.............................................................................. |
17 |
|
Fine tuning analogue television stations........................................................................................ |
17 |
|
Tuning the analogue television channels by entering the channel numbers.................................... |
18 |
|
Moving to digital setup menu.................................................................................... |
18 |
|
Special features for analogue stations........................................................................ |
18 |
|
Sound settings.................................................................................................... |
20-21 |
|
Picture settings......................................................................................................... |
22 |
|
Special features.................................................................................................. |
23-24 |
|
Teletext mode........................................................................................................ |
25 |
|
Fastext, Toptext (Model Dependant)............................................................................. |
25-26 |
|
Connecting external equipment..................................................................... |
27 |
|
Connecting a video recorder................................................................................... |
27-28 |
|
Connecting a DVD player............................................................................................................... |
29 |
|
Connecting a decoder..................................................................................................................... |
30 |
|
Connecting TV with video and satellite/digital receiver.................................................................. |
31 |
|
Troubleshooting..................................................................................................................... |
32 |
|
Technical specifications table........................................................................... |
33 |
|
Guarantee ........................................................................................................... |
34 |
|
Service ........................................................................................................... |
35 |
|

Special features of your integrated digital television
This |
television |
can receive and process all |
analogue |
and |
all digital |
stations. This television set has an integrated digital and analogue receiver. |
|||||
The digital receiver unit converts the signals from |
digital stations |
to provide |
|||
outstanding audio |
and picture quality. |
|
|
|
|
The TV guide (only for digital stations) tells you of any schedule changes at short |
|||||
notice, and provides an overview of all the stations’ schedules for the next few days. |
|||||
If the broadcaster provides it, you can call up detailed information on each programme |
|||||
at the touch of a button. |
|
|
|
||
This |
television |
has a ver y comprehensive, user-friendly |
menu system. |
||
2 |
Receiving digital stations |
|
|
|
You need a digital outdoor or indoor aerial (passive or active indoor aerial with |
|
its own power supply) to receive digital stations. |
|
Unlike analogue broadcasting, not every station has its own transmission frequency. |
|
Instead, several stations are grouped into what are known as bouquets on a regional or |
|
national level. |
|
You can find the current transmission information on teletext from various broadcasters, |
|
or look in a TV guide or on the Internet. |
Safety is Important
Your safety and the safety of others is important. Please, therefore, ensure you read the Safetyinstructions before you operate this television.
Safety instructions |
|
||||
! Read all the safety instructions before first use of your TV. |
|
||||
|
|
|
|
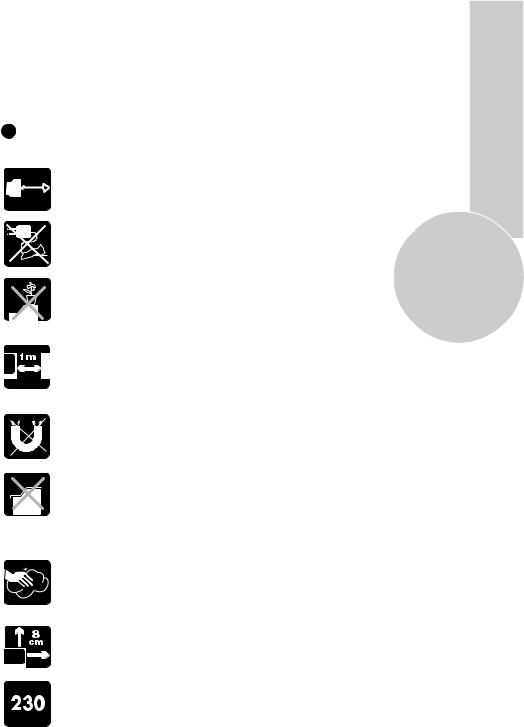
• Position the television so that direct light does not fall on |
|
|
|
|
|
the screen. Excessive light will cause a washed out effect. |
|
|
|
|
|
• Position the power supply lead and other leads so that |
|
|
|
|
|
they are not likely to be walked on or pinched by things |
|
|
|
|
|
placed on or against them. |
3 |
|
|
|
|
|
|
|
|
|
|
• Do not use the appliance in humid or damp conditions. |
|
|
|
|
|
Do not allow the appliance to get wet, i.e. dripping or |
|
|
|
|
|
splashing, as this may be dangerous. Do not place water |
|
|
|
|
|
filled objects, such as vases and flower pots on top of the |
|
|
|
|
|
appliance. |
|
|
|
|
|
• Make sure that no naked flame sources, such as lighted |
|
|
|
|
|
candles, are placed on top of the appliance. |
|
|
|
|
|
• Do not place the television near heat sources such as |
|
|
|
|
|
radiators, ovens, stoves, etc. |
|
|
|
|
|
• Do not use the television near any apparatus that produces |
|
|
|
|
|
a magnetic field such as HI-FI speakers or electric motors |
|
|
|
|
|
|
|
|
|
|
|
|
|
|
|
|
|
otherwise colourpurity may be affected. |
|
|
|
|
|
• The heat built up in the set escapes through ventilation |
|
|
|
|
|
holes, so do not cover the set by drapes, clothes etc. that may |
|
|
|
|
|
block air circulation. Do not place the television on carpet |
|
|
|
|
|
or soft furnishings. |
|
|
|
|
|
• NEVER let children push anything into the holes or slots |
|
|
|
|
|
on the case. |
|
|
|
|
|
• Clean the TV Screen using a slightly damp cloth or chamois |
|
|
|
|
|
leather. Never use abrasive cleaning agents like liquid or |
|
|
|
|
|
aerosol cleaners. |
|
|
|
|
|
• Remove the mains plug from the socket outlet while cleaning. |
|
|
|
|
|
• If you wish to place the television on a shelf or in a wall |
|
|
|
|
|
unit always ensure there is a minimum air gap of 8 cm |
|
|
|
|
|
around the top, sides and rear of the television, to assist |
|
|
|
|
|
ventilation. |
|
|
|
|
|
• Your TV set is designed to operate with mains voltages |
|
|
|
|
|
230V AC; 50Hz. Do not connect your TV set to power sources |
|
|
|
|
|
other than the mains supply. |
|
|
|
|
|
• To fully disconnect the TV, the mains plug is used as a |
|
|
|
|
|
disconnecting device and therefore shall be readily accesible. |
|

Television
Thank you for buying this television which is designed to give you many years of satisfactory service.
You may already be familiar with using a television but do please take time to read these instructions. They are designed to familiarise you with the unit’s many new features and to ensure you get the very best out of your purchase.
Special features
•Automatic tuning system with country selection
•899 Digital, 100 Analog programme memory
•Available for cable channels (A decoder maybe required)
•Manual fine tuning for analogue channels
•S-Video connection (Model dependant)
•Audio/Video PHONO sockets (Model dependant)
•Back audio out (Model dependant) 4 • CI slot (Model dependant)
•Component input via PHONO (Model dependant)
•Component input via scart (Model dependant)
•SPDIF coaxial output (Model dependant)
•Stereo headphone socket (Model dependant)
•2 Scart Socket: Video cassette recorder, satellite receiver, video disc player,DVD, TV games or a home computer can be connected to this AV socket with an appropriate connecting cable.
•Third scart socket (Model dependant)
•Stereo sound system (Nicam) (Model dependant)
•Spatial sound effect
•Equalizer sound setup
•Automatic Volume Leveling
•Virtual Dolby Surround (Model dependant)
•Subwoofer (Model dependant)
•Picture adjustment using one button (Smart control)
•Sound adjustment using one button (Smart control)
•User friendly on screen display system
•Infrared remote control
•Multilanguage menu system
•On timer
•Off timer
•Child lock-Adult lock
•Return to the last channel viewed (SWAP)
•Alarm timer (Model dependant)
•4:3, 16:9, Zoom, Letterbox, Subtitle, Panaroma (optional), picture formats ( for Widescreen TV sets)
•Naming the channels
•Teletext reception
•Digital teletext
•Auto recognition of the broadcasting format (4:3, 16-9 or Letterbox) via WSS feature
•Digital Colour Transition Improvement (DCTI).
•Digital Comb Filter (DCF)
•Digital Luminance Transition Improvement (DLTI)
•Dynamic Digital Video Adaption (Model dependant)
•TILT function (Model dependant)
•MHEG-5
•Favorite channel listing
•DVB subtitling
•OAD (Over air download)
Electrical connections |
|
|
|
|
|
|
|
|
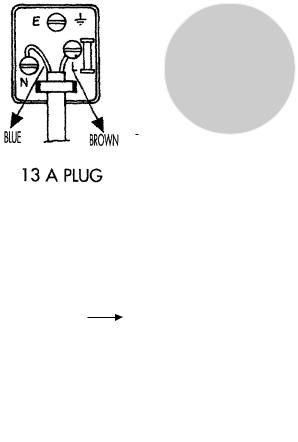
1.SECTION: INSTALLATION AND |
IMPORTANT |
|
|
|||||
PRECAUTIONS |
The wires in this mains lead are coloured |
|
||||||
|
in accordance with the following code: |
|
||||||
ELECTRICAL CONNECTIONS |
Blue - Neutral |
|
|
|||||
For your own safety read the following |
Brown - Live |
|
|
|||||
instructions carefully before attempting |
As the colours in the mains lead may |
|
||||||
to connect this unit to the mains supply. |
not correspond with the coloured markings |
|
||||||
For your convenience a mains plug with a |
identifying the terminals in your plug |
|
||||||
fuse has been fitted to this appliance. For |
proceed as follows: |
|
|
|||||
your safety please observe the following |
The wire coloured BLUE must be connected |
|
||||||
information. |
to the terminal marked with the letter N or |
|
||||||
The moulded plug on this appliance |
coloured |
|
|
|||||
|
|
|||||||
incorporates a 5A fuse. Should the fuse need |
BLACK. |
|
5 |
|||||
to be replaced an ASTA approved BS 1362 |
The wire coloured BROWN must be |
|||||||
|
||||||||
fuse of the same rating must be used. Do |
connected to the terminal marked with the |
|
||||||
not forget to refit the fuse cover. In the event |
letter L or coloured |
|
|
|||||
of losing the fuse cover the plug must not |
RED. |
|
|
|||||
be used until a replacement fuse cover |
Do not make any connection to the |
|
||||||
which must be the same colour as that visible |
terminal marked E or |
|
|
|
|
OR COLOURED |
|
|
|
|
|
|
|
||||
|
|
|
|
|
||||
on the pin face of the plug has been fitted. |
GREEN, |
|
|
|||||
Fuse covers are available from any good |
GREEN /YELLOW. |
|
|
|||||
electrical store. |
The television receiver must be protected by |
|
||||||
If the fitted moulded plug is not suitable |
a 5A fuse if a fused plug is fitted. |
|
||||||
for your socket, then the plug should be cut |
For any other plug fit a |
5A fuse at the |
|
|||||
off and an appropriate plug fitted. |
distribution board. |
|
|
|||||
IMPORTANT! FITTING A DIFFERENT PLUG.
If the mains plug is cut off from the mains cable rewire the replacement plug in accordance with these instructions.
5 A fuse
Caution: - Under no circumstances should the discarded plug be inserted into a mains socket. To prevent shock hazard carefully dispose of the discarded plug into your dustbin, do not leave the plug lying around where children might see it.

CONNECTION/PREPARATION
In the box
Inside this package you should have:
Television,Remote control,User guide, AAA batteries x 2
Read these instructions before use.
Connecting the aerial and the mains cable
|
Plug the cable of the outdoor or indoor |
aerial |
||||||
|
(passive |
or |
active indoor |
aerial with its |
own |
power |
||
|
supply) |
into |
the |
aerial |
socket » « of the television set. |
|||
|
Please note: |
|
|
|
|
|
|
|
|
When connecting |
an |
indoor aerial, you |
may have |
||||
|
||||||||
6 |
to try |
it out at different positions until you get the best |
||||||
reception. |
|
|
|
|
|
|
||
|
Connect the TV mains plug into your domestic mains socket |
|||||||
|
outlet. (230V 50Hz A.C.) |
|
|
|
|
|||
|
Please note: |
|
|
|
|
|
|
|
|
Only plug the TV into the mains socket after you have |
|||||||
|
connected the external |
equipment and |
the |
aerial. |
||||
Inserting batteries into the remote control
Open the battery compartment by removing the lid. |
|
Insert the batteries (Mignon type, for example |
UM-3 or AAA, 2x1,5V). |
Observe the polarity (marked on the base of |
the battery compartment). |
Close the battery compartment. |
|
+ -
-+
Note:
If the television no longer reacts properly to remote control commands, the batteries may be flat. Be sure to remove used batteries. The manufacturer accepts no liability for damage resulting from used batteries.
Environmental note
Batteries, including those which contain no heavy metal, may not be disposed of with household waste. Please dispose of used batteries in an environmentally sound manner. Find out about the legal regulations which apply in your area.

Control Unit
Front Panel
Program Down/Up button
P- P+
Volume Down/Up button.
V- V+
General |
|
|
|
7 |
|
|
|
|
|
ON/OFF switch |
Stand by (Model dependant) |
|||
Stand by indicator |
|
|
||
External Connections: (Front or side) |
(External connections: (Rear) |
|||
|
|
|
|
AV1 scart |
R |
Right audio PHONO (Red) |
|
|
|
|
|
AV2 scart |
||
AUDIO |
|
|
|
|
L |
Left audio PHONO/Mono PHONO (White) |
AV3 scart (Model dependant) |
||
MONO |
|
|
|
|
|
|
|
|
|
|
Video PHONO (Yellow) |
|
COAX |
|
|
|
|
|
|
VIDEO |
|
|
|
Coaxial output (Model dependant) |
|
|
|
|
|
|
S-Video connection |
|
|
|
S-VIDEO |
|
|
|
CI slot (Model dependant) |
|
|
|
|
|
|
Headphone socket |
|
This common interface (C.I) slot |
|
|
|
|
|
works with an external module, |
(Model Dependant) |
|
|
|
and for use with top up TV |
|
|
|
conditional access moduele and |
|
|
|
|
|
|
SUBWOOFER |
|
|
|
smart card. |
|
|
You may wish to connect |
|
|
R |
|
an audio amplifier or any |
|
|
|
AUDIO similar devices to audio |
|
Aerial socket |
|
|
OUT |
out. The output is always |
|
|
|
|
|
|
|
L |
|
the current channel you |
|
|
|
|
are watching. |
|
|
It is used for external subwoofer in 33” televisions
Please note
•See the external connections table on next page for available connections depending the size and model of your TV set.
•Do not use Video PHONO and S-Video connections at the same time, otherwise they will effect the picture each other.

External connections table
|
|
Picture tube |
28” |
29” |
|
|
|
size/type |
16:9 |
4:3 |
|
|
|
|
|
|
|
|
|
AV1 Scart |
STD. |
STD. |
|
|
|
|
|
|
|
|
|
AV2 Scart |
STD. |
STD. |
|
|
|
|
|
|
|
|
|
AV3 Scart |
X |
X |
|
|
|
|
|
|
|
|
|
Headphone |
X |
X |
|
|
|
|
socket |
||
|
|
|
|
|
|
|
|
Audio/Video |
X |
X |
|
|
|
PHONO |
|||
|
|
|
|
||
|
|
S-Video |
X |
X |
|
|
|
|
socket |
||
|
|
|
|
|
|
|
|
|
|
|
|
|
|
|
|
|
|
8 |
|
Back Audio |
X |
X |
|
|
|
Out |
|||
|
|
|
Coaxial |
X |
X |
|
|
|
Out |
||
|
|
|
|
|
|
|
|
|
|
|
|
|
|
|
CI |
X |
X |
|
|
|
Slot |
||
|
|
|
|
|
|
|
|
STD : Standard |
|
||
|
|
X |
: Model Dependant |
||
Please note:
The Audio/Video PHONO, S-Video and Headphone socket can be placed on the front panel or on the right-hand side of the cabinet depending to the model of your TV.
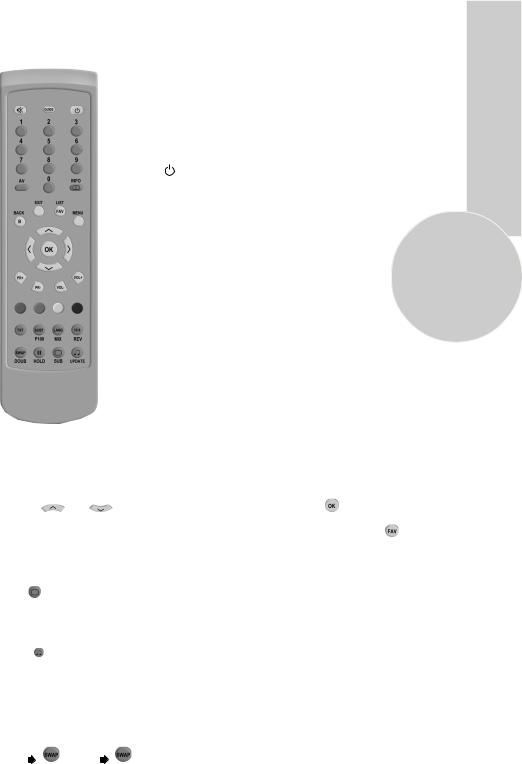
Remote control
Calls up the TV guide |
|
|
|
|
|
|
|
|
|
|
|
|
|
|
|
|
|
|
|
|
|
|
|
|
|
|
|
|
|
|
|
|
Mute |
|
|
|
|
|
|
|
|
|
|
|
|
|
|
|
|
|
|
|
|
|
|
|
|
|
|
|
|
|
|
|
Stand-by |
|
|
|
|
|
|
|
||||||||||||||||||||||||||
|
|
|
|
|
|
|
|
|
|
|
|
|
|
|
|
|
|
|
|
|
|
|
|
|
|
|
|
|
|
|
|
Numeric |
|
|
|
|
|
|
|
|
|
|
|
|
|
|
|
|
|
|
|
|
|
|
|
|
|
|
|
|
|
|
|
|
|
AV |
|
|
|
|
|
|
|
|
|
|
|
|
|
|
|
|
|
|
|
|
|
|
|
|
|
|
Info |
|||||
|
|
|
|
|
|
|
|
|
|
|
|
|
|
|
|
|
|
|
|
|
|
|
|
|
|
|||||||
Exit |
|
|
|
|
|
|
|
|
|
|
|
|
|
|
|
|
|
|
|
|
|
|
Favorites list |
|||||||||
|
|
|
|
|
|
|
|
|
|
|
|
|
|
|
|
|
|
|
|
|
|
|
|
|
|
|
|
|
|
|
||
Back |
|
|
|
|
|
|
|
|
|
|
|
|
|
|
|
|
|
|
|
|
|
|
Menu |
|||||||||
|
|
|
|
|
|
|
|
|
|
|
|
|
|
|
|
|
|
|
|
|
|
|
|
|
|
|
|
|
|
|
||
OK |
|
|
|
|
|
|
|
|
|
|
|
|
|
|
|
|
|
|
|
|
|
|
|
|
Move the cursor up |
|||||||
|
|
|
|
|
|
|
|
|
|
|
|
|
|
|
|
|
|
|
|
|
|
|
|
|
|
|
|
|
|
|
||
Move cursor to the left |
|
|
|
|
|
|
|
|
|
|
|
|
|
|
|
|
|
|
|
|
Move cursor to the right |
|||||||||||
|
|
|
|
|
|
|
|
|
|
|
|
|
|
|
|
|
|
|
|
|
|
|
||||||||||
|
|
|
|
|
|
|
|
|
||||||||||||||||||||||||
Program up |
|
|
|
|
|
|
|
|
|
|
|
|
|
|
|
|
|
|
|
|
|
|
|
|
|
|
|
|
|
|
|
Move the cursor down |
|
|
|
|
|
|
|
|
|
|
|
|
|
|
|
|
|
|
|
|
|
|
|
|
|
|
|
|
|
|
|
||
|
|
|
|
|
|
|
|
|
|
|
|
|
|
|
|
|
|
|
|
|
|
|
Volume up |
|||||||||
|
|
|
|
|
|
|
||||||||||||||||||||||||||
Program down |
|
|
|
|
|
|
|
|
|
|
|
|
|
|
|
|
|
|
|
|
|
|
|
|
|
|
|
|
|
|
|
|
|
|
|
|
|
|
|
|
|
|
|
|
|
|
|
|
|
|
|
|
|
|
|
|
Volume down |
||||||||
|
|
|
|
|
|
|
|
|
|
|
|
|
|
|
|
|
|
|
|
|
|
|
|
|||||||||
Red teletext button |
|
|
|
|
|
|
|
|
|
|
|
|
|
|
|
|
|
|
|
|
|
|
|
|
|
|
Blue teletext button |
|||||
|
|
|
|
|
|
|
|
|||||||||||||||||||||||||
Green teletext button |
|
|
|
|
|
|
|
|
|
|
|
|
|
|
|
|
|
|
|
|
|
|
Yellow teletext button |
|||||||||
|
|
|
|
|
|
|
|
|
|
|
|
|
|
|
|
|
|
|
|
|
|
|
|
|
|
|
|
|
|
|
||
|
|
|
|
|
|
|
|
|
|
|
|
|
|
|
|
|
|
|
|
|
|
|||||||||||
Teletext |
|
|
|
|
|
|
|
|
|
|
|
|
|
|
|
|
|
|
|
|
|
|
|
Picture format |
||||||||
|
|
|
|
|
|
|
|
|
|
|
|
|
|
|
|
|
|
|
|
|
|
|
|
|
|
|
|
|
|
|
||
Subtitle On/Off |
|
|
|
|
|
|
|
|
|
|
|
|
|
|
|
|
|
|
|
|
|
|
|
|
|
|
|
Reveal info |
||||
|
|
|
|
|
|
|
|
Audio language |
||||||||||||||||||||||||
Index page (Text) |
|
|
|
|
|
|
|
|
|
|
|
|
|
|
|
Teletext mode button |
||||||||||||||||
|
|
|
|
|
|
|||||||||||||||||||||||||||
Swap |
|
|
|
|
|
|
|
|
|
|
|
|
|
Sound smart control |
||||||||||||||||||
Double height (Text) |
|
|
|
|
|
|
|
|
|
|
|
|
|
TV mode button (Text) |
||||||||||||||||||
Sub page hold (Text) |
|
|
|
|
|
|
|
Picture smart control |
||||||||||||||||||||||||
|
|
|
|
|
|
|
|
|
|
|
|
|
|
|
|
|
|
|
|
|
|
|
|
|
|
|
|
|
|
|
|
Sub page button (Text) |
TELEVISION OPERATIONS
Basic functions
Switching on and off
Switch on the television by pressing the » « button on the television set.The device switches to standby mode, and the stand-by indicator will illuminate.
Switch the television on with any »Numeric button« or » «, »
«, » «. Press the » « button to switch the television to standby mode.
Completely switch the television off by pressing » « on the television set. This saves electricity.
Selecting channels
Enter single-digit or multi-digit preset channel numbers by |
|
pressing »1 ... 0« on the remote control. |
9 |
– Channels with no stations assigned are ignored.
Press » «, »
«, » « to move up and down channels.
Selecting AV channel positions
Use »AV« to select AV channels directly.
Adjusting the volume
Adjust the volume with » « or »
 «.
«.
Muting
Use » « to switch the sound off (mute) and to switch it on again.
Selecting stations from lists
You can select stations from various lists (e.g. all stations, favourites).
LIST
Press » « to open the station list. The station list »All programmes« appears.
Press » |
«, » |
« to select the station and press » « to call it up. |
- You can switch between the station list and your favourites by pressing  LIST
LIST 

EXIT
Press » « to finish the settings.
Picture settings
Select the desired picture setting from »USER«, »SOFT«, »NATURAL« or »RICH«
with » |
«. |
|
|
|
|
SUB |
the |
»User« picture setting, |
see the ”PICTURE SETTINGS” chapter |
– You can alter |
||||
on page 19. |
|
|
|
|
Sound settings |
|
|
|
|
Press »UPDATE « to select |
the audio setting »USER«, »MUSIC«, »SPORTS«, »CINEMA« |
|||
or »SPEECH«. |
|
|
|
|
– You |
can alter |
the |
»USER« audio setting – |
see the “EQUALIZER” chapter on page 18. |
Swap function
Allows you to swap between the program you are watching and the last selected program. i.e.
If you were watching Program 1 and change to Program 11, press the »  « button to go back to Program 1. Press it again to return to Program 11.DOUB
PR 01 |
PR 11 |
PR 01 |
DOUB |
|
DOUB |
SETTINGS
Searching for television stations
The television is equipped with an automatic station search system. You can start the
search |
and |
can |
then |
sort the |
television stations into your |
order of preference. |
There |
are 899 preset positions for digital stations and 100 for |
analogue stations, to |
||||
which |
you |
can |
assign |
television |
stations from the aerial or from the cable connection |
|
(analogue programmes).
Switch on the television with » « on the television set, then press »PR+«, »PR-« on the remote control or the TV, or by using any numeric button on the remote control.
LANGUAGE
10
– The »LANGUAGE« menu appears when the television is first switched on.
Hint:
If the »LANGUAGE« menu does not appear on the screen, follow the instructions on pages 10 and 16 to retune all television channels using the automatic search.
OK |
|
SELECT |
|
COUNTRY SELECTION |
|
||
BELGIUM |
HUNGARY |
PORTUGAL |
|
CZECH REP. |
IRELAND |
SCHWEIZ |
|
DANMARK |
ITALIA |
SUOMI |
|
DEUTSCLAND |
NETHERLANDS |
SVERIGE |
|
ESPANA |
NORGE |
TÜRKİYE |
|
ÖSTERREICH |
U.K. |
||
FRANCE |
POLSKA |
................ |
|
OK |
START AUTOPROGRAMMING |
||
BACK |
BACK |
|
|
Select language with |
» |
«, » |
« » |
« or » « |
and |
press » « to confirm. |
|
|
|
|
|
The country menu will now appear. Using » |
«, » |
« |
|||
» « or » «, select the appropriate country in which the television will be used. Press » « to confirm selection. Search and storing of analogue channels will begin.
Digital channels will be searched.The search is finished when the message DONE appears. Press » « (Green) to quit the station search.
EXIT
Tuning digital television stations
Select a program between 1 and 899.
Automatic search
DVB MENU
MANUAL SEARCH
 AUTOMATIC SEARCH
RESET RECEIVER
INSTALLATION
ACCESS CONTROL
SIGNAL INFORMATION


 SELECT
BACK BACK
EXIT EXIT
MENU
Press » « to open the »MAIN MENU« menu.
– The »MAIN MENU« menu appears.
Select »DIGITAL SETUP« with » |
«, » « and press |
|
» « to confirm. |
|
|
– The »DVB MENU« appears. |
|
|
Select »AUTOMATIC SEARCH« |
with » |
«, » « |
and press » « to confirm.
– The »CHANNEL SEARCH - DIGITAL« menu appears and the search begins. The automatic search may last several minutes depending on the number of television channels received. The search is finished when the message »DONE« appears.
– At the end of the search, new TV or radio stations are automatically added to the end of the station list.
BACK
Press »  « or »
 « (Green) to quit the station search. The »DVB MENU« appears.
EXIT
Press » « to finish the setting.
Manual search
DVB MENU
 MANUAL SEARCH AUTOMATIC SEARCH RESET RECEIVER INSTALLATION ACCESS CONTROL SIGNAL INFORMATION
MENU
Press » « to open the »MAIN MENU« menu.
– The »MAIN MENU« menu appears.
Select »DIGITAL SETUP« with » «, »
«, » « and press 11
» « to confirm.
– The »DVB MENU« appears.


 SELECT
BACK BACK
EXIT EXIT
Select »MANUAL SEARCH« using » «, »
«, » « and
« and
press » « to confirm. - The »MANUAL SEARCH« menu appears.
Press » |
« or » |
« to |
select the channel |
number |
and |
press » « to confirm. |
The search begins. |
|
|
|
|
||
– The search is finished when the message »DONE« appears. |
|
|||||
– At the |
end |
of the |
search, new TV or |
radio |
stations |
are automatically added |
to the end of the station list.
BACK
Press »  « or » « (Green) to quit the station search. The »DVB MENU« appears.
Press »EXIT « to finish the setting.
Resetting the TV
This function enables you to delete the station lists and all custom settings.
DVB MENU
MANUAL SEARCH AUTOMATIC SEARCH
 RESET RECEIVER
INSTALLATION ACCESS CONTROL SIGNAL INFORMATION


 SELECT
BACK BACK
EXIT EXIT
MENU
Press » « to open the »MAIN MENU« menu.
– The »MAIN MENU« menu appears.
Select »DIGITAL SETUP« with » «, »
«, » « and press
» « to confirm.
– The »DVB MENU« appears.
Select »RESET RECEIVER« with » «, »
«, » « and
« and
press » « to confirm.
 Loading...