

Page 1

P-335U
802.11a/g Wireless Router
Quick Start Guide
Version 3.60
Edition 1
5/2006
Table of Contents
ENGLISH 3
DEUTSCH 20
ESPAÑOL 38
FRANÇAIS 55
ITALIANO 74
SVENSKA 92
繁體中文 110
Page 2

Page 3

ENGLISH
Overview
The P-335U is a wireless broadband router (that supports IEEE 802.11a, b and g and print server) with a builtin four-port 10/100 Mbps switch. Use the USB port to share a USB v1.1 compliant printer with the computers
connected to the P-335U, so you don’t need to assign a dedicated computer as a print server or have a
standalone print server device. These computers can also share Internet access via a broadband (cable/DSL)
modem.
You should have an Internet account already set up and have been given most of the following information.
Table 1 Internet Account Information
Your device’s WAN IP Address (if given): ______________
DNS Server IP Address (if given): Primary _____________, Secondary ______________
Connection Type:
Ethernet Service Type: _______________________
User Name: ____________
PPTP User Name: ____________
Your WAN IP Address (if given) ____________
Connection ID (if required): ____________
PPPoE (PPPoE) Service Name: ____________
User Name: ____________ Password: ____________
Login Server IP Address: ______________
Password: ____________
Password: ____________
PPTP Server IP Address: ___________
or PPTP Domain Name: ___________
See your User’s Guide for background information on all features.
The follow lists what you need to do:
1 Hardware Connections 2 Accessing the Web Configurator
3 Internet Access Setup 4 Print Server Driver Setup
3
Page 4
ENGLISH
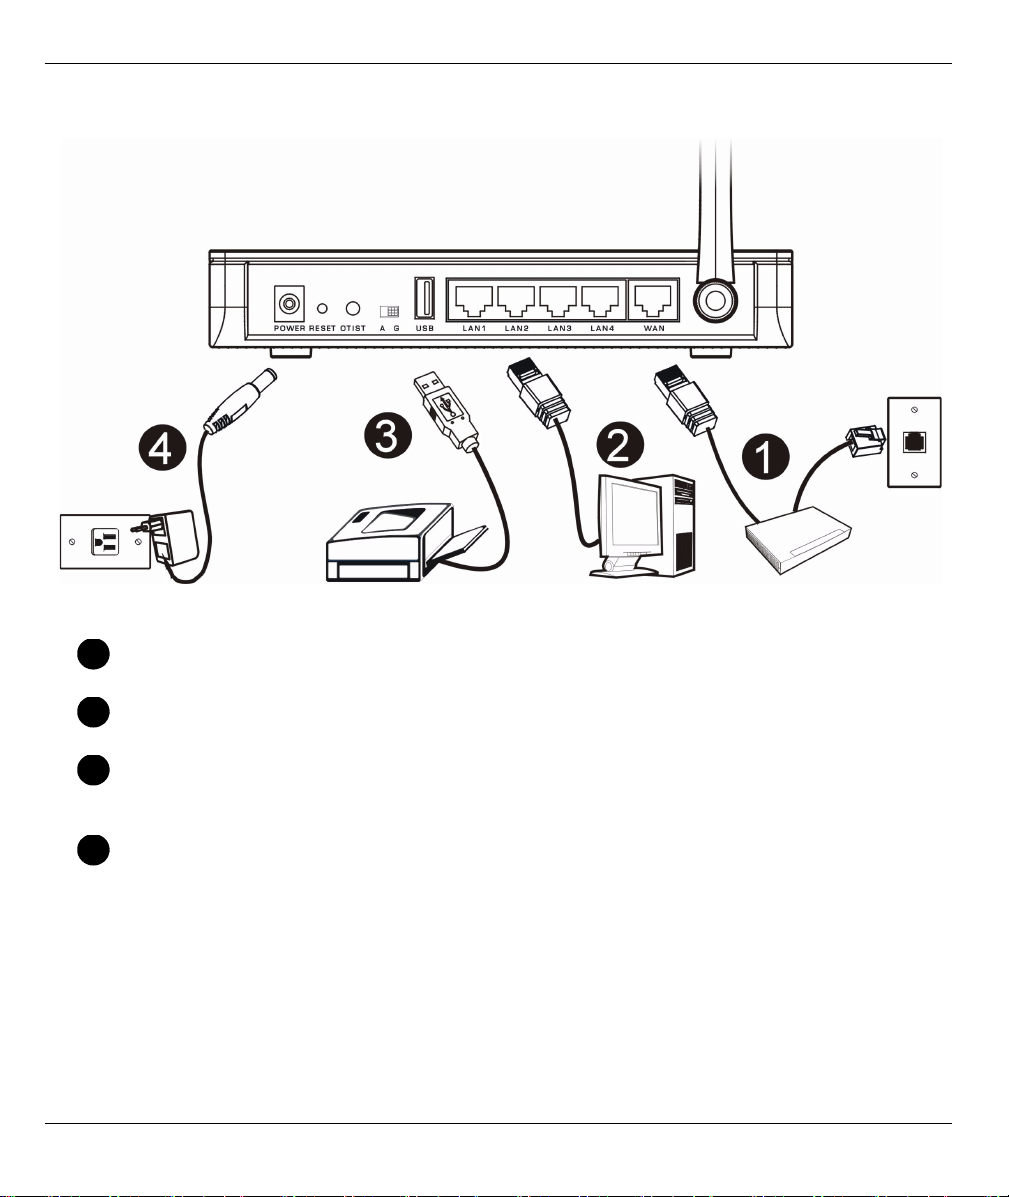
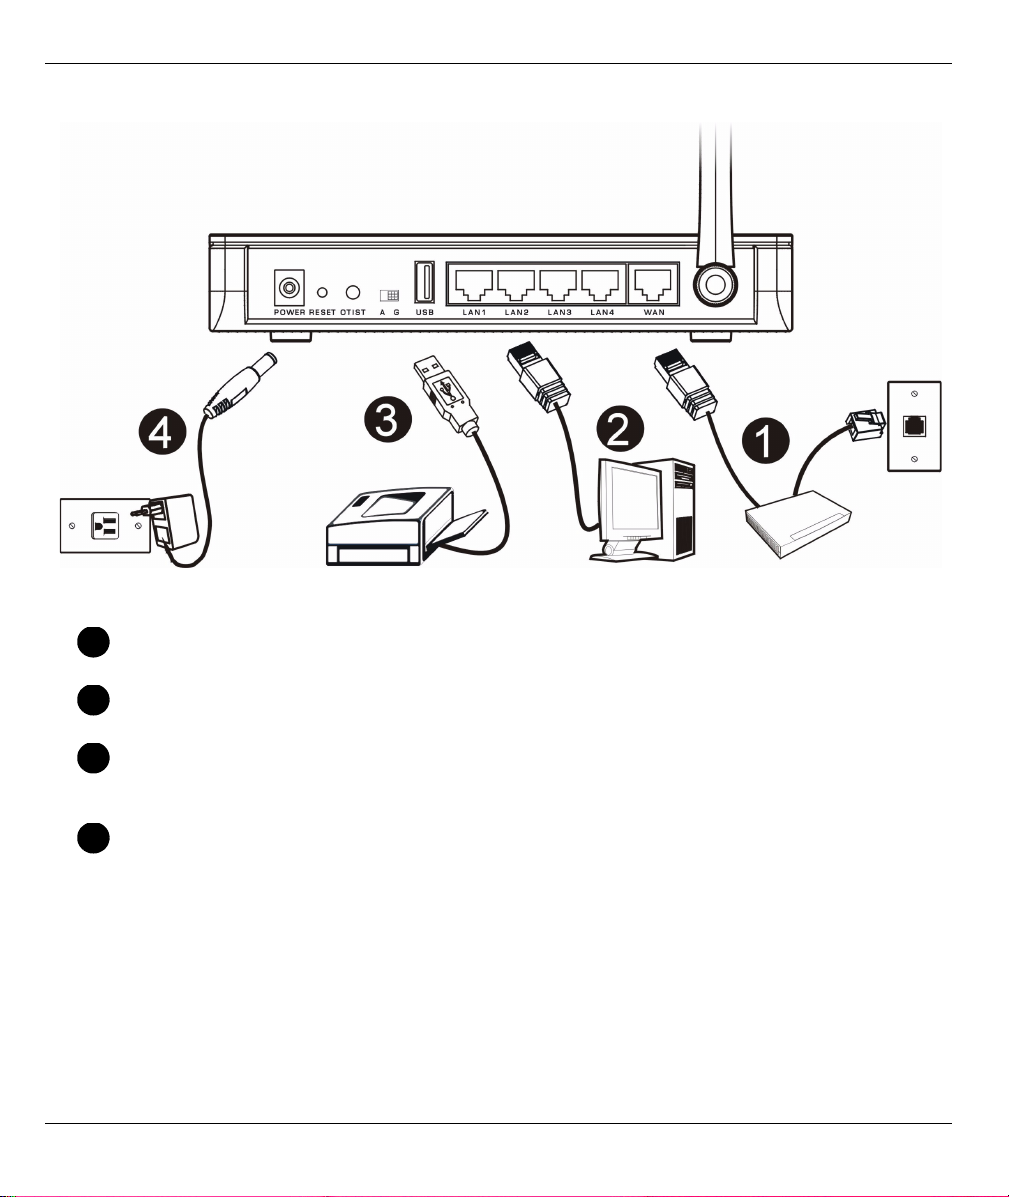
1 Hardware Connections
Do the following to make hardware connections for initial setup.
WAN Connection
1
Connect your modem to the “WAN” port using the cable that came with your modem.
LAN Connection
2
Connect your computer to a "LAN" port using the included Ethernet cable.
USB Connection
3
Use a USB cable to connect a USB (version 1.0 or 1.1) printer to this port. The P-335U automatically
detects the model of the USB printer.
POWER Connection
4
Use the included power adaptor to connect the POWER socket to an appropriate power source (see the User’s
Guide for power adaptor specifications by region).
4
Page 5
ENGLISH
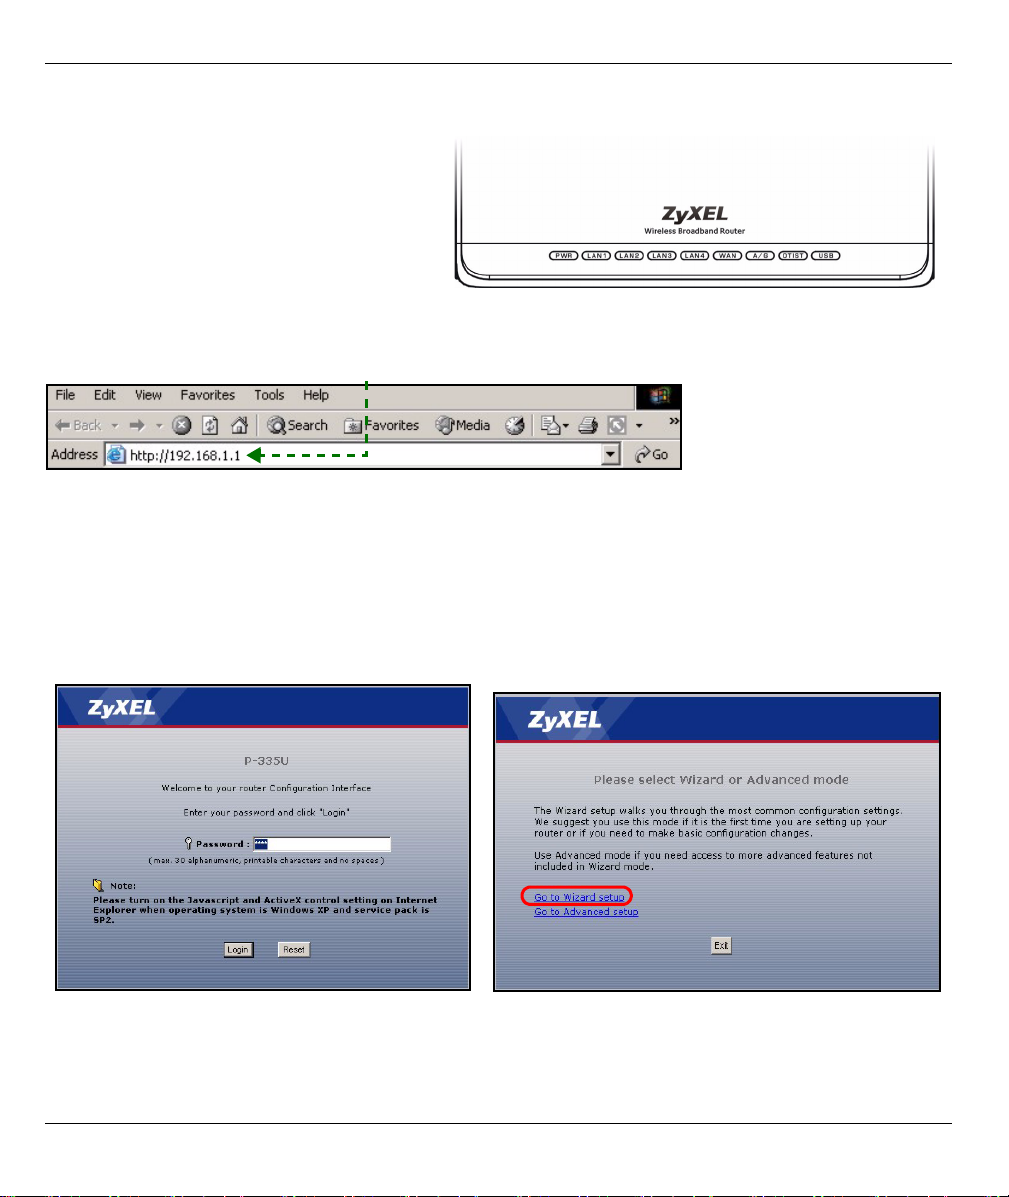
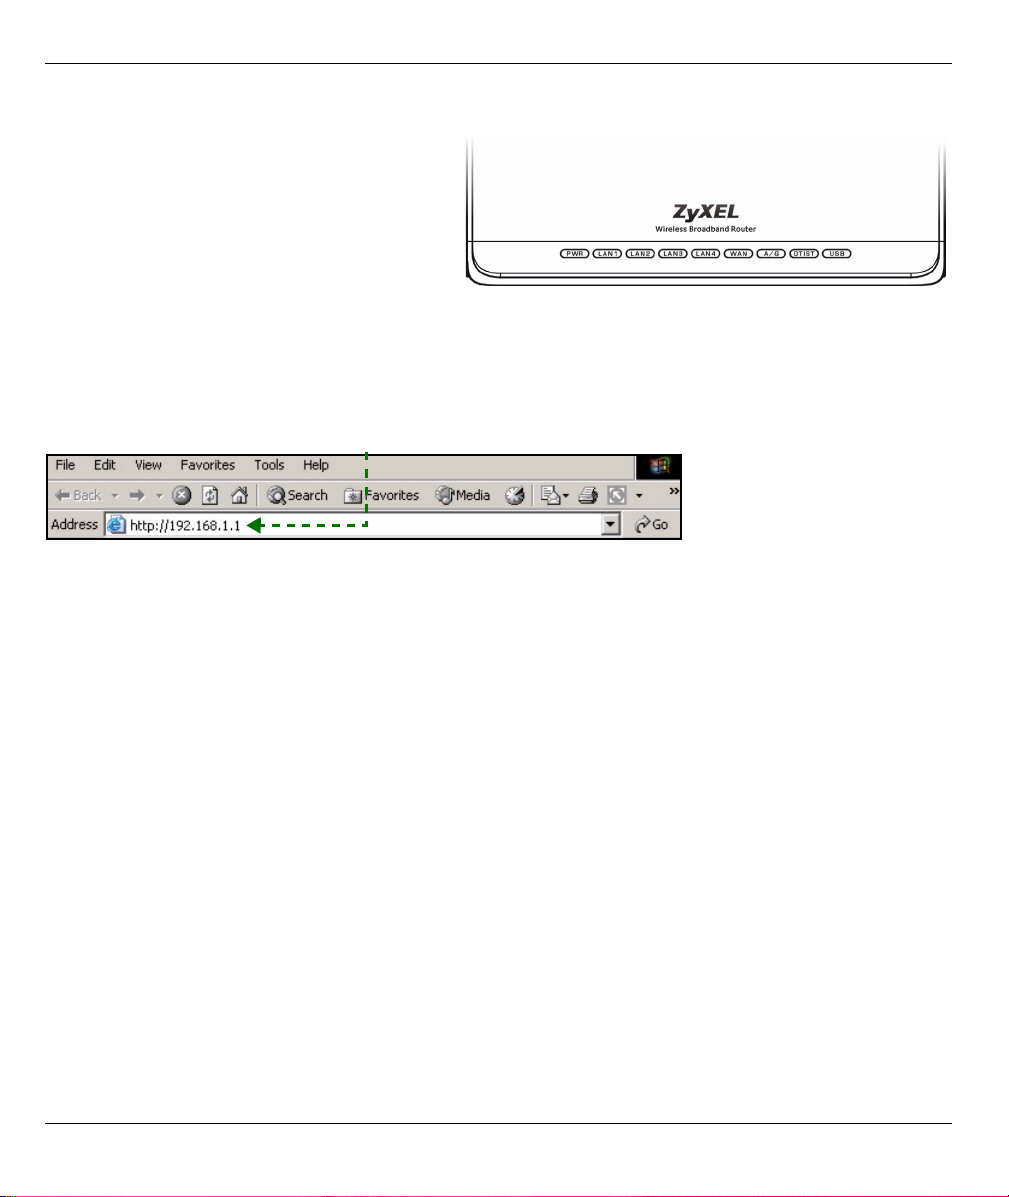
The LEDs
Look at the front panel LEDs. When you
connect the power, the PWR LED blinks and
stays on once the device is ready. About 30
seconds later, the A/G LED also comes on.
The LAN and WAN LEDs turn on if the
corresponding connections are properly made.
2 Accessing the Web Configurator
1 Launch your web browser. Enter “192.168.1.1” as the web site address.
Note: If the login screen does not display, check your browser’s security settings (see
Troubleshooting for details) or make sure your computer is set to receive an IP address
dynamically (see Set Up Your Computer’s IP Address).
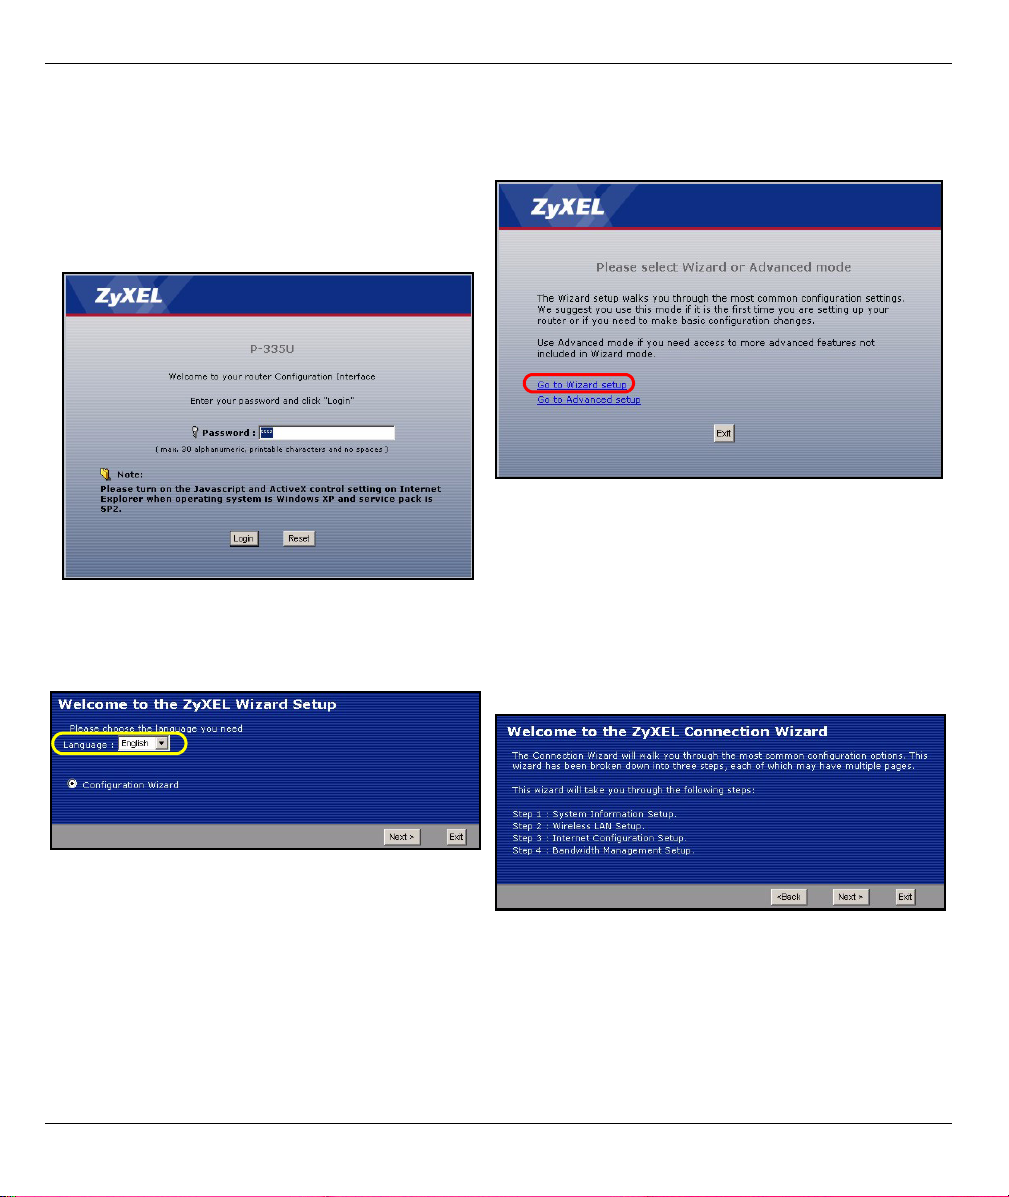
2 The Password window displays. Enter the
password (“1234” is the default) and click Login.
3 Change the password in the screen that follows
and click Apply.
4 Click Go to Wizard setup to set up your P-335U for
the first time.
5
Page 6
ENGLISH
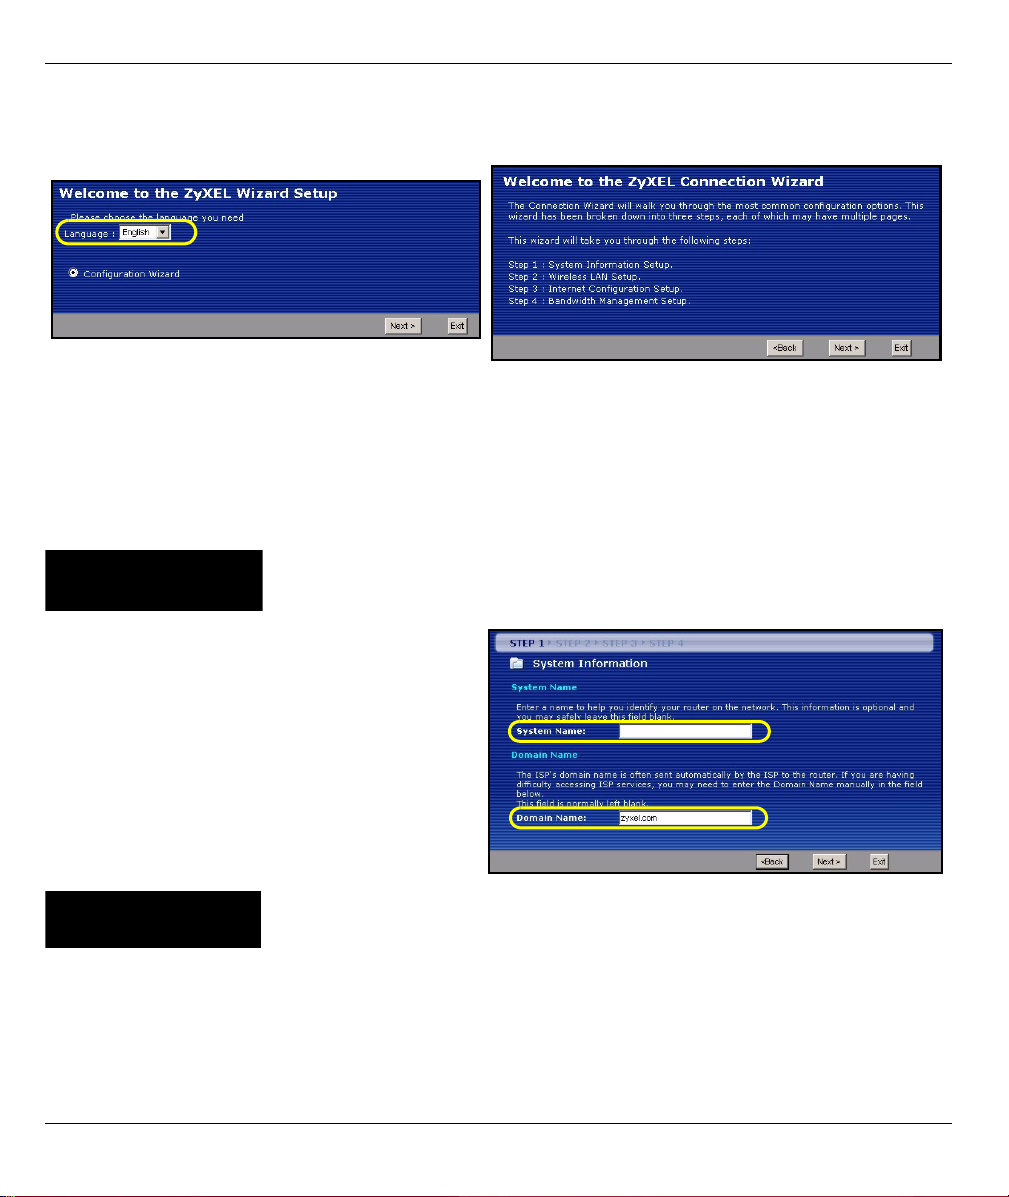
Note: The Next button is located on the bottom right of each screen.
5 Choose your language from the drop-down list
box. Click Next.
6 Click Next to proceed with the Connection Wizard.
3 Internet Access Setup
Note: Enter the Internet access information exactly as given to you by your ISP in each wizard screen
and then click Next to continue or click Back to return to the previous screen.
Current screen information will be lost if you click Back.
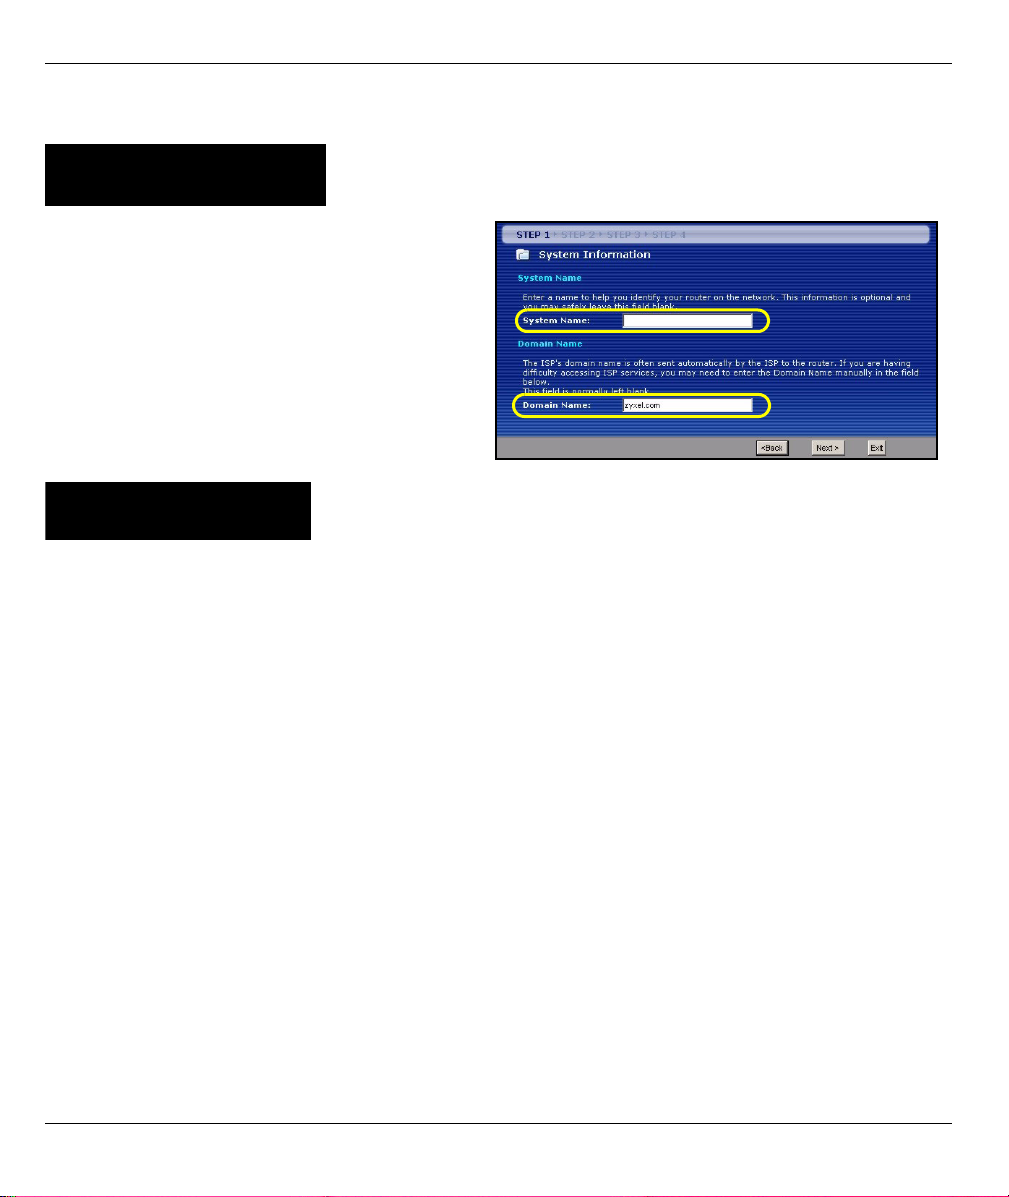
STEP 1:
1 This screen is optional. You can just click Next.
• System Name is for identifying the P-335U. You
can enter your computer's "Computer Name".
• If you leave the Domain Name blank, the domain
name obtained by DHCP from the ISP is used.
System Information
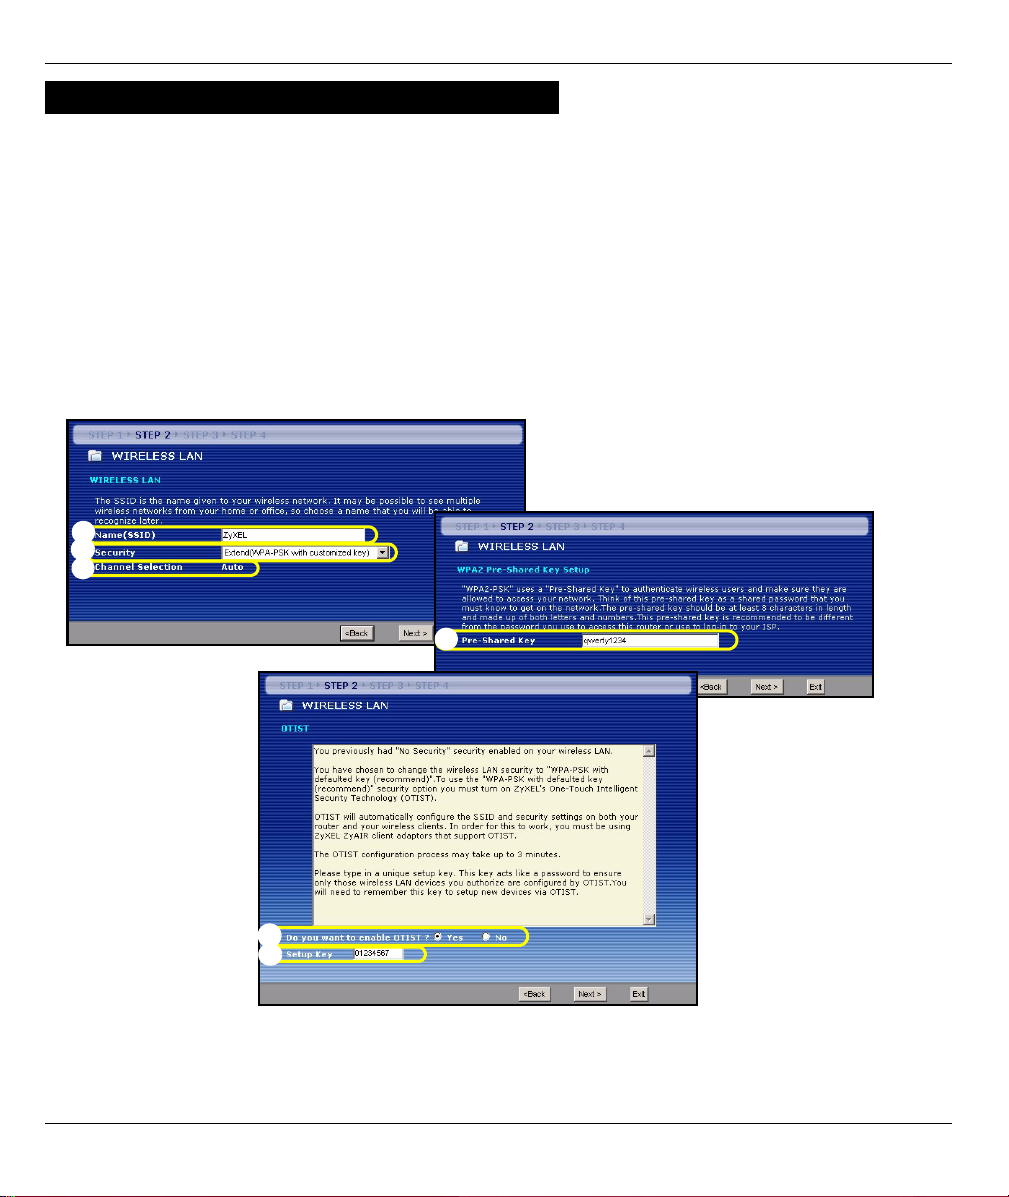
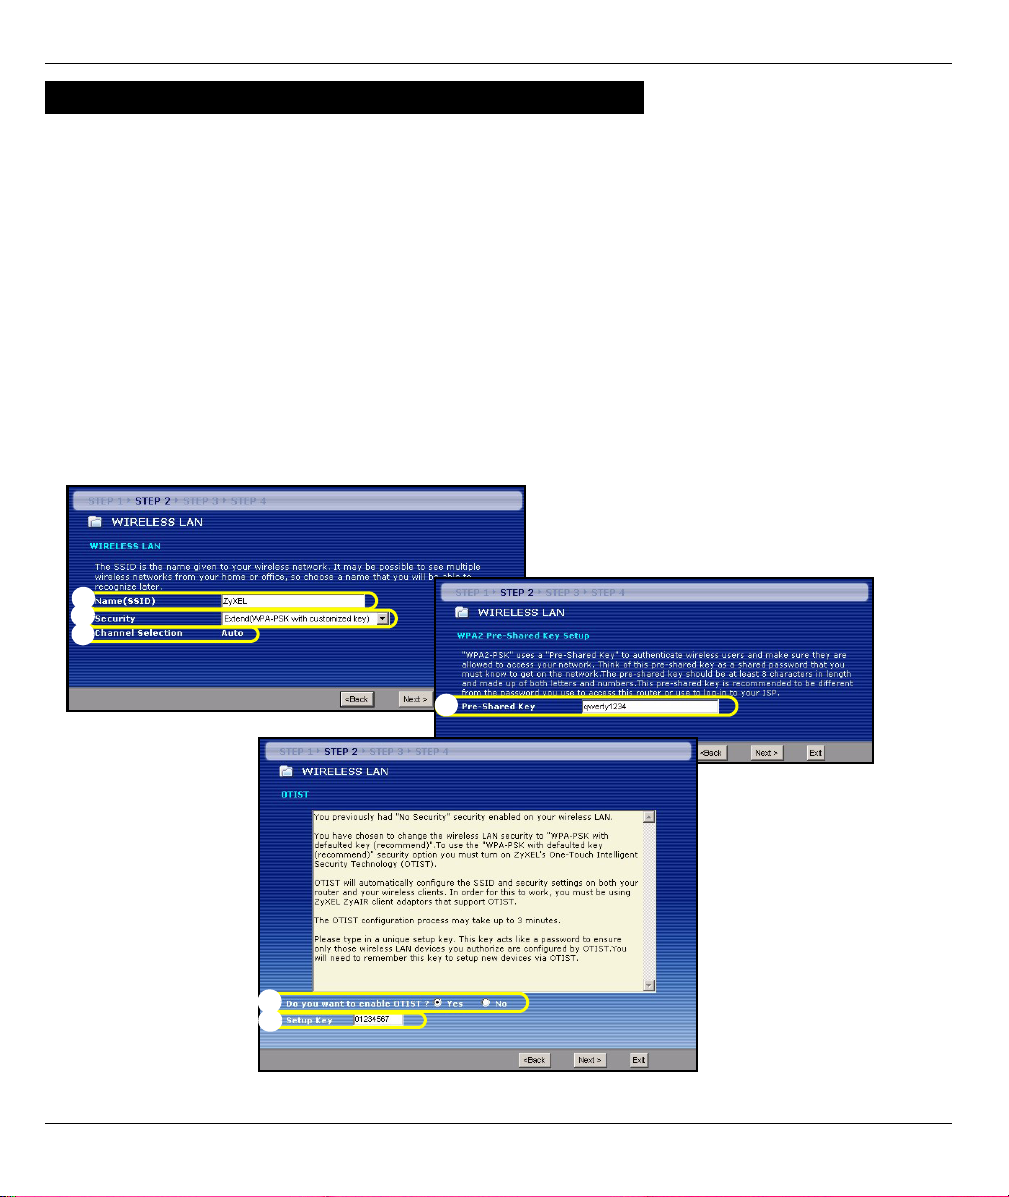
STEP 2:
Configure ONE of the following wireless security types on the P-335U:
• Auto security: Use OTIST to automatically generate a pre-shared key. View the generated pre-shared key in
the Wireless LAN screen.
Wireless LAN
6
Page 7

ENGLISH
Note: Your wireless clients must support WPA-PSK and use the same key.
• None: Have no wireless LAN security configured. If you do not enable any wireless security on your P-335U,
your network is accessible to any wireless networking device that is within range.
• Basic security: WEP (Wired Equivalent Privacy) encrypts data frames before transmitting over the wireless network. The higher the WEP Encryption, the higher the security but the slower the throughput.
• Extend (WPA-PSK or WPA2-PSK) security: Configure a Pre-Shared Key. Choose this option only if your wireless clients support WPA-PSK or WPA2-PSK respectively.
Note: The wireless clients and P-335U must use the same SSID, channel ID and WPA(2)-PSK (if
WPA(2)-PSK is enabled) or WEP encryption key (if WEP is enabled) for wireless communication.
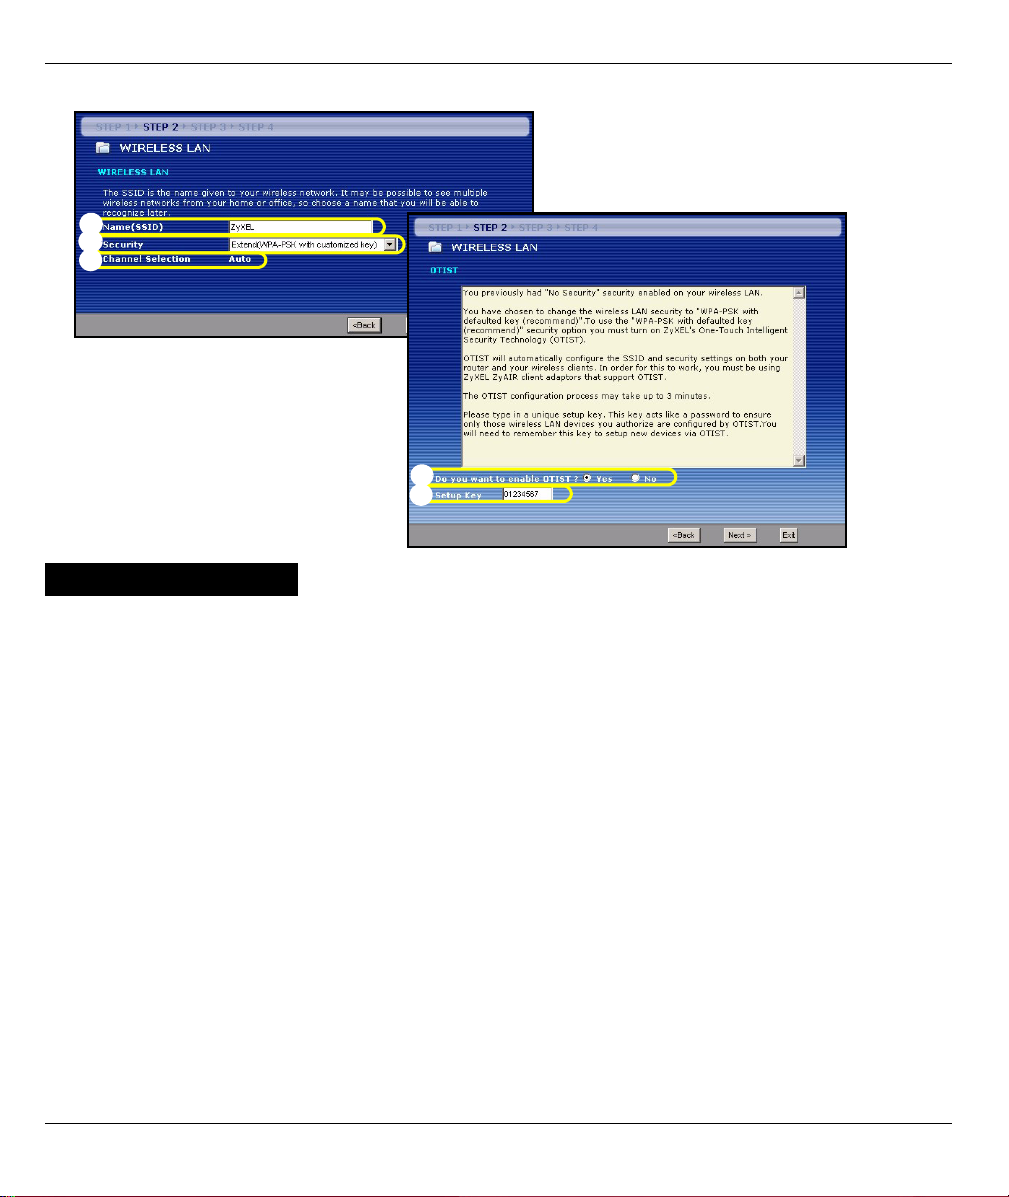
OTIST
• OTIST (One-Touch Intelligent Security Technology) allows your P-335U to assign wireless clients the P-335U’s
SSID and static WEP or WPA-PSK encryption settings. The wireless client must also support OTIST and have
OTIST enabled.
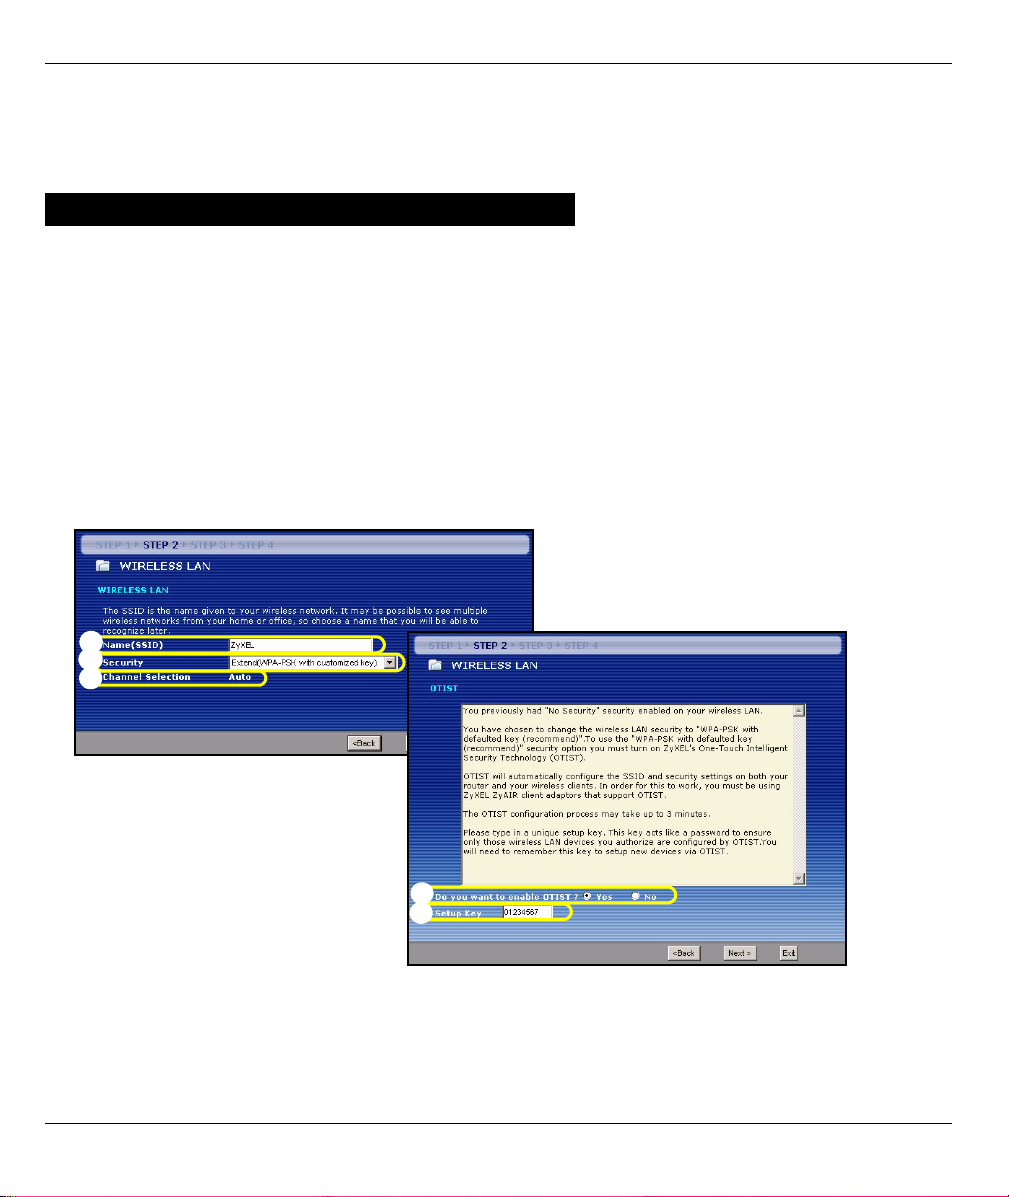
Auto or No Wireless Security
A Enter a unique name to identify the P-335U in the wireless LAN.
B Select a level of wireless security. Choose Auto or None.
C The P-335U automatically scans for and selects a channel not in use by a nearby device. The P-335U and
wireless client must use the same channel ID.
D Yes is selected by default. Select the No radio button if you don’t want to use OTIST now or your wireless
clients don’t support OTIST. If you set Security to Auto, OTIST must be enabled.
E The default OTIST Setup Key is “01234567”. This key can be changed in the OTIST screen. Be sure to use
the same OTIST Setup Key on the P-335U and wireless clients.
7
Page 8
ENGLISH
A
B
C
D
E
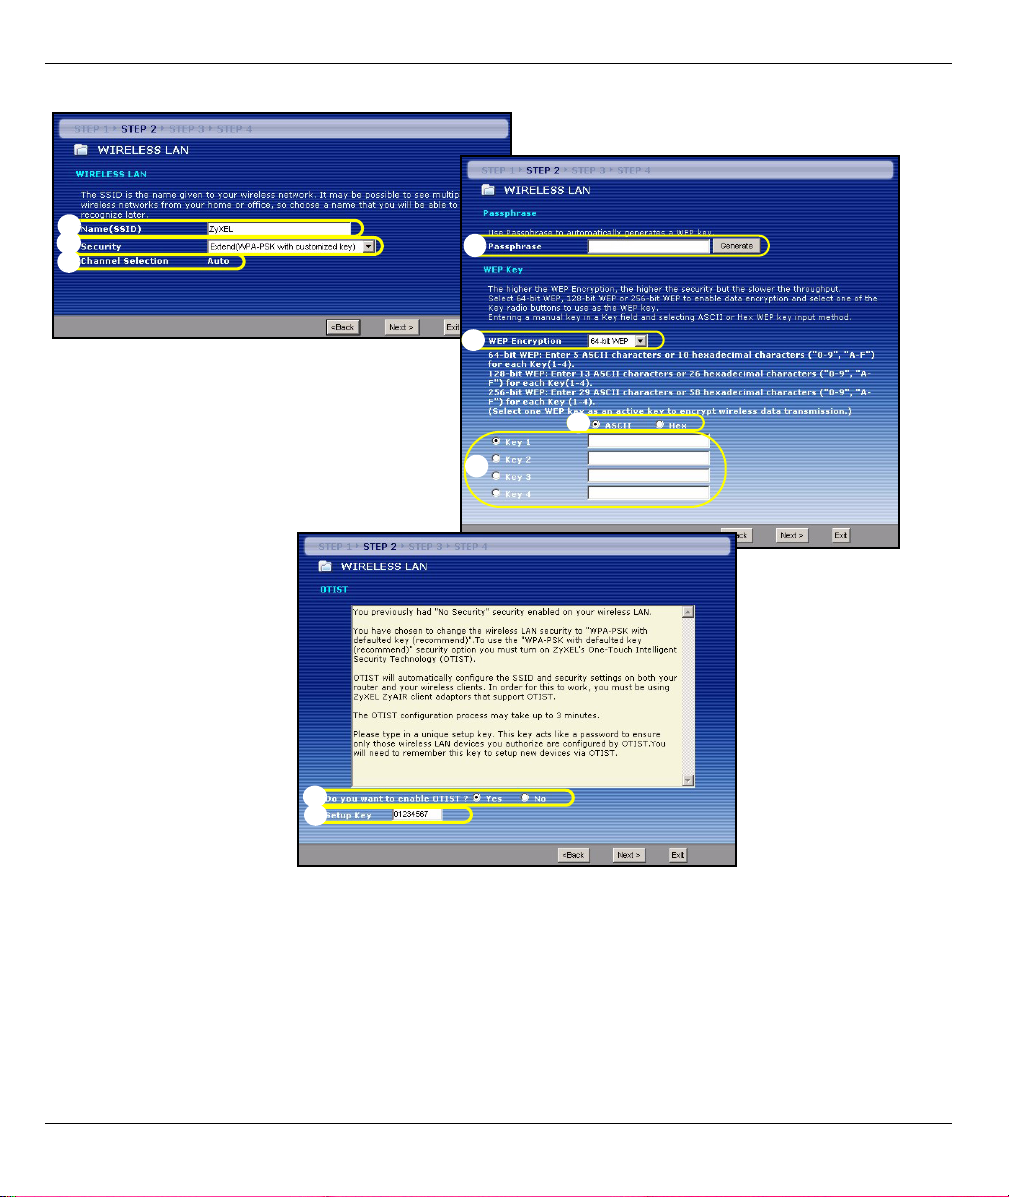
Basic(WEP) Security
A Enter a unique name to identify the P-335U in the wireless LAN.
B Select Basic(WEP) security.
C The P-335U automatically scans for and selects a channel not in use by a nearby device. The P-335U and
wireless client must use the same channel ID.
D Select 64-bit, 128-bit or 256-bit from the WEP Encryption drop-down list.
E Select ASCII or Hex WEP key input method.
F You can create a WEP key by either:
Entering a Passphrase (up to 32 printable characters) and clicking Generate to have the P-335U
automatically generates four WEP keys.
Or
Entering manual keys in each Key (1~4) field.
G Select one of the Key radio buttons to use as the default WEP key.
H Yes is selected by default. Select the No radio button if you don’t want to use OTIST now or your wireless
clients don’t support OTIST.
I The default OTIST Setup Key is “01234567”. This key can be changed in the OTIST screen. Be sure to use
the same OTIST Setup Key on the P-335U and wireless clients.
8
Page 9

ENGLISH
A
B
C
F
D
E
G
H
I
9
Page 10
ENGLISH
Extend(WPA-PSK or WPA2-PSK) Security
A Enter a unique name to identify the P-335U in the wireless LAN.
B Select WPA-PSK or WPA2-PSK security.
C The P-335U automatically scans for and selects a channel not in use by a nearby device. The P-335U and
wireless client must use the same channel ID.
D Type a pre-shared key to have a more secure wireless connection than WEP encryption. Type from 8 to 63
case-sensitive ASCII characters.You can set up the most secure wireless connection by configuring WPA(2) in
the advanced wireless screen. You need to configure a RADIUS server to do this.
E Yes is selected by default. Select the No radio button if you don’t want to use OTIST now or your wireless
clients don’t support OTIST.
F The default OTIST Setup Key is “01234567”. This key can be changed in the OTIST screen. Be sure to use
the same OTIST Setup Key on the P-335U and wireless clients.
A
B
C
D
E
F
10
Page 11
ENGLISH
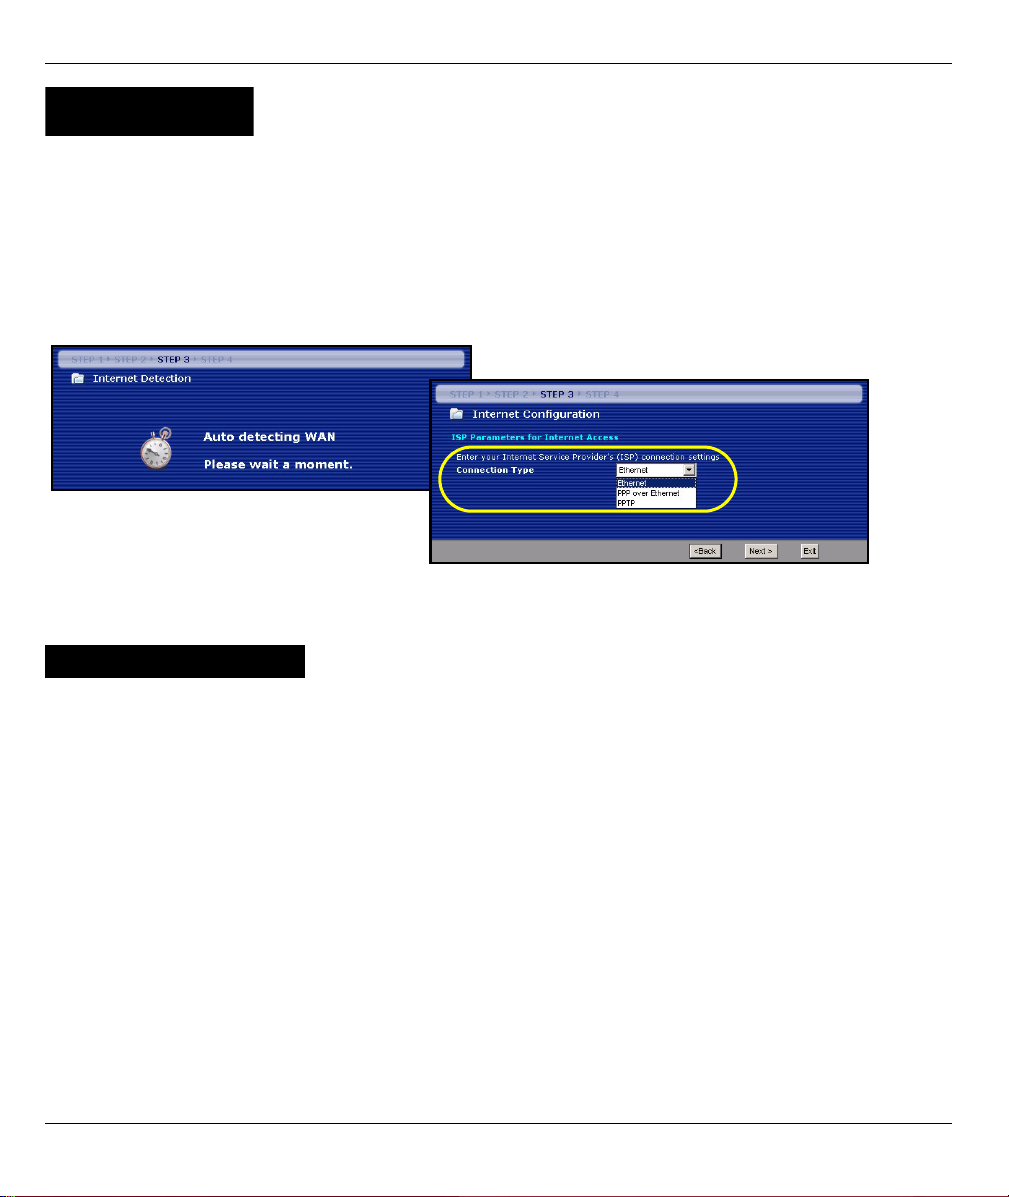
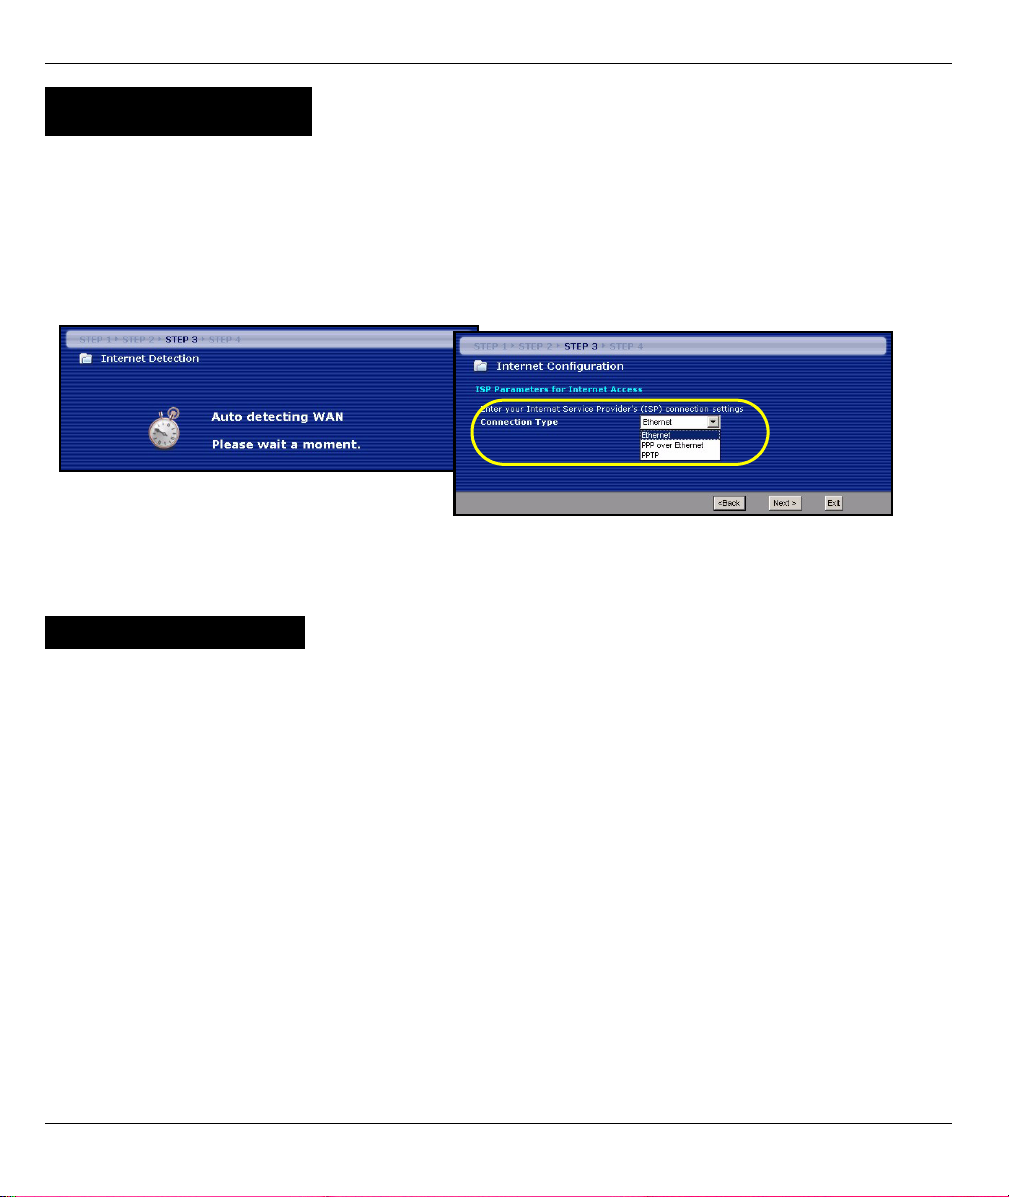
STEP 3:
The wizard attempts to detect which WAN connection type you are using.
If the wizard does not detect a connection type, you must select ONE from the drop-down list box. Check with your
ISP to make sure you use the correct type:
1 Ethernet
2 PPPoE
3 PPTP.
Note: If you were given Internet access settings, enter them in the following fields. Otherwise leave the
default settings and just click Next.
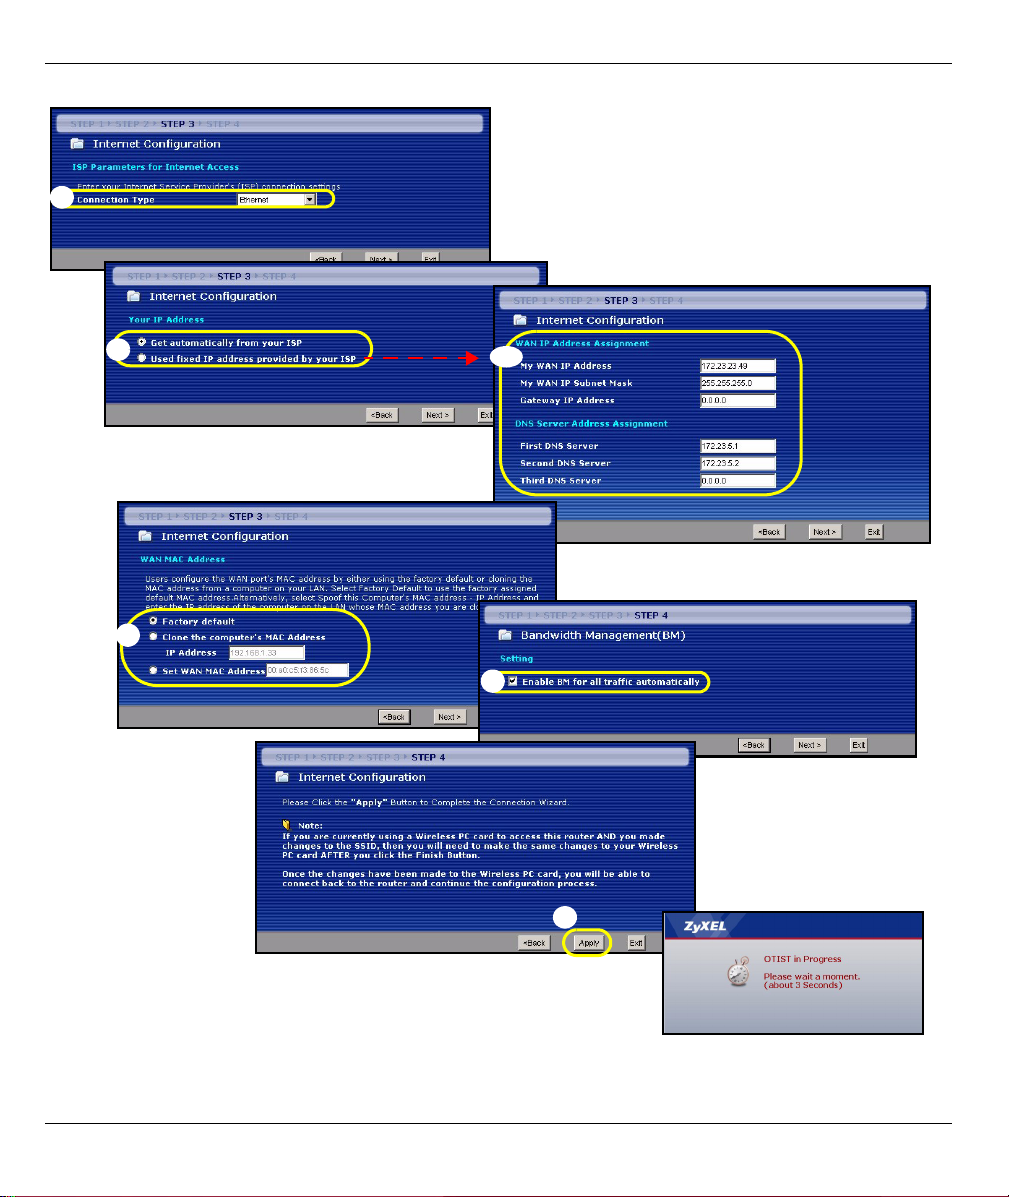
WAN
Ethernet Connection
A Select Ethernet as your WAN connection type.
B Select Get automatically from your ISP if your ISP did not assign you a fixed IP address. Skip to C.
Or
Select Use fixed IP address provided by your ISP to give the P-335U a fixed, unique IP address. Go to B1.
B1 If you select Use fixed IP address provided by your ISP, enter a WAN IP address, WAN IP Subnet Mask
and the neighboring device’s IP address given by your ISP.
If you were given DNS server settings, enter them in the fields. Otherwise leave the default settings and
just click Next.
C Select Factory Default to use the factory assigned default MAC address.
D Select the check box to have the P-335U apply bandwidth management to traffic going out through the P-
335U’s WAN, LAN or WLAN port according to the traffic type.
E Click Apply to save your changes. The OTIST in Progress screen appears if you enable OTIST in the
previous wizard screen. Wait for the P-335U to finish transferring OTIST settings.
11
Page 12

ENGLISH
A
B
C
B1
D
E
12
Page 13

ENGLISH
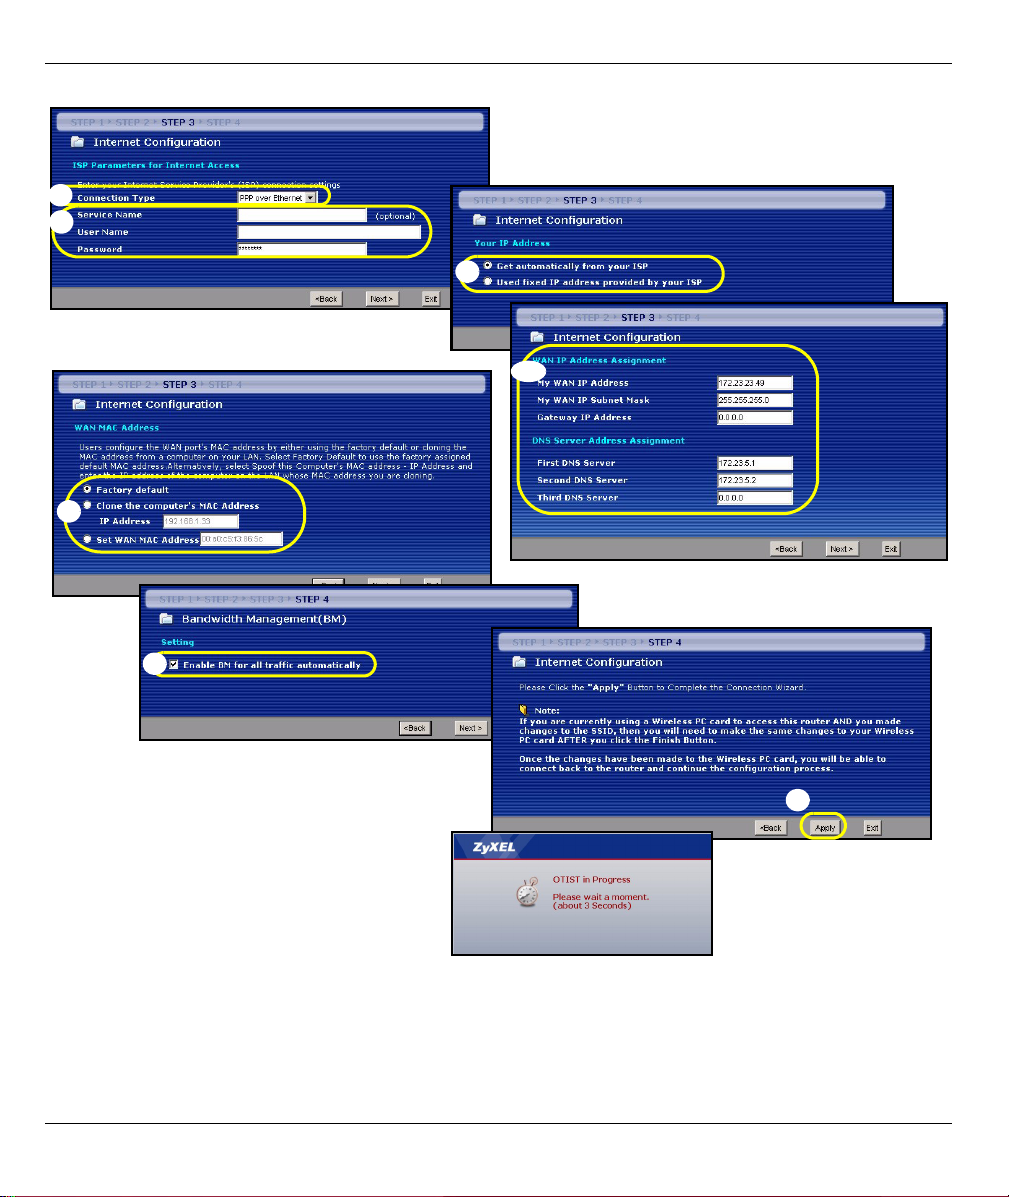
PPPoE Connection
A Select PPPoE as your WAN connection type.
B Type a Service Name (Optional), User Name and Password.
C Select Get automatically from your ISP if your ISP did not assign you a fixed IP address. Skip to D.
Or
Select Use fixed IP address provided by your ISP to give the P-335U a fixed, unique IP address. Go to C1.
C1 If you select Use fixed IP address provided by your ISP, enter a WAN IP address, WAN IP Subnet Mask
and the neighboring device’s IP address given by your ISP.
If you were given DNS server settings, enter them in the fields. Otherwise leave the default settings and
just click Next.
D Select Factory Default to use the factory assigned default MAC address.
E Select the check box to have the P-335U apply bandwidth management to traffic going out through the P-
335U’s WAN, LAN or WLAN port according to the traffic type.
F Click Apply to save your changes. The OTIST in Progress screen appears if you enable OTIST in the
previous wizard screen. Wait for the P-335U to finish transferring OTIST settings.
13
Page 14
ENGLISH
A
B
C
C1
D
E
F
14
Page 15

ENGLISH
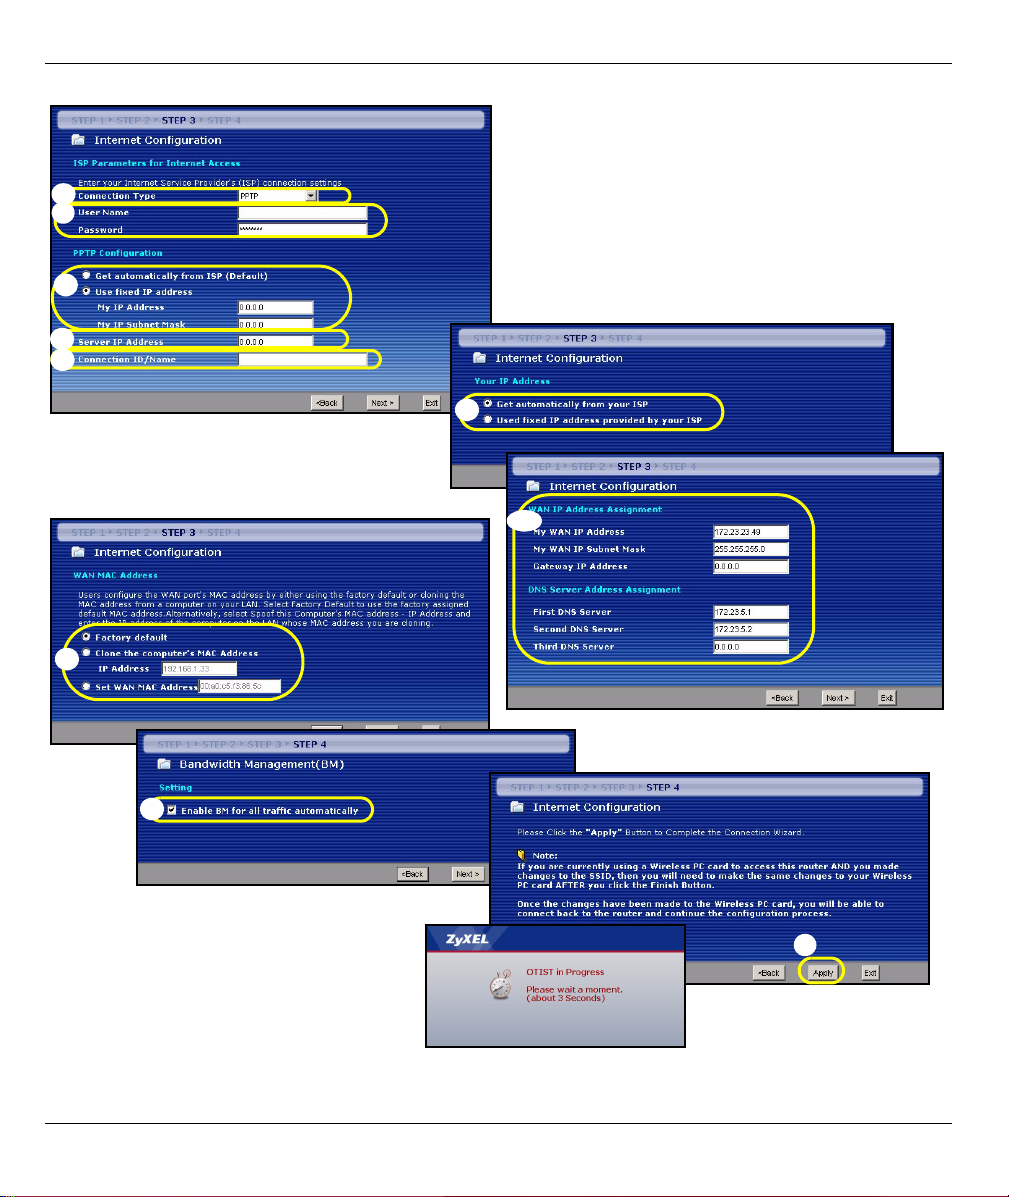
PPTP Connection
A Select PPTP as your WAN connection type.
B Type a User Name and Password.
C Select Get automatically from ISP if your ISP did not assign you a fixed PPTP IP address.
Or select Use fixed IP address to give the P-335U a fixed, unique PPTP IP address and subnet mask.
D Type a PPTP Server IP Address.
E Type a Connection ID/Name (if provided).
F Select Get automatically from your ISP if your ISP did not assign you a fixed IP address. Skip to G.
Or
Select Use fixed IP address provided by your ISP to give the P-335U a fixed, unique IP address. Go to F1.
F1 If you select Use fixed IP address provided by your ISP, enter a WAN IP address, WAN IP Subnet Mask
and the neighboring device’s IP address given by your ISP.
If you were given DNS server settings, enter them in the fields. Otherwise leave the default settings and
just click Next.
G Select Factory Default to use the factory assigned default MAC address.
H Select the check box to have the P-335U apply bandwidth management to traffic going out through the P-
335U’s WAN, LAN or WLAN port according to the traffic type.
I Click Apply to save your changes. The OTIST in Progress screen appears if you enable OTIST in the
previous wizard screen. Wait for the P-335U to finish transferring OTIST settings.
15
Page 16
ENGLISH
A
B
C
D
E
F
F1
G
H
I
16
Page 17
ENGLISH
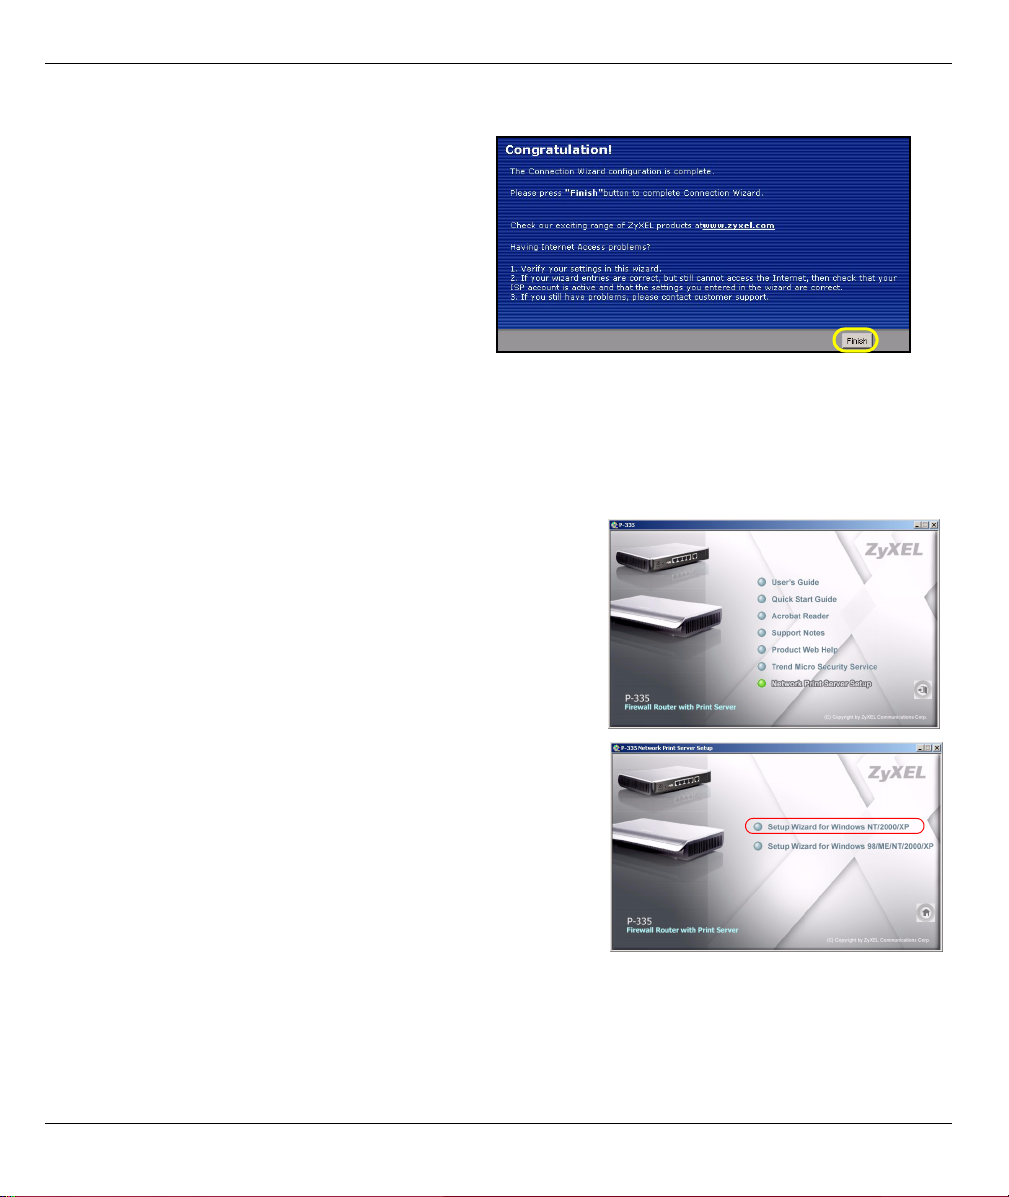
Internet Access Setup Complete
If you have any Internet access problems, follow the
on-screen instructions.
Click Finish to complete the wizard setup.
4 Print Server Driver Setup
The print server driver must be installed on each computer in your network that will use the print server.
Before you install the print server driver, make sure the USB printer and your computer are connected to the
P-335U and that both the P-335U, your computer and the USB printer are turned on.
1 Insert the supplied CD into the CD-ROM driver on your
computer. The CD Autorun screen displays automatically.
2 Select Network Print Server Setup.
3 Select Setup Wizard for Windows NT/2000/XP to open the
setup wizard.
4 Follow the instructions on the screens to set up the print
server driver on your Windows computer.
5 See the User’s Guide for more information and how to set up a
print server driver on a Macintosh computer.
Troubleshooting
1 If you cannot access the web configurator using Internet Explorer in Windows XP or Windows Server 2003,
make sure you allow pop-up windows, JavaScripts and Java permissions or set the Internet security level
17
Page 18

ENGLISH
lower than High in Internet Explorer (in Internet Explorer, click Tools > Internet Options > Security >
Custom Level...). See the appendix in the User’s Guide for more information.
2 If you cannot access the Internet when your computer is connected to the LAN port, follow these steps.
A) Check the lights on the front panel. If they are different than what is described in section 1, make sure
the connections are correct. (See section 1.) If the lights are still different, turn off the device, wait a few
seconds, and turn it on again.
B) Follow the steps in section 3 again. Make sure you enter the correct information. For example, if your
account has a user name and password, make sure you type it correctly. In addition, if you are not sure
which encapsulation your ISP uses, contact your ISP.
C) If you are using a new Internet account, contact your ISP to make sure it is active.
D) If you still have problems, see Troubleshooting in the User’s Guide.
3 If you cannot access the Internet using the wireless network, follow these steps.
A) On a computer in the wireless network, open your browser, and go to http://192.168.1.1. If you see the
screen in step 2 of section 2, follow suggestions A - D above. If you do not, go to the next step.
B) Make sure the AG switch (on the rear panel) is set to the G side if your wireless clients support IEEE
802.11b or IEEE 802.11g and set to the A side if your wireless clients support IEEE 802.11a only.
C) Make sure your P-335U and your computer are using the same wireless and wireless security settings.
Follow the steps in section 3.
4 If you cannot print anything using the USB printer connected to the P-335U, follow these steps.
A) Make sure you install the print server driver on your computer; see section 4.
B) Verify that the printer uses USB 1.1 or 1.0 by checking your printer’s specifications.
C) Make sure the USB printer is powered on and can work properly.
D) Check the USB cable connections.
Set Up Your Computer’s IP Address
This section shows you how to set your Windows NT/2000/XP computer to automatically get an IP address.
This ensures that your computer can communicate with your P-335U. Refer to your User’s Guide for detailed
IP address configuration for other Windows and Macintosh computer operating systems.
1 In Windows XP, click start, Control Panel. In Windows 2000/NT, click Start, Settings, Control Panel.
2 In Windows XP, click Network Connections. In Windows 2000/NT, click Network and Dial-up
Connections.
18
Page 19
ENGLISH
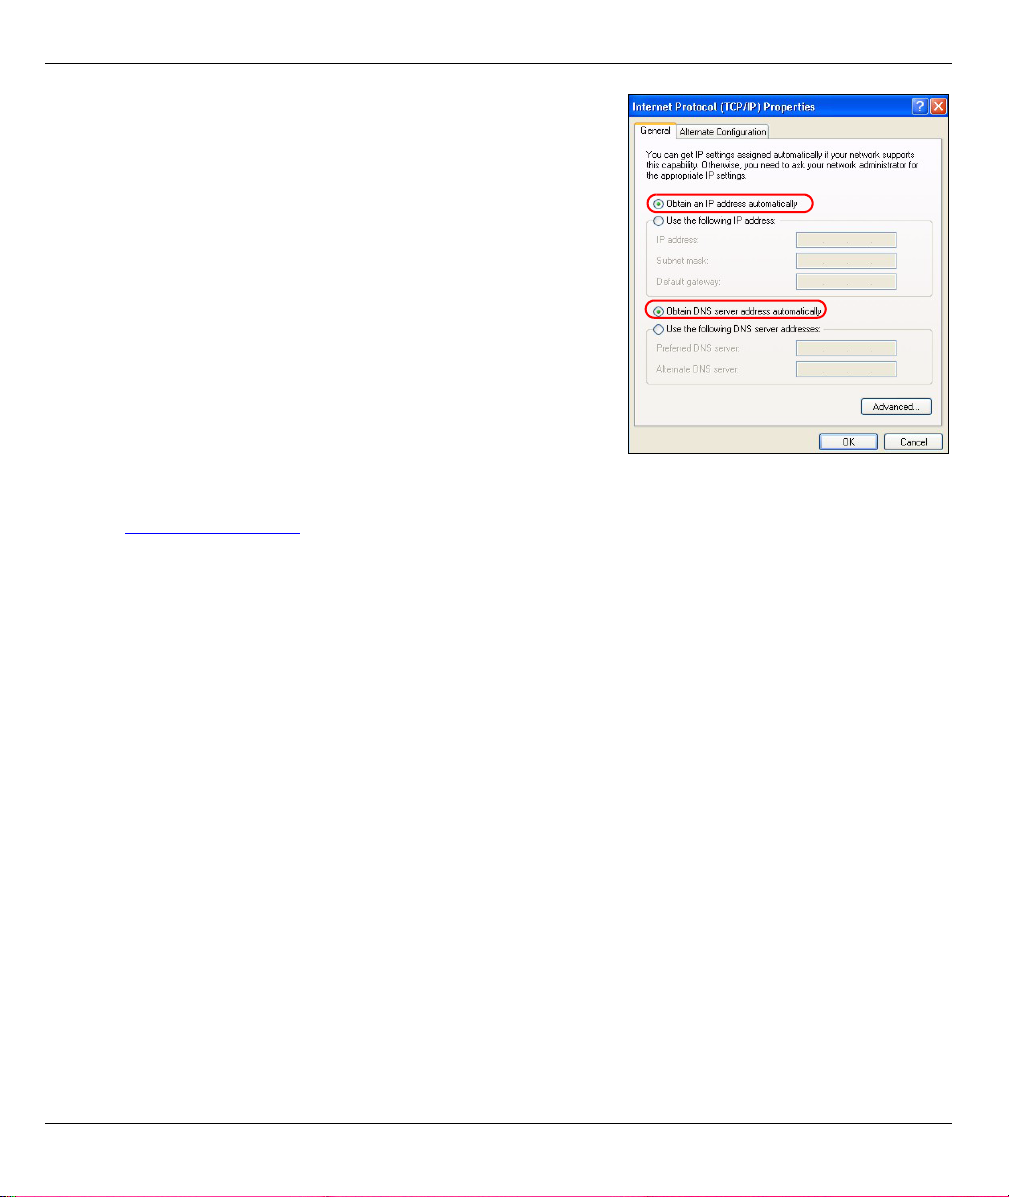
3 Right-click Local Area Connection and then click Properties.
4 Select Internet Protocol (TCP/IP) (under the General tab in Win
XP) and click Properties.
5 The Internet Protocol TCP/IP Properties screen opens (the
General tab in Windows XP).
6 Select the Obtain an IP address automatically and Obtain
DNS server address automatically options.
7 Click OK to close the Internet Protocol (TCP/IP) Properties
window.
8 Click Close (OK in Windows 2000/NT) to close the Local Area
Connection Properties window.
9 Close the Network Connections screen.
Viewing Your Product’s Certifications
1 Go to http://www.zyxel.com.
2 Select your product from the drop-down list box on the ZyXEL home page to go to that product's page.
3 Select the certification you wish to view from this page.
19
Page 20

DEUTSCH
Übersicht
Der P-335U ist ein Wireless-Breitbandrouter mit einem eingebauten 10/100 Mbps-Switch, der IEEE 802.11a, b
und g und Druckserver unterstützt. Verwenden Sie den USB-Anschluss, mit dem die an dem P-335U
angeschlossenen Computer einen mit USB v1.1 kompatiblen Drucker gemeinsam nutzen können, sodass Sie
keinen bestimmten Computer als Druckserver oder ein separates Druckservergerät verwenden müssen.
Diese Computer können auch den Internetzugang über ein Breitbandmodem (Kabel/DSL) gemeinsam
verwenden.
Voraussetzung sind ein bestehendes Internetkonto und die folgenden Informationen.
Tabelle 1 Daten zum Internetkonto
Die WAN IP-Adresse Ihres Geräts (wenn vorhanden): ______________
DNS Server IP-Adresse (wenn vorhanden): Primär _____________, Sekundär ______________
Verbindungstyp:
Ethernet Diensttyp: _______________________
Benutzername: ____________
PPTP Benutzername: ____________
Ihre WAN IP-Adresse (wenn vorhanden)
____________
Verbindungs-ID (wenn erforderlich):
____________
PPPoE (PPPoE) Dienstname: ____________
Benutzername: ____________ Passwort: ____________
Login Server IP-Adresse: ______________
Passwort: ____________
Passwort: ____________
PPTP Server IP-Adresse: ___________
oder PPTP Domain-Name: ___________
Ausführliche Informationen zu allen Funktionen finden Sie im Benutzerhandbuch.
Im Folgenden wird aufgeführt, welche Schritte notwendig sind:
1 Anschließen der Hardware 2 Zugriff auf den Web-Konfigurator
3 Einrichten des Internetzugangs 4 Einrichten des Druckservertreibers
20
Page 21
DEUTSCH
1 Anschließen der Hardware
Bei der Erstinstallation müssen die folgenden Hardwareverbindungen hergestellt werden.
Herstellen der WAN-Verbindung
1
Schließen Sie Ihr Modem mit dem mitgelieferten Kabel an den WAN-Anschluss an.
Herstellen der LAN-Verbindung
2
Schließen Sie Ihren Computer mit dem mitgelieferten Ethernet-Kabel an einen "LAN"-Anschluss an.
USB-Anschluss
3
Schließen Sie einen USB-Drucker (Version 1.0 oder 1.1) mit einem USB-Kabel an diesen Anschluss an. Der P335U erkennt automatisch das Modell des USB-Druckers.
Anschließen an das Stromnetz
4
Verbinden Sie den Netzanschluss des Geräts (POWER) mit dem mitgelieferten Netzadapter mit einer
geeigneten Stromquelle (eine nach Regionen geordnete Liste der Netzadapter-Spezifikationen finden Sie im
Benutzerhandbuch).
21
Page 22
DEUTSCH
Die LED-Anzeigen
Die LED-Anzeigen befinden sich an der
Gerätevorderseite. Wenn Sie das Gerät an das
Stromnetz anschließen, beginnt die LEDAnzeige PWR zu blinken. Wenn es bereit ist, hört
sie auf zu blinken und leuchtet stetig. Etwa 30
Sekunden später beginnt auch die LED-Anzeige
A/G zu leuchten
Die LED-Anzeigen LAN und WAN beginnen zu
leuchten, wenn die entsprechenden
Verbindungen bestehen.
2 Zugriff auf den Web-Konfigurator
1 Starten Sie Ihren Webbrowser. Geben Sie als Websiteadresse "192.168.1.1" ein.
Hinweis: Wenn das Anmeldefenster nicht angezeigt wird, prüfen Sie die Sicherheitseinstellungen Ihres
Browsers (Informationen dazu finden Sie unter Problembeseitigung) und stellen Sie sicher,
dass Ihr Computer so eingestellt ist, dass er eine IP-Adresse dynamisch erhält (siehe
Einrichten der IP-Adresse des Computers).
22
Page 23
DEUTSCH
2 Auf dem Bildschirm erscheint das Fenster
Passwort. Geben Sie das Passwort ein ("1234"
ist das Standardpasswort) und klicken Sie auf
Login (Anmelden).
3 Ändern Sie im nachfolgenden Fenster das
Passwort und klicken Sie auf Apply
(Übernehmen).
4 Wenn Sie den P-335U das erste Mal benutzen,
klicken Sie auf Go to Wizard setup (Zum
Einrichtungsassistenten).
Hinweis: Die Schaltfläche Next (Weiter) befindet sich in jedem Fenster unten rechts.
5 Wählen Sie aus dem Listenfeld Ihre Sprache
aus. Klicken Sie auf Next (Weiter).
6 Klicken Sie auf Next (Weiter) und fahren Sie mit
dem Connection Wizard (Verbindungsassistent)
fort.
3 Einrichten des Internetzugangs
Hinweis: Geben Sie in jedem Fenster des Assistenten die für den Internetzugang erforderlichen
Informationen ein, die Sie von Ihrem Internetdienstanbieter erhalten haben. Klicken Sie dann
zum Fortfahren auf Next (Weiter) oder kehren Sie mit Back (Zurück) zum vorhergehenden
Fenster zurück.
23
Page 24
DEUTSCH
Wenn Sie auf Back (Zurück) klicken, gehen alle aktuell auf dem Bildschirm vorhandenen
Daten verloren.
CHRITT 1:
1 Dieses Fenster ist optional. Sie können einfach
auf Next (Weiter) klicken.
Der System Name (Systemname) wird für die
Identifikation des P-335U benötigt. Geben Sie den
Namen des Computers "Computername" ein
Wenn Sie das Feld Domain Name (Domainname)
frei lassen, wird der Domainname verwendet, der
vom DHCP des Internetdienstanbieters vorgege-
ben ist.
CHRITT 2:
Konfigurieren Sie beim P-335U EINEN der folgenden Wireless-Sicherheitstypen:
Auto security (Automatische Sicherheit): Verwenden Sie OTIST, um automatisch einen Pre-Shared-Key zu
erzeugen. Sehen Sie sich den erzeugten Pre-Shared-Key im Fenster Wireless LAN an.
Hinweis: Die Wireless-Clients müssen WPA-PSK unterstützen und denselben Schlüssel verwenden.
None (Keine): Es wird keine Wireless-LAN-Sicherheit konfiguriert. Wenn Sie beim P-335U keine Wireless-
Sicherheitsfunktion aktivieren, ist Ihr Netzwerk für jedes beliebige drahtlose Netzwerkgerät zugänglich, das
sich in dessen Bereich befindet.
Basic security (Basissicherheit): WEP (Wired Equivalent Privacy) verschlüsselt die Datenübertragungsblöcke,
bevor sie über das Wireless-Netzwerk übertragen werden. Je höher die WEP-Verschlüsselung, um so höher ist
zwar die Sicherheit, jedoch wird die Übertragungsgeschwindigkeit geringer.
Extend (WPA-PSK or WPA2-PSK) security (Erweiterte Sicherheit (WPA-PSK oder WPA2-PSK)): Konfiguriert
einen Pre-Shared-Key. Wählen Sie diese Option nur, wenn die Wireless-Clients entweder WPA-PSK oder
WPA2-PSK unterstützen.
Systemdaten
Wireless LAN
Hinweis: Die Wireless-Clients und der P-335U müssen für die drahtlose Kommunikation dieselbe
SSID, Channel-ID und WPA(2)-PSK (wenn WPA(2)-PSK aktiviert ist) bzw. dieselbe WEPVerschlüsselung (wenn WEP aktiviert ist) verwenden.
24
Page 25
DEUTSCH
OTIST
Mit der OTIST-Technologie (One-Touch Intelligent Security Technology) kann der P-335U den Wireless-Clients
die eigenen Einstellungen für SSID und statische WEP oder WPA-PSK-Verschlüsselung zuweisen. Der Wireless-Client muss ebenfalls OTIST unterstützen, und die OTIST-Funktion muss aktiviert sein.
Automatisch oder Keine Wireless-Sicherheit
A Geben Sie einen Namen ein, mit dem der P-335U im Wireless-LAN eindeutig identifiziert wird.
B Wählen Sie eine Sicherheitsstufe für die drahtlosen Verbindungen. Wählen Sie Auto (Automatisch) oder
None (Keine).
C Der P-335U sucht automatisch nach einem Kanal, der nicht von einem Gerät in der Umgebung verwendet
wird. Der P-335U und der Wireless-Client müssen dieselbe Kanal-ID verwenden.
D Standardmäßig ist Yes (Ja) markiert. Wählen Sie die Option No (Nein), wenn Sie jetzt nicht OTIST
verwenden möchten oder die Wireless-Clients OTIST nicht unterstützen. Wenn Sie bei Security
(Sicherheit) die Option Auto wählen, muss OTIST aktiviert werden.
E Der Standard-Setupschlüssel von OTIST ist “01234567”. Dieser Schlüssel kann im OTIST-Fenster
geändert werden. Achten Sie darauf, dass Sie beim P-335U und bei den Wireless-Clients denselben
OTIST Setupschlüssel verwenden.
A
B
C
D
E
25
Page 26

DEUTSCH
Basis-Sicherheit (WEP)
A Geben Sie einen Namen ein, mit dem der P-335U im Wireless-LAN eindeutig identifiziert wird.
B Wählen Sie die Sicherheitsstufe Basic (WEP) (Basis (WEP)).
C Der P-335U sucht automatisch nach einem Kanal, der nicht von einem Gerät in der Umgebung verwendet
wird. Der P-335U und der Wireless-Client müssen dieselbe Kanal-ID verwenden.
D Wählen Sie aus der Liste für die WEP-Verschlüsselung 64-bit, 128-bit oder 256-bit.
E Wählen Sie als Eingabemethode für den WEP-Schlüssel ASCII oder Hex.
F Ein WEP-Schlüssel kann erzeugt werden:
Geben Sie eine Passphrase (mit maximal 32 druckbaren Zeichen) ein und klicken Sie auf Generate
(Erzeugen). Der P-335U erzeugt automatisch vier WEP-Schlüssel.
Oder geben Sie die manuellen Schlüssel in jedes der Felder Key (Schlüssel) (1-4) ein.
G Wählen Sie eine der Tasten Key (Schlüssel) aus, die als Standard-WEP-Schlüssel verwendet werden
soll.
H Standardmäßig ist Yes (Ja) markiert. Wählen Sie die Option No (Nein), wenn Sie jetzt nicht OTIST
verwenden möchten oder die Wireless-Clients OTIST nicht unterstützen.
I Der Standard-Setupschlüssel von OTIST ist “01234567”. Dieser Schlüssel kann im OTIST-Fenster
geändert werden. Achten Sie darauf, dass Sie beim P-335U und bei den Wireless-Clients denselben
OTIST Setupschlüssel verwenden.
26
Page 27
DEUTSCH
A
B
C
F
D
E
G
H
I
27
Page 28
DEUTSCH
Erweitern (WPA-PSK) oder WPA2-PSK-Sicherheit.
A Geben Sie einen Namen ein, mit dem der P-335U im Wireless-LAN eindeutig identifiziert wird.
B Wählen Sie die Sicherheit WPA-PSK oder WPA2-PSK.
C Der P-335U sucht automatisch nach einem Kanal, der nicht von einem Gerät in der Umgebung verwendet
wird. Der P-335U und der Wireless-Client müssen dieselbe Kanal-ID verwenden.
D Geben Sie einen Pre-Shared-Key ein, wenn die Wireless-Verbindung sicherer sein soll als mit einer
WEP-Verschlüsselung. Geben Sie zwischen 8 und 63 ASCII-Zeichen ein (Groß- und Kleinschreibung wird
unterschieden). Die sicherste Wireless-Verbindung kann errichtet werden, indem Sie im Fenster
Advanced Wireless (Erweitertes Wireless) WPA(2) konfigurieren. Dazu müssen Sie einen RADIUS-
Server konfigurieren.
E Standardmäßig ist Yes (Ja) markiert. Wählen Sie die Option No (Nein), wenn Sie jetzt nicht OTIST
verwenden möchten oder die Wireless-Clients OTIST nicht unterstützen.
F Der Standard-Setupschlüssel von OTIST ist “01234567”. Dieser Schlüssel kann im OTIST-Fenster
geändert werden. Achten Sie darauf, dass Sie beim P-335U und bei den Wireless-Clients denselben
OTIST Setupschlüssel verwenden.
A
B
C
D
E
F
28
Page 29
DEUTSCH
SCHRITT 3:
Der Assistent versucht zu ermitteln, welche Art von WAN-Verbindung Sie verwenden.
Wenn der Assistent keinen Verbindungstyp erkennen kann, müssen Sie aus dem Listenfeld EINEN auswählen.
Prüfen Sie bei Ihrem Internetdienstanbieter, ob Sie den richtigen Typ verwenden:
1 Ethernet
2 PPPoE
3 PPTP
Hinweis: Wenn Ihnen Zugangseinstellungen für das Internet vorgegeben wurden, geben Sie diese in
die folgenden Felder ein. Anderenfalls werden die Standardeinstellungen belassen. Klicken
Sie auf Next (Weiter).
WAN
Ethernet-Verbindung
A Wählen Sie als Ihren WAN-Verbindungstyp Ethernet.
B Wählen Sie Get automatically from your ISP (Automatisch vom Internetdienstanbieter laden), wenn Sie
von Ihrem Internetdienstanbieter keine feste IP-Adresse zugewiesen bekommen haben. Weiter mit C.
Oder
Wählen Sie Use fixed IP address provided by your ISP (Vom Internetdienstanbieter vorgegebene feste IP-
Adresse verwenden), um dem P-335U eine feste und eindeutige IP-Adresse zu geben. Gehen Sie zu B1.
B1 Wenn Sie die Option Use fixed IP address provided by your ISP wählen, müssen Sie die WAN IP-
Adresse, die WAN IP-Subnetz-Maske und die IP-Adresse des Standardgateway angeben, die der ISP
mitgeteilt hat.
Wenn Sie die DNS-Servereinstellungen kennen, geben Sie diese in die Felder ein. Anderenfalls werden
die Standardeinstellungen belassen. Klicken Sie auf Next (Weiter).
C Wählen Sie Factory Default (Standardwerte), um die werkseitig festgelegte Standard-MAC-Adresse zu
verwenden.
D Klicken Sie auf das Kontrollkästchen, damit der P-335U die Bandbreitenverwaltung verwendet.
E Klicken Sie auf Apply (Anwenden), um Ihre angepassten Einstellungen zu speichern. Wenn Sie im
vorhergehenden Fenster OTIST aktiviert haben, erscheint nun das Fenster OTIST in Progress (OTIST
aktiv). Warten Sie ab, bis der P-335U die Übertragung der OTIST-Einstellungen beendet hat.
29
Page 30
DEUTSCH
A
B
C
B1
D
E
30
Page 31

DEUTSCH
PPPoE-Verbindung
A Wählen Sie als Ihren WAN-Verbindungstyp PPPoE.
B Geben Sie Service Name (Servicename) (optional), User Name (Benutzername) und Password (Passwort)
ein.
C Wählen Sie Get automatically from your ISP (Automatisch vom Internetdienstanbieter laden), wenn Sie
von Ihrem Internetdienstanbieter keine feste IP-Adresse zugewiesen bekommen haben. Weiter mit D.
Oder
Wählen Sie Use fixed IP address provided by your ISP (Vom Internetdienstanbieter vorgegebene feste IP-
Adresse verwenden), um dem P-335U eine feste und eindeutige IP-Adresse zu geben. Gehen Sie zu C1.
C1 Wenn Sie die Option Use fixed IP address provided by your ISP wählen, müssen Sie die WAN IP-
Adresse, die WAN IP-Subnetz-Maske und die IP-Adresse des Standardgateway angeben, die der ISP
mitgeteilt hat.
Wenn Sie die DNS-Servereinstellungen kennen, geben Sie diese in die Felder ein. Anderenfalls werden
die Standardeinstellungen belassen. Klicken Sie auf Next (Weiter).
D Wählen Sie Factory Default (Standardwerte), um die werkseitig festgelegte Standard-MAC-Adresse zu
verwenden.
E Klicken Sie auf das Kontrollkästchen, damit der P-335U die Bandbreitenverwaltung verwendet.
F Klicken Sie auf Apply (Anwenden), um Ihre angepassten Einstellungen zu speichern. Wenn Sie im
vorhergehenden Fenster OTIST aktiviert haben, erscheint nun das Fenster OTIST in Progress (OTIST
aktiv). Warten Sie ab, bis der P-335U die Übertragung der OTIST-Einstellungen beendet hat.
31
Page 32

DEUTSCH
A
B
C
C1
D
E
F
32
Page 33

DEUTSCH
PPTP-Verbindung
A Wählen Sie als Ihren WAN-Verbindungstyp PPTP.
B Geben Sie User Name (Benutzername) und Password (Passwort) ein.
C Wählen Sie Get automatically from your ISP (Automatisch vom Internetdienstanbieter laden), wenn Sie
von Ihrem Internetdienstanbieter keine feste PPTP IP-Adresse zugewiesen bekommen haben.
Oder wählen Sie Use fixed IP address (Feste IP-Adresse verwenden), um dem P-335U eine feste und
eideutige PPTP IP-Adresse sowie Subnet-Mask zuzuweisen.
D Geben Sie eine PPTP Server IP-Adresse ein
E Geben Sie Verbindungs-ID/-Name ein (wenn vorhanden)
F Wählen Sie Get automatically from your ISP (Automatisch vom Internetdienstanbieter laden), wenn Sie
von Ihrem Internetdienstanbieter keine feste IP-Adresse zugewiesen bekommen haben. Weiter mit G.
Oder
Wählen Sie Use fixed IP address provided by your ISP (Vom Internetdienstanbieter vorgegebene feste IP-
Adresse verwenden), um dem P-335U eine feste und eindeutige IP-Adresse zu geben. Gehen Sie zu F1.
F1 Wenn Sie die Option Use fixed IP address provided by your ISP wählen, müssen Sie die WAN IP-
Adresse, die WAN IP-Subnetz-Maske und die IP-Adresse des Standardgateway angeben, die der ISP
mitgeteilt hat.
Wenn Sie die DNS-Servereinstellungen kennen, geben Sie diese in die Felder ein. Anderenfalls werden
die Standardeinstellungen belassen. Klicken Sie auf Next (Weiter).
G Wählen Sie Factory Default (Standardwerte), um die werkseitig festgelegte Standard-MAC-Adresse zu
verwenden.
H Klicken Sie auf das Kontrollkästchen, damit der P-335U die Bandbreitenverwaltung verwendet.
I Klicken Sie auf Apply (Anwenden), um Ihre angepassten Einstellungen zu speichern. Wenn Sie im
vorhergehenden Fenster OTIST aktiviert haben, erscheint nun das Fenster OTIST in Progress (OTIST
aktiv). Warten Sie ab, bis der P-335U die Übertragung der OTIST-Einstellungen beendet hat.
33
Page 34

DEUTSCH
A
B
C
D
E
F
F1
G
H
I
34
Page 35

DEUTSCH
Einrichten des Internetzugangs fertig stellen
Wenn beim Zugriff auf das Internet Probleme
auftreten sollten, befolgen Sie die Anweisungen auf
dem Bildschirm.
Klicken Sie auf Finish (Fertig stellen), um den SetupAssistenten abzuschließen.
4 Einrichten des Druckservertreibers
Der Druckservertreiber muss auf jedem Computer des Netzwerks installiert werden, der den Druckserver
benutzen soll. Bevor Sie den Druckservertreiber installieren, müssen Sie sowohl den USB-Drucker als auch
den Computer an den P-335U anschließen und alle drei Geräte, den P-335U, den Computer und den USBDrucker einschalten.
1 Legen Sie die mitgelieferte CD in das CD-ROM-Laufwerk des
Computers ein. Auf dem Bildschirm erscheint automatisch das
Autostart-Fenster.
2 Wählen Sie Network Print Server Setup
(Netzwerkdruckserver-Setup).
3 Wählen Sie Setup Wizard for Windows NT/2000/XP (Setup-
Assistent für Windows NT/2000/XP), um den Setup-
Assistenten zu starten.
4 Führen Sie die Anweisungen auf dem Bildschirm aus, um den
Druckservertreiber auf Ihrem Windows-Computer zu
installieren.
5 Weitere Informationen dazu sowie eine Beschreibung, wie der
Druckservertreiber auf einem Macintosh-Computer installiert
wird, wie finden Sie im Benutzerhandbuch.
35
Page 36

DEUTSCH
Problembeseitigung
1 Wenn Sie mit dem Internet Explorer bei Windows XP oder Windows Server 2003 nicht auf den Web-
Konfigurator zugreifen können, stellen Sie sicher, dass alle Pop-Up-Fenster, JavaScripts und JavaEinstellungen zugelassen werden, oder dass die Einstellungen für die Internetsicherheit im Internet
Explorer unter der Einstellung Hoch liegen (klicken Sie beim Internet Explorer auf Extras >
Internetoptionen > Sicherheit > Stufe anpassen...). Weitere Informationen dazu finden Sie im Anhang des
Benutzerhandbuchs.
2 Wenn Sie keine Verbindung zum Internet herstellen können, während der Computer an den LAN-
Anschluss angeschlossen ist, führen Sie die folgenden Schritte aus.
A) Prüfen Sie die Anzeigeleuchten am Gerät. Wenn sie von der Beschreibung in Abschnitt 1 abweichen,
prüfen Sie noch einmal die Verbindungen. (Siehe Abschnitt 1.) Wenn die Anzeigeleuchten immer noch
nicht übereinstimmen, schalten Sie das Gerät aus und nach einigen Sekunden wieder ein.
B) Führen Sie noch einmal die Schritte aus Abschnitt 3 aus. Stellen Sie sicher, dass Sie die richtigen Daten
eingegeben haben. Z. B. müssen der Benutzername und das Kennwort des Kontos richtig eingegeben
worden sein. Wenden Sie sich an Ihren Internetdienstanbieter, wenn Sie nicht sicher sind, welche Art
der Verschlüsselung er verwendet.
C) Wenn Sie ein neues Internetkonto verwenden, prüfen Sie, ob es aktiv ist.
D) Wenn das Problem weiterhin bestehen bleibt, lesen im Benutzerhandbuch unter Fehlerbehebung nach.
3 Wenn Sie mit dem Drahtlosnetzwerk keine Verbindung zum Internet herstellen können, führen Sie diese
Schritte aus.
A) Öffnen Sie auf einem Computer des Drahtlosnetzwerks Ihren Browser und rufen Sie die Website http://
192.168.1.1 auf. Wenn das Fenster von Schritt 2 in Abschnitt 2 angezeigt wird, führen Sie die
Vorschläge A - D aus. Erscheint das Fenster nicht, fahren Sie beim nächsten Schritt fort.
B) Stellen Sie sicher, dass der Schalter AG (an der Rückseite des Geräts) auf G eingestellt ist, wenn die
Wireless-Clients IEEE 802.11b oder IEEE 802.11g unterstützen, und dass er auf A eingestellt ist, wenn
sie nur IEEE 802.11a unterstützen.
C) Stellen Sie sicher, dass der P-335U und Ihr Computer dieselben Sicherheitseinstellungen verwenden.
Führen Sie die Schritte aus Abschnitt 3 aus.
4 Wenn der USB-Drucker, der an dem P-335U angeschlossen ist, nichts druckt, führen Sie die folgenden
Schritte aus.
A) Prüfen Sie, ob der Druckservertreiber auf dem Computer installiert ist; siehe Abschnitt 4.
B) Prüfen Sie anhand der Druckerspezifikationen, ob der Drucker USB 1.1 oder 1.0 unterstützt.
C) Stellen Sie sicher, dass der USB-Drucker eingeschaltet ist und richtig arbeitet.
D) Prüfen Sie die Verbindungen des USB-Kabels.
Einrichten der IP-Adresse des Computers
In diesem Abschnitt wird beschrieben, wie Sie Ihren Computer einrichten müssen, damit er bei Windows
2000, Windows NT und Windows XP eine IP-Adresse empfangen kann. Nur auf diese Weise kann Ihr
Computer mit dem P-335U kommunizieren. Im Benutzerhandbuch finden Sie zusätzliche Informationen zur
Konfiguration der IP-Adresse für andere Windows und Macintosh Betriebssysteme.
36
Page 37

DEUTSCH
1 Klicken Sie bei Windows XP auf Start, Systemsteuerung.
Klicken Sie bei Windows 2000/NT auf Start, Einstellungen, Systemsteuerung.
2 Klicken Sie bei Windows XP auf Netzwerkverbindungen.
Klicken Sie bei Windows 2000/NT auf Netzwerk und DFÜ-Verbindungen.
3 Klicken Sie mit der rechten Maustaste auf LAN-Verbindung
und dann auf Eigenschaften.
4 Wählen Sie Internetprotokoll (TCP/IP) (bei Windows XP auf
der Registerkarte Allgemein) und klicken Sie auf
Eigenschaften.
5 Das Fenster Eigenschaften von Internetprotokoll (TCP/IP)
erscheint (bei Windows XP auf der Registerkarte Allgemein).
6 Wählen Sie IP-Adresse automatisch beziehen und DNS-
Serveradresse automatisch beziehen.
7 Klicken Sie auf OK, um das Fenster Eigenschaften von
Internetprotokolle (TCP/IP) zu schließen.
8 Klicken Sie auf Schließen (bei Windows 2000/NT auf OK), um
das Fenster Eigenschaften von LAN-Verbindung zu
schließen.
9 Schließen Sie das Fenster Netzwerkverbindungen.
Schritte zum Ansehen der Produktzertifizierung(en)
1 Besuchen Sie http://www.zyxel.com.
2 Wählen Sie auf der ZyXEL-Homepage aus der Liste der Produkte Ihr Produkt aus.
3 Wählen Sie auf dieser die Zertifizierung aus, die Sie gerne angezeigt haben möchten.
37
Page 38

ESPAÑOL
Vista previa
El P-335U es un router de banda ancha inalámbrico (que soporta IEEE 802.11a, b y g y servidor de
impresión) con un switch de 10/100 Mbps incorporado de cuatro puertos. Utilice el puerto USB para compartir
una impresora USB v1.1 compatible con los ordenadores conectados al P-335U, así no necesitará asignar un
ordenador dedicado como servidor de impresión o tener un dispositivo servidor de impresión independiente.
Estos ordenadores también pueden compartir el acceso a Internet a través de un módem de banda ancha
(cable/DSL).
Debe tener una cuenta de Internet ya configurada y la mayor parte de la siguiente información.
Tabla 1 Información de la cuenta de Internet
Su dirección IP WAN del dispositivo (si se ha facilitado): ______________
Dirección IP del servidor DNS (si se ha facilitado): Primario _____________, Secundario ______________
Tipo de conexión:
Ethernet Tipo de servicio: _______________________
Nombre de usuario: ____________
PPTP Nombre de usuario: ____________
Su dirección IP WAN del dispositivo (si se ha
facilitado) ______________
ID de conexión (si es necesario): ____________
PPPoE Nombre del servicio (PPPoE): ____________
Nombre de usuario: ____________ Contraseña: ____________
Dirección IP del servidor de acceso:
______________
Contraseña: ____________
Contraseña: ____________
Dirección IP del servidor PPTP: ___________
o nombre del dominio PPTP: ___________
Consulte su Guía del usuario para información previa sobre todas las características.
A continuación se detalla lo que necesita hacer:
1 Conexiones del hardware 2 Acceso al configurador Web
3 Configuración del acceso a Internet 4 Instalación del controlador del servidor de impresión
38
Page 39

ESPAÑOL
1 Conexiones del hardware
Realice lo siguiente para crear conexiones de hardware para la configuración inicial.
Conexión WAN
1
Conecte su módem al puerto “WAN” usando el cable que venía con su módem.
Conexión LAN
2
Conecte su ordenador a un puerto "LAN" usando el cable Ethernet incluido.
Conexión USB
3
Utilice un cable USB para conectar una impresora USB (versión 1.0 o 1.1) en este puerto. El P-335U detectará
automáticamente el modelo de impresora USB.
Conexión de ALIMENTACIÓN
4
Utilice el adaptador de corriente incluido para conectar el zócalo POWER (ALIMENTACIÓN) a una fuente de
alimentación apropiada (consulte la Guía del usuario para especificaciones sobre el adaptador de corriente por
regiones).
39
Page 40

ESPAÑOL
Los LEDs
Mire a los LEDs del panel frontal. Cuando
conecta la alimentación, el LED PWR parpadea
y se mantiene encendido una vez que el
dispositivo está listo. Unos 30 segundos después,
el LED A/G también se enciende.
Los LEDs LAN y WAN se encenderán si se
realizan correctamente las conexiones
correspondientes.
2 Acceso al configurador Web
1 Abra su explorador de web. Introduzca “192.168.1.1” como dirección del sitio web.
Nota: Si la pantalla de acceso no aparece, compruebe la configuración de seguridad de su explorador
(ver Solución de problemas para más detalles) o compruebe que su ordenador esté ajustado
para recibir una dirección IP dinámicamente (ver Configurar la dirección IP de su ordenador).
2 Aparecerá la pantalla Password (Contraseña).
Introduzca la contraseña ("1234" es la
predeterminada) y haga clic en Login (Acceso).
3 Cambie la contraseña en la pantalla siguiente y
haga clic en Apply (Aplicar).
4 Haga clic en Go to Wizard setup (Asistente de
Configuración) para configurar su P-335U por
primera vez.
40
Page 41

ESPAÑOL
Nota: El botón Next (Siguiente) está situado en la parte inferior derecha de cada pantalla.
5 Elija su idioma en el cuadro de la lista
desplegable. Haga clic en Next (Siguiente).
6 Haga clic en Next (Siguiente) para proceder con el
Connection Wizard (Asistente para la conexión).
3 Configuración del acceso a Internet
Nota: Introduzca la información de acceso a Internet facilitada por su ISP en cada pantalla del
asistente y luego haga clic en Next (Siguiente) para continuar o haga clic en Back (Atrás) para
regresar a la pantalla anterior.
La información de la pantalla actual se perderá si hace clic en Back (Atrás).
PASO 1:
1 Esta pantalla es opcional. Puede hacer clic en
Next (Siguiente).
• System Name (Nombre del sistema) es para
identificar el P-335U. Puede introducir el "Com-
puter Name" (Nombre de ordenador) de su orde-
nador.
• Si deja el Domain Name (Nombre de dominio)
en blanco, se utilizará el nombre de dominio
obtenido por el DHCP desde el ISP.
Información del sistema
PASO 2:
Configure UNO de los siguientes tipos de seguridad en el P-335U:
• Seguridad Auto (Automática): Utilice OTIST para generar automáticamente una clave pre-compartida. Vea la
clave pre-compartida en la pantalla Wireless LAN (LAN inalámbrica).
LAN inalámbrica
41
Page 42

ESPAÑOL
Nota: Sus clientes inalámbricos deben soportar WPA-PSK y utilizar la misma clave.
• None (Ninguna): No tiene seguridad LAN inalámbrica configurada. Si no activa ninguna seguridad inalámbrica
en su P-335U, su red es accesible desde cualquier dispositivo de red inalámbrico dentro del alcance.
• Seguridad Basic (Básica): WEP (Wired Equivalent Privacy) cifra los cuadros de datos antes de transmitir por
la red inalámbrica. Cuanto mayor sea el cifrado WEP, mayor será la seguridad pero menor la velocidad.
• Seguridad Extend (Extendida) (WPA-PSK o WPA2-PSK): Configura una clave pre-compartida. Elija esta
opción sólo si sus clientes inalámbricos soportan WPA-PSK o WPA2-PSK respectivamente.
Nota: Los clientes inalámbricos y el P-335U deben usar el mismo SSID, ID de canal y WPA(2)-PSK (si
WPA(2)-PSK está activado) o la clave de cifrado WEP (si WEP está activado) para la
comunicación inalámbrica.
OTIST
• OTIST (One-Touch Intelligent Security Technology - Tecnología de Seguridad Inteligente de Un Toque) permite
a su P-335U asignar a clientes inalámbricos el SSID del P-335U y configuración de cifrado de WEP estática o
WPA-PSK. El cliente inalámbrico también debe soportar OTIST y tener activado OTIST.
Seguridad Wireless (Inalámbrica) Auto (Automática) o No
A Introduzca un nombre único para identificar al P-335U en la LAN inalámbrica.
B Seleccione un nivel de seguridad inalámbrico. Elija Auto (Automático) o None (Ninguno).
C El P-335U busca automáticamente y selecciona un canal no en uso por un dispositivo cercano. El P-335U y el
cliente inalámbrico deben usar el mismo ID de canal.
D Yes (Sí) está seleccionado por defecto. Seleccione el círculo No si no desea utilizar OTIST ahora o si sus
clientes inalámbricos no soportan OTIST. Si ajusta Security (Seguridad) a Auto (Automática), OTIST deberá
estar activado.
E La Setup Key (Clave de configuración) OTIST predeterminada es "01234567". Esta clave puede cambiarse
en la pantalla OTIST. Asegúrese de utilizar la misma Setup Key (Clave de configuración) OTIST en el P-
335U y en los clientes inalámbricos.
42
Page 43

ESPAÑOL
A
B
C
D
E
Seleccione seguridad Básica (WEP)
A Introduzca un nombre único para identificar al P-335U en la LAN inalámbrica.
B Seleccione seguridad Básica (WEP).
C El P-335U busca automáticamente y selecciona un canal no en uso por un dispositivo cercano. El P-335U y el
cliente inalámbrico deben usar el mismo ID de canal.
D Seleccione 64-bit, 128-bit o 256-bit en la lista desplegable de cifrado WEP.
E Seleccione el método de introducción de clave WEP ASCII o Hex.
F Puede crear una clave WEP de los siguientes modos:
Introduciendo una Passphrase (Frase secreta) (hasta 32 caracteres imprimibles) y haciendo clic en
Generate (Generar). El P-335U genera automáticamente cuatro claves WEP.
O escribir claves manuales en cada campo Key (Clave) (1~4).
G Seleccione uno de los botones redondos Key (Clave) para usarla como clave WEP predeterminada.
H Yes (Sí) está seleccionado por defecto. Seleccione el círculo No si no desea utilizar OTIST ahora o si sus
clientes inalámbricos no soportan OTIST.
I La Setup Key (Clave de configuración) OTIST predeterminada es "01234567". Esta clave puede cambiarse
en la pantalla OTIST. Asegúrese de utilizar la misma Setup Key (Clave de configuración) OTIST en el P-
335U y en los clientes inalámbricos.
43
Page 44

ESPAÑOL
A
B
C
F
D
E
G
H
I
44
Page 45

ESPAÑOL
Extienda la seguridad (WPA-PSK) o (WPA2-PSK).
A Introduzca un nombre único para identificar al P-335U en la LAN inalámbrica.
B Seleccione seguridad WPA-PSK o WPA2-PSK.
C El P-335U busca automáticamente y selecciona un canal no en uso por un dispositivo cercano. El P-335U y el
cliente inalámbrico deben usar el mismo ID de canal.
D Escriba una clave pre-compartida para tener una conexión inalámbrica más segura que el cifrado WEP.
Escriba de 8 a 63 caracteres ASCII con distinción entre mayúsculas y minúsculas. Puede ajustar la conexión
inalámbrica más segura configurando WPA(2) en la pantalla inalámbrica avanzada. Necesita configurar un
servidor RADIUS para hacerlo.
E Yes (Sí) está seleccionado por defecto. Seleccione el círculo No si no desea utilizar OTIST ahora o si sus
clientes inalámbricos no soportan OTIST.
F La Setup Key (Clave de configuración) OTIST predeterminada es "01234567". Esta clave puede cambiarse
en la pantalla OTIST. Asegúrese de utilizar la misma Setup Key (Clave de configuración) OTIST en el P-
335U y en los clientes inalámbricos.
A
B
C
D
E
F
45
Page 46

ESPAÑOL
PASO 3:
El asistente intentará detectar qué tipo de conexión WAN está utilizando.
Si el asistente no detecta un tipo de conexión, deberá seleccionar UNO en el cuadro de la lista desplegable.
Consulte a su ISP para comprobar que utiliza el tipo correcto:
1 Ethernet
2 PPPoE
3 PPTP.
Nota: Si se le ha facilitado una configuración de acceso a Internet, introdúzcala en los campos
siguientes. De lo contrario, deje los valores predeterminados y haga clic en Next (Siguiente).
WAN
Conexión Ethernet
A Seleccione Ethernet como tipo de conexión WAN.
B Seleccione Get automatically from your ISP (Obtener automáticamente de su ISP) si su ISP no le asignó
una dirección IP fija. Salte a C.
O
Seleccione Use fixed IP address provided by your ISP (Utilizar la dirección IP fija facilitada por su ISP)
para dar al P-335U una dirección IP única y fija. Vaya a B1.
B1 Si selecciona Use fixed IP address provided by your ISP (Utilizar la dirección IP fija facilitada por su
ISP), escriba una dirección IP WAN, una máscara de subred IP y la dirección IP del dispositivo vecino
facilitada por su ISP.
Si se le ha facilitado la dirección IP y/o la configuración del servidor DNS, introdúzcalos en los campos. De
lo contrario, deje los valores predeterminados y haga clic en Next (Siguiente).
C Seleccione Factory Default (Predeterminado de fábrica) para utilizar la dirección MAC predeterminada
asignada de fábrica.
D Seleccione esta casilla para que P-335U aplique la administración de ancho de banda.
E Haga clic en Apply (Aplicar) para guardar la configuración personalizada. Aparecerá la pantalla OTIST in
Progress (OTIST en progreso) si ha activado OTIST en la pantalla anterior del asistente. Espere a que el
P-335U termine de transferir la configuración OTIST.
46
Page 47

ESPAÑOL
A
B
C
B1
D
E
47
Page 48

ESPAÑOL
Conexión PPPoE
A Seleccione PPPoE como tipo de conexión WAN.
B Escriba el Service Name (Nombre de servicio) (Opcional), User Name (Nombre de usuario) y Password
(Contraseña).
C Seleccione Get automatically from your ISP (Obtener automáticamente de su ISP) si su ISP no le asignó
una dirección IP fija. Salte a D.
O
Seleccione Use fixed IP address provided by your ISP (Utilizar la dirección IP fija facilitada por su ISP)
para dar al P-335U una dirección IP única y fija. Vaya a C1.
C1 Si selecciona Use fixed IP address provided by your ISP (Utilizar la dirección IP fija facilitada por su
ISP), escriba una dirección IP WAN, una máscara de subred IP y la dirección IP del dispositivo vecino
facilitada por su ISP.
Si se le ha facilitado la dirección IP y/o la configuración del servidor DNS, introdúzcalos en los campos. De
lo contrario, deje los valores predeterminados y haga clic en Next (Siguiente).
D Seleccione Factory Default (Predeterminado de fábrica) para utilizar la dirección MAC predeterminada
asignada de fábrica.
E Seleccione esta casilla para que P-335U aplique la administración de ancho de banda.
F Haga clic en Apply (Aplicar) para guardar la configuración personalizada. Aparecerá la pantalla OTIST in
Progress (OTIST en progreso) si ha activado OTIST en la pantalla anterior del asistente. Espere a que el
P-335U termine de transferir la configuración OTIST.
48
Page 49

ESPAÑOL
A
B
C
C1
D
E
F
49
Page 50

ESPAÑOL
Conexión PPTP
A Seleccione PPTP como tipo de conexión WAN.
B Escriba un User Name (Nombre de usuario) y Password (Contraseña)
C Seleccione Get automatically from your ISP (Obtener automáticamente de su ISP) si su ISP no le asignó
una dirección IP PPTP fija.
O seleccione Use fixed IP address (Utilizar dirección IP fija) para dar al P-335U una dirección IP PPTP
única y fija y una máscara de subred.
D Escriba una dirección IP del servidor PPTP
E Escriba un Connection ID/Name (ID de conexión/Nombre) (si se le ha facilitado)
F Seleccione Get automatically from your ISP (Obtener automáticamente de su ISP) si su ISP no le asignó
una dirección IP fija. Salte a G.
O
Seleccione Use fixed IP address provided by your ISP (Utilizar la dirección IP fija facilitada por su ISP)
para dar al P-335U una dirección IP única y fija. Vaya a F1.
F1 Si selecciona Use fixed IP address provided by your ISP (Utilizar la dirección IP fija facilitada por su
ISP), escriba una dirección IP WAN, una máscara de subred IP y la dirección IP del dispositivo vecino
facilitada por su ISP.
Si se le ha facilitado la dirección IP y/o la configuración del servidor DNS, introdúzcalos en los campos. De
lo contrario, deje los valores predeterminados y haga clic en Next (Siguiente).
G Seleccione Factory Default (Predeterminado de fábrica) para utilizar la dirección MAC predeterminada
asignada de fábrica.
H Seleccione esta casilla para que P-335U aplique la administración de ancho de banda.
I Haga clic en Apply (Aplicar) para guardar la configuración personalizada. Aparecerá la pantalla OTIST in
Progress (OTIST en progreso) si ha activado OTIST en la pantalla anterior del asistente. Espere a que el
P-335U termine de transferir la configuración OTIST.
50
Page 51

ESPAÑOL
A
B
C
D
E
F
F1
G
H
I
51
Page 52

ESPAÑOL
Configuración del acceso a Internet completada
Si tiene algún problema de acceso a Internet, siga
las instrucciones en pantalla.
Haga clic en Finish (Finalizar) para completar la
configuración del asistente.
4 Instalación del controlador del servidor de impresión
El controlador del servidor de impresión debe estar instalado en cada ordenador de su red que vaya a utilizar
el servidor de impresión. Antes de instalar el controlador del servidor de impresión, compruebe que la
impresora USB y su ordenador están conectados al P-335U y que tanto el P-335U, como su ordenador y la
impresora USB están encendidos.
1 Inserte el CD incluido en la unidad de CD-ROM de su
ordenador. La pantalla de autoarranque del CD aparecerá en
la pantalla.
2 Seleccione Network Print Server Setup (Instalación del
servidor de impresión de redes).
3 Seleccione Setup Wizard for Windows NT/2000/XP
(Asistente para la instalación para Windows NT/2000/XP)
para abrir el asistente para la instalación.
4 Siga las instrucciones en pantalla para instalar el controlador
del servidor de impresión en su ordenador con Windows.
5 Consulte la Guía del usuario para más información y para
saber cómo instalar un controlador de servidor de impresión
en un ordenador Macintosh.
52
Page 53

ESPAÑOL
Solución de problemas
1 Si no puede acceder al configurador web utilizando Internet Explorer en Windows XP o Windows Server
2003, asegúrese de tener habilitada la apertura de ventanas emergentes, permisos para JavaScripts y
Java o ajuste el nivel de seguridad de Internet a un nivel más bajo que High (Alto) en Internet Explorer (en
Internet Explorer, haga clic en Herramientas > Opciones de Internet > Seguridad > Nivel
personalizado...). Consulte el apéndice de la Guía del usuario para más información.
2 Si no puede acceder a Internet cuando su ordenador está conectado al puerto LAN, siga estos pasos.
A) Compruebe las luces del panel frontal. Si son diferentes a las descritas en la sección 1, compruebe que
las conexiones son correctas. (Ver sección 1.) Si las luces continúan siendo distintas, apague el
dispositivo, espere unos segundos y vuelva a encenderlo.
B) Siga los pasos de la sección 3 de nuevo. Asegúrese de introducir la información correcta. Por ejemplo,
si su cuenta tiene un nombre de usuario y una contraseña, asegúrese de escribirla correctamente.
Además, si no está seguro de qué encapsulación utiliza su ISP, contacte con él.
C) Si utiliza una cuenta de Internet nueva, contacte con su ISP para comprobar que está activa.
D) Si continúa teniendo problemas, consulte Solución de problemas en la Guía del usuario.
3 Si no puede acceder a Internet utilizando la red inalámbrica, siga estos pasos.
A) En un ordenador en la red inalámbrica, abra su explorador y vaya a http://192.168.1.1. Si ve la pantalla
del paso 2 o la sección 2, siga las sugerencias A - D de arriba. Si no, vaya al paso siguiente.
B) Compruebe que el interruptor AG (en el panel posterior) esté ajustado a la posición G si sus clientes
inalámbricos soportan IEEE 802.11b o IEEE 802.11g y ajústelo a la posición A si sus clientes
inalámbricos sólo soportan IEEE 802.11a.
C) Compruebe que su P-335U y su ordenador estén utilizando la misma configuración inalámbrica y de
seguridad inalámbrica. Siga los pasos de la sección 3.
4 Si no puede imprimir nada con la impresora USB conectada al P-335U, siga estos pasos.
A) Asegúrese de haber instalado el controlador del servidor de impresión en su ordenador; ver sección 4.
B) Verifique si la impresora utiliza USB 1.1 o 1.0 comprobando las especificaciones de su impresora.
C) Compruebe que la impresora USB esté encendida y que funcione correctamente.
D) Compruebe las conexiones del cable USB.
Configurar la dirección IP de su ordenador
Esta sección le explica cómo configurar su ordenador para recibir una dirección IP en Windows 2000,
Windows NT y Windows XP. Esto asegura que su ordenador pueda conectarse con su P-335U.
1 En Windows XP, haga clic en Inicio, Panel de control.
En Windows 2000/NT, haga clic en Inicio, Configuración, Panel de control.
2 En Windows XP, haga clic en Conexiones de red.
En Windows 2000/NT, haga clic en Conexiones de red y marcación.
3 Haga clic con el botón derecho en Conexión de área local y haga clic en Propiedades.
53
Page 54

ESPAÑOL
4 Seleccione Protocolo Internet (TCP/IP) (en la ficha General en Windows XP) y haga clic en
Propiedades.
5 Se abrirá la pantalla Propiedades de Protocolo
Internet TCP/IP (la ficha General en Windows XP).
6 Seleccione las opciones Obtener una dirección IP
automáticamente y Obtener la dirección del
servidor DNS automáticamente.
7 Haga clic en Aceptar para cerrar la ventana
Propiedades de Protocolo Internet (TCP/IP).
8 Haga clic en Cerrar (Aceptar en Windows 2000/NT)
para cerrar la ventana Propiedades de conexión de
área local.
9 Cierre la pantalla Conexiones de red.
Procedimiento para ver la(s) certificación(es) del producto
1 Vaya a http://www.zyxel.com.
2 Seleccione su producto de la lista desplegable en la página inicial de ZyXEL para ir a la página de ese
producto.
3 Seleccione la certificación que desee visualizar en esta página.
54
Page 55

FRANÇAIS
Présentation
Le P-335U est un routeur large bande sans fil (qui supporte IEEE 802,11a, b et g et serveur d'impression)
avec un switch 4-ports 10/100 Mbps intégré. Utilisez le port USB pour partager une imprimante compatible
USB v1.1 avec les ordinateurs connectés au P-335U, ainsi vous n'avez pas besoin d'assigner un ordinateur
dédié comme serveur d'impression ou d'avoir un serveur d'impression périphérique séparé. Ces ordinateurs
peuvent également partager l'accès à Internet via un modem large bande (câble/DSL).
Vous devez déjà avoir un compte Internet installé et avoir reçu la plupart des informations suivantes.
Table 1 Informations sur le compte Internet
L'adresse IP WAN de votre périphérique (si fournie) : ______________
Adresse IP du Serveur DNS (si fournie) : Principale _____________, Secondaire ______________
Type de connexion :
Ethernet Type de service : _______________________
Nom d'utilisateur : ____________
PPTP Nom d'utilisateur : ____________
Votre adresse IP WAN (si fournie) ____________
ID de connexion (si nécessaire) : ____________
PPPoE Nom du service (PPPoE) : ____________
Nom d'utilisateur : ____________ Mot de passe : ____________
Adresse IP de connexion du serveur :
______________
Mot de passe : ____________
Mot de passe : ____________
Adresse IP du serveur PPTP : ___________
ou nom de domaine PPTP : ___________
Voir votre guide de l'utilisateur pour des informations supplémentaires sur toutes les fonctionnalités.
Voici la liste de ce que vous devez faire :
1 Connexions matérielles 2 Accéder au configurateur Web
3 Installation de l'accès à Internet 4 Installer le Pilote du Serveur d'Impression
55
Page 56

FRANÇAIS
1 Connexions matérielles
Procédez comme suit pour effectuer les connexions matérielles pour l'installation initiale.
Connexion WAN
1
Connectez votre modem au port “WAN” à l'aide du câble fourni avec votre modem.
Connexion par réseau local
2
Connectez votre ordinateur à un port "LAN" à l'aide du câble Ethernet fourni.
Connexion USB
3
Utilisez un câble USB pour connecter une imprimante USB (version 1.0 ou 1.1) à ce port. Le P-335U
détecte automatiquement le modèle d'imprimante USB.
Connexion de l'alimentation
4
Utilisez l’adaptateur d’alimentation fourni pour connecter à une source d’alimentation appropriée (voir le guide
de l'utilisateur pour les spécifications sur l'adaptateur d'alimentation par région).
56
Page 57

FRANÇAIS
Les LED
Observez les LED du panneau avant. Quand
vous connectez l'alimentation, la LED PWR
clignote et reste allumée une fois que l'appareil est
prêt. A peu près 30 secondes plus tard, la LED A/G
apparaît également.
Les LED LAN et WAN s'allument si les
connexions correspondantes sont correctement
effectuées.
2 Accéder au configurateur Web
1 Lancez votre navigateur web. Entrez “192.168.1.1” comme adresse de site Web.
Remarque: Si l'écran de connexion n'apparaît pas, vérifiez les paramètres de sécurité de votre
navigateur (voir Dépannage pour plus de détails) ou assurez-vous que votre ordinateur
est configuré pour recevoir des adresses IP dynamiques (Consultez Paramétrez l'adresse
IP de votre ordinateur).
57
Page 58

FRANÇAIS
2 La fenêtre Password (Mot de passe) s'affiche.
Entrez le mot de passe ("1234" est la valeur par
défaut) et cliquez sur Login (Connexion).
3 Changez le mot de passe dans l'écran suivant et
cliquez sur Apply (Appliquer).
4 Cliquez sur Go to Wizard setup (Aller à l'assistant
de paramétrage) pour paramétrer votre P-335U pour
la première fois.
Remarque: Le bouton Next (Suivant) est situé en bas à droite de chaque écran.
5 Choisissez votre langue dans la liste déroulante.
Cliquez sur Next (Suivant).
6 Cliquez sur Next (Suivant) pour continuer avec
Connection Wizard (l'Assistant de connexion).
3 Installation de l'accès à Internet
Remarque: Saisissez les informations d'accès à Internet exactement telles qu'elles sont fournies par
votre fournisseur d'accès à Internet (FAI) dans chaque écran de l'assistant et cliquez
ensuite sur Next (Suivant) pour continuer ou cliquez sur Back (Retour) pour retourner à
l'écran précédent.
Les informations d'écran actuelles seront perdues si vous cliquez sur Back (Retour).
58
Page 59

FRANÇAIS
ETAPE 1:
1 Cet écran est optionnel. Cliquez simplement sur
Next (Suivant).
• System Name (Le nom du système) sert à identi-
fier le P-335U. Vous pouvez saisir le "Nom d'ordi-
nateur" de votre ordinateur.
• Si vous laissez Domain Name (le nom de
domaine) vide, le nom de domaine obtenu par
DHCP de l'ISP est utilisé.
ETAPE 2:
Configurez UN des types de sécurité sans fil suivants sur le P-335U.
• Sécurité Auto : Utilisez OTIST pour générer automatiquement une clé pré-partagée. Visualisez la clé prépartagée dans l'écran LAN sans fil.
Remarque: Vos clients sans fil doivent supporter WPA-PSK et utiliser la même clé.
• Aucune : Aucune sécurité LAN sans fil n'est configurée. Si vous n'activez aucune sécurité sans fil sur votre P335U, votre réseau est accessible à tout périphérique de réseau sans fil se trouvant à portée.
• Sécurité de base : WEP (Wired Equivalent Privacy) crypte les trames de données avant de les transmettre sur
le réseau sans fil. Plus le cryptage WEP est élevé, meilleure sera la sécurité mais plus le débit sera lent.
• Sécurité (WPA-PSK ou WPA2-PSK) étendue : Configurer une clé prépartagée. Choisissez cette option seulement si vos clients sans fil supportent respectivement WPA-PSK ou WPA2-PSK.
Informations du système
LAN Sans Fil
Remarque: Les clients sans fil et P-335U doivent utiliser la même SSID, ID de canal et WPA(2)-PSK
(si WPA(2)-PSK est activé) ou la clé de cryptage WEP (si WEP est activé) pour la
communication sans fil.
OTIST
• OTIST (One-Touch Intelligent Security Technology) permet à votre P-335U d'attribuer la SSID du P-335U aux
clients sans fil et les paramètres de cryptage WEP statique ou WPA-PSK. Le client sans fil doit aussi supporter
OTIST et avoir OTIST activé.
59
Page 60

FRANÇAIS
Sécurité sans fil Auto ou Désactivé
A Saisissez un nom unique pour identifier le P-335U dans le LAN sans fil.
B Sélectionnez un niveau de sécurité sans fil. Choisissez Auto (Auto) ou None (Aucun).
C Le P-335U recherche et sélectionne automatiquement un canal qui n'est pas utilisé par un appareil avoisinant.
Le P-335U ZyXEL et le client sans fil doivent utiliser la même ID de canal.
D Yes (Oui) est sélectionné par défaut. Sélectionnez la case d'option No (Non) si vous ne voulez pas
utiliser OTIST maintenant ou si votre client sans fil ne prend pas OTIST en charge. Si vous paramétrez
Security (Sécurité) sur Auto, OTIST doit être activé.
E Setup Key (La clé d'installation) d'OTIST par défaut est "01234567". Cette clé peut être modifiée dans
l'écran OTIST. Vérifiez que vous utilisez la même Setup Key (Clé d'installation) OTIST sur le P-335U et
les clients sans fil.
A
B
C
D
E
60
Page 61

FRANÇAIS
Sécurité de base (WEP)
A Saisissez un nom unique pour identifier le P-335U dans le LAN sans fil.
B Sélectionnez la sécurité de base (WEP).
C Le P-335U recherche et sélectionne automatiquement un canal qui n'est pas utilisé par un appareil avoisinant.
Le P-335U ZyXEL et le client sans fil doivent utiliser la même ID de canal.
D Sélectionnez 64 bits, 128 bits ou 256 bits dans la liste déroulante de cryptage WEP.
E Sélectionnez la méthode d'entrée de clé WEP ASCII ou Hex.
F Vous pouvez créer une clé WEP de l'une des manières suivantes :
En entrant une Passphrase (phrase de passe) (jusqu'à 32 caractères imprimables) et en cliquant sur
Générer. Le P-335U génère automatiquement quatre clés WEP.
Ou en entrant les clés manuelles dans chaque champ Clé (1~4).
G Sélectionnez une des cases d'options de clé à utiliser comme Key (clé) WEP par défaut.
H Yes (Oui) est sélectionné par défaut. Sélectionnez la case d'option No (Non) si vous ne voulez pas utiliser
OTIST maintenant ou si votre client sans fil ne prend pas OTIST en charge.
I La Setup Key (clé d'installation) d'OTIST par défaut est "01234567". Cette clé peut être modifiée dans
l'écran OTIST. Vérifiez que vous utilisez la même Setup Key (Clé d'installation) OTIST sur le P-335U et
les clients sans fil.
61
Page 62

FRANÇAIS
A
B
C
F
D
E
G
H
I
62
Page 63

FRANÇAIS
Sécurité étendue (WPA-PSK ou WPA2-PSK)
A Saisissez un nom unique pour identifier le P-335U dans le LAN sans fil.
B Sélectionnez la sécurité WPA-PSK ou WPA2-PSK.
C Le P-335U recherche et sélectionne automatiquement un canal qui n'est pas utilisé par un appareil avoisinant.
Le P-335U ZyXEL et le client sans fil doivent utiliser la même ID de canal.
D Tapez une clé prépartagée pour avoir une connexion sans fil plus sécurisée que le cryptage WEP. Tapez
de 8 à 63 caractères ASCII en respectant la casse. Vous pouvez paramétrer la connexion sans fil la plus
sécurisée en configurant WPA(2) dans l'écran sans fil avancé. Pour cela vous devez configurer un
serveur RADIUS.
E Yes (Oui) est sélectionné par défaut. Sélectionnez la case d'option No (Non) si vous ne voulez pas utiliser
OTIST maintenant ou si votre client sans fil ne prend pas OTIST en charge.
F La Setup Key (clé d'installation) d'OTIST par défaut est "01234567". Cette clé peut être modifiée dans
l'écran OTIST. Vérifiez que vous utilisez la même Setup Key (Clé d'installation) OTIST sur le P-335U et
les clients sans fil.
A
B
C
D
E
F
63
Page 64

FRANÇAIS
ETAPE 3:
L'assistant essaie de détecter le type de connexion WAN que vous utilisez.
Si l'assistant ne détecte pas de type de connexion, vous devez en sélectionner UN dans la liste déroulante. Voyez
auprès de votre ISP pour être sûr d'utiliser le type correct :
1 Ethernet
2 PPPoE
3 PPTP.
Remarque: Si vous avez obtenu les paramètres d'accès Internet, saisissez-les dans les champs
suivants. Sinon laissez les paramètres par défaut et cliquez simplement sur Next
(Suivant).
WAN
64
Page 65

FRANÇAIS
Connexion Ethernet
A Sélectionnez Ethernet comme type de connexion WAN.
B Sélectionnez Get automatically from your ISP (Obtenir automatiquement de l'ISP) si votre ISP ne vous
a pas attribué une adresse IP fixe. Passez à C.
Ou
Sélectionnez Use fixed IP address provided by your ISP (Utiliser l'adresse IP fixe fournie par votre ISP)
pour donner au P-335U une adresse IP fixe et unique. Allez à B1.
B1 Si vous sélectionnez Use fixed IP address provided by your ISP (Utiliser l'adresse IP fixe fournie par
votre ISP), entrez une adresse IP WAN, le masque de sous-réseau IP WAN et l'adresse IP du périphérique
de voisinage donnée par votre ISP.
Si vous avez reçu des paramètres de serveur DNS, entrez-les dans les champs. Sinon laissez les
paramètres par défaut et cliquez simplement sur Next (Suivant).
C Sélectionnez Factory Default (Par défaut d'usine) pour utiliser l'adresse MAC par défaut attribuée en
usine.
D Sélectionnez cette case à cocher pour faire en sorte que le P-335U applique la gestion de bande
passante.
E Cliquez sur Apply (Appliquer) pour enregistrer vos paramètres personnalisés. L'écran OTIST en cours
apparaît si vous activez OTIST dans l'écran d'assistant précédent. Attendez que le P-335U finisse de
transférer les paramètres de l'OTIST.
65
Page 66

FRANÇAIS
A
B
C
B1
D
E
66
Page 67

FRANÇAIS
Connexion PPPoE
A Sélectionnez PPPoE comme étant votre type de connexion WAN.
B Tapez un Service Name (nom de service) (optionnel), User Name (nom d'utilisateur) et Password (mot de
passe).
C Sélectionnez Get automatically from your ISP (Obtenir automatiquement de l'ISP) si votre ISP ne vous
a pas attribué une adresse IP fixe. Passez à D.
Ou
Sélectionnez Use fixed IP address provided by your ISP (Utiliser l'adresse IP fixe fournie par votre ISP)
pour donner au P-335U une adresse IP fixe et unique. Allez à C1.
C1 Si vous sélectionnez Use fixed IP address provided by your ISP (Utiliser l'adresse IP fixe fournie par
votre ISP), entrez une adresse IP WAN, le masque de sous-réseau IP WAN et l'adresse IP du périphérique
de voisinage donnée par votre ISP.
Si vous avez reçu des paramètres de serveur DNS, entrez-les dans les champs. Sinon laissez les
paramètres par défaut et cliquez simplement sur Next (Suivant).
D Sélectionnez Factory Default (Par défaut d'usine) pour utiliser l'adresse MAC par défaut attribuée en
usine.
E Sélectionnez cette case à cocher pour faire en sorte que le P-335U applique la gestion de bande
passante.
F Cliquez sur Apply (Appliquer) pour enregistrer vos paramètres personnalisés. L'écran OTIST en cours
apparaît si vous activez OTIST dans l'écran d'assistant précédent. Attendez que le P-335U finisse de
transférer les paramètres de l'OTIST.
67
Page 68

FRANÇAIS
A
B
C
C1
D
E
F
68
Page 69

FRANÇAIS
Connexion PPTP
A Sélectionnez PPTP comme type de connexion WAN.
B Tapez un User Name (nom d'utilisateur) et Password (un mot de passe).
C Sélectionnez Get automatically from ISP (Obtenir automatiquement de l'ISP) si votre ISP ne vous a pas
attribué une adresse PPTP IP fixe.
Ou sélectionnez Use fixed IP address (Utiliser une adresse IP fixe) pour donne au P-335U une adresse IP
PPTP fixe et unique et un masque de sous-réseau.
D Tapez une Server IP Address (adresse IP) de serveur PPTP
E Tapez une Connection ID/Name (ID/Nom de connexion) (si fourni)
F Sélectionnez Get automatically from your ISP (Obtenir automatiquement de l'ISP) si votre ISP ne vous
a pas attribué une adresse IP fixe. Passez à G.
Ou
Sélectionnez Use fixed IP address provided by your ISP (Utiliser l'adresse IP fixe fournie par votre ISP)
pour donner au P-335U une adresse IP fixe et unique. Allez à F1.
F1 Si vous sélectionnez Use fixed IP address provided by your ISP (Utiliser l'adresse IP fixe fournie par
votre ISP), entrez une adresse IP WAN, le masque de sous-réseau IP WAN et l'adresse IP du périphérique
de voisinage donnée par votre ISP.
Si vous avez reçu des paramètres de serveur DNS, entrez-les dans les champs. Sinon laissez les
paramètres par défaut et cliquez simplement sur Next (Suivant).
G Sélectionnez Factory Default (Par défaut d'usine) pour utiliser l'adresse MAC par défaut attribuée en
usine.
H Sélectionnez cette case à cocher pour faire en sorte que le P-335U applique la gestion de bande
passante.
I Cliquez sur Apply (Appliquer) pour enregistrer vos paramètres personnalisés. L'écran OTIST en cours
apparaît si vous activez OTIST dans l'écran d'assistant précédent. Attendez que le P-335U finisse de
transférer les paramètres de l'OTIST.
69
Page 70

FRANÇAIS
A
B
C
D
E
F
F1
G
H
I
70
Page 71

FRANÇAIS
Installation de l'accès à Internet terminée
Si vous rencontrez des problèmes pour accéder à
Internet, suivez les instructions à l'écran.
Cliquez sur Finish (Terminer) pour mettre fin à
l'exécution de l'assistant.
4 Installer le Pilote du Serveur d'Impression
Le pilote du serveur d'impression doit être installé sur chaque ordinateur de votre réseau qui utilisera le
serveur d'impression. Avant d'installer le pilote de serveur d'impression, assurez-vous que l'imprimante USB
et votre ordinateur sont connectés au P-335U et que le P-335U, votre ordinateur et l'imprimante USB sont
tous allumés.
1 Insérez le CD fourni dans le lecteur CD-ROM de votre
ordinateur. L'écran d'Auto-démarrage du CD s'affiche
automatiquement.
2 Sélectionnez Network Print Server Setup(Configurer le
Serveur d'Impression du Réseau).
3 Sélectionnez Setup Wizard for Windows NT/2000/
XP(l'Assistant de Configuration pour Windows NT/2000/
XP)pour ouvrir l'assistant de configuration.
4 Suivez les instructions à l'écran pour configurer le pilote du
serveur d'impression sur votre ordinateur Windows.
5 Consultez le Guide de l'Utilisateur pour plus d'informations et
savoir comment configurer un serveur d'impression sur un
ordinateur Macintosh.
Dépannage
1 Si vous ne pouvez pas accéder au configurateur web en utilisant Internet Explorer dans Windows XP ou
Windows Server 2003, assurez-vous d'avoir autorisé les fenêtres surgissantes (fenêtres pop-up), les
permissions JavaScripts et Java ou configuré le niveau de sécurité Internet plus faible que Haut ans
71
Page 72

FRANÇAIS
Internet Explorer (dans Internet Explorer, cliquez Tools (Outils) > Internet Options (Options Internet)>
Security (Sécurité) > Custom Level (Niveau Personnalisé)...). Consultez l'appendice dans le Guide de
l'Utilisateur pour plus d'informations.
2 Si vous ne pouvez pas accéder à Internet quand votre ordinateur est connecté au port LANsuivez les
étapes suivantes:
A) Vérifiez les lumières du panneau avant. Si elles sont différentes que ce qui est décrit en section 1,
assurez-vous que les connexions sont correctes. (Consultez la section 1.) Si les lumières sont toujours
différentes, éteignez l'appareil, attendez quelques secondes, et allumez-le à nouveau.
B) Suivez les étapes en section 3 à nouveau. Assurez-vous d'avoir entré les informations correctes. Par
exemple, si votre compte a un nom d'utilisateur et un mot de passe, assurez-vous de les avoir tapé
correctement. De plus, si vous n'êtes pas sûr de l'encapsulation utilisée par votre ISP, contactez votre
ISP.
C) Si vous utilisez un nouveau compte Internet, contactez votre ISP pour confirmer l'activation du compte.
D) Si vous avez toujours des problèmes, consultez Dépannage dans le Guide de l'Utilisateur.
3 Si vous ne pouvez pas accéder à Internet en utilisant le réseau sans fil, suivez les étapes suivantes:
A) Sur un ordinateur appartenant au réseau sans fil, ouvrez votre navigateur, et allez à : http://192.168.1.1.
Si vous visualisez l'écran de l'étape 2 de la section 2, suivez les suggestions A - D ci-dessus. Si vous ne
le visualisez pas cet écran, allez à l'étape suivante.
B) Assurez-vous que l'interrupteur AG (sur le panneau arrière) est positionné sur G si vos clients sans fil
supportent IEEE 802,11b ou IEEE 802,11g, et positionné sur A si vos clients supportent seulement IEEE
802,11a.
C) Assurez-vous que votre P-335U et votre ordinateur utilisent le même sans fil et les mêmes paramètres
de sécurité sans fil. Suivez à nouveau les étapes en section 3.
4 Si vous ne pouvez rien imprimer en utilisant l'imprimante USB connectée au P-335U, suivez les étapes
suivantes.
A) Assurez-vous d'avoir installé le pilote du serveur d'impression; voir section 4.
B) Vérifiez que l'imprimante utilise USB 1.1 ou 1.0 en vérifiant les spécifications de l'imprimante.
C) Assurez-vous que l'imprimante USB est allumée et fonctionne correctement.
D) Vérifiez les connexions du câble USB.
Paramétrez l'adresse IP de votre ordinateur
Cette section vous indique comment paramétrer votre ordinateur pour recevoir une adresse IP dans Windows
2000, Windows NT et Windows XP. Cela assure que votre ordinateur peut communiquer avec votre P-335U.
Dans le guide de l’utilisateur, vous trouverez davantage d’informations sur la configuration de l’adresse IP pour
d’autres systèmes d’exploitation Windows et Macintosh.
1 Dans Windows XP, cliquez sur Start (Démarrer), Control Panel (Panneau de configuration).
Dans Windows 2000/NT, cliquez sur Start (Démarrer), Settings (Paramètres), Control Panel (Panneau de
configuration).
2 Dans Windows XP, cliquez sur Network Connections (Connexion réseau).
72
Page 73

FRANÇAIS
Dans Windows 2000/NT, cliquez sur Network and Dial-up Connection (Connexions réseau et accès à
distance).
3 Cliquez avec le bouton droit de la souris sur Local Area Connection (Connexion de réseau local) et
cliquez sur Properties (Propriétés).
4 Sélectionnez Protocole Internet (TCP/IP) (dans l'onglet
Général dans Windows XP) et cliquez sur Properties
(Propriétés).
5 L'écran de Propriétés TCP/IP de protocole Internet
s'ouvre (General tab (onglet Général) dans Windows
XP).
6 Sélectionnez les options Obtain an IP address
automatically (Obtenir automatiquement une adresse
IP) et Obtain DNS server adress automatically
(Obtenir automatiquement une adresse de serveur
DNS).
7 Cliquez sur OK pour fermer la fenêtre de Internet
protocol Properties (Propriétés (TCP/IP) de protocole
Internet).
8 Cliquez sur Close (Fermer) (OK dans Windows 2000/
NT) pour fermer la fenêtre de Local Area Connection
Properties (Propriétés de connexion au réseau local).
9 Fermez l'écran de Network Connections (Connexion
réseau).
Procédure pour Afficher la (les) certification(s) d'un produit
1 Allez à http://www.zyxel.com.
2 Sélectionnez votre produit dans la boîte de la liste déroulante dans la page d'accueil de ZyXEL pour aller à
la page de ce produit.
3 Sélectionnez la certification que vous désirez consulter dans cette page.
73
Page 74

ITALIANO
Cenni generali
P-335U è un router a banda larga wireless (che supporta IEEE 802.11a, b e g, nonché il server di stampa)
dotato di uno switch incorporato da quattro porte 10/100 Mbps. Utilizzare la porta USB per condividere una
stampante conforme USB v1.1 con i computer collegati a P-335U, così che non sia necessario riservare un
computer dedicato come server di stampa o di acquistare un server di stampa autonomo. Questi computer
possono condividere anche l'accesso a Internet tramite un modem broadband (via cavo/DSL).
È necessario disporre di un account Internet già configurato e disporre della maggior parte delle seguenti
informazioni.
Tabella 1 Informazioni sull'account Internet
Indirizzo IP WAN del proprio dispositivo (se fornito): ______________
Indirizzo IP del server DNS (se fornito): Primario _____________, Secondario ______________
Tipo di connessione:
Ethernet Tipo di servizio: _______________________
Nome utente: ____________
PPTP: Nome utente: ____________
Il proprio indirizzo IP WAN (se fornito):
______________
ID di connessione (se richiesto): ____________
PPPoE Nome di servizio (PPPoE): ____________
Nome utente: ____________ Password: ____________
Indirizzo IP del server di login: ______________
Password: ____________
Password: ____________
Indirizzo IP del server PPTP: ______________
oppure il nome di dominio PPTP: ___________
Vedere la Guida dell'utente per le informazioni basilari su tutte le funzionalità.
Nell'elenco seguente sono riportate le operazioni che occorre eseguire:
1 Collegamenti hardware 2 Accesso allo strumento di configurazione Web
3 Configurazione dell'accesso a Internet 4 Installazione del driver del server di stampa
74
Page 75

ITALIANO
1 Collegamenti hardware
Di seguito sono illustrati i collegamenti hardware per l'installazione iniziale.
Collegamento WAN
1
Collegare il modem alla porta “WAN” utilizzando il cavo fornito a corredo con il modem.
Collegamento LAN
2
Collegare il computer alla porta "LAN" utilizzando un cavo Ethernet fornito a corredo.
Collegamento USB
3
Utilizzare un cavo USB per collegare una stampante USB (versione 1.0 o 1.1) a questa porta. P-335U rileva
automaticamente il modello della stampante USB.
Collegamento POWER
4
Utilizzare l'alimentatore incluso per collegare la presa POWER a una sorgente di alimentazione appropriata
(vedere la Guida dell'utente per le specifiche terniche dell'alimentatore relative al proprio paese).
75
Page 76

ITALIANO
Indicatori LED
Sul pannello frontale sono presenti alcuni LED.
Quando si collega l'alimentazione, il LED PWR
lampeggia e poi resta acceso quando l'unità è
pronta. Dopo circa 30 secondi, si accende anche
il LED A/G.
I LED LAN e WAN si accendono se i relativi
collegamenti sono stati eseguiti correttamente.
2 Accesso allo strumento di configurazione Web
1 Avviare il browser. Immettere 192.168.1.1 nella barra degli indirizzi.
Nota: Se non viene visualizzata la schermata di login, controllare le impostazioni di sicurezza del
browser (vedere Risoluzione dei problemi per i dettagli) oppure verificare che il computer sia
impostato per ricedere dinamicamente un indirizzo IP (vedere Impostare l'indirizzo IP del
computer).
2 Viene visualizzata la finestra Password.
Immettere la password (la password predefinita è
1234) e fare clic su Login (accedi).
3 Modificare la password nella schermata
seguente e fare clic su Apply (applica).
4 Fare clic su Go to Wizard setup (Configurazione
guidata) per eseguire la prima configurazione del P335U.
76
Page 77

ITALIANO
Nota: In basso a destra di ogni schermata è presente il pulsante Next (avanti).
5 Selezionare la lingua desiderata dall'elenco a
discesa. Fare clic su
Next (avanti).
6 Fare clic su Next (avanti) per procedere con
Connection Wizard (Connessione guidata).
3 Configurazione dell'accesso a Internet
Nota: Immettere le informazioni e i parametri Internet esattamente come sono stati forniti dal proprio
ISP nelle varie schermate e quindi fare clic su Next (avanti) per continuare oppure su Back
(indietro) per tornare alla schermata precedente.
Facendo clic su Back (indietro) le informazioni presenti nella schermata corrente vengono perse.
FASE 1:
1 Questa schermata è opzionale. È unicamente
possibile fare clic su Next (avanti).
• System Name (nome di sistema) consente di
indentificare il P-335U. È possibile immettere il
"Nome computer" del proprio PC.
• Lasciando vuoto il campo Domain Name, viene
utilizzato il nome di dominio ottenuto dal DHCP
dell'ISP.
Informazioni sul sistema
FASE 2:
Configurare UNO dei seguenti tipi di protezione wireless sul P-335U:
• Protezione Auto: utilizza OTIST per generare automaticamente una chiave condivisa in precedenza. Visualizzare la chiave condivisa in precedenza generata nella schermata Wireless LAN.
LAN Wireless
77
Page 78

ITALIANO
Nota: I client wireless devono supportare WPA-PSK e utilizzare la stessa chiave.
• Nessuna: nessuna protezione LAN wireless configurata. Se non si ailita alcuna protezione wireless sul P-
335U, la rete sarà accessibile a qualsiasi periferica wireless di rete che si trova nel campo della portata.
• Protezione di Base: WEP (Wired Equivalent Privacy) esegue la crittografia dei frame di dati prima di trasmetterli sulla rete wireless. Maggiore è la crittografia WEP, maggiore è la protezione a costo di una minore velocità
di trasferimento dati.
• Protezione Estesa (WPA-PSK o WPA2-PSK): configura una chiave condivisa in precedenza. Scegliere questa
opzione solo se i client wireless supportano WPA-PSK o WPA2-PSK rispettivamente.
Nota: I client wireless e il P-335U devono utilizzare lo stesso SSID, ID di canale e WPA(2)-PSK (se è
abilitato WPA(2)-PSK) o la chiave di crittografia WEP (se è abilitato WEP) per la comunicazione
wireless.
OTIST
• OTIST (One-Touch Intelligent Security Technology) consente al P-335U di assegnare ai client wireless il SSID
del P-335U e le impostazione di crittografia WPA-PSK o WEP statiche. Anche il client wireless deve supportare
OTIST e avere abilitato OTIST.
Protezione wireless Automatica o Nessuna
A Immettere un nome univoco per identificare il P-335U nella LAN wireless.
B Selezionare un livello di protezione wireless. Scegliere Auto (Automatico) o None (Nessuno).
C P-335U cerca e seleziona automaticamente un canale non utilizzato da altri dispositivi nelle vicinanze. P-
335U il client wireless devono utilizzare lo stesso ID di canale.
D Yes (Si) è selezionato per impostaziona predefinita. Selezionare l'opzione No se non si desidera
utilizzare OTIST ora o se i client wireless non supportano OTIST. Se si imposta Security su Auto, OTIST
deve essere abilitato.
E La Setup Key (chiave di impostazione) OTIST predefinita è 1234567. Questa chiave può essere
cambiata nella schermata OTIST. Accertarsi di utilizzare la stessa Setup Key (chiave di impostazione)
OTIST sul P-335U e sui client wireless.
78
Page 79

ITALIANO
A
B
C
D
E
Protezione Base (WEP).
A Immettere un nome univoco per identificare il P-335U nella LAN wireless.
B Selezionare la protezione Base (WEP).
C P-335U cerca e seleziona automaticamente un canale non utilizzato da altri dispositivi nelle vicinanze. P-335U
il client wireless devono utilizzare lo stesso ID di canale.
D Selezionare 64 bit, 128 bit o 256-bit dall'elenco a discesa WEP Encryption (crittografia WEP).
E Selezionare il metodo di immissione della chiave ASCII o Hex WEP.
F È possibile creare una chiave WEP:
Immettendo una Passphrase (fino a 32 caratteri stampabili) e facendo clic su Generate (genera). P-335U
genera automaticamente quattro chiavi WEP.
Oppure immettendo manualmente le chiavi in ciascun campo Chiave (da 1 a 4).
G Selezionare uno dei pulsanti di opzione Key (chiave) da utilizzare come chiave WEP predefinita.
H Yes (Si) è selezionato per impostaziona predefinita. Selezionare l'opzione No se non si desidera
utilizzare OTIST ora o se i client wireless non supportano OTIST.
I La Setup Key (chiave di impostazione) OTIST predefinita è 1234567. Questa chiave può essere
cambiata nella schermata OTIST. Accertarsi di utilizzare la stessa Setup Key (chiave di impostazione)
OTIST sul P-335U e sui client wireless.
79
Page 80

ITALIANO
A
B
C
F
D
E
G
H
I
80
Page 81

ITALIANO
Protezione Estesa (WPA-PSK) o (WPA2-PSK)
A Immettere un nome univoco per identificare il P-335U nella LAN wireless.
B Scegliere la protezione WPA-PSK o WPA2-PSK.
C P-335U cerca e seleziona automaticamente un canale non utilizzato da altri dispositivi nelle vicinanze. P-335U
il client wireless devono utilizzare lo stesso ID di canale.
D Immettere una chiave condivisa in precedenza per avere una connessione wireless più sicura rispetto
alla crittografia WEP. Immettere da 8 a 63 caratteri ASCII con distinzione tra maiuscole e minuscole. È
possibile impostare una connessione wireless più sicura configurando WPA(2) nella schermata wireless
avanzata. È necessario configurare un server RADIUS per fare ciò.
E Yes (Si) è selezionato per impostaziona predefinita. Selezionare l'opzione No se non si desidera utilizzare
OTIST ora o se i client wireless non supportano OTIST.
F La Setup Key (chiave di impostazione) OTIST predefinita è 1234567. Questa chiave può essere
cambiata nella schermata OTIST. Accertarsi di utilizzare la stessa Setup Key (chiave di impostazione)
OTIST sul P-335U e sui client wireless.
A
B
C
D
E
F
81
Page 82

ITALIANO
FASE 3:
La procedura guidata tenta di rilevare quale tipo di connessione WAN si sta utilizzando.
Se la procedura guidata non rileva un tipo di connessione, è necessario selezionarne UNA dall'elenco a discesa.
Chiedere al proprio ISP il tipo di connessione corretta:
1 Ethernet
2 PPPoE
3 PPTP.
Nota: Se sono state fornite le impostazioni di accesso Internet, immettere i campi seguenti. In caso
contrario, lasciare le impostazioni predefinite e fare solo clic su Next (Avanti).
WAN
82
Page 83

ITALIANO
Collegamento Ethernet
A Scegliere Ethernet come tipo di connessione WAN.
B Selezionare Get automatically from your ISP (Ottieni automaticamente dall'ISP) se l'ISP non ha
assegnato un indirizzo IP statico. Passare alla sezione C.
Oppure
Selezionare Use fixed IP address provided by your ISP (Utilizza indirizzo IP fisso fornito dall'ISP) per fornire
al P-335U un indirizzo IP statico univoco. Passare a B1.
B1 Se si seleziona Use fixed IP address provided by your ISP (Utilizza indirizzo IP fisso fornito dall'ISP),
immettere un indirizzo IP della WAN, una Subnet Mask IP della WAN e l'indirizzo IP del dispositivo di
connessione fornito dall'ISP.
Se è stato fornito le impostazioni del server DNS, immetterle nei campi. In caso contrario, lasciare le
impostazioni predefinite e fare clic su Next (Avanti).
C Selezionare Factory Default (Predefinito di fabbrica) per utilizzare l'indirizzo MAC predefinito assegnato
in fabbrica.
D Selezionare questa casella di controllo per far sì che P-335U applichi la gestione della larghezza di
banda.
E Fare clic su Apply (Applica) per salvare le impostazioni personalizzate. Se nella schermata della
procedura guidata precedente è stato attivato OTIST, appare la schermata OTIST in corso. Attendere che
P-335U termini il trasferimento delle impostazioni OTIST.
83
Page 84

ITALIANO
A
B
C
B1
D
E
84
Page 85

ITALIANO
Collegamento PPPoE
A Selezionare PPPoE utilizzando il tipo di connessione WAN.
B Immettere Nome del servizio (opzionale), Nome utente e Password.
C Selezionare Get automatically from your ISP (Ottieni automaticamente dall'ISP) se l'ISP non ha
assegnato un indirizzo IP statico. Passare alla sezione D.
Oppure
Selezionare Use fixed IP address provided by your ISP (Utilizza indirizzo IP fisso fornito dall'ISP) per fornire
al P-335U un indirizzo IP statico univoco. Passare a C1.
C1 Se si seleziona Use fixed IP address provided by your ISP (Utilizza indirizzo IP fisso fornito dall'ISP),
immettere un indirizzo IP della WAN, una Subnet Mask IP della WAN e l'indirizzo IP del dispositivo di
connessione fornito dall'ISP.
Se è stato fornito le impostazioni del server DNS, immetterle nei campi. In caso contrario, lasciare le
impostazioni predefinite e fare clic su Next (Avanti).
D Selezionare Factory Default (Predefinito di fabbrica) per utilizzare l'indirizzo MAC predefinito assegnato
in fabbrica.
E Selezionare questa casella di controllo per far sì che P-335U applichi la gestione della larghezza di
banda.
F Fare clic su Apply (Applica) per salvare le impostazioni personalizzate. Se nella schermata della
procedura guidata precedente è stato attivato OTIST, appare la schermata OTIST in corso. Attendere che
P-335U termini il trasferimento delle impostazioni OTIST
85
Page 86

ITALIANO
A
B
C
C1
D
E
F
86
Page 87

ITALIANO
Collegamento PPTP
A Selezionare PPTP utilizzando il tipo di connessione WAN.
B Immettere Nome utente e Password
C Selezionare Ottieni automaticamente dall'ISP se l'ISP non ha assegnato un indirizzo IP PPTP statico.
Oppure selezionare Utilizza indirizzo IP fisso per fornire al P-335U un indirizzo IP statico univoco.
D Immettere un indirizzo IP del server PPTP
E Immettere ID connessione/Nome (se forniti)
F Selezionare Get automatically from your ISP (Ottieni automaticamente dall'ISP) se l'ISP non ha
assegnato un indirizzo IP statico. Passare alla sezione G.
Oppure
Selezionare Use fixed IP address provided by your ISP (Utilizza indirizzo IP fisso fornito dall'ISP) per fornire
al P-335U un indirizzo IP statico univoco. Passare a F1.
F1 Se si seleziona Use fixed IP address provided by your ISP (Utilizza indirizzo IP fisso fornito dall'ISP),
immettere un indirizzo IP della WAN, una Subnet Mask IP della WAN e l'indirizzo IP del dispositivo di
connessione fornito dall'ISP.
Se è stato fornito le impostazioni del server DNS, immetterle nei campi. In caso contrario, lasciare le
impostazioni predefinite e fare clic su Next (Avanti).
G Selezionare Factory Default (Predefinito di fabbrica) per utilizzare l'indirizzo MAC predefinito assegnato
in fabbrica.
H Selezionare questa casella di controllo per far sì che P-335U applichi la gestione della larghezza di
banda.
I Fare clic su Apply (Applica) per salvare le impostazioni personalizzate. Se nella schermata della
procedura guidata precedente è stato attivato OTIST, appare la schermata OTIST in corso. Attendere che
P-335U termini il trasferimento delle impostazioni OTIST.
87
Page 88

ITALIANO
A
B
C
D
E
F
F1
G
H
I
88
Page 89

ITALIANO
La configurazione dell'accesso a Internet viene completata
Se si verificano problemi con l'accesso a Internet,
seguire le istruzioni visualizzate a shermo.
Fare clic su Finish (fine) per completare la
configurazione guidata.
4 Installazione del driver del server di stampa
Il driver del server di stampa deve essere installato su ogni computer della rete che utilizzerà il server di
stampa. Prima di installare il driver del server di stampa, verificare che la stampante USB e il computer siano
collegati al P-335U e che entrambi i P-335U, di computer e stampante USB, siano accesi.
1 Inserire il CD fornito in dotazione nell'unità CD-ROM del
computer. Viene visualizzata automaticamente la schermata
dell'esecuzione automatica del CD.
2 Selezionare Network Print Server Setup (Installazione server
di stampa di rete).
3 Selezionare Setup Wizard for Windows NT/2000/XP
(Installazione guidata per Windows NT/2000/XP) per aprire la
procedura di installazione guidata.
4 Attenersi alle istruzioni visualizzate per installare il driver del
server di stampa sul computer Windows.
5 Vedere la Guida dell'utente per maggiori informazioni su come
installare il driver del server di stampa su un computer
Macintosh.
Risoluzione dei problemi
1 Se non si riesce ad accedere allo strumento di configurazione Web utilizzando Internet Explorer in
Windows XP o Windows Server 2003, verificare che le finestre pop-up windows, JavaScript e Java siano
89
Page 90

ITALIANO
autorizzate oppure impostare il livello di protezione Internet a un grado più basso rispetto ad Alto in
Internet Explorer (in Internet Explorer, fare clic su Strumenti > Opzioni Internet > Protezione > Livello
personalizzato...). Per ulteriori informazioni, vedere l'appendice della Guida dell'utente.
2 Se non è possibile accedere a Internet quando il computer è connesso alla porta LAN, attenersi alla
procedura seguente.
A) Controllare le luci sul pannello anteriore. Se differiscono da quanto descritto nella sezione 1, verificare
che i collegamenti siano corretti (vedere la sezione 1). Se le luci sono ancora diverse, spegnere il
dispositivo, attendere qualche secondo e poi riaccenderlo.
B) Seguire nuovamente le istruzioni a partire dalla sezione 2. Verificare di aver immesso le informazioni
corrette. Ad esempio, se il proprio account presenta nome e password, verificare di averli digitati
correttamente. Se inoltre non si è certi dell'incapsulamento ISP utilizzato, contattare il proprio ISP.
C) Se si utilizza un nuovo account Internet, contattare il proprio ISP per verificare che sia attivo.
D) Se i problemi persistono, vedere Risoluzione dei problemi nella Guida dell'utente.
3 Se non è possibile accedere a Internet utilizzando la rete wireless, attenersi alla procedura seguente.
A) Su un computer nella rete wireless, aprire il browser e digitare l'indirizzo http://192.168.1.1. Se viene
visualizzata la schermata del passo 2 della sezione 2, attenersi ai suggerimenti A - D sopra. In caso
contrario, passare al passo seguente.
B) Verificare che il selettore AG (sul pannello posteriore) sia impostato su G se i client wireless supportano
IEEE 802.11b o IEEE 802,11g, oppure su A se i client wireless supportano solo IEEE 802.11a.
C) Verificare che il P-335U e il computer utilizzino le stesse impostazioni wireless e di sicurezza wireless.
Seguire le istruzioni a partire dalla sezione 3.
4 Se non si riesce a stampare nulla utilizzando la stampante USB collegata al P-335U, attenersi alla
procedura seguente.
A) Verificare di aver installato il driver del server di stampa sul computer (vedere sezione 4).
B) Verificare che la stampante utilizzi USB 1.1 o 1.0 controllando le sue specifiche tecniche.
C) Verificare che la stampante USB sia accesa e correttamente funzionante.
D) Controllare i collegamenti dei cavi USB.
Impostare l'indirizzo IP del computer
Questa sezione spiega come configurare il computer per ricevere un indirizzo IP in Windows 2000, Windows
NT e Windows XP. In questo modo ci si assicura che il computer possa comunicare con lo P-335U.
1 In Windows XP, fare clic su Start, Pannello di controllo.
In Windows 2000/NT, fare clic su Start, Impostazioni, Pannello di controllo.
2 In Windows XP, fare clic su Connessioni di rete.
In Windows 2000/NT, fare clic su Reti e connessioni remote.
3 Fare clic con il pulsante destro del mouse su Connessione alla rete locale e scegliere Proprietà.
90
Page 91

ITALIANO
4 Selezionare Protocollo Internet (TCP/IP) (sotto la
scheda Generale in Windows XP) e fare clic su
Proprietà.
5 Si apre la schermata Protocollo Internet TCP/IP -
Proprietà (la scheda Generale in Windows XP).
6 Selezionare le opzioni Ottieni automaticamente un
indirizzo IP e Ottieni automaticamente l'indirizzo
del server DNS.
7 Fare clic su OK per chiudere la finestra Protocollo
Internet (TCP/IP) - Proprietà.
8 Fare clic su Chiudi (OK in Windows 2000/NT) per
chiudere la finestra Connessione alla rete locale -
Proprietà.
9 Chiudere la schermata Connessioni di rete.
Procedura per visualizzare le certificazioni di un prodotto
1 Aprire la pagina http://www.zyxel.com.
2 Selezionare il prodotto dall'elenco di riepilogo a discesa nella Home Page di ZyXEL per passare alla
pagina del prodotto in questione.
3 Selezionare da questa pagina la certificazione che si desidera visualizzare.
91
Page 92

SVENSKA
Översikt
P-335U är en trådlös bredbandsrouter (med stöd för IEEE 802.11a, b och g och printserver) med en inbyggd
fyra-portars 10/100 Mbps switch. Använd USB-porten för att dela en USB v1.1-anpassad skrivare med
datorerna som är anslutna till P-335U, så att du inte behöver tilldela en dedikerad dator som printserver eller
ha en fristående printserverenhet. Dessa datorer kan även dela Internet-åtkomst via ett bredbandsmodem
(kabel/DSL).
Du behöver ha ett Internet-konto redan konfigurerat och ha tillgång till följande information.
Table 1 Information om Internet-konto
Enhetens WAN IP-adress (om du fått sådan): ______________
IP-adress för DNS-server (om du fått sådan): Primär _____________, Sekundär ______________
Anslutningstyp:
Ethernet Typ av tjänst: _______________________
Användarnamn: ____________
PPTP Användarnamn: ____________
Din WAN IP-adress (om du fått sådan)
____________
Anslutnings-ID (om det krävs): ____________
PPPoE (PPPoE) Tjänstens namn: ____________
Användarnamn: ____________ Lösenord: ____________
IP-adress för inloggningsserver: ______________
Lösenord: ____________
Lösenord: ____________
PPTP-serverns IP-adress: ___________
eller PPTP-domännamn: ___________
Se din bruksanvisning för bakgrundsinformation om alla funktioner.
Här ser du vad du behöver göra:
1 Maskinvaruanslutningar 2 Åtkomst till webbkonfigurator
3 Inställning av Internet-åtkomst 4 Inställning av printserverdrivrutin
92
Page 93

SVENSKA
1 Maskinvaruanslutningar
Gör följande för att utföra maskinvaruanslutningar för inledande inställning.
WAN-anslutning
1
Anslut ditt modem till “WAN”-porten med sladden som medföljde ditt modem.
LAN-anslutning
2
Anslut datorn till en "LAN"-port med den medföljande Ethernet-sladden.
USB-anslutning
3
Använd en USB-sladd för att ansluta en USB-skrivare (version 1.0 eller 1.1) till denna port. P-335U
upptäcker automatiskt modell för USB-skrivaren.
Strömanslutning
4
Använd den medföljande strömadaptern för att ansluta uttaget POWER (ström) till en lämplig strömkälla (se
bruksanvisningen för strömadapterspecifikationer per region).
93
Page 94

SVENSKA
Indikatorlamporna
Titta på frontpanelens indikatorlampor. När du
ansluter strömmen, blinkar indikatorlampan
PWR och förblir sedan tänd när enheten är klar.
Ungefär 30 sekunder senare tänds även
indikatorlampan A/G.
Indikatorlamporna LAN och WAN tänds och
fortsätter att lysa om motsvarande
anslutningar är rätt utförda.
2 Åtkomst till webbkonfigurator
1 Starta din webbläsare. Ange “192.168.1.1” som webbplatsadress.
Note: Om inloggningsskärmen inte visas, kontrolla webbläsarens säkerhetsinställningar (se Felsökning för
detaljer
) eller kontrollera att din dator är inställd på att ta emot en IP-adress dynamiskt (se Ställa
in datorns IP-adress).
2 Fönstret Password (lösenord) visas. Ange
lösenord (“1234” är standard) och klicka på
Login (inloggning).
3 Ändra lösenord på den följande skärmen och
klicka på Apply (verkställ).
4 Klicka på Go to Wizard setup (gå till
guideinställning) för att ställa in din P-335U för
första gången.
94
Page 95

SVENSKA
Note: Knappen Next (nästa) sitter nere till höger på varje skärm.
5 Välj språk i rullgardinsrutan. Klicka på Next
(nästa).
6 Klicka på Next (nästa) för att fortsätta med
Connection Wizard (anslutningsguiden).
3 Inställning av Internet-åtkomst
Note: Ange informationen för Internet-åtkomst exakt som du fått den av din ISP på varje guideskärm
och klicka sedan på Next (nästa) för att fortsätta eller klicka på Back (bakåt) för att återgå till
föregående skärm.
Aktuell skärminformation går förlorad om du klickar på Back (bakåt).
STEG 1:
1 Denna skärm är valfri. Du kan helt enkelt klicka
på Next (nästa).
• System Name (systemnamn) handlar om att iden-
tifiera P-335U. Du kan ange din dators "Computer
Name" (datornamn).
• Om du lämnar Domain Name (domännamn) tomt,
används det domännamn som erhållits av DHCP
från ISP.
Systeminformation
STEG 2:
Konfigurera EN av de följande trådlösa säkerhetstyperna på P-335U:
Trådlöst LAN
95
Page 96

SVENSKA
• Auto-säkerhet: Använd OTIST för att skapa en fördelad nyckel automatiskt. Visa den genererade fördelade
nyckeln på skärmen Wireless LAN (trådlöst LAN).
Note: Dina trådlösa klienter måste stödja WPA-PSK och använda samma nyckel.
• None (ingen): Konfigurera ingen säkerhet för trådlöst LAN. Om du inte aktiverar någon trådlös säkerhet på din
P-335U, är ditt nätverk öppet för alla trådlösa nätverksenheter inom räckhåll.
• Basic (grundläggande) säkerhet: WEP (Wired Equivalent Privacy) krypterar dataramar före överföring i det
trådlösa nätverket. Ju högre WEP-kryptering, desto högre säkerhet med långsammare genomströmning.
• Extend (WPA-PSK eller WPA2-PSK) (utökad) säkerhet: Konfigurera en fördelad nyckel. Välj detta alternativ
endast om dina trådlösa klienter stöder WPA-PSK respektive WPA2-PSK.
Note: De trådlösa klienterna och P-335U måste använda samma SSID, kanal-ID och WPA(2)-PSK (om
WPA(2)-PSK är aktiverat) eller WEP-krypteringsnyckel (om WEP är aktiverat) för trådlös
kommunikation.
OTIST
• OTIST (One-Touch Intelligent Security Technology) låter P-335U tilldela trådlösa klienter P-335U:s SSID och
statiska WEP- eller WPA-PSK-krypteringsinställningar. Dessutom måste den trådlösa klienten stödja OTIST
och ha OTIST aktiverat.
Auto eller ingen trådlös säkerhet
A Ange ett unikt namn för att identifiera P-335U i det trådlösa LAN.
B Välj en nivå för trådlös säkerhet. Välj Auto eller None (ingen).
C P-335U söker automatiskt efter och väljer en kanal som inte används av en närliggande enhet. P-335U och
den trådlösa klienten måste använda samma kanal-ID.
D Yes (ja) är aktiverat som standard. Välj radioknappen No (nej) om du inte vill använda OTIST nu eller ifall dina
trådlösa klienter inte stöder OTIST. Om du ställer in Security (säkerhet) Auto, måste OTIST vara aktiverat.
E Standard OTIST inställningsnyckel är “01234567”. Denna nyckel kan ändras på skärmen OTIST. Var noga
med att använda samma OTIST inställningsnyckel på P-335U och de trådlösa klienterna.
96
Page 97

SVENSKA
A
B
C
D
E
Grundläggande säkerhet (WEP)
A Ange ett unikt namn för att identifiera P-335U i det trådlösa LAN.
B Välj grundläggande säkerhet (WEP).
C P-335U söker automatiskt efter och väljer en kanal som inte används av en närliggande enhet. P-335U och
den trådlösa klienten måste använda samma kanal-ID.
D Välj 64-bit, 128-bit eller 256-bit från rullgardinslistan för WEP-kryptering.
E Välj ASCII eller Hex WEP som nyckelinmatningsmetod.
F Du kan skapa en WEP-nyckel genom att antingen:
Ange en Passphrase (lösenordsfras - upp till 32 skrivbara tecken) och klicka på Generate (generera) för att
låta P-335U automatiskt generera fyra WEP-nycklar.
Eller
Ange manuella nycklar i varje fält för Key (nyckel - 1~4).
G Välj en av radioknapparna Key att använda som standard-WEP-nyckel.
H Yes (ja) är aktiverat som standard. Välj radioknappen No (nej) om du inte vill använda OTIST nu eller ifall dina
trådlösa klienter inte stöder OTIST.
I Standard OTIST inställningsnyckel är “01234567”. Denna nyckel kan ändras på skärmen OTIST. Var noga
med att använda samma OTIST inställningsnyckel på P-335U och de trådlösa klienterna.
97
Page 98

SVENSKA
A
B
C
F
D
E
G
H
I
98
Page 99

SVENSKA
Utökad (WPA-PSK eller WPA2-PSK) säkerhet
A Ange ett unikt namn för att identifiera P-335U i det trådlösa LAN.
B Välj WPA-PSK eller WPA2-PSK säkerhet.
C P-335U söker automatiskt efter och väljer en kanal som inte används av en närliggande enhet. P-335U och
den trådlösa klienten måste använda samma kanal-ID.
D Ange en fördelad nyckel för en mer säker trådlös anslutning än WEP-kryptering. Skriv in 8-63
skiftlägeskänsliga ASCII-tecken. Du kan inrätta den mest säkra trådlösa anslutningen genom att konfigurera
WPA(2) på den avancerade trådlösa skärmen. Du måste konfigurera en RADIUS-server för att göra detta.
E Yes (ja) är aktiverat som standard. Välj radioknappen No (nej) om du inte vill använda OTIST nu eller ifall dina
trådlösa klienter inte stöder OTIST.
F Standard OTIST inställningsnyckel är “01234567”. Denna nyckel kan ändras på skärmen OTIST. Var noga
med att använda samma OTIST inställningsnyckel på P-335U och de trådlösa klienterna.
A
B
C
D
E
F
99
Page 100

SVENSKA
STEG 3:
Guiden försöker detektera den WAN-anslutningstyp du använder.
Om guiden inte detekterar en anslutningstyp, måste du välja ONE (en) från rullgardinsrutan. Kontrollera med din
ISP så att du verkligen använder rätt typ:
1 Ethernet
2 PPPoE
3 PPTP.
Note: Om du har fått Internet-åtkomstinställningar, ange dem i följande fält. I annat fall, låt
standardinställningarna stå och klicka på Next (nästa).
WAN
100
 Loading...