

ZyXEL PMG2006-T20A User Manual
Default Login Details
User’s Guide
PMG2006-T20A
GPON HGU with 4-port GbE Switch
LAN IP Address http://192.168.1.1
User Name admin
Password 1234
Version 5.21 Edition 1, 04/2017
Copyright © 2017 Zyxel Communications Corporation

IMPORTANT!
READ CAREFULLY BEFORE USE.
KEEP THIS GUIDE FOR FUTURE REFERENCE.
This is a User’s Guide for a system managing a series of products. Not all products support all features.
Menushots and graphics in this book may differ slightly from what you see due to differences in release
versions or your computer operating system. Every effort has been made to ensure that the information
in this manual is accurate.
Related Documentation
•Quick Start Guide
The Quick Start Guide shows how to connect the PMG2006-T20A and get up and running right
away.
•More Information
Go to support.zyxel.com to find other information on the PMG2006-T20A.
PMG2006-T20A User’s Guide
2

Contents Overview
Contents Overview
User’s Guide ......................................................................................................................................11
Introduction ........................................................................................................................................... 12
The Web Configurator ......................................................................................................................... 17
Quick Start ............................................................................................................................................. 23
Tutorials .................................................................................................................................................. 25
Technical Reference ........................................................................................................................33
Network Map and Status Screens ...................................................................................................... 34
Broadband ............................................................................................................................................ 39
Home Networking ................................................................................................................................. 49
Routing ................................................................................................................................................... 63
Network Address Translation (NAT) ..................................................................................................... 70
Dynamic DNS Setup ............................................................................................................................. 87
Interface Grouping .............................................................................................................................. 91
Firewall ................................................................................................................................................... 95
MAC Filter ............................................................................................................................................ 102
Parental Control ................................................................................................................................. 104
Scheduler Rule .................................................................................................................................... 109
Certificates .......................................................................................................................................... 111
Log ....................................................................................................................................................... 117
Traffic Status ....................................................................................................................................... 120
ARP Table ............................................................................................................................................ 124
Routing Table ...................................................................................................................................... 126
System .................................................................................................................................................. 128
User Account ...................................................................................................................................... 129
Remote Management ....................................................................................................................... 132
SNMP .................................................................................................................................................... 135
Time Settings ........................................................................................................................................ 137
E-mail Notification .............................................................................................................................. 139
Log Setting .......................................................................................................................................... 141
Firmware Upgrade .............................................................................................................................. 145
Backup/Restore .................................................................................................................................. 147
Diagnostic ........................................................................................................................................... 150
.............................................................................................................................................................. 151
Troubleshooting .................................................................................................................................. 152
Appendices ............................................ ........................................................... ..............................156
PMG2006-T20A User’s Guide
3

Table of Contents
Table of Contents
Contents Overview .............................................................................................................................3
Table of Contents.................................................................................................................................4
Part I: User’s Guide.......................................................................................... 11
Chapter 1
Introduction ........................................................................................................................................12
1.1 Overview ......................................................................................................................................... 12
1.2 Managing the PMG2006-T20A ...................................................................................................... 12
1.3 Good Habits for Managing the PMG2006-T20A ......................................................................... 12
1.4 Applications for the PMG2006-T20A ............................................................................................. 12
1.4.1 Internet Access ...................................................................................................................... 12
1.5 Hardware ......................................................................................................................................... 13
1.5.1 Front Panel ............................................................................................................................. 13
1.5.2 LEDs (Lights) ........................................................................................................................... 13
1.5.3 Rear Panel .............................................................................................................................. 14
1.5.4 The Reset Button .................................................................................................................... 15
1.6 Wall Mounting ................................................................................................................................. 15
Chapter 2
The Web Configurator........................................................................................................................17
2.1 Overview ......................................................................................................................................... 17
2.1.1 Accessing the Web Configurator ....................................................................................... 17
2.2 Web Configurator Layout .............................................................................................................. 19
2.2.1 Title Bar ................................................................................................................................... 19
2.2.2 Navigation Panel .................................................................................................................. 20
Chapter 3
Quick Start..........................................................................................................................................23
3.1 Overview ......................................................................................................................................... 23
3.2 Quick Start Setup ............................................................................................................................ 23
Chapter 4
Tutorials...............................................................................................................................................25
4.1 Overview ......................................................................................................................................... 25
4.2 Setting Up a GPON Connection ................................................................................................... 25
4.3 Configuring Static Route for Routing to Another Network ........................................................ 28
PMG2006-T20A User’s Guide
4

Table of Contents
4.4 Access the PMG2006-T20A Using DDNS ....................................................................................... 30
4.4.1 Registering a DDNS Account on www.dyndns.org ........................................................... 30
4.4.2 Configuring DDNS on Your PMG2006-T20A ........................................................................ 31
4.4.3 Testing the DDNS Setting ...................................................................................................... 31
4.5 Configuring the MAC Address Filter ............................................................................................. 31
Part II: Technical Reference........................................................................... 33
Chapter 5
Network Map and Status Screens....................................................................................................34
5.1 Overview ......................................................................................................................................... 34
5.2 The Network Map Screen .............................................................................................................. 34
5.3 The Status Screen ........................................................................................................................... 35
Chapter 6
Broadband..........................................................................................................................................39
6.1 Overview ......................................................................................................................................... 39
6.1.1 What You Can Do in This Chapter ...................................................................................... 39
6.1.2 What You Need to Know ..................................................................................................... 39
6.1.3 Before You Begin ................................................................................................................... 42
6.2 The Broadband Screen .................................................................................................................. 42
6.2.1 Add/Edit Internet Connection .............................................................................................43
Chapter 7
Home Networking..............................................................................................................................49
7.1 Overview ......................................................................................................................................... 49
7.1.1 What You Can Do in this Chapter ....................................................................................... 49
7.1.2 What You Need To Know ..................................................................................................... 49
7.1.3 Before You Begin ................................................................................................................... 51
7.2 The LAN Setup Screen .................................................................................................................... 51
7.3 The Static DHCP Screen ................................................................................................................. 55
7.4 The UPnP Screen ............................................................................................................................. 56
7.4.1 Turning On UPnP in Windows 7 Example ............................................................................ 57
7.5 The Additional Subnet Screen ....................................................................................................... 59
7.6 The TFTP Server Name Screen ....................................................................................................... 60
7.7 Technical Reference ...................................................................................................................... 60
7.7.1 LANs, WANs and the PMG2006-T20A .................................................................................. 60
7.7.2 DHCP Setup ........................................................................................................................... 61
7.7.3 DNS Server Addresses ........................................................................................................... 61
7.7.4 LAN TCP/IP ............................................................................................................................. 62
PMG2006-T20A User’s Guide
5

Table of Contents
Chapter 8
Routing................................................................................................................................................63
8.1 Overview ........................................................................................................................................ 63
8.2 The Routing Screen ........................................................................................................................ 63
8.2.1 Add/Edit Static Route ........................................................................................................... 64
8.3 The DNS Route Screen ................................................................................................................... 65
8.3.1 The DNS Route Add Screen .................................................................................................66
8.4 The Policy Route Screen ................................................................................................................ 66
8.4.1 Add/Edit Policy Route .......................................................................................................... 68
8.5 RIP ................................................................................................................................................. 68
8.5.1 The RIP Screen ....................................................................................................................... 69
Chapter 9
Network Address Translation (NAT)..................................................................................................70
9.1 Overview ......................................................................................................................................... 70
9.1.1 What You Can Do in this Chapter ....................................................................................... 70
9.1.2 What You Need To Know ..................................................................................................... 70
9.2 The Port Forwarding Screen ......................................................................................................... 71
9.2.1 Add/Edit Port Forwarding .................................................................................................... 73
9.3 The Applications Screen ................................................................................................................ 74
9.3.1 Add New Application ........................................................................................................... 75
9.4 The Port Triggering Screen ............................................................................................................. 76
9.4.1 Add/Edit Port Triggering Rule .............................................................................................. 77
9.5 The DMZ Screen .............................................................................................................................. 78
9.6 The ALG Screen .............................................................................................................................. 79
9.7 The Address Mapping Screen ....................................................................................................... 80
9.7.1 Add/Edit Address Mapping Rule ......................................................................................... 81
9.8 The Sessions Screen ........................................................................................................................ 82
9.9 Technical Reference ...................................................................................................................... 82
9.9.1 NAT Definitions ....................................................................................................................... 83
9.9.2 What NAT Does ..................................................................................................................... 83
9.9.3 How NAT Works ...................................................................................................................... 84
9.9.4 NAT Application .................................................................................................................... 84
Chapter 10
Dynamic DNS Setup...........................................................................................................................87
10.1 Overview ....................................................................................................................................... 87
10.1.1 What You Can Do in this Chapter ..................................................................................... 87
10.1.2 What You Need To Know ...................................................................................................87
10.2 The DNS Entry Screen ................................................................................................................... 88
10.2.1 Add/Edit DNS Entry ............................................................................................................. 88
10.3 The Dynamic DNS Screen ............................................................................................................ 89
PMG2006-T20A User’s Guide
6

Table of Contents
Chapter 11
Interface Grouping............................................................................................................................91
11.1 Overview ....................................................................................................................................... 91
11.1.1 What You Can Do in this Chapter ..................................................................................... 91
11.2 The Interface Grouping Screen .................................................................................................. 91
11.2.1 Interface Group Configuration ......................................................................................... 92
11.2.2 Interface Grouping Criteria .............................................................................................. 94
Chapter 12
Firewall................................................................................................................................................95
12.1 Overview ....................................................................................................................................... 95
12.1.1 What You Can Do in this Chapter ..................................................................................... 95
12.1.2 What You Need to Know ...................................................................................................96
12.2 The Firewall Screen ....................................................................................................................... 96
12.3 The Protocol Screen .................................................................................................................... 97
12.3.1 Add/Edit a Service ............................................................................................................. 98
12.4 The Access Control Screen ......................................................................................................... 99
12.4.1 Add/Edit an ACL Rule ....................................................................................................... 99
12.5 The DoS Screen ........................................................................................................................... 101
Chapter 13
MAC Filter .........................................................................................................................................102
13.1 Overview .................................................................................................................................... 102
13.2 The MAC Filter Screen ................................................................................................................ 102
Chapter 14
Parental Control...............................................................................................................................104
14.1 Overview ..................................................................................................................................... 104
14.2 The Parental Control Screen ..................................................................................................... 104
14.2.1 Add/Edit a Parental Control Profile ................................................................................ 105
Chapter 15
Scheduler Rule .................................................................................................................................109
15.1 Overview ..................................................................................................................................... 109
15.2 The Scheduler Rule Screen ........................................................................................................ 109
15.2.1 Add/Edit a Schedule ........................................................................................................ 109
Chapter 16
Certificates .......................................................................................................................................111
16.1 Overview ..................................................................................................................................... 111
16.1.1 What You Can Do in this Chapter ................................................................................... 111
16.2 What You Need to Know ........................................................................................................... 111
16.3 The Local Certificates Screen ................................................................................................... 111
PMG2006-T20A User’s Guide
7

Table of Contents
16.3.1 Create Certificate Request ............................................................................................ 112
16.3.2 Load Signed Certificate .................................................................................................. 114
16.4 The Trusted CA Screen ............................................................................................................... 114
16.4.1 View Trusted CA Certificate ............................................................................................ 115
16.4.2 Import Trusted CA Certificate .......................................................................................... 116
Chapter 17
Log ..................................... ................................................ ...............................................................117
17.1 Overview ..................................................................................................................................... 117
17.1.1 What You Can Do in this Chapter ................................................................................... 117
17.1.2 What You Need To Know ................................................................................................. 117
17.2 The System Log Screen .............................................................................................................. 118
17.3 The Security Log Screen ............................................................................................................. 118
Chapter 18
Traffic Status .....................................................................................................................................120
18.1 Overview ..................................................................................................................................... 120
18.1.1 What You Can Do in this Chapter ................................................................................... 120
18.2 The WAN Status Screen .............................................................................................................. 120
18.3 The LAN Status Screen ............................................................................................................... 121
18.4 The NAT Status Screen ................................................................................................................ 122
Chapter 19
ARP Table..........................................................................................................................................124
19.1 Overview ..................................................................................................................................... 124
19.1.1 How ARP Works .................................................................................................................. 124
19.2 ARP Table Screen ....................................................................................................................... 124
Chapter 20
Routing Table....................................................................................................................................126
20.1 Overview ..................................................................................................................................... 126
20.2 The Routing Table Screen .......................................................................................................... 126
Chapter 21
System...............................................................................................................................................128
21.1 Overview ..................................................................................................................................... 128
21.2 The System Screen ...................................................................................................................... 128
Chapter 22
User Account................. .... .... .... .......................................................................................................129
22.1 Overview .................................................................................................................................... 129
22.2 The User Account Screen .......................................................................................................... 129
22.2.1 The User Account Add/Edit Screen ................................................................................ 130
PMG2006-T20A User’s Guide
8

Table of Contents
Chapter 23
Remote Management.....................................................................................................................132
23.1 Overview ..................................................................................................................................... 132
23.2 The MGMT Services Screen ....................................................................................................... 132
23.3 The Trust Domain Screen ............................................................................................................ 133
23.3.1 The Add Trust Domain Screen ......................................................................................... 133
Chapter 24
SNMP .................................................................................................................................................135
24.1 Overview ..................................................................................................................................... 135
24.2 The SNMP Screen ........................................................................................................................ 135
Chapter 25
Time Settings.....................................................................................................................................137
25.1 Overview ..................................................................................................................................... 137
25.2 The Time Screen ......................................................................................................................... 137
Chapter 26
E-mail Notification ...........................................................................................................................139
26.1 Overview .................................................................................................................................. 139
26.2 The E-mail Notification Screen .................................................................................................. 139
26.2.1 E-mail Notification Edit .................................................................................................... 140
Chapter 27
Log Setting ................................ ... .... .... ............................................................................................141
27.1 Overview .................................................................................................................................... 141
27.2 The Log Settings Screen ............................................................................................................. 141
27.2.1 Example E-mail Log ........................................................................................................... 143
Chapter 28
Firmware Upgrade........................................................................... ................................................145
28.1 Overview ..................................................................................................................................... 145
28.2 The Firmware Screen .................................................................................................................. 145
Chapter 29
Backup/Restore ...............................................................................................................................147
29.1 Overview ..................................................................................................................................... 147
29.2 The Backup/Restore Screen ...................................................................................................... 147
29.3 The Reboot Screen ..................................................................................................................... 149
Chapter 30
Diagnostic.........................................................................................................................................150
30.1 Overview ..................................................................................................................................... 150
PMG2006-T20A User’s Guide
9

Table of Contents
30.1.1 What You Can Do in this Chapter ................................................................................... 150
30.2 What You Need to Know ........................................................................................................... 150
30.3 Ping & TraceRoute & NsLookup ................................................................................................ 151
...........................................................................................................................................................151
Chapter 31
Troubleshooting................................................................................................................................152
31.1 Power, Hardware Connections, and LEDs ............................................................................... 152
31.2 PMG2006-T20A Access and Login ............................................................................................ 153
31.3 Internet Access ........................................................................................................................... 154
31.4 UPnP ............................................................................................................................................. 155
Part III: Appendices......................................................................................156
Appendix A Customer Support ..................................................................................................... 157
Appendix B IPv6............................................................................................................................... 163
Appendix C Services....................................................................................................................... 171
Appendix D Legal Information ...................................................................................................... 175
Index.................................................................................................................................................179
PMG2006-T20A User’s Guide
10

PART I
User’s Guide
11

1.1 Overview
The PMG2006-T20A is a HGU (Home Gateway Unit); a fiber router with routing features, such as DHCP
and NAT. The PMG2006-T20A combines a fiber optic (GPON) router with a built-in switch to provide you
local fiber-speed Internet access for bandwidth-hungry applications, such as video streaming and
gaming. The PMG2006-T20A supports OMCI (ONT Management Control Interface) to connect to the
ISP’s OLT (Optical Line Terminal)..
1.2 Managing the PMG2006-T20A
Use the PMG2006-T20A’s built-in Web Configurator to manage it. You can connect to it using a web
browser. For details on connecting to it, see the Section 2.1.1 on page 17.
CHAPTER 1
Introduction
1.3 Good Habits for Managing the PMG2006-T20A
Do the following things regularly to make the PMG2006-T20A more secure and to manage the
PMG2006-T20A more effectively.
• Change the password. Use a password that’s not easy to guess and that consists of different types of
characters, such as numbers and letters.
• Write down the password and put it in a safe place.
• Back up the configuration (and make sure you know how to restore it). Restoring an earlier working
configuration may be useful if the device becomes unstable or even crashes. If you forget your
password, you will have to reset the PMG2006-T20A to its factory default settings. If you backed up an
earlier configuration file, you would not have to totally re-configure the PMG2006-T20A. You could
simply restore your last configuration.
1.4 Applications for the PMG2006-T20A
Here are some example uses for which the PMG2006-T20A is well suited.
1.4.1 Internet Access
Your PMG2006-T20A provides shared Internet access by connecting a fiber optic line provided by the
ISP to the PON port. In addition, you can connect computers, IPTVs, gaming consoles, and other
Ethernet devices to the Ethernet ports for fiber-speed Internet access.
PMG2006-T20A User’s Guide
12
Figure 1 PMG2006-T20A Applications
1.5 Hardware
1.5.1 Front Panel
Chapter 1 Introduction
The following graphic displays the front panel of the PMG2006-T20A.
Figure 2 PMG2006-T20A Front Panel
1.5.2 LEDs (Lights)
The following graphic displays the labels of the LEDs.
PMG2006-T20A User’s Guide
13
Chapter 1 Introduction
Figure 3 LEDs (PMG2006-T20A)
None of the LEDs are on if the PMG2006-T20A is not receiving power.
Table 1 LED Descriptions
LED COLOR STATUS DESCRIPTION
Green On The PMG2006-T20A is receiving power and ready for use.
Blinking The PMG2006-T20A is self-testing.
POWER
PON
INTERNET
LAN 1~4
Red On The PMG2006-T20A detected an error while self-testing, or there is a device
malfunction.
Off The PMG2006-T20A is not receiving power and there is no device
malfunction.
Green On The PMG2006-T20A has a PON line connection.
Blinking The PMG2006-T20A’s PON port is trying to build the connection.
Off The PMG2006-T20A’s PON port is not connected. The optical transceiver
may have malfunctioned or the fiber cable may not be connected or may
be broken or damaged enough to break the PON connection.
Green On The PMG2006-T20A has an IP connection but no traffic.
Blinking The PMG2006-T20A is sending or receiving IP traffic.
Off The PMG2006-T20A attempted to make an IP connection but failed.
Red On The PMG2006-T20A attempted to get an IP address but failed.
Green On The PMG2006-T20A has a 10/100M/1000M Ethernet connection with
another device (such as a computer) on the Local Area Network (LAN)
through this port.
Blinking The PMG2006-T20A is sending/receiving data to/from the LAN through this
port.
Off The PMG2006-T20A does not have an Ethernet connection with the LAN
through this port.
Refer to Section 1.5.2 on page 13 for information on hardware connections.
1.5.3 Rear Panel
The following graphic displays the rear panel of the PMG2006-T20A.
Figure 4 PMG2006-T20A Rear Panel
PMG2006-T20A User’s Guide
14

The following table describes the items on the rear panel..
Table 2 Rear Panel Ports
LABEL DESCRIPTION
PON Connect the fiber optic cable to the PON port for fiber-speed Internet access.
LAN1 ~ LAN4 Connect computers, IPTVs, gaming consoles, and other Ethernet devices to the Ethernet ports for
Reset Press the button in for more than 5 seconds (or until the Power LED starts to blink), then release it to
Power
Button
Power Connect the power cable and press the power button to start the device.
fiber-speed Internet access.
return the Zyxel Device to the factory defaults (password is 1234, LAN IP address 192.168.1.1 etc.)
Press the power button after the power cable is connected to start the device.
1.5.4 The Reset Button
If you forget your password or cannot access the web configurator, you will need to use the RESET
button at the back of the device to reload the factory-default configuration file. This means that you will
lose all configurations that you had previously and the password will be reset to the default.
1.5.4.1 Using the Reset Button
Chapter 1 Introduction
1 Make sure the POWER LED is on (not blinking).
2 To set the device back to the factory default settings, press the RESET button for more than 5 seconds or
until the POWER LED begins to blink and then release it. When the POWER LED begins to blink, the defaults
have been restored and the device restarts.
1.6 Wall Mounting
You may need screw anchors if mounting on a concrete or brick wall.
Table 3 Wall Mounting Information
Distance between holes 142 mm
M4 Screws Two
Screw anchors (optional) Two
1 Select a position free of obstructions on a wall strong enough to hold the weight of the device.
2 Mark two holes on the wall at the appropriate distance apart for the screws.
Be careful to avoid damaging pipes or cables located inside the wall
when drilling holes for the screws.
3 If using screw anchors, drill two holes for the screw anchors into the wall. Push the anchors into the full
depth of the holes, then insert the screws into the anchors. Do not insert the screws all the way in - leave
a small gap of about 0.5 cm.
If not using screw anchors, use a screwdriver to insert the screws into the wall. Do not insert the screws all
the way in - leave a gap of about 0.5 cm.
PMG2006-T20A User’s Guide
15

Chapter 1 Introduction
4 Make sure the screws are fastened well enough to hold the weight of the PMG2006-T20A with the
connection cables.
5 Align the holes on the back of the PMG2006-T20A with the screws on the wall. Hang the PMG2006-T20A
on the screws.
Figure 5 Wall Mounting Example
PMG2006-T20A User’s Guide
16

2.1 Overview
The web configurator is an HTML-based management interface that allows easy PMG2006-T20A setup
and management via Internet browser. Use Internet Explorer 8.0 and later versions or Mozilla Firefox 3
and later versions or Safari 2.0 and later versions. The recommended screen resolution is 1024 by 768
pixels.
In order to use the web configurator you need to allow:
• Web browser pop-up windows from your PMG2006-T20A. Web pop-up blocking is enabled by default
in Windows XP SP (Service Pack) 2.
• JavaScript (enabled by default).
• Java permissions (enabled by default).
CHAPTER 2
The Web Configurator
2.1.1 Accessing the Web Configurator
1 Make sure your PMG2006-T20A hardware is properly connected (refer to the Quick Start Guide).
2 Launch your web browser. If the PMG2006-T20A does not automatically re-direct you to the login
screen, go to http://192.168.1.1.
3 A password screen displays. To access the administrative web configurator and manage the PMG2006-
T20A, type the default username admin and password 1234 in the password screen and click Login. If
you have changed the password, enter your password and click Login.
Figure 6 Password Screen
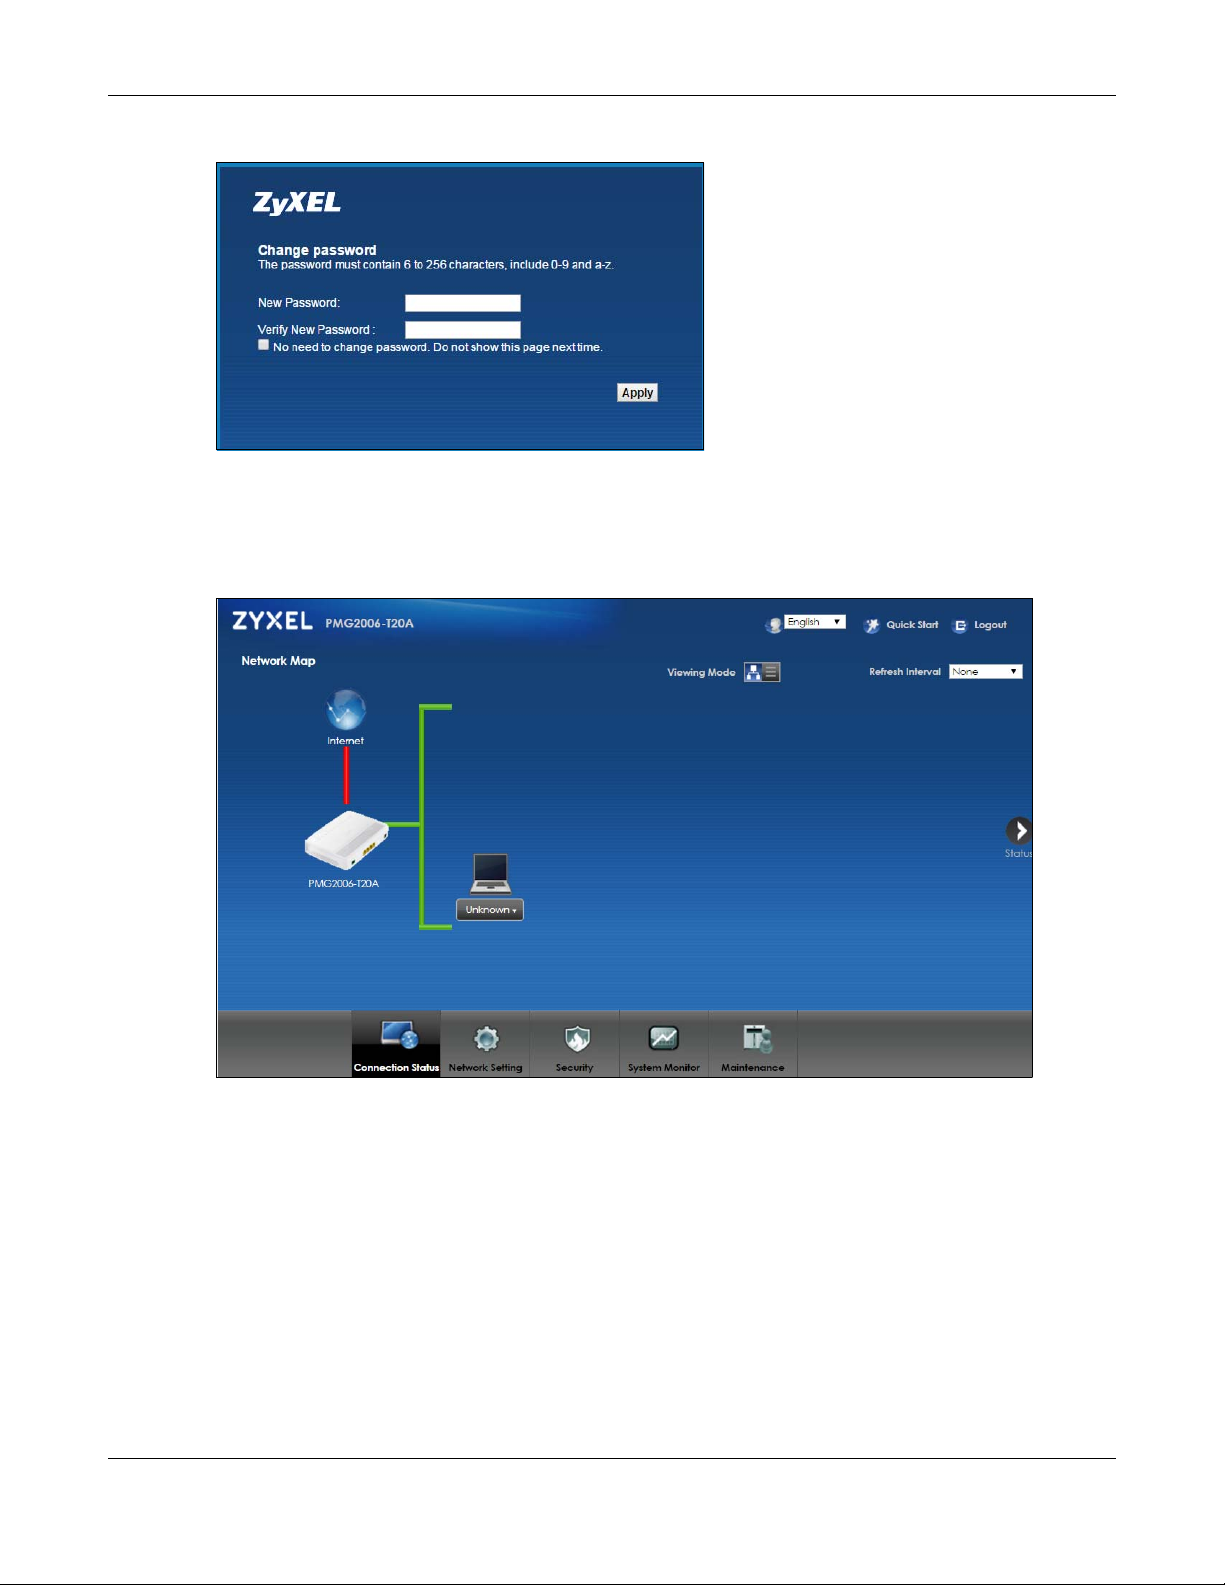
4 The following screen displays if you have not yet changed your password. Enter a new password, retype
it to confirm and click Apply.
PMG2006-T20A User’s Guide
17
Chapter 2 The Web Configurator
Figure 7 Change Password Screen
5 The Quick Start Wizard screen appears. You can configure basic Internet access, and wireless settings.
See Chapter 3 on page 23 for more information.
6 After you finished or closed the Quick Start Wizard screen, the Network Map page appears.
Figure 8 Network Map
7 Click Status to display the Status screen, where you can view the PMG2006-T20A’s interface and system
information.
PMG2006-T20A User’s Guide
18
Chapter 2 The Web Configurator
C
A
B
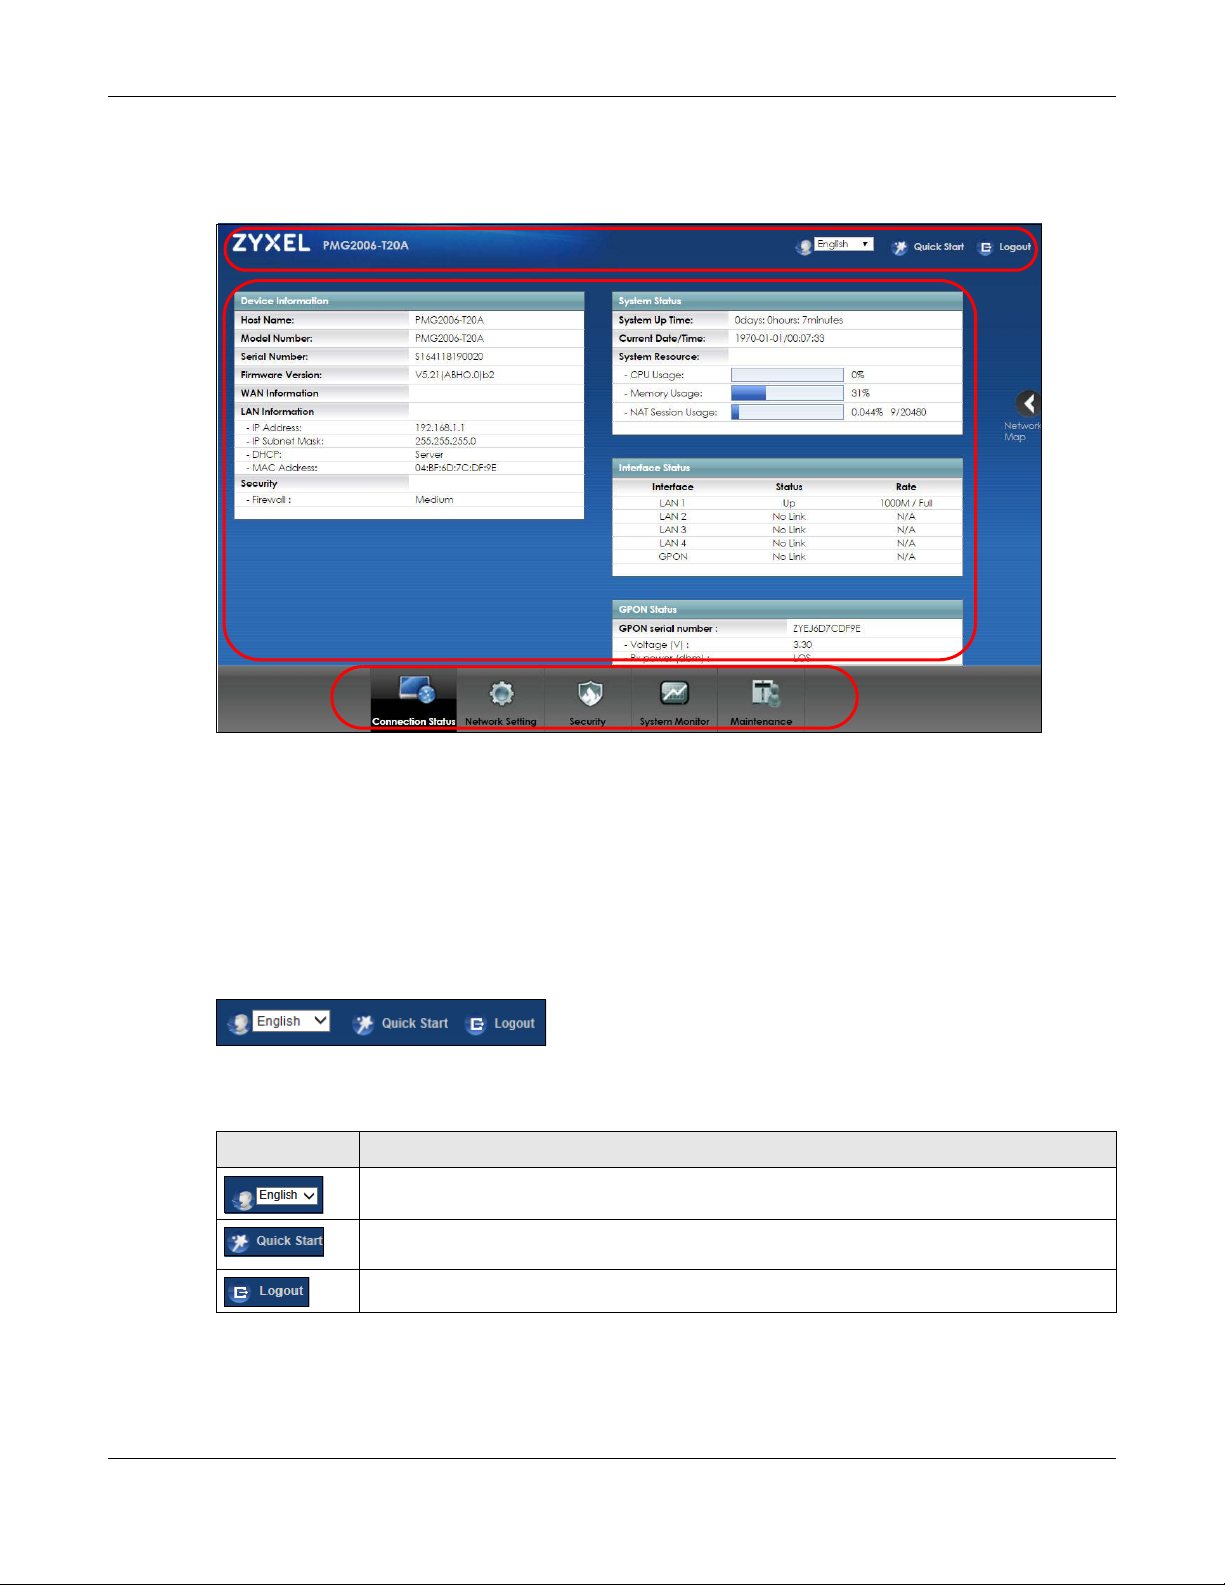
2.2 Web Configurator Layout
Figure 9 Screen Layout
As illustrated above, the main screen is divided into these parts:
• A - title bar
• B - main window
• C - navigation panel
2.2.1 Title Bar
The title bar provides some icons in the upper right corner.
The icons provide the following functions.
Table 4 Web Configurator Icons in the Title Bar
ICON DESCRIPTION
Language: Select the language you prefer.
Quick Start: Click this icon to open screens where you can configure the PMG2006-T20A’s time
zone Internet access, and wireless settings.
Logout: Click this icon to log out of the web configurator.
PMG2006-T20A User’s Guide
19

2.2.2 Navigation Panel
Use the menu items on the navigation panel to open screens to configure PMG2006-T20A features. The
following tables describe each menu item.
Table 5 Navigation Panel Summary
LINK TAB FUNCTION
Connection Status This screen shows the network status of the PMG2006-T20A and
Network Setting
Broadband Broadband Use this screen to view and configure ISP parameters, WAN IP address
Home
Networking
Routing Static Route Use this screen to view and set up static routes on the PMG2006-T20A.
NAT Port Forwarding Use this screen to make your local servers visible to the outside world.
DNS DNS Entry Use this screen to view and configure DNS routes.
Interface
Grouping
Security
Firewall General Use this screen to configure the security level of your firewall.
LAN Setup Use this screen to configure LAN TCP/IP settings, and other advanced
Static DHCP Use this screen to assign specific IP addresses to individual MAC
UPnP Use this screen to turn UPnP and UPnP NAT-T on or off.
Additional
Subnet
TFTP Server Name Configure a TFTP server name which is sent to clients using DHCP option
DNS Route Use this screen to forward DNS queries for certain domain names through
Policy Route
RIP Use this screen to configure Routing Information Protocol to exchange
Applications Use this screen to configure servers behind the PMG2006-T20A.
Port Triggering Use this screen to change your PMG2006-T20A’s port triggering settings.
DMZ Use this screen to configure a default server which receives packets from
ALG Use this screen to enable or disable SIP ALG.
Address Mapping Use this screen to change your PMG2006-T20A’s address mapping
Sessions Use this screen to configure the maximum number of NAT sessions each
Dynamic DNS Use this screen to allow a static hostname alias for a dynamic IP address.
Interface
Grouping
Protocol Use this screen to add Internet services and configure firewall rules.
Access Control Use this screen to enable specific traffic directions for network services.
DoS Use this screen to activate protection against Denial of Service (DoS)
Chapter 2 The Web Configurator
computers/devices connected to it.
assignment, and other advanced properties. You can also add new
WAN connections.
properties.
addresses.
Use this screen to configure IP alias and public static IP.
66.
a specific WAN interface to its DNS server(s).
Use this screen to configure policy routing on the PMG2006-T20A.
routing information with other routers.
ports that are not specified in the Port Forwarding screen.
settings.
client host is allowed to have through the PMG2006-T20A.
Use this screen to map a port to a PVC or bridge group.
attacks.
PMG2006-T20A User’s Guide
20

Chapter 2 The Web Configurator
Table 5 Navigation Panel Summary (continued)
LINK TAB FUNCTION
MAC Filter MAC Filter Use this screen to block or allow traffic from devices of certain MAC
addresses to the PMG2006-T20A.
Parental
Control
Scheduler Rule Scheduler Rule Use this screen to configure the days and times when a configured
Certificates Local Certificates Use this screen to view a summary list of certificates and manage
System Monitor
Log System Log Use this screen to view the status of events that occurred to the
Traffic Status WAN Use this screen to view the status of all network traffic going through the
ARP table ARP table Use this screen to view the ARP table. It displays the IP and MAC address
Routing Table Routing Table Use this screen to view the routing table on the PMG2006-T20A.
Maintenance
System System
User Account User Account Use this screen to change user password on the PMG2006-T20A.
Remote
Management
SNMP SNMP Use this screen to configure SNMP (Simple Network Management
Time Time Use this screen to change your PMG2006-T20A’s time and date.
Parental Control Use this screen to block web sites with the specific URL.
restriction (such as parental control) is enforced.
certificates and certification requests.
Trusted CA
Security Log Use this screen to view all security related events. You can select level
LAN Use this screen to view the status of all network traffic going through the
NAT Use this screen to view NAT statistics for connected hosts.
MGMT Services Use this screen to enable specific traffic directions for network services.
Trust Domain Use this screen to view a list of public IP addresses which are allowed to
Use this screen to view and manage the list of the trusted CAs.
PMG2006-T20A. You can export or e-mail the logs.
and category of the security events in their proper drop-down list
window.
Levels include:
•Emergency
•Alert
• Critical
• Error
• Warning
•Notice
• Informational
•Debugging
Categories include:
• Account
• Attack
•Firewall
• MAC Filter
WAN port of the PMG2006-T20A.
LAN ports of the PMG2006-T20A.
of each DHCP connection.
Use this screen to set Device name and Domain name.
access the PMG2006-T20A through the services configured in the
Maintenance > Remote Management screen.
Protocol) settings.
PMG2006-T20A User’s Guide
21

Chapter 2 The Web Configurator
Table 5 Navigation Panel Summary (continued)
LINK TAB FUNCTION
E-mail
Notification
Log Setting Log Setting Use this screen to change your PMG2006-T20A’s log settings.
Firmware
Upgrade
Backup/Restore Backup/Restore Use this screen to backup and restore your PMG2006-T20A’s
Reboot Reboot Use this screen to reboot the PMG2006-T20A without turning the power
Diagnostic Ping &
E-mail
Notification
Firmware
Upgrade
Traceroute &
Nslookup
Use this screen to configure up to two mail servers and sender addresses
on the PMG2006-T20A.
Use this screen to upload firmware to your PMG2006-T20A.
configuration (settings) or reset the factory default settings.
off.
Use this screen to identify problems with the DSL connection. You can
use Ping, TraceRoute, or Nslookup to help you identify problems.
PMG2006-T20A User’s Guide
22
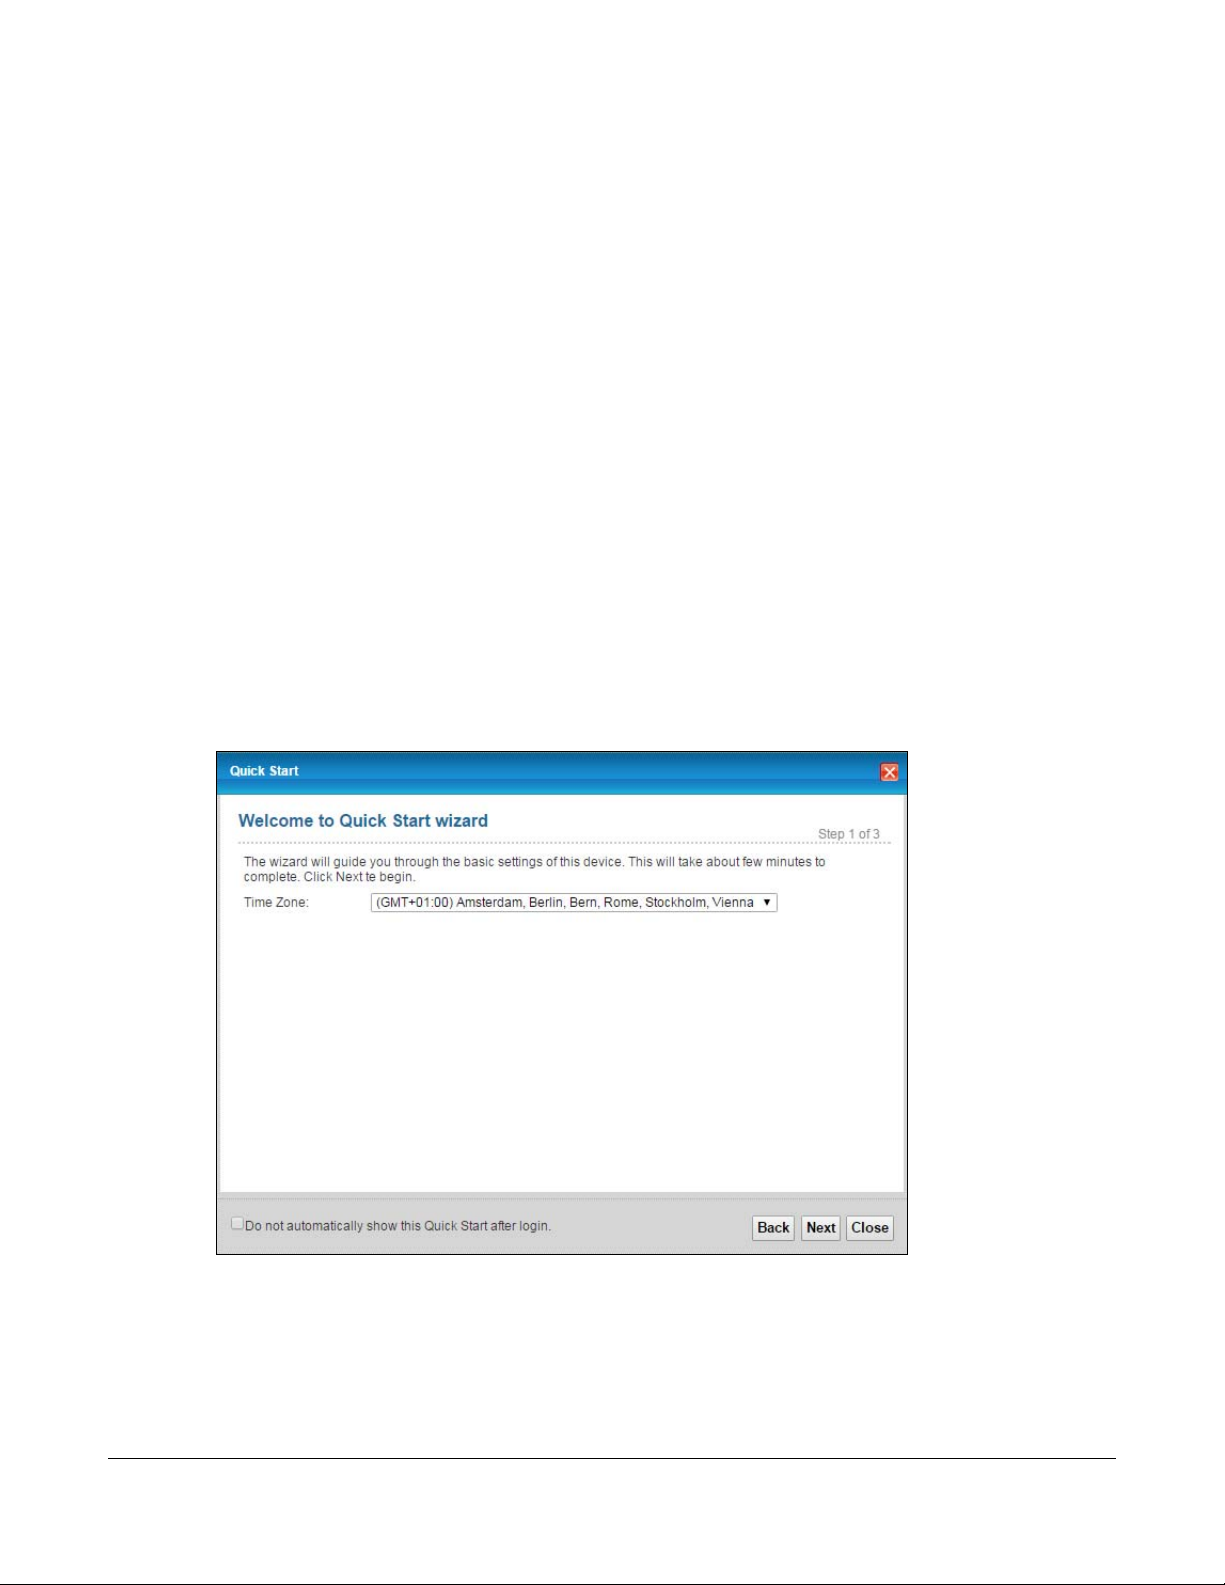
3.1 Overview
Use the Quick Start screens to configure the PMG2006-T20A’s time zone, basic Internet access, and
wireless settings.
Note: See the technical reference chapters (starting on Chapter 4 on page 25) for
background information on the features in this chapter.
3.2 Quick Start Setup
1 You can click the Quick Start icon in the top right corner of the web configurator to open the quick start
screens. Select the time zone of your location. Click Next.
Figure 10 Quick Start - Welcome
CHAPTER 3
Quick Start
2 Enter your Internet connection information in this screen. The screen and fields to enter may vary
depending on your current connection type. Click Save.
PMG2006-T20A User’s Guide
23
Chapter 3 Quick Start
Figure 11 Quick Start - Internet Connection
3 Your PMG2006-T20A saves your settings and attempts to connect to the Internet. Click Close to
complete the setup.
Figure 12 Quick Start - Result Summary
PMG2006-T20A User’s Guide
24
4.1 Overview
This chapter shows you how to use the PMG2006-T20A’s various features.
• Setting Up a GPON Connection, see page 25
• Configuring Static Route for Routing to Another Network, see page 28
• Access the PMG2006-T20A Using DDNS, see page 30
• Configuring the MAC Address Filter, see page 31
4.2 Setting Up a GPON Connection
CHAPTER 4
Tutorials
This tutorial shows you how to set up a GPON Internet connection using the Web Configurator.
If you connect to the Internet through a GPON connection, use the information from your Internet
Service Provider (ISP) to configure the PMG2006-T20A. Be sure to contact your service provider for any
information you need to configure the Broadband screens.
1 Click Network Setting > Broadband to open the following screen. Click Add New WAN Interface.
2 In this example, the GPON connection has the following information.
General
Name MyGPONConnect
Type GPON
Connection Mode Routing
Encapsulation PPPoE
IPv6/IPv4 Mode IPv4
Account Information
PPP User Name 1234@GPON-Ex.com
PPP Password ABCDEF!
PMG2006-T20A User’s Guide
25

Chapter 4 Tutorials
PPPoE Service Name MyGPON
Static IP Address 192.168.1.32
Others Authentication Method: AUTO
PPPoE Passthrough: Disabled
NAT: Enabled
IGMP Multicast Proxy: Enabled
Apply as Default Gateway: Enabled
VLAN: Disabled
3 Select Enable in the Active field. Enter the General and Account Information settings as provided
above.
Choose the Encapsulation specified by your DSL service provider. For this example, the service provider
requires a username and password to establish Internet connection. Therefore, select PPPoE as the WAN
encapsulation type.
Set the IPv6/IPv4 Mode to IPv4 Only.
4 Enter the account information provided to you by your DSL service provider.
5 Configure this rule as your default Internet connection by selecting the Apply as Default Gateway check
box. Then select DNS as Static and enter the DNS server addresses provided to you, such as 192.168.5.2
(DNS server1)/192.168.5.1 (DNS server2).
6 Leave the rest of the fields to the default settings.
7 Click Apply to save your settings.
PMG2006-T20A User’s Guide
26

Chapter 4 Tutorials
8 You should see a summary of your new GPON connection setup in the Broadband screen as follows.
Try to connect to a website to see if you have correctly set up your Internet connection. Be sure to
contact your service provider for any information you need to configure the WAN screens.
PMG2006-T20A User’s Guide
27
Chapter 4 Tutorials
4.3 Configuring Static Route for Routing to Another Network
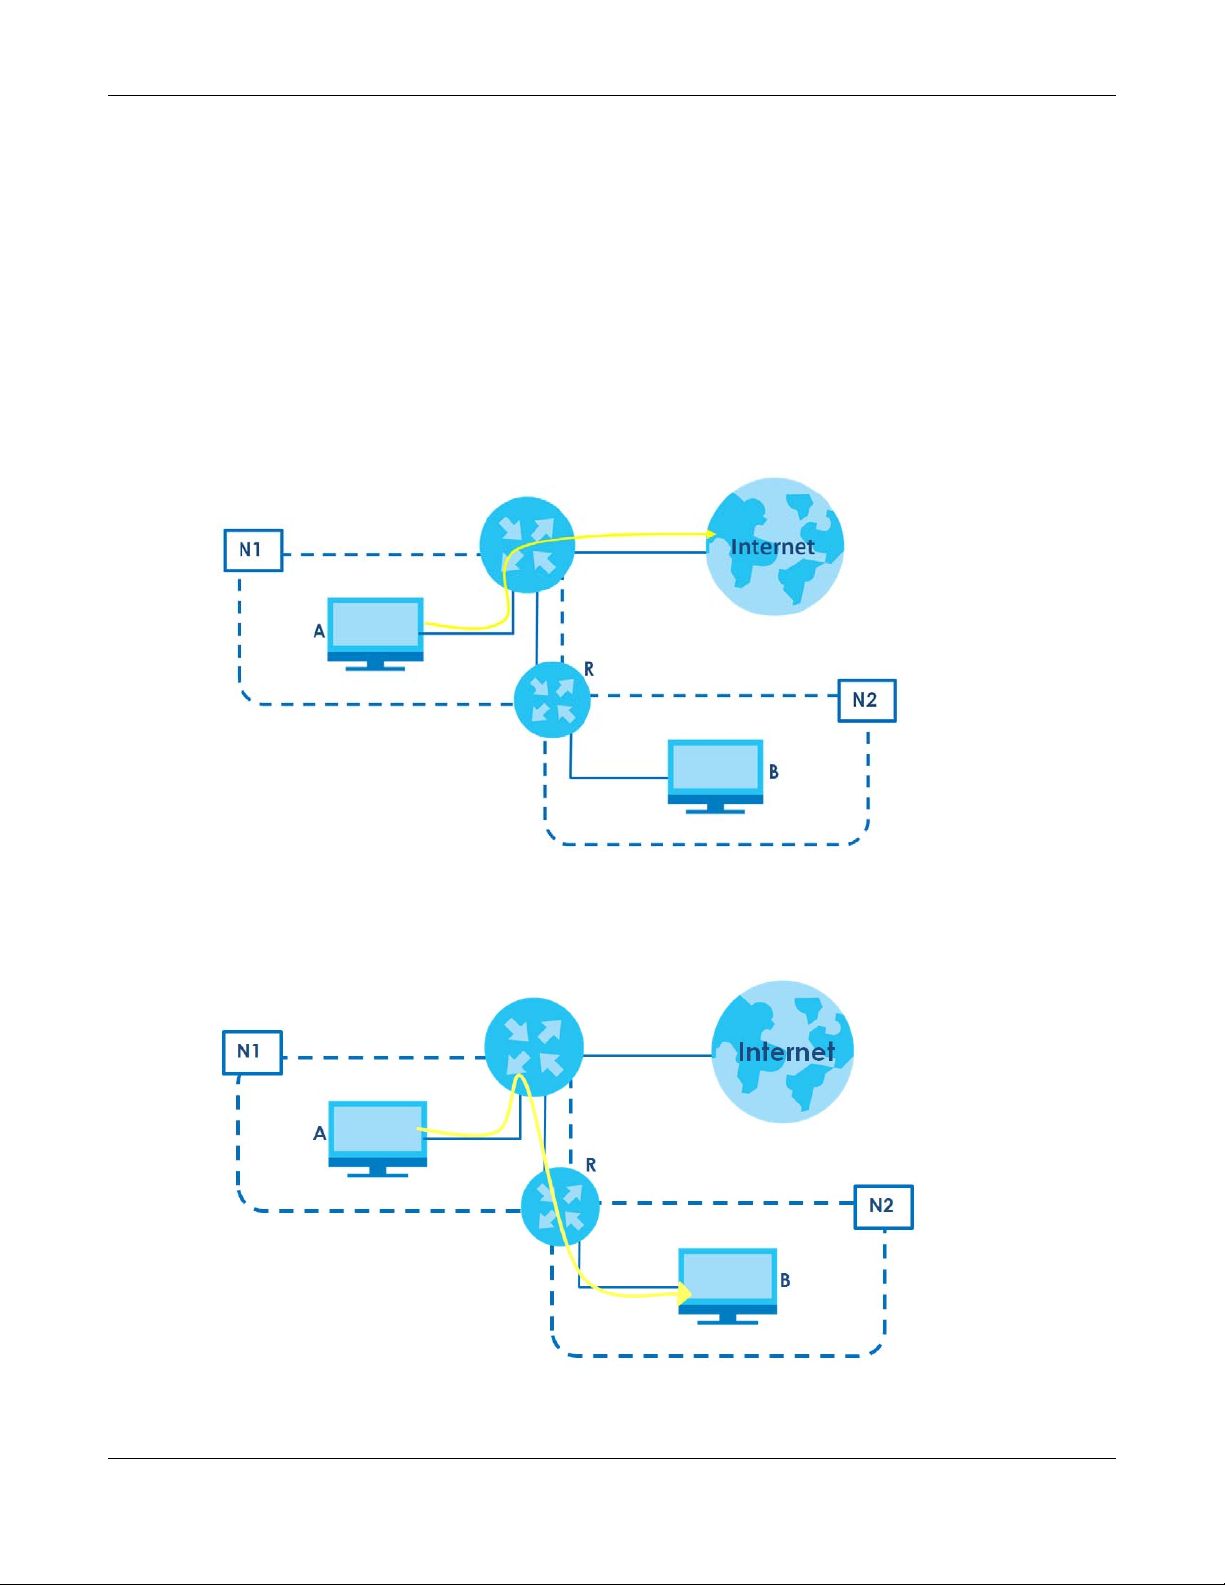
In order to extend your Intranet and control traffic flowing directions, you may connect a router to the
PMG2006-T20A’s LAN. The router may be used to separate two department networks. This tutorial shows
how to configure a static routing rule for two network routings.
In the following figure, router R is connected to the PMG2006-T20A’s LAN. R connects to two networks,
N1 (192.168.1.x/24) and N2 (192.168.10.x/24). If you want to send traffic from computer A (in N1 network)
to computer B (in N2 network), the traffic is sent to the PMG2006-T20A’s WAN default gateway by
default. In this case, B will never receive the traffic.
You need to specify a static routing rule on the PMG2006-T20A to specify R as the router in charge of
forwarding traffic to N2. In this case, the PMG2006-T20A routes traffic from A to R and then R routes the
traffic to B.
PMG2006-T20A User’s Guide
28
Chapter 4 Tutorials
This tutorial uses the following example IP settings:
Table 6 IP Settings in this Tutorial
DEVICE / COMPUTER IP ADDRESS
The PMG2006-T20A’s WAN 172.16.1.1
The PMG2006-T20A’s LAN 192.168.1.1
IP Type IPv4
Use Interface VDSL/ppp1.1
A 192.168.1.34
R’s N1 192.168.1.253
R’s N2 192.168.10.2
B 192.168.10.33
To configure a static route to route traffic from N1 to N2:
1 Log into the PMG2006-T20A’s Web Configurator in advanced mode.
2 Click Network Setting > Routing.
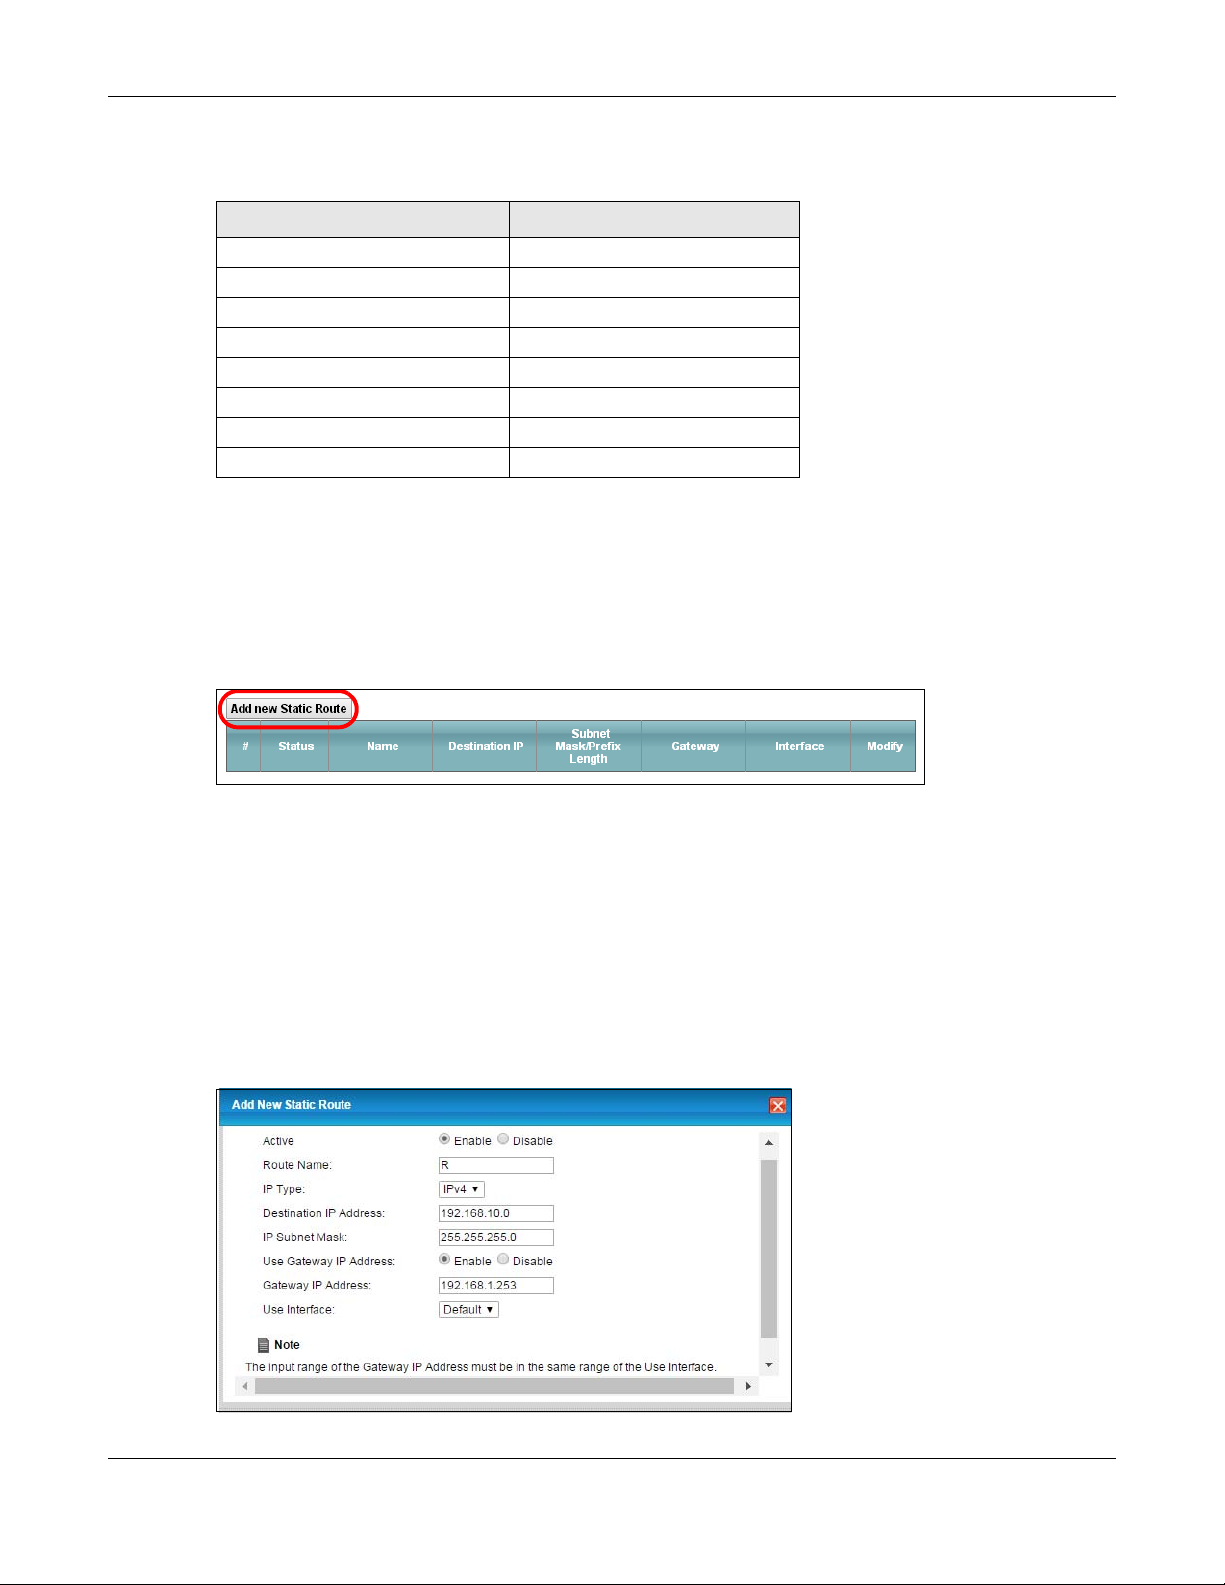
3 Click Add new Static Route in the Static Route screen.
4 Configure the Static Route Setup screen using the following settings:
4a Select Enable in Active field. Enter the Route Name as R.
4b Set IP Type to IPv4.
4c Type 192.168.10.0 and subnet mask 255.255.255.0 for the destination, N2.
4d Select Enable in the Use Gateway IP Address field. Type 192.168.1.253 (R’s N1 address) in the
Gateway IP Address field.
4e Select Default/GPON as the Use Interface.
PMG2006-T20A User’s Guide
29
Chapter 4 Tutorials
4a Click OK.
Now B should be able to receive traffic from A. You may need to additionally configure B’s firewall
settings to allow specific traffic to pass through.
4.4 Access the PMG2006-T20A Using DDNS
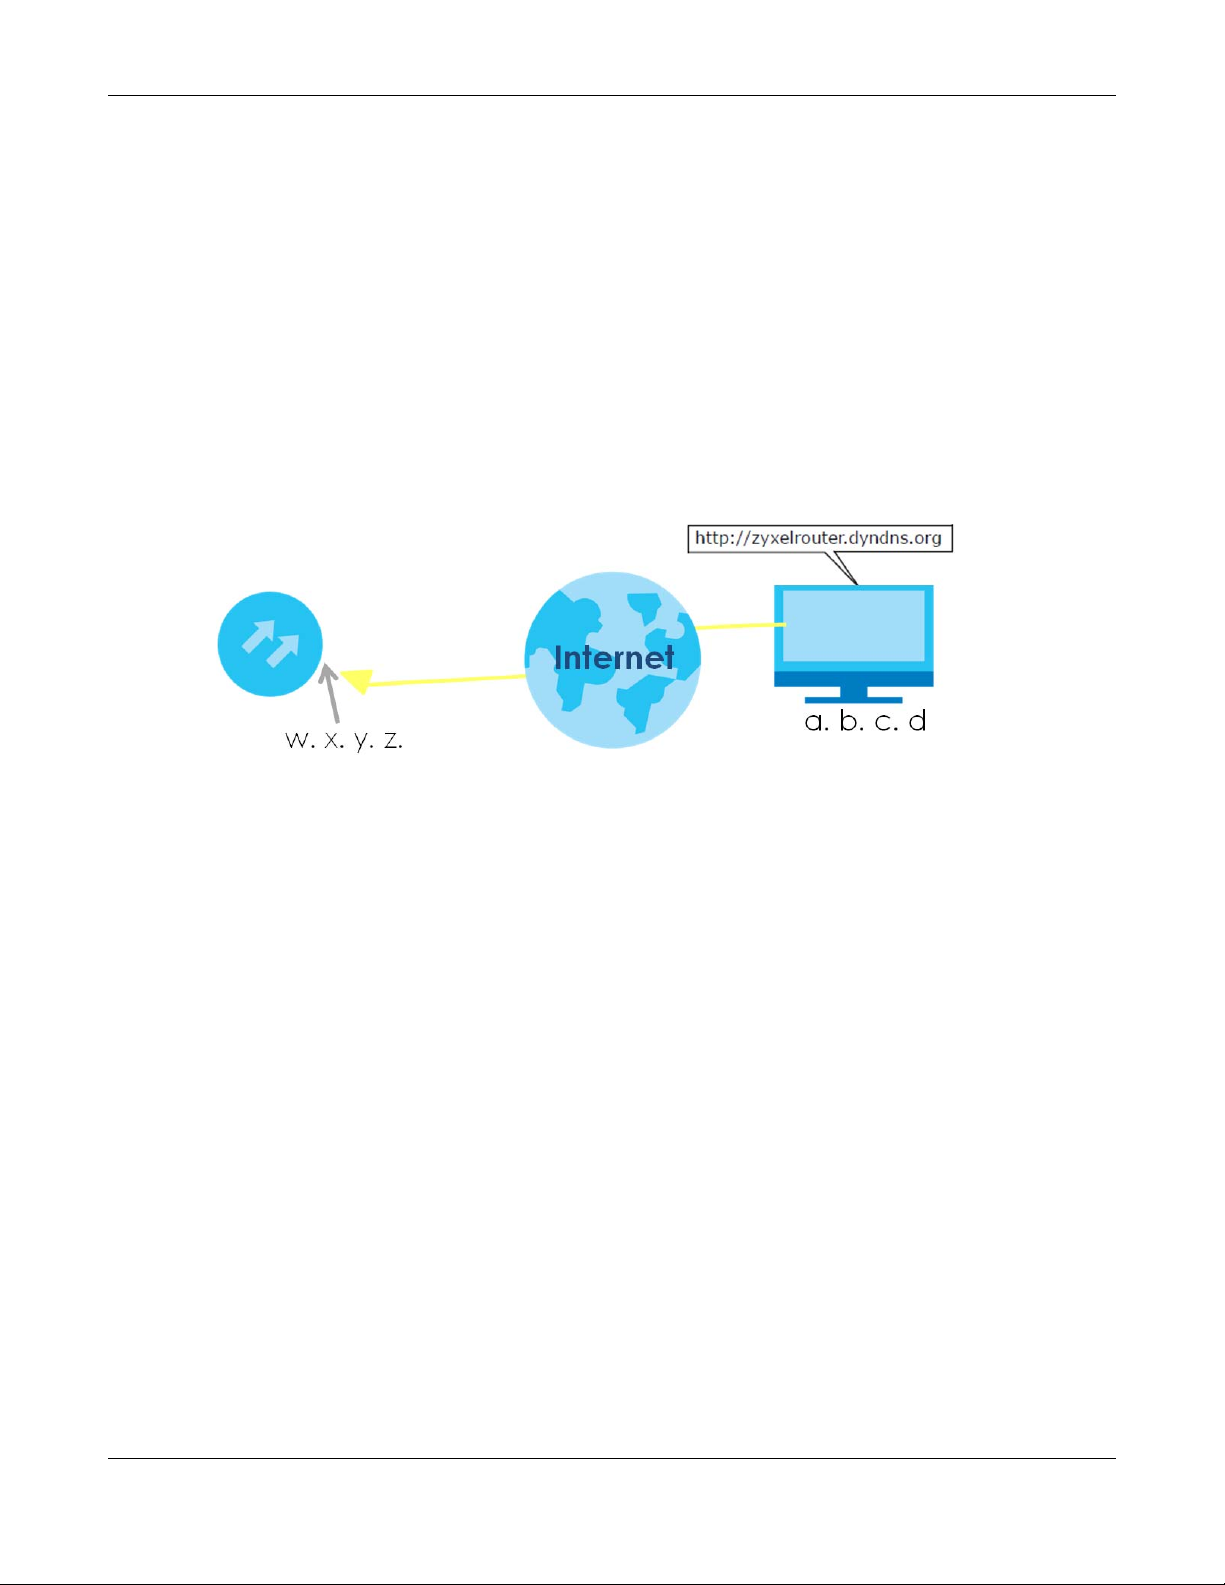
If you connect your PMG2006-T20A to the Internet and it uses a dynamic WAN IP address, it is
inconvenient for you to manage the device from the Internet. The PMG2006-T20A’s WAN IP address
changes dynamically. Dynamic DNS (DDNS) allows you to access the PMG2006-T20A using a domain
name.
To use this feature, you have to apply for DDNS service at www.dyndns.org.
This tutorial covers:
• Registering a DDNS Account on www.dyndns.org
• Configuring DDNS on Your PMG2006-T20A
• Testing the DDNS Setting
Note: If you have a private WAN IP address, then you cannot use DDNS.
4.4.1 Registering a DDNS Account on www.dyndns.org
1 Open a browser and type http://www.dyndns.org.
2 Apply for a user account. This tutorial uses UserName1 and 12345 as the username and password.
3 Log into www.dyndns.org using your account.
4 Add a new DDNS host name. This tutorial uses the following settings as an example.
• Hostname: zyxelrouter.dyndns.org
• Service Type: Host with IP address
• IP Address: Enter the WAN IP address that your PMG2006-T20A is currently using. You can find the IP
address on the PMG2006-T20A’s Web Configurator Status page.
Then you will need to configure the same account and host name on the PMG2006-T20A later.
PMG2006-T20A User’s Guide
30
 Loading...