

Page 1
NXC5200
Wireless LAN Controller
Default Login Details
IP Address https://192.168.1.1
User Name admin
Password 1234
Version 2.20
Edition 1, 05/2010
www.zyxel.com
www.zyxel.com
Copyright © 2010
ZyXEL Communications Corporation
Page 2

Page 3

About This User's Guide
About This User's Guide
Intended Audience
This manual is intended for people who want to want to configure the NXC using
the Web Configurator.
Related Documentation
•Quick Start Guide
The Quick Start Guide is designed to show you how to make the NXC hardw a re
connections and access the Web Configurator wizards. (See the wizard real time
help for information on configuring each screen.) It also contains a connection
diagram and package contents list.
•CLI Reference Guide
The CLI Reference Guide explains how to use the Command-Line Interface (CLI)
to configure the NXC.
Note: It is recommended you use the Web Configurator to configure the NXC.
• Web Configurator Online Help
Click the help icon in any screen for help in configuring that screen and
supplementary information.
• ZyXEL Web Site
Please refer to www.zyxel.com
product certifications.
for additional support documentation and
User Guide Feedback
Help us help you. Send all User Guide-related comments, questi ons or suggestions
for improvement to the following address, or use e-mail instead. Thank you!
The Technical Writing Team,
ZyXEL Communications Corp.,
6 Innovation Road II,
Science-Based Industrial Park,
Hsinchu, 300, Taiwan.
E-mail: techwriters@zyxel.com.tw
NXC5200 User’s Guide
3
Page 4

About This User's Guide
Need More Help?
More help is available at www.zyx el.com.
• Download Library
Search for the latest product updates and documentation from this link. Read
the Tech Doc Overview to find out how to efficiently use the User Guide, Quick
Start Guide and Command Line Interface Reference Guide in order to better
understand how to use your product.
• Knowledge Base
If you have a specific question about your product, the answer may be here.
This is a collection of answers to previously asked questions about ZyXEL
products.
•Forum
This contains discussions on ZyXEL prod ucts. Learn from others who use ZyXEL
products and share your experiences as well.
Customer Support
Should problems arise that cannot be solved by the methods listed above, you
should conta ct your vendor. If you cannot contact your vendor, then contact a
ZyXEL office for the region in which you bought the device.
See http://www.zyxel.com/web/contact_us.php for contact information. Please
have the following informatio n ready when you contact an office.
• Product model and serial number.
•Warranty Information.
• Date that you received your device.
4
• Brief description of the problem and the steps you took to solve it.
NXC5200 User’s Guide
Page 5

About This User's Guide
Disclaimer
Graphics in this book may differ slightly from the product due to differences in
operating systems, operating system versions, or if you installed updated
firmware/software fo r y our dev ice. Ev ery effort has been made to ensur e that the
information in this manual is accurate.
NXC5200 User’s Guide
5
Page 6

Document Conventions
Warnings and Notes
These are how warnings and notes are shown in this User’s Guide.
Warnings tell you about things that could harm you or your device.
Note: Notes tell you other important information (for example, other things you may
need to configure or helpful tips) or recommendations.
Syntax Conventions
• The product may be referred to as the “N XC”, the “device”, the “system” or the
“product” in this User’s Guide.
• Product labels, screen names, field labels and field choices are all in bold font.
Document Conventions
• A key stroke is denoted by square brackets and uppercase text, for example,
[ENTER] means the “enter” or “ret urn” key on your keyboard.
• “Enter” means for you to type one or more characters and then press the
[ENTER] key. “Select” or “choose” means for you to use one of the predefined
choices.
• A right angle bracket ( > ) within a screen name denotes a mouse click. For
example, Maintenance > Log > Log Setting means you first click
Maintenance in the navigation panel, then the Log sub menu and finally the
Log Setting tab to get to that screen.
• Units of measurement may denote the “metric” value or the “scientific” value.
For example, “k” for kilo may denote “1000” or “1024”, “M” for mega may
denote “1000000” or “1048576” and so on.
• “e.g.,” is a shorthand for “for instance”, and “i.e.,” means “that is” or “in other
words”.
6
NXC5200 User’s Guide
Page 7
Document Conventions
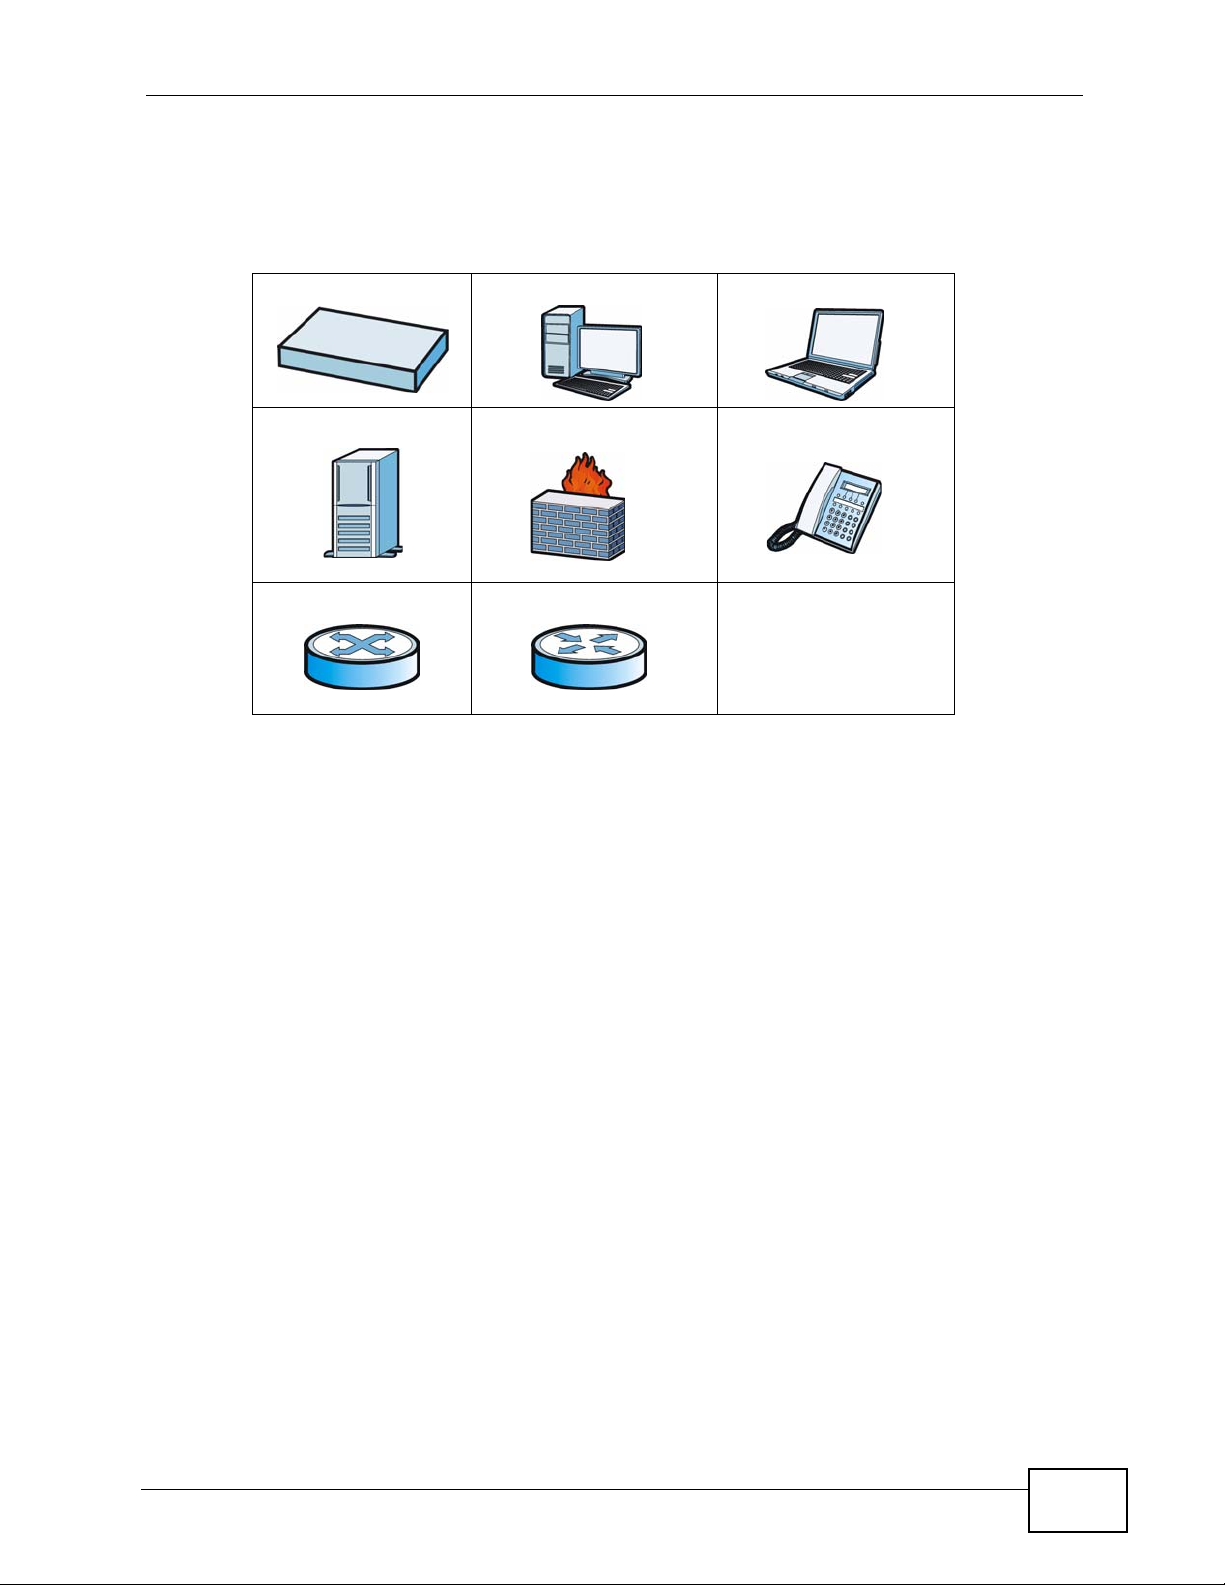
Icons Used in Figures
Figures in this User’s Guide may use the following generic icons. The NXC icon is
not an exact representation of your device.
NXC Computer Notebook computer
Server Firewall Telephone
Switch Router
NXC5200 User’s Guide
7
Page 8

Safety Warnings
• Do NOT use this product near water, for example, in a wet basement or near a swimming
pool.
• Do NOT expose your device to dampness, dust or corrosive liquids.
• Do NOT store things on the device.
• Do NOT install, use, or service this device during a thunderstorm. There is a remote risk
of electric shock from lightning.
• Connect ONLY suitable accessories to the device.
• Do NOT open the device or unit. Opening or removing covers can expose you to
dangerous high voltage points or other risks. ONLY qualified service personnel should
service or disassemble this device. Please contact your vendor for further information.
• Make sure to connect the cables to the correct ports.
• Place connecting cables carefully so that no one will step on them or stumble over them.
• Always disconnect all cables from this device before servicing or disassembling.
• Caution: This unit has more than one power supply cord. Disconnect two power supply
cords before servicing to avoid electric shock. (has multiple power cords, e.g., chassisbased Ethernet switch. Make sure you specify the correct number of power cords in both
the English and the French that follows)
• Attention: Cet appareil comporte plus d'un cordon d'alimentation. Afin de prévenir les
chocs électriques, debrancher les deux cordons d'alimentation avant de faire le
dépannage.
• Use ONLY an appropriate power adaptor or cord for your device. Connect it to the right
supply voltage (for example, 110V AC in North America or 230V AC in Europe).
• Do NOT remove the plug and connect it to a power outlet by itself; always attach the plug
to the power adaptor first before connecting it to a power outlet.
• Do NOT allow anything to rest on the power adaptor or cord and do NOT place the
product where anyone can walk on the power adaptor or cord.
• Do NOT use the device if the power adaptor or cord is damaged as it might cause
electrocution.
• If the power adaptor or cord is damaged, remove it from the device and the power
source.
• Do NOT attempt to repair the power adaptor or cord. Contact your local vendor to order a
new one.
• Do not use the device outside, and make sure all the connections are indoors. There is a
remote risk of electric shock from lightning.
• CAUTION: RISK OF EXPLOSION IF BATTERY (on the motherboard) IS REPLACED BY AN
INCORRECT TYPE. DISPOSE OF USED BATTERIES ACCORDING TO THE INSTRUCTIONS.
Dispose them at the applicable collection point for the recycling of electrical and
electronic equipment. For detailed information about recycling of this product, please
contact your local city office, your household waste disposal service or the store where
you purchased the product.
• Do NOT obstruct the device ventilation slots, as insufficient airflow may harm your
device.
Safety Warnings
8
Your product is marked with this symbol, which is known as the WEEE mark. WEEE
stands for Waste Electronics and Electrical Equipment. It means that used electrical
and electronic products should not be mixed with general waste. Used electrical and
electronic equipment should be treated separately.
NXC5200 User’s Guide
Page 9

Table of Contents
Table of Contents
About This User's Guide..........................................................................................................3
Document Conventions............................................................................................................6
Safety Warnings ........................................................................................................................8
Table of Contents......................................................................................................................9
Part I: User’s Guide................................................................................ 23
Chapter 1
Introduction.............................................................................................................................25
1.1 Overview ............. ............................................. ... .... ... ... ... .... ................................................ 25
1.2 Rack-mounted Installation ................................................................................................... 25
1.2.1 Rack-Mounted Installation Procedure ........................................................................ 26
1.2.2 LAN Module Installation Procedure ............................................................................ 27
1.3 Front and Back Panels .......... .... ... ... ................................................ .... ... ... .......................... 29
1.3.1 1000Base-T Ports ...................................................................................................... 29
1.3.2 Optional Fiber Ports ................................................................................................... 30
1.3.3 Front Panel LEDs .......................................... ............................................................. 31
1.4 Management Overview .......... .... ... ... ................................................ .... ... .............................31
1.5 Starting and Stopping the NXC ..... ... ... ... .... ... ... ... .... ... ... ... ................................................. ... 32
Chapter 2
Features and Applications.....................................................................................................35
2.1 Features ............................................. ... .... ... ............................................. ... .... ... ... .............35
2.2 Applications .................................................. ... ... .... ... ... ... .... ................................................ 37
2.2.1 AP Management .................................................... .... ... ... ... ... .... ... ... .......................... 37
2.2.2 Wireless Security ................................................... .... ... ... ... ... .... ................................ 37
2.2.3 Captive Portal ................... ............................................. ... ... ... .... ... ... ... ....................... 38
2.2.4 Load Balancing ................................................... ... ............................................. .... ... 38
2.2.5 Dynamic Channel Selection ...... ... .... ... ... ... .... ... ... ... .... ... ... ... ....................................... 38
2.2.6 User-Aware Access Control ....................................................................................... 39
2.2.7 Device HA .................... .... ............................................. ... ... ... .... ... ... ... ....................... 39
Chapter 3
The Web Configurator............................................................................................................41
3.1 Overview ............. ............................................. ... .... ... ... ... .... ................................................ 41
NXC5200 User’s Guide
9
Page 10

Table of Contents
3.2 Access ................................................................................. ... ... ... ....................................... 41
3.3 The Main Screen ................................................................................................................. 43
3.3.1 Title Bar .................................. ... ............................................. .... ... ... .......................... 44
3.3.2 Navigation Panel .......... .... ... ... ... ................................................................................. 44
3.3.3 Warning Messages ..................................................................................................... 49
3.3.4 Site Map .......... .... ... ... ... .... ............................................. ... ... ... .... ... ... ... ....................... 50
3.3.5 Object Reference ............. ... ... ............................................. ... .... ... ... ... .... ... ................ 50
3.3.6 Tables and Lists ..... ... ... .... ... ... ... ... .............................................. ... ... ... .... ... ... .............55
Chapter 4
Configuration Basics..............................................................................................................59
4.1 Overview ............. ............................................. ... .... ... ... ... .... ................................................ 59
4.2 Object-based Configuration .......................................................................... .... ... ... .............59
4.3 Zones, Interfaces, and Physical Ports ................................................................................. 60
4.3.1 Interface Types .................................................... ... .... ... ... ... ... .... ... ... .......................... 60
4.3.2 Example Interface and Zone Configuration ............................ .... ... ... ... .... ... ... ... ... .... ... 61
4.4 Feature Configuration Overview .......................................................................................... 62
4.4.1 Feature ...................................... ... .... ... ... ... .... ... ............................................. ... ... ....... 62
4.4.2 Licensing Registration ............................ ... .... ... ... ... .... ... ... .......................................... 62
4.4.3 Licensing Update ................................................... .... ... ... ... ... .... ... ... ... ....................... 63
4.4.4 Wireless .................................................... .... ... ... ............................................. ... ....... 63
4.4.5 Interface .................... ... .............................................. ... ... ... ... .... ... ... .......................... 63
4.4.6 Policy Routes ................... ............................................. ... ... ... .... ... ... ... ....................... 63
4.4.7 Static Routes .................................... ... ... ... .............................................. ... ... ... ... ....... 64
4.4.8 Zones ............................................................ ... ... ... ............................................. ....... 64
4.4.9 NAT .............................................. .... ... ............................................. ... ....................... 64
4.4.10 ALG .......................................................................................................................... 64
4.4.11 Captive Portal ...........................................................................................................65
4.4.12 Firewall ..................................................................................................................... 65
4.4.13 Application Patrol ..................................................................................................... 65
4.4.14 Anti-Virus .................................................................................................................. 65
4.4.15 IDP ........................................................................................................................... 66
4.4.16 ADP .......................................................................................................................... 66
4.4.17 Device HA ................................................................................................................ 66
4.5 Objects ............................................ ... ... .... ............................................. ... ... .... ... ................66
4.5.1 User/Group ....................... ... ... ............................................. ... .... ... ... ... .... ................... 67
4.5.2 AP Profile .................. ... .............................................. ... ... ... ... .... ... ... .......................... 67
4.5.3 MON Profile ...................... ... ... ............................................. ... .... ... ... ... .... ................... 68
4.6 System ............. ............................................. ... ... .... ............................................. ................68
4.6.1 DNS, WWW, SSH, TELNET, FTP, and SNMP ........................................................... 68
4.6.2 Logs and Reports ....................................................................................................... 68
4.6.3 File Manager ....................... ... ... ... .............................................................................. 69
4.6.4 Diagnostics ................ ... .... ... ... ... ... .............................................. ... ... ... .... ................... 69
10
NXC5200 User’s Guide
Page 11

Table of Contents
4.6.5 Shutdown .................. ... .............................................. ... ... ... ... .... ... ... .......................... 69
Chapter 5
Tutorials..................................................................................................................................71
5.1 Overview ............. ............................................. ... .... ... ... ... .... ................................................ 71
5.2 Sample Network Setup ....................... ... .... ... ... ... .... ... ... .......................................................72
5.2.1 Tutorial Tasks ...... ... ... ... .... ... ............................................. ... ... .... ... ... ... .... ................... 73
5.2.2 Set the Management VLAN (vlan99) ......................................................................... 74
5.2.3 Set the Other VLANs (vlan101, vlan102) ................................................................... 75
5.2.4 Configure the AAA Object .......................................................................................... 77
5.2.5 Configure the Auth. Method Objects (staff, guest) ..................................................... 79
5.2.6 Create the AP Profiles (staff, guest) ........................................................................... 80
5.2.7 Create the Guest User Account ................................................................................. 83
5.2.8 Configure the Captive Portal Settings ........................................................................ 84
5.2.9 Configure the Guest Firewall Rules ........................................................... ... ... ... .... ... 85
5.3 Blocking Network Protocols ................... .... ... ... ... .... .............................................................87
5.3.1 Configuring the WLAN Zone ............... ... ... .... ... ... ... .... ... ... ... ... .... ................................ 87
5.3.2 Configuring the Firewall ................................................ ... ... ... .... ... ... .......................... 88
5.3.3 Blocking Sub-Protocols ................................. ... ... ... .... ............................................. ... 90
5.4 Rogue AP Detection ..................................... ... ... .... ... ... ... .................................................... 92
5.4.1 Rogue AP Containment ............................................................................................. 96
5.5 Load Balancing .......................... ... ... ... ............................................. .... ... ... ... .... ................... 97
5.6 Dynamic Channel Selection ................................................................................................ 98
Part II: Technical Reference................................................................ 101
Chapter 6
Dashboard..........................................................................................................................103
6.1 Overview ............. ............................................. ... .... ... ... ... .... .............................................. 103
6.1.1 What Yo u Can Do in this Chapter ............................................................................ 103
6.2 Dashboard ....................................... ... ... .............................................. ... ... ... .... ... ... ...........104
6.2.1 CPU Usage .................. .... ............................................. ... ... ... .... ... ... ... ..................... 109
6.2.2 Memory Usage .................................... ... ... .... ... ... ... .... ...............................................110
6.2.3 Session Usage .... ............................................. ... ... .... ... ... ... ......................................111
6.2.4 DHCP Table .... .... ... ... ... .............................................. ... ... ... ... .... ... ............................112
6.2.5 Number of Login Users .................... ... ... ................................................. ... ... ... .........113
Chapter 7
Monitor...............................................................................................................................115
7.1 Overview ............. ............................................. ... .... ... ... ... .... ...............................................115
7.1.1 What Yo u Can Do in this Chapter .............................................................................115
NXC5200 User’s Guide
11
Page 12

Table of Contents
7.2 What You Need to Know ..................................... .... ... ... ... .... ... ............................................116
7.3 Port Statistics ........ ... .... ... ... ............................................. .... ... ... .........................................117
7.3.1 Port Statistics Graph ................................................................................................118
7.4 Interface Status ................................................ ... .... ... ............................................. ............119
7.5 Traffic Statistics ...................... .... ............................................. ... ... ... .... .............................. 121
7.6 Session Monitor ........................... ... ... ... .... ... ... ... ...............................................................124
7.7 IP/MAC Binding Monitor ....................................................................................................127
7.8 Login Users ........................................................................................ ... ... ... .... ... ... ...........128
7.9 AP List ............... ... ............................................. .... ... ... ... .... ... ........................................... 129
7.9.1 Station Count of AP ................................................................................................ 130
7.10 Radio List ........................................................................................................................ 131
7.10.1 AP Mode Radio Information ........................................ ........................................... 132
7.1 1 Station List ...................................................................................................................... 133
7.12 Detected Device .............................................................................................................134
7.13 Application Patrol ............................................................................................................135
7.13.1 Application Patrol: General Settings ...................................................................... 135
7.13.2 Application Patrol: Bandwidth Statistics ................................................................. 136
7.13.3 Application Patrol: Protocol Statistics ......................................................... ........... 137
7.13.4 Application Patrol: Protocol Statistics by Rule ....................................................... 138
7.14 Anti-Virus ......................................................................................................................... 139
7.15 IDP .................................................................................................................................. 141
7.16 View Log ..........................................................................................................................143
7.17 View AP Log ................................................................................................................... 146
Chapter 8
Registration...........................................................................................................................151
8.1 Overview ............. ............................................. ... .... ... ... ... .... .............................................. 151
8.1.1 What Yo u Can Do in this Chapter ............................................................................ 151
8.1.2 What you Need to Know ............................................................... ... ... ..................... 151
8.2 Registration ........................................ ... .... ... ............................................. ... .... ... ... ...........153
8.3 Service ................ ... ............................................. .... ... ... ... .... ... ........................................... 155
Chapter 9
Signature Update..................................................................................................................157
9.1 Overview ............. ............................................. ... .... ... ... ... .... .............................................. 157
9.1.1 What Yo u Can Do in this Chapter ............................................................................ 157
9.1.2 What you Need to Know ............................................................... ... ... ..................... 157
9.2 Anti-Virus ............................... .... ... ............................................. ... ... .... ... ........................... 158
9.3 IDP/AppPatrol ........................ .... ... ... ... ... .... ... ... ... ...............................................................159
9.4 System Protect ................................................................................................................. 161
Chapter 10
Wireless.................................................................................................................................163
12
NXC5200 User’s Guide
Page 13

Table of Contents
10.1 Overview .......................................................................................................................... 163
10.1.1 What You Can Do in this Chapter .......................................................................... 163
10.1.2 What You Need to Know ........................................................................................ 163
10.2 Controller ........................................................................................................................ 164
10.3 AP Management .............................................................................................................. 165
10.3.1 Edit AP List ............................................................................................................ 166
10.4 MON Mode ...................................................................................................................... 167
10.4.1 Add/Edit Rogue/Friendly List .................................................................................. 169
10.5 Load Balancing ................................................................................................................ 170
10.5.1 Disassociating and Delaying Connections ........................... ..................................171
10.6 DCS ................................................................................................................................173
10.7 Technical Reference ........................................................................................................174
10.7.1 Dynamic Channel Selection ........................... ........................................................ 174
10.7.2 Load Balancing ......................................................................................................176
Chapter 11
Interfaces...............................................................................................................................177
11.1 Interface Overview ........................................................................................................... 177
11.1.1 What You Can Do in this Chapter ................................... ........................................ 177
11.1.2 What You Need to Know ........................................................................................ 177
11.2 Ethernet Summary ..........................................................................................................178
11.2.1 Edit Ethernet ..........................................................................................................180
11.2.2 Object References .................................................................................................. 185
11.3 VLAN Interfaces .............................................................................................................. 186
11.3.1 VLAN Summary ...................................................................................................... 188
11.3.2 Add/Edit VLAN ...................................................................................................... 189
11.4 Technical Reference ........................................................................................................193
Chapter 12
Policy and Static Routes......................................................................................................197
12.1 Overview .......................................................................................................................... 197
12.1.1 What You Can Do in this Chapter .......................................................................... 197
12.1.2 What You Need to Know ....................................................................................... 197
12.2 Policy Route ................................................................................................................... 199
12.2.1 Add/Edit Policy Route ............................................................................................202
12.3 Static Route ....................................................................................................................206
12.3.1 Static Route Setting ................................................................................................ 207
12.4 Technical Reference ........................................................................................................208
Chapter 13
Zones ....................................................................................................................................213
13.1 Overview .......................................................................................................................... 213
13.1.1 What You Can Do in this Chapter .......................................................................... 214
NXC5200 User’s Guide
13
Page 14

Table of Contents
13.1.2 What You Need to Know ........................................................................................ 214
13.2 Zone ................................................................................................................................ 215
13.3 Add/Edit Zone ................................................................................................................. 216
Chapter 14
NAT.........................................................................................................................................217
14.1 Overview .......................................................................................................................... 217
14.1.1 What You Can Do in this Chapter .......................................................................... 217
14.2 NAT Summary .................................................................................................................218
14.2.1 Add/Edit NAT .......................................................................................................... 219
14.3 Technical Reference ........................................................................................................222
Chapter 15
ALG .......................................................................................................................................225
15.1 Overview .......................................................................................................................... 225
15.1.1 What You Can Do in this Chapter .......................................................................... 225
15.1.2 What You Need to Know ........................................................................................ 226
15.1.3 Before You Begin ...................................................................................................227
15.2 ALG ................................................................................................................................ 228
15.3 Technical Reference ........................................................................................................230
Chapter 16
IP/MAC Binding....................................................................................................................233
16.1 Overview .......................................................................................................................... 233
16.1.1 What You Can Do in this Chapter .......................................................................... 233
16.1.2 What You Need to Know ........................................................................................ 234
16.2 IP/MAC Binding Summary ............................................................................................... 234
16.2.1 Edit IP/MAC Binding .......................................... .......... ............. ............. ............ ..... 235
16.2.2 Add/Edit Static DHCP Rule .................................................................................... 237
16.3 IP/MAC Binding Exempt List ........................................................................................... 238
Chapter 17
Captive Portal.......................................................................................................................239
17.1 Overview .......................................................................................................................... 239
17.1.1 What You Can Do in this Chapter .......................................................................... 240
17.2 Captive Portal .................................................................................................................. 240
17.2.1 Add Exceptional Services ...................................................................................... 242
17.2.2 Auth. Policy Add/Edit ...................... ......... .......... ....... ......... .......... .......... ......... ........ 243
17.3 Login Page ...................................................................................................................... 245
Chapter 18
Firewall.............................................................................................................................249
14
18.1 Overview .......................................................................................................................... 249
NXC5200 User’s Guide
Page 15

Table of Contents
18.1.1 What You Can Do in this Chapter .......................................................................... 249
18.1.2 What You Need to Know ........................................................................................ 250
18.1.3 Firewall Rule Example Applications ....................................................................... 252
18.1.4 Firewall Rule Configuration Example ..................................................................... 255
18.1.5 Asymmetrical Routes ............................................................................................. 256
18.2 Firewall ............................................................................................................................ 257
18.2.1 Add/Edit Firewall Screen ........................................................................................ 260
18.3 Session Limit ................................................................................................................... 262
18.3.1 Add/Edit Session Limit ........................................................................................... 263
Chapter 19
Application Patrol...............................................................................................................265
19.1 Overview .......................................................................................................................... 265
19.1.1 What You Can Do in this Chapter .......................................................................... 265
19.1.2 What You Need to Know .......................................................................................266
19.1.3 Application Patrol Bandwidth Management Examples ........................................... 271
19.2 Application Patrol Common Applications .............................. ...................... ..................... 275
19.2.1 Edit Application ...................................................................................................... 276
19.2.2 Add/Edit Policy ......................................................................................................279
19.3 Other Applications ........................................................................................................... 281
19.3.1 Add/Edit Policy ....................................................................................................... 284
Chapter 20
Anti-Virus..............................................................................................................................287
20.1 Overview .......................................................................................................................... 287
20.1.1 What You Can Do in this Chapter .......................................................................... 287
20.1.2 What You Need to Know ........................................................................................ 288
20.1.3 Before You Begin ...................................................................................................289
20.2 Anti-Virus Summary .........................................................................................................290
20.2.1 Add/Edit Rule ......................................................................................................... 293
20.3 Black List ......................................................................................................................... 295
20.4 Add/Edit Pattern .............................................................................................................. 296
20.5 White List ......................................................................................................................... 298
20.6 Signature ......................................................................................................................... 299
20.7 Technical Reference ........................................................................................................301
Chapter 21
IDP.......................................................................................................................................303
21.1 Overview .......................................................................................................................... 303
21.1.1 What You Can Do in this Chapter .......................................................................... 303
21.1.2 What You Need To Know ....................................................................................... 303
21.1.3 Before You Begin ...................................................................................................304
21.2 IDP Summary .................................................................................................................. 304
NXC5200 User’s Guide
15
Page 16

Table of Contents
21.3 Profile Summary .............................................................................................................. 307
21.3.1 Base Profiles ..........................................................................................................308
21.4 Creating New Profiles ...................................................................................................... 309
21.5 Add/Edit Profile ................................................................................................................311
21.5.1 Policy Types ........................................................................................................... 314
21.5.2 IDP Service Groups ...............................................................................................316
21.5.3 Query View Screen ................................................................................................ 317
21.5.4 Query Example ...................................................................................................... 319
21.6 Custom IDP Signatures .................................................................................................. 320
21.6.1 IP Packet Header ...................................................................................................320
21.7 Custom Signatures .......................................................................................................... 321
21.7.1 Add/Edit Custom Signature ................................................................................... 323
21.7.2 Custom Signature Example ........................................... ... ..................................... 329
21.7.3 Applying Custom Signatures ..................................................................................331
21.7.4 Verifying Custom Signatures .................................................................................. 332
21.8 Technical Reference ........................................................................................................333
Chapter 22
ADP ......................................................................................................................................337
22.1 Overview .......................................................................................................................... 337
22.1.1 What You Can Do in this Chapter ......................................................................... 337
22.1.2 What You Need To Know ....................................................................................... 337
22.1.3 Before You Begin ...................................................................................................338
22.2 ADP Summary ................................................................................................................. 339
22.3 Profile Summary .............................................................................................................. 340
22.3.1 Base Profiles ..........................................................................................................341
22.3.2 Creating New ADP Profiles ............................ ........................................................ 342
22.3.3 Traffic Anomaly Profiles ........................................................................................ 342
22.3.4 Protocol Anomaly Profiles ................................... .... ... ... ... ..................................... 345
22.3.5 Protocol Anomaly Configuration ............................................................................. 345
22.4 Technical Reference ........................................................................................................349
Chapter 23
Device HA.............................................................................................................................357
23.1 Overview .......................................................................................................................... 357
23.1.1 What You Can Do in this Chapter .......................................................................... 357
23.1.2 What You Need to Know ........................................................................................ 358
23.1.3 Before You Begin ...................................................................................................358
23.2 Device HA General ..........................................................................................................359
23.3 Active-Passive Mode .......................................................................................................361
23.3.1 Edit Monitored Interface ................. ........................................................................ 364
23.4 Technical Reference ........................................................................................................366
16
NXC5200 User’s Guide
Page 17

Table of Contents
Chapter 24
User/Group..........................................................................................................................373
24.1 Overview .......................................................................................................................... 373
24.1.1 What You Can Do in this Chapter .......................................................................... 373
24.1.2 What You Need To Know ....................................................................................... 373
24.2 User Summary .................................................................................................................376
24.2.1 Add/Edit User ......................................................................................................... 376
24.3 Group Summary ..............................................................................................................379
24.3.1 Add/Edit Group ...................................................................................................... 380
24.4 Setting ............................................................................................................................ 381
24.4.1 Edit User Authentication Timeout Settings ........................................ ..................... 384
24.4.2 User Aware Login Example ............... ... ... .... ... ........................................................ 386
Chapter 25
AP Profile............................................................................................................................387
25.1 Overview .......................................................................................................................... 387
25.1.1 What You Can Do in this Chapter .......................................................................... 387
25.1.2 What You Need To Know ....................................................................................... 387
25.2 Radio ............................................................................................................................... 388
25.2.1 Add/Edit Radio Profile ............................................................................................389
25.3 SSID ............................................................................................................................... 392
25.3.1 SSID List ................................................................................................................392
25.3.2 Security List ............................................................................................................ 396
25.3.3 MAC Filter List ........................................................................................................ 399
Chapter 26
MON Profile ........................................................................................................................401
26.1 Overview .......................................................................................................................... 401
26.1.1 What You Can Do in this Chapter .......................................................................... 401
26.1.2 What You Need To Know ....................................................................................... 401
26.2 MON Profile ..................................................................................................................... 402
26.2.1 Add/Edit MON Profile ............................................................................................. 403
26.3 Technical Reference ........................................................................................................404
Chapter 27
Addresses...........................................................................................................................407
27.1 Overview .......................................................................................................................... 407
27.1.1 What You Can Do in this Chapter .......................................................................... 407
27.1.2 What You Need To Know ....................................................................................... 407
27.2 Address Summary ...........................................................................................................407
27.2.1 Add/Edit Address ..................................................................................................409
27.3 Address Group Summary ................................................................................................ 410
27.3.1 Add/Edit Address Group Rule .......... ... ... .... ... ... ... .... ............................................. ..411
NXC5200 User’s Guide
17
Page 18

Table of Contents
Chapter 28
Services............................................................................................................................413
28.1 Overview .......................................................................................................................... 413
28.1.1 What You Can Do in this Chapter .......................................................................... 413
28.1.2 What You Need to Know ........................................................................................ 413
28.2 Service Summary ............................................................................................................415
28.2.1 Add/Edit Service Rule ........................................................................................... 416
28.3 Service Group Summary ................................................................................................ 417
28.3.1 Add/Edit Service Group Rule ................................................................................ 418
Chapter 29
Schedules..........................................................................................................................419
29.1 Overview .......................................................................................................................... 419
29.1.1 What You Can Do in this Chapter .......................................................................... 419
29.1.2 What You Need to Know ........................................................................................ 419
29.2 Schedule Summary ......................................................................................................... 420
29.2.1 Add/Edit Schedule One-Time Rule .................. ... .... ............................................. . 421
29.2.2 Add/Edit Schedule Recurring Rule ........................................................................ 422
Chapter 30
AAA Server.........................................................................................................................425
30.1 Overview .......................................................................................................................... 425
30.1.1 What You Can Do in this Chapter .......................................................................... 425
30.1.2 What You Need To Know ....................................................................................... 425
30.2 Active Directory / LDAP ...................................................................................................429
30.2.1 Add/Edit Active Directory / LDAP Server ............................................................... 430
30.3 RADIUS ........................................................................................................................... 433
30.3.1 Add/Edit RADIUS .................................................................................................. 434
Chapter 31
Authentication Method......................................................................................................437
31.1 Overview .......................................................................................................................... 437
31.1.1 What You Can Do in this Chapter .......................................................................... 437
31.1.2 Before You Begin ...................................................................................................437
31.2 Authentication Method .....................................................................................................437
31.2.1 Add Authentication Method ...................................... .............................................. 438
Chapter 32
Certificates .........................................................................................................................441
18
32.1 Overview .......................................................................................................................... 441
32.1.1 What You Can Do in this Chapter .......................................................................... 441
32.1.2 What You Need to Know ........................................................................................ 441
32.1.3 Verifying a Certificate .............................................................................................443
NXC5200 User’s Guide
Page 19

Table of Contents
32.2 My Certificates ................................................................................................................ 445
32.2.1 Add My Certificates ................................................................................................447
32.2.2 Edit My Certificates ................................................................................................ 451
32.2.3 Import Certificates ................................................................................................. 454
32.3 Trusted Certificates .......................................................................................................... 455
32.3.1 Edit Trusted Certificates .............................. ........................................................... 457
32.3.2 Import Trusted Certificates ............................. ... ... .... ... ........................................... 460
32.4 Technical Reference ........................................................................................................461
Chapter 33
System..................................................................................................................................463
33.1 Overview .......................................................................................................................... 463
33.1.1 What You Can Do in this Chapter .......................................................................... 463
33.2 Host Name ....................................................................................................................... 464
33.3 Date and Time ................................................................................................................ 464
33.3.1 Pre-defined NTP Time Servers List ............................................. ... ... .... ... ... ... ... .... . 467
33.3.2 Time Server Synchronization ................................................................................. 468
33.4 Console Speed ................................................................................................................ 469
33.5 DNS Overview ................................................................................................................. 469
33.5.1 DNS Server Address Assignment .......................................................................... 469
33.5.2 Configuring the DNS Screen ................................ .......................................... ........ 470
33.5.3 Address Record .................................................................................................... 472
33.5.4 PTR Record ........................................................................................................... 473
33.5.5 Adding an Address/PTR Record ............................................................................ 473
33.5.6 Domain Zone Forwarder ............... ............................................. ... ... .... ................. 474
33.5.7 Add Domain Zone Forwarder ................................................................................. 474
33.5.8 MX Record ............................................................................................................475
33.5.9 Add MX Record ...................................................................................................... 476
33.5.10 Add Service Control ............................................................................................. 476
33.6 WWW Overview ..............................................................................................................477
33.6.1 Service Access Limitations .................................................................................... 477
33.6.2 System Timeout ..................................................................................................... 478
33.6.3 HTTPS ...................................................................................................................478
33.6.4 Configuring WWW Service Control ........................................................................ 479
33.6.5 Service Control Rules ............................................................................................ 483
33.6.6 HTTPS Example ....................................................................................................483
33.7 SSH .............................................................................................................................. 490
33.7.1 How SSH Works ......................................................... ... ... ... .... ... ... ........................ 491
33.7.2 SSH Implementation on the NXC ........................................................................... 492
33.7.3 Requirements for Using SSH ................................................................................. 492
33.7.4 Configuring SSH ....................................................................................................493
33.7.5 Examples of Secure Telnet Using SSH .................................................................. 494
33.8 Telnet .............................................................................................................................. 496
NXC5200 User’s Guide
19
Page 20

Table of Contents
33.9 FTP ................................................................................................................................. 497
33.10 SNMP ........................................................................................................................... 500
33.10.1 Supported MIBs ................................................................................................... 501
33.10.2 SNMP Traps ......................................................................................................... 501
33.10.3 Configuring SNMP ............................................................................................... 502
33.11 Language .......................... .... ... ..................................................................................... 503
Chapter 34
Log and Report ....................................................................................................................505
34.1 Overview .......................................................................................................................... 505
34.1.1 What You Can Do In this Chapter .......................................................................... 505
34.2 Email Daily Report ........................................................................................................... 505
34.3 Log Setting ..................................................................................................................... 507
34.3.1 Log Setting Summary ............................................................................................. 508
34.3.2 Edit Log Settings ...................................................................................................510
34.3.3 Edit Remote Server ............................................................................................... 514
34.3.4 Active Log Summary ............................................................................................. 516
Chapter 35
File Manager........................................................................................................................519
35.1 Overview .......................................................................................................................... 519
35.1.1 What You Can Do in this Chapter .......................................................................... 519
35.1.2 What you Need to Know ........................................................................................ 519
35.2 Configuration File ............................................................................................................ 522
35.3 Firmware Package ..........................................................................................................525
35.4 Shell Script ..................................................................................................................... 527
Chapter 36
Diagnostics..........................................................................................................................531
36.1 Overview .......................................................................................................................... 531
36.1.1 What You Can Do in this Chapter .......................................................................... 531
36.2 Diagnostics ..................................................................................................................... 531
36.3 Packet Capture ...............................................................................................................532
36.3.1 Packet Capture Files .................................. ... ............................................. ... ... .... . 534
36.3.2 Example of Viewing a Packet Capture File .............................. ... ... ... .... ... ... ... ... .....535
36.4 Wireless Frame Capture .. ... .............................................. ... ... ... ... .................................. 536
36.4.1 Wireless Frame Capture Files ............................................................................... 538
Chapter 37
Reboot....................................................................................................................................539
37.1 Overview .......................................................................................................................... 539
37.1.1 What You Need To Know ....................................................................................... 539
37.2 Reboot .............................................................................................................................539
20
NXC5200 User’s Guide
Page 21

Table of Contents
Chapter 38
Shutdown........................................................................................................................541
38.1 Overview .......................................................................................................................... 541
38.1.1 What You Need To Know ....................................................................................... 541
38.2 Shutdown .........................................................................................................................541
Chapter 39
Troubleshooting....................................................................................................................543
39.1 Overview .......................................................................................................................... 543
39.1.1 General ..................................................................................................................543
39.1.2 Wireless .................................................................................................................555
39.2 Resetting the NXC ........................................................................................................... 557
39.3 Getting More Troubleshooting Help ................................................................................. 557
Chapter 40
Product Specifications.........................................................................................................559
Appendix A Log Descriptions...............................................................................................565
Appendix B Common Services.............................................................................................613
Appendix C Displaying Anti-Virus Alert Messages in Windows............................................617
Appendix D Importing Certificates........................................................................................619
Appendix E Wireless LANs ..................................................................................................633
Appendix F Open Software Announcements.......................................................................647
Appendix G Legal Information..............................................................................................699
Index.......................................................................................................................................703
NXC5200 User’s Guide
21
Page 22

Table of Contents
22
NXC5200 User’s Guide
Page 23

PART I
User’s Guide
23
Page 24

24
Page 25

CHAPTER 1
Introduction
1.1 Overview
The NXC is a comprehensive wireless L AN controller. Its flexible con figuration
helps network administrators set up wireless LAN networks and efficiently enforce
security policies over them. In addition, the NXC provides excellent throughput,
making it an ideal solution for reliable, secure service.
The NXC’s security features include firewall, anti-virus, Intrusion Detection and
Prevention (IDP), Anomaly Detection and Protection (ADP), and certificates. It
also provides bandwidth management, captive portal configuration, NAT, port
forwarding, policy routing, DHCP server , extensi ve wireless AP control options, and
many other powerful features. Flexible configuration helps you set up the network
and enforce security policies efficiently.
The front panel physical Gigabit Ethernet ports (labeled P1, P2, P3, and so on)
are mapped to Gigabit Ethernet (ge) interfaces. By default P1 is mapped to ge1,
P2 is mapped to ge2 and so on.
• The default LAN IP address is 192.168.1.1.
• The default administrator login user name and password are “admin” and
“1234” respectively.
1.2 Rack-mounted Installation
Note: ZyXEL provides a sliding rail accessory for your use with your device. Please
contact your local vendor for details.
The NXC can be mounted on an EIA standard si ze, 19-inch rack or in a wiring
closet with other equipment. Follow the steps below to mount your NXC on a
standard EIA rack using a rack-mounting kit. Make sure the rack will safely
support the combined weight of all the equipment it contains and that the position
of the NXC does not make the rack unstable or top-heavy. Take all necessary
precautions to anchor the rack securely before installing the unit.
Note: Leave 10 cm of clearance at the sides and 20 cm in the rear.
NXC5200 User’s Guide
25
Page 26
Chapter 1 Introduction
Use a #2 Phillips screwdriver to install the screws.
Note: Failure to use the proper screws may damage the unit.
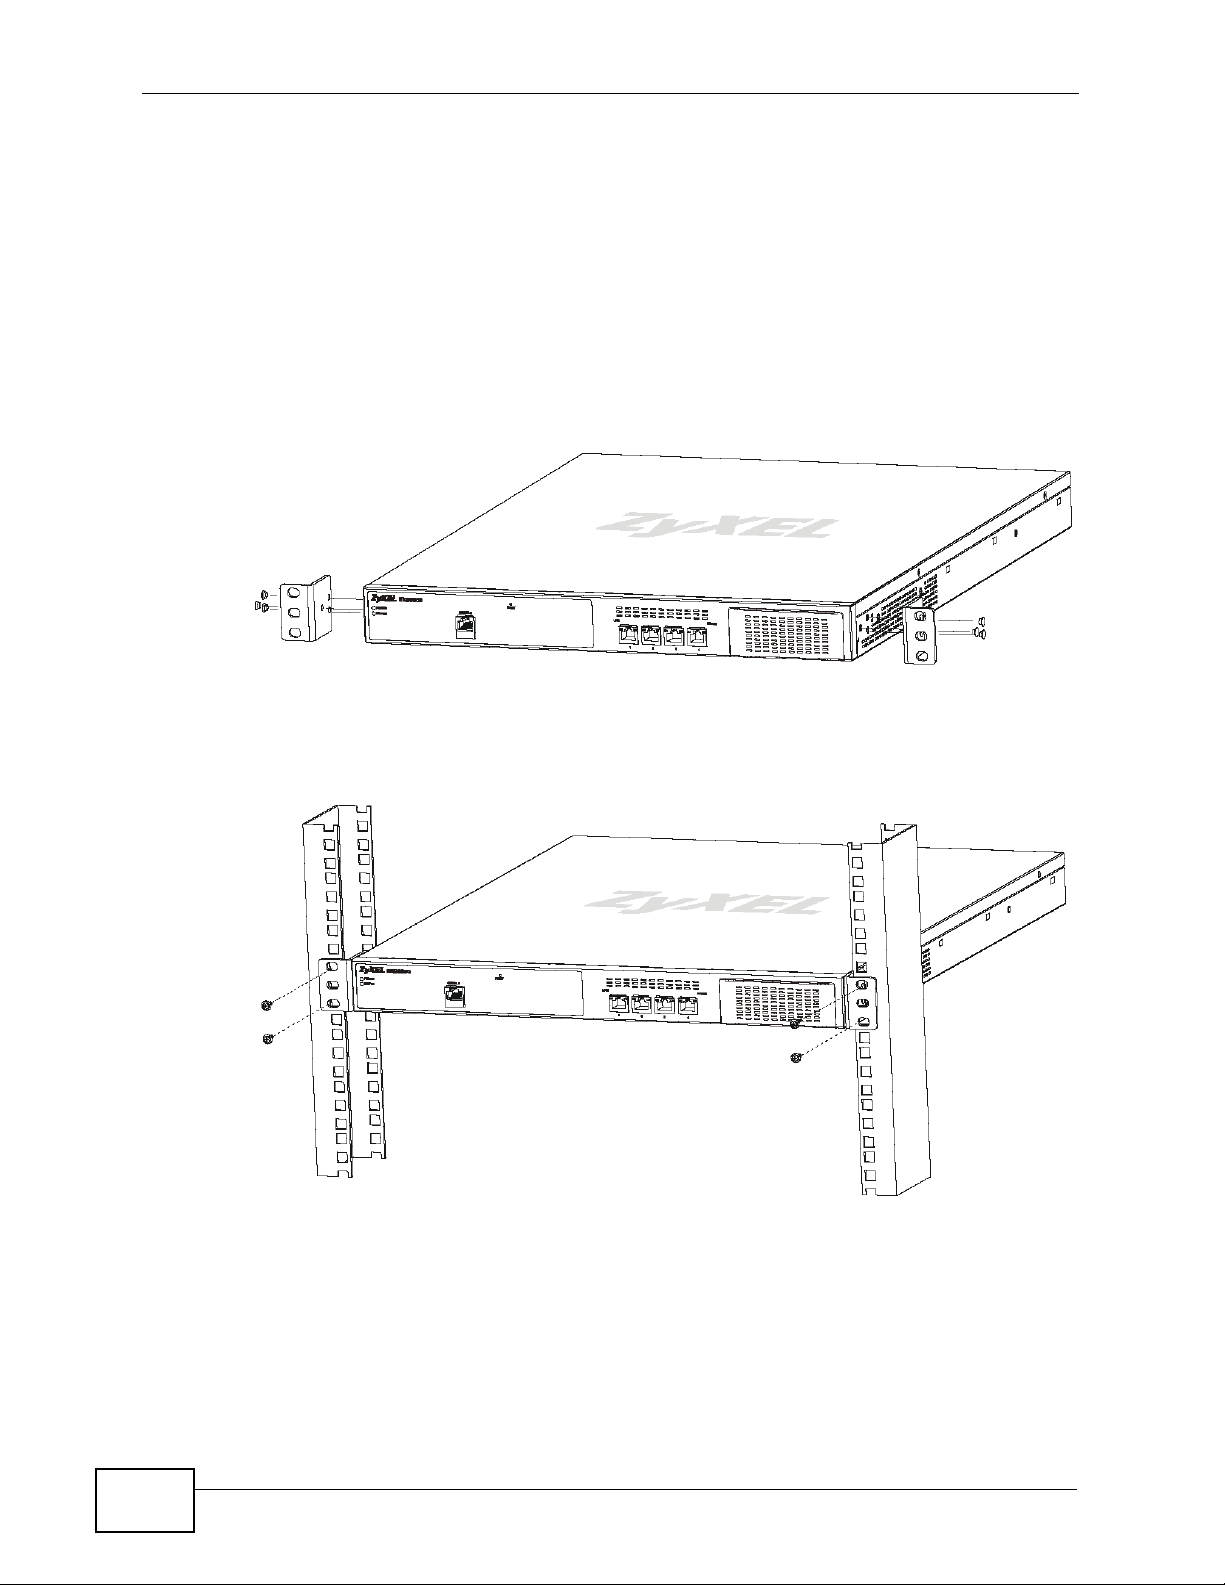
1.2.1 Rack-Mounted Installation Procedure
1 Align one bracket with the holes on one side of the NXC and secure it with the
included bracket screws (smaller than the rack-mounting screws).
2 Attach the other bracket in a similar fashion.
3 After attaching both mounting brackets, position the NXC in the rack by lining up
the holes in the brackets with the appropriate holes on the rack. Secure the NXC
to the rack with the rack-mounting screws.
26
NXC5200 User’s Guide
Page 27
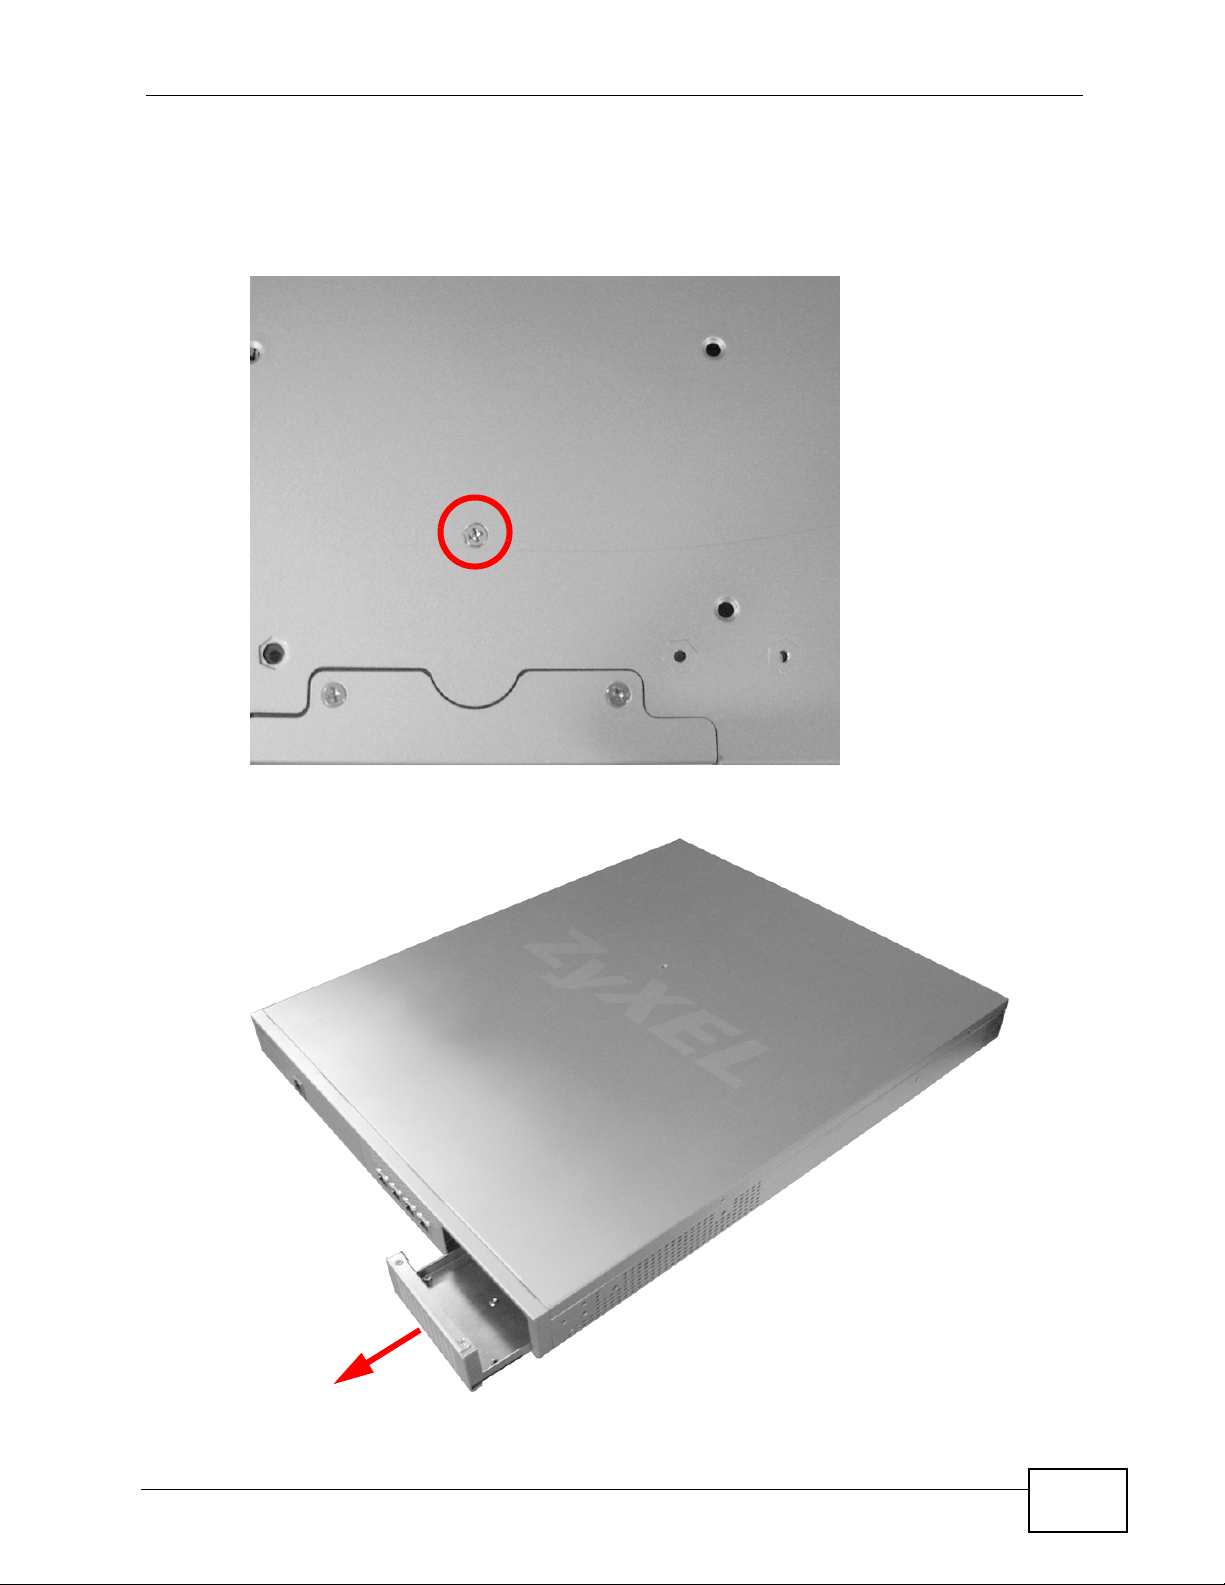
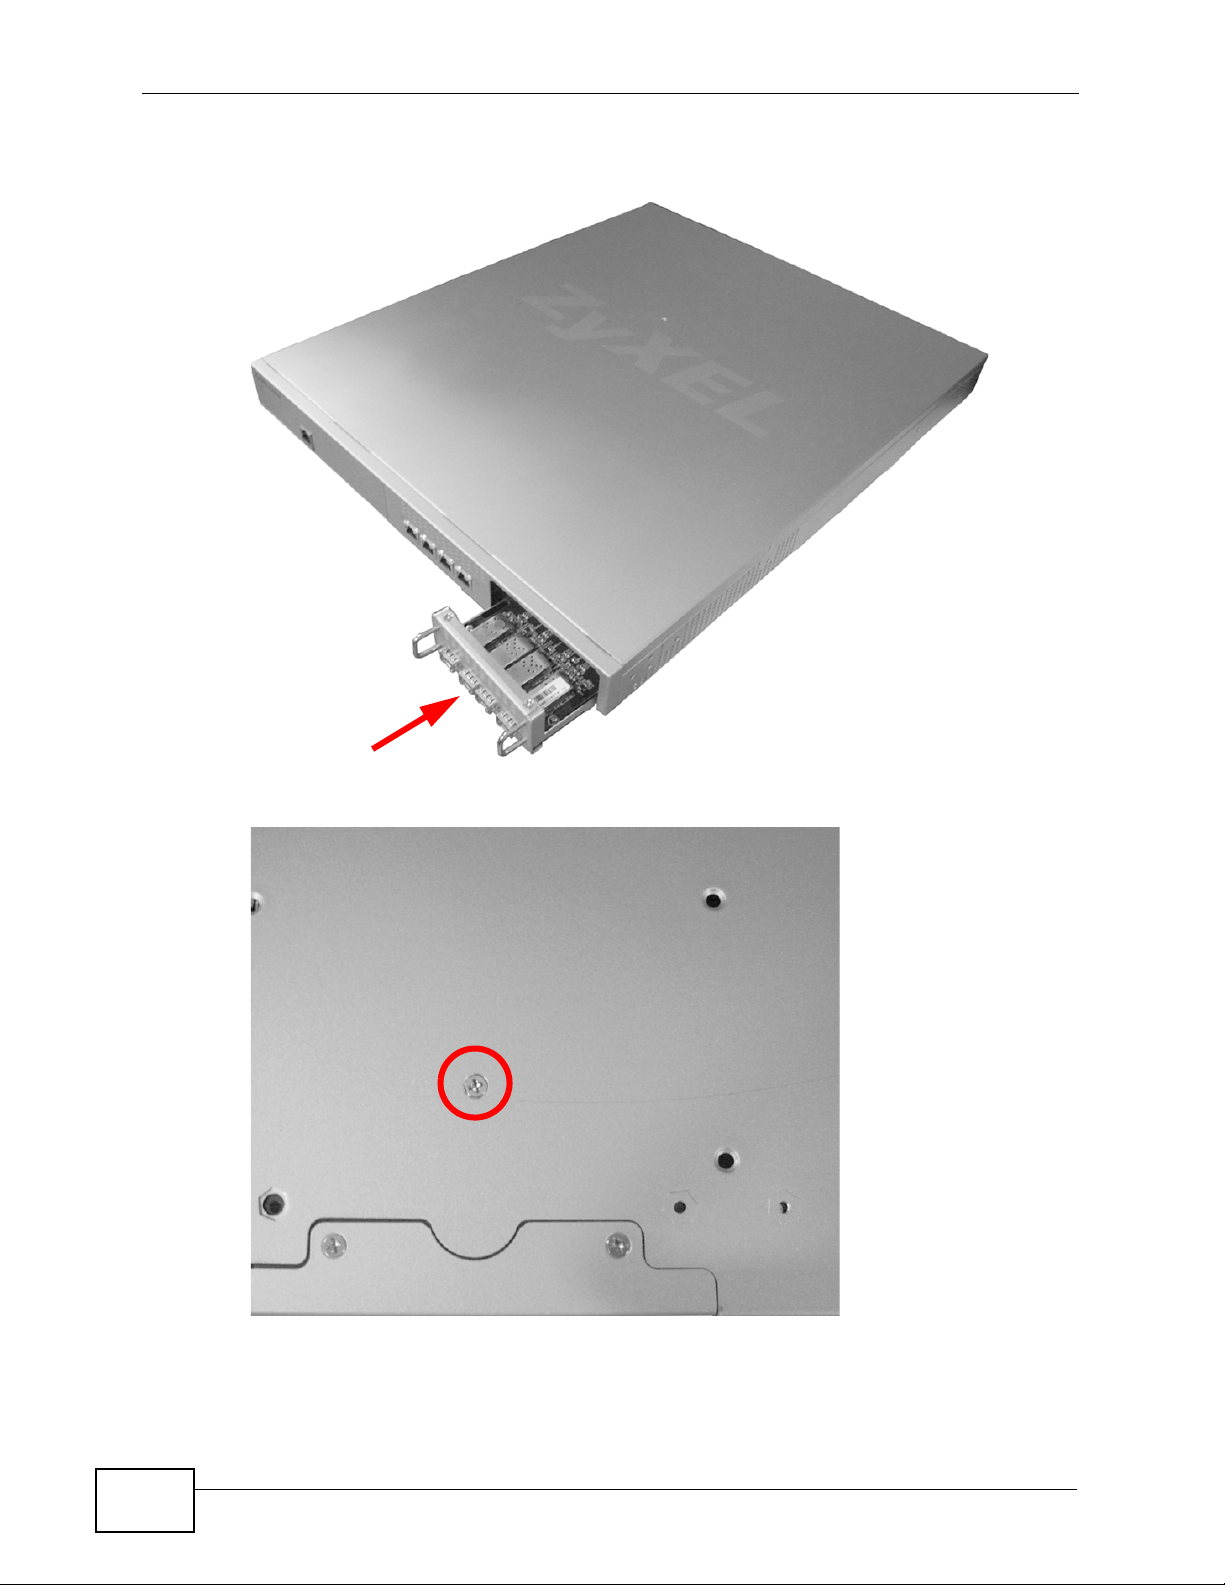
1.2.2 LAN Module Installation Procedure
1 Turn the NXC over so that its bottom side faces up, then remove the LAN module
screw.
Chapter 1 Introduction
2 Slide the empty LAN Module tray out of the NXC chassis.
NXC5200 User’s Guide
27
Page 28
Chapter 1 Introduction
3 Slide the LAN Module into the empty module bay, gently but firmly pressing it into
the NXC’s logic board until you feel it snap into place.
4 Secure the newly installed LAN Module with the screw you removed in step 1.
28
NXC5200 User’s Guide
Page 29
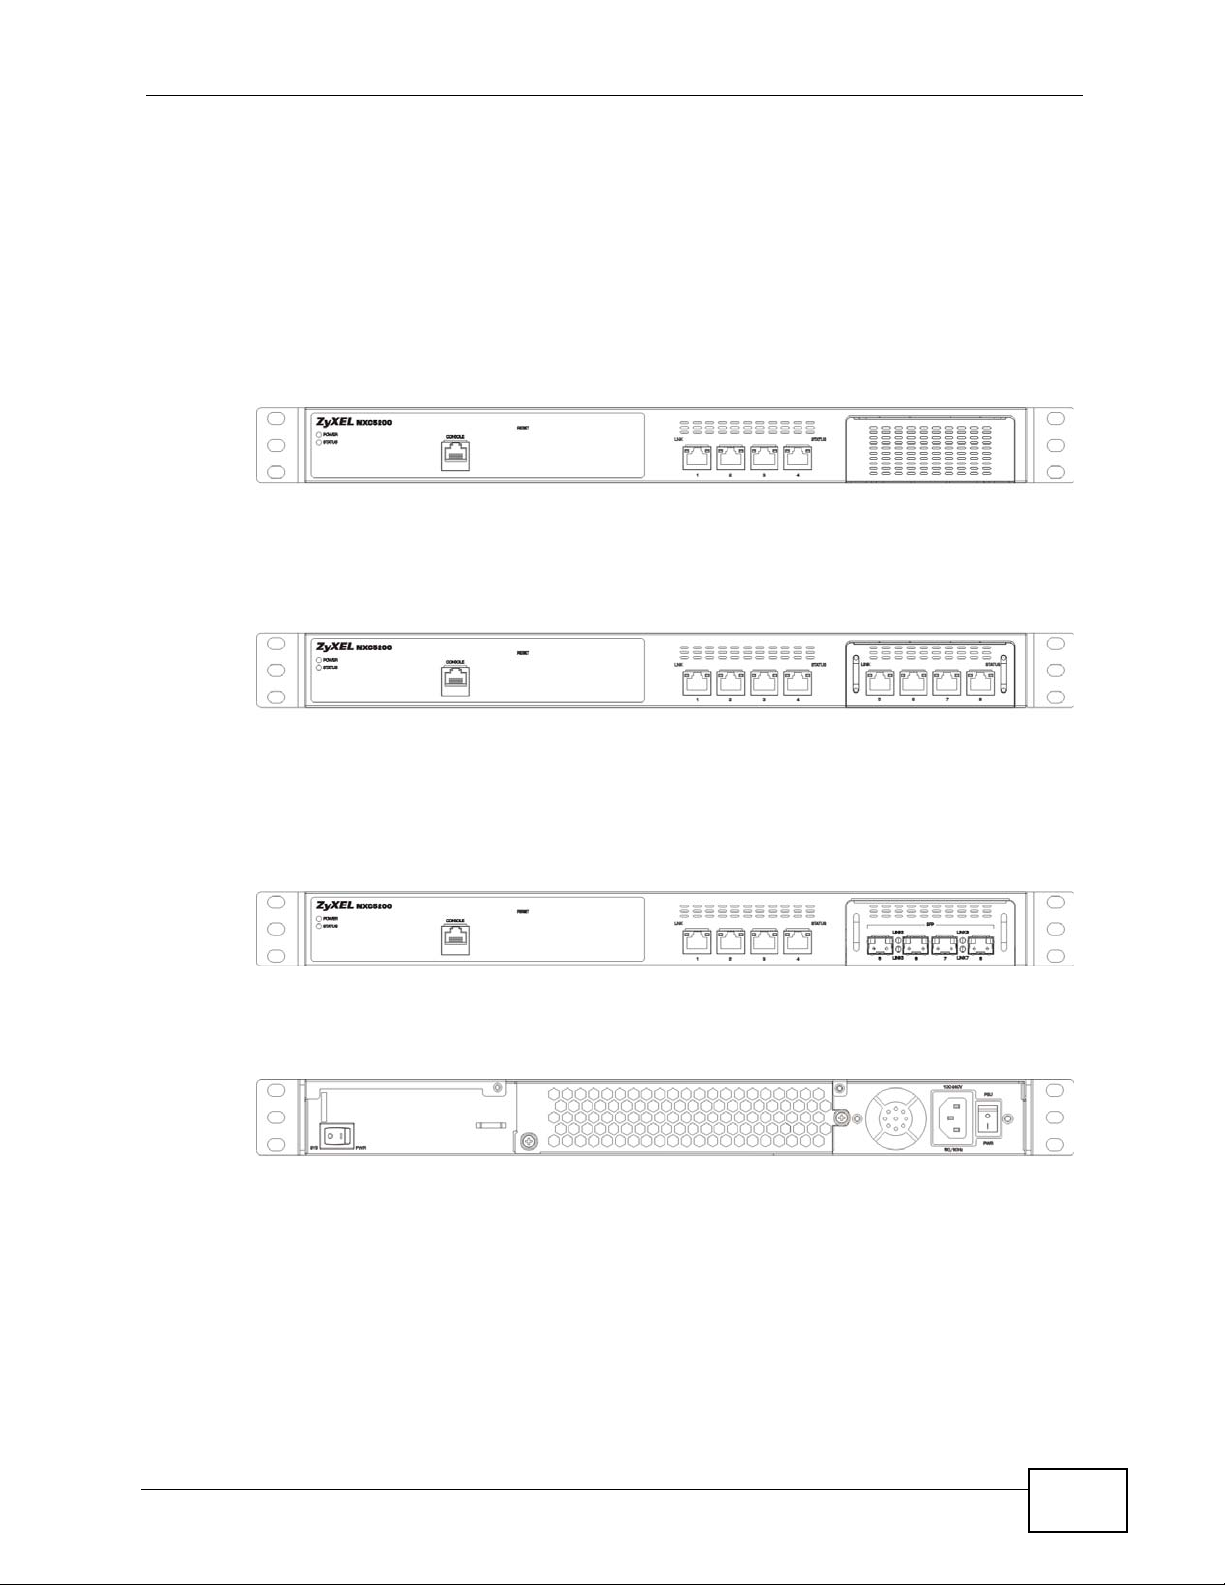
1.3 Front and Back Panels
This section gives you an overview of the front and back panels. There are three
possible front panel conf igurations, depending on how the expansion bay is used.
The back panel remains static across all configurations.
In configuration 1, the expansion bay is empty.
Figure 1 NXC Front Panel - Configuration 1
In configuration 2, the expansion bay utilizes an Ethernet module which provides
an additional 4 Ethernet ports.
Figure 2 NXC Front Panel - Configuration 2
Chapter 1 Introduction
In configuration 3, the expansion bay utilizes a Fiber port modules, which provides
fiber optic connectivity. This allows you to expand management of your APs to
distances greater than allowed by pure Ethernet connections.
Figure 3 NXC Front Panel - Configuration 3
Here is the back panel for all configurations.
Figure 4 NXC Back panel - All Configurations
1.3.1 1000Base-T Ports
The 1000Base-T auto-negotiating, auto-crossover Ethernet ports support 100/
1000 Mbps Gigabit Ethernet so the speed can be 100 Mbps or 1000 Mbps. The
duplex mode can be both half or full duplex at 100 Mbps and full duplex only at
1000 Mbps. An auto-negotiating port can detect and adjust to the optimum
Ethernet speed (100/1000 Mbps) and duplex mode (full duplex or half duplex) of
the connected device.
NXC5200 User’s Guide
29
Page 30
Chapter 1 Introduction
An auto-crossover (auto-MDI/MDI-X) port automatically works with a straightthrough or crossover Ethernet cable.
Default Ethernet Settings
The factory default negotiation settings f or the Ethernet ports on the NXC are:
• Speed: Auto
•Duplex: Auto
• Flow control: On (you cannot configure the flow control setting, but the NXC can
negotiate with the peer and turn it off if needed)
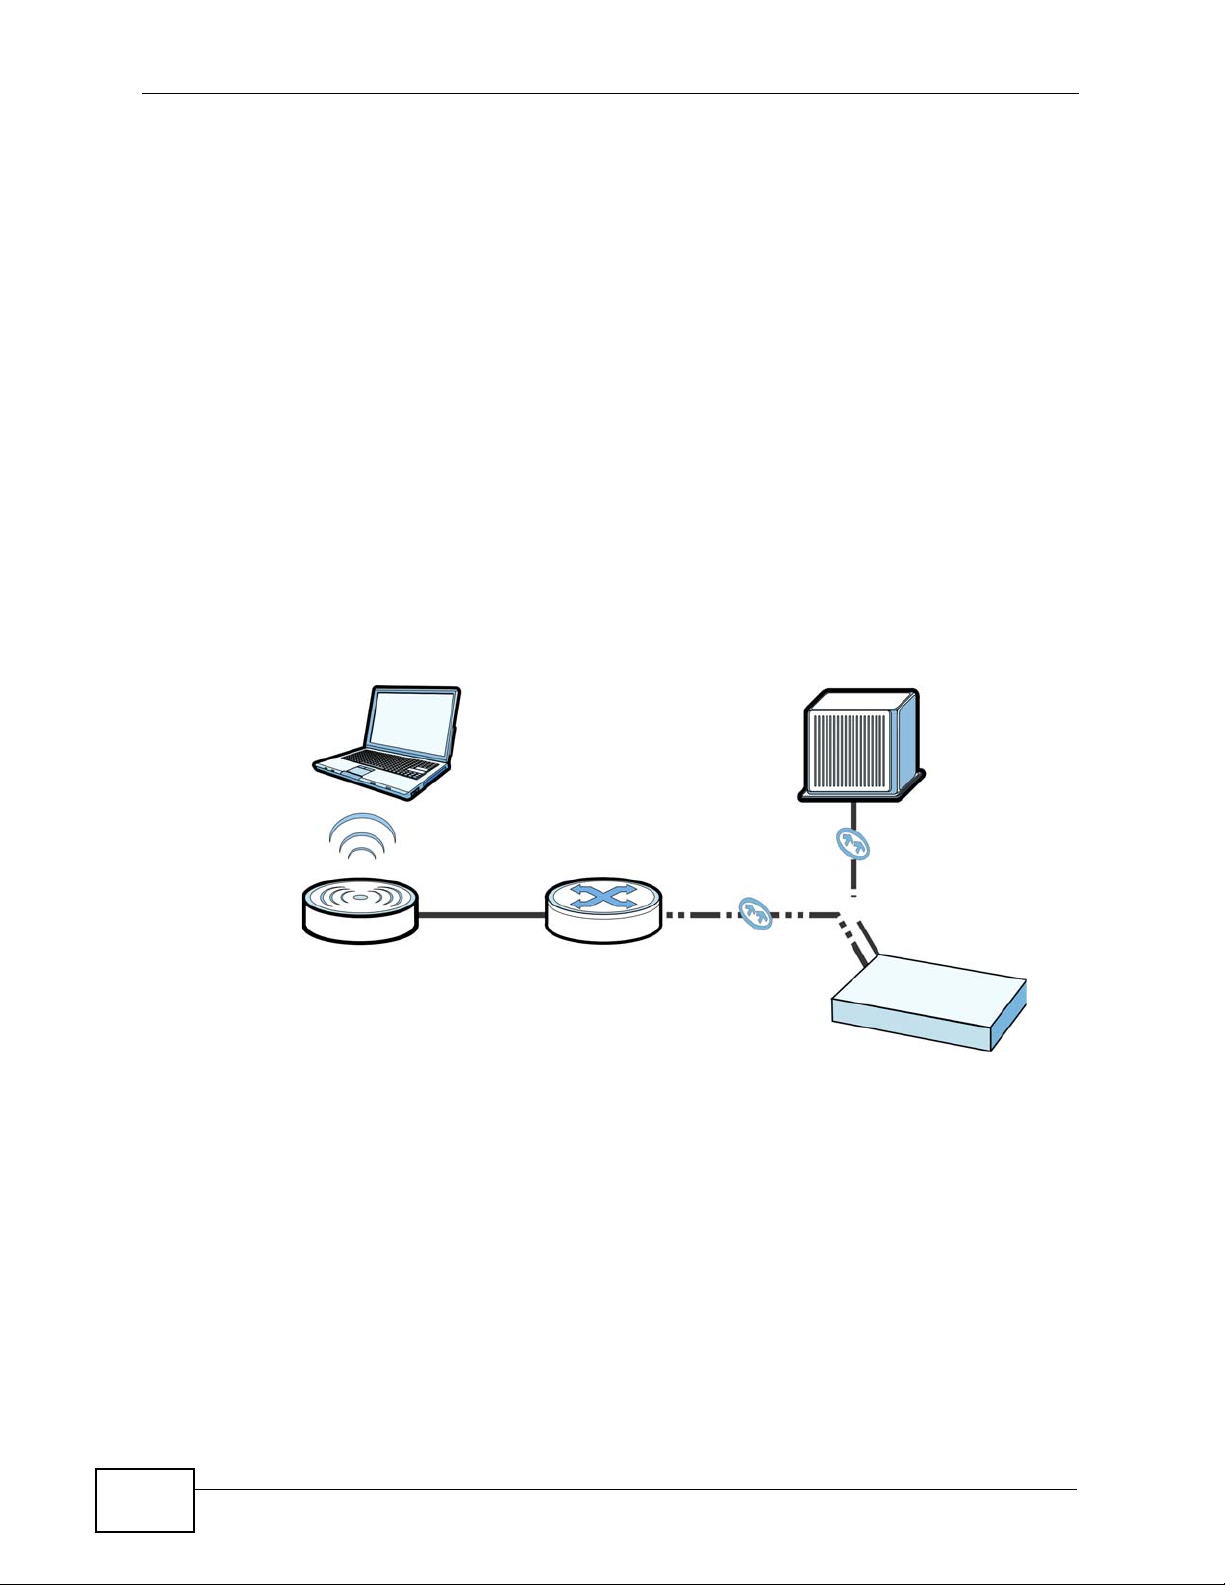
1.3.2 Optional Fiber Ports
Fiber connectivity requires a few additional considerations when you deploy the
NXC with that in mind.
Figure 5 Fiber Connection Example
CS
PoE
NXC
AP
First, you must have a fiber-based Core Switch (CS) upstream of the NXC. It
connects to one of the available fiber ports in the Fiber port module loaded into
the NXC’s expansion bay. Next, an additional fiber connection is established
between the NXC and a downstream fiber-based Power over Ethernet ( PoE)
capable of converting Fiber-to-Ethernet data packets (s uch as the ZyXEL MC1000SFP-FP). Finally, you connect your AP to the edge switch using an Ethernet cable.
30
NXC5200 User’s Guide
Page 31

1.3.3 Front Panel LEDs
This section describes the front panel LEDs.
Figure 6 NXC Front Panel - Configuration 3
Chapter 1 Introduction
Ethernet
Link Link
The following table describes the LEDs.
Status
Fiber 5 / 6
Fiber 7 / 8
Link
Table 1 Front Panel LEDs
LED COLOR STATUS DESCRIPTION
POWER Off The power module is turned off , not receiving power,
or not functioning.
Green On The power module is operating.
STATUS Off The NXC is turned off.
Green On The NXC is ready and operating normally.
Flashing The NXC is self-testing.
Ethernet Link Amber On The port has a connected RJ-45 cable.
Flashing The port is sending and receiving data.
Ethernet
Status
Fiber Link Amber On The port has a connected fiber cable.
Green On The port is functioning at 10/100M speed.
Amber On The port is functioning at 1000M speed.
1.4 Management Overview
You can use the following ways to manage the NXC.
Web Configurator
The Web Configurator allows easy NXC setup and management using an Internet
browser. This User’s Guide provides information about the Web Config urator.
NXC5200 User’s Guide
31
Page 32

Chapter 1 Introduction
Command-Line Interface (CLI)
The CLI allows you to use text-based commands to configure the NXC. You can
access it using remote management (for example, SSH or Telnet) or via the
console port. See the Command Reference Guide for more information.
Console Port
You can use the console port to manage the NXC using CLI commands. See the
Command Reference Guide for more information about the CLI.
The default settings for the console port are as follows.
Table 2 Console Port Default Settings
SETTING VALUE
Speed 115200 bps
Data Bits 8
Parity None
Stop Bit 1
Flow Control Off
1.5 Starting and Stopping the NXC
Here are some of the ways to start and stop the NXC.
Always use Maintenance > Shutdown or the shutdown command
before you turn off the NXC or remove the power. Not doing so can
cause the firmware to become corrupt.
Table 3 Starting and Stopping the NXC
METHOD DESCRIPTION
Turning on the
power
Rebooting the NXC A warm start (without powering down and powering up again)
Using the RESET
button
A cold start occurs when you turn on the power to the NXC. The NXC
powers up, checks the hardware, and starts the system processes.
occurs when you use the Reboot button in the Reboot screen or
when you use the reboot command. The NXC writes all cached data
to the local storage, stops the system processes, and then does a
warm start.
If you press the RESET button, the NXC sets the configuration to its
default values and then reboots.
32
NXC5200 User’s Guide
Page 33

Chapter 1 Introduction
Table 3 Starting and Stopping the NXC
METHOD DESCRIPTION
Clicking
Maintenance >
Shutdown >
Shutdown or
using the shutdown
command
Disconnecting the
power
The NXC does not stop or start the system processes when you apply
configuration files or run shell scripts although you may temporarily lose access to
network resources.
Clicking Maintenance > Shutdown > Shutdown or using the
shutdown command writes all cached data to the local storage and
stops the system processes. Wait for the device to shut down and
then manually turn off or remove the power. It does not turn off the
power.
Power off occurs when you turn off the power to the NXC. The NXC
simply turns off. It does not stop the system processes or write
cached data to local storage.
NXC5200 User’s Guide
33
Page 34

Chapter 1 Introduction
34
NXC5200 User’s Guide
Page 35

CHAPTER 2
Features and Applications
This chapter introduces the main features and applications of the NXC.
2.1 Features
The NXC is a wireless LAN controller. It has security features that include firewall,
anti-virus, Intrusion Detection and Prev ention (IDP), Anomaly Detection and
Protection (ADP), and certificates. It also provides bandwidth management, NAT,
port forwarding, captive portal configuration, policy routing, DHCP server, wireless
AP control options, and many other powerful features.
Data Forwarding
The NXC allows you to seamlessly manage the Access Points (APs) on your
network by having all configurable data tunneled to it or bridged to the local
network based on SSID settings.
AP Monitoring
You can assign a number of APs to act as wireless monitors, which can detect
rogue APs and help you in building a list of friendly ones. This gives you a security
advantage when setting up your network to prevent intrusions.
Managed APs
The NXC is initially configured to support up to 48 managed APs (such as the
NWA5160N). You can increase this by subscribing to additional licenses. As of this
writing, each license upgrade allows an additio nal 48 managed APs while the
maximum number of APs a single NXC can support is 240.
Flexible Security Zones
Many security settings are applied by zone, not by interface, port, or network. As
a result, it is much simpler to set up and to change security settings in the NXC.
You can create your own custom zones.
NXC5200 User’s Guide
35
Page 36

Chapter 2 Features and Applications
Firewall
The NXC’s firewall is a stateful inspection firewall. The NXC restricts access by
screening data packets against defined access rules. It can also inspect sessions.
For example, traffic from one zone is not allowed unless it is initiated by a
computer in another zone first.
Intrusion Detection and Prevention (IDP)
IDP (Intrusion Detection and Protection) can detect malicious or suspicious
packets and respond instantaneously. It detects pattern-based attacks in order to
protect against network-based intrusions. See Section 21.5.1 on page 314 for a
list of attacks that the NXC can protect against. You can also create your own
custom IDP rules.
Anomaly Detection and Prevention (ADP)
ADP (Anomaly Detection and Prevention) can detect malicious or suspicious
packets and respond instantaneously. It can detect:
• Anomalies based on violations of protocol standards (RFCs – Requests for
Comments)
• Abnormal flows such as port scans.
The NXC’s ADP protects against network-based intrusions. See Section 22.3. 3 on
page 342 and Section 22.3.4 on page 345 for more on the kinds of attacks that
the NXC can protect against. You can also create your own custom ADP rules.
Bandwidth Management
Bandwidth management allows you to allocate network resources according to
defined policies. This policy-based bandwidth allocation helps your network to
better handle applications such as Internet access, e-mail, Voice-over-IP (VoIP),
video conferencing and other business-critical applications.
Anti-Virus Scanner
With the anti-virus packet scanner, your NXC scans files transmitting through the
enabled interfaces into the network. The NXC helps stop threats at the network
edge before they reach the local host computers.
36
Application Patrol
Application patrol manages instant messenger and peer-to-peer applications like
MSN and BitTorrent. You can even control the use of a particular application’s
individual features (like text messaging, voice, video conferencing, and file
transfers). Application patrol has powerful bandwidth management including
NXC5200 User’s Guide
Page 37

traffic prioritization to enhance the performance of delay -sensitive applications like
voice and video. You can also use an option that gives SIP priority over all other
traffic. This maximizes SIP traffic throughput for improved VoIP call sound quality.
2.2 Applications
These are some example applications for your NXC. See also Chapter 5 on page
71 for configuration tutorial examples.
2.2.1 AP Management
Manage up to 240 separate Access Points (APs) from a si ngle, persis tent location.
APs can also be configured to monitor for rogue APs.
Figure 7 AP Management Example
Chapter 2 Features and Applications
Here, the NXC (A) connects to a number of Power over Ethernet (PoE) devices
(B). They connect to the NWA5260 Access Points (C), which in turn provide access
to the network for the wireless clients (D) within their broadcast radius.
2.2.2 Wireless Security
Keep the connections between wireless clients and your APs secure with the NXC’ s
comprehensive wireless security tools. APs can be configured to require WEP and
WPA encryption from all wireless clients attempting to associate with them.
Furthermore, you can protect your network by monitoring for rogue APs. Rogue
APs are wireless access points operating in a network’s cov erage area that are not
BC
D
A
NXC5200 User’s Guide
37
Page 38

Chapter 2 Features and Applications
under the control of the network’s administrators, and can potentially open up
critical holes in a network’s security policy.
2.2.3 Captive Portal
The NXC can be configured with a captive portal, which intercepts all network
traffic, regardless of address or port, until a connecting wireless user
authenticates his or her session, through a designated login Web page.
Figure 8 Applications: Captive Portal
The captive portal page only appears once per authentication session. Unless a
user idles out or closes the connection, he or she generally will not see it again
during the same session.
2.2.4 Load Balancing
With load balancing you can easily distribute wireless traffic across multiple APs to
relieve strain on your network. When a station becomes overloaded, it can
automatically delay a connection until the client associates with another network,
or it can alternatively disa s sociate idle clients or those clients with weak
connections from the network.
2.2.5 Dynamic Channel Selection
The NXC can automatically select the radio channel upon which its APs broadcast
by scanning the area around those APs and determining what channels are
currently being used by other devices not connected to the network.
38
NXC5200 User’s Guide
Page 39

2.2.6 User-Aware Access Control
Set up security policies that restrict access to sensitive information and shared
resources based on the user who is trying to access it.
2.2.7 Device HA
Set one NXC as the master device and an additional NXC as a backup device to
ensure that one is always available for the network.
Chapter 2 Features and Applications
NXC5200 User’s Guide
39
Page 40

Chapter 2 Features and Applications
40
NXC5200 User’s Guide
Page 41

CHAPTER 3
The Web Configurator
3.1 Overview
The NXC Web Configurator allows easy management using an Internet browser.
In order to use the Web Configurator, you must:
• Use Internet Explorer 7.0 and later or Firefox 1.5 and later
• Allow pop-up windows
• Enable JavaScript (enabled by default)
• Enable Java permissions (enabled by default)
• Enable cookies
The recommended screen resolution is 1024 x 768 pixels and higher.
3.2 Access
1 Make sure yo ur NXC hardwar e is properly connected. See the Quick Start Guide.
2 Browse to https://192.168.1.1. The Login screen appears.
NXC5200 User’s Guide
41
Page 42

Chapter 3 The Web Configurator
3 Enter the user name (default: “admin”) and password (default : “1234”).
4 Click Login. If you logged in using the default user name and password, the
Update Admin Info screen appears. Otherwise, the dashboard appears.
This screen appears every time you log in usi ng the default user name and default
password. If you change the password for the default user account, this screen
does not appear anymore.
42
NXC5200 User’s Guide
Page 43

3.3 The Main Screen
The Web Configurator’s main screen is divided into these parts:
Figure 9 The Web Configurator’s Main Screen
B
Chapter 3 The Web Configurator
A
C
• A - Title Bar
• B - Navigation Panel
• C - Main Window
NXC5200 User’s Guide
43
Page 44

Chapter 3 The Web Configurator
3.3.1 Title Bar
The title bar provides some useful links that always appear over the screens
below, regardless of how deep into the Web Configurator you navigate.
Figure 10 Title Bar
The icons provide the following functions.
Table 4 Title Bar: Web Configurator Icons
LABEL DESCRIPTION
Logout Click this to log out of the Web Configurator.
Help Click this to open the help page for the current screen.
About Click this to display basic information about the NXC.
Site Map Click this to see an overview of links to the Web Configurator screens.
Object
Reference
Console Click this to open the console in which you can use the command line
CLI Click this to open a popup window that displays the CLI commands sent
Click this to open a screen where you can check which configuration
items reference an object.
interface (CLI). See the NXC CLI Reference Guide for details.
by the Web Configurator.
3.3.2 Navigation Panel
Use the menu items on the navigation panel to open screens to configure NXC
features. Click the arrow in the middle of the right edge of the navigation panel to
hide the navigation panel menus or drag it to resize them. The following sections
introduce the NXC’s navigation panel menus and their screens.
Figure 11 Navigation Panel
44
NXC5200 User’s Guide
Page 45

3.3.2.1 Dashboard
The dashboard displays general device information, system status, system
resource usage, licensed service status, and interface status in widgets that you
can re-arrange to suit your needs.
For details on the Dashboard’s features, see Chapter 6 on page 103.
3.3.2.2 Monitor Menu
The monitor menu screens display status and statistics information.
Table 5 Monitor Menu Screens Summary
FOLDER OR LINK TAB FUNCTION
System Status
Port Statistics Displays packet statistics for each physical port.
Interface Status Displays general interface information and packet
Traffic Statistics Collect and display traffic statistics.
Session Monitor Displays the status of all current sessions.
IP/MAC Binding Lists the devices that have received an IP address
Login Users Lists the users currently logged into the NXC.
Wireless
AP Info AP List Displays information about the connected APs.
Station Info Displays information about the connected stations.
Rogue AP Displays information about suspected rogue APs.
AppPatrol Statistics Displays bandwidth and protocol statistics.
Anti-X Statistics
Anti-Virus Collects and display statistics on the viruses that the
IDP Collects and display statistics on the intrusions that
Log View Log Lists log entries for the NXC.
Chapter 3 The Web Configurator
statistics.
from NXC interfaces using IP/MAC binding.
Radio List Displa ys information about the radios of the connected
APs.
NXC has detected.
the NXC has detected.
View AP
Log
Allows you to query connected APs and view log
entries for them.
NXC5200 User’s Guide
45
Page 46

Chapter 3 The Web Configurator
3.3.2.3 Configuration Menu
Use the configuration menu screens to configure the NXC’s features.
Table 6 Configuration Menu Screens Summary
FOLDER OR
LINK
Licensing
Registration Registration Register the device and activate trial services.
Signature
Update
Wireless
Controller Configure how the NXC handles APs that newly
AP
Management
MON Mode Configure how the NXC monitors for rogue APs.
Load
Balancing
DCS Configure dynamic wireless channel selection.
Network
Interface Ethernet Manage Ethernet interfaces and virtual Ethernet
Routing Policy Route Create and manage routing policies.
Zone Configure zones used to define various policies.
NAT Set up and manage port forwarding rules.
ALG Configure SIP, H.323, and FTP pass-through
IP/MAC
Binding
Captive Portal Captive Portal Assign the captive portal web page to various
TAB FUNCTION
Service View the licensed service status and upgrade
Anti-Virus Update anti-virus signatures immediately or by a
IDP/AppPatrol Update IDP signatures immediately or by a
System Protect Update system-protect signatures immediately or
VLAN Create and manage VLAN interfaces and virtual
Static Route Create and manage IP static routing information.
Summary Configure IP to MAC address bindings for devices
Exempt List Configure ranges of IP addresses to which the NXC
Login Page Assign and customize the login page user’s see
licensed services.
schedule.
schedule.
by a schedule.
connect to the network.
Edit wireless AP information, remove APs, and
reboot them.
Configure load balancing for traffic moving to and
from wireless clients.
interfaces.
VLAN interfaces.
settings.
connected to each supported interface.
does not apply IP/MAC binding.
network services.
when they hit the captive portal.
46
NXC5200 User’s Guide
Page 47

Chapter 3 The Web Configurator
Table 6 Configuration Menu Screens Summary (continued)
FOLDER OR
LINK
Firewall Firewall Create and manage level-3 traffic rules.
AppPatrol General Enable or disable traffic management by
Anti-X
Anti-Virus General Turn anti-virus on or off, set up anti-virus policies
IDP General Display and manage IDP bindings.
ADP General Display and manage ADP bindings.
Device HA General Configure device HA global settings, and see the
Object
User/Group User Create and manage users.
AP Profile Radio Create and manage wireless radio settings files
TAB FUNCTION
Session Limit Limit the number of concurrent client NAT/firewall
sessions.
application and see registration and signature
information.
Common Manage traffic of the most commonly used web,
file transfer and e-mail protocols.
IM Manage instant messenger traffic.
Peer to Peer Manage peer-to-peer traffic.
VoIP Manage VoIP traffic.
Streaming Manage streaming traffic.
Other Manage other kinds of traffic.
and check the anti-virus engine type and the anti-
virus license and signature status.
Black/White List Set up anti-virus black (blocked) and white
(allowed) lists of virus file patterns.
Signature Search for signatures by signature name or
attributes and configure how the NXC uses them.
Profile Create and manage IDP profiles.
Custom
Signatures
Profile Create and manage ADP profiles.
Active-Passive
Mode
Group Create and manage groups of users.
Setting Manage default settings for all users, general
SSID Create and manage wireless SSID, security, and
Create, import, or export custom signatures.
status of each interface monitored by device HA.
Configure active-passive mode device HA.
settings for user sessions, and rules to force user
authentication.
that can be associated with different APs.
MAC filtering settings files that can be associated
with different APs.
NXC5200 User’s Guide
47
Page 48

Chapter 3 The Web Configurator
Table 6 Configuration Menu Screens Summary (continued)
FOLDER OR
LINK
MON Profile Create and manage rogue AP monitoring files that
Address Address Create and manage host, range, and network
Service Service Create and manage TCP and UDP services.
Schedule Create one-time and recurring schedules.
AAA Server Active Directory Configure the default Active Directory settings.
Auth. Method Create and manage ways of authenticating users.
Certificate My Certificates Create and manage the NXC’s certificates.
System
Host Name Configure the system and domain name for the
Date/Time Configure the current date, time, and time zone in
Console
Speed
DNS Configure the DNS server and address records for
WWW Configure HTTP, HTTPS, and general
SSH Configure SSH server and SSH service settings.
TELNET Configure telnet server settings for the NXC.
FTP Configure FTP server settings.
SNMP Configure SNMP communities and services.
Language Select the Web Configurator language.
Log & Report
Email Daily
Report
Log Setting Configure the system log, e-mail logs, and remote
TAB FUNCTION
can be associated with different APs.
(subnet) addresses.
Address Group Create and manage groups of addresses.
Service Group Create and manage groups of services.
LDAP Configure the default LDAP settings.
RADIUS Configure the default RADIUS settings.
Trusted
Certificates
Import and manage certificates from trusted
sources.
NXC.
the NXC.
Set the console speed.
the NXC.
authentication.
Configure where and how to send daily reports and
what reports to send.
syslog servers.
48
NXC5200 User’s Guide
Page 49

3.3.2.4 Maintenance Menu
Use the maintenance menu screens to manage configuration and firmware files,
run diagnostics, and reboot or shut down the NXC.
Table 7 Maintenance Menu Screens Summary
FOLDER OR
LINK
File Manager Configuration
Diagnostics Diagnostic Collect diagnostic information.
Reboot Restart the NXC.
Shutdown Turn off the NXC.
TAB FUNCTION
File
Firmware
Package
Shell Script Manage and run shell script files for the NXC.
Packet Capture Capture packets for analysis.
Wireless Frame
Capture
Chapter 3 The Web Configurator
Manage and upload configuration files for the NXC.
View the current firmware version and to upload
firmware.
Capture wireless frames from APs for analysis.
3.3.3 Warning Messages
Warning messages, such as those resulting from misconfiguration, display in a
popup window.
Figure 12 Warning Message
NXC5200 User’s Guide
49
Page 50
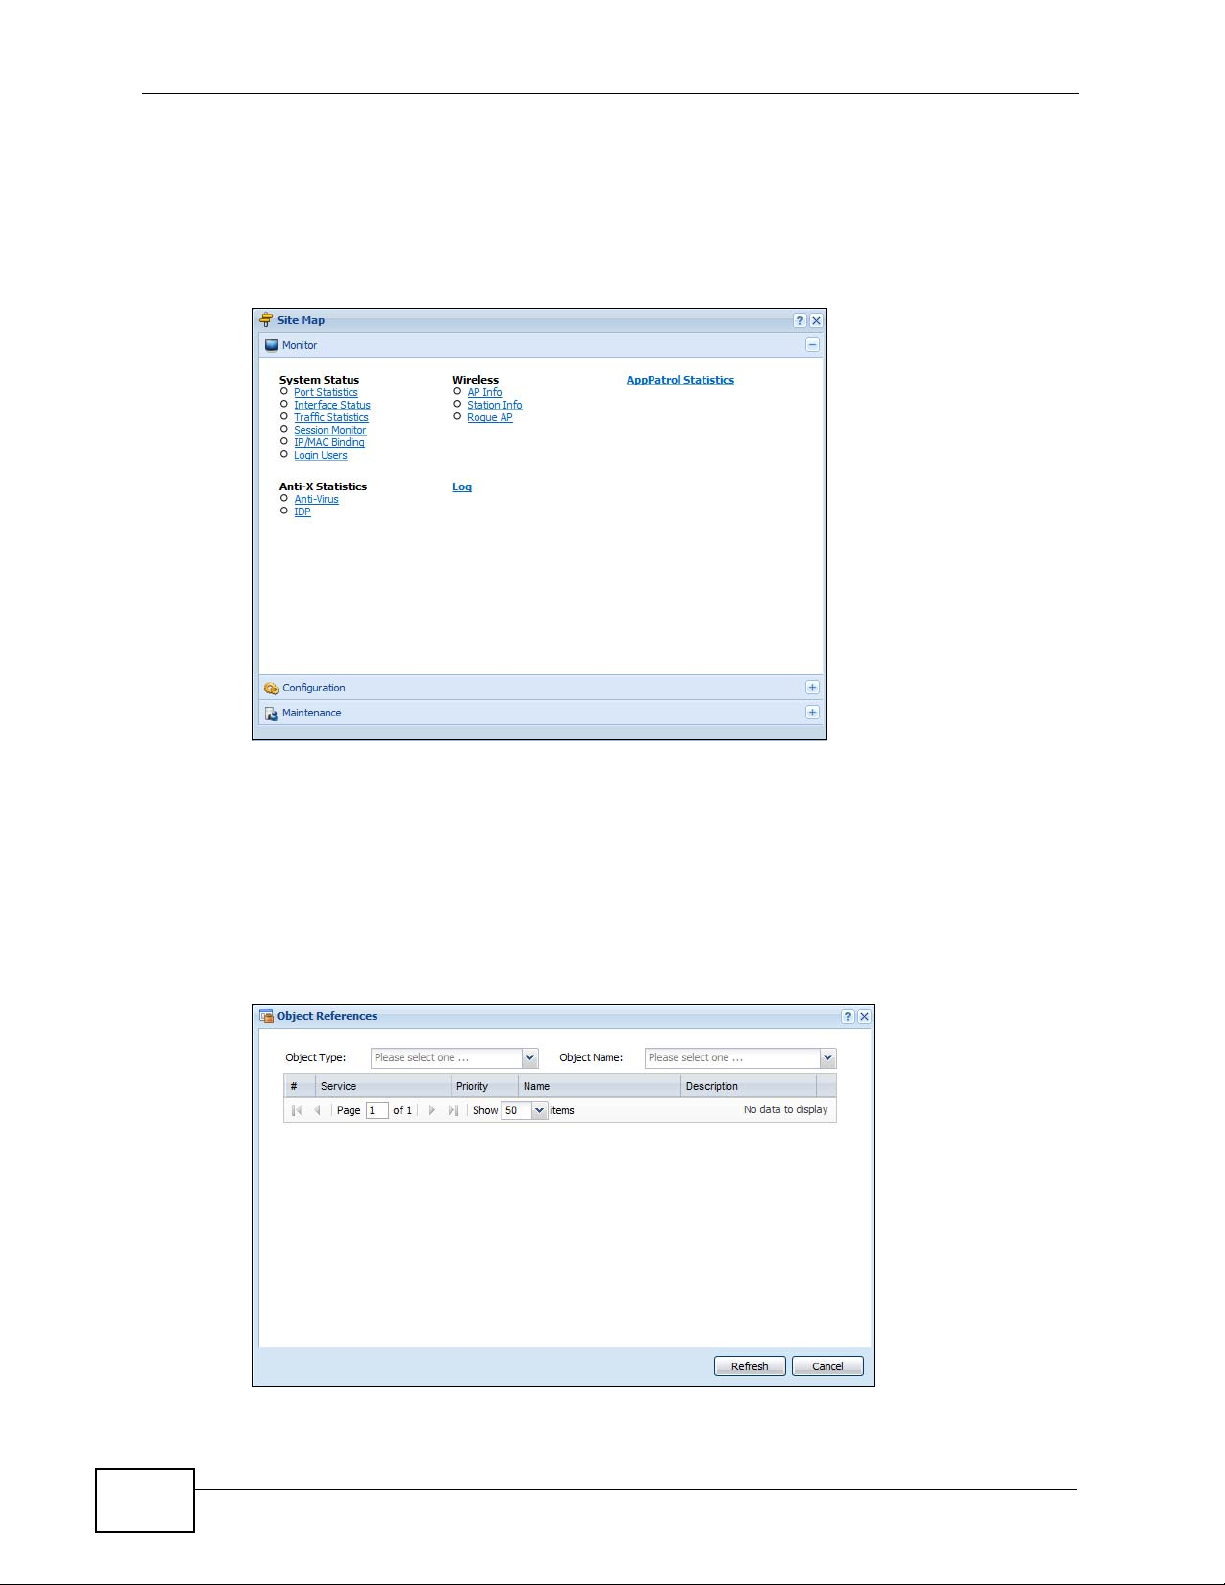
Chapter 3 The Web Configurator
3.3.4 Site Map
Click Site MAP to see an overview of links to the Web Configurator screens. Click
a screen’s link to go to that screen.
Figure 13 Site Map
3.3.5 Object Reference
Click Object Ref erence to open the Object Reference screen. Select the type of
object and the individual object and click Refresh to show which configuration
settings reference the object. The following example shows which configuration
settings reference the ldap-users user object (in this case the first firewall rule).
Figure 14 Object Reference
50
NXC5200 User’s Guide
Page 51

Chapter 3 The Web Configurator
The fields vary with the type of object. The following table describes labels that
can appear in this screen.
Table 8 Object References
LABEL DESCRIPTION
Object Name This identifies the object for which the configuration settings that use it
are displayed. Click the object’s name to display the object’s
configuration screen in the main window.
# This field is a sequential value, and it is not associated with any entry.
Service This is the type of setting that references the selected object. Click a
service’s name to display the service’s configuration screen in the main
window.
Priority If it is applicable, this field lists the referencing configuration item’s
position in its list, otherwise N/A displays.
Name This field identifies the configuration item that references the object.
Description If the referencing configuration item has a description configured, it
displays here.
Refresh Click this to update the information in this screen.
Cancel Click Cancel to close the screen.
3.3.5.1 CLI Messages
Click CLI to look at the CLI commands sent by the Web Configurator. These
commands appear in a popup window, such as the following.
Figure 15 CLI Messages
Click Clear to remove the currently displayed information.
Note: See the Command Reference Guide for information about the commands.
NXC5200 User’s Guide
51
Page 52

Chapter 3 The Web Configurator
3.3.5.2 Console
The Console allows you to use CLI commands from directly within the Web
Configurator rather than havin g to use a separate terminal program. In add ition to
logging in directly to the NXC’s CLI, you can also log into other devices on the
network through this Console. It uses SSH to establish a connection.
Note: To view the fuctions in the Web Configurator user interface that correspond
directly to specific NXC CLI commands, use the CLI Messages window (see
Section 3.3.5.1 on page 51) in tandem with this one.
Figure 16 Console
52
The following table describes the elements in this screen.
Table 9 Console
LABEL DESCRIPTION
Command Line
Enter commands for the device that you are currently logged into here.
If you are logged into the NXC, see the CLI Reference Guide for details
on using the command line to configure it.
Device IP
Address
This is the IP address of the device that you are currently logged into.
NXC5200 User’s Guide
Page 53

Table 9 Console (continued)
LABEL DESCRIPTION
Logged-In User
This displays the username of the account currently logged into the NXC
through the Console Window.
Note: You can log into the Web Configurator with a different account
than used to log into the NXC through the Console.
Connection
Status
This displays the connection status of the account currently logged in.
If you are logged in and connected, then this displays ‘Connected’.
If you lose the connection, get disconnected, or logout, then this
displays ‘Not Connected’.
Tx/RX Activity
Monitor
Chapter 3 The Web Configurator
This displays the current upload / download activity . The faster and more
frequently an LED flashes, the faster the data connection.
Before you use the Console, ensure that:
• Your web browser of choice allows pop-up windows from the IP address
assigned to your NXC.
• Your web browser allows Java programs.
• You are using the latest version of the Java program (http://www.java.com).
To login in through the Console:
1 Click the Console button on the Web Configurator title bar.
NXC5200 User’s Guide
53
Page 54

Chapter 3 The Web Configurator
2 Enter the IP address of the NXC and click OK.
3 Next, enter the User Name of the account being used to log into your target
device and then click OK.
54
4 You may be prompted to authenticate your account password, depending on the
type of device that you are logging into. Enter the password and click OK.
NXC5200 User’s Guide
Page 55

5 If your login is successful, the command line appears and the status bar at the
bottom of the Console updates to reflect your connection state.
3.3.6 Tables and Lists
The Web Configurator tables and lists are quite flexible and provide several
options for how to display their entries.
Chapter 3 The Web Configurator
3.3.6.1 Manipulating Table Display
Here are some of the ways you can manipulate the We b Configurator tables.
1 Click a column heading to sort the table’s entries according to that column’s
criteria.
2 Click the down arrow next to a column heading for more options about how to
display the entries. The options available vary depending on the type of fields in
the column. Here are some examples of what you can do:
• Sort in ascending alphabetical order
• Sort in descending (reverse) alphabetical order
• Select which columns to display
• Group entries by field
NXC5200 User’s Guide
55
Page 56

Chapter 3 The Web Configurator
• Show entries in groups
• Filter by mathematical operators (<, >, or =) or searching for text.
3 Select a column heading cell’s right border and drag to re-size the column.
56
4 Select a column heading and drag and drop it to change the column order. A green
check mark displays next to the column’s title when you drag the column to a valid
new location.
NXC5200 User’s Guide
Page 57

5 Use the icons and fields at the bottom of the table to navigate to different pages of
entries and control how many entries display at a time.
3.3.6.2 Working with Table Entries
The tables have icons for working with table entries. A sample is shown next. You
can often use the [Shift] or [Ctrl] ke y t o sel e c t multiple entries to remove,
activate, or deactivate.
Chapter 3 The Web Configurator
Table 10 Common Table Icons
Here are descriptions for the most common table icons.
Table 11 Common Table Icons
LABEL DESCRIPTION
Add Click this to create a new entry. For features where the entry’s
position in the numbered list is important (features where the NXC
applies the table’s entries in order like the firewall for example), you
can select an entry and click Add to create a new entry after the
selected entry.
Edit Double-click an entry or select it and click Edit to open a screen
where you can modify the entry’s settings. In some tables you can
just click a table entry and edit it directly in the table. For those types
of tables small red triangles display for table entries with changes
that you have not yet applied.
Remove To remove an entry, select it and click Remove. The NXC confirms
you want to remove it before doing so.
Activate To turn on an entry, select it and click Activate.
Inactivate To turn off an entry, select it and click Inactivate.
NXC5200 User’s Guide
57
Page 58

Chapter 3 The Web Configurator
Table 11 Common Table Icons (continued)
LABEL DESCRIPTION
Object References Select an entry and click Object References to open a screen that
shows which settings use the entry.
Move To change an entry’s position in a numbered list, select it and click
Move to display a field to type a number for where you want to put
that entry and press [ENTER] to move the entry to the number that
you typed. For example, if you type 6, the entry you are moving
becomes number 6 and the previous entry 6 (if there is one) gets
pushed up (or down) one.
3.3.6.3 Working with Lists
When a list of available entries displays next to a list of selected entries, you can
often just double-click an entry to move it from one list to the other. In some lists
you can also use the [Shift] or [Ctrl] key to select multiple entries, and then use
the arrow button to move them to the other list.
Figure 17 Working with Lists
58
NXC5200 User’s Guide
Page 59

CHAPTER 4
Configuration Basics
4.1 Overview
This section provides information to help you configure the NXC effectively. Some
of it is helpful when you are just getting started. Some of it is provided for your
reference when you configure various features in the NXC.
4.2 Object-based Configuration
The NXC stores information or settings as objects. You use these objects to
configure many of the NXC’s features and settings. Once you configure an object,
you can reuse it in configuring other features.
When you change an object’s settings, the NXC automatically updates all the
settings or rules that use the object. For example, if y ou create a radio object, you
can have firewall, application patrol, and other settings use it. If you modify the
radio object, all the firewall, application pat r ol, and other settings that are linked
to that object automatically apply the updated settings.
You can create address objects based on an interface’s IP address, subnet, or
gateway. The NXC automatically updates every rule or setting that uses these
objects whenever the interface’s IP address settings change. For example, if you
change an Ethernet interface’s IP address, the NXC automatically updates the
rules or settings that use the interface-based, LAN subnet address object.
You can use the Configuration > Objects screens to create objects before you
configure features that use them. If you are in a screen that uses objects, you can
also usually select Create new Object to be able to configure a new object.
Use the Object Reference screen to see what objects are configured and which
configuration settings reference specific objects.
NXC5200 User’s Guide
59
Page 60

Chapter 4 Configuration Basics
4.3 Zones, Interfaces, and Physical Ports
Zones (groups of interfaces) simplify security settings. Here is an overview of
zones, interfaces, and physical ports in the NXC.
Table 12 Zones, Interfaces, and Physical Ethernet Ports
Zones
(LAN, WLAN)
Interfaces
(Ethernet, VLAN)
Physical
Ethernet Ports
(1, 2, 3, 4)
4.3.1 Interface Types
A zone is a group of interfaces. Use zones to apply security settings
such as firewall, IDP, remote management, anti-virus, and
application patrol.
Interfaces are logical entities that (layer-3) packets pass through.
Use interfaces in configuring zones, device HA, policy routes, static
routes, and NAT.
Port combine physical ports into interfaces.
The physical port is where you connect a cable. In configuration, you
use physical ports when configuring port groups. You use interfaces
and zones in configuring other features.
There are two types of interfaces in the NXC. In addition to being used in various
features, interfaces also describe the network that is directly connected to it.
• Ethernet interfaces are the foundation for defining other interfaces and
network policies. By
• VLAN interfaces recognize tagged frames. The NXC automatically adds or
removes the tags as needed. Each VLAN can only be associated with one
Ethernet interface.
Note: By default, all Ethernet interfaces are placed into vlan0, allowing the NXC to
function as a bridge device.
60
NXC5200 User’s Guide
Page 61

Chapter 4 Configuration Basics
4.3.2 Example Interface and Zone Configuration
This section introduces the NXC’ s default z one member physical interfaces and the
default configuration of those interfaces. The following figure uses letters to
denote public IP addresses or part of a private IP address.
Figure 18 Default Network Topology
Table 13 NXC Sample Topology
PORT INTERFACE ZONE
P1~P8 ge1~ge8 LAN
CONSOLE N/A None None Local management
•The LAN zone contains the ge1~ ge8 interfaces (physical ports P1~P8). By
default, all LAN interfaces are put in vlan0.
•The WLAN zone contains Access Points (APs) that are available to the public.
These APs uses private IP addresses that can be assigned by an upstream DHCP
server (default) or the NXC itself in some configurations.
•The console port is not in a zone and can be directly accessed by a computer
attached to it using a special console-to-Ethernet adapter.
NXC5200 User’s Guide
IP ADDRESS AND DHCP
SETTINGS
192.168.1.1, DHCP server
(vlan0)
WLAN DHCP clients Managed Wireless APs
enabled
SUGGESTED USE WITH
DEFAULT SETTINGS
Dedicated LAN
connections
61
Page 62

Chapter 4 Configuration Basics
4.4 Feature Configuration Overview
This section provides information about configuring the main features in the NXC.
The features are listed in the same sequence as the menu item(s) in the Web
Configurator. Each feature description is organized as shown below.
4.4.1 Feature
This provides a brief description. See the appropriate chapter(s) in this User’s
Guide for more information about any feature.
This shows you the sequence of menu items and tabs you should click
MENU ITEM(S)
PREREQUISITES
to find the main screen(s) for this feature. See the web help or the
related User’s Guide chapter for information about each screen.
These are other features you should configure before you configure
the main screen(s) for this feature.
If you did not configure one of the prerequisites first, you can often
select an option to create a new object. After you create the object
you return to the main screen to finish configuring the feature.
You may not have to configure everything in the list of prerequisites.
For example, you do not have to create a schedule for a policy route
unless time is one of the criterion.
There are two uses for this.
These are other features you should usually configure or check right
WHERE USED
after you configure the main screen(s) for this feature.
You have to delete the references to this feature before you can delete
any settings.
Note: PREQUISITES or WHERE USED does not appear if there are no prerequisites
or references in other features to this one. For example, no other features
reference AP management entries, so there is no WHERE USED entry.
4.4.2 Licensing Registration
Use these screens to register your NXC and subscribe to services like anti-virus,
IDP and application patrol. You must have Internet access to myZyXEL.com.
MENU ITEM(S)
PREREQUISITES
Configuration > Licensing > Registration
Internet access to myZyXEL.com
62
NXC5200 User’s Guide
Page 63

4.4.3 Licensing Update
Use these screens to update the NXC’s signature packages for the anti-virus, IDP
and application patrol features. You must have a valid subscription to update the
anti-virus and IDP/application patrol signatures. You must also have Internet
access to myZyXEL.com.
Chapter 4 Configuration Basics
MENU ITEM(S)
PREREQUISITES
4.4.4 Wireless
Use these screens to manage your wireless Access Points.
MENU ITEM(S)
PREREQUISITES
4.4.5 Interface
Most of the features that use interfaces support Ethernet and VLAN interfaces.
Note: When you create an interface, no security is applied to it until you assign it to a
zone first.
MENU ITEM(S)
PREREQUISITES
WHERE USED
Configuration > Licensing > Signature Update
Registration (for anti-virus and IDP/application patrol), Internet
access to myZyXEL.com
Configuration > Network > Wireless.
Radio profiles, SSID profiles, and security profiles
Configuration > Network > Interface.
None
Zones, device HA, policy routes, static routes, NAT, application patrol
4.4.6 Policy Routes
Use policy routes to override the NXC’s default routing behavior in order to send
packets through the appropriate interface. You can also use policy routes for
bandwidth management (out of the NXC), port triggering, and general NAT on the
source address. You have to set up the criteria, next-hops, and NAT settings first.
MENU ITEM(S)
PREREQUISITES
NXC5200 User’s Guide
Configuration > Network > Routing > Policy Routes
Criteria: users, user groups, interfaces (incoming), addresses (source,
destination), address groups (source, destination), schedules,
services, service groups
Next-hop: addresses (HOST gateway), interfaces
NAT: addresses (translated address), services and service groups
(port triggering)
63
Page 64

Chapter 4 Configuration Basics
4.4.7 Static Routes
Use static routes to tell the NXC about networks not directly connected to the
NXC.
MENU ITEM(S)
PREREQUISITES
4.4.8 Zones
A zone is a group of interfaces. The NXC uses zones, not interfaces, in many
security settings, such as firewall rules and remote management.
Zones cannot overlap. Each interface can be assigned to one zone. Virtual
interfaces are automatically assigned to the same zone as the interface on which
they run. When you create a zone, the NXC does not create any firewall rules,
assign an IDP profile, or configure remote management for the new zone.
MENU ITEM(S)
PREREQUISITES
WHERE USED
4.4.9 NAT
Configuration > Network > Routing > Static Route
Interfaces
Configuration > Network > Zone
Interfaces
Firewall, anti-virus, ADP, application patrol
Use Network Address Translation (NAT) to make computers on a private network
behind the NXC available outside the private network.
The NXC only checks regular (through-NXC) firewall rules for packets that are
redirected by NAT, it does not check the to-NXC firewall rules.
MENU ITEM(S)
PREREQUISITES
4.4.10 ALG
The NXC’s Application Layer Gat eway (ALG) allows VoIP and FTP applications to go
through NA T on the NXC. You can also specify additional signaling port numbers.
MENU ITEM(S)
Configuration > Network > NAT
Interfaces, addresses (HOST)
Configuration > Network > ALG
64
NXC5200 User’s Guide
Page 65

4.4.11 Captive Portal
A captive portal intercepts all HTTP-packets, regardless of address or port, until
the user authenticates his or her connection, usually through a specifically
designated login Web page..
Chapter 4 Configuration Basics
MENU ITEM(S)
Configuration > Captive Portal
4.4.12 Firewall
The firewall controls the travel of traffic between or within zones. You can also
configure the firewall to control traffic for NAT (DNAT) and policy routes (SNAT).
You can configure firewall rules based on schedules, specific users (or user
groups), source or destination addresses (or address groups) and services (or
service groups). Each of these objects must be configured in a different screen.
T o-NXC firew all rules control access to the NXC. Configure to-NXC firewall rules for
remote management. By default, the firewall only allows management
connections from the LAN, WAN zone.
MENU ITEM(S)
PREREQUISITES
Configuration > Firewall
Zones, schedules, users, user groups, addresses, services, service
groups
4.4.13 Application Patrol
Use application patrol to control which individuals can use which services through
the NXC (and when they can do so). You can also specify allowed amounts of
bandwidth and priorities. You must subscribe to use application patrol. You can
subscribe using the Configuration > Licensing > Registration screens or one
of the wizards.
MENU ITEM(S)
PREREQUISITES
4.4.14 Anti-Virus
Use anti-virus to detect and take action on viruses. You must subscribe to use
anti-virus. You can subscribe using the Licensing > Registration screens or one
of the wizards.
MENU ITEM(S)
PREREQUISITES
Configuration > AppPatrol
Registration, zones, schedules, users, user groups, addresses. These
are only used as criteria in exceptions and conditions.
Configuration > Anti-X > Anti-Virus
Registration, zones
NXC5200 User’s Guide
65
Page 66

Chapter 4 Configuration Basics
4.4.15 IDP
Use IDP to detect and take action on malicious or suspicious packets. You must
subscribe to use IDP. You can subscribe using the Licensing > Registration
screens or one of the wizards.
MENU ITEM(S)
PREREQUISITES
4.4.16 ADP
Use ADP to detect and take action on traffic and protocol anomalies.
MENU ITEM(S)
PREREQUISITES
4.4.17 Device HA
To increase network reliability, device HA lets a backup NXC automatically take
over if a master NXC fails.
MENU ITEM(S)
PREREQUISITES
Configuration > Anti-X > IDP
Registration, zones
Configuration > Anti-X > ADP
Zones
Configuration > Device HA
Interfaces (with a static IP address), to-NXC firewall
4.5 Objects
Objects store information and are referenced by other features. If you update this
information in response to changes, the NXC automaticall y propagates the change
through the features that use the object. Select an object (such as a user group,
address, address group, service, service group, zone, or schedule) and then click
Object Reference at the top of the list box where the object appears in order to
display basic information about it.
The following table introduces the objects. You can also use this table when you
want to delete an object because you have to delete references to the object first.
Table 14 Objects Overview
OBJECT WHERE USED
user/group See the User/Group section on page 67 for details.
ap profile See the AP Profile section on page 67 for details.
mon profile See the MON Profile section on page 68 for details.
66
NXC5200 User’s Guide
Page 67

Chapter 4 Configuration Basics
Table 14 Objects Overview
OBJECT WHERE USED
address Policy routes (criteria, next-hop [HOST], NAT), authentication
policies, firewall, application patrol (source, destination), NAT
(HOST), user settings (force user authentication), address groups
address group Policy routes (criteria), firewall, application patrol (source,
destination), captive portal (force user authentication), address
groups, remote management (System)
service, service
group
schedule Policy routes (criteria), authentication policies, firewall, application
AAA server Authentication methods
authentication
methods
certificates WWW, SSH, FTP, controller
SSID profile captive portal
Policy routes (criteria, port triggering), firewall, service groups, log
(criteria)
patrol, user settings (force user authentication)
WWW (client authentication), captive portal
4.5.1 User/Group
Use these screens to configure the NXC’s administrator and user accounts. The
NXC provides the following user types.
Table 15 User Types
TYPE ABILITIES
admin Change NXC configuration (web, CLI)
ldap users LDAP authentication for downstream network clients
radius users RADIUS authentication for downstream network clients
ad users AD authentication for downstream network clients
4.5.2 AP Profile
Use these screens to configure preset profiles for the Access Points (APs)
connected to your NXC’s wireless network.
Table 16 AP Profile Types
TYPE ABILITIES
Radio Create radio profiles for the APs on your network.
SSID Create SSID profiles for the APs on your network.
Security Create security profiles for the APs on your network.
MAC Filtering Create MAC filtering profiles for the APs on your network.
NXC5200 User’s Guide
67
Page 68

Chapter 4 Configuration Basics
4.5.3 MON Profile
Use these screens to set up monitor mode configurations that allow your
connected APs to scan for other wireless devices in the vicinity.
Table 17 MON Profile Types
TYPE ABILITIES
Monitor Create monitor mode configurations that can be used by the APs to
4.6 System
This section introduces some of the management features in the NXC. Use Host
Name to configure the system and domain name for the NXC. Use Date/Time to
configure the current date, time, and time zone in the NXC. Use Console Speed
to set the console speed. Use Language to select a language for the Web
Configurator screens.
periodically listen to a specified channel or number of channels for
other wireless devices broadcasting on the 802.11 frequencies.
4.6.1 DNS, WWW, SSH, TELNET, FTP, and SNMP
Use these screens to set which services or protocols can be used to access the
NXC through which zone and from which addresses (address objects) the access
can come.
MENU ITEM(S)
PREREQUISITES
Configuration > System > DNS, WWW, SSH, TELNET, FTP,
SNMP, Language
T o-NXC firewall, zones, addresses, address groups, certificates (WWW ,
SSH, FTP), authentication methods (WWW)
4.6.2 Logs and Reports
The NXC provides a system log, offers two e-mail profiles to which to send log
messages, and sends information to four syslog servers. It can also e-mail you
statistical reports on a daily basis.
MENU ITEM(S)
Configuration > Log & Report
68
NXC5200 User’s Guide
Page 69

4.6.3 File Manager
Use these screens to upload, download, delete, or run scripts of CLI commands.
You can manage:
• Configuration files. Use configuration files to back up and restore the complete
configuration of the NXC. You can store multiple configuration files in the NXC
and switch between them without restarting.
• Shell scripts. Use shell scripts to run a series of CLI commands. These are useful
for large, repetitive configuration changes and for troubleshooting.
You can edit configuration files and shell scripts in any text editor.
Chapter 4 Configuration Basics
MENU ITEM(S)
4.6.4 Diagnostics
The NXC can generate a file containing the NXC’s configuration and diagnostic
information. It can also capture packets going through the NXC’s interfaces so yo u
can analyze them to identify network problems
MENU ITEM(S)
4.6.5 Shutdown
Use this to shutdown the device in preparation for disconnecting the power.
Always use Maintenance > Shutdown > Shut down or the shutdown
command before you turn off the NXC or remove the power. Not doing
so can cause the firmware to become corrupt.
MENU ITEM(S)
Maintenance > File Manager
Maintenance > Diagnostics
Maintenance > Shutdown
NXC5200 User’s Guide
69
Page 70

Chapter 4 Configuration Basics
70
NXC5200 User’s Guide
Page 71

CHAPTER 5
Tutorials
5.1 Overview
The tutorials featured here require a basic understanding of connecting to and
using the Web Configurator, as well as an understanding of networking concepts
and topology design.
The default login information for the NXC’s Web Configurator is:
Table 18 NXC Default Login Information
LOGIN VALUE SEE ALSO
IP Address 192.168.1.1 Chapter 3 on page 41.
User Name admin
Password 1234
NXC5200 User’s Guide
71
Page 72

Chapter 5 Tutorials
5.2 Sample Network Setup
This tutorial shows you how to create a wireless network that allows two types of
connections: staff and guest. Staff connections have full access to the network,
while guests are limited to Internet access (DNS, HTTP and HTTPS services).
Figure 19 Tutorial Network Topology
72
Requirements: A DHCP server with Option 138, an AD server, a switch that
supports 802.1q, a Layer-3 routing device and firewall.
Note: In this topology, vlan 199 is managed by the router responsible for the up stream
portion of the network, such as a ZyWALL.
The following VLAN settings are used in this tutorial:
Table 19 Tutorial Topology Summary
VLAN VLAN ID IP ADDRESS
Management 99 10.10.99.10/24
Staff 101 10.1.101.254/24
Guest 102 10.1.102.254/24
NXC5200 User’s Guide
Page 73

Figure 20 Tutorial Guest VLAN Example
Chapter 5 Tutorials
In this example, the guest VLAN (102) is highlighted with the connections that it
may make over this particular network topology. The staff VLAN (101) is
unhighlighted because it has access to all aspects of the network.
5.2.1 Tutorial Tasks
In this tutorial, you will:
Table 20 Tutorial Tasks Summary
TASK SEE ALSO
Set the Management VLAN (vlan99) Chapter 11 on page 177
Set the Other VLANs (vlan101, vlan102) Chapter 11 on page 177
Configure the AAA Object Chapter 30 on page 425
Configure the Auth. Method Objects (staff, guest) Chapter 31 on page 437
Create the AP Profiles (staff, guest) Chapter 25 on page 387
Create the Guest User Account Chapter 24 on page 373
Configure the Captive Portal Settings Chapter 17 on page 239
Configure the Guest Firewall Rules Chapter 18 on page 249
NXC5200 User’s Guide
73
Page 74

Chapter 5 Tutorials
5.2.2 Set the Management VLAN (vlan99)
This section shows you how to set up the VLAN for managing the NXC. This is only
for network administrators to access the device.
1 Open the Configuration > Network > Interface > VLAN screen then click the
Add button.
2 The Add VLAN window opens.
74
2a Enable Interface: Select this to enable this interface.
2b Interface Name: Enter ‘vlan99’.
2c VID: Enter ‘99’ as the VLAN ID tag.
2d Under Member Configuration, set the ge1 Member status to Yes and TX
Tagging to Yes.
NXC5200 User’s Guide
Page 75

2e Scroll down to IP Address Assignment and select Use Fixed IP Address.
2f IP Address: Enter 10.10.99.10.
2g Subnet Mask: Enter 255.255.255.0.
2h Gateway: Enter 10.10.99.10.
3 Click OK to save these changes.
See Also: Chapter 11 on page 177.
5.2.3 Set the Other VLANs (vlan101, vlan102)
This section shows you how to set up the other VLANs on your network. They
correspond to the topology map presented at the beginning of this tutorial.
Note: You will use this procedure twice: once for VLAN 101 and the other time for
VLAN 102. VLAN 101 is presented first, while VLAN 102 is presented second.
Chapter 5 Tutorials
1 For VLAN 101: Open the Configuration > Network > Interface > VLAN screen
then click the Add button.
NXC5200 User’s Guide
75
Page 76

Chapter 5 Tutorials
2 The Add VLAN window opens.
2a Enable Interface: Select this to enable this interface.
2b Interface Name: Enter ‘vlan101’.
2c VID: Enter ‘101’ as the VLAN ID tag.
2d Under Member Configuration, set the ge1 Member status to Yes and TX
Tagging to Yes.
2e Scroll down to IP Address Assignment and select Use Fixed IP Address.
2f IP Address, enter 10.10.101.254.
2g Subnet Mask: Enter 255.255.255.0.
2h Gateway: Enter 10.10.101.254.
3 For VLAN 102: Open the Configuration > Network > Interface > VLAN screen
then click the Add button.
4 The Add VLAN window opens.
4a Enable Interface: Select this to enable this interface.
4b Interface Name: Enter ‘vlan102’.
76
4c VID: Enter ‘102’ as the VLAN ID tag.
NXC5200 User’s Guide
Page 77

Chapter 5 Tutorials
4d Under Member Configuration, set the ge1 Member status to Yes and TX
Tagging to Yes.
4e Scroll down to IP Address Assignment and select Use Fixed IP Address.
4f IP Address, enter 10.10.102.254.
4g Subnet Mask: Enter 255.255.255.0.
4h Gateway: Enter 10.10.102.254.
5 Click OK to save these changes.
After configuring VLANs 99, 101, and 102, the Configuration > Network >
Interfaces > VLAN screen should look similar to this:
Figure 21 Tutorial VLANs Summary
See Also: Chapter 11 on page 177.
5.2.4 Configure the AAA Object
This section shows you how to set up the AAA (Authentication, Authorization,
Accounting) server settings to allow registered users to log into the network
through the staff SSID.
1 Open the Configuration > Object > AAA Server > Active Directory screen
and then click the Add button.
NXC5200 User’s Guide
77
Page 78

Chapter 5 Tutorials
2 The Add Active Directory window opens.
78
2a Name: Enter AD-1.
2b Under Server Settings, enter a Server Address of 10.1.199.250.
2c Base DN: Enter settings that match your AD server configuration. For this
example, use ‘cn=Users,dc=zyxel,dc=test’.
2d Under Server Authentication, enter a Bind DN that has privileges on your
AD server. In this tutorial, use ‘zyxel’.
2e Password: Enter the password for the Bind DN that has privileges on your
AD server. In this tutorial, use ‘1234’.
2f Scroll down to Configuration Validation, enter a valid test account for your
AD sever in the Username field, and click Test. This tests the settings you
just entered in this window.
Note: Unless your AD server is configured to explicitly handle these tutorial settings,
the Test button may not work. However, it is handy know for future reference.
NXC5200 User’s Guide
Page 79

Chapter 5 Tutorials
3 Click OK to save these settings.
See Also: Chapter 30 on page 425.
5.2.5 Configure the Auth. Method Objects (staff, guest)
This section shows you how to set up the Authentication Method profile to allow
registered users to log into the network through the staff SSID and guest users to
login through the guest SSID.
1 Open the Configuration > Object > Auth. Method screen and then click the
Add button.
2 The Add Authentication Method window opens.
2a Name: Enter ‘staff’.
2b Click the Add button to create a blank rule in the Method list.
2c Click the rule to exand the list of available AAA server profiles and then select
group AD-1. This is the AAA server profile created in Section 5.2.4 on page
77.
3 Click OK to save these settings.
4 To create a guest authentication object, repeat steps 1-3 but with the following
guest settings instead:
NXC5200 User’s Guide
79
Page 80

Chapter 5 Tutorials
4a Name: Enter ‘guest’.
4b Click the Add button to create a blank rule in the Method list.
4c Click the rule to exand the list of available AAA server profiles and then select
local. The guest account created in Section 5.2.7 on page 83 is stored in this
authentication database.
See Also: Chapter 31 on page 437.
5.2.6 Create the AP Profiles (staff, guest)
This section shows you how to configure the Access Point (AP) profiles that wil l be
used by your APs once they are connected to the network. You will first create a
security profile and an SSID profile for staff access, then you will create a second
pair for guest access. Finally, you will associate them with a radio profile which is
linked to your AP’s radio transmitter.
1 Open the Configuration > Object > AP Profile > SSID > Security List screen
and then click the Add button.
80
2 The Add Security Profile window opens.
2a Profile Name: Enter ‘wap2’.
NXC5200 User’s Guide
Page 81

Chapter 5 Tutorials
2b Security Mode: Select wpa2 from the list of available wireless security
encryption methods.
2c Under Security Settings, select 802.1X then set the Radius Type to
Internal. For Authentication Method, select ‘staff’ from the list. This is the
method that you created in Section 5.2.5 on page 79.
3 Next, open the Configuration > Object > AP Profile > SSID > SSID List
screen and click the Add button.
4 The Add SSID Profile window opens.
4a Profile Name: Enter ‘staff’.
4b SSID: Enter ‘staff’. This is the wireless network name that appears when
wireless clients are looking for networks to join.
4c Security Profile: Selec t wap2 from the list. This is the security profile
created in Step 1a.
4d QoS: Select WMM.
4e Forwar ding Mode: Select Tunnel from the list.
4f VLAN Interface: Select vlan101 from the list, which you created in Section
5.2.3 on page 75.
NXC5200 User’s Guide
81
Page 82

Chapter 5 Tutorials
4g Click OK to save these settings.
5 Repeat steps 1 and 2. All settings are the same, except as follows:
5a Profile Name: Enter ‘guest’.
5b SSID: Enter ‘guest’.
5c VLAN Interface: Select vlan102 from the list.
6 Open the Configuration > Object> AP Profile > Radio screen and then click
the Add button.
7 The Add Radio Profile window opens.
82
7a Activate: Select this to make the radio profile active.
7b Profile Name: Enter ‘nxc5200’.
NXC5200 User’s Guide
Page 83

7c Scroll down to MBSSID Settings. For item #1, select the staff SSID Profile.
For item #2, select the guest SSID profile. These are the two profiles you
created in steps 1-3 of this procedure.
7d Click OK to save these settings.
See Also: Chapter 25 on page 387.
5.2.7 Create the Guest User Account
This section shows you how to create a guest us er account. Guest users should log
into the network with the following user name and password: guest1 / guest1.
1 Open the Configuration > Object > User/Group > User screen and click the
Add button.
Chapter 5 Tutorials
2 The Add A User window opens.
NXC5200 User’s Guide
83
Page 84

Chapter 5 Tutorials
2a User Name: Enter ‘guest1’.
2b Password: Enter ‘guest1’, then enter it again in the Retype field to confirm.
3 Click OK to save these settings.
See Also: Chapter 24 on page 373.
5.2.8 Configure the Captive Portal Settings
This section shows you how to configure the NXC captive portal settings. This is
the web page that appears whenever anyone connects to the guest SSID , and it is
here where they can login using the guest credentials that you configured in
Section 5.2.7 on page 83.
1 Open the Configuration > Captive Portal screen.
84
2 Enable Captive Portal: Select this to turn on the captive portal feature for all
wireless networks managed by the NXC. Although enabled, it does not appear for
all SSIDs; only those assigned to the feature.
3 Authentication Method: Select guest from the list. This is the Auth . Method
profile that you created in Section 5.2.5 on page 79.
4 Under Authentication Policy Summary, click the Add button.
NXC5200 User’s Guide
Page 85

5 The Auth. Policy Edit window opens.
5a SSID Profile : S elec t guest from the list.
Chapter 5 Tutorials
5b Authentication: Select required from the list.
See Also: Chapter 17 on page 239.
5.2.9 Configure the Guest Firewall Rules
Finally , configure the firewall rules required for regulating how guest users can use
the network. There are 5 firewall rules that you will need to configure:
Table 21 Tutorial Firewall Rules
RULE USER SERVICE ACCESS
#1 guest1 deny
#2 guest1 DNS_UDP allow
#3 guest1 DNS_TCP allow
#4 guest1 HTTP allow
#5 guest1 HTTPS allow
NXC5200 User’s Guide
85
Page 86

Chapter 5 Tutorials
1 Open the Configuration > Firewall screen.
2 For each rule, click the Add button to open the Add Firewall Rule window.
3 Enter the settings for the specific firewall rule described in Table 21 on page 85.
86
NXC5200 User’s Guide
Page 87

Chapter 5 Tutorials
4 Click OK to save the firewall rule settings.
For example, to configure firewall rule #5:
1 Open the Configuration > Firewall screen and click the Add button.
2 The Add Firewall Rule window opens.
2a User: Select guest1 from the list.
2b Service: Select HTTPS from the list.
2c Access: Select allow from the list.
3 Click OK to sav e these settings. The new firewall rule now appears in the Firewall
Rules Summary table.
Note: For the purposes of this tutorial, the firewall rules can be created in any order
just so long as they use the settings presented here.
See Also: Chapter 18 on page 249.
5.3 Blocking Network Protocols
The NXC’s firewall allows you to control which protocols are allowed on your
wireless network. If the NXC is connected to an upstream Internet access device,
then incoming traffic off the WAN should be filtered by that device’s firewall
feature. However traffic coming into the NXC from wireless clients is not filtered
until you configure its own firewall first.
5.3.1 Configuring the WLAN Zone
This section shows you how to configure the WLAN zone, which is necessary for
implementing the firewall rules and Application Patrol rules.
1 Open the Configuration > Network > Zone screen.
2 Select WLAN from the User Configuration table and click the Edit button.
NXC5200 User’s Guide
87
Page 88

Chapter 5 Tutorials
3 The Add Zone window opens.
4 In Member List, select an interface from Available and add it to Member. For
the purposes of this tutorial, add staff and guest. These are the VIDs configured
in Section 5.2.3 on page 75.
5 Click OK to save these settings.
See Also: Chapter 13 on page 213.
5.3.2 Configuring the Firewall
This section shows you how to configure the firewall to block certain network
protocols, such as AIM.
1 Click Configuration > Firewall.
88
NXC5200 User’s Guide
Page 89

Chapter 5 Tutorials
2 Click the Add button in the Firewall Rule Summary table.
2a User: Leave this as any to apply the rule to all users, or select a specific
subset of users, such as guest or staff.
2b Enable: Select this to make the firewall rule active.
2c Description: Enter a description for the rule that makes it easy to identify
later. For the purposes of this tutorial, enter ‘AIM Block’. (This field is entirely
optional, so if you leave it blank there will be no adverse effects.)
2d Service: Select AIM from the list.
2e Access: Select reject from this list to block the service.
3 Click OK to save your cha n ges.
See Also: Chapter 18 on page 249.
NXC5200 User’s Guide
89
Page 90

Chapter 5 Tutorials
5.3.3 Blocking Sub-Protocols
Let’s say that instead of blocking all AIM traffi c, you want to only block the file
transfer and video chat options for the various Instant Messenger programs used
by employees, since those are fairly bandwidth intensive activities that maybe you
don’t want to burden your wireless network. This tutorial shows you how to do
that with the NXC’s Application Patrol feature.
1 Click Configuration > App Patrol > IM.
2 In the Configuration table, select aol-icq then click Edit.
90
NXC5200 User’s Guide
Page 91

3 Select Enable Service.
4 In the Policy table, click Add.
Chapter 5 Tutorials
4a Enable Policy: Select this to make the policy active.
4b User: Select ad-users from the list, since for the purposes of this tutorial
only employees are authenticated by an external AD server (as configured in
Section 5.2.5 on page 79.)
4c From: Se lec t WLAN from the list (Section 5.3.1 on page 87). This means
only employees logging over the wireless network have this restriction applied
to them.
4d Action Block: Select Video and File Transfer. This limits the restriction only
to video chat and file transfer requests.
5 Click OK to save your cha n ges.
See Also: Chapter 19 on page 265.
NXC5200 User’s Guide
91
Page 92

Chapter 5 Tutorials
5.4 Rogue AP Detection
Rogue APs are wireless access points interacting with the network managed b y the
NXC but which are not under the control of the network administrator. In short,
they are a security risk because they circumvent network security policy. AP
detection only works when at least 1 AP is configured for Monitor mode.
The following are some suggestions on monitor AP placement:
• Neighboring companies that both support wireless network. If you can detect
your neighbor’s APs and you know they are ‘friendly’, you can add them to the
friendly exception list.
• Reception areas. If a reception area has a high volume of visitor traffic, it might
be useful to see if anyone is setting up their wireless device as an AP.
• High security areas. An AP set to Monitor mode will let you see if any one sets up
an unauthorized AP that could potentially compromise your security.
In this example, an employee illicitly connects his own AP (RG) to the network
that the NXC manages. While not necessarily a malicious act, it can nonetheless
have severe security consequences on the network.
Figure 22 Rogue AP Example A
92
NXC5200 User’s Guide
Page 93

Chapter 5 Tutorials
Here, an attacker sets up a rogue AP (RG) outside the network, which he uses in
an attempt to mimic an NXC-controlled SSID in or der to capture passwords and
other information when authorized wireless clients mistakenly connect to it.
Figure 23 Rogue AP Example B
This tutorial shows you how to detect rogue APs on your network:
1 Click Configuration > Object > MON Profile.
NXC5200 User’s Guide
93
Page 94

Chapter 5 Tutorials
2 Click the Add button.
When the Add Mon Profile window opens, configure the following:
Activate: Select this to allow your monitor APs to use this profile.
Profile Name: For the purposes of this tutorial set this to ‘Monitor01’.
Channel Dwell Time: Leave this as the default 100 milliseconds. This field is the
number of milliseconds that the monitor AP scans each channel before moving on
to the next.
Scan Channel Mode: Set this to auto to automatically scan channels in the area.
3 Click OK to save your cha n ges.
4 Next, click Configuration > Wireless > AP Management.
94
NXC5200 User’s Guide
Page 95
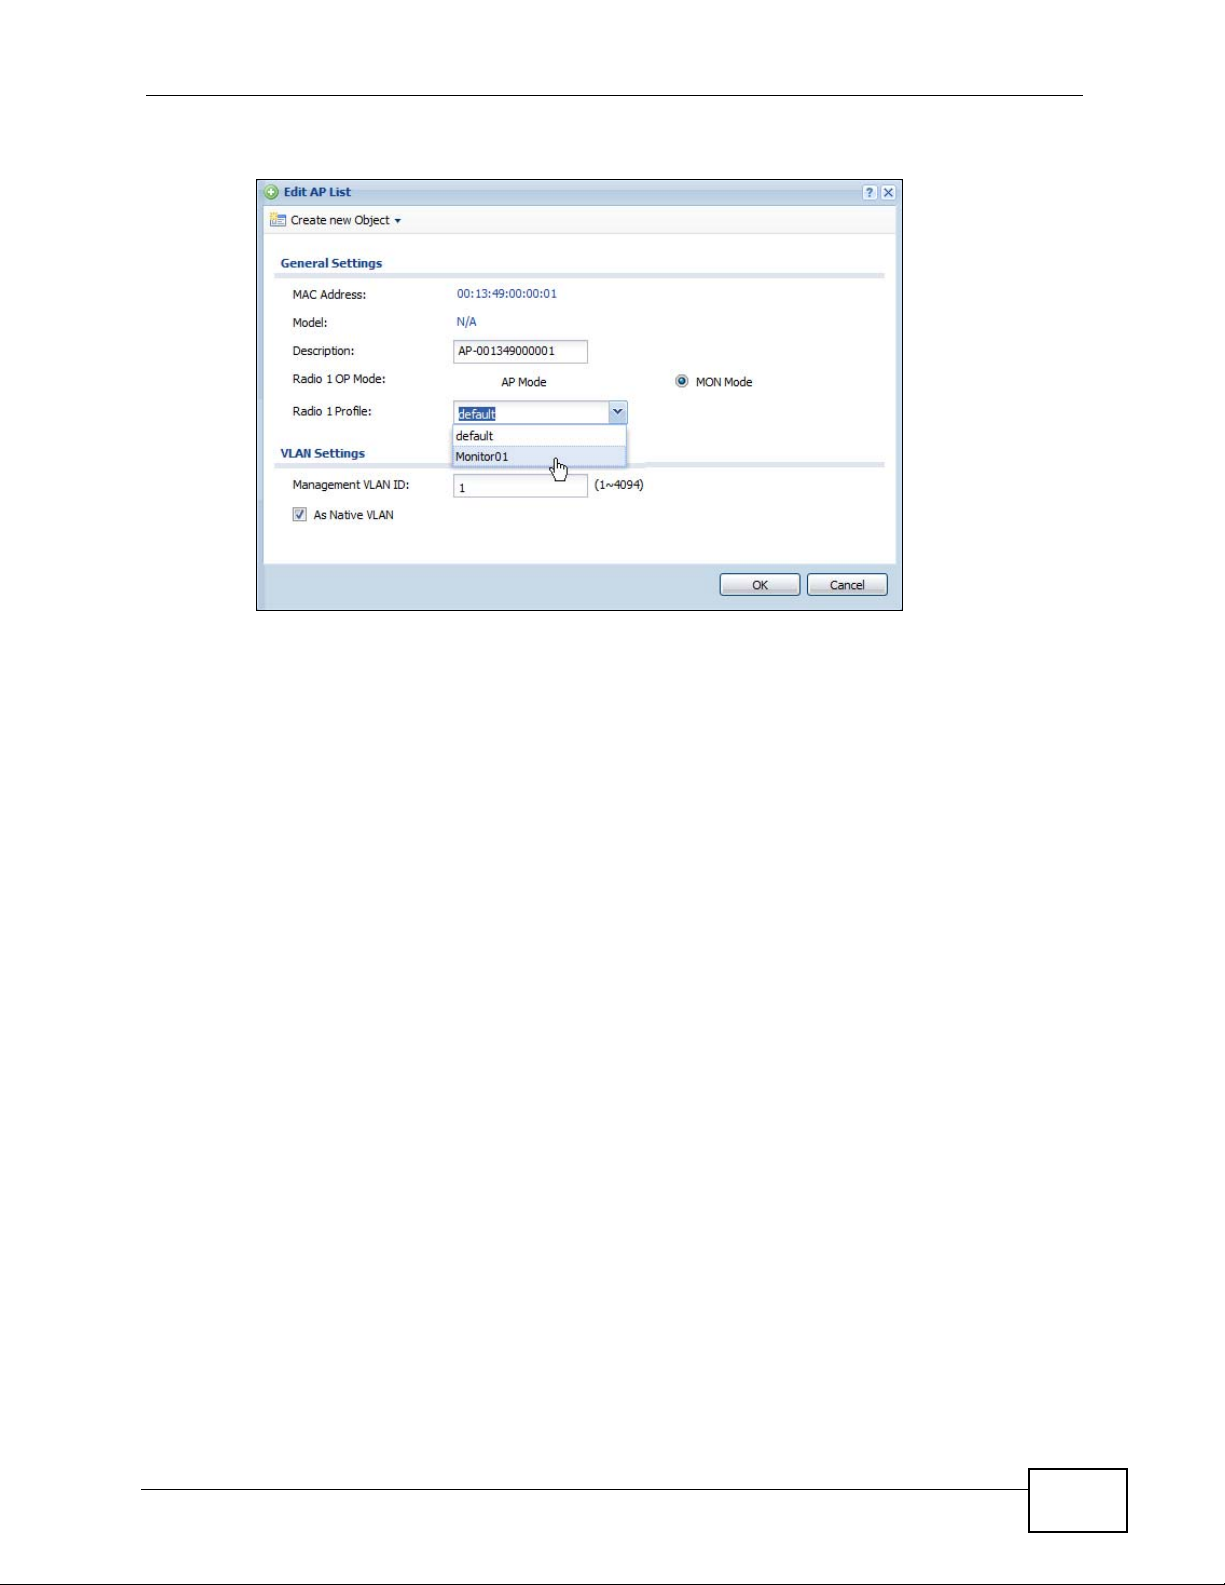
5 Select an AP and click Edit.
When the Edit AP List window opens, configur e the following:
Chapter 5 Tutorials
Radio 1 OP Mode: Set this to MON Mode to turn the AP into a rogue AP
monitoring device.
Radio 1 Profile: Select your newly created ‘Monitor01’ profile from the list.
6 Click OK to save your cha n ges.
See also: Chapter 7 on page 115 and Chapter 26 on page 401.
NXC5200 User’s Guide
95
Page 96

Chapter 5 Tutorials
5.4.1 Rogue AP Containment
When the NXC discovers a rogue AP within its broadcast radius, it can react in one
of two ways: If the rogue AP is connected directly to the network (such as plugged
into a switch downstream of the NXC), then the network administrator must
manually disconnect it. The NXC does not allow the isolation of a rogue AP
connected directly to the network.
However, if a rogue AP independent of the NXC mimics a legitimate one, then the
NXC can interfere with it by broadcasting dummy p ack ets so that it cannot mak es
connections with employee clients and capture data from them.
Figure 24 Containing a Rogue AP
96
This tutorial shows you how to quarantine a rogue AP on your network:
1 Click Configuration > Wireless > MON Mode.
NXC5200 User’s Guide
Page 97

Chapter 5 Tutorials
2 Click the Add button.
When the Edit Rogue/Friendly AP List opens, paste the MAC address copied
from the other screen in the corresponding field, set its Role as Rogue AP and
then click OK to save your changes.
3 The new rogue AP appears in the Rogue/Friendly AP List.
Select it, then click the Containment button to quarantine it away from the rest
of the network.
5.5 Load Balancing
When your AP becomes overl oaded, there are two basic responses it can tak e. The
first one is to “delay” a client connection by withholding the connection until the
data transfer throughput is lowered or the client connection is picked up by
another AP. (If the client isn’t picked up after a set period of time, the AP allows it
to connect regardless.) The second response is to kick the connections until the AP
is no longer considered overloaded. Both of these tactics are known as ‘load
balancing’.
This tutorial shows you how to configure the NXC’s load balancing feature.
NXC5200 User’s Guide
97
Page 98

Chapter 5 Tutorials
1 Click Configuration > Wireless > Load Balancing.
2 Select Enable Load Balancing to turn on this feature.
3 Set the Mode. If you choose By Station Number, then enter the Max Station
Number in the available field. This balanc es network tr affic based on the number
of specified stations downstream of the NXC. If you choose By Traffic Level, then
enter the traffic threshold at which the NXC starts balancing connected stations.
4 Select Disassociate station when overloaded to disconnect stations when the
load balancing threshold is crossed. The stations are first disconnected based on
how long they have been idle, then secondly based on the weakness of their
connection signal strength.
5 Click Apply to save your changes.
See also: Chapter 10 on page 163.
5.6 Dynamic Channel Selection
Dynamic Channel Selection (DCS) is a feature that allows an AP to automatically
select the radio channel upon which it broadcasts by scanning the area around it
and determining what channels are currently being used by other devices.
When numerous APs broadcast within a given area, they introduce the possibility
of heightened radio interference, especially if some or all of them are broadcasting
on the same radio channel. This can make accessing the network potentially
rather difficult for the stations connected to them. If the interference becomes too
great, then the network administrator must open his AP configuration options and
manually change the channel to one that no other AP is using (or at least a
channel that has a lower level of interference) in order to give the connected
stations a minimum degree of channel interference.
98
NXC5200 User’s Guide
Page 99

Chapter 5 Tutorials
1 Click Configuration > Wireless > DCS.
2 Select Enable Dynamic Channel Selection to turn on this feature.
3 Set the DCS Time Interval. This is how often the NXC surveys the other APs
within its broadcast radius. If y ou place your APs in an area with a large number of
competing APs, set this number lower to ensure that your device can adjust
quickly changing conditions.
4 Select DCS Sensitivity Level. This is how sensitive the APs on your network are
to other channels. Generally, as long as the area in which your AP is located has
minimal interference from other devices you can set the DCS Sensitivity Level to
Low. This means that the AP has a very broad tolerance.
5 Select Enable DCS Client Aware. Select this so that the APs on y our network do
not change channels as long as any wireless clients are connected to them. When
they must change channels, they will wait until all stations disconnect first.
6 Select a 2.4 GHz Channel Deployment scheme. Choose Three-Channel
Deployment to have the device rotate through 3 channels. Choose FourChannel Deployment to have the device rotate through 4 channels, if allowed.
7 Click Apply to save your changes.
See also: Chapter 10 on page 163.
NXC5200 User’s Guide
99
Page 100

Chapter 5 Tutorials
100
NXC5200 User’s Guide
 Loading...