

Page 1

NWD210N
Wireless N USB Adapter
Apple Macintosh
User’s Guide
Version 1.00
4/2008
Edition 1
Copyright © 2008. All rights reserved
CONTENTS
ENGLISH 1
DEUTSCH 35
ESPAÑOL 47
FRANÇAIS 59
ITALIANO 71
РУССКИЙ 83
中文 95
Page 2
ENGLISH
ENGLISH
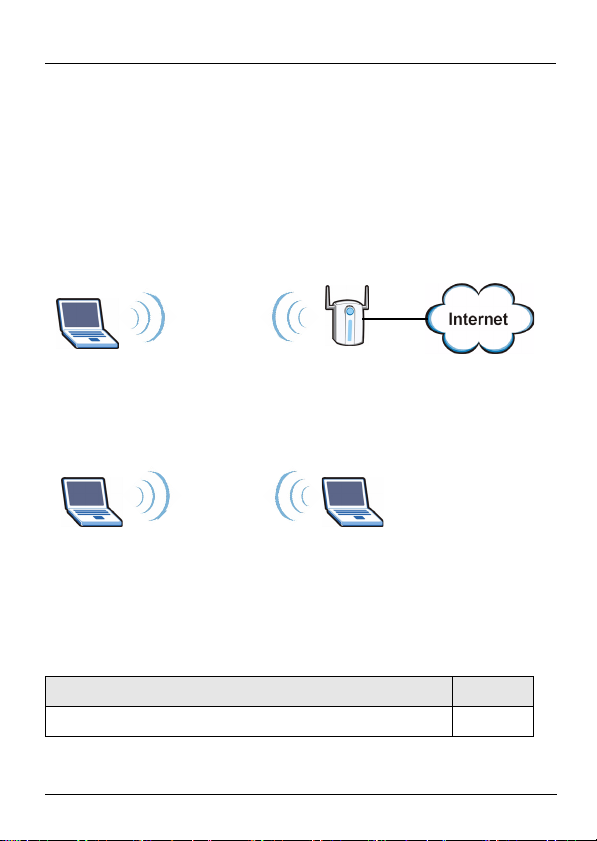
Overview
The NWD210N is a USB wireless network adapter for your
computer. The NWD210N is compatible with WPS (Wi-Fi
Protected Setup).
Use the NWD210N to connect your computer to a wireless
access point (AP). This is known as infrastructure mode.
You can also use the NWD210N to connect wirelessly to
another wireless-enabled computer. This is known as ad-hoc
mode.
This User’s Guide shows you how to set up and use your
NWD210N with your Apple Macintosh running Mac OS X.
This is described in the following sections:
Table 1 Getting Started Contents
SECTION PAGE
Install the Software 2
1
Page 3

ENGLISH
Table 1 Getting Started Contents
SECTION PAGE
Install the Hardware 7
Connect to a Wireless Network 9
This User’s Guide also includes a section detailing the
NWD210N utility’s various screens, beginning on page
contains the following:
Table 2 The Utility Screens
SECTION PAGE
The Profile Screens 11
The Link Status Screen 20
The Site Survey Screen 23
The Statistics Screen 26
The Advanced Screen 29
The About Screen 32
For more background and technical information, see the
Windows User’s Guide on the CD that came with your
NWD210N.
11. It
1 Install the Software
Take the following steps to install the NWD210N’s driver and
utility on your Mac.
2
Page 4

ENGLISH
" Install the software from the CD before you
insert the NWD210N. Do not insert the
NWD210N yet.
1 Remove the NWD210N if you already inserted it.
Insert the included CD into the CD-ROM drive on your
computer.
2 Double-click the NWD210N CD icon that appears.
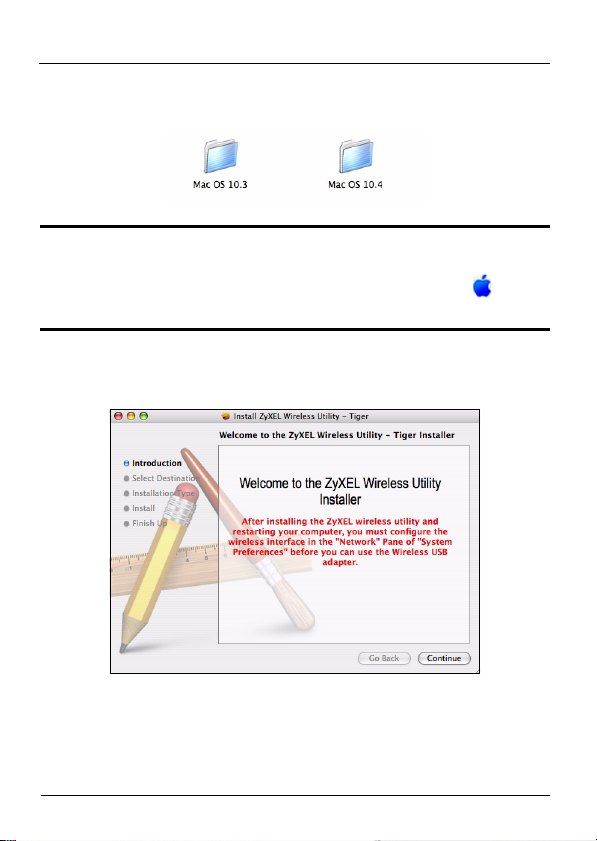
3 Select Tool > Driver > Mac OS.
4 Double-click the .dmg file icon.
3
Page 5
ENGLISH
5 The NWD210N_Installer window displays. Select your
operating system version.
" If you are not sure which operating system
version your computer is running, click >
About This Mac to check.
6 Double-click Install. The following screen displays. Click
Continue.
Select the volume on which you want to install the
NWD210N software. Click Continue.
4
Page 6

ENGLISH
" Choose an internal hard drive (identifiable by its
icon).
7 Click Upgrade.
5
Page 7

ENGLISH
The following message displays. Click Continue
Installation to proceed.
If a security window displays, enter your computer’s
administrator name and password and click OK.
8 You must restart your computer before using the
NWD210N software.
" Make sure you have saved all your work before
you restart!
6
Page 8
ENGLISH
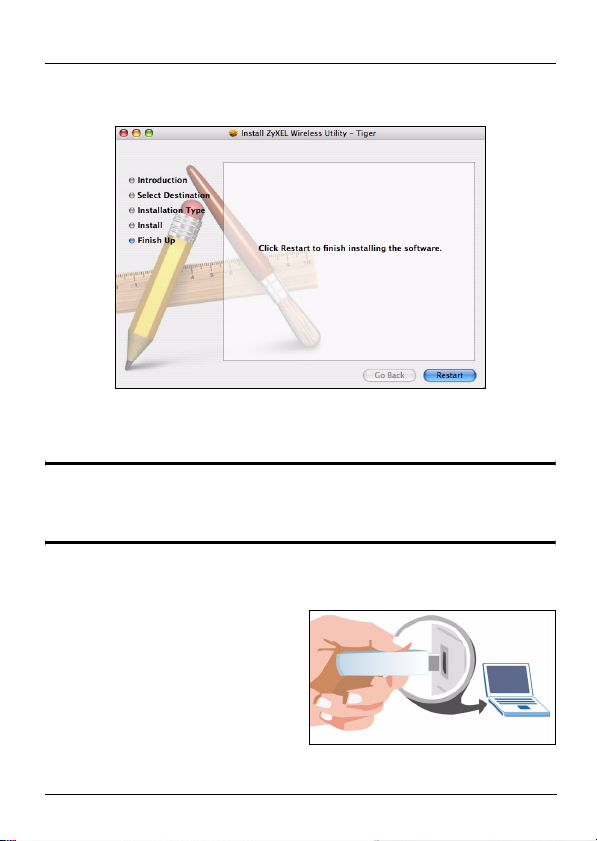
Click Restart. Your computer shuts down, then restarts
automatically.
2 Install the Hardware
" Do not install the hardware until you have
installed the software from the CD.
1 Locate an available USB port on the computer.
2 Remove the protective cap
to expose the USB
connector. Insert the
NWD210N into an
available USB port on the
computer.
7
Page 9

ENGLISH
" Never bend, twist or force the NWD210N into
the port. If there is not enough space to attach
the NWD210N, use the included USB cable.
The NWD210N’s LED (light) turns on if it is properly inserted.
V If the NWD210N’s LED is not on after you have
installed the software and the NWD210N, make
sure the NWD210N is properly inserted.
The NWD210N automatically connects to an available
wireless network without security enabled.
However, this may not be the wireless network to which you
want to connect. Run the utility to ensure you are connected
to the correct network.
2.1 Run the Utility
The utility is an interface that allows you to see information
about and control the NWD210N.
8
Page 10
ENGLISH
When you insert the NWD210N, an icon appears in the dock.
The utility runs automatically. The Site Survey screen
displays (see section 4.3 on page 23).
V If the utility does not run automatically, click the
icon.
3 Connect to a Wireless Network
This section describes how to connect your NWD210N to an
existing wireless network.
1 If the Site Survey screen is not already open, open the
utility and click the Site Survey tab.
2 The available wireless networks display in the AP List.
SSID means Service Set Identifier and is the name of the
wireless network.
9
Page 11

ENGLISH
3 Choose the network you want to connect to by clicking on
it and clicking Connect.
4 If a network has no security, go to step 6.
5 If a network has security, a screen displays prompting you
to enter security information.
Get this information from the network administrator. Be sure
to enter the information exactly as it was given to you. Click
OK.
6 A green icon ( ) displays to the left of the network’s
SSID, indicating that the NWD210N is successfully
connected.
10
Page 12

ENGLISH
To access the Internet, open your Internet browser and enter
the URL of a web site in the address bar. The AP should be
connected to the Internet.
If the web site displays correctly, you are successfully
connected to the Internet.
4 The Utility’s Screens
This section describes each of the NWD210N utility’s
interface screens. See the Windows User’s Guide (on the CD)
for background information about the NWD210N’s features.
4.1 The Profile Screens
A profile lets you automatically connect to the same wireless
network every time you use the ZyXEL utility. You can also
configure different profiles for different networks - for example
if you use wireless networks both at home and at work.
11
Page 13

ENGLISH
4.1.1 The Profile List Screen
Click the utility’s Profile tab. The following screen displays.
The following table describes the labels in this screen.
Table 3 The Profile List Screen
LABEL DESCRIPTION
This indicates the currently-active profile.
Profile This is the name of the pre-configured profile.
SSID This is the SSID of the wireless network to
which the selected profile associates.
Channel This field displays the channel number used by
the profile.
12
Page 14

ENGLISH
Table 3 The Profile List Screen
LABEL DESCRIPTION
AuthenticationThis field displays the type of authentication
used by the network (Open, Shared, WPA-
PSK or WPA2-PSK).
Encryption This field displays the encryption protocol used
by the network.
• When WEP security is used, WEP displays.
• When WPA-PSK or WPA2-PSK security is used,
TKIP or AES displays.
Network
Type
This field displays Infrastructure when the
profile is configured to connect to an access
point, or Ad Hoc when the network is
configured to connect to another computer.
Add Click this to create a new profile.
Edit Click this to alter the settings of an existing
profile.
Delete Click this to remove a profile from the list.
Activate Click this to select the profile to use.
Alternatively, double-click the profile’s name in
the list.
13
Page 15

ENGLISH
4.1.2 The Add Profile: System Configuration Screen
Use this screen to configure a profile’s basic settings. Click
Add in the Profile List screen. The following screen displays.
The following table describes the labels in this screen.
Table 4 The Add Profile: System Configuration Screen
LABEL DESCRIPTION
Profile Name Enter a descriptive name in this field, or
alternatively keep the name assigned by the
utility.
SSID Select an available wireless device from the
list, or enter the SSID of the wireless device to
which you want to associate.
14
Page 16

ENGLISH
Table 4 The Add Profile: System Configuration Screen
LABEL DESCRIPTION
CAM
(Constantly
Awake
Mode)
Power
Saving Mode
Network
Type
Tx Power This field controls the transmission power of
Channel In ad-hoc mode, choose the radio channel to
RTS
Threshold
Select this to have the NWD210N never go into
sleep mode.
Select this to have the NWD210N go into sleep
mode when it is not transmitting data.
Select Infrastructure to connect to a wireless
access point, or select 802.11 Ad Hoc to
connect to another wireless-enabled computer.
the NWD210N. When using the NWD210N with
a notebook computer, select a lower
transmission power level when you are close to
the AP in order to conserve battery power.
use for the wireless network. If there are other
networks in the area, choose a channel as far
away as possible, in order to minimize the risk
of interference.
In Infrastructure mode, this field is not
configurable; the NWD210N uses whichever
channel the access point uses.
Select the packet size above which the
NWD210N transmits an RTS (Request To
Send) message.
15
Page 17

ENGLISH
Table 4 The Add Profile: System Configuration Screen
LABEL DESCRIPTION
Fragment
Threshold
OK Click this to save your changes and return to
Cancel Click this to return to the Profile List screen
Select the packet size above which the
NWD210N fragments (breaks up) the packet
into smaller pieces.
the Profile List screen.
without saving your changes.
16
Page 18
ENGLISH
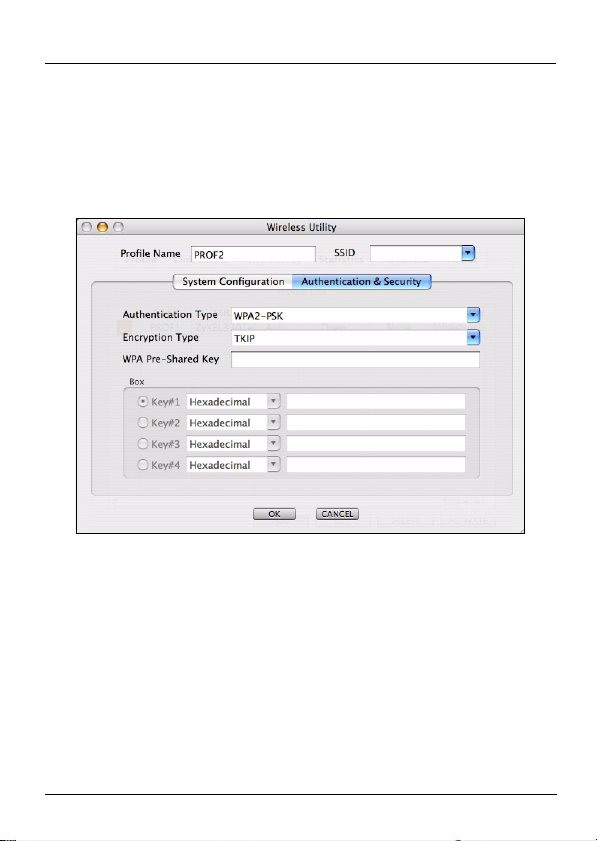
4.1.3 The Add Profile: Authentication & Security
Screen
Use this screen to configure a profile’s security settings. Click
Authentication & Security in the Add Profile: System
Configuration screen. The following screen displays.
17
Page 19

ENGLISH
The following table describes the labels in this screen.
Table 5 The Add Profile: Authentication & Security Screen
LABEL DESCRIPTION
Authenticatio
n Type
Select the security standard you want to use.
All the other wireless devices on your network
must be able to use the same standard you
select.
• Open mode is used when security is not an
issue. No authentication is required, and any
wireless device can join the network.
• Shared mode security is used with WEP (Wired
Equivalent Privacy).
• WPA-PSK security uses a pre-shared key. All the
wireless devices on the network use the same
key to access the network. This option is not
available in ad-hoc mode.
• WPA2-PSK is an improved version of WPA-PSK
security. This option is not available in ad-hoc
mode.
Encryption
Type
• When you select Open or Shared in the
Authentication Type field, either select None to
use no security, or select WEP to use Wired
Equivalent Privacy security.
• When you select WPA-PSK or WPA2-PSK in the
Authentication Type field, select TKIP to use
the Temporal Key Integrity Protocol. Alternatively,
select AES to use the Advanced Encryption
Standard.
18
Page 20

ENGLISH
Table 5 The Add Profile: Authentication & Security Screen
LABEL DESCRIPTION
WPA PreShared Key
Key #1~4 When you select WEP in the Encryption Type
OK Click this to save your settings and return to the
Cancel Click this to return to the previous screen
When you select WPA-PSK or WPA2-PSK in
the Authentication Type field, enter the
network’s pre-shared key (8~64 uppercase or
lowercase letters and numbers).
field, you must enter the network’s WEP key.
Check with your network’s administrator for the
correct settings.
Select the key number (1~4), select the key
type (Hexadecimal or ASCII), and enter the
WEP key in the field to the right.
Hexadecimal keys use numerals and the letters
a~f only, whereas ASCII keys use numerals
and all letters.
previous screen.
without saving your settings.
4.1.4 The Edit Profile: System Configuration Screen
Use this screen to change a profile’s basic settings. Click Edit
in the Profile List screen. The screen that displays is identical
to that described in section 4.1.2 on page 14.
19
Page 21

ENGLISH
4.1.5 The Edit Profile: Authentication and Security
Screen
Use this screen to change a profile’s security settings. Click
Authentication and Security in the Edit Profile: System
Configuration screen. The screen that displays is identical to
that described in section 4.1.3 on page 17.
4.2 The Link Status Screen
Use this screen to see your current connection status,
configuration and data rate statistics. Click the utility’s Link
Status tab. The following screen displays.
20
Page 22

ENGLISH
The following table describes the labels in this screen.
Table 6 The Link Status Screen
LABEL DESCRIPTION
Status This displays the SSID (Service Set IDentifier)
and MAC (Media Access Control) address of
the access point or peer device to which the
NWD210N is connected.
Current
Channel
Link Speed
(Mbps)
Throughput
(Kbps)
Link Quality This shows the quality of the wireless
This displays the channel number of the current
wireless connection, as well as the radio
frequency of the channel in megahertz.
This displays the maximum possible data
transmission (tx) and reception (rx) speeds of
the current connection in megabits per second.
This displays the actual data transmission (tx)
and reception (rx) speeds of the current
connection in kilobits per second.
connection. This refers to the percentage of
packets transmitted successfully. If there are
too many wireless stations in a wireless
network, collisions may occur which could
result in a loss of messages even though you
have high signal strength.
21
Page 23

ENGLISH
Table 6 The Link Status Screen (Continued)
LABEL DESCRIPTION
Signal
Strength 1~2
dBm format Click this to display the Signal Strength 1 and
Noise Level This displays the amount of interference on the
HT Info This section displays advanced information
These show the strength of the signal. The
NWD210N has two internal antennas, each of
which has a separate display bar.
The signal strength depends mainly on the
antenna output power and the distance
between your NWD210N and the AP or peer
computer.
2 values in dBm (decibels below 1 milliwatt).
wireless connection.
about the 802.11n wireless connection (if you
are using 802.11b or 802.11g, nothing displays
here).
HT stands for “high throughput”.
BW: this displays the bandwidth (20 or 40 Mhz)
of the wireless connection.
GI: this displays the guard interval length. The
guard interval is used to prevent wireless
transmissions from interfering with one another.
MCS: this displays the modulation and coding
scheme, which dictates how the data is
transmitted over the wireless link.
22
Page 24

ENGLISH
4.3 The Site Survey Screen
Use this screen to see information about the wireless
networks in your area, and to connect to a wireless network.
Click the utility’s Site Survey tab. The following screen
displays.
23
Page 25

ENGLISH
The following table describes the labels in this screen.
Table 7 The Site Survey Screen
LABEL DESCRIPTION
SSID This displays the network’s Service Set
IDentifier. The SSID is the name of the network.
BSSID This displays the Basic Service Set IDentifier.
The BSSID is the MAC (Media Access Control)
address of the access point or peer wireless
device.
Every networking device has a unique MAC
address, which identifies it on the network.
Signal This displays the received radio signal strength
of the network. The higher the value, the better
the connection.
Channel This displays the wireless channel on which the
network is operating.
AuthenticationThis displays whether WPA, WPA2, WPA-PSK
or WPA2-PSK is used on the network.
If the network uses no security or WEP,
Unknown displays.
At the time of writing, the NWD210N does not
support WPA or WPA2.
24
Page 26

ENGLISH
Table 7 The Site Survey Screen (Continued)
LABEL DESCRIPTION
Encryption When WPA, WPA2, WPA-PSK or WPA2-PSK is
used, this displays the encryption protocol used
(TKIP or AES).
When WEP is used, WEP displays.
When no security is used, Not Used displays.
Network
Type
RESCAN Click this to update the list.
CONNECT Click this to connect to the highlighted wireless
ADD
PROFILE
This field displays the network type
(Infrastructure or Ad Hoc) of the wireless
device.
network.
Click this to go to the Add Profile: System
Configuration screen (see <Links>Section
4.1.2 on page 14).
25
Page 27

ENGLISH
4.4 The Statistics Screen
Use this screen to view details of your NWD210N’s
transmission and reception performance. Click the utility’s
Statistics tab. The following screen displays.
26
Page 28

ENGLISH
The following table describes the labels in this screen.
Table 8 The Statistics Screen
LABEL DESCRIPTION
Transmit Statistics This section displays statistics about
the data frames sent by the
NWD210N.
Frames Transmitted
Successfully
Frames Transmitted
Successfully Without
Retry
Frames Transmitted
Successfully After
Retry(s)
Frames Failed to
Receive ACK After All
Retries
RTS Frames
Successfully Received
CTS
This displays the total number of
frames transmitted by the
NWD210N.
This displays the number of frames
successfully transmitted by the
NWD210N on the first attempt.
This displays the number of frames
transmitted by the NWD210N after a
second or subsequent attempt.
This displays the number of frames
transmitted by the NWD210N that
did not receive an acknowledgement
response from the other wireless
device.
This displays the number of frames,
large enough to require the sending
of a “Request to Send” message,
that then received a “Clear to Send”
message from the other wireless
device.
27
Page 29

ENGLISH
Table 8 The Statistics Screen
LABEL DESCRIPTION
RTS Frames Failed to
Receive CTS
Receive Statistics This section displays statistics about
Frames Received
Successfully
Frames Received with
CRC Error
Frames Dropped Due
To Out-of-Resource
This displays the number of frames,
large enough to require the sending
of a “Request to Send” message,
that did not receive a “Clear to Send”
message from the other wireless
device.
the data frames received by the
NWD210N.
This displays the number of frames
received by the NWD210N without
error.
This displays the number of frames
received by the NWD210N that
contained a Cyclic Redundancy
Check error. Cyclic Redundancy
Checks are used to determine
whether received data has been
altered in transit (by radio
interference, for example).
This displays the number of frames
that were not processed because the
NWD210N did not have the
necessary memory.
28
Page 30
ENGLISH
Table 8 The Statistics Screen
LABEL DESCRIPTION
Duplicate Frames
Received
RESET COUNTERS Click this to turn all the counters back
This shows the number of received
frames that were identical to other
received frames.
to zero.
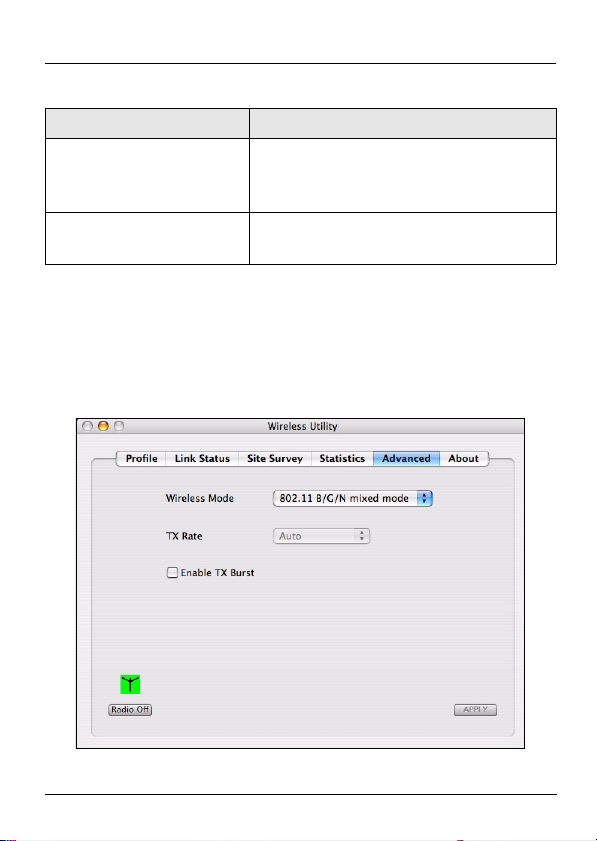
4.5 The Advanced Screen
Use this screen to configure the wireless standard used by
the NWD210N, its transmission rate, and to enable or disable
burst transmission. Click the utility’s Advanced tab. The
following screen displays.
29
Page 31

ENGLISH
The following table describes the labels in this screen.
Table 9 The Advanced Screen
LABEL DESCRIPTION
Wireless
Mode
Select the type of network to which you want to
connect.
•Select 802.11 B/G mixed mode to connect to
IEEE 802.11b or IEEE 802.11g devices.
•Select 802.1.1 B mode to connect to IEEE
802.11b devices only.
•Select 802.11 B/G/N mixed mode to connect to
IEEE 802.11b, 802.11g or 802.11n wireless
devices. Choose this if you are not sure which to
use.
TX Rate This field displays the maximum rate at which
data is sent by the NWD210N over the wireless
network.
• When you select 802.11 B/G mixed mode or
802.11 B/G/N mixed mode in the Wireless
Mode field, this field is set to Auto and is not
user-configurable.
• When you select 802.1.1 B mode in the
Wireless Mode field, select Auto to have the
NWD210N choose the highest speed the network
supports, or select 1, 2, 5.5 or 11 Mbps.
Enable TX
Burst
Select this to turn burst transmission on.
Deselect it to turn burst transmission off.
30
Page 32

ENGLISH
Table 9 The Advanced Screen
LABEL DESCRIPTION
Radio On/Off A green icon ( ) displays when the
NWD210N’s radio is enabled. A red icon ( )
displays when the NWD210N’s radio is
disabled.
•Select Radio Off to disable the NWD210N’s
wireless functions.
•Select Radio On to enable the NWD210N’s
wireless functions.
Apply Click this to save your settings.
31
Page 33

ENGLISH
4.6 The About Screen
Use this screen to see the version numbers of the
NWD210N’s utility and driver, and to see its MAC (Media
Access Control) address. Click the utility’s About tab. The
following screen displays.
The following table describes the labels in this screen.
Table 10 The About Screen
LABEL DESCRIPTION
Utility This section displays the version number and
release date of the NWD210N’s utility.
32
Page 34

ENGLISH
Table 10 The About Screen
LABEL DESCRIPTION
Driver This section displays the version number and
release date of the NWD210N’s driver.
MAC
Address
You can also see the utility’s version number by clicking on
the ZyXEL Wireless Utility menu at the top of your screen
and selecting About Wireless Utility. The following screen
displays.
This field displays the NWD210N Media
Access Control (MAC) address.
33
Page 35

ENGLISH
Procedure to View a Product’s Certification(s)
1 Go to www.zyxel.com.
2 Select your product from the drop-down list box on
the ZyXEL home page to go to that product's page.
3 Select the certification you wish to view from this
34
Page 36

DEUTSCH
H
EUTSC
Übersicht
Der NWD210N ist ein drahtloser USB-Netzwerkadapter für
Ihren Computer. Der NWD210N ist WPS-kompatibel (Wi-Fi
Protected Setup; Wi-Fi-geschütztes Setup).
Verbinden Sie einen Computer mit dem NWD210N an einen
Wireless Access Point (AP). Das ist auch als InfrastrukturModus bekannt.
Sie können den NWD210N auch verwenden, um drahtlos
eine Verbindung zu einem anderen Wireless-Computer
herzustellen. Das wird auch Ad-hoc-Modus genannt.
35
Page 37

DEUTSCH
In diesem Benutzerhandbuch wird beschrieben, wie Sie den
NWD210N mit Ihrem Apple Macintosh-Computer mit Mac OS
X verwenden. Diese Anleitung ist in die folgenden Abschnitte
aufgeteilt.
Tabelle 1 Inhalt des Abschnitts Erste Schritte
ABSCHNITT SEITE
Installieren der Software 36
Installieren der Hardware 41
Herstellen einer Verbindung zu einem
Drahtlosnetzwerk
Weitere ausführliche Informationen und technische
Informationen finden Sie im Windows-Benutzerhandbuch auf
der CD, die Sie mit Ihrem NWD210N erhalten haben.
43
1 Installieren der Software
Führen Sie die folgenden Schritte aus, um den Treiber und
das Utility-Programm des NWD210N auf Ihrem MacComputer zu installieren.
" Installieren Sie die Software von der CD, bevor
Sie den NWD210N einsetzen. Der NWD210N
darf noch nicht eingesetzt werden.
36
Page 38

DEUTSCH
1 Nehmen Sie den NWD210N heraus, wenn Sie ihn bereits
eingesetzt haben.
Legen Sie die mitgelieferte CD in das CD-ROM-Laufwerk
des Computers ein.
2 Klicken Sie doppelt auf das NWD210N CD-Symbol.
3 Wählen Sie Tool > Driver > Mac OS.
4 Klicken Sie doppelt auf das Dateisymbol .dmg.
5 Das Fenster NWD210N_Installer erscheint. Wählen Sie
die Version Ihres Betriebssystems.
37
Page 39

DEUTSCH
" Wenn Sie nicht wissen, welche
Betriebssystemversion auf Ihrem Computer
läuft, klicken Sie auf > About This Mac.
6 Klicken Sie doppelt auf Install (Installieren). Das folgende
Fenster erscheint. Klicken Sie auf Continue (Fortfahren).
Wählen Sie den Datenträger aus, auf dem die Software
NWD210N installiert werden soll. Klicken Sie auf Continue
(Fortfahren).
38
Page 40

DEUTSCH
" Wählen Sie eine interne Festplatte (sie ist durch
das Symbol gekennzeichnet).
7 Klicken Sie auf Upgrade.
39
Page 41

DEUTSCH
Die folgende Meldung erscheint. Klicken Sie auf Continue
Installation (Installation fortsetzen).
Wenn ein Sicherheitsfenster angezeigt wird, geben Sie den
Administratornamen und das Kennwort Ihres Computers ein,
und klicken Sie auf OK.
8 Damit Sie die NWD210N-Software benutzen können,
muss der Computer neu gestartet werden.
" Denken Sie daran, vorher Ihre Arbeiten zu
speichern!
40
Page 42

DEUTSCH
Klicken Sie auf Restart. Ihr Computer fährt herunter und
startet dann automatisch neu.
2 Installieren der Hardware
" Setzen Sie die Hardware erst ein, wenn Sie die
Software von der CD installiert haben.
1 Sie benötigen einen freien USB-Anschluss am Computer.
2 Entfernen Sie die
Schutzkappe vom USBStecker. Schließen Sie den
NWD210N an einen freien
USB-Anschluss des
Computers an.
41
Page 43

DEUTSCH
" Stecken Sie den NWD210N ohne starken Druck
und ohne Drehen in den Anschluss. Wenn nicht
genügend Platz für den NWD210N vorhanden
ist, können Sie auch das mitgelieferte USBKabel verwenden.
Die LED (Anzeige) des NWD210N beginnt zu leuchten,
sobald das Gerät angeschlossen ist.
V Wenn die LED des NWD210N nach dem
Installieren der Software und des NWD210N
nicht leuchtet, prüfen Sie, ob der NWD210N
richtig angeschlossen ist.
Der NWD210N stellt automatisch eine Verbindung zu einem
ungesicherten Drahtlosnetzwerk her.
Das ist möglicherweise nicht das Drahtlosnetzwerk, zu dem
Sie eine Verbindung herstellen möchten. Starten Sie das
Utility-Programm, um sicherzustellen, dass die Verbindung
zum richtigen Netzwerk hergestellt wird.
42
Page 44

DEUTSCH
2.1 Starten des Utility-Programms
Das Utility-Programm ist eine Schnittstelle, mit der Sie
Informationen über den NWD210N erhalten können.
Wenn Sie den NWD210N einsetzen, erscheint ein Symbol in
der Dockleiste.
Das Utility-Programm wird automatisch gestartet. Das
Fenster Site Survey (Übersicht) wird angezeigt.
V Wenn das Utility-Programm nicht automatisch
gestartet wird, klicken Sie auf das Symbol.
3 Herstellen einer Verbindung zu
einem Drahtlosnetzwerk
In diesem Abschnitt wird beschrieben, wie Sie den NWD210N
mit einem bestehenden Drahtlosnetzwerk verbinden.
43
Page 45

DEUTSCH
1 Wenn das Fenster Site Survey (Übersicht) noch nicht
geöffnet ist, starten Sie das Utility-Programm, und klicken
Sie auf die Registerkarte Site Survey (Übersicht).
2 Bei AP List (AP-Liste) werden alle verfügbaren
Drahtlosnetzwerke angezeigt. SSID ist die Abkürzung für
Service Set Identifier, und sie ist der Name des
Drahtlosnetzwerks.
3 Wählen Sie das Netzwerk aus, zu dem Sie eine
Verbindung herstellen möchten, und klicken Sie auf
Connect (Verbinden).
4 Wenn ein Netzwerk nicht gesichert ist, gehen Sie weiter
zu Schritt 6.
44
Page 46

DEUTSCH
5 Wenn ein Netzwerk gesichert ist, erscheint ein Fenster, in
das Sie Ihre Sicherheitsdaten eingeben müssen.
Diese Daten erhalten Sie von Ihrem Netzwerk-Administrator.
Geben Sie diese Daten genau wie vorgegeben ein. Klicken
Sie auf OK.
6 Links neben der Netzwerk-SSID erscheint ein grünes
Symbol ( ), das anzeigt, dass der NWD210N
erfolgreich verbunden wurde.
Um auf das Internet zuzugreifen, öffnen Sie Ihren InternetBrowser und geben Sie in die Adressleiste die URL einer
Website ein. Der AP ist jetzt mit dem Internet verbunden.
Wenn die Website richtig angezeigt wird, wurde die
Verbindung zum Internet erfolgreich hergestellt.
45
Page 47

DEUTSCH
Schritte zum Ansehen von Produktzertifizierung(en)
1 Zu www.zyxel.com.
2 Wählen Sie Ihr Produkt aus der drop-down Liste in
dem Feld auf der ZyXEL Homepage und gehen Sie
auf diese Produktseite.
3 Wählen Sie die Zertifizierung, die Sie sehen
möchten, auf dieser Seite.
46
Page 48

ESPAÑOL
L
SPAÑO
Vista general
El NWD210N es un adaptador de red inalámbrico USB para
su ordenador. El NWD210N es compatible con WPS (Wi-Fi
Protected Setup).
Utilice el NWD210N para conectar su ordenador a un punto
de acceso inalámbrico (PA). Esto se conoce con el nombre
de infraestructura.
También puede usar el NWD210N para conectarse de forma
inalámbrica a otro ordenador con capacidad inalámbrica. A
esto se le llama modo ad-hoc.
47
Page 49

ESPAÑOL
Esta Guía del usuario le muestra cómo configurar y usar su
NWD210N con su Apple Macintosh ejecutando Mac OS X.
Esto se describe en las siguientes secciones:
Tabla 1 Contenido de Primeros pasos
SECCIÓN
Instalar el software 48
Instalar el Hardware 53
Conectar a una red inalámbrica 55
Para una información más detallada, consulte la Guía de
Usuario que se incluye en el CD que acompaña a su
NWD210N.
PÁGIN
A
1 Instalar el software
Siga estos pasos para instalar el controlador del NWD210N y
la utilidad en su Mac.
" Instale el software desde el CD antes de
insertar el NWD210N. No inserte el NWD210N
todavía.
1 Desconecte el NWD210N de su ordenador si ya lo
hubiese conectado.
48
Page 50

ESPAÑOL
Inserte el CD incluido en la unidad de CD-ROM de su
ordenador.
2 Haga doble clic en el icono del CD NWD210N que
aparece.
3 Seleccione Tool (Herramientas) > Driver (Controlador) >
Mac OS.
4 Haga doble clic en el icono del archivo .dmg.
5 Aparecerá la ventana NWD210N_Installer. Seleccione la
versión de su sistema operativo.
49
Page 51

ESPAÑOL
" Si no está seguro de qué versión de sistema
operativo tiene su ordenador, haga clic en >
Acerca de este Mac para comprobarlo.
6 Haga doble clic en Install (Instalar) Aparecerá la siguiente
pantalla. Haga clic en Continue (Continuar).
Seleccione la unidad en la que desea instalar el software
NWD210N. Haga clic en Continue (Continuar).
50
Page 52

ESPAÑOL
" Elija una unidad de disco duro interna
(identificable por el icono ).
7 Haga clic en Upgrade (Actualizar).
51
Page 53

ESPAÑOL
Aparecerá el siguiente mensaje. Haga clic en Continue
Installation (Continuar instalación) para continuar.
Si aparece una ventana de seguridad, escriba el nombre de
administrador de su ordenador y la contraseña y haga clic en
Aceptar.
8 Debe reiniciar su ordenador antes de utilizar el software
NWD210N.
" ¡Asegúrese de haber guardado todo su trabajo
antes de reiniciar!
52
Page 54

ESPAÑOL
Haga clic en Reiniciar. Su ordenador se apagará y luego se
reiniciará automáticamente.
2 Instalar el Hardware
" No instale el hardware hasta que haya instalado
el software del CD.
1 Localice un puerto USB disponible en el ordenador.
2 Quite la tapa protectora
para descubrir el conector
USB. Inserte el NWD210N
en un puerto USB
disponible en el
ordenador.
53
Page 55

ESPAÑOL
" Nunca doble, tuerza o fuerce el NWD210N en el
puerto. Si no hay espacio suficiente para
insertar el NWD210N, utilice el cable USB
incluido.
El LED (luz) del NWD210N se enciende cuando está
correctamente insertado.
V Si el LED del NWD210N no se enciende tras
haber instalado el software y el NWD210N,
compruebe que el NWD210N esté bien
insertado.
El NWD210N se conectará automáticamente a una red
inalámbrica disponible sin seguridad habilitada.
Sin embargo, esta puede no ser la red inalámbrica a la que
se desea conectar. Ejecute la utilidad para asegurarse de
estar conectado a la red correcta.
2.1 Ejecutar la utilidad
La utilidad es una interfaz que le permite ver información
acerca del NWD210N y controlarlo.
54
Page 56

ESPAÑOL
Cuando inserte el NWD210N, le aparecerá el siguiente icono
en la barra de tareas.
La utilidad se ejecutará automáticamente. Aparecerá la
pantalla Site Survey (Búsqueda de estación).
V Si la utilidad no se ejecuta automáticamente,
haga clic en el icono.
3 Conectar a una red inalámbrica
Esta sección describe cómo conectar su NWD210N a una red
inalámbrica existente.
1 Si la pantalla Site Survey (Búsqueda de estación) no está
ya abierta, abra la utilidad y haga clic en la ficha Sondeo
de sitios.
2 Las redes inalámbricas disponibles aparecen en AP List
(Lista de PA). SSID significa Service Set Identifier
(identificador del conjunto de servicios) y es el nombre de
la red inalámbrica.
55
Page 57

ESPAÑOL
3 Elija la red a la que desea conectarse haciendo clic en
ella y haciendo clic en Connect (Conectar).
4 Si una red no tiene seguridad, vaya al paso 6.
5 Si una red tiene seguridad, aparecerá una pantalla
pidiéndole que introduzca la información de seguridad.
Obtenga esta información del administrador de red.
Asegúrese de introducir la información exactamente como
se le ha entregado. Haga clic en OK.
6 Aparecerá un icono verde ( ) a la izquierda del SSID de
la red, indicando que el NWD210N se ha conectado con
éxito.
56
Page 58

ESPAÑOL
Para acceder a Internet, abra su explorador de Internet y
escriba la URL de un sitio web en la barra de direcciones. El
PA debería estar conectado a Internet.
Si el sitio Web aparece correctamente, se ha conectado a
Internet con éxito.
Procedimiento para ver la(s) certificación(es) del
producto
1 Vaya a www.zyxel.com.
2 Seleccione su producto de la lista desplegable en la
página inicial de ZyXEL para ir a la página de ese
producto.
57
Page 59

ESPAÑOL
58
Page 60

FRANÇAIS
S
RANÇAI
Présentation
Le NWD210N est un adaptateur réseau USB sans fil destiné
à votre ordinateur. Le NWD210N est compatible avec WPS
(Wi-Fi Protected Setup).
Utilisez le NWD210N pour connecter votre ordinateur à un
point d'accès (AP) sans fil. Aussi appelé mode infrastructure.
Vous pouvez aussi utiliser le NWD210N pour vous connecter
sans fil à un autre ordinateur équipé de la fonctionnalité sans
fil. Aussi appelé mode ad-hoc.
59
Page 61

FRANÇAIS
Ce guide de l'utilisateur vous montre comment installer et
utiliser votre NWD210N avec votre Apple Macintosh
fonctionnant sous Mac OS X. Ceci est décrit dans les
sections suivantes :
Table 1 Sommaire de la mise en route
SECTION PAGE
Installation du logiciel 60
Installer le matériel 65
Connexion à un réseau sans fil 67
guide de l'utilisateur de Windows sur le CD qui accompagne
votre NWD210N.
1 Installation du logiciel
Suivez ces étapes pour installer le pilote et l'utilitaire du
NWD210N sur votre Mac.
" Installez le logiciel à partir du CD avant d'insérer
le NWD210N. Ne pas encore insérer le
NWD210N.
1 Retirez le NWD210N si vous l'avez déjà inséré.
Insérez le CD inclus dans le lecteur CD-ROM sur votre
ordinateur.
60
Page 62

FRANÇAIS
2 Double cliquez sur l'icône du CD de NWD210N qui
apparaît.
3 Sélectionnez Outils > Pilote > Mac OS.
4 Double cliquez sur l'icône du fichier .dmg.
5 La fenêtre de NWD210N_Installer apparaît. Sélectionnez
la version de votre système d'exploitation.
61
Page 63

FRANÇAIS
" Si vous n'êtes pas sûr de la version de votre
système d'exploitation utilisée par votre
ordinateur, cliquez sur > About This Mac (A
propos de ce Mac) pour vérifier.
6 Double cliquez sur Install (Installer). L'écran suivant
s'affiche. Cliquez sur Continue (Continuer).
Sélectionnez le volume sur lequel vous voulez installer le
logiciel du NWD210N. Cliquez sur Continue (Continuer).
62
Page 64

FRANÇAIS
" Choisissez un disque dur interne (identifiable
par son icône ).
7 Cliquez sur Upgrade (Mettre à niveau).
63
Page 65

FRANÇAIS
Le message suivant apparaît. Cliquez sur Continue
Installation (Continuer l'installation) pour poursuivre.
Si une fenêtre de sécurité s'affiche, entrez le nom
d'administrateur et le mot de passe de votre ordinateur et
cliquez sur OK.
8 Vous devez redémarrer votre ordinateur avant d'utiliser le
logiciel NWD210N.
" Vérifiez que vous avez enregistré tout votre
travail avant de redémarrer !
64
Page 66

FRANÇAIS
Cliquez sur Restart (Redémarrer). Votre ordinateur s'éteint,
puis redémarre automatiquement.
2 Installer le matériel
" Ne pas installer le matériel avant d'avoir installé
le logiciel du CD.
1 Trouvez un port USB disponible sur l'ordinateur.
2 Retirez le cache de
protection pour laisser
apparaître le connecteur
USB. Insérez le NWD210N
dans un port USB
disponible sur l'ordinateur.
65
Page 67

FRANÇAIS
" Ne jamais plier, tordre ou forcer le NWD210N
dans le port. S'il n'y a pas assez de place pour
fixer le NWD210N, utilisez le câble USB fourni.
La LED (témoin lumineux) du NWD210N s'allume s'il est
correctement inséré.
V Si la LED du NWD210N n'est pas allumée après
avoir installé le logiciel et le NWD210N, vérifiez
que le NWD210N est correctement inséré.
Le NWD210N se connecte automatiquement à un réseau
sans fil disponible sans sécurité activée.
Cependant, il se peut que ce ne soit pas le réseau sans fil
auquel vous désirez vous connecter. Exécutez l'utilitaire pour
vous assurer que vous êtes connecté au réseau correct.
2.1 Exécuter l'utilitaire
L'utilitaire est une interface qui vous permet de voir les
informations concernant le NWD210N et de le contrôler.
66
Page 68

FRANÇAIS
Quand vous insérez le NWD210N, une icône apparaît dans
l'ancrage.
L'utilitaire s'exécute automatiquement. L'écran Site Survey
(Exploration de site) s'affiche.
V Si l'utilitaire ne s'exécute pas automatiquement,
cliquez sur l'icône.
3 Connexion à un réseau sans fil
Cette section décrit la manière de connecter votre NWD210N
à un réseau sans fil existant.
1 Si l'écran Site Survey (Exploration de site) n'est pas déjà
ouvert, ouvrez l'utilitaire et cliquez sur l'onglet Site Survey
(Exploration de site).
2 Les réseaux sans fil disponibles s'affichent dans la Liste
d'AP. SSID signifie Service Set Identifier, c'est le nom du
réseau sans fil.
67
Page 69

FRANÇAIS
3 Choisissez le réseau auquel vous voulez vous connecter
en cliquant sur celui-ci et en cliquant sur Connect
(Connecter).
4 Si un réseau n'a pas de sécurité, allez à l'étape 6.
5 Si un réseau a une sécurité, un écran s'affiche vous
invitant à entrer les informations de sécurité.
Demandez ces informations à l'administrateur du réseau.
Prenez soin d'entrer les informations exactement comme
elles vous ont été données. Cliquez sur OK.
6 Une icône verte ( ) s'affiche à gauche du SSID du
réseau, indiquant que le NWD210N est correctement
connecté.
68
Page 70

FRANÇAIS
Pour accéder à Internet, ouvrez votre navigateur Internet et
entrez l'URL d'un site web dans la barre d'adresse. Le point
d'accès (AP) devrait être connecté à Internet.
Si le site web s'affiche correctement, vous êtes connecté à
Internet.
Procédure pour afficher la (les) certification(s) d'un
produit
1 Allez à www.zyxel.com.
2 Sélectionnez votre produit dans la liste déroulante
dans la page d'accueil du ZyXEL pour aller à la
page de ce produit.
69
Page 71

FRANÇAIS
70
Page 72

ITALIANO
O
TALIAN
Cenni generali
L'NWD210N è un adattatore di rete wireless USB per
computer. L'NWD210N è compatibile con WPS (Wi-Fi
Protected Setup).
Utilizzare l'NWD210N per connettere il computer a un Access
Point (AP) wireless. Questa modalità è definita Infrastruttura.
È possibile utilizzare l'NWD210N anche per connettersi
wireless a un altro computer con funzionalità wireless.
Questa modalità è definita Ad-Hoc.
71
Page 73

ITALIANO
In questa Guida dell'utente viene illustrato come configurare e
utilizzare l'NWD210N con un computer Apple Macintosh che
esegue Mac OS X. Le procedure vengono descritte nelle
sezioni seguenti:
Tabella 1 Contenuti delle operazioni preliminari
SEZIONE
Installare il Software 72
Installazione dell'hardware 77
Connessione a una rete senza fili 79
Per altre informazioni basilari e tecniche vedere la Guida
dell'utente per Windows sul CD fornito a corredo
dell'NWD210N.
PAGIN
A
1 Installare il Software
Attenersi alle istruzioni seguenti per installare il driver e i
programmi di utilità dell'NWD210N sul computer Mac.
" Installare il software dal CD prima di inserire
NWD210N. Non inserire ancora l'NWD210N.
1 Rimuovere NWD210N se è già stato inserito.
72
Page 74

ITALIANO
Inserire il CD fornito a corredo nell'unità CD-ROM del
computer.
2 Fare doppio clic sull'icona del CD dell'NWD210N
visualizzata.
3 Selezionare Tool (strumenti) > Driver > Mac OS.
4 Fare doppio clic sull'icona del file .dmg.
5 Viene visualizzata la finestra NWD210N_Installer.
Selezionare la versione del sistema operativo in uso.
73
Page 75

ITALIANO
" Se non si conosce la versione del sistema
operativo in uso sul computer scegliere >
About This Mac (informazioni su questo
computer Mac) per visualizzarla.
6 Fare doppio clic su Install. Viene visualizzata la seguente
schermata. Fare clic su Continue (continua).
Selezionare il volume su cui installare il software
dell'NWD210N. Fare clic su Continue (continua).
74
Page 76

ITALIANO
" Scegliere un'unità a disco rigido interna
(identificabile dalla sua icona ).
7 Fare clic su Upgrade (aggiorna).
75
Page 77

ITALIANO
Viene visualizzata il messaggio seguente. Scegliere
Continue Installation (continua installazione) per
procedere.
Se viene visualizzata una finestra di sicurezza, immettere il
nome utente e la password dell'account amministrativo del
computer e poi scegliere OK.
8 È necessario riavviare il computer prima di utilizzare il
software dell'NWD210N.
" Assicurarsi di aver salvato tutto il lavoro prima di
riavviare.
76
Page 78

ITALIANO
Scegliere Restart (riavvia). Il computer viene spento e
riavviato automaticamente.
2 Installazione dell'hardware
" Non installare l'hardware prima di aver installato
il software contenuto nel CD.
1 Individuare una porta USB libera del computer.
2 Rimuovere la copertura
protettiva per esporre il
connettore USB. Inserire
l'NWD210N in una porta
USB libera del computer.
77
Page 79

ITALIANO
" Non curvare, torcere o forzare l'NWD210N nella
porta. Se non c'è spazio sufficiente per
collegare l'NWD210N, utilizzare il cavo USB
fornito a corredo.
Il corretto inserimento viene segnalato dall'accensione del
LED dell'NWD210N.
V Se il LED dell'NWD210N non è acceso in
seguito all'installazione del software e
dell'NWD210N, assicurarsi che l'NWD210N sia
inserito correttamente.
L'NWD210N si connette automaticamente a una rete wireless
disponibile in cui non attivata la protezione.
Tuttavia la rete a cui ci si desidera connettere potrebbe non
avere queste caratteristiche. Eseguire il programma di utilità
per verificare che sia attiva la connessione alla rete
desiderata.
2.1 Eseguire il programma di utilità
Il programma di utilità è un'interfaccia che consente di
visualizzare le informazioni e di controllare l'NWD210N.
78
Page 80

ITALIANO
Quando si inserisce l'NWD210N, nella sezione appare
un'icona.
Il programma di utilità viene eseguito automaticamente. Viene
visualizzata la schermata Site Survey (analisi sito).
V Se il programma di utilità non viene eseguito
automaticamente fare clic sull'icona.
3 Connessione a una rete senza fili
In questa sezione viene descritto come connettere
l'NWD210N a una rete wireless esistente.
1 Se la schermata Site Survey (analisi sito) non è già
aperta, aprire il programma di utilità e scegliere la scheda
Site Survey (analisi sito).
2 Nell'elenco AP List vengono visualizzate le reti wireless
disponibili. SSID sta per Service Set Identifier e
rappresenta il nome della rete senza fili.
79
Page 81

ITALIANO
3 Scegliere la rete a cui si desidera connettersi e quindi fare
clic su Connect (connetti).
4 Se in una rete non è attiva la protezione, saltare al passo
6.
5 Se in una rete è attiva la protezione, viene visualizzata
una schermata che richiede di immettere le informazioni
sulla protezione.
Queste informazioni possono essere reperite contattando
l'amministratore di rete. Assicurarsi di inserire le informazioni
esattamente nel modo in cui sono state fornite. Scegliere
OK.
80
Page 82

ITALIANO
6 A sinistra del SSID della rete viene visualizzata un'icona
verde ( ) che indica che l'NWD210N è connesso con
successo.
Per accedere a Internet, aprire il browser e immettere
l'indirizzo URL di un sito Web nella barra degli indirizzi. L'AP
dovrebbe essere collegato a Internet.
Se il sito Internet viene visualizzato correttamente, il
collegamento a Internet è avvenuto con successo.
Procedura per visualizzare le certificazioni di un
prodotto
1 Aprire la pagina www.zyxel.com.
2 Selezionare il prodotto dall'elenco di riepilogo a
discesa nella Home Page di ZyXEL per passare alla
pagina del prodotto in questione.
81
Page 83

ITALIANO
82
Page 84

РУССКИЙ
Й
УССКИ
Обзор
Устройство NWD210N - это беспроводной сетевой
адаптер для вашего компьютера. Устройство NWD210N
совместимо со стандартом WPS (Защищенная настройка
Wi-Fi).
При помощи NWD210N вы можете подключить ваш
компьютер к беспроводной точке доступа (АР). Такой
вариант подключения называется режимом
инфраструктуры.
Вы также можете использовать NWD210N для
беспроводного подключения к другому компьютеру,
который имеет беспроводную сетевую карту. Такое
подключение называется одноранговым.
83
Page 85

РУССКИЙ
Данное руководство пользователя описывает настройку и
использование NWD210N на компьютере Apple Macintosh,
работающим с операционной системой Mac OS X. Вся
необходимая информация содержится в следующих
разделах:
Таблица 1 Содержание начального руководства
РАЗДЕЛ СТР.
Установк а программного обеспечения 84
Установк а оборудования 89
Подключение к беспроводной сети 91
Для получения дополнительной технической информации
обратитесь к руководству пользователя на CD -диске,
который поставляется с вашим NWD210N.
1 Установка программного
обеспечения
Для установки драйвера и утилиты NWD210N на вашем
компьютере Mac.
" Установите с CD-диска программное
обеспечение перед подключением
NWD210N. Пока не подключайте NWD210N.
84
Page 86

РУССКИЙ
1 Отключите NWD210N, если вы его уже подключили.
Вставьте CD-диск с ПО в привод CD-ROM вашего
компьютера.
2 Щелкните дважды на появившемся значке NWD210N
CD.
3 Выберите Tool (Инструмент) > Driver (Драйвер)> Mac
OS.
4 Дважды щелкните на значке файла .dmg.
5 Появится окно NWD210N_Installer. Выберите вашу
версию операционной системы.
85
Page 87

РУССКИЙ
" Если вы не знаете точно версию своей
операционной системы, то щелкните для ее
проверки на > About This Mac (Об этом
МАС).
6 Дважды щелкните на кнопке Install (Установить).
Отобразится следующее окно. Щелкните на кнопке
Continue (Продолжить).
Выберите том, на который вы хотите установить
программное обеспечение NWD210N. Щелкните на
кнопке Continue (Продолжить).
86
Page 88

РУССКИЙ
" Выберите внутренний жесткий диск
(обозначенный значком ).
7 Щелкните на Upgrade (Обновить).
87
Page 89

РУССКИЙ
Отобразится следующее сообщение. Щелкните на
кнопке Continue Installation (Продолжить установку).
Если появится окно с сообщением системы
безопасности, то введите имя и пароль администратора
вашего компьютера и нажмите OK.
8 Вы должны перезагрузить компьютер перед
использованием программного обеспечения
NWD210N.
" Перед перезагрузкой сохраните все
необходимые данные!
88
Page 90

РУССКИЙ
Щелкните на кнопке Restart (Перезагрузка). Ваш
компьютер автоматически выключится, а затем
включится.
2 Установка оборудования
" Не устанавливайте оборудование до
установки программного обеспечения с CDдиска.
1 Найдите на вашем компьютере свободный USB-порт.
89
Page 91

РУССКИЙ
2 Снимите защитную
крышку, чтобы открыть
USB-разъем. Вставьте
NWD210N в свободный
USB-порт компьютера.
" Ни в коем случае не изгибайте, не
перекручивайте и не применяйте силу при
установке NWD210N в порт. Если не хватает
места для подсоединения NWD210N,
используйте прилагаемый кабель USB.
Если NWD210N правильно подключен, то на нем
включится светодиодный индикатор.
V (Если индикатор NWD210N не загорается
после установки программного обеспечения
и адаптера NWD210N, то убедитесь в
правильность подключения NWD210N.
Адаптер NWD210N автоматически подсоединяется к
доступной беспроводной сети без включения системы
защиты.
90
Page 92

РУССКИЙ
Однако, возможно, вам нужно подключится в другой
беспроводной сети. Запустите утилиту, чтобы убедиться в
правильности выбора сети.
2.1 Запуск утилиты
Утилита является интерфейсом, который позволяет
контролировать и управлять NWD210N.
Когда вы подключите NWD210N, на панели Dock
автоматически появится значок.
Утилита должна запускаться автоматически. Появится
окно Site Survey (Поиска сетей).
V Если утилита не запускается автоматически,
то щелкните на значке.
3 Подключение к беспроводной
сети
В этом разделе описывается подключение NWD210N к
существующей беспроводной сети.
91
Page 93

РУССКИЙ
1 Если окно Site Survey (Поиск сетей) еще не открыто, то
откройте утилиту и щелкните на вкладке Site Survey
(Поиск сетей).
2 В списке AР List (Список точек доступа) будут
показаны все доступные беспроводные сети. SSID
означает Service Set Identity (Идентификация пакета
услуг). Этот параметр является именем беспроводной
сети.
3 Выберите сеть, к которой вы хотите подключиться,
щелкнув на ней кнопкой мыши или нажав на кнопку
Connect (Подключиться).
4 Если сеть не имеет системы безопасности, то
переходите к пункту 6.
92
Page 94

РУССКИЙ
5 Если в сети активирована система безопасности, то
появится окно с запросом необходимой информации.
Ее можно получить у системного администратора. Вы
должны будете ввести эти данные без ошбок. Щелкните
OK.
6 Зеленый значок ( ) слева от SSID сети говорит об
успешном подключении NWD210N.
Для доступа к сети Интернет включите ваш Интернет-
браузер и введите адрес (URL) веб-сайта в строке
адреса. Точ к а доступа должна быть подключена к сети
Интернет.
Если веб-сайт отображается правильно, то вы успешно
подключились к Internet.
93
Page 95

РУССКИЙ
Процедура просмотра сертификата(сертификатов)
продукта
1 Посетите сайт www.zyxel.com.
2 Выберите ваш продукт из выпадающего списка
на домашней странице ZyXEL и перейдите на
его страницу.
3 Выберите на этой странице сертификат, который
вы хотите просмотреть.
94
Page 96

中文
中文
概覽
NWD210N 是專為您電腦設計的 USB 無線網路配接器。
NWD210N 與 WPS (Wi-Fi 保護設定 ) 相容。
請使用 NWD210N 將電腦連接至無線接取點 (AP)。此為基礎
架構模式。
您也可以使用 NWD210N 無線連接至另一台使用無線網路的電
腦。此為點對點模式。
本《使用手冊》說明如何安裝以及在執行 Mac OS X 作業系統
的麥金塔電腦上使用 NWD210N, 內容包含下列章節:
表格 1 使用者入門目錄
章節 頁面
安裝硬體 96
安裝硬體 100
連接無線網路 102
95
Page 97

中文
如需更多背景與技術資訊,請參閱 NWD210N 隨附 CD 上的
《Windows 使用手冊》。
1 安裝硬體
請利用下列步驟將 NWD210N 的驅動程式和公用程式安裝至您
的 Mac 電腦。
" 插入 NWD210N 之前請先從 CD 安裝軟體。先
不要插入 NWD210N。
1 如果已將 NWD210N 插入,請移除之。
將隨附光碟片置入 CD-ROM 光碟機。
2 按兩下畫面上出現的 NWD210N CD 圖示。
3 選取 Tool > Driver > Mac OS ( 工具 > 驅動程式 > Mac
OS)。
96
Page 98

中文
4 按兩下 .dmg 檔圖示。
5 顯示 NWD210N_Installer (NWD210N_ 安裝程式 ) 視窗。
選取您使用的作業系統版本。
" 如果您不確定電腦執行的作業系統版本,按一下
> About This Mac ( 關於本機 ) 查看。
6 按兩下 Install ( 安裝 )。顯示以下畫面。按一下 Continue
(繼續)。
97
Page 99

中文
選取您要用來安裝 NWD210N 軟體的磁碟區。按一下
Continue ( 繼續 )。
" 選擇一個內部硬碟機 ( 可依其 圖示辨識 )。
98
Page 100

中文
7 按一下 Upgrade ( 升級 )。
顯示下列訊息。按一下 Continue Installation ( 繼續安裝 )
繼續進行下個步驟。
如果顯示安全安全視窗,請輸入電腦的管理員名稱和密碼,
然後再按一下 OK ( 確定 )。
8 您必須先重新啟動電腦才能使用 NWD210N 軟體。
99
 Loading...