

Page 1

ZyAIR G-1000
Wireless LAN 54 Mbps Access Point
Quick Installation Guide
Version 3.50
July 2003
Page 2

ZyAIR G-1000 Access Point
Table of Contents
1 Introducing the ZyAIR.............................................................................................................................. 2
2 Hardware....................................................................................................................................................2
2.1 Top Panel and Connections ..................................................................................................................2
2.2 The LED Display...................................................................................................................................3
3 Setting Up Your Computer’s IP Address.................................................................................................5
3.1 Windows 2000/NT/XP........................................................................................................................... 5
3.2 Testing the Connection to the ZyAIR.....................................................................................................6
4 Configuring the ZyAIR .............................................................................................................................7
4.1 Accessing the ZyAIR via the Web Configurator....................................................................................7
4.2 Configuring the ZyAIR Using the Wizard ............................................................................................. 9
5 Advanced Configuration .........................................................................................................................11
5.1 Wireless LAN Overview ...................................................................................................................... 11
5.2 Configuring Wireless LAN .................................................................................................................. 11
5.3 Configuring Roaming..........................................................................................................................13
5.4 Configuring IEEE 802.1x Authentication ...........................................................................................15
5.5 Local User Database and RADIUS Overview ....................................................................................17
6 Hardware Installation..............................................................................................................................19
6.1 Attaching Antennas .............................................................................................................................19
6.2 Hardware Mounting Installation ........................................................................................................19
6.3 Free-standing......................................................................................................................................19
6.4 Wall-mounted......................................................................................................................................20
7 Troubleshooting .......................................................................................................................................23
1
Page 3
ZyAIR G-1000 Access Point
1 Introducing the ZyAIR
The ZyAIR G-1000 is an IEEE802.11g-compliant, 54 Mbps wireless LAN access point. It is suited for a
wireless connection to the wired network in a home and small office environment. The key features of the
ZyAIR G-1000 are IEEE 802.1x, WEP data encryption and MAC address filtering. See your User’s Guide
for more details on all ZyAIR features.
2 Hardware
This section provides details on hardware specifications.
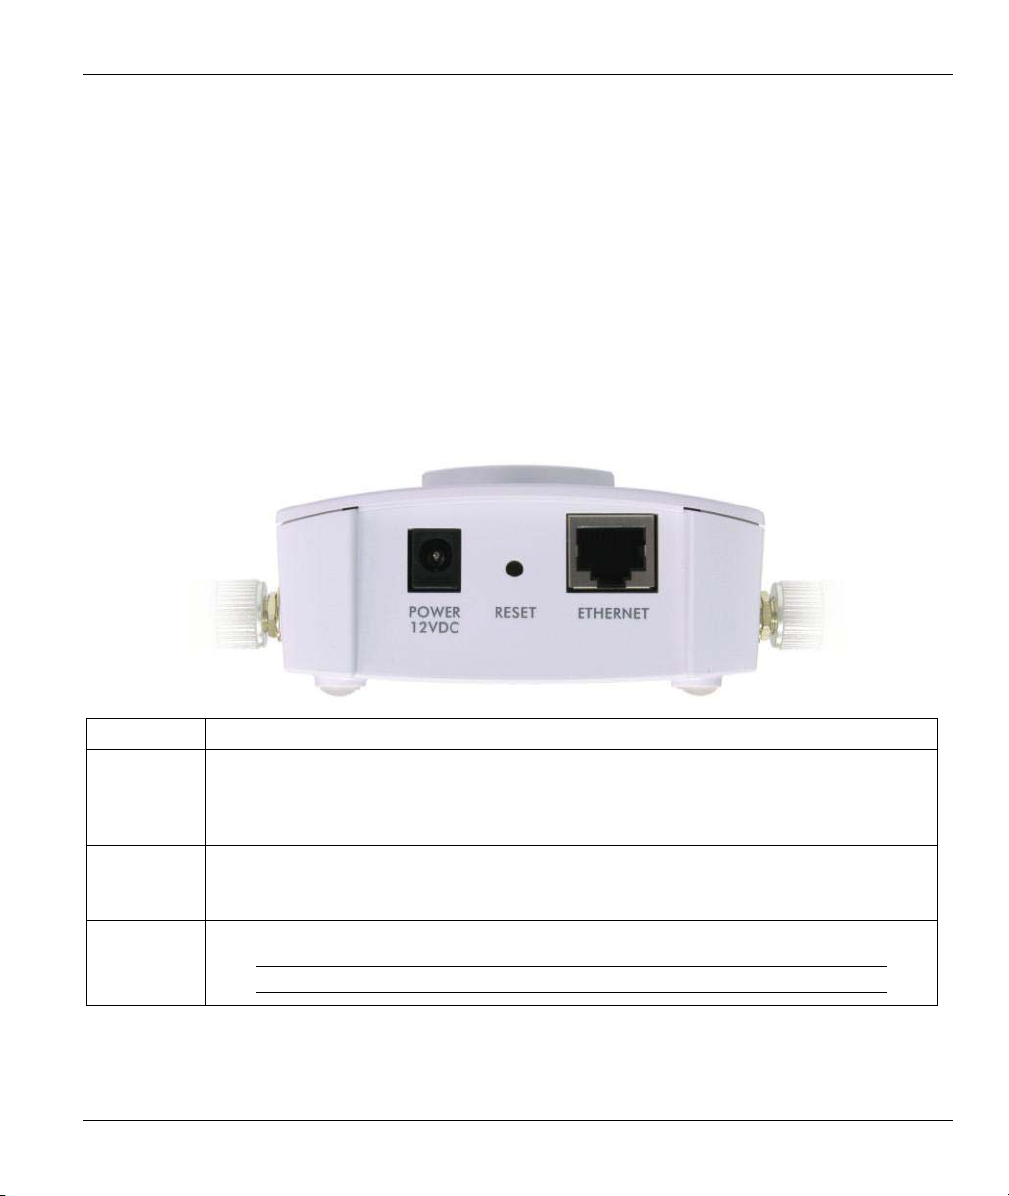
2.1 Top Panel and Connections
LABEL DESCRIPTION
ETHERNET Use an Ethernet cable to connect to a computer (with an Ethernet card) for initial
configuration to this port. The port is auto-negotiating (can connect at 10 or 100 Mbps)
and auto-crossover (automatically adjusts to the type of Ethernet cable you use (straightthrough or crossover)).
RESET You only need to use this button if you’ve forgotten the ZyAIR’s password or the IP
address is not known. It returns the ZyAIR to the factory defaults (password is 1234 and
LAN IP address 192.168.1.2). Refer to the User’s Guide.
POWER
12VDC
Connect the end of the included power adaptor to this power socket.
Use only the included power adaptor.
2
Page 4
ZyAIR G-1000 Access Point
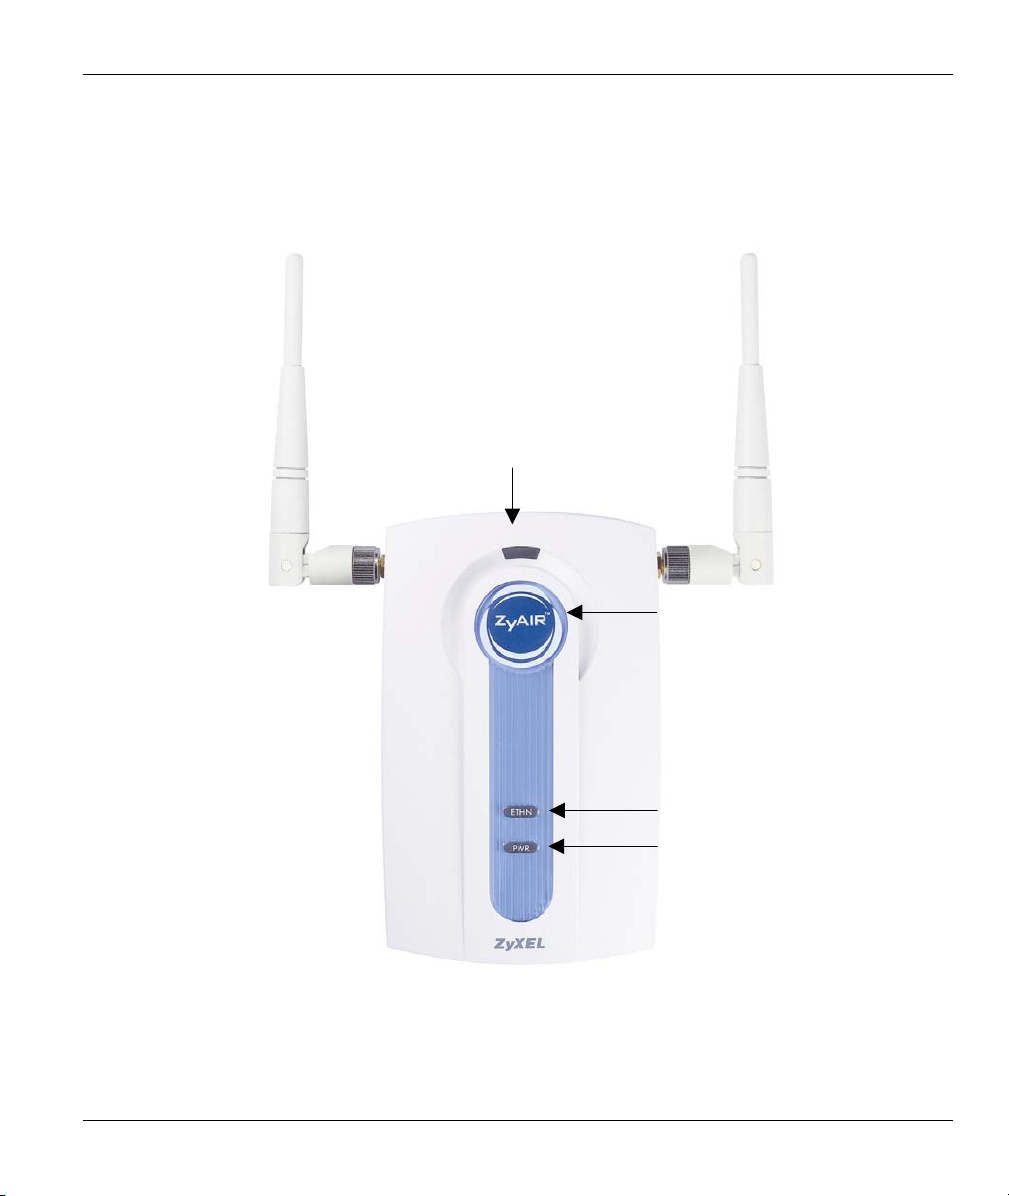
2.2 The LED Display
The PWR LED turns on when the power is connected. The Link LED blinks and turns off. The ZyAIR
LED turns on after the system test. The ETHN LED turns on, if the ETHERNET port is properly
connected.
LINK LED
ZyAIR LED
Figure 1 Front Panel LEDs
3
ETHN LED
PWR LED
Page 5

ZyAIR G-1000 Access Point
Table 1 Front Panel LED Description
LED COLOR STATUS DESCRIPTION
Blinking The ZyAIR is not ready or rebooting. Link
Off The ZyAIR is working properly.
Breathing The ZyAIR is sending/receiving data. ZyAIR
On The ZyAIR is ready, but is not sending/receiving data.
On The ZyAIR has a successful 10Mb Ethernet connection.
Blinking The ZyAIR is sending/receiving data.
Off The ZyAIR does not have 10Mb Ethernet connection.
On The ZyAIR has a successful 100Mb Ethernet connection.
Blinking The ZyAIR is sending/receiving data.
Off The ZyAIR does not have 100Mb Ethernet connection.
On The ZyAIR is receiving power. PWR Green
Off The ZyAIR is not receiving power.
(WLAN
ACK)
ETHN
Red
Blue
Green
Orange
4
Page 6

ZyAIR G-1000 Access Point
3 Setting Up Your Computer’s IP Address
Skip this section if your computer’s IP address is already in the range of
192.168.1.3 ~ 192.168.1.254 with subnet mask 255.255.255.0.
Your computer must have a network card and TCP/IP installed. TCP/IP should already be installed on
computers using Windows NT/2000/XP, Macintosh OS 7 and later operating systems.
3.1 Windows 2000/NT/XP
1. In Windows XP, click start, Control Panel. In Windows 2000/NT, click Start, Settings,
Control Panel.
2. In Windows XP, click Network Connections.
In Windows 2000/NT, click Network and Dial-up Connections.
3. Right-click Local Area Connection and then click Properties.
4. Select Internet Protocol (TCP/IP) (under the General tab in Win XP) and click Properties.
5. The Internet Protocol TCP/IP Properties
screen opens (the General tab in
Windows XP).
Configure your computer to use a static IP
address, select Use the following IP
Address and fill in the IP address
(192.168.1.3 to 192.168.1.254) and
Subnet mask (255.255.255.0) fields.
6. Leave the Preferred DNS sever and Alternate DNS server fields blank if you do not know the
IP address(es) of the DNS server.
7. Click OK to close the Internet Protocol (TCP/IP) Properties window.
8. Click OK to close the Local Area Connection Properties window.
5
Page 7

ZyAIR G-1000 Access Point
3.2 Testing the Connection to the ZyAIR
1. Click Start, (All) Programs, Accessories and then Command Prompt.
2. In the Command Prompt window, type "ping 192.168.1.2” followed by a space and the IP address of
the ZyAIR (192.168.1.2 is the default).
3. Press ENTER. The following screen displays.
Your computer can now communicate with the ZyAIR.
C:\>ping 192.168.1.2
Pinging 192.168.1.2 with 32 bytes of data:
Reply from 192.168.1.2: bytes=32 time=10ms TTL=254
Reply from 192.168.1.2: bytes=32 time<10ms TTL=254
Reply from 192.168.1.2: bytes=32 time<10ms TTL=254
Reply from 192.168.1.2: bytes=32 time<10ms TTL=254
Ping statistics for 192.168.1.2:
Packets: Sent = 4, Received = 4, Lost = 0 (0% loss),
Approximate round trip times in milli-seconds:
Minimum = 0ms, Maximum = 10ms, Average = 2ms
C:\>
6
Page 8

ZyAIR G-1000 Access Point
4 Configuring the ZyAIR
The Quick Installation Guide shows you how to use the web configurator only.
See your User’s Guide for background information on all ZyAIR features and SMT
(System Management Terminal) configuration.
4.1 Accessing the ZyAIR via the Web Configurator
1. Launch your web browser. Enter “192.168.1.2” as the web site address.
2. The default password (“1234”) is already in the password field (in non-readable format). Click Login to
proceed to a screen asking you to change your password. Click Reset to revert to the default password in
the password field.
Web site address.
Default password.
7
Page 9

ZyAIR G-1000 Access Point
3. It is highly recommended you change the default password. Enter a new password, retype it to confirm
and click Apply; alternatively click Ignore to proceed to the MAIN MENU screen if you do not want to
change the password now.
Change default
password.
8
Page 10

ZyAIR G-1000 Access Point
4. You should now see the web configurator MAIN MENU screen.
Click WIZARD SETUP to help
you configure your ZyAIR to
set up a wireless network.
The ZyAIR automatically times out after five minutes (default) of inactivity.
Simply log back into the ZyAIR if this happens.
4.2 Configuring the ZyAIR Using the Wizard
The wizard consists of a series of screens to help you configure your ZyAIR for wireless stations to access
your wired LAN. Refer to your User’s Guide for more background information.
9
Page 11

ZyAIR G-1000 Access Point
5. Click WIZARD SETUP in the main menu to display the first wizard screen shown next.
System Name is a unique name
to identify the ZyAIR in the
Ethernet network. Enter a
descriptive name.
Leave the Domain Name entry
blank and click Next to continue.
6. Use the second wizard screen to set up the wireless LAN.
ESSID is a unique name to identify
the ZyAIR in the wireless LAN.
Enter a descriptive name.
A channel is the range of radio
frequencies used by IEEE 802.11g
wireless devices.
Choose a radio channel to use in
the Choose Channel ID field.
WEP (Wired Equivalent Privacy) encrypts data frames before transmitting them over the wireless network. Select either
64-bit or 128-bit from the WEP Encryption drop-down list box to activate WEP encryption. Select Disable to turn off
WEP data encryption.
Select ASCII or HEX WEP key input method and then follow the on-screen instructions to set up the WEP keys.
Click Next to continue.
The wireless stations and ZyAIR must use the same ESSID, channel ID and WEP
encryption key (if WEP is enabled) for wireless communication.
10
Page 12

ZyAIR G-1000 Access Point
7. Fill in the fields in the last wizard configuration screen.
Select Get automatically to have the
ZyAIR obtain an IP address from a
DHCP server.
You must know the IP address
assigned to the ZyAIR (by the DHCP
server) to access the ZyAIR again.
Select Use fixed IP address to give
the ZyAIR a fixed, unique IP address.
Enter a subnet mask appropriate to
your network and the gateway IP
address if applicable.
Click Finish.
If you change the ZyAIR’s IP address, you must use the new IP address if you want
to access the web configurator again.
8. Change the wireless parameter settings in the wireless stations to match those of the ZyAIR. Refer to the
user’s guide for your wireless adapter.
5 Advanced Configuration
5.1 Wireless LAN Overview
This section introduces the wireless LAN and some basic configurations. Wireless LANs can be as simple
as two computers with wireless adapters communicating in a peer-to-peer network or as complex as a
number of computers with wireless adapters communicating through access points (APs) which bridge
network traffic to the wired LAN.
5.2 Configuring Wireless LAN
Click ADVANCED and WIRELESS to open the screen as shown next.
11
Page 13

ZyAIR G-1000 Access Point
Figure 2 Wireless LAN
The following table describes the fields in this screen.
Table 2 Wireless LAN
LABEL DESCRIPTION
ESSID (Extended Service Set ID) The ESSID identifies the service set the wireless station is to connect
Hide ESSID Select this box to hide the ESSID in the outgoing beacon frame so a station cannot obtain the
Choose
Channel ID
to. Wireless stations associating to the access point must have the same ESSID. Enter a
descriptive name (up to 32 characters) for the wireless LAN.
ESSID through passive scanning.
Adjacent access points (APs) should use a channel different from what you selected to reduce
interference. The wireless stations connected to the ZyAIR must use the same channel you
selected.
12
 Loading...