

Page 1
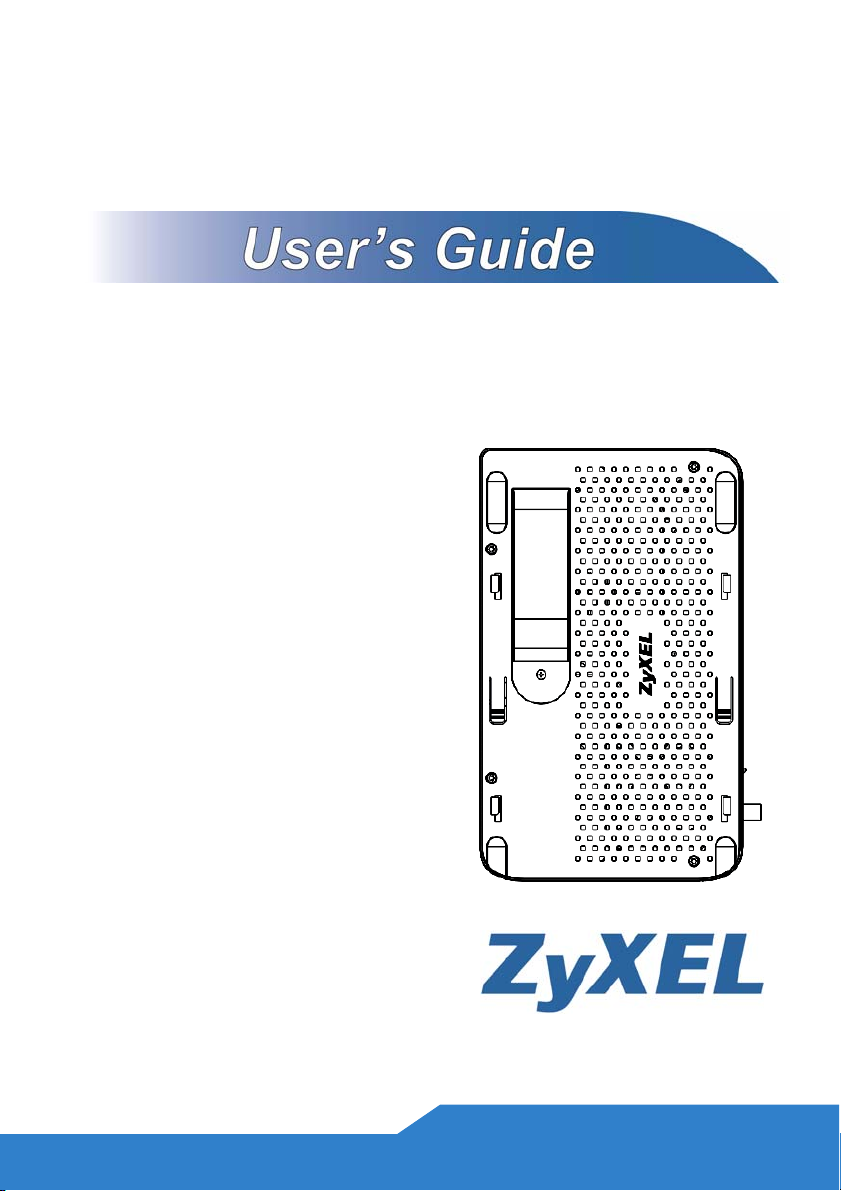
FTU2000
Fiber Termination Unit
Edition 1, 2/2010
www.zyxel.com
Copyright 2010 ZyXEL Communications
Corporation
Page 2

Device Panel
CATV
PORT
POWER
POWER LED
FIBER PORT
with COVER
FIBER
ENTRANCE
or EXIT
2
Page 3
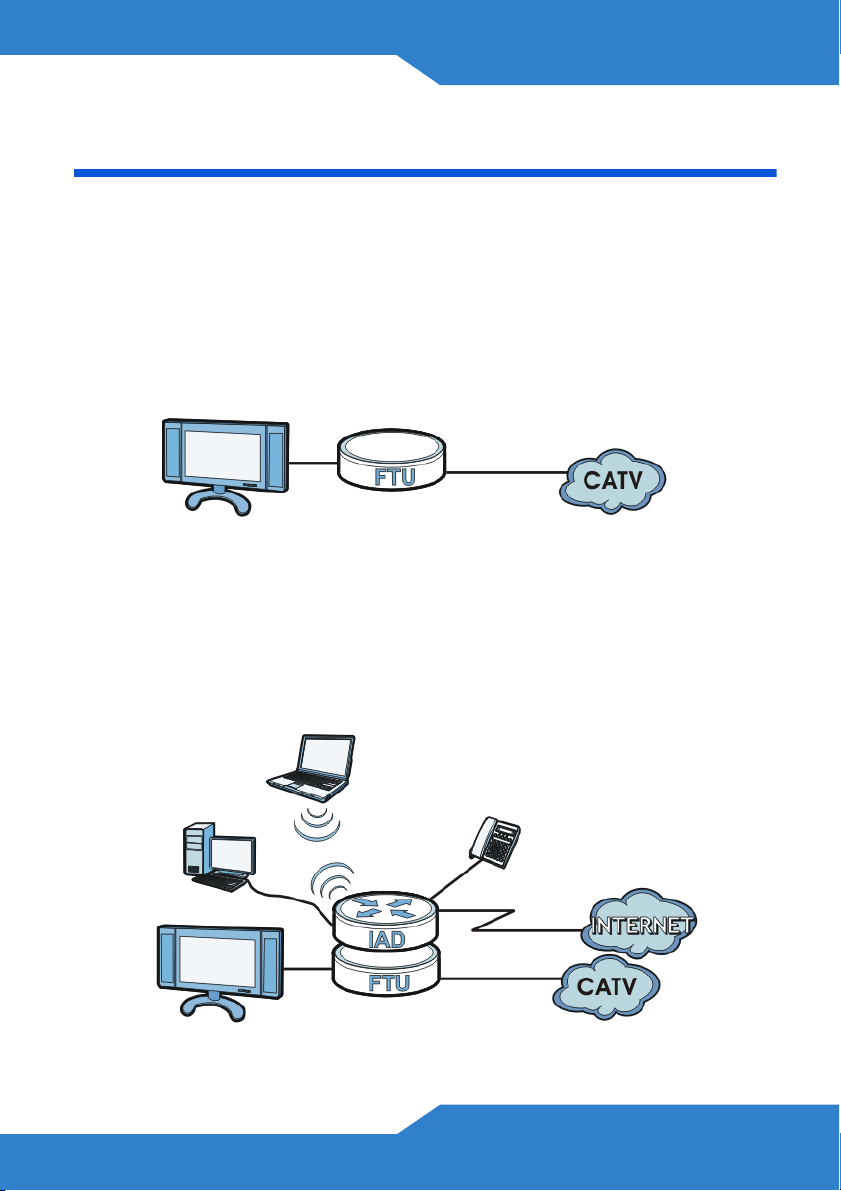
Overview
The FTU2000 is a Fiber Termination Unit (FTU) which can deliver Fiber
to the Home (FTTH) network services such as data, voice and video to
home users. The FTU2000 provides cable television (CATV) service to
subscribers. Simply connect the FTU2000 to the CATV fiber outlet in
your home. To watch CATV channels, use a coaxial cable to connect the
FTU2000 to the television set as shown in the following figure.
The FTU2000 works in tandem with the FSG2200HNU Integrated
Access Device (IAD), which combines high-speed Internet access, a
built-in switch, a firewall and high-speed wireless networking capability.
The FSG2200HNU also has two USB 2.0 port for sharing files via a USB
compatible storage device and two phone ports for making calls over the
Internet (Voice over IP or VoIP).
3
Page 4

Hardware Connections
1. To set up your Internet connection, choose:
a. FIBER (CATV): Use a fiber cable to connect this port to the CATV
fiber outlet; OR
b. FIBER (DATA): If you have an FSG2200, follow the steps in
Connecting to a FSG2200HNU. The FTU2000 enables the
FSG2200HNU to connect to a fiber network resulting in faster data
transfer rates.
2. CATV: Use a coaxial cable to connect this port to your television.
3. POWER: Use the power adaptor provided to connect an appropriate
power source to this socket. The LED light turns green once the
FTU2000 is ready.
If you are using both FTU2000 and FSG2200HNU, the power coming
from the FSG2200HNU is enough for both devices and there is no need
to connect the FTU2000 to a power source. In this setup, the CATV
service is not available when the FSG2200HNU is turned off.
4. Verify that the hardware setup is working by turning on your
television. You should be able to watch the CATV channels indicated
in your subscriber plan.
Contact your CATV provider if you cannot access the cable channels.
4
Page 5
Connecting to a FSG2200HNU
If you have subscribed to both CATV and fiber-based Internet services
but have only one fiber outlet at home, you can use the FTU2000 to
bridge the fiber port to the FSG2200HNU. Follow these steps to connect
the FTU2000 to the FSG2200HNU.
Before proceeding, the fiber cables (CATV and data) should be
connected to the FTU2000 and properly coiled within the casing. Refer
to Coiling the Fiber Cables for instructions.
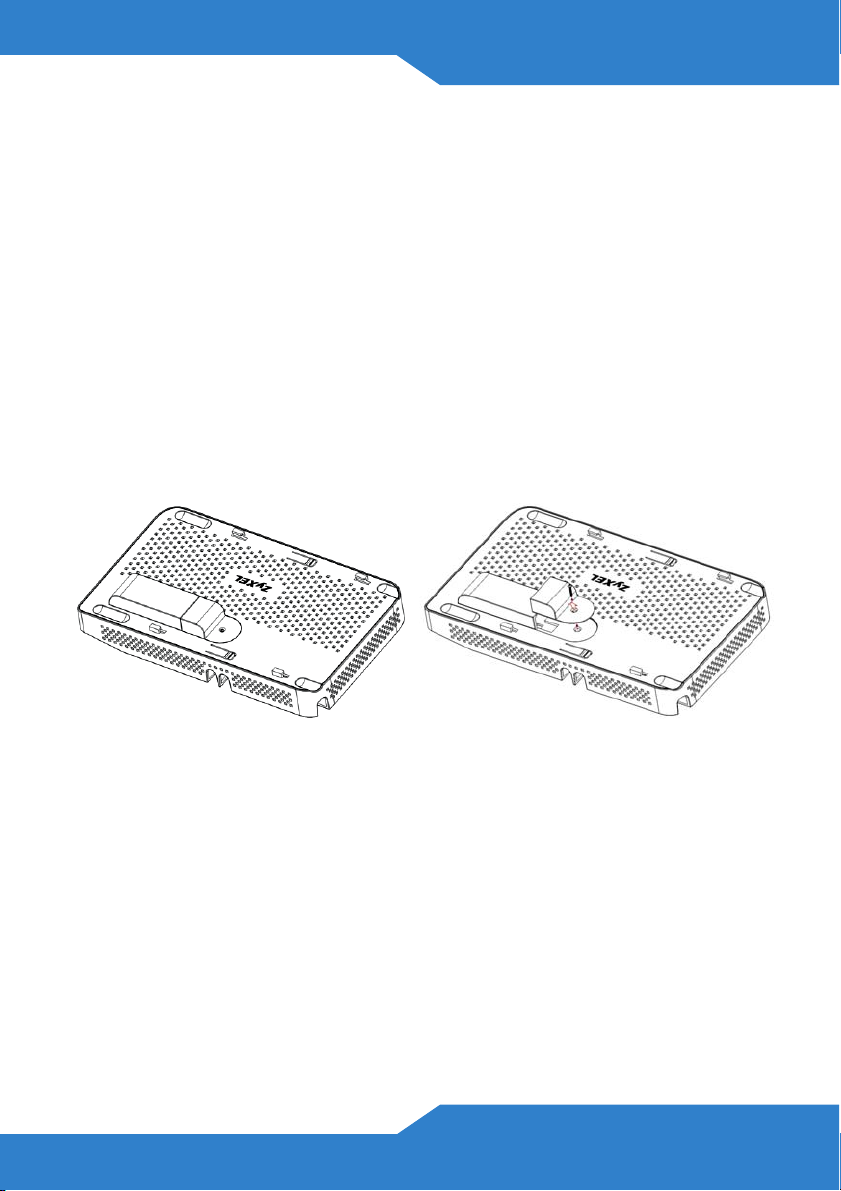
1. The FTU2000 has a nodule on the top panel that serves as an
opening for the fiber cable going to the FSG2200HNU. Remove the
screw holding the cover in place.
2. On the bottom panel of the FSG2200HNU, lift off the cover of the fiber
port. Connect the fiber cable (data) coming from the FTU2000 to this
port.
5
Page 6
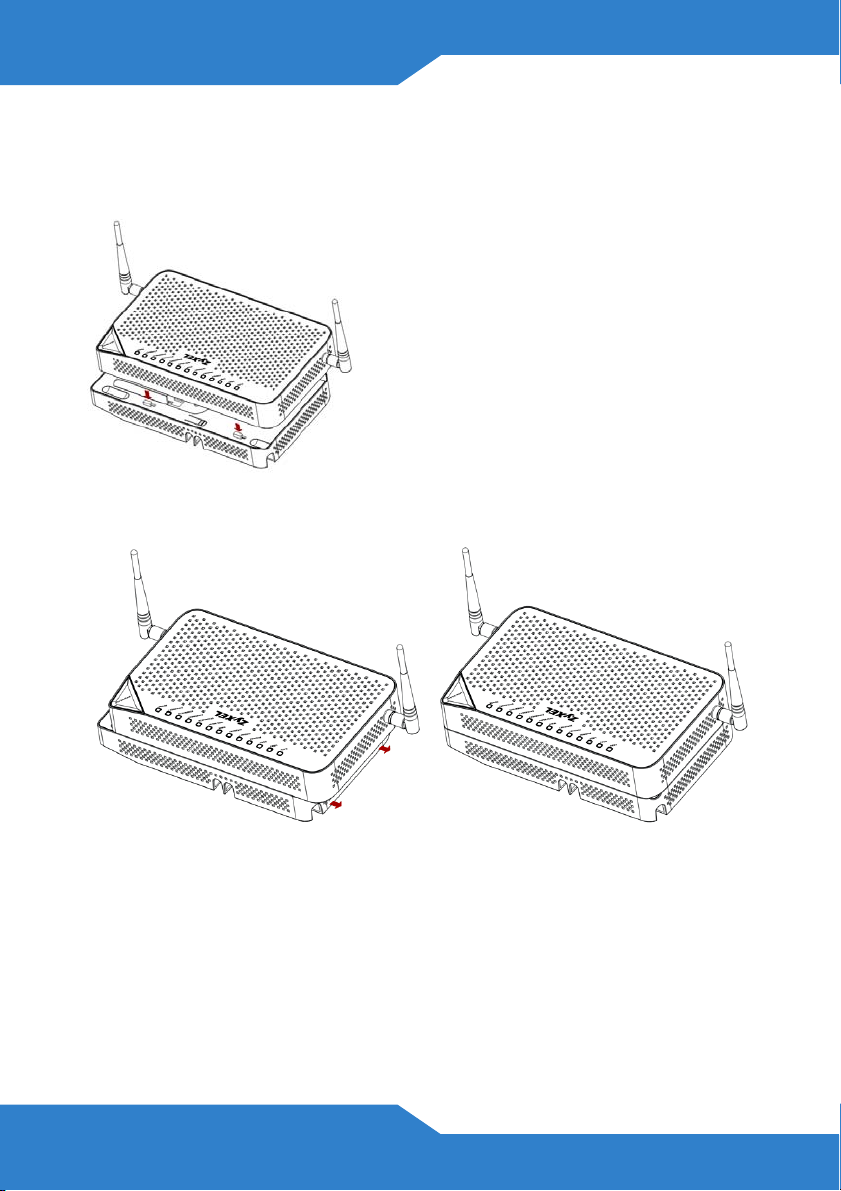
3. Place the FSG2200HNU on top of the FTU2000, such that the nodule
of the FTU2000 goes into the hollow for the fiber port of the
FSG2200HNU, as shown below:
Slide the FSG2200HNU to your right so that the two devices are
connected and locked in snugly.
6
Page 7

Coiling the Fiber Cables
The following diagrams show how to properly coil the fiber cable within
the FTU2000 casing.
There are four fiber cable entrances/exits in the FTU2000 casing. Follow
The coiling method approproate to where and how you are going to
position the device in your home.
• The following diagrams show the coiling method when you are
using the FTU2000 as a standalone unit, where you only need one
(1) fiber optic cable.
7
Page 8

• The following diagrams show the coiling methods used when you
are using the FTU2000 together with the FSG2200HNU. This setup
uses two (2) fiber optic cables.
Refer to the Quick Start Guide and User Guide of your FSG2200HNU for
instructions on how to configure and use it.
8
Page 9

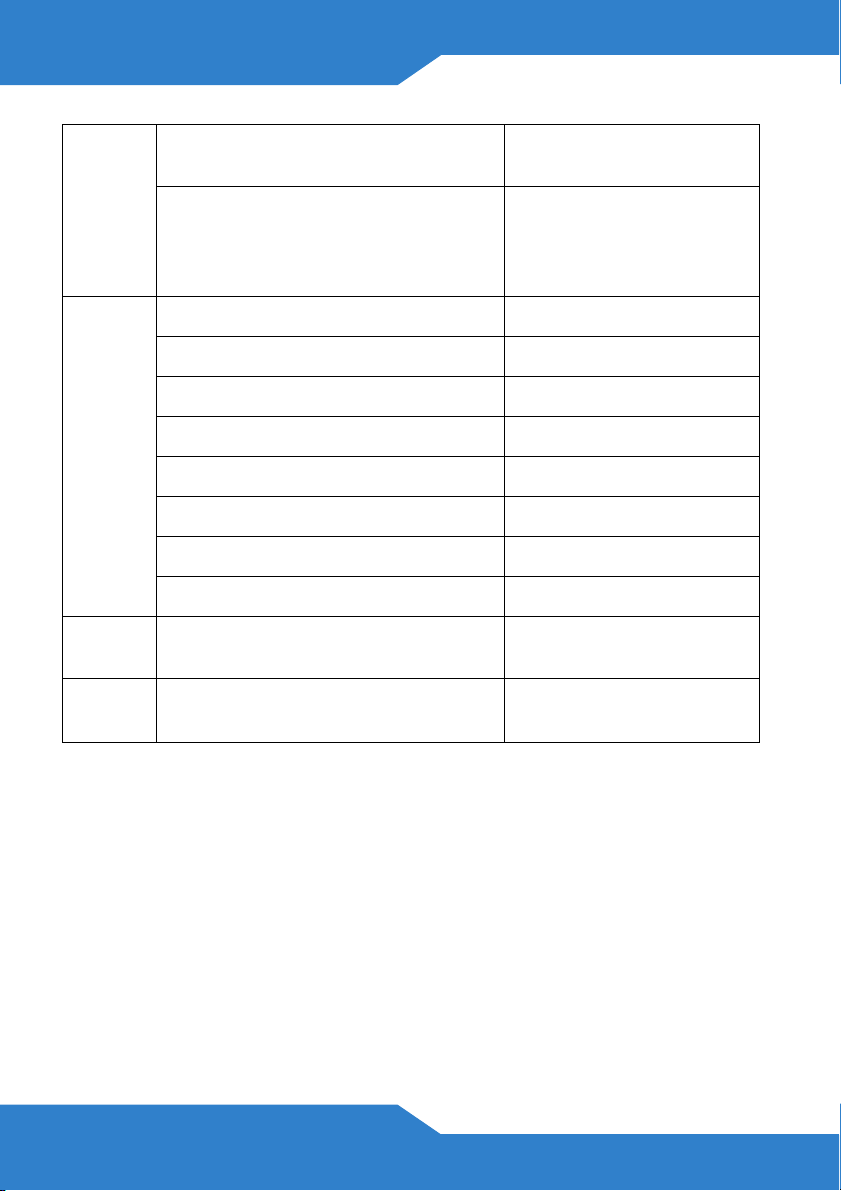
Product Specifications
The following tables summarize the FTU2000’s hardware and firmware
features.
Hardware Specifications
Box dimensions 326 mm (L) x 184 mm (W) x 91 mm (H)
Weight 350 g
Input Power 12VDC 1.0 A
Operation
Temperature
Storage Temperature -25º ~ 65º C
Humidity Operating Humidity: 20% to 85% RH
Distance between the
centers of the holes
(for wall-mounting) on
the device’s back
Screw size for wallmounting
0º ~ 40º C
Storage Humidity: 20% to 90% RH
192 mm (vertical)
95.95 mm (horizontal)
M4 tap
Standards Certifications
Item Region Description
Safety European Union (CE-LVD) EN 60950-1:2006
IEC 60950-1
9
Page 10
EMI North America FCC Part 15 Class B (with -
4dB margin)
European Union (CE Mark) EN550222006 Class B (with
-4dB margin)
EN61000-3-2
EN61000-3-3
EMS European Union (CE mark) EN55024
Electrostatic Discharge EN61000-4-2
Radio-Frequency Electromagnetic Field EN61000-4-3
EFT/Burst EN61000-4-4
Surge EN61000-4-5
Conducted Susceptibility EN61000-4-6
Power Magnetic EN61000-4-8
Voltage Dips/Interruption EN61000-4-11
Power
Supply
North America UL 60950-1
European CE mark
EN60950 (2001)
Wall-mounting Instructions
Do the following to hang your FTU2000 on a wall.
1. Locate a high position on a wall that is free of obstructions. Use a
sturdy wall.
You can hang the FTU2000 horizontally or vertically.
10
Page 11

2. Drill two holes for the screws. Make sure the distance between the
centers of the holes matches what is listed in the product
specifications appendix.
Be careful to avoid damaging pipes or cables located inside
the wall when drilling holes for the screws.
3. Do not screw the screws all the way into the wall. Leave a small gap
of about 0.5 cm between the heads of the screws and the wall.
4. Make sure the screws are snugly fastened to the wall. They need to
hold the weight of the FTU2000 with the connection cables.
11
Page 12

5. Align the holes on the back of the FTU2000 with the screws on the
wall. Hang the FTU2000 on the screws.
Horizontal
12
Page 13

Vertical
13
Page 14

The following are dimensions of an M4 tap screw and masonry plug
used for wall mounting. All measurements are in millimeters (mm).
14
Page 15

Safety Warnings
• Do NOT use this product near water, for example, in a wet basement or near a
swimming pool.
• Do NOT expose your device to dampness, dust or corrosive liquids.
• Do NOT store things on the device.
• Do NOT install, use, or service this device during a thunderstorm. There is a
remote risk of electric shock from lightning.
• Connect ONLY suitable accessories to the device.
• Ground yourself (by properly using an anti-static wrist strap, for example) whenever
working with the device’s hardware or connections.
• Make sure to connect the cables to the correct ports.
• Place connecting cables carefully so that no one will step on them or stumble over
them.
• Always disconnect all cables from this device before servicing or disassembling.
• Use ONLY an appropriate power adaptor or cord for your device.
• Connect the power adaptor or cord to the right supply voltage (for example, 110V
AC in North America or 230V AC in Europe).
• Do NOT allow anything to rest on the power adaptor or cord and do NOT place the
product where anyone can walk on the power adaptor or cord.
• Do NOT use the device if the power adaptor or cord is damaged as it might cause
electrocution.
• If the power adaptor or cord is damaged, remove it from the device and the power
source.
• Do NOT attempt to repair the power adaptor or cord. Contact your local vendor to
order a new one.
• Do not use the device outside, and make sure all the connections are indoors.
There is a remote risk of electric shock from lightning.
• Do NOT obstruct the device ventilation slots, as insufficient airflow may harm your
device.
15
Page 16

• Your product is marked with this symbol, which is known as the WEEE mark.
WEEE stands for Waste Electronics and Electrical Equipment. It means that
used electrical and electronic products should not be mixed with general
waste. Used electrical and electronic equipment should be treated
separately.
Legal Information
Copyright
Copyright © 2010 by ZyXEL Communications Corporation.
The contents of this publication may not be reproduced in any part or as a whole,
transcribed, stored in a retrieval system, translated into any language, or transmitted in
any form or by any means, electronic, mechanical, magnetic, optical, chemical,
photocopying, manual, or otherwise, without the prior written permission of ZyXEL
Communications Corporation.
Published by ZyXEL Communications Corporation. All rights reserved.
Disclaimer
ZyXEL does not assume any liability arising out of the application or use of any products,
or software described herein. Neither does it convey any license under its patent rights
nor the patent rights of others. ZyXEL further reserves the right to make changes in any
products described herein without notice. This publication is subject to change without
notice.
Certifications
1. Go to http://www.zyxel.com.
2. Select your product on the ZyXEL home page to go to that product's page.
3. Select the certification you wish to view from this page.
16
Page 17

ZyXEL Limited Warranty
ZyXEL warrants to the original end user (purchaser) that this product is free from any
defects in material or workmanship for a specific period (the Warranty Period) from the
date of purchase. The Warranty Period varies by region. Check with your vendor and/or
the authorized ZyXEL local distributor for details about the Warranty Period of this
product. During the warranty period, and upon proof of purchase, should the product
have indications of failure due to faulty workmanship and/or materials, ZyXEL will, at its
discretion, repair or replace the defective products or components without charge for
either parts or labor, and to whatever extent it shall deem necessary to restore the
product or components to proper operating condition. Any replacement will consist of a
new or re-manufactured functionally equivalent product of equal or higher value, and will
be solely at the discretion of ZyXEL. This warranty shall not apply if the product has been
modified, misused, tampered with, damaged by an act of God, or subjected to abnormal
working conditions.
Note
Repair or replacement, as provided under this warranty, is the exclusive remedy of the
purchaser. This warranty is in lieu of all other warranties, express or implied, including
any implied warranty of merchantability or fitness for a particular use or purpose. ZyXEL
shall in no event be held liable for indirect or consequential damages of any kind to the
purchaser.
To obtain the services of this warranty, contact your vendor. You may also refer to the
warranty policy for the region in which you bought the device at http://www.zyxel.com/
web/support_warranty_info.php.
Registration
Register your product online to receive e-mail notices of firmware upgrades and
information at www.zyxel.com.
17
Page 18

18
 Loading...