

Page 1

Default Login Details
User’s Guide
AX/DX/EX/PX Series
Copyright © 2022 Zyxel and/or its affiliates. All Rights Reserved.
LAN IP Address http://192.168.1.1
Login admin
Password See the device label
Version 5.15-5.70 Ed 1, 9/2022
Page 2

IMPORTANT!
READ CAREFULLY BEFORE USE.
KEEP THIS GUIDE FOR FUTURE REFERENCE.
This is a User’s Guide for a series of products. Not all products support all firmware features. Screenshots
and graphics in this book may differ slightly from your product due to differences in product features or
web configurator brand style. Every effort has been made to ensure that the information in this manual
is accurate.
Related Documentation
•Quick Start Guide
The Quick Start Guide shows how to connect the Zyxel Device.
•More Information
Go to support.zyxel.com to find other information on Zyxel Device
.
AX/DX/EX/PX Series User’s Guide
2
Page 3

Document Conventions
Document Conventions
Warnings and Notes
These are how warnings and notes are shown in this guide.
Warnings tell you about things that could harm you or your Zyxel
Device.
Note: Notes tell you other important information (for example, other things you may need to
configure or helpful tips) or recommendations.
Syntax Conventions
• Product labels, screen names, field labels and field choices are all in bold font.
• A right angle bracket ( > ) within a screen name denotes a mouse click. For example, Network Setting
> Routing > DNS Route means you first click Network Setting in the navigation panel, then the Routing
submenu, and then finally the DNS Route tab to get to that screen.
Icons Used in Figures
Figures in this user guide may use the following generic icons. The Zyxel Device icon is not an exact
representation of your Zyxel Device.
Zyxel Device Generic Router Switch
Server Firewall USB Storage Device
Printer 4G LTE/5G NR Base Station
AX/DX/EX/PX Series User’s Guide
3
Page 4

Contents Overview
Contents Overview
User’s Guide ......................................................................................................................................18
Introducing the Zyxel Device .............................................................................................................. 19
Hardware ............................................................................................................................................... 29
Web Configurator ................................................................................................................................. 56
Quick Start ............................................................................................................................................. 67
Tutorials .................................................................................................................................................. 70
App Tutorials ........................................................................................................................................ 112
Technical Reference ......................................................................................................................132
Connection Status .............................................................................................................................. 133
Broadband .......................................................................................................................................... 146
Wireless ................................................................................................................................................. 182
Home Networking ............................................................................................................................... 212
Routing ................................................................................................................................................. 236
Quality of Service (QoS) .................................................................................................................... 246
Network Address Translation (NAT) ................................................................................................... 266
DNS ....................................................................................................................................................... 283
IGMP/MLD ........................................................................................................................................... 287
VLAN Group ........................................................................................................................................ 290
Interface Grouping ............................................................................................................................ 293
USB Service .......................................................................................................................................... 300
Firewall ................................................................................................................................................. 306
MAC Filter ............................................................................................................................................ 317
Home Security ..................................................................................................................................... 320
Parental Control ................................................................................................................................. 322
Scheduler Rule .................................................................................................................................... 331
Certificates .......................................................................................................................................... 333
Voice .................................................................................................................................................... 342
Log ....................................................................................................................................................... 359
Traffic Status ....................................................................................................................................... 362
VoIP Status ........................................................................................................................................... 366
ARP Table ............................................................................................................................................ 369
Routing Table ...................................................................................................................................... 371
Multicast Status .................................................................................................................................. 374
xDSL Statistics ....................................................................................................................................... 376
WLAN Station Status ........................................................................................................................... 379
Cellular Statistics ................................................................................................................................ 381
System .................................................................................................................................................. 383
AX/DX/EX/PX Series User’s Guide
4
Page 5

Contents Overview
User Account ...................................................................................................................................... 384
Remote Management ....................................................................................................................... 387
SNMP .................................................................................................................................................... 391
Time Settings ........................................................................................................................................ 394
Email Notification ................................................................................................................................ 397
Log Setting .......................................................................................................................................... 400
Firmware Upgrade .............................................................................................................................. 404
Backup/Restore .................................................................................................................................. 407
Diagnostic ........................................................................................................................................... 410
Troubleshooting and Appendices .................................................................................................417
Troubleshooting .................................................................................................................................. 418
AX/DX/EX/PX Series User’s Guide
5
Page 6

Table of Contents
Table of Contents
Document Conventions ... .... ............................................ .... ... .... ............................................ ............3
Contents Overview .............................................................................................................................4
Table of Contents.................................................................................................................................6
Part I: User’s Guide.......................................................................................... 18
Chapter 1
Introducing the Zyxel Device ........................... .... .... ... ............................................. ... .....................19
1.1 Overview ......................................................................................................................................... 19
1.1.1 Multi-Gigabit Ethernet .......................................................................................................... 22
1.2 Example Applications .................................................................................................................... 23
1.2.1 Internet Access ...................................................................................................................... 23
1.2.2 WAN Priority ........................................................................................................................... 24
1.2.3 Dual-Band WiFi ...................................................................................................................... 25
1.2.4 VoIP Applications .................................................................................................................. 26
1.2.5 Zyxel Device’s USB Support .................................................................................................. 26
1.3 Ways to Manage the Zyxel Device .............................................................................................. 28
1.4 Good Habits for Managing the Zyxel Device ............................................................................. 28
Chapter 2
Hardware............................................................................................................................................29
2.1 Hardware ......................................................................................................................................... 29
2.2 LED Indicators Panel ....................................................................................................................... 29
2.2.1 AX7501, EX5501 and PX7501 ................................................................................................29
2.2.2 DX3300-T0, EX3300-T0, EX2210-T0, DX3301-T0 and EX3301-T0 ........................................... 32
2.2.3 DX5301-B2/B3, EX5300-B3 and EX5301-B3 ........................................................................... 35
2.2.4 DX5401-B0 and EX5401-B0 .................................................................................................... 38
2.2.5 EX5600-T1, EX5601-T0 and EX5601-T1 ................................................................................... 40
2.3 Ports Panel ....................................................................................................................................... 43
2.3.1 EX5501, AX7501 and PX7501 ................................................................................................43
2.3.2 DX3300-T0, DX3301-T0, DX5301-B2/B3, DX5401-B0, EX3300-T0/EX2210-T0, EX3301-T0,
EX5300-B3, EX5301-B3 and EX5401-B0 .................................................................................... 44
2.3.3 EX5600-T1, EX5601-T0, and EX5601-T1 .................................................................................. 49
2.3.4 WPS Button ............................................................................................................................. 54
2.3.5 RESET Button ........................................................................................................................... 55
AX/DX/EX/PX Series User’s Guide
6
Page 7

Table of Contents
Chapter 3
Web Configurator...............................................................................................................................56
3.1 Overview ......................................................................................................................................... 56
3.1.1 Access the Web Configurator ............................................................................................. 56
3.2 Web Configurator Layout .............................................................................................................. 58
3.2.1 Settings Icon .......................................................................................................................... 58
Chapter 4
Quick Start..........................................................................................................................................67
4.1 Overview ......................................................................................................................................... 67
4.2 Quick Start Setup ............................................................................................................................ 67
4.3 Quick Start Setup – Time Zone ....................................................................................................... 67
4.4 Quick Start Setup – Internet Connection ..................................................................................... 68
4.4.1 Successful Internet Connection .......................................................................................... 68
4.4.2 Unsuccessful Internet Connection ...................................................................................... 69
4.5 Quick Start Setup – WiFi ................................................................................................................. 69
4.6 Quick Start Setup – Finish ............................................................................................................... 69
Chapter 5
Tutorials...............................................................................................................................................70
5.1 Overview ......................................................................................................................................... 70
5.2 Wired Network Setup ..................................................................................................................... 70
5.2.1 Setting Up a DSL Connection ..............................................................................................70
5.2.2 Setting Up an Ethernet Connection .................................................................................... 73
5.3 WiFi Network Setup ......................................................................................................................... 75
5.3.1 Changing Security on a WiFi Network ................................................................................ 76
5.3.2 Connecting to the Zyxel Device’s WiFi Network Using WPS ............................................. 78
5.3.3 Setting Up a Guest Network ................................................................................................ 82
5.3.4 Setting Up Two Guest WiFi Networks on Different WiFi Bands .......................................... 86
5.4 USB Applications ............................................................................................................................. 91
5.4.1 File Sharing ............................................................................................................................. 91
5.4.2 Using FTP ................................................................................................................................. 95
5.5 Network Security ............................................................................................................................. 95
5.5.1 Configuring a Firewall Rule .................................................................................................. 95
5.5.2 Parental Control .................................................................................................................... 98
5.5.3 Configuring a MAC Address Filter ..................................................................................... 104
5.6 Internet Calls ................................................................................................................................. 105
5.6.1 Configuring VoIP ................................................................................................................. 105
5.6.2 Adding a SIP Service Provider ........................................................................................... 105
5.6.3 Adding a SIP Account ........................................................................................................ 106
5.6.4 Configuring a Phone .......................................................................................................... 107
5.6.5 Making a VoIP Call ............................................................................................................. 108
5.7 Device Maintenance ................................................................................................................... 109
AX/DX/EX/PX Series User’s Guide
7
Page 8

Table of Contents
5.7.1 Upgrading the Firmware .................................................................................................... 109
5.7.2 Backing up the Device Configuration .............................................................................. 109
5.7.3 Restoring the Device Configuration ................................................................................. 110
Chapter 6
App Tutorials.....................................................................................................................................112
6.1 Overview ....................................................................................................................................... 112
6.2 What You Can Do ........................................................................................................................ 112
6.3 MPro Mesh Network ..................................................................................................................... 113
6.4 General WiFi Settings .................................................................................................................... 115
6.5 Locations of the Extenders .......................................................................................................... 117
6.6 MPro Mesh Network Setup .......................................................................................................... 118
6.6.1 Setting up an MPro Mesh Router and MPro Mesh Extender with a WiFi Connection . 119
6.6.2 Setting up a non-MPro Mesh Router and MPro Mesh Extender with a Wired Connection
120
6.7 Network Management with the MPro Mesh App .................................................................... 122
6.7.1 Home Screen ....................................................................................................................... 122
6.7.2 Devices Screen .................................................................................................................... 124
6.7.3 WiFi Screen ........................................................................................................................... 126
6.7.4 Account Screen .................................................................................................................. 130
Part II: Technical Reference.........................................................................132
Chapter 7
Connection Status............................................................................................................................133
7.1 Connection Status Overview ...................................................................................................... 133
7.1.1 Connectivity ........................................................................................................................ 133
7.1.2 Icon and Device Name .....................................................................................................135
7.1.3 System Info ........................................................................................................................... 135
7.1.4 WiFi Settings ......................................................................................................................... 138
7.2 Guest WiFi Settings ........................................................................................................................ 139
7.2.1 LAN ....................................................................................................................................... 141
7.3 The Parental Control Screen ....................................................................................................... 142
7.3.1 Create a Parental Control Profile ...................................................................................... 143
Chapter 8
Broadband........................................................................................................................................146
8.1 Overview ....................................................................................................................................... 146
8.1.1 What You Can Do in this Chapter ..................................................................................... 146
8.1.2 What You Need to Know ................................................................................................... 147
8.1.3 Before You Begin ................................................................................................................. 150
8.2 Broadband Settings for DSL Routers ........................................................................................... 150
AX/DX/EX/PX Series User’s Guide
8
Page 9

Table of Contents
8.2.1 Add or Edit Internet Connection ....................................................................................... 151
8.3 Broadband Settings for Ethernet, AON and PON Routers ....................................................... 159
8.3.1 Add or Edit Internet Connection ....................................................................................... 160
8.4 Cellular Backup ............................................................................................................................ 167
8.5 Broadband Advanced Screen ................................................................................................... 173
8.6 Technical Reference .................................................................................................................... 177
Chapter 9
Wireless.............................................................................................................................................182
9.1 Overview ....................................................................................................................................... 182
9.1.1 What You Can Do in this Chapter ..................................................................................... 182
9.1.2 What You Need to Know ................................................................................................... 182
9.2 Wireless General Settings ............................................................................................................. 183
9.2.1 No Security ........................................................................................................................... 186
9.2.2 More Secure (Recommended) ......................................................................................... 186
9.3 Guest/More AP Screen ................................................................................................................ 188
9.3.1 The Edit Guest/More AP Screen ....................................................................................... 188
9.4 MAC Authentication .................................................................................................................... 191
9.5 WPS ................................................................................................................................................. 192
9.6 WMM .............................................................................................................................................. 194
9.7 Others Screen ............................................................................................................................... 195
9.8 Channel Status .............................................................................................................................. 197
9.9 MESH ................................................................................................................................................................................198
9.10 Technical Reference .................................................................................................................. 201
9.10.1 WiFi Network Overview ..................................................................................................... 201
9.10.2 Additional Wireless Terms ................................................................................................. 203
9.10.3 WiFi Security Overview ...................................................................................................... 203
9.10.4 Signal Problems ................................................................................................................. 205
9.10.5 BSS ....................................................................................................................................... 205
9.10.6 MBSSID ................................................................................................................................ 206
9.10.7 Preamble Type .................................................................................................................. 206
9.10.8 WiFi Protected Setup (WPS) ............................................................................................. 206
Chapter 10
Home Networking............................................................................................................................212
10.1 Overview ..................................................................................................................................... 212
10.1.1 What You Can Do in this Chapter ................................................................................... 212
10.1.2 What You Need To Know ................................................................................................. 212
10.1.3 Before You Begin ............................................................................................................... 214
10.2 LAN Setup .................................................................................................................................... 214
10.3 Static DHCP ................................................................................................................................. 219
10.3.1 Before You Begin ............................................................................................................... 219
10.4 UPnP ............................................................................................................................................. 221
AX/DX/EX/PX Series User’s Guide
9
Page 10

Table of Contents
10.5 LAN Additional Subnet ............................................................................................................... 222
10.6 STB Vendor ID .............................................................................................................................. 224
10.7 Wake on LAN .............................................................................................................................. 225
10.8 TFTP Server Name ....................................................................................................................... 225
10.9 Technical Reference .................................................................................................................. 226
10.9.1 DHCP Setup ....................................................................................................................... 227
10.9.2 DNS Server Addresses ....................................................................................................... 227
10.9.3 LAN TCP/IP ......................................................................................................................... 227
10.10 Turn on UPnP in Windows 10 Example .................................................................................... 228
10.10.1 Auto-discover Your UPnP-enabled Network Device .................................................. 230
10.11 Web Configurator Easy Access in Windows 10 ..................................................................... 233
Chapter 11
Routing..............................................................................................................................................236
11.1 Overview ..................................................................................................................................... 236
11.2 Configure Static Route .............................................................................................................. 236
11.2.1 Add or Edit Static Route ................................................................................................... 237
11.3 DNS Route .................................................................................................................................... 241
11.3.1 Add or Edit DNS Route ...................................................................................................... 242
11.4 Policy Route ................................................................................................................................ 242
11.4.1 Add or Edit Policy Route ................................................................................................... 243
11.5 RIP Overview ............................................................................................................................... 245
11.5.1 RIP ....................................................................................................................................... 245
Chapter 12
Quality of Service (QoS) ........................................ ..........................................................................246
12.1 QoS Overview ............................................................................................................................. 246
12.1.1 What You Can Do in this Chapter ................................................................................... 246
12.2 What You Need to Know ........................................................................................................... 246
12.3 Quality of Service General Settings .......................................................................................... 248
12.4 Queue Setup ............................................................................................................................... 250
12.4.1 Add a QoS Queue ............................................................................................................ 251
12.5 QoS Classification Setup ............................................................................................................ 252
12.5.1 Add or Edit QoS Class ....................................................................................................... 253
12.6 QoS Shaper Setup ...................................................................................................................... 257
12.6.1 Add or Edit a QoS Shaper ................................................................................................258
12.7 QoS Policer Setup ....................................................................................................................... 259
12.7.1 Add or Edit a QoS Policer ................................................................................................. 259
12.8 Technical Reference .................................................................................................................. 261
Chapter 13
Network Address Translation (NAT)................................................................................................ 266
13.1 Overview ..................................................................................................................................... 266
AX/DX/EX/PX Series User’s Guide
10
Page 11

Table of Contents
13.1.1 What You Can Do in this Chapter ................................................................................... 266
13.1.2 What You Need To Know ................................................................................................. 266
13.2 Port Forwarding ........................................................................................................................... 267
13.2.1 Port Forwarding ................................................................................................................. 267
13.2.2 Add or Edit Port Forwarding .............................................................................................268
13.3 Port Triggering ............................................................................................................................. 270
13.3.1 Add or Edit Port Triggering Rule ....................................................................................... 272
13.4 DMZ .............................................................................................................................................. 273
13.5 ALG ............................................................................................................................................... 274
13.6 Address Mapping ....................................................................................................................... 275
13.6.1 Address Mapping Screen ................................................................................................ 275
13.6.2 Add New Rule Screen ...................................................................................................... 276
13.7 Sessions ........................................................................................................................................ 278
13.8 Technical Reference .................................................................................................................. 278
13.8.1 NAT Definitions ................................................................................................................... 279
13.8.2 What NAT Does ................................................................................................................. 279
13.8.3 How NAT Works .................................................................................................................. 280
13.8.4 NAT Application ................................................................................................................ 280
Chapter 14
DNS....................................................................................................................................................283
14.1 DNS Overview ............................................................................................................................. 283
14.1.1 What You Can Do in this Chapter ................................................................................... 283
14.1.2 What You Need To Know ................................................................................................. 284
14.2 DNS Entry ..................................................................................................................................... 284
14.2.1 Add or Edit DNS Entry ........................................................................................................ 285
14.3 Dynamic DNS .............................................................................................................................. 285
Chapter 15
IGMP/MLD.........................................................................................................................................287
15.1 IGMP/MLD Overview .................................................................................................................. 287
15.1.1 What You Need To Know ................................................................................................. 287
15.2 The IGMP/MLD Screen ............................................................................................................... 287
Chapter 16
VLAN Group......................................................................................................................................290
16.1 Overview ..................................................................................................................................... 290
16.1.1 What You Can Do in this Chapter ................................................................................... 290
16.2 VLAN Group Settings .................................................................................................................. 291
16.2.1 Add or Edit a VLAN Group ............................................................................................... 291
Chapter 17
Interface Grouping..........................................................................................................................293
AX/DX/EX/PX Series User’s Guide
11
Page 12

Table of Contents
17.1 Interface Grouping Overview ................................................................................................... 293
17.1.1 What You Can Do in this Chapter ................................................................................... 293
17.2 Interface Grouping .................................................................................................................... 293
17.2.1 Interface Group Configuration ....................................................................................... 294
17.2.2 Interface Grouping Criteria .............................................................................................298
Chapter 18
USB Service......................................................................................................... .... ..........................300
18.1 USB Service Overview ................................................................................................................ 300
18.1.1 What You Can Do in this Chapter ................................................................................... 300
18.1.2 What You Need To Know ................................................................................................. 300
18.1.3 Before You Begin ............................................................................................................... 301
18.2 USB Service .................................................................................................................................. 301
18.2.1 Add New Share ................................................................................................................. 303
18.2.2 Add New User Screen ....................................................................................................... 304
18.3 Media Server ............................................................................................................................... 304
Chapter 19
Firewall..............................................................................................................................................306
19.1 Overview ..................................................................................................................................... 306
19.1.1 What You Need to Know About Firewall ........................................................................ 306
19.2 Firewall ......................................................................................................................................... 307
19.2.1 What You Can Do in this Chapter ................................................................................... 308
19.3 Firewall General Settings ............................................................................................................ 308
19.4 Protocol (Customized Services) ................................................................................................ 309
19.4.1 Add Customized Service ..................................................................................................310
19.5 Access Control (Rules) ............................................................................................................... 310
19.5.1 Add New ACL Rule ........................................................................................................... 311
19.6 DoS ............................................................................................................................................... 313
19.7 Firewall Technical Reference .................................................................................................... 314
19.7.1 Firewall Rules Overview .................................................................................................... 314
19.7.2 Guidelines For Security Enhancement With Your Firewall ............................................ 315
19.7.3 Security Considerations .................................................................................................... 316
Chapter 20
MAC Filter .........................................................................................................................................317
20.1 MAC Filter Overview ................................................................................................................... 317
20.2 MAC Filter .................................................................................................................................... 317
20.2.1 Add New Rule ................................................................................................................... 318
Chapter 21
Home Security..................................................................................................................................320
21.1 Home Security Overview ........................................................................................................... 320
AX/DX/EX/PX Series User’s Guide
12
Page 13

Table of Contents
21.2 Home Security ............................................................................................................................. 320
Chapter 22
Parental Control...............................................................................................................................322
22.1 Parental Control Overview ........................................................................................................ 322
22.2 Parental Control Schedule ........................................................................................................ 322
22.2.1 Add or Edit a Parental Control Profile ............................................................................. 323
22.2.2 Define a Schedule ............................................................................................................ 324
22.2.3 Parental Control Scheduled Profile ................................................................................. 324
22.3 Parental Control Schedule and URL Filter ................................................................................ 325
22.3.1 Add or Edit a Parental Control Profile ............................................................................. 327
Chapter 23
Scheduler Rule .................................................................................................................................331
23.1 Scheduler Rule Overview .......................................................................................................... 331
23.2 Scheduler Rule Settings .............................................................................................................. 331
23.2.1 Add or Edit a Schedule Rule ............................................................................................ 332
Chapter 24
Certificates .......................................................................................................................................333
24.1 Certificates Overview ................................................................................................................ 333
24.1.1 What You Can Do in this Chapter ................................................................................... 333
24.2 What You Need to Know ........................................................................................................... 333
24.3 Local Certificates ....................................................................................................................... 333
24.3.1 Create Certificate Request ............................................................................................. 335
24.3.2 View Certificate Request ................................................................................................. 335
24.4 Trusted CA ................................................................................................................................... 337
24.5 Import Trusted CA Certificate ................................................................................................... 338
24.6 View Trusted CA Certificate ...................................................................................................... 339
24.7 Certificates Technical Reference ............................................................................................. 339
24.7.1 Verify a Certificate ............................................................................................................ 340
Chapter 25
Voice.................................................................................................................................................342
25.1 Overview ..................................................................................................................................... 342
25.1.1 What You Can Do in this Chapter ................................................................................... 342
25.1.2 What You Need to Know About VoIP ............................................................................. 342
25.2 Before You Begin ........................................................................................................................ 343
25.3 SIP Account ................................................................................................................................. 343
25.3.1 Add or Edit SIP Account ................................................................................................... 344
25.3.2 SIP Account Entry Edit ....................................................................................................... 344
25.4 SIP Service Provider .................................................................................................................... 349
25.4.1 Provider Entry Add or Edit ................................................................................................ 349
AX/DX/EX/PX Series User’s Guide
13
Page 14

Table of Contents
25.5 Phone ........................................................................................................................................... 353
25.5.1 Phone Device .................................................................................................................... 353
25.5.2 Phone Device Edit ............................................................................................................ 354
25.6 Phone Region ............................................................................................................................. 355
25.7 Call Rule ....................................................................................................................................... 356
25.8 Call History ................................................................................................................................... 357
Chapter 26
Log ..................................... ................................................ ...............................................................359
26.1 Log Overview .............................................................................................................................. 359
26.1.1 What You Can Do in this Chapter ................................................................................... 359
26.1.2 What You Need To Know ................................................................................................. 359
26.2 System Log .................................................................................................................................. 360
26.3 Security Log ................................................................................................................................. 361
Chapter 27
Traffic Status .....................................................................................................................................362
27.1 Traffic Status Overview ............................................................................................................... 362
27.1.1 What You Can Do in this Chapter ................................................................................... 362
27.2 WAN Status .................................................................................................................................. 362
27.3 LAN Status .................................................................................................................................... 364
27.4 NAT Status .................................................................................................................................... 365
Chapter 28
VoIP Status........................................................................................................................................366
28.1 VoIP Status Screen ...................................................................................................................... 366
Chapter 29
ARP Table..........................................................................................................................................369
29.1 ARP Table Overview ................................................................................................................... 369
29.1.1 How ARP Works .................................................................................................................. 369
29.2 ARP Table .................................................................................................................................... 369
Chapter 30
Routing Table....................................................................................................................................371
30.1 Routing Table Overview ............................................................................................................ 371
30.2 Routing Table .............................................................................................................................. 371
Chapter 31
Multicast Status ...............................................................................................................................374
31.1 Multicast Status Overview ......................................................................................................... 374
31.2 The IGMP Status Screen ............................................................................................................. 374
31.3 The MLD Status Screen ............................................................................................................... 375
AX/DX/EX/PX Series User’s Guide
14
Page 15

Table of Contents
Chapter 32
xDSL Statistics ....................................... ... .... .... ............................................ ... ..................................376
32.1 Overview ..................................................................................................................................... 376
32.2 xDSL Statistics ............................................................................................................................... 376
Chapter 33
WLAN Station Status .........................................................................................................................379
33.1 WLAN Station Status Overview .................................................................................................. 379
Chapter 34
Cellular Statistics .............................................................................................................................381
34.1 Cellular Statistics Overview ........................................................................................................ 381
34.2 Cellular Statistics Settings ........................................................................................................... 381
Chapter 35
System...............................................................................................................................................383
35.1 System Overview ........................................................................................................................ 383
35.2 System .......................................................................................................................................... 383
Chapter 36
User Account.............................................................. ... .... ............................................ ...................384
36.1 User Account Overview ............................................................................................................. 384
36.2 User Account .............................................................................................................................. 384
36.2.1 User Account Add or Edit ................................................................................................. 385
Chapter 37
Remote Management.....................................................................................................................387
37.1 Overview ..................................................................................................................................... 387
37.1.1 What You Can Do in this Chapter ................................................................................... 387
37.2 MGMT Services ............................................................................................................................ 387
37.3 Trust Domain ................................................................................................................................ 389
37.4 Add Trust Domain ....................................................................................................................... 389
Chapter 38
SNMP .................................................................................................................................................391
38.1 Overview ..................................................................................................................................... 391
38.2 SNMP Settings .............................................................................................................................. 392
Chapter 39
Time Settings.....................................................................................................................................394
39.1 Time Settings Overview .............................................................................................................. 394
39.2 Time .............................................................................................................................................. 394
AX/DX/EX/PX Series User’s Guide
15
Page 16

Table of Contents
Chapter 40
Email Notification.............................................................................................................................397
40.1 Email Notification Overview ...................................................................................................... 397
40.2 Email Notification ........................................................................................................................ 397
40.2.1 E-mail Notification Edit ...................................................................................................... 398
Chapter 41
Log Setting .............................................................................................. .... .....................................400
41.1 Log Setting Overview ................................................................................................................. 400
41.2 Log Setting ................................................................................................................................... 400
41.2.1 Example Email Log ............................................................................................................ 402
Chapter 42
Firmware Upgrade..................................................... ... ............................................. ... .... ...............404
42.1 Overview ..................................................................................................................................... 404
42.2 Firmware Upgrade ...................................................................................................................... 404
Chapter 43
Backup/Restore ...............................................................................................................................407
43.1 Backup/Restore Overview ........................................................................................................ 407
43.2 Backup/Restore .......................................................................................................................... 407
43.3 Reboot ......................................................................................................................................... 409
Chapter 44
Diagnostic.........................................................................................................................................410
44.1 Diagnostic Overview .................................................................................................................. 410
44.1.1 What You Can Do in this Chapter ................................................................................... 410
44.2 What You Need to Know ........................................................................................................... 410
44.3 Ping/TraceRoute/Nslookup Test/ Speed Test .......................................................................... 411
44.4 802.1ag (CFM) ............................................................................................................................ 412
44.5 802.3ah (OAM) ............................................................................................................................ 413
44.6 OAM Ping .................................................................................................................................... 414
Part III: Troubleshooting and Appendices..................................................417
Chapter 45
Troubleshooting................................................................................................................................418
45.1 Overview ..................................................................................................................................... 418
45.2 Power and Hardware Problems ................................................................................................ 418
45.3 Device Access Problems ........................................................................................................... 419
45.4 Internet Problems ........................................................................................................................ 422
AX/DX/EX/PX Series User’s Guide
16
Page 17

Table of Contents
45.5 WiFi Problems .............................................................................................................................. 423
45.6 USB Problems ............................................................................................................................... 424
45.7 UPnP Problems ............................................................................................................................ 424
Appendix A Customer Support ..................................................................................................... 425
Appendix B Wireless LANs............................................................................................................... 430
Appendix C IPv6.............................................................................................................................. 443
Appendix D Services....................................................................................................................... 449
Appendix E Legal Information ....................................................................................................... 453
Index.................................................................................................................................................460
AX/DX/EX/PX Series User’s Guide
17
Page 18

PART I
User’s Guide
18
Page 19

CHAPTER 1
Introducing the Zyxel Device
1.1 Overview
The Zyxel Device refers to these models as outlined below.
• AX7501-B0 • EX3300-T0 • EX5501-B0 • PX7501-B0
• DX3300-T0 • EX2210-T0 • EX5600-T1
• DX3301-T0 • EX3301-T0 • EX5601-T0
• DX5301-B2 • EX5300-B3 • EX5601-T1
• DX5301-B3 • EX5301-B3
• DX5401-B0 • EX5401-B0
The AX7501-B0 is an AON (Active Optical Network) while the PX7501-B0 is a PON (Passive Optical
Network) router.
The DX Series are DSL routers, which provide Internet access over telephone lines.
The EX Series are Ethernet gateways/routers that provide Internet access through the Ethernet WAN port
or an SFP port.
The Zyxel Device (referring to all Series models in this User’s Guide) has one USB port that can be
configured as a backup cellular WAN port in case the Ethernet/Fiber/DSL connection has a problem as
well as for file sharing and as a media server. The Zyxel Device also supports WiFi6 that is most suitable in
areas with a high concentration of users. You can schedule WiFi usage using Parental Control.
For Zyxel Devices that support 2.5 Gbps Multi-Gigabit Ethernet (GbE) WAN/LAN ports, the port speeds
are backward compatible with standard Gigabit speed. See Section 1.1.1 on page 22 for more
information on Multi-Gigabit Ethernet. The Zyxel Devices with an SFP port can also provide Internet
access through a Multi-Gigabit GPON WAN connection. See the following table for the features that
your Zyxel Device supports.
The following table describes the feature differences of the Zyxel Device by model.
Table 1 Zyxel Device Comparison Table
AX7501-B0 DX3300-T0 DX3301-T0 DX5301-B2 DX5301-B3 DX5401-B0
WiFi6 Wireless
Standard
2.4G WiFi Y Y Y Y Y Y
5G WiFi Y Y Y Y Y Y
Advanced
Broadband
Parental
Control
Schedule
YYYY Y Y
NNYY Y N
YYYY Y Y
AX/DX/EX/PX Series User’s Guide
19
Page 20

Chapter 1 Introducing the Zyxel Device
Table 1 Zyxel Device Comparison Table (continued)
AX7501-B0 DX3300-T0 DX3301-T0 DX5301-B2 DX5301-B3 DX5401-B0
Parental
Control
URL Filter
Home Security
URL filter
MPro Mesh
Extender
Support
2.5 Gbe WAN N N N N N N
2.5 Gbe LAN N N N N N N
10 Gbe LAN Y N N N N N
1G AON (SFP) N N N Y N Y
1G Ethernet
(SFP)
2.5G GPON
(SFP)
10G AON (SFP) Y N N N N N
10G Ethernet
(SFP)
10G XGPON
(SFP+)
USB Port for
Cellular
Backup, File
Sharing and
Media Server
DSL Port N Y Y Y Y Y
Phone Port
(VoIP)
Wall Mount Y Y Y Y Y Y
YNNY Y N
NNNN N N
YYYY Y Y
YNNN N N
NNNN N N
YNNN N N
YNNN N N
USB 3.0 USB 2.0 USB 2.0 USB 3.0 USB 3.0 USB 3.0
YNY Y Y Y
Table 2 Zyxel Device Comparison Table
EX3300-T0 EX2210-T0 EX3301-T0 EX5300-B3 EX5301-B3 EX5401-B0 EX5501-B0
WiFi6 Wireless
Standard
2.4G WiFi YYYYYYY
5G WiFi YYYYYYY
Advanced
Broadband
Parental
Control
Schedule
Parental
Control
URL Filter
Home Security
URL filter
YYYYYYY
NNNNNNN
YYYYYYY
NNNY YNY
NNNNNNN
AX/DX/EX/PX Series User’s Guide
20
Page 21

Chapter 1 Introducing the Zyxel Device
Table 2 Zyxel Device Comparison Table (continued)
EX3300-T0 EX2210-T0 EX3301-T0 EX5300-B3 EX5301-B3 EX5401-B0 EX5501-B0
MPro Mesh
Extender
Support
2.5 Gbe WAN N N N N N N Y
2.5 Gbe LAN N N N N N N Y
10 Gbe LANNNNNNNN
1G AON (SFP)NNNNNYN
1G Ethernet
(SFP)
2.5G GPON
(SFP)
10G AON (SFP)NNNNNNN
10G Ethernet
(SFP)
10G XGPON
(SFP+)
USB Port for
Cellular
Backup, File
Sharing and
Media Server
DSL Port NNNNNNN
Phone Port
(VoIP)
Wall MountYYYYYYY
YYYNNYY
NNNNNNN
NNNNNNN
NNNNNNN
NNNNNNN
USB 2.0USB 2.0USB 2.0USB 3.0USB 3.0USB 3.0USB 3.0
NNYNY YY
Table 3 Zyxel Device Comparison Table
EX5600-T1 EX5601-T0 EX5601-T1 PX7501-B0
WiFi6 Wireless
Standard
2.4G WiFi YYYY
5G WiFi YYYY
Advanced
Broadband
Parental
Control
Schedule
Parental
Control
URL Filter
Home Security
URL filter
MPro Mesh
Extender
Support
2.5 Gbe WAN Y Y Y N
2.5 Gbe LAN Y Y Y N
10 Gbe LAN N N N Y
YYYY
NNNN
YYYY
NNNY
YYYN
YYYY
AX/DX/EX/PX Series User’s Guide
21
Page 22

Chapter 1 Introducing the Zyxel Device
Table 3 Zyxel Device Comparison Table (continued)
EX5600-T1 EX5601-T0 EX5601-T1 PX7501-B0
1G AON (SFP)NNNN
1G Ethernet
(SFP)
2.5G GPON
(SFP)
10G AON (SFP)NNNN
10G Ethernet
(SFP)
10G XGPON
(SFP+)
USB Port for
Cellular
Backup, File
Sharing and
Media Server
DSL Port NNNN
Phone Port
(VoIP)
Wall MountYYYY
NYNN
NYNN
NNNN
NNNN
USB 3.0 USB 3.0 USB 3.0 USB 3.0
NYYY
Note: For DX3300/3301-T0 and EX3300/3301-T0, the IGMP/MLD settings screen and the
multicast status screen are not available in the web configurator. IGMP/MLD is enabled
by default. The default IGMP version is 3. The default MLD version is 2.
1.1.1 Multi-Gigabit Ethernet
A 2.5 Gigabit Ethernet port supports speeds of 2.5 Gbps if the connected device supports 2.5 Gbps.
While a 10 Gigabit Ethernet port supports speeds of 10 Gbps if the connected device supports 10 Gbps
and a Cat 6a (up to 100 m) or Cat 6 cable (up to 50 m) is used.
Some network devices such as gaming computers, servers, network attached storage (NAS) devices, or
access points may have network cards that are capable of 2.5 Gbps or 5 Gbps connectivity.
If these devices are connected to a 1 Gbps or 10 Gbps Ethernet port, they can only transmit or receive
up to 1 Gbps as speeds of 2.5 Gbps / 10 Gbps cannot be attained. Moreover, if network devices with 2.5
Gbps / 10 Gbps network cards are connected to a 2.5 Gbps / 10 Gbps Ethernet port, you must use Cat
5e / Cat 6A or better Ethernet cables to achieve 2.5 Gbps / 10 Gbps speeds. Most buildings, at the time
of writing, use Cat 5e or Cat 6 Ethernet cables.
Multi-Gigabit Ethernet ports automatically allow connections up to the speed of the connected network
device (100 Mbps (not supported on EX5501-B0), 1 Gbp s, 2.5 Gbps or 5 Gbps), and you just need to use
a Cat 5, Cat 5e or Cat 6 Ethernet cable.
AX/DX/EX/PX Series User’s Guide
22
Page 23

Chapter 1 Introducing the Zyxel Device
Figure 1 Multi-Gigabit Application
See the following table for the cables required and distance limitation to attain the corresponding
speed.
Table 4 Ethernet Cable Types
CABLE TRANSMISSION SPEED MAXIMUM DISTANCE BANDWIDTH CAPACITY
Category 5 100 Mbps 100 m 100 MHz
Category 5e 1 Gbps / 2.5 Gbps / 5 Gbps 100 m 100 MHz
Category 6 5 Gbps / 10 Gbps 50 m 250 MHz
Category 6a 10 Gbps 100 m 500 MHz
Category 7 10 Gbps 100 m 650 MHz
1.2 Example Applications
This section shows a few examples of using the Zyxel Device in various network environments. Note that
the Zyxel Device in the figure is just an example Zyxel Device and not your actual Zyxel Device.
1.2.1 Internet Access
The AX7501-B0, PX7501-B0, DX5401-B0 and EX5401-B0 provides shared Internet access by connecting a
fiber cable provided by the ISP to the FIBER port. It supports OMCI (ONU Management and Control
Interface) to connect to the ISP’s OLT (Optical Line Terminal).
The DX3300-T0, DX3301-T0, DX5301-B2/B3 and DX5401-B0 provide Internet access by connecting the
WAN port to your ISP through a DSL cable.
The EX3300-T0/EX2210-T0, EX3301-T0, EX5300-B3, EX5301-B3 and EX5401-B0, EX5501-B0 provide Internet
access by connecting the WAN port to your ISP through an Ethernet cable.
The EX5600-T1 and EX5601-T1 provide Internet access by connecting the 2.5G WAN port to a
broadband modem through an Ethernet cable.
The EX5601-T0 provides Internet access by:
• connecting the 2.5G WAN port to your ISP through an Ethernet cable, or
AX/DX/EX/PX Series User’s Guide
23
Page 24

Chapter 1 Introducing the Zyxel Device
• connecting the SFP port to your ISP with an Ethernet or fiber optic cable through an SFP transceiver.
For Zyxel Devices that support both DSL/Ethernet WAN port and SFP port, see Section 1.2.2 on page 24
for WAN connection priority.
Computers can connect to the Zyxel Device’s LAN ports (or wirelessly) and access the Internet
simultaneously.
Figure 2 Zyxel Device’s Internet Access Application
You can also configure Firewall on the Zyxel Device for secure Internet access. When the Firewall is on,
all incoming traffic from the Internet to your network is blocked by default unless it is initiated from your
network. This means that probes from the outside to your network are not allowed, but you can safely
browse the Internet and download files.
Connect the WAN port to the broadband modem or router. This way, you can access the Internet
through an Ethernet connection and use the QoS, Firewall and parental control functions on the Zyxel
Device.
Figure 3 Zyxel Device’s Internet Access Application: Ethernet WAN
1.2.2 WAN Priority
The WAN connection priority is as follows:
1 SFP
2 Ethernet WAN
3 DSL
4 Cellular WAN (3G/4G)
See Section 1.3 on page 28 for more information about Cellular backup.
AX/DX/EX/PX Series User’s Guide
24
Page 25

1.2.3 Dual-Band WiFi
By default, WiFi is enabled on the Zyxel Device. IEEE 802.11a/b/g/n/ac/ax compliant clients can
wirelessly connect to the Zyxel Device to access network resources.
The Zyxel Device is a dual-band gateway that can use both 2.4G and 5G networks at the same time.
You could use the 2.4 GHz band for regular Internet surfing and downloading while using the 5 GHz
band for time sensitive traffic like high-definition video, music, and gaming.
Figure 4 Dual-Band Application
Chapter 1 Introducing the Zyxel Device
The Zyxel Device is a wireless Access Point (AP) for IEEE 802.11b/g/n/a/ac/ax WiFi clients, such as
notebook computers, iPads, smartphones, and so on. It allows them to connect to the Internet without
having to rely on inconvenient Ethernet cables.
Your Zyxel Device supports WiFi Protected Setup (WPS), which allows you to quickly set up a wireless
network with strong security.
Figure 5 Wireless Access Example
AX/DX/EX/PX Series User’s Guide
25
Page 26

Chapter 1 Introducing the Zyxel Device
1.2.4 VoIP Applications
The Zyxel Device’s VoIP function allows you to register up to two SIP (Session Initiation Protocol) accounts
and use the Zyxel Device to make and receive VoIP telephone calls. The Zyxel Device sends your call to
a VoIP service provider’s SIP server which forwards the calls to either VoIP or PSTN phones.
Figure 6 VoIP Application
1.2.5 Zyxel Device’s USB Support
The USB port of the Zyxel Device is used for cellular WAN backup, file-sharing, and media server.
Cellular WAN (3G/4G) Backup
Connect a supported cellular USB dongle with an active SIM card to the USB port. This adds a second
WAN interface and allows the Zyxel Device to wirelessly access the Internet via a cellular network. The
cellular WAN connection is a backup in case the DSL/Ethernet/Fiber connection fails.
To set up a cellular connection, click Network > Broadband > Cellular Backup.
To update the supported cellular USB dongle list, download the latest WWAN package from the Zyxel
website and upload it to the Zyxel Device using the Maintenance > Firmware Upgrade screen.
Figure 7 Internet Access Application: Cellular WAN
AX/DX/EX/PX Series User’s Guide
26
Page 27

Chapter 1 Introducing the Zyxel Device
File Sharing
Use the built-in USB 3.0 port to share files on a USB memory stick or a USB hard drive (A). Use FTP to access
the files on the USB device.
Figure 8 USB File Sharing Application
Media Server
You can also use the Zyxel Device as a media server. This lets anyone on your network play video, music,
and photos from a USB device (A) connected to the Zyxel Device’s USB port (without having to copy
them to another computer).
Figure 9 USB Media Server Application
AX/DX/EX/PX Series User’s Guide
27
Page 28

Chapter 1 Introducing the Zyxel Device
1.3 Ways to Manage the Zyxel Device
Use any of the following methods to manage the Zyxel Device.
• Web Configurator. This is recommended for management of the Zyxel Device using a (supported)
web browser.
• Simple Network Management Protocol (SNMP). Use to monitor and/or manage the Zyxel Device by
an SNMP manager.
• Secure Shell (SSH), Telnet. Use for troubleshooting the Zyxel Device by qualified personnel.
• FTP. Use FTP for firmware upgrades and configuration backup or restore.
1.4 Good Habits for Managing the Zyxel Device
Do the following things regularly to make the Zyxel Device more secure and to manage the Zyxel
Device more effectively.
• Change the WiFi and Web Configurator passwords. Use a password that is not easy to guess and that
consists of different types of characters, such as numbers and letters.
• Write down the passwords and put it in a safe place.
• Back up the configuration (and make sure you know how to restore it). Restoring an earlier working
configuration may be useful if the device becomes unstable or even crashes. If you forget your
password, you will have to reset the Zyxel Device to its factory default settings. If you backed up an
earlier configuration file, you would not have to totally re-configure the Zyxel Device. You could
simply restore your last configuration.
AX/DX/EX/PX Series User’s Guide
28
Page 29

2.1 Hardware
This section describes the front and rear panels for each model. If your model is not shown here, refer to
the Zyxel Device’s Quick Start Guides to see the product drawings and how to make the hardware
connections.
2.2 LED Indicators Panel
The following shows the Zyxel Device LED indicators panel and the LED behaviors.
None of the LEDs are on if the Zyxel Device is not receiving power.
CHAPTER 2
Hardware
2.2.1 AX7501, EX5501 and PX7501
Figure 10 LED Indicators (AX7501-B0 / PX7501-B0)
Figure 11 LED Indicators (EX5501-B0)
Note: The 2.5G LAN and 2.5G WAN LEDs are only for the Ethernet router. 10G LAN is only for the AON and PON
routers. See Section 1.1 on page 19 for more information.
The following are the LED descriptions for your AX7501 / EX5501 / PX7501.
Table 5 LED Descriptions (AX7501, EX5501 and PX7501)
LED COLOR STATUS DESCRIPTION
POWER Green On The Zyxel Device is receiving power and ready for use.
Blinking The Zyxel Device is self-testing.
Red On The Zyxel Device detected an error while self-testing, or there is a device
malfunction.
Blinking The Zyxel Device is upgrading firmware.
Off The Zyxel Device is not receiving power.
AX/DX/EX/PX Series User’s Guide
29
Page 30

Chapter 2 Hardware
Table 5 LED Descriptions (AX7501, EX5501 and PX7501) (continued)
LED COLOR STATUS DESCRIPTION
2.5G WAN Blue On The Zyxel Device has a successful 2.5 Gbps Ethernet connection on the
WAN.
Green On The Zyxel Device has a successful 1 Gbps Ethernet connection on the WAN.
Off The Zyxel Device does not have an Ethernet connection with the WAN.
The LED will cycle Green > Blue > Off > repeat, when the Zyxel Device has
an unsupported 100 Mbps Ethernet connection on the WAN.
FIBER Green On The FIBER port is connected to the ISP’s ONT and the Zyxel Device is
Blinking The Zyxel Device’s FIBER port is trying to build a PON connection.
Red On The optical power received (the strength of optical signals transmitted on
Off The connection to the ISP’s ONT is down.
INTERNET Green On The Zyxel Device has an IP connection but no traffic.
Blinking The Zyxel Device is sending or receiving IP traffic.
receiving optical signals normally.
the remote optical module) is too low.
Your device has a WAN IP address (either static or assigned by a DHCP
server), PPP negotiation was successfully completed (if used).
Note: For AON and PON routers only; see Section 1.1 on page 19
for more information.
Off There is no Internet connection or the gateway is in Bridge mode.
Red On The Zyxel Device attempted to make an IP connection but failed. Possible
causes are no response from a DHCP server, no PPPoE response, PPPoE
authentication failed.
Blinking The Zyxel Device has an unsupported 100 Mbps Ethernet connection on the
WAN.
Note: For Ethernet routers only, see Section 1.1 on page 19 for more
information.
2.5G LAN
(for the
EX5501 only)
10G LAN (for
AX7501-B0/
PX7501-B0)
LAN1 – 4 Green On The Zyxel Device has a successful 10/100/1000 Mbps Ethernet connection
Green On The Zyxel Device has a successful 2500 Mbps Ethernet connection with a
device on the Local Area Network (LAN) through the 2.5G LAN port.
Blinking The Zyxel Device is sending or receiving data to/from the LAN at 2500 Mbps
through the 2.5G LAN port.
Off The Zyxel Device does not have an Ethernet connection with the LAN
through the 2.5G LAN port.
Green On The Zyxel Device has a successful 10/100/10000 Mbps Ethernet connection
with a device on the Local Area Network (LAN) through the 10G LAN port.
Blinking The Zyxel Device is sending or receiving data to/from the LAN at 10/100/
10000 Mbps through the 10G LAN port.
Off The Zyxel Device does not have an Ethernet connection with the LAN
through the 10G LAN port.
with a device on the Local Area Network (LAN) through the LAN1 – 4 ports.
Blinking The Zyxel Device is sending or receiving data to/from the LAN at 10/100/
1000 Mbps through the LAN1 – 4 ports.
Note: For AON and PON routers only; see Section 1.1 on page 19
for more information.
Off The Zyxel Device does not have an Ethernet connection with the LAN
through the LAN1 – 4 ports.
AX/DX/EX/PX Series User’s Guide
30
Page 31

Chapter 2 Hardware
Table 5 LED Descriptions (AX7501, EX5501 and PX7501) (continued)
LED COLOR STATUS DESCRIPTION
WiFi 2.4G Green On The 2.4G wireless network is activated.
Blinking The Zyxel Device is communicating with 2.4G WiFi clients.
Note: For AON and PON routers only; see Section 1.1 on page 19
for more information.
Off The 2.4G wireless network is not activated.
Amber Blinking The Zyxel Device is setting up a WPS connection with a 2.4G WiFi client.
WiFi 5Gi Green On The 5G wireless network is activated.
Blinking The Zyxel Device is communicating with 5G WiFi clients.
Note: For AON and PON routers only; see Section 1.1 on page 19
for more information.
Off The 5G wireless network is not activated.
Amber Blinking The Zyxel Device is setting up a WPS connection with a 5G WiFi client.
PHONE Green On A SIP account is registered for the phone port.
Blinking The telephone connected to this phone port has an incoming call or is off
the hook.
Off The phone port does not have a SIP account registered.
Amber On A SIP account is registered for the phone port, and there is a voice message
in the corresponding SIP account.
Blinking The telephone connected to this phone port has an incoming call or is off
the hook. There is a voice message in the corresponding SIP account.
USB Green On The Zyxel Device recognizes a USB connection through the USB port.
Blinking The Zyxel Device is sending or receiving data to/from the USB device
connected to it.
Note: For AON and PON routers only; see Section 1.1 on page 19
for more information.
Off The Zyxel Device does not detect a USB connection through the USB port.
AX/DX/EX/PX Series User’s Guide
31
Page 32

Chapter 2 Hardware
2.2.2 DX3300-T0, EX3300-T0, EX2210-T0, DX3301-T0 and EX3301-T0
Figure 12 LED Indicators (DX3300-T0 / DX3301-T0 / EX3300-T0 / EX2210-T0 / EX3301-T0)
The following are the LED descriptions for your DX3300-T0 / EX3300-T0/ EX2210-T0.
Table 6 LED Descriptions (DX3300-T0 / EX3300-T0/ EX2210-T0)
LED COLOR STATUS DESCRIPTION
Power Green On The Zyxel Device is receiving power and ready for use.
Blinking The Zyxel Device is self-testing.
DSL /
Ethernet
WAN
Red On The Zyxel Device detected an error while self-testing, or there is a
Blinking The Zyxel Device is upgrading firmware.
Off The Zyxel Device is not receiving power.
Green On The VDSL/ ADSL link is up.
Slow Blinking The Zyxel Device is looking for a VDSL or ADSL link.
Fast Blinking The Zyxel Device is initializing the VDSL or ADSL link.
device malfunction.
AX/DX/EX/PX Series User’s Guide
32
Page 33

Chapter 2 Hardware
Table 6 LED Descriptions (DX3300-T0 / EX3300-T0/ EX2210-T0)
LED COLOR STATUS DESCRIPTION
Internet Green On The Zyxel Device has an IP connection but no traffic.
Your device has a WAN IP address (either static or assigned by a DHCP
server), PPP negotiation was successfully completed (if used) and the
DSL connection is up.
Blinking The Zyxel Device is sending or receiving IP traffic.
Off There is no Internet connection or the gateway is in bridged mode.
Red On The Zyxel Device attempted to make an IP connection but failed.
Possible causes are no response from a DHCP server, no PPPoE
response, PPPoE authentication failed.
LAN1 – 4 Green On The Zyxel Device has a successful 10/100/1000 Mbps Ethernet
connection with a device on the Local Area Network (LAN).
Blinking The Zyxel Device is sending or receiving data to/from the LAN at 10/
100/1000 Mbps.
Off The Zyxel Device does not have an Ethernet connection with the LAN.
2.4G
WLAN/WPS
5G WLAN/
WPS
Green On The 2.4 GHz wireless network is activated.
Blinking The Zyxel Device is communicating with 2.4 GHz WiFi clients.
Off The link is down or disabled.
Amber Blinking The Zyxel Device is setting up a WPS connection with a 2.4 GHz WiFi
client.
Green On The 5 GHz wireless network is activated.
Blinking The Zyxel Device is communicating with 5 GHz WiFi clients.
Off The link is down or disabled.
Amber Blinking The Zyxel Device is setting up a WPS connection with a 5 GHz WiFi
client.
The following are the LED descriptions for your DX3301-T0 / EX3301-T0.
Table 7 LED Descriptions (DX3301-T0 / EX3301-T0)
LED COLOR STATUS DESCRIPTION
Power Green On The Zyxel Device is receiving power and ready for use.
Blinking The Zyxel Device is self-testing.
Red On The Zyxel Device detected an error while self-testing, or there is a
device malfunction.
Blinking The Zyxel Device is upgrading firmware.
Off The Zyxel Device is not receiving power.
DSL /
Ethernet
WAN
Green On The VDSL / ADSL link is up.
Slow Blinking The Zyxel Device is looking for a VDSL / ADSL link.
Fast Blinking The Zyxel Device is initializing the VDSL / ADSL link.
AX/DX/EX/PX Series User’s Guide
33
Page 34

Chapter 2 Hardware
Table 7 LED Descriptions (DX3301-T0 / EX3301-T0) (continued)
LED COLOR STATUS DESCRIPTION
Internet Green On The Zyxel Device has an IP connection but no traffic.
Your device has a WAN IP address (either static or assigned by a DHCP
server), PPP negotiation was successfully completed (if used) and the
DSL connection is up.
Blinking The Zyxel Device is sending or receiving IP traffic.
Off There is no Internet connection or the gateway is in bridged mode.
Red On The Zyxel Device attempted to make an IP connection but failed.
Possible causes are no response from a DHCP server, no PPPoE
response, PPPoE authentication failed.
LAN1 – 4 Green On The Zyxel Device has a successful 10/100/1000 Mbps Ethernet
connection with a device on the Local Area Network (LAN).
Blinking The Zyxel Device is sending or receiving data to/from the LAN at 10/
100/1000 Mbps.
Off The Zyxel Device does not have an Ethernet connection with the LAN.
2.4G
WLAN/WPS
5G WLAN/
WPS
Phone1,
Phone2
Green On The 2.4 GHz wireless network is activated.
Blinking The Zyxel Device is communicating with 2.4 GHz WiFi clients.
Off The link is down or disabled.
Amber Blinking The Zyxel Device is setting up a WPS connection with a 2.4 GHz WiFi
client.
Green On The 5 GHz wireless network is activated.
Blinking The Zyxel Device is communicating with 5 GHz WiFi clients.
Off The link is down or disabled.
Amber Blinking The Zyxel Device is setting up a WPS connection with a 5 GHz WiFi
client.
Green On A SIP account is registered for at least one phone port, and there is no
voice message in the corresponding SIP account.
Blinking A telephone connected to one of the phone port has its receiver off
the hook or there is an incoming call. There is no voice message in the
corresponding SIP account.
Amber On A SIP account is registered for the phone port and there is a voice
message in the corresponding SIP account.
Blinking A telephone connected to the phone port has its receiver off the hook
or there is an incoming call. There is voice message in the
corresponding SIP account.
Off • The Zyxel Device is turned off.
• The VoIP function is not activated.
• The SIP account is not enabled.
• The phone port does not have a SIP account registered.
AX/DX/EX/PX Series User’s Guide
34
Page 35

Chapter 2 Hardware
2.2.3 DX5301-B2/B3, EX5300-B3 and EX5301-B3
Figure 13 LED Indicators (DX5301-B2 / DX5301-B3 / EX5301-B3)
AX/DX/EX/PX Series User’s Guide
35
Page 36

Figure 14 LED Indicators (EX5300-B3)
Chapter 2 Hardware
The following are the LED descriptions for your DX5301-B2/B3, EX5300-B3 and EX5301-B3.
Table 8 LED Descriptions (DX5301-B2/B3, EX5300-B3 and EX5301-B3)
LED COLOR STATUS DESCRIPTION
POWER Green On The Zyxel Device is receiving power and ready for use.
Blinking The Zyxel Device is self-testing.
DX5301-B2
WAN
Red On The Zyxel Device detected an error while self-testing, or there is a
Blinking The Zyxel Device is upgrading firmware.
Off The Zyxel Device is not receiving power.
Green On The DSL or Ethernet WAN or SFP port is connected successfully.
device malfunction.
Note: SFP connection has priority over DSL and Ethernet WAN
connection. Ethernet WAN connection has priority over
DSL connection. The Ethernet WAN and DSL ports will be
disabled if SFP link is up. The DSL port will be disabled if
the Ethernet WAN link is up.
Blinking (Slow) The DX5301-B2 is detecting the connection type (ADSL or VDSL) on its
DSL port.
Blinking (Fast) The DX5301-B2 connection on its DSL port is in process.
Off The DSL or Ethernet WAN or SFP port is not connected successfully.
AX/DX/EX/PX Series User’s Guide
36
Page 37

Chapter 2 Hardware
Table 8 LED Descriptions (DX5301-B2/B3, EX5300-B3 and EX5301-B3) (continued)
LED COLOR STATUS DESCRIPTION
DX5301-B3
WAN
Green On The DSL or Ethernet WAN port is connected successfully.
Note: Ethernet WAN connection has priority over DSL
connection. The DSL port will be disabled if the Ethernet
WAN link is up.
Blinking (Slow) The DX5301-B2 is detecting the connection type (ADSL or VDSL) on its
Blinking (Fast) The DX5301-B2 connection on its DSL port is in process.
Off The DSL or Ethernet WAN port is not connected successfully.
EX5300/
EX5301-B3
WAN
INTERNET Green On The Zyxel Device has an IP connection but no traffic.
LAN Green On The Zyxel Device has a successful 10/100/1000 Mbps Ethernet
WiFi 2.4G Green On The 2.4G wireless network is activated.
WiFi 5G Green On The 5G wireless network is activated.
PHONE Green On A SIP account is registered for the phone port.
Green On The Ethernet WAN port is connected successfully.
Off The Ethernet WAN port is not connected successfully.
Blinking The Zyxel Device is sending or receiving IP traffic.
Off There is no Internet connection or the gateway is in Bridge mode.
Red On The Zyxel Device attempted to make an IP connection but failed.
Blinking The Zyxel Device is sending or receiving data to/from the LAN at 10/
Off The Zyxel Device does not have an Ethernet connection with the LAN
Blinking The Zyxel Device is communicating with 2.4G WiFi clients.
Off The 2.4G wireless network is not activated.
Amber Blinking The Zyxel Device is setting up a WPS connection with a 2.4G WiFi
Blinking The Zyxel Device is communicating with 5G WiFi clients.
Off The 5G wireless network is not activated.
Amber Blinking The Zyxel Device is setting up a WPS connection with a 5G WiFi client.
Blinking The telephone connected to this phone port has an incoming call or is
Amber On A SIP account is registered for the phone port, and there is a voice
Blinking The telephone connected to this phone port has an incoming call or is
Off The phone port does not have a SIP account registered.
DSL port.
Your device has a WAN IP address (either static or assigned by a
DHCP server), PPP negotiation was successfully completed (if used).
Possible causes are no response from a DHCP server, no PPPoE
response, PPPoE authentication failed.
connection with a device on the Local Area Network (LAN) through
the LAN1 – 4 ports.
100/1000 Mbps through the LAN1 – 4 ports.
through the LAN1 – 4 ports.
client.
off the hook.
message in the corresponding SIP account.
off the hook. There is a voice message in the corresponding SIP
account.
AX/DX/EX/PX Series User’s Guide
37
Page 38

Chapter 2 Hardware
2.2.4 DX5401-B0 and EX5401-B0
Figure 15 LED Indicators (DX5401-B0 / EX5401-B0)
Note: The phone LED is for the Zyxel Device with phone ports only; see Section 1.1 on page 19
for more information.
The following are the LED descriptions for your DX5401-B0 / EX5401-B0.
Table 9 LED Descriptions (DX5401-B0 / EX5401-B0)
LED COLOR STATUS DESCRIPTION
Power Green On The Zyxel Device is receiving power and ready for use.
Blinking The Zyxel Device is self-testing.
DSL /
Ethernet
WAN
Red On The Zyxel Device detects an error while self-testing, or there is a device
Blinking The Zyxel Device is upgrading firmware.
Off The Zyxel Device is not receiving power.
Green On The VDSL line or a successful 10/100/1000 Mbps Ethernet connection
Slow Blinking The Zyxel Device is looking for a VDSL line.
Fast Blinking The Zyxel Device is initializing the VDSL line.
Off There is no Ethernet connection on the WAN.
Amber On The ADSL line on the WAN is up.
Slow Blinking The Zyxel Device is looking for an ADSL line
Fast Blinking The Zyxel Device is initializing the ADSL line.
malfunction.
on the WAN is up.
AX/DX/EX/PX Series User’s Guide
38
Page 39

Chapter 2 Hardware
Table 9 LED Descriptions (DX5401-B0 / EX5401-B0) (continued)
LED COLOR STATUS DESCRIPTION
Internet Green On The Zyxel Device has an IP connection but no traffic.
Your device has a WAN IP address (either static or assigned by a
DHCP server), PPP negotiation was successfully completed (if used)
and the DSL connection is up.
Blinking The Zyxel Device is sending or receiving IP traffic.
Off There is no Internet connection or the gateway is in bridged mode.
Red On The Zyxel Device attempted to make an IP connection but failed.
Possible causes are no response from a DHCP server, no PPPoE
response, PPPoE authentication failed.
LAN1 – 4 Green On The Zyxel Device has a successful 10/100/1000 Mbps Ethernet
connection with a device on the Local Area Network (LAN).
Blinking The Zyxel Device is sending or receiving data to/from the LAN at 10/
100/1000 Mbps.
Off The Zyxel Device does not have an Ethernet connection with the LAN.
2.4G WLAN/
WPS
5G WLAN/
WPS
Phone1,
Phone2
Green On The 2.4 GHz wireless network is activated.
Blinking The Zyxel Device is communicating with 2.4 GHz WiFi clients.
Amber On The WPS process fails.
Blinking The Zyxel Device is setting up a WPS connection with a 2.4 GHz WiFi
client.
Off The 2.4 GHz wireless network is not activated.
Green On The 5 GHz wireless network is activated.
Blinking The Zyxel Device is communicating with 5 GHz WiFi clients.
Amber On The WPS process fails.
Blinking The Zyxel Device is setting up a WPS connection with a 5 GHz WiFi
client.
Off The 5 GHz wireless network is not activated.
Green On A SIP account is registered for at least one phone port, and there is no
voice message in the corresponding SIP account.
Blinking A telephone connected to one of the phone port has its receiver off
the hook or there is an incoming call. There is no voice message in the
corresponding SIP account.
Amber On A SIP account is registered for the phone port and there is a voice
message in the corresponding SIP account.
Blinking A telephone connected to the phone port has its receiver off the
hook or there is an incoming call. There’s voice message in the
corresponding SIP account.
AX/DX/EX/PX Series User’s Guide
39
Page 40

Chapter 2 Hardware
2.2.5 EX5600-T1, EX5601-T0 and EX5601-T1
Figure 16 LED Indicators (EX5600-T1)
AX/DX/EX/PX Series User’s Guide
40
Page 41

Figure 17 LED Indicators (EX5601-T0)
Chapter 2 Hardware
Figure 18 LED Indicators (EX5601-T1)
AX/DX/EX/PX Series User’s Guide
41
Page 42

Chapter 2 Hardware
Note: The Phone LED is for the Zyxel Device with phone ports only; the SFP LED is for the Zyxel
Device with an SFP port only; see Section 1.1 on page 19 for more information.
The following are the LED descriptions for your EX5600-T1 / EX5601-T0/ EX5601-T1.
Table 10 LED Descriptions (EX5600-T1 / EX5601-T0/ EX5601-T1)
LED COLOR STATUS DESCRIPTION
POWER Green On The Zyxel Device is receiving power and ready for use.
Blinking The Zyxel Device is booting up.
Red On The Zyxel Device detects an error while self-testing, or there is a device
Blinking The Zyxel Device is upgrading firmware.
Off The Zyxel Device is not receiving power.
2.5G WAN Green On The Zyxel Device has a successful Ethernet connection on the 2.5G
Off The Zyxel Device does not have an Ethernet connection on the 2.5G
INTERNET Green On The Zyxel Device has a WAN IP address (either static or assigned by a
Blinking The Zyxel Device is sending or receiving traffic.
Off There is no Internet connection or the gateway is in bridged mode.
Red On The Zyxel Device attempted to obtain an WAN IP but failed. Possible
LAN Green On The Zyxel Device has a successful Ethernet connection with a device
Blinking The Zyxel Device is sending or receiving data to/from the LAN.
Off The Zyxel Device does not have an Ethernet connection on the LAN.
2.4G Green On The 2.4 GHz WiFi is activated.
Blinking The Zyxel Device is communicating with 2.4 GHz WiFi clients.
Amber Blinking The Zyxel Device is setting up a WPS connection with a 2.4 GHz WiFi
Off The 2.4 GHz WiFi network is not activated.
5G Green On The 5 GHz WiFi network is activated.
Blinking The Zyxel Device is communicating with 5 GHz WiFi clients.
Amber Blinking The Zyxel Device is connecting to 5 GHz WiFi clients via WPS.
Off The 5 GHz WiFi network is not activated.
Phone Green On All phone ports are on-hook. An SIP account is registered for at least
Blinking A telephone connected to one of the phone port has its receiver off
Amber On A SIP account is registered for the phone port and there is a voice
Blinking A telephone connected to the phone port has its receiver off the
Off All phone ports are on-hook. The VoIP function is disabled, or there is
malfunction.
WAN port.
WAN port.
DHCP server) and the Internet connection is up.
causes are no response from a DHCP server, no PPPoE response,
PPPoE authentication failed.
on the Local Area Network (LAN).
client.
one phone port, and there is no voice message in the corresponding
SIP account.
the hook or there is an incoming call. There is no voice message in the
corresponding SIP account.
message in the corresponding SIP account.
hook or there is an incoming call. There’s voice message in the
corresponding SIP account.
no registered SIP account defined for any of the phone ports.
AX/DX/EX/PX Series User’s Guide
42
Page 43

Chapter 2 Hardware
Table 10 LED Descriptions (EX5600-T1 / EX5601-T0/ EX5601-T1) (continued)
LED COLOR STATUS DESCRIPTION
SFP Green On The SFP port is connected to the ISP’s ONT and the Zyxel Device is
receiving optical signals normally, or the SFP port’s Ethernet WAN
connection is up.
Off The connection to the ISP’s ONT or the Ethernet WAN connection is
down.
Note: The phone LED is for the Zyxel Device with phone ports only; see Section 1.1 on page 19
for more information.
2.3 Ports Panel
The following shows the Zyxel Device ports panel and connection ports.
2.3.1 EX5501, AX7501 and PX7501
Figure 19 AX7501-B0
Figure 20 EX5501-B0
Figure 21 PX7501-B0
The following table describes the items on the ports panels of EX5501, AX7501 and PX7501.
Table 11 Panel Ports and Buttons
LABEL DESCRIPTION
2.5G WAN For EX5501
Connect an Ethernet cable to the Ethernet WAN port for Internet access.
FIBER For AX7501-B0
Insert a compatible SFP+ transceiver to the FIBER port and connect the fiber cable for Internet
access.
For PX7501-B0
Connect the fiber cable to the FIBER port for Internet access.
AX/DX/EX/PX Series User’s Guide
43
Page 44

Chapter 2 Hardware
Table 11 Panel Ports and Buttons (continued)
LABEL DESCRIPTION
USB The USB port is used for cellular WAN backup, file-sharing, and media server.
LAN1 – LAN4
2.5G LAN
10G LAN
PHONE1/2 Connect analog phones to the PHONE ports to make phone calls.
RESET Press the button to return the Zyxel Device to the factory defaults.
POWER Connect the power adapter and press the ON/OFF button to start the device.
WPS Press the WPS button for more than 1 second (EX5501-B0) / 5 seconds (AX7501-B0 / PX7501-B0) to
WLAN Press the WLAN button for more than 1 second (EX5501-B0) / 2 seconds (AX7501-B0 / PX7501-B0) to
Connect computers or other Ethernet devices to Ethernet ports for Internet access.
quickly set up a secure wireless connection between the device and a WPS-compatible client.
enable the wireless function.
2.3.2 DX3300-T0, DX3301-T0, DX5301-B2/B3, DX5401-B0, EX3300-T0/ EX2210-T0, EX3301-T0, EX5300-B3, EX5301-B3 and EX5401-B0
Figure 22 DX3300-T0
AX/DX/EX/PX Series User’s Guide
44
Page 45

Figure 23 DX3301-T0
Chapter 2 Hardware
Figure 24 DX5301-B2 / DX5301-B3
AX/DX/EX/PX Series User’s Guide
45
Page 46

Figure 25 DX5401-B0
Chapter 2 Hardware
Figure 26 EX3300-T0/ EX2210-T0
AX/DX/EX/PX Series User’s Guide
46
Page 47

Figure 27 EX3301-T0
Chapter 2 Hardware
Figure 28 EX5300-B3
AX/DX/EX/PX Series User’s Guide
47
Page 48

Figure 29 EX5301-B3
Chapter 2 Hardware
Figure 30 EX5401-B0
AX/DX/EX/PX Series User’s Guide
48
Page 49

Chapter 2 Hardware
The following table describes the items on the ports panels of DX3300-T0, DX3301-T0, DX5301-B2/B3,
DX5401-B0, EX3300-T0/EX2210-T0, EX3301-T0, EX5300-B3, EX5301-B3 and EX5401-B0.
Table 12 Panel Ports and Buttons
LABEL DESCRIPTION
WAN For DX5301-B3, EX3300-T0/EX2210-T0, EX3301-T0, EX5300-B3, EX5301-B3 and EX5401-B0, connect an
LAN1 – LAN4 Connect computers or other Ethernet devices to Ethernet ports for Internet access.
FIBER For DX5401-B0 and EX5401-B0, Insert a compatible SFP transceiver to the FIBER port and connect the
USB The USB port is used for cellular WAN backup, file-sharing, and media server.
DSL For DX3300-T0, DX3301-T0, DX5301-B2/B3 and DX5401-B0, connect a DSL cable to the DSL port for
PHONE1/2
RESET Press the button to return the Zyxel Device to the factory defaults.
POWER Connect the power adapter and press the ON/OFF button to start the device.
WPS Press the WPS button for more than 5 seconds to quickly setup a secure wireless connection
WLAN Press the WLAN button for more than 2 seconds to enable the wireless function.
Ethernet cable to the WAN port for Internet access.
For DX5301-B2, connect an Ethernet cable or a SFP cable for Internet access.
fiber cable for Internet access.
Internet connection.
For DX3301-T0, DX5301-B2/B3, DX5401-B0, EX3301-T0, EX5301-B3,and EX5401-B0, connect analog
phones to the PHONE ports to make phone calls.
between the device and a WPS-compatible client.
2.3.3 EX5600-T1, EX5601-T0, and EX5601-T1
Figure 31 EX5600-T1
AX/DX/EX/PX Series User’s Guide
49
Page 50

Figure 32 EX5601-T0/EX5601-T1
Chapter 2 Hardware
Note: See Section 1.1 on page 19 to see if your Zyxel Device supports the SFP port.
AX/DX/EX/PX Series User’s Guide
50
Page 51

Chapter 2 Hardware
Figure 33 EX5600-T1/EX5601-T0/EX5601-T1 Side Panels
AX/DX/EX/PX Series User’s Guide
51
Page 52

Chapter 2 Hardware
The following table describes the items on the ports panels of EX5600-T1, EX5601-T0, and EX5601-T1.
Table 13 Panel Ports and Buttons
LABEL DESCRIPTION
2.5G WAN For EX5600-T1 and EX5601-T1, connect an Ethernet cable to the 2.5G WAN port for an (up to) 2.5
Gbps Ethernet connection.
For EX5601-T0, connect an Ethernet cable to the 2.5G WAN port, or connect a fiber optic/Ethernet
cable to the SFP port through an SFP transceiver for an (up to) 2.5 Gbps Ethernet connection.
2.5G LAN1 Connect computers or other Ethernet devices to the 2.5G LAN port for Internet access with speed
LAN2-4 Connect computers or other Ethernet devices to Ethernet ports for Internet access.
SFP For EX5601-T0, insert a compatible SFP transceiver to the SFP port and connect a fiber optic or
USB The USB port is used for cellular WAN backup, file-sharing, and media server.
PHONE1/2
RESET Press the button for more than 5 seconds to return the Zyxel Device to the factory defaults.
POWER Connect the power adapter and press the ON/OFF button to start the device.
WPS Press the WPS button for more than 5 seconds to quickly setup a secure WiFi connection between
Wi-Fi Press the WiFi button for more than 2 seconds to enable the WiFi function.
up to 2.5 Gbps.
Ethernet cable for an (up to) 2.5 Gbps Internet connection.
For EX5601-T0,and EX5601-T1, connect analog phones to the PHONE ports with RJ 11 cables for VoIP
services.
the device and a WPS-compatible client.
AX/DX/EX/PX Series User’s Guide
52
Page 53

Chapter 2 Hardware
Transceiver Installation
Use the following steps to install an SFP transceiver.
1 Attach an ESD preventive wrist strap to your wrist and to a bare metal surface.
2 Align the transceiver in front of the slot opening.
3 Make sure the latch is in the lock position (latch styles vary), then insert the transceiver into the slot with
the exposed section of PCB board facing down.
4 Press the transceiver firmly until it clicks into place.
5 The Zyxel Device automatically detects the installed transceiver. Check the LEDs to verify that it is
functioning properly.
6 Remove the dust plugs from the transceiver and cables (dust plug styles vary).
7 Identify the signal transmission direction of the fiber cables and the transceiver. Insert the fiber cable into
the transceiver.
Figure 34 Latch in the Lock Position
Figure 35 Transceiver Installation Example
Figure 36 Connecting the Fiber Cables
Transceiver Removal
Use the following steps to remove an SFP transceiver.
1 Attach an ESD preventive wrist strap to your wrist and to a bare metal surface on the chassis.
2 Remove the fiber cables from the transceiver.
3 Pull out the latch and down to unlock the transceiver (latch styles vary).
AX/DX/EX/PX Series User’s Guide
53
Page 54

Chapter 2 Hardware
Note: Make sure the transceiver’s latch is pushed all the way down, so the transceiver can be
pulled out successfully.
4 Pull the latch, or use your thumb and index finger to grasp the tabs on both sides of the transceiver, and
carefully slide it out of the slot.
Note: Do NOT pull the transceiver out by force. You could damage it. If the transceiver will not
slide out, grasp the tabs on both sides of the transceiver with a slight up or down motion
and carefully slide it out of the slot. If unsuccessful, contact Zyxel Support to prevent
damage to your Zyxel Device and transceiver.
5 Insert the dust plug into the ports on the transceiver and the cables.
Figure 37 Removing the Fiber Cables
Figure 38 Opening the Transceiver’s Latch Example
Figure 39 Transceiver Removal Example
2.3.4 WPS Button
You can use the WPS button to quickly set up a secure wireless connection between the Zyxel Device
and a WPS-compatible client by adding one device at a time.
To activate WPS:
1 Make sure the POWER LED is on and not blinking.
2 Press the WPS button for at least 1 or 5 seconds (see the following table) and release it.
AX/DX/EX/PX Series User’s Guide
54
Page 55

Table 14 WPS Button Press Duration
MODELS
EX5501-B0 1 second
AX7501-B0, DX3300-T0, DX3301-T0,
DX5301-B2/B3, DX5401-B0, EX3300-T0/
EX2210-T0, EX3301-T0, EX5300-B3,
EX5301-B3, EX5401-B0, EX5600-T1,
EX5601-T0, EX5601-T1 and PX7501-B0
3 Press the WPS button on another WPS-enabled device within range of the Zyxel Device (within 120
seconds). The WIFI 2.4G / WIFI 5G LED flashes amber while the Zyxel Device sets up a WPS connection
with the other wireless device.
4 Once the connection is successfully made, the WIFI 2.4G / WIFI 5G LED will light green.
2.3.5 RESET Button
If you forget your password or cannot access the Web Configurator, you will need to use the RESET
button to reload the factory-default configuration file. This means that you will lose all configurations
that you had previously. The password will be reset to the factory default (see the device label), and the
LAN IP address will be “192.168.1.1”.
Chapter 2 Hardware
PRESS
DURATION
5 second
1 Make sure the POWER LED is on (not blinking).
2 To set the device back to the factory default settings, press the RESET button for more than 5 seconds or
until the POWER LED begins to blink and then release it. When the POWER LED begins to blink, the defaults
have been restored and the device restarts.
AX/DX/EX/PX Series User’s Guide
55
Page 56

Web Configurator
3.1 Overview
The Web Configurator is an HTML-based management interface that allows easy system setup and
management through Internet browser. Use a browser that supports HTML5, such as
Mozilla Firefox, or Google Chrome. The recommended minimum screen resolution is 1024 by 768 pixels.
In order to use the Web Configurator you need to allow:
• Web browser pop-up windows from your computer.
• JavaScript (enabled by default).
• Java permissions (enabled by default).
3.1.1 Access the Web Configurator
CHAPTER 3
Microsoft Edge,
1 Make sure your Zyxel Device hardware is properly connected (refer to the Quick Start Guide).
2 Make sure your computer has an IP address in the same subnet as the Zyxel Device. Your computer
should have an IP address from 192.168.1.2 to 192.168.1.254.
3 Launch your web browser. If the Zyxel Device does not automatically re-direct you to the login screen,
go to http://192.168.1.1.
4 A login screen displays. Select the language you prefer (upper right).
5 To access the administrative Web Configurator and manage the Zyxel Device, type the default user
name admin and the randomly assigned default password (see the Zyxel Device label) in the Login
screen and click Login. If you have changed the password, enter your password and click Login.
Figure 40 Password Screen
AX/DX/EX/PX Series User’s Guide
56
Page 57

Chapter 3 Web Configurator
Note: The first time you enter the password, you will be asked to change it. Make sure the new
password must contain at least one uppercase letter, one lowercase letter and one
number. For some models, the password must contain at least one English character
and one number. Please see the password requirement displayed on the screen.
6 The Connection Status screen appears. Use this screen to configure basic Internet access and wireless
settings.
Figure 41 Connection Status
AX/DX/EX/PX Series User’s Guide
57
Page 58

Chapter 3 Web Configurator
C
A
B
3.2 Web Configurator Layout
Figure 42 Screen Layout
As illustrated above, the main screen is divided into these parts:
• A – Settings Icon (Navigation Panel and Side Bar)
•B – Layout Icon
• C – Main Window
3.2.1 Settings Icon
Click this icon ( ) to see the side bar and navigation panel.
3.2.1.1 Side Bar
The side bar provides some icons on the right hand side.
AX/DX/EX/PX Series User’s Guide
58
Page 59

Chapter 3 Web Configurator
Figure 43 Side Bar
The icons provide the following functions.
Table 15 Web Configurator Icons in the Title Bar
ICON DESCRIPTION
Wizard: Click this icon to open screens where you can configure the Zyxel Device’s time zone
and wireless settings.
Theme: Click this icon to select a color that you prefer and apply it to the Web Configurator.
Language: Select the language you prefer.
Restart: Click this icon to reboot the Zyxel Device without turning the power off.
Logout: Click this icon to log out of the Web Configurator.
3.2.1.2 Navigation Panel
Click the menu icon ( ) to display the navigation panel that contains configuration menus and icons
(quick links). Click X to close the navigation panel.
AX/DX/EX/PX Series User’s Guide
59
Page 60

Chapter 3 Web Configurator
Use the menu items on the navigation panel to open screens to configure Zyxel Device features. The
following tables describe each menu item.
Figure 44 Navigation Panel
Table 16 Navigation Panel Summary
LINK TAB FUNCTION
Connection Status Use this screen to configure basic Internet access, wireless settings, and
Network Setting
Broadband Broadband Use this screen to view and configure ISP parameters, WAN IP address
Cellular Backup Use this screen to configure a cellular WAN connection as a backup to
Advanced Use this screen to enable or disable PTM over ADSL, Annex M/Annex J,
Wireless General Use this screen to configure the wireless LAN settings and WLAN
Guest/More AP Use this screen to configure multiple BSSs on the Zyxel Device.
MAC
Authentication
WPS Use this screen to configure and view your WPS (WiFi Protected Setup)
WMM Use this screen to enable or disable WiFi MultiMedia (WMM).
Others Use this screen to configure advanced wireless settings.
Channel Status Use this screen to scan wireless LAN channel noises and view the results.
MESH Use this screen to enable or disable Zyxel Mesh.
parental control settings. This screen also shows the network status of the
Zyxel Device and computers/devices connected to it.
assignment, and other advanced properties. You can also add new
WAN connections.
keep you online if the primary WAN connection fails.
and DSL PhyR functions.
authentication or security settings.
Use this screen to block or allow wireless traffic from wireless devices of
certain SSIDs and MAC addresses to the Zyxel Device.
settings.
AX/DX/EX/PX Series User’s Guide
60
Page 61

Chapter 3 Web Configurator
Table 16 Navigation Panel Summary (continued)
LINK TAB FUNCTION
Home
Networking
Routing Static Route Use this screen to view and set up static routes on the Zyxel Device.
QoS General Use this screen to enable QoS and traffic prioritizing. You can also
NAT Port Forwarding Use this screen to make your local servers visible to the outside world.
DNS DNS Entry Use this screen to view and configure DNS routes.
IGMP/MLD IGMP/MLD Use this screen to configure multicast settings (IGMP for IPv4 and MLD for
VLAN Group VLAN Group Use this screen to group and tag VLAN IDs to outgoing traffic from the
Interface
Grouping
USB Service File Sharing Use this screen to enable file sharing through the Zyxel Device.
Security
LAN Setup Use this screen to configure LAN TCP/IP settings, and other advanced
properties.
Static DHCP Use this screen to assign specific IP addresses to individual MAC
addresses.
UPnP Use this screen to turn UPnP and UPnP NAT-T on or off.
Additional
Subnet
STB Vendor ID Use this screen to configure the Vendor IDs of the connected Set Top Box
Wake on LAN Use this screen to remotely turn on a device on the local network.
TFTP Server Name Use DHCP option 66 to identify a TFTP server name.
DNS Route Use this screen to forward DNS queries for certain domain names through
Policy Route Use this screen to configure policy routing on the Zyxel Device.
RIP Use this screen to configure Routing Information Protocol to exchange
Queue Setup Use this screen to configure QoS queues.
Classification
Setup
Shaper Setup Use this screen to limit outgoing traffic rate on the selected interface.
Policer Setup Use this screen to configure QoS policers.
Port Triggering Use this screen to change your Zyxel Device’s port triggering settings.
DMZ Use this screen to configure a default server which receives packets from
ALG Use this screen to enable the ALGs (Application Layer Gateways) in the
Address Mapping Use this screen to change your Zyxel Device's IP address mapping
Sessions Use this screen to configure the maximum number of NAT sessions each
Dynamic DNS Use this screen to allow a static hostname alias for a dynamic IP address.
Interface
Grouping
Media Server Use this screen to use the Zyxel Device as a media server.
Use this screen to configure IP alias and public static IP.
(STB) devices, which have the Zyxel Device automatically create static
DHCP entries for the STB devices when they request IP addresses.
a specific WAN interface to its DNS servers.
routing information with other routers.
configure the QoS rules and actions.
Use this screen to define a classifier.
ports that are not specified in the Port Forwarding screen.
Zyxel Device to allow applications to operate through NAT.
settings.
client host is allowed to have through the Zyxel Device.
IPv6 multicast groups) on the WAN.
specified interface.
Use this screen to map a port to create multiple networks on the Zyxel
Device.
AX/DX/EX/PX Series User’s Guide
61
Page 62

Chapter 3 Web Configurator
Table 16 Navigation Panel Summary (continued)
LINK TAB FUNCTION
Firewall General Use this screen to configure the security level of your firewall.
Protocol Use this screen to add Internet services and configure firewall rules.
Access Control Use this screen to enable specific traffic directions for network services.
DoS Use this screen to activate protection against Denial of Service (DoS)
attacks.
MAC Filter MAC Filter Use this screen to block or allow traffic from devices of certain MAC
addresses to the Zyxel Device.
Home Security Connected
Parental
Control
Scheduler Rule Scheduler Rule Use this screen to configure the days and times when a configured
Certificates Local Certificates Use this screen to view a summary list of certificates and manage
VoIP
SIP SIP Account Use this screen to set up information about your SIP account and
Phone Phone Device Use this screen to control which SIP accounts each phone uses to handle
Call Rule Call Rule Use this screen to configure speed dial for SIP phone numbers that you
Call History Call History Use this screen to view detailed information for each outgoing call you
System Monitor
Log System Log Use this screen to view the status of events that occurred to the Zyxel
Home Security
Parental Control Use this screen to define time periods and days during which the Zyxel
Trusted CA Use this screen to view and manage the list of the trusted CAs.
SIP Service
Provider
Region Use this screen to select your location and call service mode.
Use this screen to set up a URL filter that blocks users on your network
from accessing certain websites.
Device performs parental control and/or block web sites with the
specific URL.
restriction (such as parental control) is enforced.
certificates and certification requests.
configure audio settings such as volume levels for the phones
connected to the Zyxel Device.
Use this screen to configure the SIP server information, and other SIP
settings, such as QoS for VoIP calls, outbound proxy, DTMF mode and SIP
timers.
outgoing and incoming calls.
often call.
made or each incoming call from someone calling you. You can also
view a summary list of received, dialed and missed calls.
Device. You can export or email the logs.
AX/DX/EX/PX Series User’s Guide
62
Page 63

Chapter 3 Web Configurator
Table 16 Navigation Panel Summary (continued)
LINK TAB FUNCTION
Security Log Use this screen to view all security related events. You can select the
level and category of the security events in their proper drop-down list
window.
Levels include:
•Emergency
•Alert
• Critical
• Error
• Warning
•Notice
• Informational
•Debugging
Categories include:
• Account
• Attack
•Firewall
• MAC Filter
Traffic Status WAN Use this screen to view the status of all network traffic going through the
WAN port of the Zyxel Device.
LAN Use this screen to view the status of all network traffic going through the
LAN ports of the Zyxel Device.
NAT Use this screen to view NAT statistics for connected hosts.
VoIP Status VoIP Status Use this screen to view VoIP registration, current call status and phone
ARP table ARP table Use this screen to view the ARP table. It displays the IP and MAC address
Routing Table Routing Table Use this screen to view the routing table on the Zyxel Device.
Multicast Status IGMP Status Use this screen to view the status of all IGMP settings on the Zyxel Device.
MLD Status Use this screen to view the status of all MLD settings on the Zyxel Device.
xDSL Statistics xDSL Statistics Use this screen to view the Zyxel Device’s xDSL traffic statistics.
WLAN Station
Status
Cellular
Statistics
GPON Status GPON Status Use this screen to view the fiber transceiver’s TX power and RX power
WLAN Station
Status
Cellular Statistics Use this screen to look at the cellular Internet connection status.
numbers for the phone ports.
of each DHCP connection.
Use this screen to view the wireless stations that are currently associated
to the Zyxel Device’s wireless LAN.
level and its temperature.
Note: Not yet available as of this writing.
Maintenance
System System Use this screen to set the Zyxel Device name and Domain name.
User Account User Account Use this screen to change the user password on the Zyxel Device.
Remote
Management
SNMP SNMP Use this screen to configure SNMP (Simple Network Management
MGMT Services Use this screen to enable specific traffic directions for network services.
Trust Domain Use this screen to view a list of public IP addresses which are allowed to
access the Zyxel Device through the services configured in the
Maintenance > Remote Management screen.
Protocol) settings.
AX/DX/EX/PX Series User’s Guide
63
Page 64

Chapter 3 Web Configurator
Table 16 Navigation Panel Summary (continued)
LINK TAB FUNCTION
Time Time Use this screen to change your Zyxel Device’s time and date.
E-mail
Notification
Log Settings Log Settings Use this screen to change your Zyxel Device’s log settings.
Firmware
Upgrade
Backup/Restore Backup/Restore Use this screen to backup and restore your Zyxel Device’s configuration
Reboot Reboot Use this screen to reboot the Zyxel Device without turning the power off.
Diagnostic Ping&Traceroute
E-mail
Notification
Firmware
Upgrade
&Nslookup
802.1ag Use this screen to configure CFM (Connectivity Fault Management) MD
802.3ah Use this screen to configure link OAM port parameters,
OAM Ping Use this screen to view information to help you identify problems with the
Use this screen to configure up to two mail servers and sender addresses
on the Zyxel Device.
Use this screen to upload firmware to your Zyxel Device.
(settings) or reset the factory default settings.
Use this screen to identify problems with the Zyxel Device. You can use
Ping, TraceRoute, or Nslookup to help you identify problems.
(maintenance domain) and MA (maintenance association), perform
connectivity tests and view test reports.
DSL connection.
3.2.1.3 Dashboard
Use the menu items in the navigation panel on the right to open screens to configure the Zyxel Device’s
features.
Figure 45 Navigation Panel
AX/DX/EX/PX Series User’s Guide
64
Page 65

Chapter 3 Web Configurator
Click the Widget icon ( ) in the lower left corner to arrange the screen order.
Figure 46 Screen Order
The following screen appears. Select a block and hold it to move around. Click the Check icon ( ) in
the lower left corner to save the changes.
AX/DX/EX/PX Series User’s Guide
65
Page 66

Figure 47 Screen Order
Chapter 3 Web Configurator
AX/DX/EX/PX Series User’s Guide
66
Page 67

4.1 Overview
Use the Wizard screens to configure the Zyxel Device’s time zone and wireless settings.
Note: See the technical reference chapters for background information on the features in this
chapter.
4.2 Quick Start Setup
You can click the Wizard icon in the side bar to open the Wizard screens. After you click the Wizard icon,
the following screen appears. Click Let’s go to proceed with settings on time zone and wireless networks.
It will take you a few minutes to complete the settings on the Wizard screens. You can click Skip to leave
the Wizard screens.
CHAPTER 4
Quick Start
Figure 48 Wizard – Home
4.3 Quick Start Setup – Time Zone
Select the time zone of your location. Click Next.
AX/DX/EX/PX Series User’s Guide
67
Page 68

Chapter 4 Quick Start
Figure 49 Wizard – Time Zone
4.4 Quick Start Setup – Internet Connection
Select the Internet connection mode of the Zyxel Device. Click Next to continue.
Figure 50 Wizard – Internet
4.4.1 Successful Internet Connection
The Zyxel Device has Internet access.
Figure 51 Wizard – Successful Internet Connection
AX/DX/EX/PX Series User’s Guide
68
Page 69

Chapter 4 Quick Start
4.4.2 Unsuccessful Internet Connection
The Zyxel Device did not detect a WAN connection.
Figure 52 Wizard – Internet Connection is Down
4.5 Quick Start Setup – WiFi
Turn WiFi on or off. If you keep it on, record the WiFi Name and Password in this screen so you can
configure your WiFi clients to connect to the Zyxel Device. If you want to show or hide your WiFi
password, click the Eye icon ( ).
Click Done.
Figure 53 Wizard – WiFi
4.6 Quick Start Setup – Finish
Your Zyxel Device saves your settings and attempts to connect to the Internet.
AX/DX/EX/PX Series User’s Guide
69
Page 70

5.1 Overview
This chapter shows you how to use the Zyxel Device’s various features.
• Wired Network Setup
• WiFi Network Setup
• USB Applications
• Network Security
• Internet Calls
• Device Maintenance
CHAPTER 5
Tutorials
5.2 Wired Network Setup
This section shows you how to set up a wired connection.
5.2.1 Setting Up a DSL Connection
This tutorial shows you how to set up a DSL Internet connection using the Web Configurator.
If you connect to the Internet through a DSL connection, use the information from your Internet Service
Provider (ISP) to configure the Broadband screens.
1 Go to Network Setting > Broadband and then the following screen appears. Click Add New WAN
Interface.
AX/DX/EX/PX Series User’s Guide
70
Page 71

Chapter 5 Tutorials
2 In this example, the DSL connection has the following information.
General
Name MyDSLConnection
Type ADSL over ATM
Connection Mode Routing
Encapsulation PPPoE
IPv6/IPv4 Mode IPv4
ATM PVC Configuration
VPI/VCI 36/48
Encapsulation Mode LLC/SNAP-Bridging
Service Category UBR without PCR
Account Information
PPP User Name 1234@DSL-Ex.com
PPP Password ABCDEF!
Static IP Address 192.168.1.32
Gateway IP Address 192.168.1.254
Primary DNS server 192.168.5.2
Secondary DNS server 192.168.5.1
Others Authentication Method: AUTO
PPPoE Passthrough: Disabled
NAT: Enabled
IGMP Multicast Proxy: Enabled
Apply as Default Gateway: Enabled
VLAN: Disabled
3 Enter the General and ATM PVC Configuration settings as provided above.
3a Set the Type to ADSL over ATM.
3b Choose the Encapsulation specified by your DSL service provider. For this example, the service
provider requires a username and password to establish an Internet connection. Therefore, select
PPPoE as the WAN encapsulation type.
3c Set the IPv4/IPv6 Mode to IPv4 Only.
4 Enter the account information provided by your DSL service provider.
5 Enable Apply as Default Gateway to use this rule as your default Internet connection. Then select Use
Following Static DNS Address and enter the DNS server addresses provided by your DSL service provider.
6 For the rest of the fields, use the default settings.
7 Click Apply to save your settings.
AX/DX/EX/PX Series User’s Guide
71
Page 72

Chapter 5 Tutorials
8 Try to connect to a website to see if you have correctly set up your Internet connection.
AX/DX/EX/PX Series User’s Guide
72
Page 73

Chapter 5 Tutorials
The new connection is displayed on the Broadband screen.
5.2.2 Setting Up an Ethernet Connection
If you connect to the Internet through an Ethernet connection, you need to connect a broadband
modem or router with Internet access to the WAN Ethernet port on the Zyxel Device. You need to
configure the Internet settings from the broadband modem or router on the Zyxel Device. First, make
sure you have Internet access through the broadband modem or router by connecting directly to it.
1 Make sure you have the Ethernet WAN port connect to a modem or router.
2 Go to Network Setting > Broadband and then the following screen appears. Click Add New WAN
Interface to add a WAN connection.
AX/DX/EX/PX Series User’s Guide
73
Page 74

Chapter 5 Tutorials
3 In this example, configure the following information for the Ethernet connection.
General
Name My ETH Connection
Type Ethernet
Connection Mode Routing
Encapsulation IPoE
IPv6/IPv4 Mode IPv4 Only
4 Enter the General settings provided by your Internet service provider.
4a Enter a Name to identify your WAN connection.
4b Set the Type to Ethernet.
4c Set your Ethernet connection Mode to Routing.
4d Choose the Encapsulation specified by your Internet service provider. For this example, select IPoE
or PPPoE as the WAN encapsulation type.
4e Set the IPv4/IPv6 Mode to IPv4 Only.
5 Under Routing Feature, enable NAT and Apply as Default Gateway.
6 For the rest of the fields, use the default settings.
7 Click Apply to save your settings.
AX/DX/EX/PX Series User’s Guide
74
Page 75

Chapter 5 Tutorials
8 Go to the Network Setting > Broadband screen to view the established Ethernet connection. The new
connection is displayed on the Broadband screen.
5.3 WiFi Network Setup
In this example, you want to set up a WiFi network so that you can use your notebook to access the
Internet. In this WiFi network, the Zyxel Device is an access point (AP), and the notebook is a WiFi client.
The WiFi client can access the Internet through the AP.
AX/DX/EX/PX Series User’s Guide
75
Page 76

Chapter 5 Tutorials
Figure 54 WiFi Network Setup
See the label on the Zyxel Device for the WiFi network settings and then connect manually to the Zyxel
Device. Alternatively, you can set up a WiFi network using WPS. See Section 5.3.2 on page 78.
5.3.1 Changing Security on a WiFi Network
This example changes the default security settings of a WiFi network to the following:
SSID Example
Security Mode WPA2-PSK
Pre-Shared Key DoNotStealMyWiFi
802.11 Mode 802.11b/g/n Mixed
1 Go to the Network Setting > Wireless > General screen. Select More Secure as the security level and
WPA2-PSK as the security mode. Configure the screen using the provided parameters. Click Apply.
AX/DX/EX/PX Series User’s Guide
76
Page 77

Chapter 5 Tutorials
2 Go to the Wireless > Others screen. Set 802.11 Mode to 802.11b/g/n Mixed, and then click Apply.
AX/DX/EX/PX Series User’s Guide
77
Page 78

Chapter 5 Tutorials
You can now use the WPS feature to establish a WiFi connection between your notebook and the Zyxel
Device (see Section 5.3.2 on page 78). Now use the new security settings to connect to the Internet
through the Zyxel Device using WiFi.
5.3.2 Connecting to the Zyxel Device’s WiFi Network Using WPS
This section shows you how to connect a WiFi device to the Zyxel Device’s WiFi network using WPS. WPS
(Wi-Fi Protected Setup) is a security standard that allows devices to connect to a router securely without
you having to enter a password. There are two methods:
• Push Button Configuration (PBC) – Connect to the WiFi network by pressing a button. See Section
5.3.2.1 on page 78. This is the simplest method.
• PIN Configuration – Connect to the WiFi network by entering a PIN (Personal Identification Number)
from a WiFi-enabled device in the Zyxel Device’s Web Configurator. See Section 5.3.3 on page 82. This
is the more secure method, because one device can authenticate the other.
5.3.2.1 WPS Push Button Configuration (PBC)
This example shows how to connect to the Zyxel Device’s WiFi network from a notebook computer
running Windows 10.
1 Make sure that your Zyxel Device is turned on, and your notebook is within range of the Zyxel Device’s
WiFi signal.
2 Push and hold the WPS button located on the Zyxel Device until the WiFi or WPS LED starts blinking slowly.
Alternatively, log into the Zyxel Device’s Web Configurator, and then go to the Network Setting >
Wireless > WPS screen. Enable WPS and Method 1 PBC, click Apply, and then click the WPS button.
AX/DX/EX/PX Series User’s Guide
78
Page 79
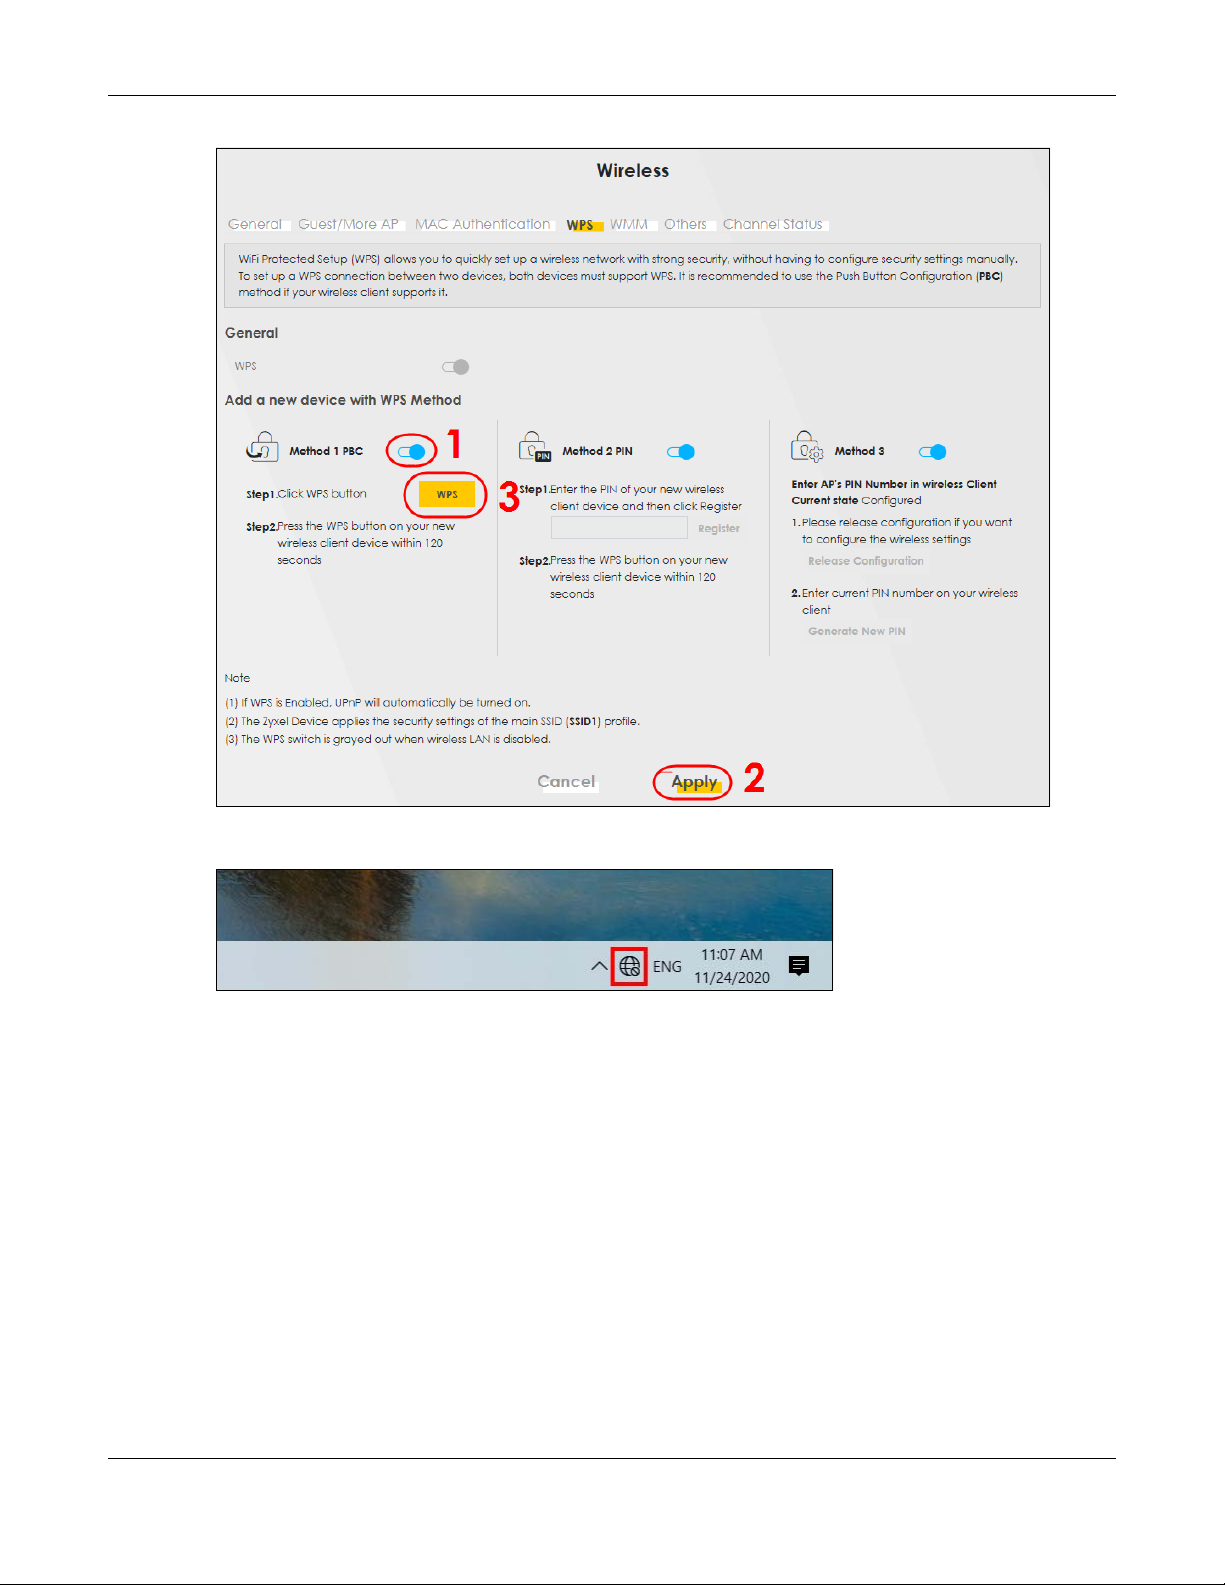
Chapter 5 Tutorials
3 In Windows 10, click on the Network icon in the system tray to open the list of available WiFi networks.
4 Locate the WiFi network of the Zyxel Device. The default WiFi network name is “Zyxel_XXXX” (2.4G) or
“Zyxel_XXXX_5G” (5G). Then click Connect.
AX/DX/EX/PX Series User’s Guide
79
Page 80

Chapter 5 Tutorials
The Zyxel Device sends the WiFi network settings to Windows using WPS. Windows displays “Getting
settings from the router”.
AX/DX/EX/PX Series User’s Guide
80
Page 81

Chapter 5 Tutorials
The WiFi device is then able to connect to the WiFi network securely.
5.3.2.2 WPS PIN Configuration
The WPS PIN (Personal Identification Number) method is a more secure version of WPS, used by WiFienabled devices such as printers. To use this connection method, you need to log into the Zyxel
Device’s Web Configurator.
1 Enable WiFi on the device you want to connect to the WiFi network. Then, note down the WPS PIN in the
device’s WiFi settings.
2 Log into Zyxel Device’s Web Configurator, and then go to the Network Setting > Wireless > WPS screen.
Enable WPS, and then click Apply.
3 Enable Method 2 PIN, and then click Apply. Enter the PIN of the WiFi device, and then click Register.
AX/DX/EX/PX Series User’s Guide
81
Page 82

Chapter 5 Tutorials
4 Within 2 minutes, enable WPS on the WiFi device.
The Zyxel Device authenticates the WiFi device using the PIN, and then sends the WiFi network settings to
the device using WPS. This process may take up to 2 minutes. The WiFi device is then able to connect to
the WiFi network securely.
5.3.3 Setting Up a Guest Network
A company wants to create two WiFi networks for different groups of users as shown in the following
figure. Each WiFi network has its own SSID and security mode. Both networks are accessible on both 2.4G
and 5G WiFi bands.
AX/DX/EX/PX Series User’s Guide
82
Page 83

Chapter 5 Tutorials
• Employees using the General WiFi network group will have access to the local network and the
Internet.
• Visitors using the Guest WiFi network group with a different SSID and password will have access to the
Internet only.
Use the following parameters to set up the WiFi network groups.
GENERAL GUEST
2.4/5G SSID Employee Guest
Security Level More Secure More Secure
Security Mode WPA2-PSK WPA2-PSK
Pre-Shared Key ForCompanyOnly guest123
1 Go to the Network Setting > Wireless > General screen. Use this screen to set up the company’s general
WiFi network group. Configure the screen using the provided parameters and click Apply. Note that if
you have employees using 2.4G and 5G devices, enable Keep the same settings for 2.4G and 5G
wireless networks to use the same SSID and password. Clear it if you want to configure different SSIDs
and passwords for 2.4G and 5G bands.
AX/DX/EX/PX Series User’s Guide
83
Page 84

Chapter 5 Tutorials
2 Go to the Network Setting > Wireless > Guest/More AP screen. Click the Modify icon to configure the
second WiFi network group.
3 On the Guest/More AP screen, click the Modify icon to configure the other Guest WiFi network group.
Configure the screen using the provided parameters and click OK.
AX/DX/EX/PX Series User’s Guide
84
Page 85

Chapter 5 Tutorials
4 Check the status of Guest in the Guest/More AP screen. A yellow bulb under Status means the SSID is
active and ready for WiFi access.
AX/DX/EX/PX Series User’s Guide
85
Page 86

Chapter 5 Tutorials
5.3.4 Setting Up Two Guest WiFi Networks on Different WiFi Bands
In this example, a company wants to create two Guest WiFi networks: one for the Guest group and the
other for the VIP group as shown in the following figure. Each network will have its SSID and security
mode to access the internet.
• The Guest group will use the 2.4G band.
• The VIP group will use the 5G band.
The Company will use the following parameters to set up the WiFi network groups.
Table 17 WiFi Settings Parameters Example
BAND 2.4G 5G
SSID Guest VIP
Security Mode WPA2-PSK WPA2-PSK
Pre-Shared Key guest123 123456789
1 Go to the Wireless > General screen and set Band to 2.4GHz to configure 2.4G Guest WiFi settings for
Guest. Click Apply.
Note: You will not be able to configure the 2.4G and 5G Guest WiFi settings separately if Keep
the same settings for 2.4G and 5G wireless network is enabled.
AX/DX/EX/PX Series User’s Guide
86
Page 87

Chapter 5 Tutorials
2 Go to the Wireless > Guest/More AP screen and click the Modify icon. The following screen appears.
Configure the Security Mode and Password using the provided parameters and click OK.
AX/DX/EX/PX Series User’s Guide
87
Page 88

Chapter 5 Tutorials
The 2.4GHz Guest WiFi network is now configuring.
3 Go to the Wireless > General screen and set Band to 5GHz to configure the 5G Guest WiFi settings for
VIP. Click OK.
AX/DX/EX/PX Series User’s Guide
88
Page 89

Chapter 5 Tutorials
4 Go to the Wireless > Guest/More AP screen and click the Modify icon. The following screen appears.
Configure the Security Mode and Password using the provided parameters and click OK.
AX/DX/EX/PX Series User’s Guide
89
Page 90

Chapter 5 Tutorials
The 5G VIP WiFi network is now configured.
AX/DX/EX/PX Series User’s Guide
90
Page 91

Chapter 5 Tutorials
5.4 USB Applications
This section shows you how to set up a cellular backup network, access shared folders and play files
through Window Media using a USB device.
5.4.1 File Sharing
This section shows you how to create a shared folder on your Zyxel Device through a USB device and
allow others to access the shared folder with File Sharing services.
5.4.1.1 Setting up File Sharing on Your Zyxel Device
1 Before enabling file sharing in the Zyxel Device, please set up your shared folders beforehand in your USB
device.
2 Connect your USB device to the USB port of the Zyxel Device.
3 Go to the Network Setting > USB Service > File Sharing screen. Enable File Sharing Services and click
Apply to activate the file sharing function. The Zyxel Device automatically adds your USB device to the
Information table.
4 Click Add New Share to add a new share.
AX/DX/EX/PX Series User’s Guide
91
Page 92
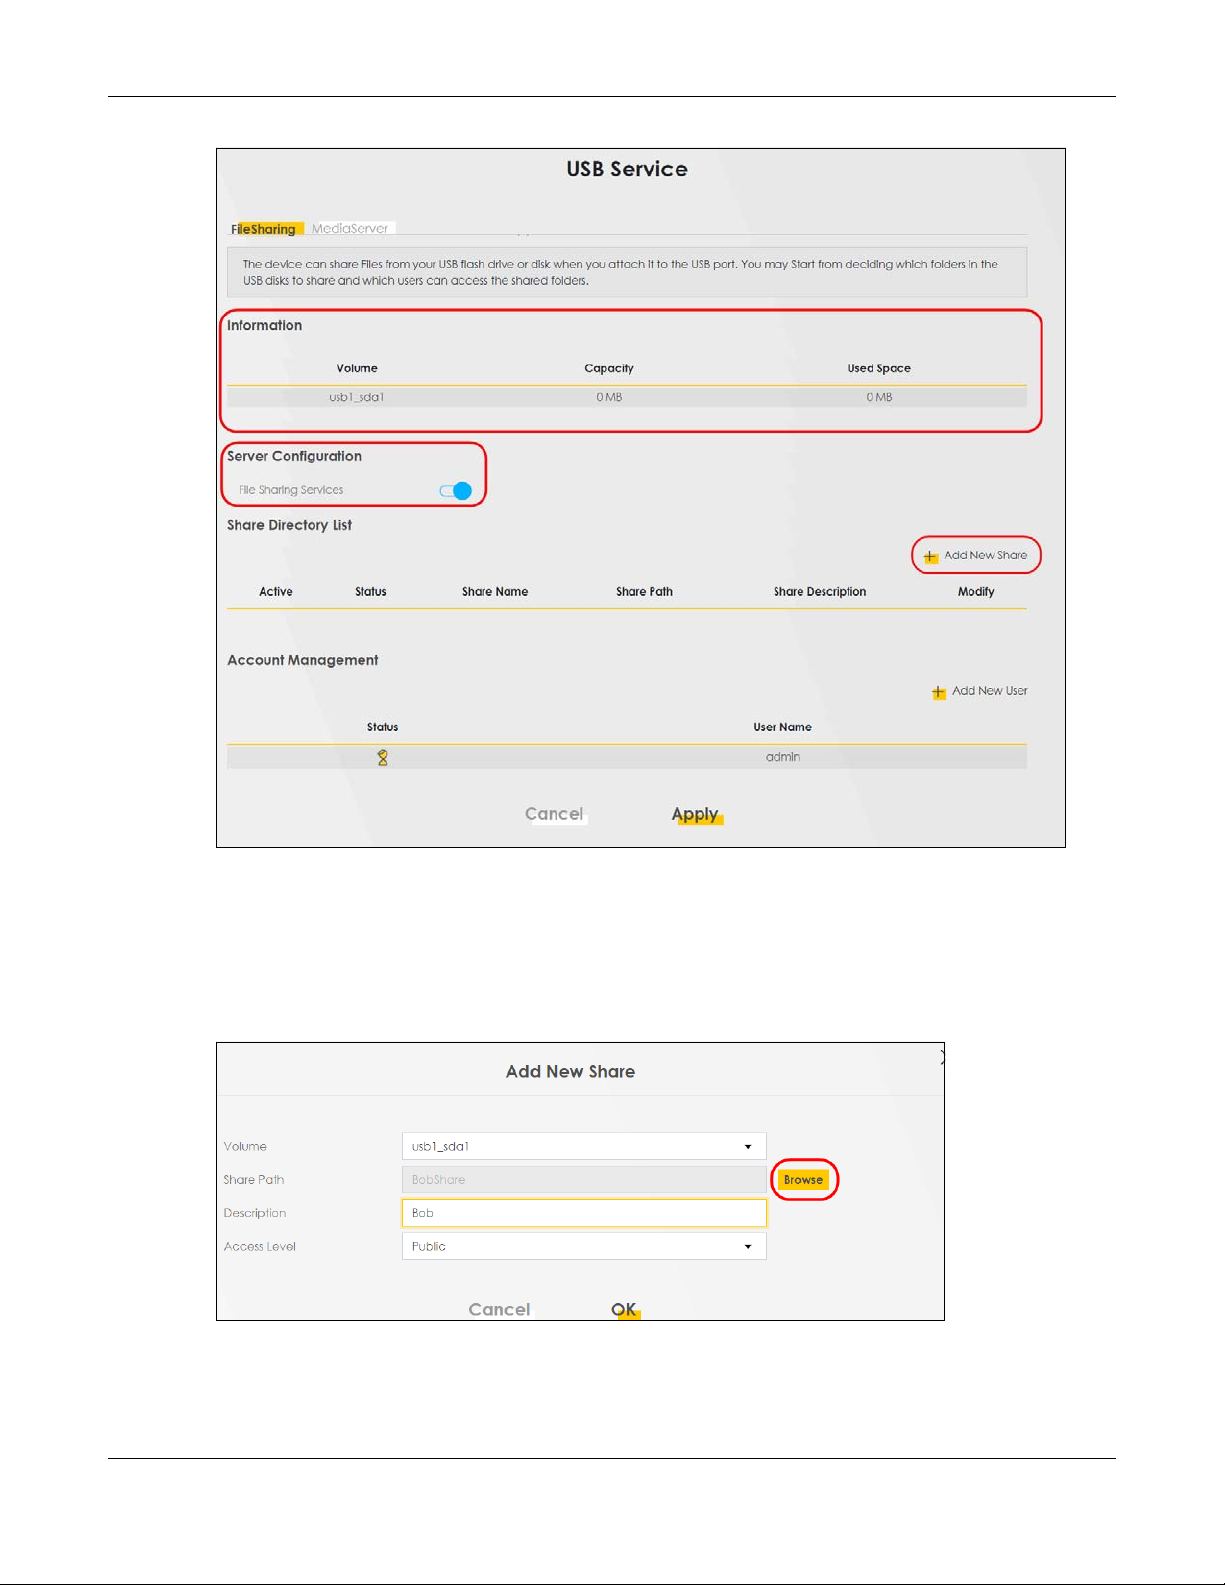
Chapter 5 Tutorials
5 The Add New Share screen appears.
5a Select your USB device from the Volume drop-down list box.
5b Enter a Description name for the added share to identify the device.
5c Click Browse and the Browse Directory screen appears.
5d On the Browse Directory screen, select the folder that you want to add as a share. In this example,
select BobShare and then click OK.
AX/DX/EX/PX Series User’s Guide
92
Page 93

Chapter 5 Tutorials
5e In Access Level, select Public to let the share to be accessed by all users connected to the Zyxel
Device. Otherwise, select Security to let the share to be accessed by specific users to access only.
Click OK to save the settings.
6 To set Access level to Security, you need to create one or more users accounts. Under Account
Management, click Add New User to open the User Account screen.
7 After you create a new user account, the screen looks like the following.
8 File sharing is now configured. You can see the USB storage device listed in the table below.
AX/DX/EX/PX Series User’s Guide
93
Page 94

Chapter 5 Tutorials
5.4.1.2 Accessing Your Shared Files From a Computer
You can use Windows Explorer to access the USB storage devices connected to the Zyxel Device.
Note: This example shows you how to use Microsoft Windows 10 to browse shared files in a
share called (usb1_sda)Zoeys file. Refer to your operating system’s documentation for
how to browse your file structure.
1 Open Windows Explorer.
2 In the Windows Explorer’s address bar, enter a double backslash “\\” followed by the IP address of the
Zyxel Device (the default IP address of the Zyxel Device is 192.168.1.1
3 Double-click on (usb1_sda)Zoeys file, and then enter the share's username and password if prompted.
4 After you access (usb1_sda)Zoeys file through your Zyxel Device, you do not have to log in again unless
you restart your computer.
AX/DX/EX/PX Series User’s Guide
94
Page 95

5.4.2 Using FTP
This section shows how to use an FTP program to access files on an USB storage device connected to
the Zyxel Device.
Note: This example uses the FileZilla FTP program to browse your shared files.
1 In FileZilla, enter the IP address of the Zyxel Device (The default IP is 192.168.1.1), your account’s
Username, Password and Port number, and then click Quickconnect. A screen asking for password
authentication appears.
File Sharing via Windows Explorer
Chapter 5 Tutorials
2 After you log in, the mnt folder is displayed as shown.
5.5 Network Security
This section shows you how to configure a Firewall rule, Parental Control rule, and MAC Filter rule.
5.5.1 Configuring a Firewall Rule
You can enable the firewall to protect your LAN computers from malicious attacks from the Internet.
1 Go to the Security > Firewall > General screen.
2 Select IPv4 Firewall/IPv6 Firewall to enable the firewall, and then click Apply.
AX/DX/EX/PX Series User’s Guide
95
Page 96

Chapter 5 Tutorials
3 Open the Access Control screen,click Add New Rule to create a rule.
4 Use the following fields to configure and apply a new ACL (Access Control List) rule.
AX/DX/EX/PX Series User’s Guide
96
Page 97

Chapter 5 Tutorials
AX/DX/EX/PX Series User’s Guide
97
Page 98

Chapter 5 Tutorials
• Filter Name: Enter a name to identify the firewall rule.
• Source IP Address: Enter the IP address of the computer that initializes traffic for the application or
service.
• Destination IP Address: Enter the IP address of the computer to which traffic for the application or
service is entering.
• Protocol: Select the protocol (ALL, TCP/UDP, TCP, UDP, ICMP or ICMPv6) used to transport the packets.
• Policy: Select whether to (ACCEPT, DROP, or REJECT) the packets.
• Direction: Select the direction (WAN to LAN, LAN to WAN, WAN to ROUTER, or LAN to ROUTER) of the
traffic to which this rule applies.
5 Select Enable Rate Limit to activate the rules you created. Click OK.
5.5.2 Parental Control
This section shows you how to configure rules for accessing the Internet using parental control.
Note: The style and features of your parental control vary depending on the Zyxel Device you
are using.
AX/DX/EX/PX Series User’s Guide
98
Page 99

Chapter 5 Tutorials
5.5.2.1 Configuring Parental Control Schedule and Filter
Parental Control Profile (PCP) allows you to set up a rule for:
• Internet usage scheduling.
• Websites and URL keyword blocking.
Use this feature to:
• Limit the days and times a user can access the Internet.
• Limit the websites a user can access on the Internet.
This example shows you how to block a user from accessing the Internet during time for studying. It also
shows you how to stop a user from accessing specific websites.
Use the parameter below to configure a schedule rule and a URL keyword blocking rule.
PROFILE NAME
Study Day:
INTERNET ACCESS
SCHEDULE
Monday to Friday
Time:
8:00 to 11:00
13:00 to 17:00
NETWORK SERVICE SITE/ URL KEYWORD
Network Service Setting:
Block
Service Name:
HTTP
Protocol:
TCP
Port:
80
Block or Allow the Web Site:
Block the web URLs
Website:
gambling
Parental Control Screen
Open the Parental Control screen. Select Enable under General to enable parental control. Then click
Add New PCP to add a rule.
AX/DX/EX/PX Series User’s Guide
99
Page 100

Add New PCP Screen
Chapter 5 Tutorials
1 Go to Parental Control > Add New PCP. Under General:
1a Select Enable to enable the rule you are configuring.
1b Enter the Parental Control Profile Name given in the above parameter.
1c Select an user this rule applies to in Home Network User, then click Add. You will see the MAC
address of the user you just select in Rule List.
2 Under Internet Access Schedule:
2a Click Add New Time to add a second schedule.
AX/DX/EX/PX Series User’s Guide
100
 Loading...