

Page 1

AG-225H v2
802.11a/g Wi-Fi Finder & Wireless USB
Adapter
Quick Start Guide
Version 1.00
Edition 1
5/2005
Table of Contents
ENGLISH 1
DEUTSCH 17
ESPAÑOL 35
FRANÇAIS 51
ITALIANO 69
РУССКИЙ 85
SVENSKA 103
繁體中文 119
Page 2

Page 3

ENGLISH
ENGLISH
1 About Your AG-225H v2
The AG-225H v2 is a wireless adapter that connects to the
USB port on your computer and allows you to search for and
connect to wireless networks. When the AG-225H v2 is not
connected to your computer, you can use the LCD screen to
see details of wireless networks in the area.
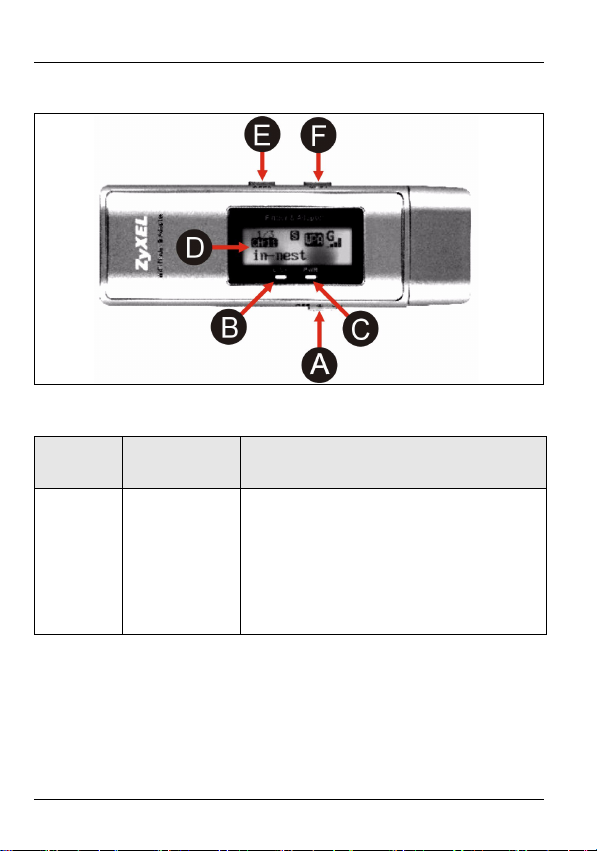
2 Overview
The following table describes the AG-225H v2.
Label Name Description
A OFF / ON
switch
Move the switch to the right to turn the
LCD screen on.
Move the switch to the left to turn the
LCD screen off.
1
Page 4

ENGLISH
Label Name Description
B LINK light If the AG-225H v2 is connected to a
computer and there is a wireless
network connection, this light is on and
blinks when there is traffic.
If the AG-225H v2 is connected to a
computer and there is no wireless
network connection, this light blinks
slowly.
If the AG-225H v2 is not connected to a
computer and the LCD screen is on, this
light is on when the AG-225H v2 is
searching for wireless networks.
C PWR light This light is on if the AG-225H v2 is
connected to a computer or the LCD
screen is on.
D LCD screen The LCD screen displays details of
available wireless networks one at a
time. See section 3 for more details.
2
Page 5

ENGLISH
Label Name Description
E SEEK button When the LCD screen is on, use this
button to have the AG-225H v2 search
for available wireless networks or
change detection modes.
• To search for available wireless net-
works, press the SEEK button once.
• To change detection modes, hold the
SEEK button down for one second.
Then, press the SEEK button once
to display available networks in that
mode. See section 3 for more
details.
F NEXT button When the LCD screen is on, use this
button to scroll through the list of
available wireless networks.
3
Page 6

ENGLISH
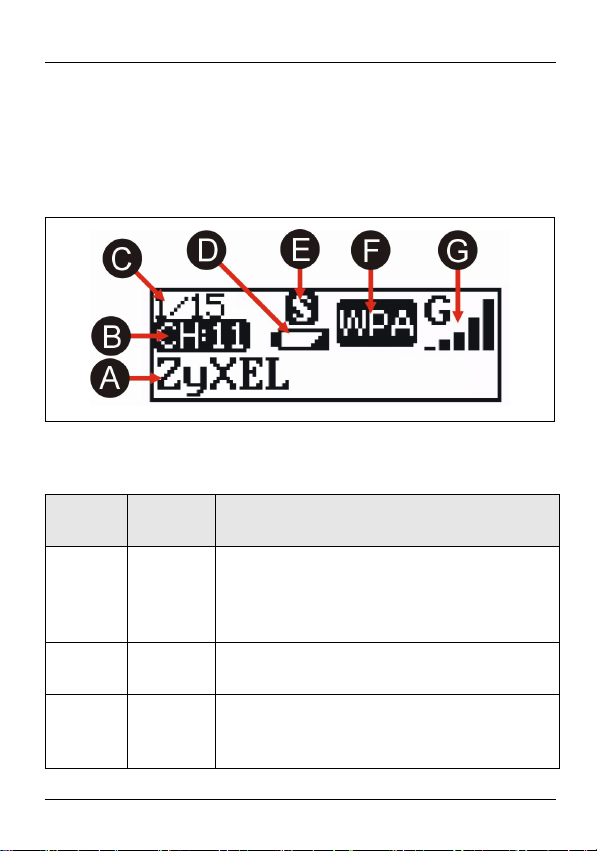
3 The LCD Screen
When the AG-225H v2 is not connected to a computer, you
can use the LCD screen to display details of available
networks.
The following table describes the labels in this figure.
Label Name Description
A SSID The SSID is the name of a wireless network.
When an SSID is longer than 12 characters
it scrolls automatically.
B Channel This displays the wireless channel of the
network.
C Entry This displays the number of the network in
the list. The AG-225H v2 can detect up to 15
networks at any one time.
4
Page 7

ENGLISH
Label Name Description
D Power This icon displays when the battery is
low.
This icon displays when the battery is
fully charged.
E Detection
Mode
This shows the way networks are detected
and listed. See section 2 for details of how to
change detection modes.
Signal mode displays all available
networks in order of signal strength.
Each time you turn the AG-225H v2
on, it uses Signal detection mode.
Free mode displays only networks
with no security enabled.
Dedicated mode displays a single
selected network.
Use the NEXT button in Signal or
Free detection mode to select a
network. Then, change to Dedicated
mode and press the SEEK button
once. The AG-225H v2 regularly
scans the selected network and
updates the display.
5
Page 8

ENGLISH
Label Name Description
F Security This displays the wireless encryption
settings of the selected network.
displays when no security is enabled.
displays when WEP security is
enabled.
displays when WPA or WPA2 security
is enabled.
G Signal This displays the wireless standard and
signal strength of the selected network.
displays when a network is using the
802.11a standard.
displays when the network is using the
802.11b standard.
displays when the network is using the
802.11g standard.
4 Power
Recharge your AG-225H v2 by connecting it to the USB port
of your computer. See section 5.3 for more details.
Your AG-225H v2 will switch off automatically after 90
seconds of inactivity to conserve power. Press the SEEK
button to switch it back on.
6
Page 9

ENGLISH
5 The ZyXEL Utility
The installation procedures are similar for all supported
Windows versions.
Install the ZyXEL utility before you insert the AG225H v2
5.1 Installation Requirements
Before installation, make sure you have a computer with the
following:
• Pentium II 300MHz or above
• A USB port (with USB1.0/1.1 the AG-225H v2 can transmit at
up to only 11Mbps)
• A minimum of 20 MB available hard disk space
• A minimum of 64 MB RAM
• A CD-ROM drive
• Windows 2000 or Windows XP
If you have already installed Funk Odyssey Client
software on the computer, uninstall (remove) it.
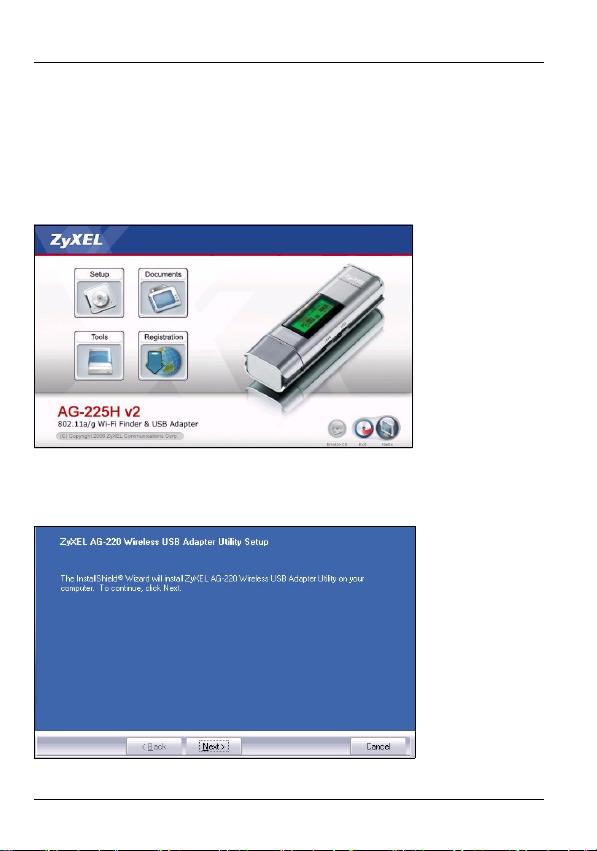
5.2 ZyXEL Utility Installation
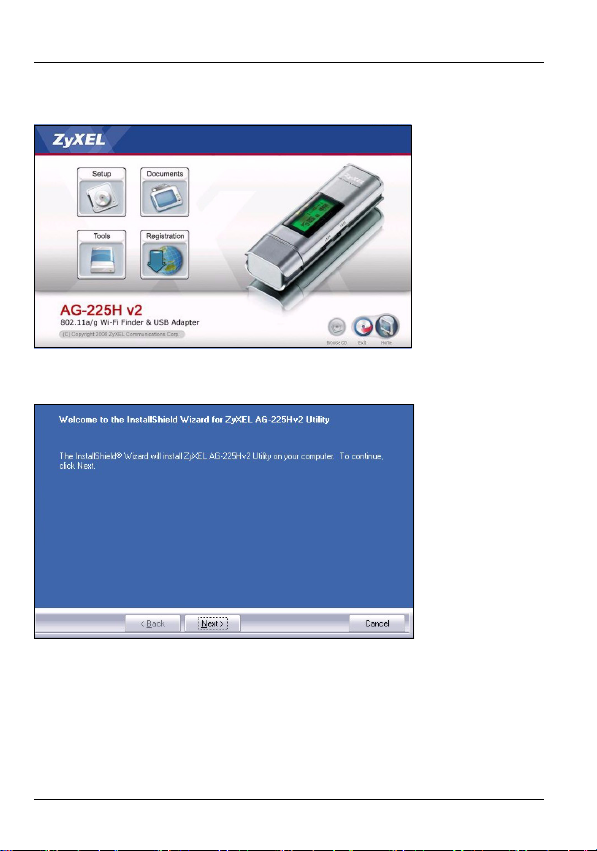
1 Insert the included CD into the CD-ROM drive on your
computer. When the following screen displays, click
7
Page 10
ENGLISH
Setup. If the screen does not display, locate and doubleclick autorun.exe.
2 Select Install Utility
3 The following screen displays. Click Next.
4 Select Driver and Utility to install both ZyXEL utility and
driver on your computer. If you want to install the driver
only and use Wireless Zero Configuration (WZC) with
Windows XP, select Driver only (see Note for Windows XP
8
Page 11

ENGLISH
Users). Click Next to accept the default file location or
click Browse to select an alternate folder.
9
Page 12

ENGLISH
5 You must restart your computer before using the ZyXEL
utility. Click Finish to complete the installation.
5.3 Hardware Connections
1 Locate an available USB port on the computer.
Remove the protective cap to
expose the USB connector.
Insert the AG-225H v2 into an
available USB port on the
computer.
10
Page 13
ENGLISH
Never bend, twist or force the AG-225H v2 into the
port. If there is not enough space to attach the AG225H v2, use the included USB cable.
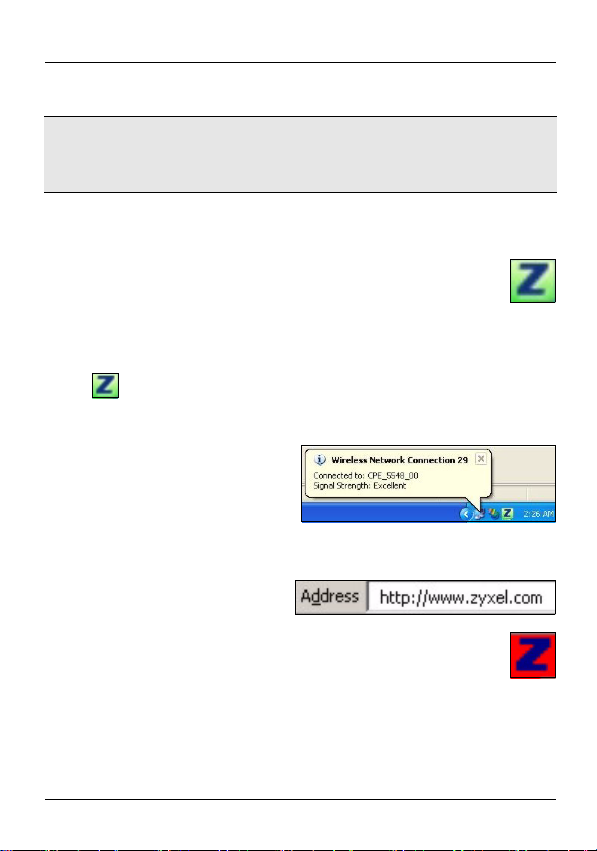
5.4 ZyXEL Utility Icons
After you install the ZyXEL utility and insert the AG225H v2, an icon appears in the system tray (typically
at the bottom of the desktop). The AG-225H v2
automatically searches for any available network(s) and
connects to a wireless network without security enabled.
If the icon color is green and/or you see the following icon
on your desktop, you are already connected to a wireless
network.
To access the Internet, open your Internet browser and enter
the URL of a web site in the address bar.
If the icon color is red, you are not connected to a
wireless network. See the next section for details on
how to manually connect to a network.
11
Page 14

ENGLISH
5.5 Manual Network Connection
If your AG-225H v2 does not automatically connect to a
wireless network, use the ZyXEL utility to connect manually.
1 Double-click the icon to display the ZyXEL utility Link
Info screen.
2 Click the Site Survey tab.
12
Page 15

ENGLISH
3 The available wireless network(s) displays in the
Available Network List. You can click Scan to have the
AG-225H v2 search again.
If a wireless network without security is available, one of the
following icons appears next to an entry in the list.
If a wireless network with security is available, one of the
following icons appears next to an entry in the list.
4 To connect to an available network, double-click an entry.
If the network has security enabled, you need to know its
13
Page 16
ENGLISH
settings. Refer to the User’s Guide for how to configure
security settings.
If no entries appear in the list, there are no available wireless
networks within range. See Troubleshooting or the User’s
Guide for more information.
5.6 Note for Windows XP Users
If you want to use WZC, either disable the ZyXEL utility (if you
already installed it) or just install the driver.
• To disable the ZyXEL utility, right-click the icon and select
Use Windows Zero Configuration. To activate the ZyXEL
utility again, double-click the icon and click OK.
• To install the driver only, select Driver only.
6 Troubleshooting
• If the AG-225H v2’s LCD screen does not turn on when you
use the OFF/ON switch, the battery may need recharging.
Insert the AG-225H v2 into an available USB port on your
computer to recharge it.
• If the PWR light on the AG-225H v2 is not on after you have
installed the utility and the AG-225H v2, make sure the AG225H v2 is properly inserted.
• If the icon does not display, uninstall and re-install the utility. See the User’s Guide for how to uninstall the utility.
• If your AG-225H v2 does not connect to a wireless network,
make sure there is an available wireless network within
range (see your User’s Guide for more details about the site
14
Page 17

ENGLISH
survey feature). If wireless security is enabled for that network, you need to configure the security settings of your AG225H v2 (see the User’s Guide).
7 Important Information
7.1 Federal Communications Commission
(FCC) Interference Statement
The 802.11a/g Wireless LAN Adapter has been tested to the
FCC exposure requirements (Specific Absorption Rate).
The equipment complies with FCC RF radiation exposure
limits set forth for an uncontrolled environment, under 47 CFR
2.1093 paragraph (d) (2).
This Transmitter must not be co-located or operating in
conjunction with any other antenna or transmitter.
Refer to the User's Guide for general FCC statements.
7.2 Procedure to View a Product's
Certification(s)
1 Go to www.zyxel.com
2 Select your product from the drop-down list box on the
ZyXEL home page to go to that product's page.
3 Select the certification you wish to view from this page.
15
Page 18

ENGLISH
16
Page 19

DEUTSCH
DEUTSCH
1 Über Ihr AG-225H v2
Der AG-225H v2 ist ein Wireless-Adapter, den Sie an einen
USB-Anschluss des Computers anschließen können. Er kann
Drahtlosnetzwerke suchen und die Verbindung zu ihnen
herstellen. Wenn der AG-225H v2 nicht an einen Computer
angeschlossen ist, können Sie sich Informationen zu den
Drahtlosnetzwerken der Umgebung auf dem LCD-Display
ansehen.
17
Page 20
DEUTSCH
2 Übersicht
In der folgenden Tabelle wird der AG-225H v2 beschrieben.
Kennzeichnung
A OFF/ON-
Name Beschreibung
Schalter
(AUS/EIN)
Schieben Sie den Schalter nach
rechts, um das LCD-Display einzuschalten.
Schieben Sie den Schalter nach
links, um das LCD-Display auszuschalten.
18
Page 21

DEUTSCH
Kennzeichnung
B LINK-LED Wenn der AG-225H v2 an einem
C PWR-LED Diese LED leuchtet, wenn der AG-
D LCD-Display Auf dem LCD-Display werden
Name Beschreibung
Computer angeschlossen ist und
eine Verbindung zu einem Drahtlosnetzwerk besteht, leuchtet diese LED
und blinkt, wenn Daten übertragen
werden.
Wenn der AG-225H v2 an einem
Computer angeschlossen ist, und
keine Verbindung zu einem Drahtlosnetzwerk besteht, blinkt diese LED
nur langsam.
Wenn der AG-225H v2 nicht an
einem Computer angeschlossen,
aber das LCD-Display eingeschaltet
ist, leuchtet diese LED, während der
AG-225H v2 nach einem Drahtlosnetzwerk sucht.
225H v2 an einem Computer angeschlossen und das LCD-Display
eingeschaltet ist.
nacheinander die Informationen über
die verfügbaren Netzwerke
angezeigt. Ausführliche Informationen dazu finden Sie unter 3.
19
Page 22

DEUTSCH
Kennzeichnung
E SEEK-Taste Wenn Sie bei eingeschaltetem LCD-
F NEXT-Taste Wenn Sie bei eingeschaltetem LCD-
Name Beschreibung
Display auf diese Taste drücken,
sucht der AG-225H v2 nach verfügbaren Drahtlosnetzwerken oder
ändert die Erkennungsmodi.
• Wenn das Gerät nach Drahtlosnetzwerken suchen soll, drücken
Sie einmal auf die SEEK-Taste.
• Um die Erkennungsmodi zu
ändern, drücken Sie eine
Sekunde lang auf die SEEK-
Taste. Drücken Sie dann noch
einmal auf die SEEK-Taste, um
die in diesem Modus verfügbaren
Netzwerke anzuzeigen. Ausführliche Informationen dazu finden
Sie unter 3.
Display auf diese Taste drücken,
können Sie durch die Liste der verfügbaren Drahtlosnetzwerke scrollen.
20
Page 23
DEUTSCH
3 Das LCD-Display
Wenn der AG-225H v2 nicht an einem Computer
angeschlossen ist, können Sie sich auf dem LCD-Display die
Informationen zu den verfügbaren Netzwerken anzeigen
lassen.
In der folgenden Tabelle werden die Bezeichnungen dieser
Abbildung beschrieben.
Bezeichnung
A SSID
B Channel
CEntry
Name Beschreibung
Die SSID ist der Name eines Drahtlos-
(SSID)
(Kanal)
(Zugang)
netzwerks. Wenn eine SSID länger als 12
Zeichen ist, wird sie automatisch
gescrollt.
Hier wird der Drahtloskanal des
Netzwerks angezeigt.
Hier wird die Anzahl der Netzwerke in der
Liste angezeigt. Der AG-225H v2 kann
bis zu 15 Netzwerke auf einmal erkennen.
21
Page 24

DEUTSCH
Bezeichnung
D Power
Name Beschreibung
(Ein/Aus)
Dieses Symbol wird angezeigt,
wenn der Akku fast leer ist.
Dieses Symbol wird angezeigt,
wenn der Akku voll geladen ist.
22
Page 25

DEUTSCH
Bezeichnung
E Detec-
Name Beschreibung
tion
Mode
(Erkennungsmodus)
Hier wird angezeigt, in welcher Art die
Netzwerke erkannt und aufgelistet werden. Eine Beschreibung, wie die Erkennungsmodi geändert werden, finden Sie
im Abschnitt 2 .
Im Modus Signal (Signal) werden
alle verfügbaren Netzwerke in der
Reihenfolge ihrer Signalstärke
angezeigt. Bei jedem Einschalten
des AG-225H v2, wird der Erkennungsmodus Signal (Signal) verwendet.
Im Modus Free (Frei), werden nur
Netzwerke ohne Sicherheitsfunktion angezeigt.
Im Modus Dedicated (Zugeord-
net) wird nur ein einziges ausgewähltes Netzwerk angezeigt.
Drücken Sie im Modus Signal
(Signal) oder Free (Frei) auf die
NEXT-Taste, um ein Netzwerk aus-
zuwählen. Wechseln Sie dann in
den Modus Dedicated (Zugeord-
net) und drücken Sie einmal auf
die SEEK-Taste. Der AG-225H v2
durchsucht regelmäßig das ausgewählte Netzwerk und aktualisiert die Anzeige.
23
Page 26

DEUTSCH
Bezeichnung
F Security
G Signal
Name Beschreibung
Hier werden die Verschlüsselungseinstel(Sicherheit)
(Signal)
lungen für das ausgewählte Drahtlos-
netzwerk angezeigt.
wird angezeigt, wenn keine Sicher-
heit aktiviert ist.
wird angezeigt, wenn WEP-Sicher-
heit aktiviert ist.
wird angezeigt, wenn WPA- oder
WPA2-Sicherheit aktiviert ist.
Hier wird der Wireless-Standard und die
Signalstärke des gewählten Netzwerks
angezeigt.
wird angezeigt, wenn ein Netzwerk
den Standard 802.11a verwendet.
wird angezeigt, wenn das Netzwerk
den Standard 802.11b verwendet.
wird angezeigt, wenn das Netzwerk
den Standard 802.11g verwendet.
4 Power (Ein/Aus)
Laden Sie den AG-225H v2 auf, indem Sie ihn an den USBAnschluss des Computers anschließen. Ausführliche
Informationen dazu finden Sie unter 5.3.
24
Page 27

DEUTSCH
Der AG-225H v2 wird zum Strom sparen automatisch nach
90 Sekunden der Inaktivität ausgeschaltet. Drücken Sie auf
die SEEK-Taste, um ihn wieder einzuschalten.
5 Das ZyXEL-Utility-Programm
Der Installationsvorgang ist für alle unterstützten WindowsVersionen ähnlich.
Note: Installieren Sie das ZyXEL-Utility-Programm bevor
Sie die AG-225H v2 einsetzen.
5.1 Installationsanforderungen
Stellen Sie bitte vor der Installation sicher, dass Ihr Computer
die folgenden Anforderungen erfüllt:
• Pentium II 300MHz oder höher
• Mindestens 20 MB freier Festplattenspeicher
• Mindestens 64 MB RAM
• CD-ROM-Laufwerk
• Ein USB-Anschluss (bei USB1.0/1.1 kann der AG-225H v2
Daten nur mit einer Datenrate von bis zu 11Mbps übertragen)
• Windows 2000 oder Windows XP
Note: Wenn auf Ihrem Computer das Programm Funk
Odyssey Client installiert ist, muss dieses zunächst
deinstalliert (entfernt) werden.
25
Page 28
DEUTSCH
5.2 Installation
1 Legen Sie die mitgelieferte CD in das CD-ROM-Laufwerk
des Computers ein. Wenn das folgende Fenster erscheint,
klicken Sie auf Setup. Wenn dieses Fenster nicht
erscheinen sollte, navigieren Sie auf der CD zur Datei
autorun.exe und klicken Sie doppelt darauf.
2 Wählen Sie Ihre Sprache und klicken Sie auf OK.
3 Das folgende Fenster erscheint. Klicken Sie auf Next
(Weiter).
26
Page 29

DEUTSCH
4 Wählen Sie Driver (Treiber) und Utility (Utility), um den
ZyXEL-Treiber und das ZyXEL-Utility auf dem Computer
zu installieren. Wenn Sie nur den Treiber installieren aber
die Wireless Zero Configuration (WZC) mit Windows XP
verwenden möchten, wählen Sie nur Driver (Treiber)
(siehe Hinweis für Windows XP-Benutzer). Klicken Sie auf
Next (Weiter), um den vorgegebenen Zielordner zu
bestätigen oder klicken Sie auf Browse (Durchsuchen),
um einen anderen Ordner auszuwählen.
5 Damit Sie das ZyXEL-Utility-Programm benutzen können,
muss der Computer neu gestartet werden. Speichern Sie
vor dem Neustart alle Arbeiten und schließen Sie alle
27
Page 30

DEUTSCH
Programme. Klicken Sie auf Finish (Fertig stellen), um die
Installation abzuschließen.
5.3 Anschließen der Hardware
1 Machen Sie einen freien USB-Anschluss am Computer
ausfindig.
2 Entfernen Sie die
Schutzkappe vom USBStecker. Schließen Sie den
AG-225H v2 an einen
freien USB-Anschluss des
Computers an.
Note: Stecken Sie den AG-225H v2 ohne starken Druck
und ohne Drehen in den Anschluss. Wenn nicht
genügend Platz für den AG-225H v2 vorhanden ist,
können Sie auch das mitgelieferte USB-Kabel
verwenden.
28
Page 31

DEUTSCH
5.4 Anzeigen des ZyXEL-Utility-Programms
Wenn Sie das ZyXEL-Utility-Programm installiert und
den AG-225H v2 angeschlossen haben, erscheint im
Systembereich der Taskleiste (diese befindet sich
normalerweise am unteren Bildschirmrand) ein
entsprechendes Symbol. Der AG-225H v2 sucht automatisch
nach verfügbaren Netzwerken und stellt bei Netzwerken ohne
Sicherheitsfunktion eine Verbindung zu einem
Drahtlosnetzwerk her.
Wenn die Anzeige grün leuchtet und/oder auf dem
Bildschirm das folgende Symbol angezeigt wird, ist das Gerät
bereit, eine Verbindung zu einem Drahtlosnetzwerk
herzustellen.
Um auf das Internet zuzugreifen, öffnen Sie Ihren InternetBrowser und geben Sie in die Adressleiste die URL einer
Website ein.
Wenn das Symbol rot ist, besteht keine Verbindung zu
einem Drahtlosnetzwerk. Im nächsten Abschnitt finden
Sie eine Beschreibung, wie eine Verbindung zu einem
Netzwerk manuell hergestellt werden kann.
29
Page 32

DEUTSCH
5.5 Herstellen einer manuellen Netzwerkverbindung
Wenn der AG-225H v2 nicht automatisch eine Verbindung zu
einem Drahtlosnetzwerk herstellt, können Sie diese mit dem
ZyXEL-Utility-Programm manuell herstellen.
1 Klicken Sie doppelt auf das Symbol, um das Fenster Link
Info (Verbindungsinformationen) des ZyXEL-Utility-
Programms aufzurufen.
2 Klicken Sie auf die Registerkarte Site Survey (Site-
Abfrage).
3 In der Liste Available Network List (Liste verfügbarer
Netzwerke) werden alle verfügbaren Drahtlosnetzwerke
30
Page 33

DEUTSCH
angezeigt. Wenn Sie auf Scan (Suchen) klicken, beginnt
der AG-225H v2 erneut mit der Suche.
Wenn ein Drahtlosnetzwerk ohne Sicherheitsfunktion
verfügbar ist, erscheint neben einem Eintrag in der Liste,
eines der folgenden Symbole.
Wenn ein Drahtlosnetzwerk mit Sicherheitsfunktion
verfügbar ist, erscheint neben einem Eintrag in der Liste,
eines der folgenden Symbole.
4 Um die Verbindung zu einem verfügbaren Netzwerk
herzustellen, klicken Sie doppelt auf einen Eintrag. Wenn
31
Page 34

DEUTSCH
bei dem Netzwerk die Sicherheitsfunktion aktiviert ist,
müssen Sie diese Einstellungen kennen. Lesen Sie im
Benutzerhandbuch nach, wie die Sicherheitseinstellungen
konfiguriert werden.
Wenn in der Liste keine Einträge angezeigt werden, sind
innerhalb der Reichweite des Geräts keine
Drahtlosnetzwerke verfügbar. Weitere Informationen zur
Fehlerbehebung finden Sie im Benutzerhandbuch.
5.6 Hinweis für Windows XP-Benutzer
• Wenn Sie die WZC verwenden möchten, müssen Sie
entweder das ZyXEL-Utility-Programm deaktivieren (wenn
es bereits installiert wurde) oder nur den Treiber installieren.
• Um das ZyXEL-Utility zu deaktivieren, klicken Sie mit der
rechten Maustaste auf das Symbol und wählen Sie Exit
(Beenden). Wenn Sie das ZyXEL-Utility wieder aktivieren
möchten, klicken Sie im Arbeitsplatz doppelt auf das Symbol
oder klicken Sie auf Start, (Alle) Programme, ZyXEL
AG-225H v2 Wireless Adapter Utility, ZyXEL AG-225H v2
Wireless Adapter Software
• Wenn Sie nur den Treiber installieren möchten, wählen Sie
nur Driver (Treiber).
6 Störungsbeseitigung
• Wenn das LCD-Display des AG-225H v2 beim Betätigen des
OFF/ON-Schalters nicht angeht, muss möglicherweise der
Akku aufgeladen werden. Schließen Sie den AG-225H v2
zum Aufladen an einen freien USB-Anschluss des Computers an.
32
Page 35

DEUTSCH
• Wenn nach dem Anschließen des AG-225H v2 und dem
Installieren des Utility-Programms die LED-Anzeige PWR
nicht leuchtet, prüfen Sie noch einmal, ob der AG-225H v2
richtig angeschlossen ist.
• Wenn das Symbol nicht angezeigt wird, deinstallieren Sie
das Utility-Programm und installieren Sie es erneut. Im
Benutzerhandbuch finden Sie eine Beschreibung, wie das
Utility-Programm deinstalliert wird.
• Wenn der AG-225H v2 keine Verbindung zu einem Drahtlosnetzwerk herstellen kann, stellen Sie sicher, ob sich ein
solches Netzwerk innerhalb der Reichweite befindet (im
Benutzerhandbuch finden Sie ausführliche Informationen zur
Siteabfragefunktion). Wenn die Drahtlossicherheit für dieses
Netzwerk aktiviert ist, müssen die Sicherheitseinstellungen
des AG-225H v2 konfiguriert werden (siehe Benutzerhandbuch).
7 Vorgehensweise zum Aufrufen einer Produktzertifizierung
1 Gehen Sie auf www.zyxel.com.
2 Wählen Sie Ihr Produkt aus der Auswahlliste auf der
ZyXEL Homepage aus, um die Seite des entsprechenden
Produkts aufzurufen.
3 Wählen Sie die Zertifizierung, die Sie von dieser Seite aus
aufrufen möchten.
33
Page 36

DEUTSCH
34
Page 37

ESPAÑOL
ESPAÑOL
1 Acerca de su AG-225H v2
El AG-225H v2 es un adaptador inalámbrico que se conecta
al puerto USB de su ordenador y le permite buscar y
conectarse a redes inalámbricas. Cuando el AG-225H v2 no
está conectado al ordenador, puede usar la pantalla LCD
para ver los detalles de las redes inalámbricas en el área.
2 Vista previa
La tabla siguiente describe al AG-225H v2.
Etiqueta
A Interruptor
Name
(Nombre)
OFF / ON
Descripción
Mueva el interruptor a la derecha para
encender la pantalla LCD.
Mueva el interruptor a la izquierda para
apagar la pantalla LCD.
35
Page 38

ESPAÑOL
Etiqueta
B Luz LINK Si el AG-225H v2 está conectado al
C Luz PWR Esta luz está encendida si el AG-225H
D Pantalla
Name
(Nombre)
LCD
Descripción
ordenador y hay una conexión
inalámbrica de red, esta luz está
encendida y parpadea cuando hay
tráfico.
Si el AG-225H v2 está conectado a un
ordenador y no hay una conexión de red
inalámbrica, esta luz parpadea
lentamente.
Si el AG-225H v2 no está conectado al
ordenador y la pantalla LCD está
encendida, esta luz está encendida
mientras el AG-225H v2 busca redes
inalámbricas.
v2 está conectado a un ordenador o si la
pantalla LCD está encendida.
La pantalla LCD muestra los detalles de
las redes inalámbricas disponibles de
una en una. Consulte la sección 3 para
más detalles.
36
Page 39

ESPAÑOL
Etiqueta
EBotón
FBotón
Name
(Nombre)
SEEK
NEXT
Descripción
Cuando la pantalla LCD esté encendida,
use este botón para que el AG-225H v2
busque las redes inalámbricas
disponibles o cambie los modos de
detección.
• Para buscar las redes inalámbricas
disponibles, pulse el botón SEEK
una vez.
• Para cambiar los modos de detección, mantenga pulsado el botón
SEEK durante más de un segundo.
Luego, pulse el botón SEEK una vez
para mostrar las redes inalámbricas
en ese modo. Consulte la sección 3
para más detalles.
Cuando la pantalla LCD esté encendida,
use este botón para desplazarse por la
lista de redes inalámbricas disponibles.
37
Page 40

ESPAÑOL
3 La pantalla LCD
Cuando AG-225H v2 no esté conectado a un ordenador,
puede usar la pantalla LCD para mostrar los detalles de las
redes disponibles.
La siguiente tabla describe las etiquetas de esta figura.
Etiqueta
A SSID El SSID es el nombre de una red
B Canal Esto muestra el canal inalámbrico de la
C Entrada Esto muestra el número de la red en la
Name
(Nombre)
Descripción
inalámbrica. Cuando un SSID tiene más de
12 caracteres, se desplaza
automáticamente.
red.
lista. El AG-225H v2 puede detectar hasta
15 redes al mismo tiempo.
38
Page 41

ESPAÑOL
Etiqueta
D Corriente Este icono aparece cuando la
Name
(Nombre)
Descripción
batería está baja.
Este icono aparece cuando la
batería está cargada por completo.
39
Page 42

ESPAÑOL
Etiqueta
E Modo de
Name
(Nombre)
detección
Descripción
Esto muestra el modo en que las redes son
detectadas y listadas. Consulte la sección 2
para más detalles sobre cómo cambiar los
modos de detección.
El modo Signal (Señal) muestra
todas las redes disponibles
ordenadas por la fuerza de señal.
Cada vez que encienda el AG-225H
v2, utilizará el modo de detección de
Signal (Señal).
El modo Free (Libre) muestra sólo
las redes sin la seguridad activada.
El modo Dedicated (Dedicado)
muestra una única red
seleccionada.
Utilice el botón NEXT (SIGUIENTE)
en el modo de detección Signal
(Señal) o Free (Libre) para
seleccionar una red. Luego, cambie
al modo Dedicated (Dedicado) y
pulse el botón SEEK (BUSCAR)
una vez. El AG-225H v2 busca
regularmente la red seleccionada y
actualiza la pantalla.
40
Page 43

ESPAÑOL
Etiqueta
F Seguridad Esto muestra la configuración de cifrado
G Señal Esto muestra el estándar inalámbrico y la
Name
(Nombre)
Descripción
inalámbrico de la red seleccionada.
aparece cuando no hay seguridad
activada.
aparece cuando la seguridad WEP
está activada.
aparece cuando la seguridad WPA o
WPA2 está activada.
fuerza de señal de la red seleccionada.
muestra cuando una red está usando
el estándar 802.11a.
aparece cuando la red está usando el
estándar 802.11b.
aparece cuando la red está usando el
estándar 802.11g.
4 Corriente
Recargue su AG-225H v2 conectándolo al puerto USB de su
ordenador. Consulte la sección 5.3 para más detalles.
Su AG-225H v2 se apagará automáticamente tras 90
segundos de inactividad para ahorrar energía. Pulse el botón
SEEK (BUSCAR) para volver a encenderlo.
41
Page 44

ESPAÑOL
5 l Utilidad ZyXEL
Los procedimientos de instalación son similares para todas
las versiones admitidas de Windows.
Note: Instale la utilidad ZyXEL antes de insertar el AG-
225H v2.
5.1 Requisitos de instalación
Antes de la instalación, asegúrese de que tiene un equipo en
el que se cumplen los siguientes requisitos:
• Pentium II a 300MHz o superior
• Un mínimo de 20 MB disponibles de espacio en disco duro
• Un mínimo de 32 MB RAM
• Una unidad CD-ROM
• Un puerto USB (con USB1.0/1.1, el AG-225H v2 sólo puede
transmitir hasta 11Mbps)
• Windows 2000 o Windows XP
Note: Si ya ha instalado el software Funk Odyssey Client
en el ordenador, desinstálelo (quítelo).
5.2 Instalación
1 Inserte el CD incluido en la unidad de CD-ROM de su
ordenador. Cuando aparezca la siguiente pantalla, haga
42
Page 45

ESPAÑOL
clic en Setup (Configuración). Si la pantalla no aparece,
busque y haga doble clic en autorun.exe.
2 Seleccione su idioma y haga clic en OK.
3 Aparecerá la siguiente pantalla. Haga clic en Next
(Siguiente).
4 Seleccione Driver (Controlador) y Utility (Utilidad) para
instalar la utilidad y el controlador del ZyXEL en su
ordenador. Si desea instalar el controlador solamente y
utiliza Wireless Zero Configuration (WZC) con Windows
XP, seleccione Driver (Controlador) solamente (ver Nota
43
Page 46

ESPAÑOL
para usuarios de Windows XP). Haga clic en Next
(Siguiente) para aceptar la ubicación de archivo
predeterminada o haga clic en Browse (Examinar) para
seleccionar una carpeta alternativa.
5 Debe reiniciar su ordenador antes de utilizar la utilizad
ZyXEL. Guarde su trabajo y cierre cualquier programa
44
Page 47

ESPAÑOL
abierto antes de reiniciarlo. Haga clic en Finish (Finalizar)
para completar el proceso de instalación.
5.3 Conexiones del hardware
1 Localice una ranura USB disponible en el equipo.
2 Quite la tapa protectora
para descubrir el conector
USB. Inserte el AG-225H
v2 en un puerto USB
disponible en el ordenador.
Note: Nunca doble, tuerza o fuerce el AG-225H v2 dentro
del puerto. Si no hay espacio suficiente para
insertar el AG-225H v2, utilice el cable USB
incluido.
45
Page 48

ESPAÑOL
5.4 Iconos de la utilidad ZyXEL
Tras instalar la utilidad ZyXEL e insertar el AG-225H
v2, aparecerá un icono en la bandeja del sistema
(normalmente en la parte inferior del escritorio). El AG225H v2 buscará automáticamente una red o redes
disponible(s) y se conectará a una red inalámbrica que no
tenga la seguridad habilitada.
Si el color del icono es verde y/o ve el siguiente icono en
su escritorio, ya está conectado a una red inalámbrica.
Para acceder a Internet, abra su explorador de Internet y
escriba la URL de un sitio web en la barra de direcciones.
Si el color del icono es rojo, no está conectado a una
red inalámbrica. Consulte la sección siguiente para
detalles sobre cómo conectarse manualmente a una
red.
5.5 Conexión manual a una red
Si su AG-225H v2 no se conecta automáticamente a una red
inalámbrica, puede usar la utilidad ZyXEL para conectar
manualmente.
46
Page 49

ESPAÑOL
1 Haga doble clic en el icono para mostrar la pantalla de
información de conexión de la utilidad ZyXEL.
2 Haga clic en la ficha Site Survey (Sondeo de sitios).
3 Aparecerá(n) la(s) red(es) disponible(s) en la Available
Network List (Lista de redes disponibles). Puede hacer
clic en Scan (Buscar) para que el AG-225H v2 vuelva a
buscar.
47
Page 50

ESPAÑOL
Si hay disponible una red sin seguridad, aparecerá uno de
los siguientes iconos junto a una entrada en la lista.
Si hay disponible una red con seguridad, aparecerá uno de
los siguientes iconos junto a una entrada en la lista.
4 Para conectarse a una red disponible, haga doble clic en
una entrada. Si la red tiene la seguridad habilitada,
necesitará saber su configuración. Consulte la Guía del
usuario para saber cómo ajustar la configuración de
seguridad.
Si no aparecen entradas en la lista, no hay redes
inalámbricas dentro del alcance. Consulte Solución de
problemas o la Guía del usuario para más información.
5.6 Nota para usuarios de Windows XP
Si desea utilizar WZC, deshabilite la utilidad ZyXEL (si la
tiene instalada) o simplemente instale sólo el controlador.
• Para desactivar la utilidad ZyXEL, haga clic con el botón
derecho en el icono y seleccione Exit (Salir). Para activar
la utilidad ZyXEL de nuevo, haga doble clic en el icono en
48
Page 51

ESPAÑOL
su escritorio o haga clic en Inicio, (Todos los) programas,
ZyXEL AG-225H v2 Wireless Adapter Utility, ZyXEL AG-
225H v2 Wireless Adapter Software.
• Para instalar el controlador solamente, seleccione Driver
(Controlador).
6 Solución de problemas
• Si la pantalla LCD del AG-225H v2 no se enciende al usar el
interruptor OFF/ON, puede que necesite recargar la batería.
Inserte el AG-225H v2 en un puerto USB disponible de su
ordenador para recargarlo.
• Si la luz PWR del AG-225H v2 no se enciende tras haber
instalado la utilidad y el AG-225H v2, compruebe si el AG225H v2 está insertado correctamente.
• Si el icono no aparece, desinstale y vuelva a instalar la
utilidad. Consulte la Guía del usuario para comprobar cómo
desinstalar la utilidad.
• Si su AG-225H v2 no se conecta a una red inalámbrica,
compruebe si hay una red inalámbrica disponible dentro del
alcance (consulte su Guía del usuario para más detalles
sobre la característica de búsqueda de estación). Si hay una
seguridad inalámbrica habilitada para esa red, necesitará
ajustar la configuración de seguridad en su AG-225H v2
(consulte la Guía del usuario).
49
Page 52

ESPAÑOL
7 Procedimiento para ver las certificaciones de un producto
1 Vaya a www.zyxel.com.
2 Seleccione el producto que desea en el cuadro de lista
desplegable que se encuentra en la página principal de
ZyXEL para obtener acceso a la página de dicho
producto.
3 Seleccione la certificación que desea ver en esta página.
50
Page 53

FRANÇAIS
FRANÇAIS
1 A propos de votre AG-225H v2
Le AG-225H v2 est un adaptateur sans fil qui se connecte au
port USB de votre ordinateur et vous permet de rechercher et
de vous connecter aux réseaux sans fil. Quand le AG-225H
v2 n'est par connecté à votre ordinateur, vous pouvez utiliser
l'écran LCD pour afficher les détails des réseaux disponibles
à proximité.
51
Page 54

FRANÇAIS
2 Présentation
Le tableau suivant décrit le AG-225H v2.
Étiquette
A Commutateur
Nom Description
OFF / ON
(Arrêt /
Marche)
Déplacez le commutateur à droite pour
allumer l'écran LCD.
Déplacez le commutateur à gauche
pour éteindre l'écran LCD.
52
Page 55

FRANÇAIS
Étiquette
B Témoin
C Témoin
D Ecran LCD L'écran LCD affiche les détails des
Nom Description
Si le AG-225H v2 est connecté à un
lumineux de
LINK
(LIAISON)
lumineux
PWR
ordinateur et qu'il y a une connexion à
un réseau sans fil, ce témoin lumineux
s'allume et clignote quand il y a du
trafic.
Si le AG-225H v2 est connecté à un
ordinateur et qu'il n'y a pas de
connexion réseau sans fil, ce témoin
lumineux clignote lentement.
Si le AG-225H v2 n'est pas connecté à
un ordinateur et que l'écran LCD est
allumé, ce témoin lumineux est allumé
quand le AG-225H v2 recherche les
réseaux sans fil.
Ce témoin lumineux s'allume si le AG225H v2 est connecté à un ordinateur
ou si l'écran LCD est allumé.
réseaux sans fil disponibles un par un.
Voir la section 3 pour plus de détails.
53
Page 56

FRANÇAIS
Étiquette
E Bouton SEEK
F Bouton NEXT
Nom Description
(RECHERCH
ER)
(SUIVANT)
Quand l'écran LCD est allumé, utilisez
ce bouton pour que le AG-225H v2
recherche des réseaux sans fil
disponibles ou changez de modes de
détection.
• Pour rechercher des réseaux sans
fil disponibles, appuyez une fois
sur le bouton SEEK (RECHER-
CHER).
• Pour changer les modes de détection, maintenez le bouton SEEK
(RECHERCHER) pendant une
seconde. Appuyez ensuite sur le
bouton SEEK (RECHERCHER)
une fois pour afficher les réseaux
disponibles dans ce mode. Voir la
section 3 pour plus de détails.
Quand l'écran LCD est allumé, utilisez
ce bouton pour parcourir la liste des
réseaux sans fil disponibles.
54
Page 57

FRANÇAIS
3 L'écran LCD
Quand le AG-225H v2 n'est par connecté à un ordinateur,
vous pouvez utiliser l'écran LCD pour afficher les détails des
réseaux disponibles.
Le tableau suivant décrit les étiquettes dans cette figure.
Étiquette
A SSID Le SSID est le nom donné à un réseau
B Canal Ceci affiche le canal sans fil du réseau.
C Entrée Ceci affiche le numéro du réseau dans la
Nom Description
sans fil. Quand un SSID a une longueur
supérieure à 12 caractères il défile
automatiquement.
liste. LeAG-225H v2 peut détecter jusqu'à
15 réseaux à tout moment.
55
Page 58

FRANÇAIS
Étiquette
D Alimentat
Nom Description
ion
Cette icône s'affiche quand la
batterie est faible.
Cette icône s'affiche quand la
batterie est entièrement chargée.
56
Page 59

FRANÇAIS
Étiquette
E Mode de
Nom Description
détection
Ceci affiche la manière dont les réseaux
sont détectés et insérés dans la liste. Voir
la section 2 pour les détails sur la manière
de changer les modes de détections.
Le mode Signal affiche tous les
réseaux disponibles par ordre de
force de signal. Chaque fois que
vous allumez le AG-225H v2, il
utilise le mode de détection du
Signal.
Le mode Free (Libre) affiche
seulement les réseaux sans sécurité
activée.
Le mode Dedicated (Dédié) affiche
un réseau sélectionné unique.
Utilisez le bouton NEXT (SUIVANT)
en mode Signal ou détection Free
(Libre) pour sélectionner un réseau.
Puis, passez en mode Dedicated
(Dédié) et appuyez une fois sur le
bouton SEEK (RECHERCHER). Le
AG-225H v2 balaie régulièrement le
réseau sélectionné et met à jour
l'affichage.
57
Page 60

FRANÇAIS
Étiquette
F Sécurité Ceci affiche les paramètres de cryptage
G Signal Ceci affiche la norme sans fil et la force du
Nom Description
sans fil du réseau sélectionné.
s'affiche quand aucune sécurité n'est
activée.
s'affiche quand la sécurité WEP est
activée.
s'affiche quand la sécurité WPA ou
WPA2 est activée.
signal du réseau sélectionné.
s'affiche quand un réseau utilise la
norme 802.11a.
s'affiche quand le réseau utilise la
norme 802.11b.
s'affiche quand le réseau utilise la
norme 802.11g.
4 Alimentation
Rechargez votre AG-225H v2 en le connectant au port USB
de votre ordinateur. Voir la section 5.3 pour plus de détails.
Votre AG-225H v2 s'éteindra automatiquement au bout de 90
secondes d'inactivité pour économiser le courant. Appuyez
sur le bouton SEEK (RECHERCHER) pour le rallumer.
58
Page 61

FRANÇAIS
5 L'utilitaire ZyXEL
Les procédures d'installation sont similaires pour toutes les
versions de Windows prises en charge.
Note: Installez l'utilitaire ZyXEL avant d'insérer la AG-
225H v2.
5.1 Configuration requise
• Avant l'installation, assurez-vous que vous avez un ordinateur avec la configuration suivante:
• Pentium II 300MHz ou plus
• Au minimum 20 Mo d'espace disponible sur le disque dur
• An minimum 32 Mo de RAM
• Un lecteur de CD-ROM
• Un port USB (avec USB1.0/1.1, le AG-225H v2 peut uniquement transmettre à un débit maximum de 11Mbps)
• Windows 2000 ou Windows XP
Note: Si vous avez déjà installé le logiciel Funk Odyssey
Client sur l'ordinateur, désinstallez-le (retirez-le).
5.2 Installation
1 Insérez le CD inclus dans le lecteur CD-ROM de votre
ordinateur. Quand l'écran suivant apparaît, cliquez sur
59
Page 62

FRANÇAIS
Setup. Si l'écran n'apparaît pas, localisez et double
cliquez sur autorun.exe.
2 Sélectionnez votre langue et cliquez sur OK.
3 L'écran suivant s'affiche. Cliquez sur Suivant.
4 Sélectionner Driver (Pilote) et Utility (Utilitaire) pour
installer à la fois l'utilitaire et le pilote de ZyXEL sur votre
ordinateur. Si vous voulez installer uniquement le pilote et
utiliser Wireless Zero Configuration (Configuration zéro
sans fil) (WZC) avec Windows XP, sélectionnez seulement
Driver (Pilote) (voir Remarques pour les utilisateurs de
60
Page 63

FRANÇAIS
Windows XP). Cliquez sur Next (Suivant) pour accepter
l'emplacement des fichiers par défaut, sinon cliquez sur
Browse (Parcourir) pour sélectionner un autre dossier.
5 Vous devez redémarrer votre ordinateur avant d'utiliser
l'utilitaire ZyXEL. Sauvegardez votre travail et fermez tous
61
Page 64

FRANÇAIS
les programmes ouverts avant de redémarrer. Cliquez sur
Ter min er pour terminer l'installation.
5.3 Connexions matérielles
6 Recherchez un emplacement USB disponible sur
l'ordinateur.
7 Retirez le cache de
protection pour laissez
apparaître le connecteur
USB. Insérez l'AG-225H
v2 dans un port USB
disponible de l'ordinateur.
Note: Ne jamais courber, vriller, ou forcer l'AG-225H v2
dans le port. Si il n'y a pas suffisamment d'espace
pour connecter l'AG-225H v2, utilisez le câble USB
fourni.
62
Page 65

FRANÇAIS
5.4 Icônes de l'utilitaire ZyXEL
Après avoir installé l'utilitaire ZyXEL et inséré l'AG225H v2, une icône apparaît dans la barre système
(typiquement en bas du bureau). L'AG-225H v2
recherche automatiquement le(s) réseau(x) disponibles et se
connecte à un réseau sans fil sans sécurité activée.
Si la couleur de l'icône est verte et/ou vous voyez l'icône
suivante sur votre écran, vous êtes déjà connecté à un
réseau sans fil.
Pour accéder à Internet, ouvrez votre navigateur Internet et
entrez l'URL du site web dans la barre d'adresse.
Si la couleur de l'icône est rouge, vous n'êtes pas
connecté au réseau sans fil. Consultez la section
suivante pour les détails sur comment se connecter
manuellement à un réseau.
5.5 Connexion Réseau Manuelle
Si votre AG-225H v2 ne se connecte pas automatiquement au
réseau sans fil, vous pouvez utiliser l'utilitaire ZyXEL pour
vous connectez manuellement.
63
Page 66

FRANÇAIS
1 Double-cliquez l'icône pour afficher l'écran d'Info Liaison
de l'utilitaire ZyXEL.
2 Cliquez sur l'onglet Site Survey (etude du site).
3 Le(s) réseau(x) disponible(s) apparaîtront dans la
Available Network List (liste de réseau disponible). Vous
pouvez cliquer sur Scan (rechercher) pour avoir une
nouvelle recherche de l'AG-225H v2.
64
Page 67

FRANÇAIS
Si un réseau sans fil sans sécurité est disponible, l'une des
icônes suivantes apparaîtra à côté d'une entrée dans la liste.
Si un réseau sans fil avec sécurité est disponible, l'une des
icônes suivantes apparaîtra à côté d'une entrée dans la liste.
4 Pour se connecter à un réseau disponible, double-cliquez
sur une entrée. Si le réseau à une sécurité activée, vous
aurez besoin de connaître ses paramètres. Se référer au
Guide de l'Utilisateur pour savoir comment configurer les
paramètres de sécurité.
Si aucune entrée n'apparaît dans la liste, il n'y a pas de
réseau sans fil disponible dans cette plage. Voir le Guide de
l'Utilisateur pour plus d'informations.
5.6 Remarques pour les utilisateurs de Windows XP
Si vous voulez utiliser WZC, vous pouvez soit désactiver
l'utilitaire ZyXEL (si vous l'avez déjà installé) soit simplement
installer le pilote.
65
Page 68

FRANÇAIS
• Pour désactiver l'utilitaire ZyXEL, cliquez avec le bouton droit
de la souris sur l'icône et sélectionnez Exit (Quitter).
Pour activer à nouveau l'utilitaire ZyXEL, double cliquez sur
l'icône sur votre bureau ou cliquez sur Start (Démarrer),
(All) Programmes ((Tous) programmes), ZyXEL AG-225H
v2 Wireless Adapter Utility (utilitaire d'adaptateur sans
fil ZyXEL AG-225H v2), ZyXEL AG-225H v2 Wireless
Adapter Software (logiciel d'adaptateur sans fil ZyXEL
AG-225H v2).
• Pour installer le pilote seulement, sélectionnez Driver
(Pilote) seulement.
6 Dèpannage
• Si l'écran LCD du AG-225H v2 ne s'allume pas quand vous
utilisez le commutateur OFF/ON(Arrêt/Marche), la batterie
a peut-être besoin d'être rechargée. Insérez le AG-225H v2
dans un port USB disponible sur votre ordinateur pour la
recharger.
• Si la lumière PWR de l'AG-225H v2 n'est pas allumée après
avoir installé l'utilitaire et l'AG-225H v2, assurez-vous que
l'AG-225H v2 est correctement inséré.
• Si l'icône ne s'affiche pas, désinstallez et réinstallez l'utilitaire. Consultez le guide de l'utilisateur pour la manière de
désinstaller l'utilitaire.
• Si votre AG-225H v2 ne se connecte pas à un réseau sans
fil, vérifiez qu'il y a un réseau sans fil disponible à portée
(consultez votre guide de l'utilisateur pour les détails concernant la fonctionnalité d'inspection de site). Si la sécurité sans
fil est désactivée pour ce réseau, vous devez configurer les
66
Page 69

FRANÇAIS
paramètres de sécurité dans votre AG-225H v2 (consulter le
guide de l'utilisateur).
7 Procédure permettant de consulter une(les) Certification(s) du Produit
1 Connectez vous sur www.zyxel.com.
2 Sélectionnez votre produit dans la liste déroulante se
trouvant sur la page d'accueil ZyXEL pour accéder à la
page du produit concerné.
3 Sélectionnez sur cette page la certification que vous
voulez consulter.
67
Page 70

FRANÇAIS
68
Page 71

ITALIANO
ITALIANO
1 La vostra AG-225H v2
AG-225H v2 è un adattatore wireless che si collega alla porta
USB del computer e consente di rilevare e connettersi a reti
wireless. Quando AG-225H v2 non è collegata a un computer,
è possibile utilizzare il display LCD per visualizzare i dettagli
relativi alle reti wireless presenti nell'area.
2 Cenni generali
La tabella seguente descrive AG-225H v2.
Etich
Nome Descrizione
etta
A Interruttore
OFF / ON
Spostare l'interruttore verso destra per
accendere il display LCD.
Spostare l'interruttore verso sinistra per
spegnere il display LCD.
69
Page 72

ITALIANO
Etich
Nome Descrizione
etta
B Spia LINK Se AG-225H v2 è collegata a un
computer ed è stabilita la connessione a
una rete wireless, questa spia è accesa
e lampeggia quando c'è traffico.
Se AG-225H v2 è collegata a un
computer e non è stabilita la
connessione a una rete wireless, questa
spia lampeggia lentamente.
Se AG-225H v2 è collegata a un
computer e il display LCD è acceso,
questa spia è accesa quando AG-225H
v2 è alla ricerca di reti wireless.
C Spia PWR Questa spia è accesa se AG-225H v2 è
collegata a un computer oppure se il
display LCD è acceso.
D Display LCD Il display LCD visualizza i dettagli relativi
alle reti wireless disponibili, uno alla
volta. Vedere la sezione 3 per ulteriori
dettagli.
70
Page 73

Etich
Nome Descrizione
etta
E Pulsante
SEEK
F Pulsante
NEXT
ITALIANO
Quando il display LCD è acceso,
utilizzare questo pulsante per
comandare alla AG-225H v2 di cercare
reti wireless disponibili o di cambiare le
modalità di rilevamento.
• Per cercare reti wireless disponibili,
premere una volta il pulsante SEEK.
• Per cambiare modalità di rilevamento, tenere premuto il pulsante
SEEK per un secondo. Quindi premere una volta il pulsante SEEK per
visualizzare le reti disponibili in
quella modalità. Vedere la sezione 3
per ulteriori dettagli.
Quando il display LCD è acceso,
utilizzare questo pulsante per scorrere
l'elenco delle reti wireless disponibili.
71
Page 74

ITALIANO
3 Display LCD
Quando AG-225H v2 non è collegata a un computer, è
possibile utilizzare il display LCD per visualizzare i dettagli
relativi alle reti disponibili.
La tabella seguente descrive le etichette presenti in questa
figura.
Etich
Nome Descrizione
etta
A SSID Il SSID è il nome di una rete wireless.
Quando un SSID è più lungo di 12 caratteri,
esso scorre automaticamente.
B Canale Visualizza il canale wireless della rete.
C Voce Visualizza il numero della rete nell'elenco.
L'adattatore AG-225H v2 può rilevare fino a
15 reti contemporaneamente.
72
Page 75

Etich
Nome Descrizione
etta
D Alimen-
tazione
ITALIANO
Questa icona notifica che la batteria
è scarica.
Questa icona notifica che la batteria
è completamente carica.
73
Page 76

Etich
Nome Descrizione
etta
E Modalità
di rilevamento
ITALIANO
Visualizza in che modo le reti sono rilevate
ed elencate. Vedere la sezione 2 per i
dettagli relativi a come cambiare modalità di
rilevamento.
La modalità Signal(Segnale)
visualizza tutte le reti disponibili in
ordine di intensità di segnale. Ogni
volta che si accende AG-225H v2,
essa utilizza la modalità di
rilevamento Signal(Segnale).
La modalità Free(Libera) visualizza
solo le reti che non presentano
alcuna sicurezza attiva.
La modalità Dedicated(Dedicata)
visualizza una singola rete
selezionata.
Utilizzare il pulsante NEXT nella
modalità di rilevamento
Signal(Segnale) o Free(Libera) per
selezionare una rete. A questo punto
passare alla modalità
Dedicated(Dedicata) e premere una
volta il pulsante SEEK. L'adattatore
AG-225H v2 scansiona regolarmente
la rete selezionata e aggiorna la
visualizzazione.
74
Page 77

ITALIANO
Etich
Nome Descrizione
etta
F Sicurezza Visualizza le impostazioni di crittografia
wireless della rete selezionata.
visualizzata quando non è attiva
alcuna sicurezza.
visualizzata quando è attiva la
sicurezza WEP.
visualizzata quando è attiva la
sicurezza WPA o WPA2.
G Segnale Visualizza lo standard wireless e l'intensità
del segnale della rete selezionata.
visualizzata quando una rete utilizza lo
standard 802.11a.
visualizzata quando una rete utilizza lo
standard 802.11b.
visualizzata quando una rete utilizza lo
standard 802.11g.
4 Alimentazione
Ricaricare l'adattatore AG-225H v2 collegandolo alla porta
USB del computer. Vedere la sezione 5.3 per ulteriori
dettagli.
L'adattatore AG-225H v2 si spegne automaticamente dopo 90
secondi di inattività per risparmiare energia. Premere il
pulsante SEEK per riaccendere l'adattatore.
75
Page 78

ITALIANO
5 Il programma ZyXEL Utility
Le procedure di installazione sono simili per tutte le versioni
di Windows supportate.
Note: Installare ZyXEL Utility prima di inserire la AG-
225H v2.
5.1 Requisiti per l'installazione
Prima dell'installazione verificare che il computer sia dotato di
qaunto segue:
• Pentium II a 300 MHz o superiore
• Spazio libero disponibile nel disco rigido di almeno 20 MB
• Almeno 32 MB di RAM
• Unità CD-ROM
• Una porta USB (con USB versioni 1.0/1.1, lo AG-225H v2
può solo trasmettere fino alla velocità di 11 Mbps)
• Windows 2000 o Windows XP
Note: Se sul computer è già installato il software Funk
Odyssey Client, provvedere a disinstallarlo.
5.2 Installazione
1 Inserire il CD fornito a corredo nell'unità CD-ROM del
computer. Alla visualizzazione della schermata seguente,
fare clic su Setup (installazione). Se la schermata non
76
Page 79

ITALIANO
viene visualizzata, individuare e fare doppio clic sul file
autorun.exe..
2 Selezionare la lingua e fare clic su OK.
3 Viene visualizzata la seguente schermata. Premere
Avanti.
4 Selezionare Driver e Utility per installare sia l'utility
ZyXEL sia il driver sul computer. Se si desidera installare
solo il driver e utilizzare Wireless Zero Configuration
(WZC) di Windows XP, selezionare solo Driver (vedere
Nota per gli utenti di Windows XP). Premere Avanti per
77
Page 80

ITALIANO
accettare la posizione predefinita del file, oppure premere
Sfoglia per scegliere un'altra cartella.
5 È necessario riavviare il computer prima di utilizzare
l'utility ZyXEL. Salvare il lavoro e chiudere tutti i
programmi aperti prima del riavvio. Fare clic su Fine per
completare l'installazione.
78
Page 81

ITALIANO
5.3 Collegamenti hardware
1 Individuare uno slot USB libero nel computer.
2 Rimuovere la copertura
protettiva per esporre il
connettore USB. Inserire
l'AG-225H v2 in una porta
USB libera del computer.
Note: Non curvare, torcere o forzare l'AG-225H v2 nella
porta. Se non c'è spazio sufficiente per collegare
l'AG-225H v2, utilizzare il cavo USB fornito a
corredo.
5.4 Icone di ZyXEL Utility
Dopo aver installato ZyXEL utility e inserito l'AG-225H
v2, nell'area di notifica di Windows verrà visualizzata
un'icona. L'AG-225H v2 cerca automaticamente
qualsiasi rete disponibile e si collega a una rete wireless se
per questa non è attiva l'opzione di protezione.
Se il colore dell'icona è verde e/o se viene visualizzata la
seguente icona sul desktop, il sistema è pronto per
connettersi a una rete wireless.
79
Page 82

ITALIANO
Per accedere a Internet, aprire il browser e immettere
l'indirizzo URL di un sito Web nella barra degli indirizzi.
Se l'icona è di colore rosso, il computer non è
connesso a una rete wireless. Vedere la sezione
successiva per i dettagli su come connettersi
manualmente a una rete.
5.5 Connessione manuale a una rete
Se l'AG-225H v2 non si connette automaticamente a una rete
wireless, è possibile utilizzare ZyXEL Utility per eseguire
manualmente la connessione.
1 Fare doppio clic sull'icona per visualizzare la schermata
informativa del collegamento di ZyXEL Utility.
2 Fare clic sulla scheda Analisi sito.
80
Page 83

ITALIANO
3 Viene visualizzato l'elenco delle reti wireless disponibili
nel campo d'azione. È possibile fare clic sul Scan (cerca)
per consentire che l'AG-225H v2 esegua un'altra ricerca.
Se è disponibile una rete wireless senza sicurezza, accanto
alla voce corrispondente dell'elenco appare una delle
seguenti icone.
Se è disponibile una rete wireless con sicurezza, accanto
alla voce corrispondente dell'elenco appare una delle
seguenti icone.
81
Page 84

ITALIANO
4 Per connettersi a una rete disponibile, fare doppio clic
sulla voce corrispondente. Se la rete ha le opzioni di
sicurezza attivate, è necessario conoscere queste
impostazioni. Vedere la Guida dell'utente per sapere come
configurare le impostazioni di sicurezza.
Se nell'elenco non appare alcuna voce, ciò significa che nel
campo non vi è alcuna rete wireless disponibile. Per
maggiori informazioni, vedere la sezione di Risoluzione dei
problemi della Guida dell'utente.
5.6 Nota per gli utenti di Windows XP
Se si desidera utilizzare la funzionalità WZC, disabilitare
ZyXEL Utility (se già installato) oppure installare unicamente
il driver.
• Per disabiltiare l'utility ZyXEL, fare clic con il pulsante destro
del mouse sull'icona e selezionare Esci. Per attivare nuovamente l'utility ZyXEL, fare doppio clic sull'icona sul
desktop oppure fare clic su Start, (Tutti i) Programmi,
ZyXEL AG-225H v2 Wireless Adapter Utility, ZyXEL AG225H v2 Wireless Adapter Software.
• Per installare solo il driver, selezionare solo Driver.
6 Risoluzione dei problemi
• Se il display LCD dell'adattatore AG-225H v2 non si accende
utilizzando l'interruttore OFF/ON, potrebbe essere necessario ricaricare la batteria. Inserire l'adattatore AG-225H v2 in
una porta USB disponibile sul computer per ricaricarlo.
82
Page 85

ITALIANO
• Se l'indicatore PWR dell'AG-225H v2 non è acceso dopo
aver installato l'utility e l'AG-225H v2, verificare che l'AG225H v2 sia inserita correttamente.
• Se l'icona non viene visualizzata, disinstallare e reinstallare l'utility. Fare riferimento alla Guida utente per le istruzioni
su come disinstallare l'utility.
• Se la AG-225H v2 non si connette a una rete wireless, verificare che vi sia una rete wireless disponibile nel campo (vedere la Guida utente per i dettagli relativi alla funzione di
analisi del luogo). Se per tale rete è attivata la protezione
wireless, è necessario configurare le impostazioni di protezione sulla AG-225H v2 (vedere la Guida utente).
7 Procedura per visualizzare le certificazioni di un prodotto
1 Andare alla pagina www.zyxel.com
2 Nel sito ZyXEL, selezionare il proprio prodotto dall’elenco
a discesa per andare alla pagina di quel prodotto.
3 Da questa pagina selezionare la certificazione che si
vuole vedere.
83
Page 86

ITALIANO
84
Page 87

РУССКИЙ
РУССКИЙ
1 О Вашем адаптере AG-225H v2
Ваш AG-225H v2 - это беспроводной адаптер, которые
присоединяется к USB порту вашего компьютера и
позволяет вам выполнять поиск и подключение к
беспроводным сетям. Если AG-225H v2 не присоединен к
компьютеру, то вы можете использовать его ЖК дисплей
для просмотра доступных беспроводных сетей.
85
Page 88

РУССКИЙ
2 Обзор
Эта таблица описывает AG-225H v2.
Пара
Name (Имя) Описание
метр
A Переключат
ель OFF /
ON [ВЫКЛ/
ВКЛ]
Передвиньте переключатель вправо,
чтобы включить ЖК дисплей.
Передвиньте переключатель влево,
чтобы выключить ЖК дисплей.
86
Page 89

РУССКИЙ
Пара
Name (Имя) Описание
метр
B Индикатор
LINK
[СВЯЗЬ]
C Индикатор
PWR
[ПИТАНИЕ]
D ЖК дисплей На ЖК дисплее поочередно
Если AG-225H v2 присоединен к
компьютеру и установлено
беспроводное соединение с сетью, то
этот индикатор будет гореть и мигать
при передаче информации.
Если AG-225H v2 присоединен к
компьютеру и беспроводное
соединение не установлено, то этот
индикатор будет медленно мигать.
Если AG-225H v2 не присоединен к
компьютеру и включен ЖК дисплей,
то этот индикатор загорается, когда
AG-225H v2 ищет беспроводные сети.
Этот индикатор загорается если AG225H v2 присоединен к компьютеру
или включен ЖК дисплей.
отображаются подробная
информация о доступных
беспроводных сетях. Смотрите
раздел (3) для получения
дополнительной информации
87
Page 90

Пара
Name (Имя) Описание
метр
E Кнопка
SEEK
[ПОИСК]
F Кнопка
NEXT
[ДАЛЕЕ]
РУССКИЙ
Если включен ЖК дисплей, то эта
кнопка будет заставлять AG-225H v2
производить поиск доступных
беспроводных сетей или изменять
режим обнаружения.
• Чтобы обнаружить все доступные
беспроводные сети нажмите
кнопку SEEK [ПОИСК] один раз.
• Чтобы изменить режим
обнаружения удерживайте кнопку
SEEK [ПОИСК] нажатой в течение
одной секунды. Затем один раз
нажмите кнопку SEEK[ПОИСК],
чтобы показать доступные в этом
режиме сети. Смотрите раздел (3)
для получения дополнительной
информации.
Если включен ЖК дисплей, то эта
кнопка прокручивает список
доступных беспроводных сетей.
88
Page 91

РУССКИЙ
3 ЖК дисплей
Если AG-225H v2 не присоединен к компьютеру, то вы
можете использовать ЖК дисплей для показа доступных
сетей.
В следующей таблице описываются надписи на этом
рисунке.
Пара
Name
метр
(Имя)
A SSID SSID – это имя беспроводной сети Если
B Channel
[Канал]
CEntry
[Запись]
Описание
SSID длиннее 12 символов, то оно
прокручивается автоматически.
Отображается беспроводной канал сети.
Отображается количество беспроводных
сетей в списке. За один раз AG-225H v2
может обнаружить до 15 сетей.
89
Page 92

Пара
Name
метр
(Имя)
D Power
[Питани
е]
РУССКИЙ
Описание
Этот значок появляется при
разряженной батарее.
Этот значок появляется при
полностью заряженной батарее.
90
Page 93

Пара
Name
метр
(Имя)
E Режим
обнаруж
ения
РУССКИЙ
Описание
Здесь показан метод обнаружения и
отображения сетей. Смотрите раздел (2)
для получения дополнительной
информации об изменении режима
обнаружения.
Режим Signal [Сигнал] отображает
все доступные сети в порядке
возрастания силы сигнала. Каждый
раз, когда вы включаете AG-225H v2
, он использует режим обнаружения
Signal[Сигнал].
Режим Free[Свободные]
показывает только сети с
отключенной беспроводной
безопасностью.
Режим Dedicated[Назначенный]
показывает только выбранную сеть.
Нажмите кнопку NEXT [Далее],
чтобы выбрать сеть в режиме
обнаружения Signal [Сигнал] или
Free [Свободный]. Затем измените
режим на Dedicated[Назначенный]
и нажмите один раз кнопку SEEK
[ПОИСК]. Ваш AG-225H v2 будет
периодически проверять сеть и
обновлять информацию на дисплее.
91
Page 94

РУССКИЙ
Пара
Name
метр
(Имя)
F Security
(Безопа
сность)
G Signal
[Сигнал]
Описание
Отображаются настройки беспроводной
безопасности для выбранной сети..
отображается при отключенной
беспроводной безопасности.
отображается при включенном
системе WEP.
отображается при включенном
системе WPA или WPA2.
Отображает беспроводной стандарт и силу
сигнала для выбранной сети.
выводится, когда сеть использует
стандарт 802.11a.
выводится, когда сеть использует
стандарт 802.11b.
выводится, когда сеть использует
стандарт 802.11g.
4 Power [Питание]
Зарядите AG-225H v2, подключив его к USB порту
компьютера. Смотрите раздел (5.3) для получения
дополнительной информации.
Чтобы экономить батарею, ваш AG-225H v2
автоматически выключится через 90 секунд простоя.
Чтобы снова его включить нажмите кнопку SEEK[ПОИСК].
92
Page 95

РУССКИЙ
5 Утилита ZyXEL
Процедуры установки схожи для всех поддерживаемых
версий Windows.
ПРИМЭЧАНИЭ: Установите ZyXEL перед
подключением AG-225H v2.
5.1 Требования по установке
Перед установкой убедитесь, что Ваш компьютер
соответствует следующим требованиям:
• Pentium II 300 МГц или выше
• Не менее 20 Мб доступного места на жестком диске
• Не менее 32 Мб ОЗУ
• Устройство CD-ROM
• USB-порт (При подключении к порту типа USB1.0/1.1,
адаптер AG-225H v2 обеспечивает скорость передачи до
11Мб/сек.)
• Windows 2000 или Windows XP
ПРИМЭЧАНИЭ: Если у вас на компьютере уже есть
установленное приложение Funk
Odyssey Client, то его следует
деинсталлировать (удалить).
93
Page 96

РУССКИЙ
5.2 Установка
1 Вставьте CD-диск с ПО в привод CD-ROM вашего
компьютера. Когда отобразится следующее окно,
щелкните на кнопке Setup (Установить). Если такое
окно не появилось, то найдите и запустите файл
autorun.exe.
2 Выберите язык и щелкните OK.
3 Отобразится следующее окно. Щелкните Next (Далее).
94
Page 97

РУССКИЙ
4 Выберите Driver and Utility (Драйвер и утилита),
чтобы установить утилиту и драйвер ZyXEL на ваш
компьютер. Если вы хотите установить только драйвер
и использовать нулевую беспроводную конфигурацию
(WZC) для Windows XP, выберите пункт Driver only
(Толь ко драйвер) (см. Примечания для пользователей
Windows XP). Щелкните Next (Далее), если Вы хотите
использовать каталог по умолчанию, или Browse
(Обзор), если Вы хотите выбрать другой каталог.
5 Вам следует перезагрузить ваш компьютер перед
применением утилиты ZyXEL. Перед перезагрузкой
сохраните вашу работу и закройте все открытые
95
Page 98

РУССКИЙ
программы. Нажмите Finish [Завершить], чтобы
завершить процесс установки.
5.3 Подключение оборудования
1 Снимите защитную
крышку, чтобы открыть
USB-разъем.
2 Снимите защитную
крышку, чтобы открыть
USB-разъем. Вставьте
AG-225H v2 в доступный
порт USB на компьютере.
ПРИМЭЧАНИЭ: Никогда не вставляйте адаптер AG-
225H v2 в порт под углом,
перевернутым или с усилием. Если
нехватает места для подсоединения
адаптера AG-225H v2, используйте
прилагаемый кабель USB
.
96
Page 99

РУССКИЙ
5.4 Иконки утилиты ZyXEL
После инсталляции утилиты ZyXEL и установки
адаптера AG-225H v2 в системной линейке (обычно
в нижней части рабочего поля) появляется иконка.
Адаптер AG-225H v2 автоматически проводит поиск
любой доступной сети(ей) и подсоединяется к
беспроводной сети без включения системы защиты.
Если цвет значка - зеленый и/или вы видите на своем
рабочем столе такой значок, то вы уже подключены к
беспроводной сети.
Для доступа к сети Интернет включите ваш Интернетбраузер и введите адрес (URL) вебсайта в строке адреса.
Если цвет иконки красный, это означает, что Вы не
подключены к беспроводной сети. Подробное
описание подсоединения к сети вручную приведено
в следующем разделе.
5.5 Подсоединение к сети вручную
Если ваш адаптер AG-225H v2 не подсоединился к
беспроводной сети автоматически, Вы можете
использовать утилиту ZyXEL для подсоединения вручную.
97
Page 100

РУССКИЙ
1 Дважды щелкните на иконке для вывода окна
информации о связи (Link Info) утилиты ZyXEL.
2 Щелкните на закладке Site Survey (Обзор сайта).
3 Доступная беспроводная сеть(и) выводится в списке
доступных сетей (Available Network List). Вы можете
щелкнуть на кнопке Scan (Сканировать), чтобы
адаптер AG-225H v2 повторил поиск.
98
 Loading...