

Page 1

1
Telstra
T809
Mobile Phone
User Manual
Page 2

2
LEGAL INFORMATION
Copyright © 201 3 ZTE CORPORATI O N.
All rights reserved.
No part of this public ation may b e quoted, reproduc ed,
translated or used in any form or by any means, electronic or
mech an ic al , inc l udi ng p hot oc op yi ng an d mic rof i lm, wit ho ut the
prior written permission of ZTE Corporation.
ZTE Corporation re serves the rig ht to mak e modifi cations on pr in t
errors or update specifications in this guide without prior notice.
The Bluetooth
®
trademark and logos are owned by the Bluetooth
SI G, Inc. and any use of such t ra demarks by Z T E C orporati on is
under license. Other trademarks and trade names are the
property of their respective owners.
This product supports expandable memory u p t o 32GB
microSD(HC ) car d as an opt ional ac cessory. External memory
ca rd is not included in the box.
The microSD logo is a tradema rk of the SD Car d
Association.
Ver. 1.4 August 2014
Thi s product is user-upgradeable. Please check for updates at
zte.com.au
or call the service hotline on 1300 789 475 for
technical support during office hours, 9am to 5pm AEST.
The worst cas e SAR value for t his devi ce is 0. 807 W/Kg
Page 3

3
Contents
Device Overview ...................................................... 5
Making Calls using the Phone app ....................... 25
Connect to Networks and Devices ....................... 36
Contacts ................................................................. 48
Messaging .............................................................. 55
Accounts ................................................................ 59
Email ....................................................................... 60
Gmail
TM
................................................................... 64
Calendar ................................................................. 67
Hangouts ................................................................ 69
Google+ .................................................................. 71
Google Location access ........................................ 71
Camera .................................................................... 74
Gallery ..................................................................... 77
Music....................................................................... 80
Google ‘Play Music’ ............................................... 83
Video Player ........................................................... 85
FM Radio ................................................................. 86
Page 4

4
Sound Recorder ..................................................... 87
More Apps ........................................................ 88
Play Store ............................................................... 89
Settings ................................................................... 90
Troubleshooting and Support ............................... 98
For Your Safety - General Safety ........................ 102
Technical Specifications ..................................... 113
Declaration of RoHS Compliance ....................... 114
Disposal of Your Old Device ............................... 115
Page 5
5
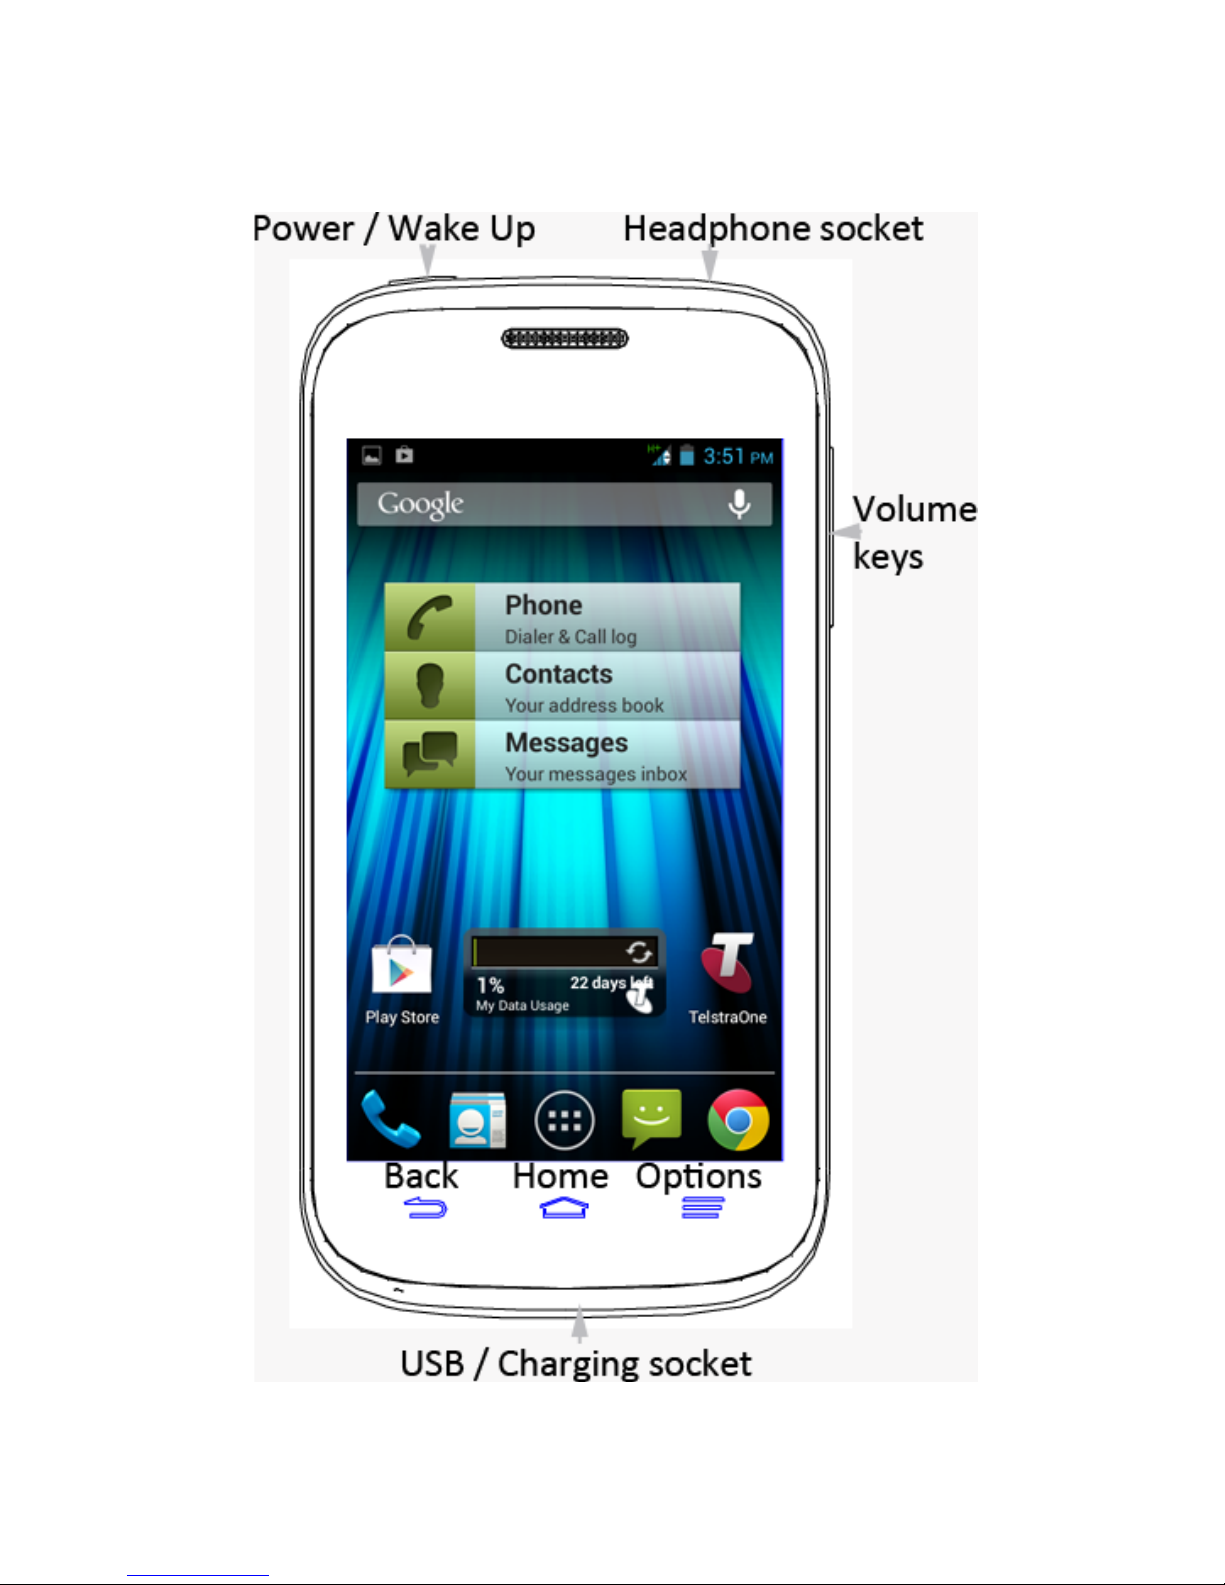
Device Over view
Page 6
6
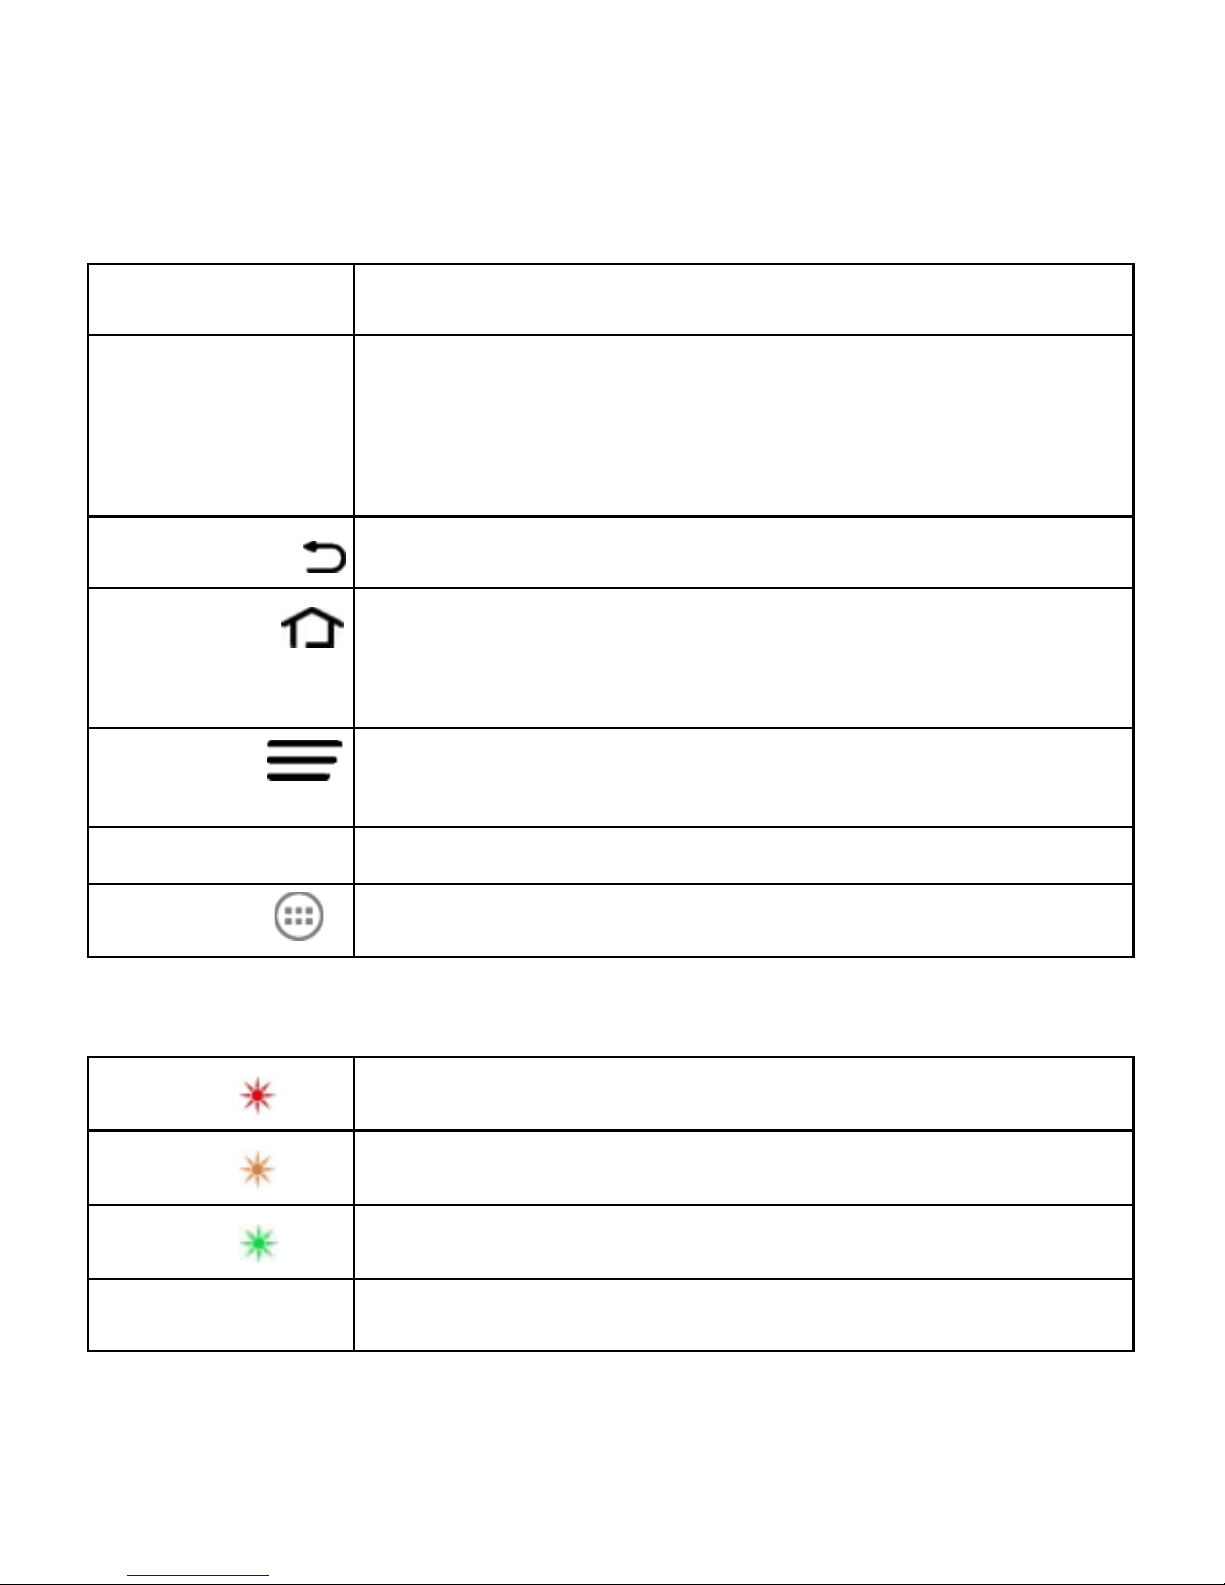
Key Functions
Key
Function
Power Key
•
Press to wake up your phone.
• Press and hold to select Silent, Vibrate or
Flight mode, or to power on and off.
• Press to switch your phone to Sleep mode.
Back
Touch to go to the previous screen.
Home
Touch to return to the Home Screen fr om any
application or screen.
Options
Press for Options.
Press and hold to view recent apps.
Volume Keys
Press or hold to turn the volume up or down.
Apps
Access the device Applications menu.
Status LED indicator
Red
Less than 10% charge
Orange
Between 10 – 70%
Green
More than 70% charge
LED Flashing
Messag e or Miss ed Cal l N otificatio n
Page 7
7
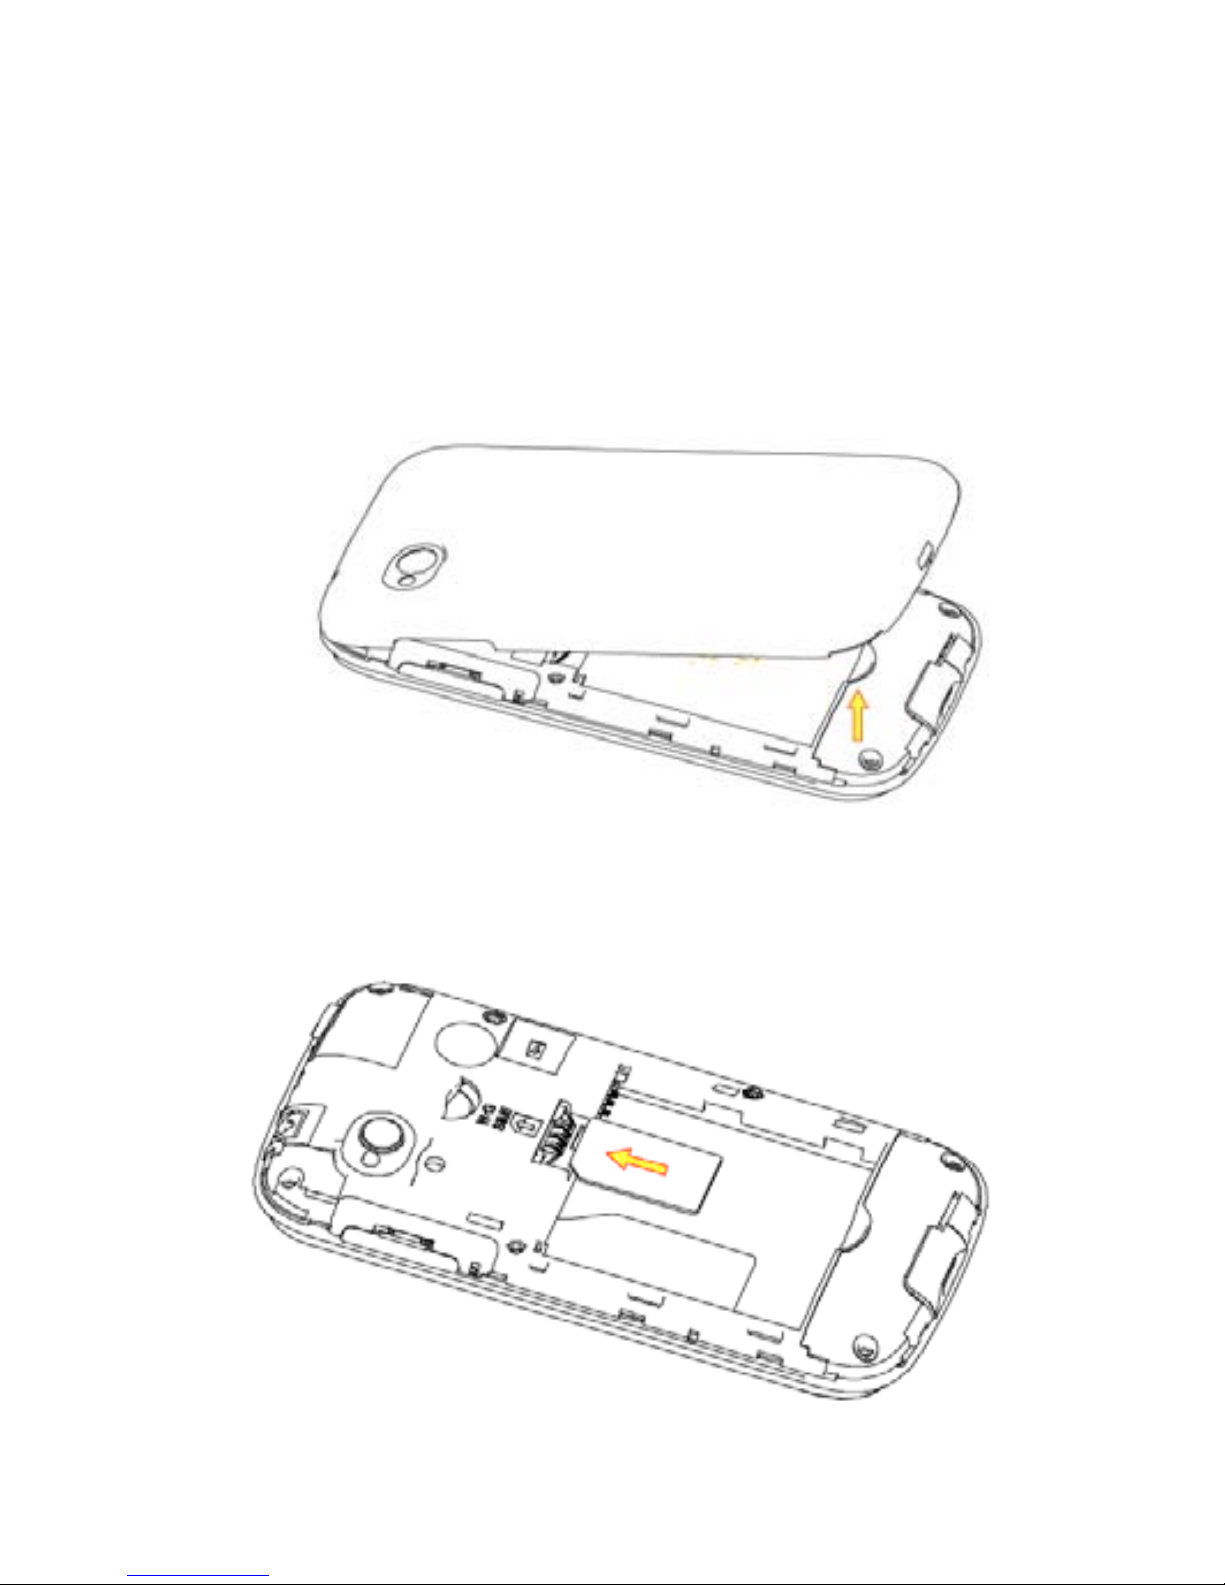
Instal ling the SIM Card, microSD C ard*,
and Battery
Switch off your phone before installing or replacing the battery, SIM
card or microSD card * (op tional a c cessory)
1. Rem ove the back c over by opening fr om t he thumb catch:
2. Hold the SIM card with the cut corner as shown and slide it
into the card holder. This device uses the st andard min i SIM
type, also known as 2FF. Do not insert a micro SIM (3FF)
Page 8
8
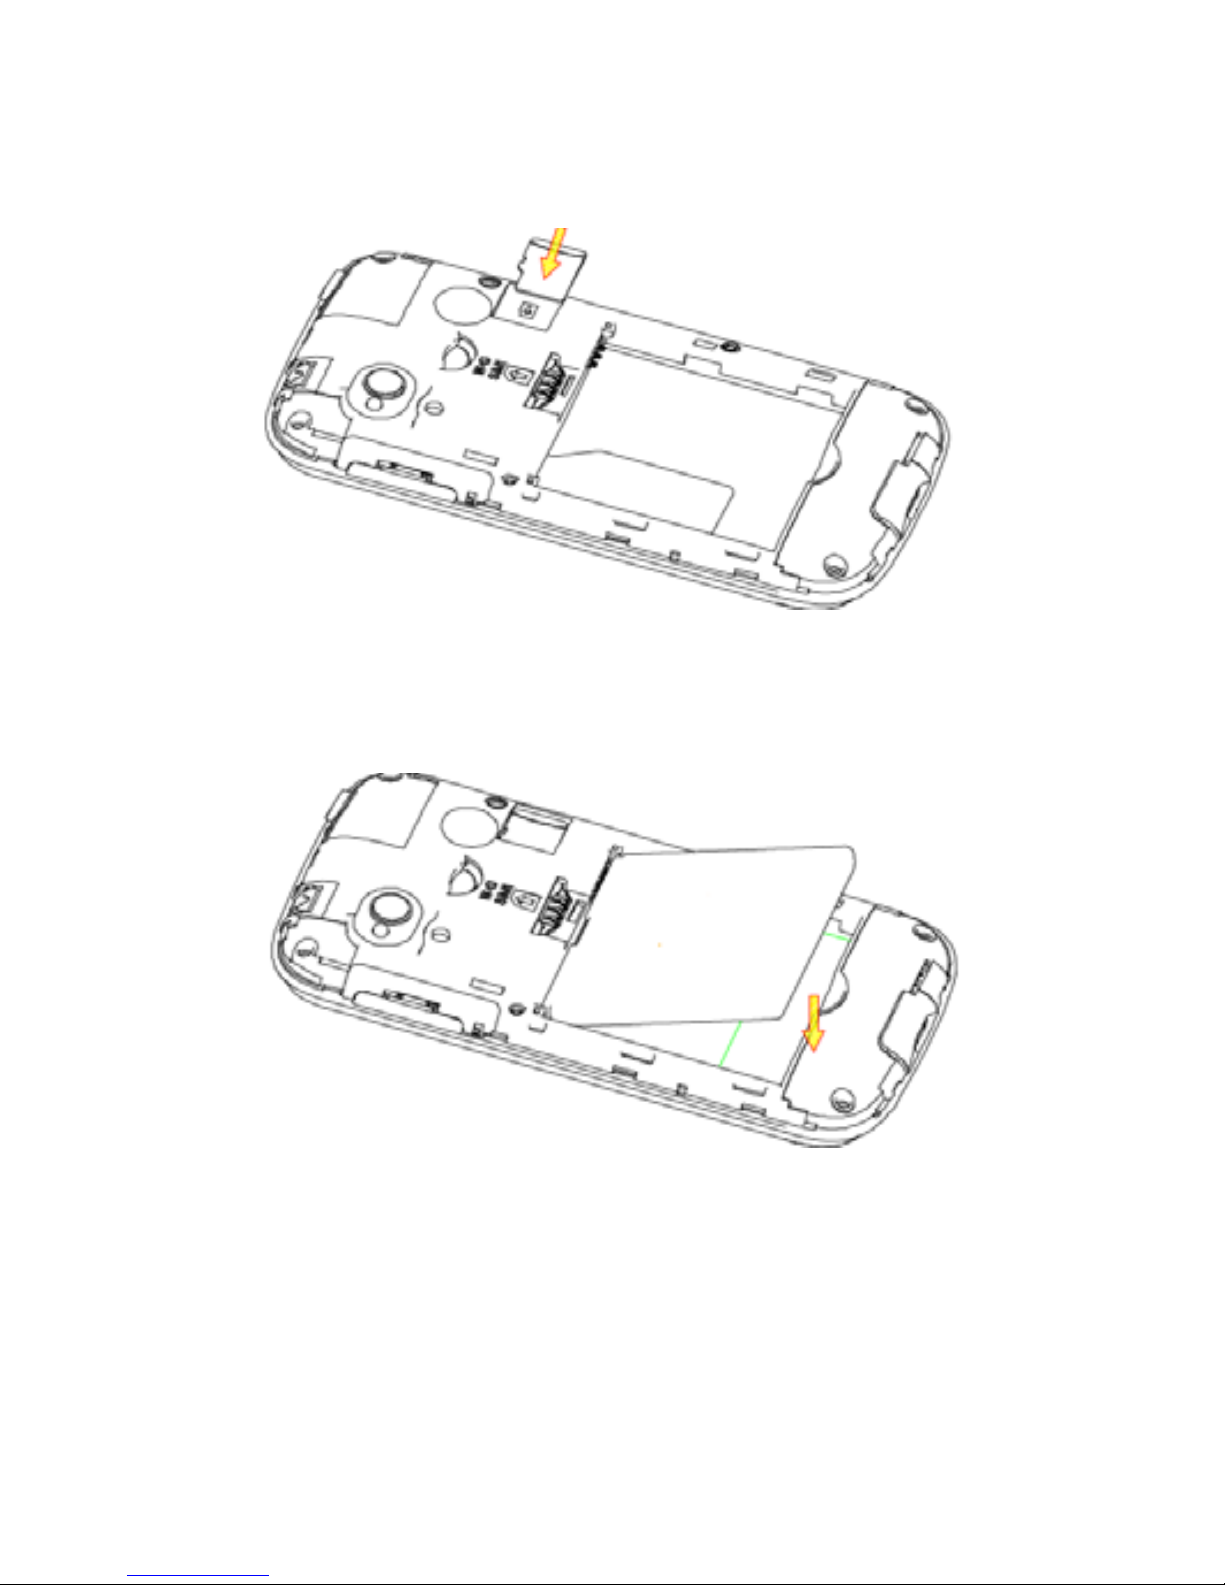
3. If you wish to increase the memory capacity insert a microSD
card (optional) with the metal contacts facing down as s hown
4. Insert the battery by aligning the gold tabs on the battery with
the gold springs in the battery co mp artmen t . Gen tly pu sh
down on the battery u ntil i t c lick s into p lace.
5. Press th e c over gentl y back into place u ntil you hear a click.
* The microSD card is not included in the box The SD Card is not
hot swappable, so you need to power cycle the dev ice to read a
new SD card, and choose Un mount befo re re mo ving the SD
Page 9

9
card.
Charging the Battery
When you first get your new phone you’ll need to charge the
battery.
1. In sert the char ger lead car efully. Ensure that the plug is
inserted with the correct orientation. Do not force the
connector into the charger jack.
2. Connect the charger to a standard AC wall outlet.
3. D isconne c t the charger when the battery is fully charged.
How much charge have you got?
If the battery is low, there will be a pop-up message on the
screen. As you charge your phone, the screen will tell you the
battery level each time you wake up your phone.
If the phone is on, you’ll see the charging icon / on the
status bar.
View battery information and show charge level
From the Home screen press Options >System settings >
Battery to see what has been consuming battery power. Also
you can select the Battery Percen tage che c k box to display the
exa c t charge level o n t he Status Bar.
System Reset
You can press the Emerg ency C all button f rom any lock screen,
Page 10

10
enter the code *983*987# into the dialler to reset your phone.
Battery and Charging Tips
• O nly use the A C charger and U SB lead supp lie d. Insert the
charger lead carefully.
• Be careful to avoid tripping over or pulling on the lead whilst it
is plugged in.
• Physical damage to the charging port is N OT cov ered by
warranty.
• The phone can also be charged by connecting it to a
comput er usi ng the USB lead supplied.
• Avoid high temperatures and direct sunlight. The battery will
not charge above 45°C
• Do not leave the battery in a discharged state. Charge the
battery promptly when flat.
• Keep your handset cool. High temperatures degrade the
battery more quickly.
• Norm al char ge time is 3-4 hours. Do not leave on charge for
more than 24hrs.
• A f ter 2-3 ch arge/discharge cycles t he battery l ife will impr ove.
From then on use top up charging to recharge frequently and
always charge promptly when flat.
• When not usin g the phone for long periods charge to approx
40% and rem ove the battery.
• With poor network conditions (less than 2 bars) battery life is
reduced, turn off Bluetooth and Wi-Fi when not in use to
extend battery life.
Page 11

11
Powering On/Off
Make sur e t he SIM c ard is i nserted and the bat tery is char ged.
• Press and hold the Power Key to turn on your phone.
• To turn it off, press and hold the Power Key to open the
options menu. Touch Power off and then touch OK.
• If your device will not power on, remove and replace the
battery, leave on charge for 20 minutes and try again.
Setting Up for the First Time
When you first power on your phone or after a factory reset (see
Settings – Backup and R eset
), you need to enter some se ttings
before use.
1. The default language is English (Australia) touch to change if
required or touch Start.
2. Select a Wi-Fi network if available or press Skip
3. Select Yes if you have a Google account or No to skip.
4. C onfigure the Google location options and touch Next.
5. Enter your name which the phone uses to personalise some
apps and touch Next.
6. You will be prompted to accept the terms of Google service.
Touch the arrow to continue .
7. Touch Finish to complete the setup.
8. F urther as si stan ce is given in the for m of pop up s describing
how to use va r i o us features. Press O K to clear th ese no tices.
Page 12
12
Locking/Unlocking your phone
Your phone allows you to quickly lock the screen and keys when
not in use and to turn the screen back on when you need it.
To lock the scre e n:
Press the Pow er Key to turn the screen off and lock the device,
NOTE: To save battery power, the phone automatically turns the
screen off af ter a p eriod of tim e when you leave it idle. R evie w
this setting at Settings – Display – Sleep.
You can still receive messages and calls while the phone screen
is off. The device will wake up to alert you of incoming calls and
messages.
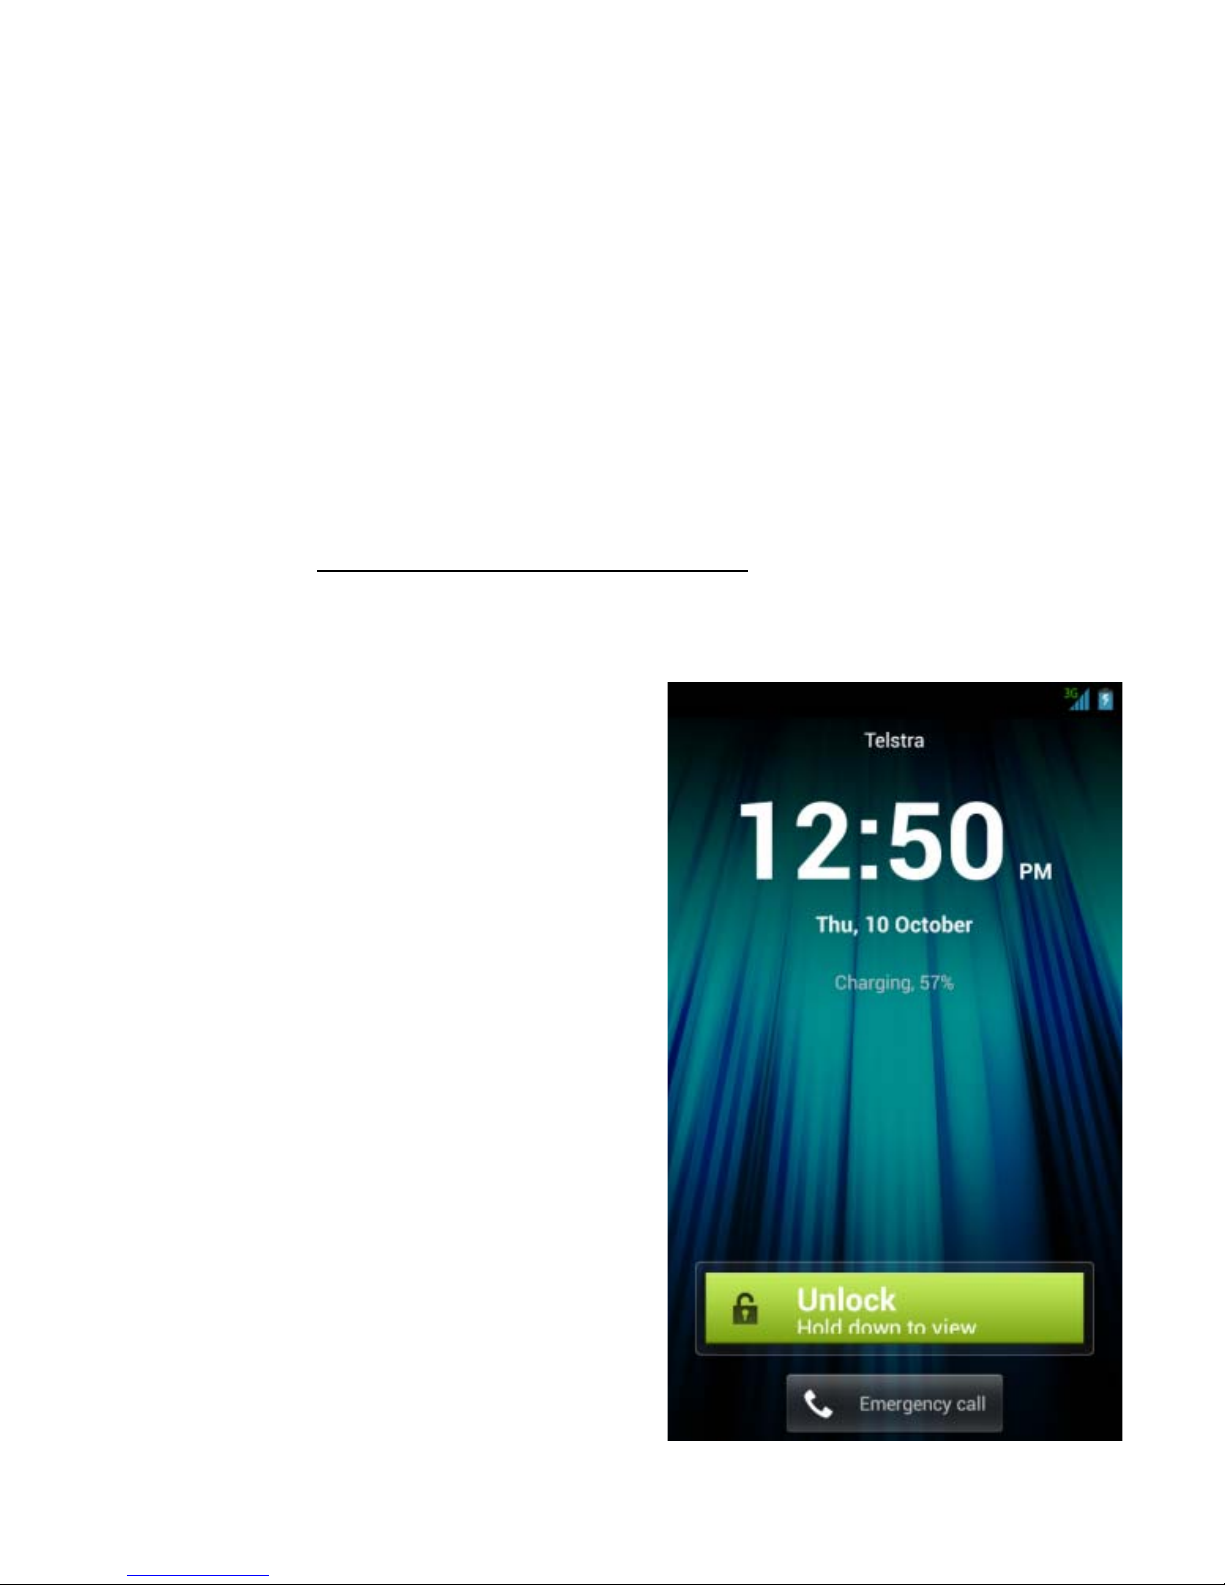
To unlock the phone :
Press the Pow er Key then press
and hold the Unlock button.
NOTE: If you have set an unlock
patte r n, PIN, or password you’ll
need to ente r the corr es pondi ng
pat ter n, PIN or password unlock
your screen.
TIP Press t he Emer genc y Call
button at any locked screen to
open the dialler function for
Em ergency Cal ls and system
reset (enter *983*987#)
Page 13

13
Using th e To uch Screen
Your phone’s touch screen lets you control actions through a
variety of touch gestures.
• Touch or Tap
When you want to type using the onscreen keyboard, select
items, or press onscreen buttons, simply touch them with
your finger.
• Touch and Hold
To open the available options for an item (for exam ple, a
messag e or link in a Web pag e), touch an d hold t he item.
• Swipe or Slide
To swipe or slide means to quickly drag your finger vertically
or horizontally across the screen .
• Drag
To drag, press and hold your finger with some pressure
before you start to move your finge r. While dragg ing, do not
release your finger until you have reached the target position.
• Pinch in and out Zoom
In some apps (such as Camera, Maps, Browser , and Gallery),
you can zoom in and out by placing two fingers on the screen
at once and pinching them together (to zoom out) or
spreading them apart (to zoom in).
• Rotate the phone to change from portrait to landscape.
Page 14
14
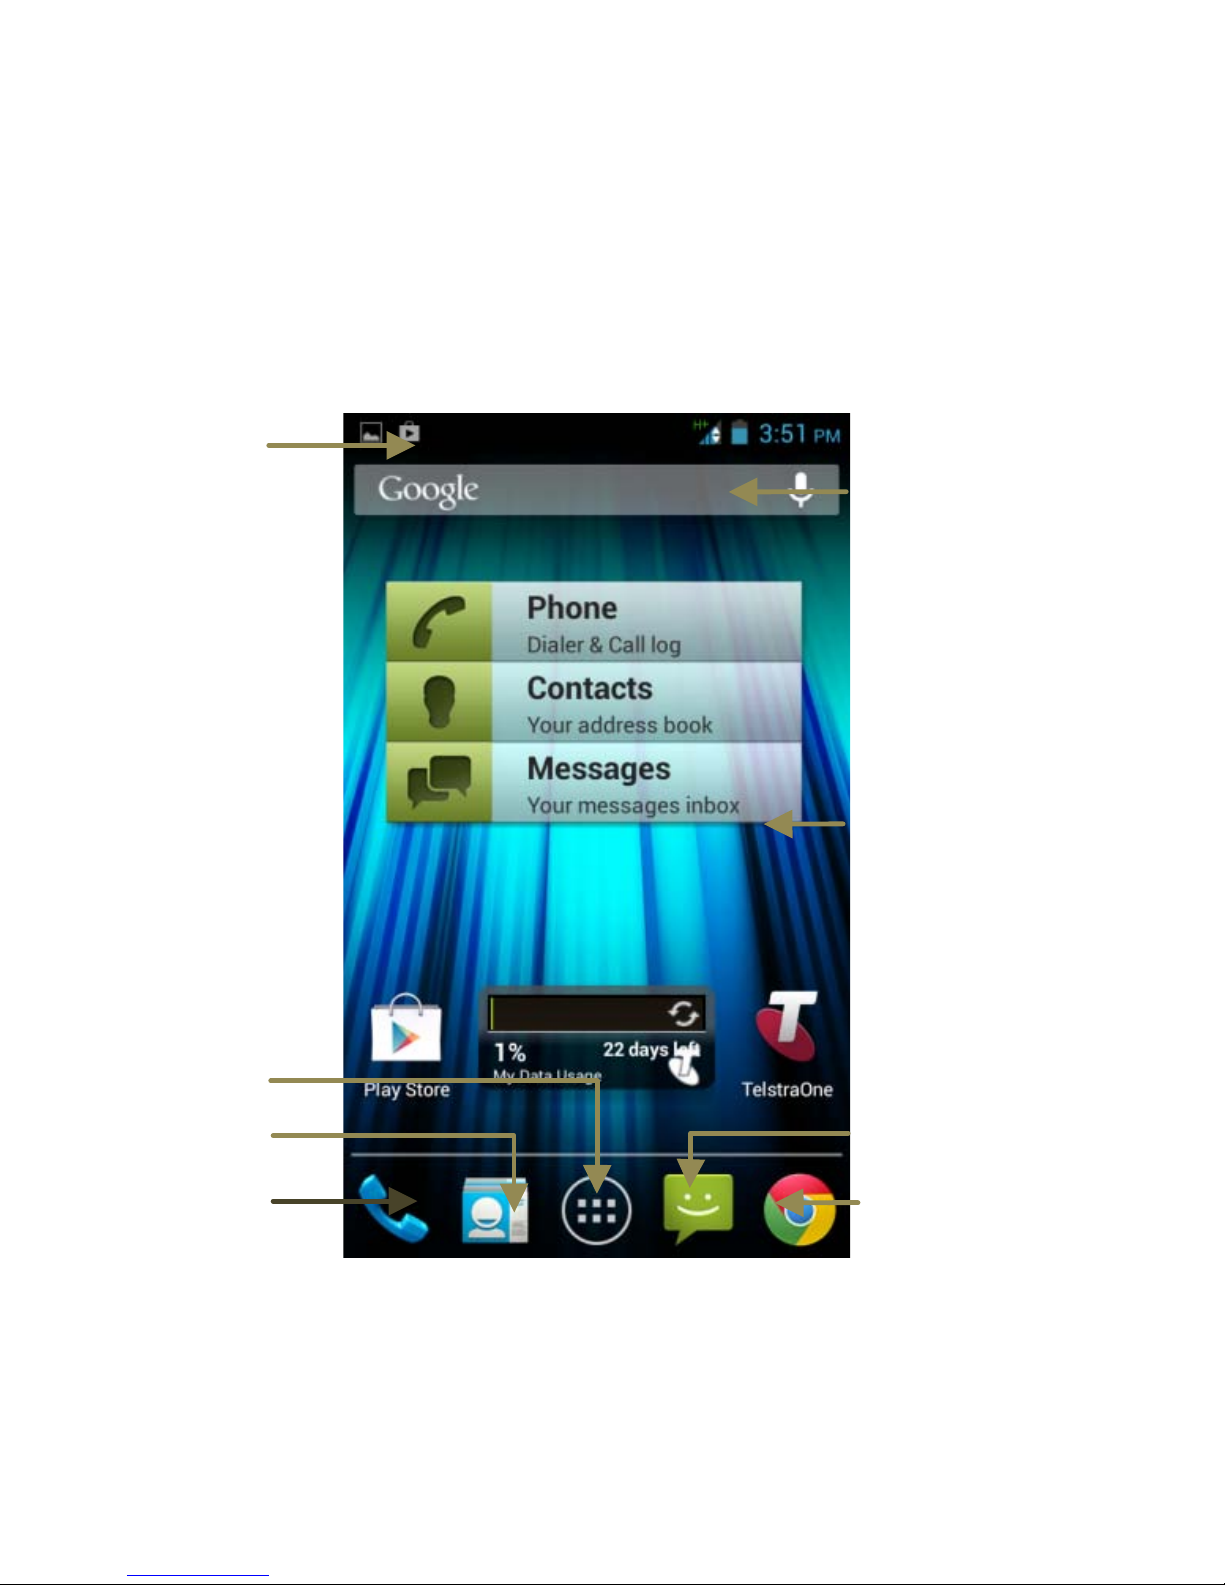
Getting to Know the Home Screen
The home screen is the star ting point for applications, functions,
and menus. You can customize your home screen by adding
application icons, short cut s, folders , widgets, and more. Swipe
the screen left or right to display additional screens.
Status &
Notifications
Drag the
notifications
bar down to
review
Back Home Options
Google Search
Wallpaper
Browser
Messaging
Apps
Contacts
Phone
Page 15
15
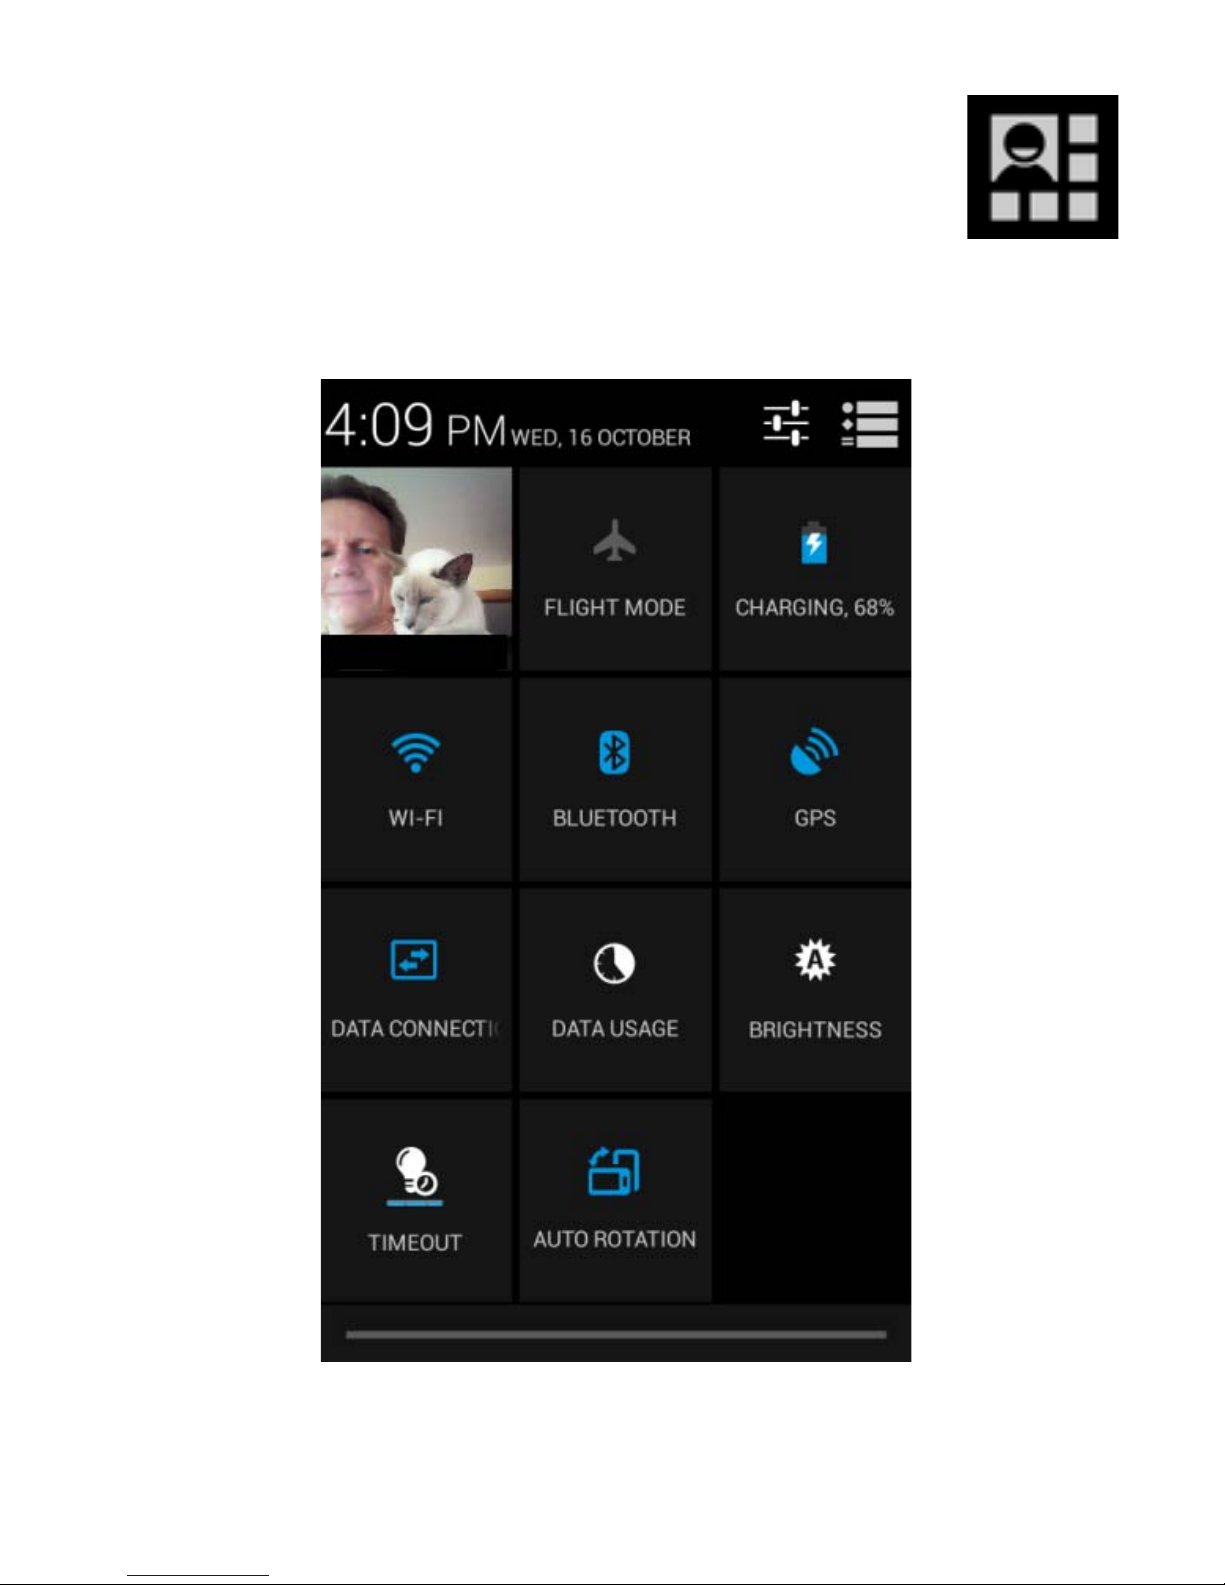
Access the Quick Settings Panel
Swipe dow n from the top of the screen and touc h the
Quick Setting icon. Tap to enable or disable the features. Some
icons can be configured with a long press (press and hold):
Page 16

16
Changing the System Language
1. Touch Home > Apps > Settings > Language & input >
Language.
2. Select your chosen language.
Setting the Date and Time
1. Touch Home > Apps > Settings > Date & time.
2. Clear the Automatic date & time and Automatic time zone
check boxes if you want to set the date, time and time zone
yourself.
3. Set t he dat e, tim e, tim e zo ne, a nd dat e/t ime format.
Changing Ringtone and Notifi cat ion
Sounds
You can customise the ringtone for incomi ng calls and def aul t
notification sound quickly.
1. Touch Home > Apps > Set ti ngs > Sound
2. Touch Phone ri ngt one or Default notification sound.
3. Touch the tone to hear, select the tone you want to use.
4. Touch OK.
NOTE: To adjust the rington e for an individual caller, go to the
Contacts app, select the Contact > Options > Set ringtone for
that card. The Contact must
be stored on the phone.
Page 17
17
Adjusting Volumes
The side volume keys work in three different ways:
1. When you are on a call use the volume keys to adjust the call
volume.
2. When you are listening to a media file, such as music, video or
games, the volume keys adj ust the media volume.
3. At other times when you are not in either of the above states,
the volume keys set the ringtone vol ume or enable vibr ate mode
at minimum volume.
1. Touch Home > Apps > Settings > Sound > Volumes.
2. Adjust the volume for music, video, games, and other media,
the ringtone and notification volu me .
3. Touch OK to save.
Enable Silent or Vibrate mode in the followi ng ways:
• Press and hold the Power Key and then touch to
enable silent mode, touch to enable vibrate mode, or
touch to disable silent mode .
• W it h no media application running pressing the volume keys
will control the Ring volume. When the icon appears in
the status bar, the phone is set to the vibrate mode. When the
icon appears in the status bar, the phone is in the silent
mode.
• Touch Home > Apps > Settings > Sound > Vibrat e whe n
ringing
Page 18

18
Applying New Wallpapers
Set the home screen wallpaper:
1. Touch Home to return to your home screen
2. Press and hold on the home screen (l ong press) t o bring up
the Choose wallpaper menu:
3. Select a wallpaper from Download Wallpapers, Gallery,
Live Wallpapers, Video Wallpaper or Wallpapers and
choose the image or animation yo u wan t to use. S ome
cropping may be needed for Gallery images.
4. Touch OK at the top of the screen (for Gallery images) or
Set wallpaper for other images.
Changing Screen Bright ness
1. Touch Home > Apps > Settings > Display > Brightness
2. Tick Automatic brightness to adjust brightness
automatically, or clear the box to set manually.
3. Tou ch OK.
Other Di splay Settings
Scenes – change wallpaper theme
Theme – change menu colours
Daydream – enable a screen saver when charging or docked
Font Size – change the font size for easier reading
Sleep – set the desired sleep time for your device.
Page 19

19
Protect Your Phone With Screen Locks
You can protect your phone by creating a screen lock with a
pattern, PIN or password to unlock the screen and keys.
1. Touch Home > Apps > Settings > Security.
2. Touch Screen lock.
3. Select from None, Long Press, Pat t ern, PIN or Passwor d.
• If you touch Pattern, you’re guided to create a pattern you
must dra w to unlock the screen. The first time you do this,
a short tutorial about creating an unlock pattern appears.
Then you’re prompted to draw and redraw your own
pattern.
• If you touch PIN or Password, you’re prompted to set a
numeric PIN or a password you must enter to unlock your
screen.
The next ti me y ou turn on your ph one or w ake up the screen, you
must draw your unlock pattern or enter your PIN or password to
unlock it.
IMPORTANT: Screen lock options are listed in the approximate
order of the strength of their security , starting with None and
Long Press, which provide no security. Pattern provides minimal
security, although it can be more co nvenient than the stronger
options.
IMPORTANT TIP
If you forget your unlock pattern, PIN or password you have to
reset yo ur dev ice. F rom the lock ed screen, touch Emergency c all,
enter the code *983*987# and follow the instructions. All data on
the handset (not the SD card) is erased.
Page 20
20
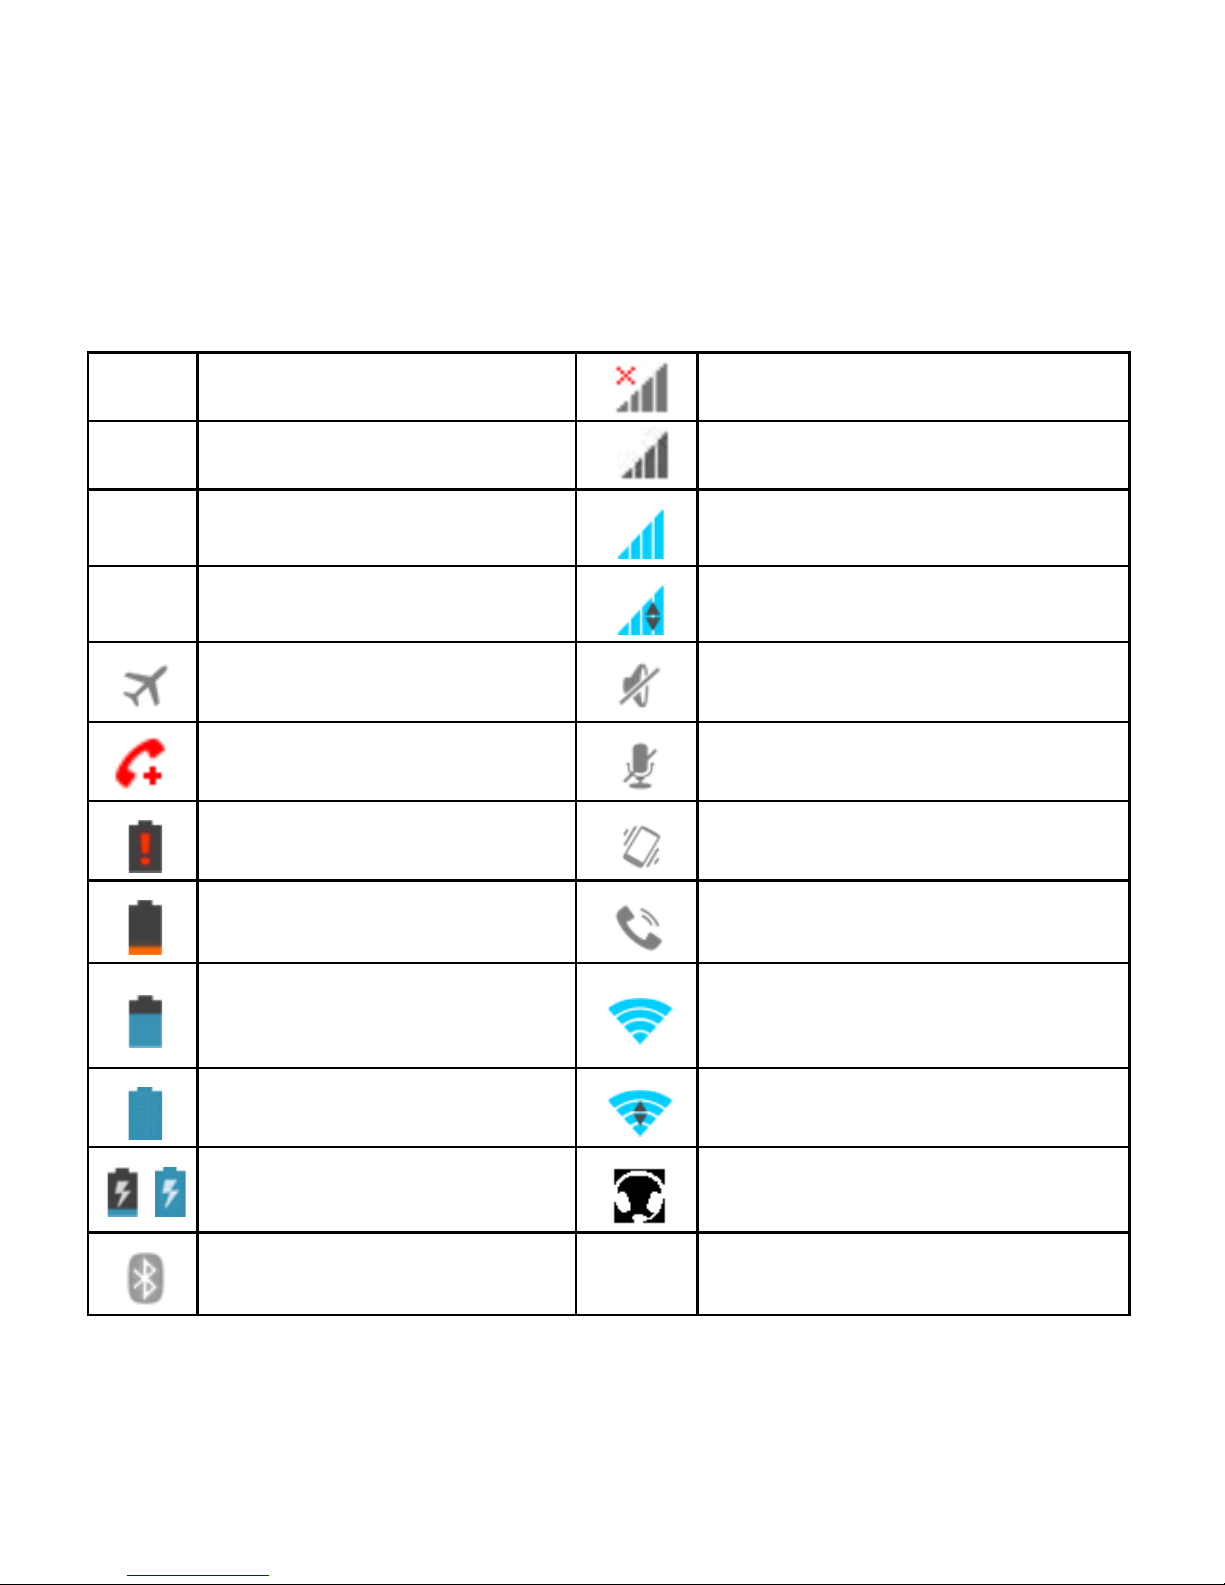
Monitoring the Phone Status
The status bar at the top of the home screen provides phone and
service status information on the right side. You can monitor the
phone status by checking the following status icons.
G
GPRS network
No Signal
E
EDGE network
Signal strength (no data)
3G 3G network
Signal str en gth (d ata read y)
H
HSDPA network
Mobile dat a in use
Flight mode
Ringer off
Emergency calls only
Microphone off (muted)
Battery flat
Vibrate on
Battery low
Speaker on
Battery par ti ally drained
Connect ed to a Wi-Fi
network
Battery full
Wi-Fi data in use
/
Battery charging
Headset co nne c te d
Bluetooth on
Page 21
21
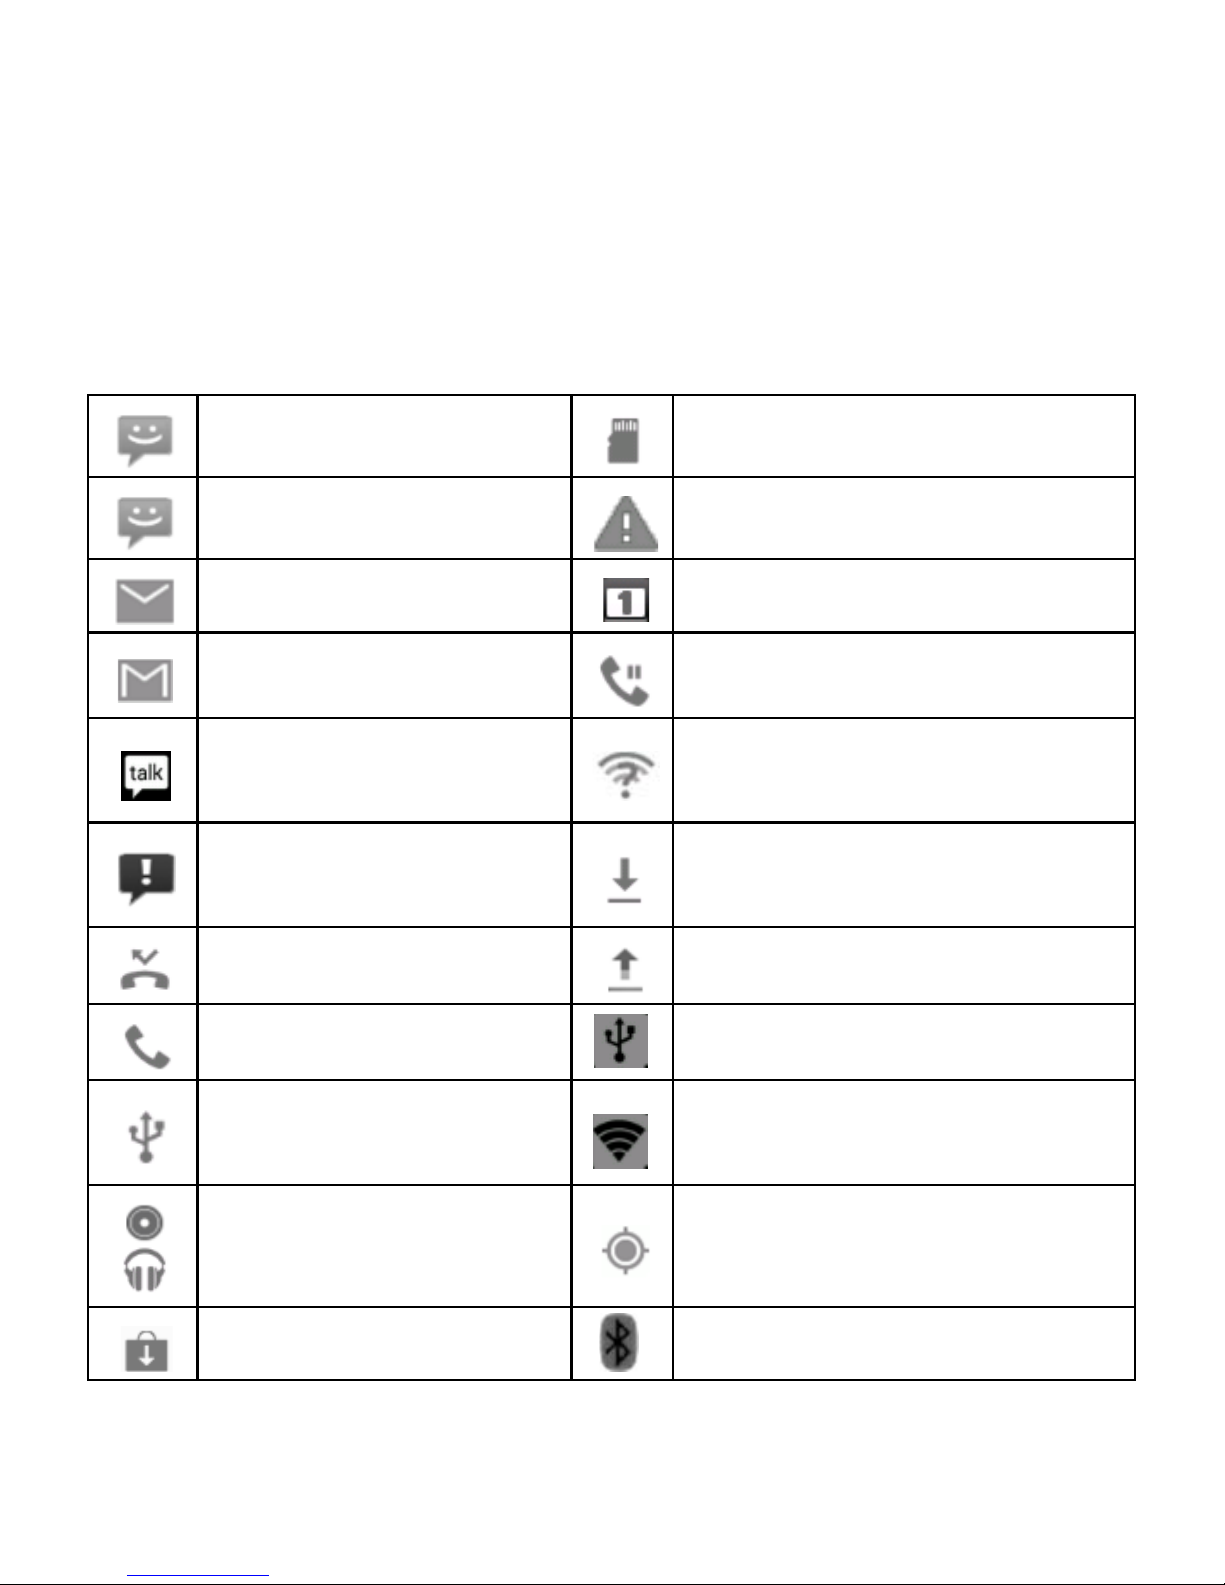
Managing Notifications
Notification Icons
The status bar at the top of the home screen provides notification
alerts on the left. You can view the following notification icons.
New SMS
microSD card not mounted
New MMS
microSD card removed
New Email
Upcoming event
New Gmail message
Call on hold
New Hangouts
message
New Wi-Fi network detected
Problem with
SMS/MMS delivery
Downloading data
Missed call
Uploading data
Call in progress
USB tethering is on
USB connected
Portable Wi-Fi hotspot or
Wi-Fi direct is on
Song is playing
GPS is on
Updates av ai lable
Bluetooth is on
Page 22

22
Open/Close the Notification Panel
Notifications report the arrival of new messages, calendar
eve nts , and ala rms , as well as o ngoi n g ev ents , suc h as when
you've configured your phone as a Wi-Fi hotspot. You can open
the notification panel to view the det ails of notifications.
• To open the notification panel, swipe your finger down from
the top of the screen.
• To close the notification panel, swipe your finger up from the
bottom of the screen or touch the Back Key.
Respond to or Remove a Notification
In the notification pa nel, y ou can re s pond to a notificati on or
remove the notifications.
• To respond to a notification, just touch it.
• To r emove a notifica tion, swipe it sideways .
• To dis miss all notifications touch in the top right corner
• Most apps that send notifications, suc h as Gmail and
Hangouts, have notification settings that you can adjust.
Opening apps
1. Touch Home Key > Apps to open the Apps menu
2. Slide left or right on the screen and touch an app to open it.
Page 23

23
Switch Between Recently Opened Apps
When you run an application, if you press the Home key and start
another app, the original app is still open in the background.
1. Touch and hold the Options key to view recently used apps.
2. Scro ll up and down and touch the required app to return to it.
Managing Shortcuts and Widgets
Add Shortcuts and Widgets
1. Touch Home Key > Apps > Select the Widgets tab at the
top of the screen.
2. Swipe right to view all available widgets
3. Touch and hold a widget or shortcut and drag it to your
ch osen Home Screen.
Move Shortcuts or Widgets
1. Touch and ho ld a widget or shortcut on the screen.
2. Drag it to your chosen location.
Remove Shor tcuts or Widgets
1. Touch and hold a widget or shortcut on the Home Screen.
2. Dra g it to to remove it.
Page 24
24
Rearranging the Favourites Tray
The Home Screen includes a customisable favourites tray
visible from all extended Home Screens. You can drag apps,
shortcuts, folders, and other priori ty it ems in or out of the
favourites tray f or instant access from any Home Screen.
To remove items from the favourites tray:
Touch and hold an item to drag in or out of the tray.
To add items to the favourites tray:
Touch a nd hold an item and d rag it on to the favourites tray.
If the favourites tray is full, you can stack icons on top o f each
other. When you tap them they will expand to show all the
stacked icon s .
Page 25
25
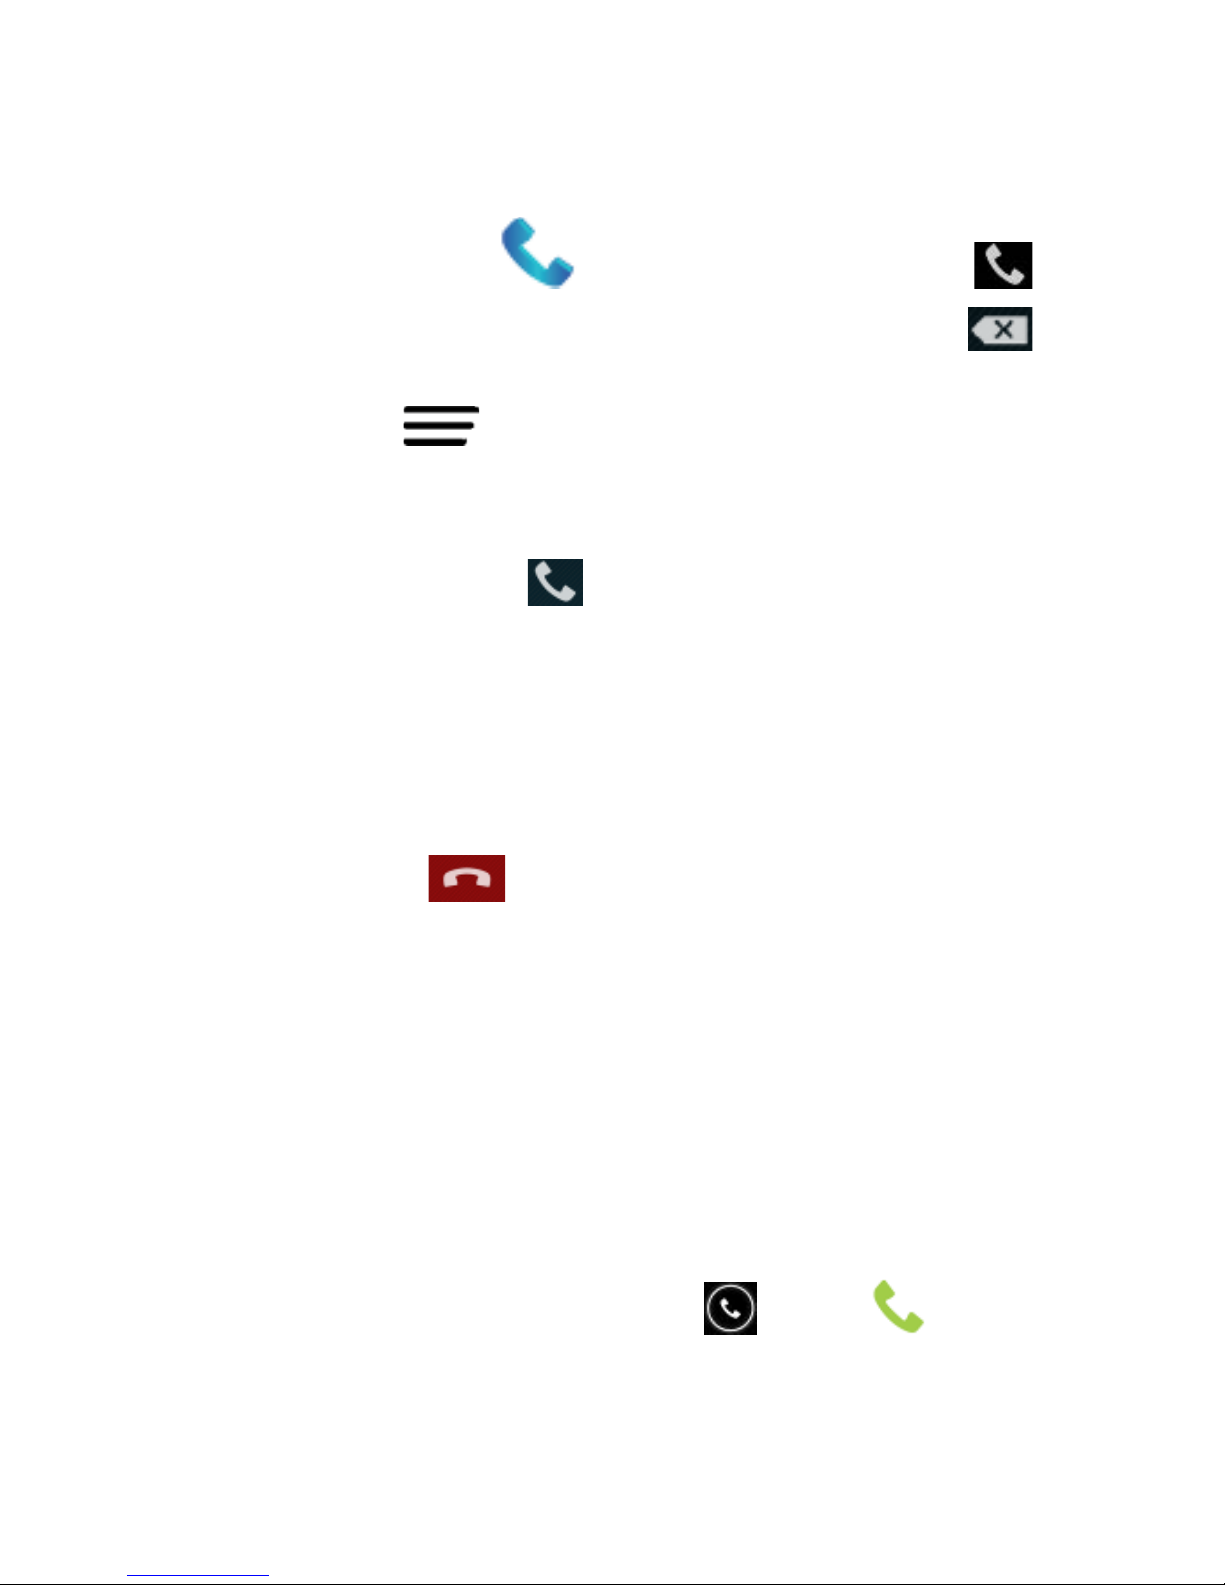
Making Calls using the Phone app
1. Touch Home Key > > select the dialer tab
2. Enter the phone number using the keypad. Touch to
delete wrong digits.
3. Press Options to add a Paus e or Wait if req uired
4. Press and hold the 0 key to enter the plus (+) symbol for
international dialling.
5. Touch the Phone icon below the keypad to dial.
TIPS: In other applications, wherever y ou see a phone number or
handset icon , t ouch i t to make a call.
DTMF tones are sent to the othe r party when you enter numbers.
End a Call
During a call, touch on the screen.
Answering or Rejecting Calls
When you receive a phone call , the Inco ming Ca ll s creen opens,
displaying the caller ID and any additional information about the
caller saved in Contacts. You can answer or reject the call, or
reject it with a text message.
Answer a Call
When you receive a phone call, drag over t o answer
th e c all.
Page 26
26
TIP: To silence the ringer before answering the ca ll, pr es s the
Volume Keys up or do wn.
Reject a Call
When you receive a phone call, drag over to rej ect
th e c all.
You can also drag over to reject the call and send a
preset text message to the caller.
TIP: To edit the default te xt response mess a ge op en t he Dialler >
touch Options > Settings > Other Setti ngs > Quick
responses.
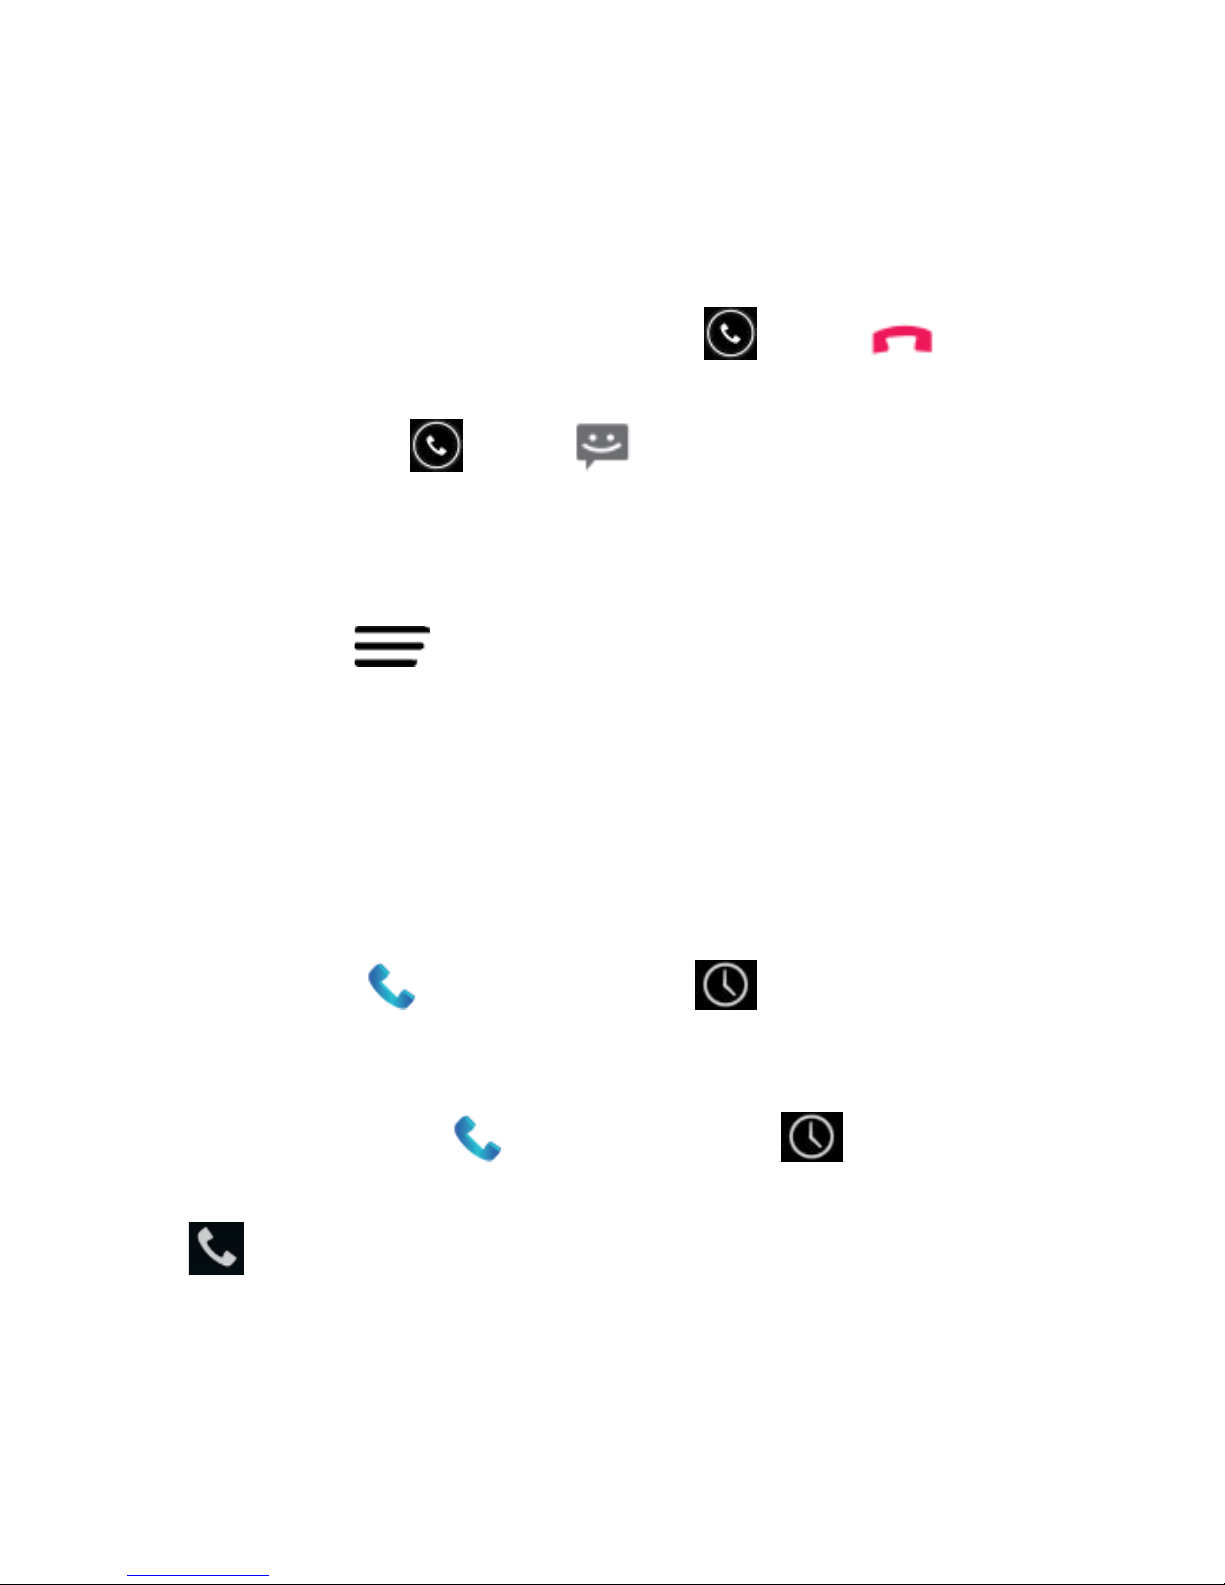
Working With Call Logs
The C all log is a li s t of all t he cal ls y ou've placed, received, or
missed. It provides a convenient way to redial a number, return a
call, or ad d a numbe r to your Contacts .
Touch Home > then select the tab.
Make a Call from Call Logs
1. Touch Home > then select the tab.
2. Touch the number for more details about the call , or touch
to call back.
Page 27
27
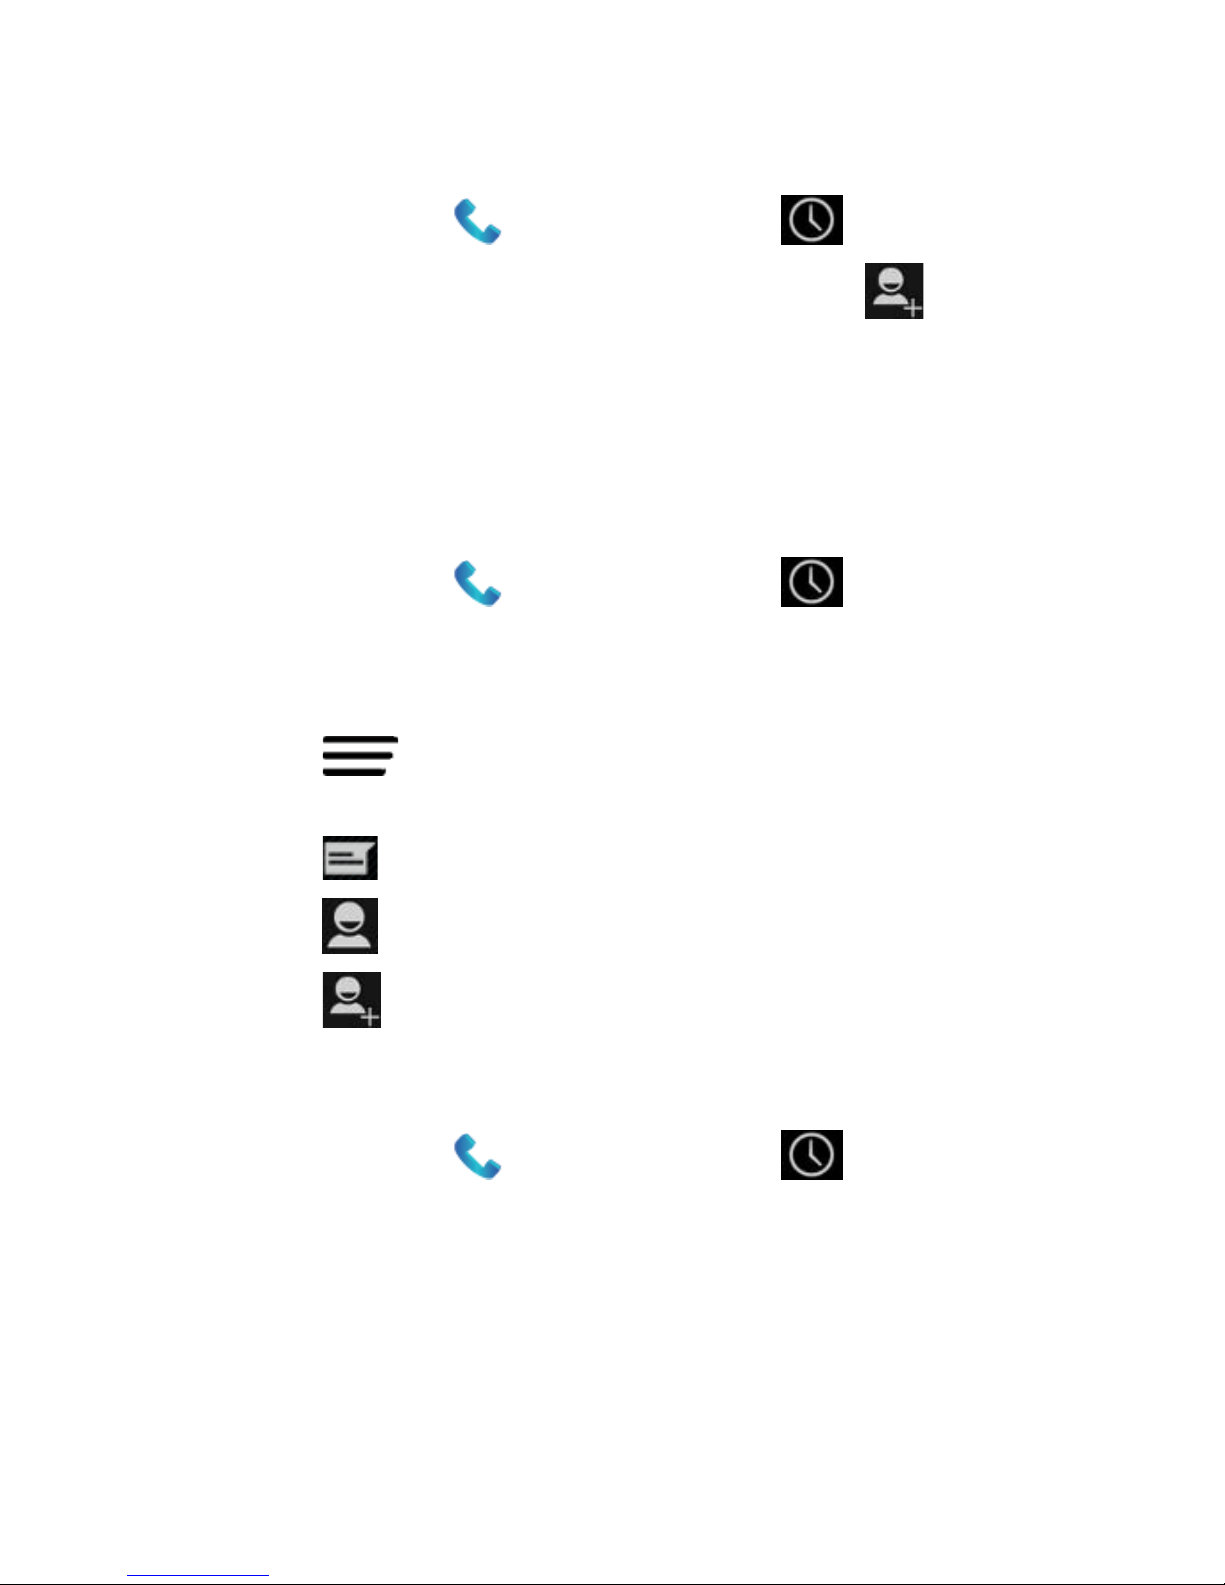
Add a Call Log Number as a Contact
1. Touch Home > then select the tab.
2. Touch the number for more details, touch to add to
your Cont act s
3. Touch an existing contact to modify or Create New Contact
to save to a new entry.
Other Actions in Call Logs
1. Touch Home > then select the tab.
2. Touch the number for mor e details:
• Touch the number to call it.
• Touch > Edit number before cal l to edit the
number in the dialer before calling it.
• Touch to send a messag e.
• Touch to view contact details.
• Touch to add the number as a contact.
Delete the Call Log
1. Touch Home > then select the tab.
2. Touch Options > Delete
3. Select individual record s or use the drop down Selected box
to Select All.
Page 28
28
Calling Your Contacts f rom Phone app
1. Touch Home > then select t he Contacts tab .
2. Flick the screen up or down to view your contacts
TIPS: Search for a contact by touching on the bottom of
the screen or use the scroll bar to flick through A-Z.
3. Touch a contact or number to call it.
Call a Favourite Contact
1. Touch Home Key > and then touch Contacts .
2. Your favourite and frequently called num ber s are listed on
the top of the screen. Touch a contact or number to call it.
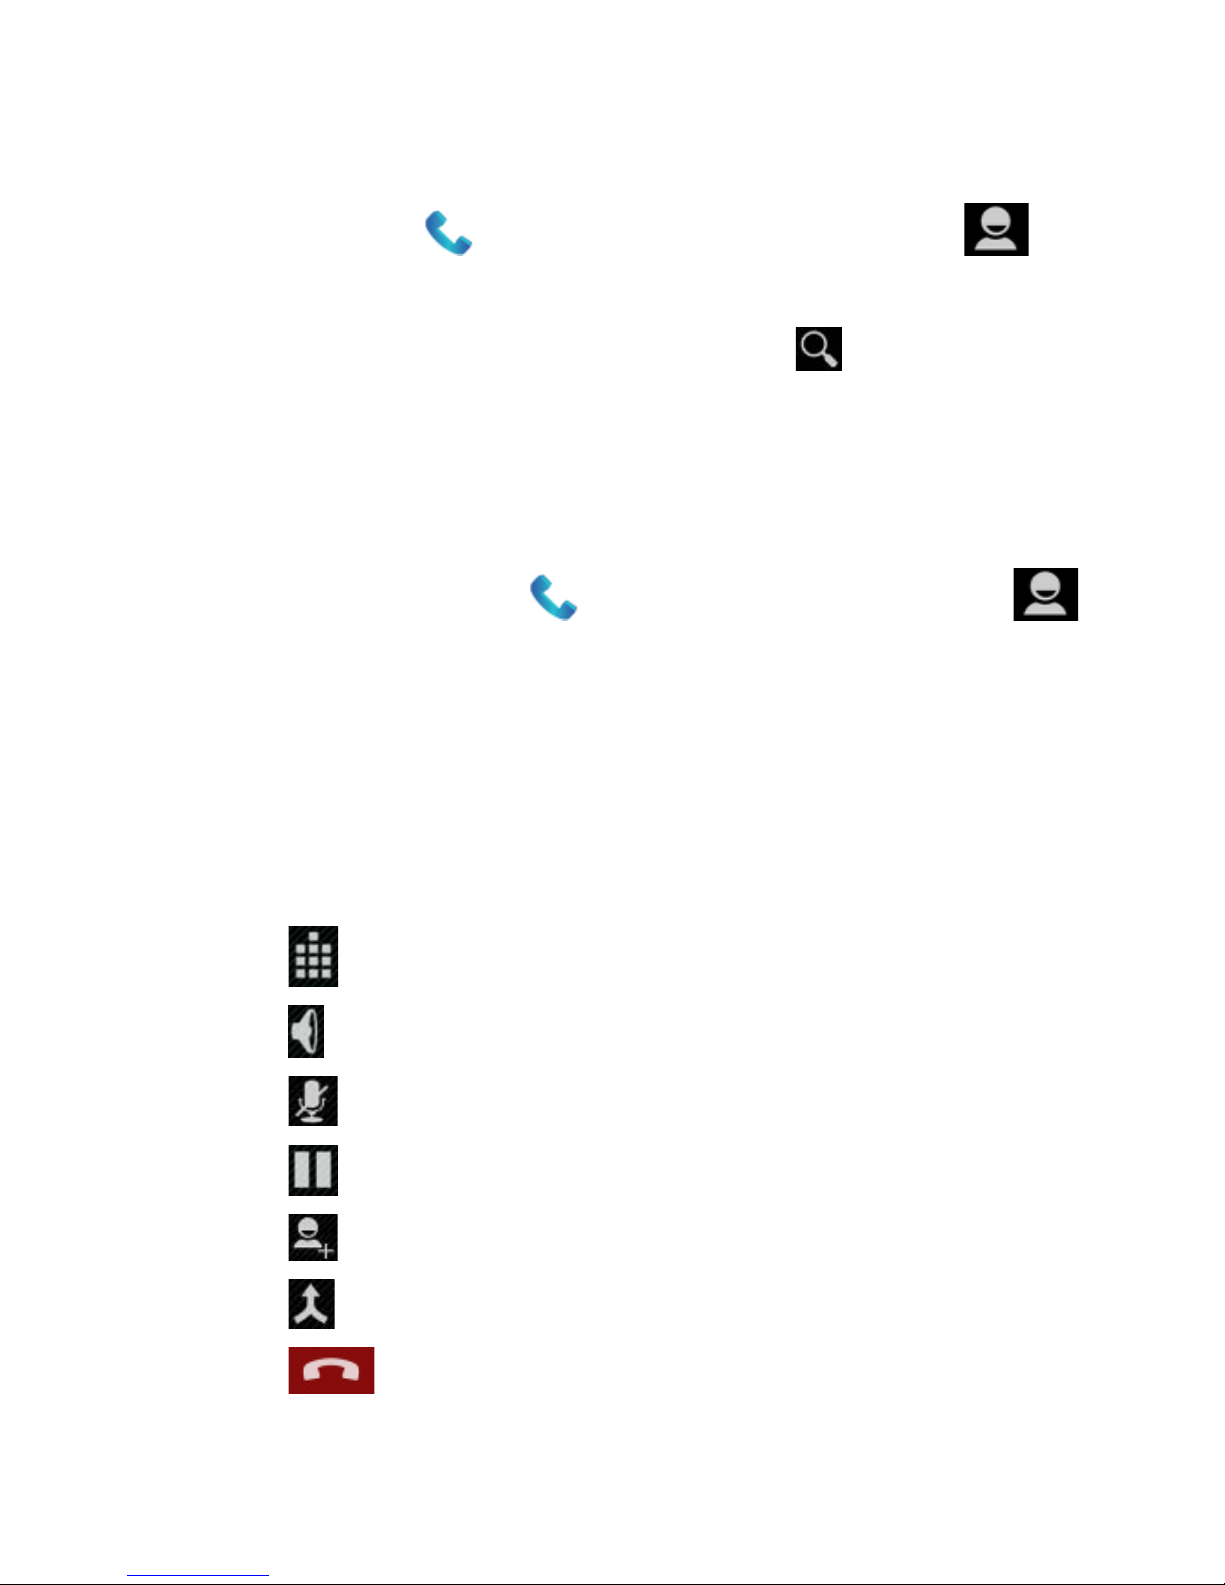
Options During a Call
During a call, you will see a number of onscreen options. Touch
an option to select it.
• Touch to open the keypad, eg to send key tone s .
• Touch to turn on or off the speaker for handsfree.
• Touch to mute or unmute your microphone.
• Touch to place the call on Hold
• Touch to make a new call, the first call is pu t on hol d.
• Touch to merge separate calls into a confere nc e call.
• Touch to end the current call.
Page 29
29
Managing Multi-party Calls
When call waiting and three-way call features are available, you
can switch betw een two calls or set up a conference call.
Switch Between Current Calls
W hen you’ re on a ca ll, your phone sc reen informs you t hat
another call is coming in and display s the call er ID .
To respond to an inc omi ng call whi le you’re on a call:
Drag over to answer the call. (This puts the first caller
on hold and answers the second call.)
To switch betw een two c all s :
Touch > Swap or touch the switch calls icon
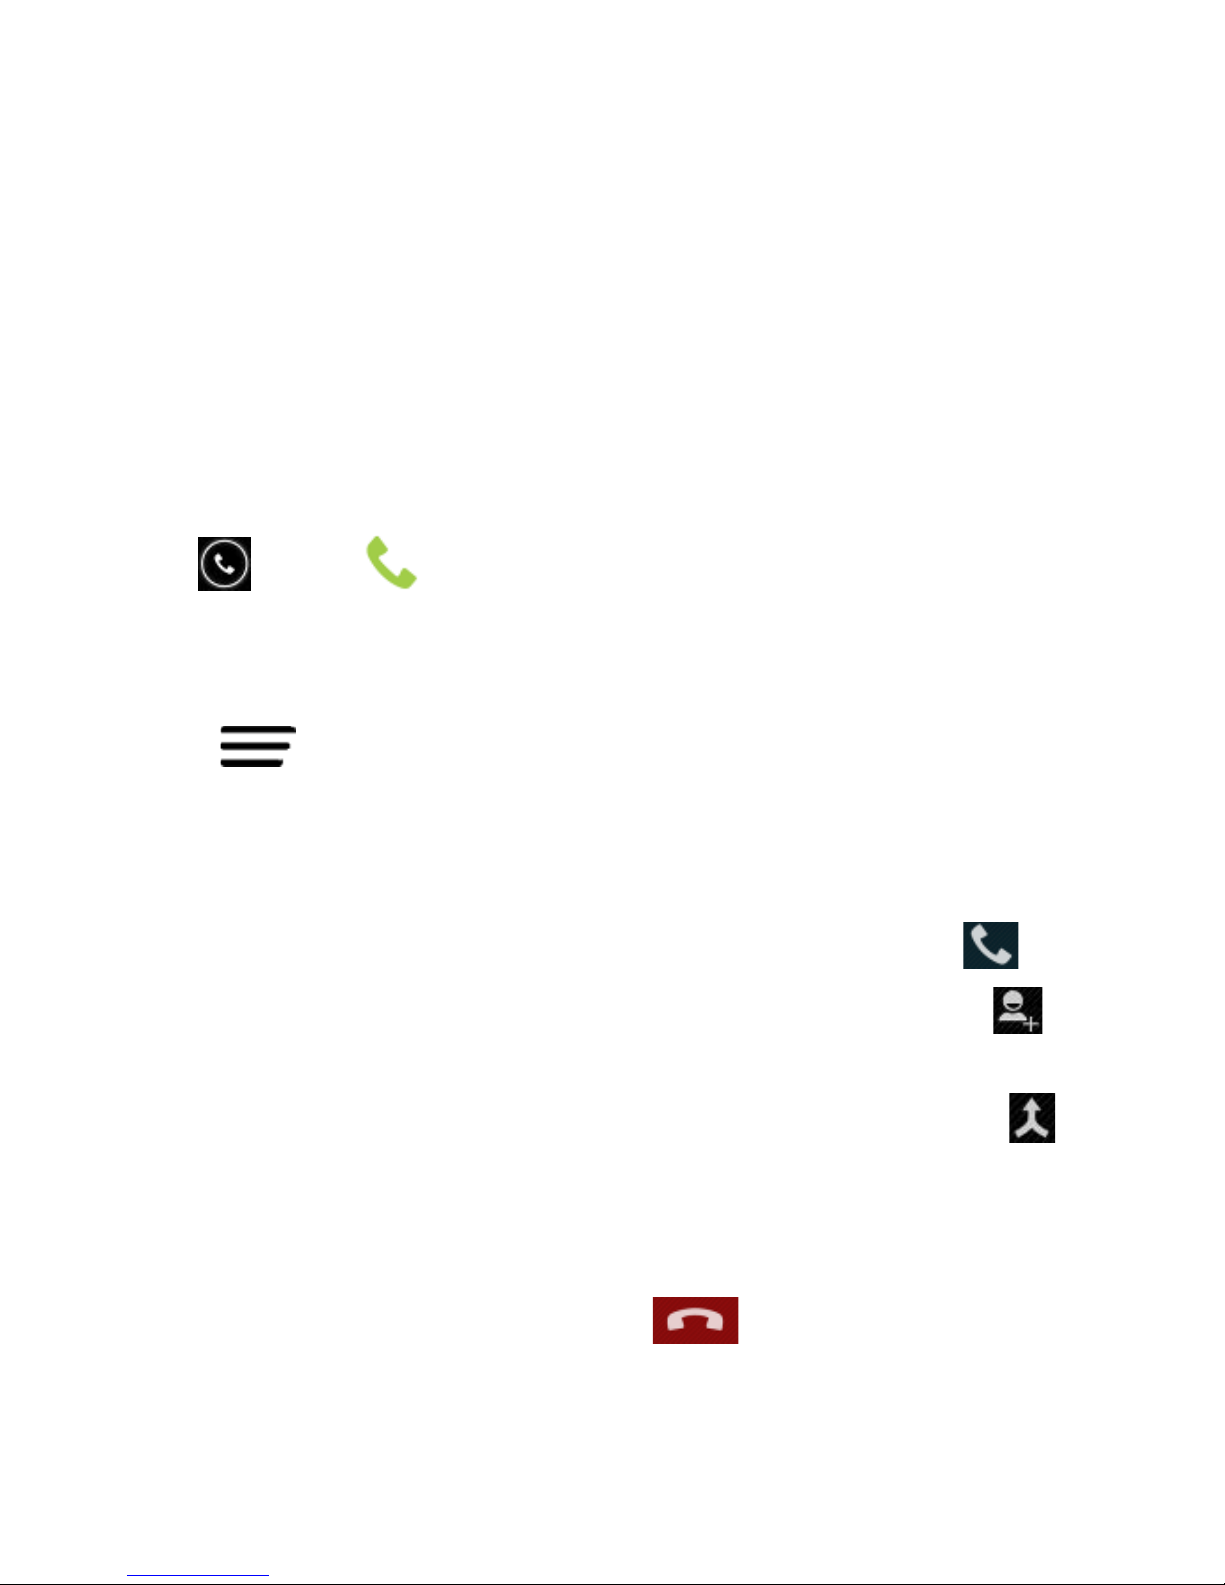
Set Up a Conference Call
With this feature, you can talk to two people at the same time.
1. On the dialer screen, enter a numbe r and tou ch .
2. Once you have established the connection, touch and
dial the second number. (The first call is put on hold)
3. When you’re connected to the second party, touch .
If the other party hangs up, you and the remaining caller stay
connected. If you initiated the call and hang up, all callers are
disconnected.
To end the conference call, touch .
Page 30

30
Other Call Settings
Use Fixed Dialling Numbers
Fixed Dialling Numbers is not normally available and depends on
carrier support and the PIN2 code. FDN allows you to restrict
outgoing calls to a limited set of phone numbers.
Touch Home > Dialler > Options > Setti ngs > Other
settings > Fixed Dialling Number s
• Enable FDN: Input the PIN2 code to enable.
• Change P IN2: Change the PIN2 code for FDN access.
• FDN lis t : Manage the FDN list.
Edit Quick Response to Rejected Callers
1. Touch Home > Dialler > Options > Settings >
Other sett ings > Q uic k res pons es.
2. Tou ch the t ext me s sage to edit it.
3. The quick response SMS is sent by rejecting an incoming
call and selecting the message icon.
Set Voicemail
1. Touch Home > Dialler > Options > Settings >
Voice Call >.
2. Touch Voicemail. The default Voicemail num ber is
configured for your carrier.
3. Touch Voicemail > Setup > Voicemail num ber to edit the
vo icemail num ber if necessary .
Page 31

31
Set Speed Dials
Touch and hold the 1 ~ 9 keys from the dialer to call the
corresponding speed dial number.
Key 1 is programmed for your voicemail and key 3 is programmed
for international voicemail. These can be changed if required.
To assign a spee d dial ke y:
1. Touch Home > Dialler > Options > Settings > Speed
dial.
2. Touch an av ailable num ber to as sig n a spee d dial
3. Enter a phone number or select one from the contact list.
4. Touch OK.
Call Barring
Call barring feature allow s you to forbid certain types of calls fro m
your phone.
1. Touch Home > Dialler > Options > Settings > Voice
Call > Call barring
2. Set the restricti on of spec i fi c typ es of calls fr om you r phon e.
Call Forwarding
Call forwarding allows you to forward incoming calls to another
phone number.
1. Touch Home > Dialler > Options > Settings > Voice
Call >Call forw a rding.
2. Touch t he ava ilable opt ions ( Alw a ys f orw ar d, Forward
when busy, Forward when unanswered, or Forward when
Page 32

32
unreachable) to configure.
Caller ID and Call Waiting
1. Touch Home > Dialler > Options > Settings > Voice
Call > Additi onal set ti ngs .
2. Caller ID determines if your number is displayed to other
parties.
3. Call waiting not ifie s y ou of in c omin g c alls during a cal l.
Entering Text
The onscreen keyboard will pop up wheneve r you need to enter
text. Just tap in any text entry box to open the keyboard. Some
apps open it automatically. Touch the Back Key to hide the
onscreen keyboard if required.
Go to Settings > Language & input > Default to change the
default keyboard . Also when entering text (eg SMS) you can
swipe down the Notifications panel to select the preferred
keyboard.
Android Keyboard
The Android Keyboard provides a layout similar to a desktop
computer keyboard . Turn the phone sideways and the keyboard
will change from portrait to landscape. The la ndsca pe k eybo ar d
is not s up po rted in all applications.
Page 33

33
• Touch and hold keys to enter numbers o r acce n t ed letter s.
For example hold down q to enter 1, hold down e to choose
accents such as Umla ut, brave, acute etc.
• Lo wer case is ind icated by . Touch once to change to
upper case . Double-tap for caps-lock .
• Touch to delete the text before the cursor.
• Touch to select numbers and symbols. You can then
touch to find more.
• Touch to use Google’s networked voice input.
• Touch and hold to change the input language s or
Android keyboard settings.
Page 34

34
TouchPal Keyboard
The TouchPal keyboard adds other f unc tions su ch as Curve
where you can sw ipe on the keyboard.
Go to Apps > Settings > Language & input > Default to select
the TouchPal keyboard.
• Touch the alphabet keys to enter lette rs.
• Touch to use uppercase or lowercase. The key changes
to i ndic ate lowercase , uppercase , and caps lock .
• Slide abc on the space bar to ena ble word prediction. Slide left
to disable word prediction.
• Touch to change input language.
• Touch to enter digits, symbols, emoticons and other
pre-defined texts. Tou ch to find more. Touch /
to l ock or unloc k t he inputting. Touch t o go back to enter
letters.
• Touch to start a new line.
Page 35

35
• Touc h or hold to delete text before the cursor.
• Touch to access the quick settings and tutorials.
Keyboard Settings
Go to Home > Settings > Language & input.
Touch Default to set your preferred default keyboard. Touch the
Set tin gs icon to configure each option.
Editing Text
• M ov e the i nsert ion point: Tap to place a cursor. Drag to
move the curso r.
• Select text: Touch and hold or double-tap within the text.
The nearest word highlights, with a tab at each end of the
selection. Drag the tabs to change the selection.
• Cut, copy, paste: Select the text you want t o manipulate.
Then touch the Cut , Copy , or Paste button:
Page 36

36
Connect to Networks and Devices
Your device is pre-configured to connect to your carrier’s network.
Do not change any network settings unless instructed to by your
carrier.
Touch Home > Apps > Settings > More > Mobile networks
From this menu you can control data usage, enable data when
roaming, configure your preferred Network connection mode, set
Access Point Names (if changing your carrier), and scan through
available Network operators.
Control Mobile Da ta Use
Pull down the Notifications panel and press the Quick Settings
Panel . Tap Data Connect to enable or disable data services.
1. Touch Home > Apps > Settings > More > Mobile
networks > Data connection > Select Off
2. Tick the Data roaming check box to enable data while
roaming if required.
IMPORTANT: Data roaming may incur significant charges.
Page 37

37
Set Access Point Names
APN settings control Internet and M MS ac ce ss and are pre-set
for your carrier. If you want to add a new APN, please contact
your service prov ider t o get the required information.
1. Touch Home > Apps > Settings > More > Mobile
networks > Access Point Names.
2. Touch > New APN.
3. Configure as specified by your servic e pro vider .
4. Touch > Save to com plet e.
TIP: To restore your original APN settings touch > Reset
to default.
Page 38

38
Connecting to a local Wi-Fi network
Pull down the Notifications panel and press the Quick Settings
Panel to quickly switch Wi-Fi on or off.
1. Touch Home > Apps > Settings > Wi-Fi, switch to On.
2. Tap Wi-Fi to view available networks.
3. Tou ch a network name to conn ect to it.
NOTES: Previously connected networks w ill connect
automatically. I f the network is secured enter the password.
Get Notified of Open Networks
1. Touch Home > Apps > Settings > Wi-Fi.
2. Slide the Wi-Fi switch to the ON position.
3. Touch > Advanced > Tick Network notifi cat ion.
With Wi-Fi on, you are notified of open Wi-Fi net wor ks. Clear the
ch ec k box t o t urn off notificatio ns.
Add a Wi-Fi Network manually
You can add a Wi-Fi netw ork manually if the network does not
broadcast its name (SSID), or to add a network when you are out
of range. You need to know the SSID, encryption and password.
1. Touch Home > Apps > Settings > Wi-Fi.
2. Slide the Wi-Fi switch to th e ON position.
3. Touch + to add a new network
4. Enter the Network SSID (name), security or other details.
5. Touch Save.
Page 39

39
Forget a Wi-Fi Network
To delete a Wi-Fi network that you no longer use or if yo u don’t
want to co nnect t o it automatically:
1. Touch Home > Apps > Settings > Wi-Fi.
2. Slide the Wi-Fi switch to th e ON position.
3. Touch the Wi-Fi network name and then touch Forget.
Using W i-Fi Direct
Wi-Fi Direct allows Wi-Fi devices to connect to each other
without the need for wireless acce s s points (hotspo t s) .
NOTE: Activating this feature will disconnect your current Wi-Fi
network connection.
Connect to a Wi-Fi Direct Device
1. Touch Home > Apps > Set tings > Wi-Fi > Opti ons > Wi-Fi
Direct.
2. Your phone will search for other devices enabled with Wi-Fi
direct connections. Tou ch Wi-Fi direct setti ngs to see all
av ailable devices .
3. Touch a device nam e t o begin the connec tion p roces s.
NOTE: The target device must also have Wi-Fi Direct service
activated and running before it can be detected by your
phone.
4. Touch Connect.
The othe r device will r eceive a Wi-Fi Direct connection
prompt and need to accept the request for connection.
Page 40

40
5. Once connected the device is displayed as “Connected” in
the Wi-Fi Direct devices list.
6. Wi-Fi Dir ec t req uires other c ompatible applications and
devices to use the featu re.
Connecting to Bluetooth Devices
Phones or other devices with Bluetooth can exchange informa tion
wirelessly w ithin a distance of about 10 meters. The Bluetooth
devices must be paired before the communication is perfor med.
Pull down the Notifications panel and press the Quick Settings
Panel to quickly switch Bluetooth on or off.
Turning Bluetooth On/Off
1. Touch Home > Apps > Settings > Bluetooth.
2. Slide the Bluetooth switch to th e ON or OFF position.
When Bluetooth is on, the icon will a ppear in the Status ba r.
Making Your Phone Visible
In order to work with other phones or devices that have Blu eto ot h,
you need to make your phone ‘vi sible ’ to them.
1. Touch Home > Apps > Setti ngs > Bluetooth.
2. Slide the Bluetooth switch to th e ON position.
3. Touch your device name on the top of the screen to make
your phone visible or invisible.
NOTE: Touch > Visibility tim e out to set th e Bluetooth
visibility timeout of your phone.
Page 41

41
Change the Device Name
When your phone is visible it will broadcast the name shown at
the top of the Bluetooth screen.
1. Touch Home > Apps > Setti ngs > Bluetooth.
2. Slide the Bluetooth switch to th e ON position.
3. Touch > Rename phone.
4. Edit the name and touch Rename.
Pair With a Bluetooth Device
1. Touch Home > Apps > Setti ngs > Bluetooth.
2. Slide the Bluetooth switch to th e ON position.
3. Your phone searches and displays the available Bluetooth
devices in range.
4. Touch the device you want to pair with.
Follow the instructions to complete the pairing. If you're prompted
to enter a passcode, try entering 0000 or 1234 or consult the
documentation that came with the other device.
Notes for pairing PBAP Enabled Devices
PBAC is Phonebook Access Profile which will automatically
tr ansfer you r C ontacts to the other device.
During the Pairing process it is normal for Android handsets to
Automatically Connect t he Blu etooth dev ice as part of the Pairing
process. After the handset and Blueto oth d evice have
successfully connected you should continue to watch the
handset display for a further prompt or notification that is asking
Page 42

42
you to Allow Phone Book Contacts to be transferred to the
Blueto oth device you have just connected. This will occur if the
Bluetooth device in ques tion suppo rt s PBAP or “Phone Book
Access Profile”. If you miss this prompt or notification then you
will more then likely get prompted to allow it the next time you
connect the Bl uetooth device to the handset or you might need t o
re-pair the handset and Blue tooth devi ce to trigg er th e PBAP
request again. See your Bluetooth de vice user manu al for mor e
information on what it supports and requires.
Connect to a B luetooth Device
Once you've paired with a Bluetooth device, you can connect to it
manually; for example, to switch devices or to reconnect after it i s
back in range.
1. Touch Home > Apps > Setti ngs > Bluetooth and make
sure Bluetooth is turned on.
2. In the list of paired devices, touch a paired but unconnected
device.
Disconnect a Bluetooth Device
1. Touch Home > Apps > Setti ngs > Bluetooth and make
sure Bluetooth is turned on.
2. In the lis t of paired devices, t ouch a devic e t o Conn ec t.
3. Touch OK to disco nnect it.
Page 43

43
Remove Pairing from a Bluetooth Device
Del ete a pairing connection w ith a Bluetooth dev ice. To c onnect
to the device again, you may need to enter or confirm a pa ss code
again.
1. Touch Home > Apps > Setti ngs > Bluetooth On.
2. In the lis t of paired devices, t ouch the options icon
beside t he Bluetooth dev ice to unpair.
3. Touch Unpair.
Connecting to Your Computer via USB
Connect your phone to a compu ter using the suppl ied USB cabl e
to transfer music, pictures, and other files in both directions. Your
phone stores these files in internal storage or on a removable
microSD card.
If y ou are using U SB tetheri ng, you must t urn th at off b efor e y ou
can use USB to transfer files between your phone and computer.
To connect to an Apple MAC computer you need to download
and install the Android File Transfer program available on line.
Page 44

44
Connect Your Phone to a Computer via USB
1. Connect your phone to the PC using the USB cable.
2. Open the Notification panel or follow the on screen pop up to
choose the desired conne cti vity mode:
• USB St ora ge. Recommended for XP operating system.
• Media device (MTP): Transfer media files on Windows, or
using Android File Transfer on Mac.
• Camera (PTP): Trans fe r photos usin g camera softw a r e ,
and transfer any files on the comput ers tha t don’t support
MTP.
• Char ge only: D isconnec t all USB services and charge
you r dev ice onl y .
• Built-in CD-ROM: Opens a virtua l CDROM to install the
handset drivers for use with PC connectivity.
Disconnect Your Phone From the Computer
To disconnect the phone from the computer, simply unplug the
USB cable when you’re finished.
Share Your Mobile Data Connection via USB
You can access the Internet on your co mputer via the USB
tethering feature of your device . The feature need s data
connection on a mobile network and will result in data charges.
1. Connect your phone to your computer with a USB cable.
2. Touch Home > Apps > Setti ngs > More > Tetheri ng &
portable hotspot.
Page 45

45
3. Tick the USB tethering check box. A new network
connection will be created on your computer.
4. To stop sharing your data connection, uncheck USB
tethering or disconne ct the USB cable.
NOTE: You cant access USB or microSD storage while
connected in tethering mode.
Share Your Mobile Data Connection via
Bluetooth
If your computer suppor ts Bluetooth tethering you can configure
your phone to share it's mobile data connection with your
computer.
1. Pair yo ur phone with y our comput er via Bluet oot h.
2. Configure your computer to obtain its network connection
via Bluetooth. For more information, please see your
computer's documentation.
3. Touch Home > Apps > Setti ngs > More > Tethe ring &
portable hotspot.
4. Tick the Bluetooth t e t heri ng check box. Your computer is
now sharing your phone's data connection.
5. To stop sharing your data connection, uncheck Bluetooth
tethering.
Page 46

46
Share Your Mobile Data Connection as a
Wi-Fi Hotspot
Enable the Wi-Fi hotspot feature to share your network data with
other devices via Wi-Fi.
NOTE: When the Wi-Fi hotspot feature is enabled, you cannot
access the internet via Wi-Fi. You remain connected to the
Internet via your mobile data network.
1. Touch Home > Apps > Setti ngs > More > Tethe ring &
portable hotspot.
2. Switch o n Wi-Fi hotspot
3. Touch Wi-Fi hots pot > Set up Wi-Fi hotspot to configure
the SSID, security settings and password for your hotspot.
4. Uncheck Portable Wi-Fi hot spot to stop sharing.
Remove the microSD Card From Your Phone
If you need to remove the microSD card while the phone is on,
you should unmount it first.
1. Touch Home > Apps > Setti ngs > Storage.
2. Slide down the screen, select Unmount SD card > OK
Erase microSD Card
1. Touch Home > Apps > Settings > Storage.
2. Slide down the screen and touch Erase SD card > Erase
SD c ard > Era se everyth ing.
NOTE: The formatting proce dure permanently eras es all the data
on t he microSD card and is not recover able.
Page 47

47
Connecting to Virtual Private Networks
Virtual private networks (VPNs) allow you to connect to the
resources in side a s ecure d local network. VPNs are comm only
deployed by corporations, schools, and other institutions to let
people access local network resources when not in the office, or
when connected to a wireless network.
Depending on the type of VPN you are using, you may be
required to enter your login credentials or install security
certificates before you can connect to your VPN. You can get this
information from your network administrator.
Lock screen PIN or Passwords must be set before configuring
th e VPN function.
Add a VPN
1. Touch Home > Apps > Setti ngs > More > VPN.
2. Touch Add VPN network and fill in the infor m atio n
provided by your network administrator.
3. Touch Save - The VPN is added to the list on the VPN
screen.
Connect to a VPN
1. Touch Home > Apps > Setti ngs > More > VPN.
2. Touch the VPN that you want to connect to.
3. When prompted, enter any requested credentials, and then
touch Connect - the VPN connected icon appears in the
Status bar.
Page 48

48
Modify a VPN
1. Touch Home > Apps > Setti ngs > More > VPN.
2. Touch and hold the VPN that you want to modify.
3. Touch Edit network > Touc h Save when done.
Delete a VPN
1. Touch Home > Apps > Setti ngs > More > VPN.
2. Touch and hold the VPN > Delete network
Contacts
Add contacts to your phone and synchronise them with your
Google account or other accounts that support contact syncing.
To see your contacts, touch Home > . From there, t ouch th e
tabs o n the top of the s cr e en to quickly switch to contact grou ps
or favourites .
1. Touch Home > and touch the all contacts tab to
access your contact list.
2. Scroll through the list to view all your contac ts.
3. Touch a co ntact to view it s detai ls.
TIP: If you have a lot of contacts stored, you'll see a slider when
you touch the right side of the screen. To go directly to a letter,
touch and hold the slider and drag it to a letter.
Page 49

49
Adding a New Contact
1. Touch Home > and touch the all contacts tab .
2. Touch to add a new contact.
3. Choose to save the Contact to the Phone or USIM
4. Touch the account field on the top of the screen to choose
where to save the contact. If a sync account is selecte d, the
contacts w ill be synced automa tically with your account
online.
5. E nt e r the contact name, phone numbers, ema il add resses,
and ot he r inf o rmat i on .
6. Touch DONE to save th e contact.
Setting Up Your Own Profile
You can create your own name card in your phone.
1. Touch Home > and touch the all contacts tab .
2. Scr oll to the top of t he screen a nd touch Set up my profile.
3. Edit your profile information and touch DONE.
Import, Expo rt , and Share Contacts
You can import/export contacts from/ to your SIM or micro SD car d .
Thi s is useful when transferring contacts between different
devices.
Import your SIM card Contac ts to add more fea tures su ch as
dedicated Ringtone, Photos etc.
Page 50

50
Import Contacts
1. Touch Home > >
2. Touch Import/export. Select where to import from
3. P r e ss Ne xt, then select Copy Contacts to
4. Touch to select the contacts t o import or touch 0 Se lected >
Select All, and then touch OK to import.
5. Repeat the process to export ie from Phone Contacts, or
SIM contacts, to another destination.
Share Contacts
1. Touch Home > , touch the all contacts tab .
2. Touch > Share vi sibl e contacts
6. Touch to select the contacts to import or touch 0 Selected >
Select All, a nd the n t ouch O K t o import.
3. Choose to share the contacts via Bluetooth, Email, Gmail,
MMS, SMS or SD Card
Add a Contac t to F avourites
You can add the contacts used frequently to Favourites, so you
can find them quickly.
1. Touch Home > and touch the all contacts tab .
2. Touch a contact and then touch to add to favourites.
Page 51

51
Remove a Conta ct From Favourites
1. Touch Home > > to uch the favourites tab .
2. Touch a favourite contact and then touch .
View Your Contact Groups
1. Touch Home > and touch the Groups t ab .
2. Scroll through the list to view the preset groups and the
groups you create.
3. Tou ch a gr oup to view its members.
Add a New Group
1. Touch Home > and touch the Groups t ab .
2. Touch to create a new group.
3. Touch the account field on the top of the screen to choose
an account for the group.
4. Enter the group name and touch Done when finished.
Add Members to a Group
1. Touch Home > and touch the Groups t ab .
2. Touch a group and then Type person’s name to add
3. Touch to select the contact s to add as group memb er s.
4. Touch Done when finished.
Page 52

52
Delete a Group
1. Touch Home > and touch the Groups tab .
2. Touch a group and then touch the > Delete.
3. Touch OK to Delete the group. The contacts in the group
will not be deleted.
Edit a Gro u p
1. Touch Home > and touch the Groups t ab .
2. Touch a group and then touch the > Edit
3. Touch the group name to edit the group name. Or touch x
next to each member to delete a member.
Searchin g for a Cont act
1. Touch Home > .
2. Touch on the b ottom of t he sc reen.
3. Input the contact name to search. The contacts matched
will be listed.
Edit Contact Details
1. Touch Home > .
2. Touch a contact to edit and then touch > Edit.
3. Edit the contact and touch DONE w hen finished
Page 53

53
Delete a Contact
1. Touch Home > .
2. Touch a contact to delete and touch > D elet e.
3. Touch OK to confirm.
To delete sev er al contac t s, you can:
1. Touch > Dele te con tact
2. Check the con tacts to delete and then touch OK
3. Touch OK to confirm.
Extende d Contact Options
When a Contact is stored on the phone you can set other
fe atur es s uch as Set ri ngton e and B lock incoming ca lls.
1. Touch Home > .
2. Touch a conta ct to set a ringtone an d then touch the >
Set ringtone (Contact must
be saved on the phone)
3. Select a ringtone a nd touch OK.
Join Contacts
Your phone can synchronise with multiple accounts containing
your contact information (such as Google, Microsoft Exchange
Active Sync, F acebo ok and Twitter). When you sync hronise your
phone with those accounts, each account adds a separate
contac t entry in the Contacts list.
Page 54

54
NOTE
The Join and Separate featur e is only available in the men u af ter
synchronising multiple con ta ct sourc es . If you are only usi ng SIM
or Phone Contacts this option is not available.
1. Touch Home > .
2. Touch a contact to w hich to join one or more other contacts,
to view the contact’s detai ls . This is the c ontact you wil l se e
in t he Contacts list afte r the jo in.
3. Touch > Join. The phone will list the suggested
contacts to join.
4. Touch the contact whose information you want to join with
th e first c ontact.
The information from the second con tact is added to the first
contact, and the second contact is no longer displayed in the
Contact s l ist .
Separate Contact Information
If contact information from dif ferent s ourc es was joined in error,
you can separate the information back into individual contacts on
your phone.
1. Touch Home > .
2. Touch a contact you want to separate, to view its details.
3. Touch Options > Edit > Options > Separate.
4. Touch OK to confirm.
The contact information is sepa rat ed into indi vidual contacts in
the list of contacts.
Page 55

55
Messaging
You can use Messaging to exchange text messages ( SMS) and
multimedia messages (MMS).
Open the Messaging Screen
Touch in the Home Screen and select Messaging
The Messaging screen opens, where you can create a new
message, search for messages, or open an ongoing message
thread.
• Touch to write a new text or multimedia message.
• Touch to search for mes sage with keywords.
• Touc h an existing message thread to open the co nversation.
Send a Text Message
1. On the Messaging scr e e n, touch at the bottom.
2. Ente r the reci pient’s number or, if the recipient is s tore d in
Contacts the first letters of their name. As matching contacts
appear, you can touch a suggested recipient.
3. Touch the Type text message field, and enter the con tent s o f
your text message.
4. Touch to Send.
Page 56

56
View Message Details
1. Touch and hold a message in a thread.
2. Touch View message details to see the message type,
se nder or rece iver, time and dat e .
Send a Multimedia Message
1. On the Messaging screen , to uch at the bottom.
2. Enter the recipient and the text of the mes sage , as you do
when sending a text message.
3. Touch > Add subject to add a message subject.
4. Touch the + to ope n the at tachments m enu:
Capture pic t ure
Take a photo and add to your message.
Pictures
Select a picture to add to your message.
Capture video
Shoot a video clip and add to your message.
Videos
Select a video clip to at tach to y our message.
Record audio
Record an audio file and add to your
message.
Audio
Select an audio file to add to your message.
Contact
Select a contact to add to your mess age as
an at tachment.
Calendar
Add a Calendar event such as an
appointment or meeting (VCS).
5. Touch to Send.
Page 57

57
Repl y to a Messag e
Messages you receive are appended to existing threads of the
same number. If the new message comes from a new number, a
new thread is created.
1. On the Messaging scr e e n, touch the thread that has the
messag e y ou want to rep ly to.
2. Type your reply in the text box at the botto m. You can touch
th e attach icon
+ if you want to reply with an MMS.
3. Touch to Send.
Forward a Message
1. On the Messaging screen , touch th e thread tha t con tains the
message you want to forward.
4. Touch and hold the message.
5. Touch Forward in the menu that opens .
6. Enter a recipient for the message and edit the content if you
want.
7. Touch to Send.
Delete Messages or Thread s
To delete messages in a thread:
1. On the Messaging scr e e n, touch a thread.
2. Touch > Select item(s).
3. Touch the messages you want to delete.
Page 58

58
4. Touch at the bottom.
5. Touch Delete.
To delete message threads:
1. On the Messaging scr e e n, touch and hold the thread to
delete.
2. If there are more threads you want to delete, touch them one
by one.
3. Touch at the bottom.
4. Touch Delete.
Message Settings
Touch > Settings i n t he Messaging screen to change
Messaging settings.
Enable Group MMS
Go to Message Settings (see above) > MMS and selec t the
Group messaging chec k box. When there is more than one
co ntact on an SMS i t is conv erted to an MMS and s ent as a
Group Message. Recipients can use reply to all to reply to the
whole group.
Note that this is sent as an MMS so requires the receiver to have
an active data account. If the receiver does not have data
enabled then they will not receive the mes sage.
Page 59

59
Accounts
You can add multiple Google accounts and Microsoft Exchange
ActiveSync accounts. You may also add other kinds of accounts,
depending on the apps installed on your device.
Add an Ac cou nt
1. Home > Apps > Settings > Add Account
2. Touch the type of account you want to add.
3. Follo w the onscreen steps to enter the required information.
Most accounts require a username and password, but the
details may vary. You may also need to obtain som e
information from your IT support or system administrator.
W hen the accoun t is successfully add ed, it is display ed in t he
Accounts list.
Remove an A ccount
Removing an account will delete it and all information associated
with it from your dev ice, s uch as ema ils a nd contacts .
1. Home > Apps > Settings > Accounts
2. Touch the account.
3. Touch > Remove account
Configur ing Ac count Sy nc
1. Home > Apps > Settings > Accounts
The Sync ico n turns green if auto m ati c sync is enable d
and gray if automatic sync is disable d.
Page 60

60
Touch the Sync icon to configure your sync options.
When automatic sync is turned on, c hange s you make to
information on your device or on the web are
automatically synced with each other.
When auto sync is turned of f , you need to sync manually
to collect emails, updates, or other recent information.
Sync Manually
1. Home > Apps > Settings > Accounts
2. Touch the account you want to sync.
3. Touch > Sync now.
Email
Touch in the Home Screen and select Email.
Set Up the First Email Accou nt
1. When you open Email for th e first time, enter you r email
address and passw ord and then tou ch Next.
NOTE: Your device will connect to the Interne t and verify
incoming and outgoing server settings before proceeding to
the next step. If the email se rvic e provi der is n ot recognised
you need to enter the incomin g and outg oing server settings.
Please contact your emai l service provider for more
information or go to Play Store and download your email
provider’s application.
Page 61

61
2. Set the Inbox checking fre quency and othe r s ett ings. T ouch
Next when done.
Your phone will show the inbox of the email account and start to
download email messages.
TIP: To add more email accounts, open Email to get the Inbox
screen. Then touch the > Account settings and touch
ADD ACCOUNT at the top right of the screen.
Checking Your Emails
Your device can automatically check for new emails at the interval
you set when setting up th e account.
You can also check new emails manu ally by touching in any
of the email account’s boxes. Touch L o ad more mess ag es at the
bottom of the email list to download earlier me s sages .
Rely to or Forward an Email
1. Tap the email from the inbox to open it
2. Touch the left arrow to select Reply, Reply All, or
Forward from the drop down box at the top.
3. Edit your me s sage and tou ch to send.
Delete an Email
View the email or select the checkbox then touch > O K.
Page 62

62
Mark an Email as Unread
View the email or select the checkb ox and then touch
Writing and Sending an Email
1. Open your email Inbox .
2. Touch to write a new email.
3. If you have more than one email accounts added on the
device, touch the sender line to select the accoun t you want
to use for sending the message.
4. Enter a c ontact name or ema il address in the ‘ To’ f ield.
Separate each rec ipie nt with a c om ma. You can also t ouch
to select recipients from your contacts.
5. Enter the email subject and compose the email text.
6. Touch > Attach file to add audio files, images, videos
and other types of fil es as at tachment.
7. Touch at the top right of the screen to send the
message.
Adding Signature to Your Emails
1. Open the Email app.
2. Touch > Settings and select the account .
3. Touch Signature.
4. Enter your required text and touch OK.
Page 63

63
Add an Email A ccount
After setting up your first email account (see Email – Set Up the
First Email Ac count), you can add m ore email account s and
manage them separately.
1. Open the Email app
2. Touch > Settings and touch ADD ACCOUNT at the
top right of the screen.
3. Set up the account as y ou hav e done previo usly.
Edit an Email A ccoun t
1. Open the Email app
2. Touch > Settings and select the account
3. Review any changes and touch the Back Key when done.
Remove an Email Account
1. Open Email t o get the Inbox screen.
2. Touch > Settings and select the account.
3. Scrol l to the bottom to se lect Remove a ccount > O K.
Changing General Email S ettings
General settings apply to all email accounts you add.
1. Open Email t o get the Inbox screen.
2. Touch > Settings > Gene ral.
3. Review any changes and touch the Back Key when done..
Page 64

64
Gmail
TM
After you sign in to your Google account on the device, you can
send and retrieve Gmail messages with the Gmail app.
Touch in the Home Screen and select Gmail to open the
Gmail app.
If you haven’t si gned in, y ou will be prompted to do s o or cr eat e a
new account.
Pull the screen down to refresh your Inbox.
Writing and Sending a Message
1. Open y o ur Gmail Inbox and switch to the account you want to
use for sending the message.
1. Touch to write a new message
2. Enter a c ontact name or ema il address in the ‘ To’ f ield.
Separate each rec ipie nt with a c om ma.
3. Enter the email subject and compose the email text.
4. To attach a n image, touch > Attach picture or video
and select a file from the image gallery.
5. Touch at the top right of the screen to send the
message.
Adding Signature to Your Gmail
Messaging
You can set a few lines of plain text as signa ture for eve ry
Page 65

65
outgoing Gmail messag e. The signature you set on the device is
independent of the signature you use for Gmail on the web.
1. Open the Gmail app.
2. Touch > Setti ngs and select the account you want to
add signature to.
3. Touch Signature and enter the text.
4. Touch OK. Tap back as required to return to previous men us .
Reply to or Forward a Message
1. Open the Gmail message you want to reply to or forward
2. Touch to reply to the sender
3. Touch > Reply all, or > Forw a rd.
4. Enter your messag e and touch the send icon .
Working With Received Attachments
When a message has an attachment, Gmail displays information
about that attachment at the t op of the mess age.
Depending on the attachment type, the applications installed on
your device a s well as your settings, y ou may preview, view, play,
save the attachment, or check information about the attachment.
TIP: For documents with multiple pages, touching the Preview
option will only download the pages you view, w hereas touchin g
View, Play, or Save will download the entire file and taking more
time and data.
Page 66

66
Searchin g for Messages
You can search for messages using words that appear in
addresses, subject s, label s, or conte nt s.
NOTE: If you search while the phone doesn’t have an active
Internet conne c tion, only messages synchronised onto your
device can be searched.
1. Open the Gmail app and touch or the Search Key.
2. Ente r the words to search for and touch Search or the search
icon on the screen keyboard.
As you type, sug g est i o ns may appear below the search field.
You can touch a suggestion to search for it right away, or
to uch the arrow next t o it to add its te x t to th e search fie ld.
3. In the search result s , touc h the me s s age you are looking for.
Changing Gmail Settings
Touch > Settings in any Gmail s creen to change General
settings, which ap ply to all Gmail account s, or other settings that
only appl y to spec i fi c acc o u nts .
Page 67

67
Calendar
Open App s and select Calendar.
Set Calendars to display
1. Open the Calendar app.
2. Touch > Calendars to display.
3. Check or uncheck the Calendars you wish to display.
Change Calendar Views
Set your Calendar view by Day, Week, Month or Agenda using
the drop down box at the top.
Page 68

68
TIPS:
• In Month view, swipe vertically to see earlier later months.
• In Week or Day view, swipe horizontally to see earlier and
later weeks/days.
• Touch at the top to jump back to today.
View Event Details
In Agenda, Day, or Week view, t ouch an event to view its details.
In Month view, touch a day to switch to Day view. Then touch an
event to view its details.
Create an Event
1. In any Calendar view, touch > New event to open an
event details screen for a new event.
You can also touch the Day or Week view t wice to add an
event to that time spot.
2. Add details about the event.
Enter a name, location, dura tion, and other additional details
about the event.
NOTE: If you have more than one calendar, you can choose
the calendar to w hich to add the event by touching the current
calendar above the Event name box.
3. Touch DONE a t the top of the scree n to save the new event.
Page 69

69
Share, E dit or Delete an Event
1. F ind the even t you w ant to edit or delete.
2. Touch to Share, touch to Edit, touch to delete
the message.
Changing Calendar Settings
To change Calendar settings, open a Calendar view (Day, Week,
Month, or Agenda). The n tou ch > Settings.
You can change General settings, which apply to all accounts,
or other s ettings that only app ly to s pecific accoun t s .
Hangouts
Hangouts is Google’s instant messaging service. You can use it
to communicate in real time with other people who also use
Hangouts, on a phone, on the web, or with a desktop application.
Sign in to see your friends
Sign in to your Google account before you can use Hangouts.
Touch in the Home Screen and select Hangouts. T he firs t
time you launch Hangouts, touch the account you want to sign in
wi th . Your friends list is then displayed.
NOTE: You remain signed in to Hangouts after launchi ng the app
ev en if you switch to other apps, until you explicitly sign out. To
sign out, go back to you r friends list and touch > S ign out.
Page 70

70
Adding a Fr ie nd
1. In the friends list, touch + at the top right of the screen.
2. Enter your friend’s address and touch DONE.
Your friend’s address in Hangouts is a Gmail or other email
address that is configured to connect to Hangouts.
NOTE: I f other people try t o add yo u as a fr iend, y ou will receive
a notification in the status bar and the invitation appears in your
friends list. You can touch the invitation to Accept, Decline, or
Block.
Chatti ng With Frien ds
1. Touch a friend in your friends list to open a chat.
2. Enter your message and touch . You can also touch or
to initiate a video or voi ce chat if the friend is online.
Switch Between Active Chats
If you have more than one active chat you can switch between
chats as fol l o ws:
• Touch the Back K ey to return from one chat to the friends list.
Then touch the other friend you want to chat with.
• While you are in one chat screen with a friend, swipe left or
right to switch to the chat screen with the other friend.
Page 71

71
Change Hangouts Settings
On any chat screen or friends list, touch > Setti ngs to
change Hangouts settings for your account.
Google+
Google+ is a social networking service offered by Google. The
Google+ application on your device enables you to manage your
data, chat with online contacts, organise them in different circles,
and share your selected infor ma tion .
Google Location access
Use Google Location access for Local, Maps, and Navigation.
1. Touch Home > Apps > Settings > Locati on access.
2. Selec t t he loc atio n opti ons you wan t to use.
Check Google’s location service to use Wi-Fi and mobile
network s to determi ne your approximate l ocation; check GPS
satellites to use GPS satellites t o determine y our loc atio n.
Find Your Location on Maps
1. Touch in the Home Screen and select Maps.
2. Touch at the top right.
The map centres on a blue blinking dot that indicates your
location.
Page 72

72
Search fo r a Location
1. Touch in the Home Screen and select Maps.
2. Touch at the bottom or tou c h the Search Key.
3. Ente r the place you’re looking f or in t he s ear ch b ox at the top.
You can enter an address, a city, or a type of business or
establishment, for exam ple , “mus eu m s in Melbour ne.”
4. As you enter information, suggestions from your previous
searches and from popular searches appear in a list below
the search box. You can touch a suggestion to search for it .
TIP: Touch beside the search box to use voice search.
5. Touch the search icon on the keyboard. Markers with letter
labels indicating search results appear on the map.
6. Touch a marker to open a balloon that contains a label with
summary information ab out the location.
7. Touch the balloon to open a screen with more information, as
well as options for obtaining directions and more.
Get Direct ions to Your Destinat ion
Maps provide direction s for travel by foot, public transport, or car.
1. Touch in the Home Screen and select Maps.
2. Touch at the top, select the mode of transport.
3. Enter a start and end point. If you have enabled My Location,
this will appear in the start point field by default.
4. D irection s are shown on the map view.
Page 73

73
Search for Local Places
Google Local helps y ou find busin es ses and establishments
around you. You can rate these plac es and get recommenda tion s
1. Touch in the Home Screen and select Local.
2. Enter your search request, eg Restaurants to find
establishments in your area.
3. Tap a result you are interested in and check out the details
and review s about that place. You can also see the pla ce on
Maps, find out how to get there, give that place a call, add
your rating and review, and more.
Search With Text
1. Start the Search app in one of the following ways.
• Touch t he Go ogle Search box at t he top of the H ome
Screen.
• Touc h the Search icon in various apps
• Start Chrome and enter the search in the address bar.
Search by Speaking
1. Touch the microphone icon at t he top of the Home Screen.
2. Speak your search request. Touch th e correc t result to view.
Change Voice Search Setti ngs
Go to Apps > Se t ti ngs > Language & input > Voice Sear c h.
Page 74

74
Camera
You can take photo s and recor d videos. Photos and videos are
stored to the phone’s memory card or the phone’s internal
storage. You can copy them to your computer or access them in
the Gallery app.
Capturing a Photo
1. Touch fr om the H ome Screen and select Camera.
2. Aim the camera at the scene and make any necessary
adjustment.
3. Touc h the shutter button to take th e pictu r e.
Page 75

75
Camera Settings
Location
Save Location informa tion using GPS.
Exposure
Adjust the exposure. Selec t 0 for auto matic
exposure.
Color effec t
Add various colour effects
Scene mode
Select normal or night mode .
W hite ba lance
Adjust white balance for indoor lighting
Anti-flicker
Set 50Hz for Australia mains flicker fi lter
Face det ection
Highlight faces for auto focus sing
Self timer
Take a shot after a preset time
Capture no.
Hold the shutter to capture continuous shots
Picture size
2MP on ly
Page 76

76
Recording a Video
1. Touch in the Home Screen and sel ect Camera
2. Touch the video ic on to start recording. T he button turns red.
3. Touc h again to St op
Video Camera Settings
Microphone
Enable or disable the mic
Audio mode
Meeting mode boosts mic sens i tivity
Time lapse in terval
Set the time lapse interval
Video quality Select from 4 different levels
Page 77

77
Gallery
Touch in the Home Screen and select Gallery to view your
pictures and videos.
Wor king Wit h Album s
To v iew album contents :
Touch an albu m to view the pictures and vid eos it contain s.
To s ha re albums:
1. Touc h and hold an album un til it is selected.
2. Touch more albu m s that you w ant to share.
3. Touch at the top of the screen and select how you w ant
to share t he albums.
To v iew details of an album:
1. Touc h and hold an album un til it is selected.
2. Touch > Details .
To de lete albums:
1. Touc h and hold an album un til it is selected.
2. Touch more albu m s that you w ant to delete.
3. Touch > Delete
Page 78

78
Working With Pictures
Touch a picture to view full screen. Double-tap to zoom in or use
two fingers to ‘pinch’ zoom in and out. Slide left or ri ght to v iew
other pictures in the album.
Touch to Share: Touch for Opti ons:
Page 79

79
Retouch Your Pictures
You can edit your photos using various post processing effects
described below. The adjusted picture is saved in the Edited
album, with the original image unchanged.
1. Touch > Edit to view the editing options:
Apply colour process effects
Apply borders and border effects
Apply crop, straighten, rotate, or mirror .
Autocolour, Contrast, Sharpness, Exposure etc.
2. Touch Options Undo, Redo, Reset or Histo r y
3. Touch SAVE to save the new picture to the Edited album.
4. Touch Back to exit with or without saving.
Working With Videos
Play and Shar e Videos
1. Touch an album in the gallery and then touch the thumbnail.
Touch at the centre to start playing.
2. Touch to share
3. Touch the screen to view the playback controls .
Page 80

80
Music
Touch in the Home Screen and select Music to play audio
files stored on your device . Music supports a wide variety of
audio formats, so it can play music you purchase from online
stores, music you copy from your CD coll ect ion.
Copying Music Files to Your Phone
Before using Music, you need to copy audio files from your
computer to your phone’s memory card. See Connecting to
Networks and Devices – Connecting to Your Computer via USB
for details on establishing the connection.
Use the computer to copy music and other audio files onto the
memory card. You can use folders to organise your music files.
Viewing Your Music Lib rary
Touch in the Home Screen and select Music to view your
music library. Touch the tabs at the top of the screen to view your
music organised by Artists, Albums, Songs, Playlists, or Top
10.
NOTE: If an audio file is being played, its summary information is
displayed at the bottom of the screen. Touch the summary area
to open the playback screen .
Page 81

81
Playing Music
Touch a song in the music library to open the music player:
Create a Playlist
1. Long press on the song
2. In the m enu tha t opens , touch Add to pl a yli s t.
3. Touch New.
4. Type the playlist name and touch Save.
The playlist is created and the song you selected is added to the
playlist.
Page 82

82
Add a Song to a Playlist
1. Long press on the song
2. In the menu that opens, touch Add to playlis t.
3. Touch the name of the playlist you want the song added to.
The song is added to the playlist.
TIP: To rearrange the songs in a playlist open the playlist and
touch and hold . Drag up or down to change the playlist o rder .
Remove a Song From a Playlist
1. Open a playlist.
2. Long press on the song > Remove.
3. Touch > OK.
Play, Delete or Rename a Playlist
1. Touch the Playlists tab in the music library to see all the
playlists.
2. Long press on a playlist and touch Play, Rename or Delete
in the menu that opens.
NOTE: These options may not be available for certain
automatically created playlis t s, such as Recently added.
Page 83

83
Google ‘Play Music’
The Play Music
application works with Google’s online
music store and streaming service.
Touch in the Home Screen and select Play Music. If you
are prom pted, select an ac cou nt t o access it s online music
library.
The app searches your online library and your device for music
and playlists before displaying your combined music library,
organised by Recent, Artists, Albums, Songs, Playlists, and
Genres. To changes views of your li brary, swipe le ft or right when
holding the device upright, or touch the view name at the top left
of the screen when holding the device on its side.
Library View Album View Track View
Page 84

84
You can still control the mu sic w hen y ou are not in the playba ck
screen.
• In the Play Mu sic app, touch the Now Playing bar at the
bottom of the screen to restore the playback screen.
• In other apps, flick down the notification panel. Touch the
song title to restore the playback screen, or just pau se /
resume playback or skip to the next/previous song.
• When the screen is locked, the song information, album cover
as well as playback control is displayed on top of the screen.
You can pause/resume playback or skip songs.
Managing Playlists
Create playlist s to organise yo ur mu s ic fil e s in to set s of so ng s, so
that you can play the songs you like in the order you prefer.
To cr eate a playlist or add a song to a playlist:
Touch and hold the song or touch to the right of the song,
select Add to playlist.
To rearrange s ongs i n a playli s t :
1. Open a playlist in the Playlists tab o f th e musi c l i b r a r y.
2. Touch and hold the small grid in front of a song.
3. Drag the grid up or down to change its order in the playlist.
Page 85

85
To remove songs from a playli s t :
1. Open the playlist in the Playlists tab of the music library.
2. T ouch and hold the song or to uch to the right of the song,
select Remov e from pl a yli s t.
To Play, Rename or Delete a playlist:
1. Swipe to the Playlists tab in the music library to see all the
playlists.
2. Touch and hold a playlist or touch next to the playlist.
3. Touch Play, Rename or Delete in the menu that opens .
Video Player
Use the video player to play variou s kinds of videos.
Opening the Video Library
Touch in the Home Screen and select Vide o player to view
your video library.
• All your local video files are listed on the screen.
Playing and Control Videos
Touch a video in the video library to play it. Rotate the device on
its side to watch the video in landscape view.
Touch the video to show the playback controls. You can paus e
and resume the playbac k, or jump to any part of the video.
Page 86

86
Share Video Files
Touch at the top of the screen to select to share th em.
Share directly to Facebook by pressing the Facebook icon.
FM Radio
W it h the FM r adio, y ou can searc h f or radio cha nnel s , listen to
them, and save them on your device. Note that the quality of the
radio broadcast depends on the coverage of the radio station in
your area. The wired headset that comes with your device works
as an antenna, so always connect the headset when using the
radio. When you receive an incoming call while listening to the
radio, the radio will be turned off.
Scanning and Saving Channels
1. Touch in the Home Screen and select FM Radio.
2. Touch the > Search
3. T he found s tation s will be displayed on the screen.
4. Touch to select a channel, press and hold on the channel to
add to favorites, and to change the c hannel nam e.
TIP: Touch > Speak er to listen to the radio programs through
th e device spe aker.
Page 87

87
Sound Recorder
Sound Recor der enables you to record voice memos and listen
to them whenev er you l ike.
Recording a Voice Memo
1. Touch in the Home Screen and select Sound Recorder.
2. Touch to start recording
3. Touch to stop recording
4. Choose Save or Discard to delete the recording.
Playing a Voice Memo
To play a memo you just recorded:
Touch Options at the bottom of the screen.
To play any saved memo:
1. Touch Options to see all reco rdin gs.
2. Touch the file to play it.
Page 88

88
More Apps
Alarm
1. Touch in the Home Screen and select Clock.
2. Touch the Alarm clock icon to configure your alarms.
3. Touch the time to set the required time and configure alarm
options, such as repeat, ringt one and vibra te.
4. Press the Back Key to s ave and exit.
5. Press + to add more alarms
Calculator
Touch in the Home Screen and select Calculator.
TIPS: Swipe left or right to switch between panels or press
Options > Adv anc ed pa nel .
TIP You can als o hold the dev ice on its side.
File Manager
Quickly access all of your images, videos, audio clips, and other
types of files on you r device an d t he memory card.
Touch in the Home Screen and select F ile Manager. Touch
the folder name at the top of the screen to switch between the
memory card storage and th e phone storage .
Page 89

89
To Do
Touch in the Home Screen and select To Do to save and
view your text notes.
System Updates
Touch and select System updates to c heck f or updates, or
change update settings.
Play Store
Touch in the Home Screen and select Play Store. You can
buy or rent music, books, movies, apps, and download them to
you r dev ice.
Mana ging Your Down loa ds
After you’ve downloaded and installed an app, you can rate it,
view it in a list with your other downloa ded apps, configure it to
update itself automatically, and so on.
Page 90

90
Settings
Touch in the Home Screen and select Settings. The
Settings app contains most of the tools for customising and
co nfig uring y our device.
SIM management
Turn your SIM acces s Off which has the same effect as Flight
Mo de. Edi t how the SIM ca rd numb er is displ ayed i n t he use r
interface.
Touch Data connec ti on to tur n of f data
Wi-Fi
Turn on or off Wi-Fi an d c onfigure y our Wi -Fi connections. See
Connecting to Networks and Devices – Connecting to Wi-Fi
.
Bluetooth
Turn on or off Bluetooth and configure your Bluetooth
connections. See Co nnecting to Netwo rks and Devices –
Connecting to Bluetooth Devices.
Data Usage – Set data limits
Touch the ON/OFF switch to turn on or off mob ile data.
Select Set mobile data limit then drag the warning and limit
lines as you prefer. After you reach your limit, data will be
disabled.
Page 91

91
Flight Mode
In the Settings app, touch More under Wireless & networks and
check the box next to Flight mode.
All radio services are turn ed
off.
VPN
Set a s cree n lock f irst, t hen us e VPN to c o nnect t o secure
corporate networks. You need configuration details from your
network manager to make the se sett ings.
Tethering and Portable Hotspot
Share your device’ s mobil e data co nnection with PCs or other
devices v ia USB o r W i-Fi. See Connecting to Networks and
Devices – Shari ng Your Mobile Data Connection.
Mobile Networks
Control mobile data use, selec t mobile network and set access
point names. See Connecting t o N et w orks and Devices –
Connecting to Mobile Networ k s .
Device - Sound
Adjust volumes (see Personalising – Ad justing Volum es), set up
ringtone and notification sound (see Personalising – Changing
Ringtone and Notification Sound), and select system sounds.
Touch Silent mode to turn off all sounds except media and alarm,
or enable silent mode with vibration.
Page 92

92
Display
• Brightness: Set the brightn es s of the dis play.
• Wallpaper: Select a background image for the Home Screen.
• Sleep: Set the length of t ime of inactivity before t he screen
turns off.
• Font s ize: Set the font size of the text on the screen.
Storage
Check your memory card and internal storage status.
• Unm ount S D card: Unmount the m emo ry card fro m your
phone so that you can safely remove the card while the
phone is on.
• Erase SD card: Er as e all data on yo ur memo ry card and
prepare it for use with your device.
Battery
Check how much power remains for the battery and what has
been using the battery.
Apps
See apps installed on your d evice and ma nage t hem.
Touch an app in the DOWNLOADED, ON SD CARD, RUNNING,
or ALL tab to see its information. You can stop the app, uninstall
the app, clear data and cache, or move the app between the
internal storage and the memory card.
NOTE: Not all applic atio ns ca n be moved or uninstalled.
Page 93

93
Location access
Activate location services to determine your location. See Maps,
Navigation, Places and Latitude – Activatin g Location Services.
Select Location & Google search to improve Google search
results and other services using your location information.
Security
• Screen lock: Lock the screen with long press, pattern, PIN,
or password.
• Owner info: Se t the text to display on the lock screen.
• E nc rypt phone: Encrypt your data on the phone to prote c t
your privacy. See below for more details.
• Set u p SIM card lock :
Lock SIM car d: Activ ate or d eactivate t he PIN lock t o
require PIN befor e ac cessing the SIM c a rd.
Change SIM PIN: Change the PIN used to access the
SIM card.
• Make passwords visible: Display passw ords as you type.
• Devic e administrators: View or deactivate a pps you have
authorised to be device administrators.
• Unk now n s ources: Permit instal lation of a p ps f rom s ource s
other than the Play Store.
• Trusted credentials: Display trusted CA certificates.
• Install from SD c ard: Install certificate s from memory ca r d.
• Clear credentia ls: Delete all certificates.
Page 94

94
Protecting Your Phone With Encryption
You can encrypt all the data on your phone: Google Accounts,
application da ta, music and other media, dow nloaded information,
and so on. After encryption is applied you need to enter a
numeric PIN or password each time you power on your phone.
WARNING! Encryption is irreversible. The only way to revert to
an unencrypted phone is to perform a factory data reset, which
erases all your data.
Encryption provides additional protection in case your phone is
stolen, and may be required or recom mended in some
organisations. C onsult your system administrator before t urnin g it
on. In many cases the PIN or password yo u set for encrypti on is
co ntro lled by y our sys tem administrator.
Before turning on encryption, prepare as follows:
1. Set a lock screen PIN or password.
2. Connect your phone to the charger.
3. The encryption process may take up to one hour. If you
interrupt the process you may lose data or your phone can
end up in an unusable state.
When you're ready to procee d:
4. Touch Home > Apps > Setti ngs > Security > Encryp t
phone.
5. Read the instructions encryption car efully .
The Encrypt phone button is not available if the battery is not
sufficiently charged or your phone is not plugged in.
If you are unsure about proceeding then touch the Back Key.
Page 95

95
WARNING! If you interrupt the encryption process, you will lose
data.
6. Touch Encrypt phone.
7. Enter your lock screen PIN or password and touch
Next.
8. Touch Encrypt phone again.
The encryption process starts and displays its progress.
Encryption can take an hour or more, during which time your
phone may restart several times.
When encryption is complete, you are prompted to enter your
PIN or password.
Subsequently, you must enter your PIN or password each time
you power on your phone, to decrypt it.
Page 96

96
Language and Input
• Language: Select a language and region for your system.
• S pe ll Checker: Add new words to the device’s dictionary or
remove words from the dict ionary. The words you add are
used for spelling check and word suggestion.
• KE Y BO ARD & INP UT METHODS : Configure text input
settin gs. See Knowing the Basics – Entering Text – Touch
Input Settings.
• Voice Search:
Language: Select the language you use when entering
text by speaking or searching by speaking.
Speech Output: enable speech output on your device
Block offe nsi v e words : Replace offensive words with
asterisk (*) when you use Google voice recognition to
tr anscribe y our vo ice into tex t .
• Text-to-speech output:
PREFERRED ENGINE: Select the speech synthesis
engine you want to use or change its settings.
Speech rate: Selec t how quick you want the synthesiser
to speak .
Listen to an example: Play a brief sample of the spee ch
synthesiser , using your current settings.
• Pointer speed: Select how fast the screen should scroll
Page 97

97
Backup and Reset
• Back up my data: Back up app data, Wi-Fi passwords, and
ot her settin gs to Google s ervers after you sig n in to your
Google account.
• Automatic restore: Restore previously backed up settings
and data when you reinstall an app.
• Factory data reset: Reset your dev ice to f acto ry status. All
your personal data from the phone’s internal storage will be
erased. You can also erase the data on the memory card
during the process.
System - Date and Time
Set date, time, time zone, and how d at e and time are displayed.
You ca n also use network-p rovi ded data.
Accessibility
Configure accessibility plug-ins on your device, such as using
Large text for the visu ally-impaired.
About Pho n e
View phone status and legal information. You can also check for
system up date s.
Page 98

98
Troubleshooting and Support
If you encounter problems while using the phone, or if it performs
abnormally, you can refer to the chart below. If your particular
problem cannot be resolve d, con ta ct the dealer where you
purchased the phone or sear ch our FAQ’ s at zte.com.au
Problem
Possible causes
Possible solution
Poor
reception
The network signal is
too weak at your current
location, for example,
in a basement or near
a tall building.
Move to a location
where the network
signal is stronger.
The network is busy. Try again in a few
minutes.
You are too f ar away
from a base station for
your service provider.
You can request a
service area map from
your service provider.
Echo or
noise
Poor network trunk
quality on the part of
your service provider.
Press End Key and
dial again. You may be
switched to a
better-qualit y phone
line.
Page 99

99
Problem
Possible causes
Possible solution
Unable to
select
certain
features
Your service provider
does not support these
features, or you have not
applied for services that
provide these features.
Contact your servic e
provider.
Battery not
charged
The battery or battery
charger is damaged.
Try charging from a
computer USB port.
Contact the dealer.
The phone’s
temperature is below
0°C or higher than 45 °C.
Adjust the battery
charging environment
to avoid extremes of
temperature.
Poor contact between
the battery and
charger.
Check all connectors
to make sure all
connections have
been properly made.
Short
battery life,
reduced
standby
time
The standby time is
related to your network
signal strength and
radio applications you
have running
If you are located in an
area of low network
signal, switch off Wi-Fi,
Bluetooth or select
Flight mode to
conserve power.
The battery is depleted.
Use a new battery.
Page 100

100
Problem
Possible causes
Possible solution
In high-temperature
environments, battery
life will be shortened.
Avoid high
temperatures.
If you are not able to
connect to the
network, the phone will
continue to send out
signals as it attempts
to locate a base
station. Doing so will
shorten standby time.
Change your location
to one where the
network is accessible,
or select Flight mode.
Cannot
switch your
phone on
Battery power has
been depleted.
Recharge the phone’s
battery.
(U)SIM card
error
(U)SIM card malfunction
or damage.
Take the (U)SIM card
to your service
provider for testing.
(U)SIM card inserted
improperly.
Insert the (U)SIM card
properly.
Debris on the (U)SIM
card contacts.
Use a soft, dry cloth to
clean the (U)SIM card
contacts.
 Loading...