

User Manua l

c
r
g
h
s
f
n
o
p
u
m
s
i
c
a
m
p
a
h
n
e
C
f
n
r
s
t
s
n
e
e
o
w
d
e
l
u
e
c
h
k
t
u
t
d
i
o
u
f
s
o
a
n
n
o
o
n
t
m
r
f
a
n
t
About
Thank yo
your devi
keep it fo
Copyri
Copyrig
All right
No part o
or used i
including
permissi
Notice
This Manu
u for choosing t
e in its best co
future referenc
ht
t © 2017 ZTE
reserved.
this publication
any form or by
photocopy ing a
n of ZTE Corpo
l
is ZTE mobile d
dition, ple ase r
.
ORPORATION
may be quoted,
any means, ele
d microfilm, wit
ation.
evice. In order t
ad this manual
reproduce d, tra
tronic or mecha
out the prior wri
keep
nd
slated
ical,
tten
ZTE Cor
errors or
This man
the accur
and reco
warranty
For Your
We offer
ZTE offic
self-servi
website t
Disclai
ZTE Cor
damages
oration reserve
pdate specifica
ual has been de
acy of its conten
mendations co
of any kind, eith
Safety to be sur
elf-service for
al website (at w
e and supporte
kes precedenc
er
oration expres s
caused by una
the right to ma
ions in this guid
igned with the
t. However, all s
tained therei n
r expressed or
to use your ph
ur smartphon e
w.zteusa.com)
product model
.
y disclaims any
thorized modific
e modifications
e without prior n
tmost care to e
atements, infor
o not constitute
mplied. Please
ne properly and
sers. Please vis
or more inform
. Information o
liability for faults
ations of the sof
n print
tice.
sure
ation
a
efer to
safely.
it the
tion on
the
and
ware.
1

Images and screenshots used in this manual may differ from the
actual product. Content in this manual may differ from the actual
product or soft ware.
Trademarks
ZTE and the ZTE l ogos are trademarks of ZTE Corpora tion.
Google and Android are trademarks of Google, Inc.
®
The Bluetooth
SIG, Inc. and any use of such trademarks by ZTE Corporation is
under license.
microSDXC Logo is a trademark of S D-3C, LLC.
trademark and logos are owned by the Bluetooth
Qualcomm
®
Snapdragon™ processors are products of
Qualcomm Technologies, Inc.
Qualcomm and Sna pdragon are tradem arks of Qualcomm
Incorporate d, registered in the United Stat es and other countries.
Used with permission
Manufactured under license from Dolby Laborator ies. Dolby,
Dolby Atmos, and the double-D symbol are trademark s of Dolby
Laboratories.
Other trademarks and trade names are the property of their
respective owners.
Version No.: R1.0
Edition Time: October 19, 2017
2

e
w
r
e
n
i
g
a
c
n
n
n
n
C
w
c
.
r
I
s
e
e
M
e
n
N
e
.
n
y
v
o
n
k
.
.
.
.
.
.
.
.
.
.
.
.
.
.
.
.
.
.
.
.
.
.
.
Cont
Getting
Getti
Kno
Insta
Cha
Pow
Setti
Lock
Usin
Getti
Moni
nts
Started .......
ng to Know You
ing the Keys ....
lling the nano-S
ging the Battery
ring On/Off ......
g Up for the Fir
ng/Unlocking th
the Touch Scr
ng to Know the
toring the Phon
.....................
Phone ..............
..........................
M Card and mic
..........................
..........................
t Time ..............
Screen and Ke
en .....................
ulti-screen .......
Status .............
.....................
.........................
.........................
roSDXC Card ...
.........................
.........................
.........................
s ......................
.........................
.........................
.........................
...... 6
........ 6
........ 8
........ 8
...... 10
...... 12
...... 12
...... 12
...... 13
...... 15
...... 19
Man
Getti
Conne
Con
Con
Con
Shar
Con
Phone
Placi
Ans
Che
ging Notificatio
ng to Know the
ting to Netw
ecting to M obil
ecting to Wi-Fi .
ecting to Blueto
ing Your Mobile
ecting to Vir tual
alls ............
ng Calls ............
ering or Rejecti
king V oicemail .
s ......................
avigation Bar ...
orks and De
Networks .........
..........................
th Devices .......
ata Connectio
Private Networ
.....................
..........................
g Calls .............
..........................
.........................
.........................
ices .............
.........................
.........................
.........................
........................
s.......................
.....................
.........................
.........................
.........................
...... 20
...... 24
.... 25
...... 25
...... 26
...... 27
...... 27
...... 29
.... 30
...... 30
...... 31
...... 31
3

Using Options During a Call .............................................. 32
Managing Multi-party Calls ................................................ 33
Adjusting Your Call Settings .............................................. 34
Contacts ................................................................. 36
Adding a New Contact ....................................................... 36
Searching for a Contact ..................................................... 36
Editing Contacts ................................................................ 37
Gmail ....................................................................... 38
Messaging .............................................................. 39
Opening the Messagin g Screen ........................................ 39
Sending a Messa ge ... .............................. .......................... 39
Changing Message Settings .............................................. 40
Web Browser .......................................................... 41
Opening the Browser ......................................................... 41
Using Multiple Browser Tabs ............................................. 41
Downloading Files ............................................................. 42
Changing Browser Settings ............................................... 42
Camera .................................................................... 43
Capturing a Photo ............................................................. 43
Recording a Video ............................................................. 46
More Apps and Features ....................................... 47
Music ................................................................................. 47
Clock ................................................................................. 47
4

File Manager ...................................................................... 48
Recorder ............................................................................ 49
Google Apps ...................................................................... 49
Settings .................................................................. 51
Wireless and Networks ........ ................ . ........ . ........ . ........ . .. 51
Device ................................................................................ 54
Personal ............................................................................ 59
System ............................................................................... 63
5
g
M
k
k
a
d
a
e
n
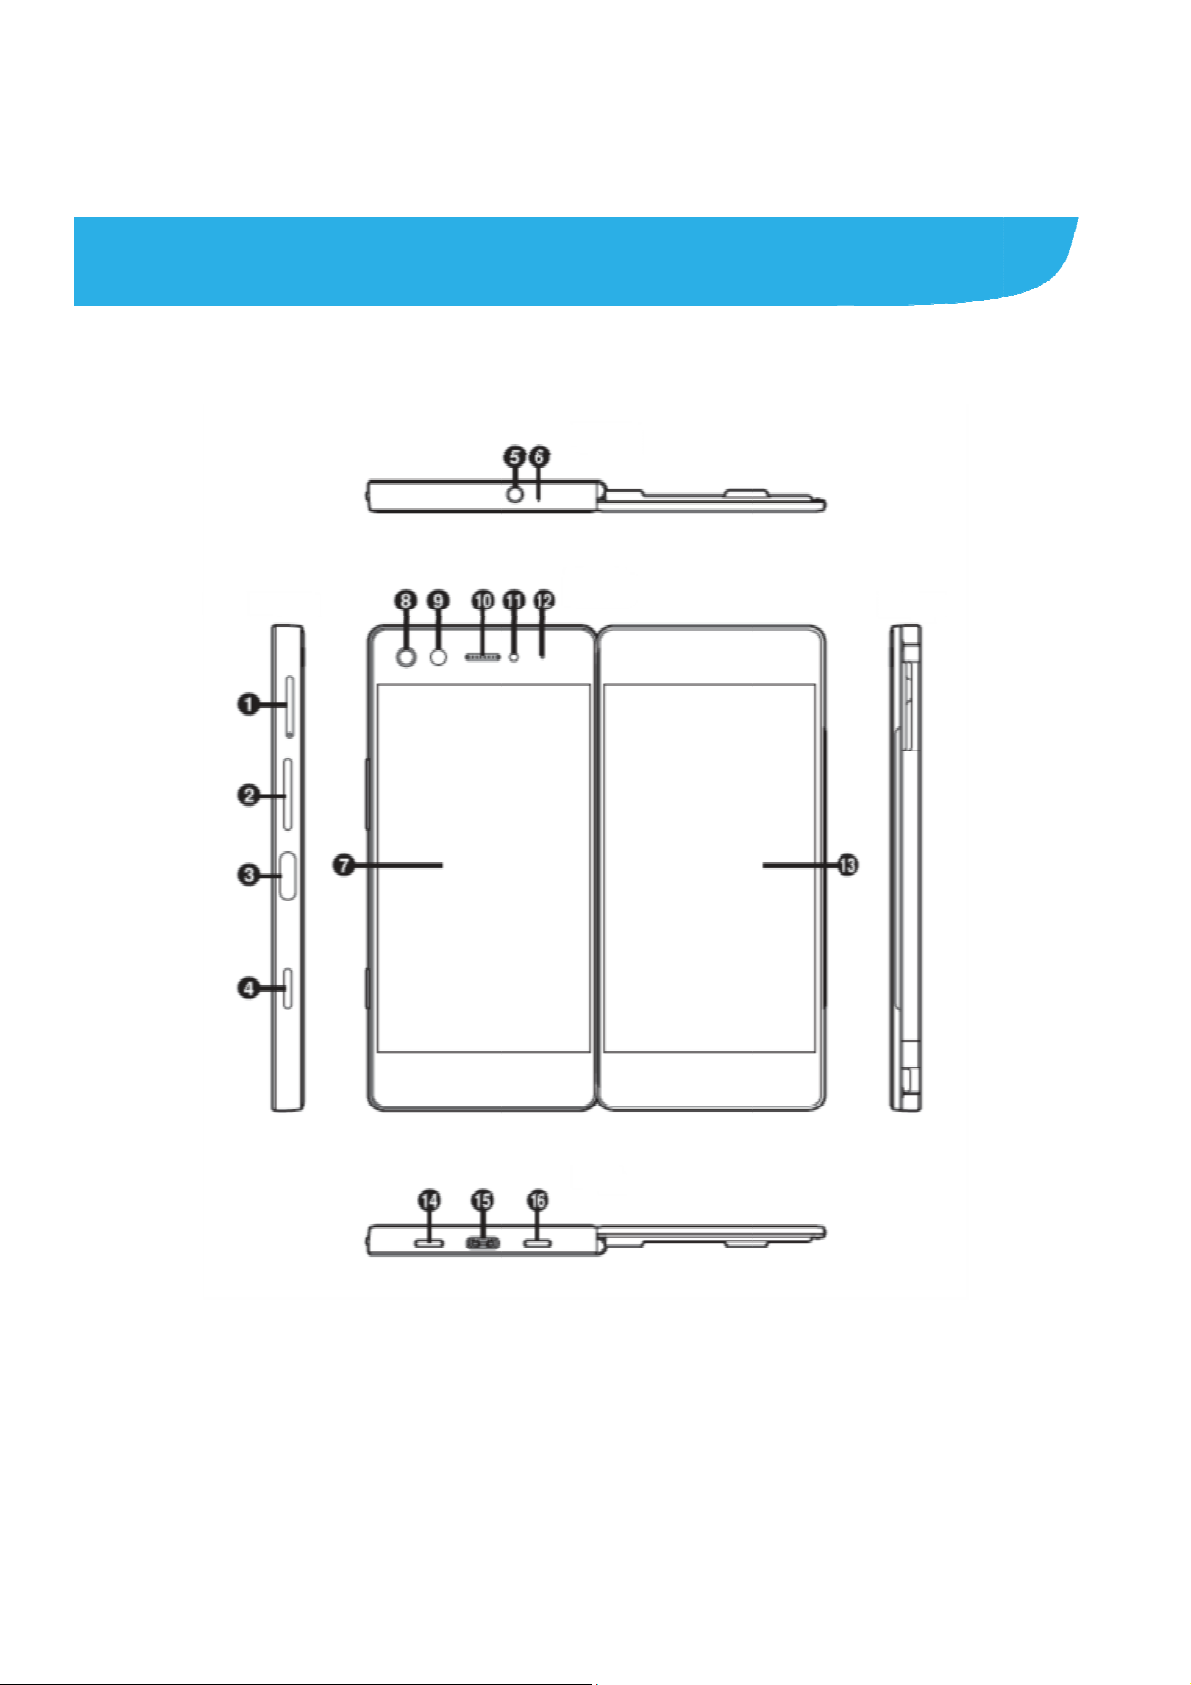
Gettin
Gettin
g Starte
to Know
Your Pho
e
1. nano-SI
2. Volume
3. .Power
4. .Quick l
/microSDXC c
ey
ey/Fingerprint s
unch key
rd slot
nsor
6
e
r
r
e
m
a
k
g
o
r
5. Heads
6. Auxilia
7. Left sc
8. Flash
9. Camer
10. Earpi
11. Proxi
12. Indic
13. Right
14. Spea
15. Char
16. Micro
t jack
y microphone
een
a
ce
ity & light sens
tor light
screen
erphone
ing/micro-USB j
phone
ack
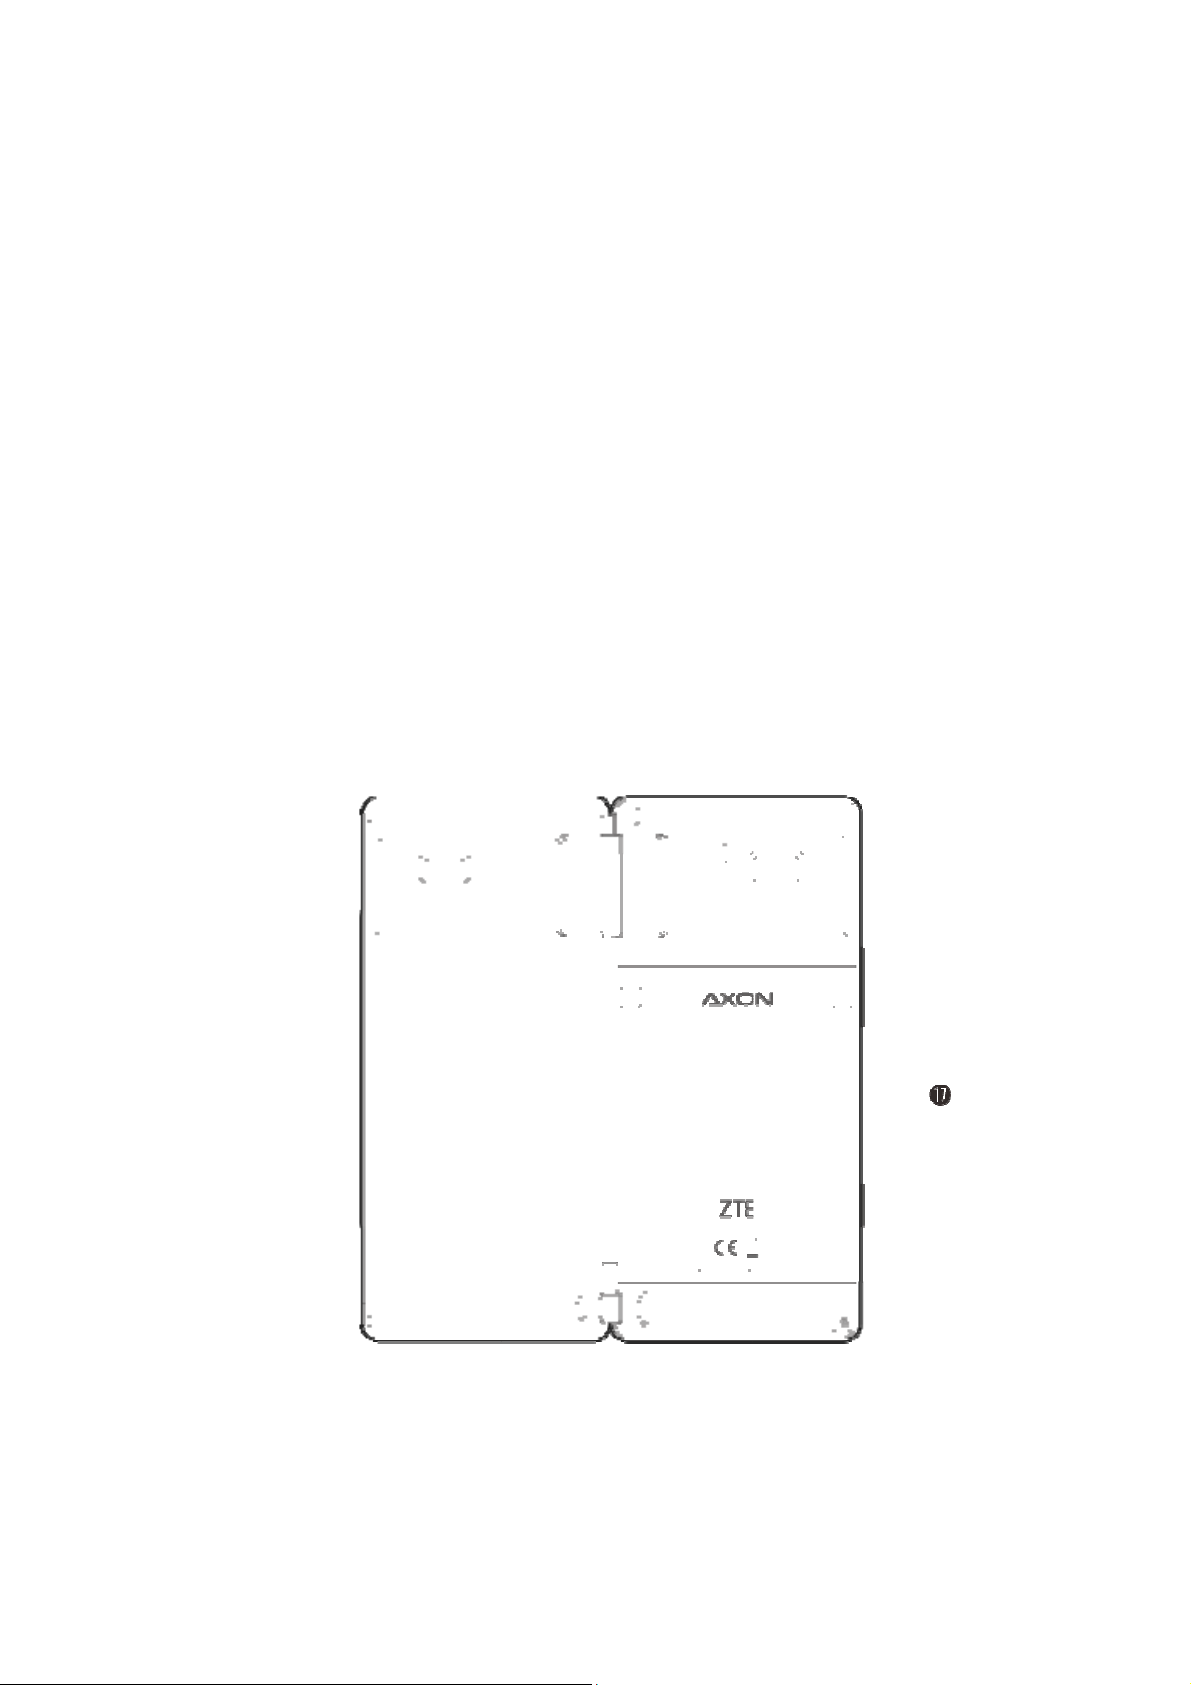
17. Back
cove
7
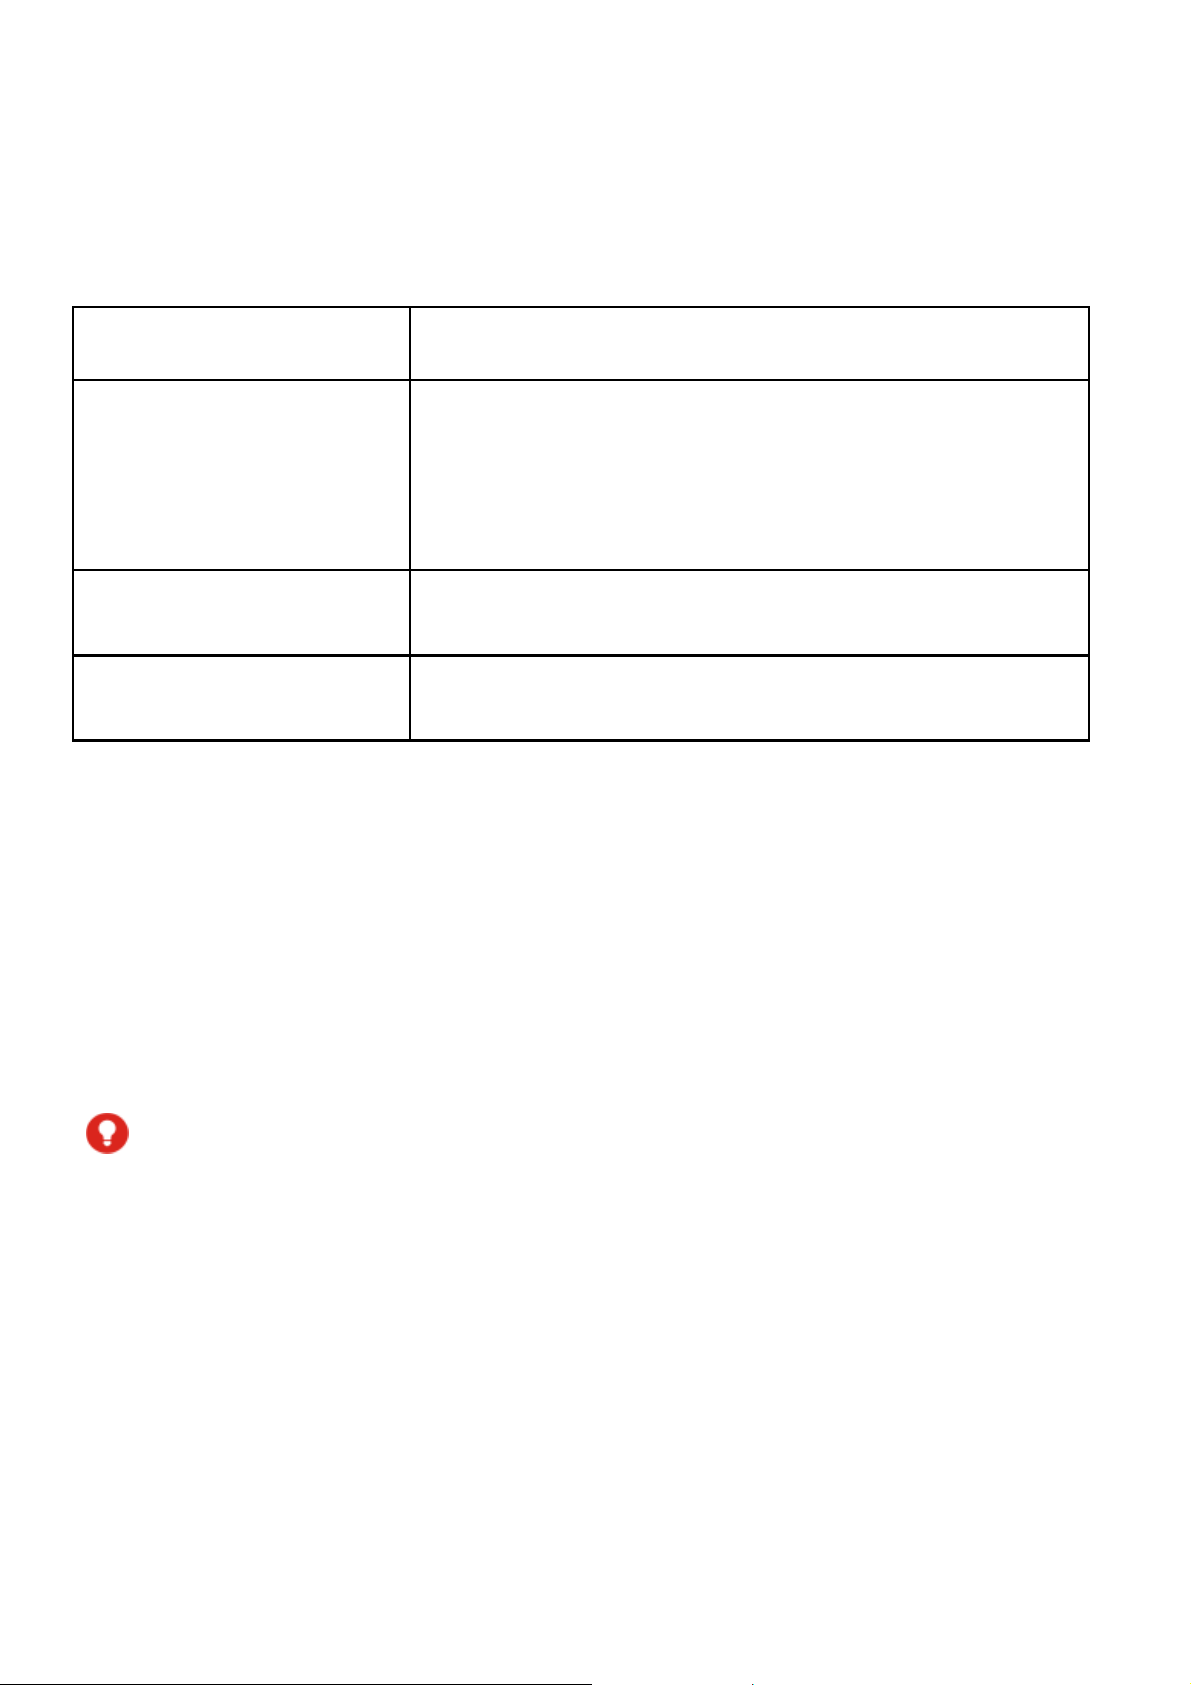
Knowing the Keys
Key Function
Press and hold to turn airplane mode on or
Power key/Fingerprint
sensor
Vo lu me ke y
Quick lunch key
off, restart, or power off.
Press to turn off or on the screen display.
Press to register the fingerprint.
Press or hold either end of the key to turn the
volume up or down.
Press for quick access to TV Mode, or any
other selected app.
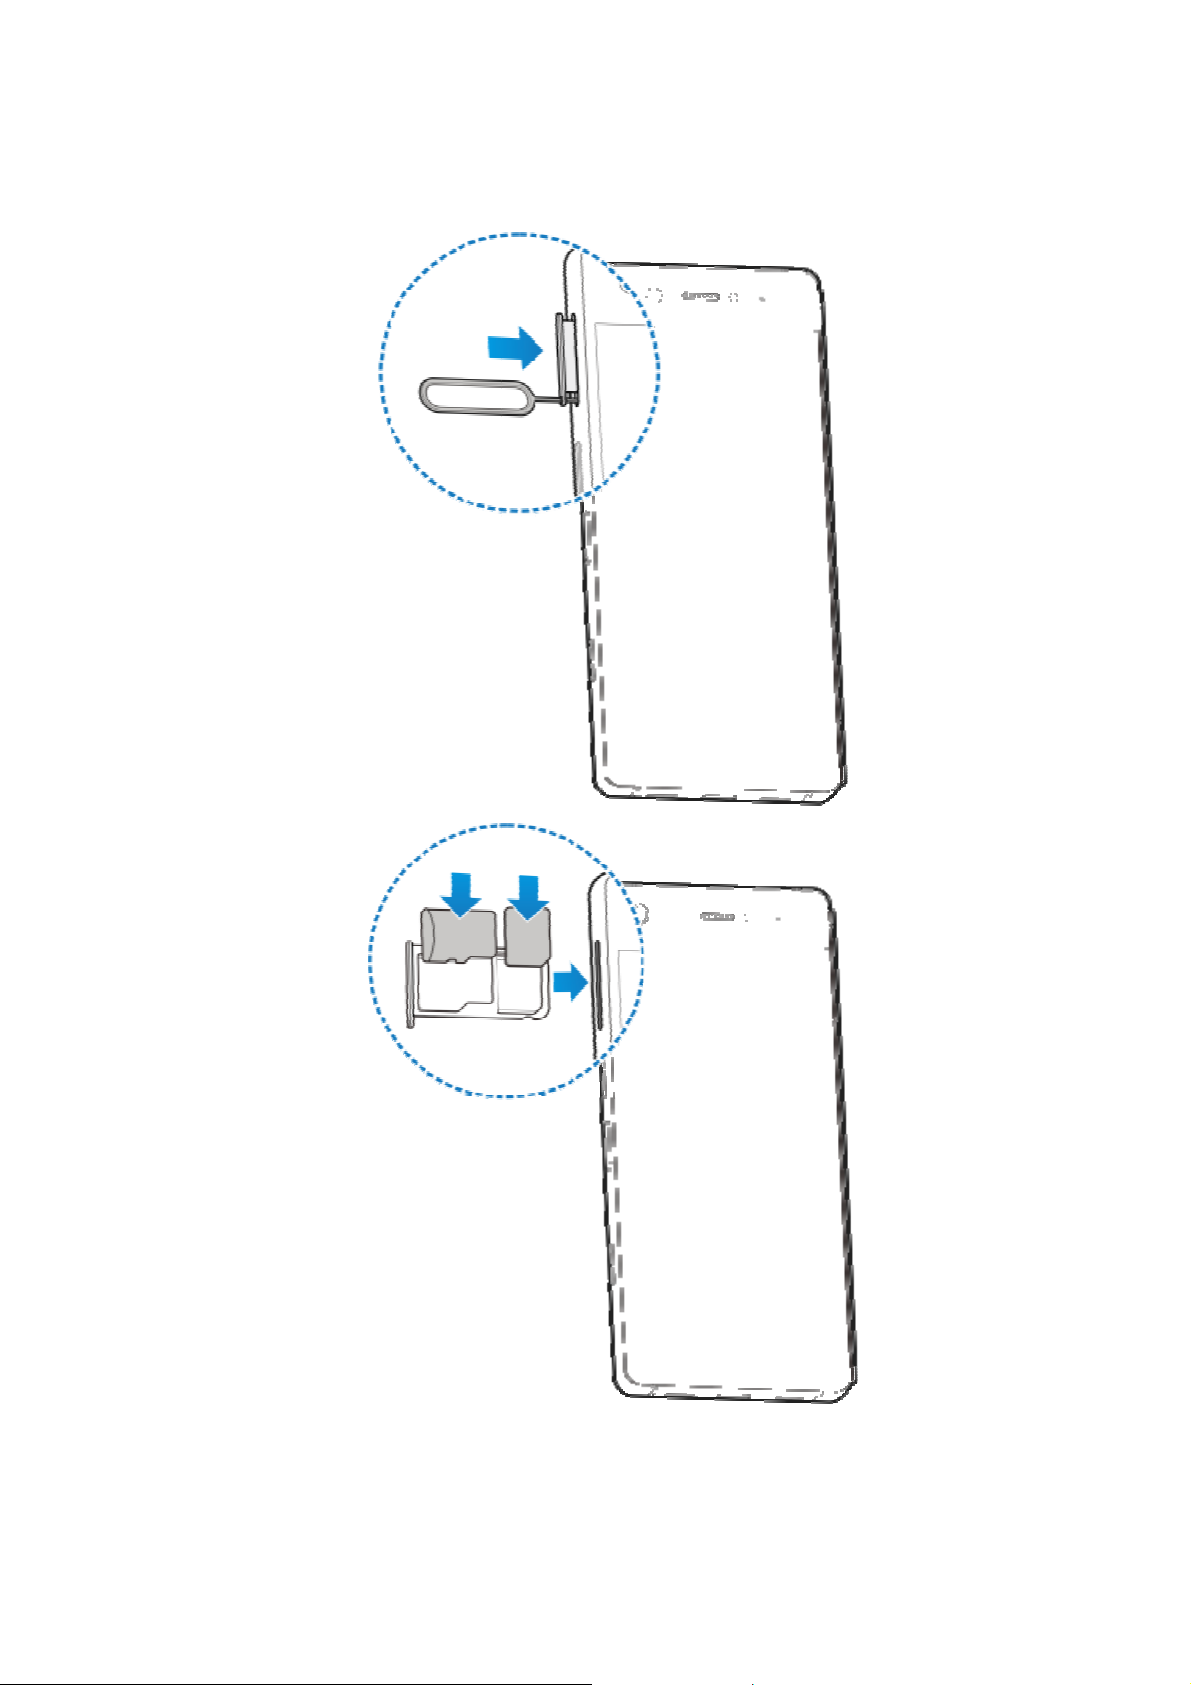
Installing the nano-SIM Card and
microSDXC Card
You do not need to power off your phone before installing or
replacing the na no-SIM card or before installing or r emoving the
microSDXC card (opt ional, not included). You need to unmount
the memory c ard before removing it
WARNING!
To avoid damage to the phone, do not use any other kind of SIM
cards, or any non-standard nano-SIM card cut f rom a SIM card.
You can get a stand ar d nano-SIM card from your service
provider.
8
9

e
d
r
I
n
N
T
d
e
S
h
c
t
d
m
w
r
o
w
t
a
o
a
y
t
p
m
e
t
o
m
e
u
t
k
o
y
u
t
n
o
y
e
u
Chargi
Your phon
turn on, fin
charge the
If the batte
screen. As
exact batte
WARN
This devic
to remove
injury. Do
WAR
Use only Z
ng the Ba
’s battery shoul
a signal, and
battery as soon
y is low, there
you charge you
ry level on the S
NG!
e contains a n
will void your
ot damage, al
ING!
E-approved ch
tery
have enough
ake a few calls.
as possible.
ill be a pop-up
phone, t he scr
tatus Bar.
nremovable b a
arranty and c
er, or try to re
rgers and cabl
ower for the ph
You should full
essage on the
en can show yo
tery. Attempti
uld cause ser i
ove the batter
s. The use of
ne to
the
g
us
.
unapprove
battery to
NOTE
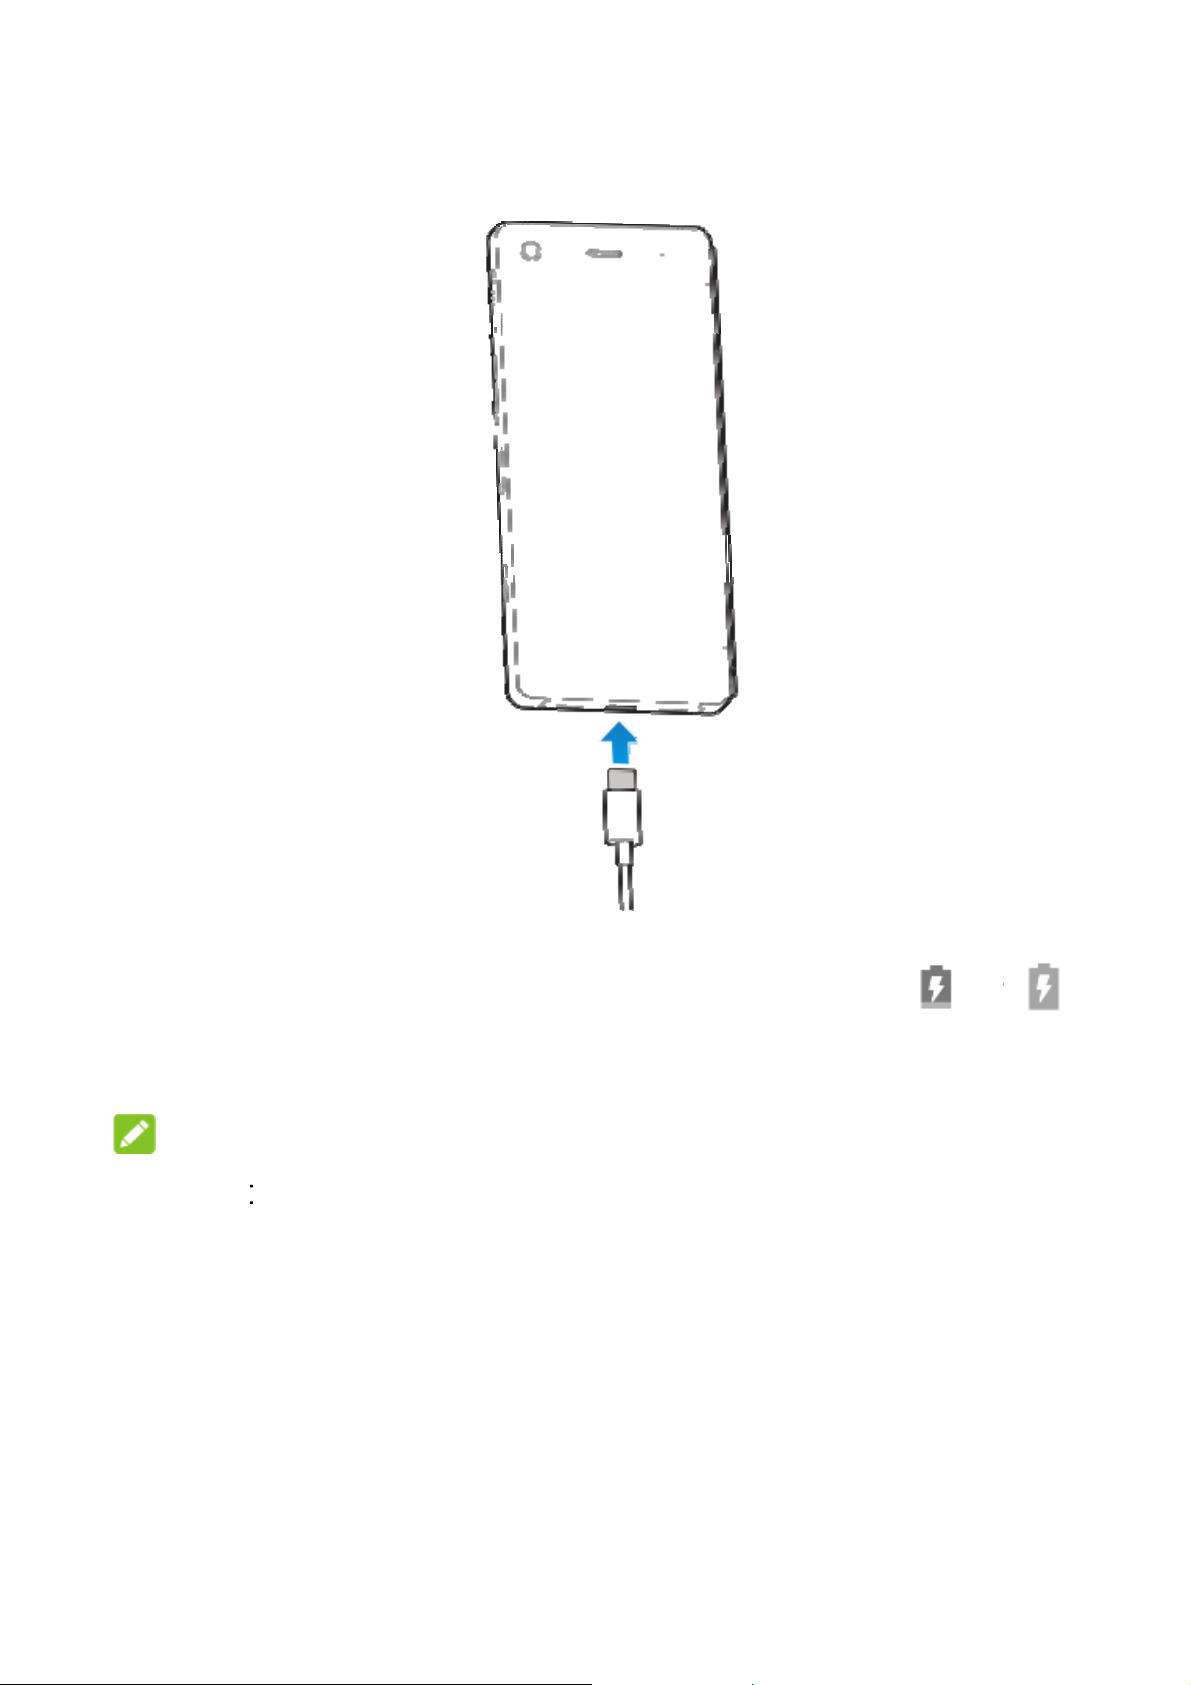
Use the U
phone to c
Charge 3.0
1. Conne
access ories c
xplode.
:
B Type -C™ ch
arge the batter
.
t the adapter to
uld damage you
rger that comes
. It’s specially b
he charging jac
r phone or caus
in-box with your
ilt to support Q
.
the
ick
10
e
e
a
E
t
b
o
e
b
e
s
p
e
m
h
o
C
o
t
e
2
o
g
2. Conn
phon
appe
3. Disco
NOT
If the bat
while cha
minutes
service if
charging.
ct the charger t
is on, you’ll se
r on the status
nnect the charg
:
ery is extremely
rging. In this ca
efore trying t o p
you still cannot
a standard AC
a charging icon
ar.
r when the batt
low, the phone
e, charge the p
wer on again.
ower on the p h
11
power outlet. If
, such as or
ry is fully charg
ay not power o
one at least for
ontact the cust
ne after prolon
he
,
d.
n even
0
mer
ed

Powering On/Off
Press and hold the Power key to power on your phone.
To power off, press and hold the Power key and touch Power
off.
NOTE:
If the phone freezes or takes too long to respond, you can press
and hold the Power key for about 10 s econds to restart the
phone.
Setting Up for the First Time
When you fir st power on your p hone after you purchase it or
reset it to factory settings (see Backup and Reset
do some settings before using it.
Touch the language field to select a language. Then touch LET'S
GO and follow the prompt s to set up your Wi-Fi connection, date
& time, name, device protection, Google services and other
options.
), you need to
Locking/Unlocking the Screen and Keys
Your phone allows you to quickl y lock the screen and k eys (put
the phone to sleep mode) when not in use and t o turn the screen
back on and unlock it when you need it.
To lock the screen and keys:
To quickly turn the screen off and lock the keys, press the Power
key.
12
NOTE:
To save battery power, the phone automatically turns off the
screen after s ome time of inactivity. You will still be able to
receive messages and calls while the phone screen is off.
To unlock the screen and keys:
1. Press the Power key to turn the screen on.
Press and hold a blank area of the screen or to wake the
phone, or
•
Press and hold to launch v oice recognition serv ice.
•
Press and hold to open t he front camer a.
•
Double-touch a notificati on to open the related app.
NOTE:
If you have set a fingerprint, pattern, PIN or pas sword for your
phone (see Protecting Your Phone With Screen Locks
need to press your finger against the Fingerprint sensor, draw the
pattern, or ente r the PIN/pa sswo rd to un lock you r screen .
), you’ll
Using the Touch Screen
Your phone’s touch screen enables you to control actions
through a vari ety of touch gestures.
Touch
When you want to type using the onscreen keyboard, select
items on the scr een such as the appl ication and settings
icons, or pres s the onscreen buttons, simply touch them wi th
your finger.
13

Touch and Hol d
To open the availa ble options for an item (f or example, a
message or link in a web page), touch and hold the item.
Swipe or Slide
To swipe or slide means to quickly drag your finger vertically
or horizontally across the screen.
Drag
To drag, pres s and hold your finger with some pressure
before you start to move your finger. While dragging, do not
release your finger until you have reached the target p osition.
Pinch
In some apps (such as Maps or web brows er), you can zoom
in and out by placing two fingers on the screen at once and
pinching them together (to zoom out) or spreading them apart
(to zoom in).
capture
On any screen, you can take a scr een capture by plac ing
three fingers on the screen at once and pinching the m
together.
Rotate the screen
For most screens, you can automatically change the screen
orientation from portrait to landscape by turning t he phone
sideways.
14
n
O
o
T
c
u
s
w
u
e
h
s
u
d
n
m
s
T
a
d
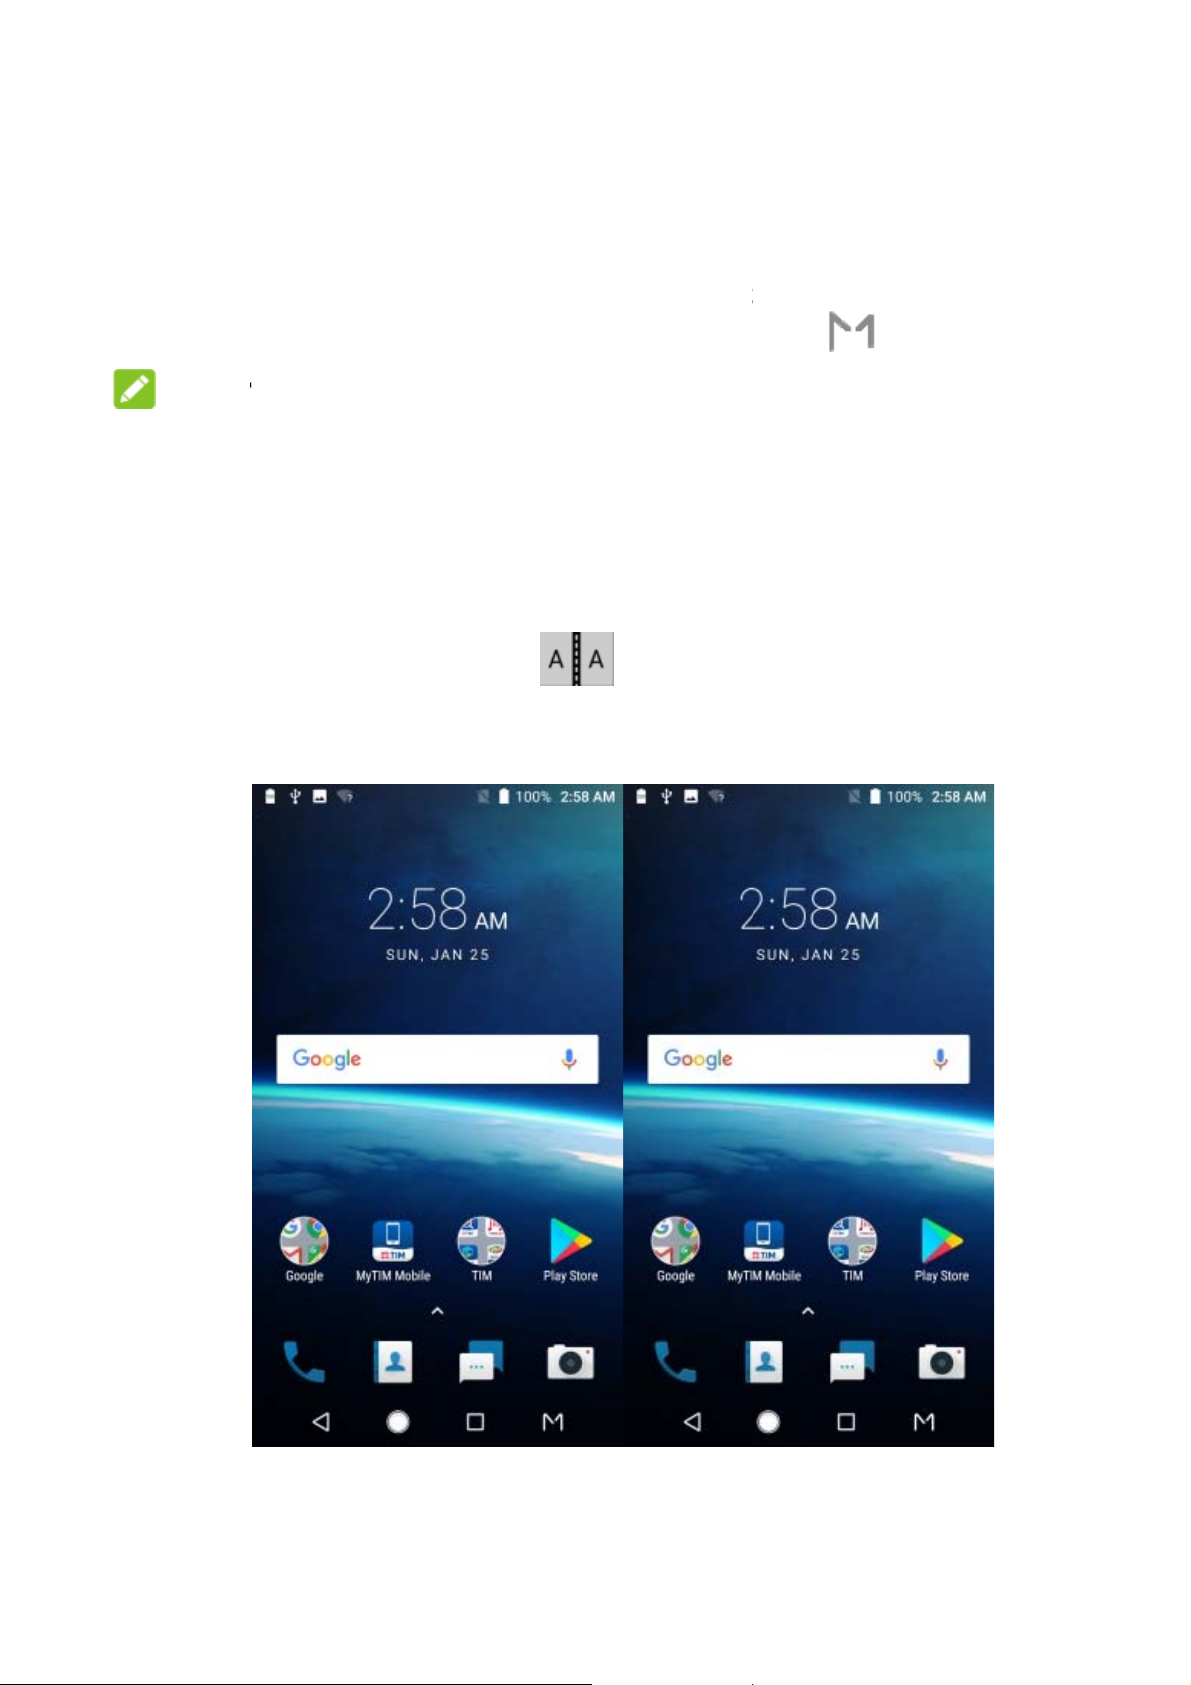
Getti
Your AX
switch m
NO
The devi
flux level.
temperat
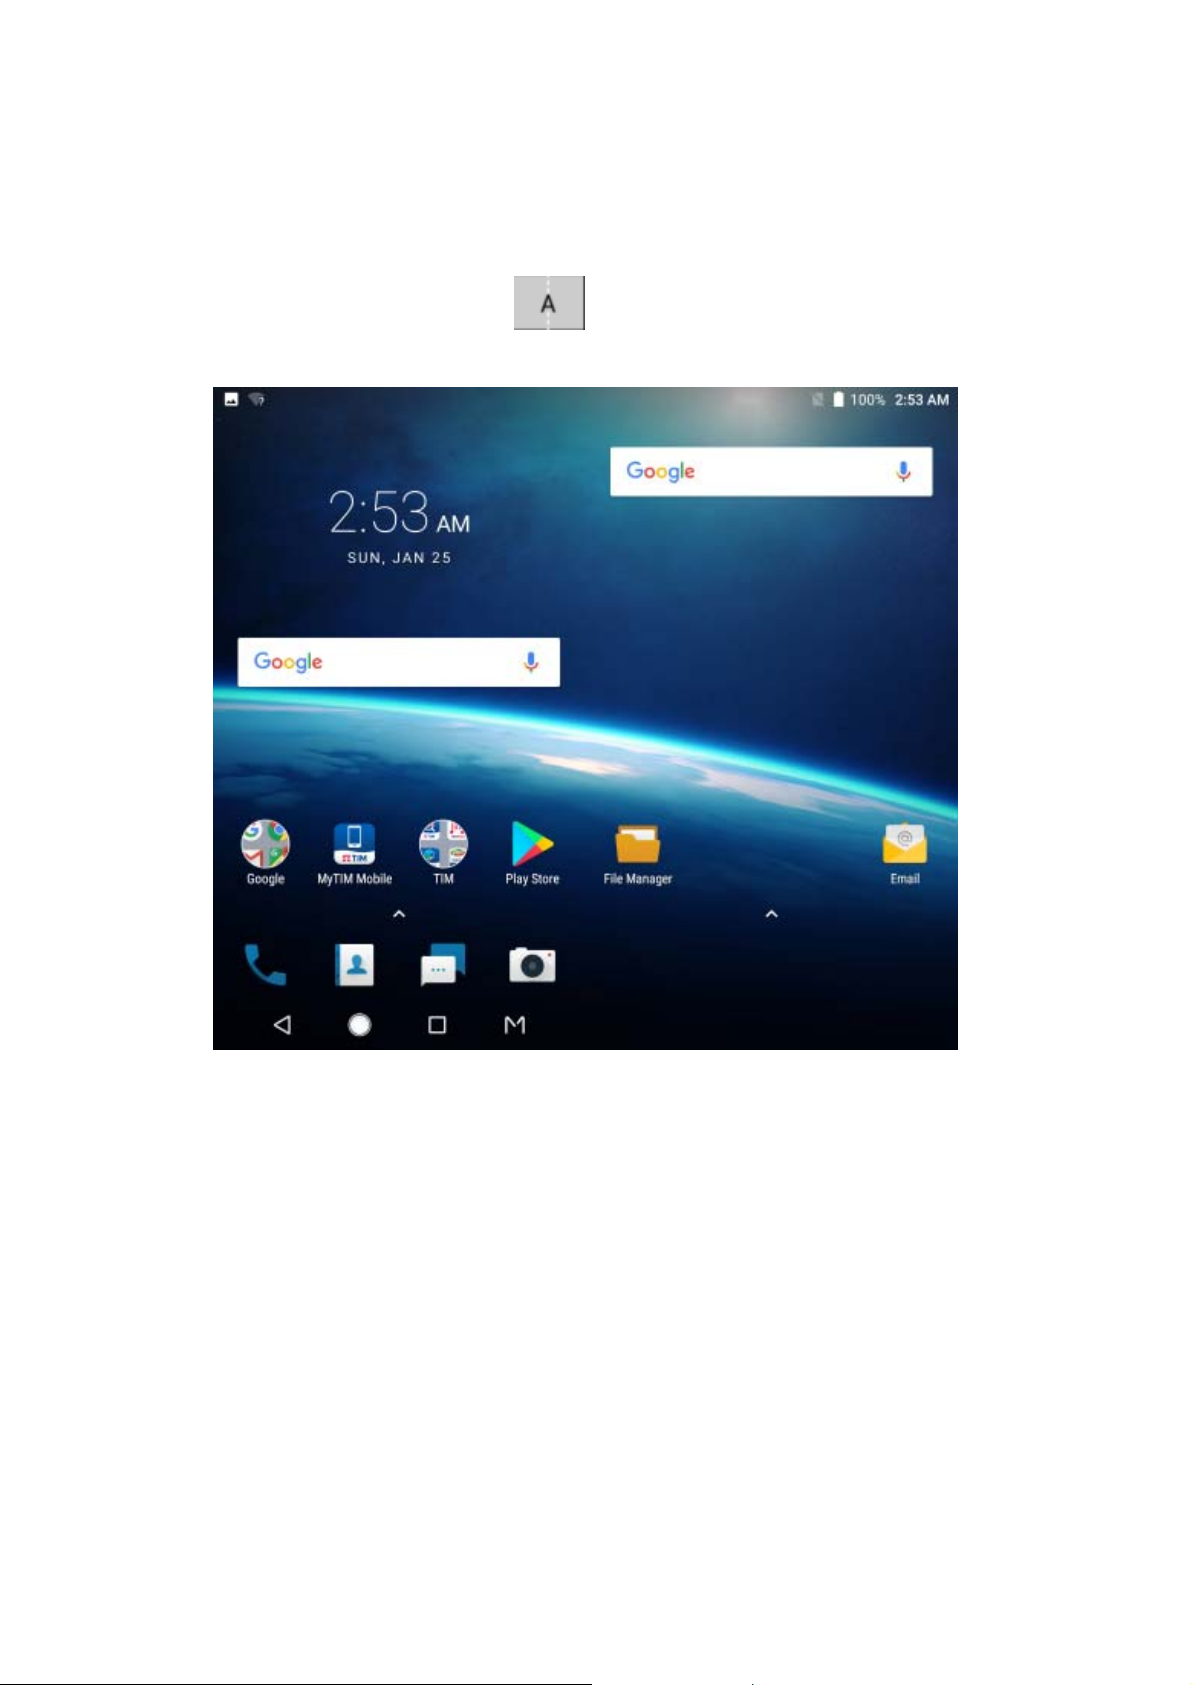
Mirror
To use M
screens
g to Kno
N M offers a va
de, flip open yo
E:
e’s multi-screen
It will be disabl
res or high iron
mode
irror Mode, touc
how the same v
the Multi
riety of different
device and to
functionalit y is
d in environme
content.
. In this
iew.
-screen
creen modes.
ch .
ependent on m
ts with high
ode, the left an
o
gnetic
right
15
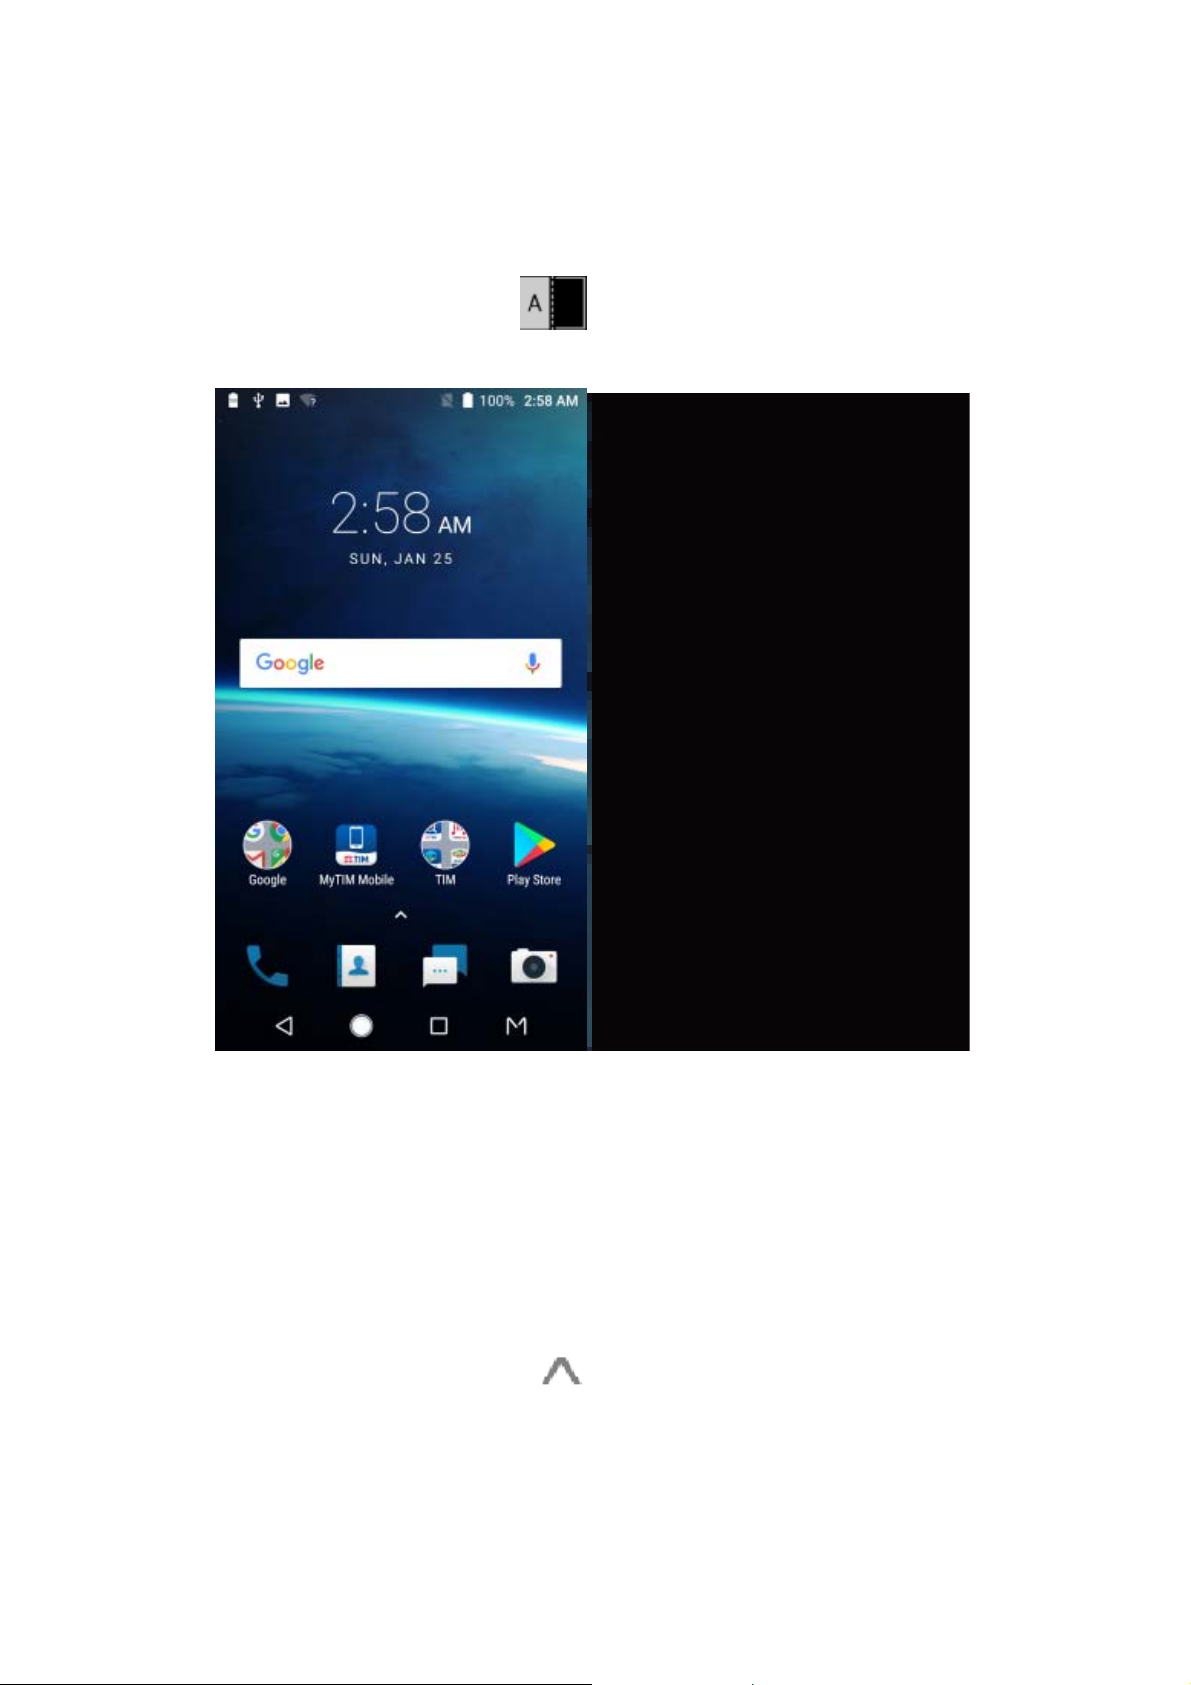
Extend mode
To use Extend Mode, touch . In this mode, the left and right
screens show a single extended view.
16

Dual mode
To use Dual Mode, touc h . In this mode, the left and r ight
screens show different views. You can have a different app ope n
on each screen.
17
Single mode
To use Single Mode, touch . In this mode, only the left
screen shows the current view; the right screen i s blank.
Extended Home Screen Panels
Your home screen is extendable, providing more space for
shortcuts , widgets, and more. Simply swipe left or right on the
home screen to see the extended panels. You can add or remove
home screen panels, or adjust their order.
To add a new home scr een panel:
1. From the home screen > , or touch and hold an empty
area of the home screen and select WIDGETS.
18
h
g
g
s
p
h
t
s
T
y
r
A
t
u
L 3 S
c
n
e
r
n
p
e
r
n
l
P
o
e
t
a
c
n
l
w
p
n
a
e
o
s
n
n
a
e
c
e
c
s
a
h
a
2. Touc
the ri
panel
Choosin
You can
1. From
Wall
2. Touc
3. Selec
and u
NO
Other wa
wallpape
the home scree
E:
and hold a n ap
ht edge of the s
and put the ico
Your Wallpap
et the wallpape
aper.
Live Wallpape
a built-in static
e it as the wall
to set the hom
:
plication icon or
reen to create
or widget on it.
r
for the home s
> > Setti
rs, Photos, Gal
wallpaper, live
aper.
screen wallpa
a widget and dr
new home scr
reen and lock s
gs > Display >
ery or Wallpap
allpaper, or a pi
er and the lock
g it to
en
reen.
rs.
ture
creen
Touch an
WALLP
or an ima
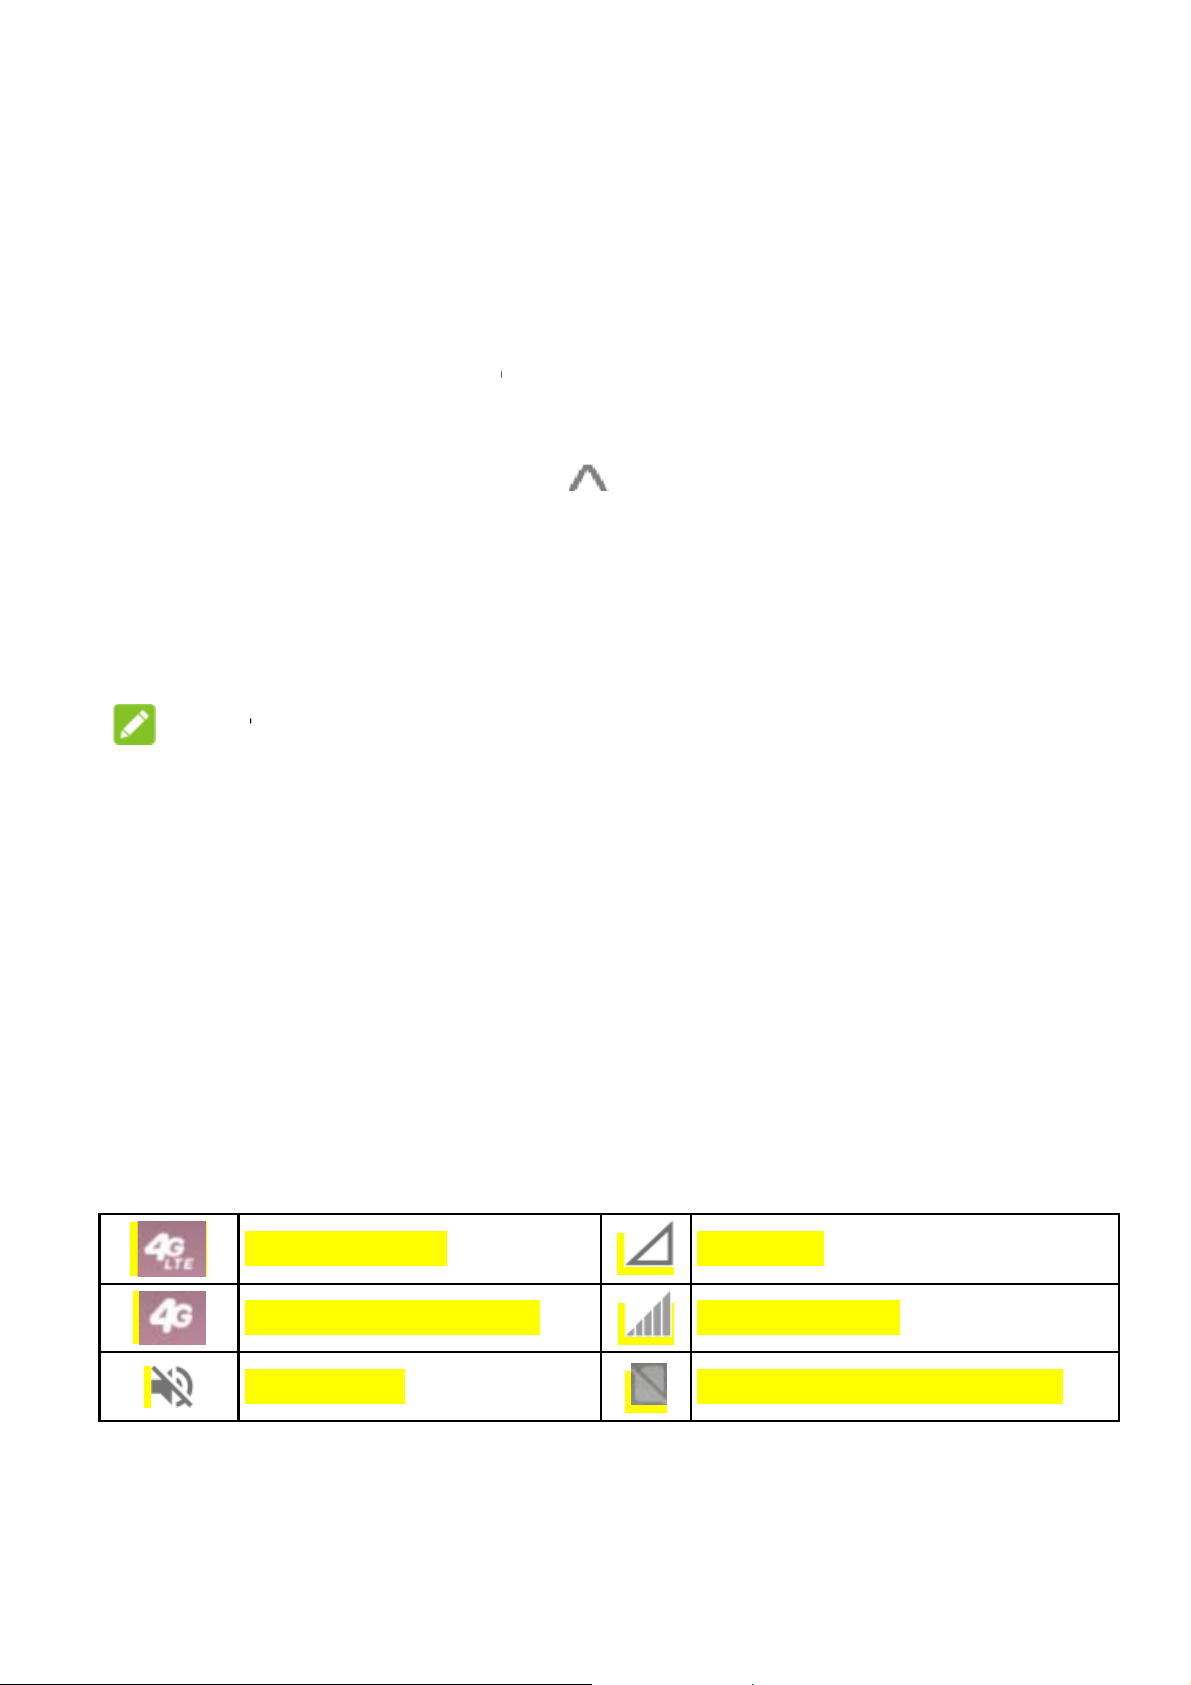
Monit
The statu
service s
icons yo
d hold a blank a
PERS tab. The
ge from your ga
oring the
s bar at the top
atus icons on th
may see.
TE connected
G/HSPA+ connec
ilent mode
ea of the scree
select a built-in
lery.
hone St
f the home scr
right side. B el
No
ed Sig
No
and select the
image, a live w
tus
en provides ph o
w are some of t
ignal
al strength
ano-SIM card inst
llpaper,
ne and
e
lled
19
bDo
a
a
a Ala
o
o
e
t
c
w
r
A
n
o
e
i
k
e
o
n
e
p
e
oSe
t
c
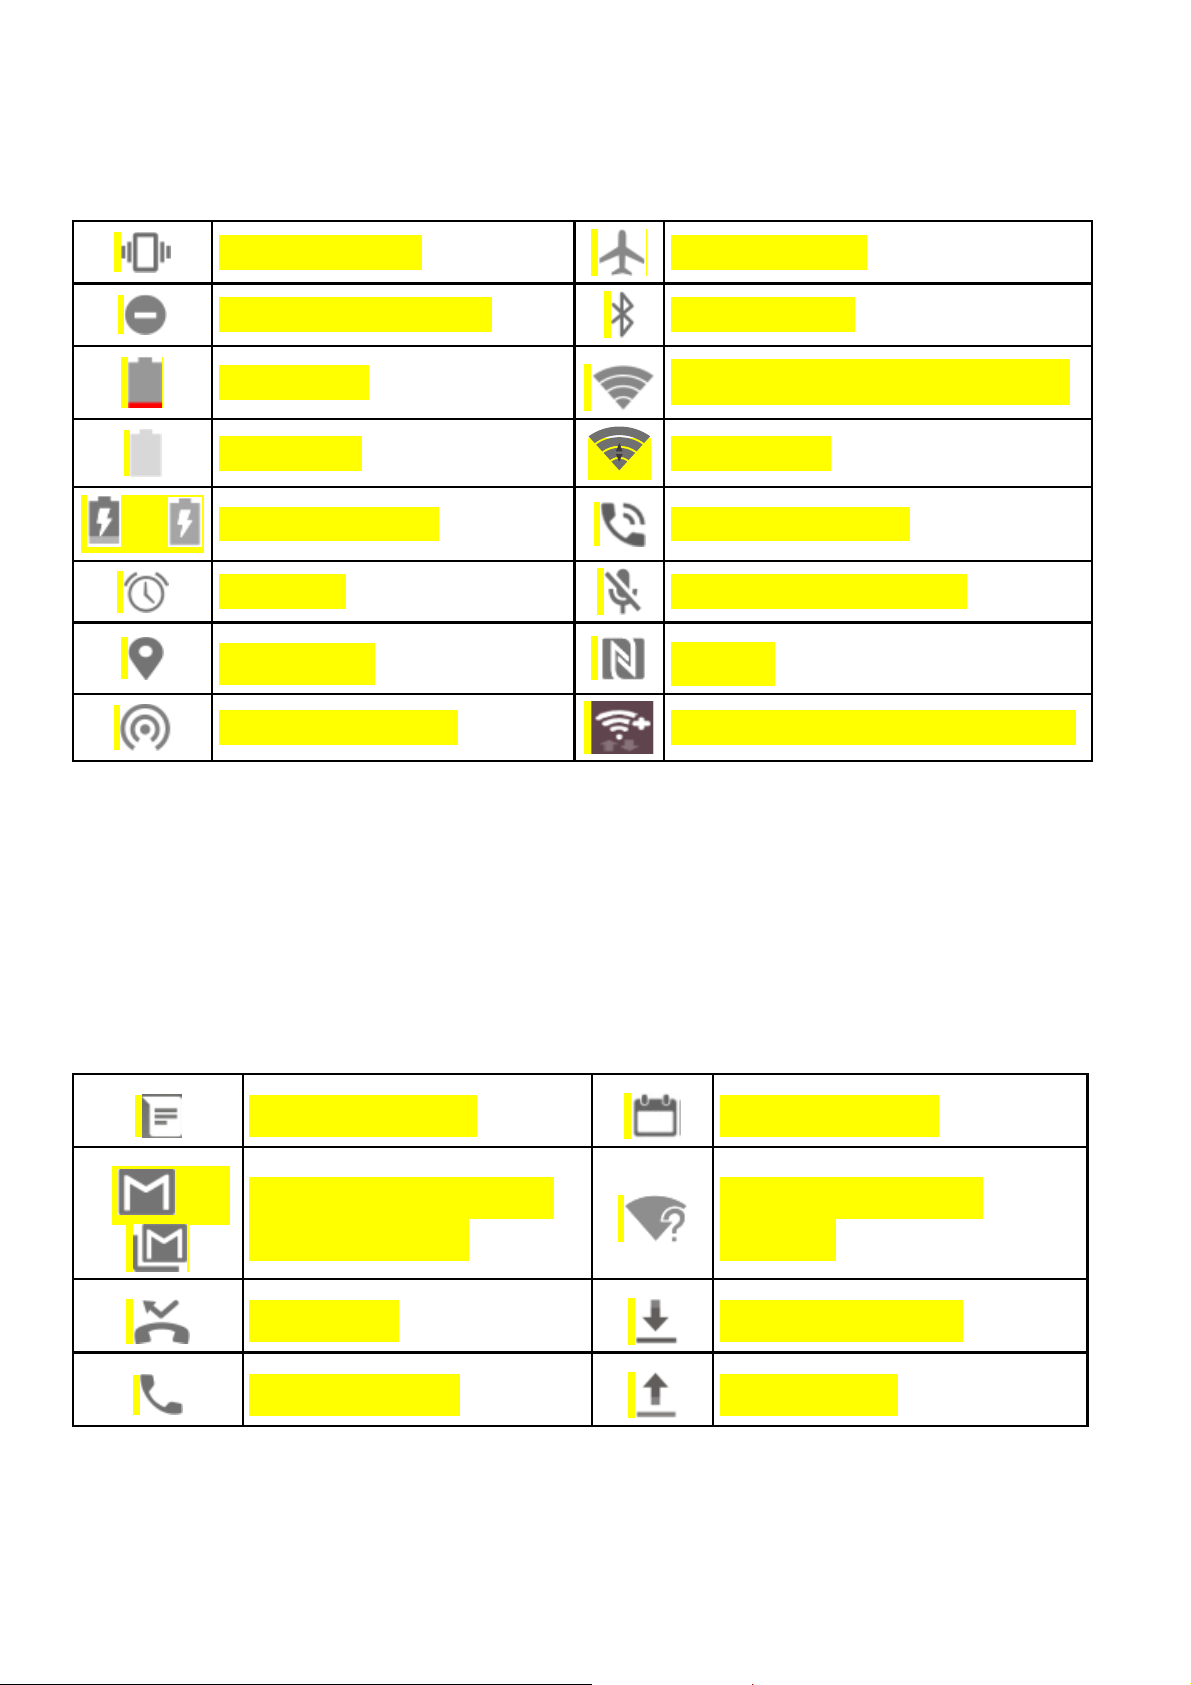
Vi
ration mode
irpla
e mode
B
B
/
B
L
M
Manag
not disturb mode
ttery low
ttery full
ttery charging
rm set
cation on
bile hotspot on
ing Notifi
ations
Bluet
Conn
Wi-Fi
Spea
Phon
NFC
Video
oth® on
cted to a Wi-Fi ne
n use
erphone on
microphone off
n
call transferring to
work
Wi-Fi
Notifica
The status
icons on th
/
tion Icons
bar at the top of
left side. Belo
New message(s)
New message(s) f
he Gmail™ app
Missed call
all in progress
the home scree
are some of th
U
om N
de
D
20
provides notifi
icons you may
coming event
w Wi-Fi network
tected
wnloading data
nding data
ation
see.

C
o
p
d
o
n
t
h
b
m
s
d
g
m
-
)
o
r
w
o
a
o
o
a
m
y
T
i
c
w
o
U
U
V
V
P
e
e
y
y
i
p
c
a
o
a
w
n
n
o
o
t
o
Open/
Notificati
events, a
you are
view the
To op
Call on hold
Song playing
Video call via Wi
New voicemail(s
lose the N
ns report the a
nd alarms, as
laying music. Y
etails of notific
en the notificati
Fi
tification
rival of new me
ell as ongoing
u can open th
tions.
n panel, swipe
SB connected
SB tethering on
ideo call via mobil
ideo call on hold
anel
ssages, calend
vents, such as
notification pa
our finger down
e data
r
hen
el to
from
the to
To cl
scree
Respo
In the no
remove t
expanda
right fro
To re
Slide
You c
settin
p of the screen.
se the notificati
or touch the B
nd to or Re
ification panel,
e notifications.
le notifications t
the notification
pond to a noti fi
own with one fi
an also swipe t
s panel.
n panel, swipe
ck key.
ove a Not
ou can respond
he notification
hat let you perfo
tself.
ation, just touc h
nger to expan d
o fingers vertic
our finger up o
fication
to a notification
anel also supp
rm additional ac
it.
ertain notificati
lly to open the q
the
r
rts
ions
ns.
uick
To re
ove a notificati
n, swipe it left
21
r right.

To remove all notifications, touch CLEAR ALL below all the
notifications.
To manage notifications you hav e received, touch and hold a
notification to ide ntify the application that created it. You can
then touch Show notifications silently > DONE to silence
future notificat ions from this app, or touch MORE SETTINGS
to configure ot her notification options for this app.
NOTE:
If you block notifications for an a pp, you may miss its important
alerts and updates. The notifications of some apps cannot be
blocked.
Use Quick Settings
The Quick Settings make it convenient to view or change the
most common settings for your phone.
Open the notification panel and drag the panel downwards to find
the following Quic k Settings on the screen.
Bluetooth: Touch to turn on or off Bluetooth. Touch and hold
to open the Bluetooth me nu in Settings.
Wi-Fi: Touch to turn on or of f Wi-Fi. Touch and hold to open
the Wi-Fi menu in Sett i ngs.
SIM:
Location: Touch to tu rn o n or off Location. Touch and hold to
open the Location menu in Settings..
Airplane mode: Touch to turn o n or off airplane mode.
Flashlight: Touch to turn on or off the flash.
Night Mode: Touch to turn on or off the night mode.
22

Data Saver: Touch to turn Data saver mode on or off. Press
and hold to open the Data usage menu.
Battery Saver: Touch to turn Bat tery saver mode o n or off.
Press and hold to open the Batt ery saver menu.
NFC: Touch to turn on or off the NFC mode.
Do not disturb / Alarms only: Touch to turn on Do not disturb
mode and select an option. Touch again to turn off Do not disturb
mode.
Auto-rotate: Touch to turn on or off the auto-rotate screen
feature.
Hotspot: Touch to turn on or off the Wi-Fi hotspot feature.
Touch and hold to open the Tet hering & portable hotspot
menu in Settings.
NOTE:
In the Quick Settings screen, touch at the top to get to the
Settings menu; touch to add or r emove control switc h.
23

Getting to Know the Navigation Bar
Home key
Back key
Key Function
Back key
Home key
Recent apps key
Touch to go to the previous screen.
Touch to return to the home screen from any
application or screen.
Touch and hold to access the Google app.
Touch t o see recently used applications.
Double-tap to switch to the most recent
application.
Mode key
Recent apps key
Mode key Touch to sele ct multi-sc reen modes.
24

n
c
e
e
t
E
m
e
c
A
o
t
o
M
s
>
w
n
e
y
w
n
>
c
e
k
d
e
c
e
a
m
t
m
n
t
r
Con
Devi
Conn
Control
To enabl
1. From
2. Touch
To get da
1. Touch
Mobile Data U
ecting t
es
cting to
or disable data
he home screen
Cellular data s
ta services whe
> Cellular ne
Networ
obile Net
e
access:
> Settings
itch to enable or
roaming:
tworks > Interna
s and
works
> Data usage.
isable mobile da
tional Data Roa
a use.
ing.
2. Touch
NOT
Data roa
Set Acc
To conne
Names (
service pr
1.
From
Cellul
2.
Touch
3.
Touch
the Mobile Data
:
ing may incur sig
ss Point Nam
t to the Internet
PN). And if you
vider to get the
he home screen
ar networks > A
.
each item to ent
switch if it is turn
nificant roaming
s
ou can use the d
ant to add a new
ecess ary info rm
> Settings
cess Point Na
r the information
d off.
harges.
fault Acces s Poi
APN, please con
tion.
> Data u sage >
es.
you get from you
t
act the
>
25

p
A
c
w
c
k
h
a
e
E
e
w
W
D
t
p
t
W
s
u
C
>
o
t
d
c
r
k
e
R
h
e
a
s
n
s
v
d
y
n
n
i
s
service
4.
Touch
NOTE:
To set the
Conne
Wi-Fi is a
Internet ac
Wi-Fi route
Turn Wi
Networ
rovider.
> Save to com
PN to default set
ting to
ireless network i
ess at distance
r and your surro
Fi On and
lete.
ings, touc h >
i-Fi
ng technology t
of up to 300 fe
ndings.
onnect to
eset to default.
at can pro vide
t, depending o
Wi-Fi
the
1. From t
2. Slide th
3. Touch
4. If the n
CONN
NOTE
Your phon
networks
Add a
You can ad
name (SSI
To connec
e home screen
e Wi-Fi switch t
network name
twork is secure
CT.
:
automatically
hen they are in
i-Fi Netwo
d a Wi-Fi networ
), or add a Wi-F
to a secured n
> Setting
the On positio
o connect to it.
, enter the pas
onnects to pre
range.
k
if the network
i network when
twork, you fi rst
> Wi-Fi.
to turn on Wi-F
word and touch
iously used Wi-
oes not broad ca
ou are out of ran
eed to get the
.
Fi
t its
ge.
26

security details from the network's administrator.
1. From the home screen > > Settings > Wi-Fi.
2. Slide the Wi-Fi switch to the On position.
3. Touch Add network.
4. Enter the network SSID (name). If necessary, enter security
or other network configuration detai ls.
5. Touch SAVE.
Connecting to Bluetooth Devices
Bluetooth is a short-range wir eless communication technology.
Phones or other devices with Bluetooth capabilities can
exchange information wireless l y within a distance of about 30
feet. The Blueto oth devices must be paired before the
communication is perfor m e d.
1. From the home screen > > Settings > Bluetooth.
2. Slide the Bluetooth switch to the On or Off position.
When Bluetooth is on, the icon appears in the status bar.
Sharing Your Mobile Data Connection
You can share your phone’s data capabilities through tethering.
Share Your Mobile Data Connection via USB
You can access the Internet on your computer via the USB
tethering feature of your phone. The feature needs data
connection on a mobile network an d may result in data charges.
27

NOTE:
You cannot transfer files between your phone and your computer
via USB while the phone is USB tethered.
1. Connect your pho ne to your comput er with a USB cable.
2. From the home screen > > Settings > More > Tethering
& portable hotspot.
3. Switch on USB tethering. A new network connecti on will be
created on your computer.
NOTE:
To stop sharing y our data connection, switch off USB tether ing
or disconnect the USB cable.
Share Your Mobile Data Connection via
Bluetooth
If your computer can obtain an Internet connection via Bluet ooth,
you can configure your phone to share its mobile data connection
with your compute r.
1. Pair your phone with your computer via Bluetooth.
2. Configure your computer to obtain its network connection via
Bluetooth. For more information, ple ase see your computer's
documents.
4. From the home screen > > Settings > More> Tethering
& portable hotspot.
3. Switch on Bluetooth tethering. Your computer is now
sharing your phone's data con nection.
NOTE:
28

g
e
i
s
c
n
n
t
e
o
V
h
d
h
h
T
t
V
V
e
,
o
i
n
w
n
r
w
o
r
o
t
v
h
r
o
g
e
c
o
h
o
e
m
o
g
N
a
To stop s
tetherin
Conn
Virtual pr
resource
deployed
people a
when co
Dependi
required
certificat
informati
haring your data
.
cting to
vate networks (
inside a secur
by corporations
cess local netw
nected to a wi re
g on the type of
o enter your log
s before you ca
n from your net
connection, swi
irtual Pri
PNs) allow you
d local network.
schools, and ot
rk resources w
less network.
VPN you are us
n credentials or
connect to you
ork administrat
ch off Bluetoot
ate Netw
to connect to th
VPNs are com
her institutions t
en not on camp
ing, you may be
install security
VPN. You can
r.
rks
only
let
us, or
et this
Add a
1. From
2. Touc
provi
3. Touc
4. Touc
5. When
touch
You mus
the home scree
prompted, ente
NO
PN
at the top
ed by your net
SAVE.
the VPN that y
CONNECT.
E:
set a lock PIN
> > Settin
ight corner and
ork administrato
u want to conn
any requested
r password bef
s > More > VP
fill in the inform
r.
ct to.
redentials, and
re using VPN.
.
tion
then
29

e
a
p
g
h
h
n
n
)
o
h
t
a
e
d
y
h
n
t
t
a
e
h
n
r
e
n
o
s
d
a
l
N
b
o
r
n
b
h
Phon
You can pl
other apps
you see a
Placin
Place a
1. From t
2. If the di
3. Enter t
Calls
ce calls from th
or widgets that
hone number,
Calls
Call From t
e home scr ee
lpad is closed,
e phone numbe
Phone app, th
isplay contac t i
ou can usually t
e Phone
> .
ouch to di
with the dialpa
Contacts app,
formation. Whe
uch it to dial.
play it.
. Touch to
r
ever
delete i
4. Touch
NOTE
To make a
the plus (+
city/area c
Place a
1. From t
call his
2. Touch
correct digit s.
below
:
international c
symbol. Next,
de and then the
Call From t
e home scr ee
ory.
listing numbe
he keypad to di
ll, touch and ho
nter the country
phone number.
e Call Hist
> > RECE
> to call
l.
d the 0 key to e
code, followed
ory
TS tab, o pen t
ack.
ter
y the
e
30

Place a Call From Your Contacts
1. From the home screen > > CONTACTS.
2. Touch next to a contact to place the call.
Answering or Rejecting Calls
When you receive a phone call, the incomi ng call screen o pens,
displaying the caller ID or the information about the caller that
you've entered in the Contacts app. You can answer or reject the
call, or reject it with a tex t message.
Answer a Call
When you receive a phone call, slide towards to .
NOTE:
To silence the ringer before answering the call, you can press the
Volume key or the Power key.
Reject a Call
When you receive a phon e call, slide towards to to
reject the call.
You can also touch Message reject to reject the call a nd sele ct a
preset text message or write one to send to the caller.
Checking Voicemail
If you have set the pho ne to divert calls to voicemail, callers can
31

e
c
h
o
t
a
O
a
o
s
o
t
w
s
n
t
d
s
t
a
o
c
t
P
n
e
o
s
h
d
a
c
t
n
e
o
r
n
r
m
o
t
n
c
leave voic
how to che
1. From t
2. If the di
3. Touch
enter y
4. Follow
voicem
Using
During a c
an option t
mail messages
k the message
e home scr ee
lpad is closed,
or touch an
ur voicemail pa
he voice promp
il messages.
ptions D
ll, you will see
select it.
hen they c ann
they left.
> .
ouch to di
hold 1 key in t
sword.
s to listen to an
uring a C
number of ons
t reach you. He
play it.
e dialer. If pro
manage your
ll
reen options. T
e’s
pted,
uch
Touch
Touch
which i
Touch
Touch
code (f
during
Touch
Touch
Touch
confere
to put the ca
to make an
put on hold.
to access
to switch to
r example, the
he call.
to mute or u
to turn on o
to merge th
nce call.
ll on hold.
ther call s epara
ontacts list.
he keypad whe
IN for your voic
mute your micr
r off the speake
separate calls i
ely from the firs
you need to e
mail or bank ac
phone.
phone.
to a single
call,
ter a
ount)
32

h
h
h
g
e
s
h
u
f
h
h
h
t
h
h
m
p
f
e
t
n
-
d
w
C
d
i
h
a
j
j
n
s
T
p
u
l
l
e
p
s
m
r
o
s
o
o
c
c
h
p
t
o
l
c
o
a
Touc
to put the
caller you are s
eaking to on h
ld, and
switc
Touc
Mana
When th
you can
Switc
When yo
screen in
Touc
puts t
to another call
to e
ing Multi
call waiting an
witch between t
Between
’re on a call an
orms you and d
e first caller on
hat has been p
d the current ca
party Cal
three-way call f
o calls or set u
urrent Call
another call co
splays the calle
t
old and answer
t on hold.
l.
s
atures are avai
a conferen ce
es in, your ph
ID.
answer the call
the second call.
able,
all.
ne
. (This
)
Touc
ends
Touc
Touc
text
Set U
With this
1. Place
2. Once
the s
he first call and
to re
to re
essage or writ e
a Confere
the first call.
you have establi
cond number. (
eature, you can
t
nswers the sec
ect the second
ect the second
one to send to t
ce Call
talk to two peo
hed the connec
his puts the first
33
answer the call
nds call.)
all.
all and select a
e caller.
le at the sa me ti
ion, touch
caller on hold.)
. (This
preset
me.
nd dial

e
t
i
o
y
f
s
e
c
o
r
p
r
d
o
r
t
Voic
c
e
s
l
o
c
C
h
a
y
e
w
u
p
e
S
b
r
n
.
g
g
m
h
n
T
u
o
o
V
e
e
a
u
e
u
a
e
t
o
k
e
e
a
l
d
o
3. When y
If one of th
the remaini
are the firs
To end the
Adjust
From the h
Displa
order o
Sound
rington
ou’re connected
people you cal
ng caller stay c
to hang up, all
conference call,
ng Your
me screen >
options: Touc
the contacts an
and vibration:
for incoming c
to the second pa
ed hangs up du
nnected. If you i
allers are disco
touch
all Settin
> > Settin
Sort by or Na
d the format of t
Touch Phone ri
lls to that card.
rty, touch .
ing your call, yo
nitiated the call
nected.
s
s > Display opt
e format to set
e contact nam
gtone to selec
ouch Dialpad t
and
nd
ions.
the
s.
the
nes
to sele
Check
Answe
call by
answe
Speed
dialer t
Quick
Call se
voi
Fix
call
t the sound pla
r uncheck the b
and Calls: Ch
ressing the Po
ed to turn on or
ial: You can to
call the corres
esponses.: Edit
tings: Configur
email: Touch
email number.
d Dialing Num
to a limited set
ed when you to
oxes to turn on
ck Power butt
er key. Check
off the function.
ch and hold th
onding speed di
Quick Respons
call settings.
etup > Voicem
ers: Allows yo
of phone numb
ch the dialpad
r off this featur
n ends call to
ibrate when c
1 ~ 9 keys from
al number.
to Rejected Ca
il number to e
to restrict outg
rs.
eys.
.
nd
ll is
the
lers.
it the
ing
34

Call forwarding: Call forwarding feature allows y ou to
forward your i ncoming calls to anot her phone number.
Call waiting: To get notified of incoming calls during a
call.
Additional settings: Touch Caller ID to choose whether
your number is displayed when someone r eceives your
outgoing call.
Call blocking: Allows you to block calls and texts from
certain numbers.
35

d
n
r
c
o
g
h
S
e
p
h
h
h
h
o
e
t
b
o
>
e
o
p
e
C
>
h
y
e
n
e
u
r
r
c
d
s
o
Conta
You can a
the contact
support co
To see you
there, you
switch to c
Addin
1. From t
cts
d contacts on y
s in your Googl
tact syncing.
contacts, from
an touch the ta
ntact groups or
a New C
e home screen
ur phone and s
account or oth
he home scree
s on the top of t
the Phone app.
ntact
> .
nchronize them
r accounts that
> > . F
he screen to qui
with
om
kly
2. Touch
3. Touch
save th
on the
4. Enter t
and ot
5. Touch
Searc
1. From t
2. Touch
to add a n
aving to to cho
contact on the
hone.
e contact nam
er information.
.
ing for a
e home screen
and enter t
w contact.
se where to sav
hone, or a acco
, phone numbe
ontact
> .
e contact name
the contact. Yo
nt you have ad
s, email addres
or any informati
u can
ed
es,
n
36

the contact has to search f or it.
The contacts matched will be listed.
Editing Contacts
1. From the home screen > > .
2. Touch a contact you need to edit and then touch .
3. Edit the contact and to uch .
37

o
s
r
r
h
A
h
N
O
n
A
t
h
n
m
u
e
>
d
p
h
s
s
c
n
e
e
l
e
s
m
a
O
n
e
m
d
Gmail
From the h
send email
or IMAP, o
for your co
1. From t
2. Touch
enter t
3. Touch
automa
N
You ca
MANU
me screen a nd
from your web
access your O
porate email ne
e home screen
dd an email a
e email address
EXT to let the
tically.
TE:
also enter thes
L SETUP or w
select Gmail. U
ail or other ac
tlook, Hotmail a
ds.
> Gmail.
dress, then sel
and password.
hone retrieve th
e details manua
en automati c s
se it to receive
ounts, using P
d Yahoo accou
ct an email typ
network para
ly by touching
tup fails.
nd
P3
t
and
eters
4. Follow
5. Your p
to dow
he on-screen in
one will show th
load email mes
tructions to fini
e inbox of the e
ages.
38
h the setup.
ail account an
start

s
u
s
i
s
,
m
h
h
h
e
e
h
e
e
h
a
o
e
s
s
a
s
d
e
M
a
S
u
e
t
o
o
o
e
e
n
e
s
e
Mes
You can
message
Open
From the
The Mes
message
ongoing
Touc
aging
se Messaging t
(SMS) and mu
ng the M
home screen >
aging screen o
search for mes
essage thr ead.
to write a
set message b
ltimedia messag
ssaging
.
pens, where yo
ages, delete m
new text or mul
ck up, exch ang
es (MMS).
creen
can create a n
ssages, or ope
imedia messag
text
w
an
.
Touc
Touc
you’v
Sendi
1. On th
2. Touc
numb
sugg
3. Touc
mess
to search
an existing me
had with a cert
ng a Mes
Messaging sc
the To field an
or the contact
stions, touc h th
the Type an S
ge text.
for a message u
sage thread to
in number.
age
reen, touch
manually ente r
name. If the ph
one you wan t t
S message fiel
sing keywords.
pen the conver
at the bottom.
the recipient’s
ne presents a f
add.
d and enter the
ation
w
39

w
i
u
a
j
r
a
g
s
h
e
g
e
n
e
4. If you
add a s
5. Touch
NOTE
Do not add
send a text
multimedia
ubject or attach
:
Chang
Touch >
messaging
ant to send a m
.
a message sub
message. Othe
message.
ng Mess
Settings in the
settings.
ltimedia messa
file to the mes
ect or any attac
wise you may b
ge Settin
Messaging scr
e, touch to
age.
ment if you wa
charged for a
s
en to change th
t to
40

o
i
a
h
t
h
o
g
o
a
r
o
o
p
x
R
h
w
B
b
w
c
t
r
h
e
t
a
a
a
.
r
e
a
c
Web
Use Chr
Browse
Open
From the
You can
example,
1. Open
2. Touc
3. Enter
want
home screen >
the Chrome ap
the address bo
the address (U
o search for.
me to view web
ng the Br
lso open the br
in an email or a
pages and s ea
wser
to launch t
wser by touchin
text message.
.
at the top.
L) of a web pag
ch for informatio
e web browser.
g a web link - fo
or enter terms
n.
you
4. Touc
keyb
Usin
You can
each tab)
To open
From the
New tab.
a URL or searc
ard to open the
Multiple
pen several we
and switch bet
new browser
main Chrome s
A new browser
suggestion or
eb page or se
rowser T
pages at the s
een them freely
tab:
reen, touch
ab opens.
ouch on th
rch results.
bs
me time (one p
> , or tou
ge in
h >
41

b
v
o
a
m
o
o
c
a
i
u
e
s
l
n
e
g
a
s
b
g
y
i
o
w
C
e
w
o
m
To switch
1. Touch
open).
2. Swipe
pages,
NOTE
Touch X or
Downl
1. Touch
page.
2. In the
etween tabs:
(The number
ertically to scrol
nd touch the o
:
swipe right or le
ading Fil
nd hold an ima
enu that opens,
hows how man
through the list
e you want to vi
t to close a tab.
s
e or a link to a f
touch Downloa
tabs you have
of opened web
ew..
le or to another
d image or
eb
Downl
The downl
card. Y ou
the File M
Chang
You can co
the way yo
to control y
To open th
ad link.
aded files ar e s
an view or open
nager app.
ng Brow
nfigure a numbe
browse the we
our privacy.
browser settin
ved to your ph
them in the Do
er Setting
r of settings in
, including sev
s screen, touch
ne or the memo
nloads sect ion
s
hrome to custo
ral that you can
> Settings.
ry
f
ize
use
42

e
u
u
e
h
m
b
h
,
e
h
o
n
e
l
r
r
.
o
t
b
u
i
e
Cam
Capt
1. From
Or yo
doubl
2. Flip t
and
used
3. Touc
focus
imag
the home scree
ra
ring a Ph
can quickly op
-tap the quick
e device over, a
ake any necess
y default.
the area on the
or let the came
.
to
> .
n the Camer a f
aunch button.
nd then aim the
ary adjustment s
screen where y
a autofocus on
om any screen
camera at the s
PHOTO mode
u want the cam
he center of t he
y
bject
s
ra to
4. Touc
.
43

Number Function
1
2
3
4 Exit the camera.
Set a time delay before the camera takes a picture after you
tap the shutter icon.
Change the High-Dynamic Range (HDR) setting (back
camera only).
Switch mode: VIDEO (front or back camera), PHOTO
(back camera) / SELFIE (front camera), or MANUAL (back
camera) / BEAUTIFY (front camera)
44

b
W
t
N
c
m
H
s
u
n
o
o
h
S
n
A
u
a
e
a
w
s
n
e
s
j
v
e
r
e
v
E
a
a
f
e
e
u
e
t
A
n
n
Num
er Function
5
6
7
8
9
10
11
12
Switch betwe
13
Change the fl
Select a colou
Capture a ph
Capture a LIV
View pictures
Use special p
MULTI EXPO
SHUTTER, a
djust the foc
Change the c
effect or other sp
to.
E photo.
and videos you ha
oto or video came
URE, TIMELAPS
d SLOW MOTION
s point and expos
mera settings.
n back and front c
sh setting (back c
cial effect
e taken.
ra modes: PANOR
, SUPER NIGHT,
.
ure.
mera.
mera only).
MA,
MAGIC
Keep
flash
•
You
zoo
•
In P
expo
•
Whe
can t
ARNING!
a safe distance
owards the eye
OTE:
an spread or pi
in or out before
OTO mode, wh
ure bar appear
p or down to ad
you flip the de
uch to us
hen using the
of people or an
ch with two fing
taking pictures.
n you touch th
beside the foc
ust the exposur
ice over to use
smile detection
lash. Do not poi
imals.
rs on the scr ee
screen to foc us
s point. You ca
.
he front camera
.
t the
n to
, the
drag
, you
45

d
c
h
o
h
e
m
n
o
O
u
y
t
e
a
m
>
s
o
r
d
n
r
e
e
e
o
s
O
e
n
d
p
t
e
t
c
g
e
o
S
Recor
You can re
camera. T
lapse vide
1. From t
2. Aim th
adjust
you wa
3. Tap
pause
a photo
4. Tap
ing a Vid
ord video cli ps
e back camera
s.
e home screen
camera at the
ents. You can t
t the camcorde
to start recor
resume reco rd
.
to stop recordi
o
t normal-speed
ode also allow
> VIDE
ubject and mak
uch any area o
to focus on an
ing. You can ta
ing, or tap
g.
with front or ba
you to record ti
.
any necessary
the screen that
during recordin
/ to
o save the fram
k
me
.
as
•
You ca
in or o
•
When
recordi
You ca
•
To cap
Tap
N
TE:
n pinch or sprea
t before and du
ou tap the scre
ng, the exposur
n drag up o
ure a time-laps
to begin rec
d two fingers on
ing recording.
n to focus durin
bar appears b
r down to adjust
video, tap
rding and
the screen t o z
g normal-speed
side the focus p
the exposure.
> TIMELAP
o stop.
om
oint.
E.
46

c
s
t
S
T
d
k
e
N
h
m
h
n
z
T
a
f
o
e
i
o
m
u
n
e
h
o
a
a
c
o
Y
r
l
p
o
r
O
More
Musi
From the
library to
audio file
can also
GENRE
NO
If an audi
displaye
playback
open the Music
o file is being pl
Apps a
home screen >
or by categori
ouch PLAYLIS
to find songs.
E:
at the bottom o
screen.
d Featur
> Play Mus
library. There y
ed lists or albu
S, ARTISIS, Al
yed, its name a
the screen. Tou
s
c > > Musi
u can view all y
s, and genres.
ms, SONGS, o
d player contro
ch the area to o
ur
ou
s are
en the
Cloc
From the
you to ch
and use t
home screen >
imers.
Set a
1. Open
2. Touc
botto
3. Touc
the Clock app a
a default alarm
the clock to set
ck local time in
ew Alarm
of the screen t
> Clock. Th
places around t
nd touch .
to configure it ,
create a new
the alarm time,
Clock app all
e world, set ala
r touch at t
larm.
nd then touch
ws
ms,
he
K, .
47

b
h
h
o
a
c
s
o
o
a
e
o
d
m
d
o
m
p
t
e
e
c
d
s
e
a
e
s
o
NOTE
To ena
S:
le or disable exi
sting alarms dir
ctly, just slide th
e
switche
Touch
Use Wo
1. Open t
2. Touch
Use the
1. Open t
2. Stopwa
while c
s to the right of
> Setting to c
rld Time
e Clock app an
at the botto
Stopwatch
e Clock app an
tch allows you t
untdown allows
ach alarm.
nfigure alarm s
touch .
to add a new
and Count
touch or
record lap ti me
you to set a tim
ttings.
ity.
own
.
(100 laps at m
and count dow
st),
n to
zero.
File M
Quickly ac
other type
From the h
record.
Touch f
Touch
delete.
nager
ess all of your i
of files on your
me screen >
lders and files
nd hold an item
ages, videos,
hone and on th
> File Manag
o access stored
for more option
48
udio clips, and
e memory card.
r to check the
items.
, such as share
or

Recorder
Recorder enables you to record voice memos and listen to
them whenever y ou like.
1. From the home screen > > Recorder.
2. Touch to start recording. Touch / to pause or
continue the rec ording.
3. Touch Done to stop recor ding.
4. Type the file name and touch DONE to save the recording.
Google Apps
Open the Google apps to use Google services. Some apps are
put in the Google folder on the home screen.
NOTE:
Some contents or Google services may not be available in
certain regions. Some apps will require you to sign in to your
Google account.
Drive: Store files on Google servers for free after you sign
in to your Google account. You can access them on y our
computers, your phones and other devices, share them, or
collaborate with others.
Gmail: Send and receive emails via your Gmail account or
other personal email accounts.
Google: Use Googl e search or get infor m ation when you
need it with Google Now.
49

Maps: Find your place and find your way in the world.
Photos: Manage photos on the phone and your Google
account.
Play Movies & TV: Purchase, download a nd watch the
latest and your f avorite movies and TV s hows.
Play Music: Play music on the phone and on your Google
account.
Play Stor e: Buy and download apps, games, an d other
content from t he Google Play Store.
YouTube: Watch video clips from YouTube.com, or upload
your own and sha re with the world.
50

n
m
e
F
C
t
o
e
o
H
h
eoth
h
e
e
g
w
T
i
o
u
g
t
f
n
n
e
m
k
Setti
From the
contains
phone.
Wirel
Wi-Fi
Turn Wi-
Wi-Fi
Touch to
gs
home screen >
ost of the tools
ss and N
i on or off and c
alling
urn Wi-Fi callin
> Settings.
for customizing
tworks
nfigure your W
settings on or
he Settings
and configur ing
-Fi connections.
ff. Choose pref
your
rred
network f
Blueto
Turn Bl u
connecti
Wi-Fi
1. Touc
N
C
S
r calls.
oth
tooth on or off a
ns.
otspot
Configure and
twork name: E
er devices see
annel: Choose
curity: Choose
nd configure y o
set the followin
nter or edit a ne
hen scannin g
a channel optio
a security optio
r Bluetooth
options.
work SSID (na
or Wi-Fi networ
.
, Open (not
e) that
s.
51

recommended) or WPA2 PSK (other users can ac cess
your Wi-Fi hotspot only if they enter the correct password).
When you select WPA2 PSK, touch the Password field to
edit the security password.
Show password: Chec k to show or hide the password.
Broadcast network name (SSID): Check to broadcast or
uncheck to hide your network name (SSID). If the
broadcast is disabled, oth er users need to get your
network SSI D to find the Wi-Fi hot spot.
2. Touch SAVE to save your settings.
Data Usage
Touch the Cellular data switch to turn on or off mobile data.
You can check how much data has been used during the time
cycle you set, set a mobile dat a limit and warning, or restrict
background data for individual apps .
NOTE:
The data usage is measured by your phone, and your carrier’s
data usage accounting may differ.
Airplane Mode
Touch More > Airplane mode to enable or disable this feature.
When airplane mode is on, Wi-Fi and cellular c onnections are
turned off.
52

Wi-Fi Calling
Touch More > Wi-Fi Calling to turn Wi-Fi calling on or off.
When Wi-Fi calling is on, your phone can route calls via Wi-Fi
networks or your carrier' s networks, depe nding on the strength
of the signal.
Tethering & Portable Hotspot
Touch More > Tethering & portable hotspot to configure
tethering and port able hots pot settings.
VPN
Touch More > VPN to set up and connect to virtual private
networks.
Cellular Networks
Touch More > Cellular network to configure mobil network
settings.
Network Settings Reset
Touch More > Network settings reset to r estore the default
network settings.
53

Device
Quick Launch Button
By default, pr essing and holding the Quick Launch button
launches Phone app. You can change the followi ng settings:
Double-tap for Camera: Enable or disable double-tapping
the Quick Launch button to open th e Camera app.
Long press: Select the app that is launched when you press
and hold the Quick Launch button.
Gestures
Configure options for controlling your device with gestures
Take a screenshot: Enable or disable capturing a screenshot
by pinching with three fingers on the screen.
Switch frequent modes: Enable or disable swiping left or right
in the navigation bar to switch between screen modes.
Switch screens in dual mode: Enable or disable switching
screens in Dual mode by swiping three finger s across the
screens.
Display
Force apps to work with dual-screen: When enable, force
all apps to work with Dual screen mode, whether or not they
support it.
Extend Mode for all apps: When enabled, forces all apps
54

to work with Extended screen mode, whether or not t hey
support it.
Brightness level: Set the brightness of the display.
Adaptive brightness: Automatically adjus t screen
brightness.
Night Light: Manag e the Night Light function. Night Light
tints your screen amber. This makes it easier to look at your
screen or read in dim light, and may help y ou fall asleep
more easily.
W a llpaper:Select a background image for the home screen
and/or the lock s creen.
Sleep: Set the l ength of time of inactiv ity before the screen
turns off automatically.
Screen saver: Manage t he screen saver function. When
this feature is enabled, photos or animations will be
displayed as a s creensaver.
Ambient display: Touch to enable/disable this feature,
which causes the screen to wake whe n you receive
notifications.
Font size: Set the font size of the text on the screen.
Display size: Set the size of the items on the screen.
When device is rotated: Select whether the screen contents
should rotate when the phone is rotated
.
Pulse notificat ion light: Touch to enable/disable this
feature, which causes the Indicator light t o flash to notify
you of missed calls, new messages, and other events.
55

Navigation key light duration: Touch to select navigation
key light duration.
Notifications
Control the display of notifications.
Touch > On the lock screen to enable/dis able
notification displ ay on the lock screen.
Touch an app to control its notifications. You can turn its
notifications off, allow them in Do not disturb mode, allow
pop-up display, or hide content on the lock screen. Options
depend on the ap p.
NOTE:
The notifications of some apps can not be turned off. Content
hiding is only availabl e if you have set a patt ern, a PIN or a
password as the s creen lock.
Sound
Adjust different types of volume, manage Dolby Atmos, select
notification mode, manage Do not disturb settings, set ringt one,
notification, and alarm sounds, or select system sounds .
Apps
See apps installed on your phon e and manage them.
Touch an app to see its information. The following options may
be available:
FORCE STOP: Stop the app.
56

UNINSTALL: Uninstall the app.
DISABLE/ENABLE: Disable or enable the app.
Storage: Check its storage information, clear its data or
cache.
Data usage: Che ck how much data has been used by the
app during the time cycle you set and restrict background
data for the app.
Permissions: Check or change the app permi ssions.
Notifications: Manage the app notifications in the
notification panel and the lock screen. You can set the
priority, sensitivity, and more.
Open by default: Check the app’s supported links and set
whether to open t he links in the app, and clear the app’s
defaults.
Battery: Check how much battery has been used by the
app.
Memory: Check how much memory has been used by the
app.
NOTE:
Not all options are available for the a pps.
Storage
Check memory infor mation for your ex ternal memory card and
internal storage. You can choos e the default location for new
data, such as downloaded files and captured photos.
57

t
o
o
m
t
a
z
r
n
e
>
t
o
t
r
y
o
d
a
t
c
o
c
e
o
E
u
e
o
c
e
n
r
n
g
e
c
r
o
n
y
r
c
h
d
r
r
p
t
t
o
Save loca
files downl
Device st
breakdown
more infor
Portable s
ion: Select the
aded, photos c
rage: Tap Phon
of space usage
orage: Manage
Battery
View the b
and optimi
Tap an
life. Fo
bright
ttery level, che
e battery us e.
example, tap S
ess and/or scr
ation or delete
pp or service t
efault location f
ptured, and voi
> Used spac
by type. Tap a d
he files you do
the memo ry ca
k what has bee
adjust its settin
reen > Reduc
en timeout to
r new data, suc
e recorded.
to get a detaile
ata type to see
ot need.
d, if one is instal
using the batte
s to save batte
the screen
hange screen
as
led.
y,
y
brightn
Tap
prolong
phone.
Not op
Don’t
Tap Ba
configu
battery
battery stan dby
To turn battery
use and improv
Memor
View avera
most mem
ge memory use
ss and sleep.
Battery optim
imized > All ap
ptimize > DON
tery saver. You
e it to turn on a
ry.
ization. Batte ry
time when you’
ptimization off f
ps, tap the app
.
can turn batter
tomatically in o
battery life.
and monitor whi
optimization hel
e not using the
r specific apps,
ame, and then
saver on or off
der to reduce
h apps use the
s
ap
ap
r
58

Call Settings
Configure all call settings.
Connect to PC
Select the USB connection mode between your phone and PC.
Personal
Location
Activate location services to determine your location. To use
location-relate d applications, such as finding your locat ion on
Google Maps, you mus t have location services turned on on
your phone.
1. Slide the switch at the top to turn location services on or off.
2. When location is enabled, touch Mode to select a location
mode.
High accuracy: Get acc urate location using both GPS
and Wi-Fi as well as mobile network s.
Battery saving: Use only Wi-F i and mobile networks to
get your approx imate location. This will drain less power
from your batter y than using GPS.
Device only: Use GPS to pinpoint your location.
In the Location menu, touch Google Locati on History or
Google Location Sharing to configure Google location options
(Google account required).
59

Security
Screen lock: Lock the screen with long press, pattern, PIN,
or password.
Fingerprint: Register up to fi ve fingerprints and enable
them to unlock t he phone or quickly open a selecte d app.
Enable pres sing the Power key/Fingerprint sensor to take a
photo or answer inc oming c alls.
Smart Lock: K eep the phone unlocked when connected to
trusted devices, in trusted places , or unlocked by trusted
faces or voice, or unlocked when your phone is being
carried on the body.
NOTE:
You need to set up a scr een lock on the phone to use the
Smart Lock feature.
Encrypt phone: Your phone is already encrypted.
Set up SIM card lock: Lock the nano-SIM card and change
the SIM PIN.
Lock SIM card: Activate or deactivate the PI N lock to
require PIN before accessing the na no-SIM card.
Change SIM PIN: Change the PIN used t o access the
nano-SIM card.
NOTE:
Put all your confi dential passwords in a s afe place for future
use. If you enter the wrong SIM PIN more times than
allowed, your nano-SIM car d will be locked and you can not
access the mobile phone network. Contact your operator for
60

a PIN Unlock Key (PUK) to restore the nano-SIM card.
Make passwords visible: Display passwords as you enter
them.
Device administr ators: View or deactiv ate apps you have
authorized to be device administrators.
Unknown sources: Check this option to permit installation
of apps from sources other than the Play Store.
Storage type: Check the credential storage type.
Trusted credentials: Display trusted CA certificates.
User credenti als: View and modify stor ed credentials.
Install from SD card: Install certificates from the storage.
Clear credentials: Delete all certificates.
Trust agents: View or deactivate trust agents.
Screen pinning: Keep a scr een of your choice in view, so
that others cannot switch to other apps and access your
personal information.
Apps with usage access: Turn on or off some apps’
access to your phone usage information.
Accounts
Manage your acc ounts and synchronization. Touch Add
account to si gn in to or create accounts on your phone.
Touch an acc ount type to see that type of accounts y ou have
added and adjust the accounts settings.
61

Google
Manage settings for Google apps and services that are installed
on your device.
Languages & Input
Languages: Select a language for your system.
Spell checker: Use Google Spell Checker to check for
spelling errors wh en entering text.
Personal dictionary: Add new words to the phone’s
dictionary or remove words f rom the dictionary. The words
you add are used for spelling check and word sugges tion.
Keyboard & input meth ods: Configure text input settings.
Text-to-speech output:
Preferred engine: Select the s peech synthesis engine
you want to use or change its settings.
Speech rate: Select how quickly you want the
synthesizer to speak.
Pitch: Drag the slider to adjus t the pitch.
Reset speech rate: Reset the speed at which the text is
spoken to normal
Reset speech pitch: Reset the speed at which the text
is spoken to default.
Listen to an example: Play a brief sample of the
speech synthesizer, using your current settings.
Default language status: Ch eck whether the
62

text-to-s peech output feature supports the current
system languag e.
Pointer speed: Select how fast the pointer/mouse should
scroll when you connect the phone to a trackpad or mouse
accessory.
Backup & Reset
Back up my data: Back up app data, Wi-Fi passwords, and
other settings to Google servers after you si gn in to your
Google account.
Backup account: Set the Google account that the data is
backed up to.
Automatic rest or e: Restore previously backed up settings
and data when yo u reinstall an app.
Factory data res et: Reset your phon e to factory default
settings. All your data in the internal s torage will be erased
during the process.
System
Date & Time
Set date, time, time zone, and ti me format, or use
network- provided data.
Accessibility
Configure the system accessibility services and plug-ins on
63

your phone, such as using Color inversion or Display size for
users with low vision..
Printing
Manage printer plug-ins installed from the Play Store or your
printer manufact urer.
About Phone
View phone status, legal information, and other information.
You can also touch Software updates > SD CARD UPDATE to
install updates from update packages copied to the storage
card.
Radio Frequency (RF) Energy
This phone is designed a nd manufactur ed not to exceed the
emission limit s f or exposure to radio frequency (RF) energy set
by the Federal Communications Co mmission of the United
States.
During SAR testing, this device was set to transmit at its highest
certified power lev el in all tested frequency bands, and placed
in positions that simulate RF exposure in usage against the
head with no separation, and near the body with the se paration
of 10mm. Although the SAR is determined at the highest
certified power level, the actual SAR level of the device while
operating can be well below the maximum value.
64

This is because the phone is des igned to operate at multiple
power levels so as to use only the power required to reach the
network. In general, the clos er you are to a wireless base
station antenna, the lower the power output.
The exposure standard for wireless devices employing a unit of
measurement is known as the Specific Absorption Rate, or
SAR. The SAR limit set by the FCC is 1.6 W/kg.
This device is complied with SAR for general population
/uncontrolled ex posure limits in ANSI/IEEE C95.1-1992 and
had been teste d in accordance with the measurement methods
and procedures specified in IEEE1528.
The FCC has gra nted an Equipment Authorization for this
model phone with all reported SAR levels evaluated as in
compliance with the FCC RF exposure guidelin es. SAR
information on this model phone is on file with the FCC and can
be found under the Display Grant sec tion of
www.fcc.gov/oet/ea/f ccid after searchi ng on FCC ID: SRQZTEZ999.
For this device, the highest report ed SAR value for usage
against the he ad is 1.064W/kg, for usage near the bo dy is
1.301W/kg.
While there may be differences between the SAR levels of
various phones and at various positions, they all meet the
government requirements.
SAR compliance for body-worn operation is based on a
separation dist ance of 10 mm between the unit and the human
body. Carry this device at least 10 mm away from your body to
65

u
h
o
r
e
e
e
o
h
r
e
r
r
n
g
:
m
C
c
n
a
w
s
p
w
n
e
s
w
e
e
e
o
p
r
C
)
e
p
y
s
n
t
d
h
i
a
c
a
h
ensure RF
level. To s
holsters, w
a separati
RF exposu
contains m
body-worn
FCC R
This devic
is subject t
not cause
any interfe
exposure lev el
pport body-w or
ich do not cont
n of 10 mm bet
e compliance w
tal, was not tes
accessory shoul
gulation
complies with
the following t
armful interfere
ence received, i
ompliant or low
operation, cho
in metallic com
een this devic e
ith any body-wo
ted and cert ified
d be avoided.
art 15 of the FC
o conditions: (1
ce, and (2) this
ncluding interfer
r to the reporte
se the belt clips
onents, to main
and your body.
n accessory, w
, and using such
Rules. Operat
This device m
device must ac
nce that may
or
ain
ich
on
y
ept
cause und
CAUTI
Changes o
manufactu
equipment.
The anten
or operatin
transmitter.
NOTE
This equip
limits for a
FCC Rules
sired operat i o n.
ON:
modifications n
er could void th
a(s) used for thi
in conjuncti on
ent has bee n t
lass B digital d
.
ot express ly ap
user’s authorit
transmitter mu
ith any other a
sted and found
vice, pursuant
roved by the
to operate t he
t not be co-loc
tenna or
to comply with t
o part 15 of the
ted
e
66

These limits are designed to provid e reasonable protection
against harmful i nterference in a reside ntial installation. This
equipment gen erates, uses and can radiate radio frequency
energy and, if not installed and used in accordance with the
instructions , may cause harmful interference to radio
communications. However, there is no guarantee that
interference will n ot occur in a particular installation. If this
equipment does cause harmful i nterference to radio or
television rec eption, which can be det ermined by turning the
equipment off and on, the user is encouraged to try to correc t
the interference by one or more of the following measures:
Reorient or relocate the receiving antenna.
Increase the sepa ration between the equi pment an d re cei ver.
Connect the equipment into an outlet on a circuit different
from that to which the r eceiver is connected.
Consult the dealer or an experienced radio/TV technician for
help.
67

r
e
a
o
Enquei
In home scr
ing the E-l
en, Settings->Ab
bel
ut phone-Regulatory labels
68
 Loading...