

Page 1

CDMA 2000 Wireless data terminal
User Manual
The manual is applicable for the
AR910.
Page 2

文档信息
版本 修订日期 修订人 软件版本 备注
1.0
2010 年 5
刘红梅
Page 3

Copyright © 2011 by ZTE Corporation
All rights reserved.
No part of this publication may be quoted, reproduced, translated or used
in any form or by any means, electronic or mechanical, including
photocopying and microfilm, without the prior written permission of ZTE
Corporation.
ZTE Corporation reserves the right to make modifications on print errors or
update specifications in this manual without prior notice.
Version 1.0 in May. 2011
Page 4

Contents
Let’s get started ...................................................................................................... 1
Lost or stolen? ..................................................................................................... 1
Using your router safely ....................................................................................... 2
Battery care and safety ........................................................................................ 5
Charger care and safety ....................................................................................... 6
Getting to know your router .................................................................................. 9
Using the battery ................................................................................................. 1 1
Inserting the battery ..................................................................................... 11
Removing the battery .................................................................................. 11
Charging the battery ................................................................................... 12
External charging ....................................................................................... 13
Inserting and removing the UIM ......................................................................... 13
Inserting and removing a memory card .............................................................. 14
Power on/off ....................................................................................................... 15
Power on .................................................................................................... 15
Power off .................................................................................................... 15
Restore factory settings ..................................................................................... 15
Page 5

LED ........................................................................................................................ 16
Functions of Data card ......................................................................................... 17
Install .................................................................................................................. 17
Onscreen icons .................................................................................................. 19
Uninstall ............................................................................................................. 20
Functions of router ............................................................................................... 21
Visit WEB UI ....................................................................................................... 21
Onscreen icons .................................................................................................. 22
Wireless Settings ............................................................................................... 22
Basic settings ............................................................................................. 22
Web UI dial settings .................................................................................... 23
Security settings ......................................................................................... 24
Appendix ............................................................................................................... 25
Care and maintenance ....................................................................................... 25
FCC regulations ................................................................................................. 27
Declaration of RoHS compliance ........................................................................ 31
Disposal of your old router ................................................................................. 32
Problems and their solutions ............................................................................... 33
Page 6

Page 7

Let’s get started
Let’s get started
Thanks for choosing the ZTE-AR910. It’s a CDMA 2000 Wireless data
terminal, which we’ll simply call ‘router’ from now on.
If you’d like your router to live a long and fruitful life, please read this guide
carefully and keep it for future reference. You never know when you might
need it.
And don’t worry if the pictures we use to demonstrate your router’s
functions look a little different from what you see on its screen. It’s the
functions they show that matter.
Lost or stolen?
If your router goes missing, please tell your service provider as soon as
you know. That way other people can be barred from using it.
We’d strongly advise you to set a PIN, and change it from time to time.
1
Page 8

Let’s get started
Using your router safely
on the road
Using a router while driving is illegal in many countries. Please follow
local laws and drive safely at all times.
near sensitive electronics
Don’t use your router near sensitive electronic equipment – particularly
medical devices such as pacemakers – as it could cause them to
malfunction. It can also interfere with the operation of fire detectors and
other automatic-control equipment.
For more information about how your router affects pacemakers or
other electronic equipment, please contact the manufacturer or your
local distributor.
Your router may cause interference when used near TVs, radios or
automated office equipment.
while flying
Your router can cause interference with aircraft equipment. So it’s
2
Page 9

Let’s get started
essential you follow airline regulations. And if airline personnel ask you
to switch off your router, or disable its wireless functions, please do as
they say.
in hospital
Your router may interfere with the normal operation of medical
equipment. Follow all hospital regulations and turn it off when you’re
asked to by posted warnings or medical staff.
at a petrol station
Don’t use your router at petrol stations. In fact, it’s always best to switch
off whenever you’re near fuels, chemicals or explosives.
around water
Keep your router away from water (or any other liquid). It’s not a
waterproof model.
making repairs
Never take your router apart. Please leave that to the professionals.
Unauthorised repairs could break the terms of your warranty.
3
Page 10

Let’s get started
Keep your mobile out of children’s reach. It should never be used as a
around children
toy and it might not be good for their health.
original accessories
Only use the original accessories supplied with your router or those
approved by the manufacturer. Using unapproved accessories may
affect performance, make the warranty void, break national regulations
on the use of routers, or even cause injury.
near explosives
Turn off your router in or near areas where explosive materials are used.
Always obey local laws and turn off your router when requested.
working temperature
The working temperature for the router is between 0℃ and 40℃.
Please don’t use the router outside the range. Using the router under
4
Page 11

Let’s get started
too high or too low temperature might cause problems.
Battery care and safety
Keep the battery in a cool, ventilated place and out of direct sunlight.
Although the battery is rechargeable, it’ll eventually start to lose its
ability to recharge. If you find that the battery won’t recharge, it’s time to
replace it.
Please don’t throw old batteries into your household rubbish. You’ll find
there are special bins for batteries at refuse collection points. And some
high street electrical stores provide a battery recycling service too.
Never throw the battery into a fire – it’s highly inflammable and could
explode, hurting you or somebody else.
When you put the battery into your router, there’s no need to use force.
Exerting too much pressure could make it leak, overheat, explode or
burst into flame.
Never take the battery apart. This may result in leakage, overheating,
explosion or fire.
If the battery becomes hot, changes colour or shape at any time (when
in use, charging or even while in storage) please stop using it
5
Page 12

Let’s get started
immediately and replace.
Keep the battery dry. Damp or wet conditions can cause it to overheat
or corrode.
Don’t leave the battery in direct sunlight or anywhere really hot, like in a
car on a summer’s day. That could make it leak or overheat, while
lowering its performance and shortening its life.
Don’t charge the battery continuously for 24 hours. Overcharging is not
good for it.
Note:
Please avoid contact with the materials inside a damaged or
leaking battery. If they get on your skin, wash with lots of water
and seek medical assistance if required.
Charger care and safety
Only plug into voltages between 110VAC and 220VAC. Using a voltage
outside that range can damage the router/charger – and cause the
6
Page 13

Let’s get started
battery to leak or catch fire.
Never short-circuit the charger – this may cause electrocution,
overheating or damage.
Don’t charge the router in direct sunlight or in an area where it’s damp,
dusty, or on a vibrating surface. And charging your router near – or on –
a TV or radio could interfere with transmission.
Don’t use the charger if the power cable is damaged. It may cause a fire
or give someone an electric shock.
Keep water well away from the charger. If the charger does get
splashed by water, or any other kind of liquid, immediately unplug it to
avoid overheating, fire or electrocution.
Don’t take the charger apart. It could cause injury, give you an electric
shock or catch fire.
Never touch any charger, electric cable or socket with wet hands.
Don’t place heavy objects on the electric cable.
If the cable is damaged, don’t try to mend it yourself – it could cause a
fire or electrocute you.
Always unplug the charger before you clean it.
When unplugging the charger, hold the plug itself, rather than pulling on
7
Page 14

Let’s get started
the cable. A damaged cable can cause electrocution or fire.
8
Page 15
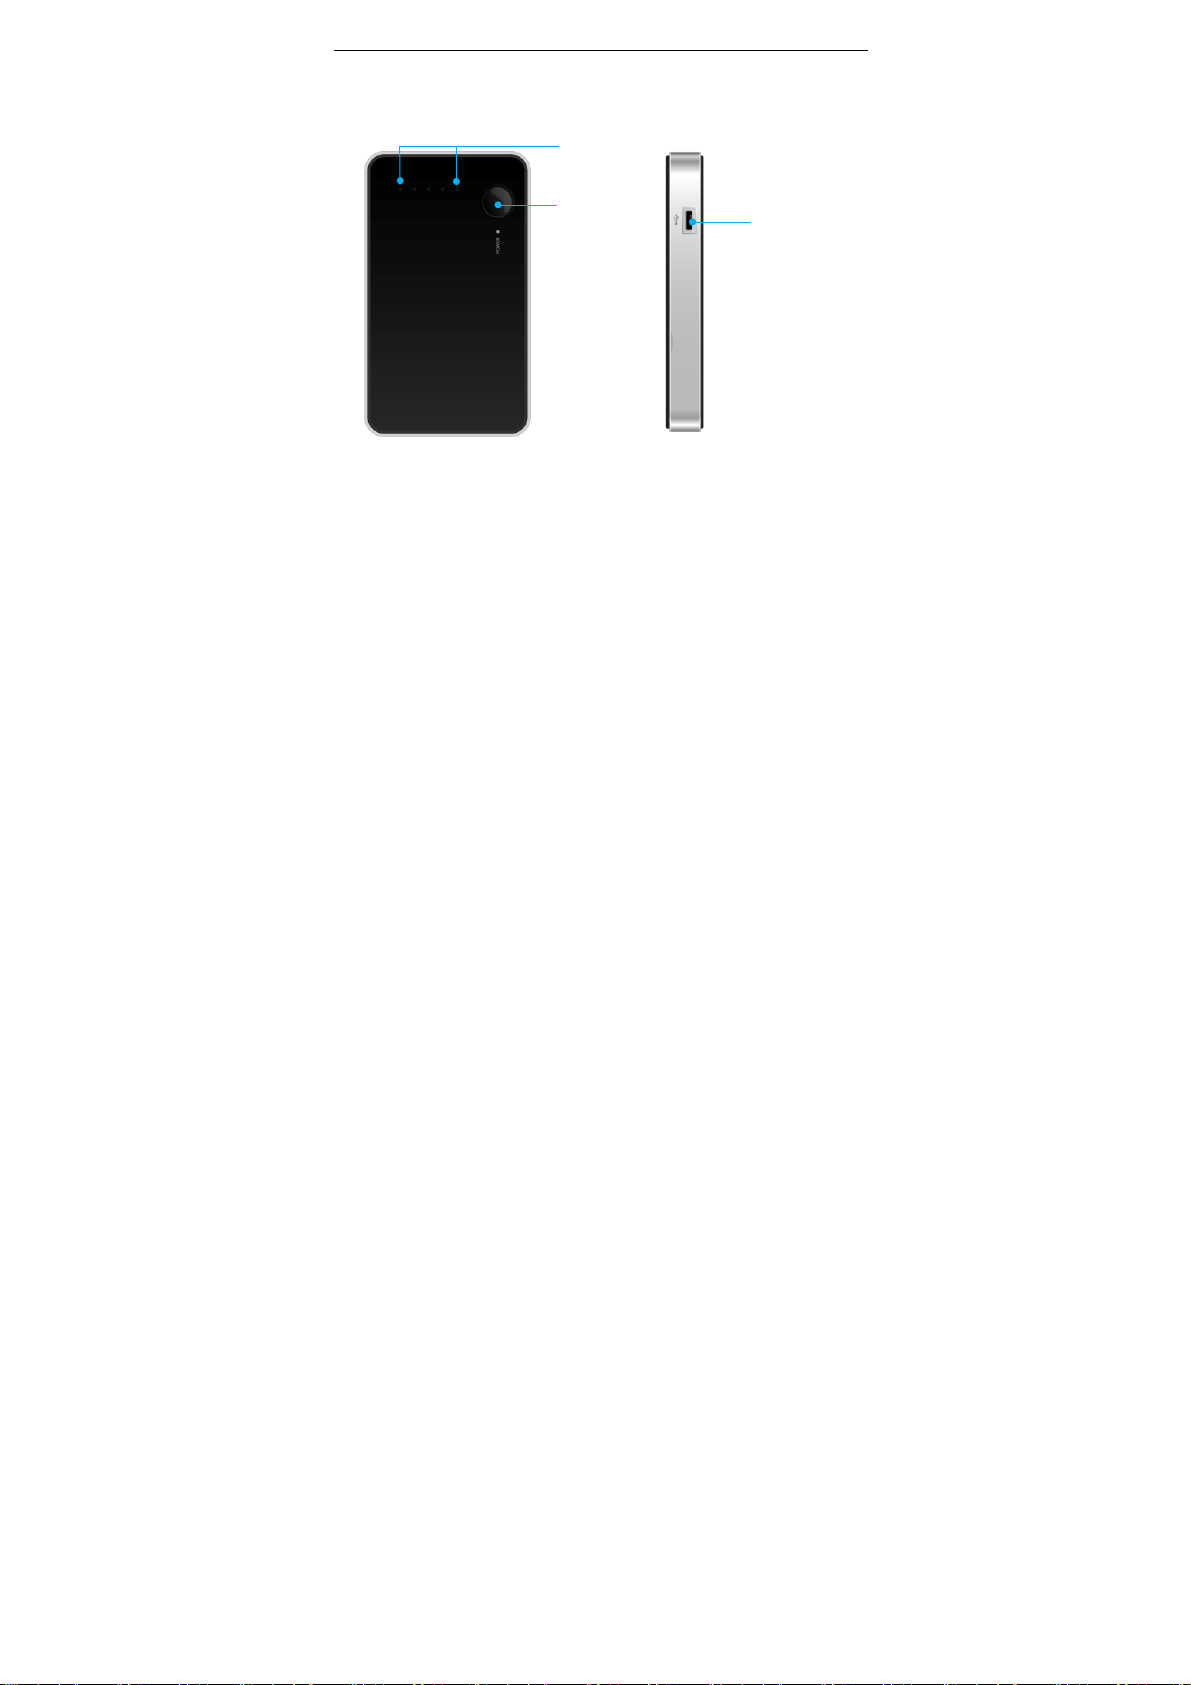
Getting to know your router
LED light
Power key
9
Let’s get started
USB
Page 16

Let’s get started
Note:
Your router might look a little different.
In this user guide, ‘press’ means pressing the key and then
releasing.
‘Hold’ means pressing and holding the key for two seconds or
more.
10
Page 17

Let’s get started
Using the battery
Inserting the battery
1. Open the battery cover on the back of your router.
2. Align the battery's contact points with those of the router and gently
press the battery down into place.
3. Replace the battery cover clicking it back into position.
Removing the battery
1. Switch off your router.
2. Open the battery cover.
3. Lift the battery up and out of your router.
11
Page 18

Let’s get started
Charging the battery
The rechargeable Li-ion battery that comes with your
router is ready to use, but is not charged. That’s easy
to do. We’ll show you how below.
The first three times you use the battery, make sure it’s
completely drained before recharging. And then recharge it fully. That will
help to ensure its optimum performance and a long life.
1. Connect the charger to your router, and plug it into an 110V/220V
socket.
2. The middle LED on the router lights up always while charging.
3. During charging, the first LED near the power key keeps red always; if
this LED keeps green, it indicates the charging is completed. During
charging, the battery, router and charger will normally become hot.
12
Page 19
Let’s get started
4. Disconnect the charger from your router, and unplug.
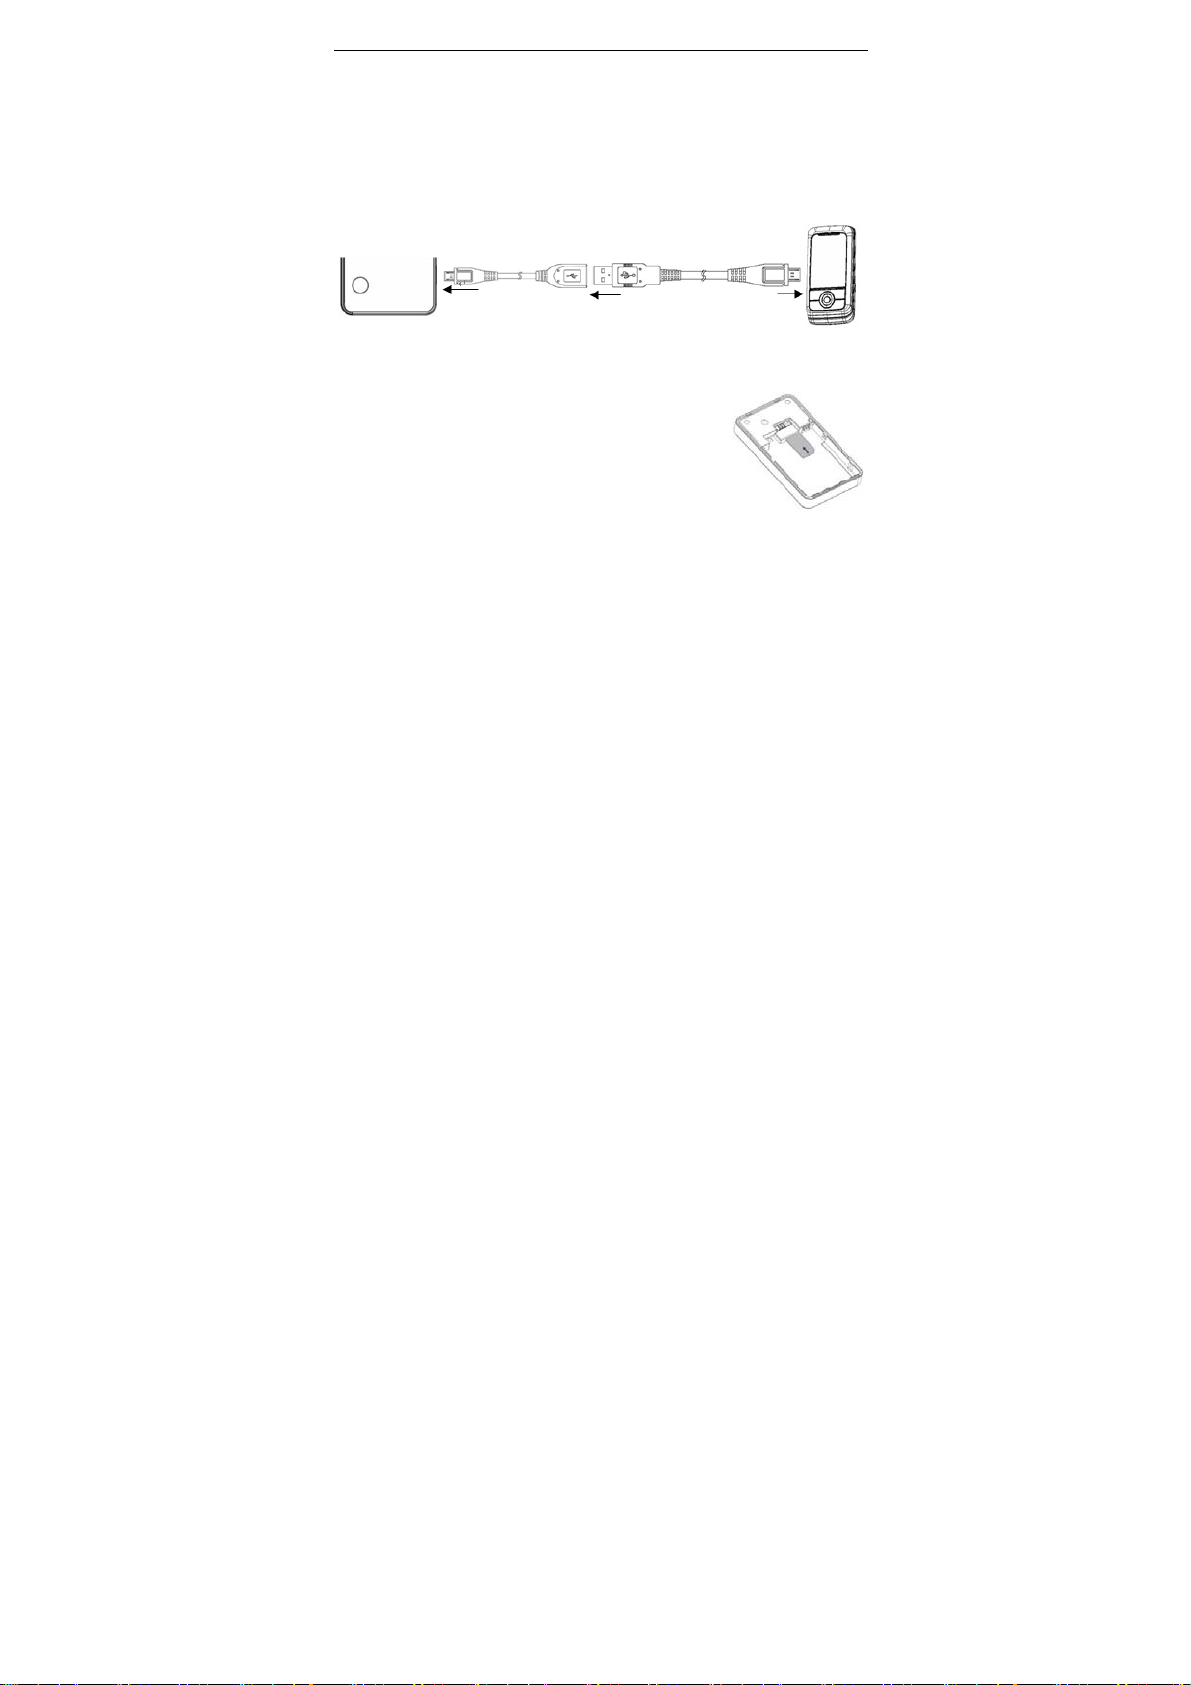
External charging
The product can be used to charge the mobile phone, MP3/MP4 player,
Bluetooth earpiece, etc. Connect one end of the charging cable to the
router’s charging interface, and another end to the USB port of external
device’s data cable.
Inserting and removing the UIM
Your router needs a valid UIM card to work (…To
keep it simple, we’ll just call it ‘UIM’ from now on).
Your network connection data and your UIM address
book are saved on the UIM. So, to avoid damaging
your UIM or losing data, try not to touch the metal
13
Page 20

Let’s get started
surface when you’re handling it – and keep well away from any magnetic or
electric source.
here’s what you do…
1. Switch off your router and disconnect any external power.
2. Remove the back cover and then the battery.
3. Hold your UIM on the cut corner, and slide it – face down – into the card
holder.
4. Insert the battery.
5. Replace the back cover.
Inserting and removing a memory card
1. Turn off your mobile router, remove the battery
and disconnect any external power.
2. Insert a memory card in the direction indicated by
the arrow.
3. But always remember to turn you r router off and
14
Page 21

Let’s get started
take the UIM out before removing the memory card.
Note:
Removing or inserting a memory card when your phone is
turned on could not only damage it and your phone, but also
destroy any data saved on the card.
Power on/off
Power on
Hold the power key until the LED turns on.
Power off
Hold the power key and then release the key to turn off the LED.
Restore factory settings
As the router is working, press the power key continuously 5 times to
restore factory settings.
15
Page 22

LED
LED
There are five LEDs on the router. The first LED near the power key
displays red and green, and other LEDs display green only.
Functions Descriptions
Power on Hold the power key until the LEDs turn on one by one.
Power off
Charge
Low battery
alert
Data activated The middle LED turns green and blinks quickly.
Data
deactivated
Check Press the power key to display the battery capacity and
Hold the power key and then release it to turn off all the
LEDs.
During charging, the first LED near the power key keeps
red always; if this LED keeps green, it indicates the
charging is completed.
The first LED near the power key turns red and blinks
quickly.
The middle LED turns green and blinks slowly.
the signal strength. The number of power-on LEDs
16
Page 23

Functions of Data card
depends on the battery capacity and signal strength.
Wi-Fi off The LED which is most distant to the power key blinks.
Functions of Data card
When connected with the PC, the router can be used as a data card. It
supports Windows 2000/XP/Vista/7, MAC and Linux operating system. In
the area where there is signal, it allows you to go surfing on the Internet.
Note:
As the router is used as a data card, the Wi-Fi function is Off
Install
1. Please connect the router with PC through USB interface. You could
2. The installation driver will automatically run. Please follow the wizard to
automatically.
use the USB extension cable to connect.
17
Page 24

Functions of Data card
install.
3. The system will automatically find new hardware and install the driver.
Wait for a while. Click “Finish” after the installation is completed.
Note:
If your CD-ROM autorun function is prohibited by the firewall,
the auto installation interface will not appear. In this case, go to
“My computer” to find the virtual CD-ROM and run the relevant
installation application in the virtual CD-ROM.
After the application is installed successfully, the application icon will
appear on your desktop. Double-click this icon, run the application to
display the user interface.
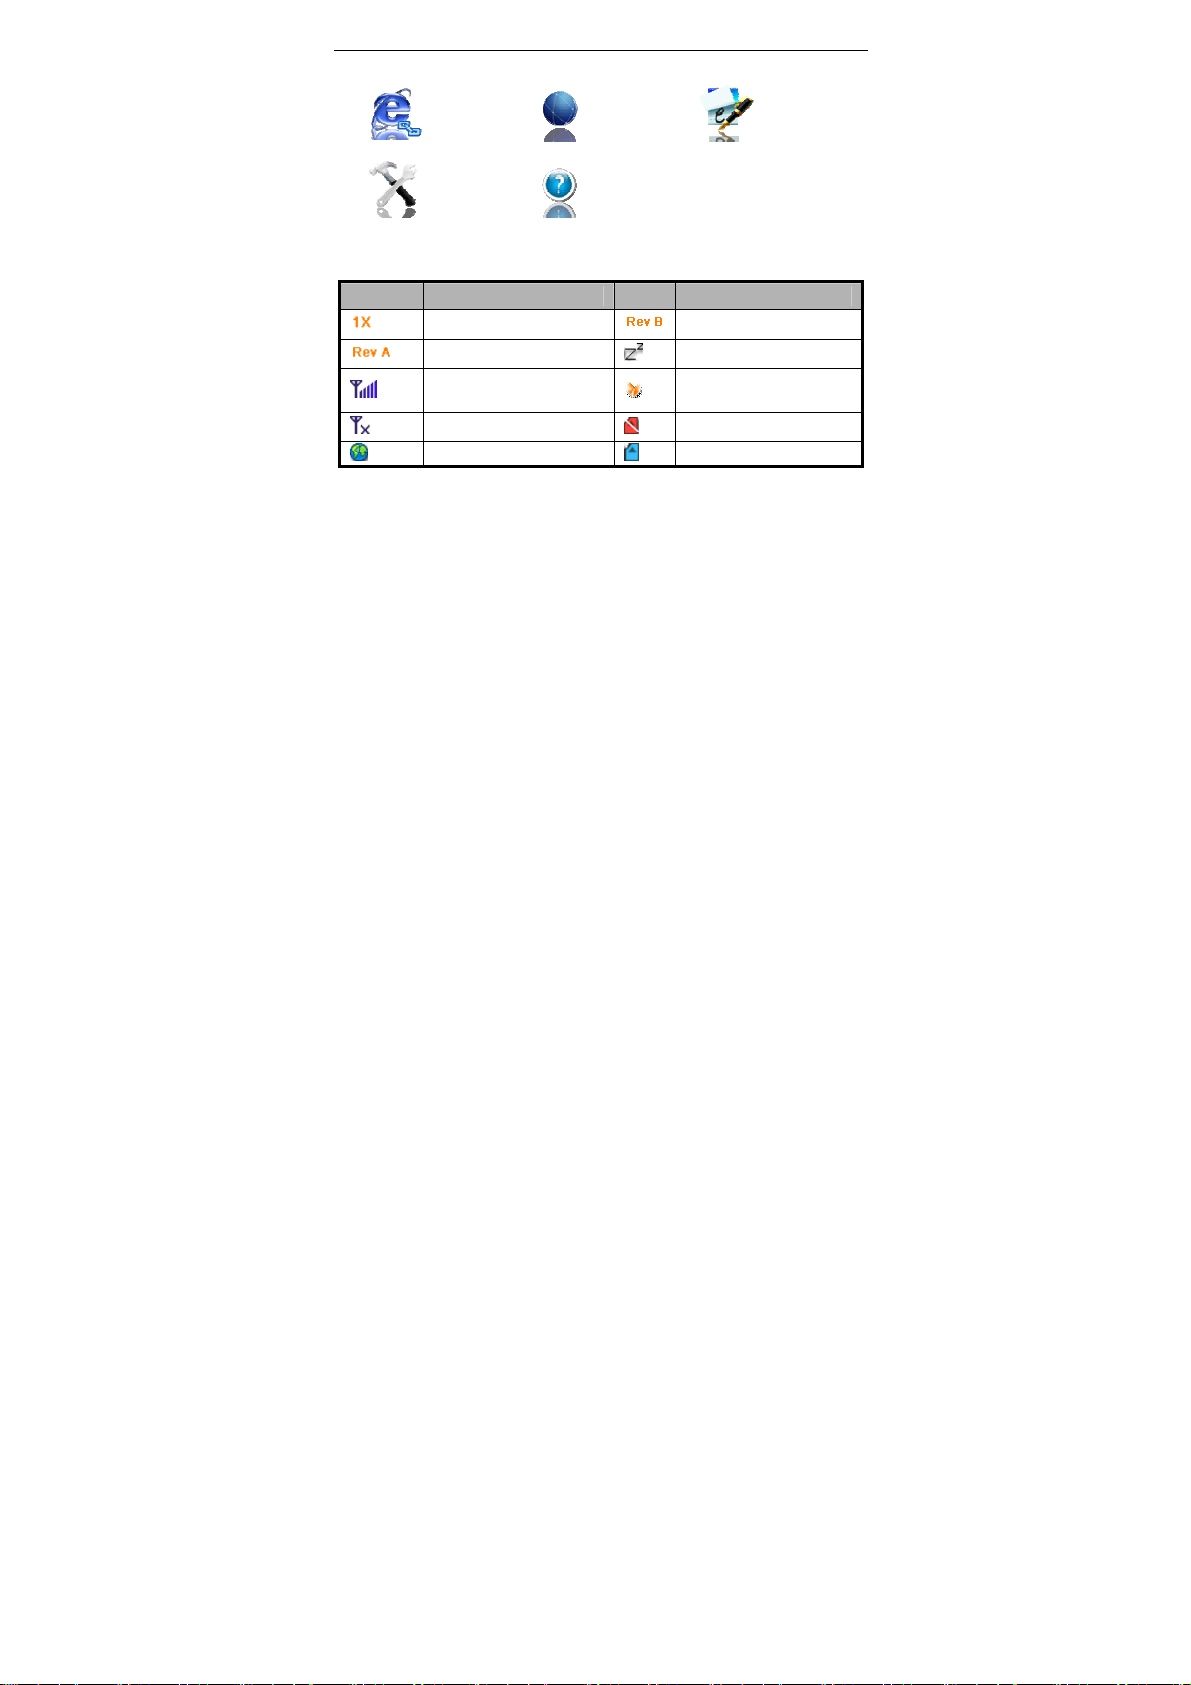
The icons on the interface are used to access the following functions in the
table below:
18
Page 25
Functions of Data card
Open URL
Settings
NetConne
ct
Help
Onscreen icons
Icons Descriptions Icons Descriptions
1X indication
EVDO Rev A network
indication
Signal strength indication, the
more bars there are, the
stronger the signal is.
CDMA network unavailable
Connection indication
19
EVDO Rev B network
indication
Sleep indication
Roaming indication
No UIM card inserted
indication
UIM card inserted indication
NetConne
ct Log
Page 26

Functions of Data card
Note:
Your router might not support EVDO Rev B network, therefore
the corresponding icon will not appear in the main window.
Uninstall
1. Select Start All Programs ZTEMT Uninstall ZTEMT UI,
and you will be asked if you want to remove the program. Click “Yes”.
2. Please wait and then click “OK” when un-installation is completed.
20
Page 27

Functions of router
Functions of router
Note:
1. Prior to use, please check if your computer has Wi-Fi
function or not
2. The router only supports the main stream browsers, e.g.,
Visit WEB UI
1. Click the icon “Wireless Network Connection” in the right-down corner,
find AR910-XXX in the network list and click “Connect”.
2. Run IE browser and input http://192.168.1.1.
3. Input the username: admin and password: admin to enter the user
interface.
4. In the user interface, go to Management homepage Network
connection
IE6+, firefox 3+, etc.
Auto connect or not and select “Yes” or “No”. Click
21
Page 28

Functions of router
“Connect” to manually connect to the network if you select “No”; after
settings, please click “Apply” to save the settings.
Onscreen icons
Icons Descriptions Icons Descriptions
3G network
indication
Connected Disconnected
Connecting
Battery capacity
Disconnection
Wireless Settings
Basic settings
Current profile: display the current network status.
Network name: display the current router’s part number.
Network broadcast: the default is ON. The terminal can find the
wireless network during wireless network scanning only as the
22
Page 29

Functions of router
network broadcast is turned ON.
MAC address: display the current MAC address in use.
Network mode: G-only, B-only, B/G Mixed and B/G/N Mixed. The
default is G-only.
Channel: auto, from 1 to 14; the default is 11.
After settings, please click “Apply” to save the settings, click “Reset” to
reset the modified data sheets.
Web UI dial settings
In user interface, go to Advanced settings PPP settings to set the
relevant network parameters (dial number, username, password) and
authentication type.
After settings, please click “Apply” to save the current settings, click
“Reset” and then “Apply” button to restore the current settings to the factory
default settings.
Dial number: #777
Username: card
Password: card
Authentication type: AUTO/PAP/CHAP
23
Page 30

Functions of router
Security settings
Security type: there are five types: Open, WEP, WPA-PSK,
WPA2-PSK and WPA/WPA2 Mixed. The default is Open.
WPA arithmetic: TKIP , AES and TKIP+AES.
WPA password: display WPA password.
Group key update time: set the relevant time.
After settings, please click “Apply” to save the current settings, click
“Reset” to reset the modified data sheets.
24
Page 31

Appendix
Appendix
Care and maintenance
Y our router is a delicate device. The following advice w ill help you to keep it
looking good and performing well…
Use a soft dry cloth to clean your router, battery and charger. Don’t use
liquids such as alcohol, dilution agents or benzene.
From time-to-time, clean the socket where the charger cable connects
to the router. Dust tends to gather there. This will ensure a really good
connection.
Don’t use needles, pen points or other sharp objects on the keypad or
screen.
Don’t use your router with wet hands – it could injure you and damage
the router.
Don’t use your router in dusty or dirty environment.
Keep your router away from extremes of heat – like radiators or ovens.
It may explode if it gets too hot.
If your router gets wet and the colour of the label on it changes, the
warranty will be void, even if the warranty period hasn’t expired.
25
Page 32

Appendix
If there’s anything wrong with the router, battery, charger, or any
accessory, please send them to your nearest service centre for
inspection.
26
Page 33

Appendix
FCC regulations
This mobile phone complies with part 15 of the FCC Rule s. Operation i s subj ect to
the following two conditions: (1) This device may not cause harmful interference,
and (2) this device must accept any interference received, including interference
that may cause undesired operation.
NOTE: The manufacturer is not responsible for any radio or TV interference
caused by unauthorized modifications to this equipment. Such modi fications could
void the user’s authority to operate the equipment.
NOTE: This equipment has been tested and found to comply with the limits for a
Class B digital device, pursuant to part 15 of the FCC Rules. These limits are
designed to provide reasonable protection against harmful interference in a
residential installation. This equipment generates uses and can radiate radio
frequency energy and, if not installed a nd u sed in a ccorda nce w ith the instruction s,
may cause harmful interference to radio communications. However, there is no
guarantee that interference will not occur in a particular installation. If this
equipment does cause harmful interference to radio or television reception, which
can be determined by turning the equipment off and on, th e user is encouraged to
try to correct the interference by one or more of the following measures:
27
Page 34

Appendix
- Reorient or relocate the receiving antenna.
- Increase the separation between the equipment and receiver.
-Connect the equipment into an outlet on a circuit different from that to which the
receiver is connected.
-Consult the dealer or an experienced radio/TV technician for help
28
Page 35

Appendix
4RF exposure information (SAR)
This mobile phone meets the government’s requirements for exposure to radio
waves.
This phone is designed and manufactured not to exceed the emission limits for
exposure to radio frequency (RF) energy set by the Federal Communications
Commission of the U.S. Government.
The exposure standard for wireless mobile phones employs a unit of measurement
known as the Specific Absorption Rate, or SAR. The SAR limit set by the FCC is
*
1.6W/kg.
by the FCC with the phone transmitting at its highest certified power level in all tested
frequency bands. Although the SAR is determined at the highest certi fied power level,
the actual SAR level of the phone while operating can be well below the maximum
value. This is because the phone is designed to opera te a t multiple pow er levels so a s
to use only the poser required to rea ch the ne tw ork. In general, the closer you are to a
wireless base station antenna, the lower the power output.
The highest SAR value for the model phone as reported to the FCC, described in this
user guide, is
(Body-worn measurements differ among phone models, depending upon available
Tests for SAR are conducted using standard operating positions accepted
Position 800MHz (W/Kg) 1900MHz (W/Kg)
Body 1.315 1.309
WIFI(W/Kg)
0.188
29
Page 36

Appendix
accessories and FCC requirements.)
While there may be differences between the SAR levels of various phones and at
various positions, they all meet the government requirement.
The FCC has granted an Equipment Authorization for this model with all reported
SAR levels evaluated as in compliance with the FCC RF exposure guidelines. SAR
information on this model phone is on file with the FCC and can be found under the
Display Grant section of http://www.fcc.gov/oet/fccid
Q78-AR910.
For body worn operation, this wireless data terminal has been tested and meets the
FCC RF exposure guidelines for use with an accessory that cont ains n o met al and the
positions the wireless data terminal a minimum of 1 cm from the body. Use of other
accessories may not ensure compliance with FCC RF exposure guidelines. If you do
not use a body-worn accessory and are not holding the phone at the ear, position the
wireless data terminal a minimum of 1cm from your body when the phone is switched
on.
This device is compliance with SAR for general population /uncontrolled exposure
limits in ANSI/IEEE C95.1-1999 and had been tested in accordance with the
measurement methods and procedures specified in OET Bulletin 65 Supplement C.
30
after searching on FCC ID:
Page 37

Appendix
Declaration of RoHS compliance
We’re determined to reduce the impact we have on the environment and take
responsibility for the earth we live on. So this document allows us to formally declare
AR910, manufactured by ZTE CORPORATION, fully complies with the
that the
European Parliament’s RoHS (Restriction of Hazardous Substances) Directive
2011/65/EC, with respect to all the following substances:
(1) Lead (Pb)
(2) Mercury (Hg)
(3) Cadmium (Cd)
(4) Hexavalent Chromium (Cr (VI))
(5) Polybrominated biphenyl (PBB)
(6) Polybrominated diphenyl ether (PBDE)
Our compliance is witnessed by written declaration from our suppliers. This confirms
that any potential trace contamination levels of the substances listed above are below
the maximum level set by EU2011/65/EC, or are exempt due to their application.
The AR910 manufactured by ZTE CORPORATION, meets all the requirements of EU
2011/65/EC.
31
Page 38

Appendix
Disposal of your old router
1. When the wheelie bin symbol is attached to a product, it
means the product is covered by the European Directive
2011/65//CE.
2. All electrical and electronic products should be disposed of
separately from normal household waste via designated
collection points provided by government or local
authorities.
3. The correct disposal of electrical and electronic products
will help protect the environment and human health.
32
Page 39

Problems and their solutions
g
g
r
Problems and their solutions
Symptoms Possible Causes Solutions
Unable to turn on
the router
Automatic
power-off
Inadequate
standby time
Unable to
connect the
network
Inadequate battery
capacity
Poor contact Reinstall the battery
Seriously poor
battery capacity
Deceasing of
battery
performance
Poor network
si
nal
Poor network
Out of the service
area
Charge the battery
Recharge the battery
Replace the battery
Turn off the router as the
si
nal is poo
Move to other places
Make sure your router is in
CDMA network service area
33
 Loading...