


Accessories 4 - 5
Table 4-2 LED Charging Status Indicators
|
LED |
Indication |
|
|
|
|
|
Mobile Computer Charging (LED on mobile computer) |
|
||
|
|
|
|
Off |
|
Mobile computer not placed correctly in the cradle; cable not connected correctly; |
|
|
|
charger is not powered. |
|
|
|
|
|
Fast Blinking Amber |
Preliminary |
||
Error in charging; check placement of mobile computer. |
|||
Slow Blinking Amber |
Mobile computer is charging. |
|
|
Solid Amber |
Charging complete. |
|
|
|
|
Note: When the battery is initially inserted in the mobile compute , the amber LED flashes |
|
|
|
once if the battery power is low or the b |
ttery is not fully inse ted. |
Spare Battery Charging (LED on cradle) |
|
||
Off |
|
No spare battery slot; spare battery |
ot pl ced correctly; cr dle is not powered. |
Fast Blinking Amber |
Error charging; check placeme t of sp re b ttery. |
||
Slow Blinking Amber |
Spare battery is charg ng. |
|
|
Solid Amber |
Charging complete. |
|
|

4 - 6 MC31XX Series Mobile Computer User Guide
Four Slot Cradles
CAUTION Ensure that you follow the guidelines for battery safety described in Battery Safety Guidelines on page 5-2.
There are two four slot cradles, Four Slot Charge Only cradle and Four Slot Ethernet cradle. The Four Slot EthernetPreliminarycradle provides Ethernet communications. Both four slot cradles:
• Provide 5.4 VDC power for operating the mobile computer and charging the battery.
• Simultaneously charges up to four mobile computers.
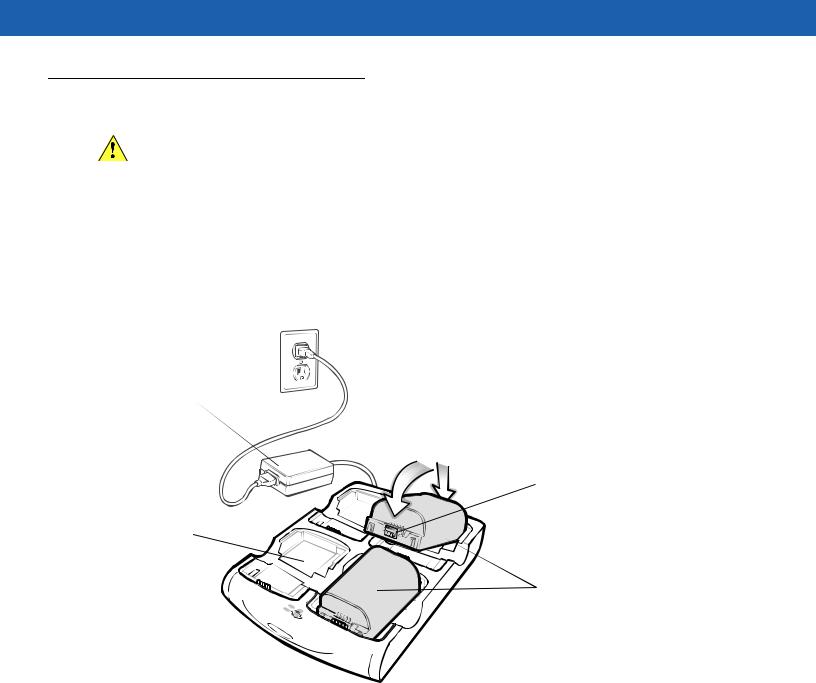
Battery Charging
The four slot cradle can charge up to four mobile computers simult neously. To ch ge the mobile computer:
1. Slide the mobile computer into the mobile computer slot.
 Ch rge LED Indic tor (amber)


 Scan/Charge Indicator LED Bar
 Mobile Computer Slot
Speed LED (Ethernet Cradle Only)
 Link LED (Ethernet Cradle Only)
 Power LED (Charge Only Cradle)
Figure 4-2 Four Slot Cradles
2. The mobile computer amber Charge LED Indicator, indicates the mobile computer battery charging status. The Standard Battery usually charges less than four hours and the Extended Life Battery usually charges in less than six hours. See Table 4-2 for charging status indications.
3.When charging is complete, remove the mobile computer from the cradle.
LED Charge Indications
The Four Slot cradles use the mobile computer amber Charge LED Indicator to indicate the battery charging status. See Table 4-2 on page 4-5 for charging status indications.

Accessories 4 - 7
Power LED
The green Power LED (only on the Four Slot Charge Only cradle) lights to indicate that the Four Slot Charge Only cradle is connected to a power source.
Speed LED
The green Speed LED (only on the Four Slot Ethernet cradle) lights to indicate that the transfer rate is 100 Mbps. When itPreliminaryis not lit it indicates that the transfer rate is 10 Mbps.
The yellow Link LED (only on the Four Slot Ethernet cradle) blinks to indicate activit , or sta s lit to indicate that a link is established. When it is not lit, it indicates that there is no link.
4 - 8 MC31XX Series Mobile Computer User Guide
Four Slot Spare Battery Charger
CAUTION Ensure that you follow the guidelines for battery safety described in Battery Safety Guidelines on page 5-2.
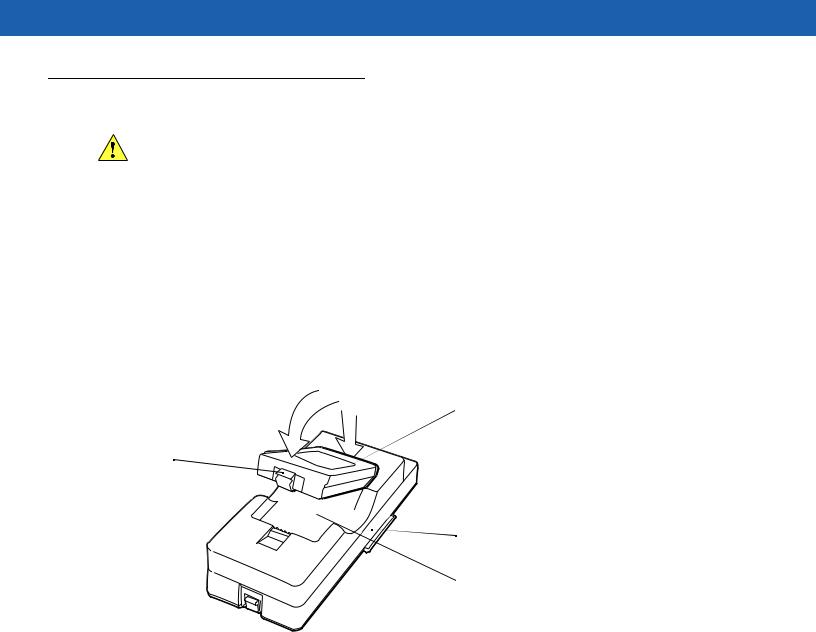
The Four Slot Spare Battery Charger simultaneously charges up to four spare batteries.
Spare Battery Charging
To charge up to four MC31XX spare batteries:
1. Insert the spare battery into the spare battery charging slot, bottom fi st.
2. Pivot the top of the battery down onto the contact pins.
Power Supply
2
1 |
Battery |
||
|
|
|
|
|
|
|
Clip |
Spare |
|
||
Battery |
|
|
|
|
|
||
|
|
||
Charging |
|
||
Slot |
|
||
|
|
|
Spare |
Spare Batte y |
Batteries |
||
|
|||
Cha ging |
|
||
LEDs (4) |
|
||
Figure 4-3 Four Slot Spare Battery Charger
3. |
Gently press down on the battery to ensure proper contact. The Standard Battery usually charges in less than |
|
four hours and the Extended Life Battery usually charges less than six hours. See Table 4-2 on page 4-5 for |
|
charging status indications. |
4. |
When charging is complete, press the battery clip and lift battery out of the slot. |
|
Preliminary |
LED Charge Indications
The Spare Battery Charging LEDs indicate the spare battery charging status. The Spare Battery Charging LEDs are arranged in the same pattern as the spare battery charging slots so that the charging status of each battery can be identified. See Table 4-2 on page 4-5 for charging status indications.
Accessories 4 - 9
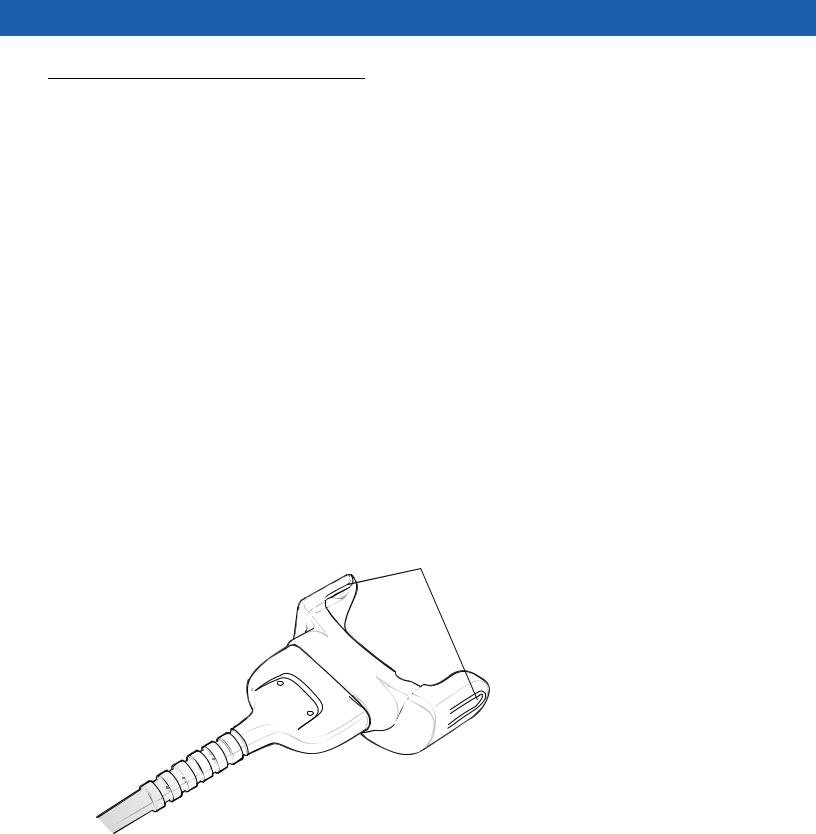
Cables
The cables are available with a variety of connection capabilities.
MC31XX Communication/Charge cables:
• Provide the mobile computer with operating and charging power when used with the Symbol approved power
DedicatedPreliminaryPrinter cables, provide communication w th a ded cated pri ter.
supply.
• Synchronize information between the mobile computer and a host computer. With customized or third party
software, it can also synchronize the mobile computer with corpo ate databases.
• Provide serial connection through the serial pass-through port for communication with a serial device, such
|
as a host computer. For communication setup procedures, refer to the MC31XX Integ ator Guide. |
|
• |
Provide USB connection through the USB pass-through port for communic tion with a USB device, such as |
|
|
a host computer. For communication setup procedures, refer to the MC31XX Integ ator Guide. |
|
The following MC31XX Communication/Charge cables are av il |
ble: |
|
• |
Serial (RS232) Charge cable (9-pin D female w th power |
put recept cle) |
• |
USB Client Charge cable (standard-A connector a d a barrel receptacle for power). |
|
The following printer cables are available directly from the pr nter manufacturer:
• O’Neil printer cable
• Zebra printer cable
• Monarch printer cab .
Snaps
Figure 4-4 Cables

4 - 10 MC31XX Series Mobile Computer User Guide
Battery Charging and Operating Power
CAUTION Ensure that you follow the guidelines for battery safety described in Battery Safety Guidelines on page 5-2.
The MC31XX Communication/Charge cables can charge the mobile computer battery and supply operating power.
LED ChargePreliminaryIndications
To charge the mobile computer battery: |
|
|
1. |
Connect the MC31XX Communication/Charge cable power input connector to the S mbol approved power |
|
|
source. |
|
2. |
Slide the bottom of the mobile computer into the MC31XX connector end of the MC31XX |
|
|
Communication/Charge cable and gently press in until the snaps latch into the mobile computer. |
|
3. |
The mobile computer amber Charge LED Indicator indicates the mobile computer batte charging status. The |
|
|
Standard Battery usually charges less than four hours |
nd the Extended Life B tte y usually charges in less |
|
than six hours. See, Table 4-2 on page 4-5 for charging st |
tus indic tions. |
4. |
When charging is complete, remove the cable by ge tly pulli g the mobile computer and the cable apart until |
|
|
the snaps release the mobile computer. |
|
The MC31XX Communication/Charge cables use the amber Charge LED I dicator to indicate the MC31XX battery charging status. See, Table 4-2 on page 4-5 for charg ng status nd cations.
Accessories 4 - 11
Universal Battery Charger (UBC) Adapter
CAUTION Ensure that you follow the guidelines for battery safety described in Battery Safety Guidelines on page 5-2.
The UBC Adapter can be used with a power supply as a standalone spare battery charger or it can be used with
the four station UBC2000 to simultaneously charge up to four spare batteries. For additional information on the UBC 2000, refer to the UBC 2000 Quick Reference Guide p/n 70-33188-xx.
UBC AdapterPrelimLED Charge Indications inary
Spare Battery Charging
To charge spare batteries: |
|
|
1. |
Insert the spare battery into the spare battery charging slot, bottom fi st. |
|
2. |
Pivot the top of the battery down onto the contact pins. |
|
|
2 |
|
|
1 |
Battery |
|
Battery Clip |
|
|
|
UBC Adapter |
|
|
Spare Battery |
|
|
Charging Slot |
Figure 4-5 UBC Adapter Batte y Insertion |
|
|
3. |
Gently press down on the battery to ensure proper contact. The Standard Battery usually charges in less than |
|
|
four hours and the Extended Life Battery usually charges |
less than six hours. See, Table 4-3 on page 4-12 |
|
for charging status indications. |
|
4. |
When charging is complete, press the battery clip and lift the battery out of the slot. |
|
The UBC Adapter charging LEDs indicate the battery charging status. The Standard Battery usually charges in less than four hours and the Extended Life Battery usually charges in less than six hours.

4 - 12 MC31XX Series Mobile Computer User Guide
 POWER
POWER
 READY or STANDBY or FAULT
(Green) (FlashingYellow) (SolidYellow)
 CHARGING
(SolidYellow)
Figure 4-6 UBC Adapter LEDs
Table 4-3 UBC Adapter Charge LED Status Indications
|
LED |
|
Indication |
Description |
|
|
|
|
|
POWER |
|
Green |
Power is connected to the UBC Ad pter. |
|
|
|
|
|
|
READY or |
|
Green |
Charging complete. |
|
|
|
|
|
|
STANDBY |
|
Flashing-Yellow |
The battery was deeply d scharged d is being trickle charged to bring the |
|
or |
|
|
|
voltage up to the operat g level. After operating level voltage is achieved, the |
|
|
|
|
battery charges nor ally. |
|
|
|
|
|
FAULT |
|
Yellow |
Charg ng error, check place ent of mobile computer/spare battery. |
|
|
|
|
|
|
CHARGING |
|
Yellow |
Nor al charge. |
|
|
|
|
Preliminary |
|
|
|
|||
Accessories 4 - 15
Fabric Holster
The Fabric Holster provides a soft holder for the mobile computer. It consists of a fabric mobile computer holder, a detachable shoulder strap and a detachable belt clip. Press the release button to remove the detachable belt clip. See Figure 4-10 to remove the detachable clip see Figure 4-11 on page 4-15 to attach the Fabric Holster to a belt and see Figure 4-12 on page 4-16 to attach the Fabric Holster to a shoulder strap.
Detachable Belt Clip
Mobile Computer Holder
Figure 4-10 Fabric Holster Detachab e Be t C p
Belt Clip
Pinch the clip ase and attach the Fabric Holster to a belt or waist band.
PreliminaryRelease Button
 Clip Release
Mobile Computer Holder
Figure 4-11 Attaching the Fabric Holster To a Belt
4 - 16 MC31XX Series Mobile Computer User Guide
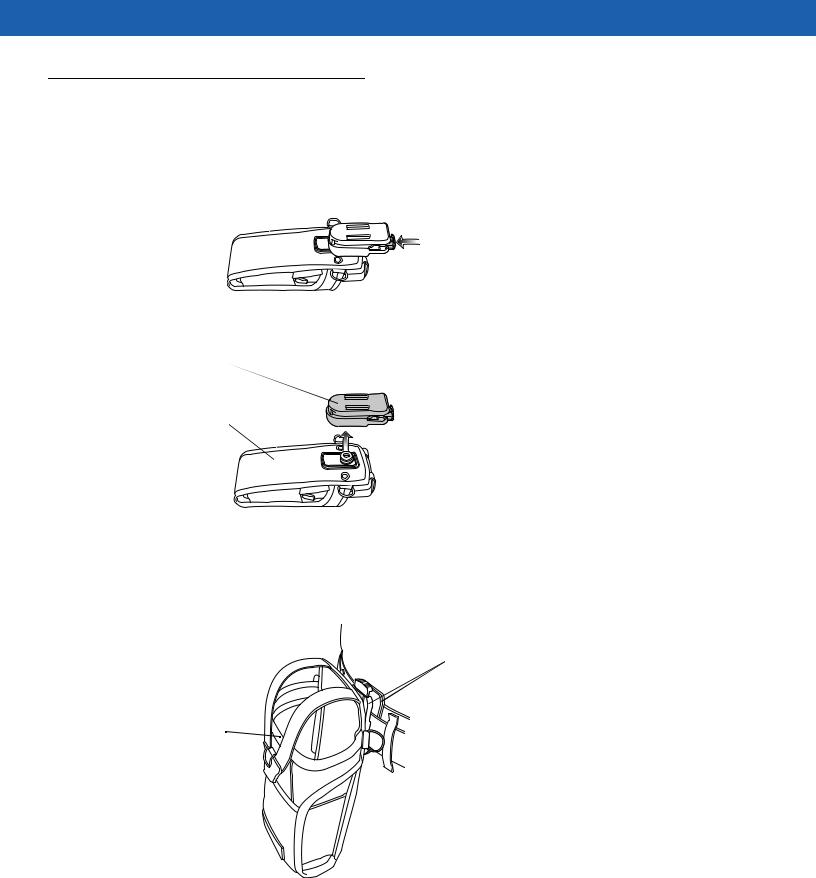
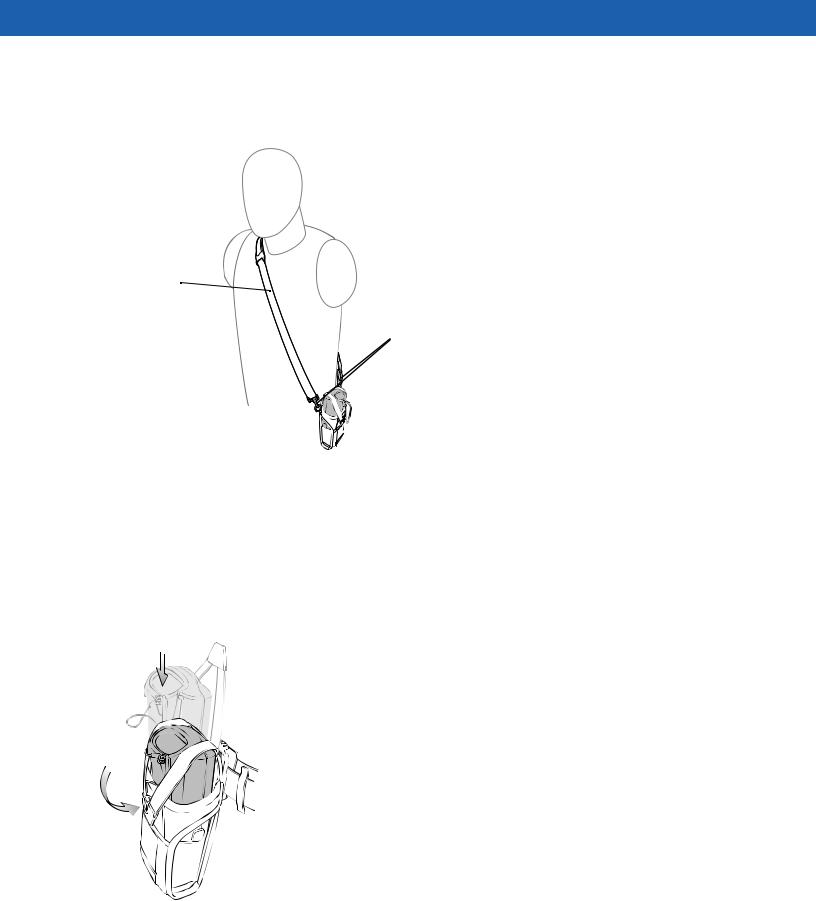
Shoulder Strap
Remove the detachable belt clip (see Figure 4-10 on page 4-15) and attach the shoulder strap.
|
Preliminary |
||
Shoulder Strap |
|
|
|
|
|
|
Clip Release |
Figure 4-12 Attach the Fabric Holster To the Shoulder Strap |
|||
The Fabric Holster holds the mob e co |
puter on a belt or waist band. |
||
1. |
To insert the mobile computer, s de the ob le co puter into the Fabric Holster with the screen facing the |
||
|
user. |
|
|
2. |
Pull restraining strap ov mob |
computer and secure in the clip. |
|
3. |
To remove the mobile comput |
r, pu |
down on restraining strap to release from clip and lift retaining strap clear. |
4. |
Lift mobile comput out of Fabric Holster. |
||
Figure 4-13 Insert and Remove the Mobile Computer
Chapter 5 Maintenance and T oubleshooting
Introduction
This chapter includes instructions on cleaning and stor g the mob le computer, and provides troubleshooting solutions for potential problems during mobile computer operat on.
Maintaining the Mobile Computer
For trouble-free service, observe the fo ow ng t ps when using the mobile computer:
For trouble-free service, observe the fo ow ng t ps when using the MC31XX:
• Preliminaryrotect the MC31XX from temperature extremes. Do not leave it on the dashboard of a car on a hot day, and keep it away from heat sources.
• Do not scratch the scr |
n of the MC31XX. When working with the MC31XX, use the supplied stylus or |
|
plastic-tipp |
d p ns int |
nd d for use with a touch-sensitive screen. Never use an actual pen or pencil or other |
sharp object on the su face of the MC31XX screen. |
||
Moto ola |
comm nds using a scr n protector, p/n KT-122010-01R. |
|
• The touch-s nsitive sc |
n of the MC31XX is glass. Do not to drop the MC31XX or subject it to strong |
|
impact. |
|
|
• Do not store or use the MC31XX in any location that is dusty, damp, or wet.
• Use soft lens cloth to clean the MC31XX. If the surface of the MC31XX screen becomes soiled, clean it with a soft cloth moistened with a diluted window-cleaning solution.
•Periodically replace the rechargeable battery to ensure maximum battery life and product performance. Battery life depends on individual usage patterns.

5 - 2 MC31XX Series Mobile Computer User Guide
• A screen protector is applied to the MC31XX. Motorola recommends using this to minimize wear and tear. Screen protectors enhance the usability and durability of touch screen displays. Benefits include:
• Protection from scratches and gouges
• Durable writing and touch surface with tactile feel
• Abrasion and chemical resistance
• Glare reduction
• Keeping the device’s screen looking new
• nearPreliminaryradiator or other heat source. Do not place battery into a microwave oven or dryer. Battery usage by children should be supervised.
• Quick and easy installation.
Battery Safety Guidelines
• |
The area in which the units are charged should be clear of debris nd combustible materials or chemicals. |
||
|
Particular care should be taken where the device is charged in |
non comme ci l envi onment. |
|
• |
Follow battery usage, storage, and charging guideli es fou d in the user's guide. |
||
• |
Improper battery use may result in a fire, explos o |
, or other h z |
rd. |
• |
To charge the mobile device battery, the battery a |
d charger temperatures must be between +32 ºF and |
|
|
+104 ºF (0 ºC and +40 ºC) |
|
|
• |
Do not use incompatible batteries and chargers. Use of an ncompatible battery or charger may present a risk |
||
|
of fire, explosion, leakage, or other hazard. If you have any questions about the compatibility of a battery or a |
||
|
charger, contact Motorola Enterpr se Mob l ty support. |
|
|
• For devices that utilize a USB port as a charging source, the device shall only be connected to products that
bear the USB-IF logo or have co p eted the USB-IF co pliance program.
• To enable authentication of an approved battery, as required by IEEE1725 clause 10.2.1, all batteries will
carry a Motorola hologram. Do not f t any battery without checking it has the Motorola authentication hologram.
• Do not disass mble or op n, crush, bend or deform, puncture, or shred.
• Seve e impact f om d opping any battery-operated device on a hard surface could cause the battery to
overheat.
• Do not sho t ci cuit a batte y or allow metallic or conductive objects to contact the battery terminals.
• Do not modify or remanufacture, attempt to insert foreign objects into the battery, immerse or expose to water
or other liquids, or expose to fire, explosion, or other hazard.
• Do not leave or store the equipment in or near areas that might get very hot, such as in a parked vehicle or
• Please follow local regulations to properly dispose of used re-chargeable batteries.
•Do not dispose of batteries in fire.
•In the event of a battery leak, do not allow the liquid to come in contact with the skin or eyes. If contact has been made, wash the affected area with large amounts of water and seek medical advice.
•If you suspect damage to your equipment or battery, contact Motorola Enterprise Mobility support to arrange for inspection.

Maintenance and Troubleshooting 5 - 3
Cleaning
CAUTION Always wear eye protection.
Read warning label on compressed air and alcohol product before using.
Preliminary! If you have to use any other solution for medical reasons please contact Motorola for more information.
WARNING Avoid exposing this product to contact with hot oil or other flammable liquids. If such exposure occurs, unplug the device and clean the product immediately in acco dance with these guidelines.
Materials Required
• Alcohol wipes
• Lens tissue
• Cotton tipped applicators
• Isopropyl alcohol
• Can of compressed air with a tube.
Cleaning the MC31XX
Housing
Using the alcohol wipes, wipe the hous ng nc ud ng keys and in-between keys.
Display
The display can be wip d down with the alcohol wipes, but care should be taken not to allow any pooling of liquid around the edges of the display. Imm diately dry the display with a soft, non-abrasive cloth to prevent streaking.
Scanner Exit Window
Wipe the scanner exit window periodically with a lens tissue or other material suitable for cleaning optical material such as eyeglasses.
Connector
1. Remove the main battery from mobile computer. See Replacing the Battery on page 1-8.
2. Dip the cotton portion of the cotton tipped applicator isopropyl alcohol.
3.Rub the cotton portion of the cotton tipped applicator back-and-forth across the connector on the bottom of the MC31XX. Do not leave any cotton residue on the connector.
4.Repeat at least three times.
5.Use the cotton tipped applicator dipped in alcohol to remove any grease and dirt near the connector area.
6.Use a dry cotton tipped applicator and repeat steps 4 through 6.

5 - 4 MC31XX Series Mobile Computer User Guide
7.Spray compressed air on the connector area by pointing the tube/nozzle about ½ inch away from the surface. CAUTION: Do not point nozzle at yourself and others, ensure the nozzle or tube is away from your face.
8.Inspect the area for any grease or dirt, repeat if required.
Cleaning Cradle Connectors
To clean the connectors on a cradle: |
|
|
|
|
1. |
Preliminary |
|||
Remove the DC power cable from the cradle. |
|
|
||
2. |
Dip the cotton portion of the cotton tipped applicator in isopropyl alcohol. |
|||
3. |
Rub the cotton portion of the cotton tipped applicator along the pins of the connector. Slowly move the |
|||
|
applicator back-and-forth from one side of the connector to the other. Do not let any cotton residue on the |
|||
|
connector. |
|
|
|
4. |
All sides of the connector should also be rubbed with the cotton tipped |
pplic tor. |
||
5. |
Spray compressed air in the connector area by poi ti g the tube/ |
ozzle |
bout ½ inch away from the surface. |
|
|
CAUTION: do not point nozzle at yourself and others, e sure the |
ozzle or tube is pointed away from your |
||
|
face. |
|
|
|
6. |
Ensure that there is no lint left by the cotton t pped appl cator, remove li |
t if found. |
||
7. |
If grease and other dirt can be found on other areas of the cradle, use li |
t free cloth and alcohol to remove. |
||
8. |
Allow at least 10 to 30 minutes (depending on a bient te perature and humidity) for the alcohol to air dry |
|||
|
before applying power to cradle. |
|
|
|
|
If the temperature is low and hu |
d ty s h gh, longer drying time is required. Warm temperature and dry |
||
|
humidity requires less dry ng t |
e. |
|
|
Cleaning Frequ ncy
The cleaning f equ ncy is up to the customer’s discretion due to the varied environments in which the mobile
devices are used. Th |
may be cl |
an d as frequently as required. However when used in dirty environments it |
may be advisable to p |
iodically cl |
an the scanner exit window to ensure optimum scanning performance. |

Maintenance and Troubleshooting 5 - 5
Troubleshooting
Mobile Computer
Table 5-1 Troubleshooting the Mobile Computer
|
|
|
||
Problem |
Preliminary |
|||
Cause |
|
|
Solution |
|
Mobile computer does |
Main battery not |
Charge or replace the main battery. |
||
not turn on. |
charged. |
|
|
|
|
Main battery not |
Ensure the battery is installed p ope ly. See Install Main Battery |
||
|
installed properly. |
on page 1-6. |
|
|
|
System crash. |
|
Perform a w |
rm boot. If the mobile computer still does not turn |
|
|
|
on, perform |
cold boot. For more information see, Resetting the |
|
|
|
Mobile Computer on p ge 2-26. |
|
Battery did not charge. |
Battery failed. |
|
Replace battery. If the mobile computer still does not operate, try |
|
|
|
|
a warm boot, then a cold boot. For more information see, |
|
|
|
|
Resett g the Mobile Computer on page 2-26. |
|
|
Mobile computer |
I sert mob le computer in cradle and begin charging. The |
||
|
removed from cradle |
Standard Battery requires up to four hours to recharge fully and |
||
|
while battery was |
the Extended Life Battery requires up to six hours to recharge |
||
|
charg ng. |
|
fully. |
|
|
Extreme battery |
Battery does not charge if ambient temperature is below 32°F |
||
|
temperature. |
|
(0°C) or above 104°F (40°C). |
|
|
|
|
||
Cannot see characters |
Mob e computer not |
Press the Power button. |
||
on screen. |
pow r d on. |
|
|
|
|
|
|
|
|
During data |
Mobile comput |
r |
Replace the mobile computer in the cradle, or reattach the cable |
|
communication, no data |
mov d from cradle |
and re-transmit. |
||
was transmitted, or |
or unplugg d from |
|
|
|
transmitted data was |
host comput |
during |
|
|
incomplete. |
communication. |
|
|
|
|
|
|
|
|
|
Incorrect cable |
|
See the system administrator or refer to the MC31XX Series |
|
|
configuration. |
|
Mobile Computer Integrator Guide. |
|
|
|
|
||
|
Communication |
See the system administrator or refer to the MC31XX Series |
||
|
software was |
|
Mobile Computer Integrator Guide. |
|
|
incorrectly installed or |
|
|
|
|
configured. |
|
|
|
|
|
|
||
Mobile computer does |
Volume setting is low |
Mobile computer may be a beeper only configuration or incorrect |
||
not emit sound. |
or turned off. |
|
setting is programmed into device. |
|
|
|
|
|
|

5 - 6 MC31XX Series Mobile Computer User Guide
Table 5-1 Troubleshooting the Mobile Computer (Continued)
|
Problem |
Cause |
|
|
|
Solution |
|
|
|
|
|||||
Mobile computer turns |
Mobile computer is |
The mobile computer turns off after a period of inactivity. This |
|||||
itself off. |
inactive. |
|
|
period can be set from one to five minutes, in one-minute |
|||
|
|
|
|
|
intervals. |
|
|
|
|
|
|
||||
|
|
Battery is depleted. |
Recharge or replace the battery. |
||||
|
|
|
|
||||
|
|
Preliminary |
|||||
|
|
Battery is not inserted |
Insert the battery properly. For more information see, Install Main |
||||
|
|
properly. |
|
|
Battery on page 1-6. |
|
|
Tapping the window |
Touch screen not |
Re-calibrate the screen. |
|
||||
buttons or icons does |
calibrated correctly. |
From the mobile compute , Demo window double-tap the Ctl |
|||||
not activate the |
|
|
|
Panel icon |
nd double-t |
p on Touch Calib ate. Follow the screen |
|
corresponding feature. |
|
|
|
prompts. |
|
|
|
|
|
The system crashed. |
Warm boot the system. To perform warm boot, see Resetting |
||||
|
|
|
|
|
the Mobile Computer on p ge 2-26. |
||
A message appears |
Too many files stored |
Delete u used memos |
d records. If necessary, save these |
||||
stating that the mobile |
on the mobile |
|
records on the host computer. |
||||
computer memory is |
computer. |
|
|
|
|
|
|
full. |
|
Too many |
|
|
Remove u |
used stalled applications from the mobile computer |
|
|
|
applications installed |
to recover |
emory. |
|
||
|
|
on the obile |
|
|
|
|
|
|
|
computer. |
|
|
|
|
|
The mobile computer |
Scann ng app cat on |
Verify that the mobile computer is loaded with a scanning |
|||||
does not accept scan |
is not oaded. |
|
application. See the system administrator. |
||||
input. |
|
|
|
|
|
|
|
|
Unr adab |
bar code. |
Ensure the symbol is not defaced. |
||||
|
|
||||||
|
|
|
|
|
|
||
|
|
Distance b |
tw |
n |
Ensure the mobile computer is within proper scanning range. |
||
|
|
scan window and bar |
|
|
|
||
|
|
code is incorr |
ct. |
|
|
|
|
|
|
|
|
|
|||
|
|
Mobile comput |
r is |
Ensure the mobile computer is programmed to accept the type of |
|||
|
|
not p ogrammed for |
bar code scanned. |
|
|||
|
|
the bar code type. |
|
|
|
||
|
|
|
|
||||
|
|
Mobile computer is |
If a beep on a good decode is expected and a beep is not heard, |
||||
|
|
not programmed to |
check that the application is set to generate a beep on good |
||||
|
|
generate |
beep. |
decode. |
|
|
|
|
|
|
|
|
|||
|
|
Battery is low. |
|
Check the battery level. When the battery is low, the mobile |
|||
|
|
|
|
|
computer automatically goes into suspend mode. |
||
|
|
|
|
|
|
|
|

Maintenance and Troubleshooting 5 - 7
Single Slot Serial/USB Cradle
Table 5-2 Troubleshooting the Single Slot Serial/USB Cradle
Symptom |
|
Possible Cause |
|
Solution |
||
|
|
|
||||
Mobile computer |
Cradle is not receiving power. |
Ensure the power cable is connected securely to both |
||||
amber Charge LED |
|
|
|
the cradle and to AC power. |
||
Indicator does not light |
Preliminary |
|||||
Mobile computer is not |
Remove and re-insert the mobile computer into the |
|||||
when mobile computer |
||||||
correctly seated. |
cradle, ensuring it is correctly seated. |
|||||
inserted. |
||||||
|
|
|
|
|
||
|
|
|
||||
Spare Battery Charging |
Spare battery is not correctly |
Remove and e-inse t the spa e battery into the charging |
||||
LED does not light |
seated. |
|
slot, ensuring it is co ectly seated. |
|||
when spare battery is |
|
|
|
|
|
|
inserted. |
|
|
|
|
|
|
|
|
|
||||
Mobile computer |
Mobile computer was |
Ensure cr dle is receiving power. Ensure the mobile |
||||
battery is not charging. |
removed from cradle or cradle |
computer is se ted correctly. If the mobile computer |
||||
|
was unplugged from AC |
battery s fully depleted, it c n take up to four hours to |
||||
|
power too soon. |
|
fully recharge a Sta dard Battery and it can take up to six |
|||
|
|
|
|
hours to fully recharge an Extended Life Battery. |
||
|
|
|
|
|||
|
Battery is faulty. |
|
Ver fy that other batteries charge properly. If so, replace |
|||
|
|
|
|
the faulty battery. |
||
|
|
|
|
|
||
|
The mob le co |
puter s not |
Re |
ove and re-insert the mobile computer into the |
||
|
fully seated n the cradle. |
cradle, ensuring it is correctly seated. |
||||
|
|
|
|
|||
Spare battery is not |
Battery not fu y seated n |
Re |
ove and re-insert the spare battery into the cradle, |
|||
charging. |
charg ng s ot. |
|
ensuring it is correctly seated. |
|||
|
|
|
|
|||
|
Batt |
ry ns rt d ncorrectly. |
Ensure the contacts are facing down and toward the |
|||
|
|
|
|
back of the cradle. |
||
|
|
|
|
|
||
|
Batt |
y is faulty. |
|
Verify that other batteries charge properly. If so, replace |
||
|
|
|
|
the faulty battery. |
||
|
|
|
|
|||
During data |
Mobile comput |
removed |
Replace mobile computer in cradle and retransmit. |
|||
communication, no |
f om c adle during |
|
|
|||
data was t ansmitted, |
communication. |
|
|
|
||
or transmitted data was |
|
|
|
|
|
|
Incorrect cable configuration. |
See the system administrator or refer to the MC31XX |
|||||
incomplete. |
||||||
|
|
|
Series Mobile Computer Integrator Guide. |
|||
|
|
|
|
|||
|
|
|
||||
|
Communication software is |
See the system administrator or refer to the MC31XX |
||||
|
not installed or configured |
Series Mobile Computer Integrator Guide. |
||||
|
properly. |
|
|
|
||
|
|
|
|
|
|
|

5 - 8 MC31XX Series Mobile Computer User Guide
Four Slot Charge Only Cradle
Table 5-3 Troubleshooting the Four Slot Charge Only Cradle
Problem |
Cause |
|
Solution |
|
|
|
|
Mobile computer amber |
Cradle is not receiving power. |
Ensure the power cable is connected securely to |
|
Charge LED Indicator does |
|
both the cradle and to AC power. |
|
Preliminary |
|||
not light when mobile |
Mobile computer is not |
Remove and re-insert the mobile computer into the |
|
computer inserted. |
correctly seated. |
cradle, ensuring it is correctly seated. |
|
Mobile computer battery is |
Mobile computer was |
Ensure c adle is |
eceiving power. Ensure the |
not charging. |
removed from cradle or cradle |
mobile computer is seated co ectly. If the mobile |
|
|
was unplugged from AC |
computer b tte |
is fully depleted, it can take up to |
|
power too soon. |
four hou s to fully ech ge a Standard Battery and |
|
|
|
it c n t ke up to six hou s to fully recharge an |
|
|
|
Extended Life B |
ttery. |
|
Battery is faulty. |
Verify th t other b tteries charge properly. If so, |
|
|
|
repl ce the f ulty b ttery. |
|
|
The mobile computer s ot |
Remove a d re-insert the mobile computer into the |
|
|
fully seated in the cradle. |
cradle, e suri g it is correctly seated. |
|
Four Slot Ethernet Cradle
Table 5-4 Troubleshooting the Four S ot Ethernet Cradle
Problem |
|
|
Cause |
Solution |
|
|
|
|
|
Mobile computer amb |
r |
Crad |
s not rece ving power. |
Ensure the power cable is connected securely to |
Charge LED Indicator do s |
|
|
both the cradle and to AC power. |
|
not light when mobile |
|
|
|
|
|
Mobile computer is not |
Remove and re-insert the mobile computer into |
||
computer inse t d. |
|
|||
|
corr |
ctly seated. |
the cradle, ensuring it is correctly seated. |
|
|
|
|||
|
|
|
|
|
Mobile computer batte |
is |
Mobile computer was removed |
Ensure cradle is receiving power. Ensure the |
|
not charging. |
|
from cradle or cradle was |
mobile computer is seated correctly. If the mobile |
|
|
|
unplugged from AC power too |
computer battery is fully depleted, it can take up |
|
|
|
soon. |
to four hours to fully recharge a Standard Battery |
|
|
|
|
|
and it can take up to six hours to fully recharge an |
|
|
|
|
Extended Life Battery. |
|
|
|
|
|
|
|
Battery is faulty. |
Verify that other batteries charge properly. If so, |
|
|
|
|
|
replace the faulty battery. |
|
|
|
|
|
|
|
The mobile computer is not |
Remove and re-insert the mobile computer into |
|
|
|
fully seated in the cradle. |
the cradle, ensuring it is correctly seated. |
|
|
|
|
|
|

Maintenance and Troubleshooting 5 - 9
Table 5-4 Troubleshooting the Four Slot Ethernet Cradle (Continued)
Problem |
Cause |
Solution |
|
|
|
|
|
During data communication, |
Mobile computer removed from |
Replace mobile computer in cradle and |
|
no data was transmitted, or |
cradle during communication. |
retransmit. |
|
transmitted data was |
|
|
|
Incorrect cable configuration. |
See the system administrator or refer to the |
||
incomplete. |
|||
|
MC31XX Series Mobile Computer Integrator |
||
|
|
||
Preliminary |
|||
|
|
Guide. |
|
|
Ethernet connection error. Link |
See the system administrator. Probable Ethernet |
|
|
LED is not lit (see Link LED on |
connection e or. |
|
|
page 4-7). |
|
|
Four Slot Spare Battery Charger
Table 5-5 Troubleshooting the Four Slot Spare Battery Charger
Symptom |
Possible Cause |
Solution |
||
|
|
|
||
Spare Battery |
Spare battery is not |
Remove a d resert the spare battery into the charging slot, |
||
Charging LED does |
correctly seated. |
ensur g t s correctly seated. |
||
not light when |
|
|
|
|
spare battery is |
|
|
|
|
inserted. |
|
|
|
|
|
|
|
||
Spare battery is not |
Charger s not |
Ensure the power cable is connected securely to both the charger |
||
charging. |
receiving power. |
and to AC power. |
||
|
|
|
||
|
Spare battery s not |
Re ove and re-insert the battery into the charger, ensuring it is |
||
|
corr |
ct y s |
at d. |
correctly seated. |
|
|
|
|
|
|
Spare batt |
ry was |
Ensure charger is receiving power. Ensure the spare battery is |
|
|
mov d f om charger |
seated correctly. If a battery is fully depleted, it can take up to four |
||
|
or cha g |
was |
hours to fully recharge a Standard Battery and it can take up to six |
|
|
unplugg d from AC |
hours to fully recharge an Extended Life Battery. |
||
|
pow |
too soon. |
|
|
|
|
|
|
|
|
Spa |
battery is faulty. |
Verify that other batteries charge properly. If so, replace the faulty |
|
|
|
|
|
battery. |
|
|
|
|
|
 Loading...