

Page 1
ZQ500 Series
Battery Eliminator Cradle Kit
Installation Guide
© 2014, ZIH Corp.
P1073631-001
August 2014
Page 2

Contents
Product Improvements...................................................................3
FCC Compliance Statement............................................................3
Canadian Compliance Statement....................................................3
Agency Approvals and Regulatory Information...............................3
Liability Disclaimer..........................................................................3
No Liability for Consequential Damage...........................................4
Copyrights......................................................................................4
Proprietary Statements
This manual contains proprietary information of Zebra Technologies Corporation. It is intended solely
for the information and use of parties operating and maintaining the equipment described herein. Such
proprietary information may not be used, reproduced, or disclosed to any other parties for any other
purpose without the expressed written permission of Zebra Technologies Corporation.
Product Improvements
Since continuous product improvement is a policy of Zebra Technologies Corporation, all specifications
and signs are subject to change without notice.
Special Notices..................................................................5
General Warnings and Cautions.........................................5
Vehicle Installation Safety..................................................5
Electrical Information.........................................................6
Indicator and Parts Descriptions........................................7
Descriptions...................................................................................7
Introduction.......................................................................9
Required for Installation.....................................................9
Using the Printer on the BE Cradle................................................10
Printer Removal.............................................................................11
Operational Notes .........................................................................11
Cradle Indicators...........................................................................12
USB Connectors............................................................................12
Installing the Mounting Arm.............................................12
Mounting Hardware......................................................................13
RAM Mount Installation................................................................13
Appendix A: Technical Specifications...............................15
Technical Support............................................................16
U.S. Only.......................................................................................16
All Others......................................................................................16
FCC Compliance Statement
Class B digital device. Tested to comply with FCC standards.
WARNING: Exposure to Radio Frequency radiation with certain versions of the printer used with this
product. To conform to FCC RF exposure requirements this device shall be used in accordance with the
operating conditions and instructions listed in the printer’s User Guide. There are several radio options
available with the printer used in conjunction with this product. Additional regulatory information is
contained in the printer’s Users Guide in sections devoted to each radio option.
Changes or modifications to this unit not expressly approved by Zebra Technologies Corporation could
void the user’s authority to operate this equipment.
Canadian Compliance Statement
This Class B digital apparatus complies with Canadian ICES-003.
Cet appareil numérique de la classe B est conforme á la norme NMB-003 du Canada.
“IC:” before the equipment ce rtific ation number signifies t hat the Industr y Canada technical speci fications were me t.
It does not guarantee that the certified product will operate to the user’s satisfaction.
Agency Approvals and Regulatory Information
• FCC part 15 Class B
• Canadian STD ICES-003 Class B
• EN55022 Class B European Electromagnetic Radiation Standard
• EN55024 European Immunity Standard
• EN60950 Safety Standard
• RCM (Australia/New Zealand)
• VCCI (Japan)
• SII (Israel)
• CB
• C-TUV-US
• CE (EU/EFTA)
pg. 2 P1073631-001
Liability Disclaimer
In as much as every effort has been made to supply accurate information in this manual, Zebra
Technologies Corporation is not liable for any erroneous information or omissions. Zebra Technologies
Corporation reserves the right to correct any such errors and disclaims liability resulting therefrom.
P1073631-001 pg. 3
Page 3
No Liability for Consequential Damage
In no event shall Zebra Technologies Corporation or anyone else involved in the creation,
production, or delivery of the accompanying product (including hardware and software) be liable
for any damages whatsoever (including, without limitation, damages for loss of business profits,
business interruption, loss of business information, or other pecuniary loss) arising out of the use of
or the results of use of or inability to use such product, even if Zebra Technologies Corporation has
been advised of the possibility of such
damages. Because some states do not allow the exclusion of liability for consequential or incidental
damages, the above limitation may not apply to you.
Copyrights
The copyrights in this manual and the label print engine described therein are owned by Zebra
Technologies Corporation. Unauthorized reproduction of this manual or the software in the label
print engine may result in imprisonment of up to one year and fines of up to $10,000 (17 U.S.C.506).
Copyright violators may be subject to civil liability.
ZebraLink and all produc t names and numbers are trademark s, and Zebra, the Zebra logo, ZPL, ZPL II, Element
Energy Equalizer Circuit, and E3 Circuit are registered trademarks of ZIH Corp. All rights reserved worldwide.
CG Triumvirate is a trad emark of AGFA Monotype Corpor ation. All rights re served worldwid e. CG Triumviratetm
font © AGFA Monotype Corporation. Intellifont® portion © AGFA Monotype Corporation. All rights reserved
worldwide. UFST is a registered trademark of AGFA Monotype Corporation. All rights reserved worldwide.
All other brand names, product names, or trademarks belong to their respective holders.
©2014 ZIH Corp
Special Notices
The following notices emphasize certain information in the guide. Each serves a special purpose
and is displayed in the format shown:
Note: Note is used to emphasize any significant information.
Caution: Indicates information that, if not followed, can result in damage to software, hardware, or
data.
Warning: This warning symbol indicates an imminently hazardous situation which, if not avoided will
result in death or serious injury. Before you work on any equipment, be aware of the hazards involved
with electrical circuitry and be familiar with standard practices for preventing accidents
General Warnings and Cautions
Caution: Read the following installation instructions before you connect the system to its power source.
Note: Zebra Technologies Corporation is not liable for personal injury or damage to any equipment
caused by the improper installation of this equipment to any power source.
Vehicle Installation Safety
Caution: Only trained and qualified personnel should be allowed to install, replace, or service this
equipment.
Caution: DO NOT USE THE PRINTER WHILE DRIVING, as this may result in property damage or personal
injury. Zebra Technologies Corporation. does not promote the use of these products except when parked
or stationary, and is not responsible for any loss resulting from the use or misuse of our products.
Caution: Do not install the Battery Eliminator Cradle where it will be exposed to precipitation, extreme
temperatures or excessive condensation.
Caution: Do not install the Battery Eliminator Cradle in a location that will affect vehicle safety or
drivability.
Caution • Use only the approved power supply for the Battery Eliminator Cradle. Use of an alternative
power supply will void the product warranty and may cause product damage.
pg. 4 P1073631-001
P1073631-001 pg. 5
Page 4

Caution: Never install or remove the equipment from the vehicle’s electrical system while the
vehicle is running. This may result in permanent damage to the equipment.
Warning: It is very important to ensure that you make the correct cable to power source connections,
because electrical energy from a vehicle’s power system can harm equipment and people.
Caution: Ensure that the Power Supply has proper cooling. Do not place any padding or cushioning
material under the unit or next to the back of the unit.
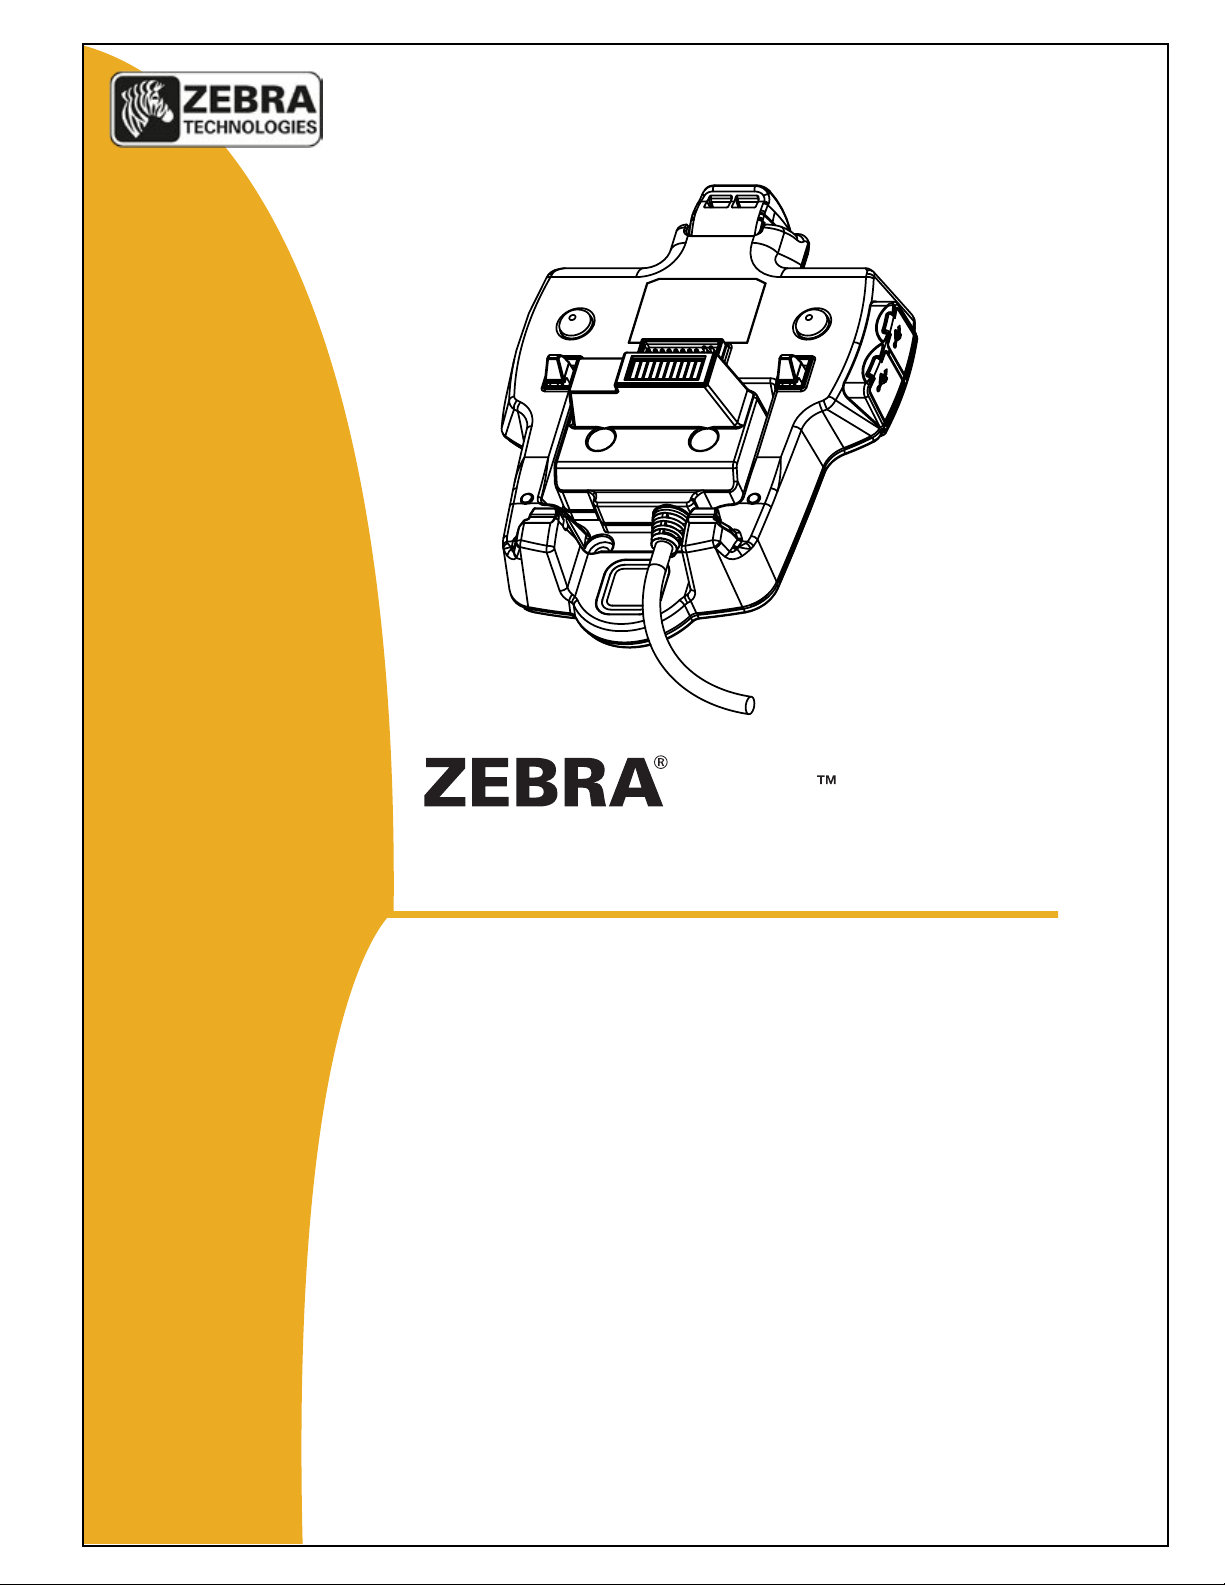
Indicator and Parts Descriptions
1
6
Electrical Information
Power Supply Input: 12VDC to 48VDC
Caution: Since the Mobile Battery Eliminator consumes vehicle power even when the printer
is turned off, it MUST be connected to a power source that is switched off when the vehicle
is turned off.
Zebra Technologies Corporation is not liable for damage to any equipment caused by improper installation of this equipment to any power source.
The following instructions for the Mobile Battery Eliminator Kit include the equipment listed
below:
• P1063406-028 : KIT, Acc Battery Eliminator Cradle, ZQ500 Series
• P1058934: DC to DC Power Adapter, 7.8V, 5A Output
• P1064241: DC to DC Power Adapter, Cigarette, 7.8V, 5A OUTPUT
• AT17147-1: RAM MOUNT RAM-101
• CA17359-1: PLATE,RAM,MNTG (Base Plate)
2
3
8
8
7
9
5
(1 not visible)
4
Figure 1: Parts DescriPtions
Descriptions
1. 12-pin docking port connector for printer
2. USB port Type A Host
3. USB port Micro B
4. Power Indicator
5. RAM mount fixing holes (4)
6. Printer release button
7. Printer connector
8. D-shape adaptor mounting holes (4)
9. D-shape adaptor (4 screws)
pg. 6 P1073631-001
P1073631-001 pg. 7
Page 5

To ensure the most reliable printer performance possible, Zebra
recommends the following installation techniques:
• It is very important that if a USB cable is connected to the printer while docked in the BE Cradle,
the USB cable must be no more than four (4) feet long. If a longer USB cable is used, intermittent
printer performance could be experienced. Please contact your Zebra sales representative to
obtain the proper cable.
• If installing the permanent bare-wire installation version, follow good wiring practices and
connect to a fused connection point on the vehicle electrical fuse block. (NOTE: The positive lead
(red wire) contains the fuse holder.)
Figure 2: Power suPPly VeHicle connectors
Introduction
The ZQ500 Battery Eliminator Cradle (BE Cradle) allows the user to operate and dock a ZQ510 or
ZQ520 printer in a vehicle, on a desk, on a wall, or any flat surface without the use of a battery. The
cradle provides battery charging power while still maintaining all of the printer’s functionality.
The BE Cradle has 3 input connections:
• A DC power supply input connects to the power adapter (not included).
• A standard USB connector.
• A micro USB connector connects with an input device (i.e. PC, tablet, smartphone, etc.).
The following instructions detail the installation and use of the BE Cradle. Following these
instructions closely will ensure safe, reliable performance of the printer when docked on the cradle.
The user should always refer to the ZQ500 Series Printer Users Guide (P1064404-001) for complete
information on using the printer.
CXA
DC Cable (365 mm cord)
color: black
color: red
Bare Wire Connector w/ Fuse
(3630 mm cord)
Output
LED
(117.6 x 81.4x 39.4 mm)
Power Adapter
Input
Required for Installation
When attaching the BE Cradle on the desktop, use the four (4) through holes circled below along
with the following tools and parts:
• An electric drill with a 1/4” (6 mm) drill bit
• Common hand tools
• Wood screws (4)
Note • Use of appropriate hardware to secure the cradle to the desktop or wall is the responsibility
of the installer. Hardware used to secure the cradle on the desktop is not supplied in the installation
kits.
Figure 3: Mounting Holes
Cigarette Lighter Connector
(3630 mm cord)
• A green LED will light on the power supply (see Fig. 2) to indicate the power is on. A red LED
will light to indicate an error condition is present. If the error condition occurs, unplug the
printer’s DC transfer pack from the power supply and turn off the vehicle power. Reconnect the
DC transfer pack to the power supply, and if the red LED remains on, contact technical support.
pg. 8 P1073631-001
Note • It is important to leave a free zone around the printer to allow the loading of media.
P1073631-001 pg. 9
Page 6

Using the Printer on the BE Cradle
+M
XXXXXXXXXXXX
+M
XXXXXXXXXXXX
Prepare the printer for docking onto the Battery Eliminator Cradle by doing the following:
• Remove the battery from the printer.
• Use a coin or small screwdriver to remove the plastic Docking Contacts Cover on the
bottom of the printer (as shown).
• Verify that the charge LED indicator on the front of the printer and power indicator LED
(Fig. 1) on the cradle’s panel are lit.
• The printer will turn on automatically when docked if the cradle is powered on.
Printer Removal
Remove the printer from the BE Cradle by following the steps below:
1. Push the Eject Button (Step 1) on the back of the cradle in the direction shown below.
2. Pivot the printer up and out of the cradle (Step 2).
Figure 5: un-Docking tHe Printer
• If necessary, clean any residue from the docking contacts using a Zebra cleaning pen or
a cotton swab with 70% Isopropyl alcohol.
• Angle the front of the printer toward the two (2) guide prongs on the front of the cradle
as shown in Step 1 below.
• Gently slide the printer onto the cradle mating the Battery Connector and Docking
Connector on the cradle with the corresponding connectors on the printer (Step 2).
• Press the printer down and onto the cradle until the latches lock it firmly in place (Step
3).
Figure 4: Docking tHe Printer on tHe Be craDle
1
2
3
2
1
Operational Notes
The media compartment and operator controls can be reached while the printer is secured to the
cradle.
If you need to take out the printer, follow the removal procedure detailed above in the Printer
Installation and Removal section.
If using a printer that has a Bluetooth or 802.11 radio, that radio can be used while the printer is
docked.
The USB ports on the printer can be used while the printer is docked.
The DC input barrel jack connection on the printer can NOT be used while the printer is in the cradle.
pg. 10 P1073631-001
P1073631-001 pg. 11
Page 7

Cradle Indicators
Charging status will be displayed on the charge LED on the front of the printer.
A fault condition could be c aused by the batter y’s internal temperature exceeding its specified limits (too hot or
too cold), or could be caused by an internal short in the ba ttery. Allow the battery to ret urn to specified charging
temperature range and try to recharge. If the fault condition persists, discontinue use of the battery.
Note • If the charge LED on the printer is not illuminated, the printer is not seated properly in the cradle.
Eject and re-dock the printer and observe if the charging LED is illuminated.
USB Connectors
The cradle has two (2) USB ports:
• A standard USB connector.
• A micro USB connector connects with an input device (i.e. PC, tablet, smartphone, etc.).
Note • Under normal circumstances, the micro USB port does not require the user to install a separate
driver. If a screen pops up with a dialog box prompting the user to install the driver, please link directly to
the CD’s .INF files.
Installing the Mounting Arm
Description
An optional mounting arm (AT17147-1) is offered for use with the BE Cradle which allows a
more versatile method of positioning the ZQ500 Series printers while docked in the cradle. It
consists of an arm with a ball and socket joint at either end, which in turn are terminated with a
mounting flange. One flange is secured to the Cradle by the four mounting holes provided on
the bottom plate, and the other is secured to the desired mounting surface. A clamp on the arm
locks the Cradle in the desired position.
Installation
Caution: Mount the Printer and BE Cradle where it will not hit the operator in case of an accident.
Warning: Do not connect the input power cable to the BE Cradle until the Cradle and Mounting Arm
installation has been completed.
For ease of installation, the Arm can be disassembled by loosening the clamp enough to
remove the two ball and socket flanged ends. These end flanges can then be easily secured to
the BE Cradle and the desired mounting surface. Then the arm can be slipped over the two ends
and the clamp tightened to secure the Cradle in position.
When installing the mounting arm, remember that the arm provides a considerable range of
movement for the BE Cradle and Printer. Extra clearance should be provided for this movement
if it is desired in the installation.
Mounting Hardware
Mounting hardware is supplied with the Mounting Arm Kit. The #10-32 or #10-24 screws
should be used to secure one end of the arm to the bottom of the Vehicle Cradle. The #10-24
x 3/4” screws and associated hardware may be used to secure the other end of the arm to the
desired mounting surface.
RAM Mount Installation
When attaching the BE Cradle and printer to the RAM mount using the RAM Mount
(p/n AT17147-1), be sure to properly route the DC Transfer Pack connector and secure the
printer to the mouting plate.
1. If you are using a RAM Mount with a Base Plate (CA17359-1), assemble the RAM Mount to
the Base Plate using four (4) #10-32 x 1/2 (TH-SL1707) long socket head cap screws and
four (4) #10 lock washers (TH-WB0810).
2. Secure the Power Adapter to the Base Plate with two (2) #10-32 x 1/2 screws and two (2)
#10 lock washers. Be sure to secure the DC cable to the plate with the wire clip
3. Secure the BE Cradle to the top mounting flange on the RAM Mount with the four (4)
#10-32 or #10-24 screws supplied with the Mounting Arm. Insert the screws through the
mounting holes (circled) from the top of the BE Cradle as shown below.
Base Plate
RAM Mount
pg. 12 P1073631-001
P1073631-001 pg. 13
Page 8

4. Dock the printer on the BE Cradle as previously shown.
DC
5. Connect the mating cable from the DC transfer pack to the DC cable from the Power
Adapter (circled).
Appendix A: Technical Specifications
Physical
• Height: 36.9 mm (1.45 in.)
• Length: 183.5 mm (7.22 in.)
• Width: 145.5 mm (5.72 in.)
• Weight (cradle only): 0.253 kg (0.55 lb.)
Environmental
• Operating Temp: -20°C (-4°F) to 55°C (131°F)
• Storage Temp: -30°C (-22°F) to 66°C (150.8°F)
• Humidity: 10% to 90% non-condensing
• Drop: 3 ft. (0.9 m) to concrete (with printer)
• Drop: 4 ft (1.2 m) to concrete (without printer)
• Vibration: Per Mil-Std-810
Caution: Since the BE Cradle consumes vehicle power even when the printer is turned off, it MUST be
connected to a power source that is switched off when the vehicle is turned off. Zebra Technologies
Corporation is not liable for damage to any equipment caused by improper installation of this equipment
to any power source.
Note: When the vehicle’s power is turned on, the icon will appear on the printer’s LCD to indicate
the the presence of a battery eliminator.
pg. 14 P1073631-001
P1073631-001 pg. 15
Page 9

Technical Support
Zebra Technologies Corporation
475 Half Day Road, Suite 500
Lincolnshire, IL
T
U.S. Only
Zebra maintains a help line for questions involving installation and use of the Battery Eliminator
Cradle Kit. Please have as much information as possible regarding your particular application ready
when you call to enable the technical support personnel to help you. The number in the U.S. is
(800)-423-0442 and is open Monday through Friday from 8:00 am to 4:30 P.M. E.S.T.
All Others
For technical support, please contact your local Zebra sales representative listed below:
Zebra Technologies Europe Limited
Dukes Meadow
Millboard Road
Bourne End
Buckinghamshire SL8 5XF, UK
T: +44 (0)1628 556000
F: +44 (0)1628 556001
Zebra Technologies Asia Pacific, LLC
120 Robinson Road
#06-01 Parakou Building
Singapore 068913
T: +65 6858 0722
F: +65 6885 0838
Zebra Technologies
Latin America Sales Oce
9800 NW 41 Street
Suite 220
Doral, Florida 33178 USA
T: +1.305.558.8470
F: +1.305.558.8485
: +1 847.634.6700 or +1 800.423.0442
pg. 16 P1073631-001
60069 USA
 Loading...