

Page 1

ZQ300 Series
P1093810-001 Rev. A
June 2017
Mobile Printers
User Guide
Page 2

Table of Contents
Proprietary Statements ..............................................................4
Document Conventions ..............................................................6
Introduction to the ZQ300 Series .............................................. 7
Unpacking and Inspection ............................................................... 8
Reporting Damage ........................................................................... 8
ZQ300 Series Technology ...........................................................9
PowerPrecision+Battery ...............................................................................9
Direct Thermal Printing ..............................................................................10
Thermal Shutdown .....................................................................................10
Near Field Communications (NFC) ............................................................10
QR Code ......................................................................................................11
Made for iPhone (MFi) ................................................................................11
Features Overview ..................................................................... 12
Getting Ready to Print .............................................................. 13
Battery ............................................................................................. 13
Installing/Removing Battery & Battery Tape Insulator ...............................13
Battery Tape Insulator .................................................................... 14
Battery Safety ................................................................................. 16
Charger Safety .............................................................................................16
Charging the Battery ................................................................. 17
AC-to-USB Adapter .....................................................................................17
1-Slot Battery Charger ................................................................................18
3-Slot Battery Charger ................................................................................19
Charging Temperature ...............................................................................19
1-Bay Docking Cradle .................................................................................20
5-Bay Docking Cradle .................................................................................21
Vehicle Adapter ..........................................................................................22
ZQ300 Series Media ....................................................................... 23
Designing Labels .........................................................................................24
Using Pre-Printed Receipt Media .................................................. 25
Loading the Media ......................................................................................30
Media Spacers .............................................................................................31
Operator Controls .......................................................................... 32
Forced Download Description and LED Behavior .....................................37
Power Save Mode .......................................................................................39
Draft Mode ...................................................................................................39
Verify the Printer Is Working ......................................................... 40
Cable Communication .................................................................................41
Wireless Communications with Bluetooth .................................................44
Bluetooth Networking Overview ................................................................44
NFC Use Cases ............................................................................................47
WLAN Overview ............................................................................. 48
Setting Up the Software ................................................................ 49
Wearing the Printer ...................................................................50
Belt Clip ........................................................................................................50
Adjustable Shoulder Strap ..........................................................................51
Soft Case......................................................................................................52
Preventive Maintenance ...........................................................53
Extending Battery Life ...................................................................53
2
ZQ300 Series User Guide
continued
Page 3

General Cleaning Instructions ....................................................... 53
ZQ300 Series Cleaning ................................................................................54
Troubleshooting ......................................................................... 56
Printer Status Indicators ................................................................ 56
Troubleshooting Topics .................................................................56
Troubleshooting Tests ................................................................... 58
Printing a Configuration Report ..................................................................58
Communications Diagnostics .....................................................................58
Calling Technical Support ...........................................................................59
Specifications .............................................................................63
Printing Specifications ...............................................................................63
Memory and Communications Specifications ...........................................63
Media Specifications ...................................................................................63
ZPL Bar Code Specifications and Commands ...........................................64
CPCL and ZPL Font Specifications ............................................................65
Printing in Chinese Fonts ............................................................................67
USB Type-C to Type-A Communications Cable .........................................69
Physical, Environmental and Electrical Specifications ..............................70
ZQ300 Series Accessories .........................................................................73
Appendix A ................................................................................. 74
Serial Number and PCC Number Locations ...............................................74
Appendix B ................................................................................. 75
User Interface LED Charging Behavior .......................................................75
Appendix C ................................................................................. 76
Battery Disposal ..........................................................................................76
Product Disposal .........................................................................................76
Appendix D ................................................................................. 77
Appendix E .................................................................................78
Using Zebra.com .........................................................................................78
Product Support Contacts ..........................................................................80
Index ............................................................................................ 81
3
ZQ300 Series User Guide
Page 4

Proprietary Statements
This manual contains proprietary information of Zebra Technologies Corporation. It is intended
solely for the information and use of parties operating and maintaining the equipment described
herein. Such proprietary information may not be used, reproduced, or disclosed to any other
parties for any other purpose without the expressed written permission of Zebra Technologies
Corporation.
Product Improvements
Since continuous product improvement is a policy of Zebra Technologies Corporation, all speci-
cations and signs are subject to change without notice.
Agency Approvals and Regulatory Information
• Design certied by TUV • FCC part 15 Class B
• Canadian IC RSS-247 • EN55024: European Immunity Standard
• EN60950: Safety Standard • NOM (Mexico)
• C-Tick (Australia) • EN55032: Class B European
Electromagnetic Radiation Standard
Liability Disclaimer
Inasmuch as every effort has been made to supply accurate information in this manual, Zebra
Technologies Corporation is not liable for any erroneous information or omissions. Zebra Technologies Corporation reserves the right to correct any such errors and disclaims liability result-
ing therefrom.
No Liability for Consequential Damage
In no event shall Zebra Technologies Corporation or anyone else involved in the creation, pro-
duction, or delivery of the accompanying product (including hardware and soft ware) be liable
for any damages whatsoever (including, without limitation, damages for loss of business prots,
business interruption, loss of business information, or other pecuniary loss) arising out of the
use of or the results of use of or inability to use such product, even if Zebra Technologies Corpo-
ration has been advised of the possibility of such damages. Because some states do not allow
the exclusion of liability for consequential or incidental damages, the above limitation may not
apply to you.
Copyrights
The copyrights in this manual and the label print engine described therein are owned by Zebra
Technologies Corporation. Unauthorized reproduction of this manual or the software in the
label print engine may result in imprisonment of up to one year and nes of up to $10,000 (17
U.S.C.506). Copyright violators may be subject to civil liability.
This product may contain ZPL®, ZPL II®, and ZebraLinktm programs; Element Energy Equalizer®
Circuit; E3®; and AGFA fonts. Software © ZIH Corp. All rights reserved worldwide.
ZebraLink and all product names and numbers are trademarks, and Zebra, the Zebra logo, ZPL,
ZPL II, Element Energy Equalizer Circuit, and E3 Circuit are registered trademarks of ZIH Corp.
All rights reserved worldwide.
Monotype®, Intellifont® and UFST® are trademarks of Monotype Imaging, Inc. registered in the
United States Patent and Trademark Ofce and may be registered in certain jurisdictions.
AndyTM , CG PalacioTM, CG Centur y SchoolbookTM, CG TriumvirateTM, CG TimesTM, Monotype
KaiTM, Monotype MinchoTM and Monotype SungTM are trademarks of Monotype Imaging, Inc. and
may be registered in some jurisdictions.
HY Gothic HangulTM is a trademark of Hanyang Systems, Inc.
AngsanaTM is a trademark of Unity Progress Company (UPC) Limited.
Andale®, Arial®, Book Antiqua®, Corsiva®, Gill Sans®, Sorts® and Times New Roman® are trade-
marks of The Monotype Corporation registered in the United States Patent and Trademark Ofce and may be registered in certain jurisdictions.
Centur y Gothic™, Bookman Old StyleTM and Century SchoolbookTM are trademarks of The
Monotype Corporation and may be registered in certain jurisdictions.
HGPGothicB is a trademark of the Ricoh company, Ltd. and may be registered in some jurisdic-
tions.
4
ZQ300 Series User Guide
continued
Page 5

UniversTM is a trademark of Heidelberger Druckmaschinen AG, which may be registered in cer-
tain jurisdictions, exclusively licensed through Linotype Library GmbH, a wholly owned subsidiary of Heidelberger Druckmaschinen AG.
Futura® is a trademark of Bauer Types SA registered in the United States Patent and Trademark
Ofce and may be registered in some jurisdictions.
TrueTy pe® is a trademark of Apple Computer, Inc. registered in the United States Patent and
Trademark Of ce and may be registered in certain jurisdictions.
All other product names are the property of their respective owners.
© 1996 –2009, QNX Soft ware Systems GmbH & Co. KG. All rights reserved. Published under
license by QNX Soft ware Systems Co.
Bluetooth® is a registered trademark of the Bluetooth SIG
All other brand names, product names, or trademarks belong to their respective holders.
©
2017 ZIH Corp.
Works with:
Certied by:
54
IP
5
ZQ300 Series User Guide
Page 6

Document Conventions
The following conventions are used throughout this document
to convey certain information:
If you are viewing this guide online, click the underlined text to
jump to a related Web site. Click on italic text (not underlined) to
jump to that location in this manual.
Cautions, Important, and Note
Caution • Warns you of the potential for electrostatic discharge.
Caution • Warns you of a potential electric shock situation.
Caution • Warns you of a situation where excessive heat could
cause a burn
Caution • Advises you that failure to take or avoid a specic
action could result in physical harm to you.
Caution • Advises you that failure to take or avoid a specic
action could result in physical harm to the hardware.
Important • Advises you of information that is essential to
complete a task.
Note • Indicates neutral or positive information that emphasizes
or supplements important points of the main text.
6
ZQ300 Series User Guide
Page 7

Introduction to the ZQ300 Series
This user guide gives you the information you will need to op-
erate the ZQ320 and ZQ310 printers. These printers feature different models for various vertical markets; one for Transportation
& Logistics (T&L)/Manufacturing/Governement, and one specically for Retail. They use some of the latest technologies such
as Bluetooth BR/EDR, LE 4.0, WLAN: 802.11ac, USB charging (Type-C connector), Near Field Communication (NFC), and
Made for iPhone® (MFi). MFi printers provide Apple co-processor
(MFi) support which allows an Apple device such as an iPhone or
iPad® to authenticate and connect over Bluetooth®. They also
share charging capabilities with Zebra’s Mobile Computers for
bettery synergy and a total solution package.
ZQ320 ZQ310
Outdoor Indoor Outdoor Indoor
Color Black Silver & Black Black Silver & Black
Connectivity Bluetooth
Output Receipts,
Sensors Media Out,
Programming
Languages
(BR/EDR,LE
4.0)
Linerless
Labels
Black Bar,
Media Door
Open
CPCL,ZPL CPCL,ZPL CPCL,ZPL CPCL,ZPL
Dual Radio
(802.11ac + BT
BR/EDR LE 4.0)
Receipts,
Labels,
Linerless Labels
Gap, Black
Bar, Media Out,
Media Door
Open
Bluetooth
(BR/EDR,LE
4.0)
Receipts,
Linerless
Labels
Media Out,
Black Bar,
Media Door
Open
Dual Radio
(802.11ac + BT
BR/EDR LE 4.0)
Receipts,
Labels,
Linerless Labels
Gap, Black
Bar, Media Out,
Media Door
Open
ZQ300 Series Software Utilities:
• Zebra Net Bridge™ : printer conguration, eet management
• Zebra Setup Utility: single printer conguration, quick setup
• Zebra Mobile Setup Utility: Android-based setup tool
• Zebra Designer Pro: label design
• Zebra Designer Drivers: Windows® driver
• OPOS Driver: Windows driver
• Multiplatform SDK
• Zebra Downloader
(These utilities can be found https://www.zebra.com/us/en/products/soft-
ware/barcode-printers/zebralink.html)
7
ZQ300 Series User Guide
Page 8
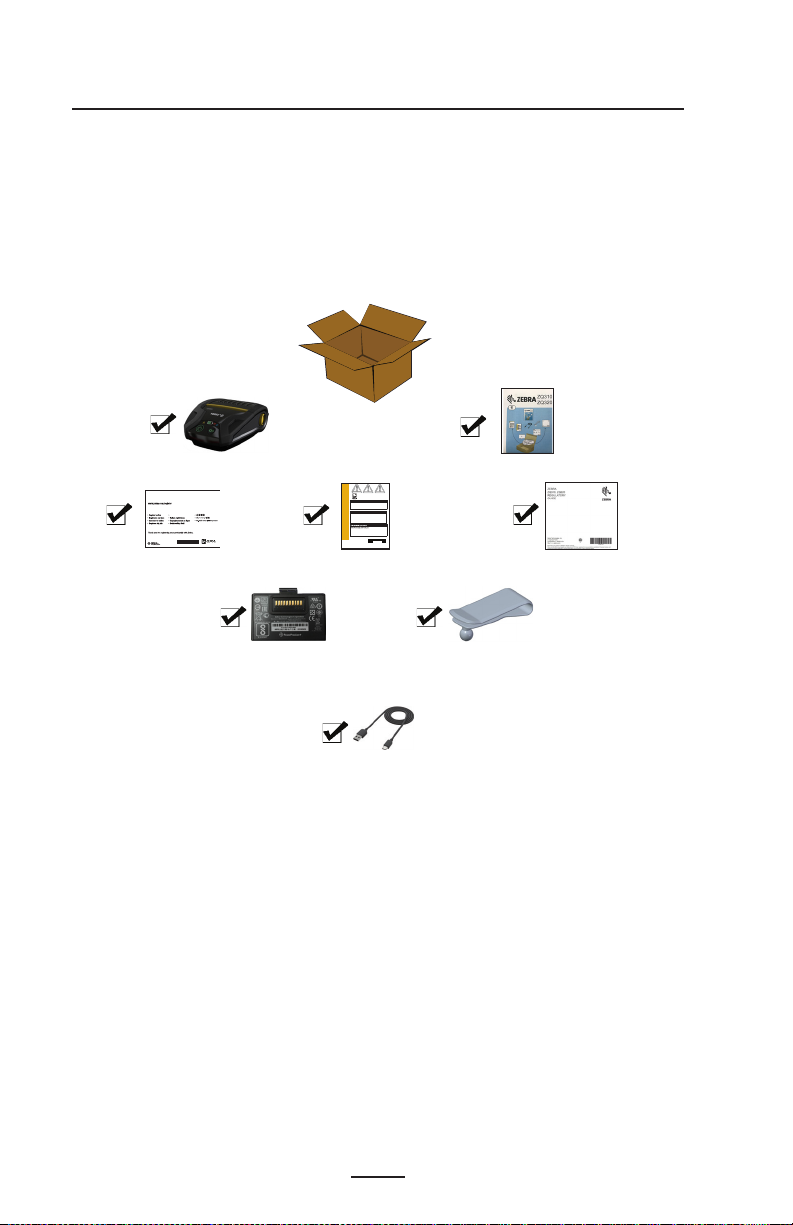
Unpacking and Inspection
Zebra Technologies Corporation
Zebra Technologies Corporation
• Check all exterior surfaces for damage.
• Open the media cover (refer to “Loading the Media” in the
Getting Ready to Print section) and inspect the media com-
partment for damage.
In case shipping is required, save the carton and all packing
material.
Printer
ZEBRA PRODUCT REGISTRATION CARD
Register today to receive beneftis including free updates and product protection!
Registrazione via internet
©2013 ZIH Corp.
/
475 Half Day Road, Suite 500
Lincolnshire, IL 60069 USA
T: +1 847.634.6700 or +1 800.423.0442
In the Americas contact:
475 Half Day Road, Suite 500
Lincolnshire, IL 60069 USA
T: +1 847.634.6700 or +1 800.423.0442
In Europe, Africa, the Middle East, and India contact:
Zebra Technologies Europe Limited
Dukes Meadow, Millboard Road
Bourne End
Buckinghamshire SL8 5XF, UK
T: +44 (0)1628 556000
F: +44 (0)1628 556001
120 Robinson Road
#06-01 Parakou Building
Singapore 068913
T: +65 6858 0722
F: +65 6885 0838
AA18153-104 Rev. B
AA18153-104
August 2012
Registration Card Safety Guide
Lithium-Ion
Battery
USB Power/Data
Comm Cable
Belt Clip
QSG
Regulatory Guide
Reporting Damage
If you discover shipping damage:
• Immediately notify and le a damage report with the shipping
company. Zebra Technologies Corporation is not responsible for any damage incurred during shipment of the printer
and will not cover the repair of this damage under its warranty polic y.
• Keep the carton and all packing material for inspection.
• Notify your authorized Zebra re-seller.
8
ZQ300 Series User Guide
Page 9

ZQ300 Series Technology
The ZQ300 Series printers use several technologies unique to
this line and/or made popular in other Zebra Mobile printer lines.
PowerPrecision+ (PP+) Battery
The ZQ300 Series printers use a 2-cell Li-Ion battery pack
with integrated intelligence and data storage capability meeting
PowerPrecision+ (PP+) functionality. This intelligent battery has
the integrated technology required to collect the detailed realtime battery metrics needed to maximize useful battery life and
ensure every battery is healthy and able to hold a full charge.
In addition, technology inside the batteries tracks and maintains the metrics required to provide real-time visibility into more
meaningful battery statistics, such as total cycle usage of the
battery, whether the battery is old and should be retired or how
long a battery will take to fully charge.
Operating Tem-
perature
-15o C to 65o C
(5o F to 149o F)
Charging
Temperature
0o C to 40o C
(32o F to 113o F)
Storage
Temperature
-25o C to 65o C
(-13o F to 149o F)
Battery Status UI Indicators (Printer ON)
Status Display
Healthy
Unhealthy
Note • Power down the printer before removing the battery to
minimize the risk of corruption.
Important • The ZQ310 and ZQ320 printers will only function
properly with genuine Zebra PowerPrecision+ battery packs.
Charging Solid Amber
Charge Fault Fast Blinking Red
(2 blinks/second
Charge Complete Solid Green
Charging Solid Red
Charge Fault Fast Blinking Red
(2 blinks/second)
Charge Complete Solid Red
9
ZQ300 Series User Guide
Page 10

Direct Thermal Printing
The ZQ300 Series printers use the Direct Thermal printing
method to print human readable text, graphics and barcodes. It
incorporates a sophisticated print engine for optimal printing under all operational conditions. Direct thermal printing uses heat
to cause a chemical reaction on specially treated media. This reaction creates a dark mark wherever a heated element on the
printhead comes in contact with the media. Since the printing el-
ements are arranged very densely at 203 d.p.i. (dots per inch)
horizontal and 200 d.p.i. vertical, highly legible characters and
graphic elements may be created a row at a time as the media is
advanced past the printhead.
This technology has the advantage of simplicity, as there is
no requirement for consumable supplies such as ink or toner.
However, since the media is sensitive to heat, it will gradually
lose legibility over long periods of time, especially if exposed to
environments with relatively high temperatures.
Thermal Shutdown
The ZQ300 Series printers have a thermal shutdown featurewhereby the printer hardware will detect a printhead over-temperature condition at 70oC (158oF). If this condition occurs, there
is a chance that label data will be lost. The printer will automatically stop printing until the printhead cools down to 62oC (144oF).
Printing will then recommence without a loss of label data or
without any degradation of print quality.
Near Field Communication (Passive NFC)
The ZQ300 Series printers support a passive NFC tag which
complies with the “Android Standard Tag format” since Android
devices are the most common found on the market today. The
NFC tag is programmed from the factory and supports Bluetooth
pairing to enable a tablet, smartphone or terminal to automati-
cally pair with the printer via a Bluetooth connection (within the
bounds of the security prole being used).
10
ZQ300 Series User Guide
Page 11

The NFC tag also supports app launching whereby an app developed either by Zebra or a third party will launch on a NFCenabled smartphone, tablet or termial. Similarly, the NFC tag
enables launching to a web support page via a tablet, smartphone or terminal.
QR Code
The QR barcode includes human readable text (URL) which
links the user to printer information and short videos on topics
such as buying supplies, features overview, loading media, print-
ing a conguration report, cleaning instructions, and accessory
information. This barcode is located on the bottom of the printer
as shown below.
Figure 1 • QR Code (ZQ320 Shown).
QR Code
www.zebra.com/zq320-info
Made for iPhone (MFi)
ZQ300 Series printers support communication with Apple de-
vices running iOS 5 or later over a standalone Bluetooth 4.0 radio and the BT3.0 radio included with the 802.11n (dual) radio.
11
ZQ300 Series User Guide
Page 12

QR Code
15
Features Overview
Figure 2 • Overview of Features (ZQ320 Shown).
10
8
11
2
5
7
6
4
9
1
3
Note • Tapping the Zebra Print Touch
Communication (NFC) enabled smartphone will provide instant access
to printer-specic information. For more information about NFC and
Zebra products, go to ht tp://www.zebra.com/nfc. Bluetooth pairing
applications via NFC is also possible. Please see Zebra Multi-platform
SDK for more information.
Paper Feed Button
1
2
Power Button
3
USB Power Port
4
Media Sensor
Black Bar/Gap Sensor
5
(Retail Only)
6
Media Cover
Platen
7
Printhead
8
Latch Release Button
9
Media Compartment
10
User Inter face Indic ators
11
Batter y Pack
12
Print Touch (NFC) Ic on
13
Belt Clip
14
TM
icon with a Near Field
13
12
ZQ300 Series User Guide
14
12
15
Page 13

Getting Ready to Print
Battery
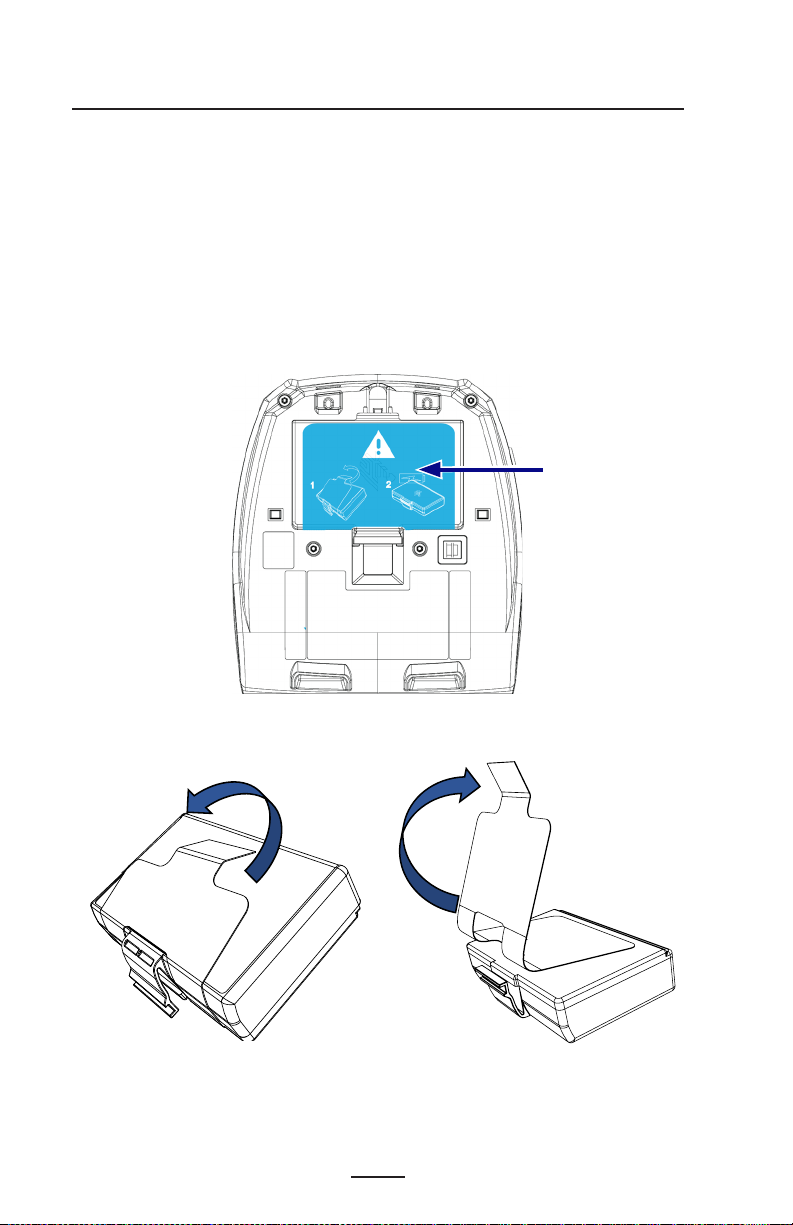
Installing/Removing Battery & Battery Tape Insulator
Important • Batteries are shipped in sleep mode to preserve their
maximum capacity while in storage prior to initial use. Plug in the
AC-to-USB Adapter with the Type-C USB cable that ships with
the printer, or insert the battery in the 1-Slot or 3-Slot battery
charger to wake it up prior to using it for the rst time. These are
optional accessories available for purchase. See Page 73 for part
numbers to be used for ordering.
Figure 3 • Removing the Battery Pack.
1. If a belt clip is present on the bot-
tom of the printer, rotate it such that it
provides clearance for the battery.
3. Lift the battery up and out of the
pr in ter.
ZQ300 Series User Guide
2. Depress the clip on the battery
pack and rotate the battery away from
the battery well.
13
Page 14
Battery Tape Insulator
The ZQ300 Series battery is installed in the printer during shipping and is protected by a battery tape insulator. The tape insulator covers the battery contacts and provides a layer of separation
from the contacts located in the battery well. The tape insulator
should be removed upon removal of the battery pack as shown
below.
Figure 4 • Removing the Battery Tape Insulator.
Battery Tape
Insulator
1. Pull up on the tape insulator tab lo-
cated on the bottom of the battery pack.
ZQ300 Series User Guide
2. Peel back the tape insulator and
remove it from the top of the battery
pack.
14
Page 15

Figure 5 • Installing the Battery Pack.
2. Slide the front of the battery pack
into the battery well. Press down on the
back of the battery pack until it clicks
into place.
1. Angle the battery pack toward the
front of the battery well. The clip on the
battery pack should be facing the rear
of the printer.
15
ZQ300 Series User Guide
Page 16

Battery Safety
Caution • Avoid accidental short circuiting of any battery.
Allowing battery terminals to contact conductive material will
create a short circuit which could cause burns and other injuries
or could start a re.
Important • Always refer to the Important Safety Information
data sheet shipped with each printer and the Technical
Bulletin shipped with each battery pack. These documents
detail procedures to ensure maximum reliability and safety
while using this printer.
Important • Always dispose of used batteries properly. Refer to
Appendix E for more battery recycling information.
Caution • Use of any charger not approved specically by Zebra
for use with its batteries could cause damage to the battery
pack or the printer and will void the warranty.
Caution • Do not incinerate, disassemble, short circuit, or
expose to temperatures higher than 65oC (149oF).
Charger Safety
Do not place any charger in locations where liquids or metallic
objects may be dropped into the charging bays.
16
ZQ300 Series User Guide
Page 17

A
Charging the Battery
When the battery is rst installed, the printer power and charge
indicators should indicate the battery is not fully charged (see
“Charging the Battery” below and “Operator Controls”).
Important • You must charge the battery fully before using the
printer for the rst time.
AC-to-USB Adapter
Use Case: Home Ofce/Small Business
Figure 6 • AC-to-USB Adapter
C Adapter
USB
Connector
USB Type-C
Connector
Rubber Door
• Connect the USB connector to the AC Adapter.
• Plug the AC Adapter into an AC receptacle.
• Rotate the rubber door on the printer counterclockwise to
expose the USB port.
• Plug the USB Type-C end of the cable into the USB port
on the printer. The connector will plug into the port in either direction as it is not keyed.
• The printer will power up and begin charging. The printer can be left on or turned off at this point as charging will
continue in either state.
Important • While it’s possible to charge the battery when using
the printer, charge times will increase under this condition.
Note • See Appendix B for LED Charging Behavior.
continued
17
ZQ300 Series User Guide
Page 18

1-Slot Battery Charger
Use Case: Home Ofce/Small Business
The 1-Slot Battery Charger provides the user with a single,
spare battery charging solution. Similar to the 3-Slot Battery
Charger, the single charger will charge a battery from empty to
fully charged in less than four (4) hours.
Figure 7 • 1-Slot Battery Charger
Charging Status Indicators
Both the 3-slot and 1-slot battery chargers use an LED indica-
tor located next to each slot to indicate the charge state in either
green, red, or amber as detailed below.
Mode Charging Indication Description
Charge Fault
Charging
(Healthy)
Charge Done
(Healthy)
Charging
(Unhealthy)
Charging Done
(Unhelathy)
Best Battery
(Charging)
Best Battery
(Charge Done)
18
ZQ300 Series User Guide
Fast blinking red
Solid amber
Solid green
Alternates between solid and
bright bursts of amber
Alternates between solid and
bright bursts of green
Solid red
Solid red
Page 19

3-Slot Battery Charger (w/ power supply and power cord)
Use Case: Settlement Room
The 3-Slot Battery Charger is a charging system for use with
the 2-cell lithium-ion batteries used in the ZQ300 Series printers. The 3-slot charger is capable of charging three batteries si-
multaneously from empty to full in less than four (4) hours. It can
either be used as a standalone charger or mounted on a 5-Bay
Docking Cradle (see Page 20).
Figure 8 • 3-Slot Battery Charger
LED
Indicator
Note • For detailed information on the 1-Slot and 3-Slot
Battery Charger, refer to the P1096070-101 and P1096218-101
Quick Start Guides at https://www.zebra.com/us/en/support-
downloads.html
Charging Temperature
Charge batteries in temperatures from 0 °C to 37 °C (32 °F to
98.6 °F). The device or cradle always performs battery charging
in a safe and intelligent manner. At higher temperatures (e.g. approximately +37 °C (+98 °F)) the device or cradle may for small
periods of time alternately enable and disable battery charging
to keep the battery at acceptable temperatures. The device and
cradle indicates when charging is disabled due to abnormal temperatures via its LED.
19
ZQ300 Series User Guide
Page 20

5-Bay Docking Cradle
Use Case: Settlement Room
The ZQ300 Series 5-Bay Docking Cradle is designed to dock
and charge up to ve (5) ZQ310 and ZQ320 printers simultaneously. The 5-bay cradle is benecial for use in settlement rooms
where space and electrical outlets are at a premium and charg-
ing in volume is critical. The 5-bay cradle charges the printer from
empty to full in less than four (4) hours. The user is allowed to op-
erate the printer during charging, although the media compartment is not accessible while the printer is docked.
1. Ensure that the 5-bay cradle has been installed properly per
its instruction manual. Ensure that the power supply is prop-
erly connected and its power indicator LED is on (see below).
LED
2. Slide a printer into any one of the ve docking bays as
shown in Figure 9.
Note • If you are using a shoulder strap, ensure it is pulled away
from the printer when docking on the cradle.
Figure 9 • 5-Bay Docking Cradle
20
ZQ300 Series User Guide
Page 21

Since the cups are removable from the base of the cradle, the
3-slot charger is mountable on the base by removing two cups.
This conguration allows individual batteries to be charged in
combination with printers and/or mobile computers.
Note • If interested in this conguration, please contact the
Custom Applications Group (CAG).
1-Bay Docking Cradle
Use Case: Home Ofce/Small Business
The ZQ300 Series printers also have the option of being
charged using a 1-bay docking cradle. This compact charging
solution charges a battery from empty to full within 3.5 hours like
the 5-slot docking cradle. The cradle is designed such that it can
easily be docked or undocked with one hand. The printer can
continue to print while charging and printer controls are still ac-
cessible. However, the media compartment cannot be accessed
while the printer is docked.
Figure 10 • 1-Bay Docking Cradle
Note • For detailed information on the 5-Bay and 1-Bay
docking cradles, refer to the P1096430-101 and P1096075-101
Quick Start Guides at https://www.zebra.com/us/en/support-
downloads.html.
21
ZQ300 Series User Guide
Page 22

Vehicle Adapter
A
B
Use Case: Vehicle
The ZQ300 Series printers, along with accompanying Zebra
TC51/TC56 mobile computers, can be charged in the vehicle
through the use of a vehicle adapter. The vehicle adapter uses
either an open-ended connection (A) or cigarette lighter
adapter (B), along with a power supply.
Figure 11 • Vehicle Adapter
Note • For detailed information on the Vehicle Adapters, refer to
the P1097394-101 Quick Start Guide at https://www.zebra.com/
us/en/support-downloads.html.
22
ZQ300 Series User Guide
Page 23

ZQ300 Series Media
The ZQ300 Series printers are designed to print either contin-
uous (receipt) media or label stock.
ZQ320 ZQ310
Max Media Width
Max Roll Outside
3.15” ±0.02” (80mm ±
0.75 mm) Spacers avaiable
to suppor t 3” ±0.02” (76 mm
± 0.75mm)
40 mm (1.57 in)
Diameter
Media Holder
Media Thickness
Media Types
Min. Receipt Length
Max Receipt Length
Drop-in Fixed Media Width (Clamshell)
0.05842mm (0.0023”) to 0.1614mm (0.0063”)
Direct Thermal : Receipt Paper, Label, Linerless label
12.5 mm (0.49”)
Unconstrained in line mode
Label Counter
Note • Scan the QR code on the bottom of the printer or go
to https://www.zebra.com/us/en/products/supplies.html for a
complete list of Zebra media and supplies.
2.28” ± 0.02” (58mm ±
0.75mm) Spacers avaiable to
suppor t 2” ±0.02” (50.8 mm
± 0.75mm)
Odometer
Note • To order custom labels, go to https://www.zebra.com/us/
en/products/supplies/custom-supplies.html
23
ZQ300 Series User Guide
continued
Page 24

Designing Labels
Safe Printing Zone
The following examples provide guidelines for designing la-
bels for the ZQ300 Series printers, specically for Gap Media,
Black Bar Media and Journal Media. The illustrations for each
media type dene recommended tolerances, keep-out zones
and safe printing zones designed to avoid any vertical registration issues during printing. Dimensions are determined based
on product registration capabilities and Zebra-recommended
media tolerances.
Figure 12 • Gap Media
1.59 mm
Top edge of
die-cut label
1.59 mm
Bottom edge of
die-cut label
CPCL Label
1.25 mm
Safe Printing Zone
1.25 mm
Height
“H”
Max Label Height = “H” = 2.5 mm
Figure 13 • Journal Media
1.59 mm
Media Feed Direction
1.59 mm
ZQ300 Series User Guide
Media Feed Direction
24
Page 25

Figure 14 • Black Bar Label Media
CPCL Label
Height
Black Bar
1.59 mm1.59 mm
Media Feed Direction
“H”
Max Label Height = “H” = 2.5 mm
Black Bar
1.25 mm
Safe Printing Zone
Safe Printing Zone
1.25 mm
Note • Black bars are located on the back of the media and are
only shown in the above view for illustration purposes.
Using Pre-Printed Receipt Media
ZQ300 Series printers support alignment of pre-printed receipts by using the out of paper sensor located near the
printhead.
Black Mark Dimensions (Receipt Media)
The reective media black marks (or black bar/marks) should
extend past the centerline of the roll on the front side of the paper.
• Minimum mark width: 0.59 in. (15 mm) perpendicular to the
edge of the media, and centered within the width of the
roll.
• Mark length: 0.19 - 0.24 in. (4.8 - 6.0 mm) parallel to the
edge of the media.
25
ZQ300 Series User Guide
Page 26

0.19 - 0.24 in.
(3.0 - 6.0 mm)
0.19 - 0.24 in.
(3.0 - 6.0 mm)
Figure 15 • Receipt Media Black Bar Dimensions
3.15 inch media
(80 mm)
0.59 in.
(15 mm)
2.28 inch media
(58 mm)
0.59 in.
(15 mm)
26
ZQ300 Series User Guide
Page 27

Label Areas
The media/black bar sensor detects the dark, pre-printed bar
on the media, so a path in the center of the paper must be kept
free of dark, pre-printed graphics.
Note • Dark, pre-printed graphics refer to any symbols,
barcodes, text and/or colored areas that have been applied to
the receipt paper rolls before they have ever been used in the
printer.
Figure 16 • Label Areas
Keep
dark color
pre-printed
graphics,
barcodes,
and text
out of the
path
of the
bar sensor.
0.59 in.
(15 mm)
27
ZQ300 Series User Guide
Page 28

Label Design Examples
1 2 3 4 5 6 7 8 9
This section shows examples of labels with and without prob-
lems.
Figure 17 • Label Design Examples
ACME COLLEGE
PARKING
VIOLATION
PROBLEM LABEL DESIGN
The dark color, pre-printed text and graphics
are in the path of the black bar at the bottom
of the receipt.
ACME RECEIPT
ACME COLLEGE
VIOLATION
PARKING
GOOD LABEL DESIGN
The center path to the black bar is free of
dark color, pre-printed text and graphics.
ACME RECEIPT
Quality FIRST
Quality FIRST
1 2 3 4 5 6 7 8 9
PROBLEM LABEL DESIGN
The dark color, pre-printed text and graphics
are in the path of the black bar at the bottom
of the receipt.
Note • Complete information on using pre-printed receipt paper can
GOOD LABEL DESIGN
The center path to the black bar is free of
dark color, pre-printed text and graphics.
be found in the FORM command in the CPCL Programming Guide
(P1073699-001) at www.zebra.com/manuals.
28
ZQ300 Series User Guide
Page 29

Keep-Out Areas
At times, incomplete printing of text and/or graphics appear be-
cause minimum margins are not provided during label design.
The recommended minimum margins, or “keep out areas” are
shown in Figure 18.
Figure 18 • Keep Out Areas
0.59 in.
(15 mm)
* *
*
*
*
Receipt Paper with Black Bars
* Maintain a minimum “keep out area” of
1/16 in. (1.59 mm) from the two outer edges
of the paper roll and from the black bars.
Note • The length of each “continuous” receipt is determined by the data
sent to the printer.
Continuous Receipt Paper
(without Black Bars)
* Maintain a minimum “keep out area” of
1/16 in. (1.59 mm) from the two outer edges
of the paper roll.
*
29
ZQ300 Series User Guide
Page 30

Loading the Media
1. Press the latch release button forward to open the printer’s
media cover.
Latch Release
Button
2. Inser t the roll of media into the media compartment in the
orientation shown.
3. Close the media cover making sure to manually feed the
end of the media roll outside the printer. The media cover
should click into place and the media will then advance on
its own.
Media Roll
30
ZQ300 Series User Guide
Page 31

Media Spacers
Zebra provides a media spacers kit (p/n KIT-MPMMDSPR5-01) that allows the ZQ320 printer to support 3 in. (76.2
mm) and the ZQ310 to support 2 in. (50.8 mm) wide media.
1. The media spacers slide into the media compartment in the
circled areas below.
2. Slide the prongs on the back of the spacer into the grooves
on each side of the media compartment (circled).
3. Use a at head tool to insert in the slot at the top of the
spacer (circled) to pull up and remove.
31
ZQ300 Series User Guide
Page 32

Operator Controls
The ZQ310 and ZQ320 printers feature a control panel with but-
tons for the Power On/Off and Media Feed functions, as well as a
backlit user interface for providing printer status relative to faults,
battery, Wi and Bluetooth.
Figure 19 • User Interface Icons
Power with
LED Ring
Media Feed
Fault Status
Battery
WiFi
Bluetooth
32
ZQ300 Series User Guide
Page 33

Normal Boot-up LED Behavior
1. Press Power (on/off) button and all LED indicators will illumi-
nate until the button is released.
2. When Power button is released, the Fault LED will be
steadily lit and the power ring will blink.
3. When the boot-up sequence is complete, the power ring will
stop blinking and remain steadily lit. The color of the power ring
depends on the charge status.
4. All other LED’s (Fault, Battery, WiFi, Bluetooth) will reect
the current state of the printer.
Note • If you press the Power Button for more than ve (5)
seconds, the boot-up sequence will be aborted and all LED’s
will turn off.
Sleep Mode LED Behavior
1. During Sleep Mode, the Power LED will slowly pulse either
Green, Amber or Red depending upon whether or not the printer
is charging successfully.
2. All other LED’s will be shut off while in sleep mode.
Shutdown Behavior
1. Press the Power Button for approximately three (3) seconds
until the Fault LED turns on and the Power Ring starts blinking.
3. All LED’s will turn off when the shutdown process is complete.
Firmware Download Behavior
The WiFi LED will alternately blink yellow and green while the
printer is either in forced download mode or if the printer is pro-
cessing a rmware download.
33
ZQ300 Series User Guide
Page 34

Power LED Ring Behavior
The Power Button is surrounded by a three-color (green, am-
ber, red) LED ring. The Power LED Ring will:
• Blink once per 2 seconds green/amber/red during boot-up.
• Display solid green when the printer is fully charged while
On or Off.
• Pulsing green to indicate Sleep Mode and not charging.
• Solid amber to indicate charging while On or Off.
• Pulsing amber to indicate charging while in sleep mode.
• Solid red to indicate an unhealthy charging or charged bat-
tery when not in sleep mode (either On or Off).
• A charge fault will ash red twice per second.
• Pulsing red to indicate unhealthy charging or charged battery when in sleep mode.
(( ))
((((
((((
(
(
(
(
(
(
((((((
Blink green/amber/red during boot-up
Power On/Charged Battery
Pulse green Sleep Mode/Not Charging
Power On/Battery Charging
Charging in Sleep Mode
Charging/Charge Complete (Unhealthy)
Charging/Charge Complete (Unhealthy/Sleep Mode)
Charge Fault
Battery LED Behavior
The Battery icon is backlit by three (3) single color (green) LED
bars, all three of which are turned off when the printer is off.
• 3 bars >= 66% State of Charge (SoC)
34
ZQ300 Series User Guide
Page 35

• 2 bars >= 33% SoC
• 1 bar >/= 15% SoC
The rst LED bar on the left will blink when the battery is at
less than15% SoC.
All LED’s will blink twice per second when printer is powered
on with no battery installed.
Fault LED Behavior
The Fault icon is backlit by a single Amber LED. If there is no
fault present, the LED will be turned off. An Out of Media condi-
tion is represented by the LED on solid as shown below.
In the presence of a Media Cover Open fault, the LED will
blink one time per second. If both an Out of Media and Media
Cover Open condition are present, the cover open state will take
precedence the blinking LED will be displayed.
When a Head Element Out and Head Over Temp condition is
present, the fault LED will blink once every two seconds. This
condition will take precedence over other conditions.
35
ZQ300 Series User Guide
Page 36

Bluetooth LED Behavior
The Bluetooth icon is backlit by a single Blue LED. If there is
no Bluetooth connection, the LED will be turned off.
• The LED will blink once every two seconds as communication is being established.
• A solid Bluetooth icon will appear on the user interface
when the printer is connected.
• The LED will blink two times per second when the printer
is receiving data over Bluetooth.
WiFi LED Behavior
The WiFi icon is backlit by a three-color LED (green, amber
and red). If there is no WiFi connection, the LED will be turned
off.
• The LED will blink Red once every two seconds while
printer is associating.
• The LED will blink Amber once every two seconds while
printer is authenticating.
• The LED will be solid Green when the printer is associated
and authenticated (if authentication is needed).
• The LED will blink Green two times per second when data
is being received over WiFi. This includes all data trafc.
Note • There will be no visual indication on the user interface
when data is received via USB.
36
ZQ300 Series User Guide
Page 37

Forced Download Description and LED Behavior
If for some reason the printer becomes inoperable, or the end-
user wants to put the printer into forced download mode, follow
the steps below.
1. Press and hold the Feed Button.
2. Press and hold the Power Button until the Power LED
blinks (1/4 second).
3. Release the Power Button.
4. At this point the Fault LED will start to pulse.
5. Continue to hold the Feed button until the WiFi LED lights
up (Amber).
6. Continue to hold the Feed button until the WiFi LED turns
green.
7. Release the Feed button and the WiFi LED will turn off and
the Fault LED will stop pulsing.
8. The WiFi LED will then alternately blink Amber and Green
to indicate the printer is now in Forced Download mode.
9. Once the rmware begins downloading the WiFi LED will
blink Green.
10. Once the rmware nishes downloading, the WiFi LED will
remain solid on Green and eventually the printer will reset.
Note • For more information about UI LED behavior, go to
Appendix B on page 75.
37
ZQ300 Series User Guide
Page 38

Printing a Conguration Report
1. Press and hold the Feed Button.
2. Press and hold the Power Button until the Power LED blinks
(1/4 second).
3. Release the Power Button.
4. The Fault LED will start to pulse.
5. Continue to hold the Feed Button until the WiFi LED lights
up Amber.
6. Release the Feed Button and the WiFi LED will turn off and
the Fault LED will stop pulsing.
7. The printer will print the Zebra logo and “Building Two-Key
Repor t ”.
8. The printer will then print the Conguration Report.
Sleep Mode
The Sleep Mode feature is a way the printer conserves battery
life whereby the printer will automatically go into a “sleep” state
after twenty (20) minutes of inactivity. The printer indicates Sleep
Mode when the Power LED Ring pulses (see Page 34).
If the Power Button is pressed for less than three (3) seconds,
then the printer will enter Sleep Mode.
If the Power Button is pressed for more than three (3) seconds,
then the printer will power down completely.
In order to “wake up” the printer, the user must press the Power
Button for less than three (3) seconds.
To enable or disable Sleep Mode, send the p o w e r.slee p.enable command to the printer using Zebra Setup Utilities (ZSU)
and set it to either “on” or “off”. (The default setting is “on”.) To set
the time after which the printer will enter Sleep Mode, send the
p o w er.s l e e p.t i m e o u t (in seconds) to the printer using the
ZSU.
Note • If using a Bluetooth-only printer, it will wake up on its own
when communication is initiated via Bluetooth.
38
ZQ300 Series User Guide
Page 39

Power Save Mode
Power Save Mode refers to a state the printer will enter when
the battery is under duress. Under normal operation with a
healthy fully charged battery, the printer will load the entire
printhead while printing a line of data.
As the battery’s health declines (due to low voltage or cold tem-
perature) the printer will change its printing strategy in a way that
breaks up the print line into smaller segments that it can print
safely without shutting down the battery. In this mode the user
may experience slower printing.
The Power Save feature can be enabled/disabled via the SGD
command: print.cold _ temp _ comp.
Draft Mode
Draft Mode printing is optimized for printing receipts comprised
of text only with no reverse image, black ll or barcodes present.
Draft mode is designed to operate at temperatures between
ambient and the maximum thermal range of the printer. For testing/grading purposes, draft mode shall print a single Code 39 bar-
code, 2-dot narrow, minimum 2 characters, horizontal
orientation at Temperatures = 25oC to 55°C, with no breakup or
separation on receipt media only.
The Draft Mode default is set to “off”. The user can congure
the printer to print in Draft Mode via SGD command:
media.draft _ mode.
Note • For an explanation and a list of all SGD commands, please
refer to the ZPL,ZBI,SGD,MIRROR,WML Programming Guide
(p/n P1012728-xxx) at:
http://www.zebra.com/us/en/support-downloads.html
Note • For detailed information on sending SGD commands
to the printer using Zebra Setup Utilities, please refer to the
Wireless Conguration for 802.11n and Bluetooth Radios for LinkOS Mobile Printers (p/n P1048352-001) at:
http://www.zebra.com/us/en/support-downloads.html
39
ZQ300 Series User Guide
Page 40

Verify the Printer Is Working
Before you connect the ZQ300 Series printer to your computer,
portable data terminal or wireless LAN, make sure that the printer
is in proper working order. You can do this by printing a conguration label using the “two key reset” method described on page
38. If you can’t get this label to print, refer to “Troubleshooting”.
Note • Refer to Fig. 27 for details on conguration report content.
The unit will print a line of interlocking “x” characters to ensure
all elements of the print head are working, print out the version of
software loaded in the printer, and then print the report.
The report indicates model, serial number, baud rate, and more
detailed information on the printer’s conguration and parameter
settings. (Refer to the Troubleshooting section for sample printouts and a further explanation on how to use the conguration label as a diagnostic tool.)
40
ZQ300 Series User Guide
Page 41

Connecting the Printer
The printer must establish communications with a host termi-
nal which sends the data to be printed. Communications occur in
four (4) basic ways:
• Via a cable using the USB 2.0 protocol. Windows drivers
are available through Zebra Designer Driver. Zebra Setup
Utilities can be used to congure the printer settings using a
USB cable.
• By means of a wireless LAN (Local Area Network) using an
optional radio per 802.11n specications.
• By means of a Bluetooth short range radio link.
• WinMobile®, Blackberry®, and Android® devices use
standard Bluetooth® protocol.
• ZQ300 Series printers are compatible with iOS devices,
therefore printing via Bluetooth to an Apple® device is pos-
sible.
Cable Communication
Caution • The printer should be turned off before connecting or
disconnecting the communications cable.
The standard cable connection for the ZQ300 Series printers
is a USB2.0 communication and charging cable. One end of the
cable has a USB Type-A connector while the other end is USB
Type- C .
USB Type-C Plug Wire USBStandard-A
Pin Signal
A1,B1,A12, B12 GND 1 GND_PWRrt1 4 GND
A4,B4,A9,B9 VBUS 2 PW R_V BUS1 1 VBUS
A5 CC See note below
B5 VCONN
A6 D p1 3 U TP_ Dp 3 D+
A7 Dn1 4 UT P_Dn 2 D-
Shell Shield Braid Shield Shell Shield
USB Type A-to-C Cable Assembly Wiring
Name
Wire # Signal Name Pin Signal
41
ZQ300 Series User Guide
Plug
Name
Page 42

The small Type C connector on the USB cable plugs into the
printer. The connector is not keyed and therefore can be plugged
in in either direction. However, do not try to force the cable if it
does not plug in. The Type A end of the cable must be plugged
into any USB 2.0 host port. The ZQ300 Series utilizes the USB
cable to charge the printer (see Fig. 6 on page 17) and for com-
munications between the printer and computer.
Figure 20 • USB Type A-to-C Cable
Communication with PC
LAN
Note • USB drivers are included in the ZebraDesigner Driver
which can be downloaded from the Zebra website at
https://www.zebra.com/us/en/products/software/barcodeprinters/zebralink/zebra-designer.html.
42
ZQ300 Series User Guide
Page 43

Zebra Setup Utilities
Before you start to congure your printer for use on a Local
Area Network (LAN), you will need some basic information
which will enable you to establish the network conguration for
your printer. Zebra Setup Utilities (ZSU) provides a quick and
easy way to congure your printers for a variety of purposes, in-
cluding setting them up for wireless communications either on a
Local Area Network (LAN) or using the international Bluetooth™
communications standard.
Once ZSU has been downloaded to your computer, attach
the USB cable to the printer and computer as shown in Fig.
19. Refer to Wireless Conguration Guide (p/n P1048352-
001) to follow the steps necessary for setting up and congur-
ing your printer via ZSU. Go to https://www.zebra.com/us/en/
support-downloads.html to download ZSU and the Wireless
Conguration Guide. (See Appendix E for details on navigating
zebra.com.)
Zebra Printer Setup Utility (Android-based)
The ZQ300 Series printers can also be congured using the
Android-based Zebra Printer Setup Utility. The setup utility can
be downloaded from Google Play to an Android device such as
a smartphone or the TC51 or TC56 mobile handheld computers. The Android mobile device can be paired with the printer via
NFC, Bluetooth or a USB cablle and users can quickly navigate
the app to perform the following tasks.
Shows currently connected printer
Displays current printer status:
Quick access to Wizards, Printer Actions
and Files
Figure 21 • Printer Setup Utility
Main Screen
43
ZQ300 Series User Guide
= all clear
= error present
Figure 20 • NFC Tap & Pair
Page 44

Wireless Communications with Bluetooth
Bluetooth is a worldwide standard for the exchange of data be-
tween two devices via radio frequencies. This form of point- topoint communication does not require access points or other
infrastructure. Bluetooth radios are relatively low powered to help
prevent interference with other devices running at similar radio
frequencies. This limits the range of a Bluetooth device to about
10 meters (32 feet). Both the printer and the device it communicates with must follow the Bluetooth standard. Other than conditions specied elsewhere in this manual, only one of the radio
options can be installed in the printer at one time and the antenna used for these transmitters must not be co-located or must not
operate in conjunction with any other antenna.
Bluetooth Networking Overview
Each Bluetooth enabled ZQ300 Series printer is identied by
a unique Bluetooth Device Address (BDADDR). This address resembles a MAC address whereby the rst three bytes are vendor, and the last three bytes are device (e.g. 00:22:58:3C:B8:CB).
This address is labeled on the back of the printer via a barcode
for ease of pairing. (See Page 47.) In order to exchange data, two
Bluetooth enabled devices must establish a connection.
Bluetooth software is always running in the background, ready
to respond to connection requests. One device (known as the
master or the client) must request/initiate a connection with another. The second device (the slave or the server) then accepts or
rejects the connection. A Bluetooth enabled ZQ300 Series printer
will normally act as a slave creating a miniature network with the
terminal sometimes referred to as a “piconet”.
Discovery identies Bluetooth devices that are available for
pairing whereby the master device broadcasts a discovery request and devices respond. If a device is not discoverable, the
master cannot pair unless in knows the BDADDR or has previously paired with the device.
Bluetooth 2.1 or higher uses Security Level 4 Secure Simple
Pairing (SSP), a mandatory security architecture that features
four (4) association models: Numeric Comparison, Passkey Entry,
Just Works (no user conrmation), and Out of Band (pairing info
transmitted OOB, e.g. via Near Field Communication).
44
ZQ300 Series User Guide
Page 45

Security Mode 1
If a BT>/= 2.1 device is pairing
with a BT</= 2.0 device, it falls
back to BT 2.0 compatibility
mode and behaves the same as
BT 2.0. If both devices are BT
>/= 2.1, Secure Simple Pairing
must be used according to the
BT spec.
Security Mode 4: Simple Secure Pairing
Simple Secure Pairing: a new security architecture introduced supported in BT >= 2.1.
Service-level enforced, similar to mode 2. Mandatory when both devices are BT >= 2.1.
There are four association models currently supported by mode 4. Security requirements for
services must be classified as one of the following: authenticated link key required, unauthenticated link key required, or no security required. SSP improves security through the addition
of ECDH public key cryptography for protection against passive eavesdropping and man-inthe-middle (MITM) attacks during pairing.
Security Mode 2
If a BT >/= 2.1 device is pairing
with a BT </= 2.0 device, it falls
back to BT 2.0 compatibility
mode and behaves the same as
BT 2.0. If both devices are BT
>/= 2.1, Secure Simple Pairing
must be used according to the
BT spec.
Security Mode 3
If a BT >/= 2.1 device is pairing
with a BT </= 2.0 device, it falls
back to BT 2.0 compatibility
mode and behaves the same as
BT 2.0. If both devices are BT
>/= 2.1, Secure Simple Pairing
must be used according to the
BT spec.
Designed for situation
Numeric
where both devices are
Comparison
capable of displaying
Designed for situation
a six-digit number and
where both devices are
allowing user to enter
capable of displaying
“yes” or “no” response.
a six-digit number and
During pairing, user
allowing user to enter
enters “yes” if number
“yes” or “no” response.
displayed on both devic-
During pairing, user
es matches to complete
enters “yes” if number
pairing. Differs from
displayed on both devic-
the use of PINs in
es matches to complete
legacy (BT<=2.0)
pairing. Differs from
pairing because the
the use of PINs in
number displayed for
legacy (BT<=2.0)
comparison is not used
pairing because the
for subsequent link key
number displayed for
generation, so even if it
comparison is not used
is viewed or captured by
for subsequent link key
an attacker, it could not
generation, so even if it
be used to determine
is viewed or captured by
the resulting link or
an attacker, it could not
encryption key.
be used to determine
the resulting link or
encryption key.
Designed for situation
Passkey Entry Just Work s Out of Band
where one device has
input capability but no
Designed for situation
display (e.g. keyboard),
where one device has
while other device has
input capability but no
a display. The device
display (e.g. keyboard),
with a display shows a
while other device has
six-digit number, then
a display. The device
the user enters this
with a display shows a
key on the device with
six-digit number, then
input. As with numeric
the user enters this
comparison, the sixkey on the device with
digit number is not used
input. As with numeric
in link key generation.
comparison, the sixdigit number is not used
in link key generation.
Designed for situation
where one (or both) of
the pairing devices has
Designed for situation
neither a display nor
where one (or both) of
keyboard for entering
the pairing devices has
digits (e.g. Bluetooth
neither a display nor
headset). It performs
keyboard for entering
authentication step 1 in
digits (e.g. Bluetooth
the same manner as as
headset). It performs
numeric comparison,
authentication step 1 in
but the user cannot
the same manner as as
verify that both values
numeric comparison,
match, so MITM (man-
but the user cannot
in-the-middle) protec-
verify that both values
tion is not provided.
match, so MITM (man-
This is the only model
in-the-middle) protec-
in SSP that does not
tion is not provided.
provide authenticated
This is the only model
link keys.
in SSP that does not
provide authenticated
link keys.
Designed for devices
that support a wireless
(OOB)
technology other than
Designed for devices
Bluetooth (e.g. NFC)
that support a wireless
for the purposes of
technology other than
device discovery and
Bluetooth (e.g. NFC)
cryptographic value
for the purposes of
exchange. In the case
device discovery and
of NFC, the OOB model
cryptographic value
allows devices to pair
exchange. In the case
securely by simply tapof NFC, the OOB model
ping one device against
allows devices to pair
the other, followed by
securely by simply tap-
the user accepting the
ping one device against
pairing via a single
the other, followed by
button push. Security
the user accepting the
against eavesdropping
pairing via a single
and MITM attacks is
button push. Security
dependant on the OOB
against eavesdropping
technology.
and MITM attacks is
dependant on the OOB
technology.
Each mode, except for Just Works, has Man-In-The-Middle
(MITM) protection, meaning no third device can view the data
being passed between the two devices involved. The SSP
mode is usually negotiated automatically based on the capabilities of both the master and slave. Lower security modes can be
disabled via the bluetooth.minimum _ security _ mode
SGD. The bluetooth.minimum _ security _ mode SGD
sets the lowest security level at which the printer will establish a
Bluetooth connection. The printer will always connect at a higher security level if requested by the master device. To change
the security mode and security settings in the ZQ300 printers,
use Zebra Setup Utilities.
45
ZQ300 Series User Guide
Page 46

Bluetooth Minimum Security Modes
BT Version of Master Device (>2.1)
bluetooth.minimum_security_mode=1
bluetooth.minimum_security_mode=2
bluetooth.minimum_security_mode=3
bluetooth.minimum_security_mode=4
bluetooth.bluetooth_PIN
Secure Simple Pairing
Just Works/Numeric Comparison
Secure Simple Pairing
Just Works/Numeric Comparison
Secure Simple Pairing
Numeric Comparison
Secure Simple Pairing
Numeric Comparison
Not Used
bluetooth.minimu m _ security _ mode sets the lowest
security level at which the printer will establish a Bluetooth
connection. The printer will always connect at a higher security
level if requested by the master device.
The ZQ300 Series printers also feature bonding for Bluetooth.
The printer caches pairing info so devices stay paired through
power cycles and disconnects. This eliminates the need to repair on every connection establishment.
The bluetooth.bonding SGD is on by default.
Note • For detailed information on Bluetooth, please refer to the
Bluetooth Wireless User Guide (P1068791-001) at:
http://www.zebra.com/us/en/support-downloads.html
Near Field Communication (NFC)
In addition, the ZQ300 Series printers support passive Near
Field Communication (NFC) technology. Much like Bluetooth and
Wi-Fi technologies, NFC allows wireless communication and
data exchange between digital devices like smartphones. Yet
NFC utilizes electromagnetic radio elds while technologies such
as Bluetooth and Wi-Fi focus on radio transmissions instead.
NFC is an offshoot of Radio Frequency Identication (RFID),
with the exception that NFC is designed for use by devices with-
in close proximity to each other, i.e. a smartphone and a ZQ300
Series printer. NFC allows these devices to establish communication with each other by touching them together or bringing
46
ZQ300 Series User Guide
Page 47

them into proximity, usually no more than 7.62 centimeters (3
inches).Using the “Print Touch” feature located on the side of the
printer, end-users can automatically connect via Bluetooth from
a handheld device that supports NFC technology. The NFC tag
has the printer’s BDADDR encoded in a URL on the tag. Simply
touching the NFC handheld device to the “Print Touch” icon on
the printer will connect and pair the handheld device to the printer.
Figure 22 • NFC Connectivity
http://www.zebra.com/nfc
NFC Use Cases
• Bluetooth Pairing – used to cause a tablet, smart phone or
terminal to automatically pair with the printer via a Bluetooth
connection, within the bounds of the security prole being
used. This shall contain the BT address and serial number
of the printer.
• App launching – used to cause an app, developed either
by Zebra or a third party to be executed on a smart phone,
tablet or terminal
• Web site launching – used to cause a smart phone, tablet
or terminal to display a web site developed by Zebra or a
third party developer
Note • Tapping the Zebra Print Touch
enabled smartphone will provide instant access to printer-
specic information. For more information about NFC and Zebra
products, go to http://www.zebra.com/nfc. Bluetooth pairing
applications via NFC is also possible. Please see Zebra Multi-
platform SDK for more information.
ZQ300 Series User Guide
TM
icon with an NFC-
47
Page 48

WLAN Overview
The Retail version of the ZQ320 printer are equipped with a
Dual Radio option, meaning a radio that uses both the industry
standard 802.11 protocols and Bluetooth 4.0. The T&L versions
of the printer will ship with Bluetooth only. Both will have the FCC
ID number on the serial number label on the back of the unit for
identication purposes.
• ZQ300 Series Wireless Network Printers with the Zebra
802.11 WLAN radio module can be identied by the text
“Wireless Network Printer” on the serial number label on the
back of the printer.
• These printers allow communication as a node within a wire-
less local area network (WLAN). Methods of establishing
communications to the printer will vary with each application.
More information and LAN conguration utilities are included
in the Zebra Net Bridge™ program (version 2.8 and later). Zebra
Setup Utilities (ZSU) can also be used to congure WLAN communications settings. Both Net Bridge and ZSU may be down-
loaded from the Zebra Web site.
Figure 23 • BT/WLAN Communications
WIFI
Barcode
TC51/56 Mobile
Computer
Bluetooth
Barcode
In order to obtain the Bluetooth address or the Wireless LAN
address, use a mobile computer to scan the Bluetooth barcode
or the WLAN barcode on the bottom of the printer where shown
in Figure 23.
48
ZQ300 Series User Guide
Page 49

To enable Bluetooth for dual radio support using Zebra Setup
Utilities (ZSU), please refer to the “Connectivity Setup via
Bluetooth” section of the Wireless Conguration for 802.11n and
Bluetooth Radios for Link-OS Mobile Printers Quick Start Guide
(p/n P1048352-001).
Also refer to ZPL Programming Guide (p/n P1012728-010)
for details on the Set-Get-Do (SGD) command ! U1 setvar
“bluetooth.enable” “on”. (This command is sent to the
printer via the ZSU as part of the steps outlined in the Wireless
Conguration Guide.)
Go to https://www.zebra.com/us/en/support-downloads.html
and search ZQ320 and/or ZQ310 to download both manuals.
Setting Up the Software
ZQ300 Series printers use Zebra’s CPCL and ZPL
Programming languages which were designed for mobile printing applications. CPCL and ZPL are fully described in the ZPL
Programming Guide (p/n P1012728-010) available on-line at
https://www.zebra.com/us/en/support-downloads.html.
You can also use Designer Pro, Zebra’s Windows® based la-
bel creation program which uses a graphical interface to create
and edit labels in either language.
Refer to Appendix E for tips on downloading the Designer Pro
application from Zebra’s Web site.
49
ZQ300 Series User Guide
Page 50

Wearing the Printer
Belt Clip
All ZQ300 Series printers have a belt clip shipped with the print-
er as a standard feature. The steps used to install the belt clip on
the printer are illustrated below. Once the belt clip is hooked over
your belt in a secure fashion, the belt clip will enable the printer to
pivot easily to allow for freedom of movement while either standing or sitting.
Figure 24 • Belt Clip Installation
1. 2.
3.
4.
The viewing area of the printer’s faceplate (which displays bat-
tery life, Bluetooth, Wi and the error icons), is angled such that
it can be seen from above while the printer hangs from the belt
clip (as shown below).
50
ZQ300 Series User Guide
continued
Page 51

Adjustable Shoulder Strap
Refer to Figure 25 if you have ordered the shoulder strap op-
tion for your printer. Secure the clip on each end of the shoulder
strap to the clip openings (circled below) on the front of the printer. Use the main buckle on the shoulder strap to adjust to the de-
sired length.
NOTE: If you are using a shoulder strap, ensure it is pulled away
from the printer when installing in the docking cradles. See
pages 20-21.
Figure 25 • Shoulder Strap Installation
LoosenTighten
51
ZQ300 Series User Guide
Page 52

Soft Case
The ZQ300 Series printers have an environmental Soft Case
option (p/n SG-MPM-SC31-01/SG-MPM-SC21-01) that helps
protect the printer, while also allowing the user to carry it from
their belt. The paper path is left open to maintain printing capability and the controls are visible and accessible while in the case.
There is also a ap on the side of the case to allow access to the
USB port. D-Ring connectors allow for attachment to the shoul-
der strap option.
1. Open the top ap and slide the printer into the case.
2. Close the top ap and ensure that the paper path and con-
trols are visible through the plastic windows on the front of
the case.
3. Locate the aps that provide access to the paper path and
USB port, and also the opening for the belt clip.
52
ZQ300 Series User Guide
Belt Clip
Page 53

Preventive Maintenance
Extending Battery Life
• Never expose the battery to direct sunlight or temperatures
over 40° C (140° F).
• Always use a Zebra charger designed specically for
Lithium-Ion batteries. Use of any other kind of charger may
damage the battery.
• Use the correct media for your printing requirements. An authorized Zebra re-seller can help you determine the optimum media for your application.
• If you print the same text or graphic on every label, consider
using a pre-printed label.
• Choose the correct print darkness, and print speed for your
media.
• Use software handshaking (XON/XOFF) whenever possible
• Remove the battery if the printer won’t be used for a day or
more and you’re not performing a maintenance charge.
• Consider purchasing an extra battery.
• Remember that any rechargeable battery will lose its ability to maintain a charge over time. It can only be recharged
a nite number of times before it must be replaced. Always
dispose of batteries properly. Refer to Appendix C for more
information on battery disposal.
General Cleaning Instructions
Caution • To avoid possible personal injury or damage to the
printer, never insert any pointed or sharp objects into the printer.
Always turn the printer off before performing any cleaning
procedures. Use care when working near the tear bar. The
edges are very sharp.
Warning • The printhead can be very hot after prolonged printing.
Allow it to cool off before attempting any cleaning procedures.
Only use a Zebra cleaning pen (not supplied with the printer) or
a cotton swab with 90% medical grade alcohol for cleaning the
printhead.
Caution • Use only cleaning agents specied in the following
tables. Zebra Technologies Corporation will not be responsible
for damage caused by any other cleaning materials used on this
printer.
53
ZQ300 Series User Guide
continued
Page 54

ZQ300 Series Cleaning
Area Method Interval
Printhead Use a Zebra cleaning pen
Platen Sur face (Linered) Rotate the platen roll-
Platen Sur face (Linerless) Rotate platen roller
Scraper (Linerless Units
Only)
Tear Bar Clean thoroughly with
Printer Exterior Water-dampened cloth
Printer Interior Gently brush out printer.
Interior of Linerless Units Clean thoroughly with
to swab the thin gray line on
the printhead, cleaning the
print elements from the cen-
ter to the outside edges of
the printhead.
er and clean it thoroughly
with a ber-free swab, or lint
free, clean damp cloth light-
ly moistened with medical-
grade alcohol (90% pure or
better).
and clean with a ber-free
swab and 1 par t liquid soap
(Palmolive or Dawn) and 25
parts water. Use pure wa-
ter to clean after soap/water
mixture.
Use adhesive side of me-
dia to clean scraper.
90% medical-grade alcohol
and a cotton swab.
or 90% medical- grade alco-
hol wipe.
Ensure the sensor window(s)
are free of dust.
90% medical-grade alcohol
and ber-free swab.
After every ve (5) rols of
media (or more often if need-
ed). When using linerless
media, cleaning is required
after every roll of media.
After every ve (5) rolls
of media (or more often if
needed.)
Clean platen only if there
is an issue during printing,
i.e. media not releasing from
the platen. (*see Note below.)
After every ve (5) rolls
of media (or more often if
needed).
As needed
As needed
As needed
After every ve (5) rolls
of media (or more often if
needed).
Note • This is an emergency procedure only to remove foreign
contaminates (oils, dirt) from the platen that can damage the
printhead or other printer components. This procedure will shorten or
even exhaust the linerless platen’s useable life. If the linerless media
continues to jam after cleaning and feeding 1 to 2 meters (3 to 5 feet)
of media, replace the platen.
Note • Never apply cleaning liquids directly to the printer. Do not let
liquid pool on any area of the printer or penetrate the internal circuitry
of the printer.
54
ZQ300 Series User Guide
Page 55

Printhead
Figure 26 • Preventive Maintenance
Tear Bar
Media
Compartment
Bar Sensor
(Back of Media/
Retail Only)
Gap Sensor
(Front of Media)
Platen
Roller
55
ZQ300 Series User Guide
continued
Page 56

Troubleshooting
Printer Status Indicators
If the printer is not functioning or charging properly, refer to the
table below to determine the state of the LED indicator ring located around the Power button.
Green Amber Red Indication
Solid Off Off Power On/Charged
Blinking Off Off Booting Up
Pulsing Off Off Sleep Mode/
Fast Blinking Off Off Printer On/No Battery
Off Solid Off Battery Charging
Off Pulsing Off Charging While in
Off Slow Blinking Off Charging (Shutdown)
Off Off Solid Charged or Charging
Off Off Pulsing Charged or Charging/
Off Off Fast Blinking Charge Fault
Off Off Slow Blinking Charged or Charging
Battery
Charge Complete
Sleep Mode
(Unhealthy)/
On or Off
Sleep Mode
(Unhealthy/Shutdown)
Troubleshooting Topics
1. No power:
• Ensure you press and hold the Power switch until the Power
light comes on.
• Check that battery is installed properly.
• Recharge or replace battery as necessary.
2. Media does not feed:
• Be sure Media Cover is closed and latched.
• Check media compartment. Ensure media is not binding on
the sides of the compartment.
3. Poor or faded print:
• Clean printhead.
• Check battery for possible damage. Recharge or replace as
56
ZQ300 Series User Guide
Page 57

necessary.
• Check quality of media.
• If using label media, ensure the “Tone” setting is set to 50.
4. Partial or missing print:
• Check media alignment.
• Clean printhead.
• Ensure Media Cover is properly closed and latched.
5. Garbled print
• Check baud rate.
6. No print
• Replace battery.
• Check cable to terminal.
• (Wireless units only) Restore wireless connection.
7. Reduced battery life
• Check battery date code. If battery is more than one year old,
short life may be due to normal aging.
• Recharge or replace battery.
8. Flashing Amber error indicator
• Check that media is loaded and that printhead is closed and
securely latched.
• If media is present and latch is closed, indicates that no
application is present or application is corrupted. Program
must be re-loaded.
9. Communication error
• (Wireless units only) Check that media is loaded, head is
closed and WiFi or Bluetooth icon is present.
•(USB) Replace cable to terminal.
10. Label jam
• Open media cover.
• Apply medical-grade alcohol to printer in area of jammed label.
11. No NFC Connectivity
• Ensure smartphone is positioned 3 inches (7.62 cm) or closer
to the Print Touch icon on the side of the printer..
57
ZQ300 Series User Guide
Page 58

Troubleshooting Tests
Printing a Conguration Report
To print out a listing of the printer’s current conguration follow
these steps:
1. Turn the printer off. Load the media compartment with journal media (media with no black bars printed on the back)
2. Follow the steps outlined in Printing a Conguration
Report on Page 38.
Refer to Figure 27 for a sample conguration printout.
Communications Diagnostics
If there is a problem transferring data between the comput-
er and the printer, try putting the printer in the Communications
Diagnostics Mode (also referred to as the “DUMP” mode). The
printer will print the ASCII characters and their text representation
(or the period ‘.’, if not a printable character) for any data received
from the host computer
To enter Communications Diagnostics Mode:
1. Print a conguration label as described above.
2. At the end of 2nd diagnostics report, the printer will print:
“Press FEED key to enter DUMP mode”.
3. Press the FEED key. The printer will print: “Entering DUMP
mode”.
Note • If the FEED key is not pressed within 3 seconds, the
printer will print “DUMP mode not entered” and will resume
normal operation.
4. At this point, the printer is in DUMP mode and will print the
ASCII hex codes of any data sent to it, and their text repre-
sentation (or “.” if not a printable character).
Additionally, a le with a “.dmp” extension containing the ASCII
information will be created and stored in the printer’s memory. It
can be viewed, “cloned” or deleted using the Label Vista application. (Refer the Label Vista documentation for more information.)
To terminate the Communications Diagnostics Mode and return
the printer to normal operations:
58
ZQ300 Series User Guide
Page 59

1. Turn the printer OFF.
2. Wait 5 seconds.
3. Turn the printer ON.
Calling Technical Support
If the printer fails to print the conguration label, or you en-
counter problems not covered in the Troubleshooting Guide, contact Zebra Technical Support. Technical Support addresses and
phone numbers for your area can be found on Page 80 of this
manual. You will need to supply the following information:
• Model number and type (e.g. ZQ320)
• Unit serial number (Found on the large label on the back
of the printer, also found in the conguration label printout.
(Refer to Figure 27.)
• Product Conguration Code (PCC) (15 digit number found on
the label on the back of the unit)
59
ZQ300 Series User Guide
Page 60

AC3FA48F4201
Wireless:
Radio: 802.11 a/b/g/n/ac
Region: usa/canada
Country: usa/canada
Enabled: on
MAC Address: ac:3f:a4:8f:42:00
IP Address: 0.0.0.0
Netmask: 255.255.255.0
Gateway: 0.0.0.0
Operating Mode: infrastructure
International Mode: off
Preamble Length: long
Security: none
Stored ESSID: 125
Associated: no
DHCP: on
DHCP CID type: 1
DHCP CID: ac3fa48f4200
Power Save: on
Active Network Information:
Active Network: Unknown
IP Address: 0.0.0.0
Netmask:
255.255.255.0
Gateway: 0.0.0.0
TCP Port: 6101
Alternate TCP Port: 9100
TCP JSON Config Port: 9200
UDP Port: 6101
Remote Server:
Remote Server Port: 10013
TCP: on
UDP: on
LPD: on
DHCP: on
BOOTP: on
FTP: on
HTTP: on
SMTP: on
POP3: on
SNMP: on
TELNET: on
MIRROR: off
UDP Discovery: on
Weblink:
DHCP CID type: 1
DHCP CID: ac3fa48f4200
Product support website:
http://zebra.com/zq320-info
Building Two-Key Report...
XXXXXXXXXXXXXXXXXXXXXXXXXXXXXX
Zebra Technologies
ZQ320
Serial Number:
XXZFJ!70700432
PCC: ZQ32-A0W01R0-00
Name: XXZFJ170700432
Program:
OS: 6.5.0
PLD: 15 Rev. 64
PSPT: 7 Rev. 14
PMCU: Rev. 28
Firmware: V81.20.04ZP36755
Checksum: 8C9C
Universal Serial Bus:
2.0 Full Speed Device
Vendor ID No: 0x0ASF
Product ID No: 0x013A
Manufacturer String: Zebra Tec
hnologies
Product String: ZTC ZQ320-203d
pi CPCL
ID string: off
Bluetooth:
iOS: supported
Version: 4.3.1p1
Date: 02/13/2015
Baud: 115200
Device: Printer
Mode: Slave
Friendly Name: XXZFJ170700432
Minimum Security Mode: 1
Discoverable: on
Bluetooth Spec: 3.0/4.0
Enabled: on
Address: AC:3F:A4:8F:42:01
Figure 27 • Conguration Report
Print Head Test
Identies Printer
as a ZQ320
Printer Serial
Number
Firmware Version
MFi Supported
Bluetooth™
Radio Address
60
ZQ300 Series User Guide
Page 61

AC3FA48F4201
Power Management:
In-activity Timeout:36000 Secs
Low-battery Timeout:60 Secs
Remote (DTR) pwr-off:Disabled
Voltage :4.75
Low-bat Warning :6.02(20)
Low-bat Shut-down :6.02(13)
Power On Cycles :48
Battery Health :good
Battery Cycle Count:0
Memory:
Flash :50331648 Bytes
RAM :4194304 Bytes
Label:
Width :576 dots, 72 mm
Height:65535 dots, 8191 mm
Sensors: (Adj)
Front Bar [DAC:143,Thr:70,Cur:
3]
Black Bar [DAC:144,Thr:70,Cur:0
]
Gap [DAC:192,Thr:50,Cur:60]
Temperature :27C (57)
Voltage :8.2V (255)
Resident Fonts:
Font Sizes Chars
--------- ----- -----
0 0- 6 20-FF
1 0 20-80
2 0- 1 20-59
4 0- 7 20-FF
5 0- 3 20-FF
6 0 20-44
7 0- 1 20-FF
File Directory:
File Size
--------------- --------
E:2KEY.TXT 0
E:TT0003M_.TTF 169188
50162176 Bytes Free
Command Language:
CCL Key ‘!’[21]
ZPL Configuration Information:
Rewind.........Print Mode
Continuous.....Media Type
10.0.............Darkness
+00.......Tear Off Adjust
2030.........Label Length
72mm..........Print Width
7Eh........Control Prefix
2Ch.............Delimiter
00...........Top Position
No Motion..Media Power Up
Feed....Media Head Closed
00............Left Margin
576..........Dots per row
End ZPL Configuration
Print-head test: OK
End of report
Press FEED key to
enter DUMP mode
Wireless:
Radio: 802.11 a/b/g/n/ac
Region: usa/canada
Country: usa/canada
Enabled: on
MAC Address: ac:3f:a4:8f:42:00
IP Address: 0.0.0.0
Netmask: 255.255.255.0
Gateway: 0.0.0.0
Operating Mode: infrastructure
International Mode: off
Preamble Length: long
Security: none
Stored ESSID: 125
Associated: no
DHCP: on
DHCP CID type: 1
DHCP CID: ac3fa48f4200
Power Save: on
Active Network Information:
Active Network: Unknown
IP Address: 0.0.0.0
Netmask:
Gateway: 0.0.0.0
TCP Port: 6101
Alternate TCP Port: 9100
TCP JSON Config Port: 9200
UDP Port: 6101
Remote Server:
Remote Server Port: 10013
TCP: on
UDP: on
LPD: on
DHCP: on
BOOTP: on
FTP: on
HTTP: on
SMTP: on
POP3: on
SNMP: on
TELNET: on
MIRROR: off
UDP Discovery: on
Weblink:
DHCP CID type: 1
DHCP CID: ac3fa48f4200
Product support website:
http://zebra.com/zq320-info
255.255.255.0
ZQ300 Series User Guide
61
802.11 radio
option installed.
Network Information
Scan QR code
to go to ZQ300
Series product
support website
continued
Page 62

Power Management:
In-activity Timeout:36000 Secs
Low-battery Timeout:60 Secs
Remote (DTR) pwr-off:Disabled
Voltage :4.75
Low-bat Warning :6.02(20)
Low-bat Shut-down :6.02(13)
Power On Cycles :48
Battery Health :good
Battery Cycle Count:0
Memory:
Flash :50331648 Bytes
RAM :4194304 Bytes
Label:
Width :576 dots, 72 mm
Height:65535 dots, 8191 mm
Sensors: (Adj)
Front Bar [DAC:143,Thr:70,Cur:
3]
Black Bar [DAC:144,Thr:70,Cur:0
]
Gap [DAC:192,Thr:50,Cur:60]
Temperature :27C (57)
Voltage :8.2V (255)
Resident Fonts:
Font Sizes Chars
--------- ----- -----
0 0- 6 20-FF
1 0 20-80
2 0- 1 20-59
4 0- 7 20-FF
5 0- 3 20-FF
6 0 20-44
7 0- 1 20-FF
File Directory:
File Size
--------------- ------- E:2KEY.TXT 0
E:TT0003M_.TTF 169188
50162176 Bytes Free
Command Language:
CCL Key ‘!’[21]
ZPL Configuration Information:
Rewind.........Print Mode
Continuous.....Media Type
10.0.............Darkness
+00.......Tear Off Adjust
2030.........Label Length
72mm..........Print Width
7Eh........Control Prefix
2Ch.............Delimiter
00...........Top Position
No Motion..Media Power Up
Feed....Media Head Closed
00............Left Margin
576..........Dots per row
End ZPL Configuration
Print-head test: OK
End of report
Press FEED key to
enter DUMP mode
Flash and
RAM Memory
Installed
Maximum
Label Size
Resident Human
Readable fonts
installed.
Files Loaded in
Printer Memory
(will include Pre-
scaled or Scalable
Fonts).
CPCL and
ZPL programming
languages are
supported
62
ZQ300 Series User Guide
Page 63

Specications
Note • Printer specications are subject to change without notice.
Printing Specications
Parameter ZQ310 ZQ320
Print Width Up to 48 mm (1.89 in.) Max Up to 72 mm (2.83 in.) Max
Print Speed
(Linered)
Print Speed
(Linerless)
Print Head Life 600,000 inches Mean Time to
Print Density 8 dots/mm (203 dots/inch) 8 dots/mm (203 dots/ inch)
Printhead Burn
Line to Tear Edge
Memory and Communications Specications
Parameter ZQ310 ZQ320
Flash Memory 256 MB (opt ion to expand u p to 512 MB)
RAM 128 MB (option to expand up to 25 6 MB)
Standard
Communications
Optional Wireless
Communications
Up to 101.6 mm (4.0 in.)/sec. U p to 101.6 mm (4.0 in.)/sec.
50.8 mm (2 in.)/sec 76.2 mm (3 in.)/sec
Failure of o utput at 18% dens ity at
20o C using virgin media
4.8 mm +/- 0.5 mm
(0.189 in. +/-0.02 in.)
USB 2.0 Type -C Inter face
Standa rd Bluetooth compatible module
Optional 802.11 a/b/g/n/ac SRRF module
Dual radio option (8 02.11ac & BT 4.0)
600,0 00 inches Mean Time to
Failure of o utput at 18% dens ity at
20o C using virgin media
4.8 mm +/- 0.5 mm
(0.189 in. +/-0.02 in.)
Media Specications
Parameter ZQ310 ZQ320
Width 58 mm +/-0.75 (2.28 in.
Length 12.5 mm (0.49 in.) minimum 12.5 mm (0.49 in.) minimum
Black Bar Sensor
to Printhead
Burnline Distance
Label Thickness 0.05842 mm to 0.1614 mm
Tag/Receipt
Thickness
Max. Media Outer
Diameter
Label Inner Core
Diameter
Black Mark
Location
Black Mark
Dimensions
+/-0.02)
76 mm +/-0.75 (3 in. +/-0.03)
with spacers
16 mm +1.0/-0.6 mm
(0.62 in. +.04/-0.02 in.)
(.0023 in. to .0063 in.)
0.1397 mm (.0055 in.) max 0.1397 mm (.0055 in.) max
40 mm (1.57 in.) 40 mm (1.57 in.)
15.875 mm to 22.22 mm
(.625 in. to .875 in. )
Centered on media roll Centered on media roll
L: 2.4 mm to 11.0 mm
(0.09 in. to 0.43 in.)
W: 12.7 mm (0.5 in.)
63
ZQ300 Series User Guide
80 mm +/-0.75 (3.15 in.
+/-0.02)
76.2 mm +/-0.75 (3 in.
+/-0.03)
with spacers
16 mm +1.0/-0.6 mm
(0.62 in. +.04/-0.02 in.)
0.05842 mm to 0.1614 mm
(.0023 in. to .0063 in.)
15.875 mm to 22.22 mm
(.625 in. to .875 in. )
L: 2.4 mm to 11.0 mm
(0.09 in. to 0.43 in.)
W: 12.7 mm (0.5 in.)
Page 64

ZPL Bar Code Specications and Commands
Barcode (ZPL Command)
Aztec (^B0)
Codabar (^BK)
Codablock (^BB)
Code 11 (^B1)
Code 39 (^B3)
Code 49 (B4)
Code 93 (^BA)
Code 128 (^BC)
DataMatrix (^BX)
EAN-8 (^B8)
EAN-13 (^BE)
GS1 DataBar Omnidirectional (^BR)
Industrial 2 of 5 (^BI)
Linear & 2-D Bar
Codes Available
Rotation Angles 0°, 90°, 180°, and 270°
*Contains UFST from Agfa Monotype Corporation
lnterleaved 2 of 5 (^B2)
ISBT-128 (^BC)
LOGMARS (^BL)
Micro-PDF417 (^BF)
MSI (^BM)
PDF-417 (^B7)
Planet Code (^B5)
Plessey (^BP)
Postnet (^BZ)
Standard 2 of 5 (^BJ)
TLC39 (^BT)
UPC/EAN extensions (^BS)
UPC-A (^BU)
UPC-E (^B9)
Maxi Code (^BD)
QR Code (^BQ)
64
ZQ300 Series User Guide
Page 65

CPCL and ZPL Font Specications
CPCL Font Specication: 203 dpi (8 dots/mm)
Fonts Matrix
(in dots)
(HxW)
0 (Standard) 9 x 8 .044" x .039" 25.4
1 (min. width) 48 x 13 .236" x .064" 15.6
1 (max. width) 48 x 39 .236” x .192” 5.2
2 (OCR-A) 12 x 20 .059" x .099" 10.2
4 Size 0 (min. width) 47 x 11 .232" x .054" 18.5
4 Size 0 (max. width) 47 x 43 .232” x .212” 4.7
5 Size 0 (min. width) 24 x 7 .118" x .034" 29
5 Size 0 (max. width) 24 x 23 .118” x .113” 8.8
6 (MICR) 27 x 28 .133" x .138" 7.3
7 24 x 12 .118” x .059” 16.9
Min. Char.
Size (HxW)
Max. CPI
• Standard Fonts: 25 bitmapped, 1 smooth, scalable (CG
Triumvirate Bold Condensed*)
• Optional Fonts: downloadable bitmapped/scalable fonts.
• International Character Sets (optional): Arabic, Cyrillic,
Hebrew, Traditional Chinese (Scalable NotoMono), 24x24
Mkai, 16x16 New Sans MT, Vietnamese (Bitmap 16x16
Utah), Simplied Chinese (Hans.ttf, bitmapped: 24x24
Msung & 16x16 SimSun), Japanese (Scalable NotoMono),
bitmapped 16x16 Square Gothic J MT, Korean (Scalable
NotoMono) and Thai (Scalable, Angsana).
• Scalable text feature.
• Standard resident fonts can be rotated in 90° increments.
• Supports user dened fonts, and graphics and logos.
• Text concatenation to assign different character styles.
• Allows text magnication 1-16 times the original size.
• Proportional and xed-width fonts.
*Contains UFST from Agfa Monotype Corporation
65
ZQ300 Series User Guide
Page 66

ZPL Font Specication: 203 dpi (8 dots/mm)
Font Matrix
(in dots)
(HxW)
A 9 x 5 U-L-D .044" x .030" 33.3
B 11 x 7 U .054" x .044" 22.7
C,D 18 x 10 U-L-D .089" x .059" 16.9
E 28 x 15 OCR-B .138" x .098" 10.2
F 26 x 13 U-L-D .128" x .079" 12.7
G 60 x 40 U-L-D .295" x .236" 4.2
H 21 x 13 OCR-A .103" x .093" 10.8
GS 24 x 24 SYMBOL .118" x .118" 8.5
P 20 x 18 U-L-D 0.098 x 0.089 N/A
Q 28 x 24 U-L-D 0.138 x 0.118 N/A
R 35 x 31 U-L-D 0.172 x 0.153 N/A
S 40 x 35 U-L-D 0.197 x 0.172 N/A
T 48 x 42 U-L-D 0.236 x 0.207 N/A
U 59 x 53 U-L-D 0.290 x 0.261 N/A
V 80 x 71 U-L-D 0.394 x 0.349 N/A
Ø 15 x 12 U-L-D Scalable (Smooth) Font
*U=upper case, L=lower case, D=descenders
Typ e* Min. Char.
Size
(HxW)
Maz.
C.P.I.
• Character Fonts: Standard bitmapped Zebra fonts: A, B, C,
D, E (OCR-B), F, G, H, (OCR-A), GS, P, Q, R, S, T, U, V &
Ø Smooth font (CG Triumvirate Bold Condensed).
• Supports Unicode UTF-8, UTF-16, and several other single
and multi-byte international character sets (See ZPL programming guide for more details).
• Supports user dened fonts and graphics – including custom logos.
• Bitmap fonts are expandable up to 10 times, height and
width independent. Fonts E and H (OCR-B and OCR-A),
however, are not considered in spec when expanded.
• Smooth scalable font Ø (CG Triumvirate Bold Condensed)
is expandable dot-by-dot, height and width independent.
• Unicode Swiss 721 font available.
66
ZQ300 Series User Guide
Page 67

Printing in Chinese Fonts
The information that follows provides details on how to print us-
ing Chinese fonts on the ZQ300 Series printers.
Note: This printer ships in line print mode from the factory. It
has the GB18030 encoding pre-selected at start up and has the
GBUNSG24.CPF font preselected at start up. You can directly
send GB18030 encoded text to the printer and it will print to the
printer without any modications to the settings. If you prefer
to use the UTF-8 encoding rather than GB18030, issue the
following command:
! U1 ENCODING UTF-8
There are two options to print Chinese fonts: UTF-8 or
GB18030. To activate one of these modes, select the control
language that you will create your label in, which in this case is
CP CL only.
To create your label in CPCL, you need to add one of following
two commands to your label in order to enable Chinese printing:
• For UTF-8, use ENCODING UTF-8 or COUNTRY UTF-8.
• For GB18030, use ENCODING GB18030 or COUNTRY GB18030
Next you need to select the correct font to print in Chinese.
The following fonts are provided for use in Chinese as follows:
• GBUNSG24.CPF (24x24 pixel bitmapped font)
• GBUNSG16.CPF (16x16 pixel bitmapped font)
67
ZQ300 Series User Guide
Page 68

Below is a sample label sent in UTF-8 Encoding format:
CPCL_UTF-8.prn
! 0 200 200 225 1
PW 384
ENCODING UTF-8
T GBUNSG24.CPF 0 0 20
T GBUNSG24.CPF 0 0 46
T GBUNSG24.CPF 0 0 72
T GBUNSG24.CPF 0 0 98
T GBUNSG24.CPF 0 0 124
T GBUNSG24.CPF 0 0 150
紅日已高三丈透,
金爐次第添香獸,
紅錦地衣隨步皺。
佳人舞點金釵溜,
酒惡時拈花蕊嗅,
別殿遙聞簫鼓奏。
PRINT
Below is a sample label sent in GB18030 Encoding format:
! 0 200 200 225 1
PW 384
ENCODING GB18030
T GBUNSG24.CPF 0 0 20
T GBUNSG24.CPF 0 0 46
T GBUNSG24.CPF 0 0 72
T GBUNSG24.CPF 0 0 98
T GBUNSG24.CPF 0 0 124
T GBUNSG24.CPF 0 0 150
PRINT
紅日已高三丈透,
金爐次第添香獸,
紅錦地衣隨步皺。
佳人舞點金釵溜,
酒惡時拈花蕊嗅,
別殿遙聞簫鼓奏。
Note: The ZQ300 Series printers do not ship with built in support
for printing Chinese in ZPL.
Note: Depending on the characteristics of the media being used,
such as media thickness and thermal sensitivity, print darkness
setting may need to be adjusted in order to improve readability
of small characters. Please use print darkness control
commands to increase or decrease print darkness as needed
and as described in the Programming Guide (p/n P1012728-
010).
68
ZQ300 Series User Guide
Page 69

USB Type-C to Type-A Communications Cable
Type-C Plug Wire Type-A Plug
Pin
#
A1,B1,
A12,B12
A4,B4,A9,
B9
A5 CC See Note 1
B5 VCONN -
A6 Dp1 3 UTP_Dp 3 D+
A7 Dn1 4 UTP_Dn 2 D-
Notes:
1. Pin A5 (CC) of the USB Type-C plug shall be connected to VBUS through a
resistor Rp(56 kΩ +/- 5%).
2. Contacts B6 and B7 should not be present in the USB Type-C plug.
3. All VBUS pins shall be connected
Bypass capacitors are not required for
4. All Ground return pins shall be
USB Type-
5. All
Signal
Name
GND 1 GND_PWrt1 4 GND
VBUS 2 PWR_VBUS1 1 VBUS
Shield Braid Shield Shell Shield
C plug pins that are not listed in this table shall be open (not connected).
Wire
#
together within the USB Type-C plug.
connected together within the USB Type-C plug.
Signal
Name
the VBUS pins in this cable.
Pin
#
Figure 28 • USB Type-C to Type-A Pinouts
Signal
Name
Type-C Type-A
A1
A12
B12
B1
69
ZQ300 Series User Guide
Pin 1
Pin 4
continued
Page 70

Physical, Environmental and Electrical Specications
Parameter ZQ310 ZQ320
Weight w/ battery,
excluding media
Temperature
Relative Humidity
Battery
Printer Input
Power
Ingression
Protection (IP)
Rating
0.37 Kg
(0.81 lbs.)
Operating : -15° to 50° C
(5° to 122° F)
Charging: 0° to 40° C (32° to 104° F)
Storage w/o battery: -20° to 60° C
(-4° to 140° F)
Storage w/ battery: -25° to 45°C
(-4° to 113° F)
Operating: 10% to 90% (non-
condensing)
Storage: 10% to 90% (non-
condensing)
Lithium-Ion, 7.2 VDC (nominal);
2280 mAHr, PowerPrecision+
12.0 VDC; 1.25A
0.43 Kg.
(0.95 lbs.)
54
70
ZQ300 Series User Guide
Page 71

Figure 29 • ZQ320 Dimensions
49.5 mm
(1.95 in.)
117.7 mm
(4.63 in.)
130 mm
(5.12 in.)
71
ZQ300 Series User Guide
Page 72

Figure 30 • ZQ310 Dimensions
49.5 mm
(1.95 in.)
93.5 mm
(3.68 in.)
130 mm
(5.12 in.)
72
ZQ300 Series User Guide
Page 73

ZQ300 Series Accessories
Part # Description
P1080867 BELT,CLIP,Micro ZQ3X
CRD-MPM-5SCHGUS1-01 5-Slot Docking Cradle,ZQ3 (includes PSU and US
CRD-MPM-1SCHGUS1-01 1-Slot Docking Cradle,ZQ3 (Includes Type A to
SAC-MPM-3BCHGUS1-01 3-Slot Battery Charger,ZQ3 (includes PSU and US
SAC-MPM-1BCHGUS1-01 1-Slot Battery Charger,ZQ3 (includes US power
MNT-MPM-VHDRD1-01 Vehicle Holder (Dashboard),ZQ3
MNT-MPM-VHDRW1-01 Vehicle Holder (Windshield),ZQ3
PWR-WUA5V12W0US AC to USB Adaptor,ZQ3 (US power plug)
CHG-AUTO-USB1 Cigarette to USB adaptor (12/24V to 5V); ZQ300
VAM-MPM-VHCH1-01 Vehicle adapter for ZQ300 and TC51/TC56 mobile
CBL-MPM-USB1-01 Kit,USB Type A to Type C Cable
SG-MPM-SC31-01 Kit,Soft Case,ZQ320
SG-MPM-SC21-01 Kit,Soft Case,ZQ310
KIT-MPM-MDSPR5-01 Kit,ZQ300,Media,Spacers
power cord)
Type C USB Cable and AC to USB Adapter with US
power plug)
power cord)
cord)
Series
computer (includes open ended and cigarette lighter
adapter cables)
73
ZQ300 Series User Guide
Page 74

Appendix A
IS 13252 (Part 1)/
IEC 60950-1
R-41004481
XXXXXX
SN:
PCC:
XXZFJ1607000036
ZQ32-ACE1210-001
Serial #
Barcode
PCC
Barcode
Serial Number and PCC Number Locations
PLG ID: XXXXSertifikat Number: XXXXX/XXXXX/XXXX
XXXXXXXXXXXXXX
Contains NCC ID:
MSIP-CMM-ZTC-XXXXX
놹볁뿱겕閵鱚ꫦ넩넽넁
뼩鲮ꓩꟹ鱉끩끞닆
Contains FCC ID: XXXXX-XXXXXXXX; IC: XXXXX-XXXXXXXX
NTC: XXX-XXXXXXXX
ertified for use in Hong Kong
XXXXXXXXXX
When calling with a specic problem regarding your
printer, please have the following information on hand:
• Model number/type (e.g. ZQ320)
• Unit serial number
• Product Conguration Code (PCC)
For Product Support Contacts, see the table on the next page
or contact your local re-seller.
ZQ300 Series User Guide Appendices
74
Page 75

Appendix B
User Interface LED Charging Behavior
PowerState Status Description
Charging SolidAmber
Healthy
ChargeFault FastBlinkingRed(2blinks/second)
On
Unhealthy
Off
Unhealthy
Sleep
Unhealthy
Boot/Shutdown
Unhealthy
ChargeComplete SolidGreen
Charging SolidRed
ChargeFault FastBlinkingRed(2blinks/second)
ChargeComplete SolidRed
N/A NoBattery (BatteryGraph)FastBlinkingGreen(2blinks/second)
Charging SolidAmber
Healthy
ChargeFault FastBlinkingRed(2blinks/second)
ChargeComplete SolidGreen
Charging SolidRed
ChargeFault FastBlinkingRed(2blinks/second)
ChargeComplete SolidRed
N/A NoBattery Noindication
Charging PulsingAmber
Healthy
ChargeFault FastBlinkingRed(2blinks/second)<otherlightsoff>
ChargeComplete PulsingGreen
Charging PulsingRed
ChargeFault FastBlinkingRed(2blinks/second)<otherlightsoff>
ChargeComplete PulsingRed
N/A NoBattery Sleepdisabledwhenbatteryremoved
Charging SlowBlinkingAmber(1blink/2seconds)
Healthy
ChargeFault FastBlinkingRed(2blinks/second)
ChargeComplete SlowBlinkingGreen(1blink/2seconds)
Charging SlowBlinkingRed(1blink/2seconds)
ChargeFault
ChargeComplete SlowBlinkingRed(1blink/2seconds)
N/A NoBattery (BatteryGraph)FastBlinkingGreen(2blinks/second)
FastBlinkingRed(2blinks/second)
75
ZQ300 Series User Guide Appendices
Page 76

Appendix C
Battery Disposal
The EPA certied RBRC® Battery Recycling
Seal on the Lithium-Ion (Li-ion) battery supplied
with your printer indicates Zebra Technologies
Corporation is voluntarily participating in an industry program to collect and recycle these batteries at the end of their useful life, when taken out of
service in the United States or Canada. The RBRC program provides a convenient alternative to placing used Li-ion batteries into
the trash or the municipal waste stream, which may be illegal in
your area.
Important • When the battery is worn out, insulate the terminals
with tape before disposal
Please call 1-800-8-BATTERY for information on Li-ion bat-
tery recycling and disposal bans/restrictions in your area. Zebra
Technologies Corporation’s involvement in this program is part of
our commitment to preserving our environment and conserving
our natural resources.
Outside North America, please follow local battery recycling
guidelines.
Product Disposal
Do not dispose of this product in unsorted municipal waste. This product is recyclable. Please
recycle according to your local standards.
76
ZQ300 Series User Guide Appendices
Page 77

Appendix D
Maintenance Supplies
In addition to using quality media provided by Zebra, it is
recommended that the printer be cleaned as prescribed in the
maintenance section on Page 51. The following item is available
for this purpose:
• Cleaning Pen (12 pack): p/n 105950-035
77
ZQ300 Series User Guide Appendices
Page 78

Appendix E
Using Zebra.com
The following examples illustrate the search function on Zebra’s
website for nding specic documents and downloads.
Example 1: Find the ZQ300 Series User Guide
Go to http://www.zebra.com/us/en/support-downloads.html
Enter the appropriate ZQ300 printer name where indicated.
Enter Printer
Model
Click on the Manuals tab to navigate to all ZQ300 Series docu-
mentation.
78
ZQ300 Series User Guide Appendices
Page 79

Example 2: Find ZebraNet Bridge Enterprise and Other Software
Downloads
Go to https://www.zebra.com/us/en/products/software/bar-
code-printers.html and click on The ZebraLink Environment to
go the Software downloads page.
Click on the appropriate tab to nd and access the latest ver-
sions of software.
79
ZQ300 Series User Guide Appendices
Page 80

Product Support Contacts
In the Americas contact:
Regional Headquarters Technical Support Customer Service
Dept.
Zebra Technologies Corporation
3 Overlook Point
Lincolnshire, Illinois 60069 U.S.A.
T: +1 847 634 6700
Toll Free: +1 866 230 9494
F: +1 847 913 8766
In Europe, Africa, the Middle East, and India contact:
T: +1 877 275 9327
F: +1 847 913 2578
Hardware:
ts1@zebra.com
Software:
ts3@zebra.com
For printers, parts, media,
and ribbon, please call
your distributor, or
contact us.
T: +1 877 275 9327
E: clientcare@zebra.com
Regional Headquarters Technical Support Customer Service
Dept.
Zebra Technologies Europe Limited
Dukes Meadow
Millboard Road
Bourne End
Buckinghamshire SL8 5XF, UK
T: +44 (0)1628 556000
F: +44 (0)1628 556001
In the Asia Pacic region contact:
T: +44 (0) 1628 556039
F: +44 (0) 1628 556003
E: Tseurope@zebra.com
For printers, parts, media,
and ribbon, please call
your dis tributor, or
contact us.
T: +44 (0) 1628 556032
F: +44 (0) 1628 556001
E: cseurope@zebra.com
Regional Headquarters Technical Support Customer Service
Dept.
Zebra Technologies Asia Pacific
Pte. Ltd.
120 Robinson Road
#06-01 Parakou Building
Singapore 068913
T: +65 6858 0722
F: +65 6885 0838
T: +65 6858 0722
F: +65 6885 0838
E: (China)
tschina@zebra.com
All other areas:
tsasiapacific@zebra.com
For printers, parts, media,
and ribbon, please call your
distributor, or contact us.
T: +65 6858 0722
F: +65 6885 0836
E: (China) order-csr@zebra.
com
All other areas:
csasiapacific@zebra.com
80
ZQ300 Series User Guide Appendices
Page 81

Index
A
Accessories
3-Slot Battery Charger 19
1-Slot Battery Charger 18
AC-to-USB Adapter 17
5-Bay Docking Cradle 20
1-Bay Docking Cradle 21
Belt clip 50
list of 73
Shoulder Strap 51
B
Battery, charging 17
Battery, installing 15
Battery, tape insulator 14
Battery, removing 13
Battery, safety 16
Black Mark Dimensions 25
Bluetooth™ Minimum Security Modes
45
C
Cable Communication 41
Charger Safety 16
Cleaning
general instructions 53
Communications
with a cable 41
Configuration Label
printing 38
sample 60
D
Designing Labels 24
Draft Mode 39
F
Font & Barcode Specs
ZPL 65
G
Getting Ready to Print 13
I
Introduction to ZQ300 Series Printer 7
K
Keep-Out Areas 29
L
Label Design 24
M
Media
loading 30
spacers 31
P
Preventive Maintenance 53
Power Save Mode 39
Programming language
ZPL/CPCL 7
S
Safety Precautions
battery 16
charger 16
Shoulder Strap 51
Sleep Mode 38
Software 7
Soft Case 52
Specifications
Media 63
Memory/Communications 63
Physical 70
printing 63
T
Technical Support, contacting 80
Troubleshooting
Communications Diagnostics Mode 58
control panel indicators 56
Troubleshooting tests 58
printing a configuration label 38
ZQ320 configuration label example 60
Troubleshooting Topics 56
W
Wearing the Printer 50
Wireless communications
Bluetooth™ radio 44
WLAN Overview 48
Z
Zebra Setup Utilities 43
Zebra Printer Setup Utility (Android) 43
ZPL Font and Bar Code Specifications and Commands 64
N
NFC Tag 47
O
Operator Controls 32
81
ZQ300 Series User Guide
Page 82

Zebra Technologies Corporation
3 Overlook Point
+1 847.634.6700 RU F: +1 847.913.8766
Lincolnshire, IL 60069 USA
3φ
 Loading...