

Page 1
PrintMonitor™
PrintManager™
P1045924-003
Virtual PrintWare Suite™
User’s Guide
Page 2

Copyright Notice
© 2016 ZIH Corp.
This document contains information proprietary to Zebra Technologies Corporation.
This document and the information contained within is Copyrighted by Zebra
Technologies Corporation and may not be duplicated in full or in part by any person
without written approval from Zebra.
While every eort has been made to keep the information contained within current
and accurate as of the date of publication, no guarantee is given that the document
is error-free or that it is accurate with regard to any specification. Zebra Technologies
Corporation reserves the right to make changes, for the purpose of product
improvement, at any time.
Trademarks
Zebra is a registered trademark and Virtual PrintWare is a trademark of Zebra
Technologies Corporation. Windows is a registered trademark of Microsoft
Corporation in the United States and other countries. All other trademarks or
registered trademarks are marks of their respective holders.
Page 3

Contents
Introduction .....................................................................................................................1
Overview ................................................................................................................................................ 1
Grid Display ...........................................................................................................................................3
PrintMonitor vs. PrintManager ...............................................................................................................4
Quick Start .............................................................................................................................................7
PrintMonitor .....................................................................................................................................7
PrintManager and PrintMonitor ........................................................................................................7
Login/Logout ...................................................................................................................9
Introduction ............................................................................................................................................9
Login/Logout ........................................................................................................................................10
File Menu ....................................................................................................................... 11
Introduction .......................................................................................................................................... 11
Login/Logout ........................................................................................................................................12
Properties .............................................................................................................................................13
Monitor Conguration ....................................................................................................................14
Table Conguration ........................................................................................................................15
Mail Server ....................................................................................................................................16
Hot Drop Folder Conguration .......................................................................................................18
Exit ....................................................................................................................................................... 21
Administration Menu .................................................................................................... 23
Introduction ..........................................................................................................................................23
Printers ................................................................................................................................................. 24
Add a Printer ..................................................................................................................................25
Edit a Printer .................................................................................................................................. 29
Delete a Printer ..............................................................................................................................30
P1045924-003 PrintMonitor / PrintManager User's Manual i
Page 4

Add Multiple Printers .....................................................................................................................31
Printer Information ......................................................................................................................... 36
Media Information .......................................................................................................................... 37
Print Card ......................................................................................................................................38
Groups .................................................................................................................................................41
Add a Printer Group .......................................................................................................................42
Modify a Printer Group ..................................................................................................................43
Delete a Printer Group ...................................................................................................................45
Users .................................................................................................................................................... 46
Add a User Account .......................................................................................................................47
Edit a User Account .......................................................................................................................48
Change a User Account Password ................................................................................................48
Delete a User Account ..................................................................................................................49
Alert Contacts ......................................................................................................................................50
Add an Alert Contact ......................................................................................................................51
Edit an Alert Contact ......................................................................................................................54
Delete an Alert Contact ..................................................................................................................55
Logs Menu .....................................................................................................................57
Introduction ..........................................................................................................................................57
Event History ........................................................................................................................................58
Printer History ......................................................................................................................................61
User History .........................................................................................................................................64
Export Event Logs ................................................................................................................................67
Export Event/Printer/User History ..................................................................................................67
Tools Menu .................................................................................................................... 71
Introduction ..........................................................................................................................................71
Firmware Download ............................................................................................................................. 72
Reset .................................................................................................................................................... 76
Backup ................................................................................................................................................. 79
Restore ................................................................................................................................................81
Clean .................................................................................................................................................... 83
PrintManager Menu ......................................................................................................85
Introduction ..........................................................................................................................................85
Queues ................................................................................................................................................86
Add a Queue .................................................................................................................................88
Edit a Queue ..................................................................................................................................98
Delete a Queue .............................................................................................................................99
Cards .................................................................................................................................................100
Media .................................................................................................................................................101
ii PrintMonitor / PrintManager User's Manual P1045924-003
Page 5

Jobs Status ........................................................................................................................................102
Active Jobs ..................................................................................................................................103
Completed Jobs ...........................................................................................................................105
Deleted Jobs ................................................................................................................................107
Pending Jobs ............................................................................................................................... 109
Held Jobs ..................................................................................................................................... 113
Jobs Process ..................................................................................................................................... 117
Remove Pending ......................................................................................................................... 11 8
Resume Held ............................................................................................................................... 120
Remove Held ............................................................................................................................... 122
IP Address .......................................................................................................................................... 124
Manage Data .....................................................................................................................................126
Image Manager ...........................................................................................................................127
Template Manager ....................................................................................................................... 131
Help Menu ...................................................................................................................135
Introduction ........................................................................................................................................135
User Manual .......................................................................................................................................136
Activate ..............................................................................................................................................136
Deactivate .......................................................................................................................................... 136
Register .............................................................................................................................................. 137
About .................................................................................................................................................. 138
Worldwide Support ..................................................................................................... 139
North America and Latin America - Technical Support ................................................................139
North America and Latin America - Repair Services ..................................................................139
Europe, Middle East, and Africa - Technical Support ..................................................................140
Europe, Middle East, and Africa - Repair Services ......................................................................141
Asia Pacic - Technical Support ..................................................................................................142
Asia Pacic - Repair Services .....................................................................................................142
Zebra Website .............................................................................................................................142
P1045924-003 PrintMonitor / PrintManager User's Manual iii
Page 6

iv PrintMonitor / PrintManager User's Manual P1045924-003
Page 7

Overview
1
Introduction
PrintMonitor is a software tool which can be used to monitor one or more Zebra ZXP
Series Card Printers over a network. Its features are accessed via six main menus
and ve main command buttons displayed across the main window.
Note • Some features are accessible via menus and command buttons.
The menus are:
• File
• Administration
• Logs
• Tools
• PrintManager
• Help
The command buttons are:
• Login/Logout
• Printer Administration
• Printer Group Administration
• User Administration
• Print Queue Administration
P1045924-003 PrintMonitor™/PrintManager™ User's Manual 1
Page 8

Introduction
Overview
The printers and their respective information being monitored will be displayed
in a grid. The information displayed is congurable by the user to suit individual
monitoring requirements.
Once PrintMonitor completes its startup initialization, it will continuously poll for
printer information until the program is terminated.
PrintMonitor allows three levels of user access: Administrator, SuperUser, and Guest.
Program access is granted and/or denied based upon the type of user currently
logged into the program.
2 PrintMonitor™/PrintManager™ User's Manual P1045924-003
Page 9

Grid Display
Upon starting PrintMonitor, its title bar displays the program’s name and version.
Directly below the title bar, the PrintMonitor Menu is displayed. If the PrintMonitor
contains information about printers to monitor, those printers will be displayed in the
grid.
Introduction
Grid Display
The Alert column (circled above) indicates the current status of each printer. One of
three different lights will be displayed depending upon the printer’s current status:
• A GREEN light indicates PrintMonitor has located the printer and the printer is
reporting neither errors nor alarm conditions.
• A YELLOW light denotes that the printer is ofine or can no longer be accessed
by the PrintMonitor.
• A RED light indicates PrintMonitor has located the printer on the network;
however, the printer is reporting some type of error or alarm condition. In
addition, the entire row for that printer will be displayed in red to draw further
attention to the fact that the printer is reporting an error.
• Printers can be congured to be part of a group or as a single entity as shown
above. The group can be expanded to show all the printers in its group, or
collapsed, in which case only the group name will be displayed. For printers
which are not part of a group, “Not Assigned” will appear as the group name.
P1045924-003 PrintMonitor™/PrintManager™ User's Manual 3
Page 10

Introduction
PrintMonitor vs. PrintManager
PrintMonitor vs. PrintManager
PrintMonitor is an asset management tool that monitors the state and activity of
printers on a network and is used by those who are tasked with maintaining a
company’s Zebra Card Printers—it is NOT intended for printing to printers.
Among its features are a grid interface that displays the current status of each printer
that is currently stored in the tool’s database. The monitor can be congured to send
emails or text messages to individual(s) tasked with maintaining the health of the
printers—this feature is known as “un-attended monitoring of printers.” The person(s)
responsible for maintaining the printers do not have to be actually looking at the main
screen (grid) to be aware of a problem with a printer, as PrintMonitor will send an
email or text message to the appropriate person(s) informing them of the printer with
the problem as well as a brief description of the problem.
Note • For each remote Location that a user wants a PrintMonitor only install at, the
Administrator will have to manually install all printers and groups for each site.
PrintManager is a Rapid Application Development tool—programmers write software
to interact with PrintManager for purposes of sending print jobs to, and requesting
status of previously sent jobs. In this sense, it is similar to the Card Printer SDKs
which are also software development tools that can only be utilized by software
applications. Unlike the Card SDKs, Print Manager is a powerful and intelligent
Print Job Management tool. Upon receiving a job from a software program, Print
Manager will check the status of the printers on the network (the same ones
PrintMonitor is currently monitoring) to nd an appropriate printer to send the print
job to for processing. PrintManager will do its best to evenly distribute the jobs to
those printers on the network which are capable of processing the received job.
Thus, PrintManager manages print jobs while PrintMonitor monitors the state of the
printers.
With PrintMonitor only installed, certain functionality will be disable versus if
PrintMonitor and PrintManager were installed and licensed. The table below shows
the menus that are visible and if they are enabled with a PrintMonitor only license,
versus the menus that are visible and enabled with a PrintMonitor/PrintManager
license enabled.
4 PrintMonitor™/PrintManager™ User's Manual P1045924-003
Page 11

File Menu
Login/Logout
Properties
Monitor Conguration
Change Message Level
Display Group / Queue
Table Conguration
Can select any and all Information
Mail Server
Hot Drop Folder Conguration
Exit
Administration Menu
Printers
Add, Edit, Delete Printers
Groups
Add, Edit, Delete Groups
Add Queues
Edit Queues
Users
Add, Edit, Delete Users
Alert Contacts
Add, Edit, Delete Alert Contacts
Logs Menu
Event History
Print History
User History
Export Event Logs
Event history
Printer History
User History
Tools Menu
Firmware Download
Reset
Backup
Restore
Clean
Print Manager Menu
Queues
Add, Edit, Delete Queues
Card
View Card Information (for ZXP8 only)
Media
Introduction
PrintMonitor vs. PrintManager
PrintMonitor Only PrintMonitor / PrintManager
Visible Enabled Visible Enabled
Y Y Y Y
Y Y Y Y
Y Y Y Y
Y Y Y Y
Y Y Y Y
Y N Y Y
Y Y Y Y
Y Y Y Y
Y Y Y Y
Y N Y Y
Y Y Y Y
Y Y Y Y
Y Y Y Y
Y Y Y Y
Y Y Y Y
Y Y Y Y
N N/A Y Y
N N/A Y Y
Y Y Y Y
Y Y Y Y
Y Y Y Y
Y Y Y Y
Y Y Y Y
Y Y Y Y
Y Y Y Y
Y Y Y Y
Y Y Y Y
Y Y Y Y
Y Y Y Y
Y Y Y Y
Y Y Y Y
Y Y Y Y
Y Y Y Y
Y Y Y Y
Y Y Y Y
Y Y Y Y
N N/A Y Y
N/A N/A Y Y
N/A N/A Y Y
N/A N/A Y Y
N/A N/A Y Y
N/A N/A Y Y
P1045924-003 PrintMonitor™/PrintManager™ User's Manual 5
Page 12

Introduction
PrintMonitor vs. PrintManager
View Printer Media Information
Job Status
Active
Completed
Deleted
Pending
Held
Job Process
Remove Pending
Resume Held
Remove Held
IP Address
Interface Manager Current / Change
Manage Data
Image Manager (Opens Interface Manager)
Template Manager (Opens Interface Manager)
Help Menu
User Manual
Activate / Deactivate
Register
About
PrintMonitor Only PrintMonitor / PrintManager
Visible Enabled Visible Enabled
N/A N/A Y Y
N/A N/A Y Y
N/A N/A Y Y
N/A N/A Y Y
N/A N/A Y Y
N/A N/A Y Y
N/A N/A Y Y
N/A N/A Y Y
N/A N/A Y Y
N/A N/A Y Y
N/A N/A Y Y
N/A N/A Y Y
N/A N/A Y Y
N/A N/A Y Y
N/A N/A Y Y
N/A N/A Y Y
Y Y Y Y
Y Y Y Y
Y Y Y Y
Y Y Y Y
Y Y Y Y
6 PrintMonitor™/PrintManager™ User's Manual P1045924-003
Page 13

Quick Start
PrintMonitor
This section outlines the steps to set up and congure PrintMonitor.
Step 1. Install the PrintMonitor Software.
Step 2. Run PrintMonitor.
Step 3. Activate License Key (see “Activate” on page 136).
Step 4. Login (see “Login/Logout” on page 9).
Step 5. Add User Account(s) (see “Add a User Account” on page 47).
Step 6. Set up Mail (see “Mail Server” on page 16).
Step 7. Add and congure Printer(s) (see “Add a Printer” on page 25).
Step 8. Add Printer Group(s) (see “Add a Printer Group” on page 42).
Introduction
Quick Start
Step 9. Logout (see “Login/Logout” on page 10).
Step 10. Exit PrintMonitor.
PrintManager and PrintMonitor
This section outlines the steps to set up and congure PrintMonitor and to congure
the queues that PrintManager will use.
Step 1. Install the PrintManager Software.
Step 2. Run PrintMonitor.
Step 3. Activate License Key (see “Activate” on page 136).
Step 4. Login (see “Login/Logout” on page 10).
Step 5. Add User Account(s) (see “Add a User Account” on page 47).
Step 6. Set up Mail (see “Mail Server” on page 16).
Step 7. Add and congure Printer(s) (see “Add a Printer” on page 25).
Step 8. Add Printer Group(s) (see “Add a Printer Group” on page 42).
Step 9. Set up and congure Print Queues (see “Queues” on page 86).
Step 10. Logout (see “Login/Logout” on page 10).
Step 11. Exit PrintMonitor.
Step 12. Refer to the “PrintManager Programmer’s Reference Manual”
(P1057447-002) for PrintManager implementation.
P1045924-003 PrintMonitor™/PrintManager™ User's Manual 7
Page 14

Introduction
PrintMonitor requires application login credentials to access most of the features. In
the menu bar, click File > Login, or click the (User Login) button.
2
Login/Logout
P1045924-003 PrintMonitor™/PrintManager™ User's Manual 9
Page 15

Login/Logout
Login/Logout
Login/Logout
The login window will appear; enter the required credentials and click Submit.
Note • If this is the rst time logging in, the User is “Admin,” and the Password is
“admin.”.
The command button and the selection in the File menu have changed to show an
active user. To log out of PrintMonitor, select File > Logout, or click the (User
Logout) button.
10 PrintMonitor™/PrintManager™ User's Manual P1045924-003
Page 16

Introduction
The rst menu in PrintMonitor is the File menu. The selections under the File menu
are: Login/Logout, Properties, and Exit.
3
File Menu
P1045924-003 PrintMonitor™/PrintManager™ User's Manual 11
Page 17

File Menu
Login/Logout
Login/Logout
The rst selection under the File menu is Login/Logout.
Selecting this option allows the user to login or logout of the PrintMonitor.
Refer to “Login/Logout” on page 9 for details regarding logging into or out of the
ZVP Monitor.
12 PrintMonitor™/PrintManager™ User's Manual P1045924-003
Page 18

Properties
File Menu
Properties
The second selection under the File menu is Properties.
To access many of these features, users must be logged in as an Administrator or
SuperUser.
The Properties selection contains four sub-selections: Monitor Conguration, Table
Conguration, Mail Server, and Hot Drop Folder Conguration; these sub-selections
enable the user to dene or alter selected program settings.
P1045924-003 PrintMonitor™/PrintManager™ User's Manual 13
Page 19
File Menu
Properties
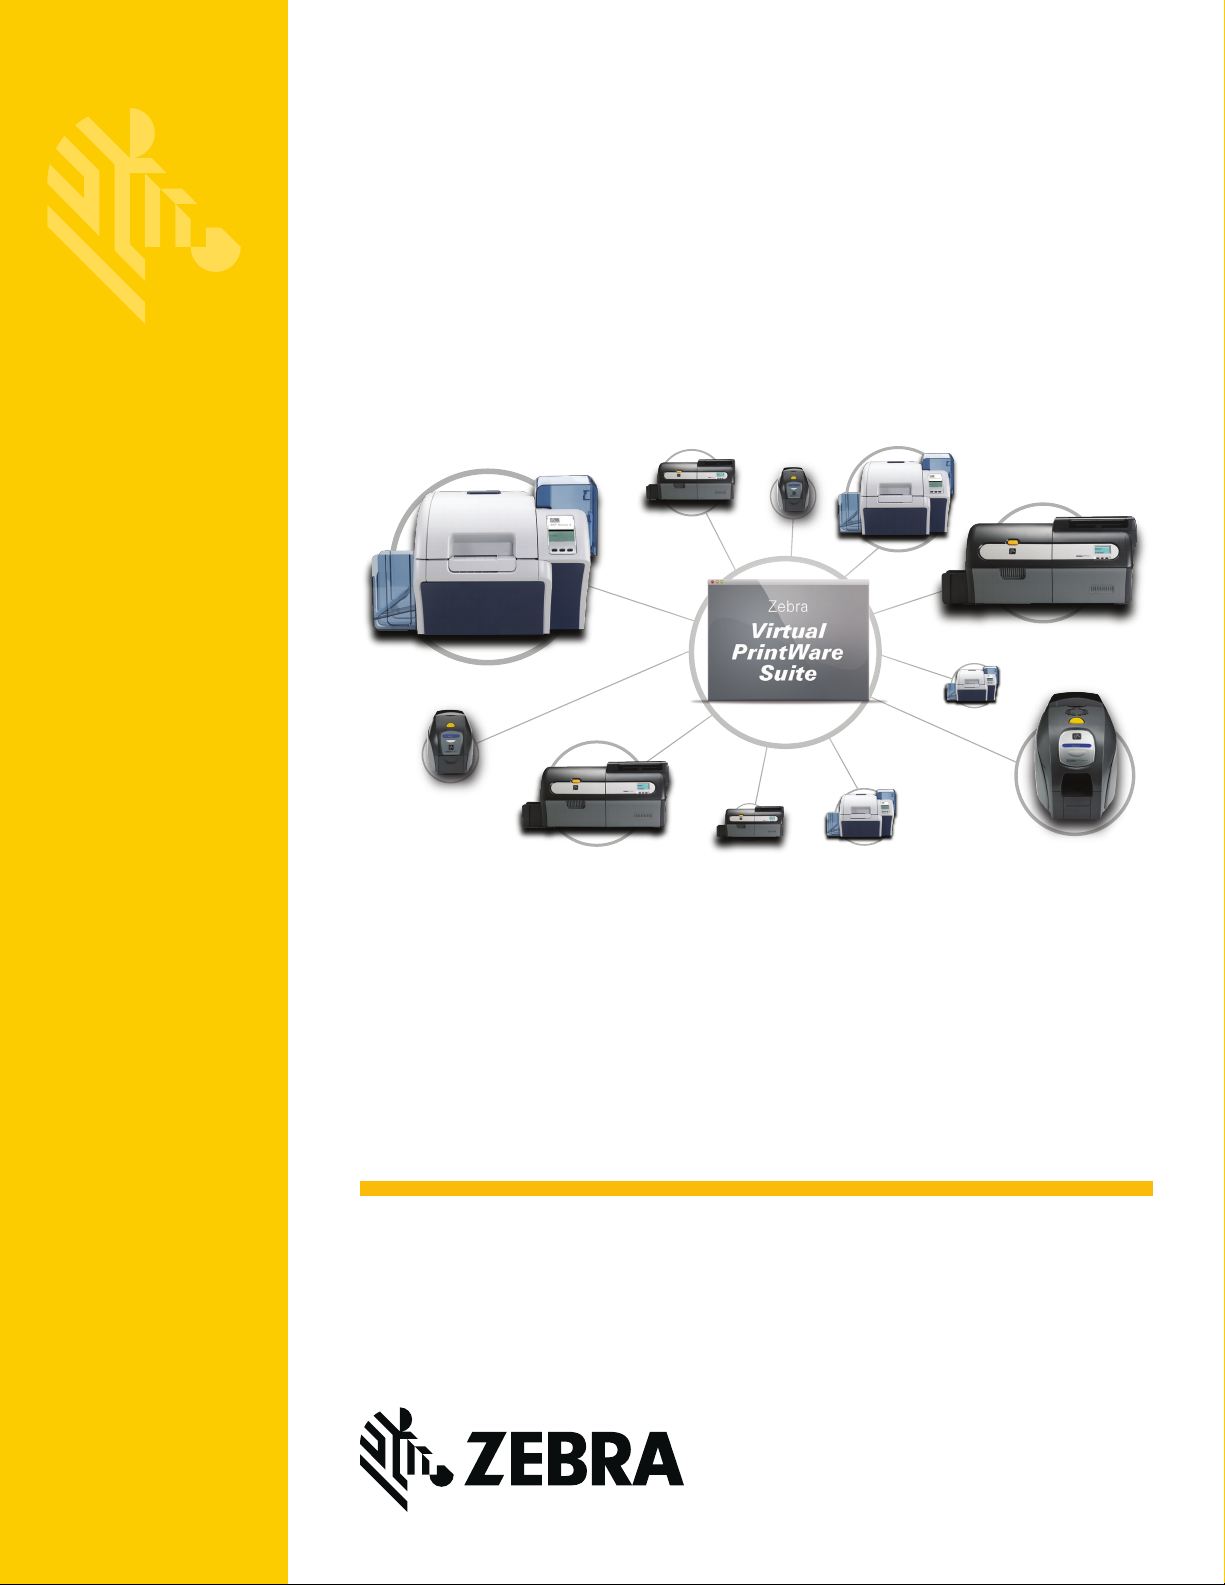
Monitor Conguration
The rst sub-selection is Monitor Conguration.
Selecting Monitor Conguration will activate the Monitor: Conguration window.
Select the message level to be logged by clicking the Message Level list-box control.
Low (default): Minimal data is entered into the Log File.
High: Detailed data is entered into the Log File. This should only be used for
investigating problems with the PrintMonitor/PrintManager.
Click Submit to save the changes—clicking Close before Submit will exit without
saving any changes.
14 PrintMonitor™/PrintManager™ User's Manual P1045924-003
Page 20
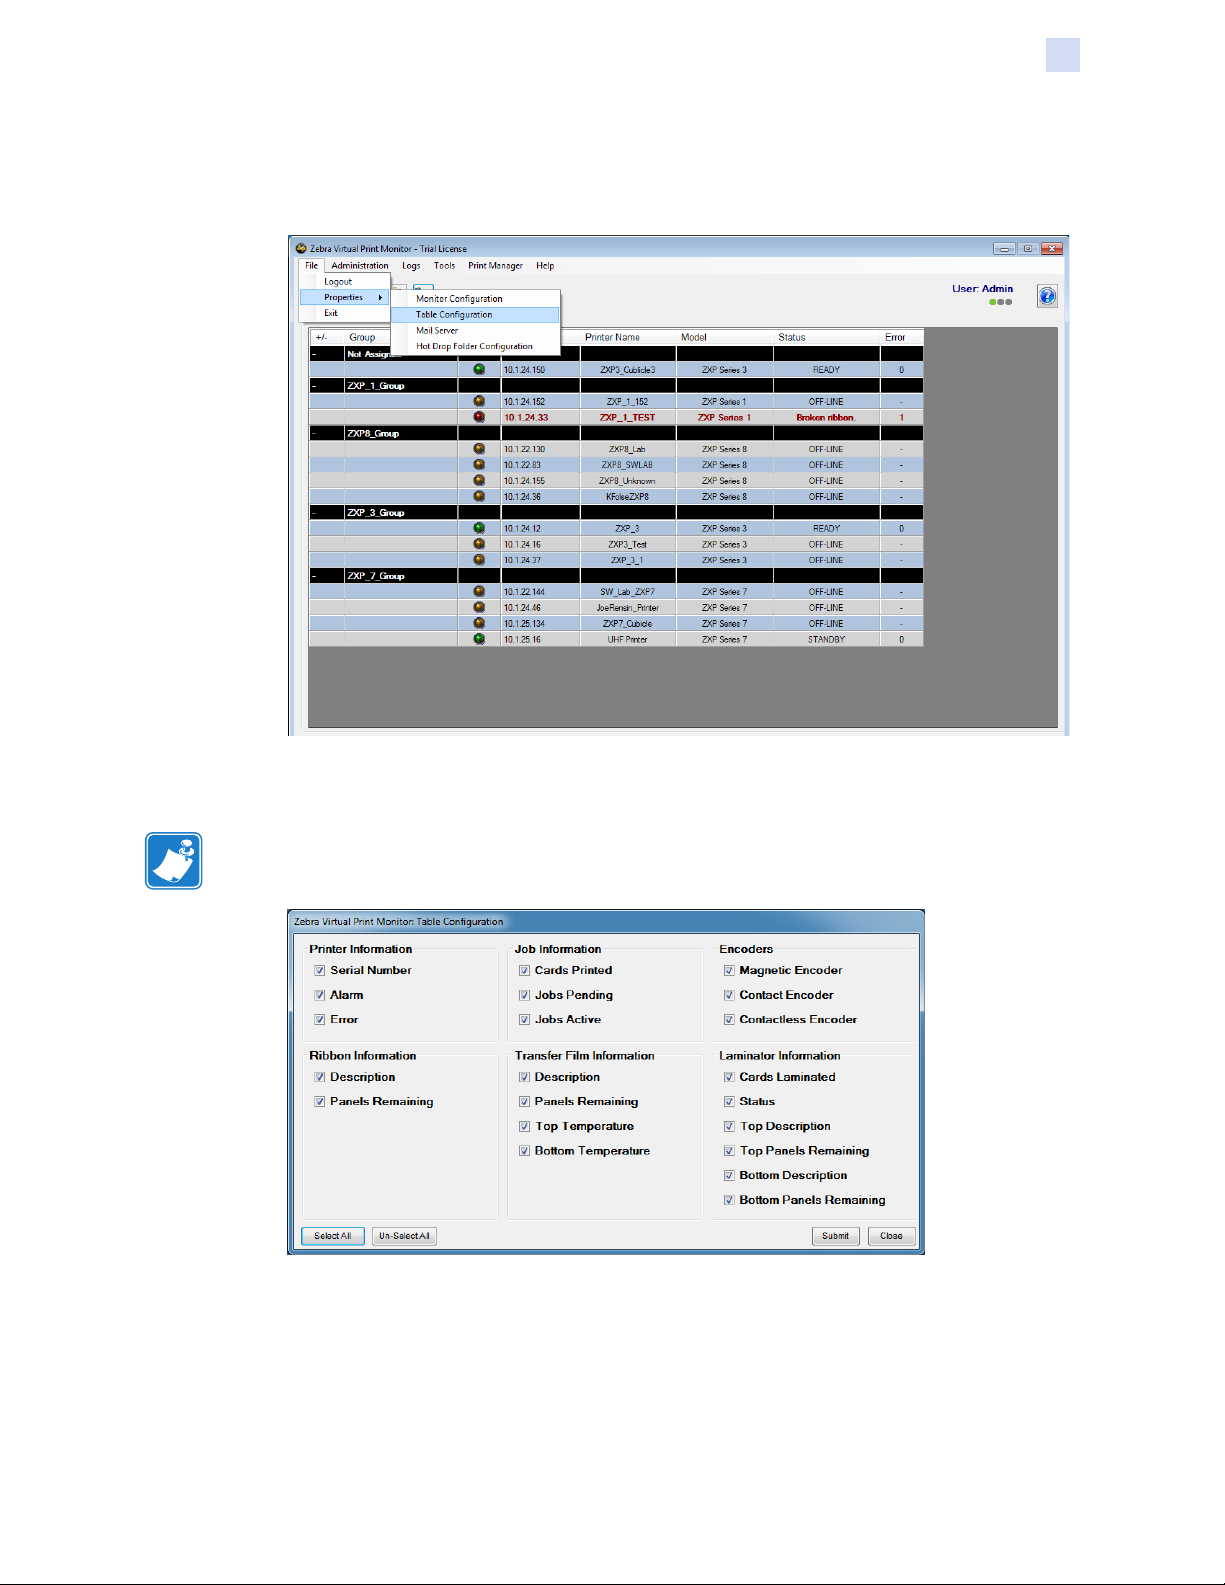
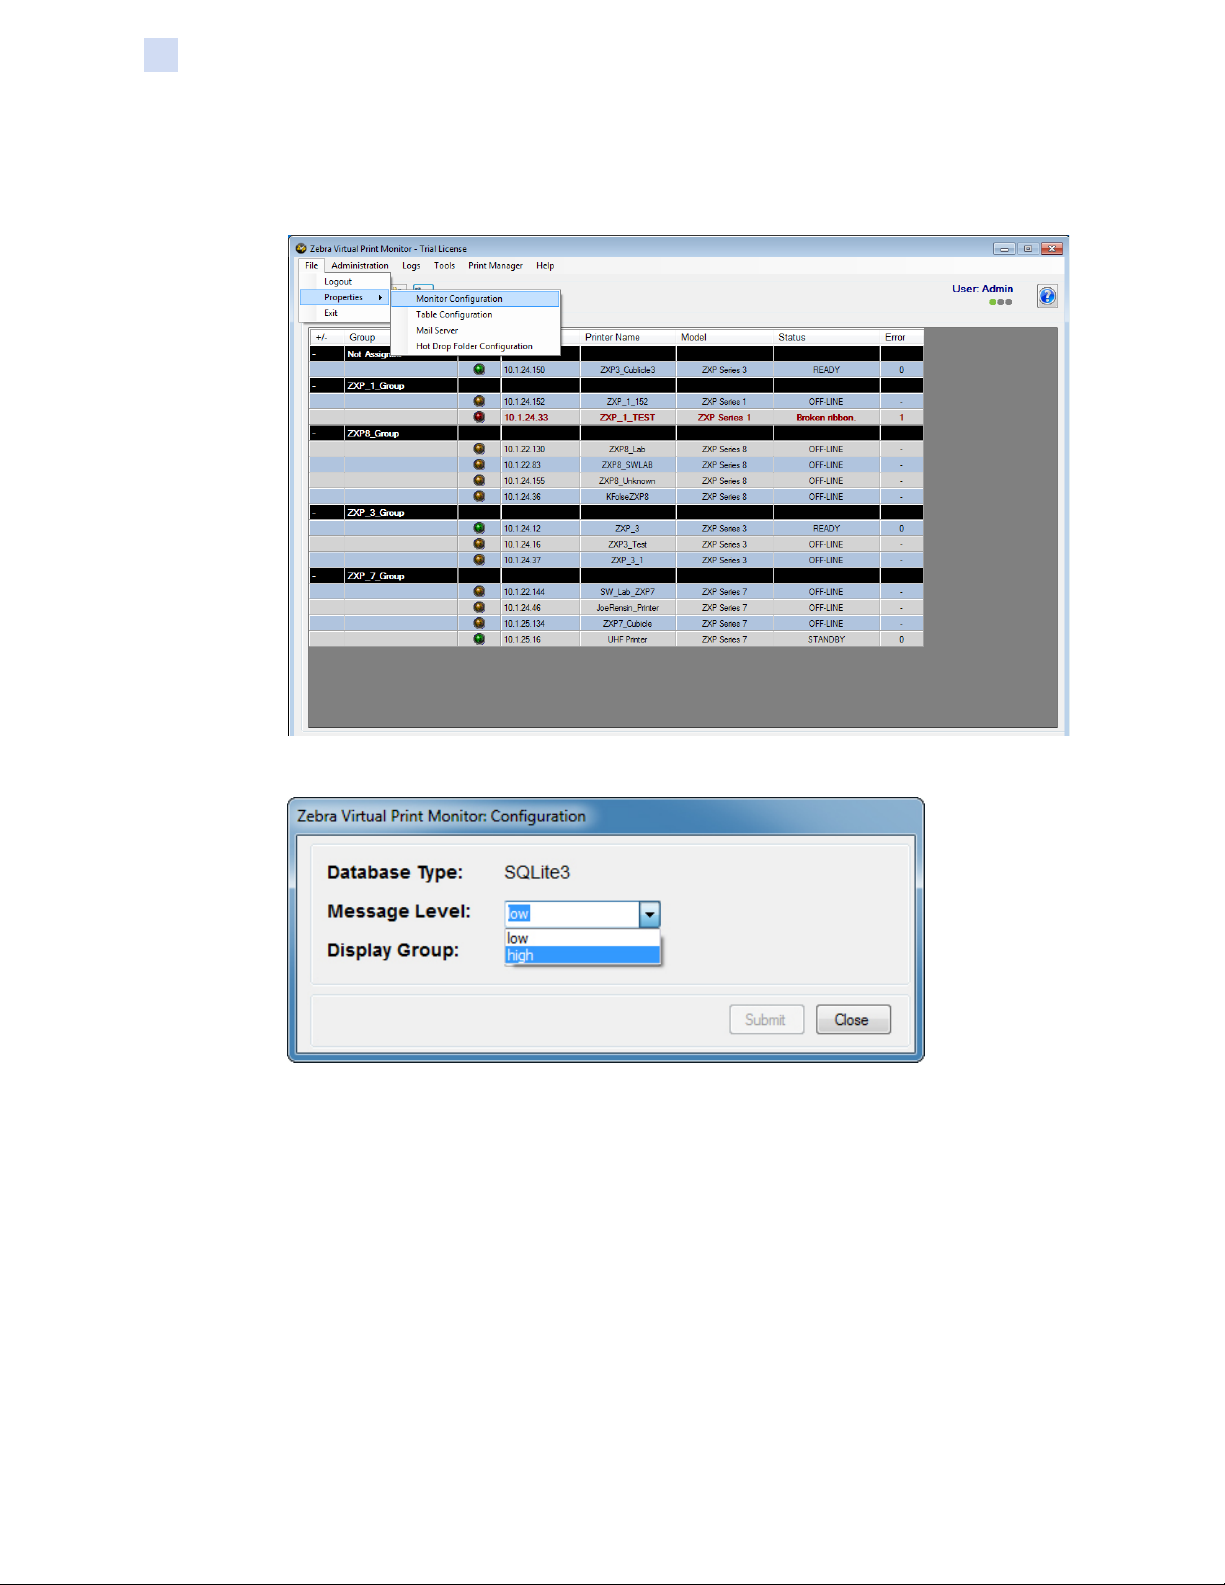
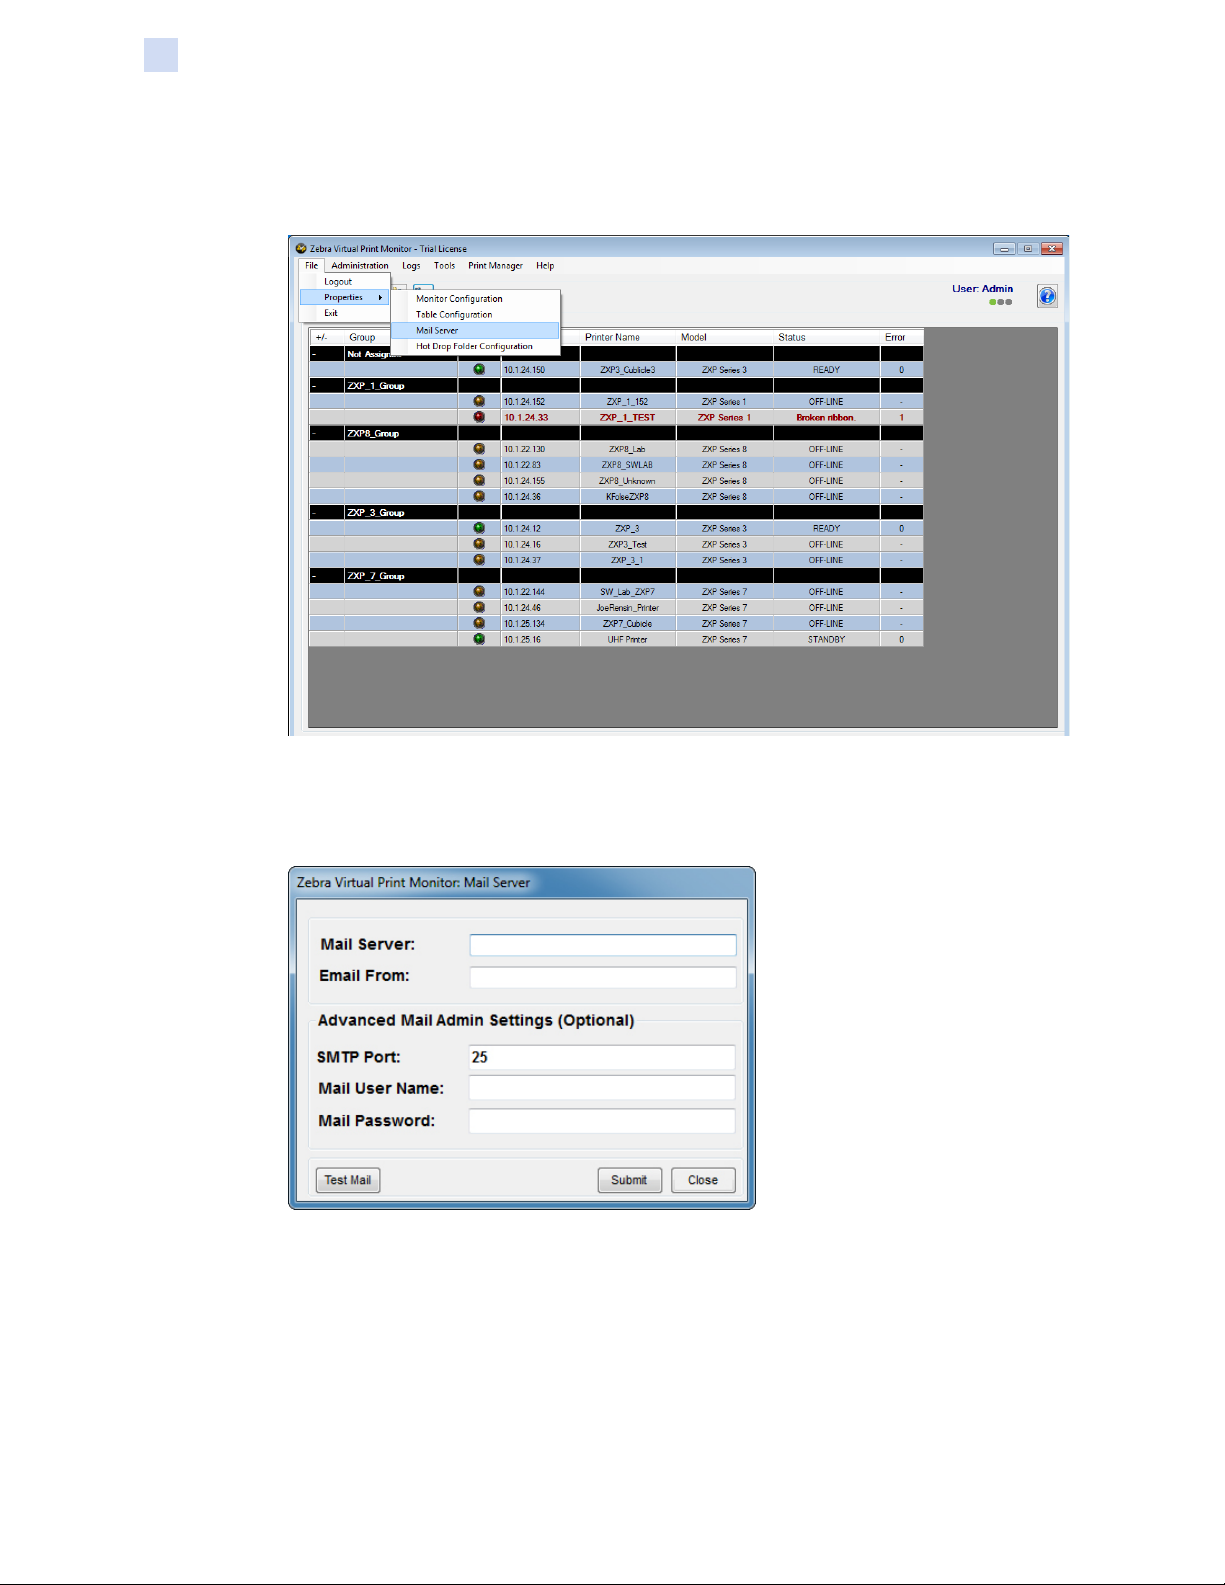
Table Conguration
The second sub-selection is Table Conguration.
File Menu
Properties
Table Conguration enables the user to select the information to be displayed in the
grid when printers are being monitored.
Note • Information available for display will vary depending on printer model selected.
Place a checkmark in the box corresponding to the data to be displayed; removing a
checkmark removes the associated data from the grid display.
Clicking Select All will place a checkmark in each of the boxes; similarly, clicking
Unselect All removes checkmarks from all of the boxes.
Once all selections have been made, click Submit to accept the updates. The
selected data will appear in the grid display.
P1045924-003 PrintMonitor™/PrintManager™ User's Manual 15
Page 21
File Menu
Properties
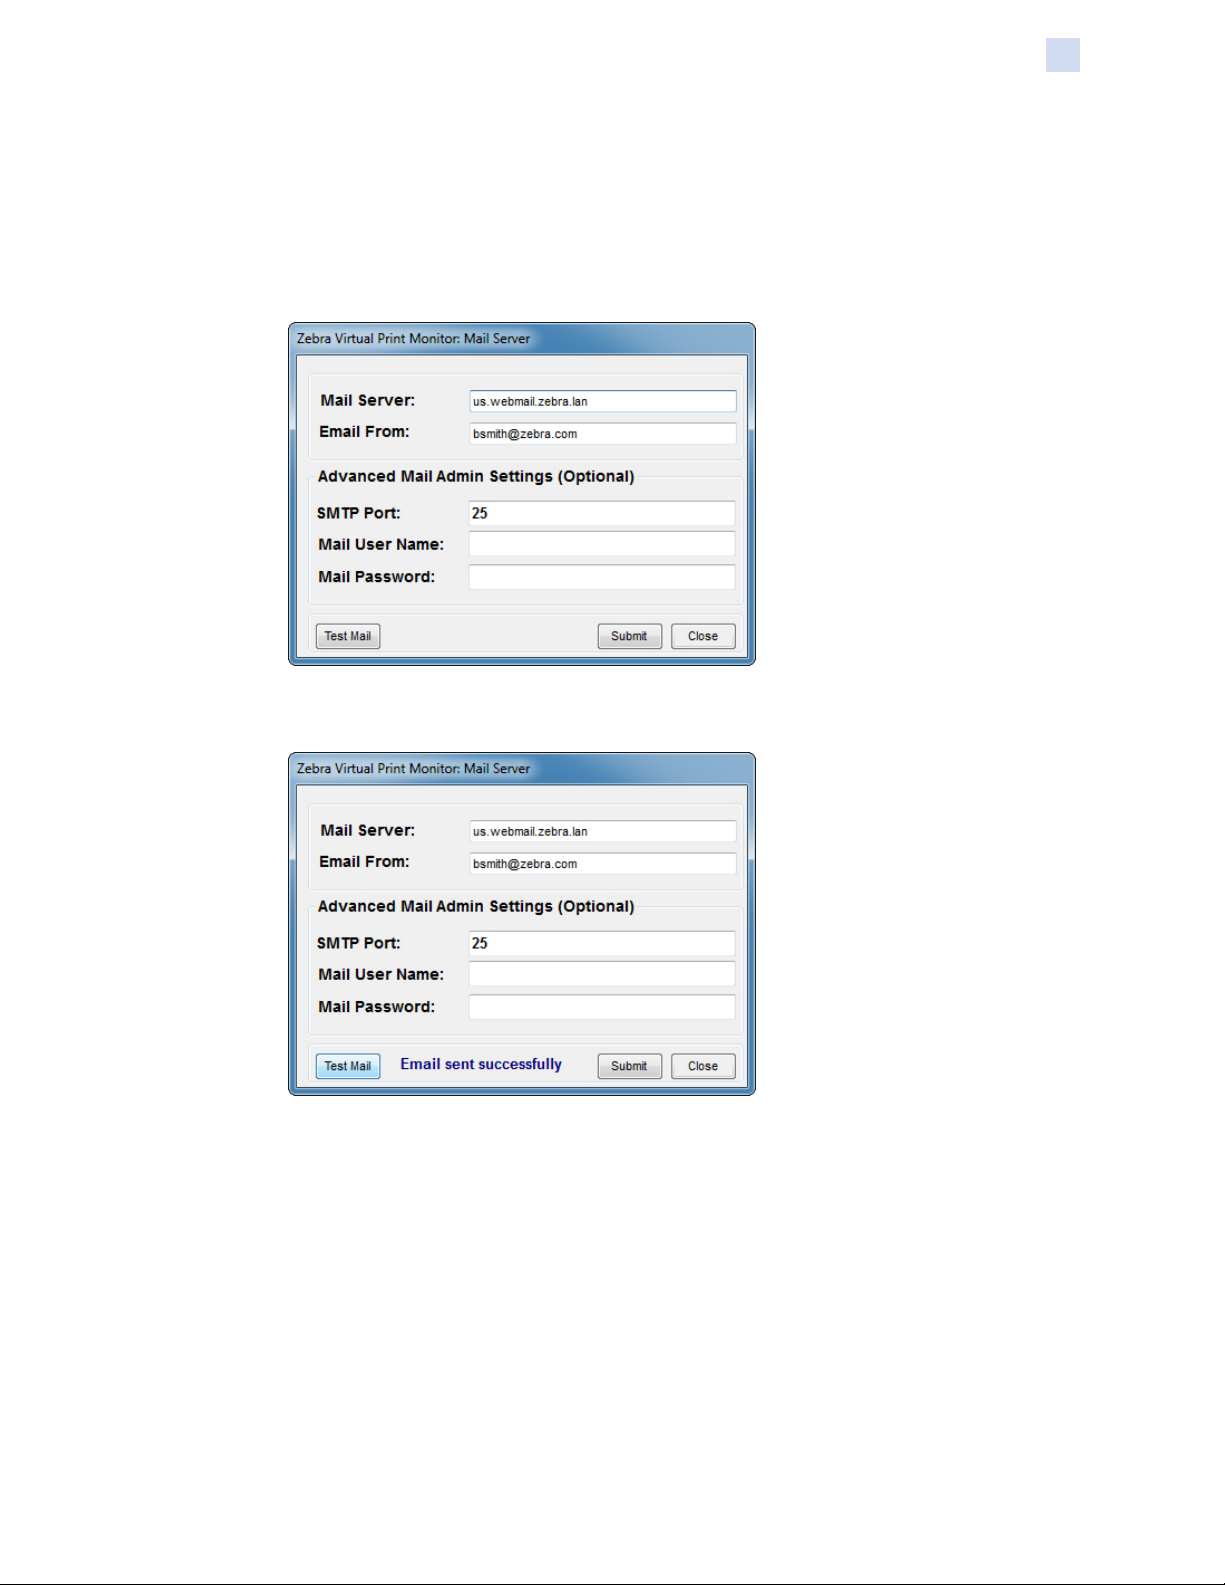
Mail Server
The third sub-selection is Mail Server.
Mail Server setup enables the user to congure the monitor to send emails to
designated alert contacts.
Selecting Mail Server will activate the Monitor: Mail Server Setup window.
16 PrintMonitor™/PrintManager™ User's Manual P1045924-003
Page 22
File Menu
Properties
Consult with your network administrator for the appropriate information to be entered
in this form. If authentication is not required, the Advanced Mail Admin Settings
option can be left blank. Do not change these values or add a mail user name or mail
password unless authorized to do so by your network administrator.
Enter the appropriate information to congure the email features—the default SMTP
Port is 25.
Click Test Mail. If the correct mail server name and valid email address has been
entered, a message will appear indicating the email has been sent.
Click Submit to save the conguration information.
P1045924-003 PrintMonitor™/PrintManager™ User's Manual 17
Page 23
File Menu
Properties
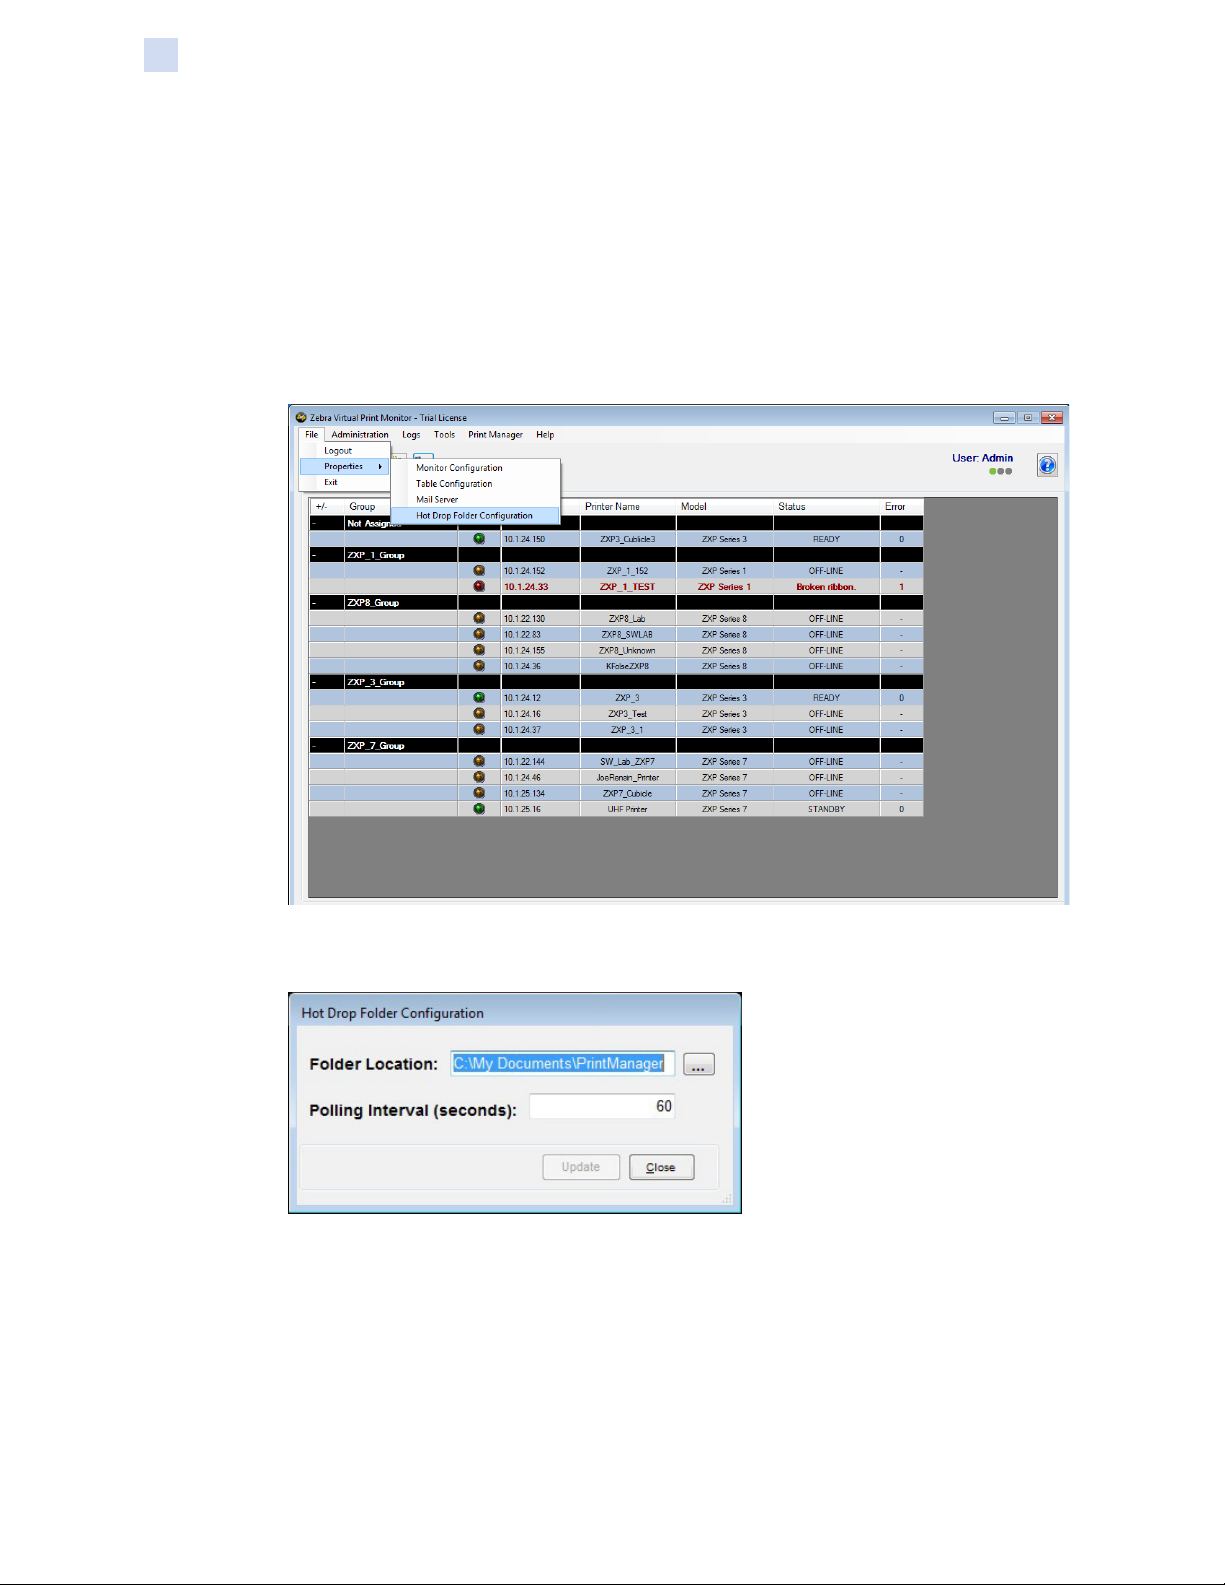
Hot Drop Folder Conguration
The fourth sub-selection is Hot Drop Folder Conguration.
Hot Drop Folder Conguration enables the user to setup le folders to enable
template-based printing via Print Queues. These folders can be used to drag and
drop data XML documents into a folder for template-based job processing without
any programming or custom application interfaces. Additionally, the data documents
can be programmically copied to the folder(s). The “Hot Drop” folders are intended to
support the SAP hot-drop feature.
Selecting File > Properties > Hot Drop Folder Conguration option will activate the
Hot Drop Conguration Setup window.
18 PrintMonitor™/PrintManager™ User's Manual P1045924-003
Page 24
File Menu
Properties
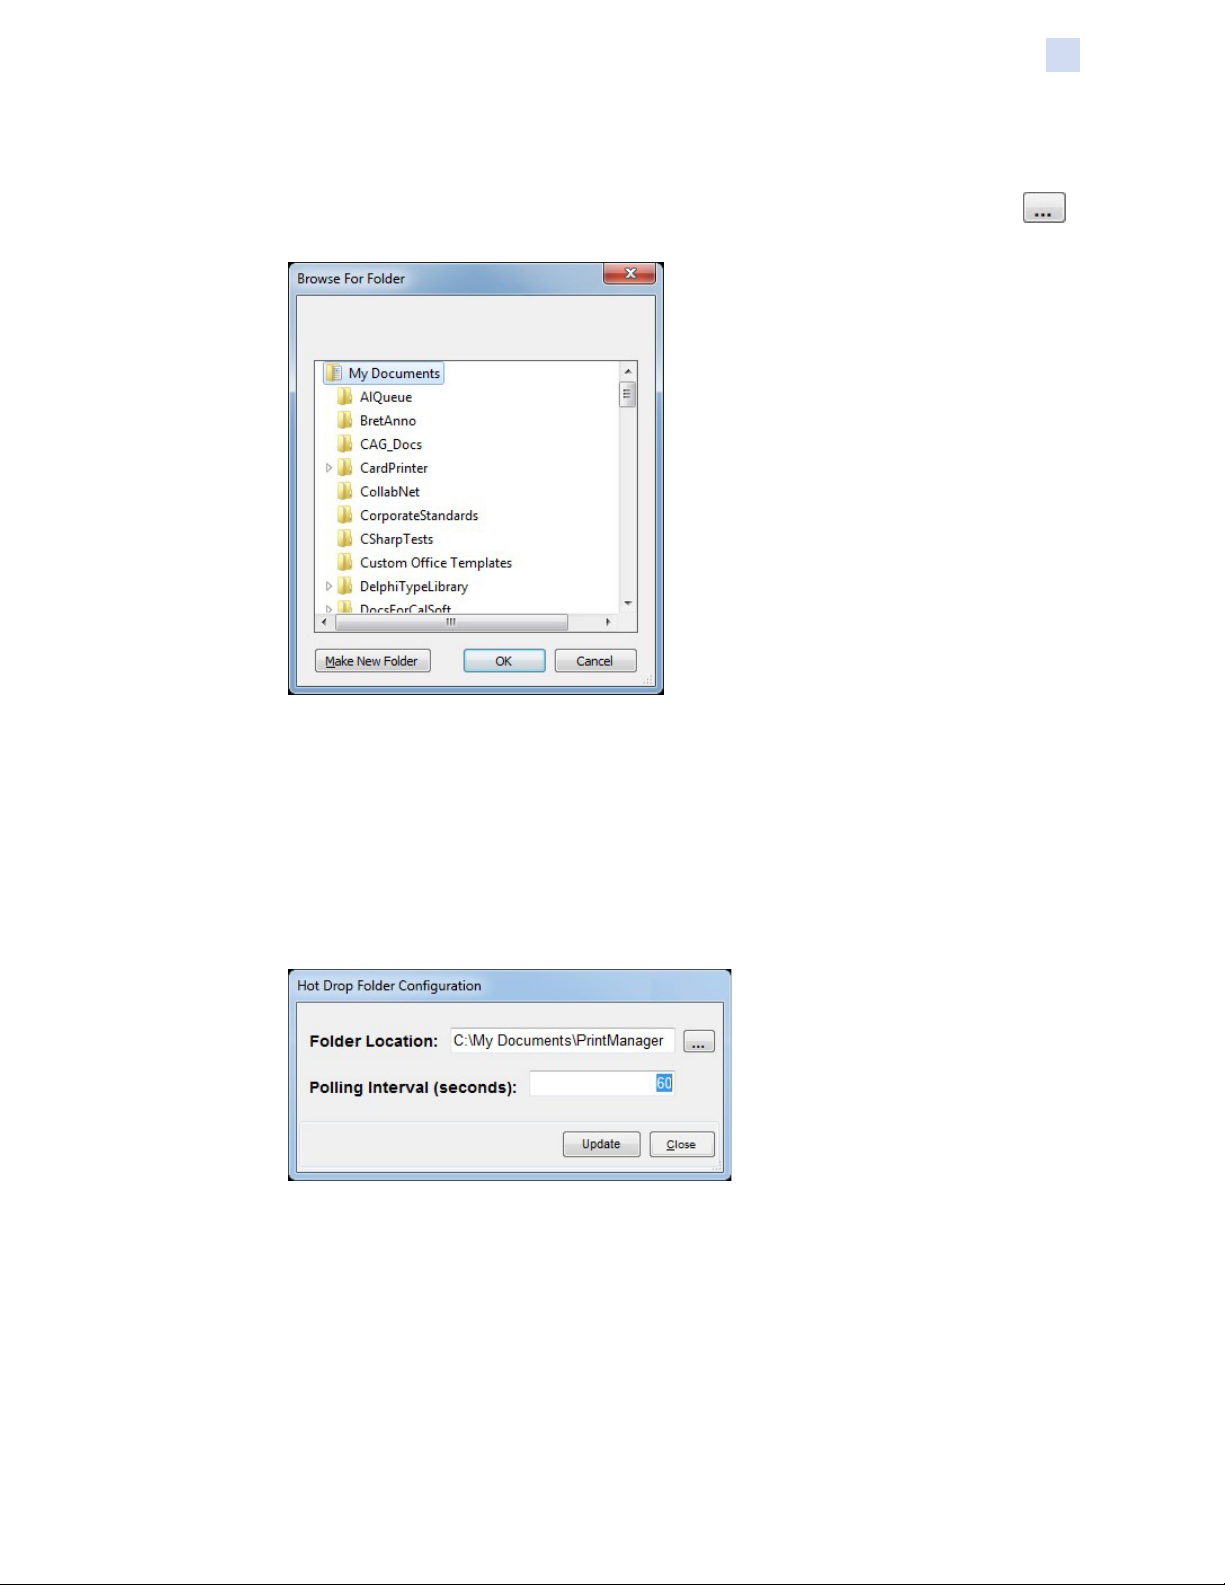
The form will show the path for the print queue folders as well as the polling interval
time in seconds—the folder location is the root folder under which all print queue
folders will be located. The folder path can be changed manually, or by clicking
(browse button).
To change the Hot-Drop folder location, select a folder from the list and click OK.
To move the current folder location to another folder location, select the folder
(PrintManager if the default is in use), then drag and drop the folder to its new
location and click OK.
To dene a new root folder, click Make New Folder, enter a name for the folder, and
click OK.
To change the polling interval, enter a new value in seconds—the value entered must
be 30 or greater, a value less than 30 will result in the Update button being disabled.
Once the desired folder location and polling interval are dened, click Update to save
the changes—clicking Close before Update will exit without saving any changes.
P1045924-003 PrintMonitor™/PrintManager™ User's Manual 19
Page 25

File Menu
Properties
A status message indicating the success or failure of the update operation will be
displayed.
Please refer to the section on setting up Print Queues for more details regarding
conguration of this feature.
Refer to the Card Studio Reference Manual (P1029261-001) for details about
template-based job processing.
20 PrintMonitor™/PrintManager™ User's Manual P1045924-003
Page 26

Exit
File Menu
Exit
Clicking Exit will close the program.
P1045924-003 PrintMonitor™/PrintManager™ User's Manual 21
Page 27

22 PrintMonitor™/PrintManager™ User's Manual P1045924-003
Page 28

Introduction
The Administration menu provides the user with a menu equivalent of the main
command buttons. The selections under the Administration menu are: Printers,
Groups, Users, and Alert Contacts.
4
Administration Menu
To access the Printers and Users selections, the user must have SuperUser or User
privilege. Administrator privilege is required for all other selections.
P1045924-003 PrintMonitor™/PrintManager™ User's Manual 23
Page 29

Administration Menu
Printers
Printers
The Printers selection provides an interface for administrating printers.
Select Administration > Printers, or click the button.
24 PrintMonitor™/PrintManager™ User's Manual P1045924-003
Page 30

Add a Printer
Click Add.
Note • The printer to be added must be connected to the network and powered on.
Administration Menu
Printers
Select the printer model from the Model drop-down list.
P1045924-003 PrintMonitor™/PrintManager™ User's Manual 25
Page 31

Administration Menu
Printers
Enter the IP Address if known.
If the IP Address is not known, PrintMonitor can search for available printers on the
same network subnet as the PrintMonitor.
Click Discover.
Note • Only printers not already congured in the monitor will be identied.
If one or more printers are located, a message will be displayed indicating that
printers have been located.
Enter the name for the selected printer.
26 PrintMonitor™/PrintManager™ User's Manual P1045924-003
Page 32

Select a printer group.
Administration Menu
Printers
If an Alert Contact is not required, click Submit.
If additional printers are to be added, check the box next to Save and Continue, and
then click Submit.
P1045924-003 PrintMonitor™/PrintManager™ User's Manual 27
Page 33

Administration Menu
Printers
Alert Contact
Select an Alert Contact from the drop-down list. The contact elds will be populated
with the available information.
If the contact has not been entered previously, click the command button next to the
contact eld to enter the new contact information.
When nished entering the new contact information, select it from the drop-down list.
Check the box next to Alert Enabled if the selected contact should be alerted in the
event of any printer issues.
If the printer information has been entered correctly, and the printer is on the network,
the conguration information will be retrieved and it will be displayed in the Printers
list.
Click Close when nished.
The new printer will appear in the main window.
28 PrintMonitor™/PrintManager™ User's Manual P1045924-003
Page 34

Edit a Printer
Select the printer from the Printers list—the printer’s information will be displayed.
Administration Menu
Printers
Make the necessary changes to the information and click Submit—a status message
will indicate the success or failure of the update.
Click Close when nished.
P1045924-003 PrintMonitor™/PrintManager™ User's Manual 29
Page 35

Administration Menu
Printers
Delete a Printer
Select the printer from the Printers list and click Delete.
A dialog box will appear for conrmation of the delete operation—click Yes to delete
the user, click No to cancel.
Click Close when nished.
30 PrintMonitor™/PrintManager™ User's Manual P1045924-003
Page 36

Add Multiple Printers
From the Printer Add window click Multi to add multiple printers.
Administration Menu
Printers
The Printer Add (Multiple) form is displayed.
NOTE: The multiple printers add feature differs from adding a single printer as
follows:
1. The IP addresses must be known beforehand—the multiple printers add
feature does not include discovering printers operating on the same subnet as
PrintMonitor.
2. Printer Groups and Alert Contacts must also be pre-dened if they are to be
assigned to the printers being added.
P1045924-003 PrintMonitor™/PrintManager™ User's Manual 31
Page 37

Administration Menu
Printers
Select the printer model from the drop-down list.
Enter the IP Address in the text box.
32 PrintMonitor™/PrintManager™ User's Manual P1045924-003
Page 38

Enter a name for the printer in the Name text box.
Administration Menu
Printers
There are also three optional steps for adding multiple printers:
Assign the printer to a group by selecting the group from the Printer Group dropdown list.
P1045924-003 PrintMonitor™/PrintManager™ User's Manual 33
Page 39

Administration Menu
Printers
Select an alert contact from the Contact drop-down list.
Check the Alert Enabled box to have alerts sent to the assigned contact.
34 PrintMonitor™/PrintManager™ User's Manual P1045924-003
Page 40

Once all printers have been added, click Submit.
Administration Menu
Printers
PrintMonitor will attempt to locate the printers and retrieve their congurations. If the
printers were successfully added, a form will be displayed conrming the printers
have been added.
Click OK when nished.
P1045924-003 PrintMonitor™/PrintManager™ User's Manual 35
Page 41

Administration Menu
Printers
Printer Information
Users must have Administrator, SuperUser, or Guest privilege to use this feature.
From the Printer Administration window, select a printer from the list and click
Information.
The Printer Information window is displayed.
If a printer is ofine, its information cannot be retrieved.
Click Refresh to update the printer information.
Click Close when nished.
36 PrintMonitor™/PrintManager™ User's Manual P1045924-003
Page 42

Media Information
Users must have Administrator, SuperUser, or Guest privilege to use this feature.
From the Printer Administration window, select a printer from the list and click Media.
Administration Menu
Printers
The Printer Media window is displayed.
If a printer is ofine, its information cannot be retrieved.
Click Refresh to update the printer information.
Click Close when nished.
P1045924-003 PrintMonitor™/PrintManager™ User's Manual 37
Page 43

Administration Menu
Printers
Print Card
Test cards can be printed from the Printer Administration window.
From the Printer Administration window, select a printer from the list and click
Information.
The Print Card window is displayed.
If a printer is ofine, test cards cannot be printed.
38 PrintMonitor™/PrintManager™ User's Manual P1045924-003
Page 44

Select the card type from the drop-down list.
Administration Menu
Printers
Select an image to be printed on the front and the back (if supported) of the card.
Click Browse, navigate to the le location, and click Open. The selected images will
be displayed in the preview window(s).
To use the default images, click the checkbox next to Default in the preview window.
P1045924-003 PrintMonitor™/PrintManager™ User's Manual 39
Page 45

Administration Menu
Printers
If the card type selected has a magnetic stripe, data can be entered for each of the
tracks to be encoded onto the card.
Click Print.
Click Close when nished.
40 PrintMonitor™/PrintManager™ User's Manual P1045924-003
Page 46

Groups
Administration Menu
Groups
The Groups selection provides an interface for administrating groups of printers.
Select Administration > Groups, or click the button.
P1045924-003 PrintMonitor™/PrintManager™ User's Manual 41
Page 47

Administration Menu
Groups
Add a Printer Group
Click Add.
The Printer Group Add window is displayed.
Enter a name for the new printer group.
Select the type of printerfrom the drop-down list.
Click Submit.
42 PrintMonitor™/PrintManager™ User's Manual P1045924-003
Page 48

A conrmation message will be displayed if the printer group was successfully added.
If multiple printer groups are to be added, place a checkmark in the box next to Save
and Continue, this will enable entry of another printer group after clicking Submit.
Click Close when nished.
Modify a Printer Group
Administration Menu
Groups
Select the printer group from the Groups list and click Printers.
P1045924-003 PrintMonitor™/PrintManager™ User's Manual 43
Page 49

Administration Menu
Groups
The Attach Printers window is displayed.
To remove a printer from the group, uncheck the box next to the desired printer and
click Submit.
44 PrintMonitor™/PrintManager™ User's Manual P1045924-003
Page 50

Delete a Printer Group
Select the printer group from the Groups list and click Delete.
A dialog box will appear to conrm the deletion. Select Yes to conrm, or No to
cancel.
A conrmation message will be displayed if the printer group was successfully
deleted.
Administration Menu
Groups
Click Close when nished.
P1045924-003 PrintMonitor™/PrintManager™ User's Manual 45
Page 51

Administration Menu
Users
Users
The Users selection provides an interface for administrating users.
Select Administration > Users, or click the button.
46 PrintMonitor™/PrintManager™ User's Manual P1045924-003
Page 52

Add a User Account
Click Add.
The User Add window displayed.
Enter the information for the new user. The user’s access privilege is dened by
selecting one of the options from the Role list-box control.
Administration Menu
Users
Click Submit.
A status message will indicate the success or failure of the operation.
To create multiple user accounts, check the Save and Continue box before clicking
Submit.
Click Close to exit the User Add window.
Click Close to exit the User Administration window.
P1045924-003 PrintMonitor™/PrintManager™ User's Manual 47
Page 53
Administration Menu
Users
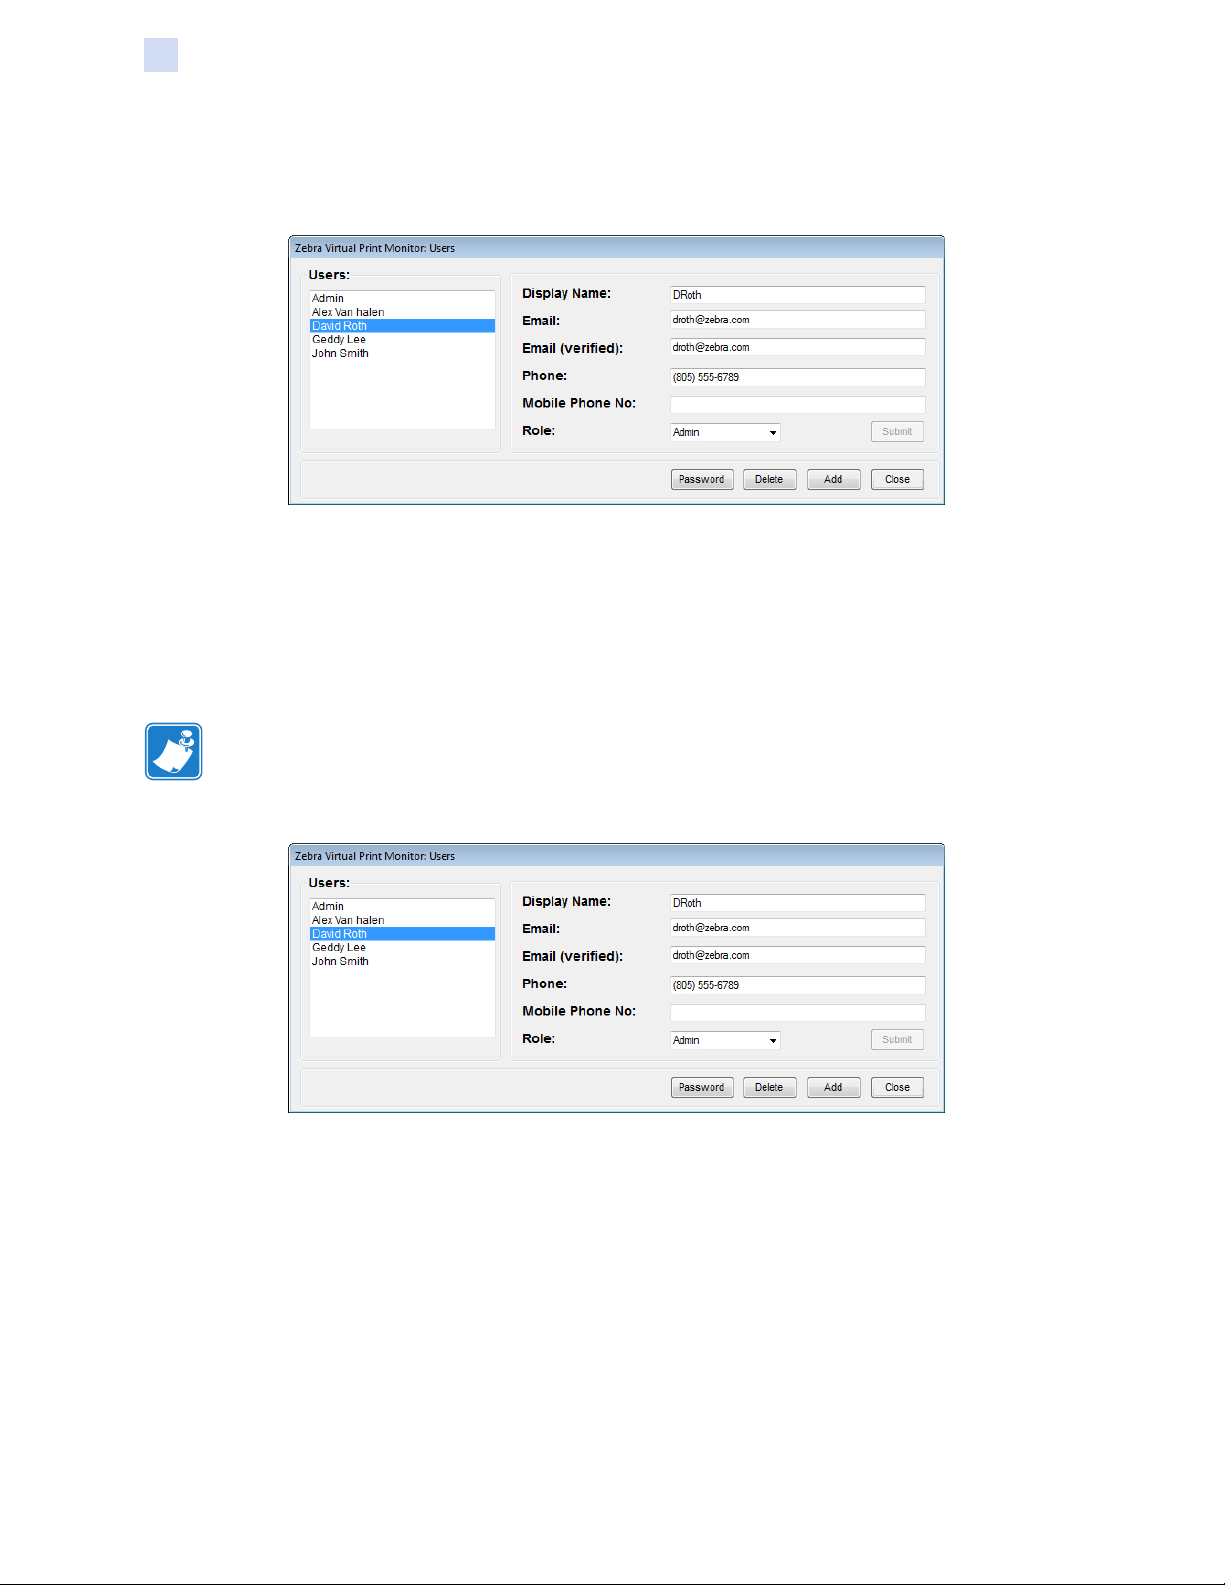
Edit a User Account
Select the account to edit and make the necessary changes
Click Submit.
A status message will indicate the success or failure of the operation.
Click Close when nished.
Change a User Account Password
Note • An Administrator can change any password; SuperUsers and Guests can only
change their own.
Select the account to edit and click Password.
48 PrintMonitor™/PrintManager™ User's Manual P1045924-003
Page 54

Administration Menu
The Change User Password window is displayed.
Enter the new password.
Click Submit.
A status message will indicate the success or failure of the operation.
Click Close when nished.
Users
Delete a User Account
Select the account to delete and click Delete.
A dialog box will appear for conrmation of the delete operation—click Yes to delete
the user, click No to cancel.
Click Close when nished.
P1045924-003 PrintMonitor™/PrintManager™ User's Manual 49
Page 55

Administration Menu
Alert Contacts
Alert Contacts
The Alert Contacts menu provides an interface for administrating alert contacts.
An Alert Contact is a person or group who will be notied when a printer encounters
an error. The notication will be in the form of an email sent to the designated alert
contact from the PrintMonitor. The email address assigned to the alert contact can be
a single user or group email address.
Select Administration > Alert Contacts.
50 PrintMonitor™/PrintManager™ User's Manual P1045924-003
Page 56

Add an Alert Contact
Click Add.
The Alert Contact Add window is displayed.
Enter the appropriate information.
Administration Menu
Alert Contacts
Note • The contact name and email address are required; the phone and mobile
phone information are optional.
If multiple alert contacts are to be added, place a checkmark in the box next to Save
and Continue, this will enable entry of another contact after clicking Submit.
A conrmation message will be displayed if the new alert contact was successfully
added to the database.
P1045924-003 PrintMonitor™/PrintManager™ User's Manual 51
Page 57

Administration Menu
Alert Contacts
If a user account is to be added as an alert contact, click the control button to the
right of the contact edit box to display the User Selection window.
The User Selection window is displayed.
Highlight the user account and click Select.
The user information will be added.
Click Submit to save the information, and then click Close.
52 PrintMonitor™/PrintManager™ User's Manual P1045924-003
Page 58

Administration Menu
Alert Contacts
A conrmation message will be displayed if the new alert contact was successfully
added to the database.
Click Close.
P1045924-003 PrintMonitor™/PrintManager™ User's Manual 53
Page 59

Administration Menu
Alert Contacts
Edit an Alert Contact
Select Administration > Alert Contacts.
Select the contact from the list of alert contacts; the contact information will be
displayed.
Make any necessary changes and click Submit to save the changes.
A conrmation message will be displayed if the alert contact was successfully
updated.
Click Close.
54 PrintMonitor™/PrintManager™ User's Manual P1045924-003
Page 60

Delete an Alert Contact
Select Administration > Alert Contacts.
Select the contact from the list of alert contacts; the contact information will be
displayed.
Click Delete.
Administration Menu
Alert Contacts
A dialog box will appear to conrm the deletion. Select Yes to conrm, or No to
cancel.
A conrmation message will be displayed if the alert contact was successfully deleted
the database.
Click Close.
P1045924-003 PrintMonitor™/PrintManager™ User's Manual 55
Page 61

56 PrintMonitor™/PrintManager™ User's Manual P1045924-003
Page 62

Introduction
The Logs menu enables reviewing and exporting the Event, Printer, and User
histories.
5
Logs Menu
To access the Logs, the user must have SuperUser or Administrator privilege.
P1045924-003 PrintMonitor™/PrintManager™ User's Manual 57
Page 63

Logs Menu
Event History
Event History
The Event History log tracks all user actions within PrintMonitor.
Select Logs > Event History.
The default event history display will be displayed showing all user actions for all
categories going back 90 days (default) from the current date.
The drop-down menus provide lters to rene the information displayed.
To see only actions for a specic user, select that user from the User drop-down list.
58 PrintMonitor™/PrintManager™ User's Manual P1045924-003
Page 64

Logs Menu
Event History
To specify an action category, select it from the Category drop-down list.
A start and end date can also be specied to rene the information further.
P1045924-003 PrintMonitor™/PrintManager™ User's Manual 59
Page 65

Logs Menu
Event History
Once the lters have been dened, click Refresh. Only those events which meet the
dened lter criteria will be displayed.
Click Close when nished.
60 PrintMonitor™/PrintManager™ User's Manual P1045924-003
Page 66

Printer History
The Printer History log tracks all printer events.
Select Logs > Printer History.
Logs Menu
Printer History
The default event history display will be displayed showing all printer events for all
categories going back 90 days (default) from the current date.
The drop-down menus provide lters to rene the information displayed.
P1045924-003 PrintMonitor™/PrintManager™ User's Manual 61
Page 67

Logs Menu
Printer History
To see only events for a specic printer, select that printer from the Printer drop-down
list.
A start and end date can also be specied to rene the information further.
62 PrintMonitor™/PrintManager™ User's Manual P1045924-003
Page 68

Logs Menu
Printer History
Once the lters have been dened, click Refresh. Only those events which meet the
dened lter criteria will be displayed.
Click Close when nished.
P1045924-003 PrintMonitor™/PrintManager™ User's Manual 63
Page 69

Logs Menu
User History
User History
The User History log tracks the date and time users log in and log out of
PrintMonitor. Additionally, if a user were to shutdown PrintMonitor while logged in,
this information would also be saved in the log.
Select Logs > User History.
The default event history display will be displayed showing all user events going back
90 days (default) from the current date.
The drop-down menus provide lters to rene the information displayed.
64 PrintMonitor™/PrintManager™ User's Manual P1045924-003
Page 70

Logs Menu
User History
To the login/logout activity for a specic user, select the user from the drop-down list.
A start and end date can also be specied to rene the information further.
P1045924-003 PrintMonitor™/PrintManager™ User's Manual 65
Page 71

Logs Menu
User History
Once the lters have been dened, click Refresh. Only those events which meet the
dened lter criteria will be displayed.
Note • The absence of user history events means that the user has not logged in or
out during the dates specied.
Click Close when nished.
66 PrintMonitor™/PrintManager™ User's Manual P1045924-003
Page 72

Export Event Logs
The Export Event Logs feature enables the user to save the individual logs to a
comma separated value (.csv) le, or an extensible markup language (.xml) le. The
process for each operation is identical—only the Export Event History examples will
be shown
Export Event/Printer/User History
To export the Event History data table:
Select Logs > Export Event Logs > Event History or Printer History or User History.
Logs Menu
Export Event Logs
Click the browse button (circled below).
P1045924-003 PrintMonitor™/PrintManager™ User's Manual 67
Page 73

Logs Menu
Export Event Logs
Select a folder or click “Make New Folder” and enter a name.
Click OK.
Enter a le name.
68 PrintMonitor™/PrintManager™ User's Manual P1045924-003
Page 74

Logs Menu
Export Event Logs
Select Specic Range and then select a start and end date to only export log entries
that fall within the specied dates.
Select All dates to export the entire log.
Select the le format: CSV or XML
P1045924-003 PrintMonitor™/PrintManager™ User's Manual 69
Page 75

Logs Menu
Export Event Logs
Click Export Data—a status message will indicate the success or failure of the
export.
70 PrintMonitor™/PrintManager™ User's Manual P1045924-003
Page 76

Introduction
There are ve selections in the Tools menu: Firmware Download, Reset, Backup,
Restore, and Clean.
6
Tools Menu
The user must have Administrator or SuperUser privilege to access these features.
P1045924-003 PrintMonitor™/PrintManager™ User's Manual 71
Page 77

Tools Menu
Firmware Download
Firmware Download
Firmware Download enables the user to download rmware to a single printer or a
group of printers. Go to www.zebra.com/rmware to download the latest rmware le
for the specied printer.
Important • Make sure the printers selected are not actively processing print jobs. All
job information will be lost when proceeding with this operation.
Select Tools > Firmware Download.
Download Firmware to a Single Printer
Select the Printers radio button
72 PrintMonitor™/PrintManager™ User's Manual P1045924-003
Page 78

Firmware Download
Select the printer from the Printer Name drop-down list.
Click the browse button (circled below) and locate the rmware le.
Tools Menu
Select the rmware le from the Firmware drop-down list.
Click Download—a status message will indicate the success or failure of the
download.
Click Close.
P1045924-003 PrintMonitor™/PrintManager™ User's Manual 73
Page 79

Tools Menu
Firmware Download
Download Firmware to a Group of Printers
Select the Groups radio button
Select the group from the Printer Group drop-down menu.
Click the browse button (circled below) and locate the rmware le.
74 PrintMonitor™/PrintManager™ User's Manual P1045924-003
Page 80

Tools Menu
Firmware Download
Select the rmware le from the Firmware drop-down list.
Click Download—a status message will indicate the success or failure of the
download.
Click Close.
P1045924-003 PrintMonitor™/PrintManager™ User's Manual 75
Page 81

Tools Menu
Reset
Reset
Reset enables the user to perform a warm-reboot of a printer or a group of printers.
Important • Make sure the printers selected are not actively processing print jobs. All
job information will be lost when proceeding with this operation.
Select Tools > Reset.
Reset a Single Printer
Select the Printers radio button
76 PrintMonitor™/PrintManager™ User's Manual P1045924-003
Page 82

Tools Menu
Reset
Select the printer from the Printer Name drop-down menu.
Click Reset—a status message will indicate the success or failure of the download.
Click Close.
Reset a Group of Printers
Select the Groups radio button
Select the group from the Printer Group drop-down menu.
P1045924-003 PrintMonitor™/PrintManager™ User's Manual 77
Page 83

Tools Menu
Reset
Click Reset—a status message will indicate the success or failure of the download.
Click Close.
78 PrintMonitor™/PrintManager™ User's Manual P1045924-003
Page 84

Backup
Tools Menu
Backup
Backup enables the user to perform a database backup operation.
Important • Make sure the printers selected are not actively processing print jobs. All
job information will be lost when proceeding with this operation.
Select Tools > Backup.
Click the browse button (circled below) and select the location for the backup le.
P1045924-003 PrintMonitor™/PrintManager™ User's Manual 79
Page 85

Tools Menu
Backup
Assign a name to the backup le—the name entered must include the extension .db
as shown.
Select the start and end date range for the backup operation
Click Submit—a status message will indicate the success or failure of the download.
Click Close.
80 PrintMonitor™/PrintManager™ User's Manual P1045924-003
Page 86

Restore
Tools Menu
Restore
Restore enables the user to perform a database restore operation.
Important • Make sure the printers selected are not actively processing print jobs. All
job information will be lost when proceeding with this operation.
Select Tools > Restore.
Click the browse button (circled below) and select the backup le.
Select Overwrite to replace the current records with those in the backup le.
Caution • Selecting Overwrite will replace newer records in the active database.
To prevent newer records in the active database being replaced by corresponding
older records in the backup database, ensure that the Overwrite checkbox control is
unchecked.
P1045924-003 PrintMonitor™/PrintManager™ User's Manual 81
Page 87

Tools Menu
Restore
Click Submit—a status message will indicate the success or failure of the download.
Click Close.
82 PrintMonitor™/PrintManager™ User's Manual P1045924-003
Page 88

Clean
Tools Menu
Clean
Clean provides the ability to remove old event log data from the database.
Important • Make sure the printers selected are not actively processing print jobs. All
job information will be lost when proceeding with this operation.
Select Tools > Clean.
Select the start and end date range for the clean operation
Click Submit—a status message will indicate the success or failure of the clean
operation.
Click Close.
P1045924-003 PrintMonitor™/PrintManager™ User's Manual 83
Page 89

84 PrintMonitor™/PrintManager™ User's Manual P1045924-003
Page 90

Introduction
The PrintManager menu provide an interface for administrating the PrintManager
service and consists of seven selections: Queues, Cards, Media, Jobs Status, Jobs
Process, IP Address, and Manage Data.
7
PrintManager Menu
Note • PrintManager is a feature separate from PrintMonitor and is not required to
make full-use of the PrintMonitor. To access PrintManager, the user logged in must
have Administrator privilege.
P1045924-003 PrintMonitor™/PrintManager™ User's Manual 85
Page 91

PrintManager Menu
Queues
Queues
The Queues selection provides an interface for administrating printer queues.
A queue is a logical grouping of similar printers and appears as a single printer to an
application. Once a queue has been dened—and printers assigned to the queue—
print jobs are sent to the queue just as if it was an individual printer.
PrintManager determines which printer in the queue will receive the job based on the
denition of the queue and the current status of each printer in the queue.
Upon receiving a job, PrintManager will track the progress to completion. If the
selected printer is unable to complete the job, PrintManager will retract the job from
the printer; and send it to an alternate printer.
Select PrintManager > Queues, or click the (Print Queue Administration) button
86 PrintMonitor™/PrintManager™ User's Manual P1045924-003
Page 92

The Queues window will be displayed.
PrintManager Menu
Queues
P1045924-003 PrintMonitor™/PrintManager™ User's Manual 87
Page 93

PrintManager Menu
Queues
Add a Queue
Click Add—the Queue Add window will appear.
Select the Model from the drop-down list.
88 PrintMonitor™/PrintManager™ User's Manual P1045924-003
Page 94

Enter a Queue Name in the space provided.
PrintManager Menu
Queues
Select the Sequence—this denes the behavior of the queue with respect to job
handling. There are three options:
• Round-Robin—jobs received by the queue will be evenly distributed among the
printers in the queue. This process will continue until all jobs in the queue have
been sent to printers and successfully completed.
• Ordered—jobs received by the queue will be sent to the same printer until the
printer indicates it cannot receive more jobs. At that time, the next printer in the
queue will receive jobs until it, too, indicates no additional jobs can be received
because it is in an error state. This process will continue until all jobs received
by the queue have been sent to printers within the queue, and each job has
completed successfully.
• Express (ZXP 7 only)—because the ZXP 7 is capable of processing multiple
jobs simultaneously, jobs received by the queue are immediately sent to the
ZXP7 instead of waiting until the printer has completed its current job as would
be the case with Round-Robin or Ordered sequences.
P1045924-003 PrintMonitor™/PrintManager™ User's Manual 89
Page 95

PrintManager Menu
Queues
Enter the number of sides to print—1 or 2 sides is allowed.
Select Ribbon Type used in the printers from the drop-down list. Make sure the
printers in the queue have the same ribbon type.
Select the Film Type (ZXP 8 only).
Select the Laminate Top and Laminate Bottom (ZXP7 and ZXP8 only). Make sure
the printers in the queue are equipped with laminators (single- or double-sided) and
have the same type of liminate installed.
Select the Mag option. If this option is selected, the queue will accept jobs which
include magnetic encoding of cards—if selected the queue can, and will, accept jobs
that do not include magnetic encoding.
Select the Strict option. A queue, dened with the strict attribute, requires that each
printer to be added to it have the exact same ribbon type as that assigned to the
queue. Example: If a queue with the strict attribute selected has ribbon type YMCK,
only printers with YMCK ribbon type installed can be added to the queue.
90 PrintMonitor™/PrintManager™ User's Manual P1045924-003
Page 96

PrintManager Menu
Queues
Select the Enable Hot Drop option—a folder will be created with the name of the
queue below the folder path for the Hot Drop Folder Conguration. This folder can be
used as a destination to drag-and-drop les within for processing by PrintManager
via template-based job processing. Refer to the CardStudio Reference Manual
(P1029261-001) for details about template-based printing.
If multiple queues are to be dened, place a checkmark in the Save and Continue
checkbox before clicking the Submit button—the Queue Add form will remain
displayed after clicking the Submit button.
Once the queue has been dened, click Submit to save.
Click Close when nished.
P1045924-003 PrintMonitor™/PrintManager™ User's Manual 91
Page 97

PrintManager Menu
Queues
The new queue displayed. The queue’s assigned port appears at the top of the
queue information form to the right of the window pane as shown below.
Add a Printer to a Queue
Select PrintManager > Queues, or click the (Print Queue Administration) button
Once a queue has been added, printers can be assigned to it.
Click Printers.
92 PrintMonitor™/PrintManager™ User's Manual P1045924-003
Page 98

PrintManager Menu
Queues
A list of printers that match the criteria of the selected queue, and that are not
currently assigned to another queue will be displayed.
Select the printer(s) to be added to the queue by clicking the check box in the
Queues column next to the printer.
Once all printers have been selected for the queue, click Submit.
Click Close when nished.
P1045924-003 PrintMonitor™/PrintManager™ User's Manual 93
Page 99

PrintManager Menu
Queues
Remove a Printer from a Queue
Select PrintManager > Queues, or click the (Print Queue Administration) button
Click Printers.
Select the printer(s) to be removed from the queue by clicking the check box in the
Queues column next to the printer.
Once all printers have been un-selected, click Submit.
Click Close when nished.
94 PrintMonitor™/PrintManager™ User's Manual P1045924-003
Page 100

PrintManager Menu
Add Cards to a Queue
Once a queue has been added, one or more card types can be assigned to it.
Select PrintManager > Queues, or click the (Print Queue Administration) button
Click Cards.
Queues
Select the card from the list of available cards on the left and click the (Add
Selected) button.
P1045924-003 PrintMonitor™/PrintManager™ User's Manual 95
 Loading...