


13857L-003 Rev. A
ZebraDesigner™ Pro™
User Guide

2
© 2011 ZIH Corp. The copyrights in this manual and the software and/or firmware in the printer described
therein are owned by ZIH Corp. and Zebra’s licensors. Unauthorized reproduction of this manual or the software
and/or firmware in the printer may result in imprisonment of up to one year and fines of up to $10,000
(17 U.S.C.506). Copyright violators may be subject to civil liability.
This product may contain ZPL
and Monotype Imaging fonts. Software © ZIH Corp. All rights reserved worldwide.
ZebraLink, Element Energy Equalizer, E
head graphic, ZPL and ZPL II are registered trademarks of ZIH Corp. All rights reserved worldwide.
All other brand names, product names, or trademarks belong to their respective holders. For additional trademark
information, please see “Trademarks” on the product CD.
Proprietary Statement This manual contains proprietary information of Zebra Technologies Corporation and its
subsidiaries (“Zebra Technologies”). It is intended solely for the information and use of parties operating and
maintaining the equipment described herein. Such proprietary information may not be used, reproduced, or disclosed
to any other parties for any other purpose without the express, written permission of Zebra Technologies Corporation.
Product Improvements Continuous improvement of products is a policy of Zebra Technologies Corporation.
All specifications and designs are subject to change without notice.
®
, ZPL II®, and ZebraLink™ programs; Element Energy Equalizer™ Circuit; E3™;
3
and all product names and numbers are trademarks, and Zebra, the Zebra
Liability Disclaimer Zebra Technologies Corporation takes steps to ensure that its published Engineering
specifications and manuals are correct; however, errors do occur. Zebra Technologies Corporation reserves the right
to correct any such errors and disclaims liability resulting therefrom.
Limitation of Liability In no event shall Zebra Technologies Corporation or anyone else involved in the creation,
production, or delivery of the accompanying product (including hard ware and software) be liab le for any damages
whatsoever (including, without limitation, consequential damages including loss of busin ess profi ts, business
interruption, or loss of business information) arising out of the use of, the results of use of, or inability to use such
product, even if Zebra Technologies Corporation has been advised of the po ssibility of such damages. Some
jurisdictions do not allow the exclusion or limitation of incidental or consequential damages, so the above limitation
or exclusion may not apply to you.
13857L-003 11/29/2011

Contents
1 • Introduction . . . . . . . . . . . . . . . . . . . . . . . . . . . . . . . . . . . . . . . . . . . . . . . . . . . . 7
Welcome . . . . . . . . . . . . . . . . . . . . . . . . . . . . . . . . . . . . . . . . . . . . . . . . . . . . . . . . . . . . . . 8
Contents of the package . . . . . . . . . . . . . . . . . . . . . . . . . . . . . . . . . . . . . . . . . . . . . . . . . . 8
About this Manual . . . . . . . . . . . . . . . . . . . . . . . . . . . . . . . . . . . . . . . . . . . . . . . . . . . . . . . 9
Overview . . . . . . . . . . . . . . . . . . . . . . . . . . . . . . . . . . . . . . . . . . . . . . . . . . . . . . . . . . . 9
Software Restrictions . . . . . . . . . . . . . . . . . . . . . . . . . . . . . . . . . . . . . . . . . . . . . . . . . . 9
Typographical Conventions . . . . . . . . . . . . . . . . . . . . . . . . . . . . . . . . . . . . . . . . . . . . . 9
2 • Installation and Activation . . . . . . . . . . . . . . . . . . . . . . . . . . . . . . . . . . . . . . . 11
System and Software Requirements . . . . . . . . . . . . . . . . . . . . . . . . . . . . . . . . . . . . . . . . 12
ZebraDesigner Editions . . . . . . . . . . . . . . . . . . . . . . . . . . . . . . . . . . . . . . . . . . . . . . . 12
Installing ZebraDesigner Pro . . . . . . . . . . . . . . . . . . . . . . . . . . . . . . . . . . . . . . . . . . . . . . 12
Overview . . . . . . . . . . . . . . . . . . . . . . . . . . . . . . . . . . . . . . . . . . . . . . . . . . . . . . . . . . 12
Close All Software Applications . . . . . . . . . . . . . . . . . . . . . . . . . . . . . . . . . . . . . . . . . 12
Run Installation . . . . . . . . . . . . . . . . . . . . . . . . . . . . . . . . . . . . . . . . . . . . . . . . . . . . . 12
Define Setup Options . . . . . . . . . . . . . . . . . . . . . . . . . . . . . . . . . . . . . . . . . . . . . . . . . 13
Install Printer Driver from within the ZebraDesigner Environment . . . . . . . . . . . . . . . 13
Activate ZebraDesigner Pro . . . . . . . . . . . . . . . . . . . . . . . . . . . . . . . . . . . . . . . . . . . . . . . 14
Demo Mode . . . . . . . . . . . . . . . . . . . . . . . . . . . . . . . . . . . . . . . . . . . . . . . . . . . . . . . . . . . 14
3 • Setting Up ZebraDesigner Software . . . . . . . . . . . . . . . . . . . . . . . . . . . . . . . 15
User Interface . . . . . . . . . . . . . . . . . . . . . . . . . . . . . . . . . . . . . . . . . . . . . . . . . . . . . . . . . 16
Using the Keyboard and Mouse Effectively . . . . . . . . . . . . . . . . . . . . . . . . . . . . . . . . 17
Interface Reference . . . . . . . . . . . . . . . . . . . . . . . . . . . . . . . . . . . . . . . . . . . . . . . . . . 18
Database Menu . . . . . . . . . . . . . . . . . . . . . . . . . . . . . . . . . . . . . . . . . . . . . . . . . . . . . 33
Tools Menu . . . . . . . . . . . . . . . . . . . . . . . . . . . . . . . . . . . . . . . . . . . . . . . . . . . . . . . . 33
System Folder . . . . . . . . . . . . . . . . . . . . . . . . . . . . . . . . . . . . . . . . . . . . . . . . . . . . . . . . . 36
Welcome Wizard . . . . . . . . . . . . . . . . . . . . . . . . . . . . . . . . . . . . . . . . . . . . . . . . . . . . . . . 36
11/29/2011 13857L-003

Table of Contents
4
4 • Designing Labels . . . . . . . . . . . . . . . . . . . . . . . . . . . . . . . . . . . . . . . . . . . . . . . 37
Using Label Setup Wizard . . . . . . . . . . . . . . . . . . . . . . . . . . . . . . . . . . . . . . . . . . . . . . . . 39
Overview . . . . . . . . . . . . . . . . . . . . . . . . . . . . . . . . . . . . . . . . . . . . . . . . . . . . . . . . . . 39
Select a Printer . . . . . . . . . . . . . . . . . . . . . . . . . . . . . . . . . . . . . . . . . . . . . . . . . . . . . 39
Select the Label Stock . . . . . . . . . . . . . . . . . . . . . . . . . . . . . . . . . . . . . . . . . . . . . . . . 41
Define the Page Size . . . . . . . . . . . . . . . . . . . . . . . . . . . . . . . . . . . . . . . . . . . . . . . . . 42
Select the Label Orientation . . . . . . . . . . . . . . . . . . . . . . . . . . . . . . . . . . . . . . . . . . . 43
Define the Label Dimensions . . . . . . . . . . . . . . . . . . . . . . . . . . . . . . . . . . . . . . . . . . . 44
Designing a Basic Label . . . . . . . . . . . . . . . . . . . . . . . . . . . . . . . . . . . . . . . . . . . . . . . . . 45
Overview . . . . . . . . . . . . . . . . . . . . . . . . . . . . . . . . . . . . . . . . . . . . . . . . . . . . . . . . . . 45
Create a Basic Label . . . . . . . . . . . . . . . . . . . . . . . . . . . . . . . . . . . . . . . . . . . . . . . . . 46
Add Variable Fields . . . . . . . . . . . . . . . . . . . . . . . . . . . . . . . . . . . . . . . . . . . . . . . . . . 57
Designing an RFID Smart Label . . . . . . . . . . . . . . . . . . . . . . . . . . . . . . . . . . . . . . . . . . . 65
Overview . . . . . . . . . . . . . . . . . . . . . . . . . . . . . . . . . . . . . . . . . . . . . . . . . . . . . . . . . . 65
Create RFID Smart Label . . . . . . . . . . . . . . . . . . . . . . . . . . . . . . . . . . . . . . . . . . . . . 66
Encode RFID Tag . . . . . . . . . . . . . . . . . . . . . . . . . . . . . . . . . . . . . . . . . . . . . . . . . . . 67
Support for RFID Tags . . . . . . . . . . . . . . . . . . . . . . . . . . . . . . . . . . . . . . . . . . . . . . . . 69
RFID Tag Locking . . . . . . . . . . . . . . . . . . . . . . . . . . . . . . . . . . . . . . . . . . . . . . . . . . . 70
RFID Tag Settings . . . . . . . . . . . . . . . . . . . . . . . . . . . . . . . . . . . . . . . . . . . . . . . . . . . 70
Change Printer Settings . . . . . . . . . . . . . . . . . . . . . . . . . . . . . . . . . . . . . . . . . . . . . . . . . . 72
Change Common Printer Settings . . . . . . . . . . . . . . . . . . . . . . . . . . . . . . . . . . . . . . . 72
Change Dithering Options . . . . . . . . . . . . . . . . . . . . . . . . . . . . . . . . . . . . . . . . . . . . . 73
Using Toolbars . . . . . . . . . . . . . . . . . . . . . . . . . . . . . . . . . . . . . . . . . . . . . . . . . . . . . . . . . 74
Use the Standard Toolbar . . . . . . . . . . . . . . . . . . . . . . . . . . . . . . . . . . . . . . . . . . . . . 74
Use the Toolbox . . . . . . . . . . . . . . . . . . . . . . . . . . . . . . . . . . . . . . . . . . . . . . . . . . . . . 75
Use the Text Toolbar . . . . . . . . . . . . . . . . . . . . . . . . . . . . . . . . . . . . . . . . . . . . . . . . . 75
Use the Design Toolbar . . . . . . . . . . . . . . . . . . . . . . . . . . . . . . . . . . . . . . . . . . . . . . . 76
Working with Objects . . . . . . . . . . . . . . . . . . . . . . . . . . . . . . . . . . . . . . . . . . . . . . . . . 77
Using Text Wizard . . . . . . . . . . . . . . . . . . . . . . . . . . . . . . . . . . . . . . . . . . . . . . . . . . . 80
Using Bar Code Wizard . . . . . . . . . . . . . . . . . . . . . . . . . . . . . . . . . . . . . . . . . . . . . . . 92
Using EAN.UCC 128 Wizard . . . . . . . . . . . . . . . . . . . . . . . . . . . . . . . . . . . . . . . . . . 103
Selecting Bar Code Type . . . . . . . . . . . . . . . . . . . . . . . . . . . . . . . . . . . . . . . . . . . . . .110
Select Objects . . . . . . . . . . . . . . . . . . . . . . . . . . . . . . . . . . . . . . . . . . . . . . . . . . . . . .118
Edit Objects . . . . . . . . . . . . . . . . . . . . . . . . . . . . . . . . . . . . . . . . . . . . . . . . . . . . . . . .119
Move Objects . . . . . . . . . . . . . . . . . . . . . . . . . . . . . . . . . . . . . . . . . . . . . . . . . . . . . . .119
Aligning Objects . . . . . . . . . . . . . . . . . . . . . . . . . . . . . . . . . . . . . . . . . . . . . . . . . . . . 120
Resize Objects . . . . . . . . . . . . . . . . . . . . . . . . . . . . . . . . . . . . . . . . . . . . . . . . . . . . . 120
Rotate Objects . . . . . . . . . . . . . . . . . . . . . . . . . . . . . . . . . . . . . . . . . . . . . . . . . . . . . 121
Supported Graphics Formats . . . . . . . . . . . . . . . . . . . . . . . . . . . . . . . . . . . . . . . . . . 121
Grouping Objects . . . . . . . . . . . . . . . . . . . . . . . . . . . . . . . . . . . . . . . . . . . . . . . . . . . 122
13857L-003 11/29/2011

Ta ble of Contents
Working with Variable Data . . . . . . . . . . . . . . . . . . . . . . . . . . . . . . . . . . . . . . . . . . . . . . 123
Dynamic Data Overview . . . . . . . . . . . . . . . . . . . . . . . . . . . . . . . . . . . . . . . . . . . . . 123
Database Wizard . . . . . . . . . . . . . . . . . . . . . . . . . . . . . . . . . . . . . . . . . . . . . . . . . . . 123
Link Label to Text Databases . . . . . . . . . . . . . . . . . . . . . . . . . . . . . . . . . . . . . . . . . . 128
Using Text File Wizard . . . . . . . . . . . . . . . . . . . . . . . . . . . . . . . . . . . . . . . . . . . . . . . 137
Work with Visual Basic Expressions . . . . . . . . . . . . . . . . . . . . . . . . . . . . . . . . . . . . 140
Using Expression Editor . . . . . . . . . . . . . . . . . . . . . . . . . . . . . . . . . . . . . . . . . . . . . 141
Using Printer Real Time Clock (RTC) . . . . . . . . . . . . . . . . . . . . . . . . . . . . . . . . . . . 142
Available Date Formats . . . . . . . . . . . . . . . . . . . . . . . . . . . . . . . . . . . . . . . . . . . . . . 143
Available Time Formats . . . . . . . . . . . . . . . . . . . . . . . . . . . . . . . . . . . . . . . . . . . . . . 144
Using Contents Mask . . . . . . . . . . . . . . . . . . . . . . . . . . . . . . . . . . . . . . . . . . . . . . . . 145
5 • Printing and Previewing Labels . . . . . . . . . . . . . . . . . . . . . . . . . . . . . . . . . . 147
Preview Pictures . . . . . . . . . . . . . . . . . . . . . . . . . . . . . . . . . . . . . . . . . . . . . . . . . . . . . . 148
Preview and Print a Label . . . . . . . . . . . . . . . . . . . . . . . . . . . . . . . . . . . . . . . . . . . . . . . 148
Optimize the Printing Speed . . . . . . . . . . . . . . . . . . . . . . . . . . . . . . . . . . . . . . . . . . . . . 149
5
A • Technical Support . . . . . . . . . . . . . . . . . . . . . . . . . . . . . . . . . . . . . . . . . . . . . 151
Online Support . . . . . . . . . . . . . . . . . . . . . . . . . . . . . . . . . . . . . . . . . . . . . . . . . . . . . . . . 152
Contact Information . . . . . . . . . . . . . . . . . . . . . . . . . . . . . . . . . . . . . . . . . . . . . . . . . . . . 153
B • Glossary of Terms . . . . . . . . . . . . . . . . . . . . . . . . . . . . . . . . . . . . . . . . . . . . . 155
Index . . . . . . . . . . . . . . . . . . . . . . . . . . . . . . . . . . . . . . . . . . . . . . . . . . . . . . . . . . . 157
11/29/2011 13857L-003

Table of Contents
Notes • ___________________________________________________________________
__________________________________________________________________________
__________________________________________________________________________
__________________________________________________________________________
__________________________________________________________________________
__________________________________________________________________________
__________________________________________________________________________
__________________________________________________________________________
__________________________________________________________________________
__________________________________________________________________________
6
13857L-003 11/29/2011

1
Introduction
Contents
Welcome . . . . . . . . . . . . . . . . . . . . . . . . . . . . . . . . . . . . . . . . . . . . . . . . . . . . . . . . . . . . . . 8
Contents of the package . . . . . . . . . . . . . . . . . . . . . . . . . . . . . . . . . . . . . . . . . . . . . . . . . . 8
About this Manual . . . . . . . . . . . . . . . . . . . . . . . . . . . . . . . . . . . . . . . . . . . . . . . . . . . . . . . 9
Overview . . . . . . . . . . . . . . . . . . . . . . . . . . . . . . . . . . . . . . . . . . . . . . . . . . . . . . . . . . . . 9
Software Restrictions. . . . . . . . . . . . . . . . . . . . . . . . . . . . . . . . . . . . . . . . . . . . . . . . . . . 9
About this Manual . . . . . . . . . . . . . . . . . . . . . . . . . . . . . . . . . . . . . . . . . . . . . . . . . . . . . 9
11/29/2011 13857L-003

Introduction
8
Welcome
Welcome
ZebraDesigner software is a family of labeling software products that offers a complete bar
code printing solution to label printing users. ZebraDesigner offers an easy-to-use interface
and meets any label design and printing requirement for efficient label printing solutions to
users in retail, logistics, health care, chemical, automotive, and other industries.
ZebraDesigner can be used with any of the following 32-bit or 64-bit Windows® operating
systems: Microsoft® Windows® XP, Windows Vista®, Windows® 7, Windows Server®
2003, or Windows Server® 2008.
The latest software is available for download on the Zebra web site at
www.zebra.com/software.
Contents of the package
The latest software is available for download on the Zebra web site at
www.zebra.com/software.
Before starting the installation of ZebraDesigner software, check the contents of the package
to ensure it is complete. The package includes:
• ZebraDesigner CD
• Software Activation key, located on label inside of CD case, or delivered via email if
purchased via www.zebrasoftware.com
If any of the mentioned items are missing, please contact your software vendor immediately
for package replacement.
13857L-003 11/29/2011

About this Manual
Overview
The ZebraDesigner Pro User Guide helps you design and print labels quickly.
The User Guide contains the following sections:
Introduction: This chapter will introduce you to ZebraDesigner Pro.
Installation and Activation: This chapter will show you how to install and activate the
labeling software.
Setting up ZebraDesigner software: This chapter will show you how to set up an d customize
software to your preferences.
Designing Labels: This chapter will show you how to create labels. You should refer to this
chapter regularly while designing labels, until you ha ve comple tely fa miliarize d yourself wi th
the commands. By using the information contained in this chapter, you will able to use
labeling software quickly and efficiently.
Introduction
About this Manual
9
Printing and Previewing Labels: This chapter will show you how to print and preview
labels.
Interface Reference: This chapter desc ribes details and e xplains all the co mmands used in the
labeling software.
Technical Support: This chapter provides information on how to contact technical support.
Software Restrictions
All features explained in the document are available in the ZebraDesigner Pro edition;
however, some features are not available in the ZebraDesigner edition.
Sections discussing features available only in ZebraDesigner Pro will display a note or a "Pro
Only" icon.
Typographical Conventions
• Text that appears in bold refers to menu names, file names (SETUP.EXE), interface
buttons (
separates one menu to the next menu (
ZebraDesigner Pro
OK), PC keyboard keys (Alt), and menu flows; menu flows have a > that
).
Start > Programs > Zebra Technologies >
• Text that appears in italic refers to confirming actions, identifies graphic captions,
identifies text that you need to type, and locations such as Folder.
11/29/2011 13857L-003

Introduction
Notes • ___________________________________________________________________
__________________________________________________________________________
__________________________________________________________________________
__________________________________________________________________________
__________________________________________________________________________
__________________________________________________________________________
__________________________________________________________________________
__________________________________________________________________________
__________________________________________________________________________
__________________________________________________________________________
10
About this Manual
13857L-003 11/29/2011

2
Installation and Activation
Contents
System and Software Requirements . . . . . . . . . . . . . . . . . . . . . . . . . . . . . . . . . . . . . . . . 12
ZebraDesigner Editions . . . . . . . . . . . . . . . . . . . . . . . . . . . . . . . . . . . . . . . . . . . . . . . . 12
Installing ZebraDesigner Pro . . . . . . . . . . . . . . . . . . . . . . . . . . . . . . . . . . . . . . . . . . . . . . 12
Overview . . . . . . . . . . . . . . . . . . . . . . . . . . . . . . . . . . . . . . . . . . . . . . . . . . . . . . . . . . . 12
Close All Software Applications. . . . . . . . . . . . . . . . . . . . . . . . . . . . . . . . . . . . . . . . . . 12
Run Installation . . . . . . . . . . . . . . . . . . . . . . . . . . . . . . . . . . . . . . . . . . . . . . . . . . . . . . 12
Define Setup Options. . . . . . . . . . . . . . . . . . . . . . . . . . . . . . . . . . . . . . . . . . . . . . . . . . 13
Install Printer Driver from within the ZebraDesigner Environment. . . . . . . . . . . . . . . . 13
Activate ZebraDesigner Pro. . . . . . . . . . . . . . . . . . . . . . . . . . . . . . . . . . . . . . . . . . . . . . . 14
Demo Mode . . . . . . . . . . . . . . . . . . . . . . . . . . . . . . . . . . . . . . . . . . . . . . . . . . . . . . . . . . . 14
11/29/2011 13857L-003

Installation and Activation
12
System and Software Requirements
System and Software Requirements
ZebraDesigner Editions
To run ZebraDesigner, you need at least the following:
• Pentium-based computer with at least 64 MB of RAM.
• One of these 32-bit or 64-bit Windows operating systems: Windows XP, Windows Vista,
Windows Server 2003, Windows 7, and Windows Server 2008.
• Hard disk with 100 MB of free disk space.
•CD-ROM drive.
• Support for OLE DB database drivers. Recent Windows operating systems have included
OLE DB database drivers. If your operating system does not have the database support,
the installation wizard prompts you to install it.
• Administrator rights to the local computer during installation.
Installing ZebraDesigner Pro
Overview
When you put the ZebraDesigner Pro CD in your CD-ROM drive, typically the
installation/demonstration program automatically starts. You can browse the directory of the
CD and look at the brochures, technical documentation, sample files, and other documents.
Note • You must be logged on with Administrator rights to the local computer to perform the
installation.
Close All Software Applications
To ensure complete installation of ZebraDesigner Pro, close all open software applications
before you start installing ZebraDesigner Pro.
Run Installation
Use the installation wizard to install ZebraDesigner Pro on your computer.
To install the software, do the following:
1. Put the ZebraD esigne r CD in yo ur CD-ROM d r ive. An install ation window a utomat ically
opens.
Note • If the installation wizard does not start automatically, go to the main CD directory
of your ZebraDesigner CD and double-click the file
2. Select the language in which you wish to use the software.
3. Click OK. A new window opens showing the ZebraDesigner Pro installer.
13857L-003 11/29/2011
START.EXE.

4. Click Next and confirm the License Agreement.
5. Follow the prompts of the Instal lat io n Wizard and enter the relevant information.
Note • For ZebraDesigner Pro, you may be prompted to activate the product when you run
it for the first time.
Define Setup Options
To continue installation, do the following:
1. Click the Next button.
2. Specify the program group you want to use for ZebraDesigner Pro.
3. Specify if shortcu ts to ZebraDesigner Pro should be created on the desktop or in the Quick
Launch bar.
4. To finish installation, click the Install button.
Installation and Activation
Installing ZebraDesigner Pro
13
After installation you will be asked to install a printer driver. It is necessary to install a
ZebraDesigner driver. If you do not install a Zebra printer driver after installing
ZebraDesigner, you will be prompted to install one the first time you run the program.
5. Once the installation is complete, the Start menu in Windows shows a new program group
Zebra Technologies that contains shortcuts for all ZebraDesigner Pro applications.
for
Install Printer Driver from within the ZebraDesigner Environment
To install the ZebraDesigner printer driver on your computer, do the following:
1. In ZebraDesigner environment, open the File Menu and click on Install Printer.
2. The printer installation wizard starts.
3. Follow the onscreen instructions.
The driver not only allows you to use all supported Zebra printers with the ZebraDesigner
software, but also provides a handy way of sending settings and commands straight to the
printer through the driver.
11/29/2011 13857L-003

Installation and Activation
14
Activate ZebraDesigner Pro
Activate ZebraDesigner Pro
Activate ZebraDesigner Pro to obtain all features. If you do not complete the activation
process, ZebraDesigner Pro only runs in DEMO mode.
Note • ZebraDesigner does not require activation. It is free software, but available with less
functionality than ZebraDesigner Pro.
To activate the software, do the following:
1. Start ZebraDesigner Pro.
The Warning dialog box appears.
2. Click the Activate button.
3. Enter the key number.
Demo Mode
ZebraDesigner Pro running in the DEMO mode has limited functionality. The major
limitations of the ZebraDesigner Pro DEMO mode are:
•All e characters in the text objects are replaced by Z characters.
• Graphic images are printed with DEMO text written over them
You should use the DEMO version only to evaluate the software.
Any commercial use of the DEMO software is prohibited. To obtain the full working version
of ZebraDesigner Pro, you must purchase and register the software.
13857L-003 11/29/2011

3
Setting Up ZebraDesigner
Software
Contents
User Interface. . . . . . . . . . . . . . . . . . . . . . . . . . . . . . . . . . . . . . . . . . . . . . . . . . . . . . . . . . 16
Using the Keyboard and Mouse Effectively. . . . . . . . . . . . . . . . . . . . . . . . . . . . . . . . . 17
Interface Reference . . . . . . . . . . . . . . . . . . . . . . . . . . . . . . . . . . . . . . . . . . . . . . . . . . . 18
System Folder . . . . . . . . . . . . . . . . . . . . . . . . . . . . . . . . . . . . . . . . . . . . . . . . . . . . . . . . . 36
Welcome Wizard . . . . . . . . . . . . . . . . . . . . . . . . . . . . . . . . . . . . . . . . . . . . . . . . . . . . . . . 36
11/29/2011 13857L-003

Setting Up ZebraDesigner Software
16
User Interface
User Interface
Start the software by clicking on the desktop icon or selecting it from the Start menu: Start >
Programs > Zebra Technologies > ZebraDesigner Pro 2 > ZebraDesigner Pro 2
This is the ZebraDesigner Pro main window, with a blank label design displayed.
Figure 1 • Main Window
13857L-003 11/29/2011

Using the Keyboard and Mouse Effectively
When selecting objects, use the Ctrl key to adjust object’s anchoring point by clicking the
object placeholders.
If you have a Wheel Mouse, you can use the wheel to scroll the label up and down. Holding
Ctrl when rotating the wheel adjusts zoom factor, and Shift scrolls the label left or right.
Double-click on the printer’s name in status bar at the bottom of the screen to open printer
properties dialog box in which you can set various options for the currently selected printer.
You can quickly move objects from one open label to another by dragging the desired object to
another window while holding
Note that you must have both label windows visible to do that.
Alt. If you want to copy objects instead, hold both Alt and Ctrl.
Setting Up ZebraDesigner Software
User Interface
17
You can select different objects on a label using the
Pressing the cursor keys while holding the
Ctrl key can move the selected object. You can use
this to fine-tune the position of the object. Holding
Tab and Shift +Tab keys.
Shift while pressing cursor keys will resi ze
the object.
You can use the right mouse button almost anywhere on the label to access the most common
options for that area/object. For example, if you click an object with the right mouse button, a
pop-up menu appears that contains options and actions that can be performed on the selected
object. Similarly clicking other parts of the label produces pop-up menus with options for that
part of the label.
You can select multiple objects by holding
Shift while clicking them.
Use the element shortcuts in toolbars whenever possible. Each label element that can be
connected to some Contents Provider has a shortcut enabled to quickly access existing
variables or define new ones. Click the element’s shortcut handle, shown as a small arrow by
the side of some toolbox icons.
11/29/2011 13857L-003

Setting Up ZebraDesigner Software
18
User Interface
Interface Reference
Mouse Wheel support
If you have a mouse that has a wheel in place of the middle button, you can use it to speed up
zooming and scrolling:
• Turning the wheel scrolls the label up or down.
• Holding Shift and turning the wheel scrolls the label left or right.
• Holding Ctrl and turning the wheel zooms the label in or out.
Shortcuts
Delete Deletes selected object
Ctrl + X Cut
Ctrl + C Copy
Ctrl + V Paste
Alt + Backspace Undo
+ (on numeric pad) Zoom In
- (on numeric pad) Zoom Out
Alt + Shift +
Backspace
Ctrl + T Rotate 90°
Ctrl + A Align
Ctrl + Z Undo
Ctrl + Y Redo
Ctrl + N New
Ctrl + O Open
Ctrl + S Save
Ctrl + P Print
Redo
Ctrl + R Print preview
Ctrl + move the
object with mouse
Alt + move the object
with mouse
13857L-003 11/29/2011
Parallel moving of the object by main axes only
Objects snap to grid even if it is off

Setting Up ZebraDesigner Software
User Interface
19
Ctrl + move the
object with cursor
keys
Shift + cursor keys Fine tuning the dimensions of the object, resize width and height
Right-clicking the
object
Enter F2 or
double-click
File Menu
New Label
To create a new label and clear the application work area, select New command from File
menu. Clicking the button has the same effect.
The software supports opening multiple documents and they are named with the increasing
numbers: Label1, Label2... unless you save them to different filename.
Fine tuning the position of the object
in very small steps
Opens pop-up menu with shortcuts to commands. The content of
the pop-up menu depends on where you clicked your mouse
button and what was selected at that time
Opens properties dialog box of the selected element
The Label Setup Wizard dialog box wi ll ap pear on your screen.
Label Setup Wizard offers
defining dimensions of the label and changing printer setup.
Open
This command opens an existing label. You can also click the button in the standard
toolbar.
The default label folder is
My Labels in My Documents. This folder also includes shortcuts to
other folders with sample labels. When you need to open a label file, which has been saved i n
a different folder or drive, you can use the Windows browse function to access it.
Once you have found the appropriate label, you can open it by double clicking its name, or by
clicking the
Open button.
Close
This command closes the active document. If you have made changes in the document and
have not saved them, the program will prompt you to save the label.
(If the document has not been named yet, the software will also prompt you for the name and
the Save As command will be executed).
11/29/2011 13857L-003

Setting Up ZebraDesigner Software
20
User Interface
Save
This command saves the active document in the current label file. If no file name has been
defined yet, you will enter the Save As dialog box.
Save command can also be accessed directly by click the button.
The
Save As
Select this command when you want to name a new label or when you want to copy an
existing label under the new name or to another folder or drive.
The default folder to save the labels is
My Label in My Documents. When you need to save the
label to a different folder or drive, you can use Windows browse function to define the target
folder.
Export to Printer
Export the label to the printer so it is available for stand-alone printing.
Label Setup
Should you want to change the label parameters, such as dimensions or print orientation, use
Label setup command from the File menu or double click the label. The Label Setup
the
Wizard dialog is shown.
Install Printer
Select this command when you want to run the printer installation wizard. After completing
the wizard, the printer becomes available, and ZebraDesigner does not need to be restarted.
Remove Printer
Select this command when you want to remove one of your installed printers.
The printers that are currently used by the application are shown as disabled and cannot be
removed. The removal of the printer does not require a restart of the application.
Printer Settings
Specific printer settings are set here. The shortcut to this dialog is to double click the printer
name in a status bar in the bottom of the working window.
Note that all printer settings are saved with the label and are restored every time the label is
opened. Each label will store its own custom printer settings. In case you want to print the
label with a different printer, the other printer will have to be setup again to suit your needs.
When changing the printer associated with the label, every custom setting is lost and have to
be re-configured.
When you change the printer associated with the label or when you create a new label, the
default printer settings are used. These default settings can be set for each printer in
.
Panel
13857L-003 11/29/2011
Control

Print and Print Preview Menu
Print and Print Preview
Setting Up ZebraDesigner Software
User Interface
21
From the
File menu, use the Print and Print Preview commands to print the labels on your
printer and to simulate the production of the labels onscreen. Previewing the label allows you
to check that all objects are positioned correctly without spending time and wasting labels.
Standard Toolbar, you can click the button.
In the
When you set values to variables and select records from the databa se, click on the appropri ate
button in the bottom of the dialog box. The
Print button will print labels to the selected printed.
Preview button will preview labels onscreen. The
If you are previewing labels, a control window will open to preview the next labels in a series.
Figure 2 • Print pause dialog box
Next: Go to the next label in a series.
Previous: Go to the previous label in the series.
Delay: Labels will be previewed automatically. Next label will be displayed after a short time
delay. Click on the
Cancel: Click this button to stop previewing labels.
Print: Click on this button to print the labels.
Stop button to disable automatic advance.
Print Dialog Box
The Print dialog box is shown when you want to print or preview the labels. This dialog box
allows you to:
• Provide values for the variables.
• Select records from the database.
• Specify label quantity.
11/29/2011 13857L-003

Setting Up ZebraDesigner Software
22
User Interface
Figure 3 • Print dialog box
General: Use this dialog to enter the values for prompted variables.
The entries are displayed in the table. The first column displa ys the prompt text of the variable.
You can enter the values for variables in the second column. The third column will d isplay the
formatted values (based on the variable format).
Select records: This dialog displays when a database is being used. Click on this button to
select the records from the database. A separate Record Selection dialog box will open.
Note • The button Select Record is accessible only if the records selection is enabled in the
database properties.
Quantity: Select the quantity of labels to be printed.
Print to file: When this checkbox is selected, the software package will offer the user the ability
to write the command language out to a file.
Close after print: The print dialog will be closed after the print button has been clicked.
Clear values after print: When selected, this option will clear the last entered values for the
variable fields. If not selected, the last entered values could be re-used in the prompt field and
the label is ready to be printed again with the old values.
Click the
Print button to start printing (or Preview for preview).
To close t h e dialog box, click the
13857L-003 11/29/2011
Close button.

Setting Up ZebraDesigner Software
User Interface
Record Selection
Record Selection dialog box is available only if you have a database linked to your label
The
and have specified that you want to select records from the database.
The purpose of the Record Selection dialog box is to be able to instruct the application not to
print all records from the database, but only the records that you will select.
23
Figure 4 • Record Selection dialog box
If you do not know the exact location of the record in the database you want to
print, you can use the search functionality . Enter the phrase you would like to find,
select the field name where the text should be searched for, and click the
Find
button.
Exact Search: Only the records that match exactly the entered condition will be
displayed. The record has to contain only the data entered and it has to be in the
proper case.
Select All: This button will select all records in the database.
Unselect: This button will de-select all marked records in the database.
11/29/2011 13857L-003

Setting Up ZebraDesigner Software
24
User Interface
You can select the multiple records using standard Windows shortcut with Ctrl key. Press and
hold the
selected record in the beginning of the line. Put a check mark in the checkbox. Only the
records that have a check in the checkbox will be printed. Use
selection/de-selection of marked records.
If you have set up your database connection to en ter the quantity of l abels you need to pr int for
each record, additional field will be inserted in front of the first field. It is marked with pound
(#). Use this field to define the quantity for each record you need to print.
Optimize for fast windows load: Enable this option to speed up the di splay of table data when
you enter the dialog box the next time. The check boxes for selection of record will not be
displayed, which speeds up working with larger databases. Record selection in this mode can
be performed using standard Windows shortcuts with
If you want to easier navigate through larger databases there is an option for you to group the
records by some database field. You can nest fields one below the other and create a tree
structure for more complex field grouping. Just click and drag the field name to the spot above
the table.
Besides grouping, you can also benefit from filtering functionali ty. Filtering can be very useful
in situations where you are dealing with larger tables and would like to limit the view of the
table data. You can set a user-defined conditions to the table and only record that comply to
them are displayed.
Ctrl key, use the mouse to select records one after another, or you can check each
Space key to toggle the
Shift and Ctrl keys.
To enable filter on some field, click the arrow button next to the field’s name. There are
multiple options you can select:
All Select this to disable filter on this field.
Custom Create a custom filter for this field. You can select standard qualifiers
as: equals, does not equal, is less than, is less than or e qual to, is greater
than, is greater than or equal, like, not like, is blank, is not blank.
You can nest two conditions for the filter and thus build a more
complex condition for the field. They can be joined together using
AND (all conditions must be true in order to display the record) or OR
(only one condition must be true in order to display the record) logical
qualifiers.
A separate dialog box is used for defining the custom fil ter.
Blanks Only the records with blank values for this field are shown.
Non Blanks Only the records with non blank values for this field are shown.
<data values> Only the records that have the selected data value in this field will be
shown.
Filters can be combined on more than just one field.
If the field has a filter defined, the arrow next to fi eld name in the caption will be displayed in
blue color. If the filter is not defined, the arrow is displayed in black color.
13857L-003 11/29/2011

Setting Up ZebraDesigner Software
User Interface
The list of defined filters is also visible below the table. You can remove the filter(s) by
clicking the button or temporary disable the filter by ticking the button next to the filter
definition.
If you want to make more modifications to the filter(s) used on the table, click the Customize
button to open a separate dialog box with detailed control over filters. If you prefer to have
more structural overview on the filters, you will like this option. This way you can quickly
define more conditions and groups using one dialog box.
25
You can save the filter for the future use (
created previously (
Load button).
Save As button), and you can load a filter you have
Test Print
The Test print command will print the current label to the printer defined on the label. All
variable fields on the label are automatically filled with the default values.
Only one label will be printed. The purpose of this command is to quickly print the label, in
order to verify that the label objects are positioned and aligned on the label correctly.
Recently Used Files
At the bottom of the pull down menu, the file names of the four most recently edited labels are
shown, available for quick selection.
Selecting the file here is the same as choosing the
Open command from the File menu and
selecting the file there.
Exit
Use this command to leave the labeling application. When using the keyboard, the shortcut to
this command can be invoked by pressing the
Alt and F4 keys simultaneously. If the opened
labels haven’t been saved yet, you will be prompted to do so.
Edit Menu
Undo
The Undo command cancels up to 10 of the most recently carried out commands or actions. If
you do not like the results of a command, or accidentally delete some elements, choose the
Undo command as the next action to restore the previous mistake.
Undo command can also be activated by clicking the button on the toolbar, or
The
pressing the
Redo
The Redo command is used when you need to restore the last Undo action. It also has the
capability to store (and restore) up to 10 previously made steps.
Redo command can be activated by clicking the button on the toolbar, or pressing
The
Shift, Alt, and Backspace keys simultaneously.
11/29/2011 13857L-003
Alt and Backspace key simultaneously.

Setting Up ZebraDesigner Software
26
User Interface
Cut
This command is used when you want to remove selected element(s) from the label. Note that
the first element is selected by clicking it. When you want to select additional elements, you
must press and hold down, the
The cut elements are stored in the internal clipboard and can be re-inserted on the label with
Paste command. The combination of Cut and Paste commands can be used to speed-up
the
label editing and designing.
The Cut command can be also activated by clicking the button on the toolbar, or by
pressing the
Copy
This command copies the selected elements to the Windows clipboard.
Shift key while clicking each additional element.
Shift and Del keys or Ctrl and X keys simultaneously.
Clicking the button or pressing
also activate the
Copy command.
Ctrl and Ins keys or Ctrl and C keys simultaneously can
Paste
The Paste command is used to paste the contents of the clipboard to a label. This command
can be used to paste the same information more than once.
It is very useful when you need to have multiple copies of the same element on the label.
Once the element has been designed, it can be copied to the clipboard and pasted on to the
label, in different places and multiple times.
You can also design objects in other Windows applications, copy them to the clipboard, and
place them on the label with the
Clicking the button or pressing the
Paste command.
Shift and Ins keys or Ctrl and V keys simultaneously
can also activate the Paste command.
Paste Special
This command provides different ways to paste the contents of the clipboard.
Result box explains the appearance of the clipboard contents on the label.
The
®
For example, you can paste the text from the clipboard, produced by Microsoft
Word as a
Word document, or as a Metafile Picture. When pasted as a Word document, the object can be
edited by double clicking it. Instead of icons and menus of a labeling application you will see
Word working space. You can use familiar Word user interface to make a changes. When
finished, labeling interface will be restored.
When the object is pasted as a Metafile Picture, it is treated as a graphics.
In the dialog box you can choose between two different types of paste. The first one (Paste)
makes the copy of the original, the second one (Paste Link) links the original document with
the label.
13857L-003 11/29/2011

Setting Up ZebraDesigner Software
User Interface
Paste Link
Using the Paste link command establishes a link between labeling application and the source
application for the contents of the clipboard.
The link information is saved in the source file; only the location of the information in the
source file is saved. The link data shows in the graphic form.
Double clicking a Paste-link object will place you into th e original source Windows
application for that object. The object is then edited in the application.
Delete
The command is used to delete selected elements. Deleted elements are not stored in the
clipboard. To restore deleted elements, the
actions.
Delete command can also be activated using the Del key.
Undo command must be used before any further
Select
This command allows you to select different objects on the label.
27
You can select all objects on the label, or selectively mark only objects from the same group
(i.e., all text objects, all bar code objects, all picture objects, etc ).
Insert Object Menu
Insert Object
This command inserts an OLE object on the label. Two subcommands exist, to import the
document from the existing file on the disk or to create a new document from scratch.
Avoid using inserted objects on the label. This consumes a lot of memory because the server
application must be running too. The file size of the label will also increase. These are other
solutions to consider:
• Convert your objects to picture and place such picture on the label.
Note • Resizing an OLE object may not work as you expect. It is advisable to resize the
object only when in OLE edit mode (after double clicking the object).
Create from File
With this command you can insert to labels already defined objects. If the object is in a Word
file, you just select the directory and the name of the file.
Create New
With this command you can insert in a label objects from any Windows application that
supports OLE 2 interface.
11/29/2011 13857L-003

Setting Up ZebraDesigner Software
28
User Interface
Links
On the screen this command shows a list of all links between the active label and other
applications in your working environment. When you insert an object on the label with the
Paste Link command, you will see this link in the list.
The links can be interrupted. This means that the changes made in the source document will
not be made on the label.
Show Objects
The command shows all inserted objects:
• If the object is linked, the object is marked with a dotted line.
• If the object is inserted, the object is marked with a solid line.
The purpose of this command is to separate objects created on the label from those linked to
other applications.
View Menu
Normal View
Selects normal label view.
In this view type, variables are shown on screen as a series of question marks (?). The number
of question marks corresponds to the variable length. Use this view to precisely position the
elements on the label as you know their maximal possible length.
Data View
Selects the data label view.
The variable elements are shown as they will appear when printed. For example, counters will
show numbers and database variables will show data that is obtained from database.
When using data view printing starts at the record currentl y shown on t he screen and not at the
beginning of the database. Be careful when printing records from a database. If you want to
print labels from the first record, make sure the first record is shown on the label.
Note • Databases are locked if you are us ing data view and variables from th ese database s. An
already opened database cannot be simultaneously used in another program. You cannot
change the structure of the database and alter its records, if using data view.
Zoom In
Zoom in command shows a smaller section of the label. The + (Plus) key on the numeric
keypad can also be used. Each time Zoom in is selected and you click once on the label, the
displayed picture becomes 10% larger.
13857L-003 11/29/2011

Setting Up ZebraDesigner Software
User Interface
Zoom Out
Zoom out command shows a wider view of the label. The - (Minus) key on the numeric
keypad can also be used. Each time
Zoom out is selected, the displayed picture becomes 10%
smaller.
Zoom
When using the Zoom command, you can define the optional zoom factor you need. You can
choose any zoom factor from 5 to 3000.
29
Figure 5 • Zoom dialog box
In the Zoom dialog box you can select the different ways of zoom.
Factor You can define your own factor of zoom (in %).
100% The size of the document on screen will be the same as the size of the
document on the label.
To page You will see the entire page on the screen.
To label You will see the entire label on the screen.
To objects You will see all the objects on the screen.
Snap to Grid
Selecting this option enables the positioning of the objects to be based on the grid settings.
When you move the objects, they are placed on a grid position. De-selecting this option allows
elements to be freely moved on the label.
The upper left corner of the object is used for starting point of the grid.
Grid size cannot be modified.
Display Grid
Selecting this option makes the grid visible on the label. De-selecting the option hides the grid.
11/29/2011 13857L-003

Setting Up ZebraDesigner Software
30
User Interface
Toolbars
Standard Toolbar
Buttons in the standard toolbar provide shortcuts to frequently used commands for working
with the software.
Design Toolbar
The design toolbar provides you with the shortcuts to the frequently used design actions on the
label.
By default, the design toolbar is docked on the right side of ZebraDesigner window.
You can use the design toolbar to:
• Change the color of label objects.
Text Toolbar
Shortcuts in the text toolbar enable you to format text objects with a single mouse click. You
can change font selection and style.
Toolbox
Select
Use this tool to enable the select tool.
Text
Use this tool to define the text object.
Click on the small arrow button for additional options.
• Align the objects relatively to each other or to the label.
• Rotate the objects.
• Change the order of the objects.
Bar code
Use this tool to define the bar code object.
Click on the small arrow button for additional options.
13857L-003 11/29/2011

Picture
Use this tool to define the picture object.
Rectangle
Use this tool to define the rectangle object.
Line
Use this tool to define the line object.
Ellipse
Use this tool to define the ellipse or circle object.
Inverse
Use this tool to define the inverse object.
Setting Up ZebraDesigner Software
User Interface
31
Object Menu
Select
After you select the Select command in the Object me nu or click the button
Toolbox, the arrow cursor appears.
in the
Use this command to select objects on the label.
Text
After you select the Text command in the Object menu or click the button
Toolbox, the cursor with the bar text appears.
in the
Use this command to place text objects on the label.
Bar Code
After you select the Bar Code command in the Object menu or click the
button in the
Move the mouse cursor to the desired position of the label and click to enter the Bar code
Wizard dialog box.
Toolbox, the cursor with the bar code symbol appears.
Picture
After you select the Picture command in the Object menu or click the
button in the
Toolbox, the cursor with the picture symbol appears.
Select this command to place a picture on the label.
11/29/2011 13857L-003

Setting Up ZebraDesigner Software
32
User Interface
Rectangle
After selecting the Rectangle command in the Object menu or clicking th e
button in the
Toolbox, the cursor with the rectangle symbol
appears.
Thickness: Defines the width of the object borders.
Note • The valid values for thickness depend on the printer being used on the label. Not all
values are acceptable for all printers.
Print as Graphics: This option lets you print the object as an internal printer element, or as
graphic elements.
Note • Printing will be faster if you do not check this option. However, if you have selected
some line or fill style options that your printer does not natively support, the printing will be
auto-set to
Rounded Rectangle: With this option you can define rounded corners of the rectangle. You
Print as Graphics and you will not be able to disable it.
can select thickness and radius for the object.
Line
After you select the Line command in the Object menu or click the
button in the
Toolbox, the cursor with the line symbol appears.
Use this command to draw lines on the label.
Ellipse
After you select the Ellipse command in the Object menu or click the
button in the
Thickness: Defines the width of the object borders.
Note • The valid values for thickness depend on the printer being used on the label. Not all
Toolbox, the cursor with the ellipse symbol appears.
values are acceptable for all printers.
Print as Graphics: The option lets you print the object as an internal printer element, or as
graphics element.
Note • Printing will be faster if you do not tick this option. However if you have selected some
line or fill style options that your printer doe s not nativel y support, t he printing will be auto-set
Print as Graphics and you will not be able to disable it.
to
Inverse
After you select the Inverse command in the Object menu or click the
button in the
Toolbox, the cursor with the inverse symbol appears.
Adds an inverted box to the label. The inverted box turns inverses the color of all underlying
objects.
Note • The Inverse command is not available for all printers. If the printer does not support
Inverse functionally internally, the command cannot be selected.
13857L-003 11/29/2011

RFID tag
The button is used to enable progra mming of RFID tags embedded into the lab els.
Database Menu
Database Menu
ZebraDesigner Pro allows you to use databases, in which your data is stored. Database type s
can be:
• ASCII (text file) where fields are fixed-length or are separated with the delimiter.
• Microsoft Excel database.
• Microsoft Access database.
• Existing ODBC data sources.
Create Database Connection: This command starts the database wizard that will help you
link the database to the label.
Note • If the database is already linked on the label, you will be able to change its settings.
Setting Up ZebraDesigner Software
User Interface
33
Delete Database: This command removes the database from the label.
Note • The database fields must not be used on the label, if you want to delete the database
link from the label.
Tools Menu
User Interface
Toolbox
Bar codes
Display toolbar with bar codes for easier access to the available bar code types.
Captions
Display captions next to the icons in the Toolbox.
Large Icons
Use large icons in the toolbars.
Small Icons
Use small icons in the toolbars.
Menus Show Recently Used Commands First
Enable this option to show only recently used commands in the menus.
11/29/2011 13857L-003

Setting Up ZebraDesigner Software
34
User Interface
All other commands are hidden to minimize the length of the menus.
Printer Tools
Printer T ools allow you to send spec ific commands directly to the printer. These commands are
simply pre-programmed strings of commands that you would be able to enter in the
Communication
allows the sending common commands to the printer, without the need for the printer to
provide a reply to the user. The commands are divided into the follow in g tw o cat ego r ies:
• Print – includes commands which trigger printing
• Action – includes commands which alter a setting in the printer and d o not trigger p rinting
Language
Direct
interface. The Printer Tools interface provides a user-friendly tool which
Figure 6 • Language dialog box
You can change the language used in the application with this option. For changes to take
effect application must be restarted.
Store pictures into label
This option allows you to store the images used in the label into the label fi le. This enables you
to transfer the label to a different computer by simply transferring the label file. If this optio n is
not selected, images are lost when the label file is transf erred to a different computer.
13857L-003 11/29/2011

Setting Up ZebraDesigner Software
Font Downloader
This command starts the Zebra Font Downloader, which is used to download fonts to the
printer’s internal memory. Downloaded fonts perform in the same way as internal printer
fonts, optimizing printing by reducing the amount of needed communication sent to the
printer.
User Interface
35
It is also possible to access the Zebra Font Downloader by clicking the
> Zebra Technologies > Zebra Font Downloader > Zebra Font Downloader
If this option is not available in ZebraDesigner, Zebra Font Downloader is not installed. The
installation of the Zebra Font Downloader is available with the installation of printer drivers.
Window Menu
Cascade
Use this command to cascade all open windows.
Note • Make sure all the windows you want to display are open. Minimized windows cannot
be displayed.
Tile
Use this command to tile all open windows in working space.
Note • Make sure all the windows you want to display are open. Minimized windows cannot
be displayed.
Arrange Icons
Use this command to arrange icons (minimized windows) in working space - to the bottom of
it. This has effect only if icons are not already arranged.
Start Menu > Programs
Close All
This command closes all open windows (documents ) with prompting for all unsaved
documents. Use it to quickly close all windows with one command (otherwise you have to use
Close command in File menu for each window).
Window List
When one or more windows (documents) are open, they are all listed. You can quickly switch
between windows by selecting an appropriate one. If more than nine wind ows are opened,
more are accessible by choosing option
11/29/2011 13857L-003
More windows…

Setting Up ZebraDesigner Software
36
System Folder
Help Menu
Content
This command opens the content file fo r this help.
About
This command displays the application version information and name of the user that has
installed and registered the application.
System Folder
The labeling application uses its system folder for storing files needed to run the program. The
location of the folder varies depending on the Windows operating system used.
The default location is
Technologies\ZebraDesigner Pro
installation.
It is important to own the write access to this folder on your co mputer system and the ri ght to
write to and modify files in this folder.
In these files, user data and user rights are stored, as well as custom settings, variable trace
logs, label usage logs, variable definition files
GLOBALS.TDB. It also stores the values of global variables.
You should design the appropriate folder layout on disk for your label projects. You can
increase your work efficiency if you always know where certain types of files are stored. The
application also finds required elements faster this way. This is important with more
demanding labels, which intensively use databases, pictures, and forms. Make a separate
folder for each project you are building, e.g. Project1. Beneath this folder make subfolders
Database (for databases), Forms (for forms) and Labels (for labels). Store appropriate files in
each of these subfolders.
Welcome Wizard
When you start the labeling software, a Welcome Wizard will appear. It provides a quick
access to most-used commands when starting working on a label layout.
C:\Documents and Settings\All Users\Application Data\Zebra
. This location may be modified by the user during
*.LVR, bar code standards, and file names
Create a new label A blank label will appear and Label Setup Wizard will start.
You can then design a new label from scratch.
Open recently used label A list of recently used labels will appear to provide a quick
access to commonly used labels.
Open other existing label A common Windows dialog box opens to let you browse for
the appropriate label file.
13857L-003 11/29/2011

4
Designing Labels
Contents
Using Label Setup Wizard . . . . . . . . . . . . . . . . . . . . . . . . . . . . . . . . . . . . . . . . . . . . . . . . 39
Overview . . . . . . . . . . . . . . . . . . . . . . . . . . . . . . . . . . . . . . . . . . . . . . . . . . . . . . . . . . . 39
Select a Printer . . . . . . . . . . . . . . . . . . . . . . . . . . . . . . . . . . . . . . . . . . . . . . . . . . . . . . 39
Select the Label Stock. . . . . . . . . . . . . . . . . . . . . . . . . . . . . . . . . . . . . . . . . . . . . . . . . 41
Define the Page Size. . . . . . . . . . . . . . . . . . . . . . . . . . . . . . . . . . . . . . . . . . . . . . . . . . 42
Select the Label Orientation. . . . . . . . . . . . . . . . . . . . . . . . . . . . . . . . . . . . . . . . . . . . . 43
Define the Label Dimensions. . . . . . . . . . . . . . . . . . . . . . . . . . . . . . . . . . . . . . . . . . . . 44
Designing a Basic Label. . . . . . . . . . . . . . . . . . . . . . . . . . . . . . . . . . . . . . . . . . . . . . . . . . 45
Overview . . . . . . . . . . . . . . . . . . . . . . . . . . . . . . . . . . . . . . . . . . . . . . . . . . . . . . . . . . . 45
Create a Basic Label . . . . . . . . . . . . . . . . . . . . . . . . . . . . . . . . . . . . . . . . . . . . . . . . . . 46
Add Variable Fields . . . . . . . . . . . . . . . . . . . . . . . . . . . . . . . . . . . . . . . . . . . . . . . . . . . 57
Designing an RFID Smart Label . . . . . . . . . . . . . . . . . . . . . . . . . . . . . . . . . . . . . . . . . . . 65
Overview . . . . . . . . . . . . . . . . . . . . . . . . . . . . . . . . . . . . . . . . . . . . . . . . . . . . . . . . . . . 65
Create RFID Smart Label . . . . . . . . . . . . . . . . . . . . . . . . . . . . . . . . . . . . . . . . . . . . . . 66
Encode RFID Tag. . . . . . . . . . . . . . . . . . . . . . . . . . . . . . . . . . . . . . . . . . . . . . . . . . . . . 67
Support for RFID Tags. . . . . . . . . . . . . . . . . . . . . . . . . . . . . . . . . . . . . . . . . . . . . . . . . 69
RFID Tag Locking . . . . . . . . . . . . . . . . . . . . . . . . . . . . . . . . . . . . . . . . . . . . . . . . . . . . 70
RFID Tag Settings . . . . . . . . . . . . . . . . . . . . . . . . . . . . . . . . . . . . . . . . . . . . . . . . . . . . 70
Change Printer Settings. . . . . . . . . . . . . . . . . . . . . . . . . . . . . . . . . . . . . . . . . . . . . . . . . . 72
Change Common Printer Settings. . . . . . . . . . . . . . . . . . . . . . . . . . . . . . . . . . . . . . . . 72
Change Dithering Options . . . . . . . . . . . . . . . . . . . . . . . . . . . . . . . . . . . . . . . . . . . . . . 73
Using Toolbars . . . . . . . . . . . . . . . . . . . . . . . . . . . . . . . . . . . . . . . . . . . . . . . . . . . . . . . . . 74
Use the Standard Toolbar . . . . . . . . . . . . . . . . . . . . . . . . . . . . . . . . . . . . . . . . . . . . . . 74
Use the Toolbox. . . . . . . . . . . . . . . . . . . . . . . . . . . . . . . . . . . . . . . . . . . . . . . . . . . . . . 75
Use the Text Toolbar . . . . . . . . . . . . . . . . . . . . . . . . . . . . . . . . . . . . . . . . . . . . . . . . . . 75
Use the Design Toolbar . . . . . . . . . . . . . . . . . . . . . . . . . . . . . . . . . . . . . . . . . . . . . . . . 76
11/29/2011 13857L-003

Designing Labels
38
Contents (Continued)
Working with Objects. . . . . . . . . . . . . . . . . . . . . . . . . . . . . . . . . . . . . . . . . . . . . . . . . . 77
Using Text Wizard . . . . . . . . . . . . . . . . . . . . . . . . . . . . . . . . . . . . . . . . . . . . . . . . . . . . 80
Using Bar Code Wizard . . . . . . . . . . . . . . . . . . . . . . . . . . . . . . . . . . . . . . . . . . . . . . . . 92
Using EAN.UCC 128 Wizard . . . . . . . . . . . . . . . . . . . . . . . . . . . . . . . . . . . . . . . . . . . 103
Selecting Bar Code Type. . . . . . . . . . . . . . . . . . . . . . . . . . . . . . . . . . . . . . . . . . . . . . 110
Select Objects . . . . . . . . . . . . . . . . . . . . . . . . . . . . . . . . . . . . . . . . . . . . . . . . . . . . . . 118
Edit Objects . . . . . . . . . . . . . . . . . . . . . . . . . . . . . . . . . . . . . . . . . . . . . . . . . . . . . . . . 119
Move Objects. . . . . . . . . . . . . . . . . . . . . . . . . . . . . . . . . . . . . . . . . . . . . . . . . . . . . . . 119
Aligning Objects. . . . . . . . . . . . . . . . . . . . . . . . . . . . . . . . . . . . . . . . . . . . . . . . . . . . . 120
Resize Objects. . . . . . . . . . . . . . . . . . . . . . . . . . . . . . . . . . . . . . . . . . . . . . . . . . . . . . 120
Rotate Objects. . . . . . . . . . . . . . . . . . . . . . . . . . . . . . . . . . . . . . . . . . . . . . . . . . . . . . 121
Supported Graphics Formats. . . . . . . . . . . . . . . . . . . . . . . . . . . . . . . . . . . . . . . . . . . 121
Grouping Objects. . . . . . . . . . . . . . . . . . . . . . . . . . . . . . . . . . . . . . . . . . . . . . . . . . . . 122
Working with Variable Data . . . . . . . . . . . . . . . . . . . . . . . . . . . . . . . . . . . . . . . . . . . . . . 123
Dynamic Data Overview . . . . . . . . . . . . . . . . . . . . . . . . . . . . . . . . . . . . . . . . . . . . . . 123
Database Wizard . . . . . . . . . . . . . . . . . . . . . . . . . . . . . . . . . . . . . . . . . . . . . . . . . . . . 123
Link Label to Text Databases. . . . . . . . . . . . . . . . . . . . . . . . . . . . . . . . . . . . . . . . . . . 128
Using Text File Wizard . . . . . . . . . . . . . . . . . . . . . . . . . . . . . . . . . . . . . . . . . . . . . . . . 137
Work with Visual Basic Expressions . . . . . . . . . . . . . . . . . . . . . . . . . . . . . . . . . . . . . 140
Using Expression Editor. . . . . . . . . . . . . . . . . . . . . . . . . . . . . . . . . . . . . . . . . . . . . . . 141
Using Printer Real Time Clock (RTC) . . . . . . . . . . . . . . . . . . . . . . . . . . . . . . . . . . . . 142
Available Date Formats . . . . . . . . . . . . . . . . . . . . . . . . . . . . . . . . . . . . . . . . . . . . . . . 143
Available Time Formats. . . . . . . . . . . . . . . . . . . . . . . . . . . . . . . . . . . . . . . . . . . . . . . 144
Using Contents Mask. . . . . . . . . . . . . . . . . . . . . . . . . . . . . . . . . . . . . . . . . . . . . . . . . 145
13857L-003 11/29/2011

Using Label Setup Wizard
Overview
With the Label Setup Wizard you can define the dimensions of the label and change printer
setup. It consists of a few simple steps.
Select a Printer
Designing Labels
Using Label Setup Wizard
39
Figure 7 • Label Setup Wizard - Selecting printer
If you want to set the printer parameter s , select the desired printer, and click the
button. The printer properties dialog box appears, allowing you to set the printer parame ters
such as print speed, print darkness, and print direction.
Note • This is a standard Windows printer properties dialog box and its options may differ
from printer to printer because it is based on the printer driver.
To continue, click
11/29/2011 13857L-003
Next.
Properties

Designing Labels
40
Using Label Setup Wizard
Figure 8 • Label Setup Wizard - Print Mode
Standard Print Mode
This is the usual print mode, where the printer sends all of the information to the printer and
prints it immediately.
Store label template and recall it for printing
This setting allows the user to store the fix ed data on the label to th e printer’s internal memory
and only send the variable information to the printer during the print operation. The variable
data is merged with the stored fixed data by the printer. This results in faster printing of
repetitive labels due to less data being sent between ZebraDesigner and the printer.
Store and Recall is operated in the
Print dialog window, where the Store Label Template tab is
used to execute the storage operation. Any regular print command on such a label is a Recall
operation.
Select one of the print modes and click Finish to complete the Label Setup Wizard.
13857L-003 11/29/2011

Select the Label Stock
Designing Labels
Using Label Setup Wizard
41
Figure 9 • Label Setup Wizard - selecting label stock
If you use one of the standard predefined label formats, you can specify it here.
Stock Type: Select the type of stock.
Stock name: Select the stock from the list.
Stock information: The information about label dimensions, printer settings, and background
images as defined by the selected stock.
Label linked to stock: If you enable this option, you cannot change the dimensions of the label,
because the stocks locks the dimensions.
Note • Using pre-defined stocks simplifies the process of label creation because you do not
have to define the label dimensions manually.
To continue, click the
Next button.
11/29/2011 13857L-003
Designing Labels
42
Using Label Setup Wizard
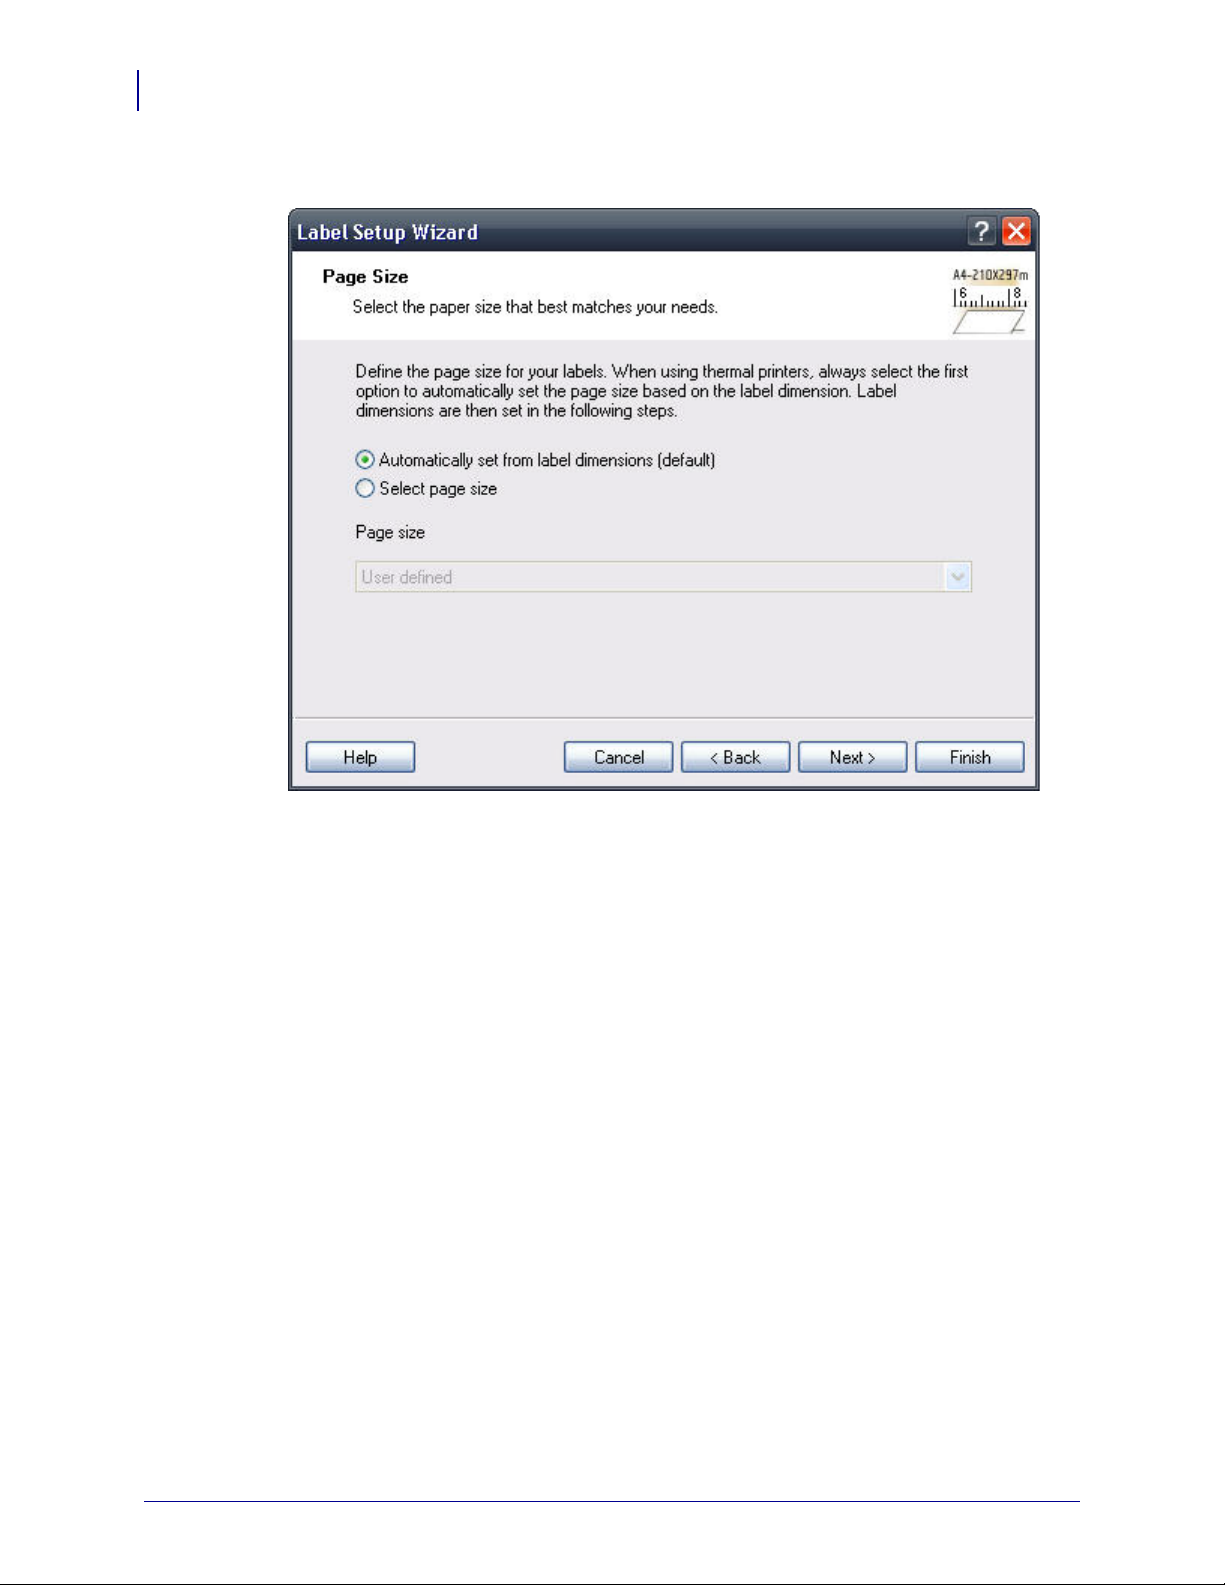
Define the Page Size
Figure 10 • Label Setup Wizard - choosing Label Dimensions
Select the page size for your labels.
Automatically set from label dimension: ZebraDesigner printer drivers will automatically size
the label dimensions.
Select page size: You can also manually define the page size.
To continue, click
Next.
13857L-003 11/29/2011

Select the Label Orientation
Designing Labels
Using Label Setup Wizard
43
Figure 11 • Selecting label layout
Orientation: Select the label orientation. Look at the screen and printer layouts to see how the
label will be printed from the printer.
Print directions: Click the Rotated option to rotate the label 180 degrees, when printed.
To continue, click the
Next button.
11/29/2011 13857L-003

Designing Labels
44
Using Label Setup Wizard
Define the Label Dimensions
Enter the label dimensions in this dialog box.
Note • If you selected the label stock in the previous step, the values for dimensions are
entered automatically.
Figure 12 • Label Setup Wizard - defining the label format
Width, height: Define the label dimensions.
Margins: Define the label margins.
Rows, columns: Define the number of labels in horizontal and vertical directions. This option
is commonly used with office printers.
Gaps: Define the gap between the labels.
Note • Define gaps only if you changed the rows and columns options. If you have rolls of
labels, the gaps between the labels are auto-identified by the gap sensor in the printer.
Unit of measure: Change the unit of measure you want to use.
When you are satisfied with the label dimensions, click the
Finish button to close the Label
setup wizard.
13857L-003 11/29/2011

Designing a Basic Label
Overview
In this section you will learn how to design a simple label file with fixed and va ri ab le ob jects.
The variable objects get values from several sources. You will learn how to:
• Provide object values with a keyboard prompt.
• Obtain object values from a database.
• Preview the label on the screen.
• Print the label.
The label you create will look like this:
Designing Labels
Designing a Basic Label
45
Figure 13 • Basic label
11/29/2011 13857L-003

Designing Labels
46
Designing a Basic Label
Create a Basic Label
Create a New Label
Select a Printer
To create a basic label, do the following:
1. Open ZebraDesigner Pro or ZebraDesigner.
2. From the File menu, select New or click the button in the Standard Toolbar.
Each time you create a new label, a Label Setup Wizard will start to help you set up the label
and connect to the printer.
Note • You can leave the Wizard at any time and accept the default settings for the label by
clicking the
1. Select the printer you want to use for label printing.
Note • If you don’t find your printer on the list, see Install Printer Driver from within the
Finish button.
ZebraDesigner Environment for installation instructions.
Figure 14 • Selecting a printer
2. Click the Next button.
13857L-003 11/29/2011

Define Label and Page Dimensions
1. If you want to use the label stock, select your choices in the Select Stock window.
Designing Labels
Designing a Basic Label
47
Figure 15 • Selecting stock
11/29/2011 13857L-003
Designing Labels
48
Designing a Basic Label
2. Click the Next button.
A new window opens to define the label dimensions manually.
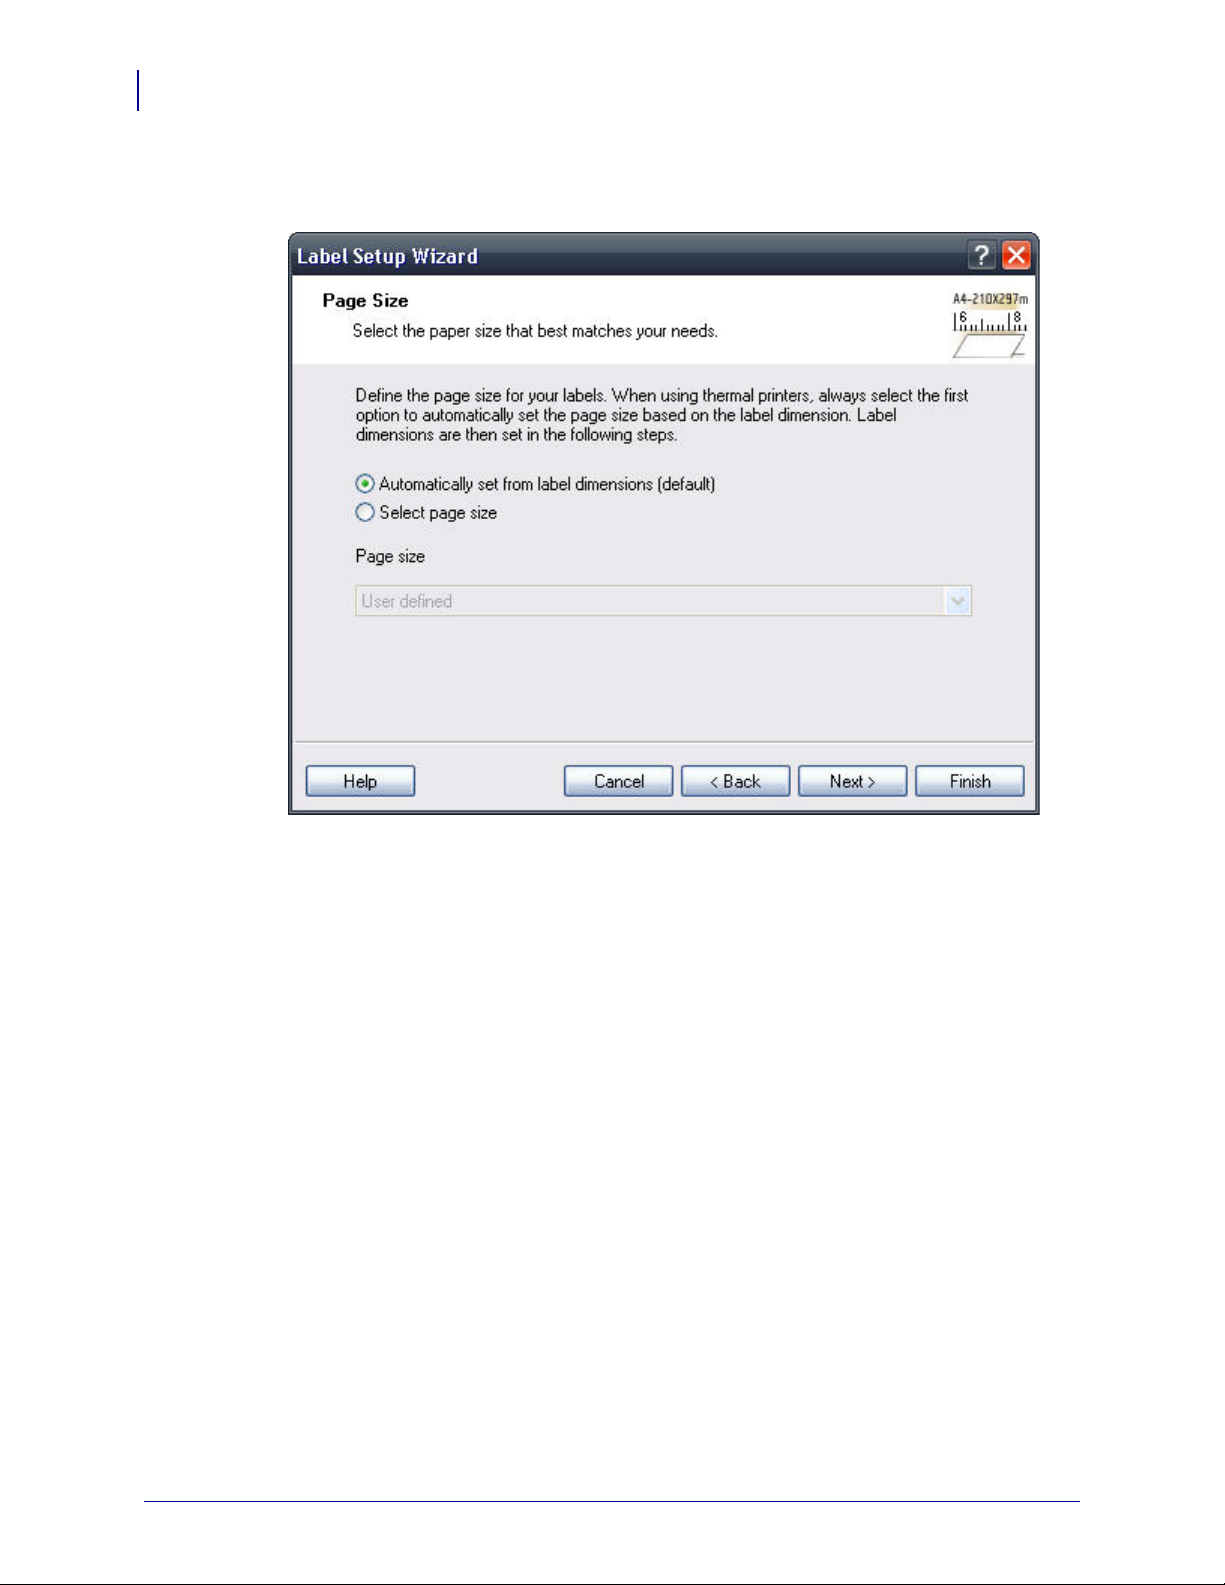
Figure 16 • Selecting page size
3. Leave the Page Size option at Automatically set from label dimensions (default) and
Automatic Sizing.
check
4. Click the Next button.
A new window opens
13857L-003 11/29/2011

5. Select the label orientation and print direction.
Designing Labels
Designing a Basic Label
49
6. Click the Next button.
A new window opens.
Figure 17 • Selecting the label layout
11/29/2011 13857L-003

Designing Labels
50
Designing a Basic Label
7. Enter the label width and height.
Figure 18 • Defining label dimensions
Note • T o change the unit of measure from centimet ers to inches or other su pporte d un its,
click on the button with unit of measure below the label preview in the dialog box.
8. Click the Finish button. A new empty label with the settings you selected is created.
Enter Fixed Text
9. Click the button in the Toolbox. The text cursor appear s on the screen.
Figure 19 • Cursor for text object
10. Move the cursor to the loca tio n on the lab el where you want to place the text object and
click the mouse button.
The Text Wizard dialog box with object properties opens.
13857L-003 11/29/2011

11. Type SAMPLE and click the Finish button.
Designing Labels
Designing a Basic Label
51
Figure 20 • Entering content for text object
12. Click on the text object to select the object.
13. Using the Text Toolbar, change the font for the text obje ct.
Choose Arial font, 28 point size, and bold style.
Using format options in the text toolbox:
14. To change the position and size of the text object, select the text object and drag the object
with your mouse to the desired position.
11/29/2011 13857L-003

Designing Labels
52
Designing a Basic Label
Object Positioning Guidelines
The screen should show the following:
Figure 21 • The text object is placed on the label
Guidelines are available to assist you in positioning objects on the label. The functionality of
guidelines is similar to grid, but they allow you much more freedom regarding positioning,
moving, and combining positioning delimiters.
Although the guidelines may be visible while designing the label, they will not be printed on
the final product, regardless of whether the
Display Guidelines setting is turned on or off.
Create Guidelines
Create vertical and horizontal guidelines:
• Click anywhere in the ruler area and drag the line out of it (the top ruler contains
horizontal, and the side ruler contains vertical guidelines).
• Finally, you can open the View menu and access the commands there.
Using Guidelines
The guidelines may be moved at any time with the drag of a mouse. If they are dragged back to
the ruler area, they are deleted. It is possible to toggle between displaying and hiding the
guidelines, either by using the menu or right clicking them.
The guidelines can be hidden with the Ctrl+H shortcut key combination, and when they are
hidden, the Snap to Guideline functionality is also disabled. The menu also includes a
all Guidelines
command, which removes all the guidelines on the label.
Holding down the SHIFT key while dragging objects allows you to temporarily turn on the
Snap to Guidelines function.
Remove
Guideline Properties
Double-click a guideline or right click a guideline and choose Edit Guideline Properties to
open the Guideline Properties dialog window. The dialog allows you to enter the numeric
positioning value, choose the horizontal or vertical guidel ine type, or remove the individual
guideline.
Note • This functionality is only available in ZebraDesigner Pro
13857L-003 11/29/2011

Insert Bar Codes
Now you will add a non-changeable Code128 bar code on the label.
1. To insert the bar code, click the button in the Toolbox.
2. Move the cursor to the desired position on the label and click the mouse button. The
Barcode Wizard dialog box with object properties will open.
3. Enter the value 1234567890 for the bar code contents.
4. Click the Define button. Edit Bar Code dialog box opens.
5. Make sure you select bar code Code128 and click the OK button.
Designing Labels
Designing a Basic Label
53
Figure 22 • Selecting bar code type
6. To return to the label, click the OK button.
7. Change th e position of the bar c ode by selecting the b ar code and dragging i t to the desired
position.
8. Change the object size by dragging the object handles. The handles are small rectangles
surrounding the object when it is selected.
11/29/2011 13857L-003

Designing Labels
54
Designing a Basic Label
Insert Pictures
The label should now show the following:
Figure 23 • Label with text and bar code objects
The ZebraDesigner Pro works with BMP, PCX, GIF, WMF, JPEG and many other popular
graphic formats.
1. To insert the picture, click on the button in the Toolbox.
2. Move the cursor to the desired position on the label and click the mouse button.
3. The Open dialog box will open allowing you to browse for a picture on your hard dri ve.
Go to the folder
4. Click the Open button.
Samples >Graphics and select the picture LEISURE.WMF.
The screen should show the following:
Figure 24 • Label with text, bar code, and picture objects
13857L-003 11/29/2011

Save a Label
Always save your label during the design process.
To save a label, do the following:
1. Click the button.
2. Type in the name of the label. Fo r example, type label for the name of the label.
The name of the label appears in the program caption.
Use Alignment Tools
You have placed the objects on the label. Now you want to make sure they are aligned on the
horizontal center of the label. You can align objects on the label by using the
the right side of the working window.
To align objects on the label, do the following:
1. In the Toolbox, choose a select arrow and draw a frame arou nd all objects to select all
objects.
Designing Labels
Designing a Basic Label
Align Toolbar on
55
Note • The first object you select determines the alignment orientation for all selected
objects.
Figure 25 • Selecting the objects on the label
2. To arrange the objects, click the Center Align button in the Design toolbar. The
selected objects will be rearranged and positioned, centered to first object that was
selected.
Note • The Align Toolbar has other alignment commands available in the Align Toolbar.
You can also align the objects to the label grid. The optio n
Snap to Grid is available in the
View menu.
11/29/2011 13857L-003

Designing Labels
56
Designing a Basic Label
Use Drawing Tools
Now you will insert a line to separate a text object from other objects and a rectangle around
the picture object.
1. From the Toolbox, select the button and move the cursor to the
required starting point of the line.
2. While drawing the line, press and hold down the mouse button. Move the mouse to the
end position of the line and release the button. The Line object is placed on the label.
3. In the Toolbox, click the button and point the mouse to the
upper left corner of the picture.
4. While you stretch the rectangle to the lower right corner of the picture, click and hold the
mouse button.
5. To change the thickness of the vertical and horizontal line, double-click on the rectangle
object to open its properties. Select the thickness yo u wa nt and click the
6. To edit the drawing object, double-click on the line or rectangle to open the dialog box
Finish button.
with its properties.
The label should show the following:
Figure 26 • Label with fixed objects
13857L-003 11/29/2011

Add Variable Fields
Overview
You may want to print a label on which the data changes for each label. ZebraDesigner Pro
offers different variable fields (counters, date/time fields, operator’s input from the keyboard)
that you can use with text, graphics, and bar code objects.
For this example, a new label was created. The steps in the following topics explain how to
create a label that contains a prompted field, a counter, and date/time fields.
The captions in the following screenshots were added separately.
Designing Labels
Designing a Basic Label
57
Figure 27 • The left label shows design mode, the right two labels are two
consecutive labels from print preview
Create Keyboard Entry Variable Fields
The content of a prompted field can be different for every print job. Before you pr int the label,
you enter the value for the field.
1. To display a list of available variable types, click the small arrow next to the
button in the
2. From the list, select New Keyboard Input and click on the label where you want to
position the object.
Toolbox.
11/29/2011 13857L-003
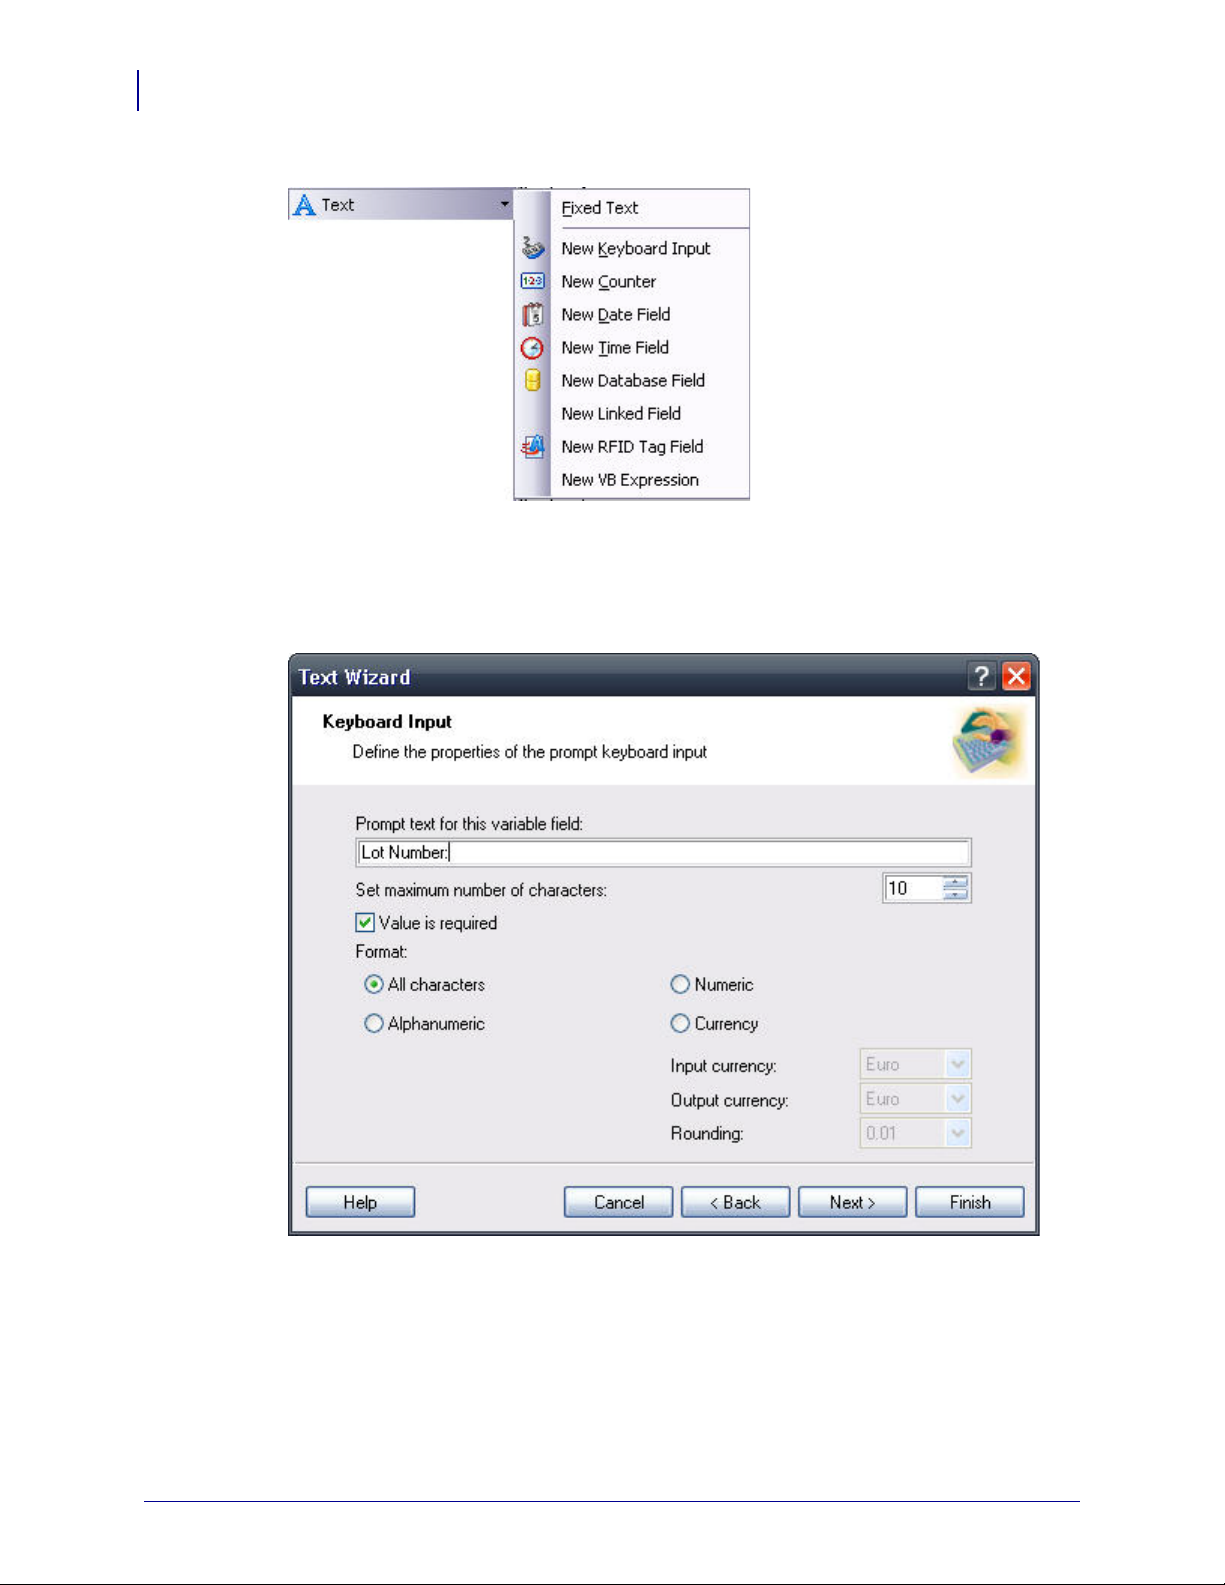
Designing Labels
58
Designing a Basic Label
A dialog box with the Variable Wizard opens.
Figure 28 • Creating new keyboard input variable field
Note • Some of the entries in the image are only available in ZebraDesigner Pro.
3. Type Lot Number: to define the prompt that the user will see at print time.
4. Click the Finish button.
The text object is placed on the label and linked to the new variable.
Note • When you print the label, you are prompted to enter the product name, which is
shown in preview on the label and on the printed label.
13857L-003 11/29/2011

Create Serialized Data Variable Fields (Counters)
Now create a counter field on the label. The value of that variable field automatically increa ses
by one on every label. Typically , the counter increases by 1 on each label. For example, 1, 2, 3,
4, 5, etc. You can also define different incremental steps.
1. To display a list of available variable types, click the arrow in the
button in the
2. Select New Counter from the list. The Cursor changes to an arrow with a text object.
3. Click on the label where the counter field should be placed.
A dialog box with counter properties opens.
Toolbox.
Designing Labels
Designing a Basic Label
59
Figure 29 • Creating new counter variable field
Note • Some of the entries in the image are only available in ZebraDesigner Pro.
11/29/2011 13857L-003
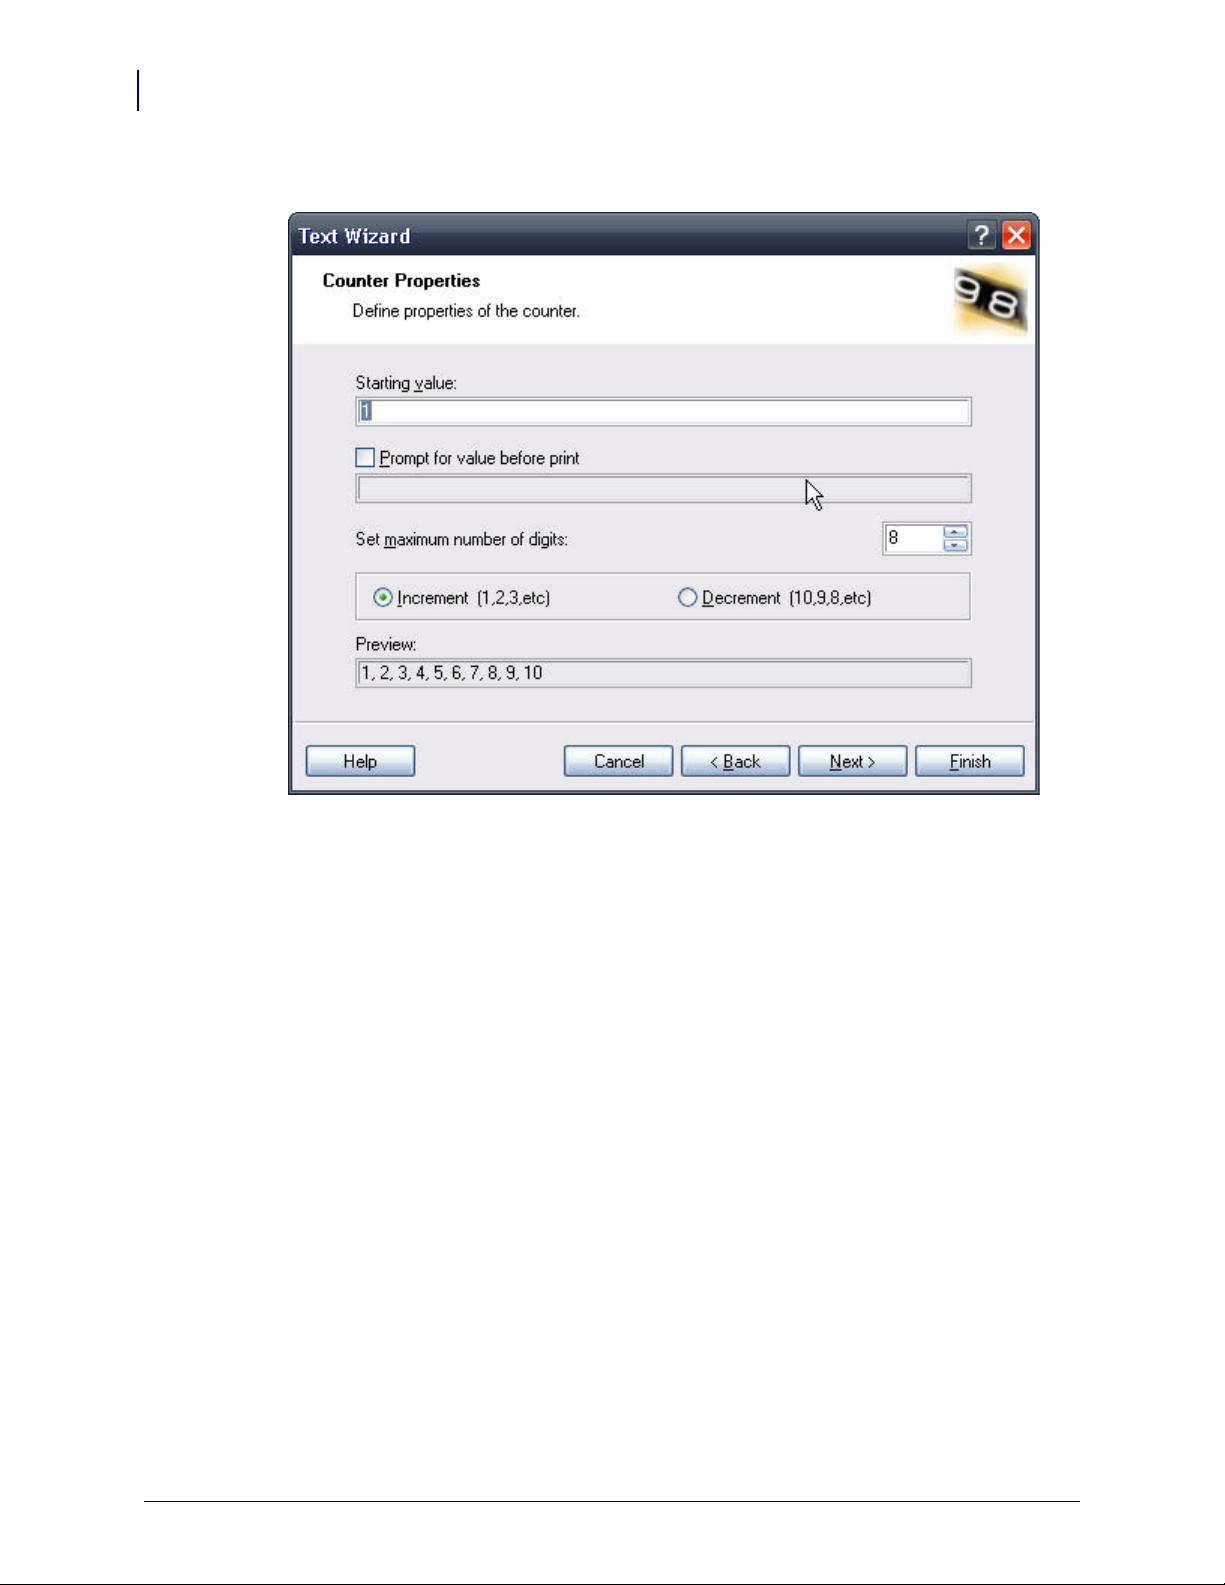
Designing Labels
60
Designing a Basic Label
4. Leave everything as default so that the counter will always start from 1 and increase by
one on each label.
5. Click the Finish button.
The new variable is linked to the text object on the label.
Note • The use of hardware counters in linked fields is only supported in EPL printers.
Using hardware counters in any other printers will result in the counter being removed
from the list of linked fields. If the label is created for an EPL printer, all internal counters
in linked fields are converted to software counters.
13857L-003 11/29/2011
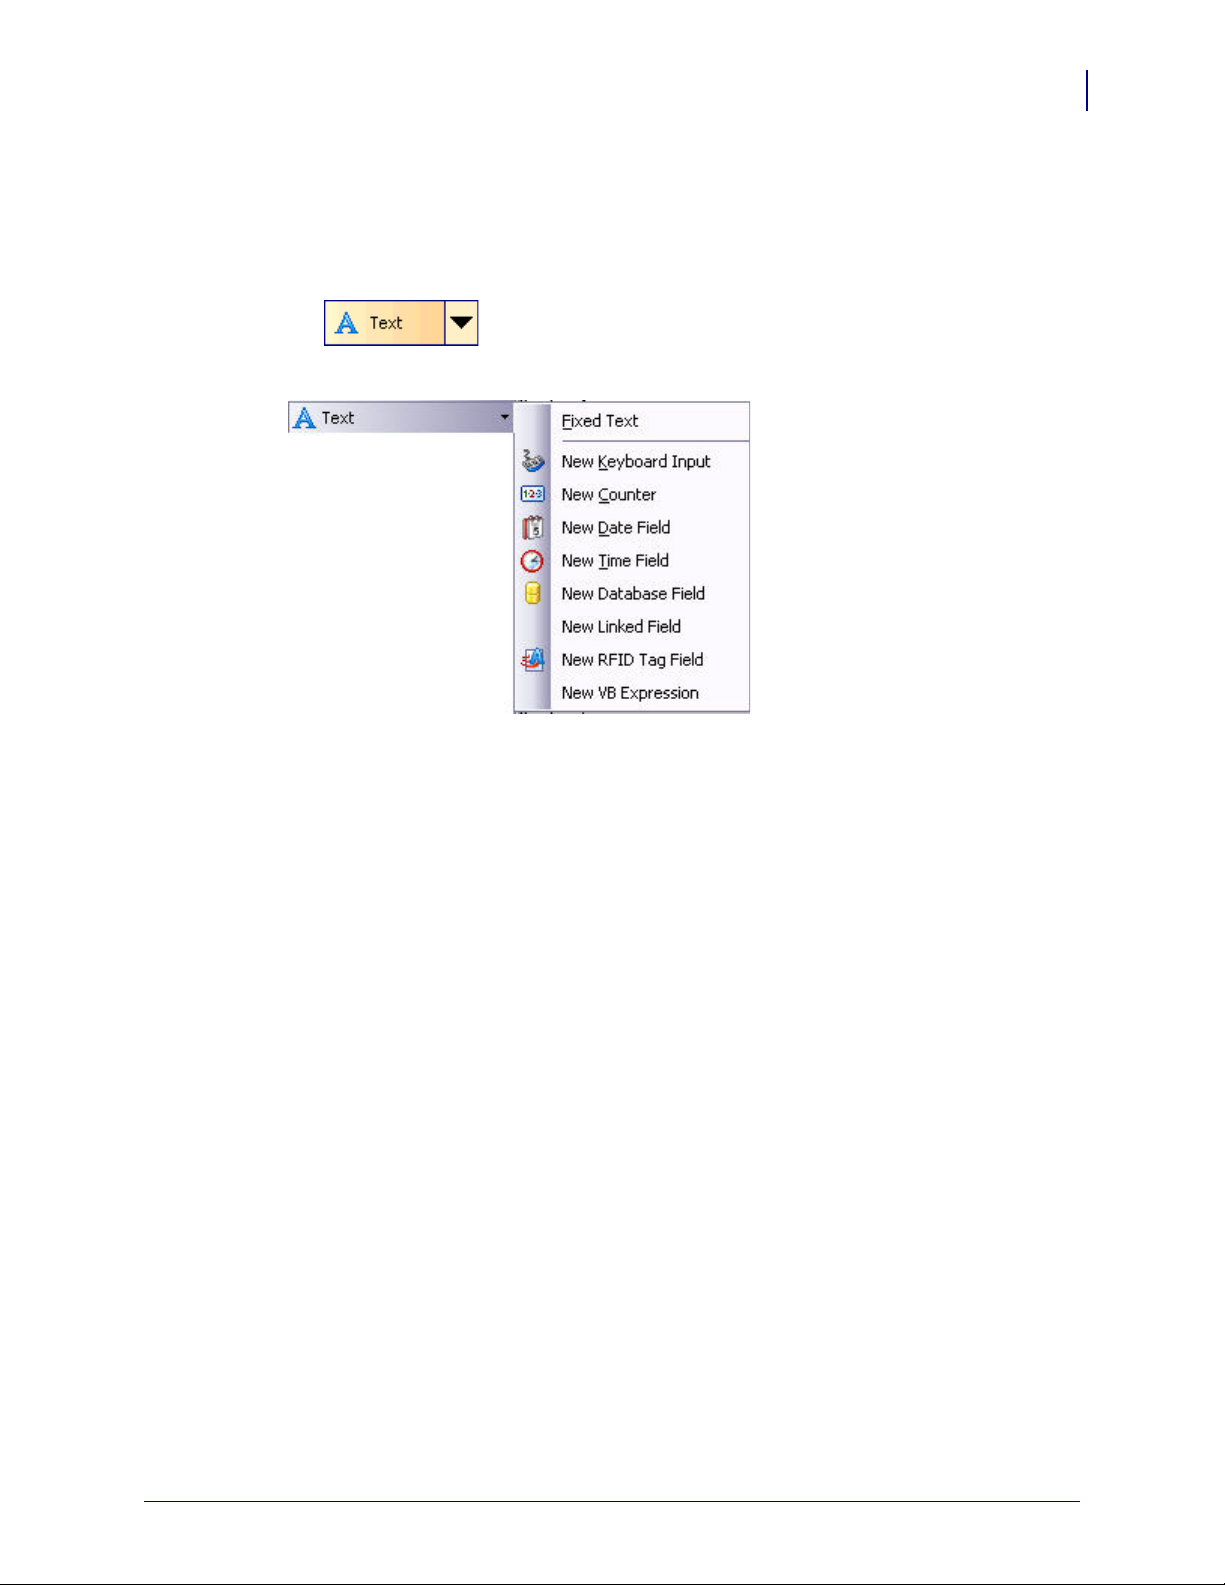
Create Date and Time Variable Fields
Content of the variable field can be filled automatically with the date or time stamp from the
computer clock or printer clock (for supported printer models).
1. To display a list of available variable types, click the small arrow next to the
Designing Labels
Designing a Basic Label
61
button in the
2. From the list, select New Date Field. A dialog box with date properties opens.
Toolbox.
Figure 30 • Creating new variable date field
Note • Some of the entries in the image are only available in ZebraDesigner Pro.
3. Leave everything as default, and the date will be used on the label using the format as
defined in your Windows operating system.
11/29/2011 13857L-003

Designing Labels
62
Designing a Basic Label
4. Click Finish.
To place a time field on the label:
5. To display a list of available variable types, click the small arrow next to the
button in the
6. From the list, select New Time Field.
7. Click on the label where the counter should be placed.
8. Leave everything as default and the time will be used on the label using the format as
Toolbox.
defined in your Windows operating system.
13857L-003 11/29/2011

Designing Labels
Designing a Basic Label
63
9. Click Finish.
The new variable is linked to the text object on the label.
The date and time fields are updated when you preview or print the label. In this example, the
values come from your computer’s system clock.
11/29/2011 13857L-003

Designing Labels
64
Designing a Basic Label
Use Prefix or Suffix Options
You can add a prefix and suffix to each variable fi eld on the label. Both are added to the value
when you preview and print the label.
To add the suffix to the variable field on the label, do the following:
1. To display a list of available variable types, click the arrow in the
button in the
2. From the list, select New Keyboard Input. A dialog box with variable propert ies will open.
3. Type t he text Enter product weight for the Prompt text for this variable field option.
4. Set the Format to Numeric and click Next.
5. Enter kg for the Suffix optio n.
Toolbox.
Figure 31 • Defining the prefix and suffix
Figure 32 • Defining the variable suffix
13857L-003 11/29/2011

6. Click Finish.
7. Click on the label where you want to position the Keyboard Input field.
The text object is placed on the label and linked to the new variable. When you preview or
print the label, the suffix kg will be appended to the entered value on the right side.
Designing an RFID Smart Label
Overview
The concept of RFID (Radio Frequency IDentification) can be simplified to that of an
electronic bar code. First emerging in the 1980’s, RFID was primarily used to track objects in
industrial environments where bar codes were unable to sustain the harsh surroundings. Today ,
RFID is being used to track proprietary assets, automate access control and has many more
additional fields of usage.
Some thermal printers have the ability to program a RFID tag at the same time as they are
printing the label. Two different technologies and their encoding methods are joined on the
same label. Of course a label must have embedded a RFID tag. The tag is paper thin, flexible
and small in size which allows it to be placed inconspicuously under the label. It consists of an
etched antenna and a tiny chip that can store ID number or your custom data in larger
quantities. This contrasts with a bar code label, which does not store any enhanced
information, but merely some code number.
Designing Labels
Designing an RFID Smart Label
65
RFID refers to technologies that use radio waves to automatically identify individual or groups
of items. The labeling software and ZebraDesigner driver support programming and printing
of RFID tags embedded in a label.
Note • You can use RFID functionality in the labeling software only if you have inst all ed a
Zebra Driver with RFID support. Make sure you install the Zebra Driv er for your RFID printer
before you design and print an RFID smart label. RFID functionality is only available with
ZebraDesigner Pro.
11/29/2011 13857L-003

Designing Labels
66
Designing an RFID Smart Label
Create RFID Smart Label
1. Click on button in the Standard toolbar. Label Setup Wizard will start.
2. Select the printer that supports RFID smart label printing.
3. Click on the Finish button.
You will see that
RFID Tag command is enabled in the Toolbox on the left side of the label
design environment.
Figure 33 • RFID Tag is available for use
4. Click on the RFID Tag option in the Toolbox and define the data you want to encode into
the RFID tag.
13857L-003 11/29/2011

Encode RFID Tag
The RFID tags embedded into the label are usually of two types: ISO tags, which encode
blocks of data; or UHF tags, which can encode one string of data.
1. In the Toolbox to begin encoding the data, click on .
The RFID tag dialog box opens.
Designing Labels
Designing an RFID Smart Label
67
Figure 34 • Encoding contents for RFID Tag
2. Select the type of the RFID Tag you want to use from the list box on the top of the dialog
box. Click on the
Tag Settings button to review RFID tag contents and define the
encoding advanced properties.
3. Enable the option Write data to RFID tag if you want to program the tag at the same time
as the label is printed.
Note • If you don’t select this option, the definition of tag content is saved but not sent to
the printer.
4. Select the appropriate entry from Data Fields section.
For RFID Gen2 tags, you are able to select from different data fields. For other RFID tags
usually only one data field is possible - RFID Tag Memory.
5. Go to the first available bloc k in th e sectio n Data Blocks and click on the Data cell in the
table.
Note • You might not see the table-like structure. Instead you can see edit fields to enter
the RFID data. The type of data that can be entered depends on the type of RFID tag that
has been selected.
11/29/2011 13857L-003

Designing Labels
68
Designing an RFID Smart Label
6. Type in the value you want to encode into this block. Repeat the process for other blocks.
7. Click on th e OK but to n. A sch emati c vi ew of th e RFID Tag antenna will open in the label
background identifying the definition of the RFID data on the label.
8. You can continue designing the smart label with non-RFID data as described in the
previous sections.
Figure 35 • RFID Tag antenna in the background
When you print the label, the RFID data will be sent to the printer. The printer prints the RFID
smart label and programs the RFID tag embedded into the label at the same.
Note • The labeling software can work with Unique RFID Tag numbers. Each RFID tag has
embedded a unique serial number. Some printers can read the Unique RFID Tag number and it
can be used on the label linked with some label objects.
13857L-003 11/29/2011

Support for RFID Tags
With the labeling software you can program RFID tags of different manufacturers. It is
important to use a ZebraDesigner printer driver. You cannot program RFID tags, if you do not
use the ZebraDesigner Driver.
ZebraDesigner Driver will let the labeling soft ware know which types of R FID tags the print er
supports.
Not all tag types are always available. The kind of RFID tags that will be available depends on
the selected printer model. There are generally two types of tags:
• ISO tags (TagIt, iCode, ISO...): These are block oriented tags. The data can be encoded in
multiple blocks.
• UHF tags (EPC): The data is encoded in one block of data.
You can input content for RFID tags using dif ferent method s, dependi ng on the tag type (UHF
or ISO).
For UHF tags
Designing Labels
Designing an RFID Smart Label
69
Data type: Data type of the selected tag can be specified here.
Data source: Incoming data that is encoded in the tag can be a fixed value or acquired from
some variable, defined in the label.
Data size: The currently used data is previewed here. You can see the amount of space still
available in the tag. The occupancy of the tag is seen graphically with growing bar and
numerically with the digit, explaining the number of already used bytes.
Block locked: If you set the block as locked, the data will be permanently encoded into the tag.
You will not be able to erase this bl ock to re-prog ram it with some oth er value. Use this option
with caution!
For ISO tags
The blocks that are dimmed and inaccessible are reserved blocks that cannot be used.
Block Number: The successive number of block in the tag.
Data source: Select where the data block will receive the data from. It can be Fixed, where
you will manually type in the data or can be Variable, where the value is acquired fro m some
variable defined in the label.
Data: Type in the tag value manually, if the selected data type is Fixed. Select the variable
defined in the label, if the selected data type is Variable. If your variable length is greater than
the block size, the next block will automatically be reserved for the data.
Size: The currently used data is previewed here. You can see the amount of space still
available in the tag. The occupancy of the tag is seen graphically with growing bar and
numerically with the digit, explaining the number of already used bytes.
11/29/2011 13857L-003

Designing Labels
70
Designing an RFID Smart Label
RFID Tag Locking
Data type: The data can be encoded as ASCII string or as HEX encoded string.
Locked: If you set the block as locked, the data will be permanently encoded into the tag. You
will not be able to erase this block to re-program it with some other va lue. Use this option wit h
caution!
Tag locking is not available for all tag types, printers, and drivers. If the Locking Settings...
button is not displayed in the
RFID tag dialog window, you may be using an unsupported
RFID tag type, printer, or driver. The locking settings are available for some GEN2 tag types.
For more information, see your printer and driver documentation.
RFID tag locking enables the user to lock the RFID tag, so that no changes can be made to it
without unlocking the tag first. If th e tag is permanently locked, it is not possib le to unlock it,
and the RFID tag can never be changed.
Preserve original locking setting: The original locking setting cannot be retrieved, but the
default option assumes that the tag setting should remain unchanged.
Lock: The RFID tag is locked and further changes to it are prevented.
Unlock: The RFID tag is unlocked, so that it can be changed.
Relock: The RFID tag is unlocked, the changes are applied, and the tag is locked immediately
after.
Permanent lock/unlock: Checking this box will apply your selection above permanently and
prevent later changes to it. This setting cannot be undone.
RFID Tag Settings
T ag Information: This se ction provides the in formation about the selected tag type. You can see
the structure of the selected RFID tag. The outlook of the information depends on the selected
type of the tag. For RFID Gen2 you will see table-like structure with the information about the
available data fields, number and size of the block, read or write support.
For other RFID tags, you can review the following structure:
Number of blocks: The number of blocks that are available in the RFID tag.
Reserved blocks: The number of blocks that cannot be accessed and used.
Block size: The size of each block (in bytes).
Unique RF Tag: This property is set to Yes, if you have the printer and/or the tag type that can
provide you with the Unique Tag ID. Each tag has a unique ID encoded already in the
production line. If your printer can read this information from the tag, you can use it with the
label objects using
RFID Tag Contents contents provider .
For example: The printer scans Unique T ag ID, remembers it and prints it on the label encoded
in a bar code element. The value of Un ique Tag is never returned to the labeling software. It is
handled internally by the printer.
13857L-003 11/29/2011

Designing Labels
Designing an RFID Smart Label
RFID Tag Data Read: This property is set to Yes, if you have the printer and/or the tag type
that allows the extraction of the encoded data. You can extract all or part of the data encoded in
the RFID tag and use it with the label objects.
Tag Settings: This section provides more control for RFID programming.
Antenna offset: To achieve better programming accuracy use this option to define the offset
for the antenna in the printer. The Offset is the distance from the antenna to the embedded tag
on the label. This option will help you prog ram the tags more accurately.
Maximum tags to stop: When the programming of the RFID tag fails, usually the word
"VOID" is printed on the label. With this option you can specify how many tags can be
programmed incorrectly. The option can be used as a precaution measure to prevent endless
consumption of labels.
Number of retries: The number of times the printer will try to program the tag if first attempt
fails. The parameter is sent to the printer with the rest of the data.
Check for a valid tag: Before the tag programming begins, the printer will verify if there is a
proper RFID tag available in the smart label. The printer will also verify if the tag can be
programmed at all. If the printer cannot check the currently selected RFID tag , the option will
not be accessible.
71
Verify data write: Once the data has been encoded into the RFID tag, the printer will check if
the written data is equal to the original value.
Electronic Article Surveillance (EAS) settings
EAS is not available for all printers and drivers. If your RFID Tag Settings do not include EAS
Settings, you may need to update your printer driver or select a different printer. For more
information, see your printer and driver documentation.
Preserve original EAS setting: The original EAS setting cannot be retrieved, but the default
option assumes that the tag setting shoul d remain unchanged.
Enable EAS: Enable Electronic Article Surv eillance in the RFID tag. If this was the original
setting, the tag will remain unchanged.
Disable EAS: Disable Electronic Article Surveillance in the RFID tag. If this was the original
setting, the tag will remain unchanged.
Permanently lock EAS tag setting: Checking this box will permanently lock the chosen setting
for the EAS. This lock cannot be undone.
11/29/2011 13857L-003
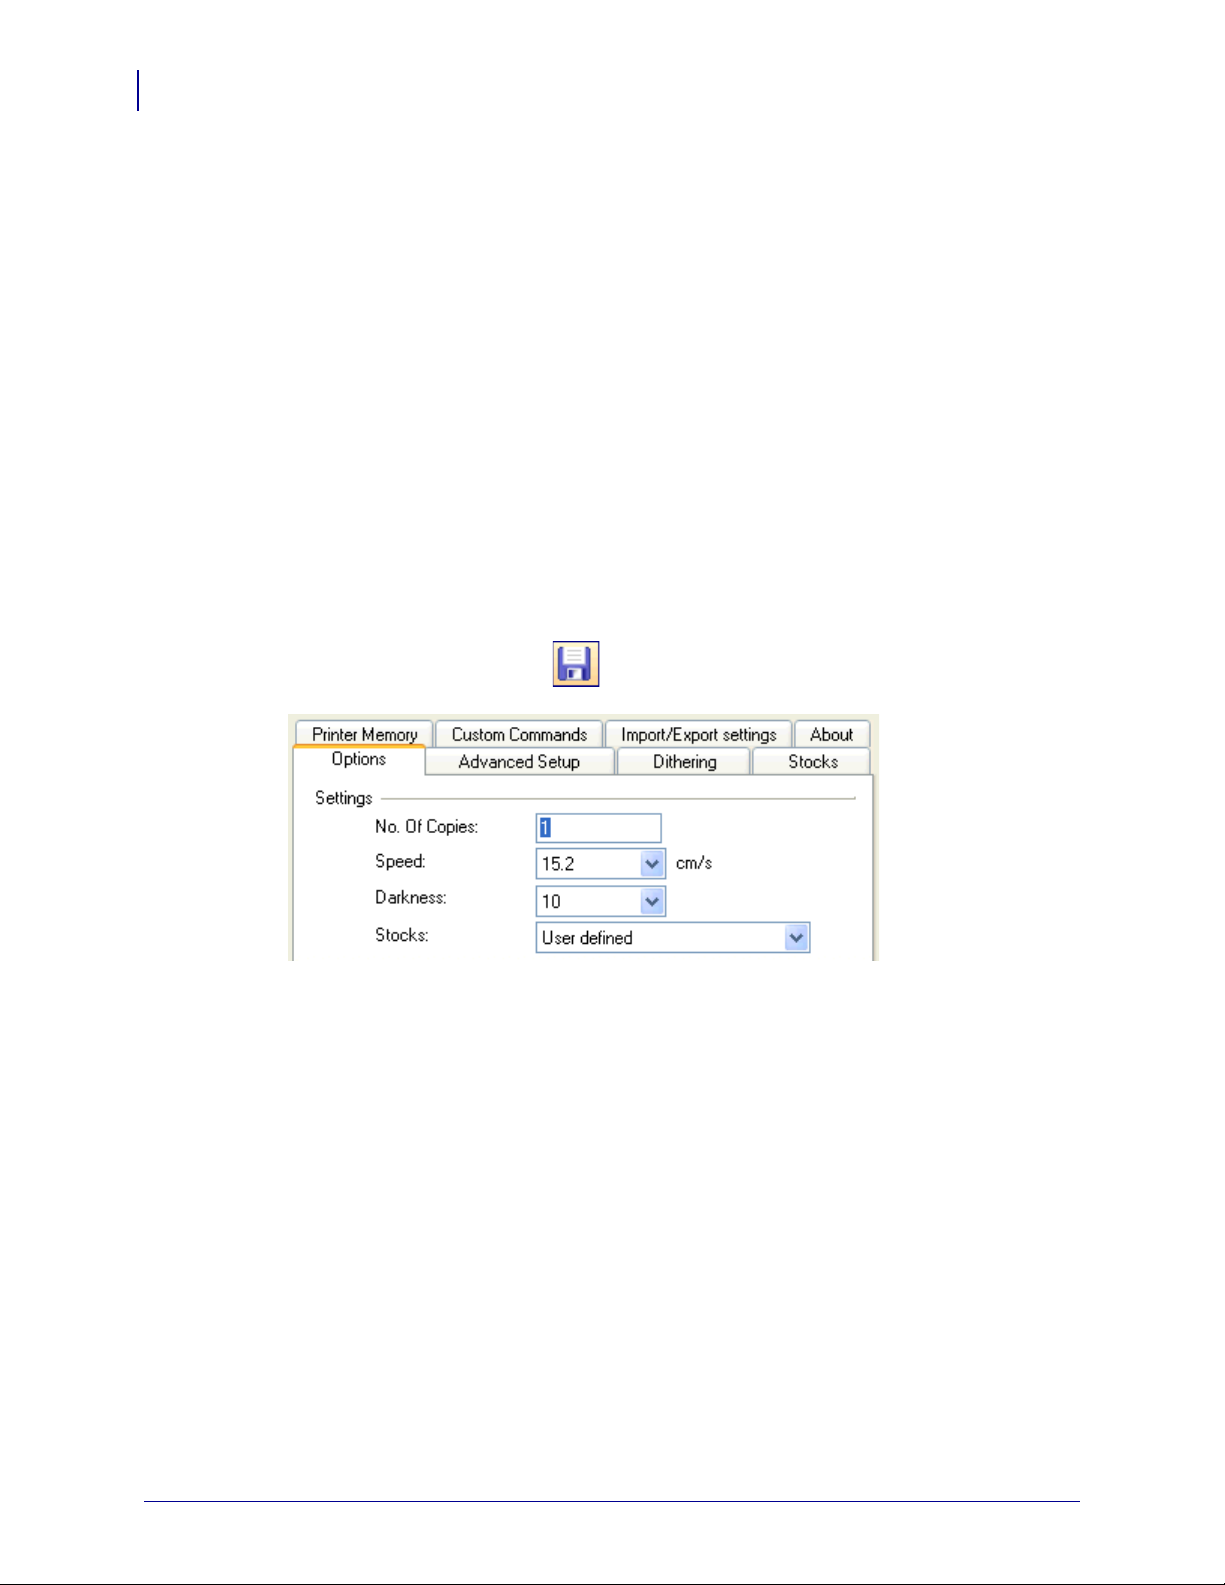
Designing Labels
72
Change Printer Settings
Change Printer Settings
Change Common Printer Settings
When you start designing a label, tell ZebraDesigner Pro what printer to connect the label to.
Each label file remembers the printer settings for the selected printer driver on the label.
This example shows you how to change the printing speed and darkness.
To change the printer settings, do the following:
1. From the File menu, select Printer Settings.
The window with the printer settings opens.
2. Open the Options tab.
3. Change the Speed and Darkness options.
4. Click the OK button.
5. To save the label, click the button in the Standard toolbar, or from the menu select
File > Save.
Figure 36 • Printer driver properties
Note • Any changes in the printer settings dialog box will be saved to the label and
applied to future print actions.
13857L-003 11/29/2011

Change Dithering Options
Dithering is a process of converting color or gray scale pictures to black and white pictures
that can be printed on thermal printers. Thermal printers normally cannot print color images
and can either print a dot on the label or not. There are no intermediate shades of gray.
During the dithering process all colors and shades of gray in the picture are converted to black
and white dots, creating the illusion of new colors and shades by varying the pattern of dots.
Different shades of gray are produced by varying the patterns of black and white dots. There
are no gray dots at all. In printing, dithering is usually called halftoning. Shades of gray are
called halftones.
To change the dithering settings, do the following:
1. From the File menu, select Printer Settings.
The window with the printer settings will open.
2. Open the Dithering tab.
3. Change the Dithering Type option to suit your needs. Look at the preview on the right side
to see the result of your selection on the label.
Designing Labels
Change Printer Settings
73
4. Click the OK button.
5. Save the label by clicking the button in the Standard toolbar or selecting Save in the
File menu.
11/29/2011 13857L-003

Designing Labels
74
Using Toolbars
Using Toolbars
Use the Standard Toolbar
Click on the buttons in the standard toolbar to execute the following actions:
Create new label
Open existing label
Save currently opened label
Cut the selected objects to clipboard
Copy the selected objects to clipboard
Paste the objects from the clipboard
Undo last action
Redo last action
Access to the print functionality. Click on the small arrow in the
toolbar for more commands
Access to the zoom functionality. Click on the small arrow in the
toolbar for more commands
Access to the view functionality. Click on the small arrow in the
toolbar for more commands
Access to the databases. Click on the small arrow in the toolbar for
more commands
Open the help file
13857L-003 11/29/2011

Use the Toolbox
Designing Labels
Using Toolbars
75
To use the Toolbox, do the following:
1. Click on the icon in the Toolbox to select the object.
2. Move the mouse over the label. Notice how the cursor has changed.
3. To place the selected object, click on the label where you want to place the object.
Some objects have additional shortcuts on the right side o f the icon. Using this shortcut, you
can quickly create a new object with fixed cont ent, create a new variable and connect it to the
selected object, or connect the object to one already defined variable.
Use the Text Toolbar
You can use the text toolbar to quickly format the text objects on the label.
To format text objects, do the following:
1. Select the text object by clicking it.
2. Click the appr op ri ate shortcut button in the text toolbar.
3. To change the font, select the appropriate font from the list in the list box.
Note • You can limit the display of fonts in the list. You can list all fonts on the system,
only graphic fonts (TrueT ype, OpenType, T ype 1, bitmap W indows fonts,) or only thermal
printer resident fonts. Click on the two icons next to the list of fonts.
11/29/2011 13857L-003

Designing Labels
76
Using Toolbars
4. To change the size of the text, click on the list with font sizes and select the appropriate
size. You can also click on the and buttons that will increase/decrease the size
of the font to the next size.
Note • You can also change the fonts size directly on the label by resizing the text element
with a mouse.
5. To format the text bold, italic, or underline, click on the appropriate formatting buttons.
Formats the selected text in bold style
Formats the selected text in italic style
Formats the selected text in underline style
6. To change the alignment of the text object, click on the appropriate alignment buttons.
Note • These buttons are accessible only for multi-line text objects.
Aligns text to the left edge
Aligns text to the horizontal center
Aligns text to the right edge
Use the Design Toolbar
The design toolbar is used for:
• Changing color of the objects.
• Aligning objects.
• Rotating objects.
• Arranging objects.
13857L-003 11/29/2011

Working with Objects
Defining Objects
Define the Text Object
To place the text object on the label, do the following:
1. In the Toolbox, click the Text button.
2. Click the position on the label where you want to place the object.
The Text Wizard dialog box opens.
3. Define the contents for the text object.
4. To advance to the next step of the wizard, click the Next button.
5. Follow the onscreen instructions in the next steps.
6. Click the Finish button.
Designing Labels
Using Toolbars
77
Note • To edit the object, select it, then double-click it. The wizard with properties
appears.
Define the Bar Code Object
To place the bar code object on the label, do the following:
1. In the Toolbox, click the Bar Code button.
2. Click the position on the label, where you want to place the object.
Bar Code Wizard dialog box opens.
3. Define the contents for the bar code object.
4. To advance to the next step of the wizard, click on the Next button.
5. Follow the onscreen instructions in the next steps.
6. Click the Finish button.
Note • To edit the object, select it then double-click it. The wizard with properties
appears.
11/29/2011 13857L-003

Designing Labels
78
Using Toolbars
Define the Picture Object
To place the picture object on the label, do the following:
1. From the Toolbox, click on the Picture object.
2. Click on the label where you want to place the picture.
The Graphics Wizard dialog box opens.
3. Browse for the picture on the hard disk, then click the Open button.
Note • T o edit the obje ct later , select it , and then double-click it. The wiz ard or dialog box
with properties appears.
Define the Rectangle Object
To place the rectangle object on the label, do the following:
1. In the Toolbox, click the Rectangle button.
2. Click the position on the label where you want the upper-left position of the object to be
set.
3. Drag in the bottom-right direction until the object size is correct.
4. The other method of positioning the rectangle object on the label is selecting the
Rectangle tool and then clicking the label. A default-sized rectangle will appear, and you
can resize it using handles around the object.
Note • If you want to draw a square, grab a handle on one of the rectangle corners,
simultaneously press and hold the Shift key, then resize the rectangle. A square will be
drawn. For more useful shortcuts available in the software, see Shortcuts.
5. To move a rectangle to a different position, select it and drag it elsewhere on the label.
Note • To edit the object, select it then double-click it. The dialog box with properties
appears.
Define the Line Object
To place the line object on the label, do the following:
1. In the Toolbox, click on the Line object.
2. Define the line starting point by clicking the mouse at the start position.
3. Move the cursor to the end point while holding down the mouse button.
A line will be drawn from the left to right side of the label.
Note • To draw a vertical line, click the starting point and then drag the cursor in the up-
down direction.
Note • Database, Visual Basic Expression and RFID Tag Contents fields are only
available in ZebraDesigner Pro.
13857L-003 11/29/2011

Define the Ellipse Object
To place the ellipse object on the label, do the following:
1. In the Toolbox, click the button.
2. Click the position on the label where you want the upper-left position of the object to be
set.
3. Drag to the bottom-right direction until the object size is correct.
4. The other method of positioning the object on the label is selecting the Ellipse tool and
then clicking the label. A default-sized ellipse will appear, and you can resize it using
handles around the object.
Note • To draw a circle, grab a handle on one of the ellipse corners, simultaneously press
and hold Shift key, then resize the ellipse. A circle will be drawn. For more useful
shortcuts available in the software, see Shortcuts.
5. To move an ellipse to a different position, select it and drag it elsewhere on the label.
Designing Labels
Using Toolbars
79
Define the Inverse Object
To place the inverse object on the label, do the following:
1. In the Toolbox, click on the button.
2. Click the position on the label where you want the upper-left position of the object to be
set.
3. Drag to the bottom-right direction until the object size is correct.
Note • To draw a square, grab a handle on one of the rectangle corners, simultaneously
press and hold the Shift key, then resize the rectangle. A square will be drawn. For more
useful shortcuts available in the software, see Shortcuts.
4. To move an inverse object to a different position, select it and drag it elsewhere on the
label.
11/29/2011 13857L-003

Designing Labels
80
Using Toolbars
Using Text Wizard
Text Wizard
Figure 37 • First screen of Text Wizard
The Text Wizard guides you to define all parameters for the text object.
Fixed text: Select this option if you would like to have a fixed non-changeable content of the
object. If you select this option, you can enter the text directly in this dialog box.
Variable text: Select this option if you would like to have variable content in the object.
Defining the content is defined in the next step.
Element name: Each text object on the label has a unique name. You can refer to the names
when you are linking fields together.
Not printable: If the object is marked as not printable, it is visible on the label during the label
design but is not printed.
Font: Currently selected font type is shown in this field.
•
Inverse: Enable this option to use the text in inverse.
Note • The option is not available for all printers.
•
Select button: You can select different font type s for this text object a mong available fo nts
in the system.
13857L-003 11/29/2011
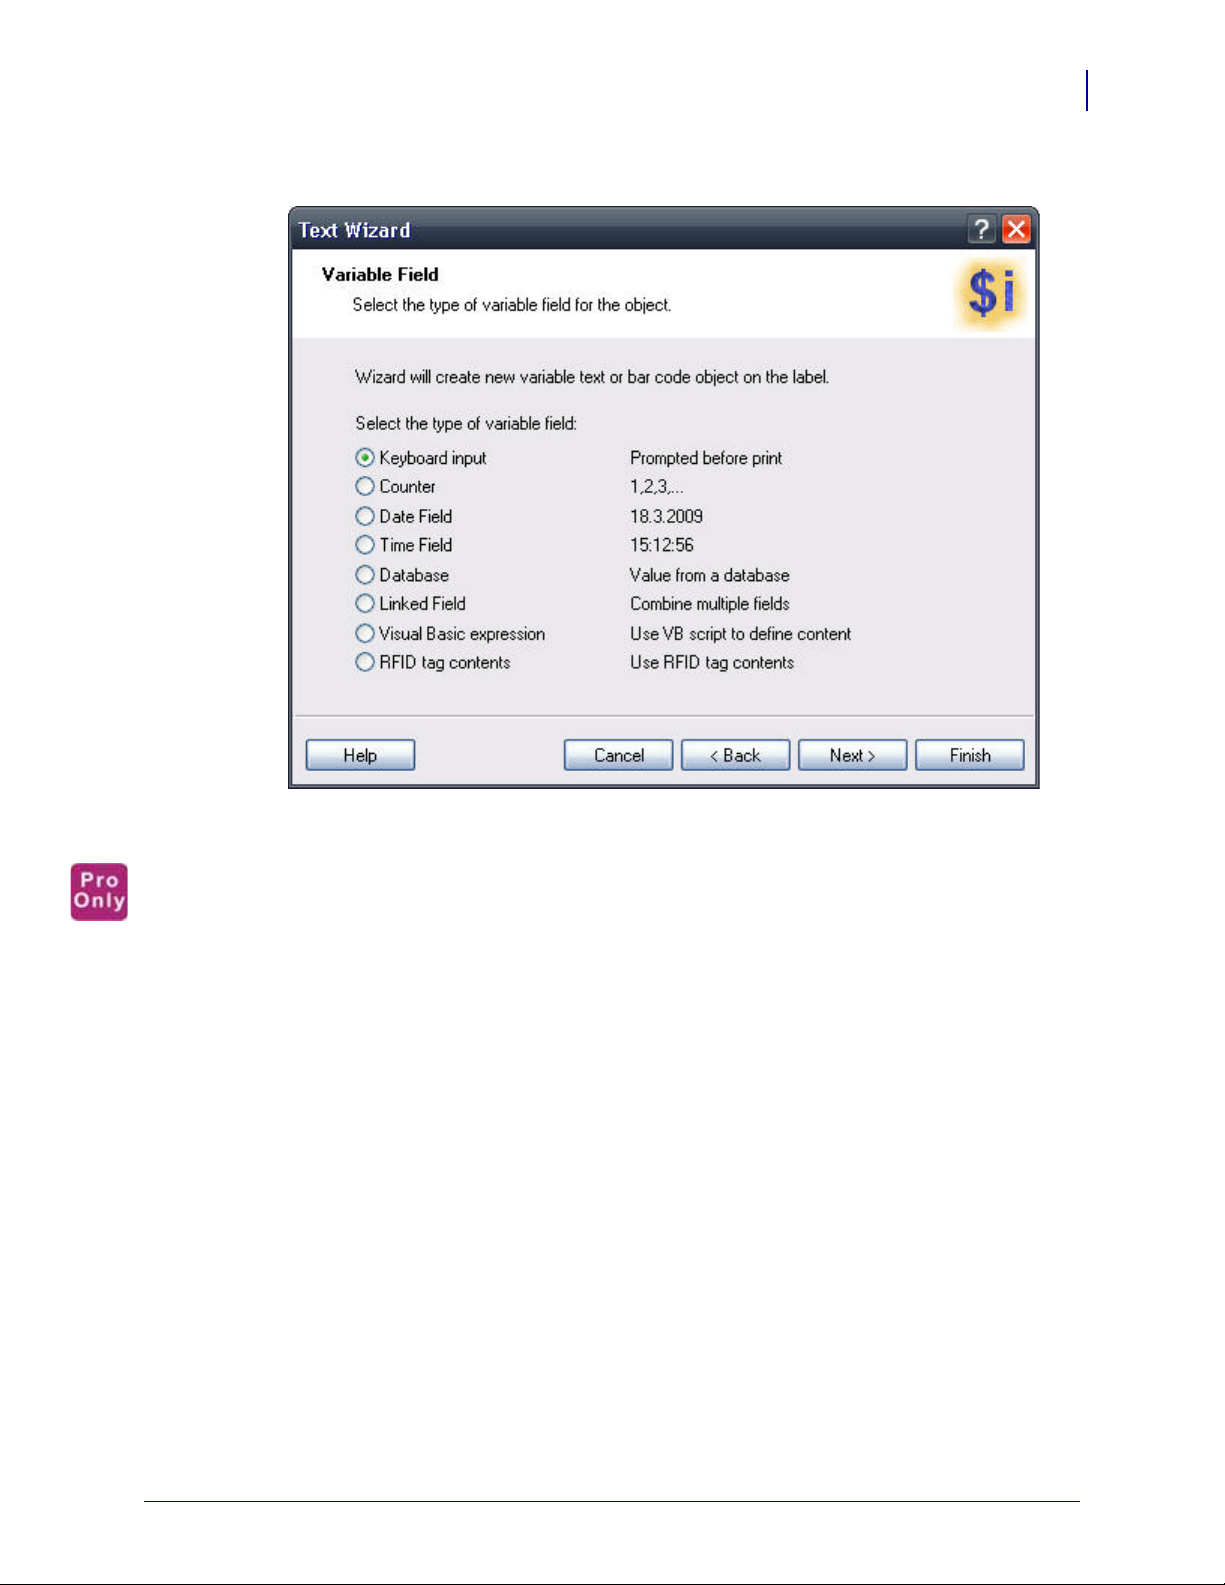
Text Wizard - Choosing Variable Text
Designing Labels
Using Toolbars
81
Figure 38 • Text Wizard - Choosing variable text
Note • The Database, Visual Basic expression, Linked Fiel ds, and RFID tag contents field
types are only available in ZebraDesigner Pro.
Select the type of the variable field you want to use.
The next page of the wizard depends on your selection here.
11/29/2011 13857L-003

Designing Labels
82
Using Toolbars
Text Wizard - Keyboard Input
Use this variable type when you want the operator to enter a value of the variable from the
keyboard before printing the specified number of labels.
Figure 39 • Dialog box for Text Wizard when Keyboard input option is chosen
Prompt text for this variable field: Fill in the message that will be shown to the user when he
enters the values for the variable field.
Set maximum number of characters: Define the maximum length of characters that can be
entered for the variable field.
Value is required: Check this box, if you wish to set this variable value as a requirement for
label printing.
Format: Select the format of data, currency, and rounding settings (if applicable) for the
variable field.
13857L-003 11/29/2011

Text Wizard - Counter
On this page of the wizard, you define the counter variable.
Designing Labels
Using Toolbars
83
Figure 40 • Dialog box for Text Wizard when Counter option is chosen
Starting Value: Set the starting value for the counter. The counter will increment or decrement
from the starting value.
Available counters: When adding a text object, the user is prompt ed to define wheth er this will
be a fixed or variable value object. If the Variable action is chosen, and then the date or time
option the user can decide between the computer time and value offsets. If the checkbox "Use
the printer’s internal counter" is checked, the variable counter will be set by the printer to the
time of printing. The variable field must use a native printer font for the counter to work.
Prompt for value before print: Click this option to enable entering the starting value of the
counter when you start printing labels. Enter the text that will be shown before printing.
The message will be shown on the screen each time the label is to be printed.
Set maximum number of digits: Define whether the maximum length of digits the counter can
occupy.
Increment or decrement: Define that the variable value will increase from label to label, or
decrease.
Preview: The field shows the preview of the counter based on your selection.
11/29/2011 13857L-003

Designing Labels
84
Using Toolbars
Text Wizard - Counter Continuation
Step: Define the step for your counter. The counter will increase by this number on every
label.
Change value every <n> labels: Define the number of label when the counter will change
value.
Rollover when reached: Enter the value, which when reached, will cause the counter to reset
the value to the starting value.
Use the printer’s internal counter: Enable this option to use the internal counter built into the
printer. Using this option increases printing speed by reducing the quantity of information
exchanged between the computer and the printer.
13857L-003 11/29/2011

Text Wizard - Date Field
Define the properties of the date field. The field will get the value from the computer clock.
Designing Labels
Using Toolbars
85
Figure 41 • Dialog box for Text Wizard when Date field option is chosen
Format: Select the format for your date from the list. You can also enter a custom format.
Date offset: You can add a certain number of da ys, months, o r years to a curren t date an d print
that date instead of the current one.
Preview: The printer will print the date as shown on the Preview field. This allows you to see
how the selected date format will look on the label.
Use the printer’s internal clock: Enable this option to recall the date information from the real
time clock (RTC) built in to the printer not the clock from the computer. The list of available
date formats changes accordingly to the capabilities of the selected printer.
Note • You must format the current text object in an internal printer font to be able to use the
printer’s internal clock option.
11/29/2011 13857L-003

Designing Labels
86
Using Toolbars
Text Wizard - Time Field
Define the properties of the time field. The variable field will get the value from the
computer’s clock.
Figure 42 • Dialog box for Text Wizard when Time field option is chosen
Format: Select the format for the time from the list. You can also enter a custom format.
Time Offset: The time offset settings allow the time field to be offset from the system clock.
Enter the duration for which you wish to increase or decrease the time on the label.
Preview: The printer will print the time as shown in the Preview field. This will allow you to
see how the selected date format will look on the label.
Use the printer’s internal clock: Enable this option to recall the time information from the Real
Time Clock (RTC) built in to the printer not the clock from the computer. The list of available
time formats changes accordingly to the capabilities of the selected printer.
Note • You must format the current text object in an internal printer font to be able to use the
printer’s internal clock optio n.
13857L-003 11/29/2011

Text Wizard - Database
Variable field linked to a database gets the value from the specified database field.
Designing Labels
Using Toolbars
87
Figure 43 • Database Properties dialog
Define: Click this button to open the database wizard that will help you define the link to the
database.
Field: Choose one of the available database fields as a source for the variable field.
Length: Define the maximum length of the string in the variable. If a field in the database
contains more characters, they will not be printed. This option is useful if the field length in
your database is not fixed (for example tab delimited ASCII file) or if you don’t want to
reserve space for all the characters in database’s field.
11/29/2011 13857L-003
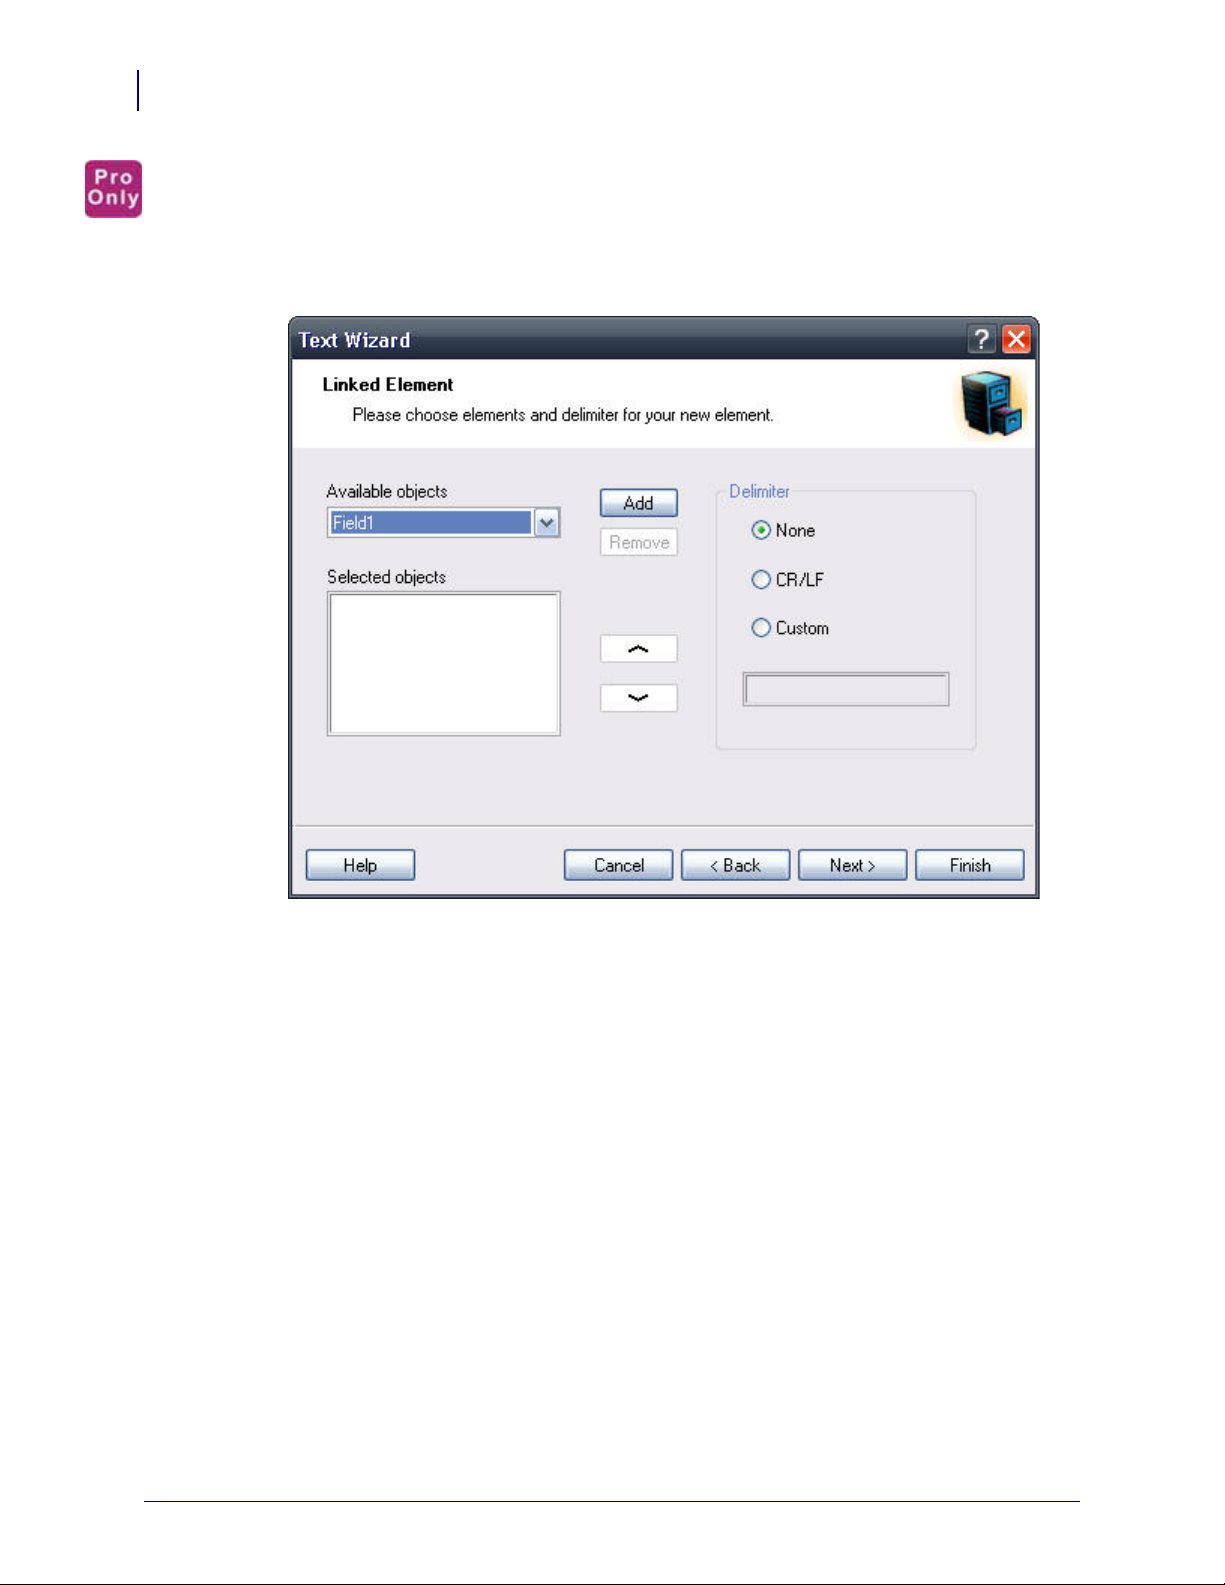
Designing Labels
88
Using Toolbars
Text Wizard - Linked Field
Select this type of field to merge the contents of selected variable fields into one field. The
selected input variable fields are combined values and used as the value for the current object.
Note • Concatenated linked fields used with EPL-based printers can only be used with the
Export to Printer function.
Figure 44 • Linked Element dialog
Available objects: The drop down menu contains the list of all defined variable fields on the
label. You can select the fields and click the
Selected objects: The Selected Objects list box contains the names of the selected variable
Add button to add them to the resulting field.
fields, whose values are merged into the resulting field. Click the up and down arrow buttons
to change the relative position of the sele cted variable fields within the merged value.
Delimiter: Select the optional separator character that will be included between the merged
variable fields.
Note • When you are merging the variable field containing time or date value from the printer
Real Time Clock, ensure the fields positioned before and after the Real Time Clock field do
not exceed 31 characters.
13857L-003 11/29/2011

Text Wizard - RFID tag Unique ID
Printers with RFID functionality can program RFID tags embedded in the labels. Each RFID
tag has a unique ID number that was programmed into the tag during the manufacturing
process. The Unique number cannot be altered, but the RFID-enabled print er can read it.
RFID tag Unique ID functionality allows you to read the unique ID number from the RFID tag
and use the content with the selected bar code obj ect. When t he label is p rinted, the p rinter will
first read the unique ID from the tag and then immediately use the value with the bar code
object.
RFID tag Unique ID can only be used with the bar code objects that are printed as internal
printer objects. You must format the bar code object to use internal fonts not TrueType fonts.
Designing Labels
Using Toolbars
89
Figure 45 • RFID Tag dialog
Selected RFID tag: Select the tag from the list.
Note • Only tags supported by the currently selected printer are listed.
Read Source: Select the source of the RFID data.
Data Format: Select the format of the data.
Preview (WYSIWYG only): Because RFID tag Unique ID information is not returned to the
labeling software, you do not see the actual data. Enter the data in a format similar to the
format encoded in the RFID tag. This information will be used for preview on the label only.
11/29/2011 13857L-003

Designing Labels
90
Using Toolbars
Text Wizard - Visual Basic Expression
Select this type of field to manipulate your variable fields with the Visual Basic function. The
result of the expression will be used with the current object on the label. You can define
one-line expressions that must follow Visual Basic programming syntax.
Look at the samples in the dialog box for ideas of what can be done with the Visual Basic
script.
Figure 46 • VB Expression dialog
Expression: Enter the Visual Basic expression. Include the names of the variable fields in the
straight quotes.
Build Expression: Click this button to open the Expression Builder text editor with reference
to frequently used Visual Basic functions.
VB Script Help: Click this button to open the Microsoft help files explai ning syntax and usage
of Visual Basic scripting.
Example • The Visual Basic expression functionality can be used for merging text fields or to
perform simple mathematical operations.
13857L-003 11/29/2011

Text Wizard - Prefix and Suffix
The variable element can have prefix and suffix values. The prefix text is pla ced in front of the
variables value. The suffix text is placed at the end of the variables value.
Designing Labels
Using Toolbars
91
Figure 47 • Setting Prefix and Suffix string for the variable text element
Note • If you leave the edit fields empty, the prefix/suffix will not be used.
Prefix and suffix can be used in situations where they are required only if the variable has a
value set. If the variable is empty, the prefix/suffix will not be printed.
Note • When you use the printer Real Time Clock for date or time fields, the length of prefix
and suffix cannot exceed 31 characters.
11/29/2011 13857L-003

Designing Labels
92
Using Toolbars
Using Bar Code Wizard
Bar Code Wizard
Figure 48 • First page of Bar Code Wizard
The Bar Code Wizard guides you to define all parameters for the text object.
Fixed bar code data: If you would like to have fixed non-changeable content for the text
object, select this option. If you sele ct t hi s op tio n, you can enter the text directly in this dialog
box.
Variable bar code data: If you would like to have variable content for the text object, select
this option. Defining the content is defined in the next step.
Note • When entering values for RSS composite bar codes, you need to provide the value for
the linear and composite (2D) parts at the same time.
Use the following syntax for entering values for RSS composite bar codes. The pipe character
(|) is used to distinguish between the components.
Syntax: <linear part>|<composite part>
Example • 12345|description
Element name: Each bar code object on the label has a unique name. You can refer to the
names when you are linking fields together.
13857L-003 11/29/2011

Not printable: If the object is marked as not printable, it is visible on the label during the label
design, but is not printed.
Bar Code Type: Click on the Define button to select the bar code type you want to use on the
label.
Bar Code Wizard - Choosing Variable Bar Code
Designing Labels
Using Toolbars
93
Select the type of variable field you want to use.
The next page of the wizard depends on your selection.
11/29/2011 13857L-003

Designing Labels
94
Using Toolbars
Bar Code Wizard - Keyboard Input
Use this variable type when you want the operator to enter a value for the variable from the
keyboard before printing the specified numbers of labels.
Prompt text for this variable field: Fill in the message that will be shown to the us er when they
enter the value for the variable field.
Value is required: User is require to enter a value for this field, if checked.
Format: Select the format of data you allow to be entered for the variable field.
Set maximum number of characters: Define the maximum length of characters that can be
entered for the variable field.
13857L-003 11/29/2011

Bar Code Wizard - Counter
Designing Labels
Using Toolbars
95
On this page of the wizard, you define the counter variable.
Starting Value: Set the starting value for the counter. The counter will increment or decrement
from the starting value.
Note • You can enter only digits for the starting value.
Prompt for value before print: Click this option to enable entering the starting value of the
counter when you start printing labels. Enter the text that will be shown to the user before
printing.
The message will be shown on the screen each time the label is to be printed.
Set maximum number of digits: Define the maximum length of digits the counter can occupy.
Increment or decrement: Define whether the variable value will increase from label to label or
decrease.
Preview: The field shows the preview of the counter based on your selection.
11/29/2011 13857L-003

Designing Labels
96
Using Toolbars
Bar Code Wizard - Counter Continuation
Step: Define the step for your counter. The counter will increase by this number on every
label.
Change value every <n> labels: Define the number of labels, when the counter will change
the value.
Rollover when reached: Enter the value, when reac hed, will cause the counter to reset the
value to the starting value.
Preview: Shows the first 10 values of the seri al number.
Use the printer’s internal counter: The printer will increment the serial number.
13857L-003 11/29/2011

Bar Code Wizard - Date Field
Designing Labels
Using Toolbars
97
Define the properties of the date field. The variable field will get the value from the
computer’s clock.
Format: Select the format for your date from the list. You can also enter a custom format.
Date offset: You can add a certain numbers of days, months, or years to a current date and
print that date instead of the current one.
Preview: The printer will print the date as shown in the Preview field. You can see how the
selected date format will look on the label.
Use the printer’s internal clock: The printer’s internal clock for the field data.
11/29/2011 13857L-003

Designing Labels
98
Using Toolbars
Bar Code Wizard - Time Field
Define the properties of the time field. The variable field will get its value from the computer
clock.
Format: Select the format for your date from the list. You can also enter a custom format.
Time offset: You can add a certain numbers of hours, minutes, seconds to a current time and
print that time instead of the current one.
Preview: The printer will print the time as shown in the Preview field. You can see how the
selected date format will look on the label.
Use the printer’s internal clock: The printer’s internal clock for the field data.
13857L-003 11/29/2011

Bar Code Wizard - Database
Designing Labels
Using Toolbars
99
Variable field linked to a database gets the value from the specified database field.
Define: Click this button to open the database wizard that will help you define t he link to the
database.
Field: Choose one of the available database fields as a source for the variable field.
Length: Define the maximum length of the string in the variable. If the field in the database
contains more characters, they will not be printed. This option is useful if the field length in
your database is not fixed (for example, a tab delimited ASCII file), or if you don’t want to
reserve space for all the characters in database’s field.
11/29/2011 13857L-003

100
Designing Labels
Using Toolbars
Bar Code Wizard - Linked Field
Select this type of field to merge the contents of the selected variable fields into one field. The
selected input variable fields are combined values and used as the value for the current object.
Note • Concatenated linked fields used with EPL-based printers can only be used with the
Export to Printer function.
Available objects: The combo box contains the list of all defined variable fields on the label.
You can select the fields and click the
Selected objects: The list box contains the names of the selected variable fields, wh ich will be
Add button to add them to the resulting value.
merged into the resulting value. Click the up and down arrow buttons to change the relative
position of the selected variable field within the merged value.
Delimiter: Select the optional separator character that will be included between the merged
variable fields.
13857L-003 11/29/2011
 Loading...