

Page 1
devices.
72-93912-04 Revision A May 2015
Absorption Rate (SAR) related to human exposure to electromagnetic fields from radio
The device complies with internationally recognized standards covering Specific
Safety Information
FCC RF Exposure Guidelines
The STB3578 is an approved Bluetooth device. Bluetooth ID: B02794.
Bluetooth Devices
Bluetooth™ Radio, Type: LMX5452.
The STB3578 contains an approved radio module. This module is identified below.
Radio Modules
http://www.zebra.com/support.
Local language translations are available at the following web site:
could void the user's authority to operate the equipment.
Any changes or modifications to Zebra equipment, not expressly approved by Zebra,
with rules and regulations in locations they are sold and will be labeled as required.
Model Numbers: STB3508, STB3578.All Zebra devices are designed to be compliant
Regulatory Information
• Improve work procedures.
• Provide a suitable working environment
• Provide adequate clearance
• Provide adjustable workstations
• Reduce or eliminate direct pressure
• Reduce or eliminate vibration
• Perform tasks at correct heights
• Keep objects that are used frequently within easy reach
• Reduce or eliminate excessive force
• Maintain a natural position
• Reduce or eliminate repetitive motion
you are adhering to your company’s safety programs to prevent employee injury.
recommendations below. Consult with your local Health & Safety Manager to ensure that
Caution: In order to avoid or minimize the potential risk of ergonomic injury follow the
Ergonomic Recommendations
Health and Safety Recommendations
©2015 ZIH Corp and/or its affiliates. All rights reserved.
property of their respective owners.
registered in many jurisdictions worldwide. All other trademarks are the
visit our website: http://www.zebra.com for the most updated warranty terms.
queries, please call Zebra Technologies Corporation at +65 6858 0722. You may also
and remedies you may have under the Australian Consumer Law. If you have any
Technologies Corporation Australia’s limited warranty above is in addition to any rights
be of acceptable quality and the failure does not amount to a major failure. Zebra
damage. You are also entitled to have the goods repaired or replaced if the goods fail to
refund for a major failure and compensation for any other reasonably foreseeable loss or
be excluded under the Australia Consumer Law. You are entitled to a replacement or
#05-02/03, Singapore 068895, Singapore. Our goods come with guarantees that cannot
This warranty is given by Zebra Technologies Asia Pacific Pte. Ltd., 71 Robinson Road,
Zebra and the stylized Zebra head are trademarks of ZIH Corp.,
http://www.zebra.com
Lincolnshire, IL USA
Zebra Technologies Corporation
For Australia Only
http://www.zebra.com/warranty.
For the complete Zebra hardware product warranty statement, go to:
Warranty
http://www.zebra.com
Lincolnshire, IL USA
Zebra Technologies Corporation
owners.
jurisdictions worldwide. All other trademarks are the property of their respective
Zebra and the stylized Zebra head are trademarks of ZIH Corp., registered in many
products.
implied license exists only for equipment, circuits, and subsystems contained in Zebra
machine, material, method, or process in which Zebra products might be used. An
any patent right or patent, covering or relating to any combination, system, apparatus,
No license is granted, either expressly or by implication, estoppel, or otherwise under
application or use of any product, circuit, or application described herein.
Zebra does not assume any product liability arising out of, or in connection with, the
or design.
Zebra reserves the right to make changes to any product to improve reliability, function,
© 2015 ZIH Corp and/or its affiliates. All rights reserved.
http://www.zebra.com/support.
For the latest version of this guide go to:
l
e
d
r
a
8
C
7
5
/
3
8
0
5
the equipment, they will contact the Zebra Support.
facility’s Technical or Systems Support. If there is a problem with
If you have a problem using the equipment, contact your
Service Information
Quick Reference Guide
3
B
T
S
Reducing RF Influence – Use Properly
It is advisable to use the device only in the normal operating position and it is
recommended that no part of the human body be allowed to come too close to the
antenna during operation of the equipment.
To satisfy FCC RF exposure requirements, this portable transmitting device must operate
with a minimum separation distance of 0 cm or more from a person's body.
Power Supply
Use ONLY a LISTED, Type no. 50-14000 (5-14Vdc/ 1.5A minimum), or
PWRS-14000 (5-14Vdc/ 1.5A minimum), Direct Plug-In Power supply, marked Class 2 or
LPS (IEC60950-1, SELV). Use of alternative Power Supply will invalidate any approvals
given to this unit and may be dangerous.
Radio Frequency Interference Requirements-FCC
Radio Transmitters (Part 15)
This device complies with Part 15 of the FCC Rules. Operation is
subject to the following two conditions: (1) this device may not cause
harmful interference, and (2) this device must accept any
interference received, including interference that may cause
undesired operation.
Radio Frequency Interference Requirements-Canada
Radio Transmitters
This device complies with RSS 210 of Industry & Science Canada. Operation is subject
to the following two conditions: (1) this device may not cause harmful interference and
(2) this device must accept any interference received, including interference that may
cause undesired operation.Label Marking: The Term "IC:" before the radio certification
only signifies that Industry Canada technical specifications were met.
Radio Frequency Interference Requirements-Brazil
Declarações Regulamentares para STB3578 (LMX5452) BRAZIL
NOTA: A marca de certificação se aplica ao Equip. de Radiação Restrita, modelo
STB3578. Este equipamento opera em caráter secundário, isto é, não tem direito a
proteção contra interferência prejudicial, mesmo de estações do mesmo tipo, e não pode
causar interferência a sistemas operando em caráter primário."
Para maiores consultas sobre ANATEL consulte o site: www.anatel.gov.br
Marking and European Economic Area (EEA)
Bluetooth for use through the EEA have the following restrictions:
• Maximum radiated transmit power of 10mW EIRP in the frequency range 2.400 -
2.4835 GHz
Other Countries
Ukraine
Statement of Compliance
For STB3578:
Zebra hereby, declares that this device is in compliance with the essential requirements
and other relevant provisions of Directive 1999/5/EC and 2011/65/EU. A Declaration of
Conformity may be obtained from http://www.zebra.com/doc.
For STB3508:
Zebra hereby, declares that this device is in compliance with the essential requirements
and other relevant provisions of Directive 2004/108/EC, 2006/95/EC, and 2011/65/EU. A
Declaration of Conformity may be obtained from http://www.zebra.com/doc.
Waste Electrical and Electronic Equipment (WEEE)
English: For EU Customers: All products at the end of their life must be returned to Zebra for recycling. For information on how to return product, please go to:
http://www.zebra.com/weee.
Bulgarish: За клиенти от ЕС: След края на полезния им живот всички продукти трябва да се
връщат на Zebra за рециклиране. За информация относно връщането на продукти, моля
отидете на адрес: http://www.zebra.com/weee.
Čeština: Pro zákazníky z EU: Všechny produkty je nutné po skonèení jejich životnosti vrátit
spoleènosti Zebra k recyklaci. Informace o zpùsobu vrácení produktu najdete na webové stránce:
http://www.zebra.com/weee.
Dansk: Til kunder i EU: Alle produkter skal returneres til Zebra til recirkulering, når de er udtjent.
Læs oplysningerne om returnering af produkter på: http://www.zebra.com/weee.
Deutsch: Für Kunden innerhalb der EU: Alle Produkte müssen am Ende ihrer Lebensdauer zum
Recycling an Zebra zurückgesandt werden. Informationen zur Rücksendung von Produkten finden
Sie unter http://www.zebra.com/weee.
Ελληνικά: Για πελάτες στην Ε.Ε.: Όλα τα προϊόντα, στο τέλος της διάρκειας ζωής τους,
επιστρέφονται στην Zebra για ανακύκλωση. Για περισσότερες πληροφορίες σχετικά με την
επιστροφή ενός προϊόντος, επισκεφθείτε τη διεύθυνση http://www.zebra.com/weee στο ∆ιαδίκτυο.
Eesti: EL klientidele: kõik tooted tuleb nende eluea lõppedes tagastada taaskasutamise eesmärgil
Zebra'ile. Lisainformatsiooni saamiseks toote tagastamise kohta külastage palun aadressi: http://
www.zebra.com/weee.
Español: Para clientes en la Unión Europea: todos los productos deberán entregarse a Zebra al
final de su ciclo de vida para que sean reciclados. Si desea más información sobre cómo devolver
un producto, visite: http://www.zebra.com/weee.
πρέπει να
Français : Clients de l'Union Européenne : Tous les produits en fin de cycle de vie doivent être
retournés à Zebra pour recyclage. Pour de plus amples informations sur le retour de produits, consultez : http://www.zebra.com/weee.
Italiano: per i clienti dell'UE: tutti i prodotti che sono giunti al termine del rispettivo ciclo di vita
devono essere restituiti a Zebra al fine di consentirne il riciclaggio. Per informazioni sulle modalità
di restituzione, visitare il seguente sito Web: http://www.zebra.com/weee.
Latviešu: ES klientiem: visi produkti pēc to kalpošanas mūža beigām ir jānogādā atpakaļ Zebra
otrreizējai pārstrādei. Lai iegūtu informāciju par produktu nogādāšanu Zebra, lūdzu, skatiet: http://
www.zebra.com/weee.
Lietuvių: ES vartotojams: visi gaminiai, pasibaigus jų eksploatacijos laikui, turi būti grąžinti utili-
zuoti į kompaniją „Zebra“. Daugiau informacijos, kaip gr
http://www.zebra.com/weee.
Magyar: Az EU-ban vásárlóknak: Minden tönkrement terméket a Zebra vállalathoz kell eljuttatni
újrahasznosítás céljából. A termék visszajuttatásának módjával kapcsolatos tudnivalókért látogasson el a http://www.zebra.com/weee weboldalra.
Malti: Għal klijenti fl-UE: il-prodotti kollha li jkunu waslu fl-aħħar tal-ħajja ta' l-użu tagħhom, iridu
jiġu rritornati għand Zebra għar-riċiklaġġ. Għal aktar tagħrif dwar kif għandek tirritorna l-prodott,
jekk jogħġbok żur: http://www.zebra.com/weee.
Nederlands: Voor klanten in de EU: alle producten dienen aan het einde van hun levensduur naar
Zebra te worden teruggezonden voor recycling. Raadpleeg
http://www.zebra.com/weee voor meer informatie over het terugzenden van producten.
Polski: Klienci z obszaru Unii Europejskiej: Produkty wycofane z eksploatacji nale¿y zwróciæ do
firmy Zebra w celu ich utylizacji. Informacje na temat zwrotu produktów znajduj¹ siê na stronie
internetowej http://www.zebra.com/weee.
Português: Para clientes da UE: todos os produtos no fim de vida devem ser devolvidos à Zebra
para reciclagem. Para obter informações sobre como devolver o produto, visite: http://
www.zebra.com/weee.
Românesc: Pentru clienţii din UE: Toate produsele, la sfârşitul duratei lor de funcţionare, trebuie
returnate la Zebra pentru reciclare. Pentru informaţii despre returnarea produsului, accesaţi: http://
www.zebra.com/weee.
Slovenčina: Pre zákazníkov z krajín EU: Všetky výrobky musia byť po uplynutí doby ich životnosti
vrátené spoločnosti Zebra na recykláciu. Bližšie informácie o vrátení výrobkov nájdete na: http://
www.zebra.com/weee.
Slovenski: Za kupce v EU: vsi izdelki se morajo po poteku življenjske dobe vrniti podjetju Zebra
za reciklažo. Za informacije o vraèilu izdelka obišèite: http://www.zebra.com/weee.
Suomi: Asiakkaat Euroopan unionin alueella: Kaikki tuotteet on palautettava kierrätettäväksi
Zebra-yhtiöön, kun tuotetta ei enää käytetä. Lisätietoja tuotteen palauttamisesta on osoitteessa
http://www.zebra.com/weee.
Svenska: För kunder inom EU: Alla produkter som uppnått sin livslängd måste returneras till
Zebra för återvinning. Information om hur du returnerar produkten finns på
http://www.zebra.com/weee.
Türkçe: AB Müşterileri için: Kullanım süresi dolan tüm ürünler geri dönüştürme için Zebra'ya iade
edilmelidir. Ürünlerin nasıl iade edileceği hakkında bilgi için lütfen şu adresi ziyaret edin: http://
www.zebra.com/weee.
ąžinti gaminį, rasite:
Introduction
The STB3508/3578 cordless scanner cradle acts as a stand, host
communication interface and charger for the LS3578 cordless scanner. It
can sit on a desktop or be mounted on a wall.
The STB3578 cradle receives data from the scanner via a Bluetooth radio,
and sends that data to the host through an attached cable. The cradle also
charges the scanner’s internal battery pack when the scanner is inserted.
The scanner can be charged from an external power supply or using a
powered host cable.
This document provides basic instructions on setting up and using the
cradle. Unless otherwise noted, “cradle” refers to both configurations of the
cradle. Any discussion of transmission of information refers specifically to the
STB3578 cradle.
CAUTION LS3478 cordless scanners are incompatible with
STB3508/3578 cradles. LS3578 cordless scanners are incompatible
with STB3408/3478 cradles.
Equipment Supplied
The cradle package includes:
• Cradle
• Four rubber feet (for desk mounting).
Accessories
The following equipment may be needed:
• Three 1.5" #8 Philips head screws (for wall mounting, if applicable, not
available from Zebra).
• Power supply for desk/wall mounting configuration (p/n 50-14000-266R).
Save the shipping container for storing or shipping. Inspect all equipment for
damage. If anything is damaged or missing, call an authorized
business Support Center
immediately.
Zebra
Related Documentation
LS3578 Product Reference Guide, p/n 72-93911-xx.
LS3578 Quick Start Guide, p/n 72-93587-xx.
This documentation is available at:
http://www.zebra.com/support.
Page 2
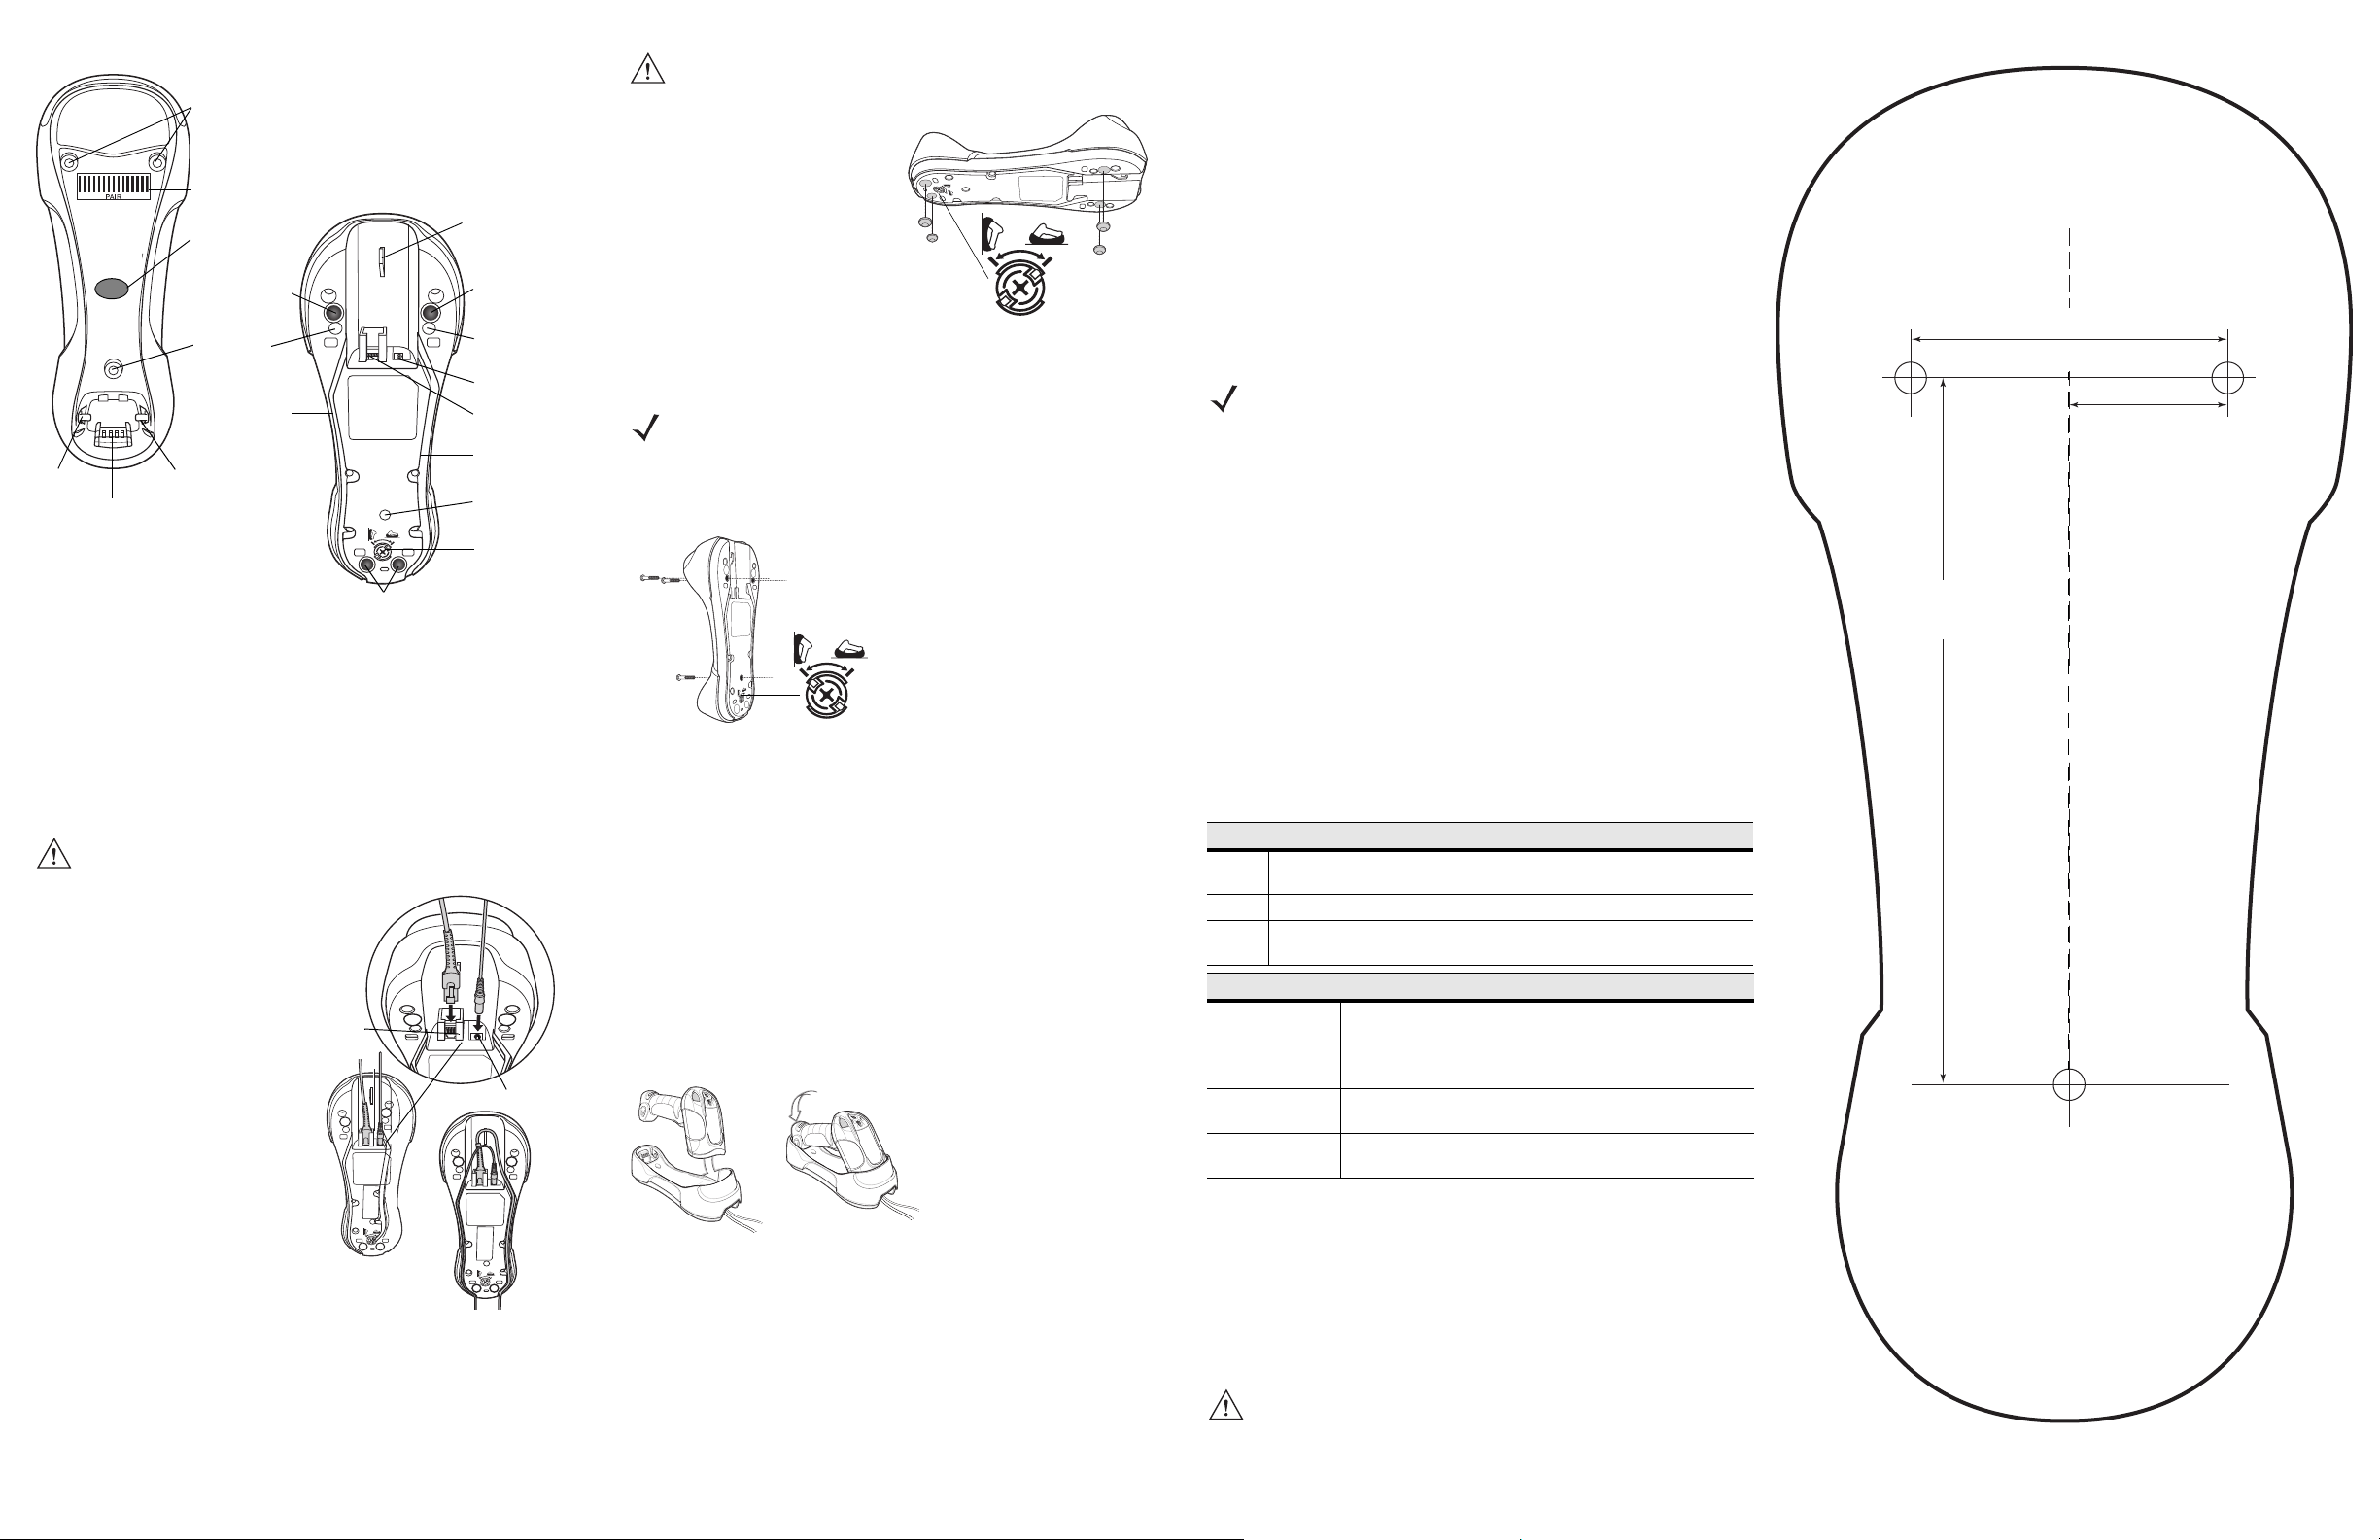
Cradle Parts
Mounting
Screw Hole
(2)
Charging/
Communication
Contacts
Latch
Pairing
Bar Code
Rubber
Foot
Rubber
Foot
Rubber Feet (2)
Mounting
Screw Hole
Power Cable
Groove
Mounting
Screw Hole
Cable
Hook
Power Port
Host Port
Host Cable
Groove
Mounting
Screw Hole
Converter
Knob
Latch
Back
Front
LED
Host
Port
Power Port
Converter Knob:
Horizontal Position
Converter Knob
Vertical Posit ion
Dimension tolerance = ± 0.01 inch (± 0.25 mm)
2.26"
[57.28mm]
1.13"
[28.64mm]
5.05"
[128.27mm]
CAUTION If the scanner does not recognize the host, disconnect the
power supply, then reconnect after connecting the host cable.
Mounting the Cradle
Horizontal Mount
1. Ensure the desk/wall mount
converter knob is in the
correct position, shown at
right.
2. If mounting the cradle
horizontally where no
fastening is necessary, peel
the protective paper from the
back of the rubber feet
included with the cradle packaging, and attach the feet to the cradle at the
indentations in the plastic. These feet provide traction and prevent surface
damage.
Vertical Mount
NOTE
Do not use the rubber feet when mounting in a vertical orientation.
To mount the cradle on a vertical surface:
1. Use a Philips screwdriver to turn the desk/wall mount converter knob to the position
shown below. The front latches protract to engage the depressions at the base of the
scanner’s handle.
The cradle includes pairing bar codes on both its front and back. To pair the
scanner with the cradle, scan a pairing bar code. A high-low-high-low beep
sequence followed by a low-high beep sequence indicates successful pairing
and connection to the remote device. A long low, long high beep sequence
indicates unsuccessful pairing. Refer to the Product Reference Guide for more
information.
Lost Connection to Host
If scanned data does not transmit to the cradle’s host, ensure that all cables are
firmly inserted and the power supply is connected to an appropriate AC outlet, if
applicable. If scanned data still does not transmit to the host, reestablish a
connection with the host:
1. Disconnect the power supply from the cradle.
2. Disconnect the host interface cable from the cradle.
3. Wait three seconds.
4. Reconnect the host interface cable to the cradle.
5. Reconnect the power supply to the cradle, if required.
6. Reestablish pairing with the cradle by scanning the pairing bar code.
NOTE The STB3578 does not always require a power supply, depending
on the host interface.
Charging the Scanner Battery in the Cradle
To charge the scanner battery, place the scanner in the cradle (see Inserting
the Scanner in the Cradle). The battery begins charging when the scanner LED
indicator starts flashing green. A complete charge of a fully discharged battery
can take up to four hours using external power and up to 10 hours using the
interface cable.
Scanner LED Indicators
The green LED on the scanner indicates charging activity (see the table below).
If the scanner is charging in fast mode (non-bus powered mode), the green
LED blinks at a fast rate. If the scanner is charging in slow mode (bus-powered
mode), the LED blinks at a slow rate.
If the red LED on the scanner begins flashing, indicating a charging problem,
remove the scanner from the cradle and replace the battery. If the red LED on
the scanner continues flashing, contact a Zebra Support Center.
Wall Mount Template
Cradle Connections
IMPORTANT
1. Insert the interface cable into the
cradle’s host port.
2. Connect the other end of the
interface cable to the host.
3. If necessary, connect the power
supply to the cradle’s power port (if
required by the interface, or to allow
fast charging of the scanner).
4. Connect the appropriate cable to the
power supply and an AC power
source, if necessary.
5. If applicable, thread the interface
cable over the cable support hook
and run the host and power cables
into their respective cable grooves.
6. If necessary, scan the appropriate
host bar code (for non-autodetected
interfaces). Refer to the Product
Reference Guide.
Changing the Host Interface
To connect to a different host, or to the
same host through a different cable:
1. Unplug the power supply from the cradle.
2. Unplug the interface cable from the host.
3. Connect the interface cable to the new host, or the new interface cable to
the existing host.
4. Reconnect the power supply, if required.
5. If necessary, scan the appropriate host bar code (for non-autodetected
interfaces). Refer to the Product Reference Guide.
Connect the interface cable and power supply (if necessary)
in the following order to ensure proper operation of the
scanner and cradle.
2. Attach the interface and power cables to the appropriate ports (see Cradle
Connections).
3. Press the cables into the cable grooves.
4. Position the cradle on the mounting surface, or use the template included in
this guide.
5. Mark the surface through the three holes on the bottom of the cradle, or use
the mounting template to determine the location of the screw holes.
6. Pre-drill holes to accommodate three 1.5" #8 Philips head screws.
7. Attach the cradle securely to the surface.
8. Place the scanner in the cradle.
Inserting the Scanner in the Cradle
To insert the scanner in the cradle:
• Insert the scanner top first. Push the handle until it clicks into place,
engaging the contacts in the cradle and scanner.
Sending Data to the Host Computer
The cradle receives data from the scanner via a wireless radio connection and
transmits it to the host computer via the host cable. The scanner and cradle
must be paired for successful wireless communication.
Pairing
Pairing registers a scanner to the cradle such that the scanner and cradle can
exchange information. The STB3578 operates in two modes: scanner-to-cradle
and multi scanner-to-cradle. In scanner-to-cradle mode, the scanner is paired to
the cradle either by insertion into the cradle (if pairing on insertion is enabled),
or by scanning the pairing bar code. In multi scanner-to-cradle mode, up to
three scanners can be paired to one cradle. A multipoint bar code must be
scanned to activate this feature. Refer to the Product Reference Guide for more
information.
Standard Scanner Use LED Sequences
Off No power applied to scanner (battery is discharged or removed); scanner is
Green A bar code was successfully decoded.
Red A data transmission error; scanner malfunction; or, LS3578 cordless
Green Slow Flash The scanner
Green Fast Flash The scanner charges at the fast rate (used when cradle is
Red Flash Charging problem. Refer to the Product Reference Guide for
Red and Green
Flash
in low power and ready to scan.
scanner was inserted into an STB3478 cradle.
Charging Use LED Sequences
charges at the slow rate (used when the cradle is
powered by the host cable).
powered from an external power supply).
more information.
Temperature fault.
Using a Host Interface to Supply Power
Some hosts can provide power to the cradle via the host interface, instead of an
external power supply.
Troubleshooting
If the cradle does not work after following the previous procedures:
• Check the system power.
• Check for loose cable connections.
• Check that the scanner is inserted properly in the cradle.
• Check that the host settings are correct and the cradle is connected to the
appropriate port on the host.
CAUTION Do not pour, spray, or spill any liquid on the cradle.
 Loading...