

Page 1
XiIIIPlus/RXi Quick Reference Guide
Use this guide to operate your printer on a daily basis. For more detailed information, refer to
the User Guide.
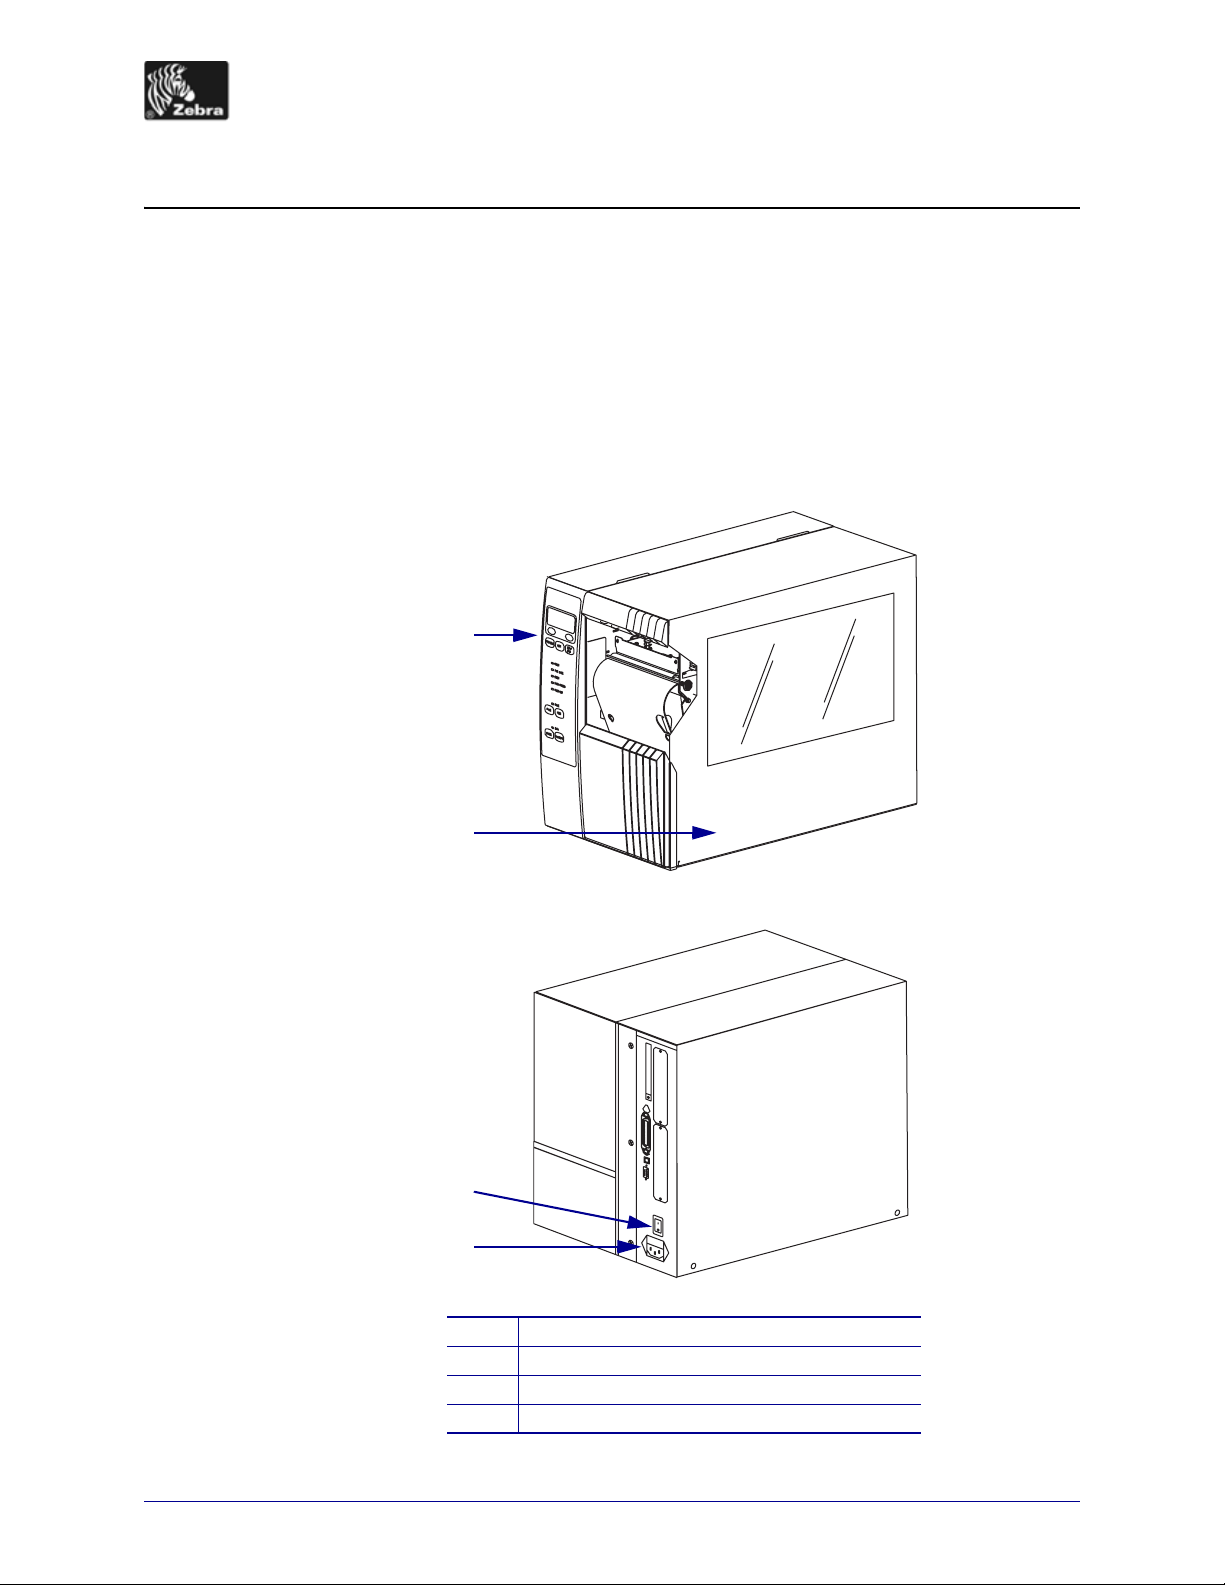
External View
Figure 1 • Exterior of Printer
Front
1
2
Rear
3
4
Control panel
1
Media door
2
Power switch (O = Off, I = On)
3
AC power connector
4
© 2006 ZIH Corp. All product names and numbers are Zebra
trademarks, and Zebra and the Zebra logo are registered
trademarks of ZIH Corp. All rights reserved.
14024L-001 Rev. A
7/26/06
Page 2
Control Panel
2
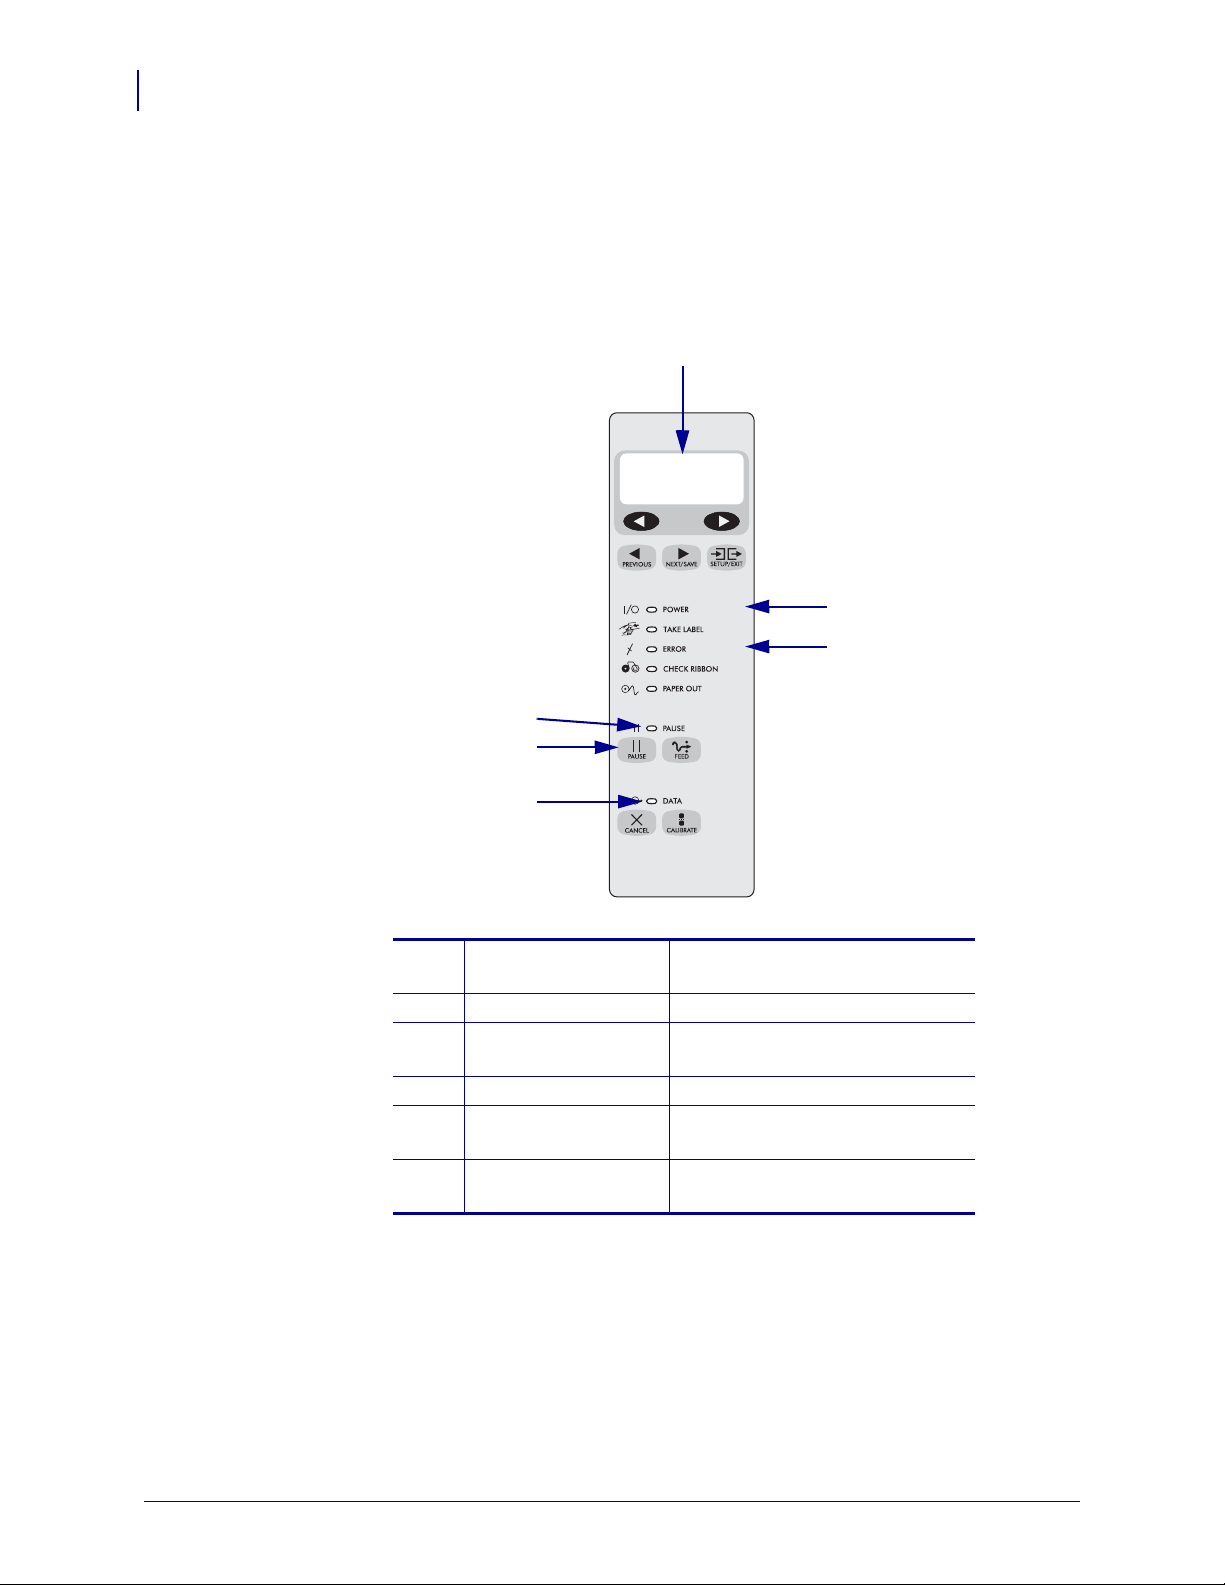
Control Panel
The control panel (Figure 2) indicates the printer’s operating status and controls basic printer
operation.
Figure 2 • Control Panel
1
2
3
4
5
6
LCD Shows the printer’s operating
1
status.
Power light On when the printer is on.
2
Error light Blinks when the printer needs
3
attention.
PAUSE light On when the printer is paused.
4
PAUSE button Starts or stops printer operation
5
when pressed.
Data light Blinks quickly when the printer is
6
receiving data.
14024L-001 Rev. A XiIIIPlus/RXi Quick Reference Guide 7/26/06
Page 3
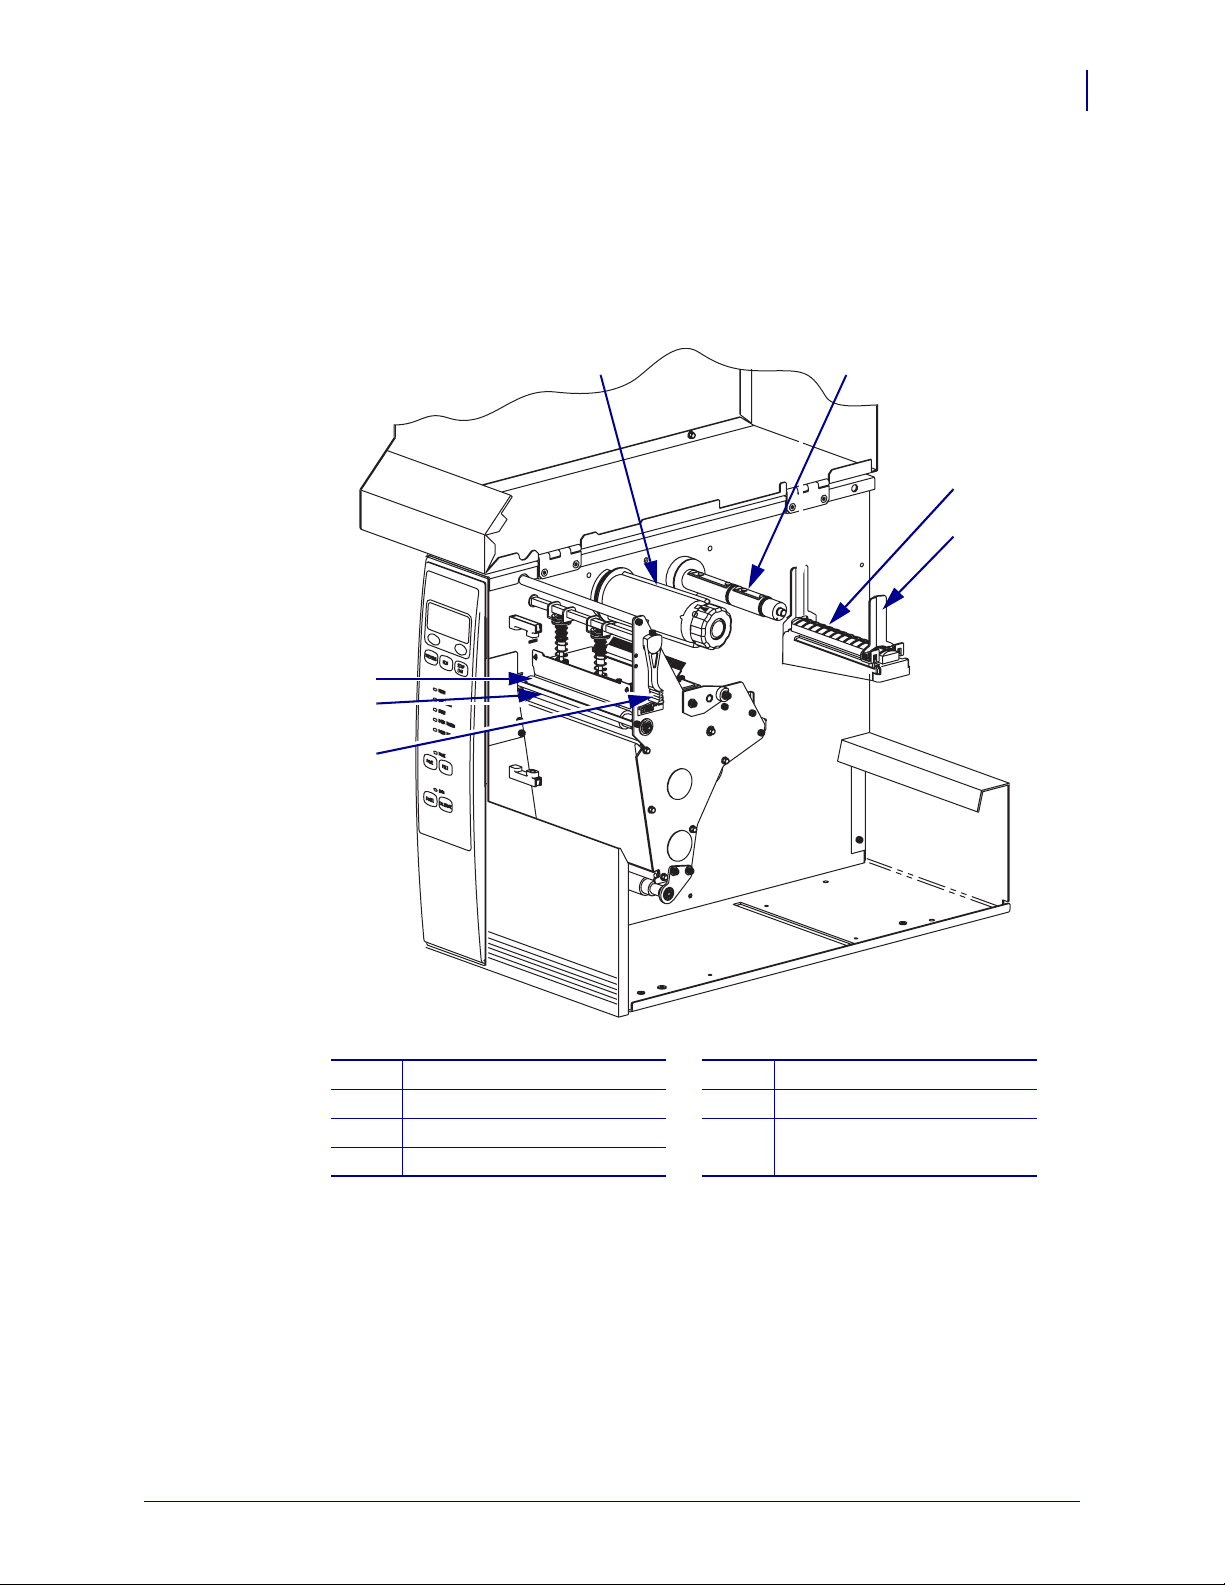
Printer Components
Figure 3 shows the components inside the media compartment of your printer. Depending on
installed options, your printer may look slightly different.
Figure 3 • Printer Components
4 5
Printer Components
6
7
3
3
2
1
Printhead-open lever
1
Peel-off/tear-off bar
2
Platen roller
3
Ribbon take-up spindle
4
Ribbon supply spindle
5
Media supply hanger
6
Media supply guide
7
7/26/06 XiIIIPlus/RXi Quick Reference Guide 14024L-001 Rev. A
Page 4

Load Media
4
Load Media
Caution • When you are loading media or ribbon, remove all jewelry that could come into
contact with the printhead or other printer parts.
Use the instructions in this section to load roll media in Tear-Off mode (Figure 4). For
instructions for loading fanfold media or for loading in different print modes, refer to the
User Guide.
Figure 4 • Tear-Off Mode Media Path
To load roll media in Tear-Off mode, complete these steps:
1. Remove and discard any tags or labels that are dirty or that are held by adhesives or tape.
Tag Stock Labels
14024L-001 Rev. A XiIIIPlus/RXi Quick Reference Guide 7/26/06
Page 5

Load Media
2. Slide out and flip down the medis supply guide.
3. Place the roll of media on the media supply hanger. Push the roll back as far as it will go.
4. Flip up the media supply guide, and then slide it in until it touches the edge of the roll.
5
5. Open the printhead assembly by rotating the printhead-open lever (1) counter-clockwise.
1
7/26/06 XiIIIPlus/RXi Quick Reference Guide 14024L-001 Rev. A
Page 6

Load Media
6
6. Loosen the thumb screw (not visible from this angle) that is located on the bottom of the
outer media guide (
1).
1
7. Slide the outer media guide (1) all the way out.
1
14024L-001 Rev. A XiIIIPlus/RXi Quick Reference Guide 7/26/06
Page 7

Load Media
8. If your printer includes a media dancer assembly (1), thread the media under the media
dancer assembly roller. For all printers, thread the media under the media guide roller (2)
and then the upper media sensor (3).
Important • Make sure that you thread the media under these components. If you thread
the media over the them, the media obstructs the ribbon sensor and causes a false
RIBBON OUT error.
3
2
1
7
9. Push the media forward until it passes under the printhead assembly (1), under the
snap plate (2), and then over the platen roller (3).
1
2
3
7/26/06 XiIIIPlus/RXi Quick Reference Guide 14024L-001 Rev. A
Page 8

Load Media
8
10. Align the media with the inner media guide (1). Slide in the outer media guide (2) until it
touches the edge of the media.
1
2
11. Tighten the thumb screw (not visible from this angle) that is located on the bottom of the
outer media guide (
1).
1
14024L-001 Rev. A XiIIIPlus/RXi Quick Reference Guide 7/26/06
Page 9

12. Push down the printhead assembly (1), and then rotate the printhead-open lever clockwise
Load Ribbon
until it locks into place (
2).
Load Ribbon
12
9
Caution • When you are loading media or ribbon, remove all jewelry that could come into
contact with the printhead or other printer parts.
Use the instructions in this section to load ribbon for use with thermal transfer labels. For
direct thermal labels, do not load ribbon in the printer. The ribbon path is slightly different for
printers with ribbon dancers (Figure 5).
Important • Use ribbon that is wider than the media to protect the printhead from wear.
Ribbon must be coated on the outside (refer to the User Guide for more information).
Figure 5 • Ribbon Path
Without Ribbon Dancer With Ribbon Dancer
7/26/06 XiIIIPlus/RXi Quick Reference Guide 14024L-001 Rev. A
Page 10

10
Load Ribbon
To load ribbon, complete these steps:
1. Align the arrow (1) on the ribbon take-up spindle knob with the notch (2) in the ribbon
take-up spindle.
12
2. Align the segments of the ribbon supply spindle.
3. Orient the ribbon with the loose end unrolling clockwise.
4. Place the roll of ribbon on the ribbon supply spindle. Push the roll back as far as it will go.
14024L-001 Rev. A XiIIIPlus/RXi Quick Reference Guide 7/26/06
Page 11

Load Ribbon
5. A ribbon leader makes ribbon loading and unloading easier. Does your roll of ribbon have
paper or something else attached to the end to serve as a ribbon leader?
If… Then…
Yes Continue with the next step.
No
a. Tear off a strip of media (labels and liner) about 6–12 in. (150–305 mm)
long from the roll.
b. Peel a label from the media strip.
c. Use this label (1) to attach the end of the ribbon (2) to the media strip (3).
The media strip acts as a leader.
23 1
6. Open the printhead assembly by rotating the printhead-open lever counter-clockwise.
11
7/26/06 XiIIIPlus/RXi Quick Reference Guide 14024L-001 Rev. A
Page 12

12
Load Ribbon
7. Does your printer contain a ribbon dancer assembly? (See Figure 5 on page 9 for the
ribbon dancer location.)
If... Then...
No Thread the ribbon over the media dancer assembly (1) and under the
ribbon guide roller (
2).
Ye s
2
a. Thread the ribbon through the ribbon dancer. The ribbon must go
under the upper roller (
b. Thread the ribbon under the ribbon guide roller (3).
1) and then over the lower roller (2).
1
3
2
1
14024L-001 Rev. A XiIIIPlus/RXi Quick Reference Guide 7/26/06
Page 13

Load Ribbon
8. Push the ribbon leader forward until it passes under the printhead assembly (1), over the
snap plate (2), and then over the platen roller (3).
1
2
3
13
9. Bring the ribbon leader over the upper ribbon roller (1) and then toward the ribbon take-up
spindle (
2).
21
10. Wind the ribbon leader and attached ribbon counterclockwise around the ribbon take-up
spindle.
7/26/06 XiIIIPlus/RXi Quick Reference Guide 14024L-001 Rev. A
Page 14
14
Load Ribbon
11. Rotate the spindle counterclockwise several turns to wind the ribbon and remove any
slack.
12. Push down the printhead assembly (1), and then rotate the printhead-open lever clockwise
until it locks into place (
2).
12
Remove Used Ribbon
Remove used ribbon from the ribbon take-up spindle each time you change the roll of ribbon.
To remove used ribbon, complete these steps:
1. Has the ribbon run out?
If the ribbon... Then
Ran out Continue with the next step.
Did not run out Cut or break the ribbon before the ribbon take-up spindle.
14024L-001 Rev. A XiIIIPlus/RXi Quick Reference Guide 7/26/06
Page 15

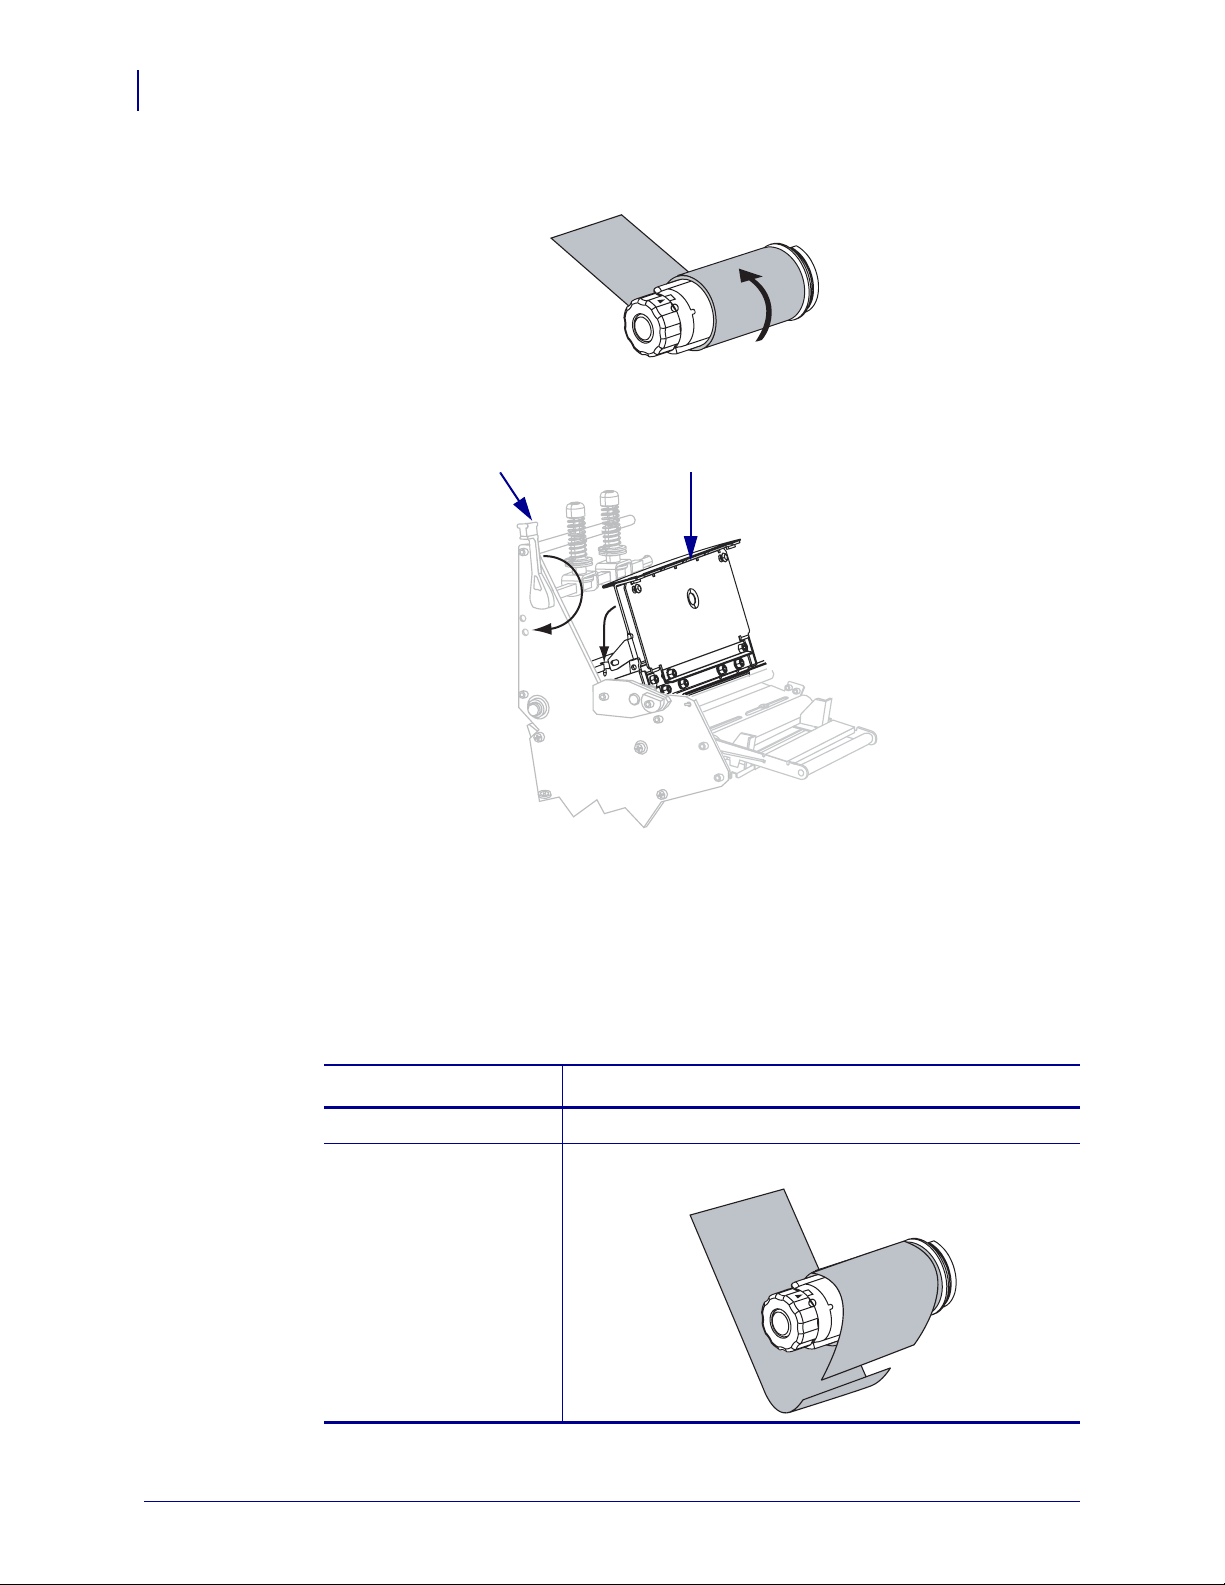
Load Ribbon
2. While holding the ribbon take-up spindle, turn the ribbon release knob clockwise until it
stops.
The ribbon release bars pivot down, easing the spindle’s grip on the used ribbon.
3. Slide the used ribbon off of the ribbon take-up spindle and discard.
15
7/26/06 XiIIIPlus/RXi Quick Reference Guide 14024L-001 Rev. A
Page 16

16
Load Ribbon
Notes • ___________________________________________________________________
__________________________________________________________________________
__________________________________________________________________________
__________________________________________________________________________
__________________________________________________________________________
__________________________________________________________________________
__________________________________________________________________________
__________________________________________________________________________
__________________________________________________________________________
__________________________________________________________________________
14024L-001 Rev. A XiIIIPlus/RXi Quick Reference Guide 7/26/06
 Loading...