


FX SERIES
Embedded SDK
Programmer’s Guide
MN000540A01 Rev. A

Table of Contents
About This Guide
Introduction ............................................................................................................................................4
Chapter Descriptions............................................................................................................................. 4
Notational Conventions .........................................................................................................................5
Related Documents and Software ........................................................................................................5
Service Information ...............................................................................................................................6
Installing CodeSourcery Lite
Introduction ..................................................................................................................................... 7
Starting the Embedded SDK .......................................................................................................... 7
Setting Up a Remote Connection for Remote Debugging .......................................................... 8
Installing Zebra FX Series Embedded SDK
Introduction ................................................................................................................................... 12
Creating an Embedded Java Project ........................................................................................... 12
Adding Source File to Embedded Java Project ......................................................................... 14
Importing RFID3 API Java Library to Embedded Java Project ................................................. 16
Building Java Executable Class File(s) ...................................................................................... 18
Setting Up the Java Remote Build Path ...................................................................................... 20
Setting Up Java Remote Debug Configuration .......................................................................... 24
Debuggin the Embedded Java Application ................................................................................ 26
Creating Java JAR-Archive Executable ...................................................................................... 30
Creating Start and Stop Scripts for the Java Installation Package .......................................... 34
Embedded C Application
Introduction ................................................................................................................................... 35
Creating an Embedded C Project ................................................................................................ 35
Adding Source File to Embedded C Project ............................................................................... 37
Reviewing and Changing Default Build Settings of Embedded C Project .............................. 38
Building C Executable File ........................................................................................................... 41
Setting Up C Remote Debug Configuration ............................................................................... 43
Debugging Embedded C Application .......................................................................................... 47
Creating Start and Stop Scripts for C Installation Package ...................................................... 50
2

Table of Contents
Embedded Application Installation Package
Introduction ................................................................................................................................... 51
Creating an FX RFID Reader Embedded Application Installation Package ............................. 51
Creating an FX RFID Reader Embedded Application Installation Package on Linux Host .... 53
3

ABOUT THIS GUIDE
Introduction
The FX Series Embedded SDK Programmer’s Guide describes how to use the FX Series Embedded SDK to
develop, debug, and package embedded applications.
Chapter Descriptions
Topics covered in this guide are as follows:
• Installing CodeSourcery Lite describes how to start the SDK and how to set up a remote
connection for debugging.
• Installing Zebra FX Series Embedded SDK describes how to create, build, and debug an embedded
Java application, and how to create Start and Stop script files for the deployment packages used to
install the application onto the FX RFID Readers.
• Embedded C Application describes how to create, build, and debug an embedded C application,
and how to create the Start and Stop script files for the deployment packages used to install the
application on the FX RFID Readers..
• Embedded Application Installation Package describes how to create an FXSeries embedded
application installation package, and includes instructions on installing a package on a Linux
OS-based host system.
4

Notational Conventions
The following conventions are used in this document:
• FX Series refers to the FX7500 and FX9600 RFID readers.
• Italics are used to highlight the following:
• Chapters and sections in this and related documents
• Bold text is used to highlight the following:
• Dialog box, window and screen names
• Drop-down list and list box names
• Check box and radio button names
• Icons on a screen
• Key names on a keypad
• Button names on a screen
• Bullets (•) indicate:
• Action items
• Lists of alternatives
• Lists of required steps that are not necessarily sequential.
• Sequential lists (e.g., those that describe step-by-step procedures) appear as numbered lists.
About This Guide
Related Documents and Software
The following documents provide more information about the reader.
• FX Series RFID Reader Integrator Guide, p/n MN000026Axx
• FX7500 RFID Reader Quick Start Guide, p/n MN000070A01
• FX7500 RFID Reader Regulatory Information, p/n MN000027Axx
• FX9600 RFID Reader Quick Start Guide, p/n MN-003087-xx
• FX Series Reader Software Interface Control Guide, p/n 72E-131718-xx
• RFID Demo Applications User Guide, p/n 72E-160038-xx
• FX Series Embedded SDK Installation Guide, p/n MN000537Axx
• FX SeriesEmbedded SDK Sample Applications User Guide, p/n MN000539Axx
• Application Guide for Zebra Enterprise Mobility Devices, p/n 72E-68902-xx
• RFID 3 API
• EPCglobal Low Level Reader Protocol (LLRP) Standard
For the latest version of these guides and software, visit: www.zebra.com/support.
5

Service Information
If you have a problem with your equipment, contact Zebra Global Customer Support for your region.
Contact information is available at: www.zebra.com/support
When contacting support, please have the following information available:
• Serial number of the unit
• Model number or product name
• Software type and version number.
Zebra responds to calls by email, telephone or fax within the time limits set forth in support agreements.
If your problem cannot be solved by Zebra Customer Support, you may need to return your equipment for
servicing and will be given specific directions. Zebra is not responsible for any damages incurred during
shipment if the approved shipping container is not used. Shipping the units improperly can possibly void
the warranty.
If you purchased your Zebra business product from a Zebra business partner, contact that business
partner for support.
About This Guide
.
6

Installing CodeSourcery
Lite
Introduction
This chapter describes how to start the SDK and how to set up a remote connection for debugging.
Starting the Embedded SDK
To start the SDK:
1. Click on the Zebra FXRFID Reader Embedded SDK shortcut.
2. In the Workspace field, enter the folder for project settings and project file storage.
Figure 1 Workspace Window
3. Close the Welcome window if it appears.
NOTE:The following instructions show Microsoft Windows 7 screens. The FX Series Embedded SDK also
supports the Microsoft Windows XP operating system. This procedure was not tested on Microsoft
Windows 8. The installation was reported as working on Microsoft Windows 8, but is currently not
officially supported.
7

Installing CodeSourcery Lite
Setting Up a Remote Connection for Remote Debugging
The following instructions describe how to set up a remote connection to a device in order to run a debug
session of the embedded application (C or Java), or access a terminal session on the device to execute
Linux commands, shell scripts, and/or applications.
1. Select the Remote System Explorer perspective in one of two ways:
• Select Window > Open Perspective > Other > Remote System Explorer.
Figure 2 Selecting Remote System Explorer
• Select the Remote System Explorer button if available.
Figure 3 Remote System Explorer Button
2. Right-click Local in the Remote Systems view and select New > Connection.
8

Installing CodeSourcery Lite
Figure 4 Selecting Local
3. Select Linux in the New Connection / Select Remote System Type window and select Next.
Figure 5 Selecting Linux
4. In the New Connection / Remote Linux Connection window enter the Host name (IP address or network
name of the device) and the Connection name (identifier, such as FX7500 or FX9600) and select Next.
Figure 6 Entering Host and Connection Names
NOTE:De-select Verify host name if the device is not accessible during setup.
9

Installing CodeSourcery Lite
5. In the New Connection / Files window select ssh.files in the Configuration section and select Next.
Selecting ssh.files
6. In the New Connection / Processes window select processes.shell.linux in the Configuration section
and select Next.
Figure 7 Selecting processes.shell.linux
7. In the New Connection / Shells window select ssh.shells in the Configuration section and select Next.
Figure 8 Selecting ssh.shells
8. In the New Connection / Ssh Terminals window ensure ssh.terminals is selected, and select Finish.
Figure 9 Ssh Terminals Window
10

Installing CodeSourcery Lite
The new entry appears in the Remote System view.
Figure 10 Remote System View
To connect to the device, right-click on the remote connection and select Connect.
Figure 11 Selecting Connect
If Enter Password window appears:
• In the User ID field Enter rfidadm.
• Leave the Password (optional) field blank.
• Select Save user ID and Save Password.
• Select OK.
Figure 12 Enter Password Window
NOTE:Select Yes or OK for any warning messages regarding authentication and missing folders for SSH
handling.
11

Installing Zebra FX Series
Embedded SDK
Introduction
This chapter describes how to create, build, and debug an embedded Java application, and how to create
Start and Stop script files for the deployment packages used to install the application onto the FX Series
RFID Readers.
Creating an Embedded Java Project
1. If default perspective is not Java, open the Java Perspective in one of two ways:
• Select the Java perspective symbol in the top right corner.
Figure 13 Selecting Java Perspective
• Select Window > Open Perspective > Other > Java Perspective.
2. Select File > New > Java Project.
Figure 14 Selecting Java Project
3. In the New Java Project / Create a Java Project window, enter the Project name and select Next.
12

Installing Zebra FX Series Embedded SDK
Figure 15 Entering Project Name
4. In the New Java Project / Java Settings window, select Finish. The new project appears in the Package
Explorer section.
Figure 16 New Project Entry
13
Installing Zebra FX Series Embedded SDK
Adding Source File to Embedded Java Project
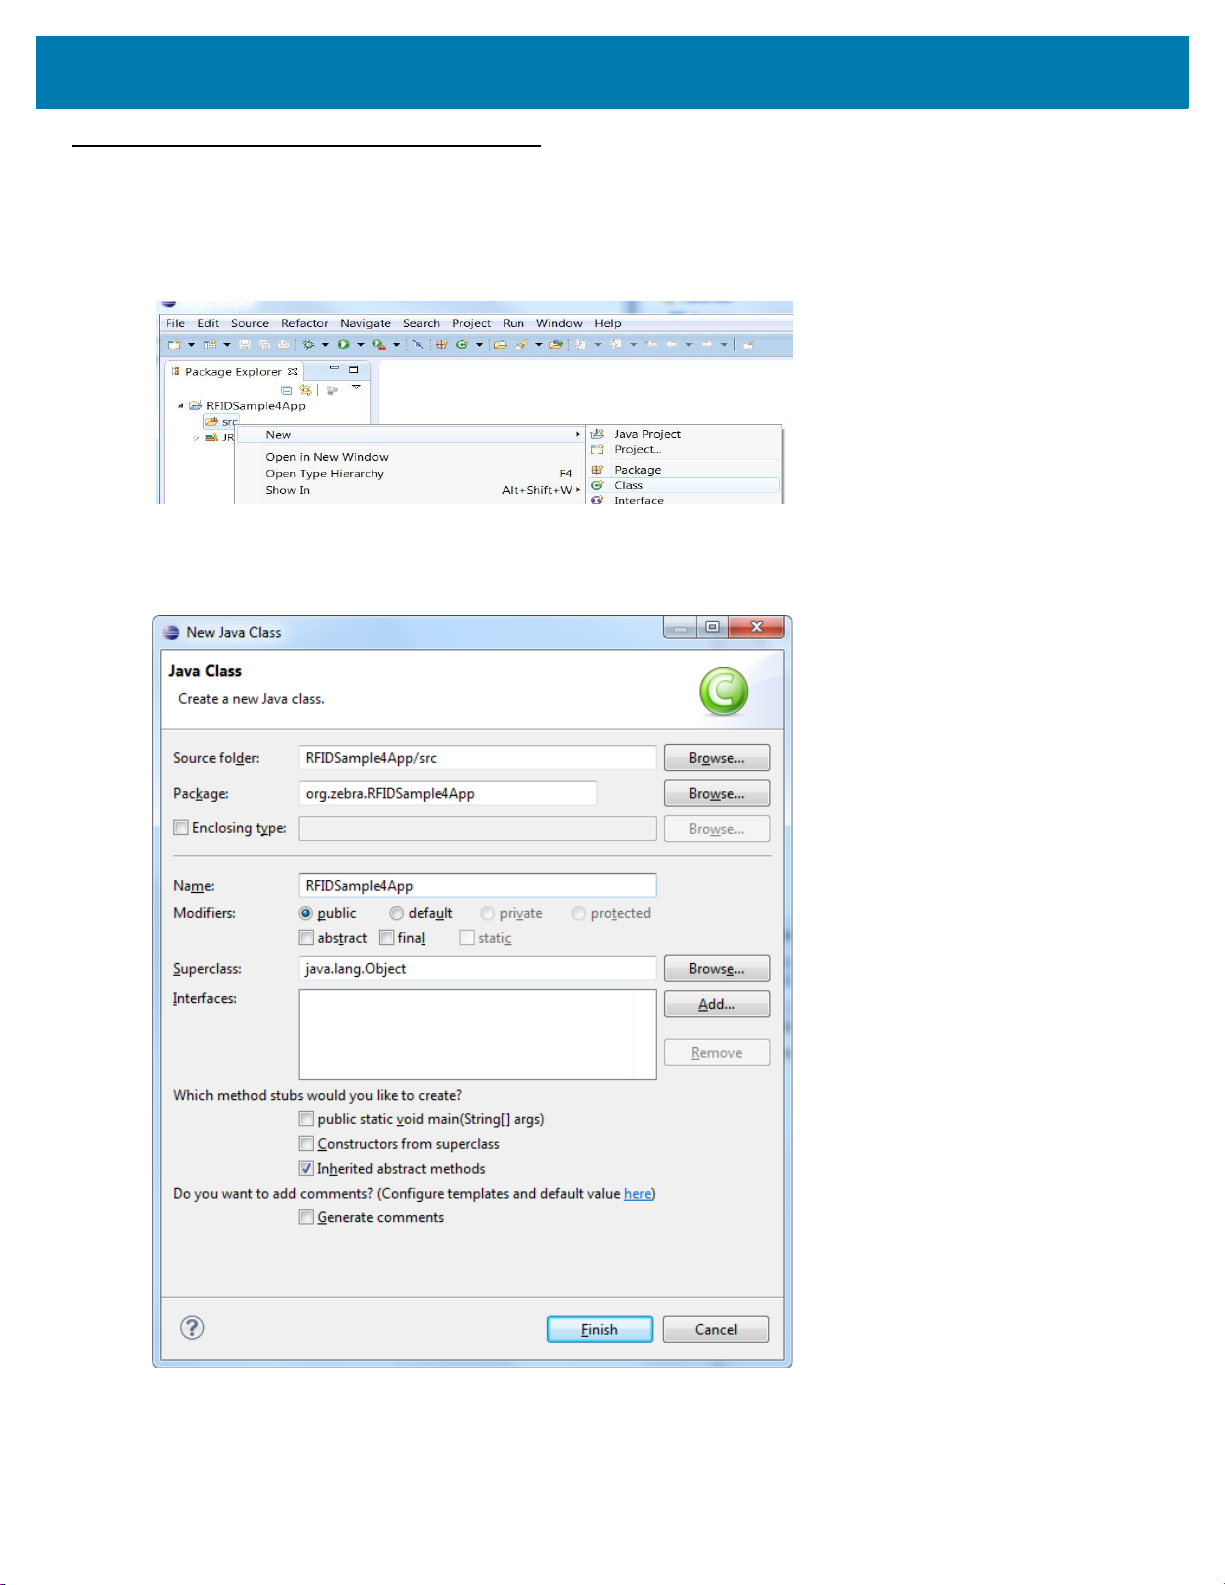
1. In the Package Explorer view, expand the project entry, right-click on src, and select New > Class.
Figure 17 Selecting Class
2. In the New Java Class / Java Class window, enter the Package and Name and select Finish.
Figure 18 Java Class Window
14
Installing Zebra FX Series Embedded SDK
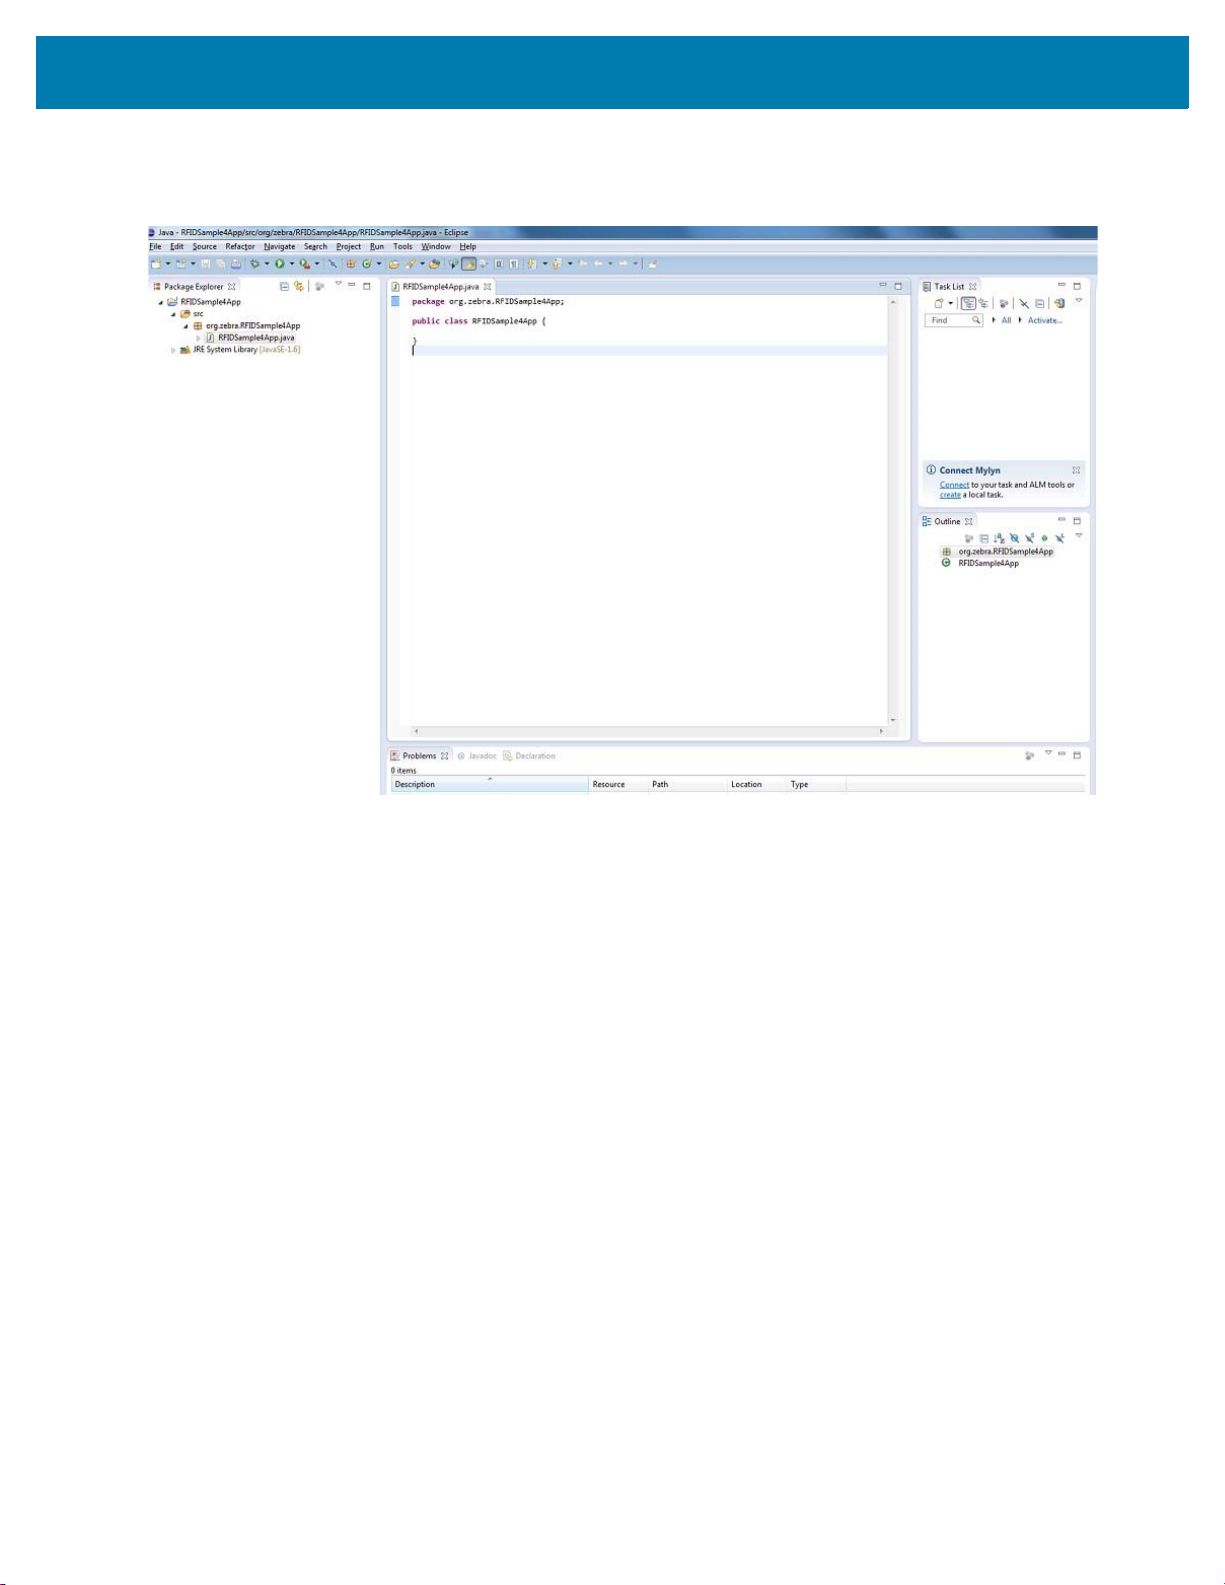
The source file appears in the window
Figure 19 Java Source File
3. Add the required application-specific RFID3 API commands.
15

Installing Zebra FX Series Embedded SDK
Importing RFID3 API Java Library to Embedded Java Project
1. In the Package Explorer view, right-click on the project entry and select Properties.
Figure 20 Selecting Properties
2. In the Properties for … window, select Java Build Path.
Figure 21 Properties for... Window
3. Select the Libraries tab and select Add External JARs … .
16

Installing Zebra FX Series Embedded SDK
4. In Jar Selection window, browse in the folder RFID_JAVA_API of the SDK installation, and select
Symbol.RFID.API3.jar.
Figure 22 Jar Selection Window
5. Select Open.
6. Select OK in the Java Build Path window to complete the import.
Figure 23 Java Build Path Window
The Symbol.RFID.API3.jar class library appears in the Referenced Libraries section of the project entry in
Package Explorer view.
17

Installing Zebra FX Series Embedded SDK
Figure 24 Symbol.RFID.API3.jar Class Library
Building Java Executable Class File(s)
Invoke the build process manually or automatically after making and saving a code change.
To build automatically, select Project > Build Automatically. This automatically invokes the build process
when you save a change in a source file.
Figure 25 Selecting Build Automatically
18

Installing Zebra FX Series Embedded SDK
To invoke the build manually, perform one of the following:
• Select Project > Build All.
• Select Project > Build Project.
• In the Package Explorer view, right-click the project entry and select Build Project.
Figure 26 Building Manually
After each build the result is shown in the Problems tab.
Figure 27 Problems Tab
19

Installing Zebra FX Series Embedded SDK
Setting Up the Java Remote Build Path
The Build Path specifies the destination folder of the successfully build executable. Setting the Build Path
as a folder on the remote device ensures the executable is deployed on device as the last step of a
successful build.
1. In the Package Explorer view, right-click the project entry and select Properties to open the project
properties window.
Figure 28 Opening Project Properties
2. In the Properties for … window, select Java Build Path and then select the Source tab.
Figure 29 Properties for … Window
3. Select Browse to open the Folder Selection window.
20

Installing Zebra FX Series Embedded SDK
Figure 30 Folder Selection Window
4. Select the folder level in which the remote folder is to be linked (top level in Figure 30).
5. Select Create New Folder… to open the New Folder window.
6. Select Advanced to expand the window to the advanced version.
Figure 31 New Folder Window
7. Select the Link to folder in file system check box.
8. Select RSE in the Choose file system drop-down menu.
9. Select Browse… to open the Browse for File window.
21

Installing Zebra FX Series Embedded SDK
Figure 32 Browse for File Window
10. Select the connection in Connection drop-down menu, which was created in Setting Up a Remote
Connection for Remote Debugging on page 8.
11. Expand the My Home entry, and create and select the directory on the device where the executable is
to be created and deployed as the final step of the build.
12. Select OK.
NOTE: If required, in the Enter Password window enter the User ID rfidadm, no password, and select the
Save Password option.
13. In the New Folder window, enter a new Folder name (for example remote_bin) and select OK.
Figure 33 Entering New Folder Name
14. Validate that the new folder appears in the Folder Selection window and select OK.
22

Installing Zebra FX Series Embedded SDK
Figure 34 New Folder in Folder Selection Window
15. In the Properties for … window, select OK to complete the Java build path setup.
Figure 35 Completing Java Build Path Setup
16. Select No to keep local build folder.
Figure 36 Selecting No
NOTE: To build an application without remote connection, select the local build folder to avoid a
connection error.
To deploy executable files onto an FX RFID Reader for automatic debugging during the build process, set
the build path to a remote folder on the device.
23

Figure 37 Error Window
Installing Zebra FX Series Embedded SDK
Setting Up Java Remote Debug Configuration
1. In the Package Explorer view, right-click the project entry and select Debug As > Debug
Configurations… .
Figure 38 Selecting Debug Configurations
2. In the Debug Configurations / Create, manage, and run configurations window, right-click on Remote
Java Application and select New to create and open a new Remote Java Application debug
configuration window.
24

Installing Zebra FX Series Embedded SDK
Figure 39 Debug Configurations Window
3. In the Name field, enter the name of the configuration.
Figure 40 New Debug Configurations Window
4. Browse and select the Project.
5. In the Host field, enter the host (the device IP address or network name).
6. In the Port field, enter the port available on the host system for remote debugging (for example 8998).
7. Select the Allow termination of remote VM check box.
8. Select Apply.
9. Select Close to complete the remote configuration setup.
25

Installing Zebra FX Series Embedded SDK
Debuggin the Embedded Java Application
1. Build the application, which deploys the application onto the device after configuring the remote build
path and selecting the build path.
2. Set the required breakpoints.
3. Open the Terminal view to access the device to start the debug session and view application output:
a. Select Window > Show View > Other… .
Figure 41 Opening Show View Window
b. In the Show View window, select Remote Systems and select OK.
Figure 42 Show View Window
c. In the Remote Systems view, right-click Ssh Terminals and select Launch Terminal to open the
Terminals view.
26

Installing Zebra FX Series Embedded SDK
Figure 43 Launching Terminal View
4. Enter the cd command to change to the build path folder set up in Setting Up the Java Remote Build
Path on page 20.
Figure 44 cd Command
5. Execute the following command to start the debug session on device:
java -Xdebug -Xrunjdwp:transport=dt_socket,address=8998,server=y -Djava.library.path=/platform/lib/
-cp .:/platform/lib/Symbol.RFID.API3.jar org.moto.RFIDSample4App.RFIDSample4App
NOTE: org.moto.RFIDSample4App.RFIDSample4App represents the relative path
(org.moto.RFIDSample4App) to the executable from the build path and the executable name
(RFIDSample4App).
27

Installing Zebra FX Series Embedded SDK
Figure 45 Debug Command
6. Start the debugging application in the Eclipse environment (FX7500 Embedded SDK):
• In the debug list menu select the debug configuration, if listed.
Figure 46 Selecting the Debug Configuration
• If not listed, in the debug list menu select Debug Configurations.
Figure 47 Selecting Debug Configurations Option
7. Select the created debug configuration and select Debug to start remote application debugging.
28

Installing Zebra FX Series Embedded SDK
Figure 48 Starting Remote Application Debugging
The application runs and displays the terminal output in the Terminals view, if implemented.
Figure 49 Debugging Output
29

Installing Zebra FX Series Embedded SDK
Creating Java JAR-Archive Executable
1. Create the Manifest file of the project:
a. Create a META-INF folder by right-clicking the project name and selecting New > Folder (optional).
Figure 50 Creating META-INF Folder
b. Create a MANIFEST.MF file in the desired folder (META-INF in Figure 51) by right-clicking the
destination folder and selecting New > File.
Figure 51 Creating MANIFEST.MF File
2. Open the MANIFEST.MF file and add the following lines with a valid main-package-name and
main-class-name:
Manifest-Version: 1.0
Class-Path: . /platform/lib/Symbol.RFID.API3.jar
Main-Class: [main-package-name].[main-class-name]
30

Installing Zebra FX Series Embedded SDK
Figure 52 Adding Information to MANIFEST.MF File
3. Create and export the JAR executable:
a. Right-click the project name and select Export…
Figure 53 Exporting the Project
b. In the Export / Select window select JAR file.
31

Installing Zebra FX Series Embedded SDK
Figure 54 Exporting the Project
c. Select Next to proceed to the JAR Export / JAR File Specification window.
Figure 55 Jar File Specification Window
d. Select the desired options and select the export destination build\[application_name].jar.
NOTE: In the Select the resources to export section, only select source folders and files, the manifest
folder and manifest file, and library folders and files.
e. Select Next proceed to the JAR Export / JAR Packaging Options window.
f. Keep the defaults and select Next to proceed to JAR Export / JAR Manifest Specification window.
32

Installing Zebra FX Series Embedded SDK
Figure 56 Jar Manifest Specification Window
g. Select Use existing manifest from workspace and select Browse to browse for the MANIFEST.MF
file in the workspace.
h. Select Finish to invoke the build process.
i. Select Yes if required to create the build folder and continue.
Figure 57 Selecting Yes to Create Build Folder
j. If compile warnings appear (as during the build) select OK to continue if the warnings are
acceptable.
Figure 58 Export Warning
NOTE: If a connection error occurs, caused by building to a remote path with no connection to the
FX RFID Reader, change the build folder or connect to the FX RFID Reader and restart the export.
33

Installing Zebra FX Series Embedded SDK
Figure 59 Connection Error
Creating Start and Stop Scripts for the Java Installation Package
To create start and stop scripts:
1. Copy start_sampleapp.sh and stop_sampleapp.sh from:
[Embedded SDK Install folder]\tools\userAppPackageBuilder\sampleScripts\java
into the JAR file build folder [workspace]\build.
2. Rename the script files to start_appname.sh and stop_appname.sh with the JAR file name
appname.jar.
3. In start_appname.sh, replace the line:
java -jar /apps/%sampleapp%.jar &
with:
java -jar /apps/appname.jar &
4. In stop_appname.sh, replace the line:
EXECUTABLE_NAME=%sampleapp%.jar
with:
EXECUTABLE_NAME=appname.jar
34

Embedded C Application
Introduction
This chapter describes how to create, build, and debug an embedded C application, and how to create the
Start and Stop script files for the deployment packages used to install the application on the FX RFID
Readers.
NOTE: Screen captures are for example use only. Actual screens may vary upon product and software
release.
Creating an Embedded C Project
1. If the default perspective is not C/C++, open the C/C++ Perspective in one of two ways:
• Select the C/C++ perspective icon in the top right corner.
Figure 60 C/C++ Icon
• Select Window-> Open Perspective->Other… > C/C++ Perspective.
2. Create the C project:
a. Select File > New > C Project.
Figure 61 Selecting C Project
b. In the C Project window, enter the Project name.
35

Embedded C Application
Figure 62 C Project Window
c. In the Project Type section, select Empty Project under FX Series SDK Application.
d. Select Next and Finish in the C Project / Select Configurations window.
Figure 63 C/C++ Eclipse Window
3. Optionally, right-click the project name and select New > Folder to create inc and src folders.
36

Embedded C Application
Adding Source File to Embedded C Project
1. In the Project Explorer section, expand the project entry, right-click on src, and select New > File.
Figure 64 Selecting File
2. In the New File / File window, enter the File name with the extension .c and select Finish.
3. To add a header file, in the Project Explorer section, expand the project entry, right-click on inc, and
select New > File.
4. In the New File / File window, enter the File name with the extension .h and select Finish.
Figure 65 Source File, Header File, and Main Function
5. Add application-specific RFID3 API commands.
37

Embedded C Application
Reviewing and Changing Default Build Settings of Embedded C Project
6. Right-click the project name and select Properties.
Figure 66 Selecting Properties
7. in the Properties window, expand C/C++ Build and select Settings.
38

Embedded C Application
Figure 67 Selecting Settings
The Tool Settings tab lists all sections of the compiler and linker settings.
The Includes section of ARM Sourcery Windows GCC C Compiler lists header file path references
(predefined paths of SDK and tool-chain folders with FX_SERIES_EMBEDDED_SDK_WORKING_DIR
and CS_LITE_WORKING_DIR as system variables referencing the SDK install and tool-chain install
directories).
Figure 68 Compiler Include Paths
The Libraries section of ARM Sourcery Windows GCC C Linker lists required libraries and library
search paths.
39

Figure 69 Linker Libraries
Embedded C Application
8. In the Build Steps tab, add the following post build step to automatically copy the executable after a
successful build into a separate folder (optional for Install Package creation):
xcopy /Y /R [workspace folder]\[project folder]\[build folder]\[executable name]
[workspace folder]\[project folder]\build
Figure 70 Entering Post-Build Step
40

Building C Executable File
Invoke the build process manually or automatically after making and saving a code change.
To build automatically, select Project > Build Automatically. This automatically invokes the build process
when you save a change in a source file.
Figure 71 Selecting Build Automatically
Embedded C Application
To invoke the build manually, perform one of the following:
• Select Project > Build All.
• Select Project > Build Project.
• In the Package Explorer view, right-click the project entry and select Build Project.
Figure 72 Building Manually
After each build the result is shown in the Problems tab.
41

Embedded C Application
Figure 73 Problems Tab
The Console tab shows the build steps executed during the build.
Figure 74 Console Tab
42

Embedded C Application
Setting Up C Remote Debug Configuration
1. In the Package Explorer view, right-click the project entry and select Debug As > Debug
Configurations… .
Figure 75 Selecting Debug Configurations
2. In the Debug Configurations / Create, manage, and run configurations window, right-click on
C/C++ Remote Application and select New to create and open a new C/C++ Remote Application debug
configuration window.
Figure 76 Debug Configurations Window
3. In the Main tab:
a. In the Name field, enter the name of the configuration.
43

Embedded C Application
Figure 77 Main Tab
b. Select Search Project … and select C/C++ Application.
c. Select Browse… and select the project.
d. In the Connection drop-down menu, select the remote connection.
e. Select Browse to select the Remote Absolute File Path for C/C++ Application. Add the application
file name after the path.
f. Enter the following in Commands to execute before application:
chmod 777 [absolute Path]/[application file name]
to change the permissions of the file to allow execution.
Figure 78 Main Tab - Entering Command
NOTE: The /apps directory on the FX7500 and FX9600 is reserved as user space and must be used for
user application and/or other user file types.
4. In the Debugger / Main tab:
a. Deselect Stop on startup at: main if the debug session is not required to break at the main function
(optional).
44

Embedded C Application
b. Modify the GDB debugger entry to arm-none-linux-gnueabi-gdb.
Figure 79 Debugger / Main Tab
NOTE: The GDB debugger setting assumes that the GDB debugger executable
arm-none-linux-gnueabi.exe resides in a directory path that can be located by the IDE (environment
variables). If the IDE experiences issues locating the GDB debugger application, add full path information
to the setting.
5. In the Debugger / Shared Libraries tab, add directories of the required library locations in Directories
section with [CS_LITE_WORKIG_DIR] as the install directory of the tool-chain and
[FX7500_EMBEDDED_SDK_WORKING_DIR] as the install directory of the SDK.
Add the following for required API and tool-chain libraries:
[FX7500_EMBEDDED_SDK_WORKING_DIR]\RUNTIME_C_API\lib
[FX7500_EMBEDDED_SDK_WORKING_DIR]\RFID_C_API\lib
[CS_LITE_WORKING_DIR]\arm-none-linux-gnueabi\libc\usr\lib
[CS_LITE_WORKING_DIR]\arm-none-linux-gnueabi\libc\lib
45

Embedded C Application
Figure 80 Adding Directories to Shared Libraries Tab
6. In the Gdbserver Settings tab:
a. Modify the Gdbserver name entry to /apps/gdbserver.
b. Modify the Port number entry to a port not blocked by firewalls that can be used for debugging.
Figure 81 Gdbserver Settings Tab
NOTE: Before running a debug session ensure the gdbserver application located in [SDK install
directory]\samples is present in the /apps folder on the device and that file permissions allow execution
of the file.
7. Select Apply.
8. Select Close.
46

Embedded C Application
Debugging Embedded C Application
9. Build the application.
10. Set the required breakpoints.
11. Start the debugging application in the Eclipse environment ( FX7500 Embedded SDK):
• In the debug list menu select the debug configuration, if listed.
Figure 82 Selecting the Debug Configuration
• If not listed, in the debug list menu select Debug Configurations.
Figure 83 Selecting Debug Configurations Option
12. Select the created debug configuration and select Debug to start remote application debugging.
47

Embedded C Application
Figure 84 Starting Remote Application Debugging
The application runs and displays the terminal output in the Terminals view, if implemented.
Figure 85 Debugging Output
48

NOTE: If the following error condition occurs at the beginning of the debug session, select the Go
button at the top of the main window to continue. This issue should not impact debugging and is
considered an issue with the device gdbserver which requires further investigation.
Figure 86 Error Condition
Embedded C Application
49

Embedded C Application
Creating Start and Stop Scripts for C Installation Package
To create start and stop scripts:
1. Copy start_sampleapp.sh and stop_sampleapp.sh from:
[Embedded SDK Install folder]\tools\userAppPackageBuilder\sampleScripts\c_c++
into the build folder
2. Rename the script files to start_appname.sh and stop_appname.sh with the executable file name as
appname.elf or appname.
3. Replace line /apps/%sampleapp% & in start_appname.sh with /apps/appname.elf & or /apps/appname
& (same as the executable name).
4. Replace the line EXECUTABLE_NAME=%sampleapp% in stop_appname.sh with
EXECUTABLE_NAME=appname.elf or EXECUTABLE_NAME=appname (same as the executable name).
50

Embedded Application
Installation Package
Introduction
This chapter describes how to create an FX Series RFID Reader embedded application installation
package, and includes instructions on installing a package on a Linux OS-based host system.
Creating an FX RFID Reader Embedded Application Installation Pack age
1. Select Tools > FX7500 or FX9600 Application Package Builder > Execute.
Figure 87 Executing Application Package Builder
2. Enter appname as the Package Name.
3. In the Maintainer (user name) field, enter the user ID of a reference person (no spaces).
4. Enter the Version (x.x.x).
5. Enter a short description of the application in the Description field.
6. In the Files(s) directory enter the [workspace]\build path (this must include start and stop script files).
7. Enter any Package Dependencies (up to 10) if this applies. After entering the last dependency the
install package is built.
-
51

Embedded Application Installation Package
Figure 88 Building the Install Package
After successful creation the package install file with the name [appname]_[version].deb is copied into the
folder [Embedded SDK Install folder]\buildPackages\all_build.
52

Embedded Application Installation Package
Creating an FX RFID Reader Embedded Application Installation Pack age on Linux Host
To create an FX RFID Reader Embedded Application install package on a Linux OS based host system:
1. Create Start and Stop scripts for the embedded application in [Build folder], which is the application
folder.
NOTE: Ensure execution permission is provided for the binary executable, the Start and Stop script. If
not, use the chmod +x command to change permission of files.
2. Install the equivs sudo apt-get install equivs, if not already installed.
3. Create the control file using the equivs-control command equivs-control sampleapp.
NOTE: The name of the package and name of the binary executable are the same.
4. Add the following lines to the control file:
Package: sampleapp
Version: 1.0
Maintainer: MyName <yourname@yourcompany.com>
Files: [Build folder]/sampleapp /sampleapp
-
[Build folder]/start_sampleapp.sh /start_sampleapp.sh
[Build folder]/stop_sampleapp.sh /stop_sampleapp.sh
NOTE: Package, Version, and Maintainer are mandatory. There are many optional fields in the control
file. For more information refer to
http://debian-handbook.info/browse/squeeze/sect.building-first-package.html.
5. Run the following equivs-build command to build the package: equivs-build sampleapp.
53

www.zebra.com
 Loading...