

Page 1

EM220II
Mobile Printer
Unified Mobile Utility Manual
P1007752-032
Rev. 1.01
Page 2

EM220II
- 2 -
Mobile Printer
Unified Mobile Utility Manual
Table of Contents
1. Notice .............................................................................................................................. 6
2. Operating System (OS) Environment ........................................................................... 6
3. Virtual Memory Switch Manager Usage ....................................................................... 7
3-1 When Using on a PC ................................................................ ................................ .. 7
3-2 When Using on a PDA .............................................................................................. 12
4. NV Image Download Manager Usage ......................................................................... 16
4-1 When Using on a PC ................................................................ ................................ 16
4-2 When Using on a PDA .............................................................................................. 19
5. Firmware Download Manager Usage ......................................................................... 22
5-1 When Using on a PC ................................................................ ................................ 22
5-2 When Using on a PDA .............................................................................................. 23
5-3 Instructions of Firmware Download ........................................................................... 24
Rev. 1.01
Page 3

EM220II
- 3 -
Mobile Printer
Unified Mobile Utility Manual
■ Proprietary Statements
This manual contains proprietary information of Zebra Technologies Corporation. It is
intended solely for the information and use of parties operating and maintaining the equipment described herein. Such proprietary information may not be used, reproduced, or disclosed to any other parties for any other purpose without the expressed written permission
of Zebra Technologies Corporation.
Product Improvements
Since continuous product improvement is a policy of Zebra Technologies Corporation, all
specifications and signs are subject to change without notice.
FCC Compliance Statement
NOTE: This equipment has been tested and found to comply with the limits or a Class B
digital device, pursuant to Part 15 of the FCC Rules. These limits are designed to provide
reasonable protection against harmful interference in a residential installation. This equipment generates, uses and can radiate radio frequency energy and, if not installed and
used in accordance with the instructions, may cause harmful interference to radio
communications. However, there is no guarantee that interference will not occur in a
particular installation. If this equipment does cause harmful interference to radio or
television reception, which can be determined by turning the equipment off and on, the
user is encouraged to try to correct the interference by one or more of the following
measures:
• Reorient or relocate the receiving antenna.
• Increase the separation between the equipment and receiver.
• Connect the equipment into an outlet or circuit different from that to which the receiver is
connected.
• Consult the dealer or an experienced radio/TV technician for help.
WARNING: Exposure to Radio Frequency radiation. To conform to FCC RF exposure requirements this device shall be used in accordance with the operating conditions and instructions listed in this manual.
NOTE: This unit was tested with shielded cables on the peripheral devices. Shielded
cables must be used with the unit to insure compliance.
Changes or modifications to this unit not expressly approved by Zebra Technologies Corporation could void the user’s authority to operate this equipment.
Rev. 1.01
Page 4

EM220II
- 4 -
Mobile Printer
Unified Mobile Utility Manual
Canadian Compliance Statement
This Class B digital apparatus complies with Canadian ICES-003.
Cet appareil numérique de la classe B est conforme á la norme NMB-003 du Canada.
“IC:” before the equipment certification number signifies that the Industry Canada technical
specifications were met. It does not guarantee that the certified product will operate to the
user’s satisfaction.
Liability Disclaimer
Inasmuch as every effort has been made to supply accurate information in this manual,
Zebra Technologies Corporation is not liable for any erroneous information or omissions.
Zebra Technologies Corporation reserves the right to correct any such errors and
disclaims liability resulting therefrom.
No Liability for Consequential Damage
In no event shall Zebra Technologies Corporation or anyone else involved in the creation,
production, or delivery of the accompanying product (including hardware and software) be
liable for any damages whatsoever (including, without limitation, damages for loss of
business profits, business interruption, loss of business information, or other pecuniary
loss) arising out of the use of or the results of use of or inability to use such product, even
if Zebra Technologies Corporation has been advised of the possibility of such damages.
Because some states do not allow the exclusion of liability for consequential or incidental
damages, the above limitation may not apply to you.
Rev. 1.01
Page 5

EM220II
- 5 -
Mobile Printer
Unified Mobile Utility Manual
Copyrights
The copyrights in this manual and the label print engine described therein are owned by
Zebra Technologies Corporation. Unauthorized reproduction of this manual or the software
in the label print engine may result in imprisonment of up to one year and fines of up to
$10,000 (17 U.S.C.506). Copyright violators may be subject to civil liability.
This product may contain ZPL® , ZPL II® , and ZebraLinktm programs; Element Energy
Equalizer® Circuit; E3® ; and AGFA fonts. Software © ZIH Corp. All rights reserved
worldwide.
ZebraLink and all product names and numbers are trademarks, and Zebra, the Zebra logo,
ZPL, ZPL II, Element Energy Equalizer Circuit, and E3 Circuit are registered trademarks of
ZIH Corp. All rights reserved worldwide.
Monotype® , Intellifont® and UFST® are trademarks of Monotype Imaging, Inc. registered
in the United States Patent and Trademark Office and may be registered in certain jurisdictions.
AndyTM , CG PalacioTM, CG Century SchoolbookTM, CG TriumvirateTM, CG TimesTM,
Monotype KaiTM, Monotype MinchoTM and Monotype SungTM are trademarks of
Monotype Imaging, Inc. and may be registered in some jurisdictions.
HY Gothic HangulTM is a trademark of Hanyang Systems, Inc.
AngsanaTM is a trademark of Unity Progress Company (UPC) Limited.
Andale® , Arial® , Book Antiqua® , Corsiva® , Gill Sans® , Sorts® and Times New Roman®
are trademarks of The Monotype Corporation registered in the United States Patent and
Trademark Office and may be registered in certain jurisdictions.
Century Gothic™, Bookman Old StyleTM and Century SchoolbookTM are trademarks of
The Monotype Corporation and may be registered in certain jurisdictions.
HGPGothicB is a trademark of the Ricoh company, Ltd. and may be registered in some jurisdictions.
UniversTM is a trademark of Heidelberger Druckmaschinen AG, which may be registered
in certain jurisdictions, exclusively licensed through Linotype Library GmbH, a wholly
owned subsidiary of Heidelberger Druckmaschinen AG.
Futura® is a trademark of Bauer Types SA registered in the United States Patent and
Trademark Office and may be registered in some jurisdictions.
TrueType® is a trademark of Apple Computer, Inc. registered in the United States Patent
and Trademark Office and may be registered in certain jurisdictions.
All other product names are the property of their respective owners.
All other brand names, product names, or trademarks belong to their respective holders.
© 2006 ZIH Corp.
Rev. 1.01
Page 6

EM220II
- 6 -
Mobile Printer
Unified Mobile Utility Manual
1. Notice
This Unified Mobile Utility Manual provides information on the utility program used to set
printer operation conditions and add functions.
The utility program consists of three functions.
1) A function that sets printer operation conditions via non-hardware control, software-
based virtual switches (VMSM: Virtual Memory Switch Manager)
2) A function that facilitates the downloading of image files, such as logos, intended for
repetitive printing (NV Image Download Manager)
3) A function that is used to download and install the latest Firmware, which is subject to
ongoing modification for the enhancement of product performance (Firmware
Download Manager)
2. Operating System (OS) Environment
The following operating systems are supported for usage:
- Microsoft Windows XP (32bit/64bit)
- Microsoft Windows 2003 Server (32bit/64bit)
- Microsoft Windows Embedded For Point Of Service
- Microsoft Windows VISTA (32bit/64bit)
- Microsoft Windows 7 (32bit/64bit)
- Microsoft Windows 8 (32bit/64bit)
- Microsoft Windows CE 5.0
- Microsoft Windows CE 6.0
- Microsoft Windows Mobile 5.0
- Microsoft Windows Mobile 6.x
Rev. 1.01
Page 7

- 7 -
Mobile Printer
Unified Mobile Utility Manual
3. Virtual Memory Switch Manager Usage
3-1 When Using on a PC
1) Connect the printer and the PC via the interface cable (USB or Serial type).
If using Bluetooth, a cable connection is not necessary.
EM220II
2) Turn on the printer power.
3) Prepare the Unified Utility executable file to be used on the PC.
The executable file can be found on the enclosed CD.
(EM220II Unified Utility for PC ver 1.x.x.exe)
4) Run the Unified Utility executable file.
Rev. 1.01
Page 8

- 8 -
Mobile Printer
Unified Mobile Utility Manual
5) Select "Port" and click the "Virtual Memory Switch Manager" button.
Refer to the Bluetooth Connection Manual regarding the Port (may vary according to
device).
EM220II
Rev. 1.01
Page 9

EM220II
- 9 -
Mobile Printer
Unified Mobile Utility Manual
6) The Virtual Memory Switch settings information of the printer appears on screen.
Rev. 1.01
Page 10

EM220II
- 10 -
Mobile Printer
Unified Mobile Utility Manual
Rev. 1.01
Page 11

- 11 -
Mobile Printer
Unified Mobile Utility Manual
7) After setting the desired function(s), click the “Save” button to store settings.
Function
Description
Printing Density
Sets printing density
Value range is 80~150%
Printing Speed
Sets printing speed
Value range is 50 or 90 mm/s
Default Code Page
Sets the default code page
(Refer to the Code Page Manual for more detailed information on
the Code Pages supported.)
Default Font Type
Sets default font type and size
Double Byte Character Mode
Sets double byte language usage mode
Printer Service
Printer Service change receipt mode or label mode.
Beeps for Paper Roll End
Sets no beeping or beeping when reaching paper roll end
Beeps for Low Battery End
Sets beeping when reaching low battery capacity
Auto Power Off Time
Sets time interval between absence of printer use and automatic
turning off of printer power
Auto Power Saving Time
Sets time interval for automatic entering into power saving mode
while the printer is in use
Black Mark Sensor
Sets using front or rear paper sensor(black mark sensor)
MSR Trigger
Sets MSR data scanning mode, 7 modes supported
(Refer to “GS ( E” in the Control Commands Manual.)
RF Interface Configuration
Sets Wireless connection type (WLAN, Bluetooth)
Serial Interface Configuration
Changes the serial Interface setting
*Printer must be reset after change for changed setting to take
effect
Authentication & Encryption
Sets or cancels Authentication & Encryption mode when
connecting via Bluetooth
* If Authentication & Encryption mode is disabled, connection to a
device can be done without a PIN Code.
Connection Mode
Sets Mode1, Mode2, or Mode3 when connecting via Bluetooth.
- Mode1: connection possible only with the first device with which
connection succeeds
- Mode2: connection with all Bluetooth enabled devices possible
via use of a PIN Code
- Mode3: connection possible only with the first device with which
connection succeeds and searching or use of connected device
possible
PIN Code
Changes the PIN Code required for Bluetooth connections
(maximum 12 characters long)
Printer Name
Changes the device name produced when establishing a
Bluetooth connection (maximum 12 characters long)
The functions per category are as follows:
EM220II
* You can check authentication, Encryption mode as well as connection mode of the
Bluetooth from self test page.
8) Reset the printers.
Rev. 1.01
Page 12

EM220II
- 12 -
Mobile Printer
Unified Mobile Utility Manual
3-2 When Using on a PDA
1) Turn on the printer power.
2) Prepare the Unified Utility executable file to be used on the PDA.
The executable file varies according to CPU and can be found on the enclosed CD.
- ARMV4: EM220II Unified Utility for PPC armv4 ver 1.x.x.exe
- ARMV4I: EM220II Unified Utility for PPC armv4i ver 1.x.x.exe
3) Run the Unified Utility executable file.
4) Select "Port" and click the "Virtual Memory Switch Manager" button.
Refer to the Bluetooth Connection Manual regarding the Port (may vary according to
device).
5) The Virtual Memory Switch settings information of the printer is received and shown on
screen.
Rev. 1.01
Page 13
- 13 -
Mobile Printer
Unified Mobile Utility Manual
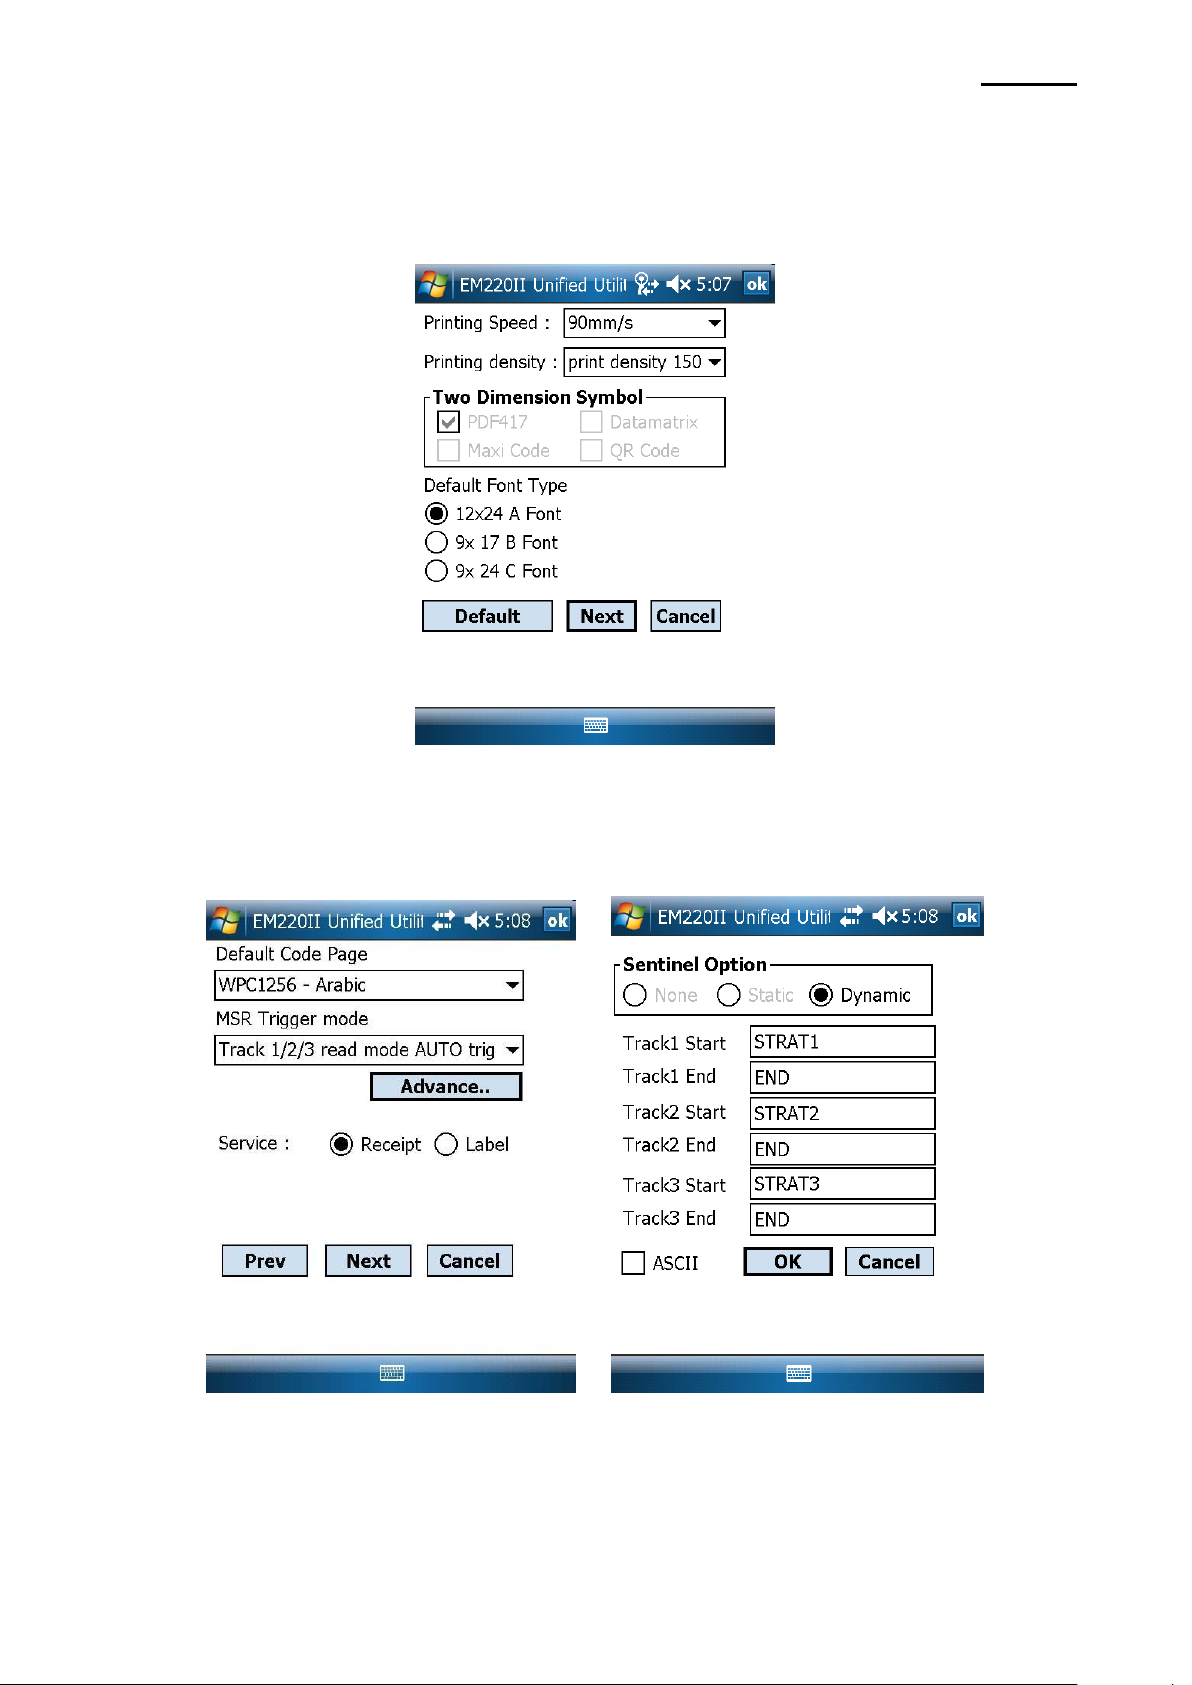
6) After setting the desired function, click the “Next” button.
(The functions per category are identical to those on the PC.)
* Please click "Default" button to return the printer to default setting
EM220II
7) After setting the desired function, click the “Next” button.
(Clicking the “Prev” button returns to the previous screen.)
Rev. 1.01
Page 14

- 14 -
Mobile Printer
Unified Mobile Utility Manual
8) After setting the desired function, click the “Next” button.
EM220II
9) After setting the desired function, click the “Next” button.
Rev. 1.01
Page 15

- 15 -
Mobile Printer
Unified Mobile Utility Manual
10) After setting the desired function, click the “Save” button.
11) Reset the printer.
EM220II
Rev. 1.01
Page 16

EM220II
- 16 -
Mobile Printer
Unified Mobile Utility Manual
4. NV Image Download Manager Usage
4-1 When Using on a PC
1) The printer connection method and instructions for running the Unified Utility executable
file are identical to those provided in “3. Virtual Memory Switch Manager”. Refer to
the aforementioned section.
2) Prepare the image file on the PC (e.g. Main.bmp)
3) Select "Port" and click the " NV Image Manager " button.
Refer to the Bluetooth Connection Manual regarding the Port (may vary according to
device) “
4) Click the “Add Image” button to add the desired image(s) to the image list.
Click the “Remove” button to delete selected image(s), and click the “Reset” button to
delete the entire image list.
Rev. 1.01
Page 17

EM220II
- 17 -
Mobile Printer
Unified Mobile Utility Manual
5) The “NV Image List” contains the address numbers of saved images.
The following buttons can be used to handle saved images.
- “Print All” Button: Prints all images in the list
- “Print” Button: Prints selected image(s)
- “Remove All” Button: Delete all images
Rev. 1.01
Page 18

EM220II
- 18 -
Mobile Printer
Unified Mobile Utility Manual
6) After selecting an image from the image list, adjust the brightness level to set the
brightness of the image to be downloaded.
7) Click the “Download” button to download the image(s).
Checking the “Auto addressing” box automatically saves address numbers.
(Manual input is required if unchecked.)
8) When downloading is complete, the saved address numbers appear in the “NV address
list”.
Rev. 1.01
Page 19

- 19 -
Mobile Printer
Unified Mobile Utility Manual
4-2 When Using on a PDA
1) Turn on the printer power.
2) Prepare the Unified Utility executable file to be used on the PDA.
The executable file varies according to CPU and can be found on the enclosed CD.
- ARMV4: EM220II Unified Utility for PPC armv4 ver 1.x.x.exe
- ARMV4I: EM220II Unified Utility for PPC armv4i ver 1.x.x.exe
3) Prepare the image file on the PDA (e.g. Main.bmp)
4) Run the Unified Utility executable file.
5) Select "Port" and click the "NV Manager" button.
EM220II
Refer to the Bluetooth Connection Manual regarding the Port (may vary according to
device).
Rev. 1.01
Page 20
EM220II
- 20 -
Mobile Printer
Unified Mobile Utility Manual
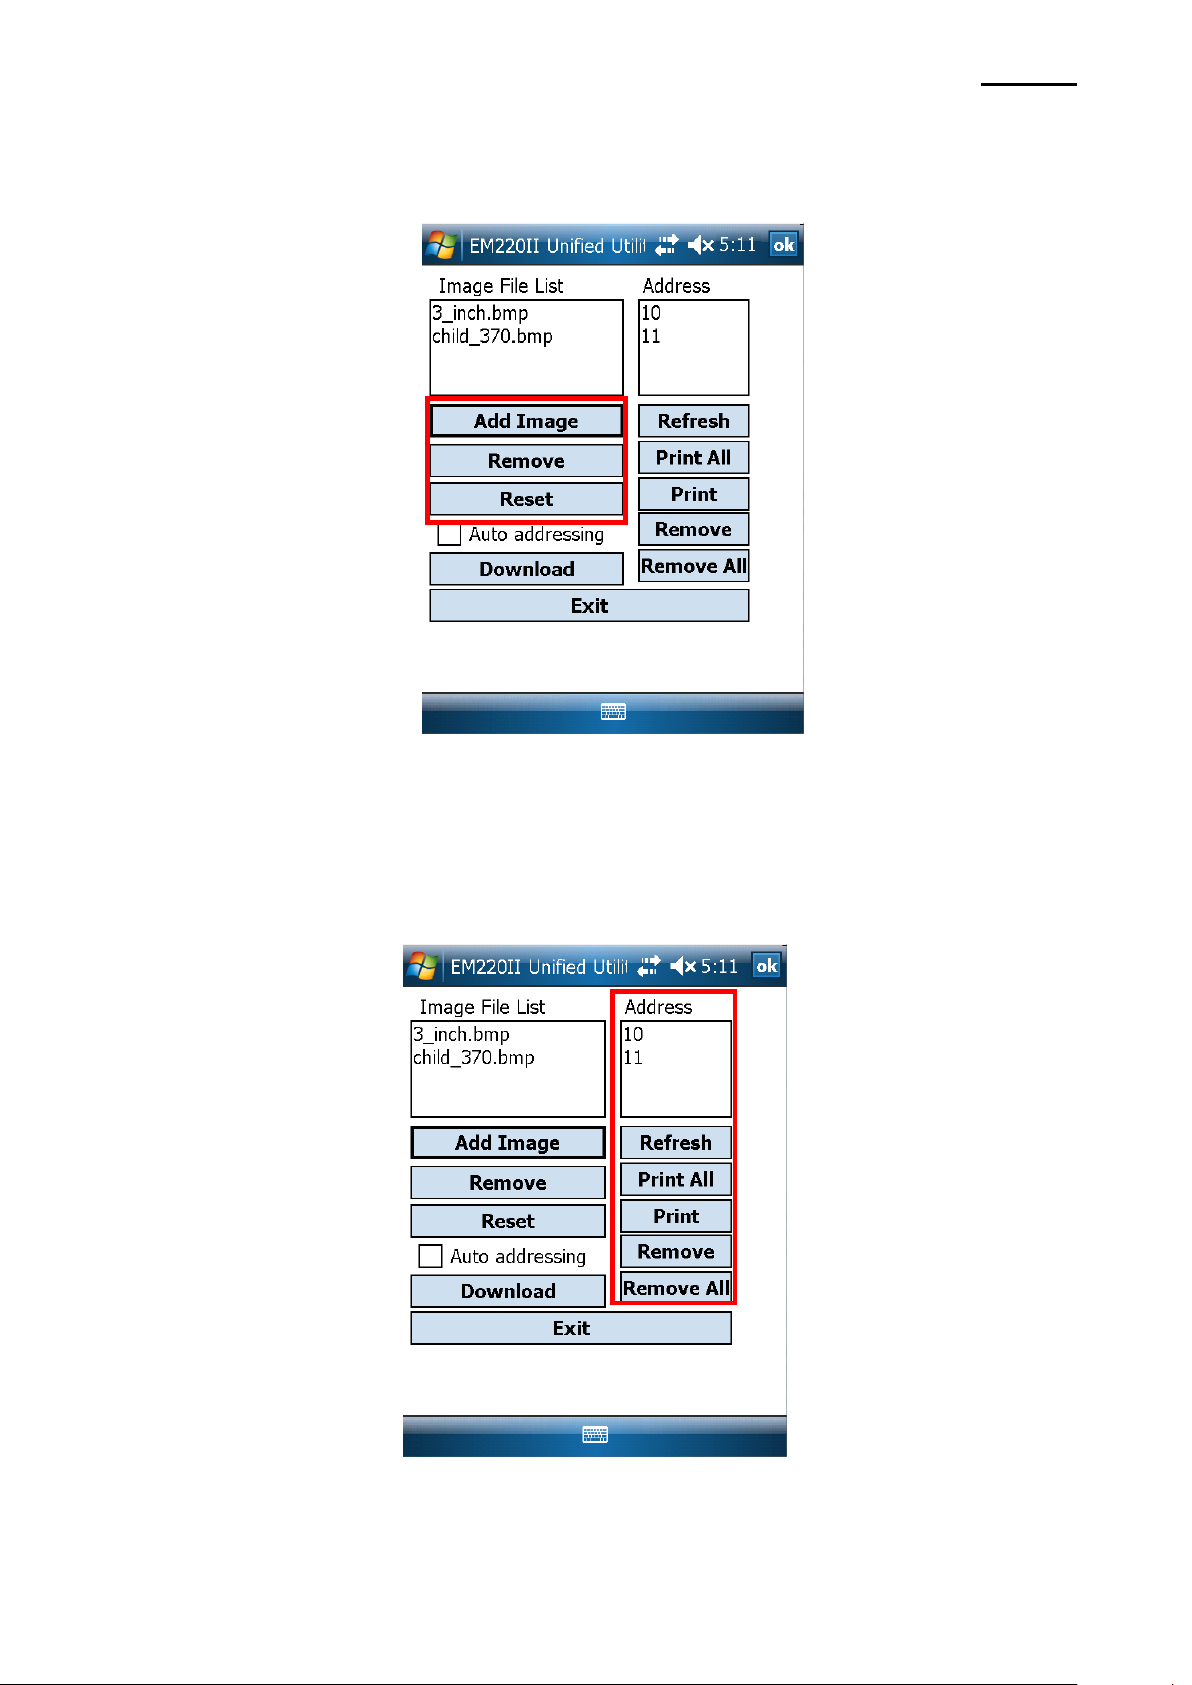
6) Click the “Add Image” button to add the desired image(s) to the image list.
Click the “Remove” button to delete selected image(s), and click the “Reset” button to
make modifications.
7) The “Address” contains the address numbers of saved images.
The following buttons can be used to handle saved images.
- “Print” Button: Prints selected image(s)
- “Print All” Button: Prints all images in the list
- “Remove All” Button: Delete all images
Rev. 1.01
Page 21

- 21 -
Mobile Printer
Unified Mobile Utility Manual
8) Click the “Download” button to download the image(s).
Automatically saves address numbers. ( Start Address is “00”)
EM220II
9) When downloading is complete, the saved address numbers appear in the “address”.
Rev. 1.01
Page 22
EM220II
- 22 -
Mobile Printer
Unified Mobile Utility Manual
5. Firmware Download Manager Usage
5-1 When Using on a PC
The printer is already equipped with standard Firmware.
Follow the steps below to download and install firmware on the EM220II printer.
1) The printer connection method and instructions for running the Unified Utility executable
file are identical to those provided in “3. Virtual Memory Switch Manager”. Refer to
the aforementioned section.
2) Prepare the Firmware file on the PC.
Firmware can be upgraded to improve printer performance.
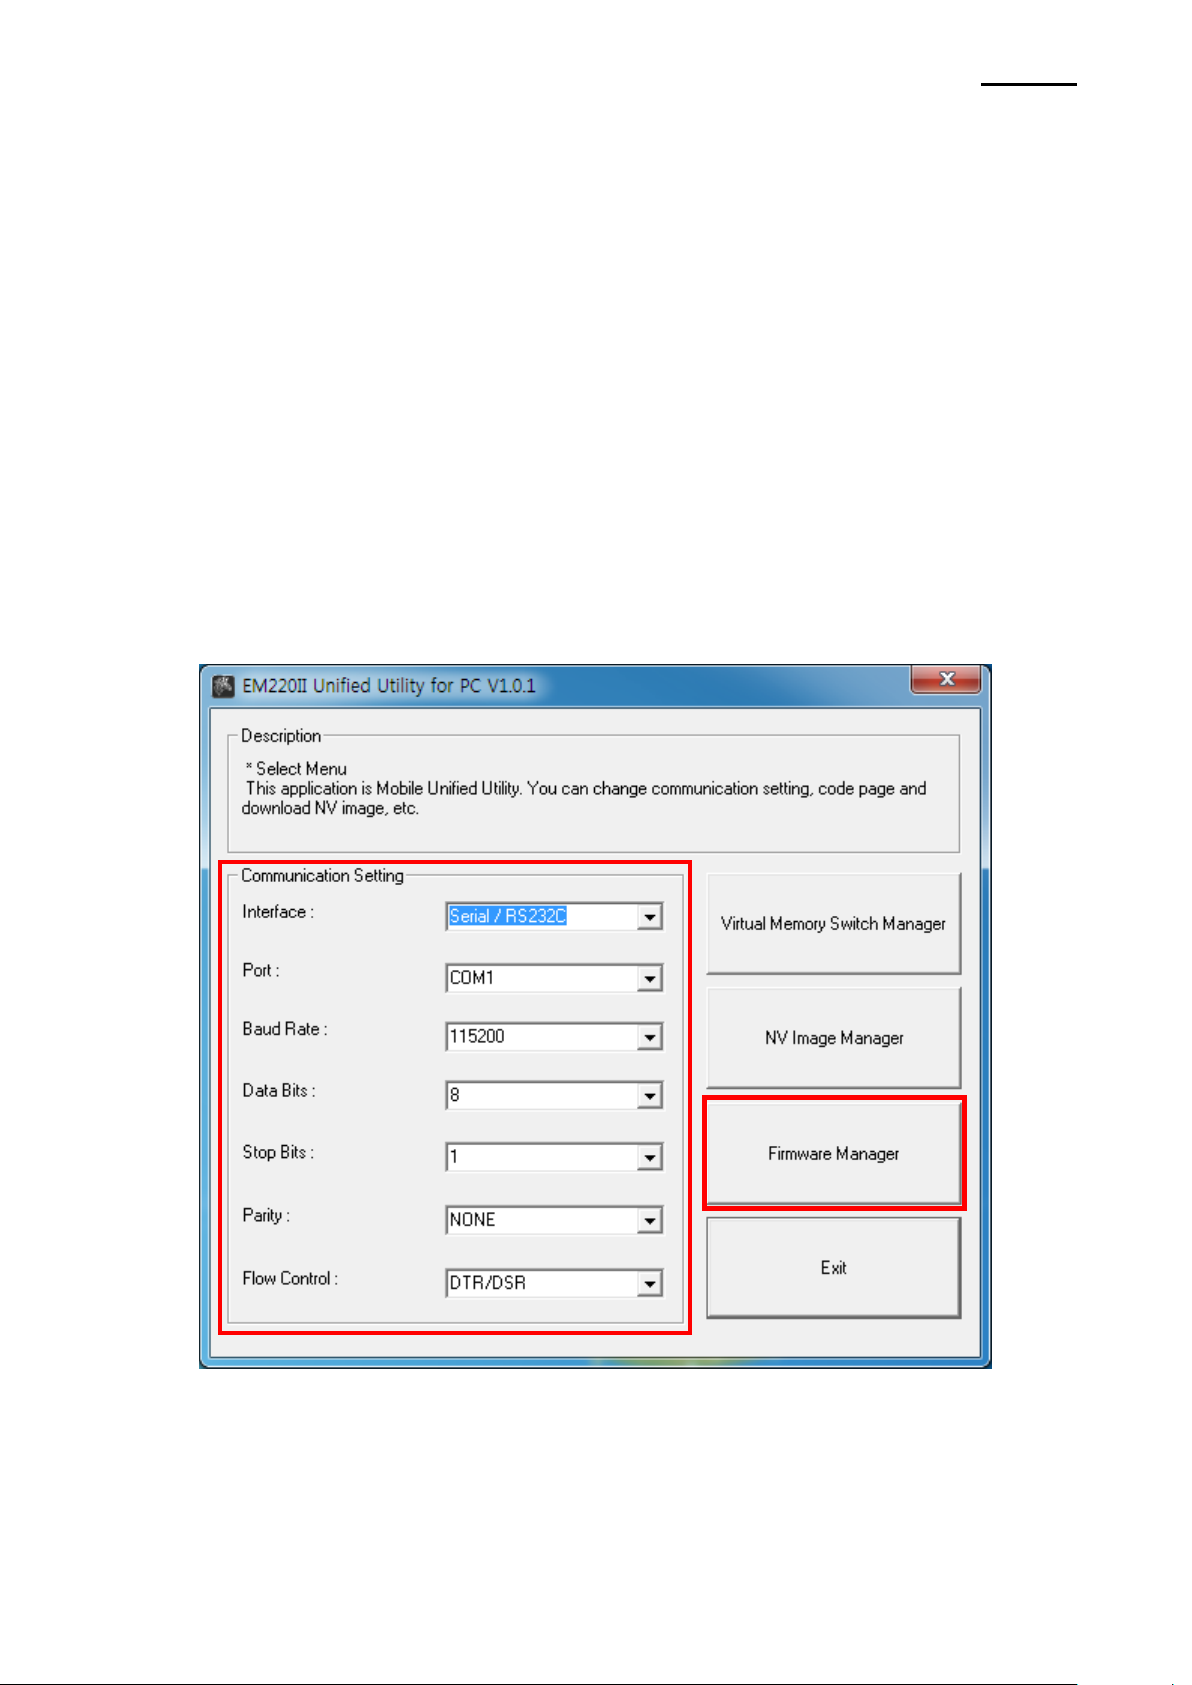
3) Select "Port" and click the "Firmware Manager" button.
Refer to the Bluetooth Connection Manual regarding the Port (may vary according to
device) “
4) Download firmware; refer to section 5-3 for specifics.
Rev. 1.01
Page 23

EM220II
- 23 -
Mobile Printer
Unified Mobile Utility Manual
5-2 When Using on a PDA
The printer is already equipped with standard Firmware.
Follow the steps below to download and install firmware on the EM220II printer.
1) Turn on the printer power.
2) Prepare the Unified Utility executable file to be used on the PDA.
The executable file varies according to CPU and can be found on the enclosed CD.
- ARMV4: EM220II Unified Utility for PPC armv4 ver 1.x.x.exe
- ARMV4I: EM220II Unified Utility for PPC armv4i ver 1.x.x.exe
3) Prepare the Firmware file on the PDA.
Firmware can be upgraded to improve printer performance.
4) Run the Unified Utility executable file.
5) Select "Port" and click the "Firmware Download Manager" button.
Refer to the Bluetooth Connection Manual regarding the Port (may vary according to
device) "
6) Download firmware; refer to section 5-3 for specifics.
Rev. 1.01
Page 24

EM220II
- 24 -
Mobile Printer
Unified Mobile Utility Manual
5-3 Instructions of Firmware Download
1) Open [Unified Utility] and run [Firmware download Manager] to download a firmware
(its extension is *.fls)
2) While downloading a firmware, the printer’s status advances as follows:
① Green LED lights;
② Red LED lights;
③ Blue LED lights;
④ All three LED’s turn on.
3) After step 2 is complete, reset the printer.
4) Open [Unified Utility], run [Firmware download Manager] and download a font file(its
extension is *.fls) which matches your downloaded firmware.
The list below provides a mapping of font files to firmware.
- In case of KROB: mobile_godic.fls
- In case of CHOB: mobile_big5.fls
- In case of CNOB: mobile_gb2312.fls
- In case of JPOB: mobile_japfont.fls
Note: You do not need to reset the printer to use the fonts. You do not need to
download the fonts in any specific order.
5) After downloading the firmware and fonts, you will need to set the memory switches
according to user preferences and printer hardware settings.
Rev. 1.01
 Loading...