


EM220II
Mobile Printer
Windows Driver Manual
P1007752-037
Rev. 1.00

EM220II
- 2 -
Mobile Printer
Windows Driver Manual
Table of Contents
1. Manual Information ........................................................................................................ 6
2. Operating System (OS) Environment ........................................................................... 6
3. Windows Driver Preparation ......................................................................................... 6
4. Windows Driver Installation .......................................................................................... 7
4-1 Installing on Windows XP/2003 Server ....................................................................... 7
4-1-1 Via Serial Port or Bluetooth .................................................................................. 7
4-1-2 Via USB Port ...................................................................................................... 11
4-1-3 Via WLAN Port ................................................................................................... 14
4-2 Installing on Windows VISTA/2008 Server/7/8 .......................................................... 17
4-2-1 Via Serial Port or Bluetooth ................................................................................ 17
4-2-2 Via USB Port ...................................................................................................... 21
4-2-3 Via WLAN Port ................................................................................................... 24
5. Detailed Windows Driver Settings ................................ ................................ .............. 27
5-1 Paper Supply Method ............................................................................................... 27
5-2 Paper Size ................................................................................................................ 29
5-3 Additional Commands ............................................................................................... 30
6. Windows Driver Specifications ................................................................................... 32
6-1 Fonts ......................................................................................................................... 32
6-2 Special Functions...................................................................................................... 34
6-3 Barcodes .................................................................................................................. 35
6-4 Two-Dimensional Barcodes ...................................................................................... 35
7. Use of Windows Driver ................................................................................................ 36
7-1 Use of Visual Basic ................................................................................................... 36
7-1-1 Windows Driver Selection ................................................................................... 36
7-1-2 Test Printing ........................................................................................................ 37
7-1-3 Barcode Printing ................................................................................................. 37
7-1-4 Two-Dimensional Barcode Printing ..................................................................... 37
7-2 Use of Wordpad ................................................................ ................................ ........ 38
7-2-1 Wordpad Environment Settings ................................ ................................ .......... 38
7-2-2 Text Printing ........................................................................................................ 38
7-2-3 Barcode Printing ................................................................................................. 39
7-2-4 Two-Dimensional Barcode Printing ..................................................................... 40
Rev. 1.00

EM220II
- 3 -
Mobile Printer
Windows Driver Manual
■ Proprietary Statements
This manual contains proprietary information of Zebra Technologies Corporation. It is
intended solely for the information and use of parties operating and maintaining the equipment described herein. Such proprietary information may not be used, reproduced, or disclosed to any other parties for any other purpose without the expressed written permission
of Zebra Technologies Corporation.
Product Improvements
Since continuous product improvement is a policy of Zebra Technologies Corporation, all
specifications and signs are subject to change without notice.
FCC Compliance Statement
NOTE: This equipment has been tested and found to comply with the limits or a Class B
digital device, pursuant to Part 15 of the FCC Rules. These limits are designed to provide
reasonable protection against harmful interference in a residential installation. This equipment generates, uses and can radiate radio frequency energy and, if not installed and
used in accordance with the instructions, may cause harmful interference to radio
communications. However, there is no guarantee that interference will not occur in a
particular installation. If this equipment does cause harmful interference to radio or
television reception, which can be determined by turning the equipment off and on, the
user is encouraged to try to correct the interference by one or more of the following
measures:
• Reorient or relocate the receiving antenna.
• Increase the separation between the equipment and receiver.
• Connect the equipment into an outlet or circuit different from that to which the receiver is
connected.
• Consult the dealer or an experienced radio/TV technician for help.
WARNING: Exposure to Radio Frequency radiation. To conform to FCC RF exposure requirements this device shall be used in accordance with the operating conditions and instructions listed in this manual.
NOTE: This unit was tested with shielded cables on the peripheral devices. Shielded
cables must be used with the unit to insure compliance.
Changes or modifications to this unit not expressly approved by Zebra Technologies Corporation could void the user’s authority to operate this equipment.
Rev. 1.00

EM220II
- 4 -
Mobile Printer
Windows Driver Manual
Canadian Compliance Statement
This Class B digital apparatus complies with Canadian ICES-003.
Cet appareil numérique de la classe B est conforme á la norme NMB-003 du Canada.
“IC:” before the equipment certification number signifies that the Industry Canada technical
specifications were met. It does not guarantee that the certified product will operate to the
user’s satisfaction.
Liability Disclaimer
Inasmuch as every effort has been made to supply accurate information in this manual,
Zebra Technologies Corporation is not liable for any erroneous information or omissions.
Zebra Technologies Corporation reserves the right to correct any such errors and
disclaims liability resulting therefrom.
No Liability for Consequential Damage
In no event shall Zebra Technologies Corporation or anyone else involved in the creation,
production, or delivery of the accompanying product (including hardware and software) be
liable for any damages whatsoever (including, without limitation, damages for loss of
business profits, business interruption, loss of business information, or other pecuniary
loss) arising out of the use of or the results of use of or inability to use such product, even
if Zebra Technologies Corporation has been advised of the possibility of such damages.
Because some states do not allow the exclusion of liability for consequential or incidental
damages, the above limitation may not apply to you.
Rev. 1.00

EM220II
- 5 -
Mobile Printer
Windows Driver Manual
Copyrights
The copyrights in this manual and the label print engine described therein are owned by
Zebra Technologies Corporation. Unauthorized reproduction of this manual or the software
in the label print engine may result in imprisonment of up to one year and fines of up to
$10,000 (17 U.S.C.506). Copyright violators may be subject to civil liability.
This product may contain ZPL® , ZPL II® , and ZebraLinktm programs; Element Energy
Equalizer® Circuit; E3® ; and AGFA fonts. Software © ZIH Corp. All rights reserved
worldwide.
ZebraLink and all product names and numbers are trademarks, and Zebra, the Zebra logo,
ZPL, ZPL II, Element Energy Equalizer Circuit, and E3 Circuit are registered trademarks of
ZIH Corp. All rights reserved worldwide.
Monotype® , Intellifont® and UFST® are trademarks of Monotype Imaging, Inc. registered
in the United States Patent and Trademark Office and may be registered in certain jurisdictions.
AndyTM , CG PalacioTM, CG Century SchoolbookTM, CG TriumvirateTM, CG TimesTM,
Monotype KaiTM, Monotype MinchoTM and Monotype SungTM are trademarks of
Monotype Imaging, Inc. and may be registered in some jurisdictions.
HY Gothic HangulTM is a trademark of Hanyang Systems, Inc.
AngsanaTM is a trademark of Unity Progress Company (UPC) Limited.
Andale® , Arial® , Book Antiqua® , Corsiva® , Gill Sans® , Sorts® and Times New Roman®
are trademarks of The Monotype Corporation registered in the United States Patent and
Trademark Office and may be registered in certain jurisdictions.
Century Gothic™, Bookman Old StyleTM and Century SchoolbookTM are trademarks of
The Monotype Corporation and may be registered in certain jurisdictions.
HGPGothicB is a trademark of the Ricoh company, Ltd. and may be registered in some jurisdictions.
UniversTM is a trademark of Heidelberger Druckmaschinen AG, which may be registered
in certain jurisdictions, exclusively licensed through Linotype Library GmbH, a wholly
owned subsidiary of Heidelberger Druckmaschinen AG.
Futura® is a trademark of Bauer Types SA registered in the United States Patent and
Trademark Office and may be registered in some jurisdictions.
TrueType® is a trademark of Apple Computer, Inc. registered in the United States Patent
and Trademark Office and may be registered in certain jurisdictions.
All other product names are the property of their respective owners.
All other brand names, product names, or trademarks belong to their respective holders.
© 2006 ZIH Corp.
Rev. 1.00

EM220II
- 6 -
Mobile Printer
Windows Driver Manual
1. Manual Information
This Windows Driver Installation Manual provides information on installation, detailed
specifications, and usage of the printer’s Windows Driver according to PC operating
system (OS).
2. Operating System (OS) Environment
The following operating systems are supported for usage:
- Microsoft Windows XP (32bit/64bit)
- Microsoft Windows 2003 Server (32bit/bit)
- Microsoft Windows Embedded For Point Of Service
- Microsoft Windows VISTA (32bit/64bit)
- Microsoft Windows Server 2008 (32bit/64bit)
- Microsoft Windows Server 2008R2 (64bit)
- Microsoft Windows 7 (32bit/64bit)
- Microsoft Windows 8 (32bit/64bit)
If “.NET Framework 3.5 SP1” is already installed on Windows XP or Windows 2003 Server
the warning message box may appear while installing. We recommend you to install the
hotfix. Visit at http://www.microsoft.com/en-us/download/details.aspx?id=18127
3. Windows Driver Preparation
The Windows Driver is included in the enclosed CD, and can also be downloaded from the
Zebra website.
(http://www.zebra.com/)
If downloading from the Zebra website, first download the EM220II_Vx.x.xx.zip file, then
unzip the file, and run the EM220II_Vx.x.xx.exe file.
If using the enclosed CD, click the “Windows Driver” button to find and run the Windows
Driver installation file (EM220II_Vx.x.xx.exe).
Rev. 1.00

- 7 -
Mobile Printer
Windows Driver Manual
4. Windows Driver Installation
4-1 Installing on Windows XP/2003 Server
4-1-1 Via Serial Port or Bluetooth
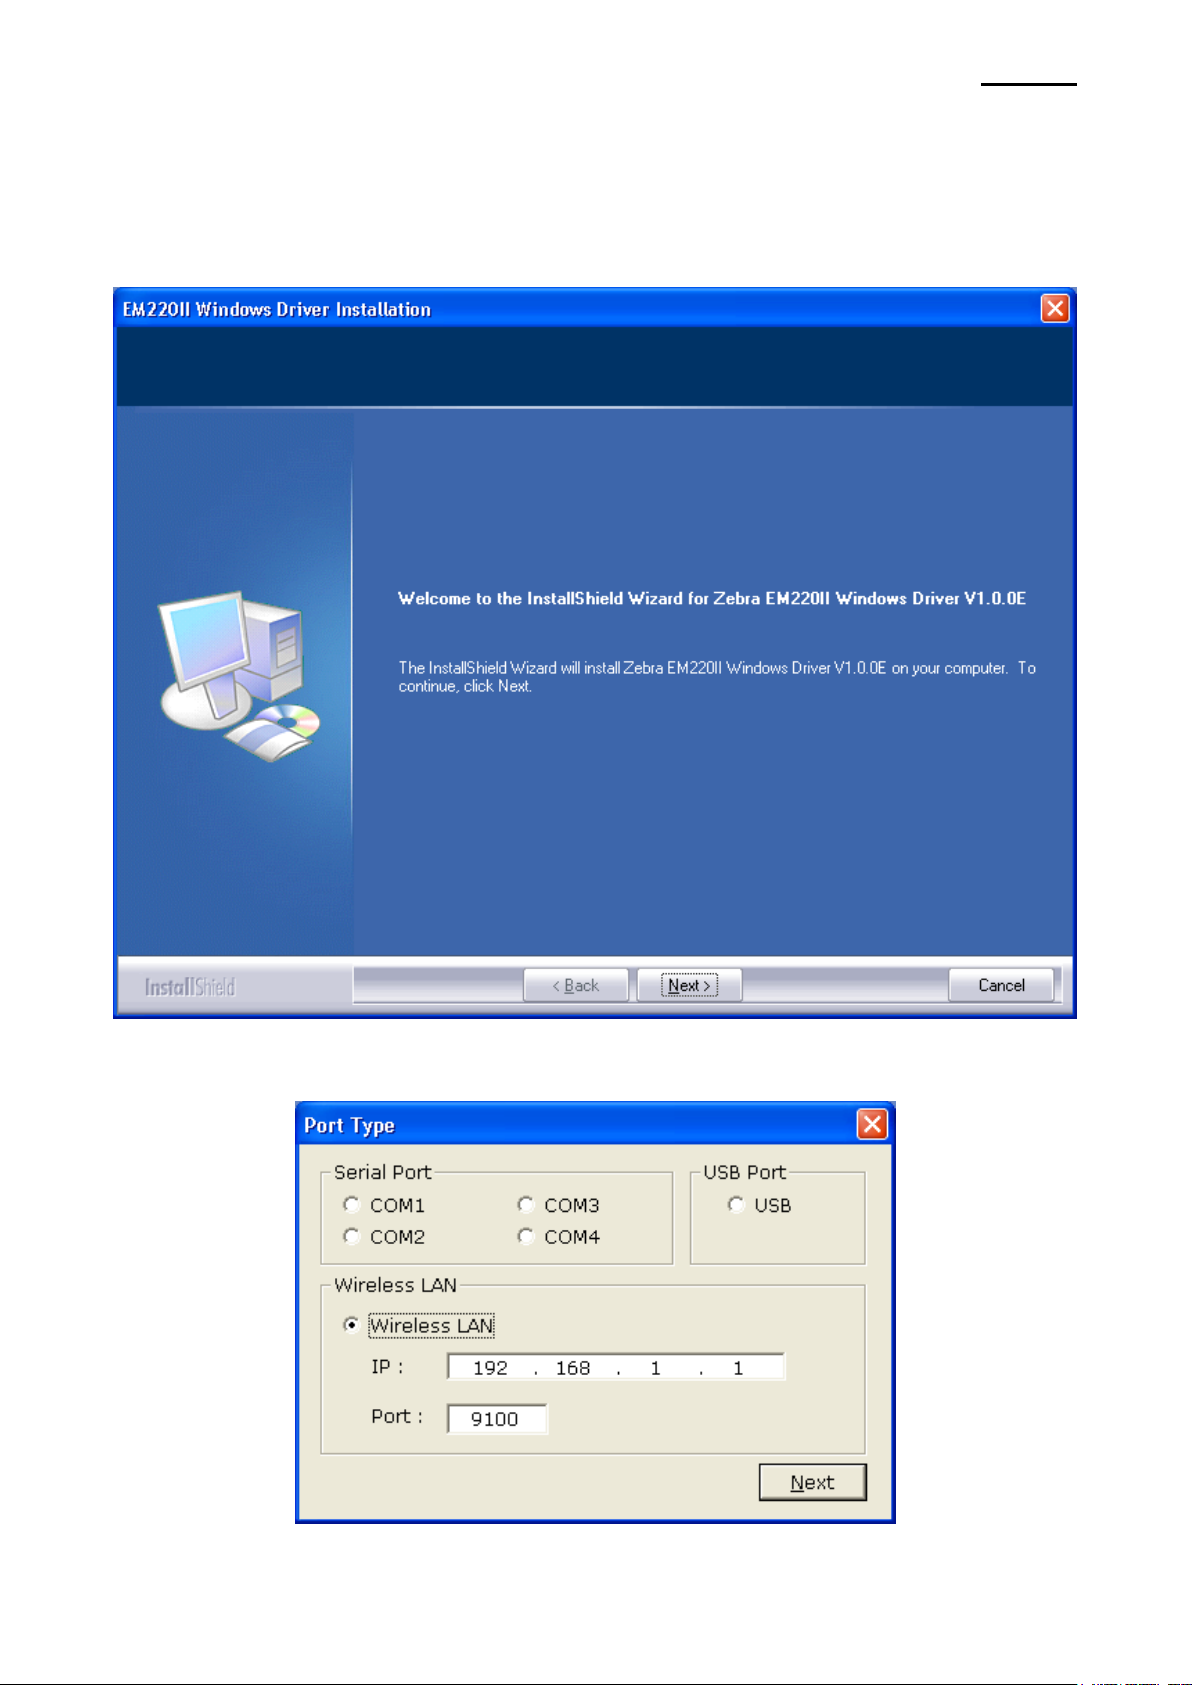
1) Double-click the Windows Driver installation file (EM220II_Vx.x.xx.exe).
2) Click the “Next” button.
EM220II
Rev. 1.00

- 8 -
Mobile Printer
Windows Driver Manual
3) Select the COM port to be used and click the “Next” button.
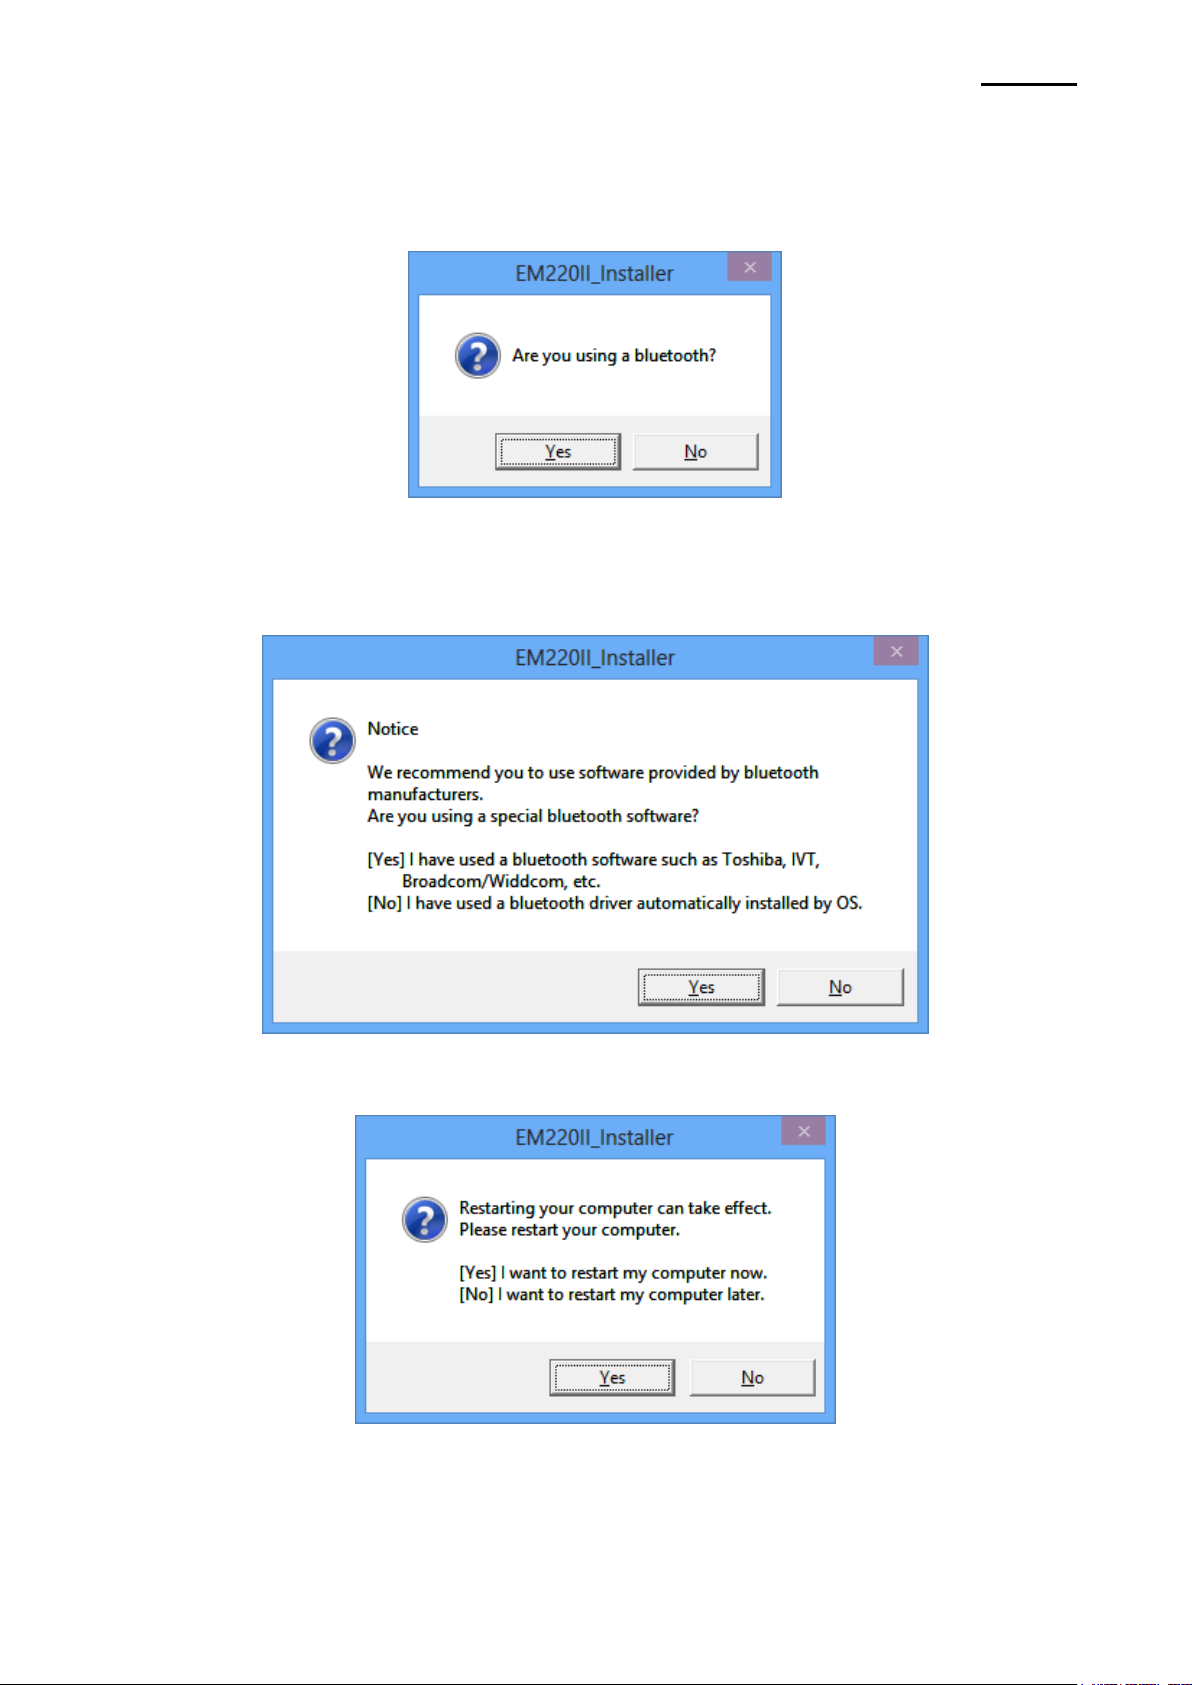
4) If using Bluetooth, click the “Yes” button.
- Click “No” if using a Serial port.
- To use Bluetooth, first install the corresponding product software.
(Refer to the user manual of the corresponding product.)
EM220II
* Select the Bluetooth Driver to be used.
“Yes”: to use an IVT, Broadcom Driver
“No”: to use a driver supplied by the Windows OS
Rev. 1.00

EM220II
- 9 -
Mobile Printer
Windows Driver Manual
5) Clicking the “Yes” button will reboot the PC.
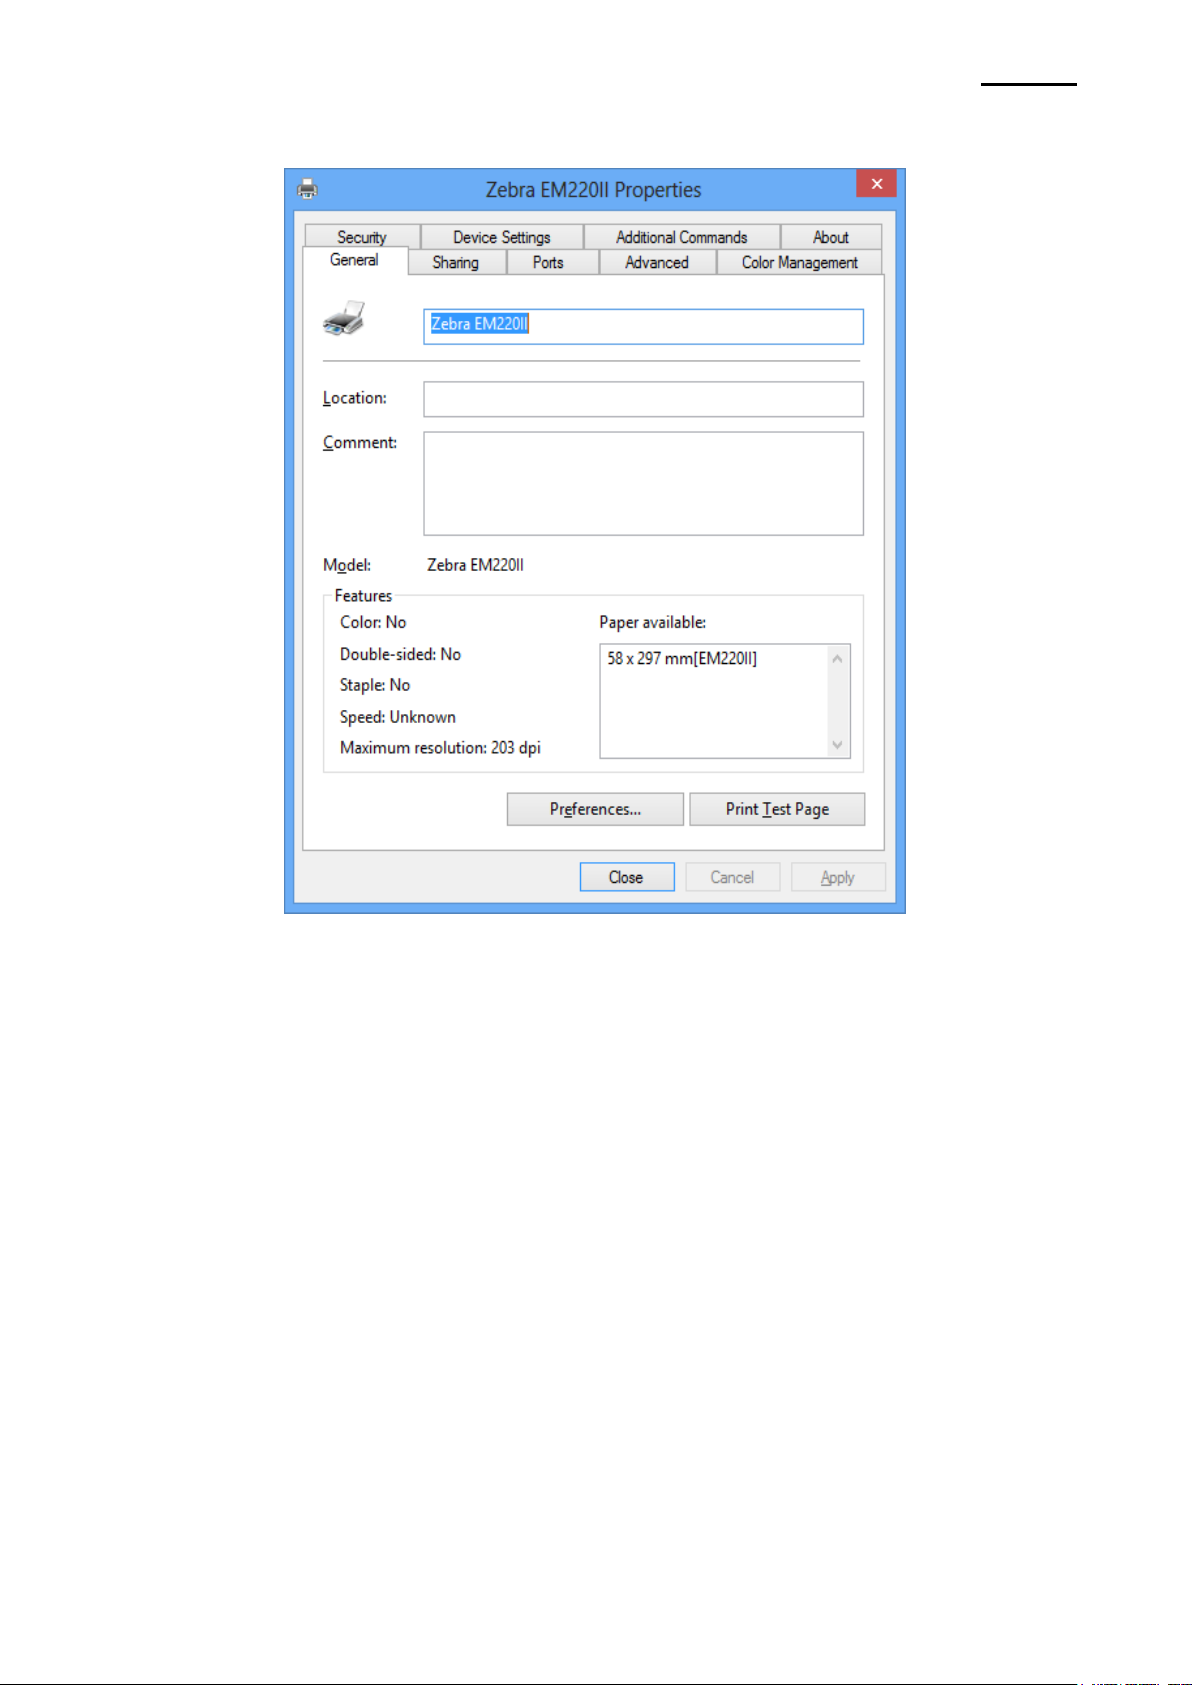
6) Open the printer properties window in the Windows OS.
7) Click the “Port Settings” button in the “Ports” tab.
8) Match the communication settings to those of the printer.
(The communication settings of the printer can be performed by conducting a self-test.)
Rev. 1.00

- 10 -
Mobile Printer
Windows Driver Manual
9) Click the “Print Test Page” button and check printing status.
EM220II
10) Proper installation of the driver is indicated if the test page is printed normally.
Rev. 1.00

- 11 -
Mobile Printer
Windows Driver Manual
4-1-2 Via USB Port
1) Double-click the Windows Driver installation file (EM220II_Vx.x.xx.exe).
2) Click the “Next” button.
EM220II
3) Select USB and click the “Next” button.
Rev. 1.00

- 12 -
Mobile Printer
Windows Driver Manual
4) Click the “OK” button.
5) Turn on the printer.
6) The USB Port setting can be confirmed in the Windows Driver properties.
EM220II
Rev. 1.00

- 13 -
Mobile Printer
Windows Driver Manual
7) Click the “Print Test Page” button and check printing status.
EM220II
8) Proper installation of the driver is indicated if the test page is printed normally.
Rev. 1.00
- 14 -
Mobile Printer
Windows Driver Manual
4-1-3 Via WLAN Port
1) Double-click the Windows Driver installation file (EM220II_Vx.x.xx.exe).
2) Click the “Next” button.
EM220II
3) Select Wireless LAN and click the “Next” button.
Rev. 1.00

EM220II
- 15 -
Mobile Printer
Windows Driver Manual
4) Clicking the ”Yes” button will reboot the PC.
5) Open the printer properties window in the Windows OS.
6) Click the “Port Settings” button in the “Ports” tab.
7) Match the communication settings to those of the printer.
(The communication settings of the printer can be performed by conducting a self-test.)
Rev. 1.00

- 16 -
Mobile Printer
Windows Driver Manual
8) Click the “Print Test Page” button and check printing status.
EM220II
9) Proper installation of the driver is indicated if the test page is printed normally.
Rev. 1.00

- 17 -
Mobile Printer
Windows Driver Manual
4-2 Installing on Windows VISTA/2008 Server/7/8
4-2-1 Via Serial Port or Bluetooth
1) Double-click the Windows Driver installation file (EM220II_Vx.x.xx.exe).
2) Click the “Next” button.
EM220II
3) Select the COM port to be used and click the “Next” button.
Rev. 1.00
- 18 -
Mobile Printer
Windows Driver Manual
4) If using Bluetooth, click the “Yes” button.
- Click “No” if using a Serial port.
- To use Bluetooth, first install the corresponding product software.
(Refer to the user manual of the corresponding product.)
* Select the Bluetooth Driver to be used.
“Yes”: to use an IVT, Broadcom Driver
“No”: to use a driver supplied by the Windows OS
EM220II
5) Clicking the “Yes” button will reboot the PC.
Rev. 1.00

EM220II
- 19 -
Mobile Printer
Windows Driver Manual
6) Open the printer properties window in the Windows OS.
7) Click the “Port Settings” button in the “Ports” tab.
8) Match the communication settings to those of the printer.
(The communication settings of the printer can be performed by conducting a self-test.)
Rev. 1.00
- 20 -
Mobile Printer
Windows Driver Manual
9) Click the “Print Test Page” button and check printing status.
EM220II
10) Proper installation of the driver is indicated if the test page is printed normally.
Rev. 1.00

- 21 -
Mobile Printer
Windows Driver Manual
4-2-2 Via USB Port
1) Double-click the Windows Driver installation file (EM220II_Vx.x.xx.exe).
2) Click the “Next” button.
EM220II
3) Select USB and click the “Next” button.
Rev. 1.00

- 22 -
Mobile Printer
Windows Driver Manual
4) Click the “OK” button.
5) Turn on the printer.
6) The USB Port setting can be confirmed in the Windows Driver properties.
EM220II
Rev. 1.00

- 23 -
Mobile Printer
Windows Driver Manual
7) Click the “Print Test Page” button and check printing status.
EM220II
8) Proper installation of the driver is indicated if the test page is printed normally.
Rev. 1.00

- 24 -
Mobile Printer
Windows Driver Manual
4-2-3 Via WLAN Port
1) Double-click the Windows Driver installation file (EM220II_Vx.x.xx.exe).
2) Click the “Next” button.
EM220II
3) Select Wireless LAN and click the “Next” button.
Rev. 1.00

EM220II
- 25 -
Mobile Printer
Windows Driver Manual
4) Clicking the “Yes” button will reboot the PC.
5) Open the printer properties window in the Windows OS.
6) Click the “Port Settings” button in the “Ports” tab.
7) Match the communication settings to those of the printer.
(The communication settings of the printer can be performed by conducting a self-test.)
Rev. 1.00

- 26 -
Mobile Printer
Windows Driver Manual
8) Click the “Print Test Page” button and check printing status.
EM220II
9) Proper installation of the driver is indicated if the test page is printed normally.
Rev. 1.00

EM220II
- 27 -
Mobile Printer
Windows Driver Manual
5. Detailed Windows Driver Settings
The following functions can be set in detail after the Windows Driver installation is
complete.
5-1 Paper Supply Method
The printer structure is such that the print head, which carries out printing, and the cutter,
which cuts the printing paper, are separated. After printing, the location of the end section
can be adjusted as follows.
- Receipt: Printed text is transferred up to the cutter (manual cutter).
- Receipt [No feed]: Printed text is transferred up to the next line only.
(minimum transfer: 0x0A).
- Form: For long print jobs, printed text is transferred according to the Receipt option per
selected paper size.
Detailed setting can be done as follows.
1) Open the printer properties window in the Windows OS.
Rev. 1.00

- 28 -
Mobile Printer
Windows Driver Manual
2) Click the “Printing Preferences” button in the “General” tab.
3) Select the desired setting in the “Paper/Quality” tab.
(Resolution is fixed at 203 203.)
EM220II
Rev. 1.00

- 29 -
Mobile Printer
Windows Driver Manual
5-2 Paper Size
The paper sizes available in the Windows Driver are as follows:
- 58 297 mm [EM220II]
- 58 3276 mm [EM220II]
Detailed setting can be done as follows:
1) Open the printer properties window in the Windows OS.
2) Click the “Printing Preferences” button in the “General” tab.
3) Select the “Paper/Quality” tab, and click the “Advanced” button.
Select the desired setting.
EM220II
Rev. 1.00

EM220II
- 30 -
Mobile Printer
Windows Driver Manual
5-3 Additional Commands
The Windows Driver serves to receive the content for print from an application and send it
to the printer. The Additional Commands function allows for the addition of desired
commands at the beginning or end of the print content sent to the printer.
The command functions available are as follows:
- Start Doc : Addition of command at the beginning of the document
- Start Page : Addition of command at the beginning of the page
- End Page : Addition of command at the end of the page
- End Doc : Addition of command/line feeding at the end of the document
Detailed setting can be done as follows:
1) Open the printer properties window in the Windows OS.
2) Click the “Additional Commands” tab.
Rev. 1.00

EM220II
- 31 -
Mobile Printer
Windows Driver Manual
3) If the user opts to open Cash Drawer 1 prior to printing, enter “<1B700019FF>” in
the “Start Doc” space and click the “OK” button.
4) If the user opts to open Cash Drawer 1 at the end of printing, enter
“<1B700019FF>” in the “End Doc” space and click the “OK” button.
5) If the user opts to feed three lines at the end of printing, enter “3” in the “End Doc” space
and click the “OK” button.
6) When downloading an image to the printer using the Mobile Unified Utility, the image
print command is FS p n m (Hex: 1C 70 m n).
For more information on the hexadecimals that can be entered in “Start Doc”, “Start Page”,
“End Page” and “End Doc”, refer to the Control Commands Manual.
Rev. 1.00

EM220II
- 32 -
Mobile Printer
Windows Driver Manual
Printer Fonts
Character Size (dot)
Sizes (point)
FontA1x1
FontA1x1[Ext.]
FontA1x1[255]
FontA1x1(12x24)
8.5
FontA1x2
FontA1x2[Ext.]
FontA1x2[255]
FontA1x2(12x48)
17
FontA2x1
FontA2x1[Ext.]
FontA2x1[255]
FontA2x1(24x24)
8.5
FontA2x2
FontA2x2[Ext.]
FontA2x2[255]
FontA2x2(24x48)
17
FontA2x4
FontA2x4[Ext.]
FontA2x4[255]
FontA2x4(24x96)
34
FontA4x2
FontA4x2[Ext.]
FontA4x2[255]
FontA4x2(48x48)
17
FontA4x4
FontA4x4[Ext.]
FontA4x4[255]
FontA4x4(48x96)
34
FontA4x8
FontA4x8[Ext.]
FontA4x8[255]
FontA4x8(48x192)
68
FontA8x4
FontA8x4[Ext.]
FontA8x4[255]
FontA8x4(96x96)
34
FontA8x8
FontA8x8[Ext.]
FontA8x8[255]
FontA8x8(96x192)
68
FontB1x1
FontB1x1[Ext.]
FontB1x1[255]
FontB1x1(9x24)
6
FontB1x2
FontB1x2[Ext.]
FontB1x2[255]
FontB1x2(9x48)
12
FontB2x1
FontB2x1[Ext.]
FontB2x1[255]
FontB2x1(18x24)
6
FontB2x2
FontB2x2[Ext.]
FontB2x2[255]
FontB2x2(18x48)
12
FontB2x4
FontB2x4[Ext.]
FontB2x4[255]
FontB2x4(18x96)
24
FontB4x2
FontB4x2[Ext.]
FontB4x2[255]
FontB4x2(36x48)
12
FontB4x4
FontB4x4[Ext.]
FontB4x4[255]
FontB4x4(36x96)
24
FontB4x8
FontB4x8[Ext.]
FontB4x8[255]
FontB4x8(36x192)
48.5
FontB8x4
FontB8x4[Ext.]
FontB8x4[255]
FontB8x4(72x96)
24
FontB8x8
FontB8x8[Ext.]
FontB8x8[255]
FontB8x8(72x192)
48.5
Printer Fonts
Character Size (dot)
Sizes (point)
FontC1x1
FontC1x1[Ext.]
FontC1x1[255]
FontC1x1(9x24)
8.5
FontC1x2
FontC1x2[Ext.]
FontC1x2[255]
FontC1x2(9x48)
17
FontC2x1
FontC2x1[Ext.]
FontC2x1[255]
FontC2x1(18x24)
8.5
FontC2x2
FontC2x2[Ext.]
FontC2x2[255]
FontC2x2(18x48)
17
FontC2x4
FontC2x4[Ext.]
FontC2x4[255]
FontC2x4(18x96)
34
FontC4x2
FontC4x2[Ext.]
FontC4x2[255]
FontC4x2(36x48)
17
FontC4x4
FontC4x4[Ext.]
FontC4x4[255]
FontC4x4(36x96)
34
FontC4x8
FontC4x8[Ext.]
FontC4x8[255]
FontC4x8(36x192)
68
FontC8x4
FontC8x4[Ext.]
FontC8x4[255]
FontC8x4(72x96)
34
FontC8x8
FontC8x8[Ext.]
FontC8x8[255]
FontC8x8(72x192)
68
6. Windows Driver Specifications
6-1 Fonts
The Windows Driver of the printer supports the fonts listed below.
Printing is done at faster speed when using the fonts below as opposed to the Windows
fonts of the OS.
Rev. 1.00

- 33 -
Mobile Printer
Windows Driver Manual
Printer Fonts are defined as follows.
1) FontA1x2
- ANSI Character code support (Code Page 16: 1252)
- Character size (dot): 12 x 24 (double height)
- Sizes (point): 17
2) FontA1x2[Ext]
- IBM expansion Character code support (Code Page 0: 437)
- Character size (dot): 12 x 24 (double height)
- Sizes (point): 17
3) FontA1x2[255]
- Buyer exclusive code support (Code Page 255)
- Character size (dot): 12 x 24 (double height)
- Sizes (point): 17
EM220II
Rev. 1.00
EM220II
- 34 -
Mobile Printer
Windows Driver Manual
Printer Font for
Special Function
Function
Size(point/dot)
FontControl
Justification (Left/Center/Right)
Output HT, Output LF, Output CR
Barcode Printing
Print NV Graphic Data
(8.5 / 12x24)
Character
Special Function
5
Prints HT (0 x 09)
6
Prints LF (0 x 0A)
7
Prints CR (0 x 0D)
i
Prints 1st color image in double-sized mode.
j
Prints 2nd color image in double-sized mode.
k
Prints 3
rd
color image in double-sized mode.
l
Prints 4th color image in double-sized mode.
m
Prints 5th color image in double-sized mode.
p
Does not add HRI characters to the barcode
q
Adds HRI characters in FontA above the barcode
r
Adds HRI characters in FontA below the barcode
s
Adds HRI characters in FontB above the barcode
t
Adds HRI characters in FontB below the barcode
w
Aligns text to the left
x
Aligns text to the center
y
Aligns text to the right
R
Prints 1st color image.
S
Prints 2nd color image.
T
Prints 3
rd
color image.
U
Prints 4th color image.
V
Prints 5th color image.
6-2 Special Functions
The Windows Driver supports the special functions indicated below.
These special functions are available when using the characters after the “FontControl”
font is selected.
Note: This function is not an ordinary character printing function.
1) Sample Use
If the “FontControl” font is selected and 6 is entered, the “LF” (Line Feeding) operation is
activated.
(does not entail the printing of the character “6”)
2) “FontControl” Font Function
Rev. 1.00

EM220II
- 35 -
Mobile Printer
Windows Driver Manual
Printer Font Name
Size
Supported Characters
Codabar
18/35.5/53/71
Numeric: 0~9
Symbols: $, +, -, ., /, :
Letters: A~D
Code39
18/35.5/53/71
Numeric: 0~9
Symbols: $, +, -, ., /
Letters: A~Z
JAN13(EAN)
18/35.5/53/71
Numeric: 0~9
JAN8(EAN)
18/35.5/53/71
Numeric: 0~9
ITF
18/35.5/53/71
Numeric: 0~9
UPC-A
18/35.5/53/71
Numeric: 0~9
UPC-E
18/35.5/53/71
Numeric: 0~9
Code93
18/35.5/53/71
ASCII CODE: 0~127
Code128
18/35.5/53/71
ASCII CODE: 0~127
6-3 Barcodes
The Windows Driver supports the barcodes indicated below.
This function is available when entering barcode data after selecting “Printer Font Name”.
In addition, the “FontControl” font can be used to add HRI characters.
1) Sample Use
Select “Code39” and Size “18”, and then enter “1234”.
The barcode corresponding to “1234” is printed.
2) When Using Code128
Select “Code128” and Size “18”, and then enter “{B1234”.
The barcode corresponding to “1234” is printed.
When using “Code128”, characters, such as “{A”, “{B”, “{C”, must be included before the
input data.
6-4 Two-Dimensional Barcodes
The Windows Driver supports the following two-dimensional barcodes.
- PDF417
- QR Code
Usage is identical to that for barcodes.
Rev. 1.00

EM220II
- 36 -
Mobile Printer
Windows Driver Manual
For Each prnPrinter In Printers
If prnPrinter.DeviceName = “Zebra EM220II” Then
Set Printer = prnPrinter
Exit For
End If
Next
7. Use of Windows Driver
7-1 Use of Visual Basic
This section explains the use of the Windows Driver with Visual Basic to control the printer
(EM220II).
Sample programs are saved together if the Windows Driver is installed.
7-1-1 Windows Driver Selection
The following code is an example of the selection of the “Zebra EM220II” Windows Driver:
Rev. 1.00

EM220II
- 37 -
Mobile Printer
Windows Driver Manual
'Print in Windows font
Printer.FontSize = 9
Printer.FontName = “Arial”
Printer.Print “Arial Test”
'Print in printer font
Printer.FontSize = 8.5
Printer.FontName = “FontA1x1”
Printer.Print “FontA1x1Test”
Printer.EndDoc
'Print Bar Code.
Printer.FontSize = 18
Printer.FontName = "JAN8 (EAN)"
Printer.Print "1234567"
Printer.EndDoc
'Print Two-dimensional Codes.
Printer.FontSize = 9.5
Printer.FontName = "PDF417"
Printer.Print "Print Test PDF417"
Printer.EndDoc
7-1-2 Test Printing
The following code is an example of the printing of Arial Test via the Windows font, and
FontA1x1Test via the printer font:
7-1-3 Barcode Printing
The following code is an example of the printing of the JAN8 (EAN) barcode:
7-1-4 Two-Dimensional Barcode Printing
The following code is an example of the printing of the PDF417 two-dimensional barcode:
Rev. 1.00

- 38 -
Mobile Printer
Windows Driver Manual
7-2 Use of WordPad
7-2-1 WordPad Environment Settings
After running WordPad and setting the following conditions, conduct a test.
- Select Printer
After selecting “Print” from the “File” tab, select the printer (Zebra EM220II).
- Select Paper Size, Orientation, and Margins
After selecting “Page Settings” from the “File” tab, select the paper size, orientation,
and margins.
7-2-2 Text Printing
Use the Windows Driver of the printer to run a test.
EM220II
1) Select the desired font from the Font menu (FontA1x1).
2) Select the desired font size (8.5).
3) Enter the text to be printed in WordPad.
4) Click the Print button in the toolbar to print.
Rev. 1.00

- 39 -
Mobile Printer
Windows Driver Manual
7-2-3 Barcode Printing
Use the Windows Driver of the printer to print the barcode.
EM220II
1) Select the desired barcode from the Font menu (Code128).
2) Select the desired font size (18).
3) Enter “{A123435” in WordPad.
4) Click the Print button in the toolbar to print.
Rev. 1.00

- 40 -
Mobile Printer
Windows Driver Manual
7-2-4 Two-Dimensional Barcode Printing
Use the Windows Driver of the printer to print the two-dimensional barcode.
EM220II
1) Select the desired two-dimensional barcode from the Font menu (PDF417).
2) Select the desired font size (8.5).
3) Enter “Two-dimensional Codes Test: PDF417” in WordPad.
4) Click the Print button in the toolbar to print.
Rev. 1.00

www.zebra.com
Zebra Technologies International, LLC Zebra Technologies Europe Limited
333 Corporate Woods Parkway Dukes Meadow
Vernon Hills, Illinois 60061, 3109 USA Millboard Road
Phone: +1.847.634.6700
Toll-Free: +1.800.423.0422
Fax: +1.847.913.8766
Bourne End
Buckinghamshire, SL8 5XF, UK
Phone: +44 (0)1628 556000
Fax: +44 (0)1628 556001
 Loading...