


Zanussi ZWD1470 User Manual
WASHER-DRYER
ZWD 1270 W
ZWD 1270 S
ZWD 1470 W
HYDROSYSTEM 5.5 kg
PROGRESS 1200
Synthetics
Delicates
Cottons
Wool
60°C
50°C
95°C
40°C
1200
900
700
500
D
e
l
a
y
ZWD 127O W
Skip
Hand Wash
Prewash
30°C
Extra Dry
Store Dry
Iron Dry
Cottons
Synthetics
Cottons
Store Dry
Synthetics
Rinse Hold
Extra Quick
Fabrics TemperatureSpin Speed Options
Auto Dry
Drying Time
Start/Pause
Reset
On/Off
Rinse
Drain
Spin
Wash
Prewash
Drying
40° AA
INSTRUCTION BOOKLET
132989240
GB

2
Installation
●
This appliance is heavy. Care should be taken when
moving it.
●
It is dangerous to alter the specifications or attempt
to modify this product in any way.
●
All packing and transit bolts must be removed before
use. Serious damage can occur to the product and to
property if this is not adhered to. See relevant section
in instructions.
●
Any plumbing work required to install this appliance
should be carried out by a qualified plumber or
competent person.
●
Any electrical work required to install this appliance
should be carried out by a qualified electrician or
competent person.
●
Care must be taken to ensure that the appliance does
not stand on the electrical supply cable.
●
If the machine is situated on a carpeted floor, please
adjust the feet in order to allow air to circulate freely.
Child Safety
●
This appliance is designed to be operated by adults.
Children should not be allowed to tamper with the
controls or play with the product.
●
Pets and children have been known to climb into
washer-dryers. Please check your drum before use.
●
The glass door becomes very hot during the washing
and drying cycle. Keep children away from the
vicinity of the appliance whilst it is in operation.
●
Keep all packaging well away from children.
●
Keep all detergents in a safe place out of children’s
reach.
Use
●
Always unplug the appliance and turn off the water
supply after use.
●
Do not overload the appliance. See relevant section
in the instruction book.
●
Only wash and dry fabrics which are designed to be
machine washed and dried. If in doubt, consult the
care label on the clothes.
●
Before washing, ensure that all pockets are empty
and buttons and zips are fastened. Avoid washing
frayed or torn articles and treat stains such as paint,
ink, rust, and grass before washing. Underwired bras
must NOT be machine washed.
●
Any objects such as coins, safety pins, nails, screws,
stones or any other hard, sharp material can cause
extensive damage and must not be placed into the
machine.
●
Garments which have been in contact with volatile
petroleum products should not be machine washed.
If volatile cleaning fluids are used, care should be
taken to ensure that the fluid is removed from the
garment before placing in the machine.
●
Wash small items such as socks, laces, washable
belts etc in a washing bag or pillow case as it is
possible for such items to slip down between the tub
and the inner drum.
●
Only use the advised quantities of fabric softener.
Damage to the fabric can ensue if you over-fill.
Refer to the manufacturer’s recommendations of
quantities.
●
As some duvets and eiderdowns should be
washed/dried in large commercial machines because
of their bulk, please check with the manufacturer of
the item before washing in a domestic machine.
●
The users should always check that they have not
left their gas lighters (disposable or otherwise) in
their clothing.
●
Never tumble dry items that have had contact with
chemicals such as dry cleaning fluid.These are of a
volatile nature and could cause an explosion.
Only tumble dry items which have been washed in
water or require airing.
●
Plastic detergent dispensers should not remain in the
drum during the drying cycle, as the plastic used is
not designed to withstand the heat. If you wish to
wash-through-to-dry you should use the
conventional detergent dispenser drawer.
●
Leave the porthole door slightly ajar between washes
to preserve the door seal.
●
Under no circumstances should you attempt to repair
the machine yourself. Repairs carried out by
inexperienced persons may cause injury or serious
malfunctioning. Contact your local Service Force
Centre. Always insist on genuine spare parts.
Important Safety Information
It is most important that this instruction book should be retained with the appliance for future
reference. Should the appliance be sold or transferred to another owner, or should you move
house and leave the appliance, always ensure that the book is supplied with the appliance in
order that the new owner can get to know the functioning of the appliance and the relevant
warnings.
These warnings have been provided in the interest of safety. You MUST read them carefully
before installing or using the appliance.

3
Contents
For the User
Important Safety Information
2
Your New Washer-Dryer
4
Description of the Appliance
5
Detergent dispenser drawer 5
Child safety feature 5
The Control Panel
6-10
Operating sequence
11-14
Washing 11
Load the laundry 11
Measure out the detergent 11
Measure out the fabric softener 11
Switch the machine on 11
Select the required programme/fabric 11
Select the temperature 12
Select the spin speed or the “Rinse Hold” option 12
Select the desired options 12
Select the “Delay” 12
Start the programme 12
How to change a programme during its cycle 13
How to cancel a programme during its cycle 13
How to open the door during the cycle of
a programme 13
End of programme 13
Drying 2.75 kg of cotton 14
Autodrying 2 kg of synthetics 14
Washing and Drying Hints
15
Which detergent to use?.... 16
And in which form? 16
Wash Care Symbols
17
Washing Programmes
18
Drying Programmes
19
Maintenance and Cleaning
20-21
Descaling 20
After each wash 20
Maintenance wash 20
External cleaning 20
Cleaning the dispenser drawer 20
Cleaning the drawer recess 20
Cleaning the pump 20-21
Cleaning the water inlet filter 21
The dangers of freezing 21
Emergency emptying out 21
Something Not Working
22-23
Service and Spare Parts
23
Guarantee Conditions
24
For the Installer
Installation Instructions
25
Technical Specifications
25
Unpacking 26
Positioning 26
Water inlet 27
Water drainage 27-28
Levelling 28
Special conditions 28
In the interest of the environment 28
Electrical connection 29
Guide to use the Instruction Book
The following symbols will be found in the text to guide you throughout the instructions:
Safety instructions
Hints and tips
Environmental information

Your New Washer-Dryer
This new machine meets all modern requirements for effective treatment of laundry with low
water, energy and detergent consumption.
●
The special wool programme with its new delicate
wash system treats your woollens with extreme care.
●
The balance control device ensures that the
machine remains stable when spinning.
●
Automatic cooling of the wash water to 60°C
before draining, with the 95°C programme. This
reduces thermal shock to fabrics, helping to prevent
creasing.
●
The ECO valve allows total use of detergent and
reduces water consumption so saving energy.
●
The two drying programmes will give your wash
that soft, relaxed feel whatever the weather.
Ecological hints
In the interest
of the environment
●
Materials marked with the symbol are
recyclable.
●
Check with your local Council or Environmental
Health Office to see if there are facilities in your area
for re-cycling this appliance.
●
When the appliance is to be scrapped, cut off the
power supply cable and make the door lock device
unusable to prevent young children from being
trapped inside.
●
Help to keep your country tidy - use authorised
disposal sites for your old appliance.
To save water and energy and help protect the
environment, we recommend that you follow these
hints:
●
Adjust the quantity of detergent according to the
hardness of your water supply, the amount of
laundry and the degree of soiling.
●
Select the “Extra Quick” programme for lightly
soiled laundry.
●
A programme without prewash is sufficient for
normally soiled laundry.
●
Try to load the maximum drying capacity of the
machine as small loads are uneconomical.
●
Always load well spun laundry. The higher the spin
speed, the lower the electricity consumption and the
shorter the drying times.
How do we help to protect the environment?
We use recycled paper!
Important
Your machine is fitted with a balance control device, which ensures the machine is stable during the spin.
If the wash load appears not to have been spun sufficiently at the end of the wash cycle, because it is not evenly
distributed in the drum, the balance control device may have operated. It will therefore be necessary to redistribute the
wash load manually and select a spin programme. For more detailed information see the section headed "Something
Not Working".
4
5
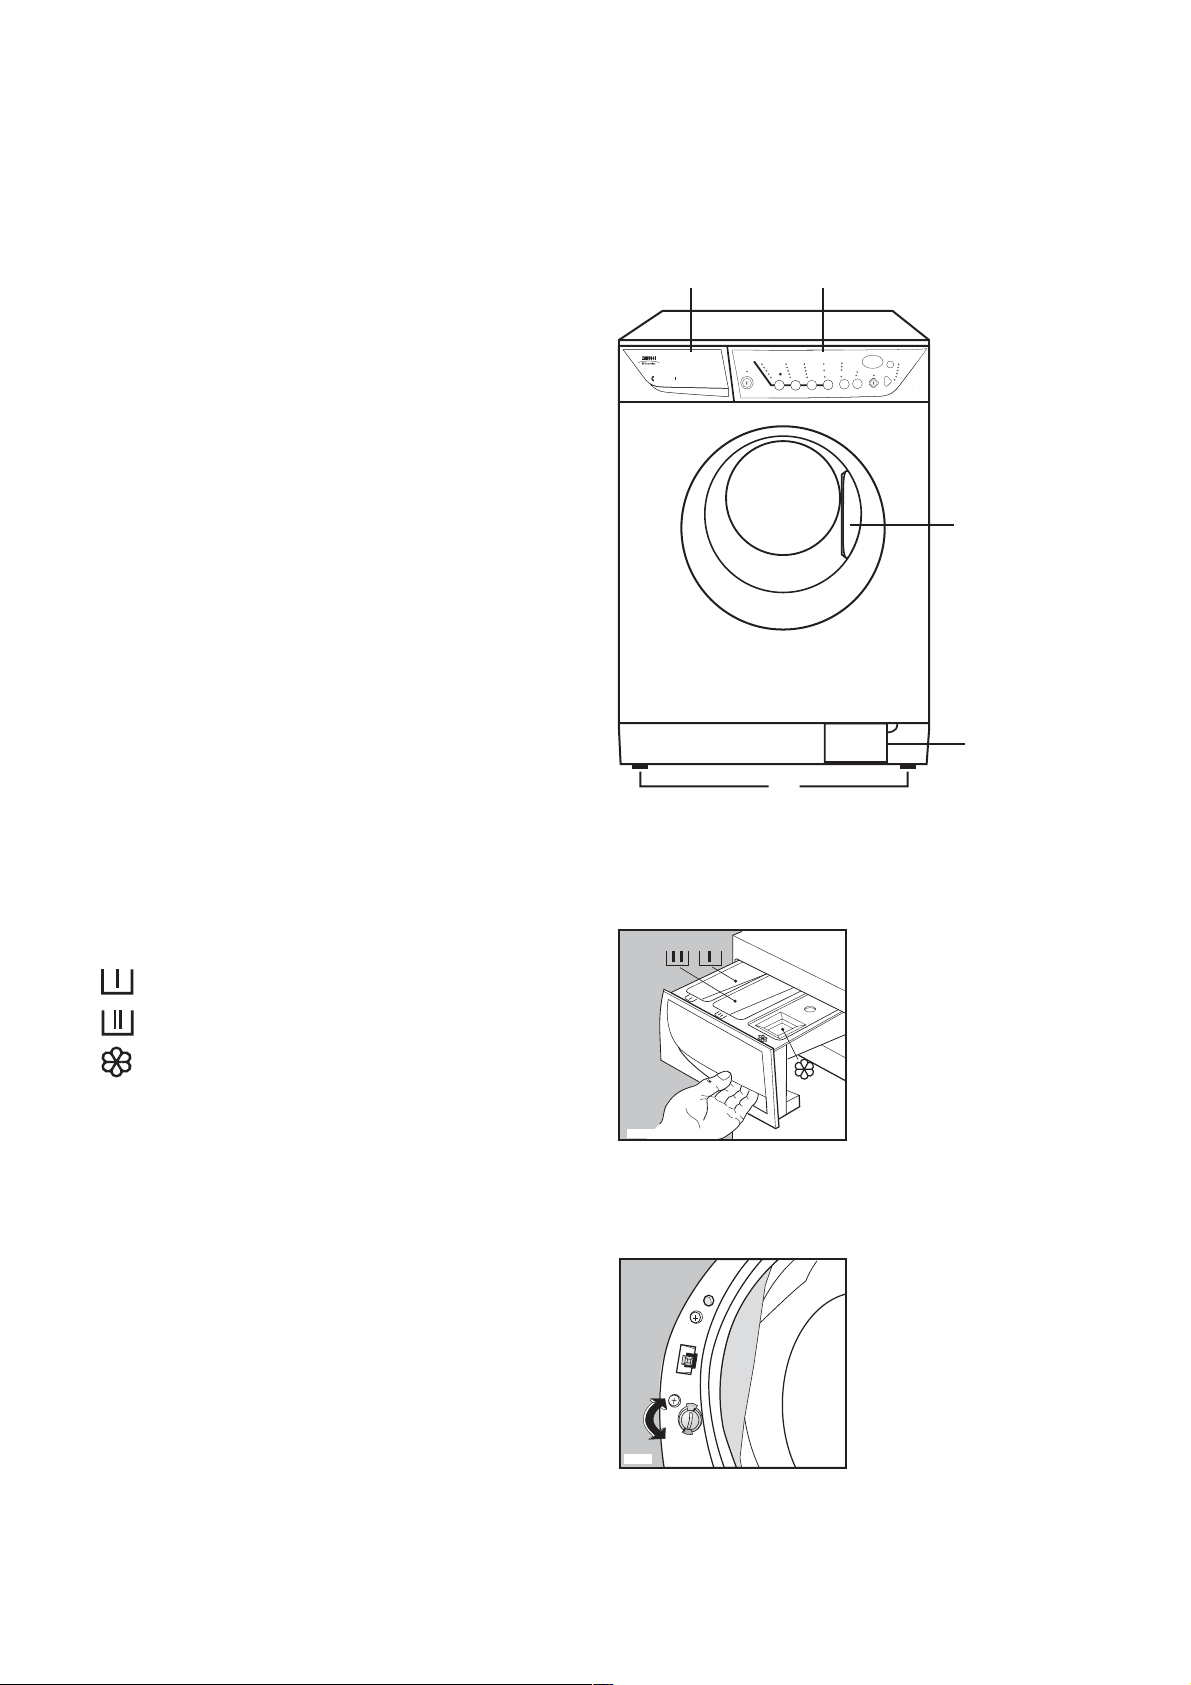
Description of the Appliance
1 Detergent dispenser drawer
2 Control Panel
3 Door opening handle
4 Drain pump
5 Adjustable feet
Detergent dispenser drawer
Prewash
Main wash
Fabric softener
Child safety feature
This machine incorporates a special child safety feature
to prevent small children from being trapped inside the
machine.
To activate this device, rotate the button (without
pressing it) inside the door clockwise until the groove is
horizontal. If necessary use a coin.
To disable this device and restore the possibility of
closing the door, rotate the button anti-clockwise until
the groove is vertical.
PROGRESS 1200
1
HYDROSYSTEM 5.5 kg
On/Off
Cottons
95°C
Synthetics
60°C
Delicates
50°C
Wool
40°C
30°C
Hand Wash
Fabrics Temperature Spin Speed Options
2
1200
900
40° AA
700
500
Extra Quick
Rinse Hold
Auto Dry
Prewash
Store Dry
Wash
Iron Dry
Rinse
Cottons
Synthetics
Spin
Skip
Synthetics
Store Dry
Drain
Drying
Reset
Start/Pause
Drying Time
ZWD 127O W
D
ela
y
Cottons
Extra Dry
Prewash
3
4
5
C0063
P1131
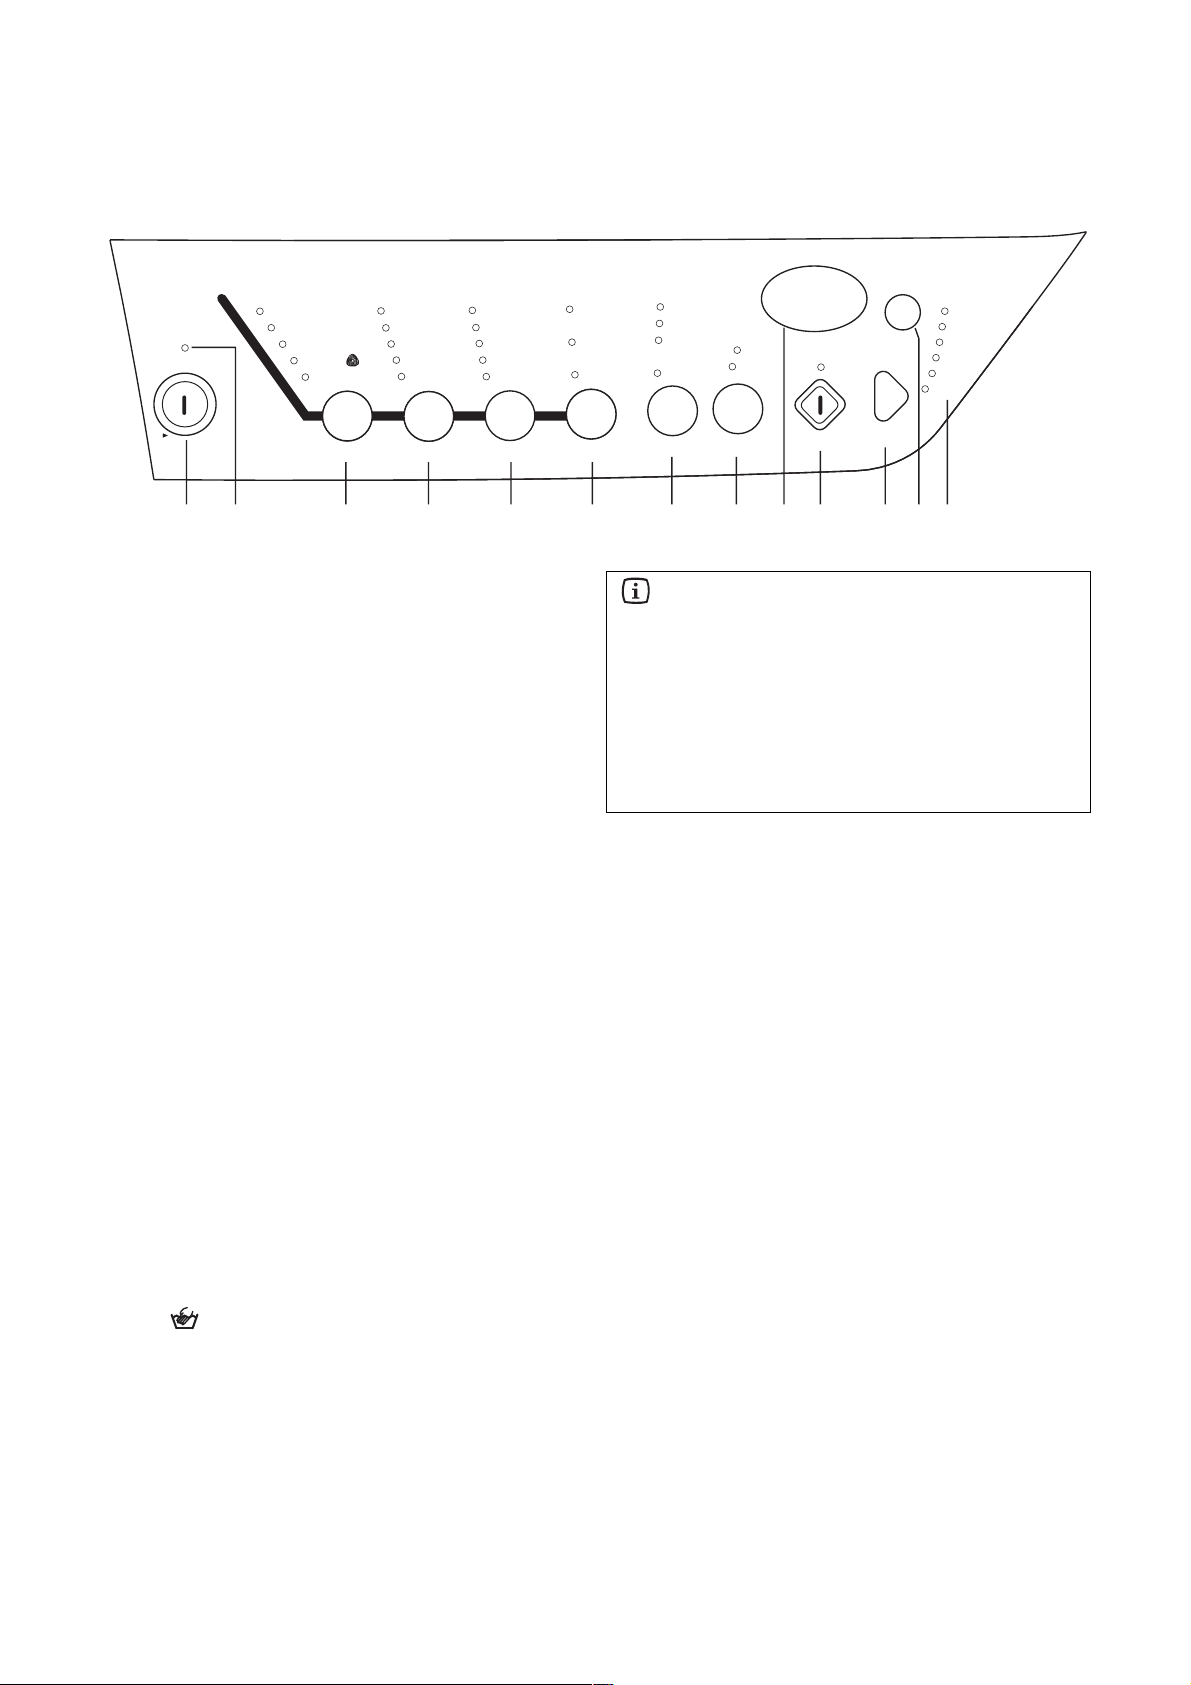
The Control Panel
Cottons
Extra Dry
Store Dry
Iron Dry
Synthetics
Store Dry
On/Off
Cottons
Synthetics
Delicates
Wool
Hand Wash
95°C
60°C
50°C
40°C
30°C
1200
900
700
500
Rinse Hold
Prewash
40° AA
Extra Quick
Cottons
Synthetics
Skip
Delay
ZWD 127O W
Prewash
Wash
Rinse
Spin
Drain
Drying
Fabrics Temperature Spin Speed Options
12 3 4 5 6 7 8910 111213
1 On/Off button
Press this button to switch the machine on. The display
(9) will show three blinking dashes or a blinking zero.
You will find more detailed explanations on page 7 and 8
(see “DISPLAY”).
Press the “On-Off” button again to switch the machine
off.
2 MAINS-ON light
This light is connected to the “On/Off” button. It lights
up when you press the button, and goes out when you
press it again.
3 “Fabrics” button
Press this button repeatedly to select the programme on
the basis of the type of laundry to be washed. The light
relevant to the selected programme will light up. The
machine will propose a temperature and automatically
select the maximum spin value provided for the
programme you have chosen. You can change these
values by operating buttons 4 and 5.
Hand Wash
When you select this programme, you obtain a
particularly delicate wash, suitable for articles of
clothing whose label indicates that they must be handwashed .
4 “Temperature” button
Press this button repeatedly to increase or decrease the
temperature, if you want your laundry to be washed at a
temperature different from the one proposed by the
machine. The relevant light will light up.
Maximum temperatures are 95°C for cotton, 60°C for
synthetic fabrics, 40°C for delicate fabrics, wool and
fabrics to be hand-washed (Hand Wash programme).
Auto Dry
Drying Time
Start/Pause
Reset
Important!
By pressing the “Temperature” and “Spin Speed”
buttons simultaneously for 3 seconds, the acoustic
signal is deactivated at the end of the cycle, when
selecting the programmes and in case of an incorrect
option selection.
By pressing these 2 buttons again the acoustic signal is
reactivated.
5 “Spin Speed” button
Press this button repeatedly to change the spin speed, if
you want your laundry to be spun at a speed different
from the one proposed by the machine. The relevant
light will light up.
Maximum speeds are:
• for cotton: 1,400 (ZWD 1470 W)
1,200 rpm (ZWD 1270 W - 1270 S) ;
• for synthetic fabrics, wool, and fabrics to be hand-
washed: 900 rpm;
• for delicate fabrics: 700 rpm.
“Rinse Hold” position : when you choose this option,
the machine will not drain the water of the last rinse, so
as not to crease the laundry.
At the end of the cycle, the “Start/Pause” button light
will flash, to indicate that the water must be drained and
a static zero will appear on the display.
To complete the cycle, choose one of the following
options:
• Draining and spin:
- Press the “Start/Pause” button. The machine will
drain the water, then spin the laundry at the
maximum speed provided for the selected
programme.
- Select spin speed by means of button 5, and press
the “Start/Pause” button.
6

7
• Drain only
- Press the “Skip/Reset” button once, so as to cause
the “Drain” light to light up, then press the
“Start/Pause” button.
Important! If you accidentally press the “Start/Pause”
button more than once, the display will show three
blinking dashes. To cause the washing machine to
drain the water, select any washing programme by
means of the “Fabric” button, then press
“Skip/Reset” three times in order to select the
“Drain” position (only the “Drain” light will remain
lit).
The Rinse Hold option cannot be selected for the
automatic WASHING & DRYING programme.
6 OPTIONS button
Press this button to select the following options:
• Prewash: select this option if you wish your laundry
to be prewashed before the main wash (not available
for wool and hand-wash cycle).
The prewash ends with a short spin at 650 rpm in
programmes for cotton and synthetic fabrics, whereas
in the programme for delicate fabrics the water is only
drained.
40° AA: this option can be selected for cottons and
synthetics lightly or normally soiled with a
temperature of 40°C or higher.
If you select 40°C together with option 40 AA, the
machine will prolong the time at 40°C in the washing
phase. On cotton programme this will allow an A class
in energy efficiency and washing performance to be
achieved.
If you select 95°C, 60°C or 50°C and press the 40 AA
button, the washing temperature will be reduced and
the washing time will be prolonged.
• “Extra Quick”: select this option for laundry that is
only slightly soiled (not for wool and Hand Wash
programme).
The washing time will be reduced according to the
type of fabric and the selected temperature.
The “Prewash”, the “40 AA” and “Extra Quick” options
cannot be selected together.
7 “Auto Dry” button
This button allows you to choose the required degree of
drying for cottons and synthetics:
- Extra dry (only for cottons)
- Store dry (cottons and synthetics)
- Iron dry (only for cottons)
The drying time is automatically adjusted by the
machine: the laundry will be dried to the selected degree
of dryness.
8 “Drying Time” button
By depressing this button you can select a timed
programme for cotton or synthetics, the relevant light
illuminates. To select “cottons” you have to push the
button for about 2 seconds. To select the drying time
push the button until the time you want appears in the
display according to the fabrics (cotton or synthetics)
you have to dry.
- For COTTON you can select a drying time from 10
minutes to 130 minutes (
2.10).
- For SYNTHETICS you can select a drying time from
10 minutes to 100 minutes (
1.40).
Every time you press the button the time increases by
5 mins.
9 Display
The following pieces of information are shown on the
display:
• Three blinking dashes, when a programme is
cancelled by means of the “Skip/Reset” button.
The three blinking dashes will also appear when you
press the “On/Off” button to switch the machine on, if
the previously selected cycle has been erased.
---
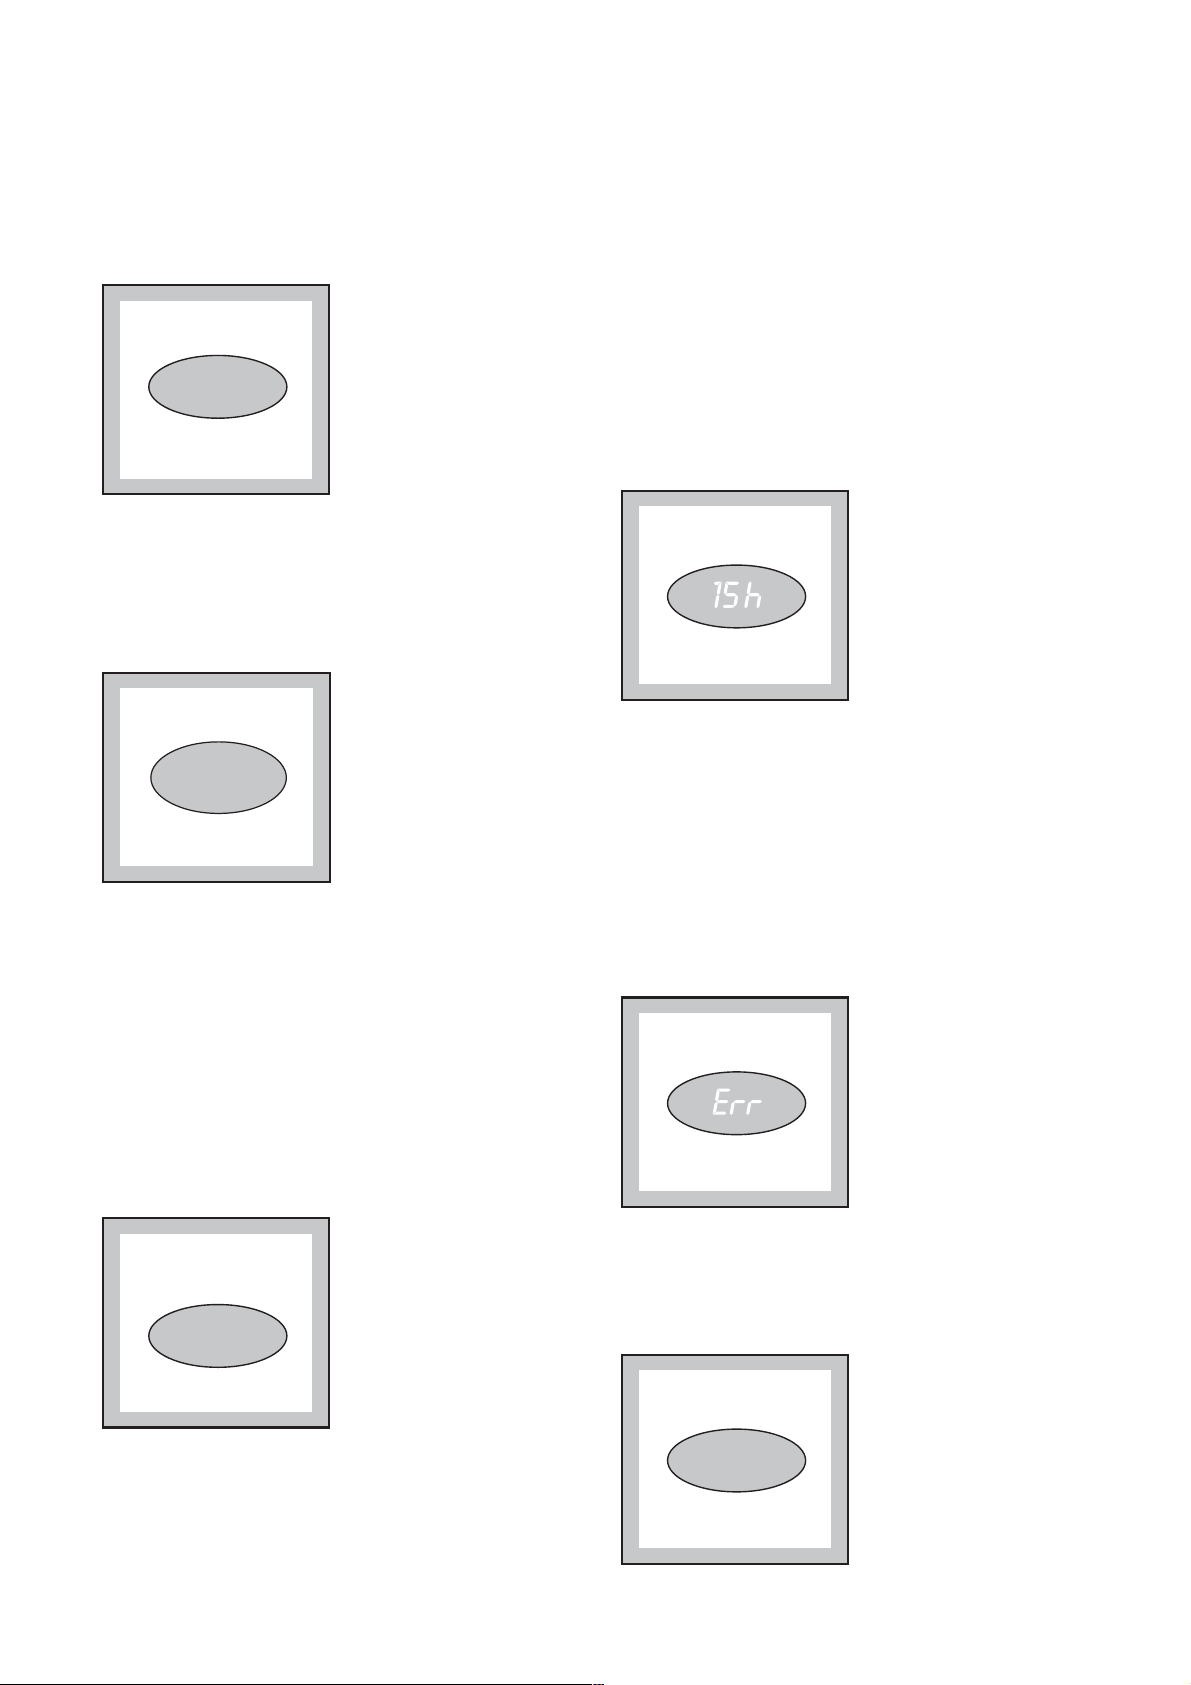
•
Duration of washing programme in hours
and minutes, after you have selected a programme.
2.05
While the programme is running (after you have
pressed the “Start/Pause” button), the displayed time
value decreases by one unit every minute.
• Selected drying time in minutes or hours and
minutes.
1.25
After the programme has started the time remaining is
updated every minute.
• The washing machine has stopped with water in
the tub, at the end of a programme with the “Rinse
Hold” option: this is indicated by a static zero.
• The washing machine has completed the
programme: this is indicated by a blinking zero. At
the same time. The zero will reappear when you
switch the washing machine on, unless the previous
programme has been erased by means of the
Skip/Reset button.
Important!
The first time you use the machine, when you switch
it on, it may display a blinking zero and give an audible
warning signal. This is due to the fact that the machine
has performed a washing cycle during the
manufacturer’s inspection tests, and this cycle has not
been erased after its completion.
• Delay start, a time value indicated in hours and
selected by means of the relevant button.
The delay time is displayed for 3 seconds, then the
duration of the selected programme reappears.
After you have pressed the “Start/Pause
countdown begins, and the delay time value decreases
by one unit every hour.
You can delay the start of the selected programme by
up to 24 hours in one hour intervals.
• An incorrect option selection has been made: this is
indicated by the message Err when a function
incompatible with the current programme is selected.
” button, the
0
The incorrect selection is also indicated by an audible
warning signal.
• An alarm code indicates a fault in the machine
operation (see the relevant chapter on page 22-23).
E20
8
9
10 “Start/Pause” button
This button has three functions:
• Start: after you have selected the desired programme
and options, press this button to start the machine. The
light above the button will stop flashing and remain lit.
If you have selected a delay time by means of button
12, the countdown will begin and will be shown on
the display.
• Pause: when you press this button again, the
programme in progress is interrupted. The light above
the button will start flashing. To restart the
programme, press the button again.
Important! You must set the washing machine to
PAUSE before you make any change in the programme
in progress.
• Draining of water and spinning after the execution
of programmes with the “Rinse Hold” option.
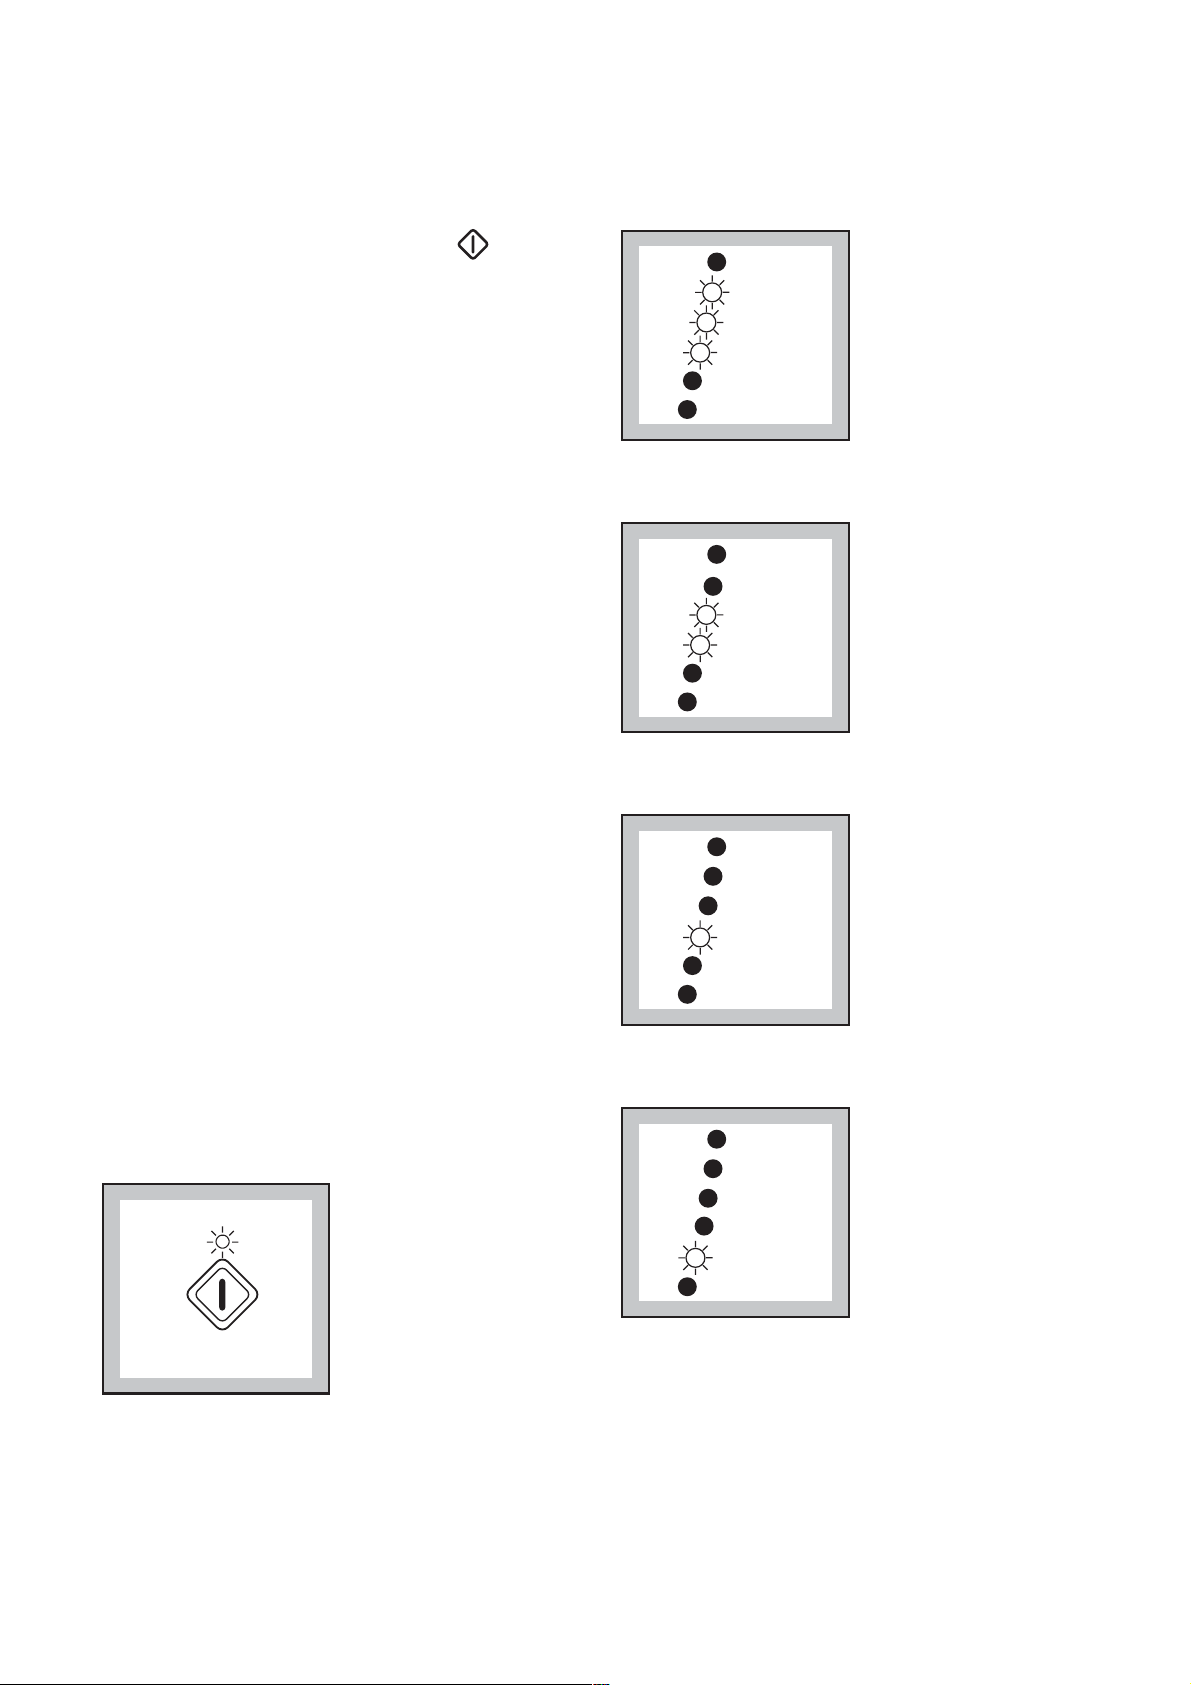
11 “Skip/Reset” button
This button performs two functions:
- Clears the memory
- Selects special programmes
At the end of every programme the “Reset” button must
be pressed once or repeatedly to clear the programme
memory. This will be confirmed by three dashes,
flashing in the display.
If the previous programme is not cleared, the display
will show a “
0” flashing and an audible signal will
sound, when you switch the machine on.
Selecting a special programme:
A wash programme must be selected in the normal way.
(“Start/Pause” button not pressed)
A normal wash cycle consists of the following phases,
Wash - Rinses - Spin and is confirmed by the
illumination of the corresponding LED,s.
To select rinse & spin, press the “Skip” button once,
the wash LED goes out.
To select spin only, press the “Skip” button twice.
The wash & rinse LED,s go out.
To select Drain press the “Skip” button three times, the
wash - rinse - spin LED,s go out.
If you wish to cancel or advance the running
programme to the required phase, PAUSE the cycle and
then press the “Skip” button as previously described.
Prewash
Wash
Rinses
Spin
Drain
Drying
Prewash
Wash
Rinses
Spin
Drain
Drying
S
t
a
e
r
s
t
/
u
P
a
Prewash
Wash
Rinses
Spin
Drain
Drying
Prewash
Wash
Rinses
Spin
Drain
Drying

10
12 “Delay” button
This button makes it possible to delay the starting of the
programme by up to 24 hours. The delay you have
selected is shown on the display for about 3 seconds;
afterwards, the duration of the programme reappears.
You must select this option after you have set the
programme and before you press the “Start/Pause”
button.
The time value shown on the display will decrease by
one unit every hour.
You can change the delay time at any moment,
before you press the “Start/Pause” button.
If you have already pressed the “Start/Pause” button,
and you wish to change or cancel the delay time,
proceed as follows:
• set the machine to PAUSE by pressing the
“Start/Pause” button;
• press the “Delay” button until the display shows the
desired delay time or
• press the “Delay” button once, to erase the delay time.
The display will indicate “
0 h”.
• press the “Start/Pause” button again.
Important!
The door will be locked throughout the delay time.
If you need to open the door, you must first set the
machine to PAUSE by pressing the “Start/Pause”
button. After you have closed the door, press the
“Start/Pause” button again.
13 Programme phase indicator
lights
When you select a programme, the lights relevant to the
phases that form the programme light up.
After you have started the programme, only the light
relevant to the phase that is currently being carried out
will remain lit.
Prewash
Wash
Spin
Rinses
Drain
Drying