

Page 1

I. W arning
To avoid fire or electrical shoc k, do not expose this product to rain or moisture.
To avoid short circuit, be sure the batteries con tacts are securely packed and in accordance with local provision
when handling the batteries.
Please place the b atteries an d the part s which can b e swallowed mis takenly a way from chi ldren. Con tact a docto r
immediately when it occurs.
To avoid possible injury to eyes, do not use the flash light in a short distance from the eyes.
To avoid possible safety accident, do not use the flash light on the people who need a high degree of attention.
Please take out the batteries and stop using immediately in case of below.
● This product is dropped or shocked seriously and the inner part of the product is bare d.
● If the battery leaks corrosive liquids, please take out the battery with gloves.
● The product gives off strange smell, smokes or heats.
Do not disassemble or maintain this product. Touching the internal high voltage circuit will cause e lectric shock.
Page 2

II. Features
z SUPPORTS HIGH-SPPEED SYNC FLASH
With high -speed sync (FP flash), the YN568EX can synchronize with a ll shutter speeds, the maximum shutter sync
up to 1/8000.
z COMPATIBLE WITH N’s and C’s WIRELESS FLASHING SYSTEM
One YN568EX is able to respectively accept internal flashing of 580EX II, SB-900/800/700, 7D/60D/600D, C
order of N’s internal flashing and ST-E2 wireless signal, a chieves external TTL and manual flashing.
z LARGE-SIZE LCD DISPLAY
Flashing function can be checked and set on a more clearly and subjectively basis and can be used more
conveniently by Large-size LCD display.
z GN58@ ISO100,105mm
YONGNUO brand-new range of speedlites with high index support TTL, M, Multi flashing model.
z MULTIPLE TRIGGER MODE SUPPORTED
YN568EX can be triggered by the camera set-top, built-in or main-controlled flashing command, S1 and S2
preflashing.
z SUPPOR TS MOTOR ZOOMING(24~105mm)
The covered focal length will vary between 24~105mm on the lamp adapter by operating the zoom button on the
flash light.
Page 3

z COMPREHENSIVELY SUPPORTS TTL FUNCTIONS
HSS, FEC, FEB, Rear-curtain sync, FE lock, Modeling Light, Canon camera menu accessable.
z REMOTE WIRELESS TRIGGER SUPPOTRED
The YN568EX supports remote wireless trigger function, which makes the Sc/SnS1/S2 mode can be used in
outdoor environme nt and the wireless trigger distance is as long as 15 meters.
z SOUND PROMPING SYSTEM
When the sound prompting system is enabled, the different sound ways will prompt the different working
conditions of the spee dlite so as to make you focus on shooting only.
z COMPLETED WITH 2.5mm PC SYNCHRONOUS INTERFACE
It makes things easier on lightening the speedlite synchronously by using PC synchronous line.
z FAST CURRENT-RETURN SYSTEM
The time for full gloss output current-return will only take you 3 seconds; you can get fast current-return
experience even witho ut brand-new batteries, which w ill only take you 4~5 seconds.
z ANDVANCED OPTION FUNCTIONS
YN568EX has advanced options setting function, where you can self-define the functions of the speedlite on your
own requirements.
z AUTOMATIC SAVING FUNCTION
YN568EX can automatic ally save the operation currently used for your future use.
Page 4

III. Quick Start
If you don’t have much time to read the whole user manual, we advise you to read this section.
1. Please avoid the excess ive use of the outp ut with maximum power. It can effectively ext end the service li fe of
this product.
2. You can understand the function of each button by pressing them and observing the displayed content.
3. Press the [High-speed /Shutter curtain sync] button to se lect High-speed sync function.
4. Press [MODE] button to select TTL/M/Multi mode, holding [MODE] for a while to select remote trigger model,
and then press [MODE] again to select Sc/Sn/S1/S2.
5. Set slave group A/B/C by operate [CH] and [MODE] buttons, set channels (1, 2, 3, 4) by [CH] and [ZOOM]
buttons.
6. Press the [UP], [DOWN], [LEFT], and [RIGHT] buttons to adjust the parameters of speedlite quickly at the
current mode. For som e parameters, the [OK] button in the center is needed to be pressed for setting.
7. Select the function of advanced option through [Illumination/Sound] and [MODE] buttons. See the section of
“Advanced Setting” for the content.
8. This product provides M, Multi, and remote TTL mode.
Page 5
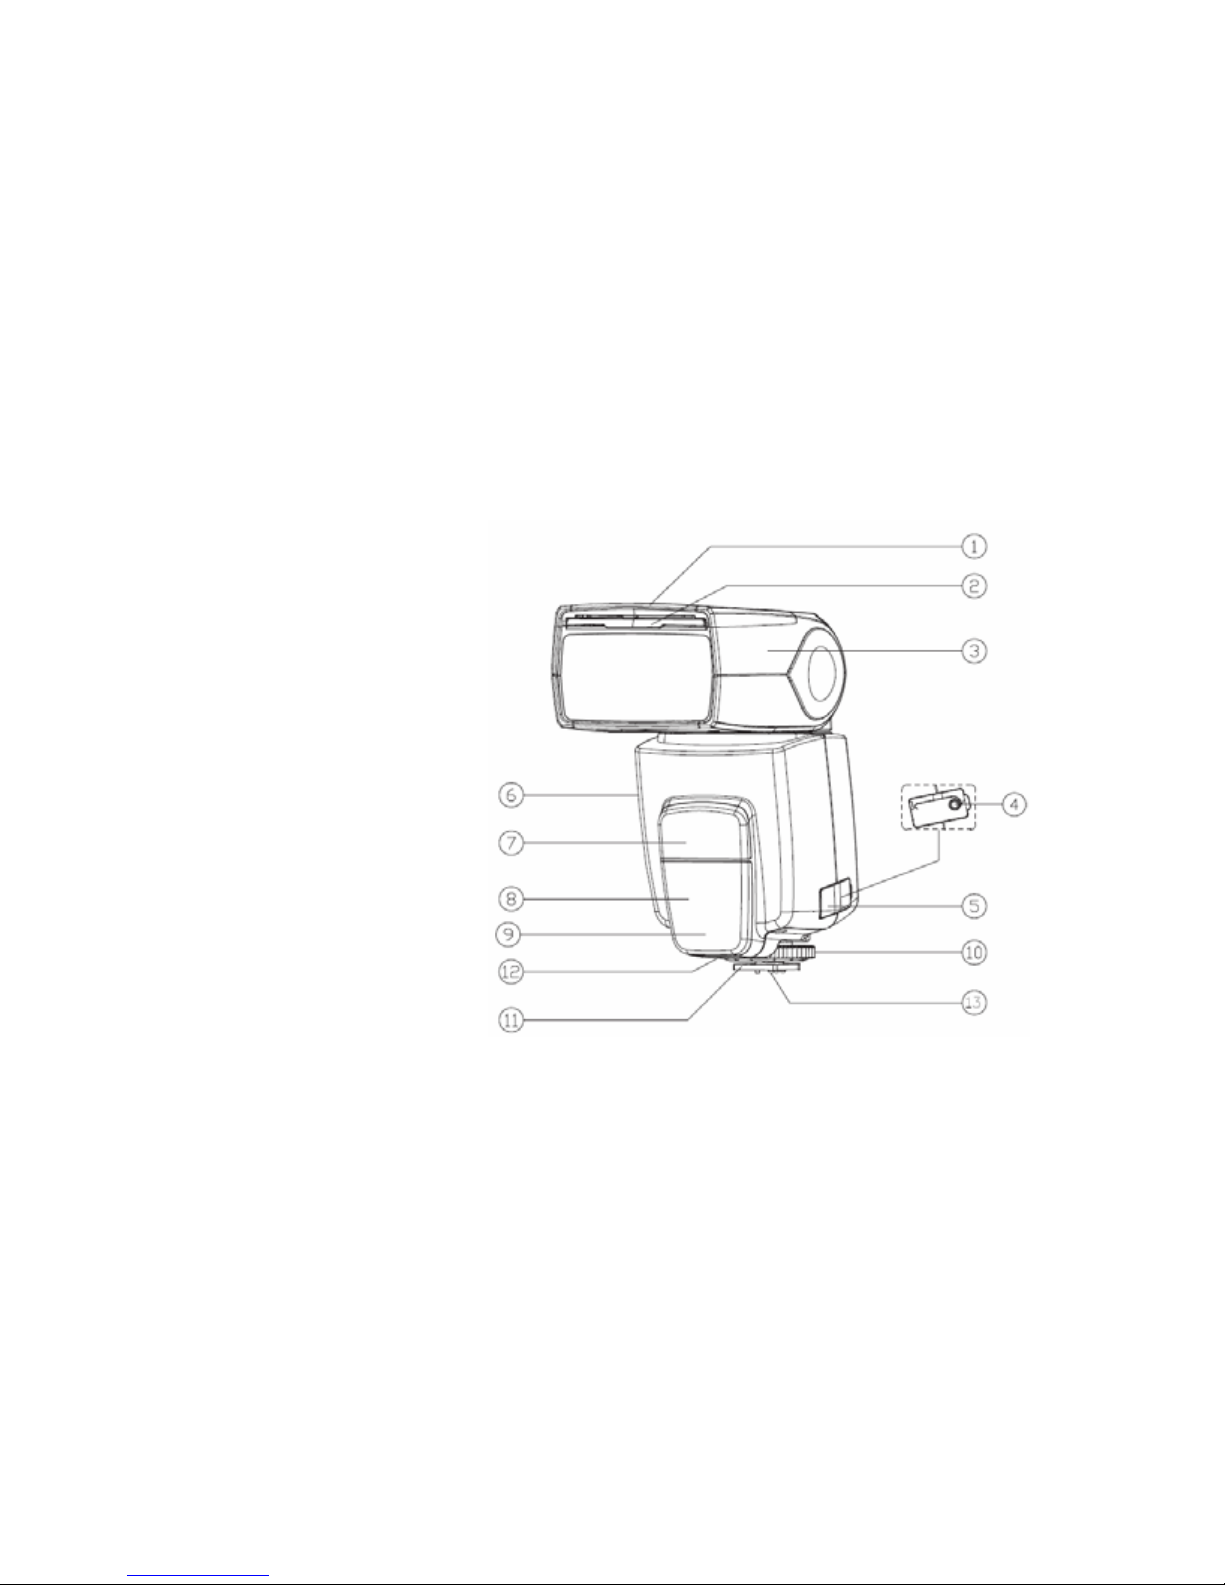
IV. Nomenclature
1.Reflection board
2.Wide-angle diffuser
3.Flash head
4.PC port (for input)
5.Contact cover
6.Battery chamber’s cover
7.Wireless trigger sensor
8.Remote indicator
9.AF-LED
10.Locking ring
11.Hot shoe stand
12.Sound port
13.Hot shoe contact
Page 6
Page 7

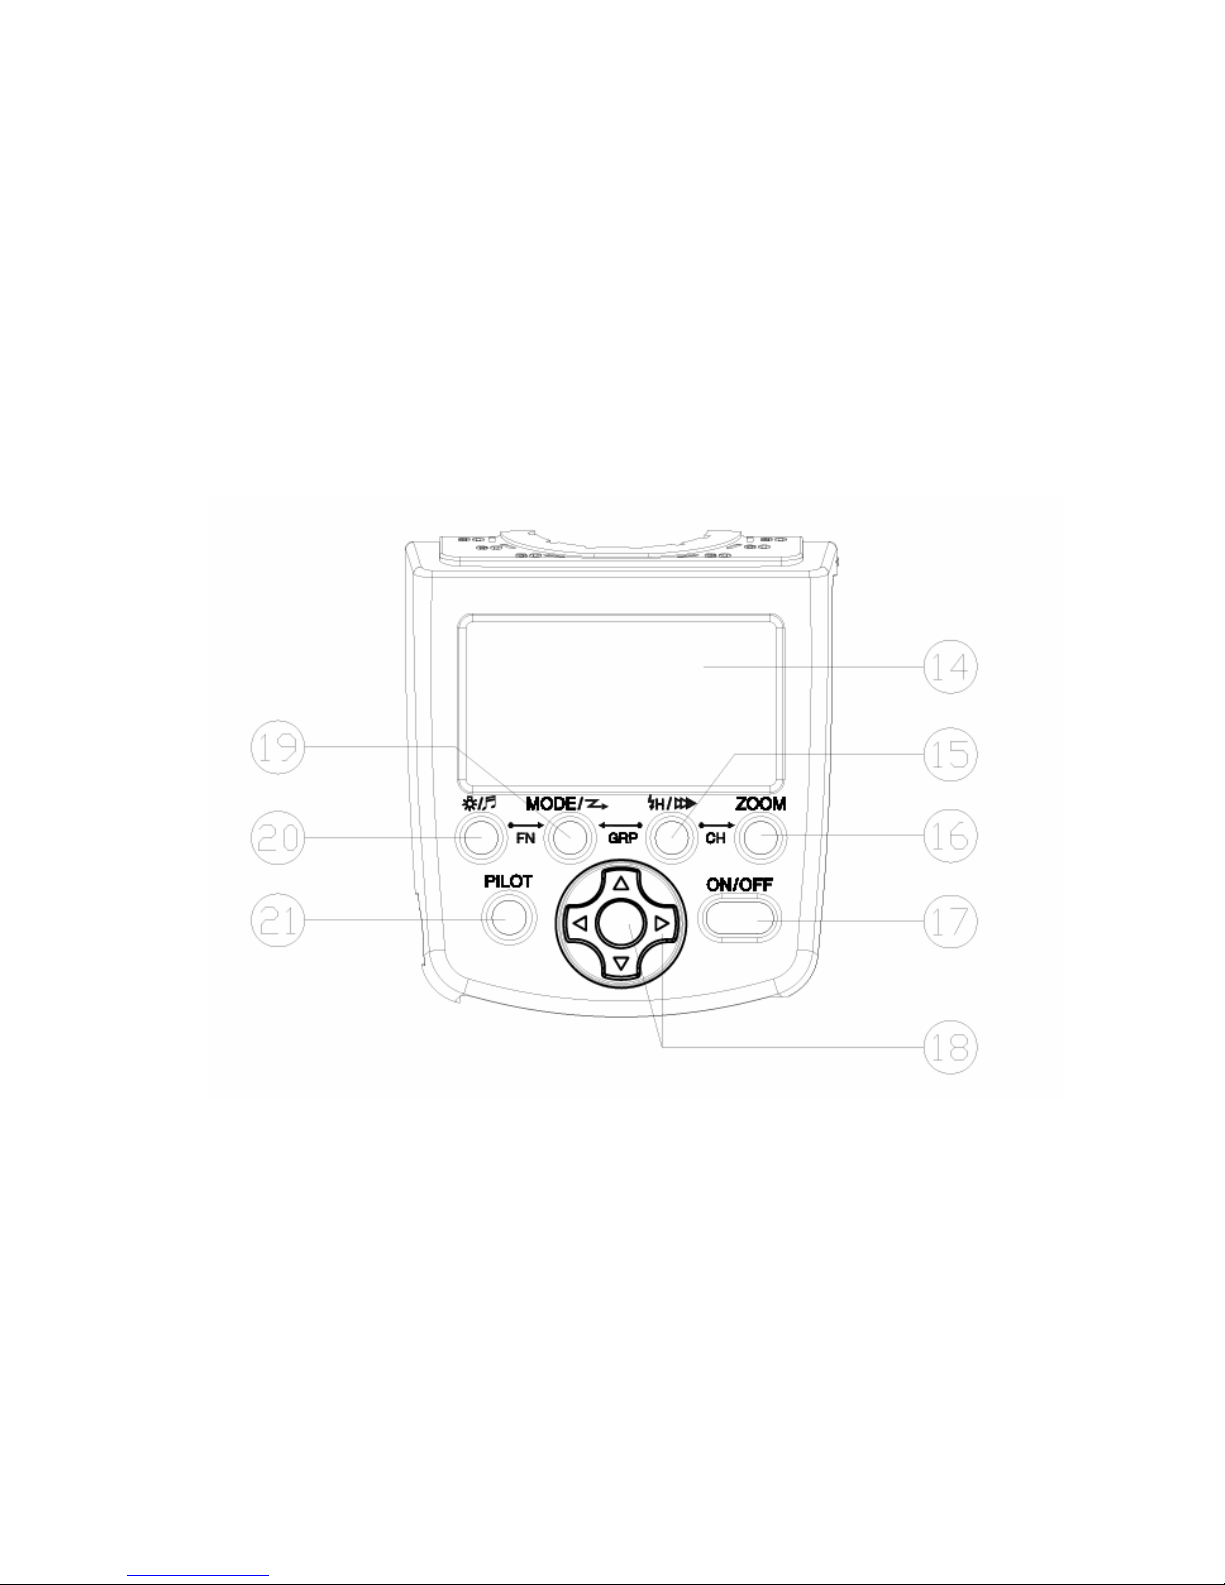
14. LCD screen: Display all functions and application setting of speedlite, convenient for users’ examination and
quick setting.
15. High-speed / rear curtain synchronous bu tton:Rear curtain sync and high-speed synchronous function can
be set by directly operating this button.
16. ZOOM button: Directly operating [ZOOM] button can adjust the zoom rang of lamp holder (auto, 24, 28, 35,
50, 70, 80, 105mm).
17. Power switch (ON/OFF): Press this button for about 2 seconds and tur n on or off the power of speedlite.
18. Selection/setting button set: Include [Left], [Right], [Up], [Down] and [Ok] at the center; [Left] and [Right]
button can set exposure compensation, output power, advanced options parameter, stroboscopic flash times,
stroboscopic flash frequency; [Up] and [Down] button can set exposure bracketing, fine brightness adjustment and
advanced options n umber .
19. MODE: Under the camera set-up state, flash mode shall switch between TTL/M/Multi with every pressing;
under wireless off-camera state, trigger mode of the speedlite shall switch between Sc/Sn/S1/S2 with every
pressing. And if press [MODE] for a long time, shift between the camera set-up and off camera state can be made.
20. Backlight/sound switch: LED backlight can be turned on or off by pressing this button for a short time; and
sound prompt function o f the speedlite shall be turned on or off by pressing this butto n for about 2 seconds.
21. Charge indicator/test button (PILOT): Red lamp means charge is completed, flash can be made; green lamp
means charge is being on, and press this button (PILOT), the speedlite shall send test speedlite.
Page 8
Page 9
V. Installation Instruction
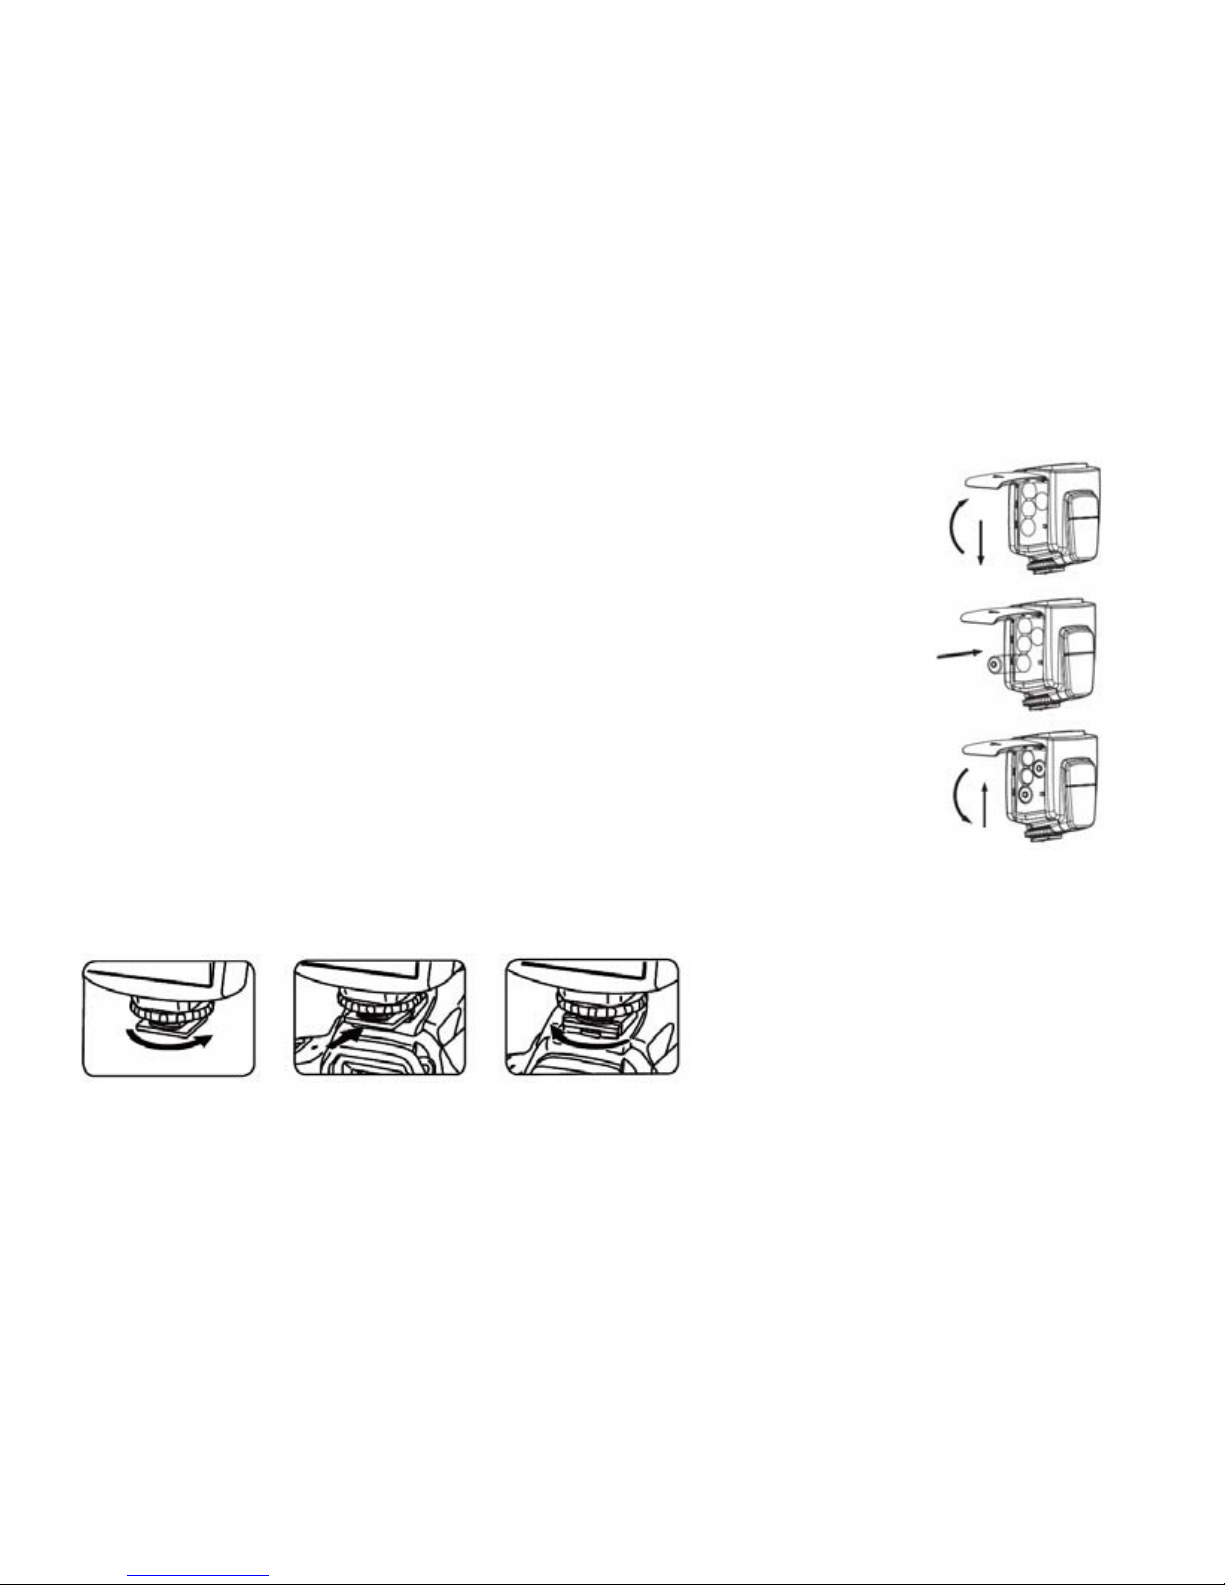
1. Install Batteries
Slide the batteries chamber’s cover in the direction of the arrow.
Insert the batteries according to the label inside battery chamber.
Make sure the direction of the batteries’ polarity is correct.
Close the battery chamber cover in the direction of the arrow.
2. Attaching to the Camera
Loosen the locking ring by turning it in the direction of the arrow.
Slip the speedlite hot shoe stand into the camera hot shoe stand until it stops.
Turn the locking ring in the direction of the arrow tighten.
To detach the speedlite, loosen the locking ring by turning it in the opposite di rection.
Page 10

VI. Basic Functions
1. Button Operation:
Parts Operation
[ON/OFF] Turn on or off the power of speedlite by pressing this switch for a long time.
It is recommended to take out battery after turning off the power of the speedlite.
[MODE]button When use the speedlite roof, flash mode shall switch between TTL/M/Multi wit h every pressing.
When the speedlite is under wireless off-camera application mode, trigger mode of the speedlite
shall switch between Sc/Sn/S1/S2. And shift between roof or off-camera state can be made by
pressing this button for a long time.
[Backlight/Sound]
button
LCD backlight can be turned on or off by pressing this butt on for a s hort time; and sound pr ompt
function of the speedlite shall be turned on or off by pressing this button for about 2 seconds. And
if keep this button and press [MODE] button, it can enter into advanced options setting state.
[High-speed / rear
curtain sync] button
When use the speedlite roof, flash mode shall switch between high-speed sync/rear curtain s ync
with every pressing. When the speedlite is under off-camera application mode, together with
[ZOOM] button set, this button can set communication channel (1/2/3/4), and with [MODE]
button set, this button can set slave group (A/B/C).
[ZOOM] button Zoom range of lamp holder (auto, 24, 28, 35, 50, 70, 80, 105 mm) can be adjusted by directly
operating [ZOOM] button.
Selection/setting bu tton
set
Include [Left], [Right], [Up], [Down] and [Ok] at the center; [Left] and [Right] button can set
exposure compensation, output power, stroboscopic flash times, stroboscopic flash frequency,
advanced options parameter, [Up] and [Down] button can set fine brightness adjustment and
advanced options number.
[PILOT] button Flash output brightness test can be made by pressing this button.
Page 11

Meaning of [Charging indicator]
Status of [Charging Indicator] Meaning Operation
The red light is lit The speedlite is fully charged, and can be used. Normal
The green light is lit The speedlite has not been fully charged. Waiting for the completion of charging.
The green light blink
The power is not enough, and the speedlite is about to shut
down.
Please replace the batteries.
The meaning of [Sound indicator]
The sound form Meaning Operation
Tick twice The sound indicator is enabled;
The speedlite is started or flash is ok.
Normal
Three tick, two times The exposure may be over Adjusting exposure compensation or charging shooting condition
Tick tick tick The exposure may be excessive Adjusting exposure compensation or charging shooting condition
Tick—tick twice—tick
twice
The speedlite is in the charging or overheating
protection state.
Waiting for the completion of charging;
waiting for about 3 minutes to cancel the protection.
Tick——a long sound The speedlite is fully charged, and can be used. Normal
Tick—tick —tick
The power is not enough and the speedlite is going
to be shut down.
Replace the batteries.
Page 12

2. Power-on and Power-off
The power of the speedlite can be turned on or turned off by pressing [Power Switch] button 2 seconds. It is
suggested that the batteries should be taken out after power of speedlite is turned off though this button.
After turned on the power of the speedlite, the charging indicator is red, which indicates the speedlite is available.
If the charging is not competed within 20 senconds, the low power indicator will be displayed on LCD panel, and
speedlite will automatically shutdown, you need to replace with new batteries.
You may press the [PILOT] button to test whether the speedlite works normally.
After use, turned off the speedlite by pressing the [ON/OFF] button.
3. ETTL Mode
In this mode, the metering system of this camera will detect flash illumination reflected back from the object so as
to automatically control flash output, and HSS, FEC, FEB, FEV, Rear-curtain, Modeling light, and CANON
camera menu accessible(CANON version only) is supported.
You can set exposure compensation for flash by pressing [+][—] buttons, the flash exposure compensation amount
can be set up to ±5EV in 1/3-stop or 1/2-stop increments.
4. M Mode
In M mode, you can set flash brightness as you like, and adjust flash bright ness by [Left], [Right], [Up] and [Dow n]
button. Adjustment range of flash brightness is 1/128~1/1, and the brightness can be divided into 8 grades, while
every grade has three grades at most for fine adjustment, and takes mixing grade 0.3EV, 0.5EV or 0.3/0.5EV as
Page 13

adjustment increment, totally 29-grade fine adjustment at most; adjust whole grade brightness with [Left] and
[Right] button, and make fine adjustment with [Up] and [Down] button, and the adjustment result shall be directly
shown on the LED screen. At shooting time, you only need to set flash brightness, adjust the camera and press the
shutter; the speedlite shall flash according to the sync signal of the camera.
5. Multi Mode
With Multi mode, a rapid series of flashes is fired. The speedlite will flash according to the output levels, flash
times and frequency you set. Use [LEFT], [RIGHT] buttons to adjust output power, flash times and frequency. The
adjustment scope of output level is 1/128-1/64-1/32-1/16-1/8-1/4, the scope of flash times is from 1 to 100, and the
scope of flash frequency is from 1 to 100. Adjustment method: Please press [OK] button to select setting items
(flash) and use the [LEFT] and [RIGHT] buttons to adjust the parameters. After the setting is completed, press
[OK] button to confirm the setting.
NOTE: The charging speed of speedlite is slow under the situation that the electricity quantity of the battery is
insufficient, which may cause the occurrence of the high-frequency flash. Please reduce the flash frequency or
change new battery under this situation.
Page 14

6. Sc/Sn and S1/S2 Mode
Set the speedlite to be Sc by pressing the [MODE] for a long time, and then operate [MODE] button, and the
speedlite shall switch between Sc/Sn/S1/S2, and these four modes all shall be applied as off-camera depende nt unit
in order to create different lighting effects.
Sc/Sn mode can separately accept 580EX II, SB-900/800/700, 7D/60D/600D
built-in flash, Nikon camera C-command, SU-800 and ST-E2 wireless signal,
supporting 4 channels and realizing TTL and manual wireless flash. When
use Sc/Sn and S1/S2 mode, wireless trigger sensors can be adjusted to face
master lamp by rotating speedlite holder. Before shooting, YN568EX and
master unit should be set at a same communication channel. Setting method:
Keep [High-speed/rear curtain sync] and operate [ZOOM] button to select
communication channel (1, 2, 3, 4). In Sc/Sn mode, brightness of YN568EX
speedlite will be totally controlled by master unit.
Page 15

S1 and S2 modes are suitable for MANUAL flash environment and TTL flash environment respectively. Under
these two modes, the way to adjust the output level is like that in M mode.
S1 mode: It will work with the first work of the master flash synchronously,
with the result consistent with the use of radio slave. To use this mode
correctly, the master flash should be set at manual flash and the TTL flash
system with preflight function and the red-reduction function with multiple
flashes should not be used.
S2 mode: It is also called “pre-flash cancel mode”. This mode is similar with
S1 mode, but it can neglect the pre-flash given by TTL flash. Therefore, it
can support the main flash working in TTL mode. In particular, if S1 mode
cannot flash correctly and synchronically with your internal flash, you can try
to use S2 mode.
The following situation shall be avoided when the S1 and S2 modes are used:
the red eye reduction function of the main light is used; the order mode
(nikon) or wireless mode (canon) of the main light is used; the ST-E2 is used as the flash controller. Otherwise,
please set the speedlite as Sc/Sn.
Page 16

7. Menu Access of Camera (only for the more recent Canon models)
You can control the speedlite by accessing to camera menu on the recent canon models which support ETTL. On
the Flash Control Menu, you can set some parameters through “External flash func. setting” and “ External flash C.
Fn setting”, for example, Flash mode, Shutter sync., FEB, Flash exp. comp, Zoom, Wireless set., and advanced
setting etc.
8. Test Flash
Whether in any mode, yo u can press PILOT butto n to test if the speedl ite flash normally. When testing the flash ,
the speedlite will give flash at relevant output level in accordance with the chosen output power setting.
9. Power Saving Mode
YONGNUO designs a power saving mode for YN568EX, and the mode can be achieved by setting advanced
options function, such as <SL Sd 10>. Operate [Backlight/voice switch]+[MODE] buttons to enter into setting
state, and then select the option numbered 01 with [Up] and [Down] button, and set the state to be SL EP - - with
[Left] and [Right] button, “Automatic power off” will be closed, and when the state is set to be SL EP on,
“Automatic power off” will be opened up.
Power saving modes set by advanced option are as following:
Page 17

NO. Scope of Application Options Power saving mode
- - Power saving mode is turned on 01
SL EP
All modes
on Power saving mode is turned off
60 Power automatic off of the slave unit is 60 minutes 10
SL Sd
SL/S1/S2
10 Power automatic off of the slave unit is 10 minutes
1H Slave auto power off cancel within 1 hours 11
SL OF
SL/S1/S2
8H Slave auto power off cancel within 8 hours
E1
SE OF
Others 3/5/10/30/
1H/2H/3H/
5H
Sleep after idle time of 3 minutes/5 minutes/10 minutes/30
minutes/1 hour/2 hours/3 hours/5hours. After it enters the
sleep state, it powers off automatically after keeps the
same idle time.
10. Overheating Protection
If the speedlite is used too frequently, the overheating protection function will be triggered; the OVERHEATING
indicator will be displayed on LCD panel. And the speedlite will be locked. In such case, please wait for about 3 to
5 minutes to cancel the protection before continuing use. Please try to use 1/4 output or lower when rapid shooting
is needed to prevent the effect on the shooting.
Page 18

11. ZOOM Setting the Flash Coverage
Auto Zoom: Press the [ZOOM] button to adjust the flash coverage (auto/24 / 28 / 35 / 50 / 70 / 80 / 105mm), if
<M> is not displayed, the flash coverage will be set automatically (35mm for default coverage). Attaching the
speedlite to the camera, the flash coverage will set automatically to match the lens focal length.
Manually set the zooming position: Press the [ZOOM] button to adjust the flash coverage, if <M> is displayed,
pressing the [ZOOM] button, the coverage focal length of the flash will switch in circle of (24, 28, 35, 50, 70, 80,
105mm).
NOTE: Using wide-angle-diffuser, the flash coverage will then be extended for 14mm.
12. Sound Prompt
When the sound prompt function is activated, the speedlite will give out different sound to indicate the working
state. See the following table for the meaning of sound.
The sound form Meaning Operation
Tick twice a. The sound indicator is enabled;
b. The speedlite is started or flash is ok.
Normal
Three tick, two
times
The exposure may be over Adjusting exposure compensation or
charging shooting condition
Page 19

Tick tick tick The exposure may be excessive Adjusting exposure compensation or
charging shooting condition
Tick—tick
twice—tick twice
The speedlite is in the char ging or
overheating protecti on state.
Waiting for the completio n of charging; or
waiting for about 3 minutes to cancel the
protection.
Tick——a long
sound
The speedlite is fully charged, and can be
used.
Normal
Tick—tick —tick The power is not enough and the
speedlite is going to be turned o ff
Replace the batteries.
13. 2.5mm type PC Sync port (for input)
By connecting to the PC sync port, you can make the fla sh synchronously.
14. Automatic setting saving
The speedlite will automatically save the current settings in order to let you have a simpler use next time after
boot.
Page 20

VII. Wireless Flash System
One YN568EX is able to respectively accept internal flashing of 580EX II, SB-900/800/700, 7D/60D/600D,
C-commander of N’s internal flashing and ST-E2 wireless signal, achieves external TTL and ma nual flashing.
Sc: Indicating that it can only receive wireless signal from Canon system, avoiding Nikon system.
Sn: Indicating that it can only receive wireless signal from Nikon system, avoiding Canon system.
Any flash exposure compensation, FEB, FE lock, manual flash, and stroboscopic flash settings set with the master
unit will be automatically transmitted to the YN568EX.
Even with multiple YN568EXs, all of them will be controlled in the same way via wireless.
1. Master unit setting: To use 580EX II, SB-900/800/700, 7D/60D/600D with built-in commander mode,
Nikon c-commander a nd ST-E2. For the setting method, please refer to your master instructions.
2. Slave unit setting
Take YN568EX as slave unit. Set the speedlite to be Sc by pressing [MODE] for a long time, and then switch it to
be Sn by pressing [MODE] button, and set dependent unit group (A, B, C) by combined application of
[High-speed /rear curtain sync] and [MODE], and select communication channel (1, 2, 3, 4) by combined
application of [High-speed /rear curtain sync] and [ZOOM].
Notes: When set slave unit set or communication channel, it is required to first keep [High-speed /rear curtain sync]
button, and then operate [MODE] or [ZOOM] button.
Page 21

3. Multi-Speedlite, Wireless lighting configurations
You can create two or three slave groups to make shooting effect better
meet your requirements, and set flash ratio for TTL autoflash shooting
of master, as well as manual flash output, frequency flash etc.
(1). Wireless flash of two slave units made up by YN568EX
z Wireless option setting: Sc/Sn for operation
z Communication Channel setting: 1, 2, 3, 4
z Groups setting: Set one YN568EX as group A, and set the other
one as group B.
z Master unit setting: Set the communication channel, Set the
flash ration of master unit A:B or A:B : C. You can conduct
flash shooting.
(2). Wireless flash with three YN568EX speedlites
z Wireless option setting: Sc/Sn
z Channel setting: 1, 2, 3, 4
z Groups setting: Set three YN568EX speedlites as group A,
group B and group C respectively.
z Setting master and shooting: Please selec t the ratio<A: B C>.
Page 22

Press the test button of master to test whether the flash works normally; if the flash does not fire, adjust the slave
unit’s angle toward the master unit and distance from the master unit.
NOTE: If ratio <A: B> is set, the slave unit in group C will not fire.
If you have the sl ave grou p set to <A> f or thr ee slav e unit s, all th ree
slave units will be controlled as if they were one speedlite in slave
group A.
4. Setting Manual Flash and Stroboscopic Flash with
Wireless
As the slave unit, YN568EX supports manual flash and Stroboscopic flash.
Manual flash: Set the master unit’s fla sh mode to <M>, and set the flash output on master unit.
Stroboscopic: Set the master unit’s flash mode to < Multi>, and set the flash output, stroboscopic flash count,
stroboscopic flash frequency on master unit.
Page 23

5. Shooting Examples with Wireless Flash System
z Master unit: 580-II, SB-900/800/700, 7D/60D/600D with built-in commander mode, Nikon c-commander
and ST-E2.
z Slave unit: YONGNUO EX series flash, you can create three slave groups at all.
z Use the mini flash stand (tripod socket provided) to prop up the YN568EX speedlite.
z Swing the YN568EX so that its wireless sensor faces the master unit.
z Indoors, the wireless signal can also bounce off the wall so there is more leeway in positioning the
YN568EX(s).
z After positioning the YN568EX(s), be sure to test the wireless flash operation before shooting.
z Don’t place any obstacles between the master unit and slave unit(s). Obstacles can block the transmission of
wireless signals.
VIII. The Andvanced Application
1. High-speed sync Flash
With high-speed sync (FP flash), the YN568EX can synchronize with all
shutter speeds, the maximum shutter sync up to 1/8000. Setting method:
Press the [High-speed /rear-curtain sync] button to select HSS.
Page 24

2. Ultra-long-range Wireless Flash
YN568EX can receive remote wireless signal. The longest distance used indoors is 25 meters and the longest
distance used outdoors is 15 meters.
Please note that the YN568EX’s wireless sensor should be faced to master unit, and make sure it is within the
effective range of transmission.
NOTE: As the slave unit, when YN568EX is used as Sc/Sn, the output level of speedlite is completely controlled
by master unit.
3. Flash Exposure Compensation
You can use the exposure compensation function of the camera to compensate flash output so as to make shooting
effect better meet your requirements. you can also make compensation of flash brightness with the [LEFT]
[RIGHT] button within the range of ±5ev, with the precision of 1/3ev or 1/2ev. Every press the button, the
compensation setting will be displa y on LCD panel.
NOTE: For Canon version, please note that this compensation setting will override the exposure compensation
setting on the camera.
4. Rear- curtain Sync
You can use slow-speed shutter to produce trailing smear for the object and the flash light will flash at the moment
when the shutter is going to be shut, which means the rear-curtain sync function .(For the rear-curtain sync setting,
refer to your camera manual for setting). You can turn on or turn off the rear-curtain sync by pressing the
Page 25

[High-speed /rear-curtain sync] hotkey on pane l of YN568EX.
NOTE: When YN568X is used as slave unit, the rear-curtain sync function cannot be set.
5. Exposure Bracketing (FEB)
The FEB function is set on the camera or speedlite. For the specific setting method, refer to your Camera
Instructions. After the FEB is set, after 3 photos are taken, exposure compensation will be made automatically in
the sequence of, for example, “normal Æ under Æ over”. This function helps you improve the success rate of
photo taking.
The setting method on the YN568X speedlite: Press the [UP] [DOWN] button to adjust the exposure bracketing
amount.
NOTE: For FEB, set the camera’s drive mode to single shooting. Be sure the flash is ready before shooting.
6. FE Lock (Canon)
To use this function, cover the subject for which flash exposure will be locked at the center of the viewfinder of
camera, press the button <*> of the flash exposure lock, and the flash light will pre-flash and the camera will
calculate the appropriate flash output data. Now you have some time for decomposition, after which, you can take
photo. (The function can be used only when it is supported by your camera. For the setting method, refer to your
Camera Instructions.)
Page 26

7. FV Lock (Nikon)
Set the AE-L/AF-L function as FV Lock on the camera before using this function. At this time, you can aim at
your desired ob ject in the viewfinder and then press the AE-L key or AF-L key, in such case, the flash lig ht will
pre-flash to get the reading of flash exposure for the object; after you have confirmed the scene frame, press the
shutter. (This function can only be available when your camera supports it; for the setting of AE-L and AF-L, refer
to your camera manual).
8. Advanced Options Setting
YN568EX has advanced options function, you can customize speedlite function as you need, set advanced options
with button group of the speedlite or camera menu access. Setting method of the buttons of the speedlite: Keep
[Backlight/voice switch] for a long time and operate [MODE] to enter into the setting state of advanced options
function, and the LCD screen shall show set items;such as: <SE oF 3> me ans the application at the ro of, the
speedlite shall automatically sleep if it is idle for 3 minutes, and automatically power off if it is idle for another 3
minutes after sleep.
Advanced options function supported by YN568EX is as following:
Fn NO.: 01
SL EP on: Auto power off is enabled
SP EP﹣﹣:Auto power off is disabled
Page 27

Fn NO.: 03
Fb CL on:FEB auto cancel is enabled
Fb CL﹣﹣:FEB auto cancel is disabled
Fn NO.: 04
Fb 0 - +:Sequence of FEB is “0→-→+”
Fb - 0 +:Sequence of FEB is “-→0→+”
Fn NO.: 08
AF on:AF-assist beam firing is enabled
AF﹣﹣:AF-assist beam firing is disabled
Page 28

Fn NO.: 09
AP S A1:Automatic identification ena bled
AP S﹣﹣:Disable
Fn NO.: 10
SL Sd 10:Power automatic off of the slave unit is 10 minutes
SL Sd 60:Power automatic off of the slave unit is 60 minutes
Fn NO.: 11
SL oF 1H:Slave auto power off cancel within 8 hours
SL oF 8H:Slave auto power off cancel within 8 hours
Page 29

Fn NO.: 20
So nd on:Sound prompt function is enabled
So nd﹣﹣:Sound prompt function is disabled
Fn NO.: E1
SE oF 3/5/10/30/1H / 2H/3H/4H/5H:Keeping idle for 3/5/10/30 minutes
or 1/2/3/4/5 hours will enter the dormancy mode, after it enters the
sleep state, it powers of f automatically after keeps the same idle time.
SE oF﹣﹣:NO dormancy, NO automatically turn off.
Fn NO.: E2
qu ic﹣﹣:Quick turn on / shut down function is disabled
qu ic on:Quick turn on / shut down f unction is enabled
Page 30

Fn NO.: E3
L cd 7/15/3 0:The display time of LCD backlight is 7/15/30 seconds
Fn NO.: E4
I nc 0.3:0.3ev for fine-tuning step
I nc 0.5:0.5ev for fine-tuning step
I nc on:Mix 0.3ev and 0. 5ev for fine-tuning step
Fn NO.: E5
CL EA﹣﹣:Recover the default settings
Page 31

9. High-speed continuous shooting
The flash can realize the high-speed continuous shooting function. Please set the camera in the continuous
shooting form and then shoot.
Please note: The number of photos that can be continuous shot is related with the output level. Please use the fully
charged battery.
10. Reflection Flash
Bounce flash means to take photos by making flash light head aimed at wall or
ceiling and using the light reflected back from the ceiling or wall to light the
desired object, so that the shade behind the object can be decreased to get more
natural shooting effect.
If the wall or ceiling is too far, the bounce flash may be too weak to get enough
exposure. The wall or ceiling should be even and white in order to get efficient
reflection; if the reflection surface is not white, color cast may appear in photo.
11. Use Reflection Board to Take Photos
With the reflection board flash, draw the reflection board and the wide-angle
diffusion board out from the light head at the same time and then push the
wide-angle diffusion board back. In such case, if this product is being used to take
Page 32

photos, it will produce a highlighted point on the eyes of the subject and thus make the eyes charming (catch light).
This function can reach optimal effect when the flasher head is up 90°.
12. Use Wide-angle Diffuser
Pull out the wide-angle diffusion board, push back the
reflection board and arrange them as per the figure; in such
case, the flash scopes will extent to 18 mm and the flash effect
will be softer and more natural.
Page 33

VIII. Specifications
Circuit design Insulated Gate Bipolar Transistor (IGBT)
Guide No. 58 (ISO 100, 105mm)
Flash mode M, Multi, Sc, Sn S1, S2
Zoom range 24, 28, 35, 50, 70, 80, 105mm
Vertical rotation angle -7~90 degrees
Horizontal rotation angle 0~270 degrees
Power supply 4×AAsize batteries (Alkaline or Ni-MH are usable)
Lighting times 100~1500 times (AA alkaline cell used)
Recycle time Approx 3s (AA alkaline cell used)
Color temperature 5600k
Flash time 1/200s~1/20000s
Flash control 8 levels of output control (1/128~1/1), 29levels of fine tuning
External interface hot shoe, PC port
Wireless triggering distance 20~25m indoor, 10~15m outdoor
Additional features High-speed sync, Rear-curtain sync, FEC, FEB, FEV, the electronic flash head zooming,
sound prompt, automatically saving setting, PC port, power saving mode, over heat protection,
advanced setting.
Dimensions 60×73×190mm (Extended state)
Net weight 350g
Accessories Flash light (1), protecting bag (1), mini stand (1) and manual (1)
Page 34

Guide Number of dif ferent focal length range (at ISO 100, in meters / feet)
Flash Coverage (mm) Flash Output
14 24 28 35 50 70 80 105
1/1 15/49.2 28/91.9 30/98.4 39/127.9 42/137.8 50/164 53/173.9 58/190.3
1/2 10.6/34.8 19.8/65 21.2/69.6 27.6/90.7 29.7/97.4 35.4/116.1 37.5/123 41/134.5
1/4 7.5/24.6 14/45.9 15/49.2 19.5/64 21/68.9 25/82 26.5/86.9 29/95.1
1/8 5.3/17.4 9.9/32.5 10.6/34.8 13.7/45.2 14.8/48.6 17.7/58.1 18.7/61.4 20.5/67.3
1/16 3.8/12.5 7/23 7.5/24.6 9.7/32 10.5/34.4 12.5/41 13.3/43.6 14.5/47.6
1/32 2.7/8.9 4.9/16.1 5.3/17.4 6.9/22.7 7.4/24.3 8.8/28.9 9.4/30.8 10.3/33.8
1/64 1.9/6.2 3.5/11.5 3.8/12.5 4.9/16 5.3/17.4 6.3/20.7 6.6/21.7 7.3/24
1/128 1.3/4.3 2.5/8.2 2.7/8.9 3.5/11.4 3.7/12.1 4.4/14.4 4.7/15.4 5.1/16.7
IX. Possible problems during use and solutions
1. Please note when use the flash outdoors: For outdoor application, please avoid direct sunlight to the wireless
triggering sensor and e nsure normal use of the flash.
2.Precaution for outdoor use of lambency umbrella: The lambency umbrella mounted on the flash light
outdoors may be blown down easily, and the hot shoe of the flash light may be broken. Please fix the mounting
rack or avoid outdoor use.
Page 35

3. Photos are under exposure or over exposure? Check if th e set s hutter, apertur e and IS O are to o near the f lash
limit or if some settings including exposure compensation in relation to flash are proper.
4. Vignetting appears in photos or only part of the subject is illuminated? Please check the current coverage of
focal length and make su re if t he lens fo cal len gth ex ceeds t he cov erage r ang e of the f lash. The produ ct’s zooming
range is 24~105mm of the medium format system. You can try to pull out the wide-angle diffuser to expand the
flash range.
5. You may feel the flash control panel is dim, because there is one protective film on the panel; you can tear it
away to enjoy a clear visual effect.
6. The flash light is abnormal? Switch off the power of flash light and camera, mount the flash light on the hot
shoe of camera, and switch on the power of flash light and camera again. If the abnormity continues, replace the
batteries.
Update version of this manual can be got form http://www.yongnuo.com.cn/usermanual/downloadIndex_en.htm
The functions of this manual are based on test conditions of our company. Further notice will not be given if the
design and specifications change.
The YONGNUO logo in this manual includes the registered trademark or trademark of SHENZHEN YONGNUO
PHOTOGRAPHY EQUIPMENT Co., Ltd in China or/and other countries (regions). All other trademarks are
the property of their respective owners.
 Loading...