


Contents
Precauti on
Features . . . . . . . . . . . . . . . . . . . . . . . . 2
Quick Star t . . . . . . . . . . . . . . . . . . . . . . . 3
Compon en ts Desc ri ption . . . . . . . . . . . . . . . . . 4
LCD Panel . . . . . . . . . . . . . . . . . . . . . . . 5-6
Instal la tion In st ructi on . . . . . . . . . . . . . . . . . . 7
Basic Op er ation s . . . . . . . . . . . . . . . . . . . . 8-10
Wirele ss F lash Shoo ti ng . . . . . . . . . . . . . . . . . 1 2- 14
Advan ce d Application s . . . . . . . . . . . . . . . . . . 15-17
C.Fn/P.Fn : Setti ng C ustom /Per son al F uncti on s . . . . . . . 18-19
Shooti ng w ith LED L ig ht . . . . . . . . . . . . . . . . . 20
Troubl es hooti ng . . . . . . . . . . . . . . . . . . . . 21
Specif ic ation s . . . . . . . . . . . . . . . . . . . . . 22
. . . . . . . . . . . . . . . . . . . . . . . 1
Precauti on
To avoid f ire or el ec trica l shock , d o not exp os e thi s product to ra in or
moistu re .
To av oi d short circui t, please make sure the bat terie s contacts are
secure ly pa cked an d use the batter y in ac cordance wit h the local
provisio ns .
Please place the ba tteries and th e parts wh ich ca n be swall ow ed
mistaken ly a way f ro m ch ildren. I f swallow ed , pleas e get med ic al help
imme di ately.
To avoid any po ss ible in jur y to ey es , do no t use t he flas h in a sh or t
distan ce f ro m the eye s.
To av oi d any possi bl e safet y acci dent, do not use the flash on the
people f oc using a tt entio n.
Pl e ase ta ke ou t th e ba t t eri e s a nd st o p usi n g t his pr oduc t
imme di ately in ca se of th e fo llowi ng s ituat io n:
This prod uc t is d ro pped or shocked seri ously and the inner part of
this produ ct i s ba re d.
Wea r gl oves and ta ke the batteri es o ut if the corrosi ve l iq uid ins id e
the batter ie s leaks .
This produ ct g ives off stra ng e smell , he at or smo ke s.
Do n ot dissemb le or ma intain thi s produ ct be cause the inter na l h igh
voltag e ci rc uit may c au se the el ec tric shoc k .
Please take out al l t he batteri es if thi s p ro duct i s n ot use d f or a lo ng
time.
-1-

Features
Equi pp ed with L ED L ight
Equipp ed wi th a h ig h p ower LED l ight of hi gh power, b ri ghtne ss ca n b e
adjust ed , the re is a buil t -in diff user and a co lo r con ve rsion filt er for
the LED li gh t.
Compat ib le with Y N6 22N and Y N5 60 Wirele ss Sys te m
When YN 968N is used as maste r unit, it can con trol and fire
YN968N /Y N622N (I I)/YN 68 5N b eing s lave unit . When YN9 68 N is set as
YN622 (sl ave mo de ), it can re ceived con trol sig na l or tr ig ger si gn al
from maste r un it YN96 8N /YN622N (I I)/YN 62 2N-TX , and a ch ieves s la ve
flash in TTL/M/Mu lt i mode. Whe n YN9 68N is set a s YN5 60 ( sl ave
mode), it can receive con trol sign al or trigg er signal fro m YN560-TX
(II)/R F603 (II) /R F605, a nd a chiev es f lash in M/M ul ti mode .
High G ui de Numb er, Sup po r ts H igh-s pe ed Syn c
GN60@I SO 100,1 05 mm, suppor ts high- sp eed sync TTL, manu al fl as h,
multi fla sh , G r g ro up ing fla sh , t he highes t s yn chronou s spe ed can
reach 1/80 00 s.
Supp or t A ut o/ Manua l Zoomi ng
The YN96 8N sup por ts auto and man ua l zoomi ng , the flash cov er age
can be cha ng ed betw ee n AU TO, 20~ 10 5mm.
Supp or t s US B Firmw ar e Upgra de
The YN968N equ ip ped with the USB interf ac e, suppor ts firm wa re
upgrad e, the user s can dow nload the upg rade firm ware throug h the
Yong nu o of ficial we bs ite to upgr ad e the fla sh .
Supp or t s Wi re less Op ti cal Sla ve f uncti on
The YN9 68 N s uppor ts recei vi ng YO NG NUO, Can on' s and Nik on' s
wirele ss o pt ical ma st er sign al , supports S1 an d S2 f lash mo de .
Sett in gs Sa ve Au tomat ic ally, Sup po r ts Custom Fun ct ions (C Fn),
.
Per sonal F un ction s( P.Fn).
Ultr a fas t Chargi ng Recycl e Sys te m, S up por ts E xtern al Powe r
Supp ly
Eq uip ped wi th Bi g Si z e LC D Dis pla y Scr een , Sta nda rd PC
Syn chronou s In ter face
-2-
Quick Sta r t
If you don't hav e m uch time to re ad the whol e u ser ma nual, we
advi se you to rea d thi s secti on.
1.Pl ease av oid t he exce ssive use of the o utp ut with maximu m
powe r. It can eff ectiv ely extend the ser v ice life of thi s p ro duct.
(It i s recomm end ed tha t the s peedl ite should b e idle for more
than 1 0 minut es when e nteri ng the ov erhea t protect ion ).
2.Press [ ] button to switch t rigge r metho ds (on- to p , r ad io wi re le ss
master, rad io w ireless s lave an d op tical s lave) s eq uentl y. Wh en
YN968N is in set-top mode, press [M ODE] button to switch flash
mode.
3.Fu nct ion b utton 1-4 co rresp ond ing to dif feren t fun cti ons
acco rd ing to curren t state of t he flas h, oper ation s and detai ls
plea se refer to t he foll owi ng chap te rs.
4.When YN 96 8N is us ed as ma ster unit, pres s [ CH ] b ut ton t o e nt er in to
channe l set ti ng st at us, press [G R] bu tton to switch grou ps , ope ra te
[ON/ OF F] but to n to se t whet he r the g ro up par ticipat in g fl as h, press
functi on b ut to n [M OD E] t o switch flash mode, and ro tate [ ] to set
flash ex po sure comp en satio n or f lash ou tp ut.
5.Sh ort pre ss t he f uncti on b utton [ ]c an e nter into the focal
leng th set ting s tate. long p re ss the funct ion button [ ] can
enter in to the ad va nce d optio ns sett ing sta te, the n throu gh the
[ ] a nd [ OK] but to ns can set the co ve rag e of the foc al l ength
and th e custo m funct ion/p ers onal fu nctio ns.
6.Long p re ss t he f unc tion butt on 2 and but ton 3 ca n se t th e flash
sh oot ing fun cti on sett ing s a n d w ire les s s hoot ing se ttin g
recove r to t he de fault s et-top T TL fl ash mod e statu s.
[LED] ,
7.Ma ke the fla sh unit verti cal , press th e button the LED
come s on , th e LE D li ghtin g on the LC D panel, press the LED
button a gai n turni ng off the LE D light .
8.Wh en you pos ition the flash head down by 7 ° , y ou can sho ot
subj ects at a s hor t dis tance i n a range o f approx. 0.5 t o 2 m.
-3-
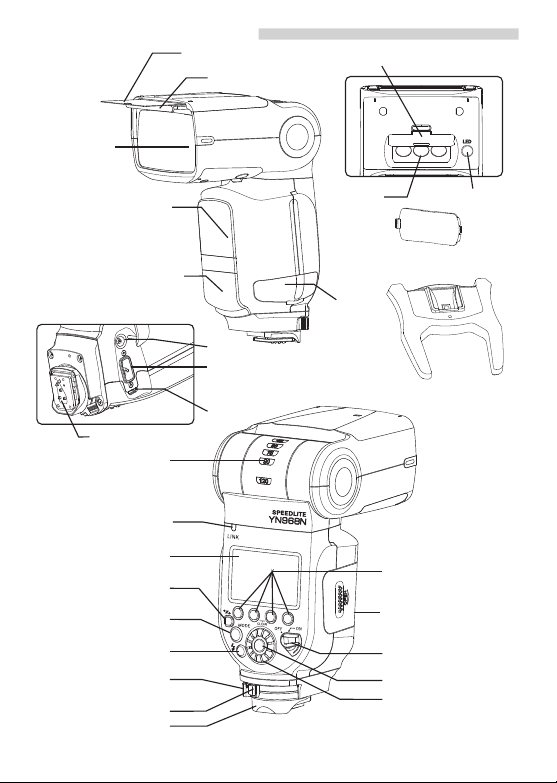
Componen ts Descri ption
Wide re fection board
Wide pa nel
Flash head
Built -in di ff us er (f or L ED l ight)
Optical tr an sm is si on
wirel ess sensor
AF-assis t be am e mi tt er
hotshoe cont ac t
Bounce ang le i nd ex
Radio tran sm is si on
confirmati on l am p
(LINK lamp )
LCD pan el
Trig ge r mo de
button
Flash mode b ut to n
Charg ing lamp/
Test flash b ut to n
Mounting f oo t
lock lever
Lock-r el ea se button
Dust- and waterres is tant adapter
PC por t
External power
sourc e por t
USB port
-4-
LED light
Color conver si on f il te r
(for LED lig ht )
Terminal
cover
Function b ut to n
1/2/3/4
Batter y co mpar tmen t
cover
Power s wi tch
Select/S et b ut to n
Select dia l
LED button
Mini stand

LCD Panel
TTL flash
Zoom:
:Automatic
A
M
TT L:TT L auto f lash
:St an da rd
:Bounce
:Over heat
ISO
:FEC
FEC amount
:Manual
Manua l flas h
M:Manual f la sh
M
M
Zm C.Fn
Zoom
Multi (stroboscopic) flash
MULTI:Multi f la sh
MULTI
M
Zoom
16
50
Hz
Number of f lashes
Zm C.Fn
0.3
MULTI
20
20
Focal leng th
:Beep
Batter y le ve l
:FP Flash
(High-sp ee d sy nc )
Apeture
Flash expo su re level
mm
Manual fla sh o ut pu t
mm
Flash frequency
Manual fla sh o ut pu t
Hz
-5-
LCD Panel
Pres s butto n [ ]can sw itc h the tri gger mo de: s et-top , rad io
wire less maste r mod e, r adi o wirel ess slave mode, opti cal
wire less sl ave mod e(inc lude SC/SN /SC&S N/S 1/S2)
:Set- to p fla sh
TTL
:Radio wire less master mode
:Master
:YN62 2 MODE
M
TTL
A
TTL
B
TTL
C
TTL
:Radio wire less s lave mode
:Slav e
TTL
M
:YN62 2 MODE
Zoom
:YN56 0 MODE
A
Zm C.Fn
:Opt ical wi re les s slave m ode
:Sla ve
TTL
A
Zm C.Fn
M
Zoom
Sn
-6-
24
SLAVE
fEB
SLAVE
Gr
20
SLAVE
SLAVE
mm
MENU1
mm
MENU1
CH 1
CH 1
Outd oors
Ind oors

Installa tion Instruction
1、Instal l Ba tt er ie s
Slide the batter y compar tmen t co ve r in t he d ir ec ti on o f th e ar ro w as s ho wn .
Insert th e bat te ri es ac co rd in g to the label insid e battery co mp ar tment
and make su re t he d ir ec ti on of th e ba tt er y contact (+ /- ) is c or re ct .
Close the batter y compar tmen t co ve r in t he d ir ec ti on o f th e ar ro w as s ho wn .
WA RNING: Li F e P O 4 and/o r L i-i on ty pe ba tte ries AR E N OT
COM PATI BL E, PLEA SE USE a lk aline or NiMH type b at te ries! To a vo id
circuit, ple as e do n ot u se d am aged batterie s.
2.Att aching to the Cam er a & De ta ch in g from the Came ra
Slip the speed li te's mounting foo t al l th e wa y in to t he c am era's ho t sh oe .
Slide the moun ti ng fo ot lo ck le ve r to t he right side as th e a rrow sh ow n, un ti l
heard t he “cli cks”sound.
To detach the spe edlite, pre ss th e [lo ck- re le as e but to n] an d sli de th e
[Mountin g fo ot l oc k le ve r] t o th e le ft si de , th en d et ac h the speedlite.
3.Pow er- on a nd P ow er- of f
Set t he pow er swi tc h to [ON ] p osition, t he
speedlite will t ur n on a nd s ta r t ch argi ng .
A f te r t u rn ed on , t he [ C ha rg i ng la m p ]
will bri gh t with red l ig ht w hi ch indica te s it
can fl as h. After us e, se t th e switch to [OF F]
position to t ur n off the power so ur ce . Ple as e
take out the batteries aft er t ur ni ng off the
power of th e sp eedlite.
4.Test F la sh
When t he char gi ng la mp tur ns red, you c an
tes t th e flas h i s no rm al o r throu gh th e [ TE ST ]
button.
-7-

Basic Oper ations
1.Button O pe ra ti on
[ON/OFF] sw it ch
[MODE]bu tt on
[ ]
Trig ge r mo de
button
[ ]Select di al
[ ]Select/ OK b ut to n
[Funct io n bu tt on 1 /2 /
3/4]
[TEST] b ut ton
2.Sta tu es o f [C ha rg ing Indicator ]
Sta tu es
Red l ig ht
Gre en l ight
Goes of f
*Abo ut Quick Fl as h
The Qu ic k Flash func ti on enab le s flash sh oo ti ng while the ch ar gi ng lamp is
gre en (before th e fl as h is full y ch ar ge d) .T he guide nu mb er i s 1/2 to 1/ 6 of t he
full o ut put, bu t i t i s usefu l for s hooting w ith a fa st er recycling time at a s ho rt
shooting d is ta nc e.
3.Meanin g of [Li nk l am p]
[LINK] lam p
statues
Gre en l ight
Red l ig ht
Set the switch to the ON/OFF c an t ur n on /o ff t he
power source
Throu gh the button can swi tch betwee n TT L/M/
MULTI
Shor t pr es s th e bu tt on c an s witc h th e trigger mod e:
set-top, radio wi reless m as te r , ra di o wi re le ss s la ve ,
optical wi reless s la ve (S C/ SN /S C&SN/S1/S 2)
Throu gh the dial can a dj us t th e se le ct ed p ar am et er s
which need a dj us te d, rel at ed o pe ra ti on s an d details
please refer to the subs eq ue nt c ha pt er s
Confirm and sa ve the param eter s et ti ng s
According to the current state of t he f lash, the
corre sponding four f un ct io n bu tt on s are in
different roles, re lated operation s an d de ta il s
please refer to the subseq ue nt c ha pt er s
Test flash
Meaning
The speedl ite is f ul ly
charg ed and can be use d.
Quick flas h* ready
The speedl ite ha s no t
been fully c ha rged .
Mean in g
Radio tran sm is si ng
Flash Trig gi ng
Method
No rma l
The speedl ite ca n be u se d
with“qui ck f la sh ”
Wai ti ng f or c om pl et ion of
fully charged
Meth od
No rma l
No rma l
-8-

Basic Oper ations
4.The mean in g of [So un d Pr om pt ]
The Sound
Form
Tick-- -a long
sound
Three t ick ,
two times
Tick tick tick
Tick-t ick tick
tick tick
Tick-t ick-t ic k
5.TT L Mo de
In TTL mode, the mete ri ng sys te m of this
camera wi ll detec t fl as h i lluminati on reflected
bac k from th e ob je ct s o as to automaticall y
adjust the e xp os ur e co mp en sa ti on .
In T TL mo de , t he light in te ns it y can b e a dj us te d
by setting F EB , FE C an d fl as h ex posure l ock(FVL).
6.M Mode
In M mo de , you can set fla sh output as y ou r
req ui re me nt by short p re ss t he f un ction button
[ ], yo u can adjust th e fl as h ou tp ut t hr ou gh
[ ].Adju st me nt rang e of fl as h output is 1/ 12 81/1, an d t he ou tp ut can be di vi de d into 8 g ra de s,
each ha s ma xi mum 3 gr ad es for fine adjustmen t,
with grade 0.3EV, 0.7 EV as adju st me nt in cr em en t,
tot ally 29 grade f in e ad ju st me nt .
7.Multi (s tr ob os co pi c) Mode
Multi mode, th e sp ee dl it e wi ll flash according to
the fl as h outp ut , flash freq uency and number of
flashes you set. Sele ct th e num be r of fla sh es
throu gh the fun ct io n but to n [ ], select the
fre qu ency through the function but to n [ ].
Then adj us t the num bers o f flashes and flas h
fre qu ency through the [ ]. The adjus tm en t
method of th e flas h out put are sam e as th e M
mode.The numb er of fla sh es rang e is 1-10 0, and
the range of flash frequency is 1- 19 9.
Mean in g
The speedl ite is f ul ly
charg ed, and can be us ed
The exposu re maybe
exc essive
The exposu re may be
insuffic ie nt
Overheat protection
pro mp t
Low bat te r y an d th e sp eedlite is about to shut down
-9-
No rma l
Adjust exp os ure co mp en sa ti on
or change shoo ti ng c on di ti on
Adjust exp os ure co mp en sa ti on
or change sh oo ti ng c on di ti on
Idle 10 minu tes fo r ov er he at
rel ea sed.
Rep la ce t he b at te ri es
Meth od

Basic Oper ations
8.Auto zoo m:
Shor t pre ss the fu nc ti on button [ ] unti l t he
local le ng th v al ue displays on LCD pan el , th en
adju st th e cov er ag e thr ou gh [ ]. Whe n it
displays [ ] ,a tt ac h th e speedl ite to th e ca me ra ,
the flas h coverag e will chan ge as the lens foc al
length and move bac k and for th to commoda te
different flash co ve ra ge .
9.Manual ly s et t he z oo mi ng positi on :
Pre ss th e fun ct io n but to n [ ]until the local
length val ue dis plays on LCD pane l, then adj us t
the coverage through [ ].
lf[ ]i s dis pl ayed, you ca n adj us t the flas h
c ov e r ag e (2 0, 2 4 ,2 8, 3 5 ,5 0, 7 0 ,8 0, 1 0 5m m)
manually.
10.AF Assi st B ea m Em it te r(C.Fn04)
When us in g A F unde r l ow -l ig ht, t he bu il t-i n A F- as si st be am emit ter of the
speedlite wi ll b e emitted automat ic al ly t o ma ke i t easier to a utofocus. Pl ea se
ref er t o the C.Fn chapters .
11.Autom at ic S et ti ng S av ing
The spee dl it e will auto ma ti ca ll y save the current set ti ng s which wil l
convenient to your nex t us e.
12. Pow er S av in g Mode(C.Fn 01 )
The p ow er sa vi ng mode can be achieved by through
settings, pl ea se ref er t o th e C. Fn c ha pters.
13.Overhea t pr ot ec ti on
When conti nu ou s flas h, the tem pe rature of the flash head may inc re as e, a
warning ic on [ ] i co n will be d is pl ay ed o n LC D pa ne l, a nd the recyclin g ti me
will be long er.
When re peated f irings of th e fl ash, the overheat protection func ti on will be
triggered, t he LCD i s li gh ti ng in red, th e sp ee dl ite will be l oc ke d ,i n such ca se ,
please wait fo r ab ou t 10 m in ut es b ef ore co nt inuing use.
When the spe ed li te w ar ns o ve rti ea ti ng , pl ea se r ed uc e the use intensity.
Please mind the hot batteries when you take the m out af ter the
continuo us s ho ot in g.
14.About B at te r y Ca pa ci ty
When the battery c apac it y is insuff ic ie nt , th e sc re en i s
as shown in fi gu re, an d pl ea se c ha ng e th e ba tt er ie s.
Zm C.Fn
Zm C.Fn
custom fun ct io ns
-10-

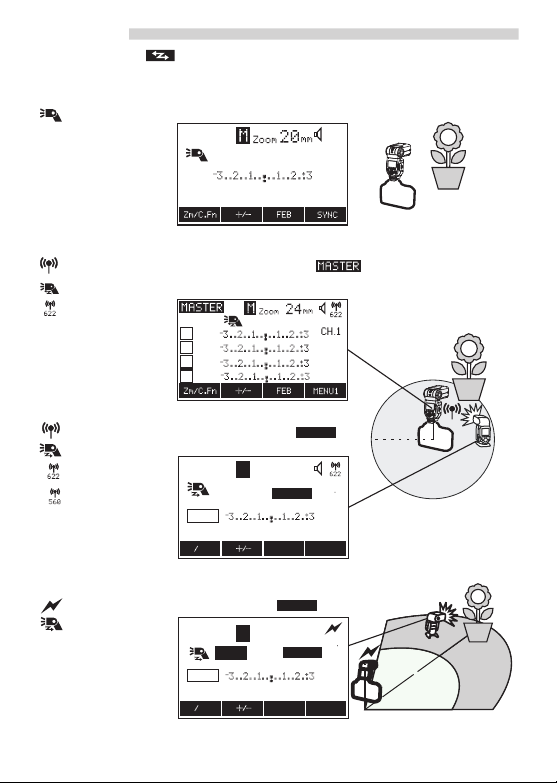
Wireless Flas h Shootin g: Radio Trans mission
TTL
TTL
TTL
M
YN968N s peedl it e suppo rts Y N6 22 mode a nd YN56 0 mode ra di o
wirele ss tr ansmi ss ion. U si ng YO NGNUO tr ansmi tt er or spe ed lite w hi ch
suppor ts w ir el ess tr an smitt in g can be e as ily ac hi eved acc or di ng to the
same met ho d of f lash ph ot og raphy.
When YN968N is use d a s m as ter unit , it can con tr ol slave unit s as
belo w: YN968N, YN 622N, YN 622N II ,Y N685N
When YN968N is use d a s sla ve unit , i t can receive s ig nal fro m
master u ni ts as bel ow :
YN968N ,Y N622N -T X ,Y N622N ,Y N622N I I( using Y N6 22 mode)
YN560- TX , RF605,R F- 603 ser ie s product s (u sing YN 56 0 mode)
Sys te m de si gn: Th e sett in gs of t he speed li te (ma te r unit ) on th e top of
the camer a aut om atica ll y ref lects in th e spe edlite (sl av e uni t) being
wirele ss ly c on trolled . Theref or e, t he re is no ne ed t o us e a s lave u nit in
shooti ng . Th e basic rel at ive po sition a nd o pe ratin g s pecif ic ation show
as below.
Pos ition ing a nd Oper ation R ang e
(Exa mple of wir ele ss flas h shoot ing )
Pos it ion the slave unit usin g t he
supplied m in i st an d.
Be fo re shooting, per fo rm a test
flash and test sho ot in g.
Th e tr an sm ission di st an ce may
b e sh or t er d ep e nd i n g o n t he
conditio ns suc h as th e po si ti on in g
of sla ve u ni ts, th e surrou nding e nv i
ron me nt and weather co nd it io ns .
1.Wire le ss M as ter Unit Se tt in gs*
Att ach th e flas h on th e came ra and se t it as t he
master uni t.
P re ss [ ]button un ti l[ ] an d [ ]
display.
Radio chan ne l se tting
P re ss th e fun ct io n b ut to n 4 u nt il [ ] is
displa ye d, press t he functio n b ut to n [ ] t o
choose th e current c ha nnel, an d a djust th e
channe l t hrou gh [ ], th er e are 1-7 c ha nn el
for opti on .
*Wireless m aster unit o nly suppo rts YN622
mode.
-11-
Mas ter
Sla ve
Tran sm is si on
dis tance Appro x.
100 m
Sla ve
CH
CH
Sla ve
SLA VE
SLA VE
MAS TER
SLA VE

Wireless Flas h Shootin g: Radio Trans mission
2.Wireless S la ve U ni t Se tt in g -YN622 Mode
Set the ot he r YN968N as s la ve unit .
Pre ss [ ]but to n unt il [ ]a nd [ ] ic ons
display, and t he n s et the channel ( The s et ti ng
method i s same as ma ster u nit. Se t the c ha nn el of
slave unit con si st en t wi th a s ma st er u ni t).
Pre ss functi on b ut to n 3 [ ] to s et t he groups
of sl av e un it . There ar e A/ B/ C grou ps o ptional.
When slave flash is ready, the AF as si st bea m
blinks at one se co nd inter va ls (It c an be d is ab le d
throu gh custom functio n C. Fn 04 ).
3.Set Flas h Mo de a nd G ro up f ro m Master Unit
Pre ss functi on b ut to n [ ] to enter in to g ro up
setting s ta tus. “ M” is sho rt f or master uni t.
A/B/C respe ct iv el y r ep re se nt s slave u ni t o f A /B /C
gro up .
Pre ss func ti on button [ ] to set whet he r
the flash group part ic ip at in g fl ash.
Pre ss fun ction button[ ] to set the flash
mode of curr en t group. TTL mod e and M mode
are s up por te d.
Pre ss func ti on button[ ]to s wi tc h groups,
rot at e [ ]to set flas h exp os ure comp ensation
and flash ou tp ut of current group.
4.Group Fo ca l Le ng th S et tings(ZOO M)
Shor t press functio n button [ ]to ente r
into grou p fo cal length se tt in g in te rface.
Pre ss fun ction button [ ]to switch gro up s,
pre ss f unction but ton [ ] an d [ ] or rotate
[ ]to s et focal leng th , an d pr es s[ ] to ret ur n.
5.Test f la sh
When ha lf press c am er a sh ut te r button, t he LINK
light of master unit a nd sl av e u ni t l ighting green.
This mea ns th e communi ca ti on is nor ma l. Pres s
[TESE] button on m as te r fla sh , the slave f la sh
fires .
Gr
ON OFF
A MODE
Gr
Gr
TTL
Zm C.Fn
M
OFF
A
TTL
B
TTL
C
ON OFF
YN622
A
1 32
A MODE
M
mm
24
Zoom
CH 1
SLAVE
Gr
MENU1
Gr
When you need bi gg er f la sh o ut pu t, you can increase the sla ve u ni t.
-12-

Wireless Flas h Shootin g: Radio Trans mission
6.Wire le ss S la ve U nit Setti ng - YN 560 Mode
YON GN UO w irel ess flash trigg er compatib le with YN968N can be use d as
transmit te r to fire YN96 8N . In ra di o wireless sl av e mode, YN96 8N can be
switched betwe en Y N6 22 m ode and YN560 mod e. F or t he m as te r unit
setting, p le as e re fer to the master u ni t’s u se rmanual .
Un d er ME N U2 in ter fac e , pr e s s fu n cti on
YN560
button [ ] t o swi tc h it to YN 56 0 s la ve mode .
Pre ss func ti on button [ ] to set cha nn el of
slave un it co ns istent with ma ster un it . T he re are
1-16 cha nn el f or o ption.
Pre ss f un ction button 3 [ ] to s et g ro up s
of slave uni t. There are A/B /C /D/E/F gro up s
option al .
In YN5 60 mode , pr es s [M ODE] bu tt on to s et
flash m ode. S up por ts M mode a nd Multi m ode.
Pre ss functio n but to n [ ]and ro ta te [ ] to
set the fl as h ou tp ut .
CH
Wire less Trigg er Comp atibl e Lis t Suppo r ted by YN 622 Mod e
CH7
CH7
CH7
Gro up
Fun ction
Sup port
A/B /C
Sup port
A/B /C
Sup port
A/B /C
TT L
Fla sh
Sup port
Sup port
Sup port
Man ual Fla sh
Sup port ( Fla sh output c an be adj usted
fro m sp eed lite)
Sup port ( Fla sh output c an be adj usted
fro m tr ans mitte r)
Sup port ( Fla sh output c an be adj usted
fro m tr ans mitte r)
Zoo m
Set ting
Sup port
Sup port
Do no t
sup port
Tran smi tter
(Sp eedli te)
YN9 68N
YN6 22N-T X
YN6 22N(I I)
YN9 68N
Sla ve
YN6 22
Mod e
Cha nnel
CH1 -
CH1 -
CH1 -
Wire less Trigg er Comp atibl e Lis t Suppo r ted by YN 560 Mod e
Tran smi tter
YN5 60-TX (II)
Ser ies
RF6 05
Ser ies
RF6 03(II )
Ser ies
YN9 68N
Sla ve
YN5 60
MOD E
Cha nnel
CH1 CH1 6
CH1 CH1 6
CH1 CH1 6
Gro up
Fun ction
Sup port
A/B /C/D/ E/F
Sup port
A/B /C/D/ E/F
Do no t Suppo rt
(Al l group s
can f ire)
-13-
TT L
Fla sh
Do no t
sup port
Do no t
sup port
Do no t
sup port
Man ual Fla sh
Sup port ( Fla sh output c an be adj usted
fro m YN 560 -TX)
Sup port ( nee d to set
the f lash ou t on the
spe edlit e)
Sup port ( nee d to set
the f lash ou t on the
spe edlit e)
Zoo m
Set ting
Sup port
Do no t
sup port
Do no t
sup port

Wireless Flas h Shootin g: Optical sla ve mo de
SLAVE
Zoom
mm
20
M
MENU1
Zm C.Fn
A
Sn
Gr
CH 1
TTL
SLAVE
Zoom
mm
20
M
M
MENU2
S2
SC
Set the YN96 8N a s op ti ca l sl av e un it.
Pre ss t he button until disp la ys t he
[ ]and [ ].
Select a trigger m od e wh en pr es s the f un ct ion
b u t t o n 4 [ M E N U ] d i s p l a y s t h e
SC/SN/SC &S N/ S1 /S 2 tr igger modes *.
Please a ll ow th e w ireles s trigger s ensor f ac e t o
the ma st er flash b y r ot at in g t he flas h h ea d.
Before sho ot in g, the sla ve unit and master un it
should be se t on t he s am e ch an ne l.
SC/SN m od e can respectively r ec ei ve the b ui lt- in flash of t he YN5 68EX
II/580EX II /7 D/ 60 D/ 600D,SB-910/900/ 80 0/ 70 0, c om mander mode of Nikon
camera, supp or ts 4 channe ls , real iz in g TTL and manua l fl as h.
Before shoo ti ng , the slave unit and mast er unit shoul d be set on th e same
channel. S1 an d S2 m od e ar e su it ab le f or M ANUA L fl ash environment and T TL
flash envi ronmen t resp ec ti ve ly. Und er these two mode s, the way to adjust
the ou tput is li ke that in M mode only by th e func ti on but to n [ ]and
rot at e th e [ ].
SC: Indi cating that it can onl y receive wirel ess sig na l fro m Can on system,
avoiding Nikon system.
SN: Indicating that it can only receive wire less signal from Ni ko n sys te m,
avoiding Canon s ys te m.
SC&SN:Both s up po rt Canon & Ni kon system.
S1 mode : In th is mode it will work wi th the firs t flash sync hr on ou sl y of t he
master flash, with t he res ul t co ns is te nt w it h the use of r ad io slave. To use th is
mode proper ly, the master flas h shou ld be se t at ma nu al fl as h and th e TTL
flash system wit h pref li gh t fu nc ti on and the red-reduction fu nc ti on w it h
multiple fla sh es s ho ul d no t be used.
S2 mo de: It is also called "pre-flas h cancel mode". This mode is si milar with
S1 m od e, bu t it ca n neg le ct the pr e- fl as h g iv en by T TL fl ash. Th er ef or e, it c an
suppor t th e ma ster flash working in TTL mode. In pa rticula r, if S1 mod e
cannot f lash pr op er ly an d synch roni ca ll y wit h your in te rn al fl as h, yo u can tr y
to us e S2 mode.
*Commonl y us ed t ri gg er m od e can be set by C.F n- 10 .
[ ]
-14-

Adva nced Applica tions
1.Flash Exposure Compe ns at io n( FE C)
In order to m ake t he sh oo ti ng effect m ore s ui ta bl e
to you r nee ds , you ca n set th e fla sh exposure
compensation th ro ug h th e camera or on the flash.
The e xp osure com pe ns at io n valu e is with in th e
range of - 3E V~ +3 EV. lt ca n b e se t t hrough p re ss in g
the function button [ ]and ro ta ti ng t he [ ] .
NOTE: Whe n the spe ed li te , camera and trigger hav e set the exposure
co mpe nsa tio n at the sam e time , whic h will o verla p the exp osu re
compensation.
2.Flash Exposure Bracketing (FEB)
The FEB function can be s et th rough the came ra . A ft er th e e xp os ur e b ra cketing
being set, after ever y 3 phot os be in g tak en , exp os ure compensatio n wil l be
made automatically, f or e xs am pl e, e xp osure in the se qu en ce of no rm al -> un de r>over. Thi s f un ct io n help s you i mp ro ve the suc ce ss rat e o f s ho ot in g. The
function need to ope ra te on the camera, for the det ai le d ope ra ti on me th od
please re fe r to y ou r ca me ra m an ua l.
NOTE: W hen u si ng the e xposure b ra ck et in g, we su gg es t y ou set t he
driving mode of th e c am er a a s “s ingle shot”,a nd chec k if the flash ba ck
to fu ll charg er before shootin g.
3.FV Lock
To u se thi s func ti on should be fi rst set the [AE/AF-L] function bu tton to “FV
Lock”on th e camera. At the mome nt plea se focu s on the su bj ec t th ro ug h th e
view wi nd ow, and then pres s th e [AE/AF-L] b ut to n. The s pe ed li te will fi re preflish to obtain the fl as h ex po su re degree of the subject. Th en press the ca mr a
shutter when y ou c on fi rm the sh oo ti ng s ce ne fr am ew or k.(The fu nc ti on c an on ly
be used whe n it is sup po rt ed by your camer a. For the sett in g meth od ple as e
ref er t o yo ur c am er a ma nu al .)
4.High-speed Sy nc F la sh
With hi gh -s pe ed sync (FP f la sh ), the flash c an b e sy nc hroniz ed with a ll shut te r
speeds, th e m axi m u m sh ut t e r sy nc is up to 1/ 80 0 0 s . H ig h - s p e e d
synchro ni za ti on is part ic ul ar ly convenient to use aper ture prio ri ty to fi ll fla sh
for th e po r tr ai ts . Th ro ug h the c am er a menu, s et t he fl as h sy nc speed to A ut o FP,
the speedlite will enable the high-speed s yn c fu nc ti on a ut om at ic al ly.
5.Second-cur ta in S yn c Fl as h
Af ter th e se co nd-curt ai n sync en ab le d, the speedlite will flas h at the mome nt
when th e sh ut te r is goin g to be shut . Us e th e sl ow -s pe ed shutter and s ec on dcurt ai n sy nc c an m ak e im ag e ta il f or t he s ho ot in g su bj ec t.
The High -s pe ed sync/s ec on d cur ta in sync fla sh function can on ly be use d
when it is supp or te d by yo ur camera. Fo r t he s et ti ng me thod p le as e r ef er to
you r ca mera manual.
-15-

Adva nced Applica tions
6.Use Wide Pa nel
Pull out the Wide panel, push back the Re fl ec ti on
boa rd and arrange t hem a s p er the fi gure ; i n such
case, the flas h scop es wil l exte nt to 14 mm ,th e
flash range will be e nlarged a nd th e e ff ec t w il l b e
sof ter and more natural.
7.Ref le ction Fla sh
Bounce f la sh m ea ns t o ta ke p ho to s by making
flash li gh t hea d ai med a t wall or ceiling an d u si ng
the li gh t refle cted b ac k from th e c ei li ng or w al l t o
light the d es ired ob je ct , s o t ha t t he sh ad e b eh in d
the ob je ct can be decrea se d to ge t mo re natu ra l
shooting e ff ec t.
If the wa ll o r ce iling is too f ar, the bounce fla sh may be to o we ak to get
enough expos ure. The wall or ceiling sho ul d be even and white in orde r
to g et ef fi ci ent ref le ction, if the ref le ction surf ac e i s n ot wh it e, co lo r c as t
may appear i n ph ot o.
8.Use Ref lection B oard
For shoot in g wit h the reflectio n boa rd in fl as h,
pull out th e reflection board an d the wide pane l
out from the l ig ht head at th e sa me time a nd t he n
push th e wi de panel ba ck . In such ca se , if this
pro du ct is bei ng used to tak e photo s, it wil l
pro du ce a hi gh li ghte d poi nt on the eyes of the
su b jec t and thus mak e th e ey e s ch a rmi n g
(catc hing light). This functio n can re ach opti mal
effect when th e fl as h he ad i s up 9 0° .
9.Using th e di ff us er (O ptions)
Fitting t he di ff us er le ts you diffus e t he li gh t f ro m
the flas h ove r a wide range, prod uc in g a softer
light and reducing s ha do ws .
When fi tt in g th e diffus er , the zoo m po si ti on is
locke d, y ou c an change the s et ti ng b y P.Fn0 5.
-16-

Adva nced Applica tions
10.Short D istance Fla sh S ho ot in g
When you po si ti on th e flash hea d dow n by 7° ,
you can shoot subje ct s at a shor t distan ce in a
range of ap prox . 0. 5 to 2 m .
11.PC Syn c po r t (i np ut )
Th ro ugh co nn e ct ing to th e PC sync po r t, yo u can make the fl ash
synchronously.
12.Use the E xt er na l Ba tt er y Pack
You can p ur ch as e t he ex te rn al batter y p ac k SF-18 C or SF -1 7C,connec t it
to t he external power socket of th e sp ee dl it e, even w he n us in g external
power, in ser t b at te ri es into t he sp ee dlite. Aft er flas h th e battery pa ck wi ll
charg e for the speed li te .
13.High- sp ee d Co nt in uous Shoo ti ng
The flash can su pp or t the high-spe ed cont in uo us shoo ti ng func ti on . Please
set the camera i n th e co nt in uo us shooting for m an d th en s ho ot .
14.Fa ct or y rese t
Long press the fu nc ti on button 2 and but to n 3
can set the flash shootin g func ti on set ti ng s and
wirel ess sho ot ing set ti ng reco ve r to the def au lt
set-top TTL flash mo de statu s. Clea n the cu stom
function set ti ng s( C. Fn ) and personal f unction
settings(P.Fn ) pl ea se r ea d th e re la te d ch ap te r.
15.Fir mw ar e Up gr ad e
1).Log in the YONGNU O off ic ia l we bs it e
(ww w. hk y on g n u o .c o m ) to do w n loa d t h e
upgrade soft wa re and t he l at es t fi rm wa re .
2).Po we r of f, use USB-Micro US B cab le connec t to
PC. (Do not incl ud e ca bl e)
3).Press th e [M OD E] but ton and set t he power
switc h to [ON], the LCD will disp la y firmware
upgrade interf ac e.
4).Complete the f ir mw ar e upgra de operatio n
according to the prompt of so ft ware .
-17-

C.Fn/P.Fn: Setting Custom /Personal Functions
Long pres s the func ti on but to n [ ] to ent er int o the custom functio n,
rot at ing the [ ] to choo se the items which ne ed adjusted. Then press th e
[OK] but to n to ente r into the prog ra m set ti ng mode, rota ti ng the [ ]to
select the optio n a nd pres s [ OK ] b ut to n. Af ter finishin g t he cu st om se tt in gs,
pre ss the fu nc ti on button [ ] return t o t he re ady shoo ti ng state. press th e
function bu tt on [P.FN ]e nter into the pe rs on al functio n, pres s the function
button[Clear ]to cl ea r th e C. FN o r P.FN settings.
C.Fn: Custom Functions
C.Fn-00: F ir mw ar e Ver si on
Display the in fo rm at io n of c ur re nt v er si on f or the speedlite.
C.Fn-01: ( Au to p ow er o ff )
When t he sp ee dlite i s n ot operated fo r 5 min., t he power turn s off
automatically to save en ergy. You c an d is ab le this functio n.
0: ON (Enabl ed ), 1 : OF F (D is ab led)
C.Fn-02: (Mo de li ng f la sh)
0: -Enable d De pt h- of- fi el d pr ev ie w bu tt on
1: / - Enabled wit h bo th b ut to ns
C.Fn-03: ( Test f ir ing with au toflas h)
0: 1/32 (1/32) , 1: 1 /1 ( Fu ll o ut pu t)
C.Fn -04: (AF -assi st be am firi ng)
0:ON (Enab le d) ,1 :O FF (D isabled)
C.Fn-05: ( Au to z oo m fo r se ns or size)
0:FX(FX fo rm at ), 1: DX(DX f ormat)
C.Fn-06: (Slave auto power off time r)
0:60min(60 m in ut es ), 1: 10 mi n(10 minutes)
C.Fn-07: (Flash exp os ur e me te ri ng setting)
0: + (Speedlite bu tton a nd d ia l) ,1 : (S pe edlite dial onl y)
C.Fn-08: (Beep)
0:OFF (Off),1:ON (On)
-18-

C.Fn/P.Fn: Setting Custom /Personal Functions
C.Fn-09: (LC D pa ne l il lu mi nation)
When a b utton o r di al is o perated, th e LC D pa ne l i ll um in at es . You can ch an ge
this illum in at io n se tt in g.
0: 12sec (On for 1 2 se c. )
1: OFF (Disa bl e pane l il lu mi na ti on)
2: ON (Illum in at io n al wa ys o n)
C.Fn-10: T hr ou gh t he f un ct ion button can w it ch t o th e
wireless opt ic al s la ve m od e.
0: SN (Only SN )
1: SC/SN (ln cl ud in g: SC /S N)
2: SN/S1/S 2 (l nc lu di ng :S N/S1/S2)
3: SC/SNS1 /S 2 (l nc lu di ng :SC/SN/S1 /S 2)
C.Fn-11: S L IN D( S la ve u ni t in di ca to r )
Enabled
0:ON( )
1:OFF(Di sa bl ed )
[MENU]
P.FN: Persona l FunctionSetting
P.Fn-01: LCD panel dis pl ay c on tr as t( )
You ca n ad ju st t he c on trast of t he LCD panel i n 5 le ve ls .
P.Fn-02: ( LCD pan el illumina ti on c ol or : Norm al s ho ot ing)
0:GREEN( Green),1 :O RA NG E(Or an ge)
P.Fn-03: ( LC D pa ne l illuminat io n co lo r : Ma st er )
0:GREEN( Green),1 :O RA NG E(Or an ge)
P.Fn-04: ( LCD pan el illumina ti on c ol or : Slav e)
0:GREEN( Green),1 :O RA NG E(Or an ge)
P.Fn-05: ( Di ff us er a ut o de tection)
0:AUTO, 1:OF F
P.Fn-06: ( Wi re le ss b ut to n to ggle sequen ce )
0:
OFF--> -->
1:OFF<-->
2:OFF<-->
-19-

Shooting with LED Light
Using the LE D li gh t
1.Make th e flash unit vert ic al(90°upw ard boun ce )
2.Pre ss the [LE D] button, the LED co me s on, th e LED li gh ti ng on th e LCD
pan el .
3.Rotate the [ ]to adjus t th e br ig ht ne ss .
4.Pre ss t he [LED ] button ag ain or press t he func ti on button[ ]to turnin g
off t he L ED l ight.
LED Lighti ng :
Brightne ss :5 0%
Using the LE D li gh t wi th r ad io wireless mas te r
When shoo t wit h LED light , pre ss th e function bu tt on [M AS TER] to keep
shooting wit h LE D li gh t an d us e(the master flash is d is ab le ).
Using the bu li t-i n di ffuser
Us in g a bui l t-in di ffu ser re duc es gla re and
sof tens light. It can als o unnat ur al mu lt ip le
shadows.
Firmly pull the handle of t he built-in diffuser
down to the b otto m of the wi ndow a nd atta ch it.
when storin g, pu ll th e handle up in to th e mai n
body.
Using the co lo r co nv er si on filter
Using a colo r conver si on filter let s you change
the co lor te mperature to ab o u t 3200K(at
maximum br ig ht ne ss )
Al i gn the cli p s on ea ch side of the co lor
conversi on filter w ith t he ri m of th e L ED li gh t and
pre ss t he color conver si on f li te r on .
To remo ve the co lo r co nv er si on f li te r, hol d th e
pro tr usions on eac h si de a nd p ul l it o ff.
The flash ca nn ot f ir e wh en t he L ED l ig ht i s on.
The co lo r te mp erature varies sl ig ht ly with b ri gh tn ess a dj us tm en ts and
LED temperature, so ch ec k th e wh it e ba la nc e be fo re r ec ordi ng .
Using t his fl as h un it when the subject is t oo close to th e ca me ra may
cre at e mu ltiple shad ow s of the sub je ct .
The LE D ligh t goes off when the flas h head is di re ct ed horizon ta l or
downward.
-20-

Troubles hooting
1 .Po we r do es n ot t urn on or the f la sh d os e no t fi re.
Make su re t ha t th e ba tt er ie s ar e in st al led in the correct or ie nt at io n.
Please check i f th e sp ee dl it e is i n overheat prote ction status.
lf the elect ri ca l conta ct s of the spee dl ite and camera ar e dirt y, clea n the
contacts.
2.The fl as h au to ma ti ca lly shut off the power.
Please c he ck if the fl as h enable th e po we r savin g mo de or whet he r th e
bat te r y po we r is e no ugh.
3.Photos are u nd er e xp os ur e or o ve r exposure.
Check if the set shutter, ap ert ur e and ISO are too near the flash limit or if
some setting s i nc lu ding exp os ure c om pe ns at ion in relatio n t o f la sh are
pro pe r.
4.Vignet ti ng a pp ea rs in photos or o nl y pa rt of th e su bject is il lu mi na te d.
Please check th e cu rr en t co ve ra ge of f oc al leng th and make sure if t he lens
focal length exceeds the coverage range of t he fl as h. Th e p ro du ct 's zooming
range is 2 0~ 10 5 mm o f th e me dium format s ys te m. You can tr y to pull ou t th e
wide-angle d if fu se r to e xp an d th e fl as h range.
5.Wireless s la ve u ni t do es n' t fire.
Please c he ck if t he mo de (YN622 o r YN5 60 m ode) of w ir el es s m as te r unit an d
slave unit are set the same . Dif fe re nt mod e settt in g will lead to abnormal
communic at io n. Please se t the ch an nel of w ir el es s master unit same as the
slave unit, and make sure the wire le ss slave unit is located in th e effe ct ive
transmis si on r an ge .
6.The opti ca l sl av e un it d oe s no t fire.
Set th e master un it t o[ ] an d[ ] (a bo ut th e ma ster unit p le ase refer t o
the m as te r unit ’s u sermanual ) a nd s et the sl av e un it to [ ]and[ ]. Se t
the tran sm is si on chan nel and of the master unit and sl av e unit to the sa me
number s. Che ck tha t the slav e unit is with in the tra ns mi ss io n rang e of th e
master unit.
7.Can not te st f la sh o r ma st er flash do es n ot f ir e.
Please che ck i f th e LE D li gh t is O N.
Please p re ss function b ut to n [ON /O FF ] to chec k if th e ma st er unit i s set a s
disabled .
8.Other prob le ms .
Try t o c le ar the settings of fl as h and c amera, t r y to di sa bl e t he fl as h
power source and then restar t th e flash.
-21-

Specific ations
Circu it design:
Guide No.:
Flash mode :
Trig ge r mo de :
Zoom :
Ver ti ca l ro ta ti on a ng le :
Horizont al rotat io n an gl e:
Power s up pl y:
Lighting t im es :
Rec yc le t im e:
Flash colo r temp er at ur e:
Flash time :
Flash cont rol:
External inter fa ce :
LED Color temper at ur e:
LED lumina nc e:
Optical tr an sm is si on
triggeri ng d is ta nc e:
Radio tran sm is si on
triggeri ng d is ta nc e:
Addition al f ea tu re s:
Dimensio ns :
Net weight:
Contains i tems :
Insulated Gate Bipol ar Tra nsistor (IGBT)
60 (ISO 100,10 5m m)
TT L, M , Mu lt i
Set-top mode, radio w irel es s ma st er m od e, r ad io
wirel ess slave mode, wireles s op ti ca l sl av e mo de
(SC,SN,SC& SN ,S 1, S2 )
Auto,20,24,28, 35 ,5 0, 70 ,8 0, 105
-7~150 degrees
0~360 degrees
4xAAsize batteries (Al ka li ne o r Ni -M H are us ab le)
100~1500 times ( AA a lk al in e ce ll used)
Appro x 3s ( AA a lk aline cell us ed )
5600k
1/200s~1/2 00 00 s
8 levels of o ut put control (1/128~1/ 1) , 29 l ev el s
of fi ne t un ing
Hot shoe, PC por t
Apporx . 55 00 K
Apporx . 30 0l ux(1m)
20~25m indoo r, 10~15m out doo r
Up to 1 00m
Master fl as h, high- sp ee d sync, sec on d- cur ta in
sync, FEC, FEB, FVL, the electronic flash head
zooming, s ou nd p ro mp t, a utom atically sa vi ng
setting, PC po rt, power saving mo de , ov er he at
pro te ct ion, c us to m funct io ns (C. Fn), p er sonal
function s( P.Fn) .
78×60.5×206mm(ex te nd ed s ta te )
435g
Sp eed lit e ( 1 ),p rot e c t ing ba g(1 ),m ini st and
(1),colo r co nv er si on f il te r for LED light(1 ),
usermanual (1 )
The f un ctions o f this user m an ua l are bas ed on tes t con di ti on s of o ur
compa ny.Fur th er not ic e will not be gi ve n i f the desi gn and spe ci fi ca ti on s
change.
The YONGNUO lo go in t hi s man ua l in cludes th e re gistered tradem ar k or
trademar k o f Shenzh en Yon gn uo Photography E q u i p m e n t C o . , L t d
i n C h i n a o r / a n d o t h e r co untries(regio ns ). Al l o th er tradem ar ks
are t he p ro pe r ty of thei r resp ec ti ve o wn er s.
-22-

深圳市永诺摄影器材股份有限公司
TEL: (086) 0 755-8 376 244 8 Ema il: ser v ice@h kyongnuo .com
深圳市福 田区华强北 路赛格科技 园2栋5楼B50 9室
FAX:(08 6) 0755 -83 76 2768 Web site: www. hky ongnu o.com
全国服务 电话:400 -001- 3888
 Loading...