

Page 1

User ’s
Manual
Model WE440
Phosphate Analyzer
IM 12Y18A04-01EN
IM 12Y18A04-01EN
1st Edition
Page 2
u Introduction
Thank you for purchasing the WE440 Phosphate Analyzer.
This Instructor’s Manual contains all essential information for the user to make full use of WE440.
Please read the following respective documents before installing and using the WE440.
The related documents are listed as follows.
General Specications
Contents Document number Note
Model WE440 Phosphate Analyzer GS 12Y18A04-01EN Online manual
“EN” in the document number is the language code.
User’s Manual
Contents Document number Note
WE410, WE420, WE430, WE440
WET CHEMISTRY ANALYZER
Safety Precautions and Protection of Environment
Model WE440 Phosphate Analyzer IM 12Y18A04-01EN Online manual (This manual)
“EN” in the document number is the language code.
An exclusive User’s Manual might be attached to the products whose sux codes or option
codes contain the code “Z” (made to customers’ specications). Please read it along with this
manual.
IM 12Y18A00-01EN
i
Attached to the product
(printed manual)
You can download the latest documents from our website. Scan QR code.
http://www.yokogawa.com/an/wet-chemistry-analyzers/download/
Media No. IM 12Y18A04-01EN 1st Edition : Oct. 2019 (YK)
All Rights Reserved Copyright © 2019, Yokogawa Electric Corporation
IM 12Y18A04-01EN 1st Edition : Oct. 04, 2019-00
Page 3

n Notes on Handling User’s Manuals
• Please provide the user’s manuals to your end users so that they can keep the user’s
manuals for convenient reference.
• Please read the information thoroughly before using the product.
• The purpose of these user’s manuals is not to warrant that the product is well suited to any
particular purpose but rather to describe the functional details of the product.
• No part of the user’s manuals may be transferred or reproduced without prior written
consent from YOKOGAWA.
• YOKOGAWA reserves the right to make improvements in the user’s manuals and product at
any time, without notice or obligation.
• If you have any questions, or you nd mistakes or omissions in the user’s manuals, please
contact our sales representative or your local distributor.
n Drawing Conventions
Some drawings may be partially emphasized, simplied, or omitted, for the convenience of
description.
Some screen images depicted in the user’s manual may have dierent display positions or
character types (e.g., the upper / lower case). Also note that some of the images contained in this
user’s manual are display examples.
ii
n Trademark Acknowledgments
• All other company and product names mentioned in this user’s manual are trademarks or
registered trademarks of their respective companies.
• We do not use TM or ® mark to indicate those trademarks or registered trademarks in this
user’s manual.
IM 12Y18A04-01EN 1st Edition : Oct. 04, 2019-00
Page 4
u Safety Precautions
n Safety, Protection, and Modication of the Product
• In order to protect the system controlled by the product and the product itself and ensure
safe operation, observe the safety precautions described in this user’s manual. We assume
no liability for safety if users fail to observe these instructions when operating the product.
• If this instrument is used in a manner not specied in this user’s manual, the protection
provided by this instrument may be impaired.
• If any protection or safety circuit is required for the system controlled by the product or for
the product itself, prepare it separately.
• Be sure to use the spare parts approved by Yokogawa Electric Corporation (hereafter
simply referred to as YOKOGAWA) when replacing parts or consumables.
• Modication of the product is strictly prohibited.
• The following safety symbols are used on the product as well as in this manual.
WARNING
This symbol indicates that an operator must follow the instructions laid out in this manual in order
to avoid the risks, for the human body, of injury, electric shock, or fatalities. The manual describes
what special care the operator must take to avoid such risks.
iii
CAUTION
This symbol indicates that the operator must refer to the instructions in this manual in order to
prevent the instrument (hardware) or software from being damaged, or a system failure from
occurring.
CAUTION
This symbol gives information essential for understanding the operations and functions.
NOTE
This symbol indicates information that complements the present topic.
This symbol indicates Protective Ground Terminal.
n Warning and Disclaimer
The product is provided on an “as is” basis. YOKOGAWA shall have neither liability nor
responsibility to any person or entity with respect to any direct or indirect loss or damage arising
from using the product or any defect of the product that YOKOGAWA can not predict in advance.
IM 12Y18A04-01EN 1st Edition : Oct. 04, 2019-00
Page 5

u CE marking products
n Authorized Representative in EEA
The Authorized Representative for this product in EEA is Yokogawa Europe B.V. (Euroweg 2,
3825 HD Amersfoort, The Netherlands).
n Identication Tag
This manual and the identication tag attached on packing box are essential parts of the product.
Keep them together in a safe place for future reference.
n Users
This product is designed to be used by a person with specialized knowledge.
n How to dispose the batteries:
This is an explanation about the EU Battery Directive. This directive is only valid in the EU.
Batteries are included in this product. Batteries incorporated into this product cannot be removed
by yourself. Dispose them together with this product.
iv
When you dispose this product in the EU, contact your local Yokogawa Europe B.V.oce.
Do not dispose them as domestic household waste.
Battery type: Manganese dioxide lithium battery
Notice: The symbol (see above) means they shall be sorted out and collected as ordained in the
EU Battery Directive.
IM 12Y18A04-01EN 1st Edition : Oct. 04, 2019-00
Page 6

Model WE440
Phosphate Analyzer
IM 12Y18A04-01EN 1st Edition
CONTENTS
u Introduction ....................................................................................................i
u Safety Precautions ......................................................................................iii
u CE marking products ..................................................................................iv
1. General Information ................................................................................. 1-1
1.1 Startup Procedure ............................................................................................. 1-1
1.2 General Product Description ........................................................................... 1-2
1.2.1 User Interface..................................................................................... 1-3
1.2.2 Menus Display ................................................................................... 1-4
1.2.3 Measurement Mode Display .............................................................. 1-4
1.2.4 Analysis Reaction Principle ............................................................... 1-6
1.2.5 Fluids Storage .................................................................................... 1-6
1.2.6 Calibration Standard .......................................................................... 1-6
1.2.7 Reagents Required ............................................................................ 1-6
1.2.8 Reagent Consumption ....................................................................... 1-6
Toc-1
2. Installation ................................................................................................. 2-1
2.1 Mounting the Instrument .................................................................................. 2-1
2.2 Plumbing Connections ..................................................................................... 2-2
2.2.1 Installing Peristaltic Pump Head Tubing ............................................ 2-3
2.2.2 Installing the Reagents ...................................................................... 2-4
2.3 Connecting Power to the Analyzer .................................................................2-4
2.3.1 Analog Outputs Connections ............................................................. 2-6
2.3.2 Alarm Connections ............................................................................ 2-6
2.3.3 Inputs Signal Connections ................................................................. 2-9
2.3.4 Communication Signal Connections ................................................. 2-9
3. Startup and Operation ............................................................................. 3-1
3.1 Executing a Manual Calibration ...................................................................... 3-1
3.2 In Auto-Calibration Mode ................................................................................. 3-2
3.3 Placing the Analyzer into Service ...................................................................3-2
3.4 Validating a Calibration Standard ...................................................................3-2
3.5 Running an Analysis (Analyze Once) ............................................................. 3-2
3.6 Instrument Operation Modes ........................................................................... 3-3
3.7 Sample Analysis and Validation ...................................................................... 3-3
3.8 Calibration ......................................................................................................... 3-3
3.9 Cleaning ............................................................................................................. 3-3
IM 12Y18A04-01EN 1st Edition : Oct. 04, 2019-00
Page 7

Toc-2
3.10 Post Wash .......................................................................................................... 3-4
3.11 Priming ............................................................................................................... 3-4
4. Analyzer Hardware Conguration and Calibration .............................. 4-1
4.1 Optics Calibration ............................................................................................. 4-1
4.2 Optics Calibration Steps .................................................................................. 4-1
4.3 Reaction Cell Temperature Calibration .......................................................... 4-2
4.4 Pumps Calibration ............................................................................................ 4-2
4.5 Pumps Calibration Method .............................................................................. 4-2
4.6 Analog Outputs Calibration ............................................................................. 4-3
5. Calibration of the Instrument for Measurement Analysis .................... 5-1
5.1 Theory of Calibration ........................................................................................ 5-1
5.2 Methods of Calibration ..................................................................................... 5-1
5.3 Single Point Calibration ................................................................................... 5-1
5.4 Base Line Calibration ....................................................................................... 5-2
5.5 High Range Dilution-Factor Calibration ......................................................... 5-2
5.6 Theory of Measurement ................................................................................... 5-3
5.7 Mode of Measurement ...................................................................................... 5-3
5.8 Auto Restart Mode ............................................................................................ 5-4
5.9 Manual Restart Mode ........................................................................................ 5-4
5.10 Measurement Cycle .......................................................................................... 5-4
5.10.1 Cell Wash ........................................................................................... 5-5
5.10.2 Sample Capture ................................................................................. 5-5
5.10.3 Optics Testing .....................................................................................5-5
5.10.4 Checking Reaction Temperature ....................................................... 5-5
5.10.5 Blank Measurement ........................................................................... 5-6
5.10.6 Add Reagents .................................................................................... 5-6
5.10.7 Collect Data ........................................................................................ 5-7
5.10.8 Post Wash .......................................................................................... 5-7
5.10.9 Measurement Data ............................................................................ 5-7
5.10.10 Printing Results .................................................................................. 5-7
6. Menu Overview ......................................................................................... 6-1
6.1 Setup Menu ........................................................................................................ 6-1
6.2 Measurement Menu .......................................................................................... 6-2
6.3 View Data and Alarms Menu ............................................................................ 6-2
6.4 Service Menu ..................................................................................................... 6-3
6.5 System Administration Menu .......................................................................... 6-3
6.6 Hardware Setup Menu ...................................................................................... 6-4
6.7 Prime Fluidics Menu and New Reagents Blank ............................................. 6-4
6.8 Diagnostics Menu ............................................................................................. 6-5
6.9 Default and Lost or Forgotten Passwords ..................................................... 6-5
6.10 User Interface Tree ............................................................................................ 6-6
7. Terms Denition ....................................................................................... 7-1
IM 12Y18A04-01EN 1st Edition : Oct. 04, 2019-00
Page 8

Toc-3
8. Maintenance Schedule ............................................................................ 8-1
8.1 Changing Reagents .......................................................................................... 8-1
8.2 Installing Tubing Maintenance Kit ................................................................... 8-2
8.3 Cleaning the Reaction Cell ............................................................................... 8-4
8.4 Cleaning the Sample Flow Chamber .............................................................. 8-5
8.5 Installing Tubing Kit .......................................................................................... 8-6
8.6 Stand-By Mode and Extended Shutdown ...................................................... 8-7
9. Standby and On-Demand Modes ........................................................... 9-1
Revision Record .......................................................................................................i
IM 12Y18A04-01EN 1st Edition : Oct. 04, 2019-00
Page 9

Blank Page
Page 10
<1. General Information>
1. General Information
The YOKOGAWA WE400 series analyzers are compact wet-chemistry analysis systems,
designed for the continuous on-line analysis of water in several applications across many
industries.
The WE440 Phosphate Analyzer uses the colorimetric detection method that relies on specic
reagents that are added to the sample to produce a reacted color compound.
The intensity of the color determines the concentration in reference to a known reacted standard.
The colored compound absorbs energy at a specic wavelength in accordance with the Beer-
Lambert Law.
The instrument uses Light Emitting Diodes (LEDs) that emit light at a narrow bandwidth selected
for the specic application.
The phosphate analysis method uses the blue LED.
n Unpacking the Instrument
Remove the analyzer from its shipping carton and inspect it for damage.
Do not destroy the shipping container during unpacking so that you can save it for possible future
use.
1-1
NOTE
The analyzer may be shipped with a translucent protective cover on the LCD. Carefully peel o
this translucent layer and discard it.
WARNING
DO NOT APPLY ELECTRICAL POWER TO VISIBLY DAMAGED COMPONENTS, AS INJURY
OR FURTHER EQUIPMENT DAMAGE MAY OCCUR.
1.1 Startup Procedure
This section describes the necessary steps to begin using the WE440 Phosphate Analyzer. Refer
to Chapter 2 for instructions on mounting the analyzer, making the plumbing connections, and
connecting electrical power. More details can be found in subsequent chapters.
Once the analyzer is securely mounted in a xed location, wired to electrical power, wired to
communications, (if necessary) and plumbed to process water, perform the following instrument
startup procedure:
1. Power on instrument.
2. To allow longer lifetime of unit, the pump-head tubing are not fully engaged when the unit is
shipped. Refer to Plumbing Connections section.
a. Reset tubes in pumps heads.
Note: This step must be repeated for all pump heads.
i. Remove tape.
ii. Slide tube retainer into place along keyway.
iii. Install tubing cover by squeezing both sides, and sliding into grooves.
3. Install reagents. Very carefully match reagent numbers and colors in their proper order.
Refer to “2.2.2 Installing the Reagents” section.
IM 12Y18A04-01EN 1st Edition : Oct. 04, 2019-00
Page 11
<1. General Information>
NOTE
• It is recommended to wear latex gloves whenever handling or changing reagents.
• Turn the reagent cap clockwise while holding bottle vertical and level.
• Inspect the tubes to be sure none have been pinched.
4. Prime the tubing. (See Installing Peristaltic Pump Head Tubing section for more details.)
a. Press Menu.
b. Select Services.
c. Select Prime Fluidics.
d. Select Prime All.
Note: This procedure will run automatically and take approximately 10 minutes per cycle.
5. Refer to Chapter 3 for more details on startup and operation. Once the above four steps
have been completed, (4. a, b, c, d) press Run. Allow the unit to operate overnight or for at
least 12 hours, to become stabilized in the local environment.
6. For additional information on WE440 Phosphate Process Analyzer Operation, refer to
Chapter 3.
Additional details can be found in the following sections:
“3.6 Instrument Operation Modes”
“4. Analyzer Hardware Conguration and Calibration”
“5. Calibration of the Instrument for Measurement Analysis”
“6. Menu Overview”
“7. Terms Denition”
“8. Maintenance Schedule”
1-2
RGT STD
REAGENT STANDARD
DRAIN
Figure 1.1 Reagent bottle numbers in proper order
SAMPLE (INLET)
SAMPLE (RETURN)
SAMPLE CHAMBER
SAMPLE
SMP
SAMPLE CHAMBER
WITH FLOAT SENSOR
1.2 General Product Description
This user manual provides the information necessary to obtain the maximum benets from the
WE440 Phosphate Analyzer. All operating instructions, functional descriptions, illustrations, and
other relevant information are contained in this manual.
Descriptions of the system hardware and user-interface software (the control panel) are included,
as an overview of the analytical techniques employed in the analyzer. Step-by-step instructions
guide you through all operating procedures and eld programming.
The analyzer is designed for easy operation. Each analyzer in this family runs in a fully
automated mode for routine, day-to-day water analysis.
The need for operator interaction is minimal. Accordingly, the information required by the routine
operator of this analyzer is modest, and that information is provided in Chapter 3 Startup and
Operation, of this manual.
IM 12Y18A04-01EN 1st Edition : Oct. 04, 2019-00
Page 12
<1. General Information>
Important standard analyzer capabilities include:
• Sampling the process stream automatically.
• Calculating concentration of your sample and reporting it in units of concentration.
• Recalibrating automatically at preprogrammed intervals to compensate for any changes in
captured sample volume, pump ow rates and reagent composition.
• Cleaning automatically (when programmed) at user-specied intervals to prevent
precipitation build-up, coating of the optics or bacterial/fungal growth.
The analyzer brings colorimetric laboratory precision to the real world of unattended process
analyzing. It is designed for long life under continuous, rigorous use.
The WE400 series analyzers are designed for accommodating several applications. Each
application requires a specic conguration in hardware and software that is set at the factory.
This analyzer model is intended to use for clean water applications such as power plant water
analysis only, suspended solids must be less than 60 microns.
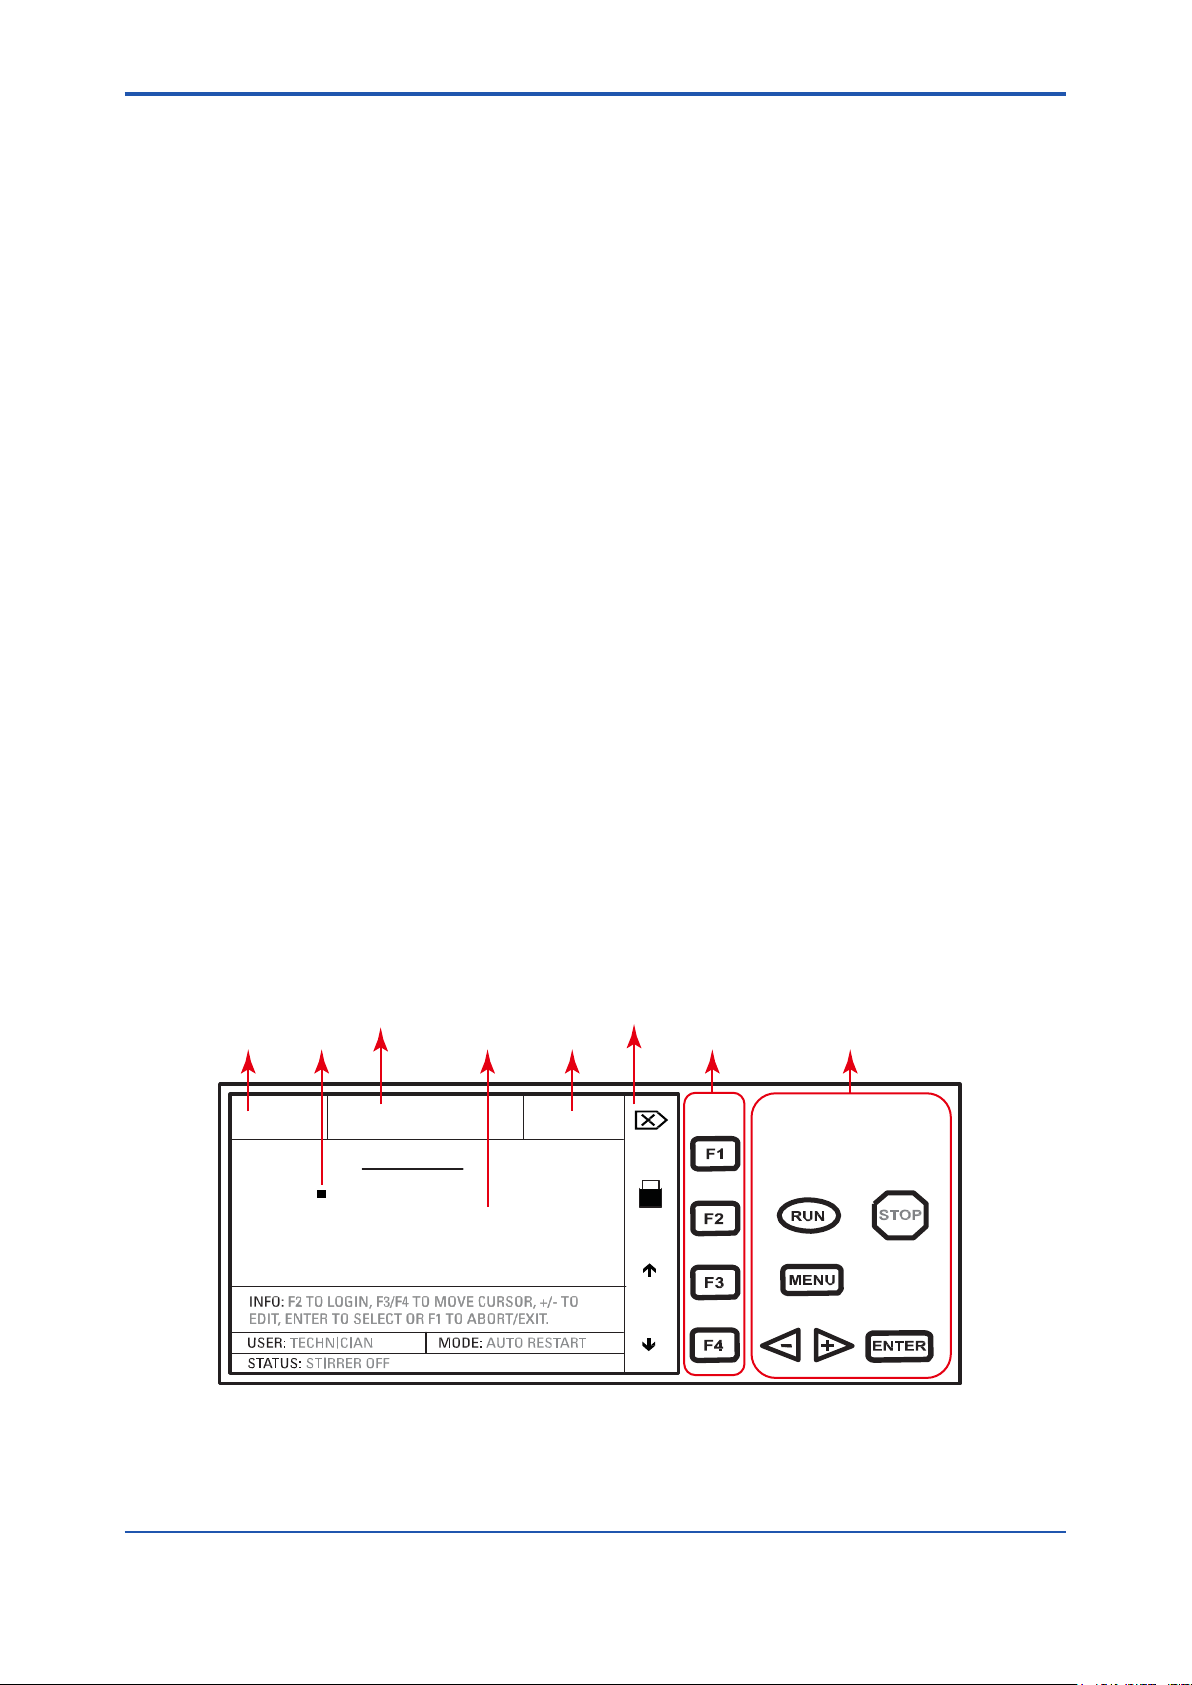
1.2.1 User Interface
n General Description
The user-interface consists of a keypad and a graphical LCD display. The keypad is located
to the right of the display. The “F1-F4” function keys (soft-keys) take on dierent meanings
depending on the menu selection. The column on the left of the soft-keys labels the keys with
their appropriate functions.
1-3
Keys
RUN: starts the analysis
STOP: stops the current functioning of the instrument.
+ , -: allows for navigation between pages
ENTER: conrms selections made in the menus
MENU: accesses the menus, Pressing the MENU key displays the instrument’s Main
Menu. System parameters can be congured from the Main Menu.
soft-keys (in appropriate menus):
additional navigations for left / right or up / down cursor movement.
LCD display
the date, analysis label, time, navigational menus, current user, instrument-working mode,
current status of the instrument and the soft-key labels.
Application name field
Data field Cursor
06/06/19
Display field Time field
PHOSPHATE
MAIN MENU
+SETUP
+MEASUREMENT
+VIEW DATA AND ALARMS
+SERVICES
Function keys assignment
Function keys Operational keys
02:20 PM
Figure 1.2
IM 12Y18A04-01EN 1st Edition : Oct. 04, 2019-00
Page 13
<1. General Information>
l Display Fields
1. DATE FIELD shows the current date.
2. CURSOR indicates current selection.
3. APPLICATION NAME FIELD shows instrument name tag.
4. TIME FIELD shows present time.
5. DISPLAY FIELD shows menus / measurements.
6. INFO eld shows information / instructions to navigate.
7. USER eld shows current user name.
8. MODE eld shows whether the instrument is working in Auto, Manual or Run mode.
9. STATUS eld shows current working status of the instrument.
10. FUNCTIONAL KEYS ASSIGNMENT FIELD shows the functions allotted to the functional
keys.
11. FUNCTION KEYS select functions.
12. OPERATIONAL KEYS are meant for operation of the instrument.
l Symbols used
Escape (Cancel/Back) Cursor
Logged out (Locked) Logged in
Scroll Up Scroll Down
1-4
Print Delete
Scroll Left Scroll right
Accept Reject
1.2.2 Menus Display
A “+” before a menu item denotes that the item has multiple options.
Keys
UP/DOWN arrow: scrolls up or down through options
ENTER: shows details of the options
MENU: shifts to Main Menu. Parameters can be congured from the Main Menu
NOTE
The analyzer may be shipped with a translucent protective cover on the LCD. Carefully peel o
this translucent layer and discard it.
1.2.3 Measurement Mode Display
In measurement mode, the instrument displays current and previous readings, units, date and
time. The measurement results can be displayed as large size fonts or normal size fonts. F1 key
will toggle between large and normal fonts.
NOTE
In AUTO mode, the user can navigate between dierent menus even though the instrument is
performing a measurement or a calibration.
IM 12Y18A04-01EN 1st Edition : Oct. 04, 2019-00
Page 14
<1. General Information>
POWER AND
I/O SIGNALS
CONNECTIONS
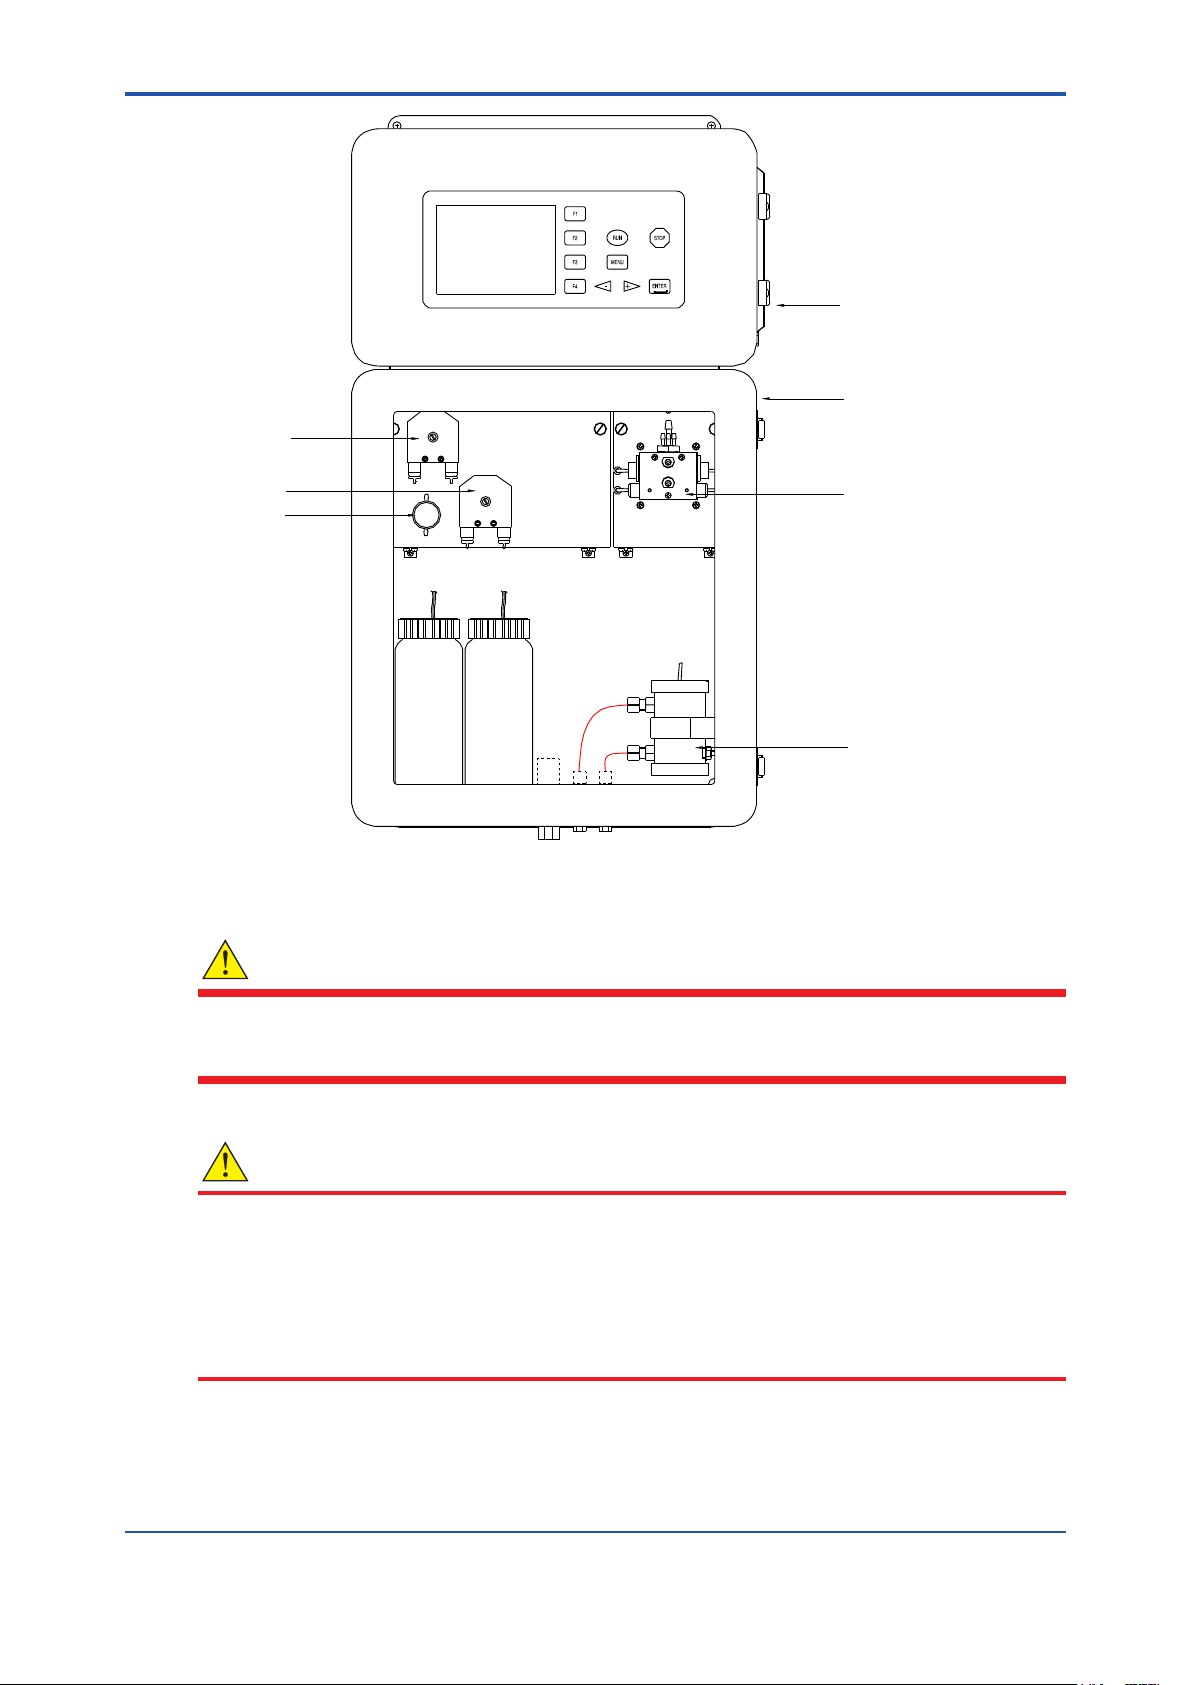
REACTION CELL
AIR VENT
SAMPLE &
STANDARD PUMP
REAGENT
PUMP
SAMPLE &
STANDARD VALVE
SAMPLE (BACK) N.C.
STANDARD (FRONT) N.O.
RGT STD
RGT
REACTION CELL
ASSEMBLY
1-5
REAGENT STANDARD
DRAIN
SAMPLE (INLET)
SAMPLE (RETURN)
SAMPLE CHAMBER
SAMPLE
SMP
SAMPLE CHAMBER
WITH FLOAT SENSOR
Figure 1.3 WE440 Phosphate Analyzer PO4 layout
WARNING
• Handling chemical samples, standards, and reagents can be dangerous.
• Review the necessary Material Safety Data Sheets and become familiar with all safety
procedures before handling any chemicals.
CAUTION
REAGENT BOTTLES MUST BE KEPT TIGHTLY CLOSED.
Observe all health and safety procedures for handling chemicals. Wash any spillage with Distilled
water.
Allow enclosure to vent any trapped fumes before servicing.
Air purge of enclosure is recommended.
EMPTY ALL REAGENTS BEFORE SHUTTING UNIT DOWN.
IM 12Y18A04-01EN 1st Edition : Oct. 04, 2019-00
Page 15

<1. General Information>
1.2.4 Analysis Reaction Principle
The colorimetric method is based on the reaction of reagents with the sample to produce a
color. This color is measured and compared to a standard color, which proportionally denes its
concentration.
The color compound, which is the reacted mixture of the sample with the reagents, absorbs
energy at a specic wavelength in accordance to Beer-Lambert Law.
1.2.5 Fluids Storage
Store all reagents and standards in a dark place at room temperature.
1.2.6 Calibration Standard
Standard part # 229510, the calibration standard required for this application is a 10 ppm
solution. Each calibration cycle consumes approximately 50 mL. Each bottle contains enough
standard solution for approximately 20 calibrations.
1.2.7 Reagents Required
The analyzer requires one reagent, and one standard solution. All bottles are housed in the
uidics enclosure compartment.
For proper operation: Ensure that the reagents are correctly installed, the analyzer tubing is
correctly routed in the pumps and that the analyzer drain tube is connected to an atmospheric
drain. All of the reagents and standard vent tubes need to exhaust to the outside of the enclosure,
to minimize the trapping of any vapors inside the enclosure.
1. Connect sample to the analyzer and ensure that it is owing through the sample chamber
by observing the ow from the sample return line.
2. Turn the power ON to the instrument. After the booting sequence (this may take several
minutes), press STOP and then MENU key.
3. Select SERVICES MENU option and then PRIME FLUIDICS → AUTO PRIME → ENTER.
1-6
The instrument will go through a priming sequence of all the available solution to the analyzer.
Follow the startup procedure described in Chapter 3. You may repeat the AUTO PRIME
sequence as necessary to purge out any trapped bubbles in the lines.
1.2.8 Reagent Consumption
The phosphate method requires one reagent. The reagent usage depends on the frequency of
analysis. Typically 0.23 mL of the reagent is used per analysis cycle.
Based on 4 analyses per hour, the 1 Liter reagent should last approximately 45 days.
IM 12Y18A04-01EN 1st Edition : Oct. 04, 2019-00
Page 16

<2. Installation>
2. Installation
The instrument is designed for general-duty, indoor installations. The electronics enclosure
environmental rating is NEMA 12 and the Fluidics enclosure is a NEMA 4X berglass with a clear
door window.
The WE440 Phosphate Analyzer should be installed in a well-ventilated location, with ambient
temperature between 5°C and 45°C (41°F to 113°F); and relative humidity not to exceed 90%
at 40°C. The area must be free from dust, corrosive gases, vibration and shocks; sheltered from
direct sunlight, and shielded from dripping water. Power should be instrument grade with over
voltage protection, and a provision for disconnecting power.
2.1 Mounting the Instrument
The instrument case is designed for wall or panel mounting.
• Use four #10 screws or equivalent for proper support.
• Refer to Figure 2.1 and Figure 2.2 for dimensions (in mm and inches).
• Make sure that the wall that you choose can support the weight of the instrument
(approximately 20 kg or 44 lbs.) See Figure 2.1.
• Locate the instrument as close to the sampling point as practical to ensure complete purging
of the sample line during each cycle.
• Allow approximately 50 cm (20 in.) of clearance at the left side for door swing. Also allow
enough clearance on the right side for wiring conduit.
• Locate the analyzer height such that the display is at eye-level height for an operator,
allowing also for appropriate sample and drain connections.
162 (6.4)
70 (2.75)
406 (16)
304.8 (12.0)
Mounting holes 4-ø8.0 (0.313)
2-1
Unit: mm (inch)
AIR PURGE
152
(6)
698
(27.5)
330.3
(13.0)
VENT LINES
Figure 2.1 Mounting dimensions
DRAIN (3/8”)
41
(1.62)
SAMPLE RETURN (1/4”)
SAMPLE IN (1/4”)
132 (5.19)
25 (0.98)30 (1.18)
POWER IN
I/O SIGNALS
AIR VENT
674.6
(26.56)
IM 12Y18A04-01EN 1st Edition : Oct. 04, 2019-00
Page 17
<2. Installation>
2-2
INSTALL HEIGHT TO
OPERATOR EYE LEVEL
FLOW DIRECTION
FILTERED AND OIL FREE
AIR PURGE SUPPLY LINE
FLOW DIRECTION
CONNECT TO
ATMOSPHERIC DRAIN
RGT
SAMPLE (BACK) N.C.
STANDARD (FRONT) N.O.
RGT STD
REAGENT STANDARD
DRAIN
AC POWER
SAMPLE CHAMBER
SAMPLE
SAMPLE (INLET)
USER TO INSTALL A 40 to 60 MICRON
FILTER, SIZE IS BASED ON SAMPLE
CONDITION, SET FLOW RATE
BETWEEN : 50 TO 500 ML/MIN
SHUT-OFF
VALVE
AC MAINS
1
0
POWER CIRCUIT BREAKER
MUST BE CLEARLY IDENTIFIED
SAMPLE IN
PROCESS LINE
Figure 2.2 Typical external plumbing connections
NOTE
1. It is recommended that you install an external sample shut o valve to allow control while
accessing or service to the sample chamber.
2. Air purging of upper and lower enclosures is recommended.
3. Each analyzer MUST have its own drain tube vented to atmosphere.
4. The installation of a power circuit breaker is highly recommended.
2.2 Plumbing Connections
Sample inlet, sample return and drain connections are made on the bottom side of the
instrument. The sample inlet and sample return ttings on the bottom of analyzer require ¼” OD
(6 mm OD) exible tubing. The drain tting at the bottom of the analyzer requires ⅜” OD (9.6
mm OD) exible tubing. The air purge inlets require ¼” OD tubing. The air purge supply must be
ltered externally and free of oil and any other particulates.
WARNING
SAMPLE RETURN
The ⅜” (9.6 mm) DRAIN MUST BE VENTED TO ATMOSPHERE. The sample drain contains
analysis wastes, which include both sample and chemical reagents. Please check with local
authorities concerning proper disposal of waste from this product.
IM 12Y18A04-01EN 1st Edition : Oct. 04, 2019-00
Page 18
<2. Installation>
NOTE
The enclosure drain produces no waste under normal use. However, in the event of spills or
leaks, some waste may be produced.
The analyzer is shipped with all of the internal tubing attached. Before starting up the instrument,
verify that the tubing lines are secured.
2-3
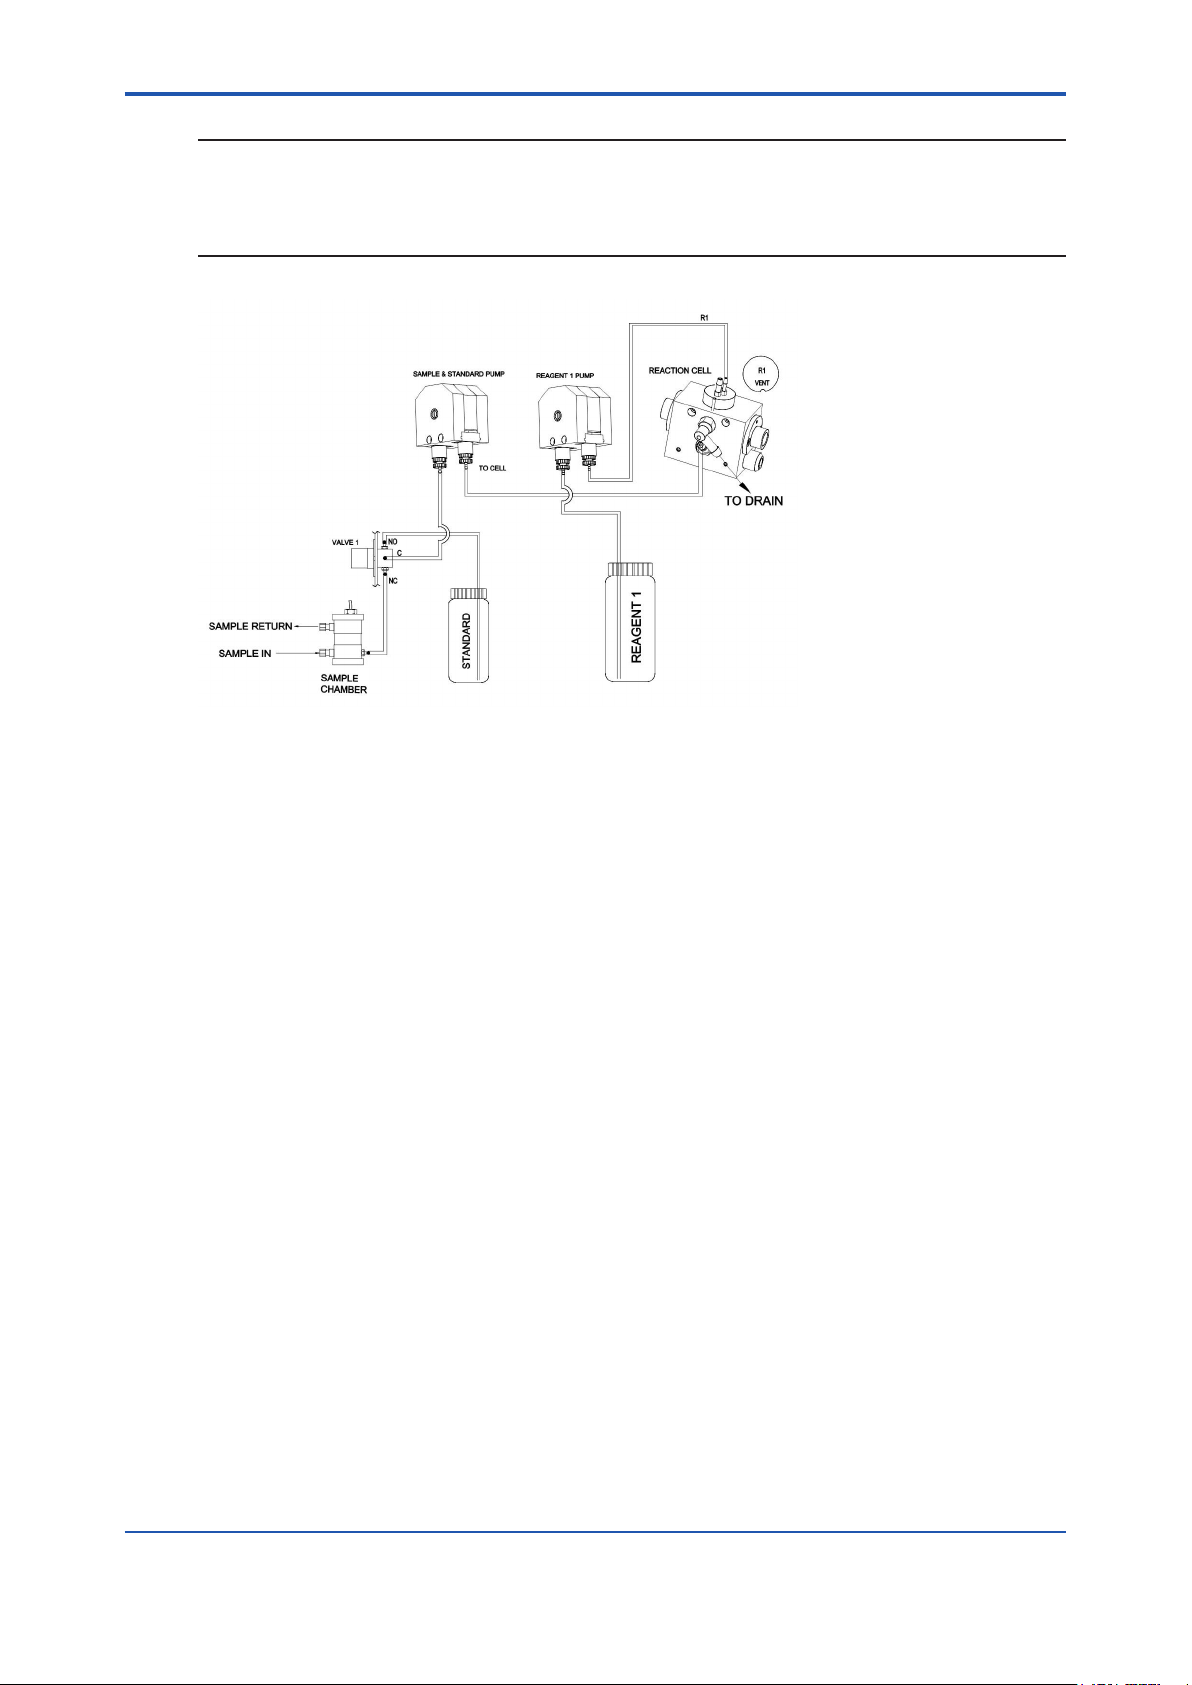
Figure 2.3 Internal tubing and tube routing interconnections
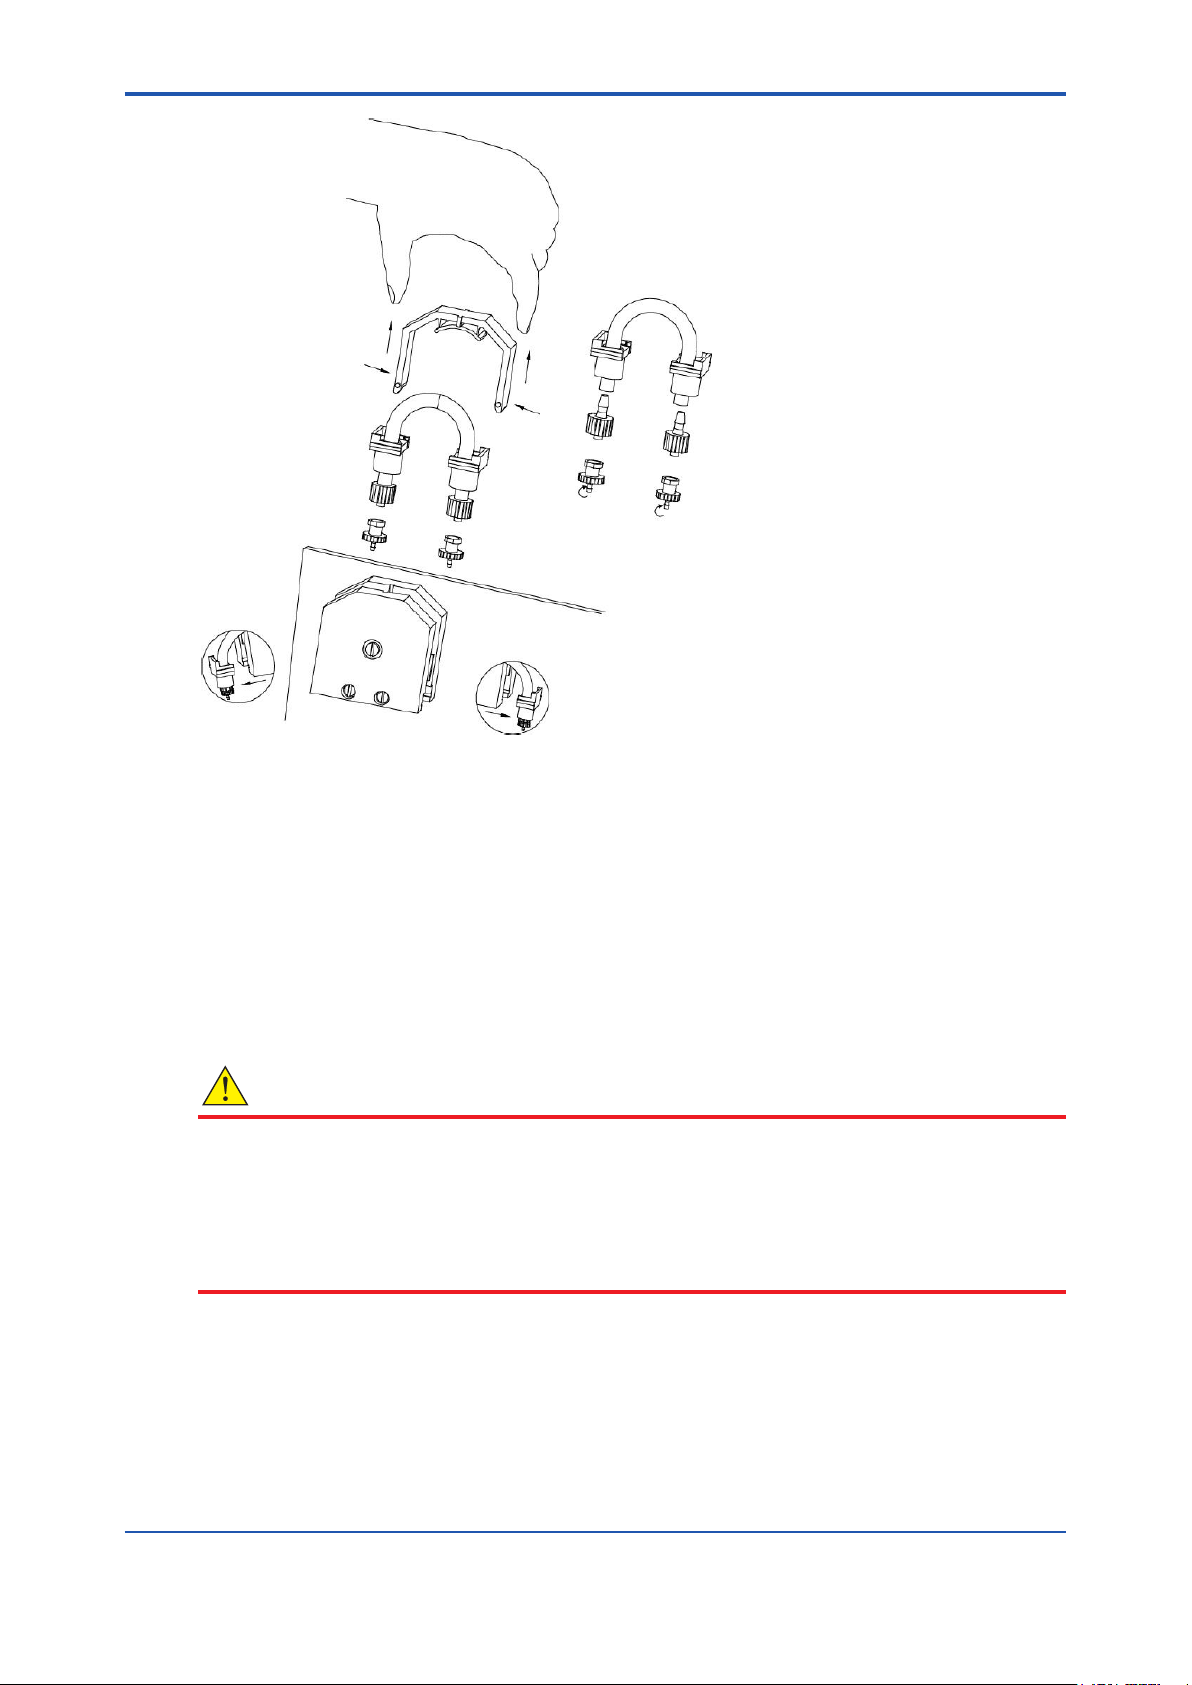
2.2.1 Installing Peristaltic Pump Head Tubing
Press the STOP key.
Disengage the U shape pressure plate of the pump head assembly by pressing with two ngers
and gently move upside as shown in Figure 2.4. Slide the tube tting retainers at each side.
Replace the old tube by sliding o the barbed tting. If necessary, clean the pump rollers.
Lubricate the tubing with pea-sized quantity of silicone oil which should be purchased separately.
Fit the new tube and replace in the pressure plate. Note that the pressure plate sides must click
properly in the pump head assembly and align on both sides.
Repeat above steps for all pumps.
You can test the pump under Diagnostics menu for proper operation:
MENU → SERVICES → DIAGNOSTICS → PUMPS & STIRRER
IM 12Y18A04-01EN 1st Edition : Oct. 04, 2019-00
Page 19
<2. Installation>
2-4
Figure 2.4 Installing peristaltic pump head tubing - (Single channel)
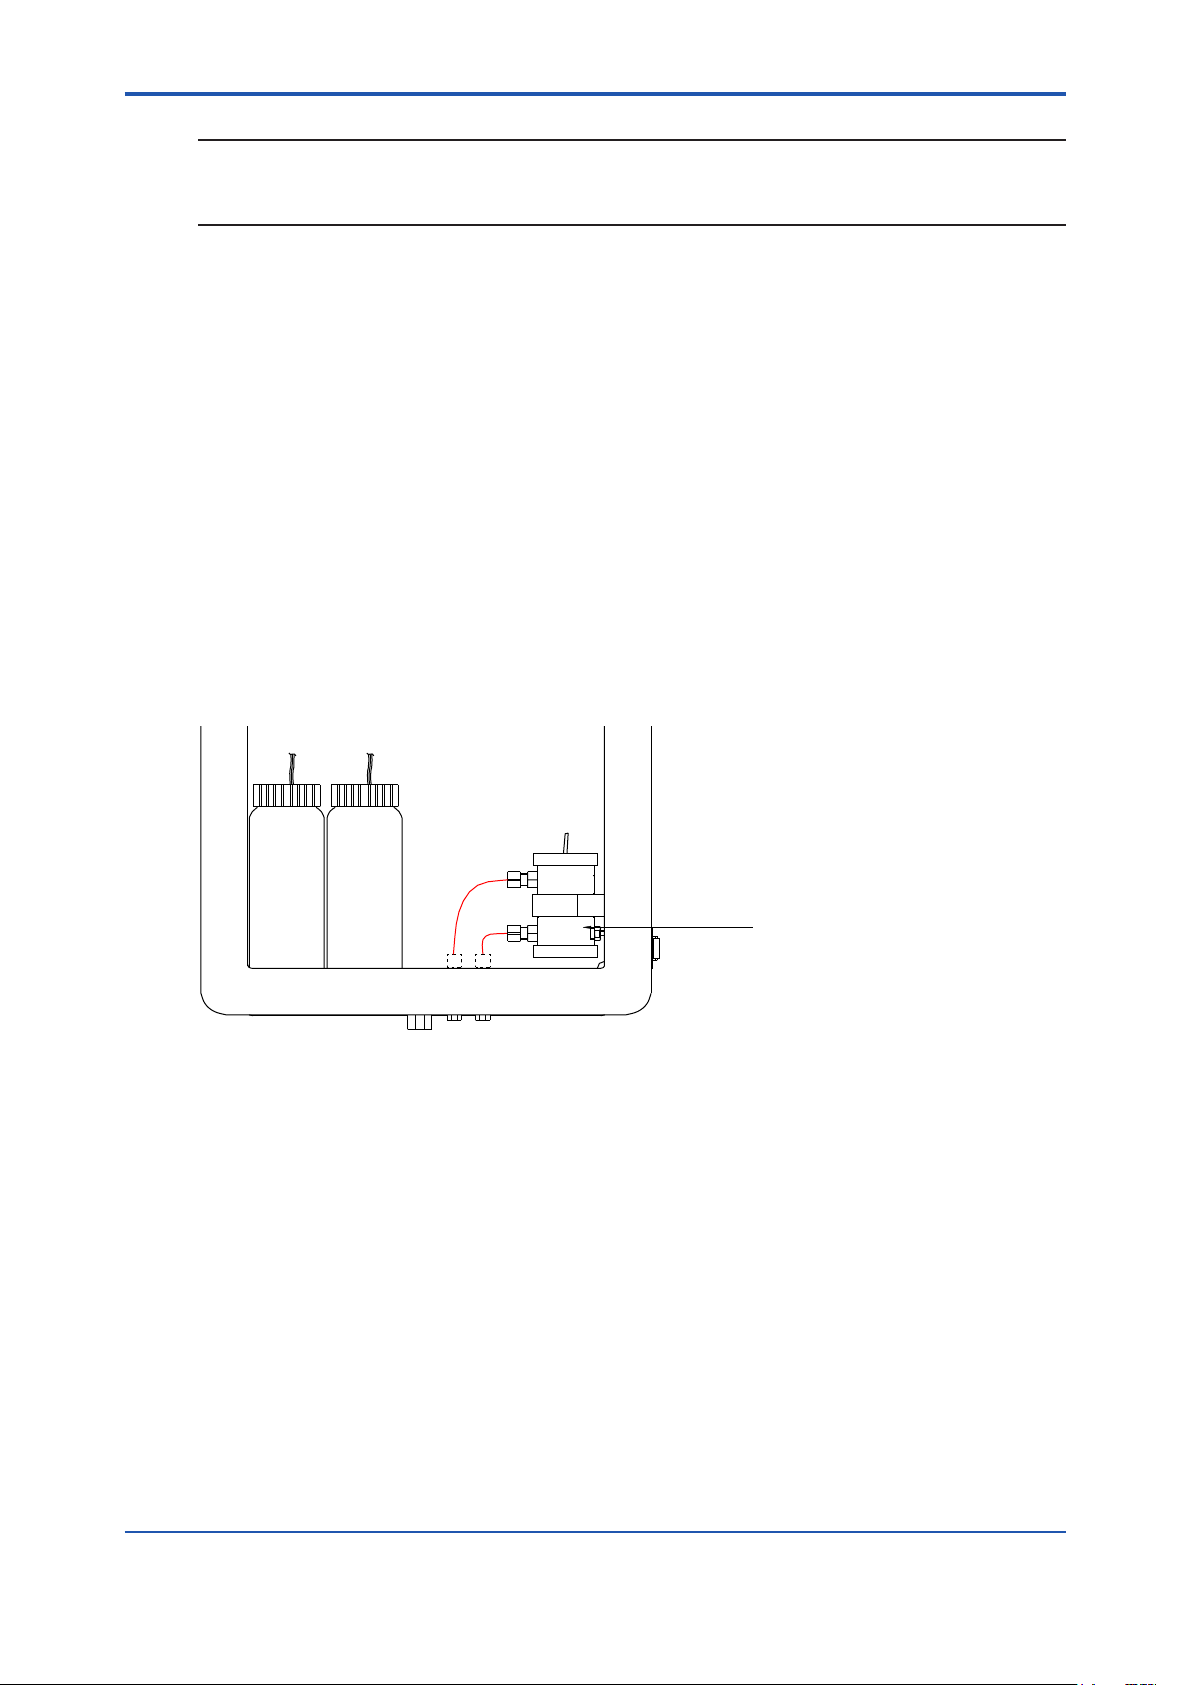
2.2.2 Installing the Reagents
The analyzer reagent startup kit contains all the necessary reagent for the specic application.
The reagent and calibration standard are supplied in ready-to-use bottles that can be replaced
directly onto the cap assemblies.
Follow the markings to install each solution into the respective feed line in the analyzer.
2.3 Connecting Power to the Analyzer
CAUTION
Only trained technical personnel should perform installation, electrical wiring and maintenance
of this product. Proper handling is required to avoid ESD (Electrostatic Discharge), as the
internal electronic components on the circuit boards can be damaged by static electricity. It is
recommended that before touching any electronic components, (such as printed circuit cards
and the components on them) you should discharge static electricity from your body. This
can be accomplished by touching an earth-grounded metal surface such as the chassis of an
instrument, metal conduit, or pipe.
The analyzer is equipped with a three terminal power connector strip located in the electronics
enclosure as shown in Figure 2.6.
IT IS HIGHLY RECOMMENDED THAT PROVISIONS FOR AN EXTERNAL CUSTOMERSUPPLIED POWER SWITCH OR BREAKER BOX (WITH COMPLETE CB SPECIFICATION),
CLEARLY MARKED FOR THE ANALYZER AND WITHIN REACH OF THE USER, BE
PROVIDED TO ALLOW REMOVING POWER DURING SERVICE.
IM 12Y18A04-01EN 1st Edition : Oct. 04, 2019-00
Page 20
<2. Installation>
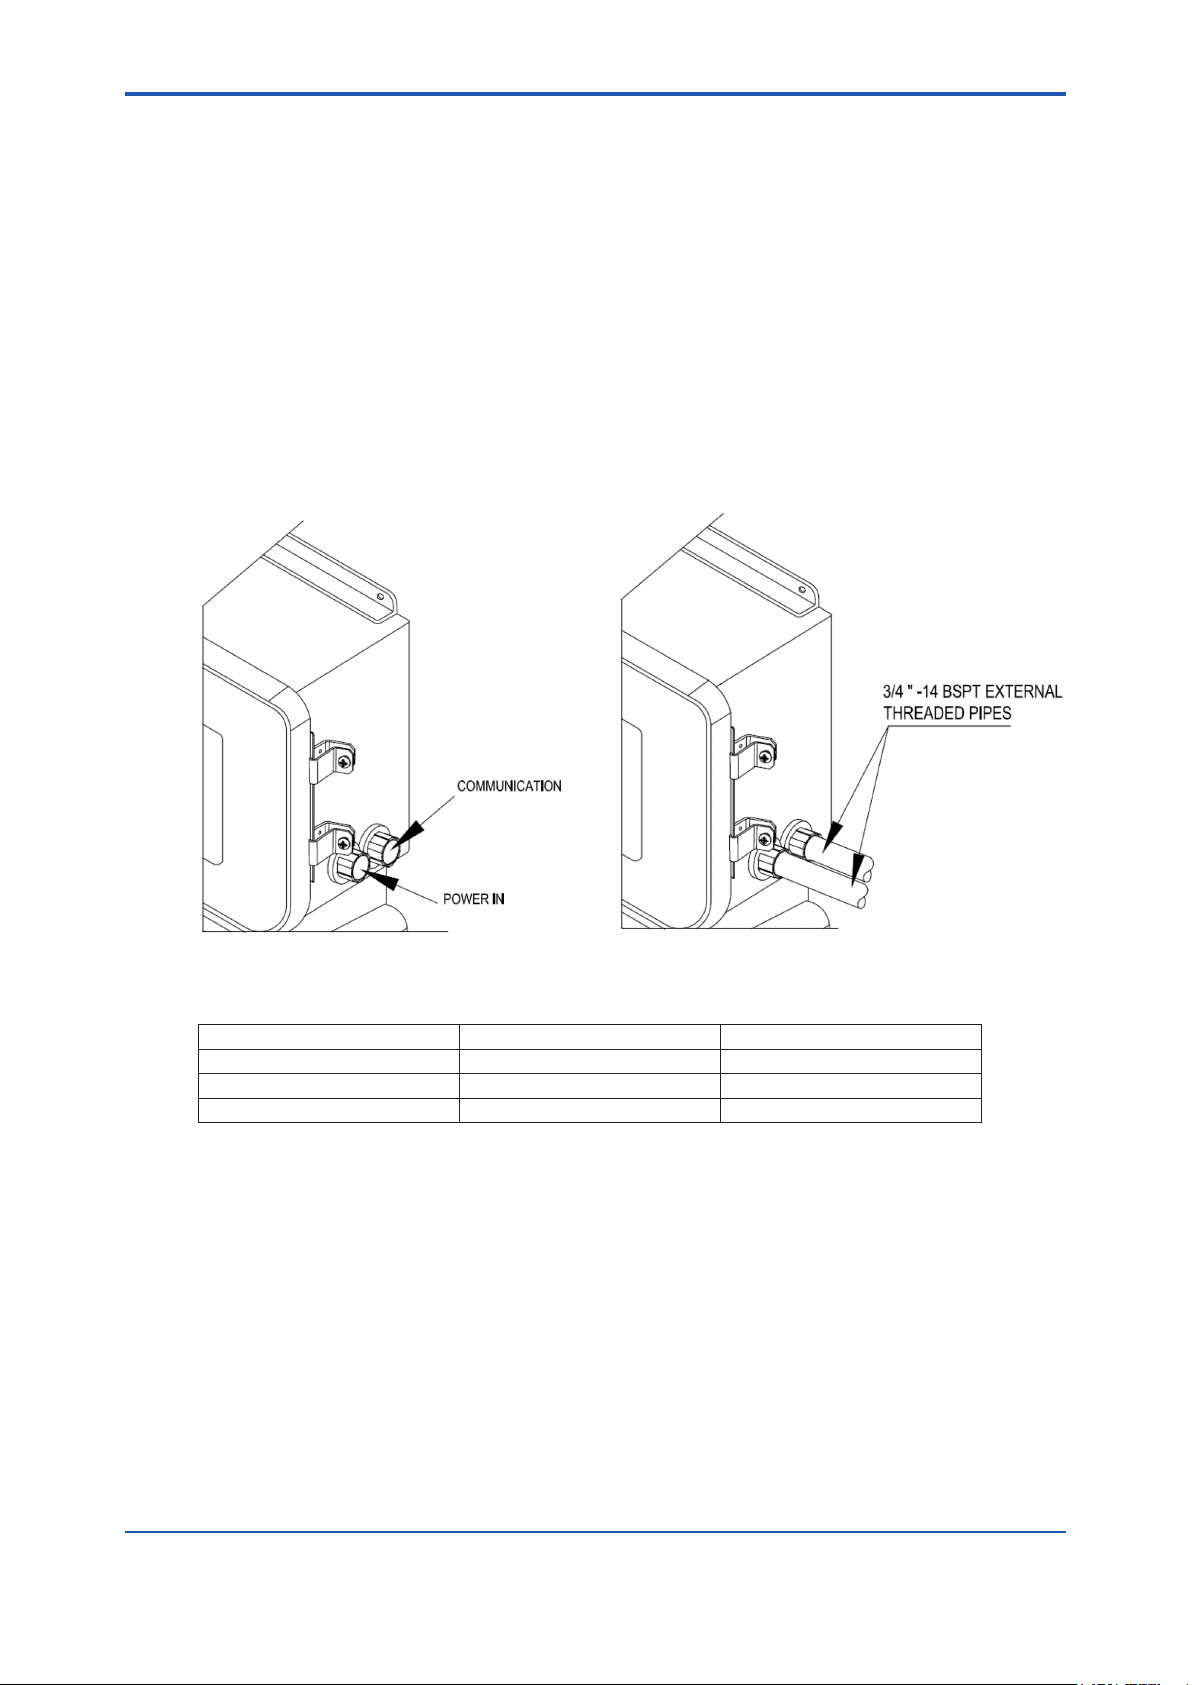
The analyzer has been designed to be hard-wired with provisions for the AC power lines to be
routed in conduit pipes connecting to the ¾” FNPT hubs located on the left side of the electronics
enclosure. See Figure 2.5.
When using line cords, use only certied power cords of 3 core, min 0.75 mm2 / 18 AWG, min.
temperature of 75°C, H05VV-F.
The power safety ground must be provided for proper operation.
BEFORE MAKING ANY CONNECTIONS:
• Make sure that the wires are not powered before connecting to the instrument.
• Disconnect any power previously connected to the relays.
• Connect the Phase Hot or L (line), Earth and Neutral to the terminal block. Note the location
of the fuse.
• Insert the wire into the terminal connector and make sure to tighten the screw.
• Route signal connections to the back hub, and power connections separately to the front
hub.
• All connections must conform to local safety standards.
2-5
Figure 2.5 Electrical wiring ports
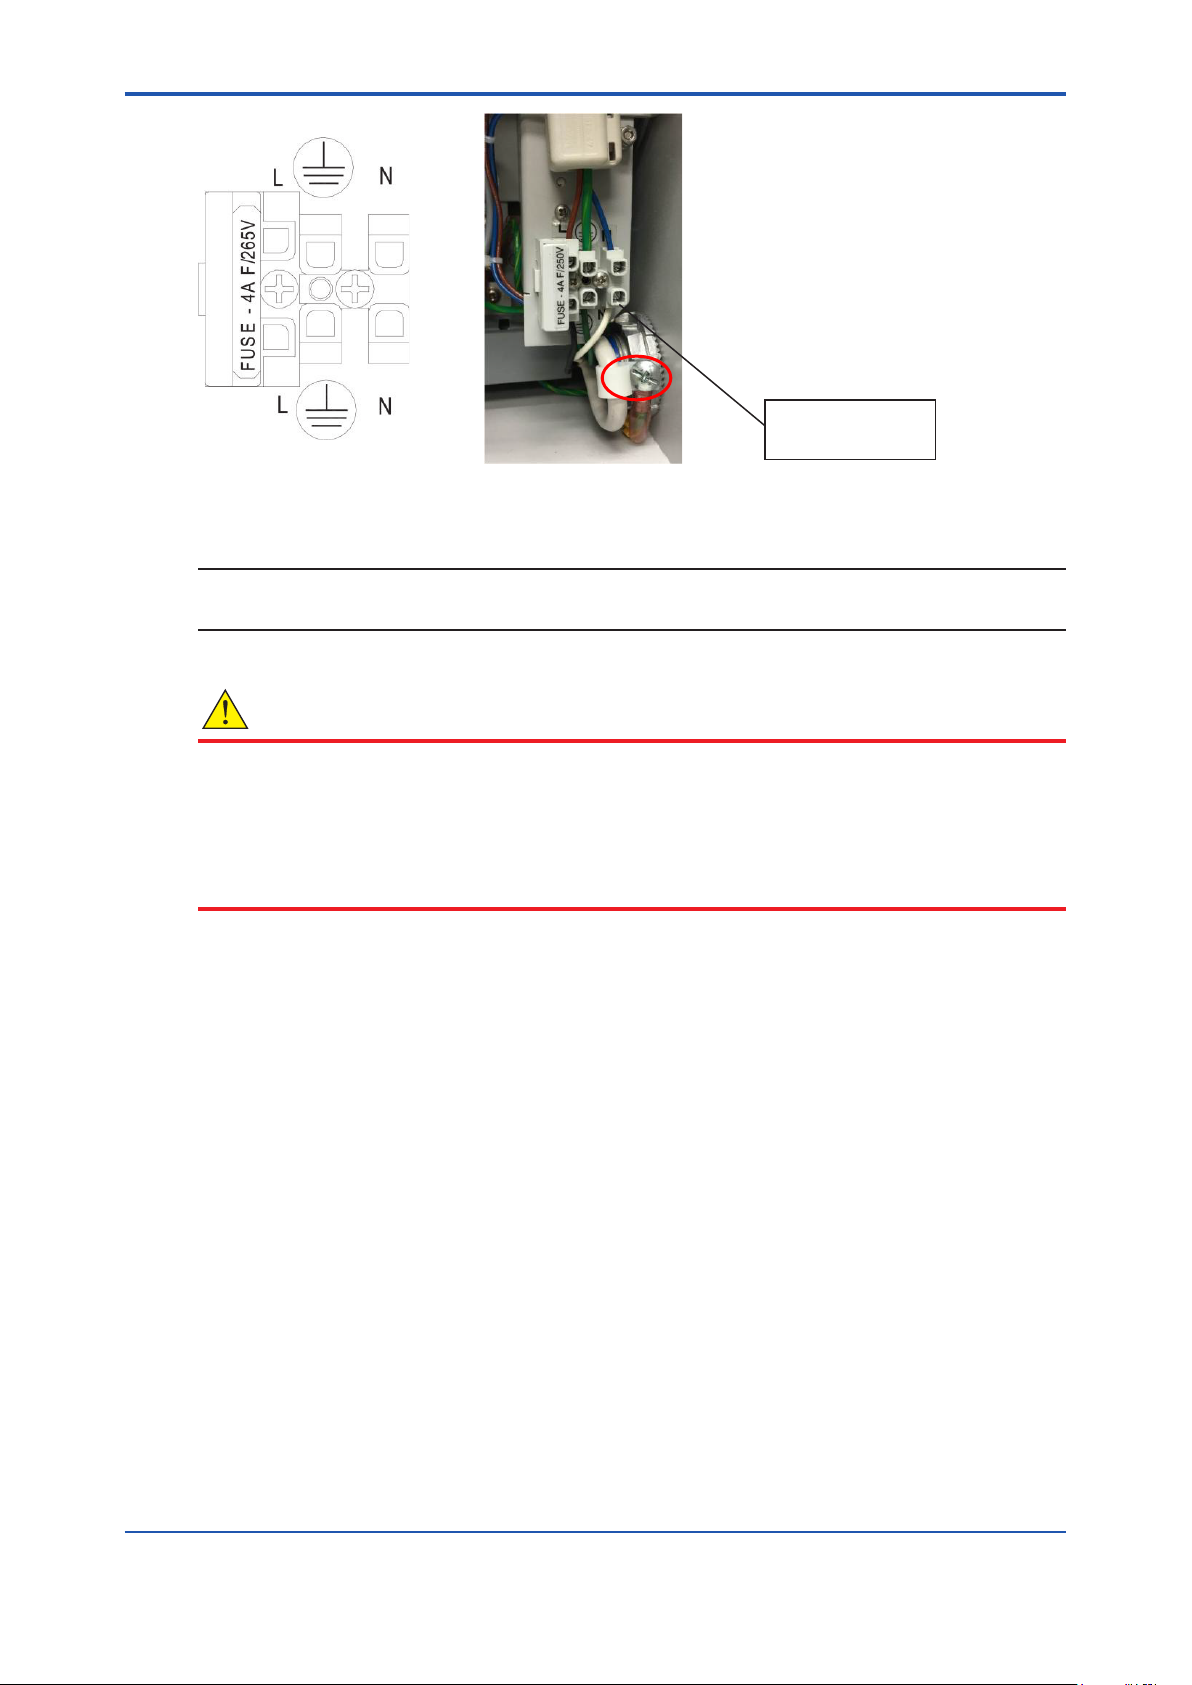
Table 2.1 AC power terminal wire connections
Analyzer Terminal Destination North America Wire Color European Wire Color
HOT or L ( Line) black brown
Protective Earth Ground (PG) green green with yellow tracer
Neutral (n) white blue
IM 12Y18A04-01EN 1st Edition : Oct. 04, 2019-00
Page 21
<2. Installation>
AC POWER
CONNECTIONS
Figure 2.6 AC power connections
NOTE
When using a UL/CSA approved power cord, loop cord through clip retainer as shown in Figure
2.6 for proper strain relief.
2-6
CAUTION
The analyzer is intended for use only with single-phase power.
The analyzer is not equipped with a power switch, therefore a circuit breaking device such as
a circuit breaker should conform to local safety standards and must be tted before the nal
installation. The circuit breaker must be in close proximity to the analyzer and within reach of the
user, and must be marked clearly as the disconnection device for the analyzer.
ALL CONDUCTORS NEED TO HAVE MINIMUM INSULATION RATING OF 75°C.
2.3.1 Analog Outputs Connections
The analyzer is equipped with two isolated analog outputs. The analog outputs can be
programmed to be any one of the following: 0-20 mA or 4-20 mA or reverse acting i.e. 20 – 0
mA or 20 – 4 mA. The range is also programmable and can be scaled according to application
needs.
The outputs have a common isolation from the main system and can drive up to a 900 Ohms
load.
Please refer to Figure 2.7, and Table 2.1, for signal terminal connection detail.
2.3.2 Alarm Connections
The analyzer has ve level sensor inputs that accept a dry contact closure signal to indicate the
state of the level sensors. Input 5 is typically assigned for sample. The analyzer is equipped with
four relays that have voltage-free contacts. Two contacts: Normally Open (NO) and Normally
Closed (NC) with a Common (C). The relay contacts are rated for use at a maximum of 240 V
and 2 A.
The terminal connectors accept wire gauge up to 14 AWG.
The terminal strip is located at the bottom of the electronics cabinet (Figure 2.7).
Table 2.2 shows the connector order and terminal designation.
• Make sure no power is supplied to the instrument.
IM 12Y18A04-01EN 1st Edition : Oct. 04, 2019-00
Page 22

<2. Installation>
• Strip the insulation on each wire back ¼”.
• Insert the wire ends through the uppermost opening below the terminal screw and make
sure that the stripped wire ends are in the terminal, tighten the connector screws.
Figure 2.7 Terminal strips for analog and relay outputs
• RELAY contacts are rated at: 250 V, 2 A AC 500 W (non-inductive load).
• All inputs (except IN 6 & 7) must be connected to POTENTIAL FREE contacts.
2-7
Figure 2.8 Communication ports
Ethertnet
RS-232
IM 12Y18A04-01EN 1st Edition : Oct. 04, 2019-00
Page 23

<2. Installation>
Table 2.2 Main terminal strip pin assignments
Terminal Number Designation Function
1 in1 Digital input 1 Live (Level sensor 1 live)
2 GnD Digital input 1 ground (Level sensor 1 ground)
3 in2 Digital input 2 live (Level sensor 2 live)
4 GnD Digital input 2 ground (Level sensor 2 ground)
5 in3 Digital input 3 live (Level sensor 3 live)
6 GnD Digital input 3 ground (Level sensor 3 ground)
7 in4 Digital input 4 live (Level sensor 4 live)
8 GnD Digital input 4 ground (Level sensor 4 ground)
9 in5 Digital input 5 live (Level sensor 5 live)
10 GnD Digital input 5 ground (Level sensor 5 ground)
11 in6 Digital input 6 live (External 1 control)
12 rTn Digital input 6 return (External 1 control return)
13 in7 Digital input 7 live (External 2 control)
14 rTn Digital input 7 return (External 2 control return)
15 +24V 24V DC live (limited to 20 mA source)
16 GnD 24V DC ground
17 Earth Ground System earth ground
18 GnD Analog output 1 ground
19 OUT1 Analog output 1 (900 Ohms Max)
20 Earth Ground System earth ground
21 GnD Analog output 2 ground
22 OUT2 Analog output 2 (900 Ohms max)
23 nC1 Normally closed contact relay 1
24 nO1 Normally open contact relay 1
25 C1 Common contact relay 1
26 nC2 Normally closed contact relay 2
27 nO2 Normally open contact relay 2
28 C2 Common contact relay 2
29 nC3 Normally closed contact relay 3
30 nO3 Normally open contact relay 3
31 C3 Common contact relay 3
32 nC4 Normally closed contact relay 4
33 nO4 Normally open contact relay 4
34 C4 Common contact relay 4
2-8
IM 12Y18A04-01EN 1st Edition : Oct. 04, 2019-00
Page 24

<2. Installation>
2.3.3 Inputs Signal Connections
The two inputs are assigned for external control commands. Inputs 6 and 7 require a DC voltage
between 5 and 24 Volts to activate. A 24 V supply is available from the main terminal strip pins 15
and 16 that can be used for activating the external control inputs.
Digital CONTROL inputs:
Pin Signal
11 Digital input 6 live
12 Digital input 6 return
13 Digital input 7 live
14 Digital input 7 return
15 +24V DC live
16 24V DC ground
USING INTERNAL 24VDC USING EXTERNAL SUPPLY
13
14
15
16
INP7
GND
24VDC
RETURN
13
14
15
16
INP7
GND
5 - 24VDC
2-9
Figure 2.9
Input 6 is assigned by default to RUN/STOP function with Close/Open of a dry contact.
Input 7 is left unassigned by default.
Dry contact = voltage free contact.
The functionality along with the state of the enabling signal is programmable by the user.
2.3.4 Communication Signal Connections
The analyzer has two communication connectors located at the right side in the upper cabinet.
See Figure 2.8. For connecting to them, use the communication conduit hub port on the right side
of the instrument for wire entry.
IM 12Y18A04-01EN 1st Edition : Oct. 04, 2019-00
Page 25

Blank Page
Page 26

<3. Startup and Operation>
3. Startup and Operation
Each WE440 Phosphate Analyzer gets thoroughly wet-tested and calibrated at the factory, so the
system is ready to begin analyzing sample streams. The results of this activity are recorded in a
Test Certicate shipped to you with the analyzer.
Since the elapsed time between factory calibration and your startup process is unpredictable, it is
important that you calibrate the analyzer again before you place it in service for the rst time.
Please refer to section Calibration for additional instructions on calibrating the analyzer. The
reported result of a calibration is a number that the analyzer uses to determine the sample
concentration. The particular value of this number is not important, but it should be within ± 5%
of the corresponding value in the Quality Control Report. If so, you can be condent that all
subsystems of your analyzer are working properly.
Before proceeding, please make sure of the following:
• The reagent bottle is full and properly connected. Reagent bottle is the reagent used in the
phosphate analysis.
• The 10 ppm phosphate calibration standard (1 L bottle) is full with the standard and properly
connected.
• The drain and sample lines are connected. Verify the sample is owing into the sample
chamber located at the bottom right side of the uidics enclosure.
• The lines are primed and there are no trapped air bubbles in any of the lines.
3-1
To prime the lines:
MENU → SERVICES → PRIME FLUIDICS → AUTO PRIME ALL
Repeat auto prime as necessary to purge all the air from the lines. When done proceed to
calibrate:
MENU → MEASUREMENT → CALIBRATE → CALIBRATE STANDARD [ENTER]
NOTE
It is highly recommended to allow the WE440 Phosphate Analyzer to complete its measurement
cycle rather than using the STOP key. If the STOP key is pressed before a measurement cycle
is complete, it is highly recommended to perform both the AUTO PRIME ALL and CLEAN
sequences described in Chapter 3.
The result of the calibration will be displayed as follows:
STANDARD : 10 ppm ***depends on the range selected
ABSORBANCE : 0.19
SLOPE : +055.00
INTERCEPT : -0.4
Refer to Theory of Measurement section for a detailed explanation about the slope and intercept.
The absorbance value found corresponds to the standard concentration used. If the calibration
absorbance value is within ± 5% of your system QC report, then the system is operating properly
and ready for running sample analysis. If the data is dierent, repeat the calibration cycle before
proceeding further.
3.1 Executing a Manual Calibration
If the result is outside the user specied tolerance (default 5%), the analyzer will warn the user to
avoid storing the wrong calibration data. The user may then ACCEPT or REJECT the calibration
result. Note user accepted manual calibration will become the REFERENCE calibration data.
The analyzer will use the REFERENCE calibration data when checking for the acceptable
tolerance limits in BOTH manual and auto cal cycles.
IM 12Y18A04-01EN 1st Edition : Oct. 04, 2019-00
Page 27

<3. Startup and Operation>
3.2 In Auto-Calibration Mode
The system will run a second calibration cycle if the rst calibration result was outside the user
specied tolerance. If the second calibration result is still outside the specied tolerance limits,
the analyzer will continue to use the previously stored calibration and will ash the “CHK CAL”
message in the Info section of the LCD screen.
The “CHK CAL” message can be cleared by resetting the fault alarm under:
VIEW DATA AND ALARMS → REVIEW/RESET ALARMS
Or by running a manual calibration.
3.3 Placing the Analyzer into Service
Your analyzer is now ready for routine operation. To place the analyzer into routine service, press
the control panel RUN key.
The analyzer typically runs unattended, analyzing sample streams and calibrating itself at regular
intervals. All relevant parameters were programmed at the factory based upon your application.
Consequently, the analyzer is fully prepared for routine operation once you complete these
startup procedures.
A qualied and authorized user can change many of the operating parameters through the
password-protected “Technician Level” menu as detailed in the USER INTERFACE menu.
3-2
3.4 Validating a Calibration Standard
You can check the analyzer’s calibration accuracy at any time using the validation function.
Validation consists of running a single measurement cycle and reporting the result in
concentration. This reported result can then be compared to the expected value, which is the
known concentration of the validation solution, to determine the accuracy of system calibration.
The advantage of using this function over the Run Analysis function is that prior knowledge of
the concentration allows for validating the accuracy of the analyzer, without aecting the data
reporting to your control center or device.
NOTE
Running a validation is identical to running an analysis: Although the results are printed they are
not stored, alarm conditions are not tested, and the analog outputs are not updated.
It is highly recommended to allow the WE440 Phosphate Analyzer to complete its measurement
cycle rather than using the STOP key. If the STOP key is pressed before a measurement cycle
is complete, it is highly recommended to perform both the AUTO PRIME ALL and CLEAN
sequences described in Chapter 3.
3.5 Running an Analysis (Analyze Once)
Although the analyzer is usually set up to analyze sample streams on a regular schedule, you
may wish to execute an analysis on command to obtain an immediate result. This function allows
you to run single or multiple analyses on a sample without requiring that the automatic mode be
initiated. The analyzer then runs the specied number of analyses, tests for alarm conditions,
exercises the analog outputs, and prints the results exactly as if it were in the automatic mode.
To run multiple analyses (more than one) set the number of repeats in ANALYSIS menu:
Press MENU → SETUP → (+) to go to page 2 → ANALYSIS PARAMETERS → ENTER →
select NO. OF REPEATS
IM 12Y18A04-01EN 1st Edition : Oct. 04, 2019-00
Page 28

<3. Startup and Operation>
3.6 Instrument Operation Modes
1 SAMPLE ANALYSIS
2 CALIBRATION
The instrument also operates cleaning and post wash cycles, along with a priming function useful
for startup and priming feed tubing lines to the reaction-measuring cell.
3.7 Sample Analysis and Validation
The SAMPLE ANALYSIS mode is similar to the calibration mode, with the exception that
during calibration the instrument calculates the relevant parameters correlating to the standard
concentrations used for calibration.
During sample analysis, the system relies on the CURRENT calibration parameters to calculate
the sample concentration.
Each measurement cycle starts with ushing the reaction cell with fresh sample. An auto blank
step makes sure that the background color of the sample is measured as a baseline. Typically,
reagents are added to develop the color of the nal compound, and the intensity of the color
developed is measured and correlated to the sample concentration.
The validation cycle is similar to the measurement cycle except that the result is not reported
on the analog loops and not stored in the sample analysis results data storage. The result of
the validation analysis is displayed and printed on the RS-232 port. The validation cycle can be
executed on any available solution standard or sample selected by the user in the validation
setup parameters menu.
3-3
3.8 Calibration
The user may execute manual or set automatic calibration cycles at user dened intervals. In
the auto mode the analyzer calibrates periodically and checks the validity of the calibration per
the specied tolerance for the REFERENCE slope and oset parameters. New calibration data
is only accepted if it is within the limits of the specied tolerance for the REFERENCE calibration
parameters. The current column shows the current operating parameters that are used to
calculate the sample concentration.
3.9 Cleaning
Automatic ushing of the reaction cell may be programmed.
The default setup for the analyzer uses the sample as the cleaning solution. A cleaning cycle can
be performed by pressing:
STOP → MENU → MEASUREMENT → CLEAN
This cycle helps maintain clean reaction cell.
NOTE
To avoid damage and contamination to the reaction cell, use only cleaning solutions
recommended by the factory.
IM 12Y18A04-01EN 1st Edition : Oct. 04, 2019-00
Page 29

<3. Startup and Operation>
3.10 Post Wash
Automatic post wash cycles are typically part of every measurement cycle. At the end of the
analysis, the post wash cycle evacuates the reacted sample from the cell and cleans it to
minimize coating and residue deposits in the cell. The post wash cycle settings can be accessed
from the ANALYSIS PARAMETERS menu:
MENU → SETUP → (+) ANALYSIS PARAMETERS →(+)
Please consult before modifying any of the parameters.
3.11 Priming
Priming of the instrument lines may be done as auto (all the solutions) or manually by selecting
the specic reagent or standard. Priming lls the tubing, purges the lines of air, and prepares the
analyzer for measurement mode.
The PRIME VOLUME in mL applies to all the listed solutions in the priming menu.
The Prime Volume may be specied as a (-) number; this allows the user to pump back the
reagents inside the tubing back into the reagents containers allowing for safer service when
replacement of the tubing is needed. User may select to pull back all or any one of the reagents
or standard.
3-4
IM 12Y18A04-01EN 1st Edition : Oct. 04, 2019-00
Page 30

<4.AnalyzerHardwareCongurationandCalibration>
4. Analyzer Hardware Conguration
and Calibration
Each analyzer is setup at the factory, and shipped ready to be commissioned for on-line analysis.
This section describes the hardware setup in case maintenance or other post calibration
adjustment after service is required.
The WE440 Phosphate Analyzer is based on colorimetric detection principles. The analyzer uses
optical components that require initial setup at the factory and can be further tuned or recalibrated
by a trained technician.
This section describes the operation and calibration of the following assemblies: Optics, Heater,
Pumps and Analog Outputs.
4.1 Optics Calibration
WE440 Phosphate Analyzer optics consists of a LED light path and a photo-detector. The
analyzer is capable of driving three LEDs and the intensity of each of the LED can be individually
varied. The light path is preset in the reaction cell sample chamber. The photo detector receiving
the light energy is connected to an amplier with programmable gain. The output of the photo
detector amplier is digitized and measured in mV. Optics calibration in the analyzer is done in
two stages. In the rst stage, the level of stray light is recorded. The LED light source is switched
o and the output of the photo detector is recorded. The second stage of calibration consists of
adjusting the intensity of the LED and the gain of the photo detector amplier to get an optimum
level of output close to a xed reference level. This is optimized for the specic LED and the
results of the calibration are stored.
The reaction cell sample chamber must be clean and lled with de-ionized water for proper optics
calibration cycle.
4-1
4.2 Optics Calibration Steps
For proper optics calibration the cell must be clean and lled with de-ionized water. Press the
MENU key and navigate to CALIBRATE OPTICS:
MAIN MENU → SERVICES → HARDWARE SETUP → CALBRATE OPTICS
The prompts remind the user to add de-ionized water in the reaction cell, and then allows them to
proceed for optics calibration upon conrmation.
The optics calibration is an automated sequence that also detects fault conditions. Once a fault
is detected, the sequence is aborted. For example, the optics calibration of stray light is aborted
if the stray light measured is greater than the factory allowed set reference value. The optics
calibration optimizes the light from the LED present in the system along with tuning the front-end
detection to maximize the signal levels with de-ionized water in the cell. The system stores all the
parameters for the application.
The calibration results are available for editing. From the MAIN MENU, follow the sequence:
MENU → SERVICES → HARDWARE SETUP → EDIT CALIBRATED VALUES
The stray light measurement is listed as OPTICS DARK; the optimum light level is listed as
OPTICS xREF for the LED specied in the MEASUREMENT METHOD.
IM 12Y18A04-01EN 1st Edition : Oct. 04, 2019-00
Page 31

<4.AnalyzerHardwareCongurationandCalibration>
4.3 Reaction Cell Temperature Calibration
In order to get consistent and repeatable measurements, the method is setup such that the
reaction cell in the WE440 Phosphate Analyzer is heated to a specic set point (25°C). A heater
element located on the back plate of the reaction cell controls the temperature. The temperature
of the reaction cell is measured by a thermistor embedded in the reaction cell body. The
temperature of the cell is displayed on the results screen.
NOTE
Calibration is typically NOT required except in rare cases where the thermistor has been replaced
and the default parameters are not functional.
The WE440 Phosphate Analyzer relies on a PID (Proportional, Integral, Derivative) algorithm
setting to control and maintain the cell at the set point. The following procedure allows for tuning
and calibrating of the thermistor in case it was replaced or required adjustment.
Heater temperature calibration:
MENU → SERVICES → HARDWARE SETUP → CALBRATE THERMISTOR
Press F3 key to RESET thermistor calibration value to FACTORY DEFAULTS.
The operator is asked to read the temperature of the reaction using an external digital
thermometer and enters the value. The unit will make appropriate correction if needed.
Editing the calibration results:
Upon successful completion of temperature calibration, the new calibrated temperature is
available for further editing. From the MAIN MENU, follow the sequence:
MENU → SERVICE → HARDWARE SETUP → EDIT CALIBRATED VALUES
4-2
4.4 Pumps Calibration
The WE440 Phosphate Analyzer uses peristaltic pumps to move uids through the reaction cell.
The pump tubing will require replacement periodically. Please refer to Chapter 8 for details.
The maximum rate of ow of the uid is dependent on both the inner diameter of the tubing
conveying the uid and the rpm of the pump. The pumps are used to move the following uids:
sample, standard, and reagents.
WHEN REPLACING WITH SAME TYPE FACTORY TUBING, USER MAY BYPASS ANY
CALIBRATION AND USE FACTORY DEFAULT VALUES. IF SUBSTITUTE TUBING IS USED,
PUMP CALIBRATION IS REQUIRED TO INSURE ACCURATE DOSING.
4.5 Pumps Calibration Method
From the MAIN MENU, follow the sequence:
MENU → SERVICES → HARDWARE SETUP → CALIBRATE PUMPS
Select the pump to be calibrated. The user is now asked to prime the pump with de-ionized water
and to respond when ready. The pump calibration procedure is aborted if the user fails to conrm
readiness to pump de-ionized water within 90 seconds.
The sequence starts with a priming step to allow uid to purge the air from the tubing. The user
may respond as soon as ready. The prime step will stop after 60 seconds. The next step prompt
asks the user to be prepared to collect the water in a measuring cylinder. This step must be
allowed to complete and is timed at 60 seconds to allow the user to enter the volume collected in
60 seconds (or 1 minute). If the measured volume amount is not entered within 90 seconds, the
pump calibration procedure is aborted.
Upon successful completion of the pump calibration procedure, the user has the choice to
calibrate the remaining pumps or to edit the calibrated values.
IM 12Y18A04-01EN 1st Edition : Oct. 04, 2019-00
Page 32

<4.AnalyzerHardwareCongurationandCalibration>
4.6 Analog Outputs Calibration
The analyzer has two isolated analog outputs. The outputs are rated 0/4-20mA with a maximum
load of 900 ohms. They can be independently calibrated.
From the MAIN MENU, follow the sequence:
MENU → SERVICES → HARDWARE SETUP → CALIBRATE ANALOG OUTPUTS
The user is asked to connect a 900 ohms resistor to each two analog outputs. The calibration
requires the use of a current meter (0–100 mA range) placed in series with the output under test.
The user may select one output at a time for calibration. The calibration starts by adjusting the
full scale to 20 mA. The -/+ buttons are used to adjust the output to 20 mA. The instrument waits
for the user to conrm the calibration by pressing ENTER. If there is no user response within 90
seconds, the analog output procedure calibration is aborted.
Upon successful calibration of one of the analog outputs, the user has the choice of calibrating
the second analog output.
The calibrated values for the analog outputs are not available for editing. For testing the
calibrated outputs use:
MENU → SERVICES → DIAGNOSTICS → ANALOG OUTPUT → CHANNEL–1:
By pressing ENTER the user may select the signal level from the following settings:
0, 4, 10, 12, and 20 mA
4-3
IM 12Y18A04-01EN 1st Edition : Oct. 04, 2019-00
Page 33

Blank Page
Page 34

<5. Calibration of the Instrument for Measurement Analysis>
5. Calibration of the Instrument for Measurement Analysis
In the analysis mode, the WE440 Phosphate Analyzer measures the absorbance of light through
the sample, and compares the result with the absorbance of light through a standard solution of
known concentration.
5.1 Theory of Calibration
Using two known standards, one of low concentration and the other of high concentration, the
absorbance for each concentration is measured and the slope and intercept are calculated from
the calibration curve as shown below:
Concentration
Concentration of
High Standard
∆ Concentration
5-1
Concentration of
Low Standard
Intercept
Figure 5.1
The Measured Absorbance is the result absorbance after subtracting the Blank Absorbance.
∆ Absorbance
Absorbance of High Standard
Absorbance of Low Standard
Slope =
5.2 Methods of Calibration
Two methods of calibration are provided in the WE440 Phosphate Analyzer.
SINGLE POINT calibration uses high concentration standard alone, and BASE LINE calibration
uses either very low or zero standards.
The base line calibration is provided to improve accuracy for low level measurements and trace
analysis.
For setting up the calibration method, from the MAIN MENU, follow the sequence:
MAIN MENU → SETUP → CALIBRATION PARAMETERS
Set the MODE for SINGLE POINT or BASE LINE.
For Calibration, from the MAIN MENU, follow the sequence:
MAIN MENU → MEASUREMENT → CALIBRATE → CALIBRATE STANDARD
∆ Concentration
∆ Absorbance
Absorbance
5.3 Single Point Calibration
For single point calibration, typically the intercept value is zero. Therefore,
Concentration = Slope x Absorbance.
The technician may modify the intercept value.
IM 12Y18A04-01EN 1st Edition : Oct. 04, 2019-00
Page 35

<5. Calibration of the Instrument for Measurement Analysis>
The analyzer uses a 10 ppm concentration standard solution for calibration. The absorbance
of the standard solution is measured and the slope is calculated and stored upon user’s
conrmation.
5.4 Base Line Calibration
After calibrating using the single point, improved accuracy around the base or zero point may be
further tuned by executing a base line calibration.
A low concentration solution is used and its absorbance is measured in the instrument. Only the
intercept is recalculated as:
Intercept = Concentration (Low) – [Slope X Absorbance (Low)]. This is used along with the slope
for single point calibration.
The calibration data is available for editing. From the MAIN MENU, follow the sequence:
MENU → SETUP → CALIBRATION PARAMETERS
The menu screen shows two columns labeled REFERENCE and CURRENT. The data in the
current column is the active data being used for slope and intercept, and the data in the reference
column is the data that the system relies on when comparing the new calibration result to check
its allowed deviation per the specied limit specied for the tolerance value.
5-2
5.5 High Range Dilution-Factor Calibration
The analyzer uses a dilution method for measurement of high concentrations. The cycle is
automatic and has been programmed at the factory. In most cases the factory default values are
sucient for the specied range of the product. For improved accuracy, the user may calibrate
the dilution factor using a high concentration standard like a 100 ppm. This calibration is only
allowed in manual mode, with user prompts and conrmation required at the end of the cycle.
Extended range calibration:
MENU → SETUP → (+) CALIBRATION PARAMETERS
Set the STANDARD CONC = 100 ppm and calibration:
MAIN MENU → MEASUREMENT → CALIBRATE → CALIBRATE STANDARD
When the system detects a high absorbance level of the reacted solution, above the set limit, it
initiates the dilution cycle using the standard.
At the end of the cycle the dilution factor is calculated based on the value of the standard used
and the existing slope and intercept.
At the end of the calibration cycle the user is presented with the new calculated dilution factor to
accept or reject. The default dilution factor is 9.0 (range 8 to 10). The range depends on the pump
ow rate (pump #1) used to add the standard used for dilution dosing.
The user may edit the dilution factor in the ANALYSIS PARAMETERS menu:
MENU → SETUP → ANALYSIS PARAMETERS → (+) (+) PAGE 3 OF 4 → DILUTION
PARAMETERS
Consult before modifying the default dilution steps. Press (+) to access the dilution steps.
The automatic dilution cycle may be turned o using either a higher than expected AU limit:
ABS HIGH LIMIT= 5 AU or by de-selecting the dilution event
DILUTION EVENT = NOT ASSIGNED
During the analysis of high concentration samples, the system checks the nal absorbance value
of the reacted solution and if it exceeds the set limit (ABS HIGH LIMIT) it will execute the dilution
steps and use the calibrated dilution factor to calculate the nal concentration.
IM 12Y18A04-01EN 1st Edition : Oct. 04, 2019-00
Page 36

<5. Calibration of the Instrument for Measurement Analysis>
5.6 Theory of Measurement
Measurement in the WE440 Phosphate Analyzer is done by measuring the absorbance of a
single wavelength of light through the sample, and comparing the result with the absorbance
of the same wavelength of light through a standard solution of known concentration. If the two
absorbencies match, then the sample concentration is equal to the standard solution.
To facilitate the comparison, the analyzer is rst calibrated with standards to determine the
slope and intercept of the range of concentration it can analyze, and then the measurement
of the unknown sample is interpolated along the calibration curve to calculate the unknown
concentration.
i.e., Concentration = (Slope x Absorbance) + intercept. Where Slope and Intercept - Determined
from Calibration. Absorbance - Calculated through measurement.
The two variables (Slope and Intercept) are available for editing in the calibration parameters
menu screen.
Concentration
Concentration
of Sample
5-3
Absorbance
Measured Absorbance
of Sample
Figure 5.2
5.7 Mode of Measurement
The WE440 Phosphate Analyzer is designed to provide on-line process measurements, and has
two modes of operation. The mode is always displayed at the bottom right, i.e., below the Info
eld and above the status eld of the display.
The two modes of the instrument are AUTO restart mode (the instrument resumes auto analysis
mode after 0.5 Hr of inactivity) and MANUAL restart mode. The instrument awaits the user to
initiate the RUN or AUTO ANALYSIS mode by pressing the RUN key.
To change the instrument mode, from MAIN MENU follow the sequence:
MENU → SETUP → (+) ANALYSIS PARAMETERS → MODE
The instrument has two special keys to start and stop the measurement. Pressing the RUN
key starts the auto analysis immediately and analysis repeats at the rate of the time set in
measurement frequency, which is selectable. During this mode, the instrument displays RUN
MODE indicating that the instrument is running continuously.
To edit the measurement frequency, from the MAIN MENU follow the sequence:
MENU → SETUP → (+) ANALYSIS PARAMETERS → SAMPLE FREQUENCY
The STOP key aborts the measurement at any stage irrespective of the mode of the instrument.
NOTE
RUN is not the mode of the instrument. It indicates that the instrument is performing
measurement continuously, at the rate of measurement frequency.
IM 12Y18A04-01EN 1st Edition : Oct. 04, 2019-00
Page 37

<5. Calibration of the Instrument for Measurement Analysis>
5.8 Auto Restart Mode
The default mode of the instrument is auto restart. In this mode, if the instrument keypad is
untouched (i.e. stays idle) for the period of auto restart idle time (default value of 30 minutes),
then it automatically starts the measurement, the mode is displayed as RUN MODE and repeats
the measurement as per the measurement frequency set in analysis parameters.
If the STOP key is pressed during this measurement, it aborts the measurement and will restart
after the idle time countdown expires.
To stop the auto restart of the instrument the mode should be changed to manual restart:
MENU → SETUP → (+) ANALYSIS PARAMETERS → MODE
5.9 Manual Restart Mode
This mode allows you to START the measurements manually.
To perform measurement on command from the MAIN MENU follow the sequence:
MENU → MEASUREMENT → ANALYZE ONCE
Pressing RUN key in this mode keeps the instrument in RUN MODE and pressing STOP key
during measurement gets back to the MANUAL RESTART mode. In this mode, if the instrument
is untouched for a period of the standby mode idle time (60 minutes default), it switches to
standby mode.
During standby operation, all uidics devices are shut down and the analyzer goes into a standby
housekeeping mode in which the pumps are activated on an hourly basis to prevent tube
pinching.
When manual restart mode is selected, the analyzer automatically goes into standby operation
after one hour (60 minutes) of inactivity. Consult should you require a dierent standby time out;
for details, refer to Chapter 6.
5-4
NOTE
Even though the instrument is running continuously and displays RUN MODE, to know the actual
RESTART mode of the instrument from MAIN MENU follow the sequence:
MENU → SETUP → (+) ANALYSIS PARAMETERS → MODE
5.10 Measurement Cycle
The WE440 Phosphate Analyzer follows a sequence of steps or events for performing the
analysis cycle. They are:
1. Cell Wash
2. Sample Capture
3. Optics Testing
4. Test Reaction Temperature (when enabled)
5. Blank Measurement
6. Add reagent and stir the solution
7. Collect Data and Output Result
8. Post Wash
IM 12Y18A04-01EN 1st Edition : Oct. 04, 2019-00
Page 38

<5. Calibration of the Instrument for Measurement Analysis>
5.10.1 Cell Wash
In cell wash, the sample is pumped into the reaction cell. The user is allowed to edit the volume of
the sample to be pumped by the parameter called CELL WASH VOLUME. To edit the cell wash
volume, from the MAIN MENU follow the sequence:
MENU → SETUP → METHOD → CELL WASH VOLUME
In cell wash volume, the positive volume is to pump the sample into the reaction cell, and the
negative volume is to pull back an amount below the drain after the cell wash is completed.
During the cell wash, the stirrer is on and the info eld (if enabled) shows the sample pumping
progress with a progress bar, along with the volume pumped.
5.10.2 Sample Capture
In the sample capture step, the stirrer is switched o and uid is allowed to settle for 5 seconds to
drain any excess from the reaction cell overow drain.
During the sample capture, the info eld (if enabled) shows the 5 seconds countdown.
5.10.3 Optics Testing
In optics testing, the system checks the optical path and status of the LED source.
During this stage in the cycle, the info eld (if enabled) shows the test optics progress bar which
times out at a maximum period of 90 seconds.
5-5
NOTE
Optics test may ag the following error messages:
“TESTING OPTICS, PLEASE CHECK FOR OPTICS FAILURE”
Optics test failed due to the non-functionality of the LED source or detector, measurement is
aborted, and the info eld will ash the error message.
“TESTING OPTICS PLEASE CHECK FOR STRAY LIGHT”
Stray light reading outside the allowed limits: will ash with a warning message.
“TESTING OPTICS LOW SIGNAL LEVEL . . . CELL MAY BE COATED AND MAY REQUIRE
CLEANING“
If the test determines that the light energy reading is outside the allowed limits, the measurement
is aborted. The cell may require cleaning, or you many need to re-calibrate the optics.
5.10.4 Checking Reaction Temperature
When reaction cell temperature control is enabled, at this stage in the cycle the reaction cell
temperature is tested against the set point.
To enable or disable the REACTION TEMPERATURE CONTROL, from the MAIN MENU follow
the sequence:
MENU → SETUP → METHOD → REACTION TEMPERATURE CONTROL
If reaction temperature control is enabled, then the temperature set point is editable. To edit the
temperature set point, from the MAIN MENU follow the sequence:
MENU → SETUP → METHOD → REACTION TEMPERATURE
The temperature stabilization is attained through PID control. Once it reaches the set point,
it stays almost at the same temperature, until and unless the reaction temperature control is
disabled or set point is altered.
This test is allowed a maximum of 240 seconds for the reaction cell to attain the set temperature.
If it does not reach stability or set point in the allowed time, it will ag a warning message and
proceed to the next step. The info eld (if enabled) shows the temperature progress bar.
IM 12Y18A04-01EN 1st Edition : Oct. 04, 2019-00
Page 39

<5. Calibration of the Instrument for Measurement Analysis>
NOTE
No variation in temperature for a period of 80 seconds aborts the measurement, and the info eld
will ash with the error message: “PLEASE CHECK FOR HEATER FAILURE”.
If the temperature is not stabilized within 200 seconds and below the set point, then the info
eld will ash with the warning message: “CHECKING THE REACTION TEMPERATURE.
TEMPERATURE BELOW SET POINT”.
If the temperature is above the set point, then the info eld will ash with the warning message:
“CHECKING THE REACTION TEMPERATURE. TEMPERATURE ABOVE SET POINT”.
5.10.5 Blank Measurement
In this event, a reading is recorded called BLANK ABSORBANCE.
The stability of the recorded reading depends on the specied stability criteria. You have the
choice of editing the stability criteria. To do this from the MAIN MENU follow the sequence:
MENU → SETUP → ANALYSIS PARAMETERS → STABILITY CRITERIA
During this stage the info eld (if enabled) shows the blank measurement progress bar with the
BLANK ABSORBANCE reading in AU. (This is a relative value and NOT an absolute value.)
For the phosphate measurement, the event of blank measurement and its sequence in the
measurement cycle is done before adding the third color developing reagent.
5-6
NOTE
When unstable and not meeting the stability criteria, the info eld will ash with the warning
message “TAKING BLANK MEASUREMENT, UNSTABLE SIGNAL”.
5.10.6 Add Reagents
In add reagent, the reagent is pumped into the reaction cell. You are allowed to edit the volume of
the reagent to be pumped by the parameter called REAGENT VOLUME.
To edit the reagent volume, from the MAIN MENU follow the sequence:
MAIN MENU → SETUP → METHOD → (+) to go to page 2 → REAGENT VOLUME (1)
In reagent volume, the positive volume is to pump the reagent in to the reaction cell, and the
negative volume is to pump back any reagent drops in the pump delivery tube after the reagent
addition is completed. After pumping the reagent, the stirrer is turned on for an editable period of
time called STIR TIME to mix the reagent thoroughly with sample.
To edit the reagent volume, from the MAIN MENU follow the sequence:
MAIN MENU → SETUP → METHOD → (+) to go to page 2 → STIR TIME (1, 2, 3)
During the addition of reagent, the stirrer is on and the info eld (if enabled) shows the reagent
pumping progress, with a bar and the volume pumped. After adding the reagent, the countdown
of stir time is also shown along with the absorbance of the sample mixture.
NOTE
If the pump is not assigned to a reagent, it will abort the measurement and the info eld will ash
with the error message: “PUMP IS NOT ASSIGNED”.
IM 12Y18A04-01EN 1st Edition : Oct. 04, 2019-00
Page 40

<5. Calibration of the Instrument for Measurement Analysis>
5.10.7 Collect Data
In collect data, the nal reading is recorded and the nal absorbance is displayed at the end of
the cycle.
The stability of the recorded reading depends on the specied stability criteria. You have the
choice of editing the stability criteria. To do this from the MAIN MENU follow the sequence:
MENU → SETUP → ANALYSIS PARAMETERS → STABILITY CRITERIA
Now the concentration is calculated (as follows) and the current concentration is updated.
Concentration = (Slope x Absorbance) + Intercept
(Where slope and intercept are from the CURRENT calibrated values of the instrument for
measurement.)
NOTE
If unstable and doesn’t meet the stability criteria, the info eld will ash with the warning message
“COLLECTING DATA, UNSTABLE SIGNAL”.
5.10.8 Post Wash
The programmable POST WASH is to wash the reaction cell after the measurement and
evacuate any residue of the reaction mixed solution. This event is optional and can be disabled,
or the reaction cell can be washed with selectable sources with editable volumes and stir times,
with up to ve programmable steps. To perform post wash after measurement, select ANALYSIS
PARAMETERS for the POST WASH EVENT.
To set the post wash parameters from the MAIN MENU follow the sequence:
MAIN MENU → SETUP → ANALYSIS PARAMETERS → (+) POST WASH EVENT → POST
WASH CYCLES
5-7
5.10.9 Measurement Data
The WE440 Phosphate Analyzer product stores measurement and calibration results for up
to 31 days. The data for each sample analysis cycle or calibration may be retrieved under
REVIEW RESULTS menu screen with the corresponding time stamp and other related operating
parameters.
Sample analysis data stores the date, time, concentration, units, temperature, wavelength and
status (Good or Fault) along with the faults for each measurement cycle.
Calibration data stores date, time, standard concentration, slope, intercept, temperature,
wavelength and status.
The stored results are displayed with respect to the selectable period of time such as: Last 12
Hours, Last 1 Day, Last 2 Days, Last 3 Days, Last 1 week, Last 2 weeks, Last 3 weeks, Last 4
weeks, All, which is selected as DATA RANGE. To display the measurement results from the
main menu follow the sequence:
MENU → VIEW DATA AND ALARMS → REVIEW ANALYSIS RESULTS →DISPLAY
NOTE
Validation results are ONLY reported on the display and the RS-232 at the time of running the
validation. Validation cycles are not stored and are not reported on the analog outputs.
5.10.10 Printing Results
The stored measurement results can be printed on to the Hyper Terminal (minicom in Linux)
through the RS-232 port within the selected data range. The selected data range is applicable to
displaying, printing and plotting of measurement results.
IM 12Y18A04-01EN 1st Edition : Oct. 04, 2019-00
Page 41

Blank Page
Page 42

<6. Menu Overview>
6. Menu Overview
Explanations of the four major menu sections are described as follows:
Setup - For conguring the instrument’s functionality and operational parameters, such as
measurement range, measurement frequency, display contrast, date, time, and more.
Measurement - For performing the manual analysis, calibration, validation and cleaning cycles.
View Data and Alarms - For reviewing the collected data of up to the last 31 days in text and
graphics mode, and for reviewing and resetting the various Alarms and Faults triggered
during the latest cycle performed.
Services - For system administration, hardware setup, prime uidics and diagnostics; and
control of the various devices including LED, pumps, input level sensors, relays and analog
outputs.
NOTE
Press the STOP key to exit Auto RUN mode to access the Service Menu.
6.1 Setup Menu
6-1
Alarms Menu
Allows conguration of alarm parameters (type, value and hysteresis). Also allows
assignment of individual alarms to faults.
Relays Mapping Menu
Allows mapping of multiple alarms to individual relays.
Analog Outputs Menu
Allows conguration of individual analog outputs.
Inputs Menu
Allows conguration of ve internal inputs (for uidics sensors) and two external inputs (for
instrument control).
Display Parameters Menu
Allows conguration of display-related parameters.
Calibration Parameters Menu
Allows conguration of parameters for calibration. The menu shows two columns tagged as
REFERENCE and CURRENT. The parameters listed under the REFERENCE column are
set for validating auto calibrations repeats. The new calibration results are tested against the
reference calibration parameters listed under the REFERENCE column. The CURRENT
column shows the current operating parameters that are being used by the instrument when
calculating the analysis measurement result. Calibrations are similar to analysis cycles and
are on the method set in METHOD PARAMETERS menu.
Validation Parameters Menu
Allows conguration of parameters for validation, choice of validation source, and repetitions
required.
Analysis Parameters Menu
Allows conguration of parameters for instrument mode, measurement frequency,
measurement units, analysis label, cell wash and reagent ow rates, stability criteria and
post wash events. Separate post wash events can be programmed for analysis, calibration,
and validation cycles. All post wash cycles can be turned OFF when set to the “NOT
ASSIGNED”.
Cleaner Parameters Menu
Allows conguration of the parameters for manual or periodic cleaning of the reaction cell.
IM 12Y18A04-01EN 1st Edition : Oct. 04, 2019-00
Page 43

<6. Menu Overview>
Temperature Units Menu
Allows selection of units for displaying the temperature readings. Choice of Fahrenheit (°F)
or Celsius (°C).
Method Parameters Menu
Allows conguration of the parameters for method and order of the events for analysis and
calibration. Consult factory before modifying any parameter.
Date and Time Menu
Allows conguration of the date and time format and editing of the current date.
Daylight Saving
Allows conguration of the daylight saving for USA, Europe and custom settings. When
daylight saving is enabled, the system will correct the time based on the settings shown
below the selection.
Recovery After Power Failure Menu
Allows conguration of the instrument after power failure recovery.
Ethernet Parameters Menu
Allows conguration of Ethernet Parameters.
RS-232 Parameters Menu
Allows selection of the BAUD RATE for the RS-232 port. Default setting of 115200 Baud.
Language Menu
Allows conguration of the instrument’s language. Current release is ENGLISH language.
(Consult factory for other languages).
6-2
6.2 Measurement Menu
Analyze Once
Allows one manual analysis to be performed. Number of repeats (default = 1) can be edited
in the ANALYSIS MENU. When performing a manual analysis, the user is restricted from
navigating through other menus.
Calibrate
Allows manual calibration to be performed using standard solutions. The slope and intercept
values obtained here may be edited in the CALIBRATION PARAMETERS menu. When
performing a manual calibration, the user is restricted from navigating through other menus.
Validate
Allows manual validation of the instrument with a known sample or standard. When
performing validation, the user is restricted from navigating through other menus.
Clean
Allows manual cleaning of the reaction cell. The parameters set for the manual clean are
also used for auto clean. When performing manual cleaning, the user is restricted from
navigating through other menus.
6.3 View Data and Alarms Menu
Review / Reset Alarms
Allows user to review and selectively reset the faults and alarms triggered during the latest
Analysis/Calibration/Validation/Cleaning cycle performed.
Review Calibration Results
Allows the user to review and print the calibration results from the stored calibration
database, using a selectable time scale. The database holds data from the last 31 days.
Review Analysis Results
Allows the user to review and print the analysis results from the stored analysis database,
using a selectable time scale. The selected results can be displayed in text or graph modes.
The database holds data from the last 31 days.
IM 12Y18A04-01EN 1st Edition : Oct. 04, 2019-00
Page 44

<6. Menu Overview>
The view graph has the following operational keys:
F1 - Escape
F2 - Un-Zoom
F3 - Scroll Left
F4 - Scroll Right
ENTER - Zoom
- / + - Cursor Movement
MENU - No Action
Zoom works as (X hrs displayed)/4, around the cursor position. Un-zoom is the exact opposite of
zoom.
Delete All Calibration Results
Allows the user to delete the entire calibration database after conrmation.
Delete All Analysis Results
Allows the user to delete the entire analysis database after conrmation.
NOTE
To enter the Service menu, the instrument must be in manual mode. (Press STOP).
6-3
6.4 Service Menu
System Administration Menu
Allows access control to the instrument for up to six users and one technician, all with
individual passwords.
Technician alone has the permission to add, delete and set access permission of any user.
Each user can have access to edit their own user name and password.
Menus also allow technician to change factory settings (factory password required), printing
options, instrument label, and to view instrument setup details.
Hardware Setup Menu
Allows technician to calibrate several hardware components of the analyzer.
Calibration results are editable by the technician.
Prime Fluidics Menu
Allows user to prime the uidics lines of the analyzer.
Diagnostics Menu
Diagnostics provide a direct mechanism to individually test devices such as pumps, relays,
optics and stirrer. Turn various pumps ON and OFF for testing or during adjustment.
Maximum of two devices can be turned on at the same time. This function also provides a
quick check of the optics subsystem.
6.5 System Administration Menu
Edit User Menu
Allows technician to edit user names, user passwords and user permissions, for
measurement, calibration and validation. Allows user to edit his or her own user name and
password.
Delete User Menu
Allows technician to delete a user from the users list.
Add User Menu
Allows technician to add a new user to the user’s list. Up to six dierent users may be
added.
IM 12Y18A04-01EN 1st Edition : Oct. 04, 2019-00
Page 45

<6. Menu Overview>
Factory Settings Menu
Allows technician to restore factory defaults, update factory defaults and edit factory
settings.
Instrument Details Menu
Allows viewing of instrument details:
• Software version
• Serial number
• Model number
Analysis Label Change Menu
Allows technician to edit the analysis label.
Printing Options Menu
Allows technician to print the system conguration, analysis parameters and method
parameters. Also allows technician to enable/disable online printing. See Chapter 7 for the
default analyzer parameters listing printouts.
6.6 Hardware Setup Menu
Calibrate Thermistor
Allows technician to calibrate the thermistor. Only required if the factory-installed thermistor
has been serviced or replaced. To calibrate the thermistor, user is required to enter the
reaction block temperature using an external reference thermometer.
Calibrate Pumps
Allows technician to calibrate the ow rate of the pumps.
Calibrate Optics
Allows technician to calibrate the optics.
Calibrate Analog Outputs
Allows technician to calibrate the two analog outputs.
Edit Calibrated Values
Allows technician to edit the calibrated results for ne-tuning.
6-4
6.7 Prime Fluidics Menu and New Reagents
Blank
Auto Prime All
This menu runs an automatic priming sequence for all reagents, standards and sample
based on the priming volume specied by the user.
Prime Input Source (Sample/Reagent/...)
Allows technician to selectively prime from the available list of devices.
Priming Volume
Allows technician to change the volume used for priming.
Press + to Navigate to NEXT Page
The new reagents blank is the ZERO intercept or oset. A user entry here will aect the zero
calibration value of the calibration parameters.
Set NEW reagents BLANK
Allows the operator to set the BLANK value for the NEW reagents.This value is usually
supplied with the new batch of reagents and its value may vary between 0 to -10. Default
value is -1.0.
PLEASE NOTE THE (-) SIGN.
IM 12Y18A04-01EN 1st Edition : Oct. 04, 2019-00
Page 46

<6. Menu Overview>
6.8 Diagnostics Menu
Pumps and Stirrer
Allows technician to selectively check the functionality of the pumps and stirrer.
Inputs Status
Allows technician to check the status of the external inputs. Once a function has been
assigned to a digital input, it disappears from the next menu of available functions for the
next input.
External Control
The analyzer can be directed to initiate an analysis or calibration cycle or change operating
mode under the command of an external controller using the digital input lines. A command
on the digital input is represented by a contact closure (as the programmed EVENT)
that occurs for more than 1 second. A new command received supersedes the previous
command; in essence it will interrupt the previous command to execute the new command.
• Analyze once
• RUN/STOP
• Calibrate
• Validate (the source is dened in the validation menu)
• Not assigned
Validate Grab Sample
This function is the same as ‘analyze once’ except that the result data does not get sent to
the analog output (4-20 mA), it is reported on the screen and the serial outputs.
Relays
Allows technician to selectively check the functionality of the four relays. The relay status is
shown next to the selected relay. Pressing the ENTER key toggles the state of the relay. The
relay initial status will be updated upon leaving this diagnostics menu.
Analog Output
Allows technician to selectively check the two analog outputs. Previous analog output
setting will be updated upon leaving this diagnostics menu.
LED and Detector Control
Allows the technician to check the functionality of the optics system and its individual
components. Also allows adjusting the detector preamp gain for the selected LED. Any new
setting of the gain or of the intensity of the LED will override any previous optics calibration
setting.
6-5
CONSULT before overriding any setting.
This diagnostics menu allows direct reading of the mV level detected at the preamp and it shows
the corresponding absorbance calculated. The internal electronics enclosure temperature and
the reaction cell temperature are also displayed for reference.
6.9 Default and Lost or Forgotten Passwords
The default passwords are as follows:
Technician - 123***
User 1 - 111111 (6 ones)
User 6 - 666666 (6 sixes)
If a user password is forgotten, the technician can delete the user and then add the user back.
IM 12Y18A04-01EN 1st Edition : Oct. 04, 2019-00
Page 47

<6. Menu Overview>
6-6
06/06/19
INFO:
Figure 6.1 UNLOCK keypad
PHOSPHATE
MAIN MENU
+SETUP
+MEASUREMENT
+VIEW DATA AND ALARMS
+SERVICES
02:20 PM
6.10 User Interface Tree
Setup Measurement View Data & Alarms Services
(+) Page 1 Analyze Once Review / Reset Alarms System Administration
Alarms Calibrate Review Calibration
Relays-Mapping Validate Review Analysis Results Prime Fluidics
Analog Outputs Clean Delete All Calibration
Inputs Delete All Analysis Results
Display Parameters
Temperature Units
(+) Page 2 (+) Press + sign to go to next page
Analysis Parameters
Validation Parameters
Cleaner Parameters
Calibration Parameters
Method
(+) Page 3
Date & Time
Daylight Saving
Recovery After Power
Failure
Ethernet Parameters
RS232 Parameters
Language
Menu
Hardware Setup
Results
Diagnostics
Results
IM 12Y18A04-01EN 1st Edition : Oct. 04, 2019-00
Page 48

<6. Menu Overview>
Menu
Measurement View Data & Alarms Services
Analyze Once Review / Reset Alarms System Administration
Press Enter Reset All Alarms
Reset All Faults
Calibrate Review Calibration
Results
Calibrate Standards Display Add User Name, Password,
Validate Print Factory Settings Restore, Update, Edit **
Press Enter Data Range Selection Instrument Details Software Version, Model
Clean Review Analysis Results Unit Label Change
Press Enter Display Printing Options Print System
View Graph Print Analysis Parameters
Print Print Method Parameters
Data Range Selection Print Cleaner Parameters
Delete All Calibration
Results
Delete All Analysis Results Hardware Setup
Edit User User name and Password
Delete User User Name X
Permission
and Serial Number
Conguration
Online Print :
Enable/Disable
Calibrate Thermistor **
Calibrate Pumps Pump 1, Pump 2
Calibrate Optics
Calibrate Analog Outputs **
Edit Calibrated Values
Prime Fluidics
Auto Prime All
Prime Standard
Prime Reagent (1)
Prime Sample
Priming Volume (+/-)
Press (+) to go to page 2 New Reagents Blank
Diagnostics
Pumps and Stirrer
Inputs Status
Relays
Analog Outputs
LED & Detector Control ** Consult Factory rst
6-7
IM 12Y18A04-01EN 1st Edition : Oct. 04, 2019-00
Page 49

<6. Menu Overview>
Menu
Setup
(+) Page 1 (+) Page 2 (+) Page 3
Alarms Analysis Parameters Date & Time
Display All + Page 1 (+) Page 2 Daylight Saving
Alarm 1 thru 7 Type, value,
Hysterisis
Relays-Mapping Measuring Frequency Post Wash Cycles Power Fail Duration
Analog Outputs Measuring Units Source, Volume,
Analog Output 1, 2 Type, Low, High Ion Label Ethernet Parameters
Inputs No of Repeats (+) Page 3 and
Level Sensors Sensor 1 – 5 Stability Criteria Dilution Parameters Server IP
External Inputs Input 1, 2 Validation Parameters RS232
Display Parameters Validation Source Baud Rate
Contrast No of Repeats Language
Back Light On time Cleaner Parameters
Display Help Cleaner Source
Display Info Volume to Add
Result Decimal Point Clean Flow Rate
Large Font Screen Stir Time
Temperature Units Frequency
Fahrenheit, Celsius Calibration Parameters
(+) Press + sign to go to next page (+) Page 3
Restart Mode Post Wash Event Recovery after
Power Failure
Power Fail Clean
Stir Time
(+) Page 4
Standard
Mode
Frequency
Slope
Intercept
Calibration Repeat
Tolerance
Method
Cell Wash Volume
Reaction Cell Control
Reaction Cell Temperature
Wavelength
Blank Measurement (+) Page 2
Reagent and Stir
Time
Cell Wash Flow rate
Reagent ow rate
Cycle
IP Address
Parameters
6-8
IM 12Y18A04-01EN 1st Edition : Oct. 04, 2019-00
Page 50

<7.TermsDenition>
7. Terms Denition
Terms Description Possible Values, Options
ALARM
Type Assigning a fault type to the alarm. Low Limit, High Limit, Fluidics Fault,
General Fault, not Assigned
Value Boundary value for triggering an alarm,
only for low limit and high limit type.
Hysteresis Value gap or dierence before an event
change.
RELAY Up to FOUR spare relays available.
MODE Allows fault ON or OFF operation. Normal or Fail Safe
ANALOG OUTPUT
Type Normal or reverse acting. 0 to 20, 4–20, 20-0 or 20–4
Low Low concentration value.
High High concentration value.
EXTERNAL INPUT
Label User programmable label.
Event Dry contact event. Close/Open or Open/Close
Action Selected function. Analyze Once, Run/Stop, Calibrate,
DISPLAY PARAMETERS
Contrast To adjust the display contrast. 120 to 200
Back Light On-Time Screen saver time duration for backlight
of display.
Display Help Help message for the user to navigate
between the menus.
Display Info Message showing the status of the
current cycle performing.
Results Decimal Point Selectable precision to show the analysis
result.
Large Fonts Screen To display the result with large fonts. Enabled, Disabled
CALIBRATION PARAMETERS
Standard The concentration of the standard used
for calibration.
Mode Mode represents the calibration type. Single-Point, Base-Line
Frequency The time duration between two
calibration cycles.
Start Time Calibrations start time, except for manual
and editable frequency.
Slope The CURRENT Slope value represents
the coecient that is multiplied by
the absorbance to calculate the
concentration of the sample +/- Intercept
value.
Intercept Reference and current numbers based
on the base line calibration cycle.
Calibration Tolerance Repeat tolerance tested during auto
calibration cycles to accept or reject
automatic calibrations.
VALIDATION PARAMETERS
Validation Source Fluid source for validation. Sample, Standard, Grab Sample, Not
Number of Repeats Number of times that the validation is to
be performed.
0 to XXXXX (XXXXX Value depends on
precision selected in Setup → Display
parameters → result Decimal Point)
0 to XXXXX (XXXXX Value depends on
precision selected in Setup → Display
parameters → result Decimal Point
Validate, Not assigned
0 to 255 minutes, 0 for Continuously On
Enabled, Disabled
Enabled, Disabled
XXXX.X, XXX.XX, XX.XXX, X.XXX,
XXXXX, Auto
0 to XXXXX (XXXXX Value depends on
precision selected in Setup → Display
parameters → result Decimal Point
Every 6Hr, 12Hr, 24Hr, Sun, Mon, Tue,
wed, Thu, Fri, Sat, Manual and Editable
0Hr to 99.99Hr
Depends on Time format in Setup →
Time Menu
Default value of -1
Default value of +/- 5%
Assigned
0 to 8
7-1
IM 12Y18A04-01EN 1st Edition : Oct. 04, 2019-00
Page 51

<7.TermsDenition>
Terms Description Possible Values, Options
ANALYSIS PARAMETERS
Mode Instrument RESTART mode. Auto Restart, Manual Restart
Measuring Frequency In the RUN mode, the frequency is the
time duration between two analysis
cycles.
Measuring Units Units for the analyzed sample. Six characters long. Alphabets, numerals
Analysis Label Six characters long. Alphabets, Numerals
Cell Wash Flow Rate The rate at which the sample is pumped
to wash the cell.
Reagent 1–3 Flow Rate The rate at which the reagent is pumped
to wash the cell.
Stability Criteria Denes the stability level of the data
before accepting it. The stability criteria is
a measure of stability of the absorbance
level rate of 0.001 AU per sec as
specied by the number 1 thrugh 10.
Post Wash Event Washing the cell after completion of the
event selected with the following source,
volume and stir time.
Post Wash Cycle Source Fluid for post washing the reaction cell. Sample, Reagent, Cleaner, Standard
Post Wash Cycle
Volume
Post Wash Cycle Stir
Time
CLEANER PARAMETERS
Cleaner Source Fluid for cleaning the cell. Sample, Reagent, Cleaner, Standard,
Volume to add The amount pumped for cleaning. 0 to 255 mL
Clean Flow Rate The rate at which the cleaner source is
Stir Time The amount of time the uid is stirred for
Frequency The time duration between two cleaning
Start Day/Date For weekly cleaning the day of cleaning.
Start Time The time to start the cleaning on the day
TEMPERATURE UNITS
Units Units of temperature. Celsius, Fahrenheit
METHOD PARAMETERS
Cell Wash Volume The amount of sample pumped to wash
Reaction Temperature
Control
Reaction Temperature The temperature set point. 0 to 60
Wavelength The LED wavelength.
Blank Measurement Allows the blank measurement in the
Reagent Volume The amount of reagent pumped in to the
Stir Time The amount of time the uid is stirred
The amount of uid pumped for post
washing.
The amount of time the uid is stirred for
post washing the cell.
pumped to clean the cell.
cleaning the cell.
cycles.
For monthly cleaning the date of
cleaning.
or date selected.
the cell.
PID temperature control. Enable, Disable
analysis cycle.
cell.
after pumping the reagent.
15, 30, 45 minutes, 1 hr, 0.20 hr are
selectable and editable minutes range
00.00 to 99.99Hr
and special symbols are allowed.
and +, - are allowed.
Depends on the inner diameter of the
pump tubing. It is derived from the
calibration of pumps.
Depends on the inner diameter of the
pump tubing. It is derived from the
calibration of pumps.
1 thrugh 10.
Analysis, Calibration, Validation, Not
Assigned.
-99.9 to +99.9 mL
0 to 999 seconds
Not Assigned
Depends on the inner diameter of the
pump tubing. It is derived from the
calibration of pumps.
0 to 999 seconds
Manual, Daily, Weekly, Monthly
Day - Week days
Date - Current month dates (1 to 31)
00:00 hr to 23:59 hr
1 to 100 mL
Disable, Before Reagent
0 to 6.00 mL
0 to 999 seconds
7-2
IM 12Y18A04-01EN 1st Edition : Oct. 04, 2019-00
Page 52

<7.TermsDenition>
Terms Description Possible Values, Options
DATE
Format Selectable date format. MM/DD/YY, YY/MM/DD, DD/MM/YY
Current Date Present date, validated depending on the
format.
TIME
Current Time Present time. Legible time depending on time format
Format Selectable time format. 12 hr, 24 hr
RECOVERY AFTER POWER FAILURE
Power Fail Duration Recovery duration after power fail. 0 to 99.99 hr
Power Fail Clean Cycle Performing clean cycle after recovering
from power fail.
ETHERNET PARAMETERS
IP Address Instrument IP address. Editable
Server IP
Network ID
RS-232 PARAMETERS
Baud Rate The rate at which the data is transferred
through serial port.
LANGUAGE
Language Language in the instrument. English, other languages, consult factory
REVIEW / RESET ALARMS
Reset All Alarms? Resets all the raised alarms, which are
shown below this option.
Reset All Faults? Resets all the faults, which are shown
below this option.
REVIEW CALIBRATION RESULTS
Display Displays the calibration results for the
selected data range.
Print Prints the Calibration results on to the PC
for the selected data range.
Data Range The time interval in which the calibration
results are to be retrieved.
REVIEW ANALYSIS RESULTS
Display Displays the analysis results for the
selected data range.
View Graphs Displays the Linear graph for the
selected data range of Analysis records.
Print Prints the analysis results on to the PC
for the selected data range.
Data Range The time interval in which the analysis
results are to be retrieved.
DELETE ALL
CALIBRATION
RESULTS
DELETE ALL ANALYSIS
RESULTS
EDIT USER
User Name Change the user. 6 users and one technician are allowed
Password Change the password of current user. Six characters long A–Z, 0–9, * and
Measure Permission Change the measurement permission for
Calibrate Permission Change the calibration permission for the
Validate Permission Change the validation permission for the
DELETE USER
User Name Delete the current user displayed
Deletes the entire calibration results
database.
Deletes the entire analysis results
database.
the current user.
current user.
current user.
opposite this eld.
Legible date
Enable, Disable
115200 (default)
Reset All Alarms?
None
None
None
Last 12 hr, 1 Day, 2 Days, 3 Days,
1 Week, 2 Weeks, 3 weeks and All
None
None
None
Last 12 hr, 1 Day, 2 Days, 3 Days,
1 Week, 2 Weeks, 3 weeks and All
None
None
space are allowed
Enabled, Disabled
Enabled, Disabled
Enabled, Disabled
All users can be deleted except
technician
7-3
IM 12Y18A04-01EN 1st Edition : Oct. 04, 2019-00
Page 53

<7.TermsDenition>
Terms Description Possible Values, Options
ADD USER
User Name Add a new user to the users list. User name is 6 characters long and only
6 users are allowed
Password Password of the new user entered. 6 characters long A–Z, 0–9 * and space
are allowed
Measure Permission Measurement permission for the new
user.
Calibrate Permission Calibration permission for the new user. Enabled, Disabled
Validate Permission Validation permission for the new user. Enabled, Disabled
Factory Settings Select this option to enter into factory
setup.
INSTRUMENT DETAILS
Software Version The current running software version of
the instrument.
Model Number Model number of the instrument. None
Serial Number Serial number of the instrument. None
UNIT LABEL CHANGE
Label Name Change the title of the instrument Maximum 9 characters A–Z, 0–9, / , - ,
PRINTING OPTIONS
Print System
Conguration
Print Analysis
Parameters
Print Method Parameters Prints only the method parameters. None
Print Clean Parameters Prints only the clean parameters. None
Online Print Prints the date, time and concentration
EDIT CALIBRATED VALUES
Pump1, Pump2 To change the ow rate of the pumps
Optics Dark The level detected as dark light level. 0 to 300 mV
Optics Xref The level used as reference potential for
PRIME FLUIDICS
Priming Volume The volume of the uid selected for
PUMPS & STIRRER
Pump1, Pump2 To check the functionality of pumps. ON, OFF
Stirrer To check the functionality of stirrer. ON, OFF
RELAYS
Relay1, Relay2, Relay3,
Relay4
ANALOG OUTPUTS
Channel1, Channel2 To test the functionality of analog outputs
LED & ADC
Select LED To test the functionality of LED. 3, None
Intensity Intensity of the LED. 0% to 100%
Optics Amplier Gain Changing the gain of the amplier. 0 to 255
Prints all the system parameters. None
Prints only the analysis parameters. None
after each analysis cycle.
after their calibration.
light energy level.
priming.
To check the functionality of relays. ON, OFF
for dierent selectable currents.
Enabled, Disabled
None
None
and space are allowed
Enabled, Disabled
0.10 to 60.00 mL
0 to 2400.00 mV
0 to 99.9 mL
0 mA, 4 mA, 10 mA, 12 mA, 20 mA
7-4
IM 12Y18A04-01EN 1st Edition : Oct. 04, 2019-00
Page 54

<8. Maintenance Schedule>
8. Maintenance Schedule
8-1
Maintenance
Schedule Frequency
Every week Inspect in / out tubes, reagent bottle, and all tubes for fouling.
Every month Inspect tubing and ensure that it is not blocked.
Every 1.5 months Replace reagent if necessary every 45 days.
Every 12 months Replace Pump tubing. Use factory supplied maintenance kit.
Inspect for any fouling reaction cell.
Conduct regular maintenance
to ensure the analyzer performs properly.
l Maintenance and service part
Part number Description
K9705CK Tubing kit - includes tubing, ttings, bottle caps and tubing case
K9705CL Sample tubing harness for pump *1
*1: Tubing lubricant isn’t enclosed. Silicon oil is required to replace the tubing. Silicone Oil must be purchased directly from Thermo
Fisher Scientic.inc.
Manufacturing Code: 01X358701
8.1 Changing Reagents
CAUTION
Wear gloves or protective equipment your site may require when changing reagents.
Press the STOP key.
Press the MENU key.
Remove the cap from each bottle and change them over one by one. Do NOT re-use or re-ll
old or existing bottles. Dispose of the used bottles and contents safely and according to local
regulations.
Tighten bottle caps and route the tubing properly making sure that it does not get pinched when
placing the bottle in the enclosure.
Press MENU key and select:
SERVICES → PRIME FLUIDICS → AUTO PRIME
Repeat AUTO PRIME if you notice air bubbles in the tubing. Each reagents kit comes with a
REAGENT BLANK value. After changing the reagent you must enter the new value.
Press (+) to go to next page and ENTER the value of the reagent blank oset which is detailed on
the form that comes with the new reagents kit.
NOTE
The reagent blank value has a (-) sign to it.
Default value is -0.4
l Reagent and standard solution
The following reagents should be purchased directly from Thermo Fisher Scientic.inc.
IM 12Y18A04-01EN 1st Edition : Oct. 04, 2019-00
Page 55

<8. Maintenance Schedule>
Thermo Fisher
Scientic
Model code
229510 10ppm calibration standard, Phosphate, 1 L
229530 30ppm calibration standard, Phosphate, 1 L
229550 50ppm calibration standard, Phosphate, 1 L
2295REC Reagents 1, Phosphate, 1 liter, 45 day supply
Please order necessary reagents with the main unit at same time.
Description
8.2 Installing Tubing Maintenance Kit
n Changing the Instrument Tubing
It is recommended that the pump head tubing be replaced twice a year at a minimum, or as
needed.
The six month maintenance kit (K9705CL) contains completely assembled tubing sets.
To change the tubing proceed as follows: Press the STOP key.
To minimize contact with the reagents, it is highly recommended that you empty out the contents
of the tubing using the PRIME back method as described here:
Press MENU and scroll down to SERVICES and then select PRIME FLUIDICS and then set the
PRIMING VOLUME to -5 mL. This step allows the user to pump back the reagents contents of
the connecting tubing, including the peristaltic pump tubing.
Scroll up to each of the reagents and press ENTER to pump back the selected reagent uid into
its container. Repeat for each reagent (1, 2, 3 & 4).
Disconnect the tubing. Replace to reduce the risk of errors in connection.
Replace the pump tubing as described in Plumbing Connections Section.
Replace with identical tubing from the maintenance kit by reversing the procedure. Apply silicone
lubricant to the pump rollers before re-installing the tubing.
8-2
NOTE
PRIME FLUIDICS menu the (-) sign for the priming volume will be reset to (+) upon next menu
entry.
SAMPLE/STANDARD
PUMP (larger tubing OD)
Reagent Pump
(smaller tubing OD)
Figure 8.1 Maintenance kit assembly detail
IM 12Y18A04-01EN 1st Edition : Oct. 04, 2019-00
Page 56

<8. Maintenance Schedule>
Always use 2 drops of Silicone Oil on the platen before replacing on pump.
n Plumbing Connections
STEP 1:
Remove pump convers as shown by squeezing the sides and lifting up for the Sample
Pump and Reagent 1.
STEP 2:
Remove old tubing by sliding out the retainers.
8-3
STEP 3:
Apply two or more drops of silicone oil on the tubing.
STEP 4:
Lay the tubing over the pump.
IM 12Y18A04-01EN 1st Edition : Oct. 04, 2019-00
Page 57

<8. Maintenance Schedule>
STEP 5:
Insert the retainers into slots in pump housing and ensure it secure properly.
STEP 6:
Apply two or more drops to the tubing of silicone oil on the pump cover and install on the
pump head.
STEP 7:
Repeat the process to all other pumps.
Note: The Sample Pump has a large diameter tubing.
8-4
8.3 Cleaning the Reaction Cell
Noisy or unstable readings may be caused by debris oating in the reaction cell or from deposits
on the optical windows inside the reaction cell. Check the reaction cell and clean as needed.
Make sure that the stir bar is clean and moving freely, all tubing is secured and in good condition.
CAUTION
Always Wear Protective equipment
Press STOP → MENU → MEASUREMENT → CLEAN (ush the reaction cell with sample)
Press STOP → MENU → SERVICES → PRIME FLUIDICS
Set PRIME VOLUME to -5.0 ml and PRIME SAMPLE (note negative sign, this will empty out the
cell).
Remove reaction cell cap and deposit cleaning solution into the reaction cell, you can use a 10 ml
syringe to ll the cell with cleaning solution and let it soak for about ½ hour.
For a more thorough cleaning, swing the reaction cell down as shown in photos below and use a
non-ber swab with a bent tip, reach inside the reaction cell and wipe the side optical windows of
the cell and the inner surfaces to dislodge and remove any deposits.
Cleaning of the reaction cell should be performed monthly or as needed to remove any debris or
deposits that may be created by the reacted solution or caused by the process sample. Deposits
on the optical windows increase the surface tension attracting small air bubbles generated from
the chemical reaction.
Note that if the analyzer is set for Auto-Restart you do NOT have to wait after leaving the cleaning
solution in the reaction cell, the analyzer will automatically start running after ½ hour.
You may repeat the cleaning procedure as needed.
IM 12Y18A04-01EN 1st Edition : Oct. 04, 2019-00
Page 58

<8. Maintenance Schedule>
NOTE
The reaction cell assembly can swing down to allow better access. Undo both thumb screws and
swing down.
8.4 Cleaning the Sample Flow Chamber
It is recommended that you inspect the sample ow chamber at least once a year to check for
any ow blockage, and to inspect the operation of the oat level sensor. The sample chamber is
located on the right lower corner of the uidics enclosure.
The chamber can be removed for service and clean up.
8-5
Figure 8.2 Sample chamber detail
IM 12Y18A04-01EN 1st Edition : Oct. 04, 2019-00
Page 59

<8. Maintenance Schedule>
8.5 Installing Tubing Kit
The tubing in the WE440 Phosphate Analyzer consists of two parts, the Main Tubing Assembly
(K9705CK) and the Pump Head Tubing Assembly (K9705CL). The two sections of tubing are
connected via luer ttings. The complete tubing layout is shown in below.
8-6
STEP 1:
lnstall the tubing channel using the pictures below. Note the the white labels will need to
be on the left side of the analyzer. The tubing channel will connect into the upper receiving
channel.
STEP 2:
Insert vent tube 1 and 2 through vent holes in the bottom left of the enclosure as shown in
the picture.
IM 12Y18A04-01EN 1st Edition : Oct. 04, 2019-00
Page 60

<8. Maintenance Schedule>
STEP3:
Connect Sample Chamber Tubing (SAM1) to sample Chamber.
STEP 4:
Connect all tubing from the tubing channel to the pumps and valve, following the labels on
the tubing. Connect the two remaining tubes into the reaction cell cap.
8-7
STEP 5:
Connect the reaction cell vent tube to the front top tting on the cell cap to the top of reaction
cell.
8.6 Stand-By Mode and Extended Shutdown
To put the system in Stand-by mode, make sure to press the STOP key and check the DISPLAY
eld next to F4 to show MANUAL RESTART. If AUTO RESTART is selected, you need to set the
mode to Manual:
MENU → SETUP → + ANALYSIS PARAMETERS → MODE
The system will switch to Stand-By after 60 minutes of no keypad activity. In Stand-By, the
analyzer will rotate the pumps periodically to avoid pinched tubing from sealing.
l Extended Shutdown
To avoid clogging, ush the entire system with distilled water before shutdown. Disconnect and
empty out the reagents bottles and ush the lines using FLUIDICS PRIME menu. Release the
pressure on the peristaltic pump tubing.
Use the Table 3 to diagnose and correct analyzer problems.
IM 12Y18A04-01EN 1st Edition : Oct. 04, 2019-00
Page 61

<8. Maintenance Schedule>
Table 8.1 Error messages
Messages Cause Solution
Login as Technician or Operator User has not logged in, and trying
to access restricted operations.
User is logged in, but does not
have adequate privileges to access
the restricted operations.
Password mismatch, Enter to
continue
Measurement is in progress Trying to perform measurement
User programmable measuring
frequency
User programmable calibration
frequency
Two or more inputs are of same
type
Error in date, press F1 to continue Date entered is invalid. Press F1 and re-enter valid date.
Error in hours, press F1 to continue Hours entered is invalid. Press F1 and re-enter valid hours.
More than 6 users are not allowed,
delete a user to add further
No records to delete. User is trying to delete Calibration/
Are you sure you want to delete all
analysis results?
Are you sure you want to delete all
calibration results?
No records to display User is trying to display records,
No records to print User is trying to print records, and
Only one record to display User is trying to view graph
Problem with memory allocation.
Insucient memory in the system
or system is busy.
Incorrect password has been
entered.
when it is already under way.
Editing option of analysis frequency
is selected.
If same type of solution is assigned
to two or more inputs.
If same type of solution is assigned
to two or more input.
Technician trying to add more than
6 users.
Analysis records, when there are
no records stored.
All analysis results? User is trying
to delete all analysis records.
(At least one analysis record is
available in the database.)
User is trying to delete all
calibration records. (At least one
calibration record is available in the
database.)
and no records are available in the
selected data range.
no records are available in the
selected data range.
when only one analysis record is
available in the database.
Do not try to repeatedly view the
graph.
User has to login either as a
Technician or Operator to access
the restricted operations.
User is not authorized to access
the restricted operations.
Press “Enter” to cancel the wrong
entry and enable re-entry of correct
password. If password is lost
consult factory for backdoor access
code.
Wait for measurement to complete.
Edit the analysis frequency.
Edit the calibration frequency.
Reassign solution to inputs.
More than 6 users are not
permitted at any time. To add a
new user after 6, delete an existing
user.
None.
None. Deleted records are not
recoverable.
None. Deleted records are not
recoverable.
None.
None.
None.
Try again after some duration
or after performing one more
measurement cycle.
8-8
IM 12Y18A04-01EN 1st Edition : Oct. 04, 2019-00
Page 62

<8. Maintenance Schedule>
Measurement/Calibration/Validation Messages
Messages Cause Solution
Sample empty Performing analysis with single
sample and sample chamber is
empty.
Testing optics, please check for
optics failure
Testing optics, low signal level ...
Cell may be coated and may
require cleaning.
Testing optics please check for
stray light
Please check for heater failure If heater is enabled in Method, and
Checking the reaction temperature.
Temperature below set point.
Checking the reaction temperature.
Temperature above set point.
Taking blank measurement,
unstable signal.
Collecting data, unstable signal Unstable temperature or cell may
No light output from optics. Run a Clean Cycle and try again.
Low light output from Optics.
Optical window of cell may be
coated.
External light is entering the cell. Check if overow cap on top of the
the Set point temperature is higher
than ambient and Cell temperature
diers from set point by ± 10ºC for
90 secs..
If the temperature is not able to
reach the set point and is below the
set point.
If the temperature is not able to
reach the set point and is above
the set point.
Unstable temperature, Cell may be
coated, or may be due to Optics
failure.
be coated, or may be due to optics
failure.
Check for Sample ow. Check for
pipe blockages to sample chamber.
Inspect cell and clean, check
for light detection under LED
& DETECTOR CONTROL in
Diagnostics menu.
Run a Clean Cycle and try to clean
the reaction cell with detergent.
reaction cell is loose.
Try a dierent set point
temperature. Call a service agent.
Re-calibrate the Thermistor.
Try a dierent set point
temperature. Call a service agent.
Re-calibrate the Thermistor.
Try a dierent set point
temperature. Call a service agent.
Perform Clean Cycle and Calibrate
Optics and thermistor.
Perform Clean Cycle and calibrate
optics and thermistor.
8-9
Messages Cause Solution
Unstable signal, stray light is high
please check.
Optimum light level. Calibration is
aborted.
Messages Cause Solution
Temperature below set point
please check for hardware
malfunction.
Temperature above set point
please check for hardware
malfunction.
Measured temperature diers
widely from set temperature.
Please check for hardware
malfunction.
Calibrating Optics Messages
Some external Light is entering in
to the cell.
Cell may be coated. Perform Clean Cycle and then
Calibrating Thermistor Messages
May be due to the connectors
or the thermistor or heater
malfunctioning.
May be due to the connectors
or the thermistor or heater
malfunctioning.
May be due to the connectors
or the thermistor or heater
malfunctioning.
Check for possible external light
entering areas on the reaction cell.
Calibrate Optics.
Check for thermistor and heater
connections, and calibrate them.
Check for thermistor and heater
connections, and calibrate them.
Check for thermistor and heater
connections, and calibrate if
necessary.
IM 12Y18A04-01EN 1st Edition : Oct. 04, 2019-00
Page 63

Blank Page
Page 64

<9. Standby and On-Demand Modes>
9. Standby and On-Demand Modes
As the power market has shifted from coal to gas plants, so have the power plant needs changed
from base load to peaker plant operations. This shift has caused a need for analyzers to work
from a continuous mode to an on-demand mode. YOKOGAWA identied this requirement as an
enhancement feature and has introduced this into the new WE440 Phosphate Analyzer.
The WE440 Phosphate Analyzer is equipped with two modes of operations:
1. AUTO RESTART mode (default)
2. MANUAL mode
The mode of operation may be selected by the user by pressing the MENU key:
SET UP → + (pg2) → ANALYSIS PARAMETERS → MODE
AUTO RESTART allows automatic restart of the sample measurement mode (same as pressing
the RUN key) after 30 minutes wait/idle time. The unit will resume running analyses per the
selected frequency (default 15 min).
In MANUAL mode, the system will wait for the operator command via keypad (RUN key)
or external control to start/resume analyses per the selected measurement frequency. If no
command is received, the system will switch to stand-by after 1 hour wait/idle time.
During automatic analysis, if the system detects a SAMPLE LOSS for more than one hour, it will
switch to stand-by house-keeping. When the sample recovers, it will switch back to RUN mode
after waiting for 1 minute to allow for fresh sample to ush the sample chamber.
STAND-BY: In stand-by the system will execute periodic house-keeping routines.
Every one hour, the uids in reagent, standard and sample lines are moved back and forth.
Every 6 hours, the system primes all the reagents lines with 1 mL each and then ushes the
reaction cell with either 2.5 mL of standard or if sample is present, the system executes a clean
cycle.
Fluids consumption while unit is left in Stand-by:
• 4 mL of each reagent per day
• 10 mL of standard** per day (with no sample). If sample is present, the system will run four
clean cycles per day and will not consume any standard.
** Note that in stand-by mode, the standard is used only to ush the cell. Distilled water may be substituted instead of phosphate
standard, or a time to rell the standard bottle if unit is kept in stand-by.
9-1
CAUTION
Make sure reagents and standard bottles have enough uids to maintain wet lines when the
analyzer is kept in stand-by.
OPTIONAL MENU setting:
(Please consult factory before modifying default setup).
An additional sub-menu selection for the Stand-by cleaner solution is provided. To access, press:
MENU → SETUP → + (pg 2) → CLEANER PARAMETERS → + (pg 2)
STDBY CLEANER SOURCE: SMP/STD (default)
STDBY CLEANER SOURCE
SMP/STD: (default) When selected, the system will use sample if present or in case of
sample loss will revert to standard for the periodic ushing of the reaction cell.
SAMPLE: The system will use sample only. In case of NO sample (sample loss) or sensor
not assigned the daily priming and ush of the cell is NOT executed. The system will force a
PRIME ALL sequence when analysis is resumed.
STANDARD: System uses only the standard for ushing the cell in stand-by.
IM 12Y18A04-01EN 1st Edition : Oct. 04, 2019-00
Page 65

<9. Standby and On-Demand Modes>
9-2
n Factory Setup Recommendations When Operating In “ON-DEMAND”
Mode
If the system is to be used “ON-DEMAND”, it is highly recommended to keep it powered and to
keep sample owing to eliminate algae growth in the lines over extended time. It is best to control
the analyzer operation either directly via the keypad (RUN / STOP) keys or using a remote ON/
OFF external control switch for controlling the analyzer.
The following describes how to setup the analyzer:
1. Select the MANUAL mode: the analyzer will switch to stand-by after one hour of inactivity
(after receiving the STOP command).
MENU → SETUP → + (pg 2) → ANALYSIS PARAMETERS → MODE
Select MANUAL mode.
2. Program external control input 6:
MENU → SETUP → INPUTS → EXTERNAL INPUTS → INPUT 6
Press the down key to select ACTION: RUN / STOP
Refer to Manual Inputs Signal Connections section for additional wiring details.
USING INTERNAL 24VDC USING EXTERNAL SUPPLY
11
12
15
16
INP6
RETURN
24VDC
GND
11
12
15
16
INP6
RETURN
5 - 24VDC
Figure 9.1
By using the ON/OFF external remote control switch the operator can turn ON analysis (RUN)
when switch is ipped ON (closed contact) and stop analysis (STOP) with switch in the OFF
position. When stopped, the unit will switch automatically to stand-by after one hour. In stand-by
mode, the system will execute the necessary house-keeping to maintain a ready state.
IM 12Y18A04-01EN 1st Edition : Oct. 04, 2019-00
Page 66

Revision Record
l Manual Title : Model WE440 Phosphate Analyzer
l Manual No. : IM 12Y18A04-01EN
Oct. 2019/1st Edition
Newly published
i
Yokogawa Electric Corporation
2-9-32 Nakacho, Musashino-shi, Tokyo 180-8750, JAPAN
http://www.yokogawa.com/
IM 12Y18A04-01EN 1st Edition : Oct. 04, 2019-00
Page 67

Blank Page
 Loading...