

Page 1

User’s
Manual
Model LL100
PC-based Parameters
Setting Tool
IM 05G01B12-01E
IM 05G01B12-01E
5th Edition
Page 2

Page 3

<Toc> <Ind> <Rev> <Introduction>
Introduction
This user’s manual describes the functions of the LL100 PC-based Parameters Setting
Tool, which are used with GREEN Series of controllers, and how to operate the tool.
This manual should also be read by users of the LL200 PC-based Custom Computation
Building Tool, which includes the functions of LL100.
■ Controllers Covered by LL100
For information about the GREEN Series controllers covered by LL100, see Section 1.3,
“Model and Suffix Codes of Applicable Controller Models.”
■ Intended Readers
This manual is intended for people familiar with the functions of the GREEN Series controllers and capable of working with Windows, such as control engineers and personnel in
charge of the maintenance of instrumentation and control equipment.
■ Related Documents
i
The following user’s manuals all relate to the LL100 PC-based Parameters Setting T ool.
Read them as necessary . The codes enclosed in parentheses are the document numbers.
● Models UT350/UT320 User’s Manual (IM 05D01D02-01E to -03E)
Explains the basic operation of the UT350/UT320 controllers.
● Models UT351/UT321 User’s Manual (IM 05D01D12-01E to -04E)
Explains the basic operation of the UT351/UT321 controllers.
● Model UT351-xA User’s Manual (IM 05D01D13-01E to -04E)
Explains the basic operation of the UT351-xA controller.
● Model UT351-x3 User’s Manual (IM 05D01D52-01E to -04E)
Explains the basic operation of the UT351-x3 controller.
● Models UT450/UT420 User’s Manual (IM 05D01C12-01E to -04E)
Explains the basic operation of the UT450/UT420 controllers.
● Models UT550/UT520 User’s Manual for Single-loop Control
(IM 05D01C02-01E to -05E)
Explains the basic operation of the UT550/UT520 controllers.
●
Model UT551 with Embedded Ethernet User’s Manual for Single-loop Control
Explains the basic operation of the UT551 controller.
Media No. IM 05G01B12-01E 5th Edition : Mar. 2005 (YK)
All Rights Reserved Copyright © 2000, Y okogawa Electric Corporation
(IM 05D01C03-01E to -06E)
IM 05G01B12-01E 5th Edition : 2005.03.25-00
Page 4

<T oc> <Ind> <Rev> <Introduction>
● Model UT551 User’s Manual for Single-loop Control
(IM 05D01C04-01E to -06E)
Explains the basic operation of the UT551 controller.
● Model UT750 User’s Manual for Single-loop Control
(IM 05D01B02-01E to -05E)
Explains the basic operation of the UT750 controller.
● Model UP350 User’s Manual (IM 05E01D02-01E to -04E)
Explains the basic operation of the UP350 controller.
● Model UP351 User’s Manual (IM 05E01D12-01E to -05E)
Explains the basic operation of the UP351 controller.
●
Model UP550 User’s Manual for Single-loop Control
Explains the basic operation of the UP550 controller.
(IM 05E01C02-01E to -07E)
ii
●
Model UP750 User’s Manual for Single-loop Control
Explains the basic operation of the UP750 controller.
(IM 05E01B02-01E to -07E)
● GREEN Series User’s Manual (Reference) (IM 05D01A02-01E)
Explains the functions of the GREEN Series controllers in detail.
(Supplied with each GREEN Series controller.)
● GREEN Series Communication Functions (IM 05G01B02-01E)
Explains the communication functions and communication protocols of the GREEN Series
in detail.
● GREEN Series Communication Reference (IM 05G01B02-02E)
Provides detailed information about GREEN Series controller’s internal registers that can
be accessed by communication.
● Ethernet Communication Functions User’s Manual (IM 05G01B52-01E)
Explains the Ethernet communication functions and communication protocols of the
UT351-xA and UT551 controllers in detail.
●
Model LL200 PC-based Custom Computation Building T ool
A user’s manual for creating UT750/UP750 custom computations on a personal computer .
(IM 05G01B22-01E)
IM 05G01B12-01E 5th Edition : 2005.03.25-00
Page 5

<Toc> <Ind> <Rev> <Introduction>
● Model LL200 PC-based Custom Computation Building Tool User’s
Reference for UT750 (IM 05G01B22-02E)
● Model LL200 PC-based Custom Computation Building Tool User’s
Reference for UP750 (IM 05G01B22-03E)
User’s manuals that describe the functions needed to create custom computations of
UT750 and UP750. Refer to these manuals if you are unfamiliar with the types of functions
available or how these functions work.
● Model VJET Ethernet/RS-485 Converter User’s Manual (IM 77J01E1 1-01E)
Explains the basic operation of the VJET converter .
■ T rademarks
Windows 98/2000/XP and Windows NT 4.0 are registered trademarks of Microsoft Corporation, USA.
“Ethernet” is registered trademark of XEROX Corporation, USA.
iii
IM 05G01B12-01E 5th Edition : 2005.03.25-00
Page 6

<T oc> <Ind> <Rev> <Introduction>
Visual Inspection and Check of Accessories
Visually inspect the product upon delivery to make sure it is not damaged in any way . Store
the box and inner packing material of the package in a safe place - they may be needed if
there is a problem with the product and it needs to be sent back for repair.
■ Check of Model and Suffix Codes
Refer to the following table to make sure the model and suffix codes of the tool are as were
specified with your order.
iv
Model code
LL100 PC-based Parameters Setting Tool for GREEN Series controllers
Suffix code
-E10 Model for use with IBM PC/AT-compatible personal computer (English version)
■ Confirmation of the Package Contents
Make sure the delivered package contains all of the following items. If any item is missing
or found to be damaged, immediately contact the sales office or dealership from which you
purchased the product.
(1) 3.5-inch floppy disks (4 disks)
(2) Dedicated adapter, supplied with two AAA-size batteries (one unit)
(3) Dedicated cable (one cable)
(4) GREEN Series User’s manual (Reference) (CD-ROM version)
Description
IM 05G01B12-01E 5th Edition : 2005.03.25-00
Page 7

<Toc> <Ind> <Rev> <Introduction>
Documentation Conventions
■ Symbols
WARNING
Indicates that operating the hardware or software in this manner may damage it or lead to
system failure.
NOTE
Draws attention to information that is essential for understanding the operation and/or
features of the product.
TIP
Gives additional information to complement the present topic.
See Also
v
Gives reference locations for further information on the topic.
■ Conventions in the T exts that Describe Tool Operation
Item
The names of named dialog box, windows, and
views are written in title caps and refer to the
exact titles.
The names of unnamed windows, dialog box, and
views are written in all lowercase letters.
Commands (including buttons) in a dialog box or
window and menu commands are written in
boldface.
Dialog box elements, such as text boxes, list
boxes, option buttons, and check boxes, are also
written in boldface and refer to their exact labels.
Characters to be typed by the user via keyboard
are written in monotype font.
Keys on a keyboard are written in all caps.
Analog Input Computation Setting dialog box
Document window
Print preview
Click OK.
Click Cancel.
From the File menu, choose Open.
Select the Spaces check box.
Click to clear the Bookmarks check box.
In the File Name box, enter a file name.
T ype UT750 in the Model box.
Press ENTER to execute.
Press ALT + CTRL.
Usage
■ Description of Displays
(1) Some of the representations of product displays shown in this manual may be exag-
gerated, simplified, or partially omitted for reasons of convenience when explaining
them.
(2) Figures and illustrations representing the controller’s displays may differ from the real
displays in regard to the position and/or indicated characters (upper-case or lowercase, for example), to the extent that they do not impair a correct understanding of the
functions and the proper operation and monitoring of the system.
IM 05G01B12-01E 5th Edition : 2005.03.25-00
Page 8

<T oc> <Ind> <Rev> <Introduction>
Notices
■ Regarding This User’s Manual
(1) This manual should be passed on to the end user. Keep at least one extra copy of the
manual in a safe place.
(2) Read this manual carefully to gain a thorough understanding of how to operate this
product before you start using it.
(3) This manual is intended to describe the functions of this product. Yokogawa Electric
Corporation (hereinafter simply referred to as Yokogawa) does not guarantee that
these functions are suited to the particular purpose of the user.
(4) Under absolutely no circumstance may the contents of this manual, in part or in whole,
be transcribed or copied without permission.
(5) The contents of this manual are subject to change without prior notice.
(6) Every effort has been made to ensure accuracy in the preparation of this manual.
Should any errors or omissions come to your attention, however, please contact your
nearest Yokogawa representative or our sales office.
vi
■ Regarding Protection, Safety , and Prohibition Against Unauthorized
Modification
(1) In order to protect the product and the system controlled by it against damage and
ensure its safe use, make certain that all of the instructions and precautions relating to
safety contained in this document are strictly adhered to. Yokogawa does not guaran-
tee safety if products are not handled according to these instructions.
(2) Modification of the product is strictly prohibited.
(3) Reverse engineering such as the disassembly or decompilation of software is strictly
prohibited.
■ Force Majeure
(1) Y okogawa assumes no liability to any party for any loss or damage, direct or indirect,
caused by the use or any unpredictable defect of the product.
(2) No portion of the software supplied by Yokogawa may be transferred, exchanged,
leased or sublet for use by any third party without the prior permission of Yokogawa.
(3) Be sure to use the spare parts approved by Yokogawa when replacing parts or
consumables.
(4) Use this software with one specified computer only . You must purchase another copy
of the software for use on each additional computer.
(5) Copying this software for purposes other than backup is strictly prohibited.
(6) Store the floppy disk(s) (original medium or media) containing this software in a
secure place.
IM 05G01B12-01E 5th Edition : 2005.03.25-00
Page 9

<Int> <Ind> <Rev>
Model LL100
PC-based Parameters Setting T ool
CONTENTS
Introduction........................................................................................................... i
Visual Inspection and Check of Accessories .....................................................iv
Documentation Conventions .............................................................................. v
Notices .................................................................................................................vi
1. Overview ................................................................................................. 1-1
1.1 Function Overview of LL100 .......................................................................... 1-1
1.2 Operating Environment and Wiring Specifications ...................................... 1-3
1.3 Model and Suffix Codes of Applicable Controller Models............................ 1-6
1.3.1 For GREEN Series ........................................................................... 1-6
1.3.2 Ethernet/RS485 Converter ............................................................... 1-8
1.3.3 For Old GREEN Series ..................................................................... 1-9
1.4 Setting Parameters ........................................................................................1-1 1
Toc-i
IM 05G01B12-01E 5th Edition
2. Setup ....................................................................................................... 2-1
2.1 Installing LL100............................................................................................... 2-1
2.2 Uninstalling LL100 .......................................................................................... 2-4
2.3 Connecting Controller to Personal Computer .............................................. 2-5
3. Using the Parameter Setting T ool .......................................................... 3-1
3.1 Starting and Quitting the Parameter Setting T ool ......................................... 3-1
3.1.1 Starting the Tool................................................................................ 3-1
3.1.2 Quitting the Tool................................................................................ 3-3
3.2 Work Flow of Parameters Setting T ool .......................................................... 3-4
3.3 Dialog Box Elements and Functions ............................................................. 3-5
3.4 Menu Commands............................................................................................ 3-6
3.5 Parameter Setting Basics ............................................................................... 3-8
3.5.1 Selecting a Parameter ...................................................................... 3-8
3.5.2 Inputting the Setting for a Parameter................................................. 3-8
3.5.3 Applying and Canceling Changes in Dialog Box................................ 3-9
3.5.4 Using the Keyboard When You Have No Mouse ............................. 3-10
4. Setting Parameters ................................................................................. 4-1
4.1 Selecting T ool and Series............................................................................... 4-2
4.1.1 Selecting the Tool ............................................................................. 4-2
4.1.2 Selecting the Series.......................................................................... 4-2
IM 05G01B12-01E 5th Edition : 2005.03.25-00
Page 10

<Int> <Ind> <Rev>
Toc-ii
4.2 Selecting New/Change ................................................................................... 4-3
4.2.1 Selecting New/Change ..................................................................... 4-3
4.2.2 Creating a New File .......................................................................... 4-4
4.2.3 Opening a User File.......................................................................... 4-7
4.2.4 Reading Current Settings from Controller ......................................... 4-8
4.3 Setting Setup Parameters ............................................................................ 4-12
4.3.1 Setup Parameter Menu Configuration............................................. 4-12
4.3.2 Setup Parameter Menu................................................................... 4-13
4.3.3 Setting Target Setpoint (SP)............................................................ 4-15
4.3.4 Setting Alarms (ALM) ...................................................................... 4-16
4.3.5 Setting Control Functions (CTL)...................................................... 4-18
4.3.6 Setting Analog Input Computations (AIN)........................................ 4-19
4.3.7 Setting Retransmission Outputs (RET) ........................................... 4-20
4.3.8 Setting Deviation Trend (TRND) ..................................................... 4-21
4.3.9 Setting Security (LOCK).................................................................. 4-22
4.3.10 Configuring SELECT Displays (CSEL)............................................ 4-23
4.3.1 1 Configuring Contact Outputs (DO) .................................................. 4-24
4.3.12 Configuring Contact Inputs (DI)....................................................... 4-25
4.3.13 Setting Units for T en-segment Linearizers (C. PYS)........................ 4-27
4.3.14 Setting Communication Protocol..................................................... 4-28
4.3.15 Confirming Specification Code, Controller Mode, IN, and
OUT Parameter Settings................................................................. 4-31
4.4 Setting Operating Parameters...................................................................... 4-33
4.4.1 Operating Parameter Menu Configuration....................................... 4-33
4.4.2 Operating Parameter Menu ............................................................ 4-34
4.4.3 Setting Operating Parameters ........................................................ 4-34
4.4.4 Setting Local Setpoint (LOC) .......................................................... 4-36
4.4.5 Setting Instrument Alarms (AL) ....................................................... 4-38
4.4.6 Setting Operation-related Parameters (P AR) .................................. 4-39
4.4.7 Setting PID Group Parameters ....................................................... 4-41
4.4.8 Setting User Parameters (USR)...................................................... 4-43
4.4.9 Setting Ten-segment Linearizer 1 and 2 (PYS1, 2) .......................... 4-44
4.5 Parameter Menu for 300 Series .................................................................... 4-45
4.5.1 Configuration of Menu Dialog Box................................................... 4-45
4.5.2 Parameter Menu............................................................................. 4-46
4.5.3 Setting Patterns PRG1 and PRG2 (for UP350 and UP351 only) ..... 4-47
4.5.4 Viewing the Input/Output Parameter Settings.................................. 4-49
5. Working with Parameter Data Files........................................................ 5-1
5.1 Setting the File Information ............................................................................ 5-1
5.2 Saving/Reading Data on/from Disk and Comparing Data Values................. 5-2
5.2.1 Saving Parameter Data on Disk ........................................................ 5-2
5.2.2 Reading Parameter Data from Disk .................................................. 5-3
5.2.3
Comparing Parameter Data V alues in LL100 with Those Saved to Disk..
IM 05G01B12-01E
5th Edition : 2005.03.25-00
5-4
Page 11

<Int> <Ind> <Rev>
Toc-iii
6.
Uploading/Downloading Data from/to Controller and Comparing Data Values ..
6.1 Uploading Parameter Data from Controller................................................... 6-1
6.2 Downloading Parameter Data to Controller .................................................. 6-5
6.3 Comparing Parameter Data Values of the Tool and Controller .................... 6-9
6.4 Address T ag .................................................................................................. 6-13
6-1
7. Printing Parameters................................................................................ 7-1
7.1 Printing Parameters........................................................................................ 7-1
7.2 Previewing the Printout .................................................................................. 7-4
7.3 Saving Printout Data as a CSV File ................................................................ 7-5
8. Tuning ..................................................................................................... 8-1
8.1 T uning the Controller...................................................................................... 8-1
8.2 T uning Guide................................................................................................... 8-6
8.2.1 What is Auto-tuning?......................................................................... 8-6
8.2.2 What is Automatic Valve Tuning?...................................................... 8-7
9. Using the Program Pattern Setting T ool ................................................ 9-1
9.1 Starting and Quitting the Program Pattern Setting T ool............................... 9-1
9.1.1 Starting the Tool................................................................................ 9-1
9.1.2 Quitting the Tool................................................................................ 9-3
9.2 Work Flow of Program Pattern Setting Tool .................................................. 9-4
9.3 Dialog Box Elements and Functions ............................................................. 9-5
9.4 Menu Commands............................................................................................ 9-6
9.5 Parameter Setting Basics ............................................................................... 9-8
9.5.1 Selecting a Parameter ...................................................................... 9-8
9.5.2 Inputting the Setting for a Parameter................................................. 9-9
9.5.3 Applying and Canceling Changes in Dialog Box................................ 9-9
9.5.4 Using the Keyboard When You Have No Mouse ............................. 9-10
10. Setting Program Patterns..................................................................... 10-1
10.1 Selecting T ool, Series, and New/Change..................................................... 10-2
10.1.1 Selecting the T ool ........................................................................... 10-2
10.1.2 Selecting the Series ........................................................................ 10-2
10.1.3 Selecting New/Change ................................................................... 10-3
10.2 Selecting New, Open File, or Upload ........................................................... 10-4
10.2.1 Creating a New Program Pattern .................................................... 10-4
10.2.2 Opening a User File ........................................................................ 10-4
10.2.3 Uploading from the Controller ......................................................... 10-6
10.2.4 Selecting the Controller Model ...................................................... 10-10
10.3 Setting a Program Pattern ...........................................................................10-11
10.3.1 Program Pattern Menu Configuration.............................................10-11
10.3.2 Program Pattern Menu ..................................................................10-1 1
10.3.3 Setting the Program Conditions .................................................... 10-12
10.3.4 Setting Start Action of the Pattern ................................................. 10-14
10.3.5 Setting a Program Pattern ............................................................ 10-16
IM 05G01B12-01E 5th Edition : 2005.03.25-00
Page 12

<Int> <Ind> <Rev>
1 1. Working with Program Pattern Data Files ............................................11-1
12. Uploading/Downloading Program Pattern from/to Controller ,
Comparing Data V alues, and Batch Copy ........................................... 12-1
13. Printing a Program Pattern................................................................... 13-1
Toc-iv
11.1 Setting the File Information ...........................................................................11-1
11.2 Saving/Reading Data on/from Disk and Comparing Data Values................1 1-2
1 1.2.1 Saving Program Pattern Data on Disk..............................................1 1-2
1 1.2.2 Reading Program Pattern Data from Disk ........................................11-3
1 1.2.3 Comparing Program Pattern Data V alues in LL100 with
Those Saved to Disk........................................................................11-4
12.1 Uploading a Program Pattern from Controller ............................................ 12-1
12.2 Downloading Program Pattern Data to Controller ...................................... 12-6
12.3
12.4 Using Batch Copy Function ....................................................................... 12-14
12.5 Address T ag ................................................................................................ 12-18
13.1 Printing a Program Pattern........................................................................... 13-1
13.2 Previewing the Printout ................................................................................ 13-3
13.3 Saving Printout Data As a CSV File.............................................................. 13-4
Comparing Program Pattern Data Values between the Tool and Controller ..
12-10
14. Starting and Setting the VJET (Ethernet Converter) Setting T ool....... 14-1
15. Starting the Custom Computation Building T ool ................................ 15-1
16. Maintenance and Troubleshooting ...................................................... 16-1
16.1 Replacing the Batteries ................................................................................ 16-1
16.2
Troubleshooting Problems with Display and Communication Functions .......
16.2.1 Problems with Display Functions .................................................... 16-3
16.2.2 Problems with Communication Functions ....................................... 16-3
16-3
Revision Information ............................................................................................ i
IM 05G01B12-01E
5th Edition : 2005.03.25-00
Page 13

<Toc> <Ind> <1. Overview >
1. Overview
Model LL100 PC-based Parameters Setting T ool is a software package used to set
various parameters of the GREEN Series controllers from a personal computer . This
tool makes it easy to set parameters that configure the many useful functions of
GREEN Series controllers. It is also possible to manage created parameter data on a
personal computer.
The LL100 tool can run on Windows 98/2000/XP or Windows NT 4.0. For details on using
your personal computer or Windows, see the respective manuals.
1.1 Function Overview of LL100
The LL100 offers the following functions.
● Setup parameter setting
Sets parameters that configure GREEN Series controller functions.
● Operating parameter setting
1-1
Sets control parameters such as P, I, and D. Also sets the program pattern for a UP350/
UP351 program controller.
● Ethernet parameter setting
Sets parameters such as IP address, subnet mask, default gateway , parity or port number
for GREEN Series controllers and VJET Ethernet converter .
● Download to/Upload from a controller
Downloads created parameter data to a GREEN Series controller, or uploads parameter
data contained in a GREEN Series controller to a personal computer.
● Saving parameters onto a disk
Saves parameter data created using the LL100 or parameters uploaded from a GREEN
Series controller to the hard disk of a personal computer or floppy disk.
● Printing parameter data
Prints created parameter data.
● T uning function
Performs online adjustment* of a GREEN Series controller’s PID parameters. The autotuning function allows automatic optimization of PID parameters. You can also manually
change PID parameter values, switch operation modes, and make other changes while
monitoring the trend graphs of PV , SP, and OUT (control output) on the personal computer
screen.
* Online adjustment means changes to tuning parameters while the GREEN Series
controller in question is being used for control.
● Program pattern setting
For UP750/UP550 program controllers, sets parameters that configure program patterns.
IM 05G01B12-01E 5th Edition : 2005.03.25-00
Page 14

<T oc> <Ind> <1. Overview >
Uploading from/downloading to the controller
1-2
(Peer-to-peer communication)
GREEN Series controller
Setup
parameters
Operating
parameters
Program
patterns*
* Program controllers only
Personal computer
Reading from/writing to disks
Saving to/reading from disks
Hard disk
Figure 1.1.1 Conceptual View of LL100 PC-based Parameters Setting T ool
Mouse
Floppy disk
IM 05G01B12-01E 5th Edition : 2005.03.25-00
Page 15

<Toc> <Ind> <1. Overview >
1-3
1.2
Operating Environment and Wiring Specifications
■ System Requirements
● Personal computer:
Windows 98/2000/XP or Windows NT 4.0 enabled PC-compatible model.
● Operating system:
Windows 98/2000(Professional)/XP(Home Edition/Professional) or Windows NT 4.0
(Service Pack 3 or later).
● CPU:
300 MHz Pentium processor or superior is recommended.
● Memory:
128 MB minimum when running LL100 under Windows 98/2000/XP or 24 MB minimum
under Windows NT 4.0, is recommended.
● Free hard disk space:
10 MB or more for storing the tool programs and 2 MB or more for parameter data.
● CRT display:
800 × 600 pixels or greater .
Should be capable of handling at least 256 colors.
Small fonts should be used.
● RS-232C communication port:
One channel or more (select from COM1 to COM16), with 9-pin D-Sub connector for PCcompatible model.
● Network:
10Base-T/100Base-TX (required for Ethernet communication)
● 3.5-inch floppy disk drive:
Required for installation.
● Printer:
Windows 98/2000/XP or Windows NT 4.0 compatible A4-size printer.
■ Dedicated Adapter
● Communication method:
Controller: Non-contact optical, bi-directional serial communication.
Personal computer: RS-232C half-duplex communication using dedicated cable.
IM 05G01B12-01E 5th Edition : 2005.03.25-00
Page 16
<T oc> <Ind> <1. Overview >
● Power supply:
Two AAA-size batteries or external power source.
Use of an external power source is recommended when using the Tuning V iew over a
prolonged time period.
● Battery life:
Approximately 50 hours (when the adapter is continuously operated on alkaline batteries).
● Specifications of external power source:
Should comply with EIAJ RC-6705.
Input rating: 5 V DC/50 mA.
(Note: Purchase a commercially available plug and AC adapter for the external power source.)
● Ambient temperature:
0°C to 50°C
● Ambient humidity:
20 to 90% Rh (no condensation)
1-4
● T ransport and storage conditions:
-25°C to 70°C, 5 to 90% RH (no condensation).
● Dustproof and waterproof construction:
Not applicable.
● Standards:
CE Marking approved (EMC only).
36
3
Controller
45.5
DC power plug
Unit: mm
4196
11
3
Cable
(100) 96
Figure 1.2.1 External View of the Dedicated Adapter
4.5 96
IM 05G01B12-01E 5th Edition : 2005.03.25-00
Page 17
<Toc> <Ind> <1. Overview >
WARNING
The dedicated adapter is not waterproof. Do not use it in locations where it is likely to be
exposed to splashes of water or other liquid.
1-5
Applicable plug
1.5
9.5
Figure 1.2.2 External Power Inlet Plug of Dedicated Adapter
■ Dedicated Cable
Cable with 9-pin D-Sub connector for PC-compatible models
Cable length: 3m
To PC
Unit: mm
D’
D’
2.1
5.5 dia.
(EIAJ)
About 3000mm (118.1 inches) To dedicated adapter
Figure 1.2.3 External View of Dedicated Cable
IM 05G01B12-01E 5th Edition : 2005.03.25-00
Page 18
<T oc> <Ind> <1. Overview >
1-6
1.3
Model and Suffix Codes of Applicable Controller Models
1.3.1 For GREEN Series
LL100 tool can handle parameter settings of the following models of GREEN Series controllers.
■ Digital Indicating Controllers
Model Code
UT750
Type
Optional functions
Model Code
UT550
UT551
Type
Optional functions
Suffix code Description
-
-0
-1
-5
Suffix code Description
-
-0
-1
-2
-3
-4
Digital Indicating Controller (provided with Custom Computing Function)
Single-loop type
Position proportional type
Dual-loop type
0
None
With communication, auxiliary analog (remote) input
1
Digital Indicating Controller (provided with retransmission output and
15 V DC loop power supply as standard)
Standard type
Position proportional type
Heating/cooling type
Standard type (with 24 V DC loop power supply)
Position proportional type (with 24 V DC loop power supply)
0
None
With communication, auxiliary analog (remote) input, 6 additional DIs and
1
4 additional DOs
With communication, auxiliary analog (remote) input, and 1 additional DI
2
With 5 additional DIs and 4 additional DOs
3
With auxiliary analog (remote) input and 1 additional DI
4
Model Code
UT551
Type
Optional functions
Model Code
UT520
Type
Optional functions
Suffix code Description
-
-0
-1
Suffix code Description
-
-0
Digital Indicating Controller (provided with retransmission output and
15 V DC loop power supply as standard)
Standard type
Position proportional type
A
With Ethernet communication
With Ethernet communication, auxiliary analog (remote) input, and
B
1 additional DIs
With Ethernet communication, 5 additional DIs and 4 additional DOs
C
D
With Ethernet communication, auxiliary analog (remote) input,
6 additional DIs and 4 additional DOs
Digital Indicating Controller (provided with retransmission output and
15 V DC loop power supply as standard)
Standard type
None
0
With communication, auxiliary analog (remote) input, and 2 additional DIs
7
With auxiliary analog (remote) input and 2 additional DIs
8
IM 05G01B12-01E 5th Edition : 2005.03.25-00
Page 19
<Toc> <Ind> <1. Overview >
1-7
Model Code
UT450
Type
Optional functions
Model Code
UT420
Type
Optional functions
Model Code
UT350
UT320
Type
Optional functions
Suffix code Description
-
-0
-1
-2
-3
-4
Suffix code Description
-
-0
Suffix code Description
-
-0
-2
-3
Digital Indicating Controller (provided with retransmission output and
15 V DC loop power supply as standard)
Standard type
Position proportional type
Heating/cooling type
Standard type (with 24 V DC loop power supply)
Position proportional type (with 24 V DC loop power supply)
0
None
1
With communication, remote input, 5 additional DIs and 1 additional alarm
2
With communication, remote input, and 1 additional DI
3
With 4 additional DIs and 1 additional alarm
4
With remote input and 1 additional DI
Digital Indicating Controller (provided with retransmission output and
15 V DC loop power supply as standard)
Standard type
None
0
With communication, remote input, and 2 additional DIs
7
With remote input and 2 additional DIs
8
Digital Indicating Controller (provided with retransmission output and
15 V DC loop power supply as standard)
Standard type
Heating/cooling type
Standard type (with 24 V DC loop power supply)
None
0
1
With communication, heater burnout alarm
2
With heater burnout alarm
Model Code
UT351
UT321
Type
Optional functions
* For UT351-0x or UT351-2x only
Suffix code Description
-
-0
-2
-3
Digital Indicating Controller (provided with retransmission output and
15 V DC loop power supply as standard)
Standard type
Heating/cooling type
Standard type (with 24 V DC loop power supply)
None
0
With communication, heater burnout alarm
1
With heater burnout alarm
2
With Ethernet communication function (*)
3
With Ethernet communication(*)
A
IM 05G01B12-01E 5th Edition : 2005.03.25-00
Page 20
<T oc> <Ind> <1. Overview >
/
/
■ Program Controllers
1-8
Model Code
UP750
Type
Optional functions
Model Code
UP550
Type
Optional functions
Model Code
UP350
Type
Optional functions
Suffix code Description
-
-0
-5
Suffix code Description
-
-0
-1
-2
Suffix code Description
-
-0
Program Controller (provided with Custom Computing Function)
Single-loop type
Dual-loop type
0
None
With communication, auxiliary analog input
1
Program Controller (provided with retransmission output and 15 V DC
loop power supply as standard)
Standard type
Position proportional type
Heating/cooling type
0
None
With communication, auxiliary analog input, and 1 additional DI
1
Program Controller (provided with retransmission output and 15 V DC
loop power supply as standard)
Standard type
None
0
With communication
1
Model Code
UP351
Type
Optional functions
Suffix code Description
-
-0
Program Controller (provided with retransmission output and 15 V DC
loop power supply as standard)
Standard type
None
0
With communication
1
1.3.2 Ethernet/RS485 Converter
Only Ethernet parameters can be set to Ethernet/RS485 converter.
VJET-0 1 -1 0 0 0 /
Model
Power supply
3: 24V DC⫾10%
6: 100 to 240V AC/DC(Operating range: 85 to 264 VAC/DC)
Options
R220: Attachment of a terminator (220 Ω)
SN: Without socket
IM 05G01B12-01E 5th Edition : 2005.03.25-00
Page 21
<Toc> <Ind> <1. Overview >
1.3.3 For Old GREEN Series
LL100 tool can handle parameter settings of the following models of old GREEN Series
controllers.
■ Digital Indicating Controllers
1-9
Model Code
UT750
Type
Optional functions
Model Code
UT550
Type
Optional functions
Model Code
UT520
Type
Optional functions
Suffix code Description
-
-0
-1
-5
-7
Suffix code Description
-
-0
-1
-2
Suffix code Description
-
-0
Digital Indicating Controller
Single-loop type
Position proportional type
Dual-loop type
Dual-loop type (provided with Custom Computation function)
0
None
With communication, auxiliary analog (remote) input
1
Digital Indicating Controller
Standard type
Position proportional type
Heating/cooling type
0
None
1
With communication, auxiliary analog (remote) input, 6 additional DIs
and 4 additional DOs
With communication, auxiliary analog (remote) input, and 1 additional DI
2
With 5 additional DIs and 4 additional DOs
3
With auxiliary analog (remote) input and 1 additional DI
4
Digital Indicating Controller
Standard type
None
0
With communication, auxiliary analog (remote) input, and 2 additional DIs
7
With auxiliary analog (remote) input and 2 additional DIs
8
Model Code
UT350
Type
Optional functions
Model Code
UT320
Type
Optional functions
Suffix code Description
-
-0
-2
Suffix code Description
-
-0
-2
Digital Indicating Controller
Standard type
Heating/cooling type
None (Not available)
0
1
With communication and heater burnout alarm
2
With heater burnout alarm (Not available)
Digital Indicating Controller
Standard type
Heating/cooling type
None (Not available)
0
With communication and heater burnout alarm
1
2
With heater burnout alarm (Not available)
IM 05G01B12-01E 5th Edition : 2005.03.25-00
Page 22
<T oc> <Ind> <1. Overview >
■ Program Controllers
1-10
Model Code
UP750
Type
Optional functions
Model Code
UP550
Type
Optional functions
Model Code
UP350
Type
Optional functions
Suffix code Description
-
-0
-5
-7
Suffix code Description
-
-0
-1
-2
Suffix code Description
-
-0
Program Controller
Single-loop type
Dual-loop type
Dual-loop type (provided with Custom Computation function)
0
None
With communication and auxiliary analog input
1
Program Controller
Standard type
Position proportional type
Heating/cooling type
0
None
With communication, auxiliary analog input, and 1 additional DI
1
Program Controller
Standard type
None (Not available)
0
With communication
1
IM 05G01B12-01E 5th Edition : 2005.03.25-00
Page 23
<Toc> <Ind> <1. Overview >
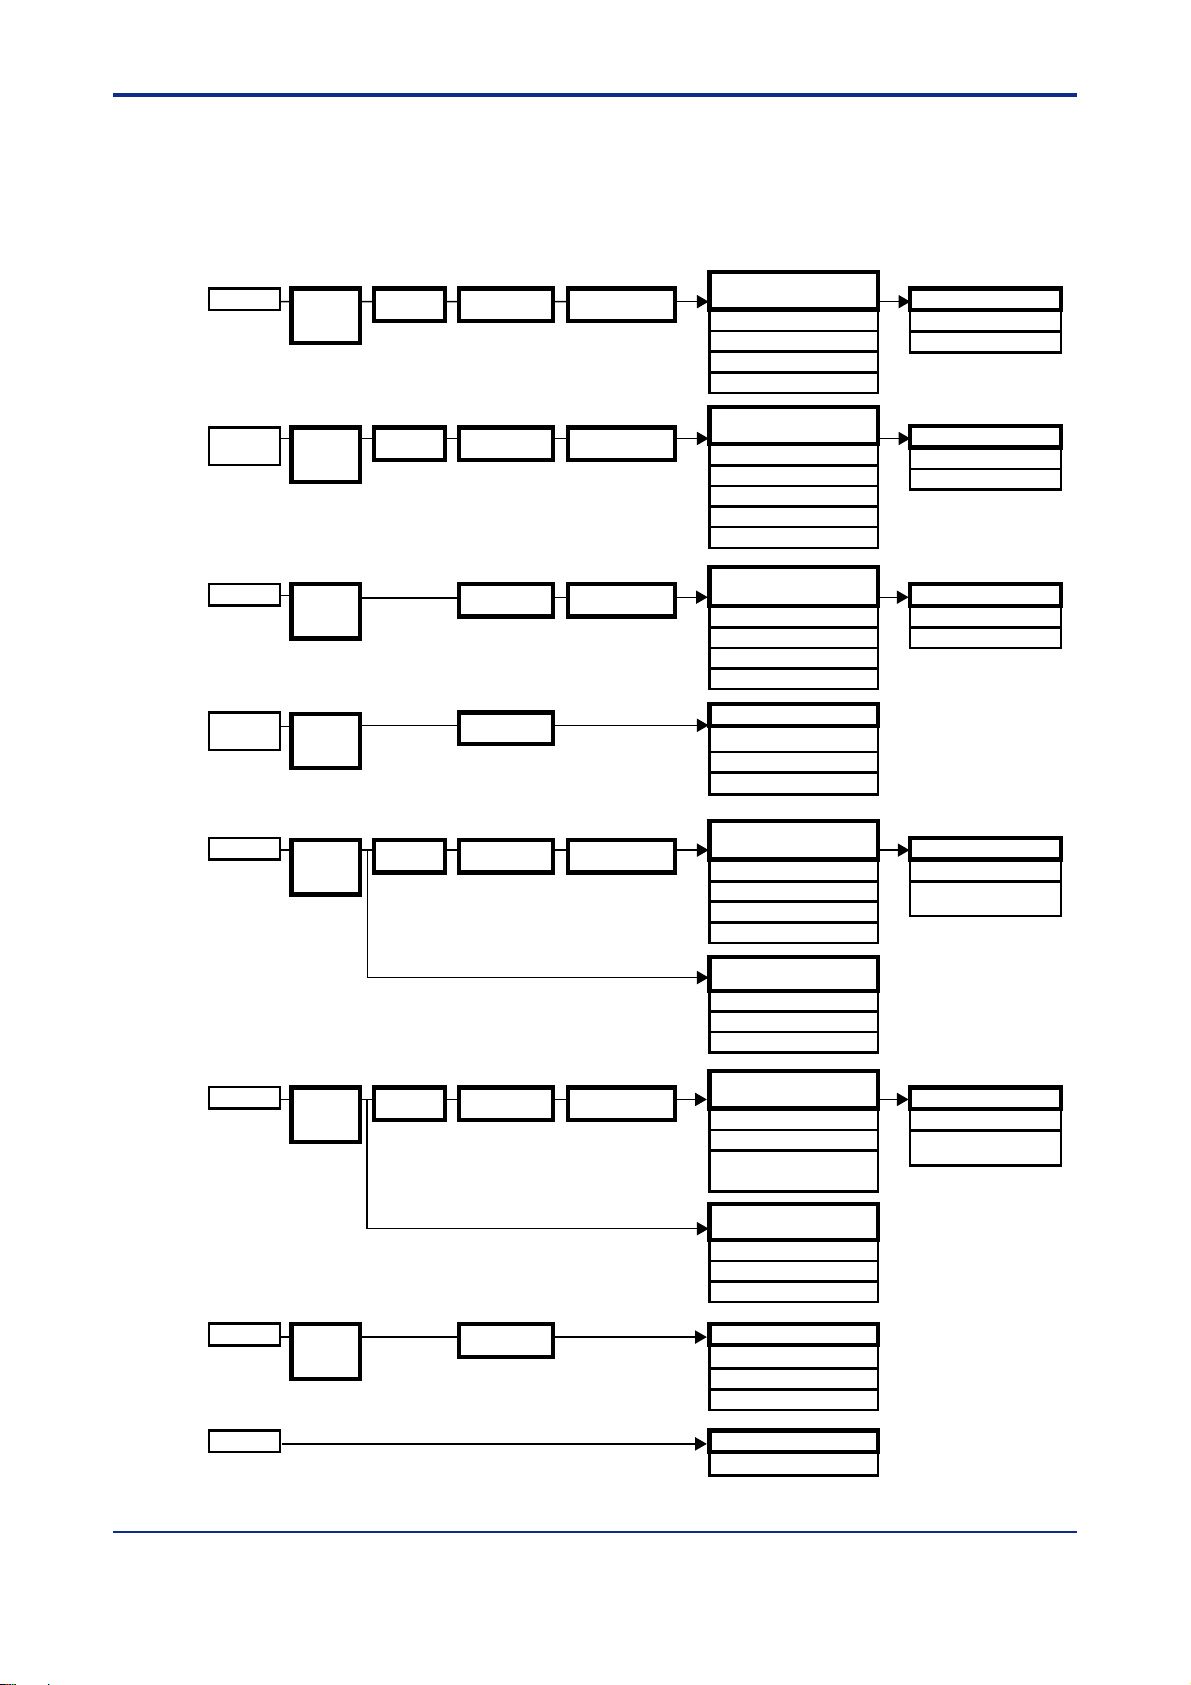
1.4 Setting Parameters
The sequence for setting parameters differs depending on the selected controller model.
In the Menu dialog box, buttons and parameters (SP for example) vary depending on the
model and specification codes, and controller mode you choose.
1-11
UT750
UT550/520
UT551
UT450/420
UT350/320
UT351/321
UP750
Model/
Specification
Code
Selection
Model/
Specification
Code
Selection
Model/
Specification
Code
Selection
Model/
Specification
Code
Selection
Model/
Specification
Code
Selection
Controller
Mode Setting
Controller
Mode Setting
Controller
Mode Setting
PV Parameter
Setting
PV Parameter
Setting
PV Parameter
Setting
Input/Output
Setting
PV Parameter
Setting
Control Output/
Valve Mode Setting
Control Output/
Valve Mode Setting
Control Output/
Valve Mode Setting
Control Output/
Valve Mode Setting
Setup Parameter Menu
Operating Parameter Menu
SP, ALM, CTL PAR
AIN, RET, TRND, LOCK
PID, USR, PYS1/2
CSEL, DO, DI, C.PYS
R485
Setup Parameter Menu
SP, ALM, CTL
AIN, RET, TRND, LOCK
Operating Parameter Menu
PAR
PID, USR, PYS1/2
CSEL, DO, DI, C.PYS
R485
Ethernet parameters
Setup Parameter Menu
SP, ALM, CTL
RET, LOCK
(for UT551-xA to xD only)
Operating Parameter Menu
Operating parameter
PID
CSEL
R485
Parameter Menu
Setup parameter
Ethernet parameter
(for UT351-xA and UT351-x3 only)
Operating parameter, PID
Setup Parameter Menu
SP, ALM, CTL
AIN, RET, TRND, LOCK
CSEL, DO, DI, C.PYS
Operating Parameter Menu
AL, PAR
LOC, PID, USR,
PYS1/2
R485
UP550
UP350/351
Model/
Specification
Code
Selection
Model/
Specification
Code
Selection
Controller
Mode Setting
PV Parameter
Setting
Input/output
Setting
VJET
Figure 1.4.1 Sequence for Setting Parameters
Control Output/
Valve Mode Setting
Program Pattern Menu
Program condition
Pattern start action
Program pattern
Setup Parameter Menu
SP, ALM, CTL
AIN, RET, TRND, LOCK
CSEL, DO, DI, C.PYS
R485
Program Pattern Menu
Program condition
Pattern start action
Program pattern
Parameter Menu
Setup parameter
Operating parameter, PID
PRG1/2 pattern
Parameter Menu
Ethernet parameter
IM 05G01B12-01E 5th Edition : 2005.03.25-00
Operating Parameter Menu
AL, PAR
LOC, PID, USR,
PYS1/2
Page 24

Blank Page
Page 25
<Toc> <Ind> <2. Setup >
2. Setup
This chapter explains how to set up the hardware and software necessary to work
with the LL100 tool.
2.1 Installing LL100
NOTE
Before installing LL100, quit all running applications.
When using Windows 2000 or XP :
Log on using the user name of Administrators group.
The program does not start normally if the user name not belonging to the Administrators
group is used for logging on.
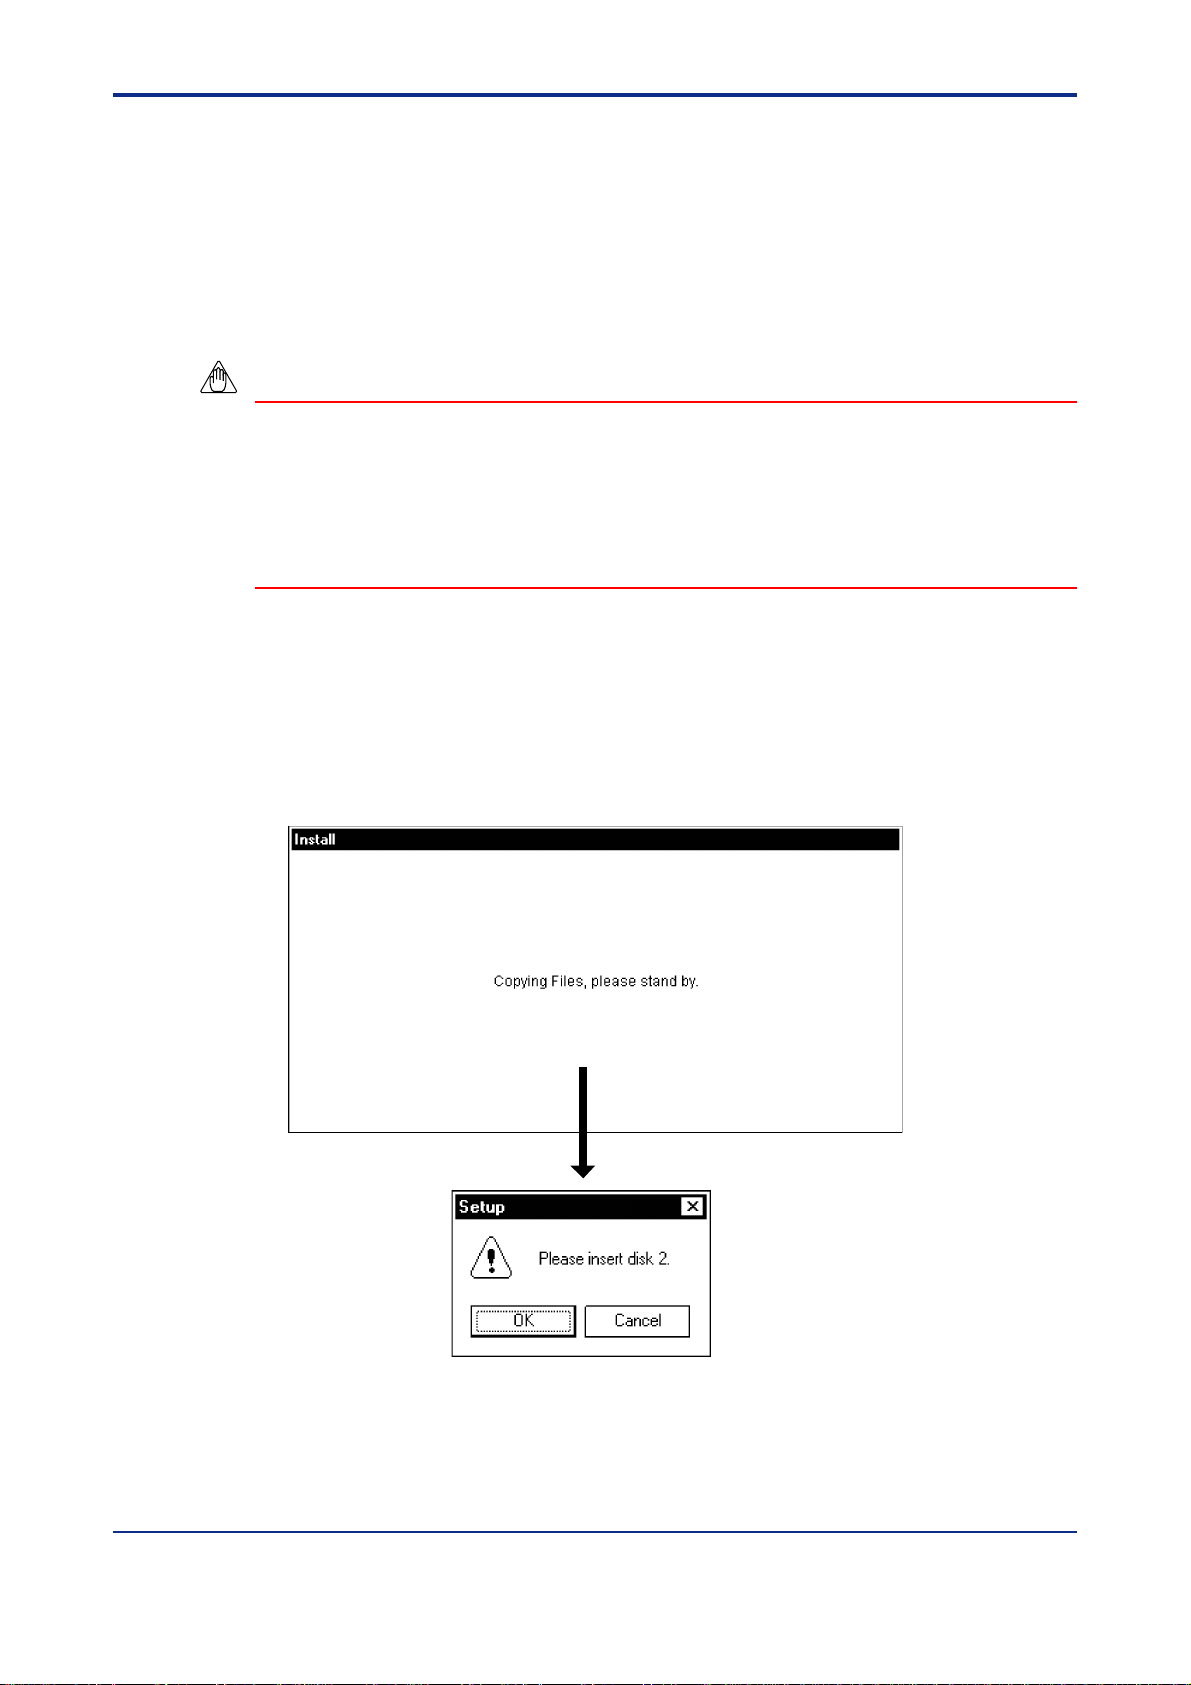
(1) Start Windows.
2-1
(2) Insert Disk 1 of LL100 into the floppy disk drive.
(3) From the Start menu of Windows, choose Run. T ype the floppy disk drive name
followed by a backslash, then Setup.exe (for example, a:\Setup.exe if the floppy
disk drive of your PC is “a”). Click OK.
(4) To continue, follow the instructions appearing on screen.
Figure 2.1.1 Dialog Boxes Appearing When Running Installer
IM 05G01B12-01E 5th Edition : 2005.03.25-00
Page 26
<T oc> <Ind> <2. Setup >
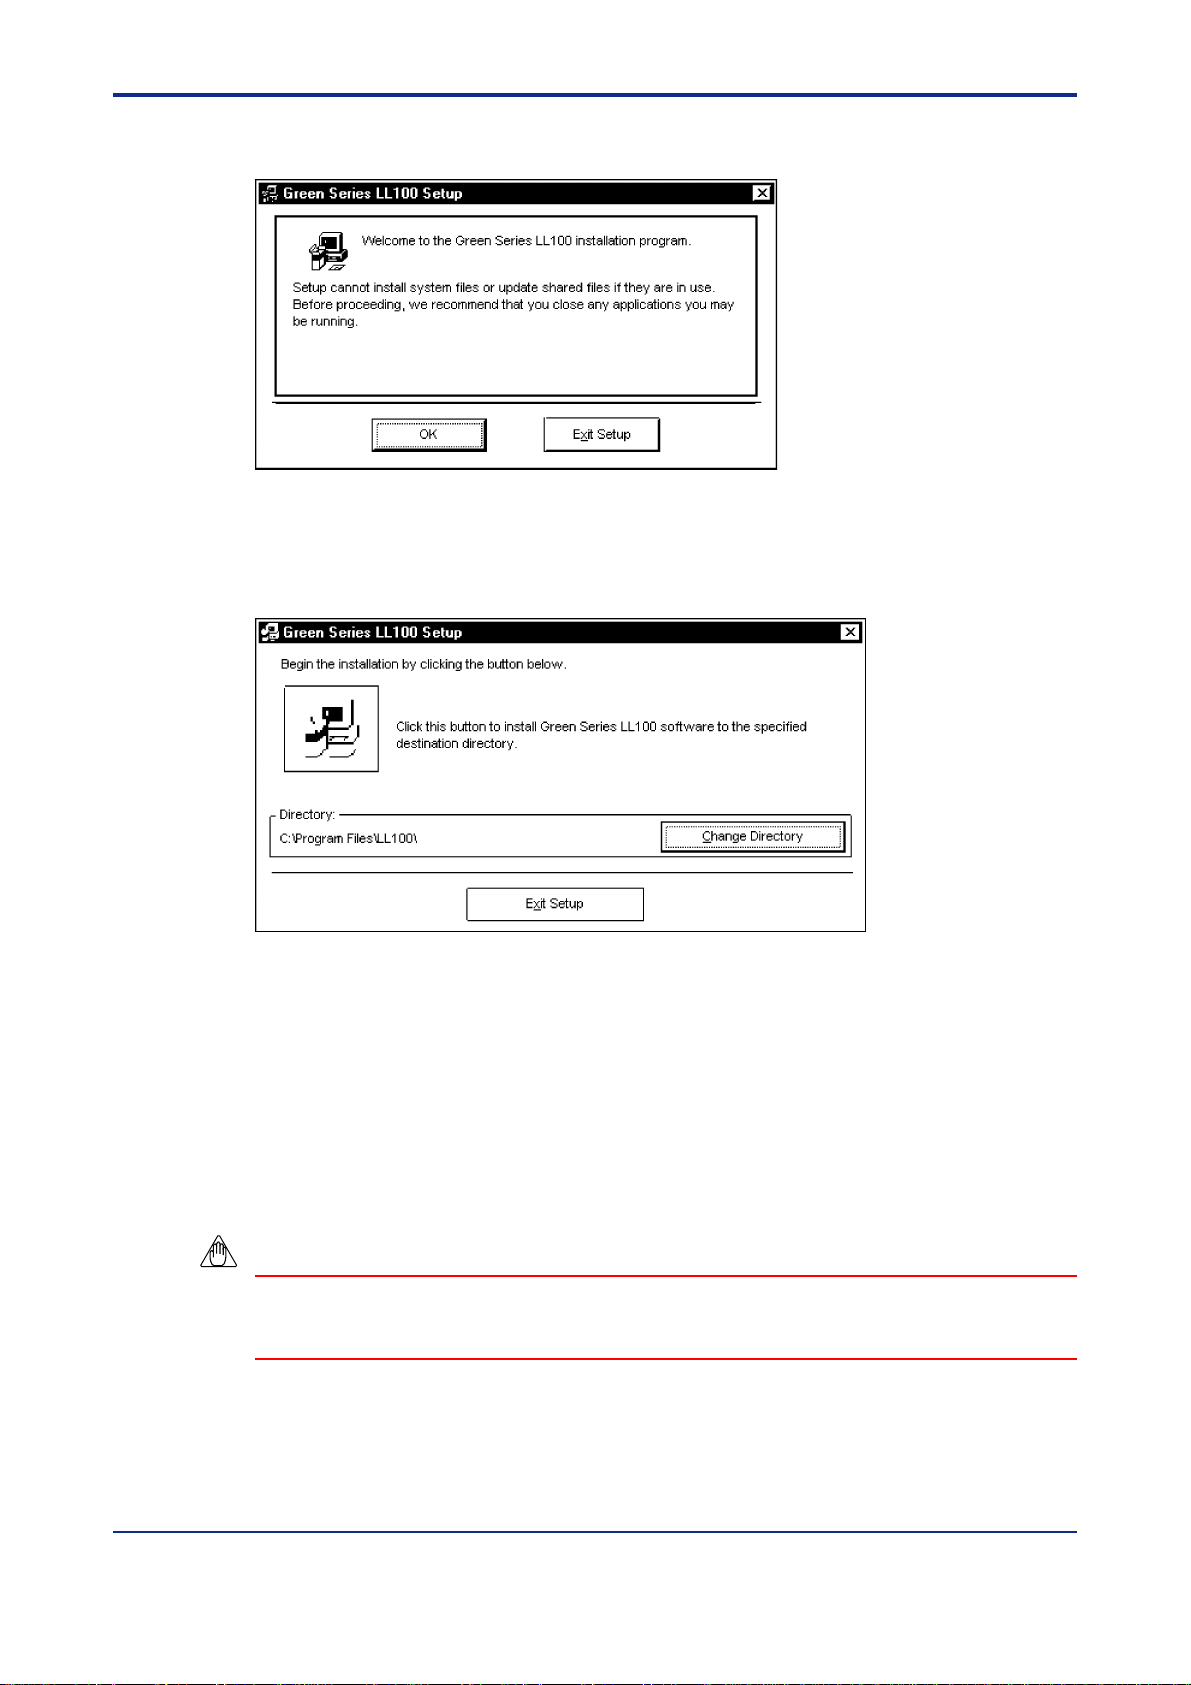
(5) When installation is ready to proceed, the setup wizard starts and the Green Series
LL100 Setup dialog box shown in Figure 2.1.2 appears.
Figure 2.1.2 Green Series LL100 Setup Dialog Box
(6) To continue the setup, click OK. The dialog box contents change as shown in Figure
2.1.3. Or, to quit the setup, click Exit.
2-2
Figure 2.1.3 Dialog Box Announcing Start of Installation of LL100
(7) To continue the setup, click the button with a symbol of a personal computer. The
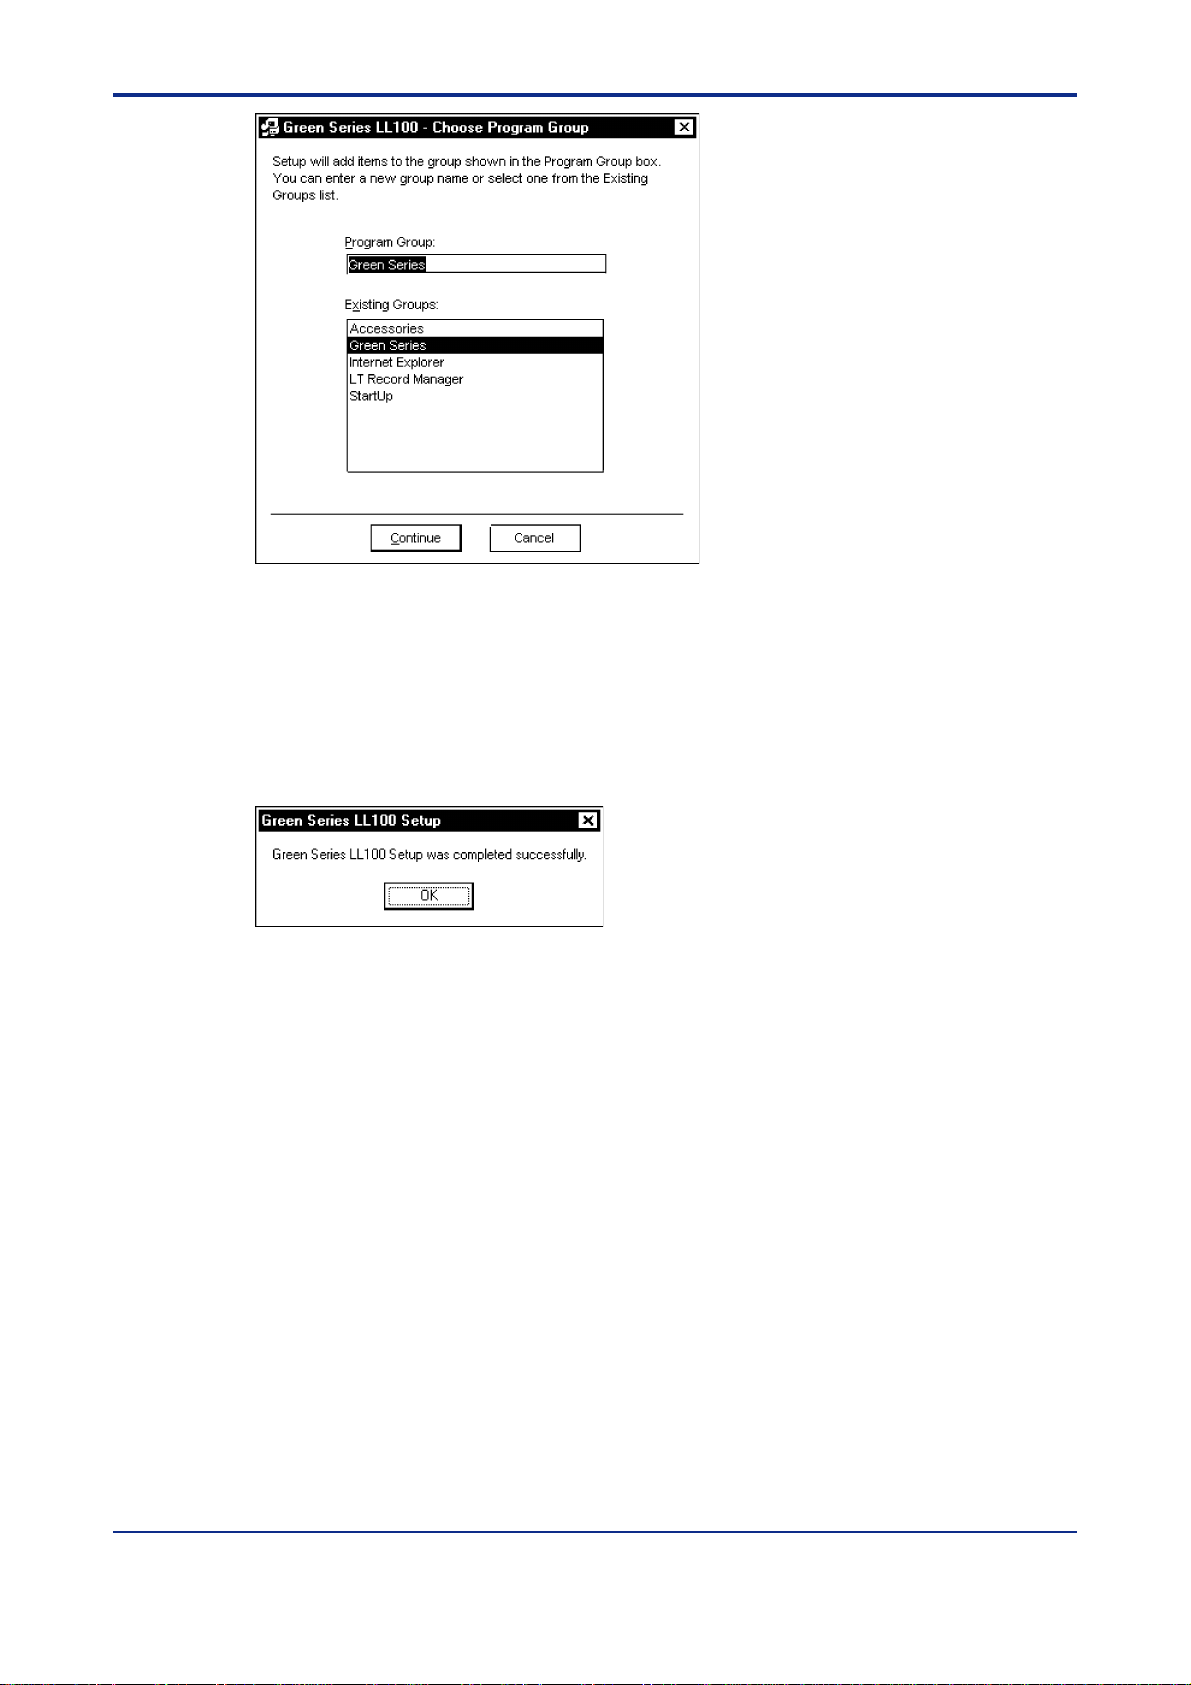
dialog box named Green Series LL100 – Choose Program Group, shown in Figure
2.1.4, appears.
• If you do not want to install LL100 in the default location, click Change Directory and
specify the installation location in the Change Directory dialog box appearing consequently .
NOTE
Avoid entering just the drive as the installation location, such as D:\. Enter the full directory path.
• T o quit the setup, click Exit Setup.
IM 05G01B12-01E 5th Edition : 2005.03.25-00
Page 27
<Toc> <Ind> <2. Setup >
Figure 2.1.4 Green Series LL100 – Choose Program Group Dialog Box
(8) To continue the setup, click Continue. Subsequently, a dialog box requesting you to
insert Disk 4 appears. Insert Disk 4 into the floppy drive and click Continue.
2-3
• Clicking Cancel aborts the setup without updating the system file; in this case, the
LL100 tool is not installed.
(9) When a message announcing completion of installation appears, click OK.
Figure 2.1.5 Dialog Box Announcing Completion of Installation of LL100
(10) Finally , check that Green Series has been added to the Programs submenu of the
Start menu, and the Green Series submenu contains Green Series LL100.
IM 05G01B12-01E 5th Edition : 2005.03.25-00
Page 28
<T oc> <Ind> <2. Setup >
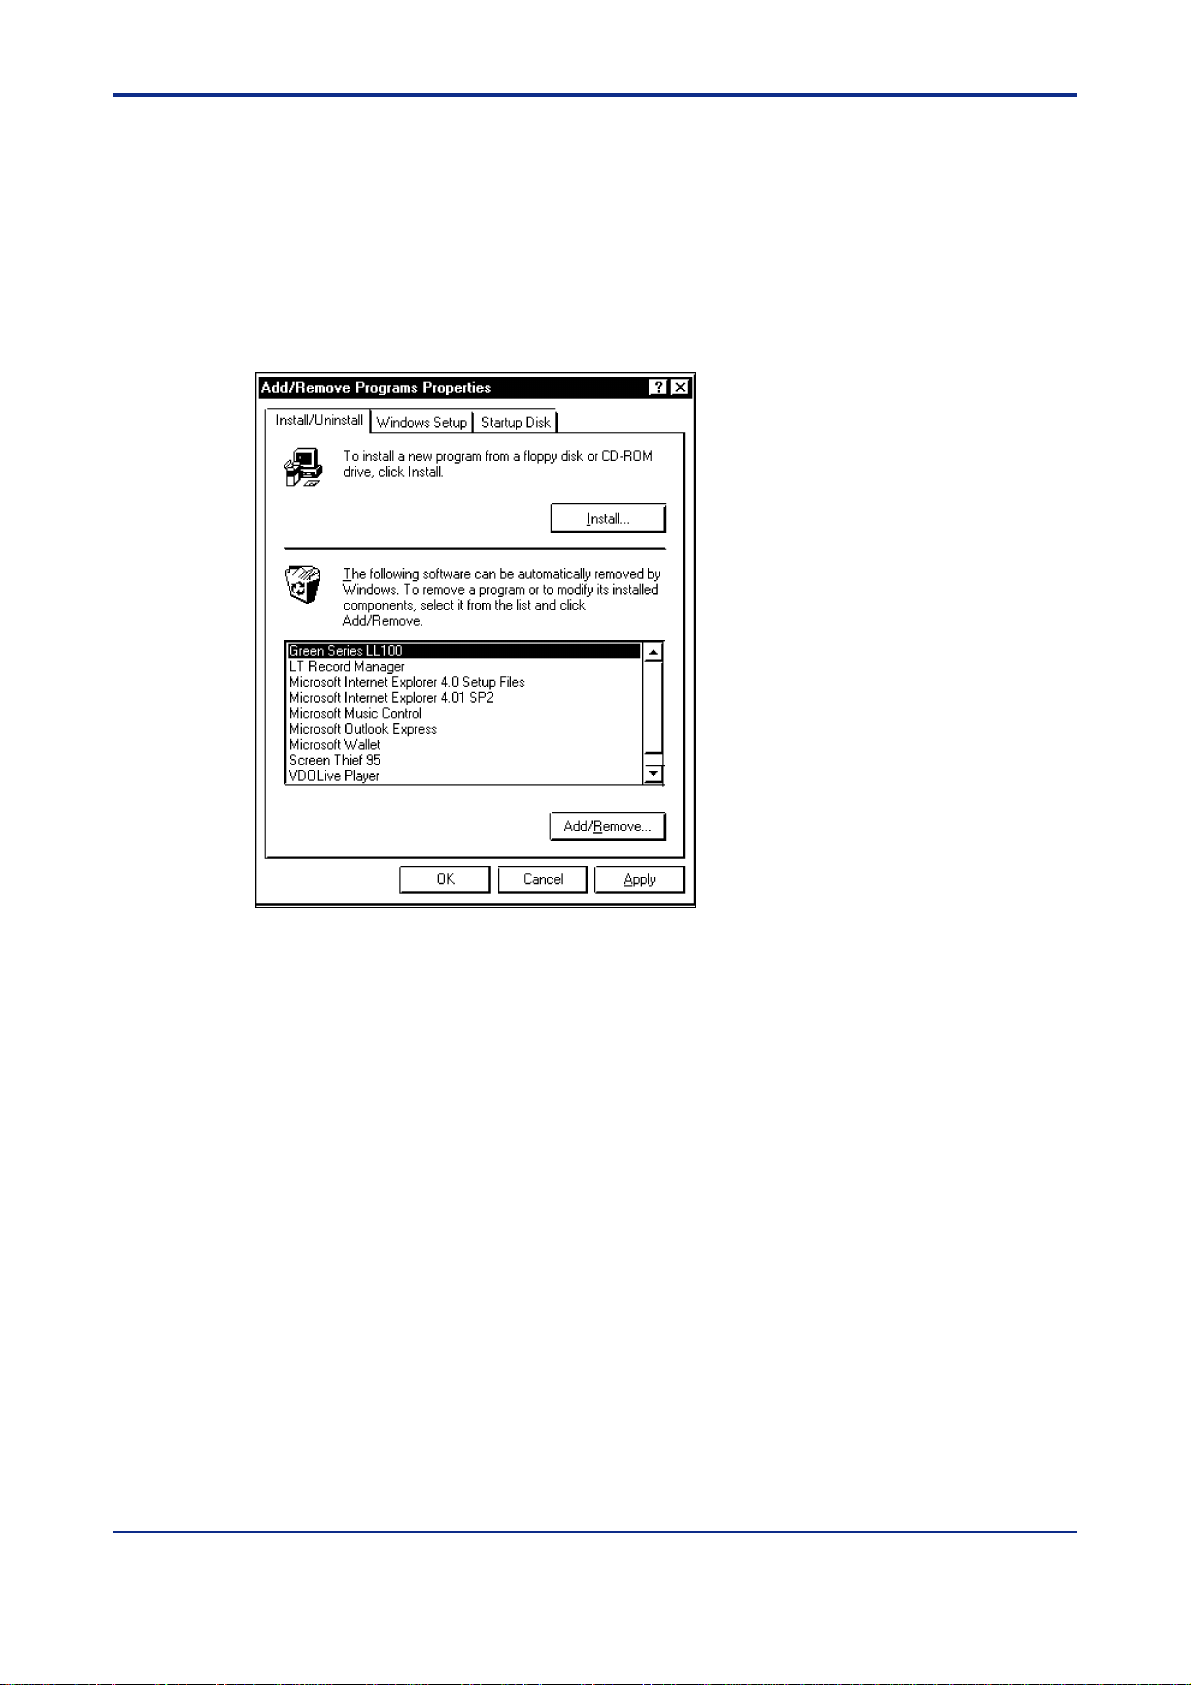
2.2 Uninstalling LL100
(1) Start Windows.
(2) In Control Panel of Windows, double-click the Add/Remove Programs icon. The
Add/Remove Programs Properties dialog box shown below appears.
(3) On the Install/Uninstall page, choose Green Series LL100, and click Add/Remove.
(4) Then, follow the instructions appearing consequently .
2-4
Figure 2.2.1 Add/Remove Programs Properties dialog box
IM 05G01B12-01E 5th Edition : 2005.03.25-00
Page 29
<Toc> <Ind> <2. Setup >
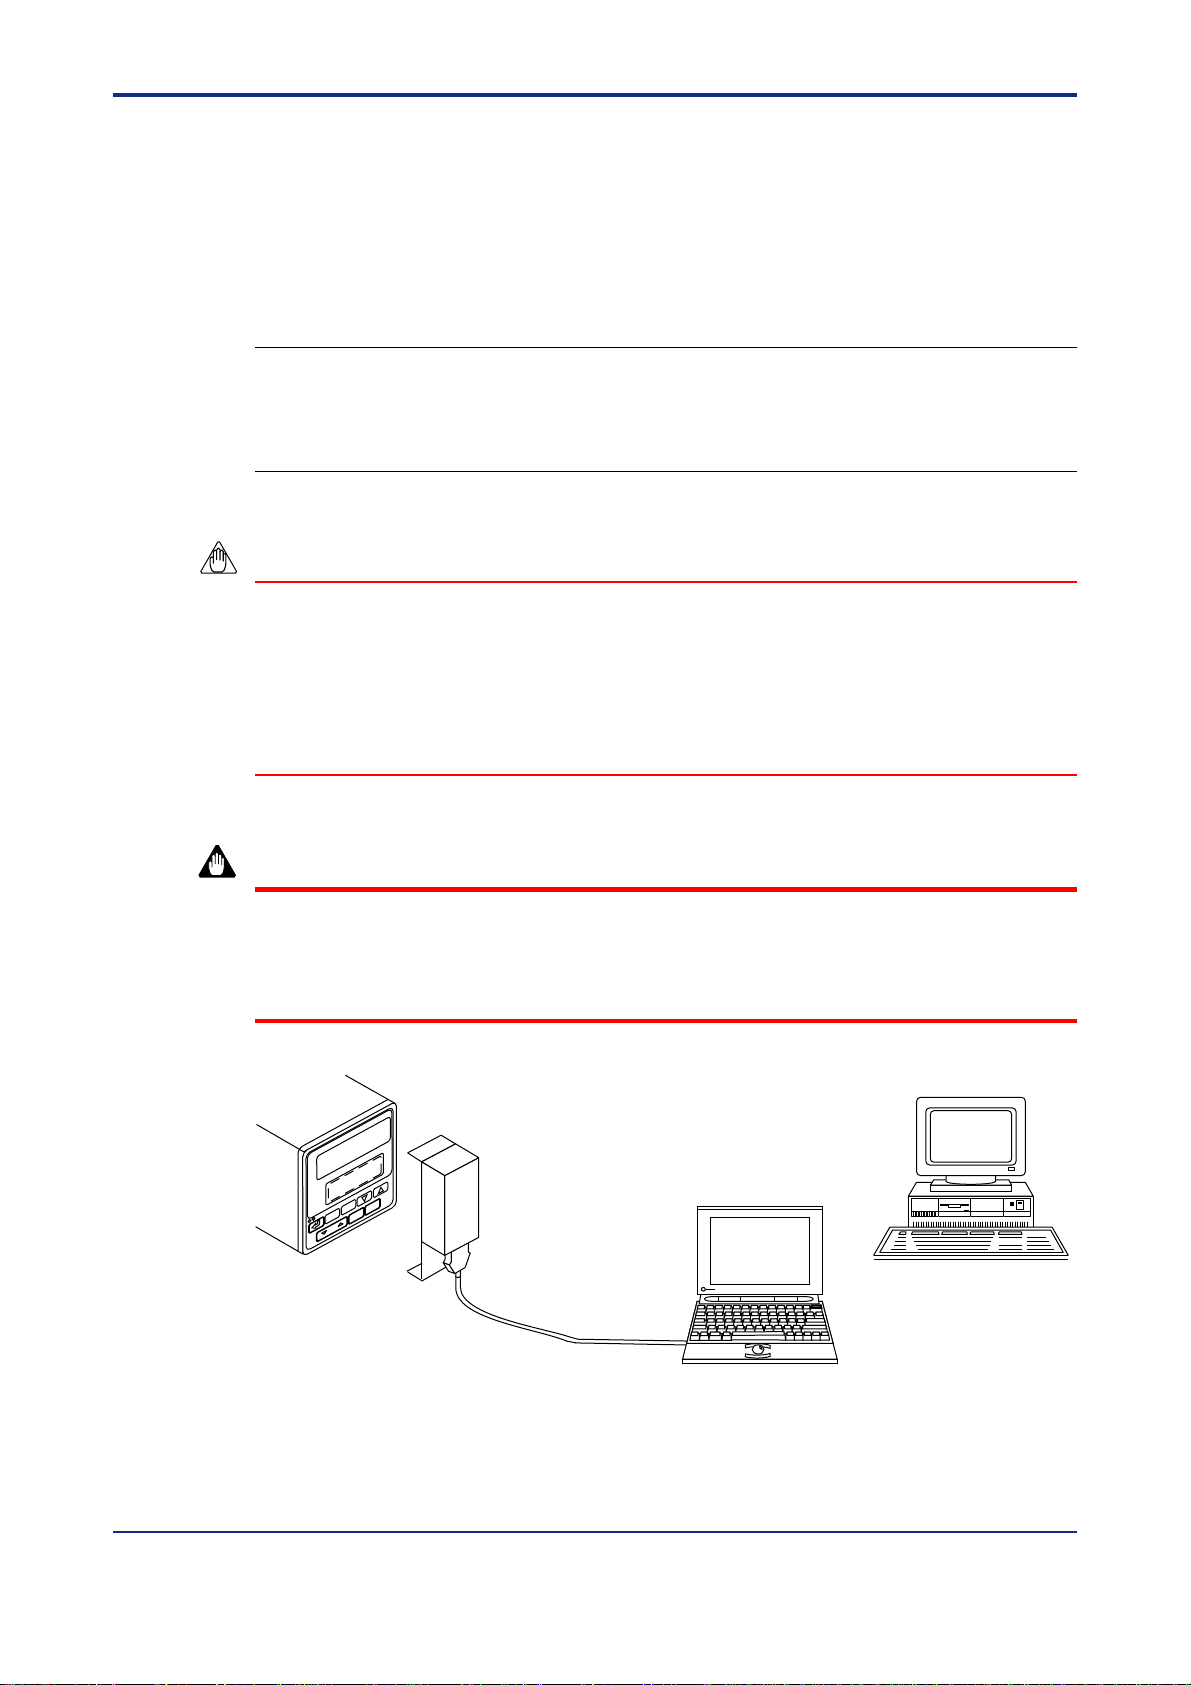
2.3 Connecting Controller to Personal Computer
A GREEN Series controller can be connected to a personal computer in three ways:
using either the optical communication interface on the controller’s front panel, the
RS-485 communication terminals on the rear panel or the Ethernet communication
terminal on the rear panel. This section describes how to connect to the optical
communication interface.
See Also
• Chapter 2, “Setup” in the GREEN Series Communication Functions user’s manual (IM 05G01B02-01E),
for how to connect to RS-485 communication terminals.
• Chapter 2, “Setup” in the Ethernet Communication Functions user’s manual (IM 05G01B52-01E), for
how to connect to Ethernet communication terminal.
NOTE
• The dedicated adapter has an internal switch (located where the adapter comes into
contact with the controller). Be careful not to break this switch when attaching the
adapter to the controller.
2-5
• Attaching the adapter in place automatically turns on this switch, causing the batteries
to discharge even if no communication is done. Therefore, if you have no immediate
plans to perform communication, keep the adapter removed from the controller.
WARNING
When using an external power source, take care to ensure that the polarities of the AC
adapter are correct (see Figure 1.2.2). Do not apply power from the adapter in excess of
the power ratings of the controller. Either of these cases can result in damage to the controller.
Dedicated adapter
(Optical/electrical signal converter)
Controller
Figure 2.3.1 Connecting GREEN Series Controller to Personal Computer via Front Optical
Communication Interface
IM 05G01B12-01E 5th Edition : 2005.03.25-00
Personal computer
Page 30
<T oc> <Ind> <2. Setup >
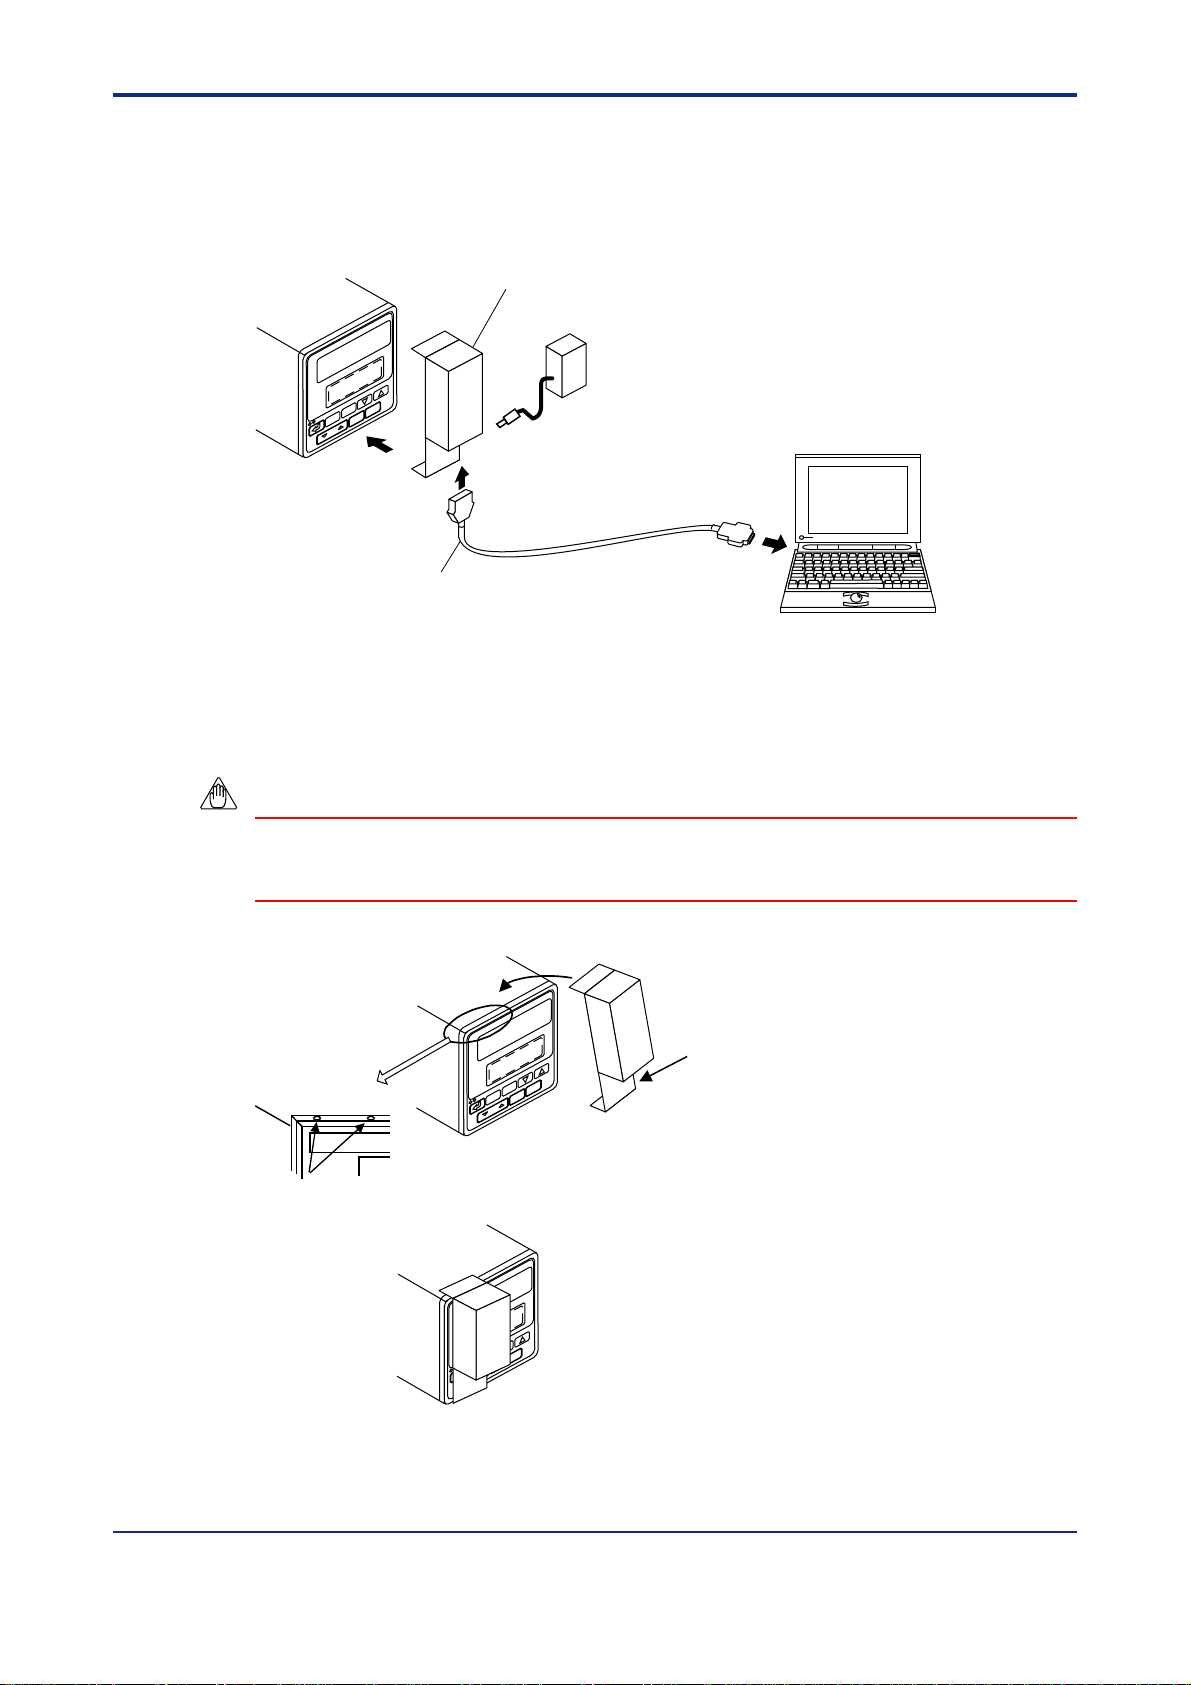
Follow the steps below to connect the controller to a personal computer.
(1) Connect the dedicated adapter to the RS-232C communication port of a personal
computer using the dedicated cable.
Dedicated adapter
(Optical/electrical signal converter)
AC adapter (optional)
for using an external power source
Personal computer
(1) Connect the dedicated cable to
the dedicated adapter and
Controller
Dedicated cable
Figure 2.3.2 Connection via Dedicated Adapter
connect the other cable end to
the PC’s communication port.
To RS-232C port.
2-6
(2) As shown in Figure 2.3.3, hang the dedicated adapter from the top groove of the
controller.
(3) Push the adapter to the controller’s front panel to securely fix it in place.
NOTE
Make sure the adapter is attached to the controller in a vertical orientation. Communication
is not possible if the dedicated adapter is attached in a slanting position.
Controller
Top of the controller
Groove
(3) Bring the dedicated adapter into contact
with the controller’s front panel.
(2) Hang the dedicated adapter’s
bracket from the groove.
Push
Figure 2.3.3 Attaching the Dedicated Adapter
IM 05G01B12-01E 5th Edition : 2005.03.25-00
Page 31

<Toc> <Ind> <3. Using LL100 >
3-1
3. Using the Parameter Setting T ool
This chapter describes how to use the parameter setting tool, showing the procedures of parameter setting via dialog boxes, notes on tool operations, and other
common operations. Be sure to read through this chapter before use.
3.1 Starting and Quitting the Parameter Setting T ool
NOTE
Before installing the tool, quit all running applications.
When using Windows 2000 or XP :
Log on using the user name of Administrators group.
The program does not start normally if the user name not belonging to the Administrators
group is used for logging on.
3.1.1 Starting the T ool
(1) Start Windows.
(2) From the Start menu of Windows, point to Programs, then Green Series, and click
Green Series LL100.
(3) LL100 then starts and the Tool Selection dialog box (Figure 3.1.1) appears.
(For LL200, “Custom Computation Building Tool” appears at the top of dialog box.)
Figure 3.1.1 Tool Selection Dialog Box
(4) Select Parameter Setting T ool and click OK.
(5) The Select Series dialog box (Figure 3.1.2) appears.
IM 05G01B12-01E
5th Edition : 2005.03.25-00
Page 32

<T oc> <Ind> <3. Using LL100 >
Figure 3.1.2 Select Series Dialog Box
(6) Select a controller model and click OK.
3-2
(7) The New/Change Selection dialog box appears (Figure 3.1.3).
Figure 3.1.3 New/Change Selection Dialog Box
To start the parameter setting tool while you are using another tool, click Set ****(P) from
the menu bar, then choose Run Parameter Setting Tool. (**** varies depending on the
tool)
IM 05G01B12-01E
5th Edition : 2005.03.25-00
Page 33

<Toc> <Ind> <3. Using LL100 >
3.1.2 Quitting the T ool
(1) From the menu bar, click File then choose Terminate.
(2) If the current setting data has not been saved, the following message box appears
(Figure 3.1.4).
• T o quit after saving the current parameter data, click Yes.
The Save As dialog box appears. Enter a file name of up to 16 alphanumeric charac-
ters, and then click Save.
• T o quit without saving the parameter data, click No.
Figure 3.1.4 Data Save Confirming Dialog Box
(3) The message box in Figure 3.1.5 appears for confirmation.
• T o exit, click YES.
3-3
• T o cancel exit, click NO.
Figure 3.1.5 Close Dialog Box
IM 05G01B12-01E
5th Edition : 2005.03.25-00
Page 34

<T oc> <Ind> <3. Using LL100 >
3.2 Work Flow of Parameters Setting T ool
There are three parameter setting procedures:
● Create new parameter data and download it to the controller.
● Upload parameter data from the controller, modify it, and then download it to the
controller.
● Read parameter data saved on disk, modify it, and then save it to the disk.
Start
Start LL100 tool
Tool Selection
(See section 3.1)
(See section 4.1)
Parameters setting tool
3-4
(See section 4.2)
New
Select model and suffix codes
Set the controller mode
Set input/PV parameters
Set control output and valve mode
Open user file
Set operating parameters
Series selection
New/Change
Open user file
Set setup parameters
Connect controller to
personal computer
Download parameters
to controller
Upload from
controller
Connect controller to
personal computer
(See section 2.3)
Upload data
from controller
(See section 6.1)
(See section 4.3)
(See section 4.4)
(See section 2.3)
(See section 6.2)
Program pattern
setting tool
(See chapter 9)
Tuning
Connect controller to
personal computer
(See section 2.3)
Tuning
(See chapter 8)
When setting the parameters of
UT351-xA, UT351-x3 and UT551-xA
to xD via Ethernet communication,
set the Ethernet parameters such as
IP address, subnet mask and
default gateway before writing other
parameters.
Tuning
Upload parameters
from controller
Save parameters
to a disk
Print parameters
End
(See chapter 8.1)
(See section 6.1)
(See section 5.2)
(See chapter 7)
(See section 3.1)
Figure 3.2.1 Work Flow of Parameters Setting T ool
IM 05G01B12-01E
5th Edition : 2005.03.25-00
Page 35

<Toc> <Ind> <3. Using LL100 >
3.3 Dialog Box Elements and Functions
3-5
1) Title bar
3) Toolbar
2) Menu bar
5) Menu button
6) Dialog box for parameter menu
8) Text box
7) Dialog box for
parameter setting
11) Guidance
Figure 3.3.1 Dialog Box Elements and Functions
4) Guidance bar
9) OK button
10) Cancel button
1) Title bar
Shows the tool name (Parameters Setting Tool) and the file name of the parameter file
being used.
2) Menu bar
Contains the various tool functions that can be selected.
3) Toolbar
Displays the frequently used tool menu items as command buttons.
4) Guidance bar
Provides helpful guidance for operation.
IM 05G01B12-01E
5th Edition : 2005.03.25-00
Page 36

<T oc> <Ind> <3. Using LL100 >
5) Menu button
Command buttons placed in a parameter menu dialog box. These buttons open their
corresponding parameter setting dialog boxes when clicked, and the color of the
button changes.
6) Dialog box for parameter menu
There are two menu dialog boxes: one for setup parameters and the other for operat-
ing parameters. (The figure 3.3.1 shows the menu dialog box for operating parameters.)
7) Dialog box for parameter setting
Y ou can set parameters via a dialog box. When you select the text box for a param-
eter in a parameter setting dialog box, a description, range of setting, and initial value
of the parameter are shown for guidance.
8) Text box
A text box is a cell in a parameter setting dialog box, in which a parameter value is
entered and set. Clicking in a text box of a parameter that cannot be set (a bar “-” is
displayed in such text boxes) does not produce any effect.
9) OK button
Clicking this button will update the parameters shown in the parameter setting table
and close the parameter setting dialog box.
3-6
10) Cancel button
Clicking this button will discard the changes made and close the parameter setting
dialog box. This operation will not update the parameter settings.
1 1) Guidance
The parameter name, range of setting, and initial value of parameter are shown for
guidance.
When range of setting and initial value make a difference, according to model code
and the other setting parameter value, see also the controller’s user’s Manual for
GREEN Series.
3.4 Menu Commands
In the parameters setting tool, you can use the menu commands when the Setup Parameter Menu, Operating Parameter Menu or Program Pattern Menu dialog box is displayed.
Most of the menu names and commands provided for the program pattern setting tool are
the same.
● Using menu commands
(1) Click a name on the menu bar.
(2) The corresponding menu (see Figure 3.4.1) appears; select the command you wish to
carry out.
IM 05G01B12-01E
5th Edition : 2005.03.25-00
Page 37

<Toc> <Ind> <3. Using LL100 >
3-7
Menu Names
File
Parameter
setting
* Available only
with LL200
Menus
Open
Close
Save
Save as
Parameter
compare
Information
Terminate
Model/specification
code selection
Controller
mode setting
IN parameter
setting
OUT/VALV
parameter setting
IN/OUT
parameter setting
Setup
parameter setting
Operating
parameter setting
Run program
pattern setting
Run custom
computing tool*
Run VJET
setting tool
New
Print
tool
Dialog Boxes
Select Series
Open User File
Main Window
Save As
Parameter
Comparing
File Information
Print Parameter
(*1)
Model/Specification
Code Selection
Controller Mode
Setting Display
PV Parameter
Setting
Sets Input/Output
(for 300 series)
Program Pattern Setting Tool
Custom computation
building tool
VJET setting tool
Go to (*1)
Setup Parameter Menu
Print
Print Preview
Output to File
Control Output/Valve
Mode Setting
Setup Parameter Menu
Operating
Parameter Menu
Printer Settings
Communi-
cation
Background
color setting
Help
Download to
controller
Upload from
controller
Parameter
comparing
Tuning
Address Tag
Help Parameter
setting T ool
Version
information
Download Parameter
Upload Paramete
Parameter Comparing
r
Tuning
Sets address tag
Color
User's Manual - Reference
(CD-ROM)
Version Information
Figure 3.4.1 Tool Menu Items (for Setup and Operating Parameter Menu)
IM 05G01B12-01E
5th Edition : 2005.03.25-00
Page 38

<T oc> <Ind> <3. Using LL100 >
3.5 Parameter Setting Basics
This section describes the basic operation procedure for parameter setting. This procedure
also applies to some of the program pattern setting operations.
Set parameters as shown in the flowchart below.
Select a menu button in Parameter Setting Menu
Select a parameter
Input data
Select the next
command button
Click OK
Figure 3.5.1 Parameter Setting Flowchart
3-8
3.5.1 Selecting a Parameter
(1) In a parameter setting dialog box, click the text box of the parameter you wish to
change.
(2) The text box of the selected parameter is displayed with a thick frame, indicating that it
is ready for input.
3.5.2 Inputting the Setting for a Parameter
Data entry in text boxes is a fundamental operation in every Windows-based application.
There are two types of text boxes in a parameter setting dialog box.
● T ext box with arrow button on the right:
Click the arrow button to open a list of available selections. Select an item from the list.
● T ext box without arrow button:
Click in the text box and type appropriate characters. See the guidance bar for the setting
range, initial value, and other information on that parameter. If an illegal value is input for a
numeric setting, a message box will appear, stating that an “Illegal value has been en-
tered.” Click OK and input a proper value.
IM 05G01B12-01E
5th Edition : 2005.03.25-00
Page 39

<Toc> <Ind> <3. Using LL100 >
Drop-down list
Arrow button
Text boxes
Enter a numeral or character string.
Figure 3.5.2 Parameter Setting Table Elements (Example of UT551)
3.5.3 Applying and Canceling Changes in Dialog Box
● T o apply the changes:
3-9
Click OK after all the settings have been made in the current dialog box.
● T o cancel the changes:
Click Cancel to cancel the changes.
NOTE
Be sure to click OK to apply changes to the parameter settings. Clicking Cancel discards
all changes you made in the dialog box.
IM 05G01B12-01E
5th Edition : 2005.03.25-00
Page 40

<T oc> <Ind> <3. Using LL100 >
3.5.4 Using the Keyboard When Y ou Have No Mouse
● Menu bar operation
(1) Press the F10 or ALT key on the keyboard. A border line appears around the menu
name File on the menu bar (like a button).
(2) Using the LEFT (←) and RIGHT (→) keys, move the border line on the menu bar to
select the menu name that contains the desired command, and press the ENTER key .
Then, the menu opens.
(3) Using the UP (↑) and DOWN (↓) keys, select the desired command in the menu and
press the ENTER key . (You can also open the File menu by simply pressing ALT and
F keys at the same time.)
(4) To cancel the operation, press ESC.
● Selecting a parameter menu
(1) Press the T AB key to select Menu button for parameter setting.
(2) Press the ENTER key .
● Selecting a parameter
3-10
(1) Pressing the T AB key switches the active element in the following sequence: OK
button, Cancel button, text box for a parameter , then back to the OK button.
(2) When a text box is active, you can move between text boxes (parameters) using the
UP, DOWN, RIGHT , and LEFT (↑/↓/←/→) keys. A selected text box is displayed with
a thick frame around it and is ready for input.
● Data input operation
After you select a parameter, do either of the following:
• Selecting from a drop-down list
(1) Press the CTRL + ENTER keys to open the drop-down list.
(2) Select an item using the UP and DOWN (↑/↓) keys.
(3) Press the ENTER key to set the item.
• Setting a numeral
(1) Type a numeral in the text box.
(2) Press the ENTER key to set the numeral in the parameter.
● Button operation (OK, Execute, Cancel, and other buttons)
(1) Press the T AB key repeatedly until the desired button becomes active.
(2) Press the ENTER key to carry out the command.
IM 05G01B12-01E
5th Edition : 2005.03.25-00
Page 41

<Toc> <Ind> < 4. Setting Parameters >
4. Setting Parameters
This chapter describes how to use the LL100 tool for making parameter settings.
This chapter is divided into the following topic areas:
(1) T ool and Series Selection
(2) New/Change Selection
(3) Setup Parameter Menu
(4) Operating Parameter Menu
Section 4.1, “Selecting
Tool and Series”
Tool
Selection
dialog box
New
Select Series
dialog box
Section 4.2.2, “Creating a New File”
Model/
Specification
Code Selection
dialog box
Section 4.2.3, “Opening a User File”
Mode Setting
Except 400 series controllers
Setting Display
For 300 series
Controller
Display
dialog box
IN/OUT
Parameter
dialog box
PV Parameter
Setting
dialog box
Section 4.3, “Setting Setup Parameters”
Control
Output/Valve
Mode Setting
dialog box
Setup
Parameter
Menu
dialog box
4-1
Operating
Parameter
Menu
dialog box
Open user file
Section 4.2.4, “Reading Current
Settings from Controller”
Uploading from
controller
Tuning
Chapter 8, “Tuning”
New/Change
Selection dialog box
Section 4.2.1,
“Selecting New/Change”
Figure 4.0.1 Configuration of Dialog Boxes Related to LL100 Parameter Setting
Open User File dialog box
Upload Parameter
dialog box
Section 4.2, “Selecting New/Change”
Section 4.5, “Parameter Menu for 300 Series”
Menu
(300 series)
(400/500/700 series)
Section 4.4, “Setting the Operating Parameters”
When setting the parameters of
UT351-xA, UT351-x3 and UT551-xA
to xD via Ethernet communication, set
the Ethernet parameters such as IP
address, subnet mask and default
gateway before writing other
parameters.
IM 05G01B12-01E
5th Edition : 2005.03.25-00
Page 42

<T oc> <Ind> < 4. Setting Parameters >
4.1 Selecting T ool and Series
4.1.1 Selecting the Tool
After the LL100 tool is started, the Tool Selectioin dialog box appears (Figure 4.1.1).
(For LL200, “Custom Computation Building Tool” appears at the top of dialog box.)
Figure 4.1.1 Tool Selection Dialog Box
4-2
● To select the tool
(1) Click Parameter Setting Tool.
(2) Click OK. (Go on to section 4.1.2)
4.1.2 Selecting the Series
After you select the Tool, the Select Series dialog box appears (Figure 4.1.2).
Figure 4.1.2 Select Series Dialog Box
● To select the controller model
(1) Click the controller model you wish to start.
(2) Click OK. (Go on to section 4.2.1)
IM 05G01B12-01E
5th Edition : 2005.03.25-00
Page 43

<Toc> <Ind> < 4. Setting Parameters >
4.2 Selecting New/Change
4.2.1 Selecting New/Change
After you select the controller model, the New/Change Selection dialog box appears
(Figure 4.2.1).
Figure 4.2.1 New/Change Selection Dialog Box
● T o create a file of new parameter settings
4-3
(1) Click New.
(2) Click OK. (Go on to section 4.2.2)
● T o make changes to parameter settings
• T o make changes to an existing parameter setting file saved in your PC:
(1) Click Open user file.
(2) Click OK. (Go on to section 4.2.3.)
• T o read and change the current parameter settings in a controller:
(1) Click Uploading from controller.
(2) Click OK. (Go on to section 4.2.4.)
• T o change the current PID control parameter settings (also referred to as “tuning
parameters”) in a controller:
(1) Click Tuning.
(2) Click OK. (Go on to chapter 8.)
IM 05G01B12-01E
5th Edition : 2005.03.25-00
Page 44
<T oc> <Ind> < 4. Setting Parameters >
4.2.2 Creating a New File
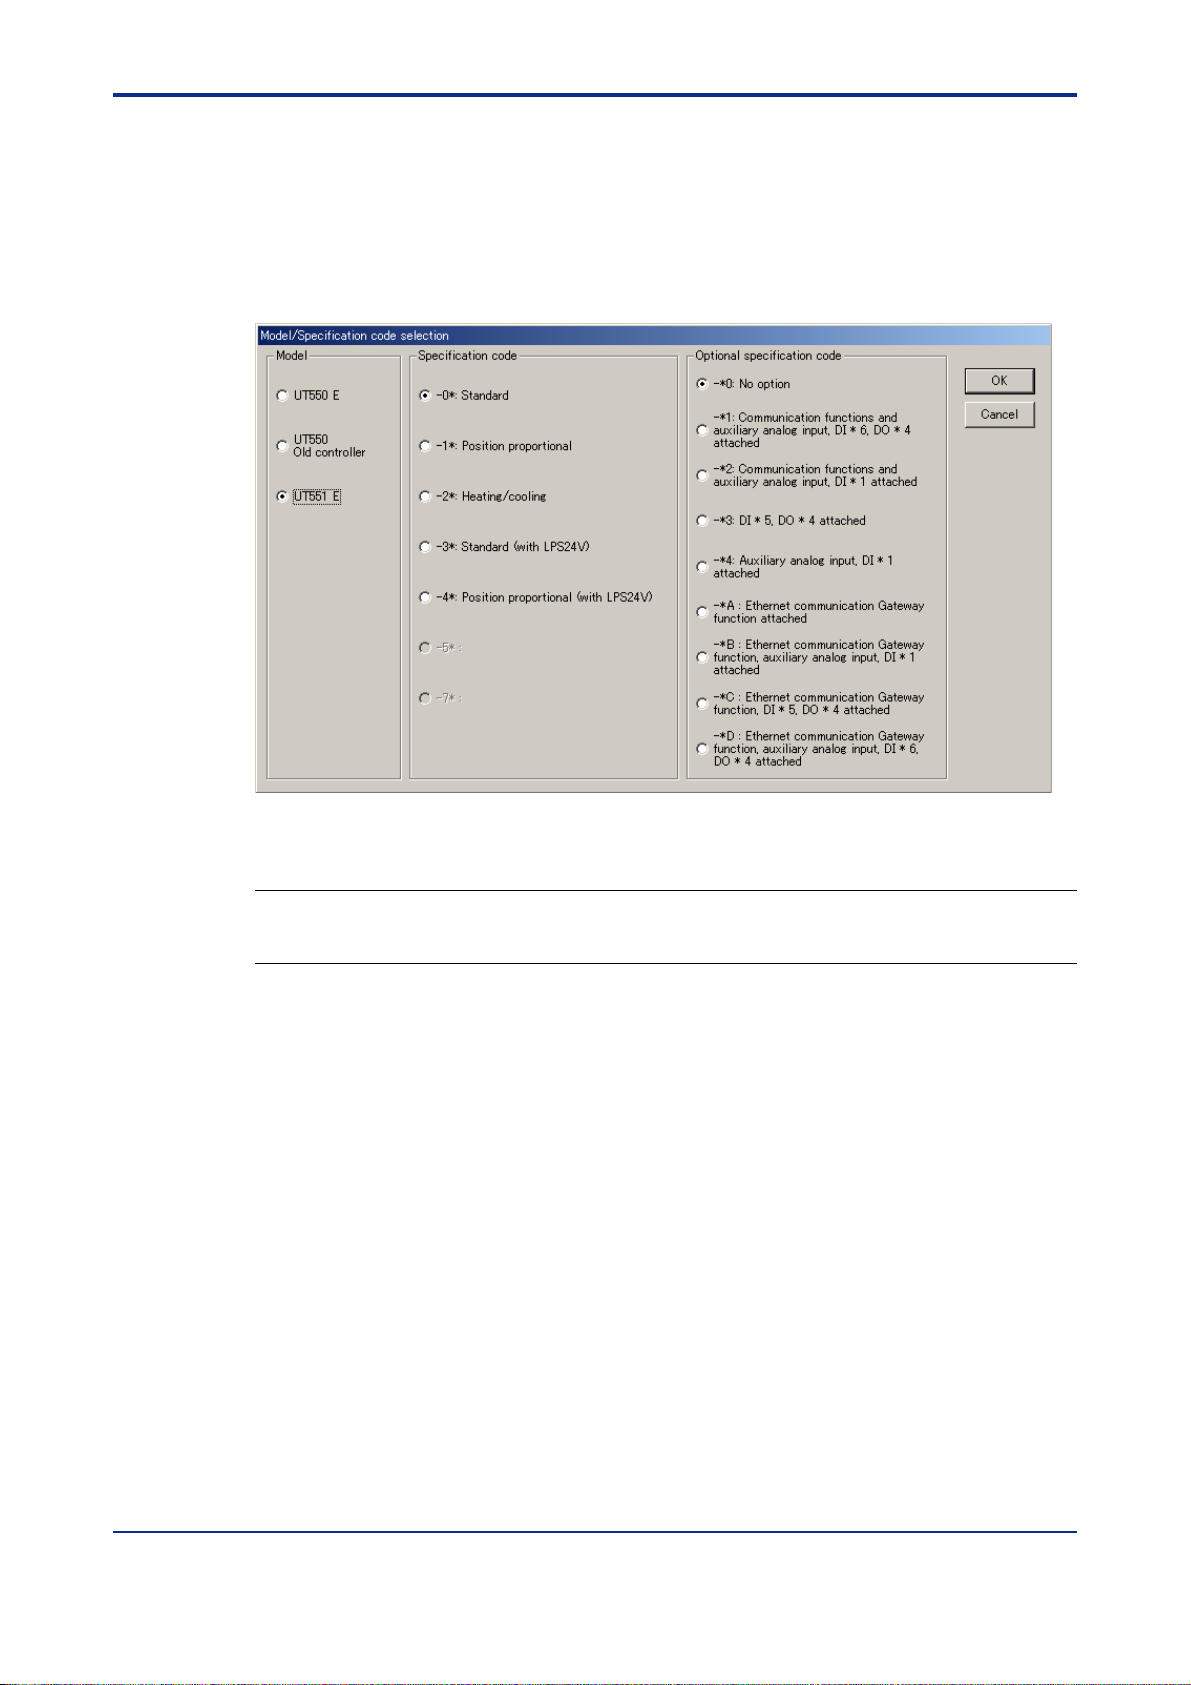
If you select New, the Model/Specification Code Selection dialog box (Figure 4.2.2) appears.
● Creating new parameter data
(1) Select the desired specification code and optional specification code.
4-4
Figure 4.2.2 Model/Specification Code Selection Dialog Box (Example of UT551)
TIP
If you are not sure of your controller’s model and specification codes, see the model and suffix indications
on the nameplate attached to the left side of the controller.
(2) Click OK.
If you click Cancel instead, the tool returns to the New/Change Selection dialog box,
discarding any settings you have made.
IM 05G01B12-01E
5th Edition : 2005.03.25-00
Page 45

<Toc> <Ind> < 4. Setting Parameters >
(3) The Controller Mode Setting Display dialog box (Figure 4.2.3) opens.
Figure 4.2.3 Controller Mode Setting Display Dialog Box (Example of UT551)
4-5
(4) Select the desired controller mode.
(5) Click OK.
If you click Cancel instead, the tool returns to the Model/Specification Code Selection
dialog box.
(6) The PV Parameter Setting dialog box (Figure 4.2.4) opens.
Figure 4.2.4 PV Parameter Setting Dialog Box (Example of UT551)
IM 05G01B12-01E
5th Edition : 2005.03.25-00
Page 46

<T oc> <Ind> < 4. Setting Parameters >
(7) Set the parameters in the following ways.
• For text boxes with an arrow button on the right: Click the arrow button to open a list of
available selections. Select an item from the list.
• For text boxes without an arrow button: Click in the text box and type appropriate
characters.
Select from the list.
Arrow button
Text boxes
Enter a numeral or character string.
Figure 4.2.5 Setting Parameters (Example of UT551)
4-6
(8) When you have finished setting the parameters, click OK.
If you click Cancel instead, the tool returns to the Controller Mode Setting Display
dialog box.
(9) The Control Output/V alve Mode Setting dialog box (Figure 4.2.6) opens.
(10) Set the parameters.
(1 1) When you have finished setting the parameters, click OK.
If you click Cancel instead, the tool returns to the PV Parameter Setting dialog box.
Figure 4.2.6 Control Output/Valve Mode Dialog Box (Example of UT551)
(12) The Setup Parameter Menu dialog box (Figure 4.3.2) opens. (Go on to section 4.3.2.)
IM 05G01B12-01E
5th Edition : 2005.03.25-00
Page 47

<Toc> <Ind> < 4. Setting Parameters >
4.2.3 Opening a User File
After you click Open user file in the New/Change Selection dialog box (Figure 4.2.1), the
Open User File dialog box (Figure 4.2.7) appears.
Can read a user file created and saved using old LL100.
Figure 4.2.7 Open User File Dialog Box (Example of UT750)
● T o open a parameter setting file
4-7
(1) On the menu bar, click File then choose Open. The Open User File dialog box (Figure
4.2.7) opens.
(2) Click in the Look in box.
(3) From the list thus appearing, locate the folder in which the desired parameter setting
file resides and select it.
(4) The files contained in the folder you selected are listed in the box beneath. Click to
select the parameter setting file, and click Open. When LL100 has successfully
finished reading the parameter settings from the file, a dialog box displaying the
“Uploading from file have finished.” message appears.
(5) Click OK. The Setup Parameter Menu dialog box (Figure 4.3.2) then appears. (Go on
to section 4.3.2.)
● File configuration of GREEN series
The filename extension of parameter setting files are either t*d or p*d. The filenames
preceding the extension must be up to 16 alphanumeric characters. The tool automatically sets the filename extension according to the model of the GREEN Series
controller as shown below.
Table 4.2.1 Filename Extensions
Type of File
Parameter setting file
Parameter comparison
result file
Program pattern file
Program-pattern
comparison result file
Print image file
UT750 UP750 UT550/520/551 UP550 UT450/420 UT350/320 UT351/321 UP350 UP351
t7d p7d t5d p5d t4d t3d ttd p3d ptd
e7d e5d e4d e3d
- p7p - p5p - - - - -
- e7p - e5p - - - - -
Controller Model
csv
IM 05G01B12-01E
5th Edition : 2005.03.25-00
Page 48

<T oc> <Ind> < 4. Setting Parameters >
4.2.4 Reading Current Settings from Controller
Clicking Uploading from controller in the New/Change Selection dialog box (Figure
4.2.1), opens the Upload Parameter dialog box (Figure 4.2.8).
Can read current settings from old GREEN series controller.
4-8
Figure 4.2.8 Upload Parameter Dialog Box
● To upload via the supplied optical communication adapter
(1) On the menu bar, click Communication, and then choose Upload from controller.
The Upload Parameter dialog box (Figure 4.2.8) opens.
(2) Click Front communication (this means to use the
the controller).
(3) From the Serial port list, select the communication port of the personal computer from
COM1 to COM16.
(4) Connect the controller to the personal computer, and then click Execute.
(5) When the parameter data has been successfully uploaded, the tool displays a mes-
sage stating “Parameter data has been uploaded from the controller .”
(6) Click OK. The Setup Parameter Menu dialog box (Figure 4.3.2) then appears. (Go on
to section 4.3.2.)
See Also
Section 2.3, “Connecting Controller to Personal Computer,” for how to connect the optical communication
adapter.
communication port at the front of
IM 05G01B12-01E
5th Edition : 2005.03.25-00
Page 49

<Toc> <Ind> < 4. Setting Parameters >
● T o upload via serial communication terminals
(1) On the menu bar, click Communication, and then choose Upload from controller.
The Upload Parameter dialog box (Figure 4.2.8) opens.
4-9
(2) Click Terminal communication (this means to use the
communication terminals at
the rear of the controller).
(3) Click Serial communication.
(4) From the Serial port list, select the communication port of the personal computer from
COM1 to COM16.
(5) Set the RS485 communication conditions:
• Communication speed, parity and address: Select from drop-down lists.
• Stop bit and data length: Select with option buttons.
Use the same settings for the target controller’s RS485 communication parameters.
(6) Connect the controller to the personal computer, and then click Execute .
(7) When the parameter data has been successfully uploaded, the tool displays a mes-
sage stating “Parameter data has been uploaded from the controller .
(8) Click OK. The Setup Parameter Menu dialog box (Figure 4.3.2) appears. (Go on to
section 4.3.2.)
NOTE
Communication via serial communication terminals is possible only for GREEN Series
controllers with the RS485 communication optional function. For controllers without the
RS485 communication optional function, always select Front communication.
To communicate via serial communication terminals, set the target controller’s RS485
communication protocol to PC-link communication. With other protocol, the serial terminal
communication is unavailable. Also note that the RS485 communication parameters
(communication speed, parity , stop bit and data length) must be set identically for both the
target controller and the personal computer.
In the case of 300 series of old GREEN Series, the serial terminal communication is possible only for the controllers with the communication function.
In the case of 300 series of GREEN Series, the LL operating parameter selects the front
communication or serial terminal communication. Be sure to confirm the setting of LL
parameter.
When LL parameter is ON, communication with LL100/LL200 is possible.
When LL parameter is OFF, communication via serial communication terminals is possible
for the controllers with RS485 communication function.
See Also
Chapter 2, “Setup” of the GREEN Series Communication Functions user’s manual (IM 05G01B02-01E),
for information about wiring for the serial communication terminals.
IM 05G01B12-01E
5th Edition : 2005.03.25-00
Page 50

<T oc> <Ind> < 4. Setting Parameters >
● To upload via Ethernet communication terminal
(1) On the menu bar, click Communication, and then choose Upload from controller.
The Upload Parameter dialog box (Figure 4.2.8) opens.
4-10
(2) Click Terminal communication (this means to use the
communication terminals at
the rear of the controller).
(3) Click Ethernet communication.
(4) Set the target controller’s IP address and RS485 communication address in the IP
Address text box.
(5) Set the target controller’s port number in the Port No. text box. The port number can
be set in decimal or hexadecimal.
(6) Connect the controller to the personal computer, and then click Execute.
(7) When the parameter data has been successfully uploaded, the tool displays a mes-
sage stating “Parameter data has been uploaded from the controller .
(8) Click OK. The Setup Parameter Menu dialog box (Figure 4.3.2) appears. (Go on to
section 4.3.2.)
NOTE
Uploading parameters via Ethernet is impossible for the UT750 in UT mode 21 and the
UP750 in UP mode 21. Use front communication.
NOTE
Communication via Ethernet communication terminal is possible only for controllers with
the Ethernet communication optional function and for the controllers with the RS485 communication function for which the Ethernet converter is used as Ethernet-serial gateway .
For controllers without the RS485 communication optional function, always select Front
communication.
In the case of 300 series of GREEN Series, the LL operating parameter selects the front
communication or Ethernet communication. Be sure to confirm the setting of LL parameter .
When LL parameter is ON, communication with LL100/LL200 is possible.
When LL parameter is OFF, communication via Ethernet communication terminal is pos-
sible for the controllers with Ethernet communication function.
IM 05G01B12-01E
5th Edition : 2005.03.25-00
Page 51

<Toc> <Ind> < 4. Setting Parameters >
NOTE
Set an IP address and RS485 communication address being divided by the comma (,) in
the IP Address text box.
Example: 192.168.1.1,1
To communicate with a controller with Ethernet communication function:
IP address=IP address set to the controller
RS485 address=1
To communicate with a controller with RS485 communication function for which
the controller with Ethernet communication function or the Ethernet converter is
used as Ethernet-serial gateway:
IP address=IP address set to the gateway
RS485 address=RS485 address set to the controller
See Also
Chapter 2, “Setup” of the Ethernet Communication Functions user’s manual (IM 05G01B52-01E), for
information about wiring for the Ethernet communication terminals.
4-11
IM 05G01B12-01E
5th Edition : 2005.03.25-00
Page 52

<T oc> <Ind> < 4. Setting Parameters >
4.3 Setting Setup Parameters
This section describes how to make settings in the Setup Parameter Menu dialog
box.
The following figures show examples of the dialog boxes displayed when using a
UT551.
For details about dialog box contents of other models, refer to the corresponding
user’s manual supplied with the controller .
4.3.1 Setup Parameter Menu Configuration
Figure 4.3.1 shows the configuration of the operating parameter menu.
See Also
Section 1.4 for information about show/hide of setup parameters of each controller.
Setup Parameter Menu
dialog box
(400/500/700 series)
LOOP1/2
SP
ALM
CTL
Sets Setpoint-related
Parameters dialog box
Sets Alarm-related
Parameters dialog box
Sets Control Operation-related
Parameters dialog box
(See section 4.3.3.)
(See section 4.3.4.)
(See section 4.3.5.)
4-12
AIN
RET
CMLP
TRND
LOCK
CSEL
DO
CONF
DI
C.PYS
UTMD/UPMD
code, controller mode, IN/OUT
R485
Conforms to specification
To operating parameter
(See section 4.3.2.)
Sets Input Computing-related
Parameters dialog box
Sets Retransmission Output-related
Parameters dialog box
Sets Deviation Trend-related
Parameters dialog box
Sets Security-related
Parameters dialog box
SELECT Display
Registration dialog box
Registration of Contact
Output dialog box
Registration of Contact
Input dialog box
Ten-segment Linearizer
I/O Unit Setting dialog box
*Old GREEN series and model UT750 and
UP750’s custom computation control only.
Communication Protocol
Selection dialog box
Conforms to Specification
Code, Controller Mode,
IN/OUT dialog box
Operating Parameter Menu
dialog box
Figure 4.3.1 Setup Parameter Menu Configuration
(See section 4.3.6.)
(See section 4.3.7.)
(See section 4.3.8.)
(See section 4.3.9.)
(See section 4.3.10.)
(See section 4.3.11.)
(See section 4.3.12.)
(See section 4.3.13.)
(See section 4.3.14.)
(See section 4.3.15.)
(See section 4.4.)
IM 05G01B12-01E
5th Edition : 2005.03.25-00
Page 53
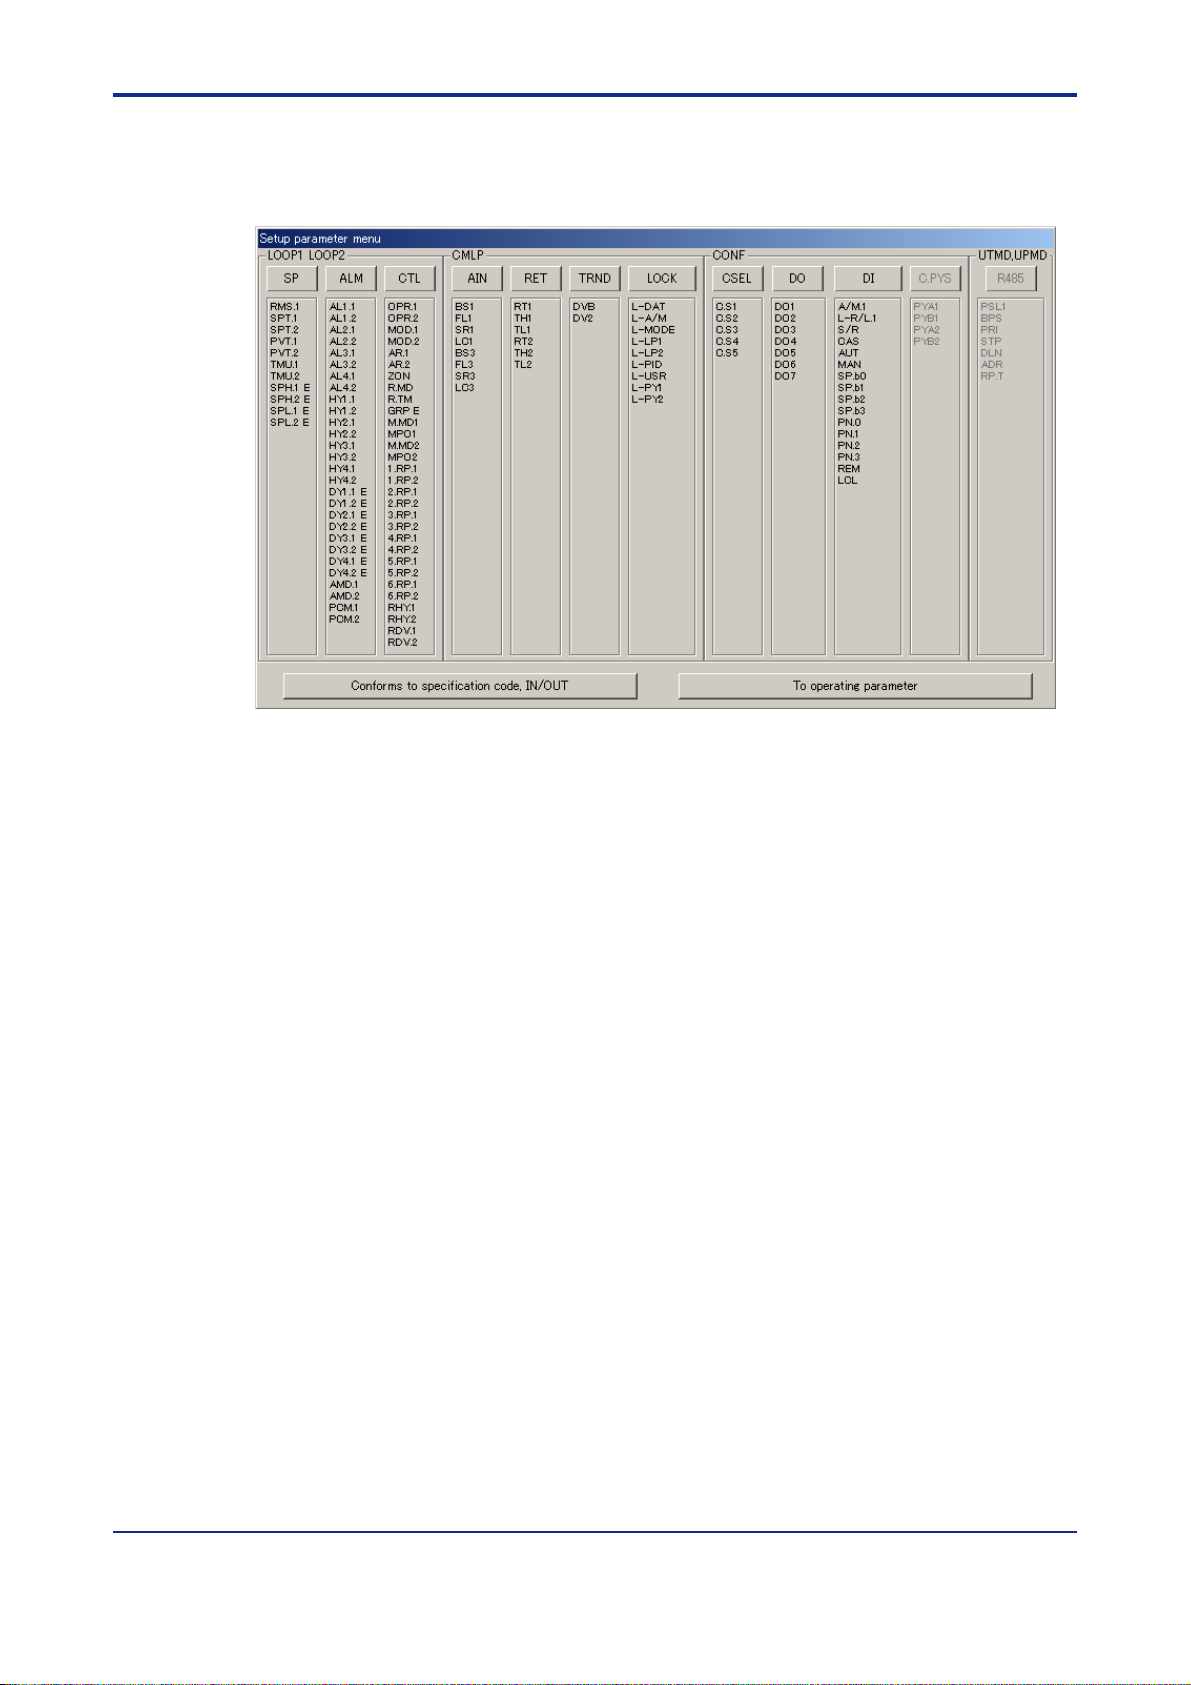
<Toc> <Ind> < 4. Setting Parameters >
4.3.2 Setup Parameter Menu
From the Setup Parameter Menu dialog box, you can open various parameter setting
dialog boxes.
4-13
Figure 4.3.2 Setup Parameter Menu Dialog Box (Example of UT551)
● T o open the Setup Parameter Menu dialog box
The menu can be opened in 5 ways:
• In the Control Output/Valve Mode Setting dialog box (figure 4.2.6), click OK.
• In the menu bar, click Parameter setting, and then choose Setup parameter setting.
(This operation is only possible when Parameter setting is shown in the menu bar.)
• The menu opens after parameter data has been loaded form a disk or a controller.
• In the Operating Parameter Menu, Click To Setup Parameter.
• The menu opens after Open User File dialog box.
● T o open individual setup parameter setting dialog boxes
Click one of the menu buttons (SP, ALM, ... , and R485).
→ The parameter setting dialog box of the clicked button opens.
● T o open other dialog boxes than those for setup parameter setting
Click Conforms to specification code, controller mode, IN/OUT. (Although the button is
named “Conforms to...,” it should be “Confirm...”)
→ The Conforms to Specification Code, Controller Mode, IN/OUT dialog box opens.
(Although the dialog box is named as “Conforms to ...,” it should be “Confirm...”.)
Click T o operating parameter .
→ The Operating Parameter Menu dialog box opens. (next page)
IM 05G01B12-01E
5th Edition : 2005.03.25-00
Page 54

<T oc> <Ind> < 4. Setting Parameters >
Operating Parameter menu Dialog Box (Example of UT551)
4-14
IM 05G01B12-01E
5th Edition : 2005.03.25-00
Page 55

<Toc> <Ind> < 4. Setting Parameters >
4.3.3 Setting T arget Setpoint (SP)
This section explains setting parameters related to the target setpoint (SP).
● T o open the Sets Setpoint-related Parameters dialog box
In the Setup Parameter Menu dialog box, click SP.
Figure 4.3.3 Sets Setpoint-related Parameters Dialog Box (Example of UT551)
● Parameters to be set
In the example shown above, only loop-1 parameters are shown because single-loop
control is assumed. However, the following parameters are provided for both loop 1 and
loop 2.
4-15
• Remote input selection (RMS)
This parameter sets the use of input terminal or communication for remote input SP.
RSP: by remote input terminal; COM: by communication
• SP tracking selection (SPT)
This parameter sets whether or not to perform SP tracking when switching from
remote input SP to local SP.
OFF: disabled; ON: enabled
• PV tracking selection (PVT)
Operating parameters UPR (setpoint ramp-up rate) and DNR (setpoint ramp-down
rate) are also used to configure this function.
OFF: disabled; ON: enabled
• Ramp-rate time unit (TMU)
This parameter is used in combination with operating parameters UPR (setpoint
ramp-up rate) and DNR (setpoint ramp-down rate) to determine the ramp rate of SP.
0: HOUR (Denotes “per hour”); 1: MIN (Denotes “per minute”)
• T arget setpoint limiter upper limit (SPH)
• T arget setpoint limiter lower limit (SPL)
These parameters limit a SP value when it is being changed.
Setting range: 0.0 to 100.0% of PV input range (SPL < SPH)
● T o go back to the Setup Parameter Menu dialog box
Click OK or Cancel.
IM 05G01B12-01E
5th Edition : 2005.03.25-00
Page 56
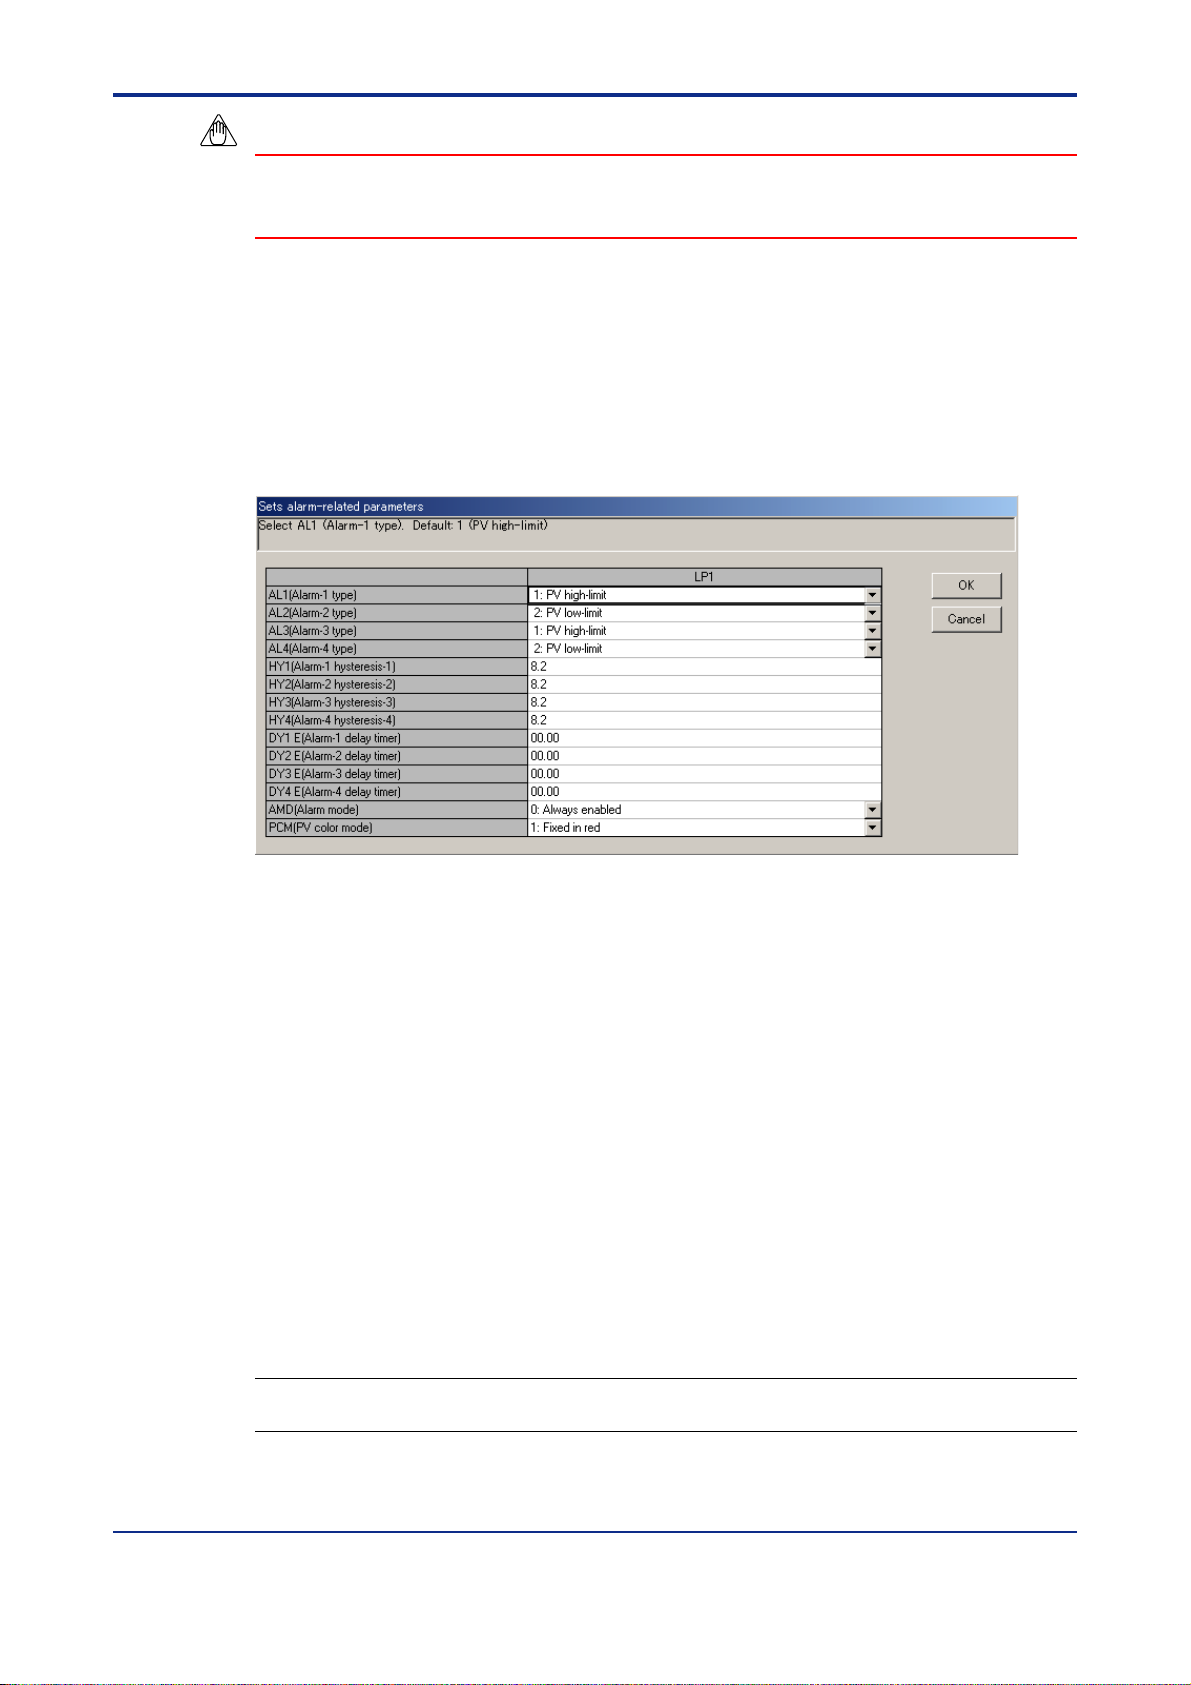
<T oc> <Ind> < 4. Setting Parameters >
NOTE
Clicking Cancel will discard the changes made and return you to the Setup Parameter
Menu dialog box. This operation will not update the parameter settings.
4.3.4 Setting Alarms (ALM)
This section explains setting parameters related to alarms.
● To open the Sets Alarm-related Parameters dialog box
In the Setup Parameter Menu dialog box, click ALM.
4-16
Figure 4.3.4 Sets Alarm-related Parameters Dialog Box (Example of UT551)
● Parameters to be set
In the example shown above, only loop-1 parameters are shown because single-loop
control is assumed. However, the following parameters are provided for both loop 1 and
loop 2.
• Alarm type (ALn: n = 1 to 4)
These parameters set the alarm types for alarm 1 to 4.
Alarm 1-type; OFF & 1 to 48
(Setting range depends on the model. See each user’s manual.)
Alarm 2 to 4-type; OFF & 1 to 48
(Setting range depends on the model. See each user’s manual.)
Example: To specify PV high-limit alarm with no waiting action and normally open
contact operation, set “1.”
See Also
GREEN Series User’s Manual (Reference) (IM 05D01A02-01E) for information on alarm types.
IM 05G01B12-01E
5th Edition : 2005.03.25-00
Page 57

<Toc> <Ind> < 4. Setting Parameters >
• Alarm hysteresis (HYn: n = 1 to 4)
These parameters set the alarm hysteresis for alarm 1 to 4.
Setting range: 0.0 to 100% of PV input range span; for output alarms, however, the
range is 0.0 to 100.0%
• Alarm delay timer (DYn: n = 1 to 4)
After the alarm setpoint is reached, the alarm will be output when the delay time has
elapsed, however, alarm type setting is 1 to 20 or 28 to 31.
• Alarm mode (AMD)
This parameter sets alarm action conditions.
0: Always enabled; 1: Disabled in ST OP mode; 2: Disabled in ST OP or MAN mode;
3: 8 alarms and always enabled; 4: 8 alarms and disabled in STOP mode;
5: 8 alarms and disabled in STOP or MAN mode.
• PV color mode (PCM) (for UT551, UT351, UT321 and UP351 only)
Set PV display color.
0: Fixed in green
1: Fixed in red
4-17
2: Link to alarm 1 (Alarm OFF: green, Alarm ON: red)
3: Link to alarm 1 (Alarm OFF: red, Alarm ON: green)
4: Link to alarm 1 and 2 (Alarm OFF: green, Alarm ON: red)
5: Link to alarm 1 and 2 (Alarm OFF: red, Alarm ON: green)
6: PV limit (Within PV range: green, Out of PV range: red)
7: PV limit (Within PV range: red, Out of PV range: green)
8: SP deviation (Within deviation: green, Out of deviation: red)
9: SP deviation (Within deviation: red, Out of deviation: green)
NOTE
The 8-alarm mode is unavailable when the controller mode is set for cascade control or
cascade control with two universal inputs.
● T o go back to the Setup Parameter Menu dialog box
Click OK or Cancel.
NOTE
Clicking Cancel will discard the changes made and return you to the Setup Parameter
Menu dialog box. This operation will not update the parameter settings.
IM 05G01B12-01E
5th Edition : 2005.03.25-00
Page 58

<T oc> <Ind> < 4. Setting Parameters >
4.3.5 Setting Control Functions (CTL)
This section explains setting parameters related to control functions.
● To open the Sets Control Operation-related Parameters dialog box
In the Setup Parameter Menu dialog box, click CTL.
Figure 4.3.5 Sets Control Operation-related Parameters Dialog Box (Example of UT551)
4-18
● Parameters to be set
In the example shown above, only loop-1 parameters are shown because single-loop
control is assumed. However, the following parameters are provided for both loop 1 and
loop 2.
• Output rate-of-change limiter (OPR) 0: OFF; 0.1 to 100%/second
• PID control mode (MOD) 0: Batch control; 1: Fixed-point control
• Anti-reset windup (AR) 0: AUT O; 50.0 to 200.0%
• Selects zone PID (ZON) 0: SP number/segment PID
1: Zone PID (selects by PV)
2: Zone PID (selects by target setpoint) (for UT551
only)
3: Selects by specified PID number. (operating
parameter P.NO) (for UT551 only)
• Restart mode (R.MD) Sets the controller condition upon power recovery
when a power failure longer than 2 seconds occurred.
0: Starts continuation; 1: Starts MAN; 2: Starts AUT O
• Restart timer (R.TM) 0 to 10 seconds
• PID group number (GRP) Sets the PID group number, each of which contains
SP, alarm, and PID parameters.
1 to 8: Specified number of PID groups will be shown
on the controller.
• Manual preset mode (M.MD) Selects the initial value of output in manual operation
when switching from automatic operation to manual
operation.
0: Automatic operation output at switching
(bumpless)
1: Manual preset output (MPO)
IM 05G01B12-01E
5th Edition : 2005.03.25-00
Page 59

<Toc> <Ind> < 4. Setting Parameters >
• Manual preset output (MPO) Selects the output value when switched to manual
operation.
-5.0 to 105.0 %
● T o go back to the Setup Parameter Menu dialog box
Click OK or Cancel.
NOTE
Clicking Cancel will discard the changes made and return you to the Setup Parameter
Menu dialog box. This operation will not update the parameter settings.
4.3.6 Setting Analog Input Computations (AIN)
This section explains setting parameters related to the computation of analog inputs 1 to 3.
● T o open the Sets Input Computing-related Parameters dialog box
4-19
In the Setup Parameter Menu dialog box, click AIN.
Figure 4.3.6 Sets Input Computing-related Parameters Dialog Box (Example of UT551)
● Parameters to be set
The following parameters are provided for each of the analog inputs 1 to 3.
• Analog input bias (A.BSn: n = 1 to 3) -100.0 to 100.0% of PV input range span
• Analog input filter (A.FLn: n = 1 to 3) 0: OFF; 1 to 120 seconds
• Analog input square-root computation (A.SRn: n = 1 to 3)
OFF, ON
• Analog input low signal cut off for square-root computation (A.LCn: n = 1 to 3)
0.0 to 5.0%
● T o go back to the Setup Parameter Menu dialog box
Click OK or Cancel.
NOTE
Clicking Cancel will discard the changes made and return you to the Setup Parameter
Menu dialog box. This operation will not update the parameter settings.
IM 05G01B12-01E
5th Edition : 2005.03.25-00
Page 60

<T oc> <Ind> < 4. Setting Parameters >
4.3.7 Setting Retransmission Outputs (RET)
This section explains setting parameters related to retransmission outputs 1 to 3.
● To open the Sets Retransmission Output-related Parameters dialog box
In the Setup Parameter Menu dialog box, click RET.
Figure 4.3.7 Sets Retransmission Output-related Parameters Dialog Box (Example of UT551)
● Parameters to be set
The following parameters are provided for each of the retransmission outputs 1 to 3.
• Retransmission output type (RETn: n = 1 to 3) 0 (OFF), 1 to 17
4-20
(Setting range depends on the model. See each user’s manual.)
• Maximum value of retransmission output scale (RTHn: n = 1 to 3)
RTH1&2: RTLn + 1 digit to 100% of PV input
range,
RTH3: RTLn + 1 digit to 100.0%
• Minimum value of retransmission output scale (RTLn: n = 1 to 3)
RTL1&2: 0.0% of PV input range span to RTHn
- 1 digit,
RTL3: 0.0% to R THn - 1 digit
● To go back to the Setup Parameter Menu dialog box
Click OK or Cancel.
NOTE
Clicking Cancel will discard the changes made and return you to the Setup Parameter
Menu dialog box. This operation will not update the parameter settings.
IM 05G01B12-01E
5th Edition : 2005.03.25-00
Page 61

<Toc> <Ind> < 4. Setting Parameters >
4.3.8 Setting Deviation T rend (TRND)
This section explains setting the deviation bandwidth used for deviation monitor lamp
display and the scale and data recording time interval for the deviation trend display .
● T o open the Sets Deviation T rend-related Parameters dialog box
In the Setup Parameter Menu dialog box, click TRND.
Figure 4.3.8 Sets Deviation Trend-related Parameters Dialog Box (Example of UT551)
● Parameters to be set
In the display example above, only loop-1 parameters are shown because single-loop
control is assumed here. However, the following parameters are provided for both loop 1
and loop 2.
4-21
• Deviation display band (DVBn: n = 1 to 3) 0.0 to 100.0% of PV input range
span
• Deviation trend display scale (TSCn: n = 1 to 3) 0.1 to 100.0% of PV input range
span
• Deviation trend display time (TTM) 1 to 600 seconds
● T o go back to the Setup Parameter Menu dialog box
Click OK or Cancel.
NOTE
Clicking Cancel will discard the changes made and return you to the Setup Parameter
Menu dialog box. This operation will not update the parameter settings.
IM 05G01B12-01E
5th Edition : 2005.03.25-00
Page 62

<T oc> <Ind> < 4. Setting Parameters >
4.3.9 Setting Security (LOCK)
This section explains setting whether to enable or disable the GREEN Series controller’s
specific main menu displays and some of the operation keys.
● To open the Sets Security-related Parameters dialog box
In the Setup Parameter Menu dialog box, click LOCK.
Figure 4.3.9 Sets Security-related Parameters Dialog Box (Example of UT551)
4-22
● Parameters to be set
• Front panel data setting keys lock (L-DAT) OFF, ON
• Front panel A/M key lock (L-A/M) OFF, ON
• Operating parameter main menu MODE menu lock (L-MODE) OFF, ON
• Operating parameter main menu LP1 menu lock (L-LP1) OFF, ON
• Operating parameter main menu LP2 menu lock (L-LP2) OFF, ON
• Operating parameter main menu PID menu lock (L-PID) OFF, ON
• Operating parameter main menu USR menu lock (L-USR) OFF, ON
• Operating parameter main menu PY1 menu lock (PY1) OFF , ON
• Operating parameter main menu PY2 menu lock (PY2) OFF , ON
● To go back to the Setup Parameter Menu dialog box
Click OK or Cancel.
NOTE
Clicking Cancel will discard the changes made and return you to the Setup Parameter
Menu dialog box. This operation will not update the parameter settings.
IM 05G01B12-01E
5th Edition : 2005.03.25-00
Page 63

<Toc> <Ind> < 4. Setting Parameters >
4.3.10 Configuring SELECT Displays (CSEL)
If you wish to display certain operating parameters on the controller during operation,
register them as SELECT displays.
● T o open the SELECT Display Registration dialog box
In the Setup Parameter Menu dialog box, click CSEL.
Figure 4.3.10 SELECT Display Registration Dialog Box (Example of UT551)
● Parameters to be set
4-23
• SELECT display registration (C.Sn: n = 1 to 5)
Y ou can add up to 5 SELECT displays in the operating displays.
The operating parameters that can be registered will be listed in the D-register List
dialog box by their D-register names.
Set the parameters in the following steps:
(1) Click the text box of the SELECT display registration parameter you wish to set.
(2) The D-register List dialog box opens.
(3) Click the setup parameter or the operating parameter (D-register name) you wish to
register.
(4) Click OK.
(To close the D-register List dialog box, click Cancel.)
(5) In the text box of the SELECT display registration parameter , the set-up parameter or
the operating parameter (D-register name) appears, and in the guidance box, the Dregister number appears.
● T o go back to the Setup Parameter Menu dialog box
Click OK or Cancel.
NOTE
Clicking Cancel will discard the changes made and return you to the Setup Parameter
Menu dialog box. This operation will not update the parameter settings.
See Also
GREEN Series Communication Functions user’s manual (IM 05G01B02-01E) or Ethernet Communication Functions user’s manual (IM 05G01B52-01E) for setup parameters, operating parameters and Dregister numbers. The correspondence between D-register names and numbers is given in the chapter
“Functions and Usage of D-registers” for each controller model.
IM 05G01B12-01E
5th Edition : 2005.03.25-00
Page 64

<T oc> <Ind> < 4. Setting Parameters >
4.3.1 1 Configuring Contact Outputs (DO)
This section explains assigning functions to the contact outputs (DO1 to 7, RDO151 to 158
and RDO251 to 258).
NOTE
The registration of contact output should be performed only by personnel with sufficient
understanding of the GREEN Series controller’s functions and custom computation function. Note that changing the contact output configuration will change the pre-assigned
contact output functions provided by the controller mode setting.
● To open the Registration of Contact Output dialog box
In the Setup Parameter Menu dialog box, click DO.
4-24
Figure 4.3.11 Registration of Contact Output Dialog Box (Example of UT551)
● Parameters to be set
(1) Click the text box of any parameter you wish to set.
(2) The Register List dialog box opens.
(3) Click the relay and output module you wish to register.
(4) Click OK.
● To go back to the Setup Parameter Menu dialog box
Click OK or Cancel.
NOTE
Clicking Cancel will discard the changes made and return you to the Setup Parameter
Menu dialog box. This operation will not update the parameter settings.
See Also
GREEN Series User’s Manual (Reference) (IM 05D01A02-01E) for contact output function assignments
by the controller mode.
To see descriptions of D registers and I relays, click D-Register I-relay explanation.
IM 05G01B12-01E
5th Edition : 2005.03.25-00
Page 65

<Toc> <Ind> < 4. Setting Parameters >
4.3.12 Configuring Contact Inputs (DI)
This section explains assigning functions to the contact inputs (DI1 to DI7). DI 8 is provided
for UT550, UT551, UT520 and UP550 only .
NOTE
The registration of contact input should be performed only by personnel with sufficient
understanding of the GREEN Series controller’s functions and custom computation function. Note that changing the contact input configuration will change the pre-assigned
contact input functions provided by the controller mode setting.
● T o open the Registration of Contact Input dialog box
In the Setup Parameter Menu dialog box, click DI.
4-25
Figure 4.3.12 Registration of Contact Input Dialog Box (Example of UT551)
● Parameters to be set
(1) Click the text box of any parameter you wish to set.
(2) The Register List dialog box opens.
(3) Click the relay and output module you wish to register.
(4) Click OK. (To close the Register List dialog box, Click Cancel.)
For UT551, set the following setting items.
• AUT : Switchs to AUT O mode by rising edge switching of the external contact input.
• MAN: Switchs to MAN mode by rising edge switching of the external contact input.
• PN.0 to PN.3: Selects PID number by bit configuration of the external contact input.
• REM: Switchs to REMOTE mode by rising edge switching of the external contact
input.
• LCL: Switchis to LOCAL mode by rising edge switching of the external contact.
IM 05G01B12-01E
5th Edition : 2005.03.25-00
Page 66

<T oc> <Ind> < 4. Setting Parameters >
● To set messages 1 to 4
For UT750, UP750, and UP550, interruptive messages can be set.
• Message 1 to 4: Set display messages with no more than 20 alphanumeric characters.
● To go back to the Setup Parameter Menu dialog box
Click OK or Cancel.
NOTE
Clicking Cancel will discard the changes made and return you to the Setup Parameter
Menu dialog box. This operation will not update the parameter settings.
See Also
GREEN Series User’s Manual (Reference) (IM 05D01A02-01E) for contact input function assignments by
the controller mode.
To see descriptions of D registers and I relays, click D-Register I-relay explanation.
For details on the interruptive message display function, see GREEN Series User’s Manual (Reference)
(IM 05D01A02-01E).
4-26
IM 05G01B12-01E
5th Edition : 2005.03.25-00
Page 67

<Toc> <Ind> < 4. Setting Parameters >
4.3.13 Setting Units for T en-segment Linearizers (C. PYS)
Set units for the input/output of ten-segment linearizer 1 and 2. (Old Green series)
● T o open the Ten-segment Linearizer I/O Unit Setting dialog box
In the Setup Parameter Menu dialog box, click C.PYS.
Figure 4.3.13 T en-segment Linearizer I/O Unit Setting Dialog Box (Example of UT551)
● Parameters to be set
• T en-segment linearizer input unit (PYAn: n = 1, 2)
4-27
0 to 15: See below for the corresponding units.
• T en-segment linearizer output unit (PYBn: n = 1, 2)
0 to 15: See below for the corresponding units.
0: %; 1: ABS0; 2: ABS1; 3: ABS2; 4: ABS3; 5: ABS4; 6: EU(AIN1); 7: EUS(AIN1); 8:
EU(AIN2); 9: EUS(AIN2); 10: EU(AIN3); 1 1: EUS(AIN3); 12: EU(PV1); 13: EUS(PV1);
14: EU(PV2); 15: EUS(PV2)
● T o go back to the Setup Parameter Menu dialog box
Click OK or Cancel.
NOTE
Clicking Cancel will discard the changes made and return you to the Setup Parameter
Menu dialog box. This operation will not update the parameter settings.
IM 05G01B12-01E
5th Edition : 2005.03.25-00
Page 68

<T oc> <Ind> < 4. Setting Parameters >
4.3.14 Setting Communication Protocol
■ When Using RS485 Terminals
Set communication conditions for the RS-485 terminals.
● To open the Communication Protocol Selection dialog box
In the Setup Parameter Menu dialog box, click R485.
Figure 4.3.14 Communication Protocol Selection Dialog Box (Example of UT551)
● Parameters to be set
4-28
• Protocol selection-1 (PSL1) 0: PC-link; 1: PC-link with checksum; 2: Ladder;
3: Coordinated master station;
4: Coordinated slave station;
7: MODBUS (ASCII); 8: MODBUS (RTU);
9: Coordinated master station (2-loop mode);
10: Coordinated slave station (loop-1 mode);
1 1: Coordinated slave station (loop-2 mode)
• Protocol selection-2 (PSL2) 0: PC-link; 1: PC-link with checksum; 2: Ladder;
3: Coordinated master station;
4: Coordinated slave station;
5: I/O expansion (for single-controller applications);
6: I/O expansion (for dual-controller applications);
9: Coordinated master station (2-loop mode);
10: Coordinated slave station (loop-1 mode);
1 1: Coordinated slave station (loop-2 mode);
• Communication rate-1 (BPS1) 0:600; 1:1200; 2:2400; 3:4800; 4:9600 bps
• Communication rate-2 (BPS2) 0:600; 1:1200; 2:2400; 3:4800; 4:9600; 5:19200;
6:38400 bps
• Parity (PRIn: n = 1, 2) 0:NONE; 1:EVEN; 2:ODD
• Stop bit (STPn: n = 1, 2) 1, 2
• Data length 1 (DLN1) 7, 8; always 7 with MODBUS (ASCII)
Always 8 with MODBUS (RTU) or ladder communication.
• Data length 2 (DLN2) 7, 8; always 8 with ladder communication
• Communication address (ADRn: n = 1, 2) 1 to 99 (however , the max. number of
connectable units is 32)
• Minimum response time (RP. Tn: n = 1, 2) 0 to 10 (× 10 ms)
● To go back to the Setup Parameter Menu dialog box
Click OK or Cancel.
IM 05G01B12-01E
5th Edition : 2005.03.25-00
Page 69

<Toc> <Ind> < 4. Setting Parameters >
NOTE
Clicking Cancel will discard the changes made and return you to the Setup Parameter
Menu dialog box. This operation will not update the parameter settings.
NOTE
If you select T erminal communication as the communication port of the LL100 tool, the
RS-485 parameter setting file will not be downloaded to the controller . The RS-485 parameter data will be downloaded only when Front communication is selected. To use the
LL100 tool with terminal communication, set the RS-485 communication protocol of the
target controller to “PC link.” Communication is not possible using another protocol.
■ When Using Ethernet T erminals
(1) Setting parameters via front communication of the controller using Light loader adapter
4-29
1) Start the LL100.
2) The Tool Selection dialog box appears. Select Parameter Setting T ool and click OK.
3) The Select Series dialog box appears. Select a controller model and click OK.
4) The New/Change Selection dialog box appears. Select New and click OK.
5) The Model/Specification Code Selection dialog box appears. Select the desired
specification code and optional specification code and click OK.
6) The Sets Input/Output dialog box appears. Set the required values to the parameters
such as Input type, PV input range and Control output 1 type. Then click OK.
7) The Menu dialog box appears. Click Ethernet, and then the Sets Ethernet Parameters dialog box appears. Set the High-speed response mode, parity , port number , IP
address, subnet mask, default gateway , parity and port number of the controller. The
initial values are as follows.
High-speed response mode: 1; Parity: EVEN; Port number: 01F6 in hexadecimal,
502 in decimal; IP address: 192.168.1.1: Subnet mask: 255.255.255.0; Default
gateway: 0.0.0.0
* Ask the system administrator for the settings of the network you are connecting to.
8) Set the setup parameters, operating parameters and PID parameters which are to be
set to the controller.
9) On the menu bar, click File then choose Save As. Enter a file name, and then click
Save to save the settings to the personal computer.
IM 05G01B12-01E
5th Edition : 2005.03.25-00
Page 70

<T oc> <Ind> < 4. Setting Parameters >
10) Connect the controller to the personal computer using Light loader adapter and
cable.
1 1) On the menu bar, click Communication then choose Download to controller to
download the settings via front communication.
Perform Upload from controller, Parameter Comparing and Tuning if required.
NOTE
When downloading the parameter data to the controller, the values set in the Sets Ethernet
Parameters dialog box are downloaded to the Ethernet parameters of the controller. Be
sure to confirm that the values set in the Sets Ethernet Parameters dialog box are appropriate.
(2) Setting parameters directly via enclosure of Local Area Network without using Light
loader adapter
1) Connect the controller to the enclosure of LAN.
2) Set the parity , port number , IP address, subnet mask and default gateway of the
controller using key operations. See the user’s manual for controllers with Ethernet
communication about the operation of the controller.
* Ask the system administrator for the settings of the network you are connecting to.
4-30
3) Set the network settings of the personal computer.
* Ask the system administrator for how to set the network.
4) Start the LL100.
5) The Tool Selection dialog box appears. Select Parameter Setting T ool and click OK.
6) The Select Series dialog box appears. Select a controller model and click OK.
7) The New/Change Selection dialog box appears. Select New and click OK.
8) The Model/Specification Code Selection dialog box appears. Select the desired
specification code and optional specification code and click OK.
9) The Sets Input/Output dialog box appears. Set the required values to the parameters
such as Input type, PV input range and Control output 1 type. Then click OK.
10) The Menu dialog box appears. Click Ethernet, and then the Sets Ethernet Parameters dialog box appears. Set the High-speed response mode, parity , port number , IP
address, subnet mask, default gateway , parity and port number of the controller . The
initial values are as follows.
High-speed response mode: 1; Parity: EVEN; Port number: 01F6 in hexadecimal,
502 in decimal; IP address: 192.168.1.1; Subnet mask: 255.255.255.0; Default
gateway: 0.0.0.0
* Ask the system administrator for the settings of the network you are connecting to.
1 1) Set the setup parameters, Operating parameters and PID parameters which are to
be set to the controller.
IM 05G01B12-01E
5th Edition : 2005.03.25-00
Page 71

<Toc> <Ind> < 4. Setting Parameters >
12) On the menu bar, click File then choose Save As . Enter a file name, and then click
Save to save the settings to the personal computer.
13) On the menu bar, click Communication then choose Download to controller to
download the settings via terminal communication.
Perform Upload from controller, Parameter Comparing and Tuning if required.
NOTE
When downloading the parameter data to the controller, the values set in the Sets Ethernet
Parameters dialog box are downloaded to the Ethernet parameters of the controller . Therefore the values set to the controller in step 2 will be replaced with the values set in the Sets
Ethernet Parameters dialog box after the downloading is completed. Be sure to confirm
that the values set in the Sets Ethernet Parameters dialog box are appropriate.
4.3.15 Confirming Specification Code, Controller Mode, IN, and OUT Parameter Settings
Y ou can confirm the current settings of the basic parameters (specification code, controller
mode, analog input, and control output related parameters) in the following dialog box.
4-31
● T o open the Conforms to Specification Code, IN/OUT dialog box
In the Setup Parameter Menu dialog box, click Conforms to specification code, IN/OUT.
Figure 4.3.15 Conforms to Specification Code, IN/OUT Dialog Box (Example of UT551)
● Parameters to be confirmed
• Specification code
• Controller mode (except the 400 series)
• PV input-related parameters (IN)
• Control output-related parameters (OUT)
IM 05G01B12-01E
5th Edition : 2005.03.25-00
Page 72

<T oc> <Ind> < 4. Setting Parameters >
● To go back to the Setup Parameter Menu dialog box
Click OK.
● To change the settings after confirmation
(1) Go back to the Setup Parameter Menu dialog box.
(2) On the menu bar, click Parameter setting and choose the following:
• Model/specification code selection, to change the specification code
GREEN series model names can’t be changed to old GREEN series model names.
• Controller mode setting, to change the controller mode
• IN parameter setting, to change the IN parameters
• OUT/VALV parameter setting, to change the OUT/VALV parameters
(3) Change the parameter settings in each dialog box.
NOTE
Note that changing the controller mode and the IN parameter will initialize all parameters
other than the controller mode, the IN parameters and the RS-485 parameters. You must
therefore be careful not to change the controller mode accidentally .
4-32
IM 05G01B12-01E
5th Edition : 2005.03.25-00
Page 73

<Toc> <Ind> < 4. Setting Parameters >
4.4 Setting Operating Parameters
This section describes the operations concerning the Operating Parameter Menu dialog
box.
4.4.1 Operating Parameter Menu Configuration
Figure 4.4.1 shows the configuration of the operating parameter menu.
See Also
Section 1.4 for information about show/hide of operating parameters of each model.
4-33
Operating Parameter Menu
To setup parameter menu
dialog box
Operating parameter
LP1,LP2
PID
PYS1,2
(See section 4.4.2.)
LOC
AL
PAR
USR
Sets Operating Parameter
dialog box (400 series only)
Sets Local Setpoint dialog box
Sets Instrument Alarm Setpoint
Sets Operation-related
Parameters dialog box
Sets PID Parameters
User Parameter Setting
Ten-segment Linearizer I/O
Setup Parameter Menu
Figure 4.4.1 Operating Parameter Menu Configuration
dialog box
dialog box
Display dialog box
Setting dialog box
dialog box
(See section 4.4.3)
(See section 4.4.4)
(See section 4.4.5)
(See section 4.4.6)
(See section 4.4.7)
(See section 4.4.8)
(See section 4.4.9)
(See section 4.3)
IM 05G01B12-01E
5th Edition : 2005.03.25-00
Page 74

<T oc> <Ind> < 4. Setting Parameters >
4.4.2 Operating Parameter Menu
From the Operating Parameter Menu dialog box, you can open individual operating parameter setting dialog boxes.
4-34
Figure 4.4.2 Operating Parameter Menu Dialog Box (Example of UT551)
● To open the Operating Parameter Menu dialog box
The menu can be opened in 2 ways:
• In the Setup Parameter Menu dialog box, click To operating parameter.
• In the menu bar, click Parameter setting, and then choose Operating parameter
setting.
(This operation is only possible when Parameter setting is shown in the menu bar.)
● To open individual operating parameter setting dialog boxes
Click one of the menu buttons (Operating parameter, LOC, ... , and PYS1,2).
→ The parameter setting dialog box of the clicked button opens.
● To open a dialog box other than those for operating parameter setting
In the Operating Parameter Menu, click T o setup parameter menu.
→ The Setup Parameter Menu dialog box opens.
4.4.3 Setting Operating Parameters
Set the operating parameters for UT450/UT420.
● To open the Sets Operating Parameter dialog box
In the Operating Parameter Menu dialog box, click Operating parameter.
IM 05G01B12-01E
5th Edition : 2005.03.25-00
Page 75

<Toc> <Ind> < 4. Setting Parameters >
Figure 4.4.3 Sets Operating Parameter Dialog Box (Example of UT450)
● Parameters to be set
4-35
• Alarm setpoint (An: n = 1 to 4)
For PV/SP alarms: -100.0 to 100.0% of PV input range
For deviation alarms: -100.0 to 100.0% of PV input range span
For timer alarm (alarm 1 only): 00.00 to 99.59 (hh.mm or mm.ss)
For output alarms: -5.0 to 105.0%
• On/off of “super” function (SC)
0: OFF; 1: Overshoot suppressing function; 2: Hunting suppressing function (Stable
mode); 3: Hunting suppressing function (Response mode)
NOTE
Even if you set parameter SC to “ON,” the super function will not operate unless the parameters for PID computation — P (proportional band), I (integral time), and D (derivative time)
— are all set.
• PV input filter (FL)
Set 0 (OFF) or an optional value within the range of 1 to 120 seconds.
• PV input bias (BS)
Set an optional value within the range of -100.0 to 100.0% of PV input range span.
• Setpoint ramp-up rate (UPR)
Set an optional value within the range of 0.0% + 1 digit to 100.0% of PV input range
span.
• Setpoint ramp-down rate (DNR)
Set an optional value within the range of 0.0% + 1 digit to 100.0% of PV input range
span.
• Ratio setting (RT)
Set an optional value within the range of 0.001 to 9.999.
IM 05G01B12-01E
5th Edition : 2005.03.25-00
Page 76

<T oc> <Ind> < 4. Setting Parameters >
• Remote input bias (RBS)
Set an optional value within the range of -100.0 to 100.0% of PV input range span
(EUS).
• Remote input filter (RFL)
Set 0 (OFF) or an optional value within the range of 1 to 120 seconds.
• ON/OFF rate detection band (ORB): 0.0 to 100.0% of PV input range span
• ON/OFF rate high limit (ORH): ORL + 1 digit to 105.0%
• ON/OFF rate low limit (ORL): -5.0% to ORH - 1 digit
• T arget setpoint (n.SP: n = 1 to 8 (PID number)): 0.0 to 100.0% of PV input range
● To go back to the Operating Parameter Menu dialog box
Click OK or Cancel.
NOTE
Clicking Cancel will discard the changes made and return you to the Operating Parameter
Menu dialog box. This operation will not update the parameter settings.
4-36
4.4.4 Setting Local Setpoint (LOC)
Set the parameters involved in the local mode operation. (for UP550 and UP750 only .)
● To open the Sets Local Setpoint dialog box
In the Operating Parameter Menu dialog box, click LOC.
Figure 4.4.4 Sets Local Setpoint Dialog Box (Example of UP750)
IM 05G01B12-01E
5th Edition : 2005.03.25-00
Page 77

<Toc> <Ind> < 4. Setting Parameters >
● Parameters to be set
In this dialog box, you can set parameters used for local mode operation of UP750/UP550:
the local setpoint and the types and setpoints for local events (used as PV events).
• Local setpoint (LSPn: n = 1, 2): 0.0 to 100.0% of PV input range
• Local event (EVn: n = 21 to 28): Local event type
0 to 10, 28 to 31, 41 to 50, 68 to 71
Each of these values represents the following:
0: OFF
1: PV high limit
2: PV low limit
3: high limit deviation
4: low limit deviation
5: high limit deviation, de-energized during alarm
6: low limit deviation, de-energized during alarm
7: deviation of high or low limits
8: high and low limits within deviation
9: PV high limit, de-energized during alarm
10: PV low limit, de-energized during alarm
28: SP high limit
29: SP low limit
30: Control output high limit
31: Control output low limit
4-37
• Local event setpoint
PV/SP events: -100.0 to 100.0% of PV input range
Deviation events: -100.0 to 100.0% of PV input range span
Control output events: -5 to 105.0%
● T o go back to the Operating Parameter Menu dialog box
Click OK or Cancel.
NOTE
Clicking Cancel will discard the changes made and return you to the Operating Parameter
Menu dialog box. This operation will not update the parameter settings.
IM 05G01B12-01E
5th Edition : 2005.03.25-00
Page 78

<T oc> <Ind> < 4. Setting Parameters >
4.4.5 Setting Instrument Alarms (AL)
Set the instrument alarm setpoints. (for UP550 and UP750 only .)
● To open the Sets Instrument Alarm Setpoint dialog box
In the Operating Parameter Menu dialog box, click AL.
Figure 4.4.5 Sets Instrument Alarm Setpoint Dialog Box (Example of UP750)
● Parameters to be set
• Instrument alarm setpoint (An: n = 1 to 4)
PV/SP alarms: -100.0 to 100.0% of PV input range
4-38
Deviation alarms: -100.0 to 100.0% of PV input range span
Timer alarms (A1 only): 00.00 to 99.59 (hh.mm or mm.ss)
Output alarms: -5.0 to 105.0%
● To go back to the Operating Parameter Menu dialog box
Click OK or Cancel.
NOTE
Clicking Cancel will discard the changes made and return you to the Operating Parameter
Menu dialog box. This operation will not update the parameter settings.
IM 05G01B12-01E
5th Edition : 2005.03.25-00
Page 79

<Toc> <Ind> < 4. Setting Parameters >
4.4.6 Setting Operation-related Parameters (P AR)
Set operating parameters.
● T o open the Sets Operation-related Parameters dialog box
In the Operating Parameter Menu dialog box, click PAR.
Figure 4.4.6 Sets Operation-related Parameters Dialog Box (Example of UT551)
4-39
● Parameters to be set
● Parameter for better controllability
• On/off of “super” function selection (SC)
0: OFF; 1: Overshoot suppressing function; 2: Hunting suppressing function (Stable
mode); 3: Hunting suppressing function (Response mode)
NOTE
Even if you set parameter SC to “ON,” the super function will not operate unless the parameters for PID computation — P (proportional band), I (integral time), and D (derivative time)
— are all set.
● Parameters related to PV calculation
These parameters set the factors of calculation provided for PV .
• PV input bias (BS)
Set an optional value within the range of -100.0 to 100.0% of PV input range span.
• PV input filter (FL)
Set 0 (OFF) or an optional value within the range of 1 to 120 seconds.
● Parameters related to SP calculation
These parameters are used in combination with the setup parameter TMU (time unit for
ramp-rate setting) and set the amount of SP change rate in order to prevent sudden
changes during SP changing operation.
• Setpoint ramp-up rate setting (UPR)
Set an optional value within the range of 0.0% + 1 digit to 100.0% of PV input range
span.
IM 05G01B12-01E
5th Edition : 2005.03.25-00
Page 80

<T oc> <Ind> < 4. Setting Parameters >
• Setpoint ramp-down rate setting (DNR)
Set an optional value within the range of 0.0% + 1 digit to 100.0% of PV input range
span.
● Parameters related to calculation for input
These parameters set the factors of calculation provided for input.
• Ratio setting (RT)
Set an optional value within the range of 0.001 to 9.999.
• Remote input bias (RBS)
Set an optional value within the range of -100.0 to 100.0% of PV input range span.
• Remote input filter (RFL)
Set 0 (OFF) or an optional value within the range of 1 to 120 seconds.
● Parameters related to ON/OFF rate calculation
These parameters set detection band and limit values for ON/OFF rate.
• ON/OFF rate detection band (ORB): 0.0 to 100.0% of PV input range span
4-40
• ON/OFF rate high limit (ORH): ORL + 1 digit to 105.0%
• ON/OFF rate low limit (ORL): -5.0% to ORH - 1 digit
● To go back to the Operating Parameter Menu dialog box
Click OK or Cancel.
NOTE
Clicking Cancel will discard the changes made and return you to the Operation Parameter
Menu dialog box. This operation will not update the parameter settings.
IM 05G01B12-01E
5th Edition : 2005.03.25-00
Page 81

<Toc> <Ind> < 4. Setting Parameters >
4.4.7 Setting PID Group Parameters
In the display example below, only loop-1 parameters are shown because single-loop
control is assumed. However, PID group parameters are provided for both loop 1 and loop
2.
● T o open the Sets PID Parameters dialog box
In the Operating Parameter Menu dialog box, click PID.
4-41
Figure 4.4.7 Sets PID Parameters Dialog Box (Example of UT551)
● Parameters to be set
For each loop, up to eight groups of parameter settings can be preset under the group
names of 1.PID to 8.PID. The number of PID groups shown depends on the value of setup
parameter GRP (see section 4.3.5). Each PID group contains the following parameters,
though some of the parameters differ between controller models.
Parameters unnecessary for the selected controller model and controller mode are displayed with “—” in their text boxes.
• T arget setpoint (n.SP, where n = 1 to 8: PID No.)
0.0 to 100.0% of PV input range
• Alarm setpoint (n.Am, where n = 1 to 8: PID No.; m = 1 to 4)
PV/SP alarms: -100.0 to 100.0% of PV input range
Deviation alarms: -100.0 to 100.0% of PV input range span
Timer alarms (A1 only): 00.00 to 99.59 (hh.mm or mm.ss)
Output alarms: -5.0 to 105.0%
• Proportional band (n.P, where n = 1 to 8: PID No.)
0.1 to 999.9 % (0.0 to 999.9 % for heating/cooling control)
• Integral time (n.I, where n = 1 to 8: PID No.)
0: OFF, 1 to 6000 sec
IM 05G01B12-01E
5th Edition : 2005.03.25-00
Page 82

<T oc> <Ind> < 4. Setting Parameters >
• Derivative time (n.D, where n = 1 to 8: PID No.)
0: OFF, 1 to 6000 sec
• Output high limit (n.OH, where n = 1 to 8: PID No.)
-0.5 to 105.0 % (0.0 to 105.0 % for heating side)
• Output low limit (n.OL, where n = 1 to 8: PID No.)
-5.0 % to 10.0% (0.0 to 105.0 % for cooling side)
• Manual reset (n.MR, where n = 1 to 8: PID No.)
-5.0 to 105.0%
• Direct/reverse action switching (n.DR, where n = 1 to 8: PID No.)
0: Reverse action, 1: Direct action
• Preset output (n.PO, where n = 1 to 8: PID No.)
-5.0 to 105.0 %
● To copy PID parameter settings
Y ou can copy parameter settings between PID groups for the same loop.
4-42
Example of operation
(1) At the Source PID, click the arrow button and select “1.PID.”
(2) At the Copy destination PID, click the arrow button and select “4.PID.”
(3) Click Executes copy.
(4) The settings of 1.PID parameters are copied to 4.PID parameters.
● To go back to the Operating Parameter Menu dialog box
Click OK or Cancel.
NOTE
Clicking Cancel will discard the changes made and return you to the Operating Parameter
Menu dialog box. This operation will not update the parameter settings.
IM 05G01B12-01E
5th Edition : 2005.03.25-00
Page 83
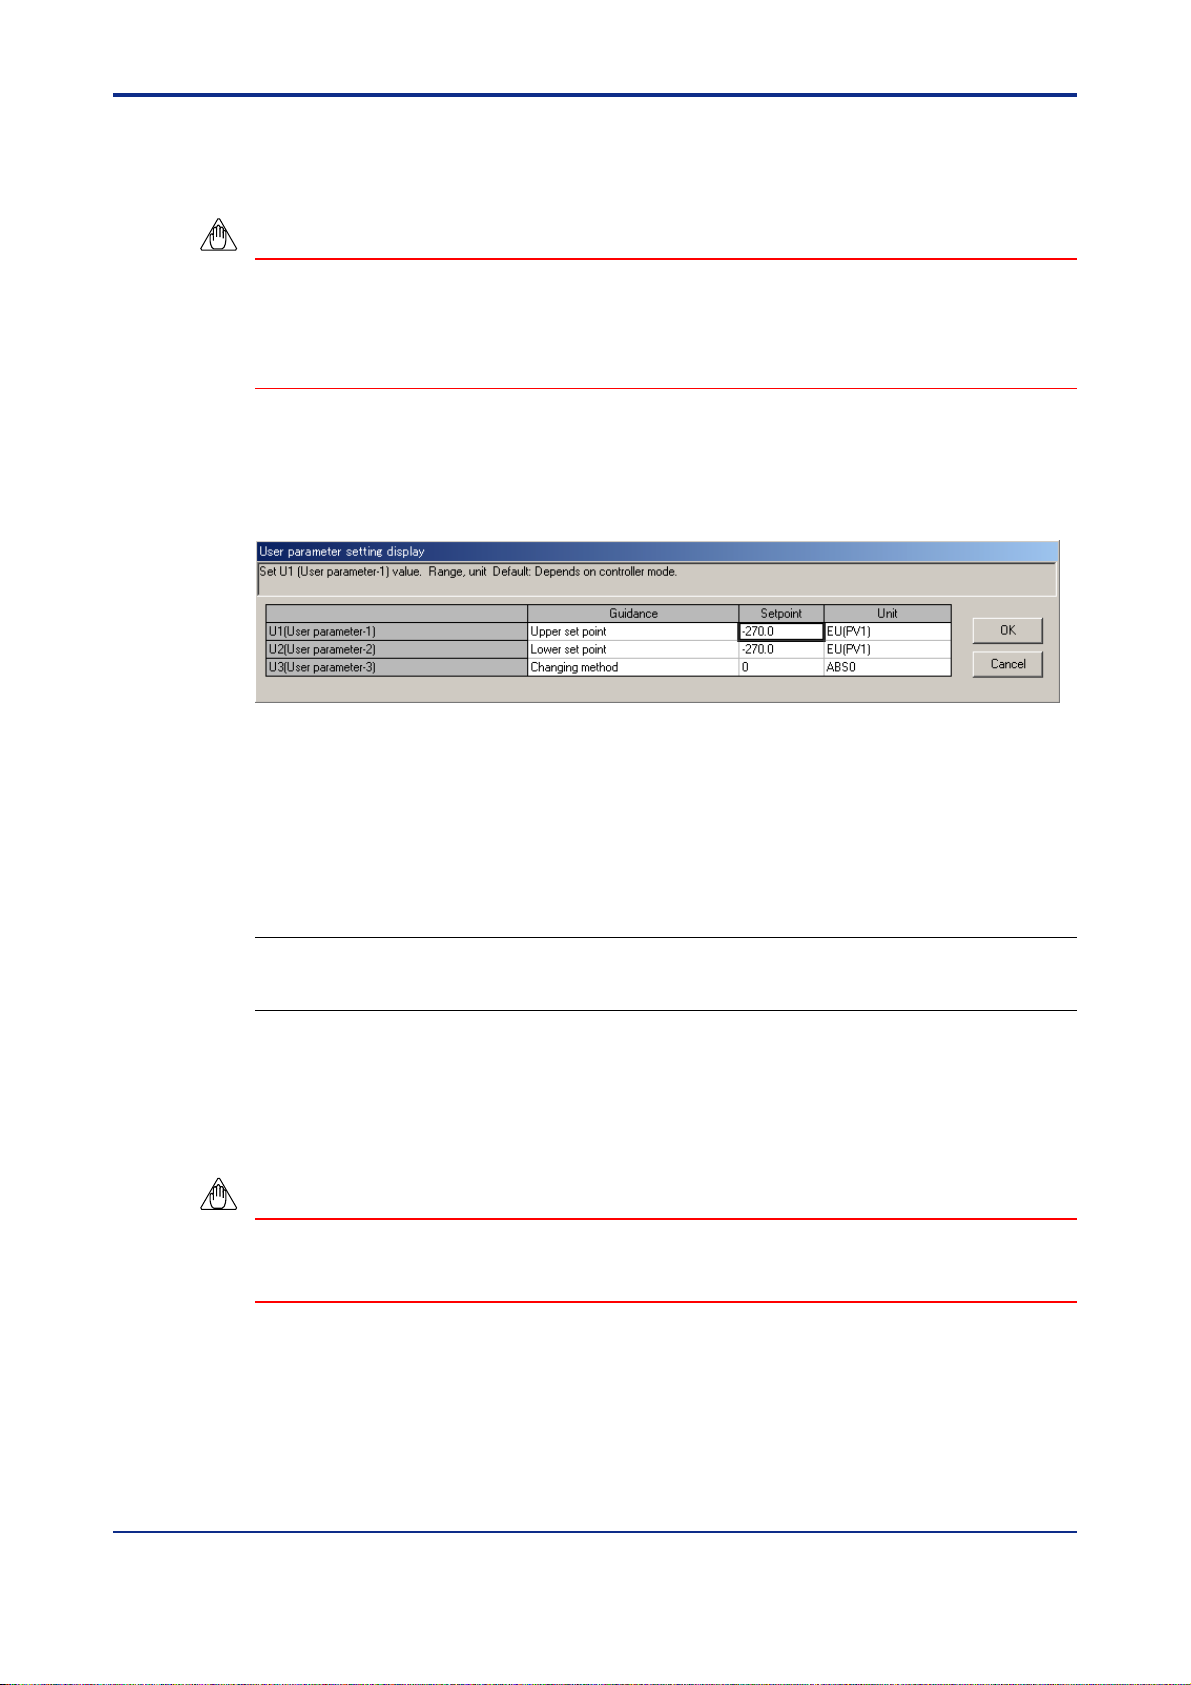
<Toc> <Ind> < 4. Setting Parameters >
4.4.8 Setting User Parameters (USR)
Set the user parameters.
NOTE
Units for user parameters can be set only when the controller mode 21 (custom computation control) is selected. The units must be set identical to the user parameter units specified using the custom computation building tool. If not, the user parameter data will not be
downloaded to the target controller.
● T o open the User Parameter Setting Display dialog box
In the Operating Parameter Menu dialog box, click USR.
4-43
Figure 4.4.8 User Parameter Setting Display Dialog Box
● Parameters to be set
• USER parameter (Un: n = 1 to 8)
U4 to U8 is for models UT750 and UP750 only .
See Also
Section 4.6 in the LL200 PC-based Custom Computation Building Tool user’s manual (IM 05G01B2202E) for the USER parameter units.
● T o go back to the Operating Parameter Menu dialog box
Click OK or Cancel.
NOTE
Clicking Cancel will discard the changes made and return you to the Operating Parameter
Menu dialog box. This operation will not update the parameter settings.
IM 05G01B12-01E
5th Edition : 2005.03.25-00
Page 84

<T oc> <Ind> < 4. Setting Parameters >
4.4.9 Setting Ten-segment Linearizer 1 and 2 (PYS1, 2)
Set the input/output parameters for ten-segment linearizer 1 and 2.
● To open the Ten-segment Linearizer I/O Setting dialog box
In the Operating Parameter Menu dialog box, click PYS1,2.
4-44
Figure 4.4.9 Ten-segment Linearizer I/O Setting Dialog Box (Example of UT551)
● Parameters to be set
The following parameters are provided for each of ten-segment linearizer 1 and 2.
• T en-segment linearizer input (n.Am: n =1 to 2, m = 1 to 11): -66.7 to 105.0% of PV
input range
• T en-segment linearizer output (n.Bm: n =1 to 2, m = 1 to 11):
-66.7 to 105.0% of PV input range
-66.7 to 105.0% of PV input range span
• T en-segment linearizer mode (n.PMD: n = 1 to 2):
Select ten-segment linearizer biasing (0) or approximation (1).
● To go back to the Operating Parameter Menu dialog box
Click OK or Cancel.
NOTE
Clicking Cancel will discard the changes made and return you to the Operating Parameter
Menu dialog box. This operation will not update the parameter settings.
IM 05G01B12-01E
5th Edition : 2005.03.25-00
Page 85

<Toc> <Ind> < 4. Setting Parameters >
4.5 Parameter Menu for 300 Series
This section describes how to make settings in the Menu dialog box for the 300
series of controllers.
4.5.1 Configuration of Menu Dialog Box
Figure 4.5.1 shows the configuration of the Menu dialog box.
Menu dialog box
Setup parameter
4-45
Setup parameter
*UT351-xA/UT351-x3 only
Ethernet parameter
Operating parameter
Operating parameter
PID
*UP350/UP351 only
Program pattern
parameter
PRG1 pattern
PRG2 pattern
Confirms input/output parameter
Setup Parameter dialog box
(See Sections 4.3.5, 4.3.7, 4.3.9,
4.3.10, and 4.3.12.)
Ethernet Parameter dialog box
(See Sections 4.13.14)
Operating Parameter
dialog box
PID dialog box
PRG1 Pattern
dialog box
PRG2 Pattern
dialog box
Conforms to Specification Code,
IN/OUT dialog box
(See Section 4.5.4.)
(See Section
4.4.6.)
(See Section
4.4.7.)
(See Section
4.5.4.)
(See Section
4.5.4.)
Figure 4.5.1 Parameter Menu Configuration
IM 05G01B12-01E
5th Edition : 2005.03.25-00
Page 86

<T oc> <Ind> < 4. Setting Parameters >
4.5.2 Parameter Menu
Shown below is the Parameter Menu dialog box for the 300 series. From this dialog box,
you can open dialog boxes for setting individual settings.
4-46
Figure 4.5.2 Parameter Menu Dialog Box (Example of UP350)
● To open the Parameter Menu dialog box
The menu can be opened in 3 ways:
• In the Sets Input/Output dialog box, click OK.
• The menu opens after parameter data has been loaded from a controller.
• The menu opens after the Open User File dialog box.
● To open a parameter setting dialog box
Click one of the buttons in the upper part of the dialog box (Setup parameter, Operating
parameter, etc.).
→ The corresponding parameter setting dialog box appears.
● To view the input/output parameter settings
Click Confirms input/output parameter.
→ The Conforms to Specification Code, Controller Mode, IN/OUT dialog box appears.
IM 05G01B12-01E
5th Edition : 2005.03.25-00
Page 87

<Toc> <Ind> < 4. Setting Parameters >
4.5.3 Setting Patterns PRG1 and PRG2 (for UP350 and UP351 only)
Set parameters for PRG1 and PRG2 patterns in the following way .
● T o open the PRG1 Sets Program Pattern dialog box or PRG2 Sets Program
Pattern dialog box
In the Parameter Menu dialog box, click PRG1 pattern or PRG2 pattern.
4-47
Figure 4.5.3 PRG1 Sets Program Pattern Dialog Box
● Parameters to be set
SEG.T, TMU, WIT .Z and WIT.T are common parameters and their settings are common to
PRG1 and PRG2.
The following parameters exist for both PRG1 and PRG2.
• SEG.T (Segment setting method) 0: Sets time; 1: Sets ramp
Selects the segment setting method.
NOTE
Changing the value of SEG.T clears all the previous program pattern settings.
• TMU (Program time unit) 0: hh:mm; 1: mm:ss
Selects the time unit for the program pattern and wait time settings.
• WIT .Z (W ait zone) 0 (OFF), 1.0 to 10.0% of the PV input range span
Sets the allowance of the deviation between the program setpoint and feedback PV.
IM 05G01B12-01E
5th Edition : 2005.03.25-00
Page 88

<T oc> <Ind> < 4. Setting Parameters >
• WIT .T (W ait time) 0 (OFF), 0.00 to 99.59 (hh:mm or mm.ss)
WIT.T is also set as the time length of waiting for PV to enter the wait zone.
Wait time is set in the same unit as is set for TMU.
• AL (PV event type)OFF, 1 to 10 (see corresponding event types shown below)
Specifies the type of alarm that will be output as a PV event.
1: PV high limit
2: PV low limit
3: High limit deviation
4: Low limit deviation
5: High limit deviation, de-energized during alarm
6: Low limit deviation, de-energized during alarm
7: Deviation of high and low limits
8: Deviation within high and low limits
9: PV high limit, de-energized during alarm
10: PV low limit, de-energized during alarm
• JC (Junction code) 0: Reset end; 1: Hold end
2: Start pattern 1; 3: Start pattern 2
Specifies the operation at the end of the program pattern.
• SSP (Starting target setpoint) 0.0 to 100.0% of the PV input range
Sets the target setpoint used at the start of program operation.
4-48
• STC (Start code) 0: Starts from SSP
1: Ramp-prioritized PV start
2: Time-prioritized PV start
Sets the start action of the program pattern.
• EV ON (ON time for time event) OFF, 0.00 to 99.59 in unit set for TMU
• EV OFF (OFF time for time event) OFF , 0.00 to 99.59 in unit set for TMU
• SP (T arget setpoint) 0.0 to 100.0% of the PV input range
Sets the final target setpoint.
• TM (Segment time)
⋅ When time-setting method is selected (SEG.T = 0), enter the time length of each
segment:
OFF, 0.00 to 99.59 in unit set for TMU (-1:deletion)
⋅ When ramp-setting method is selected (SEG.T = 1), enter the amount of PV change
per hour or minute for each segment: 0.0 to 100.0% of the PV input range span.
● To return to the Parameter Menu dialog box
Click OK or Cancel to return to the Parameter Menu dialog box.
IM 05G01B12-01E
5th Edition : 2005.03.25-00
Page 89

<Toc> <Ind> < 4. Setting Parameters >
4.5.4 Viewing the Input/Output Parameter Settings
Y ou can view the current settings of the basic parameters (related to inputs and outputs) in
the following dialog box.
● T o open the dialog box for viewing input/output-related parameters
In the Parameter Menu dialog box, click Confirms input/output parameter. The dialog
box having the name of “Conforms to Specification Code, IN/OUT” then appears.
4-49
Figure 4.5.4 Conforms to Specification Code, IN/OUT Dialog Box (Example of UP350)
● Parameters that can be viewed
Current settings of the following parameters are shown as a list.
• Model and specification codes
• Input-related parameters
• Output-related parameter
● T o return to the Parameter Menu dialog box
To return to the Parameter Menu dialog box, click OK.
● T o change the settings after they have been viewed
(1) Click OK to return to the Parameter Menu dialog box.
(2) On the menu bar, click Parameter setting and choose:
• Model/specification code selection, to change the model and specification codes.
GREEN series model names can’t be changed to old GREEN series model names.
• Input/output parameter setting to change the input/output parameters.
(3) Change the settings in the dialog box that thus opens.
NOTE
Note that changing the Input/Output Parameter will initialize all parameters other than
Input/Output parameters and SEG.T parameter .
IM 05G01B12-01E
5th Edition : 2005.03.25-00
Page 90

Blank Page
Page 91

<Toc> <Ind> < 5. Working with Parameter Data File >
5. Working with Parameter Data Files
This chapter describes the procedures for the following:
● Saving parameter data created with the LL100 or uploaded from a GREEN Series
controller as a file on disk.
● Reading parameter data files saved on disk, with the LL100.
● Comparing parameter data values in LL100 with those in a parameter file saved on
disk.
See Also
Section 4.2.3 “Opening a User File” for each parameter file.
5.1 Setting the File Information
Before saving parameter data, you can enter a title, creator, date of creation, and comments for the file. However, this information will not be downloaded to the controller.
5-1
● T o set the file information
(1) On the menu bar, click File and then choose Information.
The File Information dialog box (Figure 5.1.1) appears.
(2) Type the necessary file information in each text box.
(3) Click OK.
(4) Then, proceed to section 5.2.1, “Saving Parameter Data on Disk.”
Figure 5.1.1 File Information Dialog Box
TIP
The UT300 series controllers do not have “Parameter name.”
IM 05G01B12-01E
5th Edition : 2005.03.25-00
Page 92

<T oc> <Ind> < 5. Working with Parameter Data File >
5.2 Saving/Reading Data on/from Disk and Comparing Data V alues
5.2.1 Saving Parameter Data on Disk
● To save the data under a new filename
Carry out the following steps to save the parameter data to disk:
(1) On the menu bar, click File, and then choose Save As.
The Save As dialog box (Figure 5.2.1) appears.
(2) In the File name text box, type a name (within 16 alphanumeric characters) and then
click Save.
(3) The parameter data is saved to disk.
The file is normally located in C:\USER\controller_model (ex. UT750 and UP750)
directory .
5-2
Figure 5.2.1 Save As Dialog Box (Example of UT750)
● To overwrite the current file
(1) On the menu bar, click File, and then choose Save.
(2) The parameter data is saved to disk, overwriting the current file you are working with.
IM 05G01B12-01E
5th Edition : 2005.03.25-00
Page 93

<Toc> <Ind> < 5. Working with Parameter Data File >
5.2.2 Reading Parameter Data from Disk
Read the parameter data saved to disk with the LL100 tool.
NOTE
If you read data from a disk, it replaces all the current data in the LL100. If you need the
current data, save it to disk before reading new data.
● T o read data from disk
(1) On the menu bar, click File, and then choose Open.
The Open User File dialog box (Figure 5.2.2) appears.
(2) From the list box, select the file you wish to read.
(3) Click Open.
5-3
Figure 5.2.2 Open User File Dialog Box (Example of UT750)
IM 05G01B12-01E
5th Edition : 2005.03.25-00
Page 94

<T oc> <Ind> < 5. Working with Parameter Data File >
5.2.3 Comparing Parameter Data Values in LL100 with Those Saved to Disk
Y ou can compare parameter data values in the LL100 with those saved to disk.
NOTE
The comparison is possible only when the parameter values set in the Model/Specification
Code Selection dialog box match the controller model and specification code settings
saved on disk.
Also note that the parameters which display “—” in their text boxes and the set units will not
be compared.
● To compare parameter data values between the LL100 and those saved to
disk
(1) On the menu bar, click File, and then choose Compare.
(2) From the list box, select the parameter data file you wish to compare.
5-4
(3) Click Open.
(4) A message appears saying “The data in the Parameter Setting Tool will be compared
with those saved to the file on disk. OK?”
(5) Click Yes to start comparing.
(6) When all parameter data match, a message appears saying “Non-matching parameter
not detected.”
If any parameter value does not match, a message appears saying “Non-matching
parameter detected. Do you want to see the list?” Click Yes to open the Non-matching
Parameters dialog box.
The Non-matching Parameter dialog box (Figure 5.2.3) appears.
Figure 5.2.3 Non-matching Parameter Dialog Box
IM 05G01B12-01E
5th Edition : 2005.03.25-00
Page 95

<Toc> <Ind> < 6.
Uploading/Downloading Data from/to Controller and Comparing Data Values
>
6. Uploading/Downloading Data from/to Controller and Comparing Data V alues
This chapter describes the procedures for the following:
● Uploading parameter data from a controller
● Downloading parameter data to a controller
● Comparing parameter data values with those in a controller
6.1 Uploading Parameter Data from Controller
Upload the parameter data from a GREEN Series controller to the LL100.
NOTE
If you upload data from a controller, it replaces all the current data in the LL100. If you need
the current data, save it to disk before uploading.
6-1
Figure 6.1.1 Upload Parameter Dialog Box
● T o upload via the supplied optical communication adapter
(1) On the menu bar, click Communication, and then choose Upload from controller.
The Upload Parameter dialog box (Figure 6.1.1) appears.
(2) Click Front communication.
(3) From the Serial port list, select the communication port of the personal computer
(COM1 to COM16).
(4) Connect the controller to the personal computer, and then click Execute .
(5) When uploading is complete, a message appears informing that “Parameter data
have been uploaded from the controller.”
IM 05G01B12-01E
5th Edition : 2005.03.25-00
Page 96

<T oc> <Ind> < 6.
See Also
Section 2.3, “Connecting Controller to Personal Computer,” for how to connect via the optical communication adapter.
● To upload via serial communication terminals
(1) On the menu bar, click Communication, and then choose Upload from controller.
(2) Click Terminal communication.
(3) Click Serial communication.
(4) From the Serial port list, select the communication port of the personal computer
(5) Set the RS-485 communication conditions:
• Communication speed, parity, and address: Select from drop-down lists.
• Stop bit and data length: Select with option buttons.
(6) Connect the controller to the personal computer, and then click Execute.
(7) When uploading is complete, a message appears informing that “Parameter data
(8) Click OK. The Setup Parameter Menu dialog box appears.
Uploading/Downloading Data from/to Controller and Comparing Data Values
>
6-2
The Upload Parameter dialog box (Figure 6.1.1) appears.
(COM1 to COM16).
Use the same settings for the target controller’s RS-485 communication parameters.
have been uploaded from the controller.”
NOTE
Communication via serial communication terminals is possible only for GREEN Series
controllers with the RS485 communication optional function. For controllers without the
RS485 communication optional function, always select Front communication.
To communicate via serial communication terminals, set the target controller’s RS485
communication protocol to PC-link communication. With other protocol, the serial terminal
communication is unavailable. Also note that the RS485 communication parameters
(communication speed, parity , stop bit and data length) must be set identically for both the
target controller and the personal computer.
In the case of 300 series of old GREEN Series, the serial terminal communication is possible only for the controllers with the communication function.
In the case of 300 series of GREEN Series, the LL operating parameter selects the front
communication or serial terminal communication. Be sure to confirm the setting of LL
parameter.
When LL parameter is ON, communication with LL100/LL200 is possible.
When LL parameter is OFF, communication via serial communication terminals is possible
for the controllers with RS485 communication function.
See Also
Chapter 2, “Setup” of the GREEN Series Communication Functions user’s manual (IM 05G01B02-01E),
for information about wiring when using the rear terminals.
IM 05G01B12-01E
5th Edition : 2005.03.25-00
Page 97

<Toc> <Ind> < 6.
● T o upload via Ethernet communication terminal
(1) On the menu bar, click Communication, and then choose Upload from controller.
Uploading/Downloading Data from/to Controller and Comparing Data Values
The Upload Parameter dialog box (Figure 6.1.1) opens.
>
6-3
(2) Click Terminal communication (this means to use the
communication terminals at
the rear of the controller).
(3) Click Ethernet communication.
(4) Set the target controller’s IP address and RS485 communication address in the IP
Address text box.
(5) Set the target controller’s port number in the Port No. text box. The port number can
be set in decimal or hexadecimal.
(6) Connect the controller to the personal computer, and then click Execute .
(7) When the parameter data has been successfully uploaded, the tool displays a mes-
sage stating “Parameter data has been uploaded from the controller .
(8) Click OK. The Setup Parameter Menu dialog box appears.
NOTE
Uploading parameters via Ethernet is impossible for the UT750 in UT mode 21 and the
UP750 in UP mode 21. Use front communication.
NOTE
Communication via Ethernet communication terminal is possible only for controllers with
the Ethernet communication optional function and for the controllers with the RS485 communication function for which the Ethernet converter is used as Ethernet-serial gateway .
For controllers without the RS485 communication optional function, always select Front
communication.
In the case of 300 series of GREEN Series, the LL operating parameter selects the front
communication or Ethernet communication. Be sure to confirm the setting of LL parameter .
When LL parameter is ON, communication with LL100/LL200 is possible.
When LL parameter is OFF, communication via Ethernet communication terminal is pos-
sible for the controllers with Ethernet communication function.
IM 05G01B12-01E
5th Edition : 2005.03.25-00
Page 98

<T oc> <Ind> < 6.
NOTE
Set an IP address and RS485 communication address being divided by the comma (,) in
the IP Address text box.
See Also
Chapter 2, “Setup” of the Ethernet Communication Functions user’s manual (IM 05G01B52-01E), for
information about wiring for the Ethernet communication terminals.
Uploading/Downloading Data from/to Controller and Comparing Data Values
>
Example: 192.168.1.1,1
To communicate with a controller with Ethernet communication function:
IP address=IP address set to the controller
RS485 address=1
To communicate with a controller with RS485 communication function for which
the controller with Ethernet communication function or the Ethernet converter is
used as Ethernet-serial gateway:
IP address=IP address set to the gateway
RS485 address=RS485 address set to the controller
6-4
IM 05G01B12-01E
5th Edition : 2005.03.25-00
Page 99

<Toc> <Ind> < 6.
Uploading/Downloading Data from/to Controller and Comparing Data Values
>
6.2 Downloading Parameter Data to Controller
Download the parameter data from LL100 to a GREEN Series controller.
WARNING
Do not download parameter data to a controller while the controller is being used. Be sure
to change the controller status to OFFLINE before you execute downloading.
6-5
Figure 6.2.1 Download Parameter Dialog Box
● T o download via the supplied optical communication adapter
(1) On the menu bar, click Communication, and then choose Download to controller.
The Download Parameter dialog box (Figure 6.2.1) appears.
(2) Click Front communication.
(3) From the Serial port list, select the communication port of the personal computer
(COM1 to COM16).
(4) Connect the controller to the personal computer, and then click Execute .
(5) When downloading is complete, a message appears informing that “Parameter data
have been downloaded to the controller.”
See Also
Section 2.3, “Connecting Controller to Personal Computer, ” for how to connect via the optical communication adapter.
IM 05G01B12-01E
5th Edition : 2005.03.25-00
Page 100

<T oc> <Ind> < 6.
● To download via serial communication terminals
(1) On the menu bar, click Communication, and then choose Download to controller.
(2) Click Terminal communication.
(3) Click Serial communication.
(4) From the Serial port list, select the communication port of the personal computer
(5) Set the RS-485 communication conditions:
• Communication speed, parity, and address: Select from drop-down lists.
• Stop bit and data length: Select with option buttons.
(6) Connect the controller to the personal computer, and then click Execute.
(7) When downloading is complete, a message appears informing you that “Parameter
NOTE
Uploading/Downloading Data from/to Controller and Comparing Data Values
>
The Download Parameter dialog box (Figure 6.2.1) appears.
(COM1 to COM16).
Provide the same settings for the target controller’s RS-485 communication param-
eters.
data have been downloaded to the controller.”
6-6
Communication via serial communication terminals is possible only for GREEN Series
controllers with the RS485 communication optional function. For controllers without the
RS485 communication optional function, always select Front communication.
To communicate via serial communication terminals, set the target controller’s RS485
communication protocol to PC-link communication. With other protocol, the serial terminal
communication is unavailable. Also note that the RS485 communication parameters
(communication speed, parity , stop bit and data length) must be set identically for both the
target controller and the personal computer.
In the case of 300 series of old GREEN Series, the serial terminal communication is possible only for the controllers with the communication function.
In the case of 300 series of GREEN Series, the LL operating parameter selects the front
communication or serial terminal communication. Be sure to confirm the setting of LL
parameter.
When LL parameter is ON, communication with LL100/LL200 is possible.
When LL parameter is OFF, communication via serial communication terminals is possible
for the controllers with RS485 communication function.
See Also
Chapter 2, “Setup” of the GREEN Series Communication Functions user’s manual (IM 05G01B02-01E),
for information about wiring when using the rear terminals.
IM 05G01B12-01E
5th Edition : 2005.03.25-00
 Loading...