

Page 1
Owner’s Manual
Models 68801, 68803, 68811, 68813
Features
Heavy duty platform and over sized strain gauge bridge for
rigidity, accuracy and repeatability.
0.5" LCD with bold dark numbers for easy reading even in
well-lighted area.
Overload protection: "OL" message on LCD. Plus me-
chanical protection against extreme overload.
Water and environmental resistance with sealed LCD
display and membrane switch keypad on control module.
(features, cont.)
Read minus (-) mode to zero the display
after placing the tank on the platform,
and accurately meter refrigerant going
into the system.
Low battery indicator on LCD.
Removable platform and electronics for
more flexible use
Bubble level indicator on scale platform
promotes proper setup
Industrial load cell for improved accu-
racy
0.1 Ounce / 0.01 Pound / 0.01 Kilogram
Resolution
Automatic "Hold" if refrigerant flow
stops
"Hold" mode allows for mid-charge
cylinder changes
Accurately meters charges from 1
ounce to 100 pounds
AC adapter powers the solenoid to
extend battery life
Caution:
Do not overload scales.
Set loads carefully in center of platform.
Many factors beyond the
control of Ritchie Engineering Company, Inc.
can affect the use and
performance of the prod-
ucts in this catalog. It is
essential that the user
evaluate any product in
this catalog to determine
the suitability of that prod-
uct for a specific applica-
tion. Using any product in
a way that is not accepted
as common practice can
result in injury. All prod-
ucts are for use as de-
warranty on our dealer
NOT LEGAL FOR TRADE
WARRANTY
scribed only. See full
and wholesale price
sheets.
P/N 398163_B
To weigh an item
1. Place the scale case (or the platform alone) on a flat rigid surface and remove the control module from the scale
case. Use the "bubble level" on the scale platform to confirm that the unit is level.
2. Press the ON/OFF button to turn the scale on or press the TARE button if the scale is already on. After a short
time, the display will read zero. Press the UNITS button to change to the desired readout units.
3. Set the load on the platform, making sure to center the load before taking the reading.
4. When finished, press the ON/OFF button to turn the control module off.
Weighing recovered or charged refrigerants (without charging attachment)
1. Place the scale case (or the platform alone) on a flat rigid surface and remove the control module from the scale
case. Use the "bubble level" on the scale platform to confirm that the unit is level.
2. Carefully place cylinder onto the center of the scale platform. Be careful not to drop the cylinder onto the scale.
3. Connect all the hoses, manifold, etc. and purge the lines as necessary.
4. Press the ON/OFF button to turn on and zero out the control module or press the TARE button if the unit is
already on.
5. Charging: The weight displayed on the control module will be a negative number to indicate the amount of gas
that has been charged into the system -OR- Recovery
the weight of the gas, which has been added to the cylinder on the scale.
6. When the charging/recovery process is complete, press the ON/OFF button to turn the control module off.
Visit us at www.TestEquipmentDepot.com
: The weight displayed on the control module will show
99 Washington Street
Melrose, MA 02176
Phone 781-665-1400
Toll Free 1-800-517-8431
Test Equipment Depot - 800.517.8431 - 99 Washington Street Melrose, MA 02176
TestEquipmentDepot.com
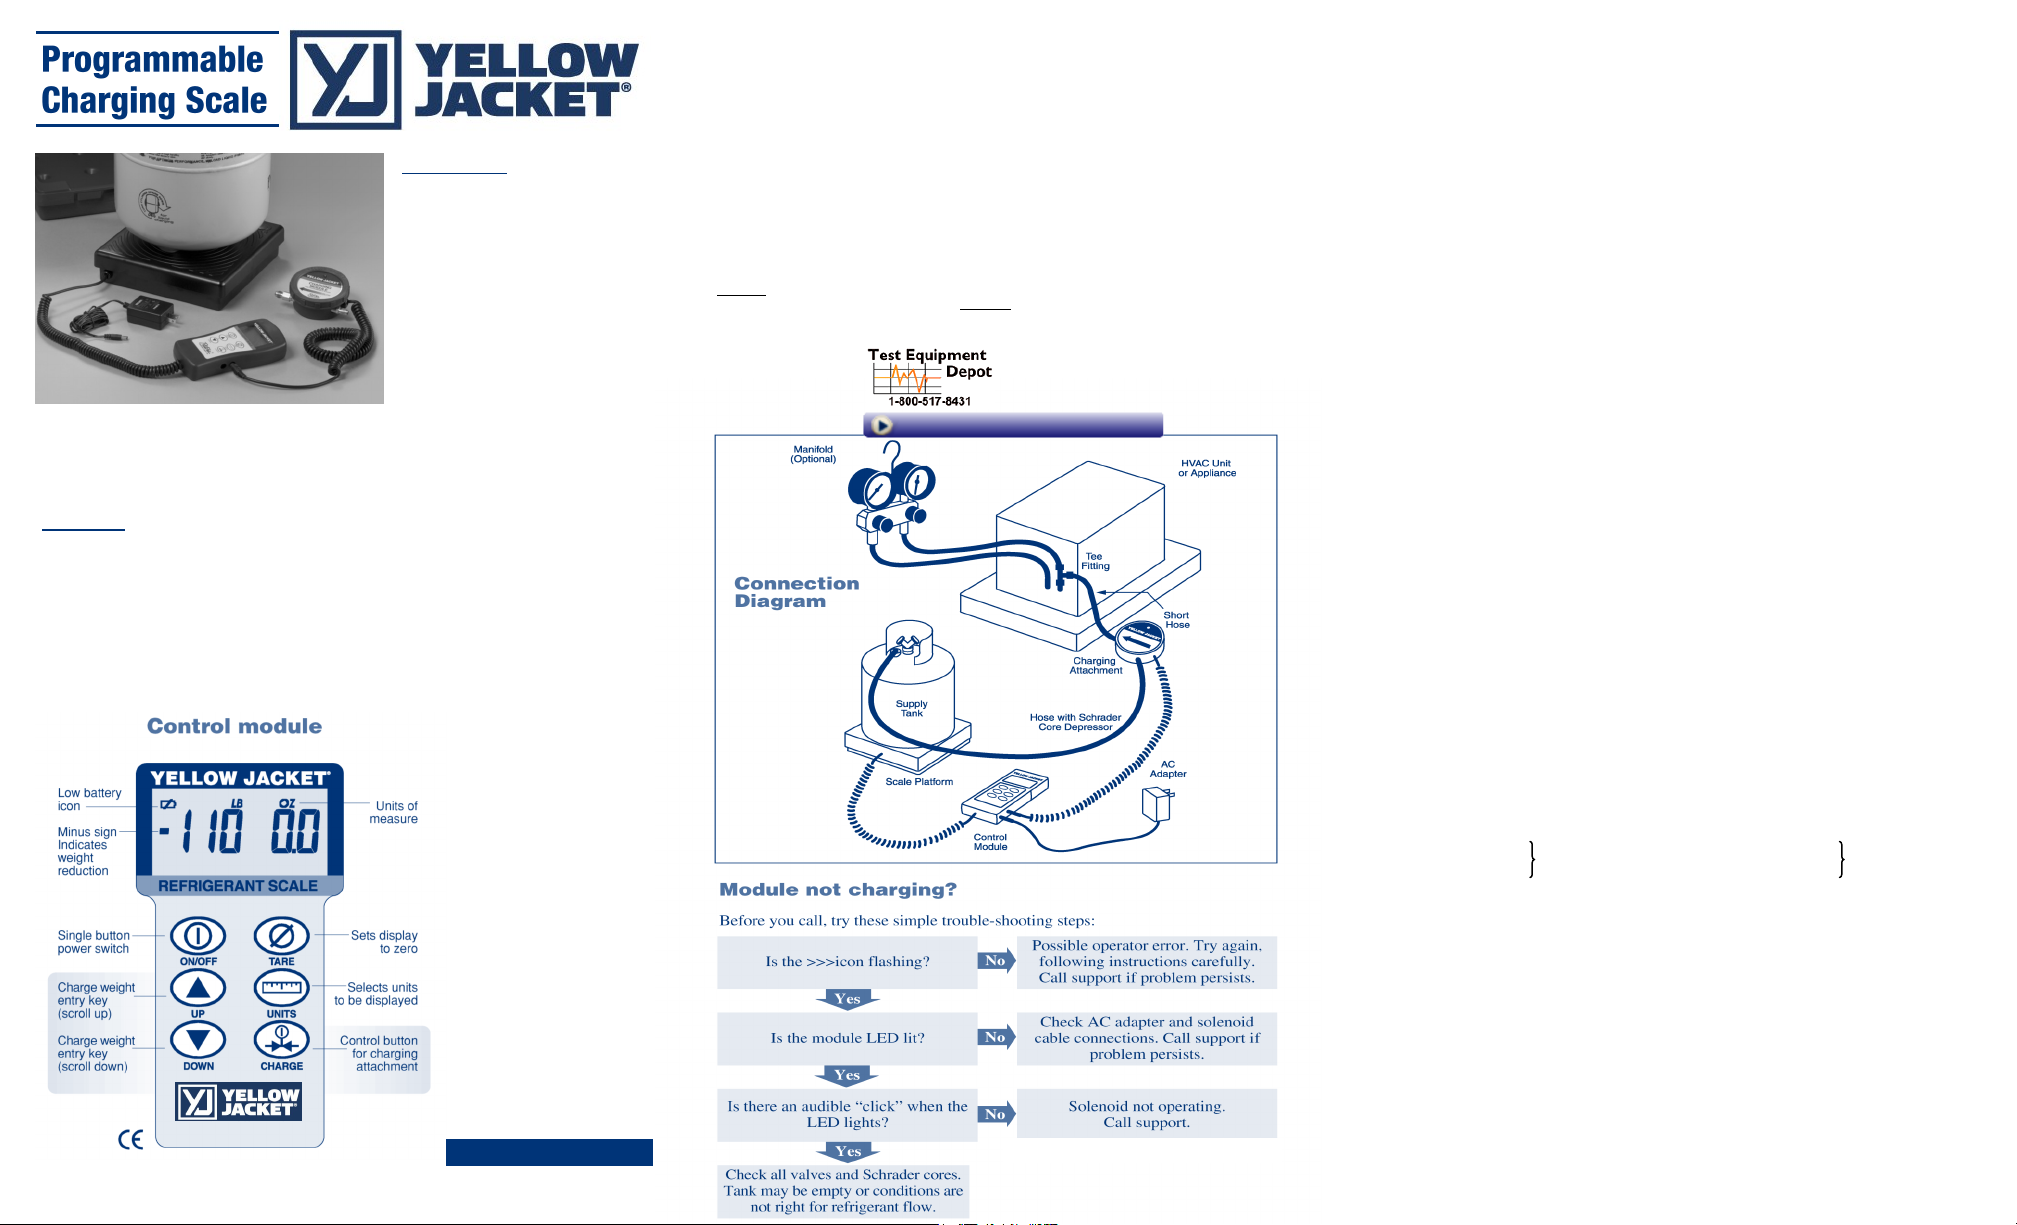
Using the charging attachment
1. Place the scale case (or the platform alone) on a flat rigid surface within four feet of the
system port to be charged and remove the control module from the scale case. Use the
bubble level on the scale platform to confirm unit is level.
2. Connect a power pack to the control module (Charging solenoid will not function without
AC power).
3. Connect the charging module cord to the control module.
4. Carefully place cylinder onto the center of the scale platform.
5. Connect the "Out" port of the charging module (indicated by the head of the refrigerant flow
arrow) with a short length of hose to the system port to be charged. Use a tee fitting if
gauges are used during charging.
6. Connect the "In" port of the charging module (indicated by the tail of the refrigerant flow
arrow) with a hose to the cylinder on the scale. The hose used must have a mechanism for
depressing the Schrader valve on the input port of the charging module.
7. Purge the hose from the tank to the charging module port.
8. Check the system, all connections, and all valves to ensure system is ready to charge.
9. Press the ON/OFF button to turn on the control module.
10. Use the UNITS key to select the desired display units.
11. Press the CHARGE button to enter charging mode. To get out of the charging mode at any
time, press the TARE button or the ON/OFF button.
12. Enter the desired charge weight by using the UP and DOWN buttons. The data entry mode
will be indicated on the display by the flashing UP/DOWN arrows in the upper left corner.
13. W hen the desired charge weight is displayed, press the CHARGE button to begin
charging. The scale will zero itself and open the solenoid. The charging process will be
indicated on the display by the flashing charging icon ">>>" in the lower left corner. The
green LED on the charging module will light indicating that power has been applied to the
solenoid valve, and the solenoid will make an audible clicking noise when it opens.
Refrigerant will begin to flow if all the proper connections have been made and all the
necessary valves have been opened. The scale display will show an increasing negative
weight as the refrigerant leaves the cylinder.
14. If the CHARGE button is pressed while the solenoid valve is open, the scale will note the
weight that has been charged, the solenoid valve will close, and the display will flash
"Hold". When the CHARGE button is pressed again, the scale will tare itself, re-open the
solenoid valve, and continue charging as if it hadn’t been stopped. This mode can be used
to change cylinders in mid-charge. Note that if the refrigerant flow falls below a certain
rate, the scale will automatically put itself into "Hold" mode. This may happen if the cylinder
is empty, if the valves are not properly opened, or if the conditions are not present to
promote refrigerant flow. Once the problem is corrected (i.e. change cylinders, open closed
valve, heat the supply cylinder), press the CHARGE button to resume charging.
15. W hen target charge weight is reached, scale will close the solenoid valve. The display will
alternately flash the charged weight and "- - -" to verify that the proper weight was charged.
16. W hen the charging process is complete, press the ON/OFF button to turn the unit off.
17. Disconnect hoses starting at the system port, working back toward the supply tank. This
will prevent the loss of the system charge.
110 Pound (50 kg) Specifications
Capacity: 110 lbs. (50 kg)
Accuracy: ± 0.5 oz.
Weight of scale: 9 lbs.
Case Size: 15.5" x 12.25" x 3.25"
Platform size: 9" x 9" (228 mm x 228 mm)
Charging Accuracy: Scale accuracy ± 0.25
Charge weight range: 1 oz. to 100 lbs.
± 0.03 lb.
± 0.015 kg
(394 x 311 x 83 mm)
Or 0.1% of reading,
whichever is
greater
(4.1 kg)
ounces (7 grams)
220 Pound (100 kg) Specifications:
Capacity: 220 lbs. (100 kg)
Accuracy: ± 1.0 oz.
Weight of scale: 12.4
Case Size: 18.0" x 13.0" x 4.25"
Platform size: 11.3" x 11.3" (287 x 287 mm)
Charging Accuracy: Scale accuracy ± 0.5
Charge weight range: 2 oz. to 200 lbs.
± 0.06 lb.
± 0.030 kg
(457 x 330 x 108 mm)
Or 0.1% of
reading, whichever
is greater
lbs. (5.6 kg)
ounces (14 grams)
Common to both:
Resolution: 0.1 ounce / 0.01 pound/ 0.01 kg
Module display: Sealed LCD with high resolution
0.5" characters
Keypad: Moisture resistant membrane keypad with
tactile metal domes
Components: Industrial grade
Solenoid Orifice Size: 1/16"
Operation method: Oversized strain gauge bridge
Operating temp: 32°F to 122°F (0° to 50°)
Storage temp: -4°F to 158°F (-20° to 70°)
Battery: 25 hours (continuous use approx.)
Battery: 9V alkaline
Solenoid Pressure Rating: 400 psi MOPD
(maximum operating pressure differential)
 Loading...