

Page 1

Digital Adjustable Torque Wrench
rque Wrench
To
60624 Deluxe Digital Adjustable
(with 3/8
60648 Digital Adjustable
” ratchet head)
To
rque Wrench
Operating Manual
Models 60624 and 60648
RevB
Page 2

This manual will help you use the
many features of your new digital
torque wrench. Before operating the
torque wrench, please read this manual
completely, and keep it handy for future
reference.
FEATURES:
• Interchangeable head
• Digital torque value readout
• +/- 2% accuracy
• CW and CCW operation
• Peak hold and track mode selectable
• Buzzer and LED indicator for the 9 pre-set
target torques
• Water contact indicator
• Engineering units (ft-lb, in-lb, N-m, kg-cm)
selectable
• 50 data memory for recall and joint torque
auditing
• Auto sleep after about 5 minutes idle
• (2) AAA batteries included
MAINTENANCE AND
STORAGE
ATTENTION: To maintain accuracy,
a one-year periodic recalibration is
recommended. Please contact your
local Calibration Laboratory to arrange
for calibration.
CAUTION:
3. Do not use this wrench as a hammer.
4. Do not leave this wrench in any place
exposed to excessive heat, humidity or
direct sunlight.
5. Do not use this apparatus in water (it is not
waterproof).
6. If the wrench gets wet, wipe it with a dry
towel as soon as possible. The salt in sea
water can be especially damaging.
7. Do not use organic solvents, such as alcohol
or paint thinner when cleaning the wrench.
8. Keep the wrench away from magnets.
9. Do not expose this wrench to dust or sand
as this could cause serious damage.
10. Do not apply excessive force to the LCD
panel.
11. Apply torque slowly and grasp the center
of the handle. Do not apply load to the end
of handle.
1. Over-torque (110% of max.
torque range) could cause
breakage or lose accuracy.
2. Do not shake violently or
drop wrench.
BATTERY MAINTENANCE:
1. When the wrench is not used for an
extended period of time, remove the battery.
2. Keep a spare battery on hand when going
on a long trip or to cold areas.
3. Do not mix battery types or combine used
batteries with new ones.
4. Sweat, oil and water can prevent a battery’s
terminal from making electrical contact.
To avoid this, wipe both terminals before
loading a battery.
5. Dispose of batteries in a designated
disposal area. Do not throw batteries into
a fire.
2
Page 3

NAMES AND FUNCTIONS OF PARTS
12
1
10
13
14
32
6
7 8
5
4
9
11
1615
1. Head Insert
2. Sensor Yoke
3. LCD Readout
4. UP/DOWN Button
5. Buzzer
6. Power ON/CLEAR Button
7. Unit/Setting Button
8. Pre-setting Number Selection Button
9. Anti-Slip Handle
17
10. Jaw Adjust
11. Battery Cover
12. LED Indicator
13. Torque Value
14. Units (ft-lb, in-lb, N-m, kg-cm)
15. Pre-Setting Number
16. Peak/Track Mode
17. Water Indicator Viewing Window
3
Page 4

SPECIFICATIONS
Model No. Length
3/8” Ratchet Head
5-30 mm Adjustable
Wrench
8-41 mm Adjustable
Wrench
Accuracy *1
Data Memory Size 50
Pre-Sets 9
Bright LED
Operation Mode Peak Hold/Track
Unit Selection ft-lb, in-lb (N-m, kg-cm)
Gear Teeth 52
Button 5
Battery AAA x 2 (included)
Operating
Temperature
Storage
Temperature
Humidity Up to 90% Non-Condensing
Drop Test 1 m
Vibration Test *2 10G
Environmental
Test *3
Electromagnetic
Compatibility
Test *4
10.6”
270 mm
12.8”
325 mm
13.3”
338 mm
All Models
Max
Torque
62.7 ft. lb.
85 N-m
49.0 ft. lb.
66.5 N-m
47.0 ft. lb.
63.75 N-m
CW : ±2%
CCW : ±3%
(1 Red + 5 Green)
14°F ~140°F (-10°C ~ 60°C)
4°F ~158°F (-20°C ~ 70°C)
Measuring
3.1-62.7 ft. lb.
4.2 -85 N-m
2.4-49.0 ft. lb.
3.3-66.5 N-m
2.3-47 ft. lb.
3.2 -64 N-m
6 LEDs
Pass
Pass
Torque
Range
NOTE: Accuracy is guaranteed from 20%
to 100% full scale.
1. The accuracy of the readout is guaranteed
from 20% to 100% of maximum range +/- 1
increment. The torque accuracy is a typical
value. Calibration point is at the middle line
black circle area on the rubber grip. To ensure
continued accuracy, yearly calibration is
suggested.
2. Horizontal and vertical test.
3. Environmental test:
a. Dry heat
b. Cold
c. Damp heat
d. Change of temperature
e. Impact (shock)
f. Vibration
g. Drop
4. Electromagnetic compatibility test:
a. Electrostactic discharge immunity (ESD)
b. Radiated susceptibility
c. Radiated emission
BEFORE USING
BATTERY INSTALLATION
• Remove battery cover.
• Insert two AAA batteries matching the
+/- polarities of the battery to the battery
compartment.
• Replace the battery cover and fasten it tightly
according to the following figures.
ATTENTION: When opening the battery cover of
your wrench, you can see a viewing window for
the water contact indicator. Through this viewing
window, you can check if this wrench is damaged
by water penetration where the water contact
indicator turns red.
4
Page 5

BEFORE USING - continued
POWER ON AND RESETTING THE WRENCH
• Press to power on the digital torque wrench.
• Usually press to reset the digital torque
wrench before using it.
SET UP
4
ATTENTION: If an external force is applied to the
torque wrench during power-on/reset or wake-up
period, an initial torque offset will exist in memory.
ACTIVATION DURING SLEEP MODE
• The wrench will auto sleep after about 5 minutes
of being idle for power saving. Press to wake
up the wrench during sleep mode.
RESETTING THE WRENCH
• Press together will reset the wrench.
• If the wrench does not function normally,
press together to reset the wrench.
LOW BATTERY VOLTAGE PROTECTION
• If the battery serial voltage is in low voltage
status, the wrench will display a battery
symbol and then turn off after awhile.
WHEN CHANGING THE TYPE OF HEAD
• If you use the different head of the wrench,
the reading on the display will be different
for the different length of the head. See
explanation below.
Applied torque at setpoint = Entered
Torque Setting *
• For ratchet head 1
• For adjustable head 0.782
• For large adjustable head 0.75
1
2 3
1. Power On/Clear
2. Unit Selection/Setting
3. Pre-setting No.
4. Up/Down Button
STEP 1: PRE-SETTING NO.
Pre-settingN o.:M 1
Press
Pre-settingN o.:M 2
Press
Pre-settingN o.:M 2
Pre-settingN o.:M 9
*Note1,2 ,3
NOTE:
1. If appears, that means this
wrench has had more than 110% of
torque applied.
2. The maximum capacity for “Pre-setting
No.” is 9 sets.
3. The “Pre-setting No.” is cyclic.
5
Page 6

STEP 2: UNIT SELECTION
STEP 2: UNIT SELECTION
Unit Selection: in-lb
Press
Unit Selection: ft-lb
Press
Unit Selection: kg-cm
Press
STEP 4:P EAK HOLD /TRACKM ODE
STEP 4: PEAK HOLD/TRACK MODE
SELECTION
SELECTION
Track Mode
Long Press
Set Peak/Track Mode
Press
for Selection
Set Peak/Track Mode
Press
Pre-setting Unit: N-m
te:
NOTE:
The“ Unit Selection”
1. The “Unit Selection” is cyclic.
STEP 3: SET TORQUE VALUE
STEP 3: SETT ORQUEV ALUE
Pre-setting Torque Value
Press
Increase Target Torque Value
Press
Decrease Target Torque Value
*Note1
Record No.
Press
*Note1
Press
Note:
NOTE:
Please skip this procedur
Clear Record
Peak Hold Mode
1. Please skip this procedure and continue
to the next step.
6
Page 7
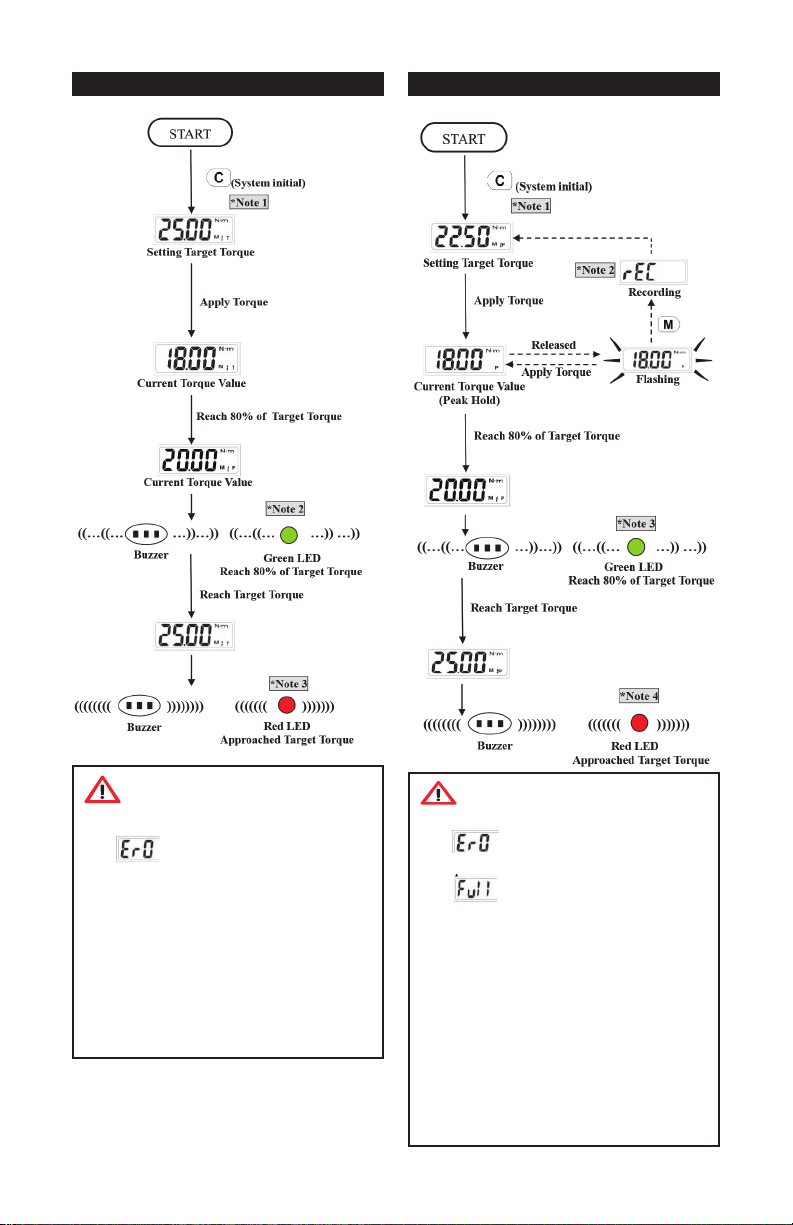
TRACK MODE OPERATION PEAK MODE OPERATION
NOTE:
1. If appears, that means this wrench
has had more than 110% of torque applied.
2. When 80% of the target torque is reached, the
green LED will begin to flash and the alarm
tone will beep intermittently.
3. When the target torque is reached, the alarm
will change to a steady tone and the green
LED will stop flashing and stay on. The LED
will also illuminate.
NOTE:
1. If appears, that means this wrench
has had more than 110% of torque applied.
2. If appears, that means this wrench’s
memory is full and the next value record
can not be written in. Please refer to the
“Peak Hold Mode Recorded Value Review”
section to clear the memory records.
3. When 80% of the target torque is reached, the
green LED will begin to flash and the alarm
tone will beep intermittently.
4. When the target torque is reached, the alarm
will change to a steady tone and the green
LED will stop flashing and stay on. The LED
will also illuminate.
7
Page 8

Peak Hold Mode Recorded
PEAK HOLD MODE RECORDED VALUE
REVIEW
Value Review
*Note 1
Peak Hold/Track Mode
Long Press
*Note 2
Set Peak/Track Mode
Press
NOTE:
1. The “Peak Hold” mode recorded value review
also can be operated from “Track” mode.
2. If you operate in the “Peak Hold” mode, the
display will show and please go to
the next step.
3. If the record is empty, it will show .
4. Communication mode is also for calibration
of torque wrench. Please contact your local
dealer for more information.
Auto Change
Record No.
Press
Clear Record
Press
Communication
Press
Peak Hold /Track Mode
*Note 3
(Give up)
Deleted
No
*Note 4
*Note4, 5, 6
(Exit)
Record Value
Yes
(Clear)
Communication
8
 Loading...