

Page 1

Copyright
Copyright © 2013 YEALINK NETWORK TECHNOLOGY CO., LTD.
Copyright © 2013 Yealink Network Technology CO., LTD. All rights reserved. No parts of this
publication may be reproduced or transmitted in any form or by any means, electronic or
mechanical, photocopying, recording, or otherwise, for any purpose, without the express
written permission of Yealink Network Technology CO., LTD. Under the law, reproducing includes
translating into another language or format.
When this publication is made available on media, Yealink Network Technology CO., LTD. gives
its consent to downloading and printing copies of the content provided in this file only for
private use and not for redistribution. No parts of this publication may be subject to alteration,
modification or commercial use. Yealink Network Technology CO., LTD. will not be liable for any
damages arising from use of an illegally modified or altered publication.
Warranty
THE SPECIFICATIONS AND INFORMATION REGARDING THE PRODUCTS IN THIS GUIDE ARE SUBJECT
TO CHANGE WITHOUT NOTICE. ALL STATEMENTS, INFORMATION, AND RECOMMENDATIONS IN
THIS GUIDE ARE BELIEVED TO BE ACCURATE BUT ARE PRESENTED WITHOUT WARRANTY OF ANY
KIND, EXPRESS OR IMPLIED. USERS MUST TAKE FULL RESPONSIBILITY FOR THEIR APPLICATION OF
PRODUCTS.
YEALINK NETWORK TECHNOLOGY CO., LTD. MAKES NO WARRANTY OF ANY KIND WITH REGARD
TO THIS GUIDE, INCLUDING, BUT NOT LIMITED TO, THE IMPLIED WARRANTIES OF MERCHANTABILITY
AND FITNESS FOR A PARTICULAR PURPOSE. Yealink Network Technology CO., LTD. shall not be
liable for errors contained herein nor for incidental or consequential damages in connection
with the furnishing, performance, or use of this guide.
Declaration of Conformity
Hereby, Yealink Network Technology CO., LTD. declares that this phone is in conformity
with the essential requirements and other relevant provisions of the CE, FCC.
CE Mark Warning
This device is marked with the CE mark in compliance with EC Directives 2006/95/EC and 2004/108/EC.
Part 15 FCC Rules
This device is compliant with Part 15 of the FCC Rules. Operation is subject to the following two conditions:
1. This device may not cause harmful interference.
Page 2

2. This device must accept any interference received, including interference that may cause undesired
operation.
Class B Digital Device or Peripheral
Note: This device is tested and complies with the limits for a Class B digital device, pursuant to Part 15 of the
FCC Rules. These limits are designed to provide reasonable protection against harmful interference in a
residential installation. This equipment generates, uses, and can radiate radio frequency energy and, if not
installed and used in accordance with the instructions, may cause harmful interference to radio
communications. However, there is no guarantee that interference will not occur in a particular installation.
If this equipment does cause harmful interference to radio or television reception, which can be
determined by turning the equipment off and on, the user is encouraged to try to correct the interference
by one or more of the following measures:
1. Reorient or relocate the receiving antenna.
2. Increase the separation between the equipment and receiver.
3. Connect the equipment into an outlet on a circuit different from that to which the receiver is connected.
4. Consult the dealer or an experience radio/TV technician for help.
WEEE Warning
To avoid the potential effects on the environment and human health as a result of the
presence of hazardous substances in electrical and electronic equipment, end users of
electrical and electronic equipment should understand the meaning of the crossed-out
wheeled bin symbol. Do not dispose of WEEE as unsorted municipal waste and have to
collect such WEEE separately.
Page 3

GNU GPL INFORMATION
Yealink SIP-T41P firmware contains third-party software under the GNU General Public License (GPL). Yealink
uses software under the specific terms of the GPL. Please refer to the GPL for the exact terms and conditions
of the license.
The original GPL license, source code of components licensed under GPL and used in Yealink products can
be downloaded from Yealink web site:
http://www.yealink.com/GPLOpenSource.aspx?BaseInfoCateId=293&NewsCateId=293&CateId=293.
Page 4

About This Guide
Thank you for choosing the SIP-T41P IP Phone, an ultra-elegant gigabit IP Phone which is
especially designed for power users in the office environment. This unit provides business
telephony features such as Call Hold, Call Transfer, Busy Lamp Field and Conference.
This guide provides everything you need to quickly use your new phone. Be sure to
verify with your system administrator that your network is prepared for configuring your
IP phone. As well, be sure to read the Packaging Contents and Regulatory Notices
sections in this guide before you set up and use the SIP-T41P IP phone.
If this is your first time using the SIP-T41P IP phone, we recommend that you first refer to
the Quick Installation Guide and Quick Reference Guide, available online:
http://www.yealink.com/DocumentDownload.aspx?CateId=142&flag=142.
About This Guide
Note
The Shared Line, Busy Lamp Field List, Network Directory and Network Call Log features
are hidden for IP phones in neutral version, which are designed for BroadWorks
environment. Please contact your system administrator for more information.
In This Guide
This guide is based on firmware version 71. The topics provided in this guide include:
z Chapter 1 Overview
z Chapter 2 Getting Started
z Chapter 3 Customizing Your Phone
z Chapter 4 Basic Call Features
z Chapter 5 Advanced Phone Features
v
Page 5

User Guide for the SIP-T41P IP Phone
Table of Contents
About This Guide .......................................................................... v
In This Guide............................................................................................................................. v
Table of Contents ........................................................................ vi
Overview ....................................................................................... 1
Hardware Component Instructions ..................................................................................... 1
Icon Instructions ...................................................................................................................... 3
LED Instructions ........................................................................................................................ 5
User Interfaces ......................................................................................................................... 6
Phone User Interface .......................................................................................................... 6
Web User Interface ............................................................................................................. 6
Documentations ..................................................................................................................... 8
Getting Started ............................................................................. 9
Packaging Contents .............................................................................................................. 9
Phone Installation ................................................................................................................. 11
Phone Initialization ................................................................................................................ 14
Phone Status .......................................................................................................................... 14
Basic Network Settings ......................................................................................................... 15
Registrati on ............................................................................................................................ 16
Idle Screen ............................................................................................................................. 16
Customizing Your Phone............................................................ 17
General Settings ................................................................................................................... 17
Backlight ............................................................................................................................. 17
Language ........................................................................................................................... 18
Time & Date........................................................................................................................ 19
Administrator Password .................................................................................................... 21
Key as Send ........................................................................................................................ 22
Audio Settings ....................................................................................................................... 22
Volume ................................................................................................................................ 22
Ring Tones ........................................................................................................................... 23
Contact Management ........................................................................................................ 25
vi
Page 6

Table of Contents
Directory ............................................................................................................................. 25
Local Directory .................................................................................................................. 26
Blacklist ................................................................................................................................ 34
Remote Phonebook ......................................................................................................... 35
Call History Management ................................................................................................... 38
System Customizations ......................................................................................................... 39
Headset Use ....................................................................................................................... 39
DSS Keys .............................................................................................................................. 42
Account Management .................................................................................................... 50
Dial Plan .............................................................................................................................. 52
Live Dialpad ....................................................................................................................... 57
Hotline ................................................................................................................................. 57
Basic Call Features ..................................................................... 60
Placing Calls .......................................................................................................................... 61
Answering Calls ..................................................................................................................... 63
Ending Calls ........................................................................................................................... 64
Redialing Numbers ............................................................................................................... 64
Recent Call In Dialing .......................................................................................................... 64
Auto Answer .......................................................................................................................... 65
Auto Redial ............................................................................................................................ 66
Call Return ............................................................................................................................. 67
Call Mute ............................................................................................................................... 67
Call Hold/Resume ................................................................................................................. 69
Do Not Disturb (DND) ........................................................................................................... 70
Call Forward .......................................................................................................................... 73
Call Transfer ........................................................................................................................... 78
Call Waiting ........................................................................................................................... 79
Conference ........................................................................................................................... 79
Local Conference ............................................................................................................. 79
Network Conference ........................................................................................................ 80
Call Park ................................................................................................................................. 82
Call Pickup ............................................................................................................................. 83
Anonymous Call .................................................................................................................... 86
Anonymous Call Rejection .................................................................................................. 87
Advanced Phone Features ....................................................... 89
Busy Lamp Field (BLF) ........................................................................................................... 89
Call Recording ...................................................................................................................... 92
Hot Desking ............................................................................................................................ 93
Intercom ................................................................................................................................. 95
Outgoing Intercom Calls .................................................................................................. 95
Incoming Intercom Calls .................................................................................................. 95
vii
Page 7

User Guide for the SIP-T41P IP Phone
Multicast Paging ................................................................................................................... 97
Sending RTP Stream .......................................................................................................... 97
Receiving RTP Stream ....................................................................................................... 99
Music on Hold ...................................................................................................................... 100
Automatic Call Distribution (ACD) ................................................................................... 101
Messages ............................................................................................................................. 103
Voice Mail ........................................................................................................................ 103
Message Waiting Indicator (MWI) ................................................................................ 104
Troubleshooting ........................................................................ 107
Regulatory Notices ................................................................... 116
Service Agreements ........................................................................................................... 116
Limitations of Liability .......................................................................................................... 116
Safety Instructio ns ............................................................................................................... 116
Appendix A - Time Zones ........................................................ 120
Index .......................................................................................... 122
viii
Page 8
Overview
This chapter provides the overview of the SIP-T41P IP phone. The topics include:
z Hardware Component Instructions
z Icon Instructions
z LED Instructions
z User Interfaces
z Documentations
If you require additional information or assistance with your new phone, contact your
system administrator.
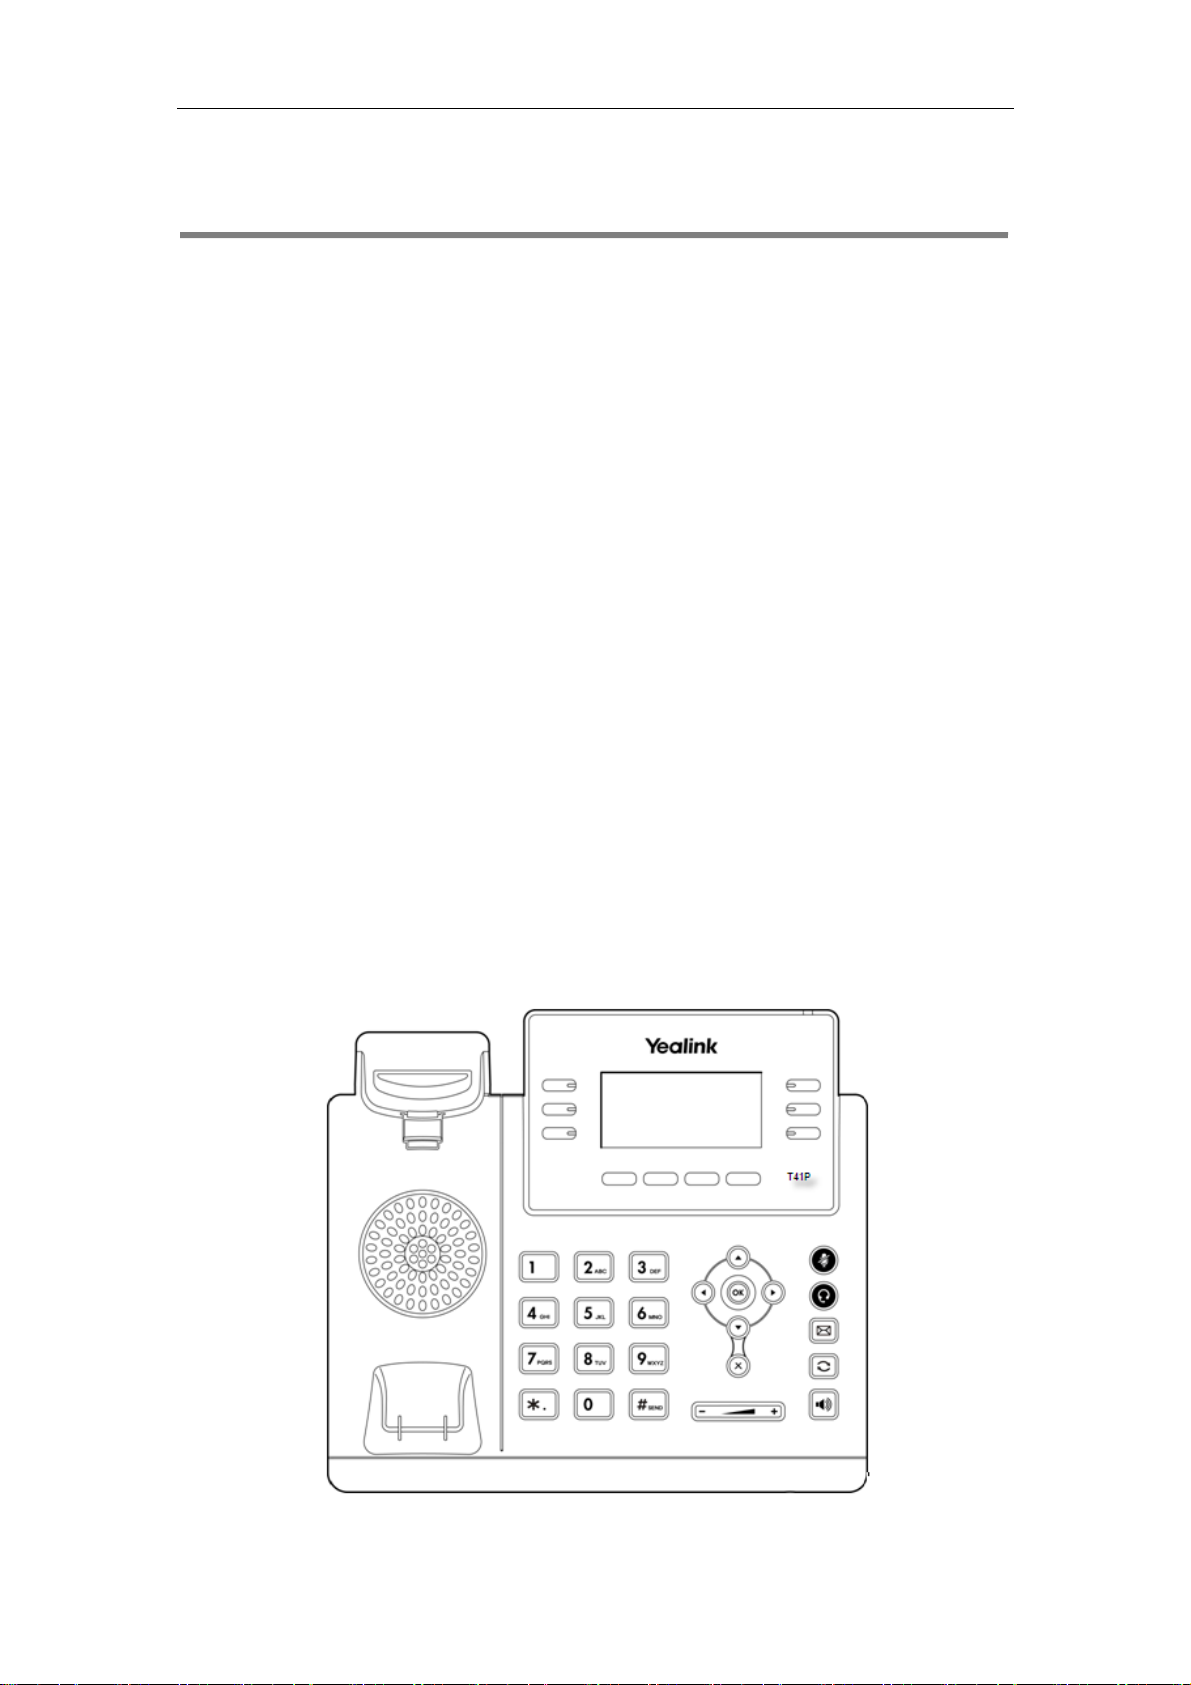
Overview
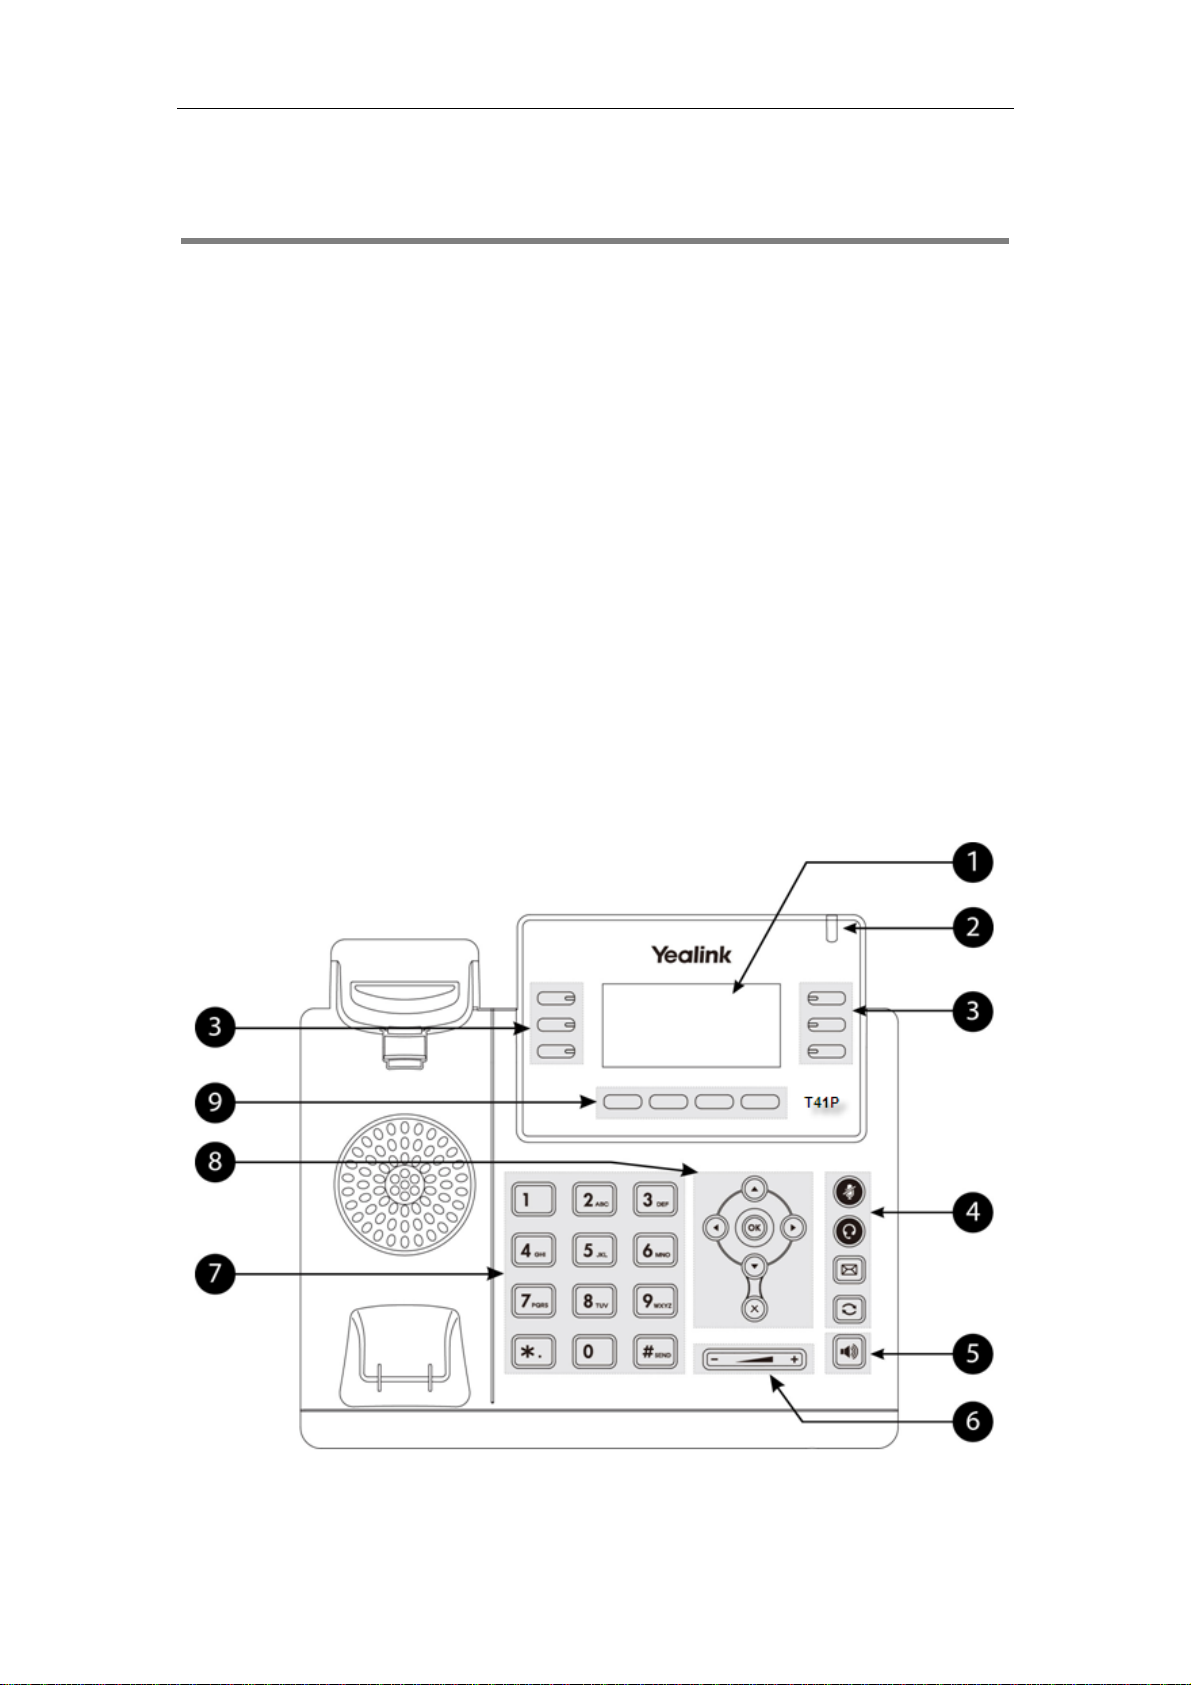
Hardware Component Instructions
The main hardware components of the SIP-T41P IP phone are the LCD screen and the
keypad.
1
Page 9
User
e
r
C
o
n
eMeRe
p
o
e
o
r
o
e
e
n
w
e
a
o
s
o
a
c
t
gToggTogg
i
ggAdju
e
u
T
o
n
m
s
t
o
a
c
c
m
u
d
m
t
t
e
e
p
a
n
S
s
p
u
u
k
n
d
n
n
c
t
n
e
c
o
a
s
e
m
o
Guide for th
SIP-T41P IP P
hone
Hardwa
L
①
P
②
Li
③
M
H
④
e compone
Item
D Screen
wer Indicat
e Keys
ute Key
adset Key
ssage Key
dial Key
nt instructio
Sho
dat
• C
• Ic
• Mi
• Pr
• D
LED Indi
Use
assi
Acc
Red
s of the SIP-
s informati
and other r
ll informatio
ns (for exa
sed call tex
mpt text (fo
te and time
ates phone
hese keys t
n various fe
les and indi
les and indi
esses voice
als a previo
41P IP phon
Descri
n about call
elevant dat
—caller ID,
ple, )
or second i
r example, "
power and
activate u
tures.
ates the m
ates the he
ails.
sly dialed n
are:
tion
s, messages,
:
call duratio
coming cal
aving file!")
ome featur
to three ac
te feature.
adset mode
mber.
soft keys, ti
ler informati
status.
ounts and
.
e,
n
S
⑤
⑥
⑦
⑧
⑨
eakerphon
V
lume Key
K
ypad
S
ft Keys
Key To
and
Prov
avai
Scro
Con
Can
Lab
feat
les the han
sts the volu
ringer.
ides the digi
lable in con
ll through th
firms actions
cels actions
l automatic
res.
s-free spea
e of the ha
s, letters, an
ext-sensitive
displayed i
or answers i
or rejects in
ally to identi
erphone m
dset, heads
special ch
application
formation.
coming cal
oming calls.
y their cont
de.
et, speaker,
racters
.
ls.
xt-sensitive
2
Page 10
u
p
oRegist
t
t
s
s
s
e
A
o
H
M
a
o
d
e
r
d
s
e
s
r
w
u
t
n
d
g
Ove
r
w
vie
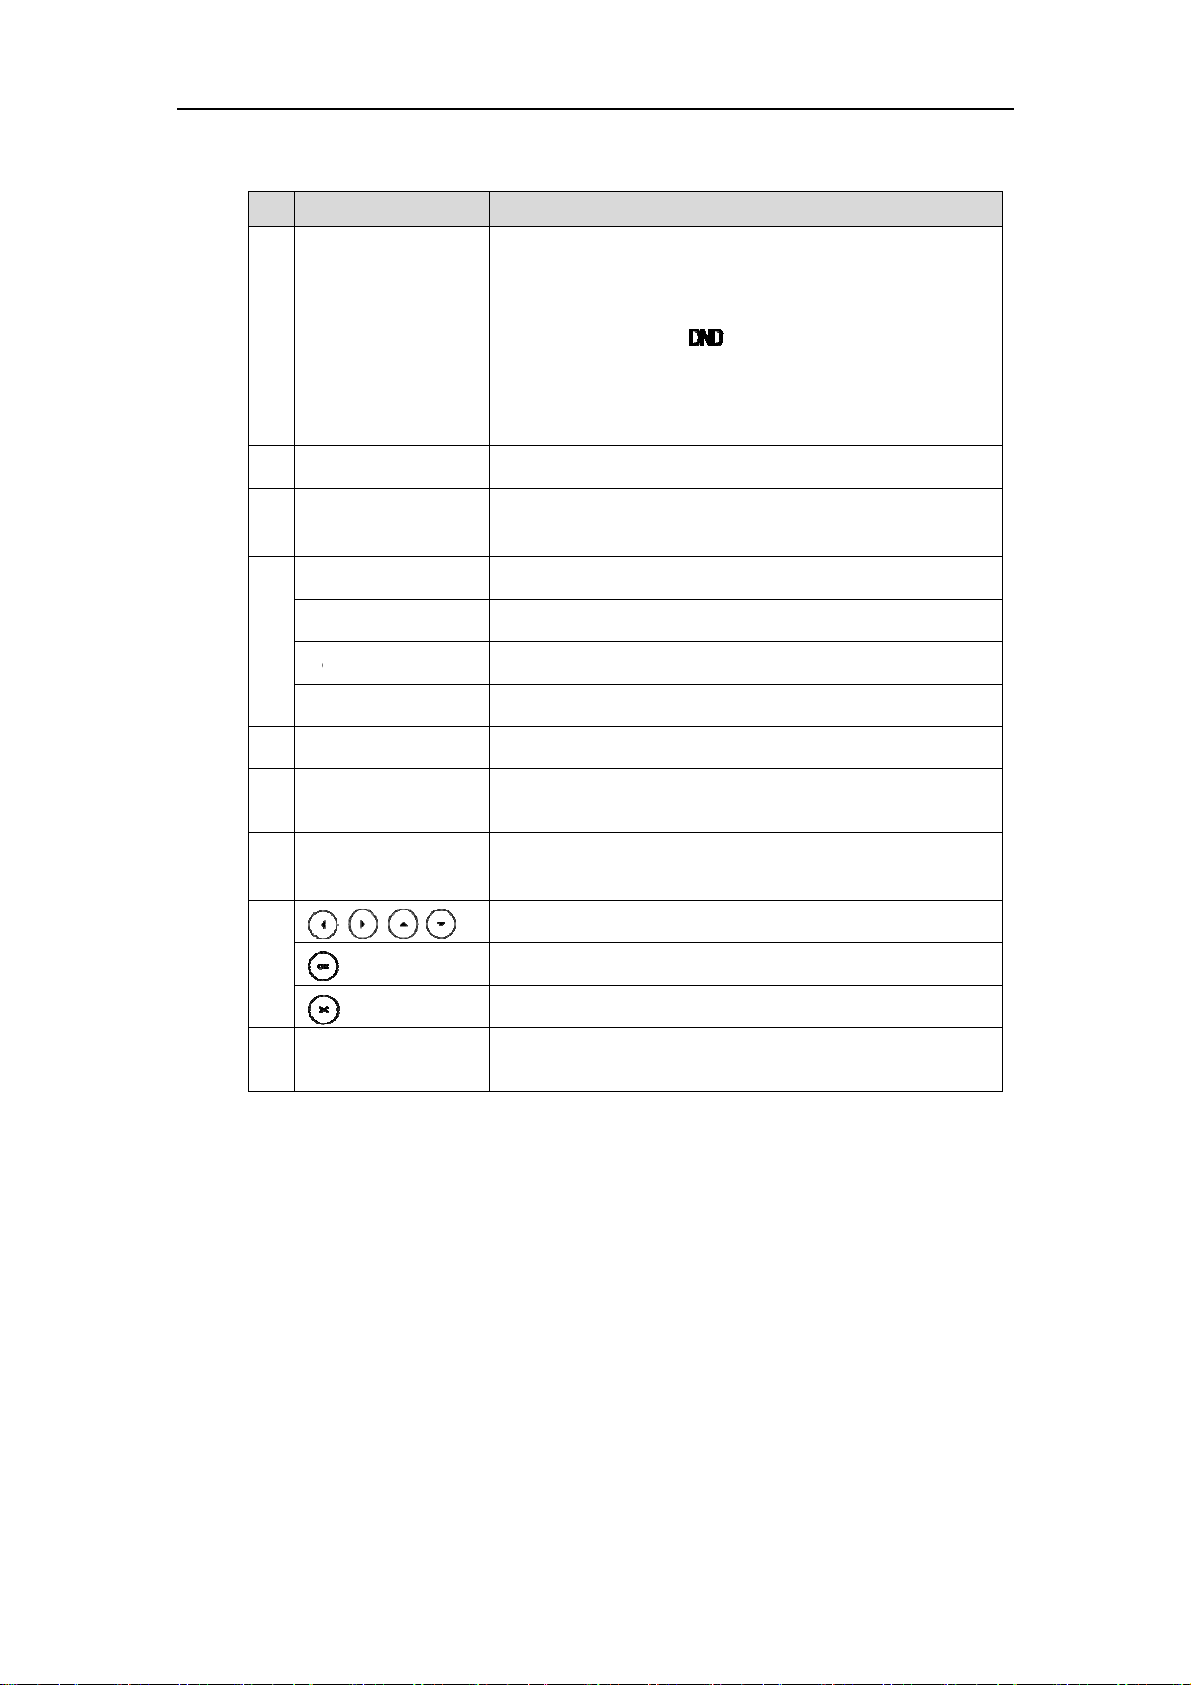
Icon Instr
Icons a
ctions
pear on the
Icon
phone LCD
Netw
Regis
Regis
Hand
Hand
Head
screen are
rk is unavail
ered succe
ration failed
ering
-free speak
et mode
et mode
escribed in
Descriptio
able
sfully
rphone mo
he followin
e
table:
Voic
Auto
Do N
Call
Call
Ringe
Keyp
Call F
Misse
Recei
Mail
nswer
t Disturb
old
ute
volume is 0
d Lock
rward/For
Calls
ved Calls
arded Calls
Plac
Reco
d Calls
ding box is f
ll
3
Page 11

User
r
r
r
r
u
t
t
n
d
Guide for the SIP-T41P IP P
hone
Icon
A call
Reco
Reco
Reco
cannot be
ding starts s
ding canno
ding canno
Descriptio
ecorded
ccessfully
be started
be stoppe
4
Page 12

LED Instructions
Power Indicator LED
LED Status Description
Solid red The phone is initializing.
Overview
Fast flashing red
Slow flashing red The phone receives a voice mail.
Off The phone is powered off.
Line key LED
LED Status Description
Solid green
Fast flashing green The line receives an incoming call.
Slow flashing green The call is placed on hold.
Off The line is inactive.
Line key LED (configured as BLF key)
LED Status Description
Solid red The monitored user is busy.
The phone is ringing.
The network is disconnected.
The line is seized.
The line is in conversation.
Fast flashing red The monitored user receives an incoming call.
Off
Line key LED (used as page switch key)
LED Status Description
Solid red
Solid green There is a call on the line key of the non-current page.
Fast flashing green
Fast flashing red
Off Line keys are idle.
The monitored user is idle.
The monitored user does not exist.
There is a parked call on the line key of the non-current
page.
The line receives an incoming call on the non-current
page.
The monitored user receives an incoming call on the
non-current page.
5
Page 13

User Guide for the SIP-T41P IP Phone
User Interfaces
There are two ways to customize specific configurations on your SIP-T41P IP phone:
z Using the user interface on the IP phone.
z Using the user interface in an internet browser window from your PC.
The hardware components keypad and LCD screen constitute the phone user
interface, which allows the user to execute all call operation tasks and basic
configuration changes directly on the phone. In addition, you can use the web user
interface to access all configuration settings. In many instances, it is possible to use both
the phone user interface and the web user interface to operate the phone and
change settings. However, in some instances, it is only possible to use the phone user
interface or the web user interface.
Phone User Interface
You can customize your phone by pressing the Menu soft key to access the phone user
interface. The Advanced Settings option is only accessible to an administrator, and the
default administrator password is admin (case-sensitive). For more information on
customizing your phone using the available options from the phone user interface, refer
to Customizing Your Phone on page 17.
Web User Interface
In addition to the phone user interface, you can also customize your phone via web
user interface. In order to access the web user interface, you need to know the IP
address of your new phone. To obtain the IP address, press the OK key on the phone.
Enter the IP address (e.g., http://192.168.0.10 or 192.168.0.10) in the address bar of web
browser on your PC. The default administrator user name and password are both admin
(case-sensitive).
The options you can use to customize the IP phone via phone user interface and/or via
web user interface are listed in the following table:
Options Phone User Interface Web User Interface
Status
--IPv4
--MAC
--Firmware
--Network
--Phone
--Accounts
Basic Call Features
6
√ √
Page 14

Overview
Options Phone User Interface Web User Interface
--Auto Answer √
--Auto Redial √
--Call Forward √
--Call Waiting √
--Call Park √
--Call Pickup √
--Call Return √
--Conference
--Anonymous Call √
--Anonymous Call Rejection
--DND √
Basic Phone Settings
--Language √ √
--Time & Date √ √
--Administrator Password √ √
--Ring Tones √ √
--Backlight √ √
--Call Waiting √ √
--Phone Volume √
--Call History Management √
--Contact Management √
--Directory √
--Local Directory √ √
--Blacklist √ √
--Remote Phonebook √
--Dial Plan √
--DSS Keys √ √
--Key as Send √ √
--Hot Line √ √
--Live Dialpad √
Advanced Phone Features
--BLF √
--Call Recording √
--Intercom √
--Multicast Paging
--Music on Hold
--ACD √
--Messages √
SIP Account
--User Options
--Register Status √
√
√
7
Page 15
User Guide for the SIP-T41P IP Phone
Options Phone User Interface Web User Interface
--Account Active √
--Label √
--Display Name √
--Register Name √
--User Name √
--Password √
--SIP Server √
--Server Option
--Registrar Port
--Outbound Status √
--Outbound Proxy √
--NAT Traversal
--STUN Status √
--STUN Server √
√
Note
The table above lists most of the feature options. Please refer to the relevant sections for
more information.
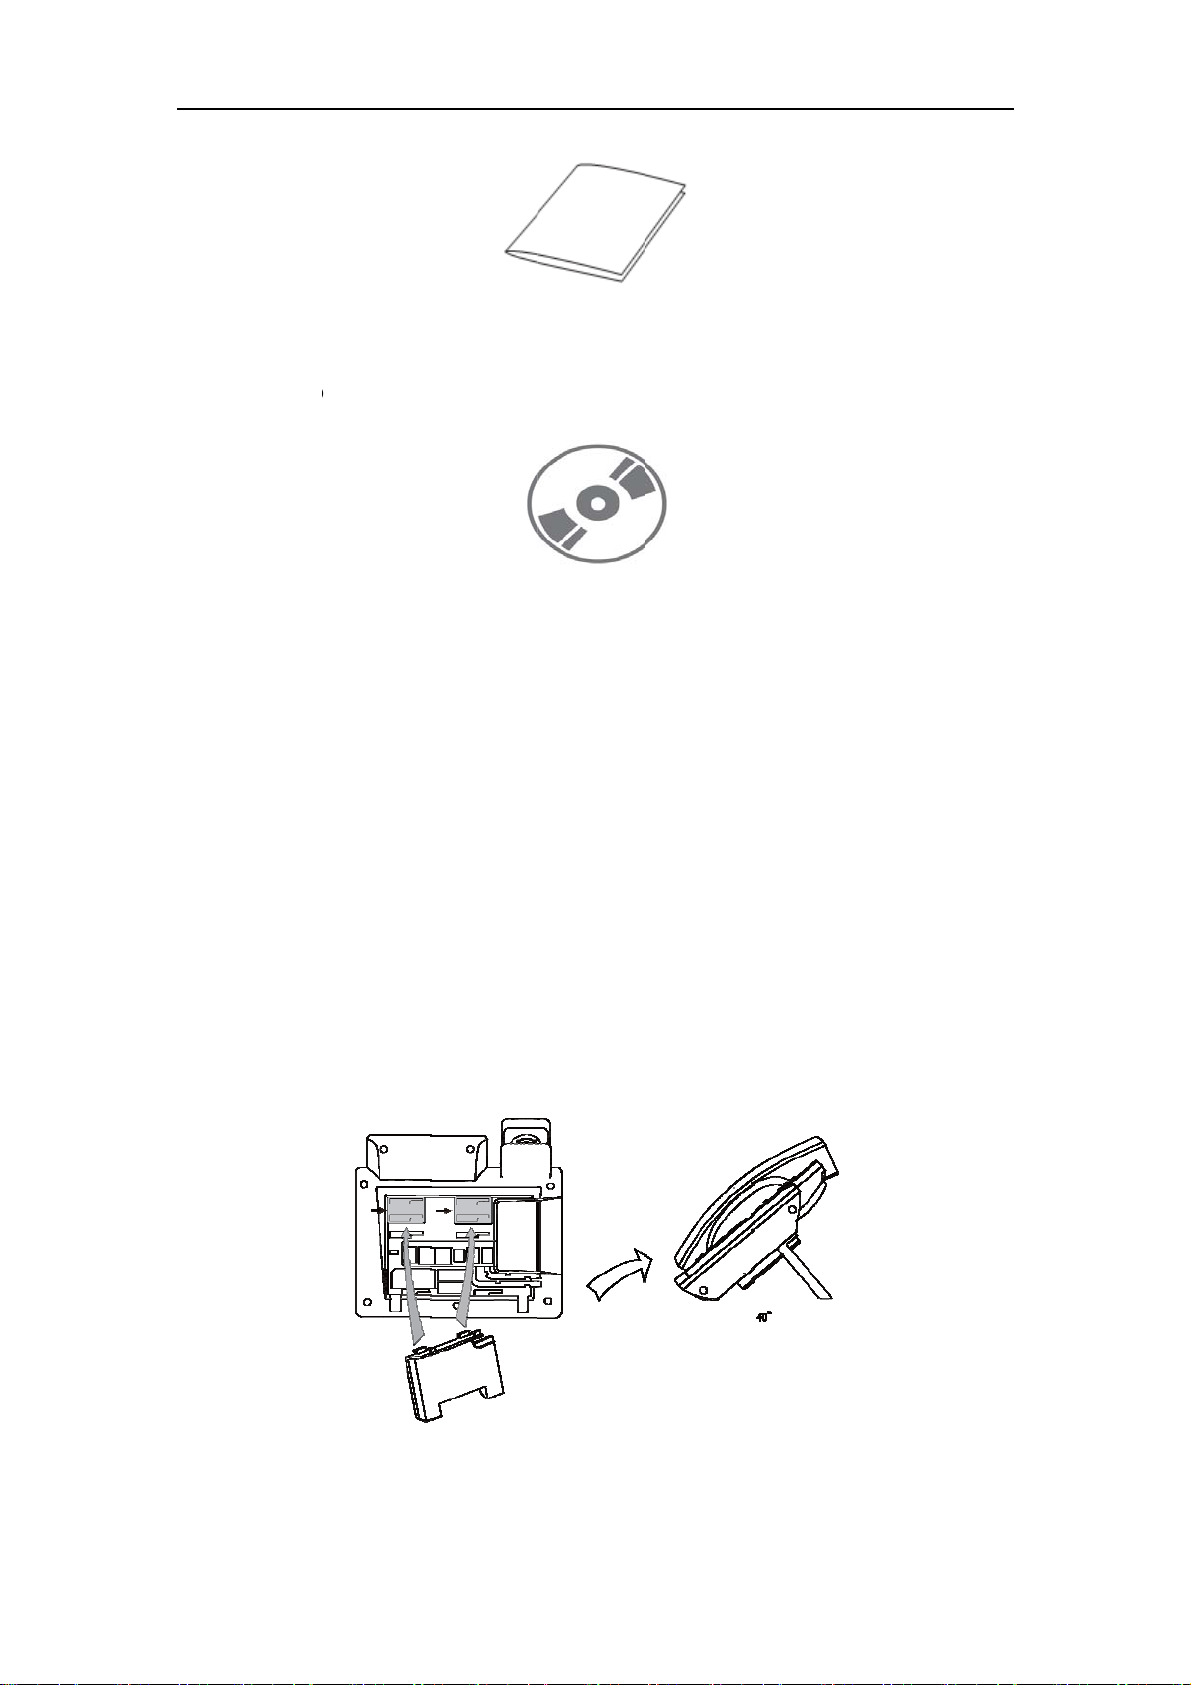
Documentations
The following table shows documentations available for the SIP-T41P IP phone.
Name Contents Where found Format/ Language
Quick Installation
Guide
Quick Reference
Guide
User Guide
Basic setup of the
phone
Basic call features
and phone
customizations
Phone/Web user
interface settings
Basic call features
and advanced
phone features
In the
package
In the
package
CD attached
in the package
PDF/English
PDF/English
PDF/English
Note
8
You can also download the latest documentations from website:
http://www.yealink.com/DocumentDownload.aspx?CateId=142&flag=142
.
Page 16
Getting Started
This chapter provides basic installation instructions and information for obtaining the
best performance with the SIP-T41P IP phone. The topics include:
z Packaging Contents
z Phone Installation
z Phone Initialization
z Phone Status
z Basic Network Settings
z Registration
z Idle Screen
Getting Started
If you require additional information or assistance with your new phone, contact your
system administrator.
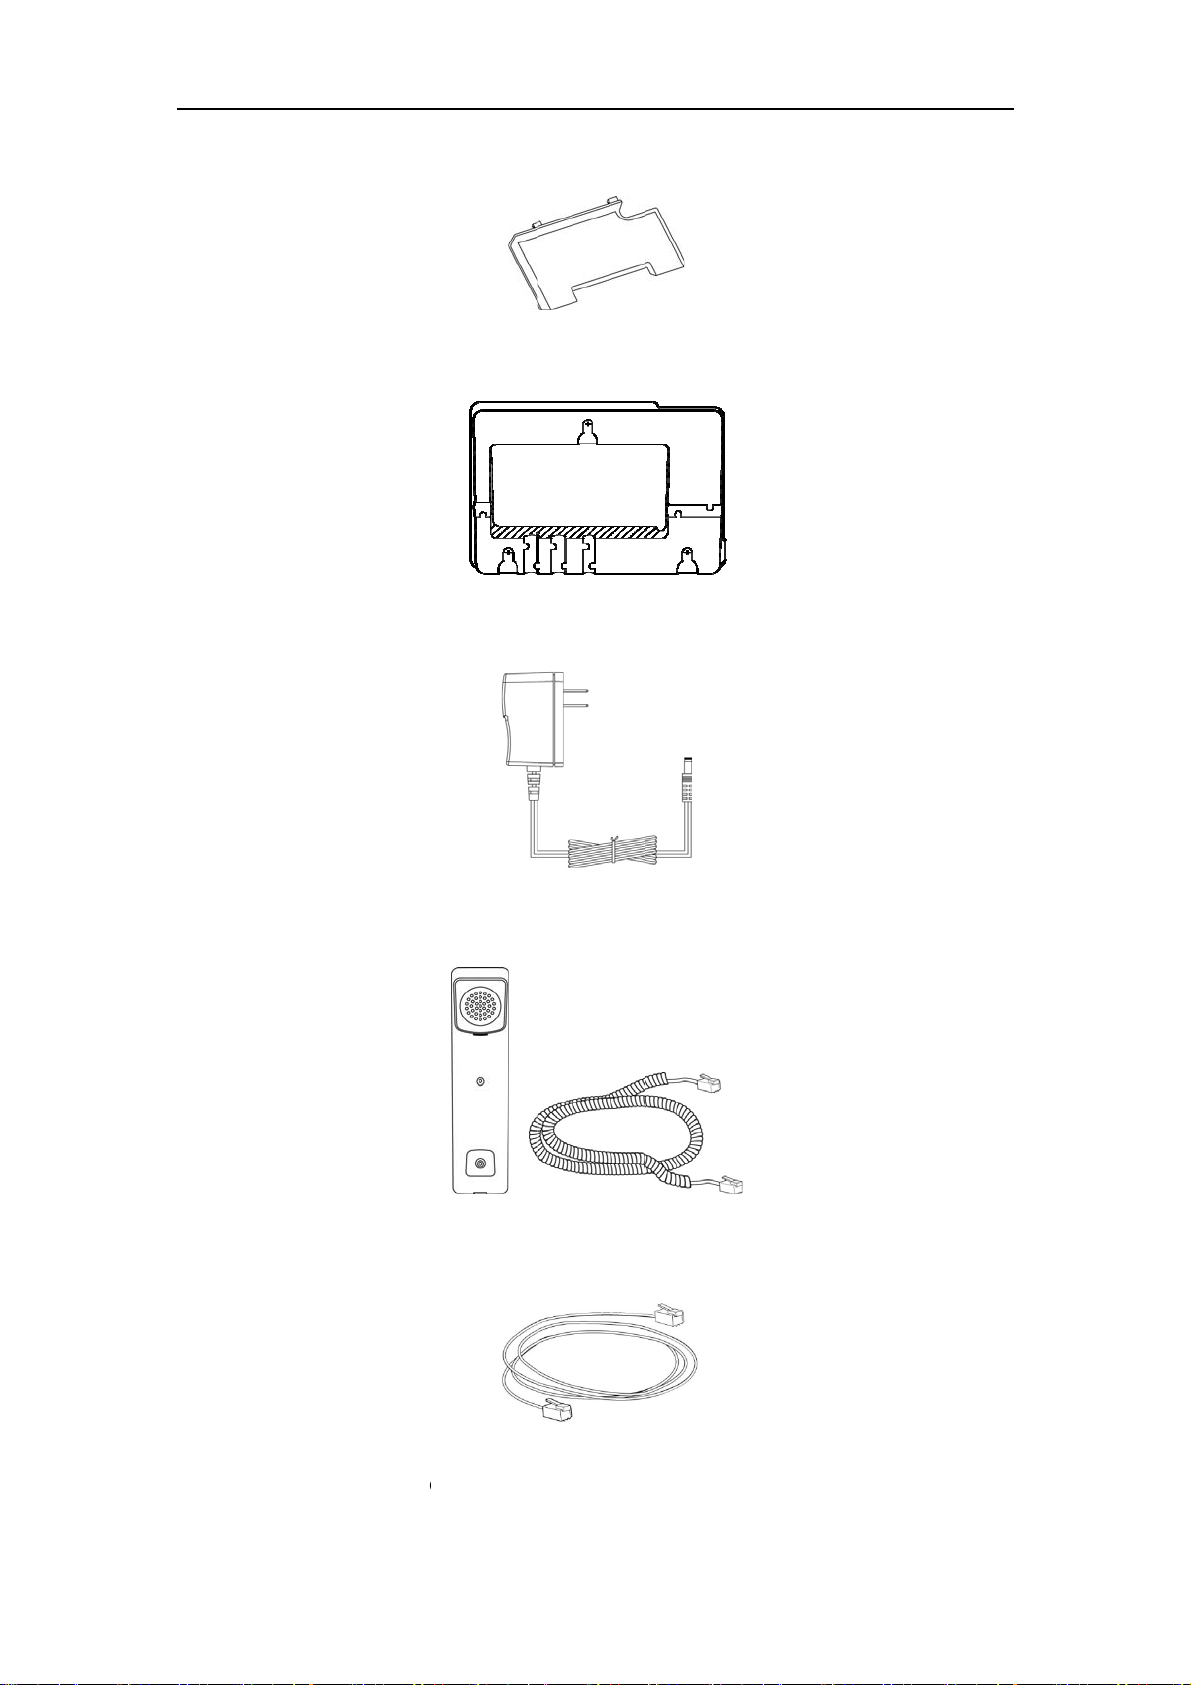
Packaging Contents
The following components are included in your SIP-T41P IP phone package:
z SIP-T41P IP Phone
9
Page 17
User
e
e
M
r
s
n
k
e
e
G
)
e
Guide for th
z
Phon
z
Wall
z
Powe
SIP-T41P IP P
Stand
ount Brack
Adapter (O
hone
t (Optional
ptional)
z
Hand
z
Ether
et & Hands
et Cable
t Cord
z
Quic
Installation
uide & Quick Referenc
Guide
10
Page 18
h
O
h
t
s
s
a
n
n
a
s
e
n
a
e
d
n
t
d
t
o
p
o
o
n
n
u
n
i
o
y
a
Getting St
a
g
z
CD-R
M
rted
P
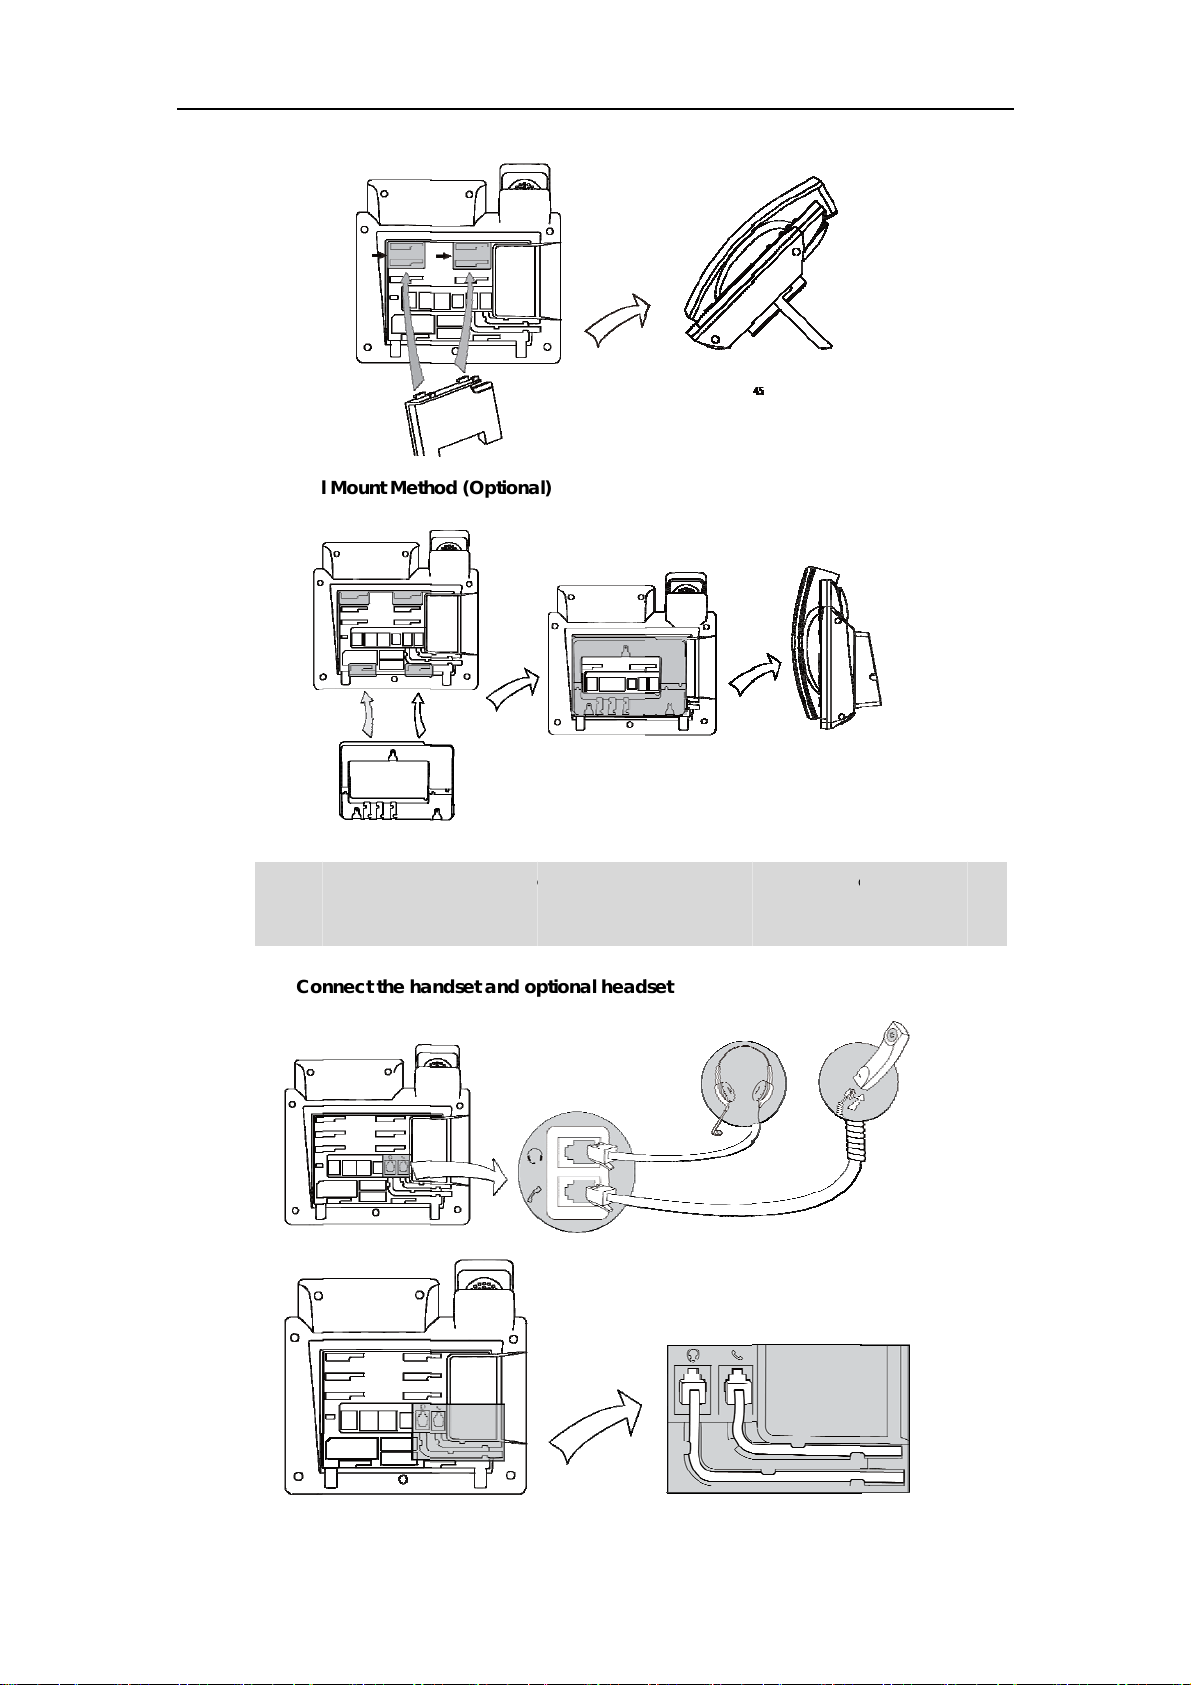
Check t
adminis
one In
If your p
This sect
content
z
Att
z
Co
z
Co
1) Att
e list befor
rator.
tallatio
hone is alre
ion introduc
:
ch the stan
nect the ha
nect the ne
ch the stan
De
k Mount Me
installation.
dy installed,
s how to ins
or the opti
dset and o
work and p
or the opti
hod
If you find a
proceed to
tall the pho
nal wall mo
tional head
wer
nal wall mo
ything missi
Phone Initial
e with the c
nt bracket
set
unt bracket
, contact
zation on p
mponents i
our system
e 14.
n the packa
ing
11
Page 19
User
e
e
l
e
h
P
h
a
p
u
a
p
e
d
r
a
a
o
Guide for th
SIP-T41P IP P
Wal
Mount Met
hone
od (Option
l)
Not
The h
attac
T4X IP
2) Co
adset is not
the wall mo
hones.
nnect the h
rovided in th
nt bracket, r
ndset and o
packaging
efer to Yealin
tional hea
contents. Fo
k Wall Mount
set
more inform
Quick Install
tion on how
tion Guide f
to
r
12
Page 20
v
s
p
w
w
e
n
n
r
)
e
n
e
e
n
h
o
p
C
p
r
w
n
p
o
o
a
(
e
w
h
p
e
o
k
p
a
t
h
P
e
h
C
t
e
o
m
o
d
o
s
Getting St
a
t
a
s
(
rted
Note
The h
admin
3) Co
You ha
will advi
z
AC
z
Po
AC Po
To conn
1. Co
con
2. Co
the
adset is not
istrator for m
nnect the n
e two optio
e you whic
ower (Opti
er over Ethe
er (Optio
ct the AC
nect the D
nect the oth
nect the su
Internet port
rovided in th
re informati
twork and p
s for power
one to use.
nal)
PoE)
rnet
nal)
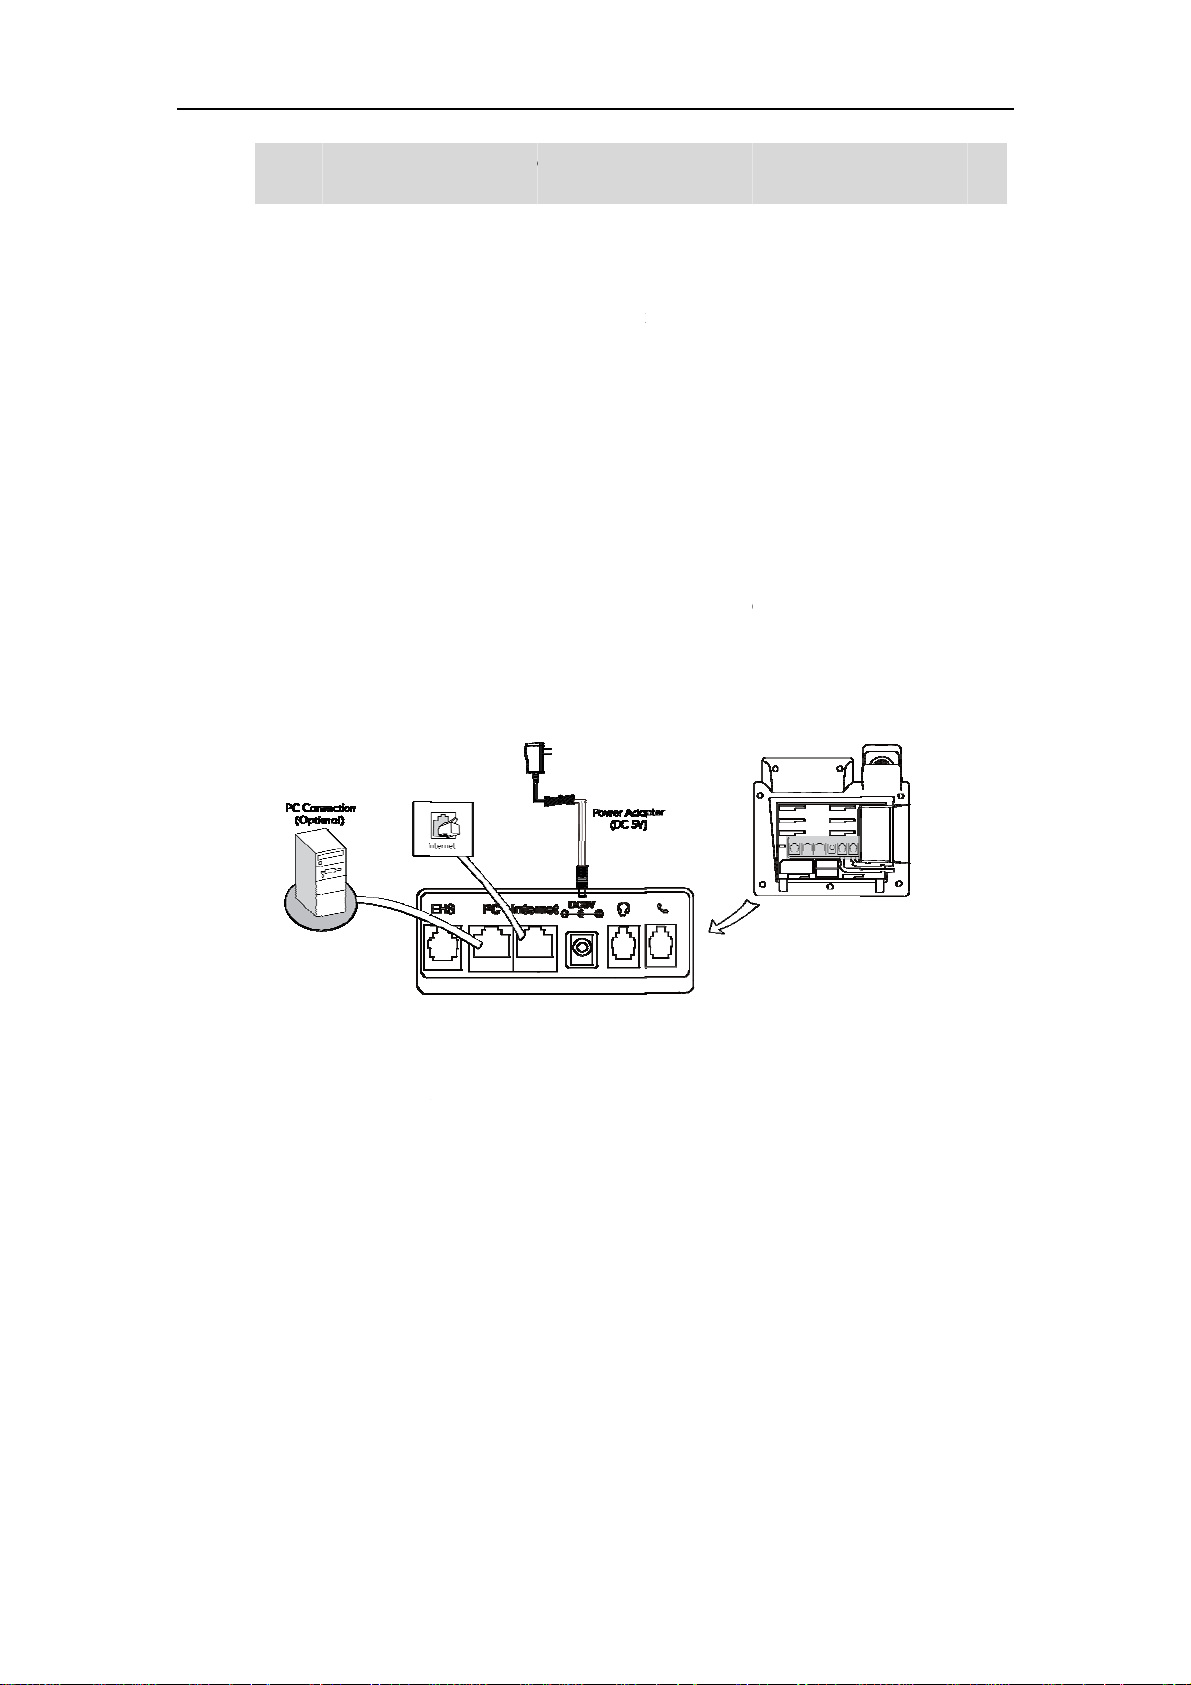
ower:
plug on the
er end of th
plied Ethern
in your net
packaging
n.
wer
nd networ
power ada
power ad
et cable be
ork or switc
contents. C
connection
ter to the D
pter into an
ween the In
/hub devic
ntact your sy
s. Your syste
5V port on
electrical p
ernet port o
port.
tem
administra
the phone
wer outlet.
n the phone
or
nd
and
Power
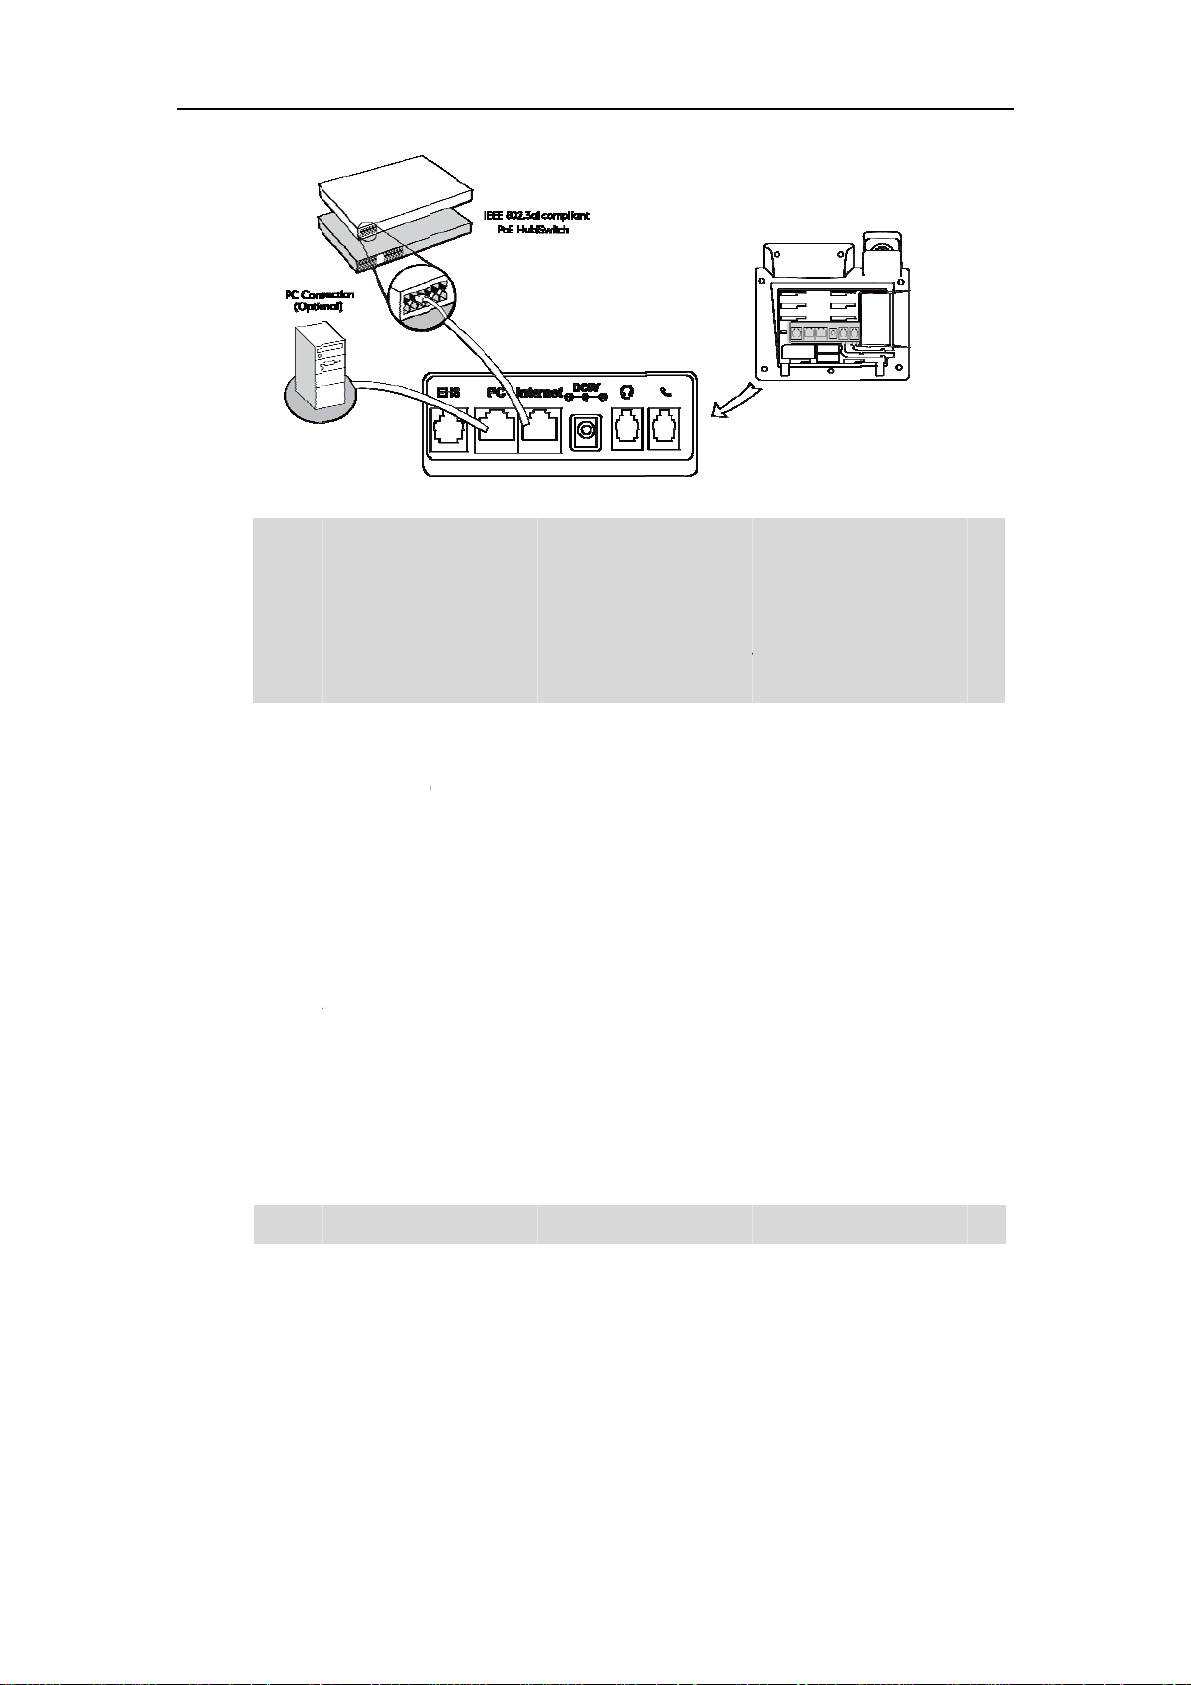
Using a
802.3af
To conn
1. Co
ava
over Ether
egular Ethe
compliant s
ct the PoE:
nect the Eth
ilable port o
net
net cable, t
itch or hub
ernet cable
the in-line
e SIP-T41P I
.
between th
ower switc
phone can
Internet po
/hub.
be powere
rt on the ph
from a PoE
ne and an
IEEE
13
Page 21
User
e
h
e
h
e
t
u
g
t
L
(D
u
h
a
n
w
n
e
e
n
a
o
o
s
t
t
h
w
t
e
e
n
n
k
o
r
n
s
e
i
o
o
t
h
t
4
o
o
C
s
y
e
)
D
t
e
d
h
t
o
s
u
b
e
d
w
o
f
a
o
e
e
a
n
g
e
w
,
Guide for th
Not
If in-lin
Ethern
The ph
(perso
SIP-T41P IP P
power is pr
t cable and
one can also
al compute
hone
vided, you d
switch/hub is
share the ne
). It is an opti
on’t need to
PoE complia
twork with ot
nal connec
connect the
nt.
er network
ion.
AC adapter.
evices such
Make sure th
s a PC
e
P
one Ini
Not
Import
and c
After yo
followin
Automa
The pho
phone
DHCP
By defa
obtain t
address
If your
nt! Do not u
nfigurations.
ializati
r phone ha
steps:
ic Phone Ini
ne finishes t
CD screen
ynamic Hos
lt the phon
e valid IPv4
and DNS ad
network doe
plug or rem
n
been pow
ialization
e initializatio
ill display "In
Configurati
attempts t
network set
dress.
not use DH
ve power to
red on, the
n process b
tializing…pl
n Protocol
contact a
ings, e.g., IP
P, proceed t
the phone
ystem boot
loading the
ase wait" d
HCP server
address, su
Basic Netw
hile it is upda
up and per
saved confi
ring the initi
in your netw
net mask, d
rk Settings o
ting firmware
orms the
uration. Th
lization.
rk in order t
fault gate
page 15.
ay
P
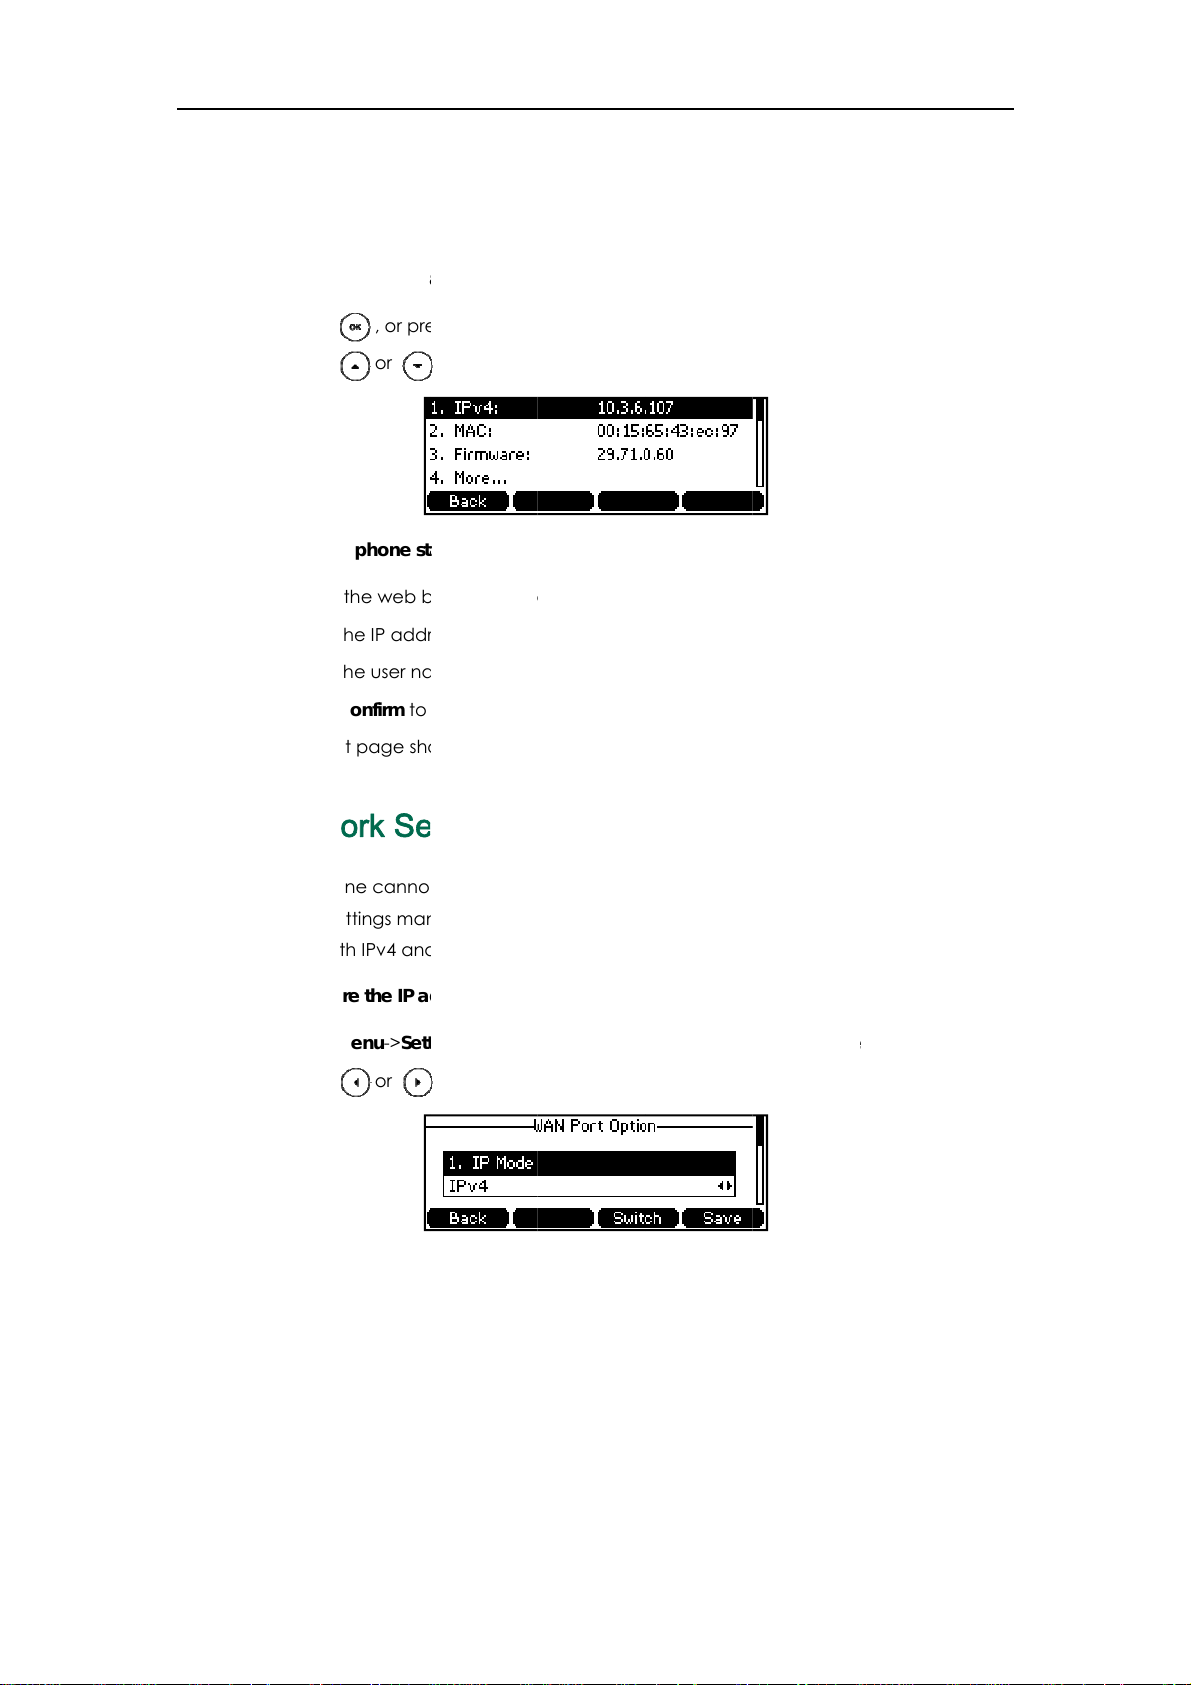
one St
You ca
Availabl
z
14
tus
view phon
e informatio
Net
ork status i
IP a
d LAN mas
status via p
of phone s
cluding IPv
.
one user in
atus includ
status, IP a
erface or w
s:
dress mode,
b user interf
MAC addr
ace.
ss, LAN type
LAN
Page 22
a
c
t
t
e
e
e
w
b
g
g
-
e
d
n
a
e
a
b
r
a
o
e
n
d
d
t
o
t
c
d
c
g
n
a
o
b
o
o
)
D
o
s
e
n
v
c
s
n
e
r
f
f
a
c
r
r
o
a
u
gs
v
a
u
s
e
o
t
e
n
n
o
d
e
mng
B
e
a
o
h
a
d
e
)
e
e
y
Getting St
a
d
e
s
N
d
z
Pho
ne status inc
ID a
nd MAC ad
z
Ac
ount status i
luding devic
ress).
cluding re
e model, ha
ister status o
dware versi
SIP accoun
n, firmware
s.
version, pro
rted
uct
B
sic Net
To view
1. Pres
2. Pres
To view
1. Op
2. Ent
3. Ent
4. Clic
The
he phone st
s , or pr
s or
he phone st
n the web
r the IP add
r the user n
k Confirm to
first page sh
ork S
tus via pho
ss Menu->St
to scroll thr
tus via we
rowser of y
ess in the br
me (admin
login.
ws the avai
ttings
e user inter
tus.
ugh the list
user interfa
ur compute
wser’s add
and passw
lable inform
ace:
nd view th
e:
.
ess bar, and
rd (admin) i
tion of pho
specific inf
then press t
the login p
e status.
rmation.
e Enter key.
e.
If your p
network
only or
To confi
1. Pres
2. Pres
3. Pres
To confi
1. Pres
Port
2. Ent
DNS
hone canno
settings ma
oth IPv4 an
ure the IP a
s Menu->Set
s or
s the Save s
ure a static
s Menu->Set
>IPv4->Stati
r the desire
fields respe
t contact a
ually. IP ph
IPv6 addre
dress mod
ings->Adva
to select IP
ft key to ac
IPv4 addres
ings->Adva
IP Client.
values in th
tively.
HCP server
nes support
ses.
via phone
ced Settin
4, IPv6 or IP
ept the ch
via phone
ced Setting
IPv4, Subn
for any reas
the IPv4 ad
ser interfac
(password:
4 & IPv6 fro
e or the
ser interfac
(password:
t Mask, Def
n, you nee
ress only, th
:
admin
admin) ->N
->N
the IP Mod
ack soft key
:
ult Gatewa
to configur
IPv6 addre
twork->WAN
e field.
to cancel.
twork->WA
, Pri DNS an
s
Port.
Sec
15
Page 23
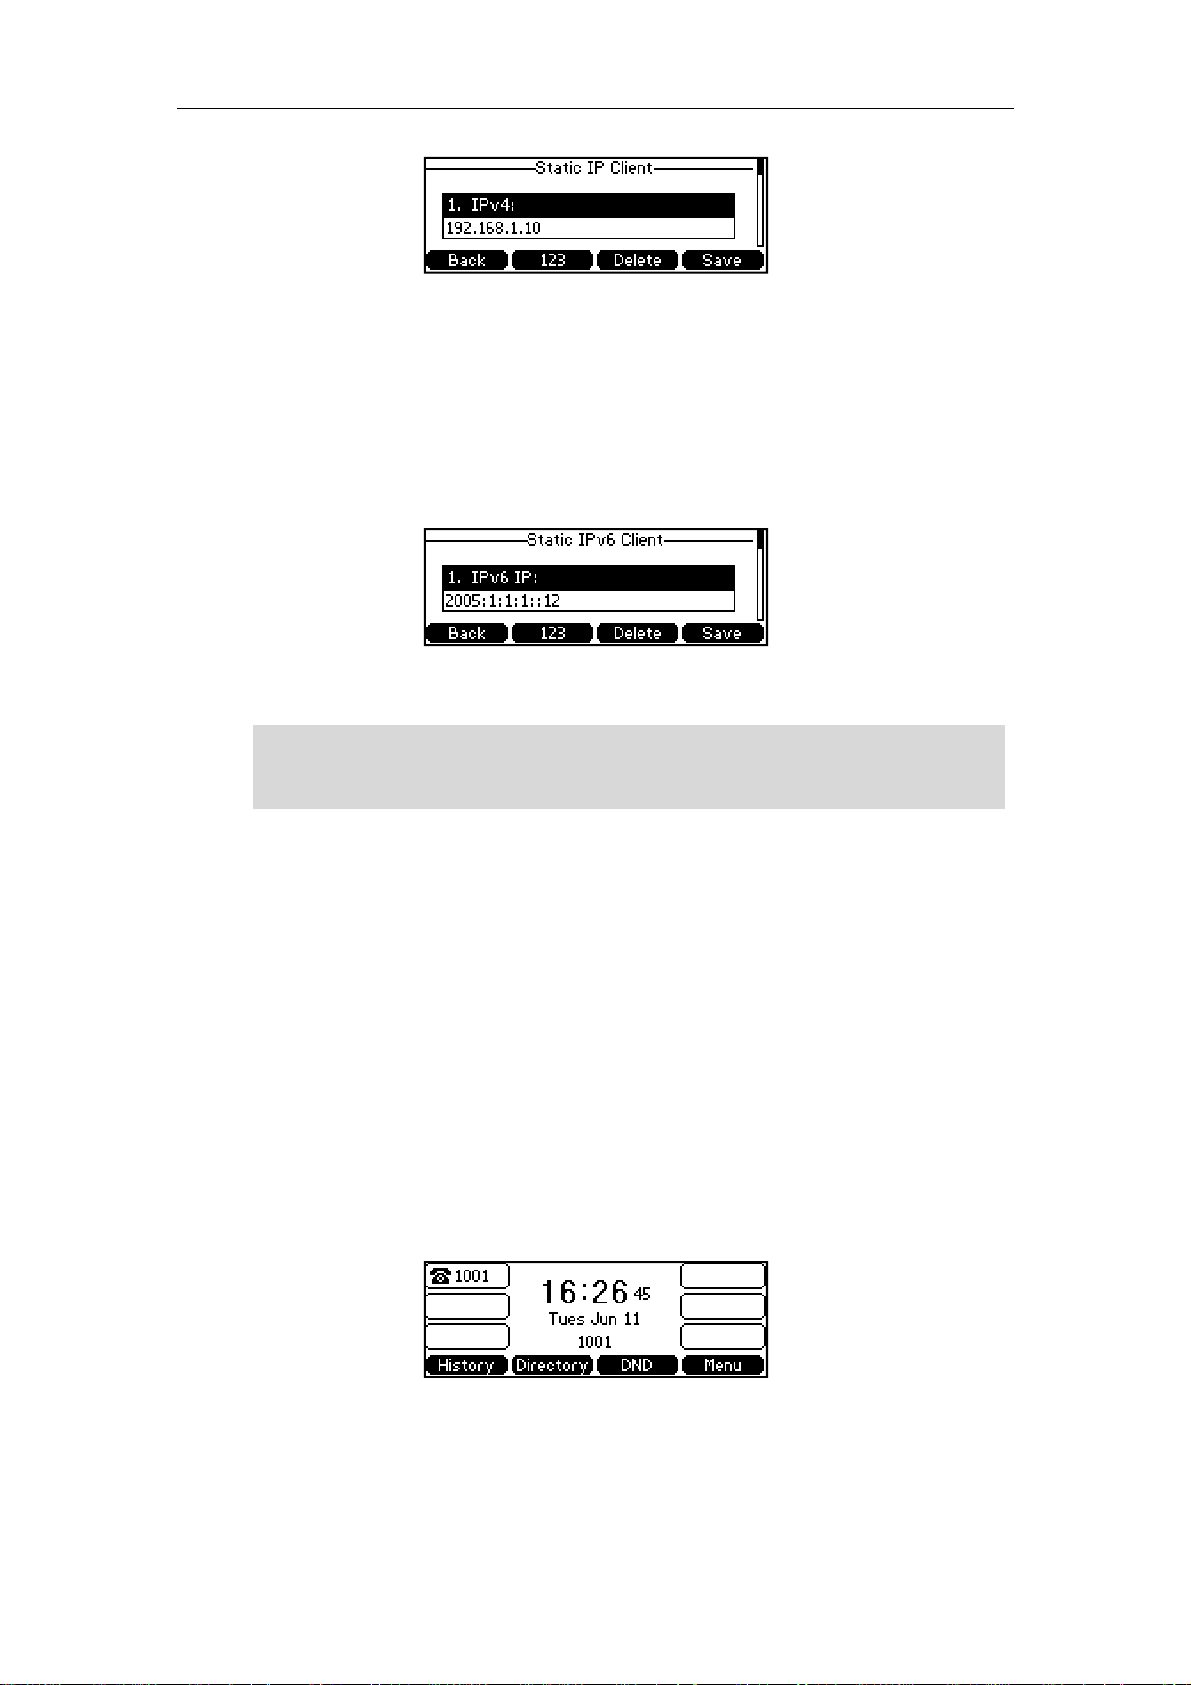
User Guide for the SIP-T41P IP Phone
3. Press the Save soft key to accept the change or the Back soft key to cancel.
To configure a static IPv6 address via phone user interface:
1. Press Menu->Settings->Advanced Settings (password: admin) ->Network->WAN
Port->IPv6->Static IPv6 Client.
2. Enter the desired values in the IPv6 IP, IPv6 IP Prefix, IPv6 Gateway, IPv6 Pri.DNS and
IPv6 Sec.DNS fields respectively.
3. Press the Save soft key to accept the change or the Back soft key to cancel.
Note
Using the wrong network parameters may result in inaccessibility of your phone and may
also have an impact on your network performance. For more information about these
parameters, contact your system administrator.
Registration
Generally, your phone will be deployed with multiple other phones. In this case, your
system administrator will configure the phone parameters beforehand, so that after you
start up your phone, the phone will be registered and ready to use. If your phone is not
registered, you may have to register it. For more information on how to register your
phone, refer to Account Management on page 50.
Idle Screen
If the phone has successfully started up, the idle LCD screen is shown as below.
16
The idle screen shows the label of current account, time and date, and four soft keys.
Page 24

C
u
e
z
n
e
l
n
n
d
n
e
q
a
S
n
B
w
i
c
g
i
o
y
s
gs
g
a
z
o
h
k
p
c
tng
g
e
d
a
i
C
e
m
n
c
o
n
d
a
gh
m
e
gs
o
t
o
u
g
gu
f
r
(
d
m
n
e
e
p
)
o
e
t
e
o
D
e
e
stomi
ing Y
ur Pho
ne
Custo
izing Your P
hone
G
You ca
ring ton
from ca
ways.
This cha
topics i
z
z
z
z
z
If you re
system
neral
customize
and so on.
l history. You
pter provide
clude:
Ge
eral Settin
Au
io Settings
Co
tact Mana
Call
History Man
Syst
m Customi
uire additi
dministrator
ettings
our SIP-T41P
You can ad
can also ha
basic oper
ement
ement
ations
nal informat
.
IP phone by
contacts t
ndle incomi
ting instruct
on or assista
configuring
the phone’
calls from
ions for cust
nce with yo
he backligh
s local direc
different co
mizing your
new phon
t, time & da
tory manuall
tacts in diff
phone. The
, contact y
e,
y or
rent
ur
Ba
cklight
You ca
screen.
z
Al
z
1m
ina
To confi
1. Pres
Sett
2. Pres
Bac
configure t
acklight sta
ays on: Bac
n, 2min, 5mi
tive for ap
ure the ba
s Menu->Set
s->Backli
s or
klight Time fi
e backlight
tus on the L
light is on p
n, 10min, 30
roximately 1
klight via ph
ings->Adva
ht.
, or the Swit
ld.
feature to a
D screen c
rmanently.
in: Backli
min, 2min, 5
one user int
ced Settin
h soft key t
ust the bri
n be confi
t is turned o
in, 10min o
rface:
password:
select the
htness of th
red as the f
f when the
30min.
admin
->Ph
esired valu
phone LC
ollowing typ
hone has b
ne
from the
s:
en
17
Page 25
User
n
e
e
n
-
a
s
g
e
e
g
g
e
o
gu
g
a
u
g
e
u
t
o
gu
e
r
g
r
c
k
h
o
u
ping
S
e
c
h
w
e
c
o
a
b
f
r
u
c
i
n
n
a
e
e
b
d
B
c
r
y
l
a
guag
f
o
p
b
e
r
guag
a
e
a
c
u
u
w
Guide for th
SIP-T41P IP P
hone
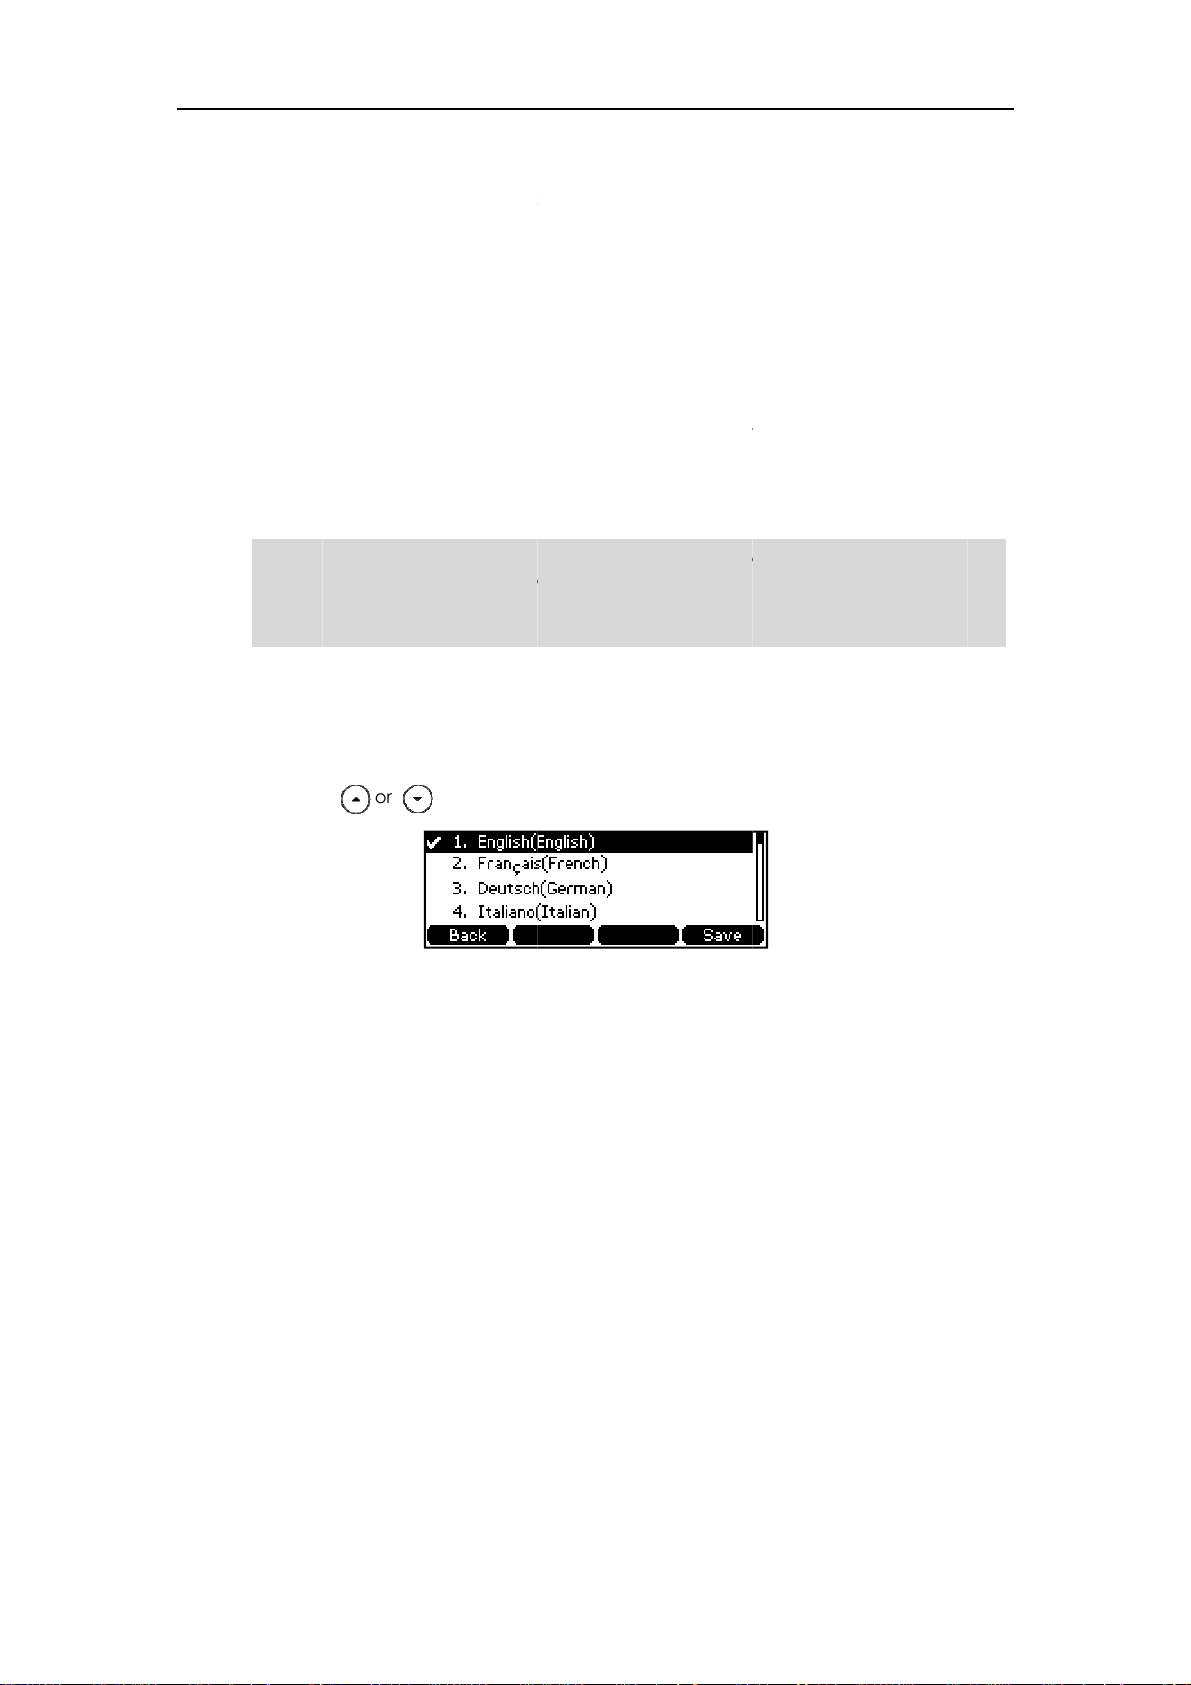
La
Not
3. Pres
You ca
Settings
guage
The def
use the
the lan
interfac
interfac
Not all
depen
system
phone
To chan
s the Save s
also confi
>Preference
ult langua
ame langu
uage of yo
will use En
and the w
of the suppo
d on the lan
administrato
.
e the lang
ft key to ac
re the bac
.
e of the pho
e as whic
r internet br
lish by defa
b user interf
ted languag
uage packs
for more inf
age for the
ept the ch
light via we
ne user inter
of your inte
wser is not s
lt. You can
ace respect
es are availa
urrently loa
rmation abo
hone user i
nge or the
user interfa
ace is Englis
net browse
pported b
hange the
vely from e
le for selecti
ed to the IP
ut the availa
terface:
ack soft key
e at the pa
h. The phon
for the web
the phone,
anguage fo
ch other.
n. The avail
hone. Pleas
le language
to cancel.
th
will detect
user interfa
the web use
the phone
ble languag
contact yo
s of your ne
nd
e. If
ser
es
r
1. Pres
2. Pres
3. Pres
Text
To chan
1. Clic
2. Sel
s Menu->Set
s or
s the Save s
on the LCD
e the lan
k on Settings
ct the desir
s->Basic
to select th
ft key to ac
screen will c
age for the
->Preferenc
d language
ettings->La
desired lan
ept the ch
ange to th
eb user int
.
from the pul
uage.
e.
nge.
selected la
rface:
l-down list o
n
e.
Language.
18
Page 26

m
e
e
e
r
l
c
t
g
a
e
p
y
e
e
r
P
t
m
n
f
o
e
c
c
e
h
a
n
a
S
c
d
C
P
c
c
e
g
d
g
m
m
o
g)
o
a
e
h
e
e
N
t
r
d
B
b
Custo
m
Y
w
m
a
T
e
e
h
m
e
izing Your P
hone
Ti
3. Clic
Text
e & Dat
The tim
configu
Protoco
phone
adminis
To confi
1. Pres
2. Pres
are
The
3. Ent
res
k Confirm to
on the web
and date d
e the phon
(SNTP) serv
annot obtai
rator for mo
ure the SNT
s Menu->Set
s or
from the Ti
default time
r the domai
ectively.
accept the
user interfa
isplay on th
to obtain t
automatic
n the time a
e informatio
settings vi
ings->Basic
, or the Swit
e Zone fiel
zone is "+8
names or I
hange.
e will chan
LCD screen
e time and
lly, or confi
d date fro
n.
phone user
ettings->Ti
h soft key t
.
hina(Beijin
addresses i
e to the sele
when the p
ate from th
ure the dat
the SNTP se
interface:
e & Date->S
select the
".
n the NTP Se
cted langua
one is idle.
Simple Net
and time
rver, contac
TP Settings.
ime zone th
ver 1 and N
e.
ou can
ork Time
anually. If t
t your syste
t applies to
P Server 2 fi
e
your
lds
Da
Please
phone
s or
light Saving
s the Save s
refer to App
.
, or the Swit
ield.
ft key to ac
ndix A - Tim
h soft key t
ept the ch
Zones for th
select the
nge or the
list of availa
esired valu
ack soft key
le time zon
from the
to cancel.
s on the IP
19
4. Pres
5. Pres
Not
Page 27

User Guide for the SIP-T41P IP Phone
To configure the time and date manually via phone user interface:
1. Press Menu->Settings->Basic Settings->Time & Date->Manual Settings.
2. Enter the specific time and date.
3. Press the Save soft key to accept the change.
The time and date on the LCD screen will change accordingly.
20
Page 28
A
g
4
e
W
M
e
n
-
o
t
t
g
e
e
e
n
d
o
e
s
n
u
D
WDY
DDD
W
gu
e
w
n
o
o
n
t
t
a
o
e
c
e
c
c
a
b
r
D
Y
Y
M
o
a
s
n
n
o
e
o
o
a
p
a
t
b
r
o
gs
f
m
d
dng
B
d
D
-
7
7
3
3
b
b
m
e
(
Custo
m
r
W
t
a
h
n
)
t
d
a
izing Your P
hone
To confi
1. Pres
2. Pres
or 2
3. Pres
Dat
4. Pres
There ar
MMM","
and "M
The dat
ure the tim
s Menu Setti
s or
Hour) from
s or
Format fiel
s the Save s
e 7 availabl
WW" repre
M" represe
formats yo
and date f
s->Basic S
, or the Swit
the Clock fi
, or the Swit
.
ft key to ac
date form
ents the ab
ts the first th
need to kn
ate Format
rmat via ph
ttings->Tim
h soft key t
ld.
h soft key t
ept the ch
ts. For exam
reviation of
ee letters of
ow:
ne user inte
& Date->Ti
select the
select the
e or the
le, for the
the week, "
the month.
Ex
mple (2013
rface:
e & Date Fo
esired time
esired date
ack soft key
ate format "
D" represen
2-27)
mat.
format (12 H
format from
to cancel.
WW DD
s two-digit
our
the
ay,
You ca
Settings
d
ministrat
The Adv
adminis
adminis
W
W
also confi
>Time & Dat
r Pass
anced Setti
rator passw
rator passw
W MMM D
D-MMM-YY
YYY-MM-DD
D/MM/YYY
MM/DD/YY
MMM YYY
W DD MM
re the date
.
ord
s option is
rd is admin.
rd as soon
and time se
nly accessi
For security
s possible.
Wed Feb 2
27-Feb-13
2013-02-2
27/02/201
02/27/13
27 Feb 201
Wed 27 Fe
tings via we
le to an ad
easons, you
user interf
inistrator. T
should cha
ce at the p
e default
e the defa
th
ult
To chan
1. Pres
2. Ent
3. Ent
e the admi
s Menu->Set
r the curren
r the new p
istrator pas
ings->Adva
password i
ssword in th
word via ph
ced Settin
the Current
e New PWD
ne user int
password:
PWD field.
ield.
rface:
admin
->Se
Password.
21
Page 29

User
y
Au
e
e
n
-
y
n
g
e
n
s
t
n
o
e
a
a
o
gu
o
s
a
e
o
gu
n
o
o
h
c
o
o
a
c
h
c
d
n
a
s
d
r
o
a
u
n
e
h
r
B
e
i
*
B
e
m
a
*
e
h
h
ge
g
e
Y
v
Guide for th
SIP-T41P IP P
hone
Ke
4. Ent
5. Pres
You ca
Security
as Sen
You ca
To confi
1. Pres
2. Pres
or s
r the new p
s the Save s
also confi
>Password.
d
set the "#"
ure key as
s Menu->Fe
s or
lect Disabl
ssword aga
ft key to ac
re the admi
r "*" to perf
end via ph
tures->Key
, or the Swit
to disable t
in in the Co
ept the ch
nistrator pas
rm as a sen
ne user inte
s send.
h soft key t
is feature.
firm Passwo
nge or the
word via w
key while d
face:
select # or
d field.
ack soft key
b user interf
aling.
from the K
to cancel.
ce at the p
y As Send fi
ath
ld,
dio Set
Vo
lume
3. Pres
You ca
Feature
You ca
can als
(hands
during
s the Save s
also confi
->General I
ings
press the v
press the v
t, speakerp
call.
ft key to ac
re key as se
formation.
lume key to
lume key to
one or hea
ept the ch
nd via web
adjust the ri
adjust the r
set), when t
nge or the
ser interfac
er volume
ceiver volu
e phone is i
ack soft key
at the pat
when the p
e of enga
n the dialin
to cancel.
one is idle.
d audio de
interface or
ou
ices
22
Page 30
e
n
s
jus
a
g
u
e
e
i
e
t
e
tker
o
t
e
s
t
o
n
e
e
h
h
n
s
S
e
c
o
r
f
o
m
c
l
o
g
a
-
h
d
e
e
c
g
B
A
R
w
Custo
m
c
n
t
g
h
e
izing Your P
hone
Not
To adju
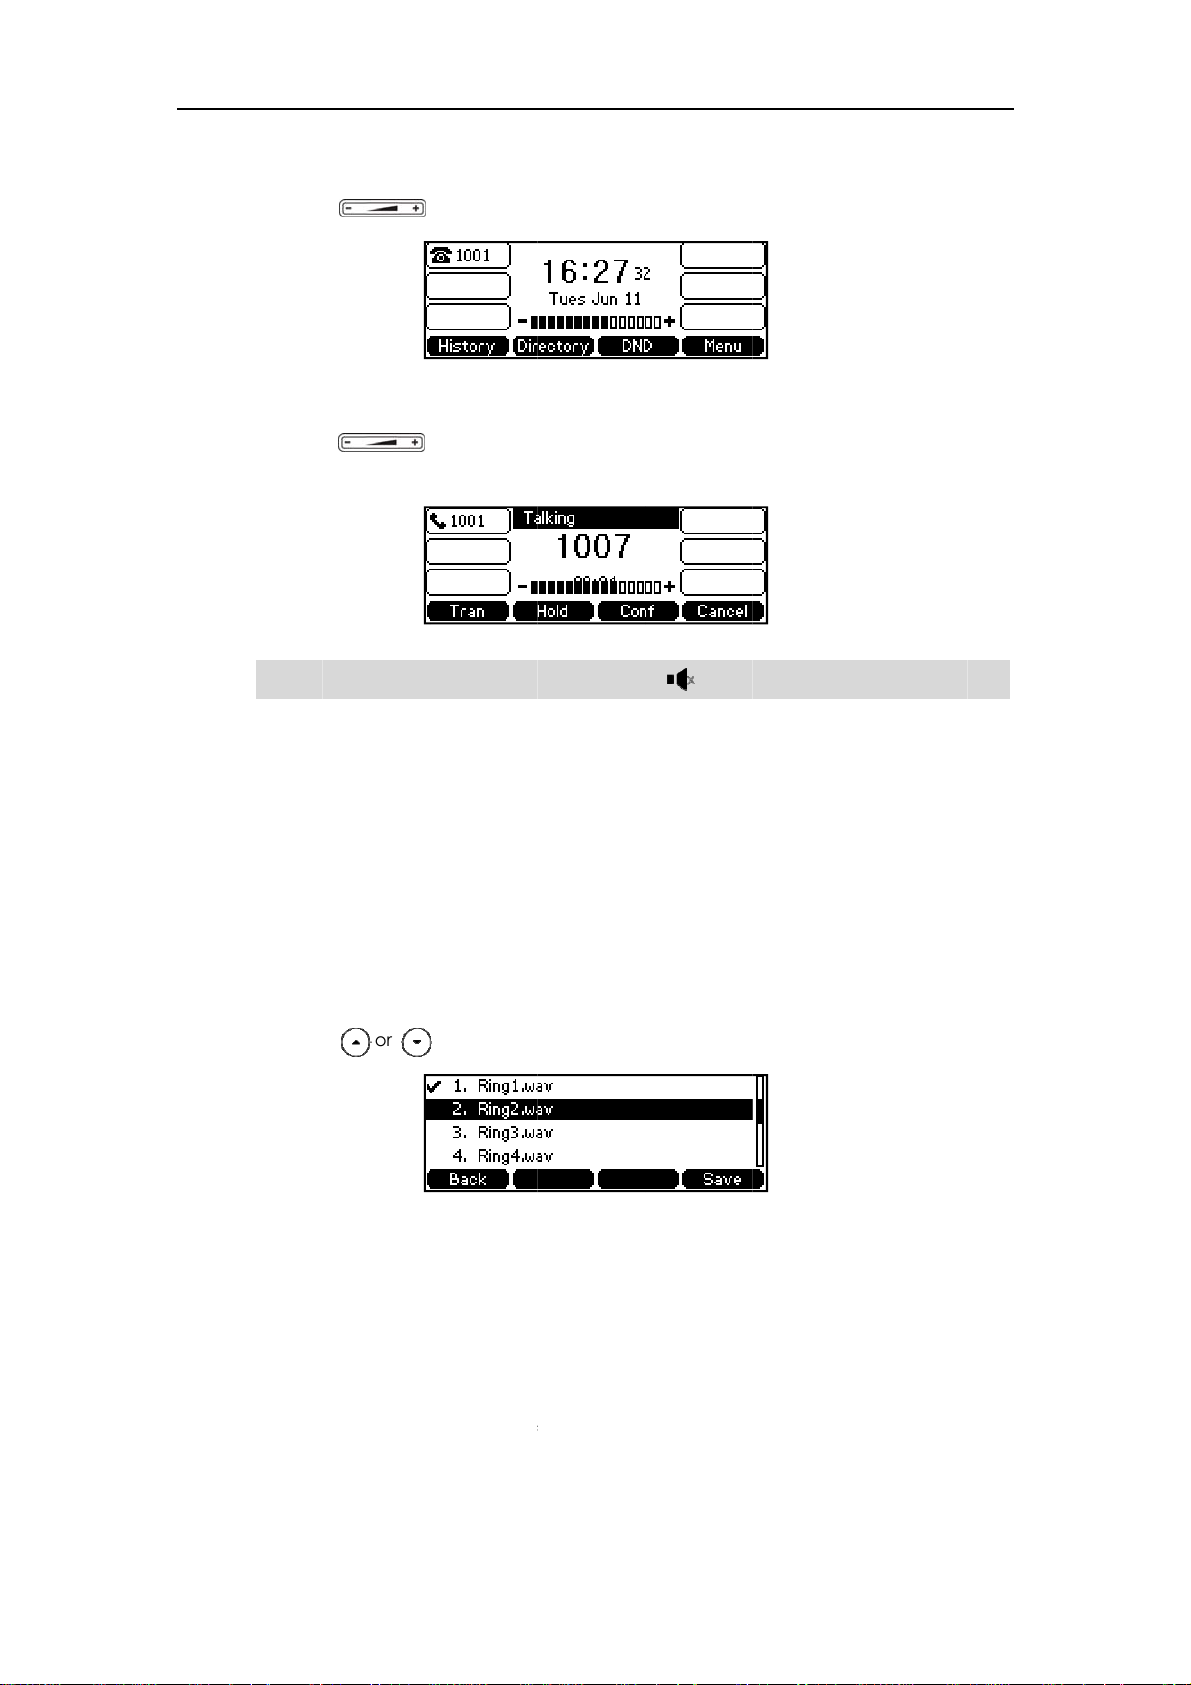
1. Pres
To ad
1. Pres
spe
If the r
t the volum
s
t the volum
s
phone
nger volume
when the p
o adjust the
when the p
o adjust the
r headset).
is adjusted t
one is idle:
ringer volu
one is durin
volume of
minimum, t
e.
a call:
urrently use
e icon
audio devi
ill appear on
e (handset,
the LCD scr
en.
Ri
g Tones
Ring ton
distin
from yo
To selec
1. Pres
2. Pres
3. Pres
To selec
1. Clic
2. Sel
es are used
ui
sh the differ
r neighbor’
t a ring tone
s Menu->Set
s or
s the Save s
t a ring tone
k on Accou
ct the desir
o indicate i
nt account
.
for the phon
ings->Basic
to select th
ft key to ac
for the acc
t.
d account f
coming cal
registered
e via phone
ettings->Rin
desired rin
ept the ch
unt via web
om the pull-
s. You can s
n your phon
user interfa
Tones.
tone.
nge or the
user interfac
down list of
lect differe
, or to distin
e:
ack soft key
e:
ccount.
t ring tones
uish your p
to cancel.
o
one
3. Clic
4. Sel
k on Basic.
ct the desir
d ring tone
rom the pull
down list of
ing Type.
23
Page 31

User Guide for the SIP-T41P IP Phone
If Common is selected, this account will use the ring tone selected for the phone at
the path of the web user interface Settings->Preference.
5. Click Confirm to accept the change.
Note
You can select a ring tone for the account via web user interface only.
To upload a custom ring tone for your phone via web user interface:
1. Click on Settings->Preference.
2. Click Browse to locate a ring tone (the file format must be *.wav) file from your local
system.
Note
24
3. Click Upload to upload the file.
The ring tone for an incoming call on the phone may be different. For example, when
the phone receives an incoming call from a contact stored in the local directory, it will
play the ring tone assigned to the contact (if not assigned, play the ring tone assigned to
the contact group) in the local directory (refer to Adding Contacts in the Contact
Management section). Otherwise, the phone will play the ring tone assigned to the
account. If both the contact ring tone and the account ring tone are not assigned, then
the phone will play the ring tone assigned for the phone.
Page 32

C
o
r
M
a
c
m
y
y
g
h
k
e
a
m
a
r
b
fdj
p
s
n
o
h
o
f
a
u
D
a
l
c
e
n
s
i
gi
n
D
d
d
e
m
c
u
n
n
l
e
ntact
anage
ent
Custo
izing Your P
hone
Di
This sect
include:
z
z
z
z
ectory
Director
Director
To confi
1. Clic
2. In t
ion provides
Dire
ctory
Loc
l Directory
Bla
klist
Re
ote Phoneb
provides e
, History, Re
ure the dire
k on Directo
e Directory
clic
.
The
selected list
the operati
ook
sy access t
mote Phone
ctory via we
y->Setting.
lock, select
appears in t
instruction
the lists yo
Book and L
b user interf
the desired
e Enabled
s for mana
use freque
AP.
ce:
ist from the
olumn.
ng contacts
tly. The lists
isabled col
. The topics
an be Loca
mn and th
n
3. Rep
4. To r
5. To
or
The
eat the step
move a list
ust the dis
.
phone LCD
2 to add m
rom the Ena
lay order o
creen displ
re lists to th
bled colum
enabled list
ys the list(s)
Enabled co
, select the
, select the
n the adjust
lumn.
esired list a
esired list a
d order.
d click
d click
.
25
Page 33

User Guide for the SIP-T41P IP Phone
6. Click Confirm to accept the change.
Note
Note
You can configure the directory via web user interface only.
To check the directory via phone user interface:
1. Press the Directory soft key when the phone is idle.
The phone LCD screen displays the enabled list(s) in the directory.
If there is only one list in the directory, pressing the Directory soft key will enter this list
directly.
If the remote phonebook and LDAP features are not configured in advance, you cannot
see the remote phonebook and LDAP lists on the phone user interface. For more
information about the remote phonebook, refer to Remote Phonebook on page 35. For
more information about the LDAP, contact your system administrator.
Local Directory
The built-in phone directory can store the names and phone numbers of your contacts.
You can store up to 1000 contacts in your phone's local directory. There are four default
groups in the local directory: All Contacts, Company, Family and Friend. You can add
new groups and add new contacts to different groups in the local directory. You can
edit, delete or search for a contact in the local directory. You can also call a contact
from the local directory.
Adding Groups
To add a group to the local directory:
1. Press the Directory soft key.
The IP phone enters the local directory directly as there is only Local Directory in the
directory by default.
26
If Local Directory is removed from the directory, press Menu->Directory->Local
Directory to enter the local directory.
Page 34

e
n
p
a
c
e
u
e
c
s
d
f
e
o
t
a
y
e
e
o
o
o
t
a
y
e
e
c
C
t
l
d
g
d
c
l
d
m
g
n
r
e
a
r
e
a
e
r
n
B
r
Custo
m
e
g
a
c
s
a
c
izing Your P
hone
Edi
ting Grou
2. Pres
3. Ent
4. Pres
5. Pres
You ca
To edit
1. Pres
The
dire
s the Group
the desire
s or
s the Add so
also edit or
s
group in th
s the Direct
IP phone en
tory by def
oft key.
group nam
to select th
t key to ac
delete the
local direc
ry soft key.
ers the loca
ult.
e in the Na
desired rin
ept the cha
ompany, Fa
ory:
directory di
e field.
tone from t
e or the B
mily and Fri
ectly as the
he Ring Ton
ck soft key
nd contact
e is only Loc
s field.
to cancel.
roups.
l Directory i
the
Del
eting Gro
If Lo
Dire
2. Sel
3. Pres
4. Pres
5. Pres
To delet
1. Pres
The
dire
cal Director
ctory to ent
ct the desir
s the Option
s or
s the Save s
ps
a group fr
s the Direct
IP phone en
tory by def
is removed
r the local
d contact
soft key an
to highlight
ft key to ac
m the local
ry soft key.
ers the loca
ult.
from the dir
irectory.
roup.
then select
the group in
ept the ch
directory:
directory di
ctory, press
Detail from t
formation a
nge or the
ectly as the
Menu->Dire
he prompt li
d then edit.
ack soft key
e is only Loc
tory->Local
t.
to cancel.
l Directory i
the
If Lo
cal Director
Dire
ctory to ent
is removed
r the local
from the dir
irectory.
ctory, press
Menu->Dire
tory->Local
27
Page 35

User
Add
e
e
a
n
m
m
g
a
c
e
e
c
u
h
e
e
s
c
y
h
s
t
o
t
a
y
e
e
a
d
r
f
g
d
c
e
l
d
g
c
c
e
c
c
w
i
a
r
e
e
o
o
n
g
g
a
n
r
e
d
e
d
a
i
y
a
c
r
o
w
o
e
Guide for th
SIP-T41P IP P
hone
2. Sel
3. Pres
The
4. Pres
ing Cont
You ca
z
Ma
z
Fro
z
Fro
ct the desir
s the Option
phone LCD
s the OK soft
cts
add conta
nually
call histor
remote p
d contact
soft key an
creen prom
key to confi
ts to the lo
onebook
roup.
then select
pts the follo
rm the delet
al directory i
Delete from
ing warnin
n
or the C
n the followi
the prompt l
:
ncel soft ke
ways:
st.
to cancel.
Addin
To add
1. Pres
The
dire
If Lo
Dire
2. Sel
3. Pres
4. Ent
5. Pres
Ac
Contact
contact to
s the Direct
IP phone en
tory by def
cal Director
ctory to ent
ct the desir
s the Add so
r the name
s or
ount field.
Manually
he local dir
ry soft key.
ers the loca
ult.
is removed
r the local
d contact
ft key.
nd the offi
, or the Swit
ctory manu
directory di
from the dir
irectory.
roup and pr
e, mobile or
h soft key t
lly:
ectly as the
ctory, press
ss the Enter
other numb
select the
e is only Loc
Menu->Dire
soft key.
rs in the cor
esired acc
l Directory i
tory->Local
esponding f
unt from th
the
ields.
If A
to is selecte
to t
e contact f
6. Pres
7. Pres
28
s or
Ton
s field.
s the Add so
, the phon
om the loca
, or the Swit
t key to ac
will use the
l directory.
h soft key t
ept the cha
first availabl
select the
e or the B
account
esired ring t
ck soft key
hen placing
ne from the
to cancel.
calls
Ring
Page 36

Not
e
g
a
e
g
a
e
e
e
e
e
5
a
a
c
c
d
s
t
c
o
e
s
t
e
e
e
e
o
a
r
o
n
o
t
a
y
x
e
d
c
d
m
e
o
e
o
o
d
v
x
y
p
e
l
x
d
h
e
a
e
h
o
e
e
c
o
c
o
r
e
r
h
a
r
y
o
e
r
w
m
t
R
t
c
e
t
a
c
C
s
s
o
o
e
Custo
If the
existe
ontact has e
!”.
isted in the
irectory, the
LCD screen
ill prompt “
izing Your P
ontactNam
hone
Addin
To add
1. Pres
2. Pres
3. Pres
4. Ent
5. Pres
The
Addin
To add
Contact
contact to
s the History
s or
s the Option
r the conta
s the Save s
entry is succ
Contact
contact to
from Call
he local dir
soft key.
to highlight
soft key, an
t name.
ft key to ac
ssfully save
from Re
he local dir
History
ctory from t
the desired
then select
ept the ch
in the loca
ote Phon
ctory from t
e call histo
ntry.
Move to Co
nge.
directory.
book
e remote p
y:
ntacts from
onebook:
he prompt li
t.
Edi
ting Cont
1. Pres
If R
Boo
2. Sel
3. Pres
4. Pres
5. Pres
If th
"Ov
con
For mor
page 3
To edit
1. Pres
s Menu->Dir
mote Phon
k to enter th
ct the desir
s or
s the Option
s the Save s
contact h
rwrite the o
tact in the l
informatio
.
cts
contact in t
s the Direct
ctory->Rem
book is add
remote ph
d remote gr
to highlight
soft key, an
ft key to sa
s already e
iginal conta
cal director
on remote
he local dir
ry soft key.
te Phone B
d to the dir
nebook.
up and pre
the desired
then select
e the conta
isted in the l
ct?". Press th
or the Can
honebook
ctory:
ok.
ctory, press
ss the Enter s
ntry.
Move to Co
t to the loc
cal directo
e OK soft ke
el soft key t
perating, r
Directory->
oft key.
ntacts from
l directory.
y, the LCD s
to overwrit
cancel.
fer to Remo
emote Phon
he prompt li
reen will pr
the origina
e Phonebo
e
t.
mpt
l
on
The
IP phone en
dire
tory by def
If Lo
cal Director
ers the loca
ult.
is removed
directory di
from the dir
ectly as the
ctory, press
e is only Loc
Menu->Dire
l Directory i
tory->Local
the
29
Page 37

User
e
e
t
e
c
e
n
n
y
e
c
e
e
o
f
o
t
a
y
e
e
s
g
t
c
o
t
a
d
g
d
c
a
l
d
g
d
v
l
e
c
a
r
e
e
c
w
i
r
r
t
B
r
ing
g
g
a
o
r
a
c
y
h
e
a
e
a
Guide for th
SIP-T41P IP P
Dire
ctory to ent
hone
r the local
irectory.
Del
eting Con
2. Sel
3. Pres
4. Pres
5. Pres
6. Pres
To delet
1. Pres
The
dire
If Lo
Dire
ct the desir
s or
s the Option
s or
s the Save s
acts
a contact
s the Direct
IP phone en
tory by def
cal Director
ctory to ent
d contact
to highlight
soft key, an
to highlight
ft key to ac
rom the loc
ry soft key.
ers the loca
ult.
is removed
r the local
roup and pr
the desired
then select
the contact
ept the ch
l directory:
directory di
from the dir
irectory.
ss the Enter
ontact.
Detail from
information
nge or the
ectly as the
ctory, press
soft key.
he prompt li
and then ed
ack soft key
e is only Loc
Menu->Dire
st.
it.
to cancel.
l Directory i
tory->Local
the
Pla
cing Calls
2. Sel
3. Pres
4. Pres
The
5. Pres
You ca
All.
You ca
Director
To plac
ct the desir
s or
s the Option
phone LCD
s the OK soft
also delete
also mana
.
to Contac
a call to a
d contact
to highlight
soft key, an
creen prom
key to confi
all contacts
e contacts
s
ontact from
roup and pr
the desired
then select
pts the follo
rm the delet
by pressing t
ia web user
the local di
ss the Enter
ontact.
Delete from
warnin
n
or the C
he Option s
interface at
ectory:
soft key.
the prompt
:
ncel soft ke
ft key, and t
the path Dir
list.
to cancel.
en select D
ctory->Loc
lete
l
1. Pres
30
s Directory s
The
IP phone en
dire
tory by def
ft key.
ers the loca
ult.
directory di
ectly as the
e is only Loc
l Directory i
the
Page 38

aSea
If Lo
e
n
u
r
c
c
e
p
c
n
e
g
h
u
y
e
e
f
b
h
e
a
r
a
a
o
t
a
y
e
t
o
h
D
o
a
s
r
u
d
g
n
m
l
d
a
u
r
Y
D
h
e
e
c
o
g
i
r
e
y
m
s
t
w
g
c
a
c
.
r
m
s
u
e
r
e
m
c
p
y
a
c
u
c
h
m
i
r
e
cal Director
Dire
ctory to ent
is removed
r the local
from the dir
irectory.
ctory, press
Custo
Menu->Dire
izing Your P
tory->Local
hone
Se
2. Sel
3. Pres
4. Pres
- If o
key
- If m
soft
rching fo
To sear
1. Pres
The
dire
If Lo
Dire
ct the desir
s or
s the Dial so
ly one num
to dial out t
ltiple numb
key to displ
Press o
Press the Di
Contacts
h for a cont
s the Direct
IP phone en
tory by def
cal Director
ctory to ent
d contact
to highlight
t key.
er of the co
e number.
rs of the co
y a list of nu
to high
l soft key to
ct in the loc
ry soft key.
ers the loca
ult.
is removed
r the local
roup and pr
the desired
tact is store
ntact are st
bers.
ht the des
li
dial out the
al directory:
directory di
from the dir
irectory.
ss the Enter
ontact.
d in the loc
red in the lo
red number
number.
ectly as the
ctory, press
soft key.
l directory,
al director
e is only Loc
Menu->Dire
ress the Dial
, press the D
l Directory i
tory->Local
soft
al
the
2. Pres
3. Ent
the
The
ap
rch Sour
You ca
interfac
To confi
1. Clic
2. In t
col
s the Search
a few con
contact ph
contacts w
ear on the L
e List in
search a c
. The lists c
ure search
k on Directo
e Search So
mn and clic
soft key.
inuous char
ne number
ose name o
CD screen.
ialing
ntact from t
n be Local
ource list in
y->Setting.
rce List In D
k .
cters of the
sing the ke
phone nu
ou can dial
he desired li
irectory, His
dialing via
ialin
block,
contact na
pad.
ber matche
from the res
ts when the
ory, Remot
eb user inte
select the d
e or contin
the chara
lt list.
phone is in t
Phonebook
face:
sired list fro
ous numbe
ters entered
e dialing
and LDAP.
the Disabl
s of
will
d
selected list
The
appears in t
e Enabled
olumn.
31
Page 39

User
e
p
e
e
a
c
k
e
g
t
p
n
e
r
a
fdj
p
s
a
d
t
d
e
a
o
n
o
a
e
s
o
f
a
c
a
e
a
a
e
d
o
r
i
e
e
n
h
h
n
r
h
s
d
s
h
e
a
C
:
n
o
y
n
Y
h
c
s
l
m
s
e
.
Guide for th
SIP-T41P IP P
hone
3. Rep
4. To r
5. To
The
eat the step
move a list
ust the dis
phone LCD
2 to add m
rom the Ena
lay order o
creen displ
re lists to th
bled colum
lists, select t
ys the searc
Enabled co
, select the
e desired li
h results in t
lumn.
esired list a
t and click
e adjusted
d click
or .
rder.
.
Not
6. Clic
You c
To sear
1. Pic
2. Ent
usin
The
ma
or
k Confirm to
n configure
h for a cont
up the han
a few con
the keypa
entries in th
ches the ch
to scroll t
accept the
earch sourc
ct in the en
set, press th
inuous char
.
enabled se
racters ent
the desire
hange.
list in dialing
bled searc
speakerph
cters of the
rch source
red will app
contact, a
via web user
source lists:
one or press
entry’s nam
lists whose n
ear on the L
d then plac
interface on
the line key.
or the entr
me or pho
D screen.
e a call to t
y.
’s phone nu
e number
ou can pres
e contact.
ber
Im
orting/Ex
You ca
interfac
To impo
32
orting Co
manage y
. But you c
t an XML fil
tact Lists
ur phone’s l
n only impo
of contact l
cal directo
t or export t
st via web u
y via phone
e contact li
er interface
user interfa
st via web u
e or web us
er interface
r
Page 40

Customizing Your Phone
1. Click on Directory->Local Directory.
2. Click Browse to locate a contact list file (file format must be .xml) from your local
system.
3. Click Import XML to import the contact list.
The web user interface prompts "The original contact will be covered, Continue?".
4. Click OK to complete importing the contact list.
To import a CSV file of contact list via web user interface:
1. Click on Directory->Local Directory.
2. Click Browse to locate a contact list file (file format must be.csv) from your local
system.
3. (Optional.) Check the Show Title checkbox.
It will prevent importing the title of the contact information which is located in the
first line of the CSV file.
4. Click Import CSV to import the contact list.
5. (Optional.) Mark the On radio box in the Delete Old Contacts field.
It will delete all existing contacts while importing the contact list.
33
Page 41
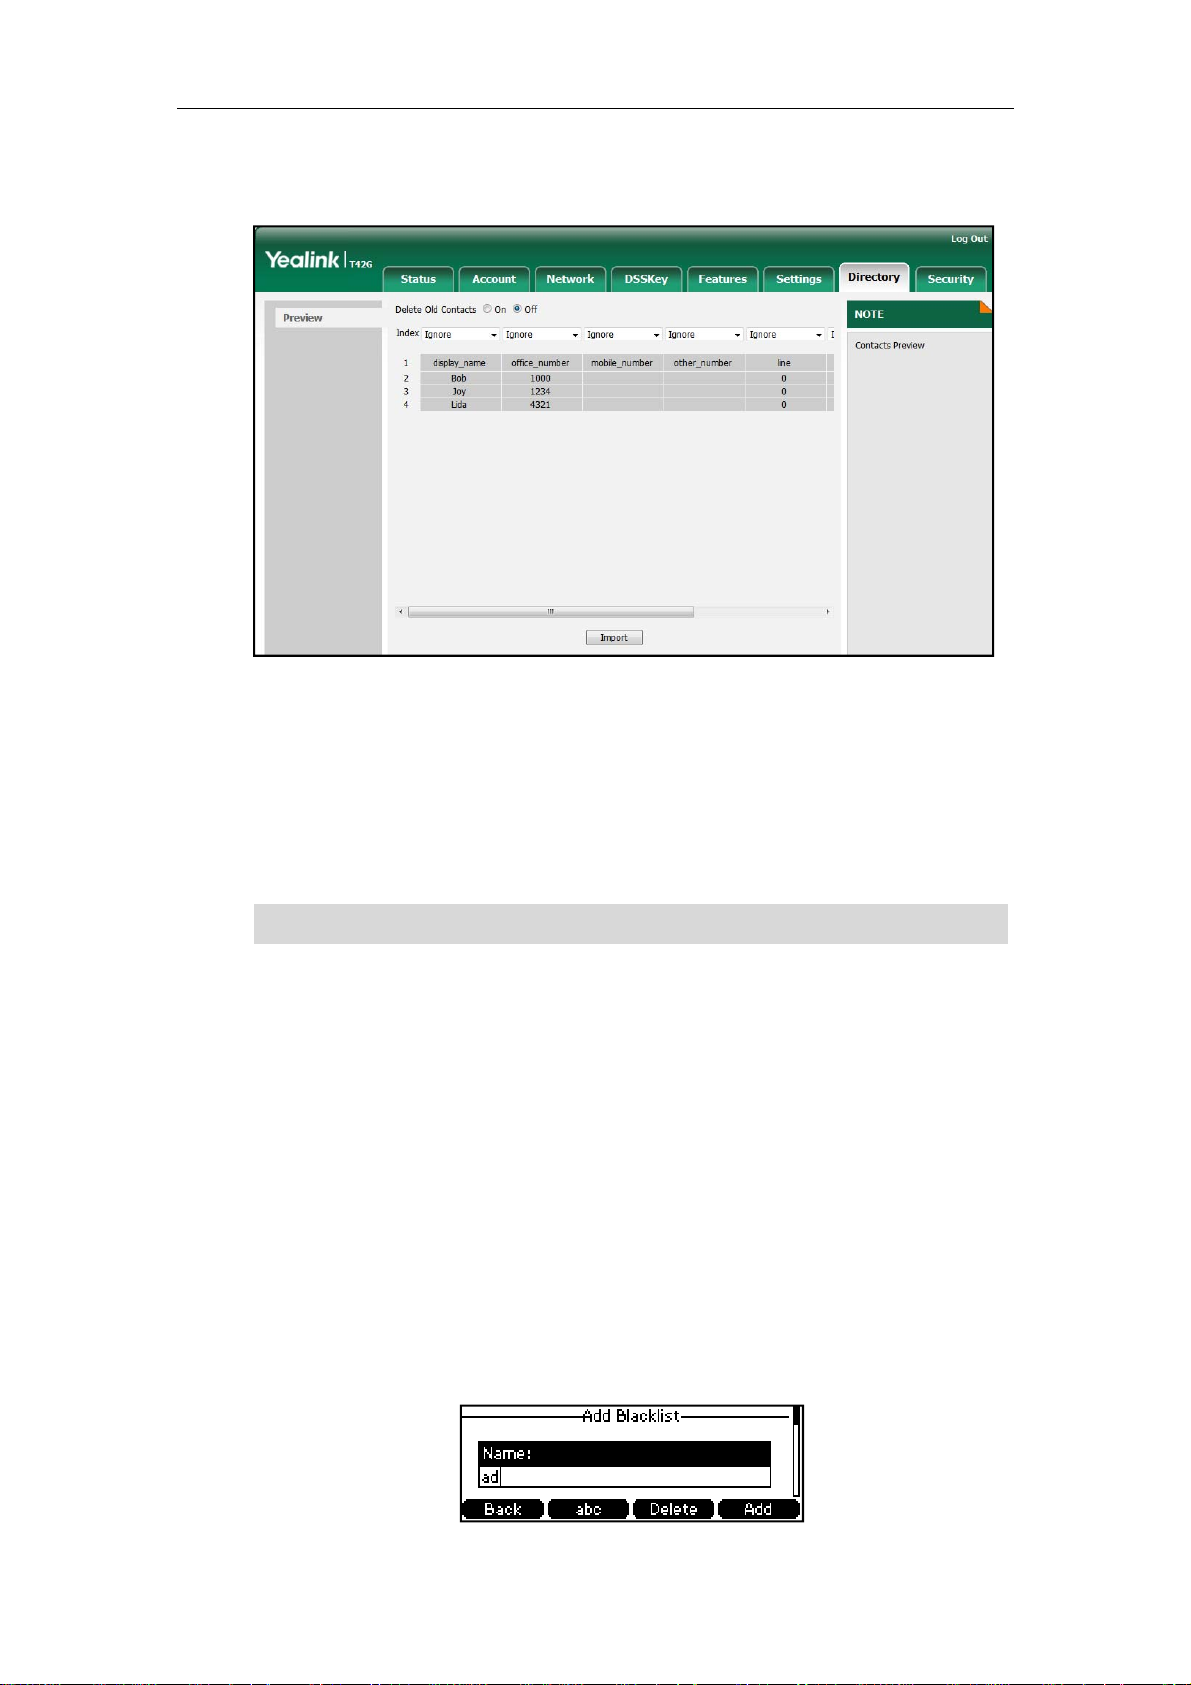
User Guide for the SIP-T41P IP Phone
6. (Optional.) Select the contact information you want to import into the local
directory from the pull down list of Index.
7. Click Import to complete importing the contact list.
To export a contact list via web user interface:
1. Click on Directory->Local Directory.
2. Click Export XML (or Export CSV).
3. Click Save to save the contact list to your local system.
Note
You can import/export contact lists via web user interface only.
Blacklist
The built-in phone directory can store the names and phone numbers of the blacklist.
You can store up to 30 contacts in your phone’s blacklist directory. You can add, edit,
delete or search for a contact in the blacklist directory. You can also call a contact in
the blacklist directory, but an incoming call from the contact in the blacklist directory
will be rejected automatically.
To add a contact to the blacklist directory manually:
34
1. Press Menu->Directory->Blacklist.
2. Press the Add soft key.
3. Enter the name and the office, mobile or other numbers in the corresponding fields.
Page 42

c
u
h
e
c
e
n
y
o
n
a
n
U
g
e
d
r
f
o
o
t
a
y
e
e
s
n
c
6
r
o
o
e
o
e
r
s
c
e
c
s
l
d
g
d
b
h
d
o
o
M
e
P
e
o
n
r
e
e
c
e
g
e
o
o
s
o
e
e
d
e
a
r
k
a
i
p
p
y
e
Custo
m
o
w
a
c
c
r
o
n
a
e
k
o
a
m
h
izing Your P
hone
4. Pres
Ac
If A
to t
5. Pres
To mov
1. Pres
The
dire
If Lo
Dire
2. Sel
3. Pres
4. Pres
The
s or
ount field.
to is selecte
e contact f
s the Add so
a contact t
s Directory s
IP phone en
tory by def
cal Director
ctory to ent
ct the desir
s or
s the Option
phone LCD
, or the Swit
, the phon
om the loca
t key to ac
the blackli
ft key.
ers the loca
ult.
is removed
r the local
d contact
to highlight
soft key an
creen prom
h soft key t
will use the
l directory.
ept the cha
t directory:
directory di
from the dir
irectory.
roup and pr
the desired
then select
pts "Move s
select the
first availabl
e or the B
ectly as the
ctory, press
ss the Enter
ontact.
Add to Blac
lected to Bl
esired acc
account
ck soft key
e is only Loc
Menu->Dire
soft key.
list from the
cklist?".
unt from th
hen placing
to cancel.
l Directory i
tory->Local
prompt list.
calls
the
Re
mote Ph
5. Pres
Operati
and sea
Director
You ca
the loc
corpora
You ca
phoneb
access
To confi
1. Clic
2. Ent
s the OK soft
instructio
rching for a
on page 2
nebook
access you
l directory fr
te directory.
configure y
ooks must b
RL of the c
ure an acc
k on Directo
r the acces
key to confi
s of editing
ontact in t
.
corporate
m the corp
ur new ph
less than 5
rporate dire
ss URL for r
y->Remote
URL in the R
rm the settin
lacklists, de
e blacklist, r
irectory thr
rate direct
ne to acces
B in size. C
ctory.
mote phon
hone Book.
mote URL fi
.
leting blackl
fer to the o
ugh your ph
ry. You can
up to 5 cor
ntact your s
book via w
ld.
sts, placing
erating inst
one. You ca
also call a c
orate direc
stem admi
b user interf
alls to blac
uctions of L
n add cont
ntact from
tories. All re
istrator for t
ce:
lists
cal
ct to
the
ote
e
35
Page 43
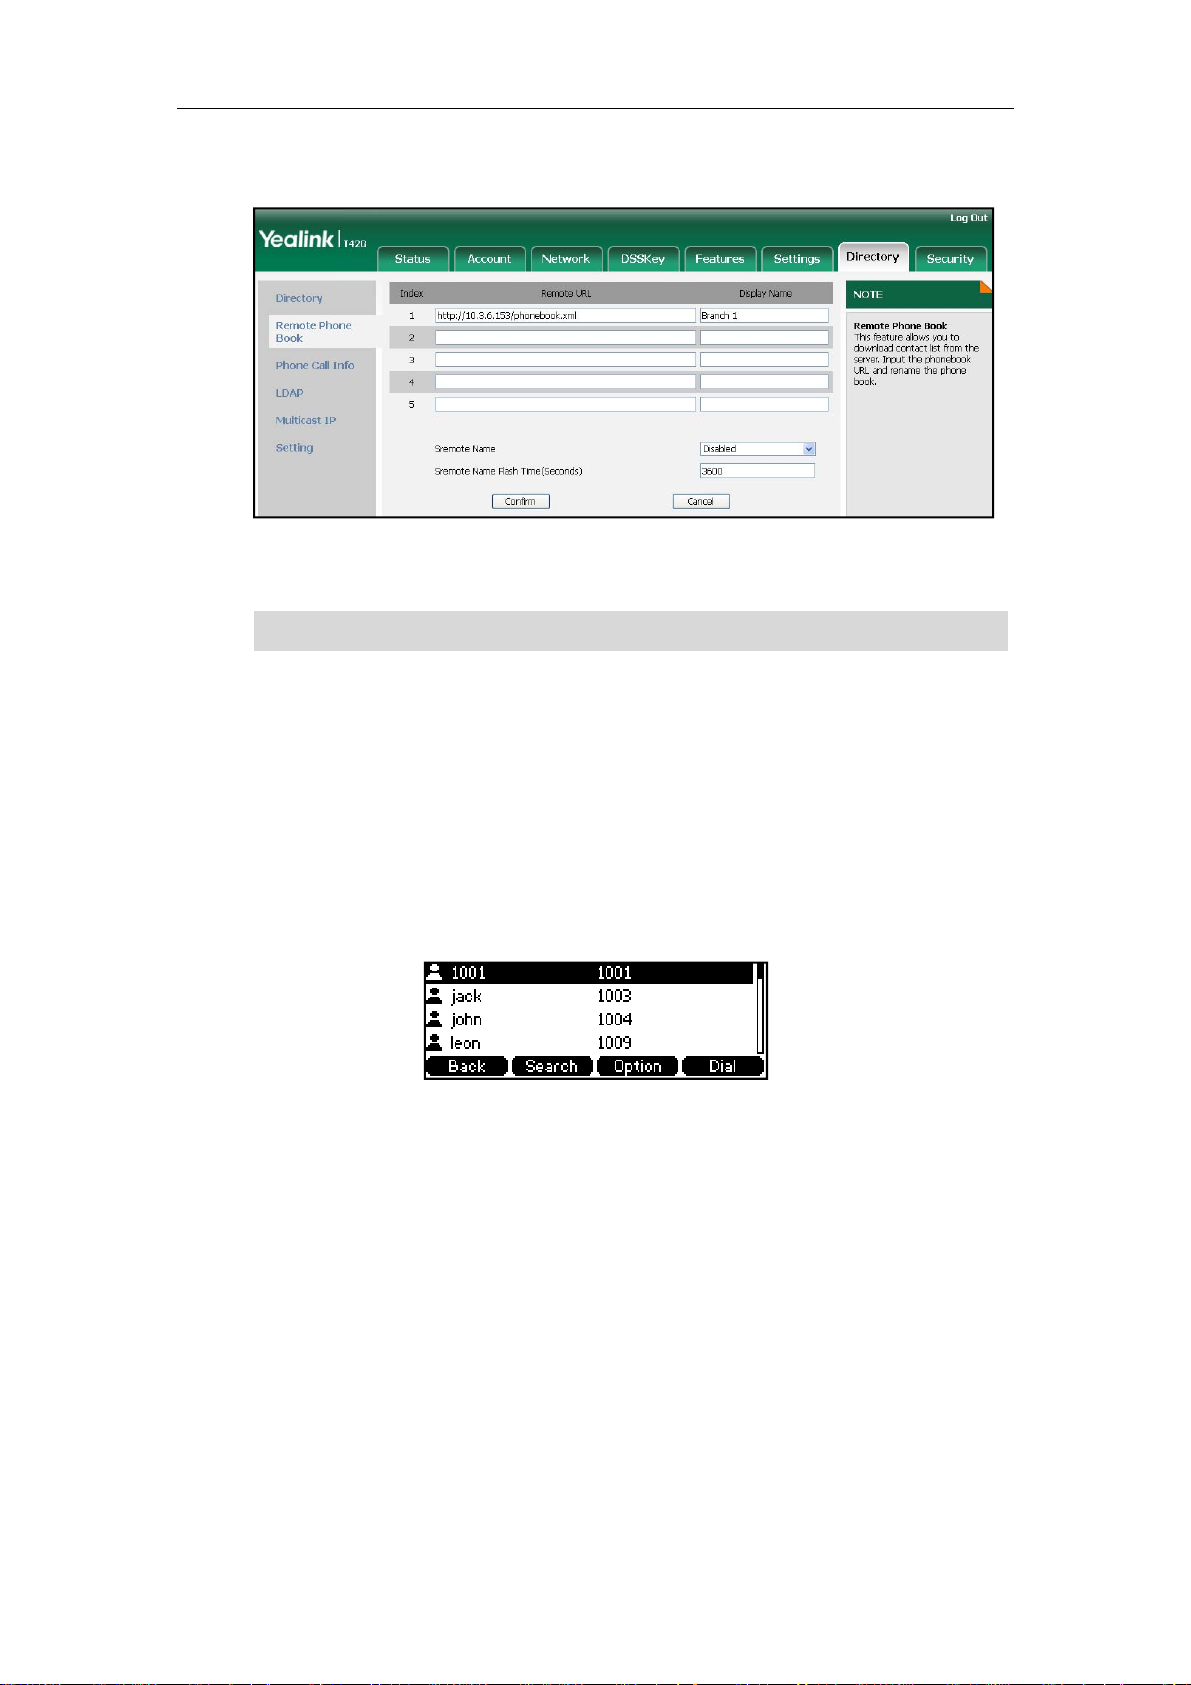
User Guide for the SIP-T41P IP Phone
3. Enter the name in the Display Name field.
4. Click Confirm to accept the change.
Note
You can configure an access URL for remote phone book via web user interface only.
To access your corporate directory via phone user interface:
1. Press Menu->Directory->Remote Phone Book.
If Remote Phone Book is added to the directory, press Directory->Remote Phone
Book to enter the remote phonebook.
2. Select the desired remote group, and then press the Enter soft key.
The phone connects to load the corporate directory, and then displays the
corporate contacts on the LCD screen.
3. Press the Back soft key to back to the previous interface.
To search for a contact in the corporate directory:
1. Press Menu->Directory->Remote Phone Book.
If Remote Phone Book is added to the directory, press Directory->Remote Phone
Book to enter the remote phonebook.
2. Select the desired remote group, and then press the Enter soft key to load the
corporate directory.
3. Press the Search soft key.
36
Page 44

Customizing Your Phone
4. Enter a few continuous characters of the contact name or continuous numbers of
the contact phone number using the keypad.
The contacts whose name or phone number matches the characters entered will
appear on the LCD screen. You can place a call from the result list.
To place a call from the corporate directory:
1. Press Menu->Directory->Remote Phone Book.
If Remote Phone Book is added to the directory, press Directory->Remote Phone
Book to enter the remote phonebook.
2. Select the desired remote group, and then press the Enter soft key to load the
corporate directory.
3. Select the desired contact in the corporate directory.
4. Press the Dial soft key.
In addition, you can enable the phone to present the caller identity stored in the
corporate directory when receiving a call.
To enable the presentation of caller identity stored in the remote phonebook:
1. Click on Directory->Remote Phone Book.
2. Select Enabled from the pull-down list of Sremote Name.
3. Enter the refresh period in the Sremote Flash Time (Seconds) field.
The default value is 3600 seconds.
4. Click Confirm to accept the change.
37
Page 45

User
a
e
r
T
d
h
a
d
a
a
a
e
d
y
h
y
a
o
d
o
e
o
t
t
c
a
h
u
r
c
c
a
e
e
d
h
y
e
e
e
e
e
t
a
e
e
o
a
t
p
t
h
t
C
e
a
b
B
t
L
r
s
r
H
s
c
s
r
d
d
d
Guide for th
C
ll Histo
SIP-T41P IP P
y Man
hone
gemen
The SIP-
Calls an
check t
list. To s
To enab
1. Pres
2. Pres
fiel
3. Pres
To chec
1. Pres
The
41P IP phon
Forwarde
e call histor
ve the call
le the histor
s Menu->Fe
s or
.
s the Save s
k the call his
s the History
LCD screen
maintains
Calls. The c
, dial a call,
istory, you s
record feat
tures->Histo
, or the Swit
ft key to ac
tory:
soft key.
isplays the
all history lis
ll history list
add a cont
ould enabl
re via phon
y Setting.
h soft key t
ept the ch
ll call list.
s of Placed
supports up
ct or delet
the history r
user interf
select Ena
nge or the
alls, Receiv
to 400 entrie
an entry fro
ecord featu
ce:
le from the
ack soft key
ed Calls, Mis
in all. You
m the call hi
e in advanc
istory Reco
to cancel.
ed
an
tory
e.
d
2. Pres
call
3. Pres
4. Pres
The
To dial
1. Pres
2. Pres
call
3. Pres
4. Pres
To add
1. Pres
2. Pres
call
3. Pres
s or
lists.
s or
s the Option
detailed inf
call from th
s the History
s or
lists.
s or
s the Send s
contact to
s the History
s or
lists.
s or
to switch b
to select th
soft key, an
rmation of t
call histor
soft key.
to switch b
to select th
ft key.
he local dir
soft key.
to switch b
to select th
tween All, P
desired en
then select
e entry ap
list:
tween All, P
desired en
ctory from t
tween All, P
desired en
laced, Rece
ry.
Detail from
ears on the
laced, Rece
ry.
e call histo
laced, Rece
ry.
ived, Missed
he prompt li
CD screen.
ived, Missed
y list:
ived, Missed
and Forwar
st.
and Forwar
and Forwar
ed
ed
ed
38
Page 46

y
m
e
e
e
e
u
s
a
t
e
t
d
o
n
o
f
s
h
s
d
c
h
e
e
e
d
y
i
.
d
a
g
t
a
i
o
p
o
a
a
Custo
m
d
y
c
g
s
d
d
r
izing Your P
hone
4. Pres
fro
5. Ent
6. Pres
For mor
To delet
1. Pres
2. Pres
call
3. Pres
4. Pres
To delet
s the Option
the promp
r the desire
s the Save s
informatio
an entry fr
s the History
s or
lists.
s or
s the Delete
all entries
soft key, an
list.
values in th
ft key to ac
, refer to Co
m the call
soft key.
to switch b
to select th
soft key.
rom the call
then select
e correspon
ept the ch
ntact Mana
istory list:
tween All, P
desired en
history list:
Move to Co
ing fields.
nge.
ement on
laced, Rece
ry.
ntacts (or A
age 25.
ived, Missed
d to Blackli
and Forwar
t)
ed
S
stem C
He
adset U
1. Pres
2. Pres
call
3. Pres
4. Pres
The
5. Pres
s the History
s or
lists.
s the Option
s the OK soft
phone LCD
s the OK soft
stomiz
e
soft key.
to switch b
soft key, an
key.
creen prom
key to confi
ations
tween All, P
then select
pts "Delete
rm the delet
laced, Rece
Delete All fr
ll records?".
on or the C
ived, Missed
m the prom
ncel soft ke
and Forwar
pt list.
to cancel.
ed
If you w
headse
to Phon
nt to use a
mode for u
Installation
eadset, ph
e. For more
on page 11
sically conn
nformation
ect your he
n physically
dset and a
connectin
tivate the
a headset,
efer
39
Page 47

User Guide for the SIP-T41P IP Phone
Headset Mode Activation/Deactivation
To activate the headset mode:
1. Press on the phone.
The headset key LED illuminates solid green when the headset mode is activated.
Press the line key or the Answer soft key to answer an incoming call, the call will be
connected to your headset automatically.
Enter the desired number and then press the Send soft key, the phone will place a
call using the headset automatically. For more information about using the headset
to place a call, refer to Placing Calls on page 61.
To deactivate the headset mode:
1. Press again on the phone.
The headset key LED turns off when the headset mode is deactivated.
Headset Prior
You can use headset in priority when enabling the headset prior feature. This feature is
especially useful for permanent or full-time headset users.
To enable the headset prior feature via web user interface:
1. Click on Features->General Information.
2. Select Enabled from the pull-down list of Headset Prior.
3. Click Confirm to accept the change.
40
Page 48

Customizing Your Phone
To use the headset prior feature, you should activate the headset mode in advance:
1. Physically connect the headset.
2. Press to activate the headset mode.
Note
If the headset prior feature is enabled, the headset mode will not be deactivated until
you press the Headset key again.
You can configure headset prior via web user interface only.
Dual Headset
You can use two headsets when enabling the dual headset feature. To use this feature,
you must physically connect headsets to the headset jack and handset jack
respectively. Once the phone joins in a call, people with the headset connected to the
headset jack has a full-duplex conversation, another people with the headset
connected to the handset jack is only allowed to listen to.
To enable the dual headset feature via web user interface:
1. Click on Features->General Information.
2. Select Enabled from the pull-down list of Dual Headset.
Note
3. Click Confirm to accept the change.
You can configure dual headset via web user interface only.
41
Page 49

User Guide for the SIP-T41P IP Phone
DSS Keys
There are two types of DSS keys: Line Keys and Programmable Keys. The details will be
introduced in the following. The SIP-T41P IP phone supports 15 line keys.
Line Keys
You can assign predefined functionalities to the line keys. You can also define a label
for the line key feature which will appear on the LCD screen. Line keys allow you to
quick access features such as call return and voice mail. The line key LED will indicate
the monitoring status when the keys are assigned specific features, such as BLF. The
default key type of line key 1-3 is Line. The default key type of line key 4-15 is N/A, which
indicates that this line key provides no functionality.
To assign functionality to the line key via phone user interface:
1. Press Menu->Features->DSS Keys.
Note
2. Select the desired line key, and then press the Enter soft key.
3. Select the desired key type from the Type field.
4. (Optional.) Select the desired key event type from the Key Type field.
5. (Optional.) Select the desired line from the Account ID field.
6. (Optional.) Enter a string that will appear on the LCD screen in the Label field.
7. (Optional.) Enter the corresponding value in the Value field.
8. (Optional.) Enter the corresponding value in the Extension field.
9. Press the Save soft key to accept the change or the Back soft key to cancel.
You can also configure the line key via web user interface at the path DSSKey->Line
Key.
When the phone is idle, you can also long press the line key to configure it directly on the
phone.
You can assign functionalities to 15 line keys. These 15 line keys are displayed on three
pages. When you assign functionality to line keys located in line key 1-6, the labels of
the line keys display on the first page.
42
The following figure shows an example:
When you assign functionality to line key located in line key 7-15, the labels of the line
key 6-10 display on the second page, and the labels of the line key 11-15 display on the
Page 50

third page. The right bottom line key is used to switch pages.
The following figure shows an example:
The following table lists the page icon status:
Icons Description
Customizing Your Phone
2
3
Indicates the current page of the line keys.
Indicates the non-current page of the line keys.
You can configure the page icon and page switch key LED to indicate the different
status. This feature is disabled by default. For more information on the page switch key
LED status, refer to LED Instructions on page 5.
The following table lists the page icon status for different states:
Icons Status Description
The BLF monitored user receives an incoming call on the
non-current page.
Fast flashing
The line receives an incoming call on the non-current page.
There is a hold call on the line on the on the non-current
page.
To configure the page icon to indicate status via web user interface:
1. Click on DSSKey->Line Key.
2. Select Enabled in the Enable Page Tips field.
3. Click Confirm to accept the change.
43
Page 51

User Guide for the SIP-T41P IP Phone
The line key features are explained in the following subchapters in detail:
z Line
z Speed Dial
z Voice Mail
z Directed Pickup
z Group Pickup
z DTMF
z Prefix
z Local Group
z XML Group
z LDAP
z Conference
z Forward
z Transfer
z Hold
z DND
z Group Listening
z Zero Touch
z URL
z Directory
For more information, contact your system administrator.
Line
You can use this key feature to accept the incoming calls, place active calls on hold or
resume a held call. It performs the same as a hard line key.
Dependencies: Type (Line)
Account ID (the account this feature will be applied to)
Value (Default/Lock/Float)
Usage: When receiving an incoming call, the DSS key LED flashes green:
44
1. Press the DSS key to accept the incoming call.
2. Press the DSS key to place the active call on hold.
3. Press the DSS key again to resume the held call.
If you select Lock in the Value field, the line keys located in the same position of the
other page will be automatically assigned the line feature with Lock filled in the Value
field. Then you can use this key on every page. This feature is only applicable to line key
1-3.
Page 52

Customizing Your Phone
If you select Float in the Value field, the phone will automatically switch to the page the
line key is located when the line key receives an incoming call.
Speed Dial
You can use this key feature to speed up dialing the numbers often used or hard to
remember.
Dependencies: Type (Speed Dial)
Account ID (the account this feature will be applied to)
Label (key label displayed on the LCD screen)
Value (the number you want to dial out)
Usage: Press the DSS key to dial out the number specified in the Value field, using the
account selected from the Account ID field.
Voice Mail
You can use this key feature to connect voice mail quickly. For more information, refer
to Voice Mail on page 103.
Dependencies: Type (Key Event)
Key Type (Voice Mail)
Account ID (the account this feature will be applied to)
Label (key label displayed on the LCD screen)
Value (the voice mail access code)
Usage: Press the DSS key to dial out the voice mail access code, you can follow the
voice prompt to listen to the voice mails.
Directed Pickup
You can use this key feature to answer someone else’s incoming call on the phone.
Dependencies: Type (Key Event)
Key Type (Direct Pickup)
Account ID (the account this feature will be applied to)
Label (key label displayed on the LCD screen)
Value (the direct pickup code followed by the specific phone number)
Usage: Press the DSS key on your phone when the specific phone number receives an
incoming call. The call is answered on your phone.
Group Pickup
You can use this key feature to answer incoming calls in a group that is associated with
their own group.
Dependencies: Type (Key Event)
Key Type (Group Pickup)
Account ID (the account this feature will be applied to)
45
Page 53

User Guide for the SIP-T41P IP Phone
Label (key label displayed on the LCD screen)
Value (the group pickup feature code)
Usage: Press the DSS key on your phone when a phone number in the group receives
an incoming call. The call is answered on your phone.
DTMF
You can use this key feature to send the specification of arbitrary key sequences via
DTMF.
Dependencies: Type (Key Event)
Key Type (DTMF)
Label (key label displayed on the LCD screen)
Value (DTMF sequence)
Note
DTMF sequence can only contain "0-9", "*", "#" and "A-D".
Usage: Press the DSS key during an active call to send the key sequence specified in the
Value field.
Prefix
You can use this key feature to add a specified prefix number before the dialed
number.
Dependencies: Type (Key Event)
Key Type (Prefix)
Label (key label displayed on the LCD screen)
Value (the prefix number)
Usage: Press the DSS key when the phone is idle, the phone enters into the dialing
screen and displays the prefix number which you specified in the Value field, enter
other digits and then dial out.
Local Group
46
You can use this key feature to access the contact group in the local directory quickly.
For more information, refer to Local Directory on page 26.
Dependencies: Type (Key Event)
Key Type (Local Group)
Local Group (the contact group name you want to access)
Label (key label displayed on the LCD screen)
Usage: Press the DSS key to access the contact group specified in the Local Group field.
XML Group
You can use this key feature to access the remote group in your corporate directory
Page 54

Customizing Your Phone
quickly. You should configure the remote phonebook in advance. For more information,
refer to Remote Phonebook on page 35.
Dependencies: Type (Key Event)
Key Type (XML Group)
XML Group (the remote group name you want to access if the remote
phonebook is configured)
Label (key label displayed on the LCD screen)
Usage: Press the DSS key to access the remote group specified in the XML Group field.
LDAP
You can use this key feature to access the LDAP search interface quickly.
Dependencies: Type (Key Event)
Key Type (LDAP)
Label (key label displayed on the LCD screen)
Usage:
1. Press the DSS key to access the LDAP search interface.
2. Enter a few continuous characters of the contact name or continuous numbers of
the contact phone number using the keypad.
The contacts whose name or phone number matches the characters entered will
appear on the LCD screen.
Conference
You can use this key feature to set up a conference call. For more information, refer to
Conference on page 79.
Dependencies: Type (Key Event)
Key Type (Conf)
Label (key label displayed on the LCD screen)
Value (the number you want to add to the conference)
Usage: Press the DSS key during an active call to set up a conference with the number
specified in the Value field.
Forward
You can use this key feature to forward an incoming call to someone else. For more
information, refer to Call Forward on page 73.
Dependencies: Type (Key Event)
Key Type (Forward)
Label (key label displayed on the LCD screen)
Value (the number you want to forward to)
Usage:
Press the DSS key to forward an incoming call to the number specified in the
Value field.
47
Page 55

User Guide for the SIP-T41P IP Phone
Transfer
You can use this key feature to handle the call differently depending on the transfer
mode on DSS key when there is an active call on the phone.
Dependencies: Type (Key Event)
Key Type (Tran)
Label (key label displayed on the LCD screen)
Value (the number you want to transfer to)
Usage:
z When the transfer mode on DSS key is Blind Transfer, press the DSS key to complete
the blind transfer to the number specified in the Value field.
z When the transfer mode on DSS key is Attended Transfer, press the DSS key to dial
out the number specified in the Value field, and then you can perform the
attended or semi-attended transfer.
z When the transfer mode on DSS key is New Call, press the DSS key to place a new
call to the number specified in the Value field.
Note
You can configure the transfer mode on DSS key via web user interface at the path
Features->Transfer. For more information on how to configure the transfer mode on DSS
key, refer to Busy Lamp Field (BLF) on page 89.
Hold
You can use this key feature to place an active call on hold or retrieve a held call.
Dependencies: Type (Key Event)
Key Type (Hold)
Label (key label displayed on the LCD screen)
Usage:
1. Press the DSS key during an active call to place the call on hold.
2. Press the DSS key again to retrieve the held call.
DND
You can use this key feature to activate or deactivate the DND mode.
Dependencies: Type (Key Event)
Key Type (DND)
Note
48
Label (key label displayed on the LCD screen)
Usage:
1. Press the DSS key to activate the DND mode.
2. Press the DSS key again to deactivate the DND mode.
When the DND mode is activated, the incoming calls will be rejected automatically.
Page 56

Customizing Your Phone
Group Listening
You can use this key feature to activate the Speakerphone and Handset/Headset
mode at the same time. It is suitable for the group conversation which has more than
one person at one side. You are able to speak and listen through the handset/headset,
meanwhile the others nearby can only listen through the speaker.
Dependencies: Type (Key Event)
Key Type (Group Listening)
Label (key label displayed on the LCD screen)
Usage:
1. During a call, press the DSS key to activate the group listening mode.
You can then speak and listen through the handset/headset, other people at your
side can listen through speaker at the same time.
2. Press the DSS key again to deactivate the group listening mode.
Zero Touch
You can use this key feature to configure auto provision and network parameters
quickly.
Dependencies: Type (Key Event)
Key Type (Zero Touch)
Label (key label displayed on the LCD screen)
Usage:
1. Press the DSS key to access the zero touch screen.
2. Press the OK soft key within a few seconds.
3. Configure the network parameters in the corresponding fields.
4. Press the Next soft key.
5. Configure the auto provision parameters in the corresponding fields.
6. Press the OK soft key.
The phone will reboot to update configurations.
URL
You can use this key feature to trigger the phone to send a HTTP GET request contained
a specific URL.
Dependencies: Type (URL)
Label (key label displayed on the LCD screen)
URL (the URL contained in the HTTP GET request)
Usage: Press the DSS key to trigger the phone to send a HTTP GET request contained the
URL specified in the URL field.
Directory
You can use this key feature to easy access to the lists you use frequently. For more
49
Page 57

User Guide for the SIP-T41P IP Phone
information, refer to Directory on page 25.
Dependencies: Type (Key Event)
Key Type (Directory)
Label (key label displayed on the LCD screen)
Usage: Press the DSS key to immediately access to the lists you use frequently.
Programmable Keys
You can customize the soft keys, navigation keys and function keys.
To customize the programmable keys via web user interface:
1. Click on DSSKey->Programmable Key.
2. Customize specific features for these keys.
3. Click Confirm to accept the change.
Note
You can configure the programmable keys via web user interface only.
Account Management
You can register one or multiple accounts on the SIP-T41P IP phone. You can also
configure each line key associated with an account or configure multiple line keys
associated with an account.
Account Registration
To register an account via phone user interface:
1. Press Menu->Settings->Advanced Settings (password: admin) ->Accounts.
2. Select the desired account and then press the Enter soft key.
50
Page 58
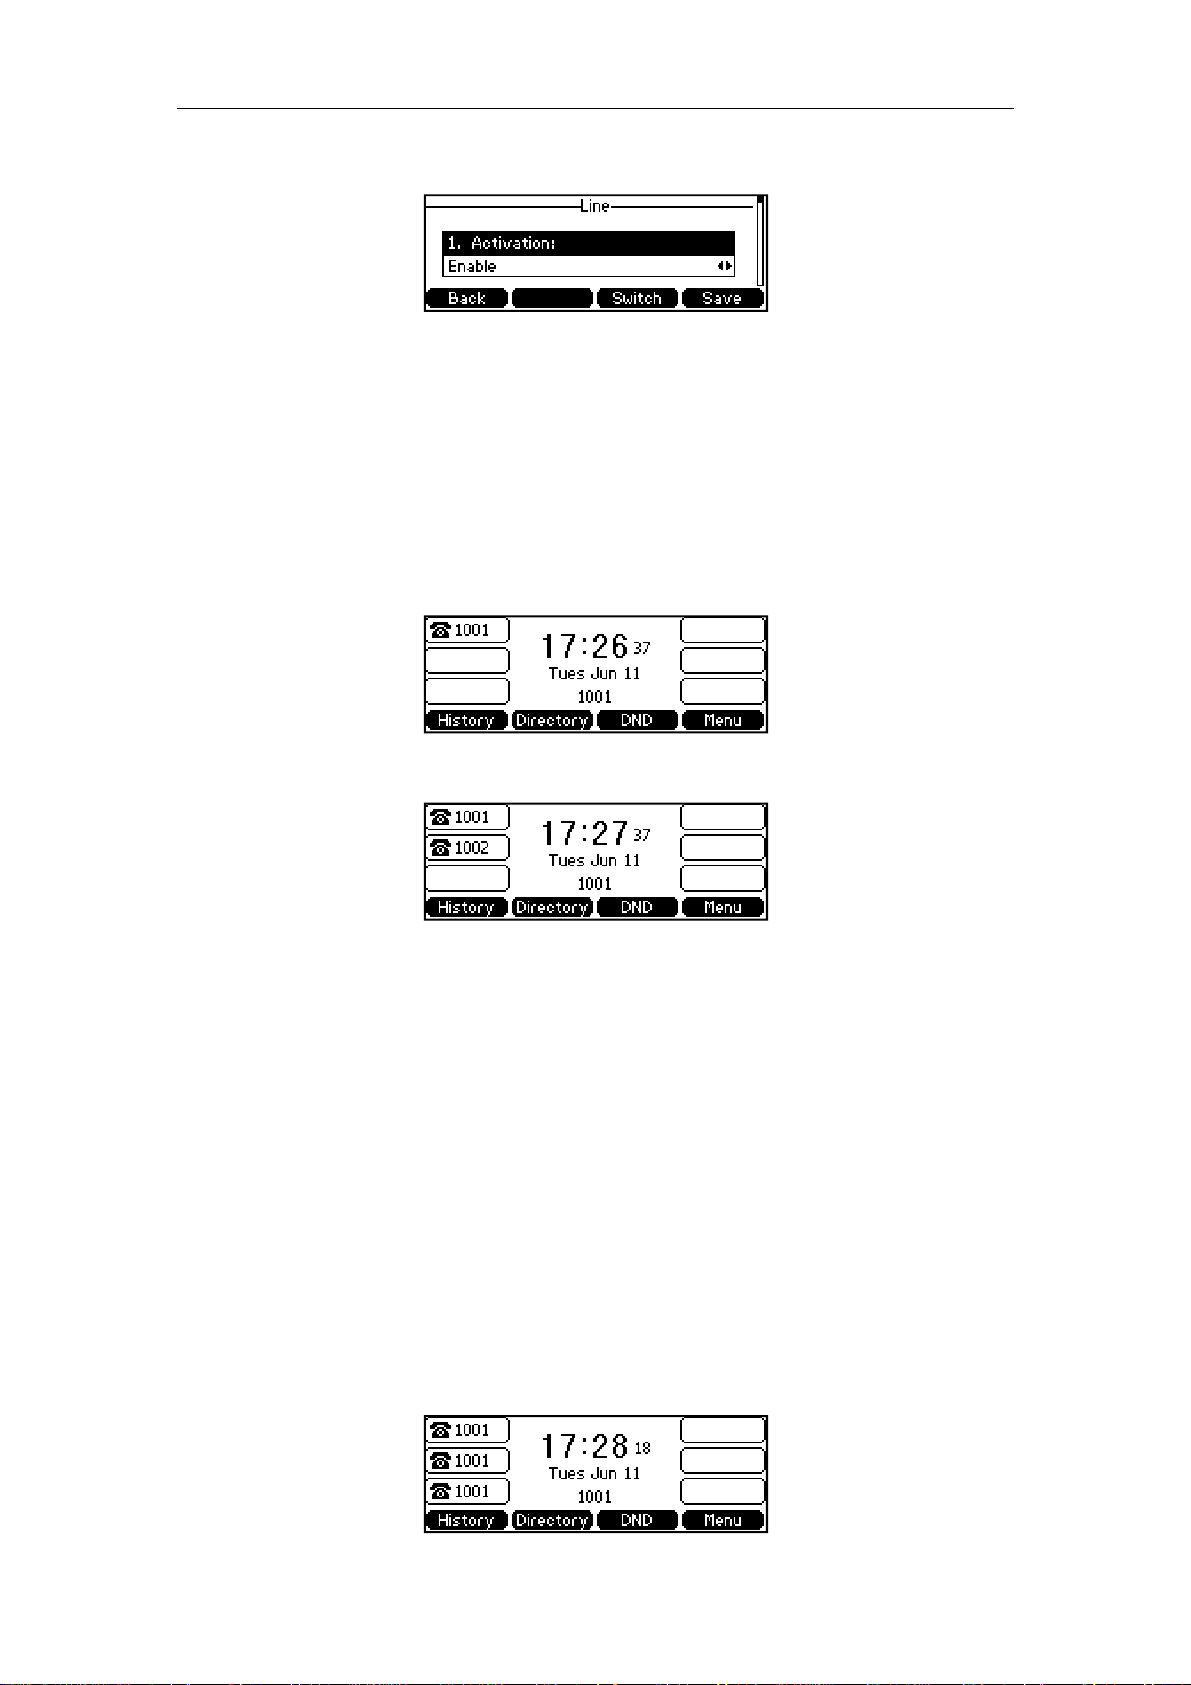
Customizing Your Phone
3. Select Enable from the Activation field.
4. Enter the desired values in Label, Display Name, Register Name, User Name,
Password and SIP Server1 fields respectively. Contact your system administrator for
more information.
5. Press the Save soft key to accept the change or the Back soft key to cancel.
6. Repeat steps 2 to 5 until you have registered all accounts.
The following figures show single or multiple accounts registered on the phone:
Single account:
Multiple accounts:
To disable an account via phone user interface:
1. Press Menu->Settings->Advanced Settings (password: admin) ->Accounts.
2. Select the desired account and then press the Enter soft key.
3. Select Disable from the Activation field.
4. Press the Save soft key to accept the change or the Back soft key to cancel.
You can also register or disable an account via web user interface at the path
Account->Register.
Multiple Line Keys per Account
You can configure multiple line keys associated with an account. This enhances call
visualization and simplifies call handling.
If this is the case, the LCD screen resembles the following figure:
51
Page 59

User Guide for the SIP-T41P IP Phone
Incoming calls to this line will be distributed evenly among the available line keys.
Similarly, outgoing calls will be distributed.
Your phone can be configured to have a combination of lines with a single line key and
lines with multiple line keys.
Dial Plan
Dial plan is a string of characters that governs the way your SIP-T41PIP phone processes
the inputs received from your phone keypad. The SIP-T41P IP phone supports the
following dial plan features:
z Replace Rule
z Dial-now
z Area Code
z Block Out
The basic expression syntax you need to know:
Syntax Description
The dot "." can be used as a placeholder or multiple placeholders for
.
any character. Example:
"12." would match "123", "1234", "12345", "12abc", etc.
x
An "x" can be used as a placeholder for any character. Example:
"12x" would match "121", "122", "123", "12a", etc.
The square brackets "[]" can be used as a placeholder for a single
[]
character which matches any of a set of characters. Example:
"91[5-7]1234" would match "9151234", "9161234", "9171234", etc.
The parentheses "( )" can be used to group together patterns, for
()
instance, to logically combine two or more patterns. Example:
"([1-9])([2-7])3" would match "923", "153", "773",etc.
The “$” should be followed by the sequence number of a parenthesis.
The “$” plus the sequence number means the whole character or
characters placed in the parenthesis. The number directs to the right
$
parenthesis when there are more than one. Example:
A replace rule configuration: Prefix: "9([5-7])(.)", Replace: "5$2". When
you enter "96123" to dial out on your phone, the number will be
replaced as "5123" and then dialed out. “$2” means the characters in
the second parenthesis, that is, “123”.
Note
52
You can configure the dial plan rules via web user interface only.
Page 60
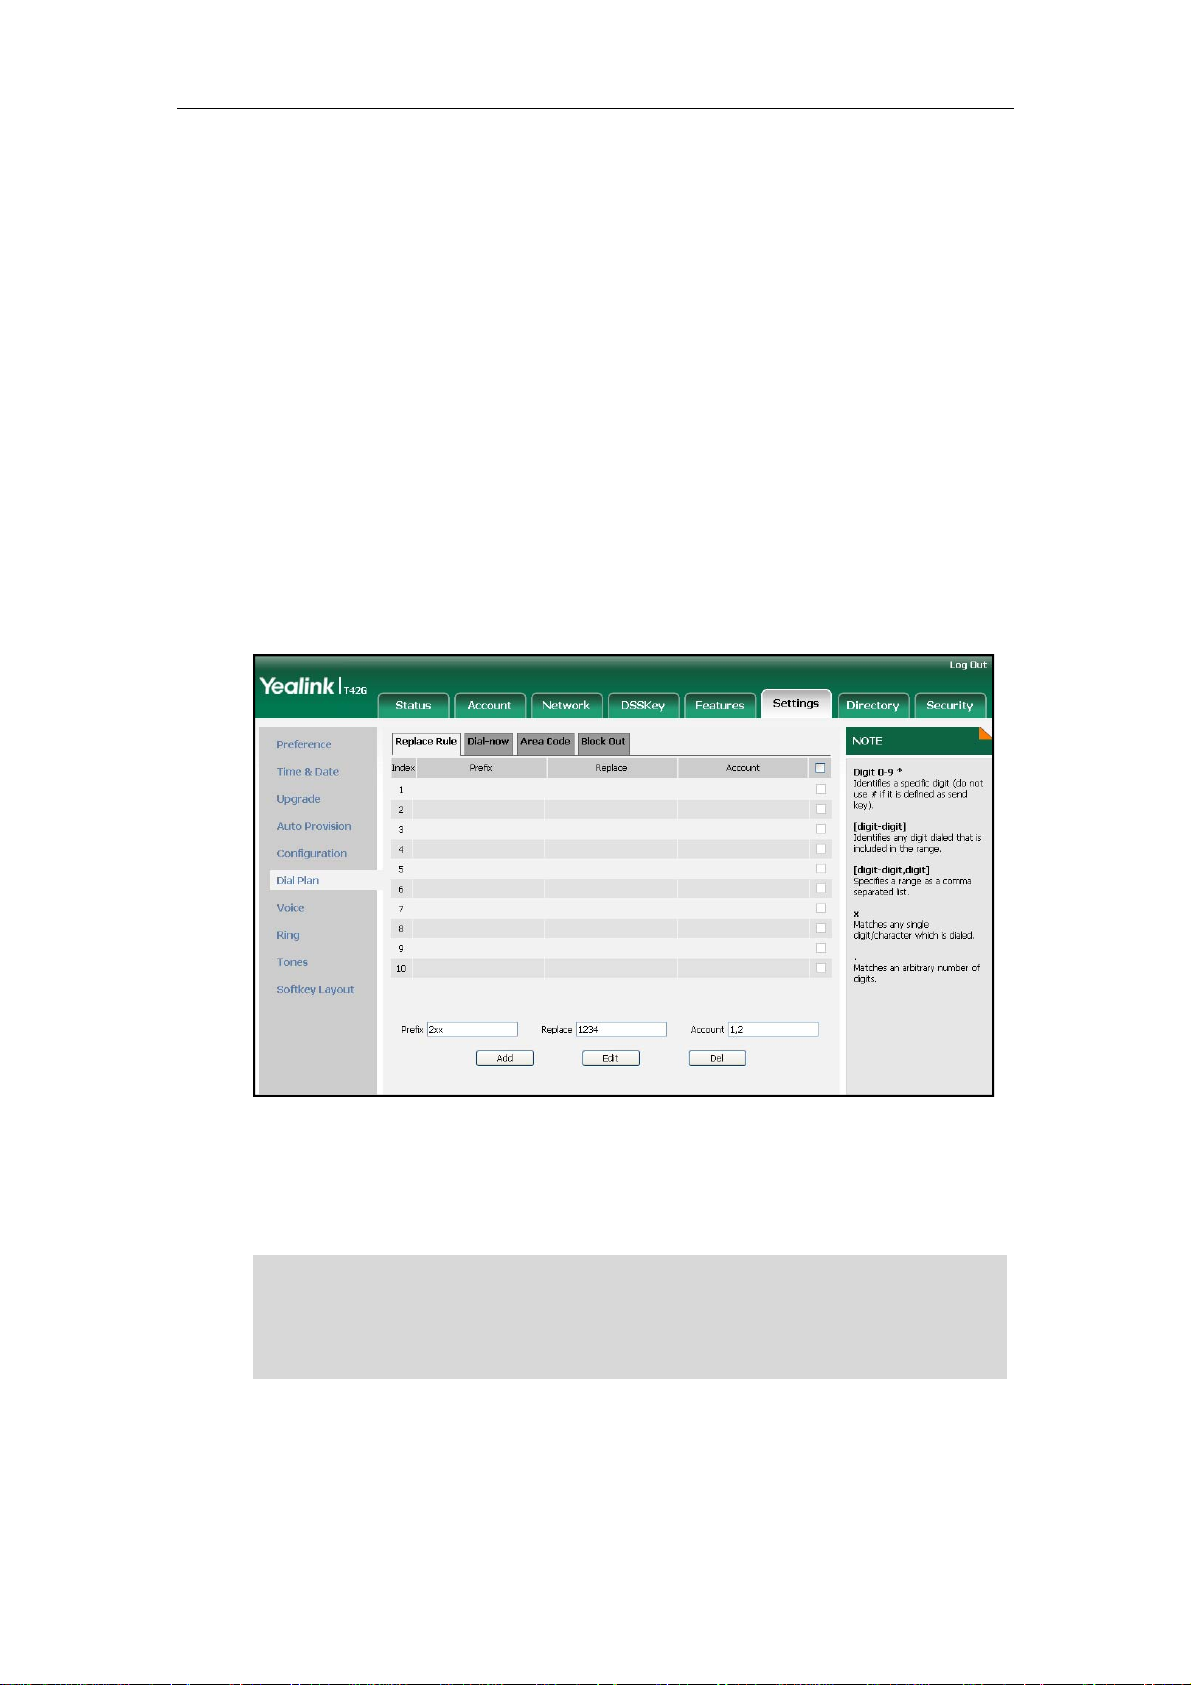
Replace Rule
You can configure one or more replace rules to remove the specified string and
replace it with another string. You can configure a pattern with wildcards (expression
syntax refer to the table above), so that any string that matches the pattern will be
replaced. This feature is convenient for you to dial out a long number. For example, a
replace rule is configured as "Prefix: 1" and "Replace: 1234567", when you try to dial out
the number “1234567”, you just need to enter “1” on the phone and then press the
Send soft key.
To add a replace rule via web user interface:
1. Click on Settings->Dial Plan->Replace Rule.
2. Enter the string (e.g., 2xx) in the Prefix field.
3. Enter the string (e.g., 12345) in the Replace field.
4. Enter the desired line ID in the Account field or leave it blank.
Customizing Your Phone
Note
5. Click Add to add the replace rule.
When you enter the number “234” using the keypad and then dial out, the phone
will dial out “12345” instead.
The valid values of Account field can be one or more digits among 1, 2, and 3. Each digit
must be separated by a “,”. For example: when you enter the value “1, 2” in the Account
field, this replace rule will apply to account1 and account2.
If you leave the Account field blank, the replace rule will apply to all accounts.
To edit a replace rule via web user interface:
1. Click on Settings->Dial Plan->Replace Rule.
2. Select the desired replace rule by checking the checkbox.
53
Page 61

User Guide for the SIP-T41P IP Phone
3. Edit the values in the Prefix and Replace fields.
4. Enter the desired line ID in the Account field or leave it blank.
5. Click Edit to edit the replace rules.
To delete one or more replace rules via web user interface:
1. Click on Settings->Dial Plan->Replace Rule.
2. Select the one or more replace rules by checking the checkbox(es).
3. Click Del to delete the replace rule(s).
Dial-now
You can configure one or more dial-now rules on your phone. When the dialed out
number matches the dial-now string, the number will be dialed out automatically. For
example, a dial-now rule is configured as "2xx", then entering any three-digit string
begins with 2 will be dialed out automatically on the phone.
To add a dial-now rule via web user interface:
1. Click on Settings->Dial Plan->Dial-now.
2. Enter the desired value (e.g., 1234) in the Rule field.
3. Enter the desired line ID in the Account field or leave it blank.
For more information about the valid values of Account field, refer to Replace Rule
on page 53.
Note
54
4. Click Add to add the dial-now rule.
When you enter the number “1234” using the keypad, the phone will dial out “1234”
automatically without pressing any key.
You can also edit or delete the dial-now rule, refer to Replace Rule on page 53 for more
information.
Page 62
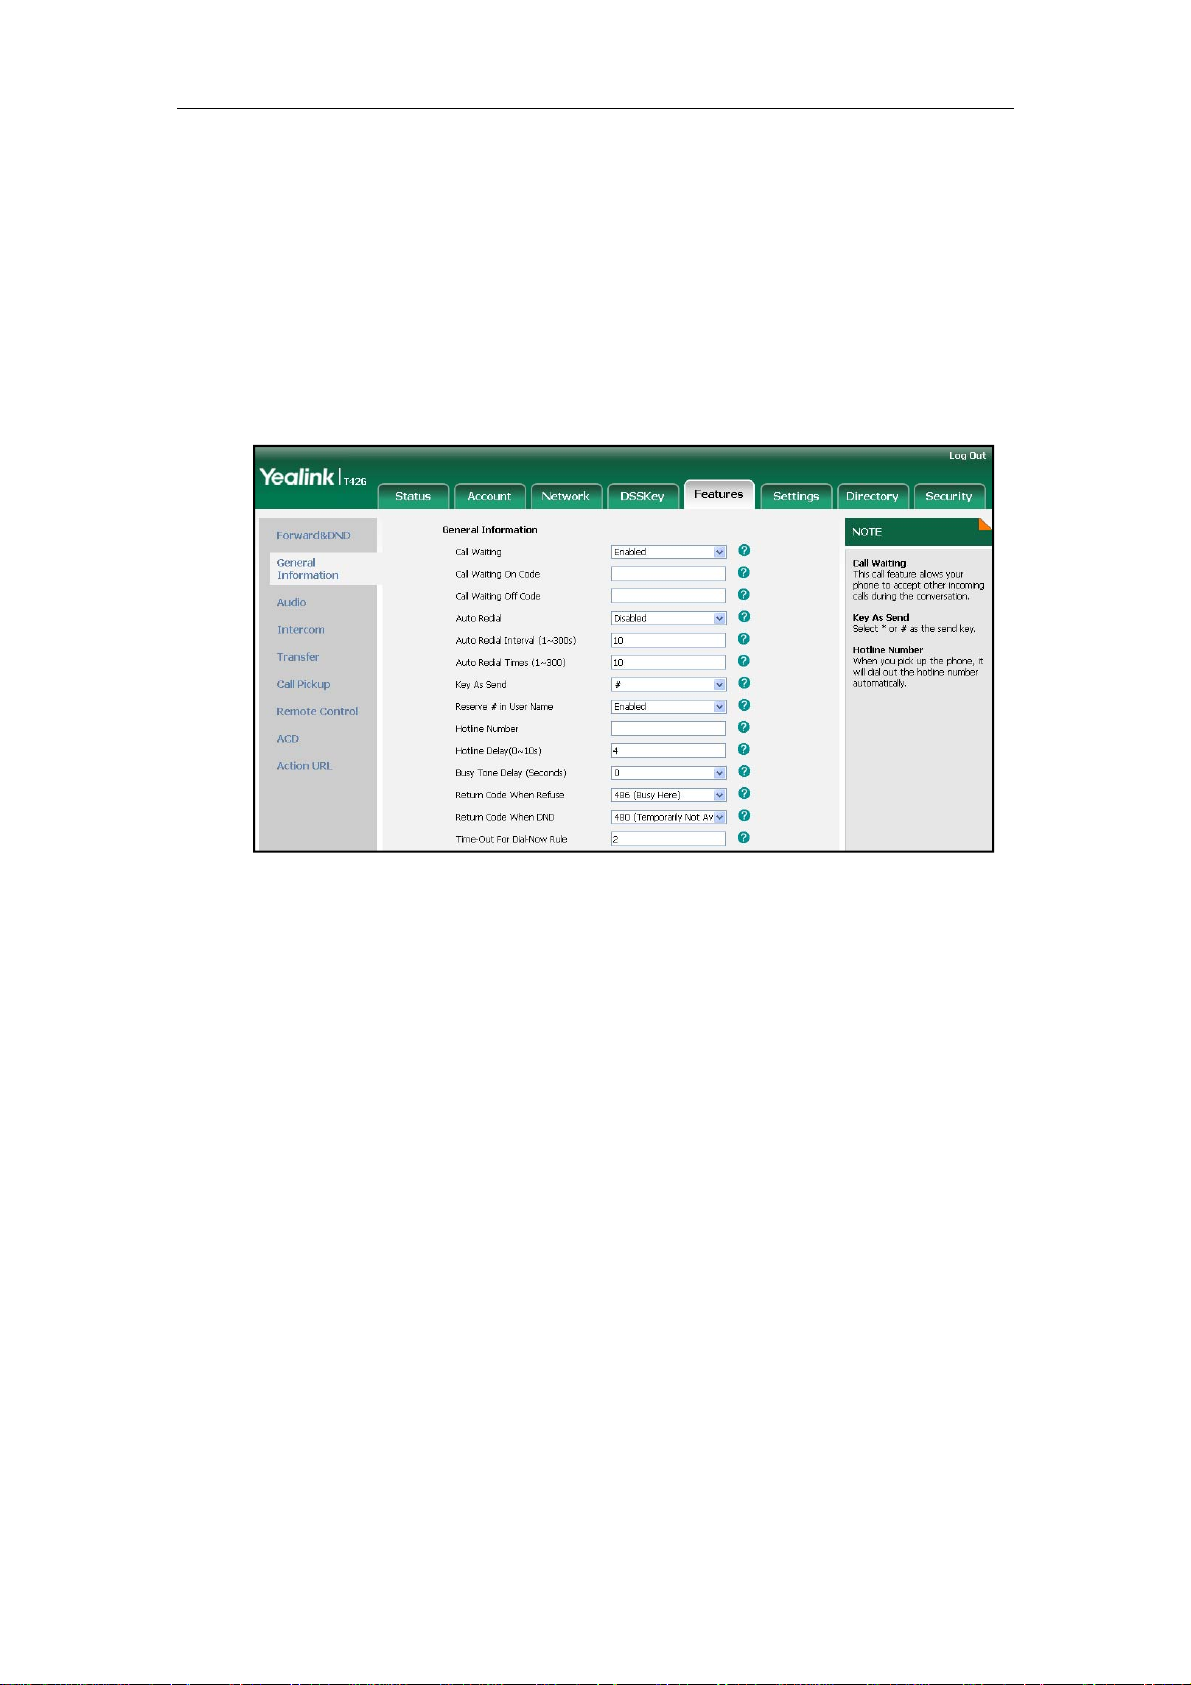
Customizing Your Phone
Time Out for Dial-Now Rule
You can configure the interval for dial-now rules. That is, you can configure your phone
to dial out the phone number automatically, which matches a dial-now rule, after the
specified delay time.
To configure the time out for dial-now rule via web user interface:
1. Click on Features->General Information.
2. Enter the time within 1-14 (in seconds) in the Time-Out For Dial-Now Rule field.
3. Click Confirm to accept the change.
Area Code
Area codes are also known as Numbering Plan Areas (NPAs). They usually indicate
geographical areas in a country. This feature is necessary only when dialing the number
outside the code area. For example, area code is configured as "Code: 011, Min
Length: 4, Max Length: 11". When you dial out the number "56789" (the length of the
number is between 4 and 11), the phone will add the area code and dial out the
number "01156789".
To configure the area code and lengths via web user interface:
1. Click on Settings->Dial Plan->Area Code.
2. Enter the desired values in the Code, Min Length (1-15) and Max Length (1-15)
fields.
3. Enter the desired line ID in the Account field or leave it blank.
55
Page 63
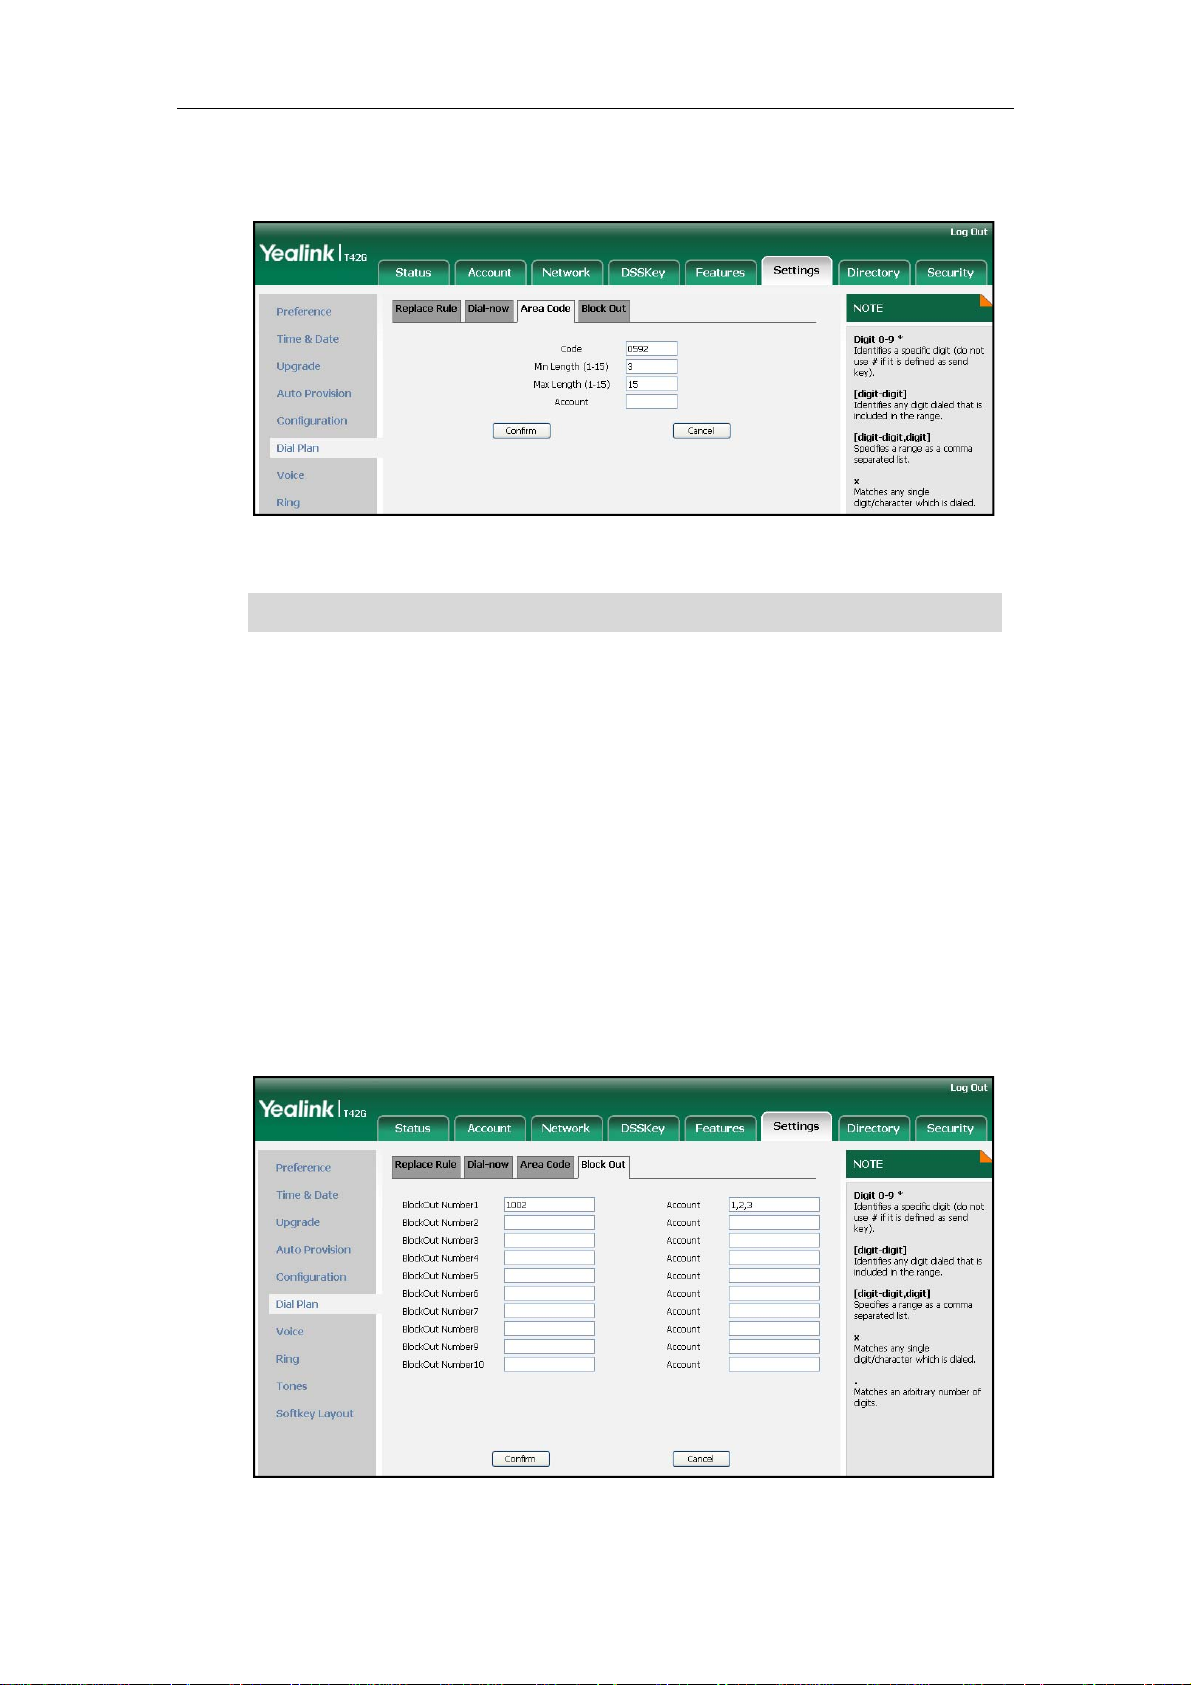
User Guide for the SIP-T41P IP Phone
For more information about the valid values of Account field, refer to Replace Rule
on page 53.
4. Click Confirm to accept the change.
Note
The default values of minimum and maximum length are 1 and 15 respectively.
Block Out
You can block some specific numbers from being dialed on your phone. When you dial
a block out number on your phone, the dialing will fail and the LCD screen will prompt
"Forbidden Number".
To add a block out number via web user interface:
1. Click on Settings->Dial Plan->Block Out.
2. Enter the desired value in the BlockOut Number field.
3. Enter the desired line ID in the Account field or leave it blank.
For more information about the valid values of the Account field, refer to Replace
Rule on page 53.
56
4. Click Confirm to add the block out number.
Page 64

Live Dialpad
You can enable the live dialpad feature on the SIP-T41P IP phone, which enables the IP
phone to automatically dial out the phone number without pressing any other key. You
can also configure a period of delay time to dial out the phone number. The phone will
dial out the phone number automatically after the specified delay time.
To enable the live dialpad via web user interface:
1. Click on Settings->Preference.
2. Select Enabled from the pull-down list of Live Dialpad.
3. Enter the desired delay time (in seconds) in the Inter Digit Time (1~14s) field.
Customizing Your Phone
4. Click Confirm to accept the change.
Note
Hotline
You can dial a hotline number immediately once you lift the handset, press the
speakerphone key or press a line key. You can also configure a period of delay time to
dial out the hotline number, the phone will dial out the hotline number automatically
after the specified delay time.
To configure the hotline number via phone user interface:
1. Press Menu->Features->Hot Line.
2. Enter the desired number in the Hot Number field.
3. Enter the delay time (in seconds) in the HotLine Delay field.
The default delay time of live dialpad feature is 4s.
You can configure live dialpad via web user interface only.
57
Page 65

User Guide for the SIP-T41P IP Phone
The valid values range from 0 to10.
4. Press the Save soft key to accept the change or the Back soft key to cancel.
You can also configure hotline via web user interface at the path Features->General
Information.
58
Page 66

User Guide for the SIP-T41P IP Phone
Basic Call Features
The SIP-T41P IP phone is designed to be easily used like a regular phone on a public
switched telephone network (PSTN). You can place calls, answer calls, transfer a call to
someone else, or conduct a conference call.
This chapter provides basic operating instructions for the SIP-T41P IP phone. The topics
include:
z Placing Calls
z Answering Calls
z Ending Calls
z Redialing Numbers
z Recent Call In Dialing
z Auto Answer
z Auto Redial
z Call Return
z Call Mute
z Call Hold/Resume
z Do Not Disturb (DND)
z Call Forward
z Call Transfer
z Call Waiting
z Conference
z Call Park
z Call Pickup
z Anonymous Call
z Anonymous Call Rejection
60
If you require additional information or assistance with your new phone, contact your
system administrator.
Page 67

Pl
a
e
a
n
g
g
g
n
a
n
l
ge
a
u
e
k
e
u
e
2
e
h
e
a
h
p
n
l
e
e
e
e
c
a
a
a
a
”
g
d
d
y
m
g
i
d
s
h
6
o
t
h
F
b
e
s
1
t
n
d
d
y
r
r
n
R
S
e
r
c
o
n
e
s
a
k
i
p
t
a
s
d
p
w
r
e
n
n
r
e
r
a
t
o
e
r
y
K
s
t
a
o
e
o
e
d
o
cing C
lls
B
sic Call Fe
tures
You ca
z
Usin
z
Usin
z
Usin
You ca
other p
You ca
and dia
on pa
During
by press
The call
to the n
place a ca
the hands
the speak
the heads
also dial th
rty.
search the
from the se
25 and Cal
call, you c
ing the Spe
duration of
mber”1007
l in three wa
t
rphone
t
number firs
all history, t
rch results.
l History Man
n alternate
kerphone k
ctive calls i
has lasted
ys using you
, and then
e local con
or more inf
agement o
etween Sp
y, the Head
visible on th
5 seconds.
SIP-T41P IP
hoose the
tact directo
rmation, ref
page 38.
akerphone,
et key, or pi
e LCD scree
hone:
ay you wan
y or the rem
r to Contac
Headset, or
cking up th
. In the figu
to speak to
te phoneb
t Managem
Handset m
handset.
e below, th
the
ok
nt
de
call
Not
To plac
1. Pic
2. Ent
3. Pres
By defa
or set n
page 2
You c
press t
exam
Your p
more i
To plac
a call usin
up the han
r the desire
s ,
lt, the # ke
ither of the
.
n also dial u
e OK key. T
le, SIP URI: 3
hone may n
formation.
a call usin
the handse
set.
number usi
, or the Sen
is configure
as send ke
ing the SIP U
e maximum
06@sip.com,
t support dir
the hands-f
:
the keyp
soft key.
as a send
s. For more
I or IP addre
IP URI or IP a
IP: 192.168.1.
ct IP dialing.
ee speaker
d.
ey. You ca
nformation,
s. To obtain t
dress length
15.
Contact you
hone mod
set the * ke
efer to the
he IP addres
is 32 charac
system adm
:
as the sen
ey as Send
of a phone,
ers. For
inistrator for
key
n
Do one
- Wit
of the follow
the handse
Ent
r the desire
Pres
s ,
ng:
t on-hook, p
number usi
or the Send
ess or
the keyp
soft key.
he line key t
d.
o obtain a d
ial tone.
61
Page 68

User
e
e
h
e
h
e
h
e
e
n
v
e
e
n
e
m
g
i
a
y
d
a
d
n
y
d
o
a
d
e
n
e
t
o
n
d
o
n
d
o
n
d
c
n
d
r
c
m
r
e
r
a
r
a
-
d
a
a
o
u
a
a
n
o
y
0
d
d
Guide for th
SIP-T41P IP P
hone
Not
- Wit
Pres
To plac
Do one
- Wit
Pres
Ent
Pres
- Wit
Ent
Pres
To per
To plac
the handse
s ,
a call usin
of the follow
the option
s the line ke
r the desire
s ,
the option
r the desire
s ,
anently use
multiple ca
t on-hook, e
, or th
the headse
ng:
l headset c
to obtain a
number usi
, or the Sen
l headset c
number usi
, or the Sen
the headset
lls:
ter the desi
Send soft k
:
nnected, p
dial tone.
the keyp
soft key.
nnected, p
the keyp
soft key.
ode, refer t
ed number
y.
ess to
d.
ess to
d.
Headset Pri
sing the ke
ctivate the
ctivate the
on page 4
pad.
headset mo
headset mo
.
e.
e.
You ca
an acti
- Pres
- Pres
You ca
key to r
have more
e call, do o
s the line ke
Ent
r the desire
Pres
s ,
s the Hold s
s the NewC
Pres
r the desire
Ent
Pres
s ,
press o
trieve the d
than one ca
e of the foll
. The active
number usi
, or the Sen
ft key to pla
ll soft key.
number usi
, or the Sen
to swit
sired call.
ll on your SIP
wing:
call is place
the keyp
soft key.
e the origin
the keyp
soft key.
h between
T41P IP pho
on hold.
d.
al call on ho
d.
the calls, an
e. To place
ld.
d then press
a new call d
the Resume
uring
soft
62
Page 69

Answering Calls
When you are not in another call, you can answer a call in three ways:
z Using the handset
z Using the speakerphone
z Using the headset
Basic Call Features
Note
You can ignore incoming calls by pressing the X key, the Reject soft key or the Silence
soft key. You can also activate Do Not Disturb mode to ignore the incoming calls without
ring on your phone. For more information, refer to Do Not Disturb (DND) on page 70.
You can forward incoming calls to someone else by pressing the Fwd soft key. For more
information, refer to Call Forward on page 73.
Answering When Not in Another Call
In all cases, call duration and destination of the active call will appear on the LCD
screen.
To answer a call using the handset:
1. Pick up the handset.
To answer a call using the hands-free speakerphone mode:
Do one of the following:
- Press .
- With the handset on-hook and the headset mode deactivated, press the Answer
soft key.
- With the handset on-hook and the headset mode deactivated, press the line key
(the line key LED flashes green).
To answer a call using the headset:
Do one of the following:
- Press .
- With the headset mode activated, press the Answer soft key.
- With the headset mode activated, press the line key (the line key LED flashes
green).
Answering When in Another Call
If you have an active call, and an incoming call arrives on the phone, do one of the
following:
- Press the Answer soft key.
63
Page 70

User
n
e
eRe
e
a
a
o
o
o
l
a
l
s
a
n
e
s
a
c
g ca
i
r
e
s
y
n
e
a
a
e
t
t
d
s
d
k
d
p
r
m
m
e
e
t
d
n
u
e
a
a
o
u
t
r
a
h
l
pig
p
y
y
C
p
e
c
n
f
n
o
o
k
l
g
n
o
c
Guide for th
SIP-T41P IP P
The
incoming c
hone
ll is answere
and the or
iginal call is
laced on h
ld.
E
Not
- Pres
Pres
The
ding C
To end
Do one
- If y
- If y
- If y
To end
or pres
s to ac
s or the
incomin
lls
call:
of the follow
u are using t
u are using t
u are using t
a call place
the Resume
ess the new
Answer soft
ll is answere
ng:
he handset,
he headset,
he speaker
on hold, yo
soft key to r
call.
ey.
and the or
press the C
press the C
hone, press
can press t
sume the ca
inal call is
ncel soft ke
ncel soft ke
or the
e Cancel so
l before endi
laced on h
or hang up
.
ancel soft
t key to end
g it.
ld.
the handset
ey.
the call dire
.
tly,
R
dialing
cent C
To redia
1. Pres
A c
To redia
1. Pres
2. Pres
pre
You ca
should
To enab
1. Clic
Numbe
the last dial
s twic
ll to your la
a previousl
s whe
s or
s or th
ll In Di
view the pl
nable the r
le the recen
k on Contac
s
ed number f
.
t dialed nu
dialed nu
the phone i
to select th
Send soft k
ling
ced calls lis
cent call in
call in diali
s->Setting.
om your ph
ber is attem
ber from yo
s idle.
desired en
y.
when the p
ialing featu
feature vi
ne:
pted.
r phone:
ry from the
hone is in th
e in advan
web user i
laced calls
pre-dialin
e.
terface:
ist, and the
interface. Y
u
64
Page 71

2. Select Enabled from the pull-down list of Recent Call In Dialing.
Basic Call Features
3. Click Confirm to accept the change.
Note
You can enable the recent call in dialing feature via web user interface only.
To view placed calls list when the phone is in the dialing interface:
1. Pick up the handset, press the speakerphone or press the line key.
The phone LCD screen displays the placed calls list.
Auto Answer
The auto answer feature allows the phone to automatically answer an incoming call on
the line. You can enable the auto answer feature on a per-line basis.
To configure auto answer via phone user interface:
1. Press Menu->Settings->Advanced Settings (password: admin) ->Accounts.
2. Select the desired account and then press the Enter soft key.
65
Page 72

User
e
Au
e
n
t
a
n
e
g
e
e
n
s
h
u
e
o
gu
w
d
a
d
d
e
o
gu
n
r
a
c
c
e
w
a
n
c
c
e
c
e
a
o
a
d
a
o
0
s
a
s
D
h
b
B
c
n
b
v
B
s
m
o
A
A
o
r
a
f
t
Guide for th
SIP-T41P IP P
hone
Not
to Redi
3. Pres
4. Pres
The
You ca
Accoun
The a
phon
You ca
when th
the tim
s or
s the Save s
icon ap
also confi
->Basic.
to answer fe
.
l
enable the
e called par
to wait bet
, or the Swit
ft key to ac
pears on th
re auto ans
ture is only
auto redial f
ty is busy. Yo
een redial
h soft key t
ept the ch
phone LCD
er via web
pplicable w
eature to re
u can also c
ttempts.
select Ena
nge or the
screen.
user interfa
en there is n
ial the pho
onfigure the
le from the
ack soft key
e at the pat
other call in
e number a
times of the
uto Answe
to cancel.
h
progress on
utomatically
auto redial
field.
he
nd
To confi
1. Pres
2. Pres
3. Ent
The
4. Ent
The
5. Pres
You ca
Feature
To use a
ure auto re
s Menu->Fe
s or
r the desire
default time
r the desire
default valu
s the Save s
also confi
->General I
uto redial:
ial via pho
tures->Auto
, or the Swit
time (in se
interval (in s
times in the
is 10.
ft key to ac
re auto redi
formation.
e user interf
Redial.
h soft key t
onds) in the
conds) is 1
Redial Time
ept the ch
al via web u
ce:
select Ena
Redial Inter
.
field.
nge or the
er interface
le from the
al field.
ack soft key
at the path
uto Redial
to cancel.
ield.
When t
66
e called pa
ty is busy, th
phone LC
screen pro
pts the foll
wing:
Page 73

aCa
t
r
n
g
e
d
(
n
n
e
s
d
a
e
a
r
o
gu
m
g
p
e
o
K
c
c
t
c
u
o
r
c
d
w
s
n
l
o
o
a
w
a
d
e
s
B
r
e
B
a
n
p
n
h
t
a
a
e
sic Call Fe
tures
C
1. Pres
The
2. Wai
The pho
ll Retu
You ca
To confi
1. Pres
2. Sel
3. Pres
s the OK soft
phone LCD
for a perio
ne will retry
n
press a call
ure a call r
s Menu->Fe
ct a desired
s or
key to activ
creen prom
of time or
s many tim
return key t
turn key via
tures->DSS
DSS key.
, or the Swit
ate auto re
pts the follo
ress the OK
s as you co
place a ca
phone user
eys.
h soft key t
ial.
ing:
oft key to re
figured until
l back to th
interface:
select Key
ial the pho
the called
last incomi
Event from t
e number.
arty is idle.
call.
e Type field
.
4. Pres
fiel
5.
Op
6. Pres
You ca
DSSKey-
ll Mute
You ca
then th
To mute
s or
.
tional.) Ente
s the Save s
also confi
>Line key.
mute the
other party
a call:
, or the Swit
a string tha
ft key to ac
re a call ret
icrophone
cannot hea
h soft key t
will appear
ept the ch
rn key via
f the active
you.
select Call
on the LCD
nge or the
eb user inte
udio devic
Return from
creen in the
ack soft key
face at the
during an
he Key Typ
Label field.
to cancel.
path
ctive call, a
nd
1. Pres
s durin
an active
all.
67
Page 74
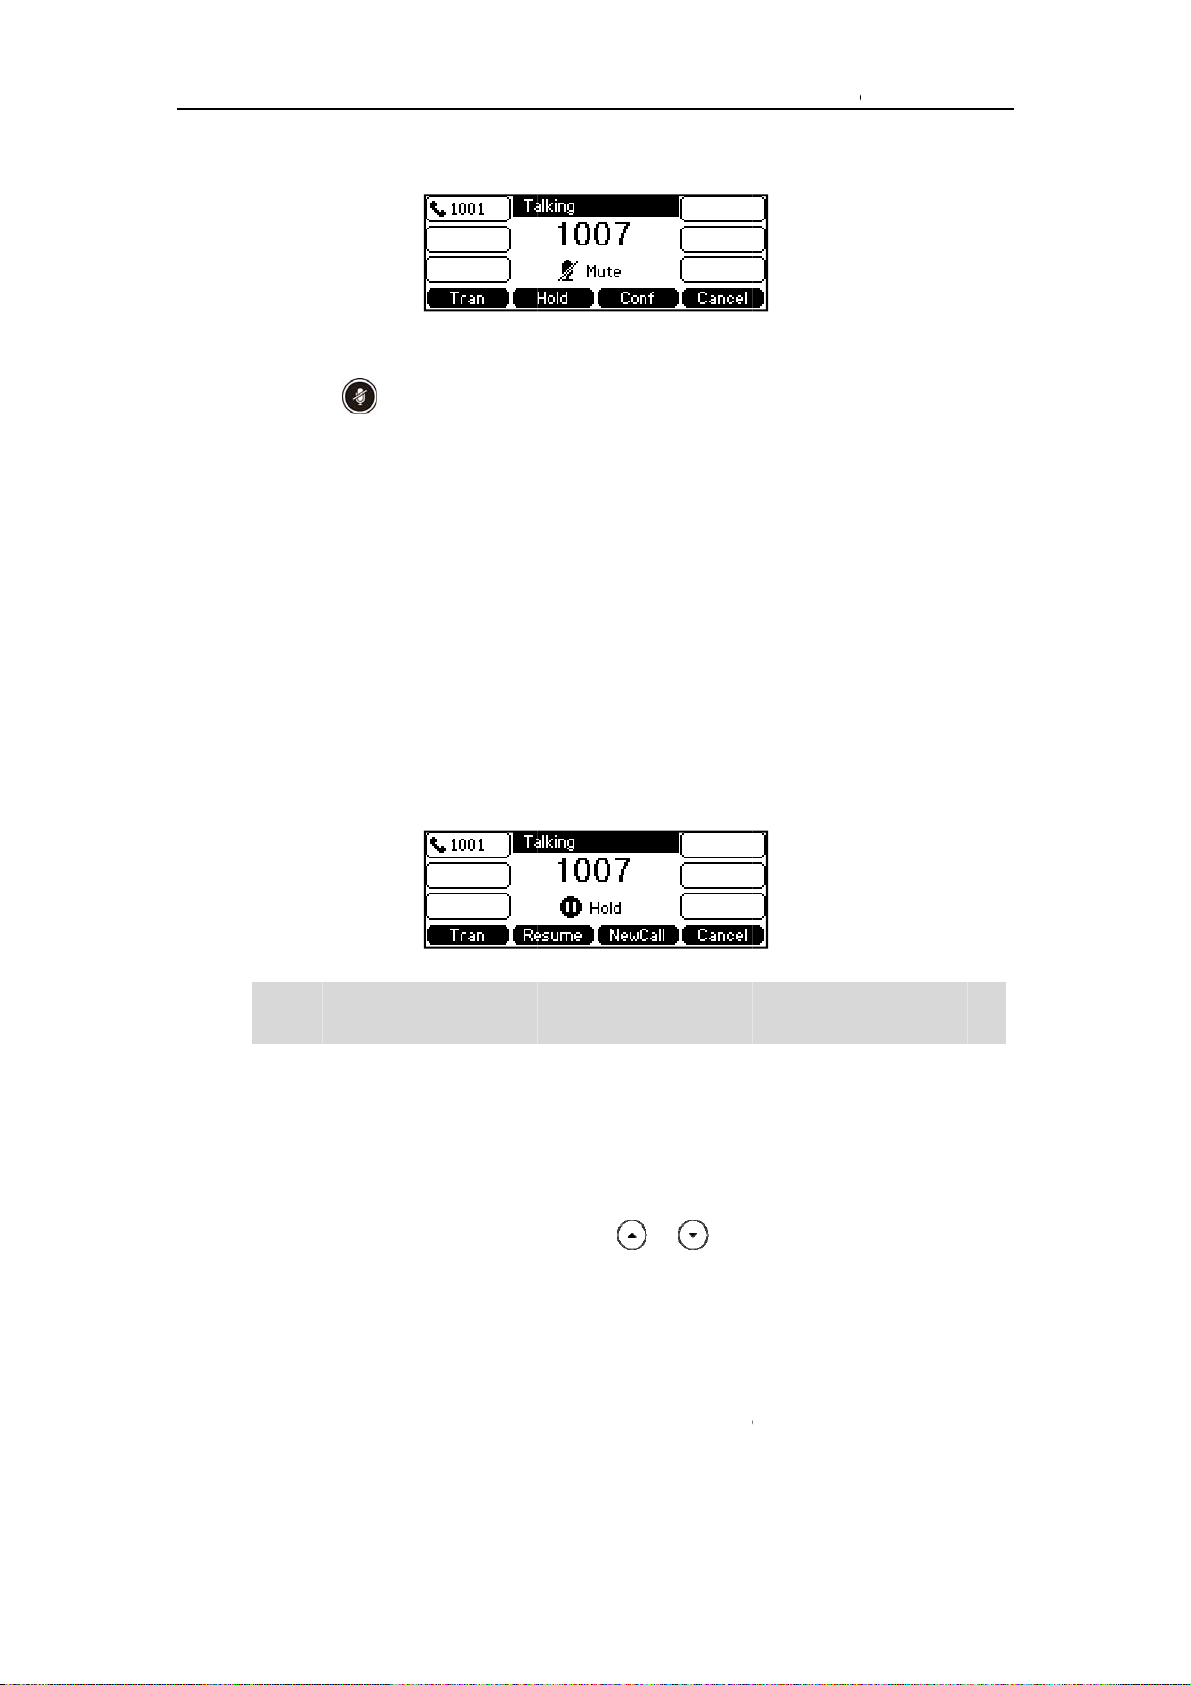
a
e
The
R
n
s
c
e
e
m
l
e
e
l
a
v
s
gain
D
e
c
o
e
o
o
s
e
d
m
a
n
p
a
a
n
g
s
o
d
s
s
3
e
h
n
h
e
o
u
s
h
w
f
e
t
a
e
E
e
h
n
a
y
e
a
e
n
phone LCD
creen indic
tes that the
call is on m
te.
B
sic Call Fe
tures
C
To un-m
1. Pres
The
ll Hold/
You ca
progres
original
the oth
To plac
1. Pres
The
ute a call:
s a
mute key LE
esum
place an a
on your ph
all on hold.
r party whil
a call on h
s the Hold s
phone LCD
to un-mute
turns off.
tive call on
ne, other c
When placi
waiting.
ld:
ft key durin
creen show
the call.
hold. At any
lls can be r
a call on
a call.
the call is o
time, at mo
ceived and
old, your IP
n hold and t
t one activ
made while
PBX might pl
e line key L
call can be
placing the
ay a melod
D flashes gr
in
to
en.
Not
The ph
hold.
To resu
1. Pres
Multiple
If multip
then pr
If more t
exampl
If multip
of the c
to retrie
one will bee
e a held ca
s the Resum
Calls on Hol
e calls are p
ss the Resu
han two call
"2/3", indic
e calls are p
lls by pressi
e the call.
softly every
ll:
soft key.
:
laced on ho
e soft key t
s are place
ting that thi
laced on ho
the corre
0 seconds t
ld, press
retrieve the
on hold, an
is the seco
ld on more t
ponding lin
remind you
or to s
desired call
indication a
d call out o
an one line
key, and th
hat you still h
itch betwe
.
ppears on t
three calls.
key, you ca
n press the
ave a call o
n the calls,
e LCD scree
view the d
Resume soft
nd
n, for
tails
key
69
Page 75
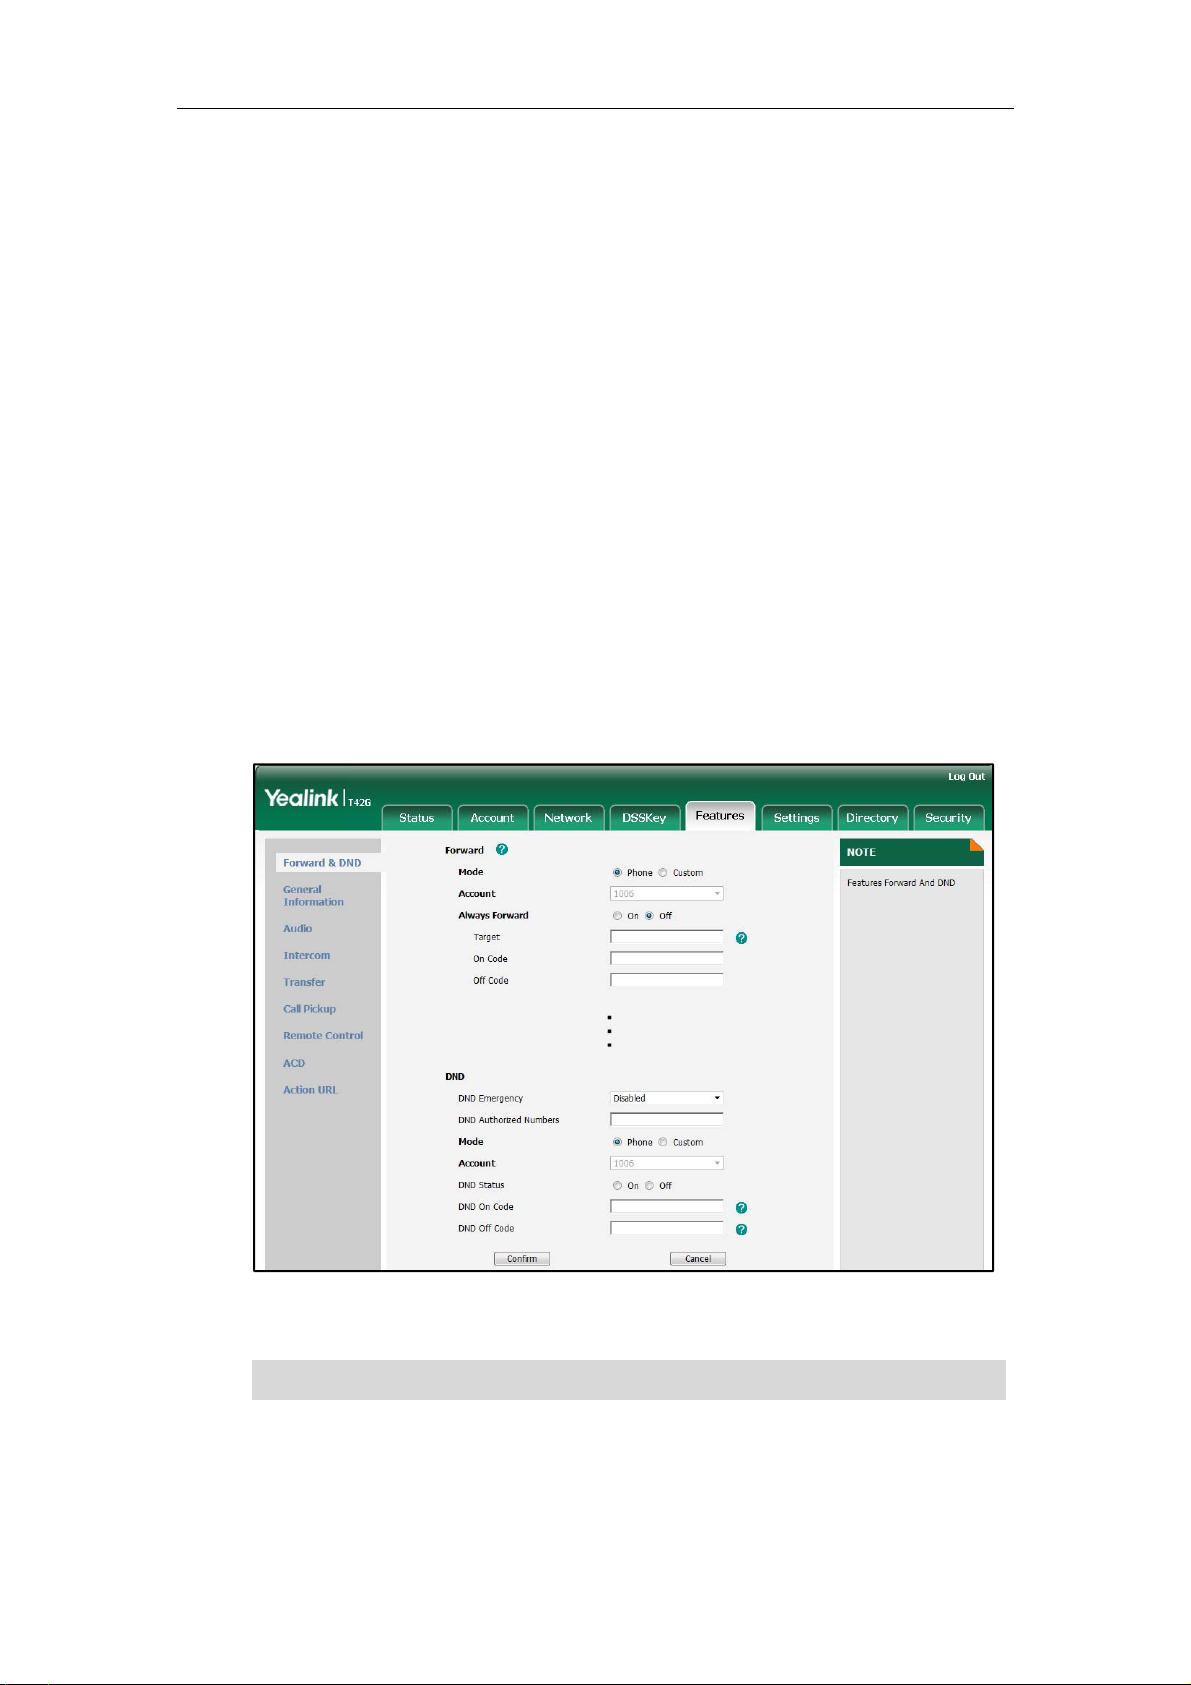
User Guide for the SIP-T41P IP Phone
Do Not Disturb (DND)
You can use the DND feature to reject incoming calls automatically on the phone and
the callers can hear a busy signal or a message depending on your server.
You can enable/disable the DND feature for the phone system, or you can customize
the DND feature for each account or all accounts. The following describes the DND
modes:
z Phone (default): DND in phone mode means that the DND feature is effective for
the phone system.
z Custom: DND in custom mode means that you can configure the DND feature for
each account or all accounts.
You can also configure the phone to receive incoming calls from some authorized
numbers when the DND feature is enabled.
To configure the DND mode via web user interface:
1. Click on Features->Forward & DND.
2. In the DND block, mark the desired radio box in the Mode field.
Note
70
3. Click Confirm to accept the change.
You can configure the DND mode via web user interface only.
To activate DND in phone mode:
1. Press the DND soft key when the phone is idle.
Page 76

The
o
a
oLCD
a
w
h
u
o
d
o
m
u
o
d
s
o
e
e
t
t
e
c
c
e
c
t
t
c
c
e
s
c
p
c
s
c
o
a
"
u
s
f
a
M
D
o
h
b
orej
t
o
u
c
a
e
)
e
e
D
a
e
ge
a
t
e
n
c
icon on
Inc
ming calls
the
number of t
the idle scr
ill be reject
e missed ca
en indicate
d automati
lls) will prom
that the DN
ally and "n
t on the LC
D feature is
issed Call(s
screen.
B
sic Call Fe
nabled.
" ("n" indica
tures
es
To activ
1. Pres
The
2. Pres
3. Pres
4. Pres
The
to
Inc
te DND in c
s the DND s
LCD screen
s or
s or
s the Save s
icon ap
.
ming calls o
screen pro
stom mode
ft key when
isplays a lis
to select th
, or the Swit
ft key to ac
pears on th
n the specifi
pts "n Misse
for a specifi
he phone is
of account
desired ac
h soft key t
ept the ch
idle screen
line will be
d Call(s)" ("n
account:
idle.
registered
ount and t
select Ena
nge.
and the ass
ected au
indicates th
n the phon
en press th
le from the
ciated line i
omatically,
e number of
.
Enter soft k
ND Enables
con change
nd the pho
the missed
y.
field.
s
e
alls).
To activ
1. Pres
te DND in c
s the DND s
The
LCD screen
stom mode
ft key when
isplays a lis
for all acco
he phone is
of account
nts:
idle.
registered
n the phon
.
2. Pres
3. Pres
s the All On
s the Save s
The
icon ap
oft key to a
ft key to ac
pears on th
tivate DND
ept the ch
idle screen
or all acco
nge.
and all line i
nts.
ons chan
to .
71
Page 77
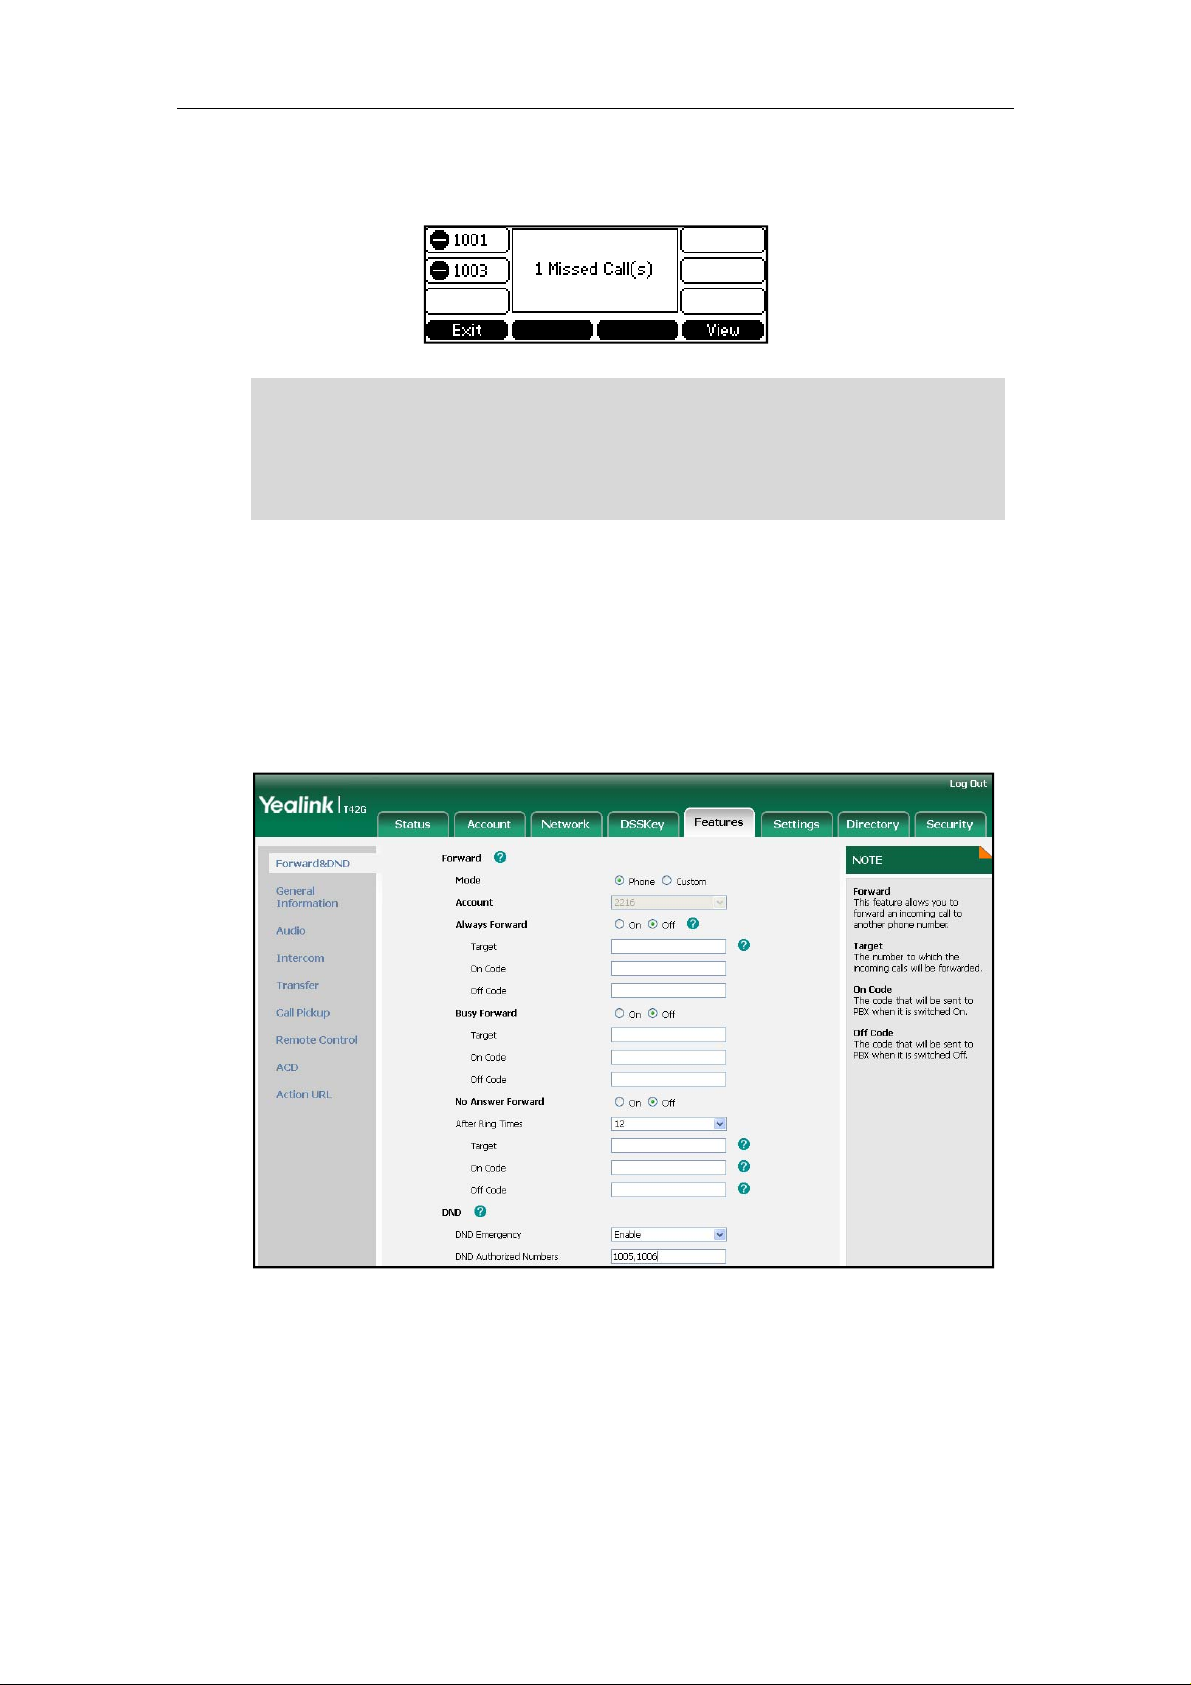
User Guide for the SIP-T41P IP Phone
Incoming calls will be rejected automatically and "n Missed Call(s)" ("n" indicates
the number of the missed calls) will be prompted on the LCD screen.
Note
The prompt message displays only if the Missed Call Log feature for the line is enabled.
The missed call log feature can be configured via web user interface at the path
Account->Basic.
The Do Not Disturb feature is local to the phone, and may be overridden by the server
settings. For more information, contact your system administrator.
To configure the DND authorized numbers via web user interface:
1. Click on Features->Forward & DND.
2. Select Enabled from the pull-down list of DND Emergency.
3. Enter the numbers in the DND Authorized Numbers field.
For multiple numbers, enter a comma between each number.
72
4. Click Confirm to accept the change.
When the DND feature is enabled on the phone, the phone can still receive incoming
calls from the numbers specified in the DND Authorized Numbers field.
Page 78
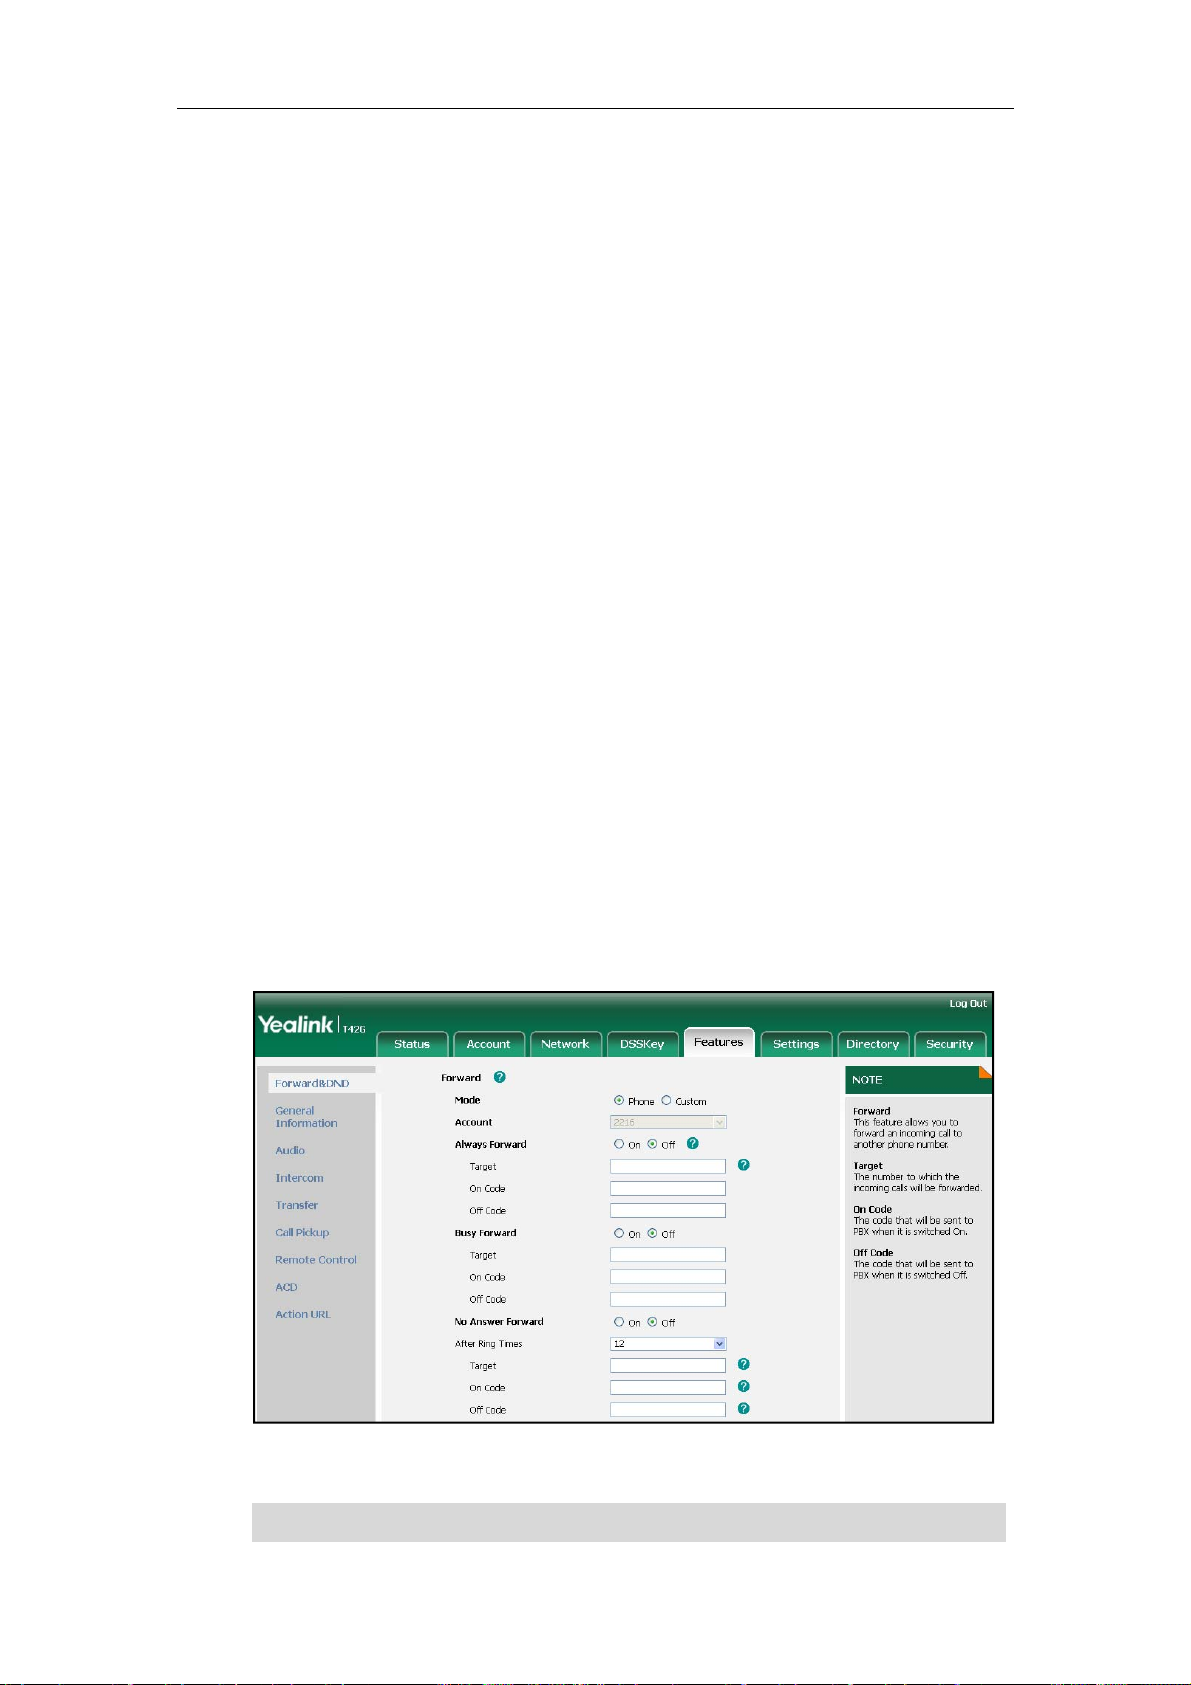
Call Forward
You can configure your phone to forward incoming calls to another party by the static
forwarding. You can also forward calls while your phone is ringing, refer to the dynamic
forwarding.
Static Forwarding
You can configure three types of call forward:
z Always Forward: Incoming calls are immediately forwarded.
z Busy Forward: Incoming calls are immediately forwarded if the phone is busy.
z No Answer Forward: Incoming calls are forwarded if not answered after a period of
time.
You can enable/disable the call forward feature for the phone system, or you can
customize the call forward feature for each account or all accounts. The following
describes the call forward modes:
Basic Call Features
z Phone: Call forward in phone mode means that the call forward feature is
effective for the phone system.
z Custom: Call forward in custom mode means that you can configure the call
forward feature for each account or all accounts.
To configure the call forward mode via web user interface:
1. Click on Features->Forward & DND.
2. In the Forward block, mark the desired radio box in the Mode field.
Note
3. Click Confirm to accept the change.
You can configure the call forward mode via web user interface only.
73
Page 79
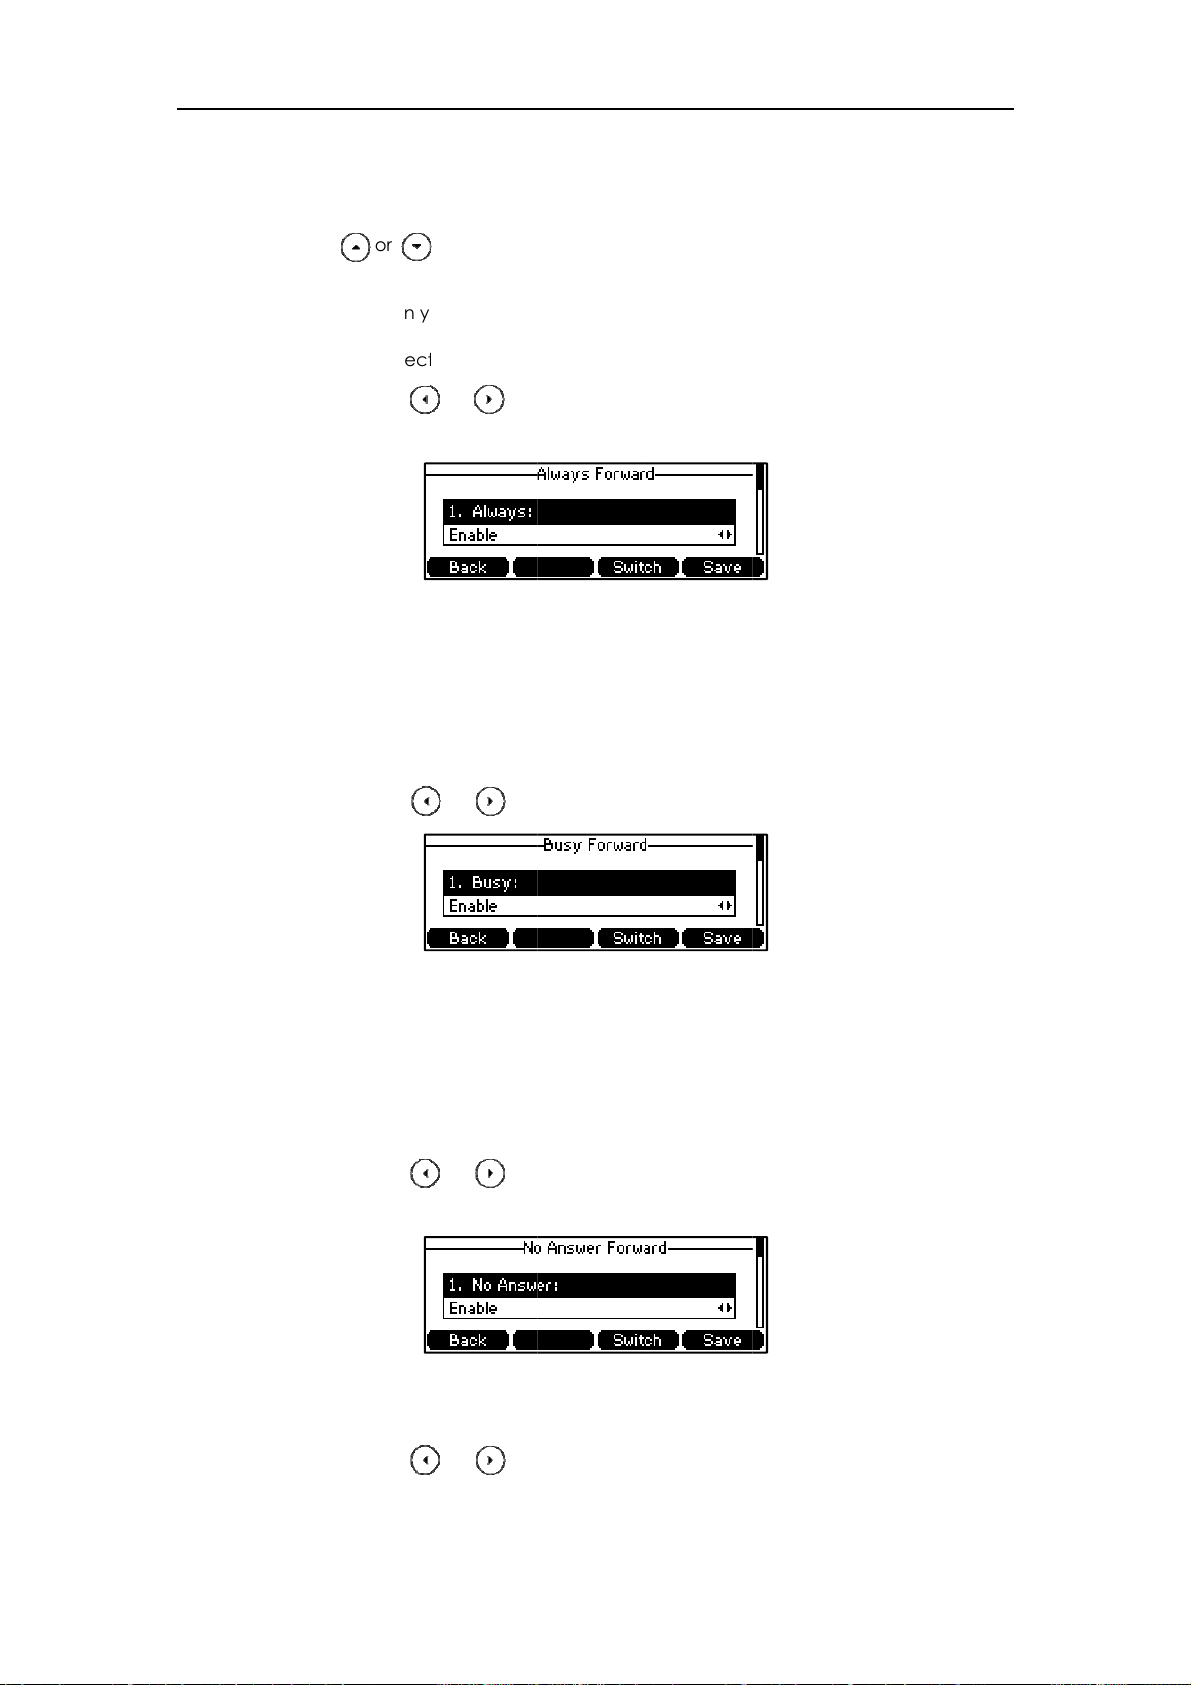
User
e
pa.) b.) c.)
r
a
t
e
w
a
C
t
e
a
e
t
f
e
a
m
F
e
n
w
l.)
C
r
e
g
t
1
w
o
u
a
o
u
r
d
o
u
T
o
n
e
e
w
e
w
d
r
e
w
e
d
p
r
o
s
r
n
t
e
a
o
o
Guide for th
SIP-T41P IP P
hone
To enab
1. Pres
2. Pres
key.
3. De
le call forwa
s Menu->Fe
s or
ending on y
If you selec
1) Press
field.
2) Enter th
the For
3) (Option
the On
d in phone
tures->Call
to select th
our selectio
Always For
or , or
destination
ard To field.
Enter the
ode or Off
ode:
orward.
desired for
:
ard:
the Switch s
number yo
always forw
ode field.
arding typ
ft key to sel
want to for
rd on code
, and then
ct Enable f
ard all inco
or off code
ress the Ent
om the Alw
ming calls t
respectively
r soft
ys
in
in
If you selec
1) Press
2) Enter th
when th
3) (Option
On Cod
If you selec
1) Press
Answer
Busy Forwa
or , or
destination
e phone is b
l.) Enter the
or Off Cod
No Answer
or , or
ield.
d:
the Switch s
number yo
usy in the Fo
busy forwar
field.
Forward:
the Switch s
ft key to sel
want to for
ward To fiel
on code o
ft key to sel
ct Enable fr
ard all inco
.
off code re
ct Enable f
m the Busy
ming calls t
pectively in
om the No
field.
the
2) Enter th
incomin
3) Press
before f
The def
74
destination
calls to in
or , or
orwarding in
ult value is
number yo
he Forward
the Switch s
the After Ri
2.
want to for
o field.
ft key to sel
Times fiel
ard all una
ct the ring
.
swered
ime to wait
Page 80

pa.) b.)
a
C
o
r
a
t
e
w
a
C
o
s
2)
e
e
t
C
c
e
F
e
e
n
w
l.)
C
r
h
f
e
r
o
a
s
c
w
a
o
u
a
w
A
“
h
e
o
B
w
h
e
o
e
w
c
a
L
o
a
B
a
d
e
p
r
e
l
c
a
e
e
e
a
o
sic Call Fe
tures
4. Pres
The
To enab
1. Pres
2. Pres
3. Pres
key.
4. De
4) (Option
the On
s the Save s
icon on
le call forwa
s Menu->Fe
s or
s or
ending on y
If you selec
1) Press
field.
l.) Enter the
ode or Off
ft key to ac
the idle scr
d in custom
tures->Call
to select th
to select th
our selectio
Always For
or , or
no answer f
ode field.
ept the ch
en indicate
mode:
orward.
desired ac
desired for
:
ard, you c
the Switch s
rward on c
nge or the
the call for
ount, and t
arding typ
n enable it f
ft key to sel
de or off co
ack soft key
ard is enabl
en press th
, and then
r a specific
ct Enable f
e respectiv
to cancel.
ed.
Enter soft k
ress the Ent
account.
om the Alw
ly in
y.
r soft
ys
2) Enter th
the For
3) (Option
the On
You can als
forward wa
1) Press
Press th
The pho
3) Press th
cancel.
destination
ard To field.
Enter the
ode or Off
enable the
enabled fo
or to
All Lines so
ne LCD scre
OK soft key
number yo
always forw
ode field.
always for
a specific a
ighlight the
t key.
n prompts
to accept t
want to for
rd on code
ard for all a
ccount, do
lways field.
Copy to All
e change
ard all inco
or off code
counts. Aft
s below:
ines?”.
r the Cance
ming calls t
respectively
r the always
soft key to
in
in
If you selec
Busy Forwa
d, you can
nable it for
specific a
count.
75
Page 81

User
e
e
a
e
o
d
e
e
t
f
e
a
a
C
o
a
2)
s
tl.)
e
f
h
f
e
g
t
1l.)
C
h
s
o
u
d
d
B
“
h
u
o
u
T
o
n
o
o
p
N
e
e
w
r
o
w
L
o
e
e
w
e
d
o
l
u
r
e
D
o
n
s
h
l
c
r
n
t
d
A
e
m
h
w
t
e
Guide for th
SIP-T41P IP P
hone
1) Press
2) Enter th
the pho
3) (Option
On Cod
You can als
was enable
1) Press
2) Press th
The pho
or , or
destination
ne is busy in
Enter the
or Off Cod
enable the
for a speci
or to
All Lines so
ne LCD scre
the Switch s
number yo
he Forward
busy forwar
field.
busy forwar
ic account,
ighlight the
t key.
n prompts
ft key to sel
want to for
To field.
on code o
for all acc
do as belo
usy field.
Copy to All
ct Enable fr
ard incomi
off code re
unts. After t
:
ines?”.
m the Busy
calls to w
pectively in
he busy for
field.
en
the
ard
3) Press th
c.)
If you selec
1) Press
2) Enter th
3) Press
4) (Option
cancel.
Answer
incomin
before f
The def
the On
OK soft key
No Answer
or , or
ield.
destination
calls to in
or , or
orwarding in
ult value is
Enter the
ode or Off
to accept t
Forward, yo
the Switch s
number yo
he Forward
the Switch s
the After Ri
2.
no answer f
ode field.
e change
can enabl
ft key to sel
want to for
o field.
ft key to sel
Times fiel
rward on c
r the Cance
it for a spe
ct Enable f
ard all una
ct the ring
.
de or off co
soft key to
ific accoun
om the No
swered
ime to wait
e respectiv
.
ly in
You can als
answer forw
1) Press
76
Pres
enable the
rd was ena
or to
the All Line
no answer f
bled for a s
ighlight the
soft key. Th
rward for a
ecific acco
o Answe
phone LC
l accounts.
nt, do as b
fi
ld.
screen pro
fter the no
low:
pts “Copy
to All
Page 82
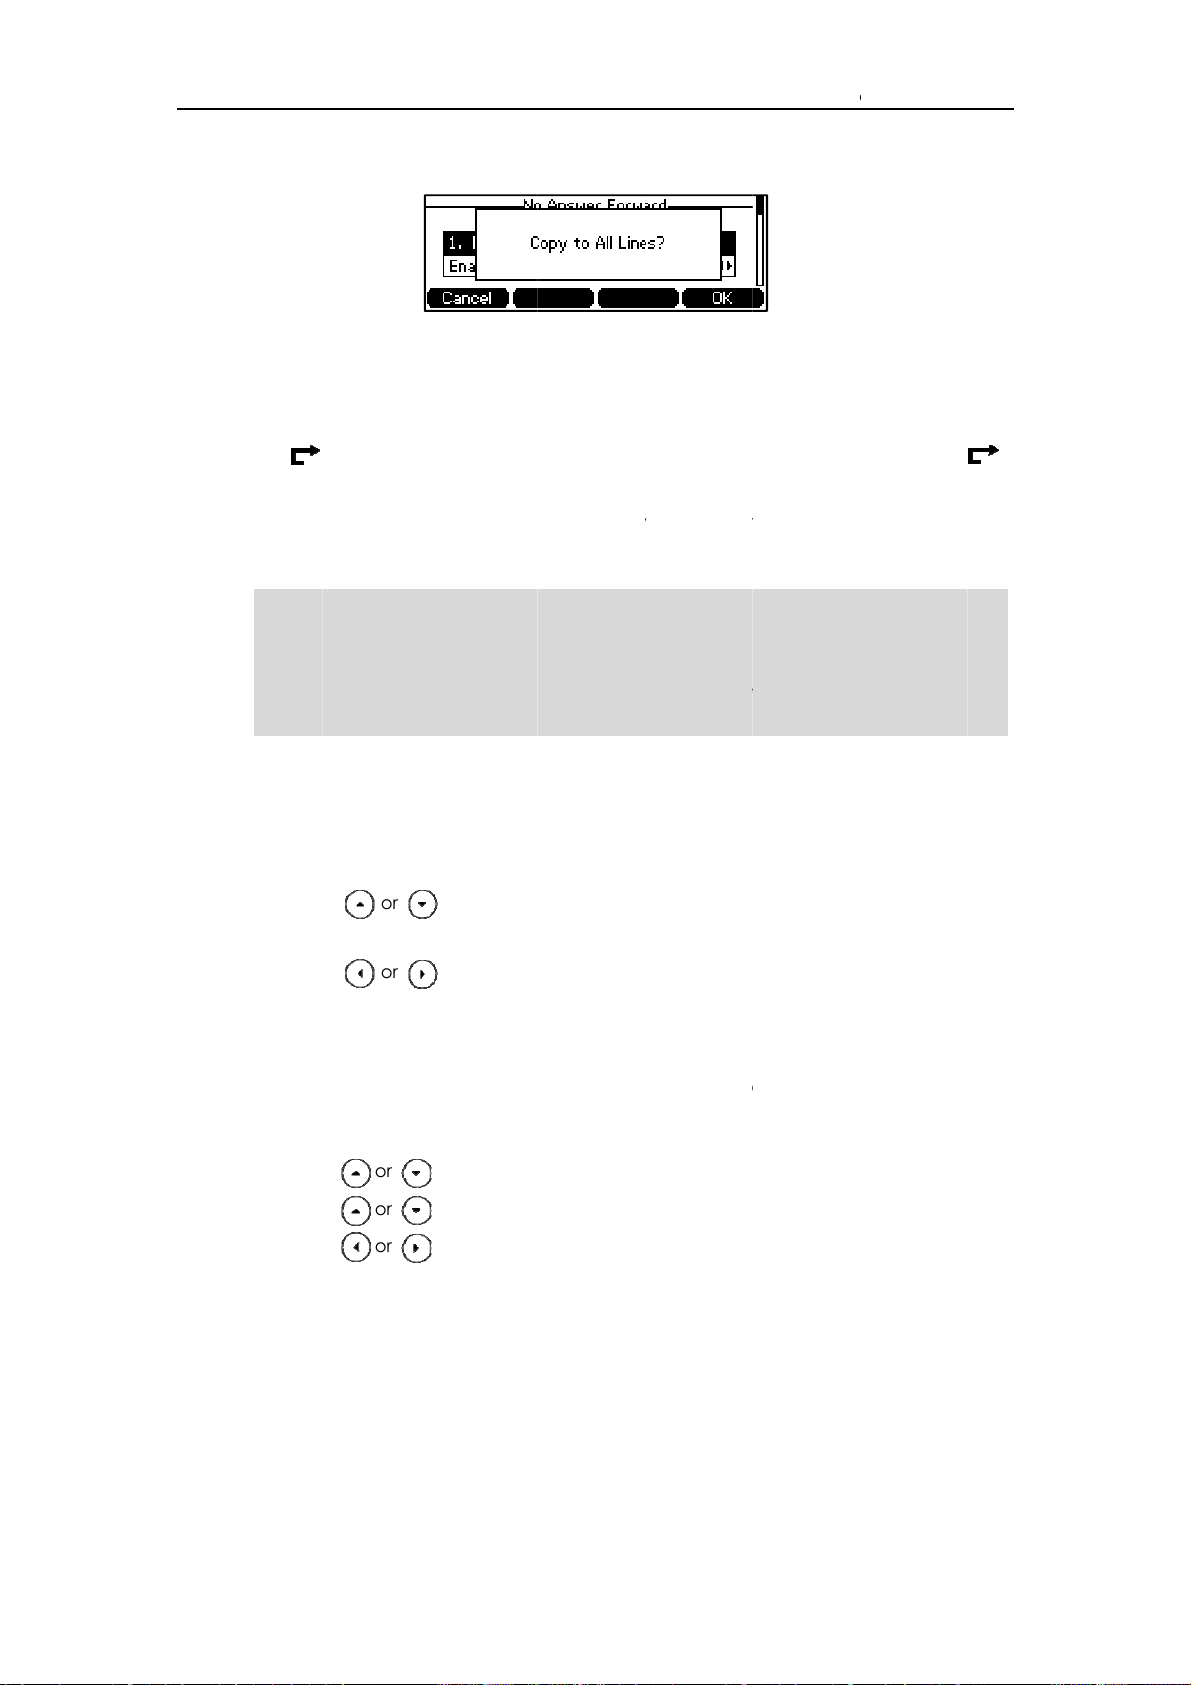
e
n
s
b
s
skey
s
w
s
b
w
m
a
e
a
n
r
a
Lines?”.
e
o
gu
a
a
o
d
e
t
e
d
c
c
r
e
m
h
t
c
F
e
e
c
c
n
e
e
h
a
d
w
r
t
t
a
s
c
w
o
a
c
d
e
ong
B
a
r
a
o
p
e
b
T
p
e
e
a
l
n
p
s
e
t
e
m
e
a
t
o
n
sic Call Fe
B
tures
Not
5. Pres
The
to .
You ca
Feature
You c
on usi
Call fo
Call fo
inform
To disa
1. Pre
2. Pre
3) Press th
cancel.
s the Save s
icon appea
also confi
->Forward &
n also enter
g the SIP URL
ward featur
rward on co
tion, conta
le call forwa
s Menu->Fe
s or
.
OK soft key
ft key to ac
s on the idl
re forward f
DND.
he SIP URL or
or IP address
is local to th
e or off cod
t your system
rd in phone
tures->Call
to select t
to accept t
ept the ch
screen, an
eature via
IP address in
, refer to Pla
phone, an
may be diff
administrato
ode:
Forward.
e desired fo
e change
e or the
the associ
eb user inte
the Forward
ing Calls on
may be ov
rent betwe
r.
warding typ
r the Cance
ack soft key
ted line ico
face at the
o field. For
age 61.
rridden by th
n servers. For
e, then pres
soft key to
to cancel.
changes
ath
ore informati
server setti
more
the Enter so
n
gs.
ft
3. Pre
4. Pre
To disa
1. Pres
2. Pres
3. Pres
4. Pres
5. Pres
Dyna
To forw
1. Wh
s or
for
ard.
s the Save s
le call forwa
s Menu->Fe
s or
s or
s or
for
ard.
s the Save s
ic Forwar
rd an incom
n the phon
, or the Swi
oft key to a
rd in custom
tures->Call
to select th
to select th
, or the Swit
ft key to ac
ing
ing call to a
is ringing, p
ch soft key
cept the ch
mode for a
orward.
desired ac
desired for
h soft key t
ept the ch
other party:
ress the Fwd
o select Dis
nge.
pecific acc
ount, then
arding typ
select Disa
nge.
soft key.
ble to disab
unt:
ress the Ent
, then press
le to disabl
le the call
r soft key.
he Enter sof
the call
key.
77
Page 83

User
a
e
e
s
n
d
m
e
e
n
e
e
e
n
e
s
a
r
a
T
e
a
f
e
f
c
t
f
e
f
d
f
e
a
n
o
d
e
d
r
s
g
o
m
o
s
g
o
.
m
g
o
.
c
a
o
e
w
e
n
s
h
o
e
a
r
e
a
e
e
c
g
e
w
ge
o
r
y
d
w
s
n
e
g
g
t
ging
e
d
o
Guide for th
SIP-T41P IP P
hone
C
2. Ent
3. Pres
The
ll Tran
You ca
z
Blin
z
Se
z
Att
To perfo
r the numb
s ,
phone LCD
fer
transfer a c
Transfe
i-Attended
nded Transf
rm a blind tr
: Tr
r you want t
, or the Sen
creen prom
ll to anoth
nsfer a call
ransfe
: Tran
: Transfer a
nsfer:
forward th
soft key.
pts a call for
r party in on
irectly to a
fer a call w
call with pri
incoming
ard messa
of the thre
other party
en the tar
r consulting.
all to.
e.
ways:
ithout con
t phone is ri
ulting.
n
.
1. Pres
2. Ent
3. Pres
The
To perfo
1. Pres
2. Ent
3. Pres
4. Pres
To perfo
1. Pres
s the Tran so
r the numb
s the Tran so
the call is
rm a semi-a
s the Tran so
r the numb
s or
s the Tran so
rm an atten
s the Tran so
t key durin
r you want t
t key to co
onnected t
tended tran
t key durin
r you want t
to dial out
t key to co
ed transfer:
t key durin
a call.
transfer th
plete the tr
the numbe
fer:
a call.
transfer th
plete the tr
a call.
call to.
nsfer.
to which y
call to.
nsfer when
u are transf
eceiving rin
rring.
back.
2. Ent
3. Pres
4. Aft
If you ar
You ca
key.
78
r the numb
s or
r the party
e using a ha
cancel the
you want t
to dial out
nswers the
dset, the tr
transfer bef
transfer th
all, press the
nsfer can b
re the call is
call to.
Tran soft ke
complete
connected
to complet
by hangin
by pressing
e the transf
up the han
he Cancel s
r.
set.
ft
Page 84

C
aCo
e
c
n
n
i
O
e
t
g
(
d
n
s
c
n
g
e
T
a
p
c
e
c
d
y
o
i
a
r
o
gu
n
o
e
f
e
n
h
a
e
m
a
e
m
a
n
n
W
c
c
c
w
P
p
t
o
a
c
u
n
f
g
o
o
e
a
r
e
e
o
f
s
b
e
g
b
b
ng
B
s
p
e
p
(
o
o
e
a
e
i
o
C
P
y
w
c
i
a
g
h
w
f
l
O
e
e
c
a
ll Waiti
g
B
sic Call Fe
tures
You ca
feature
phone.
busy m
disable
To confi
1. Pres
2. Pres
3. Pres
4.
Op
Co
5. Pres
enable or
s enabled,
therwise, a
ssage when
he phone t
ure call wa
s Menu->Fe
s or
s or
tional.) Ente
e or CW Off
s the Save s
isable the c
ou can rec
nother inco
there is an
play a war
ting via pho
tures->Call
, or the Swit
, or the Swit
the call wai
Code field.
ft key to ac
ll waiting fe
ive another
ing call is a
ctive call o
ing tone wh
e user inter
aitin
.
h soft key t
h soft key t
ting on cod
ept the ch
ture on the
all when th
tomatically
the phone.
en receivin
ace:
select Ena
select Ena
or off code
e or the
phone. If th
re is an act
rejected by
You can als
another cal
le from the
le from the
respectivel
ack soft key
call waitin
ve call on t
the phone
enable or
l.
all Waiting
lay Tone fie
in the CW
to cancel.
e
ith a
ield.
d.
n
Not
Lo
You ca
Feature
nferen
You ca
feature.
pressin
feature.
The ne
conta
al Conf
The SIP-
This is c
also confi
->General I
e
create a c
You can cr
the Conf so
twork confer
t your syste
rence
41P IP phon
lled Local C
re the call
formation.
nference wi
ate a confe
t key. The SI
nce feature
administrat
supports u
onference a
aiting featu
th two parti
rence betw
-T41P IP ph
is not availa
r.
to 3 parties
nd is the de
e via web u
s using the
en an activ
ne also sup
le on all serv
including y
ault method
er interface
hone’s loca
call and a
orts the net
rs. For more
urself) in a
of conferen
at the path
l conferenc
call on hold
ork confer
nformation,
onference
ce.
by
nce
all.
To set u
1. Pla
2. Wh
a local co
e a call to t
n the first p
ference call
e first party.
rty answers
:
he call, pre
s the Conf s
ft key to pla
ce a new c
ll.
79
Page 85

User
e
e
e
t
w
c
c
(
g th
o
n
n
n
m
h
e
e
n
u
l
o
c
o
f
g
e
a
u
l
e
k
l
o
o
p
c
o
g
h
o
w
f
d
e
o
c
c
n
e
e
e
d
e
p
m
g
a
a
n
s
w
u
n
l
o
e
n
t
e
h
n
e
e
e
,
o
h
d
e
o
e
o
n
I
b
e
a
c
t
d
e
e
c
c
k
g
a
e
r
U
Guide for th
SIP-T41P IP P
The
active call is
hone
placed on
old.
3. Ent
4. Wh
par
To join t
1. Pla
first
2. Pres
for
3. Pres
Durin
- Pres
r the numb
n the secon
ies in the co
o calls in a
e two calls
all using ac
s or
example, se
s the Conf s
e conferen
s the Hold s
r of the sec
d party ans
ference.
conference:
sing two dif
count 1, an
to select th
ect the call
ft key to join
e call, you
ft key to pla
nd party an
ers the call,
erent acco
then place
call for co
n account
the two cal
an do the f
e the conf
d press
press the C
nts on the p
the second
ference an
1).
s in the conf
llowing:
rence on h
, or th
nf soft key a
one (for ex
call using a
make sure
rence on a
ld.
Send soft
ain to join
mple, plac
count 2).
he call is ac
ccount 1.
ey.
ll
the
tive
Ne
twork C
- Pres
- Pres
-
-
-
- Pres
- Pres
You ca
confere
This feat
z
Joi
z
Invi
s the Split so
s the Mana
Press the Fa
Press the R
Press the B
s to m
s the Cance
nferenc
use networ
ce with mu
ure allows y
two calls t
te another
t key to split
e soft key, a
r Mute soft k
move soft k
ck soft key t
te the conf
soft key to
conferenc
tiple partici
u to perfor
ether into
arty into an
the confere
d then pres
y to forbid
y to remov
o return to t
rence call.
rop the con
feature on
ants.
the followi
conferenc
ctive conf
ce call into
s or
he party sp
the party fr
e previous i
ference call
the SIP-T41P
:
call.
rence call.
some indivi
to select th
aking.
m the conf
terface.
.
P phone to
ual calls.
desired pa
rence call.
onduct a
ty:
z
Re
ove a spe
To use t
advanc
80
is feature, c
, and confi
ific confere
ntact your
ure the net
ce party.
ystem admi
ork confer
nistrator for t
nce via we
he network
user interfa
onference-
ce.
RI in
Page 86

g
e
e
d
p
c
e
e
t
e
e
h
c
t
t
w
n
C
e
c
h
o
e
o
e
p
c
o
e
u
e
d
f
g
c
c
h
o
w
s
o
.
b
-
c
a
a
h
e
d
c
C
e
,
o
s
d
p
B
a
T
e
e
o
t
d
r
o
a
T
e
k
c
t
p
sic Call Fe
tures
To confi
1. Clic
2. Sel
3. Ent
fiel
ure the net
k on Accou
ct Network
r the confer
.
ork confer
t->Advance
onference
nce URI (e.
nce via we
.
rom the pull
., conferen
user interfa
down list of
e@exampl
e:
onference
.com) in th
ype.
Conferenc
URI
4. Clic
To set u
1. Pla
2. Pres
The
3. Ent
4. Wh
par
5. Pres
The
6. Ent
7. Wh
to t
8. Rep
k Confirm to
a network
e a call to t
s the Conf s
active call is
r the numb
n the secon
y to the con
s the Conf s
conference
r the numb
n the new
e conferen
eat steps 5 t
accept the
onference
e first party.
ft key to cre
placed on
r of the sec
d party ans
ference.
ft key to cre
is placed on
r of the new
arty answer
e.
7 until you
hange.
all:
ate a new c
old.
nd party an
ers the call,
ate a new c
hold.
party and t
the call, pr
have adde
ll.
d press
press the C
ll.
en press
ss the Conf
all intende
, or th
nf soft key t
, , or
oft key to a
parties.
Send soft
add the se
he Send sof
d the new
ey.
ond
key.
arty
The pro
differen
informa
edures to s
from introd
ion.
t up a netw
ced above
rk conferen
Contact yo
ce call for s
ur system ad
ecific serve
ministrator f
s may be
r more
81
Page 87

User
a
e
e
e
n
Y
a
g
e
e
(
e
n
h
r
r
s
r
e
a
p
a
n
r
e
k
s
b
a
e
r
o
gu
f
A
A
p
A
g
k
b
e
a
n
c
n
s
p
K
c
c
c
o
c
r
a
k
p
e
c
e
w
u
D
n
o
o
o
a
a
a
e
B
o
e
n
e
w
o
e
d
o
g
a
r
d
D
B
a
c
e
o
n
i
u
v
o
e
m
h
e
r
h
a
p
h
r
e
m
o
c
hing
e
i
o
d
>
n
e
Guide for th
C
ll Park
SIP-T41P IP P
hone
Not
You ca
another
room).
call is p
was par
Call p
more i
To confi
1. Pres
2. Sel
3. Pres
4. Pres
use call pa
phone in th
ou can par
rked succe
ked, or a visi
rk feature is
formation.
ure a call p
s Menu->Fe
ct the desir
s or
s or
k feature to
system (for
an active c
sfully, the re
le indicatio
ot available
ark key via
tures->DSS
d DSS key.
, or the Swit
, or the Swit
place a call
example, a
all by pressin
ponse is eith
n on the LC
on all servers
hone user i
eys.
h soft key t
h soft key t
on hold, an
phone in an
the call p
er a voice p
screen.
Contact yo
terface:
select Key
select Call
then retrie
ther office
rk key on th
ompt confir
r system ad
Event from t
Park from th
e the call fr
r conferen
phone. If t
that th
inistrator for
e Type field
Key Type f
m
e
e
call
.
eld.
5. Pres
ID fi
6.
Op
7. Ent
8. Pres
You ca
Key.
To use t
1. Use
2. Use
pre
3. Use
desi
retri
The
s or
ld.
tional.) Ente
r the call pa
s the Save s
also confi
e call park
on phone
on phone
ses the call
on phone
nated as p
ve the par
system esta
, or the Swit
the string th
rk feature c
ft key to ac
re a call pa
eature:
places a c
wants to ta
ark key on
walks to an
hone C. The
ed call.
lishes call b
h soft key t
at will appe
de in the V
ept the ch
k key via w
ll to phone
e the call in
hone A.
available c
user dials th
tween pho
select the
r on the LC
lue field.
nge or the
b user interf
.
a conferen
nference ro
call park r
e C and B.
esired line f
screen in t
ack soft key
ce at the p
e room for
om where t
trieve featu
om the Acc
e Label fiel
to cancel.
th DSSKey-
rivacy, the
e phone is
e code to
unt
.
Line
The c
system
If the
phone
ll park featur
server. Cont
arked call is
performing
Not
82
code and
ct your syst
ot retrieved
all park feat
all park retri
m administra
ithin a peri
re will receiv
ve feature c
tor for more i
d of time ass
call back.
de are pred
formation.
gned by the
fined on th
system, the
Page 88

Call Pickup
You can use call pickup feature to answer someone else’s incoming call on the phone.
The SIP-T41P IP phone supports the directed call pickup and group call pickup features.
Directed call pickup is used for picking up a call that is ringing at a specific phone
number. Group call pickup is used for picking up a call that is ringing at any phone
number in the group. The pickup group should be predefined, contact your system
administrator for more information.
You can pick up an incoming call by using the DPickup/GPickup soft key. To use the
call pickup feature, you need to configure the call pickup code beforehand on a
global or per-line basis via web user interface.
Basic Call Features
Note
If there are many incoming calls at the same time, pressing the GPickup soft key on the
phone will pick up the call that rings first.
Directed Call Pickup
To enable directed call pickup and configure the directed call pickup code on a
global basis via web user interface:
1. Click on Features->Call Pickup.
2. Select Enabled from the pull-down list of Directed Call Pickup.
3. Enter the directed call pickup code in the Directed Call Pickup Code field.
4. Click Confirm to accept the change.
To configure the directed call pickup code on a per-line basis via web user interface:
1. Click on Account.
2. Select the desired account from the pull-down list of Account.
3. Click on Advanced.
83
Page 89

User Guide for the SIP-T41P IP Phone
4. Enter the directed call pickup code in the Directed Call Pickup Code field.
5. Click Confirm to accept the change.
To pick up a call directly:
1. Pick up the handset.
The DPickup soft key appears on the LCD screen.
2. Press the DPickup soft key on your phone when a phone receives an incoming call.
3. Enter the phone number which receives an incoming call.
4. Press the DPickup soft key again.
The call is answered on your phone.
You can also configure a DSS key as a directed pickup key via phone user interface or
web user interface. You can pick up a call by pressing the directed pickup key directly.
Group Call Pickup
To enable the group call pickup and configure the group call pickup code on a global
basis via web user interface:
1. Click on Features->Call Pickup.
2. Select Enabled from the pull-down list of Group Call Pickup.
84
Page 90
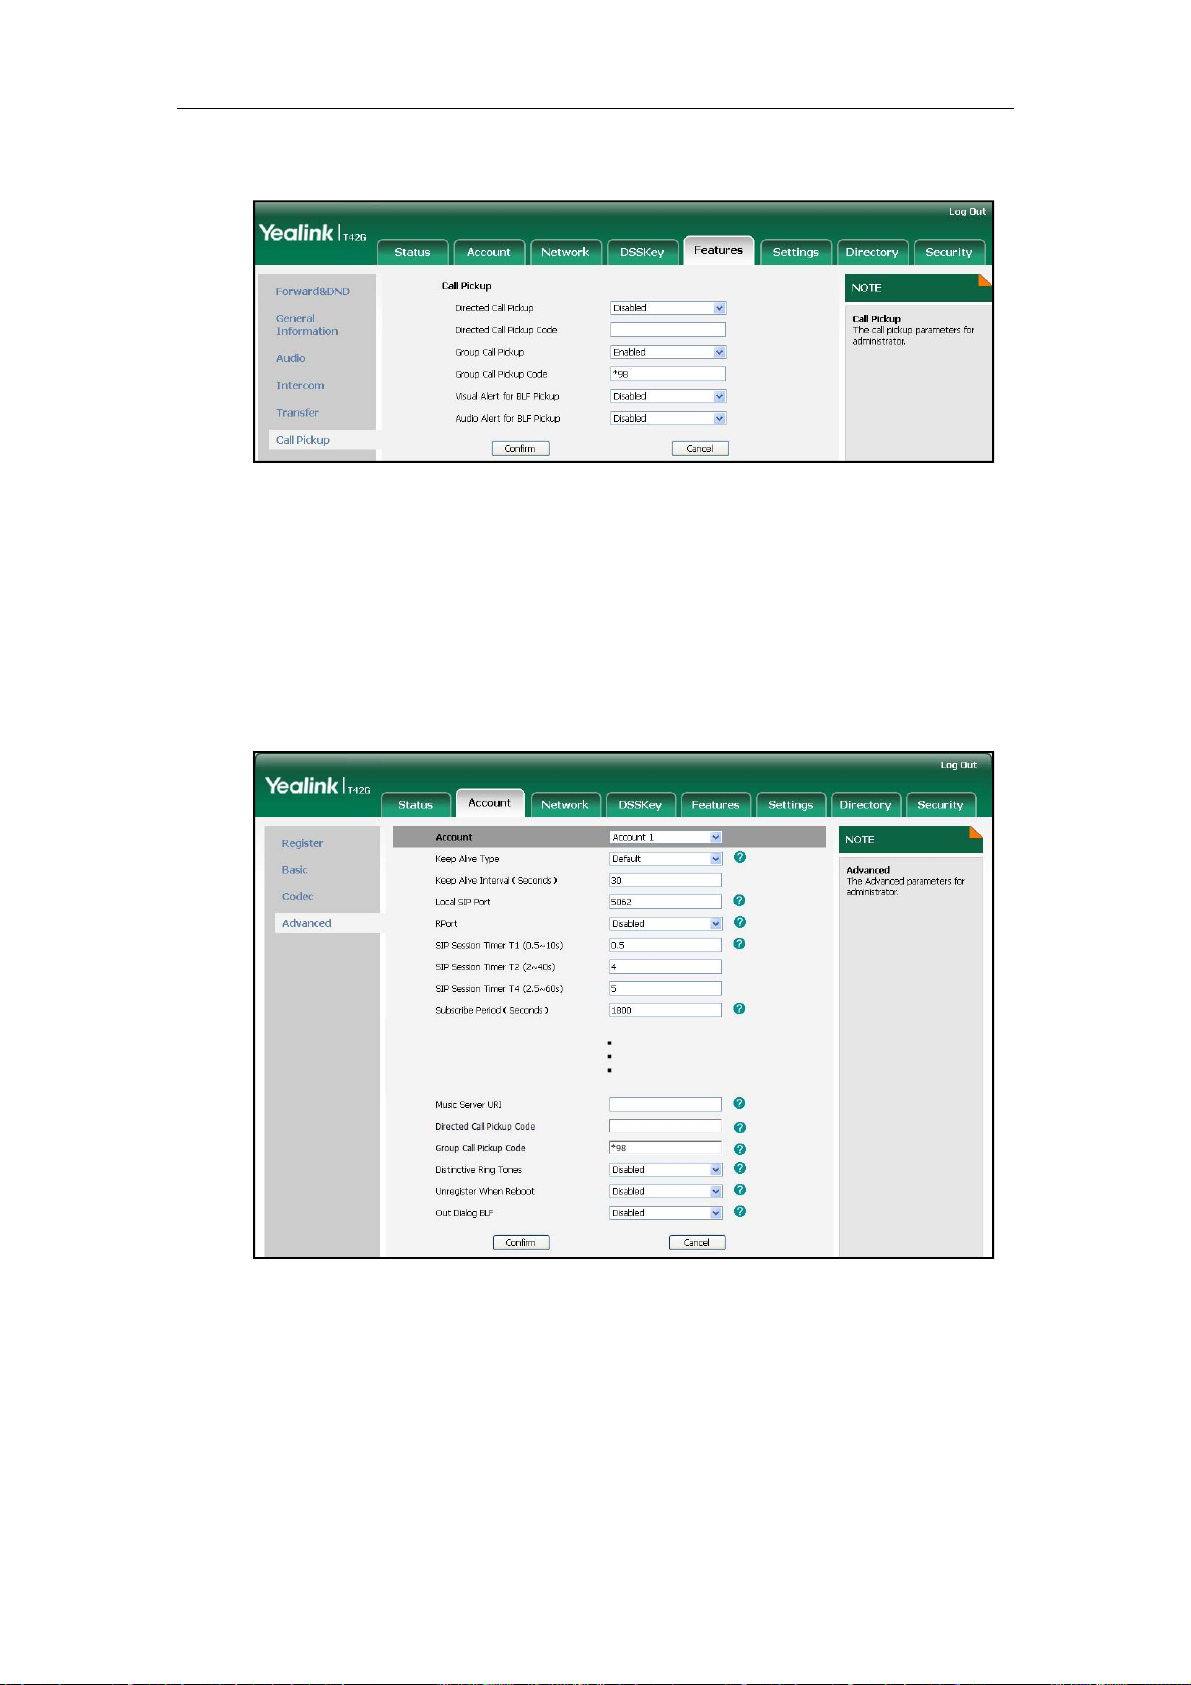
Basic Call Features
3. Enter the group call pickup code in the Group Call Pickup Code field.
4. Click Confirm to accept the change.
To configure the group call pickup code on a per-line basis via web user interface:
1. Click on Account.
2. Select the desired account from the pull-down list of Account.
3. Click on Advanced.
4. Enter the group call pickup code in the Group Call Pickup Code field.
5. Click Confirm to accept the change.
To pick up a call in the group:
1. Pick up the handset.
85
Page 91

User
e
An
e
e
o
n
e
u
n
g
u
r
g
e
d
(
(
n
o
s
e
l
u
t
e
gu
c
m
a
h
e
m
a
e
r
r
o
gu
c
a
e
r
n
y
a
w
b
c
m
m
c
o
t
n
D
e
k
l
t
i
o
c
c
a
w
n
t
o
a
u
o
b
C
C
B
r
C
e
n
o
e
n
A
e
e
p
s
e
o
s
m
a
C
Guide for th
SIP-T41P IP P
The
GPickup sof
hone
key appea
s on the LC
screen.
Not
onymo
2. Pres
inc
The
You ca
user int
The dir
system
The ca
config
You ca
showin
to cons
configu
s the GPicku
ming call.
call is answ
also confi
rface. You
cted call pi
server. Cont
l pickup cod
red on a glo
s Call
use anony
up to the c
lt some of t
able on a p
p soft key o
red on your
re a DSS ke
an pick up
kup code a
ct your syste
configured
bal basis.
ous call fea
lled party
e services,
-line basis.
your phon
phone.
as group pi
call by pres
d group call
m administra
on a per-line
ture to bloc
hen you cal
ut you don’
when a ph
ckup key vi
sing the gro
pickup code
or for more i
basis takes p
the identity
someone. F
want to be
ne in the gr
phone user
p pickup k
are predefin
formation.
recedence
and phone
r example,
harassed. A
up receive
interface or
y directly.
d on the
ver that
number fro
you want to
onymous c
an
web
call
ll is
Not
The an
admini
To confi
1. Pres
2. Sel
3. Pres
fiel
4.
Op
5.
Op
6. Pres
You ca
nymous call
trator for the
ure anony
s Menu->Fe
ct the desir
s or
.
tional.) Ente
tional.) Ente
s the Save s
also confi
feature is no
anonymous
ous call via
tures->Anon
d line.
, or the Swit
the anony
the anony
ft key to ac
re anonym
available o
call on code
phone user
ymous Call.
h soft key t
ous call on
ous call off
ept the ch
us call via
all servers.
and off cod
nterface:
select Ena
ode in the
ode in the
nge or the
eb user inte
ontact your
.
le from the
all On Cod
all Off Cod
ack soft key
face at the
ystem
nonymous
field.
field.
to cancel.
ath
all
86
Page 92

An
t
e
g
u
n
A
a
n
g
e
(
(
n
t
m
c
o
R
m
c
h
a
m
a
e
r
r
o
gu
p
je
r
je
c
m
m
c
o
a
n
e
a
r
o
c
a
c
o
c
c
e
b
d
d
B
B
a
m
g
R
je
je
c
a
m
w
t
sic Call Fe
tures
Accoun
To plac
1. Usin
The
onymo
You ca
callers.
deliber
rejectio
To confi
->Basic.
an anony
the specifi
LCD screen
s Call
use anony
nonymous
tely block t
is configur
ure anony
ous call:
line on the
f phone B
ejectio
ous call re
all rejection
eir identities
ble on a pe
ous call re
phone to pl
rompts an i
n
ction featur
automatic
and numbe
-line basis.
ction via ph
ce a call t
coming call
to reject in
lly rejects in
s from showi
one user int
phone B.
from anony
oming calls
oming calls
n
up. Anon
rface:
ity.
from anony
from callers
ymous call
ous
ho
1. Pres
2. Sel
3. Pres
4. Pres
5.
Op
6.
Op
7. Pres
You ca
Accoun
s Menu->Fe
ct the desir
s or
s or
tional.) Ente
tional.) Ente
s the Save s
also confi
->Basic.
tures->Anon
d line.
to scroll to t
, or the Swit
the anony
the anony
ft key to ac
re anonym
ymous Call.
he Rejection
h soft key t
ous call reje
ous call reje
ept the ch
us call reje
field.
select Ena
tion on co
ction off co
nge or the
tion via web
le from the
e in the Re
e in the Re
ack soft key
user interfa
ejection fiel
ct On Code
ct Off Code
to cancel.
e at the pa
d.
field.
field.
h
87
Page 93

Ad
u
d
p
T
y
r
t
o
s
q
a
n
m
p
t
e
n
s
n
g
f
g
e
n
s
c
g
g
Dsag
o
(
o
D
k
a
i
w
o
e
a
e
n
(
(A
i
m
a
e
n
u
m
o
y
e
K
c
oCD)
c
e
o
o
y
n
c
o
c
u
s
o
e
o
n
o
i
r
r
Advance
s
e
g
g
y
t
n
e
a
4
o
h
o
E
o
e
d Phone Fe
tures
vance
This cha
phone.
z
Bus
z
Call
z
Hot
z
Inte
z
Mul
z
Mus
z
Aut
z
Me
If you re
system
Pho
ter provide
he topics in
Lamp Field
Recording
Deskin
com
icast Pagin
ic on Hold
matic Call
dministrator
es
uire additi
e Feat
operating i
lude:
BLF)
istribution
nal informat
.
ures
structions f
on or assista
r the advan
nce with yo
ed feature
r new phon
of the SIP-T
, contact y
1P IP
ur
B
sy Lam
You ca
For exa
friend’s
illumina
For mor
You ca
phone i
phone
pressin
more in
To confi
1. Pres
2. Sel
3. Pres
p Field
use the BLF
ple, you ca
hone (busy
es solid red
BLF key LE
press a BLF
idle. You c
umber rece
the BLF key
ormation, c
ure a BLF k
s Menu->Fe
ct the desir
s or
BLF)
feature to
n configure
or idle). Wh
n your pho
indications,
ey to dial o
n receive a
ves an inco
hen the m
ntact your s
y via phon
tures->DSS
d DSS key.
, or the Swit
onitor a spe
BLF key on
n the friend
e to indicat
refer to LED
t the monit
visual alert a
ing call. Yo
nitored ph
stem admi
user interfa
eys.
h soft key t
ific user for
the phone f
makes a ca
that the fri
Instructions
red phone
nd an audi
u can also p
ne number
istrator.
e:
select BLF f
tatus chan
r monitorin
ll, the BLF ke
nd’s phone
n page 5.
umber whe
alert when
ck up a call
eceives an i
om the Typ
es on the p
the status
(line key) L
is in use and
n the monit
he monitor
directly by
coming cal
field.
one.
f a
D
busy.
red
d
l. For
89
Page 94
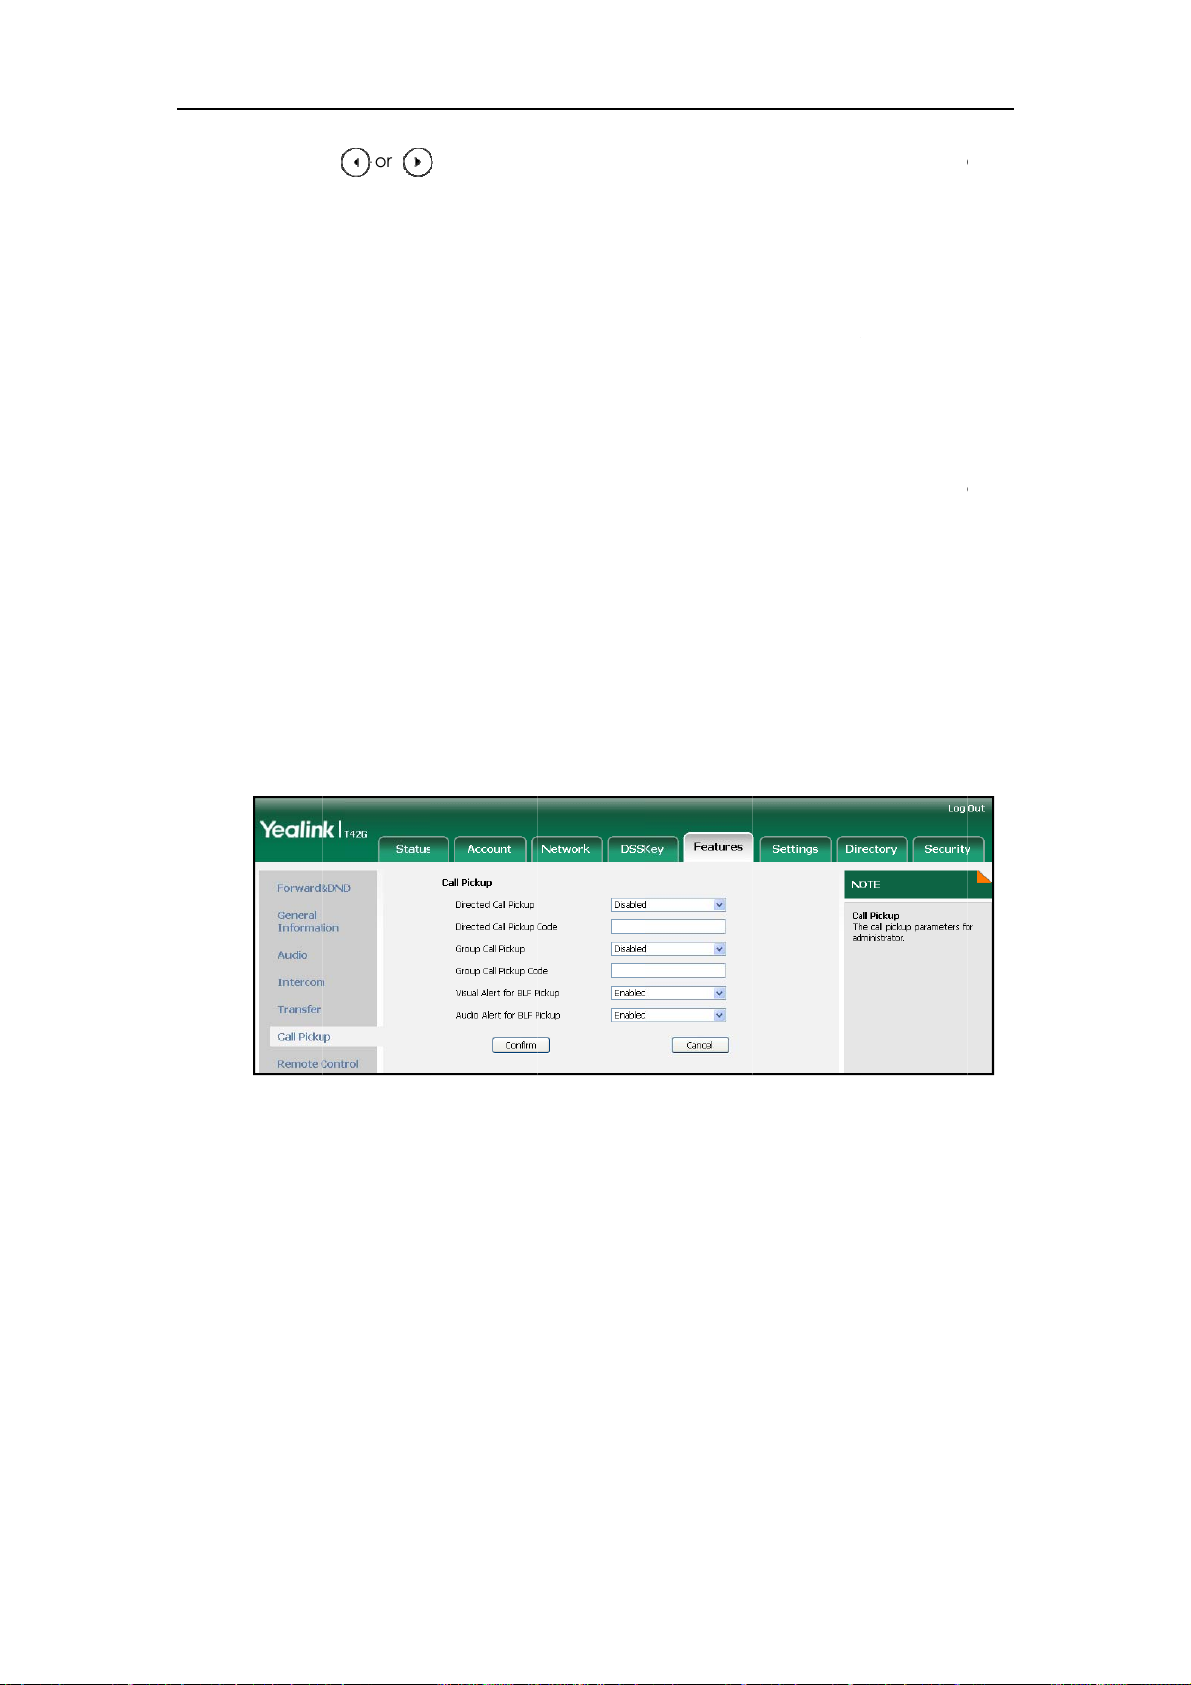
User
e
e
(
e
(
n
n
m
w
e
e
e
h
n
e
e
e
r
r
o
gu
d
c
u
s
r
r
d
c
t
e
c
c
e
u
-
-
c
t
e
o
u
E
a
a
p
i
v
V
A
s
b
d
s
o
B
e
t
p
p
i
o
o
g
)
r
V
a
e
p
p
l
o
e
h
u
Guide for th
SIP-T41P IP P
hone
4. Pres
ID fi
5.
Op
6. Ent
7.
Op
8. Pres
You ca
Key.
You ca
monitori
an inco
This allo
monitor
To enab
1. Clic
2. Sel
s or
ld.
tional.) Ente
r the phone
tional.) Ente
s the Save s
also confi
enable au
ng phone to
ing call. Yo
s the LCD s
d phone n
le the visual
k on Feature
ct Enabled f
, or the Swit
a string tha
number or
the pickup
ft key to ac
re the BLF k
io alert for B
play a warn
u can also e
reen of the
mber receiv
and audio a
->Call Pick
om the pull
h soft key t
will appear
xtension yo
ode in the
ept the ch
y via web u
LF pickup fe
ing tone, wh
nable visual
monitoring
es an incom
lert feature
p.
down list of
select the
on the LCD
want to m
xtension fiel
nge or the
ser interfac
ture on the
en the moni
alert for BLF
hone to dis
ng call.
ia web user
isual Alert f
esired line f
creen in the
nitor in the
d.
ack soft key
at the path
phone. This
ored phone
ickup featu
lay the call
nterface:
BLF Picku
om the Acc
Label field.
alue field.
to cancel.
DSSKey->Lin
llows the
number rec
re on the ph
r ID, when t
.
unt
e
ives
one.
e
3. Sel
4. Clic
When t
the mo
z
Th
z
Th
ct Enabled f
k Confirm to
e monitore
itoring phon
phone play
BLF key LED
om the pull
accept the
phone num
e:
s a warning
flashes red.
down list of
hange.
ber receive
one (if ena
udio Alert f
an incomin
led).
BLF Picku
call, the fo
.
lowing occ
rs on
z
Th
caller ID ap
90
pears on th
LCD screen
if enabled
.
Page 95
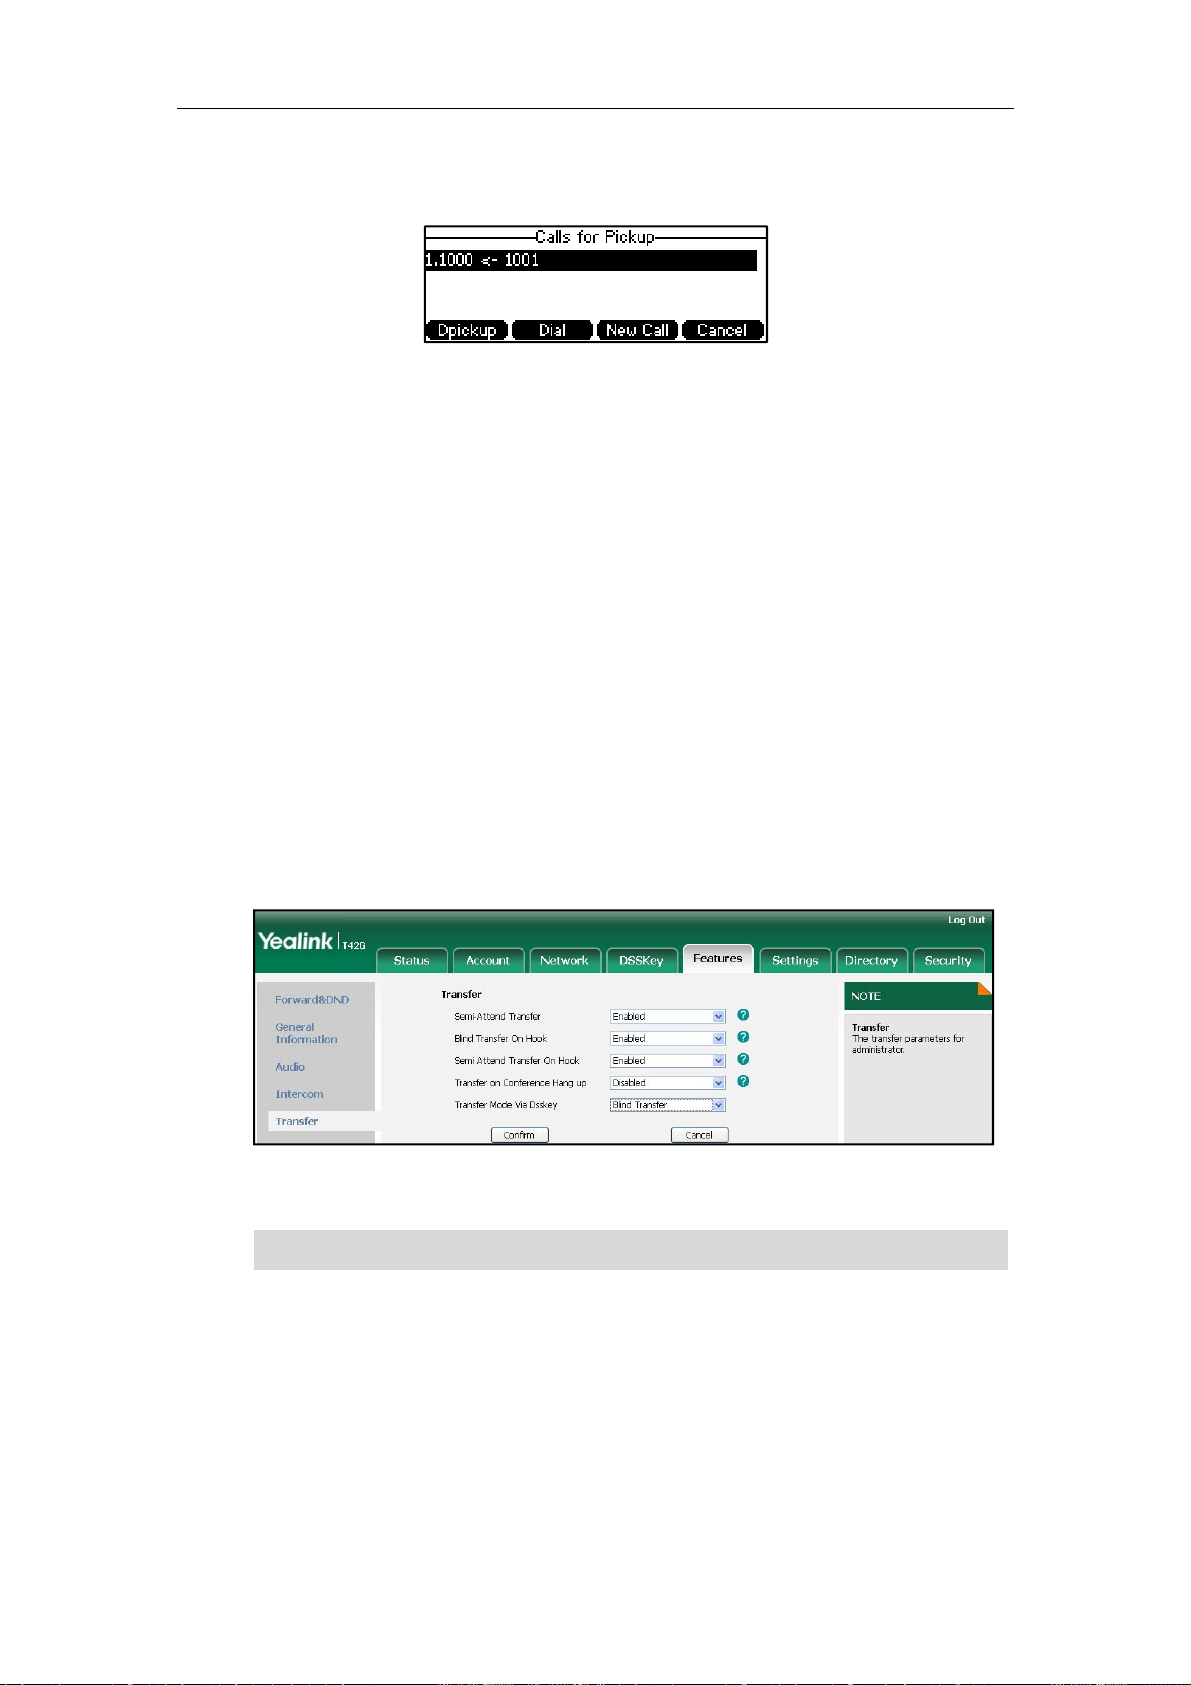
Advanced Phone Features
In the following figure, the phone LCD screen shows an incoming call from 1001 on the
monitored line.
When there is an active call on the IP phone, you can transfer the active call to the
monitored phone number directly by pressing the BLF key. The phone transfers the
active call differently depending on the transfer mode on DSS key. For more information
on performing call transfer, refer to Call Transfer on page 78.
To configure the transfer mode on DSS key via web user interface:
1. Click on Features->Transfer.
2. Select the desired transfer mode from the pull-down list of Transfer Mode Via Dsskey.
Depending on your selection:
- If you select Blind Transfer, press the BLF key to blind transfer to the monitored
phone number.
- If you select Attended Transfer, press the BLF key to dial out the monitored
phone number and then you can perform the attended or semi-attended
transfer.
- If you select New Call, press the BLF key to place a new call to the monitored
user.
3. Click Confirm to accept the change.
Note
You can configure the transfer mode on DSS key via web user interface only.
91
Page 96

User
a
e
e
r
n
t
o
o
e
g
e
(
g
e
(
e
n
S
c
n
s
n
o
r
a
e
r
o
e
a
e
r
o
gu
K
s
r
g
s
p
h
K
c
c
t
c
a
K
c
t
g
c
o
e
y
n
g
q
e
o
o
a
o
n
a
c
r
T
n
gg
o
s
B
R
s
B
a
o
e
e
g
h
g
a
d
2
r
cng
l
d
h
Guide for th
C
ll Reco
SIP-T41P IP P
ding
hone
Not
You ca
differen
z
Rec
on/
z
URL
syst
The re
more i
To confi
1. Pres
2. Sel
3. Pres
4. Pres
record call
ways of co
rd: The ph
ff” to trigge
Record: The
m administr
ord feature i
formation.
ure a Reco
s Menu->Fe
ct the desir
s or
s or
by pressing
figuring call
ne sends SIP
a recordin
phone send
ator for the
not availabl
d key via p
tures->DSS
d DSS key.
, or the Swit
, or the Swit
a record ke
recording a
INFO messa
.
HTTP URL re
redefined U
on all serve
one user int
eys.
h soft key t
h soft key t
on the SIP-
d they eve
e containin
uest to tri
RL.
s. Contact y
rface:
select Key
select Rec
41P IP phon
work differ
a specific
er a recordi
ur system a
Event from t
rd from the
. There are
ntly:
heade
ministrator fo
Key Type fie
“Re
. Contact
e Type field
ord:
your
r
.
d.
5.
Op
6. Pres
To confi
1. Pres
2. Sel
3. Pres
4.
Op
5. Ent
6. Pres
You ca
path DS
tional.) Ente
s the Save s
ure a URL R
s Menu->Fe
ct the desir
s or
tional.) Ente
r the URL (e.
s the Save s
also confi
Key->Line
a string tha
ft key to ac
cord key vi
tures->DSS
d DSS key.
, or the Swit
a string tha
., http://10.
ft key to ac
re the Rec
ey.
will appear
ept the ch
phone use
eys.
h soft key t
will appear
1.2.224/pho
ept the ch
rd or URL Re
on the LCD
nge or the
interface:
select URL
on the LCD
erecording.
nge or the
ord keys vi
creen in the
ack soft key
ecord from
creen in the
c
i) in the V
ack soft key
web user in
Label field.
to cancel.
the Type fiel
Label field.
lue field.
to cancel.
terface at t
.
e
92
Page 97

e
o
o
r
r
r
o
e
n
o
n
n
e
n
k
g
e
a
c
o
e
o
o
r
o
e
d
s
d
o
.
i
s
o
s
e
c
e
o
m
n
o
o
s
r
o
a
e
d
a
e
e
o
r
e
y
g
c
a
n
w
c
r
r
r
r
r
u
g
b
l
a
m
f
e
g
o
w
L
D
n
n
n
n
e
m
m
e
e
Advance
t
s
m
s
i
e
a
e
c
n
d Phone Fe
tures
The Rec
z
Du
z
Wh
z
Du
z
Du
z
Wh
The Rec
z
Wh
z
Wh
To recor
1. Pres
If th
and
2. Pres
rd/URL Rec
ing an activ
en calls are
ing a blind
ing a confe
en the phon
rd/URL Rec
en there are
en you plac
d a call:
s the Recor
recording
the Record
s the Recor
rd keys co
call
n hold or m
r attended t
ence call
e prompts y
rd keys are
no connect
a new call
or URL Rec
tarts succes
or URL Reco
or URL Rec
trol the reco
ute
ransfer
u to answe
not availabl
ed calls on
rd key durin
fully, there
d key LED fl
rd key agai
rding and ar
an incomin
:
our phone
a call.
ording icon
shes green.
to stop rec
available:
call
appears on
rding.
he LCD scr
en
Not
The
key
Recordi
A recor
A recor
A recor
The rec
The ca
You ca
an acc
The w
Conta
recording ic
LED turns off
status ind
Circumstan
ding is starte
ding cannot
ding cannot
rding box i
not be rec
listen to the
ss code to li
y in which y
t your syste
n disappe
cations you
ce
d
be started
be
full
rded
recordings s
ten to the r
u listen to th
administrat
rs from the L
need to kno
appea
appea
appea
appea
appea
tored on yo
cordin
recordings
r for more in
s.
CD screen a
:
I
ons on the
s on the LC
s for 1 seco
s for 1 seco
s for 1 seco
s for 1 seco
r server syst
ay be differ
ormation.
nd the Reco
CD screen
screen
d
d, then goe
d
d
m. For exa
nt on differe
rd or URL Re
back
ple, you ca
nt servers.
ord
dial
H
t Deski
Hot Des
a work s
Deskin
employ
g
ing originat
tation or surf
is cost redu
es are in th
s from the
ace by a pa
tion. This fe
office at th
efinition of
rticular emp
ture is regul
same time
eing the te
oyee. A pri
rly used in p
, or not in th
porary phy
ary motivat
laces where
office for v
ical occupa
on for Hot
not all the
ry long at a
nt of
ll,
93
Page 98

User
e
e
m
a
n
g
t
g
e
d
(
n
c
e
t
r
s
s
c
e
e
a
e
)
r
o
gu
s
s
elog
n
t
n
f
S
i
K
c
c
t
c
s
e
g
a
n
a
b
h
o
e
o
o
a
e
w
r
s
a
o
a
a
D
s
B
g
a
i
n
n
g
h
g
m
e
n
n
a
p
w
t
Guide for th
SIP-T41P IP P
hone
Not
which
space
You ca
then lo
differen
The ho
for mo
To confi
1. Pres
2. Sel
3. Pres
4. Pres
fiel
5.
Op
eans actual
nd resource
use Hot De
in a new a
time. To us
desking fea
e informatio
ure a hot d
s Menu->Fe
ct the desir
s or
s or
.
tional.
Ente
personal of
.
king on the
count. As a
this feature,
ure is not av
.
sking key v
tures->DSS
d DSS key.
, or the Swit
, or the Swit
a string tha
ices would
IP-T41P IP p
result, many
you need t
ilable on all
a phone us
eys.
h soft key t
h soft key t
will appear
e often vac
one to log
users can sh
configure
ervers. Cont
r interface:
select Key
select Hot
on the LCD
nt, consum
ut the existi
re the pho
Hot Deskin
ct your syste
Event from t
eskin
fro
creen in the
ng valuable
accounts
e resource i
key in adv
m administra
e Type field
the Key Ty
Label field.
and
nce.
or
.
e
6. Pres
You ca
DSSKey-
To use h
1. Pres
The
2. Pres
be
The
s the Save s
also confi
>Line Key.
ot desking:
s the hot de
phone LCD
s the OK soft
leared imm
in wizard
ft key to ac
re a hot de
ing key wh
creen prom
key, re
istr
diately.
will be show
ept the ch
king key via
n the phon
pts the follo
tion configu
as below:
nge or the
web user int
is idle.
ing warnin
ations of all
ack soft key
erface at th
:
accounts o
to cancel.
path
the phone
ill
3. Ent
94
r the login i
formation in
each field.
Page 99

In
t
e
uInc
m
e
n
g
e
e
(
e
n
-
e
n
u
h
e
n
e
e
s
e
C
a
e
e
r
e
o
gu
m
t
C
4
c
e
a
go
K
c
h
c
o
c
o
a
o
m
o
I
a
e
a
w
s
o
c
s
s
e
v
u
y
t
D
ng
B
o
o
t
p
n
c
i
e
e
h
e
r
t
l
a
a
c
d
s
ercom
Advance
d Phone Fe
tures
Not
O
Interco
operato
with a r
automa
The int
more i
tgoing I
To confi
1. Pres
2. Sel
3. Pres
is a useful f
r or the secr
mote exten
tically answ
rcom featur
formation.
tercom
ure an inter
s Menu->Fe
ct the desir
s or
ature in an
tary. You c
ion for out
r the incomi
is not avail
alls
com key via
tures->DSS
d DSS key.
, or the Swit
office envir
n press the i
ing interco
ng intercom
ble on all ser
phone user
eys.
h soft key t
nment to q
ntercom ke
calls, and
calls.
ers. Contact
interface:
select Inter
ickly conne
to automat
he remote
your system
com from th
t with the
cally conne
xtension will
dministrator
e Type field.
t
for
4. Sel
5.
Op
6. Ent
7. Pres
You ca
DSSKey
To plac
1. Pres
The
2. Pres
oming I
By defa
automa
incomin
microp
ct the desir
tional.) Ente
r the remot
s the Save s
also confi
>Line Key.
an interco
s the interco
phone is au
s the interco
tercom
lt, the SIP-T
tically. The p
intercom
one when it
d line from t
the string th
extension n
ft key to ac
re an interc
call:
m key when
omatically
m key again
alls
1P IP phone
hone autom
all. In additi
automatica
e Account
at will appe
umber in th
ept the ch
m key via
the phone i
onnected t
or the Can
supports an
atically play
n, you can
lly answers a
D field.
r on the LC
Value field.
e or the
eb user inte
idle.
the extensi
el soft key t
wering an in
a warning
nable the
n incoming i
screen in t
ack soft key
rface at the
n specified
end the int
coming inte
one when it
hone to mu
tercom cal
e Label fiel
to cancel.
path
in the Value
rcom call.
com call
receives an
e the
. You can al
.
field.
o
95
Page 100

User Guide for the SIP-T41P IP Phone
enable the phone to automatically answer an incoming intercom call while there is
already an active call on the phone, the active call is placed on hold.
Intercom features you need to know:
Intercom features Description
Accept Intercom
Intercom Mute
Allows you to enable or disable the IP phone to
automatically answer an incoming intercom call.
Allows you to enable or disable the microphone on
the IP phone for Intercom calls.
Allows you to enable or disable the IP phone to play
Warning Tone
a warning tone when the IP phone receives an
incoming intercom call.
Allows you to enable or disable the IP phone to
Intercom Barge
automatically answer an incoming intercom call
while there is already an active call on the phone.
To configure intercom features via phone user interface:
1. Press Menu->Features->Intercom.
2. Make the desired changes.
Note
3. Press the Save soft key to accept the change or the Back soft key to cancel.
You can also configure these specific parameters via web user interface at the path
Features->Intercom.
Accept Intercom
You can enable or disable the phone to automatically answer an incoming intercom
call. If Accept Intercom is enabled, the phone automatically answers an incoming
intercom call. If Accept Intercom is disabled, the phone rejects incoming intercom calls
and sends a busy signal to the caller. Accept Intercom is enabled by default.
Your administrator can set a time period delay before the phone automatically answers.
Contact your system administrator for more information.
Intercom Mute
You can mute or un-mute the microphone on the phone for intercom calls
automatically. If Intercom Mute is enabled, the microphone is muted for intercom calls.
If Intercom Mute is disabled, the microphone is un-muted for incoming calls. Intercom
Mute is disabled by default.
96
 Loading...