

Ultra-elegant Gigabit IP Phone
SIP VP-T49G
www.yealink.com
English | Deutsch | Español | Français
Quick Start Guide (V80.16)
Applies to firmware version 51.80.0.10 or later.


Table of Contents
English ............................................................ 1
Deutsch ........................................................15
Español .........................................................29
Français ........................................................43

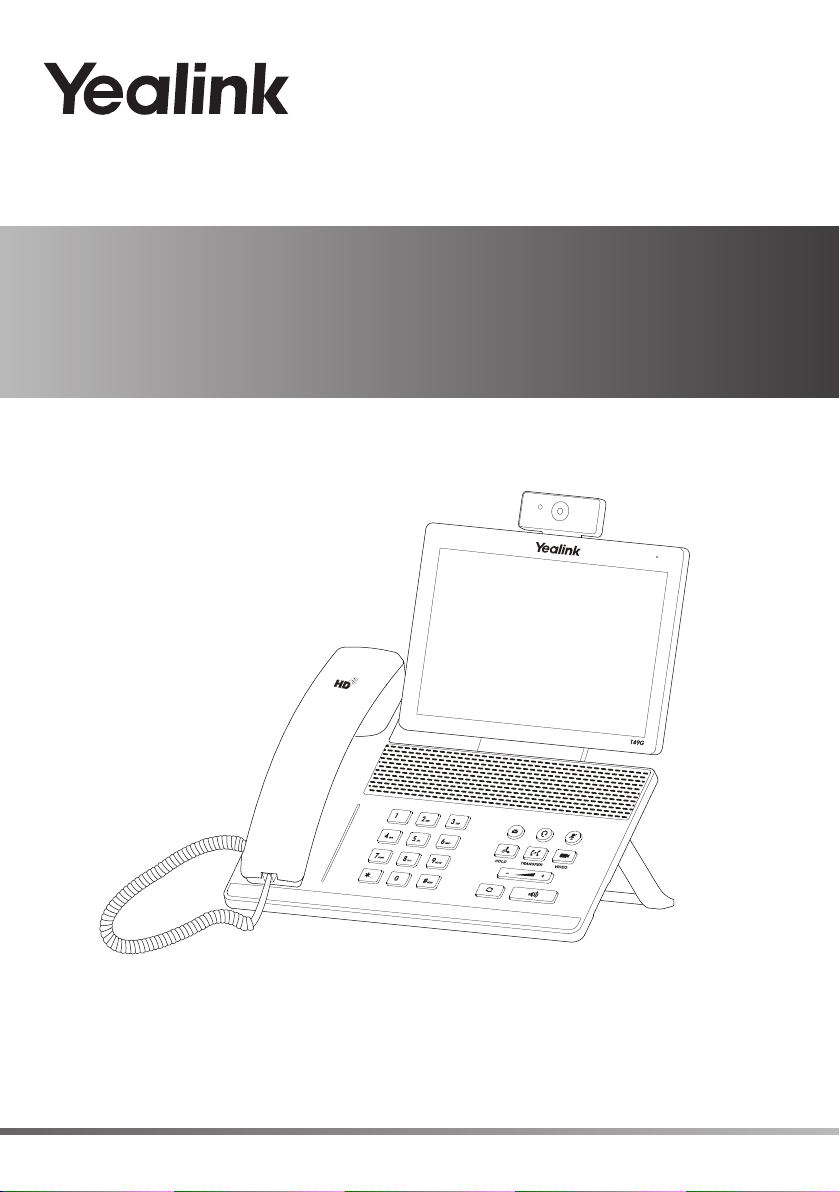
Packaging Contents
Stand
Camera
Quick Start Guide
E
N
G
L
I
S
H
Handset Cord
HDMI Cable
IP Phone
Note: The Extended Display Accessories ED10 helps you display the video image captured from the camera (both near site and
far site) on the external monitor during a video call. For more information, refer to Yealink Extended Display Assessories
Quick Installation Guide for SIP VP-T49G.
We recommend that you use the accessories provided or approved by Yealink. The use of unapproved third-party
accessories may result in reduced performance.
Handset
3M Dual Lock x2
Ethernet Cable
(2m CAT5E FTP Cable)
USB3.0 Cable
ED10 (Optional)
Power Adapter
Quick Installation Guide
Assembling the Phone
1. Attach the stand, as shown below:
.
40
2. Inser t the camera, as shown below:
Adjust Shutter Switch
Adjust Camera Angle
1
E
N
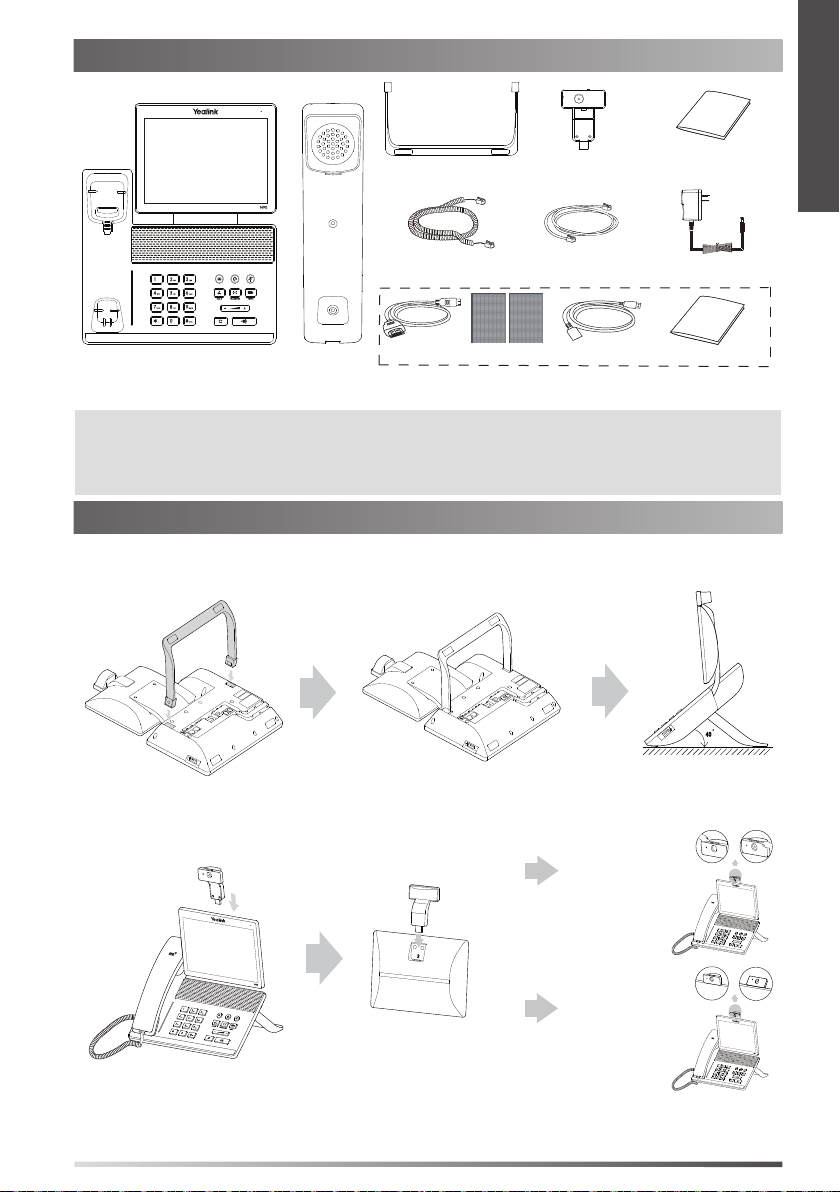
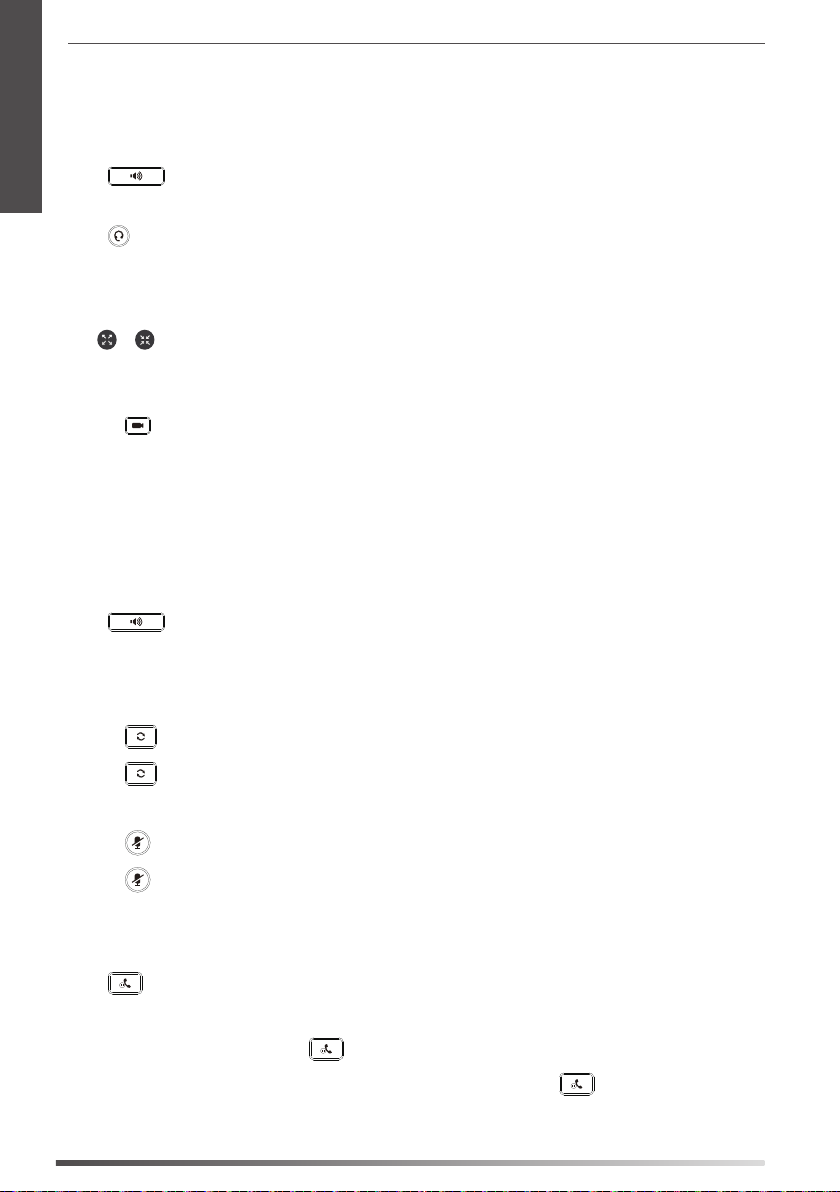
3. Connect the handset and optional headset, as shown below:
G
L
I
S
H
Note:
The headset should be purchased separately.
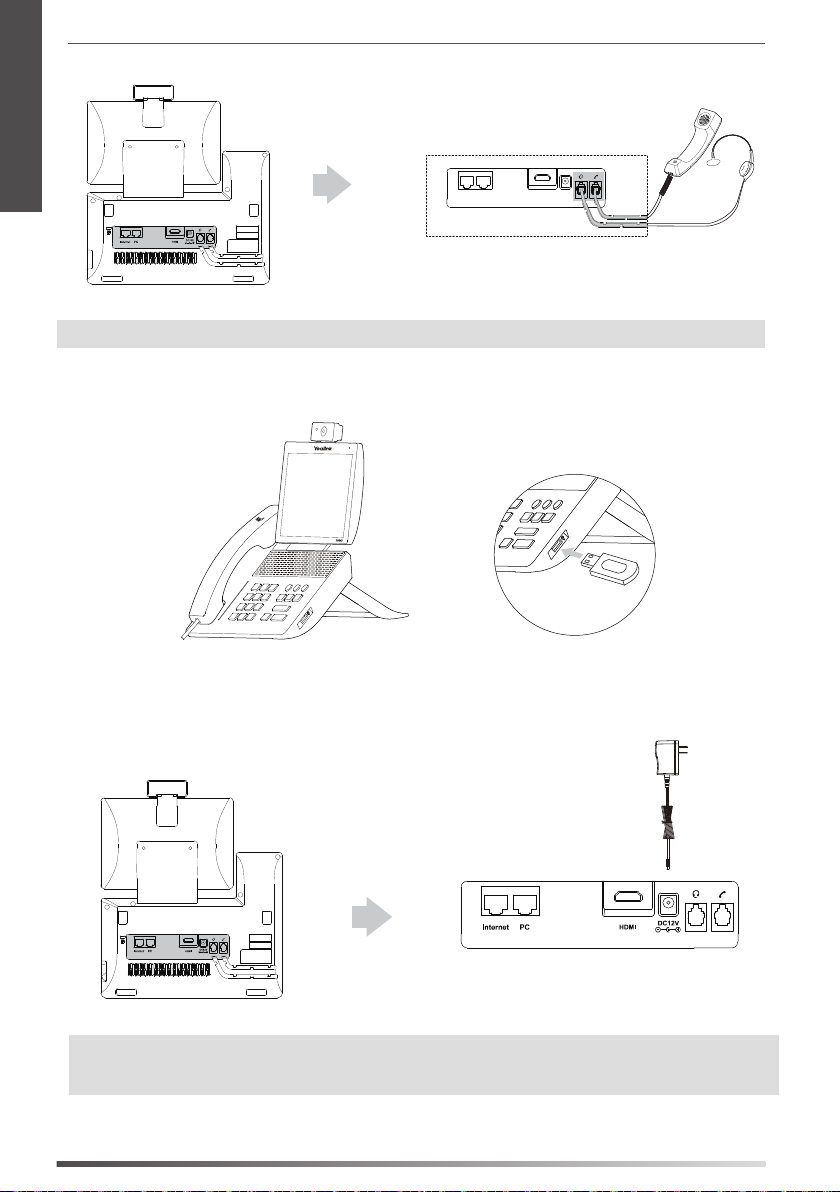
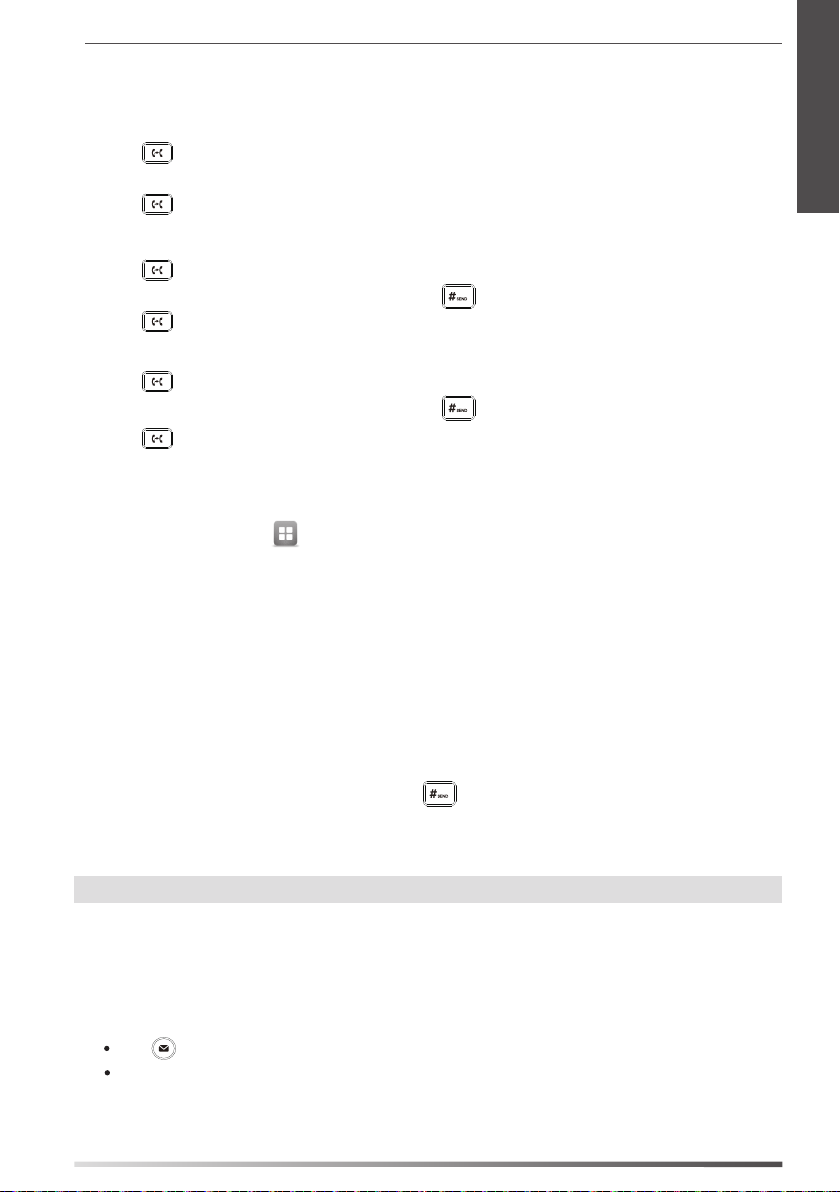
4. Connect the optional USB flash drive, as shown below:
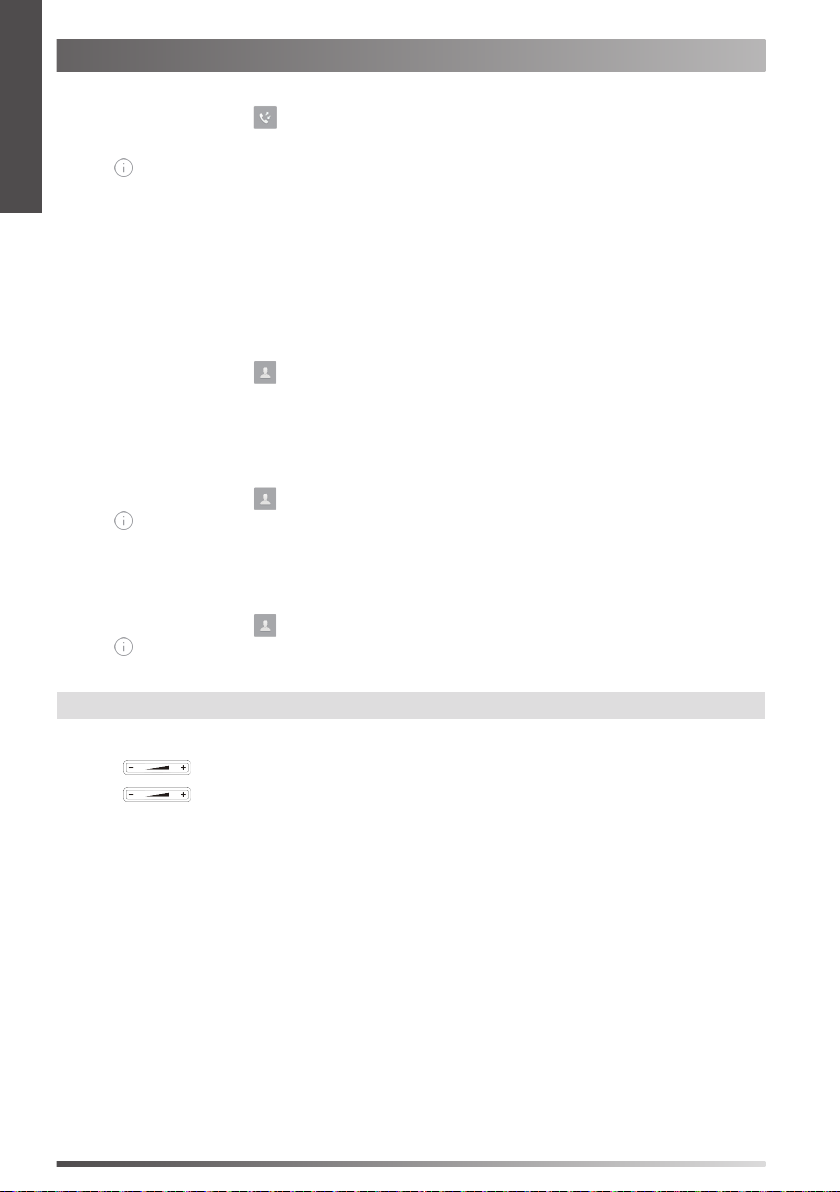
5. Connect the AC power, as shown below:
Note: The IP phone should be used with Yealink original power adapter (12V/2A) only. The use of the third-party power
adapter may cause the damage to the phone. If you are connecting a PC to your phone, we recommend that
you use the Ethernet cable provided by Yealink.
2
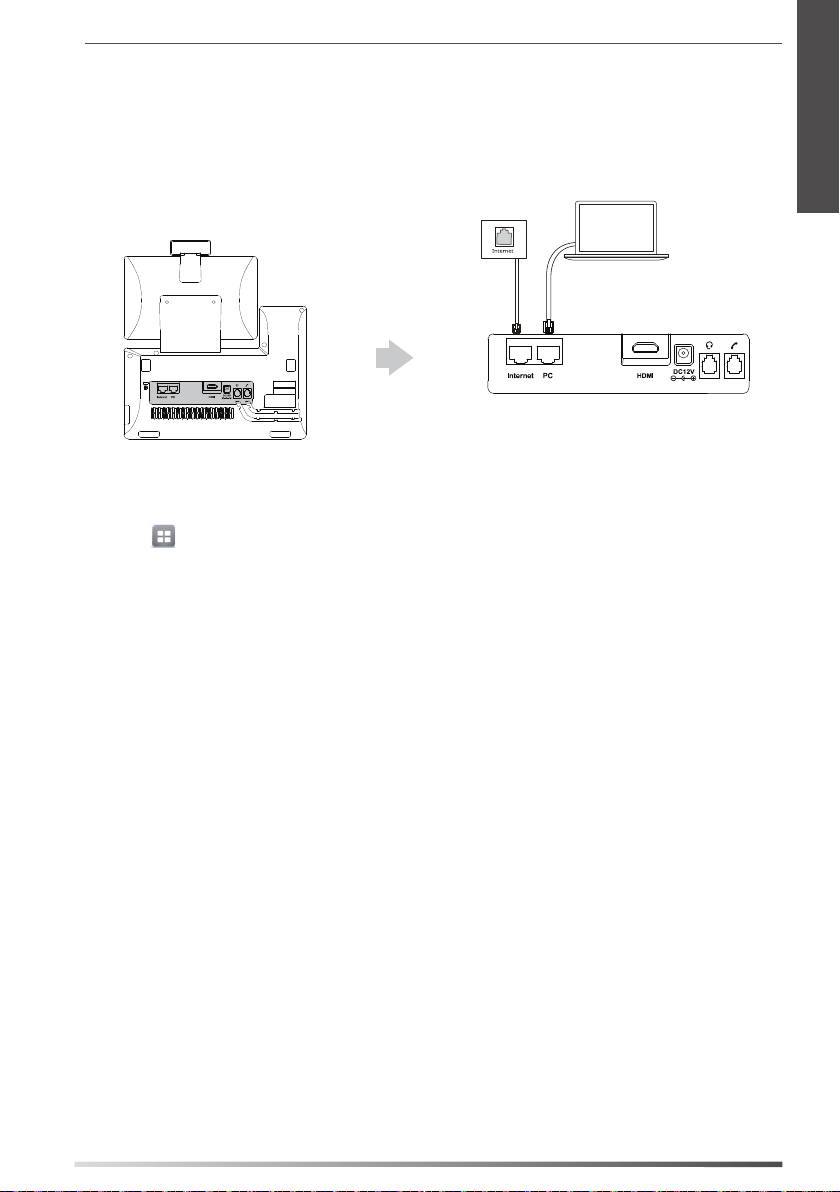
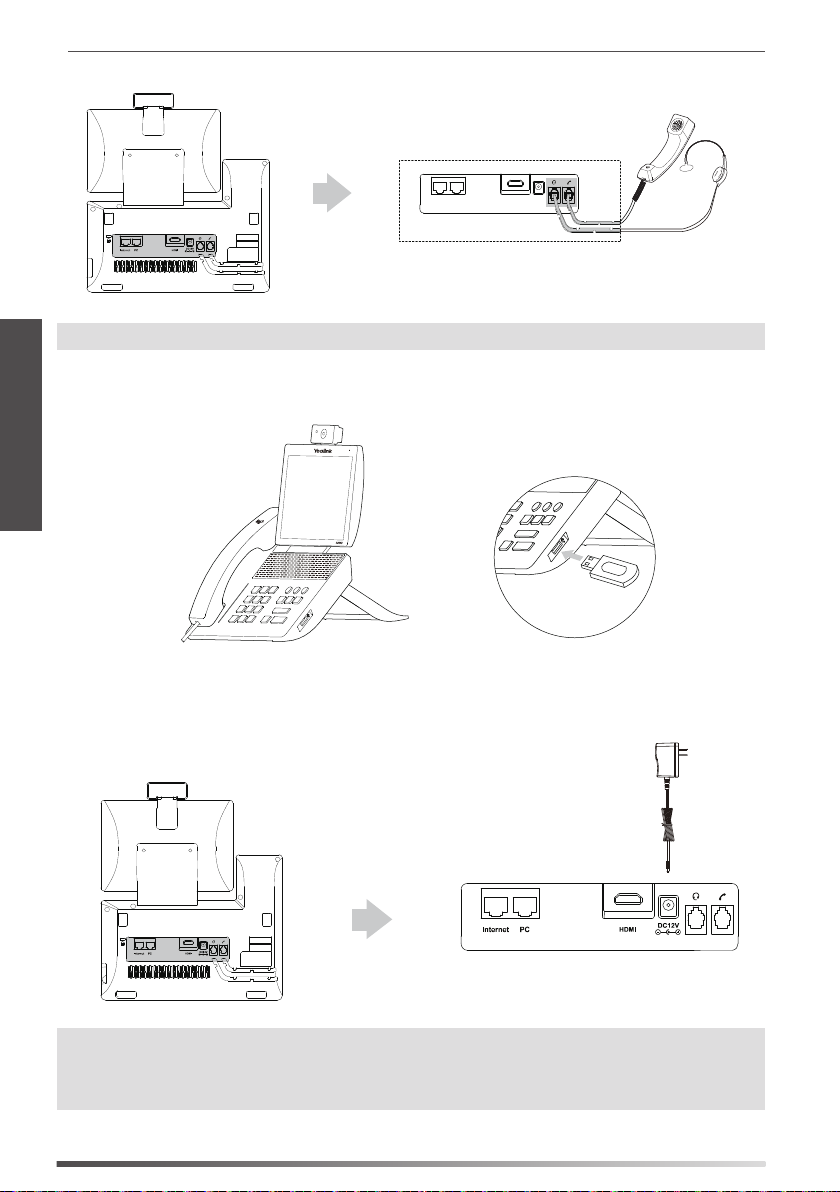
6. Connect to the network, as shown below:
You have two options for network connection. Your can select one of them according to the current oce
environment.
a) Connect to the wired network:
PC
b) Connect to the wireless network:
E
N
G
L
I
S
H
1) Tap
2) Tap On from the radio box of Wi-Fi.
3) Select an available wireless network from the list of networks.
4) If the network is secure, enter its password in the PIN eld.
5) Tap OK to connect to the wireless network.
-> Basic -> Wi-Fi.
The phone will automatically search for available wireless networks in your area.
3
E
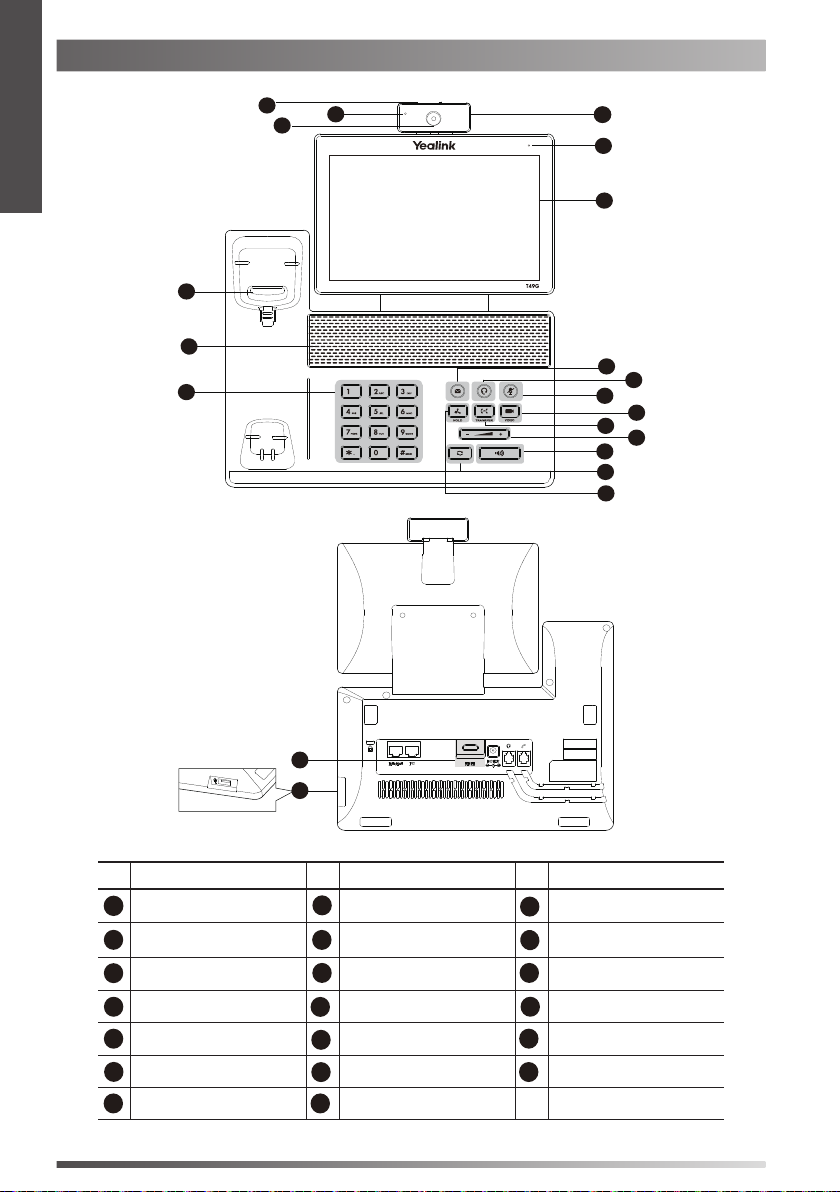
Hardware Component Instructions
N
G
L
I
S
H
15
14
14
13
16
17
18
1
1
2
2
3
3
4
5
6
7
8
9
10
11
12
12
19
20
Item Item Item
1
Camera
2
Power Indicator LED
3
Touch Screen
4
MESSAGE Key
5
HEADSET Key
6
MUTE Key
7
VIDEO Key
4
8
TRANSFER Key
9
Volume Key
10
Speakerphone Key
11
REDIAL Key
12
HOLD Key
13
Keypad
14
Speaker
15
Hookswitch
16
Shutter Switch
17
Camera Indicator LED
18
Camera Lens
19
HDMI port
20
USB2.0 port
Startup
After the IP phone is connected to the network and supplied
with power, it automatically begins the initialization process.
After startup, the phone is ready for use. You can congure
the phone via web user interface or phone user interface.
Welcome
Initializing... Please wait
Configuring Your Phone
Configuring via web user interface
Accessing the web user interface:
1. Tap -> Status when the phone is idle to obtain the IP address of the phone.
2. Open a web browser on your computer, enter the IP address into the address bar (e.g., "http://192.168.0.10" or
"192.168.0.10"), and then press Enter.
3. Enter the user name (default: admin) and password (default: admin) in the login page and click Confirm.
Network Settings: Click on Network-> Basic-> IPv4 Config
You can congure the network settings in the following ways:
DHCP: By default, the phone attempts to contact a DHCP server in your network to obtain its valid network settings, e.g.,
IP address, subnet mask, gateway address and DNS address.
Static IP Address: If the phone cannot contact a DHCP server for any reason, you need to congure IP address, subnet
mask, gateway address, primary DNS address and secondary DNS address for the phone manually.
PPPoE: If you are using an xDSL modem, you can connect your phone to the Internet via PPPoE mode. Contact the ITSP
for the user name and password.
E
N
G
L
I
S
H
Note:
The IP phone also supports IPv6, but IPv6 is disabled by default.
Account Settings: Click on Account-> Register-> Account X (X=1,2,3...15,16)
Parameters of the account:
Register Status: It shows the register status of the current account.
Line Active: You can select Enabled/Disabled to enable/disable the account.
Label: It is shown on the touch screen to identify the account.
Display Name: It is shown as Caller ID when placing a call.
Register Name: It is an authenticated ID for authentication provided by ITSP (required).
User Name: It is provided by ITSP for registration (required).
Password: It is provided by ITSP for registration (required).
Server Host: It is provided by ITSP for registration (required).
5
E
Register status icons on the touch screen:
N
G
L
I
S
H
(Green) Registered (Gray) Register Failed (Green and Flashing) Registering
Note:
Check with your system administrator if any error appears during the registration process or a specic
conguration is required for your registration.
Configuring via phone user interface
Network Settings:
When the phone is idle, tap
Type/802.1x/VPN/LLDP/CDP/NAT to congure the network.
Account Settings:
When the phone is idle, tap -> Advanced (default password: admin)-> Account to congure the account.
-> Advanced (default password: admin)-> Network-> WAN Port/VLAN/Webserver
Using Your Phone
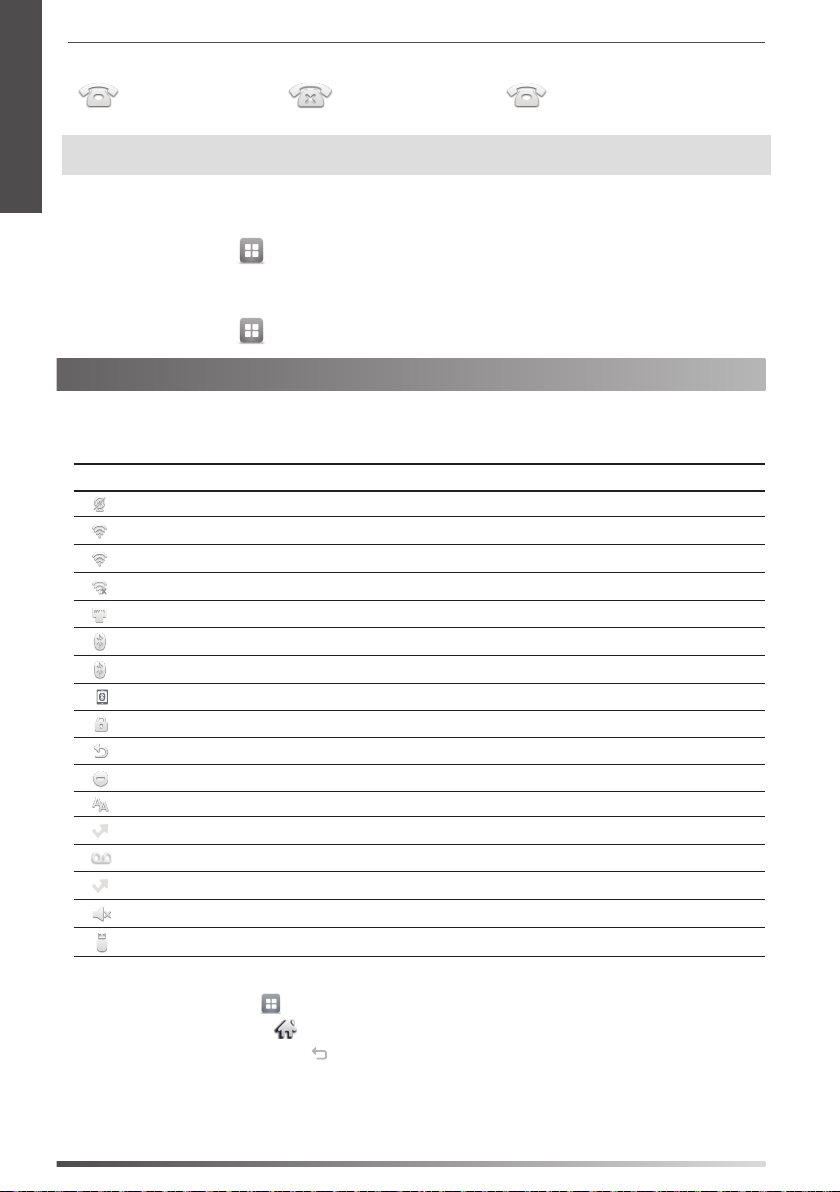
Status Icons
The icons on the status bar of the touch screen give information about phone:
Icons Description
Shows that camera is not detected.
(White) Shows that Wi-Fi is turned on.
(Green) Shows that the phone is connected to wireless network successfully.
Shows that the phone fails to connect to wireless network.
Shows that network is unavailable.
(White) Shows that Bluetooth is turned on.
(Green) Shows that Bluetooth headset is paired successfully.
(Green) Shows that Bluetooth-Enabled mobile phone is paired successfully.
Shows that the phone is locked.
Shows that “Forward” is turned on.
Shows that “Do Not Disturb” is turned on.
Shows that “Auto Answer” is turned on.
Shows that you have missed calls.
Shows that you have unread voice mails.
Shows that you have unread text messages.
Shows that ringer volume is 0.
Shows that a USB ash drive is detected.
Navigating the Touch Screen
To enter the main menu, tap
To return to the idle screen, tap
To go back to the previous menu, tap
To select an item, tap the item.
Drag up and down to scroll.
(You can wait for the scrolling to come to a stop, or touch the screen to stop it immediately.)
6
.
.
.
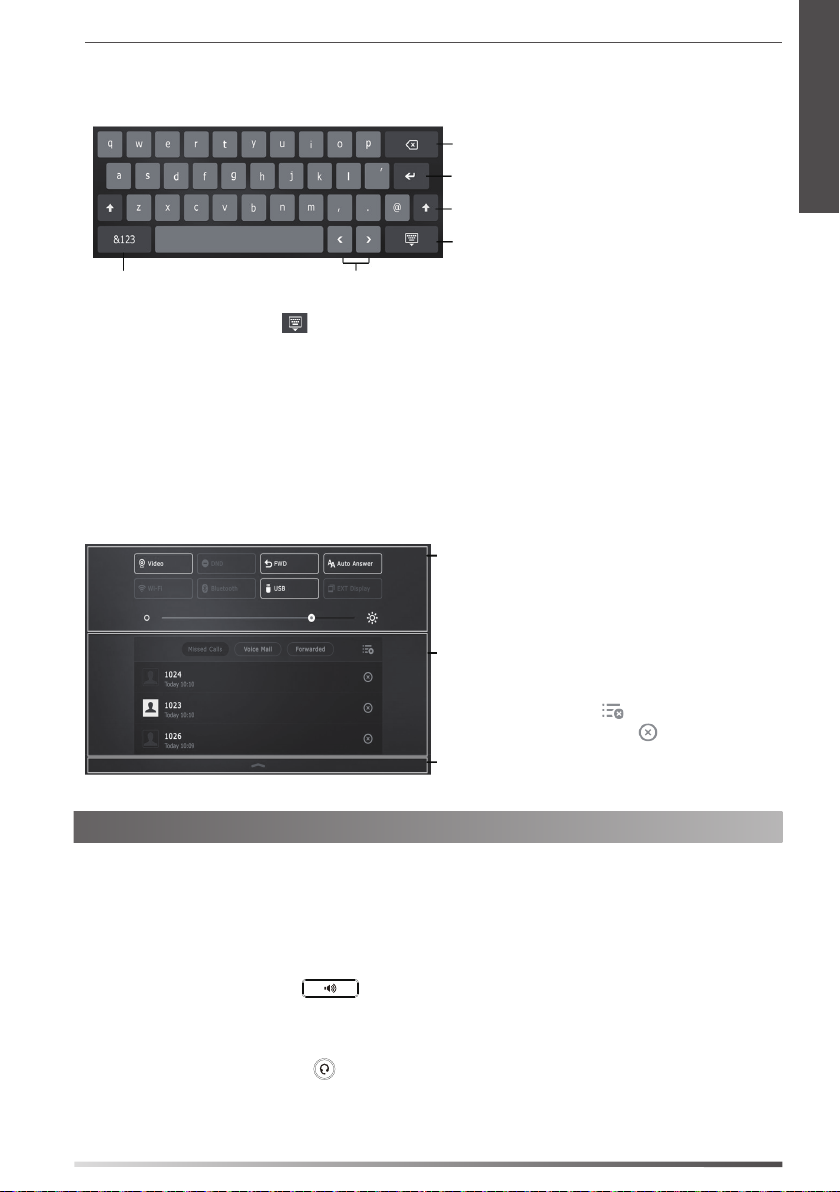
Entering and Updating Data
To use onscreen keyboard:
1. Tap the eld you want to edit, the onscreen keyboard will display on the touch screen:
Tap to backspace.
T
ap to conrm the settings/go to next eld.
Tap to switch between uppercase and lowercase.
Tap to hide the onscreen keyboard.
Tap to switch among input modes. Tap to move the cursor.
E
N
G
L
I
S
H
2. When you nish entering, tap
3. Tap the Save soft key to accept the change.
To use keypad:
Dial or enter number.
To select a field option:
Tap the eld name, tap the desired option from the pop-up dialog box.
.
Control Center and Notification Center
Swipe down from the top of the screen to enter the control center and the notication center.
Control Center
To turn on/o common functions quickly, tap
corresponding icons.
Drag the slider to adjust the screen brightness.
Notification Center
Notication center displays the list of Missed Calls, Voice
Mail and Forwarded Calls.
To delete all records, tap
To delete a specic record, tap
Swipe up to hide this screen.
Basic Call Features
Placing a Video/Voice Call
Using the handset:
1. Pick up the handset.
2. Enter the number, and then tap the Send soft key.
Using the speakerphone:
1. With the handset on-hook, press
2. Enter the number, and then tap the Send soft key.
Using the headset:
1. With the headset connected, press
2. Enter the n u mber, and then tap the Send soft key.
.
to activate the headset mode.
.
.
7
E
N
Answering a Video/Voice Call
G
Using the handset:
L
Pick up the handset.
I
Using the speakerphone:
S
Press
H
Using the headset:
Press
Controlling Video During a Call
To change the video view:
Tap
To turn on/off video during a call:
Swipe down from the top of the screen to enter the control center, tap Video to turn on/o the video.
Press
Adjust the shutter switch.
Ending a Video/Voice Call
Using the handset:
Hang up the handset or tap the EndCall soft key.
Using the speakerphone:
Press
Using the headset:
Tap the EndCall soft key.
Redial
Press
.
.
or .
.
or tap the EndCall soft key.
to enter the Placed Calls list, and then tap the desired entry.
Press
Call Mute and Un-mute
Press
Press
ttwice when the phone is idle to dial out the last dialed number.
to mute the microphone during a call.
again to un-mute the call.
Call Hold and Resume
To place a call on hold:
Press
To resume the call, do one of the following:
If there is only one call on hold, press
If there is more than one call on hold, tap the call you want to resume, and press
8
or tap the Hold soft key during an active call.
or tap the Resume soft key.
or tap the Resume soft key.
Call Transfer
You can transfer a call in the following ways:
Blind Transfer
1. Press
2. Enter the number you want to transfer to.
3. Press
Semi-Attended Transfer
or tap the Transfer soft key during a call. The call is placed on hold.
or tap the Transfer soft key.
E
N
G
L
I
S
H
1. Press
2. Enter the number you want to transfer to, and then press
3. Press
Attended Transfer
1. Press or tap the Transfer soft key during a call. The call is placed on hold.
2. Enter the number you want to transfer to, and then press
3. Press
or tap the Transfer soft key during a call. The call is placed on hold.
.
or tap the Transfer soft key when you hear the ring-back tone.
.
or tap the Transfer soft key when the second party answers.
Call Forward
To enable call forward:
1. When the phone is idle, tap
2. Select the desired forward type:
Always Forward----Incoming calls are forwarded unconditionally.
Busy Forward----Incoming calls are forwarded when the phone is busy.
No Answer Forward----Incoming calls are forwarded if not answered after a period of time.
3. Enter the number you want to forward to. For No Answer Forward, tap the After Ring Time eld, and then tap the
desired ring time to wait before forwarding.
4. Tap the Save soft key to accept the change.
Call Conference
1. Tap the Conference soft key during an active call. The call is placed on hold.
2. Enter the number of the second party, and then press
3. Tap the Conference soft key again when the second party answers. All parties are now joined in the conference.
4. Tap the EndCall soft key to disconnect all parties.
-> Features-> Call Forward.
or tap the Conference soft key.
Note:
You can split the conference call into two individual calls by tapping the Split soft key.
Voice Message
Message waiting indicator on the idle screen indicates that one or more voice messages are waiting at the message
center. The power indicator LED slowly ashes red.
To listen to voice messages: (Ensure the voice mail code is already congured on the phone.)
Press .
and then select the desired
.
Follow the voice prompts to listen to your voice messages.
2.
9
E
Customizing Your Phone
N
G
Call History
L
1. When the phone is idle, tap
I
2. Drag up and down to scroll.
S
3. Tap
after the desired entry, and then you can do the following:
H
Tap Send to place a call.
Tap Add to add the entry to the local directory.
Tap Edit to edit the phone number of the entry before placing a call.
Tap Blacklist to add the entry to the blacklist.
Tap Delete to delete the entry from the list.
Contact Directory
To add a contact:
1. When the phone is idle, tap
2. Tap Add to add a contact.
3. Enter a unique contact name in the Name eld and contact numbers in the corresponding elds.
4. Tap the Save soft key to accept the change.
To edit a contact:
1. When the phone is idle, tap
after the desired contact.
2. Tap
3. Edit the contact information.
4. Tap the Save soft key to accept the change.
To delete a contact:
1. When the phone is idle, tap
after the desired contact and then tap Delete.
2. Tap
3. Tap OK when the touch screen prompts “Delete selected item?”.
, and select the desired call list on the left.
, and select the desired group.
, and select the desired group.
, and select the desired group.
Note:
You can add contacts from call history easily. For more information, refer to Call History above.
Volume Adjustment
Press
Press
10
during a call to adjust the receiver volume of the handset/speakerphone/headset.
when the phone is idle to adjust the ringer volume.

Safety Instructions
Save these instructions. Read these safety instructions before use!
The following basic safety precautions should always be followed to reduce risk of re, electrical shock, and other
personal injury.
General Requirements
Before you install and use the device, read the safety instructions carefully and observe the situation during
operation.
During the process of storage, transportation, and operation, please always keep the device dry and clean.
During the process of storage, transportation, and operation, please avoid collision and crash of the device.
Please attempt not to dismantle the device by yourself. In case of any discrepancy, please contact the appointed
maintenance center for repair.
Without prior written consent, no organization or individual is permitted to make any change to the structure or
the safety design of the device. Yealink is under no circumstance liable to consequences or legal issues caused by
such changes.
Please refer to the relevant laws and statutes while using the device. Legal rights of others should be respected as
well.
Environmental Requirements
Place the device at a well-ventilated place. Do not expose the device under direct sunlight.
Keep the device dry and free of dusts.
Place the device on a stable and level platform.
Please place no heavy objects on the device in case of damageand deformation caused by the heavy load.
Keep at least 10 cm between the device and the closest object for heat dissipation.
Do not place the device on or near any inammable or re-vulnerable object, such as rubber-made materials.
Keep the device away from any heat source or bare re, such as a candle or an electric heater.
Keep the device away from any household appliance with strong magnetic eld or electromagnetic eld, such as
a microwave oven or a refrigerator.
Operating Requirements
Do not let a child operate the device without guidance.
Do not let a child play with the device or any accessory in case of accidental swallowing.
Please use the accessories provided or authorized by the manufacturer only.
The power supply of the device shall meet the requirements of the input voltage of the device. Pleaseuse the
provided surge protection power socket only.
Before plugging or unplugging any cable, make sure that your hands are completely dry.
Do not spill liquid of any kind on the product or use the equipment near water, for example, near a bathtub,
washbowl, kitchen sink, wet basement or near a swimming pool.
Do not tread on, pull, or over-bend any cable in case of malfunction of the device.
During a thunderstorm, stop using the device and disconnect it from the power supply. Unplug the power plug
and the Asymmetric Digital Subscriber Line (ADSL) twisted pair (the radio frequency cable) to avoid lightning
strike.
If the device is left unused for a rather long time, disconnect it from the power supply and unplug the power
plug.
When there is smoke emitted from the device, or some abnormal noise or smell, disconnect the device from the
power supply, and unplug the power plug immediately. Contact the specied maintenance center for repair.
Do not insert any object into equipment slots that is not part of the product or auxilia
Before connecting a cable, connect the grounding cable of the device rst. Do not disconnect the grounding
cable until you disconnect all other cables.
Cleaning Requirements
Before cleaning the device, stop using it and disconnect it from the power supply.
Use a piece of soft, dry and anti-static cloth to clean the device.
Keep the power plug clean and dry. Using a dirty or wet power plug may lead to electric shock or other perils.
ry product.
E
N
G
L
I
S
H
11

E
N
G
L
I
S
H
ENVIRONMENTAL RECYCLING
Never dispose of the device with domestic waste
Ask your Town Council about how to dispose of it in an environmentally friendly way. The
cardboard box, plastic packaging and player components may be recycled in accordance with
prevailing recycling regulations in your country.
Always adhere to prevailing regulations
Those who fail to do so may be ned or prosecuted in accordance with the law. The crossed out
garbage can that appears on the device means that when it has reached the end of its useful life, it
should be taken to a special waste disposal centre and treated separately to general urban waste.
E
N
G
L
I
S
H
Addr: 309, 3th Floor, No.16, Yun Ding North Road,
Huli District, Xiamen City, Fujian, P.R. China
12
Tel: +86-592-5702000
Fax: +86-592-5702455

YEALINK (XIAMEN) NETWORK TECHNOLOGY CO.,LTD
WWW.YEALINK.COM
Declaration of Conformity
Date of Issue: 2017-03-20
We: YEALINK(XIAMEN) NETWORK TECHNOLOGY CO.,LTD,
Address: 309, 3th Floor, No.16, Yun Ding North Road, Huli District, Xiamen City, Fujian, P.R. China
Declare that the product
Type: Ultra-elegant Gigabit IP Phone
Model: SIP VP-T49G
meets the essential requirements and other relevant provisions according to the following EC directive
Directive: Radio Equipment Directive 2014/53/EU;
Conformity
The product complies with the following standards:
Safety: EN 60950-1:2006+A11:2009
+A1:2010+A12:2011+A2:2013
EMC: EN 55032:2015
EN 55024:2010/AC:2015
EN61000-3-2: 2006+A1 2009+A2 2009
EN61000-3-3: 2013
Radio:
ETSI EN 301 489-1 V2.2.0
ETSI EN 301 489-3 V2.1.1
ETSI EN 301 489-17 V3.2.0
ETSI EN 300 328 V2.1.1
ETSI EN 301 893 V2.1.1
ETSI EN 300 440-1 V1.6.1
ETSI EN 300 440-2 V1.4.1
Health :
EN 62311:2008
Directive 2011/65/EU of the European Parliament and of the Council of 8 June 2011 on the restriction
of the use of certain hazardous substances in electrical and electronic equipment
(RoHS)
Directive 2012/19/EU of the European Parliament and of the Council of 24.July.2012 on Waste electrical
and electronic equipment (WEEE)
Regulation (EC) No.1907/2006 of the European Parliament and of the Council of 18.December.2006 on
Registration, Evaluation, Authorization, and Restriction of Chemicals
(REACH)
YEALINK (EUROPE) NETWORK TECHNOLOGY B.V.
Address: Strawinskylaan 3127, Atrium Building, 8th oor,
1077ZX Amsterdam, the Netherlands
Telephone: +31(0)646111373
Email: EUROPE@Yealink.com
Addr: 309, 3th Floor, No.16, Yun Ding North Road,
Huli District, Xiamen City, Fujian, P.R. China
Tel: +86-592-5702000
Fax: +86-592-5702455
13

About us
Founded in 2001, Yealink, a leading provider of VoIP Phone and IP communication solutions, has been focusing on VoIP products character ized
by reliable quality, easy deployment and aordable price for more than a decade. Today, customers from over 140 countries rely on Yealink as the
backbone of global collaboration to extend the value of network communications.
More about Yealink
Since 2001, Yealink has continued to develop state-of-the art, hi-tech VoIP communication terminals that include IP video phones, IP phones and
USB phones. With a worldwide market in more than 140 countries, the company has also established a rst-class international service network.
Our priorities are quality, functionality, ease- of-use, customer support and competitive pricing. To provide new solutions for the future in this fast
evolving sector, Yealink’s large, talented and highly-experienced VoIP R&D team is totally committed to the pursuit of excellence.
To date, we have passed more than 80 interoperability tests and meet certication requirements set by leading VoIP system and platforms. Yealink
works in close partnership with T-Mobile, Telefonica, Portugal Telecom and other leading telecommunication service providers.
YEALINK(XIAMEN) NETWORK TECHNOLOGY CO.,LTD.
Web: www.yealink.com
Addr: 309, 3th Floor, No.16, Yun Ding North Road,
Huli District, Xiamen City, Fujian, P.R. China
Copyright©2017YEALINK(XIAMEN) NETWORK
TECHNOLOGY CO.,LTD.All rights reserved.
-

Verpackungsinhalt
Folgende Teile sind im Lieferumfang Ihres Telefons enthalten. Sollte etwas fehlen, wenden Sie sich bitte an Ihren
Systemadministrator.
Standfuß Kamera Erste Schritte
Ethernet-Kabel
Hörerkabel
IP-Telefon Hörer
Die Zubehörkomponente ermöglicht einen externen Monitor anzuschließen, auf dem während eines
Hinweis:
Video-Telefonats das Video-Bild sowohl von der Kamera vor Ort als auch von der Kamera der Gegenstelle
dargestellt werden kann. Weitere Informationen sind unter Zubehör in der Installationskurzanleitung für
das Video-Telefon SIP VP-T49G zu nden.
Wir empfehlen, das Zubehör zu verwenden, das von Yealink angeboten wird oder zugelassen wurde. Die
Nutzung von nicht zugelassenem Zubehör von Drittanbietern kann zu einer verminderten Leistungsfähigkeit
führen.
HDMI Kabel Klettband 3M USB 3.0 Kabel Installations
Dual Lock x2
(2m CAT5E FTP-Kabel)
ED10 (Optional)
Netzgerät
kurzanleitung
Installation des Telefons
1. Befestigen Sie den Standfuß wie nachfolgend dargestellt:
D
E
U
T
S
C
H
.
2. Setzen Sie die Kamera wie nachfolgend dargestellt ein:
40
Blendenschalter anpassen
Kamerawinkel einstellen
15
3. Verbinden Sie den Hörer und das optionale Headset wie nachfolgend dargestellt:
Hinweis:
Das Headset ist separat zu erwerben.
D
E
4. Schließen Sie das optionale USB-Flash-Laufwerk wie unten dargestellt an:
U
T
S
C
H
5. Schließen Sie das Netzteil wie nachfolgend dargestellt an:
Hinweis:
Das IP-Telefon darf nur mit dem Original-Netzteil (12V/2A) von Yealink verwendet werden. Die Nutzung von
Netzteilen, die von Drittanbietern geliefert wurden, kann zu einer Beschädigung des Telefons führen.
Falls Sie Ihr Telefon mit einem PC verbinden, empfehlen wir, daß Sie das von Yealink mitgelieferte
Ethernet-Kabel verwenden.
16

6. Schließen Sie das Netz werk wie nachfolgend dargestellt an:
Sie haben zwei Optionen für den Anschluss an ein Netzwerk. Sie können diese in Abhängigkeit von der aktuellen
Büroumgebung wählen.
a) Verbindung mit einem kabelgebundenen Netzwerk:
PC
b) Verbindung mit einem drahtlosen Netzwerk:
D
E
U
T
S
C
H
1) Tippen Sie auf
2) Tippen Sie auf On in der Optionsschaltäche des Wi-Fi.
Das Telefon sucht automatisch nach verfügbaren drahtlosen Netzwerke in ihrer Umgebung.
3) Wählen Sie ein verfügbares drahtloses Netzwerk aus der Liste der Netze.
4) Wenn das Netzwerk gesichert ist, geben Sie das Kennwort in das Feld PIN ein.
5) Tippen Sie auf OK, um eine Verbindung zum drahtlosen Netzwerk herzustellen.
-> Basic -> Wi-Fi.
17

Anweisungen zu Hardwarekomponenten
16
15
14
D
E
U
14
13
17
18
T
S
C
H
1
1
2
2
3
3
4
5
6
7
8
9
10
11
12
12
19
20
Beschreibung Beschreibung Beschreibung
1
Kamera
2
Betriebsanzeige-LED
3
Touchscreen
4
Nachrichtentaste
5
HEADSET-Taste
6
Stummtaste
7
VIDEO-Taste
18
8
TRANSFER-Taste
9
Lautstärketaste
10
Lautsprechertaste
11
Wahlwiederholung
12
HOLD-Taste
13
Numerische Tastatur
14
Lautsprecher
15
Gabelschalter
16
Blendenschalter
17
Kamera-LED-Anzeige
18
Kameraobjektiv
19
HDMI-Anschluss
20
USB-2.0-Anschluss

Startvorgang
Nach der Verbindung mit dem Netzwerk und der
Stromversorgung startet das IP-Telefon automatisch den
Initialisierungsvorgang. Nach der Initialisierung ist das Telefon
betriebsbereit. Sie können das Telefon via Weboberäche
oder Benutzeroberäche des Telefons kongurieren.
Konfiguration Ihres Telefons
Konfiguration über die Weboberfläche
Zugriff auf die Weboberfläche:
1. Tippen Sie auf -> Status, wenn sich das Telefon im Ruhezustand bendet, um die IP-Adresse des Telefons
abzurufen.
2.
„http://192.168.0.10“ oder „192.168.0.10“) und drücken Sie dann Enter.
3. Geben Sie auf der Login-Seite den Benutzernamen (werksseitig: admin) und das Passwort (werksseitig: admin) ein
und klicken Sie auf Confirm.
Netzwerkeinstellungen: Klicken Sie auf Network->Basic->IPv4 Config
Sie können die Netzwerkeinstellungen wie folgt kongurieren:
DHCP: Per Standardeinstellung kontaktiert das Telefon einen DHCP-Server in Ihrem Netzwerk, um die gültigen
Netzwerkeinstellungen zu beziehen, z.B. IP-Adresse, Subnetzmaske, Gateway-Adresse und DNS-Adresse.
Statische IP-Adresse: Falls das Telefon aus irgendeinem Grund keinen DHCP-Server kontaktieren kann, müssen Sie die IP-
Adresse, Subnetzmaske, Gateway-Adresse, primäre DNS-Adresse und sekundäre DNS-Adresse für das
Telefon manuell kongurieren.
PPPoE: Falls Sie ein xDSL-Modem verwenden, können Sie Ihr Telefon per PPPoE-Modus mit dem Internet verbinden.
Kontaktieren Sie ITSP für Benutzername und Passwort.
Welcome
Initializing... Please wait
D
E
U
T
S
C
H
Hinweis:
Das IP-Telefon unterstützt auch IPv6, dieses ist jedoch standardmäßig deaktiviert.
Kontoeinstellungen: Klicken Sie auf Account-> Register-> Account X (X=1,2,3...15,16)
Einstellungen des Kontos:
Registrierungsstatus: Zeigt den Status der Registrierung des aktuellen Kontos an.
Leitung aktiv: Wählen Sie Enabled/Disabled, um das Konto zu aktivieren/deaktivieren.
Label: Anzeige erscheint im Touchscreen für die Identizierung des Kontos.
Anzeigename: Erscheint während eines Anrufs als Anrufer-ID.
Registrierungsname: Dies ist eine von ITSP bereitgestellte bestätigte ID für die Authentizierung (erforderlich).
Benutzername: Wird von ITSP für die Registrierung bereitgestellt (erforderlich).
Passwort: Wird von ITSP für die Registrierung bereitgestellt (erforderlich).
Server-Host: Wird von ITSP für die Registrierung bereitgestellt (erforderlich).
19

Icons für die Anzeige des Registrierungsstatus auf dem Touchscreen:
(Grün) Registriert (Grau) Registrierung fehlgeschlagen (Blinkt grün) Registrierung im Gang
Hinweis:
Wenden Sie sich an Ihren Systemadministrator, falls während der Registrierung ein Fehler auftritt oder für
Ihre Registrierung eine bestimmte Konguration benötigt wird.
Konfiguration via Benutzeroberfläche des Telefons
Netzwerkeinstellungen:
Wenn sich das Telefon im Ruhezustand bendet, tippen Sie auf
Network-> WAN Port/VLAN/Webserver Type/802.1x/VPN/LLDP/CDP/NAT, um das Netzwerk zu kongurieren.
Kontoeinstellungen:
Wenn sich das Telefon im Ruhezustand bendet, tippen Sie auf
D
Account, um das Konto zu kongurieren.
-> Advanced (werksseitiges Kennwort: admin)
-> Advanced (werksseitiges Kennwort: admin)->
E
Gebrauch Ihres Telefons
U
T
Status-Symbole
S
Die Symbole in der Statusleiste des Touchscreens geben Auskunft über das Telefon:
C
H
Symbole Beschreibung
Zeigt an, dass die Kamera nicht erkannt wurde.
(Weiß) Zeigt an, dass das WLAN eingeschaltet ist.
(Grün) Zeigt an, dass das Telefon erfolgreich mit dem drahtlosen Netzwerk verbunden wurde.
Zeigt an, dass das Telefon nicht mit dem drahtlosen Netzwerk verbunden wurde.
Zeigt an, dass das Netzwerk nicht verfügbar ist.
(Weiß) Zeigt an, dass Bluetooth aktiviert ist.
(Grün) Zeigt an, dass das Bluetooth-Headset erfolgreich gekoppelt wurde.
(Grün) Zeigt an, dass ein Bluetooth-fähiges Mobiltelefon erfolgreich gekoppelt wurde.
Zeigt an, dass das Telefon gesperrt ist.
Zeigt an, dass die „Rufweiterleitung“ aktiviert ist.
Zeigt an, dass „Nicht stören“ aktiviert ist.
Zeigt an, dass „Automatische Antwort“ aktiviert ist.
Zeigt an, dass entgangene Anrufe vorliegen.
Zeigt an, dass nicht abgespielte Sprachnachrichten vorliegen.
Zeigt an, dass ungelesene Textnachrichten vorliegen.
Zeigt an, dass die Ruftonlautstärke auf „0“ eingestellt ist.
Zeigt an, dass ein USB-Flash-Laufwerk erkannt wurde.
Touchscreen-Navigation
Tippen Sie auf
Tippen Sie auf
Tippen Sie auf
Tippen Sie zur Auswahl eines Elements auf das entsprechende Element.
Ziehen Sie nach oben und unten um zu blättern.
(Sie können warten, bis der Bildlauf zum Stillstand kommt, oder den Bildschirm berühren, um den Vorgang sofort zu
stoppen.)
20
zum Önen des Hauptmenüs.
, um zum Ruhebildschirm zurückzukehren.
, um zum vorhergehenden Menü zurückzukehren.

Daten eingeben und aktualisieren
Verwendung der Bildschirmtastatur:
1. Tippen Sie auf das Feld, das Sie bearbeiten möchten, damit die Bildschirmtastatur auf dem Touchscreen angezeigt
wird:
Rücktaste.
Schritt zur Bestätigung der Einstellungen / Gehen Sie
zum nächsten Feld
Umschalttaste für Wechsel zwischen Groß- und
Kleinbuchstaben.
Bildschirmtastatur ausblenden.
Eingabemodus wechseln. Tasten zum Bewegen des Zeigers.
2. Wenn Sie mit der Eingabe fertig sind, tippen Sie auf
3. Tippen Sie im Bildschirm auf Save, um die Änderungen zu übernehmen.
Bedienung des Tastenfelds:
Wählen Sie eine Nummer oder geben Sie diese ein.
Optionen in Feldern auswählen:
Tippen Sie auf den Feldnamen und anschließend auf die gewünschte Option im Pop-up-Dialogfenster.
.
Systemsteuerung und Mitteilungszentrale
Streichen Sie vom oberen Bildschirmrand nach unten, um die Systemsteuerung und die Mitteilungszentrale zu önen.
Systemsteuerung
Zum schnellen Ein-/Ausschalten von gemeinsamen
Funktionen tippen Sie auf die entsprechenden Symbole.
Ziehen Sie den Schieberegler, um die Helligkeit des
Bildschirms anzupassen.
Mitteilungszentrale
In der Mitteilungszentrale wird die Liste der verpassten Anrufe,
Sprachnachrichten und weitergeleiteter Anrufe angezeigt.
Tippen Sie auf
Tippen Sie auf
Datensatzes.
Streichen Sie nach oben, um diesen Bildschirm auszublenden.
zum Löschen aller Datensätze.
zum Löschen eines bestimmten
Grundlegende Anruffunktionen
Durchführen eines Video-/Sprachanrufs
Mit dem Hörer:
1. Nehmen Sie den Hörer ab.
2. Geben Sie die Nummer ein und tippen Sie dann im Bildschirm auf Send.
Mit Freisprecheinrichtung:
1. Drücken Sie bei aufgelegtem Hörer auf die Taste
2. Geben Sie die Nummer ein und tippen Sie dann im Bildschirm auf Send.
Mit Headset:
1. Drücken Sie bei angeschlossenem Headset auf die Taste
2. Geben Sie die Nummer ein und tippen Sie dann auf die Bildschirmtaste Send.
.
, um den Kopfhörermodus zu aktivieren.
D
E
U
T
S
C
H
21

Annehmen eines Video-/Sprachanrufs
Mit dem Hörer:
Nehmen Sie den Hörer ab.
Mit Freisprecheinrichtung:
Drücken Sie auf die Taste
Mit Headset:
Drücken Sie auf die Taste
.
.
Video-Steuerung während eines Anrufs
Ändern der Videoanzeige:
Tippen Sie auf
D
E
Ein-/Ausschalten der Videoübertragung während eines Anrufs:
U
Streichen Sie vom oberen Bildschirmrand nach unten, um die Systemsteuerung zu önen, und tippen Sie auf Video
T
S
C
H
zum Ein-/Ausschalten der Videoübertragung.
Drücken Sie auf die Taste
Passen Sie den Blendenschalter an.
oder .
.
Beenden eines Video-/Sprachanrufs
Mit dem Hörer:
Legen Sie den Hörer auf oder tippen Sie auf die Bildschirmtaste EndCall.
Mit Freisprecheinrichtung:
Drücken Sie die Taste
Mit Headset:
Tippen Sie auf die Bildschirmtaste EndCall.
Wahlwiederholung
Drücken Sie
, um die Anruiste Placed Calls zu önen, und tippen Sie dann auf den gewünschten Eintrag.
oder die Bildschirmtaste EndCall.
Drücken Sie im Ruhezustand zweimal die Taste , um die zuletzt gewählte Nummer erneut zu wählen.
Anruf stumm und wieder laut stellen
Drücken Sie die Taste
Drücken Sie
, um einen Anruf stumm zu stellen.
erneut, um die Funktion zu deaktivieren.
Anruf in Wartestellung versetzen und fortsetzen
Anruf in Wartestellung versetzen:
Drücken Sie während eines aktiven Anrufs die Taste
Gehen Sie wie folgt vor, um den Anruf fortzusetzen:
Falls sich nur ein Anruf in Wartestellung bendet, drücken Sie
Falls sich mehrere Anrufe in Wartestellung benden, tippen Sie im Bildschirm auf den gewünschten Anruf und
drücken Sie dann
22
oder tippen Sie auf Resume.
oder tippen Sie im Bildschirm auf Hold.
oder tippen Sie auf Resume.

Rufweiterleitung
Sie können Anrufe wie folgt weiterleiten:
Direkte Weiterleitung
1. Drücken Sie die Taste
Wartestellung versetzt.
2. Geben Sie die Nummer ein, an die der Anruf weitergeleitet werden soll.
3. Drücken Sie
Weiterleitung mit Rufzeichen
1. Drücken Sie die Taste
Wartestellung versetzt.
2. Geben Sie die Nummer ein, an die der Anruf weitergeleitet werden soll und drücken Sie dann .
3. Drücken Sie
Weiterleitung mit Rücksprache
1. Drücken Sie die Taste oder drücken Sie die Bildschirmtaste Transfer während eines Anrufs. Der Anruf wird in
Wartestellung versetzt.
2. Geben Sie die Nummer ein, an die der Anruf weitergeleitet werden soll und drücken Sie dann .
3. Drücken Sie
oder drücken Sie die Bildschirmtaste Transfer während eines Anrufs. Der Anruf wird in
oder tippen Sie im Bildschirm auf Transfer.
oder drücken Sie die Bildschirmtaste Transfer während eines Anrufs. Der Anruf wird in
oder tippen Sie im Bildschirm auf Transfer, sobald Sie den Rückrufton hören.
oder tippen Sie im Bildschirm auf Transfer, sobald der zweite Teilnehmer den Anruf entgegennimmt.
Anrufumleitung
Rufweiterleitung aktivieren:
1. Tippen Sie im Ruhezustand des Telefons auf
2. Wählen Sie die gewünschte Art der Rufumleitung:
Always Forward---- Eingehende Anrufe werden umgehend umgeleitet.
Busy Forward---- Eingehende Anrufe werden umgeleitet, wenn die Leitung besetzt ist.
No Answer Forward---- Eingehende Anrufe werden umgeleitet, falls sie innerhalb einer bestimmten Zeit nicht
entgegengenommen werden.
3. Geben Sie die Nummer ein, an die Anrufe umgeleitet werden sollen. Für eine Rufumleitung entsprechend No Answer Forward
tippen Sie auf die Option After Ring Time und tippen Sie dann auf die gewünschte Wartezeit bis zur Rufumleitung.
4. Tippen Sie im Bildschirm auf Save, um die Änderungen zu übernehmen.
Telefonkonferenz
1. Drücken Sie die Bildschirmtaste Conference während eines aktiven Anrufs. Der Anruf wird in Wartestellung versetzt.
2. Geben Sie die Nummer des zweiten Teilnehmers ein und drücken Sie anschließend die Taste
auf die Bildschirmtaste Conference.
3. Tippen Sie erneut auf die Bildschirmtaste Conference, wenn der zweite Teilnehmer antwortet. Alle Teilnehmer sind
nun der Telefonkonferenz zugeschaltet.
4. Tippen Sie auf die Bildschirmtaste EndCall, um die Verbindung mit allen Teilnehmern zu trennen.
->Features->Call Forward.
oder tippen Sie
D
E
U
T
S
C
H
Hinweis:
Sie können die Telefonkonferenz in zwei separate Anrufe aufteilen, indem Sie die Bildschirmtaste Split drücken.
Sprachnachrichten
Die Anzeige für eingegangene Nachrichten auf dem Ruhebildschirm weist darauf hin, dass im Nachrichtenzentrum
eine oder mehrere Sprachnachrichten eingegangen sind. Die LED-Betriebsanzeige blinkt langsam rot.
Sprachnachrichten abspielen: (Stellen Sie sicher, dass der Zugriscode für Sprachnachrichten bereits im Telefon
konguriert worden ist.)
1. Führen Sie eine der folgenden Aktionen aus:
Drücken Sie
Ziehen Sie den Finger auf dem Display zum Benachrichtigungs-Center, tippen Sie an und wählen
Sie dann die gewünschten Elemente.
2. Folgen Sie den Sprachanleitungen, um Ihre Nachrichten abzuspielen.
.
Voice Mail
23

Benutzereinstellungen für Ihr Telefon
Anrufliste
1. Wenn sich das Telefon im Ruhezustand bendet, tippen Sie auf
der linken Seite.
2. Ziehen Sie nach oben und unten um zu blättern.
3. Tippen Sie nach dem gewünschten Eintrag auf
Tippen Sie auf Send, um einen Anruf zu tätigen.
Tippen Sie auf Add, um den Eintrag in das lokale Telefonbuch zu übernehmen.
Tippen Sie auf Edit, um die Telefonnummer des Eintrags zu ändern, bevor Sie diese anrufen.
Tippen Sie auf Blacklist, um den Eintrag auf die schwarze Liste zu setzen.
Tippen Sie auf Delete, um den Eintrag aus der Liste zu löschen.
Telefonbuch
D
Kontakt hinzufügen:
E
1. Wenn sich das Telefon im Ruhezustand bendet, tippen Sie auf
U
2. Tippen Sie auf Add, um einen Kontakt hinzuzufügen.
T
3. Geben Sie in das Feld Name einen unverwechselbaren Namen und in die jeweiligen Felder die Telefonnummern ein.
S
4. Tippen Sie auf die Bildschirmtaste Save, um die Änderungen zu übernehmen.
C
H
Kontakt bearbeiten:
1. Wenn sich das Telefon im Ruhezustand bendet, tippen Sie auf
2. Tippen Sie nach dem gewünschten Kontakt auf
3. Bearbeiten Sie die Kontaktinformationen.
4. Tippen Sie auf die Bildschirmtaste Save, um die Änderungen zu übernehmen.
Kontakt löschen:
1. Wenn sich das Telefon im Ruhezustand bendet, tippen Sie auf
2. Tippen Sie
3. Tippen Sie auf OK, wenn im Touchscreen „Delete selected item?“ angezeigt wird.
hinter dem gewünschten Kontakt und tippen Sie dann auf Delete.
; Sie haben dann folgende Möglichkeiten:
.
und wählen Sie die gewünschte Anruiste auf
und wählen Sie die gewünschte Gruppe.
und wählen Sie die gewünschte Gruppe.
und wählen Sie die gewünschte Gruppe.
Hinweis:
Es ist außerdem möglich, Kontakte aus der Anruiste hinzuzufügen. Weitere Informationen nden Sie oben
im Abschnitt Anrufliste.
Lautstärke einstellen
Drücken Sie während eines Anrufs die Taste
Freisprecheinrichtung/des Headsets einzustellen.
Drücken Sie im Ruhezustand des Telefons die Taste
24
, um die Empfängerlautstärke des Hörers/der
, um die Lautstärke des Klingeltons einzustellen.

Sicherheitshinweise
Bewahren Sie diese Anweisungen auf. Lesen Sie diese Sicherheitshinweise vor der Verwendung!
Die folgenden grundlegenden Vorsichtsmaßnahmen müssen zur Vermeidung von Bränden, Stromschlag und anderen
Verletzungen immer befolgt werden.
Allgemeine Vorschriften
Lesen Sie vor der Installation und Verwendung des Geräts die Sicherheitshinweise sorgfältig durch und
beobachten Sie die Situation im Betrieb.
Halten Sie das Gerät während der Lagerung, dem Transport und dem Betrieb stets sauber und trocken.
Vermeiden Sie während der Lagerung, dem Transport und dem Betrieb stets Zusammenprallen und Stürze des Geräts.
Versuchen Sie nicht das Gerät eigenständig zu demontieren. Wenden Sie sich im Falle von Mängeln an das
zuständige Wartungscenter für eine Reparatur.
Ohne vorherige schriftliche Zustimmung dürfen weder Unternehmen noch Einzelperson Änderungen an der
Struktur oder dem Sicherheitskonzept des Geräts vornehmen. Yealink übernimmt unter keinen Umständen die
Haftung für Folgen oder Rechtsansprüche, die auf solche Änderungen zurückzuführen sind.
Beachten Sie bitte die entsprechenden Gesetze und Vorschriften bei der Verwendung des Geräts. Die gesetzlichen
Rechte Dritter müssen ebenfalls beachtet werden.
Umweltvorschriften
Stellen Sie das Gerät an einem gut belüfteten Ort auf. Setzen Sie das Gerät nicht direkter Sonneneinstrahlung aus.
Halten Sie das Gerät trocken und frei von Staub.
Stellen Sie das Gerät auf einen stabilen, ebenen Untergrund.
Bitte legen Sie keine schweren Gegenstände auf das Gerät, da Beschädigung und Verformungen durch zu hohe Last
möglich sind.
Halten Sie mindestens 10 cm Abstand zwischen dem Gerät und dem nächsten Objekt ein, um die Wärmeabfuhr
zu gewährleisten.
Stellen Sie das Gerät nicht auf oder in der Nähe von entammbaren oder brandgefährdeten Objekt wie
Gummimaterialien auf.
Halten Sie das Gerät fern von Hitzequellen und oenem Feuer, wie Kerzen oder einer elektrischen Heizung.
Halten Sie das Gerät fern von jedem Haushaltsgerät mit starkem Magnetfeld oder Elektromagnetfeld, z. B. einem
Mikrowellenherd oder einem Kühlschrank.
Betriebsvorschriften
Lassen Sie das Gerät nicht ohne Aufsicht durch ein Kind verwenden.
Lassen Sie kein Kind mit dem Gerät oder einem Zubehörteil spielen, da Kleinteile verschluckt werden können.
Bitte verwenden Sie ausschließlich Zubehör, das vom Hersteller bereitgestellt oder genehmigt wurde.
Die Stromversorgung des Geräts muss den Anforderungen der Eingangsspannung des Gerätes entsprechen. Bitte
verwenden Sie ausschließlich den bereitgestellten Überspannungsschutz an der Steckdose.
Achten Sie vor dem Anschließen oder Abziehen des Kabels darauf, dass Ihre Hände vollständig trocken sind.
Verschütten Sie keine Flüssigkeiten auf das Gerät und verwenden Sie es nicht in der Nähe von Wasser,
beispielsweise in der Nähe einer Badewanne, Waschschüssel, einem Spülbecken, in einem feuchten Keller oder in
der Nähe eines Schwimmbeckens.
Treten Sie nicht auf das Kabel, ziehen und verbiegen Sie es nicht, da es dadurch zu einer Fehlfunktion des Geräts
kommen kann.
Schalten Sie das Gerät bei Gewitter aus und trennen Sie es von der Stromversorgung. Ziehen Sie das Netzkabel
und das ADSL-Twisted-Pair-Kabel (Festnetzkabel) zur Vermeidung eines Blitzschlags.
Wenn das Gerät längere Zeit ungenutzt bleibt, trennen Sie es von der Stromversorgung und ziehen Sie den Netzstecker.
Wenn Rauch oder ungewöhnliche Ger
von der Stromversorgung und ziehen Sie das Netzkabel. Wenden Sie sich an das angegebene Wartungscenter für
eine Reparatur.
Führen Sie keine Gegenstände in Einschübe oder Anschlussönungen des Geräts ein, die kein Bestandteil des
Produktes oder ein Zubehörteil sind.
Schließen Sie zuerst das Erdungskabel des Geräts an, bevor Sie ein Kabel anschließen. Trennen Sie das
Erdungskabel nicht, bis nicht alle anderen Kabel entfernt wurden.
Reinigungsvorschriften
Bevor Sie das Gerät reinigen, schalten Sie es aus und trennen Sie es von der Stromversorgung.
Verwenden Sie ein Stück trockenes, weiches und antistatisches Tuch zum Reinigen des Geräts.
Halten Sie das Netzkabel sauber und trocken. Über einen schmutzigen oder nassen Netzstecker kann es zu einem
elektrischen Schlag oder anderen Gefahren kommen.
äusche oder Gerüche aus dem Gerät austreten, trennen Sie das Gerät sofort
D
E
U
T
S
C
H
25

UMWELTFREUNDLICHE VERWERTUNG
Entsorgen Sie das Gerät nicht mit dem Hausmüll.
Erkundigen Sie sich bei Ihrer Stadtverwaltung, wie Sie das Gerät umweltfreundlich entsorgen können.
Pappkarton, Kunststoverpackung und Bauteile des Gerätes können im Einklang mit den geltenden
Vorschriften in Ihrem Land verwertet werden.
Halten Sie stets die geltenden Vorschriften ein.
Deren Nichtbeachtung kann eine Buße oder Verfolgung gemäß dem geltenden Recht nach sich
ziehen.
Die durchgestrichene Mülltonne auf dem Gerät bedeutet, dass das Gerät am Ende seiner
Nutzungsdauer zu einer speziellen Elektroschrottsammelstelle gebracht und vom Hausmüll
gesondert verarbeitet werden muss.
D
E
U
T
S
C
H
Adresse: 309, 3rd Floor, No.16, Yun Ding North Road,
Huli District, Xiamen City, Fujian, P.R. China
26
Tel: +86-592-5702000
Fax: +86-592-5702455

YEALINK (XIAMEN) NETWORK TECHNOLOGY CO.,LTD
WWW.YEALINK.COM
Konformitätserklärung
Datum der Erklärung: 20.03.2017
Wir: YEALINK(XIAMEN) NETWORK TECHNOLOGY CO.,LTD,
Adresse: 309, 3th Floor, No.16, Yun Ding North Road, Huli District, Xiamen City, Fujian, P.R. China
Erklären hiermit, dass das Produkt
Typ: Ultra-elegant Gigabit IP Phone
Modell: SIP VP-T49G
die grundlegenden Anforderungen und anderen relevanten Bestimmungen der folgenden EG-Richtlinie
erfüllt
Richtlinie:
Konformität
Sicherheit: EN 60950-1:2006+A11:2009
EMC: EN 55032:2015
Radio:
Gesundheit:
Richtlinie 2011/65/EU des Europäischen Parlaments und des Rates vom 8. Juni 2011 zur Beschränkung
Richtlinie 2012/19/EU des Europäischen Parlaments und des Rates vom 4. Juli 2012 über Elektro- und
Verordnung (EG) Nr. 1907/2006 des Europäischen Parlaments und des Rates vom 18. Dezember 2006
zur Registrierung, Bewertung, Zulassung und Beschränkung chemischer
Stoe (REACH)
Funkgeräterichtlinie 2014/53/EU;
Das Produkt erfüllt die folgenden Normen:
+A1:2010+A12:2011+A2:2013
EN 55024:2010/AC:2015
EN61000-3-2: 2006+A1 2009+A2 2009
EN61000-3-3: 2013
ETSI EN 301 489-1 V2.2.0
ETSI EN 301 489-3 V2.1.1
ETSI EN 301 489-17 V3.2.0
ETSI EN 300 328 V2.1.1
ETSI EN 301 893 V2.1.1
ETSI EN 300 440-1 V1.6.1
ETSI EN 300 440-2 V1.4.1
EN 62311:2008
der Verwendung bestimmter gefährlicher Stoe in Elektro- und Elektronikgeräten
(RoHS)
Elektronik-Altgeräte (WEEE)
Adresse: 309, 3rd Floor, No.16, Yun Ding North Road,
Huli District, Xiamen City, Fujian, P.R. China
YEALINK (EUROPE) NETWORK TECHNOLOGY B.V.
Address: Strawinskylaan 3127, Atrium Building, 8th oor,
1077ZX Amsterdam, the Netherlands
Telephone: +31(0)646111373
Email: EUROPE@Yealink.com
Tel: +86-592-5702000
Fax: +86-592-5702455
27

Über uns
Das 2001 gegründete Unternehmen Yealink ist ein führender Anbieter von VoIP-Telefonen und IP-Kommunikationslösungen, dessen Schwerpunkt
auf VoIP-Produkten liegt, die sich seit mehr als einem Jahrzehnt durch eine zuverlässige Qualität, einfache Bereitstellung und einen erschwinglichen
Preis auszeichnen. Heute vertrauen Kunden aus über 140 Ländern auf Yealink als tragende Säule einer globalen Zusammenarbeit zur Verbesserung
der Netzwerkkommunikation.
Mehr über Yealink
Seit 2001 entwickelt Yealink k ontinuierlich hochmoder ne, Hi-tech-VoIP-Kommunika tionsendgeräte, die unter anderem Video-IP-Telefone, IPTelefone und USB-Telefone einschließen. Das Unternehmen mit einer weltweiten Marktpräsenz in mehr als 140 Ländern hat zudem ein erstklassiges
internationales Servicenetzwerk eingericht
Unsere Prior itäten sind Qualit ät, Funktionalität, B enutzerfreundlichkeit, Kundenservice und marktorient ierte Preise. Um neue Lösungen für die
Zukunft dieses sich schnell entwickelnden Bereichs zu schaen, hat sich das große, talentierte und erfahrene VoIP-Entwicklerteam von Yealink ganz
dem Streben nach herausragenden Ergebnissen verschrieben.
Derzeit haben wir mehr als 80 Interoperabilitätstests erfolgreich bestanden und erfüllen die Zertizierungsanforderungen von führenden VoIPSystemen und Plattformen. Yealink arbeitet eng mit Partnern wie T-Mobile, Telefónica, Portugal Telecom und anderen führenden Telekommunikatio
nsdienstleistern zusammen.
et.
YEALINK(XIAMEN) NETWORK TECHNOLOGY CO.,LTD.
Web: www.yealink.com
Adresse: 309, 3th Floor, No.16, Yun Ding North Road,
Huli District, Xiamen City, Fujian, P.R. China
Copyright©2017YEALINK(XIAMEN) NETWORK
TECHNOLOGY CO.,LTD. Alle Rechte vorbehalten.

Contenido de la caja
En la caja se incluyen los artículos siguientes. Si detecta que falta algo, contacte con el administrador de su
sistema.
Base Cámara
Cable del auricular
Cable HDMI Velcro doble 3M x2 Cable USB 3.0 Guía rápida de
Teléfono IP Auricular
Nota: El ED10 es un pack de accesorios que permite extender el vídeo capturado por la cámara (tanto la local como
la remota) en un monitor externo durante una videollamada. Para más información, consulte la guía de
instalación rápida del ED10 para VP-T49G.
Recomendamos que los accesorios empleados con estos terminales hayan sido homologados por Yealink. El
uso de accesorios de terceros no testeados puede resultar en un funcionamiento incorrecto.
Instalación del teléfono
instalación
Cable Ethernet
(Cable 2m CAT5E FTP)
ED10 (Opcional)
Guía de inicio
rápido
Alimentador
1. Fije la base como se muestra a continuación:
.
40
2. Inserte la cámara como se muestra a continuación:
E
S
P
A
Ñ
O
L
Ajuste el interruptor del obturador
Ajuste el ángulo de la cámara
29

3. Conecte el auricular y los cascos (opcional) como se muestra a continuación:
Nota:
Los cascos deben comprarse por separado.
4. Conecte la memoria USB como se muestra a continuación:
E
S
5. Conecte el alimentador como se muestra a continuación:
P
A
Ñ
O
L
Nota:
Sólo se debe usar el teléfono IP con un alimentador original (12V/2A) de Yealink. El uso de alimentadores
de terceros puede causar daños irreparables en el equipo. Si quiere conectar un PC al terminal, le
recomendamos usar el cable Ethernet proporcionado por Yealink.
30

6. Conéctelo a la red como se muestra a continuación:
Existen dos opciones de conexión a la red. Puede elegir una dependiendo del entorno.
a) Conectarlo a la red con cable:
b) Conectarlo a la red Wi-Fi:
1) Toque -> Básico -> Wi-Fi.
2) Toque Encender en la casilla de Wi-Fi.
El teléfono buscará automáticamente las redes inalámbricas disponibles en la zona.
3) Seleccione una red Wi-Fi disponible en la lista de redes.
4) Si la red es segura, introduzca la contraseña en el campo PIN.
5) Toque OK para conectarse a la red Wi-Fi.
PC
E
S
P
A
Ñ
O
L
31

Localización de controles
16
15
14
14
13
17
18
1
1
2
2
3
3
4
5
6
7
8
9
10
11
12
12
E
S
P
A
Ñ
O
19
20
L
Objeto Objeto Objeto
1
Cámara
LED indicador de
2
alimentación
3
Pantalla táctil
4
Tecla de MENSAJE
5
Tecla de AURICULARES
6
Tecla de SILENCIO
7
Tecla VIDEO
32
8
Tecla de TRANSFER
9
Tecla de volumen
10
Tecla de altavoz
11
Tecla de RELLAMADA
12
Tecla HOLD
13
Teclado
14
Altavoz
15
Conmutador de conexión
16
Interruptor del obturador
17
LED indicador de cámara
18
Lente de la cámara
19
Puerto HDMI
20
Puerto USB 2.0

Puesta en funcionamiento
El proceso de inicialización empezará automáticamente
cuando el teléfono IP esté conectado a la red y reciba
alimentación. El teléfono estará listo para usar tras la puesta
en funcionamiento. Puede congurar el teléfono a través de
la interfaz de usuario web o la interfaz de usuario del
teléfono.
Welcome
Initializing... Please wait
Configuración del teléfono
Configuración a través de la interfaz de usuario web
Acceso a la interfaz de usuario web:
1. Toque -> Estado cuando el teléfono esté en reposo para obtener la dirección IP del teléfono.
2. Abra un navegador web en el ordenador, introduzca la dirección IP en la barra de direcciones (p. ej.
"http://192.168.0.10" o "192.168.0.10") y, a continuación, pulse Entrar.
3. Marque el nombre de usuario (por defecto: admin) y la contraseña (por defecto: admin) en la página de inicio de
sesión y haga clic en Conrmar.
Configuración de la red: Haga clic en Red->Básico->Config IPv4
Puede congurar los ajustes de la red de las formas siguientes:
DHCP: El teléfono intentará contactar con un servidor DHCP de su red para obtener los ajustes de red válidos, es decir, la
dirección IP, máscara de subred, dirección de la puerta de enlace y dirección DNS.
Estática: Si el teléfono no puede contactar con un servidor DHCP por alguna razón, deberá congurar manualmente la
dirección IP, máscara de subred, dirección de la puerta de enlace y direcciónde los DNS primario y secundario
del teléfono.
PPPoE: Si está utilizando un módem xDSL, puede conectar el teléfono a Internet a través del modo PPPoE. Contacte con
el ITSP para solicitar el nombre de usuario y la contraseña.
Nota:
El teléfono IP también es compatible con IPv6, pero está deshabilitado de forma predeterminada.
Ajustes de cuenta: Haga clic en Cuenta-> Registro-> Cuenta X (X=1, 2, 3...15, 16)
Parámetros de la cuenta:
E
S
P
A
Ñ
O
L
Estado de registro: Muestra el estado del registro de la cuenta actual.
Estado de línea: Puede seleccionar Habilitar/Deshabilitar para habilitar/deshabilitar la cuenta.
Etiqueta: Se muestra en la pantalla táctil para identicar la cuenta.
Mostrar nombre: Se muestra como ID de la llamada cuando se hace una llamada.
Nombre del registro: Es el nombre requerido para la autenticación con el servidor (requerido).
Nombre de usuario: Proporcionado por el ITSP para el registro (requerido).
Contraseña: Proporcionado por el ITSP para el registro (requerido).
Servidor Host: Proporcionado por el ITSP para el registro (requerido).
33

Iconos del estado del registro en la pantalla táctil:
(Verde) Registrada (Gris) Error de registro (Verde y parpadeando) Registrando
Nota:
Compruebe con el administrador de su sistema si aparece algún error durante el proceso de registro o si se
requiere una conguración especíca para registrarse.
Configuración a través de la interfaz de usuario del teléfono
Configuración de la red:
Cuando el teléfono esté en reposo, toque
VLAN/Servidor Web Tipo/802.1x/VPN/LLDP/CDP/NAT para congurar la red.
Ajustes de cuenta:
Cuando el teléfono esté en reposo, toque
la cuenta.
-> Avanzado (contraseña por defecto: admin) -> Red -> Puerto WAN/
-> Avanzado (contraseña por defecto: admin) -> Cuenta para congurar
Usar el teléfono
Iconos de estado
Los iconos que hay en la barra de estado de la pantalla táctil dan información acerca del teléfono:
Iconos Descripción
Indica que no se ha detectado la cámara.
(blanco) Indica que el Wi-Fi está encendido.
(Verde) Indica que el teléfono se ha conectado correctamente a la red Wi-Fi.
Indica que el teléfono no se ha podido conectar a la red Wi-Fi.
Indica que no hay redes disponibles.
E
S
P
A
Ñ
O
L
(blanco) Indica que el Bluetooth está encendido.
(Verde) Indica que los cascos Bluetooth se han vinculado correctamente.
(Verde) Indica que un teléfono móvil compatible con Bluetooth se ha vinculado correctamente.
Indica que el teléfono está bloqueado.
Indica que el “Desvío” está activado.
Indica que el modo “No molestar” está activado.
Indica que la “Respuesta automática” está activada.
Indica que hay llamadas perdidas.
Indica que hay mensajes de voz sin leer.
Indica que hay mensajes de texto sin leer.
Indica que el volumen del timbre de llamada es 0.
Indica que se ha detectado una memoria USB.
Navegar por la pantalla táctil
Para entrar en el menú principal, toque
Para volver a la pantalla en reposo, toque
Para volver al menú anterior, toque
Para seleccionar una opción de la pantalla, toque sobre ella.
Deslice el dedo hacia arriba y hacia abajo para desplazarse por una lista.
(puede esperar a que el desplazamiento se detenga, o tocar la pantalla para detenerlo inmediatamente).
34
.
.
.

Introducción de texto
Uso de teclado en pantalla:
1. Toque el campo que desea editar. El teclado en pantalla aparecerá en la pantalla táctil:
Toque para retroceder.
Toque para conrmar los ajustes /saltar al siguiente campo.
Toque para alternar entre mayúsculas y minúsculas.
Toque para ocultar el teclado en pantalla.
Toque para alternar entre los modos
de entrada.
2. Cuando acabe de escribir, toque
3. Pulse la tecla de función Guardar para aplicar el cambio.
Uso del teclado:
Marque o introduzca un número.
Seleccionar una opción de campo:
Toque el campo de nombre y toque la opción deseada en el cuadro de diálogo emergente.
Toque para mover el cursor.
.
Centro de control y centro de notificaciones
Deslice el dedo de arriba a abajo en la pantalla para entrar en el centro de control y el centro de noticaciones.
Centro de control
Para activar o desactivar rápidamente las funciones
habituales, toque los iconos correspondientes.
Arrastre la barra para ajustar el brillo de la pantalla.
Centro de notificaciones
El centro de noticaciones muestra la lista de llamadas
perdidas, mensajes de voz y llamadas desviadas.
Para eliminar todos los registros, toque
Para eliminar un registro especíco, toque
Deslice hacia arriba para ocultar esta pantalla.
.
Funciones básicas de llamadas
Realizar una llamada de voz/vídeo
Con el auricular:
1. Levante el auricular.
2. Marque el número y, a continuación, pulse la tecla de función Enviar.
Con el altavoz:
1. Con el auricular colgado, pulse
2. Marque el número y, a continuación, pulse la tecla de función Enviar.
Con los cascos:
1. Con los cascos conectados, pulse para activar el modo auricular
2. Marque el número y, a continuación, toque la tecla de función Enviar.
.
E
S
P
.
A
Ñ
O
L
35

Responder una llamada de voz/vídeo
Con el auricular:
Levante el auricular.
Con el altavoz:
Pulse
Con los cascos:
Pulse
.
.
Controlar el vídeo durante una llamada
Para cambiar la vista de vídeo:
Toque
o .
Para activar/desactivar el vídeo durante una llamada:
Deslice el dedo de arriba a abajo en la pantalla para entrar en el centro de control y toque Video para activar o
desactivar el vídeo.
Pulse
Ajuste el interruptor del obturador.
.
Finalizar una llamada de voz/vídeo
Con el auricular:
Cuelgue el auricular o pulse la tecla de función Terminar llamada.
Con el altavoz:
Pulse
E
Con los cascos:
S
Toque la tecla de función Terminar llamada.
P
Rellamada
A
Ñ
O
Pulse para entrar en la lista llamadas realizadas y a continuación toque la entrada deseada.
Pulse dos veces cuando el teléfono esté en reposo para llamar al último número marcado.
L
Silenciar y activar el sonido de la llamada
o toque la tecla de función Terminar llamada.
Pulse
Pulse
para silenciar el micrófono durante una llamada.
de nuevo para activar el sonido.
Llamada en espera y reanudación de llamadas
Poner una llamada en espera:
Durante una llamada activa, pulse
Para reanudar la llamada, ejecute una de las acciones siguientes:
Si hay solamente una llamada en espera, pulse
Si hay más de una llamada en espera, toque la llamada que desea reanudar y a continuación pulse
tecla de función Reanudar.
36
o la tecla de función Retener.
o la tecla de función Reanudar.
o toque la

Transferencia de llamadas
Puede transferir una llamada de las formas siguientes:
Transferencia ciega
1. Pulse o toque la tecla de función Transferir durante una llamada. La llamada se pone en espera.
2. Marque el número al que quiere transferir la llamada.
3. Pulse o toque la tecla de función Transferir.
Transferencia semi atendida
1. Pulse o toque la tecla de función Transferir durante una llamada. La llamada se pone en espera.
2. Marque el número al que quiere transferir la llamada y a continuación pulse .
3. Cuando escuche el tono de llamada, pulse o la tecla de función Transferir.
Transferencia atendida
1. Pulse o toque la tecla de función Transferir durante una llamada. La llamada se pone en espera.
2. Marque el número al que quiere transferir la llamada y a continuación pulse .
3. Cuando la otra parte responda, pulse o la tecla de función Transferir.
Desvío de llamadas
Habilitar el desvío de llamadas:
1. Cuando el teléfono esté en reposo, toque ->Preferencias->Desvío de llamada.
2. Seleccione el tipo de desvío deseado:
Desviar siempre----Las llamadas entrantes se desvían siempre.
Desviar si ocupado----Las llamadas entrantes se desvían cuando el teléfono está ocupado.
Desviar si no responde----Las llamadas entrantes se desvían si no se responde tras un periodo de tiempo.
3. Marque el número al que quiera desviar la llamada. Para Desviar si no responde, toque el campo Después de
tono y, a continuación, elija el número de tonos tras los cuales se desviará la llamada.
4. Pulse la tecla de función Guardar para aplicar el cambio.
Conferencia
1. Toque la tecla de función Conferencia durante una llamada activa. La llamada se pone en espera.
2. Marque el número del siguiente participante y, a continuación, pulse o toque la tecla de función Conferencia.
3. Toque otra vez la tecla de función Conferencia cuando responda la segunda parte. Todas las partes están ahora
participando en la conferencia.
4. Toque la tecla de función Terminar llamada para desconectar a todas las partes.
E
S
P
A
Ñ
O
L
Nota:
Puede dividir la conferencia en dos llamadas individuales pulsando la tecla de función Dividir.
Mensaje de voz
El indicador de mensaje en espera de la pantalla en reposo indica que hay uno o más mensajes de voz en el centro de
mensajes. El LED indicador de alimentación parpadea lentamente en rojo.
Escuchar los mensajes de voz: (Asegúrese de que el código del correo de voz ya esté congurado en el teléfono)
1. Existen dos opciones:
a.
Pulse
b. Deslice la barra de noticaciones de la parte superior de la pantalla, pulse Buzón de voz y seleccione el registro
deseado.
2. Siga las indicaciones de voz para escuchar sus mensajes de voz.
.
37

Personalización del teléfono
Historial de llamadas
1. Cuando el teléfono esté en reposo, toque
2. Arrastre hacia arriba y hacia abajo para desplazarse por la lista
3. Toque
Toque Enviar para realizar una llamada.
después de la entrada deseada y a continuación podrá realizar los siguientes pasos:
Toque Añadir para añadir la entrada al directorio local.
Toque Editar para editar el número de teléfono de la entrada antes de hacer una llamada.
Toque Lista negra para añadir la entrada a la lista negra.
Toque Eliminar para eliminar la entrada de la lista.
Directorio de contactos
Añadir un contacto:
1. Cuando el teléfono esté en reposo, toque y seleccione el grupo deseado.
2. Toque Añadir para añadir un contacto.
3. Introduzca un nombre de contacto único en el campo Nombre y los números de contacto en los campos
correspondientes.
4. Toque la tecla de función Guardar para aplicar el cambio.
Editar un contacto:
1. Cuando el teléfono esté en reposo, toque
2. Toque
3. Edite la información de contacto.
4. Toque la tecla de función Guardar para aplicar el cambio.
Eliminar un contacto:
1. Cuando el teléfono esté en reposo, toque
E
2. Toque después del contacto deseado y, a continuación, toque Eliminar.
S
3. Toque OK cuando aparezca en la pantalla táctil “Eliminar contacto seleccionado?”.
P
Nota:
A
después del contacto deseado.
Puede añadir fácilmente contactos desde el registro de llamadas. Para más información, consulte el apartado
Historial de llamadas.
Ñ
Control de volumen
O
L
Pulse
Pulse
durante una llamada para ajustar el volumen de recepción del auricular/manos libres/casco.
cuando el teléfono esté en reposo para ajustar el volumen del timbre.
y seleccione la lista de llamadas deseada a la izquierda.
y seleccione el grupo deseado.
y seleccione el grupo deseado.
38

Instrucciones de seguridad
Conserve estas instrucciones. ¡Lea estas instrucciones de seguridad antes de usar el dispositivo!
Las siguientes instrucciones básicas de seguridad deben respetarse siempre para reducir el riesgo de incendio, descarga
eléctrica y otras lesiones personales.
Requisitos generales
Lea detenidamente estas instrucciones de seguridad antes de instalar y usar el dispositivo y controle la situación
durante el funcionamiento.
Mantenga siempre el dispositivo seco y limpio durante el proceso de almacenaje, transporte y funcionamiento.
Evite golpes y sacudidas en el dispositivo durante el proceso de almacenaje, transporte y funcionamiento.
No desmonte el dispositivo por su cuenta. En caso de fallos, póngase en contacto con el centro de mantenimiento
designado para su reparación.
No se permite hacer modicaciones en la estructura ni el diseño de seguridad del dispositivo sin previo
consentimiento por escrito. Yealink no será responsable bajo ninguna circunstancia de las consecuencias o
problemas legales derivados de dichas modicaciones.
Consulte las leyes y estatutos pertinentes cuando use el dispositivo. También deben respetarse los derechos
legales de terceros.
Requisitos ambientales
Coloque el dispositivo en un lugar bien ventilado. No exponga el dispositivo a la luz del sol directa.
Mantenga el dispositivo seco y libre de polvo.
Coloque el dispositivo sobre una plataforma estable y nivelada.
No coloque objetos pesados sobre el dispositivo para evitar daños o deformaciones causadas por el peso.
Deje al menos 10 cm de distancia entre el dispositivo y los objetos más cercanos para facilitar la disipación del calor.
No coloque el dispositivo encima o cerca de objetos inamables o vulnerables al fuego, como materiales hechos
de goma.
Mantenga el dispositivo alejado de fuentes de calor o fuego vivo, como velas o radiadores eléctricos.
Mantenga el dispositivo alejado de aparatos domésticos con campos magnéticos o electromagnéticos intensos,
como hornos microondas o neveras.
Requisitos de funcionamiento
No permita que los niños utilicen el dispositivo sin supervisión.
No permita que los niños jueguen con el dispositivo ni sus accesorios para evitar asxia accidental.
Utilice únicamente los accesorios suministrados o autorizados por el fabricante.
La alimentación eléctrica debe cumplir los requisitos de voltaje de entrada del dispositivo. Utilice únicamente una
toma de corriente con protección contra sobretensiones.
Asegúrese de tener las manos completamente secas antes de enchufar o desenchufar los cables.
No derrame líquidos de ningún tipo sobre el producto ni use el equipo cerca de agua, por ejemplo, cerca de una
bañera, palangana, fregadero, sótanos húmedos o piscinas.
No pise, estire ni retuerza los cables para evitar fallos del dispositivo.
En caso de tormenta, deje de usar el aparato y desenchúfelo de la alimentación eléctrica. Desenchufe la clavija
eléctrica y el cable de par trenzado (el cable de radiofrecuencia) de la línea de abonado digital simétrica (ADSL,
por sus siglas en inglés) para evitar rayos.
Si deja el dispositivo sin utilizar durante mucho tiempo, desconéctelo de la alimentación eléctrica y desenchufe la
clavija eléctrica.
Si sale humo del dispositivo o ruidos u olores anormales, desconecte el dispositivo de la alimentación eléctrica y
desenchufe la clavija eléctrica inmediatamente. Póngase en contacto con el centro de mantenimiento designado
para su reparación.
No introduzca ningún objeto que no forme parte del producto o de los accesorios en las ranuras del equipo.
Antes de conec
de tierra hasta que haya desconectado los demás cables.
Requisitos de limpieza
Antes de limpiar el dispositivo, deje de utilizarlo y desconéctelo de la alimentación eléctrica.
Utilice un trapo suave, seco y antiestático para limpiar el dispositivo.
Mantenga el enchufe eléctrico limpio y seco. Si usa un enchufe eléctrico sucio o húmedo podría provocar una
descarga eléctrica y otros peligros.
tar un cable, conecte el cable de toma de tierra del dispositivo. No desconecte el cable de toma
E
S
P
A
Ñ
O
L
39

RECICLAJE AMBIENTAL
Nunca deseche el equipo con los residuos domésticos
Pregunte en su ayuntamiento cómo desecharlo de forma respetuosa con el medio ambiente. Se
debereciclar la caja de cartón, el embalaje de plástico y los componentes en conformidad con la
normativade reciclaje vigente en su país.
Respete siempre la normativa vigente
En caso de incumplirla, podría ser multado o procesado en cumplimiento de la ley. El cubo de basura
tachado que aparece en el producto indica que debe llevarse a un centro de eliminación de residuos
especiales y debe tratarse por separado de los residuos urbanos al nal de su vida útil.
E
S
P
A
Ñ
O
L
Dirección: 309, 3th Floor, No.16, Yun Ding North Road,
Huli District, Xiamen City, Fujian, R.P. China
40
Tel: +86-592-5702000
Fax: +86-592-5702455

YEALINK (XIAMEN) NETWORK TECHNOLOGY CO.,LTD
WWW.YEALINK.COM
Declaración de conformidad
Fecha de CE: 2017.03.20
Declarante: YEALINK(XIAMEN) NETWORK TECHNOLOGY CO.,LTD,
Dirección: 309, 3th Floor, No.16, Yun Ding North Road, Huli District, Xiamen City, Fujian, P.R. China
Declara que el producto:
Clase de equipo: Teléfono IP Gigabit Ultra-Elegante
Marca: Yealink
Modelo: SIP VP-T49G
cumple con los requisitos esenciales y cualesquiera otras disposiciones aplicables o exigibles de las directivas :
Directiva de equipos de radio 2014/53 / UE;
Normas aplicadas
Seguridad: EN 60950-1:2006+A11:2009
+A1:2010+A12:2011+A2:2013
EMC: EN 55032:2015
EN 55024:2010/AC:2015
EN61000-3-2: 2006+A1 2009+A2 2009
EN61000-3-3: 2013
Radio:
ETSI EN 301 489-1 V2.2.0
ETSI EN 301 489-3 V2.1.1
ETSI EN 301 489-17 V3.2.0
ETSI EN 300 328 V2.1.1
ETSI EN 301 893 V2.1.1
ETSI EN 300 440-1 V1.6.1
ETSI EN 300 440-2 V1.4.1
Salud:
EN 62311:2008
Directiva 2011/65/EU del Parlamento Europeo y del Consejo, de 8 de Junio de 2011, sobre restricciones a la
utilización de determinadas sustancias peligrosas en aparatos eléctricos y electrónicos (RoHS).
Directiva 2012/19/EU del Parlamento Europeo y del Consejo, del 4 de Julio de 2012, sobre residuos de aparatos
eléctricos y electrónicos (RAEE).
Reglamento (CE) No 1907/2006 del Parlamento Europeo y del Consejo, del 18 de Diciembre de 2006, relativo al
registro, la evaluación, la autorización y la restricción de las sustancias y preparados químicos (REACH).
Dirección: 309, 3th Floor, No.16, Yun Ding North Road,
YEALINK (EUROPE) NETWORK TECHNOLOGY B.V.
Address: Strawinskylaan 3127, Atrium Building, 8th oor,
1077ZX Amsterdam, the Netherlands
Telephone: +31(0)646111373
Email: EUROPE@Yealink.com
Huli District, Xiamen City, Fujian, R.P. China
Tel: +86-592-5702000
Fax: +86-592-5702455
41

Acerca de nosotros
Fundada en 2001, Yealink, proveedor líder de soluciones de comunicación IP y teléfonos VoIP, se ha centrado durante más de una década en
productos VoIP caracterizados por su able calidad, fácil instalación y precio asequible. Hoy, clientes de más de 140 países confían en Yealink como
columna vertebral de sus colaboraciones globales para ampliar el valor de las comunicaciones en red.
Más acerca de Yealink
Desde 2001, Yealink ha seguido desarrollando terminales de comunicación VoIP de alta tecnología, entre ellos los teléfonos IP con vídeo, teléfonos
IP y teléfonos USB. Con su mercado mundial en más de 140 países, la empresa también ha establecido una red de servicios internacional de
primera clase.
Nuestras prioridades son la calidad, la funcionalidad, la facilidad de uso, el soporte al cliente
VoIP de Yealink, talentoso y con una gran experiencia, está completamente comprometido en la búsqueda de la excelencia para proporcionar
nuevas soluciones de futuro en este sector en rápida evolución.
Hasta la fecha, hemos superado más de 80 pruebas de interoperabilidad y cumplimos los requisitos de cer ticación establecidos por el sistema y
las plataformas VoIP líderes. Yealink trabaja en estrecha asociación con T-Mobile, Telefónica, Portugal Telecom y otros proveedores de servicios de
telecomunicación líderes.
y los precios competitivos. El gran equipo de I+D en
YEALINK(XIAMEN) NETWORK TECHNOLOGY CO.,LTD.
Página web: www.yealink.com
Dirección: 309, 3th Floor, No.16, Yun Ding North Road,
Huli District, Xiamen City, Fujian, P.R. China
Derechos de autor©2017YEALINK(XIAMEN) NETWORK
TECHNOLOGY CO.,LTD.Todos los derechos reservados.
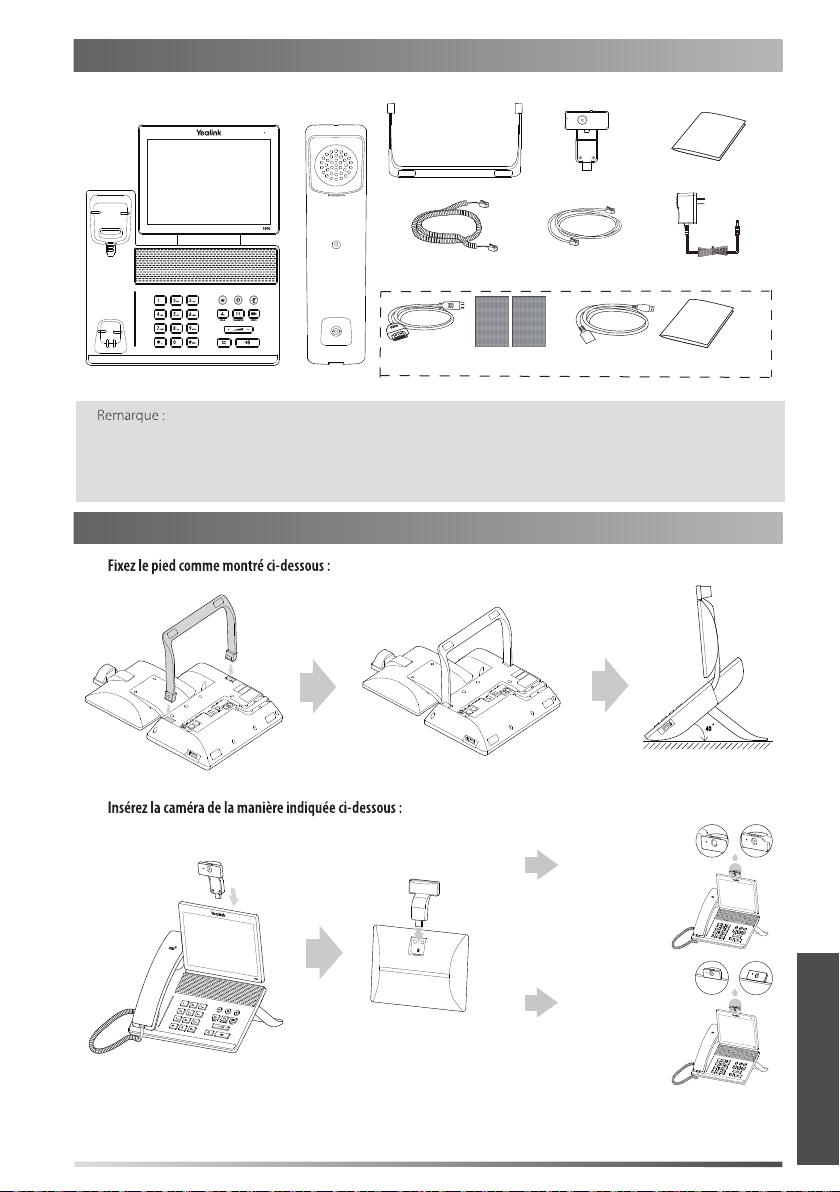
Contenu de la boîte
Les articles suivants sont inclus dans la boîte. Si un article est manquant, contactez votre administrateur de système.
Guide de
Pied Caméra
démarrage rapide
Téléphone IP Combiné
Les accessoires d’achage étendu ED10 permettent d’acher l’image de la camera sur un écran externe
lors de l’appel video. Pour plus d’information, vous pouvez vous référer au guide d’installation des accessoires
d’achage étendu ED10 pour T-49G.
Nous recommandons l’utilisation des accessoires fournis par Yealink. L’utilisation d’accessoires tiers peuvent
entrainer une performance réduite.
Montage du téléphone
1.
.
2.
Cordon du combiné
Câble HDMI
Scotch Double
(câble 2m CAT5E FTP)
Face 3M x2
Câble Ethernet
Câble HDMI Guide d’installation
ED10 (optionnel)
Adaptateur secteur
40
Ajuster l’interrupteur d’obturateur
Ajuster l’angle de la caméra
F
R
A
N
Ç
A
I
S
43

3.
Le casque est disponible séparément.
4.
5.
F
R
A
N
Ç
A
I
Le téléphone IP doit être utilisé uniquement avec l’adaptateur d’alimentation fourni par Yealink (12V/2A).
L’utilisation d’un adaptateur secteur tiers peut endommager le téléphone. Si vous connectez un
ordinateur à votre téléphone, nous vous recommandons d’utiliser le câble Ethernet fourni par Yealink.
Si vous connectez un ordinateur à votre téléphone, nous vous recommandons d’utiliser le câble Ethernet
fourni par Yealink.
S
44

6.
Vous avez deux options pour la connexion réseau. Vous pouvez choisir l’une d’entre elles en fonction de votre
environnement actuel.
a)
PC
b)
1) Appuyez sur -> Basic -> Wi-Fi.
2) Appuyez sur On depuis le boîtier radio du Wi-Fi.
Le téléphone recherchera automatiquement les réseaux sans l disponible dans votre zone.
3) Sélectionnez un réseau sans l disponible dans la liste.
4) Si le réseau est sécurisé, entrez le mot de passe dans le champ PIN.
5) Appuyez sur OK pour vous connectez au réseau sans l.
F
R
A
N
Ç
A
I
S
45

Instructions concernant les composants matériels
16
15
14
14
13
17
18
1
1
2
2
3
3
4
5
6
7
8
9
10
11
12
12
19
20
Élément Élément Élément
1
Caméra
2
Indicateur d'alimentation LED
Écran tactile
3
F
R
4
A
N
Ç
A
I
Touche MESSAGE
5
Touche CASQUE
6
Touche MUTE
7
Touche VIDEO
8
Touche de TRANSFER
9
Touche volume
Touche du haut-parleur
10
11
Touche de RECOMPOSITION
12
Touche HOLD
13
Clavier
14
Haut-parleur
15
Crochet commutateur
16
Interrupteur obturateur
Témoin lumineux LED caméra
17
18
Lentille caméra
19
Port HDMI
20
USB2.0
S
46

Démarrage
Une fois que le téléphone IP est connecté au réseau et est
alimenté en courant, la procédure d'initialisation démarre
automatiquement. Après le démarrage, le téléphone est
prêt à l'utilisation. Vous pouvez congurer le téléphone
via l'interface utilisateur web ou l'interface utilisateur du
téléphone.
Welcome
Initializing... Please wait
Configuration de votre téléphone
Configuration via l'interface utilisateur web
1. Appuyez sur -> Status lorsque le téléphone est inactif pour obtenir l’adresse IP du téléphone.
2.
Enter.
3.
connexion et cliquez sur Confirm.
Cliquez sur Network->Basic->IPv4 Config
Par défaut, le téléphone tente de se connecter à un serveur DHCP de votre réseau pour obtenir des paramètres
de réseau valables, par exemple l'adresse IP, le masque de sous-réseau, l'adresse de passerelle et l'adresse DNS.
Si le téléphone est incapable de se connecter à un serveur DHCP, pour une raison ou une autre,
vous devez congurer manuellement l'adresse IP, le masque de sous-réseau, l'adresse de passerelle,
l'adresse DNS primaire et l'adresse DNS secondaire pour le téléphone.
Si vous utilisez un modem xDSL, vous pouvez raccorder votre téléphone à l'Internet via le mode PPPoE. Contactez
votre fournisseur de service de téléphonie par internet pour obtenir le nom d'utilisateur et le mot de passe.
Le téléphone IP prend également en charge IPv6, mais IPv6 est désactivé par défaut.
Cliquez sur Account-> Register-> Account X (X=1,2,3...15,16)
Il ache le statut du registre du compte actuel.
Vous pouvez sélectionner Enabled/Disabled pour activer/désactiver le compte.
Il est indiqué sur l'écran tactile pour identier le compte.
Il s'ache comme l'ID appelant quand vous passez un appel.
Il s'agit de l'ID authentié pour l'authentication fournie par l'ITSP (requis).
Il est fourni par l'ITSP pour l'enregistrement (requis).
Il est fourni par l'ITSP pour l'enregistrement (requis).
Il est fourni par l'ITSP pour l'enregistrement (requis).
F
R
A
N
Ç
A
I
S
47

(Vert) Enregistré
Vériez auprès de votre administrateur de système si une erreur apparaît pendant la procédure
d'enregistrement ou si une conguration spécique est requise pour votre enregistrement.
Configuration via l'interface utilisateur du téléphone
Lorsque le téléphone est inactif, appuyez sur -> Advanced -> Network-> WAN Port/
VLAN/Webserver Type/802.1x/VPN/LLDP/CDP/NAT pour congurer le réseau.
Lorsque le téléphone est inactif, appuyez sur -> Advanced -> Account pour
congurer le compte.
(Gris) Échec de
l'enregistrement
(Vert et clignotant) En cours
d'enregistrement
Utiliser votre téléphone
Icône de statuts
Icônes Description
Indique que la caméra n’est pas détectée.
(blanc) Indique que la Wi-Fi est activée.
(vert) Indique que le téléphone est connecté à un réseau sans l.
Indique que la connexion au réseau sans l a échoué.
Indique que le réseau n’est pas disponible.
(blanc) Indique que la Bluetooth est activée.
(vert) Indique que le casque Bluetooth a été couplé avec succès.
(vert) Indique que le téléphone mobile Bluetooth a été couplé avec succès.
Indique que le téléphone est verrouillé.
F
Aperçu des fonctions de l'écran tactile
R
A
N
Ç
A
S
Pour accéder au menu principal, appuyez brièvement sur
Pour retourner à l'écran inactif, appuyez brièvement sur
Pour retourner au menu précédent, appuyez brièvement sur
Pour sélectionner un élément, appuyez brièvement sur l'élément.
Faites glisser de bas en haut pour faire déler.
I
(Vous pouvez attendre que le délement soit terminé ou vous pouvez l’arrêter immédiatement en appuyant sur l’écran.)
48
Indique que vous avez des appels manqués.
Indique que vous avez des messages vocaux non écoutés.
Indique que vous avez des messages non lus.
Indique que le volume de la sonnerie est réglé sur 0.
Indique qu’un lecteur ash USB a été détecté.
.
.
.

Introduction et mise à jour des données
1.
Appuyez brièvement pour revenir en arrière.
Appuyer pour conrmer les réglages/aller au champs
suivant.
Appuyez brièvement pour passer des majuscules aux
minuscules.
Appuyez brièvement pour masquer le clavier à l’écran.
Appuyez brièvement pour
changer de mode de saisie.
2. Lorsque vous avez terminé la saisie, appuyez sur
3. Appuyez sur la touche de fonction Save pour accepter la modication.
Saisissez ou entrez un numéro.
Appuyez sur le nom du champ, appuyez sur l’option souhaitée dans la fenêtre de dialogue pop-up.
Appuyez brièvement pour
bouger le curseur.
.
Centre de contrôle et centre de notification
Balayez l’écran du bas vers le haut pour entrer dans le centre de contrôle et le centre de notication.
Centre de contrôle
Pour activer/désactiver rapidement les fonctions de base,
appuyez brièvement sur les icônes correspondantes.
Faites glisser le curseur pour ajuster la luminosité de
l’écran.
Centre de notification
Le centre de notication ache la liste des appels
manqués, des messages vocaux et des appels transférés.
Pour eacer tous les enregistrements, appuyez sur
Pour eacer un enregistrement spécique, appuyez sur
Balayez vers le haut pour masquer cet écran.
Fonctions d'appel de base
Passer un appel vidéo/audio
.
1. Décrocher le combiné.
2. Saisissez le numéro, puis appuyez sur la touche de fonction Send.
1. Le combiné étant raccroché, appuyez sur .
2. Saisissez le numéro, puis appuyez sur la touche de fonction Send.
1. Le casque étant branché, appuyez sur pour activer le mode casque.
2. Saisissez le numéro puis appuyez sur la touche de fonction Send.
F
R
A
N
Ç
A
I
S
49

Répondre à un appel vidéo/audio
Décrocher le combiné.
Appuyez sur .
Appuyez sur .
Contrôler la vidéo pendant un appel
Pour changer la vue vidéo:
Appuyez sur
Balayez l’écran du bas vers le haut pour entrer dans le centre de contrôle, appuyez sur Video pour activer/désactiver la vidéo.
Appuyez sur
Ajustez l’interrupteur d’obturateur.
ou sur .
.
Terminer un appel vidéo/audio
Raccrochez le combiné ou appuyez sur la touche de fonction EndCall.
Appuyez sur ou sur la touche de fonction EndCall .
Appuyez sur la touche la touche de fonction EndCall.
Recomposer
Appuyez sur
Appuyez sur deux fois lorsque le téléphone est inactif pour appeler le dernier numéro composé.
Mettre un appel en sourdine et rétablir le son
Appuyez sur
Appuyez sur
pour accéder à la liste Placed calls puis appuyez brièvement sur l'entrée désirée.
pour couper le son du microphone pendant un appel.
à nouveau pour activer le son de l'appel.
Mise en attente et reprise d'un appel
F
Appuyez sur ou la touche de fonction Hold pendant un appel actif pour mettre en attente.
R
A
N
Ç
A
S'il n'y a qu'un seul appel en attente, appuyez sur ou la touche de fonction Resume.
S'il y a plus d'un appel en attente, appuyez brièvement sur l'appel que vous souhaitez reprendre puis sur
I
appuyez brièvement sur la touche Resume.
S
50
ou

Transfert d'appel
Transfert sans préavis
1. Appuyez sur
2. Saisissez le numéro auquel vous souhaitez transférer l'appel.
3. Appuyez sur
Transfert semi-privé
1. Appuyez sur
2. Saisissez le numéro auquel vous souhaitez transférer l'appel puis appuyez sur
3. Appuyez sur
Transfert supervisé
1. Appuyez sur ou sur la touche de fonction Transfer pendant un appel. L'appel est mis en attente.
2. Saisissez le numéro auquel vous souhaitez transférer l'appel puis appuyez sur
3. Appuyez sur
ou sur la touche de fonction Transfer pendant un appel. L'appel est mis en attente.
ou appuyez brièvement sur la touche Transfer.
ou sur la touche de fonction Transfer pendant un appel. L'appel est mis en attente.
.
ou sur la touche de fonction Transfer quand vous entendez la tonalité de retour.
.
ou la touche de fonction Transfer lorsque le second interlocuteur répond.
Renvoyer un appel
1. Quand le téléphone est inactif, appuyez brièvement sur ->Features->Call Forward.
2.
Always Forward----Les appels entrants sont transférés sans condition.
Busy Forward----Les appels entrants sont transférés lorsque le téléphone est occupé.
No Answer Forward----Les appels entrants sont transférés s'ils n'ont pas obtenu de réponse au bout d'une période de
temps dénie.
3. Saisissez le numéro que vous voulez renvoyer. Pour No Answer Forward, appuyez sur le champ After Ring Time puis
appuyez sur la durée après laquelle vous souhaitez que l’appel soit transféré.
4. Appuyez sur la touche de fonction Save pour accepter la modication.
Conférence téléphonique
1. Appuyez sur la touche de fonction Conference pendant un appel actif. L'appel est mis en attente.
Saisissez le numéro du second interlocuteur puis appuyez sur
3. Appuyez à nouveau sur la touche de fonction Conference lorsque le second interlocuteur répond. Tous les
interlocuteurs sont maintenant connectés à la conférence.
4. Appuyez brièvement sur la touche de fonction EndCall pour déconnecter tous les interlocuteurs.
ou sur la touche de fonction Conference.
Vous pouvez diviser la conférence en deux appels individuels en appuyant sur la touche de fonction Split.
Message vocal
L'indicateur de message en attente sur l'écran inactif indique qu'un ou plusieurs messages sont en attente dans la
messagerie. Le témoin d'alimentation lumineux rouge clignote lentement.
Eectuer l’une des actions suivantes:
1.
Appuyer sur
A partir du haut de l’écran faire glisser vers le bas pour entrer dans la liste de notications, appuyer sur et
sélectionner l’élément souhaité.
2.
Suivez les instructions vocales pour écouter vos messages vocaux.
(il faut s’assurer que le code pour la messagerie vocale est déjà conguré sur le téléphone)
.
Voice Mail
F
R
A
N
Ç
A
I
S
51

Personnaliser votre téléphone
Historique des appels
1. Lorsque le téléphone est inactif, appuyez sur
2. Faites glisser de bas en haut pour faire déler.
3. Appuyez brièvement sur
Appuyez brièvement sur Send pour passer un appel.
Appuyez brièvement sur Add pour ajouter l’entrée au répertoire local.
Appuyer brièvement sur Edit pour modier le numéro de téléphone de l'entrée avant de passer un appel.
Appuyez brièvement sur Blacklist pour ajouter l’entrée à la liste noire.
Appuyez brièvement sur Delete pour eacer l’entrée de la liste.
Répertoire des contacts
1. Lorsque le téléphone est inactif, appuyez brièvement sur et sélectionnez le groupe souhaité.
2. Appuyez brièvement sur Add pour ajouter le contact.
3. Saisissez un nom de contact unique dans le champ Name ainsi que les numéros de contact dans les champs
correspondants.
4. Appuyez brièvement sur la touche de fonction Save pour accepter la modication.
1. Lorsque le téléphone est inactif, appuyez brièvement sur et sélectionnez le groupe souhaité.
2. Appuyez brièvement sur
3. Modier les informations de contact.
4. Appuyez brièvement sur la touche de fonction Save pour accepter la modication.
après le contact souhaité.
et sélectionnez la liste d’appels souhaitée sur la gauche.
1. Lorsque le téléphone est inactif, appuyez brièvement sur et sélectionnez le groupe souhaité.
2. Appuyez brièvement sur
3. Appuyez brièvement sur OK
Vous pouvez facilement ajouter des contacts depuis l’historique d’appel. Pour plus d'informations,
référez-vous à Historique des appels ci-dessus.
Réglage du volume
Appuyez sur
Appuyez sur
après le contact souhaité puis sur Delete.
pendant un appel pour régler le volume sonore du combiné/haut-parleur/casque.
lorsque le téléphone est inactif pour régler le volume de la sonnerie.
F
R
A
N
Ç
A
I
S
52

Consignes de sécurit
Gardez ces instructions. Lisez ces consignes de sécurité avant utilisation de l’appareil !
Les précautions de base suivantes doivent toujours être suivies pour réduire le risque d'incendie, d'électrocution et de
blessures.
Exigences générales
Avant d'installer et d'utiliser l'appareil, lisez les consignes de sécurité et observez la situation pendant le
fonctionnement.
Lorsque l’appareil est rangé, transporté ou utilisé, veuillez le garder toujours propre et sec.
Lorsque l’appareil est rangé, transporté ou utilisé, veuillez éviter tout choc ou toute collision.
Ne tentez pas de désassembler vous-même l’appareil. En cas de mauvais fonctionnement, veuillez contacter le
centre de service désigné.
Sans consentement écrit préalable, aucune organisation ou individu n’est autorisé à apporter des changements à
la structure ou au dispositif de sécurité de l’appareil. Yealink n’est en aucun cas responsable des conséquences ou
des problèmes juridiques causés par ces changements.
Veuillez vous référer aux lois et règlements pertinents lorsque l’appareil est utilisé. Les droits légaux des tiers
doivent également être respectés.
Exigences environnementales
Placez l’appareil dans un espace correctement ventilé. N’exposez pas l’appareil à la lumière directe du soleil.
Gardez l’appareil propre et sec.
Placez l’appareil sur une surface stable et plate.
Veuillez ne placer aucun objet lourd sur l’appareil risquant d’entraîner dégâts et déformations.
Maintenez une distance d’au moins 10 cm entre l’appareil et l’objet le plus proche an que la chaleur puisse se
dissiper.
Ne placez pas l'appareil sur ou à proximité de tout objet inammable ou vulnérable au feu, comme des matériaux
en caoutchouc.
Gardez l'appareil loin de toute source de chaleur ou des ammes, comme une bougie ou un radiateur électrique.
Gardez l'appareil loin de tout appareil électroménager avec un fort champ magnétique ou un champ
électromagnétique, tel qu'un four à micro-ondes ou un réfrigérateur.
Exigences d’utilisation
Ne laissez pas des enfants utiliser l’appareil sans surveillance.
Ne laissez pas les enfants jouer avec l’appareil ou ses accessoires pour éviter tout risque d’étouement.
Veuillez uniquement utiliser les accessoires fournis ou autorisés par le fabricant.
L'alimentation de l'appareil doit satisfaire aux exigences de la tension d'entrée de l'appareil. Veuillez uniquement
utiliser la prise protégée contre les surtensions fournie.
Avant de brancher ou de débrancher tout câble, assurez-vous que vos mains sont complètement sèches.
Ne renversez aucun liquide sur le produit et n’utilisez pas l'équipement près de l'eau, par exemple, près d'une
baignoire, d'un lavabo, d'un évier, dans sous-sol humide ou près d'une piscine.
Veuillez à ne pas marcher sur, tirer sur, ou plier les câbles de l’appareil, cela pourrait entraîner son mauvais
fonctionnement.
En cas d’orage, n’utilisez pas l’appareil et débranchez-le de son alimentation. Débranchez la prise d'alimentation
et l'Asymmetric Digital Subscriber Line (ADSL) à paire torsadée (le câble de fréquence radio) pour éviter la foudre.
Si l'appareil reste inutilisé pendant une longue période de temps, débranchez-le de l'alimentation électrique et
débranchez le cordon d'alimentation.
Si l’appareil émet de la fumée, des odeurs ou bruits anormaux, débranchez l’appa
débranchez immédiatement le cordon d’alimentation. Pour toute réparation, contactez le centre de service
spécié.
N’insérez aucun objet dans les fentes de l’appareil ne faisant pas partie du produit ou n’est pas un produit
auxiliaire.
Avant de brancher un câble, connectez d’abord le câble de mise à la terre du de l’appareil. Ne débranchez pas le
câble de mise à la terre jusqu'à ce que tous les autres câbles aient été débranchés.
Exigences de nettoyage
Avant de nettoyer l’appareil, arrêtez de l’utiliser et déconnectez-le de son alimentation.
Utilisez un chion doux, sec et antistatique pour nettoyer l’appareil.
Maintenez la prise d’alimentation propre et sèche. Une prise sale ou humide peut causer des chocs électriques et
autres dangers.
reil de son alimentation et
F
R
A
N
Ç
A
I
S
53

RECYCLAGE ENVIRONNEMENTAL
Ne jetez pas cet appareil avec les déchets ménagers
Contactez vos collectivités locales pour savoir comment l’éliminer de façon écologique. La boîte en
carton, l’emballage en plastique et les composants de l’appareil peuvent être recyclés conformément
à la réglementation en vigueur dans votre pays.
Respectez toujours la réglementation en vigueur
Les personnes qui l’enfreignent sont passibles de poursuites judiciaires. Le symbole de poubelle barrée
apposé sur l’appareil signie que lorsque celui-ci a atteint sa n de vie utile, il doit être amené à un
centre de traitement des déchets spécial et traité séparément des déchets ménagers ordinaires.
F
R
A
N
Ç
A
Adresse : 309, 3th Floor, No.16, Yun Ding North Road,
I
S
54
Huli District, Xiamen City, Fujian, P.R. Chine
Téléphone : +86-592-5702000
Fax : +86-592-5702455

YEALINK (XIAMEN) NETWORK TECHNOLOGY CO.,LTD
WWW.YEALINK.COM
Déclaration de conformité
Date d’émission : 2017-03-20
Nous : YEALINK(XIAMEN) NETWORK TECHNOLOGY CO.,LTD,
Adresse : 309, 3th Floor, No.16, Yun Ding North Road, Huli District, Xiamen City, Fujian, P.R. China
Déclarons que le produit
Type : Téléphone IP Gigabit ultra élégant
Modèle : SIP VP-T49G
répond aux exigences essentielles et autres dispositions pertinentes conformément à la directive CE suivante
Directive :
Conformité
Sécurité : EN 60950-1:2006+A11:2009
EMC : EN 55032:2015
Radio :
Santé :
Directive 2011/65/EU du Parlement et du Conseil Européen du 8 Juin 2011 sur la restriction de l’utilisation
Directive 2012/19/EU du Parlement et du Conseil Européen du 24 Juillet 2012 sur les déchets
Réglement (EC) No.1907/2006 du Parlement et du Conseil Européen du 18 Décembre 2006 relatif à la
déclaration, l'évaluation, l'autorisation et la restriction des substances
chimiques (ECHA)
Directive Equipement Radio 2014/53/EU;
Le produit répond aux normes suivantes :
+A1:2010+A12:2011+A2:2013
EN 55024:2010/AC:2015
EN61000-3-2: 2006+A1 2009+A2 2009
EN61000-3-3: 2013
ETSI EN 301 489-1 V2.2.0
ETSI EN 301 489-3 V2.1.1
ETSI EN 301 489-17 V3.2.0
ETSI EN 300 328 V2.1.1
ETSI EN 301 893 V2.1.1
ETSI EN 300 440-1 V1.6.1
ETSI EN 300 440-2 V1.4.1
EN 62311:2008
de certaines substances dangereuses dans les équipements électriques et
électroniques (RoHS)
d'équipements électriques et électroniques (DEEE)
Huli District, Xiamen City, Fujian, P.R. Chine
YEALINK (EUROPE) NETWORK TECHNOLOGY B.V.
Address: Strawinskylaan 3127, Atrium Building, 8th oor,
1077ZX Amsterdam, the Netherlands
Telephone: +31(0)646111373
Email: EUROPE@Yealink.com
55

À propos de nous
VP - T 4 9 G- 4 L
Fondée en 2001, Yealink, un fournisseur leader de téléphone VoIP et de solutions de communication IP, a mis l'accent depuis plus d’une décennie
sur des produits VoIP caractérisés par leur abilité, leur simplicité d’utilisation et leur prix abordables. Aujourd'hui, des clients de plus de 140 pays
comptent sur Yealink comme pilier de la collaboration mondiale pour étendre la valeur des communications du réseau.
Plus d’informations sur Yealink
Depuis 2001, Yealink met au point des terminaux de réseau VoIP de pointe caractérisés par une haute per formance technologique, notamment les
téléphones vidéo IP, IP, USB. Présente dans plus de 140 pays, la société a mis sur pied un réseau de service international de première classe.
Notre priorité est de fournir aux clients la meilleure assistance possible ainsi que des produits de qualité, fonctionnels, conviviaux, et peu coûteux.
Pour apporter de nouvelles solutions
hautement qualiée et expérimentée en technologie VoIP qui œuvre sans relâche à la quête de l'excellence.
À ce jour, nous avons réussi à plus de 80 tests d'interopérabilité et nos produits répondent aux exigences de certication xées par les principaux
systèmes et plateformes VoIP. Yealink collabore étroitement avec T-Mobile, Telefonica, Portugal Telecom et les prestataires majeurs de services de
télécommunications.
dans ce secteur à croissance rapide, Yealink dispose d'une grande équipe de recherche et développement (R&D)
YEALINK(XIAMEN) NETWORK TECHNOLOGY CO.,LTD.
Adresse: 309, 3th Floor, No.16, Yun Ding North Road,
Huli District, Xiamen City, Fujian, P.R. China
Propriété intellectuelle©2017YEALINK(XIAMEN)
NETWORK TECHNOLOGY CO.,LTD. Tous droits réservés.
 Loading...