

Page 1

Page 2

Copyright
Copyright © 2019 YEALINK(XIAMEN) NETWORK TECHNOLOGY
Copyright © 2019 Yealink (Xiamen) Network Technology CO., LTD. All rights reserved. No parts of this publication may
be reproduced or transmitted in any form or by any means, electronic or mechanical, photocopying, recording, or otherwise, for any purpose, without the express written permission of Yealink (Xiamen) Network Technology CO., LTD.
Under the law, reproducing includes translating into another language or format.
When this publication is made available on media, Yealink (Xiamen) Network Technology CO., LTD. gives its consent to
downloading and printing copies of the content provided in this file only for private use but not for redistribution. No
parts of this publication may be subject to alteration, modification or commercial use. Yealink (Xiamen) Network Technology CO., LTD. will not be liable for any damages arising from use of an illegally modified or altered publication.
Trademarks
Yealink®, the logo and the name and marks is trademark of Yealink (Xiamen) Network Technology CO., LTD, which are
registered legally in China, the United States, EU (European Union) and other countries.
All other trademarks belong to their respective owners. Without Yealink’s express written permission, recipient shall not
reproduce or transmit any portion hereof in any form or by any means, with any purpose other than personal use.
Warranty
(1) Warranty
THE SPECIFICATIONS AND INFORMATION REGARDING THE PRODUCTS IN THIS GUIDE ARE SUBJECT TO CHANGE
WITHOUT NOTICE. ALL STATEMENTS, INFORMATION, AND RECOMMENDATIONS IN THIS GUIDE ARE BELIEVED TO BE
ACCURATE AND PRESENTED WITHOUT WARRANTY OF ANY KIND, EXPRESS OR IMPLIED. USERS MUST TAKE FULL
RESPONSIBILITY FOR THEIR APPLICATION OF PRODUCTS.
(2) Disclaimer
YEALINK (XIAMEN) NETWORK TECHNOLOGY CO., LTD. MAKES NO WARRANTY OF ANY KIND WITH REGARD TO THIS
GUIDE, INCLUDING, BUT NOT LIMITED TO, THE IMPLIED WARRANTIES OF MERCHANTABILITY AND FITNESS FOR A
PARTICULAR PURPOSE. Yealink (Xiamen) Network Technology CO., LTD. shall not be liable for errors contained herein
nor for incidental or consequential damages in connection with the furnishing, performance, or use of this guide.
(3) Limitation of Liability
Yealink and/or its respective suppliers are not responsible for the suitability of the information contained in this document for any reason. The information is provided “as is”, and Yealink does not provide any warranty and is subject to
change without notice. All risks other than risks caused by use of the information are borne by the recipient. In no
event, even if Yealink has been suggested the occurrence of damages that are direct, consequential, incidental, special,
punitive or whatsoever (Including but not limited to loss of business profit, business interruption or loss of business
information), shall not be liable for these damages.
End User License Agreement
This End User License Agreement ("EULA") is a legal agreement between you and Yealink. By installing, copying or otherwise using the Products, you: (1) agree to be bounded by the terms of this EULA, (2) you are the owner or an authorized user of the device, and (3) you represent and warrant that you have the right, authority and capacity to enter into
this agreement and to abide by all its terms and conditions, just as if you had signed it. The EULA for this product is
available on the Yealink Support page for the product.
Page 3

Patent Information
China, the United States, EU (European Union) and other countries are protecting one or more patents of accompanying products and/or patents being applied by Yealink.
Customer Feedback
We are striving to improve our documentation quality and we appreciate your feedback. Email your opinions and comments to DocsFeedback@yealink.com.
Technical Support
Visit Yealink WIKI (http://support.yealink.com/) for the latest firmware, guides, FAQ, Product documents, and more.
For better service, we sincerely recommend you to use Yealink Ticketing system (https://ticket.yealink.com) to submit
all your technical issues.
Page 4

GNU GPL INFORMATION
Yealink phone firmware contains third-party software under the GNU General Public License (GPL). Yealink uses software under the specific terms of the GPL. Please refer to the GPL for the exact terms and conditions of the license.
The original GPL license, source code of components licensed under GPL and used in Yealink products can be downloaded online: http://www.yealink.com/onepage_83.html.
Page 5

Table of Contents
Table of Contents
Table of Contents
Before You Begin
Related Documentation
Getting Started with Your Phone
Hardware Overview
VP59 Hardware
T58A Hardware
Power LED Indicator
Camera LED Indicator
Screen and Icons
Control Center and Notification Center
Idle Screen
The Home Screen
The Second Idle Screen
The Third Idle Screen
Video Call Screen
Icons in the Status Bar
Line Key Icons
Navigating Menus and Fields
Entering Information
Using the Onscreen Keyboard
English (UK) Input Method
Google Pinyin Input Method
Using the Phone Keypad and Dial Pad
1
12
12
13
13
13
15
17
17
18
18
19
19
20
21
22
23
24
24
25
25
26
28
29
Call Features
Changing the Default Account
Placing Calls
Placing a Call from the Dialer
Placing Multiple Calls
Placing a Call with a Speed Dial Key
Placing a Call Back to the Last Incoming Number
Redialing a Number
Dialing a Hotline Number
Placing an International Call
Placing a Call from the Call History
Placing a Call from the Directory
Placing an Anonymous Call
Placing a Call from the Google Contacts
Answering Calls
Answering a Call
31
31
31
32
32
32
33
33
33
34
34
34
34
35
36
36
1
Page 6

Yealink VP59 & SIP-T58A Phones User Guide
Answering a Call When in a Call
Answering a Call Automatically
Disabling Call Waiting
Switching Among the Handset, Speakerphone and Headset Modes
Audio-only/Video Call Selection
Placing an Audio-only/Video Call
Answering a Video Call
Switching between Video Call and Audio-only Call
Switching to the Audio-only Call
Initiating a Video Call
Accepting or Ignoring a Video Call Request
Switching Between Calls Screen and Idle Screen
Going Back to the Idle Screen during a Call
Returning to the Talking Screen
Options during a Video Call
Stopping Transmitting Video during a Call
Changing the Video Layout during a Call
Swapping Video
Changing the Video Layout to the Same Size Mode
Changing the Video Layout to the Full Screen Mode
Hiding the Local Video Window
Previewing the Near-Site Video
Capturing a Screenshot
Capturing a Screenshot When the Phone is Idle
Capturing a Screenshot during a Call
Viewing the Latest Screenshot
Silencing or Rejecting Incoming Calls
Silencing a Call
Rejecting a Call Manually
Rejecting Anonymous Calls
Rejecting Calls with Do Not Disturb (DND)
Rejecting Calls with DND on All Lines
Rejecting Calls with DND on a Specific Line
Deactivating DND
Ending Calls
Redialing a Call Automatically
Muting/Unmuting Audio
Keep Mute
Holding and Resuming Calls
Holding a Call
Resuming a Held Call
Redirecting Incoming Calls
Forwarding All Incoming Calls to a Contact
Forwarding All Incoming Calls on All Lines
36
37
37
38
38
38
39
39
40
40
40
40
40
40
41
41
41
41
42
43
43
43
44
44
44
44
45
45
45
45
46
46
47
47
48
48
49
49
50
50
51
51
51
51
2
Page 7

Table of Contents
Forwarding All Incoming Calls on a Specific Line
Deactivating Call Forward
Forwarding an Incoming Call Manually
Forwarding Incoming Calls with a Forward Key
Transferring Calls
Performing a Blind Transfer
Performing a Blind Transfer Normally
Performing a Blind Transfer Conveniently
Performing a Semi-Attended/Attended Transfer
Performing Transfer with a Transfer Key
Setting a Transfer Key
Performing a Blind Transfer Using a Transfer Key
Performing a Semi-attended/Attended Using a Transfer Key
Conference Calls
Local Conference
Setting Up a Local Conference Call
Merging Two Calls into a Conference
Creating a Hybrid Conference
Holding or Resuming a Conference Call
Muting or Unmuting a Conference Call
Splitting a Conference Call
Managing Conference Participants
Ending a Conference Call
Network Conference
Setting Up a Network Conference
Call Recording
Recording a Call
Recording a Conference
Setting a Mark When Recording a Call
Stopping a Recording
Checking Storage Space
Multicast Paging
Sending Multicast Paging
Setting a Multicast Paging Key
Sending a Paging by a Multicast Paging Key
Setting a Paging List Key
Setting a Paging Group
Sending Pages by a Paging List Key
Deleting a Paging Group
Receiving Multicast Paging
Managing a Paging Call
52
52
53
53
53
54
54
54
55
56
56
56
57
57
57
58
58
59
60
60
60
60
60
60
61
61
61
62
62
62
63
63
63
64
64
65
65
65
66
66
66
Advanced Call Features
Using Call Completion
Call Pickup
67
67
68
3
Page 8

Yealink VP59 & SIP-T58A Phones User Guide
Picking up a Call Directly
Picking up a Group Call Directly
Picking up a Call with a Directed Pickup Key
Picking up a Call with a Group Pickup Key
Call Park and Call Retrieve
Parking or Retrieving a Call in the FAC Mode
Parking a Call in the FAC Mode
Retrieving a Parked Call in the FAC Mode
Parking or Retrieving a Call in the Transfer Mode
Parking a Call in the Transfer Mode
Retrieving a Parked Call in the Transfer Mode
Parking or Retrieving a Call with a Park or Retrieve Key
State Indicator of the Park/Retrieve key
Parking a Call using a Park Key
Retrieving a Parked Call using a Retrieve Key
Busy Lamp Field (BLF)
Setting a BLF Key
State Indicator of Remote Line by BLF Key
Visual Alert for Monitored Lines
Picking up a Remote Call by BLF Key
Transferring a Call by BLF Key
Performing a Blind Transfer
Performing a Semi-attended/Attended Transfer
Parking or Retrieving a Call by BLF Key
Parking a Call to a Monitored Line
Retrieving a Parked Call
BLF List
State Indicator of Remote Line by BLF List Key
Visual Alert for Monitored Lines
Picking up a Remote Call by BLF List Key
Transferring a Call by BLF List Key
Performing a Blind Transfer
Performing a Semi-attended/Attended Transfer
Retrieving a Call by a BLF List Key
Barging in an Active Call by BLF List Key
Shared Line
State Indicator of Shared Line
Placing Calls on a Shared Line
Answering Calls on a Shared Line
Placing a Call on Public Hold
Placing a Call on Private Hold
Retrieving a Held Call on a Shared line
Barging in an Active Call on a Shared line
Pulling a Shared Call on a Shared line
68
69
69
70
70
70
70
71
71
72
72
72
72
73
73
74
74
74
75
75
75
76
76
76
76
76
77
77
77
78
78
78
78
78
79
79
79
80
80
80
80
81
81
82
4
Page 9

Table of Contents
Intercom
State Indicator of the Intercom key
Placing an Intercom Call
Picking up an Incoming Call of the Target Extension
Answering an Intercom Call
Video/Voice Mail
Setting the Voice Mail Code
Leaving Voice Mails
Listening to Voice Mails
Using the Hot Desking
Automatic Call Distribution (ACD)
State Indicator of ACD User
Logging into the ACD System
Changing the ACD Status
Directory
Local Directory
Managing the Local Directory Groups
Adding Contact Groups
Editing Contact Groups
Deleting Contact Groups
Managing the Local Directory Contacts
Adding Contacts
Viewing Contacts
Editing Contacts
Deleting a Contact
Deleting All Contacts
Moving a Local Directory Contact to Blacklist
Moving a Local Directory Contact to the Shared Directory
Searching for Contacts
Blacklist
Adding a Blacklist Contact
Viewing Blacklist Contacts
Editing a Blacklist Contact
Deleting Blacklist Contacts
Deleting a Blacklist Contact
Deleting All Blacklist Contacts
Moving a Blacklist Contact to the Local Directory
Mobile Contacts
Saving a Mobile Contact to the Local Directory
Searching for Mobile Contacts
Updating the Mobile Contacts
Google Contacts
Enabling the Google Contacts Feature
Viewing Google Contacts
82
82
83
83
84
85
85
85
85
86
86
86
87
87
89
89
89
89
89
90
90
90
90
90
91
91
91
91
92
92
93
93
93
93
93
93
94
94
94
95
95
96
96
96
5
Page 10

Yealink VP59 & SIP-T58A Phones User Guide
Adding a Google Contact
Editing a Google Contact
Deleting a Google Contact
Searching for Google Contacts
Manually Updating the Google Contacts
Remote Phone Book
Searching for Remote Phone Book Contacts
Viewing Remote Phone Book Contacts
Saving a Remote Phone Book Contact to the Local Directory
Saving a Remote Phone Book Contact to the Blacklist
Call History
Call History Icons
Viewing History Records
Saving a History Record to Local Directory
Saving a History Record to Blacklist
Adding a History Record to Shared Directory
Deleting History Records
Deleting a Call Record
Deleting All Call Records
Disabling History Record
96
97
97
97
98
98
98
98
98
99
101
101
101
101
101
102
102
102
102
103
System Applications
Managing Applications and Widgets
Adding a Widget to the Idle Screen
Resizing a Widget
Moving an Application or Widget
Removing a Widget from the Idle Screen
Creating a Folder
Renaming a Folder
Managing Running Applications
APP Accounts
Adding APP Accounts
Syncing APP Account Information
Removing APP Accounts
File Manager
Viewing Files
Searching Files
Copying Files
Cutting Files (Moving Files)
Deleting Files
Sharing Pictures/Videos/Audio via Bluetooth
Sharing Pictures/Videos/Audio via Email
Gallery
Viewing Pictures/Videos
105
105
105
105
106
107
107
108
108
109
109
110
111
111
111
111
112
112
113
113
114
115
116
6
Page 11

Table of Contents
Editing Pictures
Rotating Pictures
Adding a Filter for Pictures
Adding a Frame for Pictures
Cropping Pictures
Coloring Pictures
Setting a Picture as Wallpaper
Printing Pictures
Deleting Pictures/Videos
Taking a Picture/Video
Sharing Pictures/Videos via Bluetooth
Sharing Pictures/Videos via Email
Recorder
Recording Audio
Playing a Recorded Call
Pause/Resuming a Playback
Fast Forwarding/Rewinding a Playback
Stopping a Playback
Renaming the Recording
Deleting a Recording
Deleting All Recordings
Checking Storage Space
Camera
Inserting the USB Camera to the Phone
Taking Pictures
Recording Videos
Camera Settings
Email
Signing In Email
Sending Emails
Reading Emails
Deleting Emails
Marking/Printing Email
Adding Multiple Email Accounts
Using Email Widget
Sending Files via Email
Browser
Browsing a Web Page
Managing Bookmarks
Adding a Web Page to the Bookmarks Library
Accessing a Web Page from the Bookmarks Library
Editing a Bookmark
Deleting a Bookmark
Setting a Home Page
116
117
117
117
117
118
118
118
119
119
120
121
122
123
123
124
124
124
124
125
125
125
125
125
126
126
127
127
127
127
128
128
128
129
129
130
130
130
131
131
131
132
132
132
7
Page 12

Yealink VP59 & SIP-T58A Phones User Guide
Clearing the Navigation History
Modifying the Browser Settings
Calendar
Signing Into Calendar
Creating an Event
Checking Events
Modifying the Calendar Settings
Calculator
Clock
Alarm
Setting an Alarm Clock
Editing an Alarm Clock
Deleting an Alarm Clock
Setting the Alarm Parameters
Clock
Adding the Clock of Other Cities
Configuring the Clock Display Mode
Setting a Timer
Setting a Stopwatch
Customizing Your Phone
Changing the Administrator Password
Wallpaper
Changing Wallpaper on Idle Screen
Adding a Wallpaper from a USB Flash Drive
Screen Saver
Changing the Waiting Time for Screen Saver
Setting the Screen Saver Type
Changing the Screen Backlight and Time
Changing the Language
Changing the Input Method
Time & Date
Setting the Time and Date Manually
Changing the Time and Date Format
Setting a Key as Send
Phone Lock
Setting the Phone Lock
Locking Your Phone Manually
Unlocking Your Phone
Changing Your Phone Unlock PIN
Line Keys
Assigning Functionality to a Line Key
Changing the Locations of the Line Keys
Deleting a Line Key
133
133
133
133
134
134
135
136
136
136
136
137
137
137
138
138
138
139
139
141
141
141
141
142
142
142
142
143
144
144
145
145
146
146
146
146
147
147
147
148
148
149
149
8
Page 13

Table of Contents
Audio Settings
Adjusting the Volume
Setting the Ring Tone
Setting a Ring Tone for the Phone
Setting a Ring Tone for an Account
Setting a Ring Tone for a Group
Setting a Ring Tone for a Contact
Disabling the Key Tone
Enabling Touch Tone
Configuring Notification Sound
Enabling Silent Mode
Bluetooth
Activating the Bluetooth Mode
Pairing and Connecting the Bluetooth Headset
Pairing and Connecting the Bluetooth-enabled Mobile Phone
Syncing the Mobile Contacts to the Phone
Enabling the Mobile Contacts Sync Feature
Viewing Your Mobile Contacts
Handling a Mobile Phone Call on the Phone
Configuring the Phone Audio Feature
Configuring the Media Audio Feature
Changing Your Phone's Bluetooth Name
Disabling Bluetooth Device Discovery
Renaming the Paired Bluetooth Device
Unpairing the Bluetooth Device
Sending Files via Bluetooth
Receiving Files via Bluetooth
Disconnecting the Bluetooth Device
Deactivating the Bluetooth Mode
151
151
151
151
151
152
152
152
153
153
153
154
154
154
155
156
156
157
157
158
158
158
159
159
159
159
160
160
160
Wireless Network
Activating the Wi-Fi Mode
Connecting to the Wireless Network
Connecting to an Available Wireless Network Manually
Connecting to the Wireless Network Using Wi-Fi Protected Setup
Adding a Wireless Network Manually
Viewing the Wireless Network Information
Disconnect from a Wireless Network
Deactivating the Wi-Fi Mode
Optional Accessories with Your Phone
Headset
Connecting the Analog Headset
Bluetooth Headset
USB Headset
162
162
162
162
163
164
164
164
165
167
167
167
167
167
9
Page 14

Yealink VP59 & SIP-T58A Phones User Guide
Using Headsets
Expansion Module and Your Phone
Connecting the Expansion Module
Assigning the Features for Ext Keys
Adjusting the Screen Saver of Expansion Module
Adjusting the Backlight of Expansion Module
Changing the EXP Wallpaper from Phone
Adding an EXP Wallpaper from a USB Flash Drive
Using Handsets on the VP59/T58A Phone
Attaching the DECT USB Dongle DD10K
Handset Registration
Setting the Phone to the Handset Registration Mode
Registering a Handset to the Phone
De-registering a Handset on the Handset
De-registering a Handset on the Phone
DECT Intercom
Configuring Auto Intercom
Placing a DECT Intercom Call on the Handset
Placing a DECT Intercom Call on the Phone
Placing a DECT Intercom Call with a DECT Intercom Key
Performing a Blind Transfer to the Handset
Merging the DECT Intercom Call with SIP Call into a Conference
Repeater Mode
Enabling the Repeater Mode
Setting the Phone to the Repeater Registration Mode
Registering a Repeater
Master-Slave Mode
Selecting a Slave Handset for Your Phone
Push an Active Call to the Slave Handset
Pull an Active Call from the Slave Handset
Shared Directory
Adding Shared Contacts
Viewing Shared Contacts
Editing Shared Contacts
Deleting a Shared Contact
Deleting All Shared Contacts
Searching for Shared Directory Contacts
Moving a Shared Contact to the Blacklist Directory
Saving a Shared Contact to the Local Directory
Placing a Call from the Shared Directory
Renaming the Handset
Locating a Handset
Changing Base PIN
168
168
168
168
169
169
169
169
171
171
171
171
172
172
172
173
173
173
174
174
174
175
175
175
175
176
176
176
177
177
178
178
178
178
179
179
179
179
180
180
180
180
180
10
Page 15

Table of Contents
Maintaining Your Phone
Investigating Warnings
Clearing Warning Icon
Rebooting Your Phone
Resetting to Factory Settings
Updating the Phone Configuration
Appendix - Menu Structure
183
183
183
184
184
184
187
11
Page 16

Yealink VP59 & SIP-T58A Phones User Guide
Before You Begin
This guide provides information you need to quickly use your new phone.
Firstly, verify with your system administrator that the IP network is ready for phone configuration. Also be sure to read
the Quick Start Guide which can be found in your phone package before you set up and use the phone. As you read
this guide, keep in mind that some features are only configurable by your system administrator or determined by your
phone environment. As a result, some features may not be enabled or may be operated differently on your phone. Additionally, the examples and graphics in this guide may not directly reflect what is displayed or is available on your
phone screen.
Note
This guide mainly takes the SIP-T58A phones as an example.
Related Documentation
You can view more types of documents to make the phone to perform more functions.
You can obtain additional information of the following phones from Yealink Support:
l Flagship Smart Video Phone VP59
l Smart Business Phone SIP-T58A
The following types of related documents are available on each support page on Yealink support page:
l Release Notes, which details bug fixes and feature enhancements when an update is released.
l Quick Start Guide, which describes how to assemble your phone and configure the basic phone features.
l Wall Mount Installation Guide, which provides detailed instructions on how to use an optional wall mount bracket
to mount your phone on the wall. It is only applicable to SIP-T58A phones.
l Administrator Guide, which provides the detailed information on how to configure phone features for system admin-
istrator.
l Regulatory Notice, which provides information about all regulatory and safety guidance.
You can also view other user documents which provide descriptions and examples for phone settings and features on
Yealink support page.
12
Page 17
Getting Started with Your Phone
Getting Started with Your Phone
Before you use your phone, take some time to get familiar with its features and user interface.
The terms "the phone" and "your phone" refer to any of the IP phones. Unless specifically noted in this guide, all
phone models are operated in similar ways.
Topics
Hardware Overview
Screen and Icons
Navigating Menus and Fields
Entering Information
Hardware Overview
Understanding the phone hardware helps you easily use the phone's features.
Topics
VP59 Hardware
T58A Hardware
Power LED Indicator
Camera LED Indicator
VP59 Hardware
13
Page 18
Yealink VP59 & SIP-T58A Phones User Guide
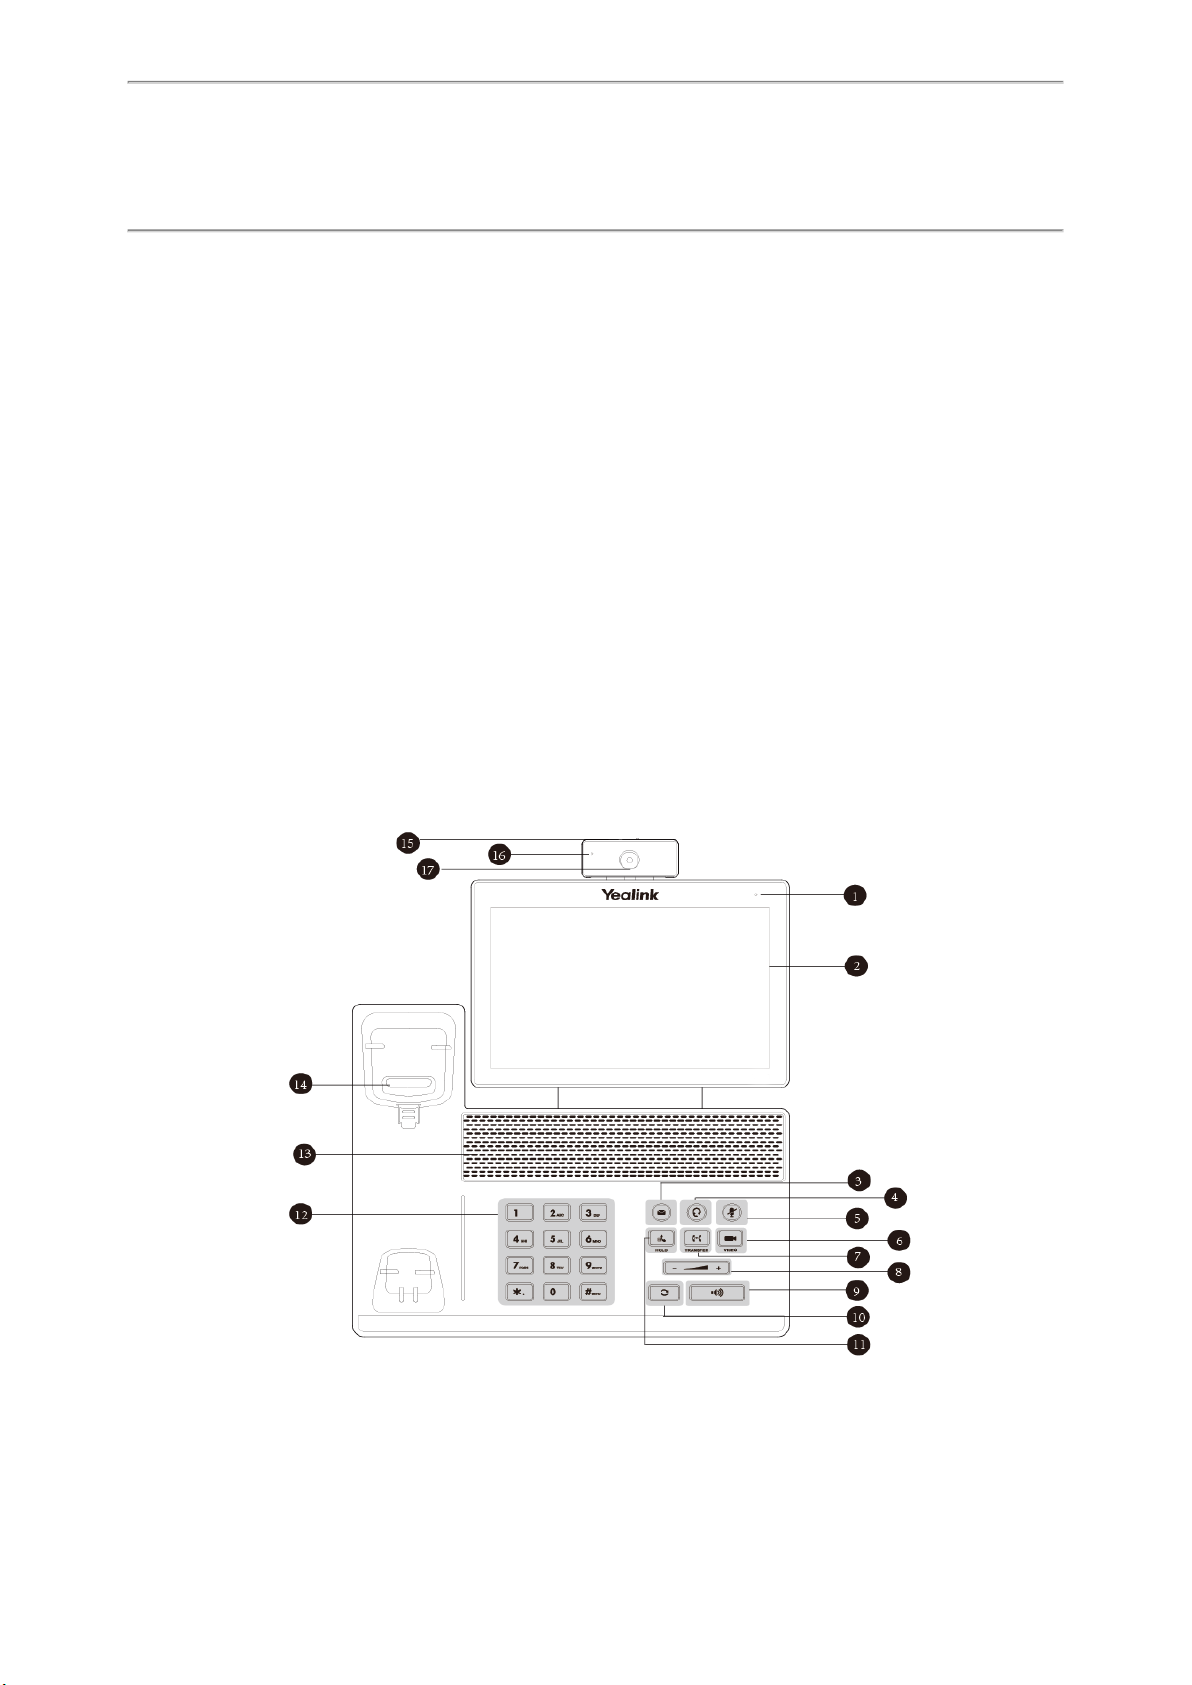
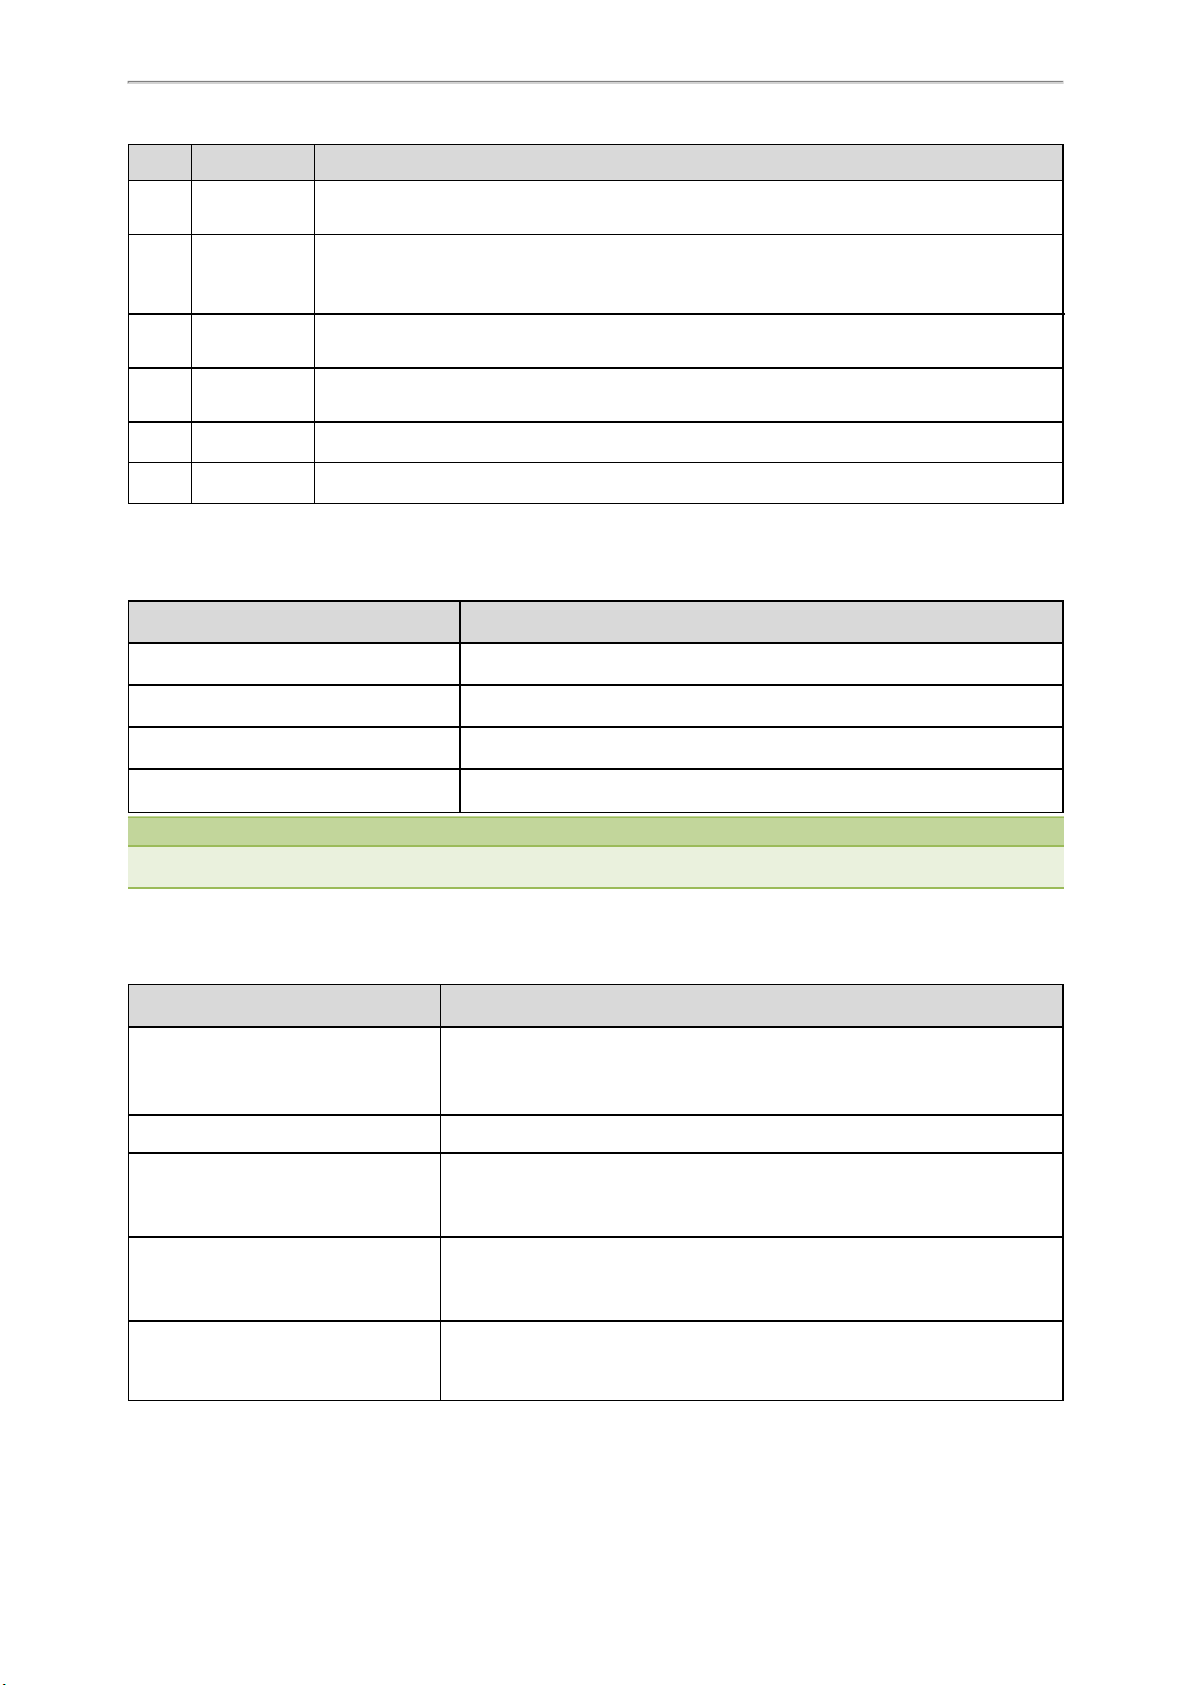
No. Item Description
Power LED
1
indicator
2 Touch Screen
3 MESSAGE Key
4 HEADSET Key
5 MUTE Key Toggles and indicates mute feature. The key LED glows red when the call is muted.
6 VIDEO Key
7 TRANSFER Key Transfers a call to another party.
8 Volume Key Adjusts the volume of the handset, headset and speaker.
Speakerphone
9
Key
10 REDIAL Key Redials a previously dialed number.
11 HOLD Key Places a call on hold or resumes a held call.
Indicates call status, message status and phone’s system status.
Allows you to select items and navigate menus on the touch-sensitive screen. Tap to select
and highlight screen items.
Shows information about calls, messages, time, date and other relevant data.
• Accesses voice mails.
• Captures screenshots during a video call.
Toggles and indicates the headset mode.
The key LED glows green when headset mode is activated.
• Allows you to preview local-site video when the phone is idle.
• Controls the transmission of video images during calls and conferences.
Toggles and indicates the hands-free (speakerphone) mode. The key LED glows green when
the hands-free (speakerphone) mode is activated.
12 Keypad Provides the digits and special characters in context-sensitive applications.
13 Speaker Provides hands-free (speakerphone) audio output.
• Picking up the handset from the handset cradle, the hookswitch bounces and the phone con-
14 Hookswitch
14
nects to the line.
• Laying the handset on the handset cradle, the phone disconnects from the line.
Page 19
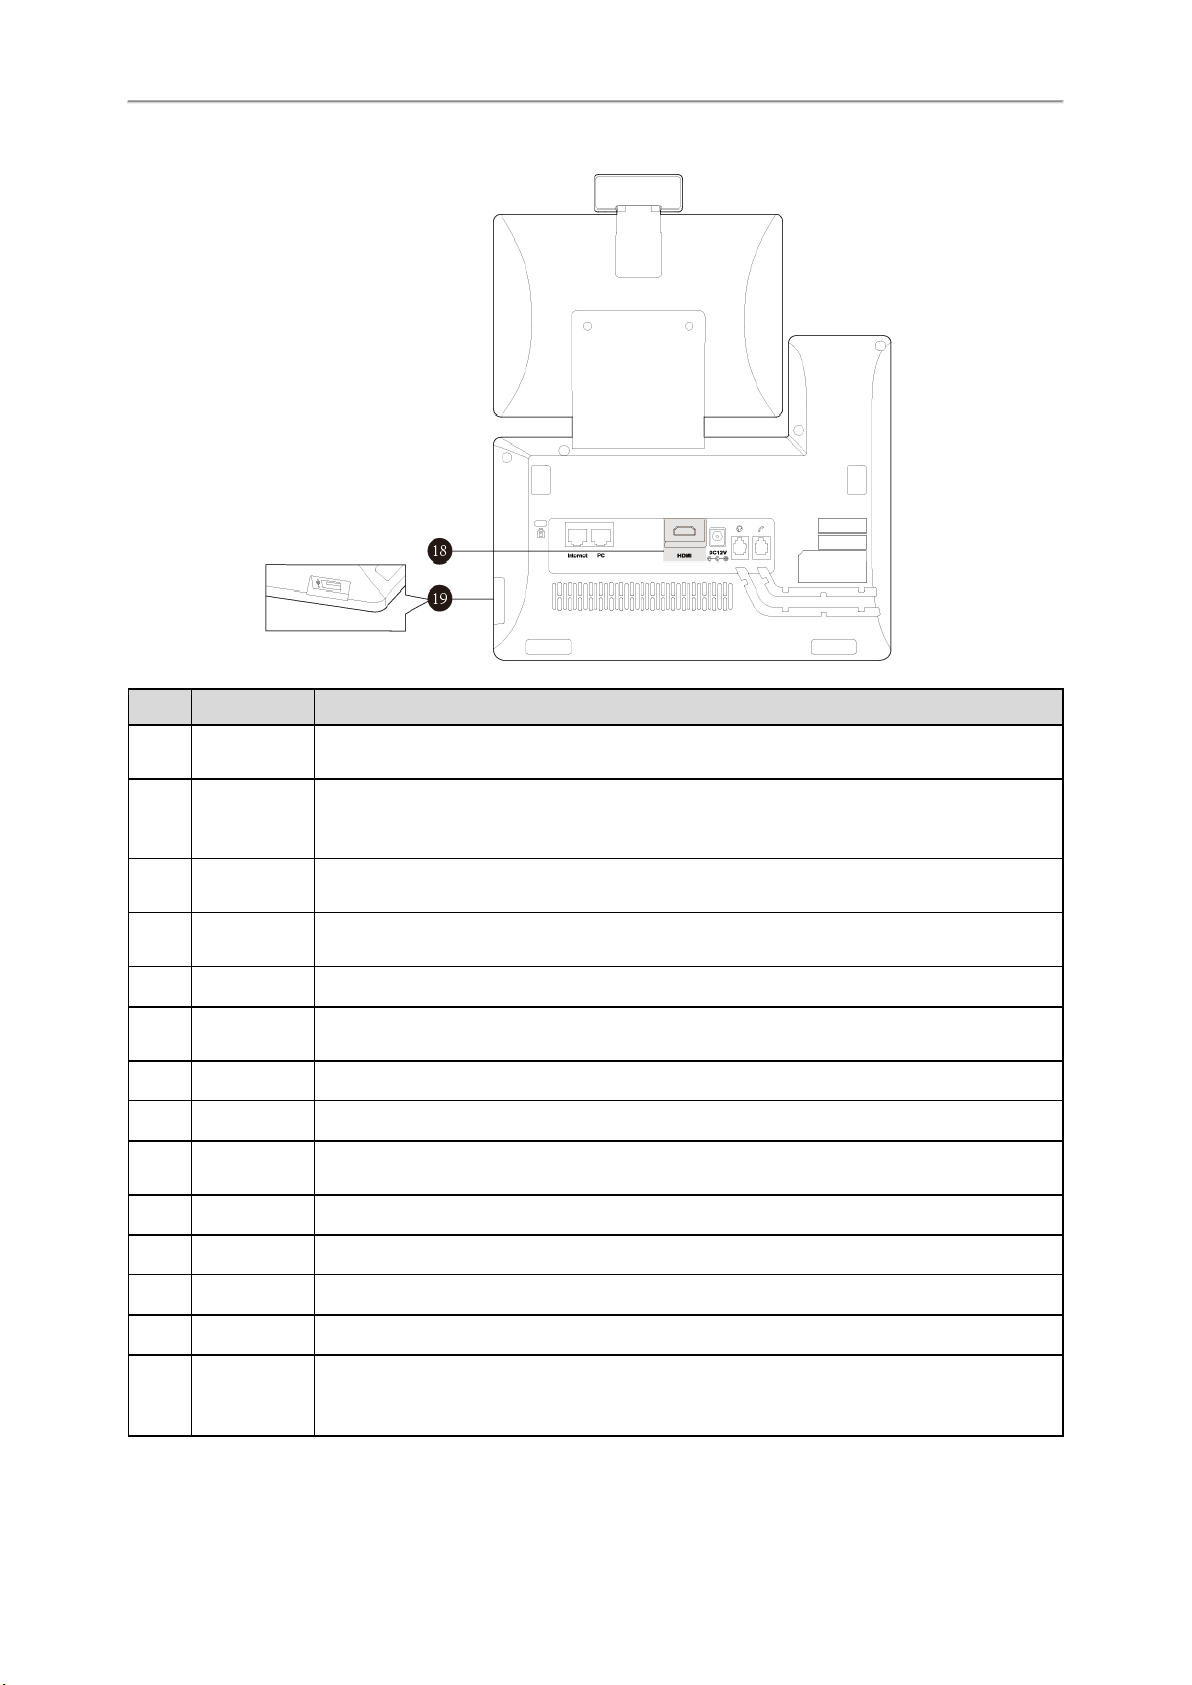
No. Item Description
15 Privacy Shutter
Camera LED
16
indicator
17 Camera Lens
18 HDMI Port
19 USB2.0 Port
Covers and uncovers the camera. When the camera is switched off, the video image turns to
be black.
Indicates video call status and camera status.
2 Mega-pixel camera. Provides near-site video. The best distance between camera and the
images you want to capture should be within 0.35 meters (1 foot) to 2 meters (6 feet).
Allows you to connect an external monitor (optional) to your phone and the video image captured from camera (both near site and far site) will also be shown on the external monitor during a video call.
Allows you to connect an optional USB device (for example, USB flash drive, DD10K) to your
phone.
T58A Hardware
Getting Started with Your Phone
15
Page 20
Yealink VP59 & SIP-T58A Phones User Guide
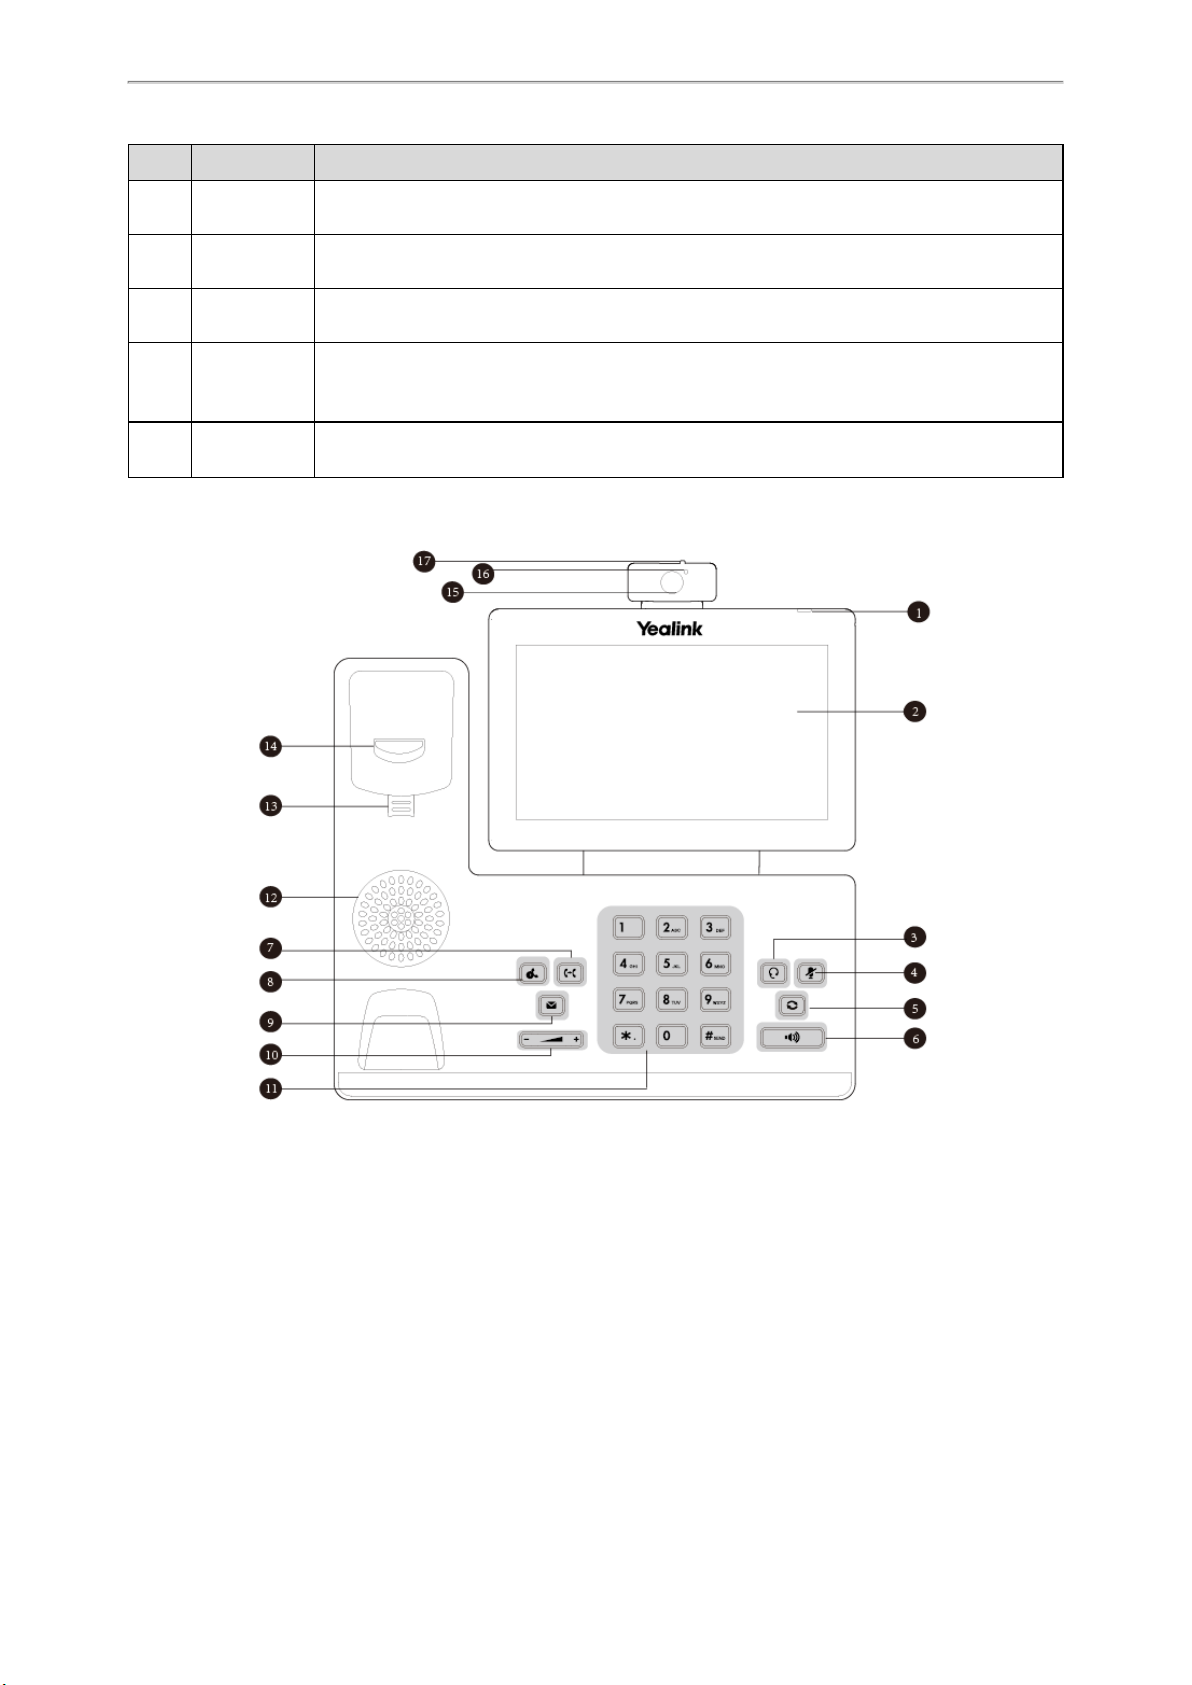
No. Item Description
Power LED
1
indicator
2 Touch Screen
3 HEADSET Key
4 MUTE Key Toggles and indicates mute feature. The key LED glows red when the call is muted.
5 REDIAL Key Redials a previously dialed number.
Speakerphone
6
Key
7 TRANSFER Key Transfers a call to another party.
8 HOLD Key Places a call on hold or resumes a held call.
9 MESSAGE Key
10 Volume Key Adjusts the volume of the handset, headset and speaker.
11 Keypad Provides the digits and special characters in context-sensitive applications.
12 Speaker Provides hands-free (speakerphone) audio output.
Indicates call status, message status and phone’s system status.
Allows you to select items and navigate menus on the touch-sensitive screen. Tap to select
and highlight screen items.
Shows information about calls, messages, time, date and other relevant data.
Toggles and indicates the headset mode. The key LED glows green when headset mode is activated.
Toggles and indicates the hands-free (speakerphone) mode. The key LED glows green when
the hands-free (speakerphone) mode is activated.
• Accesses voice mails.
• Captures screenshots during a video call.
13 Reversible Tab
16
Secures the handset in the handset cradle when the phone is mounted vertically. For more
Page 21
Getting Started with Your Phone
No. Item Description
information on how to adjust the reversible tab, refer to
Guide for Yealink IP Phones
• Picking up the handset from the handset cradle, the hookswitch bounces and the phone con-
14 Hookswitch
15 Camera Lens
Camera LED
16
Indicator
17 Privacy Shutter Covers and uncovers the camera. When the camera is switched off, the video image is black.
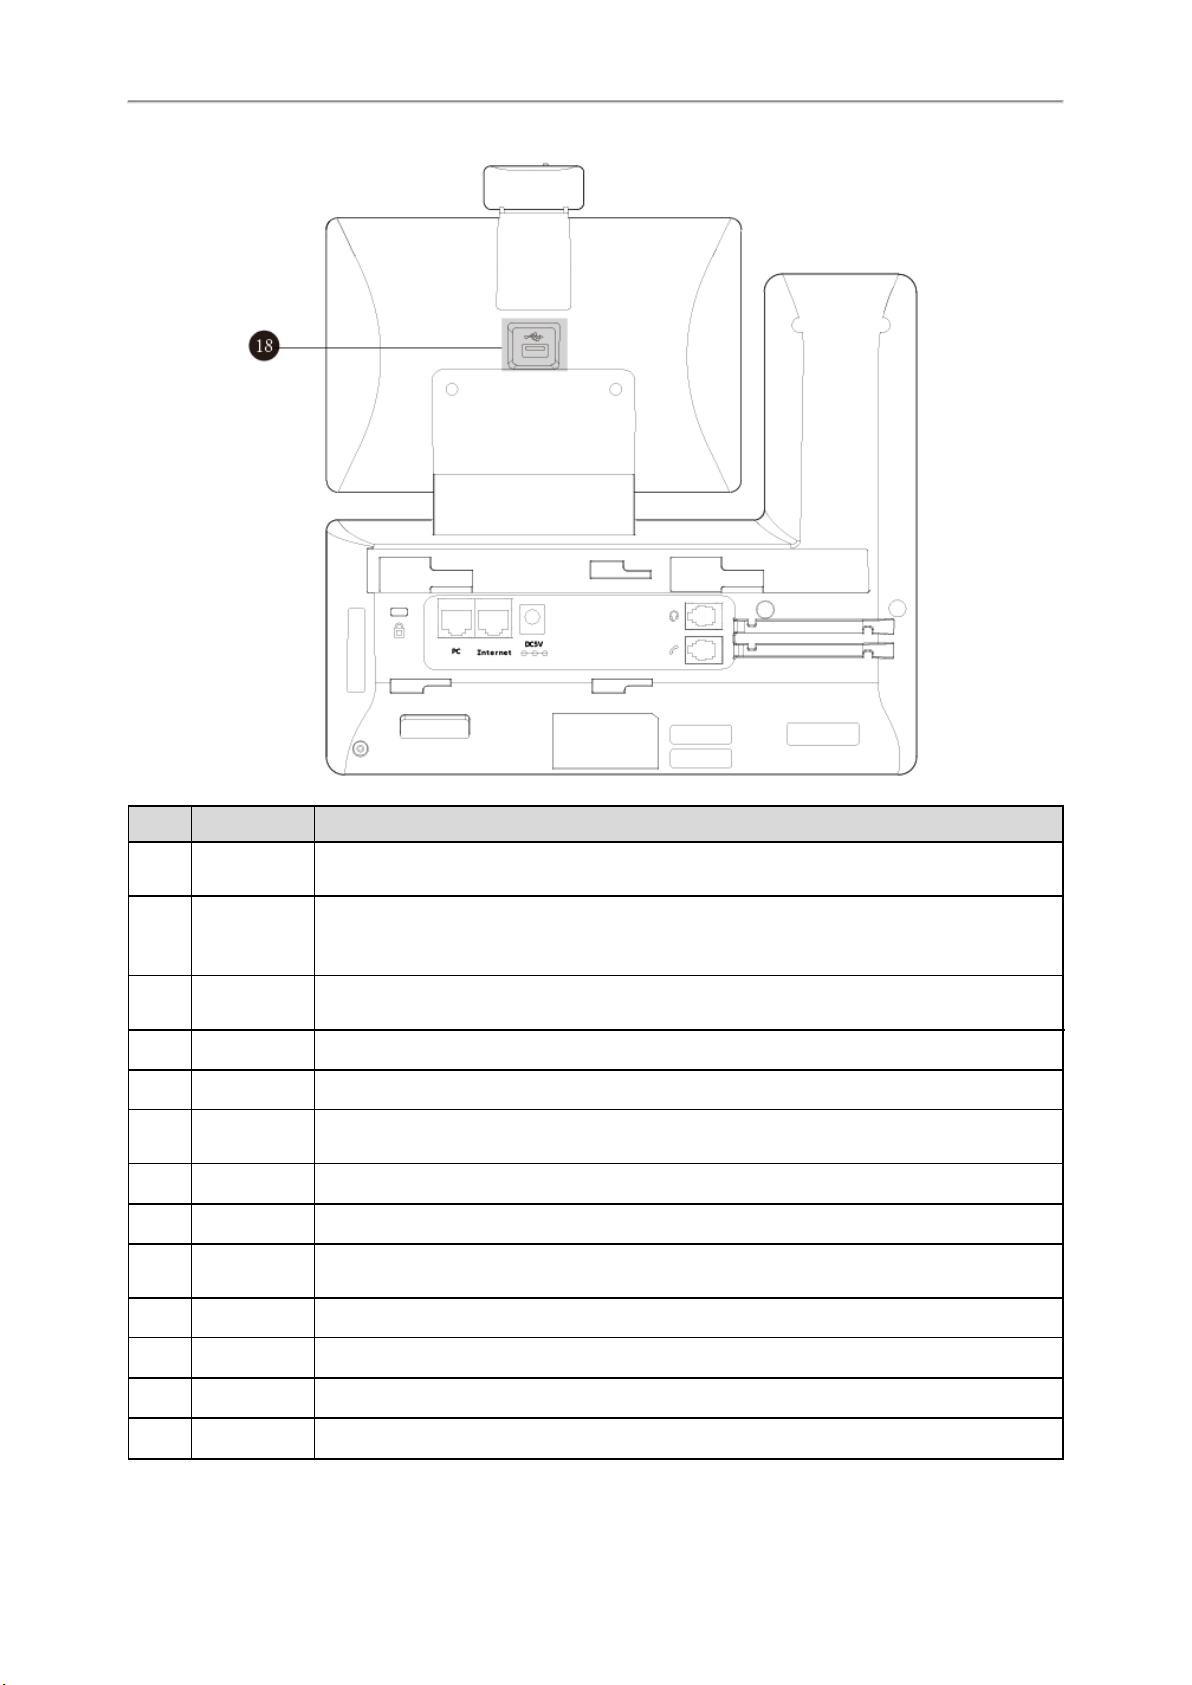
18 USB2.0 Port Allows you to connect an optional USB flash drive/EXP50/USB headset/DD10K to your phone.
nects to the line.
• Laying the handset down on the handset cradle, the phone disconnects from the line.
2 Mega-pixel camera. Provides near-site video. The better distance between camera and
images you want to capture should be in the range of 0.35 meters (1 foot) to 2 meters (6 feet).
Indicates video call status and camera status.
.
Yealink Wall Mount Quick Installation
Power LED Indicator
The power LED indicator indicates the call and message status.
LED Status Description
Solid red The phone is initializing.
Fast-flashing red (0.3s) The phone is ringing.
Slow-flashing red (1s) The phone receives a voice mail.
Solid red for 0.5s and off for 3s alternately The phone enters the power-saving mode.
Note
The above introduces the default LED status. Your system administrator can configure the status of the power LED indicator.
Camera LED Indicator
The camera LED indicator indicates the phone and camera status.
LED Status Description
The phone is powered on and the camera is properly connected to the phone.
Solid green
Flashing green The phone receives a video call.
Solid red
Slow-flashing red
Off
The camera is idle.
The phone receives an audio-only call.
There is an active video call.
The video call is muted.
The video call is held.
The shutter switch is open, but the near-site video is stopped transmitting during a video call.
The video call is placed on hold.
The phone is powered off.
The camera is not properly connected to the phone.
The shutter switch is closed.
17
Page 22
Yealink VP59 & SIP-T58A Phones User Guide
Screen and Icons
The user screens and icon indicators can help you navigate and understand the important information of the phone's
status.
Topics
Control Center and Notification Center
Idle Screen
Video Call Screen
Icons in the Status Bar
Line Key Icons
Control Center and Notification Center
Control center or notification center allows you to access some features or view important notifications quickly.
Procedure
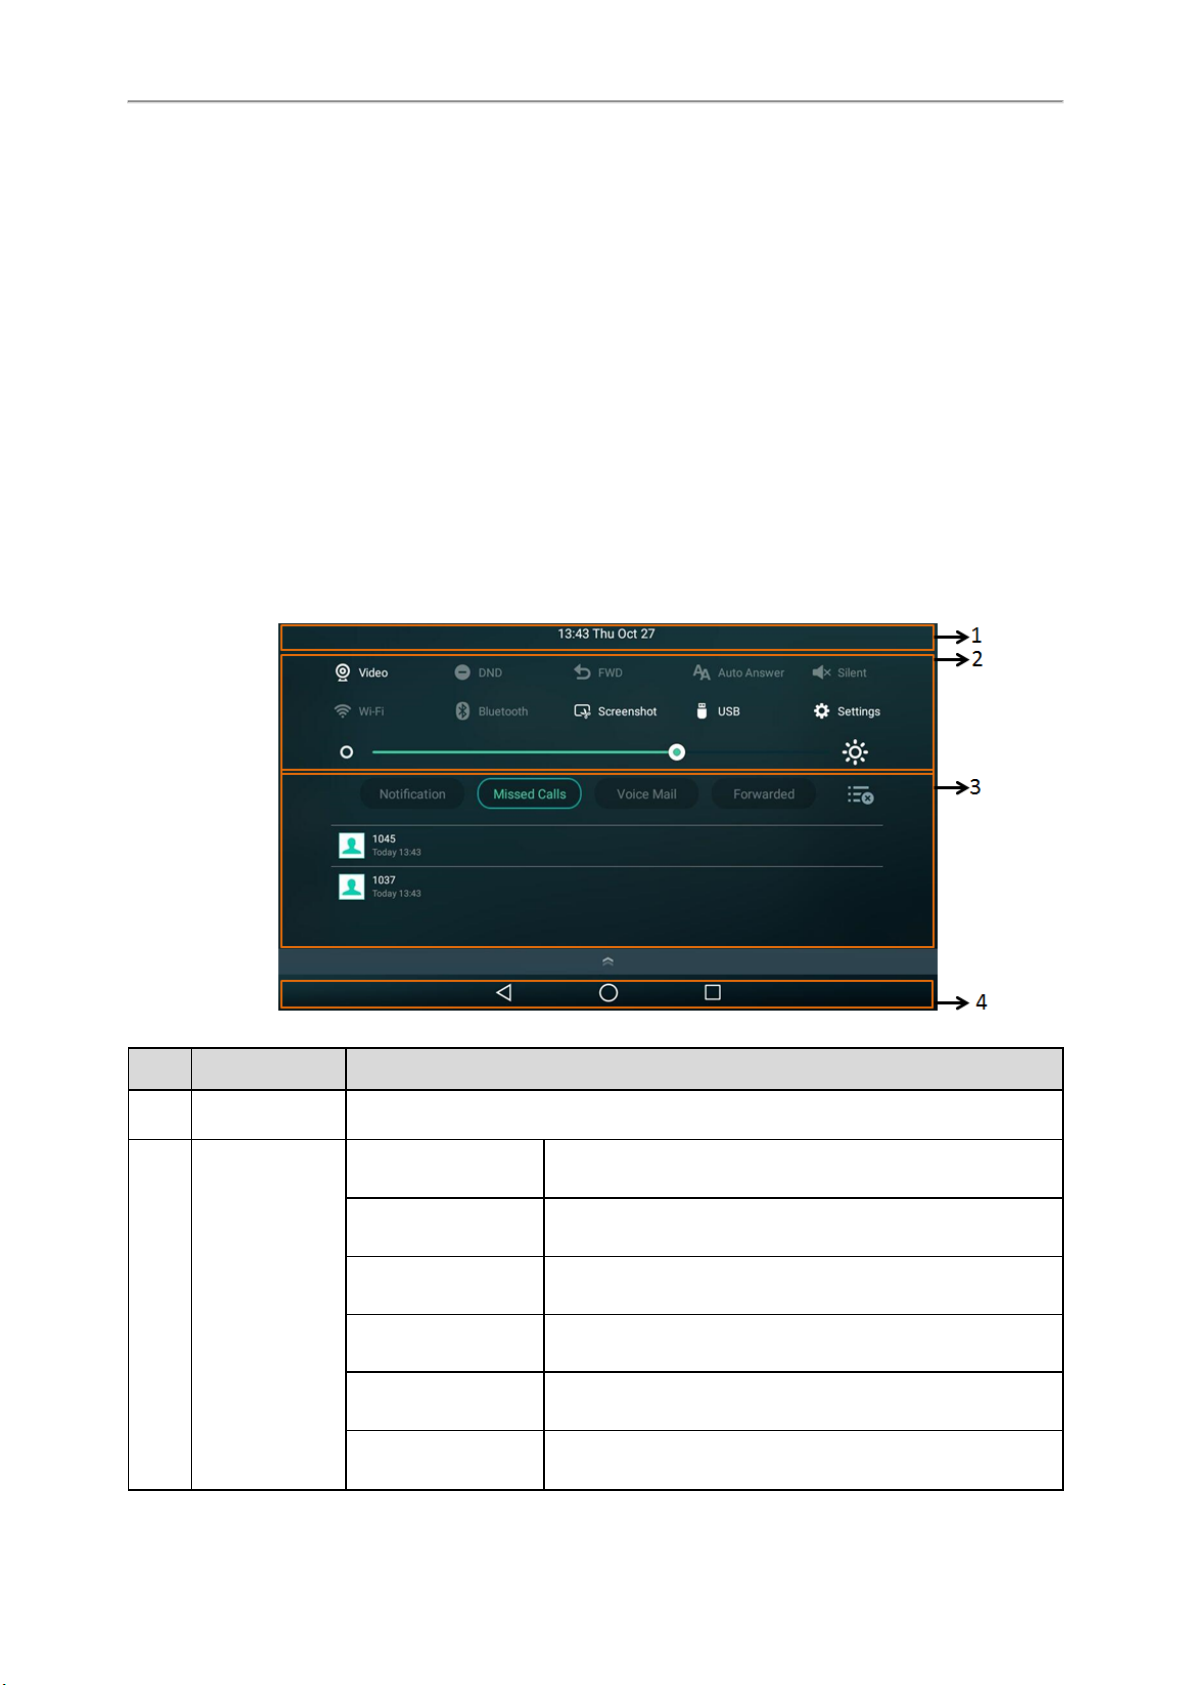
1. Swipe down from the top of the screen.
No. Name Description
1 Time and date Display the phone’s time and date.
Video
DND Tap to turn on/off DND quickly.
FWD Tap to enter Call Forward setting screen.
2 Control Center
Auto Answer Tap to enter Auto Answer setting screen.
Silent Tap to turn on/off Silent quickly.
Wi-Fi l Tap to turn on/off Wi-Fi quickly.
18
l Tap to access the Camera when the phone is idle.
l Tap to stop transmitting video during a video call.
Page 23

No. Name Description
l Long tap to enter the Wi-Fi setting screen.
Getting Started with Your Phone
Bluetooth
l Tap to turn on/off Bluetooth quickly.
l Long tap to enter the Bluetooth setting screen.
Screenshot Tap to capture a screenshot.
USB
Tap to access the File Manager to manage the files in the USB
flash drive.
Settings Tap to enter the Settings screen.
Backlight Drag the slider to adjust the screen brightness quickly.
l Tap Notification/Missed Calls/Voice Mail/Forwarded to view the corresponding noti-
fication list.
3 Notification Center
l Tap the desired notification message to view the details.
l Swipe left or right to delete a specific notification.
l Tap to delete all notifications.
: tap to go back to the previous screen.
4 Android Keys
: tap to return to the idle screen.
: tap to view and manage the list of recently used applications.
You can swipe up from the bottom of the screen to hide this screen.
Idle Screen
The phone has three idle screens by default. You can swipe left or right to switch among different idle screens.
You can add a new idle screen by moving an application or widget to the right side of the third idle screen. This idle
screen will be deleted automatically if there is no application or widget on it.
Topics
The Home Screen
The Second Idle Screen
The Third Idle Screen
Related Topic
Managing Applications and Widgets
The Home Screen
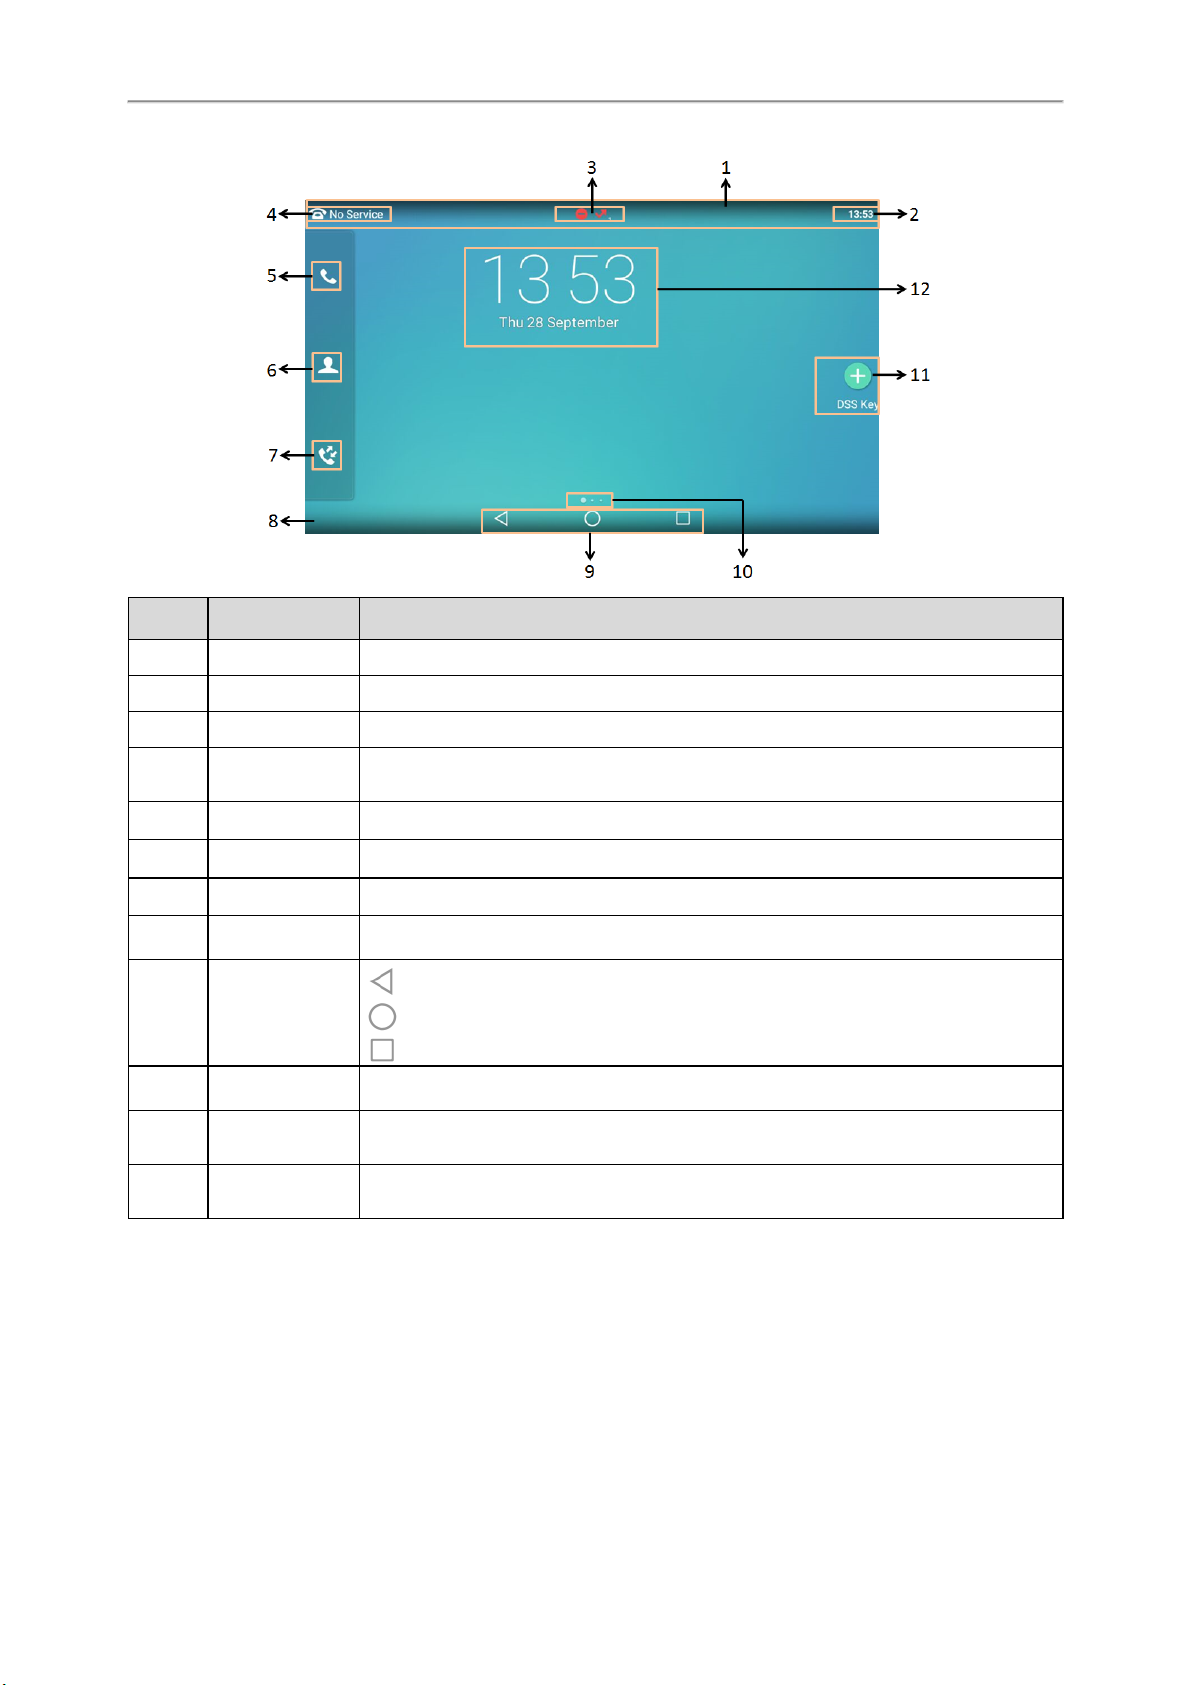
On the home screen, you can view the phone's current state, add line keys, and access the dialing, Directory, and History screens.
19
Page 24
Yealink VP59 & SIP-T58A Phones User Guide
No. Name Description
1 Status Bar Displays the phone’s default account, icons and time.
2 Time The phone’s time is displayed on the right of the status bar.
3 Icons Icons are displayed in the middle of the status bar.
4 Default account
5 Phone Dialer Tap to enter the dialing screen.
6 Directory Tap to enter the Directory screen and view contacts.
7 History Tap to enter the History screen and view call history.
8 Wallpaper Shows the specified wallpaper, which can be customized.
9 Android Keys
10 Screen Indicator Indicates which idle screen is displayed.
11 DSS Key
Digital Clock Wid-
12
get
The label of the default account is displayed on the left of the status bar.
If there is no account registered on the IP phones, this field will display No Service.
: tap to go back to the previous screen.
: tap to return to the idle screen.
: tap to view and manage the list of recently used applications.
Tap to add a line key, and then the line key list will be displayed on the right of the home
screen.
Displays the phone’s time and date.
The Second Idle Screen
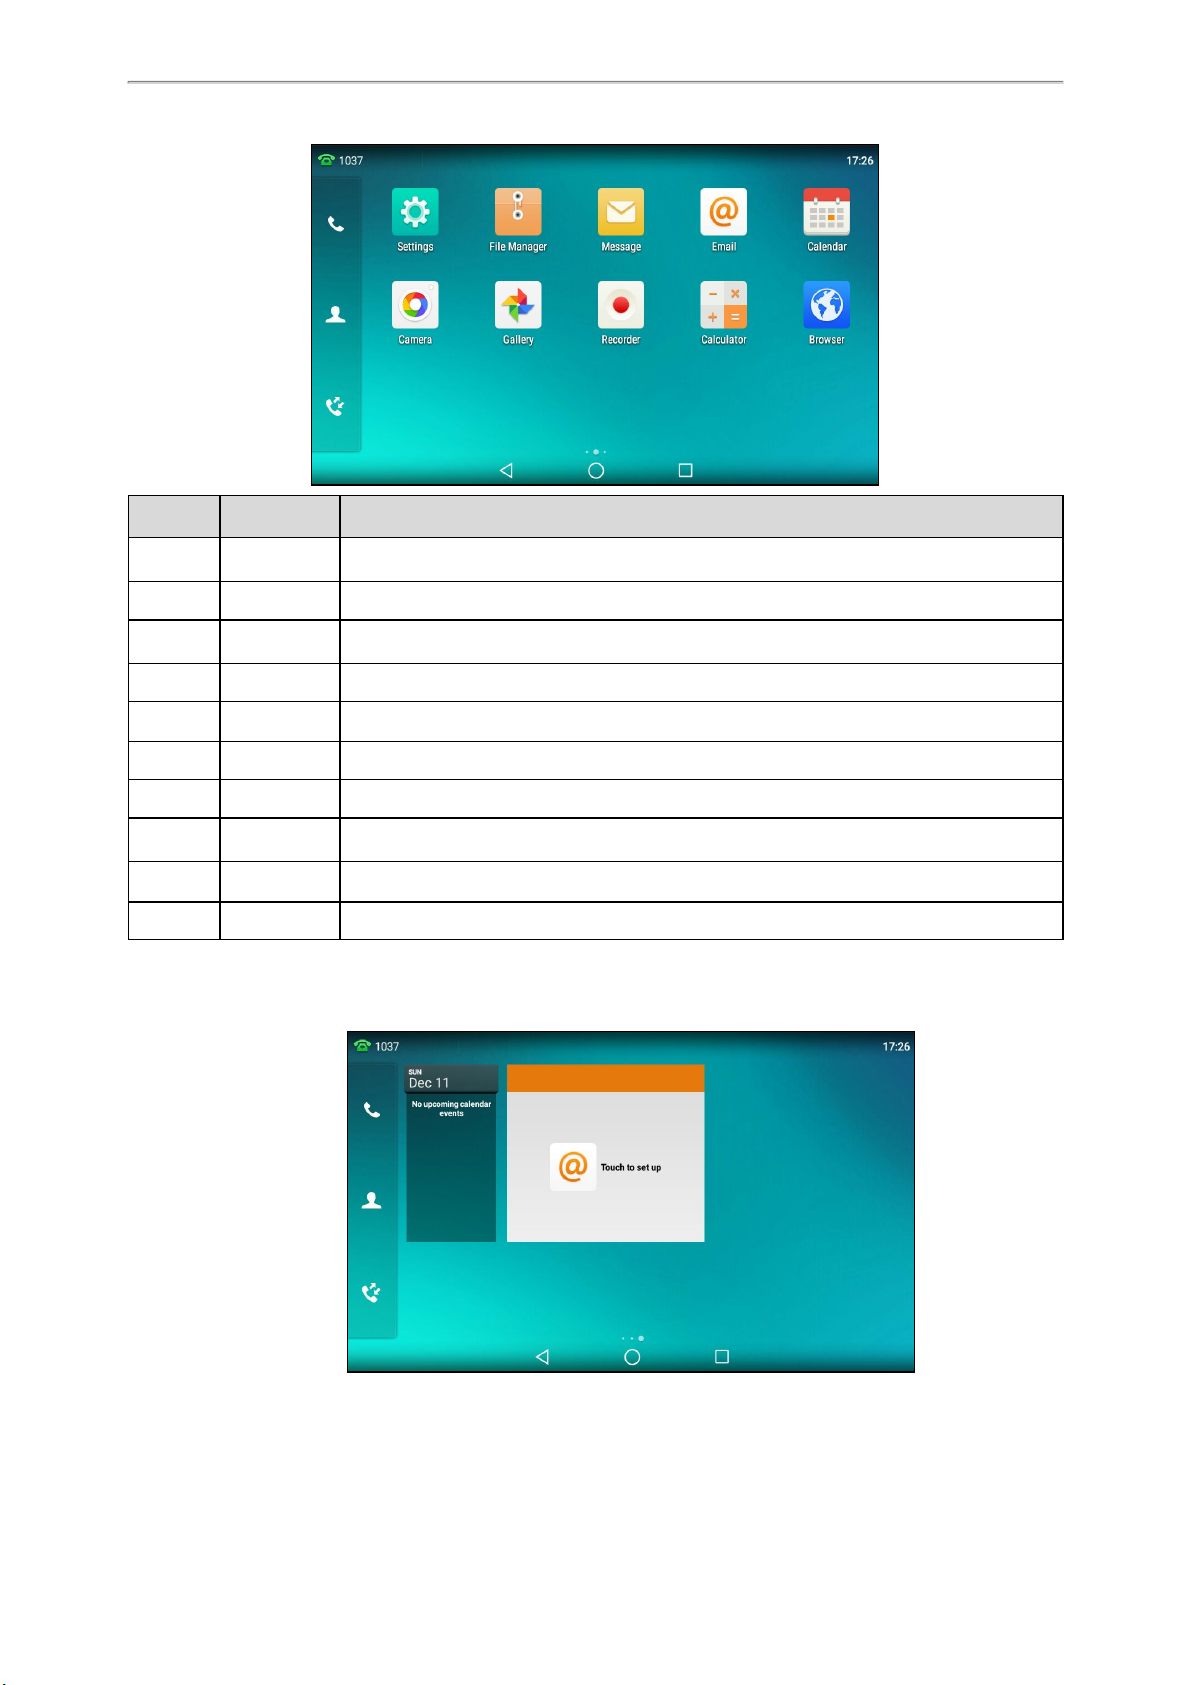
The second idle screen displays phone’s system applications by default.
20
Page 25
Getting Started with Your Phone
No. Application Description
1 Settings To access phone settings and features.
2 File Manager To manage files in the internal SD card as well as USB flash drive.
3 Message To access the video/voice mails or leave video/voice mails for someone.
4 Email To send and receive emails.
5 Calendar You can use this application as a reminder or to manage and arrange your events.
6 Camera To take pictures or record videos.
7 Gallery To view photos and videos.
8 Recorder To record audio.
9 Calculator To quickly calculate numbers
10 Browser To present and explore content on the World Wide Web.
The Third Idle Screen
The third idle screen displays the calendar and email widgets by default.
21
Page 26
Yealink VP59 & SIP-T58A Phones User Guide
No. Widget Description
1 Calendar Displays the data and upcoming events.
2 Email Displays email list of the specified folder.
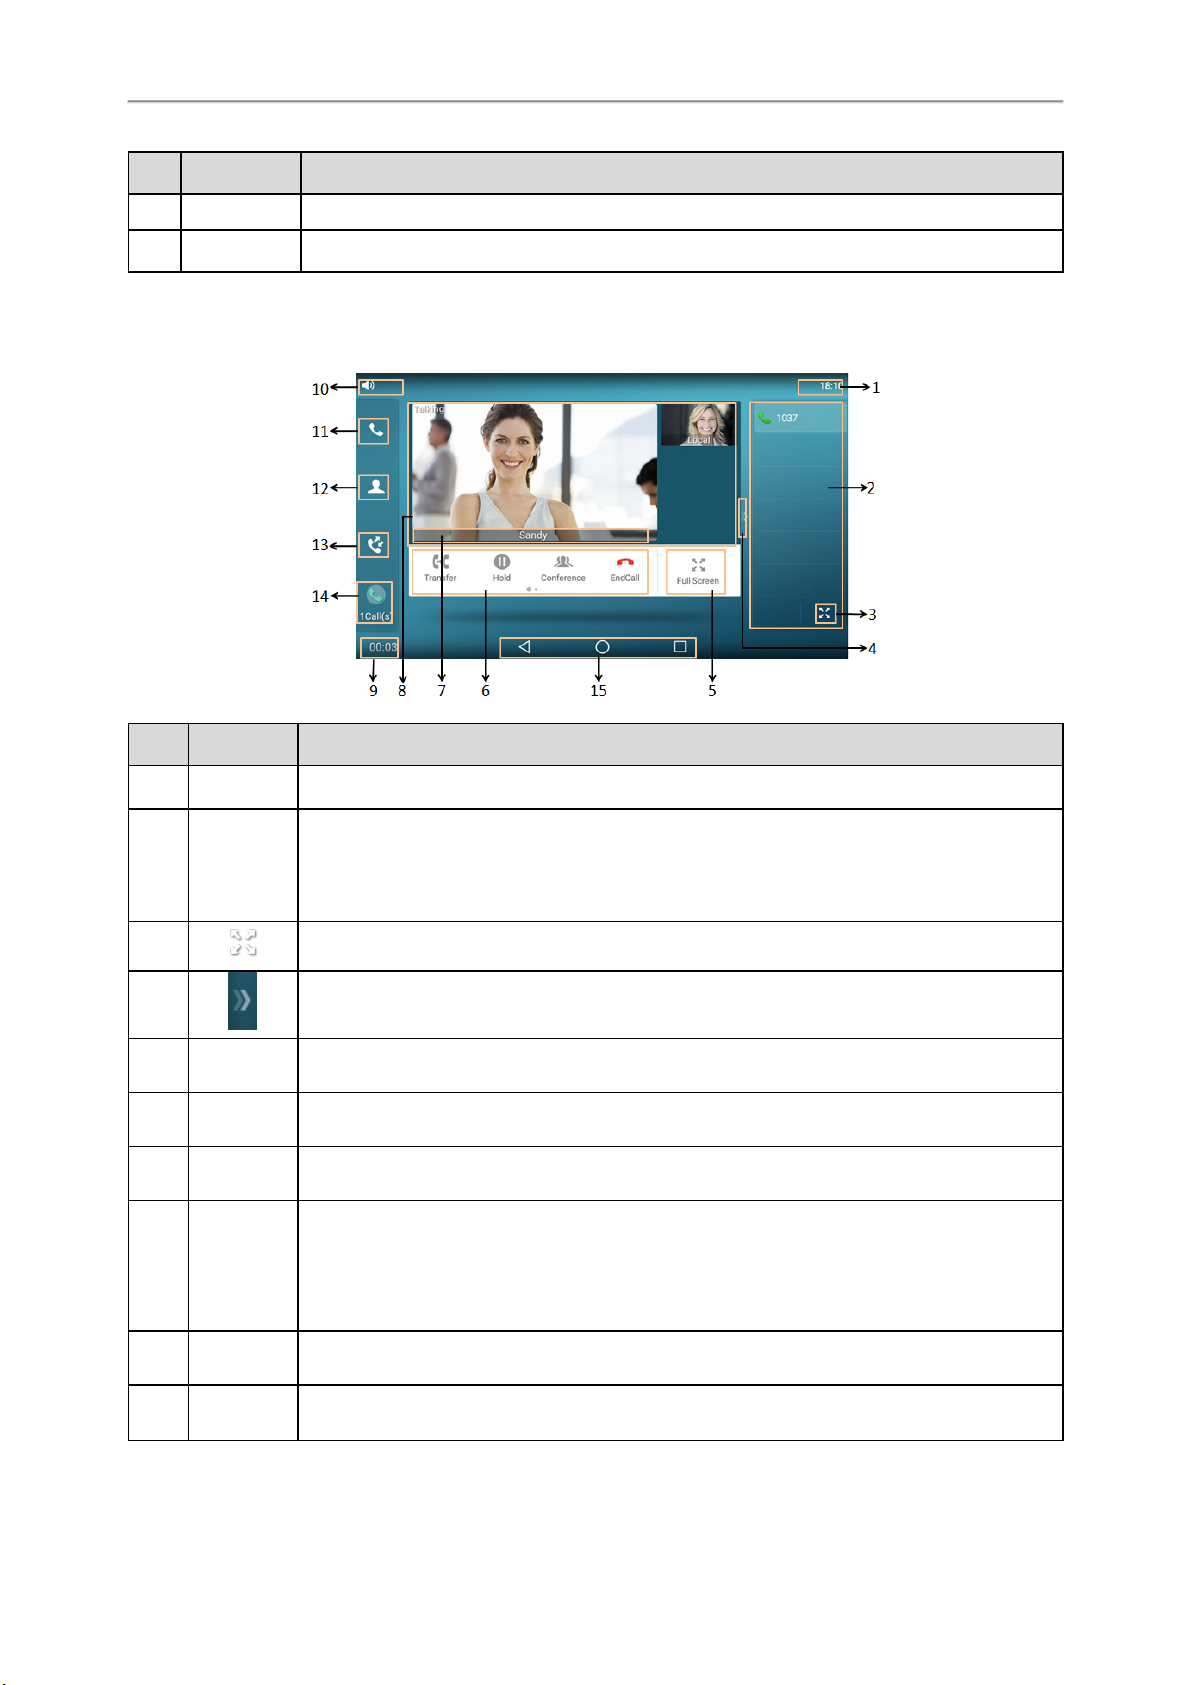
Video Call Screen
On the video call screen, you can view the video of far site and near site.
No. Name Description
1 Time The phone’s time is displayed on the right of the status bar.
The line key list displays 6 line keys by default. You can drag up and down to scroll through the
2 Line Key List
3 Tap to unfold line key list and display all line keys.
4 Tap it or swipe right to hide the line key list.
5 Full Screen
6 Soft Keys
Far-Site
7
Information
Active Call
8
Window
Call Duration
9
Timer
Talking
10
Mode
line keys. Various features can be assigned to line keys. Each line key can display the label and
indicate the status of the assigned feature.
Note: The line key list appears only if you have added at least one line key.
Tap to show the near-site (no video if USB camera is not connected) and far-site videos on the
phone in full screen.
• Labelled automatically to identify their context-sensitive features.
• Swipe left to see other soft keys.
Shows the information (name or number) of the far site.
Shows the video of far site and near site.
By default, a small window (near site) is located on the top-right of the phone screen, and a larger window (far site) is centered in the middle of the phone screen.
Note: If you do not connect the USB camera to your phone or turn off the near-site video during
the call, the phone will stop transmitting the near-site video.
Shows the duration time of current call.
Shows that you are talking using the handset, speakerphone or headset. You can alternate
among the three modes during calls.
22
Page 27

No. Name Description
11 Phone Dialer Tap to enter the dialing screen.
12 Directory Tap to enter the Directory screen and view contacts.
13 History Tap to enter the History screen and view call history.
• A number under the icon indicates the number of call(s) on the phone. For example, 1 indic-
14
ates that there is a call on the phone.
• Tap to exit or return to the talking screen.
: tap to go back to the idle screen.
Getting Started with Your Phone
15 Android Keys
: tap to return to the idle screen.
: tap to view and manage the list of recently used applications.
Icons in the Status Bar
The icons in the status bar help you easily get the current phone status, such as call and message status.
Icons Description Icons Description
Wired network is unavailable Bluetooth mode is on
Speakerphone (hands-free) mode
Handset mode
Headset mode Wi-Fi mode is on
Voice Mail
Auto Answer The USB flash drive is detected
Bluetooth headset is both paired and
connected
Bluetooth-enabled mobile phone
paired and connected
Wi-Fi signal strength from weak to
strong after connecting successfully
Do Not Disturb (DND) Screenshot captured
Keep Mute Downloading file
Silent Mode Uploading file
Phone Lock Upcoming alarm
Camera is not detected Unread email
Missed Calls Phone Warning
23
Page 28
Yealink VP59 & SIP-T58A Phones User Guide
Icons Description Icons Description
Call Forward
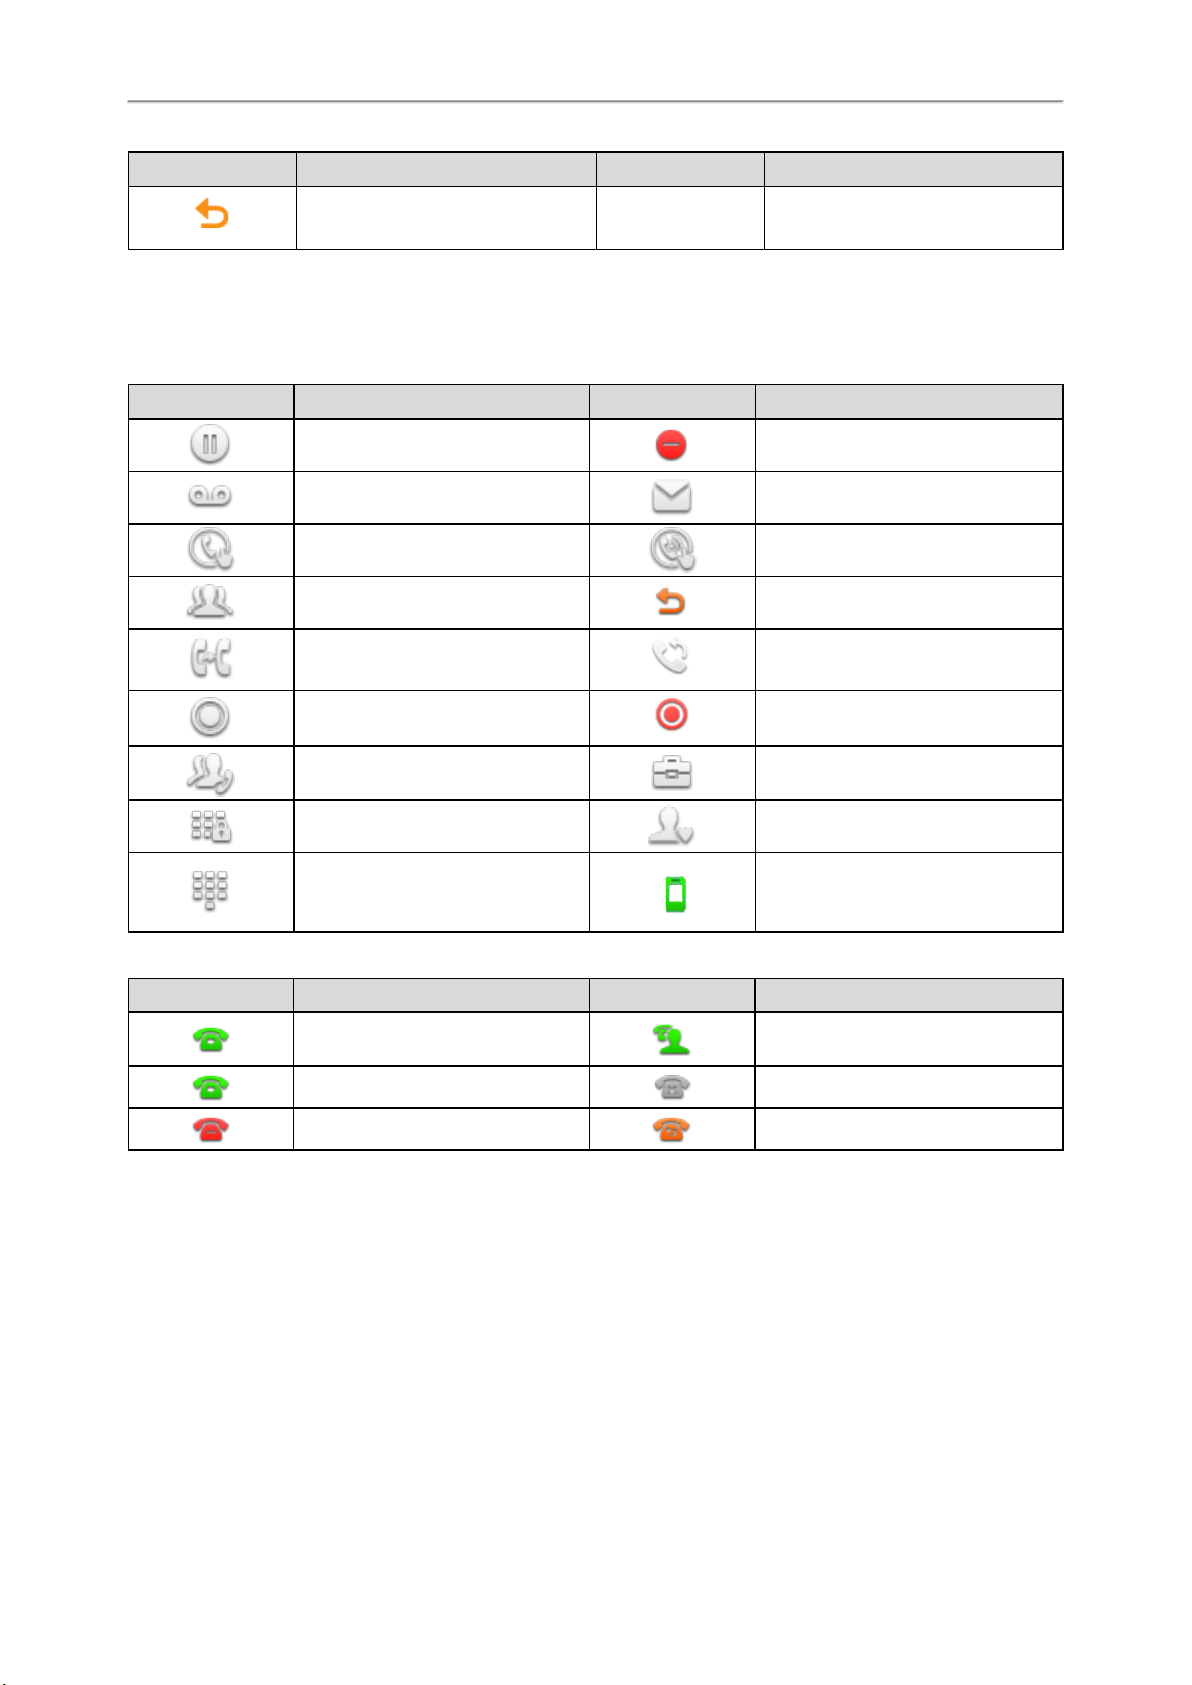
Line Key Icons
By viewing the line key icons, you can easily get the function of the line key.
Icon indicators (associated with line key features)
Icons Description Icons Description
Hold DND
Voice Mail SMS
Direct Pickup Group Pickup
Conference Forward
Transfer Recall
Record Recording in process
Multicast Paging
Paging List
Phone Lock Directory
Speed Dial DECT Intercom
Icon indicators (associated with line)
Icons Description Icons Description
The private line registers successfully.
Registering. Register failed.
DND is enabled on this line. Call forward is enabled on this line.
Navigating Menus and Fields
You can use different gestures on the touch screen to perform various operations.
Hot Desking
The shared/bridged line registers successfully.
Procedure
1. To operate your phone using gestures, follow these tips:
24
Page 29

Getting Started with Your Phone
Gesture Action
Tap Touch an item on the screen with your finger, and then lift your finger.
Long Tap
Swipe
Drag Touch and hold, then move. To stop scrolling, stop the dragging motion.
Pinch
Open
Pinch
Close
Touch an item for about 2 seconds without lifting your finger from the screen till an action
occurs.
Touch and move. When you want to scroll quickly, swipe your finger across the screen, either
up, down, left or right.
Touch the screen with two or more fingers, and then move the fingers away from each other
(stretch).
Touch the screen with two or more fingers, and then move the fingers towards each other
(pinch).
Entering Information
The phone provides onscreen keyboard, phone keypad and dial pad to enter data. Phone keypad and dial pad provide
a standard key layout, which enables you to use existing or familiar key positions.
Topics
Using the Onscreen Keyboard
Using the Phone Keypad and Dial Pad
Using the Onscreen Keyboard
The phone supports two kinds of input methods: English (UK) and Google Pinyin for the onscreen keyboard. You can
enter information into text fields using the touch screen.
When you use the onscreen keyboard, the following things you need to know:
If you want to Action
Position the cursor. Tap to the position.
1. Long tap the entered character(s).
Select all characters.
Cut/Copy characters. 1. Long tap the entered character(s).
2. Do one of the following:
• Tap SELECT ALL on the top of the phone screen.
• Drag / to select all characters.
25
Page 30
Yealink VP59 & SIP-T58A Phones User Guide
If you want to Action
Delete more characters at a time.
2. Drag / to select the characters you want to cut/copy.
3. Tap CUT/COPYon the top of the phone screen.
4. Long tap the desired field.
5. Tap PASTE.
• Long tap the entered character(s).
Drag / to select the characters you want to delete.
Tap .
• Long tap .
Replace characters.
Related Topic
Changing the Input Method
Topics
English (UK) Input Method
Google Pinyin Input Method
1. Drag your finger to highlight the characters you want to replace.
2. Tap the desired character.
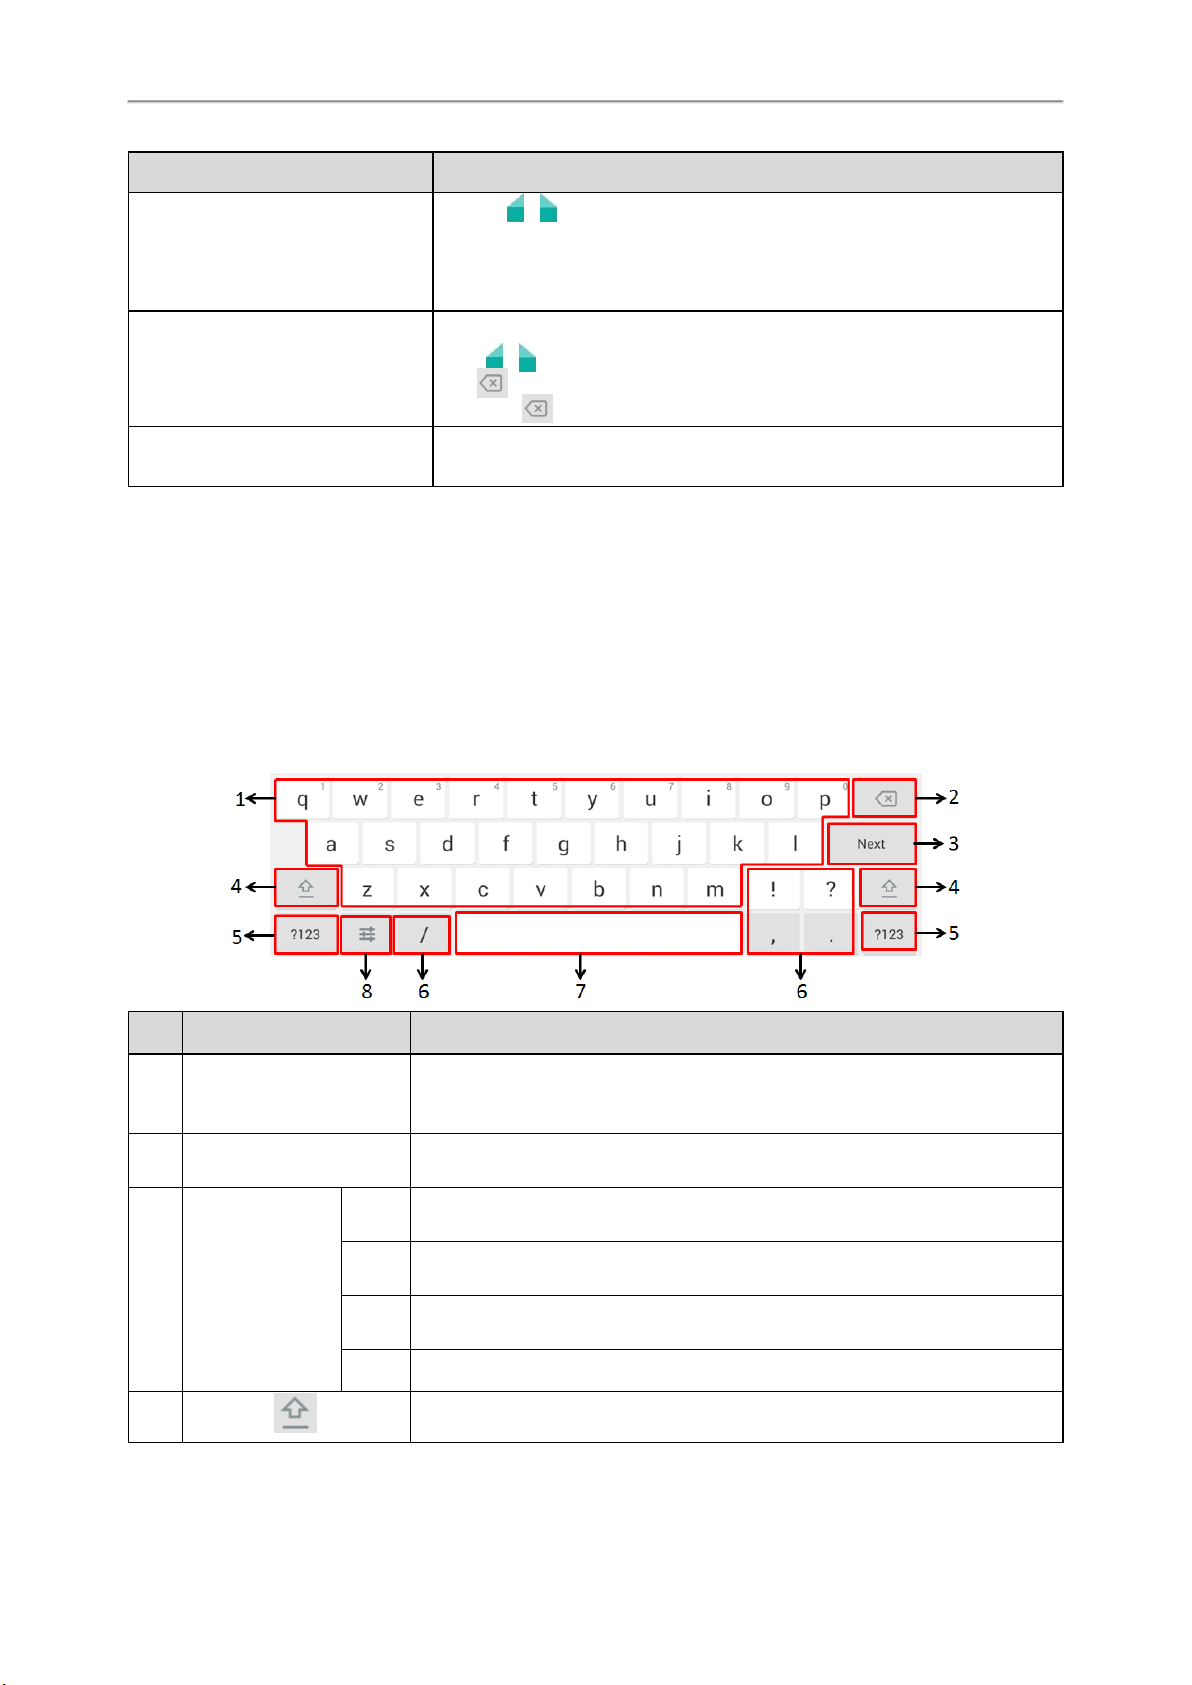
English (UK) Input Method
You can use the English (UK) input method to enter information.
No. Item Description
• Tap to enter letters.
1 26 English Letters
2 Delete Key
Next
Key
Label automatically
to identify the con-
3
text-sensitive features.
4 Tap to switch to the uppercase input mode.
26
Done
Key
Send
Key
Go Key Tap to browse the web page.
• Long tap a key then slide to choose one of the options to enter an alternate character.
• Tap to delete the entered characters one by one.
• Long tap to delete two or more characters.
Tap to go to the next field.
Tap to confirm the settings.
Tap to dial out the number.
Page 31

No. Item Description
5 Tap to switch to the numeric&symbolic input mode.
6 Five Special Characters Tap to enter the special character.
• Tap to enter spaces.
• Long tap to change the input method.
7 Space Key
8
Tap to switch to the numeric&symbolic input mode.
Tip: You can also tap at the bottom right corner of the phone screen to
change the input method.
Tap to access input options to configure Input languages or Android Keyboard
Settings (AOSP). You can use AOSP to configure Android keyboard including
Input languages, Auto-capitalization, Sound on keypress and so on.
Getting Started with Your Phone
No. Item Description
• Tap to enter numbers.
1 Numbers
2 Delete Key
Label automatically to
3
identify the context-sensitive features.
4 Tap to switch to the symbolic input mode.
5 Tap to switch to the lowercase input mode.
6 Space Key
7 Special Characters
Next Key Tap to go to the next field.
Done Key Tap to confirm the settings.
Send Key Tap to dial out the number.
Go Key Tap to browse the web page.
• Long tap a key then slide to choose one of the options to enter an alternate character.
• Tap to delete the entered characters one by one.
• Long tap to delete two or more characters.
• Tap to enter spaces.
• Long tap to change the input method.
Tip: You can also tap at the bottom right corner of the phone screen
to change the input method.
• Tap to enter special characters.
• Long tap a key, then slide to choose one of the options to enter an alternate character.
27
Page 32

Yealink VP59 & SIP-T58A Phones User Guide
Tap to switch to the symbolic input mode.
No. Item Description
• Tap to enter special characters.
1 Special Characters
2 Delete Key
Next Key Tap to go to the next field.
• Long tap a key then slide to choose one of the options to enter an
alternate character.
• Tap to delete the entered characters one by one.
• Long tap to delete two or more characters.
Label automatically to
3
identify the context-sensitive features.
4 Tap to switch to the numeric&symbolic input mode.
5 Tap to switch to the lowercase input mode.
6 Space Key
Done Key Tap to confirm the settings.
Send Key Tap to dial out the number.
Go Key Tap to browse the web page.
• Tap to enter spaces.
• Long tap to change the input method.
Tip: You can also tap at the bottom right corner of the phone
screen to change the input method.
Google Pinyin Input Method
You can use Google Pinyin input method (谷歌拼音输 入 法 ) to enter Chinese characters.
When you change the input method to Google Pinyin, the onscreen keyboard displays the English input mode as
shown below by default:
Tap to switch to the Chinese input mode as shown below:
28
Page 33

Tap to switch to the numeric&symbolic input mode as shown below:
Getting Started with Your Phone
Tap to switch to the symbolic input mode as shown below:
Using the Phone Keypad and Dial Pad
You can use the keypad on your phone or dial pad to enter data. The dial pad only provides digit keys, # key and * key.
You can tap to switch to the onscreen keyboard.
Related Topic
Using the Onscreen Keyboard
29
Page 34

Yealink VP59 & SIP-T58A Phones User Guide
30
Page 35

Call Features
Call Features
You can use the phone to place and answer calls, ignore incoming calls, transfer a call to someone else, conduct a conference call and perform other basic call features.
Topics
Changing the Default Account
Placing Calls
Answering Calls
Switching Among the Handset, Speakerphone and Headset Modes
Audio-only/Video Call Selection
Switching Between Calls Screen and Idle Screen
Options during a Video Call
Capturing a Screenshot
Disabling Call Waiting
Silencing or Rejecting Incoming Calls
Ending Calls
Redialing a Call Automatically
Muting/Unmuting Audio
Keep Mute
Holding and Resuming Calls
Redirecting Incoming Calls
Transferring Calls
Conference Calls
Call Recording
Multicast Paging
Changing the Default Account
If there are multiple registered accounts on the phone, you can place a call with the default account by default.
Procedure
1. Swipe left or right to go to the second idle screen.
2. Navigate to Settings->Features->Default Account.
3. Select the desired account from the Default Account field.
4.
Tap .
Tip
You can also tap the label of the default account at the top left, and then tap the desired account to be the new default
account.
Placing Calls
You can use your phone like a regular phone to place calls in many ways easily.
Topics
Placing a Call from the Dialer
Placing Multiple Calls
Placing a Call with a Speed Dial Key
31
Page 36

Yealink VP59 & SIP-T58A Phones User Guide
Placing a Call Back to the Last Incoming Number
Redialing a Number
Dialing a Hotline Number
Placing an International Call
Placing a Call from the Call History
Placing a Call from the Directory
Placing Calls to Google Contacts
Placing an Anonymous Call
Placing a Call from the Google Contacts
Placing a Call from the Dialer
The Dialer enables you to enter a number to place a call, and it displays a list of previously placed calls or contacts in
your directory.
You can also select the desired contact from the search list, the placed call list or Directory.
Note
Your system administrator can configure the source list for searching and disable to display the placed call records.
Procedure
1. Do one of the following:
l Start typing a phone number.
l Tapthe desired line key.
l Pick up the handset, press the Speakerphone key or the HEADSET key ( ) .
2. Enter a number.
3. Select Send.
Note
Your system administrator can enable live dialpad feature, which enables your phone to automatically dial out the phone
number after a period of time without selecting Send.
Related Topic
Switching Among the Handset, Speakerphone and Headset Modes
Placing Multiple Calls
When you are in a call, you can hold your current call and place a new call.
Procedure
1. Do one of the following:
l Tap a line key. The active call is placed on hold.
l Press the HOLD key or tap Hold to place the original call on hold.
Tap New Call.
2. Enter the desired number or select a contact.
3. Select Send.
Placing a Call with a Speed Dial Key
You can quickly dial a number by using a Speed Dial key.
Procedure
32
Page 37

1.1. Swipe left or right to go to the second idle screen.
2. Navigate to Settings->Features->Dsskey.
3. Select the desired line key.
4. Select Speed Dial from the Type field.
5. Select the desired line from the Account ID field.
6. (Optional.) Enter the string that will appear on the phone screen in the Label field.
7. Enter the contact number that you want to dial out directly in the Value field.
8. Enter the key sequence that you want to send via DTMF in the Extension field.
9.
Tap .
Tip
By default, you can drag the line key to the Edit field to set it.
When the phone is idle, you can tap the Speed Dial key to call a contact quickly.
Placing a Call Back to the Last Incoming Number
You can redial the last incoming number quickly by using a Recall key.
Call Features
Procedure
1. Swipe left or right to go to the second idle screen.
2. Navigate to Settings->Features->Dsskey.
3. Select the desired line key.
4. Select Key Event from the Type field.
5. Select Recall from the Key Type field.
6. (Optional.) Enter the string that will appear on the phone screen in the Label field.
7.
Tap .
Tip
By default, you can drag the line key to the Edit field to set it.
When the phone is idle, tap the Recall key to quickly redial the last incoming number.
Redialing a Number
The phone keeps a record of all the placed calls. You can recall the contact you recently called.
Procedure
1. Press the REDIAL key .
The phone screen displays the placed calls list.
2. Tap the desired record.
Tip
Press the REDIAL key twice to recall the contact you called.
Dialing a Hotline Number
When the phone is off-hook, it will dial out the hotline number automatically after the designated delay time.
Procedure
33
Page 38

Yealink VP59 & SIP-T58A Phones User Guide
1.1. Swipe left or right to go to the second idle screen.
2. Navigate to Settings->Features->Hot Line.
3. Enter the desired number in the Number field.
4. Enter the desired delay time (0-10 seconds) in the HotLine Delay (Hotline Delay) field.
5.
Tap .
Placing an International Call
You can place calls to international phone numbers on your phone.
Procedure
1. Long press digit key 0 on the phone keypad until the plus sign (+) appears.
2. Enter the phone number with the country code.
3. Tap Send.
Placing a Call from the Call History
You can place calls to contacts from the History list, which contains the calls that were recently placed, answered,
missed, or forwarded.
Procedure
1.
Tap or navigate to Menu->History.
The phone screen displays all call records.
2. Select the desired call list.
3. Tap the desired entry.
Placing a Call from the Directory
You can place a call to a contact directly from your directory.
Procedure
1.
Tap .
2. Select the desired directory.
3. If the contact was added to a specified contact group, you can select the desired contact group.
4. Tap the desired contact.
If the selected contact has multiple numbers, tap the desired number to dial out.
Related Topic
Searching for Contacts
Placing an Anonymous Call
You can hide your name and number when you place a call. As a result, the callee receives an anonymous call without
caller identity.
Before You Begin
Contact with your system administrator to find out if this feature is available on your phone, and to get the anonymous
call on code or off code if required.
Procedure
34
Page 39

1. Swipe left or right to go to the second idle screen.
2. Navigate to Settings->Features->Anonymous.
3. Select the desired line.
4. Turn on Local Anonymous.
5. (Optional.) Select On Code or Off Code in the Send Anonymous Code field.
6. (Optional.) Enter the anonymous call on code and off code respectively.
7.
Tap .
8. Select the anonymous line to place a call.
The callee is prompted with an incoming call from anonymity.
Call Features
If the callee enables anonymous rejection feature, you may be prompted that the callee does not accept calls from
an anonymous number.
Related Topic
Rejecting Anonymous Calls
Placing a Call from the Google Contacts
You can place calls to the contact from the Google Contacts list.
It is only applicable to SIP-T58A phones.
35
Page 40

Yealink VP59 & SIP-T58A Phones User Guide
Before You Begin
Make sure the Google Contacts feature is enabled.
Procedure
1.
Navigate to ->Google Contacts.
2. Tap the desired contact.
If the selected contact has multiple numbers, tap the desired number.
Related Topics
Enabling the Google Contacts Feature
Searching for Google Contacts
Answering Calls
When you receive a call, you can choose to answer it manually or automatically.
Topics
Answering a Call
Answering a Call When in a Call
Answering a Call Automatically
Answering a Call
When you receive an incoming call, the phone rings and the screen displays the information of the incoming call. You
can choose to answer the incoming call.
Procedure
1. Do one of the following:
l Pick up the handset.
l Press the Speakerphone key .
l Press the HEADSET key ( ) .
l Tap Answer or the line key.
The call is answered in the speakerphone (hands-free) mode by default.
Related Topic
Switching Among the Handset, Speakerphone and Headset Modes
Answering a Call When in a Call
You can answer a call when there is already an active call on your phone.
When you are in an active call and an incoming call arrives on the phone, a call waiting tone beeps, and the incoming
call information is displayed.
Procedure
1. Select Answer.
The active call is placed on hold, and the incoming call becomes active.
Note
36
Page 41

Call Features
You can disable the call waiting feature to reject the incoming call automatically during a call.
Related Topic
Disabling Call Waiting
Answering a Call Automatically
Auto answer enables you to automatically answer an incoming call in speakerphone (hands-free) mode when your
phone is idle.
Procedure
1.1. Swipe left or right to go to the second idle screen.
2. Navigate to Settings->Features->Auto Answer.
3. Select the desired line.
4. Select On in the desired line.
5.
Tap .
If the auto answer feature is enabled for the default account, the auto answer icon appears on the phone screen.
Tip
You can also swipe down from the top of the screen to enter the control center, tap Auto Answer to enter Auto Answer
setting screen, and then enable auto answer feature for the desired line.
Disabling Call Waiting
If call waiting feature is disabled, when there is already a call, the new incoming call will be rejected automatically.
Before You Begin
Check with your system administrator if the call waiting on code or off code is required. If required, get it from your system administrator.
Procedure
1.1. Swipe left or right to go to the second idle screen.
2. Navigate to Settings->Features->Call Waiting.
3. Select Off in the Call Waiting field.
37
Page 42

Yealink VP59 & SIP-T58A Phones User Guide
4. Select Off in the Play Tone field.
5. (Optional.) Enter the call waiting on code or off code respectively in the On Code or Off Code field.
6.
Tap .
Switching Among the Handset, Speakerphone and Headset Modes
You can select the desired mode before placing a call, or can alternate among Speakerphone, headset, and handset
modes during a call.
When using the speakerphone or the headset, the LED indicator glows green.
Procedure
1. During the call, pick up the handset, press the Speakerphone key , or press the HEADSET key ( ) .
For example, if you're using the handset, press the HEADSET key ( ) to switch to the headset, or press the
Speakerphone key to switch to the speakerphone.
Note
Your system administrator can disable you to use the handset, speakerphone (Hands-free) or headset mode.
Related Topic
Headset
Audio-only/Video Call Selection
You can choose to establish an audio-only call or video call while dialing or ringing, or toggle between an audio-only
call and video call. This feature should be pre-configured by your system administrator.
Topics
Placing an Audio-only/Video Call
Answering a Video Call
Switching between Video Call and Audio-only Call
Placing an Audio-only/Video Call
You can choose to initiate an audio-only call or a video call.
Procedure
1. When the phone is idle, do one of the following:
l Enter the desired number.
l Tap the line key, and enter the desired number.
38
Page 43

2. Tap Video Call/Audio Call to place a video call or audio-only call.
Answering a Video Call
When an incoming video call arrives, you can choose to answer the call with audio-only or video.
Call Features
Procedure
When an incoming call arrives, the phone screen is shown as below:
1. Tap Audio or Video to establish an audio-only call or video call.
Switching between Video Call and Audio-only Call
Your system administrator can make you have the option to switch between a video call and an audio-only call during
the active call.
Note
You cannot switch between a video call and audio-only call during a three-way conference, or while the call is placed on
hold.
Topics
Switching to the Audio-only Call
Initiating a Video Call
Accepting or Ignoring a Video Call Request
39
Page 44

Yealink VP59 & SIP-T58A Phones User Guide
Switching to the Audio-only Call
During the video call, you can switch to the audio-only call quickly.
Procedure
1.
During an active video call, tap if required.
2. Tap Audio Only.
The audio-only call is automatically established.
Initiating a Video Call
During the audio-only call, you can initiate a video call.
Procedure
1. During an audio-only call, swipe the soft key area left and then tap Add Video.
By default, the video call is automatically established with the other party that is video-enabled.
If the other party can only establish an audio-only call, the phone prompts "The other end is not available".
If the other party accepts the video call request, the video call is established; if the other party ignores the request,
the screen prompts "The other end is not available"; if there is no response within 20 seconds, the call is still audioonly.
Related Topic
Switching to the Audio-only Call
Accepting or Ignoring a Video Call Request
While the other party initiates a video call during the audio-only call, you can choose to accept or ignore the request.
Procedure
1. Tap Accept to set up a video call, or tap Ignore to return to audio-only.
Switching Between Calls Screen and Idle Screen
During the call, you can access other applications to confirm some issues. After the operation, you can return to the
call conveniently.
Topics
Going Back to the Idle Screen during a Call
Returning to the Talking Screen
Going Back to the Idle Screen during a Call
During the call, you can go back to the idle screen to access other applications.
Procedure
1.
Tap , or to go back to the idle screen.
Returning to the Talking Screen
After going back to the idle screen, you can return to the talking screen as long as the call is not ended.
Procedure
Do one of the following when you are in the idle screen:
40
Page 45

Call Features
l
Tap .
l Tap Back To Talking on the top of the phone screen.
l Tap the floating video window.
Options during a Video Call
During a video call, you can easily do some operations to make the call more personalized.
Topics
Stopping Transmitting Video during a Call
Changing the Video Layout during a Call
Previewing the Near-Site Video
Stopping Transmitting Video during a Call
When you do not want the phone to transmit your video during a video call, you can stop it.
Procedure
1. Do one of the following:
l Unplug the camera.
l Swipe down from the top of the screen in the video call screen and then tap Video.
Your phone will not transmit video to your contact and the far site cannot see you. The icon will be displayed
on the near-site video.
Note
Stopping transmitting video does not create an audio-only call. Even if you stop transmitting video, you can see the other
party, and the call is still a video call. To place an audio-only call, contact your system administrator.
Changing the Video Layout during a Call
During video calls, near-site and far-site video images are displayed on the phone screen. You can change the video
layout.
The phone supports three video layouts:
l One large, other small: One video image is displayed in a large size, the other video images along the right side of
the screen are displayed in small sizes.
l Full screen: One video image is displayed in full size, the other video images are hidden.
l Same size: All video images are displayed in the same size. It is only applicable to SIP-T58A phones.
Topics
Swapping Video
Changing the Video Layout to the Same Size Mode
Changing the Video Layout to the Full Screen Mode
Hiding the Local Video Window
Swapping Video
During a video call, you can switch the locations of near-site video and far-site video.
Procedure
1. Tap the near-site (small window) video during a video call.
41
Page 46

Yealink VP59 & SIP-T58A Phones User Guide
The near-site video will be displayed in the center of the phone screen, and the far-site video will be displayed on
the top-right of the phone screen.
The following figure shows what the phone screen looks like after you tap the near-site video:
Changing the Video Layout to the Same Size Mode
You can change the video layout from "one large, other small" to the same size on SIP-T58A phones.
Procedure
1. Pinch close the large window.
42
Page 47

The following figure shows what the phone screen looks like in the same size mode:
Changing the Video Layout to the Full Screen Mode
You can change the video layout from “one large, other small” to the full screen mode.
Procedure
Call Features
1. Do one of the following:
l Tap the large window.
l Pinch open the large window.
The small window is hidden, and the following figure shows what the phone screen looks like in full screen
mode:
Hiding the Local Video Window
You can hide the local video window during a two-way video conversation.
Procedure
1. Tap .
Previewing the Near-Site Video
If you have connected the camera to the phone, you can preview the video of yourself that will be displayed during
video calls. During the preview, you can configure camera settings.
43
Page 48

Yealink VP59 & SIP-T58A Phones User Guide
Procedure
l Swipe down from the top of the screen and then tap Video.
l Swipe left or right to go to the second idle screen and tap to launch Camera.
l On VP59, press .
Related Topic
Camera Settings
Capturing a Screenshot
You can capture a screenshot when the phone is idle or during a call.
The screenshots are saved in "*.png" format in the internal SD card with the name consisting of a prefix “Screenshot”
and date & time stamp. You can view the screenshots by File Manager or Gallery.
Tip
You can view the screenshots on either the phone itself or on a computer using an application capable of viewing "*.png"
files.
Topics
Capturing a Screenshot When the Phone is Idle
Capturing a Screenshot during a Call
Viewing the Latest Screenshot
Capturing a Screenshot When the Phone is Idle
You can capture the screenshot when the phone is idle for saving the favorite picture or picture needed.
Procedure
1. Swipe down from the top of the screen.
2. Tap Screenshot.
If the screenshot is successfully saved, a notification “Screenshot captured.” displays in the notification center.
If there is no enough space in internal SD card, you cannot save the screenshot, and the notification center will display a notification “Couldn’t capture screenshot.”.
Capturing a Screenshot during a Call
You can capture the screenshot during a call for saving the favorite picture or picture needed.
Procedure
1. Do one of the following:
l Pressthe MESSAGE Key ( ) .
l Swipe down from the top of the screen.
Tap Screenshot.
If the screenshot is successfully saved, a notification “Screenshot captured.” displays in the notification center.
If there is no enough space in internal SD card, you cannot save the screenshot, and the notification center will display a notification “Couldn’t capture screenshot.”.
Viewing the Latest Screenshot
If multiple screenshots are successfully saved, you can view the latest screenshot via the notification center.
44
Page 49

Procedure
1. Swipe down from the top of the screen.
2. Tap the notification “Screenshot captured.”
Call Features
Silencing or Rejecting Incoming Calls
When you receive an incoming call, you can choose to silence or reject the call instead of answering.
Topics
Silencing a Call
Rejecting a Call Manually
Rejecting Anonymous Calls
Rejecting Calls with Do Not Disturb (DND)
Silencing a Call
You can silence a call to stop your phone from ringing. Even if you silence the call, the incoming call notification continues to be displayed on your phone.
Procedure
1. Select Silence.
Rejecting a Call Manually
You can reject a call manually, and the call may be sent to voice mail. The rejected calls are displayed in the Received
Calls list in your History list.
Procedure
1. Tap Reject.
Rejecting Anonymous Calls
You can reject incoming calls from the callers who have hidden their identities. As a result, your phone will not ring
and you will not be notified of an attempted call.
Before You Begin
45
Page 50

Yealink VP59 & SIP-T58A Phones User Guide
Check with your system administrator if the anonymous call rejection on code or off code is required. If required, get it
from your system administrator.
Procedure
1. Swipe left or right to go to the second idle screen.
2. Navigate to Settings->Features->Anonymous.
3. Select the desired line.
4. Turn on Anonymous Rejection.
5. (Optional.) Tap the On Code or Off Code radio box in the Send Anonymous Rejection Code field.
6. Enter the anonymous call rejection on code and off code respectively in the On Code and Off Code field beneath
the Send Anonymous Rejection Code field.
7.
Tap .
Related Topic
Placing an Anonymous Call
Rejecting Calls with Do Not Disturb (DND)
You can enable DND to reject all incoming calls automatically when you do not want to be interrupted.
If you want to receive incoming calls from the specific numbers when DND is enabled, you can ask your system administrator to set DND Authorized Numbers.
Topics
Rejecting Calls with DND on All Lines
Rejecting Calls with DND on a Specific Line
Deactivating DND
Rejecting Calls with DND on All Lines
If there are multiple lines on the phone, you can enable DND for all lines. After activating it, the phone will reject all
incoming calls automatically.
Note
If both DND and busy forward are activated on the phone, calls will be forwarded to the configured destination number.
Before You Begin
Check with your system administrator if the DND on code or off code is required. If required, get it from your system
administrator.
Procedure
1. Do one of the following:
l Swipe down from the top of the screen and toggle DND on.
l Swipe left or right to go to the second idle screen, and then navigate to Settings->Features->DND.
Select On in the DND Status field.
2. (Optional.) Enter the DND on code or off code respectively in the On Code or Off Code field.
3.
Tap .
The DND icon appears in the status bar.
46
Page 51

Call Features
Related Topics
Deactivating DND
Redirecting Incoming Calls
Rejecting Calls with DND on a Specific Line
By default, the DND feature applies to all lines on your phone. Your system administrator can change the DND mode to
Custom so that you can enable DND for specific lines.
Before You Begin
The DND mode is set to Custom. Check with your system administrator if the DND on code or off code is required. If
required, get it from your system administrator.
Procedure
1. Do one of the following:
l Swipe down from the top of the screen and tap DND.
l Swipe left or right to go to the second idle screen, and then navigate to Settings->Features->DND.
2. Select the desired line.
3. Tap On radio box from the DND Status field.
4. (Optional.) Enter the DND on code or off code respectively in the On Code or Off Code field.
5.
Tap .
The DND icon appears on the desired line. If you activate DND on the default line, the DND icon will appear both
on the line and in the status bar.
Tip
Before selecting a line, you can tap ->All On to activate DND for all lines.
Related Topics
Deactivating DND
Line Key Icons
Deactivating DND
You can deactivate DND when you are ready to resume receiving calls again.
Procedure
47
Page 52

Yealink VP59 & SIP-T58A Phones User Guide
1.1. Swipe left or right to go to the second idle screen.
2. Navigate to Settings->Features->DND.
3. (Optional.) If you are in Custom mode, select the desired line.
4. Select Off from the DND Status field.
5.
Tap .
The DND icon disappears from the status bar.
Tip
You can also swipe down from the top of the screen to enter the control center and then tap DND to deactivate DND.
You can tap ->All off at the top right to deactivate DND for all lines.
Ending Calls
You can end the current call at any time.
Procedure
1. Do one of the following:
l If you are using the handset, tap End Call or hang up the handset.
l If you are using the headset, tap End Call.
l If you are using the speakerphone, press the Speakerphone key or tap End Call.
Redialing a Call Automatically
You can set the phone to redial a phone number automatically when you call a contact and the contact’s line is unavailable.
Procedure
1.1. Swipe left or right to go to the second idle screen.
2. Navigate to Settings->Features->Auto Redial.
3. Turn on Auto Redial.
4. Enter the desired time (between 1 and 300 seconds) in the Redial Interval field.
5. Enter the desired times (between 1 and 300) in the Redial Times field.
6.
Tap .
When you dial a number but fail to establish a call, The phone prompts whether to auto redial the contact, select OK to
activate auto redial.
48
Page 53

Call Features
The phone screen displays the redial times and interval. The phone will retry as many times as configured until the
callee answers the call.
Muting/Unmuting Audio
When you are in a call, you can mute the audio, so that you can hear the other person, but they cannot hear you.
Procedure
1.
Press the MUTE key ( ) during a call.
The mute key LED glows red.
2.
Press the MUTE key ( ) again to unmute the call.
The mute key LED goes out.
Tip
Keep Mute
In a meeting room, if incoming calls are answered automatically on your phone, callers may hear your discussion with
your colleagues. You can keep the phone in mute to prevent this unintended situation.
The mute state of your phone persists across calls. The phone stays in the mute state until you unmute the microphone
manually or until the phone restarts.
Before You Begin
Check with your system administrator if keep mute is configured on your phone.
Procedure
1.
Press the MUTE key ( ) when the phone is idle.
The mute key LED glows red, and the mute icon appears on the idle screen.
49
Page 54

Yealink VP59 & SIP-T58A Phones User Guide
2.
Press the MUTE key ( ) again to deactivate the mute state.
Holding and Resuming Calls
You can place an active call on hold and resume the call when you are ready. When you place a call on hold, the held
party may hear the music played by its sever.
Topics
Holding a Call
Resuming a Held Call
Holding a Call
You can place an active call on hold on your phone.
Procedure
1. Press the HOLD key or tap Hold during a call.
Note
When you have multiple calls on the phone and the current call is held, you can tap the call directly to swap to the active
call.
50
Page 55

Call Features
Resuming a Held Call
You can view and resume a held call on the phone.
Procedure
1. Press the HOLD key or tap Resume.
If multiple calls are placed on hold, select the desired call first.
Note
When you have multiple calls on the phone and the current call is active, you can tap the call directly to swap to the held
call.
Redirecting Incoming Calls
When you are not available to answer calls on your phone, you can forward the calls to another phone.
Topics
Forwarding All Incoming Calls to a Contact
Forwarding an Incoming Call Manually
Forwarding Incoming Calls with a Forward Key
Forwarding All Incoming Calls to a Contact
You can set up the forwarding type which enables your phone to forward all incoming calls to a contact.
There are three types of forwarding:
l Always Forward: Forwards all incoming calls immediately.
l Busy Forward: Forwards incoming calls when you are busy in a call.
l No Answer Forward: Forwards incoming calls when no one answers the calls.
Topics
Forwarding All Incoming Calls on All Lines
Forwarding All Incoming Calls on a Specific Line
Deactivating Call Forward
Forwarding All Incoming Calls on All Lines
You can forward all incoming calls on the phone.
Before You Begin
Check with your system administrator if the forward on code or off code is required. If required, get it from your system
administrator.
Procedure
1. Swipe left or right to go to the second idle screen.
2. Navigate to Settings->Features->Call Forward.
3. Select the desired forwarding type and tap the On radio box of the corresponding field.
4. Enter the contact number you want to forward incoming calls to in the Forward to field.
5. If you select the No Answer Forward option, select the desired ring time to wait before forwarding from the After
Ring Time field.
51
Page 56

Yealink VP59 & SIP-T58A Phones User Guide
6. (Optional.) Enter the always/busy/no answer forward on code or off code respectively in the On Code or Off Code
field.
7.
Tap .
The call forward icon on the idle screen indicates that the call forward is activated.
Tip
You can also swipe down from the top of the screen to enter the control center, tap Forward to enter the desired Call Forward setting screen according to the current forward type.
If you have not configured the call forward type, tapping Forward will turn to the Always Forward setting screen.
Forwarding All Incoming Calls on a Specific Line
By default, the forwarding setting applies to all lines on your phone. Your system administrator can change the forward
mode to Custom so that you can forward all incoming calls for specific lines.
Before You Begin
Check with your system administrator if the forward on code or off code is required. If required, get the forward on
code or off code from your system administrator.
Procedure
1. Swipe left or right to go to the second idle screen.
2. Navigate to Settings->Features->Call Forward.
3. Select the desired line.
4. Select the desired forwarding type and tap the On radio box of the corresponding field.
5. Enter the target contact number in the Forward to field.
6. If you select the No Answer Forward option, select the desired ring time to wait before forwarding from the After
Ring Time field.
7. (Optional.) Enter the always/busy/no answer forward on code or off code respectively in the On Code or Off Code
field.
8.
Tap .
The forward icon appears on the desired line. If you activate forward on the default line, the forward icon will
appear both on the line and in the status bar.
Tip
You can tap ->All Lines to activate forward for all lines.
Deactivating Call Forward
You can deactivate call forward when you no longer want to forward your calls.
Procedure
1. Swipe left or right to go to the second idle screen.
2. Navigate to Settings->Features->Call Forward.
3. If the forward is activated for specific lines, select the desired line.
4. Select the desired forwarding type and tap the Off radio box.
5.
Tap .
52
Page 57

Call Features
Tip
You can tap ->All Lines to deactivate forward for all lines.
Forwarding an Incoming Call Manually
You can manually forward the call to another contact while your phone rings.
Procedure
1. When the phone is ringing, select Forward.
2. Enter the number you want to forward the incoming call to.
3. Tap Forward.
The phone prompts a call forward message.
Forwarding Incoming Calls with a Forward Key
When the phone receives an incoming call, you can easily tap the Forward key to forward the incoming call to a specific contact.
Before You Begin
Make sure your system administrator has set the forward mode to Phone.
Procedure
1. Swipe left or right to go to the second idle screen.
2. Navigate to Settings->Features->Dsskey.
3. Select the desired line key.
4. Select Key Event from the Type field.
5. Select Forward from the Key Type field.
6. (Optional.) Enter the string that will display on the phone screen in the Label field.
7. Enter the contact number you want to forward the incoming calls to in the Value field.
8. Tap .
Tip
By default, you can drag the line key to the Edit field to set it.
When the phone is ringing, tap the forward key to quickly forward the call to the specific contact.
Transferring Calls
During a call, you can transfer the call to another contact.
You can use one of three ways:
l Blind Transfer: Transfer a call directly to the third party without consulting.
l Semi-Attended Transfer: Transfer a call when receiving ringback.
l Attended Transfer (Consultative Transfer): Transfer a call with prior consulting.
Topics
Performing a Blind Transfer
Performing a Semi-Attended/Attended Transfer
Performing Transfer with a Transfer Key
53
Page 58

Yealink VP59 & SIP-T58A Phones User Guide
Performing a Blind Transfer
You can transfer a call to another contact immediately without consulting with her/him first.
Topics
Performing a Blind Transfer Normally
Performing a Blind Transfer Conveniently
Performing a Blind Transfer Normally
You can enter the number, or select a contact from directory or history to perform a blind transfer.
Procedure
1. Pressthe TRANSFER key or tap the Transfer soft key during a call.
2. Do one of the following:
l Enter the number you want to transfer the call to, and then pressthe TRANSFER key ortap Transfer.
The phone will prompt a dialog box as the following shows:
Tap Transfer to complete the transfer. (The call will automatically dial out in about 5 seconds if you do not tap
Transfer.)
l
Tap , and then select the desired contact to complete the transfer.
l
Tap , and then select the desired list. Tap the desired entry to complete the transfer.
Performing a Blind Transfer Conveniently
You can perform a blind transfer conveniently by dragging the far-site window to a target speed dial or BLF key, or to
another one.
Procedure
You can do one of the following:
l When there is an active call for the account which is related with the speed dial or BLF key. Drag the far-site window
to that speed dial or BLF key.
54
Page 59

Call Features
Then the call is connected to the number specified in the Value field of the speed dial or BLF key.
l When there is an active call and one or more calls on hold, drag the active far-site window to another held one.
And then tap Transfer from the screen.
The active call is connected to the number of the held party.
Related Topics
Setting a BLF Key
Placing a Call with a Speed Dial Key
Performing a Semi-Attended/Attended Transfer
You can transfer calls to other contacts immediately when receiving ringback or after consulting with them first.
Procedure
1. Press the TRANSFER key or tap Transfer during a call.
2. Do one of the following:
l Enter the number you want to transfer the call to.
Tap Transfer->Send to dial out.
55
Page 60

Yealink VP59 & SIP-T58A Phones User Guide
l
Tap , and then select the desired contact to dial out.
l
Tap , and then select the desired entry to dial out.
3. Do one of the following:
l When you hear the ringback tone, press the TRANSFER key or tap Transfer to finish the semi-attended trans-
fer.
l After the contact answers the call, press the TRANSFER key or tap Transfer to finish the attended transfer
(consultative transfer).
Tip
If you are using a handset, the transfer can be completed by hanging up the handset.
Performing Transfer with a Transfer Key
By default, you can transfer a call to a specific contact directly using a Transfer key during a call.
Your system administrator can also set your phone to perform attended transfer when using a Transfer key.
Topics
Setting a Transfer Key
Performing a Blind Transfer Using a Transfer Key
Performing a Semi-attended/Attended Using a Transfer Key
Setting a Transfer Key
You can set a line key as a Transfer key, and specify a contact you want to transfer a call to for this key.
Procedure
1.1. Swipe left or right to go to the second idle screen.
2. Navigate to Settings->Features->Dsskey, and then select the desired line key.
3. Select Key Event from the Type field.
4. Select Transfer from the Key Type field.
5. (Optional.) Enter the string that will display on the touch screen in the Label field.
6. Enter the contact number you want to transfer the call to in the Value field.
7. Tap .
Tip
By default, you can drag the line key to the Edit field to set it.
Performing a Blind Transfer Using a Transfer Key
After you have set a Transfer key with a specific contact, you can perform a blind transfer by using it.
Before You Begin
Confirm with your system administrator that the transfer mode has set to perform a blind transfer.
Procedure
1. Tap the Transfer key during a call.
The call is transferred to the specific contact directly.
Related Topic
56
Page 61

Call Features
Setting a Transfer Key
Performing a Semi-attended/Attended Using a Transfer Key
After you have set a Transfer key with a specific contact, you can perform a semi-attended/attended transfer by using
it.
Before You Begin
Confirm with your system administrator that the transfer mode has set to perform attended transfer.
Procedure
1. Tap the Transfer key during a call.
The phone calls the specific contact first. Wait until you hear the ringback tone or until the contact answers the
call.
2. Tap the Transfer key again.
Related Topic
Setting a Transfer Key
Conference Calls
The phone supports a five-way local conference and multi-way network conference.
During the conference, follow these tips:
l Use the handset or a headset if you're in an open environment.
l Mute your microphone when you are not speaking, especially in noisy environments.
l Avoid tapping or rustling papers near the microphone.
l Speak in your normal voice without shouting.
Topics
Local Conference
Network Conference
Local Conference
Your phone supports up to 5 parties (including yourself) in a conference call.
You can create up to five-way audio-only and video mixed conference including a maximum of three-way video calls.
The following figure shows what the phone screen looks like in a mixed conference call with three-way video calls and
two-way audio-only calls:
57
Page 62

Yealink VP59 & SIP-T58A Phones User Guide
Topics
Setting Up a Local Conference Call
Merging Two Calls into a Conference
Creating a Hybrid Conference
Holding or Resuming a Conference Call
Muting or Unmuting a Conference Call
Splitting a Conference Call
Managing Conference Participants
Ending a Conference Call
Setting Up a Local Conference Call
You can set up a local conference call with up to four contacts.
Procedure
1. Place a call to the first party.
2. When the first party answers the call, select Conference to place a new call.
The active call is placed on hold.
3. Dial the second party’s number.
4. When the second party answers the call, selectConference again to invite two the parties to join the conference.
Merging Two Calls into a Conference
You can invite a held call into a conference call with the active call.
Procedure
1. Place two calls on the phone.
2. Do one of the following:
l Drag one far-site window to another far-site window.
58
Page 63

And then tap Conference from the pop-up box.
l Tap the desired call for a conference and ensure that the call is active.
Tap Conference.
Tap the Hold call to join the calls in the conference.
Call Features
Creating a Hybrid Conference
You can merge the calls on your phone, and connected mobile phone into a hybrid conference.
There are many ways to create a hybrid conference, the following shows an example.
Before You Begin
Make sure you have connected a mobile phone to your phone.
Procedure
1. Place a mobile call over Bluetooth on the mobile phone.
2. Place a call on the phone.
3. Tap Conference.
4. Tap the hold call.
The calls are merged into a conference call.
59
Page 64

Yealink VP59 & SIP-T58A Phones User Guide
Related Topic
Pairing and Connecting the Bluetooth-enabled Mobile Phone
Holding or Resuming a Conference Call
When you place a conference call on hold, other participants cannot hear each other until you resume the held conference call.
Procedure
1. Press the HOLD key or tap Hold to place the conference on hold.
2. Press the HOLD key again or tap Resume to resume the held conference call.
Muting or Unmuting a Conference Call
When you mute the local microphone during a conference call, other participants can hear each other except you.
Procedure
1.
Press the MUTE key to mute the conference.
2.
Press the MUTE key again to unmute the conference.
Splitting a Conference Call
You can split the conference call into individual calls. After split, the conference call ends, and other parties are held.
Procedure
1. Select Split.
Managing Conference Participants
You can manage the conference participants to make the conference more flexible.
Procedure
1. Long tap the desired party, you can do the following:
l Select Far Mute to mute the party. The muted party can hear everyone, but no one can hear the muted party.
l Select Remove to remove the party from the conference call.
Ending a Conference Call
When you end the conference call, the other parties drop the call.
However, the system administrator can set up your phone so that the other two parties remain connected when you
end the conference call.
Procedure
1. Select End Call.
Network Conference
If your system administrator has set a network conference feature on your phone, you can initiate a conference with
two or more contacts.
Topic
Setting Up a Network Conference
60
Page 65

Call Features
Setting Up a Network Conference
You can set up a network conference with multiple parties.
Procedure
1. Place a call to the first party.
2. Tap Conference to place a new call.
The active call is placed on hold.
3. Enter the number of the second party, and then tap Conference.
4. When the second party answers the call, tap Conference to add the second party to the conference.
5. Tap Conference to place a new call.
The conference call is placed on hold.
6. Enter the number of the new party, and then tap Conference.
7. When the new party answers the call, tap Conference to add the new party to the conference.
8. Repeat steps 5 to 7 until you add all parties.
The conference is set up after the intended parties answer the call.
Note
The procedures for setting up a network conference call on specific servers may be different from the introduction above.
Contact your system administrator for more information.
Call Recording
You can record up to 12 hours in one file. By default, the recorded files are saved in the internal SD card.
But if there is a USB flash drive connected to the rear USB port of your phone, the recorded files will be saved in the
storage device according to the priority: USB flash drive>internal SD card.
Topics
Recording a Call
Recording a Conference
Setting a Mark When Recording a Call
Stopping a Recording
Checking Storage Space
Recording a Call
You can record the important parts during an active call.
Important
Before call recording, especially those involving PSTN, it is necessary to know about the rules and restrictions of call recording in the country where you are.
It is also very important to inform all the call parties that you are recording and ask for their consent before recording the
conversation.
Procedure
1. During a call, swipe the soft key area left and then tap Record.
The phone screen displays a recording icon and recording duration.
61
Page 66

Yealink VP59 & SIP-T58A Phones User Guide
Recording a Conference
You can record conference calls in the same way as other calls. All conference participants are recorded while recording.
The following lists exceptions:
l If one of the participants holds the conference call, only that participant is recorded. When a conference call is
placed on hold, recording of the conference is paused. You can place or answer other calls, which will be recorded
in the same file. When the conference call is resumed, recording of the conference resumes.
l If one of the participants mutes the conference call, only that participant is not recorded.
Related Topics
Recording a Call
Setting a Mark When Recording a Call
You can set a mark when recording a call to mark the special moment. And there will be a red flag on this moment
when playing the recorded file so that you can drag to the moment quickly.
Procedure
1.
Tap .
The icon changes to , the number will increase if you set more marks.
Stopping a Recording
You can stop recording a call before the call ends. The recording also stops when the active call ends. The recording
will be saved as "*.aac" file in the internal SD card or the USB flash drive automatically.
Procedure
1. Do one of the following:
l Swipe the soft key area left and then tap Stop during a call.
The recording icon and recording duration disappears. The screen prompts a message that the call is recorded
successfully.
l Tap End Call.
The recording icon and recording duration disappears, and the phone returns to the idle screen. The screen
prompts a message that the call is recorded successfully.
62
Page 67

Call Features
Checking Storage Space
You can check the total space or available space of the phone or connected USB flash drive.
Procedure
1. Swipe left or right to go to the second idle screen.
2. Navigate to Settings->Status->Storage.
Multicast Paging
Multicast Paging allows you to broadcast instant audio announcements to users who are listening to a specific multicast group on a specific channel.
The phone supports the following 31 channels:
l 0: Broadcasts are sent to channel 0. Note that the Yealink IP phones running old firmware version (old paging mech-
anism) can be regarded as listening to channel 0. It is the default channel.
l 1 to 25: Broadcasts are sent to channel 1 to 25. We recommend that you specify these channels when broadcasting
with Polycom IP phones which have 25 channels you can listen to.
l 26 to 30: Broadcasts are sent to channel 26 to 30. We recommend that you specify these channels when broad-
casting with Yealink IP phones running new firmware version (new paging mechanism).
Note
All IP phones in the multicast paging group must be deployed in the same subnet, since a broadcast is used. The phone can
only send/receive broadcasts to/from the listened channels. Other channels’ broadcasts will be ignored automatically by
the IP phone.
Topics
Sending Multicast Paging
Receiving Multicast Paging
Managing a Paging Call
Sending Multicast Paging
Your phone supports up to 31 groups for paging. You can assign a label to each group to identify the phones in the
group, such as All, Sales, or HR.
You can set a line key as Multicast Paging key or Paging List key on the phone, which allows you to send announcements to the phones with pre-configured multicast address(es) on specific channel(s).
Note
Multicast RTP is one way only from the sender to the multicast address(es) (receiver). For outgoing RTP multicasts, all other
existing calls on the phone will be placed on hold.
Topics
Setting a Multicast Paging Key
Setting a Paging List Key
Sending Pages by a Paging List Key
Setting a Paging Group
Sending a Paging by a Multicast Paging Key
Deleting a Paging Group
63
Page 68

Yealink VP59 & SIP-T58A Phones User Guide
Setting a Multicast Paging Key
You can set a Multicast Paging key for a paging group, which allows you to send announcements quickly on the idle
screen.
Before You Begin
Get the multicast IP address and port number from your system administrator.
Procedure
1.1. Swipe left or right to go to the second idle screen.
2. Navigate to Settings->Features->Dsskey.
3. Select the desired line key.
4. Select Key Event from the Type field.
5. Select Multicast Paging from the Key Type field.
6. (Optional.) Enter the paging group name in the Label field.
7. Enter the multicast IP address and port number (for example, 224.5.6.20:10008) in the Value field.
8. Enter the desired channel between 0 and 30 in the Channel field.
9.
Tap .
Tip
By default, you can drag the line key to the Edit field to set it.
Sending a Paging by a Multicast Paging Key
You can send a paging by using the Multicast Paging key when the phone is idle.
Before You Begin
You need to set a Multicast Paging key in advance.
Procedure
1. Tap the Multicast Paging key when the phone is idle.
Both your phone and receiver’s phone play a warning tone and the multicast RTP session will be automatically
answered on the receiver’s phone in the speakerphone (hands-free) mode.
The multicast paging key icon will become and solid.
The following figure shows a multicast RTP session on the phone:
64
Page 69

Related Topic
Setting a Multicast Paging Key
Setting a Paging List Key
You can set a Paging List key to easily access the paging groups on the idle screen.
Procedure
1.1. Swipe left or right to go to the second idle screen.
2. Navigate to Settings->Features->Dsskey.
3. Select the desired line key.
4. Select Key Event from the Type field.
5. Select Paging List from the Key Type field.
6. (Optional.) Enter the string that will display on the phone screen in the Label field.
7.
Tap .
Tip
By default, you can drag the line key to the Edit field to set it.
Call Features
Setting a Paging Group
You can edit the information of the paging group.
Before You Begin
A Paging List key is set in advance. Get the multicast IP address and port number from your system administrator.
Procedure
1. Tap the Paging List key when the phone is idle.
2.
Tap after the desired paging group.
The default tag is Empty if it is not configured before.
3. Enter the multicast IP address and port number (for example, 224.5.6.20:10008) in the Address field.
4. Enter the string that will display on the phone screen in the Label field.
5. Enter the desired channel between 0 and 30 in the Channel field.
6.
Tap .
7. To set more paging groups, repeat steps 2 to 6.
Sending Pages by a Paging List Key
You can send a paging by using the Paging List key when the phone is idle.
Before You Begin
You need to set a Paging List key in advance.
Procedure
1. Tap the Paging List key when the phone is idle.
2. Select the desired paging group.
Both your phone and receiver’s phone play a warning tone and the multicast RTP session will be automatically
answered on the receiver’s phone in the speakerphone (hands-free) mode.
65
Page 70

Yealink VP59 & SIP-T58A Phones User Guide
Related Topic
Setting a Paging List Key
Deleting a Paging Group
You can delete any group from the paging group list.
Procedure
1. Tap the Paging List key when the phone is idle.
If the Paging List key is not configured, you can also swipe left or right to go to the second idle screen. And then
navigate to Settings->Features->Paging List to configure the paging list.
2. Tap after the desired paging group.
3. Tap Delete.
(missing or bad snippet)delete the paging group.
4. Select OK.
If you want to delete all paging groups, you can tap on the top-right of the phone screen.
Receiving Multicast Paging
Your system administrator has set a listening paging group for you, you can automatically receive a paging call when
the phone is idle.
When there is a voice call or a paging call in progress, the phone handles the new paging call differently according to
the multicast listening settings configured by your system administrator.
Managing a Paging Call
During a paging call, you can manage it manually at any time.
Procedure
l Tap Hold to place the current paging call on hold.
The paging call is placed on hold and the receiver releases the session.
l Tap Resume to resume the held paging call.
The multicast RTP session is re-established.
l Tap Record to record a call.
l Tap End Call to end the paging call.
66
Page 71

Advanced Call Features
Advanced Call Features
You can perform some server-dependent tasks on the phone. Contact your system administrator to find out if your
phone supports these advanced call features.
Topics
Using Call Completion
Call Pickup
Call Park and Call Retrieve
Busy Lamp Field (BLF)
BLF List
Shared Line
Intercom
Video/Voice Mail
Using the Hot Desking
Automatic Call Distribution (ACD)
Using Call Completion
When you call someone who is temporarily unavailable to answer the call, you can monitor the busy party and establish a call after the busy party becomes available to receive a call.
Note
Call completion is not available on all servers. For more information, contact your system administrator.
Procedure
1. Swipe left or right to go to the second idle screen.
2. Navigate to Settings->Features->Call Completion.
2. Turn on Call Completion.
3. Tap .
When you place a call and the callee is temporarily unavailable to answer the call, The phone prompts whether to wait
for the callee, select OK to activate the call completion feature.
When the callee becomes idle, The phone prompts whether to dial the number, select OK to dial the number.
67
Page 72

Yealink VP59 & SIP-T58A Phones User Guide
Call Pickup
You can use call pickup to answer someone else’s incoming call on your phone.
The phone supports the following two call pickup features:
l Directed Call Pickup: allows you to pick up incoming calls to another phone.
l Group Call Pickup: allows you to pick up incoming calls to any phone within a predefined group.
Check with your system administrator to find out if this feature is available on your phone.
Topics
Picking up a Call Directly
Picking up a Group Call Directly
Picking up a Call with a Directed Pickup Key
Picking up a Call with a Group Pickup Key
Picking up a Call Directly
You can answer a call that rings on another phone.
Before You Begin
The target phone receives an incoming call. Your system administrator has enabled the directed call pickup and set the
directed call pickup code.
Procedure
1. Pick up the handset, press the Speakerphone key or tap the line key.
The DPickup appears on the phone screen.
2. Select DPickup on your phone.
3. Enter the phone number which is receiving an incoming call.
4. Select DPickup again.
The call is answered on your phone.
Tip
When the phone is idle, you can use a Directed Pickup or BLF/BLF List key to pick up a call to a specific contact directly.
Related Topics
68
Page 73

Advanced Call Features
Picking up a Call with a Directed Pickup Key
Picking up a Remote Call by BLF Key
Picking up a Remote Call by BLF List Key
Picking up a Group Call Directly
When any phone within a predefined group receives an incoming call, you can pick up that call on your phone.
If there are multiple incoming calls on the group at the same time, you can only pick up the first incoming call.
Before You Begin
Your system administrator has enabled the group call pickup and set the group call pickup code.
Procedure
1. Pick up the handset, press the Speakerphone key or tap the line key.
The GPickup appears on the phone screen.
2. SelectGPickup on your phone when any phone in the group receives an incoming call.
The call is answered on your phone.
Tip
When the phone is idle, you can use a Group Pickup key to pick up a group call directly.
Related Topic
Picking up a Call with a Group Pickup Key
Picking up a Call with a Directed Pickup Key
You can easily use a Directed Pickup key to pick up a call to a specific contact’s phone.
Before You Begin
Ask your system administrator for the directed call pickup code.
Procedure
1.1. Swipe left or right to go to the second idle screen.
2. Navigate to Settings->Features->Dsskey.
3. Select the desired line key.
4. Select Key Event from the Type field.
5. Select DPickup from the Key Type field.
6. Select the desired line from the Account ID field.
7. (Optional.) Enter the string that will appear on the touch screen in the Label field.
8. Enter the directed call pickup code followed by the specific extension in the Value field.
9.
Tap .
Tip
By default, you can drag the line key to the Edit field to set it.
When the target phone receives an incoming call, you can press the Directed Pickup key, and the call is answered on
your phone.
69
Page 74

Yealink VP59 & SIP-T58A Phones User Guide
Picking up a Call with a Group Pickup Key
You can easily select a Group Pickup key to pick up a group call.
Before You Begin
Check with your system administrator if the group call pickup code is required for this key. If required, get the group
call pickup code from your system administrator.
Procedure
1.1. Swipe left or right to go to the second idle screen.
2. Navigate to Settings->Features->Dsskey.
3. Select the desired line key.
4. Select Key Event from the Type field.
5. Select Group Pick Up from the Key Type field.
6. Select the desired line from the Account ID field.
7. (Optional.) Enter the string that will appear on the touch screen in the Label field.
8. (Optional.) Enter a contact number you want to pick up a call from in the Value field.
9.
Tap .
Tip
By default, you can drag the line key to the Edit field to set it.
When any phone within a predefined group of phones receives an incoming call, you can tap the Group Pickup key,
and the call is answered on your phone.
Call Park and Call Retrieve
You can park a call, and then retrieve the call either from your phone or another phone. After parked, the call is placed
on hold, you can continue the conversation after retrieving it.
Note
Call park is not available on all servers. Check with your system administrator to find out if it is available on your phone.
Topics
Parking or Retrieving a Call in the FAC Mode
Parking or Retrieving a Call in the Transfer Mode
Parking or Retrieving a Call with a Park or Retrieve Key
Parking or Retrieving a Call in the FAC Mode
You can park the call to the local extension or a desired extension through dialing the park code.
Topics
Parking a Call in the FAC Mode
Retrieving a Parked Call in the FAC Mode
Parking a Call in the FAC Mode
You can park a call in the FAC mode directly. When you park a call to the local extension or a desired extension, the
call is held in the same network your phone.
70
Page 75

Advanced Call Features
Before You Begin
Your system administrator has set call park in the FAC mode.
Procedure
1. During a call, swipe the soft key area left and then tap Park.
The phone will dial the call park code which is pre-configured.
2. Do one of the following:
l If you want to park the call against the local extension, press the # key.
l If you want to park the call against the desired extension, enter the extension (for example, 4606) where you
want to park the call and press the # key.
If the call is parked successfully, you will hear a voice prompt that the call is parked.
Tip
You can use a Park key or a BLF key to park a call to a specific contact directly.
Related Topics
Parking or Retrieving a Call with a Park or Retrieve Key
Parking or Retrieving a Call by BLF Key
Retrieving a Parked Call in the FAC Mode
You can retrieve a parked call in the FAC mode from any phone within your network.
Before You Begin
Your system administrator has set call park in the FAC mode. There is a call parked on the extension.
Procedure
1. Pick up the handset, press the Speakerphone key or tap the line key.
2. Tap Retrieve Park on the pre-dialing screen.
The phone will dial the park retrieve code which is configured in advance.
3. Follow the voice prompt to retrieve:
l Press the # key on the phone where the call is parked.
l Enter the desired extension followed by # (for example, 4606#) on any phone.
Tip
When the phone is idle, you can use a Retrieve key, BLF key or BLF List key to retrieve a parked call directly.
Related Topics
Parking or Retrieving a Call with a Park or Retrieve Key
Parking or Retrieving a Call by BLF Key
Retrieving a Call by a BLF List Key
Parking or Retrieving a Call in the Transfer Mode
You can park the call to the shared parking lot through a blind transfer.
For some servers, the system will return a specific retrieve park number (park retrieve code) after parking successfully.
Topics
71
Page 76

Yealink VP59 & SIP-T58A Phones User Guide
Parking a Call in the Transfer Mode
Retrieving a Parked Call in the Transfer Mode
Parking a Call in the Transfer Mode
You can park a call in the transfer mode directly. When you park a call to the shared parking lot, the call is held on your
phone.
Before You Begin
Your system administrator has set call park in the Transfer mode.
Procedure
1. During a call, swipe the soft key area left and then tap Park.
The call will be directly transferred to the shared parking lot.
Tip
You can use a Call Park key to park a call to a specific shared parking lot directly.
Related Topic
Parking or Retrieving a Call with a Park or Retrieve Key
Retrieving a Parked Call in the Transfer Mode
You can retrieve a parked call in the transfer mode from any phone in the same network.
Before You Begin
Your system administrator has set call park in the Transfer mode. There is a call parked on the shared parking lot.
Procedure
1. Pick up the handset, press the Speakerphone key or tap the line key.
2. Tap Retrieve Park on the pre-dialing screen.
The phone will retrieve the parked call from the shared parking lot.
Tip
When the phone is idle, you can use a Retrieve key to retrieve a parked call directly.
Related Topic
Parking or Retrieving a Call with a Park or Retrieve Key
Parking or Retrieving a Call with a Park or Retrieve Key
You can easily use a Park key to park a call to a specific extension (if the FAC mode is set) or shared parking lot (if the
Transfer mode is set), and quickly retrieve this parked call using a retrieve key.
Topics
State Indicator of the Park/Retrieve key
Parking a Call using a Park Key
Retrieving a Parked Call using a Retrieve Key
State Indicator of the Park/Retrieve key
You can get the call park/retrieve status by viewing the icon indicator of the Park/Retrieve key.
72
Page 77

Advanced Call Features
Icons Description Icons Description
Park successfully/Idle state. Park failed.
Ringing state. Retrieve parked call.
Parking a Call using a Park Key
You can set a line key as a Park key, and specify an extension or a shared parking lot you want to park a call to for this
key. By using the Park key you can park a call quickly.
Before You Begin
Check with your system administrator if the FAC or Transfer mode is set on your phone, and if Account ID it is necessary for this key.
Procedure
1.1. Swipe left or right to go to the second idle screen.
2. Navigate to Settings->Features->Dsskey, and then select the desired line key.
3. Select Key Event from the Type field.
4. Select Call Park from Key Type field.
5. (Optional.) Select the desired line from the Account ID field.
6. (Optional.) Enter the string that will appear on the touch screen in the Label field.
7. Enter the park extension number or the shared parking lot you want to park the call to in the Value field.
8.
Tap .
Tip
By default, you can drag the line key to the Edit field to set it.
During a call, you can tap the Call Park key, and the call is parked to the desired extension or the shared parking lot directly.
Retrieving a Parked Call using a Retrieve Key
You can set a line key as a Retrieve key, and specify a parked extension or retrieve lot you want to retrieve a parked call
from for this key. By using the Retrieve key you can retrieve a parked call quickly.
Before You Begin
Check with your system administrator if the FAC or Transfer mode is set on your phone, and if Account ID is necessary
for this key.
Procedure
1.1. Swipe left or right to go to the second idle screen.
2. Navigate to Settings->Features->Dsskey.
3. Select the desired line key.
4. Select Retrieve from the Type field.
5. (Optional.) Select the desired line from the Account ID field.
6. (Optional.) Enter the string that will appear on the touch screen in the Label field.
7. Enter the parked extension or the retrieve lot in the Value field.
8.
Tap .
73
Page 78

Yealink VP59 & SIP-T58A Phones User Guide
Tip
By default, you can drag the line key to the Edit field to set it.
When there is a call parked on the extension or the shared parking lot, you can tap the Retrieve key on the idle screen,
and the call is retrieved from the parked extension or shared parking lot directly.
Busy Lamp Field (BLF)
You can monitor a specific remote line using a BLF key for status changes on the phone.
Topics
Setting a BLF Key
Picking up a Remote Call by BLF Key
Transferring a Call by BLF Key
Parking or Retrieving a Call by BLF Key
Visual Alert for Monitored Lines
State Indicator of Remote Line by BLF Key
Setting a BLF Key
You can set a BLF key to monitor a specific line for status changes on the phone.
Procedure
1.1. Swipe left or right to go to the second idle screen.
2. Navigate to Settings->Features->Dsskey.
3. Select the desired line key.
4. Select BLF from the Type field.
5. Select the desired line from the Account ID field.
6. (Optional.) Enter the string that will display on the touch screen in the Label field.
7. Enter the phone number or the extension you want to monitor in the Value field.
8. (Optional.) Enter the directed call pickup code in the Extension field.
9.
Tap .
Tip
By default, you can drag the line key to the Edit field to set it.
State Indicator of Remote Line by BLF Key
You can get the monitored line's status by viewing the icon indicator of the BLF key.
Icons Description Icons Description
The monitored line is idle
(Flashing)
The monitored line is ringing.
(Flashing)
74
The monitored line is dialing The monitored line is busy or in a call.
The monitored line places a call on
hold
The monitored line fails to register or
does not exist.
A call is parked to the monitored line.
Page 79

Advanced Call Features
Visual Alert for Monitored Lines
The Visual Alert for BLF Pickup feature allows your phone to display the caller number when the specified monitored
line receives an incoming call.
Check with your system administrator to find out if this feature is available on your phone.
You can pick up the call to the monitored line, place a call to the monitored line, place a new call or go back to the idle
screen.
Picking up a Remote Call by BLF Key
When the monitored users are not at their desks and someone rings their lines, you can pick up the desired call simply
by tapping the flashing BLF key.
If your system administrator set the directed call pickup code in advance, you can use the BLF key to pick up the call
directly. If not or if you want to set a pickup code for a specific BLF line, you can set a pickup code for BLF key manually.
Before You Begin
You have edited the BLF key's Extension field with the directed call pickup code from your system administrator.
Procedure
1. When the monitored line receives an incoming call, you can tap the BLF key to pick up the call for the monitored
line directly.
Related Topic
Setting a BLF Key
Transferring a Call by BLF Key
When there is already an active call on the IP phones, you can transfer the active call to the monitored line by tapping
the BLF key.
The phone transfers the active call differently depending on the Transfer Mode via Dsskey feature configured by your
system administrator.
Topics
Performing a Blind Transfer
Performing a Semi-attended/Attended Transfer
75
Page 80

Yealink VP59 & SIP-T58A Phones User Guide
Performing a Blind Transfer
During a call, you can transfer the call to the monitored contact in the blind-transfer way.
Before You Begin
Check with your system administrator if the Transfer Mode via Dsskey is set to Blind Transfer.
Procedure
1. During a call, tap the BLF key of the monitored line which you want to transfer this call to.
Performing a Semi-attended/Attended Transfer
During a call, you can transfer the call to the monitored contact in the semi-attended/attended-transfer way.
Before You Begin
Check with your system administrator if the Transfer Mode via Dsskey is set to Attended Transfer.
Procedure
1. During a call, tap the BLF key of the monitored line which you want to transfer this call to.
The phone will dial out the number of the monitored line.
2. Tap the BLF key of the monitored line again or Transfer to complete the transfer when the monitored user receives
ringback or after the monitored user answers the call.
Parking or Retrieving a Call by BLF Key
You can use the BLF key to park a call or retrieve a parked call directly.
Note
Check with your system administrator to find out if it is available on your phone.
Topics
Parking a Call to a Monitored Line
Retrieving a Parked Call
Parking a Call to a Monitored Line
During the call, you can use the BLF key to park the current call to a monitored line directly.
Before You Begin
Your system administrator has set call park feature in the FAC mode in advance.
Procedure
1. During a call, selectPark.
2. Tap the desired BLF key to park the call to the monitored line.
Retrieving a Parked Call
You can use the BLF key to retrieve a call that is parked to the monitored line.
Before You Begin
Your system administrator has set call park feature in the FAC mode.
Procedure
76
Page 81

Advanced Call Features
1. Select Retrieve Park on the dialing screen.
2. Tap the desired BLF key to retrieve a call that is parked to the monitored line.
BLF List
BLF List feature enables you to monitor a list of users defined by your system administrator, and the respective icons
will either flash or glow depending on the status of monitored lines.
Check with your system administrator to find out if this feature is available on your phone.
Topics
State Indicator of Remote Line by BLF List Key
Visual Alert for Monitored Lines
Picking up a Remote Call by BLF List Key
Transferring a Call by BLF List Key
Retrieving a Call by a BLF List Key
Barging in an Active Call by BLF List Key
State Indicator of Remote Line by BLF List Key
You can get the monitored line's status by viewing the icon indicator of the BLF List key.
Icons Description Icons Description
The monitored line is idle The monitored line is ringing
The monitored line is dialing The monitored line is busy or in a call
The monitored line places a call on hold
The monitored line fails to register or
does not exist
Visual Alert for Monitored Lines
The Visual Alert for BLF Pickup feature allows your phone to display the caller number when the specified monitored
line receives an incoming call.
Check with your system administrator to find out if this feature is available on your phone.
You can pick up the call to the monitored line, place a call to the monitored line, place a new call or go back to the idle
screen.
77
Page 82

Yealink VP59 & SIP-T58A Phones User Guide
Picking up a Remote Call by BLF List Key
When the monitor user is not at his/her desk and someone rings his/her line, you can pick up the call simply by tapping the flashing BLF List key.
Before You Begin
Check with your system administrator to find out if this feature is available on your phone.
Procedure
1. Tap the BLF List key to pick up the call for the monitored line directly.
Transferring a Call by BLF List Key
When there is already an active call on the IP phones, you can transfer the active call to the monitored user by tapping
the BLF List key.
The phone transfers (Blind Transfer or Attended Transfer) the active call differently depending on the Transfer Mode via
Dsskey feature configured by your system administrator.
Topics
Performing a Blind Transfer
Performing a Semi-attended/Attended Transfer
Performing a Blind Transfer
During a call, you can use the BLF List key to perform a blind transfer to the monitored line.
Before You Begin
Check with your system administrator to make sure that the Transfer Mode via Dsskey is set to Blind Transfer.
Procedure
1. During a call, tap the BLF List key of the monitored line which you want to transfer this call to.
Performing a Semi-attended/Attended Transfer
During a call, you can use the BLF List key to perform a semi-attended/attended transfer to the monitored line.
Before You Begin
Check with your system administrator if the Transfer Mode via Dsskey is set to Attended Transfer.
Procedure
1. During a call, tap the BLF List key of the monitored line which you want to transfer this call to.
The phone will dial out the number of the monitored line.
2. Tap the BLF List key of the monitored user again or Transfer to complete the transfer when the monitored user
receives ringback or after the monitored user answers the call.
Retrieving a Call by a BLF List Key
You can use the BLF List key to retrieve a call which is parked to the monitored line.
Before You Begin
Check with your system administrator to find out if this feature is available on your phone.
Procedure
78
Page 83

Advanced Call Features
1. Tap the desired BLF List key to retrieve a call that is parked to the monitored line.
Barging in an Active Call by BLF List Key
You can use the BLF List key to barge in a conversation and set up a conference call.
Before You Begin
Check with your system administrator to find out if this feature is available on your phone.
Procedure
1. Tap the BLF List key.
The phone dials out the barge-in code followed by the monitored line, and then you can join the call. Each of the
three parties can hear the other two parties.
Shared Line
Yealink phone supports using Shared Call Appearance (SCA) to share a line. So that this line can be registered on more
than one phone at the same time.
Your system administrator can set your phone to use the shared line.
Topics
State Indicator of Shared Line
Placing Calls on a Shared Line
Answering Calls on a Shared Line
Placing a Call on Public Hold
Placing a Call on Private Hold
Retrieving a Held Call on a Shared line
Barging in an Active Call on a Shared line
Pulling a Shared Call on a Shared line
State Indicator of Shared Line
You can get the shared line's status by viewing the icon indicator of the shared line key.
The following table shows the all kinds of icon indicator associated with the shared line, and the corresponding descriptions:
Icons Description Icons Description
(Flashing)
The shared line is idle.
The shared line receives an
incoming call.
The shared line is busy or is in a
call.
(monitoring SCA phone)
(Flashing)
The shared line is seized.
The shared line is dialing.
The call on the shared line is
placed on public hold.
The call on the shared line is
barged in by the other shared
line user.
In a multi-party call, place the
call on hold locally.
(local SCA phone)
(monitoring SCA phone)
The call on the shared line is
placed on private hold.
79
Page 84

Yealink VP59 & SIP-T58A Phones User Guide
Placing Calls on a Shared Line
You can place one or multiple calls on a shared line.
The phone places a call on the first shared line key automatically. You can select the desired shared line key first and
place a call using this key.
Related Topic
Placing Calls
Answering Calls on a Shared Line
You can answer one or more calls on the shared line.
When an incoming call arrives on the shared line, all the registered phones will ring simultaneously, and the call can be
answered on any one of the phones. Incoming calls will be distributed evenly among the available shared line keys.
Note
If the number of incoming calls is greater than the configured line keys, the line keys will be used by sequence circulation.
Contact your system administrator for more information.
Related Topic
Answering Calls
Placing a Call on Public Hold
You can place a call on public hold that any shared line phone can retrieve the held call.
Procedure
1. During a call, press the HOLD key or tap the Hold soft key.
Placing a Call on Private Hold
In SCA scenario, you can place a call on private hold that only you can retrieve the held call.
The PriHold soft key can be preset by your system administrator, you can also set a line key as the private hold key
manually if the PriHold soft key is not available on your phone. You need to configure a private hold key before you
place the call on private hold.
Procedure
1. Swipe left or right to go to the second idle screen.
2. Navigate to Settings->Features->Dsskey.
3. Select the desired line key.
4. Select Key Event from the Type field.
5. Select Private Hold from the Key Type field.
6. (Optional.) Enter the string that will display on the phone screen in the Label field.
7.
Tap .
Tip
By default, you can drag the line key to the Edit field to set it.
During an SCA call, tap the PriHold soft key (You may need to swipe the soft key area left to see the PriHold soft key),
or private hold key on the phone when there is an active call on the shared line. Then the call is held on your phone,
80
Page 85

Advanced Call Features
and the other phones registered with shared line show the call is in the busy state on the shared line key. Other users
on the shared line cannot resume your held call.
Retrieving a Held Call on a Shared line
If you place a call on hold on a shared line, you can resume this call at any time. When the shared line key shows a call
that is in a held state, you can resume the held call remotely from other user's phone.
Before You Begin
There is at least one call placed on public hold on the shared line.
Procedure
1. Do one of the following:
l
Tap .
l Long tap the desired line key.
The Cancel, CallPull, NewCall and Retrieve soft keys appear on the touch screen.
Tap Retrieve to retrieve the call.
Tap Retrieve to retrieve the call.
Barging in an Active Call on a Shared line
In SCA scenario, you can barge into an active call on the shared line. After you barges into a call, the call turns into a
three-party conference.
Note
Only one user can barge into an active call on the shared line at a time.
Before You Begin
There is at least one active call on the shared line.
Procedure
1. Long tap the desired line key.
The Cancel, CallPull, NewCall and Barge In appear on the screen.
2. Select Barge In to interrupt the active call.
81
Page 86

Yealink VP59 & SIP-T58A Phones User Guide
Pulling a Shared Call on a Shared line
In SCA scenario, both you and other users can pull an existing call from another shared phone that is an active or hold
state.
Check with your system administrator to find out if this feature is available for your phone.
Before You Begin
There is an active or held call on the shared line.
Procedure
1. Long tap the shared line key.
2. Tap CallPull to pull the call.
Intercom
Intercom is a useful feature in an office environment to quickly connect with the operator or the secretary.
Intercom enables you to place an intercom call that is answered automatically on the contact's phone as long as the
contact is not in an active call.
Note
Intercom is not available on all servers. Contact your system administrator for more information.
Topics
State Indicator of the Intercom key
Placing an Intercom Call
Picking up an Incoming Call of the Target Extension
Answering an Intercom Call
State Indicator of the Intercom key
You can get the intercom status by viewing the icon indicator of the Intercom key.
Icons Description Icons Description
Target extension is available. Target extension is ringing.
82
Page 87

Advanced Call Features
Icons Description Icons Description
Target extension is busy or is in a
call.
Callout
Target extension is dialing.
Talking
Target extension fails to register.
Placing an Intercom Call
You can place an intercom call to quickly relay a message to a contact.
The target phone plays a warning tone and automatically answers the call in speakerphone (hands-free) mode by
default. When the target phone has an active call, the intercom call is answered automatically after the active call ends.
Procedure
1.1. Swipe left or right to go to the second idle screen.
2. Navigate to Settings->Features->Dsskey.
3. Select the desired line key.
4. Select Intercom from the Type field.
5. Select the desired line from the Account ID field.
6. (Optional.) Enter the string that will display on the touch screen in the Label field.
7. Enter the phone number or the extension you want to monitor in the Value field.
8.
Tap .
9. Tap the Intercom key to place an intercom call.
Tip
By default, you can drag the line key to the Edit field to set it.
Related Topic
Setting a BLF Key
Picking up an Incoming Call of the Target Extension
You can pick up the target extension's incoming call by pressing the Intercom key.
Before picking up an incoming call, make sure that the directed call pickup code has been configured either for an
Intercom key or for Call Pickup feature in advance.
Check with your system administrator to find out if this feature is available on your phone.
Note
If the directed call pickup code is not set, the phone will place a call to the target extension instead of picking up an incoming call of the target extension when you tap the Intercom key.
Before You Begin
Get the directed call pickup code from your system administrator.
Procedure
1. Drag the Intercom key to the Edit field.
2. Enter the directed call pickup code in the Extension field.
83
Page 88

Yealink VP59 & SIP-T58A Phones User Guide
3.
Tap .
When the target extension receives an incoming call, the Intercom key icon of the target extension will change to .
Tap the Intercom key to pick up the incoming call directly.
Answering an Intercom Call
By default, when there is an incoming intercom call, the phone plays a warning tone and automatically answer the
incoming call.
During the intercom call, you can switch among the Speakerphone (hands-free), Handset and headset modes. If your
phone is set to answer intercom calls with your microphone muted, you need to press the Mute key to unmute your
microphone before responding to the call.
You can configure the following behaviors when receiving an intercom call.
Intercom Allow
Intercom Allow feature allows the phone to automatically answer an incoming intercom call. If you disable this feature,
the phone will reject incoming intercom calls and send a busy message to the caller.
Note
Your system administrator can set a period of delay time before the phone automatically answers intercom calls.
Intercom Mute
Intercom Mute feature allows the phone to mute the microphone when incoming intercom calls are answered automatically.
Intercom Tone
Intercom Tone feature allows the phone to play a warning tone before answering an intercom call automatically.
Intercom Barge
Intercom Barge allows the phone to automatically answer an incoming intercom call while an active call is in progress.
The active call will be placed on hold. If you disable this feature, the phone will handle an incoming intercom call like a
normal incoming call while there is already an active call on the phone.
Note
To enable the phone to receive a new incoming call when it already has an active call, make sure that the call waiting feature
is enabled on the phone in advance.
Procedure
1. Swipe left or right to go to the second idle screen.
2. Navigate to Settings->Features->Intercom.
3. Make the desired changes.
4.
Tap .
Related Topics
Switching Among the Handset, Speakerphone and Headset Modes
Muting/Unmuting Audio
Answering a Call When in a Call
84
Page 89

Advanced Call Features
Video/Voice Mail
Voice mail feature allows you to leave voice/video mails for someone or listen to your voice/video mail messages on
your phone. This feature is set up on the server side and not all servers support this feature.
To send video mails on SIP-T58A phone, you need to connect a USB camera to the phone in advance. The usage of
video mail is the same as that of voice mail, the following takes voice mail as an example.
Topics
Setting the Voice Mail Code
Leaving Voice Mails
Listening to Voice Mails
Setting the Voice Mail Code
If you want to connect your phone to the message center, you need to set the voice mail code on your phone.
Before You Begin
Get the voice mail code from your system administrator.
Procedure
1. Swipe left or right to go to the second idle screen.
2. Tap to launch Message.
3. Tap Set Voice Mail.
4. Enter the voice mail code (for example, *4) in the desired account field.
5. Tap .
Leaving Voice Mails
You can leave a voice mail to someone who is busy or inconvenient to answer the call.
Procedure
1. Follow the voice prompts to leave a voice mail.
2. Hang up to complete the voice mail.
Listening to Voice Mails
You can listen to your voice mails on the phone, to obtain a voice information sent by a contact.
Before You Begin
You need to set the voice mail code in advance.
Procedure
1. Swipe left or right to go to the second idle screen.
2. Tap to launch Message.
3. Tap View Voice Mail.
The phone screen displays the amount of new and old voice mails. You can tap the account to listen to voice mails.
Tip
When The phone prompts that the phone receives a new voice mail, you can press the MESSAGE key ( ) or tap Con-
nect to dial out the voice mail access code directly.
85
Page 90

Yealink VP59 & SIP-T58A Phones User Guide
Related Topic
Setting the Voice Mail Code
Using the Hot Desking
You can use hot desking to log out from the current account and then log into a new account. So many users can
share one phone resource at different times.
Note
Hot desking is not available on all servers. Contact your system administrator for more information.
Before You Begin
Your system administrator has set a Hot Desking key for you to use this feature. Get the login account information
from your system administrator.
Procedure
1. Tap the hot desking key when the phone is idle.
(missing or bad snippet)clear the account configuration.
2. Select OK.
Registration configurations of all accounts on the phone will be cleared immediately.
The login wizard will be displayed.
3. Enter the login information.
4. Tap .
Automatic Call Distribution (ACD)
ACD is often used in offices for customer service, such as call center.
The ACD system handles large volumes of incoming calls from callers who have no need to talk to a specific person but
who require assistance from any of multiple persons at the earliest opportunity. ACD on all IP phones allows the ACD
system to distribute large volumes of incoming calls to the registered ACD users.
ACD is not available by default. Check with your system administrator to find out if this feature is available on your
phone.
Topics
State Indicator of ACD User
Logging into the ACD System
Changing the ACD Status
State Indicator of ACD User
You can get the ACD user's status by viewing the icon indicator of the ACD key.
Icons Description Icons Description
Available/Log in Wrap up
Unavailable Log out
86
Page 91

Advanced Call Features
Logging into the ACD System
After logging into your ACD account, you are ready to receive calls from the ACD system.
Before You Begin
Your system administrator has set an ACD key for you to log into the ACD system. Get your ACD account information
from your system administrator.
Procedure
1. Tap the ACD key when the phone is idle.
2. Enter your ACD account information.
3. Select Login.
Changing the ACD Status
You can tap the ACD key to change your current ACD user status.
Procedure
1. Tap Available /Unavailable.
ACD user status synchronizes on both the phone and ACD system.
2. To log out of the ACD system, select Logout.
87
Page 92

Yealink VP59 & SIP-T58A Phones User Guide
88
Page 93

Directory
Directory
The phone provides several types of phone directories, which can be customized by your system administrator.
Topics
Local Directory
Blacklist
Mobile Contacts
Google Contacts
Remote Phone Book
Local Directory
You can store up to 1000 contacts and 48 groups in your local directory, you can search, add, edit and delete a contact.
Topics
Managing the Local Directory Groups
Managing the Local Directory Contacts
Moving a Local Directory Contact to Blacklist
Moving a Local Directory Contact to the Shared Directory
Searching for Contacts
Managing the Local Directory Groups
You can manage the Local Directory groups when the phone is idle.
Topics
Adding Contact Groups
Editing Contact Groups
Deleting Contact Groups
Adding Contact Groups
To organize your contacts and make them easier to find, you can add additional groups in the Local Directory.
Procedure
1.
Tap ->Setting->New Group.
2. Enter the desired group name.
3.
Tap .
Editing Contact Groups
You can change or add the group's information.
Procedure
1.
Tap ->Setting.
2.
Tap after the desired group.
3. Edit the group name.
4.
Tap .
89
Page 94

Yealink VP59 & SIP-T58A Phones User Guide
Deleting Contact Groups
When you delete a contact group, the contacts in the group will not be deleted. You can view the contacts in All
Contacts list.
Procedure
1.
Tap ->Setting.
2.
Tap before the desired group name.
(missing or bad snippet)delete the group.
3. Select OK.
Managing the Local Directory Contacts
You can manage the Local Directory contacts when the phone is idle.
Topics
Adding Contacts
Viewing Contacts
Editing Contacts
Deleting a Contact
Deleting All Contacts
Adding Contacts
When you add a contact to your Local Directory, you can choose how much information you want to enter for your
contact. You are required to enter a contact name at least for each new contact.
Procedure
1.
Tap .
2. If you want to add a contact to the specified contact group, tap the contact group first.
3.
Tap .
4. Enter your contact's information.
5. Tap the desired account from the Account field.
6. Tap the desired photo from the Photo field.
7.
Tap .
Viewing Contacts
You can view the local contacts from the Local Directory on your phone.
Procedure
1.
Tap .
2. If you want to view a contact to the specified contact group, tap the contact group first.
The contact names are displayed in alphabetical order.
Editing Contacts
You can update your contacts' information.
Procedure
90
Page 95

1.
Tap .
2. If you want to edit a contact from the specified contact group, tap the contact group first.
3.
Tap after the desired contact.
4. Edit the contact information.
5.
Tap .
Deleting a Contact
You can delete any contact from the Local Directory.
Procedure
1.
Tap .
2. If you want to delete a contact from the specified contact group, tap the contact group first.
3.
Tap after the desired contact.
4. Tap Delete.
The phone prompts you whether to delete the contact.
5. Tap OK.
Directory
Deleting All Contacts
You can delete all contacts from the Local Directory.
Procedure
1.
Tap ->Setting.
2. Tap Select All.
3.
Tap .
(missing or bad snippet)delete all contacts.
4. Select OK.
Moving a Local Directory Contact to Blacklist
You can move a contact in the Local Directory to blacklist. Incoming calls from this contact will be rejected automatically.
Procedure
1.
Tap .
2. If you want to select a contact to the specified contact group, tap the contact group first.
3.
Tap after the desired contact.
4. Tap Blacklist.
(missing or bad snippet)move this contact to the blacklist.
5. Tap OK.
Moving a Local Directory Contact to the Shared Directory
You can move a contact in the Local Directory to the shared directory, so that you can share the contacts with other
slave handsets.
Before You Begin
91
Page 96

Yealink VP59 & SIP-T58A Phones User Guide
Make sure the Shared Directory is available on your phone.
Procedure
1.
Tap .
2. If you want to select a contact to the specified contact group, tap the contact group first.
3. Tap Setting.
4. Select a contact.
5. Tap ->New Entry.
6.
Tap .
Related Topic
Shared Directory
Searching for Contacts
In the Local Directory, you can enter search criteria to find your desired contact quickly.
Procedure
1.
Tap .
2. Do one of the following:
l Tap Search.
Enter your search criteria in the search field.
l Tap the desired letter (e.g., T) along the right side to jump to contacts whose names start with T or t.
Blacklist
Incoming calls from the Blacklist are rejected automatically. You can store up to 30 contacts in the blacklist to block
unwanted callers.
Topics
Adding a Blacklist Contact
Viewing Blacklist Contacts
Editing a Blacklist Contact
Deleting Blacklist Contacts
Moving a Blacklist Contact to the Local Directory
92
Page 97

Adding a Blacklist Contact
You can add a blacklist contact on the phone to prevent someone from calling you.
Procedure
1.
Navigate to ->Blacklist.
2.
Tap .
3. Enter the blacklist contact’s information.
4.
Tap .
Viewing Blacklist Contacts
You can view the blacklist contacts from the Blacklist on your phone.
Procedure
1.
Navigate to ->Blacklist.
Editing a Blacklist Contact
You can update your blacklist contacts' information.
Directory
Procedure
1.
Tap ->Blacklist.
2.
Tap after the desired contact.
3. Edit the blacklist contact information.
4.
Tap .
Deleting Blacklist Contacts
You can delete one or all blacklist contacts. If a contact is removed from the blacklist, you can answer the call from the
contact normally.
Topics
Deleting a Blacklist Contact
Deleting All Blacklist Contacts
Deleting a Blacklist Contact
If you want to answer a call from a specific contact, you need to remove it from the Blacklist.
Procedure
1.
Tap ->Blacklist.
2.
Tap after the desired contact.
3. Tap Delete.
(missing or bad snippet)delete the contact.
4. Select OK.
Deleting All Blacklist Contacts
You can delete all contacts from the Blacklist when you are ready to answer calls from them again.
93
Page 98

Yealink VP59 & SIP-T58A Phones User Guide
Procedure
1.
Tap ->Blacklist.
2. Tap Setting->Select All.
3.
Tap .
(missing or bad snippet)delete all contacts.
4. Tap OK.
Moving a Blacklist Contact to the Local Directory
You can move a blacklist contact to a Local Directory. Incoming calls from this contact will not be rejected automatically.
Procedure
1.
Tap ->Blacklist.
2.
Tap after the desired contact.
3. Select Local Directory from the Group field.
4.
Tap .
Mobile Contacts
You can synchronize the contacts on your mobile phone to your IP phone. The mobile phone contacts will be imported to your IP phones and stored under Mobile Contacts directory.
You can save mobile contacts to the local directory, but you cannot save a local contact to Mobile Contacts directory.
Note
If you disconnect the Bluetooth-enabled mobile phone from phone or disable the phone to synchronize phone contacts,
the mobile contacts will not be displayed.
Topics
Saving a Mobile Contact to the Local Directory
Searching for Mobile Contacts
Updating the Mobile Contacts
Saving a Mobile Contact to the Local Directory
You can save any mobile contact to the Local Directory, to conveniently call this contact after disconnecting the
mobile phone from the phone.
Before You Begin
Make sure your Bluetooth-enabled mobile phone has been paired with your IP phones, and mobile contact sync feature is enabled.
Procedure
1.
Tap ->Mobile Contacts.
94
Page 99

Directory
2.
Tap after the desired contact.
3. Select Local Directory from the Group field.
4. Edit the contact information.
5.
Tap .
Related Topics
Pairing and Connecting the Bluetooth-enabled Mobile Phone
Syncing the Mobile Contacts to the Phone
Searching for Mobile Contacts
In the Mobile Contacts, you can enter search criteria to find your desired mobile contact quickly.
Before You Begin
Make sure your Bluetooth-enabled mobile phone has been paired with and connected to your IP phones, and mobile
contact sync feature is enabled.
Procedure
1.
Tap ->Mobile Contacts.
2. Do one of the following:
l Tap Search.
Enter a search string of the contact name or number (office, mobile or other number).
The contacts whose name or phone number matches the search string will be displayed in the result list.
l Tap the desired letter (e.g., T) along the right side to jump to the contacts whose names start with T or t.
Related Topics
Pairing and Connecting the Bluetooth-enabled Mobile Phone
Syncing the Mobile Contacts to the Phone
Updating the Mobile Contacts
You can update the Mobile Contact to synchronize the contacts you add, edit, and delete on the mobile phone to your
phone.
Before You Begin
Make sure your Bluetooth-enabled mobile phone has been paired with and connected to your phones, and mobile contact sync feature is enabled.
Procedure
1.
Tap ->Mobile Contacts.
2.
Tap .
The phone prompts “Updating, please wait…”.
Note
If you disconnect the mobile phone from the phone when the phone is updating the Mobile Contacts, the phone screen will
prompt “Fail to download mobile contacts!”, and the mobile contacts disappear from the phone directory list.
Related Topics
95
Page 100

Yealink VP59 & SIP-T58A Phones User Guide
Pairing and Connecting the Bluetooth-enabled Mobile Phone
Syncing the Mobile Contacts to the Phone
Google Contacts
You can enable the Google Contacts feature to get contacts from your Google account. The contacts are imported to
your phone under Google Contacts directory.
Only SIP-T58A phones support Google contacts.
Topics
Enabling the Google Contacts Feature
Viewing Google Contacts
Adding a Google Contact
Editing a Google Contact
Deleting a Google Contact
Searching for Google Contacts
Manually Updating the Google Contacts
Enabling the Google Contacts Feature
You need to enable the Google Contacts feature first if you want to get contacts from your Google account.
Before You Begin
Make sure you have added a Google account to your phone.
Procedure
1. Swipe left or right to go to the second idle screen.
2. Navigate to Settings->Basic Settings->Google Contacts.
3. Mark the On radio box.
Related Topic
Adding APP Accounts
Viewing Google Contacts
After enabling the Google contacts feature, you can view a list of the Google contacts on your phone.
Procedure
1.
Navigate to ->Google Contacts.
2. Drag up and down to scroll through the Google contacts list.
3.
Tap beside the desired contact.
The detailed information of the entry appears on the phone screen.
Related Topic
Enabling the Google Contacts Feature
Adding a Google Contact
You can add a Google contact on your phone directly. The operation will sync on the Google contact server.
Before You Begin
96
 Loading...