


Table of Contents
i


Table of Contents
iii
Changes from Previous Versions .............................................. v
Changes from Version 1.2 ................................................................................................... v
Introduction ............................................................................... 1
Getting Started ......................................................................... 3
Obtaining Configuration Information ................................................................................ 3
Obtaining Configuration Files ......................................................................................... 3
Obtaining Phone Information .......................................................................................... 4
Managing Configuration Files ............................................................................................ 4
Editing Common CFG File ................................................................................................ 4
Editing MAC-Oriented CFG File...................................................................................... 8
Customizing Resource Files ............................................................................................ 11
Customizing a Ringtone .............................................................................................. 11
Customizing a LCD Language ................................................................................... 12
Customizing a LCD Logo ............................................................................................. 13
Customizing a Wallpaper ........................................................................................... 13
Customizing a Screensaver ........................................................................................ 14
Customizing Local Contact File .................................................................................. 15
Customizing Replace Rule File ................................................................................... 17
Customizing Dial-now File .......................................................................................... 19
Updating Firmware ..................................................................................................... 20
Configuring a TFTP Server ...................................................... 21
Preparing a Root Directory ................................................................................................ 21
Configuring a TFTP Server ................................................................................................. 22
Obtaining the Address of Provisioning Server ...................... 23
Zero Touch ........................................................................................................................... 23
Plug and Play (PNP) Server ............................................................................................... 25
DHCP Options ..................................................................................................................... 26
Phone Flash ......................................................................................................................... 26
Downloading and Verifying Configurations .......................... 29
Downloading Configuration Files ..................................................................................... 29

Yealink Auto provisioning User Guide
iv
Verifying Configurations .................................................................................................... 29
Troubleshooting ...................................................................... 31
Glossary .................................................................................. 33
Appendix ................................................................................ 35
Configuring a FTP Server................................................................................................... 35
Preparing a Root Directory ............................................................................................ 35
Configuring a FTP server ................................................................................................ 36
Configuring a HTTP Server ................................................................................................ 38
Preparing a Root Directory ............................................................................................ 38
Configuring a HTTP Server ............................................................................................. 38
Configuring a DHCP server ............................................................................................... 41
Customizing a Ringtone Using Cool Edit Pro .................................................................. 49
Customizing a Logo File Using PictureExDemo .............................................................. 50

Changes from Previous Versions
v
The following sections are new for this version:
Customizing a Wallpaper on page 13
Customizing a Screensaver on page 14
Customizing Replace Rule File on page 17
Customizing Dial-now File on page 19
Major updates have occurred to the following sections:
Customizing Local Contact File on page 15
Updating Firmware on page 20

Yealink Auto provisioning User Guide
vi

Introduction
1
Yealink IP phones are full-featured telephones that can be plugged directly into an IP
network and can be used easily without manual configuration.
This guide shows you how to provision Yealink IP phones with the minimum settings
required. Yealink IP phones support the FTP, TFTP, HTTP, and HTTPS protocols for file
provisioning and are configured by default to use Trivial File Transfer Protocol (TFTP).
The purpose of this guide is to serve as a basic guidance for auto provisioning Yealink IP
phones, including:
Yealink VP530
Yealink SIP-T38(G)
Yealink SIP-T32(G)
Yealink SIP-T28(P)
Yealink SIP-T26(P)
Yealink SIP-T22(P)
Yealink SIP-T20(P)
The provisioning process outlined in this document applies to the firmware V70 or higher
version of Yealink IP phones. If your phones are running a firmware version earlier than 70,
please contact your system administrator for help.

Yealink Auto provisioning User Guide
2

Getting Started
3
This section shows you how to get ready for the provisioning. The provisioning process
discussed in this guide uses TFTP and a personal computer (PC) as the provisioning
server.
To begin the provisioning process, the following are required:
Obtaining Configuration Information
Managing Configuration Files
Before beginning provisioning, you need to obtain the configuration files. There are 2
configuration files both of which are CFG formatted. We call these two files Common
CFG file and MAC-Oriented CFG file. The phone will try to download these CFG files
from the server during provisioning.
The MAC-Oriented CFG file is only effectual for the specific phone. It uses the 12-digit
MAC address of the phone as the file name. For example, if the MAC address of the
phone is 0015651130F9, then the MAC-Oriented CFG file name must be
0015651130F9.cfg. However, the Common CFG file is effectual for all the phones with the
same model. It uses a fixed name “y0000000000XX.cfg” as the file name, where "XX"
equals to the hardware version of the phone model, except 0 for T28 which is special.
The names of the Common CFG file for each phone model are:
You can ask the distributor or the Yealink FAE for configuration files.
Phone Model
Common Configuration File
VP530
y000000000023.cfg
SIP-T38G
y000000000038.cfg
SIP-T32G
y000000000032.cfg
SIP-T28(P)
y000000000000.cfg
SIP-T26(P)
y000000000004.cfg
SIP-T22(P)
y000000000005.cfg
SIP-T20(P)
y000000000007.cfg
Yealink Auto provisioning User Guide
4
Before beginning the provisioning, you will also need the phone information. Such as,
MAC address and the SIP account of the phone.
MAC Address: The unique 12-digit serial number of the phone. You can obtain it from the
phone’s bar code at the back of the phone.
SIP Account: This may include SIP credentials such as user name, password and the
address of the phone’s registration server. Ask your system administrator for SIP account
information you need. Although SIP accounts may not be required to get the phone
working, we strongly recommend using them.
Auto provisioning enables Yealink IP phones to update automatically via downloading
the Common CFG file and MAC-Oriented CFG file. Before provisioning you may need to
edit and customize your configuration files.
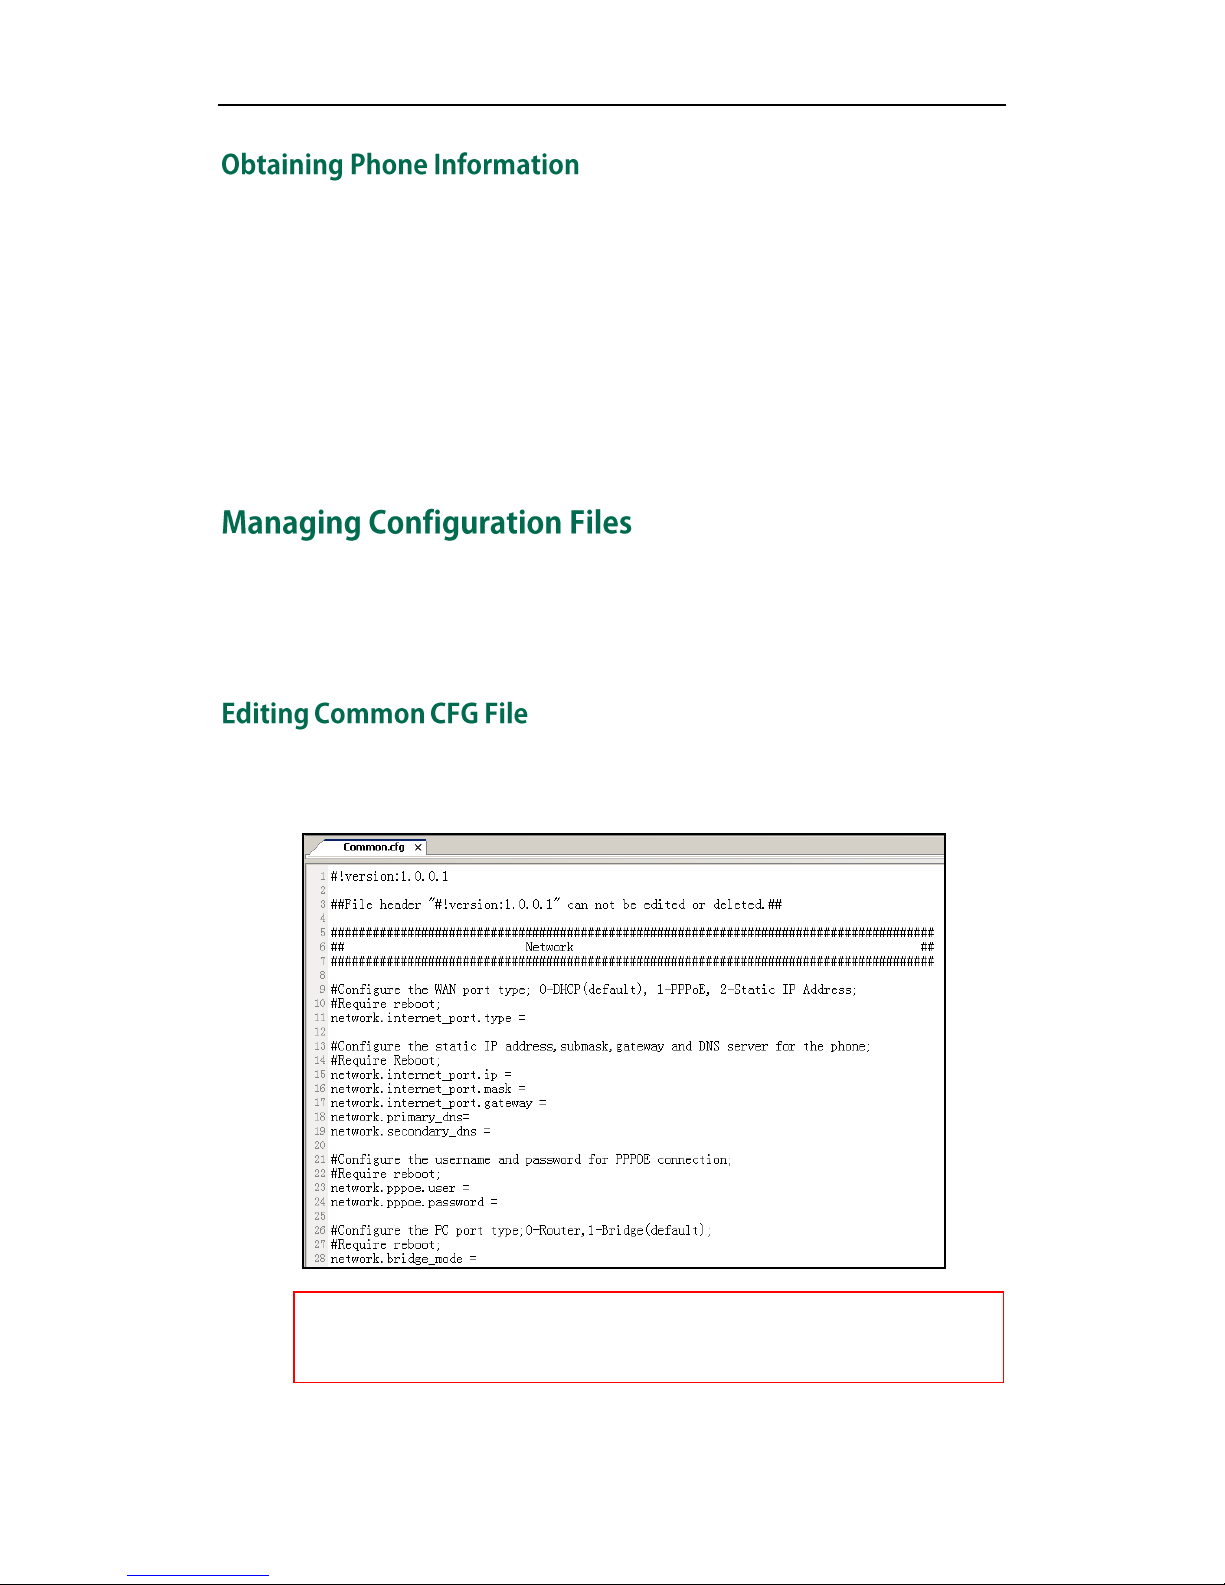
Common CFG file contains configuration parameters which apply to all phones of the
same phone model, such as the language displays on the phone LCD screen.
The line beginning with “#” is considered to be a comment.
The file header “#!version:1.0.0.1” is not a comment, it must not be edited or be deleted
and must be placed in the first line.

Getting Started
5
The parameters commonly edited in the Common CFG file (T2xP as an example) are
detailed as following:
####################################################
## Common CFG File ##
####################################################
#!version:1.0.0.1
##File header "#!version:1.0.0.1" cannot be edited or deleted and must be placed in
the first line.##
#Configure the WAN port type; 0-DHCP(default), 1-PPPoE, 2-Static IP Address
#Require reboot
network.internet_port.type = 0
#Configure the static IP address, submask, gateway and DNS server for the phone
#Require reboot
network.internet_port.ip = 192.168.1.10
network.internet_port.mask = 255.255.255.0
network.internet_port.gateway =192.168.1.1
network.primary_ dns= 202.101.103.55
network.secondary_dns = 202.101.103.54
#Configure the duplex mode and the speed of the WAN port.
#0-Auto negotiate (default), 1-Full duplex 10Mbps, 2-Full duplex 100Mbps, 3-Half
duplex 10Mbps, 4-Half duplex 100Mbps;
network.internet_port.speed_duplex =
#Configure the username and password for PPPOE connection.
#Require reboot
network.pppoe.user =
network.pppoe.password =
#Configure the PC port type; 0-Router, 1-Bridge (default)
#Require reboot
network.bridge_mode = 1
#LAN port as Router settings
#Require reboot
network.pc_port.ip = 10.0.0.1
network.pc_port.mask = 255.255.255.0
network.pc_port.speed_duplex = 0
network.pc_port.dhcp_server = 1
network.dchp.start_ip = 10.0.0.10

Yealink Auto provisioning User Guide
6
network.dchp.end_ip = 10.0.0.100
#Enable or disable the Plug and Play feature; 0-Disabled, 1-Enabled (default)
auto_provision.pnp_enable = 1
#Configure the domain name of the PNP server.
auto_provision.pnp_domain_name =
#Configure the value (manufacturer of the device) of the PNP subscribe message.
auto_provision.pnp_event_vendor =
#Configure the auto provision mode;
#0-Disabled (default), 1-Power on, 4-Repeatedly, 5-Weekly, 6-Power on + Repeatedly,
7-Power on + Weekly;
auto_provision.mode = 1
#Configure the interval (in minutes) for the phone to check new configuration files. It
ranges from 1 to 43200, the default value is 1440.
#It is only applicable to "Repeatedly" and "Power on + Repeatedly" modes.
auto_provision.schedule.periodic_minute = 1440
#Configure the start time of the day for the phone to check new configuration files. The
default value is 00:00.
#It is only applicable to "Weekly" and "Power on + Weekly" modes.
#If the desired start time of the day is seven forty-five a.m., the value format is 07:45.
auto_provision.schedule.time_from = 00:00
#Configure the end time of the day for the phone to check new configuration files. The
default time is 00:00.
#It is only applicable to "Weekly" and "Power on + Weekly" modes.
#If the desired end time of the day is seven forty-five p.m., the value format is 19:45.
auto_provision.schedule.time_to = 00:00
#Configure the day of week for the phone to check new configuration files. The default
vaule is 0123456.
#0-Sunday,1-Monday,2-Tuesday,3-Wednesday,4-Thursday,5-Friday,6-Saturday;
#It is only applicable to "Weekly" and "Power on + Weekly" modes.
#If the desired week is Monday, Tuesday and Wednesday, the value format is 012.
auto_provision.schedule.dayofweek = 0123456
#Configure the URL of the auto provisioning server.
auto_provision.server.url =
#Configure the username and password for downloading.

Getting Started
7
auto_provision.server.username =
auto_provision.server.password =
#Configure the name of the common file.
#T28P: y000000000000.cfg, T26P: y000000000004.cfg, T22P: y000000000005.cfg,
#T20P: y000000000007.cfg-T20P;
auto_provision.common_file_name =
#Enable or disable DHCP option mode; 0-Disabled, 1-Enabled (default);
auto_provision.dhcp_option.enable =
#Configure the value (manufacturer of the device) of DHCP option 60.
auto_provision.dhcp_option.option60_value =
#Configure the custom DHCP option number. It ranges from 128 to 254.
auto_provision.dhcp_option.list_user_options =
#Set the AES key used for decrypting the Common CFG file
auto_provision.aes_key_16.com =
#Set the AES key used for decrypting MAC-Oriented CFG file
auto_provision.aes_key_16.mac =
#Set the language used on the Web page
#The available values are: English, Chinese_S, Turkish, Portuguese, Spanish, Italian,
#French, Russian, Deutsch and Czech
lang.wui =
#Set the language used on the phone LCD screen
#The available values are: English (default), Chinese_S, Chinese_T, German, French,
#Turkish, Italiano, Polish, Spanish and Portuguese
lang.gui = English
#Set the web server access type (0-Disabled, 1-HTTP&HTTPS (default), 2-HTTP only,
#3-HTTPS only)
#Require reboot
network.web_server_type = 1
#Set the HTTP port (80 by default)
#Require reboot
network.port.http = 80
#Set the HTTPS port (443 by default)
#Require reboot

Yealink Auto provisioning User Guide
8
network.port.https = 443
#Set the new password (admin123) for the administrator
security.user_password = admin:admin123
#Set the new password (user123) for the user
security.user_password = user:user123
MAC-Oriented CFG file contains configuration parameters which are expected to be
updated per phone, such as the registration information.
The parameters commonly edited in the MAC-Oriented CFG file (Take T2xP IP phone as
an example) are detailed as following:
####################################################
## MAC-Oriented CFG File ##
####################################################
#!version:1.0.0.1
#File header "#!version:1.0.0.1" cannot be edited or deleted and must be placed in the
first line.##
#Line1 settings
#Enable or disable the account1, 0-Disabled (Default), 1-Enabled
account.1.enable =
#Configure the label displayed on the LCD screen for account1
account.1.label =

Getting Started
9
#Configure the display name of account1
account.1.display_name =
#Configure the user name and password for register authentication
account.1.auth_name =
account.1.password =
#Configure the register user name
account.1.user_name =
#Configure the SIP server address and port (5060 by default)
account.1.sip_server_host =
account.1.sip_server_port = 5060
#Line2 settings
#Enable or disable the account2, 0-Disabled (Default), 1-Enabled
account.2.enable =
#Configure the label displayed on the LCD screen for account2
account.2.label =
#Configure the display name of account2
account.2.display_name =
#Configure the user name and password for register authentication
account.2.auth_name =
account.2.password =
#Configure the register user name
account.2.user_name =
#Configure the SIP server address and port (5060 by default)
account.2.sip_server_host =
account.2.sip_server_port = 5060
#Line3 settings (Except SIP-T20P IP phones)
#Enable or disable the account3, 0-Disabled (Default), 1-Enabled
account.3.enable =
#Configure the label displayed on the LCD screen for account3
account.3.label =
#Configure the display name of account3
account.3.display_name =
#Configure the user name and password for register authentication
account.3.auth_name =
account.3.password =
#Configure the register user name

Yealink Auto provisioning User Guide
10
account.3.user_name =
#Configure the SIP server address and port (5060 by default)
account.3.sip_server_host =
account.3.sip_server_port = 5060
#Line4 settings (For SIP-T28P, SIP-T38G and VP530 IP phones only)
#Enable or disable the account4, 0-Disabled (Default), 1-Enabled
account.4.enable =
#Configure the label displayed on the LCD screen for account4
account.4.label =
#Configure the display name of account4
account.4.display_name =
#Configure the user name and password for register authentication
account.4.auth_name =
account.4.password =
#Configure the register user name
account.4.user_name =
#Configure the SIP server address and port (5060 by default)
account.4.sip_server_host =
account.4.sip_server_port = 5060
#Line5 settings (For SIP-T28P and SIP-T38G IP phones only)
#Enable or disable the account5, 0-Disabled (Default) 1-Enabled
account.5.enable =
# Configure the label displayed on the LCD screen for account5
account.5.label =
#Configure the display name of account5
account.5.display_name =
#Configure the user name and password for register authentication
account.5.auth_name =
account.5.password =
#Configure the register user name
account.5.user_name =
#Configure the SIP server address and port (5060 by default)
account.5.sip_server_host =
account.5.sip_server_port = 5060
#Line6 settings (For SIP- T28P and SIP-T38G IP phones only)
#Enable or disable the account6, 0-Disabled (Default), 1-Enabled

Getting Started
11
account.6.enable =
#Configure the label displayed on the LCD screen for account6
account.6.label =
#Configure the display name of account6
account.6.display_name =
#Configure the user name and password for register authentication
account.6.auth_name =
account.6.password =
#Configure the register user name
account.6.user_name =
#Configure the SIP server address and port (5060 by default)
account.6.sip_server_host =
account.6.sip_server_port = 5060
You can configure the phone features via the parameters in the configuration files. You
can also customize your phone with a personalized ringtone, language or logo.
Yealink IP phones have built-in system ringtones and the default ring type is Ring1. You
can change the ring type, or you can customize your personal ringtone and make it take
effect via auto provisioning.
The ringtone file must be PCMU audio format, mono channel, 8K sample rate and 16 bit
resolution.
The ringtone file format must be .wav.
All ringtone files uploaded must be within 100KB.
####################################################
## Configure the access URL of the customizing ringtone ##
####################################################
ringtone.url =
#ringtone.delete =http://localhost/all
#Delete all the custom ringtones uploaded through auto provisioning
ringtone.delete =
For example: enter “ftp://192.168.1.100/Ring9.wav” in the “ringtone.url =” field. During
the auto provisioning process, the phone connects to the provisioning server
“192.168.1.100”, and downloads the ringtone file “Ring9.wav”.

Yealink Auto provisioning User Guide
12
You’d better check that the ringtone file has been uploaded to the root directory of the
server before provisioning.
For more information about customizing a ringtone file, you can refer to Customizing a
Ringtone Using Cool Edit Pro in this guide.
You can modify the translation of the languages of the IP phones, but you cannot add
new language to the phone. To modify the existing language, you need to edit the
language file and upload it to the root directory of the provisioning server, then specify
the access URL in the configuration file.
The following figure shows a portion of the language file:
####################################################
## Configure the access URL of the LCD language file ##
####################################################
gui_lang.url =
#gui_lang.delete = =http://localhost/all
#Delete all custom languages downloaded through auto provision
gui_lang.delete =
For example: enter “ftp://192.168.1.100/lang-English.txt” in the “gui_lang.url = ” field.
During the auto provisioning process, the phone connects to the provisioning server
“192.168.1.100”, and downloads the language file “lang-English.txt”.
Available languages may be different between different firmware versions. Ask the
distributor for the language template file.

Getting Started
13
Yealink SIP-T2xP IP phones allow you to customize the logo displayed on the phone LCD
screen (The SIP-T20P IP phones only support displaying the text logo). Ask the distributor
for the logo file, or you can customize a .dob logo file. Upload the logo file to the root
directory of the provisioning server and then specify the access URL in the configuration
file:
####################################################
## Configure the access URL of the Logo File ##
####################################################
#(SIP-T2xP except T20P IP phones)
lcd_logo.url =
#lcd_logo.delete = =http://localhost/all
#Delete all custom logo files
lcd_logo.delete =
For example: enter “ftp://192.168.1.100/logo.dob” in the “lcd_logo.url =” field. During the
auto provisioning process, the phone connects to the provisioning server
“192.168.1.100”, and downloads the logo file “logo.dob”.
The following table lists the logo file format and resolution for each phone model:
Phone Model
Logo File Format
Resolution
SIP-T28P
.dob
<=236*82 2 gray scale
SIP-T26P
.dob
<=132*64 2 gray scale
SIP-T22P
.dob
<=132*64 2 gray scale
Upload the logo file to the root directory of the provisioning server. After provisioning,
the phone boots up, and you will then find that the customized logo displays on the
phone LCD screen.
For more information about customizing a Logo file, refer to Customizing a Logo File
Using PictureExDemo in this guide.
Yealink SIP-T3xG and VP530 IP phones allow you to customize the wallpaper displayed
on the phone LCD screen. Upload the wallpaper image to the root directory of the
provisioning server and then specify the access URL in the configuration file:
####################################################
## Configure the access URL of the wallpaper ##
####################################################
#(SIP-T3xG/VP530 IP phones only)
wallpaper_upload.url =
Yealink Auto provisioning User Guide
14
For example: enter “ftp://192.168.1.100/wallpaper.jpg” in the “wallpaper_upload.url =”
field. During the auto provisioning process, the phone connects to the provisioning
server “192.168.1.100”, and downloads the wallpaper image “wallpaper.jpg”.
The following table lists the wallpaper image format and resolution for each phone
model:
Phone Model
Wallpaper Image
Format
Resolution
VP530
.jpg/.png/.bmp
<=1920*1200
SIP-T38G
.jpg/.png/.bmp
<=480*272
SIP-T32G
.jpg/.png/.bmp
<=480*272
Yealink SIP-T3xG IP phones allow you to customize the screensaver displayed on the
phone LCD screen. The screensaver will automatically start each time your phone is idle
a certain period of time. You can stop the screensaver at any time by pressing any key.
Upload the screensaver image to the root directory of the provisioning server and then
specify the access URL in the configuration file:
####################################################
## Configure the access URL of the screensaver ##
####################################################
#(SIP-T3xG IP phones only)
screen_saver.pic.url =
For example: enter “ftp://192.168.1.100/screensaver.jpg” in the “screen_saver.pic.url =”
field. During the auto provisioning process, the phone connects to the provisioning
server “192.168.1.100”, and downloads the screensaver image “screensaver.jpg”.
The following table lists the screensaver image format and resolution for each phone
model:
Phone Model
Screensaver Image
Format
Resolution
SIP-T38G
.jpg/.png/.bmp
<=480*272
SIP-T32G
.jpg/.png/.bmp
<=480*272

Getting Started
15
Yealink IP phones allow you to batch upload contact data by auto provisioning. You can
create multiple contacts using the supplied template local contact file.
When editing the template local contact file, remember the following:
<contactData> indicates the start of a contact file and </contactData> indicates
the end of a contact file (Applicable to SIP-T2xP/T3xG IP phones).
Add groups between <groupinfo> and </groupinfo> (applicable to SIP-T2xP/T3xG
IP phones).
Add groups between <root_group> and </ root_group> (Applicable to VP530 IP
phones).
Add local contacts between <group> and </group> (Applicable to SIP-T2xP/T3xG
IP phones).
Add local contacts between <root_contact> and </ root_contact> (Applicable to
VP530 IP phones).
Add contacts to the blacklist between <blacklist> and </blacklist> (Applicable to
SIP-T2xP/T3xG IP phones).
When specifying the desired line for the contact, the valid values are 0 and line ID,
0 stands for Auto.
When specifying a ring tone for the contact or the group, the valid values are Auto,
Resource:RingN.wav (for the default system ring tone) and Custom:Name.wav (For
the customized ring tone).
To customize a local contact file:
1. Open the template file using an ASCII editor.
2. For each contact that you wish to add, add the following string to the file, each
starting on a separate line:
<contact sDisplayName="" sOfficeNumber="" sMobilNumber="" sOtherNumber=""
sLine="" sRing="" group=""/>
#(For T2xP IP phones)
<contact sDisplayName="" sOfficeNumber="" sMobilNumber="" sOtherNumber=""
sLine="" sRing="" group="" photoDefault=”” photoSelect=””/>
#(For T3xG IP
phones)
<contact display_name="" office_number="" mobile_number="" other_number=""
line="" ring="" group_id_name="" default_photo="" selected_photo=""/>
#(For
VP530 IP phones, entering “blacklist” in the “group_id_name =””“field to add the
contacts to blacklist)
Where:
sDisplayName=””/display_name=”” specifies the name of the contact (This value
cannot be blank or duplicated).
OfficeNumber=””/office_number=”” specifies the office number of the contact.

Yealink Auto provisioning User Guide
16
sMobilNumber=””/mobile_number=”” specifies the mobile number of the contact.
sOtherNumber=””/other_number=”” specifies the other number of the contact.
sLine=””/line=”” specifies the line you want to add this contact to.
sRing=””/ring=”” specifies the ring tone for this contact.
group=””/group_id_name="" specifies the existing group you want to add the
contact to.
photoDefault=””/default_photo=”” specifies the customized photo for the contact.
The value format is “Config:name.png”.
photoSelect=””/selected_photo=”” specifies the system photo for the contact.
3. For each group that you want to add, add the following string to the file, each
starting on a separate line:
<group name=”” ring=””/>
#(For T2xP IP phones)
<group name=”” Ring=””/>
#(For T3xG IP phones)
<group display name=”” ring=””/>
#(For VP530 IP phones)
Where:
group name=””/group display name=”” specifies the name of the group.
ring=””/Ring=”” specifies the desired ring tone for this group.
4. For each contact that you want to add to the blacklist, add the following string to
the file, each starting on a separate line:
<contact sDisplayName="" sOfficeNumber="" sMobilNumber="" sOtherNumber=""
sLine=""/>
#(For T2xP/T3xG IP phones)
5. Specify the values within double quotes.
6. Save the change.
After editing the template local contact file, upload the file to the root directory of the
provisioning server and then specify the access URL in the configuration file.

Getting Started
17
The following shows an example of the contactData.xml file used for SIP-T2xP and
SIP-T3xG IP phones:
<contactData>
<group>
<contact sDisplayName="Mary" sOfficeNumber="123" sMobilNumber="456"
sOtherNumber="2201" sLine="0" sRing="Auto" group="Family"
photoDefault=”Config:family.png” photoSelect=”0”/>
<contact sDisplayName="Damy" sOfficeNumber="124" sMobilNumber="789"
sOtherNumber="2202" sLine="1" sRing="Resource:Ring2.wav" group=""
photoDefault=”” photoSelect=”3”/>
<contact sDisplayName="Jack" sOfficeNumber="125" sMobilNumber="234"
sOtherNumber="2203" sLine="2" sRing="Custom:lin.wav" group="Family"
photoDefault=”” photoSelect=”2”/>
</group>
<blacklist>
<contact sDisplayName="Ada" sOfficeNumber="8800" sMobilNumber="1234"
sOtherNumber="0000" sLine="0"/>
</blacklist>
</contactData>
####################################################
## Upload local contact file ##
####################################################
local_contact.data.url =
For example: enter “ftp://192.168.1.100/ ContactData.xml” in the “local_contact.data.url
=” field. During the auto provisioning process, the phone connects to the provisioning
server “192.168.1.100”, and downloads the contact file “ContactData.xml”.
Yealink IP phones support both the .xml and .csv formats.
You can create replace rules directly in the configuration files, or create multiple replace
rules using the supplied template replace rule file. When the IP phones download the
replace rule file, the existing replace rules on the phone will be overwritten.
When editing the template replace rule file, remember the following:
<DialRule> indicates the start of the template file and </DialRule> indicates the
end of the template file (Applicable to SIP-T2xP/T3xG IP phones).

Yealink Auto provisioning User Guide
18
<dialrule> indicates the start of the template file and </dialrule> indicates the
end of the template file (Applicable to VP530 IP phones).
Create replace rules between <DialRule> (<dialrule>) and </DialRule>
(</dialrule>).
When specifying the desired line(s) to apply the replace rule, the valid values are 0
and line IDs. The digit 0 stands for all lines, multiple line IDs are separated by
comma.
Do not modify the file name.
Refer to the phone-specific user guide for the basic expression syntax of the
replace rule.
To customize a replace rule file:
1. Open the template file using an ASCII editor.
2. For each replace rule you wish to add, add the following string to the file, each
starting on a separate line:
<Data Prefix=”” Replace=”” LineID=””/>
#(For T2xP/T3xG IP phones)
<data rule=”” replace=”” lines=””/>
#(For VP530 IP phones)
Where:
Prefix=””/rule=”” specifies the numbers to be replaced.
Replace=””/replace=”” specifies the alternate string.
LineID=””/lines=”” specifies the desired line(s) for this rule. When leaving it blank,
this replace rule will apply to all lines.
3. Specify the values within double quotes.
4. Save the change.
The following is an example of a replace rule file used for SIP-T2xP and SIP-T3xG IP
phones:
<DialRule>
<Data Prefix="1" Replace="05928665234" LineID=""/>
<Data Prefix="2(xx)" Replace="002$1" LineID="0"/>
</DialRule>
####################################################
## Upload replace rule file ##
####################################################
dialplan_replace_rule.url =
For example: enter “ftp://192.168.1.100/DialPlan.xml” in the “dialplan_replace_rule.url =”
field. During the auto provisioning process, the phone connects to the provisioning
server “192.168.1.100”, and downloads the replace rule file “DialPlan.xml”.

Getting Started
19
You can create multiple dial-now rules using the supplied template dial-now file. After
creating the dial-now rules, save the dial-now file to the root directory of the
provisioning server and specify the access URL in the configuration files.
When editing a dial-now file, remember the following:
<DialNow> indicates the start of a template and </DialNow> indicates the end of
a template (applicable to SIP-T2xP/T3xG IP phones).
<dialnow> indicates the start of a template and </dialnow> indicates the end of
a template (applicable to VP530 IP phones).
Create dial-now rules between <DialNow> (<dialnow >) and </DialNow>
(</dialnow>).
When specifying the desired line(s) for the dial-now rule, the valid values are 0 and
line ID. 0 stands for all lines, multiple line IDs are separated by comma.
Do not modify the file name.
Refer to the phone-specific user guide for the basic expression syntax of the
dial-now rule.
To customize a dial-now file:
1. Open the template file using an ASCII editor.
2. For each dial-now rule you wish to add, add the following string to the file, each
starting on a separate line:
<Data DialNowRule="" LineID=""/>
#(For T2xP/T3xG IP phones)
<data rule="" lines=""/>
#(For VP530 IP phones)
Where:
DialNowRule=""/ rule="" specifies the dial-now rule.
LineID=""/ lines="" specifies the desired line(s) for this rule. When leaving it blank,
this rule will apply to all lines.
3. Specify the values within double quotes.
4. Save the change.
The following is an example of a dial-now file used for SIP-T2xP and SIP-T3xG IP phones:
<DialNow>
<Data DialNowRule="1234" LineID="1"/>
<Data DialNowRule="52[0-6]" LineID="1"/>
<Data DialNowRule="xxxxxx" LineID=""/>
</DialNow>

Yealink Auto provisioning User Guide
20
####################################################
## Upload dial-now file ##
####################################################
dialplan_dialnow.url =
For example: enter “ftp://192.168.1.100/DialNow.xml” in the “dialplan_dialnow.url =”
field. During the auto provisioning process, the phone connects to the provisioning
server “192.168.1.100”, and downloads the dial-now file “DialNow.xml”.
Yealink IP Phones allow you to update the firmware manually via web user interface, or
batch update the firmware via the auto provisioning. To batch update the phones’
firmware via auto provisioning, ask the distributor for the firmware file, upload it to the
root directory of the provisioning server, and then specify the access URL in the
configuration files.
####################################################
## Configure the access URL of the firmware file ##
####################################################
firmware.url =
For example: enter “ftp://admin:password@192.168.1.100/2.70.0.35.rom” in the
“firmware.url =” field. During the auto provisioning process, the phone connects to the
provisioning server “192.168.1.100” (“admin” as the authentication user name and
“password” as the authentication password), and downloads the firmware file
“2.70.0.35.rom”.
The following table lists the firmware version for each phone mode:
Phone Model
Firmware Version
VP530
23.x.x.x.rom
SIP-T38G
38.x.x.x.rom
SIP-T32G
32.x.x.x.rom
SIP-T28(P)
2.x.x.x.rom
SIP-T26(P)
6.x.x.x.rom
SIP-T22(P)
7.x.x.x.rom
SIP-T20(P)
9.x.x.x.rom

Configuring a TFTP Server
21
Yealink IP Phones support using the FTP, TFTP, HTTP and HTTPS protocols to download the
configuration files. TFTP server is used by default. You can use any protocol for
provisioning. The following section takes the TFTP server as an example.
We recommend that you can use 3CDaemon or TFTPD32 tool as a TFTP server.
3CDaemo and TFTPD32 are free applications for Windows. You can download the
3CDaemon software at: http://www.oldversion.com/3Com-Daemon.html and TFTPD32 at:
http://tftpd32.jounin.net/.
We provide a simple instruction of configuring a FTP server using 3CDaemon tool in the
Configuring a FTP server section.
To prepare a root directory:
1. Create a root TFTP directory on the local computer.
2. Place the configuration files to this root directory.
3. Set the security permissions for the TFTP directory folder.
4. You need to define a user or a group name, and set the permissions: read, write,
and modify files. Security permissions vary by organization.
An example of using the Windows platform is shown as below:

Yealink Auto provisioning User Guide
22
If you have a 3CDaemon application installed on your computer, use it directly.
Otherwise, download and install it.
To configure a TFTP server:
1. Double click the 3CDaemon.exe to start the application. A configuration page
shows as below:
2. Select Configure TFTP Server. Click the button to locate the TFTP root directory
on the computer:
3. Click the Confirm button to finish configuring the TFTP server. The server URL
“tftp://IP/” (Here “IP” means the IP address of the provisioning server, for
example, ”tftp://192.168.1.100/”) is capable of TFTP downloading.

Obtaining the Address of Provisioning Server
23
Yealink IP phones support to obtain the provisioning server address during bootup
process in the following ways:
Zero Touch
Plug and Play (PNP) Server
DHCP Options
Phone Flash
When the phone boots up, it will go by the above process to try to obtain the
provisioning server address. The priority of obtaining the provisioning server address is
as following: Zero Touch -->PNP server -->DHCP options (Custom option --> option 66
-->option 43) -->Phone Flash.
The following sections detail each process.
Zero Touch allows you to configure the network and provisioning server address via
phone user interface during bootup. This feature is helpful when there is a system failure
on the phone. To use Zero Touch, you need to make sure that this feature is enabled.
To configure the Zero Touch via web user interface:
1. Click on Upgrade ->Advanced.
2. Select Enabled from the pull-down list of Zero Touch.
3. Set the waiting time (in seconds) in the Wait Time (seconds) filed.

Yealink Auto provisioning User Guide
24
4. Click Confirm to accept the change.
When the Zero Touch is enabled, there will be a configure wizard during the bootup:
Press the OK soft key. Then you can configure the network via phone user interface:
Press the Next soft key after finishing the network configuration.
Configure the provisioning server address, authentication username (optional) and
password (optional) in the Auto Provision interface.
A sample screenshot is shown as below:

Obtaining the Address of Provisioning Server
25
Yealink IP phones support obtaining the provisioning server address from the PNP server.
The phone broadcast the PNP subscribe message to obtain a provisioning server
address during bootup. To use Plug and play, make sure this feature is enabled.
To configure the PNP via web user interface:
1. Click on Upgrade ->Advanced.
2. Select Enabled from the pull-down list of PNP.
3. Click Confirm to accept the change.
Any PNP server activated in the network responses with a SIP NOTIFY message and an
address of the provisioning server contained in the message body. The phone can then
connect to the provisioning server and performs the provisioning process.

Yealink Auto provisioning User Guide
26
Yealink IP phones support obtaining the provisioning server address from DHCP options.
You can configure the phone to obtain a provisioning server address from a custom
DHCP option, or the phone will automatically detect the Option 66 or Option 43. The
Option 66 is used to identify the TFTP server.
To obtain a provisioning server by a custom DHCP option, make sure that the DHCP
option is set properly.
To configure the DHCP option via web user interface:
1. Click on Upgrade ->Advanced.
2. Select Enabled from the pull-down list of DHCP Active.
3. Enter the value in the Custom Option (128~254) field.
4. Select the desired type from the pull-down list of Custom Option Type.
5. Click Confirm to accept the change.
A valid Custom Option is from 128 to 254. The Custom Option Type must be in accordance
with the one defined in the DHCP server.
Yealink IP phones support obtaining a provisioning server address from the phone flash.
To obtain a provisioning server address by reading the phone flash, make sure the
configuration is set properly.

Obtaining the Address of Provisioning Server
27
To configure the Phone Flash via web user interface:
1. Click on Upgrade ->Advanced.
2. Enter the URL, username and password of the provisioning server in the
Provisioning Server, User Name and Password fields (the authentication username
and password is optional).
3. Select Power on from the pull-down list of Check New Config.
4. Click Confirm to accept the change.
If the configuration files have been AES encrypted, the AES Keys will be needed. The
Common AES Key is for decrypting the Common CFG file. The MAC-Oriented AES Key is
for decrypting the MAC-Oriented CFG file. The keys must be 16 bytes and the
supported characters are: 0 ~ 9, A ~ Z, a ~ z and the following special characters are
also supported: # $ % * +, - . : = ? @ [ ] ^ _ { } ~.
Reboot the phone after the above configurations. During bootup, the phone will connect
to the provisioning server, using the authentication user name and password filled in the
User Name and Password fields. If the phone fails to get any information from the phone
flash, the current round of auto provisioning process will stop.

Yealink Auto provisioning User Guide
28

Downloading and Verifying Configurations
29
Once obtained a provisioning server address from one of the ways introduced above,
the phone will connect to the provisioning server and download the configuration files.
During the provisioning process, the phone will try to download the Common CFG file
firstly, and then try to download the MAC-Oriented CFG file from the root directory of
the provisioning server. If resource files need to be updated and the access URL has
been specified in the configuration files. The phone will then try to download and
update the resource files.
After auto provisioning, the phone boots up. You can then verify the update via phone
user interface, or you can verify it via web user interface of the phone. For more
information, refer to the user guide of the Yealink IP phones.
During the auto provisioning process, you can monitor the downloading request and
response message by a WinPcap tool.
If the MD5 value of the CFG file is different from that of the last one, the phone updates the
configuration and then reboots. Otherwise, the phone gives up update and doesn’t reboot.
Example1: Yealink IP phone downloads configuration files from the TFTP server.

Yealink Auto provisioning User Guide
30
Example 2: Yealink IP phone downloads the configuration files from the FTP server.
Example 3: Yealink IP phone downloads the configuration files from the HTTP server.

Troubleshooting
31
This chapter provides general troubleshooting information to help you solve the
problems you might encounter when deploying the phones.
If you require additional information or assistance with the deployment, contact your
system administrator.
Why does the phone fail to download the configuration file?
Ensure that the Auto Provisioning feature is enabled.
Check that the provisioning server or the network is reachable.
Check that authentication credentials configured on the phone are correct.
Ensure that the configuration file exists on the provisioning server.
Why does the provisioning server return a HTTP 404?
Check that the provisioning server is properly set up.
Revisit the path configuration (URL rewriting, port).
Ensure that the requested file exists on the provisioning server.
Why does the phone display "Network Unavailable"?
Ensure that the Ethernet cable is plugged into the Internet port on the phone and
the ethernet cable is not loose.
Ensure that the switch or hub in your network is operational.
Check the configuration of network is properly set in the configuration files.
Contact your system administrator for more information.
Why does the permission denied when uploading files to a FTP server?
Ensure that the root directory of the FTP server contains the full directory path.
On the provisioning server, check the file permissions, if necessary, change the file
permission.
Contact your system administrator for more information.
Why does not the phone obtain the IP address from DHCP server?
Ensure that your settings are right on the DHCP Server.
Ensure your phone is configured to obtain the IP address via DHCP server.
Contact your system administrator for more information.

Yealink Auto provisioning User Guide
32
Why does not the phone download the ringtone?
Make sure that the ringtone file’s type is .wav format.
Make sure that the size of the ringtone file is no larger than the phone support.
Check the ringtone’s properties are all right for the phone.
Ensure the network is available and the root directory is right for downloading.
Ensure that the ringtone file exists on the provisioning server.
Why does not the phone apply the configurations?
Ensure the configuration files are different from the last ones.
Ensure the phone have downloaded the configuration files.
Ensure the parameters are correctly set in the configuration files.
Contact your system administrator for more information.

Glossary
33
MAC Address: A Media Access Control address (MAC address) is a unique identifier
assigned to network interfaces for communications on the physical network segment.
MD5: The MD5 Message-Digest Algorithm is a widely used cryptographic hash function
that produces a 128-bit (16-byte) hash value.
DHCP: Dynamic Host Configuration Protocol (DHCP) is a network configuration protocol
for hosts on Internet Protocol (IP) networks. Computers that are connected to IP networks
must be configured before they can communicate with other hosts.
FTP: File Transfer Protocol (FTP) is a standard network protocol used to transfer files from
one host to another host over a TCP-based network, such as the Internet. It is often used
to upload web pages and other documents from a private development machine to a
public web-hosting server.
HTTP: The Hypertext Transfer Protocol (HTTP) is an application protocol for distributed,
collaborative, hypermedia information systems. HTTP is the foundation of data
communication for the World Wide Web.
HTTPS: Hypertext Transfer Protocol Secure (HTTPS) is a combination of Hypertext
Transfer Protocol (HTTP) with SSL/TLS protocol. It provides encrypted communication
and secure identification of a network web server.
TFTP: Trivial File Transfer Protocol (TFTP) is a simple protocol to transfer files. It has been
implemented on top of the User Datagram Protocol (UDP) using port number 69.
AES: Advanced Encryption Standard (AES) is a specification for the encryption of
electronic data.
URL: A uniform resource locator or universal resource locator (URL) is a specific
character string that constitutes a reference to an Internet resource.
XML: Extensible Markup Language (XML) is a markup language that defines a set of
rules for encoding documents in a format that is both human-readable and
machine-readable.

Yealink Auto provisioning User Guide
34

Appendix
35
This chapter shows you how to configure a FTP server using 3CDaemon and how to
configure a HTTP server using HFS tool. You can download the 3CDaemon software at:
http://www.oldversion.com/3Com-Daemon.html and HFS at:
http://www.snapfiles.com/get/hfs.html
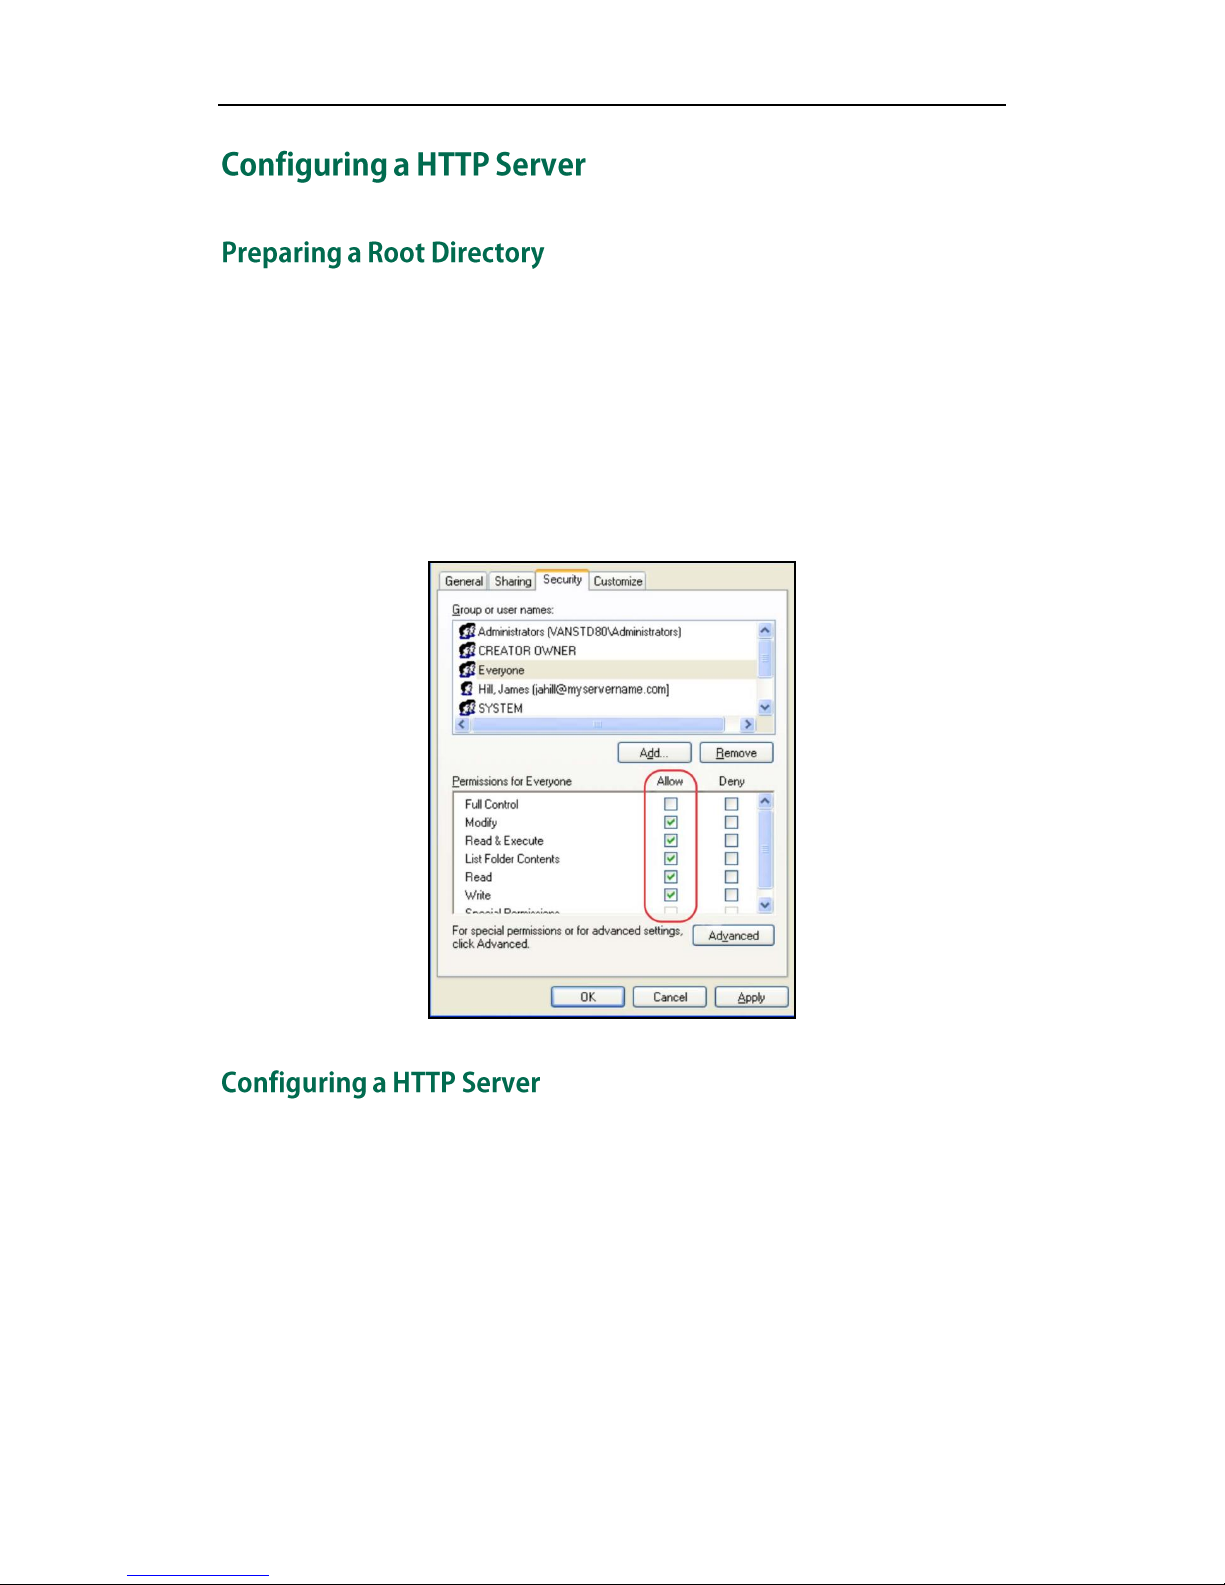
To prepare a root directory:
1. Create a root FTP directory on the local computer.
2. Place the configuration files to this root directory.
3. Set the security permissions for the FTP directory folder.
4. You need to define a user or group name, and set the permissions: read, write, and
modify files. Security permissions vary by organization.
An example of using the Windows platform is shown as below:

Yealink Auto provisioning User Guide
36
If you have a 3CDaemon application installed on your computer, open it now, or
otherwise, download and install it.
To configure a FTP server:
1. Double click the 3CDaemon.exe to start the application.
2. Click the FTP Server button on the left of the main page.
A screenshot is shown as below:
3. Select Configure FTP Server.
4. Click the button to locate the FTP root directory on the computer:
5. Enter the new authentication username in the Profile filed.
6. Click the Set/Change user’s password button to set the password in the pop-up

Appendix
37
dialogue box.
7. Click the OK button to save.
8. Mark the check boxes of Login, Download and Upload to make sure the FTP user
has the login, download and upload permission.
9. Click the Save Profile button to save the settings and finish the configurations.
10. Click the Confirm button to finish configuring the FTP server.
The server URL “ftp://username:password@IP/” (Here “IP” means the IP address of
the provisioning server, “username” and “password” are the authentication for FTP
download. For example, ”ftp://admin:123456@192.168.1.100/”) is capable of FTP
download.
Yealink Auto provisioning User Guide
38
To prepare a root directory:
1. Create a root HTTP directory on the local computer.
2. Place the configuration files to this root directory.
3. Set the security permissions for the HTTP directory folder.
4. You need to define a user or group name and set the permissions: read, write, and
modify files. Security permissions vary by organization.
An example of using the Windows platform is shown as below:
HFS tool is an executable application, so you don’t need to install it.
To configure a HTTP server:
1. Download the application file to your local directory, double click the hfx.exe.

Appendix
39
The main configuration page is shown as below:
2. Click Menu in the main page and select the IP address of the PC from IP address.

Yealink Auto provisioning User Guide
40
The default HTTP port is 8080. You can also reset the HTTP port (make sure the port isn’t
used before you reset).
3. Right click the icon on the left of the main page, select Add folder from disk to
add the HTTP Server root directory.

Appendix
41
4. Locate the root directory from the computer system. Select the kind of folder which
you want.
5. Check the server URL “http:// IP:Port/” in the “Open in browser” address bar (For
example, the server URL ”http:// 10.2.11.101:8088/” is showed on the screenshot) .
We recommend that you can fill the server URL in the address bar of the web
browser and then press <Enter> key to check the HTTP server before provisioning.
Yealink IP phones also support the Hypertext Transfer Protocol with SSL/TLS (HTTPS)
protocol for auto provisioning. HTTPS protocol provides the encrypted communication and
secure identification. For more information about installing and configuring an Apache
HTTPS Server, refer to the network resource.
This section shows you how to configure a DHCP server for windows using DHCP Turbo.
You can down this software from website at: http://www.tucows.com/preview/265297
and install it following the setup wizard.
Before configuring the DHCP Turbo, make sure that:
The firewall on the PC is disabled.
There is no DHCP server in your local system.
To configure the DHCP Turbo:
1. To start the DHCP Turbo application, double click the localhost.

Yealink Auto provisioning User Guide
42
2. Click the Login button (the login password is blank) to log in.
3. You can then edit the existed DHCP server, or you can right click the localhost and
select “New Server” to add a new DHCP server.

Appendix
43
4. Right click the Scopes and select New Scope.
5. Configure the DHCP server name, the DHCP IP range and the subnet mask.
6. You can add a custom option via DHCP Turbo. Click Option Type, right click and
select the New Option Type on the right of the main page.

Yealink Auto provisioning User Guide
44
7. Set the custom DHCP option (custom DHCP option tag number ranges from 128 to
254) and select the option type (Yealink support the String and IP Address option
type only). Click the OK button to finish setting the option properties. Click to
save the change.
8. Click Named Policies-->Global, right click and select New Option on the left of the
main page.

Appendix
45
9. Scroll down and double click the custom option 128.
10. Fill the provisioning server address in the input field.
11. Click the OK button to finish setting a custom option.
12. Click to save the change.

Yealink Auto provisioning User Guide
46
You can add the option 66 via DHCP Turbo. The following figures show the detailed
processes.
1. Click Named Policies-->Global, right click and select New Option on the left of the
main page.
2. Select the TFTP Options in the Filter field.
3. Scroll down and double click the MS option 66.

Appendix
47
4. Fill the provisioning server address in the input field.
5. Click the OK button to finish setting a custom option.
6. Click to save the change.
You also can add the option 44. The following figures show the detailed processes.
1. Click Named Policies-->Global, right click and select New Option on the left of the
main page.
2. Select the Standard Options in the Filter field.
3. Scroll down and double click the option 43.

Yealink Auto provisioning User Guide
48
4. Fill the provisioning server address in the input field.
5. Click the OK button to finish setting a custom option.
6. Click to save the change.

Appendix
49
If you have installed the Cool Edit application, double click to open it. Otherwise, you
can download the installation package from the website:
http://www.toggle.com/lv/group/view/kl36218/Cool_Edit_Pro.htm and install it.
To customize a ringtone using Coo Edit Pro:
1. Open the Cool Edit Pro application.
2. Click File to open an audio file.
3. Locate the ringtone file, click Open, the file is uploaded as follows.
A sample audio file loaded is shown as below:
4. Select and copy the audio waveform.
5. Select File->New to create a new file, set the audio format as PCMU, the channels
as Mono, the sample rate as 8000 and the resolution as 16-bit.
6. Paste the audio waveform to the new file.
7. Select File->Save as to save the new audio file. On the Save waveform page,

Yealink Auto provisioning User Guide
50
select the file format as A/mu-law wave.
The original picture format must be .bmp or .gif. We recommend placing all files and the
PictureExDemo application to the root directory of the PC.
1. Double click the PictureExDemo.exe.
2. Click Add button to open a .bmp or .gif file.
You can repeat the second step to add multiple original picture files.
3. Click the Convert button.
Then you can find the .dob logo files in the adv directory.
 Loading...