

Page 1
Page 2
Copyright © 2016 YEALINK(XIAMEN) NETWORK TECHNOLOGY CO., LTD
Hereby, Yealink(Xiamen) Network Technology CO., LTD. declares that this phone is in
conformity with the essential requirements and other relevant provisions of the CE, FCC.
You can find the CE and FCC information from the label on the back of the IP phone.
Copyright © 2016 Yealink(Xiamen) Network Technology CO., LTD. All rights reserved. No parts of
this publication may be reproduced or transmitted in any form or by any means, electronic or
mechanical, photocopying, recording, or otherwise, for any purpose, without the express written
permission of Yealink(Xiamen) Network Technology CO., LTD. Under the law, reproducing
includes translating into another language or format.
When this publication is made available on media, Yealink(Xiamen) Network Technology CO.,
LTD. gives its consent to downloading and printing copies of the content provided in this file only
for private use but not for redistribution. No parts of this publication may be subject to alteration,
modification or commercial use. Yealink(Xiamen) Network Technology CO., LTD. will not be
liable for any damages arising from use of an illegally modified or altered publication.
THE SPECIFICATIONS AND INFORMATION REGARDING THE PRODUCTS IN THIS GUIDE ARE
SUBJECT TO CHANGE WITHOUT NOTICE. ALL STATEMENTS, INFORMATION, AND
RECOMMENDATIONS IN THIS GUIDE ARE BELIEVED TO BE ACCURATE AND PRESENTED
WITHOUT WARRANTY OF ANY KIND, EXPRESS OR IMPLIED. USERS MUST TAKE FULL
RESPONSIBILITY FOR THEIR APPLICATION OF PRODUCTS.
YEALINK(XIAMEN) NETWORK TECHNOLOGY CO., LTD. MAKES NO WARRANTY OF ANY KIND
WITH REGARD TO THIS GUIDE, INCLUDING, BUT NOT LIMITED TO, THE IMPLIED WARRANTIES OF
MERCHANTABILITY AND FITNESS FOR A PARTICULAR PURPOSE. Yealink(Xiamen) Network
Technology CO., LTD. shall not be liable for errors contained herein nor for incidental or
consequential damages in connection with the furnishing, performance, or use of this guide.
Statements of compliance can be obtained by contacting support@yealink.com.
This device is marked with the CE mark in compliance with EC Directives 2014/35/EU and 2014/30/EU.
Any Changes or modifications not expressly approved by the party responsible for compliance could void
Page 3
To avoid the potential effects on the environment and human health as a result of the
presence of hazardous substances in electrical and electronic equipment, end users of
electrical and electronic equipment should understand the meaning of the crossed-out
wheeled bin symbol. Do not dispose of WEEE as unsorted municipal waste and have to
collect such WEEE separately.
the user's authority to operate the equipment.
This device complies with Part 15 of the FCC Rules. Operation is subject to the following two conditions:
1. This device may not cause harmful interference, and
2. this device must accept any interference received, including interference that may cause undesired
operation.
Note: This equipment has been tested and found to comply with the limits for a Class B digital device,
pursuant to part 15 of the FCC Rules. These limits are designed to provide reasonable protection against
harmful interference in a residential installation. This equipment generates, uses and can radiate radio
frequency energy and, if not installed and used in accordance with the instructions, may cause harmful
interference to radio communications. However, there is no guarantee that interference will not occur in a
particular installation. If this equipment does cause harmful interference to radio or television reception,
which can be determined by turning the equipment off and on, the user is encouraged to try to correct the
interference by one or more of the following measures:
1. Reorient or relocate the receiving antenna.
2. Increase the separation between the equipment and receiver.
3. Connect the equipment into an outlet on a circuit different from that to which the receiver is connected.
4. Consult the dealer or an experienced radio/TV technician for help.
We are striving to improve our documentation quality and we appreciate your feedback. Email
your opinions and comments to DocsFeedback@yealink.com.
Page 4

Yealink SIP-T27P IP phone firmware contains third-party software under the GNU General Public License
(GPL). Yealink uses software under the specific terms of the GPL. Please refer to the GPL for the exact terms
and conditions of the license.
The original GPL license, source code of components licensed under GPL and used in Yealink products can
be downloaded online:
http://www.yealink.com/GPLOpenSource.aspx?BaseInfoCateId=293&NewsCateId=293&CateId=293.
Page 5
Note
Network Directory and Network Call Log features are hidden for IP phones in neutral
your system administrator for more information.
About This Guide
Thank you for choosing the SIP-T27P IP phone, exquisitely designed to provide business
telephony features, such as Call Hold, Call Transfer, Busy Lamp Field, Multicast Paging
and Conference over an IP network.
This guide provides everything you need to quickly use your new phone. First, verify
with your system administrator that the IP network is ready for phone configuration. Also
be sure to read the Packaging Contents and Regulatory Notices sections in this guide
before you set up and use the SIP-T27P IP phone.
firmware version, which are designed for the BroadWorks environment. Please contact
Topics provided in this guide include:
Chapter 1 Overview
Chapter 2 Getting Started
Chapter 3 Customizing Your Phone
Chapter 4 Basic Call Features
Chapter 5 Advanced Phone Features
This section describes the changes to this guide for each release and guide version.
Major updates have occurred to the following sections:
Volume on page 34
Ring Tones on page 35
DSS Keys on page 59
Call Park on page 111
v
Page 6
The following section is new:
Entering Data and Editing Fields on page 22
Major updates have occurred to the following sections:
Icon Instructions on page 3
Optional Accessories on page 13
Phone Installation on page 14
Troubleshooting on page 171
Major updates have occurred to the following sections:
Table of Contents
Backlight on page 25
Contrast on page 26
Ext Keys on page 71
The following sections are new:
Shared Call Appearance (SCA) on page 142
Bridged Line Appearance (BLA) on page 157
Major updates have occurred to the following sections:
Icon Instructions on page 3
LED Instructions on page 4
Web User Interface on page 7
Call Forward on page 98
vi
Page 7

Table of Contents
About This Guide ...................................................................... v
In This Guide ......................................................................................................................... v
Summary of Changes .......................................................................................................... v
Changes for Release 80, Guide Version 80.130 ............................................................ v
Changes for Release 80, Guide Version 80.95 ............................................................. vi
Changes for Release 80, Guide Version 80.80 ............................................................. vi
Changes for Release 80, Guide Version 80.60 ............................................................. vi
Table of Contents ..................................................................... vii
Overview .................................................................................. 1
Hardware Component Instructions .................................................................................... 1
Icon Instructions .................................................................................................................... 3
LED Instructions ..................................................................................................................... 4
User Interfaces ..................................................................................................................... 7
Phone User Interface ........................................................................................................ 7
Web User Interface ........................................................................................................... 7
Documentations ................................................................................................................. 10
Getting Started ....................................................................... 11
Packaging Contents ........................................................................................................... 11
Optional Accessories ..................................................................................................... 13
Phone Installation ............................................................................................................... 14
Phone Initialization ............................................................................................................. 16
Phone Status ....................................................................................................................... 17
Basic Network Settings ...................................................................................................... 18
Registration ......................................................................................................................... 21
Idle Screen .......................................................................................................................... 21
Entering Data and Editing Fields ..................................................................................... 22
Customizing Your Phone ......................................................... 25
General Settings ................................................................................................................ 25
Backlight .......................................................................................................................... 25
Contrast ............................................................................................................................ 26
Language ......................................................................................................................... 26
Time & Date ..................................................................................................................... 27
vii
Page 8

User Guide for the SIP-T27P IP Phone
Administrator Password ................................................................................................. 30
Key as Send ..................................................................................................................... 30
Phone Lock ....................................................................................................................... 31
Audio Settings .................................................................................................................... 34
Volume ............................................................................................................................. 34
Ring Tones ........................................................................................................................ 35
Contact Management ....................................................................................................... 37
Directory........................................................................................................................... 37
Local Directory ................................................................................................................ 39
Blacklist ............................................................................................................................ 50
Remote Phone Book ....................................................................................................... 52
Call History Management ................................................................................................ 54
System Customizations ...................................................................................................... 56
Logo Customization ........................................................................................................ 56
Headset Use .................................................................................................................... 57
DSS Keys .......................................................................................................................... 59
Account Management ................................................................................................... 72
Dial Plan ........................................................................................................................... 74
Emergency Number ........................................................................................................ 80
Live Dialpad .................................................................................................................... 81
Hotline .............................................................................................................................. 82
Basic Call Features ................................................................. 83
Placing Calls ....................................................................................................................... 84
Answering Calls ................................................................................................................. 86
Ending Calls ........................................................................................................................ 87
Redialing Numbers ............................................................................................................ 87
Recent Call In Dialing ........................................................................................................ 88
Auto Answer ....................................................................................................................... 89
Auto Redial .......................................................................................................................... 90
Call Completion ................................................................................................................. 91
ReCall .................................................................................................................................. 93
Call Mute ............................................................................................................................. 93
Call Hold/Resume ............................................................................................................... 94
Do Not Disturb (DND) ........................................................................................................ 95
Call Forward ....................................................................................................................... 98
Call Transfer ...................................................................................................................... 106
Call Waiting ...................................................................................................................... 108
Conference ....................................................................................................................... 108
Local Conference .......................................................................................................... 108
Network Conference .................................................................................................... 110
Call Park ............................................................................................................................ 111
FAC Mode ...................................................................................................................... 112
Transfer Mode ............................................................................................................... 114
viii
Page 9

Table of Contents
Call Pickup ........................................................................................................................ 116
Anonymous Call ............................................................................................................... 120
Anonymous Call Rejection .............................................................................................. 121
Advanced Phone Features ....................................................123
Busy Lamp Field (BLF) ..................................................................................................... 123
BLF List ............................................................................................................................... 125
Call Recording .................................................................................................................. 127
Hot Desking ...................................................................................................................... 129
Intercom ............................................................................................................................ 131
Outgoing Intercom Calls .............................................................................................. 131
Incoming Intercom Calls .............................................................................................. 131
Using Intercom .............................................................................................................. 133
Multicast Paging ............................................................................................................... 133
Sending RTP Stream ..................................................................................................... 133
Receiving RTP Stream ................................................................................................... 136
Using Multicast Paging ................................................................................................. 138
Music on Hold ................................................................................................................... 139
Automatic Call Distribution (ACD).................................................................................. 140
Shared Call Appearance (SCA) .................................................................................... 142
Configuring SCA Feature on the IP Phone ................................................................. 143
Using SCA Feature on the IP Phone ............................................................................ 150
Bridged Line Appearance (BLA) .................................................................................... 157
Configuring BLA Feature on the IP Phone .................................................................. 157
Using BLA Feature on the IP Phone ............................................................................. 160
Messages .......................................................................................................................... 163
Short Message Service (SMS) .................................................................................... 163
Voice Mail ...................................................................................................................... 166
Message Waiting Indicator (MWI) ............................................................................. 167
Troubleshooting .....................................................................171
General Issues .................................................................................................................. 171
Display Issues ................................................................................................................... 171
Password Issues ................................................................................................................ 172
Call Issues ......................................................................................................................... 173
Headset & Handset Issues .............................................................................................. 173
Audio Issues ...................................................................................................................... 173
Log Issues .......................................................................................................................... 175
Reboot & Upgrade & Reset Issues .................................................................................. 178
Regulatory Notices ................................................................181
Service Agreements ........................................................................................................ 181
ix
Page 10

User Guide for the SIP-T27P IP Phone
Limitations of Liability ...................................................................................................... 181
Safety Instructions ............................................................................................................ 181
Appendix A - Time Zones ......................................................183
Index ......................................................................................185
x
Page 11
Overview
This chapter provides the overview of the SIP-T27P IP phone. Topics include:
Hardware Component Instructions
Icon Instructions
LED Instructions
User Interfaces
Documentations
If you require additional information or assistance with your new phone, contact your
system administrator.
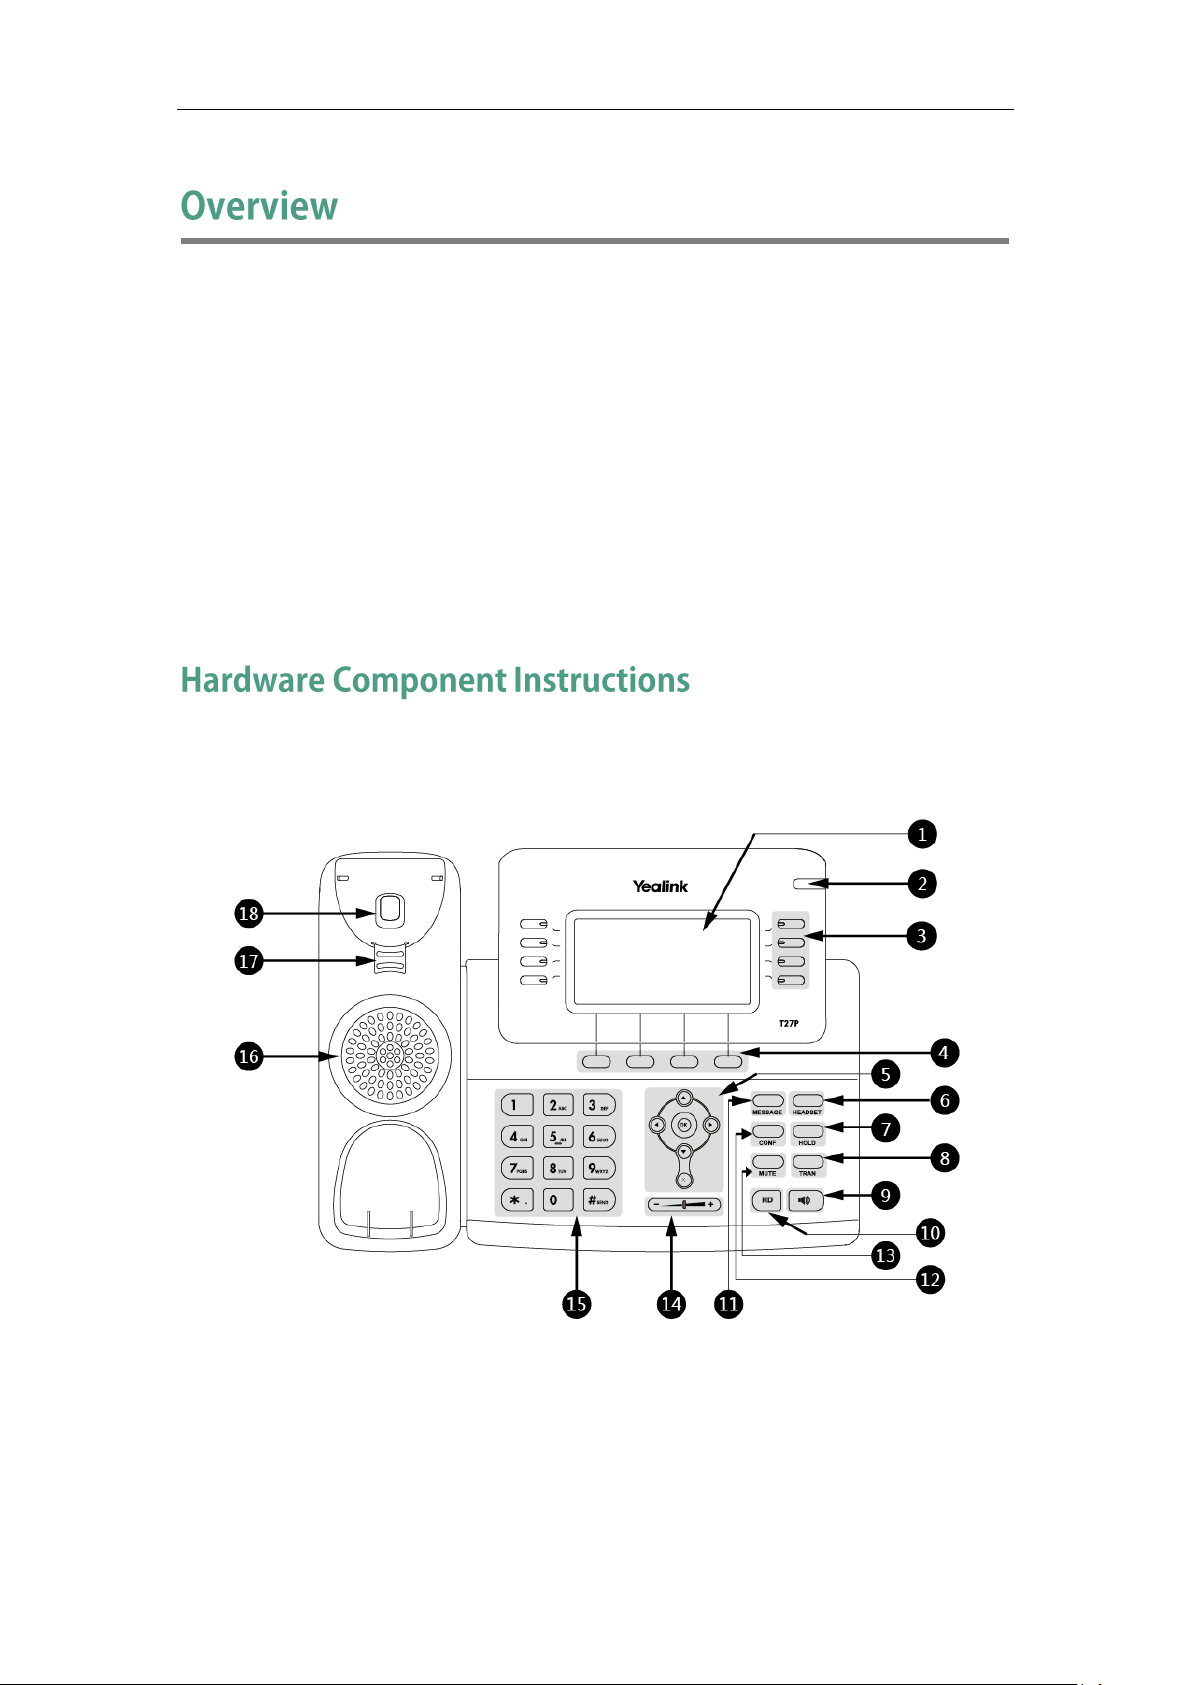
The main hardware components of the SIP-T27P IP phone are the LCD screen and the
keypad.
1
Page 12

User Guide for the SIP-T27P IP Phone
Item
Description
①
LCD Screen
Shows information about calls, messages, soft keys,
time, date and other relevant data:
caller ID, call duration
(for example, )
information
"Saving config file!")
Time and date
②
Power Indicator LED
Indicates phone power and some feature statuses.
Receives an incoming callFast flashing
Receives a voice mail or text messageSlow flashing
③
Line Keys
Use these keys to activate up to six accounts and
assign various features.
④
Soft Keys
Label automatically to identify their context-sensitive
features.
⑤
Scroll through the displayed information.
Confirms actions or answers incoming calls.
Cancels actions or rejects incoming calls.
⑥
HEADSET Key
Toggles and indicates the headset mode.
⑦
HOLD Key
Places a call on hold or resumes a held call.
⑧
TRAN Key
Transfers a call to another party.
⑨
Speakerphone Key
Toggles the hands-free speakerphone mode.
⑩
RD Key
Redials a previously dialed number.
⑪
MESSAGE Key
Indicates and accesses voice mails.
⑫
CONF Key
Conducts a conference call with multiple other parties.
⑬
MUTE Key
Mutes or un-mutes an active call.
⑭
Volume Key
Adjusts the volume of the handset, headset, speaker,
and ringer.
⑮
Keypad
Provides the digits, letters and special characters in
context-sensitive applications.
⑯
Speaker
Provides hands-free (speakerphone) audio output.
Hardware component instructions of the SIP-T27P IP phone are:
2
Page 13
Item
Description
⑰
Hookswitch Tab
Secures the handset in the handset cradle when the IP
phone is mounted vertically. For more information on
how to adjust the hookswitch tab, refer to
Yealink Wall
Mount Quick Installation Guide for Yealink IP Phones
.
⑱
Hookswitch
Picking up the handset from the handset cradle, the
hookswitch bounces and the phone connects to the
line, laying the handset down on the handset cradle,
the phone disconnects from the line.
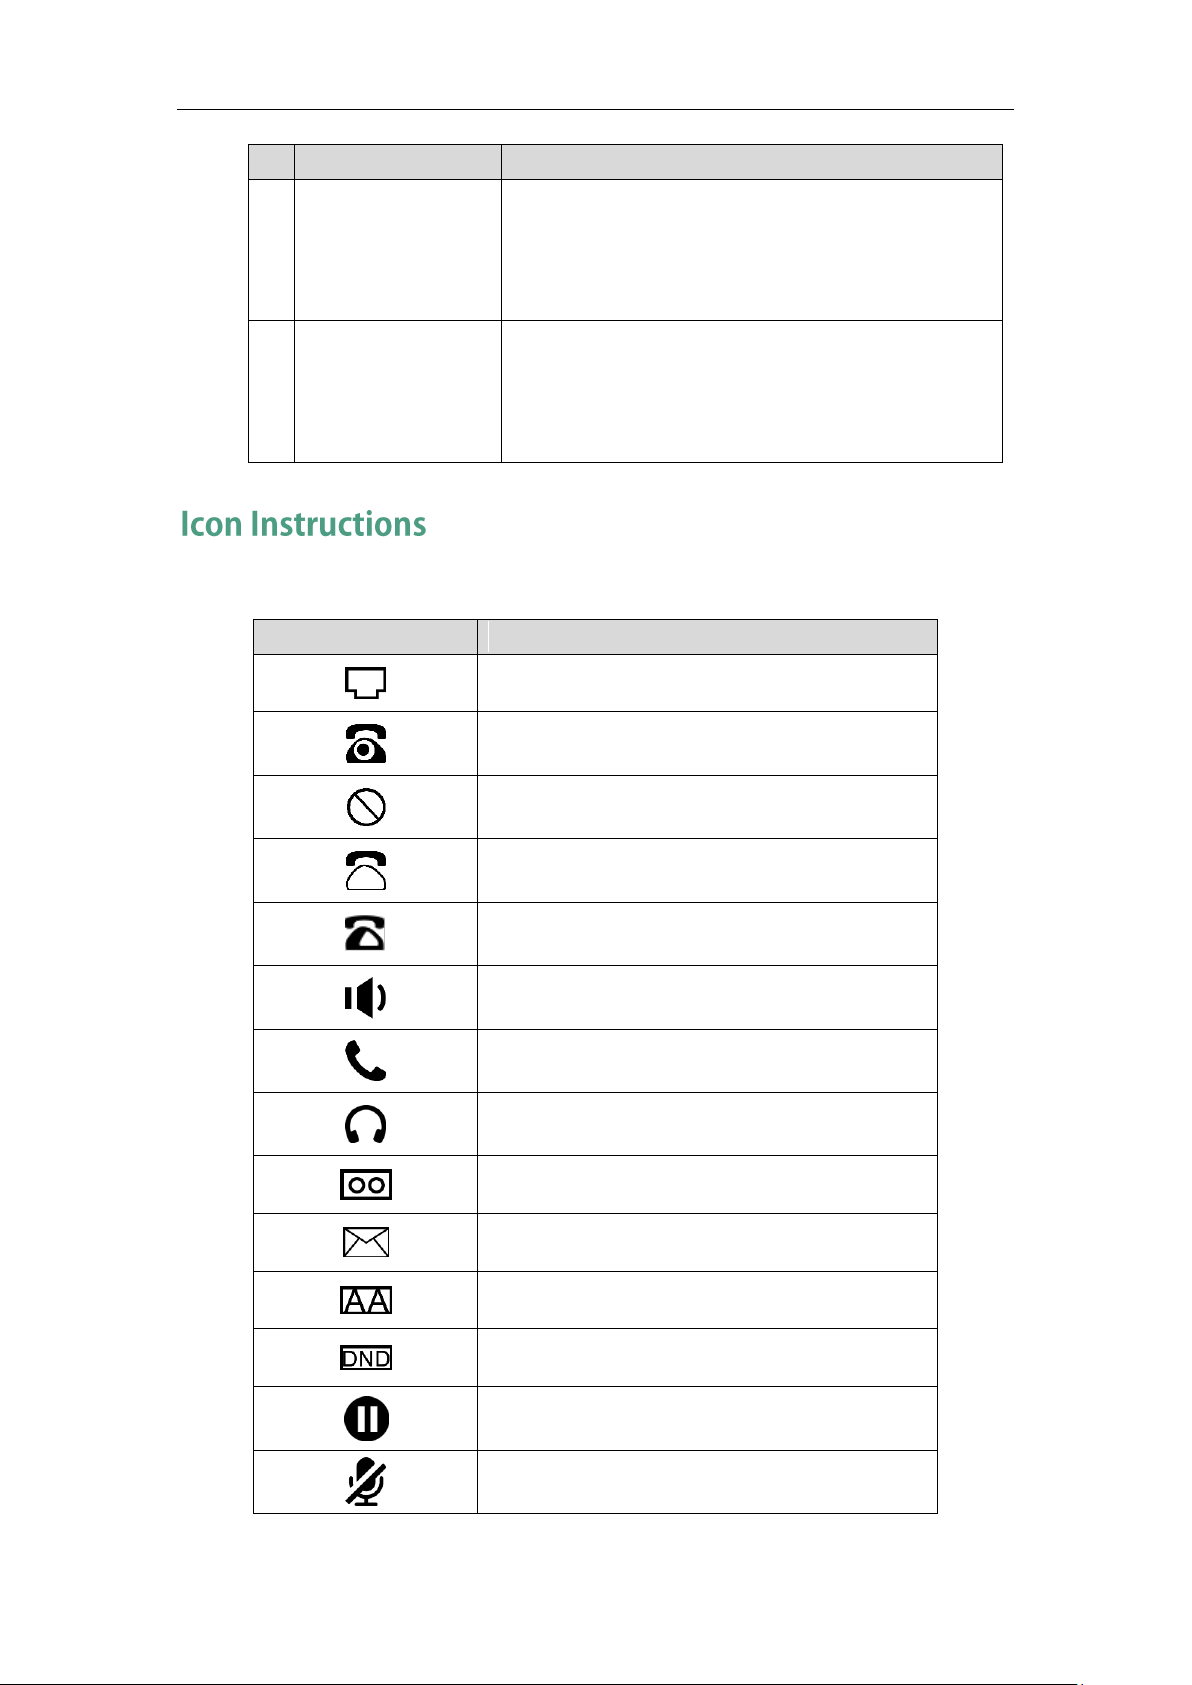
Icons appearing on the LCD screen are described in the following table:
Icons
Description
Network is unavailable
The private line registers successfully
Register failed
Registering
The shared/bridged line registers successfully
Hands-free speakerphone mode
Handset mode
Headset mode
Voice Mail
Text Message
Auto Answer
Do Not Disturb
Call Hold
Call Mute
Overview
3
Page 14
User Guide for the SIP-T27P IP Phone
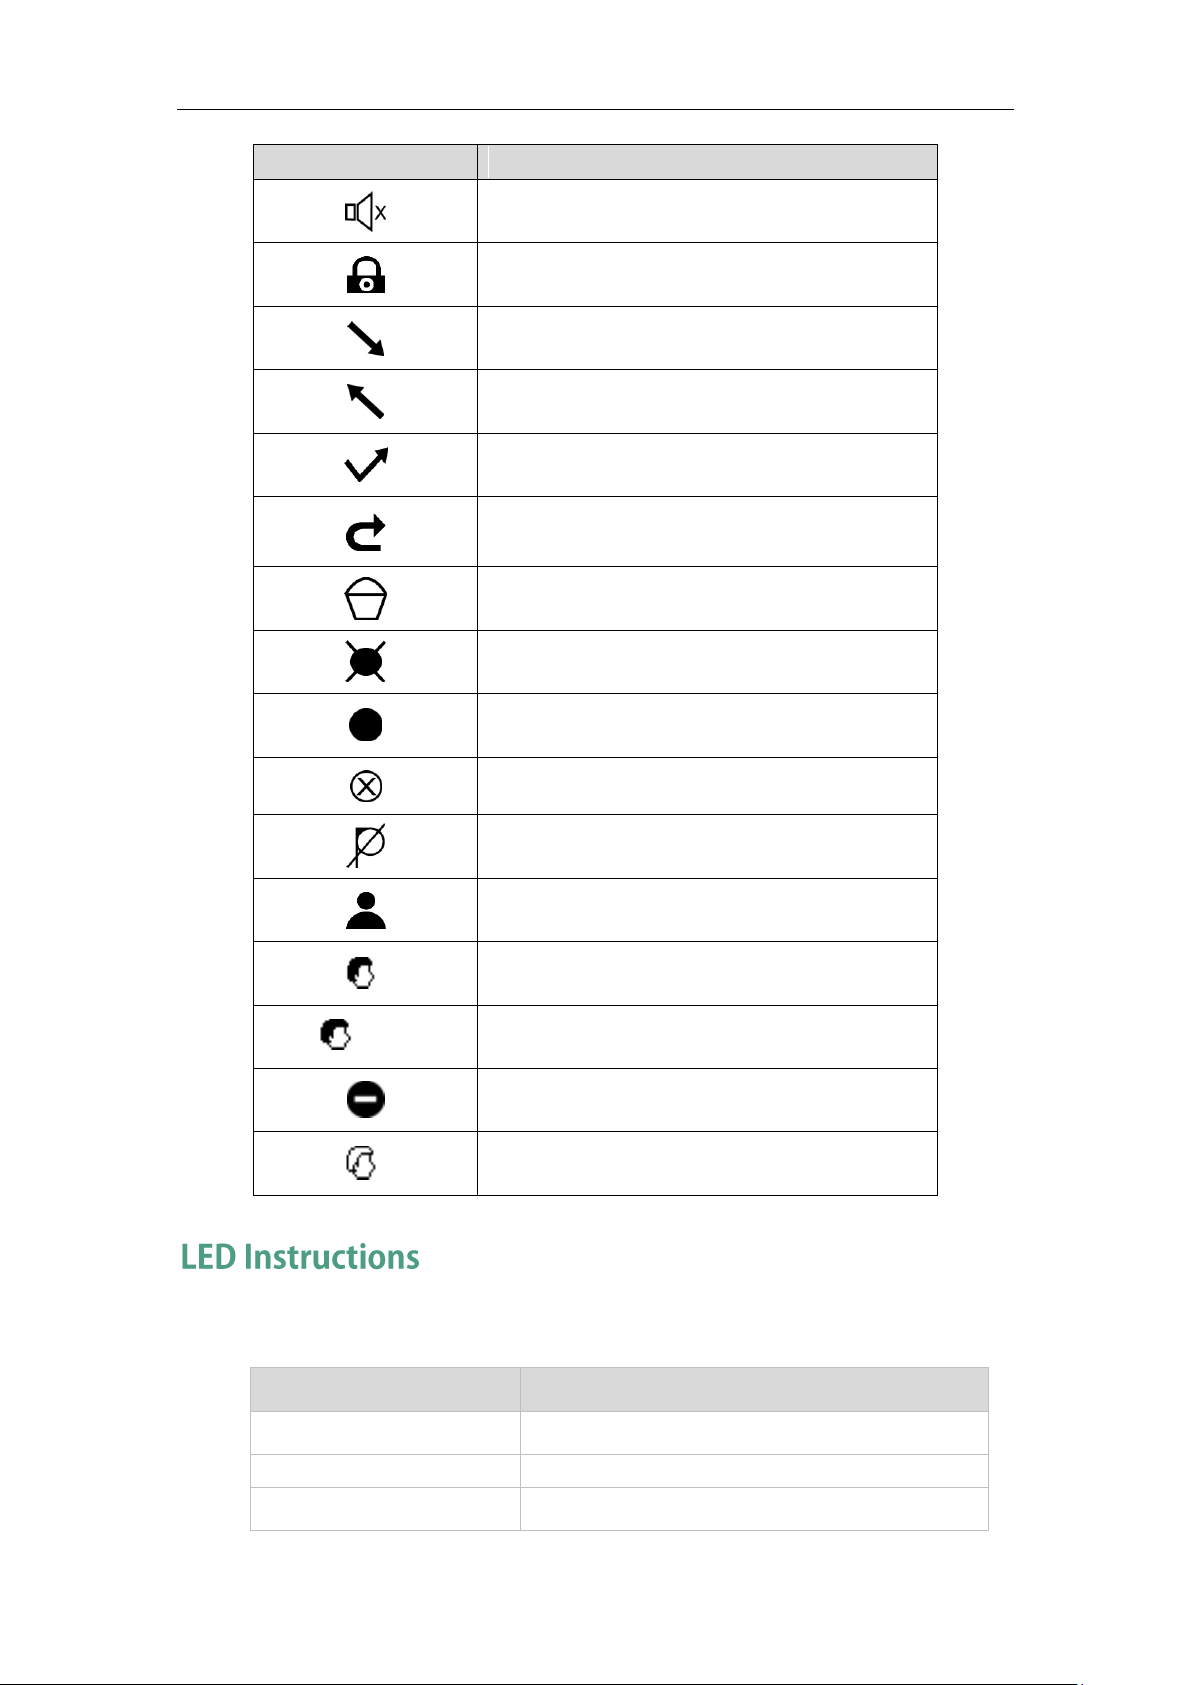
Icons
Description
Ringer volume is 0
Phone Lock
Received Calls
Placed Calls
Missed Calls
Call Forward/Forwarded Calls
Recording box is full
A call cannot be recorded
Recording starts successfully
Recording cannot be started
Recording cannot be stopped
The contact icon
The ACD state is available
and x
The ACD state is unavailable
The ACD state is Wrap up
Log out of the ACD system
LED Status
Description
Solid red
The phone is initializing.
Fast flashing red (300ms)
The phone is ringing.
Slow flashing red (1s)
The phone receives a text message or voice mail.
Power Indicator LED
4
Page 15
LED Status
Description
Off
The phone is powered off.
The phone is idle.
The phone is busy.
The call is placed on hold or is held.
The call is muted.
Line key LED
LED Status
Description
Solid green
The line is seized.
The line is in conversation.
Fast flashing green
The line receives an incoming call.
Slow flashing green
The call is placed on hold.
Off
The line is inactive.
LED Status
Description
Solid green
The monitored user is idle.
Fast flashing red (200ms)
The monitored user receives an incoming call.
Solid red
The monitored user is busy.
The monitored users conversation is placed on
hold (This LED status requires server support).
Slow flashing red (1s)
The call is parked against the monitored users
phone number.
Off
The monitored user does not exist.
LED Status
Description
Solid red
There is a parked call on the line key of the
non-current page.
Fast flashing green
The line receives an incoming call on the
non-current page.
Fast flashing red
The monitored user receives an incoming call on
the non-current page.
Off
Line keys on every page are idle.
Overview
Line key LED (configured as a BLF key or BLF List key)
Line key LED (used as a page switch key)
5
Page 16

User Guide for the SIP-T27P IP Phone
LED Status
Description
Off
The shared line is idle.
Fast flashing green
The shared line receives an incoming call.
Solid green (for local SCA
phone)
Solid red (for monitoring
SCA phone)
The shared line is in conversation.
The shared line is dialing.
The shared line is seized.
The shared line conversation is barged in by the
other shared line party.
Slow flashing green (for
local SCA phone)
Slow flashing red (for
monitoring SCA phone)
The shared line conversation is placed on public
hold.
Slow flashing green (for
local SCA phone)
Solid red (for monitoring
SCA phone)
The shared line conversation is placed on private
hold.
For a multi-party call, all the shared line parties
participating in this call place the shared line
conversation on hold.
LED Status
Description
Off
The bridged line is idle.
Fast flashing green
The bridged line receives an incoming call.
Solid green (for local BLA
phone)
Solid red (for monitoring BLA
phone)
The bridged line is in conversation.
The bridged line is dialing.
The bridged line is seized.
Slow flashing green (for
local BLA phone)
Slow flashing red (for
monitoring BLA phone)
The bridged line conversation is placed on hold.
The above introduces the default LED status. The statuses of the power indicator LED and
Yealink_SIP-T2_Series_T19(P) E2_T4_CP860_Series_IP_Phones_Administrator_Guide
.
Line key LED (associated with a shared line)
The local SCA phone indicates the phone is involved in an SCA call, while the
monitoring SCA phone indicates the phone is not involved in the SCA call.
Note
Line key LED (associated with a bridged line)
The local BLA phone indicates the phone is involved in a BLA call, while the monitoring
BLA phone indicates the phone is not involved in the BLA call.
BLF key are configurable via web user interface. For more information, refer to
6
Page 17
Overview
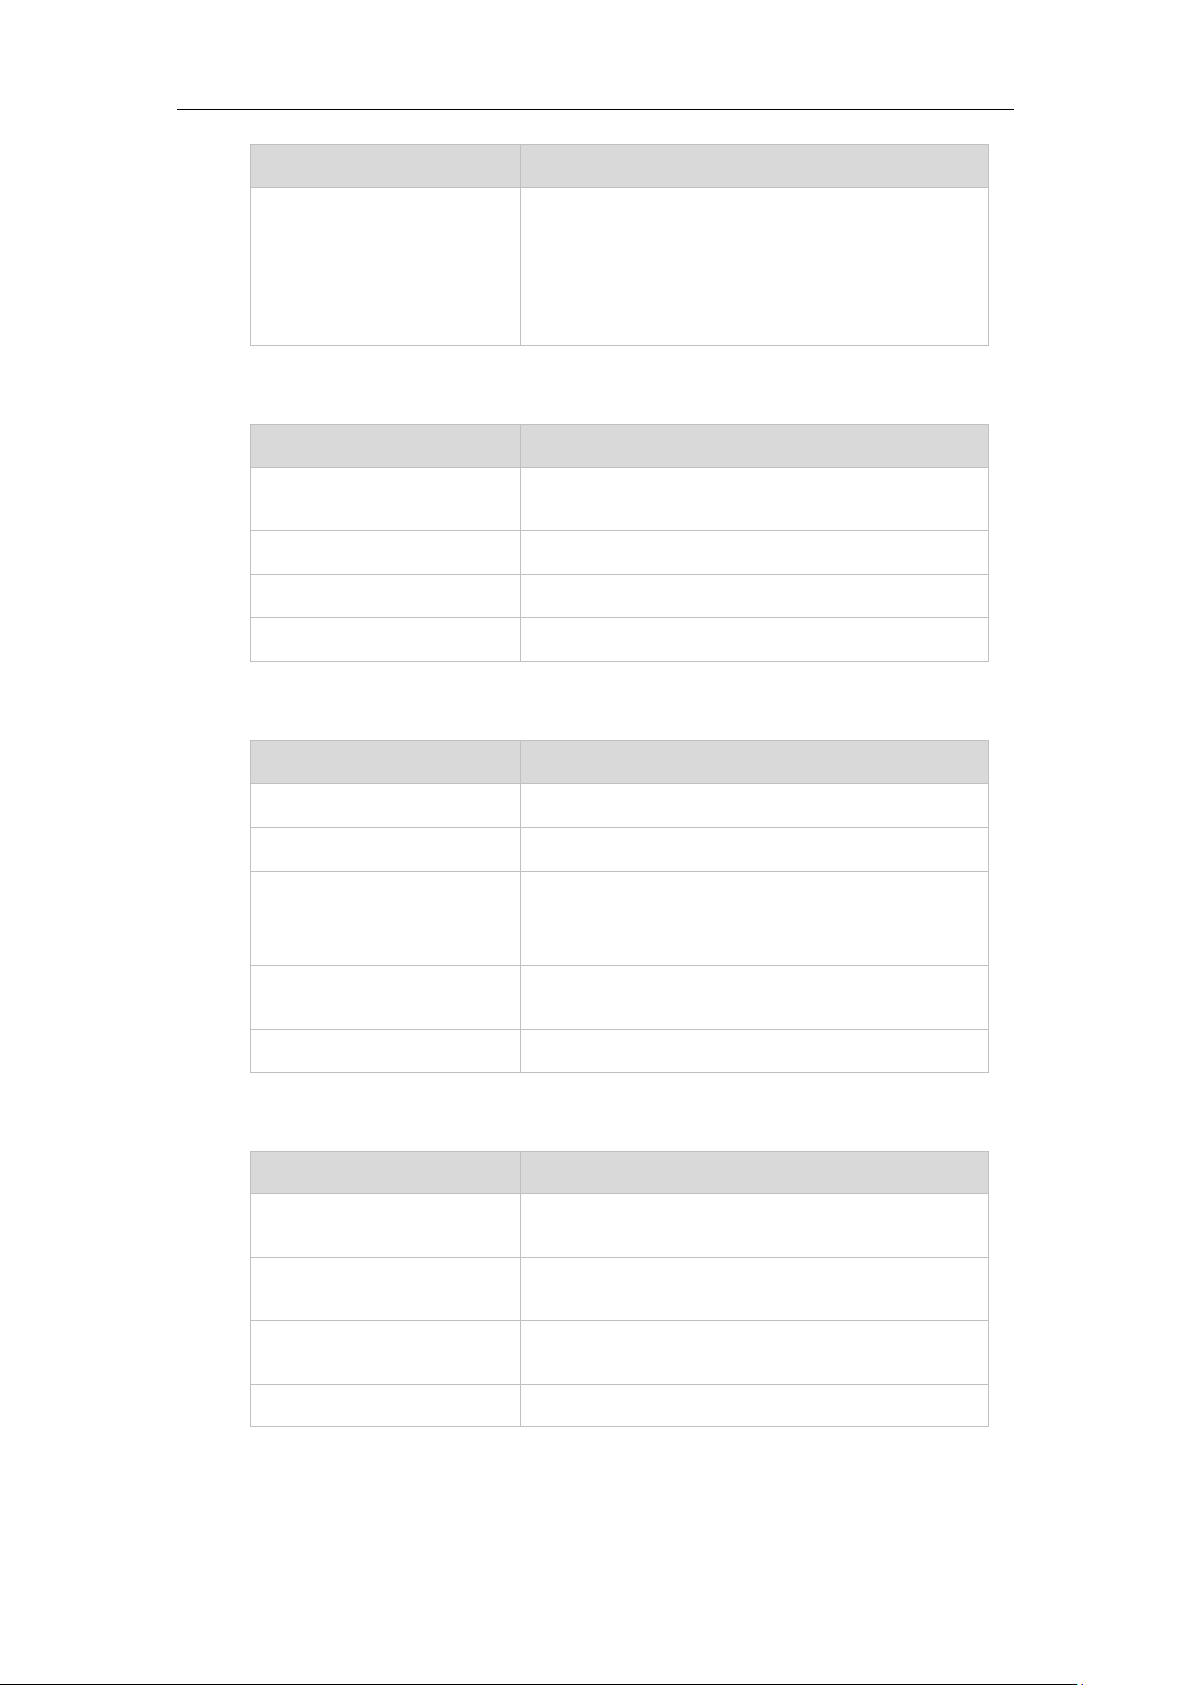
Options
Phone User Interface
Web User Interface
Status
--IPv4
--MAC
--Firmware
--Network
--Phone
--Accounts
Basic Phone Settings
Two ways to customize configurations of your SIP-T27P IP phone:
The user interface on the IP phone.
The user interface in a web browser on your PC.
The hardware components keypad and LCD screen constitute the phone user interface,
which allows the user to execute all call operation tasks and basic configuration
changes directly on the phone. In addition, you can use the web user interface to
access all configuration settings. In many cases, it is possible to use either the phone
user interface and/or the web user interface interchangeably. However, in some cases,
it is only possible to use one or the other interface to operate the phone and change
settings.
You can customize your phone by pressing the Menu soft key to access the phone user
interface. The Advanced Settings option is only accessible to the administrator, and the
default administrator password is admin (case-sensitive). For more information on
customizing your phone with the available options from the phone user interface, refer
to Customizing Your Phone on page 25.
In addition to the phone user interface, you can also customize your phone via web user
interface. In order to access the web user interface, you need to know the IP address of
your new phone. To obtain the IP address, press the OK key on the phone when the
phone is idle. Enter the IP address (e.g., http://192.168.0.10 or 192.168.0.10) in the
address bar of a web browser on your PC. The default administrator user name and
password are both admin (case-sensitive).
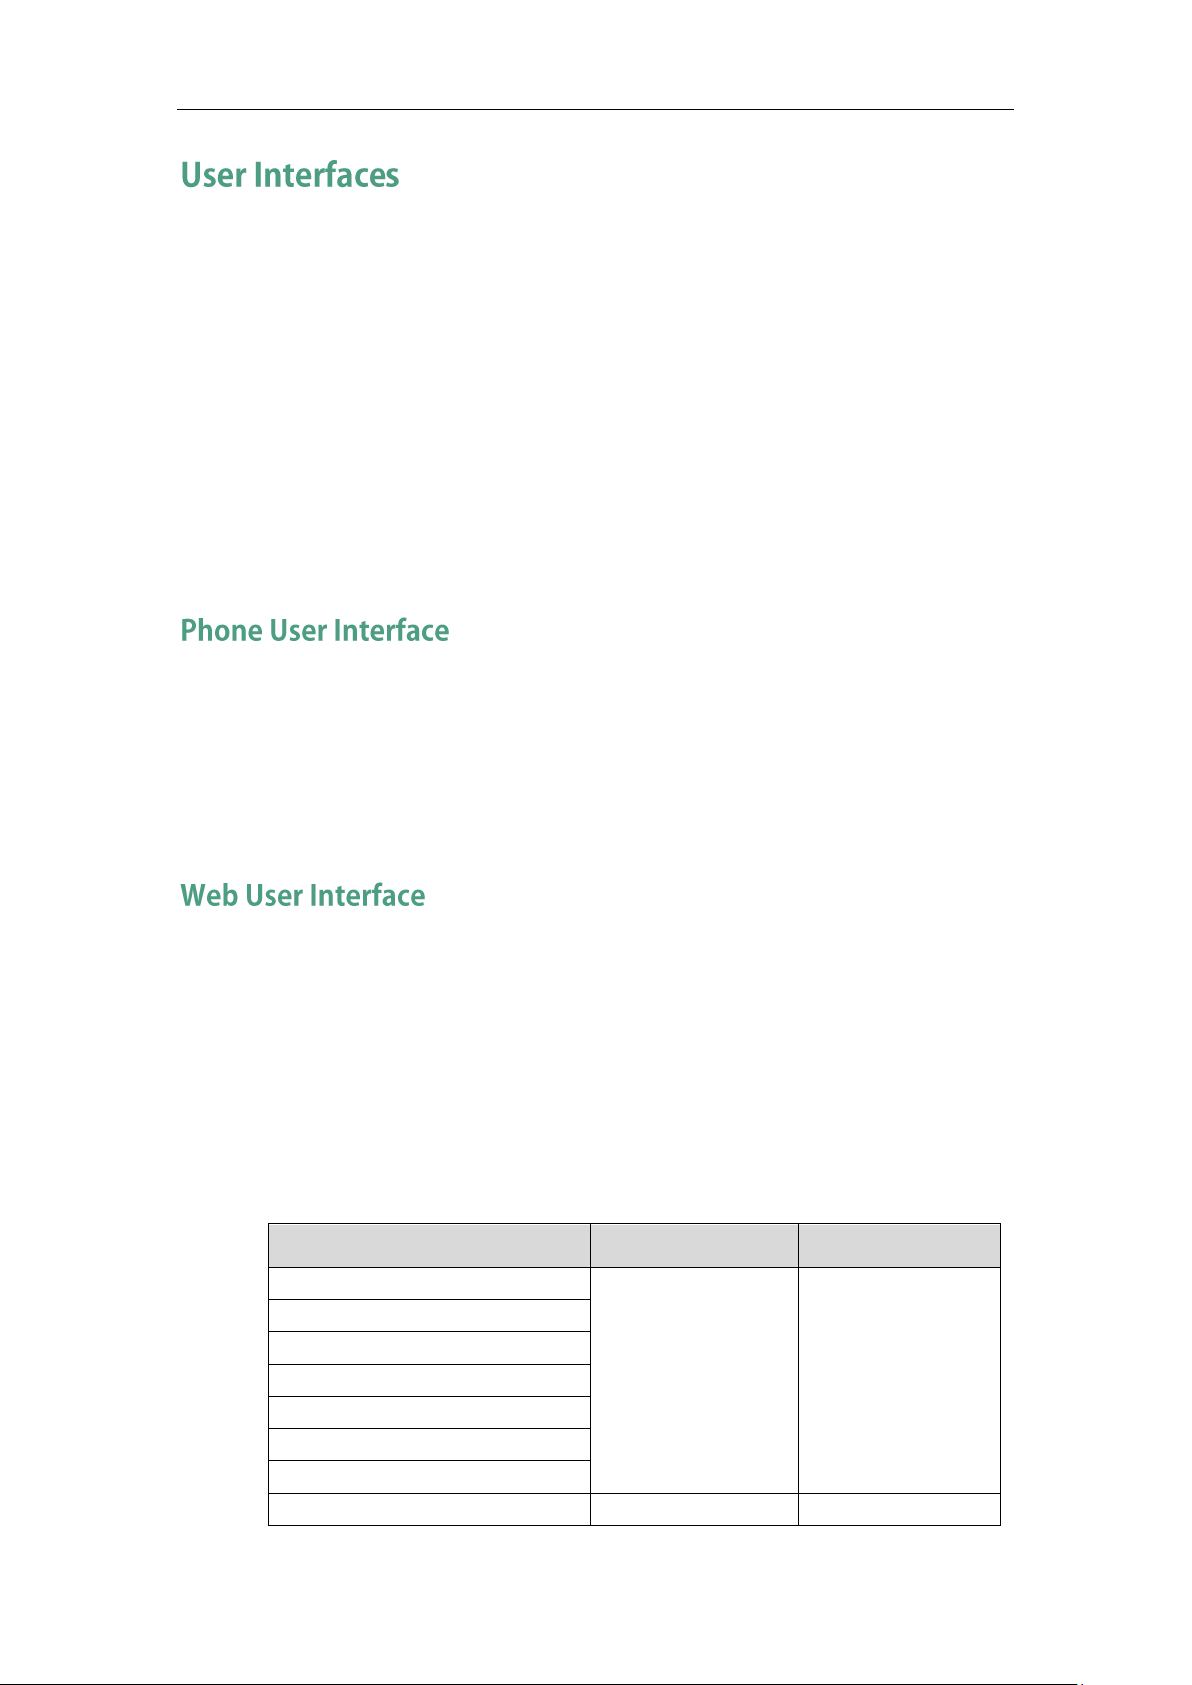
The options you can use to customize the IP phone via phone user interface and/or via
web user interface are listed in the following table:
7
Page 18

User Guide for the SIP-T27P IP Phone
Options
Phone User Interface
Web User Interface
--Backlight
--Contrast
--Language
--Time & Date
--Administrator Password
--Key as Send
--Phone Lock
--Ring Tones
--Contact Management
--Directory
x
--Local Directory
--Blacklist
--Remote Phone Book
x
--Call History Management
--Logo Customization
x
--DSS Keys
--Account Management
--Dial Plan
x
--Emergency Number
x
--Live Dialpad
x
--Hotline
Basic Call Features
--Recent Call In Dialing
x
--Auto Answer
--Auto Redial
--Call Completion
--ReCall
--Do Not Disturb (DND)
--Call Forward
--Call Transfer
--Call Waiting
--Conference
x
--Call Park
--Call Pickup
--Anonymous Call
--Anonymous Call Rejection
Advanced Phone Features
--Busy Lamp Field (BLF)
--BLF List
x
--Call Recording
--Hot Desking
8
Page 19
Overview
Options
Phone User Interface
Web User Interface
--Intercom
--Multicast Paging
x
--Music on Hold
x
--Automatic Call Distribution (ACD)
x
--Shared Call Appearance (SCA)
x
--Bridged Line Appearance (BLA)
x
--Messages
SIP Account
--User Options
--Active Line
--Label
--Display Name
--Register Name
--User Name
--Password
--Server Options
--SIP Server 1/2
--Register Port
x
--Outbound Status
--Outbound Proxy1/2
--Proxy Fallback Interval
--NAT Status
The table above lists most of the feature options. Please refer to the relevant sections for
more information.
Note
9
Page 20
User Guide for the SIP-T27P IP Phone
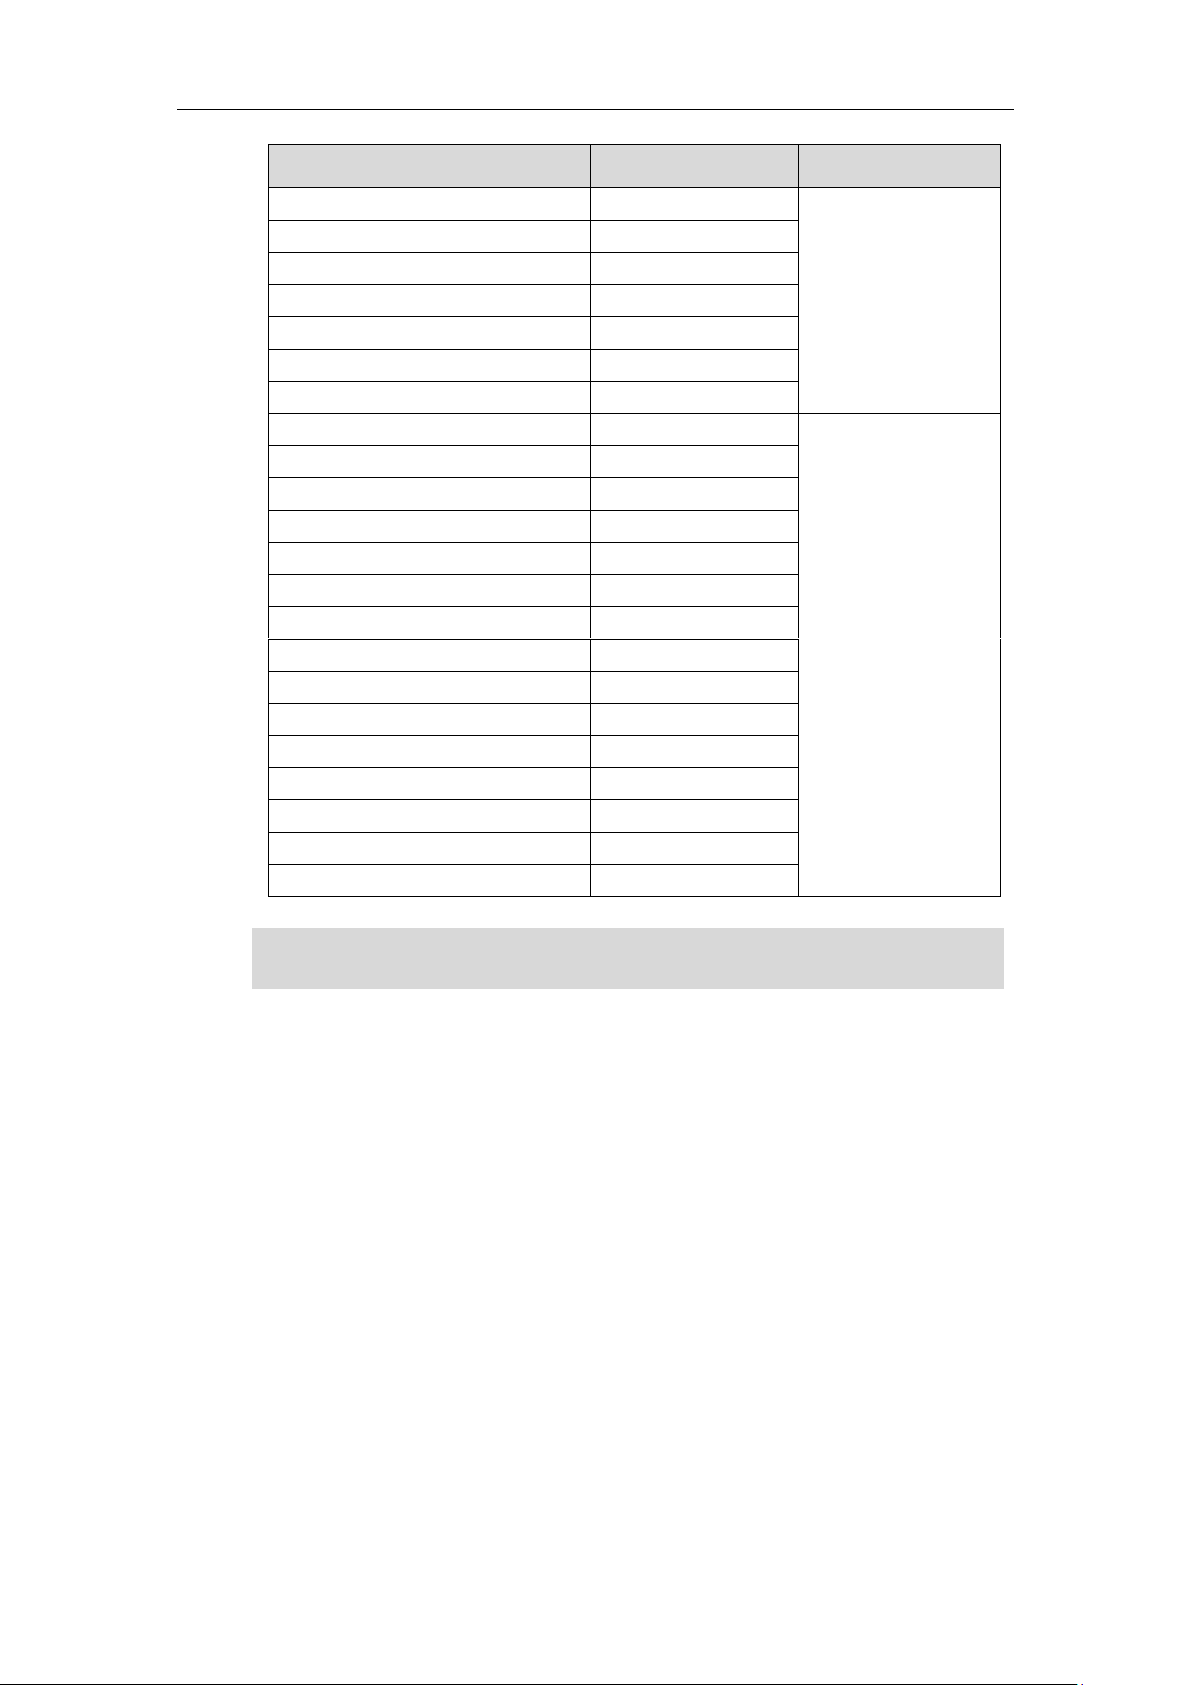
Name
Contents
Where found
Language
Quick Start Guide
Basic call features
and phone
customizations
In the package
English
On the website
English/Chinese
User Guide
Phone/Web user
interface settings
Basic call features
and advanced
phone features
On the website
English/Chinese
You can also download the latest documentations online:
36.
The following table shows documentations available for the SIP-T27P IP phone.
Note
http://support.yealink.com/documentFront/forwardToDocumentDetailPage?documentId=
10
Page 21
Getting Started
This chapter provides the following basic installation instructions and information for
obtaining the best performance with the SIP-T27P IP phone. Topics include:
Packaging Contents
Phone Installation
Phone Initialization
Phone Status
Basic Network Settings
Registration
Idle Screen
Entering Data and Editing Fields
If you require additional information or assistance with your new phone, contact your
system administrator.
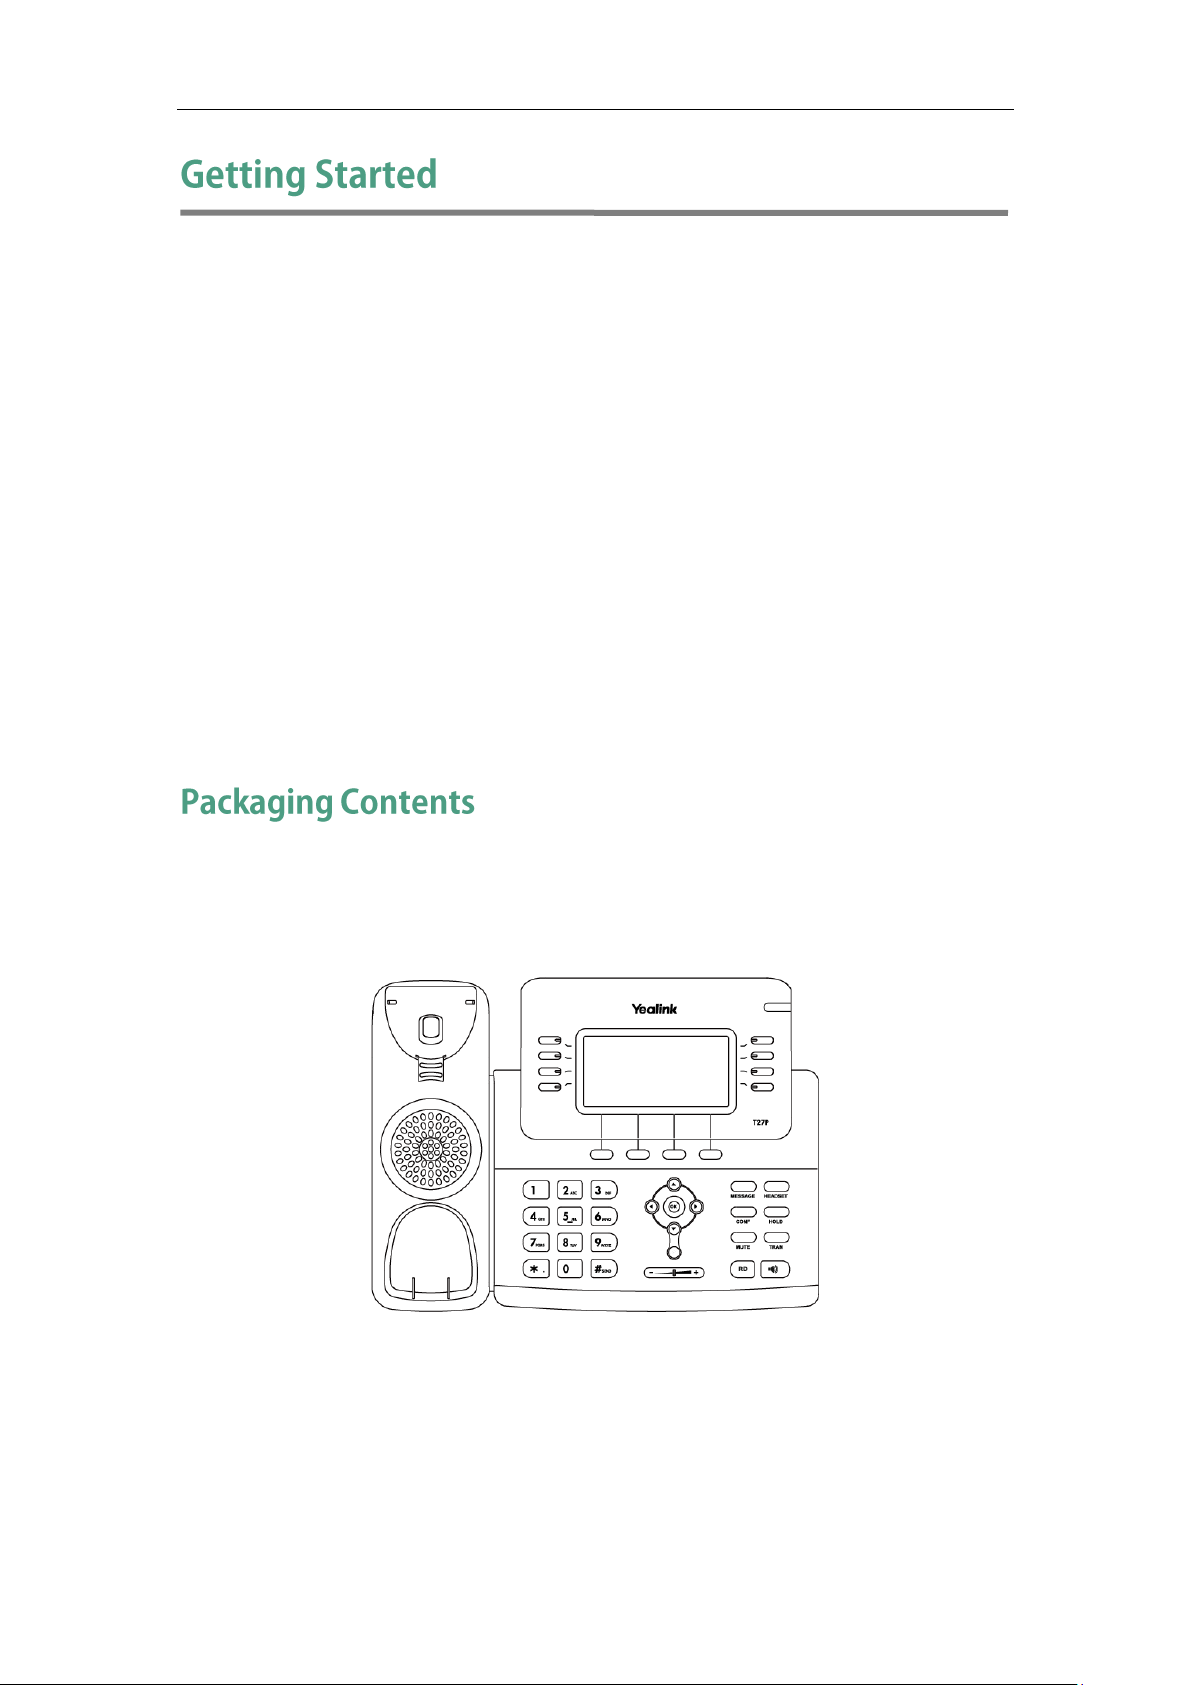
The following components are included in your SIP-T27P IP phone package:
SIP-T27P IP Phone
11
Page 22
User Guide for the SIP-T27P IP Phone
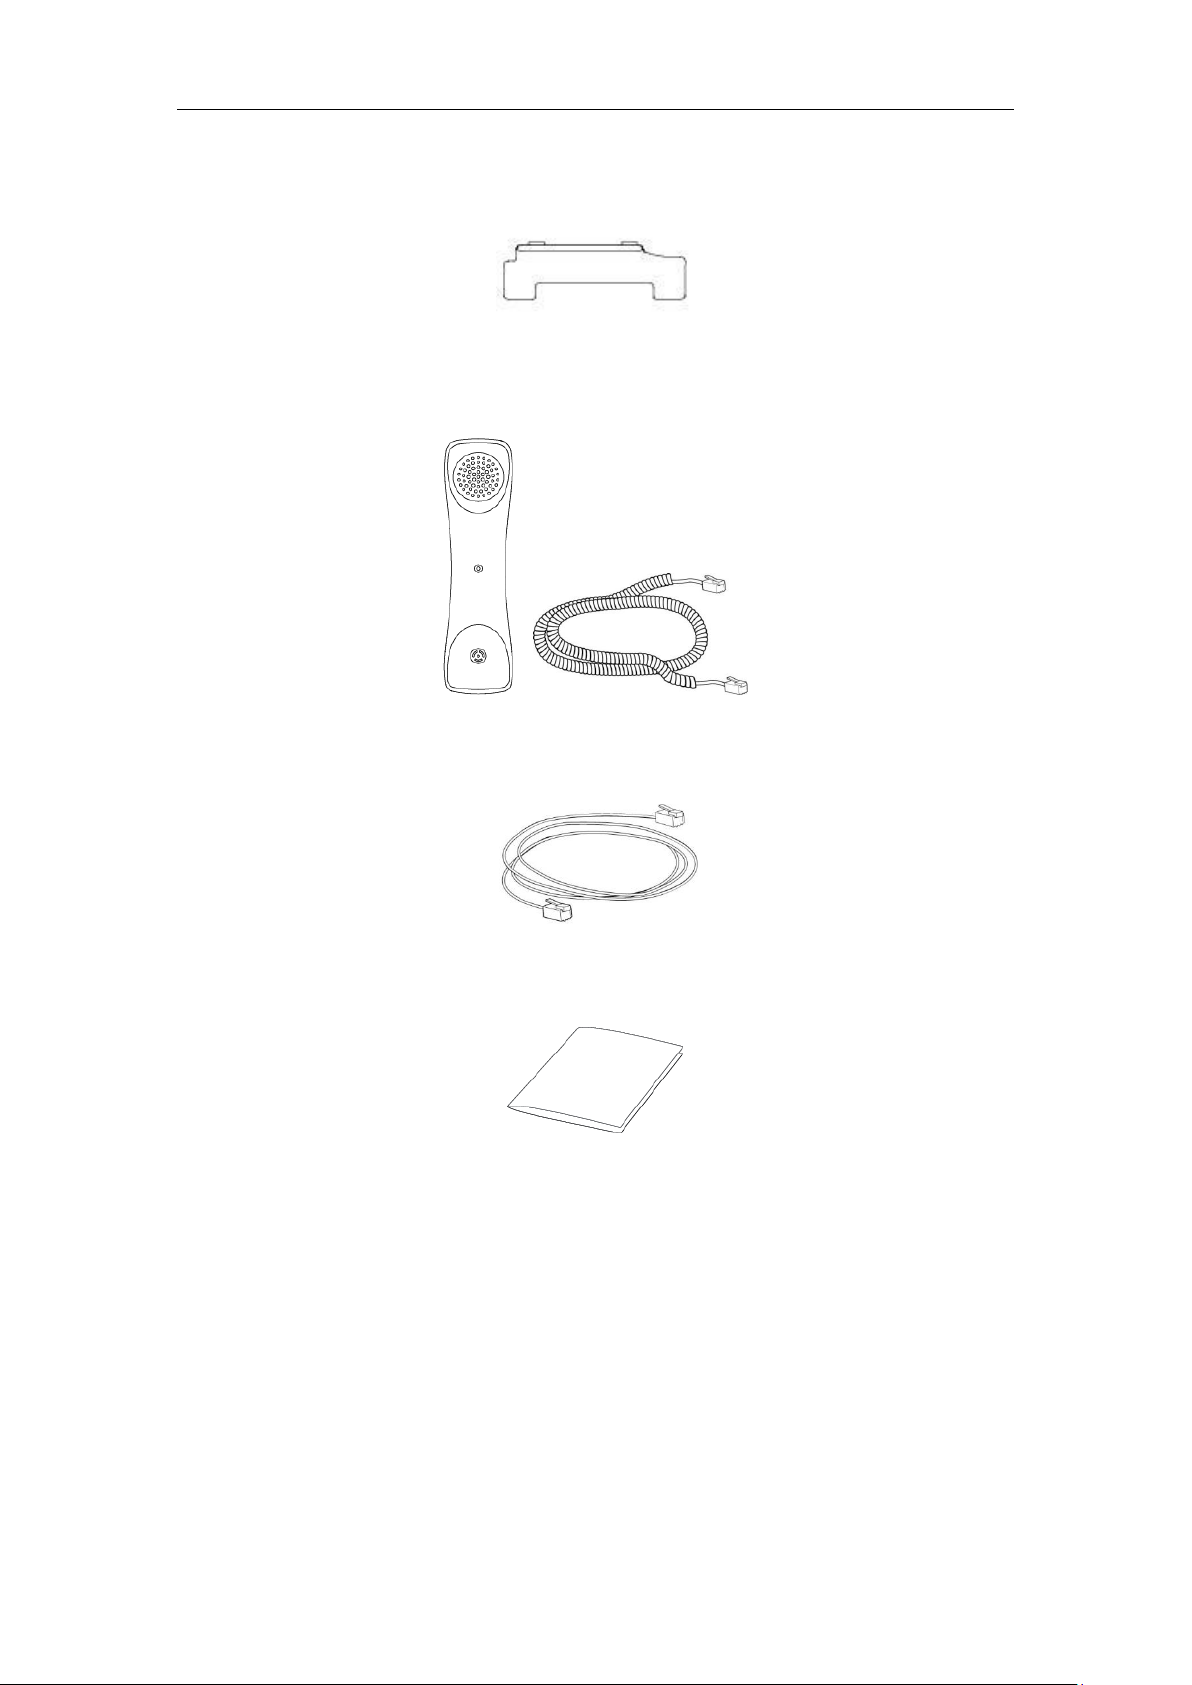
Phone Stand
Handset & Handset Cord
Ethernet Cable
Quick Start Guide
Check the list before installation. If you find anything missing, contact your system
administrator.
12
Page 23
Getting Started
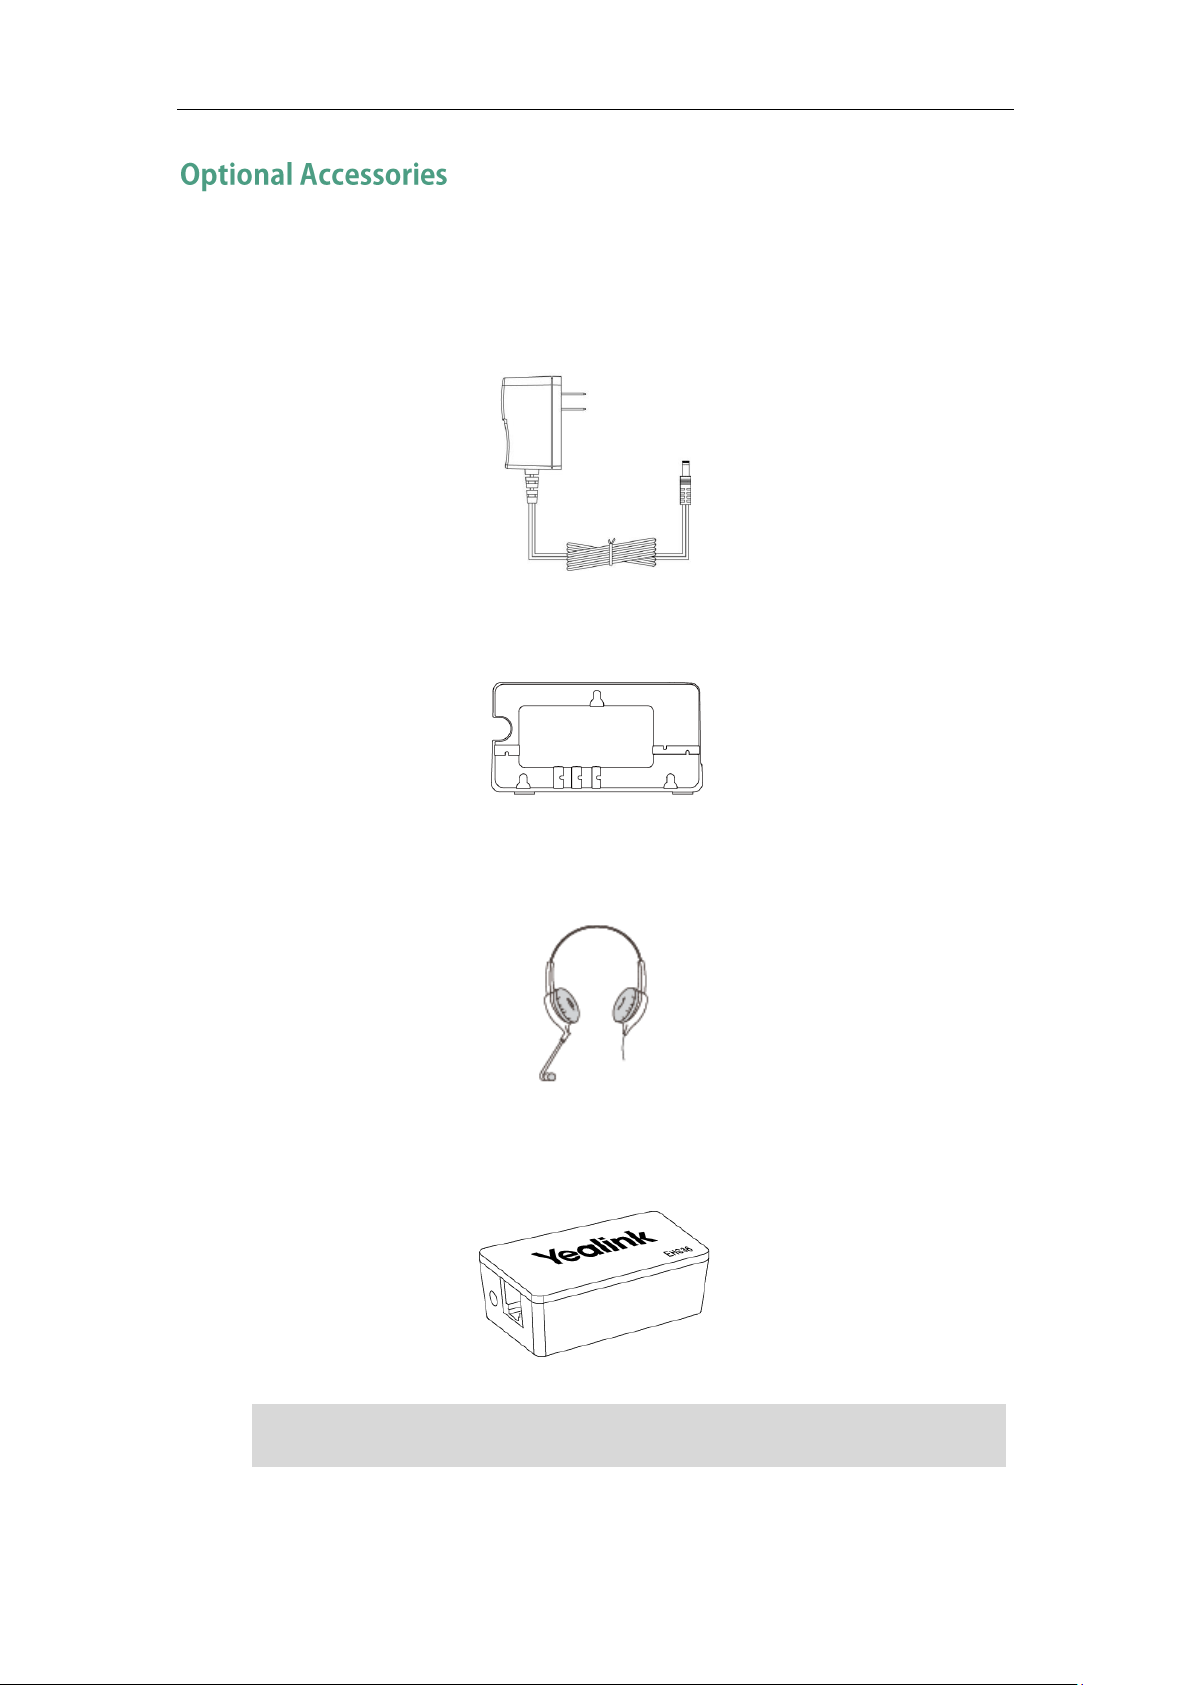
We recommend that you use the accessories provided or approved by Yealink. The use
of unapproved third-party accessories may result in reduced performance.
The following items are optional accessories for your SIP-T27P IP phone. You need to
purchase them separately if required.
Power Adapter
Wall Mount Bracket
Headset
Wireless Headset Adapter EHS36
Note
13
Page 24

User Guide for the SIP-T27P IP Phone
The hookswitch tab has a lip which allows the handset to stay on-hook when the IP
Mount Quick Installation Guide for Yealink IP Phones
.
If your phone is already installed, proceed to Phone Initialization on page 16.
This section introduces how to install the phone:
1) Attach the stand or the optional wall mount bracket
2) Connect the handset and optional headset
3) Connect the network and power
1) Attach the stand or the optional wall mount bracket
Desk Mount Method
Note
Wall Mount Method (Optional)
phone is mounted vertically.
For more information on how to attach the wall mount bracket, refer to
Yealink Wall
14
Page 25
Note
The EXT port can also be used to connect an expansion module EXP20.
The IP phone should be used with Yealink original power adapter (5V/1.2A) only. The use
of the third-party power adapter may cause the damage to the phone.
Getting Started
2) Connect the handset and optional headset
For more information on how to use EHS36 or EXP20, refer to
Yealink EXP20 User Guide
.
Yealink EHS36 User Guide
,
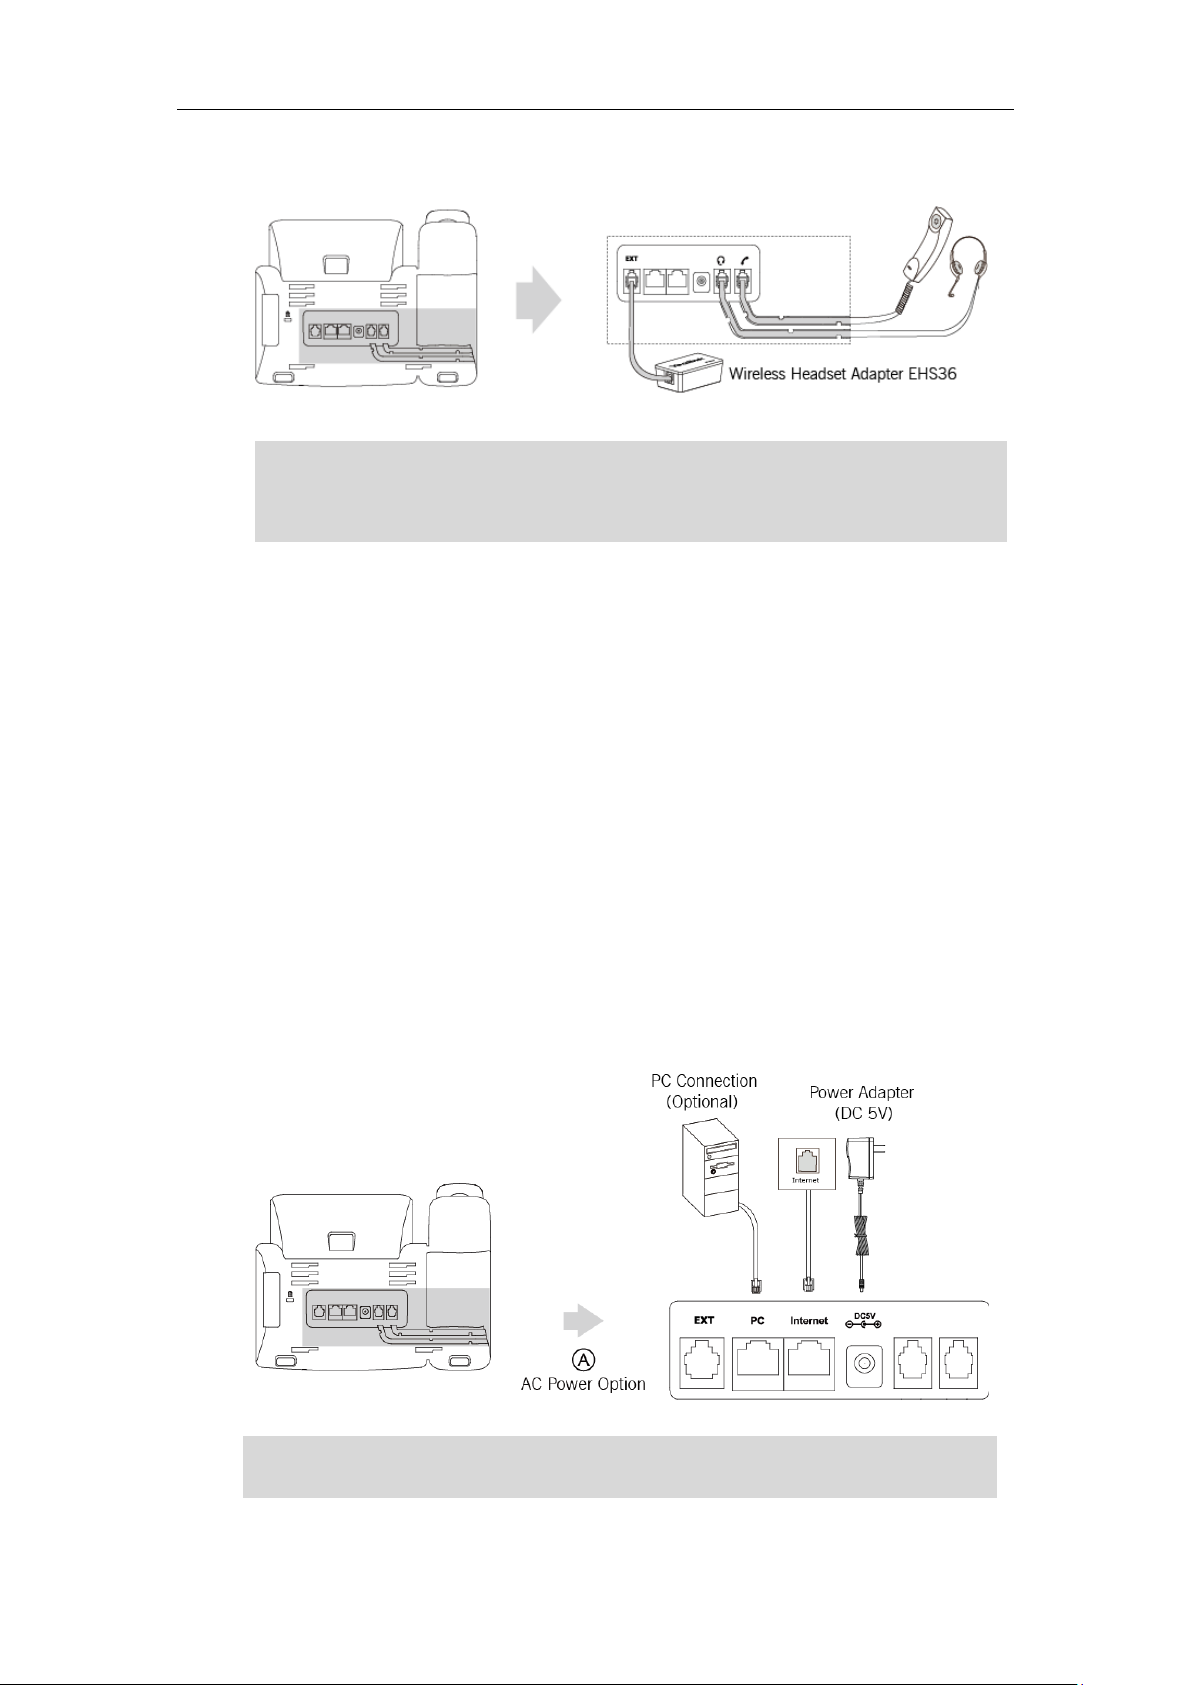
3) Connect the network and power
You have two options for power and network connections. Your system administrator will
advise you which one to use.
AC power (Optional)
Power over Ethernet (PoE)
AC Power (Optional)
To connect the AC power:
1. Connect the DC plug on the power adapter to the DC5V port on the phone and
connect the other end of the power adapter into an electrical power outlet.
2. Connect the included or a standard Ethernet cable between the Internet port on the
phone and the one on the wall or switch/hub device port.
Note
15
Page 26
User Guide for the SIP-T27P IP Phone
If in-
configurations.
If your network does not use DHCP, proceed to Basic Network Settings on page 18.
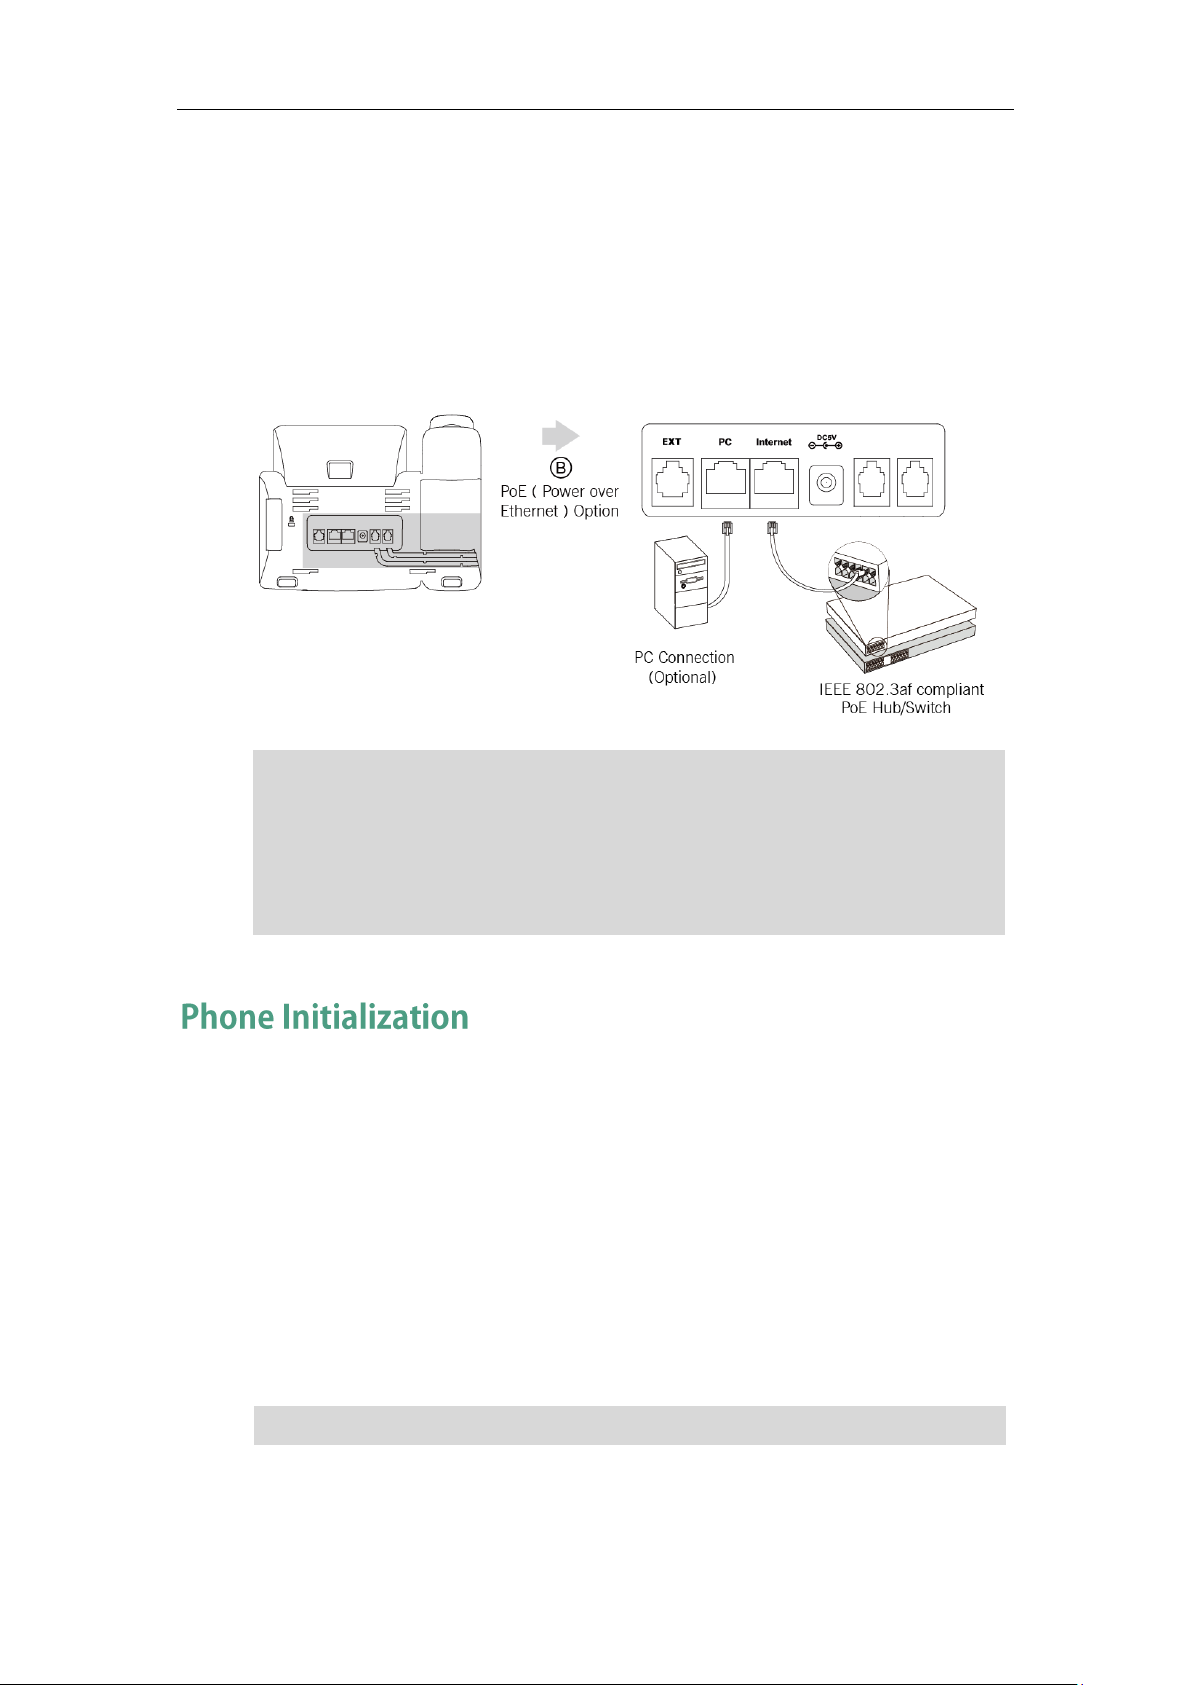
Power over Ethernet
With the included or a regular Ethernet cable, the SIP-T27P IP phone can be powered
from a PoE-compliant switch or hub.
To connect the PoE:
1. Connect the Ethernet cable between the Internet port on the phone and an
available port on the in-line power switch/hub.
Note
Make sure the switch/hub is PoE-compliant.
The phone can also share the network with another network device such as a PC
(personal computer). This is an optional connection.
Important! Do not remove power from the phone while it is updating firmware and
After your phone is powered on, the system boots up and performs the following steps:
Automatic Phone Initialization
The phone finishes the initialization by loading the saved configuration. The LCD screen
displays "Welcome Iplease wait" during the initialization.
DHCP (Dynamic Host Configuration Protocol)
The phone attempts to contact a DHCP server in your network to obtain valid IPv4
network settings (e.g., IP address, subnet mask, default gateway address and DNS
address) by default.
Note
16
Page 27

Note
You can view device certificate status via phone user interface only.
Getting Started
You can view phone status via phone user interface or web user interface.
Available information of phone status includes:
Network status (e.g., IPv4 status, IP mode and MAC address).
Phone status (e.g., product name, hardware version, firmware version, product ID,
MAC address and device certificate status).
Account status (e.g., register status of SIP accounts).
To view the phone status via phone user interface:
1. Press , or press Menu->Status.
2. Press or to scroll through the list and view the specific information.
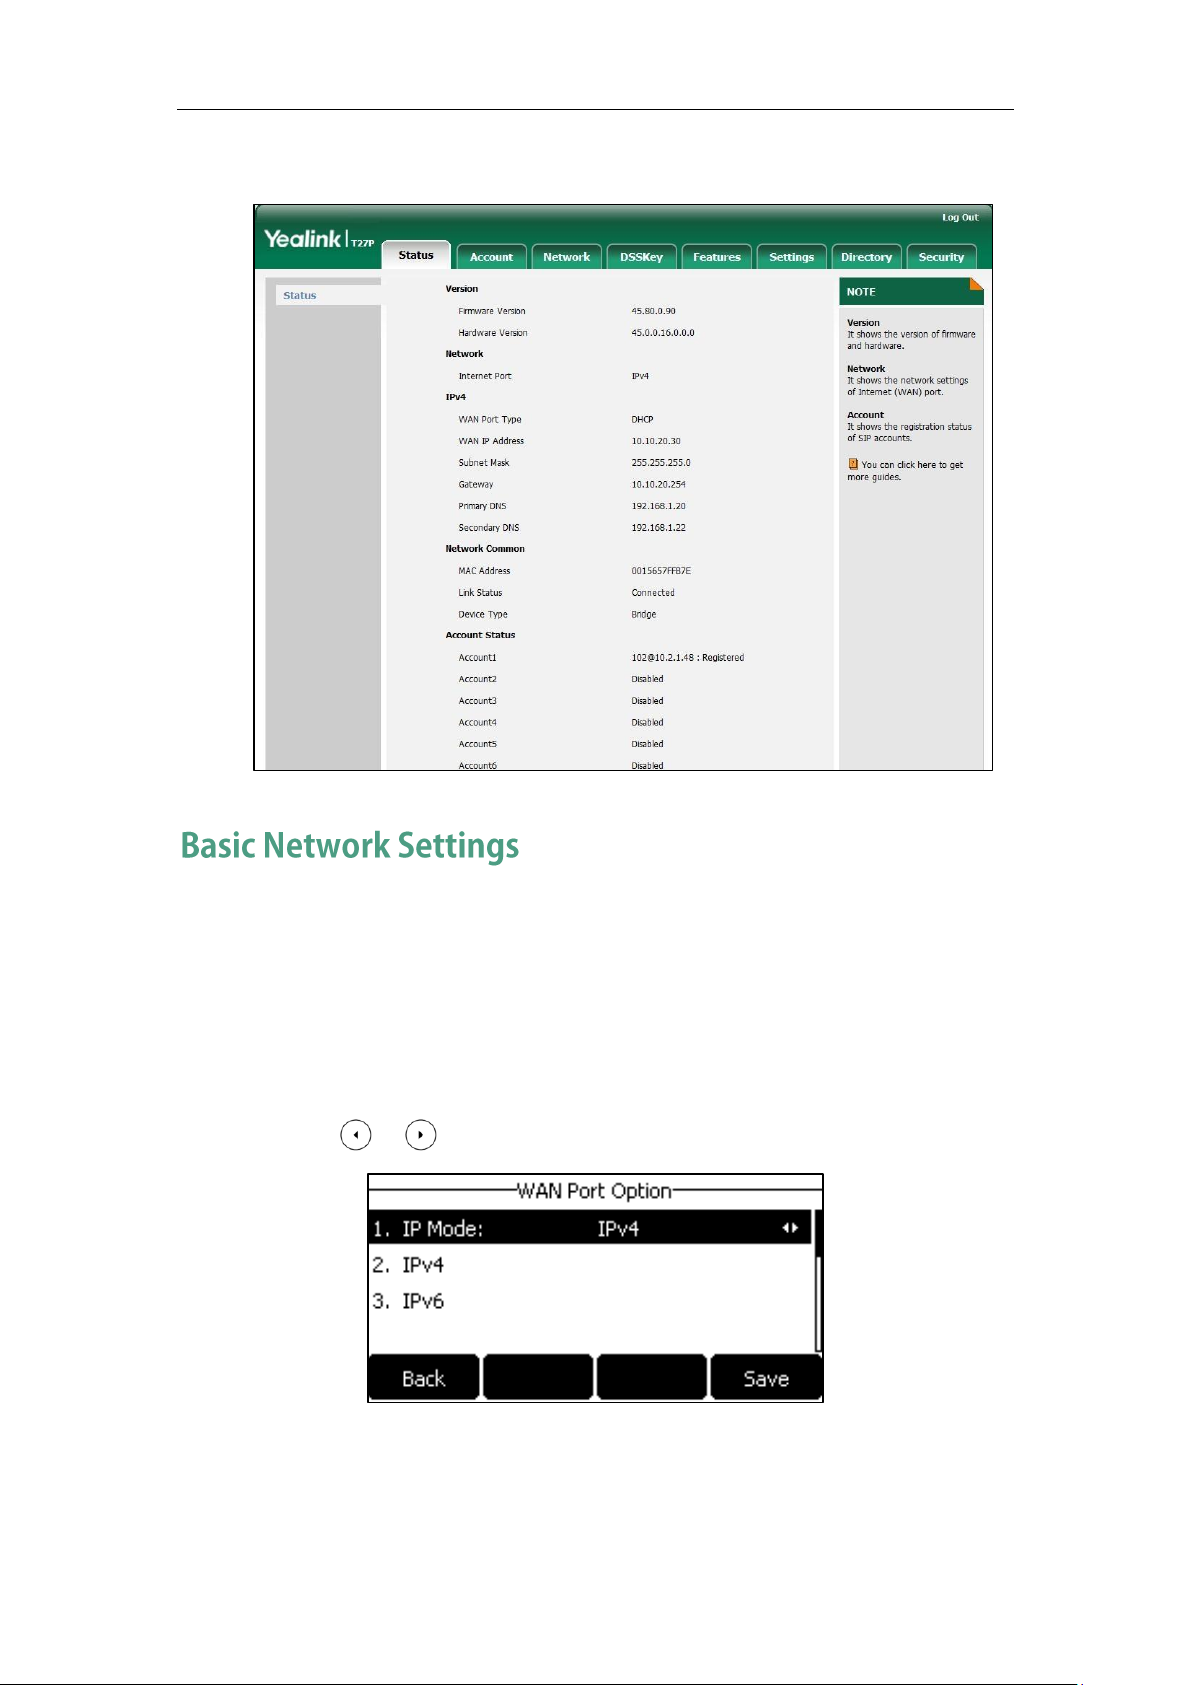
To view the phone status via web user interface:
1. Open a web browser on your computer.
2. Enter the IP addres, and then press the Enter key.
3. Enter the user name (admin) and password (admin) in the login page.
4. Click Confirm to login.
17
Page 28
User Guide for the SIP-T27P IP Phone
The phone status is displayed on the first page of the web user interface.
If your phone cannot contact a DHCP server for any reason, you need to configure
network settings manually. The IP phone can support either or both IPv4 and IPv6
addresses.
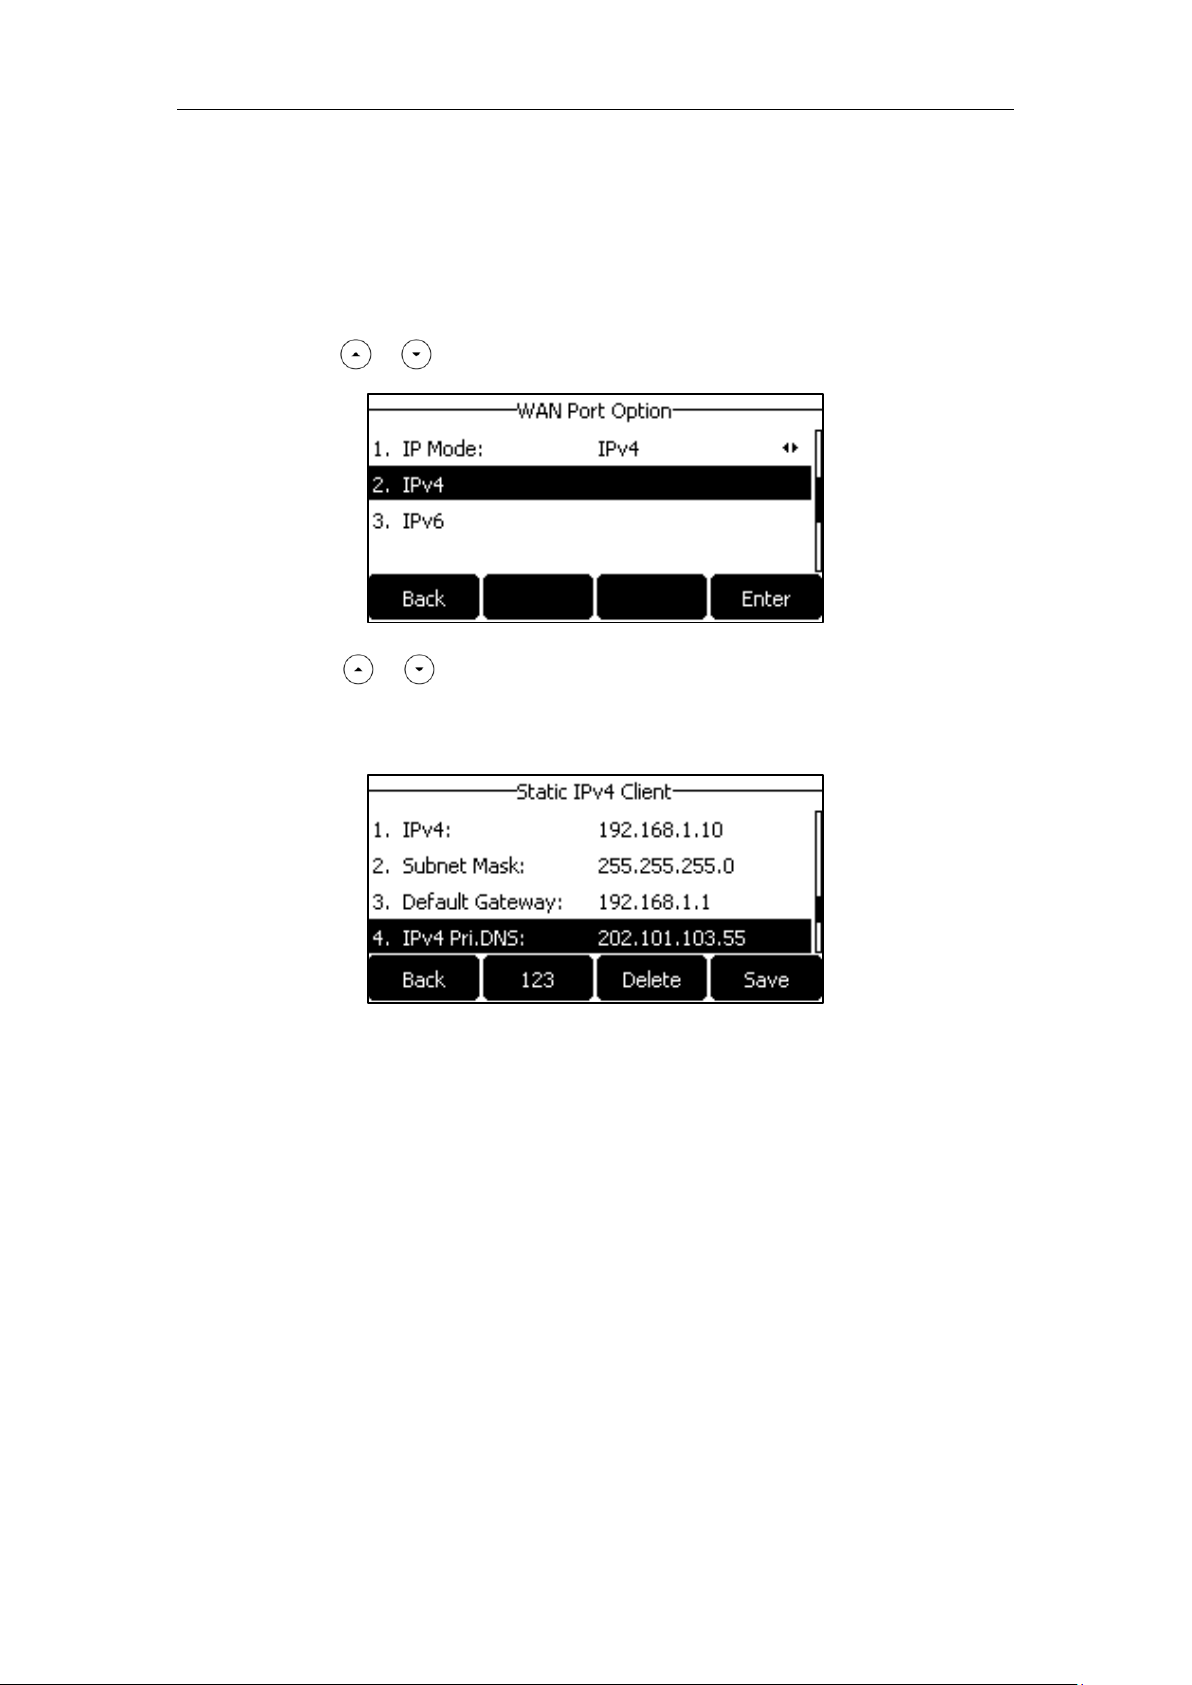
To configure the IP mode via phone user interface:
1. Press Menu->Settings->Advanced Settings (default password: admin)
->Network->WAN Port.
2. Press or to select IPv4, IPv6 or IPv4 & IPv6 from the IP Mode field.
3. Press the Save soft key to accept the change or the Back soft key to cancel.
18
Page 29
Getting Started
You can configure a static IPv4 address for the IP phone. Before configuring it, make sure
that the IP mode is configured as IPv4 or IPv4 & IPv6.
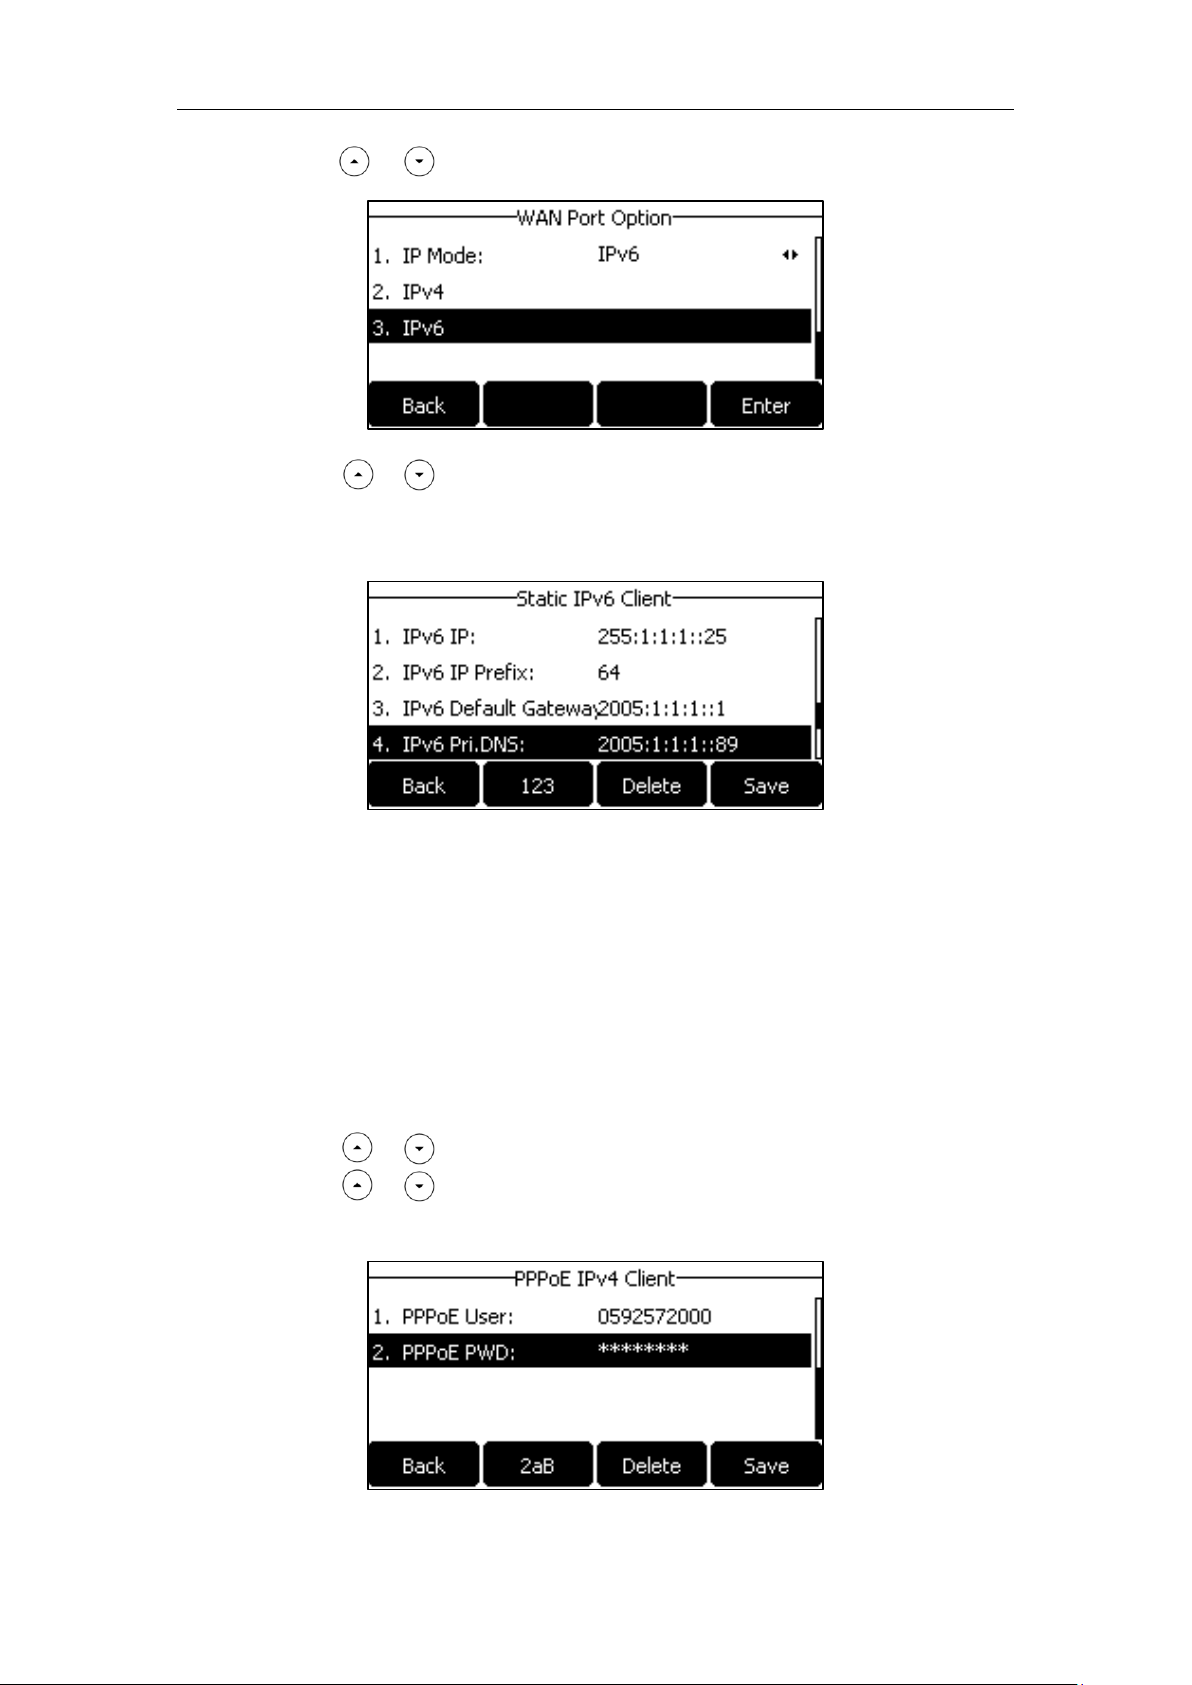
To configure a static IPv4 address via phone user interface:
1. Press Menu->Settings->Advanced Settings (default password: admin)
->Network->WAN Port.
2. Press or to select IPv4 and then press the Enter soft key.
3. Press or to select Static IPv4 Client and then press the Enter soft key.
4. Enter the desired value in the IPv4, Subnet Mask, Default Gateway, IPv4 Pri.DNS
and IPv4 Sec.DNS field respectively.
5. Press the Save soft key to accept the change or the Back soft key to cancel.
You can configure a static IPv6 address for the IP phone. Before configuring it, make sure
that the IP mode is configured as IPv6 or IPv4 & IPv6.
To configure a static IPv6 address via phone user interface:
1. Press Menu->Settings->Advanced Settings (default password: admin)
->Network->WAN Port.
19
Page 30
User Guide for the SIP-T27P IP Phone
2. Press or to select IPv6 and then press the Enter soft key.
3. Press or to select Static IPv6 Client and then press the Enter soft key.
4. Enter the desired value in the IPv6 IP, IPv6 IP Prefix, IPv6 Default Gateway, IPv6
Pri.DNS and IPv6 Sec.DNS field respectively.
5. Press the Save soft key to accept the change or the Back soft key to cancel.
If you are using an xDSL modem for IPv4 network connection, you can connect your
phone to the Internet via PPPoE mode. Set the WAN port as a PPPoE port. The PPPoE port
will perform a PPP negotiation to obtain the IP address. Contact your system
administrator for the PPPoE user name and password.
To configure PPPoE via phone user interface:
1. Press Menu->Settings->Advanced Settings (default password: admin)
->Network->WAN Port.
2. Press or to select the IPv4 and then press the Enter soft key
3. Press or to select PPPoE IPv4 Client and then press the Enter soft key.
4. Enter the user name and password in the corresponding fields.
20
Page 31

Note
No.
Description
1
This area shows the phones time, date and default account.
2
This area shows the phone feature status. For more information,
refer to Icon Instructions on page 3.
3
This area shows the line key labels. You can customize the line key
as other functions. For more information, refer to Line Keys on
page 59.
4
This area shows three page icons.
The wrong network settings may result in inaccessibility of your phone and may also
parameters, contact your system administrator.
Getting Started
5. Press the Save soft key to accept the change or the Back soft key to cancel.
have an impact on your network performance. For more information on these
Generally, your phone will be deployed with multiple other phones. In this case, your
system administrator will configure the phone parameters beforehand, so that after you
start up your phone, the phone will be registered and ready for use. The SIP-T27P IP
phone supports up to 6 accounts. If your phone is not registered, you may have to
register it. For more information on how to register your phone, refer to Account
Management on page 72.
If the phone has successfully started up, the idle LCD screen will be displayed as below.
Idle Screen description:
21
Page 32

User Guide for the SIP-T27P IP Phone
No.
Description
5
This area shows the soft key labels. The default soft key labels are
History, Directory, DND and Menu.
Input Mode
Keypad
2aB
abc
Abc
(initials in
capitals)
ABC
123
1 1
2abcABC
abc2äæ å
абвгз
abc2äæ å
абвгз
ABC2ÄÆ Å
ÀÁ ÂÃ Ç
2
3defDEF
def3èéêë
ð
def3èéêë
ð
DEF3ÈÉÊË
Ð
3
4ghiGHI
ghi4ìíîï
ghi4ìíîï
GHI4ÌÍÎÏ
4 5jklJKL
jkl5£
jkl5£
JKL5£
5
6mnoMN
O
mno6öøò
óôõñ
mno6öøò
óôõñ
MNO6Ö Ø
ТУФХС
6
7pqrsPQR
S
pqrs7ßЅ
pqrs7ßЅ
PQRS7Ѕ
7
8tuvTUV
tuv8ùúûü
tuv8ùúûü
TUV8ÙÚ Û
Ü
8
9wxyzWX
wxyz9ýÞ
wxyz9ýÞ
WXYZ9ÝÞ
9
You can enter data and edit fields using the phone keypad.
Keypad on the phone provides different characters (or numbers) when using the 2aB,
abc, Abc, ABC or 123 input mode. You can change the following input modes to enter
data and edit fields on your phone. When your phone keypad matches the input mode,
you can press the keypad repeatedly to view the character (or numbers) options and
stop to select. When the character (or numbers) you want to enter displays in the field,
wait one second, and enter the next character (or numbers).
The following table lists the input modes and character (or numbers) options for the
keypad:
22
Page 33

Input Mode
Keypad
2aB
abc
Abc
(initials in
capitals)
ABC
123
YZ 0
space
space
space
0
*.,'?!\-()@/:
_;+&%=<
>
£$¥¤[]{}
~^¡¿§#"|
*.,'?!\-()@/:
_;+&%=<
>
£$¥¤[]{}
~^¡¿§#"|
*.,'?!\-()@/:
_;+&%=<
>
£$¥¤[]{}
~^¡¿§#"|
*.,'?!\-()@/:
_;+&%=<
>
£$¥¤[]{}
~^¡¿§#"|
.*:/@[]
# # # # #
To enter or edit data:
If you want to
Then you can
Enter only digits (1),
uppercase (A) characters,
lowercase (a) characters,
or alphanumeric (2aB)
characters.
Press a keypad key one or more times
enter the characters that is displayed on the
keypad key.
You can press the abc soft key one or more
times to switch among uppercase (ABC soft
key), numeric (123 soft key), alphanumeric
(2aB soft key), uppercase and lowercase (Abc
soft key) and lowercase (abc soft key) input
modes.
For example, if the input mode is ABC:
-
-
-
quickly.
-
more than three times quickly.
Note: When you are in the uppercase (ABC
soft key), uppercase and lowercase (Abc soft
key) or lowercase (abc soft key) input mode,
is not available.
Getting Started
Do one of the following:
23
Page 34

User Guide for the SIP-T27P IP Phone
If you want to
Then you can
Enter special characters.
Press the keypad key or , or
press .
For Key:
- If it is in the uppercase (ABC soft key),
uppercase and lowercase (Abc soft key)
or lowercase (abc soft key) input mode, it
will provide the space character.
- If it is in the numeric (123 soft key) or
alphanumeric (2aB soft key) input mode,
it will only provide the digit 0.
For key:
- It only provides the pound character #.
For key:
- If it is in the uppercase (ABC soft key),
lowercase (abc soft key), uppercase and
lowercase (Abc soft key) or alphanumeric
(2aB soft key) input mode, it will provide
the following special characters:
*.,?!\-()@/:_;+&%=<>£$¥¤[]{}~^¡¿§#"|.
- If it is in the numeric (123 soft key) input
mode, it will provide the following special
characters: .*:/@[].
Delete text you entered.
Press or to position the cursor to the
right of the text you want to delete, and then
press the Delete soft key to delete one
character at a time.
24
Page 35

Customizing Your Phone
You can customize your SIP-T27P IP phone by personally configuring certain settings, for
example, contrast, time & date and ring tones. Y
local directory manually or from call history. You can also personalize different ring
tones for different callers.
This chapter provides basic operating instructions for customizing your phone. Topics
include:
General Settings
Audio Settings
Contact Management
Call History Management
System Customizations
If you require additional information or assistance with your new phone, contact your
system administrator.
You can configure the backlight to adjust the brightness of the LCD screen.
You can configure the backlight status on the LCD screen from the following options:
Always On: Backlight is on permanently.
Always Off: Backlight is off permanently.
15s, 30s, 60s, 120s, 300s, 600s or 1800s: Backlight is turned off when the phone is
inactive after the designated time (in seconds).
You can also change the intensity of the LCD screen of EXP20 connected to the SIP-T27P
IP phone.
To configure the backlight via phone user interface:
1. Press Menu->Settings->Basic Settings->Display->Backlight.
2. Press or , or the Switch soft key to select the desired time from the
Backlight Time field.
25
Page 36

User Guide for the SIP-T27P IP Phone
3. Press or , or the Switch soft key to select the desired value from the
Backlight Active Level field.
4. Press the Save soft key to accept the change or the Back soft key to cancel.
Backlight is configurable via web user interface at the path Settings->Preference.
You can configure the LCD screen contrast of EXP20 or SIP-T27P to a comfortable level.
Ensure EXP20 has been connected to the phone before configuration. The intensity of
contrast ranges from 1 to 10 and the highest intensity is 10.
To configure the contrast via phone user interface:
1. Press Menu->Settings->Basic Settings->Display->Contrast.
To configure the LCD screen contrast of EXP20, ensure it has been connected to the
phone before configuration.
2. Press or , or the Switch soft key to increase or decrease the intensity of
contrast.
The default contrast level is 6.
26
3. Press the Save soft key to accept the change or the Back soft key to cancel.
Contrast is configurable via web user interface at the path Settings->Preference.
The default language of the phone user interface is English. If the language of your web
Page 37

Customizing Your Phone
browser is not supported by the phone, the web user interface will use English by
default. You can change the language for the phone user interface and the web user
interface respectively.
To change the language for the phone user interface:
1. Press Menu->Settings->Basic Settings->Language.
2. Press or to select the desired language.
3. Press the Save soft key to accept the change.
Text displayed on the phone user interface will change to the selected language.
To change the language for the web user interface:
1. Click on Settings->Preference.
2. Select the desired language from the pull-down list of Language.
3. Click Confirm to accept the change.
Text displayed on the web user interface will change to the selected language.
The time and date are displayed on the LCD screen when the phone is idle. You can
configure the phone to obtain the time and date from the SNTP server automatically, or
27
Page 38

User Guide for the SIP-T27P IP Phone
Please refer to Appendix A - Time Zones for the list of available time zones on the IP
phone.
configure the time and date manually. If the phone cannot obtain the time and date
from the Simple Network Time Protocol (SNTP) server, contact your system administrator
for more information.
To configure the SNTP settings via phone user interface:
1. Press Menu->Settings->Basic Settings->Time & Date->SNTP Settings.
2. Press or , or the Switch soft key to select the time zone that applies to your
area from the Time Zone field.
The default time zone is "+8".
3. Enter the domain name or IP address of SNTP server in the NTP Server1 and NTP
Server2 field respectively.
4. Press or , or the Switch soft key to select the desired value from the
Daylight Saving field.
5. Press or , or the Switch soft key to select the desired time zone name from
the Location field.
This field appears only if Daylight Saving field is selected Automatic.
The default time zone name is China(Beijing).
6. Press the Save soft key to accept the change or the Back soft key to cancel.
Note
To configure the time and date manually via phone user interface:
1. Press Menu->Settings->Basic Settings->Time & Date->Manual Settings.
28
Page 39

Customizing Your Phone
Date Format
Example (2015-05-16)
WWW MMM DD
Sat May 16
DD-MMM-YY
16-May-15
YYYY-MM-DD
2015-05-16
DD/MM/YYYY
16/05/2015
MM/DD/YY
05/16/15
2. Enter the specific date and time.
3. Press the Save soft key to accept the change.
The time and date displayed on the LCD screen will change accordingly.
To configure the date and time format via phone user interface:
1. Press Menu->Settings->Basic Settings->Time & Date->Time & Date Format.
2. Press or , or the Switch soft key to select the desired time format (12 Hour
or 24 Hour) from the Time Format field.
3. Press or , or the Switch soft key to select the desired date format from the
Date Format field.
4. Press the Save soft key to accept the change or the Back soft key to cancel.
There are 7 available date formats. ,
WWWs the abbreviation of the weekdayDDs the two-digit day,
MMMs the first three letters of the month.
The date formats available:
29
Page 40

User Guide for the SIP-T27P IP Phone
Date Format
Example (2015-05-16)
DD MMM YYYY
16 May 2015
WWW DD MMM
Sat 16 May
Time and date are configurable via web user interface at the path Settings->Time &
Date.
The Advanced Settings option is only accessible to the administrator. The default
administrator password is admin. For security reasons, you should change the default
administrator password as soon as possible.
To change the administrator password via phone user interface:
1. Press Menu->Settings->Advanced Settings (default password: admin) ->Set
Password.
2. Enter the old password in the Current PWD field.
3. Enter the new password in the New PWD field.
4. Re-enter the new password in the Confirm PWD field.
5. Press the Save soft key to accept the change or the Back soft key to cancel.
Administrator password is configurable via web user interface at the path
Security->Password.
30
You can set the # key or * key to perform as a send key while dialing.
To configure key as send via phone user interface:
1. Press Menu->Features->Key as send.
Page 41

Customizing Your Phone
The emergency number setting, if desired, must be set before lock activation. For more
information, refer to Emergency Number on page 80.
2. Press or , or the Switch soft key to select # or * from the Key as Send field,
or select Disabled to disable this feature.
3. Press the Save soft key to accept the change or the Back soft key to cancel.
Key as send is configurable via web user interface at the path Features->General
Information.
Note
You can lock your phone temporarily when you are not using it. This feature helps to
protect your phone from unauthorized use.
Phone lock consists of the following:
Menu Key: The Menu soft key is locked. You cannot access the menu of the
phone until unlocked.
Function Keys: The function keys are locked. You cannot use the MESSAGE, RD,
HOLD, MUTE, TRAN, CONF, OK, X, navigation keys, soft keys
and line keys until unlocked.
All Keys: All keys are locked except the Volume key, digit keys, # key, *
key and Speakerphone key. You are only allowed to dial
emergency numbers, reject incoming calls by pressing the X
key or the Reject soft key, answer incoming calls by lifting the
handset, pressing the Speakerphone key, the HEADSET key, the
Answer soft key or the OK key, and end the call by hanging up
the handset, pressing the Speakerphone key, the EndCall soft
key or X key.
To activate the phone lock via phone user interface:
1. Press Menu->Settings->Advanced Settings (default password: admin) ->Phone
Lock.
2. Press or , or the Switch soft key to select Enabled from the Lock Enable
31
Page 42

User Guide for the SIP-T27P IP Phone
field.
3. Press or , or the Switch soft key to select the desired type from the Lock
Type field.
4. (Optional.) Enter the desired interval of automatic phone lock in the Lock Time Out
field.
The default timeout is 0. It means the phone will not be automatically locked. You
need to long press to lock it immediately when the phone is idle.
If it is set to other values except 0 (e.g., 5), the phone will be locked when the phone
is inactive in idle screen for the designated time (in seconds).
5. Press the Save soft key to accept the change.
When the phone is locked, the LCD screen prompts Phone locked. and displays
the icon .
To unlock the phone, you must know the phone unlock PIN. The default phone unlock PIN
is 123.
To change the phone unlock PIN via phone user interface:
1. Press Menu->Settings->Basic Settings-> Change PIN.
32
Page 43

Note
The unlock PIN length must be within 15 digits.
You can also unlock the phone by administrator password. When you enter the
screen.
Customizing Your Phone
2. Enter the desired value in the Current PIN, New PIN and Confirm PIN field
respectively.
3. Press the Save soft key to accept the setting or the Back soft key to cancel.
To unlock the phone via phone user interface:
Note
1. Press any locked key, enter the Unlock PIN screen.
2. Enter the PIN in the Unlock PIN field.
3. Press the OK soft key to unlock the phone.
The icon disappears from the LCD screen.
You can long press or wait for a period of time (if configured) to lock the
phone again.
administrator password to unlock the phone, the phone will turn to the Change PIN
To deactivate the phone lock via phone user interface:
1. Press Menu->Settings->Advanced Settings (default password: admin) ->Phone
Lock.
33
Page 44

User Guide for the SIP-T27P IP Phone
2. Press or , or the Switch soft key to select Disabled from the Lock Enable
field.
3. Press the Save soft key to accept the change.
Phone lock is configurable via web user interface at the path Features->Phone Lock.
You can press the Volume key to adjust the ringer volume when the phone is idle or
ringing. You can also press the Volume key to adjust the receiver volume of currently
engaged audio devices (handset, speakerphone or headset) when the phone is in use.
To adjust the ringer volume:
When the phone is idle:
1. Press to adjust the ringer volume.
34
Page 45

Note
If ringer volume is adjusted to minimum, the icon will appear on the LCD screen.
Customizing Your Phone
When the phone is ringing:
1. Press to adjust the ringer volume.
You can also press to adjust the ringer volume when selecting a ring tone.
For more information, refer to Ring Tones on page 35.
To adjust the volume when the phone is during a call:
1. Press to adjust the volume of currently engaged audio device (handset,
speakerphone or headset).
Ring tones are used to indicate incoming calls. You can select different ring tones to
distinguish different accounts registered on your phone, or to distinguish your phone
.
To select a ring tone for the phone via phone user interface:
1. Press Menu->Settings->Basic Settings->Sound->Ring Tones->Common.
35
Page 46

User Guide for the SIP-T27P IP Phone
2. Press or to select the desired ring tone.
3. (Optional.) Press to adjust the ringer volume.
4. Press the Save soft key to accept the change or the Back soft key to cancel.
A ring tone for the phone is configurable via web user interface at the path
Settings->Preference->Ring Type.
To select a ring tone for the account via phone user interface:
1. Press Menu->Settings->Basic Settings->Sound->Ring Tones.
2. Press or to select the desired account and then press the Enter soft key.
3. Press or to select the desired ring tone.
If Common is selected, this account will use the ring tone selected for the phone.
36
4. (Optional.) Press to adjust the ringer volume.
5. Press the Save soft key to accept the change or the Back soft key to cancel.
A ring tone for the account is configurable via web user interface at the path
Account->Basic->Ring Type.
Page 47

Customizing Your Phone
The priority of ring tone for an incoming call on the phone is as follows:
Uploading custom ring tones for your phone is configurable via web user interface only.
To upload a custom ring tone for your phone via web user interface:
1. Click on Settings->Preference.
2. In the Upload Ringtone field, click Browse to locate a ring tone (the file format must
be *.wav) file from your local system.
Note
3. Click Upload to upload the file.
Contact ring tone (refer to Adding Contacts) >Group ring tone (refer to Adding
Groups) >Account ring tone >Phone ring tone.
Both single custom ring tone file and total custom ring tone files must be within 100KB.
This section provides the operating instructions for managing contacts. Topics include:
Directory
Local Directory
Blacklist
Remote Phone Book
Directory provides easy access to frequently used lists. The lists may contain Local
Directory, History, Remote Phone Book and LDAP.
To configure the directory via web user interface:
1. Click on Directory->Setting.
37
Page 48

User Guide for the SIP-T27P IP Phone
Directory is configurable via web user interface only.
2. In the Directory block, select the desired list from the Disabled column and then
click .
The selected list appears in the Enabled column.
3. Repeat the step 2 to add more lists to the Enabled column.
4. To remove a list from the Enabled column, select the desired list and then click .
5. To adjust the display order of enabled lists, select the desired list and then click
or .
The LCD screen will display the list(s) in the adjusted order.
Note
6. Click Confirm to accept the change.
To view the directory via phone user interface:
1. Press the Directory soft key when the phone is idle.
The LCD screen displays the enabled list(s) in the directory.
38
Page 49

Customizing Your Phone
If the remote phone book and LDAP are not configured in advance, you cannot see
E2_T4_Series_CP860_IP_Phones_Administrator_Guide.
If there is only one list in the directory, press the Directory soft key to enter this list
directly.
Note
remote phone book and LDAP lists on the phone user interface. For more information on
remote phone book, refer to Remote Phone Book on page 52. For more information on
the LDAP, refer to
Yealink_SIP-T2_Series_T19(P)
The built-in phone directory can store the names and phone numbers of your contacts.
You can store up to 1000 contacts and 48 groups in your phone's local directory. You can
add new groups and contacts, edit, delete or search for a contact, or simply dial a
contact number from the local directory.
To add a group to the local directory:
1. Press the Directory soft key.
The IP phone enters the local directory directly as there is only Local Directory
enabled in the directory by default.
If Local Directory is removed from the directory (refer to Directory on page 37),
press Menu->Directory->Local Directory to enter the local directory.
2. Press the AddGr soft key.
3. Enter the desired group name in the Name field.
4. Press or , or the Switch soft key to select the desired group ring tone from
the Ring field.
39
Page 50

User Guide for the SIP-T27P IP Phone
If Auto is selected, this group will use the ring tone according to the priority: Contact
ring tone (refer to Adding Contacts) >Account ring tone (refer to Ring
Tones) >Phone ring tone (refer to Ring Tones). If a specific ring tone is selected, this
group will use the ring tone according to the priority: Contact ring tone (refer to
Adding Contacts) >Group ring tone.
5. Press the Add soft key to accept the change or the Back soft key to cancel.
You can also edit or delete any newly added contact groups.
To edit a group in the local directory:
1. Press the Directory soft key.
The IP phone enters the local directory directly as there is only Local Directory
enabled in the directory by default.
If Local Directory is removed from the directory (refer to Directory on page 37),
press Menu->Directory->Local Directory to enter the local directory.
2. Select the desired contact group.
40
Page 51

Customizing Your Phone
3. Press the Option soft key, and then select Detail from the prompt list.
4. Press or to highlight the group information and then edit.
5. Press the Save soft key to accept the change or the Back soft key to cancel.
To delete a group from the local directory:
1. Press the Directory soft key.
The IP phone enters the local directory directly as there is only Local Directory
enabled in the directory by default.
If Local Directory is removed from the directory (refer to Directory on page 37),
press Menu->Directory->Local Directory to enter the local directory.
2. Select the desired contact group.
3. Press the Option soft key, and then select Delete from the prompt list.
The LCD screen prompts the following warning:
4. Press the OK soft key to confirm the deletion or the Cancel soft key to cancel.
41
Page 52

User Guide for the SIP-T27P IP Phone
You can also delete all contact groups by pressing the Option soft key, and then
select Delete All.
You can add contacts to the local directory in one of the following ways:
Manually
From call history
From a remote phone book
Adding Contacts Manually
To add a contact to the local directory manually:
1. Press the Directory soft key.
The IP phone enters the local directory directly as there is only Local Directory
enabled in the directory by default.
If Local Directory is removed from the directory (refer to Directory on page 37),
press Menu->Directory->Local Directory to enter the local directory.
2. Select the desired contact group and then press the Enter soft key.
If the contact is not in any group, select All Contacts and then press the Enter soft
key.
3. Press the Add soft key.
4. Enter the name and the office, mobile or other numbers in the corresponding fields.
5. Press or , or the Switch soft key to select the desired account from the
Account field.
42
Page 53

Note
If the contact already exists in the directory, the LCD screen will prompt Contact name
existed!.
Customizing Your Phone
If Auto is selected, the phone will use the default account when placing calls to the
contact from the local directory.
6. Press or , or the Switch soft key to select the desired ring tone from the
Ring field.
If Auto is selected, this contact will use the ring tone according to the priority: Group
ring tone (refer to Adding Groups) >Account ring tone (refer to Ring Tones)>Phone
ring tone (refer to Ring Tones).
7. Press or , or the Switch soft key to select the desired group from the Group
field.
8. Press the Add soft key to accept the change or the Back soft key to cancel.
Adding Contacts from Call History
To add a contact to the local directory from call history:
1. Press the History soft key.
2. Press or to highlight the desired entry.
3. Press the Option soft key, and then select Add to Contacts from the prompt list.
4. Press the OK soft. And then edit the contact name.
5. Press the Save soft key to accept the change.
The entry is successfully saved to the local directory.
Adding Contacts from remote phone book
To add a contact to the local directory from remote phone book:
1. Press Menu->Directory->Remote Phone Book.
If Remote Phone Book is added to the directory (refer to Directory on page 37),
press Directory->Remote Phone Book to enter the remote phone book.
2. Select the desired remote group and then press the Enter soft key.
3. Press or to highlight the desired entry.
43
Page 54

User Guide for the SIP-T27P IP Phone
4. Press the Option soft key, and then select Add to Contacts from the prompt list.
5. Press the Save soft key to save the contact to the local directory.
If the contact already exists in the local directory, the LCD screen will prompt
"Contact name existed, overwrite?". Press the OK soft key to overwrite the original
contact in the local directory or the Cancel soft key to cancel.
For more information on remote phone book operating, refer to Remote Phone Book on
page 52.
To edit a contact in the local directory:
1. Press the Directory soft key.
The IP phone enters the local directory directly as there is only Local Directory
enabled in the directory by default.
If Local Directory is removed from the directory (refer to Directory on page 37),
press Menu->Directory->Local Directory to enter the local directory.
2. Select the desired contact group and then press the Enter soft key.
If the contact is not in any group, select All Contacts and then press the Enter soft
key.
3. Press or to highlight the desired contact.
4. Press the Option soft key, and then select Detail from the prompt list.
5. Press or to highlight the contact information and then edit.
44
6. Press the Save soft key to accept the change or the Back soft key to cancel.
Page 55

Customizing Your Phone
To delete a contact from the local directory:
1. Press the Directory soft key.
The IP phone enters the local directory directly as there is only Local Directory
enabled in the directory by default.
If Local Directory is removed from the directory (refer to Directory on page 37),
press Menu->Directory->Local Directory to enter the local directory.
2. Select the desired contact group and then press the Enter soft key.
If the contact is not in any group, select All Contacts and then press the Enter soft
key.
3. Press or to highlight the desired contact.
4. Press the Option soft key, and then select Delete from the prompt list.
The LCD screen prompts the following warning:
5. Press the OK soft key to confirm the deletion or the Cancel soft key to cancel.
You can also delete all contacts by pressing the Option soft key, and then select Delete
All.
To place a call to a contact from the local directory:
1. Press the Directory soft key.
45
Page 56

User Guide for the SIP-T27P IP Phone
The IP phone enters the local directory directly as there is only Local Directory
enabled in the directory by default.
If Local Directory is removed from the directory (refer to Directory on page 37),
press Menu->Directory->Local Directory to enter the local directory.
2. Select the desired contact group and then press the Enter soft key.
If the contact is not in any group, select All Contacts and then press the Enter soft
key.
3. Press or to highlight the desired contact.
4. Do one of the following:
- If only one number for the contact is stored in the local directory, press the Send
soft key to dial out the number.
- If multiple numbers for the contact are stored in the local directory, press the
Send soft key to display a list of numbers.
Press or to highlight the desired number.
Press the Send soft key to dial out the number.
To search for a contact in the local directory:
1. Press the Directory soft key.
The IP phone enters the local directory directly as there is only Local Directory
enabled in the directory by default.
46
If Local Directory is removed from the directory (refer to Directory on page 37),
press Menu->Directory->Local Directory to enter the local directory.
Page 57

Customizing Your Phone
2. Press the Search soft key.
3. Enter a few continuous characters of the contact name or continuous numbers of the
contact number (office, mobile or other number) using the keypad.
The contacts whose name or phone number matches the characters entered will
appear on the LCD screen. You can dial from the result list.
You can search for a contact from the desired lists when the phone is on the dialing
screen. The lists can be Local Directory, History, Remote Phone Book and LDAP.
To configure search source list in dialing via web user interface:
1. Click on Directory->Setting.
2. In the Search Source List In Dialing block, select the desired list from the Disabled
column and click .
The selected list appears in the Enabled column.
3. Repeat the step 2 to add more lists to the Enabled column.
4. To remove a list from the Enabled column, select the desired list and then click .
5. To adjust the display order of the enabled list, select the desired list, and click
or .
47
Page 58

User Guide for the SIP-T27P IP Phone
Search source list in dialing is configurable via web user interface only.
The LCD screen will display search results in the adjusted order.
Note
6. Click Confirm to accept the change.
To search for an entry in the enabled search source lists:
1. Pick up the handset, press the Speakerphone key or press the line key.
2. Enter a few continuous characters of the entrys name or continuous numbers of the
entrys phone number (office, mobile or other number) using the keypad.
The entries in the enabled search source lists whose name or phone number
matches the characters entered will appear on the LCD screen. You can press
or to scroll to the desired entry and then place a call to the entry.
via phone user interface or web user
interface. But you can only import or export the contact list via web user interface.
48
Page 59

Customizing Your Phone
To import an XML contact list file via web user interface:
1. Click on Directory->Local Directory.
2. Click Browse to locate a contact list file (the file format must be *.xml) from your
local system.
3. Click Import XML to import the contact list.
The web user interface prompts "The original contact will be covered, continue?".
4. Click OK to complete importing the contact list.
To import a CSV contact list file via web user interface:
1. Click on Directory->Local Directory.
2. Click Browse to locate a contact list file (the file format must be *.csv) from your
local system.
3. (Optional.) Check the Show Title checkbox.
It will prevent importing the title of the contact information which is located in the
first line of the CSV file.
4. Click Import CSV to import the contact list.
5. (Optional.) Mark the On radio box in the Delete Old Contacts field.
It will delete all existing contacts while importing the contact list.
6. Select the contact information you want to import into the local directory from the
pull-down list of Index.
49
Page 60

User Guide for the SIP-T27P IP Phone
Importing/exporting contact lists is available via web user interface only.
At least one item should be selected to be imported into the local directory.
7. Click Import to complete importing the contact list.
Note
To export a contact list via web user interface:
1. Click on Directory->Local Directory.
2. Click Export XML (or Export CSV).
3. Click Save to save the contact list to your local system.
The built-in phone directory can store names and phone numbers for a blacklist. You
can store up to 30 contacts, add, edit, delete or search for a contact in the blacklist
directory, and even call a contact from the blacklist directory. Incoming calls from
blacklist directory contacts will be rejected automatically.
To add a contact to the blacklist directory manually:
1. Press Menu->Directory->Blacklist.
2. Press the Add soft key.
50
Page 61

Customizing Your Phone
3. Enter the name and the office, mobile or other numbers in the corresponding fields.
4. Press or , or the Switch soft key to select the desired account from the
Account field.
If Auto is selected, the phone will use the default account when placing calls to the
contact from the blacklist directory.
5. Press the Add soft key to accept the change or the Back soft key to cancel.
To add a contact to the blacklist directory from the local directory:
1. Press the Directory soft key.
The IP phone enters the local directory directly as there is only Local Directory
enabled in the directory by default.
If Local Directory is removed from the directory (refer to Directory on page 37),
press Menu->Directory->Local Directory to enter the local directory.
2. Select the desired contact group and then press the Enter soft key.
If the contact is not in any group, select All Contacts and then press the Enter soft
key.
3. Press or to highlight the desired contact.
4. Press the Option soft key, and then select Add to Blacklist from the prompt list.
51
Page 62

User Guide for the SIP-T27P IP Phone
An access URL for a remote phone book is configurable via web user interface only.
The LCD screen prompts the following warning:
5. Press the OK soft key to accept the change.
For operating instructions on editing, deleting, placing calls to and/or searching for
contacts in the blacklist directory, refer to the operating instructions of Local Directory on
page 39.
You can add new contacts to the local directory, search for a contact, or simply dial a
contact number from the remote phone book.
You can configure your new phone to access up to 5 remote phone books. For the
access URL of the remote phone book, contact your system administrator.
To configure an access URL for a remote phone book via web user interface:
1. Click on Directory->Remote Phone Book.
2. Enter the access URL in the Remote URL field.
3. Enter the name in the Display Name field.
4. Click Confirm to accept the change.
Note
52
Page 63

Customizing Your Phone
To access your remote phone book via phone user interface:
1. Press Menu->Directory->Remote Phone Book.
If Remote Phone Book is added to the directory (refer to Directory on page 37),
press Directory->Remote Phone Book to enter the remote phone book.
2. Select the desired remote group, and then press the Enter soft key.
The phone then connects to the remote phone book and proceeds to load it. The
contacts in the remote phone book are displayed on the LCD screen.
3. Press the Back soft key to back to the previous screen.
To place a call from the remote phone book:
1. Press Menu->Directory->Remote Phone Book.
If Remote Phone Book is added to the directory (refer to Directory on page 37),
press Directory->Remote Phone Book to enter the remote phone book.
2. Select the desired remote group, and then press the Enter soft key to load the
remote phone book.
3. Select the desired contact in the remote phone book.
4. Press the Send soft key.
To search for a contact in the remote phone book:
1. Press Menu->Directory->Remote Phone Book.
If Remote Phone Book is added to the directory (refer to Directory on page 37),
press Directory->Remote Phone Book to enter the remote phone book.
2. Select the desired remote group, and then press the Enter soft key to load the
remote phone book.
3. Press the Search soft key.
4. Press the Abc soft key to change the input mode. And then enter a few continuous
53
Page 64

User Guide for the SIP-T27P IP Phone
characters of the contact name or continuous numbers of the contact number using
the keypad.
The contacts whose name or phone number matches the characters entered will
appear on the LCD screen. You can place a call from the result list.
You can enable the phone to present the caller/callee identity stored in the remote
phone book when receiving/placing a call.
To configure incoming/outgoing call lookup and update time interval via web user
interface:
1. Click on Directory->Remote Phone Book.
2. Select Enabled from the pull-down list of Incoming/Outgoing Call Lookup.
3. Enter the desired refresh period in the Update Time Interval(Seconds) field.
The default value is 21600.
54
4. Click Confirm to accept the change.
The SIP-T27P IP phone maintains call history lists of Missed calls, Placed calls, Received
calls and Forwarded calls. Each call history list supports up to 100 entries. You can view
call history, place a call, add a contact or delete an entry from the call history list.
Page 65

Customizing Your Phone
History record feature is enabled by default. If you dont want to save the call history,
you can disable the feature.
To disable history record via phone user interface:
1. Press Menu->Features->History Setting.
2. Press or , or the Switch soft key to select Disabled from the History Record
field.
3. Press the Save soft key to accept the change or the Back soft key to cancel.
To view call history:
1. Press the History soft key.
The LCD screen displays all call records.
2. Press or to switch among All Calls, Missed Calls, Placed Calls, Received
Calls and Forwarded Calls.
3. Press or to select the desired entry.
4. Press the Option soft key, and then select Detail from the prompt list.
The detailed information of the entry appears on the LCD screen.
To place a call from the call history list:
1. Press the History soft key.
2. Press or to switch among All Calls, Missed Calls, Placed Calls, Received
Calls and Forwarded Calls.
3. Press or to select the desired entry.
4. Press the Send soft key.
To add a contact to the local directory (or blacklist directory) from the call history list:
1. Press the History soft key.
2. Press or to switch among All Calls, Missed Calls, Placed Calls, Received
Calls and Forwarded Calls.
3. Press or to select the desired entry.
4. Press the Option soft key, and then select Add to Contacts (or Add to Blacklist) from
the prompt list.
5. Enter the desired values in the corresponding fields.
55
Page 66

User Guide for the SIP-T27P IP Phone
6. Press the Save soft key.
For more information, refer to Contact Management on page 37.
To delete an entry from the call history list:
1. Press the History soft key.
2. Press or to switch among All Calls, Missed Calls, Placed Calls, Received
Calls and Forwarded Calls.
3. Press or to select the desired entry.
4. Press the Delete soft key.
To delete all entries from the call history list:
1. Press the History soft key.
2. Press or to switch among All Calls, Missed Calls, Placed Calls, Received
Calls and Forwarded Calls.
3. Press the Option soft key, and then select Delete All from the prompt list.
4. Press the OK soft key.
The LCD screen prompts "Delete all the call records?".
5. Press the OK soft key to confirm the deletion or the Cancel soft key to cancel.
You can upload your custom logo which will be displayed on the idle screen.
To upload a custom logo via web user interface:
1. Click on Features->General Information.
2. Select Custom logo from the pull-down list of Use Logo.
56
Page 67

3. Click Browse to locate the logo file from your local system.
Delete item will appear after you upload a custom logo, you can click Delete to delete
A custom logo can be uploaded via web user interface only.
Customizing Your Phone
4. Click Upload to upload the file.
Note
the custom logo.
The logo file format must be *.dob, contact your system administrator for more
information.
If you want to use a wired headset, physically connect your headset and activate the
headset mode for use. For more information on physically connecting a headset, refer
to Phone Installation on page 14.
This section provides an introduction to wired headset use.
To activate the headset mode:
1. Press on the phone.
The HEADSET key LED illuminates solid green when the headset mode is activated.
Press the line key or the Answer soft key to answer an incoming call. The call will be
connected to your headset automatically.
Enter the desired number and then press the Send soft key, the phone will then
place a call using the headset automatically. For more information on using the
headset to place a call, refer to Placing Calls on page 84.
57
Page 68

User Guide for the SIP-T27P IP Phone
If headset prior is enabled, the headset mode will not be deactivated until you press the
Headset prior is configurable via web user interface only.
To deactivate the headset mode:
1. Press again on the phone.
The HEADSET key LED goes out when the headset mode is deactivated.
You can use headset in priority when headset prior feature is enabled. This feature is
especially useful for permanent or full-time headset users.
To enable headset prior via web user interface:
1. Click on Features->General Information.
2. Select Enabled from the pull-down list of Headset Prior.
3. Click Confirm to accept the change.
To use headset prior, you should activate the headset mode in advance:
1. Physically connect the headset.
2. Press to activate the headset mode.
Note
HEADSET key again.
If headset prior is disabled, the headset mode can be deactivated by pressing the
Speakerphone key or the HEADSET key.
58
Page 69

Customizing Your Phone
Dual headset is configurable via web user interface only.
You can use two headsets when dual headset feature is enabled. To use this feature,
you must physically connect headsets to the headset jack and handset jack respectively.
Once the phone connects to a call, the headset connected to the headset jack will have
full-duplex capabilities, while the one connected to the handset jack will only be able to
listen.
To enable dual headset via web user interface:
1. Click on Features->General Information.
2. Select Enabled from the pull-down list of Dual-Headset.
Note
3. Click Confirm to accept the change.
There are three types of DSS keys: Line Keys, Programable Keys and Ext Keys. Details
will be introduced in the following. The SIP-T27P IP phone supports 21 line keys and 14
programable keys. For more information on DSS key icon indicators, refer to Icon
Instructions on page 3.
You can assign predefined functionalities to line keys. You can also define a label for a
line key feature which will appear on the LCD screen. Line keys allow you to quickly
access features such as recall and voice mail. The line key LEDs will indicate the
59
Page 70

User Guide for the SIP-T27P IP Phone
When the phone is idle, you can also long press the line key to configure it directly on the
phone.
monitored status when the line keys are assigned with particular features, such as BLF.
The default key type of line key 1-6 is Line. The default key type of line key 7-21 is N/A,
which indicates that this line key provides no functionality until configuration.
To assign functionality to a line key via phone user interface:
1. Press Menu->Features->DSS Keys.
2. Select the desired line key, and then press the Enter soft key.
3. Select the desired key type from the Type field.
4. (Optional.) Select the desired key event type from the Key Type field.
5. (Optional.) Select the desired line from the Account ID field.
6. (Optional.) Enter the string that will appear on the LCD screen in the Label field.
7. (Optional.) Enter the corresponding value in the Value field.
8. (Optional.) Enter the corresponding value in the Extension field.
9. Press the Save soft key to accept the change or the Back soft key to cancel.
Line key is configurable via web user interface at the path DSSKey->Line Key.
Note
You can assign functionalities to 21 line keys. These 21 line keys are indicated on three
pages. When you assign functionality to line keys located in line key 1-8, the labels of
line keys are indicated on the first page. The following figure shows an example:
60
Page 71

Customizing Your Phone
Icons
Description
Indicates the current page of line keys.
Indicate the non-current page of line keys.
Icons
Description
Fast flashing:
The BLF monitored user receives an incoming call on the
non-current page.
The line receives an incoming call on the non-current page.
Solid:
There is a parked call on the non-current page.
When you assign functionality to line key located in line key 9-21, the label of the line key
8-14 are indicated on the second page, and the labels of the line key 15-21 are
indicated on the third page. The line key in the right bottom is used to switch pages. The
following figure shows an example:
The following table lists the page icons:
You can use page tips feature to enable the page icon and page switch key LED to
indicate different statuses. This feature is disabled by default.
The following table lists the page icon status to indicate different statuses:
For more information on the page switch key LED status, refer to LED Instructions on
page 4.
To configure the page tips feature via web user interface:
1. Click on DSSKey->Line key.
61
Page 72

User Guide for the SIP-T27P IP Phone
Page tips feature is configurable via web user interface only.
2. Select Enabled from the pull-down list of Enable Page Tips.
3. Click Confirm to accept the change.
Note
Line key features are explained in the following subchapters in detail:
Line
Speed Dial
Voice Mail
Direct Pickup
Group Pickup
Call Park
DTMF
Prefix
Local Group
XML Group
XML Browser
LDAP
Conference
Forward
Transfer
Hold
DND
SMS
Group Listening
Zero Touch
62
Page 73

Customizing Your Phone
URL
Phone Lock
Retrieve Park
Directory
For the features not listed above, refer to Basic Call Features on page 83 and Advanced
Phone Features on page 123. For more information, contact your system administrator.
Line
Yo u can use this key feature to accept incoming calls, place active calls on hold or
resume a held call. It performs in the same way as a hard line key.
Dependencies:
Type (Line)
Account ID (the account this feature will be applied to)
Label (key label displayed on the LCD screen)
Value (Default/Lock)
Usage: When the phone receives an incoming call, the DSS key LED flashes green:
1. Press the DSS key to accept the incoming call.
2. Press the DSS key to place a new call and the active call is placed on hold.
3. Press the DSS key again to resume the held call.
If you select Lock from the Value field, the line keys located in the same position of the
other page will be automatically assigned Line feature with Lock filled in the Value field.
This feature is only applicable to line key 1-7. Then you can use this key on every page.
If you select Default from the Value field, you can only use this key on the current page.
Speed Dial
You can use this key feature to speed up dialing the numbers frequently used or hard to
remember.
Dependencies:
Type (Speed Dial)
Account ID (the account this feature will be applied to)
Label (key label displayed on the LCD screen)
Value (the number you want to dial out)
Usage: Press the DSS key to dial out the number specified in the Value field, using the
account selected from the Account ID field.
Voice Mail
You can use this key feature to quickly connect voice mail. For more information, refer to
Voice Mail on page 166.
Dependencies:
Type (Key Event)
Key Type (Voice Mail)
Account ID (the account this feature will be applied to)
63
Page 74

User Guide for the SIP-T27P IP Phone
The call park key is also available for other accounts that are registered on the same
information on SIP server type, contact your system administrator.
Label (key label displayed on the LCD screen)
Value (the voice mail access code)
Usage: Press the DSS key to dial out the voice mail access code. Then follow the voice
prompt to listen to the voice mails.
Direct Pickup
You can use this key feature to answer on the phone.
Dependencies:
Type (Key Event)
Key Type (DPickup)
Account ID (the account this feature will be applied to)
Label (key label displayed on the LCD screen)
Value (the directed pickup code followed by the target phone number)
Usage: Press the DSS key on your phone when the target phone number receives an
incoming call. The call is then answered on your phone.
Group Pickup
You can use this key feature to answer incoming calls in a group that is associated with
their own group.
Dependencies:
Type (Key Event)
Key Type (GPickup)
Account ID (the account this feature will be applied to)
Label (key label displayed on the LCD screen)
Value (the group pickup feature code)
Note
Usage: Press the DSS key on your phone when a phone number in the group receives
an incoming call. The call is answered on your phone.
Call Park
You can use this key feature to park a call.
Dependencies:
Type (Key Event)
Key Type (Call Park)
Account ID (the account this feature will be applied to)
Label (key label displayed on the LCD screen)
Value (the call park code/call park number)
Usage: Press the DSS key on your phone to park a call.
server, and the SIP server type of other accounts must be set to Star2Star. For more
64
Page 75

Customizing Your Phone
DTMF sequence can only contain "0-9", "*", "#".
DTMF
You can use this key feature to send the specification of arbitrary key sequences via
DTMF.
Note
Dependencies:
Type (Key Event)
Key Type (DTMF)
Label (key label displayed on the LCD screen)
Value (DTMF sequence)
Usage: Press the DSS key during an active call to send the key sequence specified in the
Value field.
Prefix
You can use this key feature to add a specified prefix number before the dialed number.
You can only configure the SoftKey (1-4) as the prefix key.
Dependencies:
Type (Key Event)
Key Type (Prefix)
Label (key label displayed on the LCD screen)
Value (the prefix number)
Usage: Press the DSS key when the phone is idle, the phone will then enter the dialing
screen and display the prefix number that you specified in the Value field. You can enter
the remaining digits and then dial out.
Local Group
You can use this key feature to quickly access a contact group in the local directory. For
more information, refer to Local Directory on page 39.
Dependencies:
Type (Key Event)
Key Type (Local Group)
Local Group (the contact group name you want to access)
Label (key label displayed on the LCD screen)
Usage: Press the DSS key to access the contact group specified in the Local Group field.
XML Group
You can use this key feature to quickly access a remote group in your remote phone
book. You should configure remote phone book in advance. For more information, refer
to Remote Phone Book on page 52.
Dependencies:
Type (Key Event)
Key Type (XML Group)
PhoneBook (the remote group name you want to access if remote
65
Page 76

User Guide for the SIP-T27P IP Phone
If the Value field is left blank, the DSS key performs the same as the Conference soft key
during a call.
phone book is configured)
Label (key label displayed on the LCD screen)
Usage: Press the DSS key to access the remote group specified in the PhoneBook field.
XML Browser
You can use this key feature to quickly access an XML browser. The XML browser allows
you to create custom services which meet your functional requirements on the server.
You can customize practical applications, such as weather report, stock information,
Google search, etc.
Dependencies:
Type (XML Browser)
Label (key label displayed on the LCD screen)
Value (the access URL for XML browser)
Usage: Press the DSS key to access the XML browser specified in the Value field.
LDAP
You can use this key feature to quickly access a LDAP search screen.
Dependencies:
Type (Key Event)
Key Type (LDAP)
Label (key label displayed on the LCD screen)
Usage:
1. Press the DSS key to access the LDAP search screen.
2. Enter a few continuous characters of the contact name or continuous numbers of the
contact number using the keypad.
The contacts whose name or phone number matches the characters entered will
appear on the LCD screen.
Conference
You can use this key feature to set up a conference call. For more information, refer to
Conference on page 108.
Dependencies:
Type (Key Event)
Key Type (Conf)
Label (key label displayed on the LCD screen)
Value (the number you want to add to the conference)
Usage: Press the DSS key during an active call to set up a conference with the number
specified in the Value field.
Note
66
Page 77

Customizing Your Phone
Transfer mode via DSS key is configurable via web user interface at the path
If the Value field is left blank, the DSS key performs the same as the TRAN key or the Tran
soft key during a call. For more information, refer to Call Transfer on page 106.
If the Value field is left blank, the DSS key performs the same as the FWD soft key when
receiving an incoming call.
Forward
You can use this key feature to forward an incoming call to someone else. For more
information, refer to Call Forward on page 98.
Note
Dependencies:
Type (Key Event)
Key Type (FWD)
Label (key label displayed on the LCD screen)
Value (the number you want to forward to)
Usage:
Press the DSS key to forward an incoming call to the number specified in the Value field.
Transfer
When there is an active call on the phone, you can use this key feature to handle the call
differently depending on the transfer mode assigned to the DSS key.
Dependencies:
Type (Key Event)
Key Type (Tran)
Label (key label displayed on the LCD screen)
Note
Value (the number you want to transfer to)
Usage:
When the transfer mode on DSS key is Blind Transfer, press the DSS key to
complete the blind transfer to the number specified in the Value field.
When the transfer mode on DSS key is Attended Transfer, press the DSS key to dial
out the number specified in the Value field, and then perform the attended or
semi-attended transfer.
When the transfer mode on DSS key is New Call, press the DSS key to place a new
call to the number specified in the Value field.
Features->Transfer->Transfer Mode Via Dsskey.
Hold
You can use this key feature to place an active call on hold or retrieve a held call.
Dependencies:
Type (Key Event)
Key Type (Hold)
67
Page 78

User Guide for the SIP-T27P IP Phone
When DND is activated, the DND key LED will illuminate solid green, and the incoming
calls will be rejected automatically.
Label (key label displayed on the LCD screen)
Usage:
1. Press the DSS key during an active call to place the call on hold.
2. Press the DSS key again to retrieve the held call.
DND
You can use this key feature to activate or deactivate DND. You can also use this key
feature to access the custom DND screen. For more information, refer to Do Not Disturb
(DND) on page 95.
Dependencies:
Type (Key Event)
Key Type (DND)
Label (key label displayed on the LCD screen)
Usage:
When DND is in phone mode:
1. Press the DSS key to activate DND.
2. Press the DSS key again to deactivate DND.
When DND is in custom mode:
Note
1. Press the DSS key to access the Custom DND screen. You can activate or deactivate
DND for one or all accounts.
SMS
You can use this key feature to quickly access text message. For more information, refer
to Short Message Service (SMS) on page 163.
Dependencies:
Type (Key Event)
Key Type (SMS)
Label (key label displayed on the LCD screen)
Usage: Press the DSS key when the phone is idle to access text message.
Group Listening
You can use this key feature to activate the Speakerphone and Handset/Headset mode
at the same time. It is suitable for the group conversations which have more than one
person present at one end. You are able to speak and listen through the
handset/headset, while the others nearby can only listen through the speaker.
Dependencies:
Type (Key Event)
Key Type (Group Listening)
Label (key label displayed on the LCD screen)
68
Page 79

Customizing Your Phone
Usage:
1. During a call, press the DSS key to activate the group listening mode.
You can then speak and listen through the handset/headset, while other people at
your side can only listen through the speaker at the same time.
2. Press the DSS key again to deactivate the group listening mode.
Zero Touch
You can use this key feature to quickly configure auto provision and network
parameters.
Dependencies:
Type (Key Event)
Key Type (Zero Touch)
Label (key label displayed on the LCD screen)
Usage:
1. Press the DSS key to access the zero touch screen.
2. Press the OK soft key within a few seconds.
3. Configure the network parameters in the corresponding fields.
4. Press the Next soft key.
5. Configure the auto provision parameters in the corresponding fields.
6. Press the OK soft key.
The phone will reboot to update configurations.
URL
You can use this key feature to trigger the phone to send an HTTP GET request
containing a specific URL.
Dependencies:
Type (URL)
Label (key label displayed on the LCD screen)
Value (the URL contained in the HTTP GET request)
Usage: Press the DSS key to trigger the phone to send an HTTP GET request containing
the URL specified in the Value field.
Phone Lock
You can use this key feature to immediately lock your phone instead of long
pressing . For more information, refer to Phone Lock on page 31.
Dependencies:
Type (Phone Lock)
Label (key label displayed on the LCD screen)
Usage: When the phone lock feature is enabled, press the DSS key to immediately lock
your phone instead of long pressing .
Retrieve Park
You can use this key feature to retrieve a parked call.
69
Page 80

User Guide for the SIP-T27P IP Phone
The DSS key performs the same function as the Directory soft key when the phone is idle.
Note
Dependencies:
Type (Retrieve Park)
Account ID (the account this feature will be applied to)
Label (key label displayed on the LCD screen)
Value (the park retrieve code/park retrieval number)
Usage: Press the DSS key on your phone to retrieve a parked call.
Directory
You can use this key feature to easily access frequently used lists. For more information,
refer to Directory on page 37.
Dependencies:
Type (Directory)
Label (key label displayed on the LCD screen)
Usage: Press the DSS key to immediately access to frequently used lists.
You can customize the soft keys, navigation keys and function keys.
To customize programable keys via web user interface:
1. Click on DSSKey->Programable Key.
2. Customize specific features for these keys.
3. (Optional.) Enter the string that will appear on the LCD screen in the Label field.
Label is configurable only when customizing SoftKey (1-4).
4. Click Confirm to accept the change.
You can click Reset to default to reset custom settings to defaults.
70
Page 81

Customizing Your Phone
Programable keys are configurable via web user interface only.
Then you can press the keys on the phone to perform the features you configured.
For example:
Switch Account Up
You can press Switch Account Up key to change the default account.
Note
Dependencies: Type (
Switch Account Up
)
Usage: Press the Switch Account Up key to scroll up the account list to select the desired
default account.
Switch Account Down
You can press Switch Account Down key to change the default account.
Dependencies:
Type (Switch Account Down)
Usage: Press the Switch Account Down key to scroll down the account list to select the
desired default account.
If EXP20 is connected to the SIP-T27P IP phone, you can customize features for Ext keys.
To customize Ext keys via web user interface:
1. Click on DSSKey->Ext Key.
2. Customize specific features for these keys.
3. Click Confirm to accept the change.
71
Page 82

User Guide for the SIP-T27P IP Phone
Ext keys are configurable via web user interface only.
Note
For more information, refer to
Yealink EXP20 User Guide
.
You can register one or multiple accounts on the SIP-T27P IP phone. You can also
configure each line key to associate with an account or configure multiple line keys to
associate with an account.
To register an account via phone user interface:
1. Press Menu->Settings->Advanced Settings (default password: admin) ->Accounts.
2. Select the desired account and then press the Enter soft key.
3. Select Enabled from the Active Line field.
4. Enter the desired value in Label, Display Name, Register Name, User Name,
Password and SIP Server1/2 field respectively. Contact your system administrator for
more information.
5. If you use the outbound proxy servers, do the following:
1) Press or , or the Switch soft key to select Enabled from the Outbound
Status field.
2) Enter the desired value in the Outbound Proxy1/2 and Proxy Fallback Interval
field respectively. Contact your system administrator for more information.
6. Press the Save soft key to accept the change or the Back soft key to cancel.
You can repeat steps 2 to 6 to register more accounts.
The following figures demonstrate single or multiple accounts registered on the phone:
Single account:
72
Page 83

Customizing Your Phone
Default account can be set by pressing or on the idle screen. It has priority
when placing a call. The phones default account cannot be changed after reboot.
Multiple accounts:
To disable an account via phone user interface:
1. Menu->Settings->Advanced Settings (default password: admin) ->Accounts.
2. Select the desired account and then press the Enter soft key.
3. Select Disabled from the Active Line field.
4. Press the Save soft key to accept the change or the Back soft key to cancel.
Note
Registering an account is configurable via web user interface at the path
Account->Register.
You can configure multiple line keys to associate with an account. This enhances call
visualization and simplifies call handling.
73
Page 84

User Guide for the SIP-T27P IP Phone
.
The dot "." can be used as a placeholder or multiple placeholders for
any character. Example:
"12." would match "123", "1234", "12345", "12abc", etc.
x
An "x" can be used as a placeholder for any character. Example:
"12x" would match "121", "122", "123", "12a", etc.
-
Numeric ranges are allowed within the brackets: Digit - Digit.
Example:
[5-7] would match the number 5, 6 or 7.
[]
The square brackets "[ ]" can be used as a placeholder for a single
character which matches any of a set of characters. Example:
"91[5-7]1234" would match "9151234", "9161234", "9171234".
()
The parentheses "( )" can be used to group together patterns, for
instance, to logically combine two or more patterns. Example:
"([1-9])([2-7])3" would match "923", "153", "773", etc.
If this is the case, the LCD screen will resemble the following figure:
Incoming calls to this account will be distributed evenly among the available line keys.
Outgoing calls will be distributed similarly.
Your phone can be configured to have a combination of accounts with a single line key
and accounts with multiple line keys.
Dial plan is a string of characters that governs the way your SIP-T27P IP phone processes
the inputs received from your phone keypad. The SIP-T27P IP phone supports the
following dial plan features:
Replace Rule
Dial-now
Area Code
Block Out
Basic expression syntaxes you need to know:
74
Page 85

Customizing Your Phone
$
ollowed by the sequence number of a parenthesis means the
characters placed in the parenthesis. The sequence number stands for
the corresponding parenthesis. Example:
A replace rule configuration, Prefix: "001(xxx)45(xx)", Replace:
"9001$145$2". When you dial out "0012354599" on your phone, the IP
phone will replace the number with "90012354599"13 digits
in the first 2352 digits in the second
99
You can configure one or more replace rules (up to 100) to remove the specified string
and replace it with another string. You can configure a pattern with wildcards (refer to
the expression syntax in the table above), so that any string that matches the pattern
will be replaced. This feature is convenient for you to dial out a long number. For
example, a replace rule is configured as Prefix: 1 and Replace: 1234, when you try
to dial out the number 1234, you just need to enter 1 on the phone and then press
the Send soft key.
To add a replace rule via web user interface:
1. Click on Settings->Dial Plan->Replace Rule.
2. Enter the string (e.g., 1) in the Prefix field.
3. Enter the string (e.g., 1234) in the Replace field.
4. Enter the desired line ID in the Account field or leave it blank.
5. Click Add to add the replace rule.
When you enter the number 1 using the keypad and then press the Send soft key,
75
Page 86

User Guide for the SIP-T27P IP Phone
The valid values for the Account field can be one or more digits among 1-6. Every two
If you leave the Account field blank or enter 0, the replace rule will apply to all accounts.
Replace rule is configurable via web user interface only.
the phone will dial out 1234 instead.
Note
digits must be separated by a comma. For example, when you enter the value 1, 2 in
the Account field, this replace rule will apply to account1 and account2.
To edit a replace rule via web user interface:
1. Click on Settings->Dial Plan->Replace Rule.
2. Select the desired replace rule by checking the checkbox.
3. Edit the values in the Prefix and Replace fields.
4. Enter the desired line ID in the Account field or leave it blank.
5. Click Edit to accept the change.
To delete one or more replace rules via web user interface:
1. Click on Settings->Dial Plan->Replace Rule.
2. Select the one or more replace rules by checking the checkbox(es).
3. Click Del to delete the replace rule(s).
Note
You can configure one or more dial-now rules (up to 100) on your phone. When the
dialed number matches the dial-now string, the number will be dialed out automatically.
For example, a dial-now rule is configured as "2xx", any entered three-digit string
beginning with 2 will then be dialed out automatically on the phone.
To add a dial-now rule via web user interface:
1. Click on Settings->Dial Plan->Dial-now.
2. Enter the desired value (e.g., 2xx) in the Rule field.
3. Enter the desired line ID in the Account field or leave it blank.
76
Page 87

Customizing Your Phone
You can also edit or delete the dial-now rule, refer to Replace Rule on page 75 for more
Dial-now rule is configurable via web user interface only.
For more information on the valid values for the Account field, refer to Replace Rule
on page 75.
Note
4. Click Add to add the dial-now rule.
When you enter the number 234 using the keypad, the phone will dial out 234
automatically without the pressing of any key.
information.
Delay Time for Dial-Now Rule
You can configure the delay time for dial-now rules. That is, you can configure your
phone to automatically dial out the phone number which matches a dial-now rule, after
the designated delay time.
To configure the delay time for dial-now rule via web user interface:
1. Click on Features->General Information.
2. Enter the time between 0 and 14 (seconds) in the Time-Out for Dial-Now Rule field.
77
Page 88

User Guide for the SIP-T27P IP Phone
Delay time for dial-now rule is configurable via web user interface only.
The default value is 1.
Note
3. Click Confirm to accept the change.
Area codes are also known as Numbering Plan Areas (NPAs). They usually indicate
geographical areas in a country. This feature is necessary when dialing a phone
number outside the code area. For example, an area code is configured as "Code: 0592,
Min Length: 1, Max Length: 15". When you dial out the number "56789" (the length of the
number is between 1 and 15), the phone will add the area code and dial out the
number "059256789". You can only configure one area code rule on your phone.
To configure the area code and lengths via web user interface:
1. Click on Settings->Dial Plan->Area Code.
2. Enter the desired values in the Code, Min Length (1-15) and Max Length (1-15)
fields.
3. Enter the desired line ID in the Account field or leave it blank.
78
Page 89

Customizing Your Phone
The default value of minimum and maximum length is 1 and 15 respectively.
Area code is configurable via web user interface only.
For more information on the valid values for the Account field, refer to Replace Rule
on page 75.
4. Click Confirm to accept the change.
Note
You can block some specific numbers (up to 10) from being dialed on your phone. When
you dial a block out number on your phone, the dialing will fail and the LCD screen will
prompt "Forbidden Number".
To add a block out number via web user interface:
1. Click on Settings->Dial Plan->Block Out.
2. Enter the desired value in the BlockOut Number field.
3. Enter the desired line ID in the Account field or leave it blank.
79
Page 90

User Guide for the SIP-T27P IP Phone
Contact your local phone service provider for available emergency numbers in your
area.
Block out number is configurable via web user interface only.
For more information on the valid values for the Account field, refer to Replace Rule
on page 75.
Note
4. Click Confirm to add the block out number.
Public telephone networks in countries around the world have a single emergency
telephone number (emergency services number), that allows a caller to contact local
emergency services for assistance when necessary. The emergency telephone number
may differ from country to country. It is typically a three-digit number so that it can be
easily remembered and dialed quickly. Some countries have a different emergency
number for each of the different emergency services.
You can specify the emergency telephone numbers on the IP phone for contacting the
emergency services in an emergency situation. You can dial these numbers when the
phone is locked. For more information on phone lock, refer to Phone Lock on page 31.
Note
To specify emergency numbers via web user interface:
1. Click on Features->Phone Lock.
2. Enter the emergency number in the Emergency field.
80
Page 91

Note
Emergency number is configurable via web user interface only.
Customizing Your Phone
For multiple emergency numbers, enter a comma between every two numbers. The
default emergency numbers are 112, 911, 110.
3. Click Confirm to accept the change.
You can enable live dialpad feature on the SIP-T27P IP phone, which enables the IP
phone to automatically dial out a phone number without pressing the send key. You can
also configure a delay, and then the phone will dial out the phone number
automatically after the designated period of time.
To enable the live dialpad via web user interface:
1. Click on Settings->Preference.
2. Select Enabled from the pull-down list of Live Dialpad.
3. Enter the desired delay time in the Inter Digit Time(1~14s) field.
The default delay time is 4 seconds.
81
Page 92

User Guide for the SIP-T27P IP Phone
Live dialpad is configurable via web user interface only.
4. Click Confirm to accept the change.
Note
You can dial a hotline number immediately upon lifting the handset, pressing the
Speakerphone key or the line key. You can also configure a delay, and then the phone
will dial out the hotline number automatically after the designated period of time.
To configure the hotline number via phone user interface:
1. Press Menu->Features->Hot Line.
2. Enter the desired number in the Hot Number field.
3. Enter the delay time in the Hotline Delay field.
The valid values range from 0 to 10 (seconds) and the default value is 4.
4. Press the Save soft key to accept the change or the Back soft key to cancel.
Hotline is configurable via web user interface at the path Features->General
Information.
82
Page 93

Basic Call Features
The SIP-T27P IP phone is designed to be easily used like a regular phone on a public
switched telephone network (PSTN). You can place calls, answer calls, transfer a call to
someone else, or conduct a conference call.
This chapter provides basic operating instructions for the SIP-T27P IP phone. Topics
include:
Placing Calls
Answering Calls
Ending Calls
Redialing Numbers
Recent Call In Dialing
Auto Answer
Auto Redial
Call Completion
ReCall
Call Mute
Call Hold/Resume
Do Not Disturb (DND)
Call Forward
Call Transfer
Call Waiting
Conference
Call Park
Call Pickup
Anonymous Call
Anonymous Call Rejection
If you require additional information or assistance with your new phone, contact your
system administrator.
83
Page 94

User Guide for the SIP-T27P IP Phone
You can also dial using the SIP URI or IP address. To obtain the IP address of a phone,
information.
You can place a call in one of three ways using your SIP-T27P IP phone:
Using the handset
Using the speakerphone
Using the headset
You can also dial the number first, and then choose the way you want to speak to the
other party.
You can also search and dial a contact from call history, local directory or remote phone
book. For more information, refer to Contact Management on page 37 and Call History
Management on page 54.
During a call, you can alternate between Speakerphone, Headset, and Handset modes
by pressing the Speakerphone key, the HEADSET key, or by picking up the handset.
The call duration of the active call and far-sites information (name or phone number)
are visible on the LCD screen. In the figure below, the call to Tom (the phone number:
1021) has lasted 7 seconds.
To place a call using the handset:
1. Pick up the handset.
2. Enter the desired number using the keypad.
3. Press , , or the Send soft key.
The # key is configured as a send key by default. You can also set the * key as the send
key, or set neither. For more information, refer to the Key as Send on page 30.
Note
press the OK key when the phone is idle. The maximum length of SIP URI or IP address
length is 32 characters. For example, SIP URI: 3606@sip.com, IP: 192.168.1.15.
Your phone may not support direct IP dialing. Contact your system administrator for more
84
Page 95

Basic Call Features
To permanently use the headset mode, refer to Headset Prior on page 58.
To place a call using the hands-free speakerphone mode:
Do one of the following:
- With the handset on-hook, press or the line key to obtain a dial tone.
Enter the desired number using the keypad.
Press , or the Send soft key.
- With the handset on-hook, enter the desired number using the keypad.
Press , , or the Send soft key.
To place a call using the headset:
Do one of the following:
- With the optional headset connected, press to activate the headset mode.
Press the line key to obtain a dial tone.
Enter the desired number using the keypad.
Press , , or the Send soft key.
Note
- With the optional headset connected, press to activate the headset mode.
Enter the desired number using the keypad.
Press , , or the Send soft key.
The SIP-T27P IP phone can handle multiple calls at a time. However, only one active call
(the call that has audio associated with it) can be in progress at any time, other calls
are placed on hold. The SIP-T27P IP phone can handle a maximum of 50 calls at one
time.
To place multiple calls:
You can have more than one call on your SIP-T27P IP phone. To place a new call during
an active call, do one of the following:
- Press the line key. The active call is placed on hold.
Enter the desired number using the keypad.
Press , , or the Send soft key.
- Press or the Hold soft key to place the original call on hold.
Press the NewCall soft key.
Enter the desired number using the keypad.
Press , , or the Send soft key.
85
Page 96

User Guide for the SIP-T27P IP Phone
You can reject incoming calls by pressing the X key or the Reject soft key. You can also
activate Do Not Disturb mode to ignore the incoming calls without ringing on your phone.
information, refer to Call Forward on page 98.
If multiple accounts are registered on the phone, you can first press the desired line key
the selected account to place a call.
You can press or to switch between calls, and then press the Resume soft key
to retrieve the desired call.
Note
on the idle screen or press the Line soft key on the dialing screen, and then you can use
When you are not in another call, you can answer a call in one of three ways:
Using the handset
Using the speakerphone
Using the headset
Note
For more information, refer to Do Not Disturb (DND) on page 95.
You can forward incoming calls to someone else by pressing the FWD soft key. For more
Answering When Not in Another Call
Call duration and destination will always appear on the LCD screen for the active call.
To answer a call using the handset:
1. Pick up the handset.
To answer a call using the hands-free speakerphone mode:
Do one of the following:
- Press .
- With the handset on-hook and the headset mode deactivated, press the Answer
soft key.
- With the handset on-hook and the headset mode deactivated, press the line key
with the fast flashing green LED indicator.
To answer a call using the headset:
Do one of the following:
- Press .
- With the headset mode activated, press the Answer soft key.
- With the headset mode activated, press the line key with the fast flashing green LED
86
Page 97

Basic Call Features
When a call is placed on hold, you cannot press to end it. You should press the
Resume soft key to resume the call, and then press to end it.
indicator.
Answering When in Another Call
If you have an active call, and an incoming call arrives on the phone, do one of the
following:
- Press the Answer soft key.
The incoming call is answered and the original call is placed on hold.
- Press to access the new call.
Press or the Answer soft key.
The incoming call is answered and the original call is placed on hold.
To end a call:
Note
Do one of the following:
- If you are using the handset, press , the EndCall soft key or hang up the
handset.
- If you are using the headset, press or the EndCall soft key.
- If you are using the speakerphone, press , or the EndCall soft key.
To redial the last dialed number from your phone:
1. Press twice.
A call to your last dialed number is attempted.
To redial a previously dialed number from your phone:
1. Press when the phone is idle.
2. Press or to select the desired entry from the placed calls list, and then
press or the Send soft key.
87
Page 98

User Guide for the SIP-T27P IP Phone
Recent call in dialing is configurable via web user interface only.
To view the placed calls list when the phone is on the dialing screen, you should enable
recent call in dialing in advance.
To enable recent call in dialing via web user interface:
1. Click on Directory->Setting.
2. Select Enabled from the pull-down list of Recent Call In Dialing.
Note
3. Click Confirm to accept the change.
To view placed calls list when the phone is on the dialing screen:
1. Pick up the handset, press the Speakerphone key or press the line key.
The LCD screen displays the placed calls list.
You can also enter a few continuous characters of the contact name or continuous
88
Page 99

Basic Call Features
numbers of the contact number (office, mobile or other number) to search from
placed calls list.
You can use auto answer feature to automatically answer an incoming call on a line.
Auto answer is configurable on a per-line basis.
To configure auto answer via phone user interface:
1. Press Menu->Features->Auto Answer.
2. Press or , or the Switch soft key to select the desired account from the Line
ID field.
3. Press or , or the Switch soft key to select Enabled from the Status field.
4. Press the Save soft key to accept the change or the Back soft key to cancel.
The icon appears on the LCD screen.
89
Page 100

User Guide for the SIP-T27P IP Phone
Auto answer is only applicable when there is no other call in progress on the phone.
Auto answer is configurable via web user interface at the path Account->Basic.
Note
You can enable auto redial to automatically redial a phone number when the called
party is busy. You can also configure the number of auto redial attempts and the time to
wait between redial attempts.
To configure auto redial via phone user interface:
1. Press Menu->Features->Auto Redial.
2. Press or , or the Switch soft key to select Enabled from the Auto Redial
field.
3. Enter the desired time (in seconds) in the Redial Interval field.
The default value is 10.
4. Enter the desired number of redial attempts in the Redial Times field.
The default value is 10.
5. Press the Save soft key to accept the change or the Back soft key to cancel.
Auto redial is configurable via web user interface at the path Features->General
Information.
90
 Loading...