

Page 1

Page 2

Contents
About This Guide..................................................................................................... 7
In This Guide........................................................................................................................................................7
Related Documents...............................................................................................................................................8
Getting Started..........................................................................................................9
Hardware of VCR11 Remote Control..................................................................................................................9
Introduction of VCR11 Remote Control................................................................................................10
Entering Characters by VCR11 Remote Control................................................................................... 11
Hardware of CP960 Conference Phone............................................................................................................. 12
Introduction of CP960 Conference Phone............................................................................................. 13
Entering Characters by CP960............................................................................................................... 14
Running the Setup Wizard................................................................................................................................. 16
Powering on the System.....................................................................................................................................16
Powering off the System.................................................................................................................................... 17
Putting the System to Sleep............................................................................................................................... 17
Waking up the System........................................................................................................................................17
Screens and Icons............................................................................................................................................... 17
Idle Screen.............................................................................................................................................. 17
CP960 Control Center/Notification Center............................................................................................ 19
Icon Introduction.....................................................................................................................................20
Multipoint Licenses............................................................................................................................................ 24
| Contents | ii
Managing the Directory......................................................................................... 25
Local Contacts and Conference Contacts.......................................................................................................... 25
Adding a Local Contact......................................................................................................................... 25
Adding Conference Contacts..................................................................................................................26
Editing Contacts......................................................................................................................................27
Deleting Contacts....................................................................................................................................27
Yealink Cloud Contacts...................................................................................................................................... 28
Enterprise Directory............................................................................................................................................29
Searching for Contacts....................................................................................................................................... 29
Searching for Contacts by Remote Control........................................................................................... 29
Searching for Contacts by CP960..........................................................................................................29
Managing the Call History.................................................................................... 30
Viewing the Call History....................................................................................................................................30
Viewing the Call History by Remote Control........................................................................................30
Viewing the Call History by CP960...................................................................................................... 30
Adding a History Record to the Local Directory.............................................................................................. 30
Adding a History Record to the Local Directory by Remote control....................................................30
Adding a History Record to the Local Directory by CP960................................................................. 31
Deleting History Records................................................................................................................................... 31
Deleting a History Record by Remote Control......................................................................................31
Deleting a History Record by CP960.................................................................................................... 32
Deleting All History Records by Remote control..................................................................................32
Page 3

| Contents | iii
Operating Calls....................................................................................................... 32
Placing a Call......................................................................................................................................................32
Placing a Call by Entering a Number....................................................................................................33
Editing Numbers Before Calling............................................................................................................ 33
Placing a Call from the Search Result...................................................................................................34
Placing Calls to Contacts....................................................................................................................... 35
Placing Calls from Call History.............................................................................................................35
Joining the VMR................................................................................................................................................ 36
Answering Calls..................................................................................................................................................36
Answering a Call Automatically When not in a Call............................................................................37
Answering Multiple Calls Automatically...............................................................................................37
Muting Automatically Answered Calls.................................................................................................. 37
Manually Answering Calls..................................................................................................................... 38
Turning off the Local Camera............................................................................................................................38
Turning off the Local Camera by Using Remote Control..................................................................... 38
Turning off the Local Camera by Using CP960....................................................................................38
DND (Do Not Disturb).......................................................................................................................................39
Enabling DND When Not in a Call by Remote Control....................................................................... 39
Enabling DND When Not in a Call by CP960......................................................................................39
Enabling DND in a Call by Remote Control.........................................................................................39
Enabling DND in a Call by CP960....................................................................................................... 40
Rejecting Incoming Calls................................................................................................................................... 40
Ending Calls........................................................................................................................................................40
Managing the Local Video Conference................................................................ 40
Initiating a Local Video Conference.................................................................................................................. 41
Initiating a Conference by Dialing a Group.......................................................................................... 41
Initiating a Conference by Inviting Contacts......................................................................................... 42
Removing Conference Participants.................................................................................................................... 43
Removing Conference Participants by Remote Control........................................................................ 43
Removing Conference Participants by CP960.......................................................................................43
Muting or Unmuting All Conference Participants.............................................................................................43
Muting a Conference Participant........................................................................................................................43
Unmuting a Conference Participant................................................................................................................... 44
Ending the Local Video Conference.................................................................................................................. 44
Ending the Conference by Remote control............................................................................................44
Ending the Conference by CP960..........................................................................................................44
Using the Yealink VC Cloud Management Service Platform.............................45
Dialing Yealink Cloud Accounts........................................................................................................................45
Viewing Scheduled Conferences........................................................................................................................ 46
Joining Scheduled Conferences..........................................................................................................................46
Joining a Scheduled Conference from the Conference Reminder......................................................... 46
Joining a Scheduled Conference from the Conference Schedule.......................................................... 47
Joining a Scheduled Conference from the Notification Center............................................................. 47
Joining a Scheduled Conference by Dialing..........................................................................................47
Meet Now........................................................................................................................................................... 48
Initiating Meet Now Conferences.......................................................................................................... 48
Joining a Meet Now Conference by Dialing......................................................................................... 48
Virtual Meeting Room (VMR)...........................................................................................................................49
Joining a VMR by Remote Control.......................................................................................................49
Joining a VMR by CP960......................................................................................................................49
Page 4

| Contents | iv
Joining a Virtual Meeting Room by Dialing..........................................................................................49
Managing Yealink Cloud Video Conferences....................................................................................................50
Appointing a Lecturer.............................................................................................................................50
Switching the Roles of Teacher and Student......................................................................................... 51
Switching Free Speak and Raise Hand Mode on CTP20...................................................................... 51
Applying for Speaking........................................................................................................................... 51
Managing the Application...................................................................................................................... 52
Inviting Conference Participants............................................................................................................ 52
Removing Conference Participants........................................................................................................ 53
Muting or Unmuting All Conference Participants................................................................................. 54
Muting or Unmuting a Conference Participant......................................................................................54
Blocking or Unblocking Audio on CTP20............................................................................................ 55
Disabling or Enabling the Camera on CTP20....................................................................................... 55
Controlling Cameras by CTP20............................................................................................................. 55
Enabling or Disabling Live Broadcast on CTP20................................................................................. 56
Viewing the Message List...................................................................................................................... 56
Leaving the Conference..........................................................................................................................57
Ending Conferences................................................................................................................................ 57
Using Yealink Meeting Server............................................................................... 58
Dialing YMS Accounts...................................................................................................................................... 58
Viewing Scheduled Conferences........................................................................................................................ 58
Joining Scheduled Conferences..........................................................................................................................59
Joining a Scheduled Conference from the Conference Reminder......................................................... 59
Joining a Scheduled Conference from a Conference Invitation............................................................ 59
Joining a Scheduled Conference from the Conference Schedule.......................................................... 60
Joining a Scheduled Conference from the Notification Center............................................................. 60
Joining a Scheduled Conference by Dialing..........................................................................................60
Joining Scheduled Conferences by Scanning the QR Code.................................................................. 61
Watching the Live Broadcast by Scanning the Code.......................................................................................61
Meet Now Conference........................................................................................................................................62
Initiating Meet Now Conferences.......................................................................................................... 62
Joining a Meet Now Conference by Dialing......................................................................................... 62
Virtual Meeting Room (VMR)...........................................................................................................................62
Joining a VMR from Directory..............................................................................................................63
Joining a VMR by Dialing.....................................................................................................................63
Managing YMS Video Conferences...................................................................................................................64
Appointing a Lecturer.............................................................................................................................64
Applying for Speaking........................................................................................................................... 65
Managing the Application...................................................................................................................... 65
Inviting Conference Participants............................................................................................................ 66
Removing Conference Participants........................................................................................................ 66
Muting or Unmuting All Conference Participants................................................................................. 67
Muting or Unmuting a Conference Participant......................................................................................67
Blocking or Unblocking Audio on CTP20............................................................................................ 68
Enabling or Disabling the Camera on the CTP20................................................................................. 68
Controlling Cameras by CTP20............................................................................................................. 68
Enabling or Disabling Live Broadcast on CTP20................................................................................. 69
Viewing the Message List...................................................................................................................... 69
Leaving the Conference..........................................................................................................................69
Ending Conferences................................................................................................................................ 70
Using the Third-Party Video Conference Platforms...........................................71
Page 5

| Contents | v
Presenting.................................................................................................................71
Wired Sharing..................................................................................................................................................... 71
Sharing Content When not in a Call......................................................................................................71
Stopping Sharing Content When not in a Call...................................................................................... 72
Sharing Content in a Call.......................................................................................................................72
Stopping Sharing Content in a Call....................................................................................................... 73
Wireless Sharing................................................................................................................................................. 73
Sharing Content via WPP20...................................................................................................................73
Switching Shared Content via WPP20...................................................................................................74
Stopping Sharing Content via WPP20................................................................................................... 74
Sharing Content via Apple Device.........................................................................................................74
Stopping Sharing Content via Apple Device......................................................................................... 76
Using WPP20 Wireless Presentation Pod.............................................................77
Introduction of the WPP20 Whiteboard Note Toolbar...................................................................................... 77
Introduction of WPP20 Note Toolbar................................................................................................................ 77
Receiving Shared Whiteboard or Content..........................................................................................................78
Initiating Whiteboard Sharing on WPP20..........................................................................................................79
Saving the Content or Whiteboard Picture Locally via WPP20........................................................................79
Saving or Sharing Whiteboard Source Files via WPP20...................................................................................80
Importing the Whiteboard Source File via WPP20........................................................................................... 80
Importing an Existing Whiteboard during a Call via WPP20........................................................................... 81
Using Basic Features.............................................................................................. 81
Viewing the World Time on the CP960.............................................................................................................81
Recording Videos................................................................................................................................................82
Recording Local Videos......................................................................................................................... 82
Recording Server Videos........................................................................................................................83
Taking Screenshots............................................................................................................................................. 84
Capturing Screenshots by CP960........................................................................................................... 85
Capturing Screenshots by Remote Control............................................................................................ 85
Capturing Screenshots by CP960........................................................................................................... 85
Managing Videos and Screenshots.....................................................................................................................85
Copying the Screenshot from the Local Storage to the USB Flash Drive.............................................86
Copying the Video from the Local Storage to the USB Flash Drive.................................................... 86
Viewing Screenshots............................................................................................................................... 86
Deleting Screenshots...............................................................................................................................86
Viewing Local Recorded Videos............................................................................................................87
Deleting Local Recorded Videos............................................................................................................87
Setting the Wallpaper for CTP20 and VCS Codec............................................................................................88
Setting the CTP20 Brightness............................................................................................................................ 88
Setting CTP20 to the Sleep Mode..................................................................................................................... 88
Settings..................................................................................................................... 88
Configuring the Audio Settings..........................................................................................................................89
Adjusting the Volume............................................................................................................................. 89
Configuring Key Tone............................................................................................................................89
Enabling Silent Mode.............................................................................................................................89
Muting the Microphone.......................................................................................................................... 90
Configuring Video Settings................................................................................................................................ 91
Maximizing Monitor Video Display...................................................................................................... 91
Page 6

Allowing Website Snapshot....................................................................................................................91
Video Input Source................................................................................................................................. 91
Changing the Screen Layout.................................................................................................................. 92
Configuring Camera Settings............................................................................................................................. 96
Controlling Cameras............................................................................................................................... 96
Allowing the Remote System to Control Your Camera.........................................................................97
Setting Camera Presets...........................................................................................................................98
Accessories with Your System............................................................................. 100
Using CPE90 Wired Expansion Microphones................................................................................................. 100
Placing CPE90 Wired Expansion Microphones...................................................................................101
Muting or Unmuting the Microphone.................................................................................................. 101
Using the Soundbar.......................................................................................................................................... 101
Using the CPW90-BT Bluetooth Wireless Microphones with VCS................................................................101
Viewing the Information of CPW90-BT Bluetooth Wireless Microphones by Remote Control..........102
Viewing the Information of CPW90-BT Bluetooth Wireless Microphones by CTP20....................... 102
Using the CPN10 PSTN Box...........................................................................................................................102
Using the VCC22 Video Conferencing Cameras.............................................................................................102
Controlling VCC22 Camera................................................................................................................. 102
Camera Layout......................................................................................................................................103
Controlling Multiple Remote Cameras................................................................................................ 103
Layouts of Multiple Monitors.............................................................................................................. 104
Resetting the Camera............................................................................................................................104
Page 7

About This Guide
Thank you for choosing the Yealink Full HD video conferencing system.
It supports 1080P full HD video conferencing and includes outstanding features such as good compatibility, easy
deployment and intelligent network adaptability. With the video conferencing system, the enterprises can solve the
video conferencing dilemma they face, and the users can experience high-quality video conferences, as well as rich
and reliable data-cooperation.
This guide is applicable to the following Yealink devices:
• VC880 video conferencing system: suitable for large meeting rooms.
• PVT980 video conferencing system: suitable for meeting control rooms or lecture halls with cabinet.
• VC800 video conferencing system and VC500 (Pro)/PVT950 video conferencing endpoint: suitable for medium
meeting room.
• VC200 video conferencing endpoint: suitable for huddle rooms.
This guide can help you to quickly use VP59. Before you set up and use the phone, check with your system
administrator that the IP network is ready for phone configuration and read the Quick Start Guide in the product
package.
| About This Guide | 7
•
In This Guide
•
Related Documents
In This Guide
This guide contains the following chapters:
•
Chapter 1 About This Guide
•
Chapter 2 Getting Started
•
Chapter 3 Managing the Directory
•
Chapter 4 Managing the Call History
•
Chapter 5 Operating Calls
•
Chapter 6 Managing the Local Video Conference
•
Chapter 7 Using the Yealink VC Cloud Management Service Platform
•
Chapter 8 Using Yealink Meeting Server
•
Chapter 9 Using the Third-Party Video Conference Platforms
•
Chapter 10 Using Basic Features
•
Chapter 11 Settings
•
Chapter 12 Accessories with Your System
Page 8

Related Documents
The following table lists the documents available for the video conferencing system.
| About This Guide | 8
Name Contents Where to
find
Yealink VC880 Full HD Video Conferencing
System Quick Start Guide
Yealink VC800 Full HD Video Conferencing
System Quick Start Guide
Yealink VC500 Full HD Video Conferencing
Endpoint Quick Start Guide
Yealink VC200 Video Conferencing Endpoint
Quick Start Guide
Yealink PVT980 Full HD Video Conferencing
System Quick Start Guide
Yealink PVT950 Full HD Video Conferencing
System Quick Start Guide
Yealink VCR11 Remote Control Quick Reference
Guide
Yealink VCC22 Video Conferencing Camera Quick
Start Guide
Yealink PSTN Box CPN10 Quick Start Guide Connect the video
System installation and
network configuration
Use VCR11 Remote
Control
Install VCC22 Video
Conferencing Camera
conference system to
PSTN
On the
website
/in the
package
On the
website
On the
website
On the
website
/in the
package
Language
English/
Chinese
English/
Chinese
English/
Chinese
English/
Chinese
Yealink CPW90-BT Bluetooth Wireless
Microphones Quick Start Guide
Yealink Wi-Fi USB Dongle WF50 User Guide Connect to Wi-Fi and
Yealink WPP20 Wireless Presentation Pod Quick
Start Guide
Yealink CP960 HD IP Conference Phone Quick
Reference Guide
Yealink WPP20 Wireless Presentation Pod User
Guide
Yealink CTP20 Quick Start Guide Connect CTP20 Touch
Connect CPW90-BT
Bluetooth wireless
microphones to video
conferencing system
providing wireless AP
Connect WPP20 wireless
presentation pod to VCS
Use CP960 Conference
Phone
Use WPP20 wireless
presentation pod to share
content
Panel to VCS
On the
website
/in the
package
On the
website
On the
website
/in the
package
On the
website
On the
website
On the
website
English/
Chinese
English/
Chinese
English/
Chinese
English/
Chinese
English/
Chinese
English/
Chinese
Page 9

| Getting Started | 9
Name Contents Where to
Yealink VCM34 Quick Start Guide Connect VCM34 to VCS On the
Note: You can download the latest documents online: http://support.yealink.com/documentFront/
forwardToDocumentFrontDisplayPage.
Getting Started
This chapter introduces the basic operation of VCS.
•
Hardware of VCR11 Remote Control
•
Hardware of CP960 Conference Phone
•
Running the Setup Wizard
•
Powering on the System
•
Powering off the System
•
Putting the System to Sleep
•
Waking up the System
•
Screens and Icons
•
Multipoint Licenses
find
website
Language
English/
Chinese
Hardware of VCR11 Remote Control
The following introduces the keys of the VCR11 remote control and how to enter characters using your remote
control.
•
Introduction of VCR11 Remote Control
•
Entering Characters by VCR11 Remote Control
Page 10

Introduction of VCR11 Remote Control
The features of the keys on the remote control are described as below:
| Getting Started | 10
No. Name Description
1 Power Key
2 Video
Recording
Key
3 Layout Key Adjust the layout during a video call.
4 Custom Key
5 Volume+ Key Turn up the speaker volume.
6 Volume- Key Turn down the speaker volume.
7 Zoom in key
• Power on or power off the system.
• Put the system to sleep or wake up the system.
Start or stop recording the video and audio.
Customize the key function.
The system administrator can customize the key as the Presentation key (default),
the Input key, the ScreenShot key, Mute Speaker key, or Preset key.
• Increase the focal length of the camera.
• Zoom the captured image in.
• Turn the page up.
Page 11

No. Name Description
| Getting Started | 11
8 Zoom out key
9 OK key Go the sub-menu, confirm the action or select one item.
10 Navigation
Key
11 Mute Key Mute or unmute the microphone.
12 Home key
13 Back key Return to the previous menu.
14 Off-hook Key Enter the pre-dialing screen, the dialing screen or the answering screen.
15 Delete Key
16 On-hook Key
• Decrease the focal length of the camera.
• Zoom the captured image out.
• Turn the page down.
• Navigate through menu items.
• Pan and tilt the camera to adjust the angle.
• Return to the idle screen when the system is not in a call.
• Open Talk Menu during a call.
• Delete one character at a time.
• Long press to delete all characters in the input field.
• If the system is connected to a USB flash drive, you can long press it for 2
seconds it to start capturing packets and long press it for 2 seconds again to stop
capturing packets.
• End a call or exit a conference call.
• Return to the idle screen.
17 Keypad
18 Character Key Enter the special characters: .@*.
19 Pound key Enter the pound key (#).
Note: The infrared sensor locates within the LED indicator of camera. Aim the remote control at the infrared
sensor to operate the camera.
• Enter digits.
• Go to the Dial page.
Entering Characters by VCR11 Remote Control
You can use onscreen keyboard on the monitor or use keypad on the remote control to enter characters.
•
Enter Characters by Dial Pad
•
Using the Onscreen Keyboard
Enter Characters by Dial Pad
The keypad of your remote control only provides digit keys and #.@* keys.
Procedure
Press the keypad on the remote control to enter characters.
Page 12

| Getting Started | 12
Using the Onscreen Keyboard
You need to be familiar with the onscreen keyboard before using it. The following takes the English input method as
an example, introducing the function of the keys:
About this task
No. Name Description
1 26 English Letters Enter the letter.
2 Switch to the uppercase input mode.
3 Switch to the numeric & symbolic input mode.
4 If your system administrator enables Russian, you can select this key to
switch between English and Russian input methods.
5 Space Key Enter a space.
6 Cursor Position a cursor.
7 Hide the onscreen keyboard.
8 Special Characters Enter the corresponding special character.
9 Delete Key
Procedure
1.
In the field you want to edit, select to open the onscreen keyboard.
2.
Select the corresponding characters and press OK key.
• Delete one character at a time.
• Long press to delete two or more characters.
Hardware of CP960 Conference Phone
The following introduces the hardware of CP960 and how to enter characters by your CP960.
•
Introduction of CP960 Conference Phone
•
Entering Characters by CP960
Page 13

Introduction of CP960 Conference Phone
CP960 Conference Phone Supports 360-degree audio pickup at a radius of up to 6 meters. It can work as an audio
device for the system. You can also place calls, answer calls or view directory and history on CP960.
| Getting Started | 13
No. Name Description
1 Three Built-in
Microphones
2 Mute Touch Keys
3 Speaker Provides hands-free (speakerphone) audio output.
4 Touch Screen
5 Volume Touch
Keys
6 HOME Touch Key Return to the idle screen.
Support 360-degree audio pickup at a radius of up to 6 meters.
• Indicate the status of the phone and the call.
• Toggle mute feature.
5 inches (720 x 1280) capacitive (5 point) touch screen with two idle screens.
Tap to select items and navigate menus.
Display the information about the call, the message, the time, the date and
other relevant data:
• Call information: the caller ID and the call duration
•
Icons (for example, )
• The prompts of the missed calls
• Prompts (for example, “Delete selected item?”)
• Time and Date
Adjust the volume of the speaker, ringer or media.
7 Wired Mic Ports Connect CPE90 to your phone (optional).
8 Internet
9 Security Slot Allow you to connect a universal security cable to your phone so you can fix
• Connect to the VC Hub/Phone port on the video conferencing system.
• Connect to the Audio port on the VCH50 video conferencing hub.
your phone on the table.
Page 14

No. Name Description
| Getting Started | 14
10 3.5mm Audio-out
Port
11 Micro USB Port This port is unavailable when CP960 works with the video conferencing
12 USB Insert a USB flash drive to a USB port for storing screenshots, recording
This port is unavailable when CP960 works with the video conferencing
system.
system.
videos or captured packets (optional).
Entering Characters by CP960
You can use the onscreen keyboard on the touch screen or use the onscreen dial pad on the dialing screen to enter
characters.
•
Entering Characters by Onscreen Keyboard
•
Performing Other Operations by the Onscreen Keyboard
•
Enter Characters by Dial Pad
Entering Characters by Onscreen Keyboard
You need to be familiar with the onscreen keyboard before using it. CP960 provides English (US) and Google Pinyin
input methods.
Android Keyboard (AOSP) – English (US) Input Method
Number Key Tone Description
1 26 English Letters
2 Delete Key
3 This key is flexible to
identify the context
sensitive features.
4 Two Special Characters
Next Key Tap to go to the next field.
Send Key Tap to dial out the number.
Search Searching for Contacts.
• Enter the letter.
• Long tap a character, and then slide to
choose an item.
• Tap to delete the entered characters one by
one.
• Long tap to delete two or more characters.
• Enter the corresponding special character.
• Long tap the period and then select an item.
Page 15

Number Key Tone Description
| Getting Started | 15
5 Space Key
6 Switch to the numeric & symbolic input mode.
7 Switch to the uppercase input mode.
Google Pinyin Input Method
You can long tap the space key to change the input method to Google Pinyin, then you can enter Chinese.
• Enter a space.
• Long tap the space to change the input
method.
Tap the key in the left corner to change the input method to Android Keyboard (AOSP).
Performing Other Operations by the Onscreen Keyboard
About this task
Operation Procedure
Position the cursor. Tap the desired position on the touch screen.
Select a desired
character.
1.
Long tap the character.
2.
Do one of the following:
•
Tap on the top of the touch screen to select all characters.
•
Drag / to select parts of the characters.
Page 16

Operation Procedure
| Getting Started | 16
Cut/Copy
characters.
Delete more
characters at a
time.
Replace characters.
Enter Characters by Dial Pad
On the Dial page, you can enter the desired number. The dial pad only provides digit keys and #.@* key.
1.
Select characters.
2.
Tap CUT/POTY or tap / on the status bar.
3.
Long tap the desired field.
4.
Tap PASTE.
Do one of the following:
•
Long tap the entered character(s), drag / to select the desired characters, and then
tap .
•
Drag / to select the desired characters, and then tap .
•
Long press .
1.
Drag the cursor to select the desired character.
2.
Enter the desired character.
Running the Setup Wizard
The setup wizard appears automatically at the first startup or when the system is reset to factory. You can configure
the initial settings, for example the language, the network, and the account, for the device by your remote control.
Note: You can also tap Exit Boot Wizard on your CP960 conference phone to skip the setup wizard.
Powering on the System
Your system starts up automatically after you connect an electrical supply. If you power off the system using the
remote control, do the following to power it on.
Procedure
On your remote control, long press the Power Key for 3 seconds.
Your system is powered on successfully, and the LED indicator glows green.
Related tasks
Powering off the System
Page 17

Powering off the System
Procedure
1.
On your remote control, long press the Power Key for 3 seconds.
2.
Select Shut down.
The system shuts down immediately, and the LED on the system goes out.
Putting the System to Sleep
You can put the system to sleep immediately if you do not use it temporarily.
Procedure
| Getting Started | 17
1.
On your remote control, long press the Power Key for 3 seconds.
2.
Select Sleep.
The system goes to sleep immediately, and the LED on the system or the camera glows red.
Waking up the System
Procedure
Do one of the following:
• On your remote control, press any button.
• On your CP960, tap the touch screen or any key.
Screens and Icons
Before you use the system, you need familiarize yourself with the screen layouts and icons.
•
Idle Screen
•
CP960 Control Center/Notification Center
•
Icon Introduction
Idle Screen
•
The Home Page
•
Idle Screen of CP960
Page 18

The Home Page
If the system has a YMS account logged in, the monitor idle screen is shown as below:
| Getting Started | 18
Name Description
Time and Date The time and date are displayed on the left side of the status bar.
Site Name The site name of the system.
Status Icon The status icons are displayed on the center of the status bar.
IP Address
Register
Account
Dial Go to the Dial page.
Meet Now When you register a Yealink Cloud account or a YMS account, you can initiate a Meet
More Configure the video conferencing system.
Video Image Display the local video image, the local PC content or the image of Whiteboard
• LAN: X.X.X.X: indicates the system has obtained an IP address.
• Network disconnected: indicates the system does not connect to a network cable, and
you need check the network cable.
• 255.255.255.255: indicates the system fails to obtain an IP address. Check the
connection between the system and the DHCP server, or configure a static IP address
for the system.
Generally, your system administrator will pre-configure the related account information for
the phone. If not, contact your system administrator.
Now conference.
collaboration.
Schedule When you register a Yealink Cloud account or a YMS account, you can view the
conference schedule.
Page 19

Idle Screen of CP960
If the phone has a Yealink Cloud account or a YMS account logged in, the idle screen is shown as below.
| Getting Started | 19
Number Name Description
1 Status Bar Display the status icons of the phone and the time.
2 Digital Clock
Widget
3 Schedule When you register a Yealink Cloud account or a YMS account, you can view
4 Applications Use the corresponding feature.
5 Screen Indicator Indicates the current screen. You can swipe to left or right to view more
Display the time and date.
the conference schedule.
screens.
CP960 Control Center/Notification Center
The control center or notification center of CP960 allows you to quickly enable/disable the related feature or view the
latest notifications.
•
Going to the Control Center/Notification Center
•
Exiting Control Center/Notification Center
Going to the Control Center/Notification Center
Procedure
On your CP960, swipe down from the top to go to the control center/notification center:
Page 20

| Getting Started | 20
No. Name Description
1 Time and Date Display the time and date.
2 Control Center Adjust the screen brightness or configure the related features.
3 Notification
Center
Exiting Control Center/Notification Center
Procedure
On your CP960, do one of the following:
• Swipe up from the bottom of the screen.
• Tap the Home touch key.
Icon Introduction
Display the notifications, for example the reminder of the ongoing
conference.
•
Icons on the Monitor
Page 21

•
Icons on CP960 Conference phone
Icons on the Monitor
The icons displayed in the status bar of the monitor are introduced as below:
Icon Description
Network is available
CP960 is not connected
The local camera is disabled (it is only applicable to VC880/VC800/VC500/PVT980/PVT950)
Wi-Fi mode is enabled, but is not connect the wireless network
Wi-Fi mode is enabled, and is connected the wireless network
| Getting Started | 21
Wireless hotspot is enabled, but no device is connected to it
Wireless hotspot is on, and some devices are connected to it
A SIP account is registered
An H.323 account is registered
A Yealink Cloud account/YMS account is registered
A PSTN account is registered
Log into StarLeaf/Zoom/Pexip/BlueJeans/EasyMeet/Videxio platform
VCH50 video conferencing hub is connected to the device
Auto answer
Missed calls (it is displayed in the status bar of the device)
The volume is 0
DND (do not disturb) is enabled
Page 22

Icon Description
Dual-screen mode(it is only applicable to VC880/VC800/VC500/PVT980/PVT950, HDMI 1
and HDMI 2 ports of the system are connected to display devices)
Wired sharing (when a PC is connected to the VCH50 video conferencing hub)
Wireless sharing (share PC content via WPP20 wireless presentation pod)
A USB flash drive is inserted
VPN is enabled
BT42 dongle is connected, but the CPW90-BT Bluetooth wireless microphones are
unregistered.
BT42 dongle is connected, and the CPW90-BT Bluetooth wireless microphones are registered.
| Getting Started | 22
CTP20 is connected to the device (the number of connected CTP20 is displayed in the buttonright corner)
VCM34 is connected to the device (the number of connected VCM34 is displayed in the buttonright corner)
The phone is muted in a call.
Call encryption
Call is on hold
The camera is being controlled
The image displayed on the second monitor
Records the video and the audio to your system memory (only applicable to VC200)
Records the video and the audio to your PC by Yealink Wireless Presentation Pod
Records the video and the audio to the USB flash drive
Dialed calls (H.323 account/SIP account/IP Call)
Dialed calls (Cloud platform)
Page 23

Icon Description
Received calls (H.323 account/SIP account/IP Call)
Received calls (Cloud platform)
Missed calls (H.323 account/SIP account/IP Call)
Missed calls (Cloud platform)
Local directory
The conference contact (it is only applicable to the PVT980/PVT950 video conference system
and VC880/VC800 that has a multipoint license).
Yealink Cloud contacts or YMS contacts
| Getting Started | 23
Virtual Meeting Room (VMR)
Third-party devices
Room system
Place video calls
Place voice calls
Icons on CP960 Conference phone
Icon Description
Auto answer
Missed calls (it is displayed in the status bar of the device)
DND (Do Not Disturb) is enabled
Call mute
Call encryption
Page 24

Icon Description
The volume is 0
Local directory
Conference directory (it is only applicable to PVT980/PVT950 and the VC880/VC800 that
has an imported multipoint license)
Yealink Cloud contacts or YMS contacts
Virtual Meeting Room (VMR)
Third-party devices
Room system
| Getting Started | 24
Dialed calls (H.323 account/SIP account/IP Call)
Dialed calls (Cloud platform)
Received calls (H.323 account/SIP account/IP Call)
Received calls (Cloud platform)
Missed calls (H.323 account/SIP account/IP Call)
Missed calls (Cloud platform)
Multipoint Licenses
Only VC880/VC800/PVT980/PVT950 supports multipoint licenses. The PVT980 has a built-in 8-way multipoint
license and PVT950 has a built-in 4-way multipoint license. Only after importing multipoint license can VC880/
VC800 be used to initiate multi-party video conferences.
Multipoint licenses are described as below:
Multipoint License Type Maximum Connections Description
VC500/VC200
VC880/VC800 without a
multipoint license
One video call with a presentation
and 5 voice calls (a conference
organizer and 6 participants).
Multipoint video conferences are
unsupported.
Page 25

Multipoint License Type Maximum Connections Description
| Managing the Directory | 25
PVT980 with an 8-way multipoint
license
PVT950 with a built-in 4-way
multipoint license
VC880/VC800 with a trial
multipoint license
VC880/VC800/PVT950 with an 8way multipoint license
VC880/VC800/PVT980/PVT950
with a 16-way multipoint license
VC880/VC800/PVT980/PVT950
with a 24-way multipoint license
8 video calls with a presentation
and 5 voice calls (a conference
organizer and 13 participants).
4 video calls with a presentation
and 5 voice calls (a conference
organizer and 9 participants).
24 video calls with a presentation
(a conference moderator and 24
participants)
8 video calls with a presentation
and 5 voice calls (a conference
moderator and 13 participants).
16-way video call with a
presentation and 5-way call (a
conference moderator and 21
participants).
24 video calls with a presentation
(a conference moderator and 24
participants)
Multipoint video conferences are
supported.
Multipoint video conferences are
supported.
Period of validity: 15-day free
trial.
VC880/VC800 models can use this
trial multipoint license. You can
download it from Yealink website.
Period of validity: eternal.
One worldwide unique license for
every VC880/VC800/PVT980/
PVT950 and the license cannot
be used by other devices. You can
purchase the license from Yealink
resellers by providing the MAC
address of your VC880/VC800/
PVT980/PVT950.
Managing the Directory
Your system supports several types of directories.
•
Local Contacts and Conference Contacts
•
Yealink Cloud Contacts
•
Enterprise Directory
•
Searching for Contacts
Local Contacts and Conference Contacts
Local directory includes local contacts and conference contacts. The conference contact is only applicable to the
VC880/VC800/ PVT980/PVT950 video conference system with a multipoint license.
•
Adding a Local Contact
•
Adding Conference Contacts
•
Editing Contacts
•
Deleting Contacts
Adding a Local Contact
You can add 500 local contacts to your system at most.
•
Adding a Local Contact by Remote Control
Page 26

Adding a Local Contact by Remote Control
Procedure
1.
On your remote control, go to Dial > Directory.
2.
Select Local from the drop-down menu.
3.
Select New Contact.
4.
Enter the contact name in the Name field.
5.
Enter the contact number or IP address in the Number field.
6.
Select Add New Number to add more numbers.
You can repeat step 6 to add up to 3 numbers to a local contact.
7.
Select the desired bandwidth from the drop-down menu of Bandwidth.
| Managing the Directory | 26
The default bandwidth is Auto, which means the system will automatically select the appropriate bandwidth
during a call.
8.
Save the change.
Adding Conference Contacts
You can add up to 100 conference contacts to the system with a multiple license. A conference contact consists of
several local contacts, and you can quickly initiate a conference by calling a conference contact.
Note: The number of local contacts that you add to a conference contact depends on the imported multipoint
license. For example, if your system administrator imports a 24-way license to your system, up to 24 local
contacts can be added to a conference contact.
•
Adding a Conference Contact by Remote control
Related concepts
Multipoint Licenses
Adding a Conference Contact by Remote control
Procedure
1.
On your remote control, go to Dial > Directory.
2.
Select Conference Contacts from the drop-down menu.
3.
Select New Conference.
4.
Enter the group name in the Name field.
All the local contacts are displayed below the search box.
5.
Select the desired local contacts and add them to the conference contact.
Page 27

Enter any character of the number, the IP address, the URL of the local contact in the Search field, and select the
desired local contacts from the search result.
All the selected contacts are displayed on the right side of the screen.
6.
Save the change.
Editing Contacts
You can change or add more information to your local contacts and conference contacts.
•
Editing Contacts by Remote Control
•
Editing Contacts by CP960
Editing Contacts by Remote Control
Procedure
1.
On your remote control, go to Dial > Directory.
| Managing the Directory | 27
2.
Select Local or Conference Contacts from the drop-down menu.
3.
Select the desired contact and then press the right key.
4.
Select Edit.
5.
Edit the contact information.
6.
Save the change.
Editing Contacts by CP960
Procedure
1.
On your CP960, tap Directory.
2.
Select Local or Conference Contacts from the drop-down menu.
3.
Tap beside the desired contact.
4.
Edit the corresponding information.
5.
Save the change.
Deleting Contacts
You can delete the local contact or the conference contact. After deleting a local contact, the contact no longer exists
in the local contact, and deleting the conference contact does not delete the corresponding conference contact member
from the local contact.
•
Deleting Contacts by Remote Control
•
Deleting Contacts by CP960
Page 28

Deleting Contacts by Remote Control
Procedure
1.
On your remote control, go to Dial > Directory.
2.
Select Local or Conference Contacts from the drop-down menu.
3.
Select the desired contact or conference contacts and then press the right key.
4.
Select Delete.
The monitor prompts whether or not you are sure to delete.
5.
Confirm the action.
Deleting Contacts by CP960
Procedure
| Managing the Directory | 28
1.
On your CP960, tap Directory.
2.
Select Local or Conference Contacts from the drop-down menu.
3.
Tap beside the desired contact.
4.
Tap Delete.
The phone prompts whether or not you are sure to delete.
5.
Confirm the action.
Yealink Cloud Contacts
The Yealink Cloud contact appears only when you register a Yealink Cloud account on your VP59. Yealink Cloud
contact is managed by the Yealink Cloud enterprise administrator. Only the Yealink Cloud enterprise administrator
can add, edit and delete Yealink Cloud contacts on the Yealink VC Cloud Management Service platform. On your
system, you can only search for and place calls to the Yealink Cloud contacts. For more information about Yealink
VC Cloud Management Service platform, refer to Yealink VC Cloud Management Service Administrator Guide.
There are four types of Yealink Cloud contacts:
• Staff: the users who have Yealink Cloud accounts. The Yealink Cloud enterprise administrator can create
departments for staffs.
• Room System: the devices with Yealink Cloud accounts in the video meeting room.
• Virtual Meeting Room: it exists permanently. The enterprise administrator can determine whether to synchronize
the VMR to your system or not.
• External Contacts: other users added by the Yealink Cloud enterprise administrator.
Related information
Using the Yealink VC Cloud Management Service Platform
Page 29

| Managing the Directory | 29
Enterprise Directory
The enterprise directory appears only when you register a YMS account in your VP59. The enterprise directory
includes all YMS contacts which are created and managed by your enterprise administrator. Note that only the
enterprise administrator can add, edit and delete YMS contacts on the Yealink Meeting Server. Enterprise directory is
not available on the VC200 Custom Edition for Yealink Cloud.
On your system, you can only search for and place calls to the YMS contacts.
There are four types of YMS contact:
• User: the users that have YMS accounts. The enterprise administrator can create departments for users.
• Room system: the devices registered with YMS accounts in the video meeting room.
• Third party device: The devices without YMS accounts.
• Virtual Meeting Room: it exists permanently. The enterprise administrator can determine whether to synchronize
the VMR to your system or not.
Related tasks
Using Yealink Meeting Server
Searching for Contacts
You can search for the contacts in the directory.
•
Searching for Contacts by Remote Control
•
Searching for Contacts by CP960
Searching for Contacts by Remote Control
Procedure
1.
On your remote control, go to Dial > Directory.
2.
Enter a few or all characters of the contact name or numbers in the Search field.
The search result is displayed on the screen.
Searching for Contacts by CP960
Procedure
1.
On your CP960, tap Directory.
2.
Tap .
3.
Enter a few or all characters of the contact name or numbers.
The search result appears on the touch screen.
Page 30

Managing the Call History
The call history contains all calls, missed calls, placed calls and received calls.
•
Viewing the Call History
•
Adding a History Record to the Local Directory
•
Deleting History Records
Viewing the Call History
You can view up to 100 pieces of the call history.
•
Viewing the Call History by Remote Control
•
Viewing the Call History by CP960
Viewing the Call History by Remote Control
| Managing the Call History | 30
Procedure
1.
On your remote control, go to Dial > History.
2.
Select the desired list from the All Calls drop-down menu.
Viewing the Call History by CP960
Procedure
1.
On your CP960, tap History.
2.
Tap the All Calls field, and select the desired item from the drop-down menu.
3.
Tap beside the desired record.
Adding a History Record to the Local Directory
•
Adding a History Record to the Local Directory by Remote control
•
Adding a History Record to the Local Directory by CP960
Adding a History Record to the Local Directory by Remote control
Procedure
1.
On your remote control, go to Dial > History.
2.
Optional: Select the desired list from the All Calls drop-down menu.
Page 31

3.
Select the desired call history and then press the right key.
4.
Tap Add to Contact.
5.
Enter the contact name.
6.
Optional: You can add several numbers for one local contact.
7.
Save the change.
Adding a History Record to the Local Directory by CP960
Procedure
1.
On your CP960 tap History.
2.
Tap the All Calls field, and tap the desired list in the pop-up dialog box.
| Managing the Call History | 31
3.
Tap beside the desired record.
4.
Tap Add to Contact.
5.
Edit the corresponding information.
6.
Save the change.
Deleting History Records
You can delete one or all history records.
•
Deleting a History Record by Remote Control
•
Deleting a History Record by CP960
•
Deleting All History Records by Remote control
Deleting a History Record by Remote Control
Procedure
1.
On your remote control, go to Dial > History.
2.
Optional: Select the desired list from the All Calls drop-down menu.
3.
Select the desired history record and then press the right key.
4.
Select Delete.
Page 32

Deleting a History Record by CP960
Procedure
1.
On your CP960 tap History.
2.
Optional: Tap the All Calls field, and tap the desired list in the pop-up dialog box.
3.
Tap beside the desired history record.
4.
Tap Delete.
The phone prompts whether or not you are sure to delete.
5.
Tap OK to accept the change.
Deleting All History Records by Remote control
| Operating Calls | 32
Procedure
1.
On your remote control, go to Dial > History.
2.
Select the desired list from the All Calls drop-down menu.
3.
Select Clear.
The monitor prompts whether or not you are sure to delete all records.
4.
Confirm the action.
Operating Calls
This section is about call operations.
•
Placing a Call
•
Joining the VMR
•
Answering Calls
•
Turning off the Local Camera
•
DND (Do Not Disturb)
•
Rejecting Incoming Calls
•
Ending Calls
Placing a Call
You can use your system just like a regular phone to place calls in numerous ways.
Tip: If the administrator enables the Fast Audio Call feature, you can tap Audio Call on CP960 to place
voice calls.
Page 33

•
Placing a Call by Entering a Number
•
Editing Numbers Before Calling
•
Placing a Call from the Search Result
•
Placing Calls to Contacts
•
Placing Calls from Call History
Placing a Call by Entering a Number
You can dial the following contacts on your system: SIP URI (for example, 2210@sip.com), IP address (for example,
192.168.1.15), H. 323 account, SIP account, Cloud account or PSTN account. If you register different accounts on the
phone, you can use one of them to place the call, including the Cloud platform/H.323 account/SIP account/PSTN
account/H.323 IP Call/SIP IP Call. The VC200 Custom Edition for Yealink Cloud can dial Yealink Cloud account
only.
•
Dialing the Number by Remote Control
•
Dialing the Number by CP960
Dialing the Number by Remote Control
Procedure
| Operating Calls | 33
1.
On your remote control, go to Dial.
2.
Optional: Select the desired call type from the Call Type drop-down menu.
3.
Enter the number.
4.
Press OK key to place a video call.
If you want to place a voice call, press the right key to select (voice call).
Dialing the Number by CP960
Procedure
1.
On your CP960 tap New Call.
2.
Optional: Tap Auto, and select the desired call type from the drop-down menu.
3.
Enter the number.
4.
Tap Send.
Tip: If the administrator enables the Fast Audio Call feature, you can tap Audio Call on CP960 to place
voice calls.
Editing Numbers Before Calling
Editing numbers before calling allows you to edit the call record and dial it out, so that you do not need to enter the
similar number again.
•
Editing Numbers before Calling by Remote Control
•
Editing Numbers Before Calling by CP960
Page 34

Editing Numbers before Calling by Remote Control
Procedure
1.
Do one of the following:
• On your remote control, go to Dial > History.
• On your remote control, go to Dial.
2.
Select the desired history record and then press the right key.
3.
Select Edit before calling.
The selected call record will be filled in the dialing input box automatically.
4.
Edit the number and dial out.
Editing Numbers Before Calling by CP960
| Operating Calls | 34
Procedure
1.
On your CP960, tap History.
2.
Tap beside the desired call record.
3.
Tap Edit before calling.
The selected call record will be filled in the dialing input box automatically.
4.
Edit the number and dial out.
Placing a Call from the Search Result
You can enter search criteria on the dialing screen to find your desired contact or number, and then place a call.
Your system administrator can configure the search source list. By default, the search source list includes the local
directory, the call history, the cloud contacts and enterprise directory.
•
Placing a Call from the Search Result by Remote Control
•
Placing a Call from the Search Result by CP960
Placing a Call from the Search Result by Remote Control
Procedure
1.
On your remote control, go to Dial.
2.
Optional: Select the desired call type from the Call Type drop-down menu.
3.
Enter the contact name or number in the search box.
4.
Select the desired search result and dial.
Page 35

Placing a Call from the Search Result by CP960
Procedure
1.
On your CP960, tap New Call.
2.
Optional: Tap Auto, and select the desired call type from the drop-down menu.
3.
Enter the contact name or number in the search box.
4.
Select the desired search result and dial.
Placing Calls to Contacts
•
Placing Calls to Contacts by Remote Control
•
Placing Calls to Contacts by CP960
Placing Calls to Contacts by Remote Control
| Operating Calls | 35
Procedure
1.
On your remote control, go to Dial > Directory.
2.
Select Local from the drop-down menu.
3.
Select the desired contact.
4.
Press OK key to place a video call.
If you want to place a voice call, press the right key to select (voice call).
Placing Calls to Contacts by CP960
Procedure
1.
On your CP960, tap Directory.
2.
Select the desired contact type.
3.
Tap the desired contact to place a video call.
If you want to place a voice call, tap beside the desired contact, and then select Voice Call.
Placing Calls from Call History
You can place a call from the call history. The call history includes missed calls, placed calls and received calls.
•
Placing a Call from the Call History by Remote Control
•
Placing a Call from the Call History by CP960
Page 36

Placing a Call from the Call History by Remote Control
Procedure
1.
On your remote control, go to Dial > History.
2.
Select the desired list from the All Calls drop-down menu.
3.
Select the desired type of the call history.
4.
Press OK key to place a video call.
If you want to place a voice call, press the right key to select (voice call).
Placing a Call from the Call History by CP960
Procedure
| Operating Calls | 36
1.
On your CP960 tap History.
2.
Tap the All Calls field, and select the desired item from the drop-down menu.
3.
Tap the desired call history to place a video call.
If you want to place a voice call, tap beside the desired call record, and then tap Voice Call.
Joining the VMR
Video conferencing system can act as a virtual meeting room, so that users can call the desired video conferencing
system to join a meeting.
Note: This feature is not available on the VC200 Custom Edition for Yealink Cloud.
• If the virtual meeting room requires no password, dial IP address or account to enter the virtual meeting room.
• If the virtual meeting room requires a password, dial IP##meeting password or conference meeting
password@IP to go to the VMR.
• The IP address of a virtual meeting room is 10.3.6.201.
• The meeting password for virtual meeting room 1 is 123.
Participants can dial 10.3.6.201##123 or 123@10.3.6.201 to enter the virtual meeting room 1.
Answering Calls
You can answer calls in various ways.
•
Answering a Call Automatically When not in a Call
•
Answering Multiple Calls Automatically
•
Muting Automatically Answered Calls
•
Manually Answering Calls
Page 37

Answering a Call Automatically When not in a Call
You can enable the auto answer feature to answer calls automatically when the device is idle.
Note: Auto answer feature may create security issues, for example, an unexpected caller can view your video
conference room randomly.
•
Configuring Auto Answer by Remote Control
•
Configuring Auto Answer by CP960
Configuring Auto Answer by Remote Control
Procedure
1.
On your remote control, go to More > Setting > Call Features.
2.
Enable Auto Answer.
Configuring Auto Answer by CP960
| Operating Calls | 37
Procedure
1.
On your CP960, swipe down from the top of the screen to enter the control center.
2.
Tap Auto Answer.
Answering Multiple Calls Automatically
You can specify whether to answer a call automatically when the system is already in a call. Auto answer multiway
feature may create security issues, for example, an unexpected caller could interrupt an ongoing meeting.
•
Configuring Auto Answer during a Call by Remote Control
Configuring Auto Answer during a Call by Remote Control
Procedure
1.
On your remote control, go to More > Setting > Call Features.
2.
Enable Auto Answer Multiway.
Muting Automatically Answered Calls
You can choose to mute the local microphones when a call is answered automatically, which avoids the caller hearing
the local conversation freely.
About this task
This feature takes effect only when auto answer feature is enabled.
•
Enabling Auto Answer Mute by Remote Control
Page 38

Enabling Auto Answer Mute by Remote Control
Procedure
1.
On your remote control, go to More > Setting > Call Features.
2.
Select the Auto Answer Mute checkbox.
Manually Answering Calls
If the system is not set to answer calls automatically, you can choose to answer an incoming call manually.
Procedure
Do one of the following:
• On your remote control, press Dial key or press OK key.
• On your CP960, tap Answer.
| Operating Calls | 38
Turning off the Local Camera
In a call, you can turn off the local camera.
•
Turning off the Local Camera by Using Remote Control
•
Turning off the Local Camera by Using CP960
Turning off the Local Camera by Using Remote Control
Procedure
1.
On your remote control, press or OK key to open Talk Menu during a call.
2.
Select Camera Off.
If you turn the camera off, the remote cannot view the video image of yours.
Turning off the Local Camera by Using CP960
Procedure
On your CP960 , tap More > Camera Control during a conference.
If you turn the camera off, the remote cannot view the video image of yours.
Page 39

DND (Do Not Disturb)
You can enable DND feature to reject incoming calls automatically. All the rejected calls will be recorded to the
missed call list. To prevent callers from interrupting the active call, you can enable DND during an active call. The
DND feature will be disabled automatically after the call ends.
•
Enabling DND When Not in a Call by Remote Control
•
Enabling DND When Not in a Call by CP960
•
Enabling DND in a Call by Remote Control
•
Enabling DND in a Call by CP960
Enabling DND When Not in a Call by Remote Control
If you do not have conferences to attend, you can enable DND.
Procedure
1.
On your remote control, go to More > Setting > Call Features.
2.
Enable DND.
| Operating Calls | 39
The icon will appear in the status bar of monitor, and “Do not disturb now!” will be prompted at intervals.
Enabling DND When Not in a Call by CP960
Procedure
1.
On your CP960, swipe down from the top of the screen to enter the control center.
2.
Tap DND.
If the DND feature is enabled, the touch screen prompts “ DND mode is enabled”. The phone will
automatically reject the incoming calls and send the busy tones. The prompt “N New Missed Call(s)” is displayed
on the touch screen.
Enabling DND in a Call by Remote Control
Procedure
1.
On your remote control, press OK key to open Talk Menu during a call.
2.
Select DND.
The icon will appear in the status bar of the monitor, and “Do not disturb now!” will be prompted at intervals.
Page 40

Enabling DND in a Call by CP960
Procedure
On your CP960, tap More > DND during a conference.
The icon will appear in the status bar of the touch screen.
Rejecting Incoming Calls
Procedure
Do one of the following:
• On your remote control, press Hang up key or select Reject.
| Managing the Local Video Conference | 40
• On your CP960, tap Reject.
Ending Calls
Procedure
Do one of the following:
• On your remote control, press Hang up key.
• On your CP960, tap Ending Calls.
Managing the Local Video Conference
MCU (multipoint control unit) in the device can allow you to initiate local video conferences. Local video conference
should involve at least three parties, and the following introduces how to initiate and manage the local video
conference. You can also use the wireless Presentation Pod software to manage the local video conference. Local
video conference is not available on the VC200 Custom Edition for Yealink Cloud.
•
Initiating a Local Video Conference
•
Removing Conference Participants
•
Muting or Unmuting All Conference Participants
•
Muting a Conference Participant
•
Unmuting a Conference Participant
•
Ending the Local Video Conference
Page 41

| Managing the Local Video Conference | 41
Initiating a Local Video Conference
You can initiate a conference call by dialing a group or inviting participants during a call. For VC880/VC800/
PVT980/ PVT950 system: the number of the group members that you can invite depends on the imported multipoint
license. For VC500/VC200 endpoint: you can call 6 contacts (one video call and five voice calls) at most in a
conference call.
•
Initiating a Conference by Dialing a Group
•
Initiating a Conference by Inviting Contacts
Related concepts
Multipoint Licenses
Initiating a Conference by Dialing a Group
You can add multiple contacts to a group, and then dial this group to initiate a conference call.
•
Dialing a Group by Remote Control
•
Dialing a Group by CP960
Dialing a Group by Remote Control
Procedure
1.
On your remote control, navigate to Dial > Group Dial.
2.
Press the right key and select a desired contact group.
3.
Select the desired contacts.
4.
Press the right key.
5.
Select Start conference call.
Dialing a Group by CP960
Procedure
1.
On your CP960 tap New Call.
2.
Tap Call multiple members? Click here. Click here>> field.
3.
Do one of the following:
•
If you tap , enter a phone number and then tap Invite.
•
If you tap , select a desired contact.
•
If you tap , tap the desired history record to dial out.
4.
Tap .
Page 42
Initiating a Conference by Inviting Contacts
You can invite contacts during a call to initiate a conference.
•
Inviting Participants by Remote Control
•
Inviting Participants by CP960
Inviting Participants by Remote Control
Procedure
1.
On your remote control, press OK key to open Talk Menu during a call.
2.
Select Invite.
3.
Do one of the following:
• Select Dial, enter a phone number, and then dial out.
• Select Directory, select a desired contact, and then dial out.
| Managing the Local Video Conference | 42
• Select Group Dial, press the right key to select a desired contact group, check the desired contacts’
checkboxes, and then press the right key to select Start conference call.
• Select History, select the desired history record, and then dial out.
4.
Repeat the above steps until all the desired participants are added.
Note: You can press Dial key to go to the pre-dialing screen during a call.
Inviting Participants by CP960
Procedure
1.
On your CP960, tap Invite during a call.
2.
Do one of the following:
•
If you tap , enter a phone number and then tap Invite.
•
If you tap , tap a desired contact to dial out.
•
If you tap , tap the desired call history to dial out.
•
Tap Call multiple members? Click here. select the desired contacts you want to call, and then tap .
3.
Repeat the above steps until all the desired participants are added.
Page 43

| Managing the Local Video Conference | 43
Removing Conference Participants
If you are the moderator of a video conference, you can remove conference participants during a call.
•
Removing Conference Participants by Remote Control
•
Removing Conference Participants by CP960
Removing Conference Participants by Remote Control
Procedure
1.
On your remote control, press OK key to open Talk Menu during a call.
2.
Select Remove.
3.
Select the party you want to remove, and then press OK key.
Removing Conference Participants by CP960
Procedure
1.
On your CP960, tap Members list during a call.
All participants are displayed on the touch screen.
2.
Tap to remove the desired participant.
Muting or Unmuting All Conference Participants
If you are the moderator of a video conference, you can mute/unmute all conference participants except yourself.
Procedure
1.
On your CP960, tap Members list during a call.
All participants are displayed on the touch screen.
2.
Tap All mute/All unmute to mute/unmute all conference participants.
Muting a Conference Participant
If you are the moderator of a video conference, you can unmute a conference participant.
Procedure
1.
On your CP960, tap Members list during a call.
Page 44

| Managing the Local Video Conference | 44
All participants are displayed on the touch screen.
2.
Tap beside the participant that you want to mute.
The icon becomes . The participant is muted and other participants cannot hear his voice.
Unmuting a Conference Participant
If you are the moderator of a video conference, you can unmute a conference participant. The participants cannot
unmute themselves.
Procedure
1.
On your CP960, tap Members list during a call.
All participants are displayed on the touch screen.
2.
Tap beside the participant that you want to unmute.
The icon becomes . The participant is unmuted and other participants can hear his voice.
Ending the Local Video Conference
If you are the moderator of a video conference, you can end the conference, and then all the participants leave the
conference.
•
Ending the Conference by Remote control
•
Ending the Conference by CP960
Ending the Conference by Remote control
Procedure
1.
On your remote control, press Hang up key.
The monitor prompts whether or not you are sure to end all active calls.
2.
Confirm the action.
Ending the Conference by CP960
Procedure
1.
On your CP960, tap Ending Calls key.
2.
Tap OK.
Page 45

| Using the Yealink VC Cloud Management Service Platform | 45
Using the Yealink VC Cloud Management Service Platform
The Yealink VC Cloud Management Service is a value-added and cloud-based service platform for Cloud systems.
It offers significant convenience and cost-savings to integrators and business customers in terms of deployment,
configuration and usage.
When you register a Yealink Cloud account, you can use the video conference feature of Yealink Cloud.
There are three types of Yealink Cloud video conferences:
• Scheduled conference: you should schedule the conference via the Yealink VC Cloud Management Service or
Microsoft Outlook software.
• Meet Now: you can initiate a Meet Now conference at any time, without a reservation.
• Virtual Meeting Room: the VMR is created by your Yealink Cloud enterprise administrator. Yealink Cloud users
can join the VMR at any time without a reservation.
With the feature of Yealink Cloud videoconferencing, you can do the following:
• View and join scheduled conferences.
• Initiate and join meet now conferences.
• Join the permanent VMR.
• Manage Yealink Cloud video conferences.
• If you purchase a collaboration service, you can use the whiteboard and content sharing features during the
conference calls.
Note: If multiple devices (with the same Yealink Cloud account registered in) join the same conference, the
former joined device will exit the conference automatically once another device joins. The conference only
allows one of them to join the conference.
•
Dialing Yealink Cloud Accounts
•
Viewing Scheduled Conferences
•
Joining Scheduled Conferences
•
Meet Now
•
Virtual Meeting Room (VMR)
•
Managing Yealink Cloud Video Conferences
Dialing Yealink Cloud Accounts
You can dial other Yealink Could accounts. If the contacts are in the same Yealink Cloud directory, you can dial the 9digit account number or dial the last 4 digits. Otherwise, you can only dial the 9-digit account number. Cloud call is
encrypted by default, and you will see an encryption icon during a Cloud call.
Related tasks
Placing a Call by Entering a Number
Page 46

| Using the Yealink VC Cloud Management Service Platform | 46
Viewing Scheduled Conferences
If you have scheduled conferences or are invited to a scheduled conference, the conference schedule will be displayed
on your device (with Yealink Cloud account registered), and the mailbox linked to the Yealink Cloud account will
receive an email about the conference details.
Procedure
On your monitor/CP960, do one of the following:
• On the idle screen, view the conference schedules. The upcoming or ongoing conferences of today are
displayed in the conference schedule.
• On the idle screen, select one schedule to see the schedule list, then you can see the ongoing or upcoming
conferences of the latest month.
Joining Scheduled Conferences
•
Joining a Scheduled Conference from the Conference Reminder
•
Joining a Scheduled Conference from the Conference Schedule
•
Joining a Scheduled Conference from the Notification Center
•
Joining a Scheduled Conference by Dialing
Joining a Scheduled Conference from the Conference Reminder
A reminder pops up 5 minutes before the conference starts on your monitor/CP960.
Procedure
Do one of the following:
• Select Join to join the scheduled conference.
• Select Detail to view the conference details, and select Join.
• Select Ignore to remove the reminder and then it will not pop up any longer.
Note: When the system is in a call, the conference reminder will not pop up. If the call ends but the
scheduled conference is still ongoing, the reminder will pop up again. But if the scheduled conference
ends, the reminder will not pop up.
Page 47

| Using the Yealink VC Cloud Management Service Platform | 47
Joining a Scheduled Conference from the Conference Schedule
By default, you can join an upcoming conference 5 minutes in advance. This time is set by Yealink Cloud enterprise
administrator.
Procedure
1.
On your remote control or CP960, navigate to Schedule ( ).
2.
Select the desired conference.
By default, you can join the conference 5 minutes before it starts.
3.
Select Join.
Joining a Scheduled Conference from the Notification Center
By default, when the conference is about to take place in 5 minutes, the status bar of CP960 displays the icon
and the notification center displays the conference information. You can also join the conference by tapping the
conference notification.
Procedure
1.
On your CP960, swipe down from the top of the screen to enter the notification center.
2.
Tap the desired conference notification to join the conference.
Joining a Scheduled Conference by Dialing
If you do not register a Yealink Cloud account, or you register a Yealink Cloud account but you do not receive the
conference invitation, you can join the scheduled conference by dialing.
About this task
You can choose one of the following to get the conference information:
• The mailbox linked to Yealink Cloud accounts will receive an email, including the IP address, the conference ID,
the conference password and the method.
• Your system/CP960 will display the conference information, including the organizer, the conference ID and the
conference password.
• Contact the conference participants.
Procedure
Do one of the following:
• If you register a Yealink cloud account, dial the conference ID to join the conference. You can get the
conference information from the device, the email or other conference participants.
• If you do not register a Yealink Cloud account, dial server address to join the conference. You can get the
conference information from other conference participants.
Page 48

| Using the Yealink VC Cloud Management Service Platform | 48
• For SIP devices, dial conference ID** conference password@server address or server
address##conference ID**conference password to join the conference. You can get the conference
information from the email or other conference participants.
Meet Now
When you register a Yealink Cloud account, you can initiate a Meet Now conference at any time, without any
reservation. Contact your administrator to check whether the Meet Now conference is enabled for your account.
•
Initiating Meet Now Conferences
•
Joining a Meet Now Conference by Dialing
Initiating Meet Now Conferences
You can initiate a Meet Now conference at any time without any reservation.
Procedure
Do one of the following:
• On your remote control, go to Meet Now.
• On your CP960, tap Meet Now.
After the Meet Now conference is initiated successfully, you can invite participants.
Note: In a Meet Now conference, if you receive and answer a call from a Yealink Cloud contact, the
contact will join the conference automatically.
Joining a Meet Now Conference by Dialing
You can join a Meet Now conference by dialing. You can obtain the conference information from the conference
participants.
Procedure
Do one of the following:
• If you register a Yealink cloud account, dial the conference ID to join the conference.
• If you do not register a Yealink Cloud account, dial server address to join the conference.
• For SIP devices, dial conference ID** conference password@server address or server
address##conference ID**conference password to join the conference.
Page 49

| Using the Yealink VC Cloud Management Service Platform | 49
Virtual Meeting Room (VMR)
The VMR is created by the Yealink Cloud enterprise administrator on the Yealink VC Cloud management service
platform, so that the Yealink Cloud user can call into the VMR to initiate video conferences at any time. For more
information, refer to Yealink VC Cloud Management Service User Guide.
•
Joining a VMR by Remote Control
•
Joining a VMR by CP960
•
Joining a Virtual Meeting Room by Dialing
Joining a VMR by Remote Control
Procedure
1.
On your remote control, go to Dial > Directory.
2.
Select Cloud from the drop-down menu.
3.
Select VMR.
4.
Select the desired VMR.
5.
Press OK key to place a video call.
If you want to place a voice call, press the right key to select Voice Call.
Joining a VMR by CP960
Procedure
1.
On your CP960, tap Directory.
2.
Select Cloud from the drop-down menu.
3.
Tap VMR.
4.
Tap the desired VMR to place a video call.
If you want to place a voice call, tap beside the desired VMR and then tap Voice Call.
Joining a Virtual Meeting Room by Dialing
Procedure
Do one of the following:
• If you register a Yealink Cloud account, dial the conference ID to join the conference.
Page 50

| Using the Yealink VC Cloud Management Service Platform | 50
• If you do not register a Yealink Cloud account and the VMR requires no password: for SIP devices, dial
conference ID**@server address or server address##conference ID to join the VMR.
• If you do not register a Yealink Cloud account and the VMR requires a password: for SIP devices, dial
conference ID** conference password@server address or server address##conference ID**conference
password to join the VMR.
Managing Yealink Cloud Video Conferences
The following introduces how to manage Yealink cloud video conferences, including scheduled conferences, Meet
Now conferences and Virtual Meeting Room (VMR).
The modes of Yealink Cloud video conferences are education mode, training mode and discussion mode. In the
conference, the participant roles are as follow:
• Organizer: The organizer is someone who schedules the conference. The organizer in the training mode
conference and the discussion mode is moderator by default. The organizer can designate any participant to be the
moderator and give them control over the meeting.
• Moderator: The moderator is someone who has meeting control permissions.
• Guest: Participants other than the moderator have no control over the meeting.
•
Appointing a Lecturer
•
Switching the Roles of Teacher and Student
•
Switching Free Speak and Raise Hand Mode on CTP20
•
Applying for Speaking
•
Managing the Application
•
Inviting Conference Participants
•
Removing Conference Participants
•
Muting or Unmuting All Conference Participants
•
Muting or Unmuting a Conference Participant
•
Blocking or Unblocking Audio on CTP20
•
Disabling or Enabling the Camera on CTP20
•
Controlling Cameras by CTP20
•
Enabling or Disabling Live Broadcast on CTP20
•
Viewing the Message List
•
Leaving the Conference
•
Ending Conferences
Appointing a Lecturer
In a training mode conference, if you are the organizer or the moderator, you can appoint yourself as the lecturer via
your CP960.
About this task
Note: The modes of scheduled conferences and VMRs are Discussion mode and Training mode. Only
the Yealink Cloud enterprise administrator can configure the conference mode on Yealink VC Cloud
Management Service Platform.
• In Discussion mode conference, all conference participants can speak freely.
• In Training mode conference, all conference participants are muted by default except for the organizer and the
moderator. The organizer or the moderator can appoint lecturers, and the lecturers can speak freely.
Page 51

| Using the Yealink VC Cloud Management Service Platform | 51
•
Appointing a Lecturer by CP960
Appointing a Lecturer by CP960
Procedure
1.
On your CP960, tap More > Begin Speaking during a conference.
2.
To finish speaking, tap More > Finish Speaking.
Switching the Roles of Teacher and Student
If you are the organizer in the Education mode video conference, you can switch the role of any teacher or student; if
you are the teacher in the Education mode video conference, you can switch the role of any teacher or student other
than the organizer.
Procedure
1.
In the Conference Control page, tap Participant.
2.
Tap after the desired participant.
3.
Select Set as student or Set as teacher.
Switching Free Speak and Raise Hand Mode on CTP20
If you are the teacher in the Education mode video conference, during the conference, the students can speak freely
by default. You can switch to the raise hand mode, so that only after getting your permission, can the students speak
freely.
Procedure
1.
In the Conference Control page, tap Participant.
2.
Tap Free Speak in the lower-left corner, select Raise hand to switch to the raise hand mode.
After switching to the raise hand mode, students who want to speak must go through the teacher's consent to speak
normally.
Applying for Speaking
In Training mode conferences or VMRs, all guests are muted by default except for the moderator and the organizer.
In Education mode conferences, the teacher enables the hand-to-speak mode, you need to apply for speaking.
Procedure
Do one of the following:
• On your remote control, press MUTE Key.
Page 52

| Using the Yealink VC Cloud Management Service Platform | 52
• On the touch screen of CP960 , tap Apply for speaking.
• On your CP960, tap one of the Mute keys.
• On your CPE90 wired expansion microphones/CPW90-BT Bluetooth wireless microphones, tap the Mute key.
Managing the Application
If you are the moderator or an organizer in a Training mode conference, you can allow or reject the application.
Note: Managing the application is not applicable to the Meet Now conference.
•
Managing the Application by CP960
•
Managing the Application by CTP20
Managing the Application by CP960
Procedure
On your CP960, do one of the following:
• Tap Allow to allow the applicant to speak.
• Tap Members list.
Tap to allow the applicant to speak or tap Clear handup to clear all applications.
Managing the Application by CTP20
Procedure
1.
On the left side of your CTP20, tap Participant.
2.
On the Conference Members page, tap beside the desired participant.
3.
Select Allow to speak or Forbid to speak.
If you need clear up all the applications, tap Clear hands up.
Inviting Conference Participants
During the Yealink Cloud video conference, any participants can invite other Yealink Cloud contacts to join the
conference.
•
Inviting Conference Participants by Remote Control
•
Inviting Conference Participants by CP960
Page 53

| Using the Yealink VC Cloud Management Service Platform | 53
Inviting Conference Participants by Remote Control
During the Yealink Cloud video conference, any participants can invite other Yealink Cloud contacts to join the
conference.
Procedure
1.
On your remote control, press OK key to open Talk Menu during a call.
2.
Select Invite.
3.
Do one of the following:
• If you select Dial, enter the account number, and then dial out.
• If you select Group Dial, select the desired department and select the desired Yealink Cloud contacts, and then
select Start conference call.
4.
Repeat above steps until all the desired participants are added.
Inviting Conference Participants by CP960
Procedure
1.
On your CP960, tap Layout during a conference.
2.
Do one of the following:
•
If you tap , select the desired department, tap the desired Yealink Cloud contact, and then tap to dial out.
•
If you tap , enter the account number, tap Add Members, and repeat this step to add more members, and
then tap to dial out.
Removing Conference Participants
If you are the organizer of Yealink Cloud Video Conference, you can remove any participant in the conference; if you
are the moderator/teacher, you can remove any participant other than the organizer.
•
Removing Conference Participants by Remote Control
•
Removing Conference Participants by CP960
Removing Conference Participants by Remote Control
Procedure
1.
On your remote control, press OK key to open Talk Menu during a call.
2.
Select Remove and then press the right key.
3.
Select the desired participant to remove.
Page 54

| Using the Yealink VC Cloud Management Service Platform | 54
Removing Conference Participants by CP960
Procedure
1.
On your CP960, tap Members list during a call.
All participants are displayed on the touch screen.
2.
Tap beside the participant that you want to remove.
Muting or Unmuting All Conference Participants
If you are the organizer/moderator of a Yealink Cloud video conference, you can mute or unmute all conference
participants except for yourself via CP960. In Training mode or Education mode conference, the muted participant
cannot unmute themselves.
Procedure
1.
During a call, tap Members list on your CP960.
All participants are displayed on the touch screen.
2.
Tap All mute or All unmute to mute/unmute all conference participants.
Muting or Unmuting a Conference Participant
If you are the organizer/moderator of a Yealink Cloud video conference, you can mute or unmute a conference
participant via CP960. In Training mode or Education mode conference, the muted participant cannot unmute
themselves.
Procedure
1.
During a call, tap Members list on your CP960.
All participants are displayed on the touch screen.
2.
Tap beside the desired participant.
The icon becomes . The participant is muted and other participants cannot hear his voice.
3.
Tap beside the participant that you want to unmute.
The icon becomes . The participant is unmuted and other participants can hear his voice.
Page 55

| Using the Yealink VC Cloud Management Service Platform | 55
Blocking or Unblocking Audio on CTP20
The moderator/teacher can block/unblock audio of any participant to control whether the participant can hear the
voice in the meeting.
Procedure
1.
In the Conference Control page, tap Participant.
2.
Tap after the desired participant, select Block Audio/Unblock Audio.
Disabling or Enabling the Camera on CTP20
The moderator/teacher can enable or disable the participant's camera to control whether other participants can see the
video of the participant.
Procedure
1.
In the Conference Control page, tap Participant.
2.
Tap / after the desired participant to disable/enable the camera.
Controlling Cameras by CTP20
The moderator/teacher can control the camera of the participants, including: moving up and down, moving left and
right, and zooming in/out.
Before you begin
Make sure that the participant's camera to be controlled is not turned off and the Far Control Near Camera feature is
enabled.
Procedure
1.
In the Conference Control page, tap Participant.
2.
Tap after the desired participant, select Camera Control.
3.
Tap the navigation keys to adjust the camera angle.
4.
Tap or to adjust the focal length.
Related tasks
Disabling or Enabling the Camera on CTP20
Allowing the Remote System to Control Your Camera
Page 56

| Using the Yealink VC Cloud Management Service Platform | 56
Enabling or Disabling Live Broadcast on CTP20
The host can enable the live broadcast for the conference. Users who watch the live broadcast can scan the live code
directly without having to join the conference. If you do not want the meeting to be viewed by people other than the
participants, you can disable the live broadcast for the conference.
Before you begin
The conference organizer should enable the RTMP live feature when scheduling a conference.
Procedure
1.
In the Conference Control page, tap Participant.
2.
Tap Open RTMP.
The screen displays the live broadcast with the live broadcast time and the live QR code.
3.
If no live broadcast is required, tap RTMP is active and select Stop RTMP.
Tip: During the live broadcast, tap RTMP is active to display the QR code again.
Related tasks
Watching the Live Broadcast by Scanning the Code
Viewing the Message List
Anyone in the conference can see the message list to know the conference issue, for example, when a participant join
or leave the conference.
Procedure
On the left side of your CTP20, tap Participant.
The message list is displayed on the right side of the page.
•
Viewing the Message List by Remote Control
•
Viewing the Message List by CP960
Viewing the Message List by Remote Control
Procedure
1.
On your remote control, press OK key to open Talk Menu during a call.
2.
Select Message List.
Viewing the Message List by CP960
Procedure
On your CP960, tap More > Message List during a conference.
Page 57

| Using the Yealink VC Cloud Management Service Platform | 57
Leaving the Conference
When some conference participants leave the conference by the remote control/video conferencing phone at any time,
other participants keep going.
•
Leaving Conference by Remote Control
•
Leaving Conferences by CP960
Leaving Conference by Remote Control
Procedure
Do one of the following according to your role:
• If you are a moderator (or an organizer) of a Yealink Cloud video conference, press Hang up key and select
Leave, others keep going.
• If you are not a moderator (or an organizer) of a Yealink Cloud video conference, press Hang up key.
Leaving Conferences by CP960
Procedure
Do one of the following according to your role:
• If you are a moderator (or an organizer) of a Yealink Cloud video conference, tap End Call, and select Leave,
others keep going.
• If you are not a moderator (or an organizer) of a Yealink Cloud video conference, tap End Call.
Ending Conferences
Only the organizer (moderator or teacher) of a Yealink Cloud video conference can end the conference, making other
participants leave the conference.
•
Ending Conference by Remote Control
•
Ending Conference by CP960
Ending Conference by Remote Control
Procedure
On your remote control, press the Hang up key and select End conference.
Ending Conference by CP960
Procedure
On your CP960, tap End Call, and select End conference.
Page 58

| Using Yealink Meeting Server | 58
Using Yealink Meeting Server
You can dial other YMS accounts or use the YMS video conferencing feature, after you register a YMS account.
YMS account is not available on the VC200 Custom Edition for Yealink Cloud.
About this task
There are three types of YMS conferences:
• Scheduled conference: you should schedule the conference via the YMS or Microsoft Outlook software.
• Meet Now: you can initiate a Meet Now conference at any time, without a reservation.
• Virtual Meeting Room: the VMR is created by your enterprise administrator. YMS users can join the VMR at
any time without a reservation.
With the feature of YMS videoconferencing, you can do the following:
• View and join scheduled conferences.
• Initiate and join meet now conferences.
• Join the VMR.
• Manage YMS video conferences.
Note: If multiple devices (with the same YMS account registered in) join the same conference, the former
joined device will leave the conference automatically once another device joins. The conference only allows
one of them to join the conference.
•
Dialing YMS Accounts
•
Viewing Scheduled Conferences
•
Joining Scheduled Conferences
•
Watching the Live Broadcast by Scanning the Code
•
Meet Now Conference
•
Virtual Meeting Room (VMR)
•
Managing YMS Video Conferences
Dialing YMS Accounts
You can dial other YMS accounts. YMS call is encrypted by default, and you will see an encryption icon during a
YMS call.
Related tasks
Placing a Call by Entering a Number
Viewing Scheduled Conferences
If you have scheduled conferences or are invited to a scheduled conference, the conference schedule will be displayed
on your device (with a YMS account registered), and the mailbox linked to the YMS account will receive an email
about the conference details.
Procedure
On your monitor/CP960, do one of the following:
Page 59

• On the idle screen, view the conference schedules. The upcoming or ongoing conferences of today are
displayed in the conference schedule.
• On the idle screen, select one schedule to see the schedule list, then you can see the ongoing or upcoming
conferences of the latest month.
Joining Scheduled Conferences
•
Joining a Scheduled Conference from the Conference Reminder
•
Joining a Scheduled Conference from a Conference Invitation
•
Joining a Scheduled Conference from the Conference Schedule
•
Joining a Scheduled Conference from the Notification Center
•
Joining a Scheduled Conference by Dialing
•
Joining Scheduled Conferences by Scanning the QR Code
| Using Yealink Meeting Server | 59
Joining a Scheduled Conference from the Conference Reminder
On your monitor/CP960a, a reminder pops up 5 minutes before the conference starts.
Procedure
Do one of the following:
• Select Join to join the scheduled conference.
• Select Detail to view the conference details, and select Join.
Select Ignore to remove the reminder and then it will not pop up any longer.
Note: When the system is in a call, the conference reminder will not pop up. If the call ends but the
scheduled conference is still ongoing, the reminder will pop up again. But if the scheduled conference
ends, the reminder will not pop up.
Joining a Scheduled Conference from a Conference Invitation
If the administrator enables the auto answer feature on Yealink Meeting Server, when the scheduled conference starts,
the server will send a conference invitation to the device. If you enable the auto answer feature, your system will
join the scheduled conference automatically once it receives a conference invitation. If you disable the auto answer
feature, use your remote control/CP960 to join the conference manually.
Note: For more information about configuring the auto answer feature, contact your administrator.
Related concepts
Answering a Call Automatically When not in a Call
Related tasks
Answering Multiple Calls Automatically
Page 60

| Using Yealink Meeting Server | 60
Joining a Scheduled Conference from the Conference Schedule
By default, you can join a upcoming conference 5 minutes in advance. This time is set by the enterprise administrator.
Procedure
1.
On your remote control or CP960, navigate to Schedule.
2.
Select the desired conference.
By default, you can join the conference 5 minutes before it starts.
3.
Select Join.
Joining a Scheduled Conference from the Notification Center
By default, 5 minutes before the conference starts, the status bar of CP960 displays the icon and the notification
center displays the conference information. You can also join the conference by tapping the conference notification.
Procedure
1.
On your CP960, swipe down from the top of the screen to enter the notification center.
2.
Tap the desired conference notification to join the conference.
Joining a Scheduled Conference by Dialing
About this task
If you schedule a conference or you are invited to a scheduled conference, you can obtain the conference information
in the following ways:
• The mailbox linked to the YMS account will receive an email, including the IP address, the conference ID, the
conference password and the method to join the conference.
• Your system/CP960 will display the conference information, including the conference ID and the conference
password.
• Contact the conference participants.
Procedure
Do one of the following:
• If you register a YMS account, dial the conference ID to join the conference. You can get the conference
information from the device, the email or other conference participants.
• If you do not register a YMS account, dial server address to join the conference. You can get the conference
information from other conference participants.
Page 61

| Using Yealink Meeting Server | 61
• For SIP devices, dial conference ID** conference password@server address or server
address##conference ID**conference password to join the conference. You can get the conference
information from the email or other conference participants.
• For H.323 devices, dial server address##conference ID**conference password to join the conference. You
can get the conference information from the email or other conference participants.
Joining Scheduled Conferences by Scanning the QR Code
You can find the QR code from the conference schedule on the system/CP960/CTP20 to share conference
information. You can share QR code with people who you want to invite to a meeting or use a mobile device (mobile,
tablet) to enter the meeting by scanning the code.
About this task
If the meeting is locked by the moderator/teacher, after joining the meeting, you are in a waiting state and you need
the permission of the moderator/teacher to enter the meeting.
Procedure
1.
Select the meeting schedule by remote control/CP960 conference phone/CTP20, and select the corresponding
meeting.
2.
Scan the QR code to join the scheduled meeting.
Watching the Live Broadcast by Scanning the Code
Some activities, for example, lectures or training, have large audiences but limited interaction between the lecturers
and the audience. Moreover, the cost is high if it is held by a general video conference. In this situation, the audiences
who do not need to join the activity can choose to watch the live broadcast.
Before you begin
The conference organizer should enable the RTMP live feature when scheduling a conference. For more information
on how to enable the RTMP live feature, refer to Yealink Meeting Server User Guide.
About this task
If the conference is scheduled successfully, the QR code will be sent to the devices with the conference participant
accounts logged in, and the mailbox linked to the conference participants will receive an email containing the QR
code and a link.
Procedure
Do one of the following:
• In the received email, click Click here or scan the QR code to watch the live broadcast.
• If the RTMP live feature is enabled in the conference via CTP20, you can use a mobile device (for example,
mobile phone, tablet) to scan the QR code to watch the live broadcast.
Page 62

| Using Yealink Meeting Server | 62
Related tasks
Enabling or Disabling Live Broadcast on CTP20
Meet Now Conference
When you register a YMS account, you can initiate a Meet Now conference at any time, without a reservation.
Contact your administrator to check whether the Meet Now conference is enabled for your account.
•
Initiating Meet Now Conferences
•
Joining a Meet Now Conference by Dialing
Initiating Meet Now Conferences
You can initiate a Meet Now conference at any time without any reservation.
Procedure
Do one of the following:
• On your remote control, go to Meet Now.
• On your CP960, tap Meet Now.
After the Meet Now conference is initiated successfully, you can invite participants.
Note: In Meet Now conference, if you receive a call from a YMS contact, a reminder that you can allow
or refuse the contact to join your conference will prompt.
Joining a Meet Now Conference by Dialing
You can join a Meet Now conference by dialing. You can obtain the conference information from the conference
participants.
Procedure
Do one of the following:
• If you register a YMS account, dial the conference ID to join the conference.
• For SIP devices, dial conference ID** @server address or server address##conference ID to join the
conference.
• For H.323 devices, dial server IP address##conference ID to join the conference.
Virtual Meeting Room (VMR)
The VMR is created by the enterprise administrator on Yealink Meeting Server, and the YMS user can call into the
VMR to initiate a video conference at any time, without a reservation. For more information, refer to Yealink Meeting
Server User Guide.
•
Joining a VMR from Directory
Page 63

•
Joining a VMR by Dialing
Joining a VMR from Directory
•
Joining a VMR by Remote Control
•
Joining a VMR by CP960
Joining a VMR by Remote Control
Procedure
1.
On your remote control, go to Dial > Directory.
2.
Select Enterprise directory from the drop-down menu.
3.
Select VMR.
4.
Select the desired VMR.
5.
Press OK key to place a video call.
| Using Yealink Meeting Server | 63
If you want to place a voice call, press the right key to select Voice Call.
Joining a VMR by CP960
Procedure
1.
On your CP960, tap Directory.
2.
Select Enterprise directory from the drop-down menu.
3.
Tap VMR.
4.
Tap the desired VMR to place a video call.
If you want to place a voice call, tap beside the desired VMR and then tap Voice Call.
Joining a VMR by Dialing
Procedure
Do one of the following:
• If you register a YMS account, dial the conference ID to join the conference.
• If you do not register a YMS account and the VMR requires no password:
• For SIP devices, dial conference ID** @server address or server address##conference ID to join the
conference.
• For H.323 devices, dial the server IP address##conference ID to join the conference.
Page 64

| Using Yealink Meeting Server | 64
• If you do not register a YMS account and the VMR requires a password:
• For SIP devices, dial conference ID**conference password@server address or server
address##conference ID**conference password to join the conference.
• For H.323 devices, dial the server IP address##conference ID**conference password to join the VMR.
Managing YMS Video Conferences
The following introduces how to manage YMS video conference, including scheduled conferences, Meet Now
conferences and VMRs.
The modes of Yealink YMS video conferences are training mode and discussion mode. In the conferences, the
participant roles are as follow:
• Organizer: The organizer is someone who schedules the conference. The organizer in the training mode and
discussion mode conference is the moderator by default. The organizer can designate any participant to be the
moderator and give the participant control over the meeting.
• Moderator: The moderator is someone who has meeting control permissions.
• Guest: Participants other than the moderator have no control over the meeting.
•
Appointing a Lecturer
•
Applying for Speaking
•
Managing the Application
•
Inviting Conference Participants
•
Removing Conference Participants
•
Muting or Unmuting All Conference Participants
•
Muting or Unmuting a Conference Participant
•
Blocking or Unblocking Audio on CTP20
•
Enabling or Disabling the Camera on the CTP20
•
Controlling Cameras by CTP20
•
Enabling or Disabling Live Broadcast on CTP20
•
Viewing the Message List
•
Leaving the Conference
•
Ending Conferences
Appointing a Lecturer
In a Training mode conference, if you are the organizer or moderator, you can appoint yourself as the lecturer via
your CP960.
About this task
Note: The modes of scheduled conferences and VMRs are Discussion mode and Training mode. Only the
enterprise administrator can configure the conference mode on YMS.
• In Discussion mode conference, all conference participants can speak freely.
• In Training mode conference, all conference participants are muted by default except for the organizer or the
moderator. The organizer or the moderator can appoint lecturers, and the lecturers can speak freely.
•
Appointing a Lecturer by CP960
Page 65

| Using Yealink Meeting Server | 65
Appointing a Lecturer by CP960
Procedure
1.
On your CP960, tap More > Begin Speaking during a conference.
2.
To finish speaking, tap More > Finish Speaking.
Applying for Speaking
If you are the muted conference participant, you can speak after the moderator agrees your application for speaking.
About this task
In Training mode conferences or VMRs, all guests are muted by default except the moderator or the organizer.
Procedure
Do one of the following:
• On your remote control, press Mute Key.
• On your CP960, tap Apply for speaking.
• On the touch screen of CP960, tap one of the Mute keys on CP960 codec.
• On your CPE90 wired expansion microphones/CPW90-BT Bluetooth wireless microphones, tap the Mute key.
Note: Applying for speaking is not applicable to the Meet Now conference.
Managing the Application
If you are the moderator or an organizer in a Training mode conference, you can allow or reject the application.
Note: Managing the application is not applicable to the Meet Now conference.
•
Managing the Application by CP960
•
Managing the Application by CTP20
Managing the Application by CP960
Procedure
On your CP960, do one of the following:
• Tap Allow to allow the applicant to speak.
• Tap Members list.
Tap to allow the applicant to speak or tap Clear handup to clear all applications.
Page 66

Inviting Conference Participants
During the YMS video conference, any participants can invite other YMS contacts to join the conference.
•
Inviting Conference Participants by Remote Control
•
Inviting Conference Participants by CP960
Inviting Conference Participants by Remote Control
During the YMS video conference, any participants can invite other YMS contacts to join the conference.
Procedure
1.
On your remote control, press OK key to open Talk Menu during a call.
2.
Select Invite.
3.
Do one of the following:
• If you select Dial, enter a YMS account, and then dial out.
• If you select Group Dial, select the desired department and select the desired YMS contacts, and then press
| Using Yealink Meeting Server | 66
the right key to select Start conference call.
4.
Repeat above steps until all the desired participants are added.
Inviting Conference Participants by CP960
Procedure
1.
On your CP960, tap New Call.
2.
Do one of the following:
•
If you tap , select the desired department, tap the desired YMS contacts, and then tap to dial out.
•
If you tap , enter a YMS account, tap Add members, repeat this step to add more participants and tap to
dial out.
Removing Conference Participants
You can remove conference participants if you are the organizer/moderator of a YMS video conference.
•
Removing Conference Participants by Remote Control
•
Removing Conference Participants by CP960
Removing Conference Participants by Remote Control
Procedure
1.
On your remote control, press OK key to open Talk Menu during a call.
Page 67

| Using Yealink Meeting Server | 67
2.
Select Remove and then press the right key.
3.
Select the desired participant to remove.
Removing Conference Participants by CP960
Procedure
1.
On your CP960, tap Members list during a call.
All participants are displayed on the touch screen.
2.
Tap beside the participant that you want to remove.
Muting or Unmuting All Conference Participants
If you are the organizer/moderator of a YMS video conference, you can mute or unmute all conference participants
except for yourself via CP960. In Training mode conference, the muted participants cannot unmute themselves.
Procedure
1.
During a call, tap Members list on your CP960.
All participants are displayed on the touch screen.
2.
Tap All mute or All unmute to mute/unmute all conference participants.
Muting or Unmuting a Conference Participant
If you are the organizer/moderator of a YMS video conference, you can mute or unmute a conference participant via
CP960. In Training mode conference, the muted participants cannot unmute themselves.
Procedure
1.
During a call, tap Members list on your CP960.
All participants are displayed on the touch screen.
2.
Tap beside the desired participant.
The icon becomes . The participant is muted and other participants cannot hear his voice.
3.
Tap beside the participant that you want to unmute.
The icon becomes . The participant is unmuted and other participants can hear his voice.
Page 68

| Using Yealink Meeting Server | 68
Blocking or Unblocking Audio on CTP20
The moderator can block/unblock audio of any participant to control whether the participant can hear the voice in the
meeting.
Procedure
1.
In the Conference Control page, tap Participant.
2.
Tap after the desired participant, select Block Audio/Unblock Audio.
Enabling or Disabling the Camera on the CTP20
The moderator can enable or disable the participant's camera to control whether other participants can see the video of
the participant.
Procedure
1.
In the Conference Control page, tap Participant.
2.
Tap / after the desired participant to disable/enable the camera.
Controlling Cameras by CTP20
The moderator can control the camera of the participants, including: moving up and down, moving left and right, and
zooming in/out.
Before you begin
Make sure that the camera you want to control is not turned off and the Far Control Near Camera feature is enabled.
Procedure
1.
In the Conference Control page, tap Participant.
2.
Tap after the desired participant, select Camera Control.
3.
Tap the navigation keys to adjust the camera angle.
4.
Tap or to adjust the focal length.
Related tasks
Disabling or Enabling the Camera on CTP20
Allowing the Remote System to Control Your Camera
Page 69

| Using Yealink Meeting Server | 69
Enabling or Disabling Live Broadcast on CTP20
The moderator can enable the live broadcast for the conference. Users who watch the live broadcast can scan the live
QR code directly without having to join the conference. If you do not want the meeting to be viewed by people other
than the participants, you can disable the live broadcast for the conference.
Before you begin
The conference organizer should enable the RTMP live feature when scheduling a conference.
Procedure
1.
In the Conference Control page, tap Participant.
2.
Tap Open RTMP.
The screen displays the live broadcast with the live broadcast time and the live QR code.
3.
If no live broadcast is required, tap RTMP is active and select Stop RTMP.
Tip: During the live broadcast, tap RTMP is active to display the QR code again.
Related tasks
Watching the Live Broadcast by Scanning the Code
Viewing the Message List
Anyone in the conference can see the message list to know the conference information, for example, when a
participant join or leave the conference.
•
Viewing the Message List by Remote Control
•
Viewing the Message List by CP960
Viewing the Message List by Remote Control
Procedure
1.
On your remote control, press OK key to open Talk Menu during a call.
2.
Select Message List.
Viewing the Message List by CP960
Procedure
On your CP960, tap More > Message List during a conference.
Leaving the Conference
When some conference participants leave the conference by the remote control/video conferencing phone at any time,
other participants keep going.
•
Leaving Conference by Remote Control
•
Leaving Conferences by CP960
Page 70

| Using Yealink Meeting Server | 70
Leaving Conference by Remote Control
Procedure
Do one of the following according to your role:
• If you are a moderator (or an organizer) of a YMS video conference, press Hang up key and select Leave,
others keep going.
• If you are not a moderator (or an organizer) of a YMS video conference, press Hang up key.
Leaving Conferences by CP960
Procedure
Do one of the following according to your role:
• If you are a moderator (or an organizer) of a YMS video conference, tap End Call and select Leave, others
keep going.
• If you are not a moderator (or an organizer) of a YMS video conference, tap End Call.
Ending Conferences
If you are the organizer/moderator of a YMS video conference, you can end the conference, and then all participants
leave the conference.
•
Ending Conferences by Remote Control
•
Ending Conference by CP960
Ending Conferences by Remote Control
Procedure
On your remote control, press the Hang up key and select End conference.
Ending Conference by CP960
Procedure
On your CP960, tap End Call, and select End conference.
Page 71

| Using the Third-Party Video Conference Platforms | 71
Using the Third-Party Video Conference Platforms
Yealink video conferencing systems are compatible with StarLeaf/Zoom/BlueJeans/Pexip/EasyMeet video
conferencing platform.
Note: The third-party video conference platforms are not supported by the VC200 Custom Edition for
Yealink Cloud.
Features StarLeaf Zoom Pexip BlueJeans EasyMeet Videxio
Place calls to accounts in the same
server.
Call into the VMR to join video
conference with other devices.
Dial Microsoft Skype for Business or
Lync account.
Receive conference schedule from the
cloud video conference platform.
Related tasks
Placing a Call by Entering a Number
√ × √ × √ √
√ √ √ √ √ √
√ × √ × × ×
× × × √ √ ×
Presenting
You can present the content in your computer during a call. Using dual screen for sharing contents is recommended.
Only one content can be shared at a time, and the content shared later will replace the previous one.
•
Wired Sharing
•
Wireless Sharing
Wired Sharing
If you purchase a VCH50 video conferencing hub for sharing content, connect it to the computer according to the
quick start guide in the product package.
•
Sharing Content When not in a Call
•
Stopping Sharing Content When not in a Call
•
Sharing Content in a Call
•
Stopping Sharing Content in a Call
Related concepts
Video Input Source
Sharing Content When not in a Call
You can share the content in the computer when your system is idle.
Before you begin
Make sure the computer is powered on and connected to your system.
Page 72

Procedure
The system will connect to the wired sharing and display the sharing content automatically. If the system does not
start sharing content automatically, do one of the following to start sharing content manually:
•
If on your remote control is set as Presentation key by your system administrator, press to start
sharing content.
• On your CP960, tap Presentation to start sharing content.
Stopping Sharing Content When not in a Call
Procedure
Do one of the following:
| Presenting | 72
• Disconnect the computer from your system.
•
If on your remote control is set as Presentation key by your system administrator, Press to stop
sharing content.
• On your CP960, tap Presentation to stop sharing content.
Sharing Content in a Call
You can share content from a computer when your system is in a call.
Before you begin
Make sure the computer is powered on and connected to your system.
Procedure
Generally, the system will connect to the wired sharing and display the sharing content automatically. If the
system does not display the sharing content automatically, do one of the following to start sharing content
manually:
•
If on your remote control is set as Presentation key by your system administrator, press to start
sharing content.
• On your remote control, press OK key to open Talk Menu, and then select Presentation.
• On your CP960, tap Presentation to start sharing content.
Note: In the audio call, only the local monitor can display the sharing content. In the video call, both the
local and the remote monitor can display the sharing content.
Page 73

Stopping Sharing Content in a Call
Procedure
Do one of the following:
• Disconnect the computer from your system.
•
On your remote control, if is set as Presentation key by your system administrator, press to stop
sharing content.
• On your remote control, press OK key to open Talk Menu, and then select Presentation to stop sharing
content.
• On your CP960, tap Presentation to stop sharing content.
| Presenting | 73
Wireless Sharing
You can use Yealink WPP20 wireless presentation pod or Apple device (use the Airplay feature) for content sharing.
If you purchase a WPP20 wireless presentation pod for content sharing, connect it to the computer according to the
quick start guide in the product package. For more information, refer to Yealink WPP20 Wireless Presentation Pod
Quick Start Guide.
•
Sharing Content via WPP20
•
Switching Shared Content via WPP20
•
Stopping Sharing Content via WPP20
•
Sharing Content via Apple Device
•
Stopping Sharing Content via Apple Device
Related concepts
Video Input Source
Sharing Content via WPP20
Before you begin
Make sure the computer is powered on and you connect the WPP20 wireless presentation pod to your computer.
Procedure
1.
Do one of the following:
• On the WPP20, press the presentation button to share the full screen.
• On the WPP20, long press the presentation button for 3 seconds and then release this button. Select the file or
window you want to share and then click Share Now.
Page 74
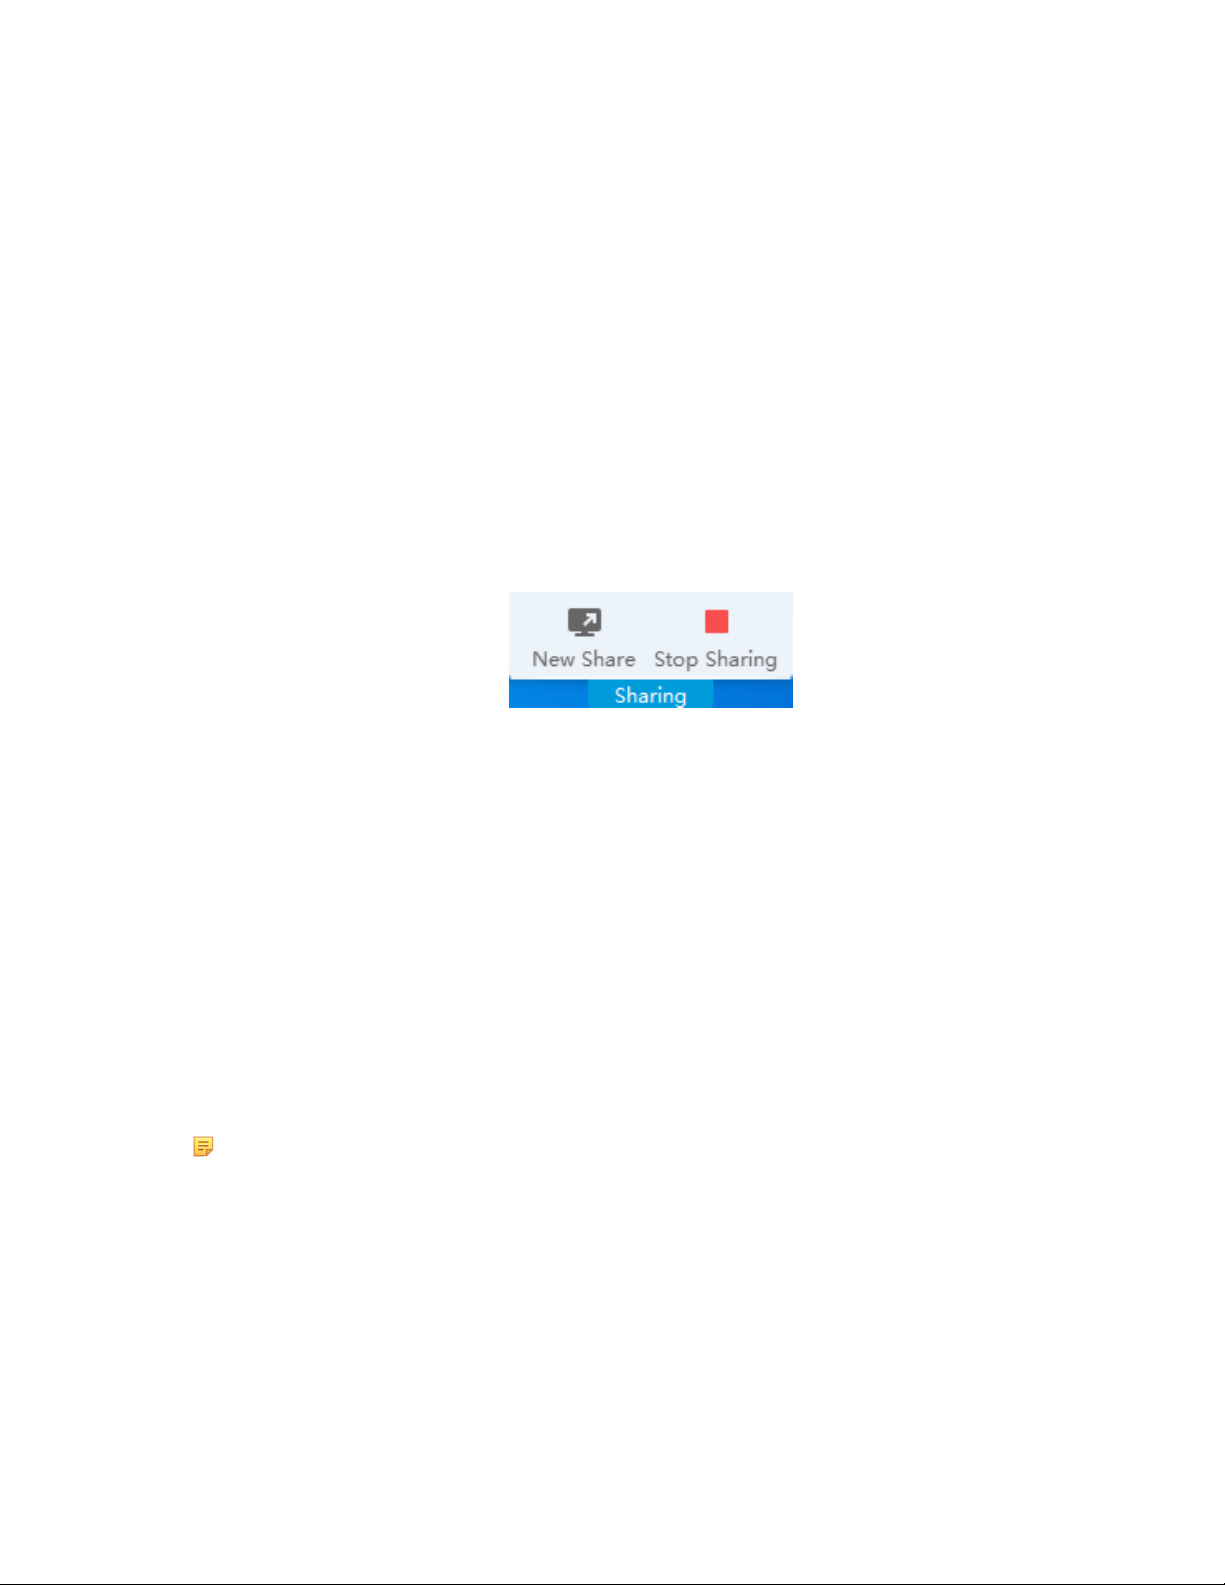
• On the Yealink Wireless Presentation Pod software, click Contents Share and choose the file you want to
share, and then click Share Now.
The computer content is automatically projected to the device.
2.
Click Annotation on the navigation bar to make notes on the shared content with the corresponding tools.
Related information
Introduction of WPP20 Note Toolbar
Introduction of the WPP20 Whiteboard Note Toolbar
Switching Shared Content via WPP20
Procedure
1.
On the Yealink Wireless Presentation Pod software, click New Share.
| Presenting | 74
2.
Select the file or window you want to share and then click Start Sharing.
Stopping Sharing Content via WPP20
Procedure
Do one of the following to stop sharing content:
• On your computer, remove WPP20.
• On the WPP20, press the presentation button.
• On the Yealink Wireless Presentation Pod software, click Stop Sharing.
Note: If you share the whiteboard via WPP20, you need to press the Presentation Button on the WPP20
Wireless Presentation Pod twice to end the content sharing.
Sharing Content via Apple Device
Before using Apple device for content sharing, make sure the Airplay feature is enabled and the Apple device
connects to the wireless AP of the VCS codec.
Procedure
1.
On your Apple device, tap Settings > General > Airplay.
Page 75

2.
Select Everyone.
The Airplay feature is enabled.
3.
The Apple device connects to the wireless AP of the VCS codec.
4.
Go to the Control Center.
| Presenting | 75
5.
Tap Screen Mirroring, and select the related content sent by the VCS codec from the pop-up dialogue.
The content on the Apple device is automatically projected to the VCS codec.
Page 76

Note: For more information about how to connect the wireless AP of the VCS codec, contact to your
administrator.
Stopping Sharing Content via Apple Device
Procedure
Go to the Control Center, and select VCS from the Screen Mirroring.
| Presenting | 76
Page 77
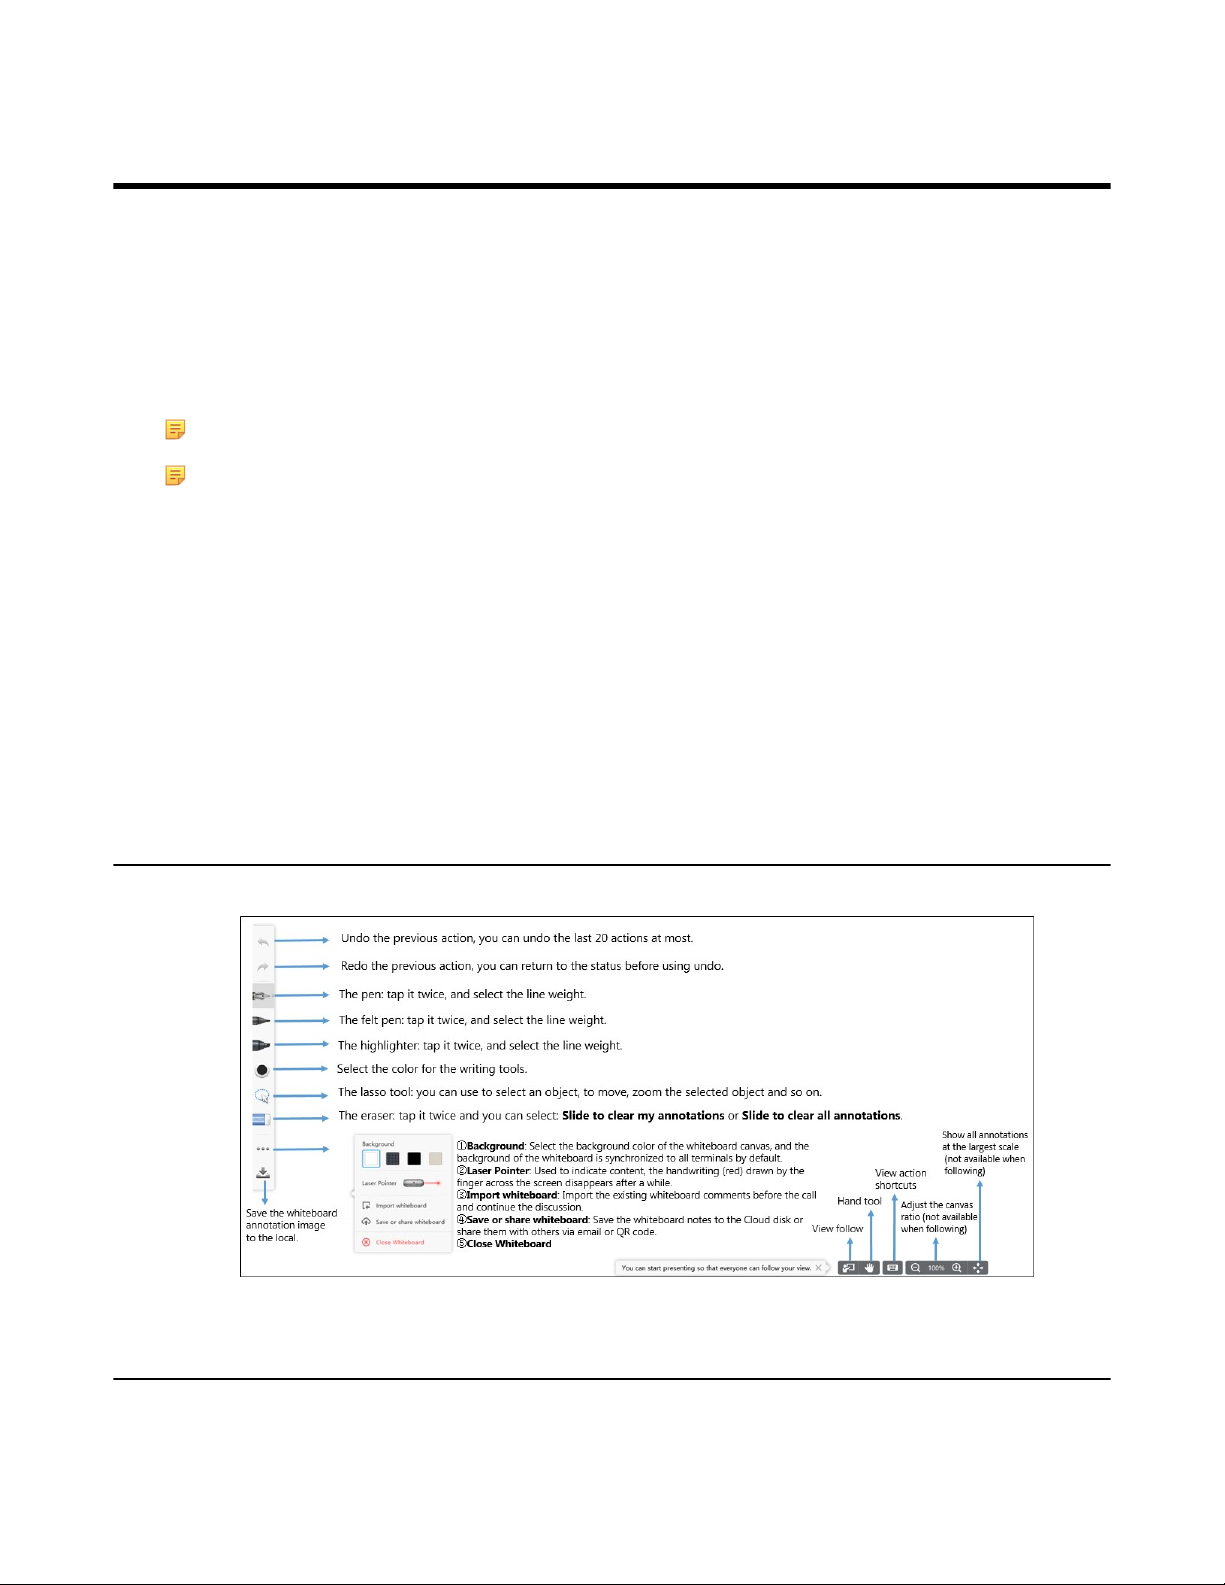
| Using WPP20 Wireless Presentation Pod | 77
Using WPP20 Wireless Presentation Pod
After WPP20 Wireless Presentation Pod is paired with VC800/VC500/VC200/PVT980/PVT950 and connected to
the computer, it can easily realize the wireless screen projection of computer screen with whiteboard collaboration
function. And it can receive the whiteboard or shared content initiated by the codec or other devices. In addition, the
WPP20 built-in Yealink Wireless Presentation Pod software, combined with a conference TV terminal and touch TV,
allows you to record and control your meeting while sharing the screen. At the same time, you can directly reversal
control the computer on the touch TV or touch panel to give you the extremely content sharing experience.
For more information, refer to Yealink WPP20 Wireless Presentation Pod Quick Start Guide.
Note: Contact your system administrator to check whether the whiteboard feature is available.
Note: If you use the WPP20 on your Mac device and after starting the Yealink Wireless Presentation Pod
software, the system will prompt Yealink WPP20 wants to make changes. After entering the device password,
it can be used normally. Otherwise, the other party will not hear the sound during the content sharing. WPP20
only supports content sharing on Mac devices.
•
Introduction of the WPP20 Whiteboard Note Toolbar
•
Introduction of WPP20 Note Toolbar
•
Receiving Shared Whiteboard or Content
•
Initiating Whiteboard Sharing on WPP20
•
Saving the Content or Whiteboard Picture Locally via WPP20
•
Saving or Sharing Whiteboard Source Files via WPP20
•
Importing the Whiteboard Source File via WPP20
•
Importing an Existing Whiteboard during a Call via WPP20
Introduction of the WPP20 Whiteboard Note Toolbar
Introduction of the WPP20 whiteboard note toolbar is as below:
Introduction of WPP20 Note Toolbar
The interface introduction of the WPP20 note toolbar is below:
Page 78

| Using WPP20 Wireless Presentation Pod | 78
Receiving Shared Whiteboard or Content
WPP20 can receive whiteboard or content shared by the VCS codec or other devices. If the administrator needs to
confirm the authentication before setting the WPP20 to obtain the collaboration data, click the Sharing area to receive
the sharing on the Yealink Wireless Presentation Pod software. Enter the four-digit authentication code in the security
check box. The authentication code is displayed in the upper right corner of the display device connected to the VCS
codec.
You can use the WPP20 annotation tool or the whiteboard annotation tool to take notes.
Related information
Introduction of WPP20 Note Toolbar
Introduction of the WPP20 Whiteboard Note Toolbar
Page 79

| Using WPP20 Wireless Presentation Pod | 79
Initiating Whiteboard Sharing on WPP20
When you use the WPP20 to initiate the content sharing, you can select initiate whiteboard sharing and the
whiteboard data will be synchronized to the VCS codec. If a CTP20 is connected to the VCS codec, the whiteboard
data is synchronized to the CTP20.
Before you begin
Make sure the computer is powered on and you connect the WPP20 wireless presentation pod to your computer.
About this task
If the administrator has set that the authentication should be confirmed before wirelessly setting up the CPT20, an
authentication is required before using the whiteboard feature. After each collaboration in the non-call, the VCS codec
will cache the authentication status of the accessory within a certain period of time (configured by the administrator).
If timeout, the accessory needs to be re-authenticated.
Procedure
1.
On the Yealink Wireless Presentation Pod software, click Contents Share.
2.
Select Whiteboard and click Start Sharing.
Note: If the administrator has set that an authentication is required before the WPP20 collaboration, you
need to enter the four-digit authentication code in the security check box before sharing the whiteboard.
The authentication code is displayed on the upper right of the display device connected to the VCS codec.
Saving the Content or Whiteboard Picture Locally via WPP20
After receiving or sending the content/whiteboard via WPP20, the shared content/whiteboard picture can be saved
locally.
Procedure
1.
In the content/whiteboard note toolbar, click .
2.
Click view the file to view the picture.
Related information
Introduction of WPP20 Note Toolbar
Introduction of the WPP20 Whiteboard Note Toolbar
Page 80

| Using WPP20 Wireless Presentation Pod | 80
Saving or Sharing Whiteboard Source Files via WPP20
After registering the YMS account, you can save the whiteboard source file, to prevent the whiteboard from being
erased due to issues switching or to save the uncompleted whiteboard data on the cloud disk. You can also directly
share the whiteboard to the relevant person via email or the QR code.
About this task
When you are in a YMS conference, no matter which participant saves the whiteboard, the image will be saved in the
conference organizer's cloud disk.
For more information on how to use or download saved whiteboard files, please contact your administrator.
Procedure
1.
At the note toolbar, tap > Save/Share.
2.
Do one of the following:
• click Save to cloud disk to save the whiteboard to the YMS server.
• click Send E-mail, enter the email address and then tap Send to share whiteboard via email.
Multiple email addresses are separated by commas (half-width, full-width) or semicolons (half-width, full-
width).
• Click Clink to get qrcode.
Other personnel can access the whiteboard image by scanning the QR code and entering the provided access
password for a limited period of time.
Tip: When sharing by QR code, you can also click Copy Link. Other people can access the image on
the web page via a link.
Importing the Whiteboard Source File via WPP20
If you want to continue discussing the saved whiteboard file, download it from the cloud disk to your local system
and use WPP20 to import the whiteboard source files.
Procedure
1.
At the note toolbar, tap > Import whiteboard.
2.
Select the whiteboard file locally and import it.
Page 81

| Using Basic Features | 81
Importing an Existing Whiteboard during a Call via WPP20
If you have made notes on the whiteboard locally before the call, you can choose to import the whiteboard to continue
the discussion after the call.
Procedure
In the note toolbar, tap > Import whiteboard before talking.
Using Basic Features
•
Viewing the World Time on the CP960
•
Recording Videos
•
Taking Screenshots
•
Managing Videos and Screenshots
•
Setting the Wallpaper for CTP20 and VCS Codec
•
Setting the CTP20 Brightness
•
Setting CTP20 to the Sleep Mode
Viewing the World Time on the CP960
You can use CP960 to check the current time of different cities in the world.
Procedure
1.
On your CP960, tap the digital clock.
The current time of the selected city is displayed on the touch screen.
2.
Tap .
3.
Do one of the following:
a)
Tap , enter the city name in the Search field.
Cities match the characters will appear on the touch screen.
b)
Tap , select Sort by name/Sort by time.
The unselected cities will be sorted by the desired method.
4.
Select or clear the checkboxes of the desired cities.
5.
Tap to return to the previous page, and check the current time of the selected cities.
Related concepts
Entering Characters by Onscreen Keyboard
Page 82

Recording Videos
You can record videos to the system memory (only applicable to VC200), a USB flash drive or your computer.
The recorded videos will be saved in .mkv format and named as the recorded time and date. In addition, if the
administrator has enabled server recording permission for your YMS account, you can use server recording to save
the video on the server during the meeting.
About this task
To record videos to your computer, you need to purchase a WPP20 wireless presentation pod. To record videos to a
USB flash drive, the USB flash drive you connect should support FAT 32 and NTFS format.
For more information on server recording permissions during meetings and how to get videos from the server, please
contact your administrator.
•
Recording Local Videos
•
Recording Server Videos
Recording Local Videos
By default, the recorded video is local video. For VC880/VC800/VC500/PVT980/PVT950, the recorded video is
saved on the connected USB flash drive. For VC200, if a USB flash drive is not connected, the recorded video is
saved directly in the local storage; if a USB flash drive is connected, it is saved on the USB flash drive by default.
| Using Basic Features | 82
Before recording the video, your system should meet the following requirements:
• For VC880/VC800/VC500/PVT980/PVT950, make sure the administrator has enabled USB and screenshots
features.
For VC200, make sure the administrator has enabled screenshots feature. And if you need to store video locally,
local storage should be enabled; if you need to store video on the USB flash drive, USB feature should be enabled.
• Make sure that VC200 or USB flash drive has enough storage space.
Tip: For VC880/VC800/VC500/PVT980/PVT950, select More > Record > Storage Info to view the USB
storage; For VC200, select More > File Manager to view local or USB storage.
•
Recording Local Videos by Remote control
•
Recording Local Videos by CP960
•
Recording Local Videos by WPP20
Recording Local Videos by Remote control
Procedure
1.
On your remote control, press to start recording.
If your system administrator enables the server recording permission for your YMS account, select Local
recording.
The monitor displays the recording icon and the time.
2.
Press again to stop recording.
Page 83

| Using Basic Features | 83
Recording Local Videos by CP960
Procedure
1.
On your CP960, tap to start recording.
If your system administrator enables the server recording permission for your YMS account, select Local
recording.
The touch screen prompts “Recording”.
2.
Tap to stop recording.
Recording Local Videos by WPP20
Before you begin
Make sure the computer is powered on and you connect the WPP20 wireless presentation pod to your computer.
Procedure
1.
Do one of the following:
• When the system is idle, click Start Sharing on the Yealink Wireless Presentation Pod software.
• When the system is during the call, click Start Sharing or Meeting Control > Recordon the Yealink Wireless
Presentation Pod software.
2.
Select the storage location for the recording file.
The system prompts whether or not you agree with the recording request.
3.
Confirm the WPP20 recording request on the system.
4.
On the Yealink Wireless Presentation Pod software, click Stop Sharing.
Recording Server Videos
If the administrator has enabled server recording permission for your YMS account, you can choose to record the
video on the server when you initiate a meeting or join a meeting that has been assigned recording permission.
•
Recording Server Videos by Remote control
•
Recording Server Videos by CP960
•
Recording Server Videos by CTP20
Recording Server Videos by Remote control
Before you begin
You are the initiator of a Meet Now conference or a participant who is given permission to record.
Page 84

Procedure
1.
On your remote control, press to start recording.
2.
Select Server recording.
3.
Press again to stop recording.
Recording Server Videos by CP960
Before you begin
You are the initiator of a Meet Now conference or a participant who is given permission to record.
Procedure
1.
On your CP960, tap to start recording.
| Using Basic Features | 84
2.
Select Server recording.
3.
Tap to stop recording.
Recording Server Videos by CTP20
Procedure
1.
On your CTP20, press to start recording.
2.
Select Server recording.
3.
Tap to stop recording.
Taking Screenshots
You can capture the screenshot on the device. The screenshots are saved as .jpg files and named as the captured time
and date.
About this task
You can use the remote control or CTP20 to capture screenshots when the system is idle. You can use the remote
control, CTP20, or CP960 to capture screenshots when the system is during a call. For VC880/VC800/VC500/
PVT980/PVT950/VC200, you can save screenshots in the USB flash drive connected to the codec, VCH50, or wired
CTP20. For VC200, you can also save screenshots to the local storage. Your system should meet the following
requirements:
• For VC880/VC800/VC500/PVT980/PVT950, make sure the administrator has enabled USB and screenshots
features.
Page 85

For VC200, make sure the administrator has enabled screenshots feature. And if you need to save the screenshots
locally, local storage should be enabled; if you need to save the screenshots on the USB flash drive, USB feature
should be enabled.
• Make sure that VC200 or USB flash drive has enough storage space.
Note: To save screenshots to a USB flash drive, the USB flash drive you connect should support FAT32 or
NTFS format.
•
Capturing Screenshots by CP960
•
Capturing Screenshots by Remote Control
•
Capturing Screenshots by CP960
Capturing Screenshots by CP960
Procedure
On your CP960, tap More > Screenshot during a conference.
Capturing Screenshots by Remote Control
| Using Basic Features | 85
Procedure
If on your remote control is set as ScreenShot key by your system administrator, press to capture
screenshots.
Capturing Screenshots by CP960
Procedure
1.
In the top-right corner of your CTP20, tap .
2.
Tap Screenshot on host.
Managing Videos and Screenshots
For VC200, the video and screenshot files can be saved to the local storage. You can directly manage them locally.
After the USB flash drive is connected to the VC200/VC500/VC800/VC880/PVT980/PVT950, VCH50 or wired
CTP20, it can be recognized by the VCS codec. You can manage images stored in the Screenshot folder in the .jpg
format and videos stored in the Video Record folder in the .mkv format.
•
Copying the Screenshot from the Local Storage to the USB Flash Drive
•
Copying the Video from the Local Storage to the USB Flash Drive
•
Viewing Screenshots
•
Deleting Screenshots
•
Viewing Local Recorded Videos
•
Deleting Local Recorded Videos
Page 86
Copying the Screenshot from the Local Storage to the USB Flash Drive
For VC200 endpoint, you can copy the screenshot from the local storage to the USB flash drive.
Procedure
1.
For VC200 video conferencing endpoint: on your remote control, go to More > File Manager > Local Storage >
Screenshot.
2.
Select a desired screenshot, and then press the right key to select .
Copying the Video from the Local Storage to the USB Flash Drive
For VC200, you can copy the recorded videos from the local storage to the USB flash drive.
Procedure
1.
For VC200: on your remote control, go to More > File Manager > Local Storage > Video.
| Using Basic Features | 86
2.
Select a desired video, and then press the right key to select .
Viewing Screenshots
Procedure
1.
On your remote control, navigate to More > Recording > Screenshot.
For VC200 video conferencing endpoint: on your remote control, navigate to More > File Manager > Local
Storage/USB flash drive > Screenshot.
2.
Select a desired screenshot, and press OK key or tap beside the desired screenshot and press OK key .
3.
Do one of the following:
• Press the left key or the right key to view the previous or next screenshot.
•
Press or to zoom the screenshot in/out.
•
On your remote control, press to exit.
Deleting Screenshots
If the USB flash drive or local storage space is insufficient, you can delete the screenshots to free up space.
Procedure
1.
On your remote control, navigate to More > Recording > Screenshot.
Page 87

For VC200 video conferencing endpoint: on your remote control, navigate to More > File Manager > Local
Storage/USB flash driver > Screenshot.
2.
Select a desired screenshot, select , and then press OK key.
The monitor prompts whether or not you are sure to delete.
3.
Confirm the action.
Viewing Local Recorded Videos
Procedure
1.
On your remote control, go to More > Recording > Video.
For VC200 video conferencing endpoint: on your remote control, go to More > File Manager > Local Storage/
| Using Basic Features | 87
USB flash driver > Video.
2.
Select a desired video, and then press OK key or select to play video.
3.
Do one of the following:
•
Select and press OK key to pause, and select to resume playing.
•
Select and press OK key to skip forward. For VC880/VC800/VC500/PVT980/PVT950, press once to skip
forward 4 seconds, for VC200 press once to skip forward 6 seconds.
•
Select and press OK key to rewind. For VC880/VC800/VC500/PVT980/PVT950, press once to rewind 4
seconds, for VC200 press once to rewind 6 seconds.
• Press the volume key to adjust the speakerphone volume.
•
Select or tap on the remote control to stop playing.
Note: If you receive an incoming call while you are playing video, the system will stop playing the video
automatically.
Deleting Local Recorded Videos
You can delete the recorded videos to free up the storage space.
Procedure
1.
On your remote control, go to More > Recording > Video.
Page 88

For VC200 video conferencing endpoint: on your remote control, go to More > File Manager > Local Storage/
USB flash driver > Video.
2.
Select the desired video and select .
The monitor prompts whether or not you are sure to delete.
3.
Click OK.
Setting the Wallpaper for CTP20 and VCS Codec
Procedure
1.
On your CTP20, tap Setting > Wallpaper.
2.
Select the desired wallpaper.
| Settings | 88
3.
In the top-right corner of the page, tap Set as wallpaper.
Setting the CTP20 Brightness
Procedure
1.
In the top-right corner of your CTP20, tap .
2.
In the CTP20 Brightness field, drag the slider to adjust the brightness of the CTP20.
Setting CTP20 to the Sleep Mode
Procedure
1.
In the top-right corner of your CTP20, tap .
2.
Drag the Slide to sleep slide to put the CTP20 to sleep.
Settings
•
Configuring the Audio Settings
Page 89

•
Configuring Video Settings
•
Configuring Camera Settings
Configuring the Audio Settings
You can configure audio settings on the system.
•
Adjusting the Volume
•
Configuring Key Tone
•
Enabling Silent Mode
•
Muting the Microphone
Adjusting the Volume
You can adjust the following volume:
• Ringer volume: adjust the ringer volume when the phone is idle or ringing.
• Talking volume: adjust the speakerphone volume when the device is in a call.
• Key tone volume: adjust the volume of key tone which is produced when you press the key on the remote control
or CP960
• Media Volume: adjust the media volume when playing recorded videos.
| Settings | 89
Procedure
Do one of the following:
• On your remote control, press volume key to adjust the volume.
• On your CP960, tap volume key or drag the volume slider to adjust the volume.
Note: You can still use CP960 to adjust the system volume even if it is not as the active audio device of
the system.
Configuring Key Tone
You can enable the key tone feature. When you press any key on the remote control or tap the onscreen dial pad on
CP960, the system will produce a sound.
•
Configuring the Key Tone by the Remote control
Configuring the Key Tone by the Remote control
Procedure
1.
On your remote control, go to More > Setting > Basic.
2.
Select the Key Tone checkbox.
Enabling Silent Mode
If you enable the silent mode, your system makes no sound.
•
Enabling Silent Mode by Remote Control
Page 90

•
Enabling Silent Mode by CP960
Enabling Silent Mode by Remote Control
Procedure
On your remote control, do one of the following:
• Long press Vol- key to decrease the volume to the minimum.
•
If is set as Mute Speaker key by your system administrator. On your remote control, press .
Note: When the silent mode is enabled, the icon will appear on the monitor.
Related tasks
Enabling Silent Mode by CP960
Enabling Silent Mode by CP960
| Settings | 90
Procedure
On your CP960, do one of the following:
• Long tap the left volume touch key to decrease the ringer volume to minimum.
• Swipe down from the top of the screen to go to the control center and tap Silent.
Note: When the silent mode is enabled, the icon will appear on the CP960’s touch screen.
Muting the Microphone
You can mute the local microphone during a call, so that other parties cannot hear you.
Procedure
Do one of the following:
• On your remote control, press Mute Key.
• On your CP960, tap one of the Mute keys.
• On your CP960’s touch screen, tap Mute.
• On your CPE90 wired expansion microphones, tap the Mute key.
• On your CPW90-BT Bluetooth wireless microphones, tap the Mute key.
If video conferencing system is muted, the icon will appear on the local video.
Page 91

Configuring Video Settings
You can configure video settings on the system.
•
Maximizing Monitor Video Display
•
Allowing Website Snapshot
•
Video Input Source
•
Changing the Screen Layout
Maximizing Monitor Video Display
Your monitor may not display the entire HD image. To solve this problem, you can scale the monitor to display the
entire HD image manually.
•
Maximizing Monitor Video Display by Remote Control
Maximizing Monitor Video Display by Remote Control
Procedure
| Settings | 91
1.
On your remote control, go to More > Setting > Basic > Display.
2.
Use left or right key to adjust the Display (90%-100%) slider.
3.
Select Save and then press OK key to accept the change.
Allowing Website Snapshot
You can enable the Website Snapshot feature, so that the image on the monitor can be synchronized to the web user
interface. If you do not want others to view the image displayed on your monitor, you can disable this feature.
•
Allowing Website Snapshot by Remote Control
Allowing Website Snapshot by Remote Control
Procedure
1.
On your remote control, go to More > Setting > Basic.
2.
Enable Website Snapshot.
3.
Select Save and then press OK key to accept the change.
Video Input Source
The system supports the video input sources both from the camera and the PC.
•
Changing the Video Input Source When not in a Call
•
Changing the Video Input Source in a Call
Changing the Video Input Source When not in a Call
Before you begin
To use the PC input source, make sure that your system is connected to a PC.
Page 92

Procedure
1.
Do one of the following:
• On your remote control, select More > Input Choose.
•
If on your remote control is set as Input key by your system administrator, press to enable the
video input source.
The monitor shows Camera and PC input sources.
2.
Select the desired input source.
The monitor shows the selected source.
Changing the Video Input Source in a Call
Before you begin
To use PC input source, make sure that your system is connected to a PC.
| Settings | 92
Procedure
1.
Do one of the following:
• Press OK key to open Talk Menu, and then select Input Choose.
•
If is set to Input key by your system administrator, press to enable the video input source.
The monitor shows Camera, Camera +PC and PC input sources.
2.
Select the desired input source.
• If you select PC, the remote video image is shown in big size, and the PC content is shown in small size
(Picture-in-Picture).
• If you select Camera+PC, the PC content is shown in big size, and other video images are shown in small
size.
• If you select Camera, the remote video image is shown in big size, and the local video image is shown in
small size (Picture-in-Picture).
Changing the Screen Layout
The screen layout depends on the number of connected participants, the display device (single or dual), and whether
the presentation is ongoing.
•
Available Screen Layouts
•
Changing the Screen Layout
•
Single Screen Layouts
Page 93
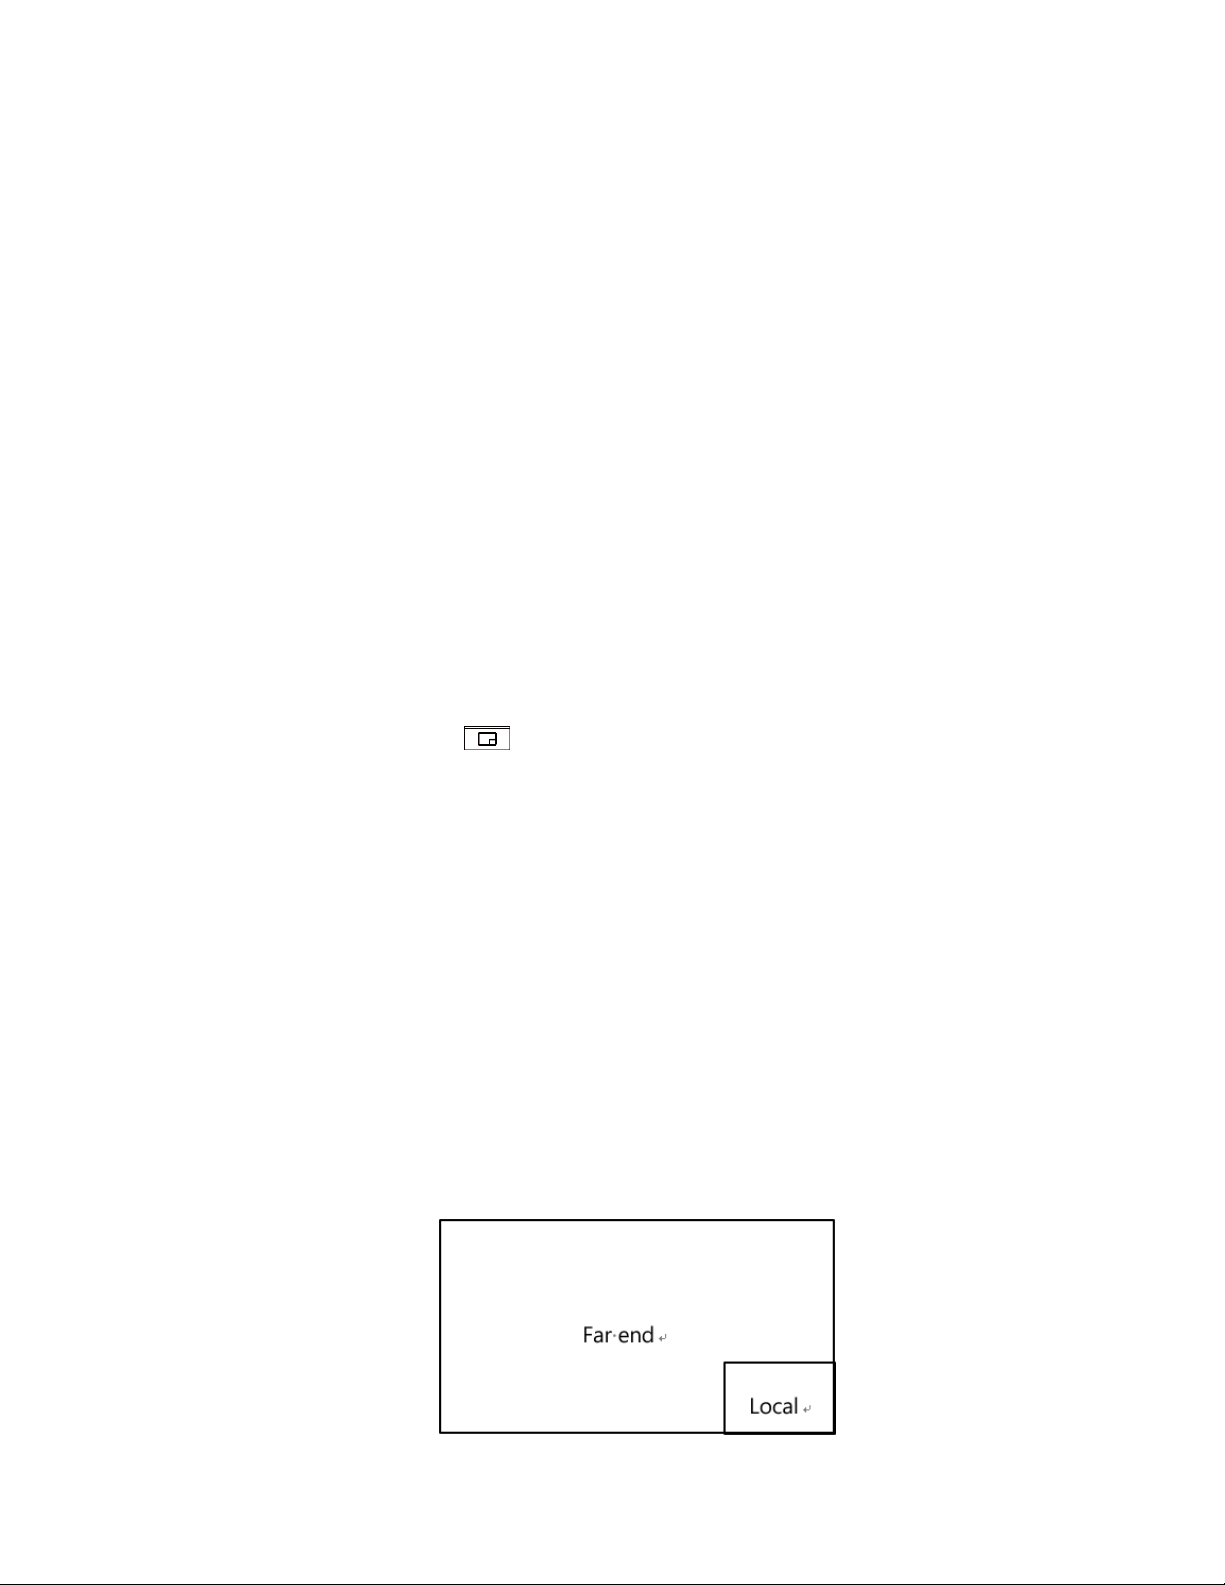
•
Dual Screen Layouts
•
Specifying Content to the Secondary Screen
Available Screen Layouts
The system supports the following layouts:
• 1+N: in this layout, the assigned participant is given prominence in the largest pane no matter who is currently
speaking, and other participants are displayed in a strip beside the assigned speaker.
• Selected Speaker: in this layout, the selected participant is displayed in full screen.
• Equal N×N: in this layout, every participant is given equal prominence in equal-sized panes.
• Picture-in-picture: PIP only takes effect on the local layout. In a two-way video call, the video on one end is
displayed in a large screen, and the small screen of the other end is superimposed on the lower right side of the
large screen. In the YMS/Cloud conference, the large screen displays the conference layout and the small screen
displays the local video.
• Speaker View: the active speaker is given prominence in the largest pane and other participants are displayed in a
strip beside the active speaker. This screen layout is not available on the VC500/VC200 endpoint.
Changing the Screen Layout
You can change the screen layout during a call by the remote control/CP960.
| Settings | 93
Procedure
1.
Do one of the followings during a call:
•
On your remote control, press .
• For VC880/VC800/VC500/PVT980/PVT950, on your remote control, press OK key to open Talk Menu, and
then select Layout Adjustment > Layout.
For VC200, on your remote control, press OK key to open Talk Menu, and then select Layout.
• On your CP960, tap Layout.
2.
Select the desired layout.
Related concepts
Available Screen Layouts
Single Screen Layouts
The following introduce the default layout when you connect one display.
Two-Way Video Call
Picture-in-picture layout is used by default.
Page 94

Two-Way Video Call with a Presentation
The PC content is displayed in large window and other participants are displayed in small windows beside the PC
content.
Multi-Way Video Calls
Take four-way video calls as an example, the voice activation layout is used by default.
The active speaker is given prominence in the largest pane and other participants are displayed in a strip beside the
active speaker.
| Settings | 94
Multi-Way Video Calls with a Presentation
Take four-way video calls as an example, the voice activation layout is used by default.
The PC content is displayed in large window and other participants are displayed in small windows besides the PC
content. The speaker is fixed at the bottom-left corner.
Note: Multi-way video calls are only applicable to PVT980/PVT950 system and the VC880/VC800 system
that has a multipoint license.
Dual Screen Layouts
The following introduces the default layout when you connect two display.
Two-Way Video Call
Page 95
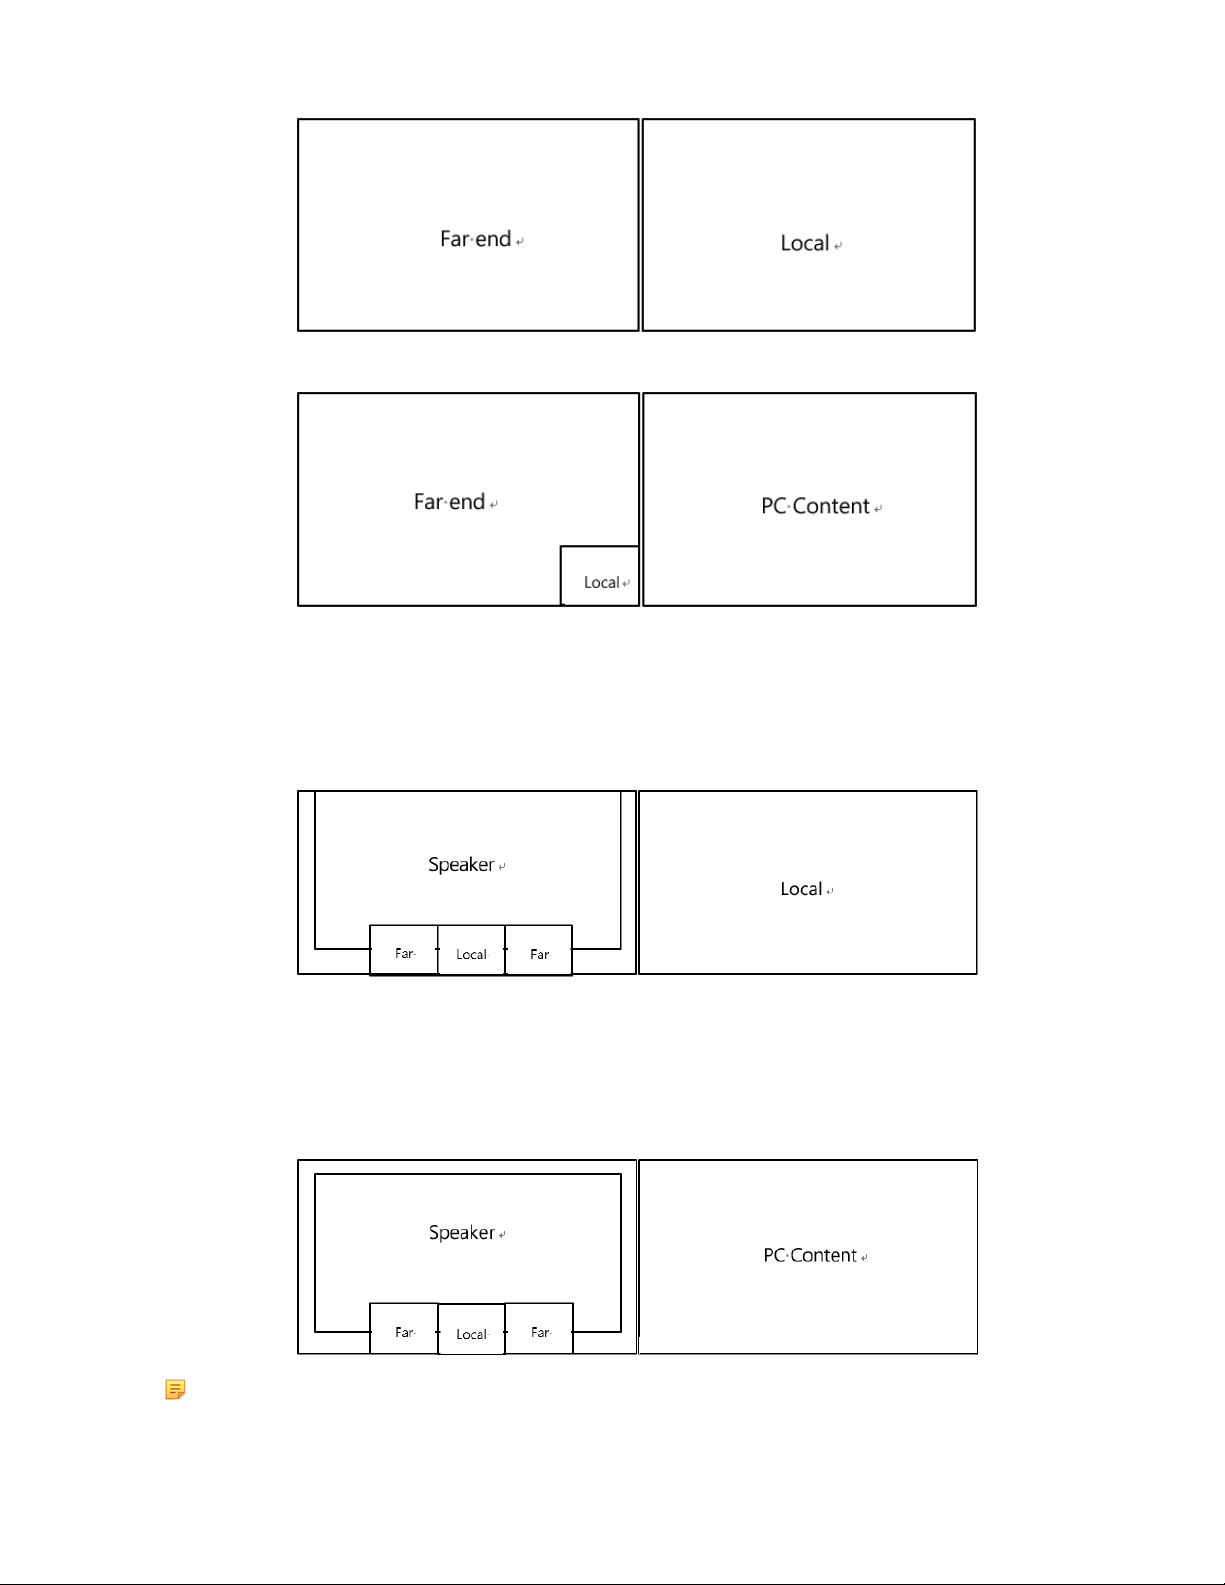
Two-Way Video Call with a Presentation
| Settings | 95
Multi-Way Video Calls
Take four-way video calls as an example, the voice activation layout is used by default.
• Primary monitor: the active speaker is given prominence in the largest pane and other participants are displayed
in a strip beside the active speaker.
• Secondary monitor: the local video image is displayed in a large pane.
Multi-Way Video Calls with a Presentation
Take four-way video calls as an example, the voice activation layout is used by default.
• Primary monitor: the active speaker is given prominence in the largest pane and other participants are displayed
in a strip beside the active speaker.
• Secondary monitor: PC content is displayed in a large pane.
Note: Multi-way video calls are only applicable to PVT980/PVT950 system and the VC880/VC800 system
that has a multipoint license.
Page 96

Specifying Content to the Secondary Screen
When you connect dual displays, you can use the default layout, or specify the content to the secondary monitor via
the remote control. This feature is not available to VC200 endpoint.
•
Specifying Content to the Secondary Screen by Remote Control
Specifying Content to the Secondary Screen by Remote Control
Procedure
1.
On your remote control, press OK key to open Talk Menu during a call.
2.
Select Layout Adjustment > Focus (Display2).
3.
Select the desired content for the secondary screen.
The secondary screen displays the selected content. If you specify a new content on the secondary screen, the PC
content on the second screen will automatically be displayed on the primary screen.
| Settings | 96
Configuring Camera Settings
You can configure camera settings on the system.
•
Controlling Cameras
•
Allowing the Remote System to Control Your Camera
•
Setting Camera Presets
Controlling Cameras
You can control the built-in camera or the VCC22 video conferencing camera connected to your local system. During
a call, if one call party enables the Far Control Near Camera feature on his device, you can control his camera.
•
Adjusting Cameras When not in a Call by Remote Control
•
Adjusting Cameras When not in a Call by CP960
•
Adjusting Cameras in a Call by Remote Control
•
Controlling Cameras by CP960 during a Call
Related tasks
Controlling Multiple Remote Cameras
Adjusting Cameras When not in a Call by Remote Control
Procedure
1.
On your remote control, select the desired video.
2.
Tap the navigation keys to adjust the camera angle.
3.
Press or to adjust the focal length.
Page 97

Adjusting Cameras When not in a Call by CP960
Procedure
1.
On your CP960, tap Camera during a conference.
2.
Tap the navigation keys to adjust the camera angle.
3.
Press or to adjust the focal length.
Adjusting Cameras in a Call by Remote Control
Procedure
1.
On your remote control, press OK key to open Talk Menu.
2.
Select Near/Far Camera and then press the right key to select the desired camera.
| Settings | 97
3.
Tap the navigation keys to adjust the camera angle.
4.
Tap or to adjust the focal length.
Controlling Cameras by CP960 during a Call
Procedure
1.
On your CP960, tap More > Camera Control > The current control camera in a conference.
2.
Select the desired camera.
3.
Tap to return.
4.
Tap the navigation keys to adjust the camera angle.
5.
Tap or to adjust the focal length.
Allowing the Remote System to Control Your Camera
You can allow the remote system to control the angle and the focal length of your camera.
•
Enabling Far Control Near Camera by Remote Control
Enabling Far Control Near Camera by Remote Control
Procedure
1.
On your remote control, go to More > Setting > Video & Audio.
2.
Enable Far Control Near Camera.
Page 98

Setting Camera Presets
Camera presets are pre-saved values of the angle and the focal length of the camera with respect to the desired
positions. Camera presets can help you quickly point the camera to a pre-defined location.
•
Storing a Camera Preset
•
Adjusting the Local Camera to a Preset
•
Updating the Stored Preset
•
Editing the Stored Preset
•
Deleting the Stored Preset
•
Clearing up the Stored Preset
Storing a Camera Preset
You can store up to 99 camera presets for the local camera.
•
Adding the Preset by Remote control
Adding the Preset by Remote control
Procedure
| Settings | 98
1.
Do one of the following when your system is idle:
• For VC880/VC800/VC500/PVT980/PVT950, navigate to More > Preset Location.
•
If you are using remote control, select the local video image and press OK key, and then press .
2.
Select New Preset.
3.
If you connect VCC22 video conferencing camera to your VC880/VC800/PVT980 video conferencing system,
select the desired camera.
4.
Press the navigation key to adjust the angle of the camera or press the / to adjust the focal length.
5.
Press OK key to store the camera preset.
Adjusting the Local Camera to a Preset
You can quickly adjust the position of your camera to a preset.
•
Adjusting the Local Camera to a Preset by Remote Control
Adjusting the Local Camera to a Preset by Remote Control
Procedure
1.
Do one of the following:
• When the system is idle, for VC880/VC800/VC500/PVT980/PVT950, navigate to More > Preset Location.
•
When the system is idle, select a local video image and press OK key, and then press .
• When the system is during a call, press OK key and select Preset Location.
Page 99

2.
Select a preset and change the camera position to this preset.
You can also press any numeric key on the remote control to change the camera position to the preset. But in this
way, you can only move the local camera to a position whose serial number ranges within 0 to 9.
Updating the Stored Preset
Once the camera is moved to a new location, you can update all of the presets to get a camera image of the new
location.
•
Updating the Stored Preset by Remote Control
Updating the Stored Preset by Remote Control
Procedure
1.
Do one of the following when your system is idle:
• For VC880/VC800/VC500/PVT980/PVT950, navigate to More > Preset Location.
| Settings | 99
•
If you are using remote control, select the local video image and press OK key, and then press .
2.
Select Update Preset.
All the stored preset will be updated.
Editing the Stored Preset
•
Editing the Stored Preset by Remote Control
Editing the Stored Preset by Remote Control
Procedure
1.
Do one of the following when your system is idle:
• For VC880/VC800/VC500/PVT980/PVT950, navigate to More > Preset Location.
•
On your remote control, select the local video image and press OK key, and then press .
2.
Select Edit.
3.
Select the desired preset.
4.
Press the navigation key to adjust the angle of the camera or press the / to adjust the focal length.
5.
Press OK key to store the camera preset.
Deleting the Stored Preset
•
Deleting the Stored Preset by Remote control
Page 100

Deleting the Stored Preset by Remote control
Procedure
1.
Do one of the following on your remote control when your system is idle:
• For VC880/VC800/VC500/PVT980/PVT950, navigate to More > Preset Location.
•
If you are using remote control, select the local video image and press OK key, and then press .
2.
Select Delete.
3.
Select the desired preset.
4.
Select Confirm Delete.
The stored preset is deleted.
Clearing up the Stored Preset
| Accessories with Your System | 100
•
Clearing up the Stored Preset by Remote Control
Clearing up the Stored Preset by Remote Control
Procedure
1.
Do one of the following on your remote control when your system is idle:
•
Select the local video image and press OK key, and then press .
• For VC880/VC800/VC500/PVT980/PVT950, navigate to More > Preset Location.
2.
Select Clear and then press OK key.
3.
Select OK, and then press OK key.
Accessories with Your System
•
Using CPE90 Wired Expansion Microphones
•
Using the Soundbar
•
Using the CPW90-BT Bluetooth Wireless Microphones with VCS
•
Using the CPN10 PSTN Box
•
Using the VCC22 Video Conferencing Cameras
Using CPE90 Wired Expansion Microphones
This section introduces how to use CPE90 Wired Expansion Microphones.
•
Placing CPE90 Wired Expansion Microphones
 Loading...